

Page 1

Quick Installation Guide
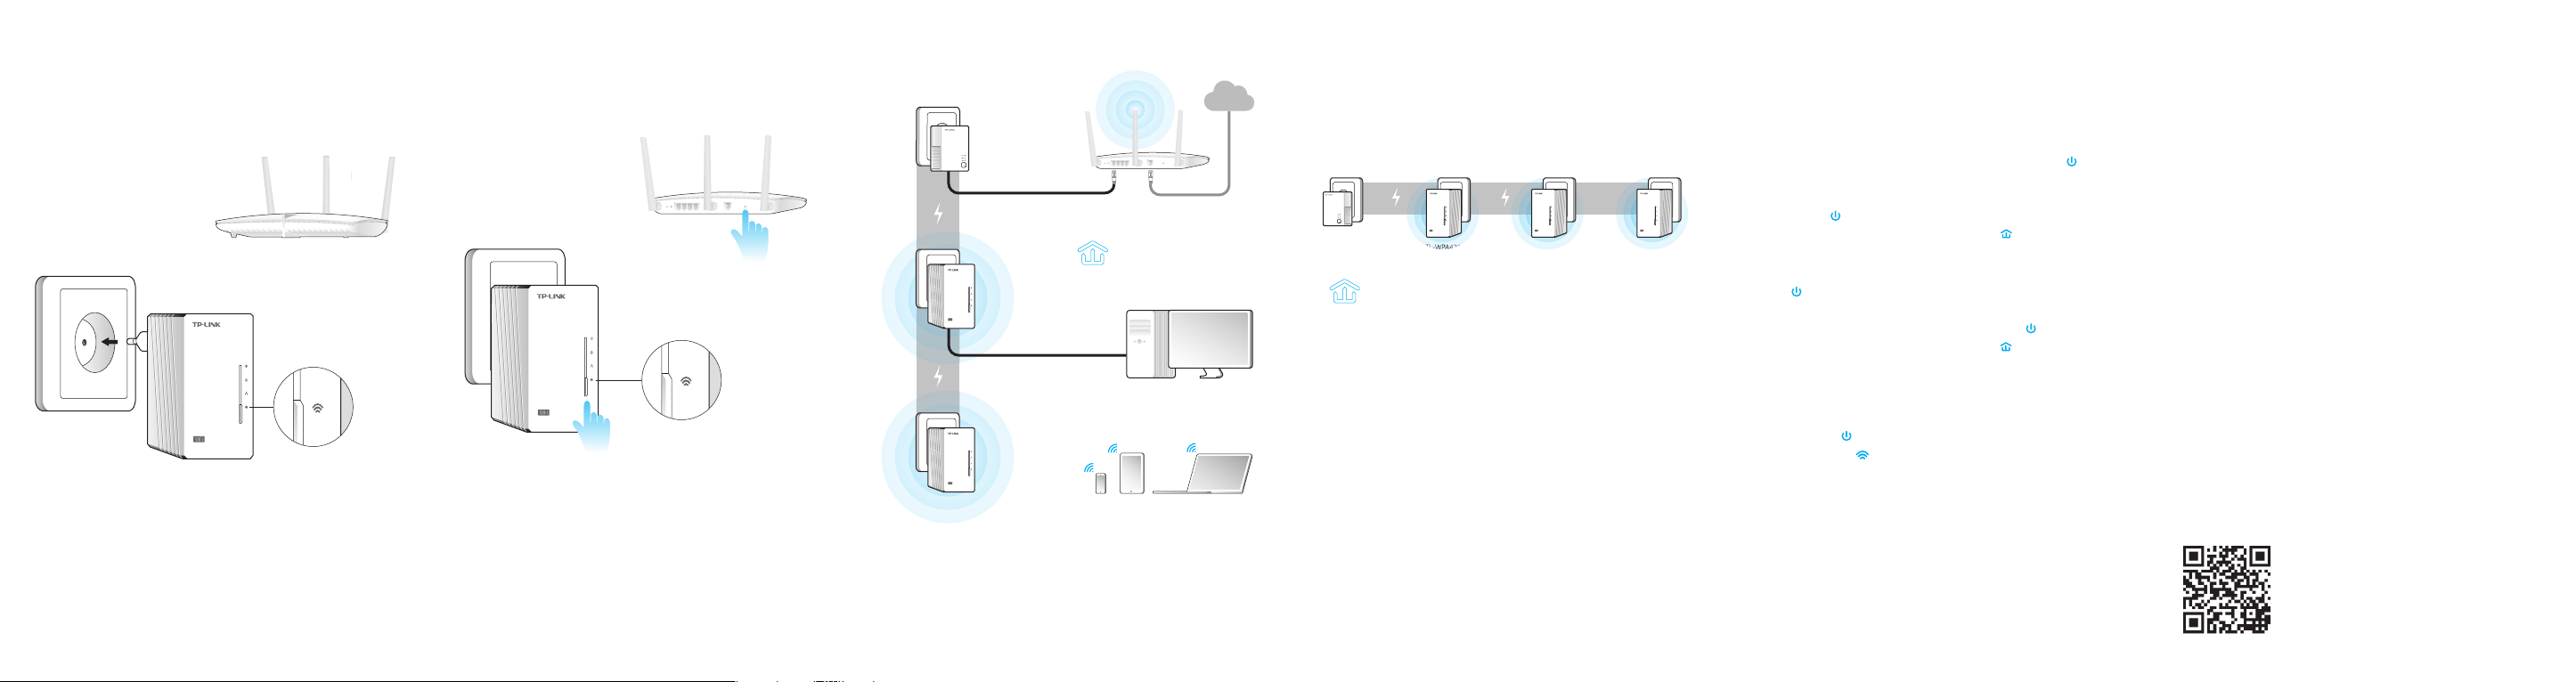
LED Indicators
Power
On: The device is on.
O: The device is o.
Blinking: The device is pairing.
Powerline
On: The device is connected to a powerline network.
O: The device isn’t connected to any powerline network.
Blinking: The device is transferring data.
Ethernet
On: At least one Ethernet port is connected.
O: No Ethernet port is connected.
Wi-Fi
O: The wireless function is disabled.
Blinking quickly: The wireless function is enabled.
Blinking every second:
a router.
The device is cloning Wi-Fi settings from
A powerline network requires at least two powerline
devices. We use the powerline adapter TL-PA4010 as an
example to work with TL-WPA4220.
Note
If your home or oce already has powerline adapters,
remove them rst, install TL-WPA4220 using Method 1
or Method 2, and then add your existing adapters to the
powerline network.
For non-passthrough powerline device
AV500 AV500
For passthrough powerline device
Method 1: Plug and Play
Create a New Wireless Network
1. Write down the default wireless network names
(SSIDs) and passwords of both TL-WPA4220s.
Wireless Network
Name (SSID)*:
TP-LINK_xxxxxx
Wireless Password:
xxxxxxxx
2. Connect your devices as follows.
SSID:
ABCDE
AV500
TL-PA4010
SSID:
TP-LINK_xxxxxx
TL-WPA4220
LAN WAN
All the Powerline LEDs will turn
solid within 1 minute.
Internet
Read this to install additional devices
1. Make sure the additional devices use factory default settings. If not,
please reset them.
2. Plug them into the outlets and wait about 1 minute until their
Powerline LEDs turn solid.
TL-PA4010
Installation is completed when all the
Powerline LEDs turn solid.
If the Powerline LEDs do not turn solid, please follow the instructions in
FAQ->Q1:
1. For the two devices connected before, use the Pair Button to create a
powerline network (Q1->A). (Skip this step if you have already done this.)
2. For additional devices, use the Pair Button to join the existing powerline
network (Q1->B).
AV500
TL-WPA4220
AV500
TL-WPA4220
AV500
Additional
Device
WiFi Powerline Extender 3-pack Kit
AV500
Wi-Fi/Wi-Fi Clone
Button
Pair
Button
AV500
Reset
Button
Ethernet
Ports
* The default SSID is TP-LINK_xxxxxx. (xxxxxx indicates the last six unique
characters of the WLAN MAC address.)
SSID:
TP-LINK_yyyyyy
AV500
TL-WPA4220
Enjoy!
Use the default
SSID (TP-LINK_xxxxxx or TP-LINK_yyyyyy)
and
password your wrote down to access the Internet.
If the Powerline LEDs don’t turn solid, reset all the powerline devices, or create
a powerline network by referring to FAQ-Q1.
7106504791 REV3.0.0
Page 2
Method 2: Setup via Wi-Fi Clone
Extend the Router's Wireless Network
1. Plug TL-WPA4220 into a wall socket near your
router.
Wireless Router
( supporting WPS )
AV500
TL-WPA4220
Blink quickly in
about 15 seconds.
2. Press the WPS button on your router, and within
1 minute, press the Wi-Fi Clone button on your
TL-WPA4220.
WPS
Wireless Router
AV500
TL-WPA4220
TL-WPA4220 will automatically copy the wireless network name and
password of the router when Wi-Fi clone is completed.
For another TL-WPA4220, follow step 1 and step 2
to complete Wi-Fi Clone.
• Blink every second after pressing the
Wi-Fi Clone button.
• Blink quickly within 1 minute when
Wi-Fi Clone is completed.
3. Connect your devices as follows.
SSID:
ABCDE
AV500
AV500
TL-PA4010
SSID:
ABCDE
TL-WPA4220
SSID:
ABCDE
TL-WPA4220
LAN WAN
All the Powerline LEDs will turn
solid within 1 minute.
Enjoy!
Use the router’s
If the Powerline LEDs don’t turn solid, reset all the powerline devices, or create
a powerline network by referring to FAQ-Q1.
SSID (ABCDE)
and password to access the Internet.
Internet
Read this to install additional devices
1. Make sure the additional devices use factory default settings. If not,
please reset them.
2. If the additional devices have Wi-Fi Clone function, follow step 1 and
2 of Method 2 to install them. If not, skip this.
3. Plug them into the outlets and wait about 1 minute until their
Powerline LEDs turn solid.
TL-PA4010
Installation is completed when all
the Powerline LEDs turn solid.
If the Powerline LEDs do not turn solid, please follow the instructions in
FAQ->Q1:
1. For the two devices connected before, use the Pair Button to create a
powerline network (Q1->A). (Skip this step if you have already done this.)
2. For additional devices, use the Pair Button to join the existing powerline
network (Q1->B).
AV500
TL-WPA4220
AV500
TL-WPA4220
AV500
Additional
Device
FAQ (Frequently Asked Questions)
Q1. How do I use the Pair button to create or join a
powerline network?
You can use the Pair button on only two devices at a time.
A. To create a powerline network
1. Press the Pair button on TL-WPA4220. The Power LED will
blink.
2. Within 2 minutes, press the Pair button on TL-PA4010. The
Power LED will blink.
3. In about 1 minute, all the Powerline LEDs will turn solid.
B. To join an existing powerline network
1. Press the Pair button on a third powerline device. The Power
LED will blink.
2. Within 2 minutes, press the Pair button on either TL-PA4220
or TL-PA4010 you have paired. The Power LED will blink.
3. In about 1 minute, all the Powerline LEDs will turn solid.
Q2. How do I reset TL-WPA4220?
With TL-WPA4220 turned on, use a pin to press and hold the
Reset button for more than 5 seconds.
The Power LED will be o momentarily before turning solid
and the Wi-Fi LED will blink quickly. This indicates that the
reset process is completed.
Q3. How do I customize the wireless settings on the web
management page?
1. Find the utility on the provided CD (for Windows only) or
download it from our ocial website.
2. Open the utility and click ‘Connect‘.
3. Log in to the web management page using the default user
name and password (admin/admin).
4. Congure the SSID and click ‘Save’ on the ‘Wireless>Wireless
Settings’ page.
5. Congure the password and click ‘Save’ on the ‘Wireless>
Wireless Security’ page.
6. Click ‘click here’ at the page bottom to reboot the extender.
Q4. What can I do if my computer can’t access the Internet
after it is connected to a powerline adapter/extender?
Check the following:
1. Connect your computer to the modem or router to test the
Internet connection.
2. Make sure the hardware connection is correct.
3. Make sure the Powerline LEDs light up on all of your
adapters/extenders. If not, create or join a powerline network
by referring to FAQ-Q1.
4. Make sure your computer is set to ‘Obtain an IP address
automatically’.
If your computer still can’t access the Internet after following
these steps, please contact our technical support.
For more information about the
advanced settings, please refer
to the User Guide.
 Loading...