

300Mbps AV500/AV200 WiFi Powerline Extender
MODEL NO. TL-WPA4220/TL-WPA2220
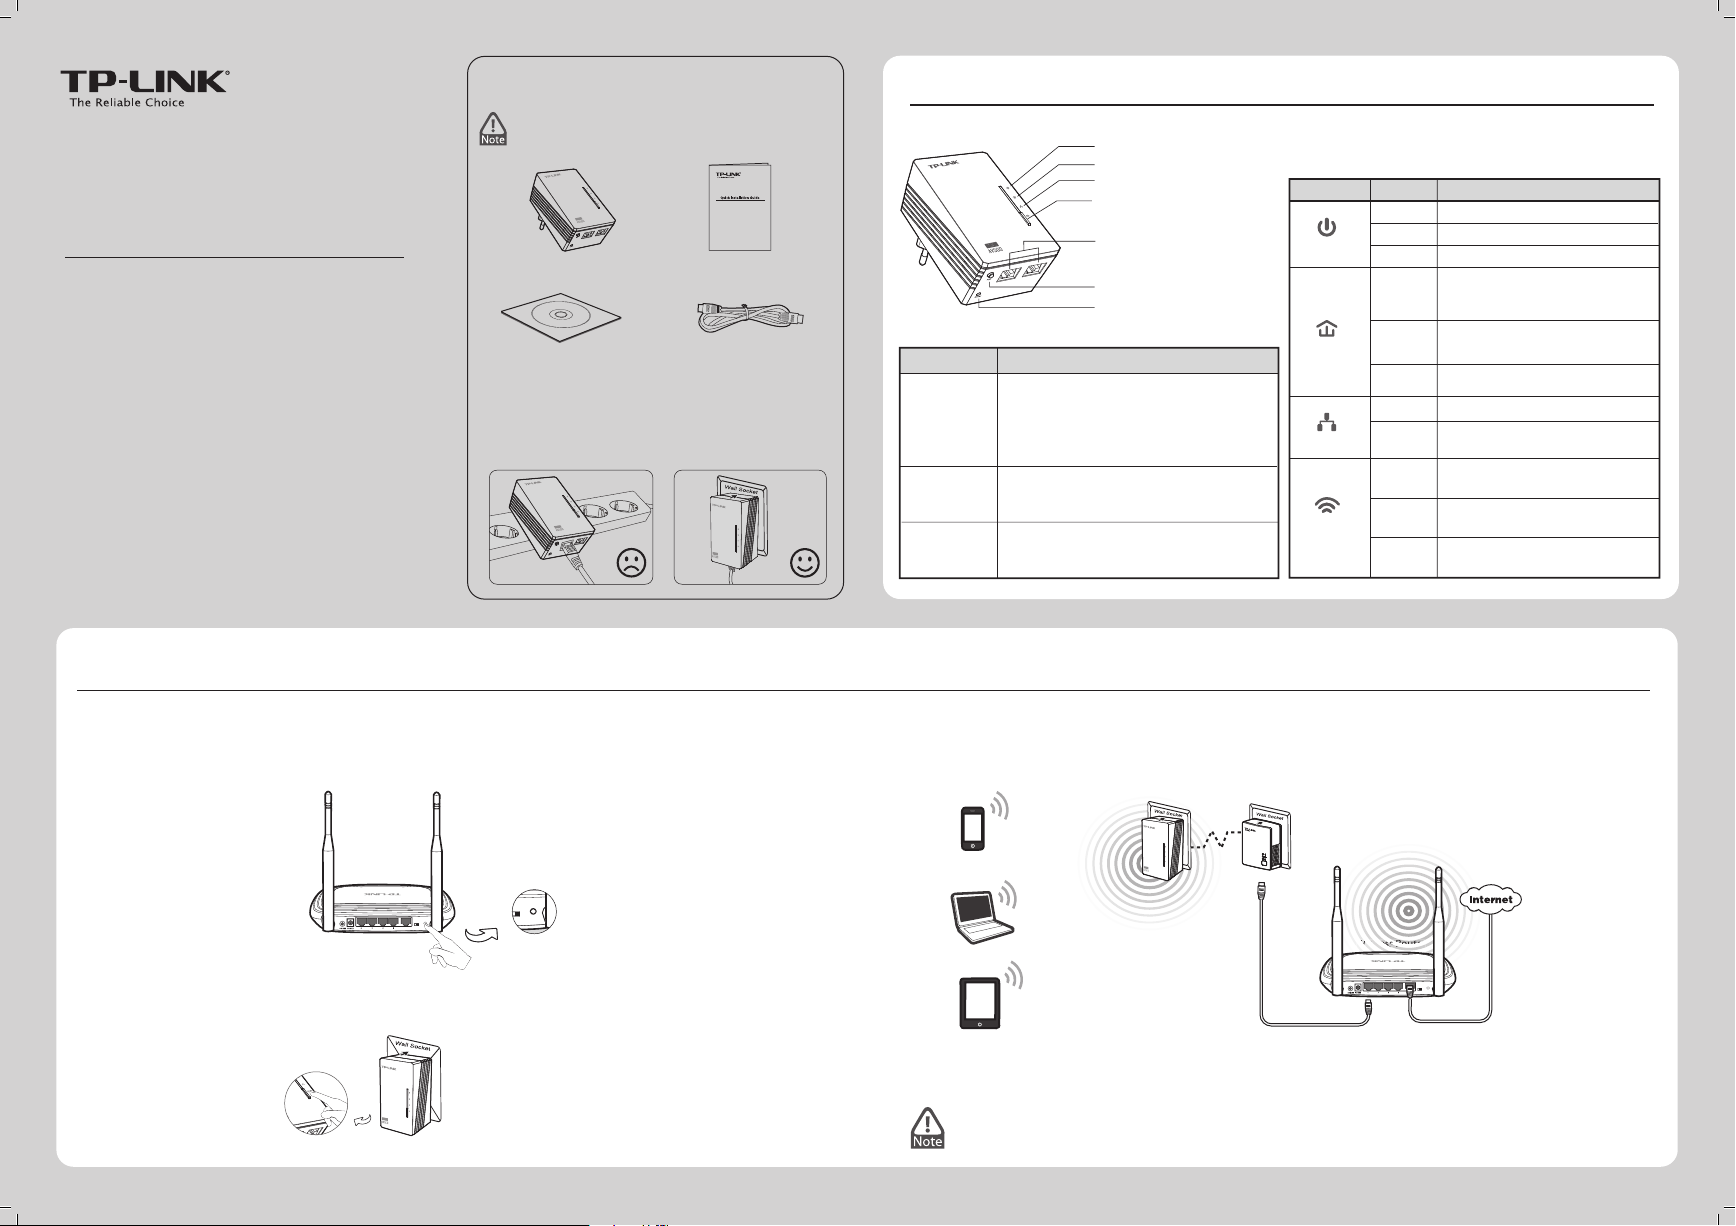
Package Contents
Quick Installation Guide
Unify and Extend Wi-Fi Network via Wi-Fi Clone Button
If you have established a Wi-Fi network with a router supporting WPS, you can unify and extend this current network using the Wi-Fi Clone button. During the Wi-Fi Clone process, the extender will automatically copy the SSID and
wireless password of your router, giving you a seamless roaming wireless networking experience . See the steps below to get started.
Resource CD Ethernet Cable
QIGWi-Fi Powerline Extender*
Warning Before Installation
300Mbps AV500/AV200 WiFi Powerline Extender
MODEL NO. TL-WPA4220/TL-WPA2220
* The provided power plug may dier from the
picture due to dierent regional power specications.
7106504344 REV1.0.1
LED and Button Description
Power LED
Powerline LED
Ethernet LED
Wi-Fi/Wi-Fi Clone LED
Wi-Fi/Wi-Fi Clone Button
Ethernet Ports
Pair Button
Reset Button
This Guide, shared by TL-WPA4220 and
TL-WPA2220, uses TL-WPA4220 as an example.
Buttons
Pair Button
Reset Button
Wi-Fi/
Wi-Fi Clone
Button
Description
Press the Reset button for more than 5
seconds, the device will restore to its
factory defaults.
Pair button is used to secure a powerline
network. (For details, see
Pair Button
on
the next page.)
Press the button to start Wi-Fi Clone.
(For details, see
Unify and Extend
Wi-Fi Network via Wi-Fi Clone Button
.)
Press the button for 5 seconds to enable
or disable the wireless function.
The device is on.
The device is o.
Solid
O
Blinking
Solid
O
Solid
O
Blinking
O
Blinking
slowly
Blinking
quickly
LEDs Status Description
The extender is cloning Wi-Fi
settings from another device.
The wireless function has been
enabled.
The wireless function has been
disabled.
The Ethernet port isn’t
connected.
The Ethernet port is connected.
The device is transferring data.
The device isn’t connected to
any powerline network.
The device is connected to a
powerline network, but there is
no data being transferred.
The device is pairing.
Extension Socket
Wi-Fi/
Wi-Fi Clone
Ethernet
Powerline
Power
Wireless Router
Powerline Adapter
Wi-Fi Powerline Extender
Wi-Fi Powerline Extender
pair
Wireless Router
ROUTER
WISP
WPS/
RESET
INTERNET
SSID: abc
Password: 123
SSID: abc
Password: 123
ROUTER
WISP
WPS/
RESET
INTERNET
WISP
WPS/
RESET
Wireless Router
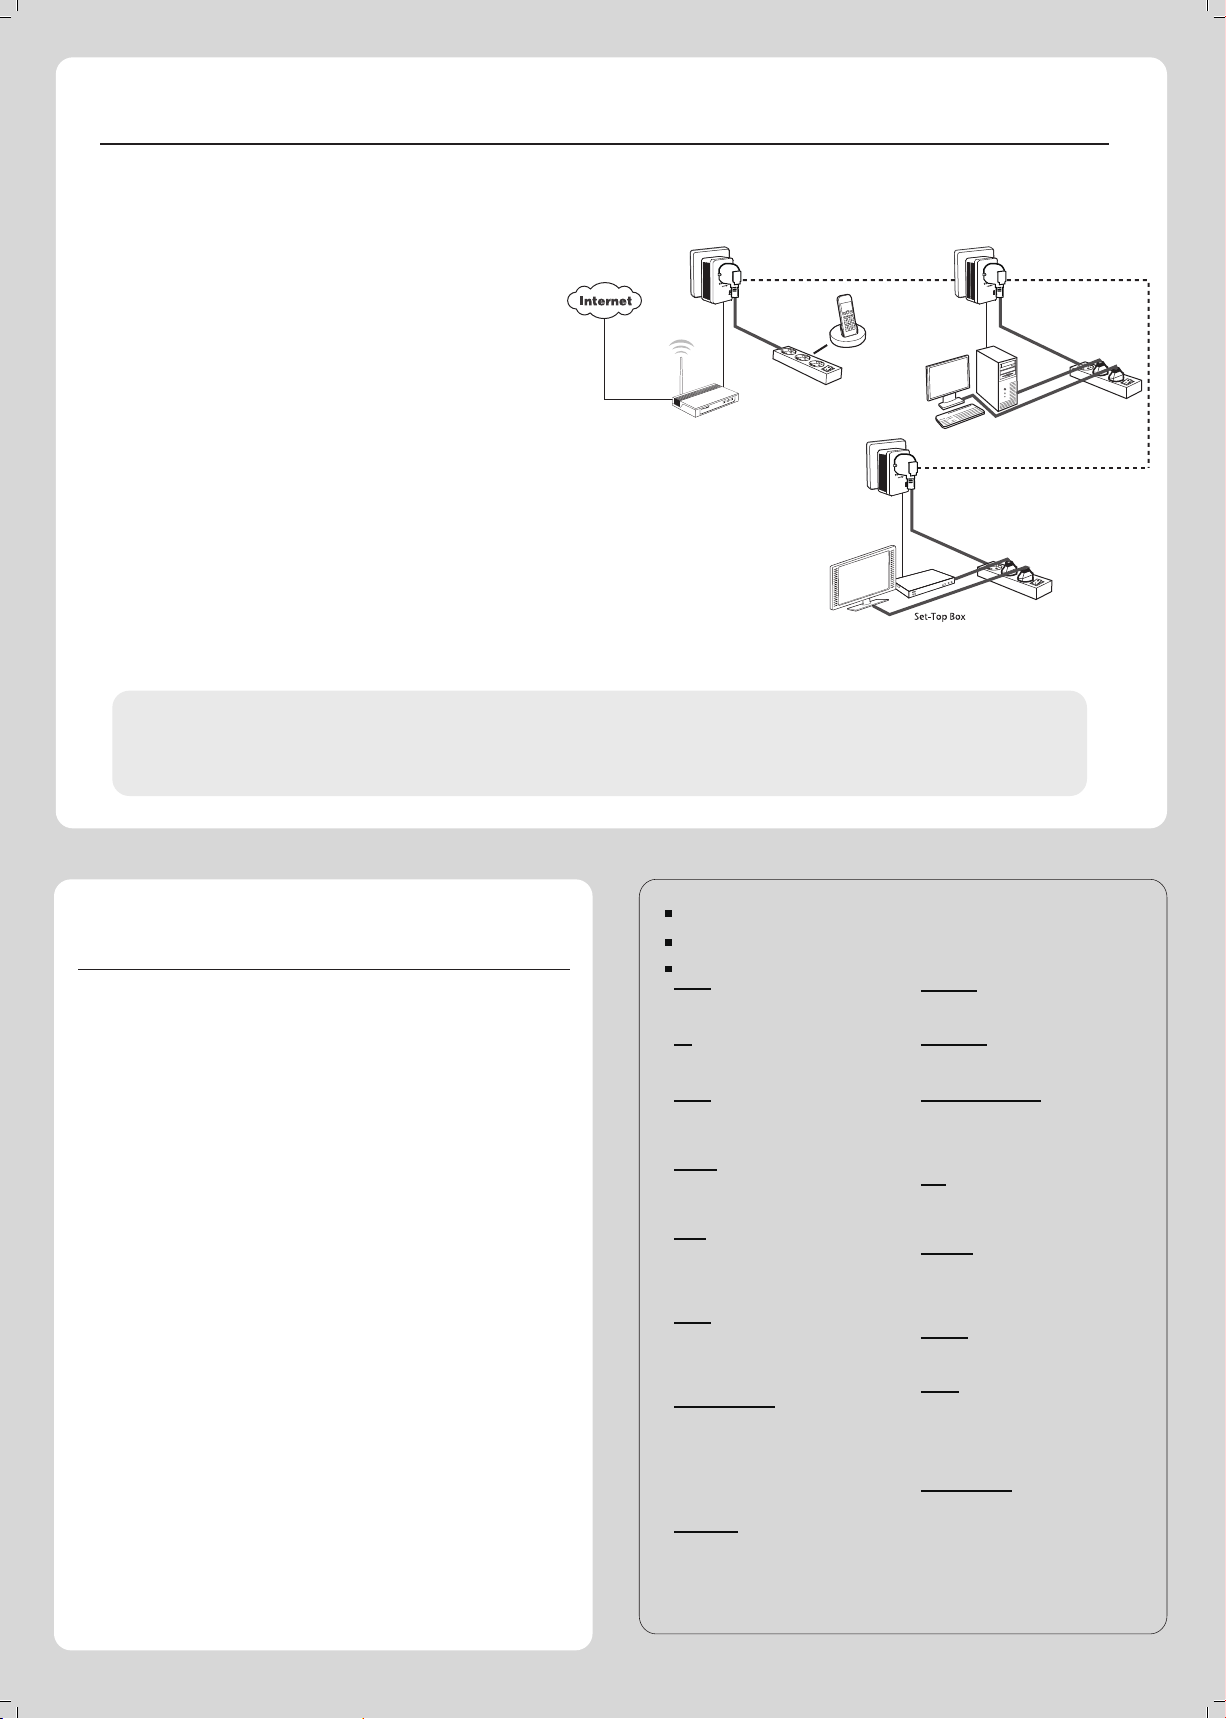
TP-LINK powerline devices are Plug and Play. A powerline network is established between
the powerline adapter and the extender as soon as you plug in the powerline devices.
Place the Wi-Fi Powerline Extender in the desired location. 5.
Connect the Powerline Adapter to the LAN port of the router and plug it into the wall socket.
Plug in the Wi-Fi Powerline Extender near your wireless router.
Press the WPS button on the router.
Press the Wi-Fi Clone button on the extender and the Wi-Fi Clone LED will begin blinking slowly. In about
20 seconds, all the LEDs will be solid momentarily and then the Wi-Fi LED will begin blinking quickly,
indicating that the Wi-Fi clone process is complete.
3.
2.
4.
1.
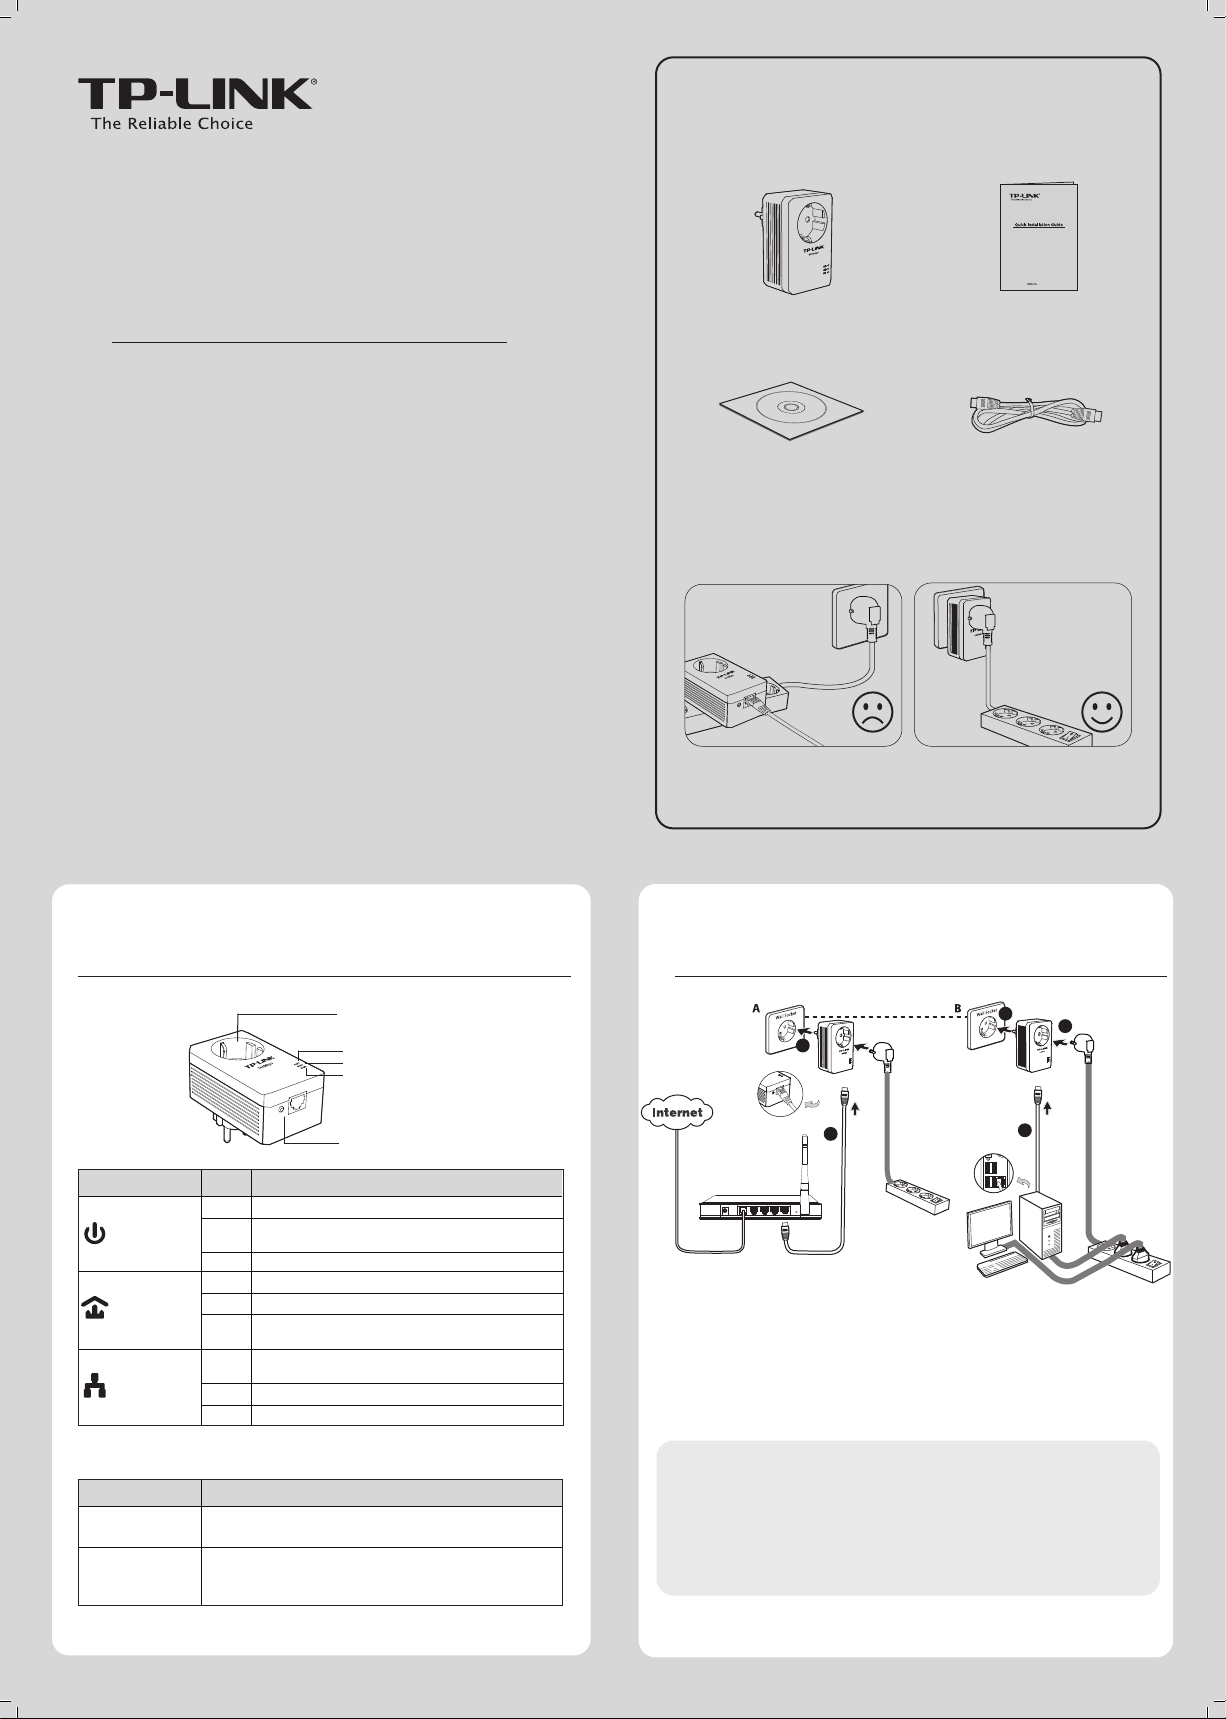
Package Contents
Pair
Pair
AV500 Powerline Adapter with AC Pass Through
TL-PA4010P
Quick Installation Guide
AV500 Powerline Adapter with AC Pass Through
MODEL NO.
TL-PA4010P
Powerline Adapter
*
Resource CD
* The provided power plug may dier from the picture due to dierent
regional power specications. Here we take the EU version as an example.
QIG
Ethernet Cable
Warning on Final Location
NOTE:
It's strongly recommended that you plug the adapter directly into the
wall socket, for some power strips have surge protector which can lter data.
7106504095
LED and Button Descriptions
1
Integrated Electrical Socket
Power LED
Powerline LED
Ethernet LED
Pair
Pair Button
Item Status Description
Solid
The adapter is on.
Power LED
Powerline LED
Ethernet LED
*
Five minutes after the device connected to the adapter is turned o, the adapter will
automatically switch to power-saving mode.
Item
Pair Button
Integrated
Electrical Socket
The adapter is in power-saving mode or in pairing
Blinking
procedure.
O
The adapter is o.
Solid
The adapter is connected to a powerline network.
Blinking
The adapter is transferring data.
The adapter isn’t connected to any powerline network
O
or is in power-saving mode. *
The Ethernet port is connected, but there is no data
Solid
being transferred.
Blinking
The Ethernet port is transferring data.
O
The Ethernet port isn’t connected.
Description
Pair button is used to secure a powerline network. To secure
your network, please refer to Appendix: Using the Pair Button.
The integrated electrical socket allows additional devices or
multiple sockets to be connected to the adapter just like to a
normal wall socket. No electrical socket is lost.
Network Installation
2
5
2
1
2
Power
3
1
4
LINE
4
3
TP-LINK powerline adapters are Plug and Play. After taking the steps above,
y
ou can surf the Internet
.
To add another adapter
Plug an additional adapter into the wall socket, and the connection will be
established automatically within 60 seconds.
NOTE:
1.
To surf the Internet, please make sure that your network is properly
connected to the Internet.
2.
If the adapters fail to automatically link to each other, you can
establish a private network by using the pair button. To set up a
private network, please go to Appendix Using the Pair Button for
detailed instructions.
Appendix: Using the Pair Button (Setting up a private network)
To set up a private network :
Press the pair button on adapter A for 1 second and the Power
1.
LED will begin ashing. If pressed more than 10 seconds, the
adapter will leave the network.
2.
Within 2 minutes, press the pair button on adapter B for 1
second and the Power LED will begin ashing as well.
In about 60 seconds you’ll see the Powerline LEDs on both
3.
adapters light up, indicating the two adapters have
intercommunicated with each other successfully.
* It is highly recommended to rst set up the two adapters in the same
room or on the same power strip and then place them in a suitable
location.
To join an existing private network:
If you want to add adapter C to the existing private network, please
follow the steps.
Press the pair button on the adapter A or B for 1 second (do not
1.
press both), and the Power LED will begin ashing.
Within 2 minutes press the pair button on adapter C for 1 second,
2.
the Powerline LED on the adapter C will light up in about 60
seconds.
* You can follow the steps above to add more adapters to the private
network one by one.
NOTE:
More advanced conguration, such as reset, rmware upgrade and QoS conguration can be accessed through the utility, so install the Powerline
Utility if necessary. (Only for Windows)
For detailed instructions, please refer to the User Guide on the Resource CD.
Troubleshooting
Q1. I have followed the above instructions, but my adapters
are still not working. What can I do?
Make sure all the adapters are under the same electric meter.
1.
2.
If the Power LED does not light up at all, there may be a
hardware problem.
3.
The PLC devices might not communicate with each other if they
are in dierent phrases of a four-wire three-phase circuit.
4.
As some power strips have surge protector, please make sure
the adapters are not separated by the power strips.
Q2. The adapters were working ne but no longer work
now that they've been moved. How do I make them
work again?
Plug the adapters into the same power strip and follow Appendix
Using the Pair Button to pair them . If they still don’t work, please
check for possible interference causes:
Air-conditioners, washing machines, and other similar household
1.
appliances are working too close to the adapters.
Air switch may lead to failed communication among PLC devices;
2.
check whether there are air switches hindering communication.
For more troubleshooting help, go to:
http://www.tp-link.com/en/support/faq
To download the latest Firmware, Driver, Utility and User Guide, go to:
http://www.tp-link.com/en/support/download
For all other technical support, please contact us by using the following details:
Global
Tel: +86 755 26504400
E-mail: support@tp-link.com
Service time: 24hrs, 7 days a week
UK
Tel: +44 (0) 845 147 0017
E-mail: support.uk@tp-link.com
Service time: 24hrs, 7 days a week
Turkey
Tel: 444 19 25 (Turkish Service)
E-mail: support.tr@tp-link.com
Service time: 9:00 AM to 9:00 PM
7 days a week
Ukraine
Tel: 0-800-505-508
E-mail: support.ua@tp-link.com
Service time: Monday to Friday
14:00 PM to 22:00 PM
Brazil
Toll Free: 0800-770-4337 (Portuguese
Service)
E-mail: suporte.br@tp-link.com
Service time: Monday to Saturday
08:00 AM to 08:00 PM
France
Tel: +33 (0) 820 800 860 (French service)
Email: support.fr@tp-link.com
Fee: 0.118 EUR/min from France
Service time: Monday to Friday 9:00 AM to
6:00 PM (Except French Bank holidays)
Russian Federation
Tel: 8 (499) 754-55-60
8 (800) 250-55-60 (toll-free call from
any RF region)
E-mail: support.ru@tp-link.com
Service time: From 10:00 to 18:00
(Moscow time)
*Except weekends and holidays in Russian
Federation
Switzerland
Tel: +41 (0) 848 800998 (German Service)
E-mail: support.ch@tp-link.com
Fee: 4-8 Rp/min, depending on rate of
dierent time
Service time: Monday to Friday 9:00 AM to
6:00 PM. GMT+ 1 or GMT+ 2
(Daylight Saving Time)
TP-LINK TECHNOLOGIES CO., LTD.
Technical Support
Singapore
Tel: +65 62840493
E-mail: support.sg@tp-link.com
Service time: 24hrs, 7 days a week
USA/Canada
Toll Free: +1 866 225 8139
E-mail: support.usa@tp-link.com
Service time: 24hrs, 7 days a week
Australia/New Zealand
Tel: AU 1300 87 5465
NZ 0800 87 5465
E-mail: support.au@tp-link.com (Australia)
support.nz@tp-link.com (New Zealand)
Service time: 24hrs, 7 days a week
Italy
Tel: +39 0230519020
E-mail: support.it@tp-link.com
Service time: Monday to Friday
9:00 AM to1:00 PM, 2:00 PM to 6:00 PM
Indonesia
Tel: (+62) 021 6259 135
E-mail : support.id@tp-link.com
Service time : Monday to Friday
9:00 -12:00; 13:00 -18:00
*Except public holidays
Malaysia
Tel: 1300 88 875465 (1300 88TPLINK)
Email: support.my@tp-link.com
Service time: 24hrs, 7 days a week
Poland
Tel: +48 (0) 801 080 618 / +48 22 7217563
(if calls from mobile phone)
E-mail: support.pl@tp-link.com
Service time: Monday to Friday
9:00 AM to 5:00 PM. GMT+1 or GMT+2
(Daylight Saving Time)
Germany/Austria
Tel: +49 1805 875465 (German Service)
+49 1805 TPLINK
E-mail: support.de@tp-link.com
Fee: 0.14 EUR/min from the German xed
phone network and up to 0.42 EUR/min
from mobile phone
Service time: Monday to Friday 9:00 AM to
6:00 PM. GMT+ 1 or GMT+ 2
(Daylight Saving Time in Germany)
*Except bank holidays in Hesse
www.tp-link.com

TP-LINK TECHNOLOGIES CO., LTD. www.tp-link.com
Technical Support
For more troubleshooting help, go to: http://www.tp-link.com/en/support/faq
To download the latest Firmware, Driver, Utility and User Guide, go to: http://www.tp-link.com/en/support/download
For all other technical support, please contact us by using the following details:
Global
Tel: +86 755 2650 4400
E-mail: support@tp-link.com
Service time: 24hrs, 7 days a week
Troubleshooting
The Powerline LED does not light up.
Check the following:
1. Double-click Powerline Scan.exe included on the Resource CD and click the “Rescan”
button.The Management Utility will automatically detect all other Powerline devices
on your powerline network.
2. Try to plug another powerline Ethernet adapter into a nearby power outlet and check
whether the Powerline LED lights up or not.
3. Make sure that the device is plugged into a wall socket instead of a power strip.
4. Follow the method in Pair Button to establish the connection again.
5. Reset the device to its factory default values.
Contact your local dealer for technical support if the Powerline LED still fails to light up.
Singapore
Tel: +65 6284 0493
E-mail: support.sg@tp-link.com
Service time: 24hrs, 7 days a week
Indonesia
Tel: (+62) 021 6386 1936
E-mail: support.id@tp-link.com
Service time: Monday to Friday
09:00 to 18:00 *Except public
holidays
Brazil
Toll Free: 0800 608 9799
(Portuguese Service)
E-mail: suporte.br@tp-link.com
Service time: Monday to Friday,
09:00 to 20:00; Saturday, 09:00 to
15:00
Ukraine
Tel: 0800 505 508
E-mail: support.ua@tp-link.com
Service time: Monday to Friday
10:00 to 22:00
Turkey
Tel: 0850 7244 488 (Turkish Service)
E-mail: support.tr@tp-link.com
Service time: 09:00 to 21:00
7 days a week
UK
Tel: +44 (0) 845 147 0017
E-mail: support.uk@tp-link.com
Service time: 24hrs, 7 days a week
Australia/New Zealand
Tel: AU 1300 87 5465
NZ 0800 87 5465
E-mail: support.au@tp-link.com
(Australia)
support.nz@tp-link.com (New
Zealand)
Service time: 24hrs, 7 days a week
Germany/Austria
Tel: +49 1805 875 465 (German
Service)
+49 1805 TPLINK
+43 820 820 360
E-mail: support.de@tp-link.com
Fee: 0.14 EUR/min from the German
xed phone network and up to 0.42
EUR/min from mobile phone
Service time: Monday to Friday,
09:00 to 12:30 and 13:30 to 17:30.
GMT+1 or GMT+2 (Daylight Saving
Time in Germany)
*Except bank holidays in Hesse
Malaysia
Tel: 1300 88 875 465
Email: support.my@tp-link.com
Service time: 24hrs, 7 days a week
Italy
Tel: +39 023 051 9020
E-mail: support.it@tp-link.com
Service time: Monday to Friday
09:00 to 13:00; 14:00 to 18:00
USA/Canada
Toll Free: +1 866 225 8139
E-mail: support.usa@tp-link.com
Service time: 24hrs, 7 days a week
Switzerland
Tel: +41 (0) 848 800 998 (German
Service)
E-mail: support.ch@tp-link.com
Fee: 4-8 Rp/min, depending on rate
of dierent time
Service time: Monday to Friday,
09:00 to 12:30 and 13:30 to 17:30.
GMT+1 or GMT+2 (Daylight Saving
Time)
France
Tel: +33 (0) 820 800 860 (French
service)
Email: support.fr@tp-link.com
Fee: 0.118 EUR/min from France
Service time: Monday to Friday,
09:00 to 18:00 *Except French Bank
holidays
Poland
Tel: +48 (0) 801 080 618 / +48 223
606 363 (if calls from mobile phone)
E-mail: support.pl@tp-link.com
Service time: Monday to Friday,
09:00 to 17:00. GMT+1 or GMT+2
(Daylight Saving Time)
Russian Federation
Tel: 8 (499) 754 5560
8 (800) 250 5560 (toll-free call from
any RF region)
E-mail: support.ru@tp-link.com
Service time: From 10:00 to 18:00
(Moscow time) *Except weekends
and holidays in Russian Federation
If your router does not support WPS function, or you just want to use a separate wireless network, follow the steps below. Before proceeding,
please write down the SSID and Wireless Password of your Wi-Fi Powerline Extender labeled on the bottom of the product.
Build a New Wi-Fi Network Pair Button
For more information about the Pair button, please refer to the User Guide
included on the Resource CD.
If you want to change the SSID and wireless password, please refer to the User Guide included on the Resource CD.
pair
BA
BA C
pair
pair
You can use the Pair button on only two devices at a time.
To create a powerline network using the Pair button, follow the steps below.
1. Press and hold the Pair button of A (TL-WPA4220) for one second.
2. Within two minutes, press and hold the Pair button of B (another TL-WPA4220
or another powerline adapter like TL-PA4010) for one second. The connection
will then be established.
To join an existing powerline network, follow the steps below.
1.
Press and hold the Pair button of C (another powerline device) for one second.
2. Within two minutes, press and hold the Pair button of A or B for one second.
The connection will then be established.
To leave an existing powerline network, press and hold the pair button on
the extender for at least ten seconds.
Room 1
Wireless Router
Powerline Adapter
Room 2
Wi-Fi Powerline Extender
pair
Wireless Router
ROUTER
WISP
WPS/
RESET
INTERNET
SSID: abc
SSID: 123
SSID*: TP-LINK_
Wireless Password:
TL-WPA4220
AV500 WiFi Powerline Extender
Power:
100-240V~ 50/60Hz 0.15A
Default Wireless Access:
http://tplinkplclogin.net
Username/Password:
admin/admin
S/N: XXXXXXXXXXXX
Password: ABCD-ABCD-ABCD-ABCD
WLAN MAC: 78CD8E81A715
Powerline MAC: 78CD8E81A716
Wireless Password: 01234567
*The default SSID is TP-LINK_ЧЧЧЧЧЧ.
(ЧЧЧЧЧЧ indicates the last six unique
characters of WLAN MAC address.)
TP-LINK powerline devices are Plug and Play. After going through the steps above, wireless clients can use the default SSID and wireless password
to join the wireless network of the Wi-Fi Powerline Extender as well as access the Internet.
 Loading...