

Page 1

71030336
User's GuideUser's Guide
TL-R410
Multifunctional Broadband Router
E-mail: export@tp-link.com.cn
Rev 1.0
Page 2

Table of Contents
Package Contents
Chapter 1 About this User's Guide...........................................................2
1.1 Usage...............................................................................................2
1.2 Assumpsit.........................................................................................2
1.3 Overview of this User's Guide..........................................................2
Chapter 2 Introduction..............................................................................3
2.1 Overview of the product...................................................................3
2.2 Features and Specification...............................................................3
2.2.1 Features............................................................................................3
2.2.2 Specification......................................................................................4
Chapter 3 Installation................................................................................6
3.1 Panel Layout.....................................................................................6
3.1.1 The Front Panel................................................................................6
3.1.2 The Rear Panel................................................................................6
3.2 System Requirements......................................................................8
3.3 Installation Environment Requirements............................................8
3.4 Hardware Installation Procedure......................................................8
Chapter 4 Internet Access......................................................................10
4.1 TCP/IP Configuration.....................................................................10
4.2 Fast Configuration..........................................................................12
Chapter 5 Advanced Configuration........................................................16
5.1 Login...............................................................................................16
5.2 Status..............................................................................................16
5.3 Wizard.............................................................................................18
5.4 Network...........................................................................................18
5.4.1 LAN Port Configuration..................................................................18
.....................................................................................1
5.4.2 WAN Port Configuration.................................................................19
5.4.3 MAC Address Clone.......................................................................23
5.5 DHCP Server...................................................................................24
5.5.1 DHCP Service.................................................................................24
5.5.2 Client List........................................................................................25
5.5.3 Static Address.................................................................................26
5.6 Forwarding Rules............................................................................27
5.6.1 Virtual Server..................................................................................27
5.6.2 Special App.....................................................................................29
5.6.3 DMZ Host........................................................................................30
5.7 Security............................................................................................31
5.7.1 Firewall............................................................................................31
5.7.2 Domain Name Filter........................................................................33
5.7.3 MAC Filter.......................................................................................34
5.7.4 Web Access....................................................................................35
5.7.5 Ping.................................................................................................36
5.8 Static Routing..................................................................................37
5.8.1 Static Route Table..........................................................................37
5.9 System............................................................................................38
5.9.1 Firmware Upgrade..........................................................................38
5.9.2 Restore Default...............................................................................40
5.9.3 Reboot.............................................................................................40
5.9.4 Change Password..........................................................................41
5.9.5 Log..................................................................................................42
5.9.6 Statistic............................................................................................42
Annex Trouble Shooting...........................................................................44
Page 3

TL-R410
Multifunctional Broadband Router User's Guide
TL-R410
Multifunctional Broadband Router User's Guide
Package Contents
The following contents should be found in your TL-R410 package:
Ø One TL-R410 Router.
Ø One AC power adapter .
Ø One User's Guide (Presswork).
Ø One Warranty card.
If any of the above contents is damaged or missing, please contact the
retailer you purchased the TL-R410 Router from.
Chapter 1 About this User's Guide
Thanks for your choosing of the TL-R410 Multifunctional Broadband
Router. The TL-R410 Multifunctional Broadband Router provides a perfect
SOHO solution. This User's Guide helps you how to get the best
operating performance from your TL-R410 Router. You can configure the
Router all by yourself without the help of professional. Please read this
guide carefully before you use the R410 Router.
1.1 Usage
This User's Guide tells you how to use your R410 Router.
1.2 Assumpsit
The Router mentioned in this User's Guide stands for the R410
Multifunctional Broadband Router.
1.3 Overview of this User's Guide
Chapter 1 About this User's Guide
Chapter 2 Introduction. Describes the R410 Router and its features
Chapter 3 Installation. Describes the steps for the hardware installation
of the TL-R410 Router
Chapter 4 Internet Access. Describes the basic configurations of the
R410 Router
Chapter 5 Advanced Configuration. Describes how to configure advanced
functions in order to get the most from the R410 Router
Annex Trouble Shooting
Page 4

TL-R410
Multifunctional Broadband Router User's Guide
TL-R410
Multifunctional Broadband Router User's Guide
Chapter 2 Introduction
2.1 Overview of the product
The TL-R410 Multifunctional Broadband Router is specially designed for
SOHO solution. It is a multifunctional, high performance, and easy-toconfigure Router. The TL-R410 Router provides many management
functions, including DHCP server, Virtual Server, DMZ host, Firewall, and
Static Routing Table, etc.
The TL-R410 Router provides flexible access control, allowing children or
stuff to browse the specific websites. The TL-R410 Router is also a smart
machine. It can connect to the Internet automatically on demand and
disconnect when idle so as to save network fee. It's easy-to-configure.
Quick Setup Wizard is supported and friendly help messages are
provided for every step.
2.2 Features and Specification
2.2.1 Features
Ø Integrates a 100Base-TX Ethernet port for connecting to a wide
area network (WAN) device, such as a Cable or DSL Modem.
addresses automatically. PCs on local LAN can also get a fixed IP
address.
Ø Allows external Internet users to access information from the
internal target host by setting the Virtual Server.
Ø Supports DMZ, One PC on local LAN can be configured to allow
unrestricted 2-way communication with servers or individual users
on the Internet.
Ø Supports VPN Pass-through.
Ø Built-in firewall to protect your PCs from outside intruders.
Ø Support Special Internet Applications, allow the applications, which
use non-standard connections or port numbers, to be used normally.
Ø Supports Static Routing, allows PCs connected to the R410 Router,
either directly or through a hub/switch, to communicate with other
PCs in the respective LAN segment that are connected to the R410
Router through another Router.
Ø Supports Domain Name Filtering and MAC address Filtering.
Ø Supports firmware upgrade by TFTP .
Ø Supports remote Web management.
Ø Integrates a 4-port 10/100Base-T/TX switch.
Ø Allows multiple users to access the Internet at the same time,
sharing a single public IP address.
Ø Uses NAT to allow all of your network's PCs to connect to the
Internet using only one IP address.
Ø Built-in DHCP server, providing the function of assigning LAN IP
2.2.2 Specification
Ø Compliant with IEEE 802.3 (10Base -T), IEEE 802.3u (100Base-TX)
Ø Supports protocols: TCP/IP , PPPoE, DHCP , ICMP , NAT
Ø Supports IEEE802.3x flow control for full-duplex mode and
collision-based backpressure for half-duplex mode
Ø Supports the port N-way auto-negotiation function, automatically
Page 5
TL-R410
Multifunctional Broadband Router User's Guide
TL-R410
Multifunctional Broadband Router User's Guide
negotiate the speed and duplex mode between two devices
Ø All ports support auto-MDI/MDIX
Ø Integrates LED indicators
Ø Power input: external, 9V~ 50Hz 0.8A
ØOperating temperature: 0 C to 40 C (32 F to 104 F)
ooo o
Ø Storage Humidity: 5% to 90% RH
Chapter 3 Installation
3.1 Panel Layout
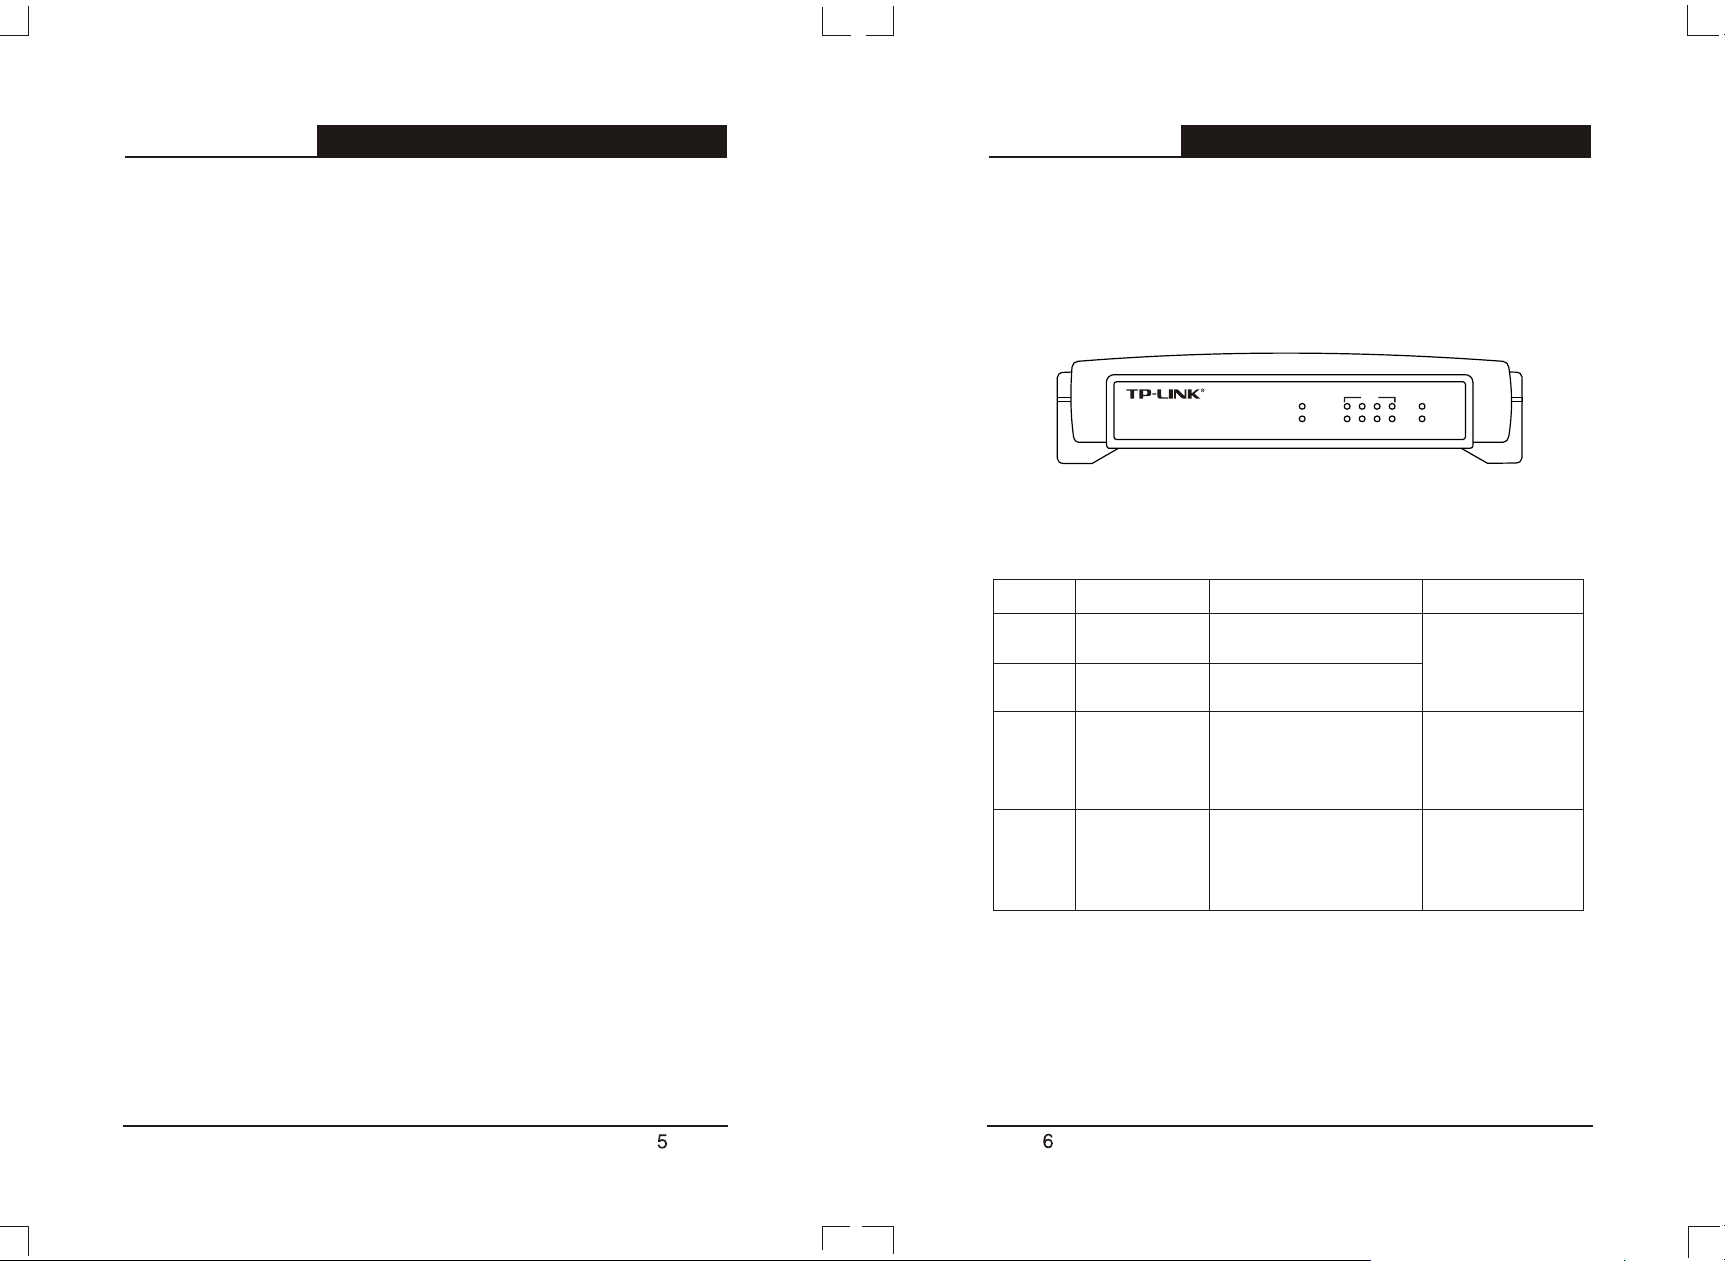
3.1.1 The Front Panel
Link/Act.
TL-R410
Multifunctional Broadband SOHO Router
M1
10/100
M2
Figure 3-1 Front Panel of the R410 Router
LED Indicators
LED Description Function Remark
M1 Router status Steady on when Router
indicator has a Hardware error
M2 Router status Steady on when Router
indicator works properly
Link/Act WAN and LAN
status indicator
Blinking when data is
flowing through the port
10/100M WAN and speed Steady on when the port is
indicator in the 100M mode
Steady
in the 10M mode
Steady on when the
Ethernet link exists
off when the port is
WANLAN
1234
M1 and M2 flash
Simultaneously when
the Router is restoring
the factory default Settings
3.1.2 The Rear Panel
Page 6

TL-R410
Multifunctional Broadband Router User's Guide
TL-R410
Multifunctional Broadband Router User's Guide
RESET
WAN
1
3
2
4
9V 50Hz 0.8A
~
Figure 3-2 Rear Panel of the R410 Router
1) Power jack: Connect the supplied AC power adapter here.
Note:
Only use the power adapter provided. Using a different one may
cause hardware damage.
2) RESET: This button is used to reboot the device (pressed and
released), or be used to restore the factory default settings of the
R410 Router. In order to restore the factory default settings,
restart the router, press and hold the Reset button until the M1
and M2 indicators flash simultaneously.
Note:
Ensure the Router is powered on before it restarts completely.
3.2 System Requirements
Ø Broadband Internet Access service (DSL/Cable/Ethernet).
Ø One DSL/Cable modem (you don't need this if connect the Router to
an Ethernet).
Ø Each PC on the LAN needs an Ethernet NIC and a standard twisted-
pair Ethernet cable (UTP network cable) with RJ45 connectors.
Ø TCP/IP protocol must be installed on all Purchase.
Ø System OS: Windows 95/98, Windows NT4.0, or Windows 2000/XP
Ø Web browser, such as Microsoft Internet Explorer 5.0 or later,
Netscape Navigator 6.0 or later
3.3 Installation Environment Requirements
Ø Lay the R410 Router horizontally.
Ø Don't put the Router near water or humidity.
Ø Avoid the dust and strong electronmagnetism.
ØTemperature: 0 C to 40 C (32 F to 104 F).
ooo o
Ø Humidity: 5% to 90% RH.
3.4 Hardware Installation Procedure
3) WAN: WAN port (RJ45) for connecting a DSL or Cable Modem.
4) Ports 1-4: LAN ports (RJ45) for connecting your PCs or Hub/
Switch.
Before you install the R410 Router, we hope you have connected your PC
to the Internet through your broadband service successfully. If there is any
problem, please contact your ISP. After that, please install the Router
according to the following steps. Don't forget to pull out the power plug
and keep your hands dry.
Page 7

TL-R410
Multifunctional Broadband Router User's Guide
TL-R410
Multifunctional Broadband Router User's Guide
1) Power everything off, including your PCs, your Cable or DSL
Modem and the R410 Router.
2) Connect the PCs and each Switch/Hub on you LAN to the LAN
Ports on the rear of the Router.
3) Connect the DSL /Cable Modem to the WAN port on the rear of
the Router.
4) Connect the AC power adapter to the Power port on the rear of
the Router, and then plug in the supplied AC power. The Router
will start to work automatically.
5) Power on the Cable/DSL Modem.
INTERNET
ISP
RESET
To WAN
xDSL modem
WAN
1
3
2
Switch/Hub
4
To LAN
9V 50Hz 0.8A
~
LAN
Figure 3-3 Physical Installation of the R410 Router
Chapter 4 Internet Access
This chapter helps you to configure the basic functions of the R410
Router. If you follow these procedures correctly, there should be no
problem in accessing the Internet via the Router. If you want to have the
advanced configurations, please read Chapter 5.
4.1 TCP/IP Configuration
Above all, ensure proper Operating System (Windows 95/98/Me/NT/
2000/XP) is available on your PCs. Default IP address of the R410 Router
is 192.168.1.1, and default Subnet Mask is 255.255.255.0. These values
refer to your internal network settings. Unless you have specific needs,
there should be no reason to change them.
Connect the PCs to the LAN Ports on the rear of the R410 Router. After
that, there are two means to configure the IP address for your PCs.
Ø Configure the IP address yourself
1) To set up the TCP/IP Protocol for the PCs, which need to be
configured IP address.
2) Configure the network parameters. IP address is 192.168.1.xxx
("xxx" is from 2 to 254), Subnet Mask is 255.255.255.0, and
Gateway IP is the Router's IP address (the default value is
192.168.1.1).
Ø Assign the IP address by the DHCP server built in the R410 Router.
Page 8

TL-R410
Multifunctional Broadband Router User's Guide
TL-R410
Multifunctional Broadband Router User's Guide
1) Configure your PCs, which need to be assigned IP addresses, in
Obtain an IP address automatically mode.
2) Power off the R410 Router and PCs. Then power on the Router
first, and then restart the PCs. The Built-in DHCP server will
assign IP addresses for the PCs.
Now, you can run the Ping command in MS-DOS mode to verify the
network connection between your PCs and the R410 Router. We choose
Windows 2000 OS as an example.
At the DOS command prompt, type ping 192.168.1.1, press Enter.
If the information such as the following data displayed, the connection
beween the PCs and the R410 Router has been established.
192.168.1.2~192.168.1.254 and the Subnet Mask must be 255.255.255.0.
4.2 Fast Configuration
With a web-based UI (User Interface), the R410 Router is easy to setup
and maintain; all functions can be configured via a web browser such as
Netscape Communicator and Internet Explorer on any Windows,
Macintosh or UNIX OS.
Start the web browser first, and you should remove the proxy and the dialup settings on your Internet browser.
Type http://192.168.1.1 in the browser's address box and then press
Enter.
If the information displayed as follow, your PCs have not connected to the
R410 Router. Please ensure you LAN hardware connection is OK, and all
the equipments are power on. (The Link/Act LEDs of LAN on the Router
and LEDs on the PCs' NICs should be lit.) If the connection is established,
ensure that your PCs and the Router are on the same subnet. Please
Check the TCP/IP settings on your PCs. If the IP address of the Router is
192.168.1.1, the PCs' IP addresses must be within the range of
A login window opens as fallow. Type admin in the User Name box,
admin in the Password box, and then click OK. If the user name or
password was previously changed, enter the current user name and
password.
Page 9

TL-R410
If the user's name and password are correct, the R410 Router's setup
page will then appear, and a Wizard page will pop up either. (If not, please
click the Wizard menu on the setup page.)
Click Next button, the page to choose the type of accessing to the
Internet will appear as follows.
Multifunctional Broadband Router User's Guide
TL-R410
The R410 Router supports three popular types to connect to the Internet.
Please choose one of them according to your situation. And then click
Next to enter the necessary network parameters.
1) If you choose PPPoE, i.e. ADSL virtual dial-up service, you should
enter the following parameters:
Multifunctional Broadband Router User's Guide
Ø User Name: The user name that ISP provides for you. If you forget it
or are not sure, please consult your ISP .
Ø Password: The password that ISP provides for you. If you forget it or
are not sure, please consult your ISP .
2) If you choose Dynamic IP, i.e. automatically get IP address from
your ISP, your host can connect to the Internet straight, without
entering any parameter.
3) If you choose Static IP, i.e. fixed IP address provided by ISP, you
should enter the following parameters:
Page 10

TL-R410
Multifunctional Broadband Router User's Guide
TL-R410
Multifunctional Broadband Router User's Guide
Ø IP Address: The Router's WAN IP address, namely the IP address
your ISP provides for you. Please consult your ISP if you have any
question.
Ø Subnet Mask: The Router's WAN Subnet Mask provided by your
ISP , usually is 255.255.255.0.
Ø Gateway: Optional, the IP address of the Gateway provided by ISP.
Please consult your ISP if you have any question.
Ø DNS Server: Optional, the IP address of the DNS server provided
by your ISP . Consult your ISP if you have any question.
Ø Secondary DNS Server: Optional, if ISP provides you two DNS
servers, input the IP address of another DNS server here.
After finishing all configurations of basic network parameters, please click
Finish button to close the page.
Chapter 5 Advanced Configuration
5.1 Login
After your successful login, the R410 Router's setup page will appear.
There are eight menus in the left menu bar: Status, Wizard, Network,
DHCP Server, Forwarding Rules, Security, Static Routing and System.
Click any one, and then you can configure the corresponding function.
You can click each page's "Help" button to get more detailed explanations
and instructions. To apply any setting you have altered on the page,
please click the "Save" button. To clear the values you've entered on the
page, click Clear button and re-enter values.
There are the detailed explanations for every function of the menus below.
5.2 Status
This page shows the R410 Router's current status. All information
provided is read-only.
Page 11

TL-R410
Multifunctional Broadband Router User's Guide
TL-R410
Multifunctional Broadband Router User's Guide
1) LAN
This field shows the current LAN port's MAC address, IP address and
Subnet Mask.
2) WAN
This field shows the current WAN port's MAC address, IP address,
Subnet Mask, Gateway and DNS Server: The type to connect to the
Internet (PPPoE/Dynamic IP/Static IP) is showed on the right also. If
PPPoE is chosen, the Duration button will be shown here while any user
accessing the Internet. User can cut the connection by clicking the button.
If user's host has not connected to the Internet, a Connect button will be
shown here. User can establish the connection by clicking the button.
3) WAN Statistic
The current statistic information of the WAN port is shown here.
5.3 Wizard
Please refer to Chapter 4 Internet Access.
5.4 Network
There are three submenus under the Network menu: LAN, WAN and
MAC Clone. Click any of them, and you can configure the corresponding
function. The detailed explanations for every submenu are provided below.
5.4.1 LAN Port Configuration
This page is to configure the basic network parameters of the LAN port.
Ø MAC Address: MAC address of the Router's LAN port. The value
can't be changed.
Ø IP Address: IP address of the Router's LAN port. The gateway of all
PCs on the LAN must be set to this IP address.
Page 12

TL-R410
Multifunctional Broadband Router User's Guide
Note:
If you have change the IP address of the LAN port, you must use
the new IP Address to login the R410 Router.
Ø Subnet Mask: Subnet Mask of the Router's LAN port, usually is
255.255.255.0. The Subnet Mask of all PCs on the LAN must be set
to a same value.
TL-R410
Multifunctional Broadband Router User's Guide
Note:
If the new LAN IP address you set is not on a same subnet, the
Virtual Server and DMZ Host will not take effect, until it is reconfigured correctly.
5.4.2 WAN Port Configuration
First, please choose the type (PPPoE/Dynamic IP/Static IP) to connect to
the Internet. The default type is Dynamic IP.
The connection type you choose is dependent on the settings assigned
by your ISP. The connection type you need to choose may differ from ISP
as well as the service you applied for. If you are not sure which
connection type you use currently, please contact your ISP to obtain the
correct information.
1) If you choose Dynamic IP, i.e. automatically get IP address from
your ISP, you can see the page as follows.
The page shows the R410 Router's network parameters assigned
dynamically by the DHCP server of your ISP, just like IP address, Subnet
Mask, Gateway, etc. Click the Renew button, and you can update these
parameters from the DHCP server. Click the Rlease button, and you can
release IP configurations to the DHCP server. You can also set DNS
server manually here.
A few ISP's DHCP server doesn't support broadcast application. If you
can't get the IP address normally, you can choose the Get IP with
Unicast DHCP option. (You needn't choose this option usually)
2) If you choose Static IP, i.e. fixed IP address provide by ISP, the
page will be shown as follow.
Page 13

TL-R410
Multifunctional Broadband Router User's Guide
TL-R410
Multifunctional Broadband Router User's Guide
You should enter the following parameters:
Ø IP Address: The Router's WAN IP address, namely the IP address
your ISP provides to you. Please consult your ISP if you have any
question.
Ø Subnet Mask: The Router's WAN Subnet Mask provided by your
ISP , usually is 255.255.255.0.
Ø Gateway: Optional, the IP address of the gateway provided by your
ISP . Please consult your ISP if you have any question.
Ø DNS Server: Optional, the IP address of the DNS server, which is
provided by your ISP . Consult your ISP if you have any question.
Ø Secondary DNS Server: Optional, if ISP provides you two DNS
servers, input the IP address of another DNS server here.
3) If you choose PPPoE, i.e. ADSL virtual dial-up service, you should
enter the following parameters:
Ø User Name: Input the user name provided by your ISP. If you have
any question, consult your ISP .
Ø Password: Input the password provided by your ISP . If you have any
question, consult your ISP .
Ø Packet MTU: Input range is 576 -1492, the default value is 1492.
Don't change it if unnecessary.
Ø Use IP address specified by ISP: If your ISP specifies an IP address
for you, please select this option and input the IP address specified
by your ISP .
Ø DNS Server: The DNS server's IP address assigned automatically
by your ISP . You can also configure the DNS server manually.
Ø Secondary DNS Server: The secondary DNS server assigned
automatically by your ISP. You can also configure the secondary
DNS server manually.
Ø Connect on Demand: By choosing this mode, the R410 Router will
connect to the internet automatically when there is any Internet
access from LAN.
Ø Max Idle Time: For non-zero value T, the router will disconnect the
network connection automatically after the router has idled for T
minute(s). The setting only takes effect to Connect on Demand
and Manually connecting.
Ø Auto-connecting: Under this mode, the R410 Router will connect
automatically after booting. If the network connection is broken after
connected, because of external factors, the Router will try to reconnect every a certain period (30 seconds) until connected
successfully.
Page 14

TL-R410
Multifunctional Broadband Router User's Guide
TL-R410
Multifunctional Broadband Router User's Guide
Ø Manually connecting: The Router must be connected or
disconnected to Internet manually.
5.4.3 MAC Address Clone
This page is to configure the MAC address of the R410 Router's WAN
port.
Ø MAC Address: The Router's MAC adddress of WAN port, which
don't need to be changed usually. However some ISPs may bind the
MAC address of your machine, then only the packets sent by this
MAC address will be passed. You can input the MAC address that
binded and click Save button. Then the WAN MAC address is
cloned.
Note:
If you click the Save button, the R410 Router will reboot.
5.5 DHCP Server
There are three submenus under the DHCP Server menu: DHCP Service,
Client List and Static Address. Click any of them, and you can configure
the corresponding function. The detailed explanations for every submenu
are provided below.
5.5.1 DHCP Service
Ø Your PC's MAC address: The MAC address of the PC that is now
browsing this page.
Ø Restore Factory MAC: Click this button to restore the MAC address
of the Router's WAN port to the factory default value.
Ø Clone MAC Address: Click this button to copy the MAC address of
current managing PC to the blank after MAC Address. Only the PCs
on the LAN can use Clone MAC address function.
The settings of TCP/IP include Host IP, Subnet Mask, Gateway, and DNS
configurations. It is not an easy job to configure many computers on your
LAN. Fortunately, DHCP provides a rather simple approach to handle all
these settings. If you enable the R410 Router's DHCP server, it will
Page 15

TL-R410
Multifunctional Broadband Router User's Guide
TL-R410
Multifunctional Broadband Router User's Guide
automatically assign the proper TCP/IP settings of the PCs on the LAN.
To apply this function, you should enter the following parameters:
Ø Starting address: The starting address loaded automatically by the
DHCP server.
Ø Ending address: The ending address loaded automatically by the
DHCP server.
Ø Gateway: Optional. Suggest to input the IP address of the LAN port
of the Router, default value is 192.168.1.1.
Ø Default Domain Name: Optional. Input the domain name of your
network.
Ø Primary DNS Server: Optional. Input the DNS server provided by
your ISP . Or consult your ISP .
Ø Secondary DNS Server: Optional. You can input the IP address of
another DNS server if your ISP provides two DNS servers.
Note:
To use the DHCP server function of the R410 Router, you must ensure
that all the computers on the LAN work as "Obtain an IP address
automatically" mode. This function will take effect after rebooting the
router.
5.5.2 Client List
This page shows the information of the LAN client hosts, whose IP
addresses are assigned by DHCP.
Ø Index: The index of the client hosts.
Ø MAC Address: The MAC addresses of the client hosts.
Ø IP Address: The client hosts' IP addresses assigned by DHCP .
Ø Lease Time: The time that DHCP client hosts can use the IP
addresses assigned by Router's DHCP server. Before the time is up,
DHCP client hosts will request to renew the lease automatically.
5.5.3 Static Address
The R410 Router provides static IP address assignment to control the IP
addresses of the PCs on the LAN better. The static IP address
assignment table can obligate static IP addresses for the PCs with
specified MAC addresses. When the PC applies for IP address, the
DHCP server will assign the obligated IP address to it.
Ø MAC Address: The MAC address of the PC that will have obligated
Page 16

TL-R410
Multifunctional Broadband Router User's Guide
TL-R410
Multifunctional Broadband Router User's Guide
IP address.
Ø IP Address: Obligated IP address.
Note:
The function won't take effect until the Router rebooting.
5.6 Forwarding Rules
There are three submenus under the Forwarding Rules menu: Virtual
Server, Special App and DMZ Host. Click any of them, and you can
configure the corresponding function. The detailed explanations for every
submenu are provided below.
5.6.1 Virtual Server
The Virtual Server function allows you to set up public services that can
be accessed by external users on the Internet, such as a web address,
Email and FTP etc. Each service provided by a dedicated network
computer (server) is configured with a fixed IP address. Although the
internal service addresses are not accessible directly for the external user,
the R410 Router is able to identify the service requested by the service
port number and redirects the request to the appropriate internal IP
address.
Note:
To use this function, it is recommended that you have to use a fixed
Public IP address from your ISP.
You should enter the following parameters:
Ø Service Port: When users from the Internet make certain requests
on the given Service Port, the Router can forward those requests to
the specific computers.
Ø IP Address: The IP address of the computer specified as server on
the LAN.
Ø Protocol: The protocol (TCP/UDP/ALL) used by the server .
Ø Enable: The rule will be realized only after you choose this option.
The R410 Router provides some common service ports in the list box of
the service port. You can choose one of them and click the "Copy to"
button to copy the provided service port to the vitual server table above.
You can also add the port manually if it isn't in the list box.
For example: If you have an FTP server (port 21) at 192.168.1.2, a web
server (port 80) at 192.168.1.3, and a POP3 server (port 110) at
192.168.1.6, you need to specify the following virtual server mapping
table:
Page 17

TL-R410
Multifunctional Broadband Router User's Guide
TL-R410
Some applications require multiple connections, like Internet games,
video conferencing, Internet telephony and so on. Due to the firewall
function, these applications can't work with pure NAT Router. Special
Application makes some of these applications to work with NAT Router.
To enable this function, you should configure the following items:
Multifunctional Broadband Router User's Guide
Ø Trigger Port: The port number to trigger the opening of Incoming
Port Range.
Note:
If you set the Virtual Server with service port 80, you must set the web
management port in the Web Access of Security to be any value except
80 such as 8080. Otherwise there will be conflict to disable the virtual
server.
5.6.2 Special App
Ø Trigger Protocol: The protocol of Trigger Port.
Ø Incoming Port Range: When the trigger packet is detected, the
inbound packets to the specified port numbers are allowed to pass
the firewall so that the according special application can work. You
can input a single port, or input at most 5 groups of ports (or port
section). The format of group is starting port-ending port. All
groups of ports must be apart with comma (","), for example: 20002038, 2050-2051, 2085, 3010-3030.
Ø Incoming Protocol: The protocol of Incoming Port Range.
Ø Enable: The rule configured in this item takes effect only after you
choose this option.
5.6.3 DMZ Host
Page 18

TL-R410
Multifunctional Broadband Router User's Guide
TL-R410
Multifunctional Broadband Router User's Guide
In some special situations, you need to expose one PC on the LAN to the
Internet to realize 2-way communication. You can specify the PC to be the
DMZ host.
Follow the steps to set the DMZ host: Input the IP address of the DMZ
host, choose Enable option, then click Save button to realize the setting.
Note:
If you set the DMZ host, the firewall related to the IP won't work.
5.7 Security
There are five submenus under the Security menu: Firewall, DNS Filter,
MAC Filter, Web Access and Ping. Click any of them, and then you can
configure the corresponding function. The detailed explanations for every
submenu are provided below.
5.7.1 Firewall
To take more control of your LAN PCs, you can allow or deny your PCs to
access certain Internet hosts by setting packet filter.
Follow the steps to set the firewall:
1) Click the Firewall submenu.
2) Choose Enable Packet Filter option to make this fuction active.
3) There are two options: Allow all to pass except those match
the following rules and Deny all to pass except those match
the following rules, choose the one you need.
4) In the LAN IP column, input the IP address of the PC on the LAN.
Empty means to control all of the PCs on the LAN. You can also
input an IP address range, for example 192.168.1.20-
192.168.1.30.
5) In the LAN Port column, input the service port of the PC on the
LAN. Empty means to control all service ports of the PC. You can
also input a service port range, for example 1030-2000.
6) In the WAN IP column, input the IP address of remote host in the
Internet, which needs to be controlled. Empty means to control all
the remote hosts. You can also input an IP address section, for
example 61.145.238.6-61.145.238.47.
7) In the WAN Port column, input the service port of remote host on
the Internet. Empty means to control all service ports of the host.
You can also input a service port range, for example 25-100 or
25,110.
8) Choose the protocol used by the controlled packet. If you want the
packets matching this rule pass the router, choose the Pass
option, otherwise deny.
9) Choose Enable option and click Save button.
Page 19

TL-R410
Multifunctional Broadband Router User's Guide
TL-R410
Multifunctional Broadband Router User's Guide
For example, if you want the PC with IP address 192.168.1.7 on the LAN
can't receive and send email, the PC with IP address 192.168.1.8 can't
visit the website of IP 202.96.134.12, while other PCs can do, you should
specify the following packet filter table:
5.7.2 Domain Name Filter
Domain Name Filter let you prevent LAN users from accessing specific
domains.
Follow the steps to set the DNS Filter:
1) Click the DNS Filter submenu.
2) Choose Enable Domain Name Filter option to make this fuction
active.
3) In the Domain Name column, input the Domain name to be
filtered, or a part of it. Empty means all websites are prohibited. If
you input a string (case insensitive) here, the PC on the LAN
can't visit all websites including that string.
4) Choose Enable option and then click Save button.
For example, suppose you want the PCs on the LAN can't visit
www.yahoo.com and www.sohu.com, and all the websites ending with
.NET, you need to specify the following Domain Name Filter table:
5.7.3 MAC Filter
The MAC Filter function allows network administrators to use the MAC
addresses of PCs to restrict users/computers from accessing the Internet.
Follow the steps to set the MAC address filter:
1) Click the MAC filter submenu.
2) Choose Enable MAC Address Filter option to make this function
active.
3) There are two options: Only those PCs with MAC address
matching the following settings can access the Internet and
All other PCs can access the Internet, except those
matching the following settings, choose the one you need.
4) In the MAC Address column, input the MAC address of the PC.
5) In the Description column, input the simple description of the PC.
Page 20

TL-R410
Multifunctional Broadband Router User's Guide
TL-R410
Multifunctional Broadband Router User's Guide
6) Click Save button.
For example, if you hope that all PCs on the LAN can access the Internet,
except the PCs with MAC address 00-E0-4C-00-07-BE and 00-E0-40-4C00-07-5F, you need to specify the following MAC Address Filter table:
5.7.4 Web Access
This page is to specify the web service port of the R410 Router and the IP
address of the PC on the WAN that can access the web pages remotely.
Ø Web service Port: The service port of Router's Web server .
Ø Remote Web Management IP Address: IP address of the PC on the
WAN that can access Web pages remotely .
The default Web service port of the Router is 80. If you change the
default web service port (for example change to 88), you must use IP:
PORT format (for example http://192.168.1.1:88) to login the Router's
Web server. This function will take effect after reboot.
The default remote Web management IP address of the Router is 0.0.0.0
and all PCs on the WAN can't login the Router to operate remote Web
mangement. If you change the default remote Web management IP
address (for example change to 202.96.12.8), only the PC with specified
IP address on the WAN (for example 202.96.12.8) can login the R410
Router. If the remote Web management IP address is 255.255.255.255,
all PCs on the WAN can login the Router.
5.7.5 Ping
This function allows you to prohibit the ping packets from LAN ports or
WAN port of the R410 Router.
Page 21

TL-R410
Multifunctional Broadband Router User's Guide
TL-R410
Multifunctional Broadband Router User's Guide
Ø Ignore Ping Packets From WAN: Enable this function, the Router
will not response to the Ping requests from the WAN.
Ø Prohibit Ping Packets From LAN: After enable this function, no Ping
packet can pass through the Router from the LAN to the WAN.
5.8 Static Routing
There is only a Static Route Table submenu under the Static Routing
menu. Click it, and you can configure the Static Routing function. The
detailed explanations for the configuration of Static Routing are provided
below.
5.8.1 Static Route Table
Ø Destination IP: The IP address of the network or PC you want to
access.
Ø Subnet Mask: The Subnet Mask of the network or PC you want to
access, the default value is 255.255.255.0.
Ø Gateway: The IP address of the Router or PC that packet is sending
to. The IP address must be on a same subnet with the Router's WAN
or LAN port.
Ø Enable: Choose this option to make the Static Routing rule active.
5.9 System
This page is to configure the static routing information of the R410 Router.
You can set eight rules of Static Routing.
There are six submenus under the System menu: Firmware Upgrade,
Restore Default, Reboot, Change Password, Log and Statistic. Click
one of them, and you can configure the corresponding function. The
detailed explanations for every submenu are provided below.
5.9.1 Firmware Upgrade
Page 22

TL-R410
Multifunctional Broadband Router User's Guide
TL-R410
Multifunctional Broadband Router User's Guide
5.9.2 Restore Default
Click Restore Factory Default button to restore the factory default
settings of the R410 Router.
This setting page allows you to upgrade the latest version firmware to
keep your R410 Router up-to-date.
Follow the steps to upgrade the firmware of your Router:
1) Download the latest version firmware from our website: http://
www.tp-link.com.
2) Set a PC on the LAN to TFTP server, and put the firmware file into
the service folder on the TFTP server.
3) In the File Name column, input the file name of the firmware.
4) In the TFTP Server IP column, input the IP address of the TFTP
server.
5) Click Upgrade button to upgrade the firmware. After upgrading, the
R410 Router will reboot automatically.
Caution:
Don't power off the R410 Router during upgrading, otherwise the Router
will be damaged.
Please pay attention to the following default values:
Ø Default User Name: admin
Ø Default Password: admin
Ø Default IP Address: 192.168.1.1
Ø Default Subnet Mask: 255.255.255.0
After restoring, the R410 Router will reboot automatically.
5.9.3 Reboot
Click Reboot button to reboot the R410 Router. During rebooting, you can
see the page as follow:
Page 23

TL-R410
Multifunctional Broadband Router User's Guide
5.9.4 Change Password
This fuction allows user to change the user name and password as the
system administrator. Please input your original user name and password
first, then input your new user name and password. Input the new
password again in the Confirmed New Password column. Click Save
button and the user name and password will be changed.
TL-R410
Multifunctional Broadband Router User's Guide
5.9.5 Log
This function allows you to trace Internet connection by viewing the Log
information.
5.9.6 Statistic
Caution:
For security reasons, it is strongly recommended that you should change
the default user name and password. If you forget the password, please
restore the factory default setting of the R410 Router.
This page shows the network traffic of each PC on the LAN, including
total traffic and traffic of last 10 seconds.
There are two parameters you can configure:
Page 24

TL-R410
Multifunctional Broadband Router User's Guide
TL-R410
Multifunctional Broadband Router User's Guide
Ø Count network traffic time: The period (10 seconds as default) to
count the current network traffic.
Ø IP Address: The IP address of the PC that is monitored.
In the flow Statistic table, you can see the following items:
Ø Packet (Total): The total amount of packets received and
transmitted by the Router.
Ø Byte (Total): The total byte amount of bytes received and
transmitted by the Router.
Ø Packet (Current): The total amount of packets received and
transmitted in last 10 seconds.
Ø Byte (Current): The total byte amount of packets received and
transmitted in last 10 seconds.
Ø ICMP Tx (Current): The amount of the ICMP packets transmitted to
the WAN in last 10 seconds.
Ø UDP Tx (Current): The amount of the UDP packets transmitted to
the WAN in last 10 seconds.
Ø TCP SYN Tx (Current): The amount of the TCP SYN packets
transmitted to the WAN in last 10 seconds.
Annex Trouble Shooting
This section provides solutions to problems you may encounter during
installation and operation of your R410 Router. If your situation is
described here, applying the corresponding solution should approach the
problem.
1. I can't connect to the R410 Router to configure it.
Check the following:
1) Check if the R410 Router is installed properly and powered ON,
and check if LAN connections are OK.
2) Check if your PC and R410 Router are on the same subnet. If not
sure, you can initiate the DHCP function, let the PC get the IP
address automatically.
3) Ensure that your PC is using an IP address within the default range
from 192.168.1.2 to 192.168.1.254.
4) Ensure that the Subnet Mask is set to 255.255.255.0.
2. I can't browse through the R410 Router.
Check the following:
1) Ensure both ends of the network cable and power adapter are
connected properly. Check if the M2 LED on the front panel is
ON.
2) Check the TCP/IP setup on the client side. The IP address of the
PC should be 192.168.1.xxx ("xxx" is from 2 to 254.), and the
Subnet Mask should be 255.255.255.0. The default gateway IP
Page 25

TL-R410
Multifunctional Broadband Router User's Guide
TL-R410
Multifunctional Broadband Router User's Guide
should be the Router's LAN IP address, and DNS is set correctly.
3) Check the same setup values in the Status page of the R410
Router.
3. When I enter a URL or IP address I get a time out error.
Check the following:
1) Check if other PCs work. If they do, ensure that your PCs IP
settings are correct. If using a Fixed IP address, check the
Network Mask, Default gateway and DNS as well as the IP
address.
2) If the PCs are configured correctly, but still don't work, check the
Router. Ensure that it is connected and ON. Connect to it and
check its settings. If you can't connect to it, check the LAN and
power connections.
3) If the R410 Router is configured correctly, check your Internet
connection to ensure it is working correctly.
4. I can't obtain an IP address from my cable/DSL modem.
1) Ensure that all of your cabling is connected properly and all of the
Router's WAN and LAN LEDs are illuminated correctly.
2) Power off your cable/DSL modem for a few seconds. Turn it on.
After the modem goes through its self-test, check if you have an
IP address now.
3) Ensure that your cable/DSL modem is compatible with DHCP.
4) Your ISP may require MAC address. Check with your ISP. This
address can be obtained in the Status screen of the R410
Router's web-based UI.
5. Some applications do not run properly when using the
R410 Router.
The R410 Router processes the data passing through it, so it is not
transparent.
Use the Special Application feature to allow the use of Internet
applications that do not work correctly.
If this can't solve the problem, you can use DMZ function. It can work with
almost every application, but the firewall is disabled when it works, and
only one PC can use this feature.
 Loading...