

TP-Link KL430, KL430E User Manual
User Guide
Kasa Smart Light Strip
KL430 / KL430E
1910012929 REV2.0.0
© 2020 TP-Link
Contents
About This Guide····················································· 1
Introduction································································ 2
Set Up Your Smart Light Strip·························· 3
Mount Your Smart Light Strip··························· 4
Main Device Control·············································· 5
Configure Your Smart Light Strip···················· 6
Create Scenes························································10
Reset Your Smart Light Strip···························12
Discover Kasa·························································13
Authentication·························································14

About This Guide
This guide provides a brief introduction to Smart Light Strip and the Kasa Smart app, as well as regulatory information.
Features available in Smart Light Strip may vary by model and software version. Smart Light Strip availability may also vary by region or ISP. All images, steps, and descriptions in this guide are only examples and may not reflect your actual Smart Light Strip experience.
Conventions
In this guide, the following convention is used:
Convention |
Description |
Teal |
Key information appears in teal, including management page text such as menus, items, buttons and so on. |
Underline |
Hyperlinks are in teal and underlined. You can click to redirect to a website. |
Support
•Specific product information can be found on the product page at https://www.tp-link.com.
•A Technical Community is provided for you to discuss our products at https://community.tp-link.com.
•Our Technical Support contact information can be found at the Help center of the Kasa Smart app and the Contact Technical Support page at https://www.tp-link.com/support.
•Videos about how to configure the Smart Light Strip features can be found on the Setup Videos page at https://www.tp-link.com/support/setup-video/#smart-bulbs.
1
Introduction
The Smart Light Strip is part of the Kasa smart home family of products, including plugs, switches, cameras and more. You can simply download the Kasa Smart app, connect to Wi-Fi and enjoy. No special hardware is needed. 16 color zones and millions of colors are available for you to pick from and create your own scenes.
You can also control multiple smart home devices with the Kasa Smart app or use your voice for added convenience. With Kasa, your home is never more than a few taps away.
•Wonderful Lighting Effects - Pick from a variety of animated lighting effects or create your own for beautiful ambiance lighting.
•Schedules - Use your Kasa Smart app to schedule your light strip to automatically turn on or off to fit around any event you're having.
•Groups and Scenes - Combine your light strip with other Kasa Smart devices for seamless control with a single tap on your mobile devices.
•Voice Control - Control light strip hands-free with Amazon Alexa, Goolge Assistant and Samsung SmartThings. Turn it on or off, and change colors with just your voice.
•Extendable - Connect up to 10 sections for a total length of 33ft and watch lighting effects span the entire strip.
2

Set Up Your Smart Light Strip
Follow the steps below to set up your Smart Light Strip via the Kasa Smart app.
Step 1. Download Kasa |
Step 2. Connect to Network |
Step 3. Log In |
|
Get the Kasa Smart app from |
Connect your mobile device to a |
Open the app, and log in with your |
|
the App Store or Google Play. |
2.4GHz Wi-Fi network. |
TP-Link ID. If you don't have an |
|
|
|
account, create one first. |
|
|
|
Note: If you forgot your login password, tap Forgot |
|
|
|
password? on the login page, the app will guide you |
|
|
|
through the rest. |
|
|
|
|
|
Step 4. Add Devices
Tap the button in the app and
select Device to add your new Smart Light Strip. Follow app instructions to complete the setup.
3

Mount Your Smart Light Strip
After configured your Smart Light Strip, you can mount it if needed. Your strip is flexible to cut and extend, allowing you to stick it or place it in the exact spot you desire.
Note:
*Maximum units: 10m light strips
*Please do not connect the light strip upside down.
* Once cut, it cannot be reattached. Prevent accidental shocks by removing its power and then cutting along the strip's indicator lines.
* To avoid damaging your Smart Light Strip, do not bend it during the installation.
Extend Light Strip |
|
Shorten Light Strip |
|
Peel and Stick Light Strip |
|
|
|
|
|
|
|
|
|
|
|
|
|
|
|
4
Main Device Control
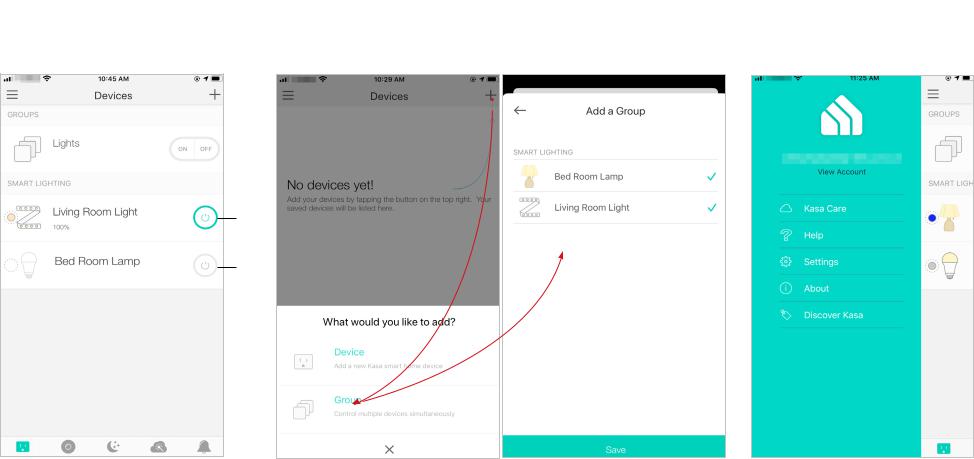
After you successfully set up your Smart Light Strip, you will see the Devices page on the Kasa Smart app. You can add new devices, control multiple devices simultaneously in a group, configure account settings, and more.
Devices Page
On the Devices page, you can instantly turn on/off the Smart Light Strip, adjust brightness or change colors.
Add a Group |
Configure Kasa Settings |
|||
Tap |
|
|
> Group to add a group for controlling multiple devices |
Swipe right and you can configure |
|
|
|||
|
|
|||
simultaneously. |
settings for your Kasa account or |
|||
|
|
|
|
get more information about Kasa. |
ON
OFF
5
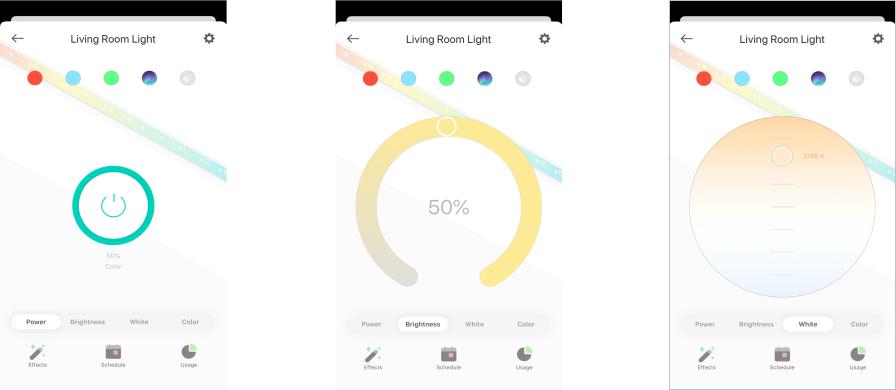
Configure Your Smart Light Strip
On the Devices page, tap a Smart Light Strip and you can adjust the light temperature, brightness or color, set schedules, save a shortcut for a light effect, track energy consumption and configure the Smart Light Strip settings.
Power On/Off At One Tap |
Adjust Brightness |
Adjust Light Temperature |
Quickly power on or off your Smart Light Strip |
Dim your Smart Light Strip with a range from |
||
with a single button. |
1% to 100%. |
||
|
|
|
|
|
|
|
|
Adjust the light temperature for your Smart Light Strip easily.
6
 Loading...