


Quick guide
Basic function
Navigation
system
• Giving guidance for the route quickly
• Information to be read before operation
• Setting initial settings before operation
• Connecting the Bluetooth
• Operating the map screen
• Searching the map
• Activating the route guidance
®
device
1
2
3
Audio/visual
system
Speech command
system
Peripheral
monitoring system
Phone
Toyota online
Index
• Listening to the radio
• Enjoying music and video
• Operating the speech command system
• Checking the situation around the vehicle
• Operating the phone
(Hands-free system for cellular phones)
• Operating the Toyota online
• Search alphabetically
4
5
6
7
8
PRIUS PHV_Navi_OM47C86E_(EE)

2
TABLE OF CONTENTS
Introduction...................................... 6
Reading this manual........................ 8
1
Quick guide
1-1. Basic function
Buttons overview ..................12
“Menu” screen....................... 14
Status icon ............................ 15
“Setup” screen ...................... 17
1-2. Navigation operation
Operating the map screen .... 18
Guiding the route .................. 19
Registering home.................. 20
2
Basic function
2-1. Basic information before oper-
ation
Initial screen.......................... 24
Touch screen ........................25
Home screen operation ........27
Entering letters and num-
bers/list screen operation ... 28
Screen adjustment................31
Linking multi-information display
and the system ...................33
2-2. Connectivity settings
Registering/Connecting a
®
Bluetooth
Setting Bluetooth
Connecting to inter-
net/Miracast™/MirrorLink™ via
Wi-Fi
2-3. Other settings
device ............... 34
®
details..... 38
®
................................. 45
General settings.................... 49
Voice settings........................51
Vehicle settings..................... 52
3
Navigation system
3-1. Basic operation
Navigation............................. 56
Map screen operation........... 61
Map screen information ........ 63
Traffic messages...................67
3-2. Destination search
Search operation ..................70
Starting route guidance......... 79
3-3. Route guidance
Route guidance..................... 82
Editing route.......................... 84
3-4. Favourite destinations
Registering an entry.............. 89
Editing the entry information. 91
3-5. Setup
Map settings .........................93
Traffic message settings ....... 96
Route preferences settings... 98
3-6. Tips for operating the naviga-
tion system
GPS (Global Positioning Sys-
tem) ..................................100
Navigation database updates
..........................................102
4
Audio/visual system
4-1. Basic operation
Quick reference ..................104

TABLE OF CONTENTS
3
Some basics .......................105
4-2. Radio operation
AM/FM/DAB radio...............110
4-3. Media operation
USB memory ......................115
iPod.....................................117
®
Bluetooth
audio.................119
MirrorLink™ ........................122
Miracast™...........................125
AUX ....................................128
4-4. Audio/visual remote controls
Steering switches................129
4-5. Setup
Audio settings .....................130
4-6. Tips for operating the
audio/visual system
Operating information .........131
5
Speech command system
Parking assist guide line display
mode.................................153
Distance guide line display
mode.................................154
Toyota parking assist monitor
precautions .......................154
Things you should know .....160
6-2. Panoramic view monitor
Panoramic view monitor .....162
Checking the front and around
the vehicle ........................166
Checking the sides of the vehicle
..........................................168
Checking the rear and around
the vehicle ........................171
Panoramic view monitor precau-
tions ..................................178
Things you should know .....186
7
Phone
1
2
3
4
5
6
7
8
5-1. Speech command system
operation
Speech command system ..140
Command list......................142
5-2. Mobile Assistant operation
Mobile Assistant..................145
Peripheral monitoring
6
system
6-1. Toyota parking assist monitor
Toyota parking assist monitor
..........................................148
Estimated course line display
mode.................................151
7-1. Phone operation (Hands-free
system for cellular phones)
Quick reference ..................190
Some basics .......................191
Placing a call using the
®
Bluetooth
hands-free system
..........................................194
Receiving a call using the
®
Bluetooth
hands-free system
..........................................198
®
Talking on the Bluetooth
hands-free system ............199
®
Bluetooth
phone message
function .............................201

4
7-2. Setup
7-3. What to do if...
8-1. Toyota online
8-2. Setup
TABLE OF CONTENTS
Phone settings ....................206
Troubleshooting ..................215
8
Toyota online
Toyota online.......................220
Settings required for using the
service ..............................223
Online search......................224
Importing favourites and stored
routes................................225
Street View .........................226
Weather ..............................227
Parking................................228
Fuel price ............................229
Toyota online settings .........230
Index
Alphabetical Index .............234

TABLE OF CONTENTS
5
1
2
3
4
5
6
7
8

6
Introduction
Navigation system owner’s
manual
This manual explains the operation
of the navigation system. Please
read this manual carefully to ensure
proper use. Keep this manual in
your vehicle at all times.
The screen shots in this document
and the actual screens of the navigation system differ depending on
whether the functions and/or a contract existed and the map data
available at the time of producing
this document.
The screens in this manual will also
differ if the screen theme settings
have been changed. (Theme setting: P. 4 9 )
In some situations when changing
between screens, it may take longer than normal for the screen to
change, the screen may be blank
momentarily or noise may be displayed.
Please be aware that the content of
this manual may be different from
the system in some cases, such as
when the system’s software is
updated.
The company names and product
names appearing on this manual
are the trademarks and registered
trademarks of their respective companies.
Navigation system
The navigation system is one of the
most technologically advanced
vehicle accessories ever developed. The system receives satellite signals from the Global
Positioning System (GPS) operated
by the U.S. Department of Defense.
Using these signals and other vehicle sensors, the system indicates
your present position and assists in
locating a desired destination.
The navigation system is designed
to select efficient routes from your
present starting location to your
destination. The system is also
designed to direct you to a destination that is unfamiliar to you in an
efficient manner. The map database was made by Harman international, based on HERE maps. The
calculated routes may not be the
shortest nor the least traffic congested. Your own personal local
knowledge or “short cut” may at
times be faster than the calculated
routes.
The navigation system’s database
includes Point of Interest categories
to allow you to easily select destinations such as restaurants and
hotels. If a destination is not in the
database, you can enter the street
address or a major intersection
close to it and the system will guide
you there.
The system will provide both a

visual map and audio instructions.
The audio instructions will
announce the distance remaining
and the direction to turn when
approaching an intersection. These
voice instructions will help you keep
your eyes on the road and are
timed to provide enough time to
allow you to maneuver, change
lanes or slow down.
Please be aware that all current
vehicle navigation systems have
certain limitations that may affect
their ability to perform properly. The
accuracy of the vehicle’s position
depends on satellite conditions,
road configuration, vehicle condition or other circumstances. For
more information on the limitations
of the system, refer to page 100.
TOYOTA MOTOR CORPORATION
7
8
Reading this manual
Explains symbols used in this
manual
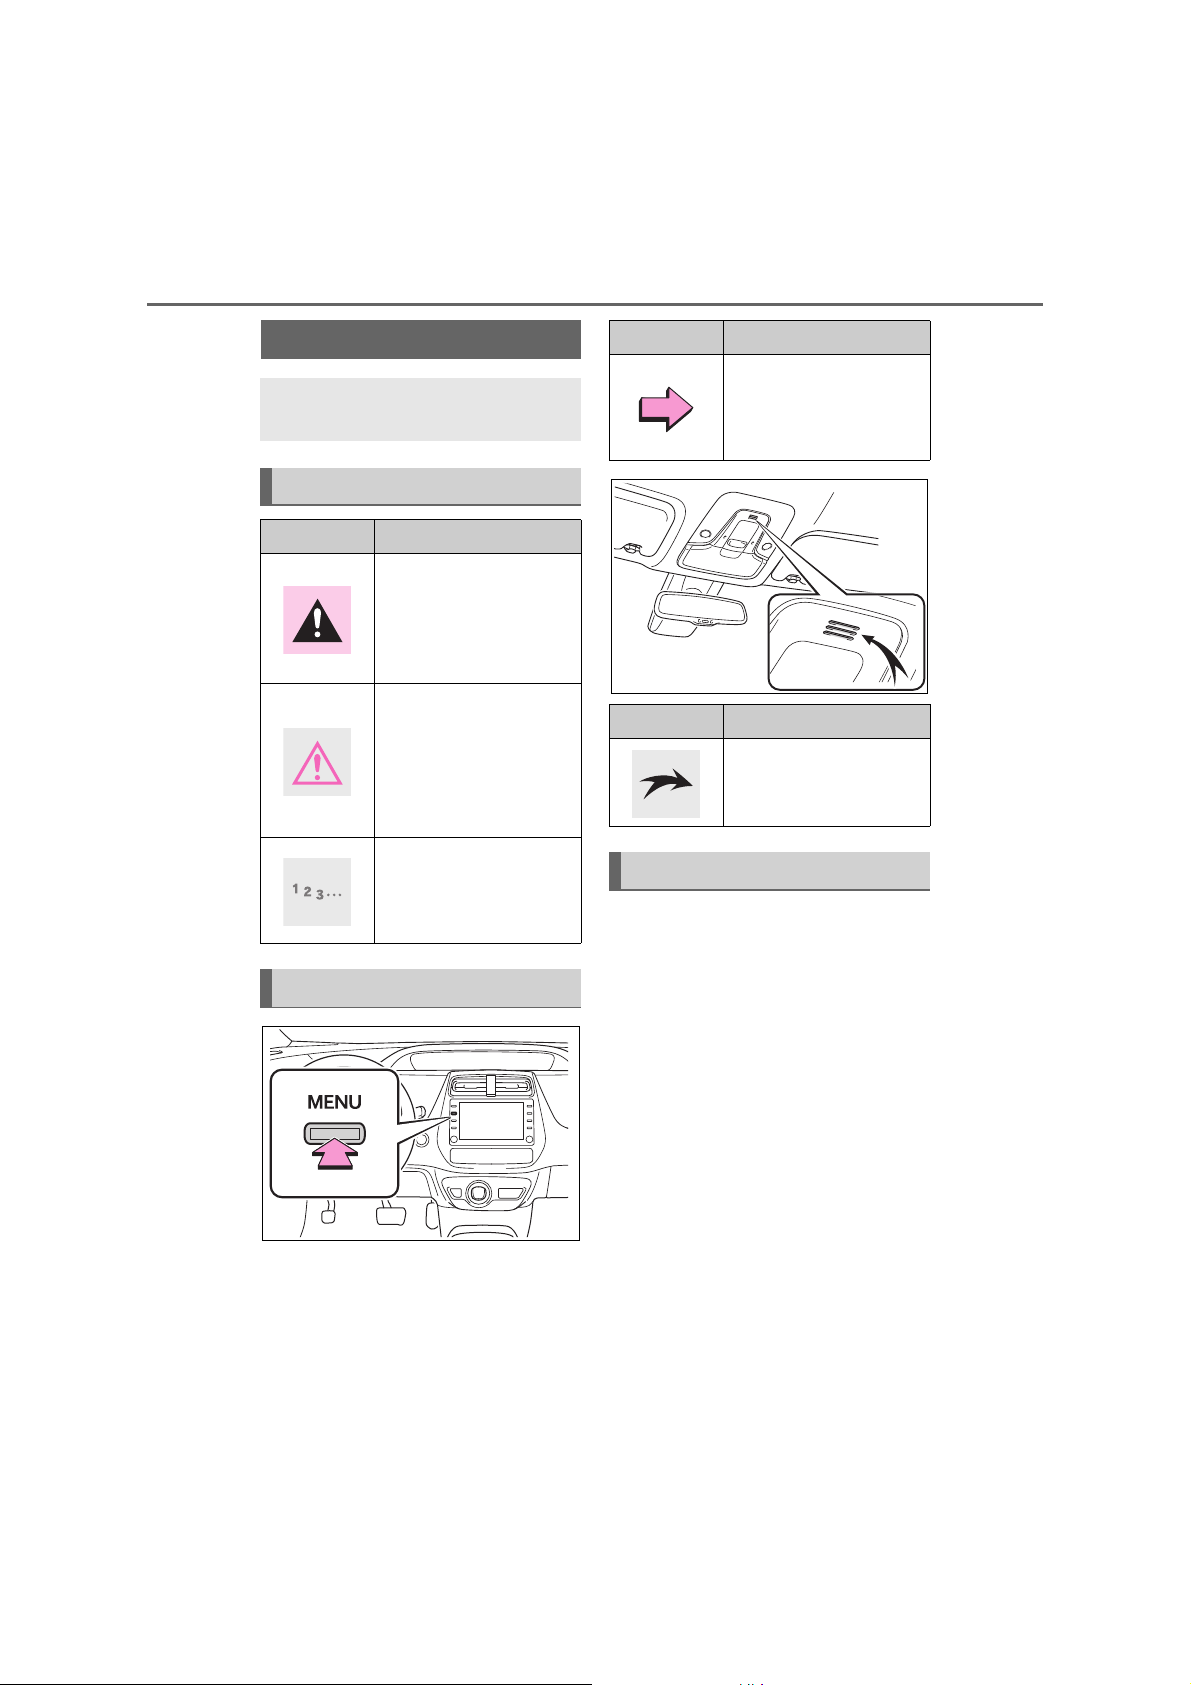
Symbols in this manual
Symbols Meanings
WARNING:
Explains something that,
if not obeyed, could
cause death or serious
injury to people.
NOTICE:
Explains something that,
if not obeyed, could
cause damage to or a
malfunction in the vehicle or its equipment.
Indicates operating or
working procedures. Follow the steps in numerical order.
Symbols in illustrations
Symbols Meanings
Indicates the action
(pushing, turning, etc.)
used to operate switches
and other devices.
Symbols Meanings
Indicates the component or position being
explained.
Safety instruction
To use this system in the safest
possible manner, follow all the
safety tips shown below.
This system is intended to assist in
reaching the destination and, if
used properly, can do so. The
driver is solely responsible for the
safe operation of your vehicle and
the safety of your passengers.
Do not use any feature of this system to the extent it becomes a distraction and prevents safe driving.
The first priority while driving
should always be the safe operation of the vehicle. While driving, be
sure to observe all traffic regulations.

9
WARNING
Prior to the actual use of this system, learn how to use it and
become thoroughly familiar with it.
Read the entire manual to make
sure you understand the system.
Do not allow other people to use
this system until they have read
and understood the instructions in
this manual.
For your safety, some functions
may become inoperable when driving. Unavailable screen buttons are
dimmed.
● Exercise extreme caution if operat-
ing the system while driving. Insufficient attention to the road, traffic or
weather conditions may cause an
accident.
● While driving, be sure to obey the
traffic regulations and maintain
awareness of the road conditions. If
a traffic sign on the road has been
changed, route guidance may not
have the updated information such
as the direction of a one way street.
(no left turns, street closures, etc.)
frequently change. Therefore,
before following any instructions
from the system, look to see
whether the instruction can be done
safely and legally.
This system cannot warn about
such things as the safety of an
area, condition of streets, and availability of emergency services. If
unsure about the safety of an area,
do not drive into it.
Under no circumstances is this system a substitute for the driver’s personal judgement.
Use this system only in locations
where it is legal to do so. Some
areas may have laws prohibiting
the use of video and navigation
screens next to the driver.
While driving, listen to the voice
instructions as much as possible
and glance at the screen briefly and
only when it is safe. However, do
not totally rely on voice guidance.
Use it just for reference. If the system cannot determine the current
position correctly, there is a possibility of incorrect, late, or non-voice
guidance.
The data in the system may occasionally be incomplete. Road conditions, including driving restrictions

10

11
Quick guide
1-1. Basic function
Buttons overview ................12
“Menu” screen .................... 14
Status icon.......................... 15
“Setup” screen .................... 17
1-2. Navigation operation
Operating the map screen .. 18
Guiding the route ................ 19
Registering home ............... 20
1
1
Quick guide
12
C
D
E
1-1.Basic function
1-1. Basic function
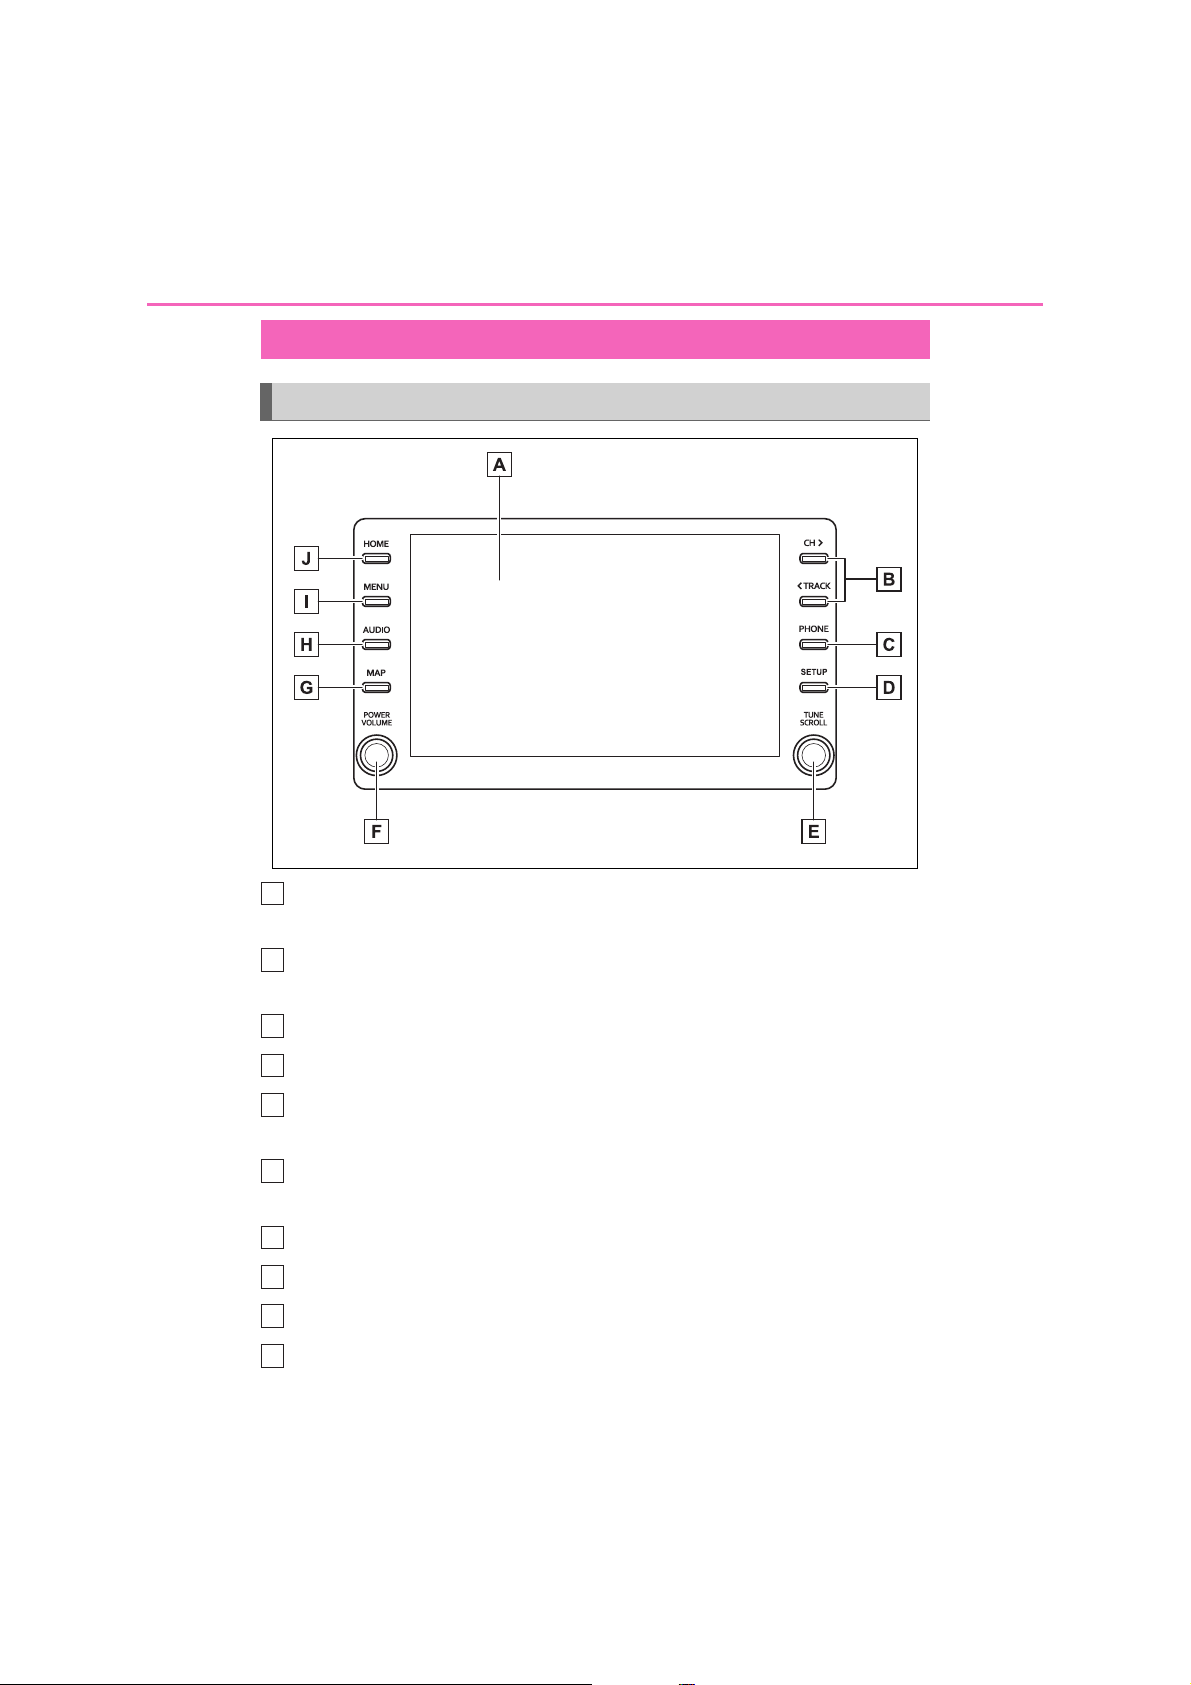
Buttons overview
Operations of each part
By touching the screen with your finger, you can control the selected
A
functions. (P. 2 5 )
Press to seek up or down for a radio station or to access a desired
B
track/file. (P.11 0, 115 , 117, 11 9)
®
Press to access the Bluetooth
hands-free system. (P.190)
Press to display the “Setup” screen. (P.17)
Turn to change the radio station or skip to the next or previous track/file.
(P.110, 11 5, 117 , 119)
Press to turn the audio/visual system on and off, and turn it to adjust the
F
volume. Press and hold to restart the system. (P.24, 105)
G
Press to display the map screen. (P. 5 6 )
Press to access the audio/visual system. (P.104, 105)
H
Press to display the “Menu” screen. (P. 1 4 )
I
Press to display the home screen. (P. 2 7 )
J

1-1. Basic function
13
● The position and shapes of the buttons may differ slightly between right-hand drive
vehicles and left-hand drive vehicles.
1
Quick guide

14
C
D
E
1-1. Basic function
“Menu” screen
“Menu” screen operation
Press the “MENU” button to display the “Menu” screen.
Select to display the destination screen. (P.56, 59)
A
B
Select to display the audio control screen. (P.104)
Select to display the hands-free operation screen. (P.190)
Select to display the application screen. (P.122, 220)
Select to display the fuel consumption or energy monitor screen.
*2
F
Select to display the “Setup” screen. (P. 17 )
G
Select to adjust the contrast and brightness of the screens, etc. (P. 3 1 )
*1
: The clock is not displayed on the screen for this vehicle. The clock is displayed
on the combination meter.
*2
: Refer to the “Owner’s Manual”
1-1. Basic function
B
15
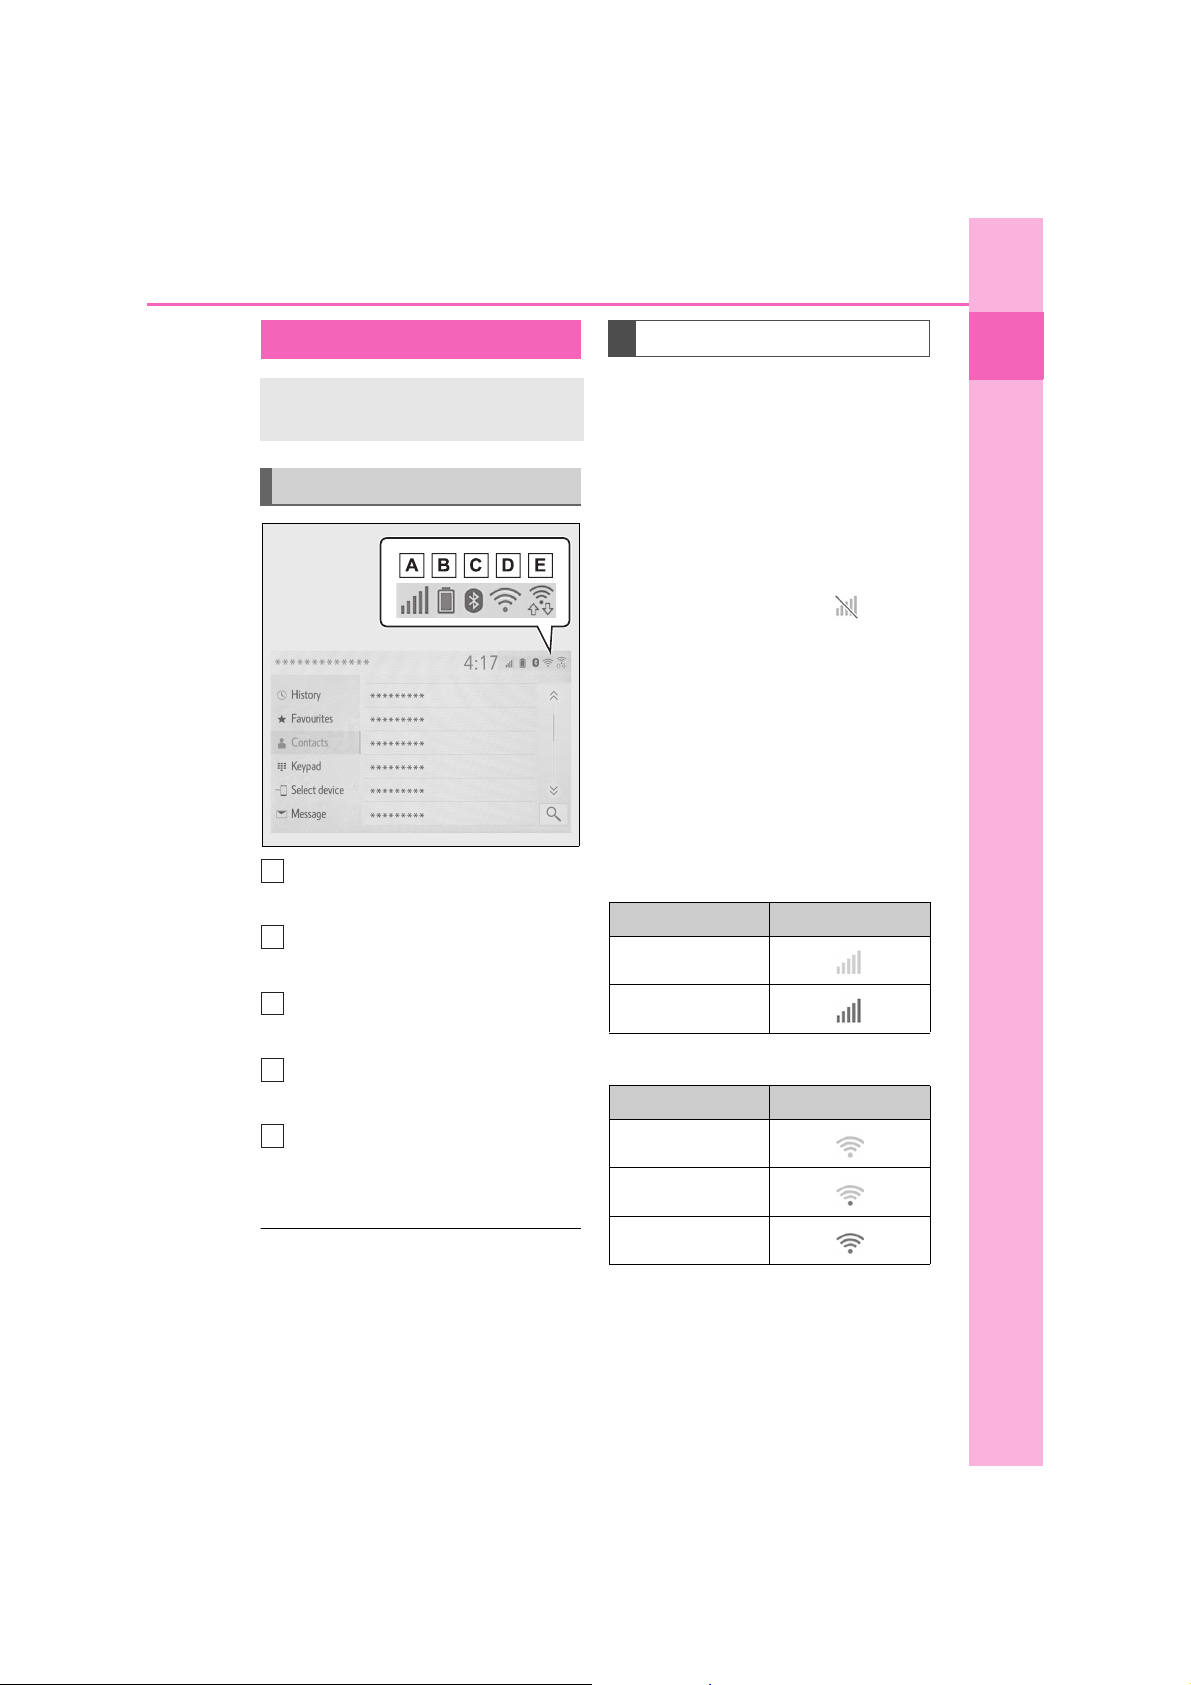
Status icon
Status icons are displayed at
the top of the screen.
Status icon explanation
The reception level of the con-
A
nected phone display (P. 1 5)
Remaining battery charge display (P. 16 )
®
Bluetooth
C
condition display (P. 16 )
D
Wi-Fi
play (P. 15 )
phone connection
®
connection condition dis-
Reception level display
The level of reception does not
always correspond with the level
displayed on the cellular phone.
The level of reception may not be
displayed depending on the phone
you have.
When the cellular phone is out of
the service area or in a place inac-
cessible by radio waves, is displayed.
“Rm” is displayed when receiving in
a roaming area. While roaming, display “Rm” top-left on the icon.
The receiving area may not be displayed depending on the type of
Bluetooth
While connected with cellular
®
phone you have.
phone
Reception Level Indicators
Poor
Excellent
When using Wi-Fi
Reception Level Indicators
®
1
Quick guide
Shown during data communica-
E
No connection
tion performed via Miracast™
(P. 1 5)
● The number of status icons that can
be displayed differs depending on the
displayed screen.
Poor
Excellent
16
1-1. Basic function
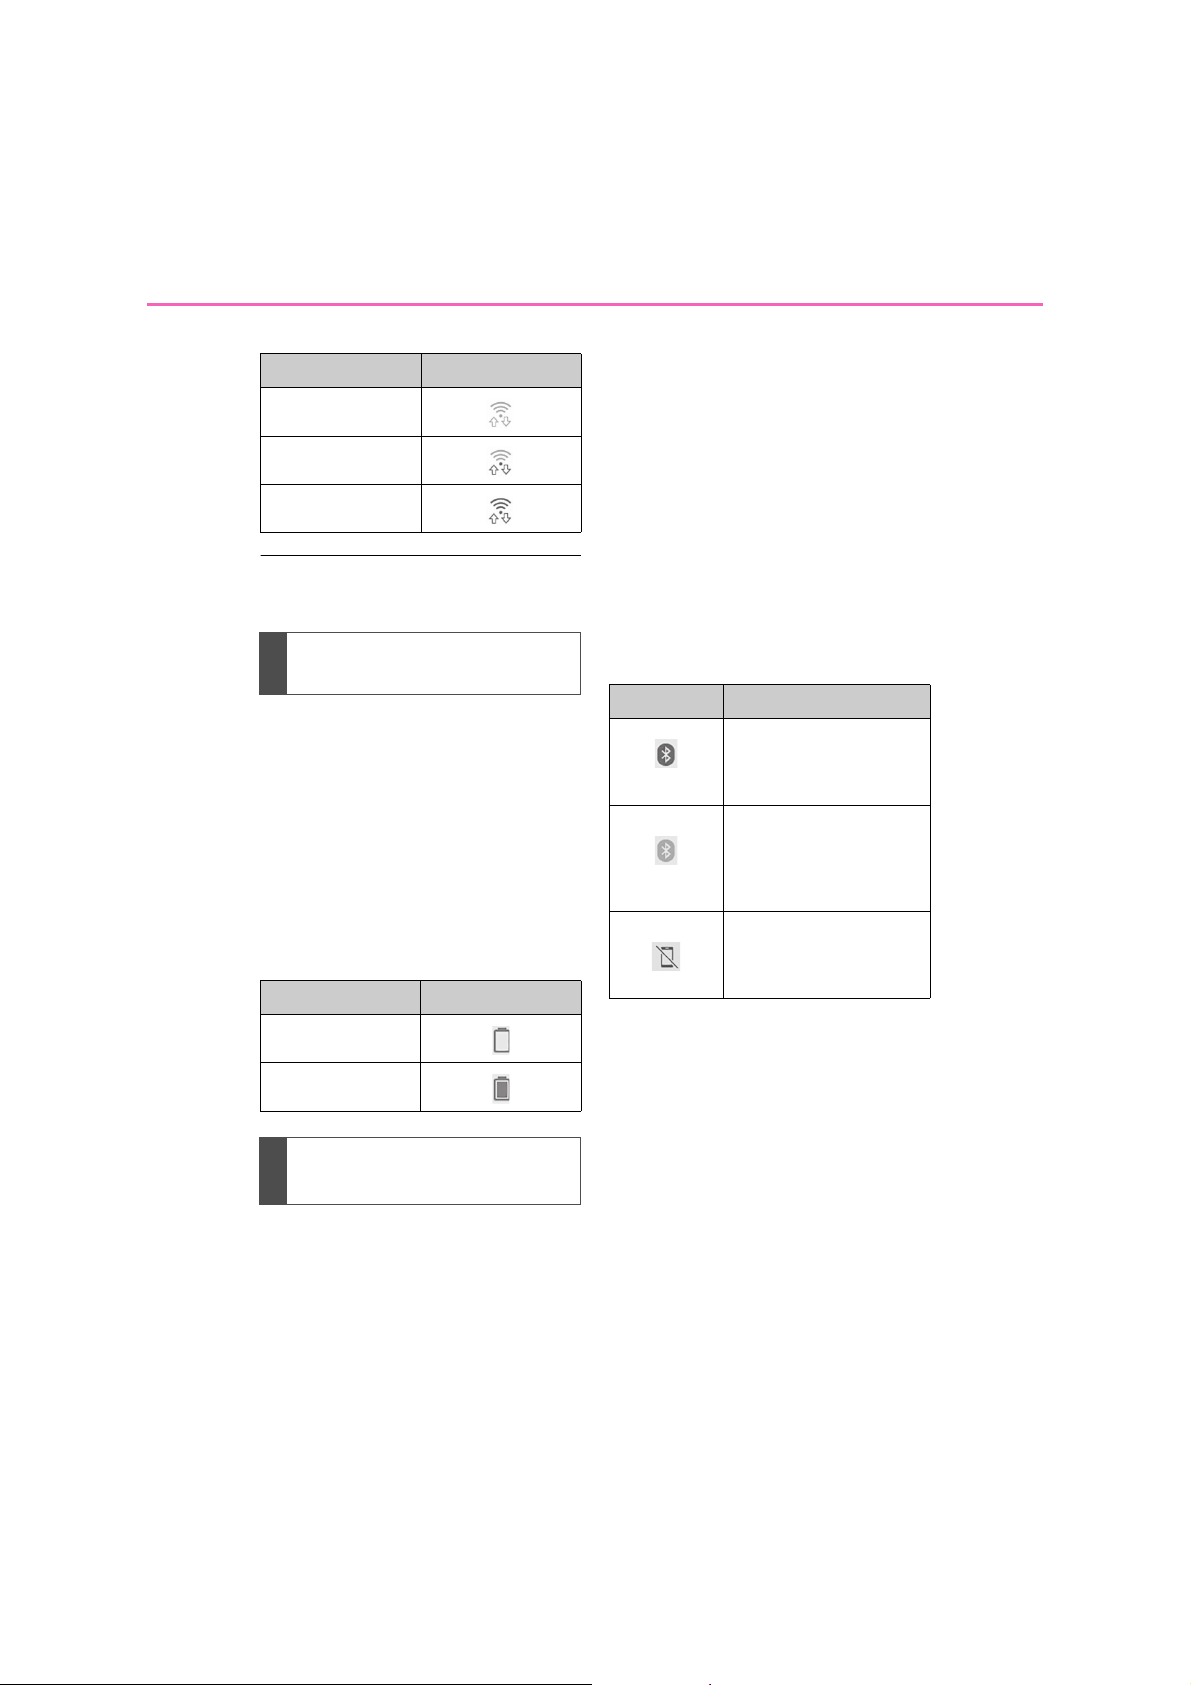
When using Miracast™
Reception Level Indicators
No connection
Poor
Excellent
● When Wi-Fi
off, no item is displayed.
®
/Miracast™ function is
Remaining battery charge
display
The amount displayed does not
always correspond with the amount
displayed on the Bluetooth
®
device.
The amount of battery charge left
may not be displayed depending on
®
the type of the Bluetooth
device
connected.
This system does not have a
charging function.
Remaining charge Indicators
system may not function when a
®
Bluetooth
phone is used in the fol-
lowing conditions and/or places:
The cellular phone is obstructed by
certain objects (such as when it is
behind the seat or in the glove box
or console box).
The cellular phone is touching or is
covered with metal materials.
Leave the Bluetooth
®
phone in a
place where the condition of the
(Blue)
(Gray)
®
connection is good.
Indicates that the condi-
tion of the Bluetooth®
connection is good.
While in this condition,
sound quality during
phone calls may deteriorate.
Indicates that the cellular
phone is not connected
via Bluetooth
®
.
Bluetooth
Indicators Conditions
Empty
Full
Bluetooth® connection condition display
An antenna for the Bluetooth
®
connection is built into the instrument
panel.
The condition of the Bluetooth
®
connection may deteriorate and the

“Setup” screen
J
“Setup” screen
Press the “SETUP” button, or press
the “MENU” button, then select
“Setup” to display the “Setup”
screen. The items shown on the
“Setup” screen can be set.
1-1. Basic function
Select to set vehicle information.
F
(P. 5 2)
G
Select to set map settings, traffic
information, route preferences
settings, etc. (P.93, 96, 98)
H
Select to set Wi-Fi
®
connection
settings. (P. 4 5 )
Select to set Toyota online set-
I
*
(P.220)
tings.
Select to set MirrorLink™ settings. (P.125)
*
: This function is not made available in
some countries or areas.
17
1
Quick guide
Select to change the selected
A
language, operation sound settings, etc. (P. 4 9 )
®
Select to set Bluetooth
B
®
and Bluetooth
system set-
device
tings.(P. 3 8 )
C
Select to set audio settings.
(P.130)
Select to set the phone sounds,
D
contacts settings, etc. (P.206)
Select to set the voice settings.
E
(P. 5 1)
18
1-2.Navigation operation
1-2. Navigation operation
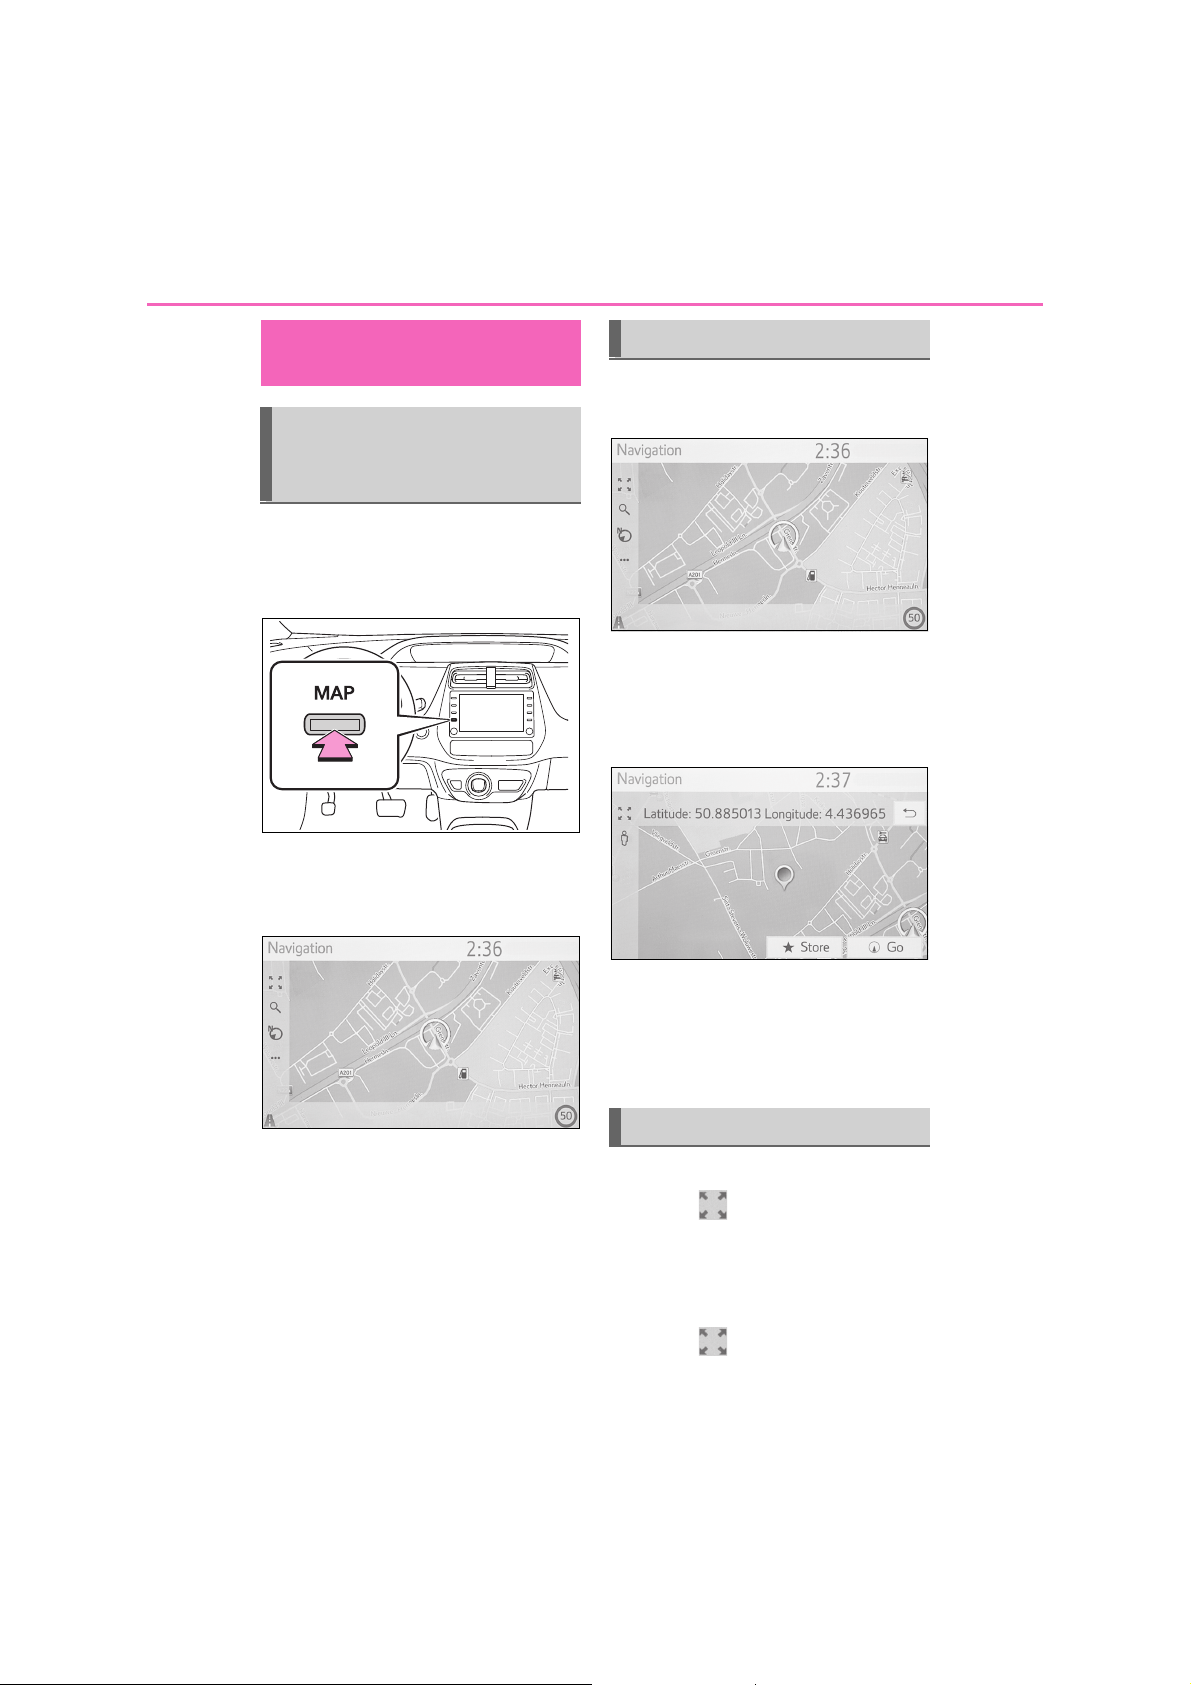
Operating the map
screen
Displaying the current position of the vehicle on the
map screen
1 Turn the power switch to
ACCESSORY or ON mode.
2 Press the “MAP” button.
3 The current position of the vehi-
cle is displayed on the map
screen.
Moving the map screen
1 Select the desired point on the
map screen.
Move the desired point on the
centre of the map screen.
It is possible to do the drag or
flick operation on the screen.
The following operations can also
be performed.
Changing the map direction
P. 6 1
Displaying 3D map
P. 6 2
Press the “MAP” button to return
to the current position.
For detailed operation about
moving the map screen: P. 6 1
Zooming in/out the map
■ Zooming in the map
1 Select on the map screen.
2 Select “+” or pinch out on the
screen. (P.6 1 )
■ Zooming out the map
1 Select on the map screen.
1-2. Navigation operation
19
2 Select “-” or pinch in on the
screen. (P. 61)
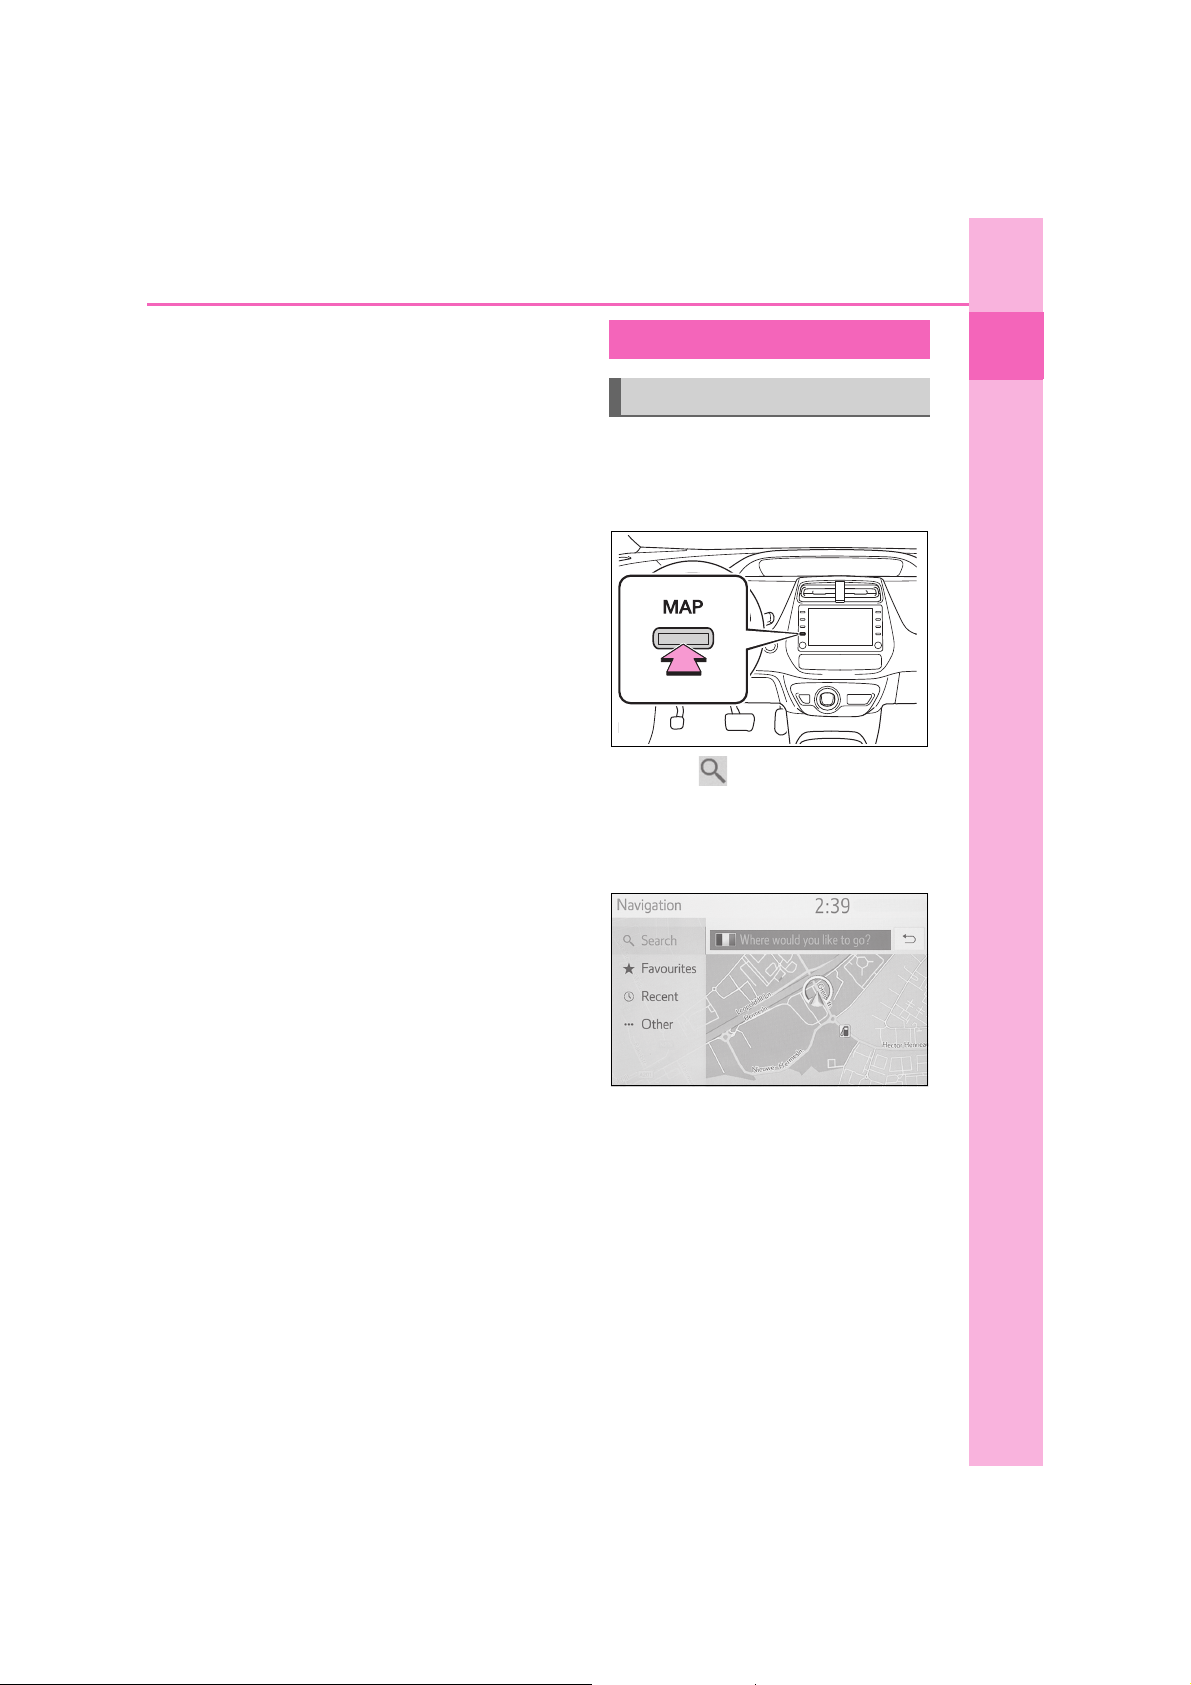
Guiding the route
Setting the destination
1 Turn the power switch to
ACCESSORY or ON mode.
2 Press the “MAP” button.
3 Select on the map screen.
4 There are different kinds of
methods to search for a destination. (P.70)
1
Quick guide
5 Select “Go”.
Check that the route overview is
displayed. (P. 79 )
6 Select “Destination”.
Guidance to the destination is
displayed on the screen and can
be heard via voice guidance.
20
1-2. Navigation operation
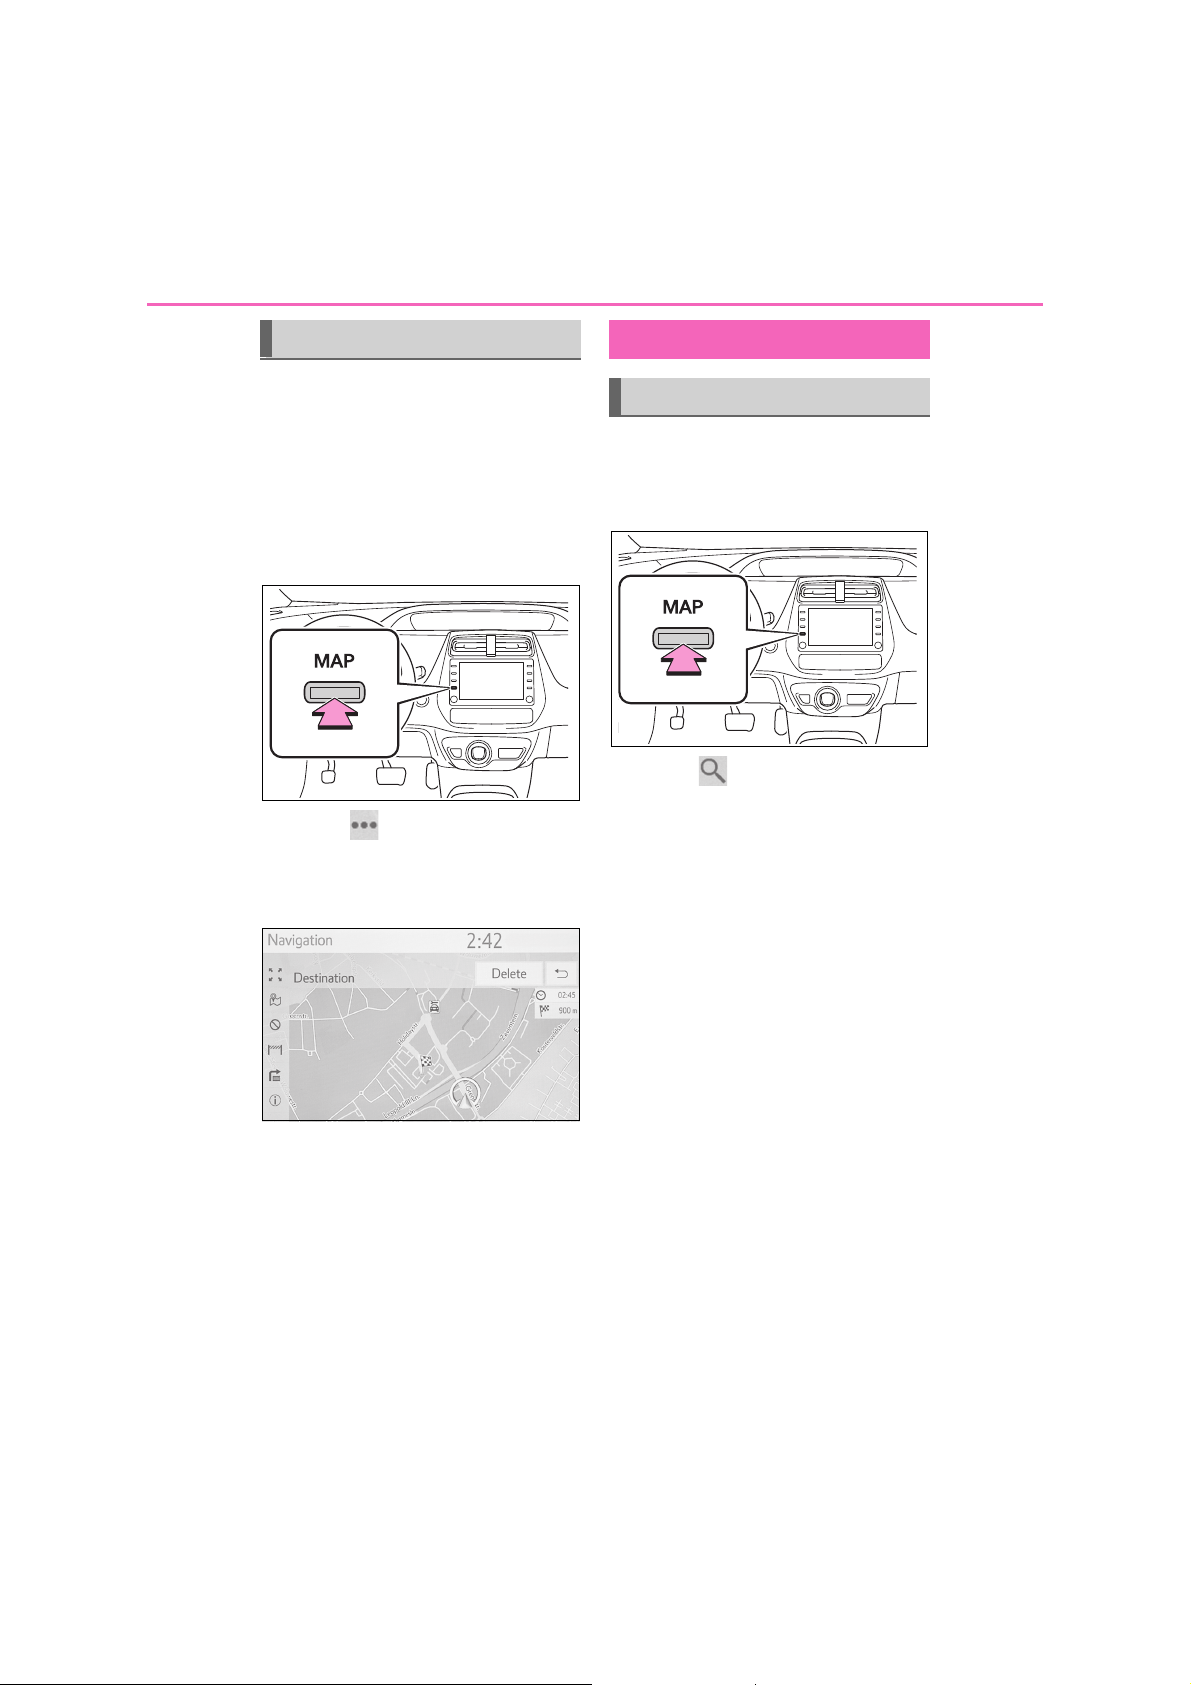
Deleting destinations Registering home
When route guidance is no longer
necessary, such as when you know
the rest of the route to your destination, the destination can be deleted.
1 Turn the power switch to
ACCESSORY or ON mode.
2 Press the “MAP” button.
3 Select on the map screen.
4 Select “Route”.
5 Select “Delete”.
Registering home
1 Turn the power switch to
ACCESSORY or ON mode.
2 Press the “MAP” button.
3 Select on the map screen.
4 Select “Favourites”.
5 Select “Home”.
6 Select “Yes”.
7 There are different kinds of
methods to search for your
home. (P.70)
When more than 1 destination
has been set, the “Stopover list”
will be displayed on the screen.
Select the item(s) to be deleted.
(P. 8 4 )
8 Select “Enter”.
Registration of home is com-
plete.
• Editing the name, address and route:
P. 9 1
• Setting home as the destination:
P. 2 1

1-2. Navigation operation
21
Setting home as the destination
1 Press the “MAP” button.
2 Select on the map screen.
3 Select “Favourites”.
4 Select “Home”.
Selecting routes other than the
one recommended (P. 7 9 )
Guidance to the destination is
displayed on the screen and can
be heard via voice guidance.
1
Quick guide

22
1-2. Navigation operation

23
Basic function
2-1. Basic information before
operation
Initial screen ....................... 24
Touch screen ......................25
Home screen operation ......27
Entering letters and num-
bers/list screen operation .28
Screen adjustment.............. 31
Linking multi-information dis-
play and the system.......... 33
2-2. Connectivity settings
Registering/Connecting a
Bluetooth
Setting Bluetooth
Connecting to inter-
net/Miracast™/MirrorLink™
via Wi-Fi
2-3. Other settings
General settings .................49
Voice settings ..................... 51
Vehicle settings................... 52
®
device............. 34
®
details... 38
®
......................... 45
2
2
Basic function
For vehicles sold outside Europe, some of the functions cannot be operated while driving.

24
WARNING
2-1.Basic information before operation
2-1. Basic information before operation
Initial screen
When the power switch is
turned to ACCESSORY or ON
mode, the initial screen will be
displayed and the system will
begin operating.
Caution screen
After a few seconds, the caution
screen will be displayed.
After about 5 seconds or selecting
“Continue”, the caution screen
automatically switches to the next
screen.
● When the vehicle is stopped with
the hybrid system operating, always
apply the parking brake for safety.
Restarting the system
When system response is
extremely slow, the system can be
restarted.
1 Press and hold the “POWER
VOLUME” knob for 3 seconds or
more.
2-1. Basic information before operation
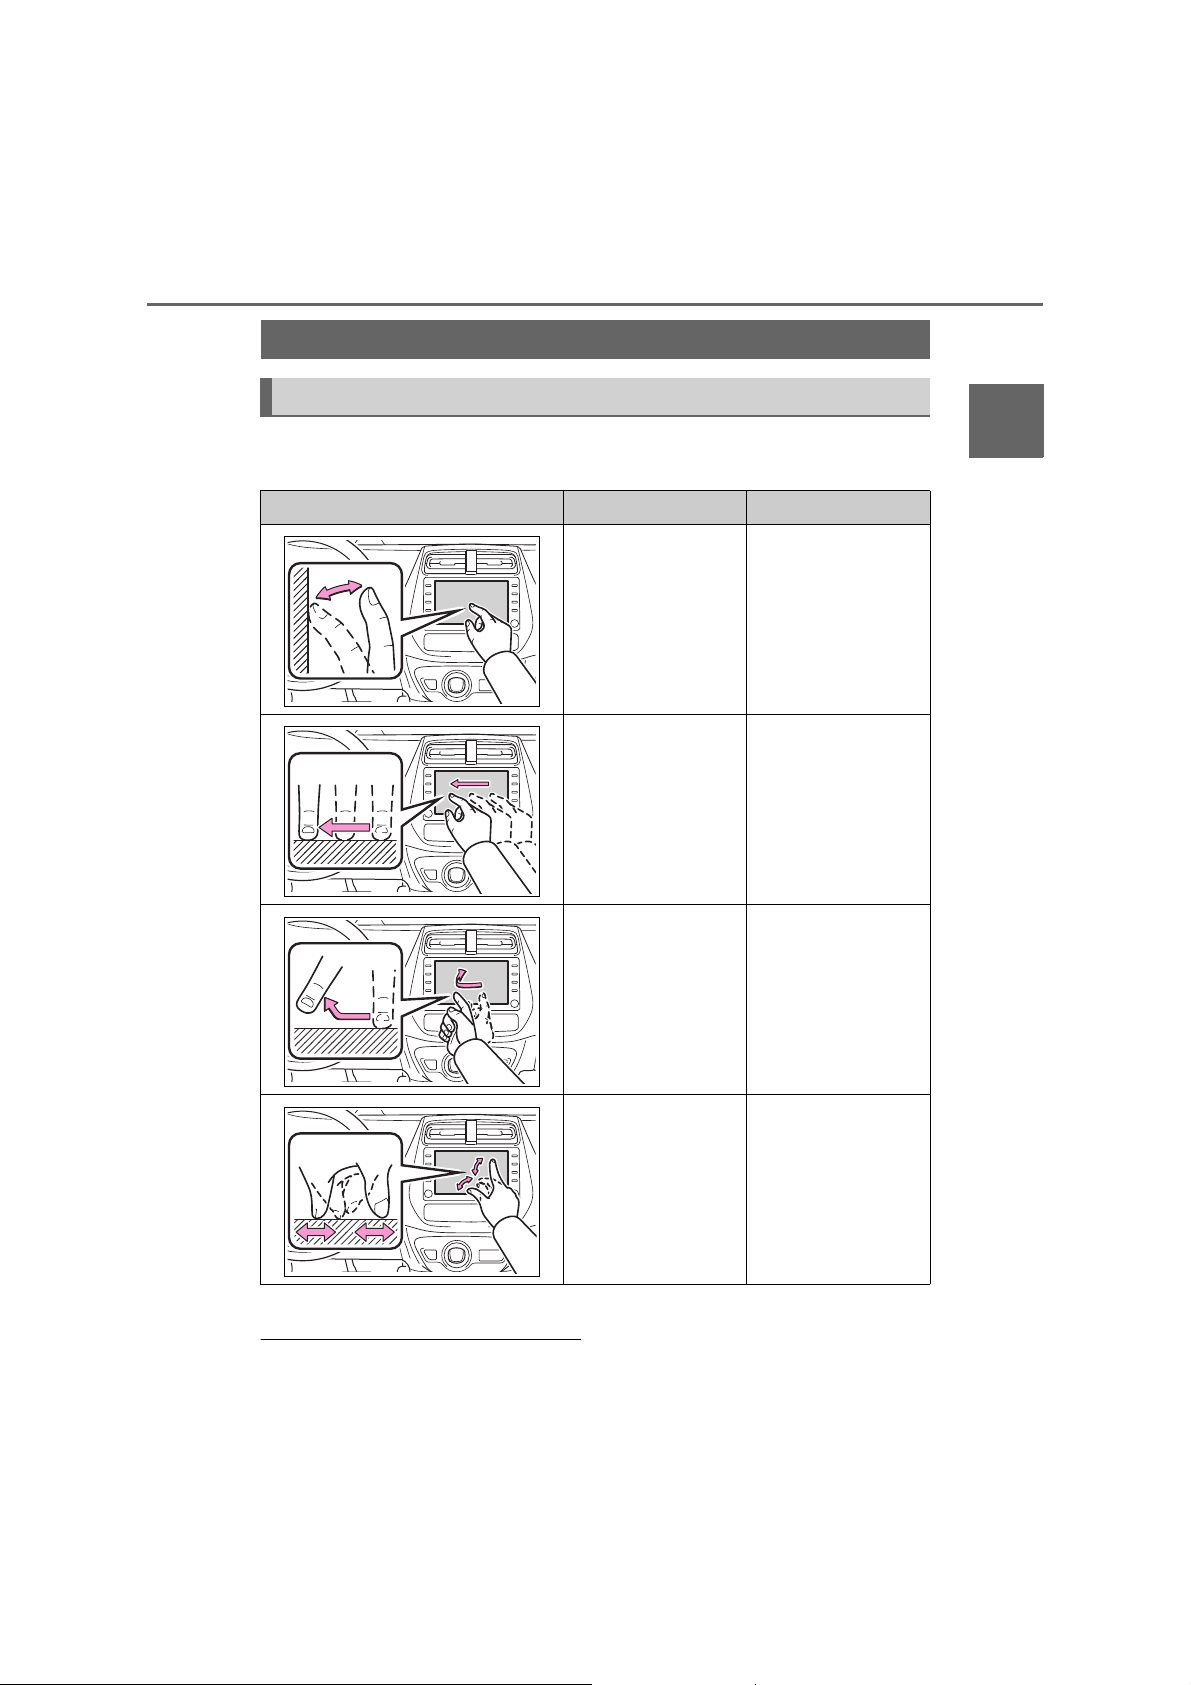
Touch screen
Touch screen gestures
Operations are performed by touching the touch screen directly with your
finger.
Operation method Outline Main use
25
2
Basic function
To uc h
Quickly touch and
release once.
*
Drag
Touch the screen with
your finger, and move
the screen to the
desired position.
*
Flick
Quickly move the
screen by flicking with
your finger.
Pinch in/Pinch out
Slide fingers toward
each other or apart on
the screen.
Selecting an item
on the screen
Scrolling the lists
Scrolling the map
screen
Moving an item on
a list
Scrolling the main
screen page
Scrolling the map
screen
Changing the scale
of the map
*
: The above operations may not be performed on all screens.
formed smoothly at high altitudes.
● Flick operations may not be per-

26
NOTICE
2-1. Basic information before operation
Touch screen operation
This system is operated mainly
by the buttons on the screen.
(Referred to as screen buttons
in this manual.)
When a screen button is
touched, a beep sounds. (To
set the beep sound: P. 49 )
● To prevent damaging the screen,
lightly touch the screen buttons with
your finger.
● Do not use objects other than your
finger to touch the screen.
● Wipe off fingerprints using a glass
cleaning cloth. Do not use chemical
cleaners to clean the screen, as
they may damage the touch screen.
● If the system does not respond to
touching a screen button, move your
finger away from the screen and then
touch it again.
● Dimmed screen buttons cannot be
operated.
● The displayed image may become
darker and moving images may be
slightly distorted when the screen is
cold.
● In extremely cold conditions, the
screen may not be displayed and the
data input by a user may be deleted.
Also, the screen buttons may be
harder than usual to depress.
● When you look at the screen through
polarized material such as polarized
sunglasses, the screen may be dark
and hard to see. If so, look at the
screen from different angles, adjust
the screen settings on the display settings screen or take off your sunglasses.
● When is displayed on the
screen, select to return to the
previous screen.
Capacitive touch screen buttons
The operable areas of the capacitive touch screen buttons use
capacitive touch sensors and may
not operate properly in the following
situations:
If the screen is dirty or wet
If a source of strong electromag-
netic waves is brought near the
screen
If a glove is worn during opera-
tion
If the screen is touched by a fin-
gernail
If a stylus is used to operate the
buttons
If your palm touches the opera-
ble area of another button during
operation
If a button is touched quickly
If the operable part of a capaci-
tive touch screen button is
touched by or covered with a
metal object, such as the following, it may not operate properly:
• Magnetic isolation cards
• Metallic foil, such as the inner packaging of a cigarette box
• Metallic wallets or bags
•Coins
• Discs, such as a CD or DVD

2-1. Basic information before operation
27
If the operable part of a capaci-
tive touch screen button is
wiped, it may operate unintentionally.
If the capacitive touch screen
button is being touched when the
power switch is changed to
ACCESSORY or ON mode, the
button may not operate properly.
In this case, remove anything
touching the button, turn the
power switch off and then turn it
to ACCESSORY or ON mode, or
restart the system by press and
hold the “POWER VOLUME”
knob for 3 seconds or more.
● Capacitive touch screen button sen-
sor sensitivity can be adjusted.
(P. 4 9 )
Home screen operation
On the home screen, multiple
screens, such as the
audio/visual system screen
and hands-free screen, can be
displayed simultaneously.
Home screen operation
1 Press the “HOME” button.
2 Check that the home screen is
displayed.
2
Basic function
Selecting a screen will display it
full screen.
● The display information and area on
the home screen can be customized.
Customizing the home
screen
The display information/area on the
28
F
2-1. Basic information before operation
home screen can be changed.
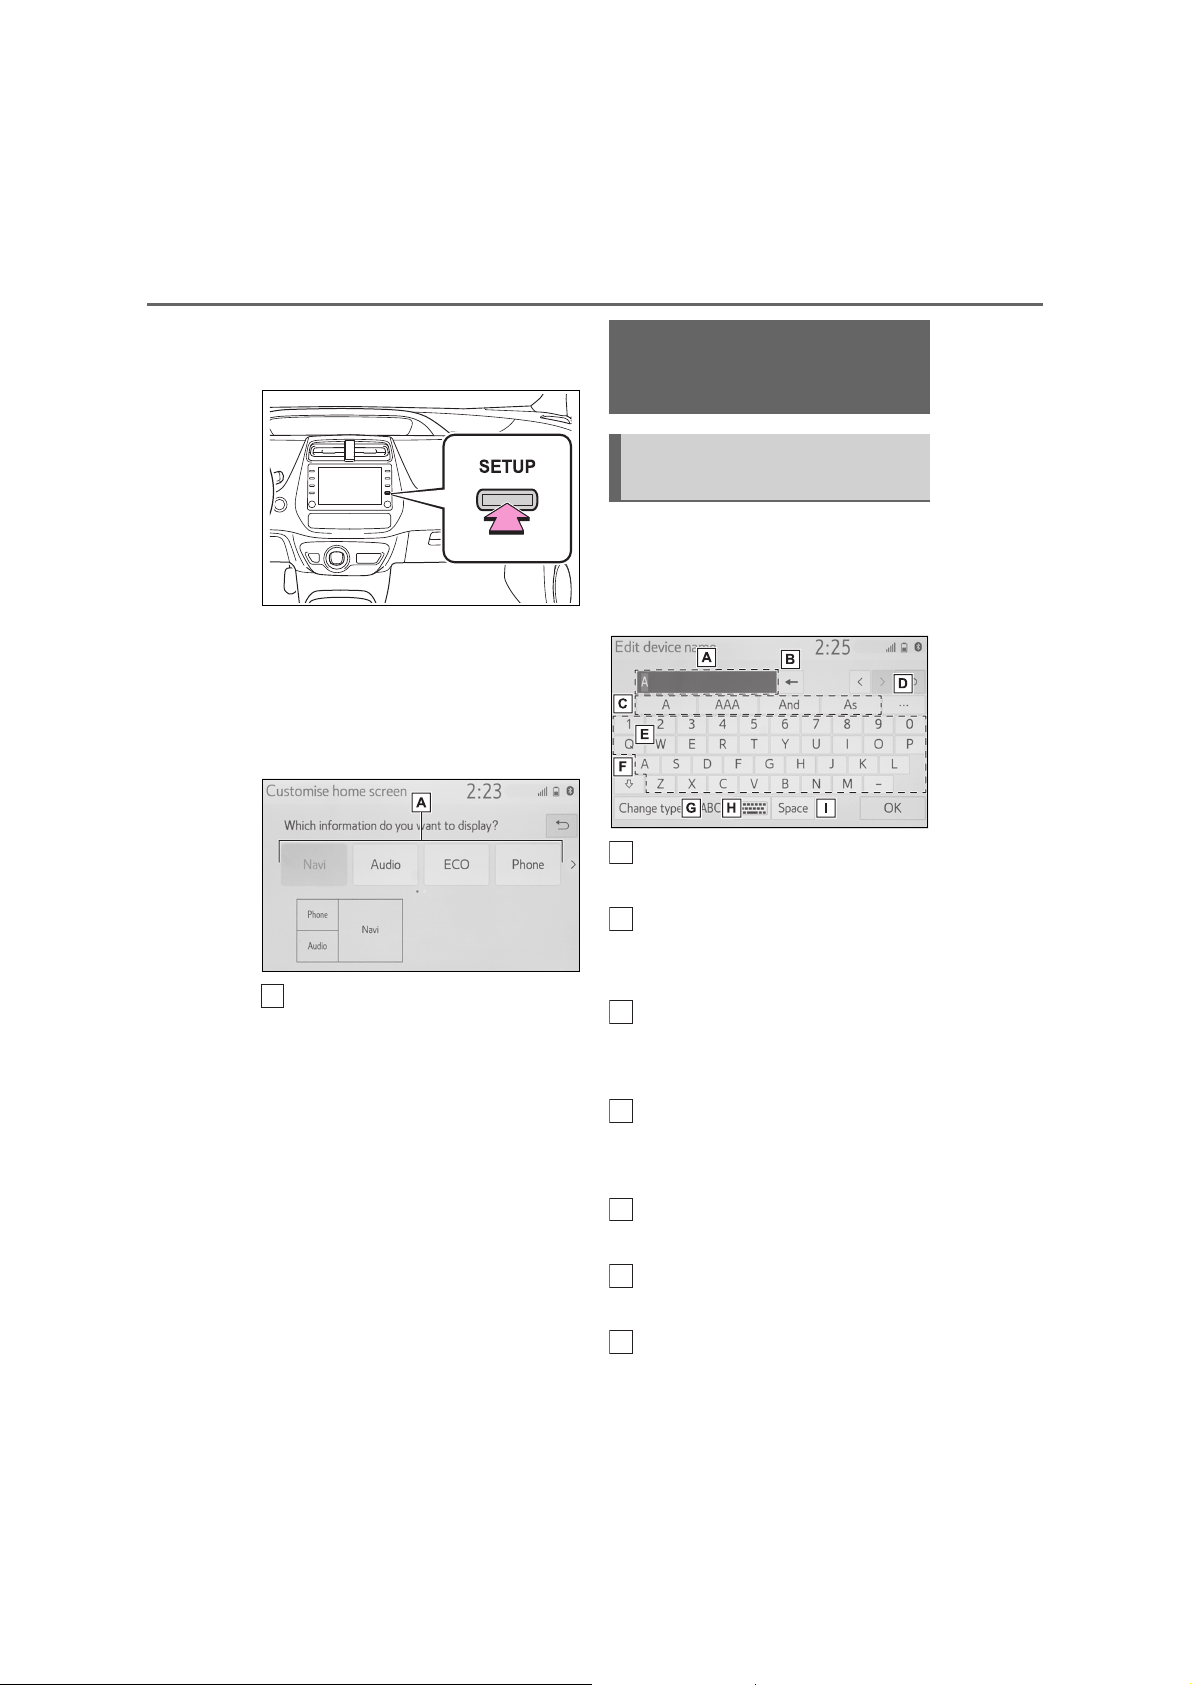
1 Press the “SETUP” button.
If the general settings screen is
not displayed, select “General”.
2 Select “Customise home
screen”.
3 Select the items to be set.
Entering letters and
numbers/list screen
operation
Entering letters and numbers
When searching by an address,
name, etc., or entering data, letters
and numbers can be entered via
the screen.
A
Text field. Entered character(s)
will be displayed.
Select to change the display
A
information and area on the
home screen.
Select to erase one character.
B
Select and hold to continue
erasing characters.
Select to choose a predictive
C
text candidate for entered text.
(P. 2 9)
Select to display a list of predic-
D
tive text candidates when there
is more than one.
Select to enter desired charac-
E
ters.
Select to enter characters in
lower case or in upper case.
Select to change character
G
*
(P.29)
*

2-1. Basic information before operation
I
29
types.
Select to change character
H
types and keyboard layout.
Select to make a space on cursor.
*
: These functions are not available in
some languages.
● When is displayed, selecting it
will move the cursor to the text field.
Changing character type and
keyboard layout
1 Select .
Changing character type
1 Select “Change type”.
2
Basic function
2 Select the desired character.
● Depending on the screen being dis-
played, it may not be possible to
change keyboard characters.
2 Select the desired character and
keyboard and select “OK”.
Displaying predictive text
candidates
*
When text is input, the system predicts the text that may complete the
currently unconfirmed text and displays predictive replacement candidates that match the beginning of
the text.
1 Input text.
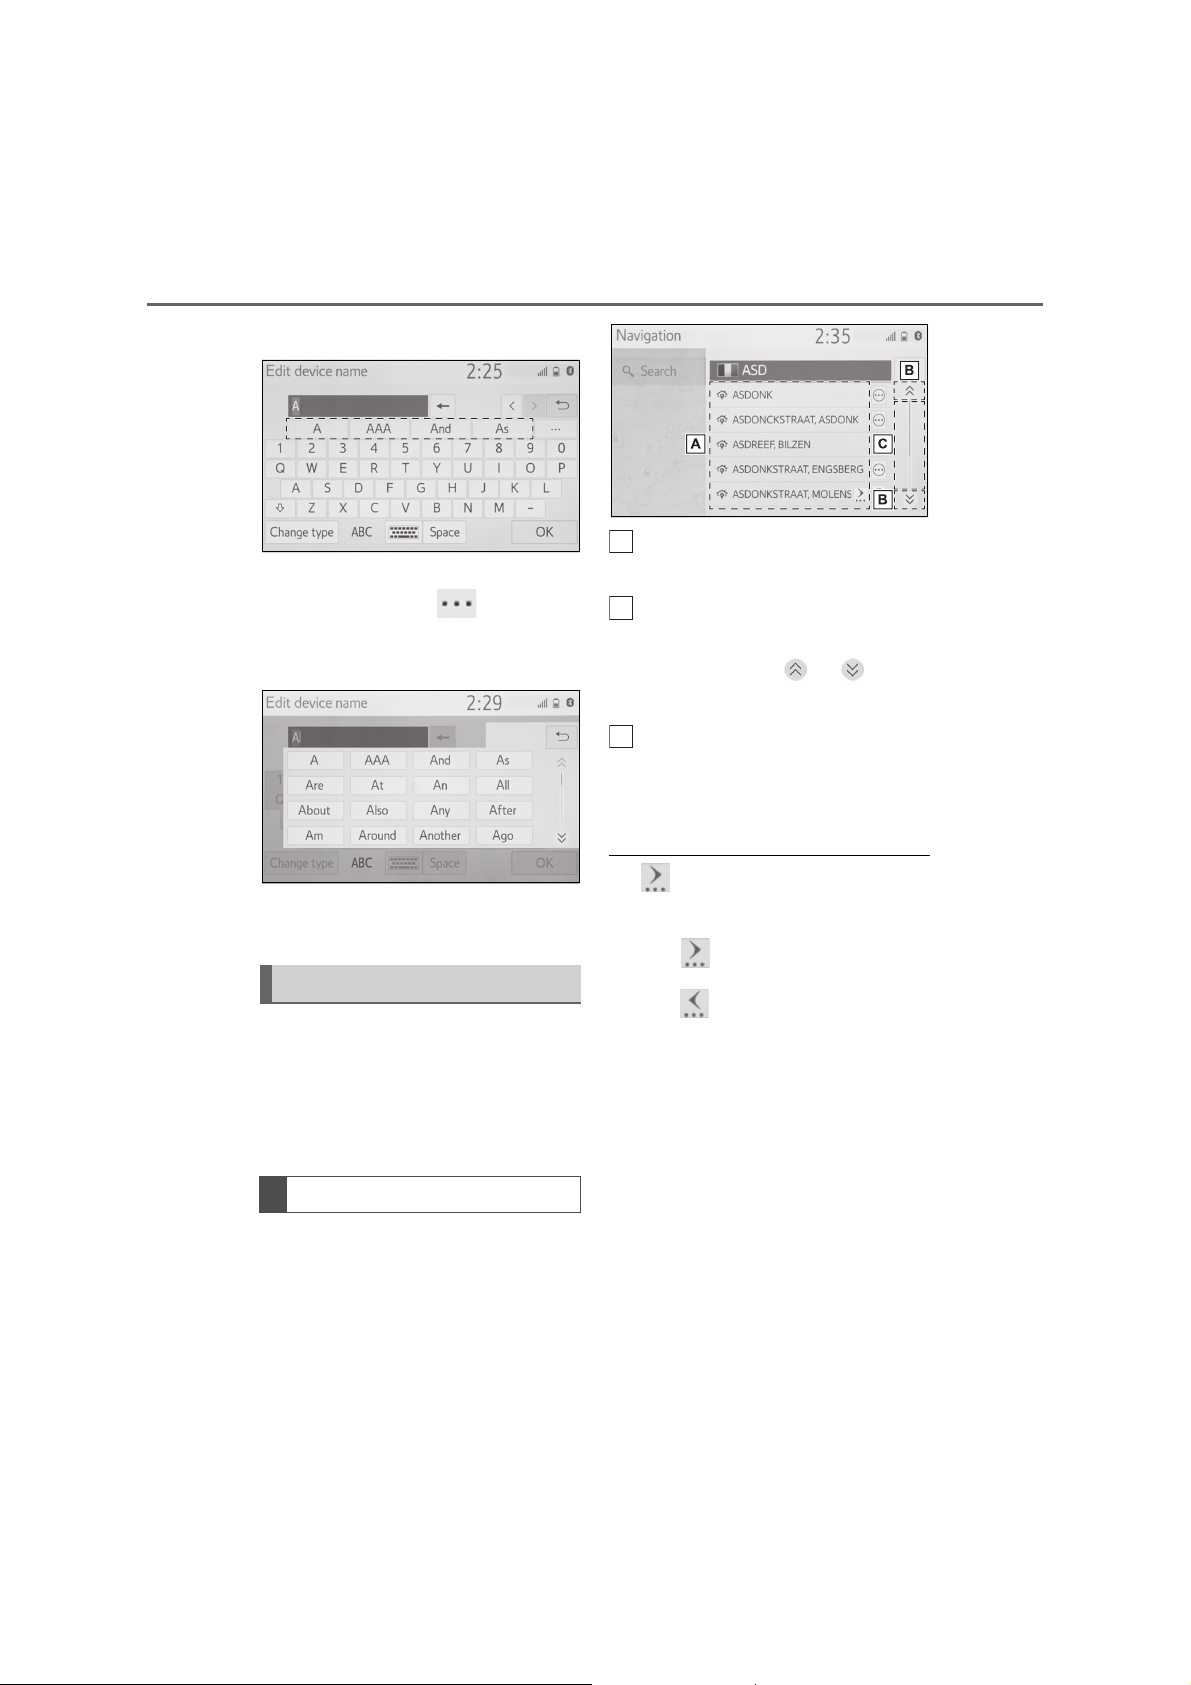
30
A
2-1. Basic information before operation
2 Select the desired candidate.
To select a candidate that is not
To scroll up/down the list, flick
the list up/down.
displayed, select , and then
select the desired predictive
replacement candidate.
*
: These functions are not available in
some languages.
List screen
The list screen may be displayed
after entering characters. When a
list is displayed, use the appropriate screen button to scroll through
the list.
Scrolling list screen
When a list is displayed, use the
appropriate screen button to scroll
through the list.
Select to skip to the next or pre-
B
vious page.
Select and hold or to
scroll through the displayed list.
Indicates the position of the dis-
C
played entries in the entire list.
To scroll up/down pages, drag
the bar.
● If appears to the right of an item
name, the complete name is too long
to display.
• Select to scroll to the end of the
name.
• Select to move to the beginning of
the name.
*1
● Matching items from the database are
listed even if the entered address or
name is incomplete.
● The list will be displayed automatically
if the maximum number of characters
is entered or matching items can be
displayed on a single list screen.
● The number of matching items is
shown on the right side of the screen.
If the number of matching items is
more than 999, the system displays
“***” on the screen.
*1
: These functions are not available in
some languages.
*2
 Loading...