


Part 4
IN CASE OF AN
EMERGENCY
If your vehicle will not start
If your engine stalls while
driving
If your vehicle overheats
If you have a flat tire
If your vehicle needs to be
towed
If you cannot shift automatic
transmission selector lever
If you lose your keys
If you lose your wireless remote
control transmitter
If your vehicle will not start—
(a) Simple checks
Before making these checks, make sure
you have followed the correct starting procedure given in ”How to start the engine”
in Part 3 and that you have sufficient fuel.
If your vehicle is equipped with the engine
immobiliser system, also check whether
the other keys will start the engine. If
they work, your key may be broken. Have
the key checked at your Toyota dealer. If
none of your keys work, the system is
possibly broken. Call your Toyota dealer.
(See ”Keys (with engine immobiliser system)” in chapter 1- 2.)
If the engine is not turning over or is
turning over too slowly—
1. Check that the battery terminals are
tight and clean.
2. If the battery terminals are O.K., switch
on the interior light.
3. If the light is out, dim or goes out
when the starter is cranked, the battery
is discharged. You may try jump starting. See ”(c) Jump starting” for further
instructions.
If the light is O.K., but the engine still will
not start, it needs adjustment or repair.
Call a Toyota dealer or qualified repair
shop.
NOTICE
Do not pull- or push- start the vehicle. It may damage the vehicle or
cause a collision when the engine
starts. Also the three- way catalytic
converter may overheat and become a
fire hazard.
If the engine turns over at its normal
speed but will not start—
1. 5S-FE engine only—Check that all the
push- on connectors are tight. (For example, connectors at the spark plugs,
ignition coil and/or distributor)
2. If the connectors are O.K., the engine
may be flooded because of repeated
cranking. See ”(b) Starting a flooded
engine” for further instructions.
172
(b) Starting a flooded engine
If the engine will not start, your engine
may be flooded because of repeated
cranking.
If this happens, turn the key to ”START”
with the accelerator pedal held down.
Keep the key and accelerator pedal so for
15 seconds and release them. Then try
starting the engine with your foot off the
accelerator pedal.
If the engine does not start after 30 seconds of cranking, release the key, wait
a few minutes and try again.
If the engine still will not start, it needs
adjustment or repair. Call a Toyota dealer
or qualified repair shop for assistance.
NOTICE
Do not crank for more than 30 seconds at a time. This may overheat
the starter and wiring systems.
(c) Jump starting
To avoid serious personal injury and
damage to your vehicle which might result from battery explosion, acid burns,
electrical burns, or damaged electronic
components, these instructions must be
followed precisely.
If you are unsure about how to follow this
procedure, we strongly recommend that
you seek the help of a competent mechanic or towing service.
CAUTION
Batteries contain sulfuric acid which
is poisonous and corrosive. Wear
protective safety glasses when jump
starting, and avoid spilling acid on
your skin, clothing, or vehicle.
If you should accidentally get acid
on yourself or in your eyes, remove
any contaminated clothing and flush
the affected area with water immediately. Then get immediate medical
attention. If possible, continue to
apply water with a sponge or cloth
while enroute to the medical office.
The gas normally produced by a
battery will explode if a flame or
spark is brought near. Use only
standardised jumper cables and do
not smoke or light a match while
jump starting.
NOTICE
The battery used for boosting must
be 12 V. Do not jump start unless you
are sure that the booster battery is
correct.
173
JUMP STARTING PROCEDURE
1. If the booster battery is installed in
another vehicle, make sure the vehicles
are not touching. Turn off all unnecessary lights and accessories.
2. If required, remove all the vent plugs
from the booster and discharged batteries. Lay a cloth over the open vents
on the batteries. (This helps reduce the
explosion hazard, personal injuries and
burns.)
3. If the engine in the vehicle with the
booster battery is not running, start it
and let it run for a few minutes. During
jump starting run the engine at about
2000 rpm with the accelerator pedal
lightly depressed.
Discharged
battery
Booster
battery
Positive
terminal
(”+” mark)
Jumper
cable
Positive terminal
(”+” mark)
4. Make the cable connections in the order a, b, c, d.
a. Connect the clamp of the positive
(red) jumper cable to the positive (
terminal on the discharged battery.
b. Connect the clamp at the other end
of the positive (red) jumper cable to
the positive (
) terminal on the booster
battery.
)
Jumper cable
Discharged
battery
Negative
terminal (”-” mark)
Booster
battery
c. Connect the clamp of the negative
(black) jumper cable to the negative
( ) terminal on the booster battery.
d. Connect the clamp at the other end
of the negative (black) jumper cable to
a solid, stationary, unpainted, metallic
point of the vehicle with the discharged
battery.
The recommended connecting points
are shown in the following illustrations:
174
Do not connect it to or near any part that
moves when the engine is cranked.
CAUTION
When making the connections, to
avoid serious injury, do not lean over
the battery or accidentally let the
jumper cables or clamps touch anything except the correct battery terminals or the ground.
If your engine stalls while
driving
If your engine stalls while driving...
1. Reduce your speed gradually, keeping
a straight line. Move cautiously off the
road to a safe place.
2. Turn on your emergency flashers.
3. Try starting the engine again.
If the engine will not start, see ”If your
vehicle will not start”.
CAUTION
Connecting point for 5S- FE engine
Connecting point for 1MZ- FE engine
5. Start your engine in the normal way.
After starting, run it at about 2000 rpm
for several minutes with the accelerator
pedal lightly depressed.
6. Carefully disconnect the cables in the
exact reverse order: the negative cable
and then the positive cable.
7. Carefully dispose of the battery cover
cloths—they may now contain sulfuric
acid.
8. If removed, replace all the battery vent
plugs.
If the cause of your battery discharging is
not apparent (for example, lights left on),
you should have it checked.
If the engine is not running, the power assist for the brakes and steering
will not work so steering and braking
will be much harder than usual.
175
If your vehicle overheats
If your engine coolant temperature
gauge indicates overheating, if you experience a loss of power, or if you hear
a loud knocking or pinging noise, the
engine has probably overheated. You
should follow this procedure...
1. Pull safely off the road, stop the vehicle and turn on your emergency
flashers. Put the transmission in ”P”
(automatic) or neutral (manual) and apply the parking brake. Turn off the air
conditioning if it is being used.
2. If coolant or steam is boiling out of the
radiator or reservoir,stop the engine.
Wait until the steam subsides before
opening the hood. If there is no coolant
boiling over or steam, leave the engine
running and make sure the electric
cooling fan is operating. If it is not,
turn the ignition off.
CAUTION
To help avoid personal injury, keep
the hood closed until there is no
steam. Escaping steam or coolant is
a sign of very high pressure.
3. Look for obvious coolant leaks from the
radiator, hoses,and under the vehicle.
However, note that water draining from
the air conditioning is normal if it has
been used.
CAUTION
When the engine is running, keep
hands and clothing away from the
moving fan and engine drive belts.
4. If the coolant is leaking, stop the engine immediately. Call a Toyota dealer
for assistance.
5. If there are no obvious leaks, check
the coolant reservoir. If it is dry, add
coolant to the reservoir while the engine is running. Fill it about half full.
CAUTION
Do not attempt to remove the radiator
cap when the engine and radiator are
hot. Serious injury could result from
scalding hot fluid and steam blown
out under pressure.
6. After the engine coolant temperature
has cooled to normal, again check the
coolant level in the reservoir. If necessary, bring it up to half full again. Serious coolant loss indicates a leak in the
system. You should have it checked as
soon as possible at your Toyota dealer.
176
If you have a flat tire—
1. Reduce your speed gradually, keeping
a straight line. Move cautiously off the
road to a safe place well away from
the traffic. Avoid stopping on the center
divider of a highway. Park on a level
spot with firm ground.
2. Stop the engine and turn on your
emergency flashers.
3. Firmly set the parking brake and put
the transmission in ”P” (automatic) or
reverse (manual).
4. Have everyone get out of the vehicle
on the side away from traffic.
5. Read the following instructions thoroughly.
CAUTION
When jacking, be sure to observe the
following to reduce the possibility of
personal injury:
Follow jacking instructions.
Do not start or run the engine while
your vehicle is supported by the
jack.
Stop the vehicle on a level firm
ground, firmly set the parking brake
and put the transmission in ”P”
(automatic) or reverse (manual).
Block the wheel diagonally opposite
to the one being changed if necessary.
Make sure to set the jack properly
in the jack point. Raising the vehicle with jack improperly positioned will damage the vehicle or
may allow the vehicle to fall off the
jack and cause personal injury.
Never get under the vehicle when
the vehicle is supported by the jack
alone.
Use the jack only for lifting your
vehicle during wheel changing.
Do not raise the vehicle with some-
one in the vehicle.
When raising the vehicle, do not
put an object on or under the jack.
Raise the vehicle only high enough
to remove and change the tire.
NOTICE
Do not continue driving with a deflated tire. Driving even a short distance can damage a tire beyond repair.
177
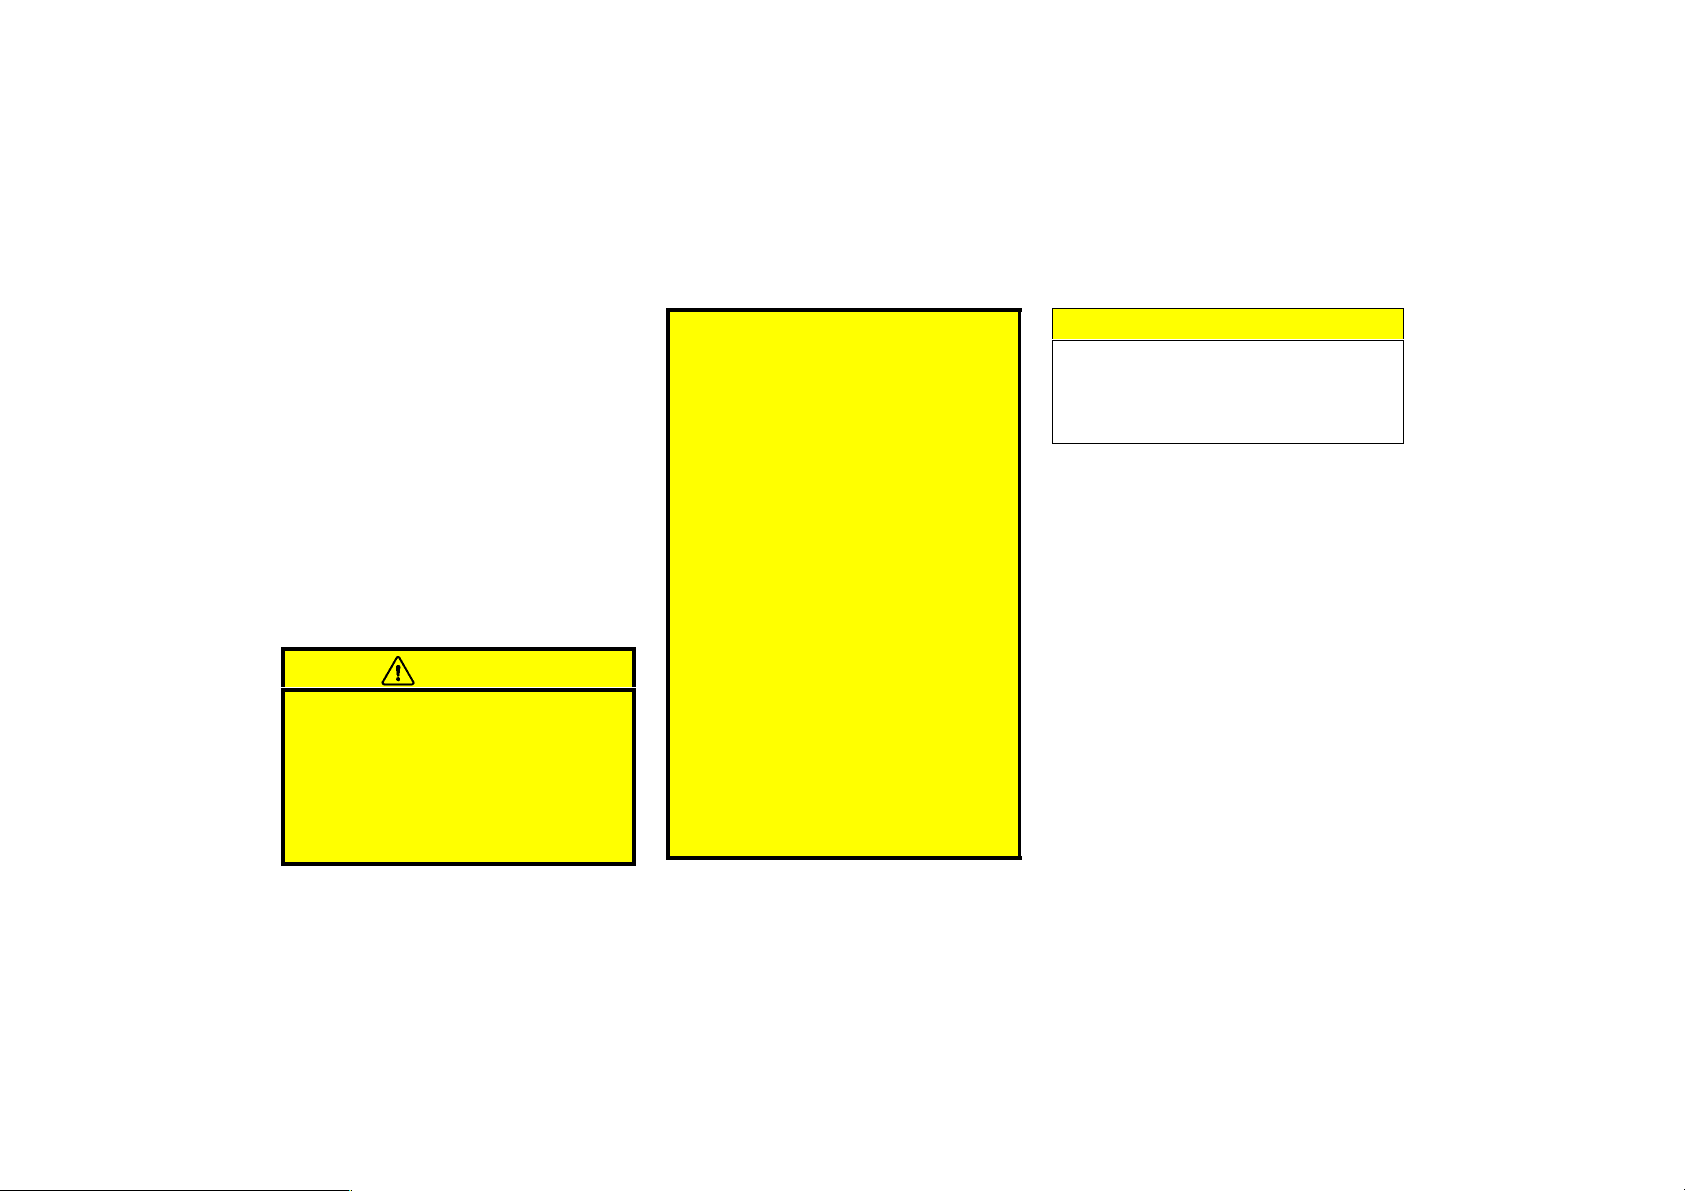
—Required tools and spare
tire
1. Get the required tools and spare
tire.
1. Wheel nut wrench
2. Jack
3. Jack handle
4. Spare tire
To prepare yourself for an emergency, you
should familiarize yourself with the use of
the jack, each of the tools and their storage locations.
178
Turn the jack joint by hand.
To remove: Turn the joint in direction 1
until the jack is free.
To store: Turn the joint in direction 2 until
the jack is firmly secured to prevent it
flying forward during a collision or sudden
braking.
To remove the spare tire:
1. Loosen the nut and remove it.
2. Remove the spare tire cover.
3. Loosen the bolt and remove it.
4. Remove the spacer.
Then take the spare tire out of the vehicle.
When storing the spare tire, put it in place
with the outer side of the wheel facing up.
Then secure the tire by repeating the
above removal steps in reverse order to
prevent it from flying forward during a
collision or sudden braking.
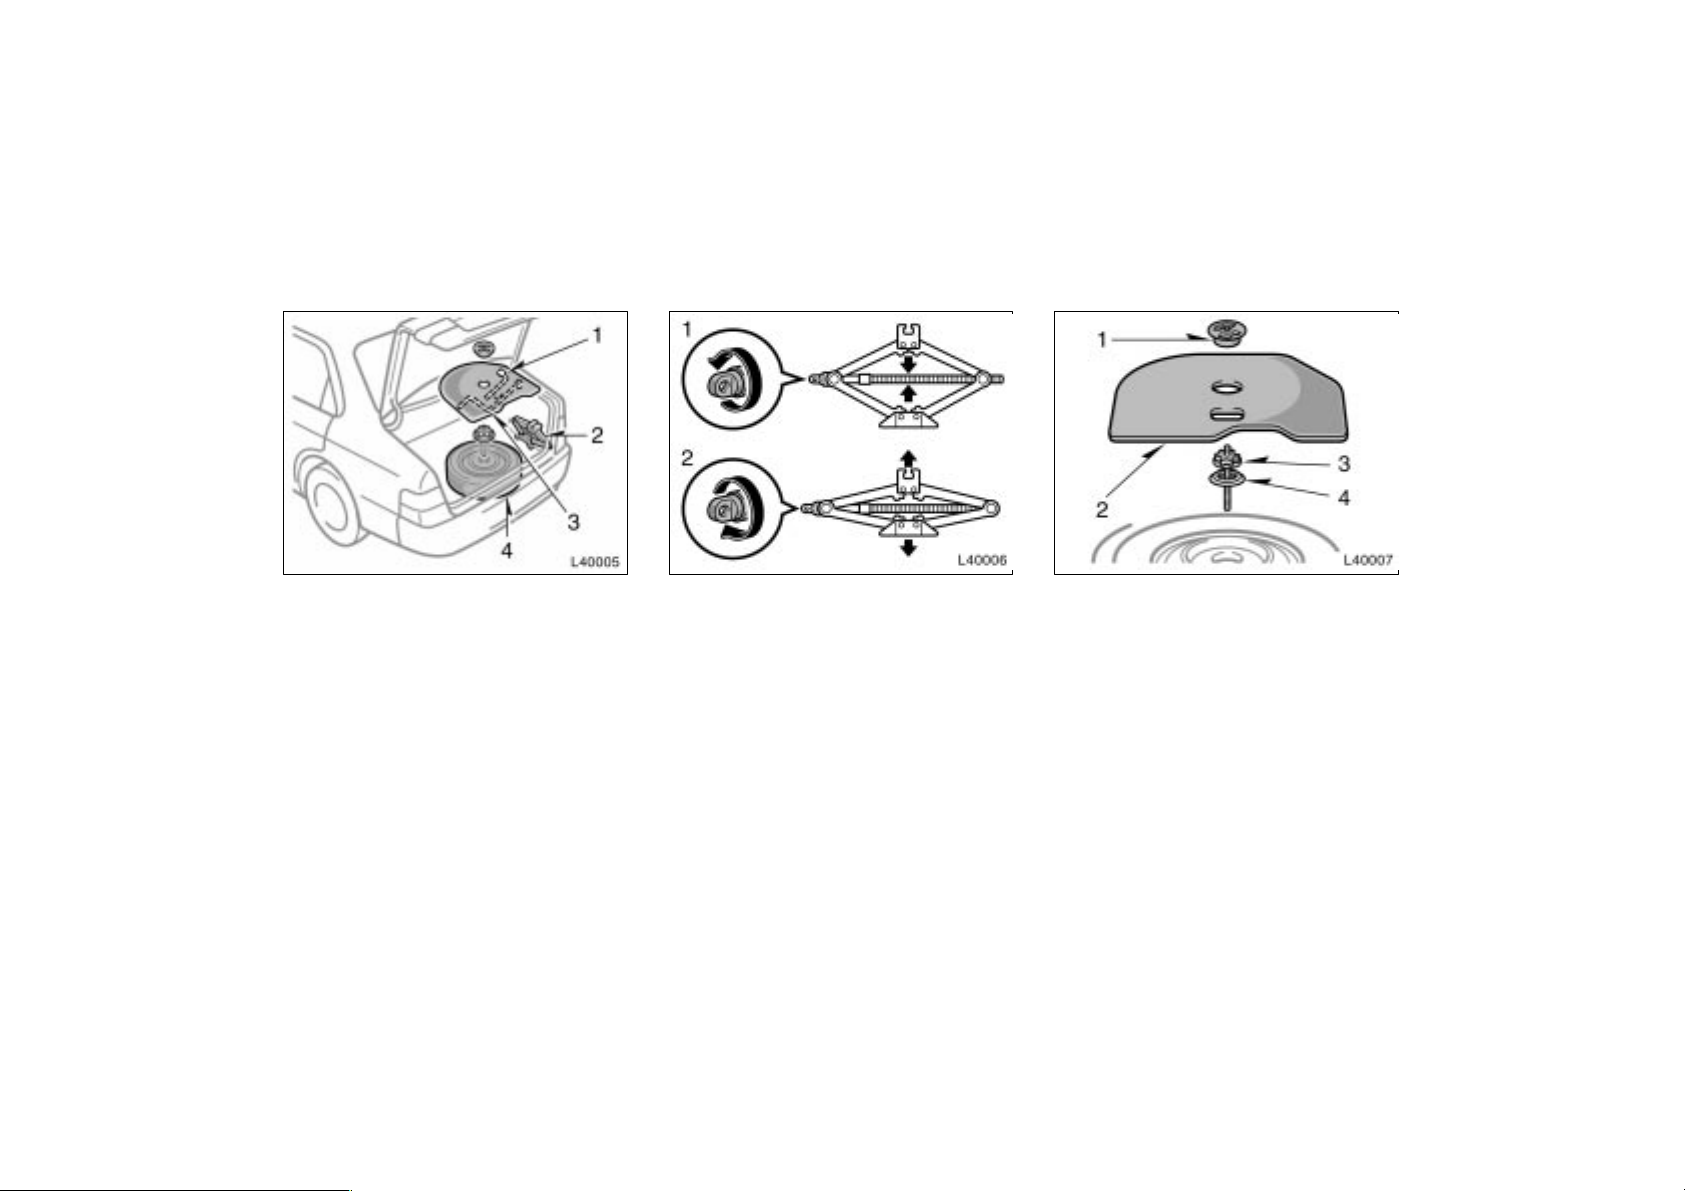
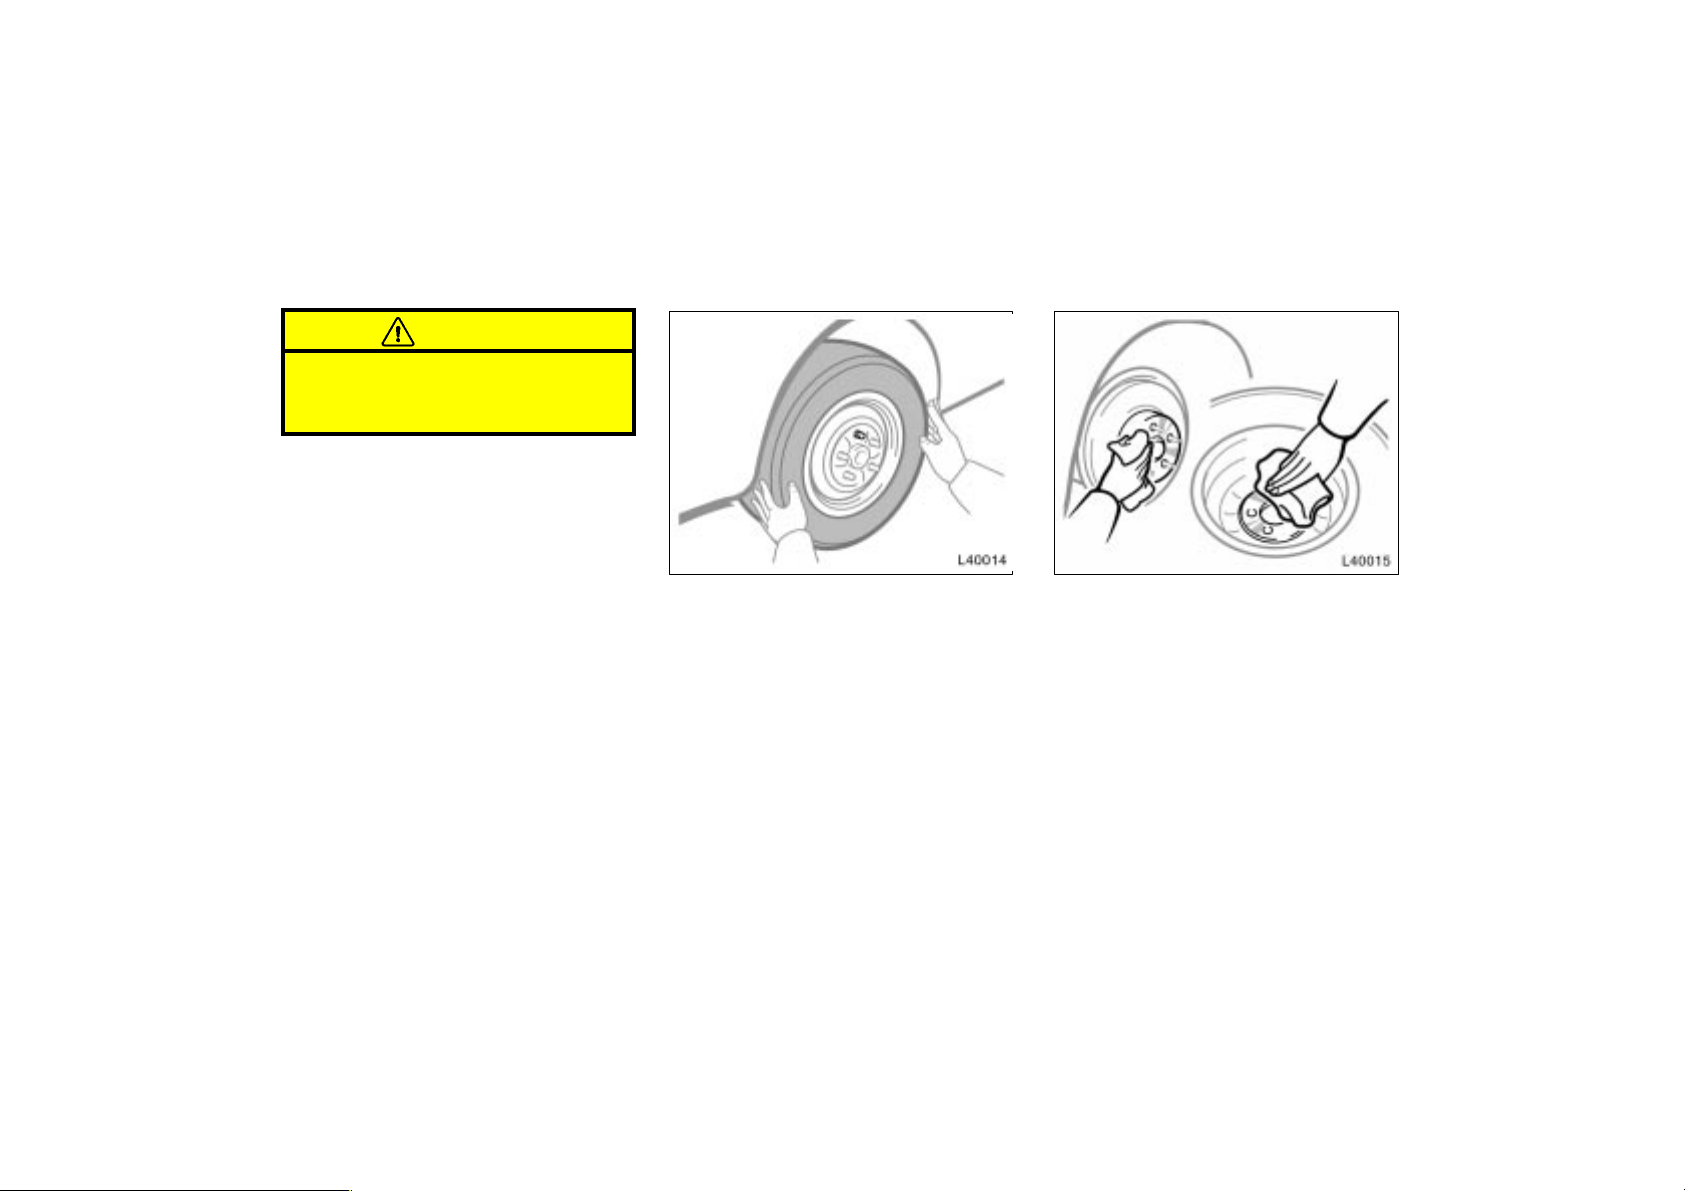
—Blocking the wheel
—Removing wheel ornament
3. Remove the wheel ornament.
Pry off the wheel ornament, using the
beveled end of the wheel nut wrench as
shown.
CAUTION
Do not try to pull off the ornament by
hand. Take due care in handling the
ornament to avoid unexpected personal injury.
2. Block the wheel diagonally opposite
the flat tire to keep the vehicle from
rolling when it is jacked up.
When blocking the wheel, place a wheel
block from the front for the front wheels
or from the rear for the rear wheels.
Steel wheels
Aluminium wheels
179
—Loosening wheel nuts
—Positioning the jack
—Raising your vehicle
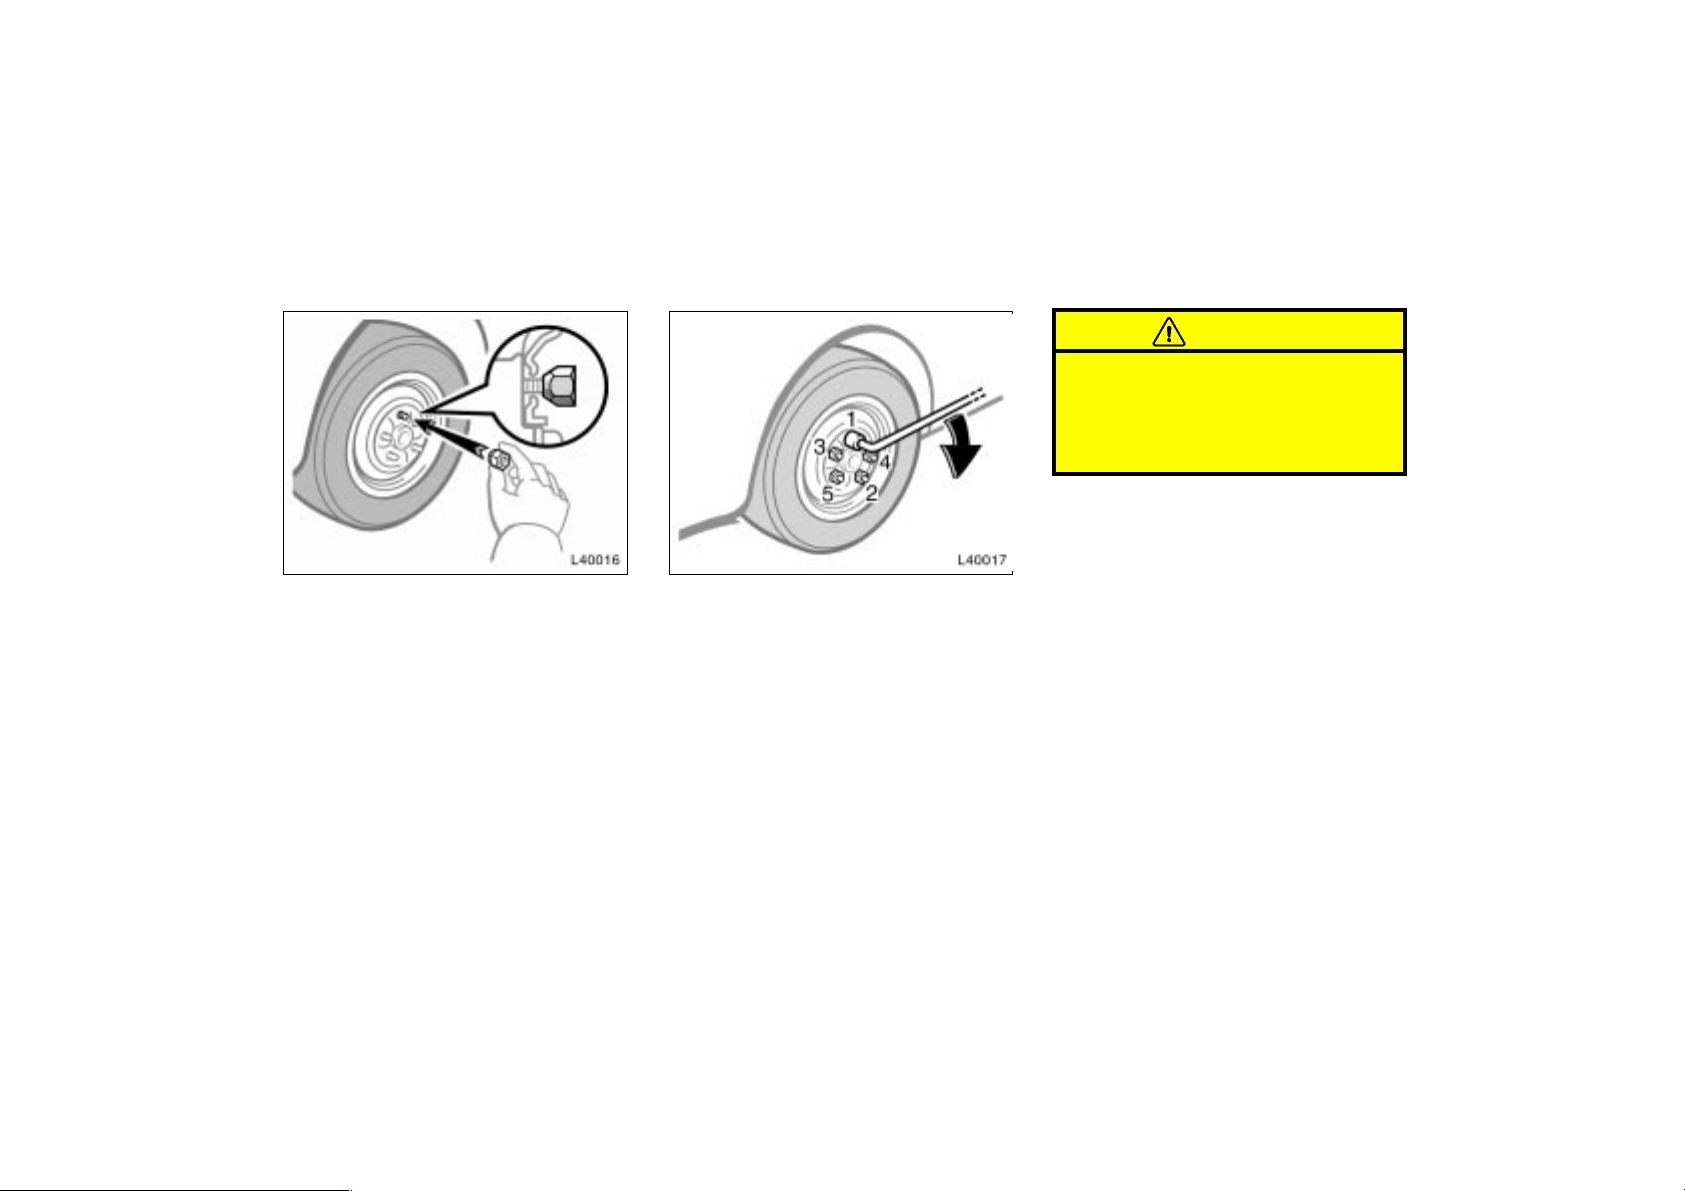
4. Loosen all the wheel nuts.
Always loosen the wheel nuts before raising the vehicle.
The nuts turn counterclockwise to loosen.
To get maximum leverage, fit the wrench
to the nut so that the handle is on the
right side, as shown above. Grab the
wrench near the end of the handle and
pull up on the handle. Be careful that the
wrench does not slip off the nut.
Do not remove the nuts yet—just unscrew
them about one- half turn.
180
5. Position the jack at the correct jack
point as shown.
Make sure the jack is positioned on a
level and solid place.
6. After making sure that no one is in
the vehicle, raise it high enough so
that the spare tire can be installed.
Remember you will need more ground
clearance when putting on the spare tire
than when removing the flat tire.
To raise the vehicle, insert the jack handle
into the jack (it is a loose fit) and turn it
clockwise. As the jack touches the vehicle
and begins to lift, double- check that it is
properly positioned.
CAUTION
Never get under the vehicle when the
vehicle is supported by the jack
alone.
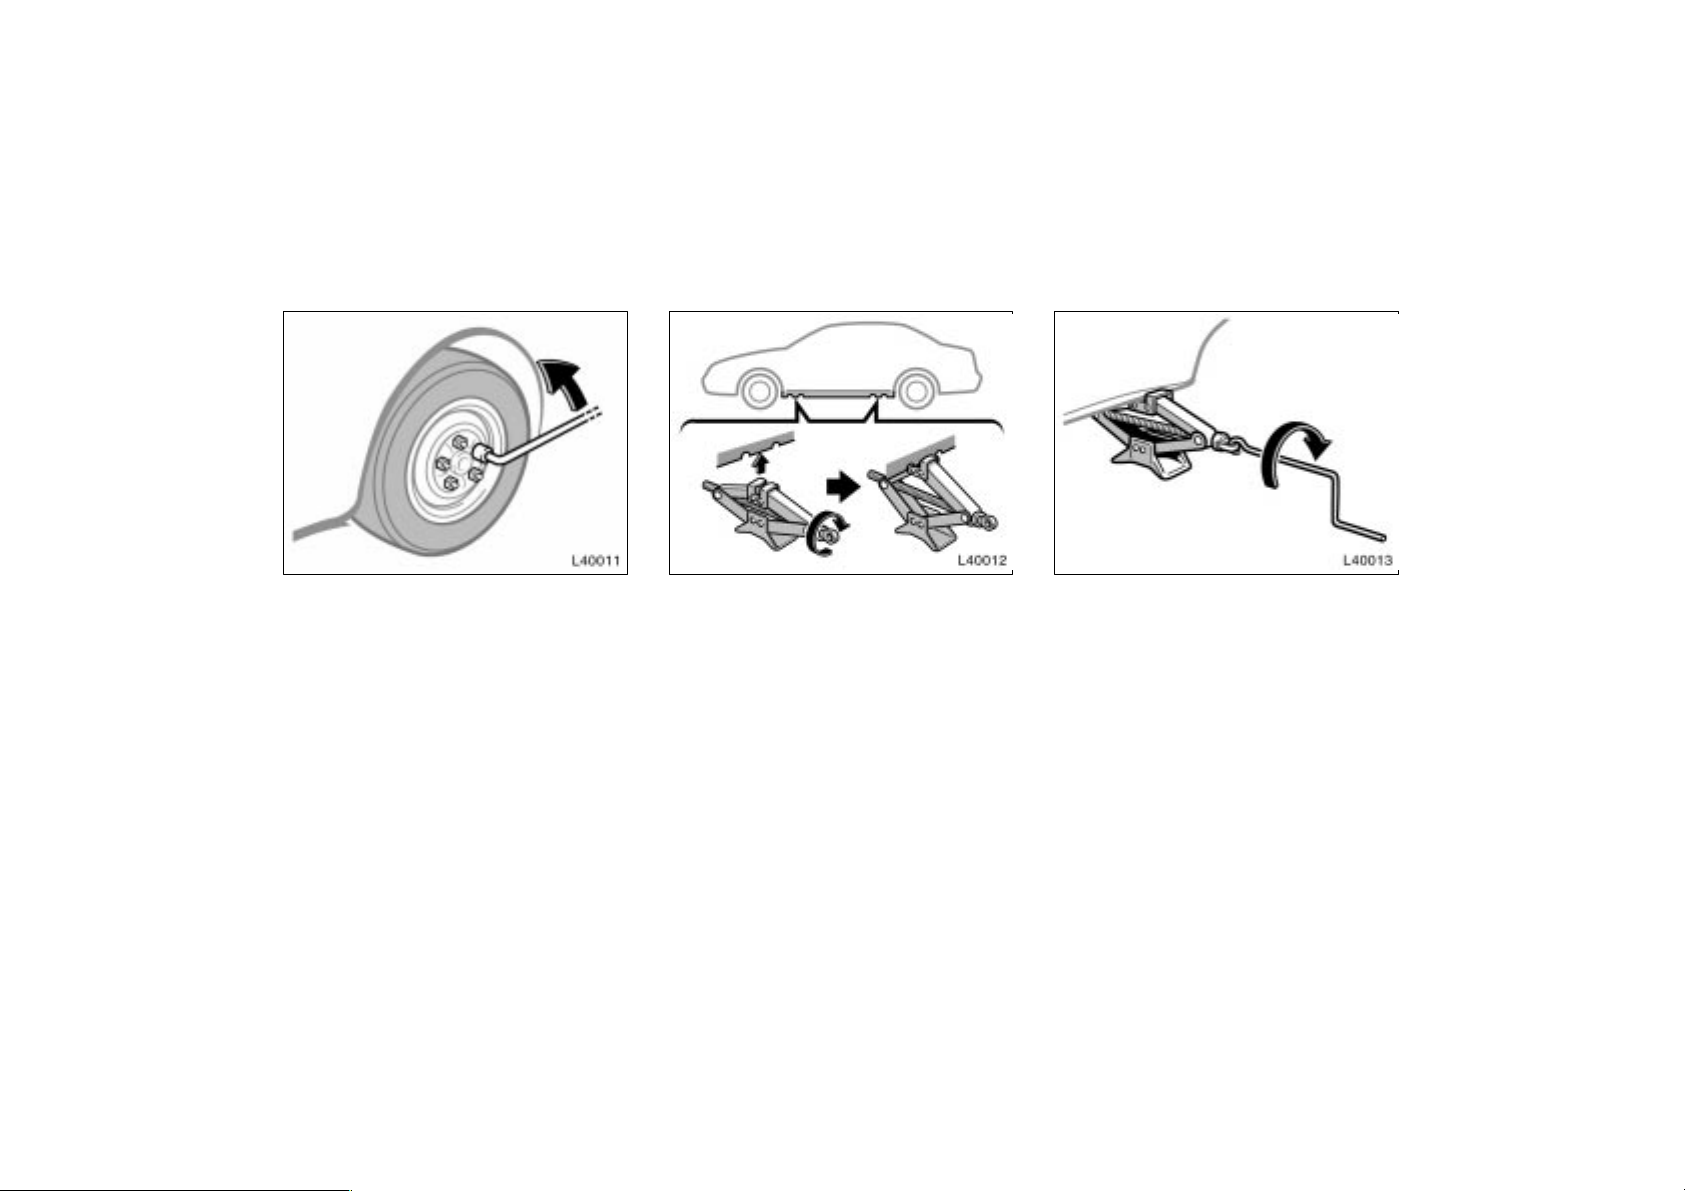
—Changing wheels
7. Remove the wheel nuts and change
tires.
Lift the flat tire straight off and put it
aside.
Roll the spare wheel into position and
align the holes in the wheel with the bolts.
Then lift up the wheel and get at least the
top bolt started through its hole. Wiggle
the tire and press it back over the other
bolts.
Before putting on wheels, remove any corrosion on the mounting surfaces with a
wire brush or such. Installation of wheels
without good metal- to- metal contact at the
mounting surface can cause wheel nuts to
loosen and eventually cause a wheel to
come off while driving. Therefore after the
first 1600 km (1000 miles), check to see
that the wheel nuts are tight.
181
—Reinstalling wheel nuts
—Lowering your vehicle
CAUTION
When lowering the vehicle, make sure
all portions of your body and all other persons around will not be injured
as the vehicle is lowered to the
ground.
8. Reinstall all the wheel nuts finger
tight.
Reinstall the wheel nuts (tapered end inward) and tighten them as much as you
can by hand. Press back on the tire and
see if you can tighten them more.
182
9. Lower the vehicle completely and
tighten the wheel nuts.
Turn the jack handle counterclockwise to
lower the vehicle.
Use only the wheel nut wrench to tighten
the nuts. Do not use other tools or any
additional leverage other than your hands,
such as a hammer, pipe or your foot.
Make sure the wrench is securely engaged over the nut.
Tighten each nut a little at a time in the
order shown. Repeat the process until all
the nuts are tight.
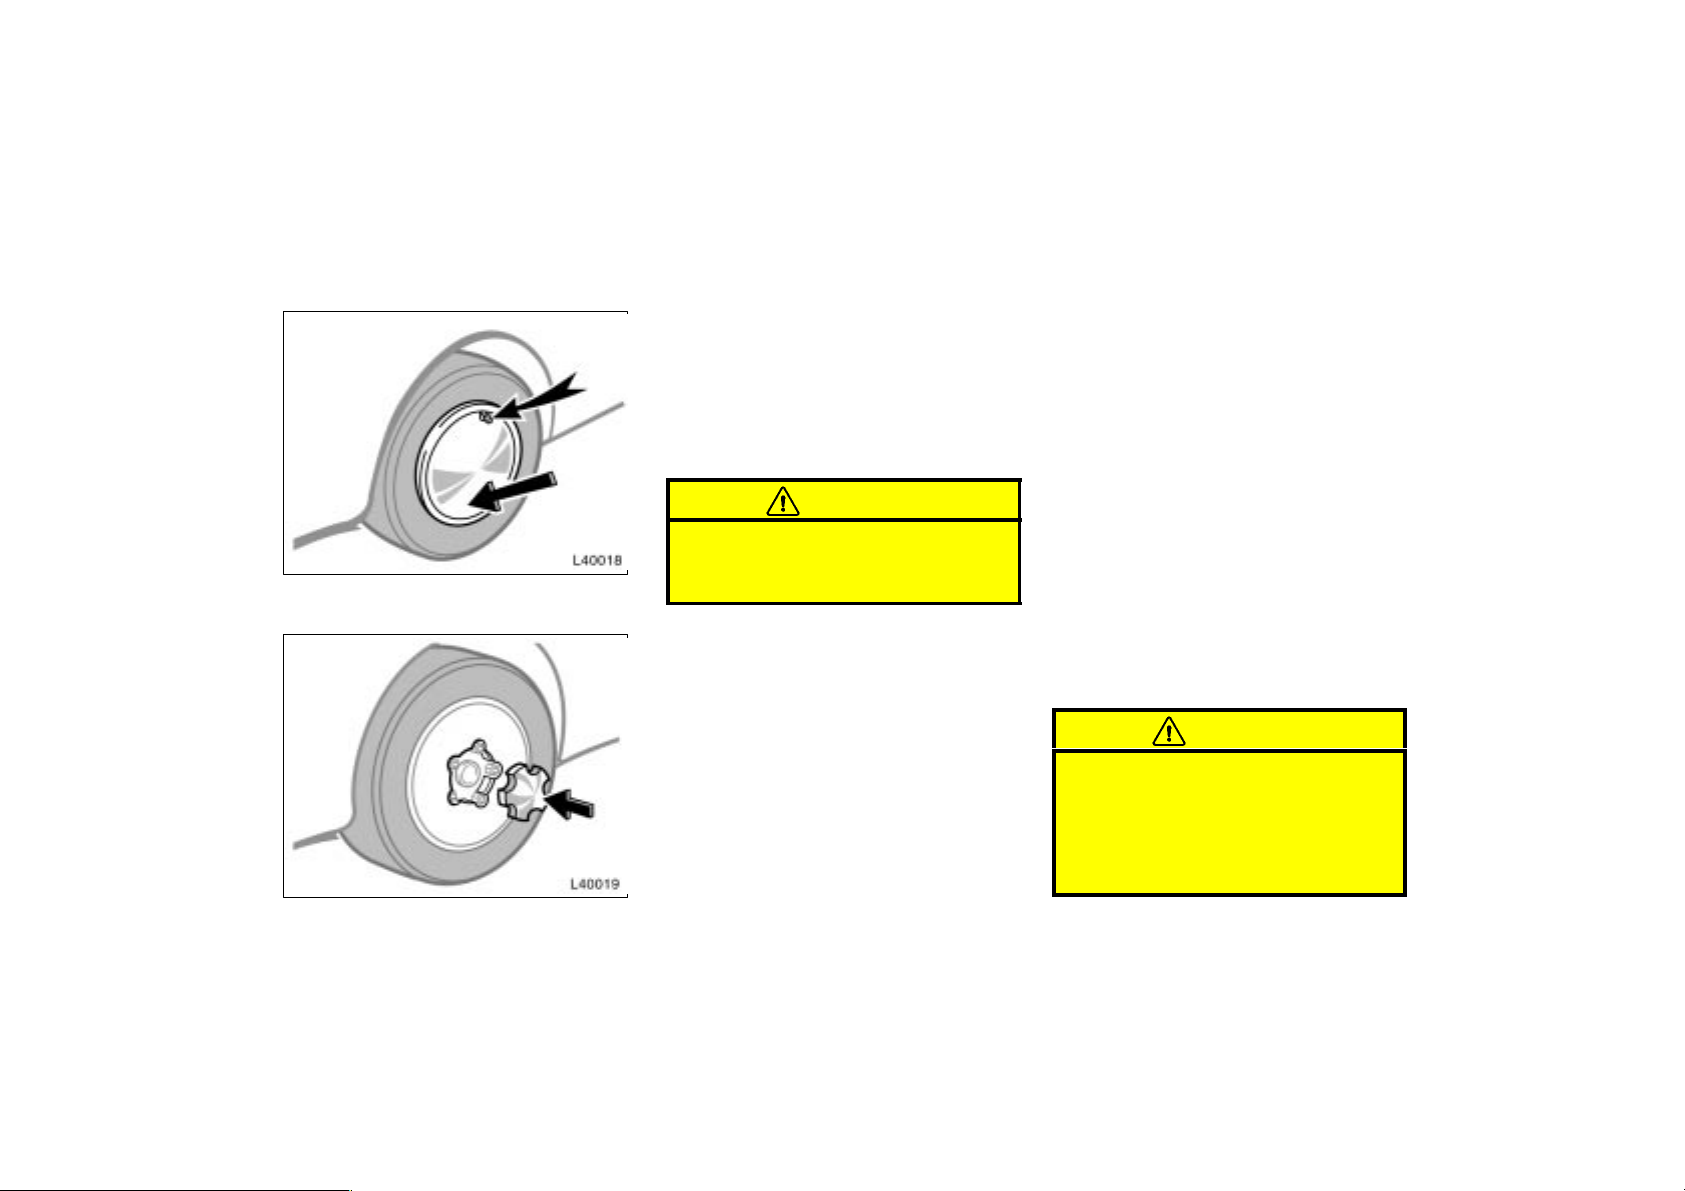
—Reinstalling wheel ornament
Steel wheels
10. Reinstall the wheel ornament.
1. Put the wheel ornament into position.
On some models, align the cutout of the
wheel ornament with the valve stem as
shown.
2. Then tap it firmly with the side or heel
of your hand to snap it into place.
CAUTION
Take due care in handling the ornament to avoid unexpected personal
injury.
—After changing wheels
11. Check the air pressure of the replaced tire.
Adjust the air pressure to the specification
designed in part 8. If the pressure is lower, drive slowly to the nearest service station and fill to the correct pressure.
Do not forget to reinstall the tire inflation
valve cap as dirt and moisture could get
into the valve core and possibly cause air
leakage. If the cap is missing, have a new
one put on as soon as possible.
12. Restow all the tools, jack and flat
tire securely.
As soon as possible after changing
wheels, tighten the wheel nuts to the
torque specified in Part 8 with a torque
wrench and have a technician repair the
flat tire.
CAUTION
Before driving, make sure all the
tools, jack and flat tire are securely
in place in their storage location to
reduce the possibility of personal injury during a collision or sudden
braking.
Aluminum wheels
183
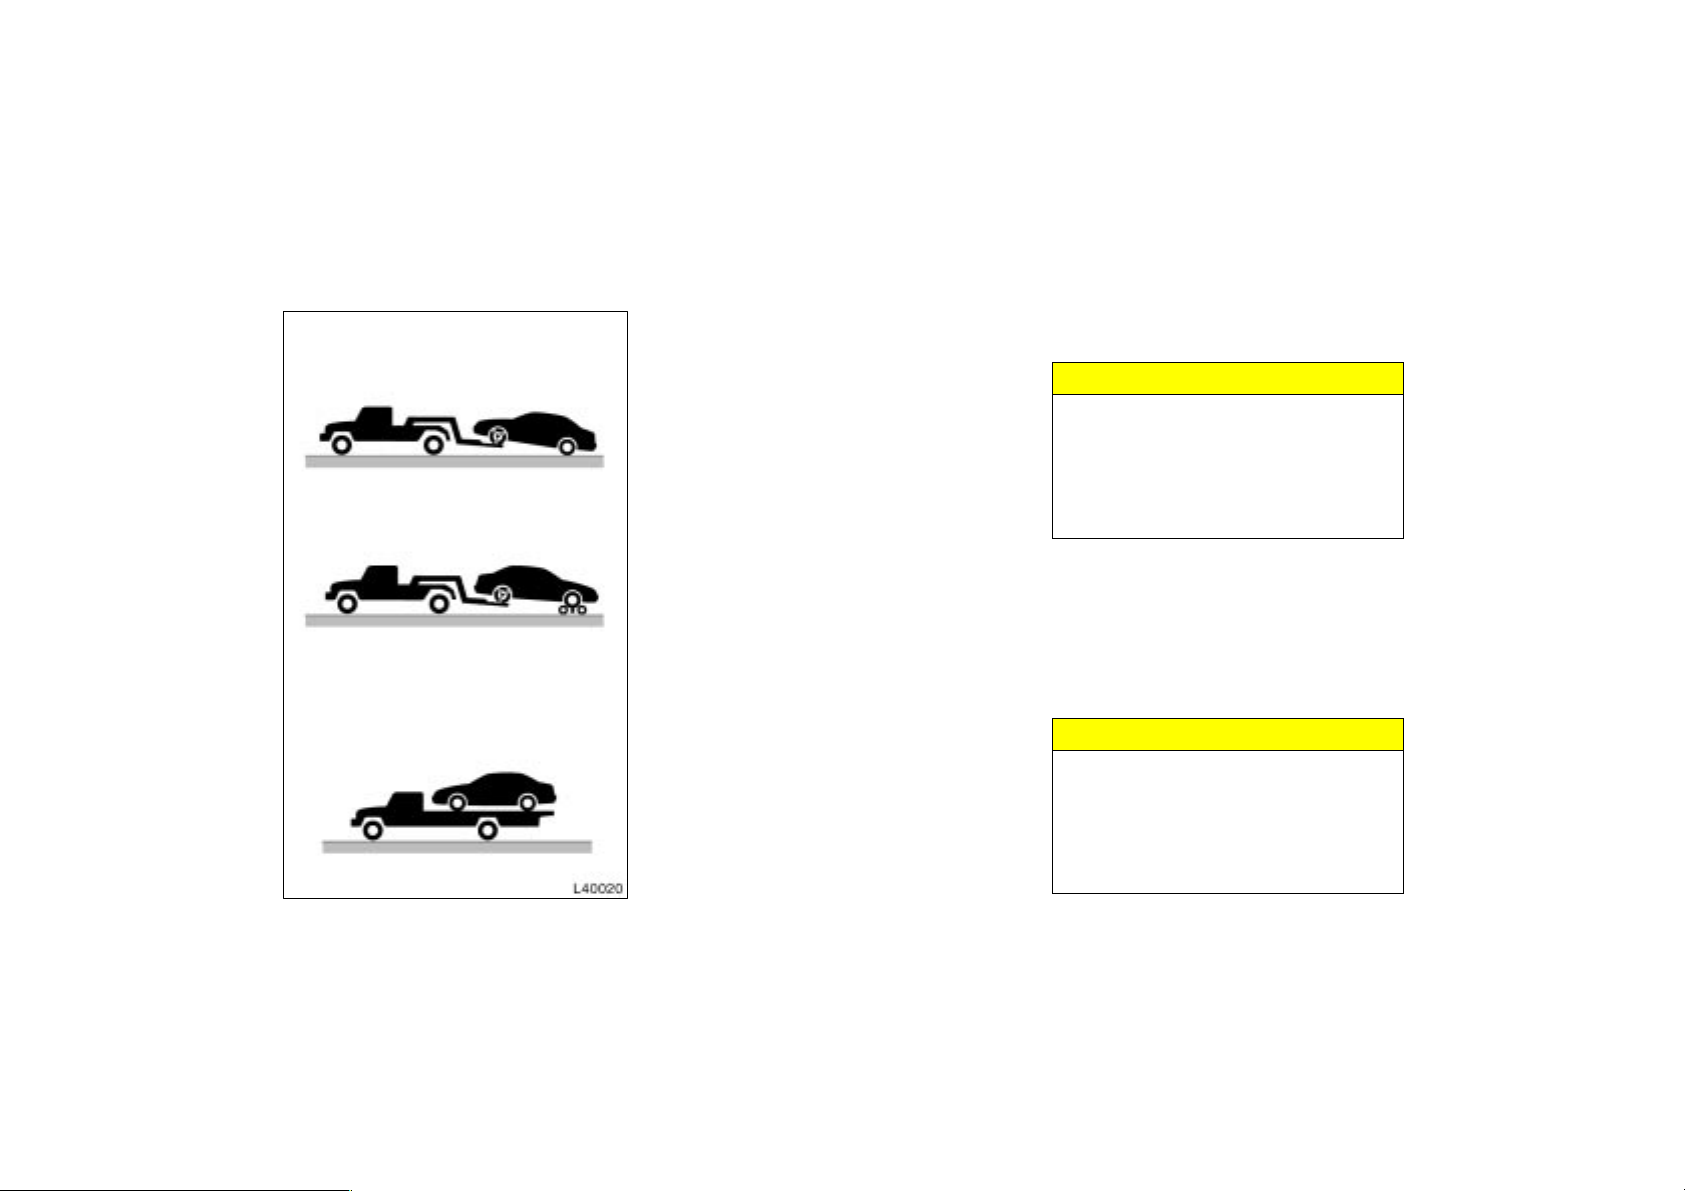
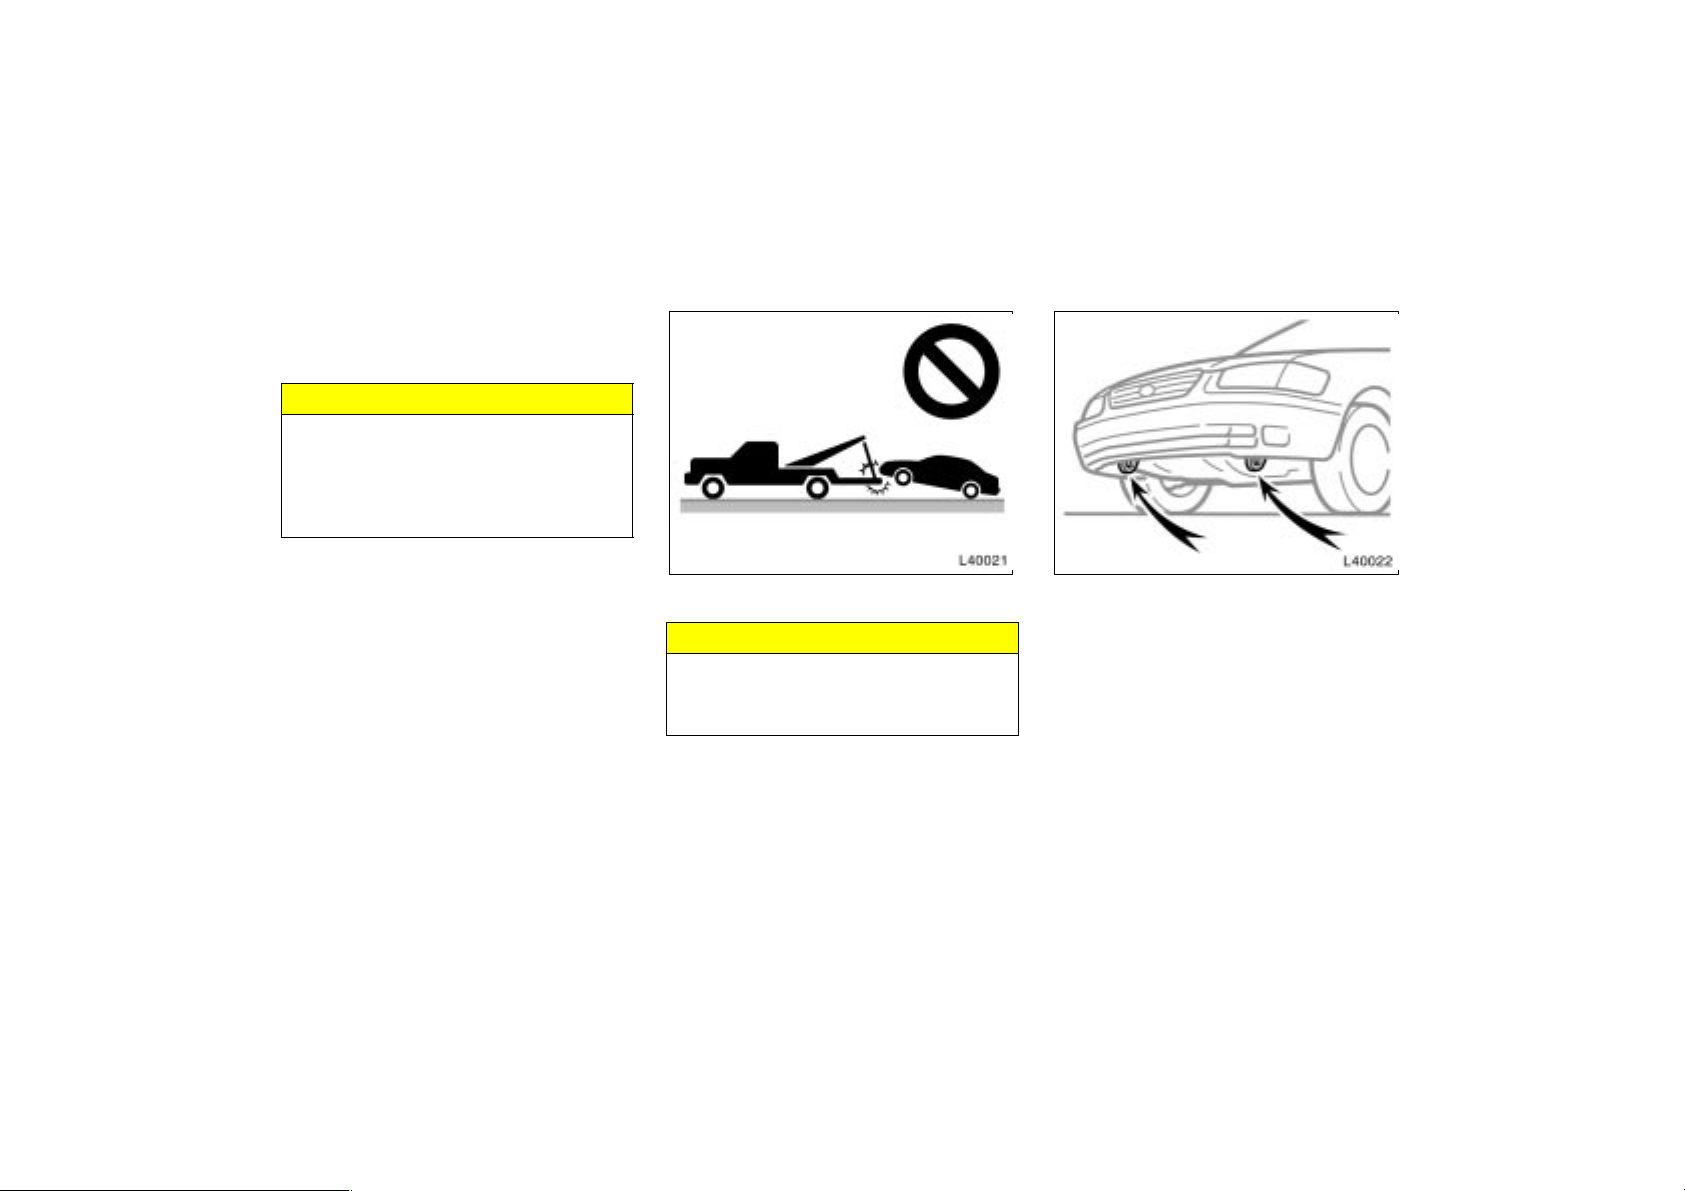
If your vehicle needs to be
towed—
(a) Towing with wheel lift type truck—
—From front
—From rear
(b) Using flat bed truck
184
If towing is necessary, we recommend
you to have it done by your Toyota
dealer or a commercial tow truck service. In consultation with them, have
your vehicle towed using either (a) or
(b).
Only when you cannot receive a towing
service from a Toyota dealer or commercial tow truck service, tow your vehicle carefully in accordance with the
instructions given in ”—Emergency towing” in this part.
Proper equipment will help ensure that
your vehicle is not damaged while being
towed. Commercial operators are generally
aware of the state/provincial and local
laws pertaining to towing.
Your vehicle can be damaged if it is
towed incorrectly. Although most operators
know the correct procedure, it is possible
to make a mistake. To avoid damage to
your vehicle, make sure the following few
precautions are observed. If necessary,
show this page to the tow truck driver.
TOWING PRECAUTIONS:
Use a safety chain system for all towing,
and abide by the state/provincial and local
laws. The wheels and axle on the ground
must be in good condition. If they are
damaged, use a towing dolly.
(a) Towing with wheel lift type truck
From front—Release the parking brake.
NOTICE
When lifting wheels, take care to ensure adequate ground clearance for
towing at the opposite end of the
raised vehicle. Otherwise, the bumper
and/or underbody of the towed vehicle
will be damaged during towing.
From rear—
Manual transmission:
We recommend using a towing dolly
under the front wheels. If you do not
use a towing dolly, place the ignition
key in the ”ACC” position and put the
transmission in neutral.
NOTICE
Do not tow with the key removed or
in the ”LOCK” position when towing
from the rear without a towing dolly.
The steering lock mechanism is not
strong enough to hold the front
wheels straight.
Automatic transmission:
Use a towing dolly under the front
wheels.
NOTICE
Never tow a vehicle with an automatic
transmission from the rear with the
front wheels on the ground, as this
may cause serious damage to the
transmission.
(b) Using flat bed truck
—Emergency towing
(c) Towing with sling type truck
(c) Towing with sling type truck
NOTICE
Do not tow with sling type truck, either from the front or rear. This may
cause body damage.
If towing is necessary, we recommend
you to have it done by your Toyota
dealer or a commercial tow truck service.
If towing service is not available in an
emergency, your vehicle may be temporarily towed by a cable or chain secured to one of the emergency towing
eyelets under the vehicle. Use extreme
caution when towing vehicles.
A driver must be in the vehicle to steer
it and operate the brakes.
Towing in this manner may be done only
on hard- surfaced roads for a short distance and at low speeds. Also, the
wheels, axles, drive train,steering and
brakes must all be in good condition.
185
If you cannot shift automatic
transmission selector lever
CAUTION
Use extreme caution when towing vehicles. Avoid sudden starts or erratic
driving maneuvers which would place
excessive stress on the emergency
towing eyelets and towing cable or
chain. The eyelets and towing cable
or chain may break and cause serious
injury or damage.
NOTICE
Use only a cable or chain specifically
intended for use in towing vehicles.
Securely fasten the cable or chain to
the towing eyelets provided.
Before towing, release the parking brake
and put the transmission in neutral (manual) or ”N” (automatic). The key must be
in ”ACC” (engine off) or ”ON” (engine running).
CAUTION
If the engine is not running, the power assist for the brakes and steering
will not work so steering and braking
will be much harder than usual.
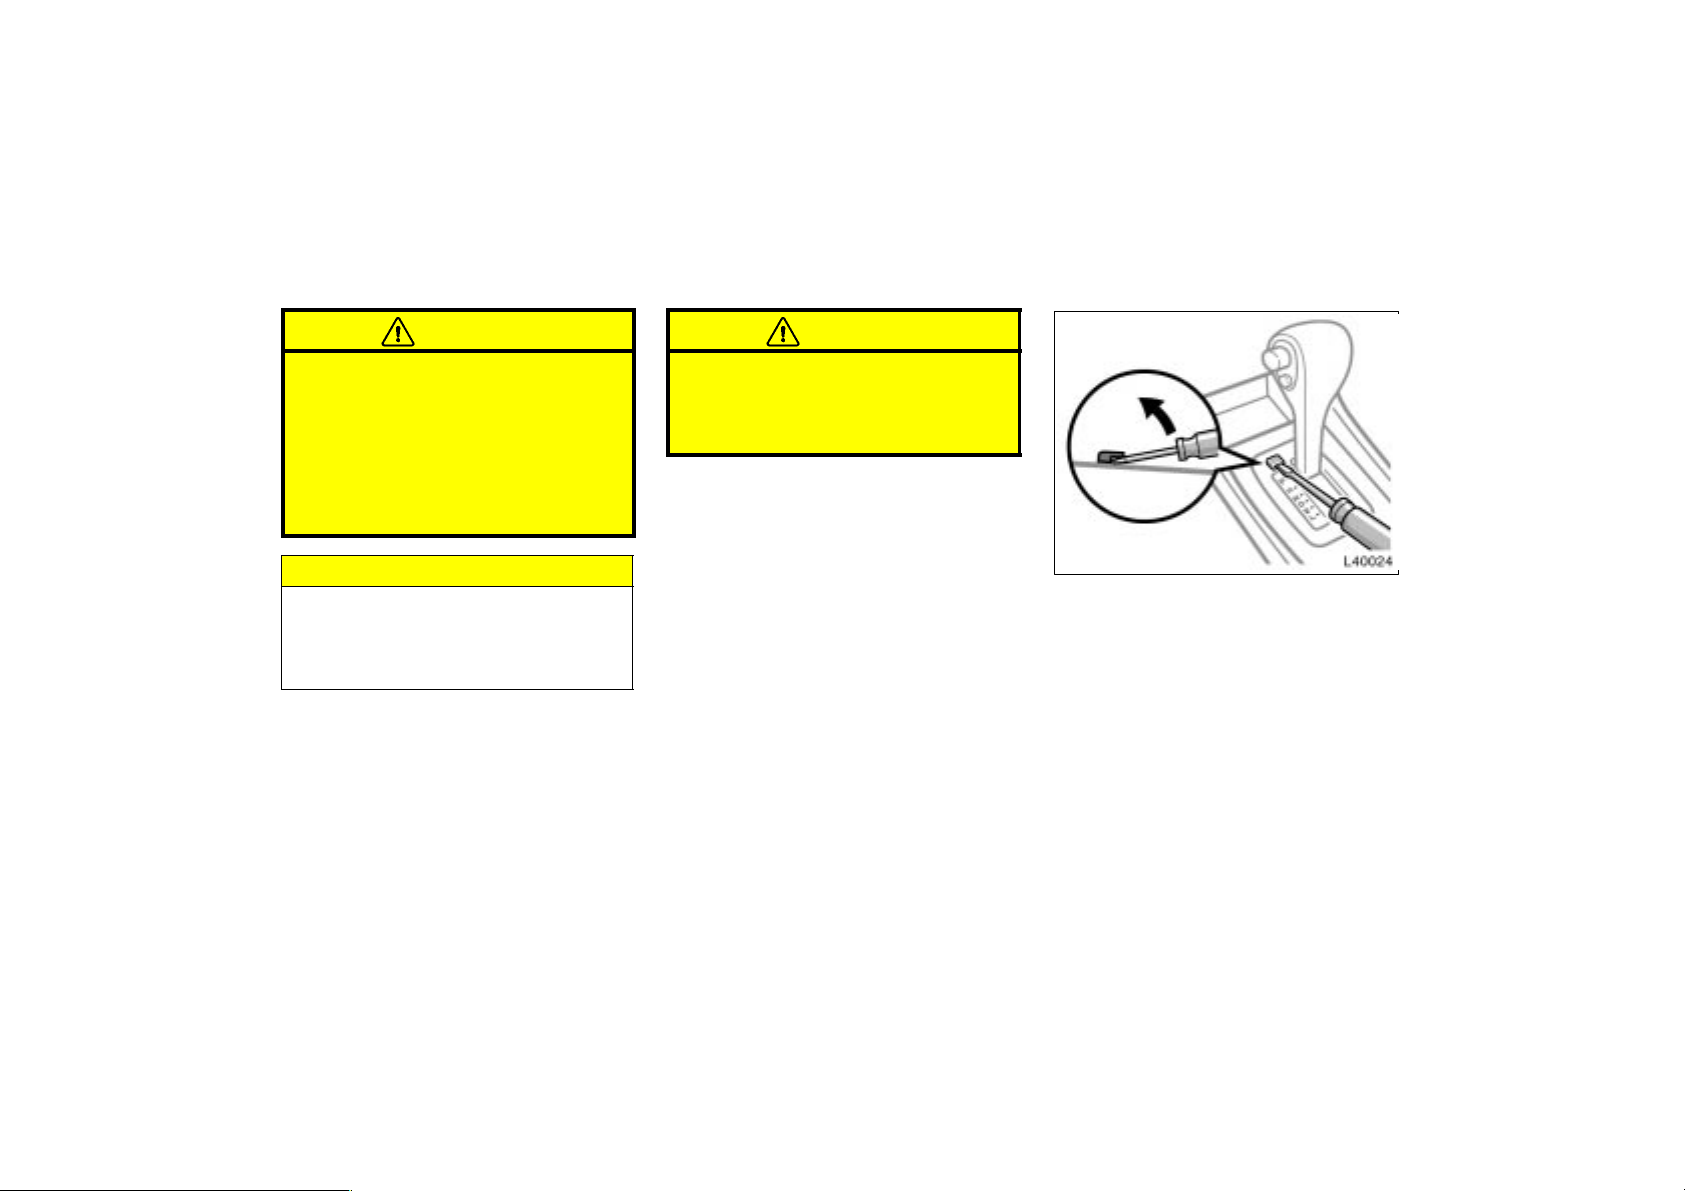
If you cannot shift the selector lever
out of ”P” position to other positions
even though the brake pedal is depressed, use the shift lock override button as follows:
1. Turn the ignition key to ”LOCK”
position. Make sure the parking
brake is on.
2. Pry up the cover with a flat-bladed
screwdriver or equivalent.
186
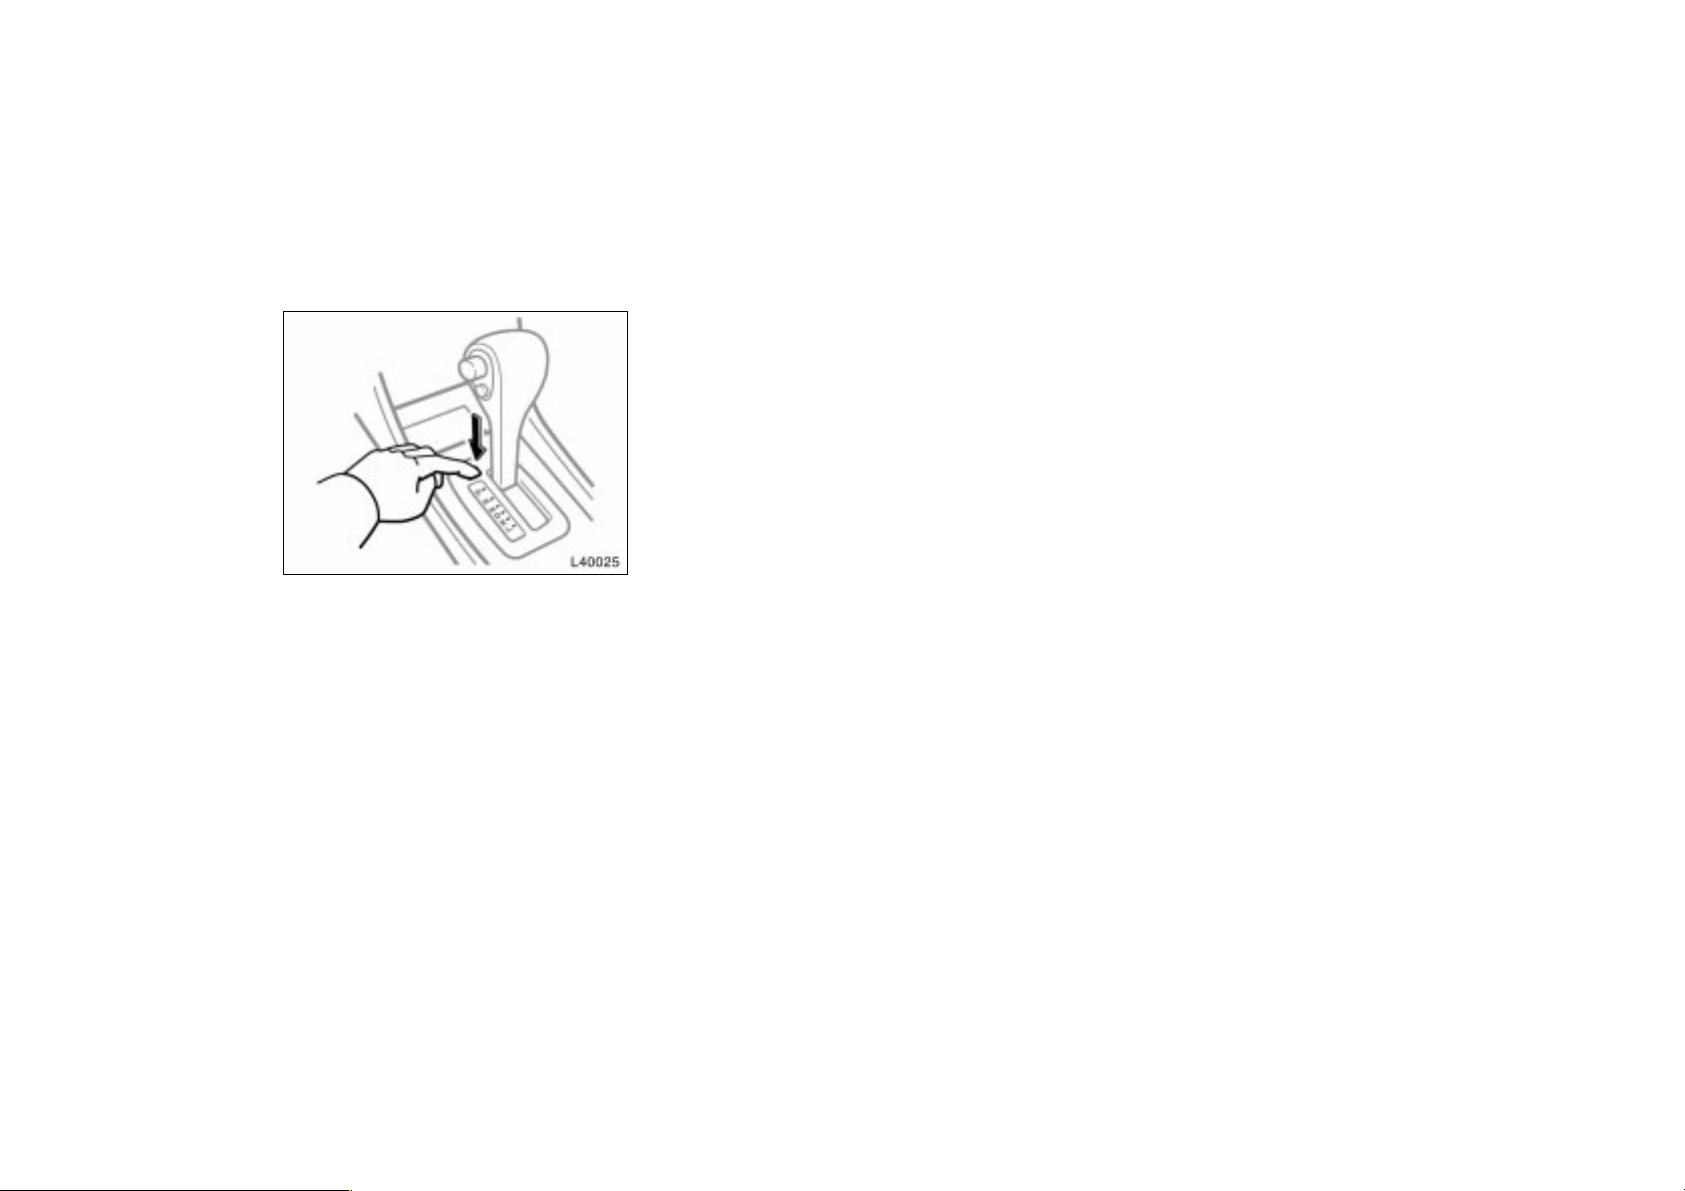
3. Insert your finger into the hole to
push down the shift lock override
button. You can shift out of ”P”
position only while pushing the button.
4. Shift into ”N” position.
5. Insert the cover.
6. Start the engine. For your safety,
keep the brake pedal depressed.
Be sure to have the system checked by
your Toyota dealer as soon as possible.
If you lose your keys
Many Toyota dealers can make a new
key if you can give them the key number.
See the suggestion given in ”Keys” in
Chapter 1- 2.
If your keys are locked in the vehicle and
you cannot get a duplicate, many Toyota
dealers can still open the door for you,
using their special tools. If you must
break a window to get in, we suggest
breaking the smallest side window because it is the least expensive to replace.
Be extremely cautious to avoid cuts from
the glass.
Vehicles with engine immobiliser system—
Even if you lose only one key, contact
your Toyota dealer to make a new key. If
you lose all your master keys, you cannot
make new keys; the whole system must
be replaced.
If you lose your wireless remote control transmitter
If you lose your transmitter, you can
purchase a new one at your Toyota
dealer.
You can use the wireless remote control
system with the new transmitter. Contact
your Toyota dealer for detailed information.
187
Part 7
Checking the engine oil level
DO- IT- YOURSELF
MAINTENANCE—
Chapter 7-2
Engine and Chassis
Checking the engine oil level
Checking the engine coolant
level
Checking brake fluid
Checking power steering fluid
Checking tire pressure
Checking and replacing tires
Rotating tires
Installing snow tires and chains
Replacing wheels
Aluminum wheel precautions
Low level Full level
Type A
Type B
Add oil O.K. Too full
With the engine at operating temperature and turned off, check the oil level
on the dipstick.
1. To get a true reading, the vehicle
should be on a level spot. After turning
off the engine, wait a few minutes for
the oil to drain back into the bottom of
the engine.
2. Pull out the dipstick, and wipe it clean
with a rag.
3. Reinsert the dipstick—push it in as far
as it will go, or the reading will not be
correct.
4. Pull the dipstick out and look at the oil
level on the end.
CAUTION
Be careful not to touch the hot exhaust manifold.
If the oil level is below or only slightly
above the low level line, add engine oil
of the same type as already in the engine.
Remove the oil filler cap and add engine
oil in small quantities at a time, checking
the dipstick.
The approximate quantity of oil needed to
fill between the low level and the full level
on the dipstick is indicated below for reference.
When the level reaches within the correct
range, install the filler cap hand- tight.
Oil quantity, L (qt., lmp. qt.):
5S-FE engine 0.7 (0.7, 0.6)
1MZ-FE engine 1.5 (1.6, 1.3)
NOTICE
Avoid overfilling, or the engine
could be damaged.
Check the oil level on the dipstick
once again after adding the oil.
208
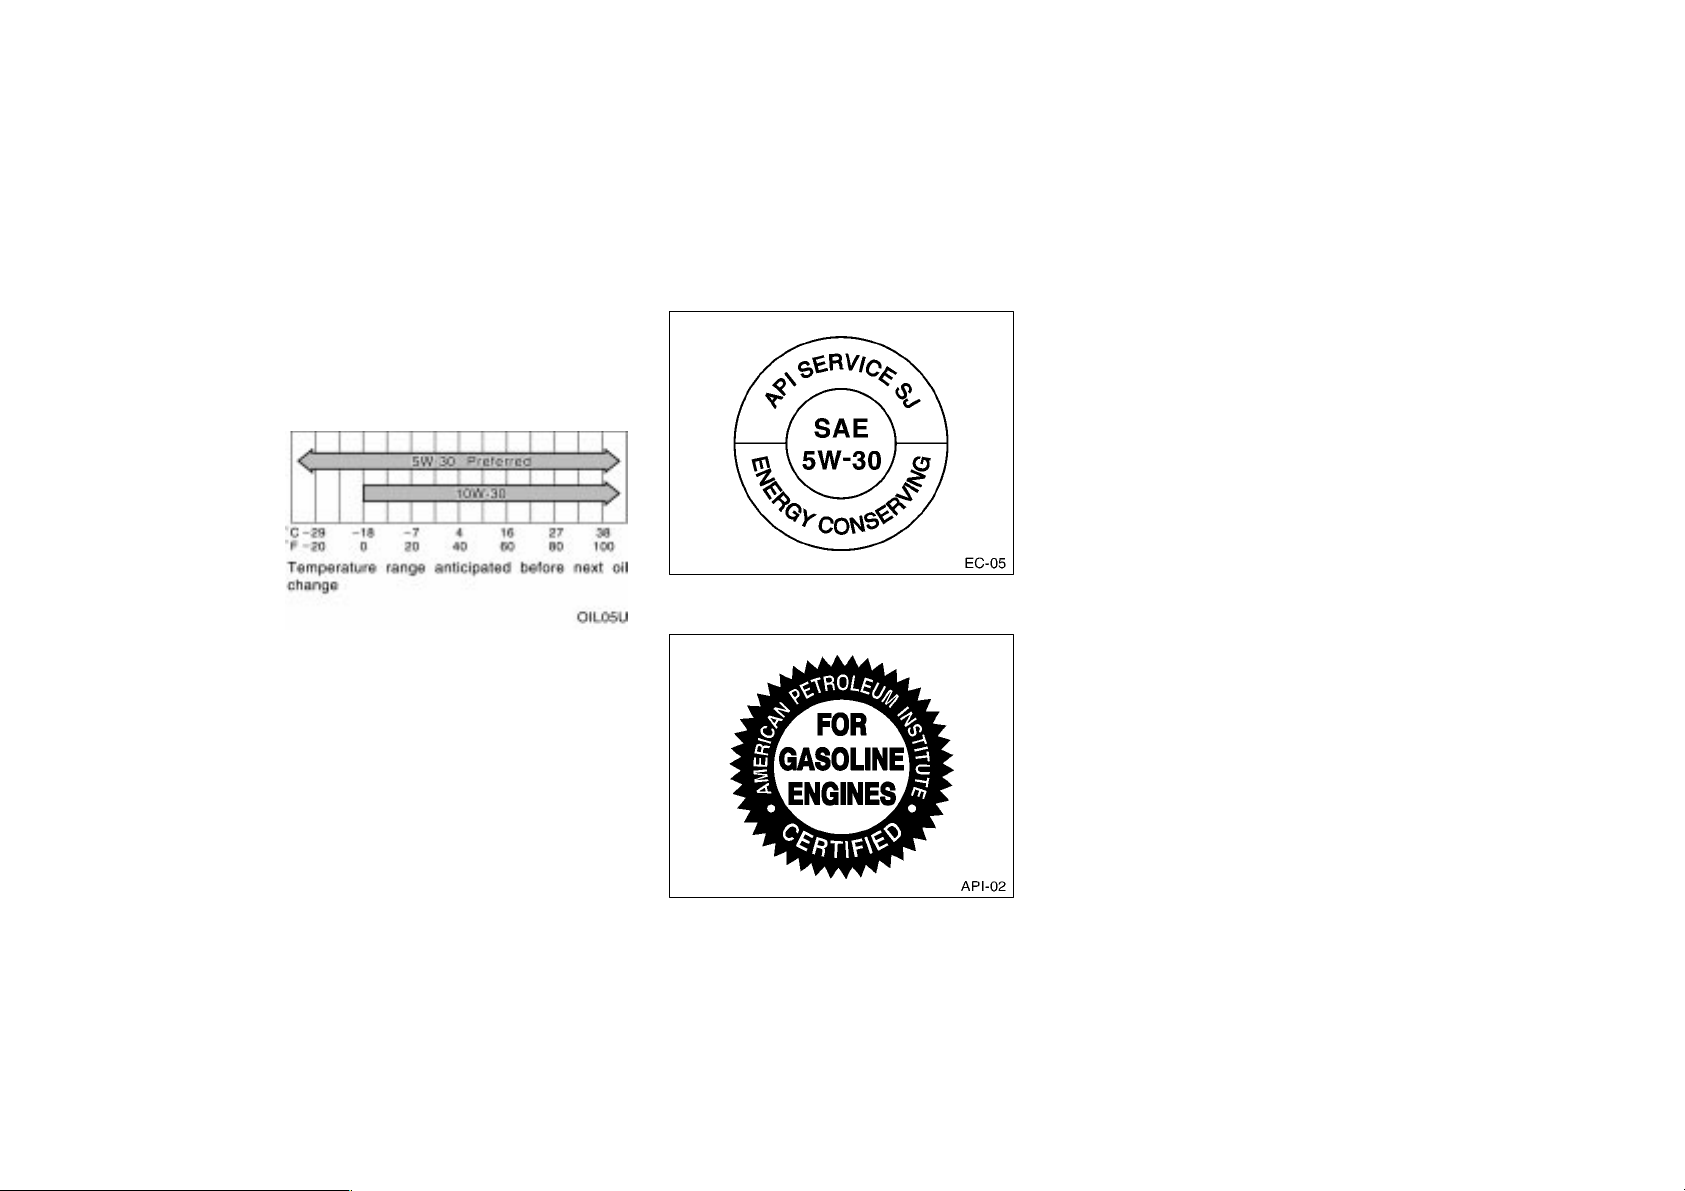
Engine oil selection
Use API grade SH, ”Energy- Conserving II”
or SJ, ”Energy- Conserving” multigrade
engine oil or ILSAC multigrade engine oil.
Recommended viscosity (SAE):
SAE 5W- 30 is the best choice for your
vehicle, for good fuel economy, and
good starting in cold weather.
If you use SAE 10W- 30 engine oil in
extremely low temperatures, the engine
may become difficult to start, so SAE
5W- 30engine oil is recommended.
API service symbol
Oil identification marks
Either or both API registered marks are
added to some oil containers to help
you select the oil you should use.
The API Service Symbol is located anywhere on the outside of the container.
The top portion of the label shows the oil
quality by API (American Petroleum Institute) designations such as SJ. The center
portion of the label shows the SAE viscosity grade such as SAE 5W-30. ”EnergyConserving” shown in the lower portion,
indicates that the oil has fuel- saving capabilities.
The ILSAC (International Lubricant Standardization and Approval Committee) Certification Mark is displayed on the front of
the container.
ILSAC certification mark
209
Checking the engine coolant
level
Look at the see- through coolant reservoir when the engine is cold. The coolant level is satisfactory if it is between
the ”FULL” and ”LOW” lines on the
reservoir. If the level is low, add ethylene- glycol type coolant.
The coolant level in the reservoir will vary
with engine temperature. However, if the
level is on or below the ”LOW” line, add
coolant. Bring the level up to the ”FULL”
line.
Use only ethylene- glycol type coolant.
See information in the next column.
If the coolant level drops within a short
time after replenishing, there may be a
leak in the system. Visually check the
radiator, hoses, engine coolant filler cap,
radiator cap and drain cock and water
pump.
If you can find no leak, have your Toyota
dealer test the cap pressure and check
for leaks in the cooling system.
CAUTION
To prevent burning yourself, do not
remove the radiator cap when the engine is hot.
Coolant type selection
Your coolant must contain ethylene- glycol
antifreeze. In addition to preventing freezing and subsequent damage to the engine,
this will also prevent corrosion. Further
supplemental inhibitors or additives are
neither needed nor recommended.
Read the antifreeze container for information on freeze protection. Follow the
manufacturer’s directions for how much to
mix with water. The total capacity of the
cooling system is given in Part 8. We
recommend 50 % solution be used for
your Toyota, or a sufficient quantity to
provide protection to about —35C
(—31F).
NOTICE
Do not use alcohol type antifreeze or
plain water alone.
Checking brake fluid
To check the fluid level, simply look at
the see- through reservoir. The level
should be between the ”MAX” and
”MIN” lines on the reservoir.
It is normal for the brake fluid level to go
down slightly as the brake pads wear. So
be sure to keep the reservoir filled.
If the reservoir needs frequent refilling, it
may indicate a serious mechanical problem.
If the level is low, add SAE J1703 or
FMVSS No. 116 DOT 3 brake fluid to
the brake reservoir.
Remove and replace the reservoir cover
by hand.
210

Use only newly opened brake fluid. Once
opened, brake fluid absorbs moisture from
the air, and excess moisture can cause a
dangerous loss of braking.
CAUTION
Take care when filling the reservoir
because brake fluid can harm your
eyes and damage painted surfaces. If
fluid gets in your eyes, flush your
eyes with clean water.
NOTICE
If you spill some of the fluid, be sure
to wash it off with water to prevent
it from damaging the parts or paint.
Checking power steering fluid
Open
If hot
O.K.
If hot
add
Check the fluid level through the reservoir. If necessary, add automatic transmission fluid DEXRONII or III.
If the vehicle has been driven around 80
km/h (50 mph) for 20 minutes (a little
more in frigid temperatures), the fluid is
hot (60C—80C or 140F—175F). You
may also check the level when the fluid
is cold (about room temperature,
10C—30C or 50F—85F) if the engine
has not been run for about five hours.
Close
If cold
O.K.
If cold
add
Clean all dirt from outside of the reservoir
tank and look at the fluid level. If the fluid
is cold, the level should be in the ”COLD”
range. Similarly, if it is hot, the fluid level
should be in the ”HOT” range. If the level
is at the low side of either range, add
automatic transmission fluid DEXRONII
or III to bring the level within the range.
To remove the filler cap, turn it counterclockwise and lift up. To reinstall it, turn
it clockwise. After replacing the filler
cap,visually check the steering box case,
vane pump and hose connections for
leaks or damage.
CAUTION
The reservoir tank may be hot so be
careful not to burn yourself.
NOTICE
Avoid overfilling, or the power steering could be damaged.
211
Checking tire pressure
Keep your tire pressures at the proper
level.
The recommended cold tire pressures, tire
size and the vehicle capacity weight are
given in Part 8. They are also on the tire
pressure label as shown.
You should check the tire pressures every
two weeks, or at least once a month. And
don’t forget the spare!
Incorrect tire pressure can reduce tire
life and make your vehicle less safe to
drive.
Low tire pressure results in excessive
wear, poor handling, reduced fuel economy, and the possibility of blowouts from
overheated tires. Also, low tire pressure
can cause poor sealing of the tire bead.
If the tire pressure is excessively low,
there is the possibility of wheel deformation and/or tire separation.
High tire pressure produces a harsh ride,
handling problems,excessive wear at the
center of the tire tread, and a greater
possibility of tire damage from road hazards.
If a tire frequently needs refilling, have it
checked by your Toyota dealer.
The following instructions for checking
tire pressure should be observed:
The pressure should be checked only
when the tires are cold. If your vehicle has been parked for at least 3
hours and has not been driven for
more than 1.5 km or 1 mile since, you
will get an accurate cold tire pressure
reading.
Always use a tire pressure gauge.
The appearance of a tire can be misleading. Besides, tire pressures that
are even just a few pounds off can
degrade handling and ride.
Take special care when adding air to
the compact spare tire. The smaller
tire size can gain pressure very quickly. Add compressed air in small quantities and check the pressure often until
it reaches the specified pressure.
Do not bleed or reduce tire pressure
after driving. It is normal for the tire
pressure to be higher after driving.
Never exceed the vehicle capacity
weight. The passenger and luggage
weight should be located so that the
vehicle is balanced.
Be sure to reinstall the tire inflation
valve caps. Without the valve caps,
dirt or moisture could get into the valve
core and cause air leakage. If the caps
have been lost, have new ones put on
as soon as possible.
212
Checking and replacing tires
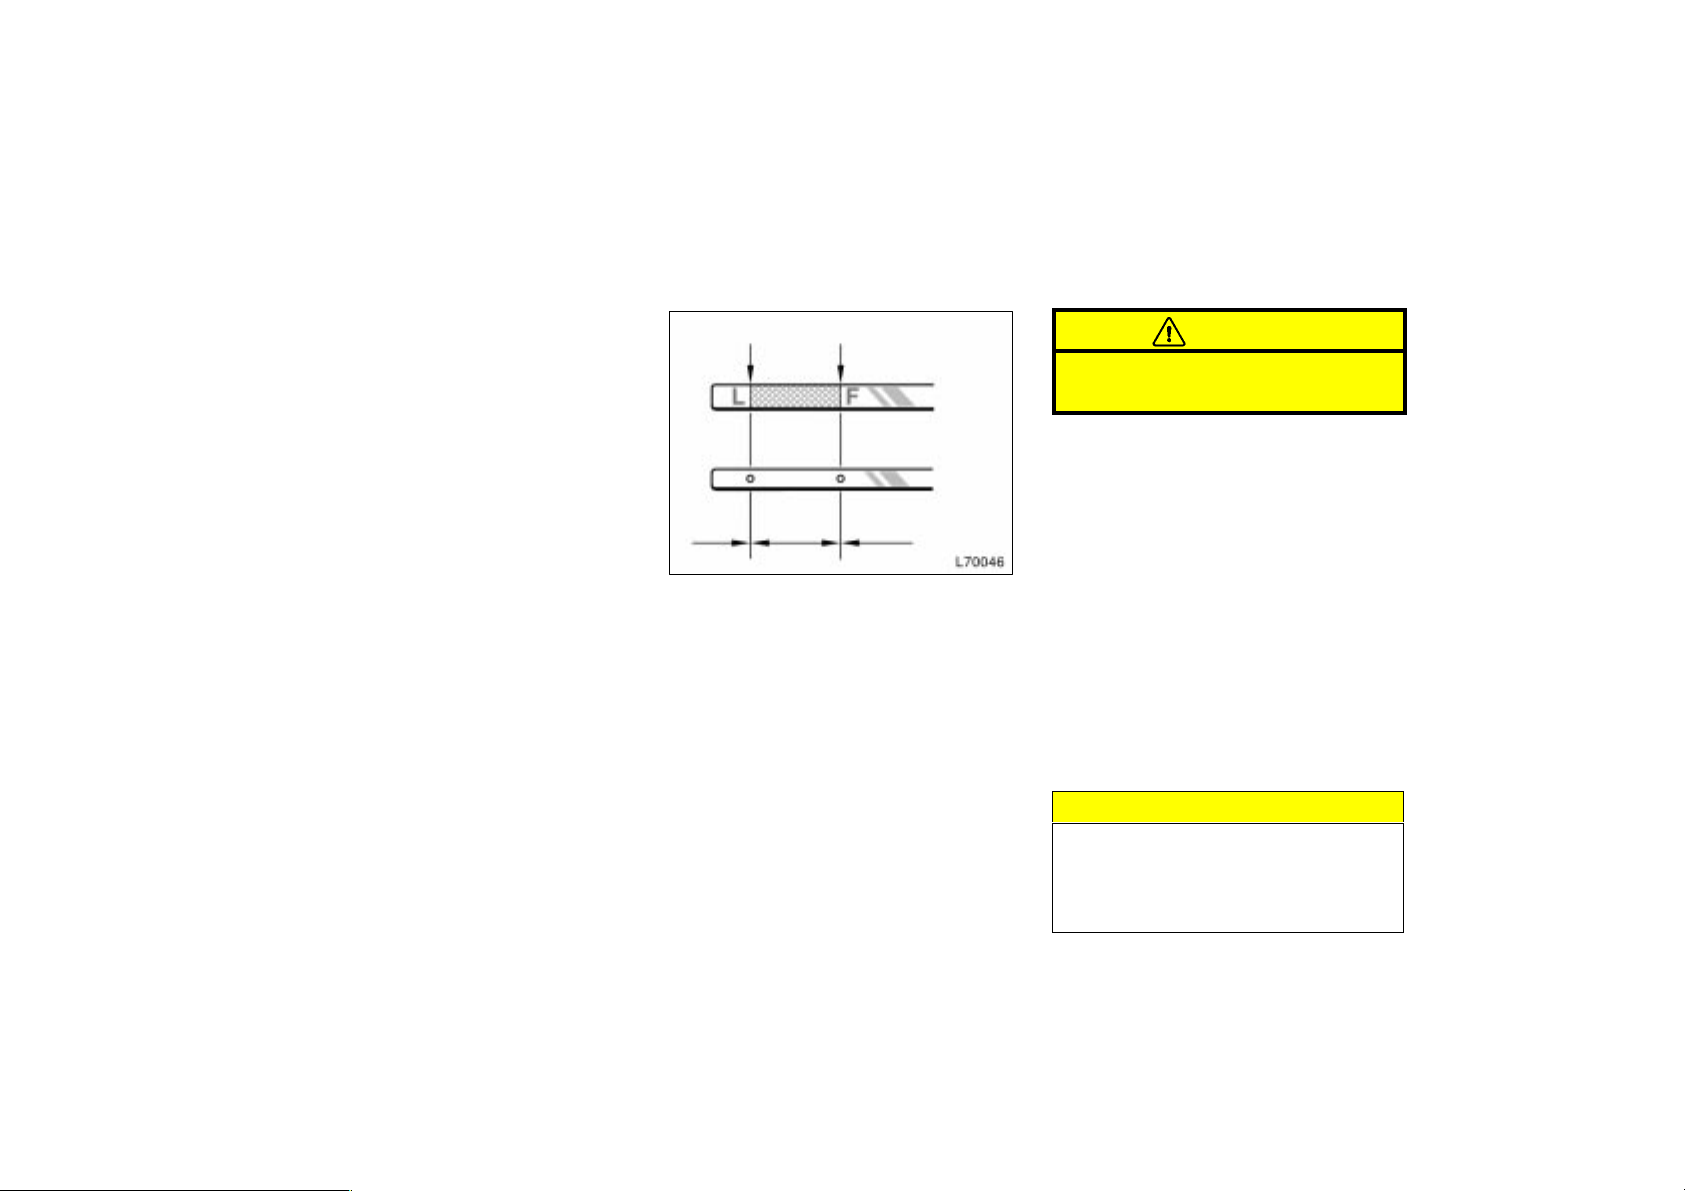
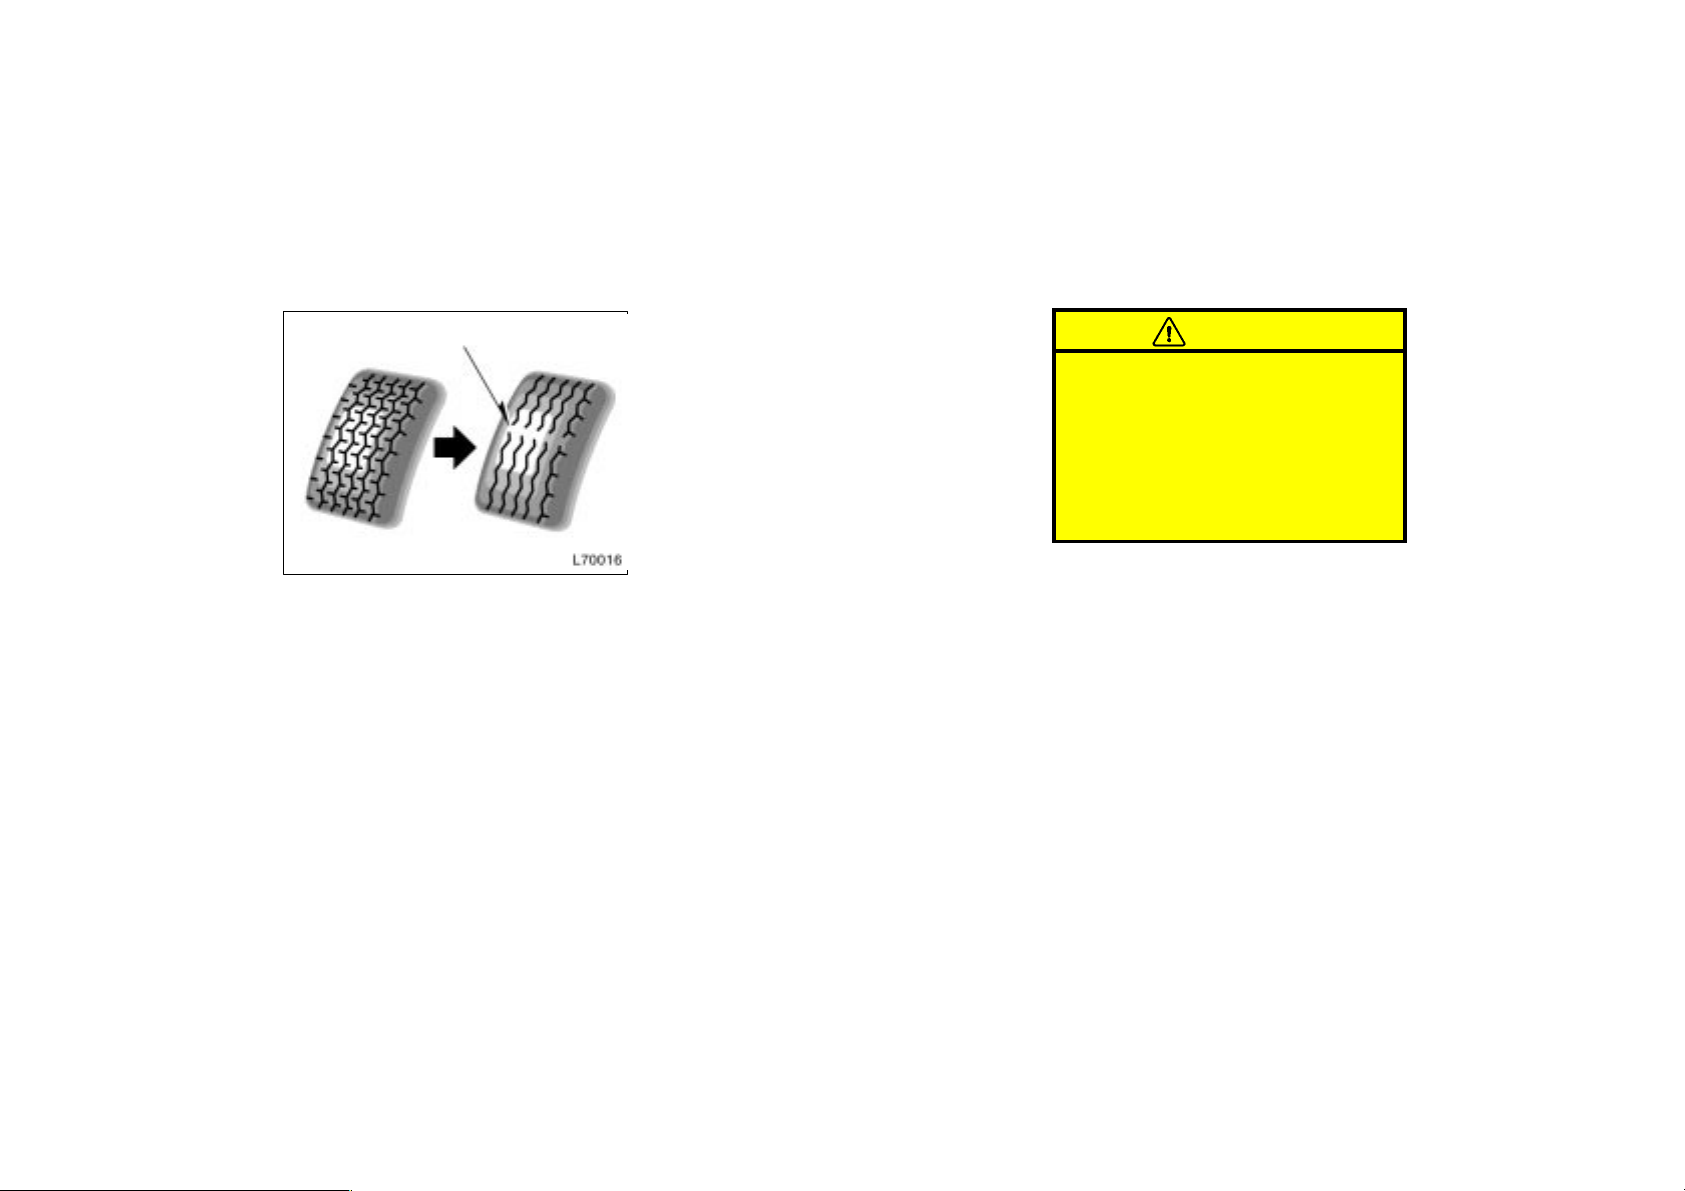
Tread wear indicator
CHECKING YOUR TIRES
Check the tires tread for the tread wear
indicators. If the indicators show, replace the tires.
The tires on your Toyota have built-in
tread wear indicators to help you know
when the tires need replacement. When
the tread depth wears to 1.6 mm (0.06
in.) or less, the indicators will appear. If
you can see the indicators in two or more
adjacent grooves, the tire should be replaced. The lower the tread, the higher
the risk of skidding.
The effectiveness of snow tires is lost
if the tread wears down below 4 mm
(0.16 in.).
Check the tires regularly for damage
such as cuts, splits and cracks. If any
damage is found, consult with a technician and have the tire repaired or replaced.
Even if the damage does not appear serious, a qualified technician should examine
the damage. Objects which have penetrated the tire may have caused internal
damage.
Any tires which are over six years old
must be checked by a qualified technician even if damage is not obvious.
Tires deteriorate with age even if they
have never or seldom been used.
This applies also to the spare tire and
tires stored for future use.
REPLACING YOUR TIRES
When replacing a tire, use only the
same size and construction as originally installed and with the same or greater load capacity.
Using any other size or type of tire may
seriously affect handling, ride, speedometer/odometer calibration, ground clearance,
and clearance between the body and tires
or snow chains.
CAUTION
Do not mix radial, bias belted, or
bias- ply tires on your vehicle. It
can cause dangerous handling characteristics, resulting in loss of control.
Do not use tires or wheels other
than the manufacturer’s recommended size.
Toyota recommends all four tires, or at
least both of the front or rear tires be
replaced at a time as a set.
See ”If you have a flat tire” in Part 4 for
tire change procedure.
When a tire is replaced, the wheel
should always be balanced.
An unbalanced wheel may affect vehicle
handling and tire life. Wheels can get out
of balance with regular use and should
therefore be balanced occasionally.
When replacing a tubeless tire, the air
valve should also be replaced with a
new one.
213
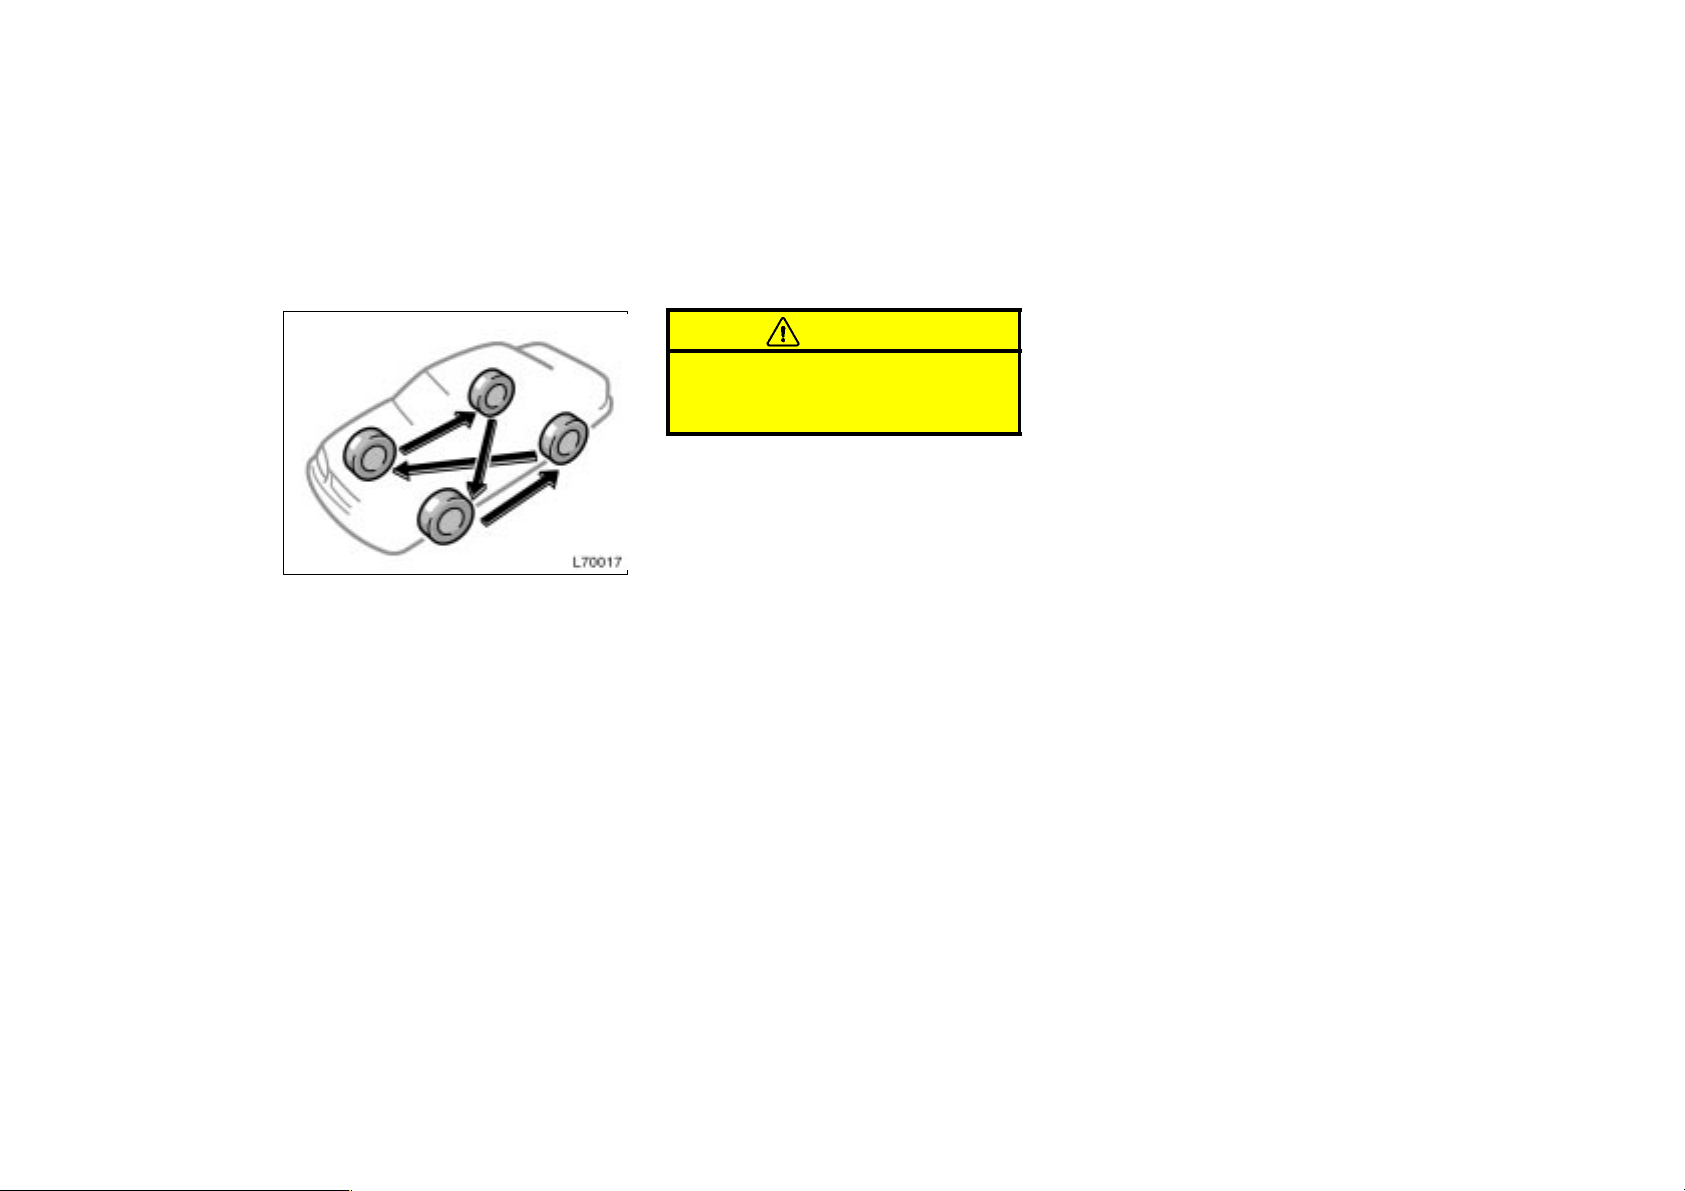
Rotating tires
To equalize the wear and help extend
tire life, Toyota recommends that you
rotate your tires approximately every
12000 km (7500 miles). However, the
most appropriate timing for tire rotation
may vary according to your driving habits and road surface conditions.
See ”If you have a flat tire” in Part 4 for
tire change procedure.
When rotating tires, check for uneven
wear and damage. Abnormal wear is usually caused by incorrect tire pressure, improper wheel alignment, out- of- balance
wheels, or severe braking.
CAUTION
Do not include a compact spare tire
when rotating the tires. It is designed
for temporary use only.
Installing snow tires and
chains
WHEN TO USE SNOW TIRES OR
CHAINS
Snow tires or chains are recommended
when driving on snow or ice.
On wet or dry roads, conventional tires
provide better traction than snow tires.
SNOW TIRE SELECTION
If you need snow tires, select the same
size, construction and load capacity as
the original tires on your Toyota.
Do not use tires other than those mentioned above. Do not install studded tires
without first checking local regulations for
possible restrictions.
SNOW TIRE INSTALLATION
Snow tires should be installed on all
wheels.
Installing snow tires on the front wheels
only can lead to an excessive difference
in road grip capability between the front
and rear tires which could cause loss of
vehicle control.
When storing removed tires you should
store them in a cool dry place. Mark the
direction of rotation and be sure to install
them in the same direction when replacing.
214
CAUTION
Do not drive with the snow tires
incorrectly inflated.
Never drive over 120 km/h (75 mph)
with any type of snow tires.
TIRE CHAIN SELECTION
Use the tire chains of correct size and
type.
Use SAE Class ”S” type radial tire chains
except radial cable chains or V- bar type
chains.
Regulations regarding the use of tire
chains vary according to location or
type of road, so always check them
before installing chains.
CHAIN INSTALLATION
Install the chains on the front tires as
tightly as possible. Do not use tire
chains on the rear tires. Retighten
chains after driving 0.5—1.0 km
(1/4—1/2 mile).
When installing chains on your tires, carefully follow the instructions of the chain
manufacturer.
If wheel covers are used, they will be
scratched by the chain band,so remove
the covers before putting on the chains.
CAUTION
Do not exceed 50 km/h (30 mph) or
the chain manufacturer’s recommended speed limit, whichever is
lower.
Drive carefully avoiding bumps,
holes, and sharp turns, which may
cause the vehicle to bounce.
Avoid sharp turns or locked- wheel
braking, as use of chains may adversely affect vehicle handling.
NOTICE
Do not attempt to use a tire chain on
the compact spare tire, as it may result in damage to the vehicle as well
as the tire.
Replacing wheels
WHEN TO REPLACE YOUR WHEELS
If you have wheel damage such as
bending, cracks or heavy corrosion, the
wheel should be replaced.
If you fail to replace damaged wheels, the
tire may slip off the wheel or they may
cause loss of handling control.
WHEEL SELECTION
When replacing wheels, care should be
taken to ensure that the wheels are replaced by ones with the same load capacity, diameter, rim width, and offset.
This must be observed on compact spare
tires, too.
Correct replacement wheels are available
at your Toyota dealer.
A wheel of a different size or type may
adversely affect handling, wheel and bearing life, brake cooling, speedometer/odometer calibration, stopping ability, headlight
aim, bumper height, vehicle ground clearance, and tire or snow chain clearance to
the body and chassis.
215

Replacement with used wheels is not recommended as they may have been subjected to rough treatment or high mileage
and could fail without warning. Also, bent
wheels which have been straightened may
have structural damage and therefore
should not be used. Never use an inner
tube in a leaking wheel which is designed
for a tubeless tire.
Aluminum wheel precautions
After driving your vehicle the first 1600
km (1000 miles), check that the wheel
nuts are tight.
If you have rotated, repaired, or
changed your tires, check that the
wheel nuts are still tight after driving
1600 km (1000 miles).
When using tire chains, be careful not
to damage the aluminum wheels.
Use only the Toyota wheel nuts and
wrench designed for your aluminum
wheels.
When balancing your wheels, use only
Toyota balance weights or equivalent
and a plastic or rubber hammer.
As with any wheel, periodically check
your aluminum wheels for damage. If
damaged, replace immediately.
216

217
Part 7
Checking battery condition—
—Precautions
DO- IT- YOURSELF
MAINTENANCE—
Chapter 7-3
Electrical components
Checking battery condition
Battery recharging precautions
Checking and replacing fuses
Adding washer fluid
Replacing light bulbs
CAUTION
BATTERY PRECAUTIONS
The battery produces flammable and
explosive hydrogen gas.
Do not cause a spark from the bat-
tery with tools.
Do not smoke or light a match near
the battery.
The electrolyte contains poisonous
and corrosive sulfuric acid.
Avoid contact with eyes, skin or
clothes.
Never ingest electrolyte.
Wear protective safety glasses when
working near the battery.
Keep children away from the bat-
tery.
EMERGENCY MEASURES
If electrolyte gets in your eyes,
flush your eyes with clean water
immediatly and get immediate medical attention. If possible, continue
to apply water with a sponge or
cloth while en route to the medical
office.
If electrolyte gets on your skin,
thoroughly wash the contact area. If
you feel pain or burning, get medical attention immediately.
If electrolyte gets on your clothes,
there is a possibility of its soaking
through to your skin, so immediately take off the exposed clothing and
follow the procedure above, if necessary.
If you happen to swallow electro-
lyte, drink a large quantity of water
or milk. Follow with milk of magnesia, beaten raw egg or vegetable
oil. Then go immediately for emergency help.
218
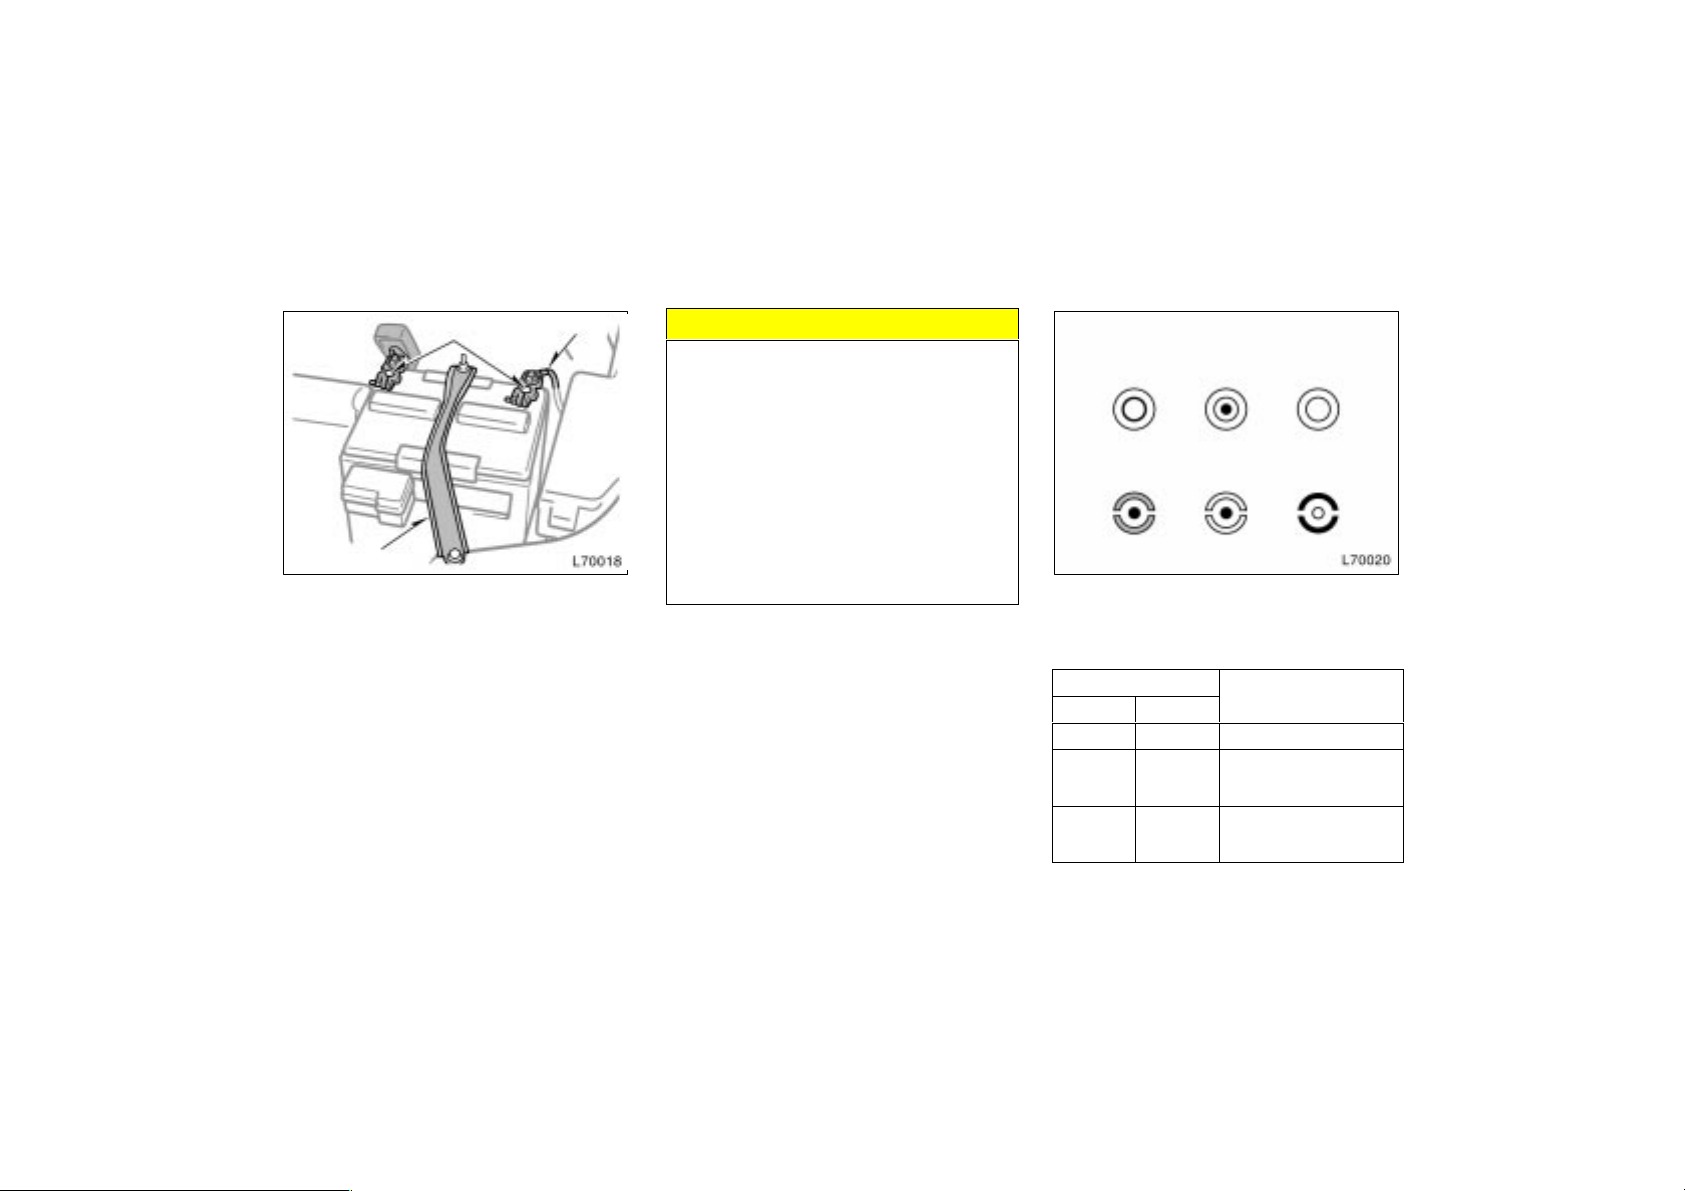
—Checking battery exterior
—Checking battery fluid
Terminals
Hold-down clamp
Ground cable
Check the battery for corroded or loose
terminal connections, cracks, or loose
hold- down clamp.
a. If the battery is corroded, wash it off
with a solution of warm water and baking soda. Coat the outside of the terminals with grease to prevent further corrosion.
b. If the terminal connections are loose,
tighten their clamp nuts—but do not
overtighten.
c. Tighten the hold-down clamp only
enough to keep the battery firmly in
place. Overtightening may damage the
battery case.
NOTICE
Be sure the engine and all accessories are off before performing maintenance.
When checking the battery, remove
the ground cable from the negative
terminal (”—” mark) first and reinstall it last.
Be careful not to cause a short circuit with tools.
Take care no solution gets into the
battery when washing it.
Type A
Green Dark
Type B
Blue White Red
Clear or light
yellow
CHECKING BY THE HYDROMETER
Check the battery condition by the
hydrometer color.
Hydrometer color
Typ e A Ty p e B
GREEN BLUE Good
DARK WHITE
CLEAR or
LIGHT
YELLOW
RED
Condition
Charging necessary. Have
battery checked by your
Toyota dealer.
Have battery checked by
your Toyota dealer.
219
Battery recharging precautions
During recharging, the battery is producing hydrogen gas.
Therefore, before recharging:
1. If recharging with the battery installed
on the vehicle, be sure to disconnect
the ground cable.
2. Be sure the power switch on the recharger is off when connecting the
charger cables to the battery and when
disconnecting them.
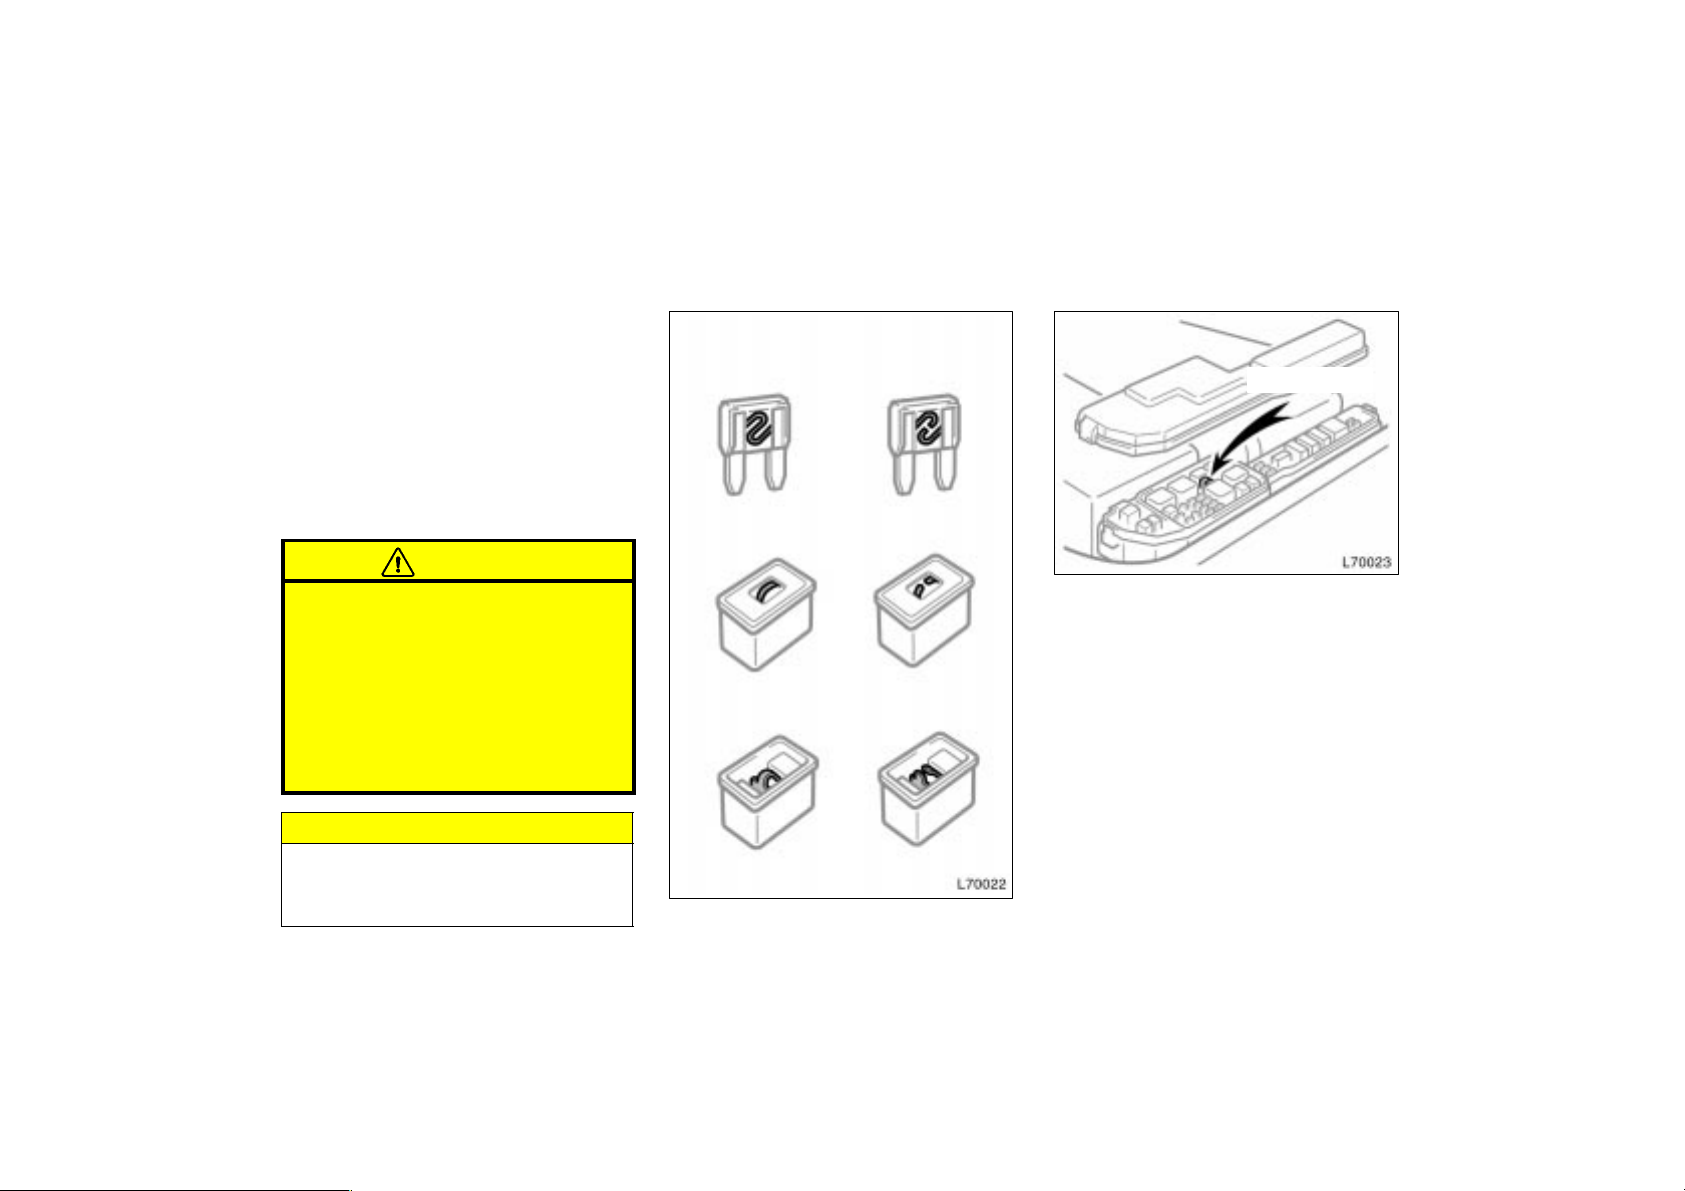
Checking and replacing fuses
Type A
Pull-out tool
Good Blown
CAUTION
Always charge the battery in an un-
confined area. Do not charge the
battery in a garage or closed room
where there is not sufficient ventilation.
Only do a slow charge (5A or less).
Charging at a quicker rate is dangerous. The battery may explode,
causing personal injuries.
NOTICE
Never recharge the battery while the
engine is running. Also, be sure all
accessories are turned off.
220
Type B
Good Blown
Type C
Good Blown
If the headlights or other electrical
components do not work, check the
fuses. If any of the fuses are blown,
they must be replaced.
See ”Fuse locations” in Chapter 7- 1 for
locations of the fuses.
Turn the ignition switch and inoperative
component off. Pull a suspected fuse
straight out and check it.
Determine which fuse may be causing the
problem. The lid of the fuse box shows
the name of the circuit for each fuse. See
Part 8 of this manual for the functions
controlled by each circuit.
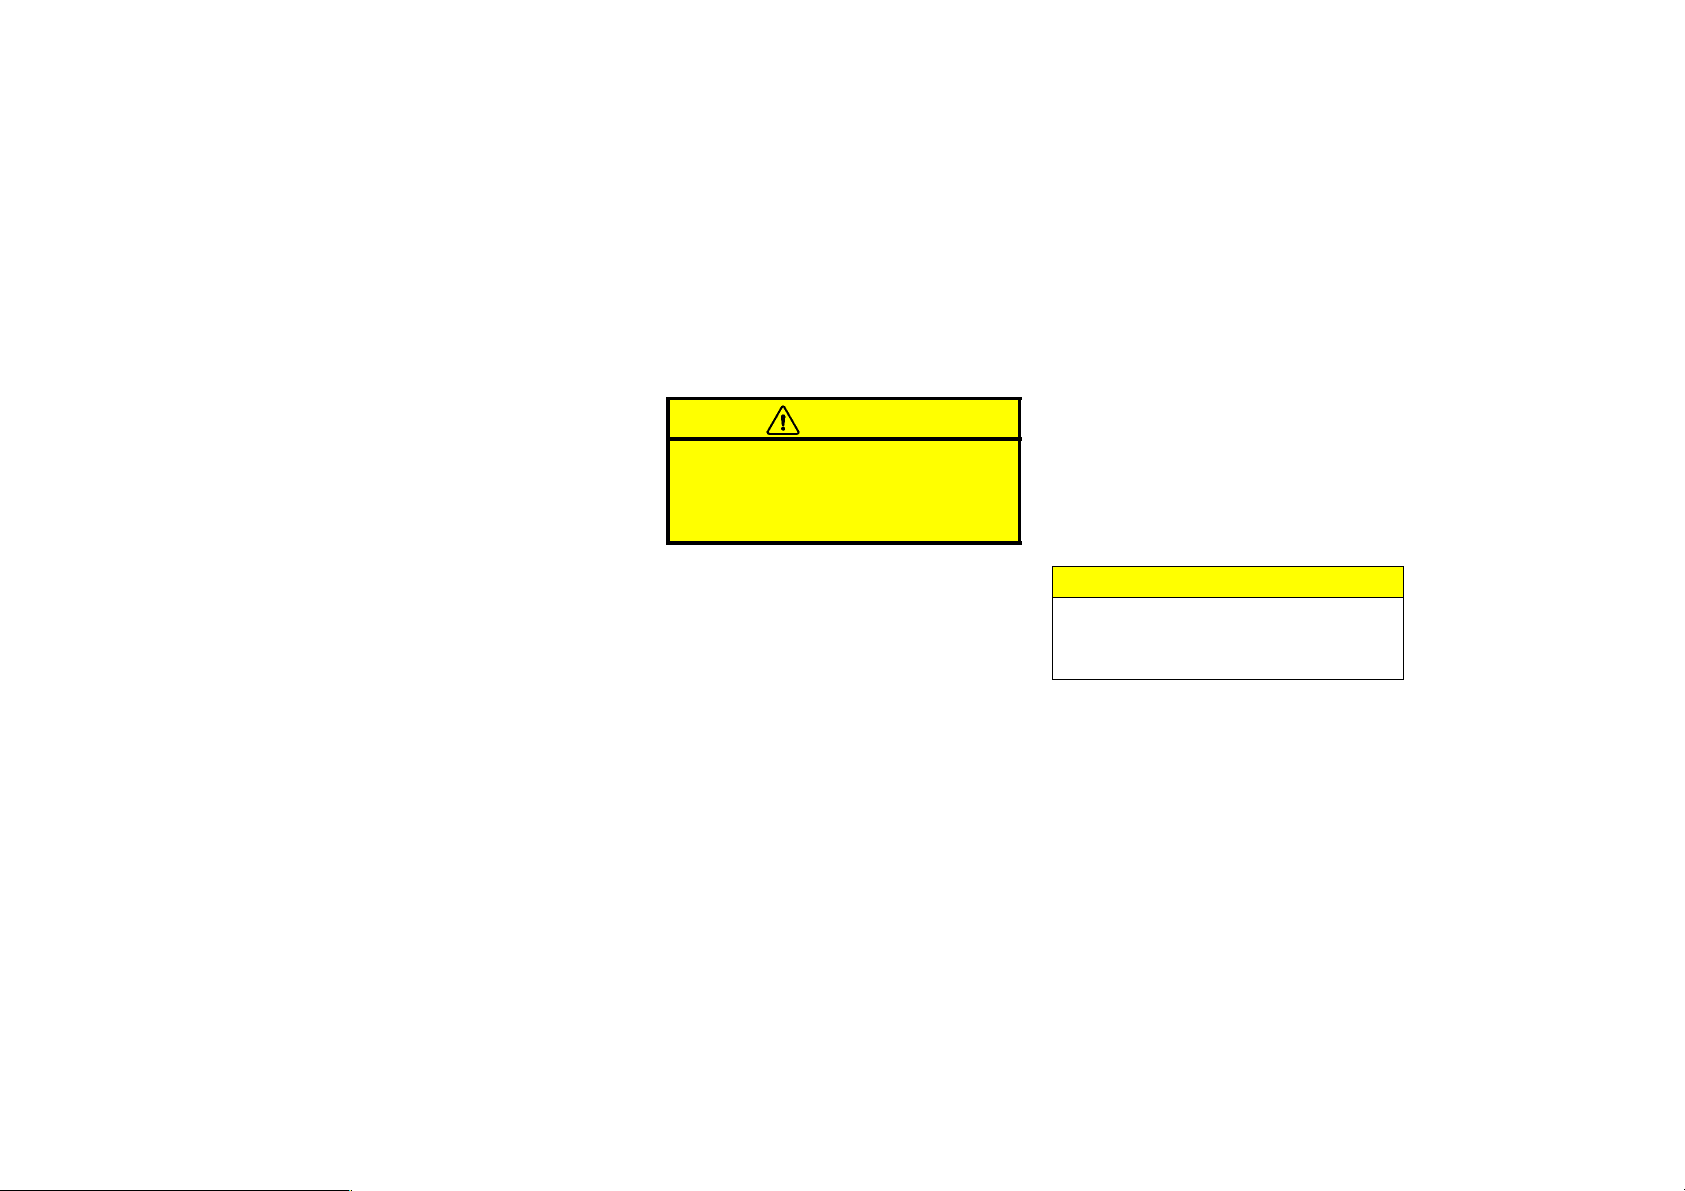
Types A and B fuses can be pulled out
by the pull-out tool. The location of the
pull- out tool is shown in the illustration.
If you are not sure whether the fuse has
blown, try replacing the suspected fuse
with one that you know is good.
If the fuse has blown, push a new fuse
into the clip.
Only install a fuse with the amperage rating designated on the fuse box lid.
If you do not have a spare fuse, in an
emergency you can pull out the
”MIRROR- HEATER”, ”DOME” or ”A/C”
fuse, which may be dispensable for
normal driving, and use it if its amperage
rating is the same.
If you cannot use one of the same amperage, use one that is lower,but as close as
possible to, the rating. If the amperage is
lower than that specified, the fuse might
blow out again but this does not indicate
anything wrong. Be sure to get the correct
fuse as soon as possible and return the
substitute to its original clip.
It is a good idea to purchase a set of
spare fuses and keep them in your vehicle for emergencies.
If the new fuse immediately blows out,
there is a problem with the electrical system. Have your Toyota dealer correct it as
soon as possible.
CAUTION
Never use a fuse with a higher amperage rating, or any other object, in
place of a fuse. This may cause extensive damage and possibly a fire.
Adding washer fluid
If any washer does not work or low
windshield washer fluid level warning
light comes on, the washer tank may be
empty. Add washer fluid.
You may use plain water as washer fluid.
However, in cold areas where temperatures range below freezing point, use
washer fluid containing antifreeze. This
product is available at your Toyota dealer
and most auto parts stores. Follow the
manufacturer’s directions for how much to
mix with water.
NOTICE
Do not use engine antifreeze or any
other substitute because it may damage your vehicle’s paint.
221
 Loading...