

Page 1
HDD/DVD VIDEO RECORDER
I
9
RD-XS35SU
RD-XS35SC
Quick Reference
This booklet is to help you start up your recorder and experience a basic operation.
To learn about the recorder and obtain its full performance, refer to the Owner’s Manual.
xx
I
(
is reference page in the INSTALLATION GUIDE, and
IMPORTANT: Before starting your hook-up and installation of your DVD recorder,
please review the safety instructions on
I
2
-
xx
O
in the OPERATIONS GUIDE.)
in the “INSTALLATION GUIDE”.
Notes on HDD
This unit contains a hard disc drive (HDD). A HDD is subject to shock, shakes, and environmental changes such as
temperature, which can damage data stored on the disc. Observe the following instructions.
Do not shock or shake the unit (especially during operation).
Do not use the unit on a shaky or unstable surface.
Do not place the unit on a location where it is not horizontal.
Do not cover the ventilation holes for the cooling fan.
Do not use in a location where the temperature rises or changes rapidly.
Do not disconnect the power plug from a wall outlet while the unit is turned on.
Do not disconnect the power plug from a wall outlet or break power supply to the unit. Before disconnecting the power plug,
be sure to press the power button and make sure the unit ends the finishing process and the power turns off completely. If the
power plug is disconnected or power supply is disrupted while the unit is recording, all recorded content will be erased.
Toshiba is not liable for any damage or loss of recorded data caused by shock, shakes, misoperation or malfunction.
Exemptions
Toshiba is not liable for any damage caused by fires, natural disaster (such as thunder, earthquake, etc.), acts by third
parties, accidents, owner’s intentional or unintentional misuse, or uses in other improper conditions.
Toshiba is not liable for incidental damages (such as profit loss or interruption in business, modification or erasure of recorded
data, etc.) caused by use or inability to use of this product.
Toshiba is not liable for any damage caused by neglect of the instructions described in the owner’s manual.
Toshiba is not liable for any damage caused by misuse or malfunction through simultaneous use of this product and the
connected equipment or software that Toshiba is not concerned.
Toshiba does not compensate for contents which was not recorded/edited because of some malfunctions of this product or
discs during operation, and is not liable for incidental damages (such as profit loss or interruption in business, etc.) produced
by such conditions.
P000453970
H
PM0025869010
RDXS35SUqE 06.2.13, 5:41 PM1
Page 2
Make sure the following accessories are supplied.
Supplied accessories
Remote control ............................................................. 1
Batteries (AAA) ............................................................. 2
Coaxial cable ................................................................ 1
Video/audio cable .......................................................... 1
®
G-LINK
OWNER’S MANUAL (INSTALLATION GUIDE) ............ 1
OWNER’S MANUAL (OPERATIONS GUIDE) .............. 1
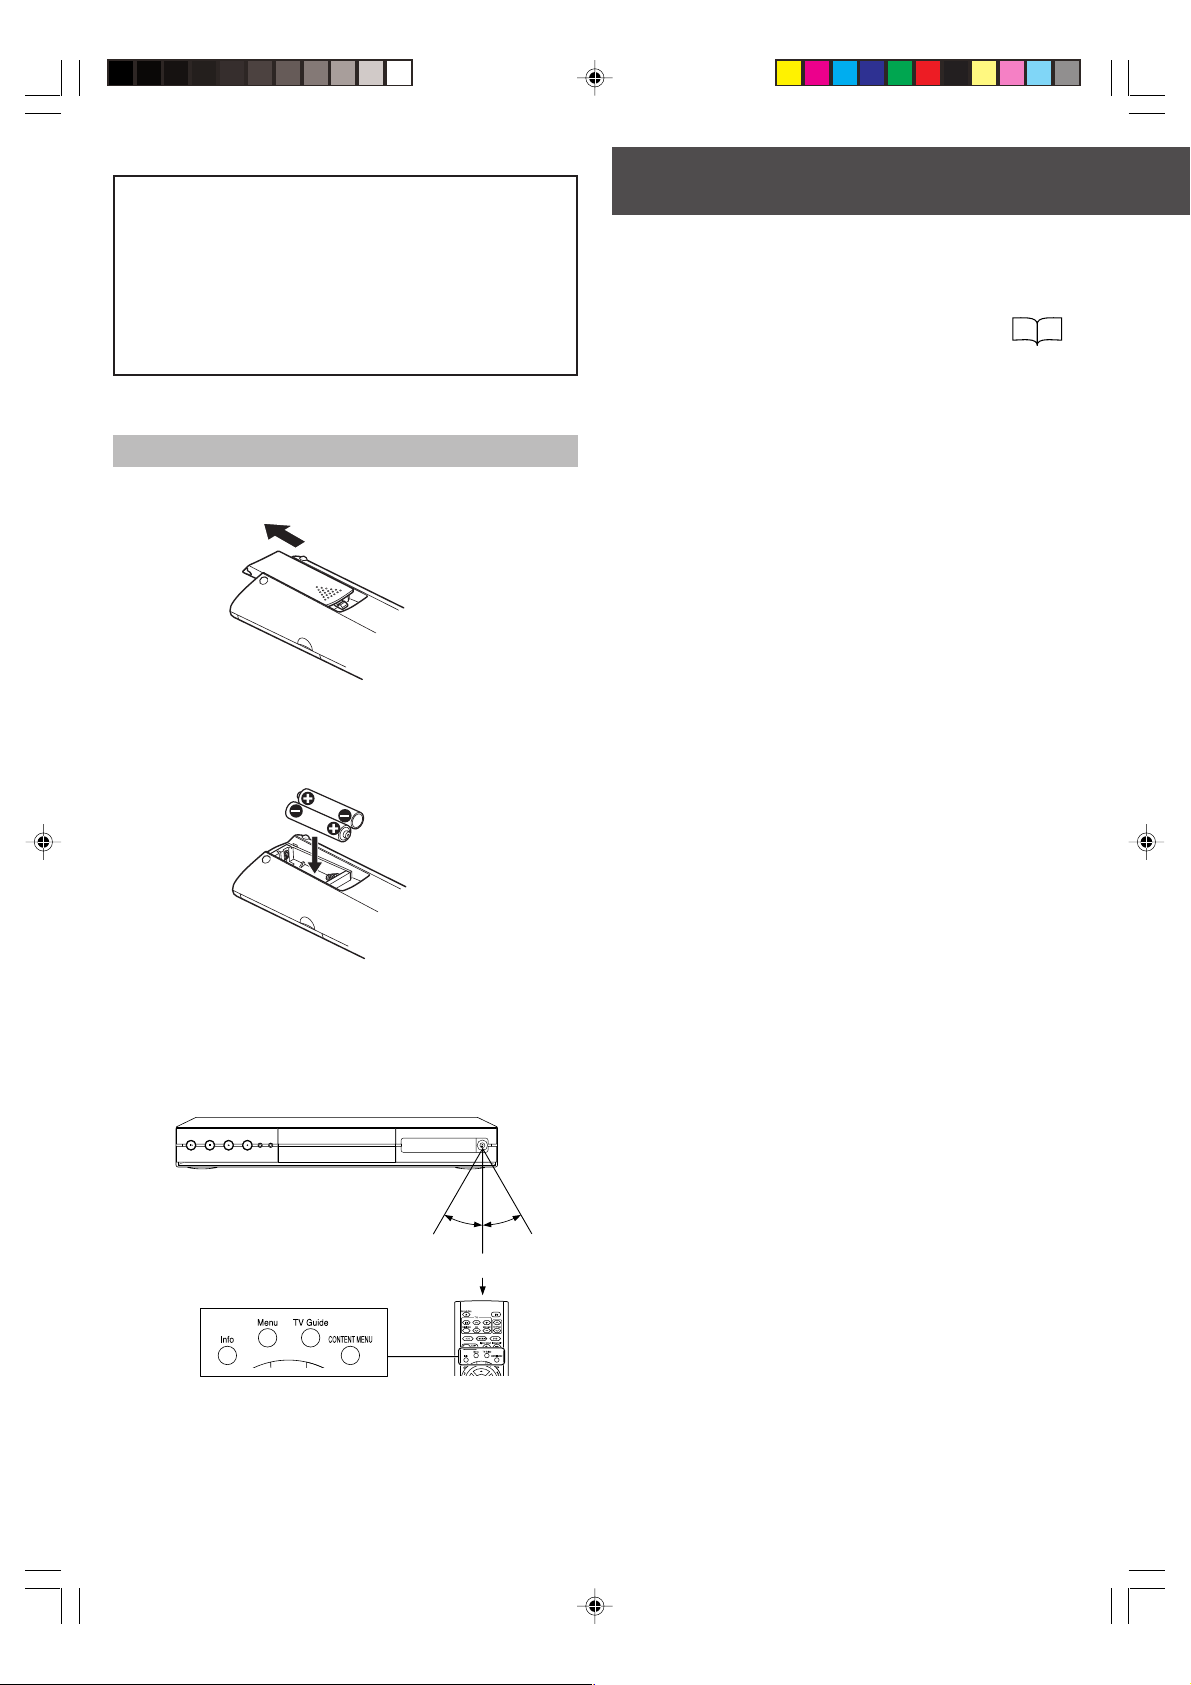
Preparing the remote control
cable ............................................................... 1
Open the cover.
1
Insert batteries (AAA size).
2
Make sure to match the + and – on the batteries to
the marks inside the battery compartment.
Connections
Connect your cable box to the RF IN
1
(FROM ANT.) terminal or the INPUT1 or
INPUT3 jacks on the recorder.
If you use the DSS set top box control function
connect your satellite set top box to the INPUT3 jacks.
If you are not using a cable box,
disconnect the antenna cable from your
TV, and connect it to the RF IN (FROM
ANT.) terminal on the recorder. Then skip
to step 3.)
Connect the supplied G-LINK® cable to the
2
G-LINK jack on the recorder.
Place the transmitter as close as possible to the signal
sensor of the cable box.
Connect the supplied coaxial cable of this
3
recorder to the RF OUT (TO TV) terminal
on the recorder and your TV.
Connect the supplied video/audio cable to
4
the OUTPUT jacks on the recorder and
your TV.
I
40
,
Close the cover.
3
Point the remote control at the remote sensor and
press the buttons.
Within about 7 m (23 ft)
Distance: About 7 m (23 ft) from the front of the
remote sensor
Angle: About 30° in each direction of the front of
the remote sensor
30°
30°
If you record from a VCR, connect it to the
5
recorder.
The following inputs are available:
Rear: INPUT1 jacks, INPUT3 jacks
Front: INPUT2 jacks (Open the lid on the left corner of
the front panel.)
Connect the power cord of the recorder to
6
a wall outlet.
Make sure that the powered recorder lights the
ON/STANDBY indicator on the front panel.
RDXS35SUqE 06.2.13, 5:41 PM2
– 2 –
Page 3
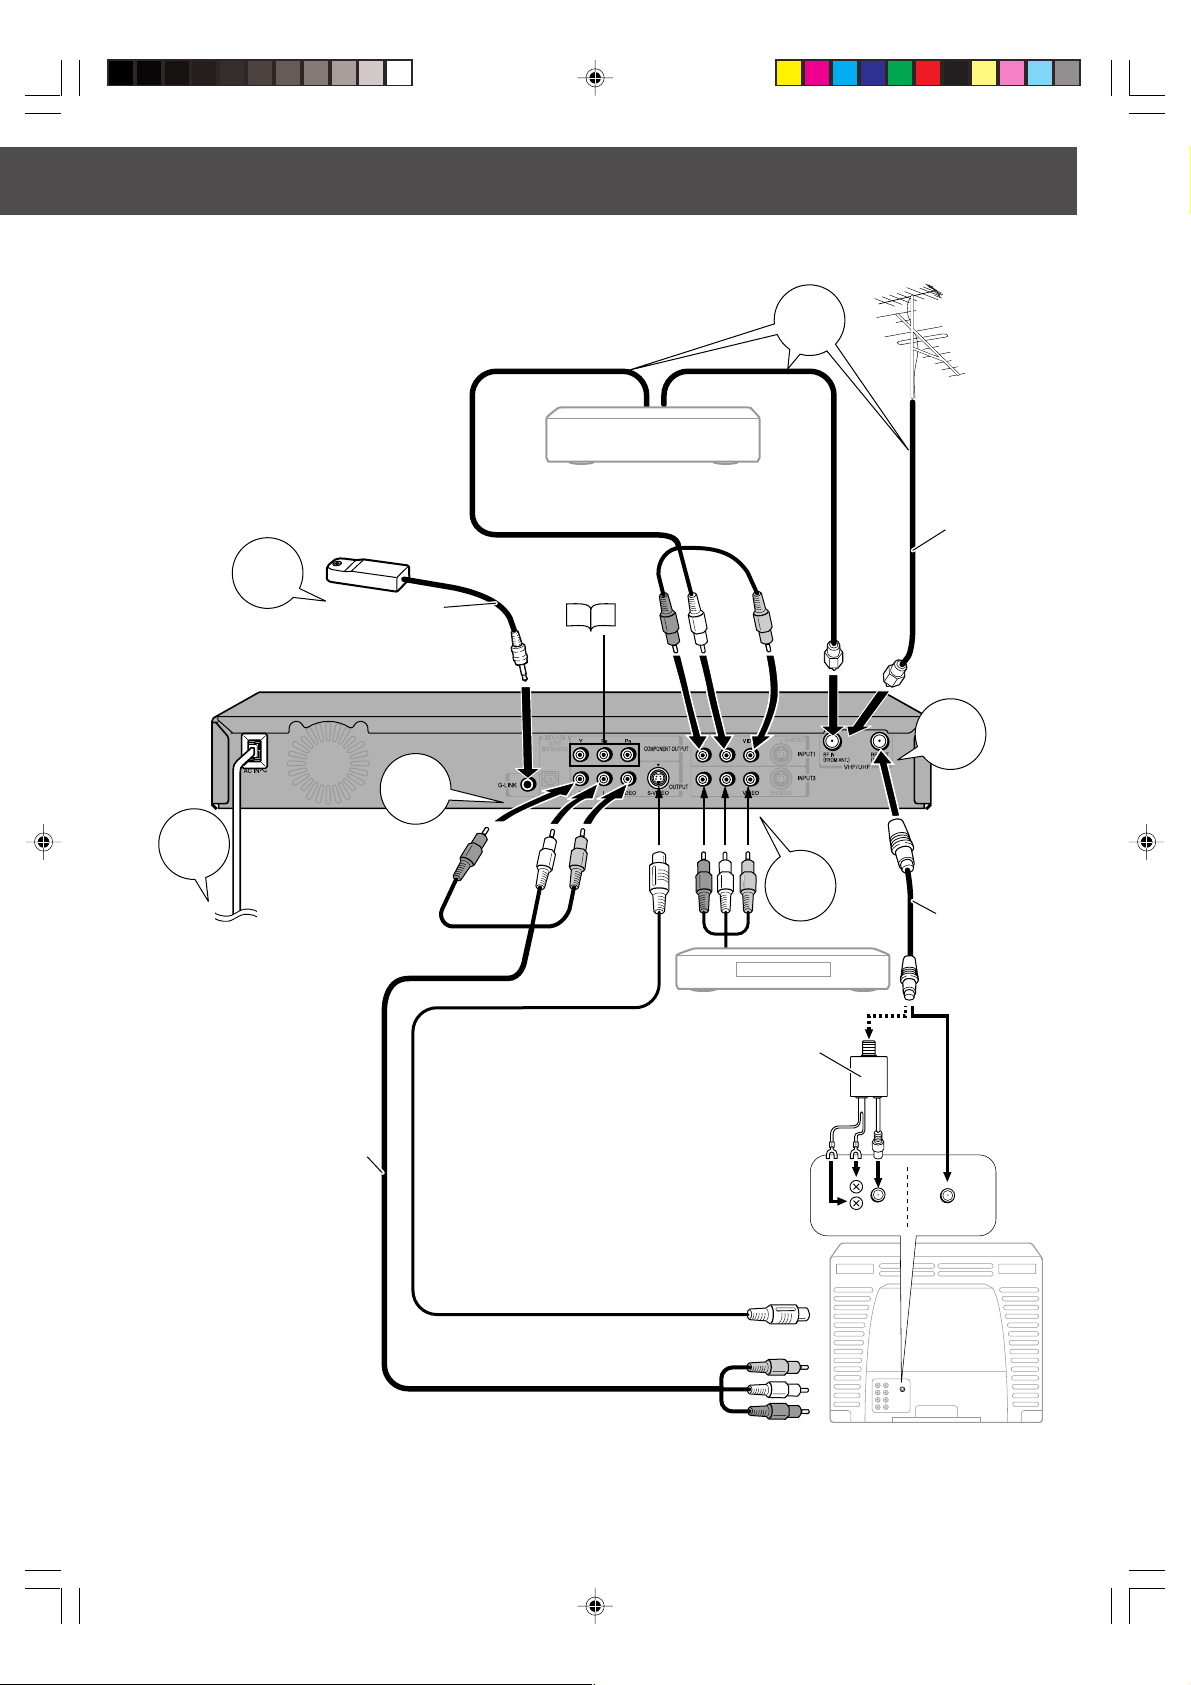
Refer to the owner’s manual of each connected equipment as well.
Select one of these connections.
Set top box
Cable box
1
Place close to the signal sensor
of the set top box.
2
6
To wall outlet
Video/audio cable
(supplied)
G-LINK
(supplied)
®
cable
4
COMPONENT
OUTPUT
I
(See .)
(White)(Red)
Types of an antenna terminal may vary
depending on the TV.
Check your type on your TV, and connect
properly using either method as shown.
26
(Red)
(Yellow)
Antenna splitter
(not supplied)
(Yellow)(White)
5
VCR
Antenna cable
(not supplied)
3
Coaxial cable
(supplied)
RDXS35SUqE 06.2.13, 5:41 PM3
If the TV has an S-video input, connect the
recorder with an S-video cable. When using
an S-video cable, do not connect the yellow
video cable.
– 3 –
To S-video input
To video input
To audio input
VHF/UHF
The RF OUT (TO TV) terminal (step 3) is for tuner
pass through only. To view pictures from the recorder,
the video cables must be connected.
TV
Page 4

Start
Settings
Preparation
Turn on the equipment (TV, VCR, etc.)
1
connected to the recorder.
Select the corresponding video input
2
on your TV.
Press ON/STANDBY on the front panel
3
or on the remote control.
When the power turns on, ON/STANDBY indicator
changes color from red (standby mode) to green
(operation).
After a few seconds, a startup screen appears.
The following icon will appear on the top right corner of
the screen.
Start
e.g.
When the icon disappears, the recorder is ready to
operate.
Note
To turn the recorder off, press ON/STANDBY again.
When the recorder is turned on for the first time, the
Welcome screen will be displayed after the “Loading”
icon has disappeared.
Press ENTER to start your setup.
The next screen appears.
Make the TV Guide On Screen
In the United States, TV Guide and other related marks are registered
marks of Gemstar-TV Guide International, Inc. and/or one of its
affiliates. In Canada, TV Guide is a registered mark of Transcontinental
Inc., and is used under license by Gemstar-TV Guide International, Inc.
Aux Etats Unis TV Guide et d’autres marques relatives sont des
marques déposées de Gemstar-TV Guide International, Inc. et/ou d’une
de ses sociétés affiliées. Au Canada TV Guide est une marque déposée
de Transcontinental Inc., utilisée sous licence de Gemstar-TV Guide
International. Inc.
The TV Guide On Screen system is manufactured under license from
Gemstar-TV Guide International, Inc. and/or one of its affiliates.
Le système TV Guide On Screen est fabriqués sous licence de GemstarTV Guide International, Inc. et/ou d’une de ses sociétés affiliées.
®
setup (next page).
Loading
ON/STANDBY Indicator
RDXS35SUqE 06.2.13, 5:41 PM4
The TV Guide On Screen system is protected by one or more of the
following issued United States patents 6,498,895, 6,418,556, 6,331,877,
6,239,794; 6,154,203; 5,940,073; 4,908,713; 4,751,578; 4,706,121.
Le système TV Guide On Screen est protégés par un ou plusieurs
brevets émis aux Etats Unis, comme le 6,498,895, 6,418,556,
6,331,877, 6,239,794; 6,154,203; 5,940,073; 4,908,713; 4,751,578;
4,706,121.
– 4 –
Page 5

TV Guide On Screen® Setup
Setup selection
1
Your DVD Recorder is equipped with the TV Guide On Screen™
Interactive Program Guide, which provides program listings,
one-touch recording, and more –– all subscription FREE!
Please follow the on-screen setup instructions to enable your TV
Guide On Screen system now. Or, press the GUIDE Key on your DVD
Recorder remote at any time.
What would you like to do now?
Set up TV Guide On Screen now
Remind me to set it up later
Don’t remind me again
Reminder
Cable service
4
STEP 2: Configuring for Cable
To supply your DVD Recorder with correct program listings, the TV Guide On
Screen system needs to know if your DVD Recorder receives its signal from a cable
service.
Do you have cable service connected to this DVD recorder?
Yes
No
Using your DVD Recorder remote, move up or down to highlight your answer. Press
Enter to choose.
Using your DVD Recorder remote, move up or down to highlight your answer. Press
Enter to choose.
Instructions are provided at the bottom for each screen.
Press / to select “Set up TV Guide
On Screen Now”, then press ENTER.
Country
2
Press
STEP 1: Identifying Your Location
To supply your DVD Recorder with correct program listings, the TV Guide On
Screen system needs to know your DVD Recorder’s location.
Which country is your DVD Recorder located in?
USA
Canada
Using your DVD Recorder remote, move up or down to highlight your answer. Press
Enter to choose.
/ to select, then press ENTER.
Zip or postal code
3
STEP 1: Identifying Your Location
To supply your DVD Recorder with the correct program listings, the TV Guide On
Screen system needs to know the town or city where your DVD Recorder is
installed.
Press
/ to select, then press ENTER.
If the answer is “No”, you will go to step 12.
Cable connection
5
Press
STEP 2: Configuring for Cable
You have indicated that you have cable service. Now the TV Guide On Screen
system needs some additional information.
Is a cable box connected to this DVD Recorder?
Yes
No
Using your DVD Recorder remote, move up or down to highlight your answer. Press
Enter to choose.
/ to select, then press ENTER.
Cable input
6
STEP 2: Configuring for Cable
Your DVD Recorder has more than one input jack. To operate properly with your
cable box, the TV Guide On Screen system needs to know which one your cable
box is plugged into. You may have to look at the back of your DVD Recorder
if you are unsure, as an incorrect selection will result in a blue or snowy screen while
watching TV.
Please indicate which DVD Recorder input the cable box is
plugged into.
TUNER
Line 1
Please enter the 5-digit ZIP code where your DVD Recorder is
located:
= = = = =
Using your DVD Recorder remote, move up, down, left, or right to enter your
information. Press Enter to confirm.
Input your numbers by either below,
then press ENTER:
• Number buttons
/ to select a number, then / to move to
•
another field
RDXS35SUqE 06.2.13, 5:41 PM5
– 5 –
Press
Using your DVD Recorder remote, move up or down to highlight your answer. Press
/ to select, then press ENTER.
Enter to choose.
If you select “TUNER”, you will go to step 7.
If you select “Line 1”, you will go to step 8.
(Continued)
Page 6

Settings (Continued)
Tuning channel for the cable box
7
Press
STEP 2: Configuring for Cable
To operate properly with your cable box, the TV Guide On Screen system needs to
know the channel your DVD Recorder is on when using the cable box. The most
commonly used output channel is 03. Please consult your cable box provider if you are
unsure, as an incorrect selection will result in a blue or snowy screen while
watching TV.
What is your DVD Recorder tuned to when using the cable box?
Ch 2
Ch 3
Ch 4
Using your DVD Recorder remote, move up or down to highlight your answer. Press
Enter to choose.
/ to select, then press ENTER.
Read the instruction and the diagram,
8
and confirm the G-LINK
®
cable is
properly installed.
If OK, press ENTER.
Cable box brand name
9
STEP 2: Configuring for Cable
Selecting the correct cable box brand from the list is needed to automatically
receive program listings. If you do not know the cable box brand, please consult
your cable provider.
Cable box code testing
11
When testing is done, the following screen
automatically appears.
STEP 2: Configuring for Cable
Cable testing in progress... please do not press any keys on
any remote control.
Now testing code 036 (Toshiba)...
Press Enter to continue.
STEP 2: Configuring for Cable
The TV Guide On Screen system needs to locate the correct code for yourcable box
brand in order to work properly.
Is your cable box now tuned to channel 09?
Yes
No
Test the code again
Using your DVD Recorder remote, move up or down to highlight your answer. Press
Enter to choose.
What brand of cable box is connected to this DVD Recorder?
Not listed
Archer
Cable Cinema
Cabletenna
Using your DVD Recorder remote, move up or down through the list to find your
brand (move down for more brands). Press Enter to choose.
Press
/ to select, then press ENTER.
Cable box preparation
10
STEP 2: Configuring for Cable
The TV Guide On Screen will conduct a series of tests to find the
correct code to control your cable box.
Follow steps A and B below
A: Please tune your cable box to channel 02
B: Make sure to leave your cable box turned ON
Once you have completed these steps, press Enter on the DVD Recorder remote to
begin testing.
Press / to select, then press ENTER.
If your answer is “Ye s ”, and:
• if you selected “TUNER” at step 6,
you will go to step 13.
• if you selected “Line 1” at step 6,
you will go to step 12.
Antenna connection
12
Press
STEP 3: Configuring for Antenna
To supply your DVD Recorder with correct program listings, the TV Guide On Screen
system needs to know if you have attached an antenna to your DVD Recorder to
receive over-the-air stations.
Do you have an antenna connected to your DVD Recorder?
Yes
No
Using your DVD Recorder remote, move up or down to highlight your answer. Press
Enter to choose.
/ to select, then press ENTER.
Follow the instructions, then press
ENTER.
RDXS35SUqE 06.2.13, 5:41 PM6
– 6 –
Page 7

Confirmation
13
Press
Confirmation
14
STEP 4: Confirming Your Settings
You have entered the following TV Guide On Screen system settings. If any setting
is marked INCOMPLETE, you will not be able to use the feature until you complete
that portion of TV Guide On Screen system setup.
ZIP code - 46001 (USA)
Cable Box on input “TUNER” Ch. 3
Cable Box selected: code 036 (Toshiba)
Are the above settings correct?
Yes, end setup
No, repeat setup process
Using your DVD Recorder remote, move up or down to highlight your answer. Press
Enter to choose.
/ to select, then press ENTER.
Congratulations!
You have completed the setup of your TV Guide On Screen system.Up-to-date
listings will begin loading over the next 24 hours when your DVD Recorder is
powered off.
It may take more than one day for all eight days of listings to update. During this
period feel free to use your DVD Recorder. The guide will automatically receive
updates during the period when your DVD Recorder is turned off.
If you have changed the location or cable configuration settings, you will receive
any changes to your local channel lineup within 24 hours.
Notes
• If you move to another area or change your cable box or
antenna and cable configulation, redo the TV Guide On Screen
setup. Press TV Guide and select “SETUP” with / , then
press ENTER.
• If TV Guide On Screen® system is not available or has any
troubles in your area, try another method to control channels.
See “C: Satellite set top box setting”
I
40
.
The settings are all complete.
Proceed to the next page to begin
your operation.
®
Press Enter to continue.
You have successfully completed the setup!
Press ENTER.
Information
15
1. To receive your channel lineup and program listings, leave your cable box ON.
Your DVD Recorder should be turned OFF overnight.
2. To view program listings, press the GUIDE key on your DVD Recorder remote.
3. You must redo TV Guide On Screen system setup if you:
Move your DVD Recorder to a new ZIP or postal code
Cancel cable service or change cable boxes
To enter the TV Guide On Screen system setup, press the GUIDE key, then go to the
Menu Bar and highlight Setup.
Helpful information
Press Enter to continue.
Read the information and press ENTER.
RDXS35SUqE 06.2.13, 5:41 PM7
– 7 –
Page 8

Whenever you operate the recorder:
1 Turn on the equipment (TV, VCR, etc.) connected to the recorder.
2 Select the corresponding video input on your TV.
3 Press ON/STANDBY to turn the recorder on.
Notes on
While the icon is flashing:
• The recorder is checking the status and reading data of the HDD and the DVD drive for startup. (If the DVD drive does not
Operations
contain a disc, the recorder consumes less time to startup, because it does not need to read data from the DVD drive.)
• The recorder cannot respond to any operations of buttons other than CH/Page and INPUT SELECT. Operate all other
functions after the icon has disappeared.
• Never unplug the recorder, as the unit and recorded data may be damaged.
Loading
Loading a disc
Press OPEN/CLOSE to open the disc tray.
DVD-RAM disc with cartridge (TYPE1/TYPE2/TYPE4) Disc without cartridge
Face the side to use (for double sided disc) or the printed side
(for single sided disc) up, and insert the cartridge into the tray
frame following the direction of the arrow on the cartridge.
After loading a disc, press OPEN/CLOSE again to close the disc tray.
Place a disc in the inside hollow.
Disc selection
The recorder is compatible with the following discs.
• DVD-RAM
• DVD-R
• DVD-RW
Which should be used to record? It depends on the purpose of use.
Purpose
Recording
Recording copy-once programs
Editing
Playing on a device other than this
recorder
• This is a brief explanation. For more details, see
Therefore, DVD-RAM is better for recording, and DVD-R/RW for distribution of recorded contents.
HDD
DVD-RAM
DVD-RAM
Ye s
Ye s
Ye s
Yes
(on compatible device)
11
O
,
38
O
.
DVD-RAM
DVD-R
DVD-RW
DVD-R
Ye s
No
No
Yes
(on most DVD players)
Note on DVD-R/RW recording
• When recording directly on a DVD-R/RW, or when
recording contents which will be copied to a DVD-R/
RW later, make the settings. See
• A recorded DVD-R/RW needs to be finalized to play
on another DVD player.
DVD-RW
Ye s
No
No
Yes
(on most DVD players)
39
O
.
RDXS35SUqE 06.2.13, 5:41 PM8
– 8 –
Page 9

Selecting a channel
Press INPUT SELECT to select the input
1
to which the cable box is connected
(2ch/3ch/4ch/Line1, page 5, 6).
Press CH/Page or the number buttons.
2
If you did not connect a cable box:
Press CH/Page or the number buttons.
Recording a current program
Press HDD or DVD to select a media to
1
record on.
HDD : To record on the HDD.
DVD : To record on a DVD-RAM/R/RW disc.
The HDD or DVD indicator illuminates.
Press REC MODE repeatedly to select a
2
recording mode.
The recorder stores 5 user recording modes to facilitate
the selection of picture and sound quality.
Each time you press REC MODE, the indicator on the
front panel display changes.
SP: Standard setting. (Default at factory set)
LP: For longer recording, but inferior to “SP” in
picture quality.
MN: Customized setting of bit rate.
You can set one recording mode as default. Also you
can customize each recording mode. See
Press REC.
3
Recording starts.
To stop recording
Press STOP.
Note
• One recording cannot exceed 9 hours even if the HDD is
selected.
When a DVD disc is used, the time that can be recorded varies
according to the recording mode and the residual capacity of
the disc.
Checking the disc capacity
Press REMAIN.
The disc capacity is displayed at the bottom of the screen.
To turn it off, press REMAIN again.
.
153
O
RDXS35SUqE 06.2.13, 5:41 PM9
– 9 –
Page 10

Operations
Recording from a connected VCR
Press INPUT SELECT repeatedly so that
1
“L-1,” “L-2,” or “L-3” appears on the
front panel display, corresponding to
the input in which the device is
connected.
Each time you press the button, the indicator changes.
L-1: To record pictures from equipment connected to
the INPUT1 jacks on the rear panel.
L-2: To record pictures from equipment connected to
the INPUT2 jacks on the front panel.
L-3: To record pictures from equipment connected to
the INPUT3 jacks on the rear panel.
Perform steps 1 - 2 of “Recording a
2
current program” (page 9).
Press REC of this recorder to start
3
recording.
Start playback of the source content on
4
the connected equipment.
When recording is completed, press
5
STOP.
Playing recorded contents
Press CONTENT MENU.
1
CONTENT MENU Title List appears.
e.g.
CONTENT
Title List Page
MENU
001:
2006/03/24 07:00
am TV:4
2006/03/29 09:00
pm TV:3
2006/04/07 11:00
am TV:4
(0:53:45)
Original
(0:52:40)
Original
(0:30:08)
Original
1/ 2
Press / / / to select a title
2
(chapter).
The following buttons are available.
HDD, DVD: To switch the drive.
PICTURE SEARCH: To turn the page.
: To view chapters in the current title.
Press ENTER.
3
Playback starts from a selected title (chapter).
To stop playback
Press STOP.
2006/03/24 11:00
pm TV:6
(0:29:50)
Original
2006/04/07 07:00
am TV:8
(0:54:30)
Original
2006/04/08 09:00
pm TV:10
(0:51:28)
Original
HDD
RDXS35SUqE 06.2.13, 5:41 PM10
– 10 –
Page 11

Erasing content
On CONTENT MENU, select an
1
unnecessary title (chapter).
Press QUICK MENU.
2
A Quick Menu appears.
e.g.
CONTENT
Title List Page
MENU
Quick Menu
HDD :
Title information
2004/06/08 07:00
Create thumbnail
am TV:4
High speed dubbing
Rate conversion dubbing
Chapter function
Edit functon
Special playback mode
2004/06/12 09:00
pm TV:3
Save captured images
Disc information
Display changeover
2004/07/12 11:00
Specific page jump
pm TV:4
Title delete
Exit
(0:53:45)
Original
(0:52:40)
Original
(0:30:08)
Original
1/ 2
2006/03/24 11:00
pm TV:6
Original
2006/04/07 07:00
am TV:8
Original
2006/04/08 09:00
pm TV:10
Original
Press / / / to select “Title
3
delete”.
e.g.
CONTENT
Title List Page
MENU
Quick Menu
HDD :
Title information
2004/06/08 07:00
Create thumbnail
am TV:4
High speed dubbing
Rate conversion dubbing
Chapter function
Edit functon
2004/06/12 09:00
Special playback mode
pm TV:3
Save captured images
Disc information
Display changeover
2004/07/12 11:00
Specific page jump
pm TV:4
Title delete
Exit
(0:53:45)
Original
(0:52:40)
Original
(0:30:08)
Original
1/ 2
2006/03/24 11:00
pm TV:6
Original
2006/04/07 07:00
am TV:8
Original
2006/04/08 09:00
pm TV:10
Original
Press ENTER.
4
The confirmation message appears.
Press / to select “Yes” or “No” then
5
press ENTER again.
Copying recorded contents
HDD
(0:29:50)
(0:54:30)
(0:51:28)
HDD
(0:29:50)
(0:54:30)
(0:51:28)
Press / to select “Copy”, “Move” or
4
“Same Disc”.
To copy from the HDD to a loaded disc, select “Copy”.
For details, see
.
101
O
Press ENTER.
5
Copying starts.
Playing a DVD-video disc
Load a disc.
1
Press DVD.
2
Press PLAY.
3
When a top menu appears
Some DVD video discs may include a top menu, on which
you can view the structure of contents or select a scene.
Most of the top menus automatically appear in certain
scenes, and also are displayed on demand. Actual
operation of the top menu depends on the disc. This
section explains a general example of how to operate a top
menu. Also refer to the instructions of the disc itself.
1) Press TOP MENU.
2) Press
3) Press ENTER.
/ / / to select the title you want.
If the titles in the top menu are assigned a number, you
can directly locate a specific title by pressing its
designated number with the number buttons.
On CONTENT MENU, select a title
1
(chapter).
Press QUICK MENU.
2
The Quick Menu appears.
Press / / / to select “High speed
3
dubbing”, then press ENTER.
e.g.
CONTENT
High Speed Library Dubbing
MENU
2006/04/10 09:00pm TV:4
RDXS35SUqE 06.2.13, 5:41 PM11
(0:52:40)
(Saves Original)
(Deletes Original)
(Saves Original)
Original
Copy
Move
Same Disc
Changing the playback speed
To skip by the specific
time.
To go back by the
specific time.
To skip chapters/tracks.
To play in slow-motion.
To play in fast reverse
or fast forward.
To play frame by frame.
To stop playback.
To pause playback.
– 11 –
Page 12

Operations
Using the TV Guide On Screen® services
As you have done TV Guide On Screen® setup, you can do
the following services of TV Guide.
• LISTINGS:
Check out up to 8 days on on-screen listings
• RECORDINGS:
Keep track of everything you record
• SEARCH:
Sort by keyword, movies, sports, HDTV, and more
• SCHEDULE:
Review and modify scheduled recordings and reminders
• SETUP:
Change defaults to your preference or redo the setup
Press TV Guide.
1
The TV Guide Listings appears.
Main service
8:03
Video window
RECORDINGS SEARCHLISTINGS
Press Menu now for Listings Options
Move to highlight any show
Press Enter to tune to current show in glid
Press Menu for more current show options
Info Box
Select the service by pressing / ,
2
then press ENTER.
See the next page for the services.
To exit the TV Guide mode, press TV
3
Guide.
A program in the video window appears in a full screen.
You may use the following buttons:
/ / / :
Moves the highlight.
ENTER:
Makes a selection or executes an action.
Menu:
Displays a Panel Menu which you can choose options.
INFO
RDXS35SUqE 06.2.13, 5:41 PM12
INFO
Info: (while
Changes the Info Box size.
Opens a Help screen when you move the highlight on the
service bar.
CH/Page:
Turns the page.
– 12 –
is displayed)
Page 13

LISTINGS
Whenever you enter the TV Guide mode, you will first see this
SEARCH
RECORDINGS
SCHEDULE
SETUP
service.
Pressing Info opens a Help screen. Operate following the
guidance.
• Selecting a program
• Selecting a channel
• Setting a program to remind or record
• Locking/unlocking the video window, etc.
You can select programs by category or by keyword.
Pressing Info opens a Help screen. Operate following the
guidance.
• Searching by category (Alphabetical, HDTV, Movies,
Sports, Children, Educational, News, Variety, Series)
• Searching by entering a keyword, etc.
You can display a list of previously recorded or currently
recording programs on the recorder or the currently loaded
DVD-RAM disc.
Pressing Info opens a Help screen. Operate following the
guidance.
Notes
• On a Panel Menu, an option may have arrows on both sides.
Press / to cycle the selection.
• On a Panel Menu, pressing Menu cancels any changes and
closes the menu.
• Listing programs in alphabetical order or by date and time
• Playing recorded program from where was last stopped or
the beginning
• Deleting recorded programs, etc.
You can set, review, edit, or delete recording or remind
events.
Pressing Info opens a Help screen. Operate following the
guidance.
• Setting a recording event from the frequency selection
(Once, Regularly, Weekly)
• Setting a reminder from the frequency selection (Once,
Regularly, Weekly)
• Deleting recording or reminder events.
• Editing a recording event, etc.
You can change defaults. Also you may redo the setup from
here.
Pressing Info opens a Help screen. Operate following the
guidance.
• Arranging the position the channel appears in Listings
• Changing the tuning channel number
• Switching channels on/off in Listings
• Changing Info Box size
• Extending a recording’s start or end time
• Adjusting the time you receive a reminder.
• Executing the setup again, etc.
RDXS35SUqE 06.2.13, 5:41 PM13
– 13 –
Page 14

Operations
Program recording with TV Guide on screen
Press TV Guide.
1
e.g.
CONTENT
Title List Page
MENU
3:19News
Welcome
to
TV G
UIDE ON SCREEN
select for more information
Using
TV G
UIDE ON SCREEN
TV G
UIDE ON SCREEN
select for more information
Press Menu now for Listings Options
Move to highlight any show
Press Enter to tune to current show in glid
Press Menu for more current show options
TODAY 3:00AM 3:30AM
1/ 2
RECORDINGS SEARCHLISTINGS
bcd
News Nightline
BOX
Rainfield Limpsons
GBS
News Dave Live
News Jay Lean
Charles Rose
QBS
Fisher Spin Town
Everybody loves... Bill & Greg
INFO
Press / to select “LISTINGS”.
2
A list of TV programs is displayed on the menu.
e.g.
CONTENT
Title List Page
MENU
3:19News
Welcome
to
TV G
UIDE ON SCREEN
select for more information
Using
TV G
UIDE ON SCREEN
TV G
UIDE ON SCREEN
select for more information
TODAY 3:00AM 3:30AM
S WCVS
News:
1/ 2
RECORDINGS SEARCHLISTINGS
bcd
News Nightline
BOX
Rainfield Limpsons
GBS
News Dave Live
News Jay Lean
Charles Rose
QBS
Fisher Spin Town
Everybody loves... Bill & Greg
3:00 3:35
INFO
®
HDD
HDD
Press / to select a TV program and
3
press REC.
Recording starts.
Notes
• To record satellite TV programs, set a program recording
manually. (next page)
• When you cannot download data of the TV program list, you can
set a recording manually. (next page)
To stop programed recording
1) Press TV Guide.
2) Press
3) Press REC repeatedly until the recording icon
/ / / to select a TV program currently
being recorded.
disappears.
RDXS35SUqE 06.2.13, 5:41 PM14
– 14 –
Page 15

Getting more information on a TV program
Setting program recording manually
Press TV Guide.
1
e.g.
CONTENT
Title List Page
MENU
8:03News
Welcome
to
TV G
UIDE ON SCREEN
select for more information
Using
TV G
UIDE ON SCREEN
TV G
UIDE ON SCREEN
select for more information
Press Menu now for Listings Options
Move to highlight any show
Press Enter to tune to current show in glid
Press Menu for more current show options
TODAY 3:00AM 3:30AM
1/ 2
RECORDINGS SEARCHLISTINGS
bcd
News Nightline
BOX
Rainfield Limpsons
GBS
News Dave Live
News Jay Lean
Charlie Rosa
QBS
Fisher Spin Town
Everybody loves... Bill & Greg
Press / to select a TV program.
2
e.g.
CONTENT
Title List Page
MENU
3:19News
Welcome
to
TV G
UIDE ON SCREEN
select for more information
Using
TV G
UIDE ON SCREEN
TV G
UIDE ON SCREEN
select for more information
TODAY 3:00AM 3:30AM
S WCVS
News:
Press Info to display the program’s
3
information.
e.g.
CONTENT
Title List Page
MENU
3:19News
Welcome
to
TV G
UIDE ON SCREEN
select for more information
Using
TV G
UIDE ON SCREEN
TV G
UIDE ON SCREEN
select for more information
TODAY 3:00AM 3:30AM
S WCVS
News:
1/ 2
RECORDINGS SEARCHLISTINGS
bcd
News Nightline
BOX
Rainfield Limpsons
GBS
News Dave Live
News Jay Lean
Charles Rose
QBS
Fisher Spin Town
Everybody loves... Bill & Greg
1/ 2
RECORDINGS SEARCHLISTINGS
bcd
News Nightline
BOX
Rainfield Limpsons
GBS
News Dave Live
News Jay Lean
Charles Rose
QBS
Fisher Spin Town
Everybody loves... Bill & Greg
3:00 3:35
3:00 3:35
Press TV Guide.
1
HDD
INFO
HDD
INFO
HDD
INFO
Press / to select “SCHEDULE” and
2
press Menu.
The Schedule Options menu appears.
Press / to select “new manual
3
recording” and press ENTER.
The Record Options menu appears.
Press / to select an item for
4
program recording.
date: Press number buttons to enter the date
(Month/Day/Year).
start: Press number buttons and
/ to set the
start time.
end: Press number buttons and
/ to set the end
time.
channel: Press number buttons to select a channel.
input: Select a recording source.
TUNER-TV broadcasts
Line 1, 2, 3-Satellite TV etc.
recorder
quality: Press
frequency
:Press / to select a recording media.
/ to select a picture quality.
:Press / to select how often programed
recording is executed.
When finishing the setting press
5
ENTER.
42
O
To return to the service menu
Press Menu when choosing options of a service menu.
RDXS35SUqE 06.2.13, 5:41 PM15
– 15 –
Page 16

Using EASY NAVI
Open “EASY NAVI Main Menu”, a main gate to the functions of this recorder. From this menu, you can access the desired
functions.
Press EASY NAVI.
1
Sound is muted and the following GUI appears. (Actual displays vary depending
on operational status.)
Appears when the finder shows
the current broadcast.
e.g.
EASY
Main Menu
Finder
Cursor
NAVI
TV Viewing
TV Guide ON Screen
Delete Title
Finalize (R/RW)
TV:12ch
005 2006/03/24 07:00am TV:18
®
Format (RAM/RW)
Press / / / to select an item.
2
Refer to the table below.
Press ENTER.
3
You can access the function.
Play Time
Play Contents
DV Recording
00:10:15
(00:54:30)
Original
TR
Dubbing
Setup
Disc
HDD
Time Slip
HDD
Recorded title
last selected
Functions
Operating the finder (For the HDD, DVD-RAM, DVD-R/RW recorded on this
recorder and not finalized yet)
1) When the cursor is on the finder, press / .
2) When you find a desired content, press PLAY or ENTER.
3) To stop, press STOP.
Item
TV Viewing
Play Contents
TV Guide On Screen
DV Recording
Delete Title
Dubbing
Finalize (R/RW)
Format (RAM/RW)
Setup
You can view thumbnails of recorded contents.
• You can select the drive by pressing HDD or DVD.
The content is played.
• Pressing ENTER enlarges the finder’s playback picture to the full of the screen.
A current channel broadcast appears. (“TV:xxxch” accompanies.)
• Pressing REC starts recording.
Function
Return to current broadcast channel.
Recorded contents are listed in a thumbnail view.
®
The TV Guide On Screen SCHEDULE appears.
The setting menu for recording contents from equipment
connected to the DV IN terminal.
You can delete the current content.
Operate according to the message.
You can access a menu to dub the current content.
You can execute the DVD-Video finalizing process on the
loaded disc.
You can format the loaded disc.
A setup menu appears.
Page*
–
60 (10)
24 (13)
52
55
100 (11)
122
34
142
RDXS35SUqE 06.2.13, 5:41 PM16
* Pages in OPERATIONS GUIDE. ( ) in this booklet.
 Loading...