

Page 1
HDD/DVD VIDEO RECORDER
RD-XS32SB
Quick Reference
Thank you for purchasing a TOSHIBA HDD/DVD video recorder.
For your safety, read “SAFETY PRECAUTIONS”, “IMPORTANT SAFETY INSTRUCTIONS”, “Precautions”
and other notes and information in the INSTALLATION GUIDE.
It is important you read and understand the “SAFETY PRECAUTIONS”, “IMPORTANT SAFETY
INSTRUCTIONS”, “Precautions” and other notes that appear in the INSTALLATION GUIDE provided
with this TOSHIBA product before you operate your HDD/DVD video recorder. The purpose of the
“SAFETY PRECAUTIONS”, “IMPORTANT SAFETY INSTRUCTIONS”, “Precautions” and other notes is
to provide you with warnings and safety instructions that will assist in preventing the misuse of your
HDD/DVD video recorder.
This leaflet is to help you start up your recorder and experience a basic operation.
To learn about the recorder and obtain its full performance, refer to the OWNER’S MANUAL.
xx
I
(
is reference page in the INSTALLATION GUIDE, and
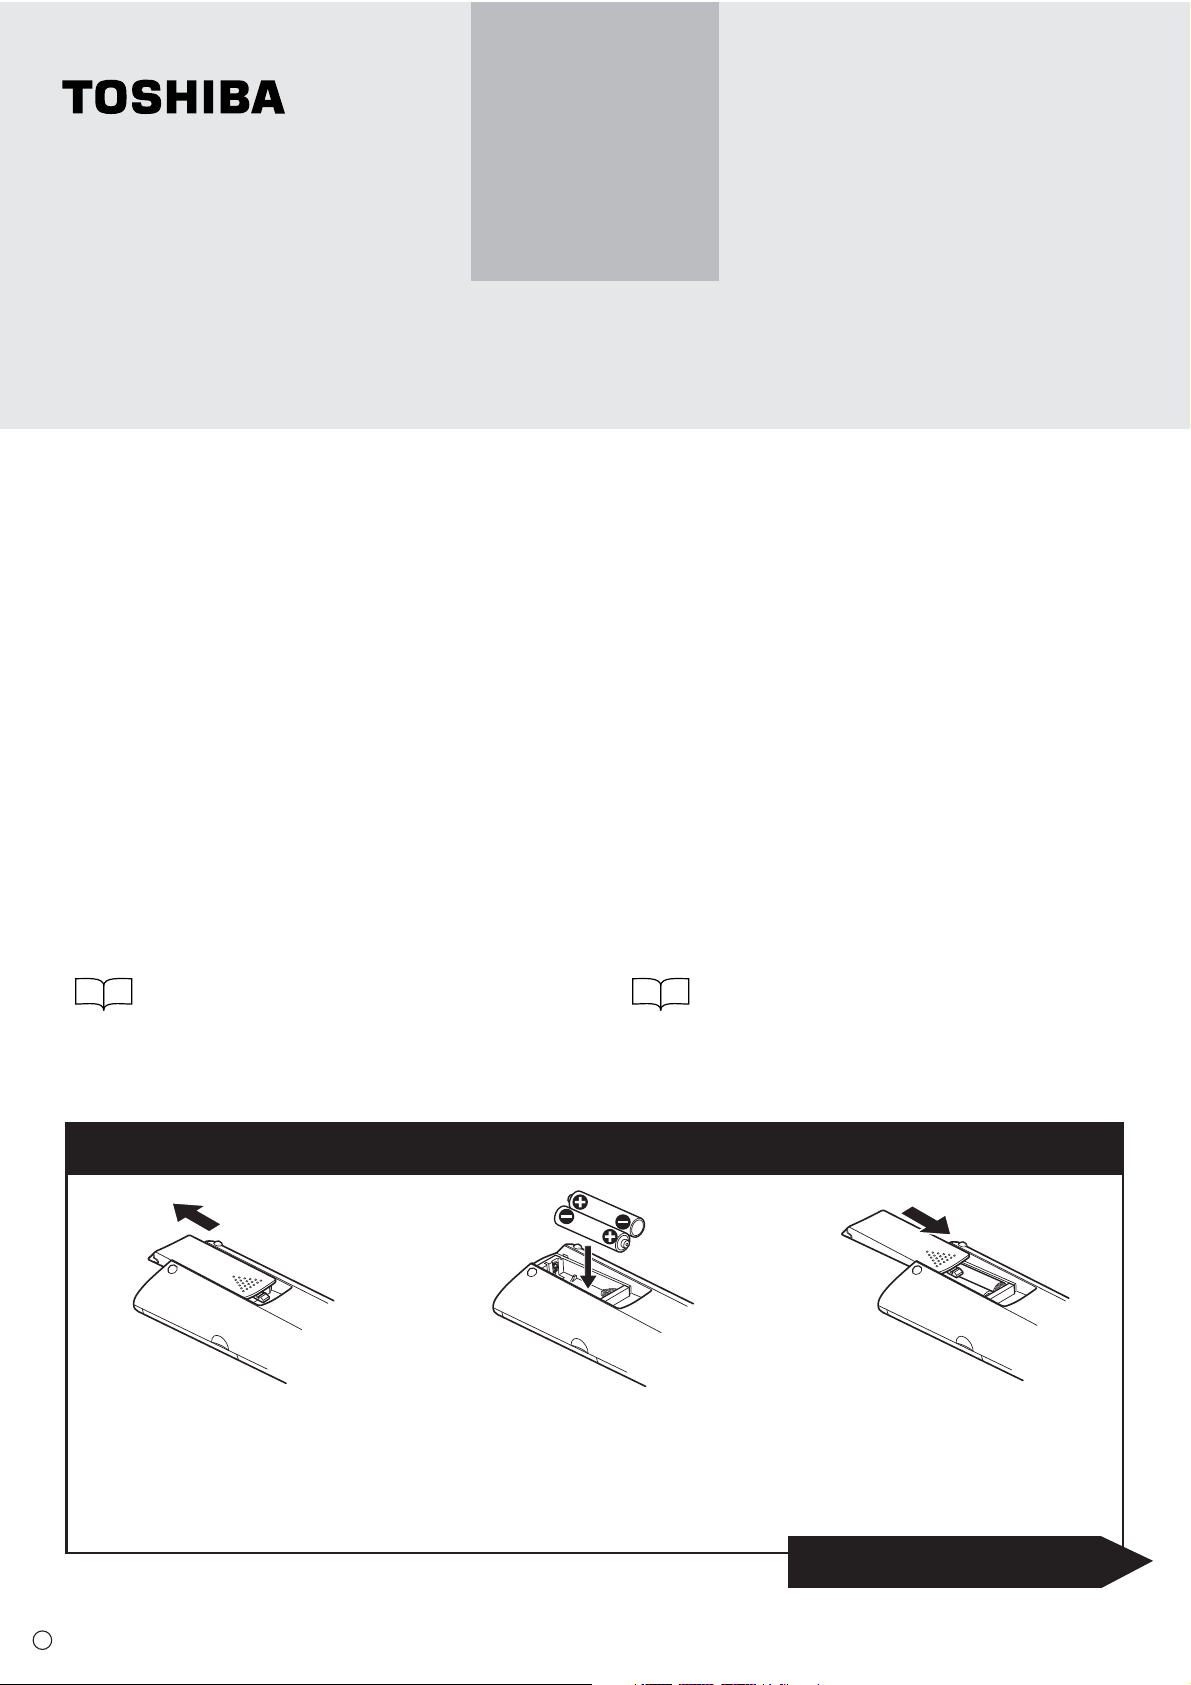
Insert the batteries into the remote control.
1
Open the cover.
2
Insert batteries (R03 size).
Make sure to match the + and – on
the batteries to the marks inside the
battery compartment.
xx
O
in the OPERATIONS.)
Close the cover.
3
P000403720
S PM0016698010
Open to go inside.
Page 2
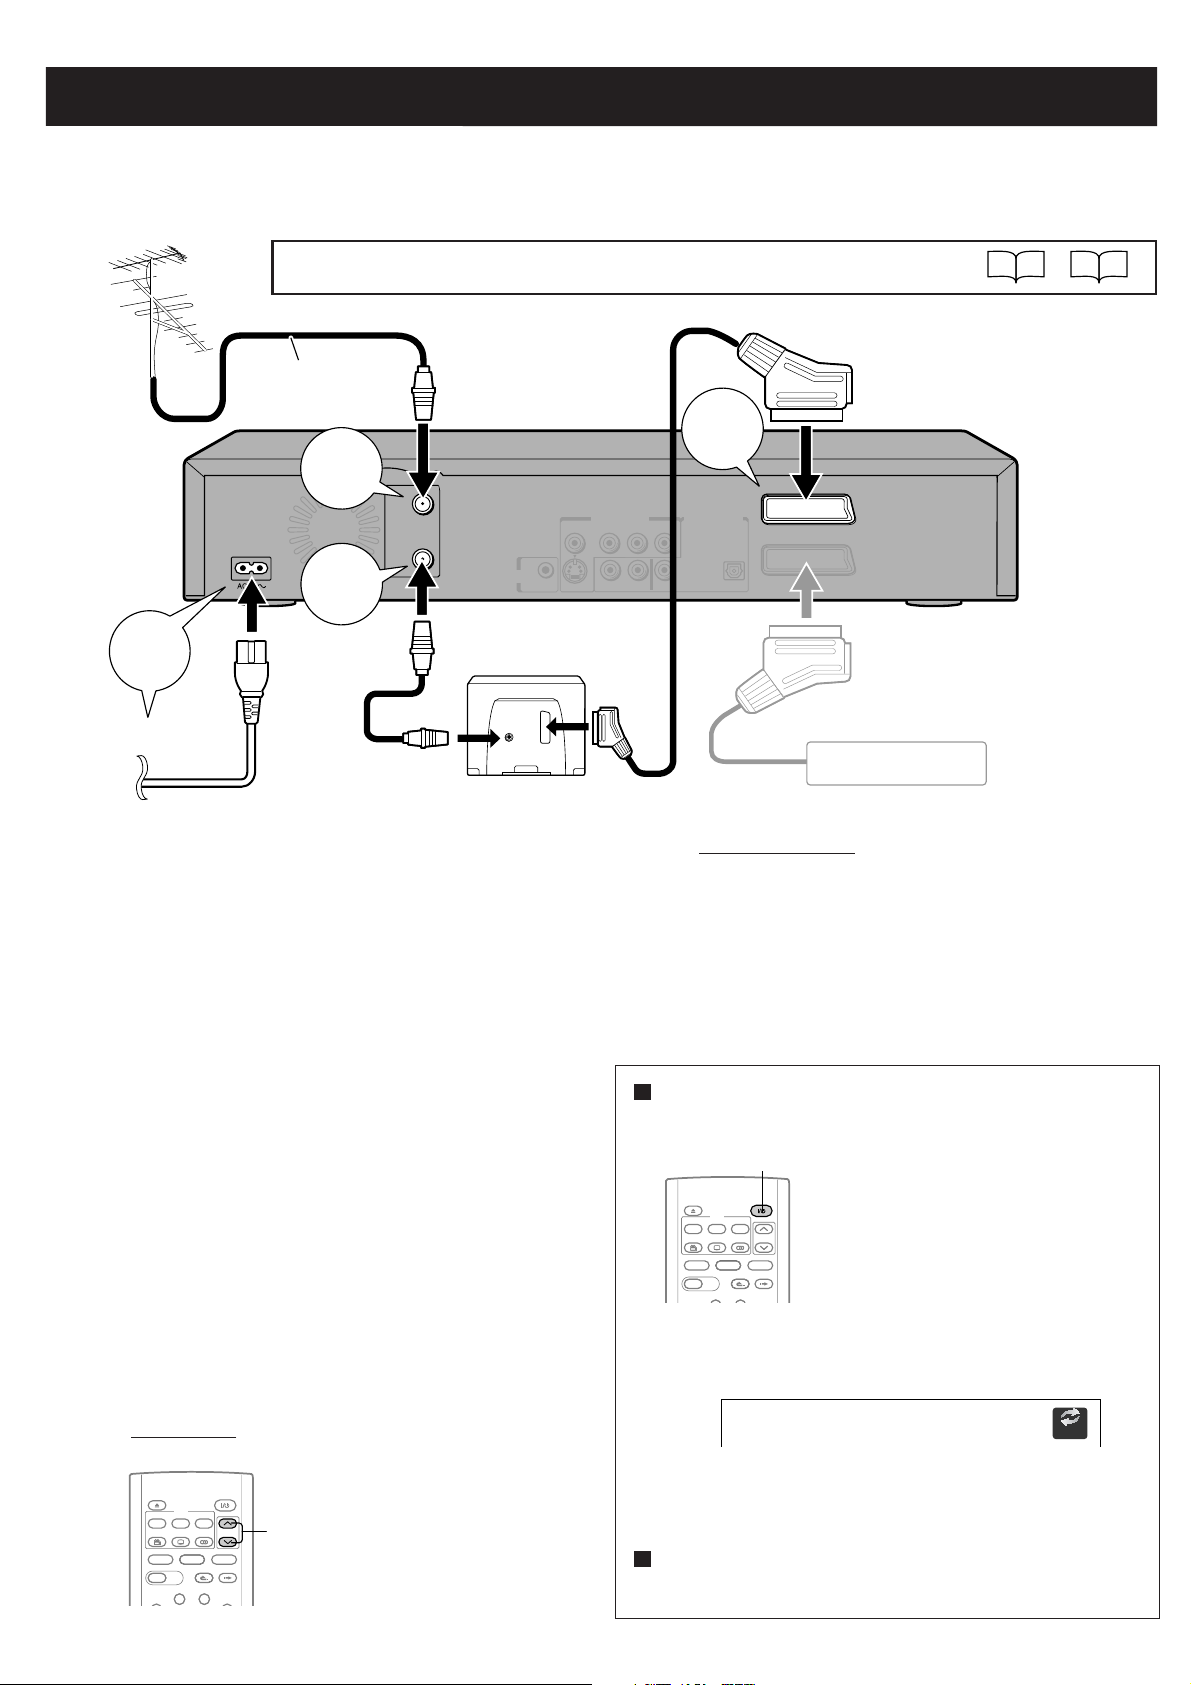
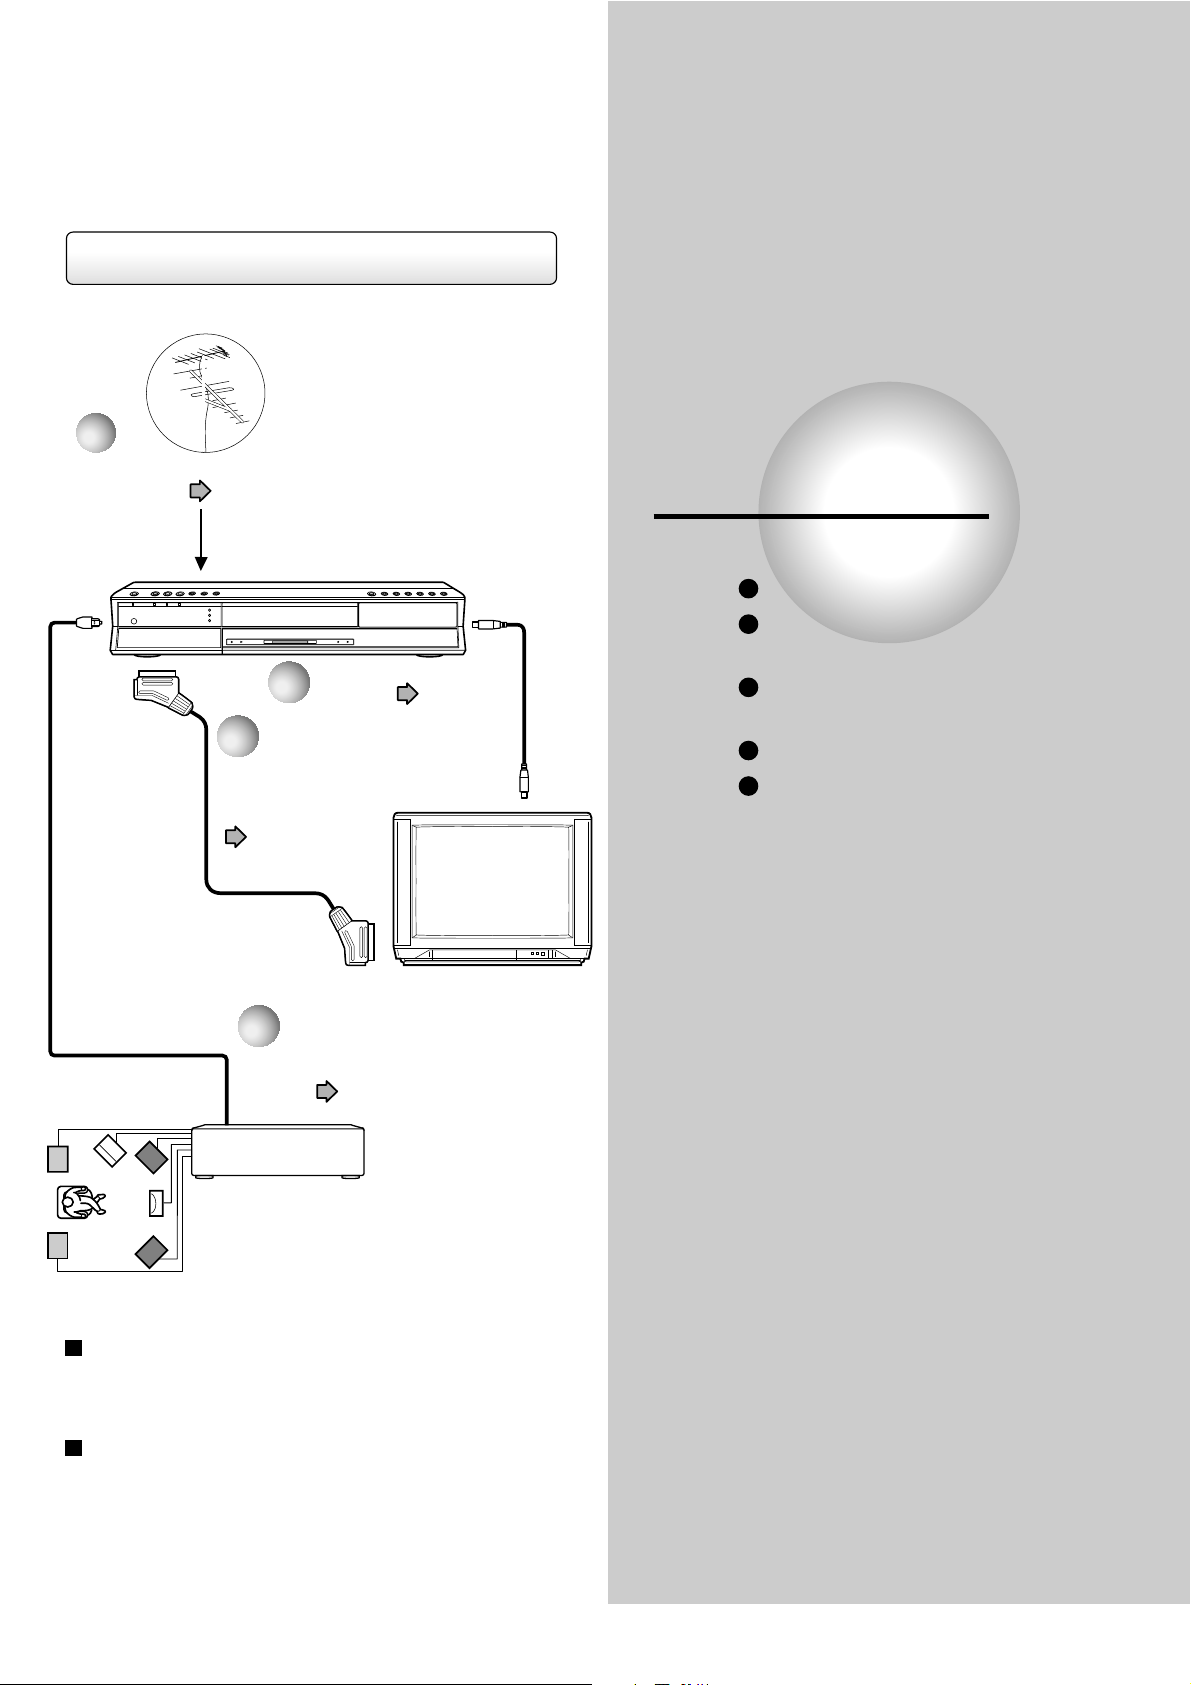
Make a connection first. - Plug & Auto Set Up function
If you make a simple connection and plug in, your recorder will automatically store TV stations in memory and
set its clock (Plug & Auto Set Up function), to be ready for recording and viewing of TV programmes. Follow the
procedure below.
4
To wall outlet
For connecting to a satellite receiver, see the INSTALLATION GUIDE. (
Aerial cable
(Not supplied)
To AV1(AUDIO/VIDEO)IN/OUT
3
1
RF IN
(FROM ANT.)
RF OUT
(TO TV)
2
To aerial input
CHANNEL
CHANGE
TV
VIDEO OUTPUT
YP
VIDEO
IR
S-VIDEO
To SCART input
ANALOG
LR
RPB
COAXIAL
AUDIO OUTPUT
BITSTREAM/PCM
DIGITAL
OPTICAL
AV1(AUDIO/VIDEO)IN/OUT
AV2(SAT/DECODER)IN/OUT
If you use a satellite receiver,
connect it to the
AV2(SAT/DECODER)IN/OUT
socket.
Satellite receiver
I
18
–
I
20
)
1
2
3
4
5
Disconnect the aerial cable from your
TV, and connect it to the RF IN (FROM
ANT.) terminal on the recorder.
Using the coaxial cable (supplied),
connect the RF OUT (TO TV) terminal
to the TV.
Connect the AV1(AUDIO/VIDEO)IN/
OUT socket to a TV equipped with
SCART input using the SCART cable.
Connect the power cord of the
recorder to a wall outlet.
TV stations (in the range of UHF E21-E69) will be
stored in memory. The process will finish after a
few minutes. (The display on the recorder shows
“Auto” while the Plug & Auto Set Up function is
running.) Then the date and time are set
automatically from broadcast signal.
Check the following.
TV stations
Press CHANNEL.
Recorder’s clock
If it is not correct, go to the next page.
If these are OK, your recorder is
ready!
Open this guide to the reverse side
to begin your recorder play.
Turning the power on
Press ON/STANDBY.
ON/STANDBY
OPEN/CLOSE
DVD
MENU
RETURN
TOP MENU
ANGLE
SUBTITLE
AUDIO
CHANNEL
TIMESLIP
HDD DVD
EASY
NAVI
REC MENU EDIT MENU
INSTANT SKIPINSTANT REPLAY
After a few seconds, a startup screen appears.
The following icon will appear on the top right corner of
the screen.
e.g.
When the power is turned on, the
ON/STANDBY indicator changes
colour from red (standby mode) to
green (operation).
Loading
OPEN/CLOSE
DVD
MENU
TOP MENU
ANGLE
SUBTITLE
TIMESLIP
HDD DVD
EASY
NAVI
REC MENU EDIT MENU
LIBRARY
RETURN
AUDIO
CHANNEL
CHANNEL
INSTANT SKIPINSTANT REPLAY
To add or change TV stations, go
CONTENT MENU
to the next page.
When this icon disappears, the recorder is ready to
operate.
Turning the power off
Press ON/STANDBY.
Page 3

Channel setting & clock setting
The recorder can be set up manually also, without using the Plug & Auto Set Up function.
If Plug & Auto Set Up function failed, or if you want to add or change channels or adjust the clock, follow this procedure.
OPEN/CLOSE
DVD
MENU
TOP MENU
ANGLE
SUBTITLE
TIMESLIP
HDD DVD
EASY
NAVI
REC MENU EDIT MENU
LIBRARY
W
O
L
S
ENTER
F
R
A
M
E
/
A
D
J
U
S
T
REC
RETURN
AUDIO
CHANNEL
INSTANT SKIPINSTANT REPLAY
CONTENT MENU
S
K
I
P
A
E
S
E
R
U
T
C
I
P
PLAYSTOPPAUSE
QUICK MENU
H
C
R
///,
ENTER
Channel setting
The recorder contains a built-in tuner used to receive
television broadcasts. You must preset the stations received
through the tuner.
1 Press SETUP.
2 Press
/ to select “Initial settings”, then press
ENTER.
3 Press
/ to select “Channel setting”, then press
ENTER.
e.g.
VIDEO Plus+
REC MODE
EXTEND
TV CODE
T.SEARCH
3
12
456
789
SETUP ENTER
CLEAR
DELETE
+
10
0
SETUP
Open the lid.
Time & date setting
Set the recorder’s clock. If it is not set correctly, the
recorder cannot perform operations other than playback.
1 Press SETUP.
2 Press
/ to select “Initial settings”, then press
ENTER.
3 Press
/ to select “Time & date setting”, then
press ENTER.
e.g.
4 Press
Time & date setting
Channel setting
Input signal
AV1 output
AV2 input
Set top box setting
Clock set position
Just clock
Initial settings
PAL
Video
Video
1
On
/ to select “Auto” or “Manual”, then press
Auto
Manual
ENTER.
Auto:
You can be free of entering each
e.g.
value. (This function will not
work correctly unless the “Clock
set position” is set correctly.
Auto Time & Date Scanning.
page 41 in the INSTALLATION
GUIDE)
When the setting is complete, the “Initial settings” menu
returns.
4 Press
Time & date setting
Channel setting
Input signal
AV1 output
AV2 input
Set top box setting
Clock set position
Just clock
Initial settings
PAL
Video
Video
1
On
/ to select “Auto” or “Manual”, then press
Auto
Manual
ENTER.
Auto:
e.g.
Automatically presets the
receiving channels of UHF
E21-E69.
Auto Scan TV 24 CH
Cancel
• The previous screen is displayed when the “Auto”
channel setting is completed.
• To cancel the “Auto” channel setting function while it is
running, press the ENTER button while “Cancel” is
highlighted.
Manual:
Manually sets the receiving channel, channel skip and
guide channel. (
page 35 in the INSTALLATION
GUIDE)
Select “Manual” to set the channel if not set correctly by
“Auto”.
Manual:
You can set the clock manually. See “Manual clock
setting”. (
page 32 in the INSTALLATION GUIDE)
Select “Manual” to set the clock if not set correctly by
“Auto”.
Page 4

Launching your recorder play.
1
3
OPEN/CLOSE
DVD
MENU
TOP MENU
ANGLE
LIBRARY
F
R
A
M
E
REC
REMAIN
DIMMER
TV/VIDEO CHANNEL
SAT.CONT.
RETURN
SUBTITLE
TIMESLIP
HDD DVD
EASY
NAVI
REC MENU EDIT MENU
W
O
L
S
ENTER
/
A
D
J
U
S
T
TIME BAR CHP DIVIDE
DISPLAY
FL SELECT
ZOOM P in P
TV
VOLUME
TV/DVR
SAT.MONI.
AUDIO
CHANNEL
INSTANT SKIPINSTANT REPLAY
CONTENT MENU
S
K
I
P
H
C
R
A
E
S
E
R
U
T
C
I
P
PLAYSTOPPAUSE
QUICK MENU
PROGRESSIVE
INPUT SELECT
2
1 Turn on the TV.
2 Turn on the recorder.
Flashing “Loading” means the recorder is preparing. Please wait until it
disappears.
After disappearing, a current broadcast will appear.
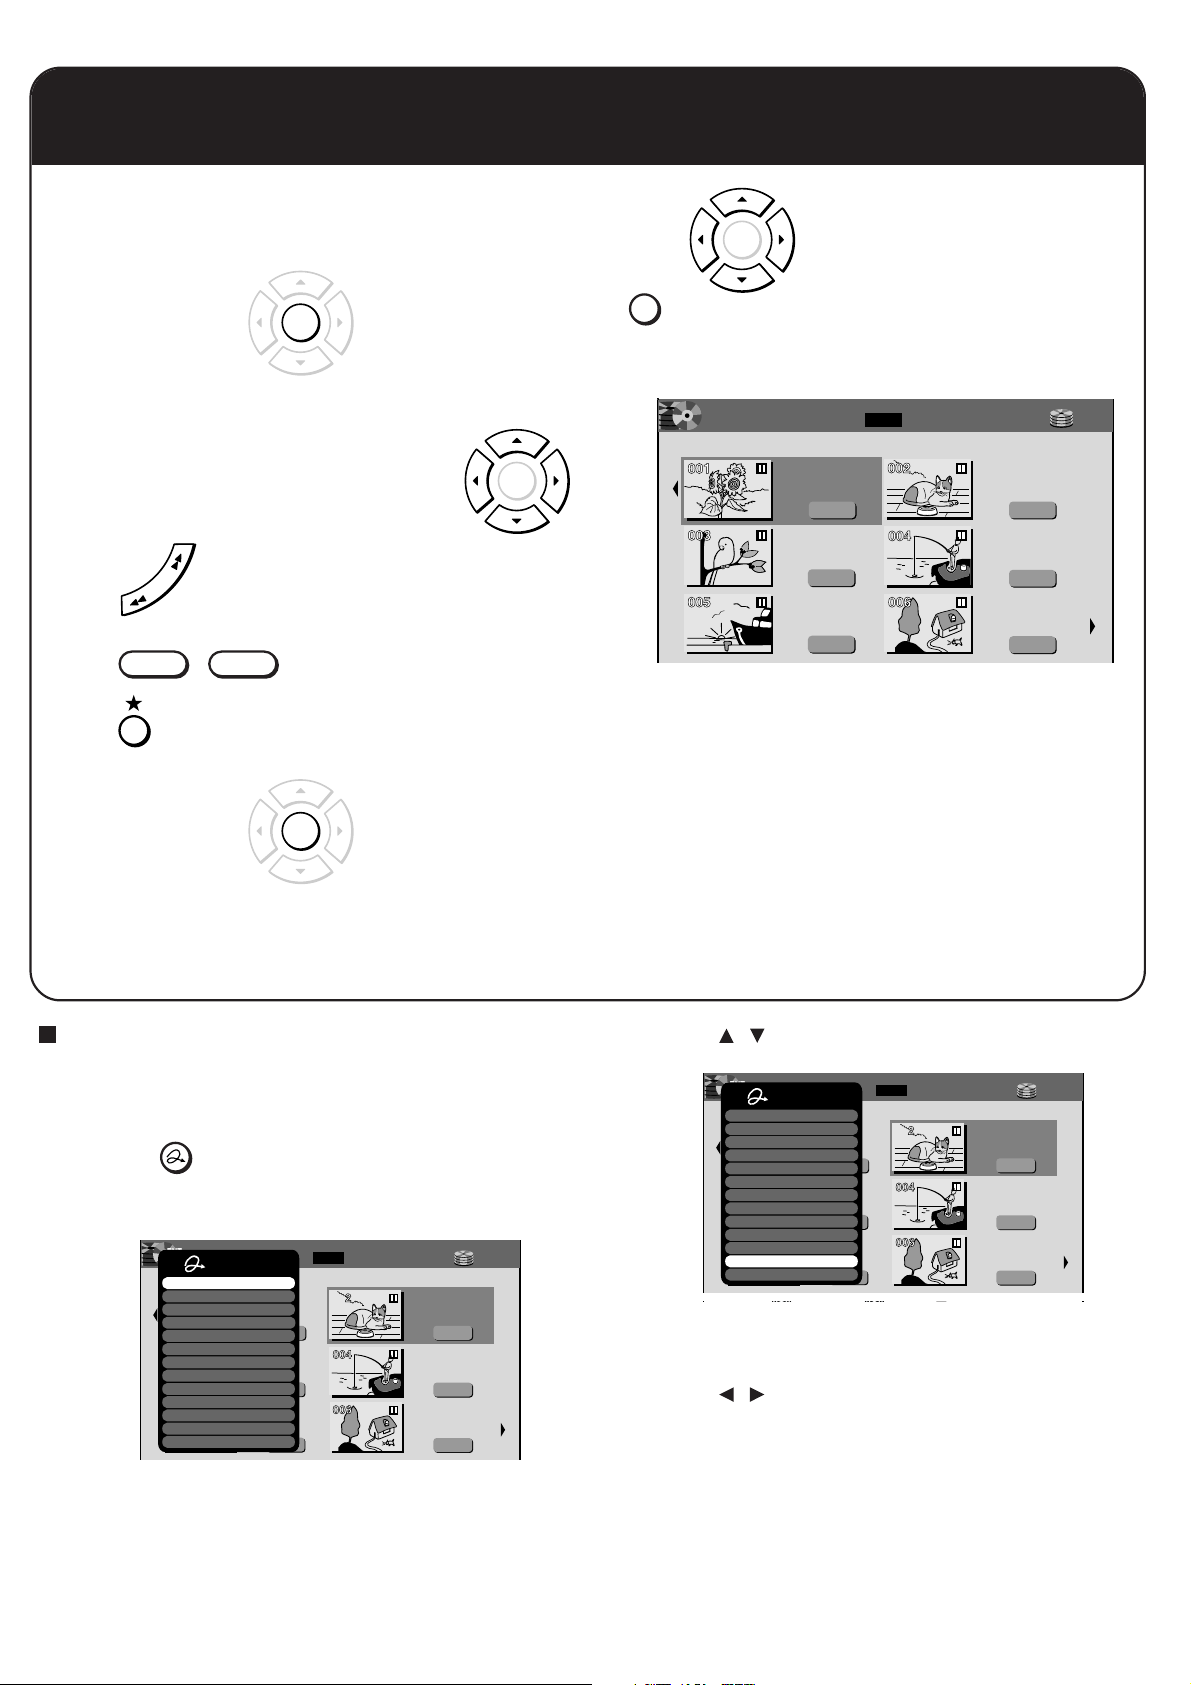
3 Press EASY NAVI.
A following screen (”EASY NAVI Main Menu”) appears.
From EASY NAVI, you can access
your favorite video source.
Finder
Cursor
Appears when the finder shows
the current broadcast.
To change the channel,
press or .
123
456
789
0
CHANNEL
Disc
Operating the finder (For the HDD,
DVD-RAM discs, unfinalized DVD-R/RW
discs recorded on this recorder)
1) When the cursor is on the finder, press
/ .
You can view thumbnails of recorded
contents.
• You can select the drive by pressing the
HDD or DVD button.
2) When you find a desired content,
press PLAY or ENTER.
The content is played.
• Pressing the ENTER button enlarges
the finder’s playback picture to the full
of the screen.
• You can change playback speed.
3) To stop, press STOP.
A current channel broadcast appears.
(“TV:xxxch” accompanies.)
• Pressing the REC button starts
recording.
Note
• TV tuner will not appear in the finder with a
DVD-RAM disc loaded in the disc tray or in HDD
mode, unless a title is played then stopped.
e.g.
EASY
NAVI
Main Menu
TV: 2ch
005 2004/04/03 19
:00 Ch:
4
(00:54:30)
Original
HDD
TR
Time Slip
Setup
Timer Recording
Dubbing
Delete Title
Finalize(R/RW)
132
O
106
O
Edit Title Name
Format(RAM/RW)
28
O
Play Time
Play Contents
DV Recording
00:10:15
Create Thumbnail
Select Item Enter Exit
An on-screen keyboard appears
Operation guide
so that you can input a name of
the current title.
O
30
You can delete the current contents in the finder.
If you select this and press ENTER, a confirming message
will appear.
Press / to select “Yes”, then press ENTER.
HDD
O
O
136
O
150
100
Page 5
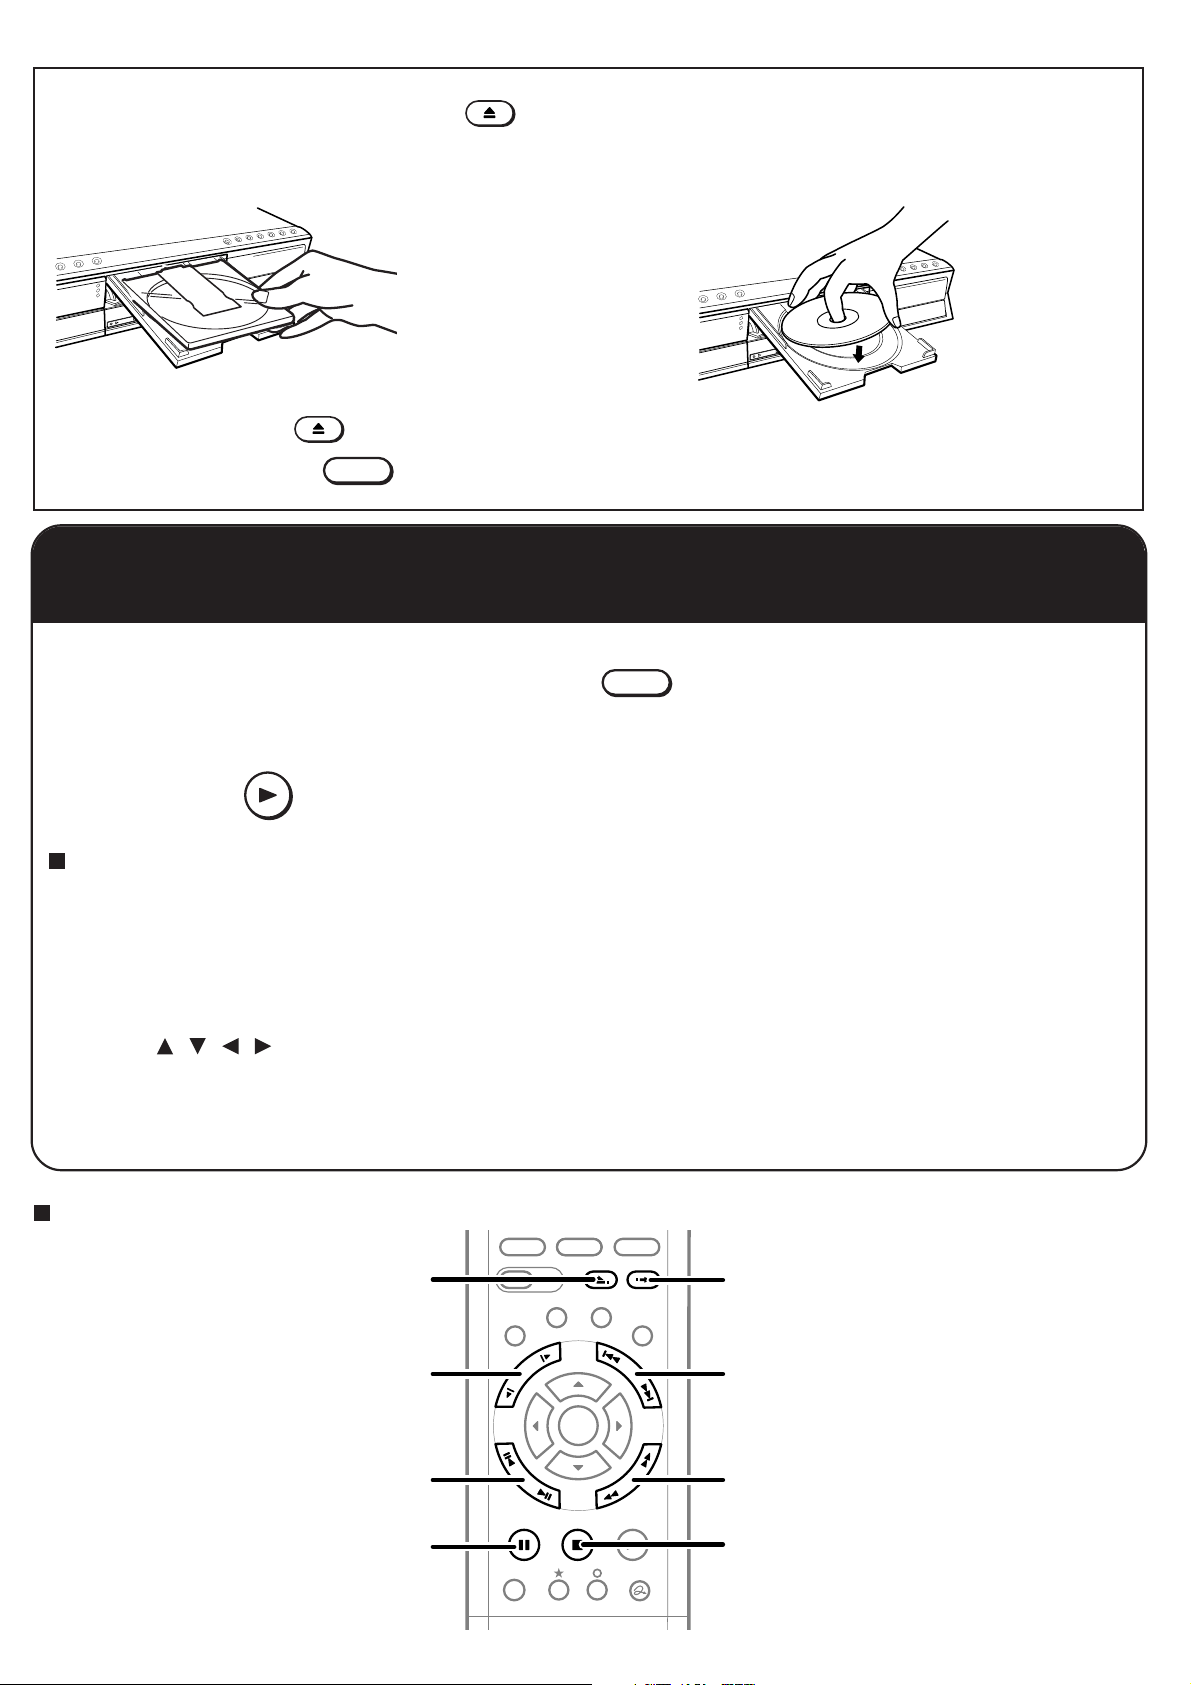
To load a disc, press
Face the side to use (for
double sided disc) or the
printed side (for single sided
disc) up, and insert the
cartridge into the tray frame
following the direction of the
arrow on the cartridge.
OPEN/CLOSE
to open the disc tray.
Disc without cartridgeDVD-RAM disc with cartridge (TYPE1/TYPE2/TYPE4)
Place a disc in
the inside hollow.
After loading a disc, press
To view the loaded disc, press
OPEN/CLOSE
again to close the disc tray.
DVD
.
To play a DVD-Video disc
1 Load a disc and press
PLAY
2 Press
When a top menu appears
Some DVD video discs may include a top menu, on which you can view the structure of contents or select a scene. Most
of the top menus automatically appear in certain scenes, and also are displayed on demand. Actual operation of the top
menu depends on the disc. This section explains a general example of how to operate a top menu. Also refer to the
instructions of the disc itself.
.
DVD
.
1) Press TOP MENU.
2) Press
/ / / to select the title you want.
If the titles in the top menu are assigned a number, you can directly locate a specific title by pressing its designated
number with the number buttons.
3) Press ENTER.
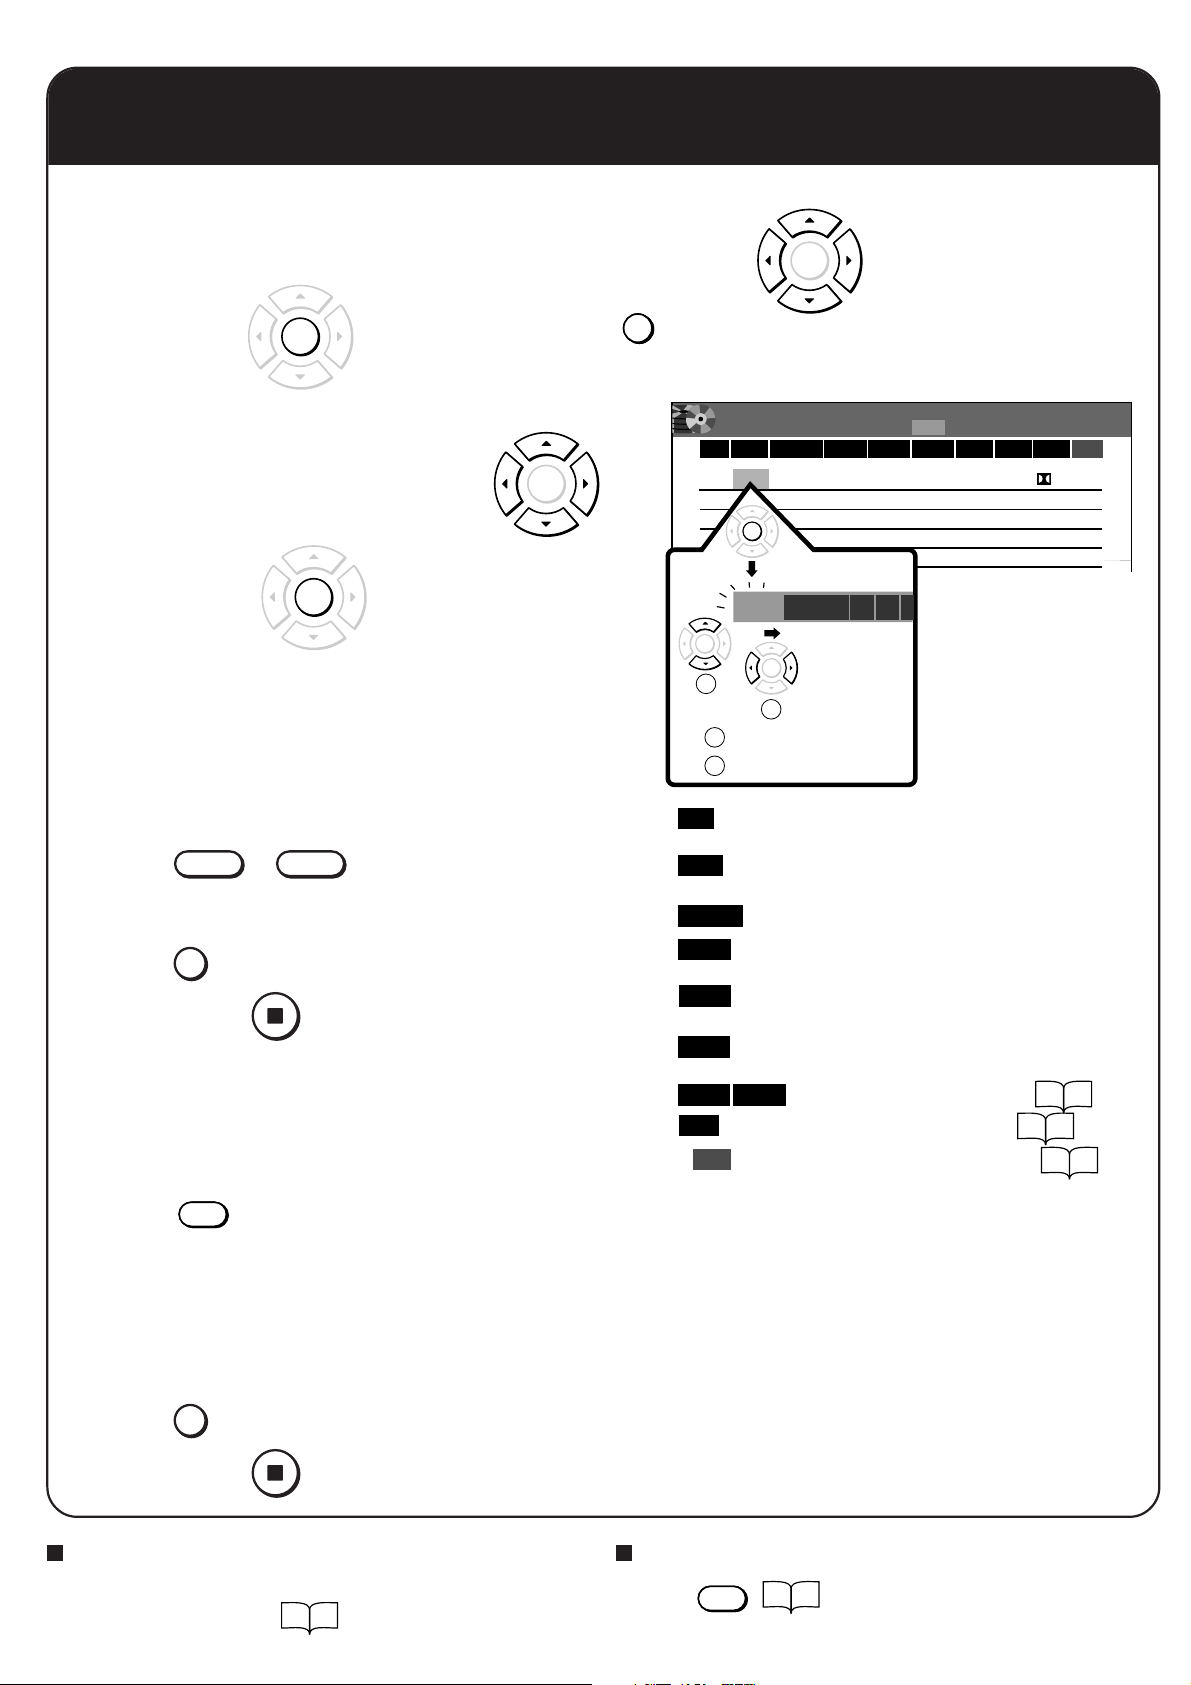
Changing playback speed
TIMESLIP
HDD DVD
LIBRARY
S
F
R
A
M
E
W
O
L
/
A
D
J
U
S
EASY
NAVI
REC MENU EDIT MENU
T
To go back by the specific time. To skip by the specific time.
To play in slow-motion.
To play frame by frame.
To pause playback.
REC
ENTER
INSTANT SKIPINSTANT REPLAY
CONTENT MENU
S
K
I
P
H
C
R
A
E
S
E
R
U
T
C
I
P
PLAYSTOPPAUSE
QUICK MENU
To skip chapters/tracks.
To play in fast reverse or fast forward.
To stop playback.
Page 6
To record programmes
For future programme
1 Select “Timer Recording” by
press
ENTER
. (Or press
“REC MENU Timer Programing” appears.
2 Set the items by
3 Press
ENTER
.
ENTER
Your program is entered.
If you want to turn off the power, press the
ON/STANDBY button. (When a starting time
comes, the recorder turns on and records your
program.)
For current programme
REC
HDD
.
1 Press
record.
If you select the DVD drive, be sure to load a disc.
2 Press
3 To stop, press
or
STOP
DVD
to select the drive to
.
For external source (e.g. VHS tape)
1 Connect an external source device (e.g. VTR) to
the input jacks of this recorder.
INPUT SELECT
2 Press
according to your connection.
Change the indicator in the front panel display, “AV1”
for AV1(AUDIO/VIDO)IN/OUT socket, “AV2” for the
AV2(SAT/DECODER)IN/OUT socket . . .
repeatedly to select the input
REC MENU
e.g.
.
.)
REC
MENU
Exec
e.g.
ENTER
1
1
2
Exec
CH
Date
Start
End
Media
Mode Rate
Audio
Disc
Timer Programing
Set the value.
Shift the cursor.
ENTER
Date StartCH
--- --: :--
------- -----
ENTER
and
1/ 1
MediaEnd
HDD
RateMode
SP
Select a line.
2------------
ENTER
2
A timer recording with this mark
will be executed.
Select a channel. (Number buttons
are also available.)
Select a date.
Enter a start time. (Default is 10
minutes later.)
Enter an end time. (Set the length
within 9 hours.)
Select to which you record, HDD or
DVD.
Select the picture quality.
Select the audio quality.
Only for a reservation disc )(
4/3(Sa)
Audio
4.6
O
O
D/M1
41
O
21:00
Disc
41
49
3 Start play on the source device.
REC
4 Press
5 To stop, press
to start recording.
STOP
.
If a message appears when you load a disc
A new disc may have to be initialized. Execute
initializing of the disc.
O
28
Confirming the disc space
REMAIN
Press
.
27
O
Page 7
To play recorded contents
1 Select “Play Contents” by
CONTENT MENU
Press
ENTER
“CONTENT MENU (Title List)” appears.
2 Select a title by
H
C
R
A
E
: To turn the page.
S
E
R
U
T
C
I
P
HDD
: To view the chapters in the current title.
,
DVD
: To switch the drive.
. (Or Press
ENTER
.
e.g.
CONTENT
MENU
ENTER
and
.)
Title List Page
HDD:
2004/06/08 7:00
Ch:4
(0:53:45)
Original
2004/06/12 21:00
Ch:3
(0:52:40)
Original
2004/07/12 23:00
Ch:4
(0:30:08)
Original
1/ 2
2004/06/08 23:00
Ch:6
(0:29:50)
Original
2004/07/11 7:00
Ch:8
(0:54:30)
Original
2004/07/12 21:00
Ch:10
(0:51:28)
Original
HDD
3 Press
ENTER
.
Playback starts.
To erase an unnecessary content
1) On the CONTENT MENU, select an unnecessary
title (chapter).
QUICK MENU
2) Press
.
A Quick Menu appears.
e.g.
CONTENT
Title List Page
MENU
Quick Menu
HDD :
Title information
2004/06/08 7:00
Create thumbnail
High speed dubbing
Rate conversion dubbing
Special playback mode
Save captured images
Display changeover
Specific page jump
Ch:4
Chapter function
Edit functon
2004/06/12 21:00
Ch:3
Disc information
2004/07/12 23:00
Ch:4
Title delete
Exit
(0:53:45)
Original
(0:52:40)
Original
(0:30:08)
Original
1/ 2
HDD
2004/06/08 23:00
Ch:6
(0:29:50)
Original
2004/07/11 7:00
Ch:8
(0:54:30)
Original
2004/07/12 21:00
Ch:10
(0:51:28)
Original
3) Press
e.g.
/ to select “Title delete”.
CONTENT
Title List Page
MENU
Quick Menu
HDD :
Title information
Create thumbnail
High speed dubbing
Rate conversion dubbing
Chapter function
Edit functon
Special playback mode
Save captured images
Disc information
Display changeover
Specific page jump
Title delete
4) Press ENTER.
A message appears.
5) Press
/ to select “Yes” or “No” then press
ENTER again.
2004/06/08 7:00
Ch:4
Original
2004/06/12 21:00
Ch:3
Original
2004/07/12 23:00
Ch:4
Exit
Original
1/ 2
(0:53:45)
(0:52:40)
(0:30:08)
HDD
2004/06/08 23:00
Ch:6
(0:29:50)
Original
2004/07/11 7:00
Ch:8
(0:54:30)
Original
2004/07/12 21:00
Ch:10
(0:51:28)
Original
Page 8

Notes on the unit and the HDD
Exemptions
Do not give a shock or shake (especially during operation).
Do not use in a shaky or unstable location.
Hold the unit horizontally.
Do not cover the ventilation holes for the cooling fan of the
unit.
Do not use in a place where the temperature rises or
changes rapidly.
Do not disconnect the power plug from a wall outlet while
the unit is turned on.
Do not disconnect the power plug from the wall outlet or
break the power supply to the unit during recording or
playing. Before disconnecting the power plug, be sure to
press the power button and make sure the unit ends the
finishing process and power turns off completely. If the
power plug is disconnected or power supply is disrupted
while the unit is recording, all recorded content will be
erased.
Toshiba is not liable for any damage or loss of recorded
data caused by shock, shakes, misoperation or malfunction.
Toshiba is not liable for any damage caused by fires,
natural disaster (such as thunder, earthquake, etc.), acts by
a third parties, accidents, owner’s intentional or
unintentional misuse, or uses in other improper conditions.
Toshiba is not liable for incidental damages (such as profit
loss or interruption in business, modification or erasure of
recorded data, etc.) caused by use or inability to use of this
product.
Toshiba is not liable for any damage caused by neglect of
the instructions described in the owner’s manual.
Toshiba is not liable for any damage caused by misuse or
malfunction through simultaneous use of this product and
the connected equipment or software that Toshiba is not
concerned.
Toshiba does not compensate for contents which were not
recorded/edited because of some malfunctions of this
product or discs during operation, and is not liable for
incidental damages (such as profit loss or interruption in
business, etc.) produced by such conditions.
Supplied accessories
Remote control ............................................................. 1
Batteries (R03) .............................................................. 2
Power cord .................................................................... 1
Coaxial cable ................................................................ 1
Video/audio cable.......................................................... 1
IR control cable ............................................................. 1
OWNER’S MANUAL (INSTALLATION GUIDE) ............ 1
OWNER’S MANUAL (OPERATIONS) .......................... 1
Should you experience any problems, during the installation of this product, or at any time in the future,
please call the Toshiba Customer Helpline on 0115 976 6958.
To assist the Helpline, when contacting them, please have available:
* The Owner’s Manual supplied with the Product
* The Model Number
* The Serial Number (Generally on the back of the unit)
* Pad of paper and pen.
Printed on 100% Recycled Paper
Printed in China
Page 9

DIGITAL VIDEO
HDD/DVD VIDEO RECORDER
RD-XS32SB
OWNER’S MANUAL
Introduction
Connections
INSTALLATION
GUIDE
Read this booklet first.
Basic Setup
P000403700
S
PM0016696011
© 2004 Toshiba Corporation
Page 10

Introduction
SAFETY PRECAUTIONS
WARNING: TO REDUCE THE RISK OF FIRE OR ELECTRIC SHOCK, DO NOT EXPOSE THIS APPLIANCE
TO RAIN OR MOISTURE. DANGEROUS HIGH VOLTAGES ARE PRESENT INSIDE THE
ENCLOSURE. DO NOT OPEN THE CABINET. REFER SERVICING TO QUALIFIED PERSONNEL
ONLY.
CAUTION: This HDD/DVD video recorder employs a Laser System.
To ensure proper use of this product, please read this owner’s manual carefully and retain for
future reference. Should the unit require maintenance, contact an authorized service location.
Use of controls or adjustments or performance of procedures other than those specified herein
may result in hazardous radiation exposure.
To prevent direct exposure to laser beam, do not try to open the enclosure.
Visible and invisible laser radiation when open and interlocks defeated.
DO NOT STARE INTO BEAM.
CLASS 1
LASER PRODUCT
2
Page 11

Copyright
It is permissible to record television programmes, film, video tapes and other material only in the event
that third party copyrights and other rights are not violated.
CAUTION: These servicing instructions are for use by qualified service personnel only. To reduce the risk
of electric shock do not perform any servicing other than that contained in the operating
instructions unless you are qualified to do so.
In the spaces provided below, record the Model and Serial No. located on the rear panel of your recorder.
Model No. Serial No.
Retain this information for future reference.
Location of the required label
The rating plate and the safety caution are on the rear of the unit.
Introduction
Connections
Basic Setup
3
Page 12

IMPORTANT SAFETY INSTRUCTIONS
CAUTION: PLEASE READ AND OBSERVE ALL WARNINGS AND INSTRUCTIONS GIVEN IN THIS
OWNER’S MANUAL AND THOSE MARKED ON THE UNIT. RETAIN THIS BOOKLET FOR
FUTURE REFERENCE.
This set has been designed and manufactured to assure personal safety. Improper use can result in electric
shock or fire hazard. The safeguards incorporated in this unit will protect you if you observe the following
procedures for installation, use and servicing. This unit is fully transistorized and does not contain any parts that
can be repaired by the user.
DO NOT REMOVE THE CABINET COVER, OR YOU MAY BE EXPOSED TO DANGEROUS VOLTAGE. REFER
SERVICING TO QUALIFIED SERVICE PERSONNEL ONLY.
1. Read these instructions.
2. Keep these instructions.
3. Heed all warnings.
4. Follow all instructions.
5. Do not use this apparatus near water.
6. Clean only with dry cloth.
8. Do not install near any heat sources such as
radiators, heat registers, stoves, or other
apparatus (including amplifiers) that produce
heat.
9. Protect the power cord from being walked on or
pinched particularly at plugs, convenience
receptacles, and the point where they exit from
the apparatus.
10.Only use attachments/accessories specified by
the manufacturer.
11.Do not place a flaming object such as a burning
candle on the apparatus.
7. Do not block any ventilation openings. Install in
accordance with the manufacturer’s
instructions.
4
Page 13

Introduction
12.Unplug this apparatus during lightning storms
or when unused for long periods of time.
13.Refer all servicing to qualified service
personnel. Servicing is required when the
apparatus has been damaged in any way, such
as power-supply cord or plug is damaged, liquid
has been spilled or objects have fallen into the
apparatus, the unit has been exposed to rain or
moisture, does not operate normally, or has
been dropped.
ADDITIONAL SAFETY INSTRUCTIONS
14.When you use headphones, keep the volume at
a moderate level. If you use the headphones
continuously with high volume sound, it may
cause hearing damage.
18.Do not place a heavy object on or step on the
apparatus. The object may fall, causing serious
personal injury and serious damage to the
apparatus.
Introduction
19.Do not place the apparatus on amplifiers or
equipment that may produce heat.
20.Do not cover the ventilating holes for the inside
cooling fan.
Connections
21.Do not use a cracked, deformed, or repaired
disc. These discs are easily broken and may
cause serious personal injury and unit
malfunction.
15.Do not overload wall outlets; extension cords, or
integral convenience receptacles as this can
result in a risk of fire or electric shock.
16.Apparatus should not be exposed to dripping or
splashing and no objects filled with liquids, such
as vases, should be placed on the apparatus.
17.Keep your fingers well clear of the disc tray as it
is closing. Neglecting to do so may cause
serious personal injury.
22.If the apparatus should smoke or smell,
immediately disconnect the power cord from the
wall outlet. Wait until the smoke or smell stops,
then ask your dealer for a check and repair.
Neglecting to do so may cause fire.
23.While it is thundering, do not touch the
connecting cables or the apparatus.
24.The apparatus includes lead, an ingredient of
solder used on the PCB, which is a harmful
substance to human and the environment.
When disposing of this apparatus, follow the
rules and regulations in your area.
Basic Setup
5
Page 14

Introduction
Precautions
Notes on handling
Never disconnect the power cord from a wall outlet
while the recorder is not in standby mode, unless it is
in an emergency. Doing so may cause malfunction.
When shipping the recorder, the original shipping
carton and packing materials come in handy. For
maximum protection, repack the unit as it was
originally packed at the factory.
Do not use volatile liquids, such as insect spray, near
the recorder. Do not leave rubber or plastic products in
contact with the recorder for a long time. They will
leave marks on the finish.
The top and rear panels of the recorder may become
warm after a long time of use. This is not a
malfunction.
When not in use
For usual absence
Be sure to remove the disc from the recorder and turn
off the power.
Prolonged absence
Unplug the recorder from a wall outlet.
Notes on cleaning
Use a soft, dry cloth for cleaning.
For stubborn dirt, use a damp cloth (containing a mild
detergent) to wipe the unit. Ensure the unit is
unplugged before you do this. Use a dry cloth to wipe
it dry.
Do not use any type of solvent, such as thinner or
benzine, as they may damage the surface of the
recorder.
If you use a chemical saturated cloth to clean the unit,
follow that product’s instructions.
Notes on antennas
Image and sound quality depend very much on signal
reception.
Reception may be poor in weak signal areas. In this
event, consult your dealer, or purchase a commercially
available antenna booster. Refer to the booster’s
instruction manual for installation details.
Notes on locating
Place the recorder on a level surface. Do not use it on
a shaky or unstable surface such as a wobbly table or
inclined stand. The loaded disc may dislodge from its
proper position and cause damage to the recorder.
Before placing the recorder, make sure that the
surface can stand the weight of the recorder. For
safety, avoid placing the recorder in a high location, as
an accidental fall of the recorder may cause personal
injury.
When you place this recorder near a TV, radio, or VTR,
the playback picture may become poor and the sound
may be distorted depending on the condition and
location of said equipment. In such an event, place the
recorder away as much as possible from the TV, radio,
or VTR.
Do not install this product in an area where it will be
exposed to large amounts of oily smoke, steam or
dust, as such exposure could result in fire or electric
shock. Cigarette smoke, dust etc. can cause the
product to malfunction.
6
Page 15

Notes on recording and editing
Power outage
When you record/edit important content, make trial
operations beforehand to confirm the recorder can
function properly.
Toshiba does not compensate for content which was
not recorded/edited because of some malfunction of
this product or discs during operation, and is not liable
for incidental damages (such as profit loss or
interruption of business, etc.) produced in such
conditions.
When the power plug is disconnected or when a
power failure occurs during any operation of this
product, all contents recorded in this recorder may be
erased.
Depending on the channel or programme, an
excessive sound input level may cause noise or cut of
recorded sound. Adjust the recording level when
necessary.
If a programme you have set a timer recording includes
copy restriction signals, it may not be recorded. When
programming a recording, confirm that a programme
you want to record is not copy-restricted.
Exemptions
Toshiba is not liable for any damage caused by fires,
natural disaster (such as thunder, earthquake, etc.),
acts by a third parties, accidents, owner’s intentional
or unintentional misuse, or uses in other improper
conditions.
Toshiba is not liable for incidental damages (such as
profit loss or interruption in business, modification or
erasure of recorded data, etc.) caused by use or
inability to use of this product.
Toshiba is not liable for any damage caused by
neglect of the instructions described in the owner’s
manual.
Toshiba is not liable for any damage caused by misuse
or malfunction through simultaneous use of this
product and the connected equipment or software that
Toshiba is not concerned with.
Toshiba does not compensate for contents which were
not recorded/edited because of some malfunctions of
this product or discs during operation, and is not liable
for incidental damages (such as profit loss or
interruption in business, etc.) produced by such
conditions.
After a power outage the clock display will flash. Set
the clock to the correct time.
Notes on the unit and the HDD
Do not give a shock or shake (especially during
operation).
Do not use in a shaky or unstable location.
Hold the unit horizontally.
Do not cover the ventilation holes for the cooling fan of
the unit.
Do not use in a place where the temperature rises or
changes rapidly.
Do not disconnect the power plug from a wall outlet
while the unit is turned on.
Do not disconnect the power plug from the wall outlet
or break the power supply to the unit during recording
or playing. Before disconnecting the power plug, be
sure to press the power button and make sure the unit
ends the finishing process and power turns off
completely. If the power plug is disconnected or power
supply is disrupted while the unit is recording, all
recorded content will be erased.
Toshiba is not liable for any damage or loss of
recorded data caused by shock, shakes, misoperation
or malfunction.
Introduction
Connections
Basic Setup
7
Page 16
Introduction
Precautions (Continued)
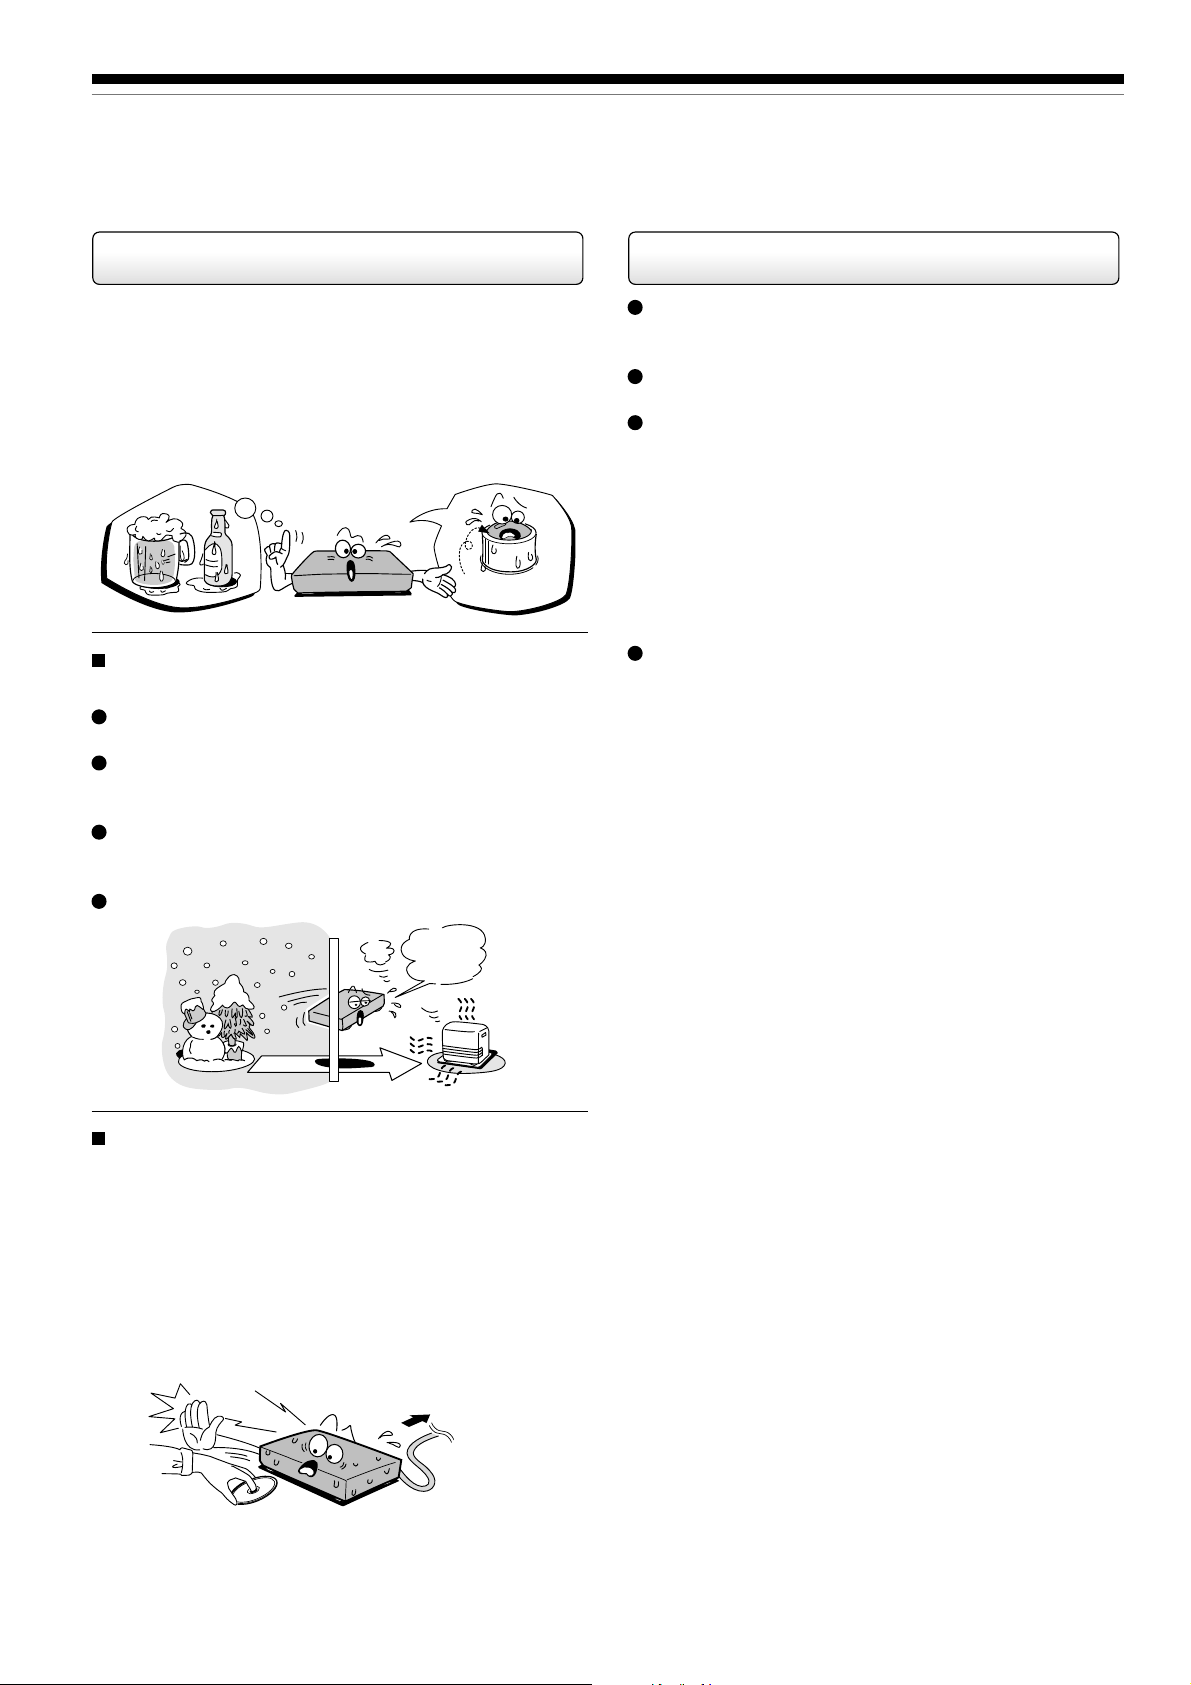
Notes on moisture condensation
Moisture condensation damages the unit. Please
read the following carefully.
Moisture condensation occurs, for example, when you
pour a cold drink into a glass on a warm day. Drops of
water form on the outside of the glass. In the same way,
moisture may condense on the optical pick-up lens inside
this unit, one of the most crucial internal parts of the unit.
f
o
m
e
o
l
p
m
a
x
E
n
o
c
Moisture condensation occurs during the
following cases.
When you bring the unit directly from a cold place to a
warm place.
When you use the unit in a room where you just
turned on the heater, or a place where the cold wind
from the air conditioner directly hits the unit.
In summer, when you use the unit in a hot and humid
place just after you move the unit from an air
conditioned room.
When you use the unit in a humid place.
i
s
t
u
r
e
s
n
a
e
t
i
d
o
n
!
Optical pick-up
lens
Notes on copyright
It is prohibited by law to copy, broadcast, show,
broadcast on cable, play in public, and rent
copyrighted material without permission.
Some DVD video discs are copy protected, and any
recordings made from these discs will be distorted.
This product incorporates copyright protection
technology that is protected by method claims of
certain U.S. patents and other intellectual property
rights owned by Macrovision Corporation and other
rights owners. Use of this copyright protection
technology must be authorized by Macrovision
Corporation, and is intended for home and other
limited viewing uses only unless otherwise authorized
by Macrovision Corporation. Reverse engineering or
disassembly is prohibited.
This unit incorporates CPRM (Content Protection for
Recording Media) technology for copyright protection
in recording devices, authorized by DVD forum.
Recording and copying on this recorder depend on the
contents as described next page.
It’s too
warm!
Do not use the unit when moisture condensation
occurs.
If you use the unit in such a situation, it may damage
discs and internal parts. Remove the disc, connect the
power cord of the unit to the wall outlet, turn on the
unit, and leave it for two or three hours. After two or
three hours, the unit will have warmed up and
evaporated any moisture. Keep the unit connected to
the wall outlet and moisture condensation will seldom
occur.
Wait!
Wall outlet
8
Page 17
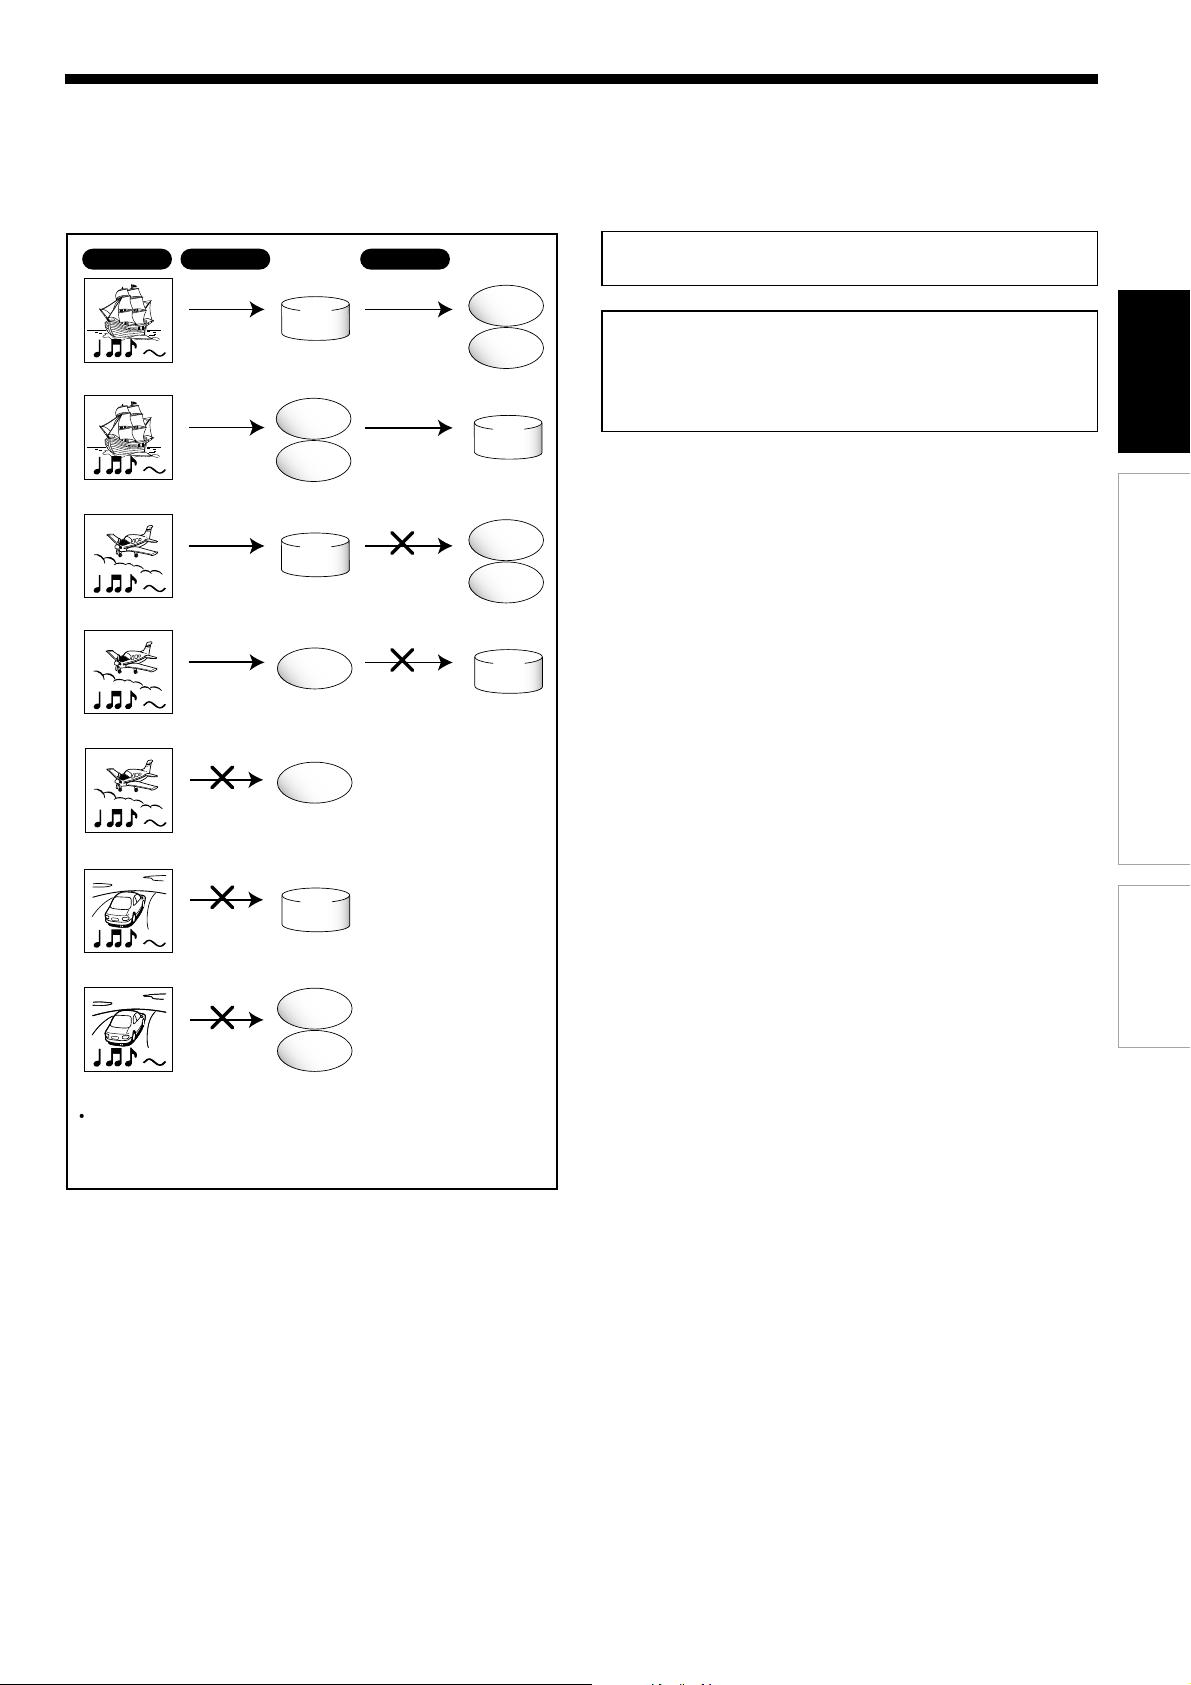
Program Recording Copy
HDD
DVD-RAM
disc
DVD-R/RW
HDD
Copy free
Copy free
Recording once
Recording once
permitted
permitted
Can be
recorded
Can be
recorded
Can be
recorded
Can be
copied
Can be
copied
Cannot be
copied
DVD-RAM
disc
DVD-R/RW
HDD
DVD-RAM
disc
DVD-R/RW
VideoPlus and VideoPlus Deluxe are the trademarks of
Gemstar Europe, Ltd.
Manufactured under license from QSound Labs, Inc. U.S.
patent Nos. 5,105,462, 5,208,860 and 5,440,638 and
various foreign counterpart. Copyright QSound Labs, Inc.
1998-2002. QXpander
TM
is a trademark of QSound Labs,
Inc. All rights reserved.
Introduction
Connections
DVD-RAM
disc
DVD-R/RW
HDD
DVD-RAM
disc
DVD-R/RW
Cannot be
copied
HDD:Hard Disc Drive
Recording once
permitted
Recording once
permitted
Recording prohibited
Recording prohibited
Can be
recorded
Cannot be
recorded
Cannot be
recorded
Cannot be
recorded
Moving (Deleting the original one after dubbing) of
record once permitted content is only possible in the
direction from the HDD to the DVD-RAM disc.
HDD
Basic Setup
9
Page 18

Introduction
Installation procedure
Read carefully “SAFETY PRECAUTIONS”,
“IMPORTANT SAFETY INSTRUCTIONS” and
“Precautions”.
(
pages 2 to 9)
Load the batteries in the remote control.
(
page 12)
Connect an aerial to the recorder.
(
page 14)
Connect a satellite receiver to the recorder.
(
pages 18 to 20)
Connect the recorder to a TV.
(
pages 14 to 17)
Connect optional equipment to the recorder.
(
pages 21 to 24)
Make the initial settings.
(
page 26)
Your recorder is ready. Read the separate
volume “OPERATIONS”.
10
Page 19

Introduction
Table of contents
Introduction
SAFETY PRECAUTIONS ...................................................................................................... 2
IMPORTANT SAFETY INSTRUCTIONS ............................................................................... 4
Precautions........................................................................................................................... 6
Installation procedure........................................................................................................ 10
Preparation of the remote control .................................................................................... 12
Connections
Connecting an aerial and TV ............................................................................................. 14
Connecting to a TV equipped with phono type jacks ..................................................... 16
Connecting to a TV equipped with component video inputs ......................................... 17
Connecting a satellite receiver ......................................................................................... 18
Connecting to an audio system ........................................................................................ 21
By using SCART cable .......................................................................................... 18
By using RF coaxial cable ..................................................................................... 19
Connecting the IR control cable ............................................................................ 20
Connecting to an amplifier equipped with a Dolby Digital decoder ....................... 22
Connecting to an amplifier equipped with Dolby Surround Pro Logic ................... 22
Connecting to an amplifier equipped with a DTS decoder .................................... 23
Connecting to an amplifier equipped with an MPEG2 audio decorder .................. 23
Connecting to an amplifier equipped with a digital audio input ............................. 24
Introduction
Connections
Basic Setup
Basic Setup
Starting up the recorder .................................................................................................... 26
A: Initial settings ................................................................................................................ 28
B: Output sound setting .................................................................................................... 48
C: TV shape setting ............................................................................................................ 50
D: Remote control settings ............................................................................................... 52
1: Time and date setting ........................................................................................ 30
2: Channel setting .................................................................................................. 33
3: Just clock setting ............................................................................................... 40
4: Input signal setting............................................................................................. 42
5: AV1 output setting ............................................................................................. 43
6: AV2 input setting ................................................................................................ 44
7: Set top box setting ............................................................................................. 45
Operating a TV with the remote control of this recorder ........................................ 52
Operating the second and third TOSHIBA HDD/DVD video recorders with
the remote control of this recorder ........................................................................ 54
11
Page 20
Introduction
Preparation of the remote control
Notes on batteries
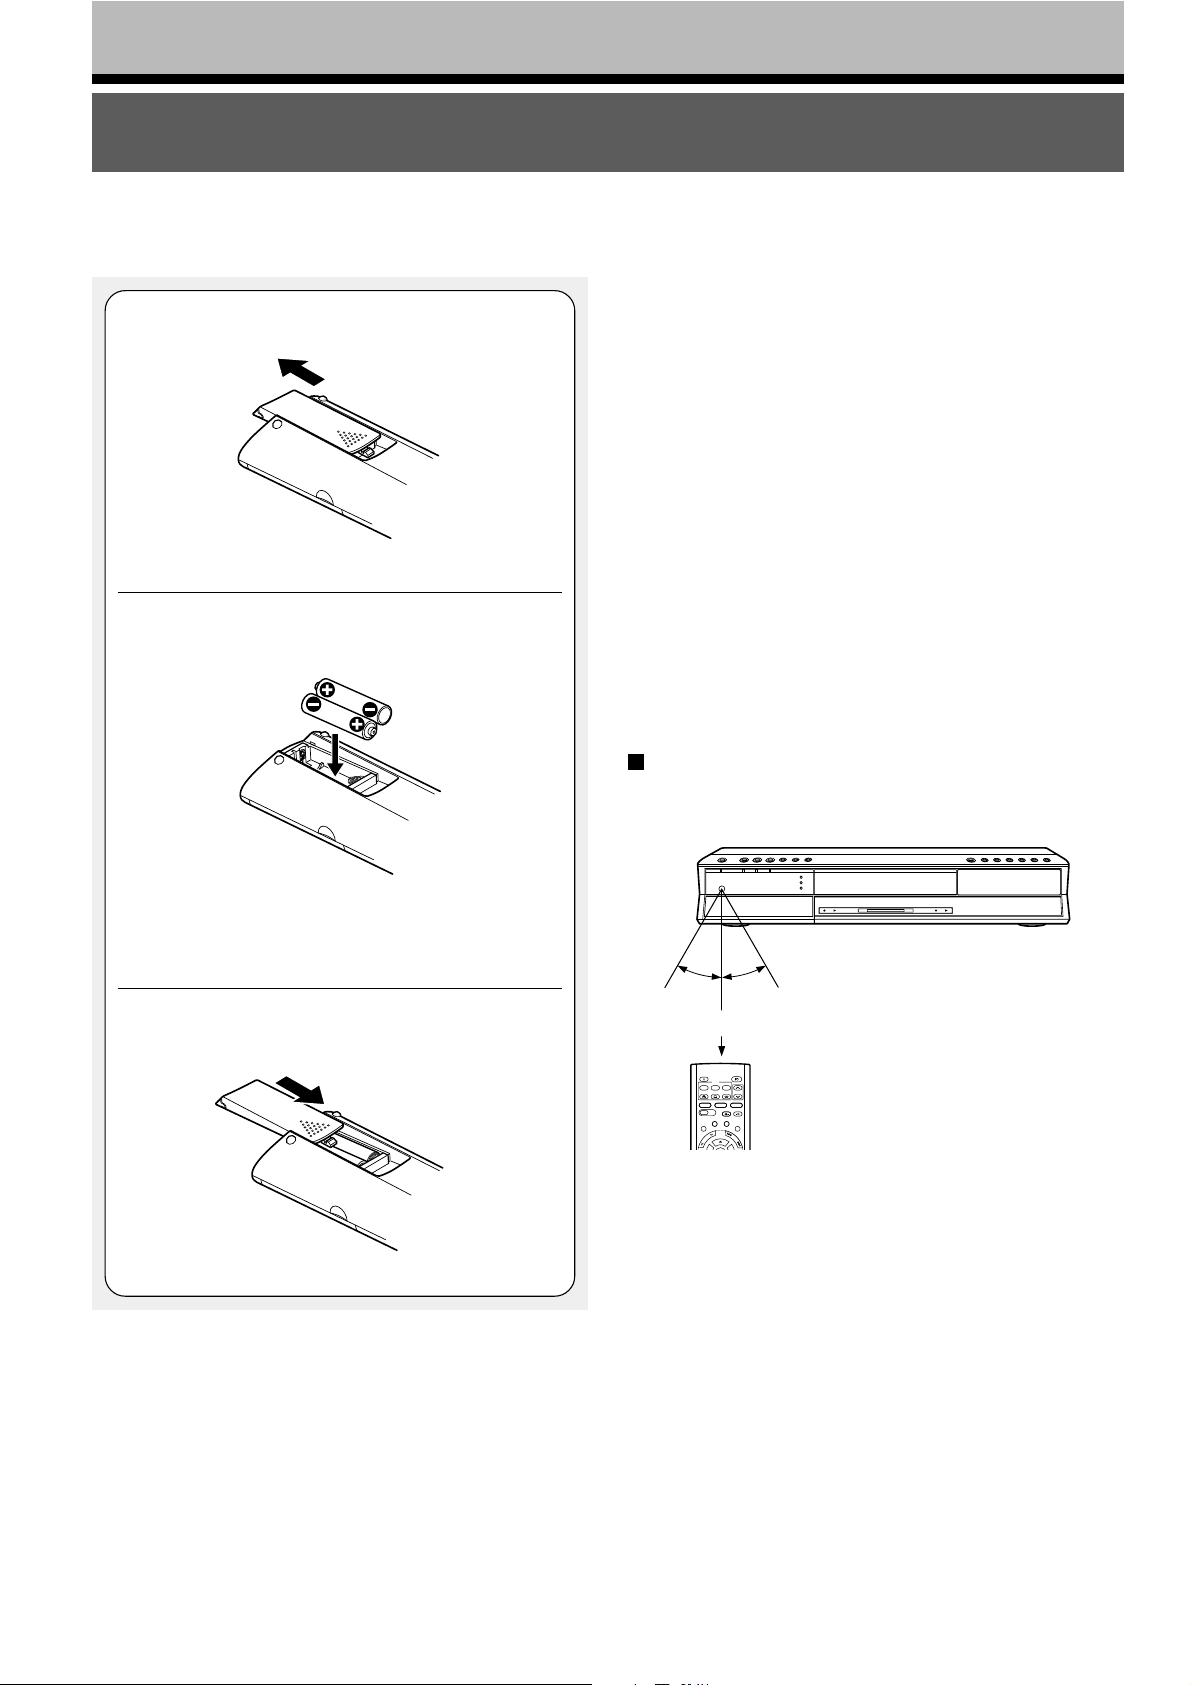
Open the cover.
1
Insert batteries (R03 size).
2
Improper use of batteries may cause battery leakage and
corrosion. To operate the remote control correctly, follow the
instructions below.
• Do not insert batteries into the remote control in the wrong
direction.
• Do not charge, heat, open, or short-circuit the batteries. Do
not throw batteries into a fire.
• Do not leave dead or exhausted batteries in the remote
control.
• Do not use different types of batteries together, or mix old
and new batteries.
• If you do not use the remote control for a long period of
time, remove the batteries to avoid possible damage from
battery corrosion.
• If the remote control does not function correctly or if the
operating range is reduced, replace all batteries with new
ones.
• If battery leakage occurs, wipe the battery liquid from the
battery compartment, then insert new batteries.
Make sure to match the + and – on the
batteries to the marks inside the battery
compartment.
Close the cover.
3
Operating with the remote control
Point the remote control at the remote sensor and
press the buttons.
30°
30°
Within about 7 m
OPEN/CLOSE
DVD
MENU
RETURN
TOP MENU
SUBTITLE
ANGLE
AUDIO
CHANNEL
TIMESLIP
DVDHDD
INSTANT SKIPINSTANT REPLAY
EASY
NAVI
REC MENU EDIT MENU
LIBRARY
CONTENT MENU
S
K
W
I
O
P
L
S
Distance : About 7 m from the front of the remote
sensor
Angle : About 30° in each direction of the front of
the remote sensor
* Do not expose the remote sensor of the recorder to a
strong light source such as direct sunlight or other
illumination. If you do so, you may not be able to
operate the recorder via the remote control.
12
Notes
• Direct the remote control at the remote sensor of the
recorder.
• Do not drop or give the remote control a shock.
• Do not leave the remote control near an extremely hot or
humid place.
• Do not spill water or put anything wet on the remote control.
• Do not disassemble the remote control.
Page 21
Connection procedure
1
“Connecting an aerial
and TV” (
page 14)
“Connecting an aerial
2
and TV” (
3
“Connecting to a TV
equipped with
SCART inputs”
(
page 15)
page 14)
Connections
Connect your recorder to your TV or stereo system.
Connecting an aerial and TV
Connecting to a TV equipped
with phono type jacks
Connecting to a TV equipped
with component video inputs
Connecting a satellite receiver
Connecting to an audio system
4
“Connecting to an audio
system” (
AV amplifier
When you connect a TV equipped with SCART
inputs
Perform steps 1, 2 and 3.
When you connect an audio system
Perform steps 1, 2, 3 and 4.
page 21)
Page 22
Connections
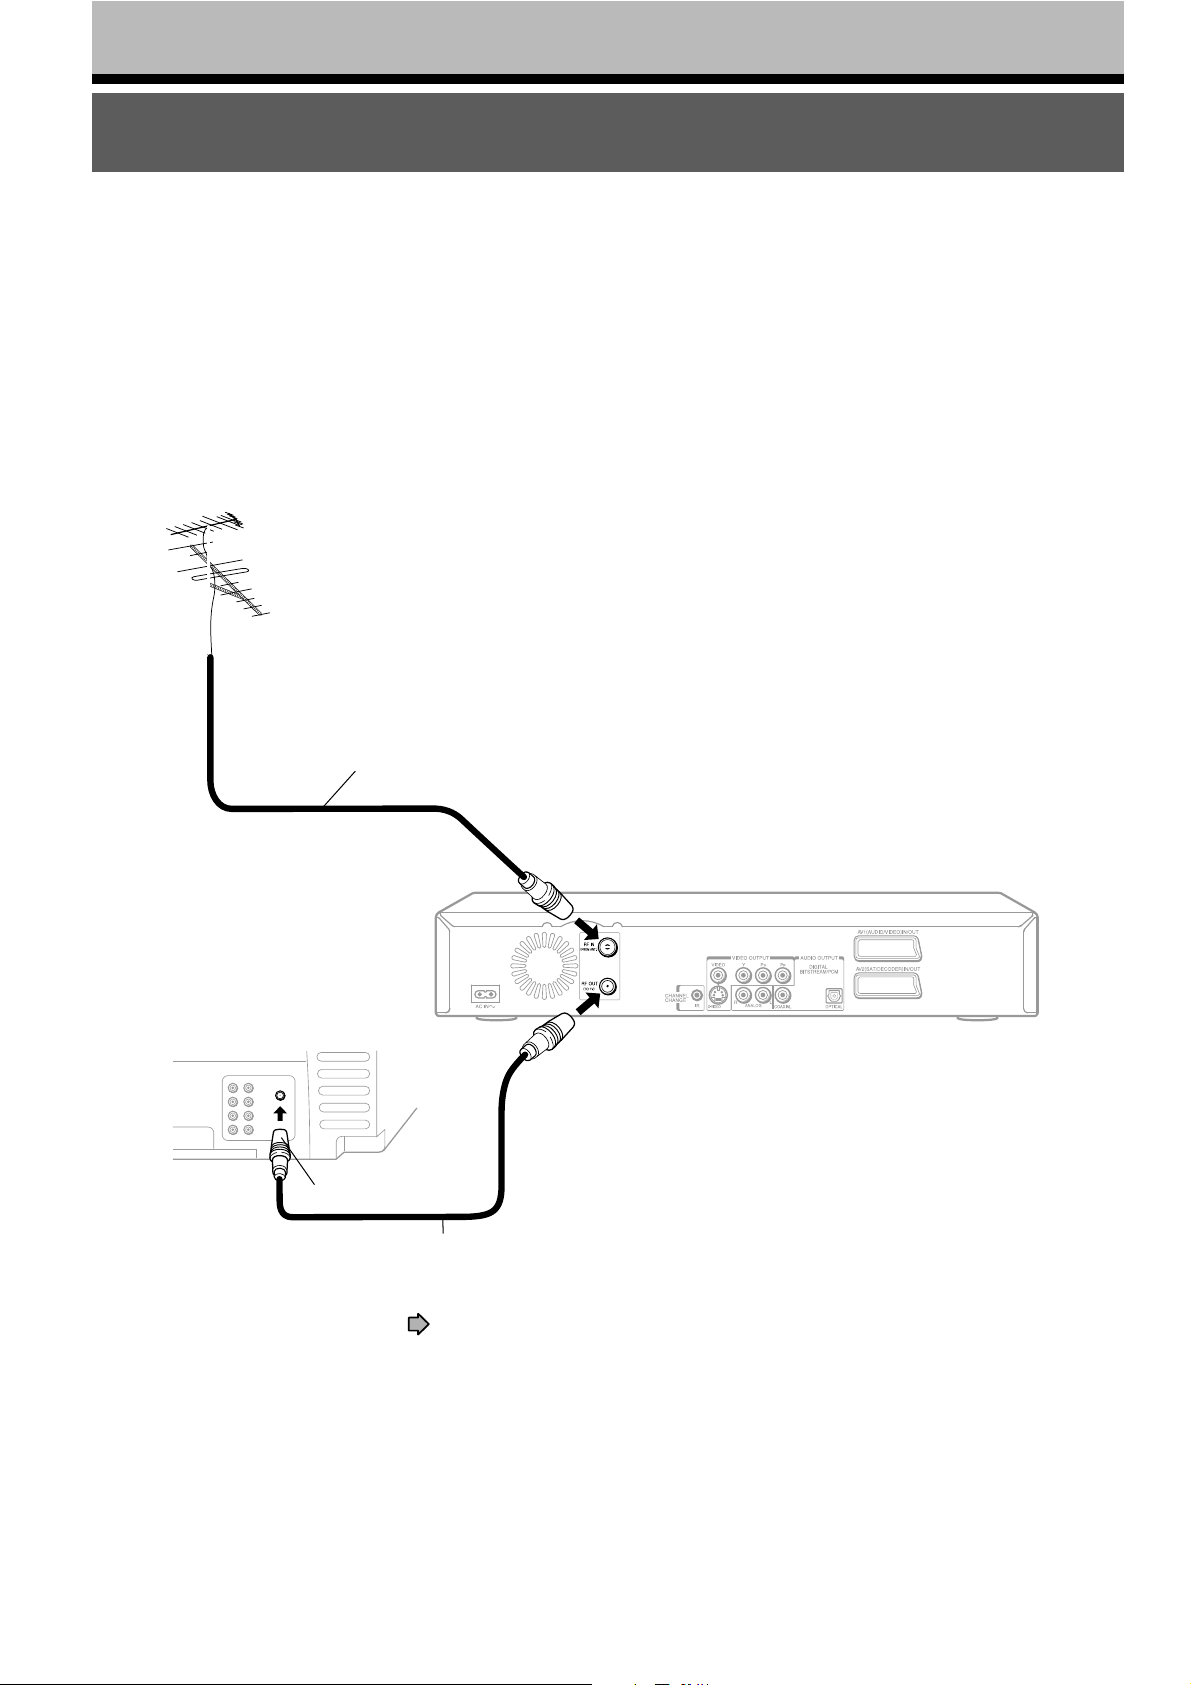
Connecting an aerial and TV
Connect your TV and the aerial to this recorder for recording and to view broadcast signals on the TV.
Disconnect the aerial cable from your TV, and connect it to the RF IN (FROM
1
2
ANT.) terminal on the recorder.
Using the supplied coaxial cable of this recorder, connect the RF OUT (TO
TV) terminal to the TV.
VHF/UHF aerial
Aerial cable
To aerial input
2
Coaxial cable (supplied)
For connecting a satellite system, see
page 18.
1
2
To RF IN (FROM ANT.)
To RF OUT (TO TV)
14
Page 23
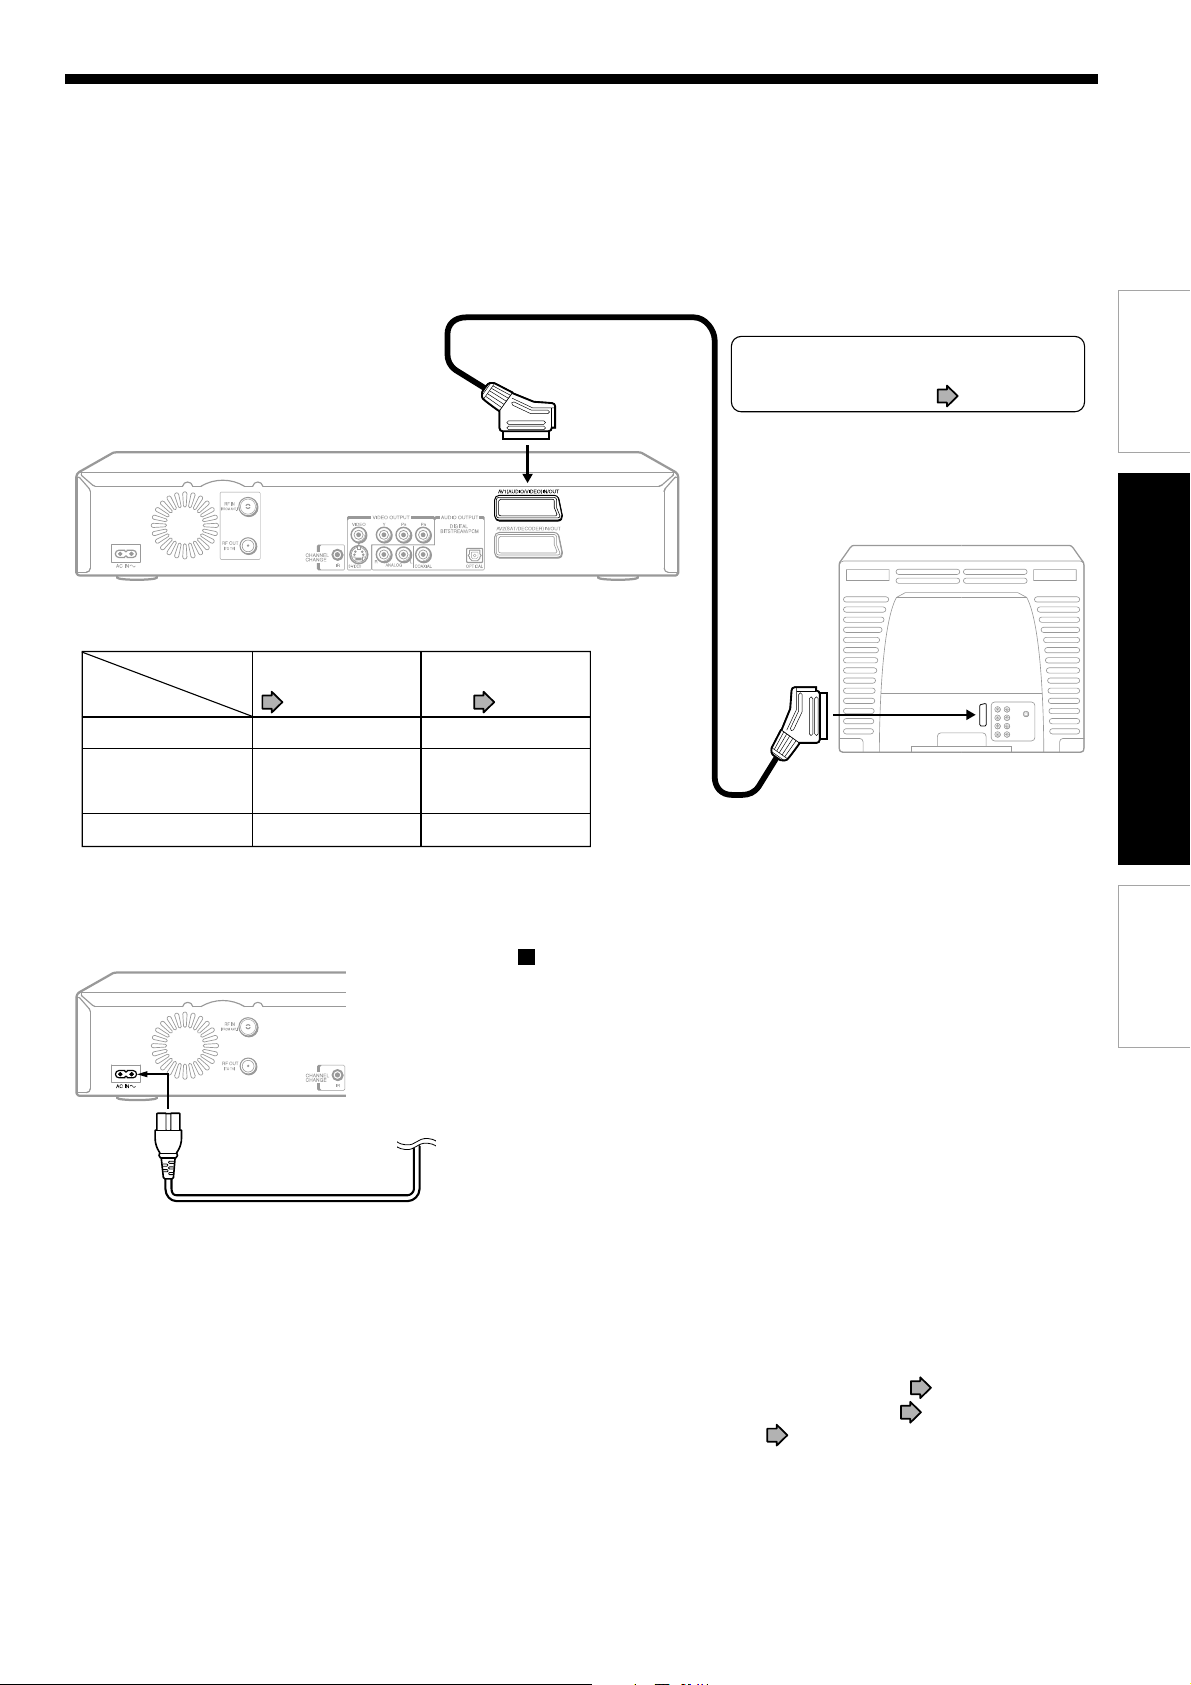
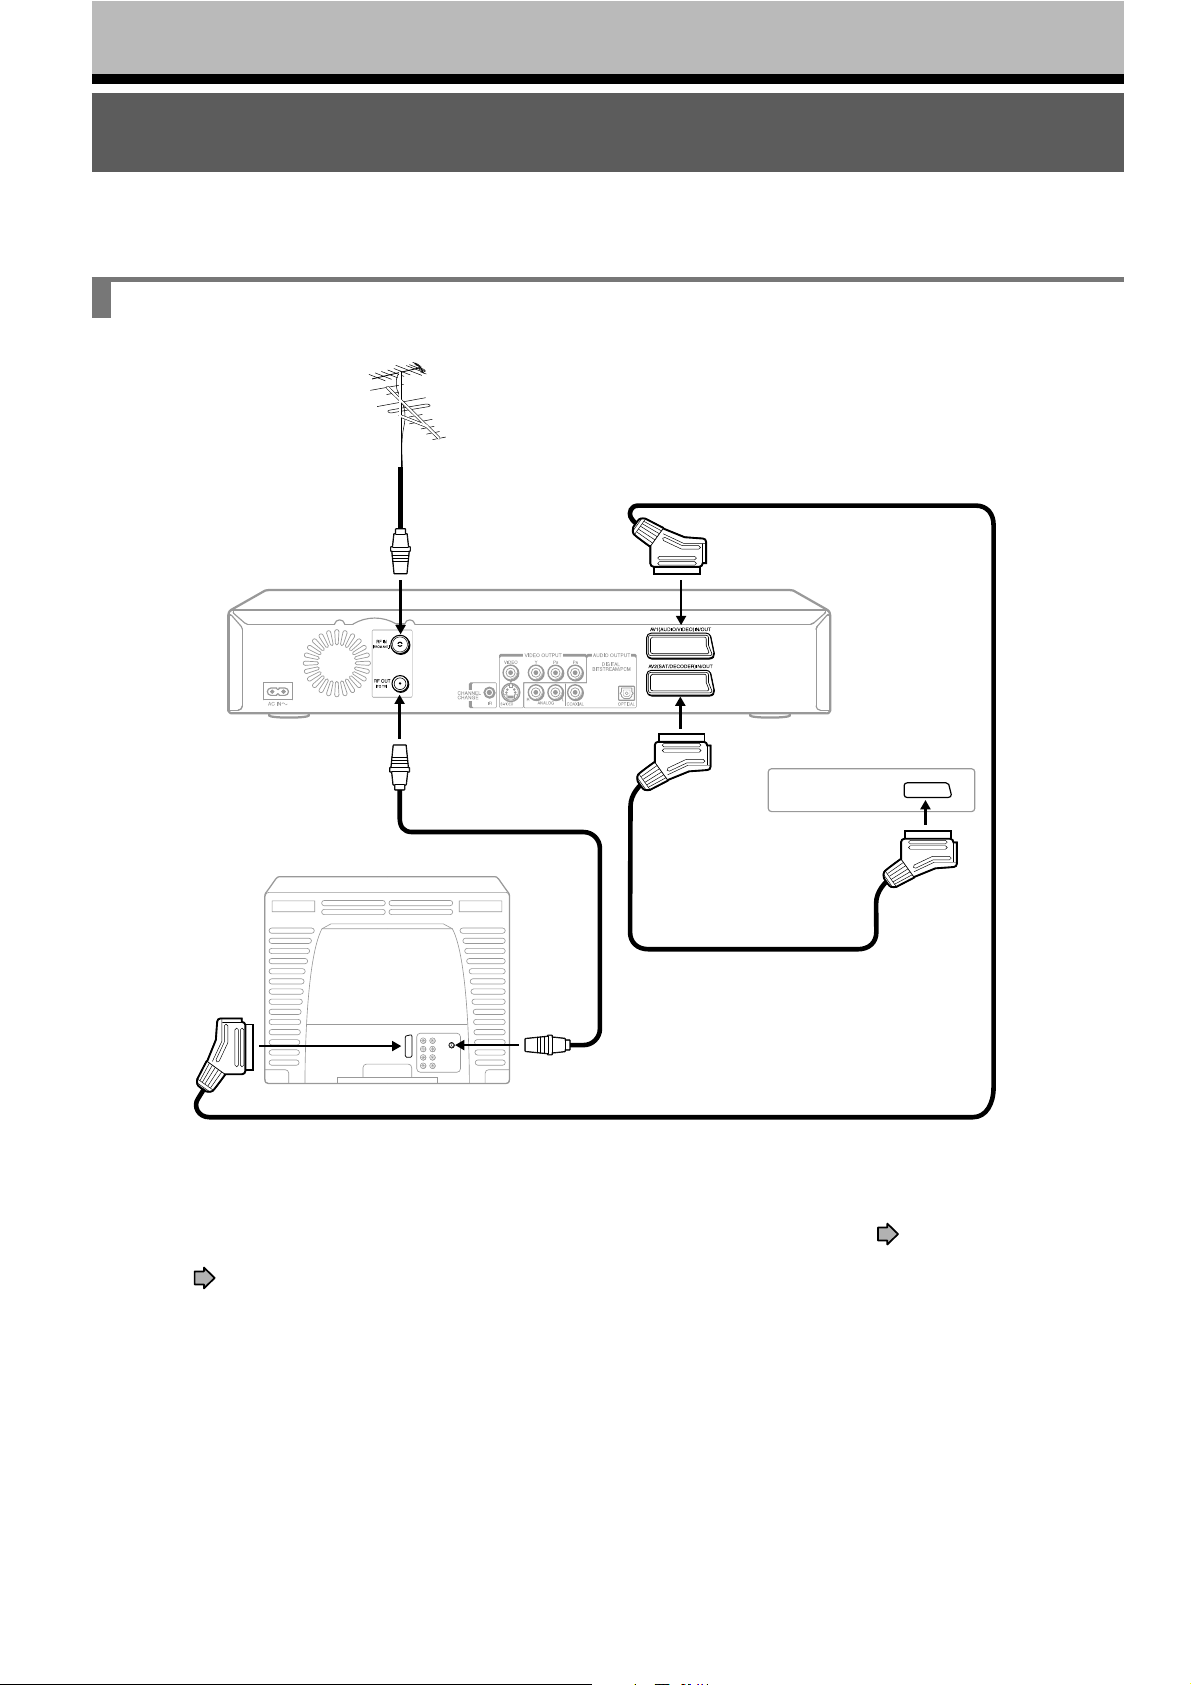
Connect to a TV equipped with SCART inputs.
3
• The following setting is required according to the TV that
you are connecting. Perform this setting after step 4.
TV
Normal TV “Video”
TV compatible with
S video signals
RGB monitor “RGB”
Connect as below for watching received channels or recorded contents. Watching via the RF OUT terminal
is not available.
To AV1(AUDIO/VIDEO)IN/OUT
Setting
“AV1 output” on the
“Initial settings” menu.
page 43
“S Video”
“Audio out select” on the
“Picture/Audio settings”
menu.
page 48
“Analog 2ch”
“Analog 2ch”
“Analog 2ch”
SCART cable (not supplied)
To SCART input
For connections to TVs with no SCART
inputs, see “Connecting to a TV equipped
with phono type jacks” (
• Normal TV
• TV compatible with S video signals
• RGB monitor
page 16).
Introduction
Connections
Connect the power cord of the recorder to a wall outlet.
4
To wall outlet
Notes
• Refer to the owner’s manual of the connected TV as well.
• When you connect the recorder to your TV, be sure to turn off the power and unplug both units from the wall outlet before any
connections.
• Connect the recorder directly to your TV. If you connect the recorder to a VTR, TV/VTR combination or video selector, the
playback picture may be distorted due to copy protection.
Plug & Auto Set Up function
This recorder will automatically set itself up when it is plugged
into the mains for the first time.
TV stations will be stored in the recorder’s memory. The process
will finish after a few minutes. Then the date and time are set
automatically from broadcast signal.
Notes
• The display on the recorder shows “Auto” while the Plug & Auto Set
Up function is running.
• TV stations are stored in the range of UHF E21-E69.
• You can only use the ON/STANDBY button while the Plug & Auto Set
Up function is running.
• The automatic setup is cancelled, if you press the ON/STANDBY
button while the Plug & Auto Set Up function is running.
• The Plug & Auto Set Up function may not work, depending on the
radio reception or other conditions. In this case, refer to “Initial
settings” in this Owner’s Manual for the setup.
To use the phono type jacks to connect the TV (
the component video jacks to connect the TV (
connect the satellite receiver (
necessary connection before connecting the power cord.
pages 18 to 20) complete the
page 16), to use
page 17), or to
Basic Setup
15
Page 24
Connections
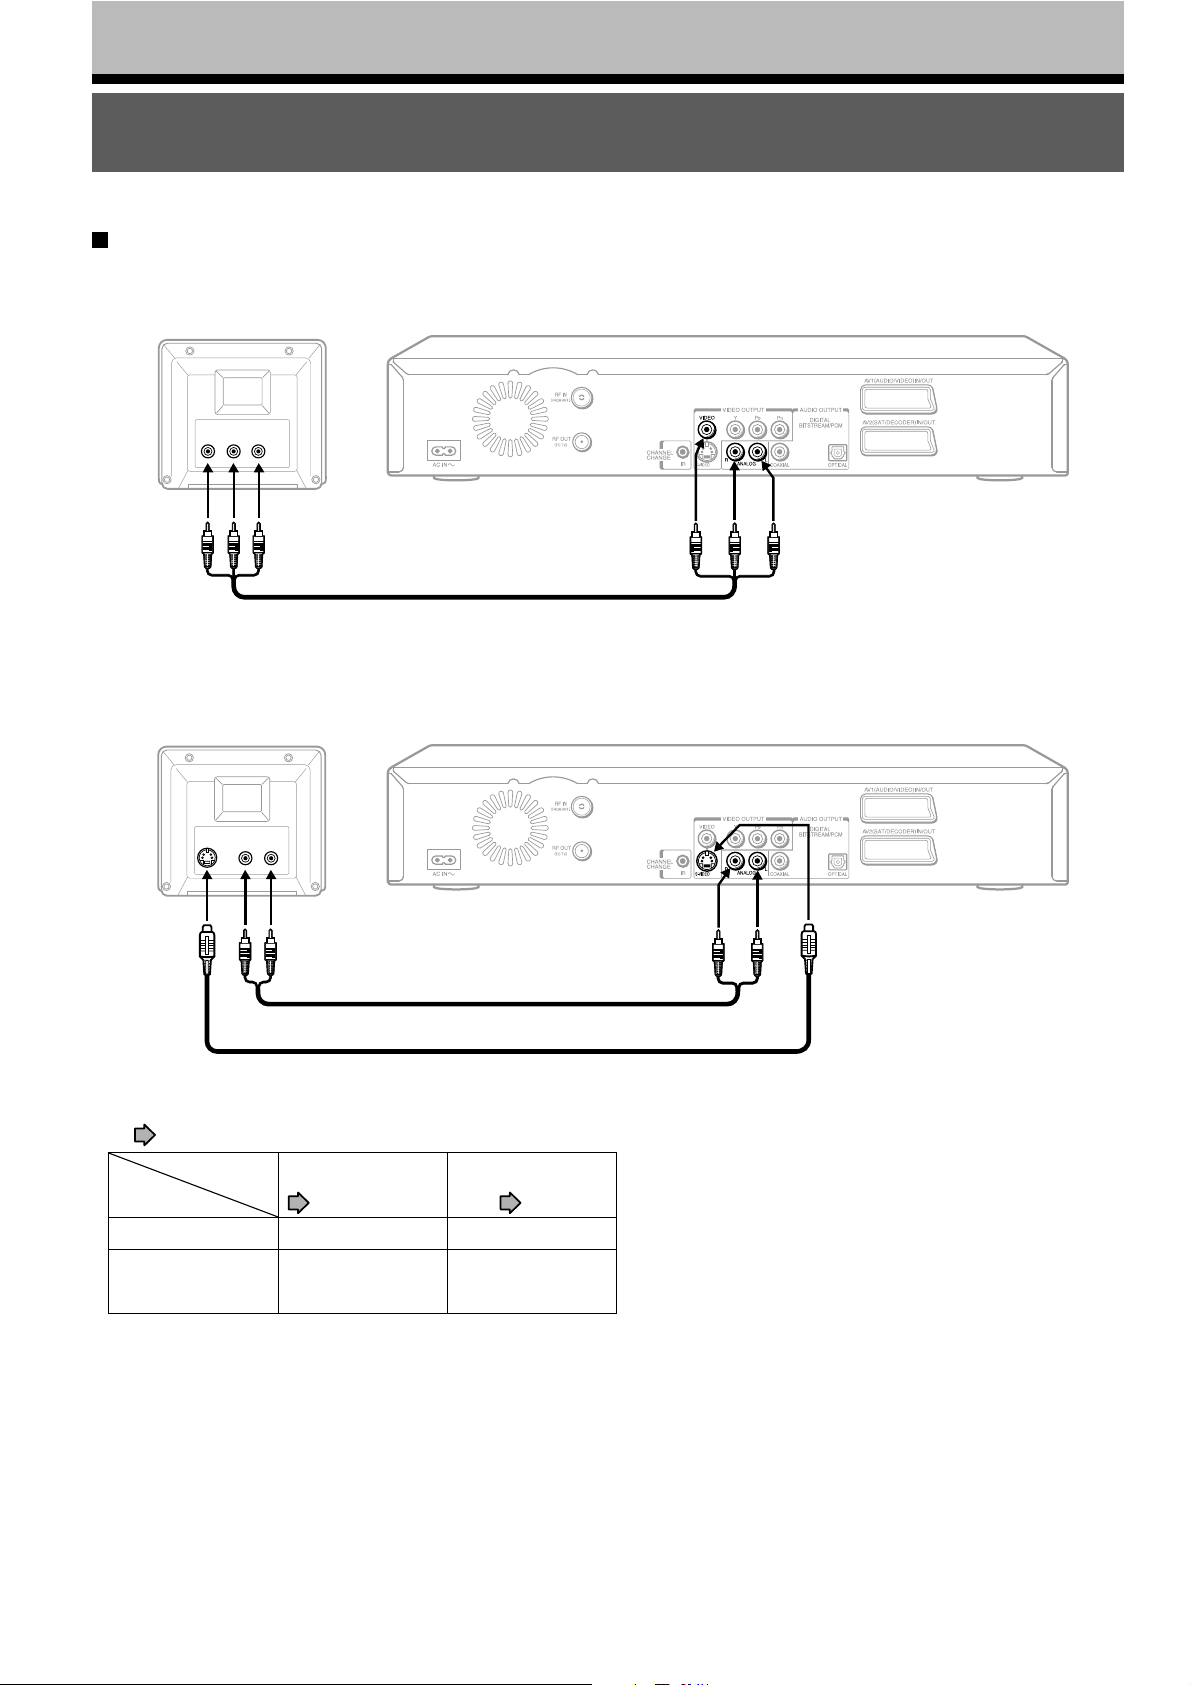
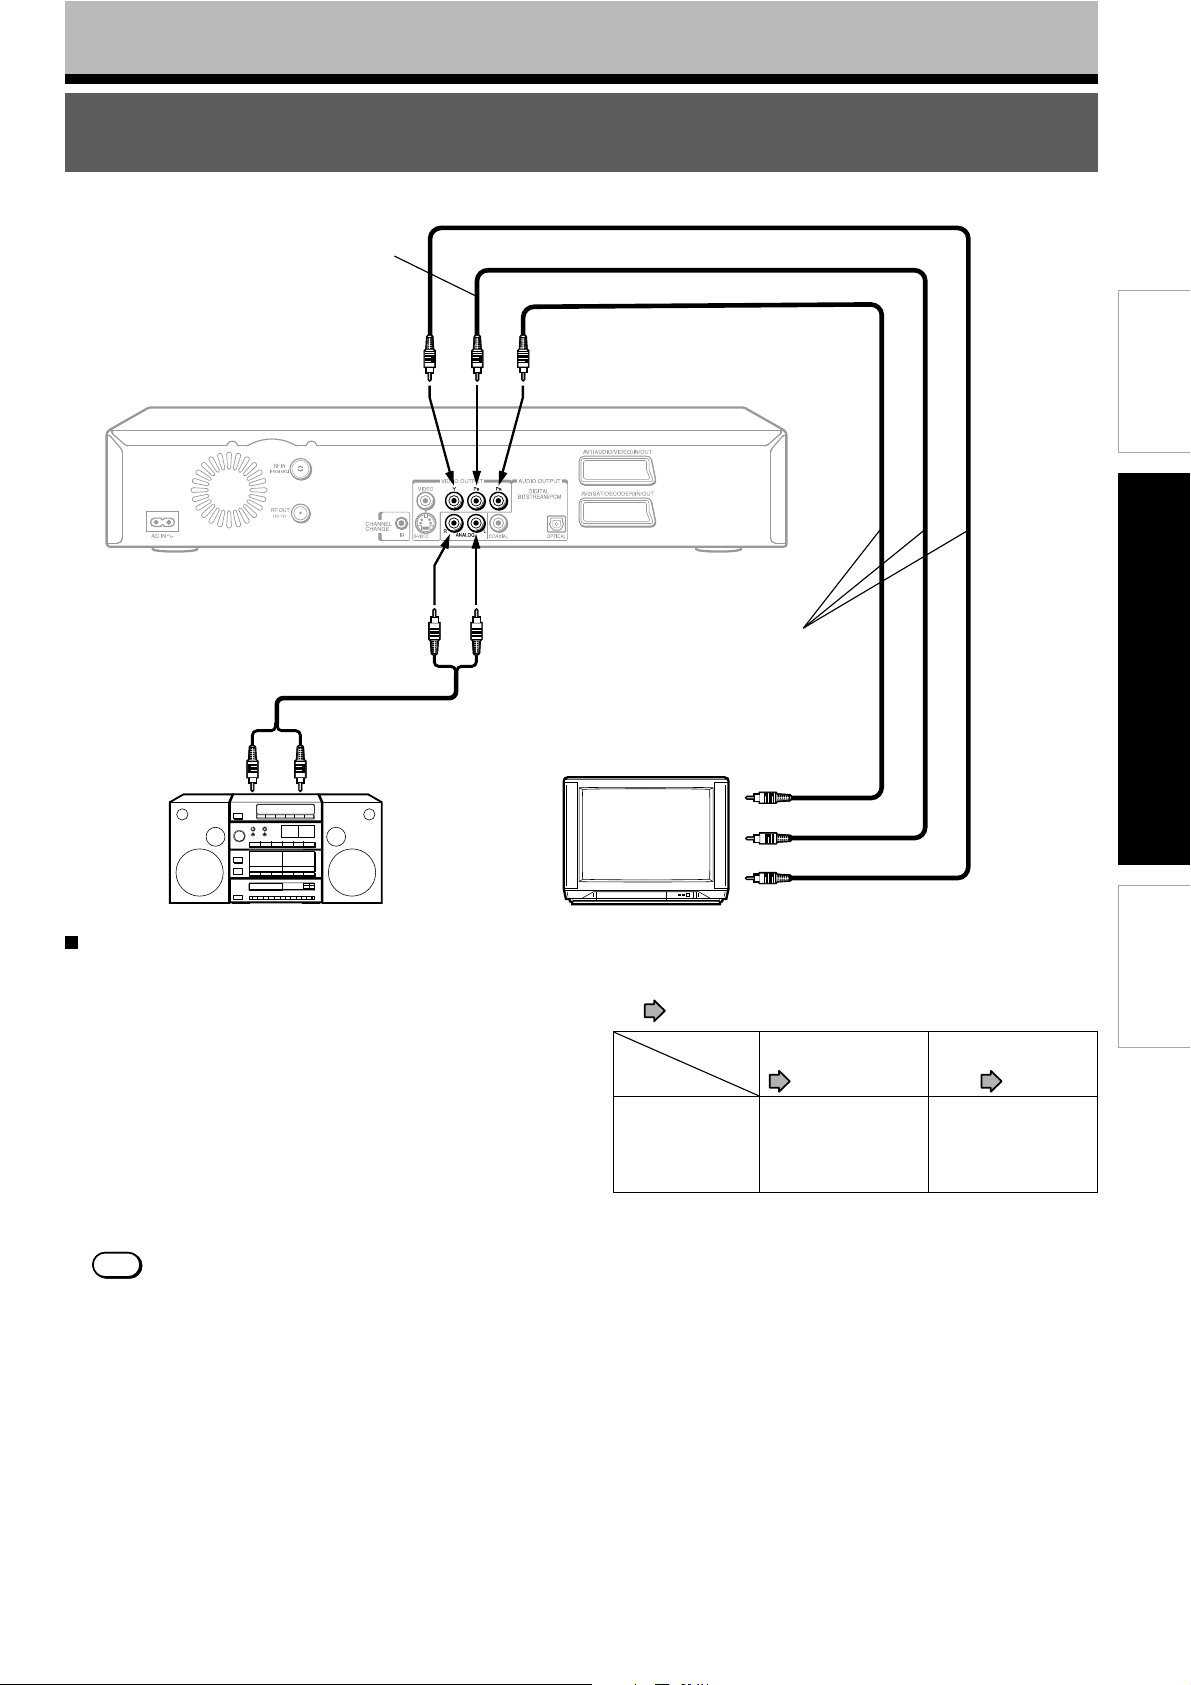
Connecting to a TV equipped with phono type jacks
Select the connection type depending on the TV. (Normal TV/TV equipped with an S video input)
Normal TV
To video
input
(yellow)
TV equipped with
an S video input
To S video
input
To audio
input
To audio
input
Video/Audio cable (supplied)
To ANALOG AUDIO OUT
(R:red, L:white)
Audio cable (not supplied)
S video cable (not supplied)
• The following setting is required according to the TV
that you are connecting. Perform this setting after step
page 15).
4 (
Setting
TV
Normal TV No need to set.
“AV1 output” on the
“Initial settings” menu.
page 43
“Audio out select” on the
“Picture/Audio settings”
menu.
page 48
“Analog 2ch”
To VIDEO OUT
(yellow)
To ANALOG AUDIO OUTPUT
(R:red, L:white)
To S-VIDEO OUTPUT
TV equipped with an
S video input
No need to set.
“Analog 2ch”
Note
• If your television set has one audio input, connect the left and right audio outputs of the recorder to a Y cable adapter (not
supplied) and then connect to your TV.
16
Page 25
Connections
Connecting to a TV equipped with component video inputs
If your TV has component video inputs, you can obtain pictures in better quality.
B VIDEO
To P
OUTPUT
Introduction
To Y VIDEO
OUTPUT
R VIDEO
To P
OUTPUT
To ANALOG
AUDIO OUTPUT
(L: white)
TV or monitor
equipped with
component
video inputs
To audio
inputs of the
amplifier
To ANALOG
AUDIO OUTPUT
(R: red)
Audio cable (not supplied)
(white)(red)
Component video outputs/inputs
Some TVs or monitors are equipped with component
video inputs. Connecting to these inputs allows you to
enjoy higher quality picture playback.
Actual labels for component video inputs may vary
depending on the TV manufacturer. (ex.Y, R-Y, R-B or
B, CR)
Y, C
In some TVs or monitors, the color levels of the
playback picture may be reduced slightly or the tint
may change. In such a case, adjust the TV or monitor
for optimum performance.
Video cable
(not supplied)
R video input
To P
B video input
To P
To Y video input
• The following setting is required according to the TV
that you are connecting. Perform this setting after step
page 15).
4 (
Setting
TV
TV or monitor
equipped with
component video
inputs
“AV1 output” on the
“Initial settings” menu.
page 43
“Video” or “S-Video”
“Audio out select” on the
“Picture/Audio settings”
menu.
page 48
“Analog 2ch”
Connections
Basic Setup
To switch the output signal (Progressive/Interlaced)
PROGRESSIVE
Press PROGRESSIVE on the remote control.
The output signal alternates between
component progressive and component
interlaced.
• Selecting “RGB” disables signal output from the VIDEO
OUT (Y, P
B, PR) jacks. If the on-screen display
disappears immediately after you select “RGB”, you
can restore it by connecting the recorder using the
VIDEO OUTPUT (yellow) jack.
• If the recorder detects any data that indicates
the contents are copy protected, it may not
output the contents in the progressive format.
Notes
• Refer to the owner’s manual of the connected TV as well.
• When you connect the recorder to other equipment, be sure to turn off the power and unplug all of the equipment from the
wall outlet before any connections.
• If you place the recorder near a tuner or radio, the radio broadcast sound might be distorted. In this event, place the recorder
away from the tuner and radio.
• The output sound of the recorder has a wide dynamic range. Be sure to adjust the amplifier’s volume to a moderate listening
level. Otherwise, the speakers and your hearing may be damaged by a sudden high volume sound.
• Turn off the amplifier before you connect or disconnect the recorder’s power cord. If you leave the amplifier power on, the
speakers may be damaged.
17
Page 26
Connections
Connecting a satellite receiver
You can connect a satellite receiver to this recorder to enjoy watching or recording satellite programmes
through the recorder.
By using SCART cable
If both your TV and satellite receiver have a SCART input, use a SCART cable to connect the recorder.
VHF/UHF aerial
To AV1(AUDIO/VIDEO)IN/OUT
To AV2(SAT/DECODER)
To SCART input
TV
Notes
• To watch broadcast programmes by using the satellite receiver, use the INPUT SELECT button on the remote control and
select “AV2” (this is shown on the display on the recorder).
• According to the type of the TV set that you are connecting, set the output for the AV1 socket. (
• According to the type of video output signal used for the satellite receiver that you are connecting, set “AV2 input” with “Initial
settings”. (
page 44)
To aerial
input
IN/OUT
SCART cable (not supplied)
SCART cable (not supplied)
Satellite receiver
page 43)
18
Page 27
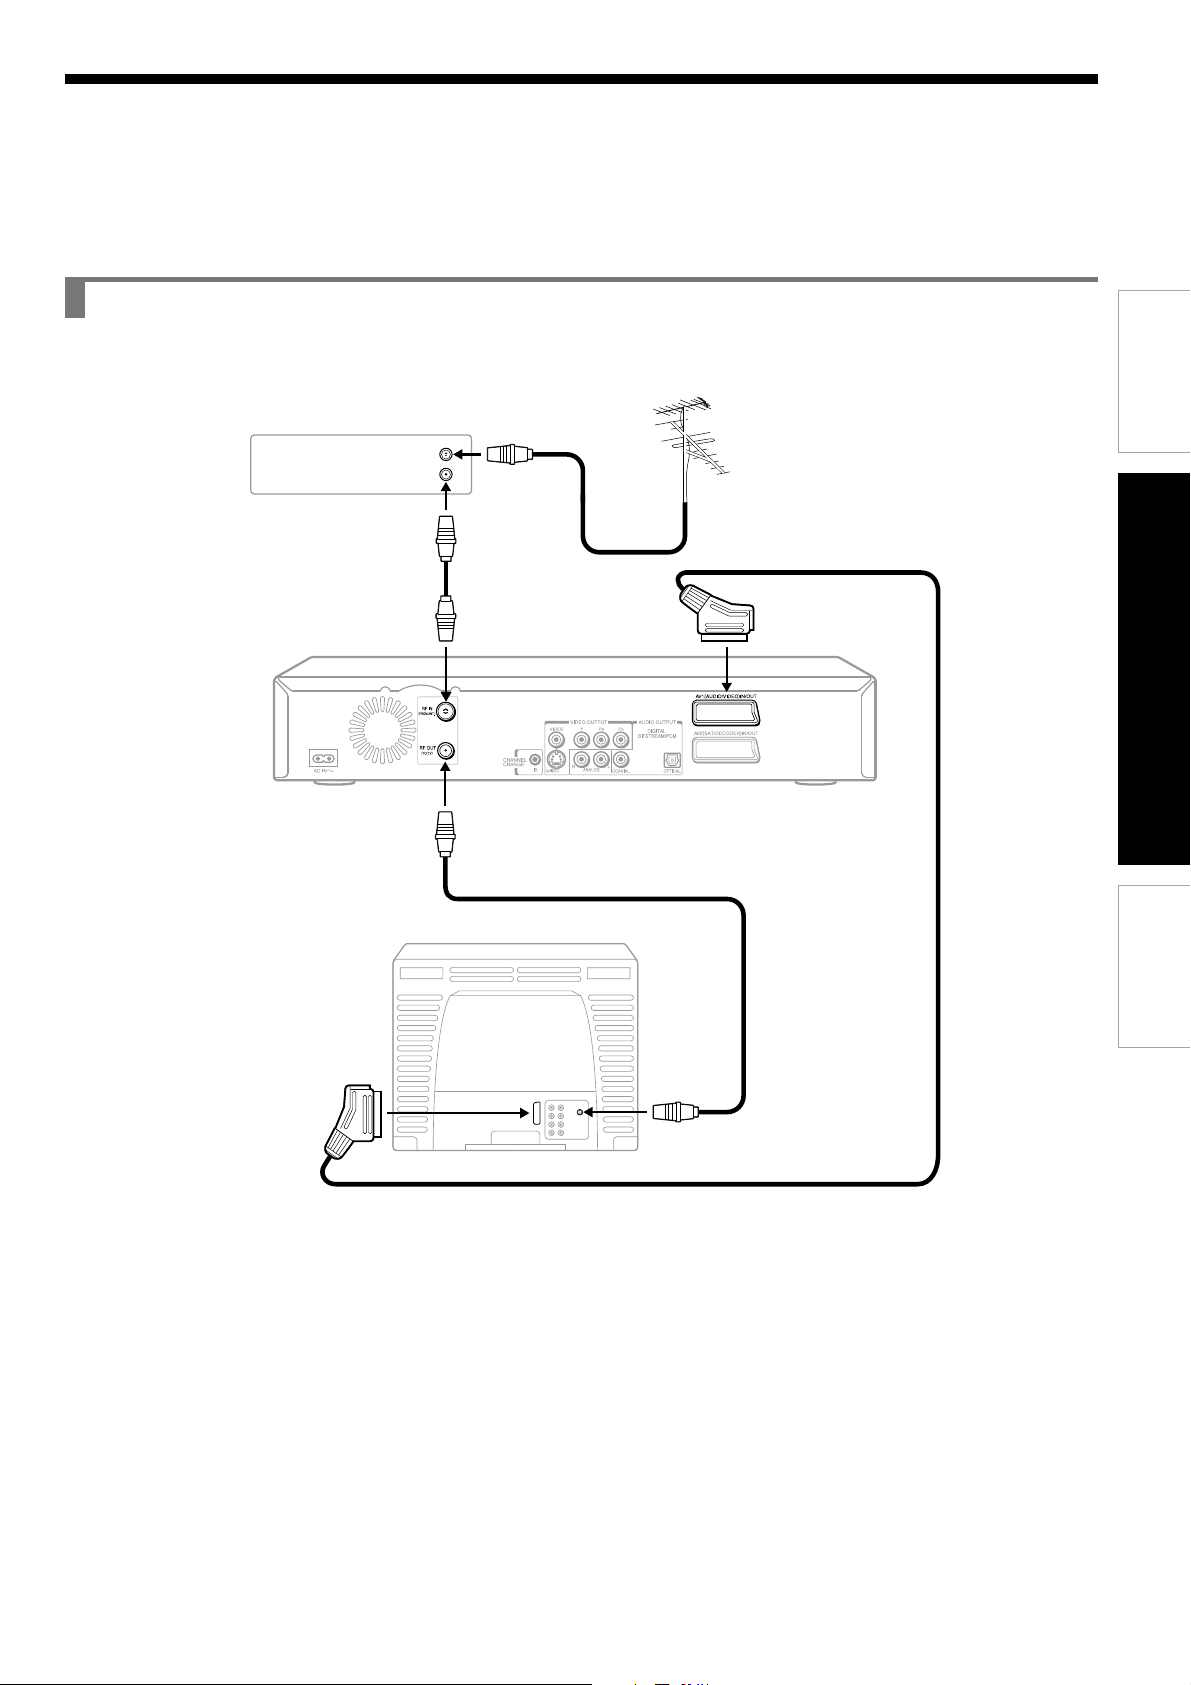
By using RF coaxial cable
After making this connection, you must allocate a channel on the recorder to receive satellite stations.
Introduction
Satellite receiver
RF IN
RF OUT
To AV1(AUDIO/VIDEO)
IN/OUT
Aerial
Connections
Basic Setup
To SCART input
To aerial
TV
SCART cable (not supplied)
input
19
Page 28
Connections
Connecting a satellite receiver (Continued)
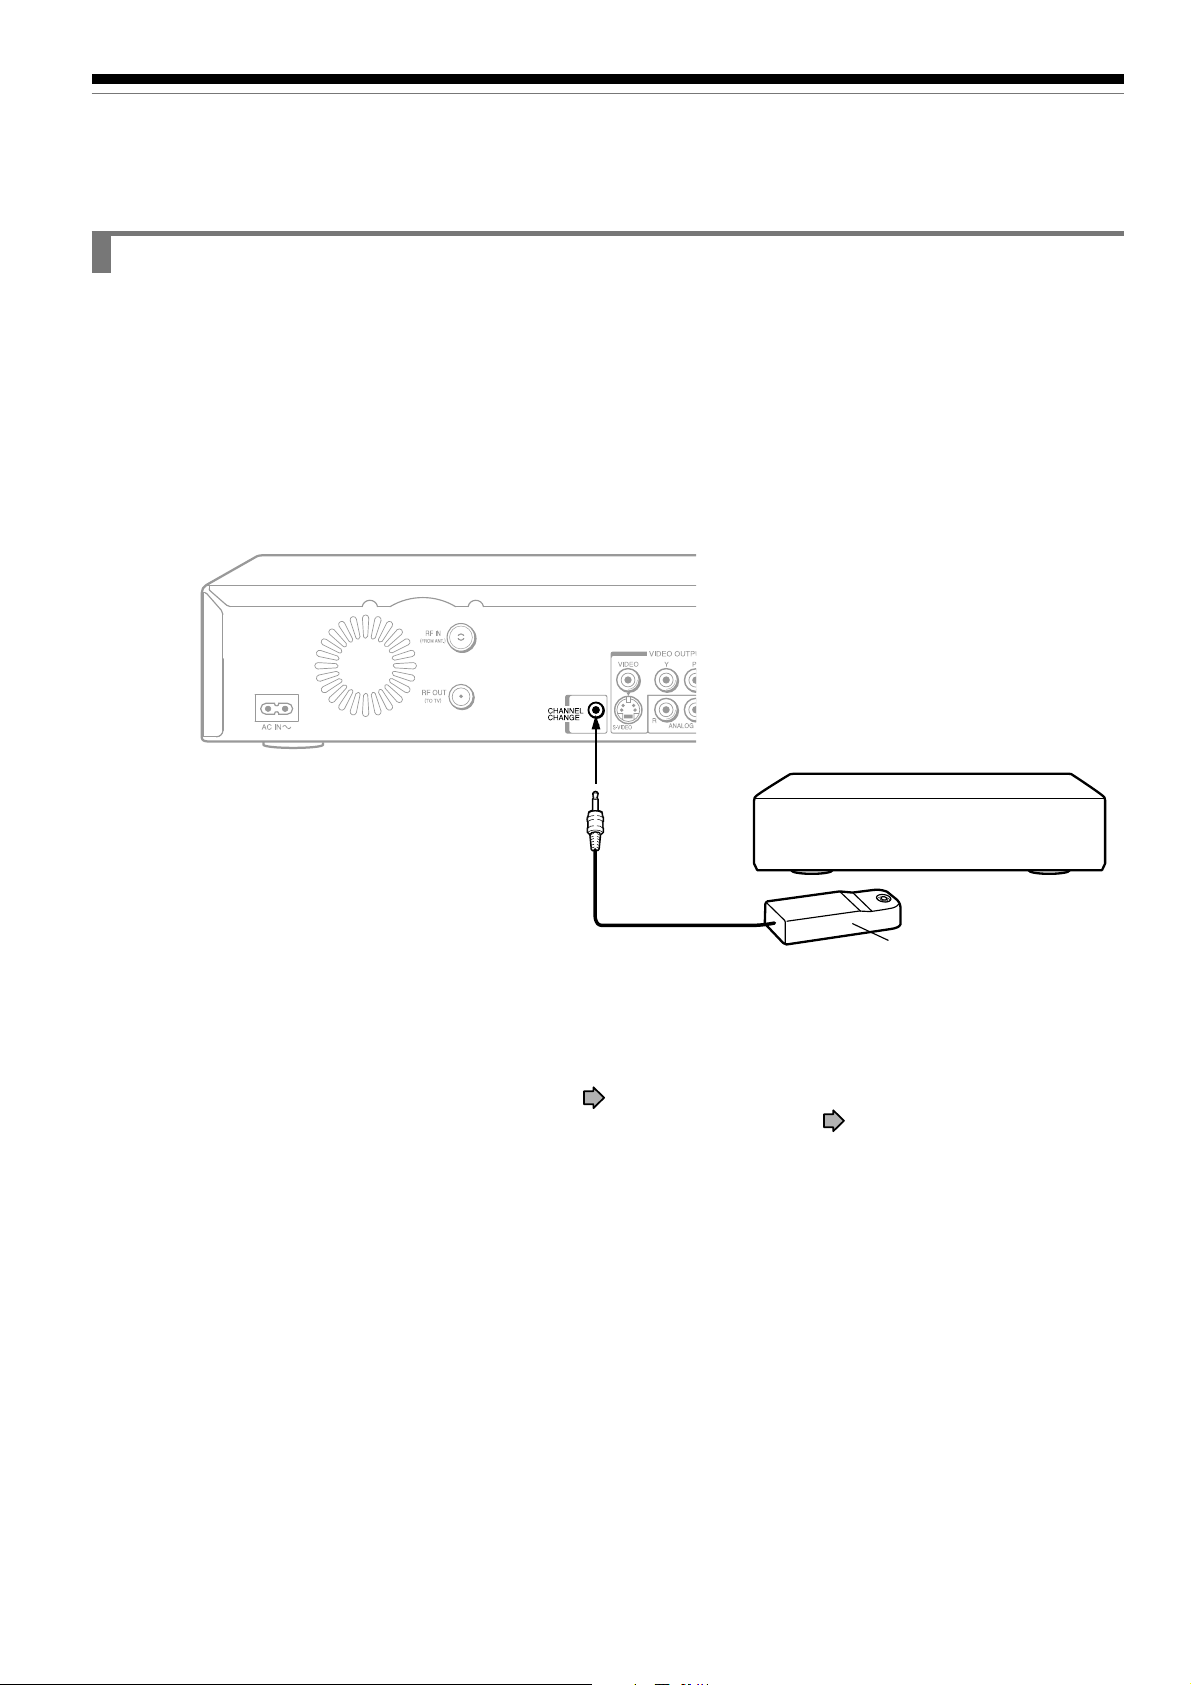
Connecting the IR control cable
The recorder sends commands to your connected satellite receiver to control the channels of it through the IR
control cable. Make the following preparation.
Connect the plug of the supplied IR control cable to the CHANNEL CHANGE
1
IR jack on the recorder.
Place the transmitter near the satellite receiver connected to the recorder.
2
Satellite receiver
(Keep the power on to receive
commands from the recorder.)
1
Transmitter
2
After connecting, make the necessary setting ( page 45).
When you use the recorder for the first time, also make the other settings (
Notes
• Do not connect an accessory other than the supplied IR control cable to the CHANNEL CHANGE IR jack.
• Do not cover the transmitter.
• The recorder sends commands even while it is turned off.
• Refer to the owner’s manual of the connected satellite receiver as well.
Place as close as possible to the
IR (signal) sensor of the satellite
receiver.
page 28).
20
Page 29

Connections
Connecting to an audio system
You can enjoy high quality dynamic sounds by connecting the recorder to an audio system.
• For connection to your TV, see pages 14 to 17.
• This section uses the following reference marks.
Front speaker
Surround speaker
Sub woofer
Notes
• DO NOT connect the BITSTREAM/PCM AUDIO OUTPUT
jack of the recorder to the AC-3 RF input of a Dolby Digital
Receiver. This input on your A/V Receiver is reserved for
Laserdisc use only and is incompatible with the
BITSTREAM/PCM AUDIO OUTPUT jack of the recorder.
• Connect the BITSTREAM/PCM AUDIO OUTPUT jack of
the recorder to the “OPTICAL” or “COAXIAL” input of a
Receiver or Processor.
• Refer to the owner’s manual of the connected equipment
as well.
• When you connect the recorder to other equipment, be
sure to turn off the power and unplug all of the equipment
from the wall outlet before any connections.
• The output sound of the recorder has a wide dynamic
range. Be sure to adjust the audio amplifier’s volume to a
moderate listening level. Otherwise, the speakers and your
hearing may be damaged by a sudden high volume sound.
• Turn off the amplifier before you connect or disconnect the
recorder’s power cord. If you leave the amplifier power on,
the speakers may be damaged.
Center speaker
Signal flow
CAUTION
• When you are connecting (via the BITSTREAM/PCM
AUDIO OUTPUT jack) an AV decoder that does not
have Dolby Digital or Digital Theater Systems (DTS)
decoding function, be sure to set “Audio out select” to
“PCM” from the on-screen displays (
Otherwise, high volume sound may damage your
hearing as well as the speakers.
• When playing DTS-encoded discs (audio CDs),
excessive noise may be output from the analog stereo
jacks. To avoid possible damage to the audio system,
you should take proper precautions when the analog
audio out (L/R) jacks of the recorder are connected to
an amplification system. To enjoy DTS Digital
Surround™ playback, an external 5.1 channel DTS
Digital Surround™ decoder system must be connected
to the BITSTREAM/PCM AUDIO OUTPUT jack of the
recorder.
page 48).
Introduction
Connections
Basic Setup
21
Page 30

Connections
Connecting to an audio system (Continued)
Connecting to an amplifier equipped with a Dolby Digital decoder
Dolby Digital
Dolby Digital is the surround sound technology used in theatres showing the latest films, and is now available to
reproduce this realistic effect in the home. You can enjoy motion picture and live concert DVD video discs with this
dynamic realistic sound by connecting the recorder to a 6 channel amplifier equipped with a Dolby Digital decoder or
Dolby Digital processor. If you have a Dolby Surround Pro Logic decoder, you will obtain the full benefit of Pro Logic
from the same DVD films that provide full 5.1-channel Dolby Digital soundtracks, as well as from titles with the Dolby
Surround mark.
Amplifier equipped with a
Dolby Digital decoder
Connect either.
To DIGITAL BITSTREAM/PCM
AUDIO OUTPUT
Optical digital cable (not supplied)
75 Ω coaxial cable (not supplied)
To OPTICAL
type digital
audio input
To COAXIAL
type digital
audio input
• Use DVD video discs encoded via the Dolby Digital recording system.
• Make the following setting.
On-screen display
“Audio out select”
Recording system
Select:
“Bitstream”
D
Page
page 48
page 73,
“OPERATIONS”
Manufactured under license from Dolby Laboratories. “Dolby”, and
the double-D symbol are trademarks of Dolby Laboratories.
Connecting to an amplifier equipped with Dolby Surround Pro Logic
Dolby Surround Pro Logic
You can enjoy the dynamic realistic sound of Dolby Surround Pro Logic by connecting an amplifier and speaker system
(right and left front speakers, a centre speaker, and one or two rear speakers).
With an amplifier equipped with Dolby Digital
Connect the equipment the same way as described in “Connecting to an amplifier equipped with a Dolby Digital
decoder”. Refer to that amplifier’s owner’s manual and set the amplifier so you can enjoy Dolby Surround Pro Logic
sound.
With an amplifier not equipped with Dolby Digital
Connect the equipment as follows.
To ANALOG (L/R)
Audio cable (not supplied)
• Make the following setting.
On-screen display
“Audio out select” “Analog 2ch” page 48
Select:
Page
Be sure to set “Audio out select” to “Analog 2ch”
when you enjoy sounds of Dolby Surround Pro Logic
using this connection.
22
Amplifier equipped with
Dolby Surround Pro Logic
To audio input
Connect one or two rear speakers.
*
The output sound from the rear speakers will be monaural
even if you connect two rear speakers.
*
Page 31

Connecting to an amplifier equipped with a DTS decoder
Digital Theater Systems (DTS)
DTS is a high quality surround technology used in theatres and now available for home use, on DVD video discs or
audio CDs.
If you have a DTS decoder or processor, you can obtain the full benefit of 5.1 channel DTS encoded sound tracks on
DVD video discs or audio CDs.
Amplifier equipped with a
DTS decoder
Connect either.
To DIGITAL BITSTREAM/PCM
AUDIO OUTPUT
Optical digital cable (not supplied)
75 Ω coaxial cable (not supplied)
To OPTICAL
type digital
audio input
To COAXIAL
type digital
audio input
• Use DVD video discs or audio CDs encoded via the DTS recording system.
• Make the following setting.
On-screen display
“Audio out select”
Recording system
Select
“Bitstream”
DTS
Page
page 48
page 73,
“OPERATIONS”
“DTS” and “DTS Digital Out” are trademarks of Digital Theater
Systems, Inc.
Introduction
Connections
Connecting to an amplifier equipped with an MPEG2 audio decoder
MPEG2 sound
You can enjoy motion picture and live concert DVD video discs with dynamic realistic sound by connecting an amplifier
equipped with an MPEG2 audio decoder or MPEG2 audio processor.
Amplifier equipped with an
MPEG2 audio decoder
Connect either.
To DIGITAL BITSTREAM/PCM
AUDIO OUTPUT
Optical digital cable (not supplied)
75 Ω coaxial cable (not supplied)
• Use DVD video discs encoded via the MPEG2
recording system.
• Make the following setting.
On-screen display
Select
Page
To OPTICAL
type digital
audio input
To COAXIAL
type digital
audio input
Basic Setup
“Audio out select”
Recording system
“Bitstream”
MPEG2
page 48
page 73,
“OPERATIONS”
23
Page 32

Connections
Connecting to an audio system (Continued)
Connecting to an amplifier equipped with a digital audio input
2 channel digital stereo
You can enjoy the dynamic sound of 2 channel digital stereo by connecting an amplifier equipped with a digital audio
input and speaker system (right and left front speakers).
Amplifier equipped with
a digital audio input
Connect either.
To DIGITAL BITSTREAM/PCM
AUDIO OUTPUT
Optical digital cable (not supplied)
75 Ω coaxial cable (not supplied)
• Make the following setting.
On-screen display
“Audio out select” “PCM” page 48
Select
Page
To OPTICAL
type digital
audio input
To COAXIAL
type digital
audio input
24
Page 33

Basic Setup
Read this chapter for necessary settings to get started.
When you use this recorder for the first time, be sure to
perform A to C in this order.
Proceed to D if necessary.
Starting up the recorder
A: Initial settings
1: Time & date setting
2: Channel setting
3: Just clock setting
– clock set position
setting
4: Input signal setting
5: AV1 output setting
6: AV2 input setting
7: Set top box setting
B: Output sound setting
C: TV shape setting
D: Remote control settings
Operating a TV with the
remote control of
this recorder
Operating the second and
third TOSHIBA HDD/DVD
video recorders with the
remote control of this
recorder
Page 34

Basic Setup
D
Starting up the recorder
While the icon is flashing, the recorder is checking
After all the necessary connections,
• Turn on the equipment connected to the
recorder.
• Select the corresponding video input on
your TV.
Perform these selections whenever you operate
the recorder.
Turning the power on
Press the ON/STANDBY button on the front panel of
the recorder or on the remote control.
ON/STANDBY button
the status and reading data of the HDD and the
DVD drive for startup. If the DVD drive does not
contain a disc, the recorder consumes less time to
startup, because it does not need to read data
from the DVD drive.
While the “Loading” icon is flashing, the recorder
cannot respond to any operations of buttons other
than CHANNEL and INPUT SELECT. Operate all
other functions after the icon has disappeared.
Note
When the recorder is turned on for the first time, the
following menu may be displayed after the “Loading” icon
has disappeared. See “A: Initial settings” (
e.g.
Time & date setting
Channel setting
Input signal
AV1 output
AV2 input
Set top box setting
Clock set position
Just clock
Initial settings
Auto
Auto
PAL
Video
Video
1
On
page 28).
ON/STANDBY indicator
OPEN/CLOSE
DVD
MENU
TOP MENU
SUBTITLE
ANGLE
TIMESLIP
HDD DVD
INSTANT REPLAY
EASY
NAVI
REC MENU EDIT MENU
LIBRARY
W
O
L
S
ENTER
F
R
A
M
E
/
A
RETURN
AUDIO
CHANNEL
INSTANT SKIP
CONTENT MENU
S
ON/STANDBY button
K
I
P
H
C
R
A
E
S
E
When the power turns on, the ON/STANDBY indicator
changes colour from red (standby mode) to green
(operation).
After a few seconds, a startup screen appears.
The following icon will appear on the top right corner
of the screen. The icon will continue flashing
momentarily.
e.g.
Loading
Turning the power off
Press the ON/STANDBY button from the remote
control or on the front panel of the recoder.
The “Unloading” icon appears on the right corner of
the top of the screen, and the ON/STANDBY indicator
turns red. Then the power turns off.
Note
If the recorder freezes for about 15 minutes or more and will
not respond to any buttons, holding down the ON/STANDBY
button on the front panel for about 10 seconds can force the
recorder to turn off. However, this is an emergency measure,
which contains a risk of damage to data or discs. Avoid
casual use of this measure. If you try this while the recorder
is operating properly, especially while the “Loading” or
“Unloading” icon is flashing, it may result in re-initialization of
the HDD.
26
Page 35

Startup/finishing (closing) icons
These icons are displayed on the right corner on the
top of the screen. While they are flashing, the recorder
is operating as follows:
Startup, reading a disc, finishing
Loading
recording
Introduction
Un
loading
Open
Close
unloading a disc, finishing the recorder’s
operation
Opening a disc tray
Connections
Closing a disc tray
Basic Setup
27
Page 36

Basic Setup
A: Initial settings
This step sets the recorder’s clock and tuner to record broadcasting TV programmes.
Once you complete this process there is generally no need to reset the clock. (However, if there are
discrepancies in the recorder’s time display or changes made to receivable TV stations, you should
make this setting again.)
Press SETUP if the setting menu is not displayed.
OPEN/CLOSE
DVD
MENU
TOP MENU
ANGLE
HDD DVD
LIBRARY
W
O
L
S
RETURN
SUBTITLE
AUDIO
TIMESLIP
EASY
NAVI
REC MENU EDIT MENU
CHANNEL
INSTANT SKIPINSTANT REPLAY
CONTENT MENU
S
K
I
P
1
2
Press / to select “Initial settings”, then
press ENTER.
e.g.
ENTER
Time & date setting
Channel setting
Input signal
AV1 output
AV2 input
Set top box setting
Clock set position
Just clock
Initial settings
Auto
Auto
PAL
Video
Video
1
On
ENTER
F
R
A
M
E
/
A
D
J
U
S
T
REC
REC
VIDEO Plus+
456
789
SETUP ENTER
EXTEND
0
REC MODE
Open the lid.
312
+
10
R
A
E
S
E
R
U
T
C
I
P
PLAYSTOPPAUSE
QUICK MENU
TV CODE
T.SEARCH
CLEAR
DELETE
H
C
3
Press / to select the setting to be adjusted,
then press ENTER.
The submenu appears.
e.g. When “Time & date setting” is selected:
ENTER
e.g.
Time & date setting
Channel setting
Input signal
AV1 output
AV2 input
Set top box setting
Clock set position
Just clock
Initial settings
Auto
Auto
PAL
Video
Video
1
On
Auto
Manual
When the recorder is operated for the first time, input
settings in the following order.
1: Time & date setting
2: Channel setting
3: Just clock setting
page 30
page 33
page 40
Clock set position setting
4: Input signal setting
5: AV1 output setting
6: AV2 input setting
7: Set top box setting
page 42
page 43
page 44
page 45
Notes
• To go back to the previous menu, press the
button.
• To exit the menu, press the SETUP button.
• If you exit the “Initial settings” menu without setting the clock and channels, a menu may automatically appear to remind you
to set them each time you turn on the recorder. Once you complete this process, the menu reminder will not appear again.
28
Page 37

Tip on setting
SETUP
The recorder provides you with a variety of GUI
(Graphical User Interface) displays to perform key
operations including customizing of setting, playback
or recording.
Refer to the guide on the bottom on each GUI for
further programming related informations.
e.g.
If a message appears
The recorder may display a message. Each message
varies according to operational status.
To respond, follow the below examples.
Message
e.g.
Introduction
Time & date setting
Channel setting
Input signal
AV1 output
AV2 input
Set top box setting
Clock set position
Just clock
Direction buttons
O button
ENTER button
SETUP
SETUP button
Initial settings
Return
Auto
Auto
PAL
Video
Video
1
On
Operation guide
SETUP
SETUP
SetSelect
Exit
FunctionExample of the icon
To select an item.
To return to the previous
page.
To enter (confirm) a
selected item or setting.
To display/exit a setting
menu.
e.g.
e.g.
message
No
OK
Yes
2 selections
message
OK
message
OK
Set
Select either response (by
highlighting in green) using the
/ buttons, then press the
ENTER button.
The message disappears.
Read the message, then press
the ENTER button.
The message disappears.
Connections
Basic Setup
e.g.
1 selection
The message disappears
automatically in a few seconds.
message
No selection
29
Page 38

Basic Setup
A: Initial settings (Continued)
1: Time and date setting
Set the recorder’s clock. If it is not set correctly, the recorder cannot perform operations other than playback.
Press SETUP if the setting menu is not displayed.
OPEN/CLOSE
DVD
MENU
TOP MENU
ANGLE
HDD DVD
LIBRARY
W
O
L
S
F
R
A
M
E
/
A
D
J
U
S
T
RETURN
SUBTITLE
AUDIO
TIMESLIP
EASY
NAVI
REC MENU EDIT MENU
ENTER
CHANNEL
INSTANT SKIPINSTANT REPLAY
CONTENT MENU
S
K
I
P
H
C
R
A
E
S
E
R
U
T
C
I
P
PLAYSTOPPAUSE
1
Press / to select “Initial settings”, then press ENTER.
2
Press / to select “Time & date setting”,
3
then press ENTER.
e.g.
ENTER
Time & date setting
Channel setting
Input signal
AV1 output
AV2 input
Set top box setting
Clock set position
Just clock
Initial settings
Auto
Auto
PAL
Video
Video
1
On
Auto
Manual
REC
REC
VIDEO Plus+
456
789
SETUP ENTER
EXTEND
0
REC MODE
Open the lid.
312
+
10
QUICK MENU
TV CODE
T.SEARCH
CLEAR
DELETE
4
Press / to select “Auto” or “Manual”, then
press ENTER.
Auto : You can be free of entering each value.
Proceed to the next page.
ENTER
Manual : You can set the clock manually. See “Manual
Select “Manual” to set the clock if not set correctly by
“Auto”.
(This function will not work correctly unless the
“Clock set position” is set correctly.
Page
41)
clock setting”
page 32
30
Page 39

Auto (Auto clock setting)
When you select “Auto” and press the ENTER button at step 4, the
Auto clock setting function starts.
e.g.
Auto Time & Date Scanning.
• When the setting is complete, the “Initial settings”
menu returns.
(Continued)
Note
• The Auto clock setting function may not work, depending on the radio reception or other conditions. If the Auto clock setting
function does not work successfully, use the “Manual” clock setting menu to enter the time and date.
Introduction
Connections
Basic Setup
31
Page 40

Basic Setup
A: Initial settings (Continued)
OPEN/CLOSE
DVD
MENU
TOP MENU
ANGLE
HDD DVD
LIBRARY
W
O
L
S
F
R
A
M
E
/
A
D
J
U
S
REC
REC
RETURN
SUBTITLE
AUDIO
TIMESLIP
EASY
NAVI
REC MENU EDIT MENU
ENTER
T
CHANNEL
INSTANT SKIPINSTANT REPLAY
CONTENT MENU
S
K
I
P
H
C
R
A
E
S
E
R
U
T
C
I
P
PLAYSTOPPAUSE
QUICK MENU
Manual (Manual clock setting)
Select “Manual”, then press ENTER at step 4 page 30.
e.g.
Manual clock set
Year
2004
Date Time
41
22 (Th) 3016 :
/
Press / and ADJUST ( / ) to set the
F
R
A
M
E
clock.
ENTER
/
A
D
J
U
S
T
/ buttons:
To select “Year”, “Date”, “Time”.
ADJUST (
/ ) buttons:
To change the data.
/ buttons can also be used in addition to the
(
ADJUST(
/ ) buttons.)
5
VIDEO Plus+
456
789
SETUP ENTER
Open the lid.
EXTEND
0
REC MODE
312
+
10
TV CODE
T.SEARCH
CLEAR
DELETE
After setting all the items, press ENTER.
6
The following message appears.
ENTER
Set date and time?
Yes No
Press / to select “Yes”, then press ENTER.
7
SETUP
ENTER
Notes
• This recorder is provided with a calendar extending to 2069. (However, this does not mean that the recorder is supported to
2069.)
• To go back to the previous menu, press the
• To exit the menu, press the SETUP button.
button.
The “Initial settings” menu returns.
“1: Time and date setting” is complete. Go to “2: Channel setting”. ( page 33)
32
Page 41

2: Channel setting
This recorder contains a built-in tuner used to receive television broadcasts.
You must preset the stations received through the tuner.
Press SETUP if the setting menu is not displayed.
OPEN/CLOSE
DVD
MENU
TOP MENU
ANGLE
HDD DVD
LIBRARY
W
O
L
S
F
R
A
M
E
/
A
D
J
U
S
T
RETURN
SUBTITLE
AUDIO
TIMESLIP
EASY
NAVI
REC MENU EDIT MENU
ENTER
CHANNEL
INSTANT SKIPINSTANT REPLAY
CONTENT MENU
S
K
I
P
H
C
R
A
E
S
E
R
U
T
C
I
P
PLAYSTOPPAUSE
1
Press / to select “Initial settings”, then press ENTER.
2
Press / to select “Channel setting”, then
3
press ENTER.
e.g.
ENTER
Time & date setting
Channel setting
Input signal
AV1 output
AV2 input
Set top box setting
Clock set position
Just clock
Initial settings
Auto
Auto
PAL
Video
Video
1
On
Auto
Manual
Introduction
Connections
REC
REC
VIDEO Plus+
456
789
SETUP ENTER
EXTEND
0
REC MODE
Open the lid.
312
+
10
QUICK MENU
TV CODE
T.SEARCH
CLEAR
DELETE
4
Press / to select “Auto” or “Manual”, then
press ENTER.
Auto : Automatically presets the receiving channels of
page 34
page 35
(Continued)
ENTER
Manual
UHF E21-E69.
: Manually sets the receiving channel, channel
skip and guide channel.
Select “Manual” to set the channel if not set
correctly by “Auto”.
Basic Setup
33
Page 42

Basic Setup
A: Initial settings (Continued)
Auto (Auto channel setting)
When you select “Auto” and press ENTER at
5
step 4, the Auto channel setting function
automatically starts.
e.g.
Auto Scan TV 24 CH
Cancel
• The previous screen is displayed when the Auto
channel setting is completed.
• To cancel the Auto channel setting function while it is
running, press the ENTER button while “Cancel” is
highlighted.
• The Auto channel setting function may not work,
depending on the radio reception or other conditions. If
the Auto channel setting function does not work
successfully, use the “Manual” channel setting menu to
enter the channel information.
34
Page 43

OPEN/CLOSE
O
O
FRAME/ADJUST
DVD
MENU
TOP MENU
ANGLE
HDD DVD
LIBRARY
W
O
L
S
RETURN
SUBTITLE
AUDIO
TIMESLIP
EASY
NAVI
REC MENU EDIT MENU
ENTER
CHANNEL
INSTANT SKIPINSTANT REPLAY
CONTENT MENU
S
K
I
P
Manual (Manual channel setting)
Select “Manual”, then press ENTER at step 4.
page 33)
5
(
The setting screen appears.
e.g.
Manual 1/51
Position Home CH
2-25
Turning range
number
Channel number
1 BBC1
2
3
4
5
Select
Station Skip
22
BBC2
28
I TV
2-25
3-32
CH4
CH5
37
O
O
Set
Return Clear
Guide CH
1
2
3
4
5
FRAME/ADJUST
Off
Off
Off
Off
On
Adjust
MFT
Introduction
0
0
0
0
0
Connections
F
R
A
M
E
/
A
D
J
U
S
T
REC
TIME BAR CHP DIVIDE
DISPLAY
REMAIN
DIMMER
FL SELECT
TV
TV/VIDEO CHANNEL
SAT.CONT. SAT.MONI. TV/DVR
VOLUME
R
U
T
C
I
P
PLAYSTOPPAUSE
QUICK MENU
ZOOM P in P
PROGRESSIVE
INPUT SELECT
PICTURE SEARCH
H
C
R
A
E
S
E
6
Press / to move the cursor to the receiving
channel (“Home CH”) of a position (“Position”)
where you want to set the channel.
To set a satellite channel:
1) Press PICTURE SEARCH to turn the page until
ENTER
“Position” shows “SAT”.
e.g.
Basic Setup
Manual 20/51
2) Press
Position Home CH
96 - - 97
98
99
SAT
/ to select any one of “Home CH”.
Station Skip
- - -
- - -
- - -
- - -
- - -
- - -
- - -
- - -
- - -
Guide CH
- - -
- - -
- - -
- - -
- - -
On
On
On
On
- - -
MFT
- - -
0
0
0
0
Then skip to step 8.
Press PAUSE ( ) and select the tuning range
7
number for the receiving channel.
See the table below to obtain the tuning range number.
PAUSE
Tuning range number
– (No display)
2
3
Band
VHF
UHF
CATV
CATV (IRELAND)
CATV (CCIR)
(Continued)
TV channel number
A – J (1 – 10), 11, 13, E2 – E12 (82 – 92)
E21 – E69 (21 – 69)
X, Y, Z (71, 72, 73)
1 – 53 (48MHz to 464MHz, 8MHz steps)
S1 – S41 (1 – 41)
35
Page 44

Basic Setup
O
O
JUS
FRAME/ADJUST
JUS
A: Initial settings (Continued)
OPEN/CLOSE
DVD
MENU
TOP MENU
ANGLE
HDD DVD
LIBRARY
W
O
L
S
F
R
A
M
E
/
A
D
J
U
S
T
REC
REC
RETURN
SUBTITLE
AUDIO
TIMESLIP
EASY
NAVI
REC MENU EDIT MENU
ENTER
CHANNEL
INSTANT SKIPINSTANT REPLAY
CONTENT MENU
T
C
I
P
PLAYSTOPPAUSE
QUICK MENU
Press ADJUST ( / ) to set the receiving
8
S
K
I
P
channel.
• Press SKIP ( / ) to search the station that you
want to receive.
F
R
A
M
E
/
A
D
J
U
S
T
When selecting “SAT”:
• The number buttons are also available.
• After setting “Home CH”, skip to step 11.
Press / to move the cursor to “Station”.
9
e.g.
H
C
R
A
E
S
E
R
U
ENTER
Manual 1/51
Position Home CH
1 BBC1
2
3
4
5
Station Skip
22
BBC2
28
I TV
2-25
CH4
3-32
CH5
37
O
O
Guide CH
1
2
3
4
5
FRAME/AD
FRAME/AD
MFT
Off
Off
Off
Off
T
T
On
0
0
0
0
0
VIDEO Plus+
456
789
SETUP ENTER
EXTEND
0
REC MODE
Open the lid.
Press ADJUST ( / ) to select a station
F
R
A
M
E
/
name.
A
D
J
U
S
T
Every time you press the ADJUST ( / ) button, the
name changes.
BBC1 → BBC2 → ITV → CH4 → CH5 → STB → - - -
→
STB (Set Top Box):
Set this when you have the satellite receiver
connected through RF cable. (
page 19)
To set the recorder to receive broadcasts via the
connected satellite receiver, select position 6 of
“Position” at step 6.
You can enter a name in “Station”. While selecting
“Station”, press the
Press the
/ buttons to select a character from 0-9,
A-Z, -/+ and space. To shift to the next, press the
button. An input window appears.
/
buttons. When complete, press the button.
10
TV CODE
T.SEARCH
312
CLEAR
DELETE
+
10
SKIP
36
Page 45

OPEN/CLOSE
TOP MENU
ANGLE
DVD
MENU
SUBTITLE
RETURN
AUDIO
CHANNEL
Press / to move the cursor to “Guide CH”.
11
Introduction
e.g.
TIMESLIP
HDD DVD
EASY
NAVI
REC MENU EDIT MENU
LIBRARY
W
O
L
S
ENTER
F
R
A
M
E
/
A
D
J
U
S
T
REC
REC
VIDEO Plus+
456
789
SETUP ENTER
EXTEND
0
REC MODE
312
+10
INSTANT SKIPINSTANT REPLAY
CONTENT MENU
S
K
I
P
H
C
R
A
E
S
E
R
U
T
C
I
P
PLAYSTOPPAUSE
QUICK MENU
TV CODE
T.SEARCH
CLEAR
DELETE
ENTER
Press ADJUST ( / ) to set the guide
12
channel.
F
R
A
M
E
/
A
D
J
U
S
T
Press / to move the cursor to “Skip” and
13
press ADJUST (
ENTER
Manual 1/51
Position Home CH
1 BBC1
2
3
4
5
Station Skip
22
BBC2
28
I TV
2-25
CH4
3-32
CH5
37
Guide CH
1
2
3
4
5
Off
Off
Off
Off
On
MFT
0
0
0
0
0
• You need to set the guide channel for VIDEO Plus+
recording.
• The guide channels should be set 1 for BBC1, 2:
BBC2, 3: ITV, 4: CHANNEL 4 (CH), and 5: CHANNEL
5 (CH5).
• If you set the guide channel that is used at a different
position, it will delete the guide channel that is set at
that position, showing “- - -”.
When selecting “SAT”:
• The number buttons are also available.
• You only have to set “Home CH” and “Guide CH”. After
setting “Guide CH”, skip to step 15.
/ ) to set “On/Off”.
Unused channels are not displayed when you select a
channel with the channel
On : Skips this channel.
/ button.
Connections
Basic Setup
Open the lid.
Off : Does not skip.
F
R
A
M
E
/
A
D
J
U
S
T
(Continued)
37
Page 46

Basic Setup
A: Initial settings (Continued)
ANGLE
SUBTITLE
AUDIO
CHANNEL
TIMESLIP
HDD DVD
EASY
NAVI
REC MENU EDIT MENU
LIBRARY
W
O
L
S
INSTANT SKIPINSTANT REPLAY
CONTENT MENU
Press / to move the cursor to “MFT” and
14
press ADJUST (
/ ) to adjust the receiving
condition.
Make an adjustment for a channel when the radio signal
is weak or when the reception is disturbed with other
S
K
I
P
ENTER
radio signals. When this is adjusted, you may get better
image and sound.
ENTER
F
R
A
M
E
/
A
D
J
U
S
T
REC
REC
VIDEO Plus+
456
789
SETUP ENTER
EXTEND
0
REC MODE
312
+
10
R
A
E
S
E
R
U
T
C
I
P
PLAYSTOPPAUSE
QUICK MENU
TV CODE
T.SEARCH
CLEAR
DELETE
F
R
A
M
E
/
A
H
C
D
J
U
S
T
Set other receiving channels.
15
Repeat steps 5 to 14.
When you have finished setting the receiving
16
channels, press ENTER.
The selected receiving channels are set and you will go
back to the “Initial settings” menu.
ENTER
• To exit the menu, press the SETUP button.
38
Open the lid.
SETUP
/
Page 47

Changing the preset station table
You can rearrange the preset TV stations according to
your own preferences position number assigned to the
station.
example: Swapping Position 1 and Position 4.
e.g.
Manual 1/51
Position Home CH
1 BBC1
2
3
4
5
Station Skip
22
BBC2
28
I TV
2-25
CH4
3-32
CH5
37
Guide CH
1
2
3
4
5
Off
Off
Off
Off
On
MFT
0
0
0
0
0
1) On the manual channel setting screen, press
/ to select the source position (e.g., Position
1) and press
.
The line for the selected position is highlighted.
Introduction
Connections
2) Press
Position 4) and press
/ to select the target position (e.g.,
.
The channel in Position 1 and the channel in
Position 4 are swapped.
“2: Channel setting” is complete. Go to “3: Just clock setting”. ( page 40)
Basic Setup
39
Page 48

Basic Setup
A: Initial settings (Continued)
3: Just clock setting
While the recorder’s power is off (in the standby mode), the clock is automatically corrected every 30 minutes
between 1:30 and 22:30 using the PDC clock data sent from BBC1.
Press SETUP if the setting menu is not displayed.
OPEN/CLOSE
DVD
MENU
TOP MENU
ANGLE
HDD DVD
LIBRARY
RETURN
SUBTITLE
AUDIO
TIMESLIP
EASY
NAVI
REC MENU EDIT MENU
CHANNEL
INSTANT SKIPINSTANT REPLAY
CONTENT MENU
1
Press / to select “Initial settings”, then press ENTER.
2
Press / to select “Just clock”, then press
3
ENTER.
e.g.
W
O
L
S
ENTER
F
R
A
M
E
/
A
D
J
U
S
T
REC
REC
VIDEO Plus+
456
789
SETUP ENTER
EXTEND
0
REC MODE
312
+10
S
K
I
P
R
A
E
S
E
R
U
T
C
I
P
PLAYSTOPPAUSE
QUICK MENU
TV CODE
T.SEARCH
CLEAR
DELETE
ENTER
H
C
Time & date setting
Channel setting
Input signal
AV1 output
AV2 input
Set top box setting
Clock set position
Just clock
Initial settings
Auto
Auto
PAL
Video
Video
1
On
Off
On
Press / to select “On” or “Off”, then press
4
ENTER.
ENTER
Off : This feature is disabled. Go to step 6.
On : The clock is automatically corrected according to
the PDC clock data broadcast. The daylight saving
time can also be adjusted. Go to step 5.
40
Open the lid.
Page 49

TIMESLIP
ANGLE
SUBTITLE
AUDIO
CHANNEL
HDD DVD
EASY
NAVI
REC MENU EDIT MENU
LIBRARY
INSTANT SKIPINSTANT REPLAY
CONTENT MENU
5
Press / to select “Clock set position”, then
press ENTER.
e.g.
Introduction
S
F
R
A
M
E
/
REC
REC
VIDEO Plus+
SETUP ENTER
W
O
L
ENTER
A
D
J
U
S
T
EXTEND
456
789
0
REC MODE
312
+
10
P
QUICK MENU
S
K
I
P
E
S
E
R
U
T
C
I
PLAYSTOPPAUSE
TV CODE
T.SEARCH
CLEAR
DELETE
ENTER
H
C
R
A
Time & date setting
Channel setting
Input signal
AV1 output
AV2 input
Set top box setting
Clock set position
Just clock
Initial settings
Auto
Auto
PAL
Video
Video
1
On
1
Connections
Press / to enter the channel position
6
receiving BBC1.
For this example, BBC1 is set at position 1.
ENTER
Press ENTER.
7
• To exit the menu, press the SETUP button.
Basic Setup
ENTER
Open the lid.
SETUP
Notes
• This function may not work correctly depending on the signal condition. In this case, select “Off” to disable this function.
• This function will not work correctly unless the “Clock set position” is set correctly.
• This function will not work if there is recording programmed to begin or end within 1 hour and 15 minutes.
• Clock adjusting process will be stopped if the recorder’s power turns on while it is in progress.
• This function will not work if the clock is ahead or behind by more than 1 hour and 15 minutes.
41
Page 50

Basic Setup
A: Initial settings (Continued)
4: Input signal setting
Make a selection according to the video system of receiving broadcasts or recording sources from the input sockets.
Press SETUP if the setting menu is not displayed.
OPEN/CLOSE
DVD
MENU
TOP MENU
ANGLE
HDD DVD
LIBRARY
W
O
L
S
F
R
A
M
E
/
A
D
J
U
S
T
RETURN
SUBTITLE
AUDIO
TIMESLIP
EASY
NAVI
REC MENU EDIT MENU
ENTER
CHANNEL
INSTANT SKIPINSTANT REPLAY
CONTENT MENU
S
K
I
P
H
C
R
A
E
S
E
R
U
T
C
I
P
PLAYSTOPPAUSE
1
Press / to select “Initial settings”, then press ENTER.
2
Press / to select “Input signal”, then press
3
ENTER.
ENTER
e.g.
Time & date setting
Channel setting
Input signal
AV1 output
AV2 input
Set top box setting
Clock set position
Just clock
Just clock
Initial settings
Auto
Auto
PAL
Video
Video
1
On
On
PAL
SECAM
Auto
REC
REC
VIDEO Plus+
456
789
SETUP ENTER
EXTEND
0
REC MODE
Open the lid.
312
+10
QUICK MENU
TV CODE
T.SEARCH
CLEAR
DELETE
4
Press / to select the video input signal
type, then press ENTER.
PAL : Select when viewing and/or recording PAL
signals broadcasted mainly in England.
ENTER
SECAM : Select when recording SECAM signals from
Auto : The recorder automatically identifies PAL or
• To exit the menu, press the SETUP button.
Additionally select when recording PAL
signals from the AV1(AUDIO/VIDEO)IN/OUT
socket, the AV2(SAT/DECODER)IN/OUT
socket, or the INPUT jacks on the front panel.
the AV1(AUDIO/VIDEO)IN/OUT socket, the
AV2(SAT/DECODER)IN/OUT socket, or the
INPUT jacks on the front panel.
SECAM video system of receiving broadcasts
or recording sources. Some signal conditions
of the broadcasts or the sources may prevent
correct detection. In this case, select “PAL” or
“SECAM” according to the broadcast or the
source.
42
Page 51

5: AV1 output setting
To select the video output type corresponding to your TV system. Be sure to make this setting if the recorder is
connected to your TV via the AV1(AUDIO/VIDEO)IN/OUT socket using a SCART cable.
Press SETUP if the setting menu is not displayed.
OPEN/CLOSE
DVD
MENU
TOP MENU
ANGLE
HDD DVD
LIBRARY
W
O
L
S
F
R
A
M
E
/
A
D
J
U
S
T
RETURN
SUBTITLE
AUDIO
TIMESLIP
EASY
NAVI
REC MENU EDIT MENU
ENTER
CHANNEL
INSTANT SKIPINSTANT REPLAY
CONTENT MENU
S
K
I
P
H
C
R
A
E
S
E
R
U
T
C
I
P
PLAYSTOPPAUSE
1
Press / to select “Initial settings”, then press ENTER.
2
Press / to select “AV1 output”, then press
3
ENTER.
ENTER
e.g.
Time & date setting
Channel setting
Input signal
AV1 output
AV2 input
Set top box setting
Clock set position
Just clock
Just clock
Initial settings
Auto
Auto
PAL
Video
Video
1
On
On
Video
S-Video
RGB
Introduction
Connections
REC
REC
QUICK MENU
4
Press / to select the video output type
corresponding to your TV system, then press
ENTER.
Video : Select when connected to a normal TV.
page 15)
VIDEO Plus+
456
789
SETUP ENTER
EXTEND
0
REC MODE
312
+10
TV CODE
T.SEARCH
CLEAR
DELETE
ENTER
S-Video : Select when connected to a TV compatible
RGB : Select when connected to an RGB monitor.
• To exit the menu, press the SETUP button.
Open the lid.
Note
• If the on-screen display disappears immediately after you select “RGB”, you can restore it by connecting the recorder using
the VIDEO OUTPUT (yellow) jack.
(
with S video signals. (
page 15)
(
page 15)
Basic Setup
43
Page 52

Basic Setup
A: Initial settings (Continued)
6: AV2 input setting
You can connect a satellite receiver or other equipment to the AV2(SAT/DECODER)IN/OUT socket on the rear panel
of this recorder. You need to select the type of video signals of the connected equipment. (
Press SETUP if the setting menu is not displayed.
OPEN/CLOSE
DVD
MENU
TOP MENU
ANGLE
HDD DVD
LIBRARY
W
O
L
S
F
R
A
M
E
/
A
D
J
U
S
RETURN
SUBTITLE
AUDIO
TIMESLIP
EASY
NAVI
REC MENU EDIT MENU
ENTER
T
CHANNEL
INSTANT SKIPINSTANT REPLAY
CONTENT MENU
S
K
I
P
H
C
R
A
E
S
E
R
U
T
C
I
P
PLAYSTOPPAUSE
1
Press / to select “Initial settings”, then press ENTER.
2
Press / to select “AV2 input”, then press
3
ENTER.
ENTER
e.g.
Time & date setting
Channel setting
Input signal
AV1 output
AV2 input
Set top box setting
Clock set position
Just clock
Just clock
Initial settings
Auto
Auto
PAL
Video
Video
1
On
page 18)
Video
S-Video
RGB
REC
REC
VIDEO Plus+
456
789
SETUP ENTER
EXTEND
0
REC MODE
Open the lid.
312
+10
QUICK MENU
TV CODE
T.SEARCH
CLEAR
DELETE
4
Press / to select the type of video signals
of the connected equipment, and press
ENTER.
Video : Select this when the type of video signals of
the connected equipment is standard.
ENTER
S-Video : Select this when the type of video signals of
the connected equipment is S video.
RGB : Select this when the type of video signals of
the connected equipment is RGB.
• To exit the menu, press the SETUP button.
44
Page 53

7: Set top box setting
You can control channels of a connected satellite receiver from the recorder. Connect the supplied IR control cable to
the CHANNEL CHANGE IR jack of the recorder (
Press SETUP if the setting menu is not displayed.
OPEN/CLOSE
DVD
MENU
TOP MENU
ANGLE
HDD DVD
LIBRARY
W
O
L
S
F
R
A
M
E
/
A
D
J
U
S
REC
REC
RETURN
SUBTITLE
AUDIO
TIMESLIP
EASY
NAVI
REC MENU EDIT MENU
ENTER
T
CHANNEL
INSTANT SKIPINSTANT REPLAY
CONTENT MENU
S
K
I
P
H
C
R
A
E
S
E
R
U
T
C
I
P
PLAYSTOPPAUSE
QUICK MENU
1
Press / to select “Initial settings”, then press ENTER.
2
3
4
page 20), and make this setting.
Press / to select “Set top box setting”,
then press ENTER.
e.g.
ENTER
Time & date setting
Channel setting
Input signal
AV1 output
AV2 input
Set top box setting
Clock set position
Just clock
Just clock
Initial settings
Auto
Auto
PAL
Video
Video
1
On
On
Select input
Brand type
Press / to select “Select input”, then press
ENTER.
Introduction
Connections
Basic Setup
VIDEO Plus+
456
789
SETUP ENTER
EXTEND
0
REC MODE
Open the lid.
+10
312
TV CODE
T.SEARCH
CLEAR
DELETE
5
e.g.
ENTER
Time & date setting
Channel setting
Input signal
AV1 output
AV2 input
Set top box setting
Clock set position
Just clock
Just clock
Initial settings
Auto
Auto
PAL
Video
Video
1
On
On
Select input
AV2
Press / to select the way of signal input
from the satellite receiver.
AV2 : When the satellite receiver is connected to the
AV2(SAT/DECODER)IN/OUT socket.
ENTER
AV1 : When the satellite receiver is connected to the
AV1(AUDIO/VIDEO)IN/OUT socket.
(Position number, 1-99)
: When the satellite receiver is connected to the
RF IN (FROM ANT.) terminal.
Select the position (e.g. 6) allocated to the
satellite receiver (
page 36).
Line : When the satellite receiver is connected to the
INPUT jacks.
(Continued)
45
Page 54

Basic Setup
A: Initial settings (Continued)
OPEN/CLOSE
DVD
MENU
TOP MENU
ANGLE
HDD DVD
LIBRARY
W
O
L
S
F
R
A
M
E
/
A
D
J
U
S
T
REC
REC
VIDEO Plus+
456
789
SETUP ENTER
RETURN
SUBTITLE
TIMESLIP
EASY
NAVI
REC MENU EDIT MENU
ENTER
REC MODE
EXTEND
0
AUDIO
312
+10
CHANNEL
INSTANT SKIPINSTANT REPLAY
CONTENT MENU
S
K
I
P
H
C
R
A
E
S
E
R
U
T
C
I
P
PLAYSTOPPAUSE
QUICK MENU
TV CODE
T.SEARCH
CLEAR
DELETE
Press ENTER.
6
ENTER
Press / to select “Brand type”, then press
7
8
ENTER.
ENTER
Press the number buttons to enter the 4 digits
of a brand code of your satellite receiver
obtained from the table (
123
456
9
78
0
Press ENTER.
The previous sub-menu returns.
e.g.
Time & date setting
Channel setting
Input signal
AV1 output
AV2 input
Set top box setting
Clock set position
Just clock
Just clock
Initial settings
Auto
Auto
PAL
Video
Video
1
On
On
Brand type
0000
page 47).
Be sure to enter a brand code correctly. If an invalid one
is entered, channels of the connected satellite receiver
cannot be controlled properly from the recorder.
46
Open the lid.
9
ENTER
Press SETUP.
10
SETUP
The previous sub-menu returns.
The “Initial settings” menu disappears.
Turn on your satellite receiver and confirm that satellite
channels are selected by the number buttons or the
CHANNEL buttons of the recorder’s remote control. If
not, shift the transmitter of the IR control cable or try
another brand code at step 8.
Page 55

Satellite receiver brand code
Brand Model Code Brand Model Code
AMSTRAD DRX100 0326
AMSTRAD SRX 301 1485
ARCON OMIX300 1522
BOCA SR 5002 1463
BOCA SR 912 1471
BOCA SR 952 1471
BOCA SR 999 VC-TD 1471
BOCA SRS-272 0268
CITYCOM CCS 170 1492
CITYCOM CCS-161 1497
COMAG A-SR 1102 1471
ECHOSTAR AD3600 1508
ECHOSTAR T-101FA 1512
GALAXIS EASYWORLD 1503
GRUNDIG GDS300 1520
GRUNDIG STR 100 1473
GRUNDIG STR 2300 1473
GRUNDIG STR 641 1473
GRUNDIG STR 642 1473
GRUNDIG STR 7100 1473
GRUNDIG STR 7122 TWIN 1473
GRUNDIG STR7100 1473
HIRSHMANN CSR 401 1475
HUMAX 5900 1504
HUMAX F1-FOX 0320
HUMAX IRCI 5400 0320
HUMAX PR-FOX 0321
KATHREIN UFD 200 1464
KATHREIN UFD 220 1464
KATHREIN UFD 230 1464
KATHREIN UFD 400 1464
KATHREIN UFD 505 1470
KATHREIN UFE 135 1448
LABGEAR DTT100 1489
LIFESAT LS 150 1482
MEDION MS-500 0324
MORGAN’S 2 SILVER LINE 1468
NOKIA 9470 S MEDIAMASTER 1479
NOKIA D-BOX 0304
NOKIA SAT 800 0249
NOKIA SAT 820S 0249
PACE MSS 200 1474
PANASONIC TU-DSB-31 1520
PHILIPS DSR 1000 1458
PHILIPS DSR 1010 1458
PHILIPS DSR 2000 1458
PHILIPS DSR 2015 1458
PHILIPS DST 5816 0042
PHILIPS DSX 6073 0042
PHILIPS DSX 7071 0042
PHILIPS DSX 7072 0042
PHILIPS DTR 1000 0327
PHILIPS DTR 1500 0327
PHILIPS STU 1130 1465
PHILIPS STU 1200 1466
PHILIPS STU 3310 1458
PHILIPS STU 430 1458
PHILIPS STU 4310 1458
PHILIPS STU 560 1458
PHILIPS STU 904 1458
PIONEER DBR-T21BGBP 1484
QUADRAL SR-800 1502
RADIX 2000 DELTA 0093
RADIX 2000 DELTA PLUS 0093
RADIX DELTA 2002 0093
RADIX DELTA TWIN 0093
SAGEM D-BOX 1533
SAGEM ITD602 1530
SATPLUS SP500 1477
SCHWAIGER SSR501/12 1500
SEG SR 850 1448
SEG SR-751 1448
SEG SR-800 1490
SETPAL Every 1489
SKYMASTER 3741 XL 15 1472
SKYMASTER 3941 XL 14 1461
SKYMASTER 3942 XL 10 1461
SKYMASTER 3954 XL17 1505
SKYMASTER XL 55 3955 1461
STRONG SRT-500 1501
TECHNISAT DRESDEN 1 1449
TELESTAR Satinco OSD 1441
TELETECH SR 700 1476
TELETECH SR-751 1448
THOMSON ASR51TG 1480
ZEHNDER BX 360 1448
Introduction
Connections
Basic Setup
Notes
• Some models may not be controlled.
• For brands or models other than listed above, consult your nearest dealer.
47
Page 56

Basic Setup
B: Output sound setting
Select the output sound setting corresponding to the connected TV or audio system.
OPEN/CLOSE
DVD
MENU
TOP MENU
ANGLE
HDD DVD
LIBRARY
W
O
L
S
F
R
A
M
E
/
A
D
J
U
S
T
REC
REC
VIDEO Plus+
456
789
SETUP ENTER
RETURN
SUBTITLE
AUDIO
TIMESLIP
EASY
NAVI
REC MENU EDIT MENU
ENTER
REC MODE
EXTEND
+
0
CHANNEL
INSTANT SKIPINSTANT REPLAY
CONTENT MENU
T
C
I
P
PLAYSTOPPAUSE
QUICK MENU
TV CODE
T.SEARCH
312
CLEAR
DELETE
10
Press SETUP to display the setup menu.
1
When it is already displayed, press the button.
SETUP
S
K
I
P
2
H
C
R
A
E
S
E
R
U
3
Press / to select “Picture/Audio settings”,
then press ENTER.
e.g.
ENTER
PAL / auto
Custom picture select
Custom picture setting
Progressive conversion
Play DNR
Audio out select
Virtual surround
NICAM
Picture/Audio settings
PAL
AutoPause / Still
Normal
Auto
Bitstream
Off
Off
Press / to select “Audio out select”, then
press ENTER.
e.g.
ENTER
PAL / auto
Pause / still
Custom picture select
Custom picture setting
Progressive conversion
Play DNR
Audio out select
Virtual surround
NICAM
Picture/Audio settings
PAL
Auto
Normal
Auto
Bitstream
Off
Off
Bitstream
Analog 2ch
PCM
48
Open the lid.
Page 57

4
Press / to select the output sound format.
Bitstream:
Select when connected to an amplifier equipped with a
ENTER
Dolby Digital, DTS and MPEG1 decoder.
pages 22, 23)
(
The recorder outputs digital audio information in the
bitstream format when you play a DVD video disc
recorded on the Dolby Digital, DTS and MPEG1
recording system.
Introduction
5
Analog 2ch:
Select when connected to a TV or audio system via the
analog audio jacks. (
PCM:
Select when connected to a 2 channel digital stereo
system. (
The recorder outputs sounds in the PCM 2ch format
when you play a DVD video disc recorded on the Dolby
Digital and MPEG1 recording system.
page 24)
pages 15, 16, 17, 22)
Once the proper setting is selected, press
ENTER.
The submenu disappears.
To exit the setting menu, press the SETUP button.
ENTER
Connections
Basic Setup
“B: Output sound setting” is complete. Go to “C: TV shape setting”. ( page 50)
49
Page 58

Basic Setup
C: TV shape setting
Select the picture shape according to the aspect ratio of your TV.
OPEN/CLOSE
DVD
MENU
TOP MENU
ANGLE
HDD DVD
LIBRARY
W
O
L
S
F
R
A
M
E
/
A
D
J
U
S
T
REC
REC
RETURN
SUBTITLE
AUDIO
TIMESLIP
EASY
NAVI
REC MENU EDIT MENU
ENTER
CHANNEL
INSTANT SKIPINSTANT REPLAY
CONTENT MENU
S
K
I
P
H
C
R
A
E
S
E
R
U
T
C
I
P
PLAYSTOPPAUSE
QUICK MENU
1
2
Press SETUP to display the setup menu.
When it is already displayed, press the button.
SETUP
Press / to select “Display settings”, then
press ENTER.
e.g.
ENTER
TV shape 4:3LB
Transparency
Startup screen
Screen protector
Bacground
Display settings
OnOn screen display
25%25%
On
On
Blue
VIDEO Plus+
456
789
SETUP ENTER
EXTEND
0
REC MODE
Open the lid.
TV CODE
T.SEARCH
312
CLEAR
DELETE
+
10
3
Press / to select “TV shape”, then press
ENTER.
e.g.
ENTER
TV shape 4:3LB
Transparency
Startup screen
Screen protector
Bacground
Display settings
OnOn screen display
25%25%
On
On
Blue
4:3LB
4:3 normal
16:9 wide
16:9 shrink
(Continued)
50
Page 59

4
Press / to select the picture shape.
4:3 LB:
Select when a standard 4:3 TV is
ENTER
connected.
Displays theatrical images with
masking bars above and below the
picture.
4:3 normal:
Select when a standard 4:3 TV is
connected.
Displays pictures cropped to fill your
TV screen. Either or both sides of the
picture are cut off.
16:9 wide:
Select when a 16:9 wide TV is
connected.
16:9 shrink:
Select when a 16:9 wide TV is
connected.
When a 4:3 aspect ratio image has
been elongated to 16:9 wide picture
size, use this setting.
Masking bars to the right and left
appears.
Introduction
Connections
Basic Setup
Once the proper setting is selected, press
5
Notes
• Actual picture shape may depend on signal type of broadcast or input source, or settings on the connected TV. Refer to the
owner’s manual of the TV.
• The displayable picture shape is preset on the DVD video disc. Therefore, the playback picture of some DVD video discs may
not conform to the picture shape you select.
“C: TV shape setting” is complete. Go to “D: Remote control settings”. ( page 52)
ENTER.
The sub-menu disappears.
To exit the setting menu, press the SETUP button.
ENTER
51
Page 60

Basic Setup
D: Remote control settings
Perform this step according to your preference and usage.
Operating a TV with the remote control of this recorder
The remote control of this recorder has a function to operate a TV.
Preparation: Entering a brand code into the remote control
TIMESLIP
HDD DVD
EASY
NAVI
REC MENU EDIT MENU
LIBRARY
W
O
L
S
ENTER
INSTANT SKIPINSTANT REPLAY
CONTENT MENU
S
K
I
P
1
While holding TV CODE, press the number
buttons to enter a corresponding brand code
(see the next page) of your TV.
e.g. To enter 0071
TV CODE
TV CODE
Hold down.
700
1
F
R
A
M
E
/
A
D
J
U
S
T
REC
REC
VIDEO Plus+
456
789
SETUP ENTER
EXTEND
0
REC MODE
Open the lid.
312
+
10
R
A
E
S
E
R
U
T
C
I
P
PLAYSTOPPAUSE
QUICK MENU
TV CODE
T.SEARCH
CLEAR
DELETE
H
C
123
456
9
78
0
Release TV CODE.
2
The brand code is memorized.
Operating the remote control
Point the remote control into which you have entered the brand code, to your TV and press the following buttons.
ON/STANDBY: To turn on and off the TV
TV/VIDEO : To change the video input
VOLUME
CHANNEL
ON/STANDBY
TV/VIDEO
REMAIN
DIMMER
FL SELECT
TV
TV/VIDEO CHANNEL
SAT. MONI.
SAT.CONT.
ZOOM P in P
PROGRESSIVE
VOLUME
INPUT SELECT
TV/DVR
CHANNEL : To select the TV channel
VOLUME : To adjust the volume
TIME BAR CHP DIVIDE
DISPLAY
52
Page 61

Brand code table
Brand name Brand code Brand name Brand code
TOSHIBA 0001 0071 0211 0571
AIWA 0921
AKAI 0201 0241 0311 0431 0501
0521 0641
BAIRD 0171 0241
BANG & OLUFSEN 0471
BEKO 0181
BLAUPUNKT 0071 0321 0331
BRIONVEGA 0461 0471 0651
BUSH 0071 0501 0551 0571
CROWN 0111 0131 0411 0491 0501
0661
DANSAI 0501
DEAWOO 0401 0411 0501
DECCA 0091 0141 0171 0441 0451
0501
FERGUSON 0031 0071 0131 0191 0291
0311 0381 0541 0601
FINLUX 0021 0041 0071 0081 0091
0111 0271 0281 0291 0301
0341 0471
FISHER 0041 0121 0181 0201 0281
0471 0571 0651
FUNAI 0001 0191 0481 0491 0891
GEC 0171 0221
GOLDSTAR 0201 0251 0281 0411 0501
GOODMANS 0171 0281 0501 0571
GRANADA 0171 0241 0271 0501 0571
0651 0671
GRUNDIG 0011 0071 0271 0321 0331
HINARI 0241 0411 0571 0631
HITACHI 0021 0221 0251 0351 0371
0381 0431 0571 0641 0751
INNO HIT 0171 0281 0411 0501 0631
0661
ITT 0231 0241 0261 0271 0401
0611
ITT-NOKIA 0231 0241 0261 0271 0401
0611
JVC 0311 0431 0521 0571
LOEWE OPTA 0471 0501 0571 0651
LUXOR 0241 0261 0271 0281 0351
MAGNAVOX 0501 0071 0191 0221 0461
0471 0591 0611 0651
MARANTZ 0201 0501
MATSUI 0001 0171 0191 0231 0411
0441 0451 0501 0551 0571
METZ 0041 0331 0361 0461 0471
0651
MITSUBISHI 0201 0321 0331 0451 0501
0511 0571 0651 0771
NATIONAL 0371 0501 0511 0531 0761
0841 0911 1061
NOKIA 0231 0241 0261 0271 0401
0611
NORDMENDE 0281 0351 0381 0421 0431
0461 0521 0541 0641 0671
OCEANIC 0481
ORION 0001 0191 0231 0361 0411
0441 0451 0501 0551 0611
PANASONIC 0371 0501 0511 0531 0761
0841 0911 1061
PHILCO 0071 0111 0181 0201 0271
0301 0461 0501 0651
PHILIPS 0071 0191 0221 0461 0471
0501 0591 0611 0651
PIONEER 0381 0431 0501 0831 1051
PROSCAN - THOMSON 0971 1041 0201 0501
RCA 0971 1071 1081 1091 0201
1041 0501
REALISTIC 0631 1001 1011 1021 1031
0851 0201 0501 0481 0321
0331 0501 0651 0771
SABA 0281 0351 0381 0421 0431
0471 0541 0641 0651 0661
0671
SAISHO 0231 0411 0441 0451 0551
SALORA 0231 0241 0351
SAMSUNG 0171 0181 0251 0281 0411
0491 0501 0631 0661 0791
SANYO 0021 0041 0081 0121 0171
0181 0201 0231 0241 0451
0571 0651 0671 0701 0711
0721
SCHNEIDER 0011 0051 0061 0281 0461
0501 0581 0591
SEG 0091 0121 0151
SELECO 0031 0051 0061 0351 0501
0561
SHARP 0851 0511 0571 0201 0501
SIEMENS 0071 0321 0331 0571 0631
SINGER 0091 0471 0651
SINUDYNE 0001 0091 0101 0131 0191
0231 0361 0471 0501 0551
0581 0651
SONY 0441 0451 0571 0681
TANDBERG 0041 0301 0351 0431 0461
0571 0651
TATUNG 0091 0141 0171 0441 0451
0501
TECHNICS 0371 0501 0511 0531 0761
0841 0911 1061
TELEFUNKEN 0071 0281 0381 0421 0431
0521 0601 0621 0671
TENSAI 0041
THOMSON 0281 0351 0371 0381 0391
0421 0431 0521 0541 0641
0971 1041
THORN 0041 0071 0281 0291 0341
0421 0491 0601 0671
UNIVERSUM 0021 0491
YAMAHA 0201 0501 0321 0331 0451
0511 0571 0651 0771
ZANUSSI 0031 0051 0061 0351 0501
0561
ZENITH 0931
Notes
• TOSHIBA code is factory set.
• Some brands have several codes. Try one by one until the remote control can operate your TV.
• Depending on the TV, the remote control may not operate at all or some of the buttons may not work.
• When replacing the batteries of the remote control, re-enter the brand code of your TV.
Introduction
Connections
Basic Setup
53
Page 62

Basic Setup
D: Remote control settings (Continued)
Operating the second and third TOSHIBA HDD/DVD video recorders with the remote control of this recorder
Switches the codes to operate the recorder.
If you use the second and third TOSHIBA HDD/DVD video recorders, set the different remote codes for each
recorder to avoid confusion in the response of the recorders.
Example:Setting this recorder’s remote control mode to DR 2, after another HDD/DVD recorder has been
set to DR 1.
(It is necessary to set the remote control mode on both the recorder and the remote control.)
Setting up the recorder
OPEN/CLOSE
DVD
MENU
TOP MENU
ANGLE
HDD DVD
LIBRARY
RETURN
SUBTITLE
AUDIO
TIMESLIP
EASY
NAVI
REC MENU EDIT MENU
CHANNEL
INSTANT SKIPINSTANT REPLAY
CONTENT MENU
1
Press SETUP.
The setting menu appears.
SETUP
W
O
L
S
ENTER
F
R
A
M
E
/
A
D
J
U
S
T
REC
REC
VIDEO Plus+
456
789
SETUP ENTER
EXTEND
0
REC MODE
312
+10
S
K
I
P
C
R
A
E
S
E
R
U
T
C
I
P
PLAYSTOPPAUSE
QUICK MENU
TV CODE
T.SEARCH
CLEAR
DELETE
Press / to select “Operational settings”,
2
H
then press ENTER.
e.g.
ENTER
Operatin beep Off
IR code
Instant skip interval
Instant replay internal
Title thumbnail point
HDD/RAM title play
Still group interval
Priority contents
Operatinal settings
OnRecording complete beep
DR 1
30
10
35
Title resume
3 sec.
Photo
sec.
sec.
sec.
Press / to select “IR code”, then press
3
ENTER.
ENTER
e.g.
Operatin beep Off
IR code
Instant skip interval
Instant replay internal
Title thumbnail point
HDD/RAM title play
Still group interval
Priority contents
Operatinal settings
OnRecording complete beep
DR 1
30
10
35
Title resume
Photo
sec.
sec.
sec.
3 sec.
DR 1
DR 2
DR 3
54
Open the lid.
4
Press / to select “DR 2” (example), then
press ENTER.
The submenu disappears.
By pressing the ENTER button, the selected command
ENTER
mode is set in the recorder. Operation may not be
possible temporarily until you set the corresponding mode
in the remote control itself. Proceed to the next setting.
Page 63

OPEN/CLOSE
TOP MENU
ANGLE
DVD
MENU
SUBTITLE
RETURN
AUDIO
CHANNEL
Setting up the remote control
While pressing SETUP, press 2.
Introduction
TIMESLIP
HDD DVD
EASY
NAVI
REC MENU EDIT MENU
LIBRARY
W
O
L
S
ENTER
F
R
A
M
E
/
A
D
J
U
S
T
REC
REC
VIDEO Plus+
456
789
SETUP ENTER
EXTEND
0
REC MODE
31 2
+
10
INSTANT SKIPINSTANT REPLAY
CONTENT MENU
S
K
I
P
H
C
R
A
E
S
E
R
U
T
C
I
P
PLAYSTOPPAUSE
QUICK MENU
TV CODE
T.SEARCH
CLEAR
DELETE
5
The remote control mode is set to DR 2.
SETUP
2
Select the same mode that you have set to the recorder.
Mode setting
Remote controlRecorder
When using with DR 1
mode
When using with DR 2
mode
When using with DR 3
mode
D R 1
D R 2
D R 3
D R 1
D R 2
D R 3
D R 1
D R 2
D R 3
SETUP
SETUP
SETUP
Connections
+
1
Basic Setup
+
2
+
3
Open the lid.
CHANNEL
Notes
• If the recorder’s mode and the remote control’s mode are different, the recorder’s mode (DR 1, DR 2 or DR 3) appears in the
display of the front panel.
• When the batteries of the remote control are replaced or when the time indicator of the front panel flashes, check the remote
control modes of both the recorder and the remote control, and re-program if necessary.
Disabling the remote control for a temporary period
You can temporarily disable the reception of the remote control signals at the recorder, when the selection of DR 1,
DR 2 and DR 3 is not sufficient while you are using several Toshiba HDD/DVD video recorders.
Press the CHANNEL
and buttons on the recorder at the same time for three seconds or more.
The recorder display shows “DR - OFF”, indicating that the remote control is disabled.
To enable the remote control, perform the same step again. (The display shows “DR-1 , DR-2 or DR-3” depending on
your setting.)
Notes
• This function is not available in Standby mode.
• You cannot use this feature when the power is turned off, if you have set “Eco. mode” to “On”.
55
Page 64

Printed on 100% Recycled Paper
Printed in China
Page 65

TOSHIBA HDD/DVD VIDEO RECORDER
Introduction
DIGITAL VIDEO
HDD/DVD VIDEO RECORDER
RD-XS32SB
RD-XS32SB
OPERATIONS
OWNER’S MANUAL
Recording
Playback
Editing
Library
Read “INSTALLATION GUIDE” first.
P000403710
S
PM0016697010
© 2004 Toshiba Corporation
Function setup
Others
Page 66

Introduction
Table of contents
Introduction
Caution for safety ................................................ 4
About this product .............................................. 5
Compatible discs ................................................ 6
Index to parts and controls .............................. 12
Front panel ........................................................... 12
Rear panel ............................................................ 14
Remote control ..................................................... 16
Display ................................................................. 18
Before operating this recorder ........................ 20
Key operation - EASY NAVI & QUICK MENU .. 23
Recording
Before recording ............................................... 26
Initializing a DVD-RAM/RW disc (Logical Format) ... 28
DVD-RAM physical format .................................... 29
Entering characters ............................................... 30
Recording a TV programme ............................. 32
Recording an external source .......................... 37
Programing a recording (REC MENU) ............. 40
VIDEO Plus+ Recording ................................... 46
Others ................................................................. 48
Relay recording .................................................... 48
A-B recording ....................................................... 48
Reservation Disc (“Lock program record”) .............. 49
To delete recorded content .................................... 50
To protect recorded content ................................... 50
Technical information ............................................ 51
Playback
Information on playback ................................... 54
Playing recorded contents
(CONTENT MENU) ............................................. 55
Playing a DVD video disc ................................. 60
Locating a title using the top menu ........................ 61
Pausing a TV broadcast to resume later ......... 62
Playing a TV programme currently being
recorded ............................................................. 63
Playing at various speeds ................................ 64
Playing in fast reverse or fast forward .................... 64
Skipping to the next/previous chapter or track ........ 65
Playing in slow-motion .......................................... 65
Playing frame by frame ......................................... 66
Viewing still pictures
(Playing a disc that contains still pictures)
Locating by entering the number .................... 67
Locating by entering the number of a desired
section
Locating a specific point by entering its elapsed time
(Time Search)
Watching a TV broadcast in the sub window
(P in P Playback) ............................................... 69
Selecting the camera angle .............................. 70
Selecting Subtitles ............................................ 71
Zooming a picture ............................................. 72
Selecting the sound .......................................... 73
Viewing JPEG files ............................................ 76
JPEG files compatibility ......................................... 77
Playing MP3/WMA files ..................................... 78
Playable files ........................................................ 79
Checking the current status and settings ...... 80
Operational status and setting details .................... 80
Using the time bar ................................................. 81
Functions in the Quick Menu ........................... 82
................................................................. 67
....................................................... 68
.............. 66
Editing
Before editing .................................................... 86
For better use the HDD of this recorder.................. 86
Editing on this recorder ......................................... 87
Creating chapters .............................................. 90
Playlist editing
(Collecting desired scenes) ............................. 95
Creating thumbnails
(Changing the picture on the
CONTENT MENU) ............................................ 100
Before dubbing ................................................ 103
High speed Library dubbing
(Dubbing only a specified part) ..................... 106
2
Page 67

Introduction
Dubbing selected Items
(Dubbing specified parts together) ............... 108
Rate conversion dubbing
(Dubbing at a modified bit rate) ..................... 112
Line-U dubbing
(Recording pictures while viewing them) ..... 116
Deleting selected items
(Deleting multiple specified parts) ................ 118
Combine Original titles
(Combine two titles into one) ......................... 120
Creating a DVD-Video using DVD-R/RW ....... 122
DVD-Video finalizing process ........................ 132
DV recording
(Recording from a digital video camera) ...... 136
Library
Using Library data........................................... 140
Basic operation of the Library system .................. 140
Searching for a desired title ........................... 141
Changing the listing order ...................................... 141
Searching ........................................................... 141
Jumping ............................................................. 142
Viewing Library data ....................................... 143
Viewing title information ...................................... 143
Viewing disc information...................................... 143
Maintenance of Library data ................................ 144
Checking remaining space............................. 147
Viewing a number and space of a disc .................. 147
Viewing remaining space .................................... 147
Others
Before calling service personnel ................... 166
Error codes on the display window ............... 169
Recording duration ......................................... 170
Language code list .......................................... 171
Specification .................................................... 172
Recording
Playback
Editing
Library
Function setup
Function Setup
Customizing the function settings ................ 150
DVD Player settings ............................................ 154
Picture/Audio settings ......................................... 157
Display settings .................................................. 159
Operational settings ............................................ 160
DVD recorder operation ...................................... 161
Management settings .......................................... 163
Setting of picture and sound quality for
recording
............................................................ 164
Others
3
Page 68

Introduction
Introduction
Caution for safety
Read “SAFETY PRECAUTIONS”, “IMPORTANT SAFETY INSTRUCTIONS”,
“Precautions” and others of the “INSTALLATION GUIDE” first.
4
Page 69

Introduction
About this product
Introduction
Some differences
This DVD recorder is more similar to a computer than it
is to a standard DVD player. In addition to a
microprocessor, it contains a hard disc drive (an HDD),
an operating system, random access memory (RAM),
and a DVD-RAM/R/RW drive. The operating system
includes software stored on the HDD that is transferred
to the RAM when the machine is turned on and at other
times during operation. This transfer can take time.
Thus, when you turn on the DVD recorder, it may be a
minute or so before it is ready to use. Likewise, other
functions may not be performed as quickly as they would
on other AV equipment. In addition, because programs
stored on the DVD-RAM/R/RW drive cannot be accessed
as quickly as those stored on the HDD, accessing those
programs (or deleting a program from a DVD-RAM or
DVD-RW disc) may take more time. Please take these
factors into consideration as you use the DVD recorder.
About the hard disc drive (HDD)
Like any HDD, the HDD in the DVD recorder is a fragile
device that is susceptible to partial or complete failure if it
is jarred or as a result of use over time. It will not last
forever. Therefore, do not use the HDD for longer term
storage of programs you wish to retain. [If portions of the
HDD become damaged, programs recorded on those
portions may exhibit pixelization or block noise when
played back. Repeated playback of the program may
cause the problem to get worse and, eventually, the
program may become unplayable. Accordingly, if you
notice such noise in a program that you want to save,
you should transfer to a recordable DVD disc as soon as
possible.] Recordable DVD discs are also susceptible to
damage if not handled and stored carefully and some or
all of the programs on them may become unplayable.
You can reduce these risks by using high quality DVD
recordable discs and checking their playability from time
to time. If it becomes necessary to service your DVD
recorder, it may be necessary to delete some or all of the
programs on the HDD.
Playback Restrictions
This owner’s manual explains the basic instructions for
this recorder. Some DVD video discs are produced in a
manner that allows specific or limited operation during
playback. As such, the recorder may not respond to all
operating commands. This is not a defect in the
recorder. Please refer to the notes on compatible discs
later in this Introduction and to the discussion of DVD
playback and features later in this manual.
” may appear on the TV screen during operation.
“
” means that the operation is not permitted by the
“
recorder or the disc.
Recording Restrictions
Copy-protected contents of DVD-Video disc, VIDEO
CDs or audio CDs on the market cannot be copied on
this recorder.
Contents without copy protection should be copied or
edited only in accordance with applicable copyright
laws, which may restrict copying or editing. Contents
that permit single copying (copy once contents) can be
recorded onto DVD-RAM discs, with some dubbing and
editing restrictions. DVD-R/RW discs cannot record
these contents.
Compatiblity
In isolated cases, a disc bearing the DVD or CD logo
may not fully and properly play back all features. This
can be due, among other reasons, to problems and
errors that can occur during the creation or recording of
DVD and other software and the manufacture of
software discs (including blank discs). Moreover,
because of variations in the quality of discs, this
recorder may not be able to record on all discs that
bear a DVD-RAM, DVD-R or DVD-RW logo, but you
should not encounter difficulty if you use only high
quality recordable DVD discs.
Recording
Playback
Editing
Library
Function setup
Others
5
Page 70

Introduction
Compatible discs
When you want to play DVD or CD software or copy programmes from the HDD to a recordable DVD,
load an appropriate disc into the recorder. There are many types and formats of discs. Please use the
following information to select an appropriate disc.
Notes
• Handle the disc according to the disc instruction manual.
• Depending on the data recording method or the disc status, playback or recording on this recorder may not be possible, even
if the disc is labeled as below. Toshiba cannot assure that all discs bearing the DVD or CD logos will operate as expected.
Please see the discussion of compatibility on page 5.
For recording / playback
Disc
DVD-RAM
DVD-R
DVD-RW
Mark Specification Remarks
• Single sided 4.7GB (12cm (43/4 in.))
• Double sided 9.4GB (12cm (4
• 4.7GB For General Ver.2.0
(12cm (4
• Ver. 1.1 or later (12cm
(4
3
/4 in.))
3
/4 in.))
3
/4 in.))
Read carefully the section “On DVD-RAM
discs” (
Select a DVD-RAM disc that shows a
statement on its package such as “this disc
can be used with video recorders and drives
compatible with 4.7GB DVD-RAM discs” or
“this disc can copy images that permit single
copying.”
Read carefully the section “On DVD-R discs”
page 9).
(
Depending on the disc status or the
recording equipment, playback of the disc
may not be possible on this recorder.
Read carefully the section “On DVD-RW
discs” (
Depending on the disc status or the
recording equipment, playback of the disc
may not be possible on this recorder.
page 8).
page 9).
Using different disc types for different purposes
DVD-RAM discs for your personal library
DVD-RAM discs comply with the global standard DVD-VR (Video Recording) format, and are optimized for recording of
TV programs. You can rewrite repeatedly without deterioration of an image quality, erase unnecessary parts, divide a
chapter, or specify playback area by frame. Its cartridge is suitable for a longer-term storage and family use, and its
large capacity of 9.4 GB allows more recording space.
DVD-R discs when creating your own original discs for distribution
DVD-R discs are designed to comply with the global standard DVD-Video format, and can be recorded only once.
DVD-R discs are convenient when you edit your original content (recorded personal events such as a wedding party)
with this recorder, transfer them to the recorder and make copies to send to your friends or relatives. The discs can be
played on other compatible DVD players. DVD-RW discs, which are rewriteable, can be used as well.
* DVD-R and DVD-RW may not be the best suited format for recording TV programs. Because of the way the discs
are formatted, it may not be possible to edit or divide the program as you may prefer, to record secondary languages,
or programs that are copy protected in a way that allows only one copy. (NOTE: “Copy once” protected programs
generally can be recorded to DVD-RAM discs.)
* This recorder records on a DVD-R/RW disc in DVD-Video format only. In DVD-VR format, recording is not possible.
* On DVD-R/RW discs, direct recording, copying or the method “Creating a DVD-Video” (
We cannot guarantee that DVD-RAM/R/RW discs recorded on this recorder will be playable on all DVD recorders/
players. Similarly, there is no guarantee that all DVD-RAM/R/RW discs recorded on other recorders will be playable on
this recorder.
page 122) are available.
6
Page 71

Introduction
For playback only
Disc
DVD video
disc
DVD-RW
VIDEO CD
Mark Specification Remarks
• 12cm (43/4 in.) / 8cm (31/4 in.)
ALL
2
• Region number
or
The region number of this DVD recorder is 2.
If region numbers, corresponding to a
specific playable area, are printed on your
DVD video disc and you do not find
ALL
, or the disc is encoded to permit
playback only in regions other than Region 2,
disc playback will not be allowed by the
recorder.
• 12cm (43/4 in.)
• DVD-VR mode
It is not possible to play contents recorded
from programs which are not copy-free
Depending on the disc status, playback may
not be possible.
• 12cm (43/4 in.) / 8cm (31/4 in.)
• Version 1.1 and 2.0
DIGITAL VIDEO
Recording
2
or
Playback
Editing
Library
Audio CD
CD-R
• 12cm (4
• 12cm (43/4 in.)
• CD-DA (audio CD) format
3
/4 in.) / 8cm (31/4 in.)
Depending on the disc status, playback may
not be possible.
CD-RW
• You cannot play discs other than those listed above.
• You cannot play non-standardized discs even if they may be labeled as above.
• You cannot play discs with specialized encoding (such as SACD discs) or the DVD audio portions of DVD Audio
discs.
• You cannot play SVCD discs.
• This recorder uses the PAL colour system for recording and playback. The NTSC colour system is used for playback
only, by selecting an appropriate setting. A disc may fail to play, if it has data in the PAL colour system and the NTSC
colour system. You cannot add the PAL colour system data to the disc with the data recorded in the NTSC colour
ALL
system even if they have region marks
• There may be some DVD discs designed for this market that cannot be played on this recorder. If you encounter
please contact TOSHIBA customer service.
• Toshiba cannot assure that all discs bearing the DVD or CD logos will operate as expected. Please see the
discussion of compatibility on page 5.
2
or
.
Function setup
Others
7
Page 72

Introduction
Compatible discs (Continued)
On DVD-RAM discs
Use only DVD-RAM discs that comply with DVDRAM standard Version 2.0 or 2.1.
The recorder cannot record on a disc formatted in any
other standard. When using such a disc, initialize it by
using the disc-format function of this recorder.
The recorder may not record, dub, or edit some DVDRAM discs, because they are edited/recorded with
another manufacture’s equipment or PC, contain a
large number of titles, or have little remaining capacity.
Also, a DVD-RAM disc may not be edited or recorded
if its title contains still pictures.
DVD-RAM discs formatted in UDF2.0 on a PC are not
compatible with this recorder. Before using these
discs, initialize them on this recorder.
This recorder complies with current copyright
protection technology and can copy a disc only when
the disc permits copying once. When there is no
indication on the disc, copying will not be allowed.
Such an indication on a disc is required also for the
Library Management database.
DVD-RAM discs with cartridges are
recommended for recording.
Two types of DVD-RAM discs are
available: ones with cartridges and ones
without cartridges. You can use either of
them with this recorder, but the former
ones are recommended.
In order to record highly detailed data, make sure the
disc is clean. DVD-RAM discs with cartridges are
easier to handle in this regard.
Do not open the cartridge shutter. The disc may not
play, or may not be recorded or edited once it
becomes dirty.
There are two types of DVD-RAM cartridges;
removable (TYPE 2/4) and not removable (TYPE 1). It
is recommended you do not remove the disc even
when you can.
Refer to the instruction manual that comes with the
disc if it is absolutely necessary to remove the disc.
Some commercially available cartridge discs cannot
be recorded or edited once the inside discs are
removed.
To protect recorded contents
Slide the write-protect tab to
“PROTECT” with something small
enough. The disc can play, but
cannot be edited or erased. Refer
to the instructions that come with
the disc.
When using a disc without a
cartridge (commercially
available discs)
Discs without cartridges can easily
attract fingerprints and dust, which
is the reason they are not recommended. If you
cannot avoid using them, handle with proper care.
When you write in a title column on a disc, use a pen
with a soft tip. Do not use a pen with a hard tip, such
as a ballpoint pen.
Recommended discs
The following discs have been tested with this recorder:
9.4 GB double-sided cartridge: Panasonic LM-AD240U
4.7 GB single-sided cartridge: Panasonic LM-AB120U
PROTECT
8
The company does not hold any responsibility to compensate the contents which should have been recorded,
and any losses or damages (e.g. losses of business profit, or business intermission) that may arise from
malfunction of this recorder (not recording/editing as intended).
Problems arising in the following situations are included.
• When a DVD disc recorded on this recorder is used in a DVD recorder of another manufacturer, or used
(insertion, playback, recording or editing) in a personal computer DVD drive.
• When a DVD that has been used as above is used again in this recorder.
• When a DVD disc recorded in a DVD recorder of another manufacturer, or in a personal computer DVD drive
is used.
Some functions such as Library may not work with PC discs.
Page 73

Introduction
On DVD-R discs
Standards
DVD-R for General Ver.2.0 discs can be used for
recording and playback.
Discs compatible with 2X speed recording (labeled
Ver.2.1/2X etc.) and discs compatible with 4X speed
recording (labeled Ver.2.1/4X etc.) can also be used.
Select discs labeled “for video,” “for recording,” “120
min.” etc.
DVD-R for authoring Ver.1.1 cannot be used.
Recording conditions
Images for which copying is prohibited or restricted
(copy once or copy prohibited) cannot be recorded.
Even if the disc is labeled as CPRM compatible, this
recorder can only be used to record copy-free
material.
Recommended discs
Taiyo-Yuden 4X
Tested discs
Panasonic LM-RF120 (4.7GB/120 min.)
On DVD-RW discs
Standards
Discs labeled DVD-RW Ver.1.1 can be used.
Discs compatible with 2X speed recording (labeled
Ver.1.1/2X etc,) can also be used.
Select discs labeled “for video,” “for recording,” “120
min.” etc.
Recording conditions
Images for which copying is prohibited or restricted
(copy once or copy prohibited) cannot be recorded.
Even if the disc is labeled as CPRM compatible, this
recorder can only be used to record copy-free
material.
DVD-VR mode recording is not possible.
Recommended discs*
JVC 2X
Note
• There are limitations on times of repeat recording on the
same disc.
Marks on DVD video discs
The following are examples of marks and the meanings.
Mark Meanings
2
2
3
4:3
LB
16:9 LB
16:9 PS
Number of audio streams
recorded in the disc.
(2 streams such as English and
Japanese in this example.)
Number of subtitle languages
recorded in the disc.
(2 subtitle languages are
recorded in this example.)
Number of camera angles
recorded in the disc.
(3 camera angles are recorded in
this example.)
Pictures are recorded in the
standard picture shape
(4:3 aspect ratio).
Pictures are recorded in the letter
box picture shape (4:3 aspect
ratio with horizontal black bars in
the top and bottom of pictures).
Pictures are recorded in the 16:9
wide picture shape.
TVs with 4:3 aspect ratio will
display them in the letter box
style.
Pictures are recorded in the 16:9
wide picture shape.
TVs with 4:3 aspect ratio will
display them in the pan scan style
(one or both sides of pictures
are cut).
Actual picture shape may vary
depending on the aspect ratio or
mode selection of the TV.
Recording
Playback
Editing
Library
Function setup
Others
*Operation has been confirmed with recommended discs
and tested discs, but some other discs may not be
usable.
9
Page 74

Introduction
Compatible discs (Continued)
Structure of disc contents
Normally, DVD video discs are divided into titles, and the
titles are subdivided into chapters.
VIDEO CDs/audio CDs are divided into tracks.
DVD video disc
Title 1 Title 2
Chapter 2 Chapter 1 Chapter 2 Chapter 3Chapter 1
VIDEO CD / audio CD
Track 1 Track 2 Track 3 Track 4 Track 5
Title: Divided contents of a DVD video disc.
Roughly corresponds to a story title in short
stories.
Chapter: Divided contents of a title. This corresponds
to a chapter in a story.
Track: Divided contents of a VIDEO CD or an audio
CD.
On handling discs
Do not touch the playback side of the disc.
Yes
Playback side
Do not stick paper or tape to discs.
No
On cleaning discs
Fingerprints and dust on the disc cause picture and
sound deterioration. Wipe the disc from the center
outwards with a soft cloth. Always keep the disc clean.
Each title, chapter, or track is assigned a number, which
is called “title number”, “chapter number”, or “track
number” respectively.
Some discs may not have these numbers.
When you record on the HDD or a DVD-RAM disc, one
recording will always equal one title. You can divide a title
into several chapters by marking borders in it to facilitate
scene search.
Yes No
If you cannot wipe off the dust with a soft cloth, wipe
the disc lightly with a slightly moistened soft cloth and
finish with a dry cloth.
Do not use any type of solvent such as thinner,
benzine, commercially available cleaners or antistatic
spray for vinyl LPs. It may damage the disc.
On storing discs
Do not store discs in a place subject to direct sunlight
or near heat sources.
Do not store discs in places subject to moisture and
dust such as a bathroom or near a humidifier.
Store discs vertically in a case. Stacking or placing
objects on discs outside of their case may cause
warping.
10
Page 75

Discs and purposes
The table shows main functions which are available on this recorder per disc category.
This will help you choose discs.
Introduction
Characteristics on this
recorder
For the first use
Recording a TV program
Erasing recorded contents
Recording additional content
on a recorded disc
Indexing recorded contents
Naming a title
Creating a thumbnail
DVD-RAM disc
Suitable for repeat use of the
disc, and data storage for
video library. Copy once
contents can be recorded
using a compatible disc.
No preparatory steps
required, however initializing
is recommended.
Ye s
Ye s
Ye s
Ye s
Ye s
DVD-RW disc
Suitable for saving data in
DVD-Video format to play on
compatible devices.
You can erase recorded
contents to use the disc
repeatedly.
Initialize the disc.
Ye s
Ye s
If the disc has been executed
DVD-Video finalizing
process, first cancel the
process then delete contents
Ye s
If the disc has been executed
DVD-Video finalizing
process, first cancel the
process then delete contents
Ye s
Ye s
After you execute DVD-Video
finalizing process on a recorded
disc, you cannot name a title or
create a thumbnail.
.
.
DVD-R disc
Suitable for saving data in
DVD-Video format to play on
compatible devices.
Once you execute DVDVideo finalizing process on a
recorded disc so that it can
be played on other players,
you cannot make addition,
correction and deletion of
contents on the disc.
No preparatory steps
required.
Ye s
Ye s
Deleting contents cannot
restore the disc space.
After you execute DVDVideo finalizing process on a
recorded disc, you cannot
delete contents of the disc.
Ye s
After you execute DVDVideo finalizing process on a
recorded disc, you cannot
add contents to the disc.
Ye s
Ye s
After you execute DVD-Video
finalizing process on a recorded
disc, you cannot name a title or
create a thumbnail.
Recording
Playback
Editing
Library
Function setup
Collecting favorite scenes
(Playlist Editing)
Making a new title from a Playlist
containing favorite scenes
(Copy within the same disc)
Playing contents recorded on
this recorder, on other devices
When a message appears and
the loaded disc cannot be
used:
Ye s
Ye s
Contents can be played on
any devices compatible with
DVD-RAM discs. Follow the
instruction of the device to
play.
Initialize the disc.
If it is still unusable, try to
execute DVD-RAM physical
format.
No
No
Execute DVD-Video
finalizing process on this
recorder. This process
makes the disc playable on
other compatible devices.
(Some models excepted.)
Initialize the disc.
No
No
Execute DVD-Video
finalizing process on this
recorder. This process
makes the disc playable on
other compatible devices.
(Some models excepted.)
–
Others
11
Page 76

Introduction
Index to Parts and Controls
See pages with arrows for details.
Front panel
Front panel
1 2 3 4 5 6 87 9
10
11
12 13 14 15 16 17 18 19 20 21 22
* The above illustration displays the front panel with the cover open. See the following page on how to open or close the cover.
1 ON/STANDBY button pages 20, 21
Turns the power on/restores the unit in the
standby mode.
2 Three mode button (HDD, TIMESLIP, DVD)
page 32, 55, 60, 62, 63
Selects recording/playback media.
3 INPUT SELECT button
Pressing repeatedly selects between various input
sources.
page 38
8 (STOP) button page 35, 60
Stops playback or recording.
9 PICTURE SEARCH (
Scans the picture backwards.
10 PICTURE SEARCH (
Scans the picture forward.
11
(PLAY) button page 60
Starts playback.
) button page 64
) button page 64
4 CHANNEL buttons
Selects the channel.
(This is not avaialble to select satellite channels
regardless of the IR control cable connection and
the set top box setting.)
(OPEN/CLOSE) button page 20
5
Opens and closes the disc tray.
6
(PAUSE) button page 35, 60
Stops playback or recording momentarily.
7
(REC) button page 34
Starts recording.
page 20, 33
12
12 ON/STANDBY indicator
Displays the operational state of the recorder.
13 Remote sensor
GUIDE”
14 DV IN connector page 136
Use this when recording from a digital video
camera.
15 INPUT jacks
Use this when recording from other input source
such as a VTR or a camcorder.
page 12 in “INSTALLATION
page 37
page 20, 21
Page 77

Introduction
Recording
Playback
Editing
16
Three mode indicator page 32, 55, 60, 62, 63
Indicates the selection by the three mode button.
17 Media indicator
Indicates the current media.
18 Operation Status Indicator (HDD)
Indicates the operation status of the HDD.
: Recording
: Playing
: Copying within the disc
19 HDD indicator
Illuminates in the HDD mode.
20 Operation Status Indicator (DVD)
Indicates the operation status of the DVD.
: Recording
: Playing
: Copying within the disc
21 Disc tray
Place a disc to play or record.
page 20
To open or close the cover on the front panel
Put your finger on the left edge of the cover and pull it
down to open.
Note
• Do not place a heavy object on the cover while it is
open. Doing so may damage the recorder.
Library
Function setup
Others
22 Front panel display
page 18
13
Page 78

Introduction
Index to Parts and Controls (Continued)
Rear Panel
1 4 652 3 7
1 AC IN socket
GUIDE”
Connects to the supplied power cord.
2 Ventilation fan
3 RF IN (FROM ANT.) input socket
“INSTALLATION GUIDE”
Connects to an aerial or satellite signal.
4 RF OUT (TO TV) output socket
“INSTALLATION GUIDE”
Connects the supplied coaxial cable to a TV.
5 VIDEO OUTPUT, AUDIO OUTPUT jacks
page 16 in “INSTALLATION GUIDE”
Outputs video and audio signals to a connected
TV or amplifier.
page 15 in “INSTALLATION
page 14 in
page 14 in
8
9
7 AV1(AUDIO/VIDEO)IN/OUT socket page 37
• Use this socket when connecting the TV that has
the terminal in this shape.
• Use this socket when connecting the video or
other equipment that has the terminal in this
shape.
8 CHANNEL CHANGE IR jack
“INSTALLATION GUIDE”
Connect the supplied IR control cable to control
cable/satellite channels according to timer
programs.
9 DIGITAL BITSTREAM/PCM COAXIAL AUDIO
OUTPUT jack
“INSTALLATION GUIDE”
Use this to connect the recorder to an audio
receiver equipped with a coaxial digital audio input
jack.
page 22, 23, 24 in
1110
page 20 in
6 Component VIDEO OUTPUT jacks
in “INSTALLATION GUIDE”
Outputs video signals to a connected TV or
monitor.
Connects to a TV or monitor equipped with
component video jacks.
14
page 17
Page 79

10 DIGITAL BITSTREAM/PCM OPTICAL AUDIO
OUTPUT jack
“INSTALLATION GUIDE”
Use this to connect the recorder to an audio
receiver equipped with an optical digital audio
input jack.
When connecting the optical digital cable,
remove the cap and fit the connector into the jack
firmly. When not using the jack, keep the cap
inserted to protect it from dust intrusion.
page 22, 23, 24 in
Introduction
Recording
Playback
Editing
Library
11 AV2(SAT/DECODER)IN/OUT socket
37
Use this socket when connecting the video or
other equipment that has the terminal in this
shape.
Function setup
page
Others
15
Page 80

Introduction
Index to Parts and Controls (Continued)
Remote control
1
2
3
4
5
6
7
8
9
10
11
12
13
14
15
16
17
18
19
20
21
OPEN/CLOSE
DVD
MENU
TOP MENU
ANGLE
HDD DVD
LIBRARY
W
O
L
S
F
R
A
M
E
/
A
D
J
U
S
T
REC
REMAIN
DIMMER
TV/VIDEO CHANNEL
SAT.CONT. SAT.MONI. TV/DVR
RETURN
SUBTITLE
AUDIO
TIMESLIP
INSTANT REPLAY
EASY
NAVI
REC MENU EDIT MENU
ENTER
TIME BAR
DISPLAY
FL SELECT
ZOOM P in P
TV
VOLUME
CHANNEL
INSTANT SKIP
CONTENT MENU
S
K
I
P
H
C
R
A
E
S
E
R
U
T
C
I
P
PLAYSTOPPAUSE
QUICK MENU
CHP DIVIDE
PROGRESSIVE
INPUT SELECT
24
25
26
27
28
29
30
31
32
33
34
35
36
37
38
39
40
41
42
43
44
45
47
48
49
50
VIDEO Plus+
123
456
789
SETUP ENTER
EXTEND
0
REC MODE
TV CODE
T.SEARCH
CLEAR
DELETE
51
52
53
54
55
+
10
16
22
23
46
Page 81

Introduction
1
OPEN/CLOSE button page 20, 21
2
MENU button*
TOP MENU button page 61
3
4
ANGLE button page 70
5
SUBTITLE button page 71
6
HDD button page 32, 38, 55
7
TIMESLIP button page 62, 63
8
EASY NAVI button page 23
9
LIBRARY button page 140
10
REC MENU button page 40
SLOW button page 65
11
12
FRAME/ADJUST button page 40, 66
13
Direction buttons ( / / / ) page 55, 150
14
PAUSE buttton page 35, 56
15
REC button page 34
16
button page 55
DISPLAY button page 80
17
REMAIN button page 27
18
19
DIMMER button page 19
20
FL SELECT button page 19
21
Buttons for TV operation page 52 in
1
“INSTALLATION GUIDE”
31
CONTENT MENU button page 55, 95
32
EDIT MENU button page 108
33
SKIP button page 65
34
PICTURE SEARCH button page 55, 64
35
ENTER button page 55, 150
PLAY button page 60
36
37
QUICK MENU button page 24, 82
38
button page 150
39
STOP button page 35
40
TIME BAR button page 81
41
CHP DIVIDE button page 90
42
P in P button page 69
43
ZOOM button page 72
PROGRESSIVE buttton page 17 in
44
“INSTALLATION GUIDE”
45
INPUT SELECT button page 38
46
TV/DVR button page 35
47
VIDEO Plus+ button page 46
48
EXTEND button page 43, 45
Number buttons page 46, 67
49
SETUP button page 150
50
51
REC MODE button page 34
Recording
Playback
Editing
Library
Function setup
22
SAT.CONT. button page 19, 32
SAT.MONI. button page 39
23
24
ON/STANDBY button page 20, 21
25
RETURN button*
CHANNEL buttons page 20, 33
26
AUDIO button page 73
27
DVD button page 32, 38, 60
28
INSTANT SKIP button page 64
29
INSTANT REPLAY button page 64
30
2
52
TV CODE button page 52 in
“INSTALLATION GUIDE”
53
T.SEARCH button page 67
54
CLEAR button page 67
55
DELETE button page 50
*1MENU
Use this to display a menu screen that is recorded on
a DVD video disc.
Operate the menu screen as the same manner as
“Locating a title using the top menu (
A menu screen is not recorded on some discs.
2
RETURN
*
Returns to the previous screen (the screen may be
specified depending on the disc).
Refer to the instructions of the disc.
page 61)”.
Others
17
Page 82

Introduction
Index to Parts and Controls (Continued)
Display
21 5 6 7 8 9
3 4
15
1 DUBBING indicator
Illuminates when copying.
2 PBC indicator
Illuminates when PBC function is “On” (
156) and a PBC-controllable VIDEO CD is loaded.
3 Angle icon
Illuminates when playing a scene recorded with
multi angles.
4 Program recording indicator
Illuminates when the recorder holds a timer
program.
page 70
page
10
8 Title indicator
Illuminates when a title number is displayed.
9 TRK (Track) indicator
Illuminates when a track number is displayed.
10 CHP (Chapter) indicator
Illuminates when a chapter number is displayed.
11 NICAM indicator
Illuminates when “NICAM” (
“On” and while receiving stereo stereo/Mode I, II/
mono programmes of NICAM broadcasts.
11
page 158) is set to
1712 13 14 16
5 Bit rate indicator
Illuminates when displaying the bit rate selected
for recording, or when displaying the actual bit
rate.
6 REMAIN (Remaining space) indicator
Illuminates when an available recording time is
displayed.
7 VCD/CD indicator
VCD : Illuminates when a VIDEO CD is loaded.
CD : Illuminates when an audio CD is loaded.
18
12 SAT indicator
See the next page.
13 PROGRESSIVE indicator
Illuminates when video signals are output in the
progressive format.
14 Picture quality mode indicator
The current picture quality mode lights up.
The modes are: MN (Manual)/SP (Standard Play)/
LP (Long Play)/SP+LP+MN (Auto)
page 161
Page 83

Dimming the display
Pressing the DIMMER button on the remote control changes the brightness of the display (normal/dimmed/off).
Switching the display
Every time you press the FL SELECT button, the display changes between the channel, title number, and time.
The display may not change, depending on the disc or recording conditions.
15 Channel indicator
Displays the current channel or other numbers
such as a title number, track number, bit rate or
input selection.
16 Multi display
Displays the current time, elapsed time, remaining
time, starting time of programmed recording, chapter
number or message, etc
.
SAT indicator and channel selection
While the SAT indicator illuminates, you can select
channels of a connected satellite receiver from the
recorder.
(It is necessary to finish the connection and the
settings (
Each time you press the SAT.CONT. button, the SAT
indicator turns on and off.
page 20, 45, INSTALLATION GUIDE).)
Introduction
Recording
Playback
Editing
Library
17 Analog output level indicator
Displays the analog output level.
L+R: Stereo and bilingual (left (main) channel and
right (sub) channel)
L : Left (main) channel
R : Right (sub) channel
Off : Mono
Level indicator may not show exact sound level. It
only shows the average level.
Function setup
Others
19
Page 84

Introduction
Before operating this recorder
Is your recorder ready?
• Refer to the supplied “INSTALLATION GUIDE”
manual and finish the necessary preparations.
• Turn on the connected equipment such as a TV or
audio system and select the input from the recorder.
Turning the power on
(This owner’s manual instructions are based on
the assumption that all proper connections have
been completed and the TV is turned on.)
Press ON/STANDBY on the front panel of the
recorder or on the remote control.
ON/STANDBY button
ON/STANDBY indicator
Loading a disc
Check disc compatibility beforehand ( page 6, 7)
and use a proper playable disc.
Caution
• Keep your fingers well clear of the disc tray. Neglecting this
may cause serious personal injury. Keep a close watch on
children.
• Do not use a cracked, deformed, or repaired disc.
1 Open the disc tray.
Press
button on the remote control.
on the front panel or the OPEN/CLOSE
button
ON/STANDBY button
CHANNEL buttons
When the power turns on, the ON/STANDBY indicator
changes from red (standby mode) to green (operation).
After a few seconds, a start-up screen appears.
The following icon appears at the top right corner of
the screen.
e.g.
When this icon disappears, the recorder is ready to
operate. If the disc drive contains a disc, it takes a
little longer to start up.
Loading
Viewing TV channels through this recorder
After turning the power on, the recorder will output TV
channel signals to the connected TV (also in the stop
mode).
You can select a desired channel by pressing the
CHANNEL or the number buttons.
While the SAT indicator is on, channels of the
connected satellite receiver are selected. It is
necessary to finish the connection and the settings.
Refer to
page 20, 45, INSTALLATION GUIDE.
OPEN/CLOSE button
2 Insert a disc.
Disc without a cartridge
Insert with the playback side down.
There are two kinds of disc size. Place a disc to fit
the guide. If a disc is out of the guide, it may result
in damage to the disc or malfunction.
Place a disc in the
inside hollow.
20
Page 85

Introduction
DVD-RAM disc with cartridge (TYPE1/TYPE2/TYPE4)
Single sided
Turn the printed side up, and insert the cartridge
into the tray frame following the direction of the
arrow on the cartridge.
Double sided
Turn the desired recording/playback side up, and
insert the cartridge into the tray frame following the
direction of the arrow on the cartridge.
3 Close the disc tray.
Press
on the front panel or the OPEN/CLOSE
button on the remote control.
Notes
• Use the button on the front panel or the remote control to
open and close the disc tray. Do not push or hold the disc
tray while it is moving. Doing so may cause the recorder to
malfunction.
• Do not insert a disc which is unplayable, or any object
other than a playable disc.
• Do not apply downforce to the disc tray. Doing so may
cause the recorder to malfunction.
• If the disc tray stops while closing, the mechanical
protection system of this recorder will open it. Do not force
it to close. Doing so may cause malfunction.
• If the disc tray will not open, turn the recorder off, and
press the
CLOSE button on the remote control. This may turn the
recorder on and open the disc tray. If it still won’t open,
contact your nearest TOSHIBA dealer.
button on the front panel or the OPEN/
Turning the power off
Press ON/STANDBY on the front panel of the
recorder or on the remote control.
Caution
• If the power fails or the power cord is disconnected from a
wall outlet while the recorder is in operation (ON/STANDBY
indicator lit in green), the HDD or a loaded disc may
become recording disabled. In such a case, executing an
initialization of the disc using the formatting function of the
recorder may refresh it. However, all contents stored on the
disc will be completely erased by this initialization process.
• This recorder may indicate alert messages with some
DVD-RAM discs right after insertion. If such a disc is used
for playback or recording on other equipment, all data in
the disc may be damaged and the disc will not be played.
By executing an initialization of the disc using the
formatting function of the recorder, the disc will become
operational.
• If the recorder freezes and does not respond at all, leave it
alone for about 15 minutes or longer. This may restore the
recorder. After the recorder has recovered, turn it off once
and turn it on again to use as usual. If the recorder is still
inoperable after more than 15 minutes have passed, press
and hold the ON/STANDBY button on the front panel or the
remote control for about 10 seconds or longer. The
recorder is forced to quit and the power turns off. Turn the
recorder on again and use it as usual. (This is an
emergency measure, which may cause losses and/or
damages of data. Avoid casual use of this measure. If you
try this while the recorder is working properly, especially
while the “Loading” or “Unloading” icon is flashing, it may
result in initializing of the HDD.) (This 15-minute measure
is available only when “Screen protector” is set to “On.”
(
page 159))
Note
• If there are any performance malfunctions of the HDD or
the DVD-RAM drive, immediately discontinue use of this
recorder, and disconnect the power cord from a wall outlet,
then contact your dealer. Continuous use of the recorder in
such a condition will aggravate the condition and result in
increased cost and repair time.
Disc tray lock
You can lock the disc tray.
Press and hold
on the front panel or PAUSE on
the remote control for longer than about 3
seconds.
To unlock, during stop press the button for longer than
about 3 seconds.
Recording
Playback
Editing
Library
Function setup
Others
The “Unloading” icon appears at the top right corner of
the screen, and the ON/STANDBY indicator turns red,
then the power turns off (Standby mode.)
Note
• Turning the power off also unlocks the disc tray.
21
Page 86

Introduction
Before operating this recorder (Continued)
Start-up/Shutdown (closing) icons
These icons are displayed at the top right corner of the
screen when startup or finishing. While they are
flashing, the recorder is operating as follows:
Start-up, reading a disc, finishing the
Loading
recording
Unloading a disc, finishing the
Un
loading
operation
Opening a disc tray
Open
Close
Closing a disc tray
Status display
Each time you operate the recorder, the following
displays appear on the TV screen to indicate the
status of the recorder.
Status display
e.g.
Main on-screen displays
(Depending on the disc, some of these may not
appear.)
: Playback
: Pause
: Stop
: Fast-forward
: Fast-reverse
: Forward skip*
: Reverse skip*
x1/2
: Forward slow-motion
x1/2
: Reverse slow-motion
: Forward frame by frame playback
: Reverse frame by frame playback
: Recording
: Recording pause
Title
: When title playback is completed
End
: Instant skip
: Instant replay
Chapter
Divide
: Chapter division
: Forward skip by 1/20
: Reverse skip by 1/20
22
* Accompanied with the followings:
HDD
DVD-RAM
:
DVD-RDVD-RW
Title number/title name and chapter number/
chapter name
DVD-VIDEO
:
Title number and chapter number
VCD
CD
:
Track number
Notes
• To disable the status display, set “On screen display”
(
page 159) to “Off.”
• You can add the current status of the settings to this
display. See
page 80.
Page 87

Introduction
Key operation - EASY NAVI & QUICK MENU
The EASY NAVI button opens the “EASY NAVI Main Menu”, a main gate to the functions of this recorder.
From this menu, you can access the desired functions while viewing a current picture.
Additionally, the QUICK MENU button provides you a sub-menu of the current function.
EASY NAVI
Press EASY NAVI.
Sound is muted and the following GUI appears. (Actual displays vary depending on operational status.)
Appears when the finder shows
HDD/DVD
EASY NAVI
ENTER
/ / /
PLAY
STOP
the current broadcast.
e.g.
EASY
Main Menu
NAVI
Finder
Cursor
Timer Recording
Dubbing
Delete Title
Finalize (R/RW)
TV:1ch
005 2004/04/03 19:00 Ch:2
Play Time
Play Contents
DV Recording
Edit Title Name
Format (RAM/RW)
00:10:15
Create Thumbnail
Operating the finder (For the HDD, DVD-RAM discs, DVD-R/RW
discs recorded on this recorder and not finalized yet)
Disc
(00:54:30)
Original
HDD
TR
Time Slip
Setup
HDD
Recorded title
last selected
Functions
1) When the cursor is on the finder, press / .
You can view thumbnails of recorded contents.
• You can select the drive by pressing the HDD or DVD button.
2) When you find a desired content, press PLAY or ENTER.
The content is played.
• Pressing the ENTER button enlarges the finder’s playback picture to
the full of the screen.
• You can change playback speed. See
page 64.
3) To stop, press STOP.
A current channel broadcast appears. (“TV:xxch” accompanies.)
•
Pressing the REC button starts recording. On recording, see page 25.
Introduction
Recording
Playback
Editing
Library
Item selection
Press / / / to select an item, then press ENTER.
(Unavailable features are grayed out.)
Item
Timer Recording
Play Contents
Dubbing
DV Recording
Delete Title
Edit Title Name
Create Thumbnail
Finalize (R/RW)
Format (RAM/RW)
Setup
A list of timer programs appears.
Recorded contents are listed in a thumbnail view.
You can access a menu to dub the current content.
The setting menu for recording contents from equipment
connected to the DV terminal appears.
You can delete the current content.
Operate according to the message.
An on-screen keyboard appears.
You can change the thumbnail picture.
You can execute the DVD-Video finalizing process on the
loaded disc.
You can format the loaded disc.
A setup menu appears.
Function
page
40
55
106
136
50
30
100
132
28
150
Function setup
Others
(Continued)
23
Page 88

Introduction
Key operation - EASY NAVI & QUICK MENU (continued)
To exit the EASY NAVI
Press EASY NAVI again.
Note
• For a disc other than the specified one, the finder cannot
be operated. To play the disc, exit the EASY NAVI then
press the PLAY button, or select the “Play Contents”
function.
• If a loaded disc contains NTSC signals, more functions will
be unavailable.
Quick Menu operation
To access various optional functions of this recorder,
open the Quick Menu. The Quick Menu displays a list
of selections relevant to your current mode.
Opening a Quick Menu
1) Press QUICK MENU.
The following menu (“Quick Menu”) appears.
(Actual selections vary depending on operational
status.)
e.g.
Quick Menu
Restart title
Title information
Bit rate
Special playback mode
Exit
2) Press
/ to select an item, then press
ENTER.
To exit the Quick Menu
Press QUICK MENU again.
Alternatively
Select “Exit” with
/ , then press ENTER.
24
Page 89

Hint on reading this manual
The following icons show the playable discs for each
function described on this instruction manual.
HDD
: HDD
DVD-RAM
DVD-RW
DVD-VIDEO
Most instructions are based on remote control operation,
unless otherwise noted. You can use the buttons on the
remote control and those on the main unit as well when
they have the same function.
: DVD-RAM disc
: DVD-RW disc
DVD-R
: DVD-R disc
: DVD video disc
VCD
: VIDEO CD
CD
: Audio CD
(For CD containing JPEG or MP3/WMA files,
see
page 76, 78.)
Recording
Recording variations for many types of programmes or
situations.
Before recording
Recording a TV programme
Recording an external source
Programing a recording (REC
MENU)
VIDEO Plus+ Recording
Others
If copy protection signal is detected during
recording on this recorder, the recording
automatically pauses and a message appears. In
this case, the PAUSE button cannot release the
recording. (It is possible to end the recording by
pressing the STOP button.) If the copy protection
signal continues, the recording will terminate.
Page 90

Recording
Before recording
Please be sure to read this critical background information prior to making a recording.
This recorder is equipped with a built-in HDD. Conventional video cassette recorders have required
tapes to record, while this recorder enables recording on the HDD whenever you want, without
selecting an available tape or confirming its recording time or tape remaining.
Further, the DVD-RAM drive on this recorder can record on a DVD-RAM/RW/R disc in the same way as
a tape. You can also copy contents recorded on the HDD to a DVD-RAM/RW/R disc to create your
own library.
Is your recorder ready?
Before recording a TV program on this recorder,
insure that channels you want to record are correctly
tuned in on this recorder.
If not tuned in, read the separate “INSTALLATION
GUIDE” volume again, and confirm all the necessary
connections and settings have been done.
Also, insure the clock is set precisely for program
recording. Set the clock using the “Initial settings”
menu (
Disc initializing
Whenever you use a new DVD-RAM/RW disc on this
recorder, be sure to initialize the disc. For DVD-RAM
disc, initialization is indispensable to the database
system of this recorder.
Normally, the HDD does not need to be formatted. If
the HDD does not work normally due to a problem,
format the HDD for possible recovery. Once you
format the HDD, all the recorded titles and Library
information are deleted. Before formatting, be sure to
write Library information to a DVD-RAM disc and
check any titles to be deleted.
DVD-RW discs can be emptied by initializing.
DVD-R discs can be used on this recorder without
initializing.
For details of initialization of DVD-RAM/RW discs, see
page 28.
If an initialized DVD-RAM disc is still unusable, it may
become usable by executing “DVD-RAM physical
format” in the “Management settings” menu.
For “DVD-RAM physical format”, see
Note on recording on a DVD-RAM disc
Confirm disc compatibility and prepare an available
DVD-RAM disc to record on (
page 30, INSTALLATION GUIDE).
page 29.
page 6, 8).
Note
• This recorder records on a DVD-RAM disc if it complies
with DVD-RAM standard Version 2.0 or 2.1. However, you
may not record on some DVD-RAM discs that have
complicated contents (often, to protect the recorded data).
When you select a DVD-RAM discs that has already been
recorded, check that the disc is suitable for recording or the
remaining time of the disc is displayed. It is recommended
to use a new DVD-RAM disc for an important recording.
Note on recording on a DVD-RW disc
Confirm disc compatibility and prepare an available
DVD-RW disc to record on (
Some discs may need to be initialized for use on the
recorder. A message will appear asking you to execute
disc initializing. Follow the procedure displayed onscreen for initialize the DVD-RW disc compatible with
this recorder.
Some DVD-RW discs initialized on a PC may not be
usable.
To play a DVD-RW disc recorded on this recorder on
other devices, finalize the DVD-RW disc on this
recorder. (
The finalization disables the disc’s rewritability. To
rewrite a finalized DVD-RW disc, cancel the
finalization (
• On DVD-RW discs recorded on other devices, you
cannot execute DVD-Video finalize process or
cancel the finalize process, or add recordings on
this recorder.
• You cannot rewrite or edit a DVD-RW disc if
recorded in DVD-VR mode.
• DVD-RW discs which are recorded on other
devices and not finalized yet, cannot be read on this
recorder. Do not rush to initialization. Check that the
contents can be erased or not.
page 132)
page 135).
page 6, 9).
Some discs may need to be formatted for use on this
recorder. A message will appear asking you to execute
disc formatting. Follow the procedure displayed onscreen to format the DVD-RAM disc compatible with
this recorder.
Some DVD-RAM discs formatted on a PC may not be
usable.
26
Page 91

Introduction
Note on recording on a DVD-R disc
Confirm disc compatibility and prepare an available
DVD-R disc to record on (
To play a DVD-R disc recorded on this recorder on
other devices, finalize the DVD-R disc on this
recorder. (
The finalization permanently disables the disc’s
writeability. (Cancelling the finalization is not possible.)
• DVD-Video finalize process cannot be cancelled if
once executed on a DVD-R disc.
• On DVD-R discs recorded on other devices, you
cannot execute DVD-Video finalize process or add
recordings on this recorder.
• DVD-R discs with the method of ”DVD-Video
Creation” have been alreadly executed the DVDVideo finalize process. Therefore, they cannot be
added the contents.
If you want to record contents which will be copied
to a DVD-R/RW disc later on
See
To check space remaining on a disc
1) Press the REMAIN button.
The current capacity per disc is displayed at the
bottom of the screen. The current capacity of the
selected drive is displayed on the front panel display.
2) After checking the capacity, press the button
again to turn off the display.
Note
• You can also check the capacity of the disc by selecting
“Disc budget calculation” from the Quick Menu within the
REC MENU (
When “HDD recording is not possible due to...”
appears
The HDD is full. To record new content, delete
unnecessary titles or transfer some content to a DVDRAM disc.
page 132)
page 36.
page 44).
page 6, 9).
Programmed recording and operational status
The recorder gives priority to programmed recordings
in every operating mode. Even if the recorder is
playing, recording or editing, or even in standby mode,
at a starting time of a programmed recording the
recorder will make itself ready or stop those
operations and start the recording.
However, “Creating a DVD-Video” (
“DVD-Video finalizing process” (
operations may have priority over programmed
recordings.
When the programmed settings overlap
Before the first recording is completed, the second
programme is scheduled to begin recording. When
using a DVD-RAM disc, the recording of the previous
programme stops 15 seconds before the next
programme starts. (If you have been recording over 8
hours on the same drive, the current recording stops
approximately 2 minutes before the next programme
starts.)
When using a DVD-R or DVD-RW disc, the recording
of the previous programme stops about 2 minutes
before the next programme starts, to complete data
process. In this 2 minutes, you cannot operate the
loaded DVD-R or DVD-RW disc.
On a programmed recording across the changeover of Daylight-saving time
• When the clock gains across Daylight-saving time
during a programmed recording, it means that the
recording completion time is consequently set onehour earlier. In this case, set the programmed
recording one-hour longer in advance. If not set
accordingly, the programmed recording stops onehour shorter.
• When the clock loses across Daylight-saving time
during a programmed recording, it means that the
recording completion time is consequently set onehour later. In this case, as the programmed
recording continues one-hour longer, delete
unnecessary chapters by chapter dividing after the
completion of recording.
page 122) and
page 132)
Recording
Playback
Editing
Library
Function setup
Notes
• The “Loading” icon appears in the top right of the screen after recording. This indicates that the unit is executing
the final recording process (writing managing information). Operations other than changing channels cannot be
done until this icon disappears. The time for executing this process differs depending on the recording time or
capacity of the disc.
• Note that all recording content may be deleted if the unit is disconnected from a wall outlet, or a power failure
occurs, during recording.
• If a power failure occurs within 5 minutes prior to the programmed recording start time, the programmed recording
may not be executed.
• A programmed recording may not be executed correctly if scheduled when Daylight-Saving time starts or ends.
Others
27
Page 92

Recording
Before recording (Continued)
Initializing a DVD-RAM/RW disc (Logical Format)
Be sure to read this section prior to using a DVD-RAM/RW disc on this recorder for the first time.
For DVD-R, initializing is not necessary.
A disc should be initialized in the following cases: (The
recorder may display a message to request you to do
so.)
e.g.
When you use a DVD-RAM/RW disc on this recorder
for the first time.
If data fragments produced by repeated recording or
erasing have accumulated.
If a disc error has occurred.
When you want to record on a DVD-RAM disc for PC.
page 8)
(
Initializing formats a disc logically and insures that it will
perform to its full capability. However, this erases all data
on the disc, so make sure that it does not matter if data
on the disc is erased whenever you initialize a disc.
How to initialize a disc
To initialize a DVD-RAM disc, load it in the recorder.
See
page 20 for loading a disc.
1) During stop, press QUICK MENU.
The following menu appears. (The actual contents
depends on the operational status of the recorder.)
e.g.
Quick Menu
Bit rate
Special playback mode
Disc management
DVD video compatibility
Aspect ratio(Video mode)
DVD-Video:CHP create
AV record quality
Exit
e.g.
Quick Menu
3) Press
Bit rate
Special playback mode
Disc management
DVD video compatibility
Aspect ratio(Video mode)
DVD-Video:CHP create
AV record quality
Exit
/ to select “DVD format,” then press
Disc information
DVD format
ENTER.
e.g.
DVD format
Edit
0 0 1 –
Start Cancel
Edit
%
0
Format
Disc Number
Disc Name
Numbering a disc
The recorder automatically numbers discs when
initializing. However, you can assign a desired number
(using 3 digits) and designate sides A and B on a doublesided disc. (DVD-RW discs cannot be numbered.)
(1) Press the
/ buttons to select “Edit” of “Disc
Number” then press the ENTER button.
(2) Press the
(3) Press the
/ buttons to select a digit.
/ buttons to shift.
(4) Repeat steps (2) and (3).
(5) Press the ENTER button.
28
2) Press
/ to select “Disc management,” then
press ENTER.
A sub-menu appears on the right side.
Naming a disc
You can name a disc.
(1) Press the
/ buttons to select “Edit” of “Disc
Name,” then press the ENTER button.
The character input window appears.
(2) Enter a disc name following the procedure of
“Entering characters” (
(3) Press the
button to eliminate the window.
page 30).
Page 93

Introduction
e.g.
HDD auto stop
All HDD titles delete
Eco. mode
Off
Off
Management settings
DVD-RAM physical format
Software version
DVD drive software
HDD format
Genre setting
4) Press / to select “Start,” then press ENTER.
e.g.
DV D format
Entire disc contents excluding
library data will be erased
if disc is formatted. Proceed?
Start
Cancel
%
0
5) Press
Format
/ to select “Start,” then press ENTER.
Initialization starts.
e.g.
DV D format
DVD
Formatting
Format
18
%
When initialization is completed, the setup window
disappears.
1) During stop, press SETUP.
2) Press
/ to select “Management settings”
then press ENTER.
3) Press
/ to select “DVD-RAM physical
format,” then press ENTER.
4) Press
/ to select “Yes,” then press ENTER
to execute.
Warning: It will take approximately
70 minutes to format a 4.7GB DVD
and all data will be erased. Confirm
t
hat timer programing is not
scheduled.
Proceed?
Yes
No
To cancel, select “No”, then press the ENTER
button.
5) Read the message, and press
/ to select
“Yes” or “No”, then press ENTER.
Recording
Playback
Editing
Library
Physical formatting is a simple execution for a disc which
cannot be used or read (or which is becoming hard to
read). It may refresh such a disc for recording and
playback. (There is no guarantee that all such discs will
be recovered.)
“DVD-RAM logical format” process only rewrites certain
data on file system and management information,
however, “DVD-RAM physical format” rewrites all data on
a disc, therefore it takes a much longer time to complete.
For a 4.7GB single sided DVD-RAM, about 70 minutes
will be necessary. While processing, all recorder
operations and functions including program recording will
not work until the process is finished. Also this process
erases all data stored on the DVD-RAM disc.
DVD-RAM physical format
Notes
• The physical format process may fail if executed to a dirty
DVD-RAM disc. Also, the disc may be difficult to record,
even if it finished. Before executing DVD-RAM physical
format process, be sure to confirm the disc is not dirty.
Clean it if necessary. If the disc has scratches or dust
beyond cleaner’s efficacy, do not execute DVD-RAM
physical format process on the disc.
• The following DVD-RAM discs require physical formatting:
– A disc which is not formatted correctly.
– The disc which has errors during writing because of dirt
on the disc, and cannot be further recorded, or cannot
initialize normally.
• You need to start physical formatting from the first step
again when you use a failed disc.
• Physical formatting does not work if the disc contains a lot
of voids beyond the limitation of this recorder.
• If an error occurs in physical formatting, “ERR-01” appears
in the front panel display. To turn off the message, press
the DISPLAY button on the remote control.
Function setup
Others
29
Page 94

Recording
CLEAR
DELETE
CLEAR
DELETE
Before recording (Continued)
Entering characters
e.g.
Cursor
An entered character
will appear here.
Language
CONTENT
MENU
Title information
Chapter
English
Spanish
French
German
Italian
etc...
Select
Cursor
003
12345678 0
qwe r t yu i p [ ]o
asdf ghjk :
zxcvbnm, /
Space Space Space
1
,
4 5 6
7 8 9
2 3
Direct(0-9)
.
;
-
Input
/
#
-
l
.
DELETE
Caps Lock
=/’9
BkSp
Delete
Clear All
CLEAR
CLEARDELETE
:
Estimated end of the
first line on the
CONTENT MENU.
Estimated limit of
Characters displayable
on the CONTENT
MENU.
The character being
selected appears.
All ClearBkSp
Space
ReturnSave
Operation guide
Operation guidance of the remote control
To enter the character, normally use the direction
/ / / buttons on the remote. About the other
buttons to be used are shown on the operation guide.
: Shifts a cursor.
1
2 3
: Enters the number.
4 5 6
7 8 9
DELETE
DELETE
: Erases one character immediately to the left
side of the cursor.
CLEAR
CLEAR
: Erases all the characters on the input column.
: Caps Lock
: Saves the changes on the input column and
returns to the previous screen.
: Cancels the changes on the input column and
returns to the previous screen.
Switching a language
Before entering a character, move a cursor to the
language selection area by pressing the
Then press the
/ buttons to select a language,
/ buttons.
then press the ENTER button.
30
: Enters a space.
/
,
.
#
;
-
: Enters a symbol.
Page 95

Entering characters
The cursor may be followed by unwanted characters.
You can erase them if necessary by either of the
following measures:
Introduction
Erasing characters
• Erasing all the characters on the writing board
Select “Clear All” by pressing the
then press the ENTER button.
Alternatively, open the lid of the remote control and
press the CLEAR button.
• Erasing one character before the cursor
Select “BkSp” by pressing the
then press the ENTER button.
Alternatively, open the lid of the remote control and
press the DELETE button.
(1) Press the
(2) Press the
then press the ENTER button.
The selected character is input on the cursor.
(3) Repeat steps (1) and (2) to enter characters.
(4) When finished, press
The characters you entered appears.
Notes
• You can enter up to 64 characters.
• When unnecessary information appears, or when you want
to alter the input character, press the CLEAR button to
erase all, or press the DELETE button to erase an
unnecessary character.
button to select an input mode.
/ / / buttons to select a character,
to save the characters.
/ / / buttons,
/ / / buttons,
Recording
Playback
Editing
Library
Function setup
Others
31
Page 96

Recording
HDD
DVD-RAM
DVD-RDVD-RW
Recording a TV programme
To record a TV programme currently being broadcast, follow the procedures of this chapter.
Preparation
• When you record on a DVD-RAM/R/RW disc, load it into the recorder.
- Load a disc which has sufficient space available to record the programme.
- Make sure the loaded disc is not write-protected.
• If you record on a DVD-R or a DVD-RW disc, set “DVD compatible mode” (
(Mode II)”. In DVD-R/RW recording, “Off” setting is regarded as “On (Mode I)”.
• If you record on a DVD-R or DVD-RW disc, set “Aspect ratio(video mode)” (
sources.
Press HDD or DVD to select a media to record
OPEN/CLOSE
DVD
MENU
TOP MENU
ANGLE
HDD DVD
LIBRARY
RETURN
SUBTITLE
AUDIO
TIMESLIP
EASY
NAVI
REC MENU EDIT MENU
1
CHANNEL
INSTANT SKIPINSTANT REPLAY
CONTENT MENU
on.
HDD
DVD
HDD : To record on the HDD.
DVD : To record on a DVD-RAM/R/RW disc.
page 162) to “On (Mode I)” or “On
page 162) according to recording
W
O
L
S
ENTER
F
R
A
M
E
/
A
D
J
U
S
T
REC
TIME BAR CHP DIVIDE
DISPLAY
REMAIN
DIMMER
FL SELECT
ZOOM P in P
TV
TV/VIDEO CHANNEL
SAT.CONT. SAT.MONI. TV/DVR
VOLUME
S
K
I
P
H
C
R
A
E
S
E
R
U
T
C
I
P
PLAYSTOPPAUSE
QUICK MENU
PROGRESSIVE
INPUT SELECT
2
INPUT SELECT
Press INPUT SELECT repeatedly to select a
recording source.
Each time you press the button, the indicator alternates.
Ch: To record a TV programme with recorder
tuner.
L: To record a source connected to the INPUT
jacks on the front panel (
AV1: To record a source connected to the AV1
socket on the rear panel (
AV2: To record a source connected to the AV2
socket on the rear panel (
L-U: To record pictures currently played (
116).
To record a satellite programme, press the SAT.CONT.
button to turn on the SAT indicator. The input you have
set (
For details, see
page 45, INSTALLATION GUIDE) is selected.
page 19.
page 37).
page 37).
page 37).
page
32
SAT.CONT.
Page 97

Introduction
OPEN/CLOSE
DVD
MENU
TOP MENU
ANGLE
HDD DVD
LIBRARY
W
O
L
S
F
R
A
M
E
/
A
D
J
U
S
T
REC
REC
RETURN
SUBTITLE
AUDIO
TIMESLIP
EASY
NAVI
REC MENU EDIT MENU
ENTER
CHANNEL
INSTANT SKIPINSTANT REPLAY
CONTENT MENU
S
K
I
P
H
C
R
A
E
S
E
R
U
T
C
I
P
PLAYSTOPPAUSE
QUICK MENU
3
4
5
Press the number buttons to select a channel
to record.
123
456
789
0
The CHANNEL buttons ( / ) are also available.
• While the SAT indicator is on, channels of the
connected satellite receiver are selected.
Press QUICK MENU to display the Quick
Menu.
quality,” skip to step 8.)
QUICK MENU
(If you want to use the default setting for “AV record
Press / to select “AV record quality,” then
press ENTER.
Recording
Playback
Editing
Library
VIDEO Plus+
456
789
SETUP ENTER
EXTEND
0
REC MODE
Open the lid.
312
+10
TV CODE
T.SEARCH
CLEAR
DELETE
6
F
R
A
M
ENTER
Press / to select a media to be recorded,
then press ADJUST to select the setting
number.
E
/
A
ENTER
D
J
U
e.g.
S
T
See page 41 for details on “Mode”, “Rate” and
“Audio quality”.
AV record quality
Setting 1 –––
HDD
L-PCM
Manual
Custom setting
6.6
Setting
Mode
Manual1
SP
2
LP
3
Manual
4
Manual
5
Total recording time: 71min.
(with 4.7 GB unused)
Rate
6.6
4.6
2.2
6.0
3.2
SP
DVD
4.6
Audio quality
D/M1
L-PCM
D/M1
D/M1
D/M2
D/M1
(Continued)
Function setup
Others
33
Page 98

Recording
Recording a TV programme (Continued)
TIMESLIP
HDD DVD
EASY
NAVI
REC MENU EDIT MENU
LIBRARY
W
O
L
S
ENTER
INSTANT SKIPINSTANT REPLAY
CONTENT MENU
S
K
I
P
7
Press ENTER.
The menu disappears.
ENTER
F
R
A
M
E
/
A
D
J
U
S
T
H
C
R
A
E
S
E
R
U
T
C
I
P
PLAYSTOPPAUSE
8
Press REC.
Recording starts.
REC
QUICK MENU
REC
Selecting the recording mode
Before recording, you can select the setting of picture and sound quality. During stop mode, press the REC MODE
button. By pressing the button repeatedly, you can select one from 5 settings of “AV record quality” appearing in
the front panel display.
Notes
• During recording, you cannot change the recording parameters, such as modes, channels, etc.
• The number of titles cannot exceed 99 for a DVD-RAM/RW/R disc or 396 for the HDD.
• One continuous recording cannot exceed in any case 8 hours. Recording automatically stops at 8 hours.
• During normal recording, you can set the programmed recording using the REC MENU.
• You cannot start recording immediately before a programmed recording starts.
• For recorded sound, see
page 74.
• During monaural sound recording, the same sound is recorded on both the left and right channels.
• When “Audio” is set to “L-PCM”, multi-channel sound is recorded as stereo sound. When playing this recorded sound, you
will hear NICAM Mode I and NICAM Mode II sounds simultaneously. Press the AUDIO button to select a desired sound.
•
When “DVD compatible mode” is set to “On (Mode I)” or “On (Mode II)”, the unit records the same sounds on both the left
and right channels when receiving monaural sound. When receiving the NICAM Mode I/Mode II sound, the selected sound,
Mode I or Mode II, is recorded on both the left and right channels
.
• Depending on the disc condition, pressing the REC button may take a longer time to start recording.
•
When a starting time of a programmed recording comes, a recording in execution is stopped and the programmed recording
starts. If you do not want to stop the recording, cancel the timer program before it starts
• Even if you set “Aspect ratio(video mode)” (
page 162) to “16:9”, images are recorded in 4:3 aspect ratio when using a
.
DVD-R or DVD-RW disc with “Rate” set to “1.4” (Mbps).
• Be careful of a programmed recording across the change-over of Daylight-saving time (
page 27).
34
Page 99

Introduction
To stop recording
Press STOP.
To pause recording (to omit an unnecessary
portion)
During recording, press PAUSE.
To resume recording, press it again.
Note
• Pausing recording automatically creates a new chapter
division at that point.
To change a TV channel to be recorded
1) During recording, press PAUSE.
Recording pauses.
2) Press CHANNEL to change the channel.
3) Press PAUSE to resume recording.
To view a TV programme while recording
another
1) Start recording on this recorder.
2) Press the TV/DVR button.
3) Using the channel selector of the TV, select a
desired channel on the TV.
If you press the TV/DVR button again, you will
go back to the display that you are recording.
To record and play at the same time
To start recording while playing a disc
Stop playback, then select the other disc by
pressing the HDD or DVD button, and start
recording on that disc.
To play a disc while recording on another disc
Select the disc that is not being recorded by
pressing the HDD or DVD button, and start
playback on the disc.
Note
• During a dubbing job, the unoccupied drive is available for
recording or playback, however, cannot perform a function
which records and plays simultaneously.
To set an end time of a recording which is in
progress
1) During recording, press QUICK MENU.
The Quick Menu appears.
2) Press
/ to select “End time” then press
ENTER .
The display changes as follows:
e.g.
End time
3) Press
2:13
/ to select an item then press
ADJUST to change the value.
4) Press ENTER.
Notes
• By setting an end time, it is memorized as a programmed
one, and the
illuminates to indicate that the recorder holds a timer
program of recording.
• The programmed end time must be set for 5 minutes later
than the current time.
indicator in the front panel display
Recording
Playback
Editing
Library
Function setup
35
Others
Page 100

Recording
Recording a TV programme (Continued)
To play a recorded title while recording another
on the same disc (Recorded Title Play)
HDD
DVD-RAM
During recording, you can play a title recorded on the
same disc.
1) While recording, press CONTENT MENU.
2) Press
press the ENTER.
Playback of the selected title starts.
Pressing the STOP button stops playback, and the
content currently recorded returns. If you press the
PLAY button, playback resumes from the location
you last stopped.
/ / / to select a desired title, then
Notes
• The playback picture may appear after a delay of several
seconds.
• While you are using this function, the following operations/
functions are not available.
- Programmed playback (repeat playback, intro scan etc.)
- Editing (Playlist programming, dubbing, title/chapter
naming, title thumbnail setting, etc.)
• This function is not available at a 10 minutes overlapped
portion of the relay recording or A-B recording (
48).
• Depending on the data condition, playback may pause.
• During a dubbing job, this function is not available.
page
When recording contents which will be copied
to a DVD-RW/R disc later on
Before recording, set “DVD compatible mode” (
page 162) to “On”.
Each timer program must to be set its “DVD
compatible mode” from the Quick Menu.
36
 Loading...