

Page 1
3
ABLE BOX
ONTROL
HDD/DVD VIDEO RECORDER
DIGITAL VIDEO
Introduction
Basic operations
RD-X2U
OWNER’S MANUAL
OPERATIONS
Read “INSTALLATION GUIDE” first.
Playback
Recording
Dubbing
Editing
Function setup
Others
© 2002 Toshiba Corporation
Page 2

Introduction
Table of Contents
Introduction
About this product .............................................. 5
Compatible discs ................................................ 6
Index to Parts and Controls ............................. 10
Front panel ........................................................... 10
Rear Panel ........................................................... 12
Remote control ..................................................... 14
Display ................................................................. 16
Before operating this recorder ........................ 18
Initializing a DVD-RAM disc (Logical Format) ......... 22
DVD-RAM Physical Format ................................... 23
Entering characters ............................................... 24
Basic Operations
Playing a DVD video disc ................................. 28
Locating a title using the top menu ........................ 29
Playing recorded contents
(CONTENT MENU) ............................................. 30
Tips on playback ............................................... 33
Programing a recording (REC MENU) ............. 34
Tips on recording .............................................. 38
Quick Menu operation ...................................... 41
Opening a Quick Menu ......................................... 41
Functions in a Quick Menu .................................... 42
Playback
Playing at various speed .................................. 46
Playing in fast reverse or fast forward..................... 46
Skipping to the next/previous chapter or track ........ 47
Playing in slow-motion .......................................... 47
Playing frame by frame ......................................... 48
Viewing still pictures
(Playing a disc that contains still pictures)
Locating by entering the number .................... 49
Locating by entering the number of a desired
section
Locating a specific point by entering its elapsed time
(Time Search)
Pausing a TV broadcast to resume later ......... 51
Playing a TV program currently being
recorded ............................................................. 52
Selecting the camera angle .............................. 53
Selecting the Sound.......................................... 54
Selecting the Subtitles...................................... 56
Zooming a picture ............................................. 57
Watching a TV broadcast in the sub window
(P in P Playback) ............................................... 58
Checking the current status and settings ...... 59
Operational status and setting details .................... 59
Using the time bar................................................. 60
Using the graphic remote control
(Virtual Remote) ................................................ 61
................................................................. 49
....................................................... 50
.............. 48
2 147
*RD-X2.Ope(US)H1-2-3-4 9/3/02, 2:07 PM2
Page 3
Introduction
Recording
Before Recording .............................................. 64
Technical Information ............................................ 66
Recording a TV program................................... 67
Tips on Recording............................................. 70
Relay Recording ................................................... 70
A–B Recording ..................................................... 70
Reservation Disc (Program Record Lock) .............. 71
VCR Plus+ Recording ....................................... 72
Recording an External Source ......................... 74
Library Management ......................................... 76
Basic operation for the Library Management
system
Checking remaining space on discs ....................... 77
Searching for a disc that contains a desired title ..... 77
Displaying information ........................................... 78
Maintenance of Library Data ................................. 79
................................................................. 76
Dubbing
Before starting dubbing ................................... 84
High Speed Library Dubbing
(Dubbing only a specified part) ....................... 86
Dubbing Selected Items
(Dubbing specified parts together) ................. 88
Rate Conversion Dubbing
(Dubbing at a modified bit rate) ....................... 92
Creating a DVD-R .............................................. 94
Playing a created DVD-R ....................................... 98
Line-U Dubbing
(Recording pictures while viewing them) ....... 99
Delete Selected Items
(Deleting specified parts together) ................ 101
Editing
Before Editing.................................................. 104
Creating Chapters ........................................... 106
Playlist Editing
(Collecting desired scenes) ........................... 111
Creating Thumbnails
(Changing the picture on the
CONTENT MENU) ............................................ 115
Function Setup
Customizing the Function Settings ............... 118
LANGUAGE Settings .......................................... 121
PICTURE Settings .............................................. 122
SOUND Settings ................................................. 123
DISPLAY Settings ............................................... 125
OPERATION Settings ......................................... 126
RECORDER Operations ..................................... 128
Initial Settings ..................................................... 130
Setting of picture and sound quality for
recording
............................................................ 130
Basic operations
Playback
Recording
Dubbing
Editing
Function setup
*RD-X2.Ope(US)p003-009 9/3/02, 11:23 AM3
Others
3
Page 4

Others
Troubleshooting .............................................. 132
Glossary ........................................................... 135
Alert message and corrective action ............ 137
Q&A .................................................................. 139
FAQ ................................................................... 141
Language Code List ........................................ 142
Specifications .................................................. 143
LIMITED WARRANTY HDD/DVD VIDEO
RECORDER...................................................... 145
4
*RD-X2.Ope(US)p003-009 9/3/02, 11:23 AM4
Page 5

Introduction
About this product
Introduction
Digital AV equipment
This recorder is operated by sophisticated software and
is different from other conventional AV equipment. Within
the recorder, a DVD-RAM/R drive and a hard disc drive
are connected by ATAPI, one of the standard
connections used for personal computers (PCs). The
hardware and software work by way of an operating
system (OS), which requires some time to start up after
turning on the power. Also, some commands, such as
erasing recorded contents may take time to execute.
About the internal hard disc (HDD)
Generally, hard discs (HDD) are very fragile. Depending
on the operating conditions, the internal HDD may
partially fail, or in the worst cases, may completely stop
functioning. Therefore, use the HDD as a temporal
storage, not as a long-term archive. After watching the
recorded contents once or copying it to a DVD-RAM disc,
the contents should be erased from the HDD.
If the damaged part of the HDD is used for recording,
block noise may occur. If you continue using the HDD,
the noise may worsen, and you risk permanent damage
to the entire HDD. When such noise is observed, copy
the HDD’s contents to a DVD-RAM disc immediately. Like
a hard disc in a PC, the HDD can be easily damaged,
and should be used cautiously with a backup.
Playback Restriction
This owner’s manual explains the basic instructions for
this recorder. Some DVD video discs are produced in a
manner that allows specific or limited operation during
playback. As such, the recorder may not respond to all
operating commands. This is not a defect in the recorder.
Refer to the instruction notes of discs.
” may appear on the TV screen during operation.
“
” means that the operation is not permitted by the
“
recorder or the disc.
Using different disc types for different purposes
Use DVD-RAM discs for your personal library
DVD-RAM discs comply with the global standard DVDVR (Video Recording) format, and are optimized for
recording of TV programs. You can rewrite them about
100,000 times without any deterioration, erase
unnecessary parts, divide a chapter, or specify playback
area by frame. Its cartridge is suitable for a long-term
storage and family use, and its large capacity of 9.4 GB
double sided disc is space saving.
Use DVD-R discs when creating your own original
discs for distribution
DVD-R discs comply with the global standard DVDVIDEO format, and can be recorded only once. DVD-R
discs are convenient when you edit your original content
(recorded personal events such as a wedding party) with
your PC, and send them to your friends or relatives. The
discs can be played on other DVD players. (Not all
compatible DVD video players can play DVD-R discs
recorded with this recorder.)
* This format is not suited for recording TV programs.
According to DVD-VIDEO format, recording and
dividing into chapters must be by 15 frames. Possibly
an unnecessary part may remain even after editing.
Also, you cannot record bilingual programs, and
programs that permit copying only once.
Basic operations
Playback
Recording
Dubbing
Editing
Function setup
*RD-X2.Ope(US)p003-009 9/3/02, 11:23 AM5
Others
5
Page 6

Introduction
Compatible discs
You can enjoy recording and playback using the HDD of this recorder. When you want to play software or
perform dubbing, load a disc into the recorder. There are many types and formats in discs. Confirm the
compatibility of selected disc to insure proper performance.
Note
Depending on the data recording method or the disc status, playback or recording on this recorder may not be possible, even
if the disc is labeled as below. In such a case please contact the sales agency of the disc.
Disc
Mark Specification Remarks
For recording / playback
DVD-RAM
DVD-R
For playback only
DVD video
disc
VIDEO CD
DIGITAL VIDEO
•Single sided 4.7GB (12cm (43/4 in.))
• Double sided 9.4GB (12cm (4
• Single sided 1.4GB (8cm (3
3
/4 in.))
1
/4 in.))
• Double sided 2.8GB (8cm (31/4 in.))
• 4.7GB For General Ver.2.0
(12cm (4
• 12cm (4
• Region number
3
/4 in.))
3
/4 in.) / 8cm (31/4 in.)
ALL
1
or
• Color system: NTSC
• 12cm (4
3
/4 in.) / 8cm (31/4 in.)
• Color system: NTSC
•Version 1.0 and 2.0
Read carefully the section “On DVD-RAM
discs” (page 7).
When using an 8cm (3
1
/4 in.) DVD-RAM disc,
Remove it from the cartridge. For details,
refer to the instructions of the disc.
Read carefully the section “On DVD-R discs”
(page 7).
Depending on the disc or the recording
equipment, playback of the disc may not be
possible on this recorder.
The region number of this DVD recorder is 1.
If region numbers, corresponding to a
specific playable area, are printed on your
DVD video disc and you do not find
ALL
, disc playback will not be allowed by the
1
or
recorder.
Audio CD
CD-R
• 12cm (4
• 8cm (3
• 12cm (4
• CD-DA (audio CD) format
3
/4 in.) / 8cm (31/4 in.)
1
/4 in.)
3
/4 in.)
Depending on the disc, playback may not be
possible.
CD-RW
• This recorder uses the NTSC color system, and cannot play DVD video discs recorded in any other color system
(PAL, SECAM, etc.), even if they have region marks
• There may be some DVD discs designed for this market that cannot be played on this recorder. If you encounter
please contact TOSHIBA customer service.
• An audio CD that has a copy-control function may not play on this recorder.
ALL
1
or
.
6
*RD-X2.Ope(US)p003-009 9/3/02, 11:23 AM6
Page 7
On DVD-RAM discs
Introduction
Use only DVD-RAM discs that comply with DVDRAM standard Version 2.0
The recorder cannot record on a disc formatted in any
other standard. When using such a disc, initialize it
using the disc-format function of the recorder.
The recorder may not record, dub, or edit some DVDRAM discs, because they are edited/recorded with
another manufacture’s equipment or PC, contain a
large number of titles, or have little remaining capacity.
Also, a DVD-RAM disc may not be edited or recorded
if its title contains still pictures.
This recorder complies with current copyright
protection technology and can copy a disc only when
the disc permits copying once. When there is no
indication on the disc, copying will not be allowed.
DVD-RAM discs with cartridges are
recommended for recording.
Tw o types of DVD-RAM discs are
available: ones with cartridges and ones
without cartridges. You can use either of
them with this recorder, but the former
ones are recommended.
In order to record highly detailed data, make sure the
disc is clean. DVD-RAM discs with cartridges are
easier to handle in this regard.
Do not open the cartridge shutter. The disc may not
play, or may not be recorded or edited once it
becomes dirty.
There are two types of DVD-RAM cartridges;
removable and not removable. It is recommended you
do not remove the disc even when you can.
Refer to the instruction manual that comes with the
disc if it is absolutely necessary to remove the disc.
Some commercially available cartridge discs cannot
be recorded or edited once the inside discs are
removed.
To protect recorded contents
Slide the write-protect tab to
“PROTECT” with something sharp.
The disc can play, but cannot be
edited or erased. Refer to the
instructions that come with the disc.
• The resuming function (
31) will not work if the write-protect
tab is set to “PROTECT”.
When using a disc without a
cartridge (commercially
available discs)
Discs without cartridges can easily
attract fingerprints and dust, which is the reason they
are not recommended. If you cannot avoid using them,
handle with proper care.
When you write in a title column on a disc, use a pen
with a soft tip. Do not use a pen with a hard tip, such
as a ballpoint pen.
Recommended discs
The following discs has been tested with this recorder:
9.4 GB double-sided type4 cartridge: Panasonic LMAD240U
4.7 GB single-sided type4 cartridge: Panasonic LMAB120U
page
PROTECT
On DVD-R discs
A 4.7 GB DVD-R disc can only be recorded from the
HDD when the DVD-R compatible mode (
is set to on; you cannot record directly on the disc. Only
blank discs that have never been recorded are usable.
Once recorded, you cannot add or delete content.
Make sure that the disc is clean, as the discs are not
covered with cartridges. Images that restrict or prohibit
copying cannot be recorded. And not all compatible DVD
Video players can play DVD-R discs recorded with this
recorder.
page 128)
Basic operations
Playback
Recording
Dubbing
Editing
Function setup
Select a disc that shows a statement on its package, such as “This disc can copy images that permit
single copying.”
Some functions such as Library may not work with PC discs.
The company does not hold any responsibility to compensate the contents which should have been recorded, and
any losses or damages (e.g. losses of business profit, or business intermission) that may arise from malfunction of
this recorder (not recording/editing as intended).
*RD-X2.Ope(US)p003-009 9/3/02, 11:23 AM7
Recommended discs
The following discs have been tested with this recorder:
Panasonic LM-RF120 (4.7 GB/120 minutes)
Other DVD-R discs may not work well.
Others
7
Page 8

Introduction
Compatible discs (Continued)
On handling discs
Do not touch the playback side of the disc.
Playback side
Do not stick paper or tape to discs.
On cleaning discs
Fingerprints and dust on the disc cause picture and
sound deterioration. Wipe the disc from the center
outwards with a soft cloth. Always keep the disc clean.
Marks on DVD video discs
The following are examples of marks and the
meanings.
Mark Meanings
2
2
3
4:3
Number of audio streams
recorded in the disc.
(2 streams such as English and
Japanese in this example.)
Number of subtitle languages
recorded in the disc.
(2 subtitle languages are
recorded in this example.)
Number of camera angles
recorded in the disc.
(3 camera angles are recorded in
this example.)
Pictures are recorded in the
standard picture size
(4:3 aspect ratio).
If you cannot wipe off the dust with a soft cloth, wipe
the disc lightly with a slightly moistened soft cloth and
finish with a dry cloth.
Do not use any type of solvent such as thinner,
benzine, commercially available cleaners or antistatic
spray for vinyl LPs. It may damage the disc.
On storing discs
Do not store discs in a place subject to direct sunlight
or near heat sources.
Do not store discs in places subject to moisture and
dust such as a bathroom or near a humidifier.
Store discs vertically in a case. Stacking or placing
objects on discs outside of their case may cause
warping.
LB
16:9 LB
16:9 PS
Pictures are recorded in the
letter box picture size (4:3 aspect
ratio with horizontal black bars in
the top and bottom of pictures).
Pictures are recorded in the 16:9
wide picture size.
TVs with 4:3 aspect ratio will
display them in the letter box
style.
Pictures are recorded in the 16:9
wide picture size.
TVs with 4:3 aspect ratio will
display them in the pan scan style
(one or both sides of pictures
are cut).
Actual picture size may vary
depending on the aspect ratio or
mode selection of the TV.
8
*RD-X2.Ope(US)p003-009 9/3/02, 11:23 AM8
Page 9
Structure of disc contents
Normally, DVD video discs are divided into titles, and the
titles are subdivided into chapters.
VIDEO CDs/audio CDs are divided into tracks.
DVD video disc
Title 1 Title 2
Chapter 2 Chapter 1 Chapter 2 Chapter 3Chapter 1
Introduction
Basic operations
VIDEO CD / audio CD
Track 1 Track 2 Track 3 Track 4 Track 5
Title: Divided contents of a DVD video disc.
Chapter: Divided contents of a title. This corresponds
Track : Divided contents of a VIDEO CD or an audio
Each title, chapter, or track is assigned a number, which
is called “title number”, “chapter number”, or “track
number” respectively.
Some discs may not have these numbers.
When you record on the internal HDD or a DVD-RAM
disc, one recording will always equal one title. You can
divide a title into several chapters by marking borders in
it to facilitate scene search.
You can also collect favorite scenes from the recorded
titles/chapters, and rearrange them to create a Playlist
(
Roughly corresponds to a story title in short
stories.
to a chapter in a story.
CD.
page 104).
Playback
Recording
Dubbing
Editing
*RD-X2.Ope(US)p003-009 9/3/02, 11:23 AM9
Function setup
Others
9
Page 10
Introduction
Index to Parts and Controls
See pages with arrows for details.
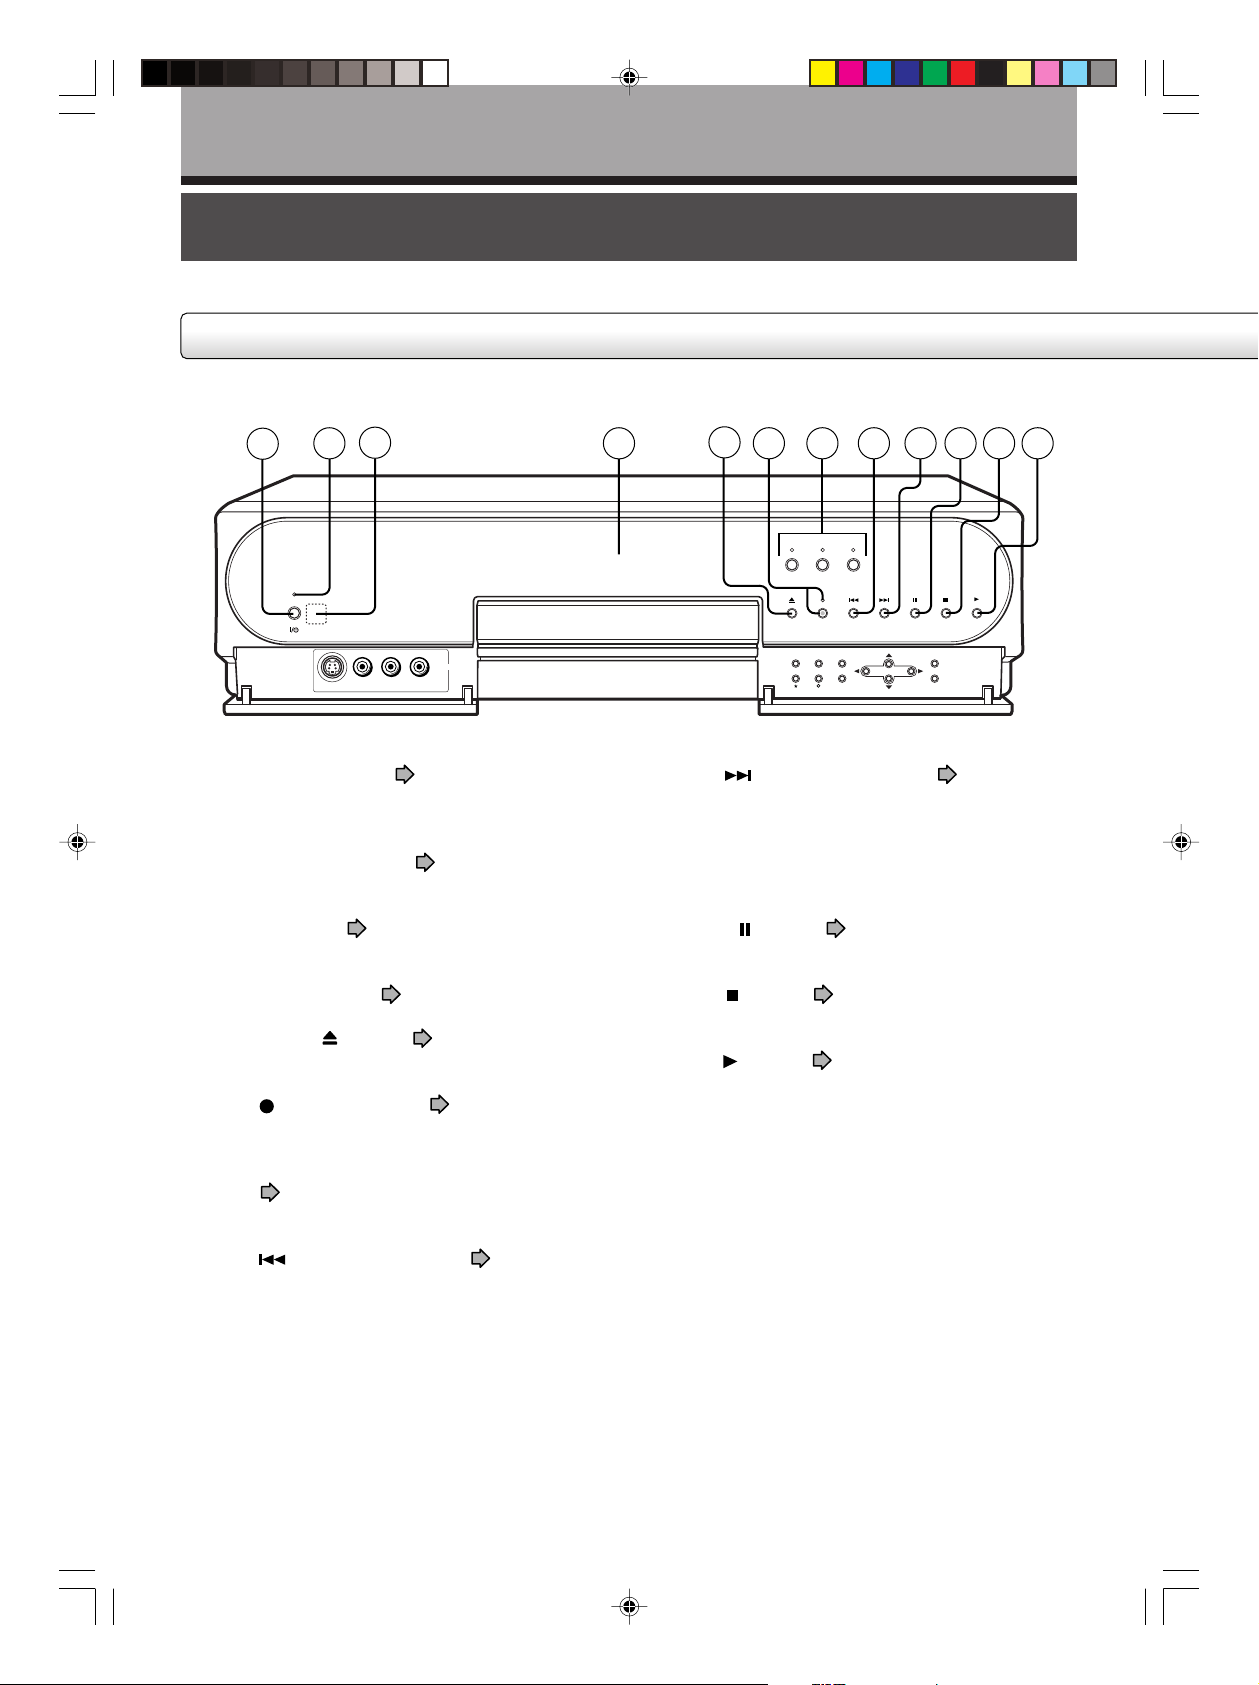
Front panel
3
1
*
The above illustration displays the front panel with the cover open. See the following page on how to open or close the cover.
2
ON/STANDBY
INPUT 2
S-VIDEO VIDEO L R
1 ON/STANDBY button pages 18, 19
4
9 Skip ( )/Fast forward button page 46, 47
Tu r ns the power on/restores the unit in the
standby mode.
5
6
HDD
INPUT SELECT
–
CHANNEL
7 8 9
TIMESLIP DVD
REC MENU
REC MODE
+
QUICK MENU
10 11 12
CONTENT MENU
ENTER
Press briefly to skip, or press down for more than
1 second for fast forward.
• Skip : Plays the next title, chapter, or
2 ON/STANDBY indicator
Displays the operational state of the recorder.
3 Remote sensor
page 12 in “INSTALLATION
GUIDE”
4 Front panel display
page 18, 19
page 16
track.
• Fast forward : Scans the picture forward.
! Pause (
) button page 28, 38
Stops playback or recording momentarily.
" Stop (
) button page 28, 38
Stops playback or recording.
5 Open/Close (
Opens and closes the disc tray.
) button page 18, 19
# Play (
) button page 28
Starts playback.
6 REC (
) button/indicator page 69
Starts recording.
7 Three mode button/indicator (HDD, TIMESLIP,
DVD)
page 28, 30, 67
Selects recording/playback media.
8 Skip (
)/Fast reverse button page 46, 47
Press briefly to skip, or press down for more than
1 second for fast reverse.
• Skip : Plays the previous title, chapter, or
track.
• Fast reverse: Scans the picture backwards.
10
*RD-X2.Ope(US)p010-017 9/3/02, 11:23 AM10
Page 11
ON/STANDBY
HDD
Introduction
Basic operations
TIMESLIP DVD
S-VIDEO VIDEO L R
INPUT 2
13 14
$ INPUT 2 jacks page 74
Use this when recording from other input source
such as a VCR or a camcorder.
% Disc tray
Place a disc to play or record.
& REC MODE button
Changes the picture and sound quality settings.
( INPUT SELECT button
Pressing repeatedly selects between various input
sources.
) CHANNEL –/+ buttons
• –/+ : Selects the channel.
• /\: Enters or cancels a command in the setup
~ REC MENU button
Displays the REC MENU.
+ QUICK MENU button
Displays the Quick Menu.
page 18
page 68
page 67, 74
page 18, 30, 68
displays.
page 34
page 41
REC MENU
REC MODE
INPUT SELECT
–
CHANNEL
QUICK MENU
16 17 18 19 20 21 22
15
CONTENT MENU
ENTER
, Directions buttons page 30, 118
Moves the cursor to select an item.
- ENTER button
page 30, 118
Enters a command.
. CONTENT MENU button
page 30
Displays the CONTENT MENU.
To open or close the cover on the front panel
Open the cover by
pressing in on PUSH-
PUSH-OPEN
OPEN printed on the
cover until it clicks.
Close the cover by lifting
the cover to the original
Press PUSH-OPEN
to open the cover.
position and pressing in
on PUSH-OPEN. When
it clicks, the cover is
closed.
Playback
Recording
Dubbing
Editing
Function setup
Others
*RD-X2.Ope(US)p010-017 9/3/02, 11:23 AM11
Note
• Do not place a heavy object on the cover while it is
open. Doing so may damage the recorder.
11
Page 12

Introduction
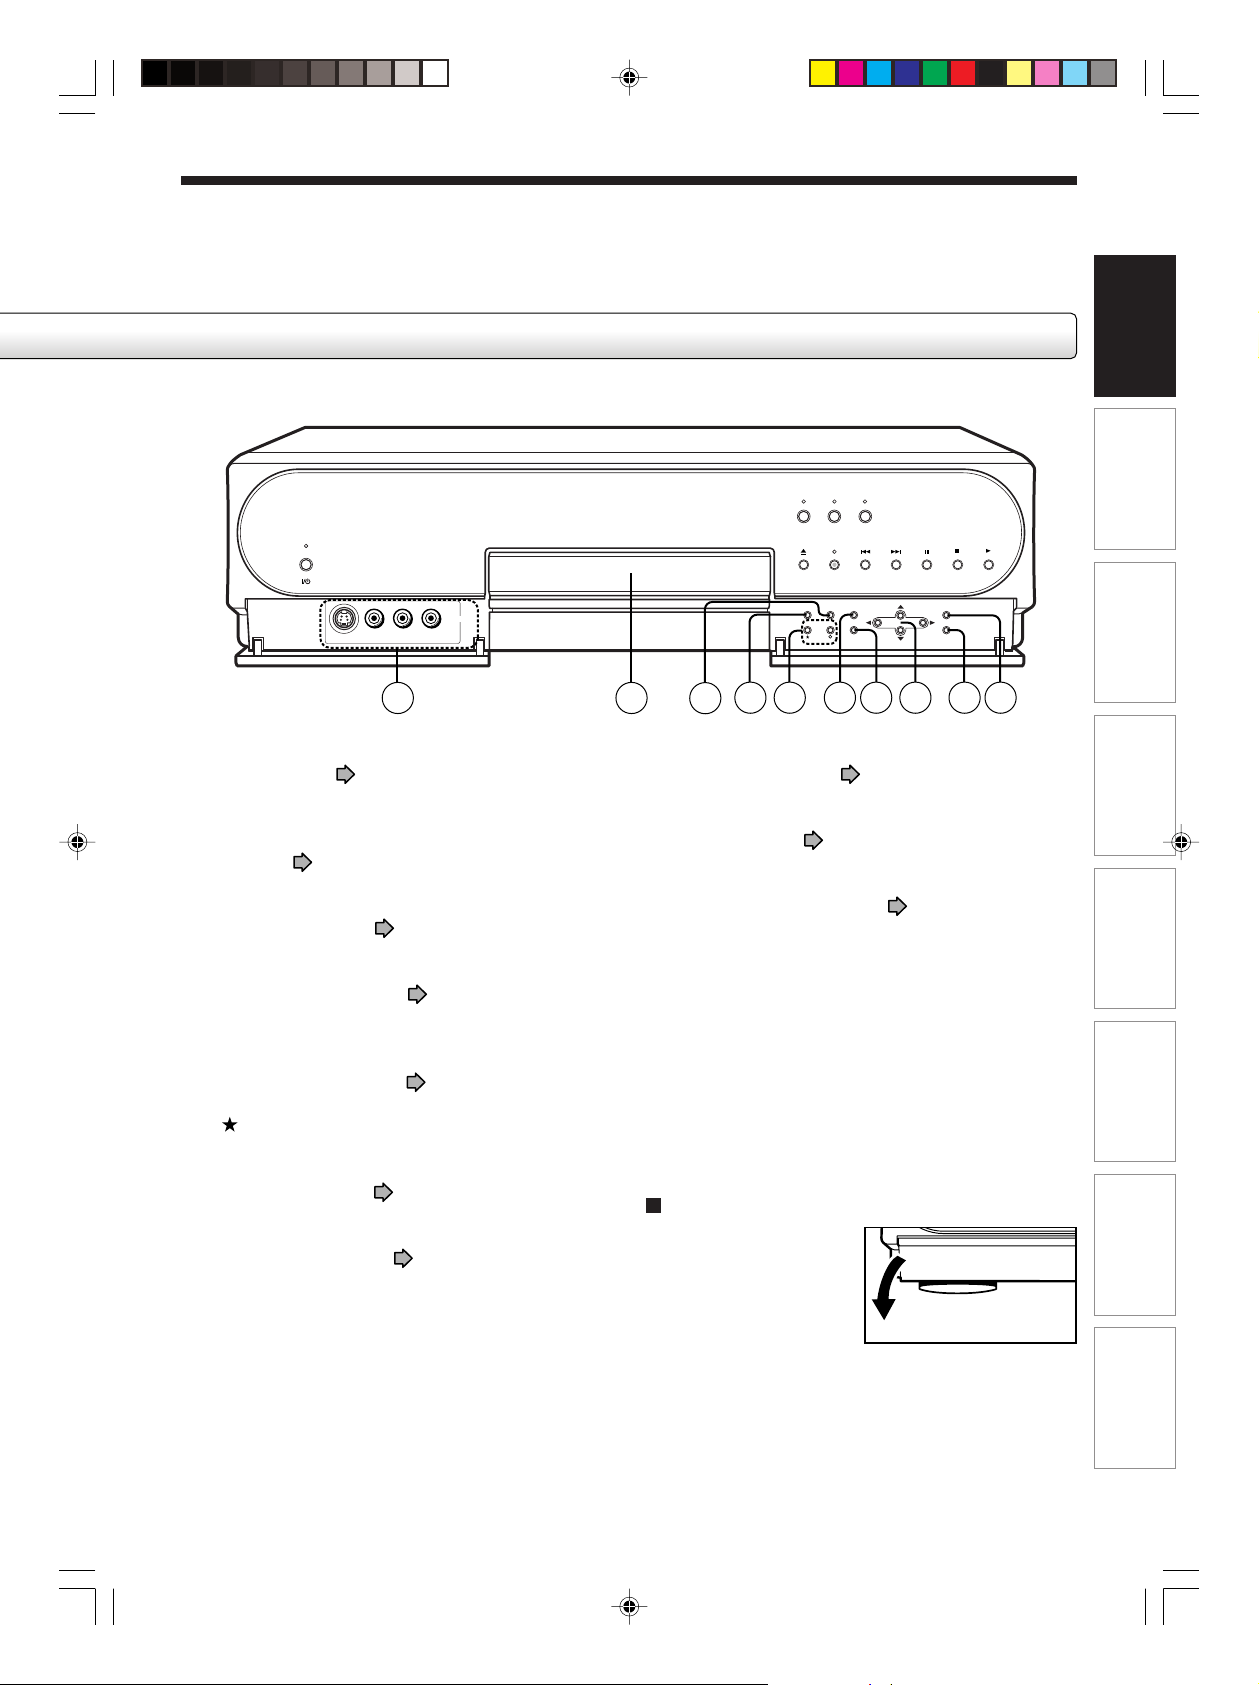
Index to Parts and Controls (Continued)
Rear Panel
1 2 3 4 6 7 8 95
1 AC IN socket page 15 in “INSTALLATION
GUIDE”
Connects to the supplied power cord.
2 DIGITAL AUDIO OUT/OPTICAL jack
21, 22, 23 in “INSTALLATION GUIDE”
Use this to connect the recorder to an audio
receiver equipped with an optical digital audio
input jack.
When connecting the optical digital cable, remove
the cap and fit the connector into the jack firmly.
When not using the jack, keep the cap inserted to
protect it from dust intrusion.
3 DIGITAL AUDIO OUT/COAXIAL jack
21, 22, 23 in “INSTALLATION GUIDE”
Use this to connect the recorder to an audio
receiver equipped with a coaxial digital audio input
jack.
4 INPUT 1 jacks
Use this to connect the recorder to output jacks of
external devices such as another player or
camcorder.
page 74
page
page
6 OUTPUT 1 jacks page 15, 18 in
“INSTALLATION GUIDE”
Outputs video and audio signals to a connected
TV or amplifier.
5 INPUT 3 jacks
Use this to connect the recorder to the output
jacks of external devices such as another player or
camcorder.
page 74
12
*RD-X2.Ope(US)p010-017 9/3/02, 11:23 AM12
Page 13
7 OUTPUT 2 jacks page 19 in “INSTALLATION
GUIDE”
Outputs video and audio signals to a connected
TV or amplifier.
B, PR: connects to a TV equipped with
Y, P
component video jacks.
8 VHF/UHF RF OUT (TO TV) output socket
page 14 in “INSTALLATION GUIDE”
Connects the supplied coaxial cable to a TV.
Introduction
Basic operations
Playback
Recording
Dubbing
9 VHF/UHF RF IN (FROM ANT.) input socket
page 14 in “INSTALLATION GUIDE”
Connects to an antenna or cable signal.
*RD-X2.Ope(US)p010-017 9/3/02, 11:23 AM13
Editing
Function setup
Others
13
Page 14
Introduction
Index to Parts and Controls (Continued)
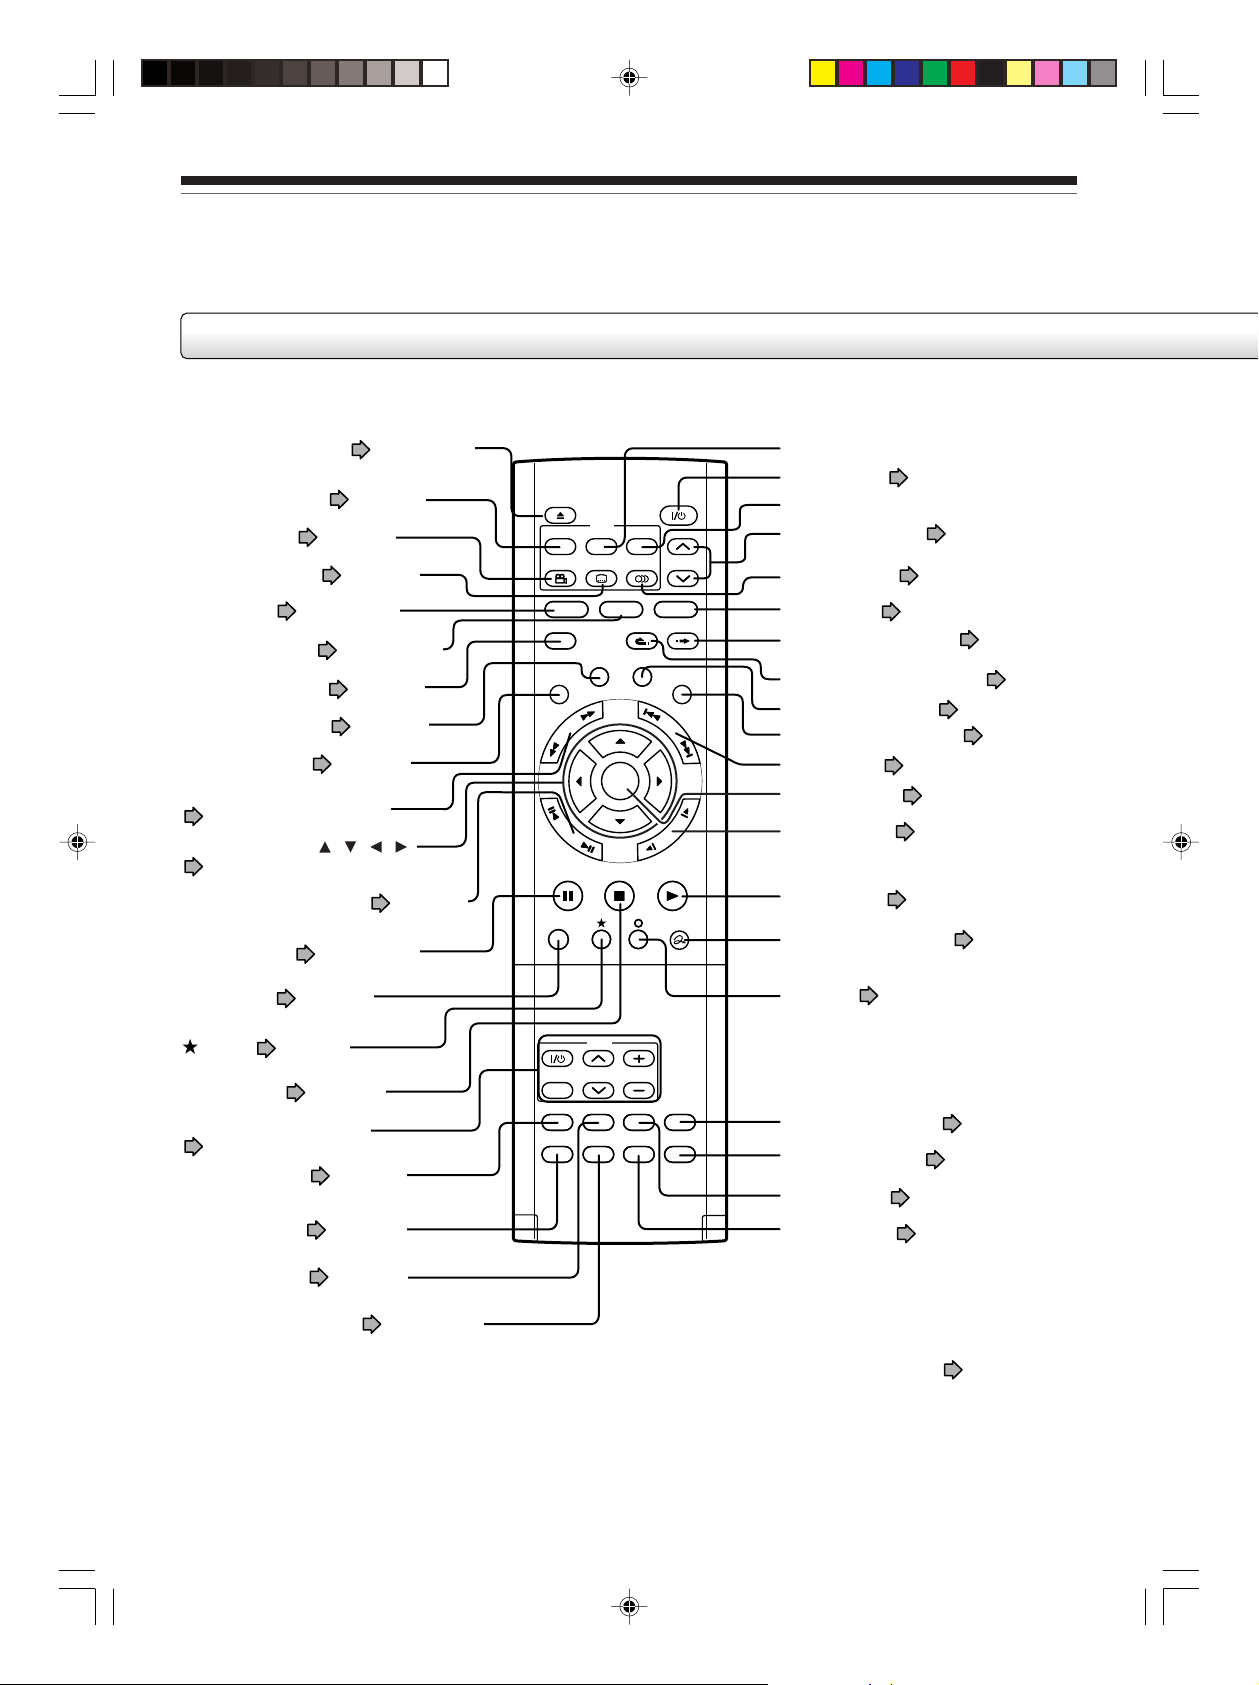
Remote control
OPEN/CLOSE button page 18, 19
TOP MENU button
ANGLE button
SUBTITLE button
HDD button
TIMESLIP button
V-REMOTE button
REC MENU button
LIBRARY button
page 29
page 53
page 56
page 30, 88
page 51, 52
page 61
page 34
page 76
PICTURE SEARCH button
page 30, 46
Direction buttons (
/ / / )
page 30, 118
FRAME/ADJUST button page 34,
48
PAUSE button page 28, 48
REC button
page 69
OPEN/CLOSE
TOP MENU
ANGLE
HDD
HDD
V-REMOTE
LIBRARY
R
A
E
S
E
R
U
T
C
I
P
F
R
A
M
E
/
A
D
J
U
S
PAUSE
REC
REC
DVD
MENU
RETURN
SUBTITLE
AUDIO
TIMESLIP
REC MENU EDIT MENU
H
C
ENTER
T
CHANNEL
DVD
DVD
INSTANT SKIPINSTANT REPLAY
CONTENT MENU
S
K
I
P
W
O
L
S
PLAYSTOP
QUICK MENU
MENU button*
1
Power button page 18, 19
RETURN button*
2
CHANNEL button page 18, 68
AUDIO button
DVD button
INSTANT SKIP button
INSTANT REPLAY button
EDIT MENU button
page 54
page 28, 30, 88
page 46
page 46
page 88
CONTENT MENU button page 30, 111
SKIP button page 47
ENTER button
SLOW button
PLAY button
QUICK MENU button
\ button
page 30
page 47
page 28
page 41
page 118
button page 30
STOP button
page 28
Buttons for TV operation
page 44 in “INSTALLATION GUIDE”
DISPLAY button
REMAIN button
DIMMER button
page 59
page 65
page 16
INPUT SELECT button page 67, 74
14
*RD-X2.Ope(US)p010-017 9/3/02, 11:23 AM14
TV
TV/VIDEO CHANNEL
DIMMER
DISPLAY
REMAIN
INPUT SELECT
VOLUME
P in P
ZOOM
CHP DIVIDE
TIME BAR
1
MENU
*
CHP DIVIDE button
TIME BAR button
P in P button
ZOOM button
page 58
page 57
page 60
Use this to display a menu screen that is recorded on
a DVD video disc.
Operate the menu screen as the same manner as
“Locating a title using the top menu (
A menu screen is not recorded on some discs.
2
*
RETURN
Returns to the previous screen (the screen may be
specified depending on the disc).
Refer to the instructions of the disc.
page 106
page 29)”.
Page 15

Introduction
Under the lid
VCR Plus+ button page 72
EXTEND button
Number buttons
SETUP button
DELETE button
page 36, 39
page 49, 68
page 118
page 40
VCR Plus+
123
12
456+10
789
SETUP
EXTEND
DELETE
REC MODE
CLEAR
TV CODE
T.SEARCH
0
REC MODE button page 68
TV CODE button
page 44
in “INSTALLATION GUIDE.”
T.SEARCH button
CLEAR button
page 49
page 49
To open, raise a lid toward you.
To open the lid, hold the upper
sides to pull up.
Basic operations
Playback
Recording
Dubbing
*RD-X2.Ope(US)p010-017 9/3/02, 11:23 AM15
Editing
Function setup
Others
15
Page 16

Introduction
Index to Parts and Controls (Continued)
Display
1 5 6 73 42
LPressing the DIMMER button on the remote control
changes the brightness of the display (normal/dimmed/
off).
1 Picture quality mode indicator (HDD) (page
128)
The current picture quality mode lights up.
The modes are: MN (Manual)/SP (Standard Play)/
LP (Long Play)
2 L-PCM indicator (Linear PCM)
Illuminates when playing back contents recorded
on the HDD or DVD-RAM disc, and the selected
audio mode is linear PCM.
3 Audio format indicator
The audio format (Dolby Digital 1,2) selected
illuminates when playing back the HDD or DVDRAM disc.
4 Remain icon
Illuminates during remain mode.
5 Picture quality mode (DVD-RAM)
The current picture quality mode is illuminated.
The modes are: MN (Manual)/SP (Standard Play)/
LP (Long Play)
(page 65)
(page 128)
(page 128)
(page 128)
10111217 16 15 14 1318
7 Multi display
Title (chapter or track) number, message, channel,
output, or audio/bilingual sound mode appear.
8 Analog output level indicator
Displays the analog output level.
L+R: Stereo and bilingual (left (main) channel and
right (sub) channel)
L: Left (main) channel
R: Right (sub) channel
Off: Mono
Level indicator may not show exact sound level. It
only shows the average level.
9 Time indicator
Displays current time, playing time, remaining
time, starting time of recording and so on.
! DVD bit rate value indicator
Displays the bit rate value during recording. During
playback, it shows the actual bit rate value.
9 8
(page 74)
(page 128)
6 Angle icon
Illuminates when playing a scene recorded with
multi angles.
(page 53)
16
*RD-X2.Ope(US)p010-017 9/3/02, 11:23 AM16
Page 17

" DVD indicator
Illuminates when a DVD-RAM, DVD video or DVDR disc is selected, or when the disc tray is empty.
Introduction
Basic operations
Playback
Recording
# DVD media indicator
Indicates playback or recording condition when a
DVD-RAM, DVD-R, VIDEO CD or audio CD is
chosen as media.
$ HDD-DVD Moving/Copy direction
Indicates moving/copy direction of HDD or DVD.
% VCD/CD indicator
Illuminates when playing a VIDEO CD or an audio
CD.
& PBC indicator
Illuminates when PBC function is “On” (
127) and a PBC-controllable VIDEO CD is loaded.
( HDD indicator
Illuminates to indicate status of HDD.
) HDD media indicator
Indicates playback or recording condition when
the HDD is chosen as media.
~ HDD bit rate value indicator
Displays the bit rate value selected for recording.
During playback, displays the actual bit rate value.
(page 128)
Dubbing
Editing
page
Function setup
Others
*RD-X2.Ope(US)p010-017 9/3/02, 11:23 AM17
17
Page 18

Introduction
Before operating this recorder
Is your recorder ready?
Refer to the supplied “INSTALLATION GUIDE” manual
and finish the necessary preparations.
Turning the power on
(This owner’s manual instructions are based on
the assumption that all proper connections have
been completed and the TV is turned on.)
Press the ON/STANDBY button on the front panel of
the recorder or the power button on the remote
control.
ON/STANDBY indicator
ON/STANDBY button
Power button
CHANNEL button
Loading a disc
Check disc compatibility beforehand (page 6) and use
a proper playable disc.
Caution
•Keep your fingers well clear of the disc tray. Neglecting this
may causes serious personal injury. Keep a close watch
on children.
• Do not use a cracked, deformed, or repaired disc.
1 Open the disc tray.
Press the
OPEN/CLOSE button on the remote control.
button on the front panel or the
button
OPEN/CLOSE button
When the power turns on, the ON/STANDBY indicator
changes from red (standby mode) to green (operation).
After a few seconds, a start-up screen appears.
The following icon appears at the top right corner of
the screen.
e.g.
Loading
When this icon disappears, the recorder is ready to
operate. If the DVD-RAM drive contains a disc, it
takes a little longer to start up.
Viewing TV channels through this recorder
After turning the power on, the recorder will output TV
channel signals to the connected TV (also in the stop
mode).
You can select a desired channel by pressing the
CHANNEL buttons.
2 Insert a disc.
Disc without a cartridge
Insert with the playback side down.
Disc size varies depending on the disc. Place a
disc to fit the guide. If a disc is out of the guide, it
may result in damage to the disc or malfunction.
12cm (43/4 in.) disc:
Set a disc so that the 2
stoppers in the opening
side can hold the rim. Do
not cover them.
8cm (31/4 in.) disc:
Place a disc in the inside
hollow.
18
*RD-X2.Ope(US)p018-026 9/3/02, 11:23 AM18
Page 19

Introduction
TYPE1/TYPE2 DVD-RAM disc with cartridge
Single sided
Tu rn the printed side up, and insert the cartridge
into the tray frame following the direction of the
arrow on the cartridge.
Double sided
Tu rn a desired recording/playback side up, and
insert the cartridge into the tray frame following the
direction of the arrow on the cartridge.
3 Close the disc tray.
Press the
button on the front panel or the
OPEN/CLOSE button on the remote control.
Notes
• Use the button on the front panel or the remote control to
open and close the disc tray. Do not push or hold the disc
tray while it is moving. Doing so may cause the recorder to
malfunction.
• Do not insert a disc which is unplayable, or any object
other than a playable disc.
• Do not apply downforce to the disc tray. Doing so may
cause the recorder to malfunction.
Turning the power off
Press the ON/STANDBY button on the front panel of
the recorder or the power button on the remote
control.
Caution
• If the power fails or the power cord is disconnected from a
wall outlet while the recorder is in operation (ON/STANDBY
indicator lit in green), the HDD or a DVD-RAM disc may
become recording disabled on. In such a case, executing
an initialization of the disc using the formatting function of
the recorder may refresh them. However, all contents
stored on the disc will be completely erased by this
initialization process.
• This recorder may indicate alert messages with some discs
right after insertion. If such a disc is used for playback or
recording on other equipment, all data in the disc may be
damaged and the disc will not be played.
By executing an initialization of the disc using the
formatting function of the recorder, the disc will be able to
work.
• If the recorder freezes and does not respond at all, leave it
alone for about 15 minutes or longer. This may restore the
recorder. After the recorder has recovered, turn it off once
and turn it on again to use as usual. If the recorder is still
inoperable after more than 15 minutes have passed, press
and hold the ON/STANDBY button on the front panel for
about 10 seconds or longer. The recorder is forced to quit
and the power turns off. Turn the recorder on again and use
it as usual. (This 15-minute measure is available only when
“Screen Protector” is set to “On.” ( page 125))
Important: This is an emergency measure, which may
cause losses and/or damages of data. Avoid casual use of
this measure. If you try this while the recorder is working
properly, especially while the “Loading” or “Unloading” icon
is flashing, it may result in initializing of the HDD.
Note
• If there are any performance malfunctions of the HDD or
the DVD-RAM drive, immediately discontinue use of this
recorder, and disconnect the power cord from a wall outlet,
then contact your dealer. Continuous use of the recorder in
such a condition will aggravate the condition and result in
increased cost and cord repair time.
Basic operations
Playback
Recording
Dubbing
Editing
The “Unloading” icon appears at the top right corner of
the screen, and the ON/STANDBY indicator turns red,
then the power turns off.
*RD-X2.Ope(US)p018-026 9/3/02, 11:23 AM19
Function setup
Others
19
Page 20

Introduction
Before operating this recorder (Continued)
Using the GUI (Graphical User Interface)
The recorder provides you with a variety of GUI
(Graphical User Interface) to assist your operation of
most functions such as customizing of setting,
playback or recording.
Refer to the operation guide on the bottom on each
GUI. This will indicate proper button selection for
desired action.
CONTENT
Title List
MENU
HDD :
DVD
Prev
1/ 1
2002/10/11 PM0
7:00 Ch:4
(0:53:45)
2002/10/15 PM0
9:00 Ch:3
(0:52:40)
2002/10/17 PM0
0:00 Ch:4
(0:30:08)
Source Chapter Play
Original Original
Original Original
Original Original
HDD
Delete
Next
2002/10/11 PM1
1:00 Ch:6
(0:29:50)
2002/10/16 PM0
7:00 Ch:8
(0:54:30)
2002/10/17 PM0
7:00 Ch:10
(1:51:28)
Operation guide
FunctionExample of the icon
Direction buttons
ENTER button
DVD button
DVD
button
PICTURE SEARCH
Prev
button
Next
FRAME/ADJUST
1
4
7
SETUP
PICTURE SEARCH
button
FRAME/ADJUST
button
2
3
Number butons
5
6
(Open the lid of the
8
9
remote control.)
EDIT
EDIT button
SETUP button
(Open the lid of the
remote control.)
To select an item.
To confirm (register) a
selected itemor setting.
To switch the modes.
To change the category of
contents
To return to the previous
page.
To proceed to the next
page.
To enter numerical digits or
change the value
To enter numerical digits.
To display/exit the EDIT
MENU.
To display/exit the Setting
menu.
If a message appears
The recorder will display messages related to
operational status. Respond accordingly, as below:
Message
e.g.
message
OK
Set
e.g.
Select either response (by
highlighting in green) using
message
No
OK
Yes
2 selections
the / buttons, then press
the ENTER button.
The message disappears.
Buttons other than the
direction buttons and the
ENTER button do not
function while a message is
displayed.
e.g.
Read the message, then
press the ENTER button.
message
OK
1 selection
e.g.
The message disappears.
Buttons other than the
ENTER button do not
function while a message is
displayed.
The message disappears
automatically in a few
message
seconds.
No selection
20
*RD-X2.Ope(US)p018-026 9/3/02, 11:23 AM20
Page 21

Introduction
Start-up/Shutdown (closing) icons
These icons are displayed at the top right corner of the
screen when startup or finishing. While they are
flashing, the recorder is operating as follows:
Start-up, reading a disc, finishing the
Loading
Un
loading
Open
Close
recording
unloading a disc, finishing the
operation
Opening a disc tray
Closing a disc tray
System software update service
Because of problems and errors that can occur during
the creation of DVD software and/or the manufacture
of DVD discs, Toshiba America Consumer Products
cannot guarantee that this recorder will play every
feature of every DVD bearing the DVD logo. As one of
the creators of DVD technology, Toshiba DVD
recorders are manufactured to the highest standards
of quality and, as a result, such incompatibilities are
very rare. If you have any questions, or if you happen
to experience any difficulty playing a DVD on a
Toshiba DVD recorder, please feel free to call our
Customer Service Hotline at 1-XXX-XXX-XXXX.
Basic operations
Playback
Recording
Dubbing
*RD-X2.Ope(US)p018-026 9/3/02, 11:23 AM21
Editing
Function setup
Others
21
Page 22

Introduction
Before operating this recorder (Continued)
Initializing a DVD-RAM disc (Logical Format)
Be sure to read this section prior to using a DVD-RAM disc on this recorder for the first time.
For DVD-R, initializing is not necessary.
A disc should be initialized in the following cases: (The
recorder may display a message to request you to do
so.)
e.g.
When you use a DVD-RAM disc on this recorder for
the first time.
If data fragments produced by repeated recording or
erasing have accumulated.
If a disc error has occurred.
When you want to record on a DVD-RAM disc for PC.
(
page 7)
Initializing formats a disc logically and insures that it will
perform to its full capability. However, this erases all data
on the disc, so make sure that it does not matter if data
on the disc is erased whenever you initialize a disc.
How to initialize a disc
To initialize a DVD-RAM disc, load it in the recorder. See
page 18 for loading a disc.
1) During stop, press the QUICK MENU button.
The following menu appears. (The actual contents
depends on the operational status of the recorder.)
e.g.
Quick Menu
Bit rate
Special Playback Mode
Disc Information
Disc format
AV Record Quality
DVD-R Broadcast Record
SAP
Exit
2) Press the / buttons to select “Disc format,”
then press the ENTER button.
A sub menu appears on the right side.
e.g.
Quick Menu
3D (N-2-2)
BIt rate
Disc Information
Disc format
AV Record Quality
DVD-R Broadcast Record
DVD-RAM Format
3) Press the ENTER button.
e.g.
DVD-RAM Format
Edit
Disc Name
Start
001–
Cancel
Edit
%
0
SetSelect
Disc Number.
Disc format
Numbering a disc
The recorder automatically numbers discs when
initializing. However, you assign a desired number (using
3 digits) and designate sides A and B on a double-sided
disc.
(1) Press the
/ buttons to select “Edit” of “Disc
Number” then press the ENTER button.
(2) Press the
(3) Press the
/ buttons to select a digit.
/ buttons to shift.
(4) Repeat steps (2) and (3).
(5) Press the ENTER button.
22
*RD-X2.Ope(US)p018-026 9/3/02, 11:23 AM22
Naming a disc
You can name a disc.
(1) Press the
/ buttons to select “Edit” of “Disc
Name,” then press the ENTER button.
The character input window appears.
(2) Enter a disc name following the procedure of
“Entering characters” (
(3) Press the
button to eliminate the window.
page 24).
Page 23

Introduction
4) Press the / buttons to select “Start,” then
press the ENTER button.
DVD-RAM Format
Entire disc contents excluding
library data will be erased if
disc is formatted. Proceed?
Start
Cancel
Disc format
SetSelect
%
0
5) Press the / buttons to select “Start,” then
press the ENTER button.
Initialization starts.
DVD-RAM Format
DVD-RAM
Formatting
Start
Cancel
Disc format
SetSelect
%
18
When initialization is completed, the setup window
disappears.
DVD-RAM Physical Format
Physical formatting is a simple execution for a disc which
cannot be used or read (or which is becoming hard to
read). It may refresh such a disc for recording and
playback. (There is no guarantee that all such discs will
be recovered.)
“DVD-RAM logical format” process only rewrites certain
data on file system and management information,
however, “DVD-RAM physical format” rewites all data on
a disc, therefore it takes a much longer time to complete.
For a 4.7GB single sided DVD-RAM, about 70 minutes
will be necessary. While processing, all recorder
operations and functions including program recording or
automatic recording of an external source will not work
until the process is finished. Also this process erases all
data stored on the disc.
1) During pause, press the SETUP button.
2) Press the
/ buttons to select “Initial
Settings” then press the ENTER button.
C
B
A
Initial Settings
Time & Date Setting
Channel Setting
Guide Channel Setting
Cable Box/DSS
Output Channel
DVD-RAM Physical Format
HDD Format
3) Press the
/ buttons to select “DVD-RAM
TVTV/CATV
Use
3CH
Physical Format,” then press the ENTER
button.
4) Press the
/ buttons to select “Yes,” then
press the ENTER button to execute.
Warning: It will take approximetely
70 minutes to format a 4.7GB
DVD-RAM and all data will be erased.
Confirm t
hat timer programing is not
scheduled.
Procceed?
Yes
No
To cancel, select “No”, then press the ENTER
button.
Notes
• The physical format process may fail if executed to a dirty
DVD-RAM disc. Also, the disc may be difficult to record,
even if it finished. Before executing DVD-RAM physical
format process, be sure to confirm the disc is not dirty.
Clean it if necessary.
• The following DVD-RAM discs require physical formatting:
–A disc which is not formatted correctly.
– The disc which has errors during writing because of dirt
on the disc, and cannot be further recorded, or cannot
initialize normally.
•You need to start physical formatting from the first step
again when you use a failed disc.
•Physical formatting does not work if the disc contains a lot
of void beyond limitation of this recorder.
• If an error occurs in physical formatting, “F--ERROR”
appears in the front panel display. To turn off the message,
press the DISPLAY button.
Basic operations
Playback
Recording
Dubbing
Editing
Function setup
Others
*RD-X2.Ope(US)p018-026 9/3/02, 11:23 AM23
23
Page 24

CLEAR
DELETE
DELETE
CLEAR
Introduction
Before operating this recorder (Continued)
Entering characters
e.g.
Cursor
An entered character
will appear here.
Language
Operation guidance of the remote control
To enter the character, normally use the direction /
/ / buttons on the remote. About the other buttons
to be used are shown on the operation guidance.
: Shifts a cursor.
1
2 3
4 5 6
: Enters the number.
7 8 9
DELETE
DELETE
:Erases one character immediately to the left
side of the cursor.
CLEAR
CLEAR
:Erases all the characters on the input column.
CONTENT
MENU
002 –
Chapter
English
Spanish
French
Germany
Italian
etc...
Select
/
-
;
Title Information
003
12345678 0
qwe r t y u i p [ ]o
asdfghjk :
z xcvbnm,,/
Input
.
#
-
l
.
Space Space Space
1
2 3
4 5 6
Direct(0-9)
7 8 9
Caps Lock
Cursor
Switching a language
Before entering a character, move a cursor to the
language selection area by pressing the
Then press the
then press the ENTER button.
=
DELETE
/
’9
BkSp
Delete
Clear All
:
Indicates the number of
maximum characters of
the first line on the
CONTENT MENU.
Indicates the number of
maximum characters on
the CONTENT MENU.
The character being
selected appears.
CLEAR
CLEARDELETE
All ClearBkSp
Space
ReturnSave
Operation guidance
/ buttons to select a language,
/ buttons.
: Caps Lock
: Preserves the characters on the input column
and returns to the previous screen.
: Cancels the characters on the input column
and returns to the previous screen.
: Enters a space.
: Enters a symbol.
24
*RD-X2.Ope(US)p018-026 9/3/02, 11:23 AM24
Page 25

Entering characters
The cursor may be followed by unwanted characters.
You can erase them if necessary by either of the
following measures:
Erasing characters
•Erasing all the characters on the writing board
Select “Clear All” by pressing the
then press the ENTER button.
Alternatively, open the lid of the remote control and
press the CLEAR button.
•Erasing one character before the cursor
Select “BkSp” by pressing the
then press the ENTER button.
Alternatively, open the lid of the remote control and
press the DELETE button.
(1) Press the button to select an input mode.
(2) Press the
then press the ENTER button.
The selected character is input on the cursor.
(3) Repeat steps 1 and 2 to enter characters.
(4) When finished, press
The characters you entered appears.
Notes
•You can enter up to 64 characters.
• When unnecessary information appears, or when you want
to alter the input character, press the CLEAR button to
erase all, or press the DELETE button to erase an
unnecessary character.
/ / / buttons to select a character,
to save the characters.
/ / / buttons,
/ / / buttons,
Introduction
Basic operations
Playback
Recording
Dubbing
*RD-X2.Ope(US)p018-026 9/3/02, 11:23 AM25
Editing
Function setup
Others
25
Page 26

*RD-X2.Ope(US)p018-026 9/3/02, 11:23 AM26
Page 27

Hint on reading this manual
Basic Operations
Record a TV program and play it back.
Playing a DVD video disc
Playing recorded contents
(CONTENT MENU)
Tips on playback
Programing a recording
(REC MENU)
Tips on recording
Quick menu operation
The following icons show the playable discs for each
function described on this instruction manual.
HDD
: HDD
DVD-RAM
: DVD-RAM disc
DVD-VIDEO
: DVD video disc
VCD
: VIDEO CD
CD
: Audio CD
Most instructions are based on remote control operation,
unless otherwise noted. You can use the buttons on the
remote control and those on the main unit as well when
they have the same function.
*RD-X2.Ope(US)p027-044 9/3/02, 11:23 AM27
Page 28

Basic operations
DVD-VIDEO
VCD CD
Playing a DVD video disc
You can also play VIDEO CDs, audio CDs or DVD-R discs in the same manner.
To play recorded contents on the HDD or a DVD-RAM disc, follow the instructions on page 30.
Preparation
•Turn on a TV or audio system and select the corresponding input source that the recorder is connected to.
• Load a disc you want to play. (
SUBTITLE
ANGLE
HDD
HDD
V-REMOTE
LIBRARY
S
E
R
U
T
C
I
P
E
AUDIO
TIMESLIP
REC MENU EDIT MENU
H
C
R
A
CHANNEL
DVD
DVD
INSTANT SKIPINSTANT REPLAY
CONTENT MENU
S
K
I
P
page 18.)
1
Press DVD.
The DVD indicator on the front panel illuminates.
This status indicates that the recorder is ready to play a
DVD
disc in the disc tray (DVD mode).
ENTER
F
R
A
M
E
/
A
D
J
U
S
T
PAUSE
REC
REC
STOP
PAUSE
TV
TV/VIDEO CHANNEL
VOLUME
To stop playback
Press the STOP button.
STOP
W
O
L
S
PLAYSTOP
QUICK MENU
2
PLAY
Press PLAY.
Playback starts.
• Depending on the disc, playback starts automatically
by selecting the DVD mode.
• The recorder may take a short time to start playback.
This occurs because the recorder is reading the data
of a disc.
To pause playback (still playback)
Press the PAUSE button.
PAUSE
To resume normal playback, press the PLAY button or
the PAUSE button.
Note
Sound is muted during still mode.
Note
DVD video disc provides high resolution pictures and a lot of information. Because of this, you may notice some fine picture
noises on TV screen, which you have never seen with regular broadcast TV program. While the amount of noise depends on
the TV you use with the recorder, you should generally reduce the sharpness adjustment on your TV when viewing DVD video
discs.
28
*RD-X2.Ope(US)p027-044 9/3/02, 11:23 AM28
Page 29

Introduction
Resuming playback from the location last
stopped (Resume Play)
DVD-VIDEO
VCD CD
You can resume playback from the location where you
stopped.
If you press the PLAY button after stopping playback,
playback resumes from the location you have stopped.
If you stop playback by pressing the STOP button
twice, the resume playback feature will be cancelled.
Notes
• Resume feature cannot function when:
–you select a disc menu language ( page 121) or change
the parental lock setting ( page 126).
–you play a PBC-featured VIDEO CD while “PBC” ( page
127) is set to “On”.
–you open the disc tray.
• There may be a difference in the location where playback
resumes depending on the disc.
• While the recorder retains a location in memory, initial
setting changes with GUI may function only after the
memory is cleared.
Locating a title using the top menu
DVD-VIDEO
Some DVD video discs may include a top menu, on
which you can view the structure of contents or select
a scene. Most of the top menus automatically appear
in certain scenes, and also are displayed on demand.
Actual operation of the top menu depends on the disc.
This section explains a general example of how to
operate a top menu. Also refer to the instructions of
the disc itself.
TOP MENU
ENTER
/ / /
1) Press the TOP MENU button.
The top menu appears on the TV screen.
2) Press the
/ / / buttons to select the title
you want.
If the titles in the top menu are assigned a number,
you can directly locate a specific title by pressing its
designated number with the number buttons.
3) Press the ENTER button.
Playback starts from chapter 1 of the selected title.
Basic operations
Playback
Recording
Dubbing
*RD-X2.Ope(US)p027-044 9/3/02, 11:23 AM29
Notes
• The instructions above describe basic procedures which
may vary depending on the contents of the DVD video disc.
If different instructions appear on the TV screen, follow
those instructions.
• If you display the top menu during playback and press the
TOP MENU button again without selecting any title, the
recorder may resume playback from the point where you
first pressed the TOP MENU button. (depending on the
actual DVD video disc.)
• This method of locating a title is available only on a disc
that contains a top menu.
• Instruction notes of discs may refer to the button that
displays the top menu as the TITLE button.
• During playback of a DVD video disc, VIDEO CD, or audio
CD, you cannot display thumbnails of contents even if you
press the CONTENT MENU button ( page 30).
Editing
Function setup
Others
29
Page 30

Basic operations
HDD
DVD-RAM
Playing recorded contents (CONTENT MENU)
Titles and chapters recorded on an HDD or a DVD-RAM disc are displayed in thumbnail view, so that you
can easily locate a desired one.
OPEN/CLOSE
DVD
MENU
TOP MENU
SUBTITLE
ANGLE
HDD
HDD
V-REMOTE
REC MENU EDIT MENU
LIBRARY
H
C
R
A
E
S
E
R
U
T
C
I
P
F
R
A
M
E
/
A
D
J
U
S
T
PAUSE
REC
REC
TV
TV/VIDEO CHANNEL
DIMMER
DISPLAY
INPUT SELECT
REMAIN
RETURN
AUDIO
TIMESLIP
ENTER
VOLUME
P in P
ZOOM
CHANNEL
DVD
DVD
INSTANT SKIPINSTANT REPLAY
CONTENT MENU
S
K
I
P
W
O
L
S
PLAYSTOP
QUICK MENU
CHP DIVIDE
TIME BAR
During stop or playback, press CONTENT
MENU.
1
The following CONTENT MENU (Title List) appears.
CONTENT MENU
Attribution
(original/playlist)
e.g.
CONTENT
Title List
MENU
HDD :
1/ 1
2002/10/11 PM0
7:00 Ch:4
(0:53:45)
2002/10/15 PM0
9:00 Ch:3
(0:52:40)
2002/10/17 PM0
0:00 Ch:4
(0:30:08)
Original Original
Original Original
Original Original
page 104.
You can switch between HDD and DVD-RAM by
pressing the HDD or DVD button.
Press / / / to select a title (chapter).
2
You can view succeeding or prior pages by pressing the
ENTER
PICTURE SEARCH (
To select a chapter, select a title and press the
button.
/ ) button.
The Chapter List appears.
By pressing the
button again, you can return to the
Title List.
Press ENTER.
3
Playback starts from a selected title (chapter).
HDD
2002/10/11 PM1
1:00 Ch:6
(0:29:50)
2002/10/16 PM0
7:00 Ch:8
(0:54:30)
2002/10/17 PM0
9:00 Ch:10
(1:51:28)
ENTER
HDD/DVD
PICTURE SEARCH
Notes
•To turn off the CONTENT MENU, press the CONTENT MENU button.
• The mark is displayed in each thumbnail when “HDD/RAM Title Play” ( page 129) is set to “Title Resume”. If you select
a title (chapter) marked , playback starts from the location where you last stopped.
•You can change a thumbnail picture of a title in a built-in HDD or a DVD-RAM. See page 115. (You cannot change a
thumbnail picture of a chapter.)
• If you load a disc while playing contents of the HDD, playback stops. To resume, press the PLAY button.
30
*RD-X2.Ope(US)p027-044 9/3/02, 11:23 AM30
Page 31

Introduction
Resuming playback from the location last
stopped (Title Resume)
The recorder memorizes the location you last stopped
playback to resume there.
To use this function, set “HDD/RAM Title Play” (
page 129) to “Title Resume.” The recorder will
memorize the location you last stopped at in each title,
so you can resume playback there. For example, if
there are 6 titles, you can start each of them as if you
had stored 6 video tapes in the recorder.
•To return to the beginning of the title
During playback, press the QUICK MENU button,
then press the
/ buttons to select “Restart Title,”
then press the ENTER button.
•To play another title
Press the CONTENT MENU button to display
“CONTENT MENU Title List,” then select a title.
You can make the recorder memorize only the very
last point, regardless of the number of titles. Set “HDD/
RAM Title Play” (
page 129) to “Serial Playback.”
•To return to the beginning of the title
Press the SKIP (
) button.
•To play the other title
Press the SKIP (
/ ) button repeatedly.
Notes
• Depending on the status or the contents, playback may not
start from the location last stopped, and instead another
location, for example, from the beginning of the disc or title.
• Depending on the disc, there may be a slight difference
between the location the recorder memorized and the
actual location where playback starts.
Playing all titles (original/playlist) in a disc
Set “HDD/RAM Title Play” ( page 129) to “Serial
Playback”. You can play all titles in the HDD or in a
DVD-RAM disc in the order of the thumbnails on the
CONTENT MENU, as if they are recorded in one video
tape.
Playing all titles (original) in a disc
(All ORG Title Play)
You can play all original titles in the HDD or in a DVDRAM disc in the order of the thumbnails on the
CONTENT MENU, as if they are recorded in one video
tape.
1) During stop, press the QUICK MENU button.
The Quick Menu appears.
e.g,
Quick Menu
Bit rate
Special Playback Mode
Disc Information
Disc format
AV Record Quality
DVD-R Broadcast Record
SAP
Exit
2) Press the
/ buttons to select “Special
Playback Mode”, then press ENTER.
3) Press the
Quick Menu
Bit rate
Special Playback Mode
Disc Information
AV Record Quality
DVD-R Broadcast Record
SAP
Exit
/ buttons to select “Play All ORG
Intro scan
Repeat All ORG Titles
Play All ORG Titles
Titles”
4) Press the ENTER button.
Playback starts from the beginning of title 1.
Notes
•To stop All ORG Title Play, press the STOP button twice.
(However, doing this when you are playing a title recorded
in the HDD while recording on the HDD ( page 39)will
stop the recording.)
Alternatively, press the QUICK MENU button to display the
quick menu, and press the / buttons to select “Quit All
ORG Title Play” and press the ENTER button.
• When the last title is complete, All ORG Title Play stops.
• If you select “Repeat All ORG Titles” at step 2, All ORG
Title Play repeats.
•A location where you last stopped All ORG Title Play is
memorized. Playback will resume from there.
Basic operations
Playback
Recording
Dubbing
Editing
Function setup
Others
*RD-X2.Ope(US)p027-044 9/3/02, 11:23 AM31
31
Page 32

Basic operations
Playing recorded contents (CONTENT MENU) (Continued)
Checking the background information on a
selected title (chapter)
1) At step 2 on page 30, select a title (chapter)
then press the QUICK MENU button.
The Quick Menu appears.
2) Press the
/ buttons to select “Title
Information,” then press the ENTER button.
Detailed information of a selected title (chapter)
appears.
Notes
• While the title list is displayed, you can select “Edit Title
Name” or “Genre.” While the chapter list is displayed, you
can select “Edit Chapter Name” or “Del Chapter Name.” (If
the title was recorded from the connected equipment, you
can select “Recording Date & Time” also. If you press the
/ / / buttons to access them and input characters,
you can use Library function ( page 76) more easily.
When you select “Lock,” you can protect recorded contents
( page 40).
• By pressing the O button, you can return to the previous
display.
•To exit these steps, press the CONTENT MENU button.
Viewing the first scenes of titles (original)
(Intro Scan)
1) After step 1 on page 30, press the QUICK
MENU button.
The Quick Menu appears.
2) Press the
/ buttons to select “Intro Scan”,
then press the ENTER button.
The recorder plays the first 5 seconds of each title
beginning from title 1.
You can go forward or back by pressing the SKIP
buttons.
: to go to the next title
: to go back to the current title
Press twice to go back to the previous title.
3) When you find a desired title, press the ENTER
button.
The selected title is played.
Note
•To stop Intro Scan, press the STOP button twice.
32
*RD-X2.Ope(US)p027-044 9/3/02, 11:23 AM32
Page 33

Tips on playback
Introduction
During playback, you can do the following:
Switch playback to another disc
Press the STOP button to stop playback.
Then press the HDD or DVD button to select a
disc you want to play.
Switch the picture to view TV broadcasts
Press the STOP button to stop playback.
Start recording
Press the STOP button to stop playback. Then
press the HDD or DVD button to select a disc on
which you want to record, and press the REC
button to start recording.
Screen Protection
If you pause playback or display a menu and leave it
still for about 15 minutes, the recorder switches the
output picture source to a TV broadcast or connected
equipment.
A still picture may be displayed after all titles are
played. In this case, the screen protection activates
after about 10 seconds.
Note
• While the TIMESLIP indicator on the front panel
illuminates, this function does not work.
Status display
Each time you operate the recorder, the following
marks appear on the TV screen to indicate the status
of the recorder.
Status display
e.g.
Main marks
(Depending on the disc, some of these may not
appear.)
: Playback
:Pause
: Stop
:Fast-forward
:Fast-reverse
:Forward skip*
:Reverse skip*
:Forward slow-motion
x1/2
:Reverse slow-motion
x1/2
:Forward frame by frame playback
:Reverse frame by frame playback
: Recording
: Recording pause
Title
: When title playback is completed
End
: Instant skip
: Instant replay
Chapter
: Chapter division
Divide
* Accompanied with a title number and a chapter
number (a track number for VIDEO CD or audio CD).
Notes
•To disable the status display, set “On Screen Display” (
page 125) to “Off.”
•You can add the current status of the settings to this
display. See page 59.
Basic operations
Playback
Recording
Dubbing
Editing
Notes
• Do not move the recorder during playback. It may damage the disc.
• Occasionally the picture may stop at the last scene, or the main menu may appear after playing.
If you display a still picture such as the main menu on the TV screen for a prolonged period, the TV may be damaged (raster
burn). To prevent this, press the STOP button to stop playback.
*RD-X2.Ope(US)p027-044 9/3/02, 11:23 AM33
Function setup
Others
33
Page 34

Basic operations
HDD
DVD-RAM
Programing a recording (REC MENU)
Use the REC MENU to program a recording. It will take less time to prepare, as it provides all necessary
information for recording, including estimated disc space remaining. It will also be convenient when you
program the same contents on TV broadcasting for collection.
For more information, see “Before Recording” (
page 64).
OPEN/CLOSE
DVD
MENU
TOP MENU
SUBTITLE
ANGLE
HDD
HDD
V-REMOTE
REC MENU EDIT MENU
LIBRARY
H
C
R
A
E
S
E
R
U
T
C
I
P
F
R
A
M
E
/
A
D
J
U
S
T
PAUSE
REC
REC
TV
TV/VIDEO CHANNEL
DIMMER
DISPLAY
INPUT SELECT
REMAIN
RETURN
AUDIO
TIMESLIP
ENTER
VOLUME
P in P
ZOOM
CHANNEL
DVD
DVD
INSTANT SKIPINSTANT REPLAY
CONTENT MENU
S
K
I
P
W
O
L
S
PLAYSTOP
QUICK MENU
CHP DIVIDE
TIME BAR
During stop, press REC MENU.
1
The REC MENU appears.
e.g.
REC MENU
REC
Timer Programing
MENU
CH Date Start End Media Mode AudioRate
AM
– – : – –– – – – – –– – – – – : – ––
AM
1/ 1
HDD
Press ENTER.
2
“CH” is ready for setting.
REC
Timer Programing
ENTER
MENU
CH Date Start End Media Audio
– – – –
– – – – – – – – : – – – – : – –
Select an item by pressing / , then press
3
F
R
A
ADJUST (
ENTER
M
E
/
A
D
J
U
S
T
/ ) to set the item.
REC
Timer Programing
MENU
CH Date Start End Media Audio
L1
– – – – – – – – : – – – – : – –
• Refer to the setting items on the next page.
•You can also set the item by pressing the
When complete, press ENTER.
PM
PM
PM
–
PM
1/ 1
HDD
1/ 1
HDD
12/26(We)
2.0
LP
12/26(We)
Mode Rate
2.0
LP
12/26(We)
Mode Rate
2.0
LP
7:25
PM
D2
7:25
PM
D2
7:25
PM
D2
/ button.
/
34
*RD-X2.Ope(US)p027-044 9/3/02, 11:23 AM34
4
To program another recording, press the button to
move to the top of the next line, then repeat steps 2 to 4.
ENTER
Press REC MENU to exit.
5
Your program is entered.
REC MENU
• If you want to turn off the power, press the power
button.
Page 35

Setting items
CH
Date
Start*
End*
Media
Mode
(Picture
Quality)
Rate
(Bit Rate)
Audio
1-125, L1-L3
Every Sunday to Saturday, Monday
to Thursday, Monday to Friday,
Monday to Saturday, everyday.
DVD
HDD
AB
SP
LP
Manual
Auto
1.4, 2.0-9.2
D1**
D2**
L-PCM
* If you set summer time on the clock of the recorder, see the
notes on page 31 in the “INSTALLATION GUIDE”
** See page 136 for details
Select a channel you want to record.
Select a date of a TV program you want to record.
Enter a starting time of recording. (Set the timer to begin recording no sooner
than 5 minutes past the current time. An initial setting is 10 minutes later.)
You can also use the number buttons under the cover.
Enter an end time. (Set the timer to begin recording no sooner than 5
minutes past the current time recording must not exceed 9 hours.)
You can also use the number buttons under the cover.
When you record on a DVD-RAM disc.
When you record on an HDD.
When you use A + B (double-side) recording. ( page 70)
Standard setting of recording time and picture quality. (Not applicable
when “L-PCM” is selected.)
For longer recording, but inferior to “SP” in picture quality. (Not
applicable when “L-PCM” is selected.)
Customized setting of rate (bit rate).
To set a rate automatically according to the remaining volume of the
disc. (If the disc does not have room for the TV program, the program
cannot be recorded to the end.)
When you select an HDD, the recorder records for a length of time
corresponding to that of a blank DVD-RAM disc (4.7GB). Not
applicable to a recording for 2.5 hours or longer.
Not applicable when “SP”, “LP” or “Auto” is selected. You can set a rate
at intervals of 0.2Mbps from 2.0 to 9.2. (The upper limit of the value
depends on the “Sound Quality” setting.)
Standard setting.
Superior to D1.
Best sound quality. Recommended for recording uncompressed original
digital audio. High data rate of L-PCM may result in shorter program length.
Introduction
Basic operations
Playback
Recording
Dubbing
Editing
Notes
• See page 66 for details on “Mode”, “Rate”, and “Audio”.
• Other recording procedures are also available. See page 67.
• When you set the bit rate below about 4.0 Mbps, playback of some speed may not work correctly. There will be noise, and the
picture quality is lower than other rate settings.
Suggestions for the picture quality setting
• For normal recording or when you cannot decide which mode to choose.
Select “SP.”
• When you do not have to preserve the recorded content longer.
Select “LP.” Inferior to “SP” in picture quality, but it can record longer.
•To record a high picture quality
Select “Manual” to set a desired bit rate. The higher the bit rate, better the picture quality is, but shorter the
recording length becomes. We recommend that you set about 6.0 Mbps to 6.8 Mbps. For saving discs to make a
collection of dramas or cartoons, 3.2 Mbps is also recommended. You can fill a double sided disc with about 14
progams of 30 minutes from which unnecessary portions are deleted.
•To fill the disc
Select “Auto.” A bit rate is calculated automatically according to the remaining volume of the disc. Some contents
may not be recorded on the disc even if you select this function. This is not the function to make full use of the
remaining space capacity.
*RD-X2.Ope(US)p027-044 9/3/02, 11:23 AM35
Function setup
Others
35
Page 36

Basic operations
Programing a recording (REC NAVI) (Continued)
Adding a programming selection
1) Press the REC MENU button.
The REC MENU appears.
2) Press the
press the ENTER button.
3) Press the
press the ADJUST button to set the item.
4) When complete, press the ENTER button.
5) Press the REC MENU button to exit.
button to select a blank line, then
/ buttons to select the item, then
Deleting a program entry
1) Press the REC MENU button.
The REC MENU appears.
2) Press the
want to delete.
3) Press the QUICK MENU button.
The Quick Menu appears.
4) Press the / buttons to select “Program
Cancel,” then press the ENTER button.
Check the message, then delete the entry.
5) Press the REC MENU button to exit.
/ buttons to select an entry you
Selecting a combination of picture and sound
quality settings
See “AV Record Quality” page 128.
1) At step 3 on
MENU button.
The Quick Menu appears.
2) Press the
Quality,” then press the ENTER button.
The sub menu shows the combinations (1 to 5) you
have registered.
3) Press the
the ENTER button.
Settings corresponding to your pre-set parameters
are automatically entered in the spaces: “Mode”,
“Rate”, and “Audio”.
page 34, press the QUICK
/ buttons to select “AV Record
/ buttons to select one, then press
Changing an entry
1) Press the REC MENU button.
The REC MENU appears.
2) Press the
want to change, then press the ENTER button.
3) Press the
press the ADJUST button to set the item.
4) Press the ENTER button.
The modification is registered.
5) Press the REC MENU button to exit.
Notes
•You cannot change any entry within 5 minutes before
recording start time. You can only delete the programming.
• Recording start time cannot be set to less than 5 minutes
after the current time.
/ buttons to select an entry you
/ button to select an item, then
Shifting a time period of a recording (Time
Shift)
If a prior TV program extends beyond its scheduled
time and into one that you programmed, you can shift
the programmed start and end time of the recording.
e.g.
PM09:00 PM09:54
Time Shift
20 mintes
extend
PM09:20
1) Press the REC MENU button.
The REC MENU appears.
2) Press the
want to shift the time period.
3) Open the cover of the remote control and press
the EXTEND button.
“Start Time” and “End Time” are ready to be input.
4) Press the EXTEND button repeatedly.
Each time you press the button, “Start Time” and
“End Time” is shifted in 10 minutes intervals to, up
to 60 minutes later.
5) Press the ENTER button.
6) Press the REC MENU button to exit.
/ buttons to select an entry you
PM10:14
36
*RD-X2.Ope(US)p027-044 9/3/02, 11:23 AM36
Page 37

Introduction
REC-MENU
Using elapsed programming data (Make an
entry of the same TV program)
1) Press the REC MENU button.
The REC MENU appears.
2) Press the QUICK MENU button.
The Quick Menu appears.
3) Press the
/ buttons to select “Elapsed
Programing,” then press the ENTER button.
The list of the past entry records appears.
The latest 9 entries are listed.
You can access preceeding and previous pages by
pressing the PICTURE SEARCH (
4) Press the
/ buttons to select an entry you
/ ) button.
want to use, then press the ENTER button.
Information corresponding to the selected program
appears on the Timer Programing List.
5) Press the
/ buttons to select an item, then
press the ADJUST button to modify the item.
6) When complete, press the ENTER button.
7) Press the REC MENU button to exit.
Note
• The recorder stores the latest 36 entries. A new entry
erases the oldest one.
Remaining volume
1) Press the REC MENU button.
The REC MENU appears.
2) Press the QUICK MENU button.
The Quick Menu appears.
3) Press the
/ button to select “Disc Budget
Calculation” then press the ENTER button.
The Disc Budget Calculation menu appears.
4) Press the
/ buttons to select an entry, then
press the ENTER button or press the ADJUST
button.
The recorder calculates on a bar graph how much
a specific program (identified by a check mark) will
occupy on the disc.
Pressing the ADJUST button can display or remove
the check mark.
e.g.
REC
Disc Budget Calculation
MENU
CH Date
10
42
4
Select Return Adjust Revise List
Selected entry
Start End Media Audio
–
0:20
PM
AM
11:30
10/ 9(Wed)
3
10/10(Thu)
10/10(Thu)
10/11(Fri)
Elapsed AvailableSelected(current)
PM
PM
PM
()
9:30
10:30
8:30
–
–
–
PM
PM
PM
10:00
11:30
11:30
Available disc volume
HDD Manual
Manual
DVD
LP
HDD
DVD
SP
10/8(Tu)
Rate
6. 0
6. 0
2. 2
4. 4
19:25
PM
ResultMode
D2
D2
D1
D2
DVDHDD
DVDHDD
REC-MENU
REC-MENU
End
When the entry item is marked X, the
recording does not end. Change the setting.
5) Correct the parameters of the entry if
necessary.
(Skip to step 7 if you do not need this.)
You can change “Media”, “Mode”, “Rate”, and
“Audio”.
Select an item you want to modify and press the
ENTER button. The item will be ready to be altered.
Press the ADJUST button to modify. When
complete, press the ENTER button.
6) Press the
button.
Program modification is registered.
7) Press the REC MENU button to exit the GUI.
Basic operations
Playback
Recording
Dubbing
Editing
*RD-X2.Ope(US)p027-044 9/3/02, 11:23 AM37
Note
• When a Reservation disc is inserted in the recorder
( page 71), you cannot check the remaining volume of
other discs.
Function setup
Others
37
Page 38

Tips on recording
To stop recording
Press the STOP button.
To pause recording (to omit an unnecessary
portion)
During recording, press the PAUSE button.
To resume recording, press it again.
Note
•Pausing recording automatically creates a new chapter at
that point.
To stop a programmed recording
To finish,
Press the
When you press it once, a message appears. While
the message is displayed, press the
again.
(This operation is not applicable while a menu is
displayed.)
To pause recording,
Press the
To resume recording, press it again.
button on the front panel twice.
button once
button on the front panel.
To change a TV channel to be recorded
1) During recording, press the PAUSE button.
Recording pauses.
2) Press the CHANNEL buttons to change the
channel.
3) Press the PAUSE button to resume recording.
To reduce noise on recordings (Rec DNR)
Before recording, select “Rec DNR” from the setup
display.
page 129.
To record and play at the same time
To start recording while playing a disc
Stop playback, then select the other disc by
pressing the HDD or DVD button, and start
recording on that disc.
To play a disc while recording on another disc
Select the disc that is not being recorded by
pressing the HDD or DVD button, and start
playback on the disc.
To set an end time while recording is in progress
1) During recording, press the QUICK MENU
button.
The Quick Menu appears.
2) Press the
then press the ENTER button.
The display changes as follows:
e.g.
3) Press the
press the ADJUST button to change the value.
4) Press the ENTER button.
/ buttons to select “End Time”
PM
End Time
2:13
/ buttons to select an item then
To view a TV program while recording another
1) Start recording on this recorder.
2) On a connected TV, select the TV mode.
3) Using the channel selector of the TV, select a
desired channel on the TV.
38
*RD-X2.Ope(US)p027-044 9/3/02, 11:23 AM38
Note
• By setting an end time, it is memorized as a programmed
one, and the indicator in the display section illuminates
to indicate that the recorder keeps an entry of recording.
•You cannot change the end time, once the setting is
completed.
• The programmed end time must be set for after 5 minutes
from the current time.
To turn the power off automatically after
completing a programmed recording
1) While performing a programmed recording,
press the QUICK MENU button.
The Quick Menu appears.
2) Press the
Off” then press the ENTER button.
/ buttons to select “Auto Power
Page 39

Introduction
To delay the end time while recording
Press the EXTEND button under the lid of the
remote control.
When you press it once, the current end time appears.
Each time you press the button, the end time
(displayed in the indication section) is delayed in 10
minutes increments, up to 60 minutes.
Notes
• Pressing any button other than the EXTEND button
completes this procedure to determine the end time.
• This operation must be performed prior to 1 minute before
the programmed end time.
•A recording automatically finishes when the disc is full or
when the recording exceeds 9 hours regardless of whether
or not you delayed the end time.
To play a title recorded on the HDD while
recording on the HDD (Recorded Title Play in
HDD)
HDD
This function works only during HDD recording.
You cannot play a title recorded on a DVD-RAM disc
sinultoneously with DVD-RAM recording.
1) While recording on the HDD, press the
CONTENT MENU button.
2) Press the
/ / / buttons to select a
desired title, then press the ENTER button.
Playback of the selected title starts.
Pressing the STOP button stops playback, and the
content that is being recorded appears on the
display. If you press the PLAY button, playback
resumes from the location you last stopped.
Note
• While you are using this function, the following operations/
functions are not available.
- Dividing chapters. (By the CHP DIVIDE button)
- Programmed playback (Repeat playback, etc.)
- Editing (Chapter dividing, Playlist programming, dubbing,
title naming, title thumbnail setting, intro scan)
• While performing relay recording ( page 70), this
function is not available.
Notes
•You cannot close the disc tray automatically at the
recording start time. If you want to record on a DVD-RAM
disc, load it on the recorder beforehand.
• While recording, you cannot change the settings of a
program, such as the channel, mode, etc.
• The number of titles cannot exceed in any case 99 for a
DVD-RAM and 198 for the HDD.
•You cannot record on both an HDD and a DVD-RAM disc
at the same time (except relay recording).
• The maximum length of a recording is 9 hours. Recording
automatically stops when length exceeds 9 hours.
• While performing a programmed recording, you cannot
program a new timer selection.
•You may not be able to start recording if there is too little
time before a programmed recording begins.
•A programmed recording may not be executed if a power
failure occurrs within 5 minutes before the start time.
• If an HDD starts programmed recording while you are
playing a DVD-drive disc, the picture may pause
momentarily.
• When you record monaural sound, the same sound is
recorded to both left and right channel.
• When you record a bilingual program in the “L-PCM” mode
( page 35), the sound is recorded as stereo. In this
case, both the main and sub sound will be output at the
same time. Select the output sound by pressing the INPUT
SELECT button.
• When you record content which will be dubbed on a DVDR, be sure to set “DVD-R Broadcast Record” to “Main” or
“SAP” ( page 128).
•To select SAP, set “SAP” to “on” ( page 124).
• When you set “DVD-R Broadcast Record” to “Main” or
“SAP” ( page 128), only the selected sound of the
bilingual program (main or sub) is recorded.
• When you set “DVD-R Broadcast Record” to “Main” or
“SAP” ( page 128), only the selected sound of the
bilingual program is recorded. To prevent this, set “DVD-R
Broadcast Record” only when you record content that will
be dubbed to a DVD-R.
Basic operations
Playback
Recording
Dubbing
Editing
Function setup
Entering the recording format on the DVD-R
Before recording, make sure “DVD-R Broadcast
Record” is set to “Main” or “SAP” (
*RD-X2.Ope(US)p027-044 9/3/02, 11:23 AM39
page 128).
Others
39
Page 40

Basic operations
Tips on recording (continued)
To delete recorded content
Important note
Any deleted title/chapter (original) cannot be restored.
Before deleting, be sure to check contents on the disc.
ENTER
/ / /
DELETE
1) Perform steps 1 and 2 in “Playing recorded
contents (CONTENT MENU)” (
page 30) to
select a title (chapter).
2) Open the lid of the remote control and press the
DELETE button.
Alternate method:
Press the QUICK MENU button, then press the
/ buttons to select “Title Delete” (“Chapter
Delete”) and press the ENTER button.
3) Check the message and press the
/ buttons
to select “Yes,” then press the ENTER button.
To protect recorded content
You can protect recorded content from unexpected
deletion.
Protection is provided for each title (original).
1) Perform steps 1 and 2 in “Playing recorded
contents (CONTENT MENU)” (page 30) to select
a title.
2) Press the QUICK MENU button, and press the
/ buttons to select “Title Information”. Then
press the ENTER button. Press the
/
buttons to select “Lock” and then press the
ENTER button.
The mark
Notes
•To cancel protection, repeat this procedure.
• Disc initialization erases all titles on a disc even if they are
protected.
appears.
Notes
• Deleting a title (a chapter) decreases the numbers of the
succeeding titles (chapters).
•A chapter of about 5 seconds or shorter may not be
deleted. Deleting a short chapter may not change the
display of the available disc volume.
• Deleting a playlist ( page 104) title/chapter does not
affect the original title/chapter.
• Deleting an original ( page 104) title/chapter affects all
the corresponding playlist title/chapters.
• Deleting all chapters in a title erases the title itself.
• Chapters in a title which contains still pictures cannot be
deleted.
40
*RD-X2.Ope(US)p027-044 9/3/02, 11:23 AM40
Page 41

Basic operations
HDD
DVD-RAM
DVD-VIDEO
VCD CD
Quick Menu operation
To access various optional functions of this recorder, open the Quick Menu. The Quick Menu displays a
lite of selections relevant to your current mode.
e.g.
Quick Menu
Preview
Title Information
Auto Power Off
Exit
Budget
HDD
Source :Title
Object : DVD-RAM
All Clear
Original
Start
Opening a Quick Menu
MENU
SUBTITLE
RETURN
AUDIO
CHANNEL
Press QUICK MENU.
TOP MENU
ANGLE
1
HDD
HDD
V-REMOTE
LIBRARY
R
U
T
C
I
P
F
R
A
M
E
/
S
E
A
D
J
PAUSE
A
E
U
TIMESLIP
REC MENU EDIT MENU
H
C
R
ENTER
S
T
DVD
DVD
INSTANT SKIPINSTANT REPLAY
CONTENT MENU
S
K
I
P
W
O
L
S
PLAYSTOP
The Quick Menu appears.
QUICK MENU
Press / to select an item, then press
ENTER.
2
ENTER
Introduction
Basic operations
Playback
Recording
Dubbing
REC
REC
QUICK MENU
To exit the Quick Menu
Press the QUICK MENU button again.
Alternatively
Select “Exit” with the
/ buttons, then press the
ENTER button.
*RD-X2.Ope(US)p027-044 9/3/02, 11:23 AM41
Editing
Function setup
Others
41
Page 42

DVD-VIDEO
VCD CD
Basic operations
Quick menu operation (Continued)
Functions in a Quick Menu
Besides these examples, various other ones are introduced on respective pages for convenience.
To play repeatedly (Repeat playback)
You can repeat a desired section.
HDD
DVD-RAM
Disc:
DVD-VIDEO
VCD CD
Status: Stop / Play
Special Playback Mode
Item:
A sub menu appears. Follow steps 2 ( page 41) to
select an item.
A-B Repeat
:
You can designate a portion in a title or track to repeat
continuously.
If you select “A-B Repeat” and press the ENTER
button, the following display appears. Perform steps 1
and 2 below.
e.g.
A
B
Set A
repeat
To cancel the procedure, press the \ button.
1) Press the ENTER button at the beginning of the
segment (point A) you want to repeat.
The location of point A is memorized.
The display changes to “Set B”.
2) Press the ENTER button at the end of the
segment (point B).
The location of point B is memorized, and repeat
playback begins between point A and B.
Title repeat
:
To repeat the same title.
Chapter repeat
:
To repeat the same chapter.
Track repeat
:
To repeat the same track.
Disc repeat
:
To repeat the entire disc.
42
Repeat All ORG Titles
:
To repeat all original titles in a disc.
Repeat All PL Titles
:
To repeat all playlist titles in a disc.
Cancel repeat
: (in Repeat playback mode)
To resume normal playback.
Playback of an HDD or DVD-RAM stops.
Notes
• Some discs may not permit repeat operation.
•You cannot use repeat playback in conjunction with
Random play.
• If you press the STOP button during repeat playback, this
operation is canceled.
• While you are performing repeat playback on an HDD or a
DVD-RAM disc, other operations except pause play is not
available.
To play in random order (Random play)
You can play sections in random order.
Disc:
Status: Stop / Play
Item:
Special Playback Mode
A sub menu appears. Follow steps 2 ( page 41) to
select an item.
Title random
:
Plays all titles in a loaded disc in random order.
Each title is played beginning from chapter 1.
Chapter random
:
Plays all chapters in a current title in random order.
Track random
:
Plays all tracks on a loaded disc in random order.
Cancel random
: (in Random play mode)
Resumes normal playback.
Notes
• Some discs may not permit random playback operation.
•You cannot use the random playback function in
conjunction with the memory playback function.
•You cannot use the random playback function in
conjunction with the repeat playback function.
• Pressing the STOP button during operation cancels
random playback.
*RD-X2.Ope(US)p027-044 9/3/02, 11:23 AM42
Page 43

Introduction
To play in favorite order (Memory playback)
You can select 30 titles, chapters, or tracks and play
them in favorite order.
(To play contents in an HDD or DVD-RAM disc in
favorite order, make a playlist. For details, see “Editing”
on
page 104.)
Disc:
DVD-VIDEO
VCD CD
Status: Stop / Play
Item:
Special Playback Mode
A sub menu appears. Follow steps 2 ( page 41) to
select an item.
Memory list
:
If you select this and press the ENTER button, the
following display appears. Perform the steps below.
e.g.
01 T CT 11 T CT 21 T CT
02 T CT 12 T CT 22 T CT
03 T CT 13 T CT 23 T CT
04 T CT 14 T CT 24 T CT
05 T CT 15 T CT 25 T CT
06 T CT 16 T CT 26 T CT
07 T CT 17 T CT 27 T CT
08 T CT 18 T CT 28 T CT
09 T CT 19 T CT 29 T CT
10 T CT 20 T CT 30 T CT
2) Press the
/ buttons to select the next box,
then perform step 1).
To select another chapter in the same title, you do
not need to select the title number.
Repeat these steps if necessary.
You can program up to 30 selections into memory.
3) Press the ENTER button.
Memory
: (in normal playback mode)
To display an entry box for one program selection.
Memory release
: (in memory playback mode)
To resume normal playback.
Memory repeat
: (in memory playback mode)
To repeat a current memory playback.
Notes
• Some discs may not permit memory playback operation.
• Inputting numbers of titles, chapters or tracks that a disc
does not contain will result in error.
•You cannot program/change selections during memory
playback. To change selections, cancel memory playback
by pressing the STOP button.
• When you turn off the power, the selected memory is
erased.
•You can exit the memory playback display by pressing the
O button.
Basic operations
Playback
Recording
Dubbing
1) Input numbers of a titles, chapters, or tracks by
using the number buttons, in favorite order.
Input each 3-digit number.
To input a 1- or 2-digit number, first input 0.
(e.g. “0”, “0”, “3”.)
To cancel the numbers, press the CLEAR button.
To input a chapter number, press the
/ buttons
to shift the cursor.
Editing
Function setup
Others
43
*RD-X2.Ope(US)p027-044 9/3/02, 11:23 AM43
Page 44

HDD
DVD-RAM
HDD
DVD-RAM
HDD
DVD-RAM
Basic operations
Quick menu operation (Continued)
To display the current bit rate
HDD
DVD-RAM
Disc:
DVD-VIDEO
Status: Stop / Play
Item:
Note
•To turn off the bit rate display, select this item again.
Bit rate
To use virtual surround sound effect
You can obtain expansive virtual surround sound
effects from just two speakers. (3-D sound)
HDD
DVD-RAM
Disc:
DVD-VIDEO
VCD CD
Status: Stop / Play
Item:
3D (N-2-2
)
A sub menu appears. Perform step 2 ( page xx) to
select an item.
Off
:
3D effect is turned off.
On
:
3D effect is activated.
Headphone
:
A 3D effect designed especially for headphone sound
is activated.
Notes
•You may notice a change in apparent volume level when
using this function.
• This function may not work depending on the sound format
and the setting ( page 55).
• Dolby Surround Pro Logic may not work at all or correctly
when using the 3D sound effect.
•For high quality sound, set to “Off” when playing back a
Linear PCM track.
To preview the first and end of every selection
(titles/chapters)
Disc:
Status: While the EDIT MENU is displayed.
Item:
Preview
To cancel selection of a title/chapter
Disc:
Status: While the EDIT MENU is displayed.
Cancel Selected Title
Item:
To program the recorder to turn itself off
automatically after an operation is finished
Disc:
Status: While the EDIT MENU is displayed. / During
timer program recording.
Item:
Note
• This function will be canceled if the initial operation was not
completed properly, e.g., canceled or interrupted.
Auto Power Off
To exit the Quick Menu
HDD
DVD-RAM
Disc:
DVD-VIDEO
VCD CD
Status: While the Quick Menu is displayed.
Item:
Exit
To check information on a title
HDD
Disc:
DVD-RAM
Status: Play
Item:
Title Information
44
*RD-X2.Ope(US)p027-044 9/3/02, 11:23 AM44
 Loading...