


ON-LINE MANUAL
40L545*DB LED Backlight LCD TV
During the life of your TV firmware updates will be made available to ensure that your TV maintains optimum performance.
You can download the latest version of firmware from
www.toshiba-om.net/firmware.php
Some features listed in this document are limited due to local legislation and may not be available in all countries.

English
Get started with Freeview
Freeview gives you over 50 TV channels to play with, not to mention 25 radio stations.
Start watching all your favourite TV content today, just connect your aerial and tune in.
Keep up-to-date
New channels are launched on Freeview from time to time along with other updates to the service. So it pays to retune your digital TV periodically to make sure your Digital TV/Radio channels are up to date. To retune your Toshiba Digital TV, please refer to the Re-tune section for guidance.
Alternatively find out more on the dedicated Freeview website:
www.freeview.co.uk/retune
Freeview service is subject to availability. Aerial upgrade may be required.
English - 2 -

Contents
Safety Precautions.................................................. |
5 |
Air Circulation...................................................... |
5 |
Heat Damage...................................................... |
5 |
Mains Supply....................................................... |
5 |
Warning............................................................... |
5 |
Do........................................................................ |
5 |
Do not.................................................................. |
5 |
Installation and Important Information..................... |
6 |
EXCLUSION CLAUSE........................................ |
6 |
Important safety information.................................... |
7 |
Fitting or Removing the pedestal stand................... |
8 |
The Remote Control................................................ |
9 |
Inserting Batteries and Effective Range of the |
|
Remote Control................................................... |
9 |
Connecting External Equipment............................ |
10 |
Connecting an HDMI® or DVI Device to the HDMI |
|
Input....................................................................... |
11 |
To Connect an HDMI Device.............................. |
11 |
To Connect a DVI Device................................... |
11 |
Connecting a Computer........................................ |
12 |
To Connect a Computer.................................... |
12 |
Connecting to a DVD Player via YPbPr............ |
12 |
Connecting a USB Memory................................... |
12 |
To Connect a USB Flash Drive.......................... |
12 |
Connecting a home network................................. |
13 |
Power Save Mode................................................. |
14 |
Environmental Information ............................... |
14 |
Controlling the TV................................................. |
15 |
Switching on...................................................... |
15 |
Using the Remote Control................................. |
15 |
Using the Controls on the TV............................ |
15 |
Initial Installation.................................................... |
16 |
Auto Tuning........................................................... |
18 |
Auto Tuning....................................................... |
18 |
Auto Channel Scan Menu Operation................. |
18 |
Manual Tuning, Analogue Fine Tuning.................. |
19 |
Digital Aerial Manual Search............................. |
19 |
Digital Cable Manual Search............................. |
19 |
Analogue Manual Search.................................. |
19 |
Analogue Fine Tune.......................................... |
19 |
General Operation................................................. |
20 |
Stereo and Bilingual Transmissions.................. |
20 |
Displaying Subtitles........................................... |
20 |
Viewing Main Menu........................................... |
20 |
Controlling Volume and Muting Sound.............. |
20 |
Selecting Programme Positions........................ |
20 |
Standby Notifications......................................... |
20 |
Channel List, Sorting Programmes, Programme |
|
Locking.................................................................. |
21 |
Viewing Channel List......................................... |
21 |
Moving a Channel............................................. |
21 |
Deleting a Channel............................................ |
21 |
Renaming a Channel......................................... |
21 |
Locking a Channel............................................. |
21 |
English |
|
Viewing Info Banner, Electronic Programme |
22 |
Guide..................................................................... |
|
Viewing Info Banner.......................................... |
22 |
Electronic Programme Guide............................ |
22 |
Language Selection.............................................. |
23 |
Language Settings............................................ |
23 |
Preferred........................................................ |
23 |
Current........................................................... |
23 |
Digital Settings - Parental Control, Menu Lock, Set |
|
PIN........................................................................ |
24 |
Viewing Parental Control Menu......................... |
24 |
Menu Lock......................................................... |
24 |
Child Lock.......................................................... |
24 |
Set PIN.............................................................. |
24 |
Configuring Picture Settings.................................. |
25 |
Configuring Picture Settings.............................. |
25 |
Operating Picture Settings Menu Items............. |
25 |
3D Settings........................................................ |
25 |
Mode................................................................. |
25 |
Contrast............................................................. |
25 |
Brightness......................................................... |
25 |
Sharpness......................................................... |
25 |
Colour................................................................ |
25 |
Power Save Mode............................................. |
25 |
Backlight............................................................ |
25 |
Noise Reduction................................................ |
25 |
Advanced Settings........................................ |
25 |
Reset................................................................. |
26 |
Changing Picture Format...................................... |
27 |
Configuring PC Picture Settings............................ |
28 |
PC Picture Settings (*)...................................... |
28 |
PC Picture controls............................................ |
28 |
PC Position........................................................ |
28 |
Autoposition....................................................... |
28 |
H Position.......................................................... |
28 |
V Position.......................................................... |
28 |
Dot Clock........................................................... |
28 |
Phase................................................................ |
28 |
Configuring Sound Settings.................................. |
29 |
Configuring Sound Settings............................... |
29 |
Operating Sound Settings Menu Items............. |
29 |
Volume.............................................................. |
29 |
Equalizer (Only for speaker).............................. |
29 |
Balance (Only for speaker)................................ |
29 |
Headphone........................................................ |
29 |
Sound Mode...................................................... |
29 |
AVL.................................................................... |
29 |
Headphone/Lineout........................................... |
29 |
Dynamic Bass................................................... |
29 |
Surround Sound................................................ |
29 |
Digital Out.......................................................... |
29 |
Settings Menu Operation, Conditional Access...... |
30 |
Configuring Your TV’s Settings.......................... |
30 |
Viewing Settings Menu...................................... |
30 |
Using a Conditional Access Module.................. |
30 |
- 3 - |
|
English

English
Contents
Viewing Conditional Access Menu (*)................ |
30 |
Setting Timers....................................................... |
31 |
Timers............................................................... |
31 |
Setting Sleep Timer........................................... |
31 |
Setting Programme Timers................................ |
31 |
Adding a Timer.................................................. |
31 |
Editing a Timer.................................................. |
31 |
Deleting a Timer................................................ |
31 |
Setting Date/Time................................................. |
32 |
Configuring Date/Time Settings........................ |
32 |
Configuring Source Settings.............................. |
32 |
Input Selection................................................... |
32 |
Other Controls....................................................... |
33 |
Configuring Other Settings - General................ |
33 |
Operation........................................................... |
33 |
Menu Timeout.................................................... |
33 |
Scan Encrypted Channels ................................ |
33 |
Blue Background............................................... |
33 |
Software Upgrade............................................. |
33 |
Application Version............................................ |
33 |
Hard of Hearing................................................. |
33 |
Audio Description.............................................. |
34 |
Auto TV Off........................................................ |
34 |
Standby Search (optional) ................................ |
34 |
Store Mode........................................................ |
34 |
Media Renderer................................................. |
34 |
Power Up Mode................................................. |
34 |
Virtual Remote................................................... |
34 |
CEC................................................................... |
34 |
CEC Auto Power On.......................................... |
34 |
Network Settings, Portal, Internet Browser and |
|
YouTube................................................................ |
35 |
Configuring Network Settings............................ |
35 |
First enter to Toshiba Portal.............................. |
35 |
Using the Toshiba Portal................................... |
35 |
Using the Internet Browser................................ |
35 |
Using YouTubeTM .............................................. |
36 |
Using 3D Feature.................................................. |
37 |
Operating the 3D Mode “ 3D ”.......................... |
37 |
LITHIUM BATTERY CAUTION.......................... |
37 |
Using the 3D Eyewear....................................... |
37 |
Viewing 3D images............................................ |
37 |
Changing 3D format from the Quick menu........ |
37 |
Watching 3D images in 2D format..................... |
37 |
Watching 2D images in 3D format..................... |
37 |
Switching left and right images.......................... |
37 |
3D Settings........................................................ |
38 |
3D Viewing Information..................................... |
38 |
Using Media Browser............................................ |
40 |
Manual Start...................................................... |
40 |
Auto Start.......................................................... |
40 |
Playing MP3 Files.............................................. |
41 |
Viewing JPEG Files........................................... |
41 |
Slideshow Feature............................................. |
42 |
Video Playback.................................................. |
42 |
|
English |
Media Browser Settings.................................... |
43 |
Using MENU button in Media Browser Mode.... |
43 |
To Close the Media Player................................ |
43 |
Analogue Only Text Services................................ |
44 |
Analogue Text Services..................................... |
44 |
Using Text Button -TEXT................................... |
44 |
Acessing Sub-Pages......................................... |
44 |
Revealing Concealed Text................................. |
44 |
Holding a Page.................................................. |
44 |
To display an initial page................................... |
44 |
Appendix A: PC Input Typical Display Modes....... |
45 |
Appendix B: AV and HDMI Signal Compatibility |
|
(Input Signal Types).............................................. |
46 |
Appendix C: PIN Information................................. |
47 |
Appendix D: Supported File Formats for USB |
|
Mode..................................................................... |
48 |
Cautions for 3D..................................................... |
49 |
Important information for 3D viewing................. |
49 |
Cautions and Other Information for 3D................. |
50 |
Notes on watching the TV................................. |
50 |
Re-tune Section.................................................... |
51 |
Re-tuning: TOSHIBA Freeview Products.............. |
51 |
Specifications and Accessories............................. |
52 |
License Information............................................... |
53 |
Q & A Section........................................................ |
54 |
- 4 -
Safety Precautions
This equipment has been designed and manufactured to meet international safety standards but, like any electrical equipment, care must be taken to obtain the best results and for safety to be assured. Please read the points below for your own safety. They are of a general nature, intended to help with all electronic consumer products.
Air Circulation
Leave more than 10cm around all edges when wall mounting the television to allow adequate ventilation. This will prevent overheating and possible damage to the television. Dusty places should also be avoided.
Heat Damage
Damage may occur if the television is left in direct sunlight or near a heater. Avoid places subject to extremely high temperatures or humidity, or locations where the temperature is likely to fall below 5°C (41°F).
Mains Supply
The set should be operated only from a 220-240 V AC 50 Hz outlet. DO ensure that the television is not standing on the mains lead. DO NOT cut off the mains plug from this equipment, this incorporates a special Radio Interference Filter, the removal of which will impair its performance. In the UK, the fuse fitted in this plug is approved by ASTA or BSI to BS1362. It should only be replaced by a correctly rated and approved type. IF IN DOUBT PLEASE CONSULT A COMPETENT ELECTRICIAN.
Warning
To prevent the spread of fire, keep candles or other open flames away from this product at all times.
Do
DO read these operating instructions before you attempt to use the equipment.
DO ensure that all electrical connections (including the mains plug, extension leads and interconnections between pieces of equipment) are properly made and in accordance with the manufacturers’instructions.Switchoffandwithdrawthemains plug before making or changing connections.
DO consult your dealer if you are ever in doubt about the installation, operation or safety of your equipment.
DO be careful with any glass panels or doors on equipment.
Do not
DON’T removeanyfixedcoverasthismayexposedangerous voltages.
DON’T obstruct the ventilation openings of the equipment with items such as newspapers, tablecloths, curtains, etc. Overheating will cause damage.
DON’T allow electrical equipment to be exposed to dripping or splashing or objects filled with liquids.
DON’T place hot objects or naked flame sources, such as lighted candles or nightlights on, or close to equipment. High temperatures can melt plastic and lead to fires.
DON’T usemakeshiftstandsandusethestandmanufacturers supplied screws.
DON’T leave equipment switched on when it is unattended, unlessit isspecificallystated thatitisdesigned for unattended operation or has a standby mode. Switch off by withdrawing the plug, make sure your family know how to do this. Special arrangements may need to be made for people with disabilities.
DON’T continue to operate the equipment if you are in any doubt about it working normally, or it is damaged in any way - switch off, withdraw the mains plug and consult your dealer.
WARNING - excessive sound pressure from earphones or headphones can cause hearing loss.
ABOVE ALL - NEVER let anyone, especially children, push or hit the screen, push anything into holes, slots or any other openings in the case.
NEVER guess or take chances with electrical equipment of any kind - it is better to be safe than sorry.
THE MAINS PLUG IS USED AS A DISCONNECTING DEVICE AND THEREFORE SHOULD BE READILY OPERABLE.
Note: Interactive video games that involve shooting a “gun” type of joystick at the on-screen target may not work with this TV.
The illustrations and the OSD in this operation manual are for explanation purposes and may vary slightly from the actual operations.
English
English - 5 -
Installation and Important Information
Where to install
English
* Button and stand style is dependent on model.
Locate the television away from direct sunlight and strong lights. Soft, indirect lighting is recommended for comfortable viewing. Use curtains or blinds to prevent direct sunlight falling on the screen.
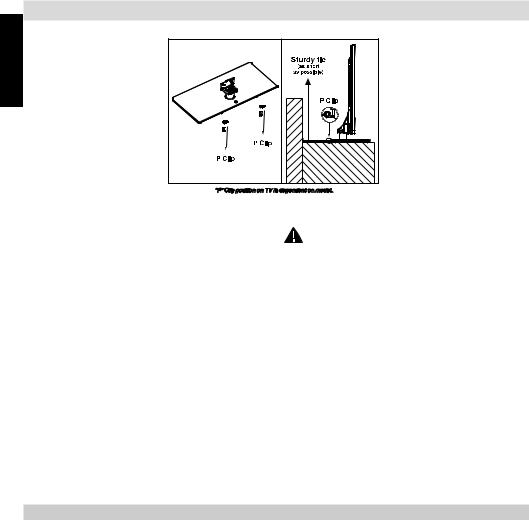
Place the TV on a stable, level surface that can support the weight of the TV. In order to maintain stability and prevent it falling over, its recommended to secure the TV to a wall using a sturdy tie on the back of the stand.
The LCD display panels are manufactured using an extremely high level of precision technology; however, sometimes some parts of the screen may be missing picture elements or have luminous spots. This is not a sign of a malfunction.
Makesurethe televisionis locatedin aposition whereitcannot be pushed or hit by objects, as pressure will break or
damage the screen. Also, please ensure that small items are not inserted into slots or openings in the case.
Avoid using chemicals (such as air refreshers, cleaning agents, etc.) on or near the TV pedestal. Studies indicate that plastics may weaken and crack over time from the combination effects of chemical agents and mechanical stress (such as weight of TV). Failure to follow these instructions could result in serious injury and/or
permanent damage to TV and TV pedestal. Cleaning the screen and cabinet…
Turn off the power, and clean the screen and cabinet with a soft, dry cloth. We recommend that you do not use any proprietary polishes or solvents on the screen or cabinet as this may cause damage.
Please take note
The digital reception function of this television is only effective in the countries listed in the “Country” section during the first time installation menu. Depending on country/area, some of this television’s functions may not be available. Reception of future additional or modified services cannot be guaranteed with this television.
If stationary images generated by 4:3 broadcasts, text services, channel identification logos, computer displays, video games, on screen menus, etc. are left on the television screen for any length of time, they could become conspicuous. It is always advisable to reduce both the brightness and contrast settings.
Very long, continuous use of the 4:3 picture on a 16:9 screen may result in some retention of the image at the 4:3 outlines. This is not a defect of the LCD TV and is not covered under the manufacturer’s warranty.
Regular use of other size modes will prevent permanent retention.
EXCLUSION CLAUSE
Toshiba shall under no circumstances be liable for loss and/or damage to the product caused by:
i)fire;
ii)earthquake;
iii)accidental damage;
iv)intentional misuse of the product;
v)use of the product in improper conditions;
vi)loss and/or damage caused to the product whilst in the possession of a third party;
vii)any damage or loss caused as a result of the owner’s failure and/or neglect to follow the instructions set out in the owner’s manual;
viii)any loss or damage caused directly as a result of misuse or malfunction of the product when used simultaneously with associated equipment;
Furthermore, under no circumstances shall Toshiba be liable for any consequential loss and/or damage including but not limited to the following, loss of profit, interruption of business, the loss of recorded data whether caused during normal operation or misuse of the product.
English - 6 -

Important safety information
• Any function related to the digital television (with the DVB logo) is available only within the country or area |
English |
|
where such signals are transmitted. Verify with the salesperson if it is possible to receive a DVB - T/T2/C |
||
signal in the area where you live. |
||
|
||
• Even if the television conforms to the required DVB - T/T2/C specifications, the compatibility with future |
|
|
digital DVB - T/T2/C transmissions is not guaranteed. |
|
|
• Some digital television functions may not be available in certain countries. |
|
|
• The DVB - T/T2/C system present in this device, allows reception of both FTA (Free To Air) and Encrypted |
|
|
channels. |
|
|
• Note; Encrypted channels require a specific encryption system to view, which may not be available in certain |
|
|
countries. |
|
|
• DVB is a registered trademark of the DVB Project. The DVB logo indicates that the product is compliant |
|
|
with European Digital Broadcasting. |
|
IMPORTANT INFORMATION
TV Installation
•Do not stand the televisions on cloth or other materials placed between the television and supporting furniture.
•Educating children about the dangers of climbing on furniture to reach the television or its controls.
•Always hold the plug when disconnecting the unit from the socket outlet. Do not pull on flex. The flex can become damaged and cause a short circuit.
•Use a soft, dry cloth to clean the unit.
•Set up unit so that no one will trip over the flex.
•If you intend to wall mount the unit, contact the shop where you purchased the unit for advice, and leave the installation work to professionals. Improper installation can cause damage and/or injuries.
•To protect the unit during a thunder storm, unplug the AC power cord and disconnect the aerial, cable and satellite decoder/systems etc.
Caution: Do not touch the aerial connector.
•The unit becomes warm when in operation. Do not place any covers or blankets on the unit in order to prevent overheating.
•The ventilation holes should not be blocked. Do not set up near radiators. Do not place in direct sunshine.
•Moisture condensation occurs in the following situations:
-When you move the unit from a cold place to a warm place.
-When you use the unit in a room where the heater was just turned on.
-When you use the unit in an area where cold air from an air conditioner directly hits the unit.
-When you use the unit in a humid place.
•Never use the unit when moisture condensation could occur.
•Using the unit when moisture condensation exists may damage its own internal parts. Allow two or three hours, the unit will warm up and moisture will be evaporated before switching on.
English - 7 -
English
Fitting or Removing the pedestal stand
Fitting or Removing the pedestal stand
(1)Carefully lay the front of the unitface down on a flat, cushioned surface with thestand hanging overthe edge.
(2)To fit the stand use the screws supplied.
or
(3)Remove the screws fixing the pedestal stand
(4)After the screws are removed, hold the pedestal stand in place, then remove the pedestal stand and the plastic moulding from the TV.
Note: Extreme care should always be used when removing the pedestal stand to avoid damage to the LCD panel.
For 40L545*DB model
When using a Wall Bracket
Please use a wall bracket appropriate for the size and weight of the LCD TV and two people are required for the installation.
(1)Unplug and remove any cables and/or other component connectors from the rear of the TV.
(2)Carefully lay the front of the unit face down on a flat, cushioned surface such as a quilt or blanket.
(3)Follow the instructions provided with your wall bracket. Before proceeding, make sure the appropriate bracket(s) are attached to the wall and the back of the TV as described in the instructions provided with the wall bracket.
English - 8 -

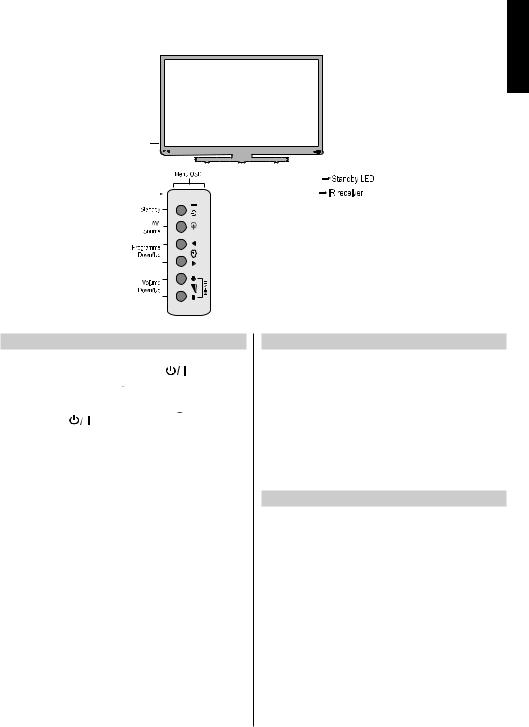
The Remote Control
Simple at-a-glance reference of the remote control. The supplied type is model dependant.
1. Standby

 2. Numeric buttons
3. 3D Settings
4. Mute
5. Volume Up / Down
6. Menu on-off
7. Navigation buttons
(Up/Down/Left/Right)
8. Okay (Confirm) / Hold (in 
 TXT mode) / Channel List
9. Return / Index page (in 
 TXT mode)
10. Netflix apllication
11. Quick Menu
12. My button 1(*)
13. Coloured buttons
14. Mono/Stereo - Dual I-II /
Current Language
(in DVB channels)

 15. Rapid reverse

 16. No function

 17. Pause
18.Play
19.Subtitle on-off (in Media
Browser mode and in DVB channels)
20.Stop
21.Rapid advance
22.Image size
23.My button 2(*)
24.Teletext / Mix (in TXT mode)
25.Electronic programme guide(in DVB channels)
26.Exit
27.Internet portal
28.Info / Reveal (in TXT mode)
29.Programme Down / Page up - Programme Up / Page down
30.Previous programme
31.AV / Source selection
(*) MY BUTTON 1 & MY BUTTON 2
These buttons may have default functions depending on the model. However you can set a special function to these buttons by pressing on themforfivesecondswhenonadesiredsourceor channel.Aconfirmation message will be displayed on the screen. Now the selected MYBUTTON is associated with the selected function.
Note that if you perform first time installation, MYBUTTON 1&2 will return to their default function.
Inserting Batteries and Effective Range of the Remote Control
Remove the back cover to reveal the battery compartment and make sure the batteries are inserted the right way round. Suitable battery types for this remote are AAA, IEC R03 1.5V.
1.2. Do not combine a used, old battery with a new one or mix battery types.
Remove exhausted batteries immediately to prevent acid from leaking into the battery compartment. Dispose of them in a designated disposal area.
Warning: Batteries must not be exposed to excessive heat such as sunshine, fire or the like.
The performance of the remote control will deteriorate beyond a distance of five metres or outside an angle of 30 degrees from the IR receiver. If the
3.operating range becomes reduced the batteries may need replacing.
English
English - 9 -
English
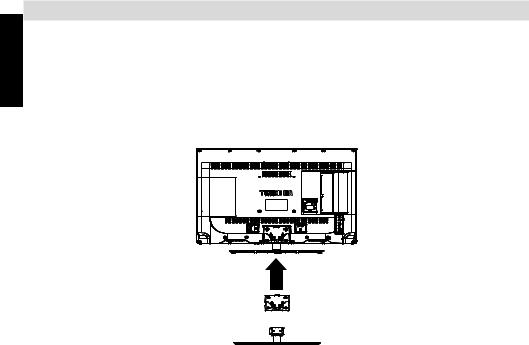
Connecting External Equipment
Before connecting any external equipment, remove the mains plug from the wall socket.
LAN Input
RGB/PC
Input
SPDIF
DIGITAL AUDIO
Socket
Coax.OUT
SCART
Socket
1IM DH |
2IM DH |
Side View
HDMI Input |
5Vdc |
Max:500mA |
|
Sockets (*) |
|
COMMON INTERFACE
The Common Interface is for a Conditional Access Module (CAM).
USB Inputs (*)
5Vdc
Max:500mA

 YPbPr SIDE AV
Aerial |
Input |
 SIDE AV
 Headphone


 YPbPr
YPbPr
(*) Number of these inputs may change according to the model of your TV.
Aerial cable:................................................................
Connect the aerial to the ANT. socket on the rear of the TV.
SCART lead:..............................................................
If you use a decoder* or a media recorder, it is essential that the scart cable is connected to the TV.
Before running first time installation,anyconnecteddevices need to be set to standby mode.
The DIGITAL AUDIO socket enables the connection of a suitable surround sound system.
HDMI® (High-Definition Multimedia Interface) is for using with a DVD decoder or other equipment with digital audio and video output. It is designed for best performance with 1080i and 1080p high-definition video signals but will also accept and display VGA, 480i, 480p, 576i, 576p and 720p signals. PC format signals will also be displayed.
Note: Although this TV is able to connect to HDMI equipment, it is possible that some equipment may not operate correctly.
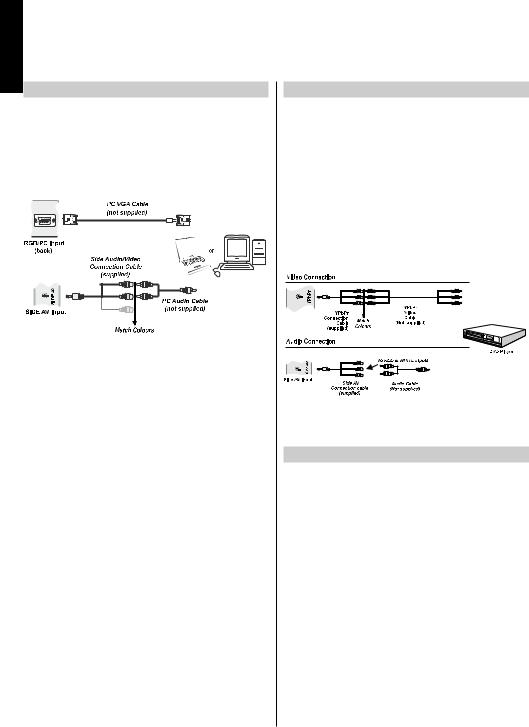
When connecting a device via the Side AV input, you must use the supplied connection cable to enable connection.
When connecting a device viaYPbPr input, you must use the supplied connection cable to enable connection.
LAN Input is used to connect the TV to your home network.
Awide variety of external equipment can be connected to the TV; therefore, the relevant owner’s manuals for all additional equipment must be referred to for exact instructions.
If the TV automatically switches over to monitor external equipment, return to normal TV by pressing the desired programme position button. To recall external equipment, press “SOURCE - ” button repeatedly to switch between sources.
Regardless of source’s property, audio output from the DIGITALAUDIO socket cannot be copied.
English - 10 -
Connecting an HDMI® or DVI Device to the HDMI Input
The HDMI inputs on your TV receive digital audio and uncompressed digital video from an HDMI source device or uncompressed digital video from a DVI (Digital Visual Interface) source device.
These inputs are designed to accept HDCP(High-Bandwidth Digital-Content Protection) programme material in digital form from EIA/CEA-861-D–compliant [1] consumer electronic devices (such as a set-top box or DVD player with HDMI or DVI output).
NOTE:
•Some early HDMI equipment may not work properly with your latest HDMI TV.
•Supported Audio format: Linear PCM, sampling rate 32/44.1/48kHz.
To Connect an HDMI Device
Connect an HDMI cable (type A connector) to the HDMI terminal. For proper operation, it is recommended that you use an HDMI cable with the HDMI Logo ( ).
).
•If your HDMI connection is capable of 1080p and/or your TV is capable of refresh rates greater than 50Hz, you will need a Category 2 cable. Conventional HDMI/DVI cable may not work properly with this mode.
•HDMI cable transfers both video and audio. Separate analogue audio cables are not required (see illustration).
•To view the HDMI device video, press “SOURCE -  ” button to select the appropriate HDMI input.
|
* Number of |
2I |
these inputs |
MDH |
may change |
|
according to |
|
the model of |
HDMI |
your TV. |
Socket |
|
(Back) |
|
HDMI device
English
CEC
CEC operation is available if a CEC device is present. This feature is limited to Toshiba disc players that support CEC.
The CEC osd menu is accessed through the “QUICK” button on the remote the osd CEC menu will only be displayed if a
CEC product is connected.
To Connect a DVI Device
ConnectanHDMI-to-DVIcable(HDMItypeAconnector)tothe HDMI input socket and audio cables to the RED and WHITE SIDEAVAUDIO inputs on theAudio/Video connection cable supplied (see illustration).
•The maximum recommended HDMI-to-DVI cable length is 6.6 ft (2m).
•An HDMI-to-DVI cable transfers video only. Separate analogue audio cables are required.
SIDE AV Input
Side Audio/Video |
|
|
|
Connection Cable |
|
|
|
(supplied) |
|
* Number of |
|
|
|
||
HDMI Input |
2 |
these inputs |
|
MDH |
may change |
||
Sockets |
|||
|
I |
|
|
Match |
|
according to |
|
Colours |
|
the model of |
|
|
|
your TV. |
|
Audio Transfer |
|
Video Transfer |
|
Audio Cable |
|
||
(not supplied) |
|
HDMI to DVI Cable |
|
|
|
(not supplied) |
NOTE:
To ensure that the HDMI or DVI device is reset properly, it is recommended that you follow these procedures:
•When turning on your electronic components, turn on the TV first, and then the HDMI or DVI device.
•When turning off your electronic components, turn off the HDMI or DVI device first, and then the TV.
English - 11 -
Connecting a Computer |
Connecting a DVD Player |
English
To Connect a Computer
WitheitheranRGB/PCoranHDMIconnection,youcanwatch your computer’s display on the TV and hear the sound from the TV’s speakers.
When connecting a PC to the RGB/PC input on TV, use an analogue RGB (15-pin) computer cable and use the SIDE AV socket with a PC audio cable (not supplied) for audio connection, using the supplied Side AV connection cable’s RED and WHITE inputs (see illustration).
To use a PC, set the monitor output resolution on the PC before connecting it to theTV.To display the optimum picture, use the PC setting feature.
NOTE:
•Some PC models cannot be connected to this TV. An adaptor is not needed for computers with a compatible mini D-sub15-pin terminal.
•Depending on the DVD’s title and the specifications of the PC on which you are playing the DVD-Video, some scenes may be skipped or you may not be able to pause during multiangle scenes.
Connecting to a DVD Player via YPbPr
Some DVD players are connected through COMPONENT SOCKETS (YPbPr). In this case, you must use the supplied Component YPbPr video connection cable for enabling connection. First, plug the single jack of the cable to the TV’s YPbPr socket (side). Afterwards, insert your YPbPr cable’s (not supplied) connectors into the plural part of the supplied YPbPrvideoconnectioncable(seeillustrationbelow).Colours of the connected jacks should match.
To enable audio connection, use the supplied Side AV connection cable. First, plug single jack of the cable to the SideAV Input of the TV.Afterwards, insert your DVD player’s audio cable’s connectors into the plural part of the supplied SideAV connection cable (see illustration below). Colours of the connected jacks should match.
Connecting a USB Memory
To Connect a USB Flash Drive
•You can connect a USB Flash Drive to your TV by using the USB input/inputs on the TV. This feature allows you to display/playmusic,photoorvideofilesstoredinaUSBstick.
•It is possible that certain types of USB devices (e.g. MP3 Players) may not be compatible with this TV.
•You may back up your files before making any connections to the TV set in order to avoid any possible data loss. Note that manufacturer will not be responsible for any file damage or data loss.
•Do not pull out USB module while playing a file.
CAUTION: Quickly plugging and unplugging USB devices may cause damage to the USB device.
English - 12 -
Connecting a home network
Connectivity feature allows the TV to connect to the home network wired or wirelessly. You can use this networking system to connect to theToshiba Portal or to access photo, video and audio files that are stored on a media server connected to the network and play/ display them on the TV.
Wired connection
Connect the TV to the modem/router via a LAN cable (not supplied). Select Network Type as Wired Device in Network Settings menu andthen highlight
Network. Press Left or Right buttons and set as
Enabled to connect.
LAN input on the TV

 LAN Cable
modem/router
access point
 LAN Cable
Broadband
ISP connection
English
Wireless connection
To connect theTV to the home network wirelessly just selectNetwork Type asWireless Device in Network Settings menu and then highlight Network. Press Left or Right buttons and set as Enabled to connect. The TV will search for available networks. Select the desired network and press OK. The TV has a built-in
WLAN system and has no need for additional devices to connect to a wireless network.
TV (Built-In WLAN system)
wireless modem/router
access point
 LAN Cable
Broadband
ISP connection
Performance depends on many factors, conditions and variables, including distance from acces point(AP), volume ofnetwork traffic, building materials and construction, operating system used, mix of wireless products used, interference and other adverse conditions.
Please refer toNetwork Settings section to configure a wired or a wireless connection, if more detailed information is needed.
English - 13 -

Power Save Mode
English
Environmental Information
This television is designed to be environment friendly. You not only help to save the environment but also you can save money by reducing electricity bills thanks to the energy efficiency feauture of this TV. To reduce energy consumption, you should take the following steps:
You can use Power Save Mode setting, located in the Picture Settings menu. If you set Power Save Mode as
Eco, the TV will switch to energy-saving mode and luminance level of TV set will be decreased to optimum level. Note that some picture settings will be unavailable to be changed when the TV is in Power Save Mode.
If pressed Right button, “Screen will be off in 15 seconds.” message will be displayed on the screen. Select Proceed and press OK to turn the screen off immediately. If you don’t press any button, the screen will be off in 15 seconds. Press any button on the remote or on the TV to turn the screen on again. If you disable Power Save Mode, picture mode will be automatically set to Dynamic.
It is highly recommended to activate Power Save Mode to reduce your annual power consumption.And also it is recommended to disconnect the TV from the mains plug to save more energy when you are not going to use it for a long period of time.
Repair Information
Please refer all servicing to qualified personnel. Only qualified personnel must repair the TV. Please contact your local dealer, where you have purchased this TV for further information.
English - 14 -
Controlling the TV
A wide variety of external equipment can be connected via the sockets located on the side and back of the
TV. Whilst all the necessary adjustments and controls for the TV are made using the remote control, the buttons on the Back of the TV may be used for some functions.
English
Switching on
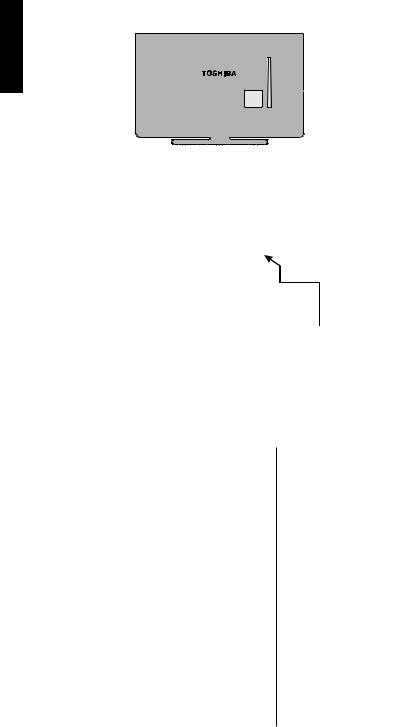
If the standby LED is unlit, check that the mains plug is connected to the power and press the button on the back side of the television or  button on the remote control to switch the television on.
To put the television into Standby, press  button on the remotecontrolor buttonontheTV.Toviewthetelevision, press again. The picture may take a few seconds to appear.
Note: The active Standby LED colour will turn to red in a few moments when the TV is switched into Standby.
For energy saving:
Turning theTV off at its mains supply, or un-plugging it, will cut energy use to nearly zero for all TV’s. This is recommended when the TV is not being used for a long time, e.g. when on holiday.
Reducing the brightness of the screen will reduce energy use.
Note: Putting the TV into standby mode, will reduce energy consumption, but will still draw some power.
Using the Remote Control
Press the MENU button on the remote control to see the menus.
The main menu appears as a group of icons each for a menu option. Press the Left or Right button to select a topic.
In sub menu screen mode the menu appears as a list. Press the Up or Down button to select a topic.
To use the options press the Up and Down buttons on the remote control to move up and down through them and OK, Left or Right buttons to select the required choice. Follow the on screen instructions. The functions of each menu are described in detail throughout the manual.
Using the Controls on the TV
Using the control buttons on the Back of the TV:
•To alter the volume press 
 or
or 
 .
.
•To alter the programme position press 

 buttons on the Back of the TV.
•Press 

 buttons at the same to view main menu and use

 buttons to navigate and

 to change value.
To select an external input, press  button until the appropriate input source is selected.
Please always refer to the owner’s manual of the equipment to be connected for full details.
English - 15 -
English
Initial Installation
Before switching on the TV, put your decoder and media recorder to Standby if they are connected and ensure the aerial is connected to your TV. To set up the TV, use the buttons on the remote control as detailed on The Remote Control page.
 IMPORTANT: Ensure that the aerial is connected and a Common Interface module is not inserted before switching on the TV for the first time installation.
1.Connect the mains plug and switch the TV on
using the  button. If the TV does not switch on, press any numbered or
  button on the remote control, then the language selection menu will be displayed. This screen will appear the first time that the TV is switched on and each time the TV is reset.
2.By pressing Up or Down button, highlight the language you want to set and press OK button. The following screen will be displayed next:
3.By pressing Left or Right button, select the country you want to set and press Down button to highlight the Search Type option. Use Left or
Right to set the desired search type. Available search types are Digital only, Analogue TV only and Full.
4.When set, press Down button to highlight Teletext Language. Use Left or Right button to select desired language region. Highlight Scan Encryted Channels and enable/disable this option by using Left or Right buttons. Press OK to continue.
Note: Depending on the Country selection you may be asked to set and confirm a PIN at this point. The selected PIN cannot be 0000. You have to enter it if you are asked to enter a PIN
for any menu operation later.
5.The following message will be displayed next on the screen:
Select Store mode if the TV will be placed in a store to exhibit. This option will configure your TV’s settings for best display quality and the supported features of the TV will be displayed on the top of the screen as a info banner. If Store mode is selected, a confirmation screen will be displayed. Select YES to proceed. For home use select Home Mode.
This option will be available in Other Settings menu and can be turned off/on later.
6.PressOK buttonontheremotecontroltocontinue and a message will be displayed asking wheter you want to do network settings. Select Yes and the Network Settings menu will be displayed. PleaserefertoConnecting a Home Network and
Network Settings sections to configure a wired or a wireless connection. After the settings are completed press OK button to continue.
7.Afterwards, the following OSD will be displayed on the screen:
8.If you select Cable option, a confirmation screen will be displayed. If you want to search for available networks, select YES to proceed. The following screen will be displayed:
Note: Although this cable feature can be selected, it is not fully supported in the UK. If cable signals are input to this
TV from a Cable Network Provider some may be displayed.
English - 16 -
Initial Installation - continued
English
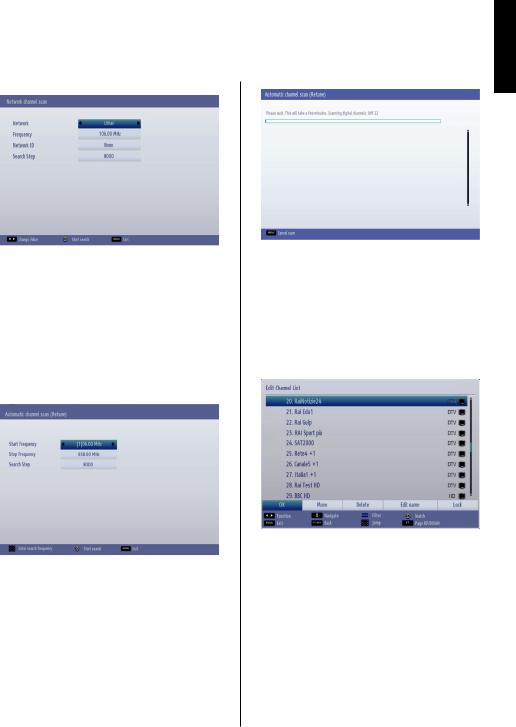
You can select Network, Frequency, Network ID and Search Step from this screen. For highlightinglinesyousee,useUp or Down button. You can set Search Step as 8000 kHz or 1000 kHz. If you select 1000 kHz, the TV will perform search process in a detailed way. Searching duration will thus increase accordingly. When finished, press OK button to start automatic search.
If you select NO, the following screen will be displayed:
You can set Start - Stop Frequencies and Search
Step as desired. When finished, press OK button to start the search.
9.If you select Aerial option from the Search Type screen, the television will search for broadcasts.
10.The Auto tuning screen will appear and the television will start to search for available stations.
The progress bar will move along the line. You must allow the television to complete the search.
Note: You can press MENU button to cancel.
While the search continues a message will appear, asking whether you want to sort channels according to the LCN(*). Select Yes and press OK to confirm.
(*) LCN is the Logical Channel Number system that organizes available broadcasts in accordance with a recognizable channel sequence (if available).
After the available stations are stored, Edit Channel List will be displayed on the screen.
Press OK button to quit channel list and watch TV.
Note: Do not turn off the TV while initializing first time installation.
English - 17 -

Auto Tuning
English
Auto Tuning
As new services are broadcast, it will be necessary to retune the television in order to view them.
•It is recommended to run Auto Tuning periodically to ensure that all new services are added. Please be aware that Auto Tuning will completely retune the television and all current channels and settings will be lost.
•PressMENU buttonontheremotecontrolandselect
Install and Retune by using Left or Right button. Press OK button and the following menu screen will be displayed.
•Select Automatic Channel Scan (Retune) by using
Up or Down button and pressOK button.Automatic Channel Scan options will be displayed. You can select options by usingUp or Down and OK buttons.
Auto Channel Scan Menu Operation
Digital Aerial: Searches and stores aerial DVB stations.
Digital Cable: Searches and stores cable DVB stations.
Analogue: Searches and stores analogue stations.
Digital Aerial & Analogue: Searches and stores aerial DVB and analogue stations.
Digital Cable & Analogue: Searches and stores cable DVB and analogue stations.
•Whenever you select an automatic search type and press OK button, a confirmation screen will appear on the screen. To start installation process, select
Yes, to cancel select No by using Left or Right and OK button.
•After auto channel scan type is set and selected and confirmed, installation process will start and progress bar will move along. The television will search for all available stations. You must allow the television to complete the search. Press MENU button to cancel the process. In such a case, located channels are not stored.
Note: Menu list of available features may change depending on the model.
English - 18 -
 Loading...