

Page 1
INSTRUCTIONS
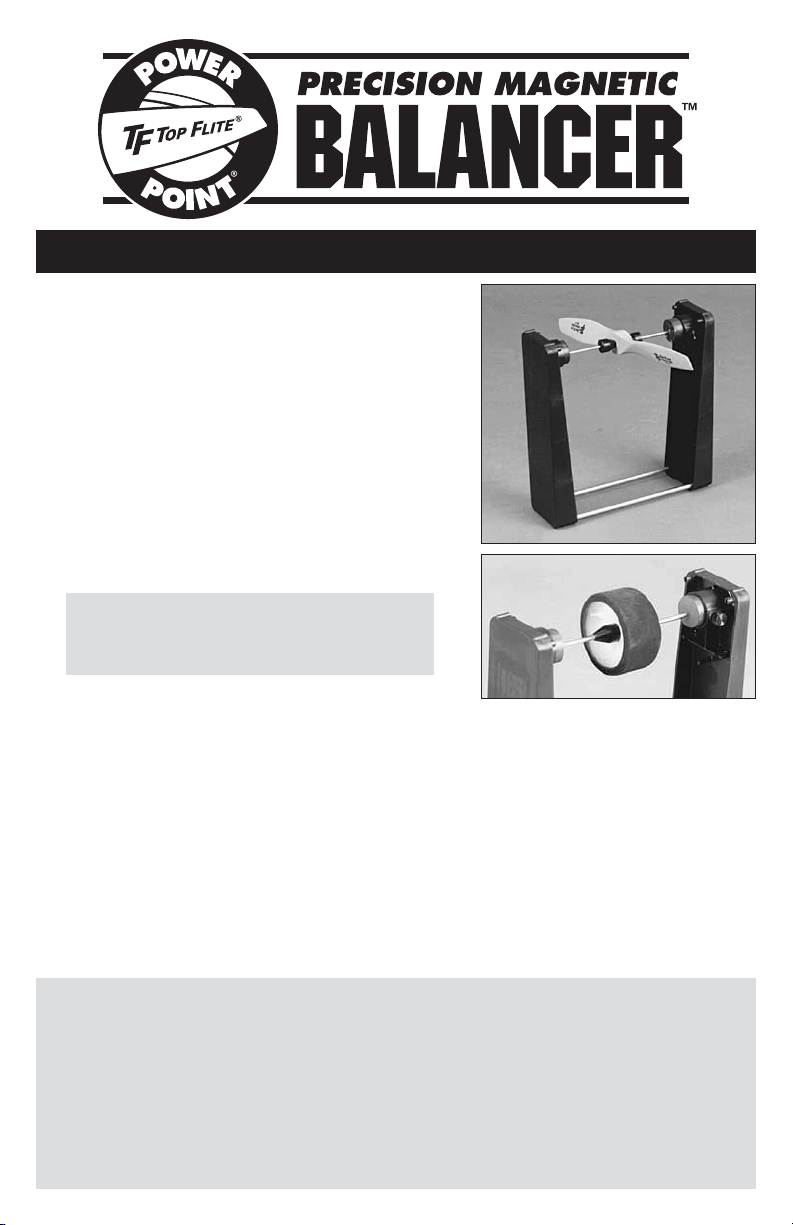
Thank you for purchasing the Top Flite
PRECISION MAGNETIC BALANCER. We think
you’ll agree that this ingenious design, which
uses powerful magnets to support the balancer
shaft, is the simplest, easiest-to-use and most
friction-free balancer available. The compact,
rugged case halves press together to provide a
convenient carrying case for the balancer parts.
Originally designed by Mark McCormack
IMPORTANT: Please read through this
booklet in its entirety before attempting
to assemble or use the balancer.
Use the Top Flite PRECISION MAGNETIC BALANCER to balance all spinning
•
components of your models (propellers, spinners, rotors, and even wheels!).
Accurately balancing these components will provide noticeably smoother, quieter
operation and will help extend the life of your models, radio gear and engines.
This balancer is capable of suspending objects up to a maximum weight of
•
approximately 5.5 ounces (156 grams). For example, this permits balancing up
to a 24x16 wood propeller. Your balancer may have slightly greater or less
capacity, depending on the strength of the magnets which varies slightly.
This booklet also explains how you can use your Top Flite PRECISION
•
MAGNETIC BALANCER as a wind speed indicator!
CAUTION - STRONG MAGNETS:
1. When removing the magnets from the carton and when handling the magnets,
use care to prevent them from snapping against each other. The ceramic magnet
material is brittle and a hard impact can result in chipping or breaking.
2. If not handled properly, the powerful magnets in this balancer may cause
temporary or permanent damage to TV SCREENS, COMPUTER MONITORS, VIDEO
TAPES, AUDIO TAPES, FLOPPY DISKS, TAPE STORAGE MEDIA, etc. To avoid
damage, keep the magnets at least 24 inches (600mm) away from components that
are sensitive to magnetic fields.
Page 2
ASSEMBLY
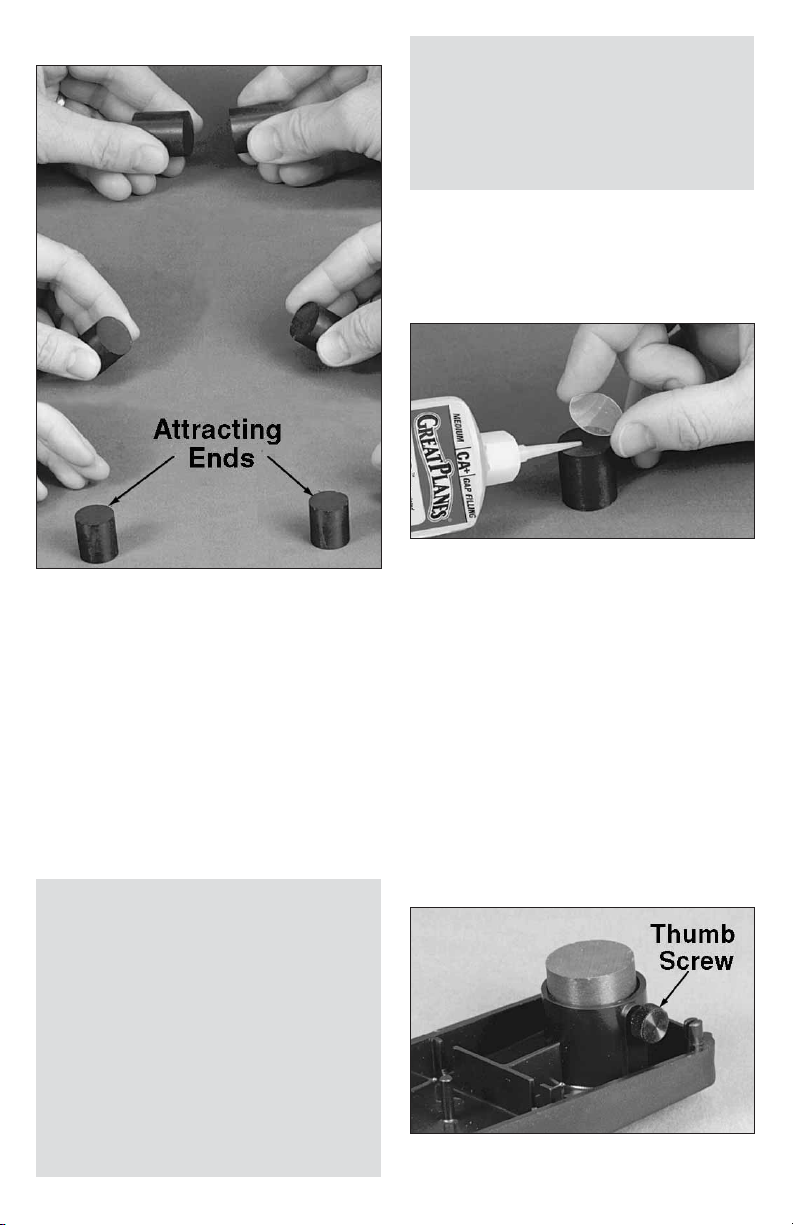
❑ 1.
Carefully remove the magnets from
the carton (see CAUTIONS on page 1).
Note how the magnets have a strong
attraction for one another. Note also how
they repel one another if one of the magnets
is turned end-for-end. When installed in the
magnet tubes, the magnets must be
positioned so they attract, not repel. Place
the magnets on your workbench with the
attracting ends pointing up. Separate the
magnets at least 12", so they won’t
accidentally snap together.
NOTE: To make the balancer as
friction-free as possible, it is very
important to provide smooth magnet
faces on which the balancer shaft
ends will spin. There are two ways of
doing this: 1) Glue the supplied clear
plastic disks to the magnet faces; or,
2) Polish the magnet faces to a
smooth and high gloss finish using
#400 and #600-grit wet-or-dry
sandpaper, followed by a rubbing/
polishing compound. Method #1 is
quick and easy and is described in
the following steps. Method #2 results
in a more scratch-resistant and
friction-free surface, but it requires
more work. The choice is yours which
method to use.
❑ 2. Remove all oil and foreign
particles from the exposed magnet
ends by wiping with a tissue dampened
with rubbing alcohol.
❑ 3. Glue one of the clear plastic
disks to each of the exposed magnet
ends by applying one drop of thick or
medium CA glue to the magnet. Center
the clear disk over the magnet and
press the disk down firmly until the CA
has spread evenly between the magnet
and the disk. Epoxy may be used
instead of CA, if you prefer. Wipe off all
excess glue before it cures, wiping
downward to avoid getting any glue on
the face of the disk. The disk will protect
the magnets and provide a smoother
bearing surface for the balancer shaft.
❑ 4. After the adhesive cures, place
the magnets into the magnet holder
Page 3
tubes in the plastic balancer cases.
When installed in the magnet tubes,
the magnets must be positioned so
they attract, not repel. Secure each of
the magnets in the magnet tubes with
a thumb screw. Do not over-tighten
the screws, as this can deform the
plastic and put the magnets out of
alignment. Slight screw pressure is all
that is required. NOTE: The 6-32
threads will self-tap into the plastic, but
you may cut threads with a 6-32 tap,
making the thumb screw easier to
adjust with your fingertips.
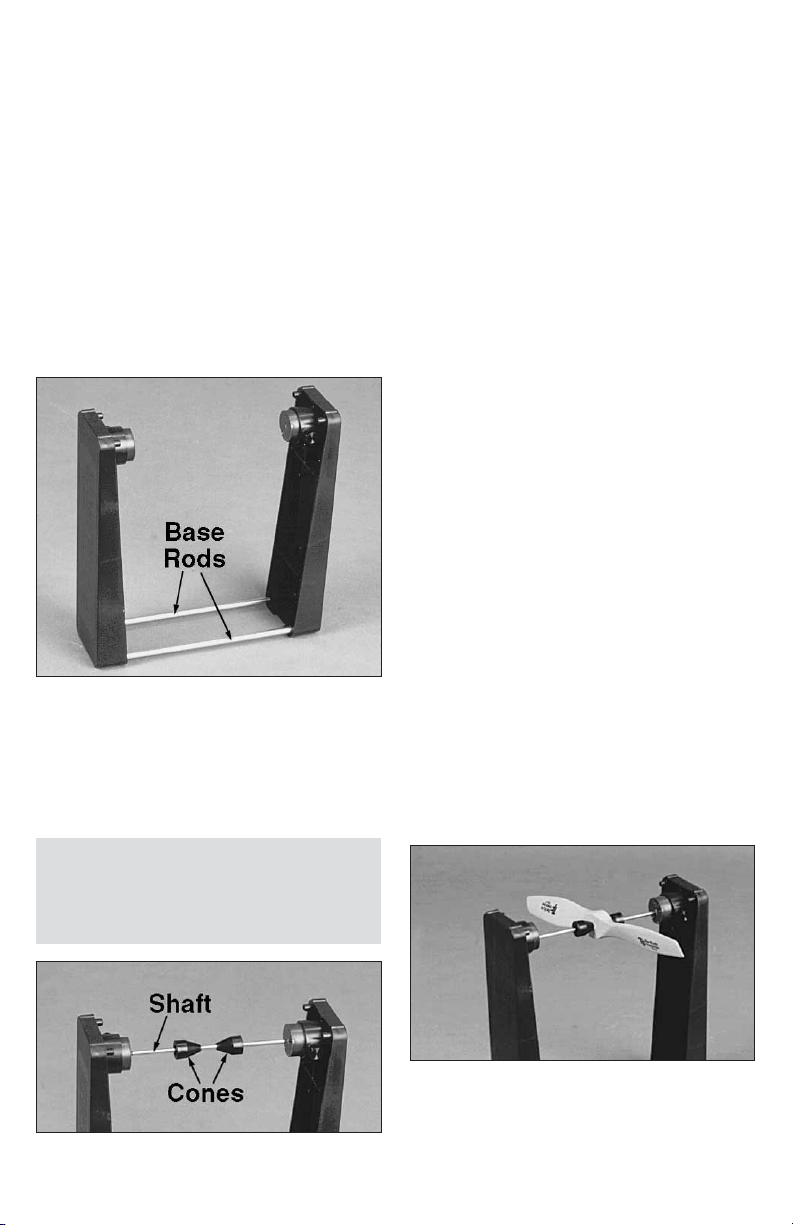
❑ 5. Push and twist the two long base
rods into the sockets in one of the case
halves. Assemble the second case
half to the other ends of the base rods.
Press firmly to seat the rods. Stand the
assembly up as shown.
shaft between the two magnets. The
balancer shaft will touch one magnet
and the other end will be suspended in
the magnetic field. For the lowest
possible friction, adjust the magnets
by loosening the thumb screws and
sliding the magnets in or out until the
gap is very small (approximately 1/32"
[0.8mm]) at the shaft end. Secure the
magnets in this position with the thumb
screws. NOTE: The smaller gap
provides lower friction and greater loadcarrying capability.
HOW TO USE YOUR TOP FLITE
PRECISION MAGNETIC BALANCER
The general principle of balancing is
to determine the “heavy side” of an
object and then to either remove
material from the heavy side, or add
weight to the light side (see safety
precautions below). Because the
Top Flite PRECISION MAGNETIC
BALANCER is so nearly frictionless,
you’ll wait a long time for a propeller
to stop swinging; therefore, you
should help the object to nearly stop
by applying light friction to the
balancer shaft with your finger. An
object is perfectly balanced if it can
be stopped and will remain stationary
in any position.
CAUTION: Do not allow the balancer
rod ends to snap hard against the
magnets, as this will damage the rod
ends or the plastic discs.
❑ 6. Slide the balancing cones onto
the balancer shaft. Place the balancer
How to balance SMALL AND MEDIUM
SIZE PROPELLERS: Slide the cones
onto the balancer shaft with the tapered
ends facing each other, trapping the
propeller between the cones. The object
Page 4

is to hold the item to be balanced
perpendicular and concentric to the
center line of the balancing shaft. Always
position the item to be balanced near
the midpoint of the balancing shaft for
best results. Determine which are the
heavy and light blades of the propeller.
BALANCING
Below are several commonly accepted
methods for balancing.
Method 1: Lightly sand the back side of
the heavier blade with fine sandpaper.
Recheck often to avoid removing too
much material.
Method 2: Apply a drop of medium CA to
the back side of the light blade and use a
piece of waxed paper or a plastic bag
over your finger to smooth the CA into a
thin film. Cure the CA with a light spray of
accelerator. Re-check the balance. Apply
more CA in thin layers until the propeller
is balanced. NOTE: Before adding glue
to a prop, make sure it is absolutely clean
and free of any oil residue.
CAUTION: Never remove material
in a way that will cause weak spots
or structural failure in the propeller.
How to balance HEAVY OBJECTS:
The capacity of the balancer can be
significantly increased by loosening the
thumb screw of one magnet. This will
allow both magnets to remain in contact
with the shaft. Allow one magnet to
“float” by leaving the thumb screw
loose. The friction between the shaft
and the magnets increases in this
mode, but balancing accuracy will not
be significantly affected with heavy
objects. Also, keep in mind that large
propellers do not have to make a full
revolution to enable balancing.
Method 3: Balance by sanding material
from the very end of the heavy blade.
This will avoid changing the airfoil shape
and avoid the possibility of weakening
the blade. NOTE: Do not attempt to
remove material by carving with a knife,
as this can leave cuts where cracks can
begin to form.
A prop is truly balanced if it can be
stopped and will remain stationary in
any position. If the prop comes to rest in
a level position, but is still obviously out
of balance (hole slightly off-center), you
may need to add weight to the lighter
side of the hub (see method 2). Do not
remove material from the hub. This
could weaken the prop, making it unsafe.
How to balance THIN OBJECTS (such
as spinner backplates), or a propeller
with a LARGE HOLE: For this
application, the tapered ends of the
cones would probably touch each other
before centering the object on the shaft,
so you’ll have to turn one of the cones
around (both cones facing the same
direction). This configuration does not
Page 5

hold the object as securely, so check the
cones frequently to make sure they are
tight against the object while balancing.
BALANCING SUGGESTIONS: To
balance a spinner, balance the backplate
first. Mark the light side (up), then
remove material from the heavy side by
drilling several shallow holes in the
backplate. Don’t drill through the
backplate and don’t drill where it will
weaken the structure. Repeat by trial
and error, until the backplate balances
perfectly. If the spinner cone has a front
hole, you can now join the backplate and
the cone on the balancer, to determine
the balance of the cone. To balance the
cone, carefully remove material from the
inside of the cone with a piece of
medium-grit sandpaper, being careful
not to remove so much material in one
place that it would weaken the cone.
NOTE: Spinners that do not have a hole
in the front of the cone do not lend
themselves to balancing, so in this case
just balance the backplate.
balancer using the method described
above and doing so will make a big
difference in the smoothness and
handling of your car. Certain car wheels
which have large diameter holes (such
as 1/10 scale on-road rear wheels) will
also require the use of an inexpensive
adapter, such as the DuraTrax®
#DTXC9581 BBS Wheel Adapter
(available from your hobby dealer),
which reduces the center hole to a size
that this balancer can accommodate.
Another way to balance rear on-road
wheels is to mount them to an extra left
diff side from your model.
When balancing car wheels,
safety is of utmost importance.
Do not attempt to balance car
wheels by sticking pins into the
rubber, as these can come loose.
Also, a spinning wheel with any
protruding metal can be very
hazardous to a person holding the
car. Self-adhesive lead tape works
great for balancing wheels. Check
with your hobby dealer or a golf
supply store for this type of tape.
Consult with your local hobby dealer
and track owner for methods that
are acceptable in your area.
TIPS FOR ULTRA-PRECISION
BALANCING:
If you need to balance small objects
with high precision, such as boat
propellers, you can follow this
procedure to increase the precision of
your balancer:
How to balance CAR WHEELS: Most
car wheels can be balanced with this
1. Examine the balancer shaft ends
with a magnifying glass. The shaft ends
should be concentric with the shaft
centerline and should not be blunt or
scratched. If a careful inspection of the
shaft ends reveals any imperfections,
you may carefully true up the points
Page 6

with a knife-sharpening stone, then
polish the points with 600-grit
sandpaper followed by rubbing
compound. The smoother the points,
the less friction. However, don’t
sharpen the points too much. Leave a
very small polished radius at the tip.
2. Before using the balancer, spread a
very thin film of oil on the magnet ends.
3. Check the balancer shaft for
straightness by rolling it slowly on a
piece of clean, dust-free plate glass. If
the shaft it bent, you’ll be able to see
light under the shaft as you roll it on the
glass. If the shaft has any significant
bend, it will not balance accurately.
Straighten the shaft by carefully
bending it. You can check the trueness
of the shaft by placing it on the balancer
without the cones.
4. Balance each individual balancer
cone, one at a time.
5. Your balancer is now ready to be
used for high precision work.
PROPER CARE OF
YOUR BALANCER
Place all components into the case
•
halves in the positions shown in the
photo. Press on the ends of the rods
(not in the middle) when storing, to
prevent bending. We recommend
storing one base rod in each case
half, for minimum case distortion.
If the balancer parts become exposed
•
to water, dry them thoroughly. Do not
close the balancer case halves
together with metal parts inside if there
is moisture in the case, as this can
result in corrosion of the metal parts.
Do not drop the magnets, or allow the
•
magnets to snap together. NOTE: If
you should happen to break a magnet,
you may glue the magnet pieces back
together with epoxy or CA glue, with
very little reduction in magnet strength.
Handle the balancer shaft with care.
•
It is made of soft steel (for high
magnetic attraction) which will bend
easily if handled roughly. When
pushing the shaft into the storage
slots in the case, push down near
both ends of the shaft, rather than at
the middle. Also, when removing the
shaft from the case, pull up near the
ends. Don’t let the shaft snap hard
against the magnets, as this will blunt
and deform the shaft ends.
When disassembling the balancer,
•
gently twist the base rods as you pull
them out.
Always open the case halves by
•
popping both ends open with a coin.
Don’t try to force the halves open
from one end only.
Do not subject the balancer to high
•
temperatures, above 120°F (49°C),
such as on the dashboard of a closed
automobile on a hot, sunny day, as
high temperatures may deform the
plastic and permanently reduce the
strength of the magnets.
If you need more friction or “holding
•
power” between the shaft and the cones
(for balancing heavy objects), try
cleaning the shaft with rubbing alcohol
or solvent. If you still need additional
friction, try roughening the plated surface
of the shaft with 320-grit sandpaper.
Page 7

MODIFICATION
In the years since its introduction, users
have informed us of various useful
modifications they have discovered. One
particularly useful one is to drill out the
Base Rod holes in one of the balancer
cases with a 3/16" drill bit, allowing the
two halves of the case to be positioned
closer together. Doing this makes it
possible to suspend a Great Planes
Fingertip Prop Balancer (GPMQ5000),
which has a threaded shaft that will hold
some items more securely.
HOW TO USE YOUR BALANCER AS
A WIND SPEED INDICATOR
(ANEMOMETER)
A unique feature of the Precision
Magnetic Balancer is its ability to read
the wind speed. Because of its nearly
friction-free design, it can determine
the wind speed to within 2 mph. All you
need is a photocell tachometer and a
balanced Top Flite 11 x 8 Power Point
prop. Any tachometer will work to read
the wind speed, but the Hobbico
Digital Mini Tach (HCAP0401) is ideal.
You can temporarily mount it on the
balancer which will allow you to set the
unit down and read the wind speed
without having to hold any of the
components.
PROCEDURE
Mount the 11 x 8 Power Point prop on
the balancer shaft and place the shaft
between the magnets. Adjust the
magnets if necessary until the shaft is
touching only one magnet. For stronger
winds, adjust the Magnets so they
touch both ends of the shaft.
Place the balancer unit on a flat surface
(or hold it) in free flowing air so the
back of the prop is facing the direction
the wind is coming from. Turn on the
tach and read the wind speed. The
wind speed with the 11 x 8 Power Point
prop will be the RPM divided by 100.
The Hobbico Digital Mini Tach reads
RPM in thousands so the wind speed
will be in tens. For example, a reading
of 0.5 on the tach is 5 mph. A reading
of 18.8 on the tach is 188 mph (in which
case you should not fly) and so on.
To temporarily mount the Hobbico Digital
Mini Tach on the balancer, use a piece of
Page 8

2" length of self-adhesive Velcro® near
the middle of one balancer case half.
Position another piece of Velcro® on the
Hobbico Digital mini-tach so that the
sensor faces the propeller blade.
NOTE: The Top Flite 11 x 8 Power
Point prop is the best prop we have
found that will give an accurate wind
speed reading without having to use
a calculator. Other props will work but
you will have to use the following
formula to determine the wind speed.
The accuracy may also be affected
due to the different efficiencies of
prop designs and pitches, but the
results will be reasonably close for
approximating the wind speed.
Wind Speed (in MPH) = RPM x Pitch
of the prop(in inches) x .00114
PARTS LIST
PART # UNITS DESC.
NYLON92 ...........2 ...............Case Half
WIRES80 ............1 .......Balancer Shaft
METAL058 .......... 2 .................. Magnet
WIRES81 ............2 ...............Base Rod
SCRW102 ...........2 ........ Thumb Screw
NYLON97 ...........2 ......................Cone
PSDC001 ............2 ..............Clear Disk
Visit our website for prices and
ordering information:
www.top-flite.com/manuals/index.html
We accept Visa and MasterCard. Note:
Parts and prices subject to change
without notice.
Top Flite Model Mfg.
3002 N Apollo Drive, Suite 1
Champaign, IL 61822
Ph: (217) 398-8970
Fx: (217) 398-7721
E-mail: partssupport@top-flite.com
© 2011 Hobbico®, Inc. All rights reserved. TOPZP01 V2.1
 Loading...