

Page 1

Cover_webtalker6000.indd 1 27/04/2007 15:31:01
Page 2
A
)
1
B
a) b) c)
2)
C
R
3)
D
E
5)
6)
4)
100-240V
F
R
7)
10 min.
Cover_webtalker6000.indd 2 27/04/2007 15:31:02
Page 3

INSTALLATION GUIDE
ENGLISH ................................ 5
DEUTSCH ................................ 39
FRANÇAIS ............................... 77
ESPAÑOL ............................... 113
ITALIANO . . . . . . . . . . . . . . . . . . . . . . . . . . . . . . . 147
ENGLISH
PORTUGU
NEDERLANDS ............................
ÊS ............................. 183
221
DANSK ................................. 257
SVENSKA
. . . . . . . . . . . . . . . . . . . . . . . . . . . . . . . 291
SUOMI ................................. 325
POLSKI. . . . . . . . . . . . . . . . . . . . . . . . . . . . . . . . . . 359
PYCCK
ий ............................... 393
INSTALLATION GUIDE
3
Page 4

4
Page 5
ENGLISH
R
ENGLISH
INSTALLATION GUIDE
5
Page 6

Dear customer
ENGLISH
Thank you for purchasing our product. We hope you will enjoy
using it. Please read this document before you start using your new
Webtalker 6000 for Skype™. If you experience any difficulties,
please consult our support centre.
Conformity of the telephone with EU directives is
0470
confirmed by the CE symbol. We hereby declare that the
Webtalker 6000 comply with the essential requirements and
other relevant provisions of the R&TTE Directive 1999/5/EEC.
The declaration of conformity is available in the user manual at
www.topcom.net/cedeclarations.php
The Webtalker 6000 is covered by the European Directive
2002/96/EC which indicates that this product should not
be disposed of via the normal household
waste stream. To prevent possible harm to the environment or
human health, please separate this product from other waste
streams to ensure that it can be recycled in an environmentally
sound manner. For more details on available collection facilities,
please contact your local government office or the retailer from
whom you purchased this product.
Notes:
• This Installation Guide covers the basic installation process
and the most common features of your Webtalker. For more
advanced functionality descriptions you should consult the
User Manual found at
• Skype™, SkypeMe™, SkypeOut™, SkypeIn™, Skype
Voicemail™, the whole world can talk for free™, the Skype
logo and the S logo are trademarks of Skype™.
www.topcom.net/userguides.php
6
INSTALLATION GUIDE
Page 7

SAFETY INFORMATION
Intended Use
This telephone is designed for telephoning within a standard
telephone network and the Internet. Any other use is
considered unintended use. Unauthorised modifications or
reconstruction not described in this manual are not permitted.
Safety information
General
• Only use the power supply included with the product. Using
an unauthorised power supply will invalidate the product
guarantee and may damage the telephone. Only use the
following power supply for the Webtalker 6000: Salom SSW-
1328.
• Use only approved Nickel Metal Hydride (Ni-MH)
rechargeable batteries for the handset. Never use other
batteries or conventional alkaline batteries, as they could
cause a short-circuit or destroy the battery casing, or be
harmful to the health and cause personal injury. Use only
batteries recommended by the manufacturer.
• Even though the key lock is switched on, it is still possible to
make emergency calls (see instructions for details).
• Do not open the handset (other than to change batteries) or
base station. This could expose you to high voltages or other
risks.
• Radio signals transmitted between the handset and base may
cause interference with hearing aids.
• This product should not be used near emergency/intensive
care medical equipment and should not be used by people
with pacemakers.
• Do not install the base in bathrooms or shower rooms. The
handset and base are not watertight.
ENGLISH
INSTALLATION GUIDE
7
Page 8

ENGLISH
• Do not use the telephone in environments subject to
explosion hazard (e.g. auto paint shops).
Cleaning
• Simply clean the handset and base station with a damp (not
wet) cloth, or an anti-static wipe.
• Never use household polish, as this will damage the product.
• Never use a dry cloth as this may cause a static shock.
Environmental
• Do not expose the product to direct sunlight.
• The product may heat up when the batteries are being
charged. This is normal. However, we recommend that you
do not place the product on antique/veneered wood to avoid
damage.
• Do not stand your product on carpets or other surfaces which
generate fibres, or place it in locations preventing the free
flow of air over its surface.
• Do not submerge any part of your product in water and do
not use it in damp or humid conditions, such as bathrooms.
• Do not expose your product to fire, explosive or other
hazardous conditions.
• There is a slight chance that your product could be damaged
by a thunder storm. We recommend that you unplug the
power and telephone line cord and switch off your computer
during a thunder storm.
8
INSTALLATION GUIDE
Page 9

In this guide
IN THE BOX .................................... 10
YOUR HANDSET AT A GLANCE
HOW TO INSTALL THE BASE STATION
HOW TO INSTALL THE HANDSET
FIRST-TIME START-UP
GETTING STARTED WITH SKYPE
Create a new Skype account .................... 17
Sign in to Skype .............................. 19
Skype features supported by Webtalker ............ 20
Main display. . . . . . . . . . . . . . . . . . . . . . . . . . . . . . . . . 21
Main menu ................................. 23
CONTACTS
Add a Skype contact .......................... 25
Add a SkypeOut or landline contact ............... 27
Search for Skype users ......................... 29
MAKE AND RECEIVE CALLS
Call a Skype contact. . . . . . . . . . . . . . . . . . . . . . . . . . . 31
Dial a landline number ......................... 32
Receive a call ................................ 33
TROUBLESHOOTING
.................................... 25
............................ 15
............................. 34
(See left flap) ........ 11
(See right flap) . . 13
(See right flap) ...... 14
................... 17
....................... 31
ENGLISH
CONTENTS
9
Page 10

In the box
ENGLISH
• 1 cordless Webtalker handset
• 1 charging cradle for the handset with power supply
• 1 Webtalker base station
• 1 power supply for the base station
• 1 Ethernet cable
• 1 telephone cable
• 1 belt clip
• 1 Installation Guide
• 2 batteries (AAA; rechargeable)
• 1 SkypeOut voucher
• Telephone plug(s) (not all countries)
Should anything be missing, please contact your place of
purchase.
10
IN THE BOX
Page 11
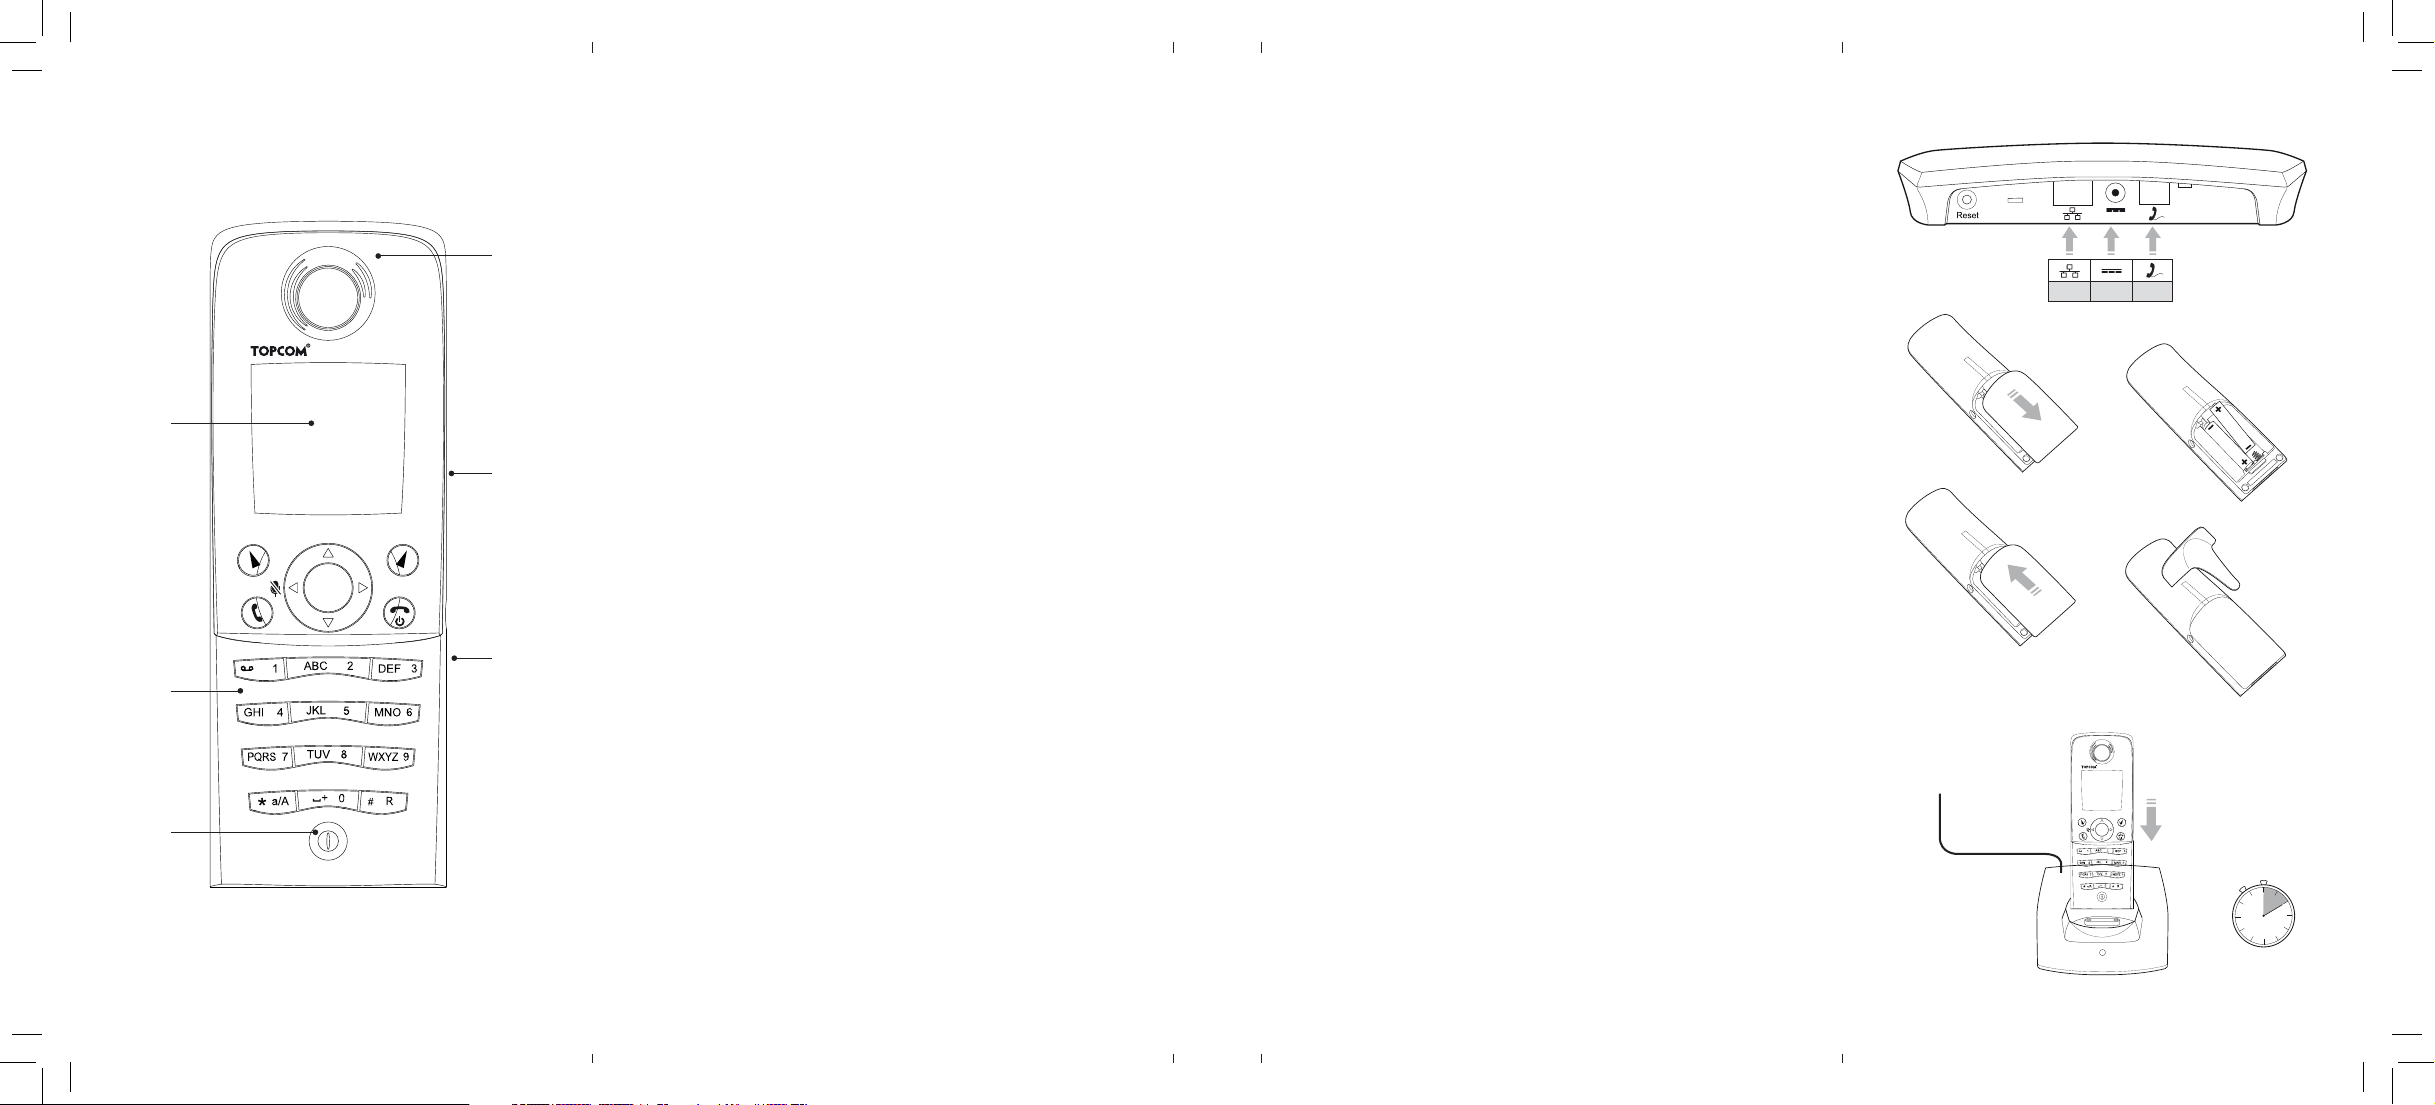
Your handset at a glance
Please refer to the left flap of this Installation Guide for illustration
for your handset at a glance.
NO. ITEM FUNCTION
A
Earpiece
B
Colour display
Displays the status of your handset.
ENGLISH
Loudspeaker/
C
ringer
Headset jack
D
connector
E
Keypad
F
Microphone
Left soft Key.
Selects the current menu item or confirms a setting,
depending on the current screen.
Right soft Key.
Cancels the last action or returns to the previous screen,
depending on the current screen.
Call key.
Initiates or answers a call.
End/power key/Skype status.
When in call, ends a call. Turns the phone on or off by
pressing and holding. From idle, provides access to Skype
status menu with a short key press.
For handsfree speakerphone and
ringing (on the back of the
Webtalker).
For 2.5 mm jack (on the side of the
Webtalker).
Keys used for entering digits 0-9
and letters A-Z.
YOUR HANDSET AT A GLANCE
11
Page 12

ENGLISH
Navigation keys/Enter key.
The outer keys navigate up, down, left and right.
The Enter key in the centre selects/confirms a setting.
When you are in text editor, changes to lower-case,
upper-case or numeric entry.
When you make a landline call, you can send a #-key
by pressing the key shortly. If you wish to switch
between an ongoing call and a call waiting, press the
key down for a longer period of time. When you are
in text editor, provides a symbol table.
12
YOUR HANDSET AT A GLANCE
Page 13

How to install the base station
Please refer to the right flap of this Installation Guide for
illustrations for the installation of the base station.
a) Connect on the base station to a LAN (Local Area
Network) port on your broadband connection (modem,
router, hub, switch etc.) using the provided Ethernet cable.
b) Connect the power adapter to an active power outlet and
connect on the base station to the power adapter
(12 V, 300 mA, 3.6 VA).
c) Connect on the base station to a telephone socket
(if available), using the provided telephone cable and
optional plug.
The light indicator on the front has two functions:
• Always on confirms that the Ethernet cable is connected.
• Blinking indicates that the Ethernet cable is not connected.
ENGLISH
HOW TO INSTALL THE BASE STATION
13
Page 14

How to install the handset
ENGLISH
Please refer to the right flap of this Installation Guide for
illustrations for the installation of the handset.
1) Push the top of the battery compartment cover on the
back of the handset inwards and downwards.
2) Insert the two batteries provided with the handset, making
sure that their plus and minus ends are facing the same
way as shown in the illustrations on the sides of the battery
compartment.
3) Slide the battery compartment cover shut.
4) Affix the belt clip as illustrated.
5) Connect the power adapter of the charging cradle to an
active power outlet.
6) Place the handset in the charging cradle to charge the
batteries.
7) Wait for 10 minutes and the batteries will be ready for
first-time start-up.
Notes:
• After completion of the full installation procedure we
recommend that you charge the batteries fully before first
use. This takes approximately 6 hours.
• Normally, you need to be within 50 m of the base station
to connect successfully.
14
HOW TO INSTALL THE HANDSET
Page 15
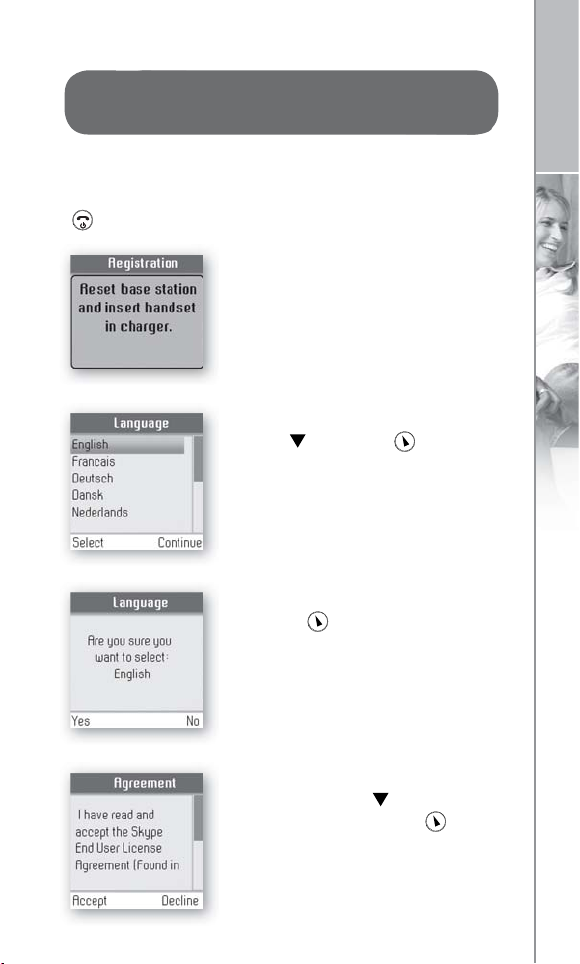
First-time start-up
You must complete the following steps the fi rst time you use
your Webtalker. Start by turning on the handset by pressing
until the handset turns on.
1) Reset the base station by pressing
the button on the back of the unit
and insert the Webtalker in the
cradle in order to register with the
base station. The Webtalker screen
informs you when ready for next step.
2) Find your preferred language
using , then press to select
a language.
3) Confi rm your selection by
pressing .
ENGLISH
4) You are then directed to the Skype
Agreement. Use to read the
entire text and then press to
accept the agreement.
FIRST TIME START-UP
15
Page 16
ENGLISH
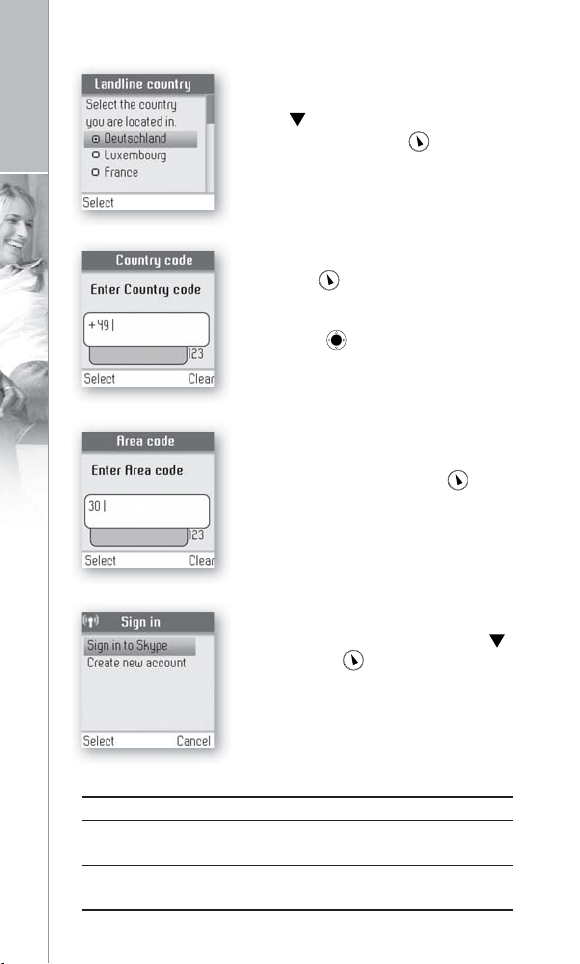
5) You are then directed to Country
setting for landline confi guration.
Use to fi nd the country you are
located in, then press to select
your country.
6) Confi rm the country code setting by
pressing . Alter your country code
by inserting “+” followed by the
country code number of your choice
and press .
7) If your country uses area codes,
please enter the area code following
the above procedure. Press to
continue.
8) Choose Sign in to Skype or
Create new account by pressing
followed by .
Notes:
• The country setting confi gures the landline telephony port.
• If your country setting is not confi gured correctly,
emergenc y calls may not work properly.
• Emergency calls via the landline are only possible if power is
applied to the base station and the landline is properly connected.
16
FIRST TIME START-UP
Page 17
Getting started with Skype
You can confi gure your Webtalker with an existing Skype
account during the fi rst-time installation, or you can optionally
create a new Skype account. You only need a Skype username
and password defi ned by you to create a new account. You
can enter further account details when your Webtalker has
been confi gured and is online.
Note:
• Skype does not allow emergency calls. Such calls are
therefore always routed to the traditional telephony port.
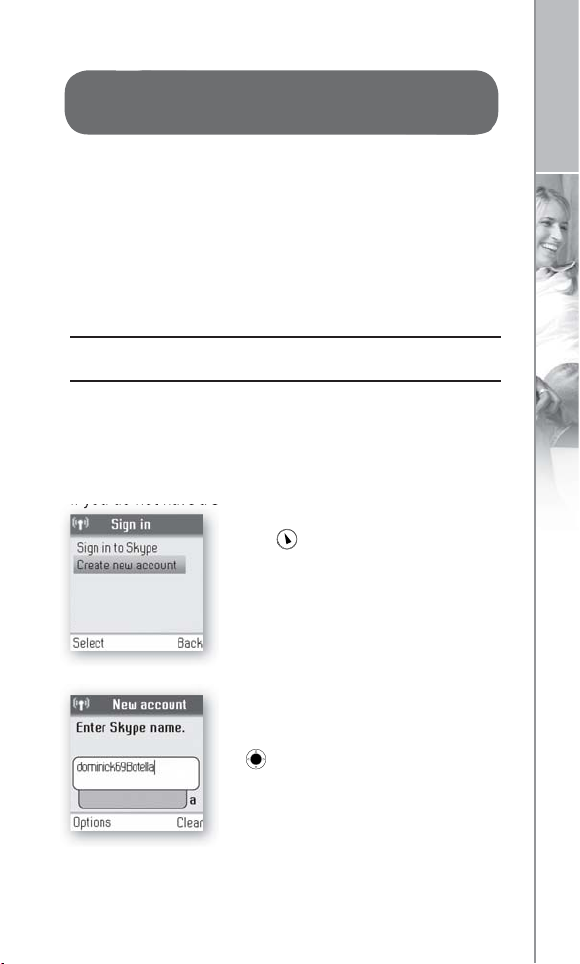
■ Create a new Skype
account
If you do not have a Skype account, follow this procedure.
1) Use to select Create new
account.
ENGLISH
2) Use the keypad to enter a Skype
name of your own choice and press
.
GETTING STARTED WITH SKYPE
17
Page 18

3) Use the keypad to enter a password
and press . You are asked to
ENGLISH
confi rm the password by entering it
again.
4) You are then directed to the Skype
Agreement. Use to read the
entire text and then press to
accept.
Notes:
• Use to change to lower-case, upper-case or numeric
entry when entering your Skype name and password.
Skype names can be 6-32 characters. You can use any mix
of upper- and lower-case characters, numbers and
punctuation marks. You cannot use spaces and your name
cannot begin with a number or punctuation mark. If the
name is already in use, you will be prompted to try another
name.
• Use
to input symbols from the symbol table.
• Passwords can be 4-20 characters. You can use any mix of
upper- and lower-case characters, numbers and punctuation
marks. You cannot use spaces, your password cannot
begin with a number or punctuation mark, and you cannot
use your Skype name as a password.
• Please be patient as the creation of your Skype account
may take several minutes to perform.
18
GETTING STARTED WITH SKYPE
Page 19

■ Sign in to Skype
When you have a Skype account, you can sign in to Skype.
Please have your Skype name and password ready before you
sign in and beware of lowercase/upper-case and special
characters.
1) Use to select Sign in to Skype.
2) Use the keypad to enter your Skype
name and press .
3) Use the keypad to enter your
password and press .
ENGLISH
4) You are now asked whether you
want to save your Skype name and
password for automatic sign-in.
Press to accept, to decline.
GETTING STARTED WITH SKYPE
19
Page 20
Notes:
• Use to change to lower-case, upper-case, or numeric
ENGLISH
entry when entering your Skype name and password.
• Use
• If you have forgotten your Skype password go to
www.skype.com and choose “Sign in”. Then choose
“Forgot your password?” and follow the directions on
your computer screen.
• Please be patient as synchronization of Skype contacts
might take several minutes.
Skype features supported
■
to input symbols from the symbol table.
by Webtalker
After you have created your Skype account, you can call other
people with Skype accounts for free. Skype also offers
additional subscription features, including:
SkypeOut
SkypeIn
Skype
Voicemail
All of these features are supported by your new Webtalker and
are available at www.skype.com.
Please visit www.topcom.net to explore which future Skype
features your Webtalker supports.
20
GETTING STARTED WITH SKYPE
Allows you to make calls to ordinary
landline and mobile phones.
Provides you with an ordinary phone
number for receiving Skype calls on your
Webtalker from ordinary landline and
mobile phones.
Skype Voicemail allows you to send and
receive voicemail messages and record a
greeting.
Page 21
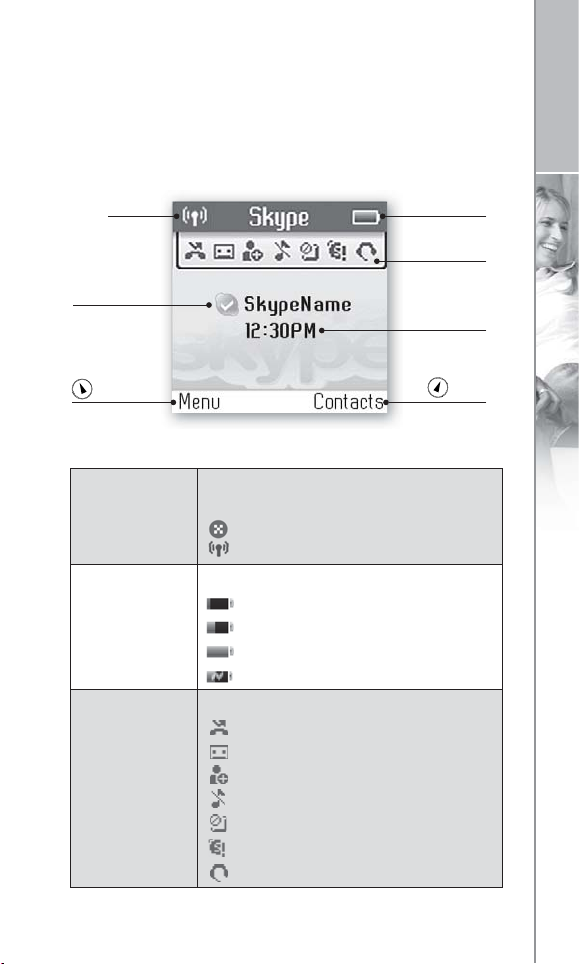
■ Main display
The main display of your Webtalker provides various status
indicators and access to the Skype menu-based interface. The
illustration below shows the main screen and its elements.
ENGLISH
Radio
signal Status
Skype™
online status
Action
Radio signal
status
Battery status
Notifi cations
Battery status
Notifi cations
Current time
Action
Indicates the strength of the radio
signal.
No radio signal.
Radio signal.
Indicates the status of the battery.
Low level.
Partially charged.
Fully charged.
Charging.
Displays notifi cation icons.
Missed call.
New voicemail.
Exchange contact details request.
Silent mode is active.
Keypad locked.
Skype credit is close to expiry.
Headset connected.
GETTING STARTED WITH SKYPE
21
Page 22

Skype online
status
ENGLISH
Indicates your current Skype online
status.
Online.
Away.
Not available.
Skype Me. Available for calls from
anyone.
Do not Disturb. Indicates you are
busy.
Offl ine (not signed in).
Invisible. Still online, but unseen by
others.
Current time
Skype credit
Action
The currently set time.
Your current Skype credit balance.
Left soft key.
Selects the current menu item or confi rms
a setting, depending on the current
screen.
Action
Right soft key.
Cancels the last action or returns to the
previous screen, depending on the current
screen.
Short cut to outgoing calls.
Short cut to all call history.
Short key press is a short cut to the
Skype status menu.
Short cut to search Skype users.
Mute ringer.
22
GETTING STARTED WITH SKYPE
Page 23
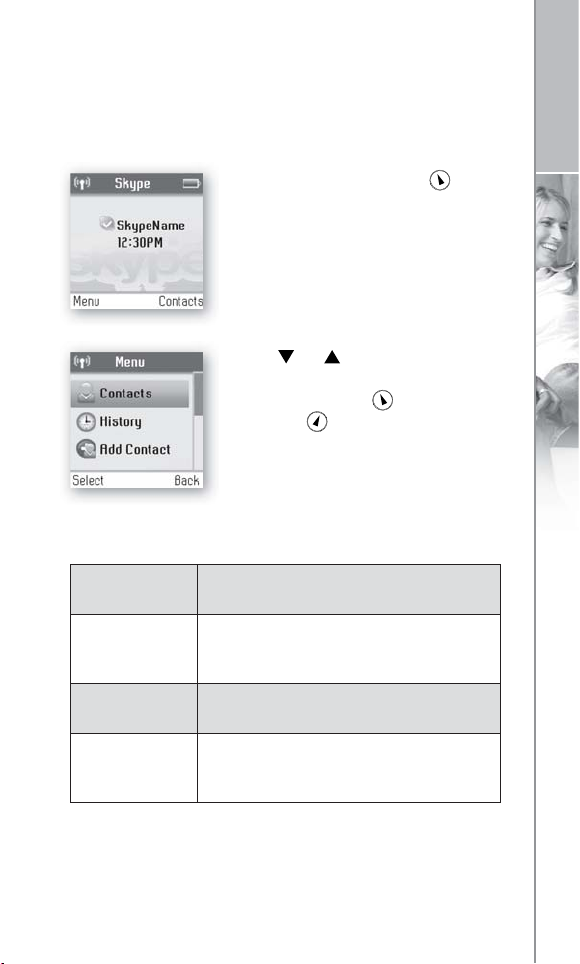
■ Main menu
The main menu provides easy access to all of your Skype and
Webtalker settings.
1) From idle screen just press to
enter the main menu.
2) Use or to navigate and
highlight an item.
Select by pressing or go back by
pressing .
The following table outlines the main menu items:
ENGLISH
Contacts
History
Add Contact
Status
Your contact list and the current Skype
status of your contacts.
Your calls, missed calls, incoming
and outgoing calls, voicemails and
exchange contact details.
Adds a Skype user or SkypeOut number
to your contact list.
Sign in to Skype, create a new account,
change your profi le, change your
password, choose auto sign-in.
GETTING STARTED WITH SKYPE
23
Page 24

Search
ENGLISH
Services
Settings
Searches for Skype contacts online.
View Skype credit, SkypeIn and Skype
Voicemail status.
Settings for call divert, privacy, sounds, time
and date, manage blocked users, cordless
settings, phone settings, information and
advanced settings.
24
GETTING STARTED WITH SKYPE
Page 25
Contacts
Your contact list displays all of the names you can make calls
to. If you have an existing Skype account, your contact list is
automatically downloaded when you sign in. If you are new to
Skype and have just created an account, your contact list will
be empty. You will need to add contacts to your list.
Skype protects the privacy of its users by requiring exchange
contact details on names that you wish to add to your contact
list. When you add a name to your list, an exchange contact
details request is sent to the user. The user can accept or
decline the request. When a request is accepted, you can see
when your contacts are online and make calls to them. You
can also view their personal profi le details.
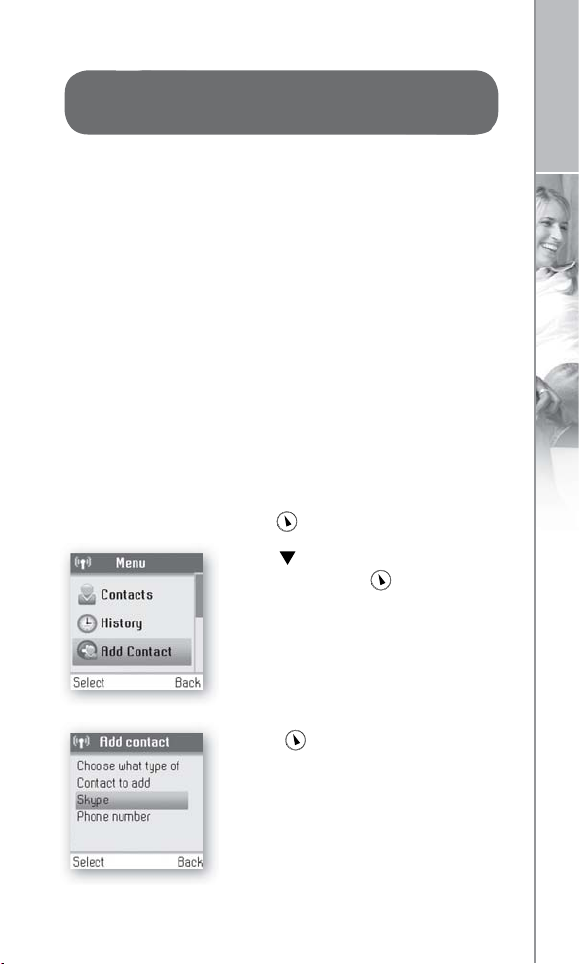
■ Add a Skype contact
To add a Skype contact, press to select Menu, then:
1) Use to go to Add Contact,
select by pressing .
ENGLISH
2) Press to select Skype.
CONTACTS
25
Page 26
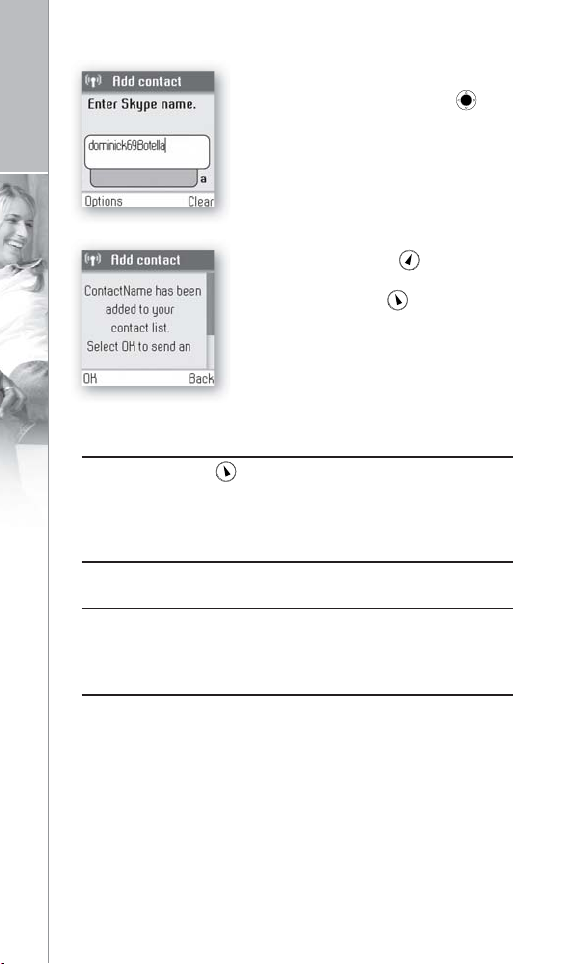
ENGLISH
3) Use the keypad to enter the Skype
name or full name and press .
4) Confi rm by pressing
back or
send a request to exchange contact
details by pressing .
Notes:
• After you press in step 4, an exchange contact details
request is sent to the contact. When it has been sent, a
confi rmation message is displayed. The name is added to
your contact list, and when accepted by the contact it will
change status.
• Please be patient as synchronization of Skype contacts
might take several minutes.
• Use “echo123” to test your Skype connection.
Add “echo123” to your contacts. Calling echo123 will
launch an automated testing robot that allows you to
record and play back sound.
26
CONTACTS
Page 27
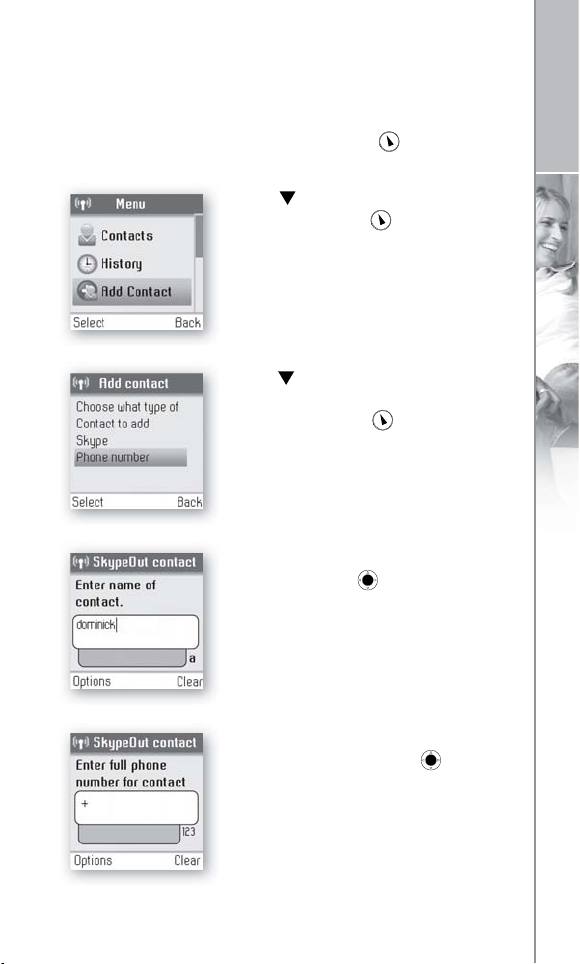
Add a SkypeOut or
■
landline contact
To add a SkypeOut or landline contact, press to select
Menu, then:
ENGLISH
1) Use
2) Use to enter a phone number for
use with SkypeOut or landline.
Select by pressing .
3) Use the keypad to enter the contact’s
4) Use the keypad to enter the full
by “country code”, “area code”
to go to Add Contact,
select by pressing .
name and press .
phone number and press .
SkypeOut numbers (even local
numbers) must be entered in the
following format: “+” followed
and “number”.
CONTACTS
27
Page 28

Notes:
• Use to change to lower-case, upper-case or numeric
ENGLISH
entry.
• Use to input symbols from the symbol table.
• SkypeOut allows you to make calls to traditional landline
and mobile phones. Go to www.skype.com to learn more
about SkypeOut.
28
CONTACTS
Page 29
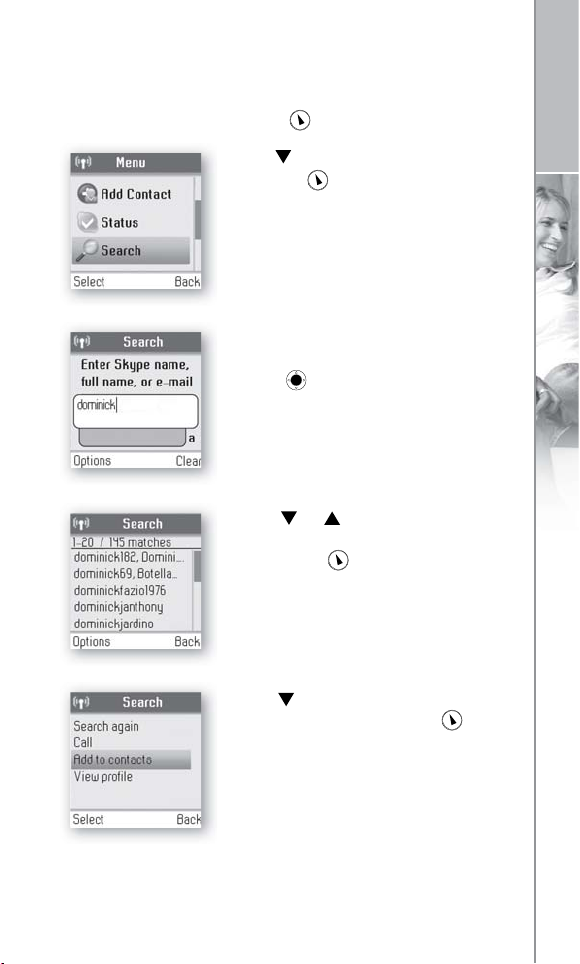
■
Search for Skype users
To search for Skype users, press to select Menu, then:
1) Use to go to Search, select by
pressing .
2) Use the keypad to enter the Skype
name or full name name and
press .
3) Use or to navigate and
highlight a name from the list, select
by pressing .
4) Use to highlight Add to
contacts, select by pressing .
ENGLISH
CONTACTS
29
Page 30

Notes:
• Use to change to lower-case, upper-case or numeric
ENGLISH
entry.
• Use to input symbols from the symbol table.
• Other options available during a search include:
Search again – Repeats the search.
Call – Calls the selected name.
View profile – Displays the selected name’s profile.
•
You can stop a search at any time by pressing
.
30
CONTACTS
Page 31

Make and receive calls
The procedures for making and receiving calls apply to any type
of call – Skype-to-Skype calls, SkypeOut calls and SkypeIn calls.
Furthermore, you can use your phone for landline telephony.
■ Call a Skype contact
To make a Skype call:
ENGLISH
1) Press
2) Use or to select a contact
from the list.
3. Press to call. Wait for the call to
connect, ring, and be answered.
Press to end the call.
to select Contacts.
MAKE AND RECEIVE CALLS
31
Page 32

■ Dial a landline number
To dial a landline number:
ENGLISH
1) Use the keypad to enter the
number. Press to call the
number.
2) Use to select landline or
SkypeOut and press .
3) Wait for the call to connect, ring and
be answered. Press to end the
call.
Notes:
• You can select a preferred line for dialing by going to
Menu > Settings > Phone settings > Preferred line. Choose
one of the following options:
1) Always landline
2) Always SkypeOut
3) Always ask
32
MAKE AND RECEIVE CALLS
Page 33

■ Receive a call
When someone calls you, the ringing tone sounds and the
incoming call message is displayed. To receive a Skype, SkypeIn
or landline call:
1) Press to receive the call.
2) Press to end the call.
ENGLISH
MAKE AND RECEIVE CALLS
33
Page 34

Troubleshooting
ENGLISH
Check www.topcom.net for more information.
PROBLEM POSSIBLE CAUSE
My Webtalker
does not work
• The software needs to be updated
to the latest version.
I cannot sign in to
Skype
Screen displays:
“Network connection
lost” and the base
station light
indicator is blinking
slowly
I cannot make a
Skype call
No display
• Skype does not accept your Skype
name and/or password.
• The Ethernet cable is not connected.
• The Ethernet cable is not connected.
• The router or the modem is not
turned on.
• The base station cannot retrieve the.
IP address
• You are not signed in as a Skype user.
• The batteries are discharged.
34
TROUBLESHOOTING
Page 35

This is a guide to the most common problems that may occur
during installation or use of your Webtalker.
You can easily solve some of the problems yourself, but may
need your broadband service provider or landline provider to
help you with others.
SOLUTION
• Go to the Setting menu and select Advanced settings and
Firmware update. Select the latest software version and
confirm to update.
• Check if you are using the correct Skype name and
password. Beware of upper-case/lower-case letters and
numeric numbers.
• Check that the Ethernet cable between on the base
station and the LAN port on your broadband connection
(modem, router, hub, switch etc.) is connected properly.
• Check that the Ethernet cable between on the base
station and the LAN port on your broadband connection
(modem, router, hub, switch etc.) is connected properly.
• Turn on the power to the modem or router and reset the
base station.
ENGLISH
• In Internet settings, check that the IP mode corresponds to
the IP mode of your Internet connection or you are behind
a proxy server. Check the user manual for the proxy settings
guidance.
• Go to the status menu and select Sign in as a Skype user.
From there refer to the section “Sign in to Skype” in this
guide.
• Charge or replace the batteries.
TROUBLESHOOTING
35
Page 36

PROBLEM POSSIBLE CAUSE
ENGLISH
Handset is not
registering
• Base station is not ready for
registration.
• The charging cradle is not
connected.
• There are no batteries in the
handset.
• The base station is not connected.
No connection
between handset
• You are out of range of the base
station.
and base station
• The handset is not registered.
• The base station is not connected to
power.
Handset on the
• The cradle is not powered.
charging cradle does
not charge
• The handset is not placed properly
in the charging cradle.
• The batteries are not inserted correctly.
Handset does not
ring
• The Skype status is set to offline or
do not disturb.
• The handset ringer may be off.
• The handset may be too far away
from the base station.
Notes:
•
This Installation Guide covers the basic installation process
and the most common features of your Webtalker.
36
TROUBLESHOOTING
Page 37

SOLUTION
• Reset the base station by pressing the key on the back of
the base station and try to register again.
• Make sure the power supply is properly connected to the
charging cradle and that the power is on.
• Make sure the batteries are correctly fitted into the handset.
Reset the base station and try to register again.
• Make sure that the power supply is properly connected to
on the base station and that the power is on.
• Move closer to the base station.
• Register the handset.
ENGLISH
• Make sure the power supply is properly connected to
on the base station and that the power is on.
• Connect the power adapter of the charging cradle to an
active power outlet.
• Place the handset correctly in the charging cradle.
• Check the position of the batteries.
• Set your Skype status to online.
• Increase the ringer volume.
• Move closer to the base station.
•
For more advanced functionality descriptions you should consult the
User Manual found at www.topcom.net/userguides.php.
TROUBLESHOOTING
37
Page 38

38
Page 39

DEUTSCH
R
DEUTSCH
INSTALLATIONSLEITFADEN
39
Page 40

Lieber Kunde,
DEUTSCH
Vielen Dank für den Kauf unseres Produkts. Wir wünschen Ihnen
viel Vergnügen mit dem Gerät. Bitte lesen Sie diesen Leitfaden
sorgfältig, bevor Sie Ihr neues Webtalker 6000 für Skype™ in
Benutzung nehmen. Falls Sie Fragen haben, nehmen Sie Kontakt
auf mit unserem Kundensupportcenter.
Das CE-Symbol bestätigt die Übereinstimmung des
0470
Gerätes mit EU-Richtlinien. Wir erklären hiermit, dass das
Webtalker 6000 den wesentlichen Anforderungen und anderen
relevanten Regelungen der Richtlinie 1999/5/EG entsprechen.
Die Übereinstimmungserklärung ist im Benutzerhandbuch auf
www.topcom.net/cedeclarations.php
Das Webtalker 6000 entspricht der EU-Richtlinie 2002/ 96/
EG, was bedeutet, dass das Gerät nicht mit dem
gewöhnlichen Hausmüll entsorgt werden darf. Um Umweltoder Gesundheitsschäden vorzubeugen, sollte das Gerät
getrennt entsorgt und auf umweltfreundliche Weise wiederverwendet werden. Weitere Auskünfte zur Entsorgung erhalten Sie
bei der Sammelstelle vor Ort oder beim Händler.
Hinweise:
• Dieser Installationsleitfaden erläutert den allgemeinen
Installationsvorgang und die wichtigsten Funktionen Ihres
Webtalker. Detailliertere Funktionsbeschreibungen finden Sie
im Benutzerhandbuch auf www.topcom.net/userguide.php.
Skype™, SkypeMe™, SkypeOut™, SkypeIn™, Skype Voice-
•
mail™, the whole world can talk for free™, das Skype-Logo
und das S-Logo sind Warenzeichen von Skype™.
40
INSTALLATIONSLEITFADEN
Page 41

Sicherheitshinweise
Gebrauchszweck
Dieses Telefon wurde entwickelt für Telefonie in Standardtelefonnetzen und im Internet. Jede andere Verwendung ist als
zweckwidrig anzusehen. Nicht autorisierte Veränderungen oder
Reparaturmaßnahmen, die nicht in dieser Anleitung beschrieben
sind, sind nicht zulässig.
Sicherheitshinweise
Allgemeines
• Nur das mitgelieferte Stromversorgungsgerät verwenden. Die
Verwendung eines nicht zulässigen Stromversorgungsgerätes
führt zum Erlöschen der Garantie und kann zu Schäden am
Telefon führen. Nur das folgende Stromversorgungsgerät für
das Webtalker 6000 verwenden: Salom SSW-1328.
• Nur zugelassene Nickel-Metallhydrid-Akkus (Ni-MH) für das
Handgerät verwenden. Nie andere Akkus oder herkömmliche
Alkaline-Batterien verwenden, da es dadurch zu einem
Kurzschluss oder zu Schäden am Akkugehäuse kommen kann.
Außerdem besteht die Gefahr von Gesundheitsschäden und
Verletzungen.
Nur vom Hersteller empfohlene Batterien verwenden.
• Auch wenn die Tastensperre eingeschaltet ist, können Notrufe vorgenommen werden (siehe Handbuch für Details).
• Öffnen Sie niemals das Mobilteil (außer zum Akkuwechsel)
oder die Basisstation. Sie setzen sich sonst Hochspannung
und anderen Gefahren aus.
• Die zwischen dem Mobilteil und der Basisstation ausgewechselten Radiosignale können möglicherweise die Funktion von
Hörhilfen beeinträchtigen.
• Dieses Produkt sollte nicht in der Nähe von notfall- oder
intensivmedizinischen Ausrüstungen oder von Personen mit
Herzschrittmachern verwendet werden.
DEUTSCH
INSTALLATIONSLEITFADEN
41
Page 42

DEUTSCH
• Installieren Sie die Basis nicht in Badezimmern oder
Duschräumen. Mobilteil und Basis sind nicht wasserdicht.
• Benutzen Sie das Telefon nicht in explosionsgefährdeten
Umgebungen (z.B. Autolackierereien).
Reinigung
• Verwenden Sie zur Reinigung des Mobilteils und der
Basisstation einfach ein feuchtes (nicht nasses) Tuch oder ein
Antistatiktuch.
• Verwenden Sie niemals Poliermittel, da diese das Produkt
beschädigen.
• Verwenden Sie nie ein trockenes Tuch, da dadurch schädliche
statische Ladungen aufgebaut werden können.
Umwelt
• Setzen Sie das Produkt nicht direktem Sonnenlicht aus.
• Das Produkt kann sich erwärmen, wenn die Akkus geladen
werden. Dies ist normal. Um auf jeden Fall Schäden zu vermeiden,
empfehlen wir das Produkt nicht auf antikes oder
wachsbehandeltes Holz zu stellen.
• Stellen Sie das Produkt nicht auf Teppiche oder andere
Oberflächen, aus denen Fasern austreten können, und stellen
Sie es auch nicht dort auf, wo die freie Luftzufuhr zur
Oberfläche behindert wird.
• Tauchen Sie kein Teil des Produktes in Wasser und verwenden
Sie das Produkt nicht in feuchter Umgebung (wie z.B.
Badezimmern).
• Setzen Sie das Produkt nicht Feuer, Explosivstoffen oder
anderen gefährlichen Mitteln aus und verwenden Sie es nicht
in feuer- oder explosionsgefährlicher Umgebung.
• Es besteht eine geringe Möglichkeit, dass Ihr Produkt bei
Gewitter beschädigt wird. Wir empfehlen deshalb, dass Sie
bei Gewitter das Netzteil und den Telefonanschluss aus den
Steckern ziehen und Ihren Computer ausschalten.
42
INSTALLATIONSLEITFADEN
Page 43

Inhalt
VERZEICHNIS DER TEILE .......................... 44
IHR MOBILTEIL AUF EINEN BLICK
(siehe Umschlagklappe links) ........................ 45
INSTALLATION DER BASISSTATION
(siehe Umschlagklappe rechts) ...................... 47
INSTALLATION DES MOBILTEILS
(siehe Umschlagklappe rechts) ...................... 48
ERSTMALIGE BENUTZUNG
DER EINSTIEG MIT SKYPE
Erstellung eines neuen Skype-Kontos .............. 52
Anmeldung bei Skype ......................... 54
Skype-Funktionen, die Ihr Webtalker unterstützt ..... 56
Hauptdisplay ................................ 57
Hauptmenü ................................. 59
KONTAKTE
Skype-Kontakt hinzufügen ...................... 61
SkypeOut- oder Festnetzkontakt hinzufügen ........ 63
Skype-Nutzer suchen .......................... 65
ANRUFE TÄTIGEN UND EMPFANGEN
Skype-Kontakt anrufen ........................ 67
Eine Festnetznummer anwählen .................. 68
Einen Anruf empfangen ........................ 69
FEHLERSUCHE
.................................... 61
.................................. 70
........................ 49
........................ 52
............... 67
DEUTSCH
INHALT
43
Page 44

Verzeichnis der Teile
DEUTSCH
• 1 schnurloses Webtalker Mobilteil
• 1 Ladestation für das Mobilteil mit Netzgerät
• 1 Webtalker Basisstation
• 1 Netzgerät für die Basisstation
• 1 Ethernet-Kabel
• 1 Telefonkabel
• 1 Gürtelklammer
• 1 Installationsleitfaden
• 2 Batterien (AAA; wiederaufladbar)
• 1 SkypeOut-Gutschein
• Telefonstecker (nicht in allen Ländern)
Sollten ein oder mehrere Teile fehlen, kontaktieren Sie bitte
Ihren Händler.
44
VERZEICHNIS DER TEILE
Page 45

Ihr Mobilteil auf einen Blick
Eine Illustration für das Mobilteil auf einen Blick finden Sie auf
der linken Umschlagklappe dieses Installationsleitfadens.
NR. TEIL FUNKTION
A Hörer
DEUTSCH
B Farbdisplay
Lautsprecher/
C
Klingel
Headset-
D
Buchsenstecker
E Tastenfeld
F Mikrophon
Softkey links.
Wählt den angezeigten Menüpunkt oder bestätigt eine
Einstellung, je nach Anzeige.
Softkey rechts.
Löscht den letzten Schritt oder geht zurück auf die
vorige Anzeige, je nach Anzeige.
Anruftaste.
Beginnt oder beantwortet einen Anruf.
Ende/Einschalttaste/Skype-Status.
Beendet einen empfangenen Anruf. Schaltet das Telefon
ein oder aus durch lang anhaltendes Drücken. Bietet ab
Ausschaltstellung Zugang zum Skype-Statusmenü durch
kurzes Drücken der Taste.
Zeigt den Status Ihres Mobilteils an.
Für Freihand-Lautsprechertelefon
und Klingeln (auf der Rückseite des
Webtalker).
Für 2,5 mm Buchse (seitlich auf
dem Webtalker).
Tasten zur Eingabe der Ziffern 0-9
und Buchstaben A-Z.
IHR MOBILTEIL AUF EINEN BLICK
45
Page 46

DEUTSCH
Navigationstasten/Enter-Taste.
Die äußeren Tasten navigieren nach oben, unten, links
und rechts. Die Enter-Taste in der Mitte wählt/bestätigt
eine Einstellung.
Wenn Sie sich im Texteditor befinden: Wechsel zu
Kleinbuchstaben, Großbuchstaben oder Zahleneingaben.
Bei Festnetzanrufen: Wenn Sie ein # senden möchten,
drücken Sie kurz, wenn Sie zu einem wartenden Anruf
wechseln möchten, drücken Sie die Taste länger. Wenn
Sie sich im Texteditor befinden: ruft eine Symboltabelle
auf.
46
IHR MOBILTEIL AUF EINEN BLICK
Page 47

Installation der Basisstation
Eine Illustration der Basisstation finden Sie auf der rechten
Umschlagklappe dieses Installationsleitfadens.
a) Verbinden Sie die Basisstation an einen LAN-Port
(Local Area Network) an Ihrer Breitbandverbindung
(Modem, Router, Hub, Switch etc.) mittels des beigefügten
Ethernet-Kabels.
b) Stecken Sie das Netzteil in eine Steckdose und verbinden
Sie die Basisstation an das Netzteil (12 V, 300 mA,
3,6 VA).
c) Verbinden Sie die Basisstation mit einer Telefon-
steckdose (wenn vorhanden) mittels des beigefügten
Telefonkabels und einem wahlweisen Stecker.
Die Anzeigeleuchte auf der Vorderseite hat zwei Funktionen:
• Dauerhaft an heißt, dass das Ethernet-Kabel verbunden ist.
• Blinkend heißt, dass das Ethernet-Kabel nicht verbunden ist.
DEUTSCH
INSTALLATION DER BASISSTATION
47
Page 48

Installation des Mobilteils
DEUTSCH
Eine Illustration zur Installation des Mobilteils finden Sie auf der
rechten Umschlagklappe dieses Installationsleitfadens.
1) Drücken Sie die Oberseite der Abdeckung des Batteriefachs
auf der Rückseite des Mobilteils nach innen und unten.
2) Legen Sie die beiden beigefügten Batterien ein und achten
Sie dabei darauf, dass die Plus- und Minuspole der Batterien
der Darstellung auf den Seiten des Batteriefachs entsprechen.
3) Schließen Sie die Abdeckung des Batteriefachs.
4) Bringen Sie die Gürtelklammer wie dargestellt an.
5) Verbinden Sie das Netzteil der Ladestation mit einer
Steckdose.
6) Stellen Sie das Mobilteil auf die Ladestation, um die
Batterien aufzuladen.
7) Nach 10 Minuten sind die Batterien für die erstmalige
Benutzung des Geräts bereit.
Hinweise:
• Nach Beendigung der gesamten Installation empfehlen wir,
dass Sie die Batterien vor der erstmaligen Benutzung
vollständig aufladen. Das dauert etwa 6 Stunden.
• Im Regelfall müssen Sie sich in einem Umkreis von 50 m um
die Basisstation befinden, um erfolgreich verbunden zu sein.
48
INSTALLATION DES MOBILTEILS
Page 49

Erstmalige Benutzung
Vor der erstmaligen Benutzung Ihres Webtalker müssen Sie
die folgenden Schritte erledigen. Schalten Sie das Mobilteil an,
indem Sie drücken, bis sich das Mobilteil anschaltet.
1) Stellen Sie die Basisstation neu ein,
indem Sie den Knopf auf der Rückseite
des Geräts drücken, und stellen Sie
das Webtalker auf die Ladestation, um
es bei der Basisstation anzumelden. Das
Display auf dem Webtalker
zeigt Ihnen an, wenn es bereit ist für
den nächsten Schritt.
2) Stellen Sie die gewünschte Sprache
mit Hilfe von ein, dann drücken
Sie , um eine Sprache zu wählen.
3) Bestätigen Sie Ihre Auswahl
durch .
DEUTSCH
ERSTMALIGE BENUTZUNG
49
Page 50

DEUTSCH
4) Sie werden dann weitergeleitet zu
Skype Agreement (Skype-
Vereinbarung). Lesen Sie den ganzen
Text mittels und stimmen Sie der
Vereinbarung durch zu.
5) Sie werden dann zu Country setting
(Ländereinstellung) weitergeleitet,
um das Festnetz zu konfi gurieren.
Mit
suchen Sie das Land, in dem
Sie sich befi nden, dann wählen Sie
mit Ihr Land.
6) Bestätigen Sie die Einstellung der
Landesvorwahl durch . Ändern Sie
Ihre Landesvorwahl durch Eingabe von
“+”, gefolgt von der gewünschten
Landesvorwahl, dann drücken Sie .
7) Wenn es in Ihrem Land Ortsvorwahlen
gibt, geben Sie diese in der oben
beschriebenen Vorgehensweise ein.
Drücken Sie , um die Installation
fortzusetzen.
50
ERSTMALIGE BENUTZUNG
Page 51

8) Wählen Sie Sign in to Skype
(Bei Skype anmelden) oder
Create new account (Neues
Konto erstellen), indem Sie auf
und dann auf drücken.
Hinweise:
• Die Ländereinstellung konfi guriert den Festnetzport.
• Wenn Ihre Ländereinstellung nicht korrekt konfi guriert ist,
kann es sein, dass Notrufe nicht richtig funktionieren.
• Notrufe über das Festnetz sind nur möglich, wenn die
Basisstation mit dem Stromnetz verbunden und das
Festnetz richtig angeschlossen ist.
DEUTSCH
ERSTMALIGE BENUTZUNG
51
Page 52

Der Einstieg mit Skype
DEUTSCH
Sie können Ihr Webtalker während der erstmaligen Installation
mit einem bestehenden Skype-Konto konfi gurieren oder
wahlweise ein neues Skype-Konto erstellen. Sie brauchen nur
einen von Ihnen festgelegten Benutzername und ein Passwort
für Skype, um ein neues Konto zu erstellen. Sie können weitere
Kontodetails eingeben, wenn Ihr Webtalker konfi guriert und
angeschlossen ist.
Hinweis:
• Skype gestattet keine Notrufe. Solche Anrufe werden
daher immer an den herkömmlichen Telefonport geleitet.
■ Erstellung eines neuen
Skype-Kontos
Wenn Sie noch kein Skype-Konto haben, folgen Sie den
folgenden Schritten.
1) Wählen Sie mit Create new
account (Neues Konto erstellen).
2) Geben Sie über das Tastenfeld einen
Skype-Namen Ihrer Wahl ein und
drücken Sie .
52
DER EINSTIEG MIT SKYPE
Page 53

3) Geben Sie über das Tastenfeld ein
Passwort Ihrer Wahl ein und drücken
Sie . Sie werden gebeten, das
Passwort durch nochmaliges
Eingeben zu bestätigen.
4) Sie werden dann zu Skype
Agreement (Skype-Vereinbarung)
weitergeleitet. Lesen Sie den ganzen
Text mittels und stimmen Sie der
Vereinbarung mit zu.
Hinweise:
• Mit wechseln Sie zu Kleinbuchstaben, Großbuchstaben
oder Zahleneingabe, wenn Sie Ihren Skype-Namen und Ihr
Passwort eingeben. Skype-Namen können 6-32 Zeichen
umfassen. Sie dürfen Kleinbuchstaben, Großbuchstaben,
Zahlen und Satzzeichen beliebig mischen. Leerzeichen sind
unzulässig und Ihr Name darf nicht mit einer Zahl oder
einem Satzzeichen beginnen. Wenn der Name bereits
vergeben ist, werden Sie gebeten, einen anderen Namen
einzugeben.
• Mit
geben Sie Symbole aus der Symboltabelle ein.
• Passwörter können 4-20 Zeichen umfassen. Sie dürfen
Kleinbuchstaben, Großbuchstaben, Zahlen und Satzzeichen
beliebig mischen. Leerzeichen sind unzulässig, Ihr Passwort
darf nicht mit einer Zahl oder einem Satzzeichen beginnen
und Sie dürfen nicht Ihren Skype-Namen als Passwort
verwenden.
• Haben Sie Geduld, die Erstellung Ihres Skype-Kontos kann
mehrere Minuten dauern.
DEUTSCH
DER EINSTIEG MIT SKYPE
53
Page 54

■ Anmeldung bei Skype
Wenn Sie ein Skype-Konto haben, können Sie sich bei Skype
DEUTSCH
anmelden. Halten Sie bitte Ihren Skype-Name und das
Passwort bereit, bevor Sie sich anmelden, und achten Sie auf
Klein-/Großbuchstaben und Sonderzeichen.
1) Wählen Sie mit Sign in to
Skype (Bei Skype anmelden).
2) Geben Sie über das Tastenfeld Ihren
Skype-Namen ein und drücken Sie
.
3) Geben Sie über das Tastenfeld Ihr
Passwort ein und drücken Sie .
4) Sie werden gefragt, ob Sie Ihren
Skype-Namen und das Passwort für
automatische Anmeldung speichern
möchten. Wenn ja, drücken Sie ,
wenn nein, dann drücken Sie .
54
DER EINSTIEG MIT SKYPE
Page 55

Hinweise:
• Mit wechseln Sie zu Kleinbuchstaben, Großbuchstaben
oder Zahleneingabe, wenn Sie Ihren Skype-Namen und Ihr
Passwort eingeben.
• Mit
Wenn Sie Ihr Skype-Passwort vergessen haben, klicken
•
Sie auf
geben Sie Symbole aus der Symboltabelle ein.
www.skype.com und wählen Sie “Sign in”
(Anmelden). Dann wählen Sie “Forgot your password?”
(Passwort vergessen?) und folgen den Anweisungen auf
Ihrem Bildschirm.
Bitte haben Sie Geduld, da die Synchronisation von
•
Skype-Kontakten einige Minuten lang dauern kann.
DEUTSCH
DER EINSTIEG MIT SKYPE
55
Page 56

■ Skype-Funktionen, die Ihr
Webtalker unterstützt
DEUTSCH
Nachdem Sie Ihr Skype-Konto erstellt haben, können Sie jetzt
andere Personen mit einem Skype-Konto kostenlos anrufen.
Skype bietet auch zusätzliche Abonnementfunktion, darunter:
SkypeOut Ermöglicht Ihnen Anrufe ins normale
SkypeIn
Skype
Voicemail
Alle diese Funktionen werden von Ihrem neuen Webtalker
unterstützt und sind verfügbar auf www.skype.com.
Bitte klicken Sie auf www.topcom.net um zu erfahren,
welche künftigen Skype-Funktionen Ihr Webtalker unterstützt.
Festnetz und auf Handys.
Erteilt Ihnen eine normale Telefonnummer
für den Empfang von Skype-Anrufen auf
Ihrem Webtalker aus dem normalen
Festnetz oder von Handys.
Skype Voicemail ermöglicht Ihnen das
Senden und Empfangen von Sprachnachrichten und die Aufzeichnung eines
Grußes.
56
DER EINSTIEG MIT SKYPE
Page 57

■ Hauptdisplay
Das Hauptdisplay Ihres Webtalker bietet verschiedene
Statusanzeigen und den Zugang zur Schnittstelle mit dem
Skype-Menü. Die Illustration unten zeigt das Hauptdisplay und
seine Elemente.
DEUTSCH
Funksignalstatus
Skype™
Onlinestatus
Bedienung
Funksignalstatus
Zeigt die Stärke des Funksignals an.
Kein Funksignal.
Funksignal.
Batteriestatus Zeigt den Status der Batterie an.
Niedrig.
Teilweise aufgeladen.
Voll aufgeladen.
Lädt auf.
Anzeigen Zeigt Anzeigesymbole an.
Entgangener Anruf.
Neue Sprachnachricht.
Genehmigung für Austausch von
Kontaktangaben.
Ruhemodus ist aktiviert.
Tastenfeld ist gesperrt.
Skype-Guthaben verfällt bald.
Headset ist angeschlossen.
Batteriestatus
Anzeigen
Zeit
Bedienung
DER EINSTIEG MIT SKYPE
57
Page 58

Skype
Onlinestatus
DEUTSCH
Zeigt Ihren aktuellen Skype
Onlinestatus an.
Online.
Nicht erreichbar.
Nicht verfügbar.
Skype Me! Verfügbar für Anrufe von
jedermann.
Nicht stören. Zeigt an, dass Sie
beschäftigt sind.
Offl ine (nicht angemeldet).
Unsichtbar. Online, aber unsichtbar
für Andere.
Zeit
SkypeGuthaben
Bedienung
Die aktuell eingestellte Zeit.
Ihr aktueller Skype-Guthabenstand.
Softkey links.
Wählt den angezeigten Menüpunkt oder
bestätigt eine Einstellung, je nach
Anzeige.
Bedienung
Softkey rechts.
Löscht den letzten Schritt oder geht
zurück auf die vorige Anzeige, je nach
Anzeige.
Verknüpfung zu herausgehenden
Anrufen.
Verknüpfung zur Anrufl iste.
Kurzer Knopfdruck verknüpft mit Skype
Statusmenü.
Verknüpfung mit Suche nach SkypeNutzern.
Klingel stumm.
58
DER EINSTIEG MIT SKYPE
Page 59

■ Hauptmenü
Das Hauptmenü bietet raschen Zugang zu allen Skype- und
Webtalker-Einstellungen.
1) Von der leeren Anzeige drücken Sie
nur , um zum Hauptmenü zu
gelangen.
2) Mit oder navigieren Sie und
markieren Sie einen Punkt.
Für auswählen drücken Sie ,
für zurückgehen drücken Sie .
Die folgende Tabelle beschreibt die Hauptmenüpunkte:
DEUTSCH
Contacts
(Kontakte)
History
(Anrufl iste)
Add Contact
(Kontakt
hinzufügen)
Status
Ihre Kontaktliste und der aktuelle SkypeStatus Ihrer Kontakte.
Ihre Anrufe, entgangene Anrufe,
empfangene und herausgehende Anrufe,
Sprachnachrichten und Austausch von
Kontaktangaben.
Fügt einen Skype-Nutzer oder eine
SkypeOut-Nummer Ihrer Kontaktliste
hinzu.
Anmeldung zu Skype, Erstellung eines
neuen Kontos, Änderung Ihres Profi ls,
Änderung Ihres Passworts, automatische
Anmeldung wählen.
DER EINSTIEG MIT SKYPE
59
Page 60

Search (Suche)
DEUTSCH
Services
(Dienste)
Settings
(Einstellungen)
Sucht Skype-Kontakte online.
Zeigt das Skype-Guthaben und den
Status von SkypeIn und Skype Voicemail
an.
Einstellungen für Rufumleitung,
Privatsphäre, Töne, Zeit und Datum, die
Verwaltung blockierter Nutzer, Telefoneinstellungen, Informationseinstellung
und erweiterte Einstellungen.
60
DER EINSTIEG MIT SKYPE
Page 61

Kontakte
Ihre Kontaktliste zeigt alle Namen an, die Sie anrufen können.
Wenn Sie ein bestehendes Skype-Konto haben, wird Ihre
Kontaktliste automatisch heruntergeladen, wenn Sie sich
anmelden. Wenn Sie neuer Skype-Nutzer sind und gerade ein
Konto erstellt haben, ist Ihre Kontaktliste leer. Sie müssen
Kontakte auf Ihrer Liste hinzufügen. Skype schützt die Daten
seiner Nutzer, indem es eine Genehmigung für den Austausch
von Kontaktangaben bei Namen erfordert, die Sie auf Ihrer
Kontaktliste hinzufügen wollen. Wenn Sie einen Namen auf
Ihrer Liste hinzufügen wollen, wird eine Genehmigungsanfrage
an den Nutzer geschickt. Der Nutzer kann die Genehmigung
geben oder ablehnen. Wenn die Genehmigung erteilt ist,
können Sie sehen, ob Ihr Kontakt online ist, und ihn anrufen.
Sie können auch seine persönlichen Profi ldetails ansehen.
■ Skype-Kontakt hinzufügen
Um einen Skype-Kontakt hinzuzufügen, wählen Sie mit
Menu (Menü), dann:
1) Gehen Sie mit zu Add Conatct
(Kontakt hinzufügen), auswählen
durch .
DEUTSCH
2) Wählen Sie mit Skype.
KONTAKTE
61
Page 62

DEUTSCH
3) Geben Sie über das Tastenfeld den
Skype-Namen oder vollständigen
Namen ein und drücken Sie .
4) Bestätigen Sie durch
oder
senden Sie eine Genehmigungsanfrage zum Austausch von Kontaktangaben durch .
Hinweise:
• Nachdem Sie in Schritt 4 gedrückt haben, wird eine
Genehmigungsanfrage zum Austausch von Kontaktangaben
an den Kontakt gesendet. Nachdem sie gesendet wurde,
wird eine Bestätigungsmeldung angezeigt. Der Name wird
Ihrer Kontaktliste hinzugefügt, und wenn die Genehmigung
erteilt wird, ändert der Kontakt seinen Status.
• Bitte haben Sie Geduld, da die Synchronisation von SkypeKontakten einige Minuten lang dauern kann.
• Verwenden Sie “echo123”, um Ihre Skype-Verbindung zu
prüfen. Fügen Sie “echo123” zu Ihren Kontakten hinzu.
Wenn Sie echo123 anrufen, wird ein automatischer Testroboter aktiviert, der Ihnen ermöglicht, Töne aufzunehmen
und abzuspielen.
62
KONTAKTE
Page 63

SkypeOut- oder Festnetz-
■
kontakt hinzufügen
Um einen SkypeOut- oder Festnetzkontakt hinzuzufügen,
wählen Sie mit Menu (Menü), dann:
1) Gehen Sie mit zu Add Contact
(Kontakt hinzufügen), auswählen
mit
2) Mit geben Sie eine Telefonnummer
3) Geben Sie über das Tastenfeld den
.
für die Verwendung mit SkypeOut
oder dem Festnetz ein.
Auswählen mit .
Namen des Kontakts ein und drücken
Sie .
DEUTSCH
Hinweise:
4) Geben Sie über das Tastenfeld die
vollständige Telefonnummer ein und
drücken Sie . SkypeOut-Nummern
(auch örtliche Nummern) müssen wie
folgt eingegeben werden: “+”, dann
“Ländervorwahl”, “Ortsvorwahl”
und “Nummer”.
KONTAKTE
63
Page 64

• Mit wechseln Sie zu Groß- und Kleinbuchstaben
oder Zahleneingabe.
• Mit geben Sie Symbole aus der Symboltabelle ein.
DEUTSCH
• SkypeOut ermöglicht Ihnen Anrufe ins normale Festnetz
und auf Handys. Auf www.skype.com erfahren Sie mehr
über SkypeOut.
64
KONTAKTE
Page 65

■ Skype-Nutzer suchen
Um Skype-Nutzer zu suchen, wählen Sie mit Menu
(Menü), dann:
1) Gehen Sie mit zu Search
(Suche), auswählen durch .
2) Geben Sie über das Tastenfeld den
Skype-Namen oder vollständigen
Namen ein und drücken Sie .
3) Verwenden Sie oder um zu
navigieren oder einen Namen aus der
Liste zu markieren, wählen Sie mit .
DEUTSCH
4) Markieren Sie mit Add to
contacts (Zu Kontakten
hinzufügen), wählen Sie mit .
KONTAKTE
65
Page 66

Hinweise:
• Mit wechseln Sie zu Groß- und Kleinbuchstaben
DEUTSCH
oder Zahleneingabe.
• Mit geben Sie Symbole aus der Symboltabelle ein.
• Weitere Suchoptionen sind möglich:
Search again (Noch einmal suchen) – wiederholt die
Suche.
Call (Anrufen) – ruft den gewählten Namen an.
View profile (Profil anzeigen) – zeigt das Profil des
gewählten Namens an.
•
Sie können jederzeit die Suche abbrechen, indem Sie
drücken.
66
KONTAKTE
Page 67

Anrufe tätigen und empfangen
Die Art und Weise, Anrufe zu tätigen und zu empfangen, ist
bei allen Anrufarten dieselbe – Anrufe von Skype zu Skype,
SkypeOut-Anrufe und SkypeIn-Anrufe. Darüber hinaus können
Sie Ihr Telefon für Festnetztelefonie verwenden.
■ Skype-Kontakt anrufen
Einen Skype-Anruf tätigen:
1) Wählen Sie mit Contacts
(Kontakte).
2) Wählen Sie mit oder einen
Kontakt von der Liste.
DEUTSCH
3. Drücken Sie um anzurufen.
Warten Sie, bis der Anruf verbunden
wird, klingelt und beantwortet wird.
Beenden Sie den Anruf mit .
ANRUFE TÄTIGEN UND EMPFANGEN
67
Page 68

■ Eine Festnetznummer
anwählen
DEUTSCH
Um eine Festnetznummer anzuwählen:
1) Geben Sie über das Tastenfeld
die Nummer ein. Drücken Sie ,
um die Nummer anzuwählen.
2) Wählen Sie mit das Festnetz oder
SkypeOut, dann drücken Sie .
3) Warten Sie, bis der Anruf verbunden
wird, klingelt und beantwortet wird.
Beenden Sie den Anruf mit .
Hinweise:
• Wenn Sie eine bevorzugte Leitung wählen möchten, gehen
Sie zu Menu > Settings > Phone settings > Preferred line
(Menü > Einstellungen > Telefoneinstellungen > Bevorzugte
Leitung). Wählen Sie eine der folgenden Optionen:
1) Always landline (Immer Festnetz)
2) Always SkypeOut (Immer SkypeOut)
3) Always ask (Immer anfragen)
68
ANRUFE TÄTIGEN UND EMPFANGEN
Page 69

■
Einen Anruf empfangen
Wenn Sie angerufen werden, ertönt der Klingelton und der
Anruf wird auf dem Display angezeigt. Um einen Skype-,
SkypeIn- oder Festnetzanruf zu empfangen:
1) Drücken Sie , um den Anruf zu
empfangen.
2) Mit beenden Sie den Anruf.
DEUTSCH
ANRUFE TÄTIGEN UND EMPFANGEN
69
Page 70

Fehlersuche
DEUTSCH
Weitere Informationen finden Sie auf www.topcom.net.
PROBLEM MÖGLICHE URSACHE
Mein Webtalker
funktioniert nicht
• Die Software muss aktualisiert
werden (neue Version).
Ich kann mich nicht
bei Skype anmelden
Die Anzeige zeigt
„Network connection
lost” (Netzwerkverbindung verloren) an
und das Licht an der
Basisstation blinkt
langsam
Ich kann keinen
Skype-Anruf tätigen
Keine Anzeige
• Skype akzeptiert nicht Ihren Skype-
Namen und/oder Ihr Passwort.
• Das Ethernet-Kabel ist nicht
verbunden.
• Das Ethernet-Kabel ist nicht
verbunden.
• Der Router oder das Modem ist
nicht angeschaltet.
• Die Basisstation kann die IP-Adresse
nicht abrufen.
• Sie sind nicht als Skype-Nutzer
angemeldet.
• Die Batterien sind entladen.
70
FEHLERSUCHE
Page 71

Hier finden Sie Hinweise zu den häufigsten Problemen, die bei
der Installation oder der Verwendung Ihres Webtalker auftreten
können.
Einige Probleme können Sie selbst lösen, für andere werden Sie
die Überstützung Ihres Breitband- oder Festnetz-Serviceproviders
brauchen.
LÖSUNG
• Gehen Sie ins Menü Einstellungen und wählen Sie Erweiterte
Einstellungen und Firmware-Update. Wählen Sie die aktuelle
Softwareversion und bestätigen Sie den Update.
• Prüfen Sie, dass Sie den korrekten Skype-Namen und das
korrekte Passwort verwenden Achten Sie auf Groß-/
Kleinbuchstaben und Zahleneingaben.
• Prüfen Sie, dass das Ethernet-Kabel zwischen an der
Basisstation und dem LAN-Port an Ihrer Breitbandverbindung
(Modem, Router, Hub, Switch usw.) richtig verbunden ist.
• Prüfen Sie, dass das Ethernet-Kabel zwischen an der
Basisstation und dem LAN-Port an Ihrer Breitbandverbindung
(Modem, Router, Hub, Switch usw.) richtig verbunden ist.
• Schalten Sie das Modem oder den Router an und stellen Sie
die Basisstation neu ein.
DEUTSCH
• Prüfen Sie in den Internet-Einstellungen, dass der IP-Modus
dem IP-Modus Ihrer Internet-Verbindung entspricht oder
dass Sie hinter einem Proxy-Server sind. Im Benutzerhandbuch finden Sie eine Übersicht über die Proxy-Einstellungen.
• Gehen Sie zum Statusmenü und wählen Sie Als Skype-Nutzer
anmelden. Von dort aus siehe das Kapitel “Anmeldung bei
Skype” in diesem Leitfaden.
• Ersetzen Sie die Batterien.
FEHLERSUCHE
71
Page 72

PROBLEM MÖGLICHE URSACHE
Mobilteil meldet sich
DEUTSCH
nicht an
• Basisstation ist nicht zur Anmeldung
bereit.
• Die Ladestation ist nicht verbunden.
• Keine Batterien im Mobilteil.
• Die Basisstation ist nicht verbunden.
Keine Verbindung
zwischen Mobilteil
• Sie befinden sich außerhalb der
Reichweite der Basisstation.
und Basisstation
• Das Mobilteil ist nicht angemeldet.
• Die Basisstation ist nicht ans Netz
angeschlossen.
Mobilteil lädt nicht
auf der Ladestation
• Die Ladestation ist nicht
angeschlossen.
auf
• Das Mobilteil ist nicht richtig in die
Ladestation eingesetzt.
• Die Batterien sind nicht richtig
eingesetzt.
72
FEHLERSUCHE
Page 73

LÖSUNG
• Stellen Sie die Basisstation durch Drücken des Knopfs auf
der Rückseite der Basisstation neu ein und versuchen Sie
wieder, sich anzumelden.
• Prüfen Sie, ob das Netzteil richtig mit der Ladestation
verbunden und dieses eingeschaltet ist.
• Prüfen Sie, ob die Batterien korrekt im Mobilteil eingelegt
sind. Stellen Sie die Basisstation neu ein und versuchen Sie
wieder, sich anzumelden.
DEUTSCH
• Prüfen Sie, ob das Netzteil richtig mit
auf der
Basisstation verbunden ist und diese angeschaltet ist.
• Gehen Sie näher an die Basisstation.
• Melden Sie das Mobilteil an.
• Prüfen Sie, ob das Netzteil richtig mit
auf der
Basisstation verbunden ist und diese angeschaltet ist.
Verbinden Sie das Netzteil der Ladestation mit einer Steckdose.
•
• Setzen Sie das Mobilteil richtig in die Ladestation ein.
• Prüfen Sie die Stellung der Batterien.
FEHLERSUCHE
73
Page 74

PROBLEM MÖGLICHE URSACHE
Mobilteil klingelt
DEUTSCH
nicht
Hinweise:
•
Dieser Installationsleitfaden erläutert den allgemeinen
Installationsvorgang und die wichtigsten Funktionen Ihres
Webtalker.
• Der Skype-Status ist auf Offline oder
Nicht stören.
• Der Rufton des Mobilteils kann
ausgeschaltet sein.
• Das Mobilteil kann außerhalb der
Reichweite der Basisstation sein.
74
FEHLERSUCHE
Page 75

LÖSUNG
• Stellen Sie den Skype-Status auf Online.
• Erhöhen Sie die Lautstärke des Ruftons.
• Gehen Sie näher an die Basisstation.
•
Detailliertere Funktionsbeschreibungen finden Sie im
Benutzerhandbuch auf www.topcom.net/userguides.php
DEUTSCH
FEHLERSUCHE
75
Page 76

76
Page 77

FRANÇAIS
R
FRANÇAIS
MANUEL D’INSTALLATION
77
Page 78

Cher client,
FRANÇAIS
Nous vous remercions d’avoir acheté notre produit et espérons
que vous serez satisfait. Veuillez lire le présent document avant
d’utiliser votre nouveau Webtalker 6000 pour Skype™.
Si vous rencontrez des difficultés, veuillez consulter notre centre
d’assistance.
La conformité du téléphone aux directives européennes est
confirmée par la présence de la marque CE. Nous déclarons
0470
par la présente que le téléphone Webtalker 6000 est conforme aux
exigences fondamentales et autres dispositions de la directive
1999/5/CEE. La déclaration de conformité figure dans le manuel
de l’utilisateur, disponible sur le site
www.topcom.net/cedeclarations.php
Le téléphone Webtalker 6000 est couvert par la directive
européenne 2002/96/CE et ne doit donc pas être éliminé
avec les déchets domestiques ordinaires. Afin de prévenir
toute nuisance à l’environnement ou à la santé humaine, veuillez
séparer le produit des autres déchets pour qu’il puisse être recyclé
de façon écologique. Pour en savoir plus sur les centres de collecte
disponibles, veuillez vous adresser aux autorités locales ou au
revendeur auprès duquel vous avez acheté le produit.
Remarques :
• Le présent manuel d’installation décrit la méthode
d’installation de base et les fonctions les plus courantes de
votre Webtalker. Pour une description plus détaillée des
fonctionnalités du produit, veuillez consulter le manuel de
l’utilisateur sur le site
• Skype™, SkypeMe™, SkypeOut™, SkypeIn™, Skype
mail™, le monde entier peut se parler gratuitement™, le logo
Skype et le logo S sont des marques commerciales de Skype™.
www.topcom.net/userguides.php
.
.
Voice-
78
MANUEL D’INSTALLATION
Page 79

INFORMATIONS SUR LA SÉCURITÉ
Utilisation prévue
Ce téléphone est destiné à être utilisé avec un réseau
téléphonique standard et Internet. Toute autre utilisation est
considérée comme une indue. Les modifications ou reconstructions non autorisées et non décrites dans ce manuel
sont interdites.
Consignes de sécurité
Généralités
• Utilisez exclusivement le câble d’alimentation au secteur
fourni avec le produit. L’utilisation non autorisée d’un autre
câble d’alimentation invalidera la garantie du produit et peut
endommager le téléphone. Utilisez exclusivement le câble
d’alimentation Salom SSW-1328 pour le Webtalker 6000.
• Pour le combiné, n’utilisez que des batteries approuvées
rechargeables Nickel Métal Hydride
(Ni-MH). N’utilisez jamais d’autres batteries ou des batteries
alcalines conventionnelles. Elles pourraient provoquer un
court-circuit, détruire le compartiment à batterie, nuire à
votre santé et provoquer des accidents corporels. N’utiliser
que les piles recommandées par le fabricant.
• Même si le verrouillage du clavier est activé, il est possible
d’effectuer des appels d’urgence (voir les instructions pour
plus de renseignements).
• N’ouvrez pas le combiné (sauf pour remplacer la batterie) ou
la base. Cela pourrait vous exposer à des tensions élevées ou
à d’autres risques.
• Les signaux radio transmis entre le combiné et la base
peuvent provoquer des interférences avec les appareils
auditifs.
• Ce produit ne doit pas être utilisé à proximité d’équipements
TITRE
FRANÇAIS
MANUEL D’INSTALLATION
79
Page 80

FRANÇAIS
de soins intensifs/urgences et ne doit pas être utilisé par des
personnes équipées d’un stimulateur cardiaque.
• N'installez pas la base dans une salle de bain ou de douche.
Le combiné et sa base ne sont pas étanches.
• N'utilisez jamais le téléphone dans des lieux à risques
d'explosion (par exemple un atelier de peinture auto).
Nettoyage
• Nettoyez le combiné et la base avec un chiffon humide (pas
mouillé) ou antistatique.
• N’utilisez pas de produits d’entretien ménager. Vous risquez
d’endommager le produit.
• N’utilisez pas de chiffon sec. Vous risquez de provoquer des
chocs statiques.
Environnement
• N’exposez pas l’appareil à la lumière directe du soleil.
• Le produit est susceptible de chauffer pendant le chargement
de la batterie. Ceci est normal. Nous conseillons toutefois de
ne pas le poser sur du bois ancien/plaqué pour éviter les
dommages.
• Ne posez pas le produit sur des tapis ou autres surfaces
générant des fibres ou posez-le là où l’air ne risque pas de
souffler dessus.
• N’immergez aucune pièce du produit dans l’eau. Ne l’utilisez
pas dans un environnement humide ou mouillé, comme la
salle de bain.
• N’exposez pas le produit au feu, à des agents explosifs ni à
des conditions dangereuses.
• Le produit est susceptible d’être endommagé par l’orage.
Nous vous conseillons de débrancher les câbles électrique et
téléphonique et d’éteindre votre ordinateur, en cas d’orage.
80
MANUEL D’INSTALLATION
Page 81

Sommaire
CONTENU DE LA BOÎTE .......................... 82
VOTRE COMBINÉ EN UN CLIN D’ŒIL (cf. rabat gauche)
INSTALLATION DE LA BASE (cf. rabat droit)
INSTALLATION DU COMBINÉ (cf. rabat droit)
MISE EN SERVICE
PREMIERS PAS AVEC SKYPE
Création d’un nouveau compte Skype ............ 89
Connexion à Skype ........................... 91
Fonctions Skype prises en charge par Webtalker ..... 92
Affichage principal ............................ 93
Menu principal ............................... 95
CONTACTS
Ajout d’un contact Skype ...................... 97
Ajout d’un contact SkypeOut ou terrestre .......... 99
Recherche d’utilisateurs Skype .................. 101
APPELS ET RÉCEPTION D’APPELS
Appel d’un contact Skype ...................... 103
Appel d’un numéro terrestre .................... 104
Réception d’un appel .......................... 105
DÉPANNAGE
............................... 87
...................... 89
.................................... 97
.................. 103
................................... 106
.......... 85
......... 86
. 83
FRANÇAIS
SOMMAIRE
81
Page 82

Contenu de la boîte
FRANÇAIS
• 1 combiné Webtalker sans fil
• 1 berceau de chargement pour le combiné, avec alimentation
électrique
• 1 base Webtalker
• 1 alimentation électrique pour la base
• 1 câble Ethernet
• 1 câble de téléphone
• 1 pince de ceinture
• 1 manuel d’installation
• 2 piles (AAA ; rechargeables)
• 1 bon SkypeOut
• Prise(s) de téléphone (certains pays uniquement)
En l’absence d’une composante quelconque, veuillez contacter
votre point de vente.
82
CONTENU DE LA BOÎTE
Page 83

Votre combiné en un clin
d´oEil
Veuillez vous reporter au rabat gauche du présent manuel
d’installation pour obtenir une vue d’ensemble de votre combiné.
N°
COMPOSANTE FONCTION
A
Écouteur
B
Écran couleur
Affiche l’état de votre combiné.
FRANÇAIS
Haut-parleur/
C
sonnerie
Prise de casque
D
Connecteur
E
Clavier
F
Microphone
Touche de fonction gauche.
Selon l’écran, cette touche permet de sélectionner l’objet
de menu actuel ou de confirmer un paramétrage.
Touche de fonction droite.
Selon l’écran, cette touche permet d’annuler la dernière
action ou de revenir à l’écran précédent.
Touche d’appel.
Cette touche permet de procéder ou de répondre à un
appel.
Fin / mise sous tension / état Skype.
Cette touche permet de terminer un appel. En outre,
vous pouvez mettre le téléphone sous ou hors tension en
appuyant sur cette touche et en la maintenant enfoncée.
Pour une utilisation mains libres
(à l’arrière du Webtalker).
Pour prise 2,5 mm (sur le côté du
Webtalker).
Touches permettant de saisir les
chiffres 0 à 9 et les lettres A à Z.
VOTRE COMBINÉ EN UN CLIN D’ŒIL
83
Page 84

Lorsque le téléphone est inactif, appuyez brièvement
sur cette touche pour accéder au menu d’états Skype.
FRANÇAIS
Touches de navigation / touche Enter.
Les touches extérieures permettent de naviguer vers le
haut, le bas, la gauche et la droite.
La touche Enter au centre permet de sélectionner /
valider un paramétrage.
Dans l’éditeur de texte, elle permet de passer entre les
minuscules, les majuscules et les entrées numériques.
Lors d’un appel terrestre, vous pouvez utiliser la
touche # en appuyant brièvement. Si vous souhaitez
passer entre un appel en cours et un appel en attente,
appuyez plus longtemps sur la touche. Dans l’éditeur
de texte, elle donne accès à un groupe de symboles.
84
VOTRE COMBINÉ EN UN CLIN D’ŒIL
Page 85

Installation de la base
Veuillez vous reporter au rabat droit du présent manuel
d’installation pour consulter la méthode d’installation de la
base sous forme illustrée.
a) Raccordez de la base à un port LAN (réseau local)
de votre connexion à bande large (modem, routeur,
concentrateur, commutateur, etc.) à l’aide du câble
Ethernet fourni.
b) Branchez l’adaptateur électrique sur une prise électrique
active et raccordez de la base à l’adaptateur
électrique (12 V, 300 mA, 3,6 VA).
c) Raccordez de la base sur une prise de téléphone (le
cas échéant) à l’aide du câble de téléphone fourni et de la
prise en option.
Le voyant à l’avant remplit deux fonctions :
• Allumé en permanence, il confirme que le câble Ethernet
est raccordé.
• S’il clignote, il indique que le câble Ethernet n’est pas
raccordé.
FRANÇAIS
INSTALLATION DE LA BASE
85
Page 86

Installation du combiné
FRANÇAIS
Veuillez vous reporter au rabat droit du présent manuel
d’installation pour consulter la méthode d’installation du
combiné sous forme illustrée.
1) Poussez vers l’intérieur et vers le bas sur le dessus du
couvercle du compartiment des piles à l’arrière du combiné.
2) Insérez les deux piles fournies avec le combiné en veillant à
ce que les signes + et - soient orientés conformément aux
illustrations reproduites sur les côtés du compartiment des
piles.
3) Faites glisser le couvercle du compartiment des piles pour le
remettre en place.
4) Montez la pince de ceinture comme illustré.
5) Raccordez l’adaptateur électrique du berceau de chargement
sur une prise électrique active.
6) Placez le combiné dans le berceau de chargement pour
charger les piles.
7) Attendez 10 minutes que les piles soient prêtes pour la mise
en service.
Remarques :
• Au terme de la procédure d’installation, nous vous
recommandons de charger complètement les piles avant
d’utiliser votre téléphone. Le chargement complet des piles
dure environ six heures.
• Généralement, vous devez vous trouver dans un rayon de
50 m de la base pour parvenir à vous connecter.
86
INSTALLATION DU COMBINÉ
Page 87

Mise en service
Lors de la mise en service de votre Webtalker, procédez comme
suit : Commencez par mettre le combiné sous tension en
appuyant sur jusqu’à ce qu’il s’allume.
1) Réinitialisez la base en appuyant sur
le bouton à l’arrière de l’unité et
insérez Webtalker dans le berceau
afi n de l’enregistrer sur la base.
L’écran Webtalker vous indique
lorsqu’il est prêt pour l’étape suivante.
2) Choisissez votre langue préférée à
l’aide de . Appuyez sur pour
sélectionner une langue.
3) Validez votre sélection en appuyant
sur .
FRANÇAIS
4) Vous êtes ensuite dirigé vers Skype
Agreement (l’accord Skype).
Utilisez pour consulter le texte
dans sa totalité et appuyez sur
pour accepter l’accord.
MISE EN SERVICE
87
Page 88

FRANÇAIS
5) Vous êtes ensuite dirigé vers le
paramétrage national de votre ligne
terrestre. Utilisez pour localiser
votre pays.
Appuyez sur pour sélectionner.
6) Validez le paramétrage de l’indicatif
de votre pays en appuyant sur
.
Pour modifi er l’indicatif de votre pays,
insérez « + », suivi de l’indicatif de
votre choix et appuyez sur .
7) En cas d’utilisation d’indicatifs
régionaux dans votre pays, saisissez
l’indicatif régional en appliquant la
procédure ci-dessus.
Appuyez sur pour continuer.
8) Choisissez Sign in to Skype
(Connexion à Skype) ou Create
new account (Création d’un
nouveau compte) en appuyant sur
, suivi de .
Remarques :
• Le paramétrage du pays confi gure le port de téléphonie terrestre.
• Si le paramétrage de votre pays n’est pas correctement confi guré,
les appels d’urgence risquent de ne pas fonctionner correctement.
• Les appels d’urgence via la ligne terrestre ne sont possibles que si
la base est
raccordée.
88
MISE EN SERVICE
sous tension et si la ligne terrestre est correctement
Page 89

Premiers pas avec Skype
Vous pouvez confi gurer votre Webtalker avec un compte
Skype existant lors de la première installation ou créer un
nouveau compte Skype. Il vous suffi t de défi nir un nom
d’utilisateur et mot de passe Skype pour créer un nouveau
compte. Vous pouvez compléter les informations manquantes
concernant votre compte une fois que votre Webtalker est
confi guré et en ligne.
Remarque :
• Skype ne permet pas les appels d’urgence. Par conséquent,
ces appels sont toujours dirigés vers le port de téléphonie
traditionnelle.
■ Création d´’un nouveau
compte Skype
Si vous ne possédez pas de compte Skype, appliquez la
procédure ci-après.
1) À l’aide de , sélectionnez Create
new account (Création d’un
nouveau compte).
FRANÇAIS
2) À l’aide du clavier, saisissez un nom
Skype de votre choix et appuyez sur
.
PREMIERS PAS AVEC SKYPE
89
Page 90

3) À l’aide du clavier, saisissez un mot
de passe et appuyez sur . Le
système vous demande de confi rmer
FRANÇAIS
le mot de passe en le saisissant une
nouvelle fois.
4) Vous êtes ensuite dirigé vers Skype
Agreement (l’accord Skype).
Utilisez pour consulter le texte
dans sa totalité et appuyez sur
pour accepter l’accord.
Remarques :
• Utilisez pour passer entre les minuscules, les
majuscules et les entrées numériques lors de la saisie de
votre nom et mot de passe Skype. Les noms Skype peuvent
comporter entre 6 et 32 caractères. Vous pouvez alterner
les majuscules, les minuscules, les lettres, les chiffres et les
signes de ponctuation comme bon vous semble. Vous ne
pouvez pas utiliser d’espace et votre nom ne peut pas
commencer par un chiffre ou un signe de ponctuation. Si
le nom est déjà utilisé, le système vous demande d’essayer
un autre nom.
• Utilisez pour sélectionner des symboles du groupe
proposé.
• Les mots de passe peuvent comporter entre 4 et 20 caractères. Vous pouvez alterner les majuscules, les minuscules,
les lettres, les chiffres et les signes de ponctuation comme
bon vous semble. Vous ne pouvez pas utiliser d’espaces.
Votre mot de passe ne peut pas commencer par un chiffre
ou un signe de ponctuation. Vous ne pouvez pas utiliser
votre nom Skype comme mot de passe.
• Soyez patient, car la création de votre compte Skype peut
prendre quelques minutes.
90
PREMIERS PAS AVEC SKYPE
Page 91

■ Connexion à Skype
Lorsque vous possédez un compte Skype, vous pouvez vous
connecter. Veillez à avoir votre nom et mot de passe Skype à
votre disposition avant de vous connecter. Soyez attentif aux
majuscules, aux minuscules et aux caractères spéciaux.
1) À l’aide de , sélectionnez
Sign in to Skype (Connexion à
Skype).
2) À l’aide du clavier, saisissez votre
nom Skype et appuyez sur .
3) À l’aide du clavier, saisissez votre
mot de passe et appuyez sur .
FRANÇAIS
4) Le système vous demande maintenant
si vous souhaitez enregistrer votre
nom et mot de passe Skype en vue
de vous connecter automatiquement
par la suite.
Appuyez sur pour accepter ou
sur pour refuser.
PREMIERS PAS AVEC SKYPE
91
Page 92

Remarques :
• Utilisez pour passer entre les minuscules, les
majuscules et les entrées numériques lors de la saisie de
FRANÇAIS
votre nom et mot de passe Skype.
Utilisez
•
proposé.
•
Si vous avez oublié votre mot de passe Skype, consultez le
site www.skype.com et sélectionnez « Sign in »
(Connexion). Choisissez ensuite « Forgot your password?
(Oublié votre mot de passe?) et suivez les instructions à
l’écran.
• Soyez patient, car la synchronisation des contacts Skype
peut durer quelques minutes.
pour sélectionner des symboles du groupe
■ Fonctions Skype prises en
charge par Webtalker
Après avoir créé votre compte Skype, vous pouvez appeler
gratuitement d’autres personnes possédant un compte Skype.
Skype vous propose également d’autres fonctions auxquelles
vous pouvez souscrire :
SkypeOut Vous permet d’appeler des numéros
SkypeIn Vous attribue un numéro de téléphone
Skype
Voicemail
terrestres et de portables ordinaires.
ordinaire pour la réception d’appels Skype
sur votre Webtalker depuis un téléphone
terrestre ou portable ordinaire.
Skype Voicemail vous permet d’envoyer et
de recevoir des messages vocaux et
d’enregistrer un message de bienvenue.
»
Toutes ces fonctions sont prises en charge par votre nouveau
Webtalker et disponibles sur www.skype.com.
Visitez le site www.topcom.net pour découvrir les autres
fonctions Skype prises en charge par votre Webtalker.
92
PREMIERS PAS AVEC SKYPE
Page 93

■ Affichage principal
L’affi chage principal de votre Webtalker comprend plusieurs
indicateurs d’état et permet d’accéder à l’interface de menus
Skype. L’illustration ci-après montre l’écran principal et les
éléments le composant.
FRANÇAIS
État
du signal radio
État Skype™
en ligne
Heure actuelle
Action
État du signal
radio
Indique la longueur du signal radio.
Aucun signal radio.
Signal radio.
État des piles Indique l’état des piles.
Niveau faible.
Chargement partiel.
Chargement complet.
Chargement en cours.
Notifi cations Affi che les icônes de notifi cation.
Appel manqué.
Nouveau message vocal.
Demande d’autorisation.
Mode silencieux actif.
Clavier verrouillé.
Crédit Skype arrivant à expiration.
Casque raccordé.
État des piles
Notifi cations
Action
PREMIERS PAS AVEC SKYPE
93
Page 94

État Skype en
ligne
FRANÇAIS
Indique votre état Skype en ligne
actuel.
En ligne.
Absent.
Pas disponible.
Skype Me : disponible pour tout
appel.
Ne pas déranger : indique que vous
êtes occupé.
Hors ligne (pas connecté).
Invisible : toujours en ligne, pas
invisible aux autres.
Heure actuelle
Crédit Skype
Action
Heure actuelle réglée.
Votre solde de crédit Skype actuel.
Touche de fonction gauche.
Selon l’écran, cette touche permet de
sélectionner l’objet de menu actuel ou de
confi rmer un paramétrage.
Action
Touche de fonction droite.
Selon l’écran, cette touche permet
d’annuler la dernière action ou de revenir
à l’écran précédent.
Raccourci vers les appels sortants.
Raccourci vers l’historique de tous les
appels.
Appuyez brièvement sur la touche pour
accéder en raccourci au menu des états
Skype.
Raccourci pour rechercher des utilisateurs
Skype.
Sourdine.
94
PREMIERS PAS AVEC SKYPE
Page 95

■ Menu principal
Le menu principal vous permet d’accéder facilement à tous vos
paramètres Skype et Webtalker.
1) Sur l’écran inactif, appuyez sur
pour accéder au menu principal.
2) Les touches ou vous
permettent de naviguer et de vous
positionner sur un élément.
Appuyez sur pour sélectionner ou
sur pour revenir en arrière.
Le tableau ci-après décrit succinctement les éléments du menu
principal :
Contacts Votre liste de contacts et l’état Skype
actuel de vos contacts.
History
(Historique)
Add Contact
(Ajouter
contact)
Vos appels, les appels manqués, les
appels entrants et sortants, les messages
vocaux et les autorisations.
Permet d’ajouter un utilisateur Skype ou
un numéro SkypeOut dans la liste de vos
contacts.
FRANÇAIS
PREMIERS PAS AVEC SKYPE
95
Page 96

Search
(Rechercher)
FRANÇAIS
Services Affichage de votre crédit Skype ainsi que
Settings
(Paramètres)
Permet de rechercher des contacts Skype
en ligne.
de votre état SkypeIn et Skype Voicemail.
Paramètres déviation d’appels,
confidentialité, sonneries, heure et date,
gestion des utilisateurs bloqués,
paramètres sans fil, paramètres du
téléphone, informations et paramètres
avancés.
96
PREMIERS PAS AVEC SKYPE
Page 97

Contacts
La liste de vos contacts affi che tous les noms que vous pouvez
appeler. Si vous possédez un compte Skype existant, votre liste
de contacts est automatiquement téléchargée lors de votre
connexion. Si vous êtes un nouvel utilisateur Skype et venez de
créer un compte, votre liste de contacts est vide. Vous devez
ajouter des contacts dans votre liste.
Skype protège la vie privée de ses utilisateurs en exigeant que
vous obteniez l’autorisation des contacts que vous souhaitez
ajouter dans votre liste. Lorsque vous ajoutez un nom dans
votre liste, une demande d’autorisation est transmise à
l’utilisateur. L’utilisateur peut accepter ou refuser votre
demande. Lorsque votre demande est acceptée, vous pouvez
voir lorsque vos contacts sont en ligne et les appeler. Vous
pouvez également consulter leurs informations personnelles.
■ Ajout d´’un contact Skype
Pour ajouter un contact Skype, appuyez sur pour
sélectionner Menu, puis :
1) À l’aide de , accédez à Add
Contact (Ajouter contact).
Appuyez sur pour sélectionner.
FRANÇAIS
2) Appuyez sur pour sélectionner
Skype.
CONTACTS
97
Page 98

3) À l’aide du clavier, saisissez le nom
Skype ou le nom complet et appuyez
sur .
FRANÇAIS
4) Appuyez sur pour valider ou sur
pour envoyer une demande
d’autorisation.
Remarques :
• Lorsque vous avez appuyé sur à l’étape 4, une
demande d’autorisation est envoyée au contact. Un
message de confi rmation s’affi che lorsque la demande a
été envoyée. Le nom est ajouté dans votre liste de
contacts. Une fois votre demande d’autorisation acceptée,
l’état du contact change.
• Soyez patient, car la synchronisation des contacts Skype
peut durer quelques minutes.
• Utilisez « echo123 » pour tester votre connexion Skype.
Ajoutez « echo123 » à vos contacts. Le fait d’appeler
echo123 lance un robot de test automatique qui vous
permet d’enregistrer et d’écouter du son.
98
CONTACTS
Page 99

Ajout d´’un contact Skype-
■
Out ou terrestre
En vue d’ajouter un contact SkypeOut ou terrestre, appuyez
sur pour sélectionner Menu, puis :
1) À l’aide de , accédez à Add
Contact (Ajouter contact).
Appuyez sur pour sélectionner.
2) À l’aide de , saisissez un numéro
de téléphone à utiliser avec
SkypeOut ou une ligne terrestre.
Appuyez sur pour sélectionner.
3) À l’aide du clavier, saisissez le nom
du contact et appuyez sur .
FRANÇAIS
4) À l’aide du clavier, saisissez le
numéro de téléphone complet et
appuyez sur . Les numéros
SkypeOut (même locaux) doivent
être saisis selon le format suivant :
« + », suivi de l’indicatif du pays, de
l’indicatif régional et du numéro.
CONTACTS
99
Page 100

Remarques :
• Utilisez pour passer entre les minuscules, les
majuscules et les entrées numériques.
FRANÇAIS
• Utilisez pour sélectionner des symboles du groupe
proposé.
• SkypeOut vous permet d’appeler des numéros terrestres et
de portables ordinaires. Visitez le site www.skype.com
pour en savoir plus sur SkypeOut.
100
CONTACTS
 Loading...