

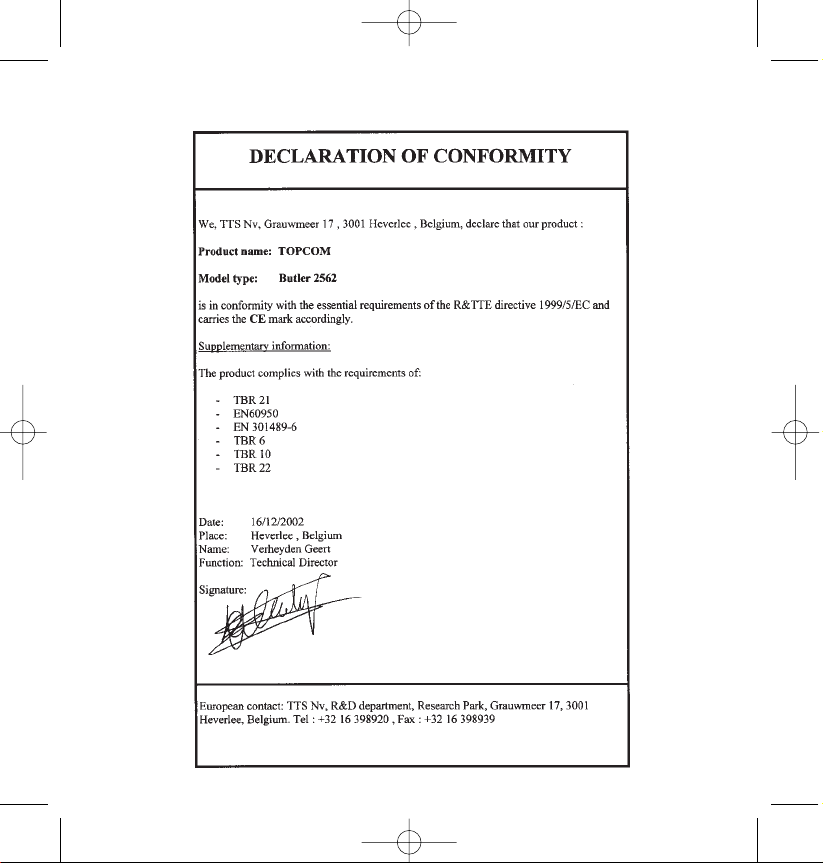
Page 1

Butler 2562
Handleiding
Mode d’emploi
User Guide
Bedienungsanleitung
- v3-
HL_B2562_v3.qxd 24-03-2003 10:01 Page 1
Page 2
HL_B2562_v3.qxd 24-03-2003 10:01 Page 2
Page 3
!! Belangrijk !!
Om de ‘Nummerweergave’ te kunnen gebruiken, moet deze dienst geactiveerd zijn
op uw telefoonlijn. Om deze dienst te activeren, hebt U hiervoor meestal een apart
abonnement van uw telefoonmaatschappij nodig.
Indien U geen nummerweergavefunctie hebt op uw telefoonlijn,
zullen de inkomende telefoonnummers NIET op de display van uw
toestel verschijnen.
GB The features described in this manual are published with reservation to modifications.
NL De in deze handleiding beschreven mogelijkheden worden gepubliceerd onder
voorbehoud van wijzigingen.
F Les possibilités décrites dans ce manuel sont publiées sous réserve de modifications.
D Die in dieser Bedienungsanleitung umschriebenen Möglichkeiten, werden vorbehaltlich
Änderungen publiziert.
!! Important !!
Pour utiliser la fonction ‘Caller ID/Clip’ (affichage de l’appelant), ce service doit être
activé sur votre ligne téléphonique. Généralement, vous avez besoin d’un abon-
nement séparé de votre compagnie de téléphone pour activer cette fonction.
Si vous n’avez pas la fonction ‘Caller ID - Affichage Appelant’ sur votre ligne
téléphonique, les numéros de téléphone entrants n’apparaîtront PAS sur
l’écran de votre téléphone.
!! Important !!
To use ‘Caller ID’ (display caller), this service has to be activated on your phone line.
Normally you need a separate subscription from your telephone company to activate
this function.
If you don’t have the Caller ID function on your phone line, the incoming
telephone numbers will NOT be shown on the display of your telephone.
!! Wichtig!!
Zur Verwendung der ‘Rufnummernanzeige’ muss dieser Dienst erst für Ihre
Telefonleitung freigegeben werden. Zur Aktivierung dieser Dienstleistung benöti-
gen Sie meistens ein separates Abonnement Ihrer Telefongesellschaft.
Wenn Sie für Ihre Telefonleitung keine Rufnummernanzeigefunktion
haben, erscheinen die eingehenden Telefonnummern NICHT im Display
Ihres Gerätes.
HL_B2562_v3.qxd 24-03-2003 10:01 Page 3
Page 4
Safety Instructions
• Only use the charger plug supplied. Do not use other chargers, as this may damage the battery
cells.
• Only insert rechargeable batteries of the same type. Never use ordinary, non-rechargeable
batteries. Insert rechargeable batteries so they connect to the right poles (indicated in the
battery compartment of the handset).
• Do not touch the charger and plug contacts with sharp or metal objects.
• The operation of some medical devices may be affected.
• The handset may cause an unpleasant buzzing sound in hearing aids.
• Do not place the basic unit in a damp room or at a distance of less than 1.5 m away from a
water source. Keep water away from the handset.
• Do not use the telephone in environments where there is a risk of explosions.
•Dispose of the batteries and maintain the telephone in an environment-friendly manner.
•As this telephone cannot be used in case of a power cut, you should use a mains-independent
telephone for emergency calls, e.g. a mobile phone.
Cleaning
Clean the telephone with a slightly damp cloth or with an anti-static cloth. Never use cleaning
agents or abrasive solvents.
4 Topcom Butler 2562
ENGLISH
HL_B2562_v3.qxd 24-03-2003 10:01 Page 4
Page 5

1. DESCRIPTION OF TELEPHONE 7
1.1 Handset/base Butler 2562 7
1.2 Display 8
2. TELEPHONE INSTALLATION 9
2.1 Connections 9
2.2 Rechargable batteries 9
3. USING THE TELEPHONE 11
3.1 Handset ON/OFF 11
3.2 Choosing menu language 11
3.3 Receiving a call 11
3.4 Making an external call 11
3.5 MakING an internal call 11
3.6 Hands free mode 12
3.7 Internal call transfer 12
3.8 Conference Call 12
3.9 Display of call duration 12
3.10 Microfoon mute 13
3.11 Pause Key 13
3.12 Caller Identification 13
3.13 Redial memory 14
3.14 Calling from the phonebook 14
3.15 Using the alphanumerical keypad 15
3.16 Using the menu 15
4. PERSONALISATION 15
4.1 Adjusting speaker volume 15
4.2 Adjusting the ring volume 16
4.3 Choosing the ring melody 16
4.4 Activation / Deactivation of beeps 17
4.5 Naming handsets 18
4.6 Setting the Date and Time 18
4.7 Changing the PIN code 19
4.8 Setting the dialling MODE 19
4.9 Flash time duration 19
4.10 Automatic answer 20
4.11 Reset 20
Topcom Butler 2562 5
ENGLISH
HL_B2562_v3.qxd 24-03-2003 10:01 Page 5
Page 6

5. ADVANCED FUNCTIONS 20
5.1 Phonebook 20
5.2 Searching a handset from the base 22
5.3 Choosing priority ringing 22
5.4 Using your telephone with a PABX 23
5.5 Keypad lock 23
5.6 Emergency call (Baby call) 24
5.7 Monitor mode (Baby sit) 24
6. SMS (SHORT MESSAGES SERVICE) 25
6.1. SMS main menu 25
6.2. SMS Setting 26
6.3. Sending SMS Messages 27
6.4. Reading SMS messages 28
6.5. deleting all messages 29
7. MANAGING MULTIPLE HANDSETS 29
7.1 Setting up an ADDITIONAL handset 29
7.2 Removing a handset 30
7.3 Setting up a handset on another base 31
7.4 Selecting a base 31
8. TROUBLE SHOOTING 32
9. GUARANTEE 33
10. TECHNICAL CHARACTERISTICS 33
6 Topcom Butler 2562
ENGLISH
HL_B2562_v3.qxd 24-03-2003 10:01 Page 6
Page 7
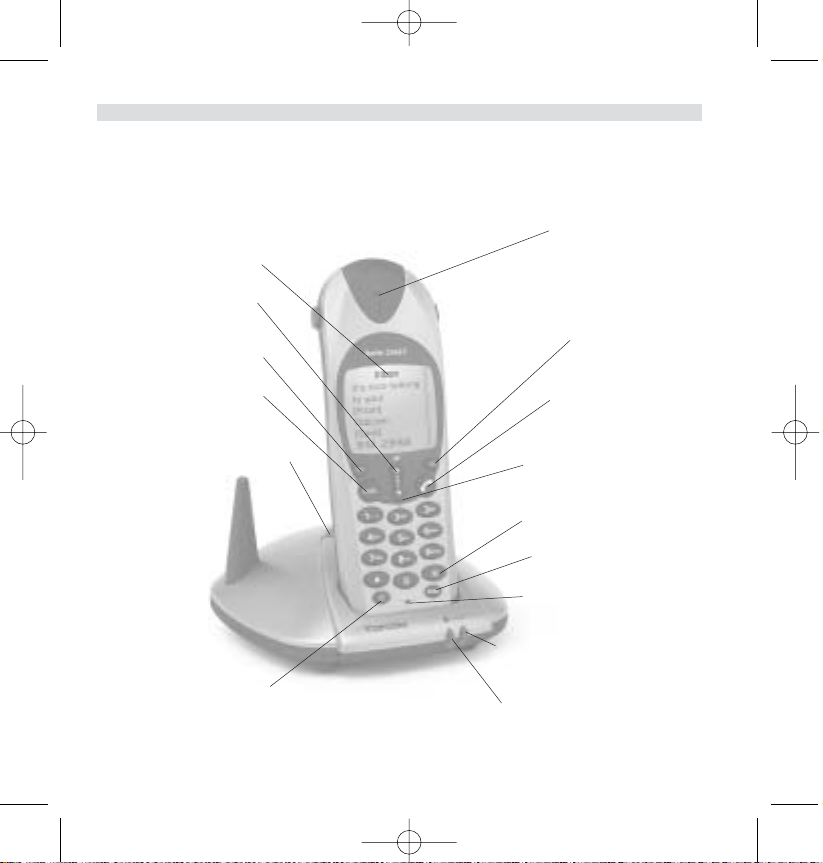
1. DESCRIPTION OF TELEPHONE
1.1 HANDSET/BASE BUTLER 2562
Topcom Butler 2562 7
ENGLISH
Earpiece
Display
SMS
Menu/OK Line-key
Paging Key
Set-up subscription
(press and hold ) Down Key
Call log Key
3 way
Conversation
Internal call
Flash Key
Microphone
Power indicator
Incoming call LED
Handsfree key Charge indicator
Power ON/OFF/
Escape/Mute key
Up arrow/Redial/
Pause key
HL_B2562_v3.qxd 24-03-2003 10:01 Page 7
Page 8
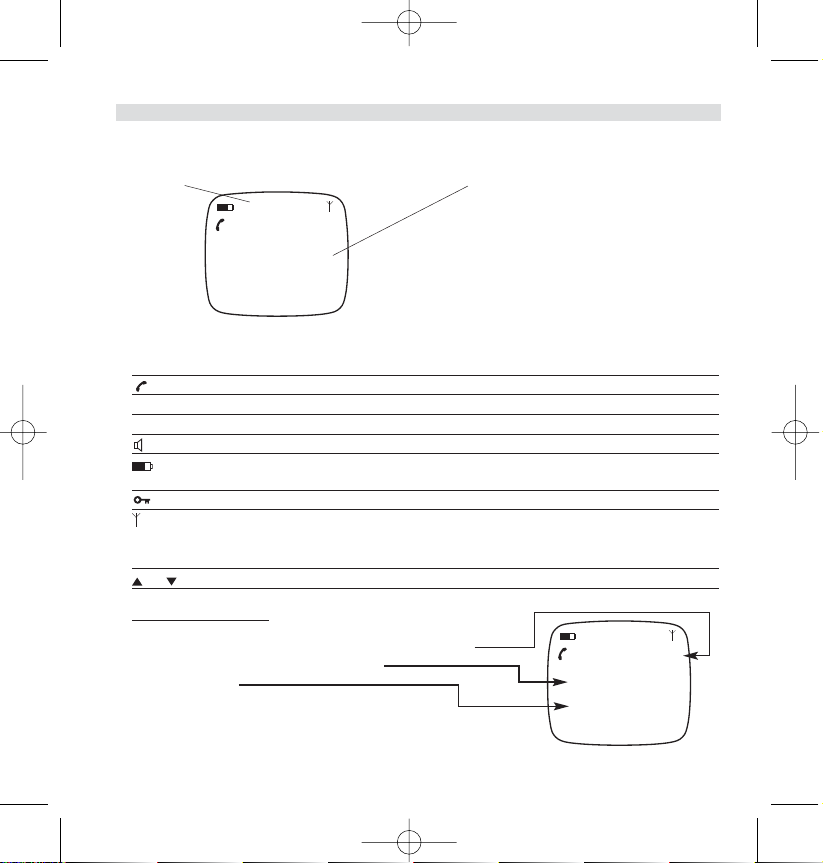
1.2 DISPLAY
Icon line Dot matrix display
Each operation has an associated icon
ICON: MEANING:
You are online
EXT You are in external communication
INT You are in internal communication
Hands free mode activated
rechargeable battery level indicator
The segments scroll during battery recharging
Hand set keypad locked.
The antenna indicates the quality of reception.
The antenna flashes when the handset is not
registered on the base.
or Possible scroll direction in the menu
1.2.1 Standby display
In standby mode, the display shows the:
- Nummers of new calls in the call list, if there are
- Handset name and the handset number
- Date and Time
8 Topcom Butler 2562
ENGLISH
HL_B2562_v3.qxd 24-03-2003 10:01 Page 8
?New Calls :1
B2562 1
22/04 15h25
?New Calls :1
B2562 1
22/04 15h25
Page 9
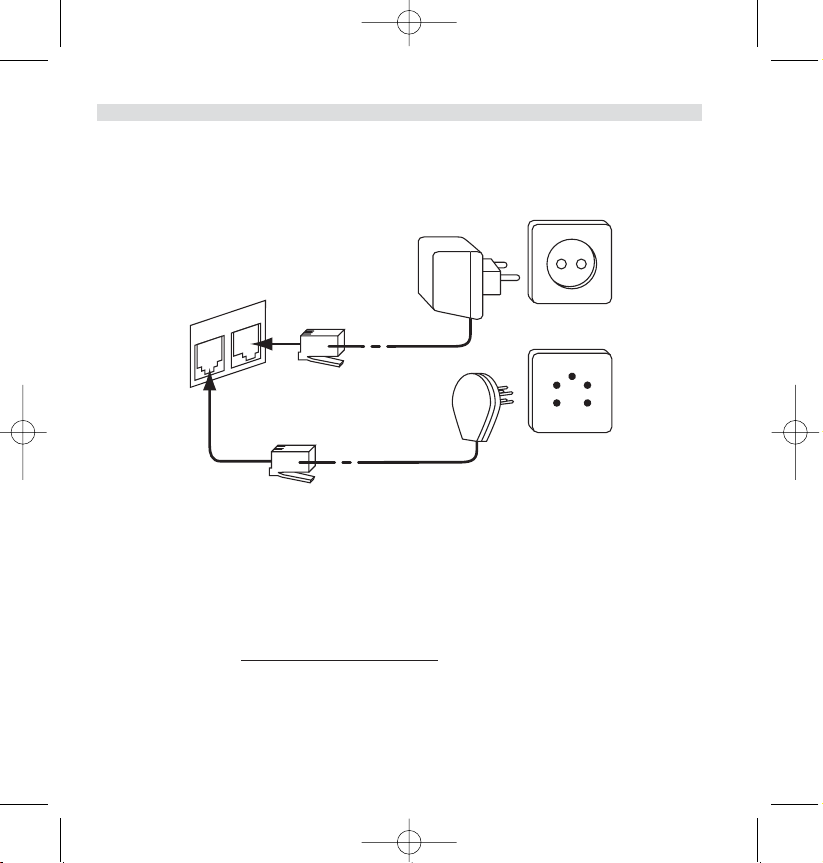
2. TELEPHONE INSTALLATION
2.1 CONNECTIONS
2.2. RECHARGABLE BATTERIES
Before you use your Butler 2562 for the first time, you must first make sure that the batteries are charged for 6-8 hourse. The telephone will not work optimally if not properly charged.
To change or insert a rechargeable battery:
1. Slide the cover towards the bottom and then lift it up.
2. Insert the batteries respecting the (+ and -) polarity.
3. Replace the battery cover
Note: The maximum working time of the batteries is approx. 250h and the maximum talk time is 13 hours! In the
course of time the batteries will start to drain faster. The batteries must be replaced. You can buy new batteries from
any DIY outlet (2 rechargeable batteries, type AAA NiMH)!
Topcom Butler 2562 9
ENGLISH
Te lephone cord
bottom view
of base
Power cable
HL_B2562_v3.qxd 24-03-2003 10:01 Page 9
Page 10
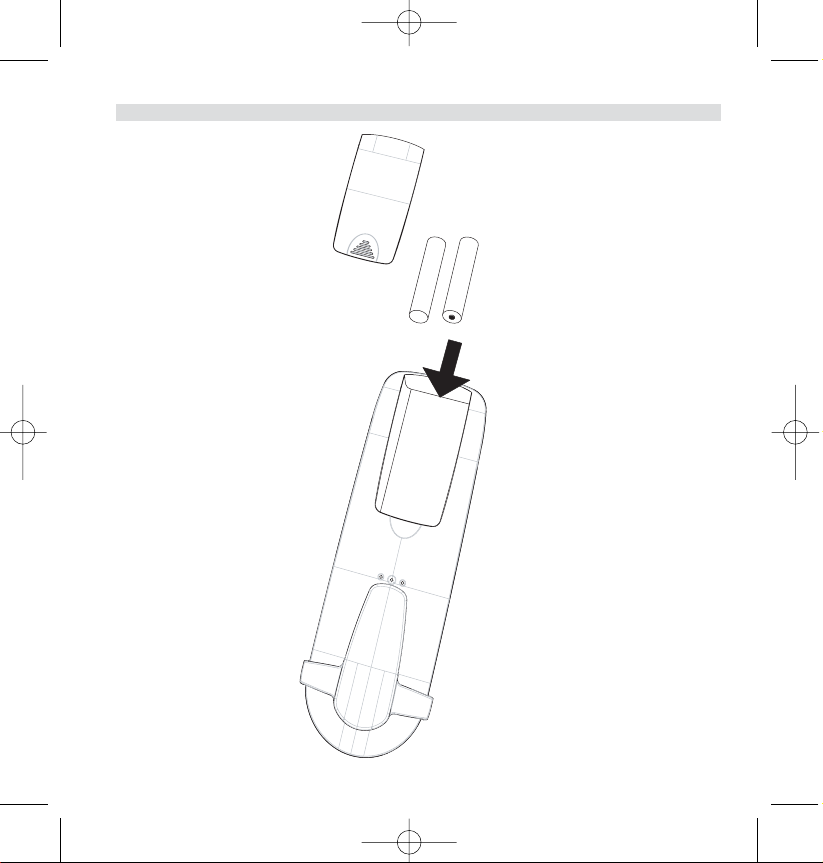
Rechargeable Batteries
back view of hand-set
Cover
+ -
- +
10 Topcom Butler 2562
ENGLISH
HL_B2562_v3.qxd 24-03-2003 10:01 Page 10
Page 11
3. USING THE TELEPHONE
3.1 HANDSET ON/OFF
•Turn ON handset: Press shortly (1sec). The handset will search the base.
•Turn OFF handset: Press for 2s. The display will go OFF.
3.2 CHOOSING MENU LANGUAGE
1. Enter the menu by pressing /OK
2. Select HANDSET MENU using the and keys
3. Press OK
4. Select LANGUAGE using the and keys
5. Press OK
6. Select the language of choice by means of the and down keys.
7. Press OK to validate
3.3 RECEIVING A CALL
When the handset rings, press to answer. You are then connected to your correspondent. If the
handset is on the base when the telephone rings, you just need to pick up the handset to answer the
call (if the option autoanswer is set ON: See 4.10. Automatic answer).
If you press when the telephone rings, you pick-up the line and automatically change to handsfree
mode.
3.4 MAKING AN EXTERNAL CALL
Nor
mal numeration:
1. Press
2. Enter telephone number
Block dialling:
1. Dial your correspondents number
2. Press
To correct a number use the key to delete an entered digit
3.5 MAKING AN INTERNAL CALL
Only possible when more than one handsets are registered to the base!!
Topcom Butler 2562 11
ENGLISH
HL_B2562_v3.qxd 24-03-2003 10:01 Page 11
Page 12
Normal numeration:
1. Press INT for 2 sec.
2. Enter the number of the internal handset (1 to 5)
Prenumération:
1. Enter the number of the internal handset (1 to 5)
2. Press INT for 2 sec.
3.6 HANDS FREE MODE
You can converse with your correspondent without picking up the handset.
To activate or deactivate the hands free mode, press the key during a call.
To adjust the volume, refer to the chapter “ Personalisation “- adjusting speaker volume.
3.7 INTERNAL CALL TRANSFER
Only possible when more than one handset are registered to the base!!
When you want to transfer an external call to another handset:
1. During a conversation press and hold the INT key for 2 s.
2. Select the number of the internal handset, the external caller is put on hold.
3. When the other handset picks up, press to hang up and transfer the call.
If the internal correspondent does not pick-up, press INT for 2 seconds again to reconnect to the
external caller on line.
3.8 CONFERENCE CALL
Only possible when more than one handsets are registered to the base!!
You can converse simultaneously with an internal correspondent and an external correspondent.
When you are on line with an external correspondent:
1. Press and hold the INT key for 2 s.
2. Enter the number of the internal handset that you want to call
3. When the internal correspondent picks- up, press and hold
4. If the internal correspondent does not answer, press INT again for 2 sec. to reconnect to the external
correspondent on-line.
3.9 DISPLAY OF CALL DURATION
The call duration is displayed after 15 seconds, in minutes - seconds,: “00:20”
At the end of each call, the total call duration is displayed for 5 seconds.
12 Topcom Butler 2562
ENGLISH
HL_B2562_v3.qxd 24-03-2003 10:01 Page 12
Page 13
3.10 MICROFOON MUTE
It is possible to mute the microphone during a conversation.
Press during the conversation, the microphone is then deactivated, you can talk freely without being
heard by the calling party.
“Secrecy On” is displayed.
Press again to return to normal mode.
3.11 PAUSE KEY
When dialling a number you can add a pause between two digits by pressing the redail/pause key
for 3 s.
3.12 CALLER IDENTIFICATION
Caller identification is only available if you have subscribed to this service with your telephone operator.
When you receive an external call, the callers number will appear on the display as the telephone rings.
If the network sends it, or if the name of the caller is in the address book, the caller is identified by his
or her name.
The caller identity is replaced by the call duration after 15 seconds in communication. It is still possible
to display the caller’s identity after this time by pressing OK-key repeatedly for the name and number.
3.12.1 List of calls
Your telephone keeps a list in memory of the last 10 unanswered (missed) calls. This function is only
available if your are subscribed to the caller ID information. The correspondents that have called are
identified by their telephone number or name in the same way as in caller identification. The list also
shows:
-repeat call counter (up till 99): indication of how many times this caller has called
- date and time of this incoming call
Topcom Butler 2562 13
ENGLISH
Time/Date
Repeat call timer
Caller Name
Caller telephonenumber
HL_B2562_v3.qxd 24-03-2003 10:01 Page 13
7 14h35 3O/O4
TOPCOM
O123456789
Page 14
1. Press . If there are no calls in the list ‘NO ENTRY STORED’ will appear.
2. Scroll through the calls using the up or down arrows. The callers names will be shown if the
name is send by the network or is stored in the phonebook. If you are at the end of the list you will
hear a beep tone.
3. Pressing OK again will give you the option to delete or add this entry in the phonebook if it’s not
already stored:
• Select ‘ADD ENTRY’ and press OK. Enter or modify the name and press OK. The entry will be stored in the phonebook and deleted from the call list!
• Select ‘DELETE ENTRY’ and press OK to delete this entry, or to return to the previous menu.
4. To call back a correspondent, simply press the key when their telephone number or name are
displayed.
If a caller is in the phonebook, they are identified by their name in the list of calls.
Also the date and the time of the call will be shown (if day & time are send together with the caller id
information).
3.12.2. Voice mail indication
This function only works if you have the voice mail or phone mail service and if the network sends this
indication along with the FSK caller ID (CLIP) information!
When you receive a new message in your voice mail system, the icon will appear on the display.
Once you have listened to your message, the icon will disappear.
3.13 REDIAL MEMORY
Your telephone keeps a list of the 10 last calls (of 20digits) you have made in memory; The correspondents called are identified by their telephone number or by their name if they appear in the phonebook.
To consult the redial list:
1. Press
2. Scroll through the calls with the up and down arrows.
3. To call by the selected correspondent, simply press when their telephone number or name is displayed.
Note: When name is displayed, you can toggle between name and number by pressing the OK key!
3.14 CALLING FROM THE PHONEBOOK
To call a correspondent whose name you have saved in the phonebook:
1. Enter the menu by pressing /OK.
2. Select ‘PHONEBOOK’ and press ‘OK’.
14 Topcom Butler 2562
ENGLISH
HL_B2562_v3.qxd 24-03-2003 10:01 Page 14
Page 15
3. Press the first letter of the name. The first name that starts with this letter or the nearest letter in the
alphabet will be displayed.
4. Go through the list of names with the and keys. The list scrolls in an alphabetical order.
5. Press to dial the number of the correspondent whose name is displayed.
To see the number before dialling, carry out steps 1 to 3 from before and press Ok.
3.15 USING THE ALPHANUMERICAL KEYPAD
With your telephone you can also enter alphanumeric characters. This is useful for entering a name into
the phonebook, giving a name to a hand-set, …
To select a letter, press the corresponding key as many times as is necessary. For example to select an
‘A’, press ‘2’ once, to select a ‘B’, press ‘2’ twice and so on. To select ‘A’ and then B consecutively,
select ‘A’, wait until the cursor moves on to the next character, then press ‘2’ twice.
To select a space, press 1.
To s e lect a dash, press ‘1’ twice
The keypad characters under each keys appears on top of the screen whenever a key is pressed!
3.16 USING THE MENU
A wide range of telephone functions are accessible through a user friendly menu.
1. To enter the menu, press /OK
2. Scroll through the selections using the and keys, the selections scroll in a loop ( you return to
the first after the last).
3. To validate a selection, press OK
4. To return to the previous menu, press
4. PERSONALISATION
4.1 ADJUSTING SPEAKER VOLUME
There are two ways to set the speaker volume:
4.1.1 Speaker volume during call
During conversation, press the or key to change the volume accordingly.
4.1.2 Set the default speaker volume
1. Enter the menu by pressing /OK
2. Select HANDSET MENU using the and keys
Topcom Butler 2562 15
ENGLISH
HL_B2562_v3.qxd 24-03-2003 10:01 Page 15
Page 16
3. Press OK
4. Select EAR VOLUME using the and keys
5. Press OK
6. Select the desired volume (1 to 5 ) by means of the and key.
7. Press OK
A double bleep confirms the validation of your choice
Note: The handsfree volume of the Butler 2562 is also adjust together with the receiver in the handset as above
described!
4.2 ADJUSTING THE RING VOLUME
4.2.1 Handset ring
1. Enter the menu by pressing /OK
2. Select HANDSET MENU using the and keys
3. Press OK
4. Select RING VOLUME using the and keys
5. Press OK
6. Select the desired volume (OFF or 1 to 5 )
7. Press OK to confirm or to return to the previous menu.
Note: Every programmation is confirmed at the end by a double or single long beep. A double bleep confirms the validation of your choice
A long bleep signifies that the modification has not been taken into account.
4.2.2 Base ring
1. Enter the menu by pressing /OK
2. Select SETUP using the and keys
3. Press OK
4. Select BASE VOLUME using the and keys
5. Press OK
6. Select the desired volume (OFF or 1 to 5 )
7. Press OK to confirm or to return to the previous menu.
4.3 CHOOSING THE RING MELODY
The base and each hand set can ring with a different melody.
The handsets can ring with a different melody according to whether the incoming call is internal or
external.
16 Topcom Butler 2562
ENGLISH
HL_B2562_v3.qxd 24-03-2003 10:01 Page 16
Page 17
4.3.1 Base melody
1. Enter the menu by pressing /OK
2. Select SETUP using the and keys
3. Press OK
4. Select BASE MELODY using the and keys
5. Press OK
6. Select the melody of your choice ( 1 to 5 ) using the and keys
7. Press OK to confirm or to return to the previous menu.
4.3.2 Handset melody, external call
1. Enter the menu by pressing /OK
2. Select HANDSET MENU using the and keys
3. Press OK
4. Select EXT MELODY using the and keys
5. Press OK
6. Select the melody of your choice ( 1 to 5 ) using the and keys
7. Press OK to confirm or to return to the previous menu.
4.3.3 Handset melody, internal call
1. Enter the menu by pressing /OK
2. Select HANDSET MENU using the and keys
3. Press OK
4. Select INT MELODY using the and keys
5. Press OK
6. Select the melody of your choice ( 1 to 5 ) using the and keys
7. Press OK to confirm or to return to the previous menu.
4.4 ACTIVATION / DEACTIVATION OF BEEPS
The handsets can emit beeptone when a key is pressed, when the batteries are low and when the
handset is out of range.
4.4.1 Key pressed beeptone on/off
1. Enter the menu by pressing /OK
2. Select HANDSET MENU using the and keys
3. Press OK
4. Select WARNING TONES using the and keys
Topcom Butler 2562 17
ENGLISH
HL_B2562_v3.qxd 24-03-2003 10:01 Page 17
Page 18
5. Press OK
6. Select KEY PRESS using the and keys
7. Press OK
8. Select ON to activate, OFF to deactivate
9. Press OK to confirm.
4.4.2 Low battery
Proceed as before, but select at point 6 "LOW BATTERY" instead of "KEY PRESS".
4.4.3 Handset out of range
Proceed as before, but select at point 6 "OUT OF RANGE" instead of “KEY PRESS".
4.5 HANDSET NAME
This function allows you to personalise each handset.
1. Enter the menu by pressing /OK
2. Select HANDSET MENU using the and keys
3. Press OK
4. Select HANDSET NAME using the and keys
5. Press OK
6. Enter the name
7. Press OK to validate
While entering the name, press to delete a character and press and hold to exit the menu without taking any modifications into account.
4.6 SETTING THE DAY AND TIME
1. Enter the menu by pressing /OK
2. Select “SETUP”
3. Press OK
4. Select “TIME SETTING”
5. Press OK
6. Enter day and month and press OK to confirm
7. Enter hours and minutes and press OK to confirm
The new date and time is shown.
Note: The day and time will be automatically set by the network if the network send the date and time together with
the callerID.
18 Topcom Butler 2562
ENGLISH
HL_B2562_v3.qxd 24-03-2003 10:01 Page 18
Page 19
4.7 CHANGING THE PIN CODE
Certain functions are only available to users who know the PIN code. By default this is PIN code = 0000.
To change the PIN code:
1. Enter the menu by pressing /OK
2. Select SETUP using the and keys
3. Press OK
4. Select PIN CODE using the and keys
5. Press OK
6. Enter the old 4 figure PIN code.
7. Press OK
8. Enter the new 4 figure PIN code
9. Press OK
10. Enter the new PIN code a second time
11. Press OK to validate
4.8 SETTING THE DIALLING MODE
There are two types of dialling mode:
• DTMF/Tone dialling (the most common)
• Pulse dialling ( for older installations )
To change the dialling mode:
1. Enter the menu by pressing /OK
2. Select SETUP using the and keys
3. Press OK
4. Select DIALLING MODE using the and keys
5. Press OK
6. Select the dialling mode using the and keys
7. Press OK to validate
4.9. FLASH TIME DURATION
1. Enter the menu by pressing /OK
2. Select Setup using the and keys
3. Press OK
4. Select RECALL using the and keys
5. Choose RECALL 1 for short flash time (100ms) or RECALL 2 for long flash time (250ms)
Topcom Butler 2562 19
ENGLISH
HL_B2562_v3.qxd 24-03-2003 10:01 Page 19
Page 20
4.10. AUTOMATIC ANSWER
When there is a incoming call and the handset in on the base, the phone automatically takes the line
when lifted. This is the default setting, but can be set OFF:
1 Enter the menu by pressing /OK
2 Select HANDSET MENU using the and keys
3Press OK
4 Select AUTO ANSWER using the and keys
5 Select ON (for automatic answer) or OFF
6Press OK
4.11 RESET
It is possible to return the phone to the original default configuration. This is the configuration which
was installed when you first received the telephone.
To r e tu r n to default settings:
1. Enter the menu by pressing /OK
2. Select SETUP using the and keys
3. Press OK
4. Select DEFAULT using the and keys
5. Press OK
6. Enter the 4 digit PIN code (default =0000)
7. Press OK to validate
WARNING! Returning to default settings will delete all entries in the phonebook and call log.
The PIN code will also be reset to 0000
5. ADVANCED FUNCTIONS
5.1 PHONEBOOK
The Phonebook allows you to memorise 40 telephone numbers and names. You can enter names of up
to 8 characters length and numbers of up to 20 digits length.
To call a correspondent whose number is stored in the phonebook, refer to the section 3.14
To enter alphanumerical characters, refer to the section 3.15.
20 Topcom Butler 2562
ENGLISH
HL_B2562_v3.qxd 24-03-2003 10:01 Page 20
Page 21
5.1.1 Add an entry into the phonebook
1. Enter the menu by pressing /OK
2. Select ED. PHONEBOOK using the and keys
3. Press OK
4. Select ADD ENTRY using the and keys
5. Press OK
6. Enter the name
7. Press OK to validate.
8. Enter the telephone number
9. Press OK to validate
5.1.2 Modify a name or number
To modify a number in the phonebook:
1. Enter the menu by pressing /OK
2. Select ED. PHONEBOOK using the and keys
3. Press OK
4. Select EDIT ENTRY using the and keys
5. Press OK
6. Move through the list of names with the and keys. The list scrolls in alphabetical order.
7. Press OK when you find the name to modify
8. Use the key to go back and enter the new name
9. Press OK to validate
10. Enter the new telephone number
11. Press OK to validate
5.1.3 Deleting an entry
To delete an entry:
1. Enter the menu by pressing /OK
2. Select ED. PHONEBOOK using the and keys
3. Press OK
4. Select DELETE ENTRY using the and keys
5. Press OK
6. Move through the list of names using the and keys the list scrolls in alphabetical order.
7. Press OK when you find the name you wish to delete
8. The phone number is displayed, press OK
9. CONFIRM appears, press OK to confirm or to stop.
Topcom Butler 2562 21
ENGLISH
HL_B2562_v3.qxd 24-03-2003 10:01 Page 21
Page 22
5.2 SEARCHING A HANDSET FROM THE BASE
When the paging button on the base is pressed all the handsets will ring. This ringing will help you
locate a lost handset. By simply pressing one of the handset keys the ringing stops.
5.3 CHOOSING PRIORITY RINGING
This function allows you to make the base or one of the handsets ring before the others when there is
an external call.
The priority unit will ring a number of times, then the others units will start to ring in turn.
To use this function, you must choose the priority unit, this can be the base or one of the handsets. You
can set the number of rings before the other units start ringing.
Setting the priority unit
1. Enter the menu by pressing /OK
2. Select SETUP using the and keys
3. Press OK
4. Select RING PRIORITY using the and keys
5. Press OK
6. Select “DEF. PRIORITY” using the and keys
7. Press OK
8. Select "BASE" or "HANDSET X" using the and keys
9. Press OK to validate
10. Choose the number of rings using the and keys
11. Press OK to validate
Activate / Deactivate the priority ring
1. Enter the menu by pressing /OK
2. Select SETUP using the and keys
3. Press OK
4. Select RING PRIORITY using the and keys
5. Press OK
6. Select "ON" or "OFF" using the and keys
7. Press OK to validate
22 Topcom Butler 2562
ENGLISH
HL_B2562_v3.qxd 24-03-2003 10:01 Page 22
Page 23
5.4 USING YOUR TELEPHONE WITH A PABX
It is possible to use your telephone with a PABX or a local telephone network.
Use of your telephone with a recent system does not require any special adjustment. With certain older
systems, it is necessary to insert a pause between dialling a prefix and dialling the rest of the number.
Your telephone can inserts this pause automatically during the numeration.
In order to do this you must enter the prefix and the pause length.
It is possible to choose 2 prefixes for 2 different PABX.
To r emove the pause, delete the prefix in memory in the same way as you entered it.
Setting the prefix
1. Enter the menu by pressing /OK
2. Select SETUP using the and keys
3. Press OK
4. Select PABX SETUP using the and keys
5. Press OK
6. Select PBX1 or PBX2 using the and keys
7. Press OK
8. Enter the PIN code (default = 0000)
9. Press OK to validate
10. Enter the PABX prefix
11. Press OK to validate
Setting the pause duration
1. Enter the menu by pressing /OK
2. Select SETUP using the and keys
3. Press OK
4. Select PABX SETUP using the and keys
5. Press OK
6. Select PAUSE SETUP using the and keys
7. Press OK
8. Select the PAUSE time using the and keys
9. Press OK to validate
5.5 KEYPAD LOCK
Locking the keypad prevents you dialling a number accidentally. This can be useful with small children.
When the keypad is locked, only the /OK is available, all the others are locked.
Topcom Butler 2562 23
ENGLISH
HL_B2562_v3.qxd 24-03-2003 10:01 Page 23
Page 24
Activating/Deactivating the keypad lock
1. Enter the menu by pressing /OK
2. Select KEYPAD LOCK
3. Press OK
4. Select ON/OFF
5. Press OK to confirm
5.6 EMERGENCY CALL ( BABY CALL )
With emergency call you can dial a pre-programmed number by simply pressing one key. This is useful
for young children or telephone use in an emergency.
5.6.1 Edit emergency call number
1. Enter the menu by pressing /OK
2. Select BABYCALL
3. Press OK
4. Select NUMBER
5. Press OK
6. Enter the emergency number
7. Press OK to confirm
5.6.2 Activate/Deactivate the emergency number
1. Enter the menu by pressing /OK
2. Select BABYCALL
3. Press OK
4. Select ON/OFF
5. Press OK to confirm
6. Once the mode is activated, the word " BABYCALL" is displayed.
5.7 MONITOR MODE (BABY SIT)
You need at least two handsets. This function allows you to listen to the second handset by internal call
if it is in monitor mode. You can listen what is happen in another room.
When the function is ON, “Monitor Mode” is displayed. When you hang up the first handset, the
second one hangs down too.
24 Topcom Butler 2562
ENGLISH
HL_B2562_v3.qxd 24-03-2003 10:01 Page 24
Page 25
5.7.1 Activating/Deactivating the keypad lock
1. Enter the menu by pressing /OK
2. Select MONITOR MODE
3. Press OK
4. Select ON/OFF
5. Press OK to confirm
6. SMS (SHORT MESSAGES SERVICE)
To use SMS, this service has to be activated on your phone line. Normally you need to call a special num-
ber to get a subscription from your telephone company to activate this function. Please contact your telep-
hone company for this service.
The phone can send and receive SMS messages. The minimum messages that can be stored are 58
messages (of 160 characters each). When the memory is almost full ‘Memory Full’ will blink on the
screen (when completely full, the blinking will stop).
When a new message comes in, the unit will ring shortly.
6.1. SMS MAIN MENU
You can enter the SMS main menu by pressing the SMS key or by selecting SMS in the menu.
SMS
>New message
Inbox
Outbox
Delete all
Settings
- Inbox: Contains all SMS messages received.
- Outbox: Contains all SMS messages which are typed and send.
- New message: Menu to enter a new message
- Delete all: Delete all messages from the Inbox and Outbox
- Setting: To set various setting for sending and receiving SMS.
Note: When new messages are received, you will automatically go to the ‘Inbox’ menu when pressing the SMS-key.
Topcom Butler 2562 25
ENGLISH
HL_B2562_v3.qxd 24-03-2003 10:01 Page 25
Page 26
6.2. SMS SETTING
Settings
>Send
Receive
Melody
Terminal nr.
- Send: Contains the SMS center sending telephone number. This number is needed to
send SMS messages towards the server.
- Receive: Contains the SMS center receiving telephone number.
When the SMS center sends you a new message, this telephone number is send
together with the message.
Remark: The SMS center numbers are depending from country to country and
networkoperator. Please check the extra sheet added in this manual for different countries
(ADDENDUM) or contact your local networkoperator.
- Melody: To turn on/off the melody sound each time when a new SMS is received.
-Terminal number: If more SMS devices are on the same telephone line, you can give each device
another terminal number (up till 9). So that SMS messages can be send to each
device separately. This function is networkoperator depending (Default = 1)
6.2.1. Setting up the SMS center numbers
See ADDENDUM for the correct SMS center numbers.
1. Enter the SMS-menu by pressing SMS-key
2. Select ‘Setting’
3. Press OK
4. Select Send or Receive
5. Press OK
6. Delete the existing number by pressing the ‘c’-key and enter the new Message center numbers.
7. Press OK
6.2.2. New SMS message melody on/off
1. Enter the SMS-menu by pressing the SMS-key
2. Select ‘SETTING’
3. Press OK
4. Select MELODY
5. Select ON of OFF and press OK
26 Topcom Butler 2562
ENGLISH
HL_B2562_v3.qxd 24-03-2003 10:01 Page 26
Page 27
6.3. SENDING SMS MESSAGES
6.3.1. New messages
By entering the SMS main menu, you can chose ‘NEW MESSAGE’ to enter a new message. There are
two writing methods: Standard or Fast Text (Eatoni) method. The standard method is the same method
used to enter a name in the phonebook.
The FAST TEXT methode is a Letterwise predictive text method which means that the software will predict the next character to be typed. This method requires less key press to form words/sentences than
the standard method.When the FAST TEXT predicted letter is not the character you want to type, you
can use the ‘#’-key to select a other character.
For example: when you want to enter the name ‘LUC’
Eatoni method:
Tap 5 once for ‘L’
Tap 8 and then ‘#’-key to select ‘U’
Top 2 once for ‘C’ (FAST TEXT method immediately predicts the letter ‘C’)
Total keystrokes required = 4
Standard method:
Ta p 5 three times to select ‘L’
Tap 8 two times to select ‘U’
Ta p 2 three times to select ‘C’
Total keystrokes required = 8
The following characters can be entered for SMS:
Key Assigned keys
00 è é & % / _ £ ¥ ù ( )
1 Space 1 _ - + = ì Ç ø (
2A b c à ä A BC Ä @ 2 [ ] {
3D e f D E F 3 É ∆
4G h i G H I 4ΦΓΛ ΩΠ
5J k l ‘ J K L 5 Ψ _ θΞ
6M noñ Ò ö MN O 6 ÑÖ~
7P q r s P Q R S 7 Æ æ _
8T u v ù ü T UV 8 Ü “ # \ |
9W xyzW X YZ 9Å å<>
** .,; : ? !¡ ¿§ ^€
Topcom Butler 2562 27
ENGLISH
HL_B2562_v3.qxd 24-03-2003 10:01 Page 27
Page 28
To enter a new message:
1. Enter the SMS-menu by pressing SMS-key
2. Select New message
3. Write your message you want to send. The available characters which can be entered is shown in
the lower right corner. The lower left corner shows to type method. You can switch between FAST
TEXT and Normal by pressing the ‘#’-key for 3s. You can erase the character in front of the cursor
by pressing the ‘c’-key.
4. Press OK to go to the next menu or press and hold the ‘c’-key to go back to the main SMS menu.
Remark: It’s not possible to have a carriage return in a SMS message! Only continuously text can be typed.
5. After you pressed OK you will see the following display:
>Send to?
_
Phonebook
Edit message
Delete?
6. Enter the phone number where you want to send the SMS too. Or select:
•‘Phonebook’ to search a number in the phonebook.
•‘Edit Message’ to change/edit the message
•‘Delete?’ to delete the message
6.3.2 Outbox
The ‘Outbox’ contains a list of all messages that are ready to be send. If you enter the ‘OUTBOX’ you
will see the beginning of each message. The first one is the first entered message.
You can read the complete message by selecting a message first using the up and down key.
Pressing the OK key will show the complete message including date/time and the recipient telephone
number. Press ‘c’ key to go back to the ‘Outbox’-menu. Or press OK will give you the same options as
in 6.3.1 point 5.
6.4. READING SMS MESSAGES
When you have received new messages, there are 3 ways to indicate this:
1. By a short melody in the handset
2. A flashing envelope in the display: When ONE of the new messages is read, the envelope will stop
flashing. The envelope is displayed as long as there is non-read messages.
3. A flashing LED at the base.
28 Topcom Butler 2562
ENGLISH
HL_B2562_v3.qxd 24-03-2003 10:01 Page 28
Page 29
Note that the flashing LED at the base also indicates that there are new calls received in the call list. As
long as both are not read, the LED keeps flashing.
When (a) new message(s) has been received and you want to read it, just press the SMS key. You will
immediately enter the ‘Inbox’ menu (not the main SMS menu).
6.4.1. Inbox
The ‘Inbox’ contains a list of all messages that are received (ready and non-read). Each line contains the
beginning of the message. The first one is the latest received message. Before each new message
appears an envelope icon. You can read the compleet message by selecting a message first using
the up and down key. Pressing the OK key will show the compleet message including: date/time
when send + senders telephone number.
Press ‘c’ key to go back to the ‘Inbox’-menu. Or press OK will give you the following options:
- Delete? To delete the current message. No confirmation needed.
-Forward Transfer the message in the Outbox and let this message ready to be send
- Reply To send a reply back to the sender of this message.
6.5. DELETING ALL MESSAGES
By selecting ‘Delete all’ in the main SMS menu, you can delete all messages in the ‘Inbox’ and ‘Outbox’.
1. Enter the SMS-menu by pressing SMS-key
2. Select Delete All
3. Press OK to confirm or ‘c’-key to go back.
7. MANAGING MULTIPLE HANDSETS
7.1. SETTING UP AN ADDITIONAL HANDSET
You can subscribe new handsets on the base if these handsets support the DECT GAP protocol.
The base can support a maximum of 5 handsets. If you already have 5 handsets, and you wish to add
another one or change one handset, you must first delete a handset, then associate the new handset.
To r egister any handset, the base must be put into a special registration mode:
1. Press and hold the paging key of the base for 6 seconds.
2. The base will then emit a beeptone. The base is now ready to register a new handset. You have 90
seconds after pressing the button to register a new handset.
After putting the base into registration mode, start the procedure on the new handset:
Topcom Butler 2562 29
ENGLISH
HL_B2562_v3.qxd 24-03-2003 10:01 Page 29
Page 30
if your additional handset is a 2500/2505/2510/2550/2560/2561/2562/2600/2605/2610/
2660/2661/2662/2700/2705/2710/2750/2760/2761/2762
3. Enter the menu by pressing /OK
4. Select REGISTRATION using the and keys
5. Press OK
6. Enter a base number ( from 1 to 4 ). The flashing numbers are already in use.
7. Enter the BASE PIN code (0000 by default )
8. Press OK. The handset will start searching for the DECT base
9. If the handset has located the base, it will display the base identification number, validate the
base registration by pressing OK or stop by pressing ,
10. If the handset does not locate the base, it will return to the standby mode after a few seconds.
Try again by changing the base number and check that you are not in a environment where there
is interference. Move closer to the base.
if your handset is another model
After starting the registration procedure on the base, register the handset (see handset manual to find
out how). The handset must be GAP compatible.
The icon and the text "NOT REGISTERED" flashes on the display when the handset is not associated
with the base.
When a handset is associated with a base, it is attributed a handset number by the base. It is this number that is displayed on the handset after the name and must be used for internal calls.
7.2 REMOVING A HANDSET
You can remove a handset with a base to allow another handset to be registered
1. Enter the menu by pressing /OK
2. Select setup using the and keys
3. Press OK
4. Select REMOVE HS using the and keys
5. Press OK
6. Enter the 4 digit base PIN code
7. Press OK
8. Select the handset to be removed
9. Press OK to validate
30 Topcom Butler 2562
ENGLISH
HL_B2562_v3.qxd 24-03-2003 10:01 Page 30
Page 31

7.3 SETTING UP A HANDSET ON ANOTHER BASE
If you want to use a Butler 2562 handset with a base of another model. The base must be GAP compatible.
1. To put the base in registration mode, refer to the base user manual.
2. Carry out operations 3 to 9 from the paragraph 6.1.
7.4 SELECTING A BASE
The handsets can be registered up to 4 bases simultaneously.
To s e lect a base:
1. Enter the menu by pressing /OK
2. Select SETUP using the and keys
3. Press OK
4. Select SELECT BASE using the and keys
5. Press OK
6. Select a base or select AUTOMATIC using the and keys
7. Press OK
When selecting the base, the currect selected base in indicated by a ‘✔’ sign after the base number. If
you select ‘AUTOMATIC’ the handset will automatically search for another base when you are out of
range!
Topcom Butler 2562 31
ENGLISH
HL_B2562_v3.qxd 24-03-2003 10:01 Page 31
Page 32

8. TROUBLE SHOOTING
Symptom Possible cause Solution
No display Batteries uncharged Check the position of the batteries
Recharge the batteries
Handset turned OFF Turn ON the handset
No tone Telephone cord badly connected Check the telephone cord connection
The line is occupied by another Wait until the other handset hangs up
handset
The icon Handset out of range Bring the handset closer to the base
flashes
The base has no power supply Check the mains connection to the base
The handset is not registered Register the handset on the base
on the base
Base or handset The ringing volume is zero or low Adjust the ringing volume
do not ring
Tone is good, but The dialling mode is wrong Adjust the dialling mode (pulse/tone)
there is
no communication
Not possible to The FLASh time is too short Set the unit to Long Flash time
transfer a call
on PABX
Te lephone does not Manipulation error Remove the batteries and
react to pressing but them back in place
the keys
32 Topcom Butler 2562
ENGLISH
HL_B2562_v3.qxd 24-03-2003 10:01 Page 32
Page 33

9. GUARANTEE
• This equipment comes with a 24-month warranty. The warranty will be honoured on presentation of
the original bill or receipt, provided the date of purchase and the unit type are indicated.
• During the time of the warranty Topcom will repair free of charge any defects caused by material or
manufacturing faults. Topcom will at its own discretion fulfil its warranty obligations by either
repairing or exchanging the faulty equipment.
• Any warranty claims will be invalidated as a result of intervention by the buyer or unqualified third
parties.
•Damage caused by inexpert treatment or operation, and damage resulting from the use of nonoriginal parts or accessories not recommended by Topcom is not covered by the warranty.
• The warranty does not cover damage caused by outside factors, such as lightning, water and fire, nor
does it apply if the unit numbers on the equipment have been changed, removed or rendered
illegible.
Note: Please do not forget to enclose your receipt if you return the equipment.
10. TECHNICAL CHARACTERISTICS
•Standard: DECT ( Digital Enhanced Cordless Telecommunications )
GAP ( Generic Access Profile )
•Frequency range: 1880 MHZ to 1900 MHz
• Number of channels: 120 duplex channels
• Modulation: GFSK
• Speech coding: 32 kbit/s
• Emission power: 10 mW ( average power per channel )
• Range: 300 m in open space /50 m maximum inhouse
• Base power supply: 220 V / 50 Hz for the base
•Handset Batteries: 2 rechargeable batteries AAA, NiMh 550-600mAh
•Handset autonomy: 250 hours in standby
•Talk time: 13 hours
• Charging time: 6-8 hours
• Normal conditions of use: +5 °C to +45 °C
•Dialling mode: Pulse / Tone
•Flash time 100 or 250 ms
Topcom Butler 2562 33
ENGLISH
HL_B2562_v3.qxd 24-03-2003 10:01 Page 33
Page 34

34 Topcom Butler 2562
NEDERLANDS
Veiligheidsvoorschriften
•Gebruik enkel de meegeleverde adapter. Geen vreemde adapters gebruiken, de accucellen
kunnen hierdoor beschadigd worden.
•Gebruik enkel oplaadbare batterijen van hetzelfde type. Gebruik nooit gewone, niet oplaadbare
batterijen. Let bij het plaatsen van de oplaadbare batterijen op de polariteit (aangeduid in de
batterijruimte van de handset).
• Raak de laad- en stekkercontacten niet aan met scherpe en metalen voorwerpen.
• De werking van medische toestellen kan worden beïnvloed.
• De handset kan een onaangenaam gezoem veroorzaken in hoorapparaten.
• Het basisstation niet opstellen in vochtige ruimten en niet op minder dan 1,5 m van een waterbron. De handset niet in aanraking brengen met water.
• De telefoon niet gebruiken in explosieve omgevingen.
• Ontdoe u op een milieuvriendelijke wijze van de batterijen en de telefoon.
• Daar bij stroomuitval met dit toestel niet kan getelefoneerd worden, in geval van nood een
telefoon gebruiken die geen netstroom nodig heeft bvb. een GSM.
Reinigen
Veeg de telefoon met een licht vochtig doek of met een antistatische doek af. Gebruik nooit
reinigingsmiddelen of agressieve oplosmiddelen.
HL_B2562_v3.qxd 24-03-2003 10:01 Page 34
Page 35

1. BESCHRIJVING VAN DE TELEFOON 37
1.1 Handset en basistoestel van de Butler 2562 37
1.2 Display 38
2. TELEFOONINSTALLATIE 39
2.1 Aansluitingen 39
2.2 Herlaadbare batterijen 39
3. DE TELEFOON GEBRUIKEN 41
3.1 Handset AAN/UIT 41
3.2 Menutaal kiezen 41
3.3 Oproepen ontvangen 41
3.4 Een externe oproep 41
3.5 Een interne oproep (INT) 41
3.6 Handenvrije modus 42
3.7 Interne oproepdoorschakeling 42
3.8 Conferentiegesprek 42
3.9 Tonen van de gespreksduur 43
3.10 Microfoon uitschakelen 43
3.11 Pauze-toets 43
3.12 Identificatie van de beller 43
3.13 REDIAL-geheugen 44
3.14 Bellen vanuit het telefoonboek 45
3.15 Het alfanumerieke toetsenbord gebruiken 45
3.16 Het menu gebruiken 45
4. PERSONALISERING 46
4.1 Luidsprekervolume aanpassen 46
4.2 Belvolume aanpassen 46
4.3 Belmelodie kiezen 47
4.4 Bieptonen activeren/desactiveren 48
4.5 Naam van de handset (WIJZIGEN) 48
4.6 Datum en tijd instellen 49
4.7 De PIN-code wijzigen 49
4.8 De kiesmodus instellen 50
4.9 Flashtijd instellen 50
4.10 Automatisch opnemen 50
4.11 RESET 51
Topcom Butler 2562 35
NEDERLANDS
HL_B2562_v3.qxd 24-03-2003 10:01 Page 35
Page 36

5. GEAVANCEERDE FUNCTIES 51
5.1 Telefoonboek 51
5.2 Een intern toestel zoeken via het basistoestel 52
5.3 Prioritair bellen kiezen 53
5.4 Uw telefoon gebruiken op een PABX 53
5.5 Klaviervergrendeing 54
5.6 Baby Call 55
5.7 Ruimtebewaking 55
6. SMS (SHORT MESSAGES SERVICE) 56
6.1. SMS-hoofdmenu 56
6.2. SMS-Instelling 57
6.3. SMS-berichten versturen 58
6.4. SMS-berichten lezen 60
6.5. Alle berichten wissen 61
7. GEBRUIK VAN MEERDERE HANDSETS 61
7.1 Een bijkomende handset registreren 61
7.2 Een handset verwijderen 62
7.3 Een handset installeren op een ander basistoestel 62
7.4 Een basistoestel selecteren 62
8. PROBLEMEN VERHELPEN 63
9. GARANTIE 64
10. TECHNISCHE KENMERKEN 64
36 Topcom Butler 2562
NEDERLANDS
HL_B2562_v3.qxd 24-03-2003 10:01 Page 36
Page 37

1. BESCHRIJVING VAN DE TELEFOON
1.1 HANDSET EN BASISTOESTEL VAN DE BUTLER 2562
Topcom Butler 2562 37
NEDERLANDS
Luidspreker
Display
SMS-toets
Menu/OK Lijn-toets
Paging-toets
To ets omlaag
Oproeplijst
Conferentiegesprek
Interne oproep
Flash-toets
Microfoon
Spanning/
inkomende oproep
indicator
Handenvrij
Laadindicator
Toets omhoog
Herkies/Pauze toets
Mute/Escape-toets
Aan/Uit
HL_B2562_v3.qxd 24-03-2003 10:01 Page 37
Page 38

1.2 DISPLAY
Regel voor pictogrammen Dot matrix display
Voor elke functie is er een bijhorend pictogram
Pictogram: Betekenis:
In verbinding
EXT Er vindt een externe oproep plaats
INT Er vindt een interne oproep plaats
Handenvrije modus geactiveerd
Laadniveau van de herlaadbare batterijen
Tijdens het laden ziet u het aantal blokjes toenemen en verdwijnen, waarna deze
beweging wordt herhaald.
Klaviervergrendeling geactiveerd.
De antenne toont de kwaliteit van de ontvangst.
De antenne knippert als de handset niet is aangemeld op de basis.
of Mogelijke bladerrichting in het menu
1.2.1 Standby-scherm
In stand-by verschijnt er op het display:
- Het aantal nieuwe oproepen in de oproeplijst
- Handset naam en nummer
- Datum en tijd
38 Topcom Butler 2562
NEDERLANDS
HL_B2562_v3.qxd 24-03-2003 10:01 Page 38
?New Calls :1
B2562 1
22/04 15h25
?New Calls :1
B2562 1
22/04 15h25
Page 39

2. TELEFOONINSTALLATIE
2.1 AANSLUITINGEN
2.2. HERLAADBARE BATTERIJEN
Vooraleer u uw Butler 2562 de eerste keer gaat gebruiken, moet u ervoor zorgen dat de batterijen 6 à
8 uur zijn opgeladen. Het telefoontoestel zal niet optimaal functioneren als het niet voldoende werd
opgeladen.
Een oplaadbare batterij vervangen of plaatsen:
1. Schuif het kapje naar beneden en til het op.
2. Plaats de batterijen en houd daarbij rekening met de polariteit (+ en -).
3. Plaats het kapje terug.
Opmerking: De batterijen gaan telkens zo'n 250 uur mee en de gesprekstijd is maximaal 13 uur. Na verloop van tijd
raken de batterijen sneller leeg. De batterijen moeten dan worden vervangen. Nieuwe batterijen kunt u kopen bij elke
doe-het-zelf-zaak (twee herlaadbare batterijen, type AAA NiMH).
Topcom Butler 2562 39
NEDERLANDS
Telefoonkabel
onderaanzicht van
het basistoestel
Stroomkabel
HL_B2562_v3.qxd 24-03-2003 10:01 Page 39
Page 40

40 Topcom Butler 2562
NEDERLANDS
Oplaadbare batterijen
achteraanzicht van de handset
Kapje
+ -
- +
HL_B2562_v3.qxd 24-03-2003 10:01 Page 40
Page 41

3. DE TELEFOON GEBRUIKEN
3.1. HANDSET AAN/UIT
• De handset inschakelen (ON): Kort indrukken. De handset zoekt het basistoestel.
• De handset uitschakelen (OFF): Twee seconden lang indrukken. Het display gaat uit.
3.2 MENUTAAL KIEZEN
1. Open het menu met een druk op /OK
2. Selecteer HANDSET met behulp van de toetsen en .
3. Druk op OK
4. Selecteer LANGUAGE met behulp van de toetsen en .
5. Druk op OK.
6. Selecteer de gewenste taal met behulp van de toetsen en .
7. Druk op OK om te bevestigen.
3.3. OPROEPEN ONTVANGEN
Als de handset belt, druk dan op om de oproep te beantwoorden. U bent nu verbonden met de
persoon aan de andere kant van de lijn. Als de handset in het basistoestel staat op het moment dat de
telefoon rinkelt, hoeft u enkel de handset uit het basistoestel te nemen om de oproep te beantwoorden
(als de optie automatisch beantwoorden ingeschakeld werd: zie 4.10).
Als u op drukt wanneer de telefoon rinkelt, neemt u op en wordt er automatisch overgeschakeld op
de handenvrije modus.
3.4. EEN EXTERNE OPROEP
Nor
male nummering:
1. Druk op
2. Telefoonnummer ingeven
Blokkiezen:
1. Vorm het nummer van uw correspondent.
2. Druk op
Als u een nummer wilt corrigeren, gebruik dan de toets om een ingevoerd cijfer te wissen.
3.5. EEN INTERNE OPROEP (INT)
Alleen mogelijk wanneer meer dan één handset werd geregistreerd op het basistoestel!
Topcom Butler 2562 41
NEDERLANDS
HL_B2562_v3.qxd 24-03-2003 10:01 Page 41
Page 42

Normale nummering:
1. Druk gedurende 2 seconden op de INT-toets
2. Voer het nummer van het interne toestel in (1 tot 5)
Blokkiezen:
1. Voer het nummer van het interne toestel in (1 tot 5)
2. Druk gedurende 2 seconden op de INT-toets
3.6 HANDENVRIJE MODUS
U kunt met uw correspondent praten zonder de handset op te nemen.
Om de handenvrije modus te activeren of te desactiveren, drukt u tijdens een oproep op de toets .
Voor het aanpassen van het volume wordt verwezen naar het hoofdstuk “Personaliseren“ - het luidsprekervolume aanpassen.
3.7 INTERNE OPROEP DOORSCHAKELEN
Interne gesprekken zijn enkel mogelijk wanneer meer dan één handset werd geregistreerd op het basistoestel.
Een externe oproep doorschakelen naar een andere handset:
1. Druk 2 sec. lang op de INT toets tijdens een gesprek
2. Selecteer het nummer van het interne toestel, de externe beller wordt in de "wachtstand" geplaatst.
3. Als het andere interne toestel reageert, drukt u op om de oproep door te schakelen.
Als de interne correspondent niet opneemt, drukt dan gedurende 2 seconden opnieuw op INT om
terug te schakelen naar de externe beller.
3.8 CONFERENTIEGESPREK
Conferentiegesprekken zijn enkel mogelijk wanneer meer dan één handset werd geregistreerd op het
basistoestel.
U kunt gelijktijdig met een interne en een externe correspondent spreken.
U bent in gesprek met een externe correspondent:
1. Druk 2 sec. lang op de INT-toets
2. Voer het nummer in van de interne telefoon die u wilt oproepen
3. Zodra de interne correspondent opneemt, indrukken en vasthouden (2 sec.)
4. Als de interne correspondent de oproep niet beantwoordt, druk dan nogmaals op INT om weer over
te schakelen naar de externe correspondent die aan de lijn is.
42 Topcom Butler 2562
NEDERLANDS
HL_B2562_v3.qxd 24-03-2003 10:01 Page 42
Page 43

3.9 TONEN VAN DE GESPREKSDUUR
De gespreksduur wordt getoond na 15 seconden (eerst de minuten, dan de seconden): “00:20”
Aan het einde van elk gesprek wordt de totale gespreksduur getoond gedurende vijf seconden.
3.10 MICROFOON UITSCHAKELEN (MUTE)
Het is mogelijk om de microfoon tijdens een gesprek uit te schakelen.
Druk op tijdens het gesprek. De microfoon wordt gedesactiveerd en u kunt vrij spreken zonder dat
de persoon aan de andere kant van de lijn u kan horen.
U krijgt “Secrecy On” te zien.
Druk op om terug te keren naar de normale modus.
3.11 PAUZE TOETS
Tijdens het intoetsen van het nummer kan u een pauze invoegen door 3s lang op de herkies/pauzetoets te drukken.
3.12 IDENTIFICATIE VAN DE BELLER
De belleridentificatie is maar beschikbaar als u bij uw telefoonmaatschappij een abonnement heeft op
deze dienst.
Als u een externe oproep ontvangt, verschijnt het nummer van de beller op het scherm wanneer de
telefoon rinkelt.
Als de netwerk ook de naam verstuurt of wanneer de naam van de beller in het adresboek is opgenomen, zal de beller worden geïdentificeerd aan de hand van zijn of haar naam.
Eerst wordt de identiteit van de beller getoond, na 15 seconden krijgt u de gespreksduur te zien. Na
deze tijd is het nog steeds mogelijk om de identiteit van de beller weer op het scherm te brengen: druk
hiertoe herhaaldelijk op de toets OK voor de naam en het nummer.
3.12.1 LIJST VAN OPROEPEN
Uw telefoon houdt een lijst bij in het geheugen van de laatste 10 ontvangen oproepen. Deze functie is
alleen beschikbaar wanneer u een abonnement nam op de dienst voor belleridentificatie. De correspondenten die hebben gebeld, worden geïdentificeerd aan de hand van hun telefoonnummer of hun
naam, op dezelfde manier zoals dat bij het belleridentificatiesysteem gebeurt.
De oproeplijst laat ook het volgende zien:
- Een teller (oproep teller) die aangeeft hoeveel keer het huidige nummer is ontvangen (tot 99)
- Datum en tijd van de oproep
Topcom Butler 2562 43
NEDERLANDS
HL_B2562_v3.qxd 24-03-2003 10:01 Page 43
Page 44

1. Druk op . Als de lijst geen oproepen bevat, krijgt u ‘NO ENTRY STORED’ te zien.
2. De oproepen kunt u doorbladeren met behulp van de pijltjestoetsen of . De namen van de
bellers worden getoond als de naam door het netwerk werd doorgestuurd of in het telefoonboek is
opgeslagen. Als u het einde van de lijst heeft bereikt, krijgt u een bieptoon te horen.
3. Drukt u nogmaals op OK, dan krijgt u de mogelijkheid om deze beller te wissen of hem toe te voe-
gen aan het telefoonboek als dit nummer nog niet werd opgeslagen:
• Selecteer ‘ADD ENTRY’ en druk op OK. Naam invoeren of wijzigen en op OK drukken. De naam
wordt opgeslagen in het telefoonboek en gewist in de oproeplijst.
• Selecteer ‘DELETE ENTRY’ en druk op OK om het oproepnummer te wissen, of op om terug te
keren naar het vorige menu.
4. Om een correspondent terug te bellen, drukt u gewoon op de toets als hun telefoonnummer of
naam op het scherm verschijnen.
Als een beller in het telefoonboek is opgenomen, wordt hij geïdentificeerd aan de hand van zijn naam
in de lijst van oproepen.
U krijgt u ook tijdstip en datum te zien van de oproep.
3.12.2 Voice mail indicatie
Deze functie werkt enkel als u beschikt over de Voice Mail of Phone Mail dienst, en als het netwerk
deze indicatie doorstuurt samen met de Caller-ID/CLIP informatie!
Als u een nieuwe boodschap ontvangen hebt in uw Voice Mail systeem, zal het
‘ ’-icoon op de display verschijnen. Nadat u uw boodschappen beluisterd hebt, zal het ‘ ‘-icoon
verdwijnen.
3.13 HERKIES-GEHEUGEN
Uw telefoon houdt een lijst bij van de 10 laatste oproepen (van telkens 20 cijfers) die u deed. Als ze
opgenomen zijn in het telefoonboek, worden de gebelde correspondenten geïdentificeerd aan de hand
van hun telefoonnummer of hun naam.
44 Topcom Butler 2562
NEDERLANDS
Tijd/datum
Oproep teller
Naam oproeper
Te lefoonnummer
HL_B2562_v3.qxd 24-03-2003 10:01 Page 44
7 14h35 3O/O4
TOPCOM
O123456789
Page 45

De herkies-lijst opent u als volgt:
1. Druk op
2. U kunt de oproepen doorbladeren met behulp van de pijltjestoetsen en .
3. Om de geselecteerde correspondent op te bellen, druk u gewoon op zodra hun telefoonnummer of naam wordt getoond.
Opmerking: Als de naam wordt getoond, kunt u heen en weer schakelen tussen de naam en het nummer met
behulp van de OK-toets.
3.14 BELLEN VANUIT HET TELEFOONBOEK
Een correspondent bellen wiens naam u in het telefoonboek heeft opgeslagen, doet u als volgt:
1. Open het menu met een druk op /OK.
2. Selecteer ‘PHONEBOOK’ en druk op OK.
3. Voer de eerste letter van de naam in. De eerste naam die begint met deze letter of met de dichtstbijzijnde letter van het alfabet wordt nu getoond.
4. Doorloop de lijst met behulp van de toetsen en . De lijst wordt weergegeven in alfabetische
volgorde.
5. Druk op om het nummer te kiezen van de correspondent wiens naam wordt getoond.
Om het nummer te zien vooraleer u de oproep daadwerkelijk doet, voert u de vermelde stappen 1 tot 3
uit en drukt u op OK.
3.15 HET ALFANUMERIEKE TOETSENBORD GEBRUIKEN
Met uw telefoon kunt u ook alfanumerieke karakters invoeren. Dat is nuttig om een naam in te voeren,
om een intern toestel een naam te geven, …
Om een letter te selecteren drukt u het vereiste aantal keren op de bijhorende toets. Om bijvoorbeeld
een 'A' te selecteren, drukt eenmaal op '2', om een 'B' te selecteren drukt u tweemaal op '2', enz. Om
achtereenvolgens een 'A' en een 'B' te selecteren, wacht u tot de cursor na het invoeren van de 'A'
naar het volgende karakter springt. Daarna drukt u opnieuw op '2'.
Om een spatie te selecteren drukt u op '1'.
Om een streepje te selecteren drukt u tweemaal op '1'.
De karakters onder elke toets verschijnt bovenaan het scherm.
3.16 HET MENU GEBRUIKEN
Dankzij een gebruiksvriendelijk menu heeft u toegang tot een groot aantal telefoonfuncties.
1. Om het menu te openen drukt u op /OK
2. Doorloop de selectiemogelijkheden met de toetsen en , zodra u de laatste heeft bereikt springt
het menu weer naar de eerste.
Topcom Butler 2562 45
NEDERLANDS
HL_B2562_v3.qxd 24-03-2003 10:01 Page 45
Page 46

3. Druk op OK om een selectie te bevestigen.
4. Om terug te keren naar het vorige menu drukt u op
4. PERSONALISERING
4.1 LUIDSPREKERVOLUME AANPASSEN
Er zijn twee manieren om het luidsprekervolume in te stellen:
4.1.1 Luidsprekervolume tijdens oproep
Druk tijdens het gesprek op de toets of om het volume aan te passen.
4.1.2 Het standaardluidsprekervolume instellen
1. Open het menu met een druk op /OK
2. Selecteer ‘HANDSET MENU’ met behulp van de toetsen en
3. Druk op OK
4. Selecteer EAR VOLUME met behulp van de toetsen en
5. Druk op OK
6. Selecteer het gewenste volume (1 tot 5) met behulp van de toetsen en .
7. Druk op OK
Een dubbele bieptoon geeft aan dat uw keuze is bevestigd.
Opmerking: Het volume voor het handenvrij bellen met de Butler 2562 worden samen aangepast met dat van de
handset zoals hierboven is uiteengezet.
4.2 BELVOLUME AANPASSEN
4.2.1 Belvolume van de handset
1. Open het menu met een druk op /OK
2. Selecteer ‘HANDSET MENU’ met behulp van de toetsen en
3. Druk op OK
4. Selecteer RING VOLUME met behulp van de toetsen en
5. Druk op OK
6. Selecteer het gewenste volume (OFF of van 1 tot 5).
7. Druk op OK om te bevestigen of op om terug te keren naar het vorige menu.
46 Topcom Butler 2562
NEDERLANDS
HL_B2562_v3.qxd 24-03-2003 10:01 Page 46
Page 47

Opmerking: Bij elke programmatie hoort u aan het einde een enkele of dubbele lange bieptoon. Een dubbele bieptoon geeft aan dat uw keuze is aanvaard.Een lange bieptoon geeft aan dat met de wijziging geen rekening werd
gehouden.
4.2.2 Belvolume van het basistoestel
1. Open het menu met een druk op /OK
2. Selecteer SETUP met behulp van de toetsen en
3. Druk op OK
4. Selecteer BASE VOLUME met behulp van de toetsen en
5. Druk op OK
6. Selecteer het gewenste volume (OFF of van 1 tot 5)
7. Druk op OK om te bevestigen of op om terug te keren naar het vorige menu.
4.3 BELMELODIE KIEZEN
Het basistoestel en de handsets kunnen elk een ander melodiebelgeluid hebben.
De handsets kunnen een verschillende melodie hebben al naargelang de ingaande oproep intern of
extern is.
4.3.1 Belmelodie van het basistoestel
1. Open het menu met een druk op /OK
2. Selecteer SETUP met behulp van de toetsen en
3. Druk op OK
4. Selecteer BASE MELODY met behulp van de toetsen en
5. Druk op OK
6. Selecteer een melodie (1 tot 5)
7. Druk op OK om te bevestigen of op om terug te keren naar het vorige menu.
4.3.2 Belmelodie handset, externe oproep
1. Open het menu met een druk op /OK
2. Selecteer HANDSET MENU met behulp van de toetsen en
3. Druk op OK
4. Selecteer EXT MELODY met behulp van de toetsen en
5. Druk op OK
6. Selecteer een melodie (1 tot 5)
7. Druk op OK om te bevestigen of op om terug te keren naar het vorige menu.
Topcom Butler 2562 47
NEDERLANDS
HL_B2562_v3.qxd 24-03-2003 10:01 Page 47
Page 48

4.3.3 Belmelodie handset, interne oproep
1. Open het menu met een druk op /OK
2. Selecteer HANDSET MENU met behulp van de toetsen en
3. Druk op OK
4. Selecteer INT MELODY met behulp van de toetsen en .
5. Druk op OK
6. Selecteer een melodie (1 tot 5)
7. Druk op OK om te bevestigen of op om terug te keren naar het vorige menu.
4.4 BIEPTONEN ACTIVEREN/DESACTIVEREN
De handsets kunnen een bieptoon laten horen wanneer een toets wordt ingedrukt, wanneer de batterijen
bijna leeg zijn en wanneer het toestel te ver van het basistoestel is verwijderd.
4.4.1 Bieptoon bij indrukken van toets aan- en uitzetten
1. Open het menu met een druk op /OK
2. Selecteer HANDSET MENU met behulp van de toetsen en
3. Druk op OK
4. Selecteer WARNING TONES met behulp van de toetsen en .
5. Druk op OK
6. Selecteer KEY PRESS met behulp van de toetsen en .
7. Druk op OK.
8. Selecteer ON om de bieptoon in te schakelen, OFF om hem uit te schakelen.
9. Druk op OK om te bevestigen.
4.4.2 Batterij bijna leeg
Ga tewerk zoals hierboven wordt uiteengezet maar selecteer bij punt 6 "LOW BATTERY" in plaats van
"KEY PRESS".
4.4.3 Handset te ver van basistoestel (buiten bereik)
Ga tewerk zoals hierboven wordt uiteengezet maar selecteer bij punt 6 "OUT OF RANGE" in plaats van
"KEY PRESS".
4.5 NAAM VAN DE HANDSET WIJZIGEN
Met deze functie kunt u elke handset personaliseren.
1. Open het menu met een druk op /OK
2. Selecteer HANDSET MENU met behulp van de toetsen en .
48 Topcom Butler 2562
NEDERLANDS
HL_B2562_v3.qxd 24-03-2003 10:01 Page 48
Page 49

3. Druk op OK
4. Selecteer HANDSET NAME met behulp van de toetsen en .
5. Druk op OK
6. Voer de naam in
7. Druk op OK om te bevestigen
Bij het invoeren van de naam drukt u op om een karakter te wissen of houdt u ingedrukt om
het menu te verlaten zonder enige wijzigingen aan te brengen.
4.6 DATUM EN TIJD INSTELLEN
1. Ga in het menu door op /OK te drukken
2. Selecteer “SETUP”
3. Druk OK
4. Selecteer “TIME SETTING”
5. DRUK OK
6. Geef de dag en maand in en druk op OK ter confirmatie.
7. Geef het uur en de minuten in en druk op OK ter confirmatie
De nieuwe datum en tijd wordt weergegeven.
Opm.: De datum en tijd kan ook automatisch door het netwerk worden ingesteld indien deze wordt meegestuurd via
de oproepnummer informatie(callerID)!
4.7 DE PIN-CODE WIJZIGEN
Sommige functies zijn enkel beschikbaar voor gebruikers die de PIN-code kennen. Deze PIN-code is
standaard 0000.
De PIN-code wijzigen:
1. Open het menu met een druk op /OK
2. Selecteer SETUP met behulp van de toetsen en .
3. Druk op OK.
4. Selecteer PIN CODE met behulp van de toetsen en .
5. Druk op OK.
6. Voer de oude PIN-code van 4 cijfers in.
7. Druk op OK.
8. Voer de nieuwe PIN-code van 4 cijfers in.
Topcom Butler 2562 49
NEDERLANDS
HL_B2562_v3.qxd 24-03-2003 10:01 Page 49
Page 50

9. Druk op OK.
10. Voer de nieuwe PIN-code een tweede keer in.
11. Druk op OK om te bevestigen.
4.8 DE KIESMODUS INSTELLEN
Er zijn twee kiesmodi:
•DTMF/toonsysteem (het meest gebruikelijke)
• pulssysteem (bij oudere installaties)
De kiesmodus wijzigen:
1. Open het menu met een druk op /OK
2. Selecteer SETUP met behulp van de toetsen en .
3. Druk op OK.
4. Selecteer DIALLING MODE met behulp van de toetsen en .
5. Druk op OK.
6. Selecteer de kiesmodus met behulp van de toetsen en .
7. Druk op OK om te bevestigen.
4.9. FLASHTIJD INSTELLEN
1. Open het menu met een druk op /OK
2. Selecteer SETUP met behulp van de toetsen en .
3. Druk op OK.
4. Selecteer RECALL met behulp van de toetsen en .
5. Kies RECALL 1 voor een korte Flashtijd (100ms) of RECALL 2 voor een lange Flashtijd
(250 ms)
4.10. AUTOMATISCH OPNEMEN
Als een ingaande oproep plaatsvindt en de handset zich op het basistoestel bevindt, zal de telefoon
automatisch de oproep beantwoorden wanneer de handset uit de basis wordt genomen. Dit is de standaardinstelling, die u echter kunt uitschakelen (OFF):
1. Open het menu met een druk op /OK
2. Selecteer HANDSET MENU met behulp van de toetsen en .
3. Druk op OK.
4. Selecteer AUTO ANSWER met behulp van de toetsen en .
5. Selecteer ON (voor automatisch beantwoorden) of OFF.
6. Druk op OK.
50 Topcom Butler 2562
NEDERLANDS
HL_B2562_v3.qxd 24-03-2003 10:01 Page 50
Page 51

4.11 RESET
U heeft de mogelijkheid om de telefoon weer om te schakelen naar de oorspronkelijke standaardconfiguratie. Dat is de configuratie die reeds was geïnstalleerd toen u de telefoon in gebruik nam.
Te rugkeren naar de standaardinstellingen doet u als volgt:
1. Open het menu met een druk op /OK
2. Selecteer SETUP met behulp van de toetsen en
3. Druk op OK
4. Selecteer DEFAULT met behulp van de toets en
5. Druk op OK
6. Voer de PIN-code van vier cijfers in (standaard =0000).
7. Druk op OK om te bevestigen.
OPGELET! Als u terugkeert naar de standaardinstellingen, wist u hiermee alle informatie in het telefoonboek en de
oproeplijst. Tegelijk wordt de PIN-code teruggezet naar 0000.
5. GEAVANCEERDE FUNCTIES
5.1 TELEFOONBOEK
Met behulp van het telefoonboek kunnen 40 telefoonnummers en namen worden opgeslagen. U kunt
namen invoeren die tot 8 karakters lang zijn. Nummers mogen max. 20 cijfers lang zijn.
Om een correspondent op te bellen die in het telefoonboek is opgeslagen, wordt verwezen naar hoofdstuk 3.14.
Om alfanumerieke karakters in te voeren verwijzen we naar hoofdstuk 3.15.
5.1.1 Een correspondent toevoegen aan het telefoonboek
1. Open het menu met een druk op /OK
2. Selecteer ED. PHONEBOOK met behulp van de toetsen en
3. Druk op OK
4. Selecteer ADD ENTRY met behulp van de toetsen en
5. Druk op OK
6. Voer de naam in
7. Druk OK om te bevestigen.
8. Voer het telefoonnummer in
9. Druk op OK om te bevestigen
Topcom Butler 2562 51
NEDERLANDS
HL_B2562_v3.qxd 24-03-2003 10:01 Page 51
Page 52

5.1.2 Een naam of nummer wijzigen
Een nummer in het telefoonboek wijzigen:
1. Open het menu met een druk op /OK
2. Selecteer ED. PHONEBOOK met behulp van de toetsen en .
3. Druk op OK.
4. Selecteer EDIT ENTRY met behulp van de toetsen en .
5. Druk op OK.
6. Doorloop de namenlijst met behulp van de toetsen en . De lijst wordt weergegeven in
alfabetische volgorde.
7. Druk op OK als u de naam heeft gevonden die u wilt wijzigen.
8. Gebruik de toets om terug te gaan en de nieuwe naam in te voeren.
9. Druk op OK om te bevestigen.
10. Voer het nieuwe telefoonnummer in.
11. Druk op OK om te bevestigen.
Opgelet! Als u het telefoonboek eerst opent met de toets en een telefoonnummer wijzigt met de toets , zal
de wijziging enkel voor deze oproep gelden, maar niet in het telefoonboek worden opgeslagen.
5.1.3 Een correspondent wissen
Correspondenten wissen:
1. Open het menu met een druk op /OK
2. Selecteer ED. PHONEBOOK met behulp van de toetsen en .
3. Druk op OK.
4. Selecteer DELETE ENTRY met behulp van de toetsen en .
5. Druk op OK.
6. Doorloop de namenlijst met behulp van behulp van de toetsen en . De lijst wordt weergegeven
in alfabetische volgorde.
7. Druk op OK als u de naam heeft gevonden die u wilt wissen.
8. Het telefoonnummer wordt getoond. Druk op OK.
9. CONFIRM verschijnt. Druk op OK om te bevestigen of op om het wissen te stoppen.
5.2 EEN INTERN TOESTEL ZOEKEN VIA HET BASISTOESTEL
Als de Paging-toets op het basistoestel wordt ingedrukt, beginnen alle handsets te rinkelen. Dankzij
het belsignaal kunt u de verloren handset lokaliseren. U stopt het belsignaal door op een van de toetsen van de handset te drukken.
52 Topcom Butler 2562
NEDERLANDS
HL_B2562_v3.qxd 24-03-2003 10:01 Page 52
Page 53

5.3 PRIORITAIR BELLEN KIEZEN
Met behulp van deze functie kunt u het basistoestel of een van de handsets als eerste en vóór de andere laten bellen als een externe oproep binnenkomt.
Het prioritaire toestel zal een aantal keer bellen, dan beginnen alle andere toestellen te bellen.
Om deze functie te kunnen gebruiken moet u eerst bepalen welk toestel prioritair moet bellen. Dit kan
het basistoestel zijn of één van de handsets. U kunt het aantal belsignalen instellen voordat de andere
toestellen beginnen te bellen.
Het prioritaire toestel instellen
1. Open het menu met een druk op /OK
2. Selecteer SETUP met behulp van de toetsen en .
3. Druk op OK.
4. Selecteer RING PRIORITY met behulp van de toetsen en .
5. Druk op OK.
6. Selecteer “DEF. PRIORITY” met behulp van de toetsen en .
7. Druk op OK.
8. Selecteer "BASE" of "HANDSET X" met behulp van de toetsen en .
9. Druk op OK om te bevestigen.
10. Kies het aantal beltonen met behulp van de toetsen en .
11. Druk op OK om te bevestigen.
De prioriteitsbeltoon activeren/desactiveren
1. Open het menu met een druk op /OK
2. Selecteer SETUP met behulp van de toetsen en .
3. Druk op OK.
4. Selecteer RING PRIORITY met behulp van de toetsen en .
5. Druk op OK.
6. Selecteer "ON" of "OFF" met behulp van de toetsen en .
7. Druk op OK om te bevestigen.
5.4 UW TELEFOON GEBRUIKEN OP EEN PABX
Het is mogelijk om uw telefoon te gebruiken met een PABX of een lokaal telefoonnetwerk.
Als u uw telefoon gebruikt in combinatie met een recent PABX systeem, zijn er geen speciale aanpassingen nodig. Bij sommige oudere systemen is het nodig om een pauze te voorzien tussen het buitenlijnnummer en de rest van het nummer. Uw telefoon kan deze pauze automatisch inlassen tijdens het bellen van het nummer.
Topcom Butler 2562 53
NEDERLANDS
HL_B2562_v3.qxd 24-03-2003 10:01 Page 53
Page 54

Hiertoe moet u het voorkiesnummer instellen evenals de lengte van de pauze.
Het is mogelijk om twee voorkiesnummers te selecteren.
Om de pauze te wissen, wist u het voorkiesnummer in het geheugen, op dezelfde manier als waarop u
hem heeft ingevoerd.
Het buitenlijnnummer instellen
1.Open het menu met een druk op /OK
2.Selecteer SETUP met behulp van de toetsen en .
3.Druk op OK.
4.Selecteer PABX SETUP met behulp van de toetsen en .
5.Druk op OK.
6.Selecteer PBX1 or PBX2 met behulp van de toetsen en .
7.Druk op OK.
8.Voer de PIN-code in (standaard = 0000).
9. Druk op OK om te bevestigen.
10. Voer het PABX-buitenlijnnummer in (bv. ‘0’).
11. Druk op OK om te bevestigen.
De duur van de pauze instellen
1. Open het menu met een druk op /OK
2. Selecteer SETUP met behulp van de toetsen en .
3. Druk op OK.
4. Selecteer PABX SETUP met behulp van de toetsen en .
5. Druk op OK.
6. Selecteer PAUSE SETUP met behulp van de toetsen en .
7. Druk op OK.
8. Selecteer de pauzeduur met behulp van de toetsen en .
9. Druk op OK om te bevestigen.
5.5 KLAVIERVERGRENDELING
Deze functie vermijdt dat een nummer ongewild gevormd wordt, hetgeen handig kan zijn in de nabijheid van kinderen.
Als het klavier vergrendeld is, kan enkel op de /OK -toets gedrukt worden, al de andere toetsen zijn
vergrendeld.
54 Topcom Butler 2562
NEDERLANDS
HL_B2562_v3.qxd 24-03-2003 10:01 Page 54
Page 55

Klaviervergrendeling activeren/deactiveren
1. Ga in het menu door op /OK te drukken
2. Selecteer SETUP
3. Druk OK
4. Selecteer KEYPAD LOCK
5. Druk OK
6. Selecteer ON/OFF
7. Druk OK om te confirmeren
5.6 BABY CALL
Deze functie laat u toe één enkel specifiek nummer te programmeren dat automatisch gevormd wordt
wanneer men eender welke toets drukt. Dit is nuttig als men jonge kinderen heeft of in geval van een
noodsituatie.
5.6.1 Nummer inbrengen
Druk op de /OK -toets om naar het menu te gaan.
1 Selecteer BABYCALL .
2 Druk op de OK -toets.
3 Selecteer NUMMER ?
4 Druk op de OK -toets.
5 Geef het noodnummer in.
6 Druk op de OK -toets ter bevestiging.
Een dubbele beeptoon bevestigt deze instelling.
5.6.2 Het noodnummer activeren/deactiveren
1 Druk op de /OK -toets om naar het menu te gaan.
2 Selecteer NOODROEP .
3 Druk op de OK -toets.
4 Selecteer ON (AAN) of OFF (UIT).
5 Druk op de OK -toets ter bevestiging.
Een dubbele beeptoon bevestigt deze instelling.
Zodra deze functie geactiveerd is, verschijnt en knippert de vermelding "BABYCALL" op de display.
5.7 RUIMTEBEWAKING
Deze functie laat u toe (indien U minstens over 2 handsets beschikt) vanop afstand te luisteren naar
eventuele geluiden in een ruimte.
Topcom Butler 2562 55
NEDERLANDS
HL_B2562_v3.qxd 24-03-2003 10:01 Page 55
Page 56

U dient één handset te plaatsen in de ruimte die u wenst te controleren. Indien u nu vanaf een andere
handset belt, zal dit toestel automatisch de lijn beantwoorden zonder te rinkelen, waarna u kan luisteren naar eventuele geluiden.
Na 30 seconden wordt de verbinding automatisch verbroken.
5.7.1 Om de ruimtebewakings modus te activeren/deactiveren :
1Druk op de /OK -toets om naar het menu te gaan.
2 Selecteer MONITOR MODE.
3Druk op de OK -toets.
4 Selecteer ON (AAN) of OFF (UIT)
5Druk op de OK -toets om te bevestigen.
6. SMS (SHORT MESSAGES SERVICE)
Om SMS te kunnen gebruiken, moet deze dienst worden geactiveerd op uw telefoonlijn. Normaal gezien
moet u naar een speciaal nummer bellen om van uw telefoonmaatschappij een abonnement te krijgen om
deze functie te activeren. Wend u tot uw telefoonmaatschappij voor deze dienst.
Het telefoontoestel kan SMS-berichten versturen en ontvangen. Het minimum aantal berichten dat kan
worden opgeslagen is 58 (van elk 160 tekens). Als het geheugen bijna vol is zal ’Memory Full’ knipperen op het scherm (als het geheugen volledig vol is, zal het knipperen stoppen).
Als een nieuw bericht binnenkomt, zal het toestel kort rinkelen.
6.1. SMS-HOOFDMENU
U komt in het SMS-hoofdmenu terecht door op de SMS-toets te drukken of door SMS in het menu te
selecteren.
SMS
>New message
Inbox
Outbox
Delete all
Settings
56 Topcom Butler 2562
NEDERLANDS
HL_B2562_v3.qxd 24-03-2003 10:01 Page 56
Page 57

-Inbox: Bevat alle ontvangen SMS-berichten.
-Outbox: Bevat alle SMS-berichten die werden ingegeven en verstuurd.
-New message: Menu om een nieuw bericht in te voeren
-Delete all: Alle berichten uit de Inbox en Outbox wissen.
- Setting: Om verschillende parameters voor het versturen en ontvangen van
SMS-berichten in te stellen.
Opmerking: Als nieuwe berichten worden ontvangen, gaat u automatisch naar het ’Inbox-menu wanneer u op de
SMS-toets drukt.
6.2. SMS-INSTELLING
Settings
> Send
Receive
Melody
Terminal nr.
-Send: Bevat het telefoonnummer van de berichtencentrale. Dit nummer is nodig om
SMS-berichten naar de server te sturen.
- Receive: Bevat het ontvangsttelefoonnummer van de berichtencentrale.
Als de berichtencentrale u een nieuw bericht stuurt, wordt dit telefoonnummer mee
gestuurd samen met het bericht.
Opmerking: De nummers van de berichtencentrale verschillen van land tot land en hangen af van
de netwerkoperator. Raadpleeg het extra blad dat bij de handleiding is gevoegd voor de verschillende landen
(ADDENDUM) of wend u tot uw lokale netwerkoperator.
-Melody: Om de beltoon in/uit te schakelen wanneer een nieuwe SMS wordt ontvangen.
-Terminal number: Als er meerdere SMS-toestellen aangesloten zijn op dezelfde telefoonlijn, kunt u
elk toestel een ander toestelnummer geven (max. 9). Zo kunnen SMS-berichten
worden gestuurd naar elk toestel apart. Deze functie hangt af van de
netwerkoperator (Standaard = 1)
Topcom Butler 2562 57
NEDERLANDS
HL_B2562_v3.qxd 24-03-2003 10:01 Page 57
Page 58

6.2.1. De nummers van de berichtencentrale instellen
Zie ADDENDUM voor de juiste nummers van de berichtencentrale.
1. Ga naar het SMS-menu door op de SMS-toets te drukken
2. Selecteer ’SETTING’
3. Druk op OK
4. Selecteer SEND of RECEIVE
5. Druk op OK
6. Wis het bestaande nummer door op de ’c’-toets te drukken en voer de nummers van de nieuwe
berichtencentrale in.
7. Druk op OK
6.2.2. Beltoon nieuw SMS-bericht aan/uit
1. Ga naar het SMS-menu door op de SMS-toets te drukken
2. Selecteer ’SETTING’
3. Druk op OK
4. Selecteer MELODY
5. Selecteer ON(Aan) of OFF(Uit) en druk op OK
6.3. SMS-BERICHTEN VERSTUREN
6.3.1. Nieuwe berichten
In het SMS-hoofdmenu kunt u ’NEW MESSAGE’ selecteren om een nieuw bericht in te voeren. Er zijn
twee schrijfmethodes: Standard of Fast Text (Eatoni). Met de standaard methode voert u nieuwe
berichten in op dezelfde manier als een naam in het telefoonboek.
Bij de Fast Text-methode voorspelt de software het volgende teken dat moet worden ingetikt. Met deze
methode hoeft u minder toetsen in te drukken om woorden/zinnen te vormen dan bij de standaard
methode.
Als de door Fast Text voorspelde letter niet het teken is dat u wilt intikken, kunt u met de ’#’-toets een
ander teken selecteren.
Bijvoorbeeld: U wilt de naam ’LUC’ tikken
Eatoni-methode:
Druk één keer op 5 voor ’L’
Druk op 8 en dan op de ’#’-toets om de ’U’ te selecteren.
Druk één keer op 2 voor ’C’ (De Fast Text-methode voorspelt onmiddellijk de letter ’C’)
To taal aantal toetsen ingedrukt = 4
Standaard methode:
Druk drie keer op 5 om ’L’ te selecteren
58 Topcom Butler 2562
NEDERLANDS
HL_B2562_v3.qxd 24-03-2003 10:01 Page 58
Page 59

Druk twee keer op 8 om ’U’ te selecteren
Druk drie keer op 2 om ’C’ te selecteren
To taal aantal toetsen ingedrukt = 8
De volgende tekens kunnen worden ingevoerd voor een SMS-bericht:
Toets Toegewezen toetsen
00 è é & % / _ £ ¥ ù ( )
1 Spatie 1 _ - + = ì Ç ø (
2A b c à ä A BC Ä @ 2 [ ] {
3D e f D E F 3 É ∆
4G h i G H I 4 ΦΓΛ ΩΠ
5J k l ‘ J K L 5 Ψ _ θΞ
6M noñ Ò ö MN O6 ÑÖ~
7P q r s P Q R S 7 Æ æ _
8T u v ù ü T UV 8 Ü “ # \ |
9W xyzW X YZ 9Å å<>
** .,; : ? !¡ ¿§ ^€
Een nieuw bericht invoeren
1. Ga naar het SMS-menu door op de SMS-toets te drukken
2. Selecteer New Message
3. Schrijf het bericht dat u wilt versturen. De beschikbare tekens die u kunt invoeren, worden rechts
onderaan weergegeven. In de linker benedenhoek ziet u de schrijfmethode. U kunt veranderen van
Fast Text naar Normal en omgekeerd door 3 seconden lang op de ’#’-toets te drukken. Om het
teken vóór de cursor te wissen drukt u op de ’c’-toets.
4. Druk op OK om naar het volgende menu te gaan of houd de ’c’-toets ingedrukt om terug te keren
naar het SMS-hoofdmenu.
Opmerking: Een carriage return (ENTER) is niet mogelijk in een SMS-bericht! Alleen doorlopende tekst kan worden
ingevoerd.
5. Nadat u op OK heeft gedrukt, krijgt u het volgende scherm te zien:
>Send to?
_
Phonebook
Edit message
Delete?
Topcom Butler 2562 59
NEDERLANDS
HL_B2562_v3.qxd 24-03-2003 10:01 Page 59
Page 60

6. Voer het telefoonnummer in naar waar u het SMS-bericht wilt versturen. Of selecteer:
•’PHONEBOOK’ om een nummer op te zoeken in het telefoonboek.
•’EDIT MESSAGE’ om het bericht te wijzigen/bewerken
•’DELETE?’ om het bericht te wissen
6.3.2 Outbox
De ’OUTBOX’ bevat een lijst met alle berichten die verzendklaar zijn. Als u naar de ’OUTBOX’ gaat,
krijgt u het begin van elk bericht te zien. De eerste lijn bevat het bericht dat eerst werd ingevoerd.
U kunt het volledige bericht lezen door eerst een bericht te selecteren via de up- en down- toetsen. Druk op OK om het volledige bericht, met datum/uur en het telefoonnummer van de bestemmeling te zien. Druk op de ’c’-toets om terug te keren naar het ’Outbox’-menu. Of druk op OK voor
dezelfde opties als in 6.3.1 punt 5.
6.4. SMS-BERICHTEN LEZEN
Als u nieuwe berichten heeft, kan dit op 3 verschillende manieren worden aangeduid:
1. Door een korte beltoon in het toestel
2. Een knipperende envelop op het scherm: Als één van de nieuwe berichten gelezen is, stopt de enve-
lop met knipperen. De envelop blijft op het scherm zolang er niet-gelezen berichten zijn.
3. Een knipperende LED op het basisstation.
De knipperende LED op het basisstation kan ook wijzen op nieuwe oproepen in de oproeplijst. Zolang
beide niet gelezen zijn, blijft de LED knipperen.
Als (een) nieuw bericht(en) is (zijn) ontvangen en u wilt dit (die) lezen, drukt u gewoon op de SMStoets. Zo komt u onmiddellijk in het ’Inbox’-menu (niet het SMS-hoofdmenu) terecht.
6.4.1. Inbox
‘INBOX’ bevat een lijst met alle berichten die werden ontvangen (gelezen en niet-gelezen). Elke lijn
bevat het begin van het bericht. Het eerste is het laatst ontvangen bericht. Voor elk nieuw bericht verschijnt een envelop . U kunt het volledige bericht lezen door eerst een bericht te selecteren via de
toetsen . Als u op OK drukt, krijgt u het volledige bericht te zien, inclusief: datum/uur waarop het
bericht werd verstuurd + het telefoonnummer van de afzender.
Druk op de ’c’-toets om terug te keren naar het ’Inbox’-menu. Of druk op OK voor de volgende opties:
-DELETE? Om het huidige bericht te wissen. Geen bevestiging nodig.
-FORWARD Stuurt het bericht door naar de Outbox waar het verzendklaar blijft
- REPLY Om een antwoord te sturen naar de afzender van dit bericht.
60 Topcom Butler 2562
NEDERLANDS
HL_B2562_v3.qxd 24-03-2003 10:01 Page 60
Page 61

6.5. ALLE BERICHTEN WISSEN
Als u ’DELETE ALL’ selecteert in het SMS-hoofdmenu, kunt u alle berichten in de ’INBOX’ en ’OUTBOX’
wissen.
1. Ga naar het SMS-menu door op de SMS-toets te drukken
2. Selecteer DELETE ALL
3. Druk op OK om te bevestigen of druk op de ’c’-toets om terug te keren.
7. GEBRUIK VAN MEERDERE HANDSETS
7.1. EEN BIJKOMENDE HANDSET REGISTREREN
U kunt nieuwe handsets toevoegen aan het basistoestel op voorwaarde dat deze handsets met het
DECT-GAP-protocol werken.
Het basistoestel kan maximaal met vijf handsets werken. Als u reeds vijf handsets heeft en u er meer
wilt toevoegen of een toestel wilt vervangen, moet u eerst een handset wissen en het nieuwe vervolgens toevoegen.
Om een handset te kunnen registreren, moet het basistoestel eerst in de speciale registratiemodus worden gezet:
Eerst zet u het basistoestel in de registratiemodus, daarna start u de procedure bij de nieuwe handset:
1. Houd de Paging-toets van het basistoestel 6 seconden lang ingedrukt.
2. Het basistoestel geeft dan een pieptoon. Het basistoestel is nu klaar om een nieuwe handset te
registreren. Na het indrukken van de knop heeft u 90 seconden tijd om een nieuwe handset te
registreren.
Als de bijkomende handset een Butler 2505/2510/2550/2560/2561/2562/2605/2610/
2650/2660/2661/2662/2705/2710/2750/2760/2761/2762/2805/2810/2850/2860/2861/2862 is
3. Open het menu met een druk op /OK
4. Selecteer REGISTRATION met behulp van de toetsen en
.
5. Druk op OK
6. Voer het nummer van een basistoestel in (1 tot 4). Nummers die knipperen zijn reeds in gebruik op
andere DECT-basistoestellen.
7. Druk op OK.
8. Voer de PIN-code van het basistoestel in (standaard: 0000).
9. Druk op OK. De handset zoekt nu naar het DECT-basistoestel.
10. Als de handset het basistoestel heeft gelokaliseerd, wordt het identificatienummer van het basistoestel getoond. De registratie bij het basistoestel bevestigt u met een druk op OK. Stoppen is
mogelijk met een druk op de toets .
Topcom Butler 2562 61
NEDERLANDS
HL_B2562_v3.qxd 24-03-2003 10:01 Page 61
Page 62

11. Als de handset het basistoestel niet lokaliseert, keert het na enkele seconden automatisch terug
naar de standbymodus. Probeer het nogmaals door het nummer van het basistoestel te wijzigen
en te controleren of er zich in de omgeving geen interferentiebronnen bevinden. Ga dichter bij het
basistoestel staan.
uw handset is een ander model
Nadat u de registratieprocedure heeft gestart bij het basisstation, registreert u de handset (zie in de
handleiding van de handset). De handset moet GAP-compatibel zijn.
Het pictogram en de tekst "NOT REGISTERED" knipperen in het scherm als de handset niet op het
basistoestel is geregistreerd.
Als een handset op een basistoestel wordt geregistreerd, kent het basistoestel een handset nummer
toe. Dit nummer verschijnt op de handset na de naam en moet worden gebruik voor interne oproepen.
7.2 EEN HANDSET VERWIJDEREN
U kunt een handset verwijderen van een basistoestel om een andere handset te registreren.
1. Open het menu met een druk op /OK
2. Selecteer SETUP met behulp van de toetsen en .
3. Druk op OK
4. Selecteer REMOVE HS met behulp van de toetsen en .
5. Druk op OK.
6. Voer de viercijferige PIN-code van het basistoestel in.
7. Druk op OK.
8. Selecteer het interne toestel dat moet worden verwijderd.
9. Druk op OK om te bevestigen.
7.3 EEN BUTLER HANDSET INSTALLEREN OP EEN ANDER BASISTOESTEL
Wanneer u een Butler 2562 handset wilt gebruiken met het basistoestel van een ander model, moet
het basistoestel GAP-compatibel zijn.
1. Zie de gebruikershandleiding van het basistoestel voor het activeren van de registratiemodus.
2. Voer de stappen 3 tot 10 uit die in de paragraaf 6.1 worden beschreven.
7.4 EEN BASISTOESTEL SELECTEREN
De handsets kunnen bij maximaal vier basistoestellen geregistreerd zijn.
Een basistoestel selecteren:
1. Open het menu met een druk op /OK
2. Selecteer SETUP met behulp van de toetsen en .
62 Topcom Butler 2562
NEDERLANDS
HL_B2562_v3.qxd 24-03-2003 10:01 Page 62
Page 63

3. Druk op OK
4. Selecteer SELECT BASE met behulp van de toetsen en .
5. Druk op OK
6. Selecteer een basistoestel of kies AUTOMATIC met behulp van de toesten en .
7. Druk op OK.
Bij het selecteren van het basistoestel wordt het huidige geselecteerde basistoestel aangeduid door een
'✔'-teken na het nummer van het basistoestel. Als u 'AUTOMATIC' selecteert, zal de handset automatisch naar een ander basistoestel zoeken als u uit het zendbereik bent.
8. PROBLEMEN VERHELPEN
Symptoom Mogelijke oorzaak Oplossing
Geen scherm Batterijen niet opgeladen Controleer de positie
van de batterijen
Herlaad de batterijen
Handset uitgeschakeld (OFF) Handset inschakelen
(ON)
Geen kiestoon Telefoonkabel verkeerd Controleer de aansluiting van
aangesloten de telefoonkabel
De lijn wordt gebruikt door Wacht tot de andere handset
een andere handset het gesprek beëindigt
Het pictogram knippert Handset buiten bereik Breng de handset dichter bij
het basistoestel
Het basistoestel krijgt Controleer de netaansluiting
geen stroom. van het basistoestel.
De handset is niet geregistreerd . Registreer de handset bij het
bij het basistoestel basistoestel.
Het basistoestel of de Er is geen belsignaal of Belvolume aanpassen
handset geven geen belsignaal. de beltoon is nauwelijks hoorbaar.
Er is kiestoon, maar men kan Verkeerd kiessysteem. Kiessysteem aanpassen
geen nummer vormen. (puls/toon).
In PABX kunnen geen oproepen De FLASH-tijd is te kort. Schakel het toestel om naar
worden doorgeschakeld. de Long Flash-tijd.
De telefoon reageert niet Manipulatiefout. Verwijder de batterijen en
op toetsindrukken. plaats ze weer in het toestel.
Topcom Butler 2562 63
NEDERLANDS
HL_B2562_v3.qxd 24-03-2003 10:01 Page 63
Page 64

9. GARANTIE
•De garantieperiode bedraagt 24 maanden. De garantie wordt verleend na voorlegging van de
originele factuur of betalingsbevestiging waarop de datum van aankoop en het toesteltype staan
vermeld.
• Gedurende de garantieperiode verhelpt Topcom kostenloos alle defecten die te wijten zijn aan
materiaal- of productiefouten. Topcom kan, naar keuze, het defecte toestel ofwel herstellen ofwel
vervangen.
•De garantieclaim vervalt bij ingrepen door de koper of onbevoegde derden.
•Schade te wijten aan onoordeelkundige behandeling of bediening of aan het gebruik van
wisselstukken en accessoires die niet origineel of door Topcom aanbevolen zijn, valt niet onder de
garantie.
•Niet gedekt door de garantie is schade ten gevolge van externe invloedfactoren: bliksem, water,
brand e.d. of wanneer het toestelnummer op het toestel werd gewijzigd, verwijderd of onleesbaar
gemaakt.
Opgelet: Als u uw toestel terugstuurt, vergeet uw aankoopbewijs niet mee te sturen.
10. TECHNISCHE KENMERKEN
•Standaard: DECT (Digital Enhanced Cordless Telecommunications)
GAP (Generic Access Profile)
•Frequentieband: 1880 MHZ tot 1900 MHz
• Aantal kanalen: 120 duplexkanalen
• Modulatie: GFSK
• Codering: 32 kbit/s
•Zendvermogen: 10 mW (gemiddeld vermogen per kanaal)
• Bereik: 300 m in openlucht / max. 50 m binnenshuis
•Voeding basistoestel: 220 V / 50 Hz (basistoestel)
• Handsetbatterijen: 2 oplaadbare batterijen AAA, NiMh 600mAh
• Autonomie basistoestel: 250 uur in standby
•Gesprekstijd: 13 uur
•Laadduur: 6-8 uur
• Normale gebruiksomstandigheden: +5 °C tot +45 °C
•Kiessysteem: Puls / toon
• Flashtijd: 100 of 250 ms
64 Topcom Butler 2562
NEDERLANDS
HL_B2562_v3.qxd 24-03-2003 10:01 Page 64
Page 65

Topcom Butler 2562 65
NEDERLANDS
HL_B2562_v3.qxd 24-03-2003 10:01 Page 65
Page 66

66 Topcom Butler 2562
FRANÇAIS
Consignes de sécurité
•Utilisez uniquement l’adaptateur fourni à la livraison. Ne pas utiliser des adaptateurs étrangers,
les cellules de charge pourraient être endommagées.
•Installez uniquement des batteries rechargeables du même type. N'utilisez en aucun cas des
batteries normales non rechargeables. Placez correctement les pôles des batteries rechargeables
(comme indiqué dans le compartiment à batteries du combiné).
• Ne touchez pas les contacts des chargeurs et des prises à l'aide d'objets contendants et
métalliques.
•Le fonctionnement des appareils médicaux peut être perturbé.
•Le combiné peut provoquer des grésillements désagréables dans des écouteurs.
• Ne pas placer le poste de base dans une pièce humide ou à moins de 1,5 m d'un point d'eau.
Le combiné ne peut être en contact avec l'eau.
•N'utilisez pas le téléphone dans un endroit où une explosion est susceptible de se produire.
• Respectez les directives relatives à la mise en décharge et au retraitement des batteries et du
téléphone.
•Etant donné qu'il n'est pas possible d'utiliser le téléphone pendant une panne d'électricité,
employez un téléphone indépendant de l'alimentation sur secteur, par exemple un téléphone
portable, pour tout appel d'urgence.
Entretien
Frottez le téléphone avec un chiffon légèrement humide ou avec un linge antistatique. N'utilisez
jamais de produits détergents ou agressifs.
HL_B2562_v3.qxd 24-03-2003 10:01 Page 66
Page 67

1. DESCRIPTION DU TELEPHONE 69
1.1 COMBINE BUTLER 2562 69
1.2 ECRAN 70
2. INSTALLATION DU TELEPHONE 71
2.1 CONNEXIONS 71
2.2 PILES RECHARGEABLES 71
3. UTILISATION DU TELEPHONE 73
3.1 COMBINE ON/OFF 73
3.2 CHOIX DE LA LANGUE DU MENU 73
3.3 RECEVOIR UN APPEL 73
3.4 APPEL EXTERNE 73
3.5 APPEL INTERNE 74
3.6 MODE MAINS LIBRES 74
3.7 TRANSFERT INTERNE D'UN APPEL 74
3.8 APPEL DU TYPE CONFERENCE 74
3.9 AFFICHAGE DE LA DUREE DE L'APPEL 75
3.10 COUPURE DU SON DU MICROPHONE 75
3.11 TOUCHE PAUSE 75
3.12 IDETIFICATION DE L'APPELANT 75
3.13 MEMOIRE DE RECOMPOSITION DE NUMEROS 77
3.14 APPELER DEPUIS LE REPERTOIRE TELEPHONIQUE 77
3.15 UTILISATION DU CLAVIER ALPHANUMERIQUE 77
3.16 UTILISATION DU MENU 78
4. PERSONNALISATION 78
4.1 REGLAGE DU VOLUME DU HAUT-PARLEUR 78
4.2 REGLAGE DU VOLUME DE LA SONNERIE 78
4.3 CHOIX DE LA MELODIE DE LA SONNERIE 79
4.4 ACTIVATION / DESACTIVATION DES BIPS 80
4.5 DESIGNATION DES COMBINES 80
4.6 REGLER LE JOUR ET L’HEURE 81
4.7 MODIFIER LE CODE PIN 81
4.8 REGLAGE DU MODE DE COMPOSITION DES NUMEROS 82
4.9 DUREE DE LA FONCTION FLASH TIME 82
4.10 REPONDEUR AUTOMATIQUE 82
4.11 REMISE A ZERO 83
Topcom Butler 2562 67
FRANÇAIS
HL_B2562_v3.qxd 24-03-2003 10:01 Page 67
Page 68

5. FONCTIONS DE POINTE 83
5.1 REPERTOIRE TELEPHONIQUE 83
5.2 RECHERCHER UN COMBINE A PARTIR DE LA BASE 85
5.3 CHOISIR LES SONNERIES PRIORITAIRES 85
5.4 UTILISER VOTRE TELEPHONE AVEC UN PABX 86
5.5 VERROUILLAGE DU CLAVIER 86
5.6 APPEL D’URGENCE (BABY CALL) 87
5.7 MODE MONITOR (MONITOR MODE) 87
6. SMS (SHORT MESSAGES SERVICE) 88
6.1. MENU SMS PRINCIPAL 88
6.2. PARAMÉTRAGE SMS 89
6.3. ENVOYER DES MESSAGES SMS 90
6.4. LIRE LES MESSAGES SMS 91
6.5. EFFACER TOUS LES MESSAGES 93
7. GESTION DE PLUSIEURS COMBINES 93
7.1 INSTALLER UN COMBINE SUPPLEMENTAIRE 93
7.2 ELIMINER UN COMBINE 94
7.3 INSTALLER UN COMBINE SUR UNE AUTRE BASE 94
7.4 SELECTIONNER UNE BASE 94
8. DETECTION DE PANNES 95
9. GARANTIE 96
10. CARACTERISTIQUES TECHNIQUES 96
68 Topcom Butler 2562
FRANÇAIS
HL_B2562_v3.qxd 24-03-2003 10:01 Page 68
Page 69

1. DESCRIPTION DU TELEPHONE
1.1 COMBINE BASE BUTLER 2562
Topcom Butler 2562 69
FRANÇAIS
Courant ON/OFF/
Escape/Mute‘
Mains-libres
Flèche 'Monter/
Reformer/Pause’
Ecouteur
Ecran
Touche SMS
Menu/OK
Touche 'Appel' Touche 'Ligne'
Installation souscription
(activer et maintenir) Flèche 'Descendre'
Touche 'Enregistrement appel'
Conversation à 3
Appel interne
Touche ‘Flash’
Microphone
Indicateur de
courant LED
appels entrants
Indicateur de charge
HL_B2562_v3.qxd 24-03-2003 10:01 Page 69
Page 70

1.2 ECRAN
Icône 'Ligne' Ligne d'affichage (12 caractères maximum)
Chaque opération est associée à une icône.
Icône: Signification:
Vous avez decroché la ligne.
EXT Vous avez une communication externe.
INT Vous avez une communication interne.
Mode 'Mains libres' activé.
Indicateur de niveau de la pile rechargeable.
Les segments se déroulent pendant le chargement de la pile.
Clavier du combiné verrouillé.
L'antenne indique la qualité de la réception.
L'antenne clignote lorsque le combiné n'est pas enregistré dans la base.
or Directions de défilement possibles dans le menu.
1.2.1 Affichage en stand-by
En mode stand-by, l’écran affiche :
- les numéros des nouveaux appels dans la liste d’appels,
le cas échéant
- le nom et le numéro du combiné
- la date et l’heure
70 Topcom Butler 2562
FRANÇAIS
HL_B2562_v3.qxd 24-03-2003 10:01 Page 70
?New Calls :1
B2562 1
22/04 15h25
?New Calls :1
B2562 1
22/04 15h25
Page 71

2. INSTALLATION DU TELEPHONE
2.1 CONNEXIONS
2.2. PILES RECHARGEABLES
Avant d'utiliser votre Butler 2562 pour la première fois, vous devez vous assurer que les piles ont été
chargées pendant 6-8 heures. Le téléphone ne fonctionnera pas de façon optimale si les piles ne sont
pas correctement chargées.
Pour changer ou insérer les piles rechargeables:
1. Faites glisser le couvercle vers le bas et soulevez-le ensuite.
2. Insérez les piles en respectant la polarité (+ et -).
3. Replacez le couvercle à piles.
Remarque: la durée d'utilisation maximale des piles est d'environ 250 heures et la durée maximale de communication
est de 13 heures! Au fil du temps, les piles se déchargeront plus rapidement. Les piles doivent alors être remplacées.
Vous pouvez acheter les piles dans n'importe quel magasin de bricolage (2 piles rechargeables du type AAA NiMH)!
Topcom Butler 2562 71
FRANÇAIS
Câble du téléphone
Face inférieure
de la base
Câble de courant
HL_B2562_v3.qxd 24-03-2003 10:01 Page 71
Page 72

72 Topcom Butler 2562
FRANÇAIS
Piles rechargeables
Le combiné vu de dos
Couvercle
+ -
- +
HL_B2562_v3.qxd 24-03-2003 10:01 Page 72
Page 73

3. UTILISATION DU TELEPHONE
3.1 COMBINE ON/OFF
•Brancher le combiné MARCHE (ON): appuyez sur la touche . Le combiné recherchera sa base.
• Débrancher le combine ARRET (OFF): appuyez sur la touche pendant 2 secondes. L'écran
s'éteindra.
3.2 CHOIX DE LA LANGUE DU MENU
1. Entrez dans le menu en appuyant sur la touche /OK
2. Sélectionnez COMBINE (HANDSET MENU) avec les touches et
3. Appuyez sur la touche OK
4. Sélectionnez LANGUE (LANGUAGE) avec les touches et
5. Appuyez sur la touche OK
6. Sélectionnez la langue de votre choix avec les touches et
7. Appuyez sur la touche OK pour valider
3.3 RECEVOIR UN APPEL
Lorsque le combiné sonne, vous appuyez sur la touche pour répondre. Vous êtes alors en communication avec votre correspondant. Si le combiné est posé sur la base lorsque le téléphone sonne, vous
devez simplement décrocher le combiné pour répondre (si l'option 'Répondeur automatique' est
activée: voir 4.10 Répondeur automatique).
Si vous appuyez sur la touche lorsque le téléphone sonne, vous décrochez la ligne et vous passez
automatiquement en mode 'Mains libres'.
3.4 PROCEDER A UN APPEL EXTERNE
NUMEROT
ATION NORMALE:
1. Appuyez sur la touche
2. Introduisez le numéro de téléphone.
NUMEROTATION BLOQUEE:
1. Composez le numéro de votre correspondant.
2. Appuyez sur la touche
Pour corriger un numéro, utilisez la touche pour effacer un caractère enregistré.
Topcom Butler 2562 73
FRANÇAIS
HL_B2562_v3.qxd 24-03-2003 10:01 Page 73
Page 74

3.5. PROCEDER A UN APPEL INTERNE
Uniquement possible lorsque plus d'un combiné est enregistré dans la base!!
NUMEROTATION NORMALE:
1. Appuyez pendant 2 secondes sur la touche INT.
2. Introduisez le numéro du combiné interne (1 à 5).
PRE-NUMEROTATION:
1. Introduisez le numéro du combiné interne (1 à 5).
2. Appuyez pendant 2 secondes sur la touche INT.
3.6 MODE MAINS LIBRES
Vous pouvez avoir une conversation avec votre correspondant sans décrocher le combiné.
Pour activer ou désactiver le mode 'Mains libres', appuyez sur la touche pendant l'appel.
Pour régler le volume, référez-vous au chapitre "Personnalisation "- réglage du volume du haut-parleur.
3.7 TRANSFERT INTERNE D'UN APPEL
Uniquement possible lorsque plus d'un combiné est enregistré dans la base!!
Lorsque vous voulez transférer un appel externe vers un autre combiné:
1. Au cours d'une conversation, appuyez pendant 2 secondes sur la touche INT.
2. Sélectionnez le numéro du combiné interne pendant que l'appelant externe est en attente.
3. Lorsque l'autre combiné décroche, appuyez sur la touche pour raccrocher et transférer ainsi l'ap-
pel.
Si le correspondant interne ne décroche pas, appuyez pendant 2 secondes sur la touche INT et
reconnectez-vous avec l'appelant externe qui est en ligne.
3.8 CONFERENCE CALL
Uniquement possible lorsque plus d'un combiné est enregistré dans la base!!
Vous pouvez tenir une conversation simultanée avec un correspondant interne et un correspondant
externe.
Lorsque vous êtes en ligne avec un correspondant externe:
1. Appuyez pendant 2 secondes sur la touche INT.
2. Introduisez le numéro du combiné interne que vous voulez appeler.
3. Lorsque le correspondant interne décroche, appuyez sur et maintenez la touche .
74 Topcom Butler 2562
FRANÇAIS
HL_B2562_v3.qxd 24-03-2003 10:01 Page 74
Page 75

4. Si le correspondant interne ne décroche pas, appuyez à nouveau sur la touche INT et reconnectezvous avec l'appelant externe qui est en ligne.
3.9 AFFICHAGE DE LA DUREE DE L'APPEL
La durée de l'appel est affichée après 15 secondes, exprimée en minutes & secondes: "00:20".
A la fin de chaque appel, la durée totale de l'appel est affichée pendant 5 secondes.
3.10 COUPURE DU SON DU MICROPHONE
Il est possible de couper le son du microphone pendant une conversation.
Appuyez sur la touche en cours de conversation, le microphone est alors désactivé et vous pouvez
parler librement sans être entendu par l'appelant.
L'écran affiche ‘SECRET ACTIVÉ (Secrecy On).
Appuyez une nouvelle fois sur la touche pour revenir au mode normal.
3.11 TOUCHE PAUSE
Lorsque vous composez un numéro, il est possible d’ajouter une pause entre deux chiffres en appuyant
sur la touche rappel/pause pendant 3 secondes.
3.12 IDENTIFICATION DE L'APPELANT
L'identification de l'appelant n'est disponible que si vous avez souscrit un abonnement en ce sens
auprès de votre opérateur téléphonique.
Lorsque vous recevez un appel externe, le numéro de l'appelant s'affichera sur l'écran pendant que le
téléphone sonne.
Si le réseau le transmet, ou si le nom de l'appelant se trouve dans le répertoire téléphonique, l'appelant
sera identifié par son nom.
L'identité de l'appelant est remplacée par la durée de l'appel après 15 secondes de communication. Il
est toujours possible d'afficher l'identité de l'appelant après ce délai en appuyant de façon répétée sur
la touche OK pour le nom et le numéro.
3.12.1 LISTE DES APPELS
Votre téléphone conserve en mémoire la liste des 10 derniers appels reçus. Cette fonction n'est
disponible que si vous avez souscrit un abonnement pour la fonction 'Caller ID'. Les correspondants qui
ont appelé sont identifiés par leur numéro de téléphone et leur nom de la même façon que pour la
fonction 'Caller ID'. La liste affiche également:
Topcom Butler 2562 75
FRANÇAIS
HL_B2562_v3.qxd 24-03-2003 10:01 Page 75
Page 76

- le compteur de répétition d’appels (jusque 99): indication du nombre de fois qu’a appelé un appelant
- la date et l’heure de cet appel entrant
1. Appuyez sur la touche . S'il n'y a pas d'appels dans la liste, l'écran affichera ‘AUCUN NUMÉRO’
(NO ENTRY STORED).
2. Parcourez les appels à l'aide des touches ou . Les noms des appelants seront affichés s'ils ont
été envoyés par le réseau ou s'ils sont stockés dans le répertoire téléphonique. En atteignant la fin
de la liste, vous percevrez un bip sonore.
3. Un appui sur la touche OK vous permettra d'effacer cette entrée ou de l'ajouter à votre répertoire
téléphonique si elle n'est pas déjà stockée:
• Sélectionnez AJOUTER ‘ADD ENTRY’ et appuyez sur la touche OK. Introduisez ou modifiez le nom
et appuyez sur la touche OK. L'entrée sera stockée dans le répertoire téléphonique et effacée de la
liste des appels!
• Sélectionnez EFFACER (DELETE ENTRY) et appuyez sur la touche OK pour effacer cette entrée ou
appuyez sur la touche pour revenir au menu précédent.
4. Pour rappeler un correspondant, appuyez simplement sur la touche lorsque son numéro de
téléphone ou son nom est affiché à l'écran.
Si l'appelant est dans le répertoire téléphonique, il est identifié par son nom dans la liste des appels.
Au même temps l'heure et la date de l'appel seront affichées.
3.12.2 Indication voice mail
Vous ne pouvez utiliser cette fonction que si vous disposez du service Voice mail ou Phone mail et si le
réseau transmet cette indication en même temps que les
informations concernant le code Caller ID (Affichage Appelant/Clip) ! Si vous avez reçu un nouveau
message dans votre système de Voice mail, l’écran affichera
l’icône ‘ ’. Lorsque vous aurez écouté vos messages, l’icône ‘ ’ disparaîtra.
76 Topcom Butler 2562
FRANÇAIS
Date/Heure
Compteur de
répétition d’appels
Nom de
l’appelant
Numéro de téléphone
de l’appelant
HL_B2562_v3.qxd 24-03-2003 10:01 Page 76
7 14h35 3O/O4
TOPCOM
O123456789
Page 77

HL_B2562_v3.qxd 25-03-2003 11:05 Page 77
3.13 MEMOIRE DE RECOMPOSITION DE NUMEROS
Votre téléphone conserve une liste des 10 derniers appels (de 20 caractères) que vous avez effectués;
les correspondants sont identifiés par leur numéro de téléphone ou leur nom s'ils apparaissent dans le
répertoire téléphonique.
Pour consulter la liste de recomposition des numéros:
1. Appuyez sur la touche .
2. Parcourez les appels avec les touches et .
3. Pour appeler le correspondant sélectionné, appuyez simplement sur la touche lorsque le numéro de
téléphone ou le nom est affiché.
Remarque: lorsque le nom est affiché, vous pouvez passer du nom au numéro de téléphone en appuyant sur la
touche OK!
3.14 APPELER DEPUIS LE REPERTOIRE TELEPHONIQUE
Pour appeler un correspondant dont le nom est conservé dans le répertoire téléphonique:
1. Entrez dans le menu en appuyant sur la touche /OK.
2. Sélectionnez ‘RÉPERTOIRE’ (PHONEBOOK) avec les touches et .
3. Appuyez sur la touche OK.
4. Introduisez la première lettre du nom. Le premier nom commençant par cette lettre ou la prochaine
lettre de l'alphabet apparaîtra à l'écran.
5. Parcourez la liste de noms avec les touches et . La liste est parcourue dans l'ordre alphabétique.
6. Appuyez sur la touche pour composer le numéro du correspondant dont le nom est affiché.
Pour consulter le numéro avant d'appeler, vous reprenez les étapes 1 à 3 ci-dessus et vous appuyez sur
la touche OK.
3.15 UTILISATION DU CLAVIER ALPHANUMÉRIQUE
Votre téléphone vous permet également d'introduire des caractères alphanumériques. Cette fonction
est utile pour introduire un nom dans le répertoire téléphonique, donner un nom à un combiné,...
Pour sélectionner une lettre, appuyez sur la touche correspondante autant de fois que nécessaire. Par
exemple: pour sélectionner un 'A', vous appuyez une seule fois sur la touche '2', pour sélectionner un
'B', vous appuyez deux fois sur la touche '2' et ainsi de suite. Pour composer successivement un 'A' et
un 'B', sélectionnez 'A', attendez que le curseur se soit déplacé vers le caractère suivant et appuyez
deux fois sur la touche '2'.
Pour sélectionner un espace, appuyez sur la touche '1'.
Pour sélectionner un trait, appuyez deux fois sur la touche '1'.
Les caractères du clavier se trouvant sous chaque touche apparaissent en haut de l’écran chaque fois
qu’une touche est enfoncée !
FRANÇAIS
Topcom Butler 2562 77
Page 78

3.16 UTILISATION DU MENU
Une vaste gamme de fonctions téléphoniques est accessible par un menu très facile à manipuler.
1. Pour avoir accès au menu, appuyez sur la touche /OK.
2. Parcourez les sélections avec les touches et . Les sélections défilent en boucle (vous revenez à la
première fonction après la dernière).
3. Pour valider une sélection, appuyez sur la touche OK
4. Pour revenir au menu précédent, appuyez sur la touche
4. PERSONNALISATION
4.1 REGLAGE DU VOLUME DU HAUT-PARLEUR
Il existe deux façons de régler le volume du haut-parleur:
4.1.1 Volume du haut-parleur en cours d’appel
Pendant la conversation, vous appuyez sur les touches et pour modifier le volume dans un sens
ou dans l'autre.
4.1.2 Régler le volume du haut-parleur par défaut
1. Entrez dans le menu en appuyant sur la touche /OK
2. Sélectionnez MENU COMBINÉ (HANDSET MENU) avec les touches et
3. Appuyez sur la touche OK
4. Sélectionnez VOL ECOUTEUR (EAR VOLUME) avec les touches et
5. Appuyez sur la touche OK
6. Sélectionnez le volume souhaité (1 à 5) avec les touches et
7. Appuyez sur la touche OK
Un double bip confirme la validation de votre choix
Remarque: le volume 'Mains libres' du Butler 2562 peut également être réglé au niveau du combiné comme décrit
plus haut!
4.2 REGLAGE DU VOLUME DE LA SONNERIE
4.2.1 Sonnerie du combiné
1. Entrez dans le menu en appuyant sur la touche /OK
2. Sélectionnez MENU COMBINÉ (HANDSET MENU) avec les touches et
3. Appuyez sur la touche OK
4. Sélectionnez VOLUME SONN (RING VOLUME) avec les touches et
78 Topcom Butler 2562
FRANÇAIS
HL_B2562_v3.qxd 24-03-2003 10:01 Page 78
Page 79

5. Appuyez sur la touche OK
6. Sélectionnez le volume souhaité (OFF ou 1 à 5)
7. Appuyez sur la touche OK pour confirmer ou pour revenir au menu précédent
Remarque: toute programmation est confirmée à la fin par un double bip ou par un seul bip prolongé. Un double bip
confirme la validation de votre choix. Un bip prolongé signifie que la modification n'a pas été prise en compte.
4.2.2 Sonnerie de la base
1. Entrez dans le menu en appuyant sur la touche /OK
2. Sélectionnez REGLAGES (SETUP) avec les touches et
3. Appuyez sur la touche OK
4. Sélectionnez VOLUME SONN (RING VOLUME) avec les touches et
5. Appuyez sur la touche OK
6. Sélectionnez le volume souhaité (OFF ou 1 à 5)
7. Appuyez sur la touche OK pour confirmer ou pour revenir au menu précédent.
4.3 CHOIX DE LA MELODIE DE LA SONNERIE
La base et chaque combiné peuvent être réglés en vue de reproduire une mélodie différente.
Les combinés peuvent également reproduire une mélodie différente selon s'il s'agit d'un appel interne
ou externe.
4.3.1 Mélodie de la base
1. Entrez dans le menu en appuyant sur la touche /OK
2. Sélectionnez REGLAGES (SETUP) avec les touches et
3. Appuyez sur la touche OK
4. Sélectionnez MÉLODIE BASE (BASE MELODY) avec les touches et
5. Appuyez sur la touche OK
6. Sélectionnez la mélodie de votre choix (1 à 5)
7. Appuyez sur la touche OK pour confirmer ou pour revenir au menu précédent.
4.3.2 Mélodie du combiné, appel exterene
1. Entrez dans le menu en appuyant sur la touche /OK
2. Sélectionnez MENU COMBINÉ (HANDSET MENU) avec les touches et
3. Appuyez sur la touche OK
4. Sélectionnez MÉLODIE EXT. (EXT MELODY) avec les touches et
5. Appuyez sur la touche OK
Topcom Butler 2562 79
FRANÇAIS
HL_B2562_v3.qxd 24-03-2003 10:01 Page 79
Page 80

6. Sélectionnez la mélodie souhaitée (1 à 5)
7. Appuyez sur la touche OK pour confirmer ou pour revenir au menu précédent.
4.3.3 Mélodie du combiné, appel interne
1. Entrez dans le menu en appuyant sur la touche OK
2. Sélectionnez MENU COMBINÉ (HANDSET MENU) avec les touches et
3. Appuyez sur la touche OK
4. Sélectionnez MÉLODIE INT (INT MELODY) avec les touches et
5. Appuyez sur la touche OK
6. Sélectionnez la mélodie de votre choix (1 à 5)
7. Appuyez sur la touche OK pour confirmer ou pour revenir au menu précédent.
4.4 ACTIVATION / DESACTIVATION DES BIPS
Le combiné peut émettre un bip quand une touche est activée, lorsque les piles sont faibles ou lorsque
le combiné est hors de portée.
4.4.1 Bip sonore ‘touche activée’ on/off
1. Entrez dans le menu en appuyant sur la touche /OK
2. Sélectionnez MENU COMBINE (HANDSET MENU) avec les touches et
3. Appuyez sur la touche OK
4. Sélectionnez BIPS SONORES (WARNING TONES) avec les touches et
5. Appuyez sur la touche OK
6. Sélectionnez TOUCHE (KEY PRESS) avec les touches et
7. Appuyez sur la touche OK
8. Sélectionnez MARCHE (ON) pour activer, (ARRET) OFF pour désactiver
9. Appuyez sur la touche OK pour confirmer.
4.4.2 Piles faibles
Procédez comme ci-dessus, mais sélectionnez BATT FAIBLE (LOW BATTERY) au point 6 au lieu de TOUCHE (KEY PRESS).
4.4.3 combiné hors de portée
Procédez comme ci-dessus, mais sélectionnez HORS PORTÉE (OUT OF RANGE) au point 6 au lieu de
TOUCHE (KEY PRESS).
4.5 DESIGNATION DES COMBINES
Cette fonction vous permet de personnaliser chaque combiné.
80 Topcom Butler 2562
FRANÇAIS
HL_B2562_v3.qxd 24-03-2003 10:01 Page 80
Page 81

1. Entrez dans le menu en appuyant sur la touche /OK
2. Sélectionnez NOM COMBINÉ (HANDSET NAME) avec les touches et
3. Appuyez sur la touche OK
4. Sélectionnez NOM COMBINÉ (HANDSET NAME) avec les touches et
5. Appuyez sur la touche OK
6. Introduisez le nom
7. Appuyez sur la touche OK pour valider
Pendant que vous introduisez le nom, vous pouvez appuyer la touche pour effacer un caractère et
appuyez sur & maintenir la touche pour quitter le menu sans prendre en compte une quelconque
modification.
4.6 REGLER LE JOUR ET L’HEURE
1. Entrez dans le menu en appuyant sur /OK
2. Sélectionnez REGLAGES SETUP
3. Appuyez sur OK
4. Sélectionnez ‘RÉG DATE/HEURE’ (TIME SETTING)
5. Appuyez sur OK
6. Introduisez le jour et le mois et appuyez sur OK pour confirmer
7. Introduisez les heures et les minutes et appuyez sur OK pour confirmer
La nouvelle date et la nouvelle heure apparaissent à l’écran.
Note: le jour et l’heure seront automatiquement réglés par le réseau si ce dernier envoie la date et l’heure avec le
numéro de l’appelant (callerID).
4.7 MODIFIER LE CODE PIN
Certaines fonctions ne sont disponibles qu'aux utilisateurs informés du code PIN. Par défaut, ce code
PIN = 0000.
Pour modifier le code PIN:
1. Entrez dans le menu en appuyant sur la touche /OK.
2. Sélectionnez REGLAGES (SETUP) avec les touches et
.
3. Appuyez sur la touche OK.
4. Sélectionnez ‘CODE PIN’ (PIN CODE) avec les touches et .
5. Appuyez sur la touche OK.
6. Introduisez l'ancien code PIN à 4 chiffres.
7. Appuyez sur la touche OK.
Topcom Butler 2562 81
FRANÇAIS
HL_B2562_v3.qxd 24-03-2003 10:02 Page 81
Page 82

8. Introduisez le nouveau code PIN à 4 chiffres.
9. Appuyez sur la touche OK.
10. Introduisez une deuxième fois le nouveau code PIN.
11. Appuyez sur la touche OK pour valider.
4.8 REGLAGE DU MODE DE COMPOSITION DES NUMEROS
Il existe deux types de composition des numéros:
•DTMF/composition par tonalité (le mode le plus commun)
• Composition par pulsations (pour les installations plus anciennes)
Pour modifier le mode de composition des numéros:
1. Entrez dans le menu en appuyant sur la touche /OK.
2. Sélectionnez REGLAGES (SETUP) avec les touches et .
3. Appuyez sur la touche OK.
4. Sélectionnez NUMÉROTATION (DIALLING MODE) avec les touches et .
5. Appuyez sur la touche OK.
6. Sélectionnez le mode de composition avec les touches et .
7. Appuyez sur la touche OK pour valider.
4.9. DUREE DE LA FONCTION FLASH TIME
1. Entrez dans le menu en appuyant sur la touche /OK.
2. Sélectionnez REGLAGES (SETUP) avec les touches et .
3. Appuyez sur la touche OK.
4. Sélectionnez TOUCHE R (RECALL) avec les touches et .
5. Choisissez touche R1 (RECALL 1) pour une brève durée de la fonction flash time (100ms) ou touche
R2 (RECALL 2) pour une durée plus longue pour la fonction flash time (250ms).
4.10. REPONDEUR AUTOMATIQUE
Si le combiné est posé sur la base lors d'un appel entrant, le téléphone prend automatiquement la
ligne. Ceci est un réglage par défaut, mais vous pouvez le désactiver:
1 Entrez dans le menu en appuyant sur la touche /OK.
2 Sélectionnez MENU COMBINÉ (HANDSET MENU) avec les touches et . Décrochez.
3 Appuyez sur la touche OK.
4 Sélectionnez AUTO (AUTO ANSWER) avec les touches et
5 Sélectionnez MARCHE (ON) pour une réponse automatique ou ARRET (OFF).
6 Appuyez sur la touche OK.
82 Topcom Butler 2562
FRANÇAIS
HL_B2562_v3.qxd 24-03-2003 10:02 Page 82
Page 83

4.11 REMISE A ZERO
Il est toujours possible de revenir à la configuration d'origine par défaut. Il s'agit de la configuration
telle qu'elle était prévue lors de la livraison du téléphone.
Pour revenir aux réglages par défaut:
1. Entrez dans le menu en appuyant sur la touche /OK.
2. Sélectionnez REGLAGES (SETUP) avec les touches et .
3. Appuyez sur la touche OK.
4. Sélectionnez RÉGL. USINE (DEFAULT) avec les touches et .
5. Appuyez sur la touche OK.
6. Introduisez le code PIN en 4 chiffres (par défaut = 0000).
7. Appuyez sur la touche OK pour valider.
AVERTISSEMENT! Le fait de revenir aux réglages par défaut entraînera l'effacement de toutes vos entrées dans le
répertoire téléphonique et le journal de bord des appels.
Le code PIN sera également restauré à sa valeur initiale, à savoir 0000
5. FONCTIONS DE POINTE
5.1 REPERTOIRE TELEPHONIQUE
Le répertoire téléphonique vous permet de mémoriser 40 numéros de téléphone et noms. Vous pouvez
introduire des noms de 8 caractères maximum et des numéros de 20 chiffres maximum.
Pour appeler un correspondant dont le numéro est stocké dans le répertoire téléphonique, référez-vous
à la section 3.14 Appeler depuis le répertoire téléphonique.
Pour introduire des caractères alphanumériques, référez-vous à la section 3.15 Utilisation du clavier
alphanumérique.
5.1.1 Ajouter une entrée dans le répertoire téléphonique
1. Entrez dans le menu en appuyant sur la touche /OK.
2. Sélectionnez ED. RÉPERTOIRE (ED. PHONEBOOK) avec les touches et .
3. Appuyez sur la touche OK.
4. Sélectionnez ‘AJOUTER N°’ (ADD ENTRY) avec les touches et .
5. Appuyez sur la touche OK.
6. Introduisez le nom.
7. Appuyez sur la touche OK pour valider.
Topcom Butler 2562 83
FRANÇAIS
HL_B2562_v3.qxd 24-03-2003 10:02 Page 83
Page 84

8. Introduisez le numéro de téléphone.
9. Appuyez sur la touche OK pour valider.
5.1.2 Modifier un nom ou un numéro
Pour modifier un nom ou un numéro dans le répertoire téléphonique:
1. Entrez dans le menu en appuyant sur la touche /OK.
2. Sélectionnez ED. RÉPERTOIRE (ED. PHONEBOOK) avec les touches et .
3. Appuyez sur la touche OK.
4. Sélectionnez MODIFIER N° (EDIT ENTRY) avec les touches et .
5. Appuyez sur la touche OK.
6. Déplacez-vous dans la liste de noms avec les touches et . La liste défile dans l'ordre
alphabétique.
7. Appuyez sur la touche OK lorsque vous trouvez le nom à modifier.
8. Utilisez la touche pour reculer et introduisez le nouveau nom.
9. Appuyez sur la touche OK pour valider.
10. Introduisez le nouveau numéro de téléphone.
11. Appuyez sur la touche OK pour valider.
Attention: si vous entrez dans le répertoire téléphonique avec la touche et si vous modifiez un numéro de téléphone avec la touche
, la modification ne sera prise en compte que pour ce seul appel, sans être stocké dans le
répertoire téléphonique!
5.1.3 Effacer une entrée
Pour effacer une entrée:
1. Entrez dans le menu en appuyant sur la touche /OK.
2. Sélectionnez ED. RÉPERTOIRE (ED. PHONEBOOK) avec les touches et
3. Appuyez sur la touche OK.
4. Sélectionnez EFFACER N° (DELETE ENTRY) avec les touches et .
5. Appuyez sur la touche OK.
6. Déplacez-vous dans la liste des noms avec les touches et . La liste défile dans l'ordre alphabétique.
7. Appuyez sur la touche OK dès que vous avez trouvé le nom que vous voulez effacer.
8. Le numéro de téléphone est affiché, appuyez sur la touche OK.
9. L'écran affiche CONFIRMER (CONFIRM), appuyez sur la touche OK pour confirmer ou pour
interrompre l'opération.
84 Topcom Butler 2562
FRANÇAIS
HL_B2562_v3.qxd 24-03-2003 10:02 Page 84
Page 85

5.2 RECHERCHER UN COMBINE A PARTIR D'UNE BASE
Si vous appuyez sur la touche 'Appel' sur la base, tous les combinés se mettront à sonner. Cette sonnerie vous aidera à localiser un combiné égaré. La sonnerie est interrompue en appuyant sur simplement l'une des touches du combiné.
5.3 CHOISIR LES SONNERIES PRIORITAIRES
Cette fonction vous permet de faire en sorte que la base ou l'un des combinés sonne avant les autres
en cas d'appel externe.
L'unité prioritaire sonnera un certain nombre de fois avant que les autres se mettent à sonner à leur
tour.
Pour utiliser cette fonction, vous devez choisir une unité prioritaire, qui peut être tant la base que l'un
des combinés. Vous pouvez régler le nombre de sonneries avant que le signal ne soit transmis aux autres unités.
REGLAGE DE L'UNITE PRIORITAIRE
1. Entrez dans le menu en appuyant sur la touche /OK.
2. Sélectionnez REGLAGES (SETUP) avec les touches et .
3. Appuyez sur la touche OK.
4. Sélectionnez PRIORITÉS (RING PRIORITY) avec les touches et .
5. Appuyez sur la touche OK.
6. Sélectionnez DÉFINIR PRIO. (DEF. PRIORITY) avec les touches et .
7. Appuyez sur la touche OK.
8. Sélectionnez BASE ou COMBINE (HANDSET MENU) X avec les touches et .
9. Appuyez sur la touche OK pour valider.
10. Choisissez le nombre de sonneries avec les touches et .
11. Appuyez sur la touche OK pour valider.
ACTIVER / DESACTIVER LA SONNERIE PRIORITAIRE
1 Entrez dans le menu en appuyant sur la touche /OK.
2 Sélectionnez REGLAGES (SETUP) avec les touches et .
3 Appuyez sur la touche OK.
4 Sélectionnez PRIORITÉS (RING PRIORITY) avec les touches et .
5 Appuyez sur la touche OK.
6 Sélectionnez MARCHE (ON) ou ARRET (OFF) avec les touches et .
7 Appuyez sur la touche OK pour valider.
Topcom Butler 2562 85
FRANÇAIS
HL_B2562_v3.qxd 24-03-2003 10:02 Page 85
Page 86

5.4 UTILISER VOTRE TELEPHONE AVEC UN PABX
Il est possible d'utiliser votre téléphone avec un PABX ou un réseau téléphonique local.
L'utilisation de votre téléphone avec un système récent ne demande aucun réglage spécial. Avec certains systèmes plus anciens, il est nécessaire d'insérer une pause entre la composition d'un préfixe et la
composition du reste du numéro. Votre téléphone peut insérer cette pause automatiquement pendant
la numérotation.
A cet effet, vous devez introduire le préfixe et la longueur de la pause.
Il est possible de choisir 2 préfixes pour 2 PABX différents.
Pour effacer la pause, vous effacez le préfixe dans la mémoire en suivant la même procédure que pour
l'introduction.
REGLAGE DU PREFIXE
1 Entrez dans le menu en appuyant sur la touche /OK.
2 Sélectionnez REGLAGES (SETUP) avec les touches et .
3 Appuyez sur la touche OK.
4 Sélectionnez MENU PABX (PABX SETUP) avec les touches et .
5 Appuyez sur la touche OK.
6 Sélectionnez PBX1 OU PBX2 avec les touches et .
7 Appuyez sur la touche OK.
8Introduisez le code PIN (par défaut = 0000).
9 Appuyez sur la touche OK pour valider.
10 Introduisez le préfixe PABX.
11 Appuyez sur la touche OK pour valider.
REGLAGE DE LA DUREE DE LA PAUSE
1 Entrez dans le menu en appuyant sur la touche /OK.
2 Sélectionnez REGLAGES (SETUP) avec les touches et .
3 Appuyez sur la touche OK.
4 Sélectionnez MENU PABX (PABX SETUP) avec les touches et .
5 Appuyez sur la touche OK.
6 Sélectionnez RÉGL. PAUSE (PAUSE SETUP) avec les touches et .
7 Appuyez sur la touche OK.
8 Sélectionnez la durée de la pause avec les touches et .
9 Appuyez sur la touche OK pour valider.
5.5 VERROUILLAGE DU CLAVIER
Verrouiller le clavier permet d’empêcher la numérotation accidentelle d’un numéro. Cela peut se révéler
utile avec des enfants en bas âge.
86 Topcom Butler 2562
FRANÇAIS
HL_B2562_v3.qxd 24-03-2003 10:02 Page 86
Page 87

Lorsque le clavier est verrouillé, seule la touche /OK est disponible, toutes les autres sont verrouillées.
Activer / Désactiver le verrouillage du clavier
1. Entrez dans le menu en appuyant sur /OK
2. Sélectionnez VERROU CLAV. (KEYPAD LOCK)
3. Appuyez sur OK
4. Sélectionnez MARCHE/ARRET (ON/OFF)
5. Appuyez sur OK pour confirmer
5.6 APPEL D’URGENCE ( BABY CALL )
La fonction d’appel d’urgence permet de composer un numéro préprogrammé en appuyant simplement
sur une seule touche. Cela peut être utile pour les jeunes enfants ou pour l’utilisation du téléphone en
cas d’urgence.
5.6.1 Modifier le numéro d’appel d’urgence
1. Entrez dans le menu en appuyant sur /OK
2. Sélectionnez APP. D’URGENCE (BABYCALL)
3. Appuyez sur OK
4. Sélectionnez NUMBER
5. Appuyez sur OK
6. Introduisez le numéro d’urgence
7. Appuyez sur OK pour confirmer
5.6.2 Activer / Désactiver le numéro d’urgence
1. Entrez dans le menu en appuyant sur /OK
2. Sélectionnez APP. D’URGENCE (BABYCALL)
3. Appuyez sur OK
4. Sélectionnez MARCHE/ARRET (ON/OFF)
5. Appuyez sur OK pour confirmer
6. Dès que le mode est activé, le mot “APP. D’URGENCE” (BABYCALL) s’affiche.
5.7 MODE MONITOR (BABY SIT)
Vous devez disposer de deux combinés. Cette fonction vous permet d’appeler automatiquement le
second combiné par appel interne s’il est en mode monitor. Vous pouvez écouter ce qui se passe dans
une autre pièce.
Lorsque la fonction est activée, “SURVEILLANCE” (Monitor Mode) s’affiche. Lorsque vous raccrochez le
premier combiné, le second raccroche également.
Topcom Butler 2562 87
FRANÇAIS
HL_B2562_v3.qxd 24-03-2003 10:02 Page 87
Page 88

5.7.1 Activer / Désactiver le verrouillage du clavier
1. Entrez dans le menu en appuyant sur /OK
2. Sélectionnez SURVEILLANCE (MONITOR MODE)
3. Appuyez sur OK
4. Sélectionnez MARCHE/ARRET (ON/OFF)
5. Appuyez sur OK pour confirmer
6. SMS (SHORT MESSAGES SERVICE)
Pour utiliser les SMS, ce service doit être activé sur votre ligne de téléphone. Normalement, vous devez for-
mer un numéro spécial pour demander à votre compagnie de téléphone d’activer cette fonction. Veuillez
contacter votre compagnie de téléphone pour ce service.
Le téléphone peut envoyer et recevoir des messages SMS. Le nombre minimum de messages pouvant
être enregistrés est de 58 (de 160 caractères chacun). Lorsque la mémoire est presque remplie, ’Mémoire pleine’ clignote à l’écran (lorsque la mémoire est complètement pleine, le clignotement s’arrête).
Lorsqu’un nouveau message arrive, l’appareil sonne brièvement.
6.1. MENU SMS PRINCIPAL
Vous pouvez entrer dans le menu SMS en appuyant sur la touche SMS ou en sélectionnant SMS dans le
menu.
SMS
>Ecrire
Inbox
Archive
Effacer tous
Configurer
-Inbox: Contient tous les messages SMS reçus.
-Archive: Contient tous les messages SMS qui sont tapés et prêts à être envoyés.
- Ecrire: Menu permettant de saisir un nouveau message
-Effacer tous: Efface tous les messages de la boîte de réception et de la boîte d’envoi
- Configurer: Pour régler différents paramètres pour l’envoi et la réception des SMS.
Note: Lorsque de nouveaux messages ont été reçus, vous arrivez directement dans le menu ’Inbox’ en appuyant sur la
touche SMS.
88 Topcom Butler 2562
FRANÇAIS
HL_B2562_v3.qxd 24-03-2003 10:02 Page 88
Page 89

6.2. PARAMÉTRAGE SMS
Configurer
>Centre msg 1
Centre msg 2
Mélodie
Num. de Term
-Centre msg 1: Contient le numéro de téléphone du centre d’envoi des SMS. Ce numéro est utile
pour envoyer des messages SMS au serveur.
-Centre msg 2: Contient le numéro de téléphone du centre de réception des SMS.
Lorsque le centre SMS vous envoie un nouveau message, ce numéro de téléphone
est envoyé avec le message.
Remarque: Les numéros des centres SMS varient d’un pays à l’autre et d’un opérateur à l’autre. Veuillez vérifier sur la
feuille supplémentaire jointe au présent manuel pour les différents pays (ADDENDUM) ou contacter votre opérateur de
réseau local.
-Mélodie: Pour activer / désactiver la mélodie à chaque réception d’un nouveau SMS.
- Num. de Term: Si plusieurs appareils SMS se trouvent sur la même ligne de téléphone,
vous pouvez attribuer à chaque appareil un autre numéro de terminal
(jusque 9). De cette manière, les messages SMS peuvent être envoyés à
chaque appareil séparément. Cette fonction dépend de l’opérateur réseau
(Défaut = 1)
6.2.1. Régler les numéros de centre SMS
Voir ADDENDUM pour les numéros de centre SMS corrects.
1. Entrez dans le menu SMS en appuyant sur la touche SMS
2. Sélectionnez ’CONFIGURER’ (SETTING)
3. Appuyez sur OK
4. Sélectionnez ‘CENTRE MSG 1’ (SEND) ou ‘CENTRE MSG 2 (RECEIVE)
5. Appuyez sur OK
6. Effacez le numéro existant en appuyant sur la touche ’c’ et introduisez les nouveaux numéros des
centres de messages.
7. Appuyez sur OK
Topcom Butler 2562 89
FRANÇAIS
HL_B2562_v3.qxd 24-03-2003 10:02 Page 89
Page 90

6.2.2. Activer / désactiver la mélodie en cas de nouveau message SMS
1. Entrez dans le menu SMS en appuyant sur la touche SMS
2. Sélectionnez ’CONFIGURER’ (SETTING)
3. Appuyez sur OK
4. Sélectionnez ‘MÉLODIE’ (MELODY)
5. Sélectionnez ‘ARRÊT’ (ON) ou ‘MARCHE’ (OFF) et appuyez sur OK
6.3. ENVOYER DES MESSAGES SMS
6.3.1. Nouveaux messages
En entrant dans la menu principal SMS, vous pouvez choisir ’ÉCRIRE’ (NEW MESSAGE) pour former un
nouveau message. Il existe deux méthodes d’écriture: Les méthodes standard et Fast Text (Eatoni). La
méthode standard est la même méthode que celle utilisée pour entrer un nom dans le répertoire.
La méthode Fast Text est une méthode prédictive, ce qui signifie que le logiciel peut prédire le caractère
suivant à taper. Grâce à cette méthode, il faut appuyer moins de fois sur les touches pour constituer les
mots / phrases qu’avec la méthode standard.
Lorsque la lettre prévue par Fast Text n’est pas le caractère souhaité, il vous suffit d’appuyer sur la touche ’#’ sélectionner un autre caractère.
Par exemple: Lorsque vous souhaitez taper le prénom ’LUC’
Méthode Eatoni:
Tapez une fois sur 5 pour ’L’
Tapez sur 8 et ensuite sur la touche ’#’ pour sélectionner ’U’
Tapez deux fois sur ’C’ (la méthode Fast Text prédit immédiatement la lettre ’C’)
Nombre total d’utilisation des touches = 4
Méthode standard:
Tapez trois fois sur 5 pour sélectionner ’L’
Tapez deux fois sur 8 pour sélectionner ’U’
Tapez trois fois sur 2 pour sélectionner ’C’
Nombre total d’utilisation des touches = 8
90 Topcom Butler 2562
FRANÇAIS
HL_B2562_v3.qxd 24-03-2003 10:02 Page 90
Page 91

Les caractères suivants pour être saisis dans un SMS:
Key Touches assignées
00 è é & % / _ £ ¥ ù ( )
1Espace 1 _ - + = ì Ç ø (
2A b c à ä A BC Ä @ 2 [ ] {
3D e f D E F 3 É ∆
4G h i G H I 4 ΦΓΛ ΩΠ
5J k l ‘ J K L 5 Ψ _ θΞ
6M noñ Ò ö MN O6 ÑÖ~
7P q r s P Q R S 7 Æ æ _
8T u v ù ü T UV 8 Ü “ # \ |
9W xyzW X YZ 9Å å<>
** .,; : ? !¡ ¿§ ^€
Pour saisir un nouveau message:
1. Entrez dans le menu SMS en appuyant sur la touche SMS
2. Sélectionnez ‘ÉCRIRE’ (NEW MESSAGE)
3. Écrivez le message que vous souhaitez envoyer. Les caractères disponibles pouvant être saisis sont
indiqués dans le coin inférieur droit. Le coin inférieur gauche indique la méthode de saisie. Vous
pouvez basculer entre le mode Fast Text et Normal en appuyant sur la touche ’#’ pendant 3s. Vous
pouvez effacer le caractère se trouvant devant le curseur en appuyant sur la touche ’c’.
4. Appuyez sur OK pour aller dans le menu suivant ou appuyez sur la touche ’c’ et maintenez-la enf-
oncée pour revenir au menu SMS principal.
Remarque: Il n’est pas possible d’aller à la ligne dans un message SMS ! Il est uniquement possible de
taper du texte continu.
5. Après avoir appuyé sur la touche OK, vous verrez l’écran suivant:
>Envoyer à?
_
Répertoire
Edition du msg
Effacer?
Topcom Butler 2562 91
FRANÇAIS
HL_B2562_v3.qxd 24-03-2003 10:02 Page 91
Page 92

HL_B2562_v3.qxd 25-03-2003 11:05 Page 92
FRANÇAIS
6. Entrez le numéro de téléphone auquel vous désirez envoyer le SMS. Ou sélectionnez:
•’RÉPERTOIRE’ pour chercher un numéro de téléphone dans le répertoire.
•’EDITION DU MSG’ pour modifier /éditer le message
•’EFFACER?’ pour effacer le message
6.3.2 Outbox
La ’ARCHIVE’ contient une liste de tous les messages qui sont prêts à être envoyés. Si vous entrez dans
la ’ARCHIVE’, vous verrez le début de chaque message. Le premier est le premier message saisi.
Vous pouvez lire le message dans son entièreté en le sélectionnant à l’aide des touches et down .
Appuyer sur la touche OK vous permettra d’afficher le message complet, y compris la date / heure et le
numéro de téléphone du destinataire. Appuyez sur la touche ’c’ pour revenir au menu ’ARCHIVE’.
Appuyer sur OK vous permettra d’obtenir les mêmes options qu’au paragraphe 6.3.1 point 5.
6.4. LIRE LES MESSAGES SMS
Il existe trois manières de signaler que vous avez reçu des nouveaux messages:
1. par une brève mélodie dans le combiné
2. une enveloppe clignotante à l’écran: Lorsqu’UN des nouveaux messages est lu, l’enveloppe arrête de
clignoter. L’enveloppe est affichée aussi longtemps qu’il y a des messages non lus.
3. une DEL clignotante sur la base.
Notez que la DEL clignotante sur la base indique également qu’il y a de nouveaux appels dans la liste
d’appels. Aussi longtemps que les deux ne sont pas lus, la DEL continue à clignoter.
Lorsque des nouveaux messages ont été reçus et que vous souhaitez les lire, il vous suffit d’appuyer sur
la touche SMS. Vous entrerez immédiatement dans le menu ’Inbox’ (pas le menu SMS principal).
6.4.1. Inbox
La ’boîte de réception’ contient une liste de tous les messages reçus (lus et non lus). Chaque ligne contient le début de chaque message. Le premier est le dernier message reçu. Devant chaque nouveau
message, vous verrez une enveloppe . Vous pouvez lire le message dans son entièreté en sélectionnant un message à l’aide des touches up et down . Appuyer sur la touche OK vous permettra
d’afficher le message complet, y compris: date/heure d’envoi + numéro de téléphone de l’expéditeur.
Appuyez sur la touche ’c’ pour revenir au menu ’Inbox’. Ou appuyez sur OK pour obtenir les options
suivantes:
-EFFACER? Pour effacer le message actuel. Aucune confirmation nécessaire.
-RÉPONDRE Transfert le message dans la boîte d’envoi et vous permet d’envoyer ce message
- TRANSFÉRER Pour envoyer une réponse à l’auteur de ce message.
92 Topcom Butler 2562
Page 93

6.5. EFFACER TOUS LES MESSAGES
En sélectionnant ’EFFACER TOUS’ (DELETE ALL) dans le menu SMS principal, vous pouvez effacer tous
les messages de la ’INBOX’ et ’ARCHIVE’.
1. Entrez dans le menu SMS en appuyant sur la touche SMS
2. Sélectionnez ‘EFFACER TOUS’ (DELETE ALL)
3. Appuyez sur OK pour confirmer ou sur la touche ’c’ pour revenir en arrière.
7. GESTION DE PLUSIEURS COMBINES
7.1. INSTALLER UN COMBINE SUPPLEMENTAIRE
Vous pouvez enregistrer de nouveaux combinés dans la base si ces combinés soutiennent le protocole
DECT GAP.
La base peut soutenir un maximum de 5 combinés. Si vous disposez déjà de 5 combinés et si vous souhaitez ajouter ou remplacer un combiné, vous devrez d'abord effacer un combiné avant d'associer le
nouveau combiné à la base.
1 Appuyez sur et maintenez la touché sur la base pendant 6 secondes.
2La base émettra alors un bip. La base est maintenant prête pour l'enregistrement d'un nouveau
combiné. Vous disposez de 90 secondes après avoir activé le bouton pour enregistrer un nouveau
combiné.
Pour enregistrer un combiné, la base doit être placée en mode d'enregistrement
Après avoir placé la base en mode d'enregistrement, vous lancez la procédure sur le nouveau combiné:
Si votre combiné supplémenteire est un Butler 2505/2510/2550/2560/2561/2562/2605/2610/
2650/2660/2661/2662/2705/2710/2750/2760/2761/2762/2805/2810/2850/2860/2861/2862
3 Entrez dans le menu en appuyant sur la touche /OK.
4 Sélectionnez DÉCLARATION (REISTRATION) avec les touches et .
5 Appuyez sur la touche OK.
6Introduisez un numéro de base (de 1 à 4). Les numéros clignotants sont déjà utilisés par d'autres
bases DECT.
7 Appuyez sur la touche OK.
8Introduisez le code PIN de la base (0000 par défaut).
9 Appuyez sur la touche OK. Le combiné se mettra à la recherche de la base DECT.
10 Dès que le combiné aura localisé la base, il affichera le numéro d'identification de la base. Validez
l'enregistrement de la base en appuyant sur la touche OK ou interrompez l'opération en appuyant
sur la touche .
Topcom Butler 2562 93
FRANÇAIS
HL_B2562_v3.qxd 24-03-2003 10:02 Page 93
Page 94

11 Si le combiné ne localise pas la base, il retournera en mode stand-by après quelques secondes.
Essayez encore une fois en modifiant le numéro de la base et en vérifiant si vous ne vous trouvez
pas dans un environnement générant des interférences. Rapprochez-vous de la base.
Si votre combiné est d’un autre modèle
Après avoir lancé la procédure d'enregistrement sur la base, référez-vous au mode d'emploi du combiné
pour découvrir comment vous devez l'enregistrer. Le combiné doit être compatible avec le protocole
GAP.
L'icône et le texte "NON ASSOCIÉ” (NOT REGISTERED) clignotent sur l'écran lorsque le combiné n'a
pas été associé à la base.
Lorsqu'un combiné a été associé à une base, il se voit attribuer un numéro de combiné par la base.
C'est ce numéro qui est affiché sur le combiné derrière le nom et qu'on devra utiliser pour les appels
internes.
7.2 ELIMINER UN COMBINE
Vous pouvez éliminer un combiné d'une base pour permettre à un autre combiné d'être enregistré:
1. Entrez dans le menu en appuyant sur le bouton /OK.
2. Sélectionnez REGLAGES (SETUP) avec les touches et .
3. Appuyez sur la touche OK.
4. Sélectionnez SUP COMB. (REMOVE HS) avec les touches et .
5. Appuyez sur la touche OK.
6. Introduisez le code PIN en 4 chiffres.
7. Appuyez sur la touche OK.
8. Sélectionnez le combiné à éliminer.
9. Appuyez sur la touche OK pour valider.
7.3 INSTALLER UN COMBINE SUR UNE AUTRE BASE
Si vous voulez utiliser un Butler 2562 avec une base d'un autre modèle, cette base doit être compatible
avec le protocole GAP.
1 Pour placer la base en mode d'enregistrement, référez-vous au mode d'emploi de la base.
2Effectuez les opérations 3 à 10 du paragraphe 6.1.
7.4 SELECTIONNER UNE BASE
Les combinés peuvent être enregistrés simultanément sur 4 bases.
Pour sélectionner une base:
1 Entrez dans le menu en appuyant sur la touche /OK.
2 Sélectionnez REGLAGES (SETUP) avec les touches et .
94 Topcom Butler 2562
FRANÇAIS
HL_B2562_v3.qxd 24-03-2003 10:02 Page 94
Page 95

3 Appuyez sur la touche OK.
4 Sélectionnez CHOIX BASE (SELECT BASE) avec les touches et .
5 Appuyez sur la touche OK.
6 Sélectionnez une base ou sélectionnez AUTOMATIQUE (AUTOMATIC) avec les touches et .
7 Appuyez sur la touche OK.
Lorsque vous sélectionnez la base, la base actuellement sélectionnée est désignée par un signe '✔'
après le numéro de la base. Si vous sélectionnez 'AUTOMATIQUE’ (AUTOMATIC), le combiné cherchera
automatiquement une autre base dès que vous êtes hors de portée!
8. DETECTION DE PANNES
Symptôme Cause possible Solution
Pas d'écran Piles non-chargées Vérifiez la position des piles.
Rechargez les piles.
combiné sur ARRET (OFF) Branchez le combiné MARCHE
(ON).
Pas de tonalité Câble téléphonique mal connecté Vérifiez la connexion du câble
téléphonique.
La ligne est occupée par un autre Attendez que l'autre combiné
combiné raccroche.
L'icône combiné hors de portée Rapprochez le combiné de la
clignote base.
La base ne reçoit pas de courant Vérifiez les connexions électriques à la
base.
Le combiné n'est pas Procédez à l'enregistrement du combiné
enregistré dans la base dans la base.
La base ou le combiné Le volume de la sonnerie est Réglez le volume de la sonnerie.
ne sonne pas coupé ou faible
La tonalité est bonne, Le mode de composition du Réglez le mode de composition du
mais il n'y a pas de numéro est incorrect numéro (pulsation/tonalité).
communication
Impossible de transférer La fonction Flash Time est Placez l'unité en mode de Flash Time
un appel vers le PABX trop courte long.
Le téléphone ne réagit Erreur de manipulation Enlevez les piles et remettez-les en place.
pas à l'activation des
touches
Topcom Butler 2562 95
FRANÇAIS
HL_B2562_v3.qxd 24-03-2003 10:02 Page 95
Page 96

9. GARANTIE
•La durée de la garantie est de 24 mois. La garantie est assurée sous présentation de la facture
originale ou d'une preuve de paiement mentionnant la date d'achat ainsi que le type d'appareil.
•Topcom prend en charge pendant la durée de la garantie toutes les défaillances issues de défauts des
matériaux ou de défauts de fabrication. Topcom décide seul s'il souhaite remplacer ou réparer
l'appareil défectueux sous garantie.
•La garantie prend fin lors de toute intervention de l'acheteur ou de tout tiers non-habilité.
• Des dégâts découlant d'une utilisation inappropriée, par exemple l'utilisation de pièces de rechange
ou d'accessoires n'étant pas d'origine où n'étant pas recommandés par Topcom, ne peuvent faire
l'objet de recours à la garantie.
•La garantie ne couvre pas les dommages dus à des phénomènes extérieurs: foudre, eau, feu, etc. ou
tout évènement qui aurait modifié, effacé ou rendu illisible le numéro de série.
Attention: N'oubliez pas de joindre une preuve d'achat à l'envoi de votre appareil.
10. CARACTERISTIQUES TECHNIQUES
•Standard: DECT (Digital Enhanced Cordless Telecommunications)
GAP (Generic Access Profile)
•Gamme de fréquences: 1880 MHZ à 1900 MHz
• Nombre de canaux: 120 canaux duplex
• Modulation: GFSK
• Encodage de la parole: 32 kbit/s
• Puissance d'émission: 10 mW (puissance moyenne par canal)
• Portée: 300 m dans un espace ouvert /50 m maximum à l'intérieur
de la maison
•Alimentation électrique de la base: 220 V / 50 Hz pour la base
•Piles pour le combiné: 2 piles rechargeables AAA, NiMh 600mAh
• Autonomie du combiné: 250 heures en stand-by
•Temps de conversation: 13 heures
• Durée de charge: 6-8 heures
• Conditions normales d'utilisation: +5 °C à +45 °C
• Mode de composition du numéro: pulsation/tonalité (IWV/MFV)
•Temps Flash: 100 ou 250 ms
96 Topcom Butler 2562
FRANÇAIS
HL_B2562_v3.qxd 24-03-2003 10:02 Page 96
Page 97

Topcom Butler 2562 97
FRANÇAIS
HL_B2562_v3.qxd 24-03-2003 10:02 Page 97
Page 98

98 Topcom Butler 2562
DEUTSCH
Sicherheitshinweise
•Verwenden Sie nur das mitgelieferte Steckernetzgerät. Keine fremden Adapter verwenden, die
Akkuzellen können sonst beschädigt werden.
•Legen Sie nur, aufladbare Akkus des gleichen Typs ein. Verwenden Sie auf keinen Fall normale
nicht aufladbare Batterien. Wiederaufladbare Akkus richtig gepolt einlegen (Hinweisschild ist in
den Akkufächern des Mobilteils angebracht).
• Berühren Sie nicht die Lade- und Steckerkontakte mit spitzen und metallischen Gegenständen.
• Medizinische Geräte können in ihrer Funktion beeinflusst werden.
•Das Handgerät kann in Hörgeräten einen unangenehmen Brummton verusachen.
•Die Basisstation nicht in feuchten Räumen und nicht weniger als 1,5 m entfernt von einer
Wasserstelle aufstellen. Das Mobilteil nicht mit Wasser in Berührung bringen.
• Nutzen Sie das Telefon nicht in explosionsgefährdeten Umgebungen.
•Entsorgen Sie Akkus und Telefon umweltgerecht.
•Da bei Stromausfall das Telefonieren mit diesem Gerät nicht möglich ist, verwenden Sie bitte im
Falle eines Notrufes ein Telefon, daß netzstromunabhängig ist, also z.B. ein Handy.
Reinigen
Wischen Sie das Telefon mit einem leicht feuchtigen Tuch oder mit einem Antistatiktuch ab.
Niemals Reinigungsmittel oder gar aggressive Löschungsmittel verwenden.
HL_B2562_v3.qxd 24-03-2003 10:02 Page 98
Page 99

1. BESCHREIBUNG DES TELEFONS 101
1.1 Handgerät/Basisstation Butler 2562 101
1.2 Display 102
2. INSTALLATION DES TELEFONS 103
2.1 Anschlüsse 103
2.2 Wiederaufladbare Batterien 103
3. VERWENDUNG DES TELEFONS 105
3.1 Handgerät AN/AUS 105
3.2 Wahl der Menüsprache 105
3.3 Einen Anruf erhalten 105
3.4 Extern Telefonieren 105
3.5 Intern Telefonieren 105
3.6 Freisprechmodus 106
3.7 Internes Weiterleiten eines externen Anrufs 106
3.8 Konferenzschaltung 106
3.9 Anzeige der Gesprächdauer 107
3.10 Stummschaltung (mute) 107
3.11 Pausentaste 107
3.12 Rufnummernanzeige 107
3.13 Wahlwiederholungsspeicher 108
3.14 Eine Nummer aus dem Telefonbuch anrufen 109
3.15 Verwendung der alphanumerischen Tastatur 109
3.16 Verwendung des Menüs 110
4. PERSÖNLICHE EINSTELLUNGEN 110
4.1 Einstellung der Lautsprecherlautstärke 110
4.2 Einstellen der Klingellautstärke 111
4.3 Auswahl der Klingelmelodie 111
4.4 Aktivieren/Deaktivieren von Pieptönen 112
4.5 Handgerät Name 113
4.6 Einstellen von Tag und Uhrzeit 113
4.7 Den PIN-Code ändern 114
4.8 Den Wählmodus einstellen 114
4.9 Flash-Zeit 114
4.10 Automatisches Annehmen 115
4.11 Reset 115
Topcom Butler 2562 99
DEUTSCH
HL_B2562_v3.qxd 24-03-2003 10:02 Page 99
Page 100

5. WEITERE FUNKTIONEN 115
5.1 Telefonbuch 115
5.2 Handgerät von der Basisstation aus suchen 117
5.3 Vorzugsklingeln einstellen 117
5.4 Verwendung Ihres Telefons mit einem PABX 118
5.5 Tastaturverrieglung 119
5.6 Notruf (Baby call) 119
5.7 Kontrollmodus (Babyphon) 120
6. SMS (SHORT MESSAGES SERVICE) 120
6.1. SMS-Hauptmenü 120
6.2. SMS-Einstellung 121
6.3. SMS-Nachrichten verschicken 122
6.4. SMS-Nachrichten lesen 124
6.5. Alle Nachrichten löschen 125
7. MEHRERE HANDGERÄTE VERWALTEN 125
7.1 Zusätzliches Handgerät anmelden 125
7.2 Handgerät abmelden 126
7.3 Handgerät auf einer anderen Basisstation anmelden 127
7.4 Basisstation auswählen 127
8. PROBLEMLÖSUNG 128
9. GARANTIE 129
10. TECHNISCHE EIGENSCHAFTEN 129
100 Topcom Butler 2562
DEUTSCH
HL_B2562_v3.qxd 24-03-2003 10:02 Page 100
 Loading...