

OPERATING INSTRUCTIONS
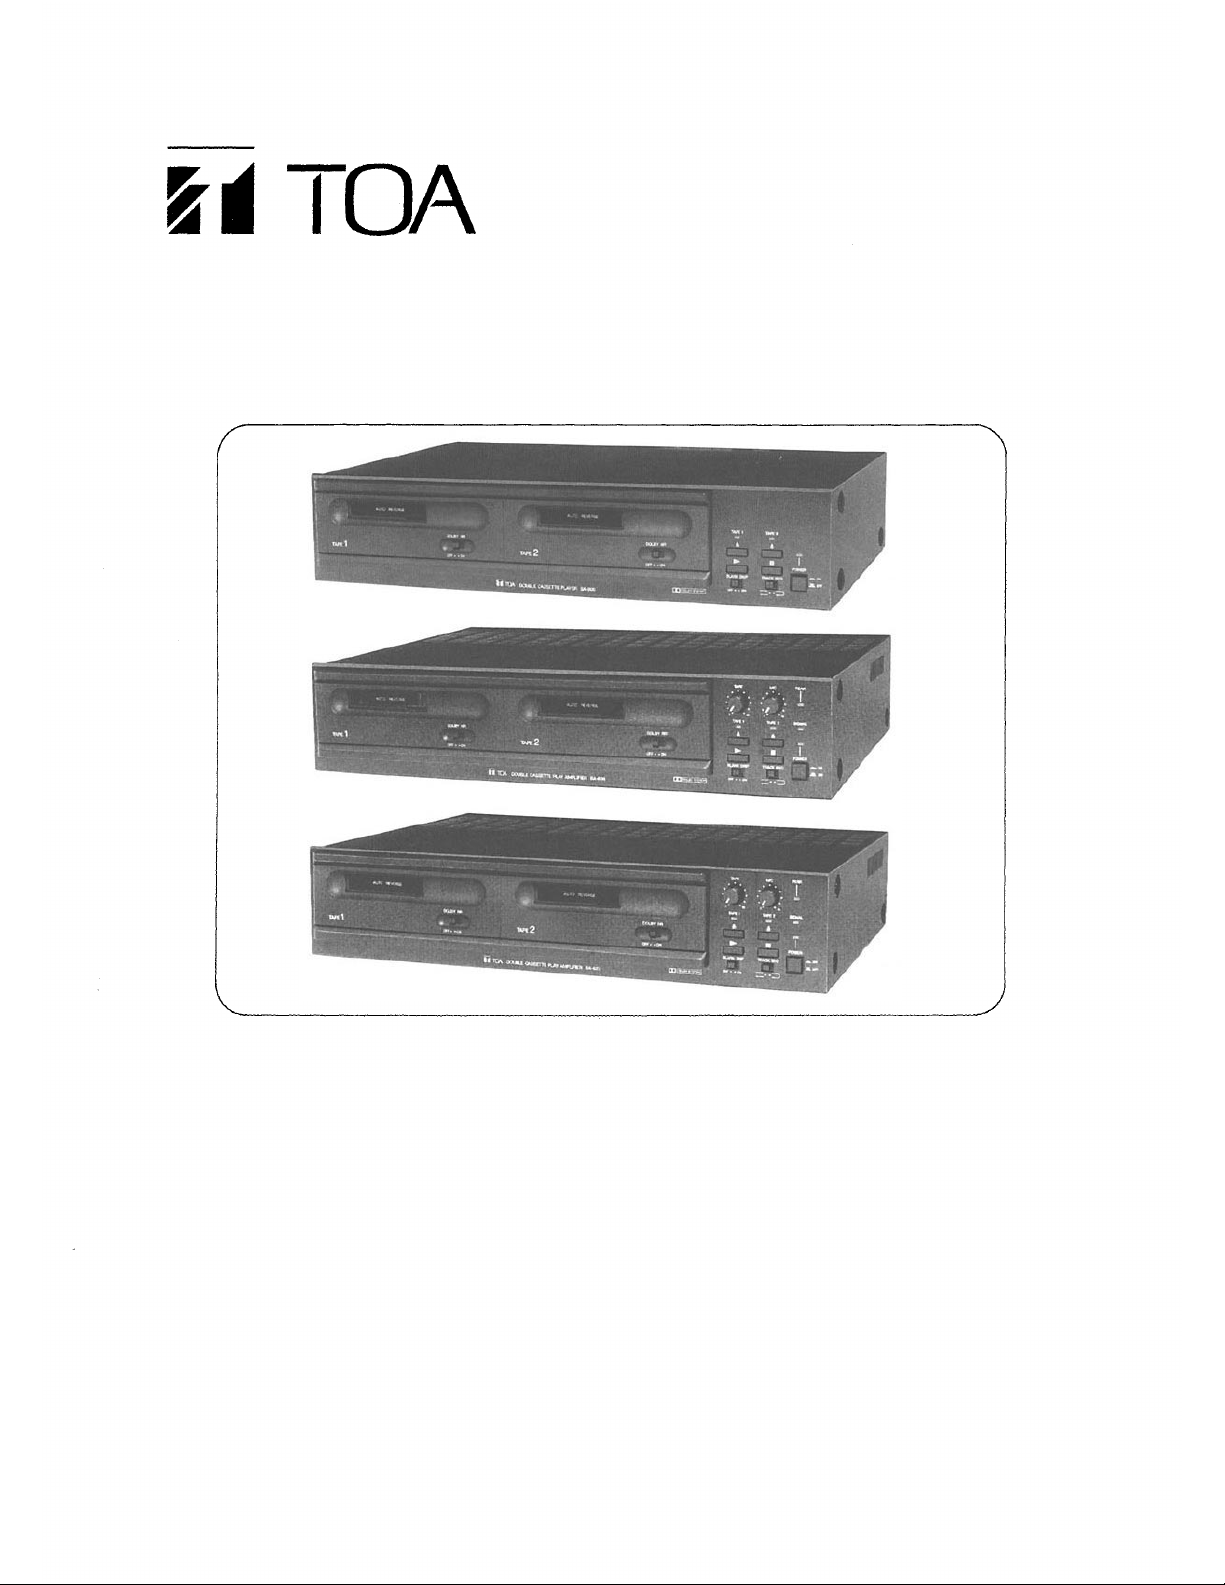
DOUBLE CASSETTE PLAYER
DOUBLE CASSETTE PLAY AMPLIFIER
DOUBLE CASSETTE PLAY AMPLIFIER
BA-800
BA-806
BA-823
BA-800
BA-806
BA-823
Please follow the instructions in this manual to obtain optimum results from this unit. We also
recommend that you keep this manual handy for future reference.
TOA Corporation
THE LIGHTNING FLASH WITH
ARROWHEAD WITHIN A TRIANGLE IS
INTENDED TO TELL THE USER THAT
CAUTION
TO REDUCE THE RISK OF ELECTRICAL
SHOCK, DO NOT REMOVE COVER.
NO USER SERVICEABLE PARTS INSIDE.
REFER SERVICING TO QUALIFIED
SERVICE PERSONNEL.
PARTS INSIDE THE PRODUCT ARE A
RISK OF ELECTRIC SHOCK TO
PERSONS.
THE EXCLAMATION POINT WITHIN A
TRIANGLE IS INTENDED TO TELL THE
USER THAT IMPORTANT OPERATING
AND SERVICING INSTRUCTIONS ARE
IN THE PAPERS WITH THE
APPLIANCE.
This equipment has been tested and found to comply with the limits for a Class A digital device, pursuant to Part
15 of the FCC Rules. These limits are designed to provide reasonable protection against harmful interference
when the equipment is operated in a commercial environment. This equipment generates, uses, and can radiate
radio frequency energy and, if not installed and used in accordance with the instruction manual, may cause
harmful interference to radio communications.
— 2 —— 2 —

CONTENTS
1. USER PRECAUTIONS
2. CASSETTE TAPES
3. NOMENCLATURE
3.1. BA-800 Front and Rear View
3.2. BA-806 Front and Rear View
3.3. BA-823 Front and Rear View
4. CONNECTIONS
4.1. BA-800 Connection Example
4.2. BA-806 Connection Example
4.3. BA-823 Connection Example
4.4. BA-806 Speaker Connection
4.5. BA-823 Speaker Connection
4.6. Timer Connection
5. OPERATION
5.1. Playback
(1) Playback Operation
(2) Stop Operation
(3) Tape Ejection/Loading
(4) Timer ON/OFF Control
(5) AGC Circuit
(6) Microphone Announcements
(7) Microphone-Activated Muting Circuit
(8) Signal and Peak Indicators
5.2. Track Sequence Selection
(1) Alternate A-A-B-B Playback
(2) Alternate A-B-A-B Playback
6. EXPANSION
6.1. Connections
(1) Expansion Using One BA-800
(2) Expansion Using Two BA-800's
6.2. Operation of An Expanded System
(1) Playback Operation
(2) Stop Operation
6.3. Timer Connection When Expanded
7. FAULT INDICATION
8. "BLANK SKIP" FUNCTION
9. CASSETTE PLAYER UNIT (CU-800) REPLACEMENT
10. MAINTENANCE
11. TROUBLESHOOTING
12. SPECIFICATIONS
13. ACCESSORIES
4
5
6~7
8~9
10~11
12
13
14
15
16
16
17
17
18
18
18
19
19
19
20
20
21
22
23~24
24
25
26
26
27
27
28
28~29
30
— 3 —
1. USER PRECAUTIONS
Avoid installing the unit near heaters, as well as locations exposed to direct sunlight as this may discolor or
deform the unit's exterior.
Avoid using the unit in humid or dusty locations. Also, do not block air exhaust vents located on the top and side
panels to prevent equipment failures. (BA-806/BA-823)
Keep beverages away from the unit as they may be spilt. Also, do not insert combustibles or metallic objects,
such as hairpins and needles, into the unit to prevent fires, electrical shocks and equipment failures.
To avoid severe electrical shocks and possible catastrophic damage, never open the unit nor touch its internal
components.
Always take hold of the plug to unplug it from the power outlet. Do not bend the power cord excessively nor place
any heavy equipment on the cord as the cable may be damaged, resulting in fires or electrical shock.
Unplug the power cord from the wall outlet if the unit is to be stored for two weeks or more.
Avoid installing the unit on the unstable table or in vibratory locations as this may damage the unit or badly
influence its operation.
Use a soft cloth to wipe off dust and grease from the front panel and case. When these parts are very dirty, dip
the soft cloth in a small amount of neutral detergent, remove the dirt and wipe with a dry cloth. Never use
thinner, benzine, alcohol, or other solvents, which may damage the unit's finish.
Dolby noise reduction manufactured under license from Dolby Laboratories Licensing Corporation.
"DOLBY" and the double-D symbol are trademarks of Dolby Laboratories Licensing Corporation.
— 4 —
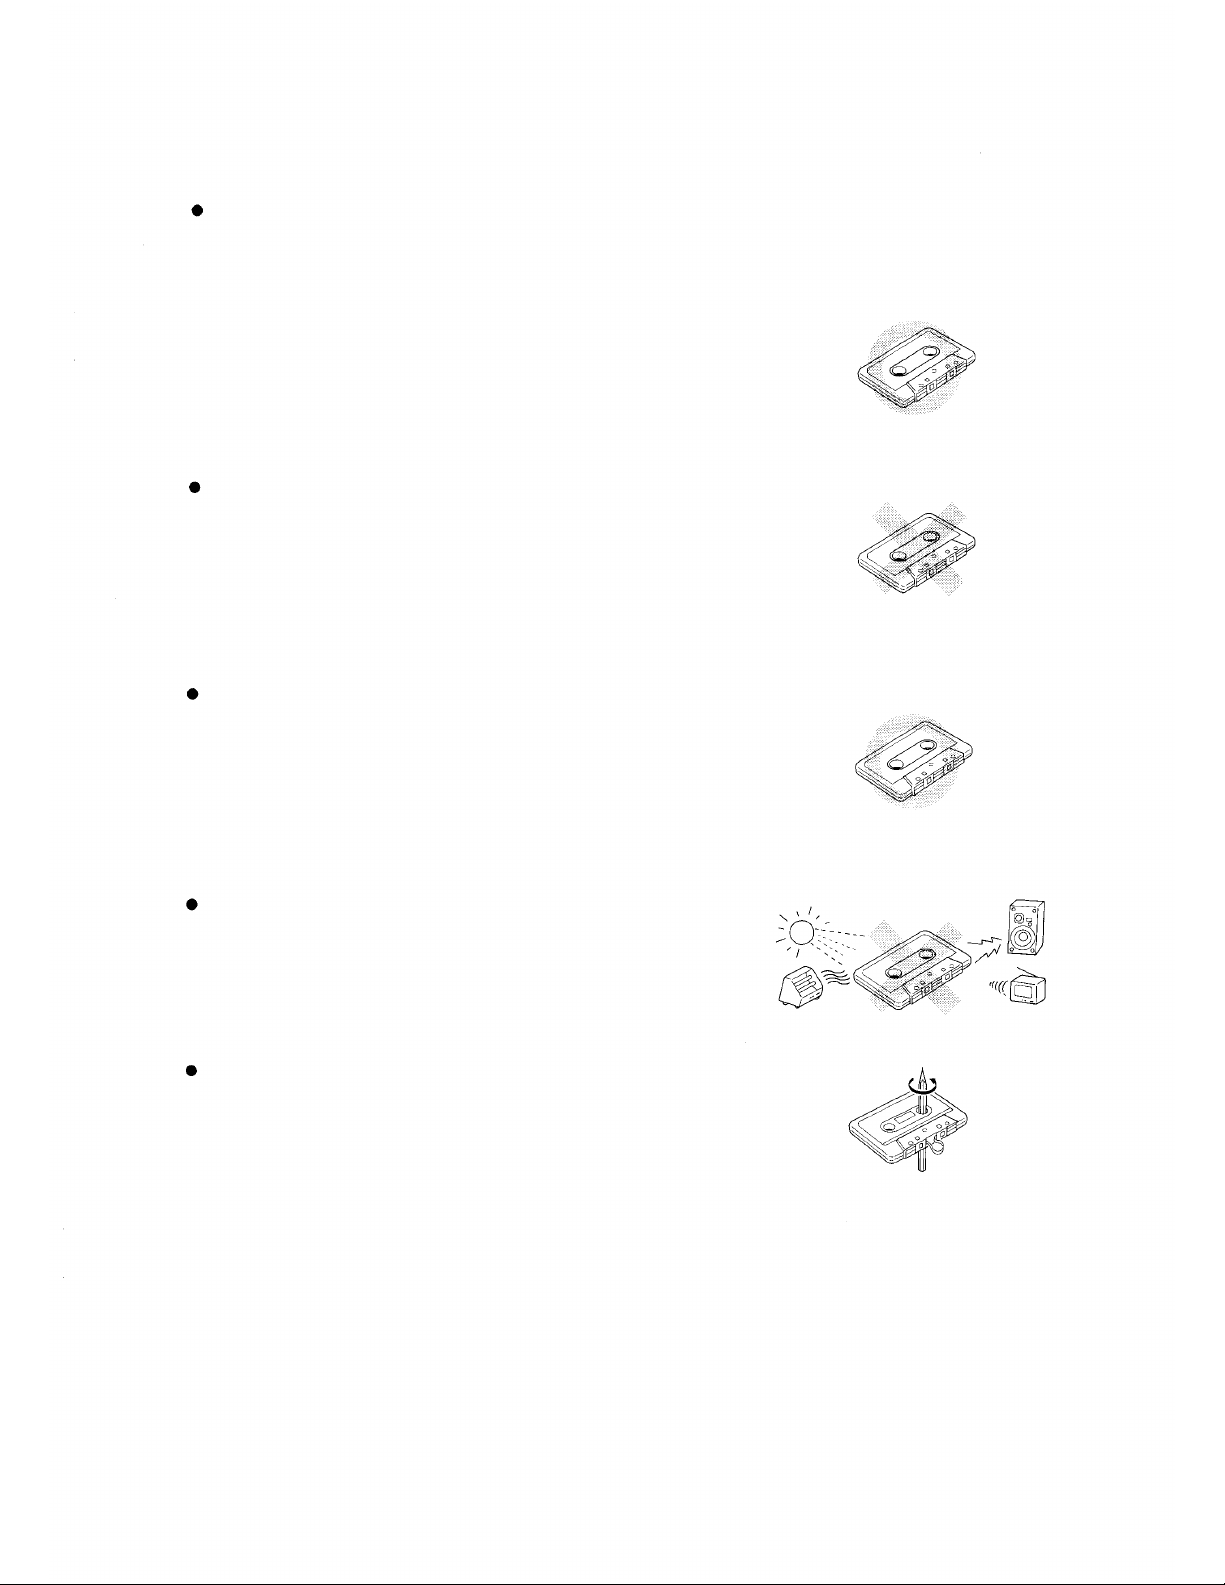
2. CASSETTE TAPES
Your tape player automatically detects the type of tape you are using,
without having to switch a tape selector in accordance with the type of
tape.
The following three different cassette tapes are usable:
(1) Normal tape
(2 ) Chrome tape
(3) Metal tape
The C-120 tapes (120 minutes' recording time for both sides) and
endless tapes are not recommended because their tapes are extremely
thin and can often be slack or twist, leading to unstable operation.
The C-90 (90 minutes) and C-60 (60 minutes) are most commonly
used.
Good!!
Normal tape
Chrome tape
Metal tape
No!!
C-120
Endless tape
Good!!
C-90
C-60
To prevent damage of the tape and unstable operation, always store the
cassette tapes in locations offering limited exposure to direct sunlight,
high temperature, and magnetic effects (speakers and TV receivers).
If the slack or protruding tape is used, it may cause a tape twist around
the pinch roller and capstan, or damage the tape. Before inserting the
tape into the cassette player unit, take up the slack by inserting a
pencil through the reel hub and turning it, as shown in the figure.
No!!
— 5 —
3. NOMENCLATURE
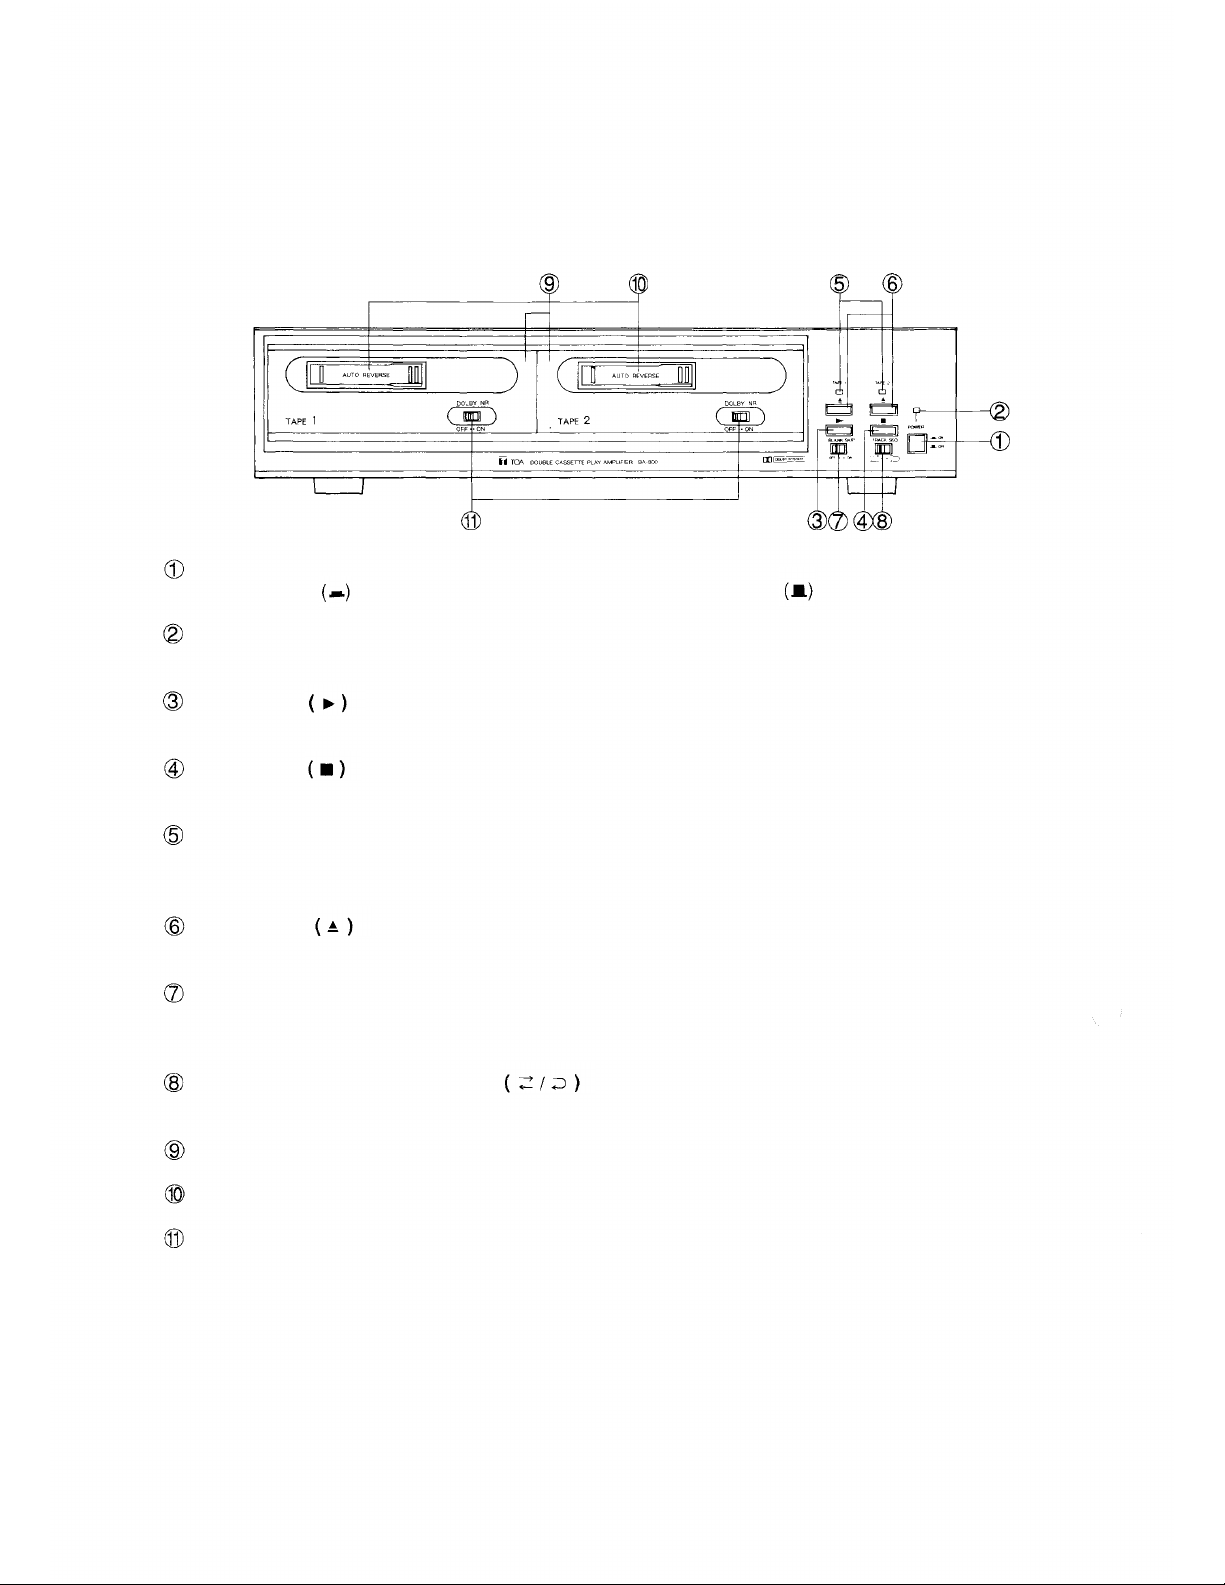
[BA-800] < Front View >
Power Switch
Press this switch to turn power ON. To turn power OFF, press this switch again.
Power Indicator (Green)
Lights when the power is switched ON, and goes out when switched OFF.
Play Button
Press this button when playing back a tape. For details, refer to "Tape Playback" on p.17.
Stop Button
Press this button to stop the tape run.
Tape Travel Indicator (Green)
The indicator of a cassette player unit in operation lights. It flashes when the cassette player unit fails. Refer to
"Fault indication" on p.26.
Eject Button
Press this button to eject the tape.
Blank Skip Switch
Set this switch to ON to use the "blank skip" function. Set it to OFF when not using the function. Refer to p.26 for
this function.
Track Sequence Selection Switch
Selects tape playback order. For details, refer to p.20 "Track Sequence Selection".
Auto-Reverse Cassette Player Unit (CU-800)
Cassette Tape Receptacle
Dolby NR Switch (OFF/ON)
Set this switch to ON when playing a tape recorded with Dolby B-type NR.
— 6 —
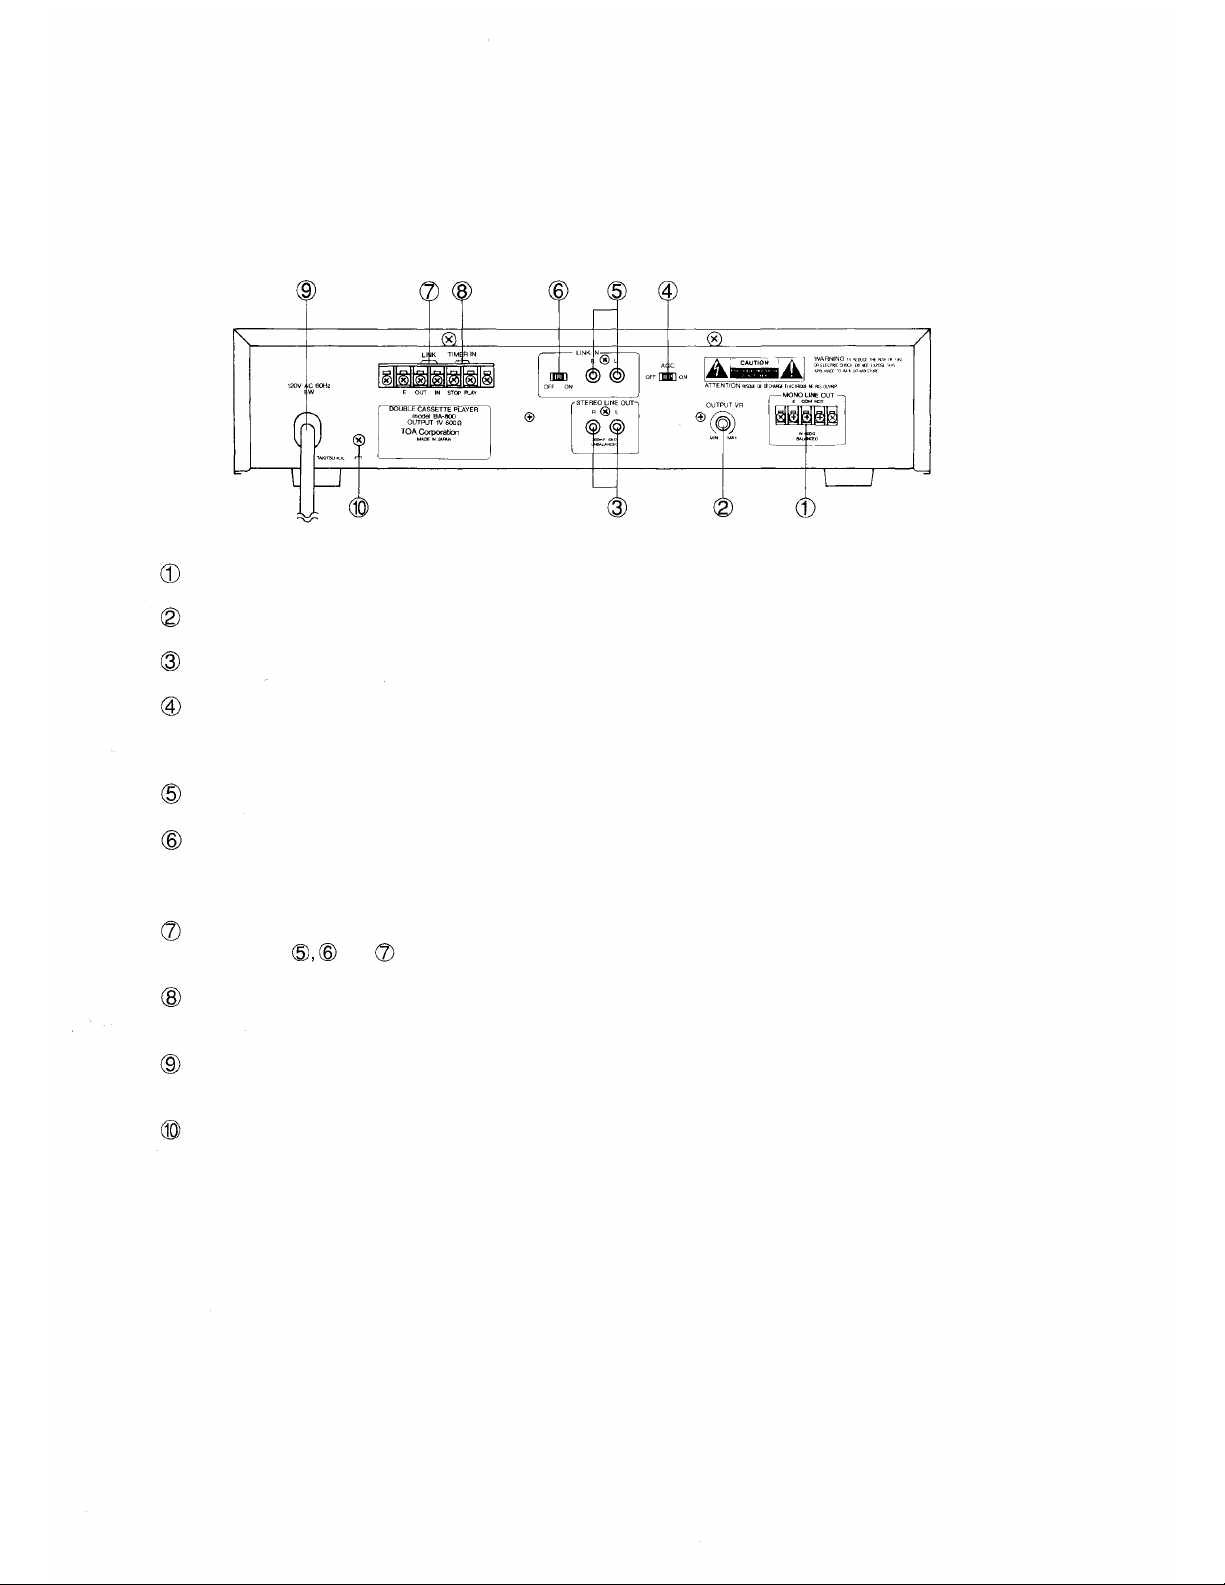
[BA-800] < Rear View >
Monaural Line Output Terminal
Monaural Line Output Volume Control
Stereo Line Output Connector
AGC Switch
Setting this switch to ON maintains the playback output volume constant regardless of variations in the tape
recording level. For details, refer to "AGC Circuit" on p.18.
Link Input Connector (Signal)
Link Switch (ON/OFF)
Set this switch to ON when expanding.
Be sure to set the switch to OFF if not expanded.
Link Input Terminal (Control)
[Note] : Use and for expansion using the BA-800. Refer to "Expansion" on p.21~22.
Timer Input Terminal
Connects to an external timer. Refer to p.16.
Power Cord
Plug this cord into the wall AC outlet (120V AC).
Ground Terminal
Grounding point for the unit.
— 7 —
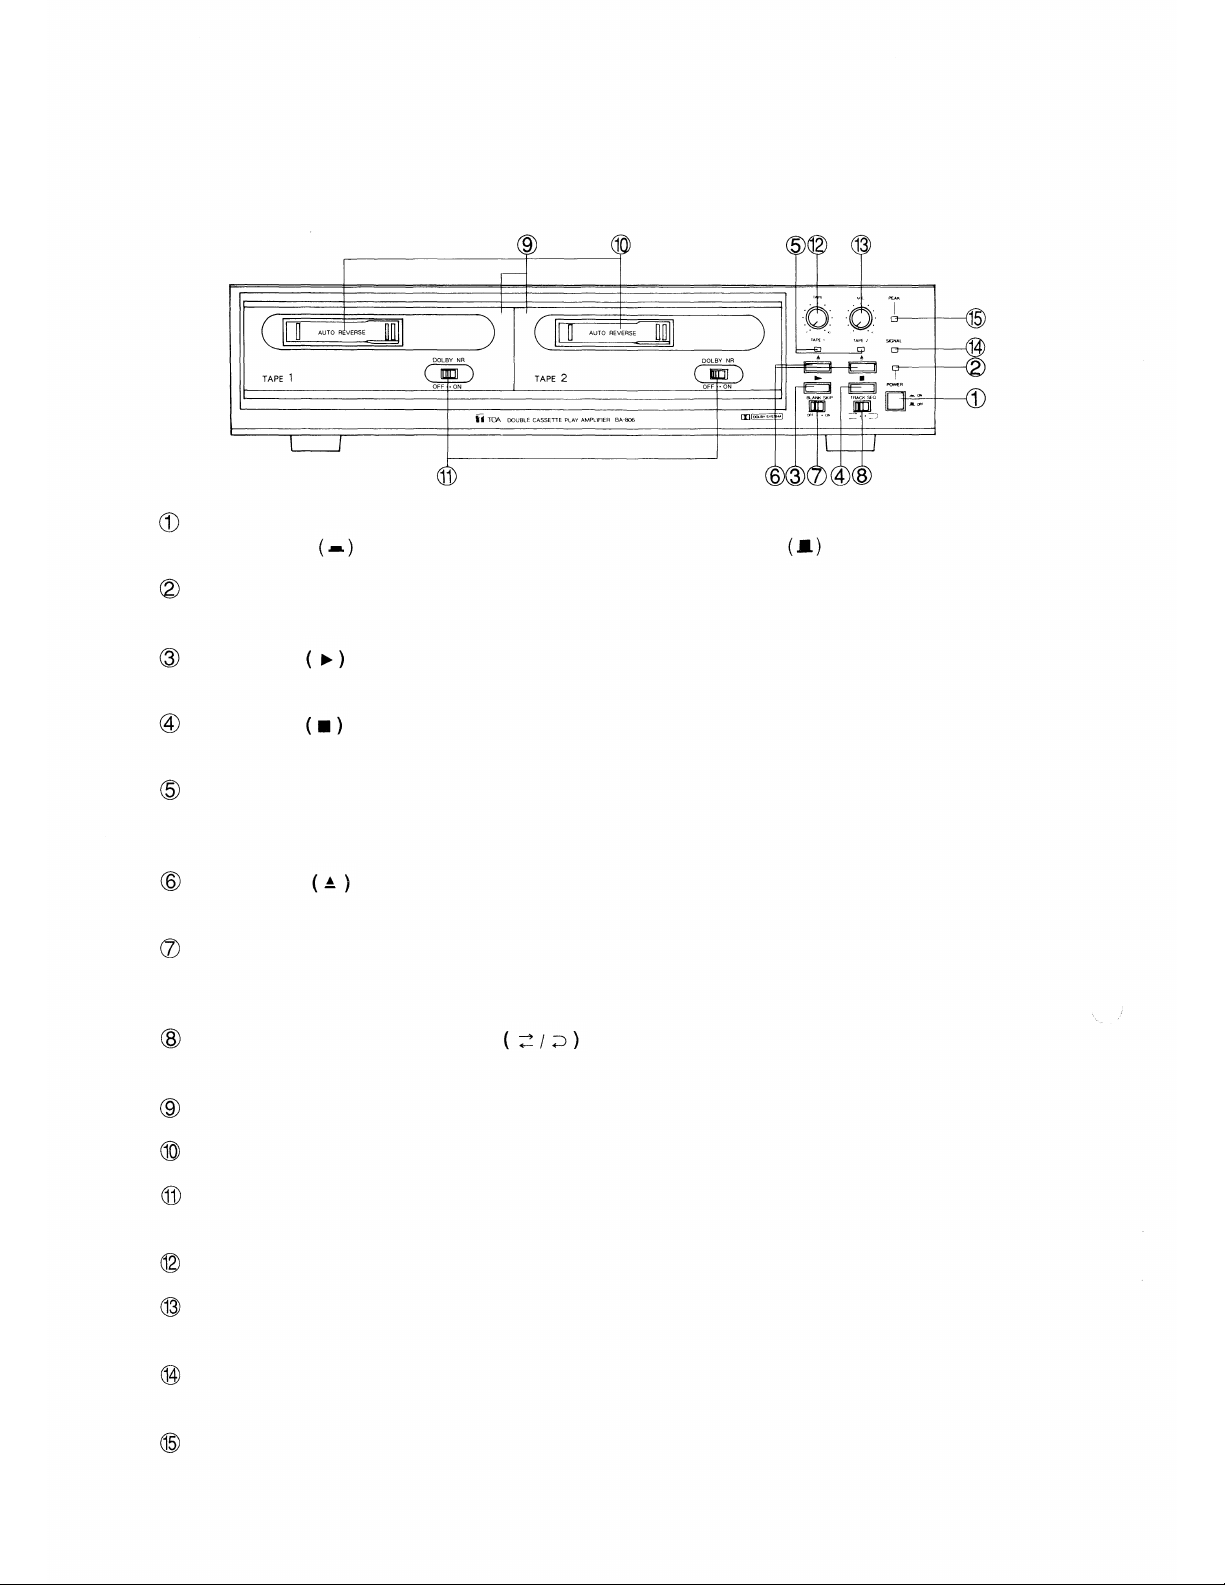
[BA-806]< Front View >
Power Switch
Press this switch to turn power ON. To turn power OFF, press this switch again.
Power Indicator (Green)
Lights when the power is switched ON, and goes out when switched OFF.
Play Button
Press this button when playing back a tape. For details, refer to "Tape Playback" on p.17
Stop Button
Press this button to stop the tape run.
Tape Travel Indicator (Green)
The indicator of a cassette player unit in operation lights. It flashes when the cassette player unit fails. Refer to
"Fault indication" on p.26.
Eject Button
Press this button to eject the tape.
Blank Skip Switch
Set this switch to ON to use the "blank skip" function. Set it to OFF when not using the function. Refer to p.26 for
this function.
Track Sequence Selection Switch
Selects tape playback order. For details, refer to p.20 "Track Sequence Selection".
Auto-Reverse Cassette Player Unit (CU-800)
Cassette Tape Receptacle
Dolby NR Switch (OFF/ON)
Set this switch to ON when playing a tape recorded with Dolby B-type NR.
Tape Volume Control
Microphone Volume Control
Make sure to set this control to zero when no microphone is connected to the BA-806.
Signal Indicator (Green)
Lights green when a signal is transmitted to the speaker output terminal. Refer to p.19.
Peak Indicator (Red)
Lights red when the output to the speaker approaches a clipping level. If steadily lit, turn down the volume. Also
refer to p. 19.
— 8 —

[BA-806]< Rear View >
Microphone Input Terminal
AUX-1 Input Connector
AUX-1 Volume Control
AUX-2 Input Terminal
AUX-2 Volume Control
AGC Switch
Setting this switch to ON maintains the playback output volume constant regardless of variations in the tape
recording level. For details, refer to "AGC Circuit" on p.18.
Tone Control (Bass/Treble)
Line Output Terminal
Link Input Connector (Signal)
Link Switch
Set this switch to ON when expanding the BA-806 using the BA-800.
Be sure to set the switch to OFF if not expanded.
Link Input Terminal (Control)
[Note] : Use , and for expansion using the BA-800. Refer to "Expansion" on p.21~22.
Timer Input Terminal
Connects to an external timer for ON/OFF control. Refer to p.16.
Speaker Output Terminal
Connects to the speaker. For Details, refer to p.15 "Speaker Connections".
Power Cord
Plug this cord into the wall outlet (120V AC).
Ground Terminal
Grounding point for the unit.
— 9 —
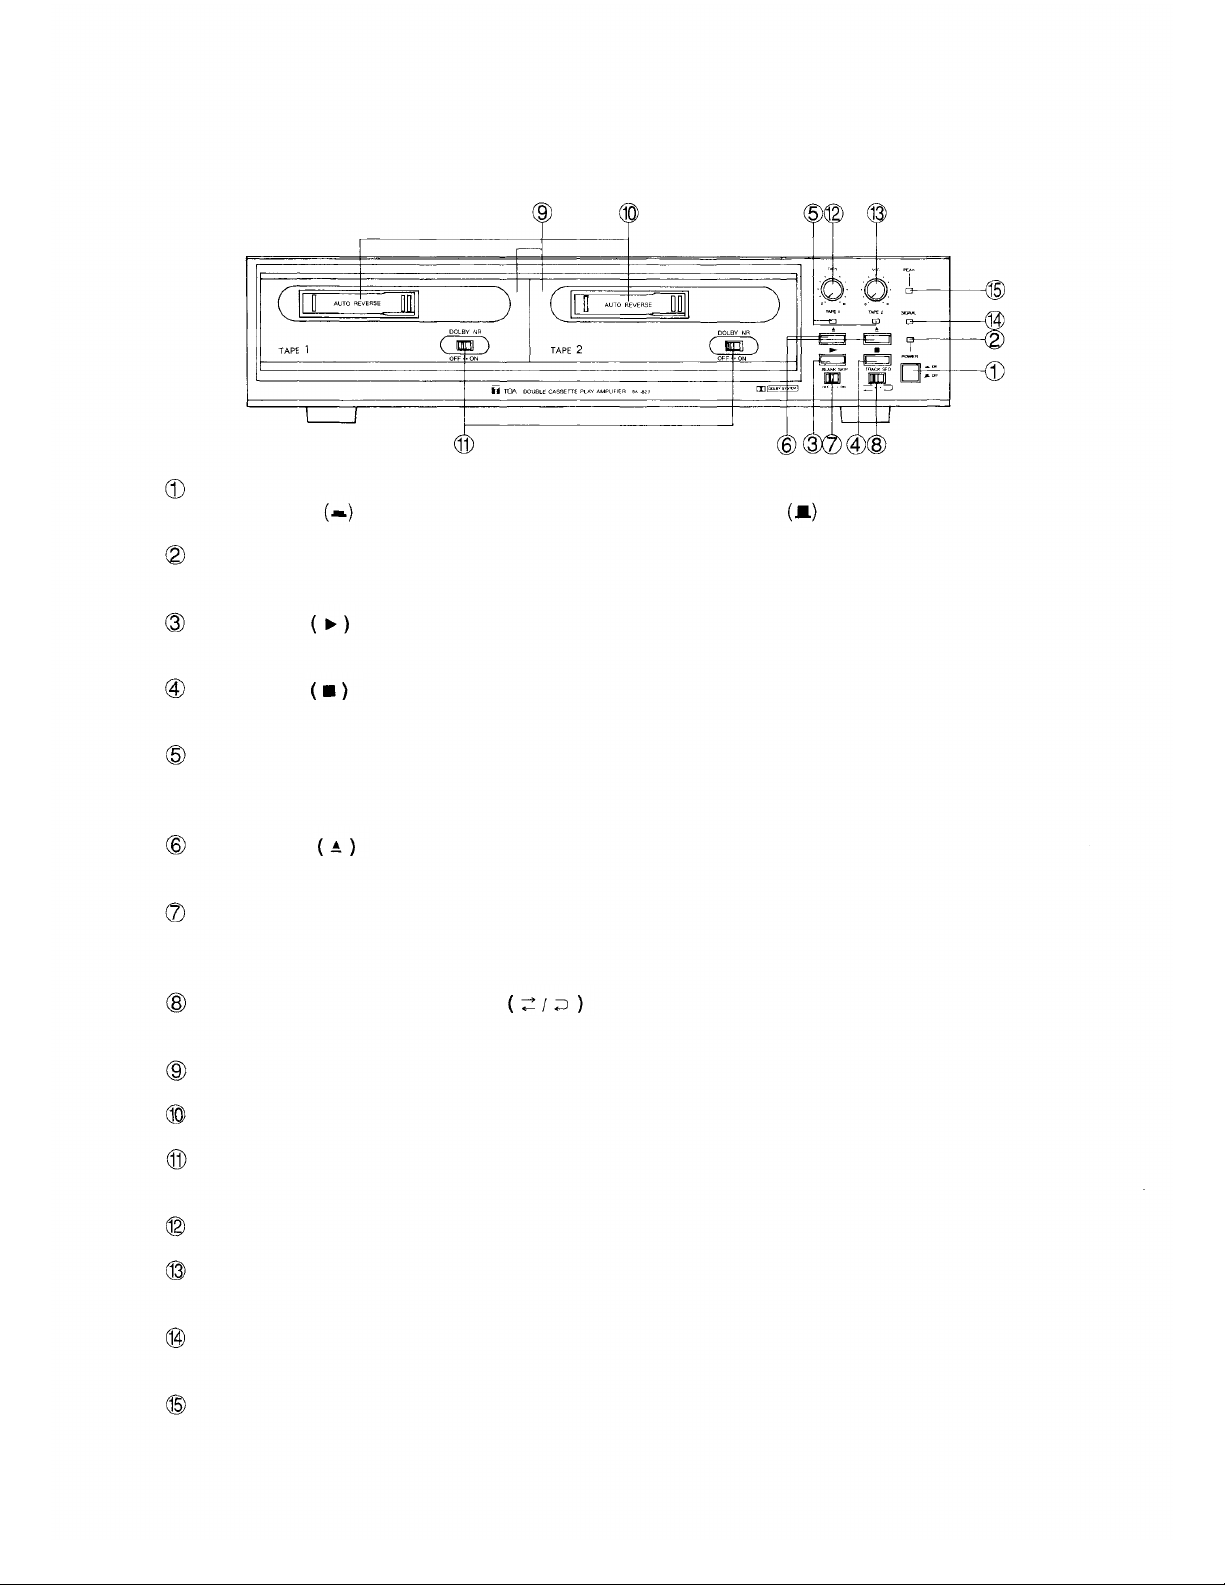
[BA-823]< Front View >
Power Switch
Press this switch to turn power ON. To turn power OFF, press this switch again.
Power Indicator (Green)
Lights when the power is switched ON, and goes out when switched OFF.
Play Button
Press this button when playing back a tape. For details, refer to "Tape Playback" on p.17.
Stop Button
Press this button to stop the tape run.
Tape Travel Indicator (Green)
The indicator of a cassette player unit in operation lights. It flashes when the cassette player unit fails. Refer to
"Fault indication" on p.26.
Eject Button
Press this button to eject the tape.
Blank Skip Switch
Set this switch to ON to use the "blank skip" function. Set it to OFF when not using the function. Refer to p.26 for
this function.
Track Sequence Selection Switch
Selects tape playback order. For details, refer to p.20 "Track Sequence Selection".
Auto-Reverse Cassette Player Unit (CU-800)
Cassette Tape Receptacle
Dolby NR Switch (OFF/ON)
Set this switch to ON when playing a tape recorded with Dolby B-type N R .
Tape Volume Control
Microphone Volume Control
Make sure to set this control to zero when no microphone is connected to the BA-823.
Signal Indicator (Green)
Lights green when a signal is transmitted to the speaker output terminal. Refer to p.19.
Peak Indicator (Red)
Lights red when the output to the speaker approaches a clipping level. If steadily lit, turn down the volume. Also
refer to p.19.
— 10 —

[BA-823]< Rear View >
Microphone Input Terminal
AUX-1 Input Connector
AUX-1 Volume Control
AUX-2 Input Terminal
AUX-2 Volume Control
AGC Switch
Setting this switch to ON maintains the playback output volume constant regardless of variations in the tape
recording level. For details, refer to "AGC Circuit" on p.18.
Balance Control
Tone Control (Bass/Treble)
Line Output Terminal
Link Input Connector (Signal)
Link Switch
Set this switch to ON when expanding the BA-823 using the BA-800.
Be sure to set the switch to OFF if not expanded.
Link Input Terminal (Control)
[Note] : Use and for expansion using the BA-800. Refer to "Expansion" on p.21~22.
Timer Input Terminal
Connects to an external timer for ON/OFF control. Refer to p.16.
Speaker Output Terminal
Connects to the speaker. For Details, refer to p.16 "Speaker Connections".
Power Cord
Plug this cord into the wall outlet (120V AC).
Ground Terminal
Grounding point for the unit.
— 11 —

4. CONNECTIONS
4.1. BA-800 Connection Examples
[Note]: Be sure to plug the power cord into the 120VAC wall outlet.
If the power voltage differs, the equipment may not work properly or fires or electrical shocks may
result.
BA-800(for extension)
PROGRAM TIMER
120VAC, 60Hz GROUND
STEREO AMPLIFIER
BA-800
AMPLIFIER
— 12 —

4.2. BA-806 Connection Examples
[Note]: Be sure to plug the power cord into the 120VAC wall outlet.
If the power voltage differs, the equipment may not work properly or fires or electrical shocks may
result.
BA-800(for expansion)
MICROPHONE
PROGRAM TIMER
120VAC, 60Hz GROUND
SPEAKER
AMPLIFIER
To amplifier line input
To amplifier or
mixer line output
AMPLIFIER
BA-806
CD PLAYER or To tape
recorder playback output
CD PLAYER
CASSETTE DECK
— 13 —

4.3. BA-823 CONNECTION EXAMPLE
[Note]: Be sure to plug the power cord into the 120VAC wall outlet.
If the power voltage differs, the equipment may not work properly or fires or electrical shocks may
result.
BA-800(for expansion)
MICROPHONE
PROGRAM TIMER
120VAC, 60Hz
SPEAKER(RIGHT)
SPEAKER(LEFT)
GROUND
To amplifier
line input
AMPLIFIER
AMPLIFIER
To amplifier or
mixer line output
CD PLAYER or To tape
recorder playback output
CD PLAYER
CASSETTE DECK
— 14 —

4.4. Speaker Connections [BA-806]
Low-impedance speakers (4 to 16
OUTPUT
Low impedance speakers
(4 to 16
When connecting two or more speakers, make sure that the total speaker impedance is greater than 4 .. (If two
8 speakers are connected in parallel, the total impedance is 4 ) .
High-impedance speakers have to be connected to the 70V or 25V terminal.
1. Connection to the 70V terminal
2. Connection to the 25V terminal
Parallel connection
(Total impedance has to be greater than 83
or total wattage less than 60W.)
Parallel connection
(Total impedance has to be greater than 10
* Be sure to replace the speaker output terminal cover after speaker connection completion.
— 15 —

4.5. Speaker Connections [BA-823]
OUTPUT
SPEAKER (RIGHT)
Low impedance speakers (4 to 16
The type of speakers connectable to each channel are those with impedance of over 4 . When connecting
multiple speakers, the total speaker impedance must be over 4 . If under 4 , a protective circuit is
triggered to prevent the equipment's normal operation, or equipment failures will occur.
Use speakers with permissible input of over 30W. Note that if the power exceeding the permissible input is
applied to the speaker, the speaker may be damaged.
4.6. Timer Connections [BA-800, BA-806 and BA-823]
Connect the rear-mounted terminals to the timer's no-voltage contacts.
SPEAKER (LEFT)
Make duration needs to be 200msec or more.
— 16 —

5. OPERATION [BA-800, BA-806 and BA-823]
Check for proper connection of the power cord, speaker cables, etc.
Set each volume control to minimum position.
Set the tone control to center position. (BA-806/BA-823)
Set each of the following switches to desired position:
AGC switch: Refer to p.18.
Track sequence selection switch: Refer to p.20.
Blank skip switch: Refer to p.26.
Link switch: Refer to p. 21~22.
Set the Dolby NR switch to ON to play a tape recorded with Dolby B-type noise reduction.
5.1. Playback
(1) Playback Operation
Set the power switch
to ON, and confirm that the power indicator lights.
Insert the tape into the tape receptacle.
Press the play button
Play begins, and the tape travel indicator (TAPE 1 or TAPE 2) lights.
Adjust the tape volume control. (BA-806/BA-823)
Adjust the BA-800's monaural line output volume control to an appropriate level in advance when using the
BA-800's mono line output.
Adjust the tone control.
[Note]: When tapes are inserted into both cassette player units (TAPE 1 and 2), play begins with the TAPE 1
cassette player unit.
(2) Stop Operation
To stop tape motion during playback, press the stop button
The tape travel indicator is extinguished.
— 17 —

(3) Tape Ejection and Loading
Press the eject button
depending on whether or not the tape has been recorded using the Dolby NR.
[Note]: ( 1 ) Tape can be ejected only when the power is ON. (It cannot be ejected if power is OFF.)
(2 ) When both cassette player units (TAPE 1 and 2) are loaded with tapes, if the tape being played back
is ejected, other tape is played back.
to eject the tape. When inserting a new tape, set the Dolby NR switch to ON or OFF
TAPE 1 ejected.
TAPE 2 ejected.
TAPE 2 played back
TAPE 1 played back
( 3 ) Do not block tape actions when ejected, because this may result in equipment failures or cause the
fault indication facility to malfunction.
( 4 ) When ejecting and instantly re-loading the tape, wait until the tape is completely ejected. Your
attempt to force the tape in the cassette player unit while it is still being ejected may lead to
equipment failures or malfunctions of the fault indication facility.
(5 ) When the fault indication facility malfunctions, it can be returned to normal by pressing the eject
button.
(4) Timer ON/OFF Control
Confirm that the program timer is connected properly, as indicated on p.16.
Set the power switch to ON, and confirm that the power indicator lights.
Insert a tape.
Play begins when the player's timer ON terminals are shorted by the timer.
Play stops when the player's timer OFF terminals are shorted by the timer.
[Note]: ( 1) The timer ON/OFF control can be performed only when the power is ON. Be sure to set the power
switch to ON before inserting the tape.
( 2 ) Adjust the tape volume to an appropriate level in advance. (BA-806/BA-823)
When using a timer to activate the BA-800, adjust the monaural line output volume control to an
appropriate level in advance.
(5) AGC Circuit [BA-800, BA-806 and BA-823]
Your tape player has a built-in AGC (Automatic Gain Control) circuit to maintain the tape output volume constant
regardless of variations in the recording level of each tape. This eliminates the necessity of adjusting the volume
control every time tapes are swapped.
To use the AGC circuit, set the AGC switch to ON. Set the switch to OFF if the function is not required.
— 18 —

(6) Microphone Announcements [BA-806 and BA-823]
Connect a microphone to the microphone input terminal located on the rear panel.
Set the power switch to ON, and confirm that the power indicator lights.
Adjust the microphone volume control.
Making an announcement during tape play triggers an internal microphone-activated muting circuit, and the
tape output volume automatically decreases by approximately 20dB. The tape volume automatically returns to
a previous level after announcement completion. For the microphone-activated muting circuit, refer to Item
below.
[Cautions]
(1)Make sure to set this control to zero when no microphone is connected to the BA-806 or BA-823.
(2)Be sure to set the microphone switch to OFF after announcement completion, because the muting circuit is
activated by ambient noise if the switch is left ON.
(7) Microphone-Activated Muting Circuit [BA-806 and BA-823]
The microphone and AUX 2 inputs are provided with the muting circuit which automatically reduces the tape
output volume and AUX 1 volume by approximately 20dB when a microphone announcement is made through such
inputs. The tape output volume gradually returns to its original level after the announcement is completed.
[Note]: The microphone-activated muting circuit does not work when the microphone volume control is set to
minimum position.
(8) Signal and Peak Indicators [BA-806 and BA-823]
During tape play or microphone announcement, see to it that the peak indicator (red) does not light. If it lights, this
indicates that the output is distorted and so, turn down the volume.
The signal indicator (green) lights when a signal is output to the speaker. Check amplifier operation with this
indicator.
— 19 —

5.2. Track Sequence Selection [BA-800, BA-806 and BA-823]
When both cassette player units (TAPE 1 and 2) are used, the tapes can be played back in order of side A-A-B-B
or A-B-A-B, which is selectable by means of the track sequence selection switch.
(1) Alternate A-A-B-B Playback
With the track sequence switch set to A-A-B-B position, both cassette player units first play back side A of their
respective tapes, and then side B, starting with TAPE 1. This is repeated between both cassette player units in the
following sequence:
START
Side A of TAPE 1
Side B of TAPE 1
Side A of TAPE 2
Side B of TAPE 2
(2) Alternate A-B-A-B Playback
If the track sequence selection switch is set to A-B-A-B position, both cassette player units alternately play back
both sides (A and B) of their respective tapes before they are switched to each other.
[Note]: ( 1 ) Side A of the tape mentioned above refers to the side to play first. Therefore, it is not the same as
that which is shown on the tape.
(2 ) Be sure to set the link switch to OFF when using a BA-800 (BA-806 or BA-823) individually.
If set to ON, the tape stops after TAPE 2 playback is finished.
— 20 —

6. EXPANSION
Connection of the BA-800 (BA-806 or BA-823) to the BA-800 increases the number of usable cassette player
units from two to four, which repeat plays in turn.
6.1. Connections
(1) Expansion using one BA-800
Set both link switches to ON.
BA-800 (for expansion)
BA-800 (BA-806 or BA-823)
Playback order of an expanded system
When the BA-800 (BA-806 or BA-823) is expanded using a BA-800 unit, play begins with TAPE 1 (TAPE 2
if TAPE 1 is not loaded with a tape) of the unit of which play button has been pressed, and is switched as
follows depending on the track sequence selection switch setting.
(a) When the sequence selection switch of both units is set to A-A-B-B position
(b) When the sequence selection switch of both units is set to A-B-A-B position
— 21 —

(2) Expansion using two BA-800's
Set all link switches to on.
2nd BA-800 for expansion
1st BA-800 for expansion
BA-800 (BA-806 or BA-823)
— 22 —

6.2. Operation of an Expanded System
Follow the procedures below to operate the BA-806 expanded by using two BA-800 units. (The operation is quite
similar to that which is required when using two BA-800 units to expand the BA-800, BA-806 or BA-823.)
(1) Playback Operation
Set all power switches to ON.
Insert tapes into cassette player units to use. Each cassette player unit plays in turn, starting with TAPE 1
(TAPE 2 if TAPE 1 is not loaded with a tape) of the unit of which play bu tton has been pressed.
[Example 1]
The BA-800's play button is pressed during the BA-806's play.
2nd BA-800 f or expansion
1st BA-800 for expansion
BA-806
The optional BA-806's play is not interrupted.
[Example 2]
The 2nd BA-800's play button is pressed while the 1st BA-800 unit is playing.
2nd BA-800 for expansion
1st BA-800 for expansion
BA-806
Speaker
The 1st BA-800 still continues to play.
— 23 —
Speaker

[Note]: (1 ) If the play button of other connected player is pressed during playback, its tape starts to run
and tape travel indicator lights. In this event, the highest priority is given to the BA-806, followed
by the BA-800 connected directly to the BA-806, and the remaining BA-800 unit.
( 2 ) Even if the BA-800's play button is left ON in the above examples, tapes can be switched from one
cassette player unit to another. To prevent incomplete tape to tape switching (play begins from the
middle of the tape), however, do not press the play button of any connected component during play.
( 3 ) Be sure to set the power switch of all connected BA-800 units to ON. If a certain unit has its power
switch set to OFF, the tape stops at that unit, making continuous play impossible any longer.
(2) Stop Operation
Press the stop button of the component in play mode.
— 24 —

6.3. Timer Connection When Expanded
Even when the system is expanded, a timer can be used to control ON/OFF operation of tape playback. In this
event, play begins with the component the timer is connected to.
[Note]: Connect all the timer stop input terminals to each other. Otherwise, the tape may not stop.
Timer Connection Example
No-voltage make contact of program timer, etc.
2nd BA-800 for expansion
1st BA-800 for expansion
Connect all the timer stop input terminals.
BA-806 (BA-823)
— 25 —

7. FAULT INDICATION [BA-800, BA-806 and BA-823]
If a cassette player unit (TAPE 1 or 2) malfunctions, the corresponding tape travel indicator flashes.
Tape travel indicator
TAPE 1
TAPE 2
Flashes when TAPE 1 deck malfunctions.
Flashes when TAPE 2 deck malfunctions.
If either indicator flashes, make no further attempt to use the corresponding cassette player unit. Eject the tape
immediately and replace the faulty cassette player unit with a new one. The cassette player unit of other indicator
that does not flash can still be used.
[Note]: The tape travel indicator also flashes when the cassette player unit is removed, but this does not infer real
malfunction. You can still use other cassette player unit unless its tape travel indicator is flashing. For
cassette player unit (CU-800) replacement, refer to p.27.
8. "BLANK SKIP" FUNCTION [BA-800, BA-806 and BA-823]
Your tape player comes with a Blank Skip function. If an unrecorded section in the tape lasts for ten seconds or
more during playback, the tape is automatically sent forward at top speed to skip the unrecorded section to re-start
playback from the top of a next piece of music.
The Blank Skip function can be made available by setting the blank skip switch to ON.
[Note]: The function may operate in the middle of playback if an extremely low recording level tape is used or if
the tape contains a relatively long low signal level section, such as pianissimo. In such cases, set the blank
skip switch to OFF.
— 26 —

9. CASSETTE PLAYER UNIT (CU-800) REPLACEMENT
Revolving parts of a unit mechanism are impaired with extended use, downgrading the sound quality. The CU-
800's life is approximately 2,000 hours, which can be made 4,000 hours (500 days for 8 hours per day) by
using two units alternately. Whenever possible, attempt to use both units of the BA-800, BA-806 or BA-823 to
make overall unit life longer. If the unit is used for more than 1,000 hours and the sound quality deteriorates,
replace it with a new unit. For cassette player unit (CU-800) replacement, contact your nearest TOA dealer.
10. MAINTENANCE
Cleaning the head section
The head section is comprised of the heads, capstans and pinch rollers, and with extended use these parts
accumulate dust, dirt, and grease easily as the tape runs. If this assembly gets dirty, the contact between the tape
and the surface of the heads is impaired and this not only downgrades the sound quality, but causes a tape twist
around the pinch roller and capstan. To prevent this, clean the head section and surrounding parts regularly once a
month.
Demagnetizing the heads
The recording head becomes magnetized when you use the player for prolong periods of time. This results in noise
being generated and the treble dropping off. The head should therefore be regularly demagnetized with the
commercial head eraser.
— 27 —

11. TROUBLESHOOTING
Although some failures can be traced to legitimate mechanical faults, some are in fact the results of improper
maintenance, tape defects or lack of experience in operating the player. If you think that there is a failure, refer
first to the following checklist.
- Is the BA-800, BA-806 or BA-823 properly connected to the speaker and other components ?
- Is the power cord securely plugged in the power outlet ?
- Are switches and volume controls placed in the proper positions ?
- Is the microphone switch set to ON ?
Symptom
Tape does not run.
AC cord is not plugged in.
Tape is inserted improperly.
Output cords are connected improperly.
No playback sound.
High frequencies
are weak.
Sound is unsteady.
Excessive noise.
Tape volume control is set to leftmost
position.
Heads are dirty.
Heads are magnetized.
Capstan is dirty.
Tape is old.
12. SPECIFICATIONS
< BA-800 >
Power Requirements
Power Consumption
Outputs.
Distortion
Frequency Response
S/N Ratio
Usable Tape
Tape Speed
Wow and Flutter
Playing System
Finish
Dimensions
Weight
Specifications are subject to change without notice.
*
120VAC, 60Hz.
8W
Mono line out : 600 1 V, balanced
Stereo line out : 10k 300 mV, unbalanced (L/R)
Less than 3% (Mono line out : 1000 Hz/1 V)
50~15,000 Hz
50 dB (Dolby NR : OFF) (AGC OFF)
60 dB (Dolby NR : ON) (AGC OFF)
Compact cassette tapes
4.76cm/sec
Less than 0.2% (WRMS)
Auto Reverse
Front panel : Aluminium, alumite process (black)/ABS resin
Case : Steel color plate (black)
420(W)x97(H)x300(D)mm (16.6(W) x3.8 (H) x11.9(D)in.)
Approx. 6.2kg (13.7 Ib.)
Cause
Remedy
Plug cord in correctly.
Remove tape and insert properly.
Connect cords correctly.
Turn control to suitable position.
Clean capstan and pinch roller with a commercial
cleaning tape.
Renew the tape.
— 28 —

Power Requirements
Power Consumption
Output Power
Distortion
Frequency Response
Tone Controls
Inputs
Outputs
S/N Ratio
Usable Tape
Tape Speed
Wow and Flutter
Playing System
Finish
Dimensions
Weight
120V AC, 60Hz.
100W
60W
Less than 1 % (1000Hz at rated output on AUX 2 input)
TAPE : 50~15,000 Hz
AUX 2 : 50~20,000 Hz ( ± 3 dB)
BASS :100Hz±10dB
TREBLE : 10,000 Hz ±10 dB
MIC :200 1mV , balanced
AUX 1 : 50k 100m V, unbalanced
AUX 2 :600 1V, unbalanced
LINK IN (signal) : 10 k 150m V, unbalanced
Speaker output : 4
10 : 25V
83 : 70V
Line output : 600 1V, unbalanced
TAPE : 50 dB (Dolby NR : OFF) (AGC OFF)
60 dB (Dolby NR : ON) (AGC OFF)
MIC :60dB
Compact cassette tapes
4.76cm/sec
Less than 0.2% (WRMS)
Auto Reverse
Front panel : Aluminium, alumite process (black)/ABS resin
Case : Steel color plate (black)
420(W)x97(H)x350(D) mm (16.6 (W) x 3.8 (H) x13 .8 (D) in.)
Approx. 10.3 kg (22.7 Ib.)
Power Requirements
Power Consumption
Output Power
Distortion
Frequency Response
Tone Controls
Inputs
Outputs
S/N Ratio
Usable Tape
Tape Speed
Wow and Flutter
Playing System
Finish
Dimensions
Weight
120V AC, 60Hz.
100W
30W + 30W (Stereo)
Less than 0.5% (1000 Hz at rated output on AUX 2 input)
TAPE : 50~15,000 Hz
AUX 2 : 50~20,000 Hz( ±3 dB)
BASS : 100Hz±10dB
TREBLE: 10,000 Hz ±10 dB
MIC :20 0 1mV, balanced
AUX 1 : 50k 100 mV, unbalanced
AUX 2 :600 1V, unbalanced
LINK IN (signal) :1 0k 150 mV, unbalanced
SPEAKER OUTPUT : L : 4
R :4
LINE OUTPUT : 600 1 V , unbalanced
TAPE : 50 dB (Dolby NR : OFF) AGC OFF
60 dB (Dolby NR : ON) AGC OFF
MIC :60dB
Compact cassette tapes
4.76cm/sec
Less than 0.2% (WRMS)
Auto Reverse
Front panel : Aluminium, alumite process (black)/ABS resin
Case : Steel color plate (black)
420(W) x97(H) x350(D) mm (16.6 (W) x 3.8 (H) x 13.8 (D) in.)
Approx. 8.7kg (19.2 lb.)
— 29 —

13. ACCESSORIES
BA-800
Stereo pin cord
Warranty card
Operating instructions
BA-803,806
Warranty card
Operating instructions
1
1
1
1
1
— 30 —

TOA Corporation
KOBE, JAPAN
133-12-107-60
 Loading...