

Page 1
THRUSTMASTER
S
P
®
QUICK INSTALL
U
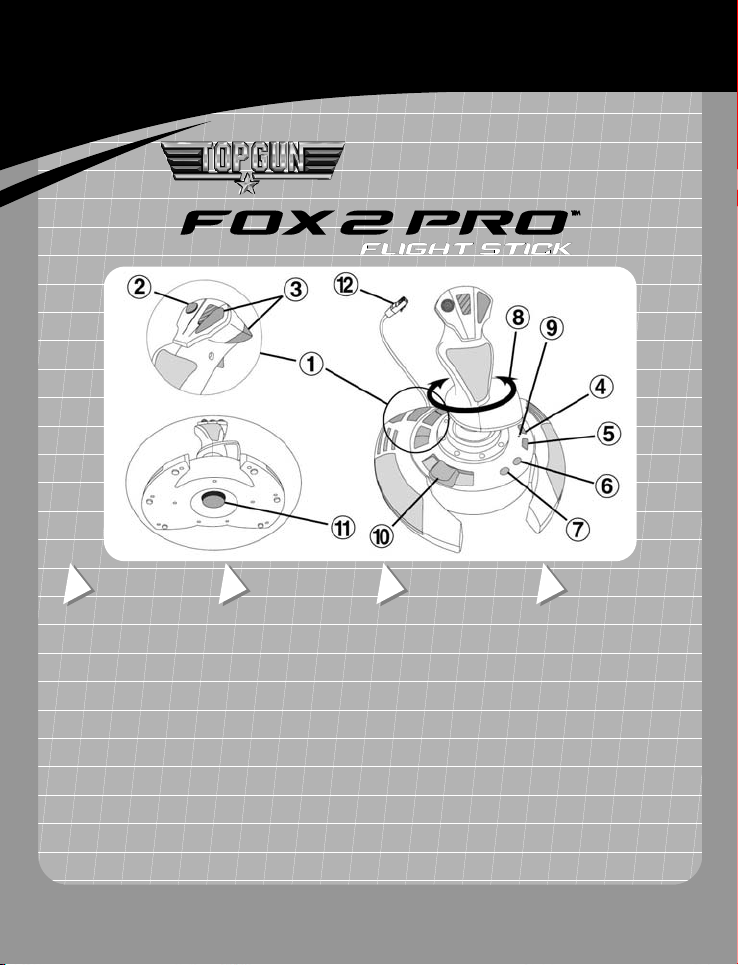
1. 8 progressive action buttons
2. 8-way hat-switch
3. 2 digital action buttons
4. Program button
5. Rumble button / Access to
Preset 3
6. Start button / Access to
Preset 2
7. Select button / Access to
Preset 1
8. Rudder: Twisting handle
with lock mechanism
9. LED
10.Throttle (Accelerate / Brake)
11.Resistance dial
12.PlayStation 2 connector
TECHNICAL
FEATURES
D
TECHNISCHE
DETAILS
1. 8 progressive Aktionstasten
2. 8-Wege Coolie-Hat
3. 2 digitale Aktionstasten
4. Programmierungstaste
5. Rumble-Taste / aktiviert
Konfiguration 3
6. Start-Taste / aktiviert
Konfiguration 2
7. Select-Taste / aktiviert
Konfiguration 1
8. Seitenruder: Drehgriff mit
Feststell-Funktion
9. LED
10.Schubregler
(Beschleunigung/Bremsen)
11.Joystick-Empfindlichkeit
12.PlayStation 2 Anschluss
E
CARACTERÍSTICAS
TÉCNICAS
1. 8 bot. de acción progres.
2. Hat-switch de 8 direcciones
3. 2 botones de acción digit.
4. Botón Program
5. Botón Rumble / Acceso a
Preset 3
6. Botón Start / Acceso a
Preset 2
7. Botón Select / Acceso a
Preset 1
8. Timón: Mango giratorio con
mecanismo de bloqueo
9. LED
10.Acelerador (Acelerar /
Frenar)
11.Rueda de resistencia
12.Conector PlayStation 2
CARACTERÍSTICAS
TÉCNICAS
1. 8 botões de acção progressiva
2. Botão-chapéu de 8 direcções
3. 2 botões de acção digitais
4. Botão Program
5. Botão Rumble / Acesso à Pré-
definição 3
6. Botão Start / Acesso à Pré-
definição 2
7. Botão Select / Acesso à Pré-
definição 1
8. Leme de direcção: Manípulo
giratório com mecanismo de
bloqueio
9. LED
10.Manete de potência (Acelerar /
Travar)
11.Indicador de resistência
12.Conector da PlayStation 2
Page 2
U
S
A
P
A
A
PRESET AND DEFAULT CONFIGURATIONS
To match the different game configurations, the flight stick comes with a default configuration and 3 preset configurations.
Default settings: LED is off, all buttons and axes are in default mapping.
Preset configurations: Some games use different controls, especially for throttle and rudder.
D
VOREINSTELLUND UND GRUND-KONFIGURATION
Um den unterschiedlichen Spielkonfigurationen gerecht zu werden, besitzt der Flight Stick neben der Grundkonfiguration noch drei
voreingestellte Konfigurationen.
Grundkonfiguration: LED aus, alle Tasten und Achsen in Grund-einstellung.
Voreinstellung: Einige Spiele verwenden andere Einstellungen, insbesondere für Schub und Ruder.
E
CONFIGURACIONES PREDEFINIDAS Y POR DEFECTO
Para ajustarse a las distintas configuraciones de los juegos, el flight stick incluye una configuración por defecto y 3 configuraciones
predefinidas.
Valores por defecto: LED está apagado, todos los botones y ejes tienen el mapeado por defecto.
Configuraciones por defecto: Algunos juegos utilizan controles diferentes, especialmente para el acelerador y el timón.
CONFIGURAÇÕES PRÉ-DEFINIDAS E PADRÃO
A fim de atender às várias definições do jogo, a manche traz 1 configuração padrão e 3 pré-definidas.
Definições padrões: LED apagado, todos os botões e eixos no mapeamento padrão.
Configurações pré-definidas: Alguns jogos usam controlos diferentes, em especial para a manete de potência e o leme de direcção.
- Use a configuração padrão
- Use a Pré-definição 1 se a configuração do jogo for:
- Use a Pré-definição 2 se a configuração do jogo for:
- Use a Pré-definição 3 se a configuração do jogo for:
- Use default configuration
if game configuration is:
- Use Preset 1 if game configuration is:
- Use Preset 2 if game configuration is:
- Use Preset 3 if game configuration is:
- Verwenden Sie diese Einstellung
bei folgender Spielkonfiguration:
- Konfiguration 1 für folgende Einstellungen:
- Konfiguration 2 für folgende Einstellungen:
- Konfiguration 3 für folgende Einstellungen:
- Usa configuración por defecto
si la del juego es:
- Utiliza Preset 1 si la configuración del juego es:
- Utiliza Preset 2 si la configuración del juego es:
- Utiliza Preset 3 si la configuración del juego es:
se a configuração do jogo for:
Control Button
Accelerate / Brake R2 / L2
Rudder R1 / L1
ccelerate / Brake R1 / L1
Rudder R2 / L2
Accelerate / Brake R2 / L2
Rudder Right mini-stick
Accelerate / Brake Cross / Square
Rudder R2 / L2
Steuerung Taste
Beschleunigen / Bremsen R2 / L2
Ruder R1 / L1
Beschleunigen / Bremsen R1 / L1
Ruder R2 / L2
Beschleunigen / Bremsen R2 / L2
Ruder Rechter Ministick
Beschleunigen / Bremsen Kreuz / Quader
Ruder R2 / L2
Control Botón
Acelerar / Frenar R2 / L2
Timón
celerar / Frenar R1 / L1
Timón R2 / L2
Acelerar / Frenar R2 / L2
Timón Mini-stick Derecha
Acelerar / Frenar Cruz / Cuadrado
Timón R2 / L2
Controlo Botão
Acelerar / Travar R2 / L2
Leme de direcção R1 / L1
celerar / Travar R1 / L1
Leme de direcção R2 / L2
Acelerar / Travar R2 / L2
Leme de direcção Minialavanca direita
Accelerate / Brake Cruz / Quadrado
Leme de direcção R2 / L2
For use with PlayStation®, PlayStation® 2 & PS one™
R1 / L1
Page 3

A
U
S
P
A
A
A
A
A
BUTTON MAPPING
LL CONFIGURATIONS:
D-PAD
LL CONFIGURATIONS:
RIGHT MINI-STICK – DOWN
Right mini-stick – Left
Right mini-stick – Left
L1
Right mini-stick – Left
Right mini-stick – Right
Right mini-stick – Right
R1
Right mini-stick – Right
D
LL CONFIGURATIONS:
RIGHT MINI-STICK – UP
TASTENFUNKTION
SZUWEISUNG
Circle
Square
Square
R1
Cross
Cross
Cross
Triangle
E
Black
A
MAPEADO DE
BOTONES
Square
Circle
Circle
Circle
Triangle
Triangle
Triangle
L1
LL CONFIGURATIONS:
MAPEAMENTO
DOS BOTÕES
Default configuration
Preset 1
Preset 2
Preset 3
LEFT MINI-STICK
L1 / R1
L2 / R2
Right mini-stick – Left & Right
L2 / R2
ALL CONFIGURATIONS:
L3
LL CONFIGURATIONS:
R3
Default configuration Grundeinstellung Configuración defecto Configuração padrão
Preset Konfiguration Preset Pré-definição
Square () Quader () Cuadrado () Quadrado ()
Triangle (U) Dreieck (U) Triángulo (U) Triângulo (U)
Cross (±) Kreuz (±) Cruz (±) Cruz (±)
Circle ({) Kreis ({) Círculo ({) Círculo ({)
D-Pad D-Pad D-Pad Almofada digital
Right mini-stick – Down Rechter Ministick / Abwärts Mini-stick Derecha – Abajo Minialavanca direita – Para baixo
Right mini-stick – Up Rechter Ministick / Auf Mini-stick Derecha – Arriba Minialavanca direita – Para cima
Right mini-stick – Right Rechter Ministick / Rechts Mini-stick Derecha – Derecha Minialavanca direita – Direita
Right mini-stick – Left Rechter Ministick / Links Mini-stick Derecha – Izquierda Minialavanca direita – Esquerda
Left mini-stick Linker Ministick Mini-stick Izquierda Minialavanca esquerda
Right mini-stick – Left & Right Rechter Ministick / Links+Rechts Mini-stick Derecha – Izquierda y
All configurations Alle Konfigurationen Todas configuraciones Todas as configurações
R2 / L2
R1 / L1
R2 / L2
Cross / Square
Derecha
Minialavanca direita – Esquerda &
Direita
Für PlayStation®, PlayStation® 2 & PS one™
Page 4

U
S
P
r
t
LOADING PRESETS
Preset 1: press and hold the Program (4) button - the LED turns on green. Press the Select (7) button at the same time - the LED
turns off. Preset 1 is activated.
Preset 2: press and hold the Program (4) button - the LED turns on green. Press the Start (6) button at the same time - the LED
turns off. Preset 2 is activated.
Preset 3: press and hold the Program (4) button - the LED turns on green. Press the Rumble (5) button at the same time - the LED
turns off. Preset 3 is activated.
To return to the default configuration:
Press the Program (4) button once: the LED turns on green and turns off after 5 seconds. The default configuration is restored.
D
LADEN DER KONFIGURATIONEN
Konfiguration 1: Drücken und halten Sie die Program (4) Taste – die LED-Anzeige leuchtet grün. Drücken Sie gleichzeitig die
Select (7) Taste. Die LED-Anzeige erlischt. Konfiguration 1 ist aktiviert.
Konfiguration 2: Drücken und halten Sie die Program (4) Taste – Die LED-Anzeige leuchtet grün. Drücken Sie gleichzeitig die
Start (6) Taste. Die LED-Anzeige erlischt. Konfiguration 2 ist aktiviert.
Konfiguration 3: Drücken und halten Sie die Program (4) Taste – Die LED-Anzeige leuchtet grün. Drücken Sie gleichzeitig die
Rumble (5) Taste. Die LED-Anzeige erlischt. Konfiguration 3 ist aktiviert.
Zurück zur Grundkonfiguration:
Drücken Sie die Program (4) Taste einmal: Die LED-Anzeige leuchtet grün und erlischt nach 5 Sekunden. Die Grundkonfiguration is
wiederhergestellt.
E
CARGAR CONFIGURACIONES PREDEFINIDAS
Preset 1: mantén pulsado el botón Program (4) - el LED se vuelve verde. Pulsa el botón Select (7) al mismo tiempo - el LED se
apaga. Se activa Preset 1.
Preset 2: mantén pulsado el botón Program (4) - el LED se vuelve verde. Pulsa el botón Start (6) al mismo tiempo - el LED se apaga.
Se activa Preset 2.
Preset 3: mantén pulsado el botón Program (4) - el LED se vuelve verde. Pulsa el botón Rumble (5) al mismo tiempo - el LED se
apaga. Se activa Preset 3.
Para volver a la configuración por defecto:
Pulsa una vez el botón Program (4): el LED se pone verde y se apaga después de 5 segundos. Se restaura la configuración po
defecto.
CARREGAR PRÉ-DEFINIÇÕES
Pré-definição 1: prima e mantenha pressionado o botão Program (4) - o LED fica verde. Prima o botão Select (7) ao mesmo tempo -
o LED apaga-se. A Pré-definição 1 está activada.
Pré-definição 2: prima e mantenha pressionado o botão Program (4) - o LED fica verde. Prima o botão Start (6) ao mesmo tempo -
o LED apaga-se. A Pré-definição 2 está activada.
Pré-definição 3: prima e mantenha pressionado o botão Program (4) - o LED fica verde. Prima o botão Rumble (5) ao mesmo
tempo - o LED apaga-se. A Pré-definição 3 está activada.
Para regressar à configuração padrão:
Prima o botão Program (4) uma vez: o LED fica verde e apaga-se ao fim de 5 segundos. A configuração padrão é reposta.
Para utilizar con PlayStation®, PlayStation® 2 & PS one™
Page 5

U
S
t
A
r
r
A
r
P
CHANGING RUMBLE SETTING
Rumble button: sets the degree of vibration for the motor. By default, Rumble is 100% and the LED is off. To change the defaul
setting:
1. Press the Program (4) button once: the LED flickers red (Rumble = 50%).
2. Press twice the Program (4) button: the LED turns on red (Rumble = off).
3. Press once more the Program (4) button: the red LED turns off (Rumble = 100%).
© Guillemot Corporation 2001. Thrustmaster® is a registered trademark of Guillemot Corporation S.A. © 2001 Paramount Pictures.
PlayStation®, PS one™ and the PlayStation® symbols are trademarks and/or registered trademarks of Sony Computer Entertainment, Inc.
rights reserved. All other nationally and internationally recognized trademarks and brand names are hereby acknowledged. Photos not binding.
Contents, designs and specifications are subject to change without notice and may vary from one country to another.
D
ÄNDERUNG DER RUMBLE-EINSTELLUNGEN
Rumble Taste: Einstellung der Vibrationsstärke. Die Rumble-Grundeinstellung ist 100%. LED-Anzeige ist aus. Zur Änderung de
Einstellung gehen Sie folgendermaßen vor:
1. Drücken Sie die Program (4) Taste einmal: Die LED-Anzeige blinkt rot (Vibration = 50%).
2. Drücken Sie die Program (4) Taste zweimal: Die LED-Anzeige leuchtet rot (Vibration = aus).
3. Drücken Sie die Program (4) Taste ein weiteres Mal: Die LED-Anzeige erlischt (Vibration = 100%).
© Guillemot Corporation 2001. Thrustmaster® ist ein eingetragenes Warenzeichen der Guillemot Corporation S.A. © 2001 Paramount Pictures.
PlayStation®, PS one™ und die PlayStation® Symbole sind Warenzeichen und/oder eingetragene Warenzeichen der Sony Compute
Entertainment, Inc. Alle Rechte vorbehalten. Alle anderen nationalen und internationalen Warenzeichen und Namen werden hiermit anerkannt.
bbildungen sind unverbindlich. Inhalt, Design und technische Angaben können je nach Land variieren. Änderungen sind vorbehalten und
bedürfen keiner besonderen Benachrichtigung.
E
CAMBIAR CONFIGURACIÓN DE VIBRACIÓN
Botón Rumble: ajusta el nivel de vibración del motor. Por defecto, Rumble está al 100% y el LED está apagado. Para cambiar la
configuración por defecto:
1. Pulsa una vez el botón Program (4): el LED parpadea en rojo (Rumble = 50%).
2. Pulsa dos veces el botón Program (4): el LED se vuelve rojo (Rumble = off).
3. Pulsa una vez más el botón Program (4): el LED rojo se apaga (Rumble = 100%).
© Guillemot Corporation 2001. Thrustmaster® es una marca comercial registrada de Guillemot Corporation S.A. © 2001 Paramount Pictures.
PlayStation®, PS one™ y los símbolos de PlayStation® son marcas comerciales y/o marcas comerciales registradas de Sony Compute
Entertainment, Inc. Reservados todos los derechos. Todas las demás marcas comerciales y nombres de marca reconocidos nacional e
internacionalmente también se reconocen aquí. Fotos no vinculantes. Los contenidos, diseños y especificaciones están sujetos a cambios sin
previo aviso y pueden variar de un país a otro.
ll
MUDAR A DEFINIÇÃO RUMBLE
Botão Rumble: define o grau de vibração para o motor. Normalmente, Rumble está definido a 100% e o LED encontra-se apagado.
Para mudar a definição padrão:
1. Prima o botão Program (4) uma vez: o LED pisca a vermelho (Rumble = 50%).
2. Prima duas vezes o botão Program (4): o LED fica vermelho (Rumble = desactivado).
3. Prima mais uma vez o botão Program (4): o LED vermelho apaga-se (Rumble = 100%).
© Guillemot Corporation 2001. Thrustmaster® é uma marca registada da Guillemot Corporation S.A. © 2001 Paramount Pictures. PlayStation®,
PS one™ e os símbolos PlayStation® são marcas comerciais e/ou marcas registadas da Sony Computer Entertainment, Inc. Reservados todos
os direitos. Todas as outras marcas comerciais e nomes de marcas reconhecidas nacional e internacionalmente são por este meio aceites. As
fotografias não são vinculativas. Os conteúdos, desenhos e especificações estão sujeitos a alteração sem aviso prévio, e poderão variar dum
país para outro.
Para a PlayStation®, PlayStation® 2 & PS one™
 Loading...