

Page 1

- USER MANUAL
- MANUEL DE L’UTILISATEUR
- BENUTZERHANDBUCH
- HANDLEIDING
- MANUALE D’USO
- MANUAL DEL USUARIO
- MANUAL DO UTILIZADOR
-
УКЦИЯ ПО ЭКСПЛУАТАЦИИ
ИНСТР
- ΕΓΧΕΙΡΙΔΙΟ ΧΡΗΣΗΣ
- KULLANIM KILAVUZU
- INSTRUKCJA OBSŁUGI
Ferrari Challenge wheel
Compatible/Kompatibel
PC / PS3
™
Page 2

1/10
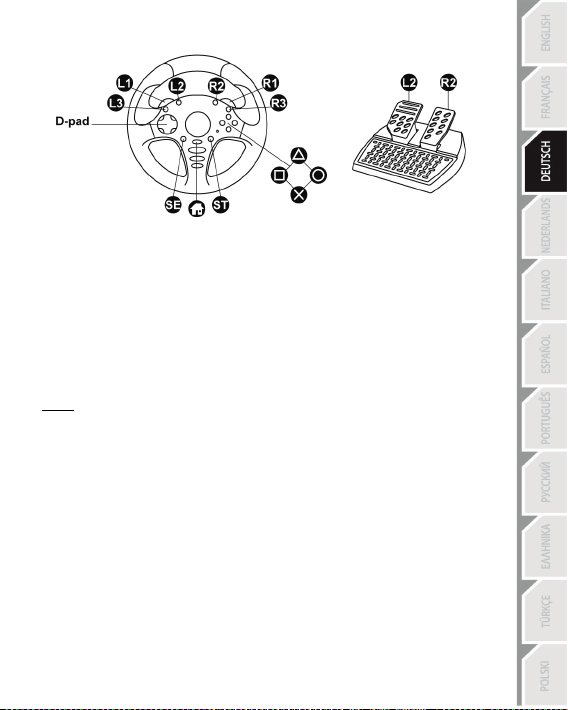
1 D-Pad
(Select and Start/Programming)
7 USB connector (for PC and PS3)
For: PlayStation®3 / PC
User manual
TECHNICAL FEATURES
2 2 Up & Down paddle shifters
3 Action buttons
4 PS button for PS3
5 LED
6 SE and ST buttons
8 Wheel’s RJ45 port
9 PS3/PC switch
10 Pedal set’s RJ45 connector
11 Table/desk mounting system
Page 3

2/10
INSTALLING THE WHEEL
Fixing the wheel in place (11)
1. Place the wheel on the edge of a table or other flat surface.
2. Insert the shorter end of the threaded rod into the opening at the base of the wheel.
3. Slide the V-shaped piece onto the threaded rod, so that the jaws of the V clamp against
the underside of the table.
4. Place the tightening screw onto the threaded rod, and tighten everything together until
the wheel is perfectly stable. Be sure not to over-tighten the screw, as you risk
damaging the mounting system and/or the table.
Connecting the pedal set
Connect the pedal set’s RJ45 connector (10) to the wheel’s RJ45 port (8).
Always connect the pedal set to the wheel before
plugging in the wheel's USB connector (7) or starting a game!
Calibration of the wheel and pedal set
Calibration is carried out automatically.
Always make sure that the wheel is centered, and be sure not to press on the pedals,
when plugging in the wheel’s USB connector (7) or when starting a game!
For safety reasons, never use the pedal set with bare feet or while wearing only
socks on your feet.
THRUSTMASTER® DISCLAIMS ALL RESPONSIBILITY IN THE EVENT OF INJURY
RESULTING FROM USE OF THE PEDAL SET WITHOUT SHOES.
Page 4

3/10
PLAYSTATION®3
Installing the wheel on PlayStation®3
1. Set the PS3/PC switch (9) (on the back of the wheel) to the PS3 position.
2. Plug the wheel’s USB connector (7) into USB port 1 on the console.
3. Switch on your console.
4. Start your game.
You are now ready to play!
Important notes regarding PlayStation®3
- The wheel’s PS3/PC switch (9) must always be set to the PS3 position before
connecting the wheel.
- The wheel emulates the PS3 gamepad controller (go to Options / Controller /
Gamepads to modify the configuration).
- In 1 player mode: if your official PS3 gamepad controller is powered on, you must switch
it to controller port 2 in order for your wheel to be functional.
- Don’t hesitate to test out your wheel’s 2 sensitivity modes, to optimize its precision.
Page 5

4/10
PC
Installing the wheel on PC
1. Set the PS3/PC switch (9) (on the back of the wheel) to the PC position.
2. Plug the wheel’s USB connector (7) into one of your computer’s USB ports.
Windows® XP, Vista, 7 or 8 will automatically detect the new device.
3. In the Windows Game Controllers window and in games, the wheel will be detected
under the name FGT Rumble 3-in-1 or Ferrari GT Experience.
You are now ready to play!
Important notes regarding PC
- The wheel’s PS3/PC switch (9) must always be set to the PC position before connecting
the wheel.
- Advanced programming software for PC is also available for download from our website,
at the following address: http://ts.thrustmaster.com/ (under Updates and
Downloads/PC/Wheels/Challenge PS3 PC/Drivers). The Test Forces tab (in the
advanced programming software) is not compatible with this wheel.
Page 6

5/10
Action
LED (5)
Simultaneously press and release:
the D-Pad (1) + the 2 Up & Down paddle shifters (2).
Action
LED (5)
Simultaneously press and release:
the D-Pad (1) + the 2 Up & Down paddle shifters (2).
Steps
Action
LED (5) 1 Simultaneously press and release: SE + ST (6).
OFF
FLASHES
QUICKLY
Press and release the button or pedal on which you want
to place your function.
ADVANCED FUNCTIONS
ADJUSTING THE WHEEL’S SENSITIVITY
Your wheel’s steering features 2 sensitivity modes:
- Normal sensitivity (the default mode)
- High sensitivity (must be selected)
• To switch to High sensitivity mode:
FLASHES SLOWLY
(This procedure must be carried out following every restart or disconnection of your wheel)
Your wheel’s steering has now returned to Normal sensitivity (the default mode).
PROGRAMMING THE WHEEL AND THE PEDALS
Your wheel is fully programmable:
- All action buttons can be swapped.
- All buttons can be programmed onto the paddle shifters or onto the pedals.
• Examples of possible uses:
- On PS3, programming L2/R2 or L3/R3 onto the 2 Up & Down paddle shifters (L1/R1).
- On PS3, programming the Cross/Square buttons onto the pedals (L2/R2 by default).
- Switching different buttons for greater accessibility.
2 Press and release the button to program.
3
(This procedure must be carried out following every restart or disconnection of your wheel)
Your wheel’s steering is now more sensitive.
• To return to Normal sensitivity mode (the default mode):
DOES NOT FLASH
• Programming procedure:
Your programming has now been carried out.
ON
Page 7

6/10
Action
LED (5)
TURNS OFF AND
ON AGAIN
PEDAL SET MODE
LED (5)
SEPARATE (default mode: recommended)
RED
COMBINED
GREEN
Separate pedals
(default mode)
Combined pedals
(must be selected)
controller’s right mini-stick
• Erasing your programming:
Press and hold down for 2 seconds: SE + ST (6).
THEN COMES BACK
Your programming has now been erased.
CONFIGURING THE PEDAL SET
By default, your wheel’s gas and brake pedals function in Separate mode, meaning that the
pedals function on independent axes.
This mode allows you to considerably improve your driving precision.
If your game does not support Separate mode, your wheel's pedal set will not function
properly. You will then have to switch to Combined mode.
• Pedal set mode changing procedure:
Simultaneously press and release: the 2 pedals + the PS button (4).
(This procedure must be carried out following every restart or disconnection of your wheel)
• Setup of pedals on PLAYSTATION®3:
- Gas = R2 trigger
on the PS3 controller
- Brake = L2 trigger
on the PS3 controller
- Gas = Up direction on the PS3
controller’s right mini-stick
- Brake = Down direction on the PS3
Page 8

7/10
Separate pedals
(default mode)
Combined pedals
(must be selected)
- Brake = Down direction on RZ axis
• Setup of pedals on PC:
- Gas = RZ axis
- Brake = Y axis
- Gas = Up direction on RZ axis
TROUBLESHOOTING AND WARNING
• My wheel is not functioning correctly or seems improperly calibrated:
- Switch off your PC or your PS3, verify that the PS3/PC switch (9) is in the proper position,
completely disconnect your wheel and all cables, reconnect everything and then restart
your game.
- Never move the wheel or the pedals when connecting your wheel, in order to avoid any
calibration problems.
• My pedal set is not functioning correctly:
- Always connect the pedal set to the wheel (10/8) before connecting the wheel's USB
connector (7).
- Reconfigure your wheel in your game's controller options.
• I can't configure my wheel:
- On PS3, in your game’s Options / Controller / Gamepads menu: select the most
appropriate configuration.
- On PC, in your game’s Options / Controller / Wheels menu: select the most appropriate
configuration.
- You can also use your wheel’s programming function to resolve this type of problem.
• On PC, the menus in my game are scrolling by themselves:
- Exit the game and switch the pedal set to Combined mode (2 axes). Then return to your
game to reconfigure the wheel with the new axes.
• My wheel's steering is not responsive enough:
- Switch your wheel to High sensitivity mode.
- Adjust the sensitivity in your game’s options.
• On PC: in some games, use the pre-existing presets for FGT Rumble 3-in-1 or
Ferrari GT Experience.
Page 9

8/10
Monday to Friday from 9 a.m. to 8 p.m.
(Pacific Standard Time)
Monday to Friday from 9 a.m. to 8 p.m.
(Pacific Standard Time)
TECHNICAL SUPPORT
If you encounter a problem with your product, please go to http://ts.thrustmaster.c om and click Technical
Support. From there you will be able to access various utilities (Frequently Asked Questions (FAQ), the
latest versions of drivers and software) that may help to resolve your problem. If the problem persists, you
can contact the Thrustmaster products technical support service (“Technical Support”):
By email:
In order to take advantage of technical support by email, you must first register online. The information you
provide will help the agents to resolve your problem more quickly. Click Registration on the left-hand side
of the Technical Support page and follow the on-screen instructions. If you have already registered, fill in
the Username and Password fields and then click Login.
By telephone (if you do not have Internet access):
Days and hours of operation and telephone numbers are subject to change. Please visit
http://ts.thrus tmaster.com for the most up-to-date Technical Support contact information.
United Kingdom
United States
08450800942
Charged at local rate
1-866-889-5036
Free
Monday to Friday from 8 a.m. to 7 p.m.
(Eastern Standard Time)
Monday to Friday from 6 a.m. to 5 p.m.
Canada
Denmark
Sweden
Finland
Consumer warranty information
Worldwide, Guillemot Corporation S.A. (hereinafter “Guillemot”) warrants to the consumer that this
Thrustmaster product shall be free from defects in materials and workmanship, for a warranty period which
corresponds to the time limit to bring an action for conformity with respect to this product. In the countries of
the European Union, this corresponds to a period of two (2) years from delivery of the Thrustmaster
product. In other countries, the warranty period corresponds to the time limit to bring an action for
conformity with respect to the Thrustmaster product according to applicable laws of the country in which the
consumer was domiciled on the date of purchase of the Thrustmaster product (if no such action exists in
the corresponding country, then the warranty period shall be one (1) year from the original date of purchase
of the Thrustmaster product).
1-866-889-2181
Free
80887690
Free
0200884567
Free
0800 913060
Free
(Eastern Standard Time)
Monday to Friday from 6 a.m. to 5 p.m.
Monday to Friday from 9 a.m. to 8 p.m.
(English)
Monday to Friday from 9 a.m. to 8 p.m.
(English)
Monday to Friday from 10 a.m. to 9 p.m.
(English)
Page 10

9/10
Notwithstanding the above, rechargeable batteries are covered by a warranty period of six (6) months from
the date of original purchase.
Should the product appear to be defective during the warranty period, immediately contact Technical
Support, who will indicate the procedure to follow. If the defect is confirmed, the product must be returned
to its place of purchase (or any other location indicated by Technical Support).
Within the context of this warranty, the consumer’s defective product shall, at Technical Support’s option,
be either repaired or replaced. If permitted under applicable law, the full liability of Guillemot and its
subsidiaries (including for consequential damages) is limited to the repair or replacement of the
Thrustmaster product. If permitted under applicable law, Guillemot disclaims all warranties of
merchantability or fitness for a particular purpose. The consumer’s legal rights with respect to laws
applicable to the sale of consumer goods are not affected by this warranty.
This warranty shall not apply: (1) if the product has been modified, opened, altered, or has suffered
damage as a result of inappropriate or abusive use, negligence, an accident, normal wear, or any other
cause unrelated to a material or manufacturing defect (including, but not limited to, combining the
Thrustmaster product with any unsuitable element, including in particular power supplies, rechargeable
batteries, chargers, or any other elements not supplied by Guillemot for this product); (2) in the event of
failure to comply with the instructions provided by Technical Support; (3) to software, said software being
subject to a specific warranty; (4) to consumables (elements to be replaced over the product’s lifespan:
disposable batteries, audio headset or headphone ear pads, for example); (5) to accessories (cables,
cases, pouches, bags, wrist-straps, for example); (6) if the product was sold at public auction.
This warranty is nontransferable.
Additional warranty provisions
In the United States of America and in Canada, this warranty is limited to the product’s internal mechanism
and external housing. In no event shall Guillemot or its affiliates be held liable to any third party for any
consequential or incidental damages resulting from the breach of any express or implied warranties. Some
States/Provinces do not allow limitation on how long an implied warranty lasts or exclusion or limitation of
liability for consequential or incidental damages, so the above limitations or exclusions may not apply to
you. This warranty gives you specific legal rights, and you may also have other rights which vary from State
to State or Province to Province.
Liability
If permitted under applicable law, Guillemot Corporation S.A. (hereinafter “Guillemot”) and its subsidiaries
disclaim all liability for any damages caused by one or more of the following: (1) the product has been
modified, opened or altered; (2) failure to comply with assembly instructions; (3) inappropriate or abusive
use, negligence, an accident (an impact, for example); (4) normal wear. If permitted under applicable law,
Guillemot and its subsidiaries disclaim all liability for any damages unrelated to a material or manufacturing
defect with respect to the product (including, but not limited to, any damages caused directly or indirectly by
any software, or by combining the Thrustmaster product with any unsuitable element, including in particular
power supplies, rechargeable batteries, chargers, or any other elements not supplied by Guillemot for this
product).
Page 11

10/10
FCC STATEMENT
1. This device complies with Part 15 of the FCC Rules. Operation is subject to the following two
conditions:
(1) This device may not cause harmful interference, and
(2) This device must accept any interference received, including interference that may
cause undesired operation.
2. Changes or modifications not expressly approved by the party responsible for compliance
could void the user's authority to operate the equipment.
COPYRIGHT
© 2014 Guillemot Corporation S.A. All rights reserved. Thrustmaster® is a registered
trademark of Guillemot Corporation S.A. Ferrari® is a registered trademark of Ferrari S.p.A.
PlayStation® is a registered trademark of Sony Computer Entertainment, Inc. Windows® is
a registered trademark of Microsoft Corporation in the United States and/or in other
countries. All other trademarks and brand names are hereby acknowledged and are the
property of their respective owners. Illustrations not binding. Contents, designs and
specifications are subject to change without notice and may vary from one country to
another. Made in China.
ENVIRONMENTAL PROTECTION RECOMMENDATION
At the end of its working life, this product should not be disposed of with
standard household waste, but rather dropped off at a collection point for
the disposal of Waste Electrical and Electronic Equipment (WEEE) for
recycling.
This is confirmed by the symbol found on the product, user manual or
packaging.
Depending on their characteristics, the materials may be recycled.
Through recycling and other forms of processing Waste Electrical and Electronic Equipment,
you can make a significant contribution towards helping to protect the environment.
Please contact your local authorities for information on the collection point near est you.
Retain this information. Colours and decorations may vary.
This product conforms to all standards regarding children 14 years of age and older. This
product is not suitable for use by children less than 14 years of age.
www.thrustmaster.com
Page 12

1/10
1 D-Pad
(Select et Start / Programmation)
7 Connecteur USB (pour PC et PS3)
Pour : PlayStation®3 / PC
Manuel de l'utilisateur
CARACTÉRISTIQUES TECHNIQUES
2 2 leviers de vitesses Up & Down
3 Boutons d’action
4 Bouton PS pour PS3
5 LED
6 Boutons SE et ST
8 Connecteur femelle du volant
9 Interrupteur PC ou PS3
10 Connecteur mâle RJ45 du pédalier
11 Système de fixation à la table
Page 13

2/10
INSTALLATION DU VOLANT
Fixer le volant (11)
1. Placez le volant au bord d’une table ou autre surface plane.
2. Introduisez l’extrémité la plus courte de la tige filetée dans l’orifice à la base du volant.
3. Faites glisser la pièce en forme de V dans la tige filetée de façon à ce que les
mâchoires du V fassent étau avec la table.
4. Placez la vis de serrage dans la tige filetée, puis vissez l’ensemble jusqu’à ce que le
volant soit parfaitement stable. Ne serrez pas trop fort la vis, car vous risquez
d’endommager le système de fixation ou la table.
Relier le pédalier
Reliez le connecteur mâle du pédalier (10) au connecteur femelle du volant (8)
Reliez toujours le pédalier au volant avant de brancher le connec teur USB (7) ou de lancer un jeu !
Calibration du volant ou du pédalier
La calibration est automatique.
Le volant doit toujours être centré et vous ne devez pas appuyer sur les pédales lorsque vous
branchez le connecteur USB (7) ou lorsque vous lancez votre jeu !
Pour des raisons de sécurité, ne jouez pas pieds nus ou en chaussettes lorsque
vous utilisez le pédalier.
THRUSTMASTER® DECLINE TOUTE RESPONSABILITE EN CAS DE BLESSURE
SUITE A UNE UTILISATION DU PEDALIER SANS CHAUSSURES.
Page 14

3/10
PLAYSTATION®3
Installation sur PlayStation®3
1. Positionnez l’interrupteur PC/PS3 (9), situé à l’arrière de votre volant, en position PS3.
2. Branchez le connecteur USB (7) sur le port USB n°1 de la console.
3. Allumez votre console.
5. Lancez le jeu.
Vous êtes maintenant prêt à jouer !
Remarques importantes sur PlayStation®3
- L’interrupteur du volant (9) doit toujours être positionné sur PS3 avant de connecter le
volant.
- Le volant émule la manette PS3 (accédez à Options/Manette pour modifier la
configuration).
- En mode 1 Joueur, si votre manette officielle est allumée, il est alors nécessaire de
basculer celle-ci en port manette 2 afin que votre volant soit fonctionnel.
- N’hésitez pas à tester les 2 modes de sensibilité de votre volant afin d’optimiser sa précision.
Page 15

4/10
PC
Installation sur PC
1. Positionnez l’interrupteur PC/PS3 (9), situé à l’arrière de votre volant, en position PC.
2. Reliez le connecteur USB (7) à l'un des ports USB de votre unité centrale.
Windows® XP, Vista, 7 ou 8 détectera automatiquement le nouveau périphérique.
3. Dans la fenêtre Contrôleurs de jeu Windows et dans les jeux, le volant est détecté sous
le nom FGT Rumble 3-in-1 ou Ferrari GT Experience.
Vous êtes maintenant prêt à jouer !
Remarques importantes sur PC
- L’interrupteur du volant (9) doit toujours être positionné sur PC avant de connecter le
volant.
- Un Logiciel de Programmation Avancée pour PC est également disponible en
téléchargement sur notre site Internet à cette adresse : http://ts.thrustmaster.com/ dans
la rubrique PC / Volant / Challenge PS3 PC / Pilotes. L’onglet Tester les forces
(du Logiciel de Programmation Avancée) n’est pas compatible avec ce volant.
Page 16

5/10
Action
LED (5)
Appuyez simultanément et relâchez :
le D-Pad (1) + les 2 leviers UP et DOWN (2)
Action
LED (5)
Appuyez simultanément et relâchez :
le D-Pad (1) + les 2 leviers UP et DOWN (2)
Etapes
Action
LED (5)
1
Appuyez simultanément et relâchez : SE + ST (6)
ETEINT
CLIGNOTE
RAPIDEMENT
Pressez et relâchez le bouton ou la pédale
fonction.
FONCTIONS AVANCEES
REGLAGE DE LA SENSIBILITE DU VOLANT
La direction de votre volant possède 2 modes de sensibilité :
- Sensibilité Normale (mode par défaut)
- Sensibilité Haute (nécessite un paramétrage)
•Paramétrage en mode Sensibilité Haute :
CLIGNOTE LENTEMENT
(cette opération doit être effectuée à chaque redémarrage ou déconnexion de votre volant)
La direction de votre volant est revenue en sensibilité normale (qui est le mode par défaut)
PROGRAMMATION DU VOLANT ET DES PEDALES
Votre volant est entièrement programmable :
- Tous les boutons d’action peuvent être permutés entre eux.
- Tous les boutons peuvent être programmés sur les leviers de vitesses ou sur les pédales.
• Exemples d’applications possibles :
- Sur PS3, programmer L2/R2 ou L3/R3 sur les 2 leviers de vitess es Up et Down (L1/R1).
- Sur PS3, programmer les boutons Croix/Carré sur les pédales (L2/R2 par défaut).
- Inverser différents boutons pour plus d’accessibilité.
La direction de votre volant est désormais plus sensible.
• Paramétrage en mode Sensibilité Normale (mode par défaut) :
NE CLIGNOTE PAS
• Procédure de programmation
2 Pressez et relâchez le bouton à programmer.
3
sur lequel/laquelle vous souhaitez placer votre
ALLUME
Votre programmation est désormais effectuée.
(cette opération doit être effectuée à chaque redémarrage ou déconnexion de votre volant)
Page 17

6/10
Action
LED (5)
Pressez et maintenez appuyé pendant 2 secondes : SE +
ST (6)
S’ETEINT ET
SE RALLUME
MODE DU PEDALIER
LED (5)
SEPARE (mode par défaut
conseillé)
COMBINE
VERTE
Pédalier Séparé (mode par
défaut)
Pédalier Combiné (nécessite un
paramétrage)
du mini-stick droit de la manette PS3
• Effacer sa programmation
Votre programmation est désormais effacée.
CONFIGURATION DU PEDALIER
Par défaut, les commandes d’accélérateur et de frein de votre volant fonctionnent en mode
Séparé, ce qui signifie que les pédales fonctionnent sur des axes indépendants.
Ce mode permet d’améliorer considérablement la précision de votre pilotage.
Si votre jeu ne supporte pas le mode Séparé, le pédalier de votre volant ne fonctionnera
pas correctement. Vous devez alors activer le mode Combiné.
• Procédure de changement de mode du pédalier :
Appuyez simultanément et relâchez : les 2 pédales + le bouton PS (4)
(cette opération doit être effectuée à chaque redémarrage ou déconnexion de votre volant)
ROUGE
• Paramétrage du pédalier sur PLAYSTATION®3
- Accélérateur = Gâchette R2
de la manette PS3
- Frein = Gâchette L2
de la manette PS3
- Accélérateur = Direction Haut
du mini-stick droit de la manette PS3
- Frein = Direction Bas
Page 18

7/10
Pédalier Séparé (mode par
défaut)
Pédalier Combiné (nécessite un
paramétrage)
- Frein = Axe Y
RZ
- Frein = Direction Bas de l’Axe RZ
• Paramétrage du pédalier sur PC
-
Accélérateur = Axe RZ
- Accélérateur = Direction Haut de l’Axe
DEPANNAGE ET AVERTISSEMENT
• Mon volant ne fonctionne pas correctement ou semble mal calibré :
- Eteignez votre PC ou votre PS3, vérifiez la bonne position de l’interrupteur PC/PS3 (9),
déconnectez entièrement votre volant et tous les câbles, rebranchez et relancez votre jeu.
- Ne bougez jamais le volant et les pédales lorsque vous branchez votre volant, afin
d’éviter tout problème de calibration.
• Mon pédalier ne fonctionne pas correctement :
- Branchez toujours le pédalier sur le volant (10/8) avant de brancher le connecteur USB
(7) du volant.
- Reconfigurez votre volant dans les options contrôleur de votre jeu.
• Je n’arrive pas à configurer mon volant :
- Sur PS3, dans le menu Options / Contrôleur / Manettes de votre jeu : choisissez la
configuration la plus appropriée.
- Sur PC, dans le menu Options / Contrôleur / Volants de votre jeu : choisissez la
configuration la plus appropriée.
- Vous pouvez également utiliser la fonction programmation de votre volant pour résoudre
ce type de problème.
• Sur PC, les menus de mon jeu défilent tout seul :
- Quittez le jeu et basculez le pédalier en mode Combiné (2 axes). Retournez ensuite dans
votre jeu pour reconfigurer le volant avec les nouveaux axes.
• La direction de mon volant n’est pas assez réactive :
- Basculez votre volant en mode sensibilité Haute.
- Ajustez la sensibilité dans les options de votre jeu.
• Sur PC, dans certains jeux, utilisez les profils du FGT Rumble 3-in-1 ou du Ferrari
GT Experience préexistants.
Page 19

8/10
SUPPORT TECHNIQUE
Si vous rencontrez un problème avec votre produit, rendez-vous sur le site http://ts.thr ustmaster.com et
cliquez sur Support Technique. Vous aurez alors accès à différents services (Foire Aux Questions (FAQ),
dernières versions des pilotes et logiciels) susceptibles de résoudre votre problème. Si le problème
persiste, vous pouvez contacter le support technique des produits Thrustmaster (« Support Technique ») :
Par e-mail :
Pour bénéficier du support technique par e-mail, vous devez d’abord vous enregistrer en ligne. Les
informations fournies vont permettre aux techniciens de résoudre plus rapidement votre problème. Cliquez
sur Enregistrement à gauche de la page Support technique et suivez les instructions à l’écran. Si vous êtes
déjà enregistré, renseignez les champs Nom d’utilisateur et Mot de passe puis cliquez sur Connexion .
Par téléphone (si vous n’avez pas d’accès Internet) :
Jours, horaires et numéros de téléphone susceptibles de changer. Veuillez consulter
http://ts.thrus tmaster.com pour obtenir une liste à jour.
Canada
France
Suisse
Belgique
Luxembourg
1-866-889-2181
Gratuit
02 99 93 21 33
Numéro fixe France Telecom non
surtaxé.
Tarif selon opérateur
0842 000 022
Tarif d’une communication locale
078 16 60 56
Tarif d’une communication
nationale
80028612
Gratuit
Du lundi au vendredi de 7h à 14h
(Heure de l’Est)
Du lundi au vendredi de 4h à 11h
(Heure du Pacifique)
Du lundi au vendredi de 9h à 20h
Du lundi au vendredi de 9h à 20h
Du lundi au vendredi de 9h à 20h
Du lundi au vendredi de 9h à 20h
Informations relatives à la garantie aux consommateurs
Dans le monde entier, Guillemot Corporation S.A. (ci-après « Guillemot ») garantit au consommateur que
le présent produit Thrustmaster est exempt de défaut matériel et de vice de fabrication, et ce, pour une
période de garantie qui correspond au délai pour intenter une action en conformité de ce produit. Dans les
pays de l’Union Européenne, ce délai est de deux (2) ans à compter de la délivrance du produit
Thrustmaster. Dans les autres pays, la durée de la période de garantie correspond au délai pour intenter
une action en conformité du produit Thrustmaster selon la législation en vigueur dans le pays où le
consommateur avait son domicile lors de l’achat du produit Thrustmaster (si une telle action en conformité
n’existe pas dans ce pays alors la période de garantie est de un (1) an à compter de la date d’achat
d’origine du produit Thrustmaster).
Page 20

9/10
Nonobstant ce qui précède, les batteries sont garanties six (6) mois à compter de la date d’achat d’origine.
Si, au cours de la période de garantie, le produit semble défectueux, contactez immédiatement le Support
Technique qui vous indiquera la procédure à suivre. Si le défaut est confirmé, le produit devra être
retourné à son lieu d’achat (ou tout autre lieu indiqué par le Support Technique).
Dans le cadre de la garantie, le consommateur bénéficiera, au choix du Support Technique, du
remplacement ou de la réparation du produit défectueux. Lorsque la loi applicable l’autorise, toute
responsabilité de Guillemot et ses filiales (y compris pour les dommages indirects) se limite à la réparation
ou au remplacement du produit Thrustmaster. Lorsque la loi applicable l’autorise, Guillemot exclut toutes
garanties de qualité marchande ou d’adaptation à un usage particulier. Les droits légaux du
consommateur au titre de la législation applicable à la vente de biens de consommation ne sont pas
affectés par la présente garantie.
Cette garantie ne s’appliquera pas : (1) si le produit a été modifié, ouvert, altéré, ou a subi des dommages
résultant d’une utilisation inappropriée ou abusive, d’une négligence, d’un accident, de l’usure normale, ou
de toute autre cause non liée à un défaut matériel ou à un vice de fabrication (y compris, mais non
limitativement, une combinaison du produit Thrustmaster avec tout élément inadapté, notamment
alimentations électriques, batteries, chargeurs, ou tous autres éléments non-fournis par Guillemot pour ce
produit) ; (2) en cas de non respect des instructions du Support Technique ; (3) aux logiciels, lesdits
logiciels faisant l’objet d’une garantie spécifique ; (4) aux consommables (éléments à remplacer pendant la
durée de vie du produit : piles, coussinets de casque audio, par exemple) ; (5) aux accessoires (câbles,
étuis, housses, sacs, dragonnes, par exemple) ; (6) si le produit a été vendu aux enchères publiques.
Cette garantie n’est pas transférable.
Stipulations additionnelles à la garantie
Aux États-Unis d’Amérique et au Canada, cette garantie est limitée au mécanisme interne et au boîtier
externe du produit. En aucun cas, Guillemot ou ses sociétés affiliées ne sauraient être tenues
responsables envers qui que ce soit de tous dommages indirects ou dommages accessoires résultant du
non respect des garanties expresses ou implicites. Certains États/Provinces n’autorisent pas la limitation
sur la durée d’une garantie implicite, ou l’exclusion ou la limitation de responsabilité pour les dommages
indirects ou accessoires, de sorte que les limitations ou exclusions ci-dessus peuvent ne pas vous être
applicables. Cette garantie vous confère des droits spécifiques ; vous pouvez également bénéficier
d’autres droits qui peuvent différer d’un État/Province à l’autre.
Responsabilité
Lorsque la loi applicable l’autorise, Guillemot Corporation S.A. (ci-après « Guillemot ») et ses filiales
excluent toute responsabilité pour tous dommages causés par un ou plusieurs des faits suivants: (1) le
produit a été modifié, ouvert, altéré, (2) l’irrespect des instructions de montage, (3) l’utilisation inappropriée
ou abusive, la négligence, l’accident (un choc, par exemple), (4) l’usure normale du produit. Lorsque la loi
applicable l’autorise, Guillemot et ses filiales excluent toute responsabilité pour tout dommage dont la
cause n’est pas liée à un défaut matériel ou à un vice de fabrication du produit (y compris, mais non
limitativement, tout dommage causé directement ou indirectement par tout logiciel, ou par une
combinaison du produit Thrustmaster avec tout élément inadapté, notamment alimentations électriques,
batteries, chargeurs, ou tous autres éléments non-fournis par Guillemot pour ce produit).
Page 21

10/10
COPYRIGHT
© 2014 Guillemot Corporation S.A. Tous droits réservés. Thrustmaster
de Guillemot Corporation S.A. Ferrari
une marque déposée de Sony Computer Entertainment Inc. Windows® est une marque déposée
de Microsoft Corporation aux Etats-Unis et/ou dans d’autres pays. Toutes les autres marques
déposées et noms commerciaux sont reconnus par les présentes et sont la propriété de leurs
propriétaires respectifs. Illustrations non contractuelles. Le contenu, la conception et les
spécifications sont susceptibles de changer sans préavis et de varier selon les pays. Fabriqué en
Chine.
RECOMMANDATION RELATIVE A LA PROTECTION DE L’ENVIRONNEMENT
significative à la protection de l’environnement. Veuillez consulter les autorités locales qui vous
indiqueront le point de collecte concerné.
Informations à conserver. Les couleurs et décorations peuvent varier.
Ce produit est en conformité avec l’ensemble des normes relatives aux enfants de plus de 14 ans.
Il ne convient pas aux enfants de moins de 14 ans.
www.thrustmaster.com
En fin de vie, ce produit ne doit pas être éliminé avec les déchets ménagers
normaux mais déposé à un point de collecte des déchets d'équipements
électriques et électroniques en vue de son recyclage.
Ceci est confirmé par le symbole figurant sur le produit, le manuel utilisateur
ou l’emballage.
En fonction de leurs caractéristiques, les matériaux peuvent être recyclés. Par
le recyclage et par les autres formes de valorisation des déchets
d'équipements électriques et électroniques, vous contribuez de manière
®
est une marque déposée de Ferrari S.p.A. PlayStation® est
®
est une marque déposée
Page 22

1/10
1 D-Pad
(Select und Start/Programmierung)
7 USB-Stecker (für PC und PS3)
Für: PlayStation®3 / PC
Benutzerhandbuch
TECHNISCHE FEATURES
2 2 paddelförmige Hoch & Runter
Schalthebel
3 Actionbuttons
4 PS Button für PS3
5 LED
6 SE und ST Buttons
8 RJ45 Port des Lenkers
9 PS3/PC Umschalter
10 RJ45-Stecker des Pedalsets
11 Tisch-
/Schreibtischbefestigungssystem
Page 23

2/10
MONTIEREN DES LENKERS
Befestigen des Lenkers am Platz (11)
1. Plazieren Sie den Lenker an der Kante eines Tisches oder einer anderen ebenen
Oberfläche.
2. Stecken Sie das kürzere Ende des Gewindestabes in die Öffnung an der Basis des
Lenkers.
3. Schieben Sie das V-förmige Stück auf den Gewindestab, so, daß die Auflagebacken
der V-Klammer gegen die Unterseite des Tisches drücken.
4. Drehen Sie die Feststellschraube auf den Gewindestab und schrauben alles zusammen
bis das Lenkrad perfekt stabil sitzt. Überdrehen Sie die Schraube auf keinen Fall, da Sie
andernfalls eine Beschädigung des Befestigungssystems und/oder des Tisches
riskieren.
Anschluß des Pedalsets
Stecken Sie den RJ45-Stecker des Pedalsets (10) in den RJ45 Port (8) des Lenkers.
Schließen Sie immer das Pedalset an das Lenkrad an, bevor
Sie den USB-Stecker des Lenkers (7) einstecken oder bevor Sie ein Spiel beginnen!
Kalibrierung des Lenkers und des Pedalsets
Die Kalibrierung wird automatisch ausgeführt.
Stellen Sie sicher, daß das Lenkrad immer zentriert ist und Sie nicht die Pedale drücken
wenn Sie den USB-Stecker (7) des Lenkers einstecken oder ein Spiel beginnen!
Benutzen Sie das Pedalset aus Sicherheitsgr ünden niemals barfuß oder wenn Sie
nur Socken tragen.
THRUSTMASTER® LEHNT JEDWEDE HAFTUNG IM FALLE EINER VERLETZUNG
DURCH DAS PEDALSET DURCH NUTZUNG DESSELBEN OHNE SCHUHWERK AB.
Page 24
3/10
PLAYSTATION®3
Installieren des Lenkers auf der PS3®
1. Stellen Sie den PS3/PC Umschalter (9) (auf der Rückseite des Lenkers) auf die PS3-
Position.
2. Stecken Sie den USB-Stecker (7) des Lenkers in den USB-Port 1 an der Konsole.
3. Schalten Sie Ihre Konsole ein.
4. Starten Sie Ihr Spiel.
Sie sind nun spielbereit!
Wichtige Anmerkungen bezüglich der PlayStation®3
- Der PS3/PC Umschalter (9) am Lenker muß immer auf die PS3-Position gestellt sein
bevor Sie den Lenker anschließen.
- Der Lenker emuliert den PS3-Gamepadcontroller (gehen Sie in Optionen / Controller /
Gamepads, um die Konfiguration zu modifizieren).
- Im Einzelspieler-Modus: Falls Ihr offizieller PS3-Gamepadcontroller angeschaltet ist,
müssen Sie diesen auf den Controller-Port 2 umschalten, damit Ihr Lenker funktioniert.
- Zögern Sie nicht die beiden Empfindlichkeitsmodi Ihres Lenkers auszuprobieren, um damit
dessen Präzision zu optimieren.
Page 25

4/10
PC
Installieren des Lenkers auf dem PC
1. Stellen Sie den PS3/PC Umschalter (9) (auf der Rückseite des Lenkers) auf die PC-
Position.
2. Stecken Sie den USB-Stecker (7) des Lenkers in einen der USB-Ports Ihres Computers.
Windows® XP, Vista, 7 oder 8 erkennt automatisch das neue Gerät.
3. Im Windows Game Controllers Fenster und in Spielen, wird der Lenker unter dem
Namen FGT Rumble 3-in-1 oder Ferrari GT Experience erkannt.
Sie sind nun spielbereit!
Wichtige Anmerkungen bezüglich PC
- Der PS3/PC Umschalter (9) am Lenker muß immer auf die PC-Position gestellt sein
bevor Sie den Lenker anschließen.
- Eine erweiterte Programmierungssoftware für PC steht unter folgender Adresse zum
Herunterladen von unserer Website zur Verfügung: http://ts.thrustmaster.com/
(under Updates and Downloads/PC/Wheels/Challenge PS3
PC/Drivers). Der Test Forces Tab (in der erweiterten
Programmierungssoftware) ist mit diesem Lenker nicht kompatibel.
Page 26

5/10
Aktion
LED (5)
Gleichzeitig drücken und loslassen: das D-Pad (1) + die 2
paddelförmigen Hoch & Runter Schalthebel (2).
BLINKT
LANGSAM
Aktion
LED (5)
Gleichzeitig drücken und loslassen: das D-Pad (1) + die 2
paddelförmigen Hoch & Runter Schalthebel (2).
Schritte
Aktion
LED (5)
1
Gleichzeitig drücken und loslassen: SE + ST (6).
AUS
Drücken und loslassen des Buttons zum
Programmieren.
BLINKT
SCHNELL
Drücken und loslassen des Buttons oder Pedals auf
dem Sie Ihre Funktion plazieren wollen.
ERWEITERTE FUNKTIONEN
Einstellen der Lenkerempfindlichkeit
Ihre Lenkradsteuerung verfügt über 2 Empfindlichkeitsmodi:
- Normale Empfindlichkeit (Standardmodus)
- Hohe Empfindlichkeit (muß ausgewählt werden)
• Um in den Hochempfindlichkeitsmodus zu schalten:
Ihre Lenkradsteuerung ist nun empfindlicher (Dieser Vorgang muß nach jedem Neustart
oder Abtrennung Ihres Lenkers vorgenommen werden)
• Um in den Normalempfindlichkeitsmodus zurückzukehren (den Standardmodus):
BLINKT NICHT
Ihre Lenkradsteuerung ist in den Normalempfindlichkeitsmodus zurückgekehrt (den Standardmodus).
PROGRAMMIERUNG DES LENKERS UND DER PEDALE
Ihr Lenker ist vollständig programmierbar:
- Alle Actionbuttons können umbelegt werden.
- Alle Buttons können auf die paddelförmigen Schalthebel oder auf die Pedale
programmiert werden.
• Beispiele möglicher Verwendungen:
- Auf der PS3, programmieren von L2/R2 oder L3/R3 auf die 2 paddelförmige Hoch & Runter
Schalthebel (L1/R1).
- Auf der PS3, programmieren der Kreuz-/Quadrat-Buttons auf di e Pedale (L2/R2 Standard).
- Umschalten verschiedener Buttons für bessere Erreichbarkeit.
• Programmierungsvorgang:
2
3
Ihre Programmierung wurde nun ausgeführt.
(Dieser Vorgang muß nach jedem Neustart oder Abtrennung Ihres Lenkers vor genommen werden)
AN
Page 27

6/10
Aktion
LED (5)
GEHT AUS UND
GEHT WIEDER AN
PEDALSET-MODUS
LED (5)
SEPARAT (Standardmodus: empfohlen)
ROT
KOMBINIERT
GRÜN
Separate Pedale
(Standardmodus)
Kombinierte Pedale
(muß ausgewählt werden)
rechten Ministick des PS3 Kontrollers
• Löschen Ihrer Programmierung:
Drücken und Halten für 2 Sekunden: SE + ST (6).
Ihre Programmierung wurde gelöscht.
KONFIGURATION DES PEDALSETS
Standardgemäß ist die Gas- und Bremspedalfunktion Ihres Lenkers im separaten Modus,
das heißt die Pedale funktionieren auf voneinander unabhängigen Achsen.
Dieser Modus gestattet Ihnen die wesentliche Verbesserung Ihrer Fahrpräzision.
Falls Ihr Spiel den separaten Modus nicht unterstützt, funktioniert das Pedalset Ihres
Lenkers nicht ordnungsgemäß. Sie müssen demnach in den kombinierten Modus
umschalten.
• Änderungsvorgang des Pedalset-Modus:
Gleichzeitig drücken und loslassen: die 2 pedals + den PS button (4).
(Dieser Vorgang muß nach jedem Neustart oder Abtrennung Ihres Lenkers vorgenommen
werden)
• Einrichten der Pedale auf der PLAYSTATION®3:
- Gas = R2 Trigger
auf dem PS3 Kontroller
- Bremse = L2 Trigger
auf dem PS3 Kontroller
- Gas = Hoch-Richtung auf dem
rechten Ministick des PS3 Kontrollers
- Bremse = Runter-Richtung auf dem
Page 28

7/10
Separate Pedale
(Standardmodus)
Kombinierte Pedale
(müssen ausgewählt werden)
- Bremse = Runter-Richtung auf RZ Achse
• Einrichten der Pedale auf dem PC:
- Gas = RZ Achse
- Bremse = Y Achse
- Gas = Hoch-Richtung auf RZ Achse
FEHLERBESEITIGUNG UND WARNUNG
• Mein Lenker funktioniert nicht richtig oder ist falsch kalibriert:
- Schalten Sie den PC oder Ihre PS3 aus, vergewissern Sie sich, daß der PS3/PC
Umschalter (9) in der richtigen Position steht, trennen Sie Ihren Lenker und alle Kabel und
schließen dann alles erneut wieder an, starten Sie Ihr Spiel neu.
- Bewegen Sie niemals Ihren Lenker oder die Pedale wenn Sie diese anschließen, um
jedwede Kalibrierungsprobleme zu vermeiden.
• Mein Pedalset funktioniert nicht richtig:
- Schließen Sie das Pedalset immer an den Lenker an (10/8) bevor Sie den USB-Stecker
(7) des Lenkers einstecken.
- Rekonfigurieren Sie Ihren Lenker in Ihren Kontrolleroptionen des Spiels.
• Ich kann mein Lenkrad nicht konfigurieren:
- Auf der PS3, im Menü Ihres Spiels Optionen / Kontroller / Gamepads: Wählen Sie die
dienlichste Konfiguration.
- Auf dem PC, im Menü Ihres Spiels Optionen / Kontroller / Lenker: Wählen Sie die
dienlichste Konfiguration.
- Sie können auch die Programmierungsfunktion Ihres Lenkers nutzen, um diesen
Problemtyp zu beheben.
• Auf dem PC, die Menüs in meinem Spiel scrollen selbsttätig:
- Verlassen Sie das Spiel und stellen das Pedalset auf den kombinierten Modus (2
Achsen). Kehren Sie dann zu Ihrem Spiel zurück und rekonfigurieren Ihren Lenker mit den
neuen Achsen.
• Meine Lenkradsteuerung reagiert nicht hinreichend:
- Schalten Sie Ihren Lenker in den Hochempfindlichkeitsmodus.
- Regeln Sie die Empfindlichkeit in Ihren Spieloptionen.
• Auf dem PC: Bei einigen Spielen sollten Sie die bestehenden Voreinstellungen für
FGT Rumble 3-in-1 oder Ferrari GT Experience nutzen.
Page 29

8/10
TECHNISCHER SUPPORT
Sollten Sie mit Ihrem Produkt ein Problem haben, besuchen Sie bitte die Seite http://ts.thrustmaster.com
und klicken Sie auf Technischer Support. Von dort aus können Sie auf verschiedene Instrumente
zugreifen (Fragen und Antworten (FAQ), die neuesten Versionen von Treibern und Software), die Ihnen bei
der Lösung Ihres Problems helfen könnten. Falls das Problem weiterhin besteht, können Sie mit dem
technischen Support der Thrustmaster Produkten in Kontakt treten („Technischer Support“):
Per E-Mail:
Um den Vorzug des technischen Supports per Email in Anspruch nehmen zu können, müssen Sie sich
zunächst online registrieren. Mit den Informationen, die Sie uns so zukommen lassen, können die
Mitarbeiter Ihr Problem schneller lösen. Klicken Sie auf Registrierung links auf der Seite des technischen
Supports und folgen Sie den Instruktionen auf dem Bildschirm. Falls Sie bereits registriert sind, füllen Sie die
Textfelder Anwendername und Passwort aus und klicken dann auf Login.
Per Telefon (falls Sie über keinen Internetzugang verfügen):
Geschäftstage und -zeiten und Telefonnummern können sich ändern. Bitte besuchen Sie für die aktuellen
Kontaktinformationen des Technischen Supports http://ts.thrustmaster.com.
Deutschland
Österreich
Schweiz
Luxemburg
Kunden-Garantie-Information
Guillemot Corporation S.A. (fortfolgend “Guillemot”) garantiert Kunden weltweit, daß dieses Thrustmaster
Produkt frei von Mängeln in Material und Verarbeitung für eine Gewährleistungsfrist ist, die mit der Frist für
eine Mängelrüge bezüglich des Produktes übereinstimmt. In den Ländern der Europäischen Union
entspricht diese einem Zeitraum von zwei (2) Jahren ab Kaufdatum des Thrustmaster Produktes. In
anderen Ländern entspricht die Gewährleistungsfrist der zeitlichen Begrenzung für eine Mängelrüge
bezüglich des Thrustmaster Produktes in Übereinstimmung mit anwendbarem Recht des Landes, in dem
der Kunde zum Zeitpunkt des Erwerbs eines Thrustmaster Produktes wohnhaft ist. Sollte eine
entsprechende Regelung in dem entsprechenden Land nicht existieren, umfasst die
Gewährleistungspflicht einen Zeitraum von einem (1) Jahr ab dem originären Kaufdatum des Thrustmaster
Produktes.
08000 00 1445
Kostenlos
0810 10 1809
Zum Preis eines
Ortsgesprächs
0842 000 022
Zum Preis eines
Ortsgesprächs
80028612
Kostenlos
Montag bis Freitag 9:00 bis 20:00 Uhr
Montag bis Freitag 9:00 bis 20:00 Uhr
Montag bis Freitag 9:00 bis 20:00 Uhr
Montag bis Freitag 9:00 bis 20:00 Uhr
Page 30

9/10
Ungeachtet dessen werden wiederaufladbare Batterien (fortfolgend „Akkus“) durch eine
Gewährleistungsfrist von sechs (6) Monaten ab dem Kaufdatum abgedeckt.
Sollten bei dem Produkt innerhalb der Gewährleistungsfrist Defekte auftreten, kontaktieren Sie
unverzüglich den Technischen Kundendienst, der die weitere Vorgehensweise anzeigt. Wurde der Defekt
bestätigt, muß das Produkt an die Verkaufsstelle (oder an eine andere Stelle, je nach Maßgabe des
Technischen Kundendienstes) retourniert werden.
Im Rahmen dieser Garantie sollte das defekte Produkt des Kunden, je nach Entscheidung des
Technischen Kundendienstes, repariert oder ausgetauscht werden. Wenn nach geltendem Recht zulässig,
beschränkt sich die volle Haftung von Guillemot und ihrer Tochtergesellschaften auf die Reparatur oder
den Austausch des Thrustmaster Produktes (inklusive Folgeschäden). Wenn nach geltendem Recht
zulässig, lehnt Guillemot alle Gewährleistungen der Marktgängigkeit oder Eignung für einen bestimmten
Zweck ab. Die Rechte des Kunden in Übereinstimmung mit anwendbarem Recht bezüglich des Verkaufs
auf Konsumgüter wird durch diese Garantie nicht beeinträchtigt.
Der Gewährleistungsanspruch verfällt: (1) Falls das Produkt modifiziert, geöffnet, verändert oder ein
Schaden durch unsachgemäßen oder missbräuchlichen Gebrauch hervorgerufen wurde, sowie durch
Fahrlässigkeit, einen Unfall, Verschleiß oder irgendeinem anderen Grund – aber nicht durch Material- oder
Herstellungsfehler (einschließlich, aber nicht beschränkt auf, die Kombination der Thrustmaster Produkte
mit ungeeigneten Elementen, insbesondere Netzteile, Akkus, Ladegeräte, oder andere Elemente, die von
Guillemot für dieses Produkt nicht mitgeliefert wurden); (2) Im Falle der Nichteinhaltung der durch den
Technischen Support erteilten Anweisungen; (3) Durch Software. Die besagte Software ist Gegenstand
einer speziellen Garantie; (4) Bei Verbrauchsmaterialien (Elemente, die während der Produktlebensdauer
ausgetauscht werden, wie z. B. Einwegbatterien, Ohrpolster für ein Audioheadset oder für Kopfhörer); (5)
Bei Accessoires (z. B. Kabel, Etuis, Taschen, Beutel, Handgelenk-Riemen); (6) Falls das Produkt in einer
öffentlichen Versteigerung verkauft wurde.
Diese Garantie ist nicht übertragbar.
Haftung
Wenn nach dem anwendbaren Recht zulässig, lehnen Guillemot Corporation S.A. (fortfolgend "Guillemot")
und ihre Tochtergesellschaften jegliche Haftung für Schäden, die auf eine oder mehrere der folgenden
Ursachen zurückzuführen sind, ab: (1) das Produkt wurde modifiziert, geöffnet oder geändert; (2)
Nichtbefolgung der Montageanleitung; (3) unangebrachte Nutzung, Fahrlässigkeit, Unfall (z. B. ein
Aufprall); (4) normalem Verschleiß. Wenn nach dem anwendbaren Recht zulässig, lehnen Guillemot und
seine Niederlassungen jegliche Haftung für Schäden, die nicht auf einen Material- oder Herstellungsfehler
in Bezug auf das Produkt beruhen (einschließlich, aber nicht beschränkt auf, etwaige Schäden, die direkt
oder indirekt durch Software oder durch die Kombination der Thrustmaster Produkte mit ungeeigneten
Elementen, insbesondere Netzteile, Akkus, Ladegeräte, oder andere Elemente, die von Guillemot für
dieses Produkt nicht geliefert wurden), ab.
Page 31

10/10
COPYRIGHT
© Guillemot Corporation S.A. 2014. Alle Rechte vorbehalten. Thrustmaster
eingetragenes Warenzeichen der Guillemot Corporation S.A. Ferrari® ist ein eingetragenes
Warenzeichen der Ferrari S.p.A. PlayStation
®
ist ein eingetragenes Warenzeichen von
®
ist ein
Sony Computer Entertainment Inc. Windows® ist ein eingetragenes Warenzeichen der
Microsoft Corporation in den Vereinigten Staaten von Amerika und/oder anderen Ländern.
Alle anderen Warenzeichen oder Handelsmarken werden hierdurch ausdrücklich anerkannt
und sind im Besitz Ihrer jeweiligen Eigentümer. Illustrationen nicht verbindlich. Inhalte,
Design und Spezifikationen können ohne vorherige Ankündigung geändert werden und
können von Land zu Land unterschiedlich sein. Hergestellt in China.
HINWEISE ZUM UMWELTSCHUTZ
Dieses Produkt darf nach Ende seiner Lebensdauer nicht über den
Hausmüll entsorgt werden, sondern muss an einem Sammelpunkt für das
Recycling von elektrischen und elektronischen Geräten abgegeben werden.
Das Symbol auf dem Produkt, der Gebrauchsanleitung oder der Verpackung
weist darauf hin.
Die Werkstoffe sind gemäß ihrer Kennzeichnung wiederverwertbar. Mit der
Wiederverwertung, der stofflichen Verwertung oder anderen Formen von
Altgeräten leisten Sie einen wichtigen Beitrag zum Schutz unserer Umwelt.
Bitte erfragen Sie bei der Gemeindeverwaltung die zuständige Entsorgungsstelle.
Wichtige Informationen. Die Farben und Verzierungen können abweichen.
Dieses Produkt stimmt mit allen Standards, die Kinder ab 14 und älter betreffen, überein. Dieses
Produkt ist nicht geeignet für den Gebrauch von Kindern, die jünger als 14 Jahre sind.
www.thrustmaster.com
Page 32

1/10
1 D-pad
7 USB-connector (voor pc en PS3)
Voor: PlayStation®3 / pc
Handleiding
TECHNISCHE KENMERKEN
2 2 flippers: op- & terugschakelen
3 Actieknoppen
4 PS-knop voor PS3
5 LED
6 SE- en ST-knoppen
(Select en Start/Programmering)
8 RJ45-connector voor stuur
9 PS3/PC-schakelaar
10 RJ45-connector voor pedaalset
11 Bevestigingssysteem voor
tafel/werkblad
Page 33

2/10
HET STUUR INSTALLEREN
Het stuur vastzetten (11)
1. Zet het stuur op de rand van een tafel of een ander vlak oppervlak.
2. Duw het korte eind van de van schroefdraad voorziene stang in de opening van de voet
van het stuur.
3. Schuif het V-gevormde onderdeel op de stang zodat de kaken van de V-klem tegen de
onderkant van de tafelrand klemmen.
4. Schroef de moer op de stang en draai hiermee het stuur goed vast. Draai de moer niet
al te vast omdat anders het klemsysteem of de tafel beschadigd kan raken.
De pedaalset aansluiten
Sluit de RJ45-connector van de pedaalset (10) aan op de RJ45-connector van het stuur (8).
Sluit altijd de pedaalset aan op het stuur voordat u de USB-connector (7) van het stuur aansluit of
een game start!
Het stuur en de pedaalset kalibreren
Het kalibreren wordt automatisch uitgevoerd.
Zet het stuur altijd in de middenstand en trap niet op de pedalen wanneer u de USB-connector (7)
van het stuur aansluit of een game start!
Voor uw en andermans veiligheid mag de pedaalset nooit gebruikt worden op blote
voeten of met alleen sokken aan.
THRUSTMASTER® WIJST ELKE VERANTWOORDELIJKHEID AF IN GEVAL VAN LETSEL
ALS GEVOLG VAN HET GEBRUIK VAN DE PEDAALSET ZONDER SCHOENEN AAN.
Page 34

3/10
PLAYSTATION®3
Het stuur installeren op de PlayStation®3
1. Zet de PS3/PC-schakelaar (9) (achterop het stuur) in de stand PS3.
2. Sluit de USB-connector van het stuur (7) aan op USB port 1 van de console.
3. Zet de console aan.
4. Start de game.
Nu kan er gespeeld worden!
Belangrijke opmerkingen over de PlayStation®3
- Zet de PS3/PC-schakelaar (9) van het stuur altijd in de stand PS3 voordat u het stuur
aansluit.
- Het stuur emuleert de PS3-gamepad-controller (ga naar
controller en de gamepad).
- In de modus 1 Player: als uw officiële PS3-gamepad-controller aan staat, moet u deze
op controller port 2 zetten anders werkt het stuur niet.
- Aarzel niet de twee gevoeligheidsmodi van het stuur uit te proberen om de nauwkeurigheid
perfect ingesteld te krijgen.
het menu met opties voor de
Page 35

4/10
PC
Het stuur op de pc installeren
1. Zet de PS3/PC-schakelaar (9) (achterop het stuur) in de stand PC.
2. Sluit de USB-connector van het stuur (7) aan op een van de USB-poorten van de
computer.
In Windows® XP, Vista, 7 of 8 wordt het nieuwe apparaat automatisch herkend.
3. In het venster Game-controllers van Windows en in games, wordt het stuur
weergegeven onder de naam FGT Rumble 3-in-1 of Ferrari GT Experience.
Nu kan er gespeeld worden!
Belangrijke opmerkingen over de pc
- Zet de PS3/PC-schakelaar (9) van het stuur altijd in de stand PC voordat u het stuur
aansluit.
- Geavanceerde software voor het programmeren van de pc is ook beschikbaar als
download van onze website: http://ts.thrustmaster.com/ (onder Updates and
Downloads/PC/Wheels/Challenge PS3 PC/Drivers). De tab Test Forces in deze
geavanceerde programmeersoftware is niet compatibel met dit stuur.
Page 36

5/10
Actie
LED (5)
Gelijktijdig indrukken en loslaten van:
de D-pad (1) + de twee schakelflippers (2).
Actie
LED (5)
Gelijktijdig indrukken en loslaten van:
de D-pad (1) + de twee schakelflippers (2).
Stap
Actie
LED (5)
1
Gelijktijdig indrukken en loslaten van: SE + ST (6).
UIT
KNIPPERT
SNEL
Druk op de knop of het pedaal waaraan u de functie wilt
toewijzen en laat deze weer los.
GEAVANCEERDE FUNCTIES
DE GEVOELIGHEID VAN HET STUUR AANPASSEN
De gevoeligheid van dit stuur kent twee instellingen:
- Normale gevoeligheid (standaardinstelling).
- Hoge gevoeligheid (moet worden ingesteld).
• Overschakelen naar hoge gevoeligheid:
KNIPPERT LANGZAAM
(Herhaal deze procedure elke keer dat u het stuur opstart of loskoppelt)
Het stuur reageert nu weer met de normale gevoeligheid (standaardinstelling).
HET STUUR EN DE PEDALEN PROGRAMMEREN
Het stuur is volledig programmeerbaar:
- Alle actieknoppen kunnen worden verwisseld.
- Alle knoppen kunnen aan de schakelflippers of de pedalen worden toegewezen.
• Voorbeelden van mogelijk gebruik:
- L2/R2 of L3/R3 toewijzen aan de UP- en DOWN-schakelflippers (L1/R1) op de PS3.
- De Kruis/Vierkant-knoppen toewijzen aan de pedalen (L2/R2 standaard) op de PS3.
- Knoppen verwisselen voor een betere toegankelijkheid.
2 Druk op de te programmeren knop en laat deze weer los.
3
(Herhaal deze procedure elke keer dat u het stuur opstart of loskoppelt)
Het stuur reageert nu gevoeliger (directer).
• Terugzetten van de Normale gevoeligheid (standaardinstelling):
• Programmeerprocedure:
Uw programmering is nu uitgevoerd.
KNIPPERT NIET
AAN
Page 37

6/10
Actie
LED (5)
GAAT UIT EN
DAARNA WEER AAN
PEDAALSETMODUS
LED (5)
GESCHEIDEN (standaard modus: aanbevolen)
ROOD
GECOMBINEERD
GROEN
Gescheiden pedalen
(standaardmodus)
Gecombineerde pedalen
(moet worden ingesteld)
controller
• Uw programmering wissen:
Twee seconden ingedrukt houden: SE + ST (6).
Uw programmering is nu gewist.
DE PEDAALSET CONFIGUREREN
Standaard zijn het gas- en het rempedaal zo ingesteld dat ze onafhankelijk van elkaar
werken.
Door deze gescheiden werking kunt u veel nauwkeuriger rijden.
Als uw game een gescheiden werking niet ondersteunt, functioneren de pedalen van uw
stuur wellicht niet correct. U moet de instelling van de pedalen dan overzetten naar een
gecombineerde werking.
• Procedure voor het wijzigen van de werking van de pedaalset:
Houd de twee pedalen + de PS-knop (4) tegelijkertijd ingedrukt en laat ze weer los.
(Herhaal deze procedure elke keer dat u het stuur opstart of loskoppelt)
• Het instellen van de pedalen op de PLAYSTATION®3:
- Gas = R2-trigger
op de PS3-controller
- Remmen = L2-trigger
op de PS3-controller
- Gas = Omhoog-richting op de
rechter mini-joystick van de PS3-
- Remmen = Omlaag-richting op de
controller
rechter mini-joystick van de PS3-
Page 38

7/10
Gescheiden pedalen
(standaardmodus)
Gecombineerde pedalen
(moet worden ingesteld)
- Remmen = Y-as
- Remmen = Omlaag-richting op de RZ-as
• Het instellen van de pedalen op de pc:
- Gas = RZ-as
- Gas = Omhoog-richting op de RZ-as
PROBLEMEN OPLOSSEN EN WAARSCHUWINGEN
• Het stuur werkt niet goed of lijkt niet goed gekalibreerd te zijn:
- Zet de pc of de PS3 uit, controleer of de PS3/PC-schakelaar (9) in de goede stand staat,
maak alle kabels los, sluit alles weer aan en start de game opnieuw op.
Om kalibratieproblemen te voorkomen, mag u het stuur of de pedalen nooit bewegen
wanneer u het stuur aansluit.
• De pedaalset werkt niet correct:
- Sluit de pedaalset altijd eerst op het stuur aan (10/8) voordat u de USB-connector van het
stuur (7) aansluit.
- Configureer het stuur opnieuw in de optiesectie van uw gamecontroller.
• Ik kan mijn stuur niet configureren:
- Ga op de PS3 naar het menu met opties voor de controller en de gamepad: selecteer
daar de meest geschikte configuratie.
- Ga op de PC naar het menu met opties voor de controller en het stuur: selecteer daar de
meest geschikte configuratie.
- U kunt ook de programmeerfunctie van het stuur gebruiken om dit soort problemen op te
lossen.
• Op de pc scrollen de menu's in mijn games uit zichzelf:
- Sluit de game af en zet de pedaalset in de modus "Gecombineerd" (2 assen). Start de
game vervolgens opnieuw en configureer het stuur voor de nieuwe instelling.
• Het stuur reageert niet gevoelig/direct genoeg:
- Stel het stuur in op de hoge gevoeligheid.
- Wijzig de gevoeligheid in de opties van de game.
• Op de pc: in sommige games, kunnen de bestaande presets voor FGT Rumble 3-
in-1 of Ferrari GT Experience worden gebruikt om problemen te voorkomen.
Page 39

8/10
Van maandag t/m vrijdag van 9:00 tot 13:00
(Engels)
TECHNISCHE ONDERSTEUNING
Mocht u problemen ondervinden met dit product, ga dan naar http://ts.thrustmaster.com en klik op
Technical Support. U hebt daar toegang tot verschillende onderwerpen die u helpen bij het vinden van
oplossingen, zoals de FAQ (veelgestelde vragen) en de meest recente drivers en software. Als het
probleem op die manier niet kan worden verholpen, kunt u contact opnemen met de Thrustmaster product
technical support service (Technical Support).
Per e-mail:
Voordat u gebruik kunt maken van technische ondersteuning per e-mail dient u zich eerst online te
registreren. Met de door u verstrekte informatie kan uw probleem sneller en beter worden opgelost. Klik op
Registration aan de linkerzijde van de pagina Technical Support en volg de aanwijzingen op het scherm.
Indien u reeds geregistreerd bent, vult u de velden Username en Password in en klikt u op Login.
Per telefoon (als u geen internettoegang hebt):
Openingsdagen en -uren en telefoonnummers kunnen gewijzigd worden. Ga naar
http://ts.thrus tmaster.com voor de actuele contactgegevens van Technical Support.
België
Nederland
078 16 60 56
Kosten van interlokaal gesprek
0900 0400 118
Kosten van lokaal gesprek
Van maandag t/m vrijdag van 9:00 tot 13:00
en van 14:00 tot 18:00
en van 14:00 tot 18:00
(Nederlands)
Van maandag t/m vrijdag van 9:00 tot
20:00
Informatie met betrekking tot kopersgarantie
Wereldwijd garandeert Guillemot Corporation S.A. (“Guillemot”) de koper dat dit Thrustmaster-product vrij
zal zijn van materiaal- en fabricagefouten gedurende een garantieperiode gelijk aan de tijd maximaal
vereist om een restitutie/vervanging voor dit product te claimen. In landen van de Europese Unie komt dit
overeen met een periode van twee (2) jaar vanaf het moment van levering van het Thrustmaster-product.
In andere landen komt de garantieperiode overeen met de tijd maximaal vereist om een
restitutie/vervanging voor dit Thrustmaster-product te claimen zoals wettelijk is vastgelegd in het land
waarin de koper woonachtig was op de datum van aankoop van het Thrustmaster-product. Indien een
dergelijk claimrecht niet wettelijk is vastgelegd in het betreffende land, geldt een garantieperiode van één
(1) jaar vanaf datum aankoop van het Thrustmaster-product.
Ongacht het hierboven gestelde, geldt voor oplaadbare batterijen een garantieperiode van zes (6)
maanden vanaf datum aankoop.
Indien u in de garantieperiode een defect meent te constateren aan dit product, neem dan onmiddellijk
contact op met Technical Support die u zal informeren over de te volgen procedure. Als het defect wordt
bevestigd, dient het product te worden geretourneerd naar de plaats van aankoop (of een andere locatie
die wordt opgegeven door Technical Support).
Page 40

9/10
Binnen het gestelde van deze garantie wordt het defecte product van de koper gerepareerd of vervangen,
zulks ter beoordeling van Technical Support. Indien toegestaan door van toepassing zijnde wetgeving,
beperkt de volledige aansprakelijkheid van Guillemot en haar dochterondernemingen (inclusief de
aansprakelijkheid voor vervolgschade) zich tot het repareren of vervangen van het Thrustmaster-product.
Indien toegestaan door van toepassing zijnde wetgeving, wijst Guillemot elke garantie af met betrekking tot
verhandelbaarheid of geschiktheid voor enig doel. De wettelijke rechten van de koper die van toepassing
zijn op de verkoop van consumentproducten worden op generlei wijze door deze garantie beperkt.
Deze garantie is niet van kracht: (1) indien het product aangepast, geopend of gewijzigd is, of beschadigd
is ten gevolge van oneigenlijk of onvoorzichtig gebruik, verwaarlozing, een ongeluk, normale slijtage, of
enige andere oorzaak die niet gerelateerd is aan een materiaal- of fabricagefout (inclusief maar niet
beperkt tot het combineren van het Thrustmaster-product met enig ongeschikt element waaronder in het
bijzonder voedingsadapters, oplaadbare batterijen, opladers of enig ander element niet geleverd door
Guillemot voor dit product); (2) indien u zich niet houdt aan de instructies zoals verstrekt door Technical
Support; (3) op software die onder een specifieke garantie valt; (4) op verbruiksartikelen (elementen die
tijdens de levensduur van het product worden vervangen zoals bijvoorbeeld batterijen of pads van een
headset of koptelefoon); (5) op accessoires (zoals bijvoorbeeld kabels, behuizingen, hoesjes, etui's,
draagtassen of polsbandjes); (6) indien het product werd verkocht op een openbare veiling.
Deze garantie is niet overdraagbaar.
Aansprakelijkheid
Indien toegestaan door van toepassing zijnde wetgeving, wijzen Guillemot Corporation S.A. (hierna te
noemen “Guillemot”) en haar dochterondernemingen alle aansprakelijkheid af voor enige schade
veroorzaakt door één van de volgende oorzaken: (1) indien het product aangepast, geopend of gewijzigd
is; (2) de montage-instructies niet zijn opgevolgd; (3) oneigenlijk of onvoorzichtig gebruik, verwaarlozing,
een ongeluk (bijvoorbeeld stoten); (4) normale slijtage. Indien toegestaan onder van toepassing zijnde
wetgeving, wijzen Guillemot en haar dochterondernemingen alle aansprakelijkheid af voor enige schade
aan dit product niet gerelateerd aan een materiaal- of fabricagefout (inclusief maar niet beperkt tot enige
schade direct of indirect veroorzaakt door enige software, of door het combineren van het Thrustmasterproduct met enig ongeschikt element waaronder in het bijzonder voedingsadapters, oplaadbare batterijen,
opladers of enig ander element niet geleverd door Guillemot voor dit product).
Page 41

10/10
COPYRIGHT
© 2014 Guillemot Corporation S.A. Alle rechten voorbehouden. Thrustmaster
geregistreerd handelsmerk van Guillemot Corporation S.A. Ferrari
handelsmerk van Ferrari S.p.A. PlayStation
®
is een geregistreerd handelsmerk van Sony
®
is een geregistreerd
®
is een
Computer Entertainment Inc. Windows® is een geregistreerd handelsmerk van Microsoft
Corporation in de Verenigde Staten en/of andere landen. Alle andere handelsmerken en
merknamen worden hierbij erkend en zijn eigendom van de respectieve eigenaren.
Afbeeldingen zijn niet bindend. Inhoud, ontwerp en specificaties kunnen zonder
kennisgeving vooraf worden gewijzigd en kunnen per land verschillen. Geproduceerd in
China.
TouchSense® -technologie in licentie gegeven door Immersion Corporation. Beschermd
door een of meer van de volgende patenten:
AANBEVELINGEN VOOR DE BESCHERMING VAN HET MILIEU
Gooi dit product na het einde van de levensduur niet weg met het
normale afval, maar breng het naar het door uw gemeente
aangewezen inzamelpunt voor elektrische en/of computerapparatuur.
Ter herinnering is hiertoe op het product, de gebruikshandleiding of de
verpakking een symbool aangebracht.
De meeste materialen kunnen worden gerecycled. Door recycling en
andere methoden voor verantwoorde verwerking van afgedankte
elektrische en elektronische apparaten kunt u een belangrijke bijdrage
leveren aan de bescherming van het milieu.
Neem contact op met uw gemeente voor informatie over een inzamelpunt bij u in de buurt.
Bewaar deze informatie. De kleuren en decoraties kunnen variëren.
Dit product voldoet aan alle normen voor kinderen van 14 jaar en ouder. Dit product is niet
geschikt voor gebruik door kinderen jonger dan 14 jaar.
www.thrustmaster.com
Page 42

1/10
1 D-Pad
7 Connettore USB (per PC e PS3)
Per: PlayStation®3 / PC
Manuale d’uso
CARATTERISTICHE TECNICHE
2 2 Leve del cambio Up & Down
3 Pulsanti azione
4 Pulsante PS per PS3
5 LED
6 Pulsanti SE e ST
(Select e Start/Programmazione)
8 Porta del volante RJ45
9 Selettore PS3/PC
10 Connettore RJ45 della pedaliera
11 Sistema di fissaggio a
tavolo/scrivania
Page 43

2/10
INSTALLAZIONE DEL VOLANTE
Fissare il volante in posizione (11)
1. Colloca il volante sul bordo di un tavolo o altra superficie piana.
2. Inserisci l’estremità più corta della barra scanalata nell’apposito foro presente alla base
del volante.
3. Fai passare il blocco a “V” dalla barra scanalata, in modo tale che i bracci della V si
infilino contro la parte inferiore del tavolo.
4. Inserisci la vite di bloccaggio nella barra scanalata e stringi il tutto finché il volante non
risulti perfettamente stabile. Accertati di non stringere troppo la vite: rischieresti di
danneggiare il sistema di fissaggio e/o il tavolo.
Collegamento della pedaliera
Collega il connettore RJ45 della pedaliera (10) alla porta RJ45 del volante (8).
Ricordati di collegare la pedaliera al volante prima
di collegare il connettore USB del volante (7) o di avviare un gioco!
Calibrazione di volante e pedaliera
La calibrazione viene effettuata automaticamente.
Quando colleghi il connettore USB del volante (7) o avvii un gioco,
assicurati sempre che il volante sia centrato e non premere i pedali!
Per ragioni di sicurezza, non usare mai la pedaliera a piedi nudi o
indossando soltanto dei calzini.
THRUSTMASTER® DECLINA OGNI RESPONSABILITÀ PER QUALSIASI INFORTUNIO
DERIVANTE DALL’USO DELLA PEDALIERA SENZA SCARPE.
Page 44

3/10
PLAYSTATION®3
Installazione del volante su PlayStation®3
1. Sposta il selettore PS3/PC (9) (sul retro del volante) in posizione PS3.
2. Collega il connettore USB del volante (7) alla porta USB 1 della console.
3. Accendi la tua console.
4. Avvia il tuo gioco.
Ora sei pronto per giocare!
Note importanti per PlayStation®3
- Il selettore PS3/PC del volante (9) deve sempre trovarsi in posizione PS3 prima di
collegare il volante.
- Il volante emula il funzionamento del gamepad della PS3 (vai su Opzioni / Controller /
Gamepad per modificare la configurazione).
- In modalità 1 giocatore: per poter utilizzare il tuo volante, se il tuo gamepad ufficiale per
PS3 è acceso, dovrai assegnarlo alla porta controller 2.
- Per ottimizzarne la precisione, non esitare a provare i 2 diversi livelli di sensibilità del tuo
volante.
Page 45

4/10
PC
Installazione del volante su PC
1. Sposta il selettore PS3/PC (9) (sul retro del volante) in posizione PC.
2. Inserisci il connettore USB del volante (7) ad una delle porte USB del tuo computer
USB.
Windows® XP, Vista, 7 o 8 rileverà automaticamente la nuova periferica.
3. Nella finestra di Windows Controller di gioco e nei giochi, il volante comparirà con il
nome FGT Rumble 3-in-1 o Ferrari GT Experience.
Ora sei pronto per giocare!
Note importanti per PC
- Il selettore PS3/PC del volante (9) deve sempre trovarsi in posizione PC prima di
collegare il volante.
- Il software di programmazione avanzata per PC è scaricabile anche dal nostro sito web,
al seguente indirizzo: http://ts.thrustmaster.com/ (in Updates and
Downloads/PC/Wheels/Challenge PS3 PC/Drivers). La pagina Test
Forze (nel software di programmazione avanzata) non è compatibile con questo
volante.
Page 46

5/10
Azione
LED (5)
Premi e rilascia simultaneamente:
il D-Pad (1) + le 2 leve del cambio Up & Down (2).
LAMPEGGIA
LENTAMENTE
Azione
LED (5)
Premi e rilascia simultaneamente:
il D-Pad (1) + le 2 leve del cambio Up & Down (2).
Passo
Azione
LED (5)
1
Premi e rilascia simultaneamente: SE + ST (6).
SPENTO
LAMPEGGIA
RAPIDAMENTE
Premi e rilascia il pulsante o il pedale cui desideri
attribuire la funzione in questione.
FUNZIONI AVANZATE
REGOLARE LA SENSIBILITÀ DEL VOLANTE
Lo sterzo del tuo volante è dotato di 2 diversi livelli di sensibilità:
- Sensibilità Normale (la modalità predefinita)
- Sensibilità Alta (occorre selezionarla)
• Per passare alla modalità ad Alta sensibilità:
(Occorre ripetere questa procedura dopo ogni riavvio o dopo aver scollegato il tuo volante)
Ora lo sterzo del tuo volante è più sensibile.
• Per ritornare alla modalità a sensibilità Normale (modalità predefinita):
NON LAMPEGGIA
Ora lo sterzo del tuo volante è tornato alla modalità a sensibilità Normale
(modalità predefinita).
PROGRAMMAZIONE DI VOLANTE E PEDALI
Il tuo volante è totalmente programmabile:
- Tutti i pulsanti azione possono essere scambiati tra loro.
- Tutti i pulsanti possono essere assegnati alle leve del cambio o ai pedali.
• Esempi di usi possibili:
- Su PS3, assegnare L2/R2 o L3/R3 alle 2 leve del cambio Up & Down (L1/R1).
- Su PS3, assegnare i pulsanti Croce/Quadrato ai pedali (L2/R2 per default).
- Scambiare tra loro pulsanti differenti, per una migliore accessibilità.
• Procedura di programmazione:
2 Premi e rilascia il pulsante che desideri assegnare.
3
La tua programmazione è ora impostata.
(Occorre ripetere questa procedura dopo ogni riavvio o dopo aver scollegato il tuo volante)
ACCESO
Page 47

6/10
Azione
LED (5)
SI SPEGNE PER POI
RIACCENDERSI
MODALITÀ DELLA PEDALIERA
LED (5)
SEPARATA (modalità predefinita: consigliata)
ROSSO
COMBINATA
VERDE
Pedali separati
(modalità predefinita)
Pedali combinati
(occorre selezionarla)
destro del controller PS3
• Annullare la tua programmazione:
Tieni premuti per 2 secondi: SE + ST (6).
La tua programmazione è stata cancellata.
CONFIGURARE LA PEDALIERA
Per default, i tuoi pedali di acceleratore e freno funzionano in modalità Separata, ovvero si
muovono lungo assi indipendenti.
Questa modalità ti permette di migliorare considerevolmente la precisione della tua guida.
Qualora il tuo gioco non supportasse la modalità Separata, la pedaliera del tuo volante non
funzionerà correttamente. Dovrai quindi passare alla modalità Combinata.
• Procedura per il cambio della modalità della pedaliera:
Premi e rilascia simultaneamente: i 2 pedali + il pulsante PS (4).
(Occorre ripetere questa procedura dopo ogni riavvio o dopo aver scollegato il tuo volante)
• Impostazione dei pedali su PLAYSTATION®3:
- Acceleratore = grilletto R2
del controller PS3
- Freno = grilletto L2
del controller PS3
- Acceleratore = direzione Su del
mini-stick destro del controller PS3
- Freno = direzione Giù del mini-stick
Page 48

7/10
Pedali separati
(modalità predefinita)
Pedali combinati
(occorre selezionarla)
RZ
- Freno = direzione Giù lungo l’asse RZ
• Impostazione dei pedali su PC:
- Acceleratore = asse RZ
- Freno = asse Y
- Acceleratore = direzione Su lungo l’asse
RISOLUZIONE DEI PROBLEMI E AVVISI
• Il mio volante non funziona correttamente o non sembra essere ben calibrato:
- Spegni il tuo PC o la tua PS3, verifica che il selettore PS3/PC (9) si trovi nella corretta
posizione, scollega completamente il tuo volante e tutti i cavi, ricollega il tutto e riavvia il tuo
gioco.
- Mentre colleghi il tuo volante, non muovere mai lo sterzo o i pedali: eviterai così qualsiasi
problema di calibrazione.
• La mia pedaliera non funziona correttamente:
- Collega sempre la pedaliera al volante (10/8) prima di collegare il connettore USB del
volante (7).
- Riconfigura il volante dalle opzioni del controller del tuo gioco.
• Non riesco a configurare il mio volante:
- Su PS3, dal menu Opzioni / Controller / Gamepad del tuo gioco: seleziona la
configurazione più appropriata.
- Su PC, dal menu Opzioni / Controller / Volanti del tuo gioco: seleziona la configurazione
più appropriata.
- Per risolvere questo tipo di problema, puoi anche utilizzare la funzione di
programmazione del tuo volante.
• Su PC, i menu del mio gioco si muovono da soli:
- Esci dal gioco e porta la pedaliera in modalità Combinata (2 assi). Torna quindi al tuo
gioco per riconfigurare il volante con i nuovi assi.
• Lo sterzo del mio volante non risponde a sufficienza:
- Porta il tuo volante in modalità ad Alta sensibilità.
- Regola la sensibilità dalle opzioni del tuo gioco.
• Su PC: in alcuni giochi, utilizza i profili preimpostati per FGT Rumble 3-in-1 o
Ferrari GT Experience.
Page 49

8/10
ASSISTENZA TECNICA
Qualora riscontrassi un problema con il tuo prodotto, accedi al sito
http://ts.thrustmaster.com e clicca su Technical Support. Da qui, potrai accedere a vari
servizi ed informazioni (Risposte alle Domande più Frequenti (FAQ), le più recenti versioni
di driver e software) che potrebbero esserti utili per risolvere il tuo problema. Qualora il
problema persistesse, puoi contattare il servizio di assistenza tecnica Thrustmaster
(“Technical Support”):
Tramite e-mail:
Per poter usufruire del servizio di assistenza tecnica tramite e-mail, dovrai prima registrarti
online. Le informazioni che fornirai aiuteranno i nostri esperti a risolvere più rapidamente il
tuo problema. Fai clic su Registration nella parte sinistra della pagina di Assistenza
Tecnica e segui le istruzioni che appariranno sullo schermo. Se sei già registrato, riempi i
campi Username e Password e clicca quindi su Login.
Via telefono (qualora non disponessi di un accesso a internet):
Gli giorni e orari di reperibilità e i numeri telefonici sono soggetti a modifiche. Per conoscere
le informazioni più aggiornate su come contattare il Servizio di Assistenza Tecnica, ti
preghiamo di visitare il sito http://ts.thrustmaster.com.
Italia
800035261
Numero gratuito
Lun - Ven: 9:00-13:00 e 14:00-18:00
Page 50

9/10
Informazioni sulla garanzia al consumatore
A livello mondiale, Guillemot Corporation S.A. (d’ora in avanti “Guillemot”) garantisce al consumatore che il
presente prodotto Thrustmaster sarà privo di difetti relativi ai materiali e alla fabbricazione, per un periodo
di garanzia corrispondente al limite temporale stabilito per la presentazione di un reclamo riguardante la
conformità del prodotto in questione. Nei paesi della Comunità Europea, tale periodo equivale a due (2)
anni a partire dalla consegna del prodotto Thrustmaster. In altri paesi, la durata della garanzia corrisponde
al limite temporale stabilito per la presentazione di un reclamo riguardante la conformità del prodotto
Thrustmaster in base alle leggi applicabili nel paese in cui il consumatore risiedeva alla data di acquisto del
prodotto Thrustmaster (qualora nel paese in questione non esistesse alcuna norma a riguardo, il periodo di
garanzia corrisponderà a un (1) anno a partire dalla data originale di acquisto del prodotto Thrustmaster).
Diversamente da quanto affermato in precedenza, le batterie ricaricabili sono coperte da una garanzia di
sei (6) mesi dalla data di acquisto originale.
Qualora, durante il periodo di garanzia, il prodotto dovesse apparire difettoso, contatti immediatamente
l’Assistenza Tecnica, che le indicherà la procedura da seguire. Qualora il difetto dovesse essere
confermato, il prodotto dovrà essere riportato al luogo di acquisto (o qualsiasi altro luogo indicato
dall’Assistenza Tecnica).
Nel contesto della presente garanzia, il prodotto difettoso di proprietà del consumatore potrà essere
riparato oppure sostituito, a discrezione dell’Assistenza Tecnica. Qualora le leggi applicabili in materia lo
consentano, la totale responsabilità di Guillemot e delle sue controllate (compresi i danni conseguenti) si
limita alla riparazione o alla sostituzione del prodotto Thrustmaster. Qualora le leggi applicabili in materia lo
consentano, Guillemot declina ogni garanzia sulla commerciabilità o la conformità a finalità particolari. I
diritti legali del consumatore, stabiliti dalle leggi vigenti in materia di vendita di beni di consumo, non
vengono intaccati dalla presente garanzia.
La presente garanzia non potrà essere applicata: (1) se il prodotto è stato modificato, aperto, alterato o ha
subito danni derivanti da un uso inappropriato o non autorizzato, da negligenza, da un incidente, dalla
semplice usura, o da qualsiasi altra causa non riconducibile a difetti nei materiali o nell'assemblaggio
(compresi, ma non i soli, prodotti Thrustmaster combinati con elementi inadatti, tra cui, in particolare,
batterie ricaricabili, caricatori o qualsiasi altro elemento non fornito da Guillemot per questo prodotto); (2) in
caso di mancato rispetto delle istruzioni fornite dall'Assistenza Tecnica; (3) in caso di software, ovvero
software soggetto a una specifica garanzia; (4) ai materiali di consumo (elementi che richiedono la loro
sostituzione al termine della loro durata di esercizio come, ad esempio, batterie di tipo convenzionale o
cuscinetti protettivi per auricolari o cuffie); (5) agli accessori (ad esempio, cavi, custodie, borsette, borse,
cinturini); (6) se il prodotto è stato venduto ad un'asta pubblica.
La presente garanzia non è trasferibile.
Responsabilità
Qualora le leggi applicabili in materia lo consentano, Guillemot Corporation S.A. (d'ora in avanti
“Guillemot”) e le sue controllate declinano ogni responsabilità per qualsiasi danno derivante da almeno una
delle seguenti condizioni: (1) il prodotto è stato modificato, aperto o alterato; (2) mancato rispetto delle
istruzioni di installazione; (3) uso inappropriato o non permesso, negligenza, incidente (come, ad esempio,
un impatto); (4) semplice usura. Qualora le leggi applicabili in materia lo consentano, Guillemot e le sue
controllate declinano ogni responsabilità per qualsiasi danno non riconducibile a difetti nei materiali o nella
fabbricazione del prodotto (compresi, ma non i soli, potenziali danni causati direttamente o indirettamente
da un qualunque software, oppure dall’uso del prodotto Thrustmaster in combinazione con elementi
inadatti, tra cui, in particolare, batterie ricaricabili, caricatori o qualsiasi altro elemento non fornito da
Guillemot per questo prodotto).
Page 51

10/10
COPYRIGHT
© 2014 Guillemot Corporation S.A. Tutti i diritti riservati. Thrustmaster
®
è un marchio
registrato di proprietà di Guillemot Corporation S.A. Ferrari® è un marchio depositato di
Ferrari Idea S.p.A. PlayStation® è un marchio registrato di proprietà di Sony Computer
Entertainment Inc. Windows® è un marchio registrato di proprietà di Microsoft Corporation,
negli Stati Uniti e/o altri Paesi. Tutti gli altri marchi e nomi commerciali vengono qui citati
previa autorizzazione ed appartengono ai legittimi proprietari. Illustrazioni escluse. I
contenuti, i design e le caratteristiche possono essere oggetto di modifiche senza preavviso
e possono variare da un Paese all’altro. Fabbricato in Cina.
RACCOMANDAZIONI SULLA TUTELA DELL’AMBIENTE
Al termine della sua vita operativa, questo prodotto non dovrebbe
essere gettato assieme ai comuni rifiuti, ma dovrebbe essere portato ad
un apposito punto di raccolta destinato al riciclaggio del Materiale
Elettrico ed Elettronico.
Ciò è confermato dal simbolo riportato sul prodotto, nel manuale d’uso o
sulla confezione.
A seconda delle proprie caratteristiche, i materiali potrebbero essere
riciclati. Tramite il riciclaggio ed altre forme di trattamento del Materiale
Elettrico ed Elettronico, è possibile fornire un importante contributo per la salvaguardia
dell’ambiente.
Per conoscere i punti di raccolta più vicini a te, contatta le autorità locali competenti.
Informazioni da conservare. I colori e le decorazioni possono variare.
Questo prodotto è conforme con le norme relative ai bambini di età superiore ai 14 anni. Non
è adatto all’uso da parte di bambini di età inferiore ai 14 anni.
www.thrustmast er.com
Page 52

1/10
1 D-Pad
7 Conector USB (para PC y PS3)
Para: PlayStation®3 / PC
Manual del usuario
CARACTERÍSTICAS TÉCNICAS
2 2 levas de cambio Arriba y Abajo
3 Botones de acción
4 Botón PS para PS3
5 LED
6 Botones SE y ST
(Select y Start/Programación)
8 Puerto RJ45 del volante
9 Interruptor PS3/PC
10 Conector RJ45 de los pedales
11 Sistema de montaje en
mesa/escritorio
Page 53

2/10
INSTALACIÓN DEL VOLANTE
Sujeción del volante en su sitio (11)
1. Coloca el volante en el borde de una mesa u otra superficie plana.
2. Inserta el extremo más corto de la varilla roscada en la abertura de la base del volante.
3. Desliza la pieza con forma de V dentro de la varilla roscada, de tal manera que las
mordazas de la V enganchen contra la cara inferior de la mesa.
4. Coloca el tornillo de apriete en la varilla roscada, y aprieta el conjunto hasta que el
volante quede perfectamente estable. Ten cuidado de no apretar en exceso el tornillo,
pues te arriesgas a dañar el sistema de montaje y/o la mesa.
Conexión de los pedales
Conecta el conector RJ45 de los pedales (10) al puerto RJ45 del volante (8).
¡Conecta siempre los pedales al volan te antes
de enchufar el conector USB del volante (7) o de i niciar un juego!
Calibración del volante y de los pedales
La calibración se realiza automáticamente.
¡Asegúrate siempre de que el volante este centrado y de no pisar los pedales,
Por motivos de seguridad, no utilizar nunca los pedales con los pies desnudos o
al enchufar el conector USB del volante (7) o al iniciar un juego!
únicamente con calcetines en los pies.
THRUSTMASTER® DECLINA CUALQUIER RESPONSABILIDAD EN CASO DE
LESIONES PRODUCTO DEL USO DE LOS PEDALES SIN CALZADO.
Page 54

3/10
PLAYSTATION®3
Instalación del volante en PlayStation®3
1. Pon el interruptor PS3/PC (9) (de la parte trasera del volante) en la posición PS3.
2. Enchufa el conector USB del volante (7) en el puerto USB 1 de la consola.
3. Enciende la consola.
4. Inicia el juego.
¡Ya estás preparado para jugar!
Notas importantes relacionadas con PlayStation®3
- El interruptor PS3/PC del volante (9) se debe poner siempre en la posición PS3 antes
de conectar el volante.
- El volante emula al controlador gamepad de la PS3 (dirígete a Opciones / Controlador
/ Gamepads para modificar la configuración).
- En modo 1 jugador: si tienes conectado el controlador gamepad oficial de PS3, debes
cambiarlo al puerto 2 del controlador para que el volante funcione.
- No dudes en probar 2 dos modos de sensibilidad del volante para optimizar su precisión.
Page 55

4/10
PC
Instalación del volante en PC
1. Pon el interruptor PS3/PC (9) (en la parte trasera del volante) en la posición PC.
2. Enchufa el conector USB del volante (7) en uno de los puertos USB del ordenador.
Windows® XP, Vista, 7 u 8 detectarán automáticamente el nuevo dispositivo.
3. En la ventana Dispositivos de juego de Windows y en los juegos, el volante se
detectará con el nombre FGT Rumble 3-in-1 o Ferrari GT Experience.
¡Ya estás preparado para jugar!
Notas importantes relacionadas con PC
- El interruptor PS3/PC del volante (9) se debe poner siempre en la posición PC antes de
conectar el volante.
- También se puede descargar de nuestro sitio web un software de programación
avanzada para PC, en la siguiente dirección: http://ts.thrustmaster.com/ (en
Updates and Downloads/PC/Wheels/Challenge PS3 PC/Drivers). La
pestaña Probar fuerzas (en el software de programación avanzada) no es
compatible con este volante.
Page 56

5/10
Acción
LED (5)
Pulsa y suelta simultáneamente:
el D-Pad (1) + las 2 levas de cambio Arriba y Abajo (2).
PARPADEA
LENTAMENTE
Acción
LED (5)
Pulsa y suelta simultáneamente:
el D-Pad (1) + las 2 levas de cambio Arriba y Abajo (2).
Pasos
Acción
LED (5)
1
Pulsa y suelta simultáneamente: SE + ST (6).
APAGADO
PARPADEA
RÁPIDAMENTE
Pulsa y suelta el botón o el pedal en que quieras
colocar tu función.
FUNCIONES AVANZADAS
AJUSTE DE LA SENSIBILIDAD DEL VOLANTE
El giro del volante incorpora 2 modos de sensibilidad:
- Sensibilidad normal (el modo predeterminado)
- Alta sensibilidad (se debe seleccionar)
• Para cambiar al modo de alta sensibilidad:
(Este procedimiento se debe llevar a cabo en cada reinicio o desconexión del volante)
El giro del volante ahora es más sensible.
• Para volver al modo de sensibilidad normal (el modo predeterminado):
NO PARPADEA
Ahora el giro del volante ha vuelto a sensibilidad normal (el modo predeterminado).
PROGRAMACIÓN DEL VOLANTE Y LOS PEDALES
Tu volante es totalmente programable:
- Todos los botones de acción se pueden intercambiar.
- Todos los botones se pueden programar en las levas de cambio o en los pedales.
• Ejemplos de usos posibles:
- En PS3, programación de L2/R2 o L3/R3 en 2 levas de cambio Arriba y Abajo (L1/R1).
- En PS3, programación de los botones Cruz/Cuadrado en los pedales (de forma
predeterminada L2/R2).
- Intercambio de los distintos botones para lograr una mayor accesibilidad.
• Procedimiento de programación:
2 Pulsa y suelta el botón a programar.
3
La programación se ha llevado a cabo.
(Este procedimiento se debe llevar a cabo en cada reinicio o desconexión del volante)
ENCENDIDO
Page 57

6/10
Acción
LED (5)
SE APAGA Y LUEGO
ENCENDER
MODO DE PEDALES
LED (5)
INDEPENDIENTE (modo predeterminado: recomendado)
ROJO
COMBINADO
VERDE
Pedales independientes
(modo predeterminado)
Pedales combinados
(se debe seleccionar)
derecho del controlador de PS3
• Borrado de la programación:
Pulsa y mantén pulsado durante 2 segundos: SE + ST (6).
SE VUELVE A
La programación se ha borrado.
CONFIGURACIÓN DE LOS PEDALES
De forma predeterminada, los pedales de acelerador y freno funcionan en modo
independiente, lo que significa que funcionan en ejes distintos.
Este modo te permite mejorar considerablemente tu precisión al conducir.
Si el juego no admite el modo independiente, los pedales del volante no funcionarán
correctamente. Tendrás que cambiarlos al modo combinado.
• Procedimiento de cambio del modo de los pedales:
Pulsa y suelta simultáneamente: los 2 pedales + el botón PS (4).
(Este procedimiento se debe llevar a cabo en cada reinicio o desconexión del volante)
• Configuración de pedales en PLAYSTATION®3:
- Acelerador = gatillo R2
en el controlador de PS3
- Freno = gatillo L2
en el controlador de PS3
- Acelerador = dirección Arriba en el mini-
stick derecho del controlador de PS3
- Freno = dirección Abajo en el mini-stick
Page 58

7/10
Pedales independientes
(modo predeterminado)
Pedales combinados
(se debe seleccionar)
- Freno = dirección Abajo en eje RZ
• Configuración de pedales en PC:
- Acelerador = eje RZ
- Freno = eje Y
- Acelerador = dirección Arriba en eje RZ
RESOLUCIÓN DE PROBLEMAS Y ADVERTENCIAS
• Mi volante no funciona correctamente o parece estar calibrado incorrectamente:
- Apaga tu PC o tu PS3, verifica que el interruptor PS3/PC (9) está en la posición
adecuada, desconecta completamente el volante y todos los cables, reconecta todo y a
continuación reinicia el juego.
- No muevas nunca el volante ni los pedales al conectar el volante para evitar problemas
de calibración.
• Mis pedales no funcionan correctamente:
- Conecta siempre los pedales al volante (10/8) antes de conectar el conector USB del
volante (7).
- Vuelve a configurar el volante en las opciones del controlador del juego.
• No puedo configurar el volante:
- En PS3, en el menú Opciones / Controlador / Gamepads del juego: selecciona la
configuración más apropiada.
- En PC, en el menú Opciones / Controlador / Volantes del juego: selecciona la
configuración más apropiada.
- También puedes usar la función de programación del volante para resolver este tipo de
problema.
• En PC, los menús del juego se desplazan solos:
- Sal del juego y cambia los pedales al modo combinado (2 ejes). A continuación, vuelve al
juego para reconfigurar el volante con los nuevos ejes.
• La dirección del volante no es lo bastante receptiva:
- Cambia el volante al modo de alta sensibilidad.
- Ajusta la sensibilidad en las opciones del juego.
• En PC: en algunos juegos, utiliza los valores predeterminados para FGT Rumble
3-in-1 o Ferrari GT Experience.
Page 59

8/10
SOPORTE TÉCNICO
Si encuentras un problema con tu producto, visita http://ts.thrustmaster.com y haz clic en
Technical Support. Desde allí podrás acceder a distintas utilidades (preguntas frecuentes
(Frequently Asked Questions, FAQ), las últimas versiones de controladores y software) que
pueden ayudarte a resolver tu problema. Si el problema persiste, puedes contactar con el
servicio de soporte técnico de los productos de Thrustmaster (“Soporte Técnico”):
Por correo electrónico:
Para utilizar el soporte técnico por correo electrónico, primero debes registrarte online. La
información que proporciones ayudará a los agentes a resolver más rápidamente tu
problema. Haz clic en Registration en la parte izquierda de la página de Soporte técnico y
sigue las instrucciones en pantalla. Si ya te has registrado, rellena los campos Username y
Password y después haz clic en Login.
Por teléfono (si no dispone de acceso a Internet):
Las dias i horas de funcionamiento y los números de teléfono pueden cambiar. En
http://ts.thrustmaster.com se puede obtener la información de contacto de Soporte técnico
más actualizada.
España
901988060
Precio de una llamada
De lunes a viernes de 9:00 a 19:00
telefónica local
Page 60

9/10
Información de garantía al consumidor
En todo el mundo, Guillemot Corporation S.A. (en lo sucesivo “Guillemot”) garantiza al consumidor que
este producto de Thrustmaster estará libre de defectos de materiales y mano de obra, durante un período
de garantía que corresponde al límite de tiempo para interponer una acción legal referida a la conformidad
en relación con este producto. En los países de la Unión Europea, esto corresponde a un período de dos
(2) años a partir de la entrega del producto de Thrustmaster. En otros países, el período de garantía
corresponde al límite de tiempo para interponer una acción legal referida a la conformidad en relación con
este producto de Thrustmaster según las leyes aplicables del país en el que el consumidor estuviese
domiciliado en la fecha de compra del producto de Thrustmaster (si no existiese una acción similar en el
país correspondiente, entonces el período de garantía será de un (1) año a partir de la fecha de compra
original del producto de Thrustmaster).
A pesar de lo anterior, las baterías recargables están cubiertas por un período de garantía de seis (6)
meses a partir de la fecha de compra original.
Si el producto resultase defectuoso durante el período de garantía, hay que ponerse en contacto
inmediatamente con el Soporte Técnico, que indicará el procedimiento a seguir. Si se confirma el defecto, el
producto debe devolverse a su lugar de compra (o a cualquier otra ubicación indicada por el Soporte Técnico).
Dentro del contexto de esta garantía, el producto defectuoso del consumidor será reparado o sustituido, a
elección del Soporte Técnico. Si la ley aplicable lo permite, toda la responsabilidad de Guillemot y sus
filiales (incluso por daños resultantes) se limita a la reparación o sustitución del producto de Thrustmaster.
Si la ley aplicable lo permite, Guillemot renuncia a todas las garantías de comerciabilidad o adecuación
para un propósito determinado. Los derechos legales del consumidor en relación con las leyes aplicables
a la venta de productos de consumo no se ven afectados por esta garantía.
Esta garantía no se aplicará: (1) si el producto ha sido modificado, abierto, alterado o ha sufrido daños
como resultado de un uso inapropiado o abuso, negligencia, accidente, desgaste normal, o cualquier otra
causa no relacionada con un defecto de materiales o fabricación (incluyendo, pero no de forma exclusiva,
la combinación del producto de Thrustmaster con cualquier elemento no adecuado, incluyendo en
particular fuentes de alimentación, baterías recargables, cargadores o cualquier otro elemento no
suministrado por Guillemot para este producto); (2) en caso de incumplimiento de las instrucciones
proporcionadas por el Soporte Técnico; (3) a software, es decir software sujeto a una garantía específica;
(2) en caso de incumplimiento de las instrucciones proporcionadas por el Soporte Técnico; (3) a software,
es decir software sujeto a una garantía específica; (4) a consumibles (elementos que se tienen que
reemplazar a lo largo de la vida del producto: por ejemplo, baterías desechables o almohadillas para
auriculares de audio); (5) a accesorios (por ejemplo, cables, cajas, bolsas, bolsos o muñequeras); (6) si el
producto se ha vendido en una subasta pública. (6) si el producto se ha vendido en una subasta pública.
Esta garantía no es transferible.
Responsabilidad
Si la ley aplicable lo permite, Guillemot Corporation S.A. (en lo sucesivo “Guillemot”) y sus filiales
renuncian a toda responsabilidad por los daños causados por uno o más de los siguientes motivos: (1) el
producto ha sido modificado, abierto o alterado; (2) incumplimiento de las instrucciones de montaje; (3)
uso inapropiado o abuso, negligencia, accidente (un impacto, por ejemplo); (4) desgaste normal. Si la ley
aplicable lo permite, Guillemot y sus filiales renuncian a toda responsabilidad por los daños no
relacionados con defectos de materiales o fabricación en relación con el producto (incluyendo, pero no de
forma exclusiva, los daños causados de forma directa o indirecta por cualquier software, o por combinar el
producto de Thrustmaster con cualquier elemento no adecuado, incluyendo en particular fuentes de
alimentación, baterías recargables, cargadores o cualquier otro elemento no suministrado por Guillemot
para este producto).
Page 61

10/10
COPYRIGHT
© 2014 Guillemot Corporation S.A. Todos los derechos reservados. Thrustmaster
marca registrada de Guillemot Corporation S.A. Ferrari® es una marca registrada de Ferrari
Idea S.p.A. PlayStation
®
es una marca comercial registrada de Sony Computer
®
es una
Entertainment Inc. Windows® es una marca registrada de Microsoft Corporation en Estados
Unidos y/o en otros países. Todas las demás marcas registradas y nombres comerciales se
reconocen por los presentes y son propiedad de sus respectivos dueños. Ilustraciones no
definitivas. El contenido, la concepción y las especificaciones son susceptibles de cambiar
sin previo aviso y varían según el país. Fabricado en China.
RECOMENDACIÓN DE PROTECCIÓN AMBIENTAL
Al terminar su vida útil, este producto no debe tirarse en un
contenedor de basuras estándar, sino que debe dejarse en un punto
de recogida de desechos eléctricos y equipamiento electrónico para
ser reciclado.
Esto viene confirmado por el símbolo que se encuentra en el
producto, manual del usuario o embalaje.
Dependiendo de sus características, los materiales pueden
reciclarse. Mediante el reciclaje y otras formas de procesamiento de
los desechos eléctricos y el equipamiento electrónico puedes
contribuir de forma significativa a ayudar a proteger el medio ambiente.
Contacta con las autoridades locales para más información sobre el punto de recogida más
cercano.
Esta información debe conservarse. Los colores y motivos decorativos pueden variar.
Este producto cumple con todas las normas relativas a los niños de más de 14 años. No es
recomendable para niños de menos de 14 años.
www.thrustmaster.com
Page 62

1/10
1 D-Pad
(Select e Start/Programação)
7 Conetor USB (para PC e PS3)
Para: PlayStation®3 / PC
Manual do utilizador
CARACTERÍSTICAS TÉCNICAS
2 2 pás de mudança de velocidades
Para cima e Para baixo
3 Botões de ações
4 Botão PS para a PS3
5 Indicador luminoso
6 Botões SE e ST
8 Porta RJ45 do volante
9 Seletor PS3/PC
10 Conetor RJ45 do conjunto de
pedais
11 Sistema de montagem na
mesa/secretária
Page 63

2/10
INSTALAR O VOLANTE
Fixar o volante na posição (11)
1. Coloque o volante na borda de uma mesa ou outra superfície plana.
2. Insira a extremidade mais curta da haste roscada na abertura situada na base do
volante.
3. Faça deslizar a peça em forma de V para cima da haste roscada, de forma que os
grampos do V se fixem à parte inferior da mesa.
4. Coloque o parafuso de aperto na haste roscada e aperte tudo até o volante ficar
perfeitamente estável. Certifique-se de que não aperta demasiado o parafuso, caso
contrário poderá danificar o sistema de montagem e/ou a mesa.
Ligar o conjunto de pedais
Ligue o conetor RJ45 (10) do conjunto de pedais à porta RJ45 (8) do volante.
Ligue sempre o conj unto de pedais ao volante antes
de ligar o conetor USB (7) do volante ou de iniciar um jogo!
Calibrar o volante e o conjunto de pedais
A calibragem é realizada automaticamente.
Certifique-se sempre de que o volante está centrado e não prima os pedais
quando ligar o conetor USB (7) do volante ou iniciar um jogo!
Por razões de segurança, nunca utilize o conjunto de pedais com os pés descalços
ou quando estiver apenas de meias calçadas.
A THRUSTMASTER® NÃO ASSUME QUALQUER RESPONSABILIDADE NA
EVENTUALIDADE DE DANOS FÍSICOS RESULTANTES DA UTILIZAÇÃO DO
CONJUNTO DE PEDAIS SEM CALÇADO.
Page 64

3/10
PLAYSTATION®3
Instalar o volante na PlayStation®3
1. Regule o seletor PS3/PC (9) (situado na parte posterior do volante) para a posição PS3.
2. Ligue o conetor USB (7) do volante à porta USB 1 na consola.
3. Ligue a consola.
4. Inicie o jogo.
Está pronto para começar a jogar!
Notas importantes relativamente à PlayStation®3
- O seletor PS3/PC (9) tem de ser sempre regulado para a posição PS3 antes de ligar o
volante.
- O volante emula o controlador da PS3 (vá até Opções / Controlador / Gamepads para
alterar a configuração).
- Em modo 1 jogador: se o seu controlador PS3 oficial estiver ligado, terá de mudá-lo
para a porta do controlador 2 para que o volante possa funcionar.
- Não hesite em testar os 2 modos de sensibilidade do volante para otimizar a respetiva
precisão.
Page 65

4/10
PC
Instalar o volante no PC
1. Regule o seletor PS3/PC (9) (situado na parte posterior do volante) para a posição PC.
2. Ligue o conetor USB (7) do volante a uma das portas USB do computador.
O Windows® XP, Vista, 7 ou 8 detetará automaticamente o novo dispositivo.
3. Na janela Controladores de jogos do Windows e nos jogos, o volante será detetado
com o nome FGT Rumble 3-in-1 ou Ferrari GT Experience.
Está pronto para começar a jogar!
Notas importantes relativamente ao PC
- O seletor PS3/PC (9) tem de ser sempre regulado para a posição PC antes de ligar o
volante.
- No nosso sítio Web está igualmente disponível para transferência software de
programação avançada para PC, através do seguinte endereço:
http://ts.thrustmaster.com/ (em Updates and
Downloads/PC/Wheels/Challenge PS3 PC/Drivers). O separador
Testar efeitos (no software de programação avançada) não é compatível com este
volante.
Page 66

5/10
Ação
Indicador luminoso (5)
Prima e solte em simultâneo: D-Pad (1) + pás de
mudança de velocidades Para cima e Para baixo (2).
Ação
Indicador luminoso (5)
Prima e solte em simultâneo: D-Pad (1) + pás de
mudança de velocidades Para cima e Para baixo (2).
Indicador
luminoso (5)
1
Prima e solte em simultâneo: SE + ST (6).
APAGADO
PISCA
RAPIDAMENTE
Prima e solte o botão ou pedal ao qual pretende
atribuir a função.
FUNÇÕES AVANÇADAS
AJUSTAR A SENSIBILIDADE DO VOLANTE
O volante possui 2 modos de sensibilidade:
- Sensibilidade normal (modo predefinido)
- sensibilidade Alta (tem de ser selecionado)
• Para mudar para o modo de sensibilidade Alta:
PISCA LENTAMENTE
(É necessário repetir sempre este procedimento depois de reiniciar ou desligar o volante)
O volante regressou ao modo de sensibilidade Normal (modo predefinido).
PROGRAMAR O VOLANTE E OS PEDAIS
O volante é totalmente programável e permite:
- Trocar todos os botões de ações.
- Programar todos os botões nas pás de mudança de velocidades ou nos pedais.
• Exemplos de utilizações possíveis:
- Na PS3, programar L2/R2 ou L3/R3 nas 2 pás de mudança de velocidades Para cima
e Para baixo (L1/R1).
- Na PS3, programar os botões Cruz/Quadrado nos pedais (L2/R2 por predefinição).
- Trocar botões diferentes para uma maior acessibilidade.
Passos Ação
2 Prima e solte o botão a programar.
3
(É necessário repetir sempre este procedimento depois de reiniciar ou desligar o volante)
A condução do volante está agora mais sensível.
• Para regressar ao modo de sensibilidade Normal (modo predefinido):
NÃO PISCA
• Procedimento de programação:
A programação foi executada.
ACESO
Page 67

6/10
Indicador luminoso
(5)
APAGA-SE E EM
ACENDER-SE
MODO DO CONJUNTO DE PEDAIS
Indicador luminoso (5)
SEPARADO (modo predefinido: recomendado)
VERMELHO
COMBINADO
VERDE
Pedais em modo Separado
(modo predefinido)
Pedais em modo Combinado
(tem de ser selecionado)
minialavanca direita do controlador da PS3
• Apagar a programação:
Ação
Prima continuamente durante 2 segundos: SE + ST (6).
SEGUIDA VOLTA A
A programação foi apagada.
CONFIGURAR O CONJUNTO DE PEDAIS
Por predefinição, os pedais do acelerador e do travão funcionam em modo Separado, o
que significa que os pedais funcionam em eixos independentes.
Este modo permite-lhe melhorar consideravelmente a precisão da sua condução.
Se o jogo não suporta o modo Separado, o conjunto de pedais do volante não funcionará
corretamente. Terá de mudar então para o modo Combinado.
• Procedimento de alteração do modo do conjunto de pedais:
Prima e solte em simultâneo: 2 pedais + botão PS (4).
(É necessário repetir sempre este procedimento depois de reiniciar ou desligar o volante)
• Configuração dos pedais na PLAYSTATION®3:
- Acelerador = Gatilho R2
no controlador da PS3
- Travão = Gatilho L2
no controlador da PS3
- Acelerador = Direção Para cima na
minialavanca direita do controlador da PS3
- Travão = Direção Para baixo na
Page 68

7/10
Pedais em modo Separado
(modo predefinido)
Pedais em modo Combinado
(tem de ser selecionado)
R
- Travão = Direção Para baixo no eixo RZ
• Configuração dos pedais no PC:
- Acelerador = Eixo RZ
- Travão = Eixo Y
- Acelerador = Direção Para cima no eixo
RESOLUÇÃO DE PROBLEMAS E AVISO
• O meu volante não funciona corretamente ou parece estar mal calibrado:
- Desligue o PC ou a PS3, verifique se o seletor PS3/PC (9) está na posição correta,
desligue completamente o volante e todos os cabos, volte a ligar tudo e reinicie o jogo.
- Nunca mova o volante ou os pedais quando ligar o volante, para evitar quaisquer
problemas de calibragem.
• O meu conjunto de pedais não funciona corretamente:
- Ligue sempre o conjunto de pedais ao volante (10/8) antes de ligar o conetor USB (7) do
volante.
- Reconfigure o volante nas opções de controlador do jogo.
• Não consigo configurar o meu volante:
- PS3: no menu Opções / Controlador / Gamepads do jogo, selecione a configuração
mais adequada.
- PC: no menu Opções / Controlador / Volantes do jogo, selecione a configuração mais
adequada.
- Pode também utilizar a função de programação do volante para resolver este tipo de
problema.
• No PC, os menus no meu jogo deslocam-se sozinhos:
- Saia do jogo e mude o conjunto de pedais para o modo Combinado (2 eixos). Regresse
então ao jogo para reconfigurar o volante com os novos eixos.
• O meu volante não responde eficazmente:
- Mude o volante para o modo de sensibilidade Alta.
- Ajuste a sensibilidade nas opções do jogo.
• PC: em alguns jogos, utilize as predefinições pré-existentes para FGT Rumble 3-
in-1 ou Ferrari GT Experience.
Page 69

8/10
SUPORTE TÉCNICO
Se surgir algum problema com o seu produto, vá até http://ts.thrustmaster.com e clique em
Technical Support. A partir daqui pode aceder a vários utilitários, como as perguntas mais
frequentes (FAQ) ou as versões mais recentes dos controladores e do software, capazes de
ajudá-lo a resolver o seu problema. Se o problema se mantiver, contacte o serviço de
suporte técnico dos produtos Thrustmaster (“Technical Support”):
Por correio electrónico:
Para tirar partido do suporte técnico por correio electrónico, primeiro tem de se registar
online. As informações que fornecer ajudarão os agentes a resolver mais rapidamente o seu
problema. Clique em Registration no lado esquerdo da página Technical Support e siga as
instruções que surgirem no ecrã. Se já tiver feito o seu registo, preencha os campos
Username e Password e clique em Login.
Page 70

9/10
Informações sobre a garantia para o consumidor
A Guillemot Corporation S.A. (a seguir designada como “Guillemot”) garante a nível mundial ao
consumidor que este produto Thrustmaster está livre de defeitos em termos de materiais e fabrico durante
um período de garantia que corresponde ao limite de tempo para intentar uma ação de conformidade
relativamente a este produto. Nos países da União Europeia, isto corresponde a um período de dois (2)
desde a entrega do produto Thrustmaster. Noutros países, o período de garantia corresponde ao limite de
tempo para intentar uma ação de conformidade relativamente ao produto Thrustmaster de acordo com a
legislação em vigor do país no qual o consumidor residia à data de compra do produto Thrustmaster (se a
dita ação não existir no país correspondente, então o período de garantia será de um (1) ano a partir da
data de compra original do produto Thrustmaster.
Não obstante o supracitado, as baterias recarregáveis estão cobertas por um período de garantia de seis
(6) meses a partir da data de compra original.
No caso de o produto apresentar algum defeito durante o período da garantia, contacte imediatamente o
Suporte Técnico, que lhe indicará o procedimento a tomar. Se esse defeito se confirmar, o produto terá de
ser devolvido ao respetivo local de compra (ou qualquer outro local indicado pelo Suporte Técnico).
No âmbito da presente garantia, e por opção do Suporte Técnico, o produto defeituoso do consumidor
será reparado ou substituído. Se for permitido pela legislação em vigor, a responsabilidade total da
Guillemot e das respetivas filiais (incluindo para danos indiretos) está limitada à reparação ou substituição
do produto Thrustmaster. Se for permitido pela legislação em vigor, a Guillemot rejeita todas as garantias
de comercialização ou adequação a um fim específico. Os direitos legais do consumidor no que concerne
à legislação aplicável à venda de bens de consumo não são afetados pela presente garantia.
A presente garantia não se aplicará: (1) se o produto tiver sido modificado, aberto, alterado ou danificado
em resultado de utilização inadequada ou abusiva, negligência, acidente, desgaste normal ou qualquer
outra casa relacionada com um defeito de material ou fabrico (incluindo, mas sem limitação, combinar o
produto Thrustmaster com qualquer elemento inadequado, incluindo, em particular, fontes de alimentação,
baterias recarregáveis, carregadores ou quaisquer outros elementos não fornecidos pela Guillemot para
este produto); (2) na eventualidade de incumprimento das instruções fornecidas pelo Suporte Técnico; (3)
a software, estando o mesmo sujeito a uma garantia específica; (4) a consumíveis (elementos para
substituir ao longo da vida útil do produto, como baterias descartáveis e auriculares de auscultadores, por
exemplo); (5) a acessórios (cabos, estojos, bolsas, sacos e correias de pulso, por exemplo); (6) se o
produto foi vendido num leilão público.
A presente garantia não é transmissível.
Responsabilidade
Se for permitido ao abrigo da legislação aplicável, a Guillemot Corporation S.A. (a seguir designada
“Guillemot”) e as respetivas filiais rejeitam qualquer responsabilidade por danos resultantes de uma ou
mais das seguintes causas: (1) o produto foi modificado, aberto ou alterado; (2) incumprimento das
instruções de montagem; (3) utilização inadequada ou abusiva, negligência ou acidente (um impacto, por
exemplo); (4) desgaste normal. Se for permitido ao abrigo da legislação aplicável, a Guillemot e as
respetivas filiais rejeitam qualquer responsabilidade por danos relacionados com um defeito de material ou
fabrico relativamente ao produto (incluindo, mas sem limitação, quaisquer danos causados direta ou
indiretamente por qualquer software ou por combinar o produto Thrustmaster com qualquer elemento
inadequado, incluindo, em particular, fontes de alimentação, baterias recarregáveis, carregadores ou
quaisquer outros elementos não fornecidos pela Guillemot para este produto).
Page 71

10/10
DIREITOS DE AUTOR
© 2014 Guillemot Corporation S.A. Todos os direitos reservados. Thrustmaster
marca registada da Guillemot Corporation S.A. Ferrari® é uma marca registada da Ferrari
Idea S.p.A. PlayStation
®
Windows
é uma marca registada da Microsoft Corporation nos Estados Unidos e/ou
®
é uma marca registada da Sony Computer Entertainment Inc.
®
é uma
noutros países. Todas as outras marcas comerciais e nomes de marcas são por este meio
reconhecidas e pertencem aos respectivos proprietários. As ilustrações não são
vinculativas. Os conteúdos, desenhos e especificações estão sujeitos a alteração sem
aviso prévio e podem variar de país para país. Fabricado na China.
RECOMENDAÇÕES DE PROTECÇÃO AMBIENTAL
Quando este produto chegar ao fim da sua vida útil, não o elimine
juntamente com os resíduos domésticos normais; em vez disso,
deixe-o num ponto de recolha de resíduos de equipamento
eléctrico e electrónico (REEE) para posterior reciclagem.
O símbolo presente no produto, no manual de utilizador ou na caixa
confirma-o.
Os materiais podem ser reciclados, dependendo das suas
características. Através da reciclagem e de outras formas de
processamento de resíduos de equipamento eléctrico e electrónico,
pode dar um importante contributo no sentido de ajudar a proteger o ambiente.
Contacte as autoridades locais para saber onde fica o ponto de recolha mais perto da sua
área de residência.
Informações a reter. As cores e as decorações podem variar.
Este produto está em conformidade com as normas relativas às crianças com mais de 14
anos de idade. Não é recomendado às crianças com menos de 14 anos de idade.
www.thrustmaster.com
Page 72

1/10
1 Многопозиционная кнопка
Start (Пуск)/Программирование)
7 USB-разъем (для ПК и PS3)
для PlayStation®3 / ПК
Инструкция по эксплуатации
ТЕХНИЧЕСКИЕ ХАРАКТЕРИСТИКИ
2 2 лепестка-переключателя
скоростей вверх и вниз
3 Функциональные кнопки
4 Кнопка PS для PS3
5 Индикатор
6 Кнопки SE и ST (Select (Выбор) и
8 Порт RJ45 рулевой системы
9 Переключатель PS3/ПК
10 Разъем RJ45 педального блока
11 Система крепления на столе
Page 73

2/10
УСТАНОВКА РУЛЕВОЙ СИСТЕМЫ
Закрепление руля (11)
1. Расположите рулевое колесо на краю стола или иной плоской поверхности.
2. Вставьте короткий конец нарезного стержня в отверстие на базе рулевой системы.
3. Наденьте на стержень V-образную деталь таким образом, чтобы ее выступы были
прижаты к нижней поверхности стола.
4. Наденьте на стержень стопорную шайбу и затяните ее до упора, чтобы
обеспечить абсолютную устойчивость системы. Не допускайте чрезмерной
затяжки, поскольку иначе можно повредить систему крепления и/или стол.
Подключение педального блока
Подключите разъем RJ45 педального блока (10) к порту RJ45 на базе руля (8).
Педальный блок следует подключать к рулевой системе, перед
подключением USB-кабеля рулевой системы (7) или запуском игры!
Калибровка руля и педального блока
Калибровка выполняется автоматически.
Убедитесь, что руль отцентрован, и ни в коем случае не нажимайте педали
во время подключения USB-кабеля рулевой системы (7) и во время запуска игры!
Из соображений безопасности никогда не нажимайте на педали босой ногой или
ногой в носке (без обуви).
КОМПАНИЯ THRUSTMASTER® ОТКАЗЫВАЕТСЯ ОТ ЛЮБОЙ ОТВЕТСТВЕННОСТИ В
СЛУЧАЕ ПОЛУЧЕНИЯ ТРАВМЫ В РЕЗУЛЬТАТЕ НАЖИМАНИЯ НА ПЕДАЛИ
НЕОБУТЫМИ НОГАМИ.
Page 74

3/10
PLAYSTATION®3
Установка рулевой системы для PlayStation®3
1. Переведите переключатель PS3/ПК (9) (на задней стороне рулевой системы) в
положение PS3.
2. Подключите USB-разъем рулевой системы (7) к USB-порту 1 на консоли.
3. Включите консоль.
4. Запустите игру.
Теперь все готово для игры!
Важные примечания по PlayStation®3
- Переключатель PS3/ПК рулевой системы (9) обязательно следует переводить в
положение PS3 перед подключением к консоли.
- Рулевая система имитирует игровой пульт для PS3 (для изменения конфигурации
откройте Параметры / Контроллер / Игровые пульты).
- В режиме 1 игрока: если оригинальный игровой пульт для PS3 включен, для
обеспечения работы рулевой системы пульт необходимо перевести на порт
контроллера 2.
- Для оптимизации настроек точности рулевой системы протестируйте 2 режима
чувствительности.
Page 75

4/10
ПК
Установка рулевой системы на ПК
1. Переведите переключатель PS3/ПК (9) (на задней стороне рулевой системы) в
положение PC (ПК).
2. Подключите USB-кабель рулевой системы (7) к одному из USB-портов
компьютера.
В ОС Windows® XP, Vista, 7 и 8 новое устройство распознается автоматически.
3. В окне Игровые контроллеры ОС Windows и в играх рулевая система будет
обозначаться именем FGT Rumble 3-in-1 или Ferrari GT Experience.
Теперь все готово для игры!
Важные примечания для ПК
- Переключатель PS3/ПК рулевой системы (9) обязательно следует переводить в
положение PC перед подключением к консоли.
- Расширенный программный пакет Advanced Programming Software для ПК можно
также загрузить с нашего веб-сайта: http://ts.thrustmaster.com/ (в разделе
Updates and Downloads/PC/Wheels/Challenge PS3 PC/Drivers). -
Вкладка Test forces (Проверка сил) расширенного программного
пакета не поддерживается для данной рулевой системы.
Page 76

5/10
Действие
Индикатор (5)
Одновременно нажать и отпустить:
переключателя скоростей (2).
Действие
Индикатор (5)
Одновременно нажать и отпустить:
переключателя скоростей (2).
РАСШИРЕННЫЕ ФУНКЦИИ
РЕГУЛИРОВКА ЧУВСТВИТЕЛЬНОСТИ РУЛЯ
Поддерживаются 2 режима чувствительности рулевого управления:
- нормальная чувствительность (Normal Sensitivity), режим по умолчанию;
- высокая чувствительность (High sensitivity), выбирается пользователем.
• Переключение в режим высокой чувствительности
многопозиционную кнопку (1) + 2 лепестка-
РЕДКО МИГАЕТ
Рулевое управление настроено на повышенную чувствительность.
(Эту процедуру необходим о выполнять после каждого перезапуска или
отключения рулевой системы).
• Возврат в режим нормальной чувствительности (режим по умолчанию)
многопозиционную кнопку (1) + 2 лепестка-
НЕ МИГАЕТ
Теперь чувствительность рулевого управления возвращена к нормальному значению
(режим по умолчанию).
ПРОГРАММИРОВАНИЕ РУЛЕВОЙ СИСТЕМЫ И ПЕДАЛЬНОГО БЛОКА
Рулевая система полностью программируется:
- все функциональные кнопки можно переопределить;
- функции всех кнопок можно запрограммировать на лепестки-переключатели или
на педали.
• Возможные примеры применения:
- на консоли PS3 перенос функций кнопок L2/R2 или L3/R3 на лепесткипереключатели (L1/R1);
- на консоли PS3 программирование функций кнопки с крестом и квадратной кнопки
на педали (по умолчанию — L2/R2);
- перенос функций различных кнопок для более удобного доступа.
Page 77

6/10
Индикатор
(5)
1
Одновременно нажать и отпустить кнопки SE + ST (6).
ВЫКЛ.
ЧАСТО
МИГАЕТ
Нажать и отпустить кнопку или педаль, на которую
переносится функция.
Действие
Индикатор (5)
ВЫКЛЮЧАЕТСЯ И
ВКЛЮЧАЕТСЯ
РЕЖИМ РАБОТЫ ПЕДАЛЬНОГО БЛОКА
ИНДИКАТОР (5)
РАЗДЕЛЬНЫЙ (режим по умолчанию,
рекомендуется)
СОВМЕСТНЫЙ
ЗЕЛЕНЫЙ
• Процедура программирования
Этап Действие
2 Нажать и отпустить перепрограммируемую кнопку.
3
Программирование выполнено.
(Эту процедуру необходим о выполнять после каждого перезапуска или
отключения рулевой системы).
• Удаление результатов программирования
ВКЛ.
Нажать и удерживать в течение 2 секунд кнопки SE +
ST (6).
СНОВА
Программирование стерто.
НАСТРОЙКА ПЕДАЛЬНОГО БЛОКА
По умолчанию педали газа и тормоза рулевой системы действуют в раздельном
режиме, то есть, функционируют на независимых осях.
Этот режим позволяет значительно повысить точность управления.
Если в игре не поддерживается раздельный режим, педальный блок не будет
работать корректно. В этом случае необходимо переключиться в совместный режим.
• Процедура измерения режима работы педального блока
Одновременно нажать и отпустить: 2 педали + кнопку PS (4).
(Эту процедуру необходим о выполнять после каждого перезапуска или
отключения рулевой системы).
КРАСНЫЙ
Page 78

7/10
Раздельная работа педалей
(режим по умолчанию)
Совместная работа педалей
(выбирается пользователем)
пульта PS3
Раздельная работа педалей
(режим по умолчанию)
Совместная работа педалей
(выбирается пользователем)
RZ
на ос
Y
• Настройка педального блока для PLAYSTATION®3:
- Педаль газа = триггер R2
на игровом пульте PS3
- Педаль тормоза = триггер L2
на игровом пульте PS3
• Настройка педального блока для ПК:
- Педаль газа = ось RZ
- Педаль тормоза = ось Y
- Педаль газа = движение вверх
правым мини-джойстиком игрового
- Педаль тормоза = движение вниз
пульта PS3
правым мини-джойстиком игрового
- Педаль газа = движение вверх на оси
- Педаль тормоза = движение вниз
Page 79

8/10
УСТРАНЕНИЕ НЕИСПРАВНОСТЕЙ И ПРЕДУПРЕЖДЕНИЯ
• Рулевая система не работает должным образом или кажется неверно откалиброванной:
- выключите ПК или PS3; убедитесь, что переключатель PS3/ПК (9) находится в правильном
положении; отключите от рулевой системы все кабели и подключения, подключите все заново и
перезапустите игру;
-ни в коем случае не сдвигайте руль и педальный блок во время подключения системы во
избежание ошибок калибровки.
• Педальный блок не работает должным образом:
- педальный блок обязательно следует подключать к рулевой системе (10/8) перед подключением
USB-кабеля системы (7);
- перенастройте рулевую систему в меню параметров игрового пульта игры.
• Не удается настроить рулевую систему:
- на консоли PS3: в игре, в разделе Параметры / Контроллер выберите оптимальную
конфигурацию;
- на ПК: в игре, в разделе Параметры / Контроллер / Рули выберите оптимальную конфигурацию;
- для решения этой проблемы можно также воспользоваться функцией программирования
рулевой системы.
• На ПК меню в игре самопроизвольно разворачиваются:
- выйдите из игры и переключите педальный блок в совместный режим (2 оси). Затем вернитесь в
игру и перенастройте рулевую систему с новыми осями.
• Недостаточное реагирование руля на поворот:
- переключите рулевую систему в режим высокой чувствительности;
- отрегулируйте чувствительность в параметрах игры.
• На ПК: в некоторых играх можно пользоваться предварительными настройками для FGT
Rumble 3-in-1 или Ferrari GT Experience.
ТЕХНИЧЕСКАЯ ПОДДЕРЖКА
При возникновении проблем, связанных с использованием контроллера, зайдите на веб-сайт
http://ts.thrus tmaster.com и перейдите по ссылке Technical Support (техническая поддержка). На
этой странице есть доступ к различным утилитам (часто задаваемые вопросы (FAQ), самые новые
версии драйверов и программного обеспечения) – это может помочь решению проблемы. Если это
не помогло, можно связаться со службой технической поддержки Thrustmaster (“Technical Support”):
По электронной почте:
Чтобы отправить запрос в отдел технической поддержки по электронной почте, необходимо
зарегистрироваться. Предоставленная информация поможет быстрее решить проблему.
Перейдите по ссылке Registration (регистрация), которая находится слева на странице
технической поддержки Technical Support и следуйте инструкциям на экране. Если вы уже
зарегистрированы, введите имя пользователя и пароль, затем щелкните Login (вход).
Сведения о потребительской гарантии
Корпорация Guillemot Corporation S.A. (далее — «Guillemot») гарантирует своим клиентам во всем
мире, что в данном изделии Thrustmaster не будет выявлено никаких дефектов материалов и
производства в течение гарантийного периода, который равен сроку предъявления претензии по
соответствию для данного изделия. В странах Европейского Союза этот срок соответствует двум (2)
годам с момента поставки изделия Thrustmaster. В других странах гарантийный период равен сроку
Page 80

9/10
предъявления претензии по соответствию для изделия Thrustmaster, определяемому
соответствующим законодательством страны, в которой проживал потребитель на момент
приобретения изделия Thrustmaster (если подобные претензии не действуют в соответствующей
стране, гарантийный период равняется одному (1) году с первоначальной даты приобретения
изделия Thrustmaster).
Невзирая на вышеизложенное, гарантия на аккумуляторы равняется шести (6) месяцам с
первоначальной даты приобретения.
В случае обнаружения дефектов изделия во время гарантийного периода незамедлительно
обратитесь в службу технической поддержки, сотрудники которой определят дальнейшую
процедуру. Если дефект будет подтвержден, изделие следует вернуть по месту приобретения (или
в любое другое место, указанное службой технической поддержки).
В рамках действия гарантии дефектное изделие будет, по усмотрению службы технической
поддержки, отремонтировано или заменено. В мере, разрешенной применимым законодательством,
полная ответственность компании Guillemot и ее дочерних компаний (в том числе косвенный ущерб)
ограничивается ремонтом или заменой изделия Thrustmaster. В мере, разрешенной применимым
законодательством, компания Guillemot отказывается от любых гарантий коммерческой пригодности
или пригодности для определенной цели. Настоящая гарантия не ущемляет прав потребителя,
предоставляемых ему применимыми законами в отношении продажи потребительских товаров.
Настоящая гарантия не распространяется: (1) на ситуации, когда изделие было видоизменено,
открыто, модифицировано или получило повреждения в результате недопустимого или
неправильного использования, небрежности или несчастного случая, естественного износа или
любой другой причины, не связанной с дефектом материалов или производства (включая, помимо
прочего, использование изделия Thrustmaster совместно с любыми неподходящими элементами, в
частности — с блоками питания, аккумуляторами, зарядными устройствами и любыми другими
элементами, не входящими в комплектацию Guillemot для данного изделия); (2) на ситуации, когда
указания службы технической поддержки не были выполнены; (3) на ПО, так как на такое ПО
распространяется отдельная гарантия; (4) на расходные материалы (элементы, предназначенные
для замены в течение срока службы изделия: например, батарейки и ушные подушки для гарнитур
или наушников); (5) на аксессуары (например, кабели, чехлы, с умки, футляры, наручные ремешки);
(6) на случаи продажи изделия с открытого аукциона.
Данная гарантия не подлежит передаче.
Ответственность
В мере, разрешенной применимым законодательством, компания Guillemot Corporation S.A. (далее
— «Guillemot») и ее дочерние предприятия отказываются от любой ответственности за любой
ущерб, вызванный одним или несколькими из следующих факторов: (1) видоизменение, вскрытие
или модификация изделия; (2) несоблюдение инструкций по сборке; (3) недопустимое или
неправильное использование, небрежность, несчастный случай (например, физическое
воздействие); (4) естественный износ. В мере, разрешенной применимым законодательством,
компания Guillemot и ее дочерние предприятия отказываются от любой ответственности за любой
ущерб, не связанный с дефектами материалов или изготовления, в отношении данного изделия
(включая, помимо прочего, любой ущерб, вызванный прямо или опосредованно любым
программным обеспечением или использованием изделия Thrustmaster с любыми неподходящими
элементами, в частности — блоками питания, аккумуляторами, зарядными устройствами и любыми
другими элементами, не входящими в комплектацию Guillemot для данного изделия).
Page 81

10/10
АВТОРСКОЕ ПРАВО
© 2014 Guillemot Corporation S.A. Все права защищены. Thrustmaster® является
зарегистрированной торговой маркой Guillemot Corporation. Ferrari® является зарегистрированной
торговой маркой Ferrari S.p.A. PlayStation® является зарегистрированной торговой маркой Sony
Computer Entertainment Inc. Microsoft® Windows® является зарегистрированной торговой маркой
Microsoft Corporation в Соединенных Штатах Америки и/или других странах. Все прочие торговые
марки и фирменные названия приведенные в данном документе, являются собственностью
соответствующих владельцев. Иллюстрации могут не соответствовать внешнему виду/функциям
конкретного изделия. Содержание руководства, конструкция и технические характеристики
изделия изменяются без предварительного уведомления и зависят от страны приобретения.
РЕКОМЕНДАЦИИ ПО ЗАЩИТЕ ОКРУЖАЮЩЕЙ СРЕДЫ
Обратитесь в местные органы власти за информацией о ближайшем пункте приема таких отходов.
При пользовании изделием учитывайте следующее. Цвета и украшения могут различаться.
Настоящий продукт соответствует всем стандартам в отношении детей в возрасте 14 лет и
старше. Использование данного продукта детьми младше 14 лет недопустимо.
www.thrustmaster.com
После окончания срока службы данное изделие не следует утилизировать
вместе с бытовым мусором, но в пункте сбора отходов электрического и
электронного оборудования.
Данное указание подтверждается соответствующим символом, нанесенным на
изделие, руководство пользователя или упаковку.
В зависимости от свойств, материалы могут передаваться в повторную переработку.
Повторная переработка отходов электрического и электронного оборудования может
внести значительный вклад в сохранение окружающей среды.
Page 82

1/10
1 Σταυρός κατευθύνσεων
(Select και Start/Προγραμματισμός)
7 Σύνδεση USB (για PC και PS3)
Για: PlayStation®3 / PC
Εγχειρίδιο χρήσης
ΤΕΧΝΙΚΑ ΧΑΡΑΚΤΗΡΙΣΤΙΚΑ
2 2 Πεντάλ για αλλαγή ταχυτήτων
Πάνω/Κάτω
3 Κουμπιά δράσης
4 Κουμπί PS για PS3
5 Λυχνία LED
6 Κουμπιά SE και ST
8 Θύρα τροχού RJ45
9 Διακόπτης PS3/PC
10 Υποδοχή για σετ πεντάλ RJ45
11 Σύστημα στερέωσης σε
τραπέζι/γραφείο
Page 83

2/10
ΕΓΚΑΤΑΣΤΑΣΗ ΤΙΜΟΝΙΟΥ
Τοποθέτηση τιμονιού στη σωστή θέση (11)
1. Τοποθετήστε το τιμόνι στην άκρη ενός τραπεζιού ή κάποιας άλλης επίπεδης
επιφάνειας.
2. Τοποθετήστε την πιο κοντή και σπειροειδή ράβδο στο άνοιγμα στη βάση του τιμονιού.
3. Γλιστρήστε το τμήμα σε σχήμα V επάνω στη σπειροειδή ράβδο, έτσι ώστε οι σιαγόνες
του σε σχήμα V να σφίξουν στην κάτω πλευρά του τραπεζιού.
4. Τοποθετήστε τη βίδα σύσφιξης επάνω στη σπειροειδή ράβδο και σφίξτε γενικώς έως
ότου το τιμόνι είναι απόλυτα σταθερό. Βεβαιωθείτε ότι δεν έχετε σφίξει πολύ τη βίδα,
καθώς κινδυνεύετε να χαλάσετε το σύστημα σύσφιξης και/ή το τραπέζι.
Σύνδεση του σετ των πεντάλ
Συνδέστε την υποδοχή του σετ των πεντάλ RJ45 (10) στη θύρα του τιμονιού RJ45 ( 8).
Να συνδέετε πάντα το σετ των πεντάλ στο τιμόνι πριν
το τοποθετήσετε στην υποδοχή USB του τιμονιού (7) ή ξεκινήσετε ένα παιχνίδι!
Βαθμονόμηση του τιμονιού και του σετ των πεντάλ
Η βαθμονόμηση εκτελείται αυτόματα.
Να βεβαιώνεστε πάντα ότι το τιμόνι είναι κεντραρισμένο και βεβαιωθείτε ότι δεν πατάτε τα
πεντάλ, κατά την εισαγωγή στην υποδοχή USB του τιμονιού (7) ή όταν ξεκινάτε ένα παιχνίδι!
Για λόγους ασφαλείας, ποτέ μην χρησιμοποιείτε το σετ των πεντάλ ξυπόλητοι ή ενώ
φοράτε μόνο κάλτσες.
Η THRUSTMASTER® ΑΠΟΠΟΙΕΙΤΑΙ ΟΠΟΙΑΣΔΗΠΟΤΕ ΕΥΘΥΝΗΣ ΣΕ ΠΕΡΙΠΤΩΣΗ
ΤΡΑΥΜΑΤΙΣΜΟΥ ΠΟΥ ΠΡΟΚΑΛΕΙΤΑΙ ΑΠΟ ΤΗ ΧΡΗΣΗ ΤΟΥ ΣΕΤ ΤΩΝ ΠΕΝΤΑΛ ΧΩΡΙΣ
ΠΑΠΟΥΤΣΙΑ.
Page 84

3/10
PLAYSTATION®3
Εγκατάσταση του τιμονιού σε PlayStation®3
1. Ρυθμίστε τον διακόπτη PS3/PC (9) (στο πίσω μέρος του τιμονιού) στη θέση PS3.
2. Τοποθετήστε την υποδοχή USB του τιμονιού (7) στη θύρα 1 USB της κονσόλας.
3. Ενεργοποιήστε την κονσόλα σας.
4. Ξεκινήστε το παιχνίδι σας.
Τώρα είστε έτοιμοι για παιχνίδι!
Σημαντικές σημειώσεις σχετικά με το PlayStation®3
- Ο διακόπτης PS3/PC (9) πρέπει να είναι πάντοτε ρυθμισμένος στη θέση PS3 πριν τον
συνδέσετε με το τιμόνι.
- Το τιμόνι μιμείται τον ελεγκτή του χειριστηρίου παιχνιδιών PS3 (μετάβαση στις
Επιλογές / Ελεγκτής / Χειριστήρια παιχνιδιών για την τροποποίηση της
διαμόρφωσης).
- Σε λειτουργία 1 παίκτης: εάν το επίσημο χειριστήριο παιχνιδιών είναι ενεργοποιημένο,
πρέπει να τοποθετήσετε τον διακόπτη στη θέση θύρα 2 ελεγκτή για να είναι
λειτουργικό το χειριστήριο για το τιμόνι σας.
- Μην διστάζετε να δοκιμάσετε τις 2 λειτουργίες ευαισθησίας του τιμονιού σας, για να
βελτιστοποιήσετε την ακρίβειά του.
Page 85

4/10
PC
Εγκατάσταση του τιμονιού σε PC
1. Ρυθμίστε τον διακόπτη PS3/PC (9) (στο πίσω μέρος του τιμονιού) στη θέση PC.
2. Συνδέστε την υποδοχή USB του τιμονιού (7) σε μια από τις θύρες USB του υπολογιστή
σας.
Τα Windows® XP, Vista, 7 ή 8 θα εντοπίσουν αυτόματα τη νέα συσκευή.
3. Στο παράθυρο Ελεγκτές παιχνιδιών των Windows και σε παιχνίδια, το τιμόνι θα
εντοπιστεί με το όνομα FGT Rumble 3-in-1 ή Ferrari GT Experience.
Τώρα είστε έτοιμοι για παιχνίδι!
Σημαντικές σημειώσεις σχετικά με το PC
- Ο διακόπτης PS3/PC του τιμονιού (9) πρέπει να είναι πάντοτε ρυθμισμένος στη θέση
PC πριν τον συνδέσετε με το τιμόνι.
- Το λογισμικό προγραμματισμού για προχωρημένους για PC είναι επίσης διαθέσιμο για
λήψη στην ιστοσελίδα μας, στην ακόλουθη διεύθυνση: http://ts.thrustmaster.com/
(στη διαδρομή Updates and Downloads/PC/Wheels/Challenge PS3
PC/Drivers). Η καρτέλα Δοκιμή λειτουργιών Forces (στο λογισμικό
προγραμματισμού για προχωρημένους) δεν είναι συμβατή με αυτό το τιμόνι.
Page 86

5/10
Ενέργεια
Λυχνία LED (5)
Ταυτόχρονα πατήστε και ελευθερώστε:
αλλαγή ταχυτήτων Πάνω & Κάτω (2).
Ενέργεια
Λυχνία LED (5)
Ταυτόχρονα πατήστε και ελευθερώστε:
αλλαγή ταχυτήτων Πάνω & Κάτω (2).
ΣΥΝΘΕΤΕΣ ΛΕΙΤΟΥΡΓΙΕΣ
ΡΥΘΜΙΣΗ ΤΗΣ ΕΥΑΙΣΘΗΣΙΑΣ ΤΟΥ ΤΙΜΟΝΙΟΥ
H τιμονιέρα σας χαρακτηρίζεται από 2 λειτουργίες ευαισθησίας:
- Κανονική ευαισθησία (προεπιλεγμένη λειτουργία)
- Υψηλή ευαισθησία (πρέπει να επιλεχθεί)
• Για εναλλαγή λειτουργίας σε Υψηλή ευαισθησία:
τον σταυρό κατευθύνσεων (1) + τα 2 πεντάλ για
ΑΝΑΒΟΣΒΗΝΕΙ ΑΡΓΑ
Τώρα η τιμονιέρα σας βρίσκεται τώρα σε πιο ευαίσθητη λειτουργία (Αυτή η διαδικασία
πρέπει να εκτελείται με κάθε επανεκκίνηση ή αποσύνδεση του τιμονιού σας)
• Για επιστροφή σε λειτουργία Κανονικής ευαισθησίας (η προεπιλεγμένη λειτουργία):
τον σταυρό κατευθύνσεων (1) + τα 2 πεντάλ για
ΔΕΝ ΑΝΑΒΟΣΒΗΝΕΙ
Τώρα η τιμονιέρα σας επέστρεψε στην Κανονική ευαισθησία (η προεπιλεγμένη λειτουργία).
ΠΡΟΓΡΑΜΜΑΤΙΣΜΟΣ ΤΙΜΟΝΙΟΥ ΚΑΙ ΠΕΝΤΑΛ
Το τιμόνι σας είναι πλήρως προγραμματιζόμενο:
- Όλα τα κουμπιά δράσης επιδέχονται εναλλαγής.
- Όλα τα κουμπιά που υπάρχουν πάνω στα πεντάλ για αλλαγή ταχυτήτων ή πάνω στα πεντάλ.
•Παραδείγματα πιθανών χρήσεων:
- Σε PS3, είναι δυνατός ο προγραμματισμός των L2/R2 ή L3/R3 πάνω στα 2 πεντάλ για
αλλαγή ταχυτήτων Πάνω & Κάτω (L1/R1).
- Σε PS3, είναι δυνατός ο προγραμματισμός του κουμπιού με τον σταυρό/τετράγωνου
κουμπιού πάνω στα πεντάλ (L2/R2 από προεπιλογή).
- Υπάρχει δυνατότητα εναλλαγής διαφορετικών κουμπιών για μεγαλύτερη προσβασιμότητα.
Page 87

6/10
Λυχνία LED
(5)
Απενεργοποί
ηση
Πατήστε και ελευθερώστε το κουμπί για
προγραμματισμό.
ΑΝΑΒΟΣΒΗΝ
ΕΙ ΓΡΗΓΟΡΑ
Πατήστε και ελευθερώστε το κουμπί ή το πεντάλ στο
οποίο θέλετε να τοποθετήσετε τη λειτουργία σας.
ΕΝΕΡΓΟΠΟΙΗ
ΣΗ
Ενέργεια
Λυχνία LED (5)
ΑΠΕΝΕΡΓΟΠΟΙΗΣΗ
ΞΑΝΑ
ΛΕΙΤΟΥΡΓΙΑ ΤΟΥ ΣΕΤ ΤΩΝ ΠΕΝΤΑΛ
Λυχνία LED (5)
ΞΕΧΩΡΙΣΤΗ (προεπιλεγμένη λειτουργία:
συνιστάται)
ΣΥΝΔΥΑΣΤΙΚΗ
ΠΡΑΣΙΝΟ
• Διαδικασία προγραμματισμού:
Βήματα Ενέργεια
1
Ταυτόχρονα πατήστε και ελευθερώστε: SE + ST (6).
2
3
Τώρα ο προγραμματισμός σας λειτουργεί. (Αυτή η διαδικασία πρέπει να εκτελείται με κάθε
επανεκκίνηση ή αποσύνδεση του τιμονιού σας)
• Σβήσιμο του προγραμματισμού σας:
Πατήστε παρατεταμένα για 2 δευτερόλεπτα: SE + ST (6).
ΚΑΙ ΕΝΕΡΓΟΠΟΙΗΣΗ
Τώρα ο προγραμματισμός σας έχει σβηστεί.
ΔΙΑΜΟΡΦΩΣΗ ΤΟΥ ΣΕΤ ΤΩΝ ΠΕΝΤΑΛ
Από προεπιλογή, τα πεντάλ γκαζιού και φρένου της τιμονιέρας σας λειτουργούν σε
Ξεχωριστή λειτουργία, που σημαίνει ότι η λειτουργία των πεντάλ εκτελείται σε
ανεξάρτητους άξονες.
Αυτή η λειτουργία σας επιτρέπει να βελτιώσετε αισθητά την ακρίβεια στην οδήγηση.
εάν το παιχνίδι σας δεν υποστηρίζει την Ξεχωριστή λειτουργία, το σετ των πεντάλ της
τιμονιέρας σας δεν θα λειτουργεί σωστά. Τότε θα πρέπει να αλλάξετε σε Συνδυαστική
λειτουργία.
• Διαδικασία αλλαγής λειτουργίας του σετ των πεντάλ:
ταυτόχρονα πατήστε και ελευθερώστε: τα 2 πεντάλ + το κουμπί PS (4). (Αυτή η
διαδικασία πρέπει να εκτελείται με κάθε επανεκκίνηση ή αποσύνδεση του τιμονιού σας)
ΚΟΚΚΙΝΟ
Page 88

7/10
Ξεχωριστά πεντάλ
(προεπιλεγμένη λειτουργία)
Συνδυαστικά πεντάλ
(πρέπει να επιλεχθεί)
mini stick του ελεγκτή PS3
Ξεχωριστά πεντάλ
(προεπιλεγμένη λειτουργία)
Συνδυαστικά πεντάλ
(πρέπει να επιλεχθεί)
- Φρένο = Άξονας Y
RZ
- Φρένο = Κατεύθυνση Κάτω στον άξονα RZ
• Ρύθμιση των πεντάλ σε PLAYSTATION®3:
- Γκάζι = Σκανδάλη R2
στον ελεγκτή PS3
- Φρένο= Σκανδάλη L2
στον ελεγκτή PS3
• Ρύθμιση των πεντάλ σε PC:
- Γκάζι = Άξονας RZ
- Γκάζι = Κατεύθυνση Πάνω στο δεξί
mini stick του ελεγκτή PS3
- Φρένο = Κατεύθυνση Κάτω στο δεξί
- Γκάζι = Κατεύθυνση Πάνω στον άξονα
Page 89

8/10
ΑΝΤΙΜΕΤΩΠΙΣΗ ΠΡΟΒΛΗΜΑΤΩΝ ΚΑΙ ΠΡΟΕΙΔΟΠΟΙΗΣΕΙΣ
Το τιμόνι μου δεν λειτουργεί σωστά ή φαίνεται να έχει βαθμονομηθεί λανθασμένα:
- Απενεργοποιήστε το PC ή το PS3, επαληθεύστε ότι ο διακόπτης PS3/PC (9) βρίσκεται στη σωστή θέση,
αποσυνδέστε πλήρως το τιμόνι σας και όλα τα καλώδια, επανασυνδέστε τα πάντα και έπειτα,
επανεκκινήστε το παιχνίδι σας.
- Ποτέ μην μετακινείτε το τιμόνι ή τα πεντάλ όταν συνδέετε το τιμόνι σας, ώστε να αποτρέψετε
οποιαδήποτε προβλήματα βαθμονόμησης.
Το σετ των πεντάλ δ εν λειτουργεί σωστά:
- Συνδέετε πάντα το σετ των πεντάλ στο τιμόνι (10/8) πριν συνδέσετε την υποδοχή USB του τιμονιού (7).
- Διαμορφώστε ξαν ά το τιμόνι σας στις επιλογές του ελεγκτή στο παιχνίδι σας .
Δεν μπορώ να διαμορ φώσω το τιμόνι μου:
- Στο PS3, στο μενού Επιλογές / Ελεγκτής / Χειριστήρια παιχνιδιών στο παιχνίδι σας: επιλέξτε την πιο
κατάλληλη διαμόρφωση.
- Στο PC, στο μενού Επιλογές / Ελεγκτής / Τιμόνια στο παιχνίδι σας: επιλέξτε την πιο κατάλληλη
διαμόρφωση.
- Μπορείτε επίσης να χρησιμοποιήσετε τη λειτουργία προγραμματισμού του παιχνιδιού σας για να
επιλύσετε αυτόν τον τύπο προβλήματος.
Στο PC, τα μενού στο παιχνίδι μου κυλούν μόνα τους:
- Βγείτε από το παιχνίδι και αλλάξτε το σετ των πεντάλ σε Συνδυαστική λειτουργία (2 άξονες). Έπειτα,
επιστρέψτε στο παιχνίδι σας για να δια μορφώσετε ξανά το τιμόνι με του ς νέους άξονες.
Η τιμονιέρα μου δεν α ποκρίνεται αρκετά:
- Αλλάξτε τη λειτουργία του τιμονιού σας σε Υψηλή ευαισθησία.
- Ρυθμίστε την ευαισθησία τις επιλογές του παιχν ιδιού σας.
Σε PC: σε μερικά παιχνίδια, χρησιμοποιήστε τις προϋπάρχουσες προκαθορισμένες ρυθμίσεις για FGT
Rumble 3-in-1 ή Ferrari GT Experience.
ΤΕΧΝΙΚΗ ΥΠΟΣΤΗΡΙΞΗ
Αν αντιμετωπίσετε πρόβλημα με το προϊόν σας, μεταβείτε στον ιστότοπο http://ts.thrustmas ter.com και
κάντε κλ ικ στην επιλογή Technical Support. Από εκεί μπορείτε να δείτε διάφορες χρήσιμες πληροφορίες
(Συχνές ερωτήσεις, τις τελευταίες εκδόσεις οδηγών και λογισμικού) που ενδέχεται να σας βοηθήσουν να
λύσετε το πρόβλημα που αντιμετωπίζετε. Αν το πρόβλημα παραμείνει, μπορείτε να επικοινωνήσετε με την
υπηρεσία τεχνικής υποστήριξης των προϊόντων της Thrustmaster (“Technical Support”):
Με email:
Για να επωφεληθείτε τη δυνατότητα τεχνικής υποστήριξης μέσω email, πρέπει πρώτα να εγγραφείτε
online. Οι πληροφορίες που παρέχετε θα βοηθήσουν τους αντιπροσώπους να επιλύσουν το πρόβλημά
σας γρηγορότερα. Κάντε κλικ στην επιλογή Registration στα αριστερά της σελίδας της Technical Support
και ακολουθήστε τις οδηγίες που εμφανίζονται στην οθόνη. Αν έχετε ήδη εγγραφεί, συμπληρώστε τα πεδία
Username και Password και στη συνέχεια, κάντ ε κλικ στην επιλογή Login.
Page 90

9/10
Πληροφορίες εγγύησης καταναλωτή
Παγκοσμίως, η Guillemot Corporation S.A. (εφεξής “Guillemot”) εγγυάται στον καταναλωτή ότι το προϊόν της
Thrustmaster δεν παρουσιάζει ελάττωμα στο υλικό ούτε κατασκευαστικές ατέλειες για το χρονικό διάστημα της
εγγύησης, το οπ οίο αντιστοιχεί στο χρονικό όριο για άσκηση αγωγής για συμ μόρφωση αναφορικά με αυτό το
προϊόν. Στις χώρες της Ε.Ε., αυτό αντιστοιχεί σε διάστημα δύο (2) ετών από την παράδοση του προϊόντος της
Thrustmaster. Σε άλλες χώρες, η περίοδος εγγύησης αντιστοιχεί στο χρονικό όριο για άσκηση αγωγ ής για
συμμόρφωση αναφορικά το προϊόν της Thrustmaster σύμφωνα με την ισχύουσα νομοθεσία της χώρας στην οποία
ο καταναλωτής διέμενε κατά την ημερομηνία αγοράς του προϊόντος τη ς Thrustmaster (σε περίπτωση που δεν
υπάρχει τέτοια ενέργεια στην αντίστοιχη χώρα, τότε η εγγύηση θα ισχύει για ένα (1) έτος από την αρχική
ημερομηνία αγοράς του προϊόντος της Thrustmaster).
Κατά πα ρέκκλιση των παραπάνω, οι επαναφορτιζόμενε ς μπαταρίες καλύπτονται από περίοδο εγγύησης έξι (6)
μηνών από ημερομηνία της αρχικής αγοράς.
Σε περίπτωση που το προϊόν σας φαίνεται να είναι ελαττωματικό κατά την περίοδο της εγγύησης, επικοινωνήστε
αμέσως με την Τεχνική υ ποστήριξη, η οποία θα υποδείξει την διαδικασία που θα ακολουθήσετε. Αν το ελάττωμα
επιβεβαιωθεί, το προϊόν πρέπει να επιστραφεί στο σημείο αγοράς του (ή σε οποιοδήποτε άλλο σημείο υποδε ικνύει
η Τεχνική υποστή ριξη).
Στα πλαίσια της εγγύησης, το ελαττωματικό προϊόν του καταναλωτή, με ε πιλογή της Τεχνικής υποστήριξης, είτε θα
επισκευαστεί είτε θα αντικατασταθεί. Αν επιτρέπ εται από την ισχύουσα νομοθεσία, η πλήρης ευθύνη της Guillemot
και των θυγατρικών της (περιλαμβάνονται οι επακόλουθες ζημιές) περιορίζεται στην επισκευή ή αντικατάσταση του
προϊόντος της Thrustmaster. Αν επιτρέπεται από την ισχύουσα νομοθεσία, η Guillemot αποποιείται κάθε εγγύηση
εμπορευσιμότητας ή καταλληλότητας για τον συγκεκριμένο σκοπό. Τα νομικά δικαιώματα του καταναλωτή σε
σχέση με την ισχύουσα νομοθεσία όσον αφορά την πώληση των καταναλωτικών ειδών δεν επηρεάζονται από την
παρούσα εγγύηση.
Η παρούσα εγγύηση δεν ισχύει: (1) αν το προϊόν έχει τροποποιηθεί, ανοιχτεί, μεταποιηθεί ή υποστεί βλάβη ως
αποτέλεσμα ακατάλληλης ή κακής χρήσης, αμέλειας, ατυχήματος, φυσιολογικής φθοράς ή οποιασδήποτε άλλης
αιτίας που δεν σχετίζεται με ελάττωμα στο υλικό ή κατασκευαστικό ελάττωμα (συμπεριλαμβανομένων, ενδεικτικά,
συνδυάζοντας το προϊόν της Thrustmaster με οπο ιοδήποτε ακατάλληλο στοιχείο, συμπεριλαμβανομένων
συγκεκριμένων παροχών ρεύματος, επαναφορτιζόμενων μπαταριών, φορτιστών ή άλλων στοιχείων που δεν
παρέχονται από τη Guillemot για αυτό το προϊόν), (2) σε περίπτωση μη συμμόρφωσης με τις οδηγίες που
παρέχονται από την Τεχνική υποστήριξη, (3) για λογισμικό, το εν λόγω λογισμικό υπόκειται σε συγκεκριμένη
εγγύηση, (4) για αναλώσιμα (στοιχεία που πρόκειται να αντικα τασταθούν από τη διά ρκεια ζωής του προϊό ντος: για
παράδειγμα, μπατ αρίες μίας χρήσης, καλύμ ματα αυτιών για σετ ακουστικών ή ακουστικά), (5) για αξ εσουάρ (για
παράδειγμα, καλώδια, περ ιβλήματα, θήκες, τσάντε ς, λουρά κια καρπού), (6) αν το προϊόν πωληθ εί σε δημοπ ρασία.
Η παρούσα εγγύηση δεν μεταβιβάζεται.
Ευθύνη
Αν επιτρέπεται από την ισχύουσα νομοθεσία, η Guillemot Corporation S.A. (εφεξής “Guillemot”) και οι
θυγατρικές της αποποιούνται κάθε ευθύνης για οποιαδήποτε ζημιά προκαλείται από ένα ή περισσότερα
από τα ακόλουθα: (1) το προϊόν έχει τροποποιηθεί, ανοιχτεί ή μεταποιηθεί, (2) αποτυχία ως προς τη
συμμόρφωση με τις οδηγίες συναρμολόγησης, (3) ακατάλληλη ή κακή χρήση, αμέλεια, ατύχημα (για
παράδειγμα, πρόσκρουση), (4) φυσιολογική φθορά. Αν επιτρέπεται από την ισχύουσα νομοθεσία, η
Guillemot και οι θυγατρικές της αποποιούνται κάθε ευθύνης για οποιαδήποτε ζημιά δεν σχετίζεται με
λάθος στο υλικό ή την κατασκευή αναφορά με το προϊόν (συμπεριλαμβάνεται, ενδεικτικά, οποιαδήποτε
ζημιά προκαλείται άμεσα ή έμμεσα από οποιοδήποτε λογισμικό ή από συνδυασμό του προϊόντος της
Thrustmaster με κάθε ακατάλληλο στοιχείο, συμπεριλαμβανομένων συγκεκριμένων παροχών ρεύματος,
επαναφορτιζόμενων μπαταριών, φορτιστών ή άλλων στοιχείων που δεν παρέχονται από την Guillemot
για αυτό το προϊό ν).
Page 91

10/10
πνευματικα δικαιωματα
© 2014 Guillemot Corporation S.A. Με την επιφύλαξη παντός δικαιώματος. Η ονομασία
Thrustmaster
εμπορικό σήμα της Ferrari Idea S.p.A. Η ονομασία PlayStation
Computer Entertainment Inc. Η ονομασία Windows® είναι εμπορικό σήμα κατατεθέν της Microsoft
Corporation στις Ηνωμένες Πολιτείες Αμερικής και/ή σε άλλες χώρες. Όλα τα υπόλοιπα εμπορικά
σήματα και οι εμπορικές επωνυμίες με το παρόν επιβεβαιώνονται και αποτελούν ιδιοκτησία των
αντίστοιχων κατόχων τους. Οι εικόνες δεν είναι δεσμευτικές. Τα περιεχόμενα, οι σχεδιασμοί και οι
προσδιορισμοί προδιαγραφών υπόκεινται σε αλλαγή χωρίς ειδοποίηση και ενδέχεται να ποικίλουν
από χώρα σε χώρα. Κατασκευάζεται στην Κίνα.
ΣΥΣΤΑΣΗ ΠΡΟΣΤΑΣΙΑΣ ΠΕΡΙΒΑΛΛΟΝΤΟΣ
περιβάλλοντος. Επικοινωνήστε με τις τοπικές αρχές για το πλησιέστερο σε εσάς σημείο συλλογής.
Κρατήστε αυτές τις πληροφορίες. Τα χρώματα και τα διακοσμητικά ενδέχεται να ποικίλουν.
Αυτό το προϊόν συμμορφώνεται με όλα τα πρότυπα όσον αφορά τα παιδιά ηλικίας 14 ετών και
πάνω. Αυτό το προϊόν δεν είναι κατάλληλο για παιδιά ηλικίας κάτω των 14 ετών.
www.thrustmaster.com
®
είναι εμπορικό σήμα της Guillemot Corporation S.A. Η ονομασία Ferrari® είναι
Στο τέλος της ωφέλιμης διάρκειας ζωής, το παρόν προϊόν δεν πρέπει να
απορρίπτεται με τα τυπικά οικιακά απορρίμματα, αλλά να απορρίπτεται σε
σημείο συλλογής απόρριψης ηλεκτρικού και ηλεκτρονικού εξοπλισμού για
ανακύκλωση.
Το παρόν επιβεβαιώνεται με το σύμβολο που υπάρχει στο προϊόν, στο
εγχειρίδιο χρήσης ή στη συσκευασία.
Ανάλογα με τα χαρακτηριστικά τους, τα υλικά μπορούν να ανακυκλωθούν. Μέσω
της ανακύκλωσης και άλλων μορφών επεξεργασίας απόρριψης ηλεκτρικού και
ηλεκτρονικού εξοπλισμού, μπορείτε να συμβάλετε σημαντικά στην προστασία του
®
είναι εμπορικό σήμα της Sony
Page 92

1/10
1 D-Ped
(Select ve Start/Programlama)
7 USB konektörü (PC ve PS3 için)
PlayStation®3 / PC için
Kullanım kılavuzu
TEKNİK ÖZELLİKLER
2 2 Yukarı ve Aşağı direksiyondan
kumandalı vites
3 Hareket tuşu
4 PS3 için PS düğmesi
5 LED
6 SE ve ST düğmeleri
8 Direksiyon RJ45 jakı
9 PS3/PC anahtarı
10 Pedal setinin RJ45 konektörü
11 Masa montaj sistemi
Page 93

2/10
DİREKSİYONUN TAKILMASI
Direksiyonun yerine sabitlenmesi (11)
1. Direksiyonu masanın veya başka düz bir yüzeyin kenarına yerleştirin.
2. Dişli kolun kısa ucunu direksiyonun tabanındaki deliğe sokun.
3. V şeklindeki parçayı, tırnakları masanın altına gelecek şekilde dişli kola takın.
4. Sıkma vidasını dişli kola geçirin ve direksiyon tamamen sabit hale gelene dek sıkın.
Montaj sistemi ve/veya masaya zarar verebileceğinden vidayı aşırı sıkmayın.
Pedal setinin bağlanması
Pedal setinin RJ45 konektörünü (10) direksiyonun RJ45 jakına (8) bağlayın.
Pedal seti ni direksiyona daima direksiyonun USB konektörünü (7) bağlamadan veya oyun
başlatmadan önce bağlayın.
Direksiyon ve pedal seti kalibrasyonu
Kalibrasyon otomatik olarak yapılır.
Direksiyonun USB konektörünü (7) takarken veya oyun başlatırken daima direksiyonun ortada
Güvenlik gerekçeleriyle pedal setini hiçbir zaman çıplak ayaklarla veya ayaklarınızda
olduğundan emin olun ve pedallara basm ayın.
sadece çorap varken kullanmayın.
THRUSTMASTER®, PEDAL SETİNİN AYAKKABISIZ OLARAK KULLANILMASINDAN
KAYNAKLANAN YARALANMALARDAN DOLAYI HİÇBİR SORUMLULUK KABUL ETMEZ.
Page 94

3/10
PLAYSTATION®3
Direksiyonun PlayStation®3'e takılması
1. Direksiyonun arka tarafındaki PS3/PC anahtarını (9) PS3 pozisyonuna alın.
2. Direksiyonun USB konektörünü (7) konsolun USB bağlantı noktası 1'e takın.
3. Konsolu açın.
4. Oyunu başlatın.
Artık oynamaya hazırsınız!
PlayStation®3 ile ilgili önemli hususlar
- Direksiyonu bağlamadan önce direksiyonun PS3/PC anahtarı (9) daima PS3
pozisyonuna ayarlanmalıdır.
- Direksiyon, PS3 oyun pedi kumanda birimi gibi çalışır (konfigürasyonu değiştirmek için:
Seçenekler / Kumanda / Oyun pedleri).
- 1 oyuncu modunda: Resmi PS3 oyun pedi kumanda biriminiz açıksa direksiyonu
fonksiyonel duruma getirmek için kumanda birimi, bağlantı noktası 2'ye geçirilmelidir.
- Hassasiyetini optimize etmek için direksiyonunuzun 2 hassasiyet modunu test edebilirsiniz.
Page 95

4/10
PC
Direksiyonun PC'ye takılması
1. Direksiyonun arka tarafındaki PS3/PC anahtarını (9) PC pozisyonuna alın.
2. Direksiyonun USB konektörünü (7) bilgisayarınızın USB bağlantı noktalarından birine
takın.
Windows® XP, Vista, 7 veya 8 yeni aygıtı otomatik olarak algılayacaktır.
3. Windows Oyun Kumandaları penceresinde ve oyunlarda direksiyon, FGT Rumble 3-in-
1 veya Ferrari GT Experience adı ile algılanır.
Artık oynamaya hazırsınız!
PC ile ilgili önemli hususlar
- Direksiyonu bağlamadan önce direksiyonun PS3/PC anahtarı (9) daima PC
pozisyonuna ayarlanmalıdır.
- PC için gelişmiş programlama yazılımını aşağıdaki adresteki İnternet sitemizden
indirebilirsiniz: http://ts.thrustmaster.com/ (Updates and
Downloads/PC/Wheels/Challenge PS3 PC/Drivers altında). Gelişmiş
programlama yazılımda yer alan Güç Testi sekmesi bu direksiyonla uyumlu değildir.
Page 96

5/10
İşlem
LED (5)
Şunlara aynı anda basın ve bırakın:
vites (2).
İşlem
LED (5)
Şunlara aynı anda basın ve bırakın:
kumandalı vites (2).
GELİŞMİŞ FONKSİYONLAR
DİREKSİYON HASSASİYETİNİN AYARLANMASI
Direksiyonunuz 2 hassasiyet modu içerir:
- Normal hassasiyet (varsayılan mod)
- Yüksek hassasiyet (seçilmesi gerekir)
• Yüksek hassasiyet moduna geçmek için:
D-Ped (1) + 2 Yukarı ve Aşağı direksiyondan kumandalı
YAVAŞ YANIP SÖNER
Direksiyonunuz artık daha hassastır. (Bu prosedür her yeniden başlatma sonrasında veya
direksiyon bağlantısı kesildikten sonra tekrarlanmalıdır)
• Normal hassasiyet moduna (varsayılan mod) dönmek için:
D-Ped (1) + 2 Yukarı ve Aşağı direksiyondan
YANIP SÖNMEZ
Direksiyonunuz Normal hassasiyet moduna (varsayılan mod) dönmüştür.
DİREKSİYONU VE PEDALLARI PROGRAMLAMA
Direksiyonunuz tamamen programlanabilir yapıdadır:
- Tüm hareket düğmeleri yer değiştirilebilir.
- Tüm düğmeler, direksiyondan kumandalı vites veya pedallara programlanabilir.
• Olası uygulama örnekleri:
- PS3'de L2/R2 veya L3/R3'ü 2 Yukarı ve Aşağı direksiyondan kumandalı vitese (L1/R1)
programlama.
- PS3'de, Çarpı/Kare düğmelerini pedallara (varsayılan olarak L2/R2) programlama.
- Daha kolay erişim için farklı düğmeleri değiştirme.
Page 97

6/10
Adım
İşlem
LED (5) 1 Şunlara aynı anda basın ve bırakın: SE + ST (6) .
KAPALI
HIZLI YANIP
SÖNER
Fonksiyonunuzu yerleştirmek istediğiniz düğmeye veya
pedala basın ve bırakın.
İşlem
LED (5)
SÖNER VE
YANAR
PEDAL SETİ MODU
LED (5)
AYRI (varsayılan mod: önerilir)
KIRMIZI
BİRLEŞİK
YEŞİL
• Programlama prosedürü:
2 Programlanacak düğmeye basın ve bırakın.
3
Programlama tamamlanmıştır. (Bu prosedür her yeniden başlatma sonrasında veya
direksiyon bağlantısı kesildikten sonra tekrarlanmalıdır)
• Programlamanızın silinmesi:
YANAR
Basın ve 2 saniye basılı tutun: SE + ST (6).
ARDINDAN YENİDEN
Programlamanız artık silinmiştir.
PEDAL SETİNİN AYARLANMASI
Varsayılan olarak direksiyonunuzun gaz ve fren pedalları Ayrı modda çalışır, yani pedallar
bağımsız eksenlerde işlev görür.
Bu mod, sürüş hassasiyetinizi kayda değer ölçüde geliştirmenizi sağlar.
Oyununuz Ayrı modu desteklemiyorsa direksiyonunuzun pedal seti düzgün çalışmayacaktır.
Bu durumda Birleşik moda geçmeniz gerekecektir.
• Pedal seti mod değiştirme prosedürü:
2 pedala + PS düğmesine (4) aynı anda basın ve bırakın.
(Bu prosedür her yeniden başlatma sonrasında veya direksiyon bağlantısı kesildikten sonra
tekrarlanmalıdır)
Page 98

7/10
Ayrı pedallar
(varsayılan mod)
Birleşik pedallar
(seçilmesi gerekir)
mini çubuğunda Aşağı yönü
Ayrı pedallar
(varsayılan mod)
Birleşik pedallar
(seçilmesi gerekir)
- Fren = Y ekseni
- Fren = RZ ekseninde Aşağı yönü
• PLAYSTATION®3'te pedal ayarları:
- Gaz = PS3 kumanda biriminde
R2 tetiği
- Fren = PS3 kumanda biriminde
• PC'de pedal ayarları:
- Gaz = RZ ekseni
L2 tetiği
- Gaz = PS3 kumanda biriminin sağ
mini çubuğunda Yukarı yönü
- Fren = PS3 kumanda biriminin sağ
- Gaz = RZ ekseninde Yukarı yönü
Page 99

8/10
SORUN GİDERME VE UYARI
• Direksiyonum düzgün çalışmıyor veya hatalı kalibre edilmişe benziyor:
- PC veya PS3'ünüzü kapatın, PS3/PC anahtarının (9) doğru pozisyonda olduğu kontrol
edin, direksiyonunuzu ve tüm kabloları birbirinden ayırın, her şeyi yeniden bağlayın ve
oyununuzu yeniden başlatın.
- Kalibrasyon sorunlarını engellemek için direksiyonunuzu bağlarken direksiyon veya
pedalları asla hareket ettirmeyin.
• Pedal setim düzgün çalışmıyor:
- Pedal setini direksiyona (10/8) daima direksiyonun USB konektörünü (7) bağlamadan
önce bağlayın.
- Direksiyonunuzu oyun kumanda birimi seçeneklerinde yeniden ayarlayın.
• Direksiyonumu ayarlayamıyorum:
- PS3 üzerinde oyununuzun Seçenekler / Kumanda / Oyun pedleri menüsünde: En uygun
konfigürasyonu seçin.
- PC üzerinde oyununuzun Seçenekler / Kumanda / Direksiyonlar menüsünde: En uygun
konfigürasyonu seçin.
- Bu tür sorunları çözmek için oyun pedinizin programlama fonksiyonunu da
kullanabilirsiniz.
• PC'de oyun menülerim kendiliğinden kayıyor:
- Oyundan çıkın ve pedal setini Birleşik moda geçirin (2 eksenli). Ardından oyuna dönerek
direksiyonu yeni eksenlerle yeniden ayarlayın.
• Direksiyonum yeterince hassas değil:
- Direksiyonunuzu Yüksek hassasiyet moduna geçirin.
- Oyun seçeneklerinde hassasiyet ayarı yapın.
• PC'de: bazı oyunlarda FGT Rumble 3-in-1 veya Ferrari GT Experience için
önceden mevcut olan ayarları kullanın.
TEKNİK DESTEK
Ürününüzle ilgili bir sorunla karşılaşırsanız, lütfen http://ts.thrustmaster.com adresini ziyaret
edin ve Technical Support’u tıklayın. Sayfadan, sorununuzu çözmenize yardımcı olacak
çeşitli kaynaklara (Sıkça Sorulan Sorular (SSS), sürücü ve yazılımların son sürümleri)
erişebilirsiniz. Sorununuz devam ederse, Thrustmaster ürünleri teknik destek hizmeti
(“Technical Support”) ile iletişime geçebilirsiniz:
E-posta yoluyla:
E-posta yoluyla teknik destek almak için öncelikle çevrimiçi olarak kayıt olmalısınız.
Verdiğiniz bilgiler, temsilcilerin sorununuzu daha hızlı bir şekilde çözmesine yardımcı
olacaktır. Technical Support sayfasının sol tarafındaki Registration’ı tıklayın ve ekrandaki
talimatları izleyin. Daha önce kayıt olduysanız, Username ve Password alanlarını
doldurup Login’i tıklayın.
Page 100

9/10
Tüketici garant i bilgisi
İşbu Thrustmaster ürünü, malzeme ve işçilik hatalarına karşı, müşterinin kusurlu ürünün ücretinin iade
edilmesi veya değiştirilmesi talebinde bulunabileceği süreye karşılık gelen garanti süresince dünya çapında
Guillemot Corporation S.A. (bundan sonra “Guillemot” olarak ifade edilecektir) garantisi altındadır. Avrupa
Birliği ülkelerinde bu süre, Thrustmaster ürününün tesliminden itibaren iki (2) seneye karşılık gelir. Diğer
ülkelerde garanti süresi, Thrustmaster ürünü ile ilgili olarak, Thrustmaster ürününün satın alındığı tarihte
müşterinin ikamet ettiği ülkede geçerli yasalara uygun şekilde, müşterinin kusurlu ürünün ücretinin iade
edilmesi veya değiştirilmesi talebinde bulunabileceği süreye karşılık gelir (İlgili ülkede bu tür bir düzenleme
mevcut değilse garanti süresi Thrustmaster ürününün satın alındığı asıl tarihten itibaren bir (1) yıl
olacaktır).
Yukarıdakilere bağlı kalmaksızın, yeniden doldurulabilir piller ilk satın alındıkları tarihten itibaren altı (6) ay
boyunca garanti kapsamındadır.
Garanti süresi içinde üründe hata veya kusur tespit edilmesi durumunda derhal izlenecek yöntem ile ilgili
size bilgi verecek olan Teknik Destek servisimize başvurun. Hata veya kusur onaylanırsa ürünün satın
alındığı yere (ya da Teknik Destek servisi tarafından belirtilen yere) iade edilmesi gerekmektedir.
İşbu garanti kapsamında müşterinin kusurlu ürünü, Teknik Destek servisinin insiyatifine bağlı olarak,
onarılacak veya değiştirilecektir. Yürürlükte olan yasaların izin verdiği durumlarda, Guillemot ve bağlılarının
tüm sorumluluğu (dolaylı hasarlar da dahil olmak üzere) Thrustmaster ürününün onarılması veya
değiştirilmesi ile sınırlıdır. Yürürlükte olan yasaların izin vermesi halinde Guillemot, ticarete elverişlilik veya
belirli bir amaca uygunluk ile ilgili tüm garantileri reddeder. Tüketim mallarının satışına ilişkin tüketicinin
yasal hakları işbu garantiden etkilenmemektedir.
İşbu garanti aşağıdaki durumlar için geçerli değildir: (1) Ürün modifiye edilmişse, açılmışsa, üzerinde
değişiklik yapılmışsa, uygunsuz veya kötü kullanım, ihmal, kaza, normal aşınma ya da malzeme veya
üretim hatası ile ilgili olmayan nedenlerden dolayı hasar görmüşse (ancak bununla sınırlı kalmamak üzere,
Thrustmaster ürününü herhangi uygun bir elemanla birleştirmek, buna dahil olarak özellikle güç kaynakları,
yeniden doldurulabilir piller, şarj cihazları veya bu ürün için Guillemot tarafından tedarik edilmemiş tüm
diğer elemanlar); (2) Teknik Destek servisi tarafından sağlanan talimatlara uyulmamışsa; (3) yazılım için,
işbu garanti geçerli değildir, söz konusu yazılım için sağlanan özel garanti hükümlerine tabidir; (4) sarf
malzemeleri için (ürünün kullanım süresi içinde değiştirilecek elemanlar: örneğin; tek kullanımlık piller,
kulaklık yastıkları); (5) aksesuarlar için (örneğin; kablolar, kılıflar, cepler, çantalar, bileklikler); (6) ürün açık
artırma ile satılmış sa.
Bu garanti devrolunamaz.
Sorumluluk
Yürürlükte olan yasaların izin vermesi halinde, Guillemot Corporation S.A. (bundan sonra “Guillemot”
olarak ifade edilecektir) ve bağlıları aşağıdakilerin biri veya daha fazlasından kaynaklanan her türlü hasara
karşı tüm sorumluluğu reddeder: (1) Ürün modifiye edilmişse, açılmışsa, üzerinde değişiklik yapılmışsa; (2)
montaj talimatlarına uyulmamışsa; (3) uygunsuz veya kötü kullanım, ihmal, kaza (örneğin bir darbe); (4)
normal aşınma. Yürürlükte olan yasaların izin vermesi halinde, Guillemot ve bağlıları ürünle ilgili malzeme
veya üretim hatası ile ilgili olmayan her türlü hasara karşı tüm sorumluluğu reddeder (ancak bununla sınırlı
kalmamak üzere, herhangi bir yazılımdan veya Thrustmaster ürününün herhangi bir uygun olmayan
elemanla birleştirilmesinden doğrudan veya dolaylı olarak kaynaklanan tüm hasarlar, buna dahil olarak
özellikle güç kaynakları, yeniden doldurulabilir piller, şarj cihazları veya bu ürün için Guillemot tarafından
tedarik edilmemiş tüm diğer elemanlar).
 Loading...