

Page 1

Page 2

1/18
PC compatible
User Manual
TECHNICAL SPECIFICATIONS
1. 28 backlit programmable buttons
2. 2 programmable identification LEDs
3. 2 adjustable attachment rods
4. Removable base
5. 4 bore covers
6. 2 attachment thumbscrews
7. USB connector
8. 2 removable rod attachment screws
9. Rod attachment system
10. Removable rod
11. 2 Plexiglas windows
Page 3

2/18
GETTING TO KNOW YOUR MFD COUGAR
The THRUSTMASTER MFD COUGAR is the exact replica of the MFDs equipping U.S. Air
Force F-16 fighters.
Each MFD COUGAR features 20 buttons and 4 switches, i.e. 28 buttons per MFD in total!
The MFD's features enable you to allocate advanced keyboard or mouse controls to
the device and to emulate various flight instruments, for enhanced gaming realism.
THRUSTMASTER is the creator of the HOTAS COUGAR and T.16000M simulation
joysticks.
INTERNAL MEMORY
Each MFD COUGAR features an internal memory.
All personal settings (MFD identifier and number, backlighting intensity, identification LED
status) will automatically be saved in the device's memory.
This way, all settings and preferences are retained if you choose
MFD COUGAR to another computer.
BACKLIGHTING
The backlighting intensity can be software-adjusted, via the Thrustmaster Control Panel, or
hardware-adjusted, directly from within the game.
2 IDENTIFICATION LEDS
Each MFD features 2 identification LEDs, enabling you to tell the devices apart.
SIMULTANEOUSLY COMPATIBLE WITH UP TO 8 MFD COUGARS
The Thrustmaster Control Panel's advanced options enable you to adjust and control up to 8
MFDs simultaneously. Each MFD is therefore fully personalised and identifiable.
PHYSICAL ADJUSTMENT
The MFD COUGAR's base and window are mobile (for optimum comfort and visibility) and
removable (enabling users to attach them to a cockpit or a computer
ACCESSORIES AND GAMES COMPATIBILITY
The MFD COUGAR is compatible with all currently available controllers, joysticks and yokes,
as well as all PC simulation games (both military and civil) supporting multiUSB connectivity.
FLIGHT SIMULATOR X / FLIGHT SIMULATOR 2004 PLUG-INS
The included plug-ins enable you to instantly configure both MFD COUGARs for these
games.
to connect your
display).
Page 4
3/18
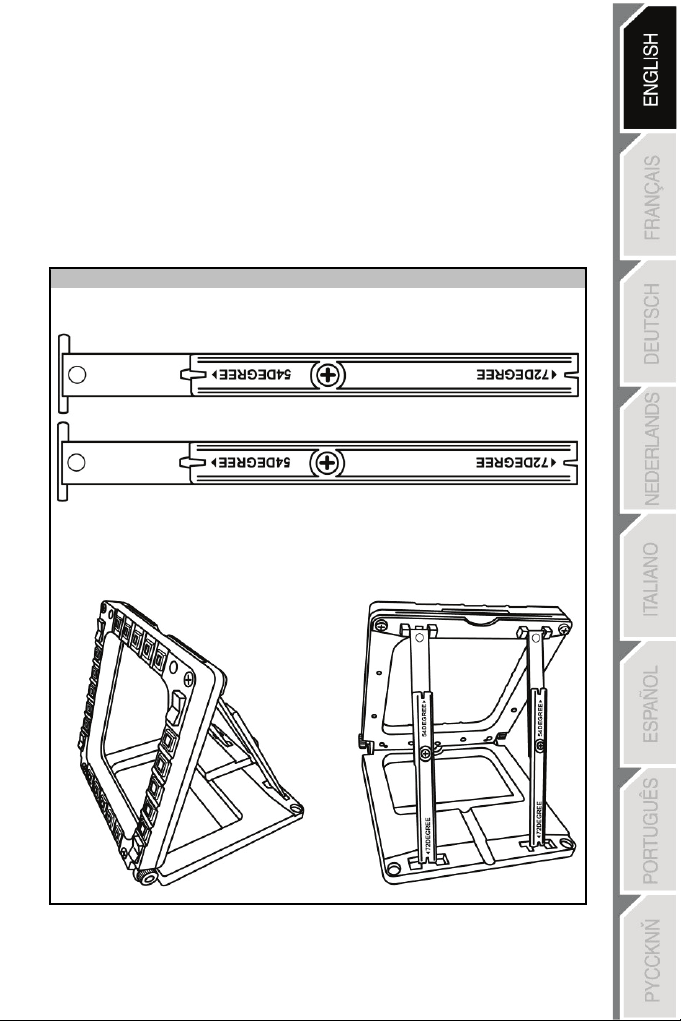
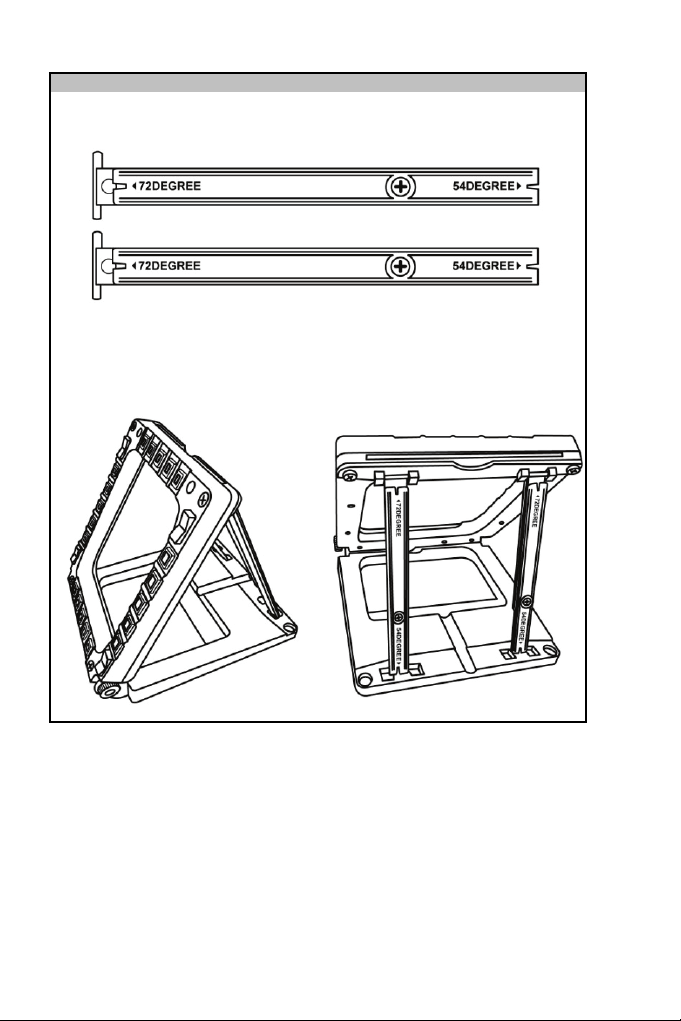
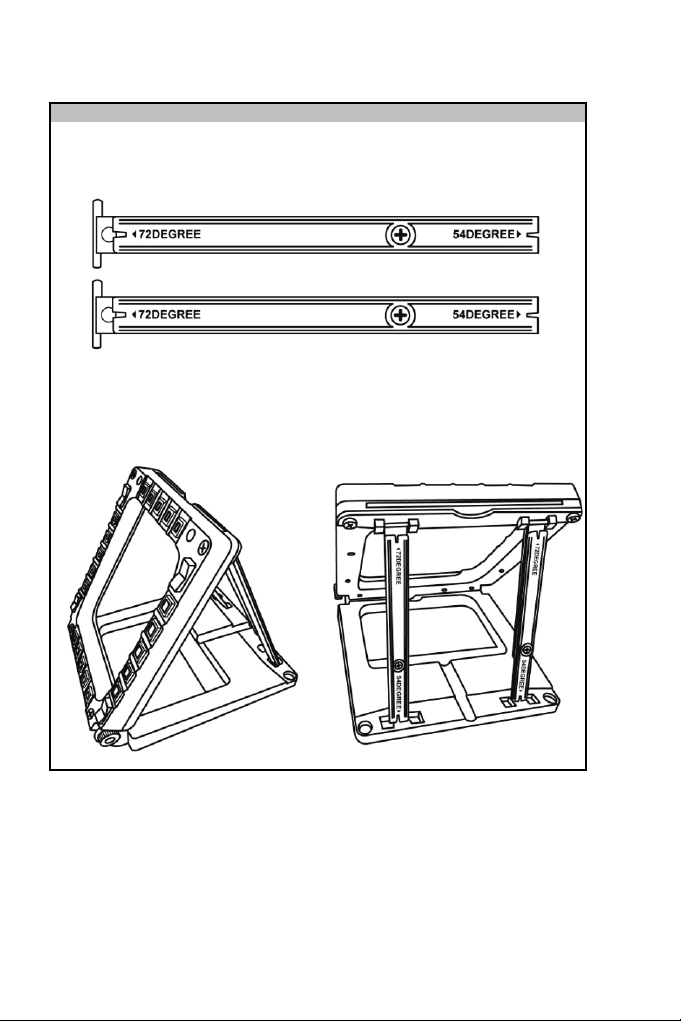
ADJUSTING THE MFD'S ANGLE ON THE BASE
When the MFD is attached to the base (4), its angle can be adjusted to 72, 54 or
39 degrees.
The attachment device (3) is comprised of 2 rods that can be set at an
- One long rod (featuring the indications 72DEGREE and 54DEGREE)
- One short rod (featuring the indication 39DEGREE)
ADJUSTING THE ANGLE TO 72 DEGREES
- Place the attachment rods (3), with the 72DEGREE indication facing down (if required,
slightly loosen the centre screw to facilitate angle adjustment).
- Insert the upper end of the rods in the attachment system (9) located at the back of the
MFD, on
- Attach the lower end of the rods to the back of the base, then tighten the 2 attachment
the device's upper side.
thumbscrews (6).
angle
or removed:
Page 5
4/18
- Place the 2 attachment rods, with the 54DEGREE indication facing down (if required,
slightly loosen the centre screw to facilitate angle adjustment).
ADJUSTING THE ANGLE TO 54 DEGREES
- Insert the upper end of the rods in the attachment system (9) located at the back of the
MFD, on the device's upper side.
- Attach the lower end of the rods to the back of the base, then tighten the 2 attachment
thumbscrews (6).
Page 6

5/18
- Loosen the centre screw, then remove all the rods.
ADJUSTING THE ANGLE TO 39 DEGREES
- Place the short attachment rods, with the 39DEGREE indication facing down.
- Insert the upper end of the rods in the attachment system (9) located at the back of the
MFD, on the device's upper side.
- Attach the lower end of the rods to the back of the base, then tighten the 2 attachment
thumbscrews (6)
.
Page 7
6/18
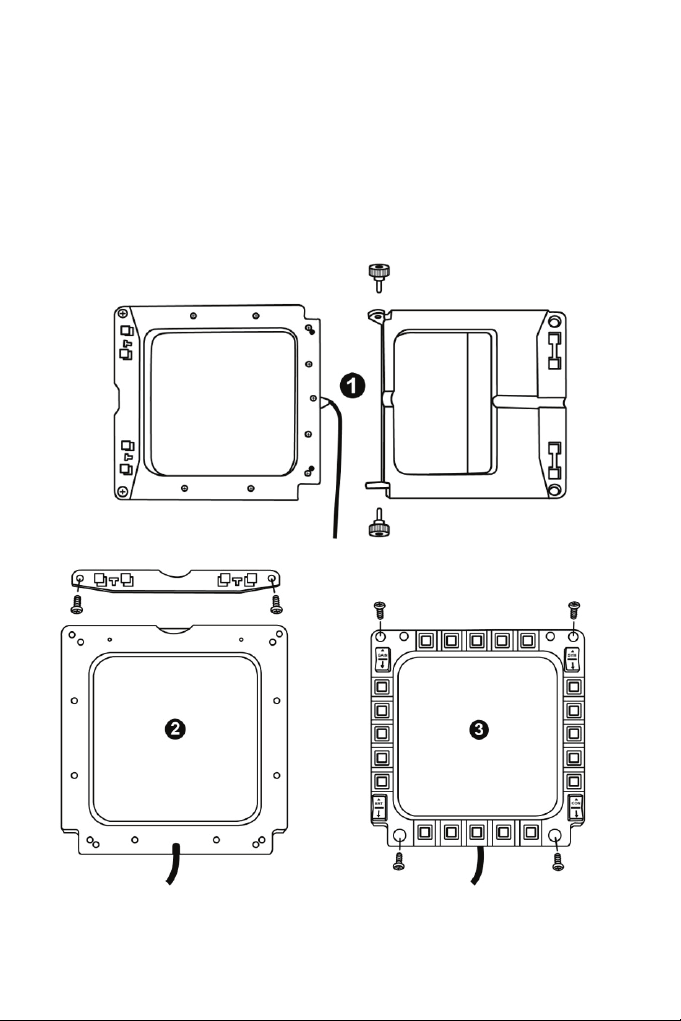
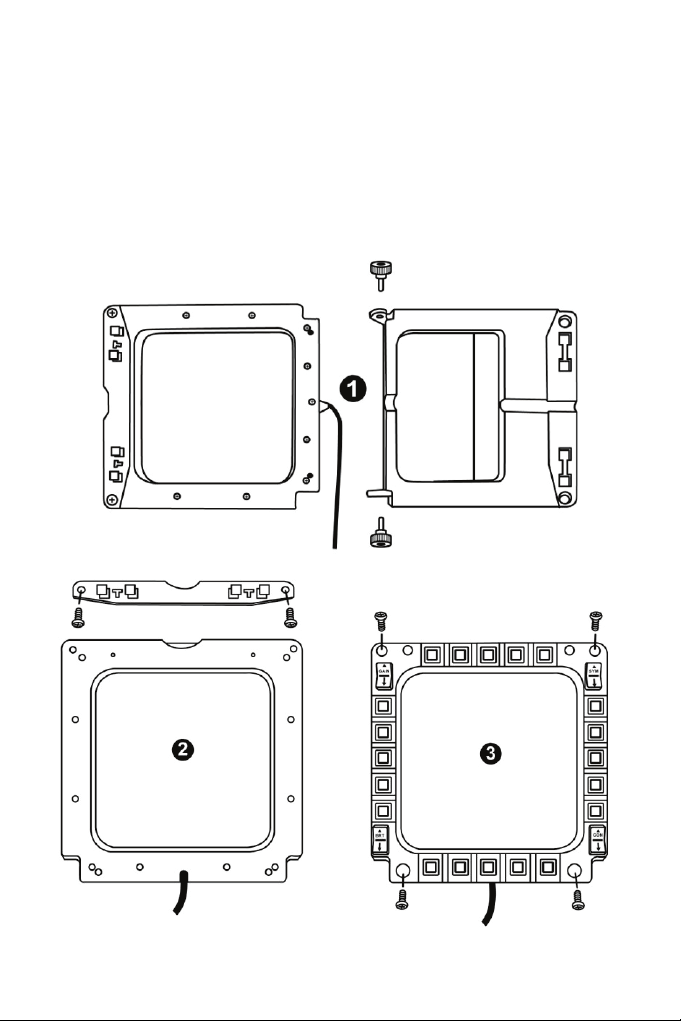
ATTACHING THE MFD TO A COCKPIT OR A SCREEN
1) Detach the attachment rods and remove the MFD from the base by fully unscrewing
the 2 attachment thumbscrews (6).
2) Detach the removable rod (10) located at the back of the MFD, on the device's upper
side, by fully unscrewing the 2
3) Remove the 4 bore covers (5) by pushing them out from the back, using a thin
screwdriver or a pin.
attachment screws
(8) located to either side.
You can now attach the MFD using the 4 bores.
Page 8

PERSONALISING THE MFD COUGARS
- Insert the 2 included Plexiglas windows (11) in the relevant slot located at the top of the
MFD COUGAR.
- Between the 2 Plexiglas windows, insert the relevant graphic or one of the cards supplied
with the pack.
NOTES:
- Flight Simulator X cards (available in English only) are included in this pack.
- You can also download and print cards for the Flight Simulator 2004 plug-in and other
cards from the following website:
-
http://ts.thrustmaster.com/
7/18
Page 9

PC INSTALLATION
System requirements:
PC (Windows® XP, Windows® Vista, Windows® 7) featuring 2 USB ports
The CD-ROM included with this product is designed for driver installation.
1. Insert the installation CD-ROM in your CD-ROM drive. The installation wizard
automatically appears onscreen (if the installation program doesn't launch automatically,
access My Computer, then click twice on the CD-ROM drive icon; if necessary, doubleclick the file Setup.exe).
2. Click on the DRIVERS button to launch the driver installation sequence.
3. Once the installation is finished, click Finish and restart your computer.
4. Once your computer restarts, connect the MFD COUGAR's USB connectors (7) to your
PC's USB ports. Windows® automatically detects
the
new
devices.
5. Driver installation occurs automatically.
Follow the instructions displayed onscreen to
finalise the installation.
6. Select Start/Programs/Thrustmaster MFD COUGAR to
Control Panel and Flight Simulator 2004 /
Flight
Simulator X
access
plug-ins.
the
Thrustmaster
8/18
Page 10

THRUSTMASTER CONTROL PANEL
- Select Start/Programs/Thrustmaster MFD COUGAR/Control Panel.
- The Game Controllers dialog displays the 2 MFD's default name (F16 MFD 1 and F16
MFD 2) with the status indication OK
.
- Click on Properties to configure your MFD.
9/18
Page 11

IDENTIFYING YOUR MFD COUGAR
When you open the Control Panel, the relevant MFD's name flashes for 2 seconds, enabling
you to tell it apart from the other devices.
If you click on the Identify tab, the relevant MFD starts flashing, allowing you to locate it
easily.
ADJUSTING THE BACKLIGHTING INTENSITY
All buttons' and identification LEDs backlighting can be software-adjusted or hardwareadjusted.
ADJUSTING THE BACKLIGHTING FEATURE USING SOFTWARE
- In the Thrustmaster Control Panel, select the Backlit / LED Intensity tab.
ADJUSTING THE BACKLIGHTING FEATURE USING HARDWARE
(To adjust backlighting when playing)
- Simultaneously press buttons 14 + 15 + 25 to increase backlighting intensity
- Simultaneously press buttons 14 + 15 + 26 to increase reduce backlighting intensity
2 IDENTIFICATION LEDS
The MFD COUGAR features 2 LEDs (2), enabling users to easily identify and recognise the
relevant MFD.
Unless configured otherwise, both LEDs turn on or off according to the selected MFD's name
and number:
NAME and
NUMBER
F16 MFD 1 ON OFF LEFT-HAND MFD no. 1
F16 MFD 2 OFF ON RIGHT-HAND MFD no. 1
F16 MFD 3 ON ON LEFT-HAND MFD no. 2
F16 MFD 4 OFF OFF RIGHT-HAND MFD no. 2
F16 MFD 5 ON OFF LEFT-HAND MFD no. 3
F16 MFD 6 OFF ON RIGHT-HAND MFD no. 3
F16 MFD 7 ON ON LEFT-HAND MFD no. 4
F16 MFD 8 OFF OFF RIGHT-HAND MFD no. 4
This default mode can be modified by activating or deactivating the Left LED and Right LED
options in the Thrustmaster Control Panel.
of MFD
LEFT-
HAND LED
LED
RIGHT
10/18
LOCATION
in a cockpit
Page 12

USING MORE THAN 2 MFD COUGARS SIMULTANEOUSLY
The Thrustmaster Control Panel can simultaneously manage up to 8 MFD
COUGARs connected to one same PC.
- If you are using more than 2 MFDs simultaneously (and only in this event), access the F16
MFD tab and select the relevant MFD number.
- Click OK
.
- After performing this operation, the relevant MFD automatically disconnects from the
computer before reconnecting with its new number.
NOTE: We recommend that you only modify the MFD number if using more
than 2 MFD COUGARs simultaneously.
11/18
Page 13
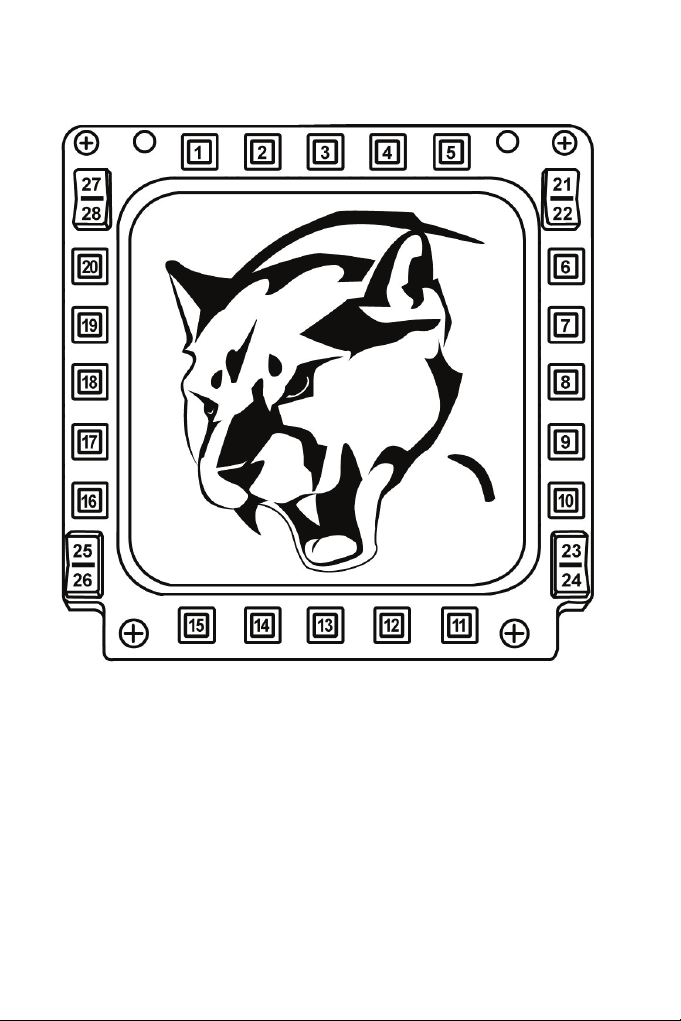
BUTTON CONFIGURATION AND LOCATION
12/18
Page 14

FLIGHT SIMULATOR PLUG-IN
The included plug-ins enable you to instantly configure both your MFDs for FLIGHT
SIMULATOR 2004 and FLIGHT SIMULATOR X (you therefore no longer need to access the
relevant game's options to manually configure each button on the MFDs).
3 profiles are available to you:
* Generic Profile:
This profile covers the most frequent requirements for both civil and military aircraft.
* Light Aviation Profile:
This profile is specifically designed to meet the requirements of light and leisure aircraft. It
comprises a basic autopilot feature as well as landing gear and flaps controls, electric
systems management features, engine mixture, propeller pitch and engine cooling system
controls, etc.
* Airliner Profile:
While offering a number of features available in the Light Aviation Profile, this profile also
accounts for more specific aspects inherent to airliners and professional aviation, while also
providing an advanced autopilot feature.
IMPORTANT NOTES
- The plug-ins are preconfigured for 2 MFD COUGARs ONLY!
- The game must not be running when installing the plug-ins.
- Prior to installing these plug-ins, configure both MFD COUGARs using the F16 MFD 1 and
F16 MFD 2 identifiers (default identifiers).
13/18
Page 15

INSTALLING THE PLUG-INS
- To access the Flight Simulator 2004 plug-in, select:
Start/Programs/Thrustmaster MFD Cougar/FLIGHT SIMULATOR 2004 Plug-In
- To access the Flight Simulator X plug-in, select:
Start/Programs/Thrustmaster MFD Cougar/FLIGHT SIMULATOR X Plug-In
- After performing this operation, 3 profiles are available to you:
Generic Profile / Airliner Profile / Light Aviation Profile.
Choose the relevant profile, then click START
.
- The SUCCESS pane displays, confirming that the profile has been installed correctly.
Click OK.
WITH YOUR 2 MFD COUGARS FEATURING
NOTE: To play with another profile, proceed as described
the required profile.
YOU ARE NOW READY TO
PLAY
THE
RELEVANT
above
PROFILE!
while selecting
14/18
Page 16

15/18
IN OTHER GAMES
The MFD COUGAR is compatible with all PC simulation games (both military and
civil aviation simulators) supporting multi-USB connectivity.
To configure the MFD COUGAR in your game, access the game's Controller Options,
then manually allocate the required features to each of the MFD's buttons.
You only need to perform this operation once; the relevant setting will automatically be
saved in your game.
TROUBLESHOOTING AND WARNING
My MFD COUGARs are not recognised or disconnect unexpectedly.
- Shut down your computer, disconnect the MFD COUGARs, then reconnect them
and restart your computer.
- If this fails to solve the problem, connect the MFD COUGARs to other USB ports,
or connect them directly to a mains-powered USB hub.
- Avoid connecting your MFD COUGARs to an unpowered USB hub.
The Flight Simulator X and Flight Simulator 2004 plug-ins do not install or do not
operate correctly.
- Check that the game is not running prior to installing the plug-ins.
- Ensure that both MFD COUGARs have been configured with the identifiers F16 MFD 1
and F16 MFD 2 (default identifiers) in the Control Panel
I can't configure my MFD COUGAR in other games.
- In your game's Options / Controllers / Pad or Joystick menu, manually allocate each of the
MFD's buttons to the required function.
- Please refer to your game's user manual or online help for more information.
- Install the latest updates for your game.
.
Page 17

16/18
Consumer warranty information
Worldwide, Guillemot Corporation S.A., whose registered office is located at Place du
Granier, B.P. 97143, 35571 Chantepie, France (hereinafter “Guillemot”) warrants to the
consumer that this Thrustmaster product shall be free from defects in materials and
workmanship, for a warranty period which corresponds to the time limit to bring an action for
conformity with respect to this product. In the countries of the European Union, this
corresponds to a period of two (2) years from delivery of the Thrustmaster product. In other
countries, the warranty period corresponds to the time limit to bring an action for conformity
with respect to the Thrustmaster product according to applicable laws of the country in which
the consumer was domiciled on the date of purchase of the Thrustmaster product (if no such
action exists in the corresponding country, then the warranty period shall be one (1) year
from the original date of purchase of the Thrustmaster product).
Notwithstanding the above, rechargeable batteries are covered by a warranty period of six
(6) months from the date of original purchase.
Should the product appear to be defective during the warranty period, immediately contact
Technical Support, who will indicate the procedure to follow. If the defect is confirmed, the
product must be returned to its place of purchase (or any other location indicated by
Technical Support).
Within the context of this warranty, the consumer’s defective product shall, at Technical
Support’s option, be either replaced or returned to working order. If, during the warranty
period, the Thrustmaster product is subject to such reconditioning, any period of at least
seven (7) days during which the product is out of use shall be added to the remaining
warranty period (this period runs from the date of the consumer’s request for intervention or
from the date on which the product in question is made available for reconditioning, if the
date on which the product is made available for reconditioning is subsequent to the date of
the request for intervention). If permitted under applicable law, the full liability of Guillemot
and its subsidiaries (including for consequential damages) is limited to the return to working
order or the replacement of the Thrustmaster product. If permitted under applicable law,
Guillemot disclaims all warranties of merchantability or fitness for a particular purpose.
This warranty shall not apply: (1) if the product has been modified, opened, altered, or has
suffered damage as a result of inappropriate or abusive use, negligence, an accident, normal
wear, or any other cause unrelated to a material or manufacturing defect (including, but not
limited to, combining the Thrustmaster product with any unsuitable element, including in
particular power supplies, rechargeable batteries, chargers, or any other elements not
supplied by Guillemot for this product); (2) in the event of failure to comply with the
instructions provided by Technical Support; (3) to software, said software being subject to a
specific warranty; (4) to consumables (elements to be replaced over the product’s lifespan:
disposable batteries, audio headset or headphone ear pads, for example); (5) to accessories
(cables, cases, pouches, bags, wrist-straps, for example); (6) if the product was sold at
public auction.
This warranty is nontransferable.
The consumer’s legal rights with respect to laws applicable to the sale of consumer goods in
his or her country are not affected by this warranty.
Page 18
17/18
Additional warranty provisions
During the warranty period, Guillemot shall not provide, in principle, any spare parts, as
Technical Support is the only party authorized to open and/or recondition any Thrustmaster
product (with the exception of any reconditioning procedures which Technical Support may
request that the consumer carry out, by way of written instructions – for example, due to the
simplicity and the lack of confidentiality of the reconditioning process – and by providing the
consumer with the required spare part(s), where applicable).
Given its innovation cycles and in order to protect its know-how and trade secrets, Guillemot
shall not provide, in principle, any reconditioning notification or spare parts for any
Thrustmaster product whose warranty period has expired.
In the United States of America and in Canada, this warranty is limited to the product’s
internal mechanism and external housing. In no event shall Guillemot or its affiliates be held
liable to any third party for any consequential or incidental damages resulting from the
breach of any express or implied warranties. Some States/Provinces do not allow limitation
on how long an implied warranty lasts or exclusion or limitation of liability for consequential
or incidental damages, so the above limitations or exclusions may not apply to you. This
warranty gives you specific legal rights, and you may also have other rights which vary from
State to State or Province to Province.
Liability
If permitted under applicable law, Guillemot Corporation S.A. (hereinafter “Guillemot”) and its
subsidiaries disclaim all liability for any damages caused by one or more of the following: (1)
the product has been modified, opened or altered; (2) failure to comply with assembly
instructions; (3) inappropriate or abusive use, negligence, an accident (an impact, for
example); (4) normal wear. If permitted under applicable law, Guillemot and its subsidiaries
disclaim all liability for any damages unrelated to a material or manufacturing defect with
respect to the product (including, but not limited to, any damages caused directly or indirectly
by any software, or by combining the Thrustmaster product with any unsuitable element,
including in particular power supplies, rechargeable batteries, chargers, or any other
elements not supplied by Guillemot for this product).
FCC STATEMENT
1. This device complies with Part 15 of the FCC Rules. Operation is subject to the following two
conditions:
(1) This device may not cause harmful interference, and
(2) This device must accept any interference received, including interference that may cause
undesired operation.
2. Changes or modifications not expressly approved by the party responsible for compliance could void
the user's authority to operate the equipment.
Page 19

COPYRIGHT
TECHNICAL SUPPORT
© 2015 Guillemot Corporation S.A. All rights reserved. Thrustmaster® is a registered trademark of
Guillemot Corporation S.A. Windows® is a registered trademark of Microsoft Corporation in the United
States and/or other countries. All other trademarks are the property of their respective owners. Illustrations
not binding. Contents, designs and specifications are subject to change without notice and may vary from
one country to another. Made in China.
ENVIRONMENTAL PROTECTION RECOMMENDATION
Please contact your local authorities for information on the c ollection point nearest you.
Retain this information. Colours and decorations may vary.
This product conforms to all standards regarding children 14 years of age and older. This product is not
suitable for use by children less than 14 years of age.
www.thrustmaster.com
At the end of its working life, this product should not be disposed of with standard
household waste, but rather dropped off at a collection point for the disposal of Waste
Electrical and Electronic Equipment (WEEE) for recycling.
This is confirmed by the symbol found on the product, user manual or packaging.
Depending on their characteristics, the materials may be recycled. Through recycling and
other forms of processing Waste Electrical and Electronic Equipment, you can make a
significant contribution towards helping to protect the environment.
http://ts.thrustmaster.com
18/18
Page 20

1/18
Compatible : PC
Manuel de l'utilisateur
CARACTÉRISTIQUES TECHNIQUES
1. 28 boutons rétro-
éclairés programmables
2. 2 LED d’identification programmables
3. 2 barres de
4. Base détachable
5. 4 caches « trou de vis »
fixation ajustables
6. 2 molettes de fixation
7. Connecteur USB
8. 2 Vis de fixation de la
9. Système de fixation des barres
10. Barre amovible
11. 2 Fenêtres plexiglas
barre amovible
Page 21

2/18
A LA DECOUVERTE DU MFD COUGAR
THRUSTMASTER MFD COUGAR est la réplique exacte des MFD équipant les avions F-16
de l’U.S. Air Force.
Chaque MFD COUGAR possède 20 boutons et 4 commutateurs, soit 28 boutons au total
par MFD !
L’ensemble de ses fonctions permet de remplacer une partie des commandes avancées du
clavier ou de la souris et de simuler certains instruments de vol pour plus de réalisme.
THRUSTMASTER est le créateur des joysticks de simulation HOTAS COUGAR
et T.16000M.
MEMOIRE INTERNE
Chaque MFD COUGAR dispose d’une mémoire interne.
L’ensemble de vos réglages (nom et numéro de MFD, intensité du rétro-éclairage, état des
Led d’identification) sera automatiquement sauvegardé à l’intérieur de cette mémoire.
Vos réglage
sur un autre ordinateur.
RETRO-ECLAIRAGE
Il peut-être ajusté par Software (dans « Thrustmaster Control Panel ») ou par Hardware
(directement dans le jeu).
2 LED D’IDENTIFICATION
Chaque MFD dispose de 2 LED d’identification afin de les reconnaître entre eux.
COMPATIBLE JUSQU'À 8 MFD COUGAR SIMULTANEMENT
« Thrustmaster Control Panel » et ses options avancées vous permettent d’ajuster et de piloter
jusqu’à 8 MFD en même temps. Chaque MFD est ainsi personnalisé et reconnaissable.
AJUSTEMENT PHYSIQUE
Le socle et la fenêtre du MFD COUGAR sont multi-orientables (pour un confort et
une visibilité optimale) et détachables
COMPATIBILITE DES ACCESSOIRES ET DES JEUX
Le MFD COUGAR est compatible avec l’ensemble des manettes, joystick et yokes
du marché et avec tous les jeux de simulation PC (militaire ou civile) supportant le multi-USB.
PLUG-IN « FLIGHT SIMULATOR X » / « FLIGHT SIMULATOR 2004 »
Les « Plug-In » inclus préconfigurent instantanément vos 2 MFD COUGAR dans ces jeux.
s et préférences seront ainsi préconfigurés si vous utilisez les MFD COUGAR
(pour être fixé sur un cockpit ou sur un écran).
Page 22

3/18
INCLINAISON DU MFD SUR SA BASE
Lorsqu’il est fixé à sa base (4) l’inclinaison du MFD est ajustable à 72°, 54° ou 39°.
Les barres de fixation (3) sont chacune composées de 2 barres qui peuvent être orientées
ou séparées :
- Une longue (avec les indications « 72DEGREE » et « 54DEGREE »)
- Une courte (avec l’indication « 39DEGREE »)
INCLINAISON
- Orientez les barres de fixation (3) avec l’indication « 72DEGREE » positionnée en bas
des barres (dévissez légèrement la vis centrale si nécessaire pour faciliter
l’orientation).
- Clipsez le haut des barres dans le système de fixation (9) situé à l’arrière et en haut de
la fenêtre du MFD.
- Clip
sez le bas des barres à l’arrière de la base puis resserrez les 2 molettes de
fixation (6).
A 72°
Page 23
- Orientez les 2 barres de fixation avec l’indication « 54DEGREE » positionnée en bas
des barres (dévissez légèrement la vis
l’orientation).
INCLINAISON A
centrale si
54°
nécessaire pour faciliter
- Clipsez le haut des barres dans le système de fixation (9) situé à l’arrière et en haut de
la fenêtre du MFD
- Clipsez le bas des barres à l’arrière de la base puis resserrez les 2 molettes de
fixation (6)
4/18
Page 24

- Dévissez la vis centrale puis séparez l’ensemble des barres.
INCLINAISON A 39°
- Positionnez les barres de fixation courtes avec l’indication « 39DEGREE » positionnée
en bas des barres.
- Clipsez le haut des barres dans le système de fixation (9) situé à l’arrière et en haut de
la fenêtre du MFD.
- Clipsez le bas des barres à l’arrière de la base puis resserrez les 2 molettes de
fixation (6).
5/18
Page 25
FIXATION DU MFD SUR UN COCKPIT OU UN ECRAN
1) Déclipsez les barres du système du système de fixation et séparez le MFD de sa
base en dévissant complètement les 2 molettes de fixation (6).
2) Retirez la barre amovible (10) située en haut à l’arrière du MFD en dévissant
complètement les 2 vis de fixation (8) situées de chaque côté.
3) Retirez les 4 caches « trou de vis » (5) en les poussant par l’arrière à l’aide un
tournevis fin ou d’une épingle.
Le MFD peut désormais être fixé en utilisant les 4 « trous de
6/18
vis ».
Page 26

PERSONNALISATION DES MFD COUGAR
- Insérez les 2 Fenêtres plexi-glasses (11) inclus dans la
partie supérieur du MFD COUGAR.
fente prévue
à cet effet sur la
- Insérez entre les 2 fenêtres plexiglas le visuel de votre choix où l’une des cartonnettes
livrées avec le pack.
REMARQUES :
- Les cartonnettes (version anglaise) des plug-In « Flight Simulator X » sont incluses dans
ce pack.
- Vous pouvez également télécharger (pour impression)
« Flight Simulator 2004 » et d’autres cartonnettes à cette adresse :
-
http://ts.thrustmaster.com/
les
cartonnettes des
plug-In
7/18
Page 27
INSTALLATION SUR PC
Configuration requise :
PC (Windows® Xp, Windows® Vista, Windows® 7) équipé de 2 ports USB
Le CD-ROM fourni avec ce produit permet d’installer les pilotes.
1. Insérez le CD-ROM d’installation dans votre lecteur de CD-ROM. L’assistant d’installation
apparaît automatiquement (si le menu d’installation ne se lance pas automatiquement :
double cliquez sur « Poste de travail », puis sur l’icône du CD-ROM et si
nécessaire sur « Setup.exe »).
2. Cliquez sur le bouton « DRIVERS » pour lancer l’installation des pilotes.
3. Une fois l’installation terminée, cliquez sur Terminer et redémarrez votre ordinateur.
4. Au redémarrage de l’ordinateur, reliez les connecteurs USB (7) des MFD COUGAR aux
ports USB de votre unité centrale. Windows® détectera automatiquement les nouveaux
périphériques.
5. L'installation des pilotes est automatique.
Suivez les instructions affichées à l'écran pour terminer l'installation.
6. Sélectionnez Démarrer/Programmes/Thrustmaster MFD Cougar pour accéder au
Control Panel et aux Plug-In de « Flight Simulator 2004 » / « Flight Simulator X ».
8/18
Page 28

THRUSTMASTER CONTROL PANEL
- Sélectionnez Démarrer/Programmes/Thrustmaster MFD Cougar/Control Panel.
- La boîte de dialogue Contrôleurs de jeu affichera le nom par défaut des 2 MFD
(« F16 MFD 1 » et « F16 MFD 2 ») avec l’état OK.
- Cliquez sur « Propriétés » pour configurer votre MFD.
9/18
Page 29

IDENTIFIER SON MFD COUGAR
Lorsque vous ouvrez le Control Panel, le MFD concerné clignote 2 secondes afin de
le reconnaître visuellement parmi les autres.
Vous pouvez également cliquer sur l’onglet « Identify » pour
reconnaître visuellement le MFD concerné.
faire clignoter
manuellement et
AJUSTER L’INTENSITE DU RETRO-ECLAIRAGE
Le rétro-éclairage de l’ensemble des boutons et des 2 LED d’identification peut-être effectué
par Software ou par Hardware.
AJUSTEMENT DU RETRO-ECLAIRAGE PAR SOFTWARE
- Dans “Thrustmaster Control Panel”, utilisez l’onglet « Backlit / LED Intensity ».
AJUSTEMENT DU RETRO-ECLAIRAGE PAR HARDWARE
(pour ajuster directement dans les jeux)
- Appuyez simultanément sur les touches 14 + 15 + 25 pour augmenter l’intensité
- Appuyez simultanément sur les touches 14 + 15 + 26 pour diminuer l’intensité
2 LED D’IDENTIFICATION
Le MFD COUGAR est équipé de 2 LED (2) afin d’identifié et reconnaître facilement le
MFD concerné.
NOM et
F16 MFD 1 ON OFF MFD GAUCHE n°1
F16 MFD 2 OFF ON MFD DROITE n°1
F16 MFD 3 ON ON MFD GAUCHE n°2
F16 MFD 4 OFF OFF MFD DROITE n°2
F16 MFD 5 ON OFF MFD GAUCHE n°3
F16 MFD 6 OFF ON MFD DROITE n°3
F16 MFD 7 ON ON MFD GAUCHE n°4
F16 MFD 8 OFF OFF MFD DROITE n°4
défaut ces 2 LED s’allument où s’éteignent selon le nom et le
Par
Il est possible de modifier ce mode par défaut en activant ou non « Left LED » et « Right
LED » dans « Thrustmaster Control Panel ».
NUMERO
du MFD
LED
GAUCHE
LED
DROITE
10/18
EMPLACEMENT
dans un cockpit
numéro du
MFD :
Page 30

UTILISER PLUS DE 2 MFD COUGAR SIMULTANEMENT
« Thrustmaster Control Panel » peut gérer jusqu’à 8 MFD COUGAR branchés
simultanément sur le même PC.
- En cas d’utilisation simultanée de plus de 2 MFD (et uniquement dans ce cas), ouvrez
l’onglet « F16 MFD » et choisissez le numéro de MFD de votre choix.
- Cliquez sur « OK ».
- Une fois cette opération effectuée, le MFD concerné se déconnecte et se reconnecte
automatiquement avec son nouveau numéro.
REMARQUE : Il est conseillé de ne modifier le numéro de MFD
plus de 2 MFD COUGAR.
que si
vous possédez
11/18
Page 31

CONFIGURATION ET EMPLACEMENT DES BOUTONS
12/18
Page 32

PLUG-IN “FLIGHT SIMULATOR”
Les « Plug-In » inclus préconfigurent instantanément vos 2 MFD dans les jeux « FLIGHT
SIMULATOR 2004 » et « FLIGHT SIMULATOR X » (il est ainsi inutile d’accéder aux options
du jeu pour
3 profils au choix vous sont proposés :
* « Generic Profile » :
Ce profil couvre les besoins les plus communs, tous types d'aviation confondus.
* « Light Aviation Profile » :
Ce profil est conçu spécialement pour les besoins propres aux appareils d'aviation légère
ou de loisir. Il inclut la gestion d'un pilote automatique "basique", les trains d’atterrissage,
les volets, la gestion du circuit électrique, la richesse moteur, le pas d'hélice, le
refroidissement
* « Airliner Profile » :
Reprenant une partie des fonctions disponibles en aviation légère, ce
spécificités des "avions de Ligne" et de l'aviation professionnelle en proposant par
exemple le contrôle d'un pilote automatique évolué.
REMARQUES IMPORTANTES
- Ces « Plug-In » sont préconfigurés pour 2 MFD COUGAR (et pas plus).
- Le jeu doit-être fermé lorsque vous installez les « Plug-In ».
- Avant d’installer ces « Plug-In », les 2 MFD COUGAR doivent toujours être
configurés avec les désignations « F16 MFD 1 » et « F16 MFD 2 » (désignations par défaut).
configurer manuellement
moteur,
etc...
chaque touche des MFD).
profil
tient compte des
13/18
Page 33

INSTALLER LES PLUG-IN
- Pour accéder au « Plug-In » de « Flight Simulator 2004 », sélectionnez :
Démarrer/Programmes/Thrustmaster MFD Cougar/Plug-In FLIGHT SIMULATOR 2004
- Pour accéder au « Plug-In » de « Flight Simulator X », sélectionnez :
Démarrer/Programmes/Thrustmaster MFD Cougar/Plug-In FLIGHT SIMULATOR X
- Une fois cette opération effectuée, 3 profils vous sont proposés :
« Generic Profile » / « Airliner Profile » /« Light aviation Profile ».
Choisissez le profil de votre choix puis cliquez sur « START ».
- Le panneau « SUCCESS » s’ouvre pour indiquer la bonne installation du profil.
Cliquez sur « OK ».
AVEC VOS 2 MFD COUGAR DEJA PRE-CONFIGURE AVEC
REMARQUE : Pour jouer avec un autre profil, effectuez la
VOUS ETES MAINTENANT PRET A
profil de votre choix.
14/18
JOUER
LE
PROFIL CHOISI !
même opération
en choisissant le
Page 34

15/18
DANS LES AUTRES JEUX
Le MFD COUGAR est compatible avec tous les jeux de simulation PC (militaire ou civile)
supportant le multi-USB.
Pour configurer le MFD COUGAR dans votre jeu, accédez aux « Options Contrôleur » du
jeu, puis configurez manuellement chaque touche du MFD sur la fonction de votre choix.
Cette opération n’est à effectuer qu’une seule fois car elle sera automatiquement
sauvegardée dans votre jeu.
DEPANNAGE ET AVERTISSEMENT
Les MFD COUGAR ne sont pas reconnus ou se déconnectent inopinément.
- Eteignez votre ordinateur, déconnectez vos MFD COUGAR, rebranchez-les et redémarrez
l’ordinateur.
- Si le problème persiste, branchez-les sur de nouveaux ports USB ou branchez-les
directement sur un HUB alimenté par le secteur.
- Evitez de les brancher sur un HUB non alimenté par le secteur.
Les « Plug-In » de « Flight Simulator X » et « Flight Simulator 2004 » ne s’installent
pas ou ne fonctionnent pas correctement.
- Vérifiez que le jeu est complètement fermé avant d’installer les « Plug-In ».
- Vérifiez que les 2 MFD COUGAR sont bien configurés avec les désignations
« F16 MFD 1 » et « F16 MFD 2 » (désignations par défaut) dans le « Control Panel ».
Je n’arrive pas à configurer mon MFD COUGAR dans les autres jeux.
- Dans le menu « Options / Contrôleur / Manettes ou Joystick » de votre jeu,
configurez manuellement chaque touche du MFD sur la fonction de votre choix.
- Reportez-vous au manuel de l’utilisateur ou à l’aide en ligne de votre jeu pour
plus d’informations.
- Effectuez les dernières mises à jour disponibles pour votre jeu.
Page 35

16/18
INFORMATIONS RELATIVES A LA GARANTIE AUX CONSOMMATEURS
Dans le monde entier, Guillemot Corporation S.A., ayant son siège social Place du Granier, B.P.
97143, 35571 Chantepie, France (ci-après « Guillemot ») garantit au consommateur que le présent
produit Thrustmaster est exempt de défaut matériel et de vice de fabrication, et ce, pour une
période de garantie qui correspond au délai pour intenter une action en conformité de ce produit.
Dans les pays de l’Union Européenne, ce délai est de deux (2) ans à compter de la délivrance du
produit Thrustmaster. Dans les autres pays, la durée de la période de garantie correspond au délai
pour intenter une action en conformité du produit Thrustmaster selon la législation en vigueur dans
le pays où le consommateur avait son domicile lors de l’achat du produit Thrustmaster (si une telle
action en conformité n’existe pas dans ce pays alors la période de garantie est de un (1) an à
compter de la date d’achat d’origine du produit Thrustmaster).
Nonobstant ce qui précède, les batteries sont garanties six (6) mois à compter de la date d’achat
d’origine.
Si, au cours de la période de garantie, le produit semble défectueux, contactez immédiatement le
Support Technique qui vous indiquera la procédure à suivre. Si le défaut est confirmé, le produit
devra être retourné à son lieu d’achat (ou tout autre lieu indiqué par le Support Technique).
Dans le cadre de la garantie, le consommateur bénéficiera, au choix du Support Technique, d'un
remplacement ou d'une remise en état de marche du produit défectueux. Si, pendant la période de
garantie, le produit Thrustmaster fait l'objet d'une telle remise en état, toute période d'immobilisation
d'au moins sept jours vient s'ajouter à la durée de la garantie qui restait à courir (cette période court
à compter de la demande d'intervention du consommateur ou de la mise à disposition pour remise
en état du produit en cause, si cette mise à disposition est postérieure à la demande d'intervention).
Lorsque la loi applicable l’autorise, toute responsabilité de Guillemot et ses filiales (y compris pour
les dommages indirects) se limite à la remise en état de marche ou au remplacement du produit
Thrustmaster. Lorsque la loi applicable l’autorise, Guillemot exclut toutes garanties de qualité
marchande ou d’adaptation à un usage particulier.
Cette garantie ne s’appliquera pas : (1) si le produit a été modifié, ouvert, altéré, ou a subi des
dommages résultant d’une utilisation inappropriée ou abusive, d’une négligence, d’un accident, de
l’usure normale, ou de toute autre cause non liée à un défaut matériel ou à un vice de fabrication (y
compris, mais non limitativement, une combinaison du produit Thrustmaster avec tout élément
inadapté, notamment alimentations électriques, batteries, chargeurs, ou tous autres éléments nonfournis par Guillemot pour ce produit) ; (2) en cas de non respect des instructions du Support
Technique ; (3) aux logiciels, lesdits logiciels faisant l’objet d’une garantie spécifique ; (4) aux
consommables (éléments à remplacer pendant la durée de vie du produit : piles, coussinets de
casque audio, par exemple) ; (5) aux accessoires (câbles, étuis, housses, sacs, dragonnes, par
exemple) ; (6) si le produit a été vendu aux enchères publiques.
Cette garantie n’est pas transférable.
Les droits légaux du consommateur au titre de la législation applicable dans son pays à la vente de
biens de consommation ne sont pas affectés par la présente garantie.
Par exemple, en France, indépendamment de la présente garantie, le vendeur reste tenu de la garantie
légale de conformité mentionnée aux articles L. 211-4 à L. 211-13 du code de la consommation et de
celle relative aux défauts (vices cachés) de la chose vendue, dans les conditions prévues aux articles
1641 à 1648 et 2232 du code civil. La loi applicable (c'est-à-dire la loi française) impose de reproduire
les extraits de la loi française suivants:
Article L. 211-4 du code de la consommation:
Le vendeur est tenu de livrer un bien conforme au contrat et répond des défauts de conformité
existant lors de la délivrance.
Il répond également des défauts de conformité résultant de l'emballage, des instructions de
montage ou de l'installation lorsque celle-ci a été mise à sa charge par le contrat ou a été réalisée
sous sa responsabilité.
Page 36

17/18
Article L. 211-5 du code de la consommation:
Pour être conforme au contrat, le bien doit :
1° Etre propre à l'usage habituellement attendu d'un bien semblable et, le cas échéant :
- correspondre à la description donnée par le vendeur et posséder les qualités que celui-ci a
présentées à l'acheteur sous forme d'échantillon ou de modèle ;
- présenter les qualités qu'un acheteur peut légitimement attendre eu égard aux déclarations
publiques faites par le vendeur, par le producteur ou par son représentant, notamment dans la
publicité ou l'étiquetage ;
2° Ou présenter les caractéristiques définies d'un commun accord par les parties ou être propre à
tout usage spécial recherché par l'acheteur, porté à la connaissance du vendeur et que ce dernier a
accepté.
Article L. 211-12 du code de la consommation:
L'action résultant du défaut de conformité se prescrit par deux ans à compter de la délivrance du
bien.
Article L. 1641 du code civil:
Le vendeur est tenu de la garantie à raison des défauts cachés de la chose vendue qui la rendent
impropre à l'usage auquel on la destine, ou qui diminuent tellement cet usage que l'acheteur ne
l'aurait pas acquise, ou n'en aurait donné qu'un moindre prix, s'il les avait connus.
Article L. 1648 alinéa 1er du code civil:
L'action résultant des vices rédhibitoires doit être intentée par l'acquéreur dans un délai de deux ans
à compter de la découverte du vice.
Stipulations additionnelles à la garantie
Pendant la période de garantie, Guillemot ne fournira, en principe, pas de pièce détachée car le
Support Technique est seul habilité tant à ouvrir qu'à remettre en état tout produit Thrustmaster (à
l'exception des remises en état que le Support Technique demanderait, par instructions écrites, au
consommateur d'effectuer -par exemple en raison de la simplicité et de l'absence de confidentialité
du processus de remise en état-, en lui fournissant, le cas échéant, la ou les pièces détachées
nécessaires).
Compte tenu de ses cycles d'innovation et pour préserver ses savoir-faire et secrets, Guillemot ne
fournira, en principe, ni notice de remise en état, ni pièce détachée pour tout produit Thrustmaster
dont la période de garantie est expirée.
Aux États-Unis d’Amérique et au Canada, la présente garantie est limitée au mécanisme interne et au
boîtier externe du produit. En aucun cas, Guillemot ou ses sociétés affiliées ne sauraient être tenues
responsables envers qui que ce soit de tous dommages indirects ou dommages accessoires résultant
du non respect des garanties expresses ou implicites. Certains États/Provinces n’autorisent pas la
limitation sur la durée d’une garantie implicite, ou l’exclusion ou la limitation de responsabilité pour les
dommages indirects ou accessoires, de sorte que les limitations ou exclusions ci-dessus peuvent ne
pas vous être applicables. Cette garantie vous confère des droits spécifiques ; vous pouvez également
bénéficier d’autres droits qui peuvent différer d’un État/Province à l’autre.
Responsabilité
Lorsque la loi applicable l’autorise, Guillemot Corporation S.A. (ci-après « Guillemot ») et ses filiales
excluent toute responsabilité pour tous dommages causés par un ou plusieurs des faits suivants: (1)
le produit a été modifié, ouvert, altéré, (2) l’irrespect des instructions de montage, (3) l’utilisation
inappropriée ou abusive, la négligence, l’accident (un choc, par exemple), (4) l’usure normale du
produit. Lorsque la loi applicable l’autorise, Guillemot et ses filiales excluent toute responsabilité
pour tout dommage dont la cause n’est pas liée à un défaut matériel ou à un vice de fabrication du
produit (y compris, mais non limitativement, tout dommage causé directement ou indirectement par
tout logiciel, ou par une combinaison du produit Thrustmaster avec tout élément inadapté,
notamment alimentations électriques, batteries, chargeurs, ou tous autres éléments non-fournis par
Guillemot pour ce produit).
Page 37

18/18
COPYRIGHT
SUPPORT TECHNIQUE
© 2015 Guillemot Corporation S.A. Tous droits réservés. Thrustmaster
de Guillemot Corporation S.A. Windows® est une marque déposée de Microsoft Corporation aux
Etats-Unis et/ou dans d’autres pays. Toutes les autres marques sont la propriété de leurs
propriétaires respectifs. Illustrations non contractuelles. Le contenu, la conception et les
spécifications sont susceptibles de changer sans préavis et de varier selon les pays. Fabriqué en
Chine.
RECOMMANDATION RELATIVE A LA PROTECTION DE L’ENVIRONNEMENT
En fin de vie, ce produit ne doit pas être éliminé avec les déchets ménagers
normaux mais déposé à un point de collecte des déchets d'équipements
électriques et électroniques en vue de son recyclage.
Ceci est confirmé par le symbole figurant sur le produit, le manuel utilisateur ou
l’emballage.
En fonction de leurs caractéristiques, les matériaux peuvent être recyclés. Par le
recyclage et par les autres formes de valorisation des déchets d'équipements
électriques et électroniques, vous contribuez de manière significative à la protection de
l’environnement. Veuillez consulter les autorités locales qui vous indiqueront le point de collecte
concerné.
Informations à conserver. Les couleurs et décorations peuvent varier.
Ce produit est en conformité avec l’ensemble des normes relatives aux enfants de plus de 14 ans. Il
ne convient pas aux enfants de moins de 14 ans.
www.thrustmaster.com
®
est une marque déposée
http://ts.thrustmaster.com
Page 38

1/18
PC-kompatibel
Benutzerhandbuch
TECHNISCHE SPEZIFIKATIONEN
1. 28 hinterleuchtete, programmierbare
Buttons
2. 2 programmierbare
Identifikations- LEDs
3. 2 justierbare Befestigungsstreben
4. Abnehmbare Basis
5. 4 Bohrungsblenden
6. 2 Befestigungsflügelschrauben
7. USB Stecker
8. 2 abnehmbare Befestigungsstreben-
Schrauben
9. Befestigungsstrebensystem
10. Abnehmbare Strebe
11. 2 Plexiglasscheiben
Page 39

2/18
LERNEN SIE IHR MFD COUGAR KENNEN
Das THRUSTMASTER MFD COUGAR ist die exakte Replik der MFDs mit der die U. S. Air
Force F-16 Kampfflugzeuge ausgestattet sind.
Jedes MFD COUGAR verfügt über 20 Buttons und 4 Schalter, d. h. insgesamt 28 Buttons
pro MFD!
Die MFD-Features ermöglichen Ihnen die Zuordnung erweiterter Tastatur- oder
Mauskontrollen auf das Gerät und dadurch
verbesserten
und T.16000M Simulationsjoysticks.
Spielrealismus.
THRUSTMASTER ist der Entwickler des HOTAS COUGAR
INTERNER SPEICHER
Jedes MFD COUGAR verfügt über
Alle persönlichen Einstellungen (MFD-Kennung und Nummer,
Beleuchtungsintensität, Status der Identifizierungs-LED) werden a
des Gerätes gesichert.
Auf diesem Weg werden alle Einstellungen und Präferenzen beibehalten, falls Sie
sich entschließen Ihr MFD COUGAR an einen anderen Computer anzuschließen.
ANZEIGENHINTERGRUNDBELEUCHTUNG
Die Beleuchtungsintensität kann via des Thrustmaster
werden oder hardwareseitig direkt im Spiel.
2 IDENTIFIKATIONS-LEDS
Jedes MFD verfügt über 2 Identifikations-LEDs, um diese auseinanderhalten zu können.
GLEICHZEITIG MIT BIS ZU 8 MFD COUGARS KOMPATIBEL
Die erweiterten Einstellungen des Thrustmaster Control Panel's ermöglichen Ihnen gleichzeitig
bis zu 8 MFDs zu justieren und zu kontrollieren. Demnach ist jedes MFD vollständig
personalisiert und identifizierbar.
PHYSIKALISCHE ANPASSUNG
Die Basis und Fenster des MFD COUGAR's sind mobil (für optimalen Komfort und
Sichtbarkeit) und abnehmbar (ermöglicht Nutzern die Anbringung an einem Computerdisplay
oder einem Cockpit).
ACCESSORIES- UND SPIELEKOMPATIBILITÄT
Das MFD COUGAR ist mit allen aktuell erhältlichen
und Steuerknüppeln – aber auch mit allen PC-Simulationsspielen (sowohl militärisch, als
auch zivil), die Multi-USB-Konnektivität unterstützen, kompatibel.
FLIGHT SIMULATOR X / FLIGHT SIMULATOR 2004 PLUG-INS
Die inklusiven Plug-ins ermöglichen Ihnen die sofortige Konfiguration beider
MFD COUGARs für diese Spiele.
die Emulation
einen internen
verschiedener Fluginstrumente für
Speicher.
utomatisch im Speicher
Control Panel's
Kontrollern
softwarejustiert
– Joysticks
Page 40

3/18
ANPASSEN DES WINKELS DES MFDs AN DIE BASIS
Wenn das MFD an der Basis befestigt wird (4), kann der Winkel auf
(DEGREE) justiert werden.
Das Befestigungssystem (3) setzt sich aus 2 Streben zusammen, die als
Winkel zusammengesetzt oder entfernt werden können:
- Eine lange Strebe (mit der Bezeichnung 72DEGREE und 54DEGREE)
- Eine kurze Strebe (mit der Bezeichnung 39DEGREE)
ANPASSEN DES WINKELS AUF 72 GRAD (DEGREES)
- Plazieren Sie die Befestigungsstreben (3) mit der 72DEGREE Bezeichnung nach unten
zeigend (falls erforderlich, lösen Sie die mittige Schraube leicht, um die Justierung zu
erleichtern).
- Stecken Sie das obere Ende der Streben in das Befestigungssystem (9) hinten an der
Oberseite des MFD.
- Befestigen Sie das untere Ende der Streben hinten an der Basis und ziehen die beiden
Befestigungsflügelschrauben (6) an.
72, 54
oder 39 Grad
Page 41

Plazieren Sie die Befestigungsstreben (3) mit der 54DEGREE Bezeichnung nach unten
zeigend (falls erforderlich, lösen Sie die mittige Schraube leicht, um die Justierung zu
erleichtern).
ANPASSEN DES WINKELS AUF 54 GRAD (DEGREES)
- Stecken Sie das obere Ende der Streben in das Befestigungssystem (9) hinten an der
Oberseite des MFD.
- Befestigen Sie das untere Ende der Streben hinten an der Basis und ziehen die beiden
Befestigungsflügelschrauben (6) an.
4/18
Page 42

- Lösen Sie die mittlere Schraube und entfernen alle Streben.
ANPASSEN DES WINKELS AUF 39
GRAD (DEGREES
)
- Plazieren Sie die Streben mit der 39DEGREE Bezeichnung nach unten zeigend.
- Stecken Sie das obere Ende der Streben in das Befestigungssystem (9) hinten an der
Oberseite des MFD.
- Befestigen Sie das untere Ende der Streben hinten an der Basis und ziehen die beiden
Befestigungsflügelschrauben (6) an.
5/18
Page 43

BEFESTIGEN DES MFD AN EIN COCKPIT ODER EINEN
BILDSCHIRM
1) Demontieren Sie die Befestigungsstreben und nehmen das MFD aus der Basis
indem Sie die beiden Befestigungsflügelschrauben (6) vollständig herausschrauben.
2) Demontieren Sie die abnehmbare Strebe (10) hinten an der Oberseite des MFD
indem Sie die beiden Befestigungsflügelschrauben (8) an beiden Seiten vollständig
herausschrauben. Entfernen Sie die 4 Bohrungsblenden (5) indem Sie diese von
hinten mit einem kleinen Schraubendreher oder einer Nadel herausdrücken.
Sie können das MFD unter Nutzung der 4 Bohrungen anbringen.
6/18
Page 44

PERSONALISIERUNG DES MFD COUGARS
- Stecken Sie beiden inklusiven Plexiglasscheiben (11) in den entsprechenden Schacht
oben am MFD COUGAR.
- Zwischen die beiden Plexiglasscheiben stecken Sie die relevante Grafik oder eine der
Karten, die dem Paket beiliegen.
Anmerkungen:
- Flight Simulator X Karten (nur auf Englisch verfügbar) befinden sich in diesem Paket.
- Auf der Website http://ts.thrustmaster.com/ können für das Flight Simulator 2004 Plugin ( aber auch andere) Karten herunterladen und ausdrucken.
7/18
Page 45

PC INSTALLATION
Systemanforderungen:
PC (Windows® XP, Windows® Vista, Windows® 7) mit 2 USB Ports
Die diesem Produkt beigelegte CD-ROM dient der Treiberinstallation.
1. Legen Sie die Installations-CD-ROM in Ihr CD-ROM Laufwerk. Der Installationsassistent
erscheint automatisch auf dem Bildschirm (sollte das Installationsprogramm
nicht automatisch starten, gehen Sie auf Arbeitsplatz und (doppel-)klicken dann auf das
CD- ROM Laufwerksicon; falls erforderlich, (doppel-)klicken Sie auf die Datei Setup.exe).
2. Klicken Sie auf den DRIVERS Button, um die Treiberinstallation zu starten.
3. Nach Beendigung der Installation klicken Sie auf
Computer neu.
Fertigstellen und
starten Ihren
4. Nach dem Neustart Ihres Computers stecken Sie die MFD COUGAR USB Stecker (7) in
die USB Ports Ihres Computers. Windows® erkennt die neuen Geräte automatisch.
5. Die Treiberinstallation läuft automatisch ab.
Folgen Sie den Bildschirminstruktionen, um die Installation
abzuschließen.
6. Wählen Sie Start/Programme/Thrustmaster MFD COUGAR, um auf das Thrustmaster
Control Panel und Flight Simulator 2004 / die Flight Simulator X Plug-ins zuzugreifen.
8/18
Page 46

THRUSTMASTER CONTROL PANEL
- Wählen Sie Start/Programme/Thrustmaster MFD COUGAR/Control Panel.
- Der Game Controller-Dialog zeigt den standardmäßigen Namen der beiden 2
(F16 MFD 1 und F16 MFD 2) mit der Statusanzeige OK an
- Klicken Sie auf Eigenschaften, um Ihr MFD zu konfigurieren.
.
MFD's
9/18
Page 47

IDENTIFIZIERUNG IHRES MFD COUGAR
Wenn Sie die Steuerkonsole öffnen, blinkt der Name des entsprechenden MFDs für zwei
Sekunden und ermöglicht Ihnen somit dieses von anderen Geräten zu unterscheiden.
Wenn Sie auf den Identify Tab klicken, beginnt das entsprechende MFD zu blinken und
ermöglicht Ihnen selbiges leicht zu lokalisieren.
ANPASSEN DER HINTERGRUNDBELEUCHTUNGSINTENSITÄT
Die Beleuchtung aller Buttons und Identifikations-LEDs kann soft- oder hardwarejustiert
werden.
JUSTIERUNG DER BELEUCHTUNG MITTELS SOFTWARE
- Im Thrustmaster Control Panel wählen Sie den Backlit / LED Intensity Tab.
JUSTIERUNG DER BELEUCHTUNG MITTELS HARDWARE
(Zur Justierung der Beleuchtung während des Spiels)
- Gleichzeitig die Buttons 14 + 15 + 25 zur Anhebung der Beleuchtungsintensität drücken
- Gleichzeitig die Buttons 14 + 15 + 26 zur Absenkung der Beleuchtungsintensität drücken
2 IDENTIFICATION LEDS
Das MFD COUGAR verfügt über 2 LEDs (2), um dem Nutzer zu ermöglichen das
entsprechende MFD zu identifizieren und zu erkennen.
Beide LEDs schalten sich je nach gewähltem MFD Namen oder Nummer ein oder aus,
außer Sie haben diese anderweitig konfiguriert:
of MFD
LEFT-
HAND LED
LED
RIGHT
10/18
RECHTES MFD Nr. 2
LOCATION
in a cockpit
NAME and
NUMBER
F16 MFD 1 ON OFF LINKES MFD Nr. 1
F16 MFD 2 OFF ON RECHTES MFD Nr. 1
F16 MFD 3 ON ON LINKES MFD Nr. 2
F16 MFD 4 OFF OFF
F16 MFD 5 ON OFF LINKES MFD Nr. 3
F16 MFD 6 OFF ON RECHTES MFD Nr. 3
F16 MFD 7 ON ON LINKES MFD Nr. 4
F16 MFD 8 OFF OFF RECHTES MFD Nr. 4
Dieser standardmäßige Modus kann durch Aktivierung der Left LED und Right LED
Optionen im Thrustmaster Control Panel geändert werden.
Page 48

GLEICHZEITIGE NUTZUNG VON MEHR ALS 2 MFD COUGARS
Das Thrustmaster Control Panel kann gleichzeitig bis zu 8 MFD COUGARs am selben PC
angeschlossen handhaben.
- Falls Sie mehr als 2 MFDs gleichzeitig nutzen (und nur in diesem Fall), greifen Sie auf den
F16 MFD Tab zu und wählen die entsprechende MFD Nummer aus.
- Klicken Sie auf OK
.
- Nach Ausführung dieser Operation trennt sich das entsprechende MFD automatisch vom
Computer und verbindet sich dann mit seiner neuen Nummer erneut.
Bitte beachten: Wir empfehlen die Änderung der MFD-Nummer nur in dem Fall, daß
Sie mehr als zwei MFD
COUGARs
gleichzeitig
nutzen.
11/18
Page 49

BUTTONKONFIGURATION UND LAGE
12/18
Page 50

FLIGHT SIMULATOR PLUG-IN
Die inklusiven Plug-ins ermöglichen Ihnen die sofortige Konfiguration Ihrer MFDs für
FLIGHT SIMULATOR 2004 und FLIGHT SIMULATOR X (Sie brauchen demnach nicht mehr
auf die entsprechenden Spieloptionen zuzugreifen, um jeden Button auf den MFDs manuell
zu konfigurieren).
3 Profile sind für Sie verfügbar:
* Generic Profile:
Dieses Profil deckt die meisten Erfordernisse für Zivil- und Militärflüge ab.
* Light Aviation Profile:
Dieses Profil wurde speziell für die Bedürfnisse des leichten und Freizeitflugsports
entwickelt. Es enthält ein Basis-Autopilot-Feature aber auch Fahrwerk- und
Bremsklappenkontrollen, Elektrosystem-Managementfeatures,
Maschinenzusammensetzung, Propellerneigung und Maschinenkühlsystemkontrollen, etc.
* Airliner Profile:
Neben einer Reihe von Features, die im Light Aviation Profil geboten werden, beinhaltet
dieses Profil mehr spezifische Aspekte für Passagierflüge und professionelle Luftfahrt,
sowie ein erweitertes Autopilotfeature.
WICHTIGE ANMERKUNGEN
- Die Plug-ins sind NUR für zwei 2 MFD COUGARs vorkonfiguriert!
- Das Spiel darf nicht laufen, wenn Sie die Plug-ins installieren.
- Bevor Sie diese Plug-ins installieren, konfigurieren Sie beide MFD COUGARs unter
Nutzung der F16 MFD 1 und F16 MFD 2 Kennungen (standardmäßige Kennungen).
13/18
Page 51

INSTALLIEREN DER PLUG-INS
- Um auf das Flight Simulator 2004 Plug-in zugreifen zu können, wählen Sie:
Start/Programme/Thrustmaster MFD Cougar/FLIGHT SIMULATOR 2004 Plug-In
- Um auf das Flight Simulator X Plug-in zugreifen zu können,
Start/Programme/Thrustmaster MFD Cougar/FLIGHT SIMULATOR X Plug-In
wählen Sie:
- Nachdem Sie diese Operation ausgeführt haben, stehen Ihnen 3
Generic Profile / Airliner Profile / Light Aviation Profile.
Wählen Sie das entsprechende Profil und klicken auf START
Profile
zur Verfügung:
.
- Es erscheint eine SUCCESS Anzeige und bestätigt die korrekte Installation des Profils.
Klicken Sie auf OK.
SIE SIND NUN MIT IHREN BEIDEN MFD COUGARS MIT DEM ENTSPRECHENDEN
Bitte beachten Sie: Um mit einem anderen Profil zu spielen, verfahren Sie wie oben
beschrieben und wählen das erforderliche Profil.
PROFIL SPIELBEREIT!
14/18
Page 52

15/18
IN ANDEREN SPIELEN
Das MFD COUGAR ist mit allen PC-Simulationsspielen (militärische und zivile
Luftfahrtsimulationen), die Multi-USB-Konnektivität
unterstützen, kompatibel.
Um das MFD COUGAR in Ihrem Spiel zu konfigurieren, greifen Sie auf die
Gameskontrolleroptionen zu und belegen manuell die entsprechenden Features für jeden
MFD Button.
Sie müssen diese Operation nur einmal ausführen – die entsprechenden Einstellungen
werden automatisch in Ihrem Spiel gespeichert.
FEHLERBEHANDLUNG UND WARNUNG
Meine MFD COUGARs werden nicht erkannt oder trennen sich unerwartet.
- Fahren Sie Ihren Computer herunter, trennen Sie die MFD COUGARs, schließen dieser
wieder an und starten Ihren Computer erneut.
- Falls dies das Problem nicht behebt, schließen Sie die
Ports an oder verbinden diese direkt
mit einem
stromversorgten USB-Hub.
- Vermeiden Sie den Anschluß Ihrer MFD COUGARs an einen nicht stromversorgten USB
Hub.
Die Flight Simulator X und Flight Simulator 2004
installieren oder funktionieren nicht korrekt.
- Überprüfen Sie bitte, daß das Spiel nicht vor der Installation der Plug-ins läuft.
- Stellen Sie sicher, daß beide MFD COUGARs mit den Kennungen F16 MFD 1 und F16
MFD 2 (standardmäßige Kennungen) im Control Panel konfiguriert wurden
Ich kann mein MFD COUGAR nicht in anderen Spielen konfigurieren.
- In Ihren Spieloptionen / Kontroller / Pad- oder Joystickmenü, belegen Sie manuell jeden
der MFD Buttons mit der erforderlichen Funktion.
- Lesen Sie bitte im Handbuch oder der Onlinehilfe Ihres Spiels für weitere Informationen
nach.
- Installieren Sie die neusten Aktualisierungen für Ihr Spiel.
MFD COUGARs
Plug-ins lassen
an andere USB
sich nicht
.
Page 53

16/18
Kunden-Garantie-Information
Guillemot Corporation S.A. mit Hauptfirmensitz in Place du Granier, B.P. 97143, 35571 Chantepie,
France (fortfolgend “Guillemot”) garantiert Kunden weltweit, daß dieses Thrustmaster Produkt frei von
Mängeln in Material und Verarbeitung für eine Gewährleistungsfrist ist, die mit der Frist für eine
Mängelrüge bezüglich des Produktes übereinstimmt. In den Ländern der Europäischen Union
entspricht diese einem Zeitraum von zwei (2) Jahren ab Kaufdatum des Thrustmaster Produktes. In
anderen Ländern entspricht die Gewährleistungsfrist der zeitlichen Begrenzung für eine Mängelrüge
bezüglich des Thrustmaster Produktes in Übereinstimmung mit anwendbarem Recht des Landes, in
dem der Kunde zum Zeitpunkt des Erwerbs eines Thrustmaster Produktes wohnhaft ist. Sollte eine
entsprechende Regelung in dem entsprechenden Land nicht existieren, umfasst die
Gewährleistungspflicht einen Zeitraum von einem (1) Jahr ab dem originären Kaufdatum des
Thrustmaster Produktes.
Ungeachtet dessen werden wiederaufladbare Batterien (fortfolgend “Akkus”) durch eine
Gewährleistungsfrist von sechs (6) Monaten ab dem Kaufdatum abgedeckt.
Sollten bei dem Produkt innerhalb der Gewährleistungsfrist Defekte auftreten, kontaktieren Sie
unverzüglich den technischen Kundendienst, der die weitere Vorgehensweise anzeigt. Wurde der
Defekt bestätigt, muß das Produkt an die Verkaufsstelle (oder an eine andere Stelle, je nach
Maßgabe des technischen Kundendienstes) retourniert werden.
Im Rahmen dieser Garantie sollte das defekte Produkt des Kunden, je nach Entscheidung des
technischen Kundendienstes, entweder ausgetauscht oder repariert werden. Sollte während der
Garantiezeit das Thrustmaster Produkt einer derartigen Instandsetzung unterliegen und das Produkt
während eines Zeitraums von mindestens sieben (7) Tagen nicht benutzbar sein, wird diese Zeit der
restlichen Garantiezeit hinzugefügt. Diese Frist läuft ab dem Zeitpunkt, an dem der Wunsch des
Verbrauchers bezüglich einer Intervention vorliegt oder ab dem Tag, an dem das fragliche Produkt
zur Instandsetzung zur Verfügung steht, falls das Datum, an dem das Produkt zur Instandsetzung zur
Verfügung steht, dem Datum des Antrags auf Intervention nachfolgt. Wenn nach geltendem Recht
zulässig, beschränkt sich die volle Haftung von Guillemot und ihrer Tochtergesellschaften auf die
Reparatur oder den Austausch des Thrustmaster Produktes (inklusive Folgeschäden). Wenn nach
geltendem Recht zulässig, lehnt Guillemot alle Gewährleistungen der Marktgängigkeit oder Eignung
für einen bestimmten Zweck ab.
Der Gewährleistungsanspruch verfällt: (1) Falls das Produkt modifiziert, geöffnet, verändert oder ein
Schaden durch unsachgemäßen oder missbräuchlichen Gebrauch hervorgerufen wurde, sowie durch
Fahrlässigkeit, einen Unfall, Verschleiß oder irgendeinem anderen Grund – aber nicht durch Materialoder Herstellungsfehler (einschließlich, aber nicht beschränkt auf, die Kombination der Thrustmaster
Produkte mit ungeeigneten Elementen, insbesondere Netzteile, Akkus, Ladegeräte, oder andere
Elemente, die von Guillemot für dieses Produkt nicht mitgeliefert wurden); (2) Im Falle der
Nichteinhaltung der durch den Technischen Support erteilten Anweisungen; (3) Durch Software. Die
besagte Software ist Gegenstand einer speziellen Garantie; (4) Bei Verbrauchsmaterialien
(Elemente, die während der Produktlebensdauer ausgetauscht werden, wie z. B. Einwegbatterien,
Ohrpolster für ein Audioheadset oder für Kopfhörer); (5) Bei Accessoires (z. B. Kabel, Etuis, Taschen,
Beutel, Handgelenk-Riemen); (6) Falls das Produkt in einer öffentlichen Versteigerung verkauft
wurde.
Diese Garantie ist nicht übertragbar.
Die Rechte des Kunden in Übereinstimmung mit anwendbarem Recht bezüglich des Verkaufs auf
Konsumgüter im Land der/der Kunden/Kundin wird durch diese Garantie nicht beeinträchtigt.
Page 54

17/18
Zusätzliche Gewährleistungsbestimmungen
Während der Garantiezeit bietet Guillemot grundsätzlich keine Ersatzteile an, da der technische
Kundendienst der einzige autorisierte Partner zum Öffnen und/oder Instandsetzen jedweden
Thrustmaster-Produkts ist (mit Ausnahme von irgendwelchen Instandsetzungsprozeduren, die
der Kunde nach Maßgabe des technischen Kundendienstes und durch schriftliche Instruktionen
sowie der Zurverfügungstellung des/der eventuell erforderlichen Ersatzteil(s)(e) selbst in der
Lage ist durchzuführen – zum Beispiel aufgrund der Einfachheit und einer nicht erforderlichen
Geheimhaltung des Instandsetzungsverfahrens).
Aufgrund seiner Innovationszyklen und um sein Know-how und seine Geschäftsgeheimnisse zu
schützen, bietet Guillemot grundsätzlich keine Instandsetzungs-Benachrichtigung oder
Ersatzteile für alle Thrustmaster Produkte an, deren Garantiezeit abgelaufen ist.
In den Vereinigten Staaten von Amerika und in Kanada ist diese Gewährleistung auf den
internen Mechanismus und das externe Gehäuse beschränkt. Auf keinen Fall haftet Guillemot
oder ihre Tochtergesellschaften gegenüber Dritten für etwaige Folgeschäden oder mittelbare
Schäden, die aus der Nichteinhaltung der ausdrücklichen oder stillschweigenden Gewährleistung
resultieren. Einige Staaten/Provinzen erlauben keine Begrenzung der impliziten Garantie oder
einen Ausschluss oder die Beschränkung der Haftung für Folgeschäden oder mittelbare
Schäden, so dass die oben genannten Einschränkungen oder Ausschlüsse möglicherweise nicht
auf Sie zutreffen.
Diese Garantie gibt Ihnen bestimmte Rechte, und Sie haben möglicherweise auch andere
Rechte, die von Staat zu Staat oder Provinz zu Provinz unterschiedlich sein können.
Haftung
Wenn nach dem anwendbaren Recht zulässig, lehnen Guillemot Corporation S.A. (fortfolgend
"Guillemot") und ihre Tochtergesellschaften jegliche Haftung für Schäden, die auf eine oder
mehrere der folgenden Ursachen zurückzuführen sind, ab: (1) das Produkt wurde modifiziert,
geöffnet oder geändert; (2) Nichtbefolgung der Montageanleitung; (3) unangebrachte Nutzung,
Fahrlässigkeit, Unfall (z. B. ein Aufprall); (4) normalem Verschleiß. Wenn nach anwendbarem
Recht zulässig, lehnen Guillemot und seine Niederlassungen jegliche Haftung für Schäden, die
nicht auf einen Material- oder Herstellungsfehler in Bezug auf das Produkt beruhen
(einschließlich, aber nicht beschränkt auf, etwaige Schäden, die direkt oder indirekt durch
Software oder durch die Kombination der Thrustmaster Produkte mit ungeeigneten Elementen,
insbesondere Netzteile, Akkus, Ladegeräte, oder andere Elemente, die von Guillemot für dieses
Produkt nicht geliefert wurden), ab.
Page 55

18/18
COPYRIGHT
TECHNISCHER SUPPORT
© Guillemot Corporation S.A. 2015. Alle Rechte vorbehalten. Thrustmaster
Warenzeichen der Guillemot Corporation S.A. Windows® ist eine eingetragene Warenzeichen der
Microsoft Corporation in den Vereinigten Staaten von Amerika und/oder anderen Ländern. Alle anderen
Handelsmarken sind im Besitz Ihrer jeweiligen Eigentümer. Illustrationen nicht verbindlich. Inhalte,
Design und Spezifikationen können ohne vorherige Ankündigung geändert werden und können von
Land zu Land unterschiedlich sein. Hergestellt in China.
HINWEISE ZUM UMWELTSCHUTZ
leisten Sie einen wichtigen Beitrag zum Schutz unserer Umwelt. Bitte erfragen Sie bei der
Gemeindeverwaltung die zuständige Entsorgungsstelle.
Wichtige Informationen. Die Farben und Verzierungen können abweichen.
Dieses Produkt stimmt mit allen Standards, die Kinder ab 14 und älter betreffen, überein. Dieses
Produkt ist nicht geeignet für den Gebrauch von Kindern, die jünger als 14 Jahre sind.
www.thrustmaster.com
Dieses Produkt darf nach Ende seiner Lebensdauer nicht über den Hausmüll entsorgt
werden, sondern muss an einem Sammelpunkt für das Recycling von elektrischen
und elektronischen Geräten abgegeben werden.
Das Symbol auf dem Produkt, der Gebrauchsanleitung oder der Verpackung weist
darauf hin.
Die Werkstoffe sind gemäß ihrer Kennzeichnung wiederverwertbar. Mit der
Wiederverwertung, der stofflichen Verwertung oder anderen Formen von Altgeräten
®
ist ein eingetragenes
http://ts.thrustmaster.com
Page 56

1/18
pc-compatibel
Handleiding
TECHNISCHE SPECIFICATIES
1. 28 verlichte programmeerbare
knoppen
2. 2 programmeerbare identificatie-
LED's
3. 2 instelbare bevestigingsstangen
4. Afneembare voet
5. 4 boorgatafsluiters
6. 2 bevestigingsduimschroeven
7. USB-connector
8. 2 verwijderbare stangbevestigings-
schroeven
9. Stangbevestigingssysteem
10. Afneembare stang
11. 2 plexiglas vensters
Page 57

2/18
KENNISMAKEN MET UW MFD COUGAR
De THRUSTMASTER MFD COUGAR is een exacte replica van de MFD's uit de U.S. Air
Force F-16-straaljagers.
Elke MFD COUGAR heeft 20 knoppen en 4 schakelaars: dat betekent in totaal 28
bedieningselementen per MFD!
U kunt geavanceerde toetsenbord- of muisbedieningen toewijzen
diverse vlieginstrumenten emuleren. Dit zorgt voor zeer realistisch vliegen.
THRUSTMASTER is de maker van de befaamde HOTAS COUGAR- en T.16000M-joysticks.
INTERN GEHEUGEN
Elke MFD COUGAR heeft een eigen intern geheugen.
Alle persoonlijke instellingen (MFD-identificatie en -nummer, intensiteit van de
achtergrondverlichting, status van de identificatie-LED) worden automatisch op
het geheugen van het apparaat.
Hierdoor blijven alle instellingen en voorkeuren bewaard als u uw MFD COUGAR op
een andere computer aansluit.
ACHTERGRONDVERLICHTING
De intensiteit van de achtergrondverlichting kan via het Thrustmaster Control
Panel softwarematig worden ingesteld, of hardwarematig, rechtstreeks vanuit de game.
TWEE IDENTIFICATIE-LED'S
Elke MFD heeft 2 identificatie-LED's waardoor u de apparaten uit elkaar kunt houden.
GELIJKTIJDIG COMPATIBEL MET MAXIMAAL 8 MFD COUGARS
Met de geavanceerde opties van het Thrustmaster Control Panel kunt u tot 8 MFD's gelijktijdig
aanpassen en controleren. Elke MFD is daarom
herkenbaar.
volledig aan
AANPASSINGEN AAN HET APPARAAT ZELF
De voet en het venster van de MFD COUGAR zijn draagbaar (voor optimaal comfort
en zicht) en afneembaar (waardoor ze ook op een cockpit
worden bevestigd).
ACCESSOIRES EN COMPATIBILITEIT MET GAMES
De MFD COUGAR is compatibel met alle momenteel beschikbare controllers, joysticks en
stuurknuppels, en met alle pc-simulatiegames (zowel militaire als burgerluchtvaart) die het
aansluiten van meerdere USB-apparaten ondersteunen.
PLUG-INS VOOR FLIGHT SIMULATOR X / FLIGHT SIMULATOR 2004
Met de meegeleverde plug-ins kunt u beide MFD COUGARs direct configureren voor deze
games.
aan de
MFD en
geslagen in
de eigen wensen aan te passen en
of computerscherm
kunnen
Page 58

3/18
DE MFD KANTELEN OP DE VOET
Een op de voet (4) bevestigde MFD kan in een hoek van 72, 54 of 39 graden
worden gekanteld.
De bevestiging (3) bestaat uit 2 stangen die onder een hoek kunnen worden geplaatst, of
kunnen worden verwijderd:
- Een lange stang met opschrift 72DEGREE en 54DEGREE
- Een korte stang met opschrift 39DEGREE
DE HOEK INSTELLEN OP 72 GRADEN
- Plaats de bevestigingsstangen (3), met het opschrift 72DEGREE naar beneden
wijzend (indien nodig, kunt u de centrale schroef iets los draaien om het instellen van
de hoek te vergemakkelijken).
- Steek de bovenkant van de stangen in het bevestigingssysteem (9) achterop de MFD,
aan de bovenkant van
- Steek de onderkant van de stangen achterop de voet en draai de 2 bevestigings-
duimschroeven aan (6).
het apparaat.
Page 59

-
Plaats de 2 bevestigingsstangen (3), met het opschrift 54DEGREE naar beneden
wijzend (indien nodig, kunt u de centrale schroef iets los draaien om het instellen van
de hoek te vergemakkelijken).
DE HOEK INSTELLEN OP 54 GRADEN
- Steek de bovenkant van de stangen in het bevestigingssysteem (9) achterop de MFD,
aan de bovenkant van het apparaat.
- Steek de onderkant van de stangen achterop de voet en
duimschroeven aan (6).
draai de
2 bevestigings-
4/18
Page 60

- Draai de centrale schroef los en verwijder alle stangen.
DE HOEK INSTELLEN OP 39
GRADEN
- Plaats de korte bevestigingsstangen met het opschrift 39DEGREE naar beneden
wijzend.
- Steek de bovenkant van de stangen in het bevestigingssysteem (9) achterop de MFD,
aan de bovenkant van het apparaat.
- Steek de onderkant van de stangen achterop de voet en draai de 2 bevestigings-
duimschroeven aan (6)
.
5/18
Page 61

DE MFD OP EEN COCKPIT OF SCHERM BEVESTIGEN
1) Verwijder de bevestigingsstangen en haal de MFD
bevestigingsduimschroeven
2) Verwijder de stang (10) achterop de MFD, aan de bovenkant van het apparaat, door
de 2 bevestigingsschroeven (8) aan beide kanten helemaal los te draaien.
3) Verwijder de 4 boorgatafsluiters (5) door ze achterlangs uit te duwen met
bijvoorbeeld een dunne schroevendraaier.
(6) helemaal
van de
los te draaien.
voet door de
U kunt de MFD nu bevestigen aan de 4 boorgaten.
Page 62

DE MFD COUGAR AAN DE EIGEN WENSEN
AANPASSEN
- Steek de 2 meegeleverde plexiglas vensters (11) in de daartoe bestemde sleuf bovenop
de MFD COUGAR.
- Steek de gewenste afbeelding of een van de meegeleverde voorbedrukte kaarten tussen
de plexiglas vensters.
Opmerkingen:
- Kaarten voor Flight Simulator X (alleen beschikbaar in het Engels)
- Op de volgende website kunt u zelf af te drukken kaarten voor Flight Simulator 2004 en
andere kaarten downloaden:
-
http://ts.thrustmaster.com/
zijn meegeleverd.
7/18
Page 63

INSTALLATIE OP DE PC
Systeemvereisten:
Pc (Windows® XP, Windows® Vista, Windows® 7) met 2 USB-poorten.
Op de meegeleverde cd-rom staan de drivers die moeten worden geïnstalleerd.
1. Plaats de installatie-cd in een cd-station. De installatiewizard verschijnt automatisch
op het scherm. Als het installatieprogramma niet automatisch wordt gestart, ga dan
naar Deze computer (of Computer), dubbelklik op het pictogram van het cdstation en dubbelklik op het bestand Setup.exe.
2. Klik op de DRIVERS-knop om de installatie te starten.
3. Klik na het installeren op Voltooien en start de computer opnieuw op.
4. Sluit, als de computer opnieuw is gestart, de USB-connectoren (7)
aan op de USB-poorten van de pc. Windows® herkent de
nieuwe
van de
MFD COUGAR
apparaten
automatisch.
5. De drivers worden automatisch geïnstalleerd. Volg de instructies op het scherm om de
installatie te voltooien.
6. Selecteer Start/Programma's/Thrustmaster MFD COUGAR voor toegang tot het
Thrustmaster Control Panel en de plug-ins voor Flight Simulator 2004
/
Flight Simulator
8/18
X.
Page 64

HET THRUSTMASTER CONTROL PANEL
- Selecteer Start/Programma's/Thrustmaster MFD COUGAR/Control Panel.
- Het Game Controllers-dialoogvenster toont de standaardnamen (F16 MFD 1 en
2) van de 2 MFD's met als status OK
.
- Klik op Properties om uw MFD te configureren.
F16
MFD
9/18
Page 65

DE MFD COUGAR IDENTIFICEREN
Wanneer u het Control Panel opent, knippert 2 seconden de naam van de betreffende MFD
waardoor u onderscheid tussen de verschillende MFD's kunt maken.
Als u op de Identify-tab klikt, begint de betreffende MFD te knipperen zodat u deze
gemakkelijk kunt herkennen.
INTENSITEIT VAN DE ACHTERGRONDVERLICHTING AANPASSEN
De achtergrondverlichting van alle knoppen en identificatie-LED's kan software-
of hardwarematig worden aangepast.
DE ACHTERGRONDVERLICHTING SOFTWAREMATIG AANPASSEN
- Selecteer in het Thrustmaster Control Panel de Backlit / LED Intensity-tab.
DE ACHTERGRONDVERLICHTING HARDWAREMATIG AANPASSEN
(De achtergrondverlichting tijdens het gamen aanpassen)
- Druk gelijktijdig op de knoppen 14 + 15 + 25 om de achtergrondverlichting te versterken.
- Druk gelijktijdig op de knoppen 14 + 15 + 26 om de achtergrondverlichting te verzwakken.
TWEE IDENTIFICATIE-LED'S
De MFD COUGAR beschikt over 2 LED's (2) waardoor de gebruiker elke MFD eenvoudig
kan herkennen en identificeren.
Tenzij afwijkend geconfigureerd, gaan beide LED's aan of uit bij het selecteren van de naam
en het nummer van de betreffende MFD.
NAAM en
NUMMER
van MFD LED LINKS
F16 MFD 1 ON OFF LINKER MFD no. 1
F16 MFD 2 OFF ON RECHTER MFD no. 1
F16 MFD 3 ON ON LINKER MFD no.
F16 MFD 4 OFF OFF RECHTER MFD no. 2
F16 MFD 5 ON OFF LINKER MFD no. 3
F16 MFD 6 OFF ON RECHTER MFD no. 3
F16 MFD 7 ON ON LINKER MFD no. 4
F16 MFD 8 OFF OFF RECHTER MFD no. 4
Dit standaardgedrag kan worden gewijzigd door in het Thrustmaster Control Panel de opties
Left LED en Right LED in- of uit te schakelen.
LED
RECHTS
10/18
PLAATS in
een cockpit
2
Page 66

MEER DAN TWEE MFD COUGARS GELIJKTIJDIG GEBRUIKEN
In het Thrustmaster Control Panel kunnen gelijktijdig maximaal 8 op dezelfde
pc aangesloten MFD COUGARs worden beheerd.
- Als u meer dan 2 MFD's gelijktijdig gebruikt (en alleen in dat geval), gebruik dan de F16
MFD-tab en selecteer daar het relevante MFD-nummer.
- Klik op OK
.
- Vervolgens wordt de betreffende MFD automatisch losgekoppeld van de computer en
daarna weer verbonden, met het nieuwe nummer.
OPMERKING: We adviseren een MFD-nummer alleen te wijzigen wanneer u
2 MFD COUGARs gelijktijdig gebruikt.
mee
11/18
r dan
Page 67

CONFIGURATIE EN PLAATS VAN KNOP
12/18
Page 68

13/18
FLIGHT SIMULATOR PLUG-IN
Met de meegeleverde plug-ins kunt u onmiddellijk beide MFD's configureren voor FLIGHT
SIMULATOR 2004 en voor FLIGHT SIMULATOR X. U hoeft dus niet meer in de
game- opties te
Er zijn 3 profielen beschikbaar:
* Generic Profile:
De algemene profiel is geschikt voor zowel een militair vliegtuig als een vliegtuig uit de
burgerluchtvaart.
* Light Aviation Profile:
Dit profiel is ontworpen voor lichte vliegtuigen en pleziervliegtuigen. Het bevat onder
andere een elementaire automatische piloot, bediening van landingsgestel en kleppen,
beheer van elektrische en koelsystemen, brandstofmengsel en propellerstand.
* Airliner Profile:
Dit profiel deelt een aantal kenmerken met het Light Aviation
behoeve van lijntoestellen en de professionele luchtvaart met functies zoals een
geavanceerde automatische piloot.
BELANGRIJKE OPMERKINGEN
- De plug-ins zijn voorgeconfigureerd voor SLECHTS TWEE MFD COUGARs!
- De plug-ins mogen niet geïnstalleerd
- Voordat u deze plug-ins installeert, moet u beide MFD COUGARs configureren met
de F16 MFD 1- en F16 MFD 2-identificaties (standaardindentificaties).
duiken om
elke knop van de MFD's handmatig te configureren.
worden tijdens
het gamen.
Profile maar
is uitgebreid ten
Page 69

14/18
DE PLUG-INS INSTALLEREN
- Ga naar de Flight Simulator 2004-plug-in door te selecteren:
Start/Programma's/Thrustmaster MFD Cougar/FLIGHT SIMULATOR 2004 Plug-In
- Ga naar de Flight Simulator X-plug-in door te selecteren:
Start/Programma's/Thrustmaster MFD Cougar/FLIGHT SIMULATOR X Plug-In
- Hierna zijn 3 profielen beschikbaar:
Generic Profile / Airliner Profile / Light Aviation Profile.
Kies het gewenste profiel en klik vervolgens op START
.
- Ter bevestiging dat het profiel correct is geïnstalleerd, wordt het SUCCESS-dialoogvenster
weergegeven.
Klik op OK.
U BENT NU KLAAR OM TE
MET UW 2 MFD COUGARS EN HET
OPMERKING: Als u met een van de andere profielen wilt gamen, volg dan de hierboven beschreven
stappen voor het selecteren van een profiel.
GAAN VLIEGEN
GEKOZEN PROFIEL!
Page 70

15/18
IN ANDERE GAMES
De MFD COUGAR is compatibel met alle pc-simulatiegames (zowel
militaire als burgerluchtvaart) die het aansluiten van meerdere USB-apparaten
ondersteunen.
Als u de MFD COUGAR in uw game wilt configureren, dan gaat u naar de Controller
Options in de game en wijst u de gewenste functies handmatig toe aan elk van de
knoppen van de MFD.
U hoeft deze handeling maar één keer uit te voeren omdat uw instellingen automatisch
worden opgeslagen in uw game.
PROBLEMEN OPLOSSEN EN WAARSCHUWINGEN
Mijn MFD COUGAR wordt niet herkend of valt onverwacht uit.
- Sluit uw computer af, koppel de MFD COUGARs los, sluit ze weer aan en
start uw computer opnieuw op.
- Als het probleem hiermee niet wordt opgelost, sluit de MFD COUGARs dan aan op
andere USB-poorten of sluit ze aan op een USB-hub met eigen voeding.
- U kunt uw MFD COUGARs beter niet aansluiten op een USB-hub zonder eigen
voeding.
De plug-ins voor Flight Simulator X en Flight Simulator 2004 laten zich niet
correct installeren of werken niet correct.
- Controleer of de game is afgesloten voordat u de plug-ins installeert.
- Controleer of beide MFD COUGARs zijn geconfigureerd met de identificaties F16
MFD 1 en F16 MFD 2 (standaardidentificaties) in het Control Panel
Ik kan mijn MFD COUGAR niet configureren in andere games.
- Uw game heeft een menu genaamd Options / Controllers / Pad of Joystick,
of iets dergelijks, waarin u handmatig elke knop op
de gewenste functie.
- Raadpleeg de handleiding of de online help van de game voor meer informatie.
- Installeer de meest recente updates voor uw game.
.
de MFD
kunt toewijzen aan
Page 71

16/18
Informatie met betrekking tot kopersgarantie
Wereldwijd garandeert Guillemot Corporation S.A., het statutair adres gevestigd aan de Place du
Granier, B.P. 97143, 35571 Chantepie, Frankrijk, (hierna te noemen “Guillemot”) aan de de koper
dat dit Thrustmaster-product vrij zal zijn van materiaal- en fabricagefouten gedurende een
garantieperiode gelijk aan de tijd maximaal vereist om een restitutie/vervanging voor dit product te
claimen. In landen van de Europese Unie komt dit overeen met een periode van twee (2) jaar vanaf
het moment van levering van het Thrustmaster-product. In andere landen komt de garantieperiode
overeen met de tijd maximaal vereist om een restitutie/vervanging voor dit Thrustmaster-product te
claimen zoals wettelijk is vastgelegd in het land waarin de koper woonachtig was op de datum van
aankoop van het Thrustmaster-product. Indien een dergelijk claimrecht niet wettelijk is vastgelegd in
het betreffende land, geldt een garantieperiode van één (1) jaar vanaf datum aankoop van het
Thrustmaster-product.
Ongeacht het hierboven gestelde, geldt voor oplaadbare batterijen een garantieperiode van zes (6)
maanden vanaf datum aankoop.
Indien u in de garantieperiode een defect meent te constateren aan dit product, neem dan
onmiddellijk contact op met Technical Support die u zal informeren over de te volgen procedure. Als
het defect wordt bevestigd, dient het product te worden geretourneerd naar de plaats van aankoop
(of een andere locatie die wordt opgegeven door Technical Support).
Binnen het gestelde van deze garantie wordt het defecte product van de koper gerepareerd of
vervangen, zulks ter beoordeling van Technical Support. Indien het Thrustmaster- product tijdens de
garantieperiode is onderworpen aan een dergelijk herstel, wordt elke periode van ten minste zeven
(7) dagen waarin het product niet in gebruik is, opgeteld bij de resterende garantieperiode (deze
periode loopt vanaf de datum van verzoek van de consument voor interventie of vanaf de datum
waarop het product in kwestie beschikbaar is gesteld voor herstel als de datum waarop het product
ter beschikking wordt gesteld voor herstel later is dan de datum van het verzoek om interventie).
Indien toegestaan door van toepassing zijnde wetgeving, beperkt de volledige aansprakelijkheid van
Guillemot en haar dochterondernemingen (inclusief de aansprakelijkheid voor vervolgschade) zich
tot het repareren of vervangen van het Thrustmaster-product. Indien toegestaan door van
toepassing zijnde wetgeving, wijst Guillemot elke garantie af met betrekking tot verhandelbaarheid
of geschiktheid voor enig doel.
Deze garantie is niet van kracht: (1) indien het product aangepast, geopend of gewijzigd is, of
beschadigd is ten gevolge van oneigenlijk of onvoorzichtig gebruik, verwaarlozing, een ongeluk,
normale slijtage, of enige andere oorzaak die niet gerelateerd is aan een materiaal- of fabricagefout
(inclusief maar niet beperkt tot het combineren van het Thrustmaster-product met enig ongeschikt
element waaronder in het bijzonder voedingsadapters, oplaadbare batterijen, opladers of enig ander
element niet geleverd door Guillemot voor dit product); (2) indien u zich niet houdt aan de instructies
zoals verstrekt door Technical Support; (3) op software die onder een specifieke garantie valt; (4) op
verbruiksartikelen (elementen die tijdens de levensduur van het product worden vervangen zoals
bijvoorbeeld batterijen of pads van een headset of koptelefoon); (5) op accessoires (zoals
bijvoorbeeld kabels, behuizingen, hoesjes, etui's, draagtassen of polsbandjes); (6) indien het
product werd verkocht op een openbare veiling.
Deze garantie is niet overdraagbaar.
De wettelijke rechten van de koper die in zijn/haar land van toepassing zijn op de verkoop van
consumentproducten worden op generlei wijze door deze garantie beperkt.
Page 72

17/18
Aanvullende garantiebepalingen
Gedurende de garantieperiode zal Guillemot in principe nooit reserveonderdelen leveren omdat
Technical Support de enige partij is die bevoegd is een Thrustmaster-product te openen en/of te
herstellen (met uitzondering van een herstelprocedure die de klant door Technical Support
gevraagd wordt uit te voeren met behulp van schriftelijke instructies – omdat deze procedure
bijvoorbeeld eenvoudig is en het herstelproces niet vertrouwelijk is – en door het verstrekken
aan de consument van de benodigde onderdelen, indien van toepassing).
Gezien de innovatiecycli en om haar knowhow en handelsgeheimen te beschermen, zal
Guillemot in principe nooit een herstelbeschrijving of reserveonderdelen verstrekken voor een
Thrustmaster-product waarvan de garantieperiode is verstreken.
In de Verenigde Staten en Canada is deze garantie beperkt tot het interne mechanisme en de
externe behuizing van dit product. In geen geval kan Guillemot of een van de bij Guillemot
aangesloten ondernemingen aansprakelijk worden gesteld voor enige derde partij voor
vervolgschade of incidentele schade als gevolg van inbreuk op expliciete of impliciete
garantiebepalingen. In sommige rechtsgebieden zijn beperkingen ten aanzien van de duur van
impliciete garanties en uitsluiting of beperking van aansprakelijkheid voor incidentele schade of
vervolgschade niet toegestaan. Het is dus mogelijk dat bovenstaande beperkingen of
uitsluitingen voor u niet van toepassing is. Deze garantie verleent u specifieke wettelijke
rechten. Anderzijds is het mogelijk dat u rechten hebt die niet in deze garantiebepalingen
worden genoemd. Voorwaarden en condities variëren van land tot land.
Aansprakelijkheid
Indien toegestaan door van toepassing zijnde wetgeving, wijzen Guillemot Corporation S.A.
(hierna te noemen “Guillemot”) en haar dochterondernemingen alle aansprakelijkheid af voor
enige schade veroorzaakt door één van de volgende oorzaken: (1) indien het product
aangepast, geopend of gewijzigd is; (2) de montage-instructies niet zijn opgevolgd; (3)
oneigenlijk of onvoorzichtig gebruik, verwaarlozing, een ongeluk (bijvoorbeeld stoten); (4)
normale slijtage. Indien toegestaan onder van toepassing zijnde wetgeving, wijzen Guillemot en
haar dochterondernemingen alle aansprakelijkheid af voor enige schade aan dit product niet
gerelateerd aan een materiaal- of fabricagefout (inclusief maar niet beperkt tot enige schade
direct of indirect veroorzaakt door enige software, of door het combineren van het Thrustmasterproduct met enig ongeschikt element waaronder in het bijzonder voedingsadapters, oplaadbare
batterijen, opladers of enig ander element niet geleverd door Guillemot voor dit product).
Page 73

18/18
COPYRIGHT
© 2015 Guillemot Corporation S.A. Alle rechten voorbehouden. Thrustmaster
geregistreerd handelsmerk van Guillemot Corporation S.A. Windows® is een geregistreerd
handelsmerk van Microsoft Corporation in de Verenigde Staten en/of andere landen. Alle andere
handelsmerken zijn eigendom van de respectieve eigenaren. Afbeeldingen zijn niet bindend.
Inhoud, ontwerp en specificaties kunnen zonder kennisgeving vooraf worden gewijzigd en
kunnen per land verschillen. Geproduceerd in China.
AANBEVELINGEN VOOR DE BESCHERMING VAN HET MILIEU
Gooi dit product na het einde van de levensduur niet weg met het normale
afval, maar breng het naar het door uw gemeente aangewezen inzamelpunt
voor elektrische en/of computerapparatuur.
Ter herinnering is hiertoe op het product, de gebruikshandleiding of de
verpakking een symbool aangebracht.
De meeste materialen kunnen worden gerecycled. Door recycling en andere
methoden voor verantwoorde verwerking van afgedankte elektrische en
elektronische apparaten kunt u een belangrijke bijdrage leveren aan de
bescherming van het milieu.
Neem contact op met uw gemeente voor informatie over een inzamelpunt bij u in de buurt.
Bewaar deze informatie. De kleuren en decoraties kunnen variëren.
Dit product voldoet aan alle normen voor kinderen van 14 jaar en ouder. Dit product is niet
geschikt voor gebruik door kinderen jonger dan 14 jaar.
www.thrustmaster.com
®
is een
TECHNISCHE ONDERSTEUNING
http://ts.thrustmaster.com
Page 74

1/18
PC compatibile
Manuale d’uso
CARATTERISTICHE TECNICHE
1. 28 pulsanti programmabili
retroilluminati
2. 2 LED di
identificazione
programmabili
3. 2 staffe per il fissaggio regolabili
4. Base rimovibile
5. 4 coperture per i fori delle viti
6. 2 rotelle di fissaggio
7. Connettore USB
8. 2 viti rimuovibili per le staffe di fissaggio
9. Sistema di attacco delle staffe
10. Barra rimuovibile
11. 2 finestre in plexiglas
Page 75

2/18
CONOSCIAMO MEGLIO IL TUO MFD COUGAR
Il THRUSTMASTER MFD COUGAR è l’esatta replica degli MFD presenti sui caccia F16 della U.S. Air Force.
Ogni MFD COUGAR è dotato di 20 pulsanti e 4 switch, ossia un totale di 28 pulsanti per
MFD!
Le funzioni del MFD ti permettono di assegnare a questa periferica controlli avanzati,
solitamente associati alla tastiera o al mouse, e emulando svariati strumenti di volo, offrendo
così un maggiore realismo di gioco.
THRUSTMASTER è il creatore dei joystick per simulazioni HOTAS COUGAR e T.16000M.
MEMORIA INTERNA
Ciascun MFD COUGAR è dotato di una memoria interna.
Tutte le impostazioni personalizzate (identificativo e numero
retroilluminazione, stato dei LED di identificazion
memoria della periferica.
In questo modo, se decidi di collegare il tuo MFD COUGAR ad un altro computer, tutte le
impostazioni e le preferenze verranno conservate.
e) verranno salvate automaticamente nella
RETRO-ILLUMINAZIONE
L’intensità della retro-illuminazione può essere regolata
Thrustmaster Control Panel, oppure via hardware, direttamente durante il gioco.
2 LED IDENTIFICATIVI
Ciascun MFD è dotato di 2 LED identificativi, per meglio distinguere le periferiche tra loro.
COMPATIBILITÀ FINO A UN MASSIMO DI 8 MFD COUGAR IN
SIMULTANEA
Le opzioni avanzate del Thrustmaster Control Panel ti permettono di configurare e controllare fino
a un massimo di 8 MFD simultaneamente. Ciascun MFD risulterà pertanto
personalizzabile e identificabile.
REGOLAZIONI FISICHE
La base e la finestra del MFD COUGAR sono mobili (per la massima visibilità e il massimo
comfort) e rimuovibili (permettendo agli utenti di attaccarli ad un cockpit o a uno schermo per
computer).
ACCESSORI E COMPATIBILITÀ CON I GIOCHI
MFD COUGAR è compatibile con tutti i controller, i joystick e le cloche oggi disponibili sul
mercato, nonché con tutti i giochi per PC di simulazione di volo (sia militare che civile), che
supportano una molteplice connettività USB.
PLUG-IN PER FLIGHT SIMULATOR X / FLIGHT SIMULATOR 2004
Gli acclusi plug-in ti permettono di configurare istantaneamente entrambi gli MFD COUGAR
per questi giochi.
del MFD,
via
software, attraverso il
intensità della
totalmente
Page 76

3/18
REGOLARE L’INCLINAZIONE DELL’MFD TRAMITE LA
BASE
Quando l’MFD è attaccato alla propria base (4), la sua inclinazione può essere impostata a
72, 54 o 39 gradi.
Il sistema di attacco (3) è composto da 2 staffe che possono essere regolate su
diversi angoli oppure rimosse:
- Una staffa lunga (riportante le indicazioni 72DEGREE e 54DEGREE)
- Una staffa corta (riportante l’indicazione 39DEGREE)
REGOLAZIONE DELL’INCLINAZIONE A 72 GRADI
- Posiziona le staffe di attacco (3), con l’indicazione 72DEGREE rivolta verso il basso
(se necessario, allenta leggermente la vite centrale per facilitare la regolazione
dell’inclinazione).
- Inserisci l’estremità superiore delle staffe nel sistema di attacco (9) posto sul retro del
MFD, nella parte superiore della periferica.
- Fissa la parte inferiore delle staffe al retro della base, quindi stringi le 2 rotelle di
fissaggio (6).
Page 77

4/18
- Posiziona le staffe di attacco con l’indicazione 54DEGREE rivolta verso il basso (se
necessario, allenta leggermente la vite centrale per facilitare la regolazione
dell’inclinazione).
REGOLAZIONE DELL’INCLINAZIONE A 54 GRADI
- Inserisci l’estremità superiore delle staffe nel sistema di attacco (9) posto sul retro del
MFD, nella parte superiore della periferica.
- Fissa la parte inferiore delle staffe al retro della base, quindi stringi le 2 rotelle di
fissaggio (6).
Page 78

5/18
- Allenta la vita centrale, quindi rimuovi tutte le staffe.
REGOLAZIONE DELL’INCLINAZIONE A 39
GRADI
- Posiziona le staffe di attacco corte, con l’indicazione 39DEGREE rivolta verso il basso.
- Inserisci l’estremità superiore delle staffe nel sistema di attacco (9) posto sul retro del
MFD, nella parte superiore della periferica.
- Fissa la parte inferiore delle staffe al retro della base, quindi stringi le 2 rotelle di
fissaggio (6).
Page 79

6/18
FISSARE L’MFD AD UN COCKPIT O A UNO SCHERMO
1) Rimuovi le staffe di attacco e stacca l’MFD dalla base, svitando totalmente le 2 rotelle
di fissaggio (6).
2) Rimuovi la barra rimuovibile (10) posta sul retro del MFD,
periferica, svitando totalmente le 2 viti di fissaggio (8) poste su entrambi i lati.
3) Rimuovi i 4 tappi dei fori (5) spingendoli fuori dal retro, utilizzando un cacciavite
sottile o una puntina.
nella parte
superiore della
Ora puoi fissare l’MFD sfruttando i 4fori.
Page 80

7/18
PERSONALIZZARE GLI MFD COUGAR
- Inserisci le 2 accluse finestre in plexiglas (11) nel relativo slot presente nella parte
superiore del MFD COUGAR.
- Fra le 2 finestre 2 in plexiglas, inserisci gli schemi che
già presenti nella confezione.
preferisci, oppure
NOTE:
- Nella confezione kit sono già presenti le schede per Flight Simulator X (disponibili solo in
inglese).
- Inoltre, puoi scaricare e stampare le schede per i plug-in di Flight Simulator 2004 (e altre
schede ancora) dal seguente sito web:
-
http://ts.thrustmaster.com/
una delle schede
Page 81

8/18
INSTALLAZIONE SU PC
Requisiti di sistema:
PC (Windows® XP, Windows® Vista, Windows® 7) dotato di 2 porte USB
Il CD-ROM accluso a questo prodotto è stato realizzato per l’installazione dei driver.
1. Inserisci il CD-ROM di installazione del tuo lettore CD-ROM. Apparirà automaticamente
sullo schermo la procedura guidata (qualora il programma di installazione non dovesse
avviarsi automaticamente, entra in Risorse del Computer, quindi fai doppio clic sull’icona
del CD-ROM; se necessario, fai doppio clic sul file Setup.exe).
2. Clicca sul pulsante DRIVERS per avviare la procedura di installazione dei driver.
3. Una volta terminata l’installazione, clicca su Fine e riavvia il
tuo computer.
4. Una volta riavviato il computer, collega i connettori USB del MFD COUGAR (7) alle porte
USB del tuo PC. Windows® individuerà automaticamente
le
nuove
periferiche.
5. L’installazione dei driver avverrà automaticamente.
Per completare l’installazione, segui le istruzioni che compaiono sullo schermo.
6. Seleziona Start/Programmi/Thrustmaster MFD COUGAR per accedere al Thrustmaster
Control Panel e ai plug-in di Flight Simulator 2004 / Flight Simulator X.
Page 82

9/18
IL THRUSTMASTER CONTROL PANEL
- Seleziona Start/Programmi/Thrustmaster MFD COUGAR/Control Panel.
- Nella finestra Controller di Gioco compaiono nomi predefiniti dei 2 MFD (F16
F16 MFD 2), con associato lo stato “OK”
.
- Clicca su proprietà per configurare il tuo MFD.
MFD 1
e
Page 83

10/18
IDENTIFICARE IL TUO MFD COUGAR
Quando apri il Panello di Controllo, il nome del MFD in questione lampeggia per 2 secondi,
consentendoti di poterlo distinguere dalle altre periferiche.
Cliccando sulla pagina Identify, l’MFD in questione inizierà a lampeggiare, permettendoti di
individuarlo facilmente.
REGOLAZIONE DELLA RETROILLUMINAZIONE
La retroilluminazione dei LED identificativi e di tutti i pulsanti può essere regolata via
software o via hardware.
REGOLAZIONE DELLA FUNZIONE DI RETROILLUMINAZIONE VIA SOFTWARE
- Nel Thrustmaster Control Panel, seleziona la pagina Backlit / LED Intensity.
REGOLAZIONE DELLA FUNZIONE DI RETROILLUMINAZIONE VIA HARDWARE
(Per regolare la retroilluminazione durante il gioco)
- Premi simultaneamente i pulsanti 14 + 15 + 25 per aumentare l’intensità della
retroilluminazione
- Premi simultaneamente i pulsanti 14 + 15 + 25 per diminuire l’intensità della
retroilluminazione
2 LED IDENTIFICATIVI
MFD COUGAR è dotato di 2 LED (2), grazie i quali puoi facilmente riconoscere e distinguere
l’MFD in questione.
Se non configurati altrimenti, entrambi i LED si accendono e si spengono in base al nome e
al numero del MFD selezionato:
NOME
e NUMERO
del MFD
F16 MFD 1
F16 MFD 2 OFF
F16 MFD 3
F16 MFD 4 OFF
F16 MFD 5
F16 MFD 6 OFF
F16 MFD 7
F16 MFD 8 OFF OFF MFD n. 4 DESTRO
Questa modalità predefinita può essere modificata attivando o disattivando le opzioni Left
LED e Right LED del Thrustmaster Control Panel.
LED DI
SINISTRA
ON OFF MFD n. 1 SINISTRO
ON
ON
ON
LED DI
DESTRA
ON MFD n. 1 DESTRO
ON MFD n. 2 SINISTRO
OFF
MFD n. 2 DESTRO
OFF
MFD n. 3 SINISTRO
ON MFD n. 3 DESTRO
ON MFD n. 4 SINISTRO
POSIZIONE
in un cockpit
Page 84

11/18
UTILIZZARE PIÙ DI 2 MFD COUGAR CONTEMPORANEAMENTE
Il Thrustmaster Control Panel può gestire fino a un massimo di 8 MFD COUGAR collegati
simultaneamente ad uno stesso PC.
- Se stai utilizzando più di 2 MFD contemporaneamente (e solo in questo caso), accedi alla
pagina F16 MFD e seleziona il numero di MFD desiderato.
- Clicca su OK
.
- Fatto questo, l’MFD in questione si scollegherà automaticamente dal computer, prima di
ricollegarsi con il numero da te scelto.
NOTA: Ti consigliamo di modificare il numero del MFD solo nel caso in cui tu
stia utilizzando più di 2 MFD COUGAR contemporaneamente.
Page 85

12/18
CONFIGURAZIONE E POSIZIONAMENTO DEI PULSANTI
Page 86

13/18
FLIGHT SIMULATOR PLUG-IN
I plug-in acclusi ti permettono di configurare
FLIGHT SIMULATOR 2004 e FLIGHT SIMULATOR X (pertanto, per poter configurare i vari
pulsanti degli MFD, non dovrai più accedere alle relative opzioni del gioco).
Puoi scegliere fra 3 profili a tua disposizione:
* Generic Profile:
Questo profilo è tarato sulle funzioni utilizzate più di frequente sia nel volo civile che il quello
militare.
* Light Aviation Profile:
Questo profilo è stato appositamente concepito per gestire al meglio le funzioni richieste da
un aereo ultra-leggero o da un aereo da turismo. Comprende una funzione di base di pilota
automatico, i controlli per flap e carrelli, le funzioni di gestione del sistema elettronico, la
miscela nel motore, il passo dell’elica e i controlli per il raffreddamento del motore, ecc.
* Airliner Profile:
Oltre ad offrire un numero di funzioni pari al Light Aviation Profile, questo profilo punta
inoltre su aspetti più specifici r
contempo un’avanzata funzione di pilota automatico.
elativi all’aviazione
NOTE IMPORTANTI
- I plug-in sono pre-configurati SOLO PER 2
- Durante l’installazione dei plug-in, il gioco non deve essere caricato.
- Prima di installare i plug-in, configura entrambi gli MFD COUGAR utilizzando
gli identificativi F16 MFD 1 e F16 MFD 2 (identificativi predefiniti).
istantaneamente entrambi
di linea e professionale, offrendo nel
MFD
COUGAR!
i tuoi MFD per
Page 87

14/18
INSTALLAZIONE DEI PLUG-IN
- Per accedere al plug-in per Flight Simulator 2004 , seleziona:
Start/Programmi/Thrustmaster MFD Cougar/FLIGHT SIMULATOR 2004 Plug-In
- Per accedere al plug-in per Flight Simulator X, seleziona:
Start/Programmi/Thrustmaster MFD Cougar/FLIGHT SIMULATOR X Plug-In
- Fatto questo, potrai scegliere fra 3 diversi profili a tua disposizione:
Generic Profile / Airliner Profile / Light Aviation Profile.
Scegli il profilo desiderato, quindi clicca su START
.
- Apparirà la pagina SUCCESS, a conferma della corretta installazione del profilo.
Clicca su OK.
CON I TUOI 2 MFD COUGAR CONFIGURATI CON IL
ORA SEI PRONTO
NOTA: per giocare con un altro profilo, ripeti la procedura sopradescritta, selezionando il
profilo desiderato.
PER GIOCARE
PROFILO SELEZIONATO
!
Page 88

15/18
CON ALTRI GIOCHI
MFD COUGAR è compatibile con tutti i giochi di simulazione per PC (di volo sia miliare
che civile) che supportino più connessioni USB.
Per configurare l’MFD COUGAR dal tuo gioco, accedi alle Opzioni di Controllo del tuo
gioco, quindi associa manualmente le funzioni desiderate ai vari pulsanti del MFD.
Dovrai compiere questa operazione una sola volta: le relative impostazioni verranno
automaticamente salvate dal tuo gioco.
RISOLUZIONE DEI PROBLEMI E AVVISI
I miei MFD COUGAR sono vengono individuati o si scollegano all’improvviso.
- Spegni il tuo computer, scollega gli MFD COUGAR,
il tuo computer.
- Qualora il problema dovesse ripresentarsi, collega gli MFD
USB, oppure collegali direttamente ad un hub USB alimentato esternamente.
- Evita di collegare i tuoi MFD COUGAR ad un hub USB non alimentato.
I plug-in per Flight Simulator X e Flight Simulator 2004 non si installano
o non funzionano correttamente.
- Prima di installare i plug-in, verifica che il gioco non sia aperto.
- Assicurati che entrambi gli MFD COUGAR siano stati
Panel, con gli identificativi F16 MFD 1 e F16 MFD 2 (identificativi predefiniti)
Non riesco a configurare il mio MFD COUGAR in altri giochi.
- Nel menu Opzioni / Controller / Pad o Joystick del tuo gioco, assegna
manualmente a ciascun pulsante del MFD la funzione desiderata.
- Per ulteriori informazioni, ti consigliamo di consultare il manuale
del tuo gioco.
- Installa gli aggiornamenti più recenti per il tuo gioco.
quindi ricollegali
COUGAR ad
configurati, tramite
d’uso o
e riavvia
altre porte
il Control
.
l’help online
Page 89

16/18
Informazioni sulla garanzia al consumatore
A livello mondiale, Guillemot Corporation S.A., avente sede legale in Place du Granier, B.P. 97143,
35571 Chantepie, Francia (d’ora in avanti “Guillemot”) garantisce al consumatore che il presente
prodotto Thrustmaster sarà privo di difetti relativi ai materiali e alla fabbricazione, per un periodo di
garanzia corrispondente al limite temporale stabilito per la presentazione di un reclamo riguardante la
conformità del prodotto in questione. Nei paesi della Comunità Europea, tale periodo equivale a due (2)
anni a partire dalla consegna del prodotto Thrustmaster. In altri paesi, la durata della garanzia
corrisponde al limite temporale stabilito per la presentazione di un reclamo riguardante la conformità del
prodotto Thrustmaster in base alle leggi applicabili nel paese in cui il consumatore risiedeva alla data di
acquisto del prodotto Thrustmaster (qualora nel paese in questione non esistesse alcuna norma a
riguardo, il periodo di garanzia corrisponderà a un (1) anno a partire dalla data originale di acquisto del
prodotto Thrustmaster).
Diversamente da quanto affermato in precedenza, le batterie ricaricabili sono coperte da una garanzia
di sei (6) mesi dalla data di acquisto originale.
Qualora, durante il periodo di garanzia, il prodotto dovesse apparire difettoso, contatti immediatamente
l’Assistenza Tecnica, che le indicherà la procedura da seguire. Qualora il difetto dovesse essere
confermato, il prodotto dovrà essere riportato al luogo di acquisto (o qualsiasi altro luogo indicato
dall’Assistenza Tecnica).
Nel contesto della presente garanzia, il prodotto difettoso di proprietà del consumatore potrà essere
sostituito o reso nuovamente funzionante, a discrezione dell’Assistenza Tecnica. Se, durante il periodo
coperto dalla garanzia, il prodotto Thrustmaster fosse oggetto di tale rimessa in operatività, alla
rimanente durata della garanzia dovrà essere aggiunto un periodo di almeno sette (7) giorni, durante il
quale il prodotto risulta non utilizzabile (tale periodo intercorre dalla data della richiesta di intervento da
parte del consumatore o dalla data in cui il prodotto in questione è reso disponibile per la rimessa in
operatività, questo nel caso in cui tale data sia successiva alla data di richiesta di intervento). Qualora
le leggi applicabili in materia lo consentano, la totale responsabilità di Guillemot e delle sue controllate
(compresi i danni conseguenti) si limita alla rimessa in operatività o alla sostituzione del prodotto
Thrustmaster. Qualora le leggi applicabili in materia lo consentano, Guillemot declina ogni garanzia
sulla commerciabilità o la conformità a finalità particolari.
La presente garanzia non potrà essere applicata: (1) se il prodotto è stato modificato, aperto, alterato o
ha subito danni derivanti da un uso inappropriato o non autorizzato, da negligenza, da un incidente,
dalla semplice usura, o da qualsiasi altra causa non riconducibile a difetti nei materiali o
nell'assemblaggio (compresi, ma non i soli, prodotti Thrustmaster combinati con elementi inadatti, tra
cui, in particolare, batterie ricaricabili, caricatori o qualsiasi altro elemento non fornito da Guillemot per
questo prodotto); (2) in caso di mancato rispetto delle istruzioni fornite dall'Assistenza Tecnica; (3) in
caso di software, ovvero software soggetto a una specifica garanzia; (4) ai materiali di consumo
(elementi che richiedono la loro sostituzione al termine della loro durata di esercizio come, ad esempio,
batterie di tipo convenzionale o cuscinetti protettivi per auricolari o cuffie); (5) agli accessori (ad
esempio, cavi, custodie, borsette, borse, cinturini); (6) se il prodotto è stato venduto ad un'asta
pubblica.
La presente garanzia non è trasferibile.
I diritti legali del consumatore, stabiliti dalle leggi vigenti in materia di vendita di beni di consumo nel
relativo paese, non vengono intaccati dalla presente garanzia.
Page 90

17/18
Disposizioni addizionali sulla garanzia
Per tutta la durata della garanzia, in linea di principio, Guillemot non fornirà alcuna parte di
ricambio, in quanto la sola Assistenza Tecnica è la parte autorizzata ad aprire e/o rimettere in
funzionamento tutti i prodotti Thrustmaster (fatta eccezione per eventuali procedure di rimessa in
operatività che l’Assistenza Tecnica potrebbe richiedere al consumatore, attraverso istruzioni
scritte – viste, ad esempio, la semplicità e la mancanza di riservatezza della procedura di rimessa
in operatività – e fornendo al consumatore le necessarie parti di ricambio, se ve ne fosse
l’esigenza).
Considerando i propri cicli di innovazione e per proteggere il proprio know-how e i propri segreti
commerciali, in linea di principio, Guillemot non fornirà alcuna notifica o parte di ricambio
finalizzata alla rimessa in attività di un qualunque prodotto Thrustmaster il cui periodo di garanzia
risultasse scaduto.
Negli Stati Uniti d'America e in Canada, la presente garanzia è limitata al meccanismo interno del
prodotto e alla struttura esterna. In nessun caso Guillemot o le sue controllate potranno essere
ritenute responsabili, da una qualunque parte terza, per qualsiasi danno accidentale o
consequenziale derivante dalla violazione di una qualunque garanzia, espressa o implicita. Alcuni
Stati/Province non ammettono limitazioni alla durata di una garanzia implicita, oppure
all'esclusione o alla limitazione della responsabilità per danni accidentali o consequenziali, per cui
le suddette limitazioni o esclusioni potrebbero non riguardarti. La presente garanzia ti fornisce
specifici diritti legali, inoltre potresti avere anche altri diritti, variabili da Stato a Stato o da Provincia
a Provincia.
Responsabilità
Qualora le leggi applicabili in materia lo consentano, Guillemot Corporation S.A. (d'ora in avanti
“Guillemot”) e le sue controllate declinano ogni responsabilità per qualsiasi danno derivante da
almeno una delle seguenti condizioni: (1) il prodotto è stato modificato, aperto o alterato; (2)
mancato rispetto delle istruzioni di installazione; (3) uso inappropriato o non permesso,
negligenza, incidente (come, ad esempio, un impatto); (4) semplice usura. Qualora le leggi
applicabili in materia lo consentano, Guillemot e le sue controllate declinano ogni responsabilità
per qualsiasi danno non riconducibile a difetti nei materiali o nella fabbricazione del prodotto
(compresi, ma non i soli, potenziali danni causati direttamente o indirettamente da un qualunque
software, oppure dall’uso del prodotto Thrustmaster in combinazione con elementi inadatti, tra cui,
in particolare, batterie ricaricabili, caricatori o qualsiasi altro elemento non fornito da Guillemot per
questo prodotto).
Page 91

18/18
COPYRIGHT
ASSISTENZA TECNICA
© 2015 Guillemot Corporation S.A. Tutti i diritti riservati. Thrustmaster
proprietà di Guillemot Corporation S.A. Windows® è un marchio registrato di proprietà di Microsoft
Corporation per gli Stati Uniti e/o altri Paesi. Tutti gli altri marchi appartengono ai legittimi
proprietari. Illustrazioni escluse. I contenuti, i design e le caratteristiche possono essere oggetto di
modifiche senza preavviso e possono variare da un Paese all’altro. Fabbricato in Cina.
RACCOMANDAZIONI SULLA TUTELA DELL’AMBIENTE
Al termine della sua vita operativa, questo prodotto non dovrebbe essere
gettato assieme ai comuni rifiuti, ma dovrebbe essere portato ad un apposito
punto di raccolta destinato al riciclaggio del Materiale Elettrico ed Elettronico.
Ciò è confermato dal simbolo riportato sul prodotto, nel manuale d’uso o sulla
confezione.
A seconda delle proprie caratteristiche, i materiali potrebbero essere riciclati.
Tramite il riciclaggio ed altre forme di trattamento del Materiale Elettrico ed
Elettronico, è possibile fornire un importante contributo per la salvaguardia dell’ambiente.
Per conoscere i punti di raccolta più vicini a te, contatta le autorità locali competenti.
Informazioni da conservare. I colori e le decorazioni possono variare.
Questo prodotto è conforme con le norme relative ai bambini di età superiore ai 14 anni. Non è
adatto all’uso da parte di bambini di età inferiore ai 14 anni.
www.thrustmaster.com
®
è un marchio registrato di
http://ts.thrustmaster.com
Page 92

1/18
Compatible con PC
Manual del usuario
ESPECIFICACIONES TÉCNICAS
1. 28 botones programables
retroiluminados
2. 2 LED de identificación programables
3. 2 varillas de fijación ajustables
4. Base desmontable
5. 4 tapas de agujeros
6. 2 tornillos de pulgar para fijación
7. Conector USB
8. 2 tornillos de fijación de varillas
desmontables
9. Sistema de fijación de varillas
10. Varilla desmontable
11. 2 ventanas de Plexiglás
Page 93

2/18
INTRODUCCIÓN AL MFD COUGAR
El THRUSTMASTER MFD COUGAR es la réplica exacta de los MFD que montan los cazas
F-16 de la U.S. Air Force.
Cada MFD COUGAR incorpora 20 botones y 4 interruptores, es decir, 28 botones por MFD
en total.
Las funciones del MFD te permiten asignar controles avanzados de teclado o ratón
al dispositivo y emular diversos instrumentos de vuelo, para aumentar el realismo del juego.
THRUSTMASTER es el
T.16000M.
MEMORIA INTERNA
Cada MFD COUGAR incorpora una memoria interna.
Todos los ajustes personales (número e identificador
de retroiluminación, estado del LED de identificación) se guardarán automáticamente
en la memoria del di
De esta forma, todos los ajustes y preferencias se conservan si optas por conectar
MFD COUGAR a otro ordenador.
RETROILUMINACIÓN
La intensidad de retroiluminación se puede ajustar por software, mediante el Panel
de control de Thrustmaster, o por hardware, directamente desde dentro del juego.
2 LED DE IDENTIFICACIÓN
Cada MFD incorpora 2 LED de identificación, que te
COMPATIBLE SIMULTÁNEAMENTE CON HASTA 8 MFD COUGAR
Las opciones avanzadas del Thrustmaster Control Panel te permiten ajustar y controlar hasta 8
MFD simultáneamente. Por consiguiente, cada MFD se
completo.
AJUSTE FÍSICO
La base y la ventana del MFD COUGAR son móviles (para una comodidad y
visibilidad
óptimas) y desmontab
ordenador).
COMPATIBILIDAD DE ACCESORIOS Y JUEGOS
El MFD COUGAR es compatible con todos los controladores, joysticks y yokes disponibles
actualmente, además de con todos los juegos de simulación para PC (tanto militares como
civiles) y admite conectividad multi-USB.
PLUG-INS DE FLIGHT SIMULATOR X / FLIGHT SIMULATOR 2004
Los plug-ins incluidos te permiten configurar instantáneamente ambos MFD COUGAR para
esos juegos.
creador de
spositivo.
les (lo que permite a los usuarios fijarlos a una cabina o pantalla de
los joysticks de simulación HOTAS COUGAR y
de
MFD,
intensidad
permiten distinguir
puede
los dispositivos.
personalizar e identificar por
Page 94

3/18
CÓMO AJUSTAR EL ÁNGULO DEL MFD EN LA BASE
Cuando el MFD está fijado a la base (4), su ángulo se puede ajustar a 72, 54 o 39 grados.
El dispositivo de fijación (3) se compone de 2 varillas que se pueden colocar formando un
ángulo o quitarse:
- Una varilla larga (con las indicaciones 72DEGREE y 54DEGREE)
- Una varilla corta (con la indicación 39DEGREE)
CÓMO AJUSTAR EL ÁNGULO A 72 GRADOS
- Coloca las varillas de fijación (3), con la indicación 72DEGREE mirando hacia abajo (si
es necesario, afloja ligeramente el tornillo central para facilitar el ajuste del ángulo).
- Inserta el extremo superior de las varillas en el sistema de fijación (9) situado en la
parte trasera del MFD, en la cara superior del dispositivo.
- Fija el extremo inferior de las varillas a la parte trasera de la base y, a continuación,
aprieta los 2 tornillos de pulgar de fijación (6).
Page 95

Coloca las 2 varillas de fijación, con la indicación 54DEGREE mirando hacia abajo (si
-
es necesario, afloja ligeramente el tornillo central para facilitar el ajuste del ángulo).
CÓMO AJUSTAR EL ÁNGULO A 54 GRADOS
- Inserta el extremo superior de las varillas en el sistema de fijación (9) situado en la
parte trasera del MFD, en la cara superior del dispositivo.
- Fija el extremo inferior de las varillas a la parte trasera de la
aprieta los 2 tornillos de pulgar de fijación (6).
base y,
a continuación,
4/18
Page 96

- Afloja el tornillo central y, a continuación, extrae todas las varillas.
CÓMO AJUSTAR EL ÁNGULO A 39
GRADOS
- Coloca las varillas de fijación cortas, con la indicación 39DEGREE mirando hacia
abajo.
- Inserta el extremo superior de las varillas en el sistema de fijación (9) situado en la
parte trasera del MFD, en la cara superior del dispositivo.
- Fija el extremo inferior de las varillas a la parte trasera de la base y, a continuación,
aprieta los 2 tornillos de pulgar de fijación (6)
.
5/18
Page 97

COMO FIJAR EL MFD A UNA CABINA O UNA PANTALLA
1) Quita las varillas de fijación y extrae el MFD de la base desatornillando totalmente
los 2 tornillos de pulgar de fijación (6).
2) Quita la varilla desmontable (10) situada en la parte trasera del MFD, en la cara
superior del dispositivo, desatornillando totalmente los 2 tornillos de fijación (8)
situados en cada lado.
3) Quita las 4 tapas de los agujeros (5) empujándolas
trasera, utilizando un destornillador fino o un alfiler.
hacia afuera
desde la parte
Ya puedes fijar el MFD utilizando los 4 agujeros.
6/18
Page 98

CÓMO PERSONALIZAR LOS MFD COUGAR
- Inserta las 2 ventanas de Plexiglás incluidas (11) en la ranura correspondiente situada
en la parte superior del MFD COUGAR.
- Entre las 2 ventanas de Plexiglás, inserta el gráfico correspondiente o una de las tarjetas
suministradas con el paquete.
NOTAS:
- En este paquete se incluyen tarjetas para Flight Simulator
- También puedes descargar e imprimir tarjetas para el plug-in de Flight Simulator 2004 y
otras tarjetas del siguiente sitio web:
-
http://ts.thrustmaster.com/
X
(disponibles sólo en
inglés).
7/18
Page 99

INSTALACIÓN EN PC
Requisitos del sistema:
PC (Windows® XP, Windows® Vista, Windows® 7) que incorpore 2 puertos USB
El CD-ROM incluido con este producto está diseñado para la instalación de controladores.
1. Inserta el CD-ROM de instalación en el lector de CD-ROM. El asistente de instalación
aparecerá automáticamente en la pantalla (si el programa de instalación no se ejecuta
automáticamente, accede a Mi PC y, a continuación, haz clic dos veces en el icono de la
unidad de CD-ROM; si es necesario, haz doble clic en el archivo Setup.exe).
2. Haz clic en el botón DRIVERS para ejecutar la secuencia de instalación de controladores.
3. Una vez finalizada la instalación, haz clic en Terminar y reinicia el ordenador.
4. Cuando el ordenador se reinicie, conecta los conectores USB (7) del MFD COUGAR a los
puertos USB del PC. Windows® detectará automáticamente los nuevos dispositivos.
5. La instalación de los controladores se realiza de forma automática.
Sigue las instrucciones mostradas en la pantalla para terminar la instalación.
6. Selecciona Inicio/Programas/Thrustmaster MFD COUGAR para acceder al Panel de
control de Thrustmaster y a los plug-ins de Flight Simulator 2004 / Flight Simulator X.
8/18
Page 100

PANEL DE CONTROL DE THRUSTMASTER
- Selecciona Inicio/Programas/Thrustmaster MFD COUGAR/Control Panel.
- El cuadro de diálogo Dispositivos de juego muestra los nombres predeterminados de los
2 MFD (F16 MFD 1 y F16 MFD 2) con la indicación de estado OK
.
- Haz clic en Propiedades para configurar el MFD.
9/18
 Loading...