

Page 1

Page 2

Compatible: PC
Hardware User Manual
1/18
Page 3

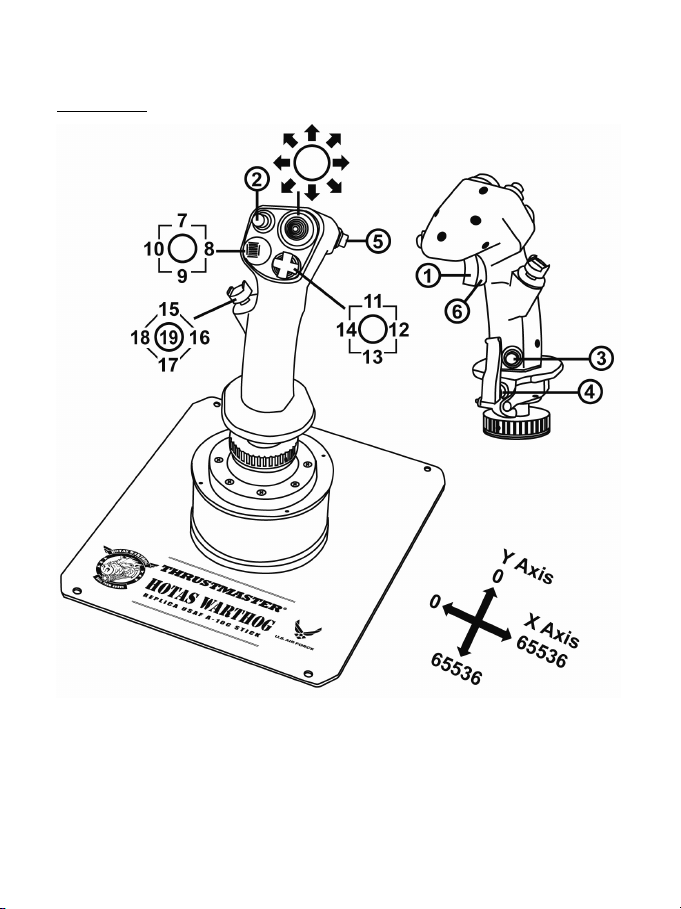
U.S. Air Force A-10C attack aircraft HOTAS™(**) (Hands On Throttle And Stick) replica
joystick pack, including:
1 Replica JOYSTICK
• Innovative new H.E.A.R.T HallEffect AccuRate Technology(*):
- 3D magnetic sensors (Hall Effect) on the stick
- 16-bit resolution (65536 x 65536 values)
- 5 coil spring system(*)
• USB connection with upgradeable firmware
• Super-stable, weighted base (over 3kg)
• New detachable handle, crafted entirely of metal:
- also compatible with HOTAS COUGAR™ handle (and vice-versa)
- new replica shape
- detachable metal plate for desk- or cockpit-style use
- new, realistic pressure on buttons and trigger
- 19 action buttons in total + one 8-way “point of view” hat:
. 1 x 8-way “point of view” hat
. 2 x 8-way hats
. 1 x 4-way hat with push button
. 1 x metal dual trigger
. 2 x push buttons
. 2 x pinkie push buttons
1 Replica CONTROL PANEL
- Weighted base (over 3,5kg) incorporated underneath the throttles
- Backlit functions
- 5 programmable LEDs
- Realistic pressure on buttons and switches
- 15 action buttons in total + 1 TRIM wheel:
. 1 x TRIM wheel
. 2 x push buttons
. 5 x 2-position switches (2 permanent)
. 2 x 3-position switches (1 momentary + 2 permanent)
. 2 x 3-position switches (3 permanent)
2/18
Page 4

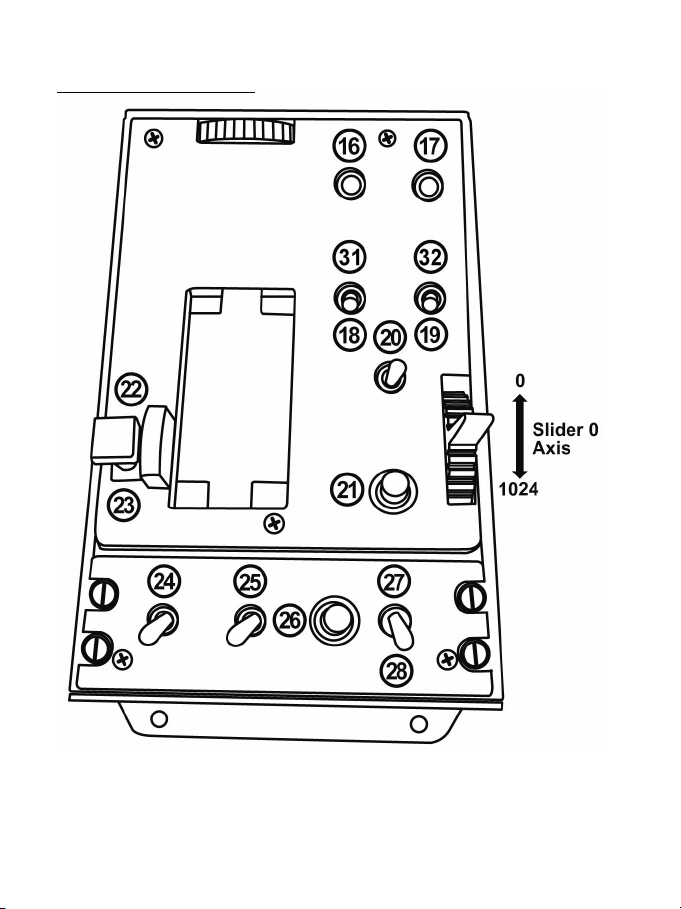
Dual Replica THROTTLES
• Innovative new H.E.A.R.T HallEffect AccuRate Technology(*):
- 3D magnetic sensors (Hall Effect) on the 2 throttles
- 14-bit resolution (16384 values) on each throttle
• USB connection with upgradeable firmware
• Dual throttles, featuring:
- metal hand rest
- locking system
- adjustable friction system
- realistic IDLE detent with “Pull & Push”(*) system
- realistic and disengageable AFTERBURNER detent with “Pull & Push”(*) system
- realistic pressure on buttons and switches
- 17 action buttons in total + 1 mouse hat with push button + one 8-way “point of view” hat:
. 1 x mouse hat with push button and 3D magnetic sensor (Hall Effect)
. 1 x 8-way hat
. 1 x 4-way hat with push button
. 1 x push button
. 1 x 3-position switch (2 momentary + 1 permanent)
. 2 x 3-position switches (3 permanent)
. 1 x 3-position switch (1 momentary + 2 permanent)
(*) Patent pending.
(**) HOTAS™ is a trademark of Guillemot Corporation S.A.
3/18
Page 5

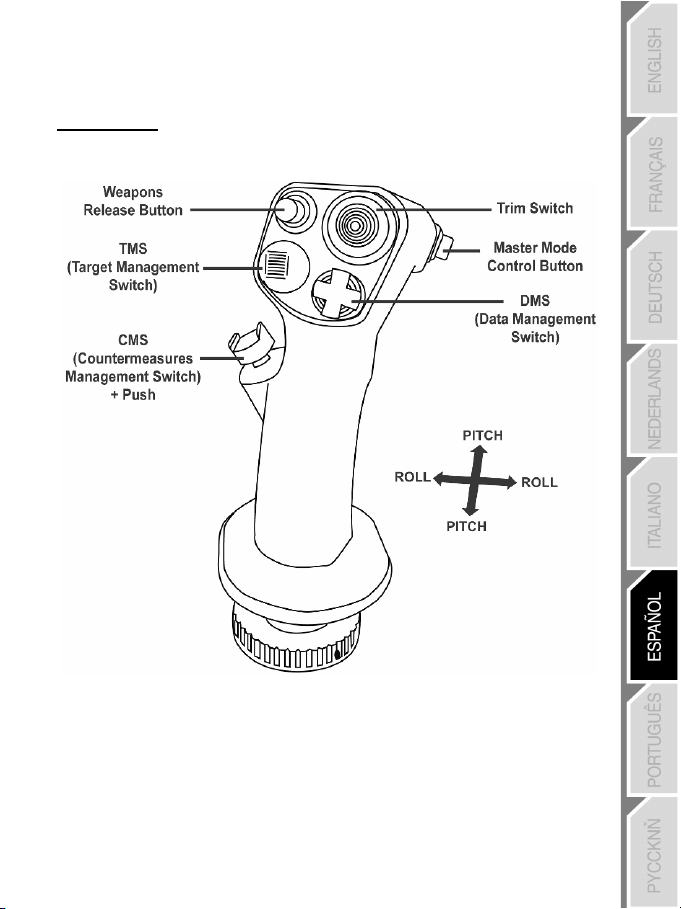
CONFIGURATION OF BUTTONS AND AXES
On the JOYSTICK:
4/18
Page 6

On the THROTTLE:
5/18
Page 7

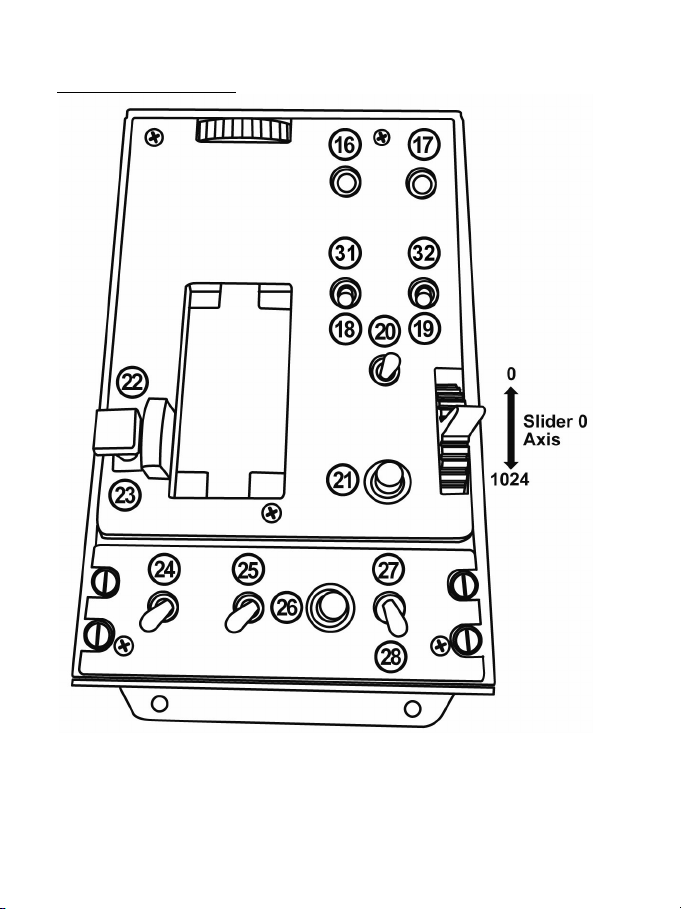
On the CONTROL PANEL:
6/18
Page 8

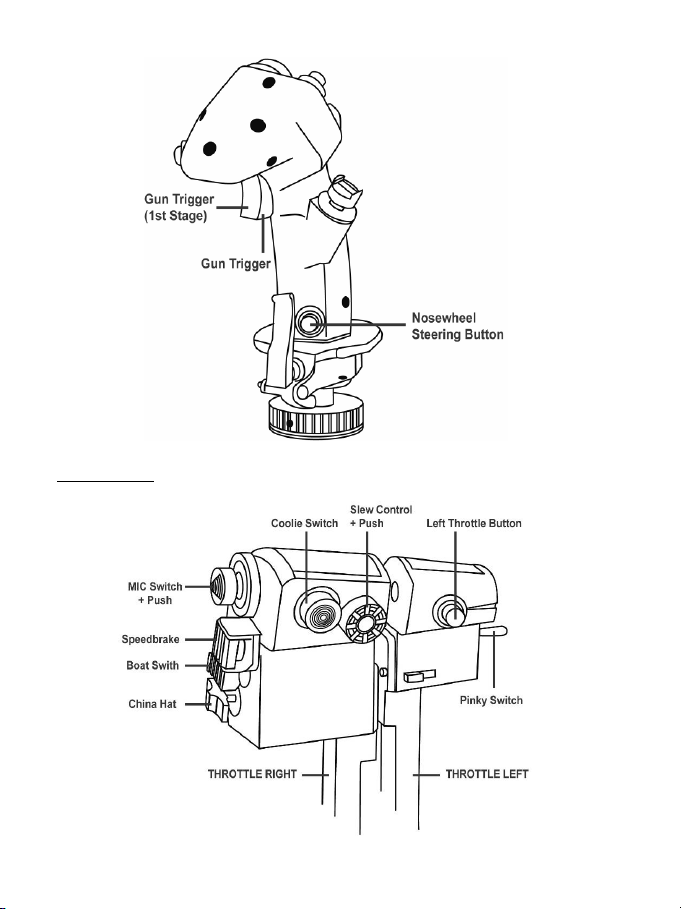
“A-10C” AIRCRAFT FUNCTIONS
On the JOYSTICK:
7/18
Page 9

On the THROTTLE:
8/18
Page 10

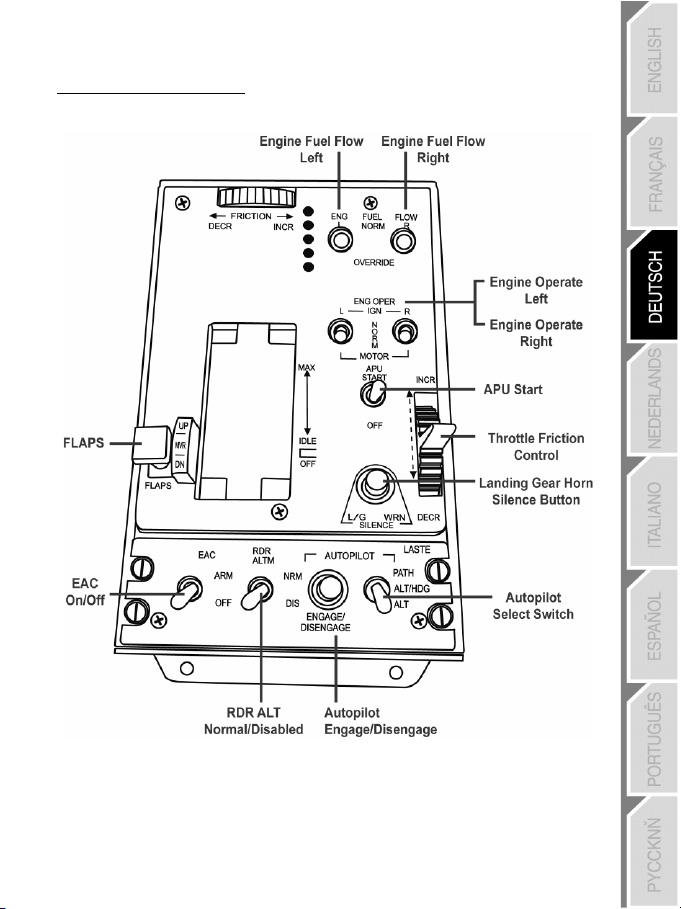
On the CONTROL PANEL:
9/18
Page 11
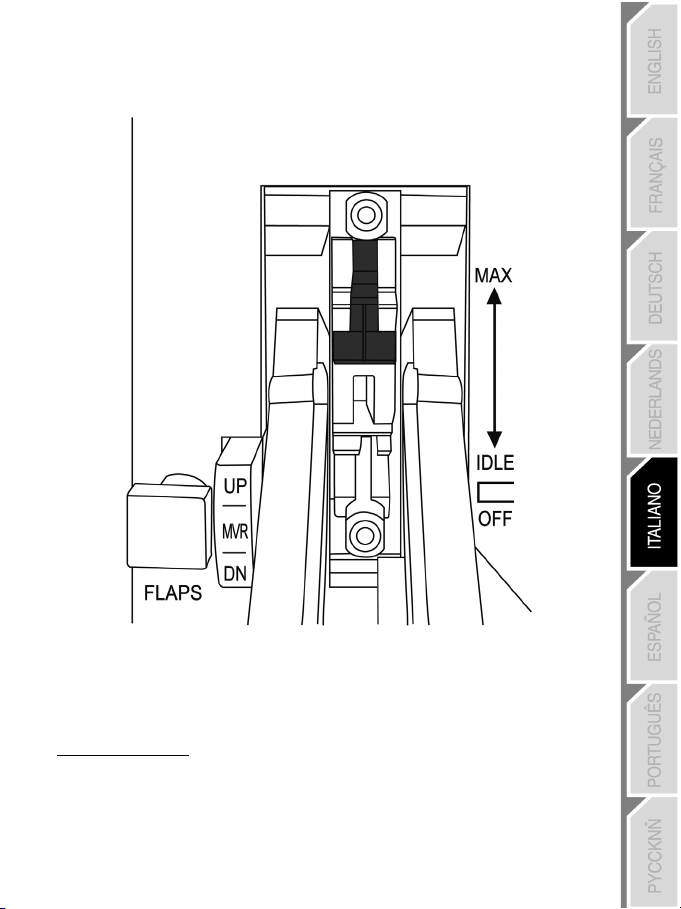
REALISTIC IDLE AND AFTERBURNER DETENTS
The HOTAS Warthog’s throttle features realistic systems for IDLE and AFTERBURNER
detents (the AFTERBURNER system is disengageable).
IDLE:
When set to IDLE: to cut off the aircraft’s motors (in compatible games), raise the throttle
levers slightly (in order to get over the stop) and put the throttle levers into the OFF position.
To power the motors back on, simply push the throttle levers forward (and then slightly
down), into the IDLE position.
10/18
Page 12

AFTERBURNER:
When the AFTERBURNER module stop is in place, raise the throttle levers slightly (in order
to get over the stop) and push them forward.
INSTALLING/UNINSTALLING THE AFTERBURNER STOP:
(By default, the AFTERBURNER module stop is not installed).
- Using the included Allen Key, unscrew the 2 screws as shown below, and take out the
removable bar located between the 2 throttle levers.
11/18
Page 13

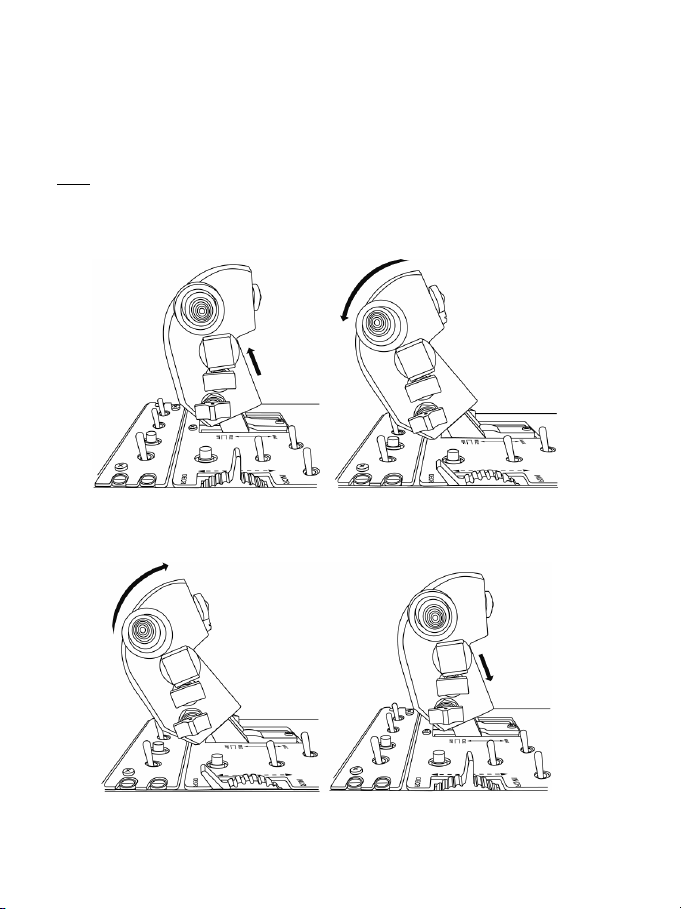
- Take out the AFTERBURNER module, located underneath the removable bar:
(In this position, the AFTERBURNER stop is disabled)
12/18
Page 14

- Turn the module upside down and put it back in its place:
(In this position, the AFTERBURNER stop is now enabled)
- Put the removable bar back between the 2 throttle levers, then replace and re-tighten the
2 screws.
IMPORTANT NOTE:
In order to avoid any possible damage to the AFTERBURNER module,
you must never use the throttle levers without the removable bar properly installed (using the
2 screws) between the 2 throttle levers.
13/18
Page 15

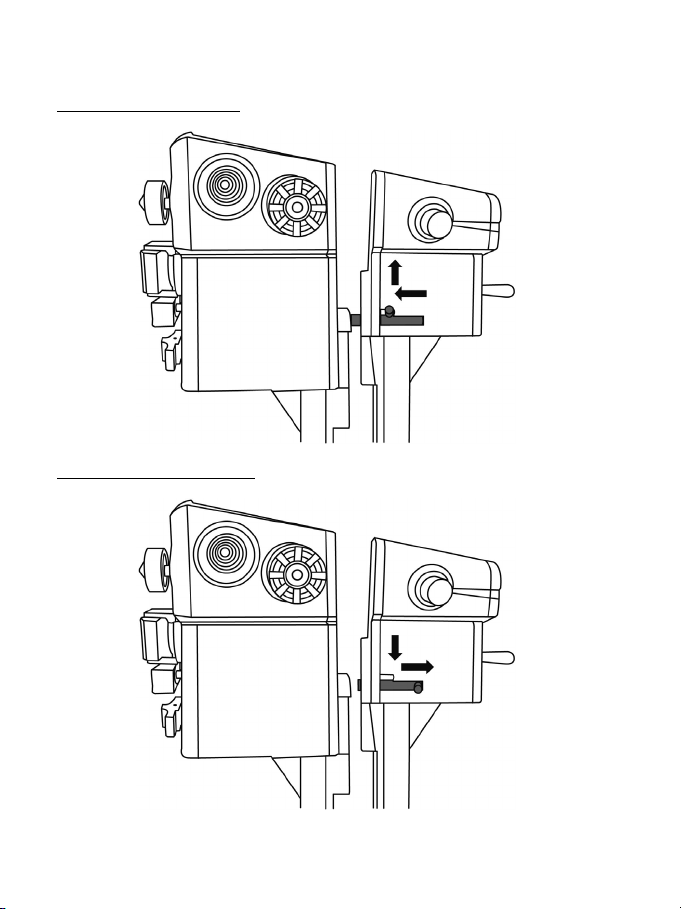
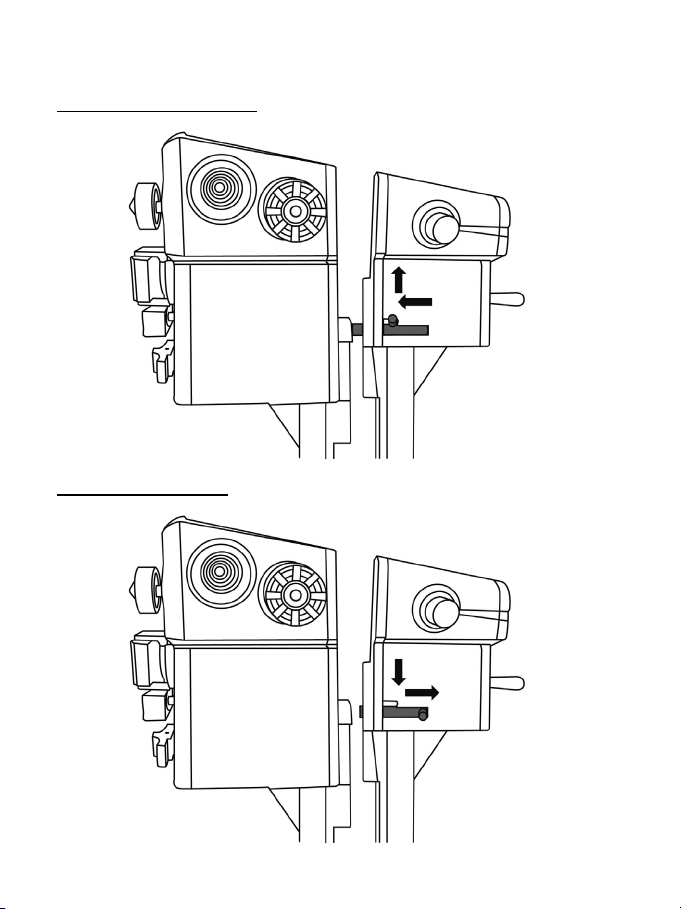
ATTACHING/SEPARATING THE 2 THROTTLE LEVERS
To attach the throttle levers together:
To detach the throttle levers from one another:
14/18
Page 16

INSTALLING THE JOYSTICK IN A COCKPIT OR OTHER FIXED SUPPORT
To attach the joystick in a cockpit:
- Unscrew the 4 screws located underneath the joystick’s metal base plate, and remove the
metal base plate.
- Use the 4 screw threads located on the underside of the joystick to attach the joystick
directly to your fixed support.
You can also use the 4 holes located in the corners of the metal base plates of the joystick
and the throttle to attach both elements to a fixed support.
15/18
Page 17

THROTTLE ADJUSTABLE FRICTION SYSTEM
- To increase the friction: turn the wheel to the right.
- To decrease the friction: turn the wheel to the left.
IMPORTANT NOTES
:
- Friction on the dual throttles is set to the minimum value by default.
- In order to allow for precise adjustment according to your taste, roughly ten full turns must
be made to go from minimum friction to maximum friction.
- You can use the white mark, found on the wheel, to help count your turns, if necessary.
BACKWARDS-COMPATIBILITY
The new “HOTAS Warthog” handle is backwards-compatible with the base of the “HOTAS
Cougar” (and vice versa).
Only the CMS push button (button 19) will be non-functional, as it was not originally featured
on the HOTAS Cougar.
CONTROL PANEL BACKLIGHTING
The intensity of the control panel's backlighting can be adjusted directly via T.A.R.G.E.T
(Thrustmaster Advanced pRogramming Graphical EdiTor). Five different levels of intensity
are available: from 1 (minimum intensity) to 5 (maximum intensity), with the default level set
at 2.
MANAGING THE 5 PROGRAMMABLE LEDS
You can manage the Control Panel’s 5 programmable LEDs directly via T.A.R.G.E.T.
(Thrustmaster Advanced pRogramming Graphical EdiTor).
16/18
Page 18

TECHNICAL SUPPORT
If you encounter a problem with your product, please go to http://ts.thrustmaster.com and click Technical Support. From
there you will be able to access various utilities (Frequently Asked Questions (FAQ), the latest versions of drivers and
software) that may help to resolve your problem. If the problem persists, you can contact the Thrustmaster products technical
support service (“Technical Support”):
By email:
In order to take advantage of technical support by email, you must first register online. The information you provide will help
the agents to resolve your problem more quickly. Click Registration on the left-hand side of the Technical Support page and
follow the on-screen instructions. If you have already registered, fill in the Username and Password fields and then click
Login.
By telephone:
United Kingdom
United States
Canada
Denmark
Sweden
Finland
WARRANTY INFORMATION
Worldwide, Guillemot Corporation S.A. (“Guillemot”) warrants to the consumer that this Thrustmaster product will be free
from material defects and manufacturing flaws for a period of two (2) years from the original date of purchase. Should the
product appear to be defective during the warranty period, immediately contact Technical Support, who will indicate the
procedure to follow. If the defect is confirmed, the product must be returned to its place of purchase (or any other location
indicated by Technical Support).
Within the context of this warranty, the consumer’s defective product will, at Technical Support’s option, be either repaired or
replaced. Where authorized by applicable law, the full liability of Guillemot and its subsidiaries (including for indirect
damages) is limited to the repair or replacement of the Thrustmaster product. The consumer’s legal rights with respect to
legislation applicable to the sale of consumer goods are not affected by this warranty.
This warranty shall not apply: (1) if the product has been modified, opened, altered, or has suffered damage as a result of
inappropriate or abusive use, negligence, an accident, normal wear, or any other cause not related to a material defect or
manufacturing flaw; (2) in the event of failure to comply with the instructions provided by Technical Support; (3) to software
not published by Guillemot, said software being subject to a specific warranty provided by its publisher.
08450800942
Charges
at local rate
1-866-889-5036
Free
1-866-889-2181
Free
80887690
Free
0200884567
Free
0800 913060
Free
Monday to Friday from Noon to 4pm and 5pm to 10pm
Saturday from 9am to Noon and 1pm to 7pm
Sunday from 9am to Noon and 1pm to 4pm
Monday to Friday from 7am to 11am and from Noon to 5pm
Saturday from 8am to 2pm
Sunday from 8am to 10am
(Eastern Standard Time)
Monday to Friday from 7am to 11am and from Noon to 5pm
Saturday from 8am to 2pm
Sunday from 8am to 10am
(Eastern Standard Time)
Monday to Friday from 1pm to 5pm and 6pm to 11pm
Saturday from 9am to 1pm and 2pm to 8pm
Sunday from 10am to 1pm and 2pm to 5pm
(English)
Monday to Friday from 1pm to 5pm and 6pm to 11pm
Saturday from 9am to 1pm and 2pm to 8pm
Sunday from 10am to 1pm and 2pm to 5pm
(English)
Monday to Friday from 2pm to 6pm and 7pm to Midnight
Saturday from 10am to 2pm and 3pm to 9pm
Sunday from 11am to 2pm and 3pm to 6pm
(English)
17/18
Page 19

Additional warranty provisions
In the United States of America and in Canada, this warranty is limited to the product’s internal mechanism and external housing.
Any applicable implied warranties, including warranties of merchantability and fitness for a particular purpose, are hereby limited to
two (2) years from the date of purchase and are subject to the conditions set forth in this limited warranty. In no event shall
Guillemot Corporation S.A. or its affiliates be liable for consequential or incidental damage resulting from the breach of any express
or implied warranties. Some States/Provinces do not allow limitation on how long an implied warranty lasts or exclusion or limitation
of incidental/consequential damages, so the above limitation may not apply to you. This warranty gives you specific legal rights,
and you may also have other legal rights which vary from State to State or Province to Province.
COPYRIGHT
© 2010 Guillemot Corporation S.A. All rights reserved. Thrustmaster® is a registered trademark of Guillemot Corporation S.A. All
other trademarks and brand names are hereby acknowledged and are property of their respective owners. Illustrations not binding.
Contents, designs and specifications are subject to change without notice and may vary from one country to another. Made in
China.
ENVIRONMENTAL PROTECTION RECOMMENDATION
Reference: 5075723
At the end of its working life, this product should not be disposed of with standard household waste, but rather
dropped off at a collection point for the disposal of Waste Electrical and Electronic Equipment (WEEE) for
recycling.
This is confirmed by the symbol found on the product, user manual or packaging.
Depending on their characteristics, the materials may be recycled. Through recycling and other forms of
processing Waste Electrical and Electronic Equipment, you can make a significant contribution towards
helping to protect the environment.
Please contact your local authorities for information on the collection point nearest you.
www.thrustmaster.com
18/18
Page 20

Compatible : PC
Manuel de l'utilisateur Hardware
1/18
Page 21

Ensemble de Joystick HOTAS™(**) (Hands On Throttle And Stick), réplique de l’avion
d’attaque A-10C de l’U.S. Air Force, comprenant :
1 JOYSTICK (réplique)
• Nouvelle technologie H.E.A.R.T HallEffect AccuRate Technology(*) :
- capteurs magnétiques 3D (Hall Effect) sur le manche
- résolution de 16 bits (65536 x 65536 valeurs)
- système de 5 ressorts hélicoïdaux(*)
• Connectique USB avec possibilité de mise à jour du firmware
• Système hyper-stable et lesté (> à 3kg)
• Nouveau manche détachable entièrement en métal avec :
- rétrocompatibilité avec HOTAS COUGAR™ (et inversement)
- nouvelle forme, réplique du manche original
- plaque métal détachable pour utilisation type bureau ou cockpit
- nouvelle force de pression réaliste des boutons et de la gâchette
- 19 boutons d’actions au total + 1 chapeau chinois « point de vue » 8 directions :
. 1 x chapeau « point de vue » 8 directions
. 2 x chapeaux 8 directions
. 1 x chapeau 4 directions avec bouton-poussoir
. 1 x double gâchette en métal
. 2 x boutons-poussoirs
. 2 x boutons-poussoirs petit-doigt
1 PANNEAU DE CONTRÔLE (réplique)
- Base lestée (> à 3,5 kg) incorporée sous les poignées des gaz
- Rétro-éclairage des fonctions
- 5 voyants lumineux programmables
- Force de pression réaliste des boutons et des interrupteurs
- 15 boutons d’actions au total + 1 molette TRIM :
. 1 x molette TRIM
. 2 x boutons-poussoirs
. 5 x interrupteurs 2 positions (2 permanents)
. 2 x interrupteurs 3 positions (1 à rappel + 2 permanents)
. 2 x interrupteurs 3 positions (3 permanents)
2/18
Page 22

DOUBLE MANETTE DES GAZ (répliques)
• Nouvelle technologie H.E.A.R.T HallEffect AccuRate Technology(*) :
- capteurs magnétiques 3D (Hall Effect) sur les 2 manettes des gaz
- résolution de 14 bits (16384 valeurs) sur chaque manette des gaz
• Connectique USB avec possibilité de mise à jour du firmware
• Double manette des gaz avec :
- repose-main en métal
- système de verrouillage
- système de friction ajustable
- IDLE réaliste avec système « Pull & Push »(*)
- AFTERBURNER réaliste débrayable avec système « Pull & Push »(*)
- force de pression réaliste des boutons et des interrupteurs
- 17 boutons d’actions au total + 1 chapeau souris avec bouton-poussoir + 1 chapeau chinois
« point de vue » 8 directions :
. 1 x chapeau souris avec bouton-poussoir et capteur magnétique 3D (Hall Effect)
. 1 x chapeau 8 directions
. 1 x chapeau 4 directions avec bouton-poussoir
. 1 x bouton-poussoir
. 1 x interrupteur 3 positions (2 à rappel + 1 permanent)
. 2 x interrupteurs 3 positions (3 permanents)
. 1 x interrupteur 3 positions (1 à rappel + 2 permanents)
(*) Brevet en instance.
(**) HOTAS™ est une marque de Guillemot Corporation S.A.
3/18
Page 23

CONFIGURATION DES BOUTONS ET DES AXES
Sur le Joystick :
4/18
Page 24

Sur les MANETTES DES GAZ (THROTTLE) :
5/18
Page 25

Sur le PANNEAU DE CONTRÔLE :
6/18
Page 26

FONCTIONNALITÉS SUR L’AVION « A-10C »
Sur le JOYSTICK :
7/18
Page 27

Sur les MANETTES DES GAZ (THROTTLE) :
8/18
Page 28

Sur le PANNEAU DE CONTRÔLE :
9/18
Page 29

DÉTENTE IDLE ET AFTERBURNER RÉALISTE
Les manettes des gaz du « Hotas Warthog » possèdent un système de détente IDLE et
AFTERBURNER réaliste (système débrayable pour l’Afterburner).
IDLE :
Après avoir positionné les manettes des gaz sur IDLE pour couper les moteurs de l’avion
(dans les jeux compatibles), soulevez-les (afin de dépasser la butée), puis ramenez-les en
position OFF.
Pour rallumer les moteurs, poussez simplement les manettes des gaz jusqu’à la position
IDLE.
10/18
Page 30

AFTERBURNER:
Lorsque la butée du module Afterburner est mise en place, soulevez les manettes des gaz
(afin de dépasser la butée), puis poussez les.
INSTALLER / DÉSINSTALLER LA BUTÉE AFTERBURNER :
(Par défaut, la butée du module AFTERBURNER n’est pas installée).
- À l’aide de la clé Allen fournie, dévissez les 2 vis et retirez la barre amovible située entre
les 2 manettes des gaz.
11/18
Page 31

- Retirez le « Module Afterburner » situé sous la barre amovible :
(dans cette position, la butée AFTERBURNER est désactivée)
12/18
Page 32

- Retournez le module et repositionnez-le dans son emplacement :
(dans cette position, la butée AFTERBURNER est désormais activée)
- Repositionnez la barre amovible entre les 2 manettes des gaz, puis revissez les 2 vis.
IMPORTANT
: Afin de ne pas endommager le module Afterburner, ne jamais utiliser les
manettes des gaz sans que la barre amovible ne soit préalablement vissée entre les 2
manettes.
13/18
Page 33
ATTACHER / SÉPARER LES 2 MANETTES DES GAZ
Pour solidariser les 2 manettes
:
Pour désolidariser les 2 manettes
:
14/18
Page 34

INSTALLATION DU JOYSTICK SUR UN COCKPIT OU AUTRE SUPPORT FIXE
Pour fixer le joystick dans un cockpit
:
- Dévissez les 4 vis situées sous la plaque en métal du joystick
- Utilisez les 4 « pas de vis » prévus à cet effet pour fixer le manche directement sur votre
support fixe.
Vous pouvez également utiliser les 4 perforations situées dans les coins des plaques métal
du joystick et des manettes des gaz pour fixer l’ensemble sur un support fixe.
15/18
Page 35

MOLETTE DE FRICTION DE LA DOUBLE MANETTE DES GAZ
- Pour augmenter la friction : tourner la molette vers la droite
- Pour diminuer la friction : tourner la molette vers la gauche
REMARQUES IMPORTANTES
:
- La friction de la double manette des gaz est réglée par défaut au minimum.
- Afin de permettre un réglage précis selon votre convenance, une dizaine de tours
complets sont nécessaires pour passer de la friction minimale à la friction maximale (et
inversement).
- La marque blanche, située sur la molette, vous permettra de compter les tours, si
nécessaire.
RÉTROCOMPATIBILITÉ
Le nouveau manche du « Hotas Warthog » est rétro-compatible avec la base du « Hotas
Cougar » (et inversement).
Seul le bouton-poussoir du CMS (bouton 19) ne sera pas fonctionnel, car non présent à
l’origine sur le « Hotas Cougar ».
RÉTRO-ÉCLAIRAGE DU PANNEAU DE CONTRÔLE
L’intensité du rétro-éclairage du panneau de contrôle pourra être ajustée directement via
T.A.R.G.E.T (Thrustmaster Advanced pRogramming Graphical EdiTor). Cinq niveaux
d’intensité sont disponibles : de 1 (intensité minimum) à 5 (intensité maximum), le niveau par
défaut étant réglé sur 2.
GESTION DES 5 LEDS PROGRAMMABLES
La gestion des 5 Leds programmables du panneau de contrôle s’effectuera directement via
T.A.R.G.E.T (Thrustmaster Advanced pRogramming Graphical EdiTor).
16/18
Page 36

SUPPORT TECHNIQUE
Si vous rencontrez un problème avec votre produit, rendez-vous sur le site http://ts.thrustmaster.com et cliquez sur Support
Technique. Vous aurez alors accès à différents services (Foire Aux Questions (FAQ), dernières versions des pilotes et
logiciels) susceptibles de résoudre votre problème. Si le problème persiste, vous pouvez contacter le support technique des
produits Thrustmaster (« Support Technique ») :
Par e-mail :
Pour bénéficier du support technique par e-mail, vous devez d’abord vous enregistrer en ligne. Les informations fournies
vont permettre aux techniciens de résoudre plus rapidement votre problème. Cliquez sur Enregistrement à gauche de la
page Support technique et suivez les instructions à l’écran. Si vous êtes déjà enregistré, renseignez les champs Nom
d’utilisateur et Mot de passe puis cliquez sur Connexion.
Par téléphone (si vous n’avez pas d’accès Internet) :
Canada
France
Suisse
Belgique
* Tarif indicatif (hors coût de mise en relation)
INFORMATIONS RELATIVES A LA GARANTIE
Dans le monde entier, Guillemot Corporation S.A. (« Guillemot ») garantit au consommateur que le présent produit
Thrustmaster est exempt de défauts matériels et de vices de fabrication, et ce, pour une période de deux (2) ans à compter
de la date d’achat d’origine. Si, au cours de la période de garantie, le produit semble défectueux, contactez immédiatement
le Support Technique qui vous indiquera la procédure à suivre. Si le défaut est confirmé, le produit devra être retourné à
son lieu d’achat (ou tout autre lieu indiqué par le Support Technique).
Dans le cadre de la garantie, le consommateur bénéficiera, au choix du Support Technique, du remplacement ou de la
réparation du produit défectueux. Lorsque la loi applicable l’autorise, toute responsabilité de Guillemot et ses filiales (y
compris pour les dommages indirects) se limite à la réparation ou au remplacement du produit Thrustmaster. Les droits
légaux du consommateur au titre de la législation applicable à la vente de biens de consommation ne sont pas affectés par
la présente garantie.
Cette garantie ne s’appliquera pas : (1) si le produit a été modifié, ouvert, altéré, ou a subi des dommages résultant d’une
utilisation inappropriée ou abusive, d’une négligence, d’un accident, de l’usure normale, ou de toute autre cause non liée à
un défaut matériel ou à un vice de fabrication ; (2) en cas de non-respect des instructions du Support Technique ; (3) aux
logiciels non-édités par Guillemot, lesdits logiciels faisant l’objet d’une garantie spécifique accordée par leurs éditeurs.
1-866-889-2181
Gratuit
02 99 93 21 33
Numéro fixe France Telecom non surtaxé.
Tarif selon opérateur
0842 000 022
Tarif d’une communication locale
078 16 60 56
Tarif d’une communication nationale
Du lundi au vendredi de 7h à 11h et de 12h à 16h
Le samedi de 8h à 14h
Le dimanche de 8h à 10h
(Heure de l’Est)
Du lundi au vendredi de 13h à 17h et de 18h à 22h
Le samedi de 9h à 13h et de 14h à 20h
Le dimanche de 10h à 13h et de 14h à 17h
Du lundi au vendredi de 13h à 17h et de 18h à 22h
Le samedi de 9h à 13h et de 14h à 20h
Le dimanche de 10h à 13h et de 14h à 17h
Du lundi au vendredi de 13h à 17h et de 18h à 22h
Le samedi de 9h à 13h et de 14h à 20h
Le dimanche de 10h à 13h et de 14h à 17h
17/18
Page 37

Stipulations additionnelles à la garantie
Aux États-Unis d’Amérique et au Canada, cette garantie est limitée au mécanisme interne et au boîtier externe du produit. Toute garantie
implicite applicable, incluant les garanties de qualité marchande ou d’adaptation à un usage particulier, est limitée à deux (2) ans à
compter de la date d’achat et soumise aux conditions de la présente garantie limitée. En aucun cas, Guillemot Corporation S.A. ou ses
sociétés affiliées ne sauraient être tenues responsables envers qui que ce soit de tous dommages indirects ou dommages accessoires
résultant du non-respect des garanties expresses ou implicites. Certains États/Provinces n’autorisent pas la limitation sur la durée d’une
garantie implicite, ou l’exclusion ou la limitation de responsabilité pour les dommages indirects ou accessoires, de sorte que les
limitations ou exclusions ci-dessus peuvent ne pas vous être applicables. Cette garantie vous confère des droits spécifiques ; vous
pouvez également bénéficier d’autres droits qui peuvent différer d’un État/Province à l’autre.
COPYRIGHT
© 2010 Guillemot Corporation S.A. Tous droits réservés. Thrustmaster® est une marque déposée de Guillemot Corporation S.A.
Toutes les autres marques déposées et noms commerciaux sont reconnus par les présentes et sont la propriété de leurs
propriétaires respectifs. Illustrations non contractuelles. Le contenu, la conception et les spécifications sont susceptibles de
changer sans préavis et de varier selon les pays. Fabriqué en Chine.
RECOMMANDATION RELATIVE A LA PROTECTION DE L’ENVIRONNEMENT
Référence : 5075723
En fin de vie, ce produit ne doit pas être éliminé avec les déchets ménagers normaux mais déposé à un point
de collecte des déchets d'équipements électriques et électroniques en vue de son recyclage.
Ceci est confirmé par le symbole figurant sur le produit, le manuel utilisateur ou l’emballage.
En fonction de leurs caractéristiques, les matériaux peuvent être recyclés. Par le recyclage et par les autres
formes de valorisation des déchets d'équipements électriques et électroniques, vous contribuez de manière
significative à la protection de l’environnement. Veuillez consulter les autorités locales qui vous indiqueront le
point de collecte concerné.
www.thrustmaster.com
18/18
Page 38

Kompatibel: PC
Hardware-Benutzerhandbuch
1/18
Page 39

U.S. Air Force A-10C Schlachtflugzeug HOTAS™(**) (Hands On Throttle And Stick) Replik
Joystick-Pack, mit:
1 Replik-JOYSTICK
• Innovative, neue H.E.A.R.T HallEffect AccuRate Technology(*):
- 3D Magnetsensoren (Hall Effect) am Stick
- 16-bit Auflösung (65536 x 65536 Werte)
- 5 Spriraldruckfedersystem(*)
• USB-Anschluss mit erweiterungsfähiger Firmware
• Superstabile, gewichtete Basis (über 3 kg)
• Neuer abnehmbarer Griff, komplett aus Metall gefertigt:
- ebenso mit dem HOTAS COUGAR™ Griff kompatibel (und umgekehrt)
- neue Replikform
- abnehmbare Metallplatte für Gebrauch im Tisch- oder Cockpitstil
- neuer, realistischer Druck bei Buttons und Triggern
- 19 Actionbuttons insgesamt + einen achtwegigen “Ansichtsperspektiven-Kopfschalter“:
. 1 x achtwegigen “Ansichtsperspektiven-Kopfschalter“
. 2 x Achtwege-Kopfschalter
. 1 x Vierwege-Kopfschalter mit Druckbutton
. 1 x Doppeltrigger aus Metall
. 2 x Druckbuttons
. 2 x Druckbuttons für den kleinen Finger
1 Replik-BEDIENUNGSEINHEIT
- Gewichtete Basis (über 3,5 kg), eingearbeitet unterhalb der Gashebel
- Beleuchtungsfunktionen
- 5 programmierbare LEDs
- Realistischer Druck bei Buttons und Schaltern
- 15 Actionbuttons insgesamt + 1 TRIM-Rad:
. 1 x TRIM-Rad
. 2 x Druckbuttons
. 5 x Zweifach-Positionsschalter (2 permanent)
. 2 x Dreifach-Positionsschalter (1 momentan + 2 permanent)
. 2 x Dreifach-Positionsschalter (3 permanent)
2/18
Page 40

Zwei Replik-GASHEBEL
• Innovative, neue H.E.A.R.T HallEffect AccuRate Technology(*):
- 3D Magnetsensoren (Hall Effect) an den beiden Gashebeln
- 14-bit Auflösung (16384 Werte) an jeden Gashebel
• USB-Anschluss mit erweiterungsfähiger USB Firmware
• Zwei Gashebel mit:
- Handauflage aus Metall
- Schließsystem
- einstellbares Spannungssystem
- realistische IDLE Arretierung mit “Pull & Push”(*) System
- realistische und abschaltbare AFTERBURNER Arretierung mit “Pull & Push”(*) System
- realistischer Druck bei Buttons und Schaltern
- 17 Actionbuttons insgesamt + 1 Maus-Kopfschalter mit Druckbutton + einen achtwegigen
“Ansichtsperspektiven-Kopfschalter“:
. 1 x Maus-Kopfschalter mit Druckbutton und 3D Magnetsensor (Hall Effect)
. 1 x Achtwege-Kpofshalter
. 1 x Vierwege-Kopfschalter mit Druckbutton
. 1 x Druckbutton
. 1 x Dreifach-Positionsschalter (2 momentan + 1 permanent)
. 2 x Dreifach-Positionsschalter (3 permanent)
. 1 x Dreifach-Positionsschalter (1 momentan + 2 permanent)
(*) Patent angemeldet.
(**) HOTAS™ ist ein Markenzeichen von Guillemot Corporation S.A.
3/18
Page 41

KONFIGURATION DER BUTTONS UND ACHSEN
Am JOYSTICK:
4/18
Page 42

Am GASHEBEL:
5/18
Page 43

Auf der BEDIENUNGSEINHEIT:
6/18
Page 44

“A-10C” FLUGZEUGFUNKTIONEN
Am JOYSTICK:
7/18
Page 45
Am GASHEBEL:
8/18
Page 46
Auf der BEDIENUNGSEINHEIT:
9/18
Page 47
REALISTISCHE IDLE- UND AFTERBURNER-ARRETIERUNG
Die Gashebel des HOTAS Warthogs verfügen über ein realistisches System zur IDLE(LEERLAUF-) und AFTERBURNER- (NACHBRENNER-) Arretierung (das AFTERBURNERSystem ist abschaltbar).
IDLE:
Wenn auf IDLE gesetzt: Um die Motoren des Flugzeugs abzustellen (in kompatiblen
Spielen), heben Sie die Gashebel etwas an (um über Stop zu kommen) und stellen die
Gashebel auf die OFF-Position.
Um die Motoren wieder zu starten, drücken Sie die Gashebel nach vorne (und etwas nach
unten) in die IDLE-Position.
10/18
Page 48

AFTERBURNER:
Wenn das AFTERBURNER-Stopmodul etabliert ist, heben Sie die Gashebel etwas an (um
über Stop zu kommen) und drücken diese nach vorne.
MONTIEREN/DEMONTIEREN DES AFTERBURNER-STOPS:
(Werksseitig ist das AFTERBURNER-Stopmodul nicht montiert).
- Benutzen Sie den beigefügten Inbusschlüssel, um die beiden Schrauben, wie
untenstehend gezeigt, zu lösen und entfernen den herausnehmbaren Riegel zwischen
den beiden Gashebeln.
11/18
Page 49

- Herausnehmen des AFTERBURNER-Moduls, zu finden unter dem herausnehmbaren
Riegel:
(In dieser Position ist der AFTERBURNER-Stop deaktiviert)
12/18
Page 50

- Drehen Sie das Modul um und stecken dieses wieder an seinen Platz:
(In dieser Position ist der AFTERBURNER-Stop nun aktiviert)
- Stecken Sie den herausnehmbaren Riegel wieder zwischen die beiden Gashebel und
drehen die beiden Schrauben fest.
WICHTIGE ANMERKUNG:
Um eine mögliche Beschädigung des AFTERBURNER-Moduls
zu vermeiden, sollten Sie die Gashebel nicht ohne den ordnungsgemäß installierten Riegel
(mittels der beiden Schrauben) zwischen den beiden Gashebeln benutzen.
13/18
Page 51

ZUSAMMENFÜGEN/SEPARIEREN DER BEIDEN GASHEBEL
Um die beiden Gashebel zusammenzufügen:
Um die beiden Gashebel voneinander zu separieren:
14/18
Page 52

EINBAU DES JOYSTICKS IN EIN COCKPIT ODER AUF EINER ANDEREN HALTERUNG
Um den Joystick in ein Cockpit einzubauen:
- Lösen Sie die vier Schrauben unter der Metallbasis des Joysticks und entfernen die
metallene Basisplatte.
- Nutzen Sie die vier Schraubgewinde unten am Joystick, um diesen auf Ihre Halterung zu
montieren.
Sie können die vier Löcher in den Ecken der metallenen Basisplatten des Joysticks und des
Gashebels dazu benutzen, beide Elemente auf eine Halterung zu montieren.
15/18
Page 53
EINSTELLBARES GASHEBEL-SPANNUNGSSYSTEM
- Um die Spannung anzuheben: Drehen Sie das Rad nach rechts.
- Um die Spannung abzusenken: Drehen Sie das Rad nach links.
WICHTIGE ANMERKUNGEN
:
- Die Spannung der beiden Gashebel ist werksseitig auf den geringsten Wert eingestellt.
- Um eine präzise Einstellung nach Ihrem Gusto zu ermöglichen, müssen ungefähr zehn
volle Drehungen ausgeführt werden, um von minimaler auf maximale Spannung zu
gehen.
- Sie können die weiße Markierung auf dem Rad dazu nutzen, um Ihre Drehungen
gegebenenfalls zu zählen.
ABWÄRTSKOMPATIBILITÄT
Der neue “HOTAS Warthog-” Griff ist abwärtskompatibel mit der Basis des “HOTAS Cougar”
(und umgekehrt).
Nur der CMS Druckbutton (Button 19) funktioniert nicht, da dieser ursprünglich nicht auf dem
HOTAS Cougar vorhanden ist.
BELEUCHTUNG BEDIENUNGSEINHEIT
Die Intensität der Hintergrundbeleuchtung der Bedieneinheit kann direkt via T.A.R.G.E.T
(Thrustmaster Advanced pRogramming Graphical EdiTor) eingestellt werden. Es sind fünf
verschiedene Intensitätsstufen verfügbar: Von 1 (minimale Intensität) bis 5 (maximale
Intensität), werksseitig ist Stufe 2 voreingestellt.
HANDHABUNG DER 5 PROGRAMMIERBAREN LEDS
Sie können die 5 programmierbaren LEDs der Bedieneinheit direkt via T.A.R.G.E.T.
(Thrustmaster Advanced pRogramming Graphical EdiTor) managen.
16/18
Page 54

TECHNISCHER SUPPORT
Sollten Sie mit Ihrem Produkt ein Problem haben, besuchen Sie bitte die Seite http://ts.thrustmaster.com und klicken Sie auf
Technischer Support. Von dort aus können Sie auf verschiedene Instrumente zugreifen (Fragen und Antworten (FAQ), die
neuesten Versionen von Treibern und Software), die Ihnen bei der Lösung Ihres Problems helfen könnten. Falls das Problem
weiterhin besteht, können Sie mit dem technischen Support der Thrustmaster Produkten in Kontakt treten („Technischer
Support“):
Per E-Mail:
Um den Vorzug des technischen Supports per Email in Anspruch nehmen zu können, müssen Sie sich zunächst online
registrieren. Mit den Informationen, die Sie uns so zukommen lassen, können die Mitarbeiter Ihr Problem schneller lösen.
Klicken Sie auf Registrierung links auf der Seite des technischen Supports und folgen Sie den Instruktionen auf dem Bildschirm.
Falls Sie bereits registriert sind, füllen Sie die Textfelder Anwendername und Passwort aus und klicken dann auf Login.
Per Telefon (falls Sie über keinen Internetzugang verfügen):
Deutschland
Österreich
Schweiz
GEWÄHRLEISTUNGSINFORMATIONEN
Guillemot Corporation S.A. („Guillemot“) bietet dem Kunde weltweit eine 2-jährige Garantie auf Materialschäden und
Herstellungsmängel ab dem Kaufdatum. Sollte das Produkt dennoch während dieser 2 Jahre Schäden oder Mängel
aufweisen, kontaktieren Sie unverzüglich den Technischen Support, der Ihnen mitteilt, wie weiter zu verfahren ist. Sollte ein
Defekt vorliegen, muss das Produkt dort zurückgegeben werden, wo es gekauft wurde (oder an die vom Technischen
Support angegebene Adresse).
Im Rahmen dieser Garantie wird das defekte Produkt des Kunden nach Ermessen des Technischen Supports entweder
repariert oder ersetzt. Überall wo es geltendes Recht zulässt, wird die volle Haftung von Guillemot und seinen
Niederlassungen (einschließlich für indirekte Beschädigungen), begrenzt auf die Reparatur oder den Ersatz des
Thrustmaster Produktes, übernommen. Die Rechte des Käufers entsprechend geltendem Recht im jeweiligen Land werden
nicht durch diese Garantie beeinflusst.
Diese Garantie tritt unter folgenden Umständen nicht in Kraft: (1) Falls am Produkt etwas verändert wurde oder es geöffnet
wurde, ein Schaden durch unangebrachte Nutzung, Fahrlässigkeit, einen Unfall, Verschleiß oder irgendeinen anderen Grund
verursacht wurde, der nicht im Zusammenhang mit einem Materialdefekt oder Herstellungsmangel aufgetreten ist. (2) Im
Falle der Nichtbeachtung der durch den technischen Support erteilten Anweisungen. (3) Software, die nicht von Guillemot
herausgegeben wurde, unterliegt der speziellen Garantie des jeweiligen Softwareherstellers.
08000 00 1445
Kostenlos
0810 10 1809
Zum Preis eines
Ortsgesprächs
0842 000 022
Zum Preis eines
Ortsgesprächs
Montag bis Freitag 13:00 bis 17:00 Uhr und 18:00 bis 22:00 Uhr
Samstag 9:00 bis 13:00 Uhr und 14:00 bis 20:00 Uhr
Sonntag 10:00 bis 13:00 Uhr und 14:00 bis 17:00 Uhr
Montag bis Freitag 13:00 bis 17:00 Uhr und 18:00 bis 22:00 Uhr
Samstag 9:00 bis 13:00 Uhr und 14:00 bis 20:00 Uhr
Sonntag 10:00 bis 13:00 Uhr und 14:00 bis 17:00 Uhr
Montag bis Freitag 13:00 bis 17:00 Uhr und 18:00 bis 22:00 Uhr
Samstag 9:00 bis 13:00 Uhr und 14:00 bis 20:00 Uhr
Sonntag 10:00 bis 13:00 Uhr und 14:00 bis 17:00 Uhr
17/18
Page 55

COPYRIGHT
© Guillemot Corporation S.A. 2010. Alle Rechte vorbehalten. Thrustmaster® ist ein eingetragenes Warenzeichen der Guillemot
Corporation S.A. Alle anderen Warenzeichen oder Handelsmarken werden hierdurch ausdrücklich anerkannt und sind im Besitz
Ihrer jeweiligen Eigentümer. Illustrationen nicht verbindlich. Inhalte, Design und Spezifikationen können ohne vorherige
Ankündigung geändert werden und können von Land zu Land unterschiedlich sein. Hergestellt in China.
Hinweise zum Umweltschutz
Produktreferenz: 5075723
www.thrustmaster.com
Dieses Produkt darf nach Ende seiner Lebensdauer nicht über den Hausmüll entsorgt werden, sondern muss
an einem Sammelpunkt für das Recycling von elektrischen und elektronischen Geräten abgegeben werden.
Das Symbol auf dem Produkt, der Gebrauchsanleitung oder der Verpackung weist darauf hin.
Die Werkstoffe sind gemäß ihrer Kennzeichnung wiederverwertbar. Mit der Wiederverwertung, der stofflichen
Verwertung oder anderen Formen von Altgeräten leisten Sie einen wichtigen Beitrag zum Schutz unserer
Umwelt. Bitte erfragen Sie bei der Gemeindeverwaltung die zuständige Entsorgungsstelle.
18/18
Page 56
Compatibel met: pc
Hardwarehandleiding
1/18
Page 57

U.S. Air Force A-10C aanvalstoestel HOTAS™(**) (Hands On Throttle And Stick) replicajoystick-bundel, met de volgende inhoud:
1 Replica-JOYSTICK
• Innovatieve nieuwe H.E.A.R.T HallEffect AccuRate Technology(*):
- 3D magnetische sensoren (Hall Effect) op de stick
- 16-bits resolutie (65536 x 65536 waarden)
- 5-springveerssysteem(*)
• USB-aansluiting met up te graden firmware
• Superstabiele verzwaarde voet (> 3 kg)
• Nieuwe afneembare handgreep, volledig van metaal gemaakt:
- ook compatibel met HOTAS COUGAR-handgreep (en andersom)
- nieuwe replicavorm
- afneembare metalen plaat voor gebruik op desktop of in cockpit
- nieuw: realistische drukkracht op knoppen en trigger
- 19 actieknoppen in totaal + een 8-richtingen “point of view”-hat-knop:
. 1 x 8-richtingen “point of view”-hat
. 2 x 8-richtingen hats
. 1 x 4-richtingen hat met drukknop
. 1 x dubbele trigger van metaal
. 2 x drukknoppen
. 2 x drukknoppen voor pinkbediening
1 Replica-CONTROLEPANEEL
- Verzwaarde voet (> 3,5 kg) onder de throttles
- Met verlichte functies
- 5 programmeerbare LED’s
- Realistische drukkracht op knoppen en schakelaars
- 15 actieknoppen in totaal + 1 TRIM-wiel:
. 1 x TRIM-wiel
. 2 x drukknoppen
. 5 x 2-standen schakelaar (2 permanent)
. 2 x 3-standen schakelaar (1 moment + 2 permanent)
. 2 x 3-standen schakelaar (3 permanent)
2/18
Page 58

DUBBELE Replica-THROTTLES
• Innovatieve nieuwe H.E.A.R.T HallEffect AccuRate Technology(*):
- 3D magnetische sensoren (Hall Effect) op de 2 throttles
- 14-bits resolutie (16384 waarden) op elke throttle
• USB-aansluiting met up te graden firmware
• Dubbele throttles, met:
- metalen handsteun
- vergrendelingssysteem
- instelbaar frictiesysteem
- realistische IDLE-positie met “Pull & Push”(*)-systeem
- realistische en uitschakelbare AFTERBURNER-positie met “Pull & Push”(*)-systeem
- realistische drukkracht op knoppen en schakelaars
- 17 actieknoppen in totaal + 1 muis-hat-knop met drukknop + een 8-richtingen “point of
view”-hat-knop:
. 1 x muis-hat met drukknop en 3D magnetische sensor (Hall Effect)
. 1 x 8-richtingen hat
. 1 x 4-richtingen hat met drukknop
. 1 x drukknop
. 1 x 3-standen schakelaar (2 moment + 1 permanent)
. 2 x 3-standen schakelaar (3 permanent)
. 1 x 3-standen schakelaar (1 moment + 2 permanent)
(*) Patent aangevraagd.
(**) HOTAS™ is een handelsmerk van Guillemot Corporation S.A.
3/18
Page 59

CONFIGURATIE VAN KNOPPEN EN ASSEN
Op de JOYSTICK:
4/18
Page 60
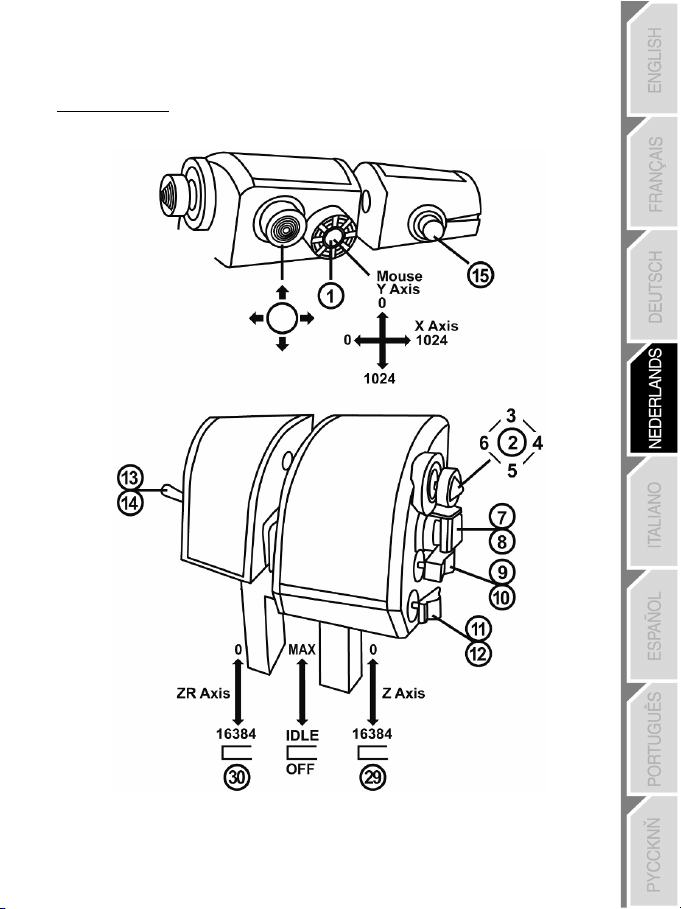
Op de THROTTLE:
5/18
Page 61
Op het BEDIENINGSPANEEL:
6/18
Page 62

"A-10C"-TOESTELFUNCTIES
Op de JOYSTICK:
7/18
Page 63

Op de THROTTLE:
8/18
Page 64

Op het BEDIENINGSPANEEL:
9/18
Page 65

REALISTISCHE STANDEN VOOR IDLE EN AFTERBURNER
De throttle van de HOTAS Warthog heeft realistische systemen voor de standen IDLE
(stationair) en AFTERBURNER (het AFTERBURNER-systeem is afkoppelbaar).
IDLE:
In de stand IDLE: om te motoren van het toestel af te zetten (in games waarin dit mogelijk
is), trekt u de throttle-hendels iets omhoog over de vergrendeling heen en zet u de throttlehendels in de stand OFF.
Om de motoren weer aan te zetten, drukt u de throttle-hendels naar voren en daarna iets
naar beneden in de stand IDLE.
10/18
Page 66

AFTERBURNER:
Als de vergendeling van de AFTERBURNER-module aanwezig is, trekt u de throttle-hendels
iets omhoog over de vergrendeling heen en drukt u de hendels naar voren.
DE AFTERBURNER-VERGRENDELING (DE)MONTEREN:
(De AFTERBURNER-vergrendeling is standaard niet gemonteerd).
- Draai de 2 bouten los met de meegeleverde imbussleutel zoals hieronder afgebeeld.
Verwijder vervolgens het plaatje tussen de 2 throttle-hendels.
11/18
Page 67

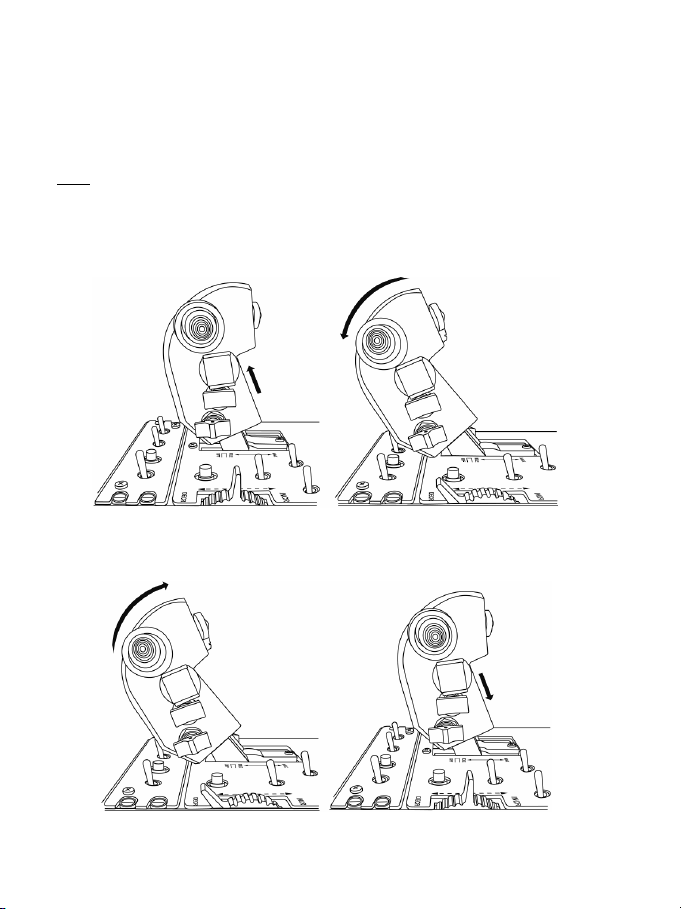
- Haal de AFTERBURNER-module weg die zich onder het verwijderbare plaatje bevindt.
(In deze stand is de AFTERBURNER-vergrendeling UITgeschakeld)
12/18
Page 68

- Draair de module op zijn kop en plaats hem weer terug:
(In deze stand is de AFTERBURNER-vergrendeling INgeschakeld)
- Plaats het verwijderbare plaatje terug tussen de 2 throttle-hendels en zet de 2
imbusbouten weer vast.
BELANGRIJKE OPMERKING:
Om mogelijke schade aan de AFTERBURNER-module te
vermijden, mag u de throttle-hendels nooit gebruiken als het verwijderbare plaatje niet correct
met de 2 imbusbouten tussen de 2 throttle-hendels is gemonteerd.
13/18
Page 69
DE 2 THROTTLE-HENDELS SAMENVOEGEN/SCHEIDEN
De throttle-hendels samenvoegen:
De throttle-hendels scheiden:
14/18
Page 70

DE JOYSTICK IN EEN COCKPIT OF OP ANDERE VASTE STEUN INSTALLEREN
De joystick in een cockpit monteren:
- Draai de 4 bouten onderop de metalen onderplaat van de joystick los en verwijder de
metalen onderplaat.
- Gebruik de 4 schroefdraden onderop de joystick om de joystick direct op een vaste steun
te bevestigen.
U kunt ook de 4 gaten op de uithoeken van de metalen onderplaten van de joystick en de
throttle gebruiken om beide onderdelen op een vaste steun te bevestigen.
15/18
Page 71

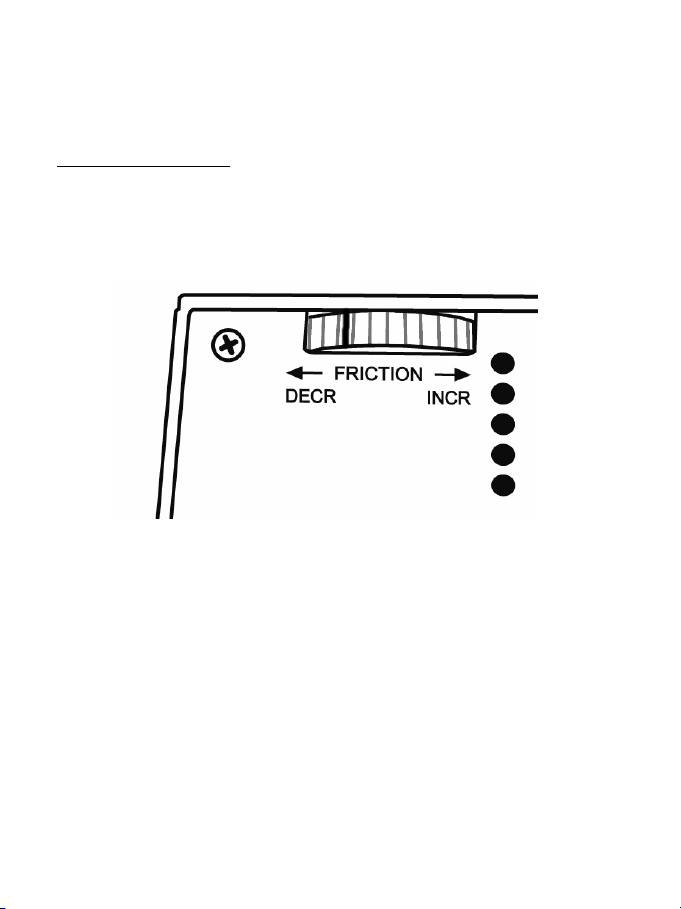
INSTELBAAR THROTTLE-FRICTIESYSTEEM
- De frictie verhogen: draai het wieltje naar rechts (INCR).
- De frictie verlagen: draai het wieltje naar links (DECR).
BELANGRIJKE OPMERKINGEN
:
- Standaard staat de frictie op beide throttles ingesteld op de laagste stand.
- U kunt de frictie zeer precies afstellen op uw eigen smaak. U draait het wieltje ongeveer
10 keer volledig rond om van de laagste naar de hoogste frictie te gaan.
- Het wieltje heeft een witte markering die nuttig kan zijn bij het tellen van het aantal keren
dat u het wieltje hebt gedraaid.
COMPATIBILITEIT MET EERDERE PRODUCTEN:
De nieuwe “HOTAS Warthog”-greep is compatibel met de voet van de “HOTAS Cougar” (en
vice versa).
Alleen de CMS-drukknop (knop 19) zal niet werken omdat deze functie niet aanwezig was
op de HOTAS Cougar.
ACHTERGRONDVERLICHTING VAN HET BEDIENINGSPANEEL
De intensiteit van de achtergrondverlichting van het bedieningspaneel kan worden
aangepast in de T.A.R.G.E.T (Thrustmaster Advanced pRogramming Graphical EdiTor). Er
zijn vijf niveaus aan helderheid beschikbaar: van 1 (minimale intensiteit) tot 5 (maximale
intensiteit). De standaardinstelling is 2.
DE 5 PROGRAMMEERBARE LED'S AANSTUREN
De 5 programmeerbare LED's van het bedieningspaneel worden bestuurd via de
T.A.R.G.E.T. (Thrustmaster Advanced pRogramming Graphical EdiTor).
16/18
Page 72
TECHNISCHE ONDERSTEUNING
Mocht u problemen ondervinden met dit product, ga dan naar http://ts.thrustmaster.com en klik op Technical Support. U
hebt daar toegang tot verschillende onderwerpen die u helpen bij het vinden van oplossingen, zoals de FAQ (veelgestelde
vragen) en de meest recente drivers en software. Als het probleem op die manier niet kan worden verholpen, kunt u contact
opnemen met de Thrustmaster product technical support service (Technical Support).
Per e-mail:
Voordat u gebruik kunt maken van technische ondersteuning per e-mail dient u zich eerst online te registreren. Met de door
u verstrekte informatie kan uw probleem sneller en beter worden opgelost. Klik op Registration aan de linkerzijde van de
pagina Technical Support en volg de aanwijzingen op het scherm. Indien u reeds geregistreerd bent, vult u de velden
Username en Password in en klikt u op Login.
Per telefoon:
Van maandag t/m vrijdag van 13:00 tot 17:00 en van 18:00 tot 22:00
(Nederlands)
Belgïe
Nederland
* TIJDELIJK IS DE NEDERLANDSTALIGE TECHNISCHE DIENST ENKEL BEREIKBAAR VAN 13:00 TOT 17:00 EN VAN
18:00 TOT 22:00. TIJDENS DE ANDERE UREN KUNT U STEEDS TERECHT VOOR ENGELS-, DUITS-, OF
FRANSTALIGE SUPPORT.
INFORMATIE MET BETREKKING TOT DE GARANTIE
Wereldwijd garandeert Guillemot Corporation S.A. (“Guillemot”) de koper dat dit Thrustmaster-product gedurende een
periode van twee (2) jaar vanaf de oorspronkelijke aankoopdatum vrij zal zijn van materiaal- en fabricagefouten. Indien u in
de garantieperiode een defect meent te constateren aan dit product, neem dan onmiddellijk contact op met de Technical
Support, die u zal informeren over de te volgen procedure. Als het defect wordt bevestigd, dient het product te worden
geretourneerd naar de plaats van aankoop (of een andere locatie die wordt opgegeven door Technical Support).
Binnen het gestelde van deze garantie wordt het defecte product van de consument gerepareerd of vervangen, zulks ter
beoordeling van Technical Support. Indien toegestaan door van de geldende wetgeving, beperkt de volledige
aansprakelijkheid van Guillemot en haar dochterondernemingen (inclusief de aansprakelijkheid voor indirecte schade) zich
tot het repareren of vervangen van het Thrustmaster product. De wettelijke rechten van de klant volgens de wetgeving die
van toepassing is op de verkoop van consumentproducten, worden op generlei wijze beperkt door deze garantie.
Deze garantie is niet van kracht: (1) indien het product aangepast, geopend of gewijzigd is, of beschadigd is ten gevolge van
oneigenlijk of onvoorzichtig gebruik, verwaarlozing, een ongeluk, normale slijtage, of enige andere oorzaak die niet
gerelateerd is aan een materiaal- of fabricagefout; (2) indien u zich niet houdt aan de instructies zoals verstrekt door
Technical Support; of (3) op software die niet is geleverd door Guillemot en daardoor onder de specifieke garantie valt zoals
verstrekt door degene die deze software levert.
078 16 60 56
Kosten van interlokaal gesprek
0900 0400 118
Kosten van lokaal gesprek
Van maandag t/m vrijdag van 13:00 tot 17:00 en van 18:00 tot 22:00
Zaterdag van 9:00 tot 13:00 en van 14:00 tot 20:00
Zondag van 10:00 tot 13:00 en van 14:00 tot 17:00
(Engels)
Van maandag t/m vrijdag van 13:00 tot 17:00 en van 18:00 tot 22:00
(Nederlands)
Van maandag t/m vrijdag van 13:00 tot 17:00 en van 18:00 tot 22:00
Zaterdag van 9:00 tot 13:00 en van 14:00 tot 20:00
Zondag van 10:00 tot 13:00 en van 14:00 tot 17:00
(Engels)
17/18
Page 73

COPYRIGHT
© 2010 Guillemot Corporation S.A. Alle rechten voorbehouden. Thrustmaster® is een geregistreerd handelsmerk van
Guillemot Corporation S.A. Alle andere handelsmerken en merknamen worden hierbij erkend en zijn eigendom van de
respectieve eigenaren. Afbeeldingen zijn niet bindend. Inhoud, ontwerp en specificaties kunnen zonder kennisgeving vooraf
worden gewijzigd en kunnen per land verschillen. Geproduceerd in China.
AANBEVELINGEN VOOR DE BESCHERMING VAN HET MILIEU
Productreferentie: 5075723
Gooi dit product na het einde van de levensduur niet weg met het normale afval, maar breng het
naar het door uw gemeente aangewezen inzamelpunt voor elektrische en/of computerapparatuur.
Ter herinnering is hiertoe op het product, de gebruikshandleiding of de verpakking een symbool
aangebracht.
De meeste materialen kunnen worden gerecycled. Door recycling en andere methoden voor
verantwoorde verwerking van afgedankte elektrische en elektronische apparaten kunt u een
belangrijke bijdrage leveren aan de bescherming van het milieu.
Neem contact op met uw gemeente voor informatie over een inzamelpunt bij u in de buurt.
www.thrustmaster.com
18/18
Page 74

Compatibile: PC
Manuale d’uso hardware
1/18
Page 75

Kit joystick HOTAS™(**) (Hands On Throttle And Stick), replica dell’aereo da attacco U.S.
Air Force A-10C, comprendente:
1 JOYSTICK (replica)
• Nuova e innovativa H.E.A.R.T HallEffect AccuRate Technology(*):
- Sensori magnetici 3D (Hall Effect) nella leva
- Risoluzione a 16-bit (65536 x 65536 valori)
- Sistema a 5 molle elicoidali(*)
• Connessione USB con firmware aggiornabile
• Base appesantita ultra-stabile (oltre 3kg)
• Nuova manetta sganciabile, realizzata interamente in metallo:
- compatibile anche con la leva HOTAS COUGAR™ (e vice-versa)
- nuovo profilo replica
- placca in metallo rimuovibile, per un uso da scrivania o stile-abitacolo
- nuova, realistica pressione dei pulsanti e del grilletto
- un totale di 19 pulsanti azione + 1 hat switch “angolo di visuale” ad 8 direzioni:
. 1 x hat switch “angolo di visuale” ad 8 direzioni
. 2 x hat switch a 8 direzioni
. 1 x hat switch a 4 direzioni con pulsante a pressione
. 1 x doppio grilletto in metallo
. 2 x pulsanti a pressione
. 2 x pulsanti a pressione per il dito mignolo
1 PANNELLO DI CONTROLLO (replica)
- Base appesantita (oltre 3,5kg) incorporata sotto alle manette
- Funzioni retro-illuminate
- 5 LED programmabili
- Pressione su pulsanti e switch
- Un totale di 15 pulsanti azione + 1 rotella TRIM:
. 1 x rotella TRIM
. 2 x pulsanti a pressione
. 5 x switch a 2 posizioni (2 permanenti)
. 2 x switch a 3 posizioni (1 momentanea + 2 permanenti)
. 2 x switch a 3 posizioni (3 permanenti)
2/18
Page 76
DOPPIA MANETTA (replica)
• Nuova e innovativa H.E.A.R.T HallEffect AccuRate Technology(*):
- Sensori magnetici 3D (Hall Effect) nelle 2 manetta
- Risoluzione a 14-bit (16384 valori) per ciascuna manetta
• Connessione USB con firmware aggiornabile
• Doppia manetta, dotata di:
- zona in metallo per il riposo della mano
- sistema di bloccaggio
- sistema a resistenza regolabile
- realistica posizione IDLE con sistema “Pull & Push”(*)
- realistica posizione AFTERBURNER sganciabile, con sistema “Pull & Push”(*)
- pressione realistica su pulsanti e switch
- un totale di 17 pulsanti azione + 1 hat switch per l’emulazione del mouse con pulsante a
pressione + 1 hat switch “angolo di visuale” ad 8 direzioni:
. 1 x hat switch per l’emulazione del mouse con pulsante a pressione e sensore
magnetico 3D (Hall Effect)
. 1 x hat switch a 8 direzioni
. 1 x hat switch a 4 direzioni con pulsante a pressione
. 1 x pulsante a pressione
. 1 x switch a 3 posizioni (2 temporanee + 1 permanente)
. 2 x switch a 3 posizioni (3 permanenti)
. 1 x switch a 3 posizioni (1 momentanea + 2 permanenti)
(*) In attesa di brevetto.
(**) HOTAS™ è un marchio di proprietà di Guillemot Corporation S.A.
3/18
Page 77
CONFIGURAZIONE DI PULSANTI E ASSI
Sul JOYSTICK:
4/18
Page 78

Sulla MANETTA:
5/18
Page 79
Sul PANNELLO DI CONTROLLO:
6/18
Page 80

COMANDI AEREO “A-10C”
Sul JOYSTICK:
7/18
Page 81

Sulla MANETTA:
8/18
Page 82

Sul PANNELLO DI CONTROLLO:
9/18
Page 83

REALISTICHE POSIZIONI IDLE E AFTERBURNER
La manetta di HOTAS Warthog è dotata di un realistico sistema per le posizioni IDLE
(STALLO) e AFTERBURNER (POSTBRUCIATORI) (il sistema AFTERBURNER è
sganciabile).
IDLE:
A manetta impostata su IDLE: per spegnere i motori dell’aereo (nei giochi compatibili),
solleva leggermente le leve della manetta (per portarle al di sopra della tacca) e porta le leve
della manetta in posizione OFF.
Per riaccendere i motori, non devi far altro che spingere in avanti (e poi leggermente verso il
basso) le leve della manetta, portandole in posizione IDLE.
10/18
Page 84

AFTERBURNER:
Quando il modulo di blocco AFTERBURNER è installato, solleva leggermente le leve della
manetta (per portarle al di sopra della tacca) e spingile quindi in avanti.
INSTALLARE/DISINSTALLARE IL BLOCCO AFTERBURNER:
(Per default, il modulo di blocco AFTERBURNER non è installato).
- Utilizzando l’acclusa chiave Allen, svita le 2 viti così come mostrato in figura e sfila la barra
rimuovibile inserita tra le 2 leve della manetta.
11/18
Page 85

- Sfila il modulo AFTERBURNER, posto al di sotto della barra rimuovibile:
(In questa posizione, il blocco AFTERBURNER è disabilitato)
12/18
Page 86
- Ribalta il modulo a faccia in giù e reinseriscilo in posizione:
(In questa posizione, il blocco AFTERBURNER è ora attivo)
- Reinserisci la barra rimuovibile tra le 2 leve della manetta, dopodiché inserisci e stringi
nuovamente le 2 viti.
NOTA IMPORTANTE:
Per evitare qualsiasi potenziale danno al modulo AFTERBURNER,
non utilizzare mai le leve della manetta senza che la barra rimuovibile sia correttamente
installata tra le 2 leve stesse (tramite le 2 apposite viti).
13/18
Page 87

INSERIRE/SEPARARE LE 2 LEVE DELLA MANETTA
Per vincolare tra loro le leve della manetta:
Per sganciare tra loro le leve della manetta:
14/18
Page 88

INSTALLARE IL JOYSTICK IN UN ABITACOLO O IN UN ALTRO SUPPORTO FISSO
Per attaccare il joystick ad un abitacolo:
- Svita le 4 viti poste al di sotto della placca metallica presente nella base del joystick,
rimuovendo poi la stessa placca metallica.
- Tramite le apposite 4 guide per viti poste nella parte inferiore del joystick, fissa il joystick
direttamente al tuo supporto rigido.
In alternativa, per fissare joystick e manetta ad un supporto fisso, puoi utilizzare i 4 fori posti
agli angoli delle placche metalliche presenti nelle basi di entrambi gli elementi.
15/18
Page 89

SISTEMA DI REGOLAZIONE DELLA RESISTENZA DELLA MANETTA
- Per aumentare la resistenza: gira la rotella verso destra.
- Per ridurre la resistenza: gira la rotella verso sinistra.
NOTE IMPORTANTI
:
- Per default, la resistenza di entrambe le manette è regolata sul valore minimo.
- Per poter ottenere un’accurata regolazione rispetto al valore della resistenza da te
desiderato, per spostarsi dal valore minimo al valore massimo occorrono circa dieci giri
completi.
- Se lo desideri, per aiutarti a contare i giri, puoi sfruttare la tacca bianca presente sulla
rotella.
RETRO-COMPATIBILITÀ
La nuova leva di “HOTAS Warthog” è retro-compatibile con la base di “HOTAS Cougar” (e
viceversa).
Solo il pulsante a pressione CMS (pulsante 19) risulterà non funzionante, in quanto non
originariamente presente su HOTAS Cougar.
RETROILLUMINAZIONE DEL PANNELLO DI CONTROLLO
L'intensità della retro-illuminazione del pannello di controllo può essere regolata
direttamente tramite T.A.R.G.E.T (Thrustmaster Advanced pRogramming Graphical EdiTor).
Sono disponibili cinque diversi livelli di intensità: da 1 (intensità minima) a 5 (intensità
massima), con un valore predefinito pari a 2.
GESTIONE DEI 5 LED PROGRAMMABILI
Puoi gestire i 5 LED programmabili del Pannello di Controllo dirattamente tramite
T.A.R.G.E.T. (Thrustmaster Advanced pRogramming Graphical EdiTor).
16/18
Page 90

ASSISTENZA TECNICA
Qualora riscontrassi un problema con il tuo prodotto, accedi al sito http://ts.thrustmaster.com e clicca su Assistenza
tecnica. Da qui, potrai accedere a vari servizi ed informazioni (Risposte alle Domande più Frequenti (FAQ), le più recenti
versioni di driver e software) che potrebbero esserti utili per risolvere il tuo problema. Qualora il problema persistesse, puoi
contattare il servizio di assistenza tecnica Thrustmaster (“Technical Support”):
Tramite e-mail:
Per poter usufruire del servizio di assistenza tecnica tramite e-mail, dovrai prima registrarti online. Le informazioni che
fornirai aiuteranno i nostri esperti a risolvere più rapidamente il tuo problema. Fai clic su Registrazione nella parte sinistra
della pagina di Assistenza Tecnica e segui le istruzioni che appariranno sullo schermo. Se sei già registrato, riempi i campi
Username e Password e clicca quindi su Login.
Per telefono:
Italia
*costo massimo alla riposta de 0.1 Euro
INFORMAZIONI SULLA GARANZIA
Nel mondo, Guillemot Corporation S.A. (“Guillemot”) garantisce al consumatore che questo prodotto Thrustmaster è privo di
difetti nei materiali e nell’assemblaggio per un periodo di due (2) anni a partire dalla data di acquisto originale. Qualora il
prodotto presentasse dei difetti durante tale periodo, contatta immediatamente il servizio di Assistenza Tecnica, che ti
indicherà la procedura da seguire. Se il difetto viene confermato, il prodotto dovrà essere riconsegnato al luogo di acquisto
(o a qualsiasi altra destinazione indicata dall’Assistenza Tecnica).
Contestualmente a tale garanzia, il prodotto difettoso potrà essere riparato o sostituito, secondo il parere del servizio di
Assistenza Tecnica. Dove ciò è concesso dalle leggi vigenti, gli obblighi di Guillemot e delle sue controllate sono limitati alla
riparazione o alla sostituzione del prodotto Thrustmaster (compresi eventuali danni indiretti). I diritti legali del consumatore,
stabiliti dalla legge riguardante la vendita di beni di consumo, non vengono intaccati da tale garanzia.
Questa garanzia non è applicabile se: (1) il prodotto è stato modificato, aperto, alterato o ha subito danni derivati da un uso
improprio o non corretto, da negligenza, da un incidente, dalla normale usura o da qualsiasi altra causa non riconducibile a
difetti nei materiali o nell’assemblaggio; (2) non vengono rispettate le istruzioni fornite dal servizio di Assistenza Tecnica; (3)
si stia utilizzando un software non pubblicato da Guillemot, ossia un software soggetto ad una specifica garanzia offerta dal
suo distributore.
Ulteriori clausole sulla garanzia
Negli Stati Uniti d’America e in Canada, questa garanzia è limitata al meccanismo interno al prodotto e allo chassis esterno.
Qualsiasi garanzia implicita applicabile, compresa la garanzia di commercializzazione e di conformità a particolari
indicazioni, viene qui limitata a due (2) anni a partire dalla data di acquisto ed è soggetta alle condizioni stabilite dalla
presente garanzia limitata. In nessun caso, Guillemot Corporation S.A. o le sue sussidiarie potranno essere ricollegate a
danni diretti o accidentali derivati dal mancato rispetto di qualsiasi garanzia espressa o implicita. Alcuni Stati/Province non
autorizzano limitazioni alla durata delle garanzie implicite, all’esclusione o alla limitazione della responsabilità per danni
accidentali/diretti: pertanto, la limitazione sovra citata potrebbe non essere applicabile nel tuo caso. Questa garanzia ti
fornisce specifici diritti legali, ai quali potrebbero sommarsi altri diritti legali, variabili da Stato a Stato o da Provincia a
Provincia.
848999817
costo chiamata locale*
Lun - Ven: 13:00-17:00 e 18:00-22:00
17/18
Page 91

COPYRIGHT
© 2010 Guillemot Corporation S.A. Tutti i diritti riservati. Thrustmaster® è un marchio registrato di proprietà di Guillemot
Corporation S.A. Tutti gli altri marchi e nomi commerciali vengono qui citati previa autorizzazione ed appartengono ai legittimi
proprietari. Illustrazioni escluse. I contenuti, i design e le caratteristiche possono essere oggetto di modifiche senza preavviso
e possono variare da un Paese all’altro. Fabbricato in Cina.
RACCOMANDAZIONI SULLA TUTELA DELL’AMBIENTE
Codice prodotto: 5075723
Al termine della sua vita operativa, questo prodotto non dovrebbe essere gettato assieme ai comuni
rifiuti, ma dovrebbe essere portato ad un apposito punto di raccolta destinato al riciclaggio del
Materiale Elettrico ed Elettronico.
Ciò è confermato dal simbolo riportato sul prodotto, nel manuale d’uso o sulla confezione.
A seconda delle proprie caratteristiche, i materiali potrebbero essere riciclati. Tramite il riciclaggio
ed altre forme di trattamento del Materiale Elettrico ed Elettronico, è possibile fornire un importante
contributo per la salvaguardia dell’ambiente.
Per conoscere i punti di raccolta più vicini a te, contatta le autorità locali competenti.
www.thrustmaster.com
18/18
Page 92
Compatible: PC
Manual del usuario del hardware
1/18
Page 93

Pack de joystick réplica HOTAS™(**) (Hands On Throttle And Stick) del avión de ataque
U.S. Air Force A-10C, que incluye:
1 JOYSTICK (réplica)
• Nueva e innovadora tecnología H.E.A.R.T HallEffect AccuRate Technology(*):
- sensores magnéticos 3D (Hall Effect) en la palanca
- resolución de 16 bits (65536 x 65536 valores)
- sistema con 5 muelles de bobina(*)
• Conexión USB con firmware actualizable
• Base pesada y súper estable (más de 3 kg)
• Nueva palanca desmontable, hecha totalmente de metal:
- también compatible con la palanca HOTAS COUGAR™ (y viceversa)
- nueva forma de réplica
- placa de metal desmontable para uso en escritorio o cabina
- presión nueva y realista en los botones y el gatillo
- 19 botones de acción en total + un hat switch “punto de vista” de 8 direcciones:
. 1 x hat switch “punto de vista” de 8 direcciones
. 2 x hat switch de 8 direcciones
. 1 x hat switch de 4 direcciones con botón pulsador
. 1 x gatillo dual metálico
. 2 x botones pulsadores
. 2 x botones pulsadores con el dedo meñique
1 PANEL DE CONTROL (réplica)
- Base pesada (más de 3,5 kg) incorporada debajo de los mandos de potencia
- Funciones de retroiluminación
- 5 LED programables
- Presión realista en botones e interruptores
- 15 botones de acción en total + 1 rueda de TRIM:
. 1 x rueda de TRIM
. 2 x botones pulsadores
. 5 x interruptores de 2 posiciones (2 permanentes)
. 2 x interruptores de 3 posiciones (1 momentánea + 2 permanentes)
. 2 x interruptores de 3 posiciones (3 permanentes)
2/18
Page 94

MANDOS DE POTENCIA DUALES (réplica)
• Nueva e innovadora tecnología H.E.A.R.T HallEffect AccuRate Technology(*):
- sensores magnéticos 3D (Hall Effect) en los 2 mandos de potencia
- resolución de 14 bits (16384 valores) en cada mando de potencia
• Conexión USB con firmware actualizable
• Mandos de potencia duales, que incorporan:
- reposamanos metálico
- sistema de bloqueo
- sistema de fricción ajustable
- detentor IDLE realista con sistema “Pull & Push”(*)
- detentor AFTERBURNER realista y desconectable con sistema “Pull & Push”(*)
- presión realista en botones e interruptores
- 17 botones de acción en total + 1 hat switch ratón con botón pulsador + un hat switch
“punto de vista” de 8 direcciones:
. 1 x hat switch ratón con botón pulsador y sensor magnético 3D (Hall Effect)
. 1 x hat switch de 8 direcciones
. 1 x hat switch de 4 direcciones con botón pulsador
. 1 x botón pulsador
. 1 x interruptor de 3 posiciones (2 momentáneas + 1 permanente)
. 2 x interruptores de 3 posiciones (3 permanentes)
. 1 x interruptor de 3 posiciones (1 momentánea + 2 permanentes)
(*) Pendiente de patente.
(**) HOTAS™ es una marca comercial de Guillemot Corporation S.A.
3/18
Page 95

CONFIGURACIÓN DE LOS BOTONES Y LOS EJES
En el JOYSTICK:
4/18
Page 96

En el MANDO DE POTENCIA:
5/18
Page 97

En el PANEL DE CONTROL:
6/18
Page 98
FUNCIONES DEL AVIÓN “A-10C”
En el JOYSTICK:
7/18
Page 99

En el MANDO DE POTENCIA:
8/18
Page 100

En el PANEL DE CONTROL:
9/18
 Loading...