

RADIO WITH ALARM
РАДИОПРИЕМНИК С БУДИЛЬНИКОМ
TF-1702UB
Instruction manual
Руководство по
эксплуатации

Instruction manual
Dear customer!
Thank you for purchasing our product. For safety, it is strongly recommended to read
this manual carefully before connecting, operating and/or adjusting the product and keep
the manual for reference in future.
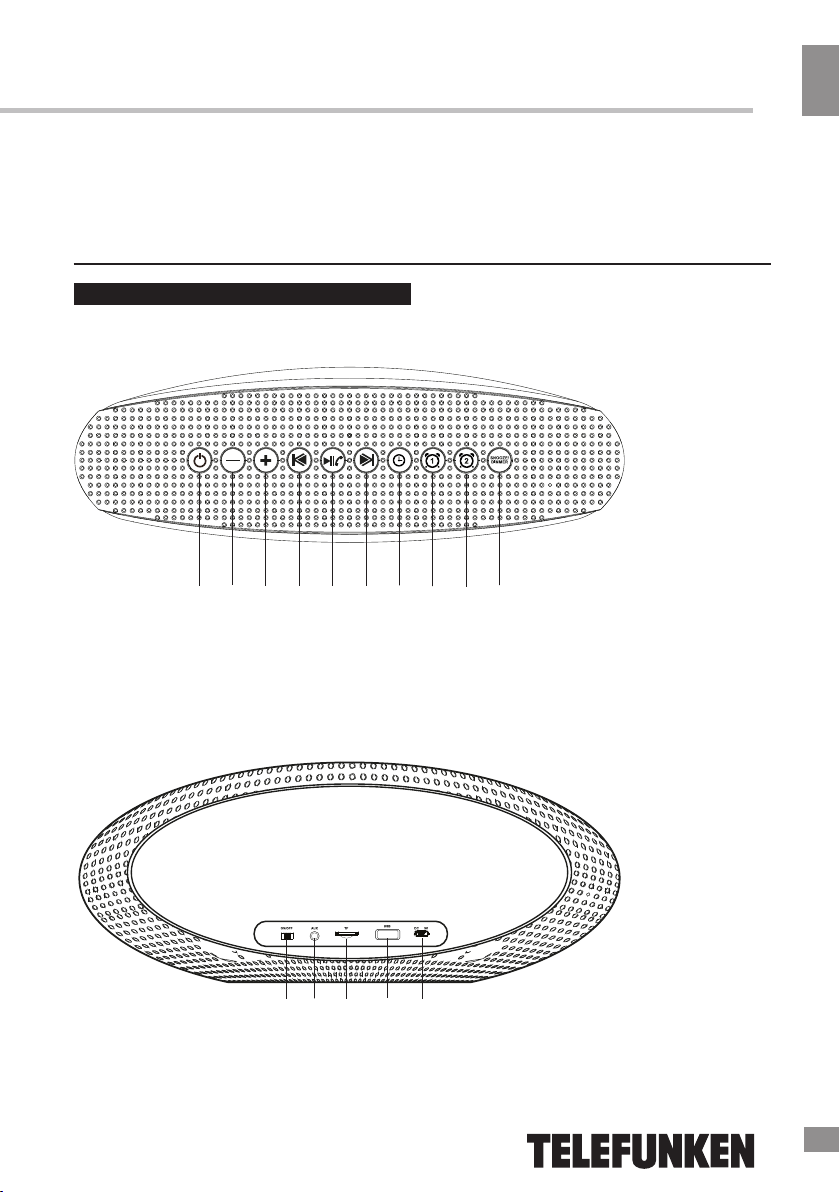
Description
Top panel
Back panel
4
3
2
1
11 12
6
5
13 14 15
10
9
8
7
1. ON/OFF button
2. Volume -
3. Volume +
4. Previous track
5. Play/Pause/Calling
6. Next track
7. Clock
8. Alarm 1
9. Alarm 2
10. Snooze/Dimmer
11. Power on/off switch
12. AUX input
13. TF (microSD) card slot
14. USB port
15. DC 5V charging port
2
Instruction manual
Important safeguards
• The instruction manual contains important
operating and maintenance instructions. For
your safety, it is necessary to refer to the
manual. Keep the manual for future use.
• Do not hit or drop the unit
•
Do not expose the unit to vibration, direct
sunlight, too high or low temperatures or
humidity.
• Do not disassemble the unit yourselves
Refer servicing to qualified service personnel
All the illustrations in this manual are
schematic images, which may differ from
actual objects.
Power supply
• The unit operates on an internal
rechargeable Li-ion battery.
• The battery can be recharged with the
provided USB charging cable. Before first
plugging the appliance check that voltage
indicated on the rating label corresponds
to the mains voltage in your home.
• Insert the charging cable into the
DC 5V socket at the top panel of the unit.
• Connect the charging cable to the power
source. The unit is charging when the red
LED indicator is on.
• For best results, try to fully charge the
battery before each use. If the battery is
drained, please allow it to recharge for a few
hours.
• Put the OFF/ON switch into ON
position to switch the unit on. Put it into OFF
position to switch off.
Setting the clock
• Press the button.
The time will start to flash.
• Press the - and + button
to set the HOUR. Press the button after the
hour is set.
• Press the - and + buttons
to set the MINUTES. Press the button after
the minute is set.
• Choose the 12- or 24-hour format.
Press the - and + buttons to select, to confirm.
• The time is now set.
You can press the button any time to go to
clock display from any operation mode.
s
Setting the alarm
• Press the button to go to
Alarm Clock 1 mode.
• Press the button to
set the alarm hour. Use the - and + buttons to
set and press to confirm and go to minutes.
• In the same way set the
alarm minutes, signal and circulation.
• You have 7 options when selecting
the alarm signal. The first 5 are built-in ring tones.
Number 6 is the first track from the TF (microSD)
card. Number 7 is the last played FM radio
station. Press + and - to select, to confirm.
• When selecting circulation you can
set the alarm to go off every single day of the
week or just once. If every day circulation is set,
the special symbol will light on the display.
• When finished, press and hold
to confirm the settings and activate the alarm.
• Alarm Clock 2 is set the same
way as Alarm Clock 1. Use the button instead.
General operation
Backlight brightness
• Press the DIMMER button to select
between the levels of display backlight
brightness.
3
Instruction Manual
Snooze control
• When the alarm time comes,
press any button to snooze. The alarm
signal will stop ringing for 10 minutes.
Double press the SNOOZE button to
cancel snooze.
• If no button is pressed, the alarm
will sound for 2 minutes.
Bluetooth operation
Bluetooth wireless playback
• This unit can wirelessly playback audio
from any device with Bluetooth A2DP
function.
• The wireless range is approximately within
5 meters.
• Wireless audio streaming requires pairing
of a Bluetooth device (e.g. smartphone).
HOW TO PAIR YOUR DEVICE TO
THIS UNIT:
• Make sure the Bluetooth function is
switched on in your device (e.g. smartphone,
tablet).
• Switch on the unit and press and hold the
button to switch on the Bluetooth.
• Once the Bluetooth pairing indicator
begins flashing, you will find the unit listed in
the Bluetooth connections list of your device
(as TF-1702UB).
• If asked for a passcode, enter “0000”.
• The initial setup is required only once
per device. The unit will automatically pair to
the last paired device.
• The LED indicator will flash when
searching for a Bluetooth device and stay
on when the devices are paired.
• When playing files, you can press
button to pause and resume
the
playback.
• Press the |<< or >>| button to go to a
previous or next track. Press the - or +
buttons to decrease or increase volume,
respectively.
AUX input
• You can connect the audio output of an
external device to this unit, to listen to the sound
of that device through the speaker.
• To connect an external audio device,
please use the supplied audio cable with
3.5mm-to-3.5 mm plugs to connect the
headphone out or audio line-out of the external
device to the AUX input of this unit.
• Turn on the external device. You can
press the - or + buttons to adjust the
volume.
4
Instruction manual
TF and USB operation
Playback
•
Turn on the device.
•
Insert a TF (microSD) card into the slot
or a USB drive into the port. The unit will
automatically enter the TF/USB mode.
• When playing, you can press
to play/pause the playback.
• During the playback you can press
the - or + buttons to adjust the volume and
press |<< or >>| to go to a previous or next
track.
It may take up to 60 seconds to open
and verify a large TF card or USB
drive with many files.
General TF/USB notes
• This unit is equipped with a TF slot and
a USB port that can read and play MP3
files stored on standard TF (microSD)
cards and USB drives up to 32 GB.
• FAT and FAT32 file system is supported by
this unit.
Never remove TF cards and USB drive
from the unit during playback, always stop
playback, then switch to another mode
before removing the storage to prevent
damage to your files and storage devices
themselves.
Specifications
FM radio
• The AUX or USB cable can used as
an FM radio antenna. Please insert the
cable into the unit and extend it for a
better signal reception.
•
Turn on the device.
•
select the FM mode.
• Press to automatically scan and
save all available radio stations. The
procedure will take several minutes and
cannot be interrupted.
• Once the search is finished, you can
press the |<< and >>| buttons to go to a
previous or next radio station. Press the -
and + buttons to adjust volume.
and hold the button to
Press
Maintenance and care
Switch off the unit, unplug from the power
supply. The outside of the appliance can be
cleaned with a slightly damp cloth.
Accessories
Alarm clock
Charger
Charging cable
3.5mm-3.5mm audio cable
Instruction manual
1 pc
1 pc
1 pc
1 pc
1 pc
Output power 10 W
Input voltage
Nominal power consumption 5 W
FM radio 87.5 - 108 MHz
Battery power supply Li-ion, 3.7V, 4000 mA/h
Net weight 0.5 kg
Unit dimensions 240 * 80 * 95 mm
Specifications and functions are subject to change without notice. It is connected with continual
improvement of the device.
MANUFACTURED AND DISTRIBUTED BY TECHNO ELECTRIC LIMITED,
Legal address: 801 Luk Yu Building, 24 - 26 Stanley Street, Central, China
4
TELEFUNKEN and the TELEFUNKEN logo are trademarks of
5
TELEFUNKEN Licenses GmbH and are used under a trademark license.
DC 5V, 1 A
 Loading...