


DWM 859 FI
12 place setting s

Dear Custo mer,
Pleas e car efully r ead th is manua l bef ore using the
dishw ashe r, it will help y ou to use and maintain the
dishw ashe r pro per ly.
Keep it to refer to it at a later date.
Pass it on to any subs e que nt ow ner of the app lian ce.
This manua l contains sections on safe ty In structions,
Opera ting Ins truc tions, Instal lati on Instr uctions and
Tro uble shooting Tips , etc .
Control Pa nel. .... ... ........... ....... .... ... ........... ....... 3
Dishwasher Fe atu r es...... ... .... ... ....... ....... . ..... .. .3
A Water Softener. . ...... ...... ....... .................. ....4、
B Load ing the Sa lt in to the So ftener...... ... ....... .5、
C Fill the Rins e Aid Di spenser. ...... ........ ... .... ...5、
D Funct ion of Deter gent ....... .... . .. .... .............. .6、
Atte ntio n bef ore o r af t er loading the Di shwa sher
Baskets........................... ...... . ...... . ...... . ... ... ....9
The Me thod Load ing Norm al Di shware. ....... .....10
To revi ew the se cti on on trou bleshoo ting Ti ps
will he lp you to solve some co mmon prob l ems
by yoursel f .
If you can no t solve the probl ems by your sel f ,
please ask for the help of pro fess ion al technician s.
The ma nufac turer, follow ing a p olicy of constan t
devel opment and updating of the produ ct, may
make modifications without givi ng prior noti ce.
This user ma nual sha ll also be got from the
manuf actu rer or res pons ible vendor.
Was h Cyc le Table..... . .......... .... .... ...... . .......... ..11
Turning on the A ppl iance............. . ...... . ...........12
Ch ang e the P rogr amm e.......... .... ..... . ...... .... 12....
At the end of the Wa sh Cycle.......... .... .... ... .... ..12
Filt e rin g Sys tem.. ....... .... .............. ....... .... .......13
Carin g for the Dishwash er.. .... .............. . .........14.
Positioni ng the Applian c e.. . ...... . ....... .. ......... .15..
About Power Connec tion. ........... ....... ..... .......15.
Water Connecti on...... ...... . ...... . ....... ....... ...... .16.
Start of dishw ash e r.. . .... ... .... ... .... ........... ... ...17..
Befor e calling for s ervi ce.......... ... ... . ....... ... ..... 18.
Error cod es...... . ... ........... ... . ........... ...... ........19.
Technical in for matio n.. ....... ....... ....... ....... .....20..

When using your dishwasher,
follow the precautions listed below:
This appliance is intended to be used in household
and similar applications such as:
-staff kitchen areas in shops, offices and other
working environments;
-farm houses;
-by clients in hotels, motels and other residential type
environments;
-bed and breakfast type environments.
This appliance can be used by children aged from 8
years and above and persons with reduced physical,
sensory or mental capabilities or lack of experience
and knowledge if they have been given supervision
or instruction concerning use of the appliance in a
safe way and understand the hazards involved.
Children shall not play with the appliance. Cleaning
and user maintenance shall not be made by children
without supervision. For EN60335-1
( )
This appliance is not intended for use by persons
(including children )with reduced physical, sensory
or mental capabilities, or lack of experience and
knowledge ,unless they have been given supervision
or instruction concerning use of the appliance by a
person responsible for their safety. For IEC60335-1
( )
This appliance is for indoor use only, for household
use only.
To protect against the risk of electrical shock, do not
immerse the unit, cord or plug in water or other liquid.
Please unplug before cleaning and maintenance the
appliance .
Use a soft cloth moisten with mild soap, and then use
a dry cloth to wipe it again.

This appliance must be earthed. In the event of a
malfunction or breakdown, earthing will reduce the risk
of anelectric shock by providing a path of least
resistance of electric current. This appliance is equipped
with a cord having an equipment-earthing conductor
and a grounding plug.
The plug must be plugged into an appropriate outlet that
is installed and earthed in accordance with all local
codes and ordinances.
Improper connection of the equipment-earthing
conductor can result in the risk of an electric shock.
Check with a qualified electrician or service
representative if you are in doubt whether the appliance
is properly grounded.
Do not modify the plug provided with the appliance;
If it does not fit the outlet.
Have a proper outlet installed by a qualified electrician.
Do not abuse, sit on, or stand on the door or dish rack of
the dishwasher.
Do not operate your dishwasher unless all enclosure
panels are properly in place.
Open the door very carefully if the dishwasher is
operating, there is a risk of water squirting out.
Do not place any heavy objects on or stand on the door
when it is open. The appliance could tip forward.
When loading items to be washed:
1) Locate sharp items so that they are not likely to
damage the door seal;

2) Warning: Knives and other utensils with sharp points
must be loaded in the basket with their points down or
placed in a horizontal position.
Check that the detergent powder is empty after
completion of the wash cycle.
Do not wash plastic items unless they are marked
dishwasher safe or the equivalent.
For plastic items n
recommendations.
Use only detergent and rinse additives designed for
an automatic dishwasher.
Never use soap, laundry detergent, or hand washing
detergent in your dishwasher.
Children should be supervised to ensure that they do not
play with the appliance.
The door should not be left open, since this could increase
the risk of tripping.
If the supply cord is damaged, it must be replaced by the
manufacturer or its service agent or a similarly qualified
person in order to avoid a hazard.
During installation, the power supply must not be
ot so marked,
check the manufacturer's
excessively or dangerously bent or flattened.
Do not tamper with controls.
The appliance is to be connected to the water mains using
new hose sets and that old hose-sets should not be reused.
The maximum number of place settings to be washed
is 12.
The maximum permissible inlet water pressure is 1MPa.
The minimum permissible inlet water pressure is 0.04MPa.

Dispose of the dishwasher packaging material
correctly.
All packaging materials can be recycled.
Plastic parts are marked with the standard
international abbreviations:
PE for polyethylene, e.g. sheet wrapping material
PS for polystyrene, e.g. padding material
POM polyoxymethylene, e.g. plastic clips
PP polypropylene, e.g. Salt filler
ABS Acrylonitrile Butadiene Styrene, e.g. Control
Panel .
Packaging material could be dangerous for children!
For disposing of package and the appliance please
go to a recycling centre. Therefore cut off the power
supply cable and make the door closing device
unusable.
Cardboard packaging is manufactured from recycled
paper and should be disposed in the waste paper
collection for recycling.
By ensuring this product is disposed of correctly, you
will help prevent potential negative consequences
for the environment and human health, which could
otherwise be caused by inappropriate waste handling
of this product.
For more detailed information about recycling of this
product, please contact your local city office and your
household waste disposal service.
DISPOSAL: Do not dispose this product as unsorted
municipal waste. Collection of such waste separately
for special treatment is necessary.

For detailed oper ating method read the correspo nding conten t on the ins t ruction manu a l.
Switch on the appliance Open the door,press the On/Off button to switch on the appliance .
With each wash cycle.
Fill the detergent dispenser
Compartment
For programmes with pre-wash only.
(Follow the user instructions!)
Check the rinse aid level
Check the regeneration
salt level
Load the baskets
Select a programme
Changing the programme
Electric indicator on control panel (if provided).
(On models with water softener system only.)
Electric indicator on control panel (if provided).
If there is no salt warning light in the control panel
(for some models), you can estimate when to fill the salt into
the softener by the number of cycles the dishwasher has run.
Scrape off any large amount of leftover food. Soften remnants of burnt food in pans,
then load the baskets. Refer to the dishwasher loading instructions.
Press the Programme Button until the selected programme lights up.
( See the section entitled Operation instruction )“ ”
T urn on the water tap ,close the door . The machine will start working after about 10 seconds.Running the dishwasher
1. A running cycle can only be modified if it has been running for a short time. Otherwise the detergent
may have already been released and the water already drained. If this is the case, the detergent
dispenser must be refilled.
2. Press the for more than 3 seconds to cancel the running programme.
3. Select a new programme.
4. Restart the dishwasher.
Programme Button
Add forgotten dishes in the
dishwasher.
If the appliance is switched
off during a wash cycle.
Switch off the appliance
Turn off the water tap,
unload the baskets
1.Open the door a little to stop the dishwasher.
2.After the spray arms stop working, you can open the door completely.
3.Add the forgotten dishes.
4.Close the door, the dishwasher will start running again after 10 seconds.
If the appliance is switched off during a wash cycle, when switched
on again, please re-select the washing cycle and operate the dishwasher
according to the original Power-on state ).
When the working cycle has finished, the buzzer of the
dishwasher will sound 8 times, then stop.
Turn off the appliance using the On/Off Button.
Warning: wait a few minutes (about 15 minutes) before unloading the dishwasher to avoid handling
the dishes and utensils while they are still hot and more susceptible to break.
They will also dry better.Unload the appliance, starting from the lower basket.
Op en t he doo r car e fully.
Ho t stea m m a y esca pe
wh en t he door is ope ned !
2

To get the best perfo rman c e from you r d ishwa sher, rea d al l opera ting in structions
be fore u sing it for the first t ime.
1.Pro gra m ind i cat ors : to show which prog ram
you have chose;
2. Pro gram Button : To Press the butt on to sele ct a
wa sh Progr am.
3.Del ay indic ators: to show the dela y tim e
(3 h/6h /9h )
4.Del ay Butto n : To Pr ess the bu tton to de lay.
5.Hal f load functi ons Butt on: To sel ect Half load
functions . (Wi th this Half load function you can
only use it when you have only abou t or less than
7 plac e set ting dish wave, an d you will see l ess
wa ter and energy consumptio n , ca n onl y be used
wi th Inten sive , Normal , ECO , and 90 min .)
Front view
6.Hal f load indica tor : To show when you selec t the
ha lf load funct ion .
7.On/ Off Button: To turn o n/off the po wer supply.
8.Salt and rins e aid wa rni ng light s: To sho w
when the salt co nta iner or dispe n ser need to be
refilled
Rinse Aid indica tor:
Indicates when the disp enser needs to be refilled.
Add sa lt in dica tor:
Indicates when the disp enser needs to be refilled.
Back View
1
2
6
7
3
4
8
5
10
Upper Basket
1
Inner pipe
2
Lower Bask et
3
Salt Conta ine r
4
Dispe nser
5
Cup Sh elf
6
9
Spray arms
7
Filte r ass embly
8
Inlet pipe conn ect or
9
10
Drain pipe

Befor e usi ng your dishw ashe r fo r the firs t time:
A. Set the water sof tene r
B. Add 1.5Kg dish was her salt and then full fill the salt conta iner with wat er
C. Fil l the rins e ai d dis penser
D. Fil l in detergent
The water softe ner must be se t manual ly, using the water har dnes s dial.
The water softe ner is de signed to rem ove miner als a nd salts from the water, whi ch wo uld have
a detr imen tal or advers e effect on the op erat ion of the applian ce.
The hi gher the cont ent of the se mi nerals and sa lts , the hard er your water is.
The so ften er should be adjus ted acco rdin g to the hardn ess of the water in your area. Your local Water Autho rity
can ad vise you on the har dnes s of the water in yo ur ar ea.
Adjusting Salt Consumption
The di shwa she r is desig ned to allow for ad just ment in the am ount of salt consu med base d on the ha rdness of
the water used. This is inte nded to optim ise and cu sto mise the level o f salt consu mpti on.
Pleas e fol low the steps below for adjustm ent in salt co nsum ption.
1. Ope n the doo r ,Sw itch on th e ap plia nce;
2. Pre ss the Pr ogra m button for more than 5 s econ ds to start the wat er softe ner
set mo del w ithin 60 seco nds afte r the appl iance wa s swi tched on( Th e Salt and
Rinse aid warni nglight s will be on pe r iod ically wh en it get in th e set model );
3. Pre ss the Pr ogra m button to select the proper se t acc ording to you r local en vir onme nt,
the se ts wi ll ch ang e in the following sequ ence : H1->H2 ->H3 ->H4->H 5->H 6;
4. Pre ss the Po wer butto n to end the se t up model.
WATER H ARDNE SS
dH
6- 11
18-22 31-40 22-28 3.1 -4.0
23-3 4 4 .1 -6 .0
35-55 61-98 43-69 6.1 -9.8
fH
0~90~5 0~0. 94
10-20
21- 3012- 17 2.1- 3.0
41- 60
Clar ke
0~6
7-14
15-2 1
29-4 2
mm ol /l
1.0- 2.0
Select or Positi on
H1 R apid)(
H2(90mi n)
H3(9 0m in+ rapid )
H4(E CO)
H5(E CO+ra pid )
H6(ECO+ 90m in )
Sa lt con su mpt ion
(gra m/c yc le)
0
9
12
20
30
60
dH =1.25 Clar ke= 1.78 fH=0.178mmol/l1
dH: Germ an degree
fH: French degree
Clark: British degr ee
The manuf acto ry setting: H (EN 50242)
3
Conta ct yo ur local wate r boa rd for in form ati on on the hardness of yo ur wa ter supply.
If your model does not h ave any water softener, you may skip this section.
WATER SO F TENER
The ha rdne s s of the water var ies f rom plac e to place. If hard water is us ed in the dis hwasher, depo s its will
form on the dishes and utensils.
The ap plia nce is equippe d with a spec ial softener that uses a salt con tainer specific ally designed to el imin ate
lime and mi n erals from th e water.
4

Alway s use the salt in ten ded f or use with dishw asher.
The sa lt contai ner is lo cated ben eat h the lower basket and should be fill e d as e xpl ained
in the following:
Attention!
Only us e sal t sp ecifical ly desi g ned for the use in dishw ashers! Eve ry ot her type of
salt no t specif ica l ly desig ned f or the use in a dishwash er, espec iall y table salt, wil l
da mage the wate r soften er. In case o f dam ages caused by the use of unsuit able
salt th e man ufactu rer do es not gi ve any warranty nor is liab l e for any damages caused.
Only fill wi th salt just before st arting on e of the co mplete washing programs.
Th is wi ll pr event an y gr a ins of salt or salty wa t er, whic h may have been spilled,
re mai n ing on the bot tom of the mac hin e for any period of time, whi ch may cause
corrosion.
A Aft er the lower bas ke t has been remo ved, uns crew and r emov e the cap f rom t he salt conta i ner.
B Place the end o f the f u nnel (supplied) into the ho le and intro duce about 1. 5 kg of dishwa s her s a lt.
Ful l fill the salt conta iner with w ater,It is normal for a sm all amount of wat er to com e out o f th e
C
salt container.
D After fillin g th e co n tainer , scr ew th e cap t ightly b ack clock wi s e.
E The salt warni n g li g ht will stop being af ter the sal t container has bee n filled with salt .
F I m mediate l y af ter filling the salt in to th e sa lt contai ner, a washin g program sho u ld be sta rted
program Otherwise t h e fi lter s ys tem, pump or other important pa rts o f the m a chi n e ma y be dama ged
by salty water. This is out of warranty.
).
1. Th e sal t co ntai ner mu st only be refill ed wh en th e salt warning lig ht in the control p anel co mes on .
Depen din g on how wel l the salt dis solv es, the salt warni ng light may stil l be on eve n though the
salt containe r is filled.
If there is no salt warnin g light in the cont rol pane l (fo r some Models ),you can estimate wh en to fill
the sa lt into the softene r by the cycle s tha t th e dishwasher has run.
2. If there are spills of the salt, a soak or a r apid program shou ld be run to remove the excessi ve sa l t.
(We suggest to use a s hor t
5

Rinse Aid Dispenser
The rinse aid is release d dur ing the final rins e to prevent water from for ming drop lets on your dishe s, which can
leave spots an d stre aks . It also impr oves dry i ng by all owing water to rol l off th e dishes. Your dishwasher is
de sig ned to use liq uid rinse aids. The ri nse aid di spenser is locat e d in side the door n ext to th e detergent dispe nser.
To fil l the dispens er, op en the ca p and pour the rinse aid into the disp enser unt il the level indic ator tur ns co mpletely
black. Th e volume of th e rinse ai d contai ner is abo ut 110ml .
Function of Rinse Aid
Rinse aid is automa tica lly added during the la st rinse, ens uri ng th orough ri nsing, and spot and streak free drying.
Attention!
Only use br and ed rin se aid fo r dishwasher. N e ver fill the rins e aid disp enser wit h any oth er su bstance s
(e.g. Dishwas her cleaning agen t, li quid det ergent) . Th is wo uld damage th e applian ce.
When to Refill the Rinse Aid Dispenser
If there is no ri nse -aid warn ing light in the cont rol panel, you c an es tim ate the amoun t fro m the col our
of the opti cal leve l ind ica tor C loc ated nex t to the cap. When th e rin se-a id conta iner is full, the whole
" "
indic ator will be dark .As the rinse- aid dimi nis hes, the size of the dark dot decr ease s. You should ne ver let
the rinse aid level fall 1 / 4 full.
As the rinse aid diminis hes, the size of th e bla ck dot
on the rinse aid level indica tor chan ges, as il lustrated below.
Full
3 / 4 full
1 / 2 full
1 / 4 full - Sho uld refi ll to elimina te spott ing
Empty
To ope n the disp ens er, turn th e cap to the "open" (le ft) arro w and l ift it out .
1
Pour the rinse ai d in to the di spens er, bein g care ful n o t to o verfill .
2
Replac e the cap by i n sert ing i t aligne d with "open " arro w and tur nin g it to the clos ed (r ight) arrow.
3
Clean up an y rin se aid spille d whi le durin g fil ling wit h an absor ben t clo th to avoi d excess ive foaming
durin g the next wash. Do n't forg et to repl ace the cap before you close dis hwas her door.
Adjusting Rinse Aid Dispenser
The rinse aid dispen se r has s ix or four set ting s. Alwa ys st art with the dispe nser
set on " 4". If spots and poor dryin g are a prob lem, inc reas e the amount o f rin se
ai d dispen sed by removing th e dis penser lid an d rotat i ng the di a l to "5". I f the
di sh es sti ll are not dry ing prope rly or are sho w spots, adju st th e dial to the next
hi ghe r lev er un til your dishes ar e sp ot-f ree. The recommende d setting is "4 ".
(Fact ory value is "4 ".)
Incre ase the dose if there are dr ops of wat er or lime spo ts on the d ishes aft er washing.
Reduc e it if the re ar e st ick y whi tish sta i ns on your dis hes or a bl uish film on glasswar e or
knife blades.
6

Deter gents with it s che mic al in gred ien ts ar e ne cessa ry to rem ove dirt, cru sh dirt an d tra nsp ort it out of the dishwa she r.
Most o f the com merc ial quality deter gent s ar e suitabl e fo r this pur pose.
Attention!
Prope r Use of Detergent
Use on ly de tergent spec ifi cally mad e for the u se in dis hwas hers. Ke ep yo ur detergent fresh and dry.
Don't put powde red dete rgen t into th e dis pens er until you're ready to wa sh di she s.
Detergents
There are 3 sorts of detergen ts
1.With phosphate an d wit h chl orine
2.With phospha te an d wit hou t chlorine
3.Without phos phat e and with out chlo rine
Norma lly new pulverised det ergent is without pho sphate. Thus the water sof tener fu nction of
phosp hate is not given. In this case we rec omme nd to fill salt in the salt conta iner even when
the ha rdne ss of water is only 6 dH. If deter gents wi thou t phosphate are us ed in the case of hard water
often white spots appea r on dishes and gla sses . In this case plea se add mo re detergent to reach
bette r results. Detergents without chl orin e do only blea ch a littl e. Stron g and colo ured spo ts wi ll no t
be rem oved completely. I n this cas e please choo se a program with a high er te mpe ratu re.
°
Concentrated Detergent
Based on their chem ical comp osition , deterg ents can be split in two basi c types:
conve ntio nal, alkalin e deterg ents with caustic components
low alkali ne co nce ntra ted dete rgen ts wi th natural en zymes
Detergent Tablets
Deter gent tab lets of di fferen t bra nds disso lve at di fferent speeds. For this reas on so me
deter gent tablets cannot dissolve and de vel op their full cleaning powe r during shor t
progr ams. Theref ore please us e lon g pro grams when us ing detergen t tab let s, to
ensur e the complet e removal of de tergent resi dua ls.
Detergent Dispenser
The di spenser must be re fill ed before the start of each wash cycl e fo llow ing the in str ucti ons
provided in the wash cyc le ta ble . You r dis hwas her uses less deterge nt an d rin se aid than
Conve ntional dish washer. Gener ally, only on e tablesp oon of detergent is nee ded for
a norm al wa sh lo ad. M ore heav ily soiled it ems need more dete rgen t. Always add the
deter gent just bef ore starting the dishwasher, ot herw ise it could get da mp and will no t
disso lve properly.
Amount of Detergent to Use
Deterge nt p owd er
Deterge nt t abl et
7

Fill in Detergent
Fill the de tergent disp enser wi th detergent .
The ma rking ind ica tes the dosing lev els , a s
illus trated on the righ t:
The pl ace of main wash cy cle detergent pla ced .
A
The pl ace of pre-wa sh cy cle dete rgen t pla ced .
B
Pleas e observ e the manu facture rs do sing and stor age
Recom mend ations as stated on th e det ergent packaging .
Close the lid an d press until it locks in pl ace.
If the dish es ar e heavil y soi led, place an addi tional
deter gent dose in the pr e-wash deter gent chamber. This deterg ent will take effect during the pre -wash pha se.
You fi nd infor mation about the amount of dete rgent for the sing le progr amme on the last pa ge.
Pleas e awa re, that acco rding to the level soil ing and the sp ecific hardn ess of water diff erences are poss ible.
Pleas e observ e the manu facture r's reco mmendati ons on the detergent packa ging.
Close the Detergent compartment
1
2
If your dishes are only moderately dirty,
you may be able to use less detergent
than recommended.
compartment.
Press down the lid (1) until it clicks
shut (2).
If you are using detergent in tablet form,
read the manufacturer
recommendations on the packaging in
order to
determine where the tablets should be
placed inside the dishwasher (e.g. in
cutlery basket, detergent compartment,
etc.).
Make sure that the lid on the detergent
compartment is closed, even if you are
using tablets.
8

Consider buyi ng ut ensi ls which are identifi ed as dish washer- proof.
Use a mild detergen t that is descr ibe d as 'kind to di she s'. If nec ess ary, seek further
information from the de tergent manufac ture rs.
For pa rtic ula r ite ms, sele ct a progr am with as low a tempe rature as pos sib le.
To prevent damage, do not tak e gla ss and cutler y out of the di shwa sher imm edia tel y
after the programm e has ended.
Are not suitable Are of limited suitability
Cutle ry wi th woode n, ho rn ch ina o r
mo the r-of-pe arl handles
Plastic it ems that are not he at resistant
Older cutlery with glue d parts that are no t
tempe rature resis tant
Bonde d cut lery items or dish es
Pewte r or cooper items
Cryst al gl ass
Steel item s sub jec t to rusti ng
Wood en pl atters
Items made from syn thet ic fibre s
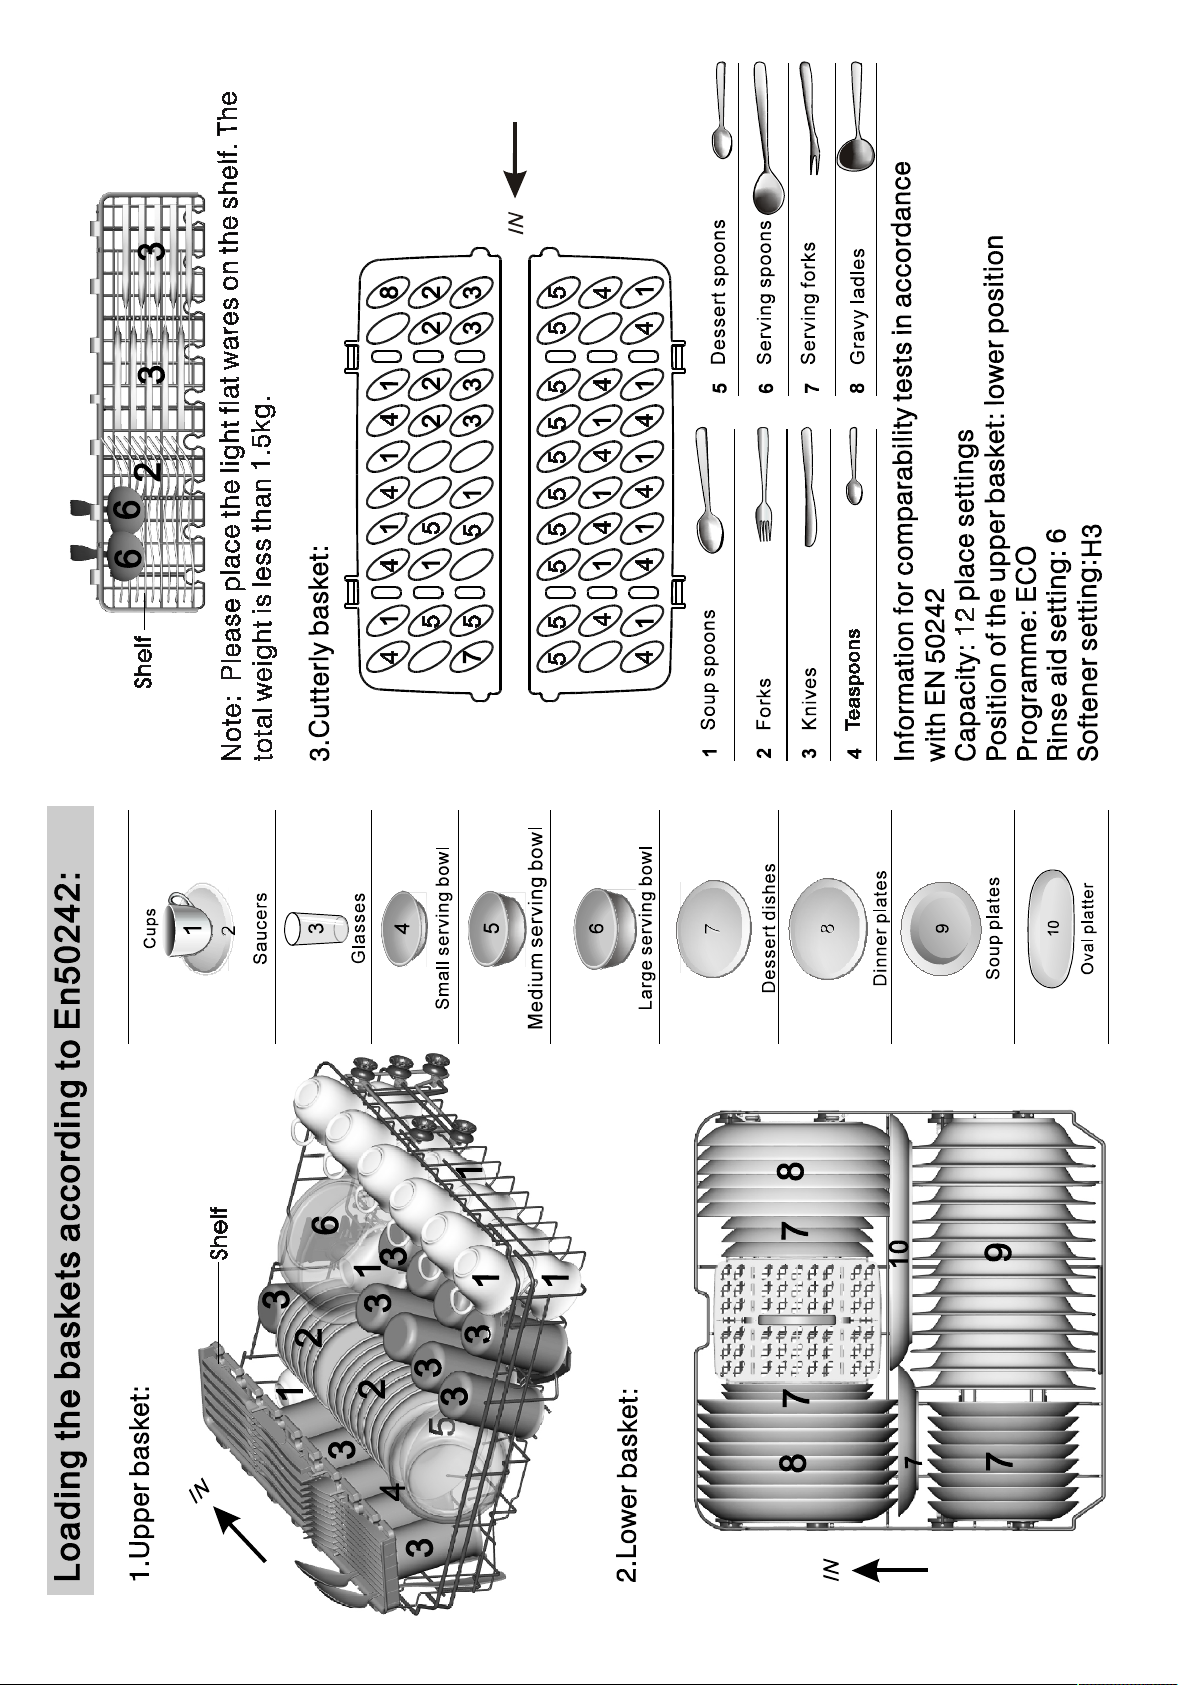
(For best perfo rma nce of the dishwas her, follow th ese loadi ng guide line s.
Features a nd appearance of baskets and cutlery ba sket s ma y var y fro m your mod el. )
Some types of glasses ca n bec ome
dull after a large numbe r of washe s
Silver and alum inu m par ts ha ve a
tende ncy to discol our during washin g
Glaze d pat terns ma y fad e if machine
washe d frequently
Scrap e off any large amount s of leftover food . Soften remn ants of burnt food in pa ns.
It is not ne cess ary to ri nse the di shes under ru nnin g wa ter.
Place obje cts in the dis hwas her in fo llow ing way:
1.Item s suc h as cups, gla sses , po ts/p ans, etc. are face d dow nwards.
2.Curv ed it ems, or ones with recesses , sho uld b e lo aded asla nt so tha t wat er ca n run off.
3.All utens ils are stack ed se curely and ca n not tip o ver.
4.All utens ils are place d in the wa y that the spr ay ar ms can ro tate freely durin g was hing.
Very sm all items sho uld not be wash ed in the dishwasher as the y cou ld ea sil y fal l out of the basket .
Load hollow items such as cup s, gl ass es, pans etc. With the opening fa cin g dow nwards so tha t
water cannot colle ct in the cont aine r or a deep base.
Di she s and item s of cutl ery must not li e inside one anoth er, or cov er each ot her.
To avo id da mag e to glass es, they must not touch.
Load large item s whi ch are mo st di fficult to clean int o the lower bas ket.
The up per baske t is desi gned to hold more delic ate and light er di shware such as gla sses, co ffe e
and tea cups
Long blade d kni ves stor ed in an upright positi on are a poten tial hazard!
Long and/o r sharp items of cu tler y such as carv ing knives mu st be positio ned
horiz ontally in the upp er ba sket.
Pleas e do not ov erload your dishw ash er. T his is imp ortant for go od results an d for
reasonabl e consumptio n of energy.
To pre vent wat er dr ippi ng from the up per basket into th e lower baske t, we recommend th at yo u
em pty the lower basket first and then the upper basket.
9

The up per baske t is desi gned to hold more delic ate
and li ghter dis hwa re su ch as glasses , coffee and
tea cu ps an d sau cer s, as well as pl ates, sm all bowls
and sh allow pans (a s lon g as they are not too dir ty).
Position the dishes and cookwar e so that they will
not ge t mov ed by the spray of water.
Pleas e be remin ded that :
Pots, serv ing bowl s, et c, must alway s be place d to p down.
Deep pots should be s lan ted to all ow water to fl ow out.
The Bottom Basket featu res fold ing spikes so that larg er or more pot s and pans can be loaded .
We sugges t that you place la rge items and the most
diff icul t to clea n ite ms are to be placed into the lower
baske t: such as pot s, pans, lids , ser ving dis hes and
bowls , as shown in the figure below. It is prefer able to
place serv ing dishes an d lid s on the side of the racks
in ord er to avoi d blocki ng the rotation of the t op spray
arm.
Adjusting the Upper Basket
The he ight of th e upper baske t can be ad jus ted in ord er to
create mor e spa ce for la rge utensils both for the upper
/lowe r bas ket. The hei ght of the upp er basket can be
adjus ted by pl acin g the whee ls on differ ent height of the
rails . Lon g items, serv ing cutlery, sala d servers and kniv es
shoul d be placed on the shelf so th at they do not obst ruct
the rotation of the spra y arm s..
Folding back the cup shelives
For better stackin g of pots and pans,
the sp ikes can be folded down as
show in the pict ure righ t.
Folding Spikes of Lower Basket
For better stackin g of pots and pans,
the sp ikes can be folded down as
show in the pict ure righ t.
Cutle ry sh ould be place d in the cu tle ry basket with the hand les at the bottom. If th e rac k has side bas kets, the
spoon s sho uld be lo aded sepa rately i nto the appro pria te sl ots, esp ecia lly long uten sils should be pla ced in th e
horiz ontal po siti on at the front of the up per bask et as show n in the pi ctu re.
Do not let any item extend through the bottom.
Always load sharp utensils with
the sharp point down!
10

( )
Means: need to fill ri nse into the Rinse-Aid Dispenser.
Intensi ve
No rmal
(*EN 502 42)
90 min
Ra pid
For heavi est s oil e d cr ockery,
and norma lly s oil e d po ts
pans d ish es etc with dried
、
、
on so iling .
For normally soile d loads,
such as , plat es,glas ses
pots
and lightly so iled pans.
This is st and ard pr ogram me, it is
suit abl e to clea n normally s oil ed
tab lew a re and it is th e m ost e ffici ent
prog ram me i n term s of its c omb ined
ener gy and wat er c ons umption for
tha t ty pe o f tabl ewa re.
For lightl y soi led load s that
do not need excellent dr ying
efficien cy.
A sho rter was h for ligh tly
soile d loads and quick wash.
Prewash 50
Was h 60
(
(
℃)
Rinse
Rinse
(
℃)
Rinse 70
Dr yin g
Prewash(45 )
Was h (55 )
℃
℃
Rinse
Rinse (65 )
℃
Dr yin g
Prewash
Was h (45 )
Rinse( 65 )
℃
℃
Dr yin g
Was h(65 )
℃
Rinse
Rinse (65 )
℃
Dryin g
Was h (45 )
Rinse
(50 )℃
Rinse (55 )℃℃
℃ )
5/25 g
5/25 g
5/25 g
30g
25g
17 0
180
19 0
90
30
1. 6
1. 3
0. 91
1.35
0. 75
18 .5
15
11
12.5
11
*E N 50242 : Thi s pro gramme is the test cycl e. The information fo r com parability test
in acc ordance with EN 50 242 , as follo ws:
Capac ity: 12 se tting
Position Upper bas ket: upper wh eels on ra ils
Rinse aid setti ng: 6
Pl:0. 49w; Po:0 .45w.
Start ing a cycle wash
Dr aw out th e lower and up per baske t, lo ad th e dishes and push them back .
1
It is comme nded to load the lo wer bask et fi r st, then the upper one (see the section entit led
Loading th e Dishwa sher ).
“ ”
Pour in the deterge nt (s ee th e sec tio n ent itled Sal t, Deter gent and Rins e Aid ).
2
Inser t the plu g into the socket. The powe r supp ly is 220 -240 VAC /50 HZ, th e spe cif icat ion
3
“ ”
of the sock et is 10A 250VAC. Make sure th at the wa ter supp ly is turn ed on to full pressure .
Open the do or, pr ess t he ON/OFF Button , and the ON/OFF lig ht will turn on.
4
Press the progr am Butto n , the wash pr ogr am will be changed as follows direc tion:
5
Intensive->Normal->ECO->9 0 Min ;-> Rapid
If a pr ogram is sele cted, the res ponse light will li ght. Th en cl ose the door, the di shw ashe r
begin s to start.
11

Premise:
A cyc le that is und erwa y can only be modif ied i f it has only been runni ng f or a short time. Ot herw ise, the
1
deter gent may have alre ady b een rele ased, and the appl iance may hav e already dra ined the w ash wate r.
If this is the ca se, the detergent dis penser mu st be ref ille d (s e e the sec tion entitle d " Loadi ng th e
Detergent " ).
Open the do or ,p ress the Pro g ram butt on , the machine wi ll be in standby st ate,
2
then you ca n cha nge the program to the desi red cycle setting (see the sect ion entit led " Starti ng a
wash cycl e . . ." ).
more than 3 seconds
If y ou ope n the door , the m achin e will pau se. The pr ogra m light will
sto p blink i ng and the buzzer will mooing every minute unles s you close the door . After
you close the door , the machine will keep on worki ng after 1 0 seconds.
A forgotten dish can be added any time before the detergent cup opens.
Open the door a little .
1
After the spray arms stop working, you can open the door
2
completely.
Add forgotten dishes.
3
When the wo rking cycle has fi nish ed, the buzzer of the dishw asher wi ll so und for 8 seconds, then stop. Turn off
the ap plia nce usin g the ON/OFF button, sh ut off the wa ter suppl y and ope n the door of the di shwa sher.
Wai t for a few minu tes befo re un load ing the dishw asher to avoi d handling th e dis hes and utens ils while the y
are st ill hot an d more su scep tibl e to b reakage . They will also dry be tter.
during a was h cycle
Close the door
4
The dishwasher will run after 10 seconds.
5
Switch Off the Dishwasher
The pr ogram light is on but is not blinking , onl y in this case the progr amme has ende d.
1.Swit ch off the dishwasher by pr ess ing the ON /OFF but ton.
2.Turn off th e water tap!
Open the door carefully.
Hot dishes are sens itiv e to knocks. The dishe s should ther efor e be allo wed to coo l down around 15 mi nute s
befor e rem oving from th e appliance.
Open the di shw a she r's door, leave it ajar and wa it a few minutes be fore rem ovin g the dish es. In th is wa y the y
will be coo ler and the dr ying will be improved.
Unloading the dishwasher
It is norma l tha t the dis hwas her is wet ins ide.
Empty the lower basket first and then the upper one. Th is will av oid water drippin g fro m the upp er Ba sket ont o
the di shes in the lower one.
It is dangerous to open the door when washing,
because the hot water may scald you.
12

The fi lter prevent s lar ger remnants of fo od or other ob ject s from ge ttin g ins ide the pump.
The residu es may block the fi lte r, in this case they must be remove d.
The fi lter system consi sts of a co arse fil ter,a flat (Ma in filter)
And a microfilter( Fine filter) .
1
2
3
2
1
3
Main filter
Food and so il parti cles trapped in th is fi lter are pulv eriz ed by a
speci al je t on the lower spra y arm and wash ed down to drain.
Coarse filter
Larger items, such as pi eces of bo nes or gl ass, that cou ld bl ock
the dr ain are trapp ed in the coars e filter. To remove the ite ms
caugh t by the filte r, gen tly squeeze the ta p on the top of this
filte r and lift out.
Fine filter
This filte r holds soil and food re sidues in the sump area and
preve nts it from be ing deposite d on the di shes during wash cycle.
Filter assembly
The fi lter efficientl y
For best pe rfor man ce an d results, th e filter m ust be cl eaned regularly. thi s rea son , it is a go od id ea to
remove the larger food parti cle s trapped in th e fi lter afte r eac h wash cy cle by rinsing the semi circular fil ter and
cup un der running water. To remove the fil ter device, pull the cup handle in th e upw ard dire ction.
remov es food parti cles from the wash water, allowi ng it to be recy cle d during the cycle .
For
The di shwa sher must never be used with out the filters.
Impro per repla cem ent of the filter may reduc e the perf ormance leve l of the ap pliance
and da mage dishes and utensi ls.
1
2
St e p 1 Turn the filter in an ti-c lockwis e dir ection,:
Step 2 lift the fi lter ass y up:
When following this procedure from step1 to step 2, the filter system will be removed;
when following it from Step 2 to Step 1, the filter system will be installed.
13

Remarks:
- Insp ect the fi lter s fo r blo cking after every time the dishwash er has been used.
- By un screwing the coarse fi lter, you can re mov e the filter syst em. Remo ve an y food remnant s and
clean the filters under runn ing water.
The entire filter assembly should be cleaned once a week.
Cleaning the Filter
To cle an th e coarse filt er and the fin e fil ter, use a cleaning brush. Reass embl e the fil ter parts as shown in th e figures
on the last page and rein sert the entire as semb ly in the d ish wash er, positioni ng it in its se at an d pre ssing do wnwa rds.
When cleaning the fi l ters, don't knock on them. Otherwise, the filters could be
contorted and the performance of t he dish washer c ould be dec rease d.
The co ntro l panel can be clea ned by using a lightly dampened cloth.
After cleaning, ma ke su re to dry it thorou ghly.
For the exterior, use a go od appliance poli sh wa x.
Never use sharp objects , scouri ng pads or harsh cleaners on any part of the dis hwasher.
Cleaning The Door
To cle an th e edge around the door, you shoul d use only a soft wa r m, damp cloth.
To avo id pe netrati on of water in to the doo r loc k and ele ctri cal componen ts, do not
use a spray clea ner of any kind.
Never use a spra y cleane r to clean the doo r pan el as it may damage the do or lo ck
and el ectr ical com pone nts.
Abras ive agen ts or some pape r tow els sho uld not be used because of the risk of
scrat chin g or leav ing spots on the sta inless steel sur fac e.
Protect Against Freezing
pleas e take frost prote ction me asur es on the d ish wash er in winter. Every fter washing cycle s,
pleas e operat e as follo ws
1.Cut off the el ect rica l pow er to the dishwasher.
2.Turn off th e water su ppl y and disc onnect the water inlet pip e from the wat er valve.
3.Drai n the water from th e inl et pipe an d wa ter valve. (Use a pan to gather the water)
4.Reconnec t th e wat er inlet pipe to the wat er valve.
5.Remove th e fil ter at th e bot tom of the tub and use a sponge to s oak up water in the sum p.
:
If you r dishwasher cannot wo rk becau se of the ice,
please con tac t pro fession al se rvice per son s.
time a
Cleaning the Spray Arms
It is necessary to cl ean the spray arms reg ular ly fo r hard
water chem icals wil l clog th e spray arm jets and bea rings.
To rem ove the upper spray arm, hold th e nut, rotate the arm
clock wise to re mov e it.
To rem ove the lower spra y arm , pu ll ou t the spra y arm upw ard.
Was h the arms in so apy a nd warm water and u se a soft brus h to
clean the jets. Rep lace them after ri nsin g them thoroughly.
14

After Every Wash
After every was h, turn off the wa ter supp ly to the
appli ance and leav e the door slightl y ope n so that
mo ist ure and od our s are not trapped insid e.
Remove the Plug
Befor e cle aning or perf orming maint enance, alwa ys
remove the plug fro m the sock et.
No Solvents or Abrasive Cleaning
To cle an th e exteri or an d rub ber parts of th e dishwa sher,
do not use solve nts or abrasi ve cl eani ng pr oducts.
Only use a cloth with warm soa py wa ter.
To rem ove spot s or stain s fro m the surface of the
interior, use a cloth dam pene d with wat er an a little
vineg ar, or a cleaning pr oduc t mad e specifi cally for
dishw ashe rs.
When not in Use for a LongTime
It is rec omm end that you run a wash cycle with the
dishw asher empty an d then rem ove the plug from the
socket , tu rn off the water su pply and leave the door of
the app liance slightly open. This will he lp th e doo r
seals t o las t lon ger and preve nt odours fro m for min g
withi n the a ppli ance.
Moving the Appliance
If the appl ianc e mus t be moved, try to kee p it in the
ve rti cal position. If absol ute ly necessar y, it can be
posit ione d on its ba ck.
Seals
One of the factors that cause odours to form in the
dishw asher is food that remains trap ped in the seals.
Perio dic clea ning with a damp sp onge will prevent this
from occur ring.
Electrical Shock HazardDisconnect electrical
power beforeinstalling dishwasher.
Failure to do so can result in death or
electrical shock.
The in stallation of the pipes
and el ectr ical equi pmen ts
shoul d be done by professiona ls.
●
Installation preparation
The in stallat ion posit ion of di shwa sher should be nea r the existin g inlet and drain hoses and
power cord.
One side of the cabi net sink should be chos en to faci lit ate the co nnectio n of drain hos es of
the di shwa she r.
Note: please check the accompanying installatio n acc ess orie s(hook for aes thetic panel ,screw)
15

Please carefully read the installation instruction.
Illustrations of cabin et dimension s and installation po siti on of the dish wash er
Prepa rations shou ld be made before moving th e di shwa she r to the in sta llat ion place.
Choos e a place near the sink to fa cili tate the installatio n of in let and drain hoses
1
(see figur e 1) .
2
If dis hwas her is in stal led at th e corner of th e cab ine t, th e re sh ould be some space
(illu strated in fi gure 2) when the door is opened.
【 】Figure1
Cabinet dimensions
Less than 5m m
between the t op
of dishwasher and
cab inet and the
outer door aligne d
to cab inet.
820mm
580mm
90 °
Electrical, drain and
water supply line
entrances
Space between cabinet
bottom and floor
600 mm
90 °
80
100
【 】Figure2
Di shw as he r
Min imum s pa ce when
the door is o p ened
Do or of
dis hw as he r
Minimum space of 50mm
Aesthetic panel's dimensions and installation
●
The aesthetic wooden panel coul d be processed ac cording to the Figure 3.
1
【 】Figure3
The aest hetic p a n el should
be p rocessed in accordance
with the ill ustra ted dime nsion s
Cabinet
(Unit: mm)
16

2 Inst all the hook on the aest heti c wo oden pane l and put the hook into the sl ot of the oute r door of
dishwash er(see figure 4a). After pos itioning of the panel , f ix th e panel onto the ou ter door by
sc rews and bol ts(S ee fi gure 4b) .
【 】Figure4a
Installation of aesthetic panel
【 】Figure4b
Installation of aesthetic
wooden panel
. take away the four
1
short screws
2
. pin up the four lo ng
screw s
17

●
Tension adjustment of the door spring
The door springs are set at the factory to the proper tension for the outer door.
If aesthetic woo den panel are installed, you will have to adjust the door spring tension.
Rotate the adjus ting screw to drive the adjustor to strain or relax the steel cable
(see figure 5).
Door spring tension is correct when
th e door remains horizontal in the
fu lly open ed position yet rises
to a close with the slight lift of a
finger.
,
【 】Figure5
Tension adjustment
of the door spring
●
Connection of drain hoses
Inser t the drain hose in to a drain pipe wit h a mi nimu m diameter of 40mm , or let it run into the sink, making sure to
avoid bending or crimpi ng it . Th e to p of the hose mu st be less than 100 0mm.
Front
Counter
NOTE
The top of the hose
must be less than
A
1000mm.
Drain pipe
B
18
φ 4 0mm

●
Dishwasher installation steps
1
In stall the furniture door to the outer do or of the dishwasher using the brackets pro vided . R efer
to the temp late for p ositioning of the brackets.
2
Adjust the tension of the doo r s prings b y using an Allen ke y turnin g in a clockw ise motion to
tighten the lef t a nd right do or springs. Failure to do thi s could ca use damage to your dis hwash er
(Illustrati on 2)
3 .
Co nnect the inlet hose to the co ld water suppl y
4 .
Co nnect the drai n h ose. Refer to diagram (Fi gure 6)
5 .
Co nnect the powe r c ord
6
Affix the condensation strip under the w ork surf ace of cabinet. Pl ease ensure the condensa tion
strip is flush with edg e of work sur face.
7
Place the dishwas her into position.(Illustration 4)
8
Level the dishwasher. The rear foo d can be adjusted fro m t he front of the dishwasher by turni ng
the Allen scr ew in the middle of the base of dishwasher us e a n Allen key (Illustration 5 A). To adjus t
the front feet, use a flat scr ew driver and t urn the front feet until the dishwasher is level (Illust ration 5B).
9 The dis hwash er must be se cured in place. There are two ways to do this:
A. N ormal work surface: Put the installa tion hoo k into the slot of the side pla ne and secu re it to the
wo rk surface with the wood screws (Illustrati on 6).
B. M arble or granite work top:Fix the side with Screw. (Illust ration 7).
.
【Figure 7
19
】

Dishwasher must be level for proper dish rack operation and wash performance.
Place a spirit level on door and rack track inside the tub as shown to check that the
1
dishwasher is level.
level the dishwasher by adjusting the three levelling legs individually.
2
When level the dishwasher, please pay attention not to let the dishwasher tip over.
3
【 】Figure 8
Ill ustration of feet adjustment
NOTE:
The maximum adjustment
height of the feet is 50 mm.
For personal safety:
Do not use an extension cord or an adapter plug
with this appliance.
Do not, under any circumstances, cut or remove the
earthing
Connection from the power cord.
Ch eck lev el Fr on t t o Bac k
Sp iri t l eve l
Che ck lev el si de to sid e
Pleas e look at the rat ing label to know th e rating vo ltag e and conn ect the dishw ashe r to the app ropr iate powe r sup ply.
Use th e req uired fuse 10 am p, ti me de lay fuse or circuit breaker re comm end ed and prov ide separ ate circu it serving
only this appli ance .
Ensure the volta ge and fr eque ncy of the power being corr espo nds to
those on the rati ng plate. Onl y inse rt the plug into an electrical socke t which is ear thed
prope r ly. If the elect rical socke t to wh ich th e app lian ce mu st be conne cted is not
appro priat e for the plug , r epla ce th e sock et, rathe r than usin g a ad a ptors or the like as
they co uld cause overhea ting and burns.
The ap plia nce must be connec ted to the wat er ma ins u sin g new hose -se ts.
The ol d hos e-se ts shoul d not be re use d.
Wat er pr essu re must be bet ween 0,0 4 MPa and 1 MPa. If th e pressure is belo w the
minim um co nsult ou r Ser vice Dep artm ent for ad vic e.
Pull The safety supply hoses completely out from storage compartment located at rear of dishwasher.
1
Tighter the screws of the safety supply hose to the faucet with thread 3/4inch.
2
Turn water fully on before starting the dishwasher.
3
20

The sa fety supply hose consi sts of th e dou ble wall s. The hose's system guara ntees it s intervention by bloc king the
flow of water in case of the su pply hose brea kin g and when the a ir space betw een the suppl y hos e itself and the ou ter
corru gated hose is full of wa ter.
A hos e that attaches to a sin k spray can bu rst if it is instal led on the same water line as the dishwasher. If your sin k
has on e, it is re commended th at the hose be disconne cte d and the hole plug ged.
Turn off the water.
1
Release the water pressure by depressing the pressure release button. This relieves water pressure and protects you, and the
2
room, from severe splashing.
Unscrew the safety supply hose from the faucet.
3
Conne ct the co ld water supp ly ho se to a th read e d 3/4 (inch) conn ector an d mak e sure that it is fa stened tightl y in plac e.
If the water pip es a re new or have not been used for an exte nded per iod of ti me, let the wa ter r un to make sure that the
water is cl ear and free of im puri ties. If this precaution is not take n, th ere is a risk that the water inlet ca n g et block ed
and da mage the a ppli anc e.
Positioning the Appliance
Posit ion the appli ance in th e de sire d loc ati on. The back shou ld rest again st the wa ll be h ind it, and the sid es,
along the adjac ent cabinets or walls . Th e dis hwa sher is equipped with wate r supply and drain hoses tha t can
be pos itioned e ith er to the right or the le ft sides to fa cilitate proper installation.
How to Drain Excess Water From Hoses
If the sink is 10 00 hi gher fro m the floo r, th e exc ess water in hoses cann ot be dra ined dire ctly
into the si nk. It wi ll be nece ssar y to drai n exc ess wate r fro m hos es in to a bowl or suitab le
conta iner that is held outsi de and lo wer than the sink.
Water Outlet
Conne ct th e water drain hose. The drain hose must be correc tly fitte d to avoi d wat er leaks.
Ensur e tha t the wat er in let hose is not kin ked or squashed.
Extension Hose
If you need a drai n hos e exte nsio n, make su re to use a simi lar dr ain hose.
It must be no long er th an 4 me tres ; oth erwi se th e cle anin g eff ect of the dish wash er co uld be reduced.
Syphon Connection
Inser t the drain hose in to a drain pipe wit h a mi nimu m diameter of 40mm , or let it run into the sink, making sure to
avoid bending or crimpi ng it . Th e to p of the hose mu st be less than 100 0mm.
The following things should be checked before starting the dishwasher.
1 The dishwasher is level and fixed properly
2 The inlet valve is open
3 Inlet
hose connec t ions a re fully ti g hte ned and not leakin g
4 The wires are tightly connected
5 The power is switched on
6 The inlet and drain hoses are kn otted
7 All packing materials and printings should be taken out from the dishwasher
After installation, please make sure to keep this manual.
The content of this manual is very helpful to the users.
21

Fuse blown, or the
circuit breaker acted
Replace fuse or reset circuit breaker. Remove any other
appliances sharing the same circuit with the dishwasher
Power supply is not
turned on
Water pressure is low
Door of dishwasher
not properly closed.
Kink in drain hose
Filter clogged
Kitchen sink clogged
Improper detergent
Spilled rinse-aid
Make sure the dishwasher is turned on and the door is
closed securely.
Make sure the power cord is properly plugged into the
wall socket.
Check that the water supply is connected properly and
the water is turned on.
Make sure to close the door properly and latch it.
Check drain hose.
Check coarse filter
the
(see section titled )
Check the kitchen sink to make sure it is draining well.
If the problem is the kitchen sink not draining ,you may
need a plumber rather than a serviceman for dishwashers.
" Cleaning The Filter "
Use only the special dishwasher detergent to avoid suds.
If this occurs, open the dishwasher and let suds evaporate.
Add 1 gallon of cold water to the tub. Close and latch the
dishwasher, then select any cycle. Dishwasher will drain
out the water at the first step.Open the door after draining
is stop and check if the suds is disappeared.
Repeat if necessary.
Always wipe up rinse-aid spills immediately.
Detergent with
colourant was used
Hard water minerals
The affected items are
not corrosion resistant.
A programme was not
run after dishwasher
salt was added.
Traces of salt have
gotten into the wash cycle.
The lid of the softer
is loose
A sp ay arm is
r
knocking against
an item in a basket
Items of crockery
are loose in the
wash cabinet
This may be caused
by on-site installation
or the cross-section of
the piping.
Make sure that the detergent is the one without
colourant.
To clean the interior, use a damp sponge with
dishwasher detergent and wear rubber gloves.
Never use any other cleaner than dishwasher
detergent for the risk of foaming or suds.
Always run the quick wash programme .
without any crockery in the dishwasher and
without selecting the Turbo function (if present),
after adding dishwasher salt.
Check the lip .Ensure the fix is fine.
Interrupt the programme, and rearrange the items
which are obstructing the sp ay arm.r
Interrupt the programme,
and rearrange the items of crockery.
This has no influence on the dishwasher function.
if in doubt, contact a suitably qualified plumber.
22

The dishes were not
loaded correctly.
See notes in " Loading the Dishwasher Baskets ".
The programme was
not powerful enough.
Not enough detergent
was dispensed.
Items are blocking
the path of sp ay arms.r
The filter combination
in the base of wash
cabinet is not clean or
is not correctly fitted.
This may cause
the sp ay arm jets
r
to get blocked.
Combination of soft
water and too much
detergent.
Aluminum utensils
have rubbed against
dishes.
Dishes block
detergent cups.
Improper loading
Too little rinse-aid
Select a more intensive programme.
See" Wash Cycle Table ."
Use more detergent, or change your detergent.
Rearrange the items so that the sp ay can rotate freely.r
Clean and/or fit the filter combination correctly.
Clean the sp ay arm jets. See "Cleaning the Spray
Arms".
Use less detergent if you have soft water and select
a shortest cycle to wash the glassware and to get
them clean.
Use a mild abrasive cleaner to eliminate those marks.
Re-loading the dishes properly.
Load the dishwasher as suggested in the directions.
Increase the amount of rinse-aid/refill the rinse-aid
dispenser.
r
Dishes are removed
too soon
Wrong program
has been selected
Use of cutlery with
a low-quality coating
Do not empty your dishwasher immediately after
washing. Open the door slightly so that the steam can
escape. Begin unloading the dishwasher only once t
he dishes are barely warm to the touch. Empty the low
basket first. This prevents water form dropping off
dishes in the upper basket.
In short program the washing temperature is lower.
This also lowers cleaning performance. Choose
a program with a long washing time.
Water drainage is more difficult with these items.
Cutlery or dishes of this type are not suitable for
washing in the dishwasher.
When some malfunctions come on, the appliance will display error codes to warn you:
The Rapid light flicker fle etly
Th e 90 m in light a ndRa pid ligh t fli cker flee tly
Th e ECO light fl icker fle etl y
Longer inlet time.
Not reaching required temperature.
Overflow.
Faucets is not opened, or water intake is
restricted,or water pressure is too low.
Malfunction of heating element.
Some element of dishwasher leaks .
If overflow occurs, turn off the main water supply before calling a service.
If there is water in the base pan because of an overfill or small leak,
the water should be removed before restarting the dishwasher.
23

Height : 815mm
Width : 598 mm
wi th the doo r closed
Depth : 550mm
( )
Water pressure: 0.04-1.0MPa
Power supply: see rating label
Capacity: 12 place settings
24

Technical Data Sheet
Sheet of ho usehold dish washer accor ding to EU Dir ecti ve 10 59/2010 :
Ma nuf actu rer
Type / Descr iption
Stand ard place settings
Energ y efficienc y cla ss
Annua l ene rgy consumpt ion
Energ y con sum ptio n of the st and ard clean ing cycl e
Power consumption of off-m ode
Power consumption of le ft-on mo de
Annua l water co nsu mption
Dryin g efficienc y cla ss
Stand ard clean ing cycl e
Progr am duration of the stan dard cle aning cy cle
Noise leve l
Mo unt ing
Could be bu ild-in
TEKA
DWM 85 9 FI
12
A++
258 kW h
0.91 kWh
0.45 W
0.49 W
3080 litre
A
EC O 45℃
190 mi n
49dB( A) re 1 pW
Build -in
Yes
Heigh t
Width
Depth (wit h connectors )
Power consumption
Rated volt age / f requ ency
Wat er pr essu re (flow pres sure ) 0.4-1 0 bar = 0.04-1 M pa
NOTE:
A + + + (hig hest effici ency) to D (lowest eff iciency )
Energ y con sum ptio n 2 58 kWh per year, based on 280 standard clean ing cycles us ing cold wate r fill and
the co nsum ption of the low po wer mode s. Actual en ergy consump tio n wil l dep end on how the a pplianc e is used.
Wat er co nsumpti on 3080 litre pe r yea r, based on 280 stan dard clea nin g cyc les . Actu al wa ter consumpt ion
will depen d on how the applia nce is used.
A (hi ghest effic ienc y) to G (l owes t efficienc y)
This progr am is suitabl e for cleanin g soi led norm ally soiled table ware and that i t is the
mo st effi cient progra mme in terms of its comb ined ene rgy and wa ter cons umpt ion for
that type of tab leware.
The de vice meets the Eur opea n standards and the di rect ives in the cu rren t version at deliv ery:
- LVD 2014/ 35/E U
- EMC2 014/30/ EU
- ErP 2009 /125 /EC
“ ”
“ ”
81.5 cm
59.8 cm
55 cm
1760-2100 W
AC 220 -240 V/ 50 Hz
The ab ove values have been measured in acc orda nce with stan dards un der specifie d ope rating condi tions.
Resul ts may va ry greatly acc ording to quantity an d pol luti on of the dishes, water har dnes s,
am oun t of detergen t, etc.
The ma nual is ba sed on the Eur opea n Union' s standards and ru les.

 Loading...