

Page 1
Contents
1
1. Description of the controls ________________________________ 2
2. Operating instructions ____________________________________ 9
3. Cleaning and maintenance _______________________________ 20
4. Troubleshooting _______________________________________ 25
Thank you for choosing one of our products.
You are advised to read this manual carefully; it contains all the
information you need use your dishwasher safely, correctly and in the
most satisfactory manner.
Following the cleaning instructions provided here will keep your
dishwasher's performance at peak levels in the long term.
USER INSTRUCTIONS: these consist of recommendations for using the
appliance, a description of its controls and of the correct cleaning and
maintenance procedures.
Page 2
User instructions
2
1. Description of the controls
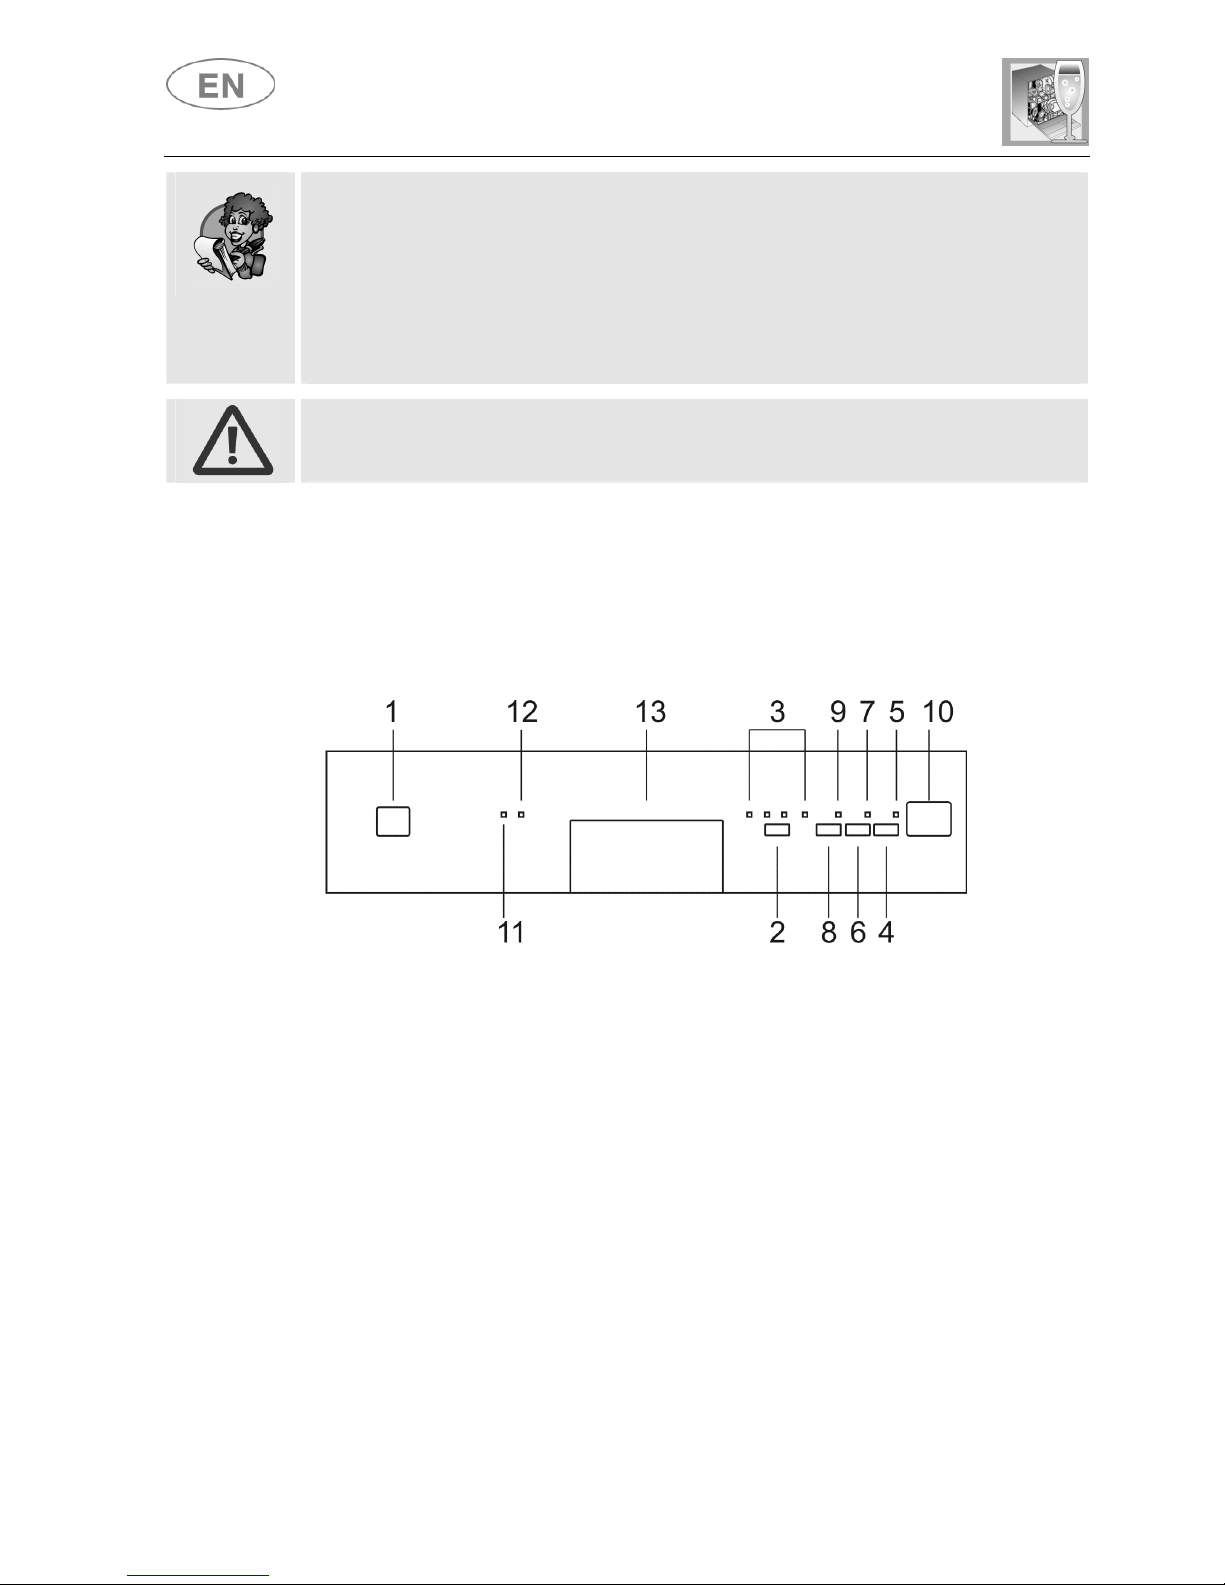
1.1 Front panel
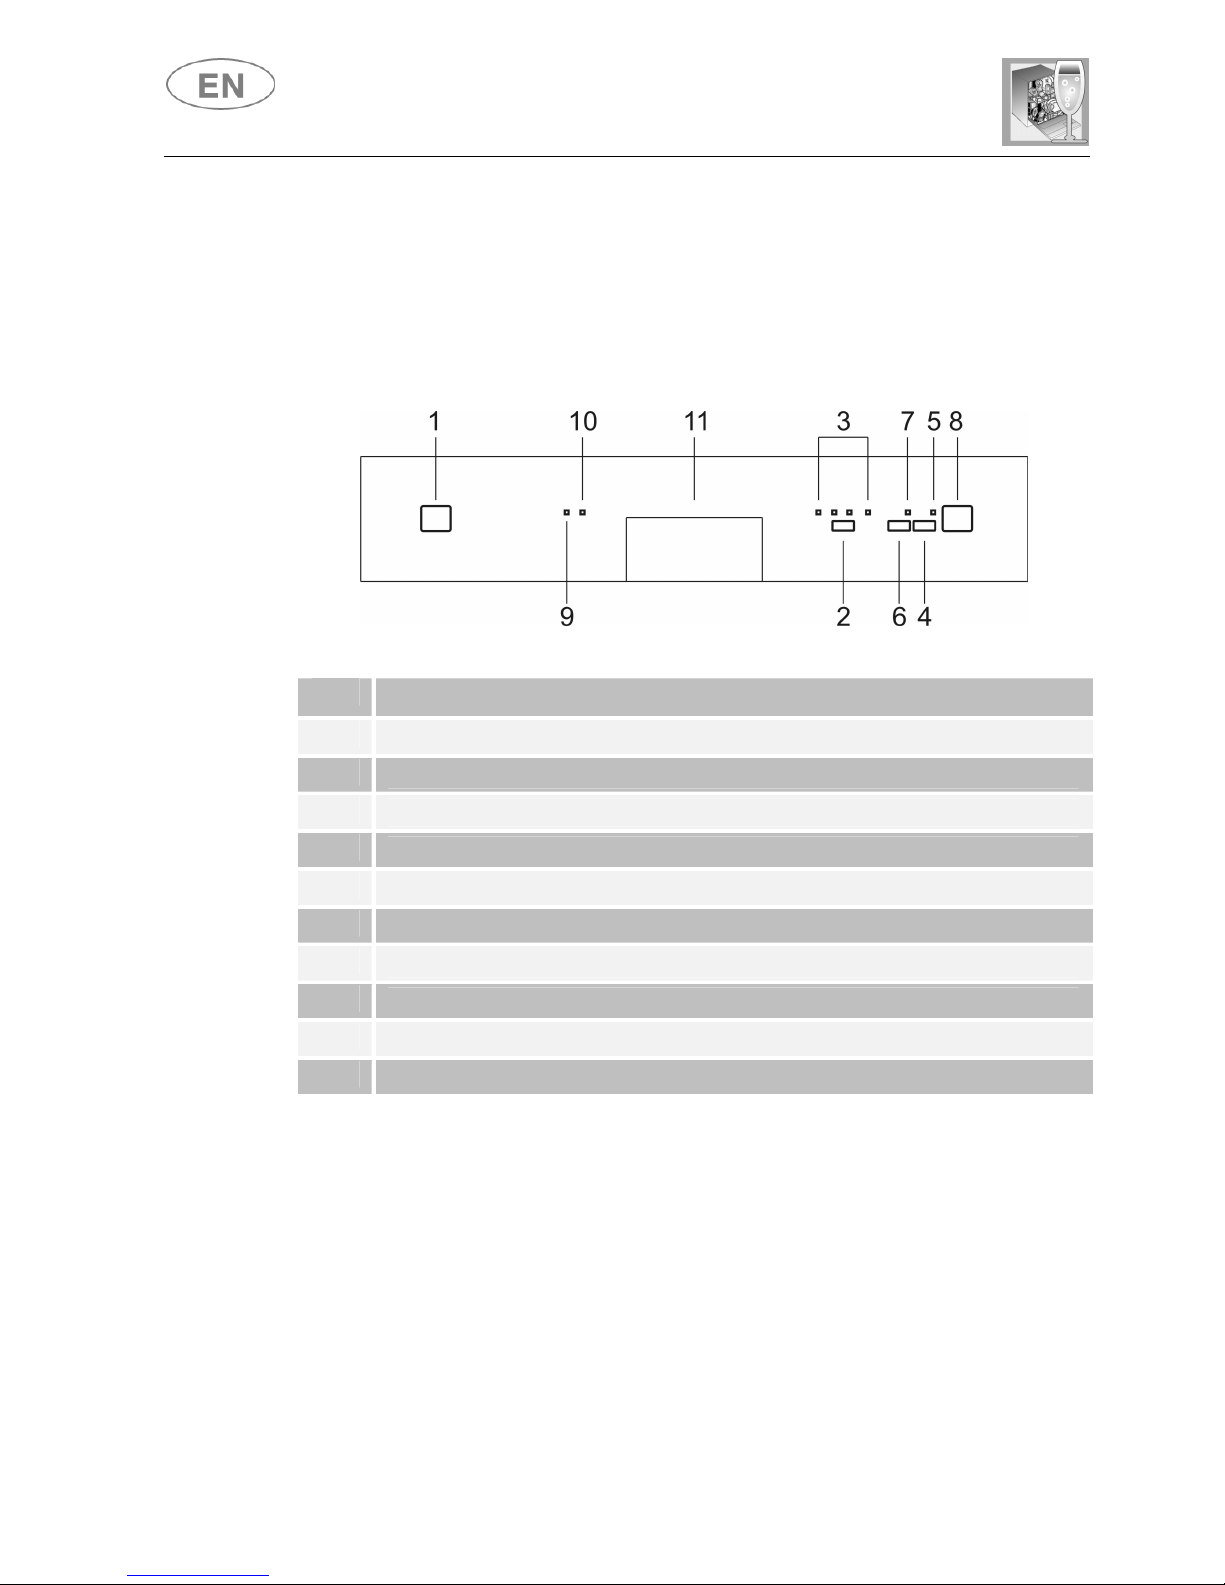
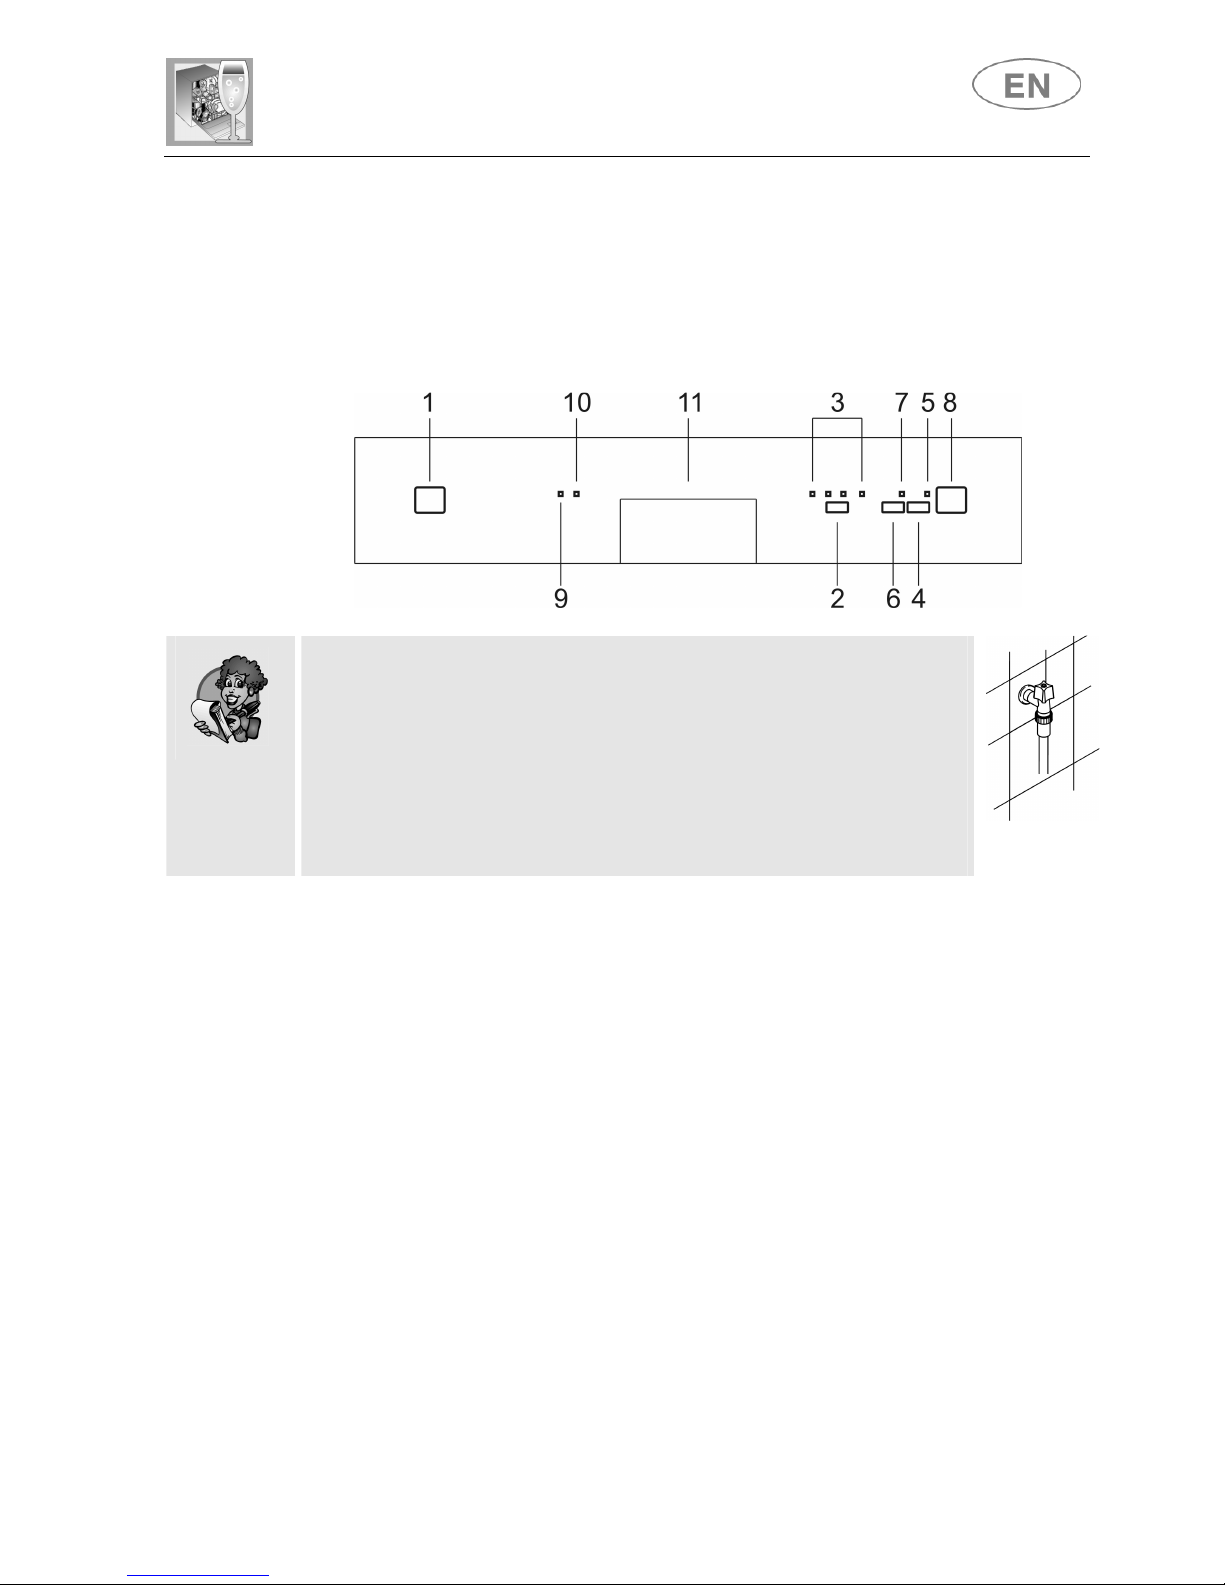
All the dishwasher control are grouped on the front panel. Programming
and option selection are only possible with the door closed.
1
ON/OFF BUTTON
2
SELECTION PROGRAM BUTTON
3
PROGRAM INDICATOR LIGHTS
4
START/PAUSE BUTTON
5
PROGRAM STARTED/STOP INDICATOR LIGHT (*)
6
PROGRAM DELAY BUTTON
7
PROGRAM DELAY LIGHT
8
3-FIGURE DISPLAY (remaining time, program delay, alarms…)
9
SALT WARNING LIGHT
10
RINSE AID WARNING LIGHT
11
DOOR HANDLE
(*) flashes while the program is in progress, stops flashing and remains on
at the end of the program, or if the program is interrupted (intentionally
or due to a malfunction).
Page 3
User instructions
3
SETTING THE
WASHING PROGRAM
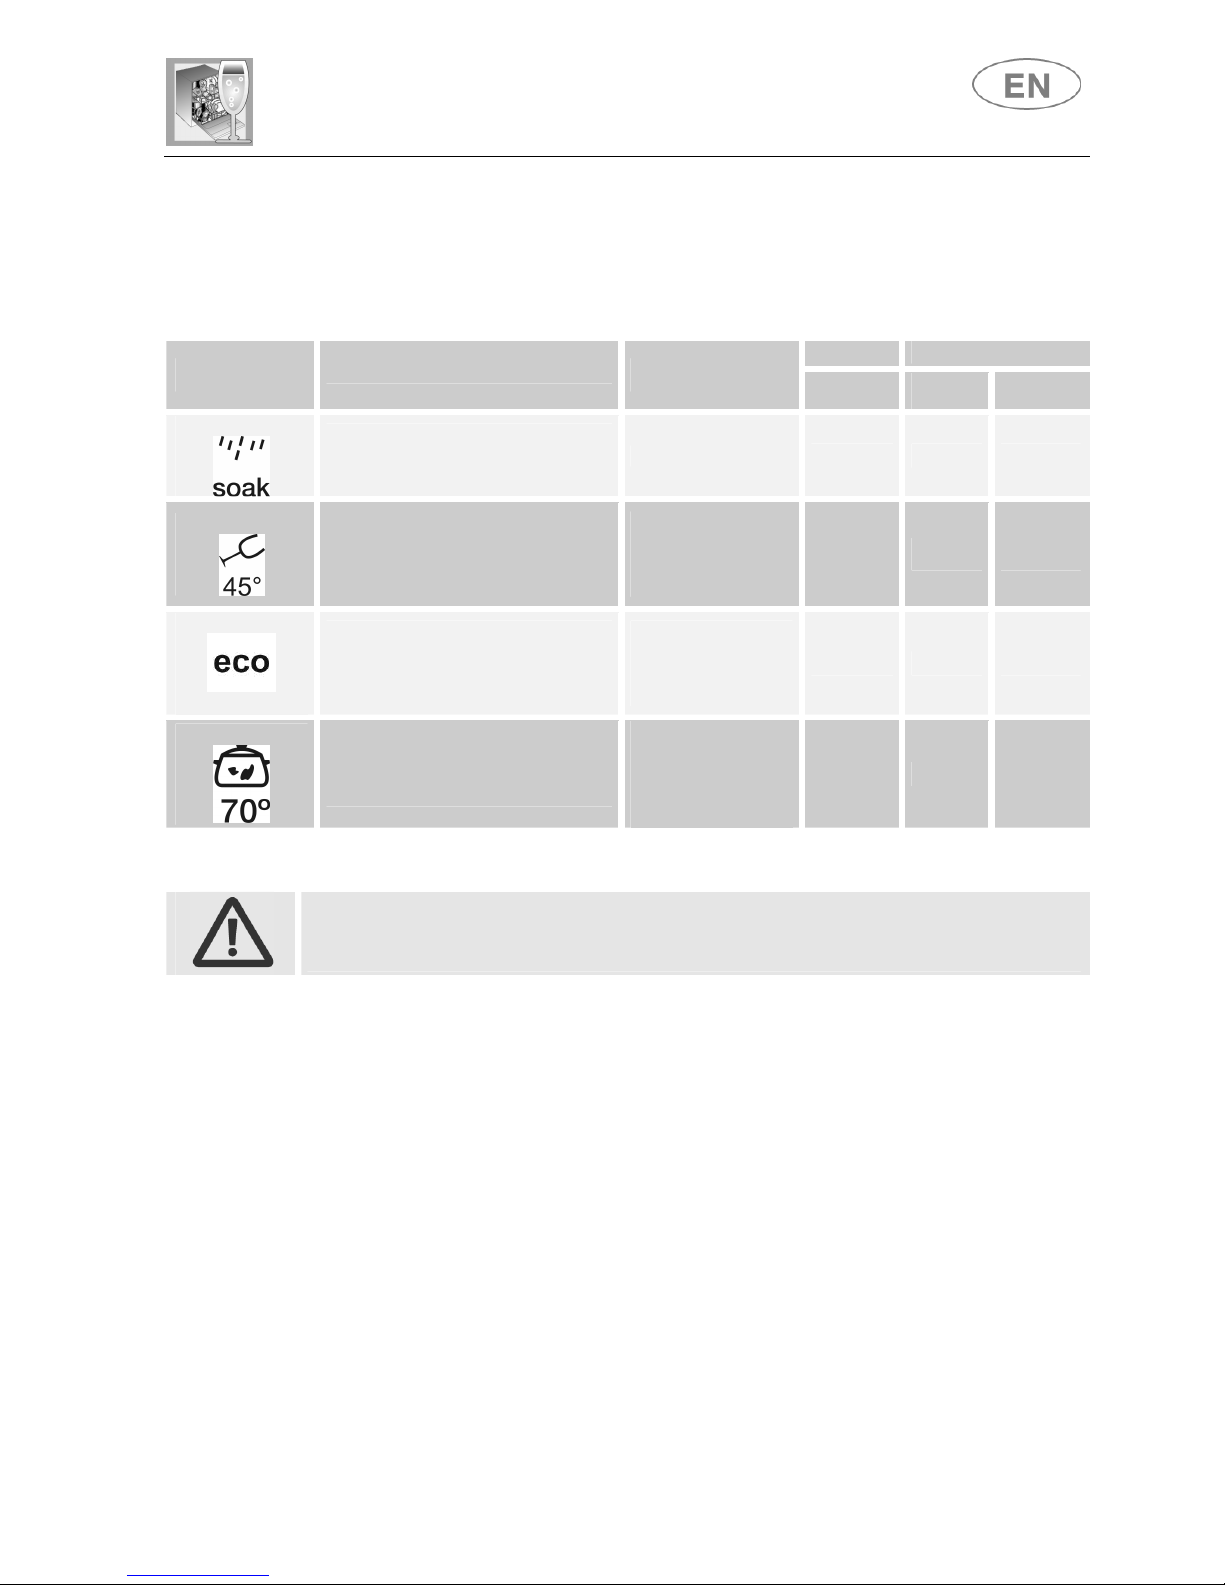
To select the most suitable program for the dishes to be washed refer to
the table below, which indicates the most appropriate program according
to dish type and degree of soiling.
PROGRAM
SELECTION
TYPE AND GRADE DIRT
PROGRESS
PROGRAM
DURATION
CONSUMPTION
MINUTES
(1)
WATER
LITRES
POWER
KWh (1)
1 SOAK
PANS AND DISHES
AWAITING COMPLETION
OF THE LOAD
Cold prewash
9 5 0,02
2 GLASS
DELICATE DISHES
WITH NORMAL DIRT
Wash at 45°C
Cold rinse
Rinse at 70°C
Dry
59
12 0,90
3 ECO (*)
EN 50242
DISHES
WITH NORMAL DIRT,
WASHED IMMEDIATELY AFTER
USE
Cold prewash
Wash at 45°C
Rinse at 65°C
Dry
** ** **
4 SUPER
VERY DIRTY PANS
AND DISHES, EVEN
WITH DRIED-ON RESIDUES
Prewash at 45°C
Wash at 70°C
Cold rinse (2)
Rinse at 70°C
Dry
105 20 1,50
IMPORTANT: see “NOTES AND REFERENCES” table on the following pages.
The washing cycle will not take place if the dishwasher door is left open
or not properly closed.
Page 4
User instructions
4
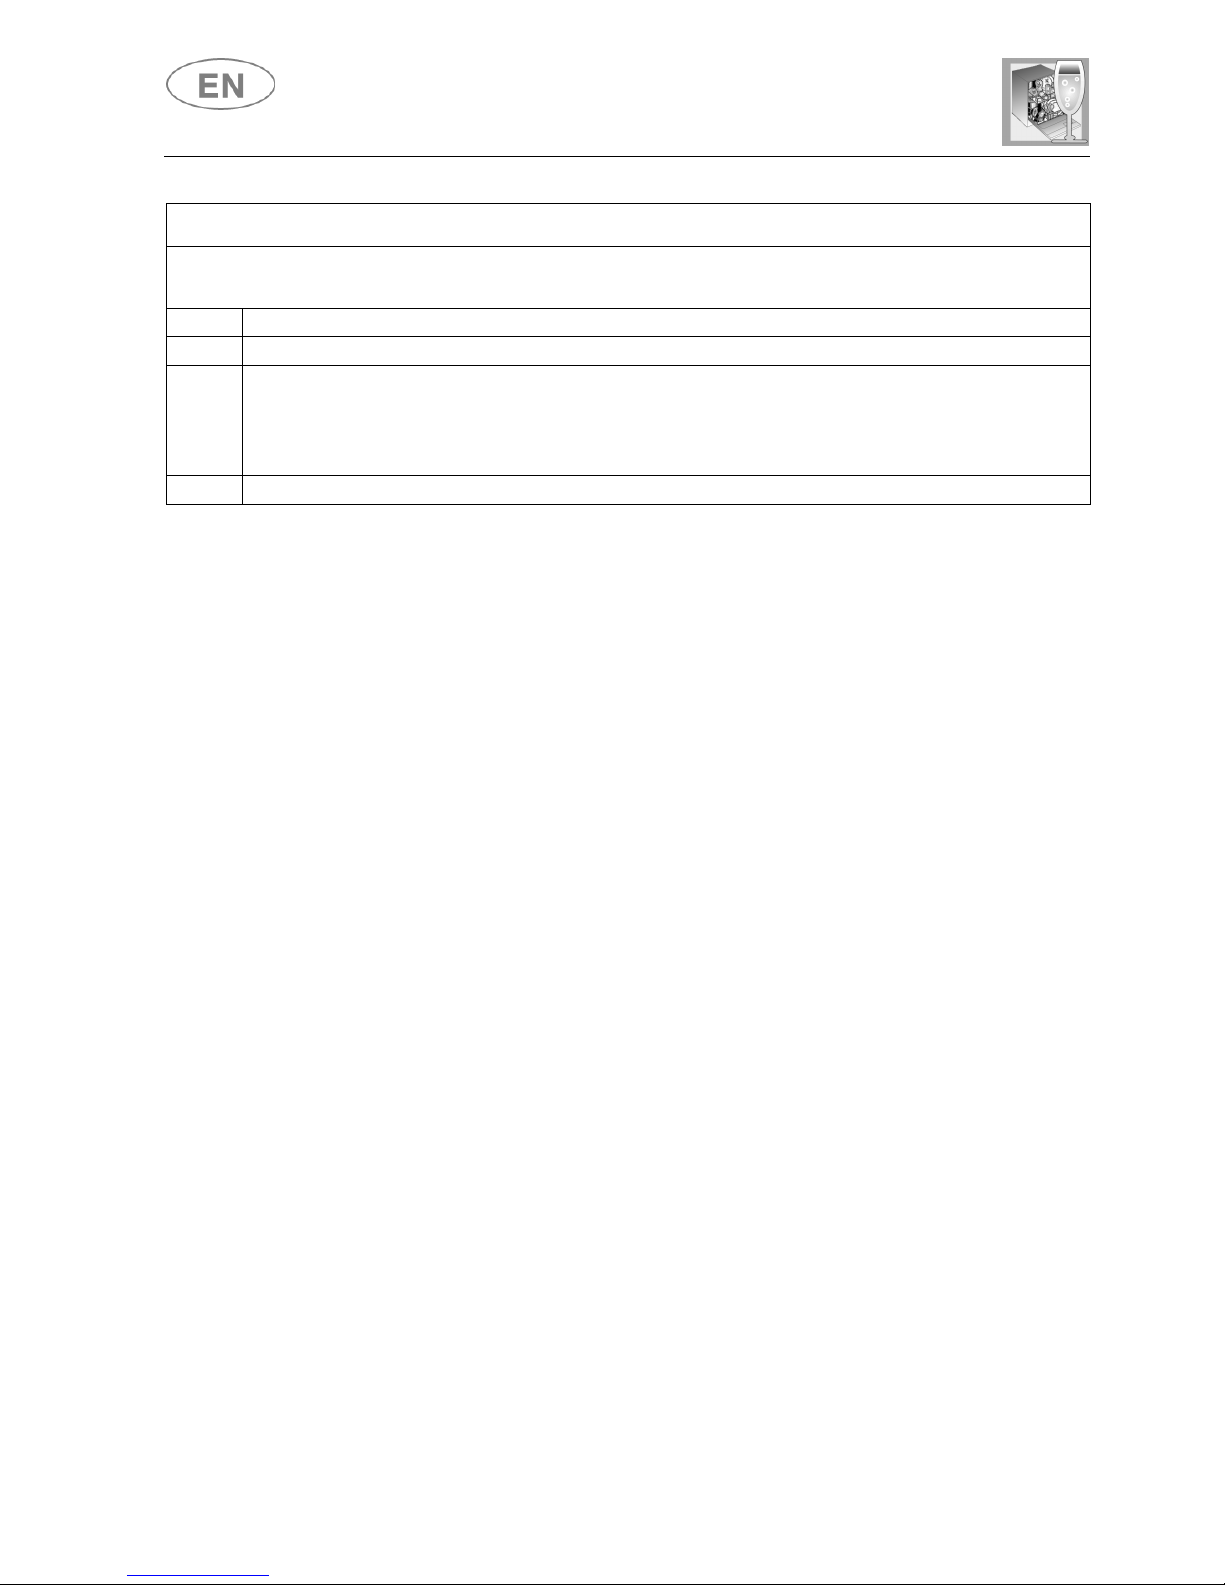
NOTES AND REFERENCES
Only
run the soak program with half loads.
Options cannot be used with the soak program.
*
Standard programme under
EN 50242
.
** See information sheet provided
(1) Program consumption and duration figures have been measured in
accordance with the EN 50242 standard. Values may vary depending on
water supply and ambient temperatures and the type and quantity of dishes
loaded.
(2) 1 or 2 cold rinses depending on the model.
REFERENCES for the ENERGY LABEL supplied with the dishwasher:
- Annual energy consumption is based on 280 standard wash cycles with
cold water and consumption of low-energy operating modes. Actual
consumption depends on the way in which the appliance is used.
- Water consumption is based on 280 standard wash cycles. Actual
consumption depends on the way in which the appliance is used.
- Information refers to the EN 50242 STANDARD programme (identified in the
programmes table), which is the most effective in terms of combined energy
and water consumption. The programme is recommended for dishes with a
normal level of dirt.
- Drying efficiency class on a scale from “G” (minimum efficiency) to “A”
(maximum efficiency).
Page 5
User instructions
5
1.2 Washing programs
The dishwasher is equipped with a control panel and an
3-FIGURE
DISPLAY (8), described in chapter “3.Description of the controls”, from
which it is possible to carry out all the power switch-on, switch-off and
programming operations.
Before starting a washing program make sure that:
• The water supply tap is open.
• The correct amount of detergent has been added to the
dispenser.
• The baskets have been correctly loaded.
• The spray arms are able to rotate freely and without
obstruction.
• The dishwasher door is securely closed.
PROGRAMMING
In this dishwasher model all the programming operations are possible
only with closed door. With open door, on the 3-FIGURE DISPLAY (8)
will appear the symbols – and the PILOT LIGHT PROGRAMS (3)
remains out.
PROGRAM SELECTION
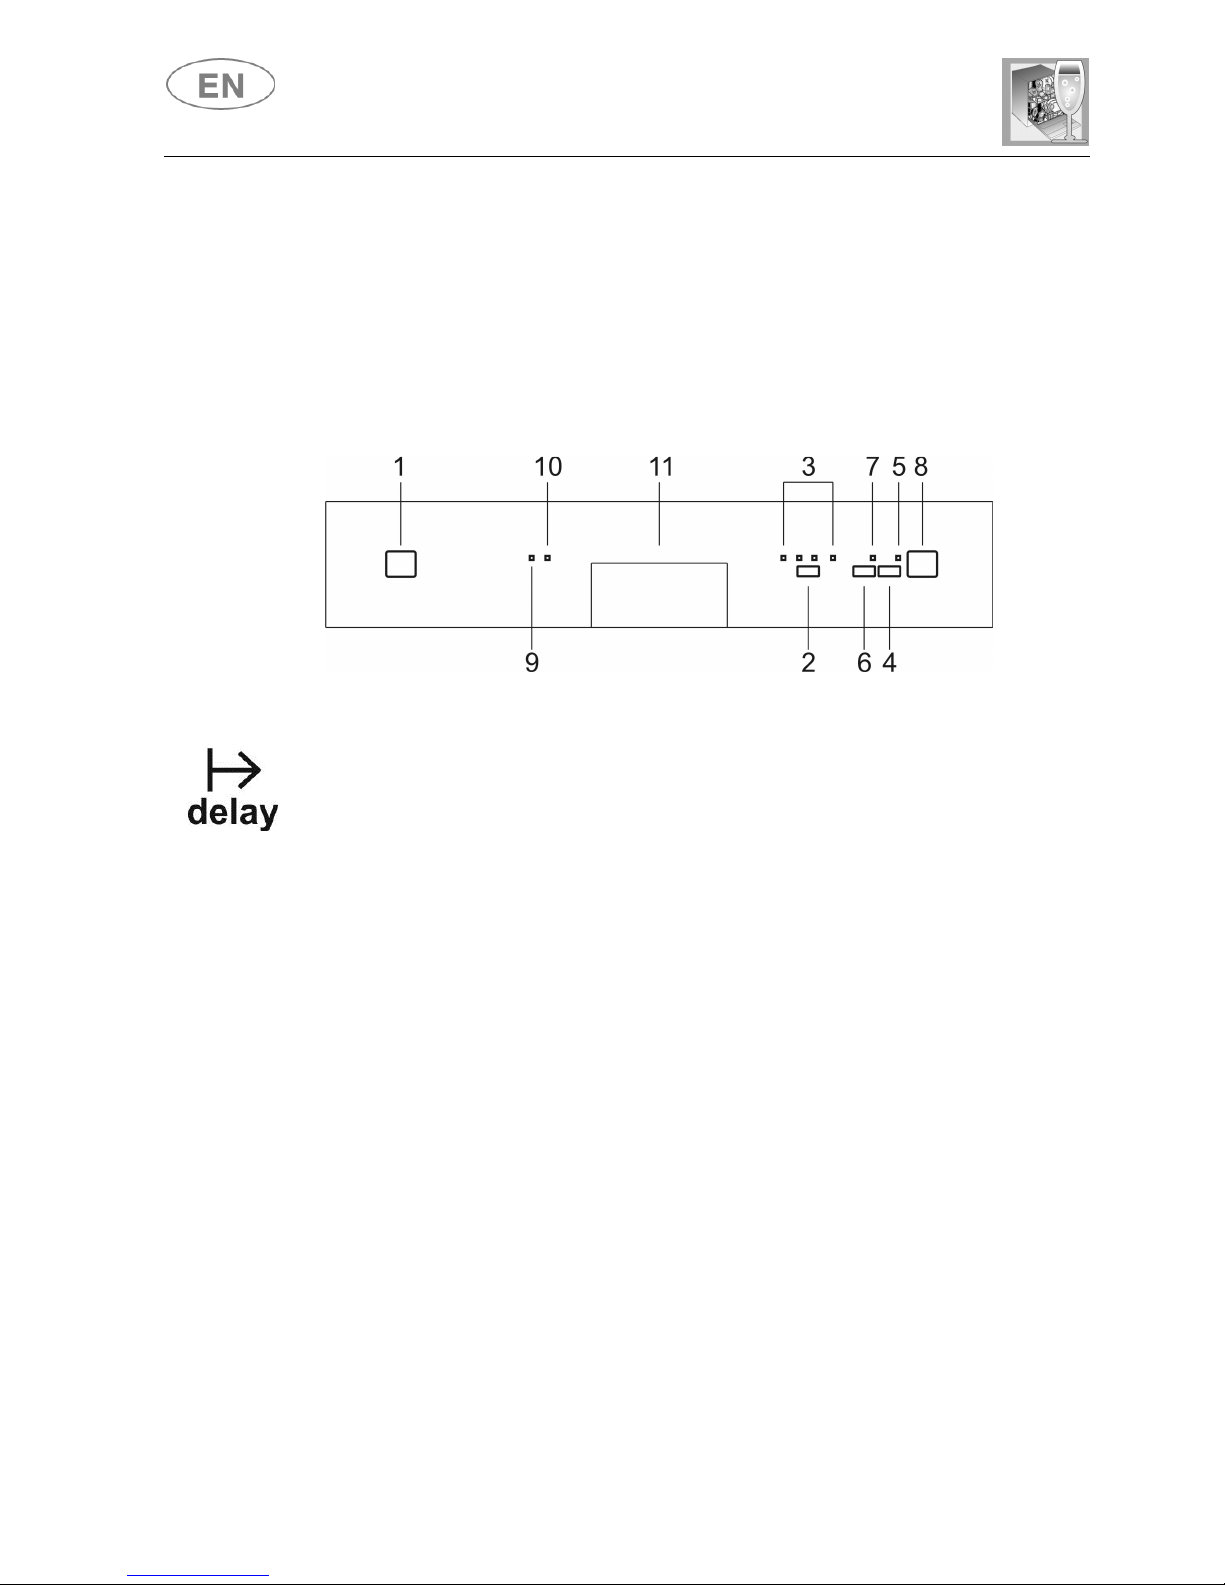
Keep pressing the PROGRAM SELECTION button (2) until the indicator
light corresponding (3) to the desired program illuminates.
CANCELLING THE CURRENT
PROGRAM
To annul the current program, press the START/PAUSE button (4) for a
few seconds, until the PROGRAM STARTED light (5) stop flashing. Now
press the START/PAUSE button (4) again until “P0” appears on the
display (about 10 seconds).
Page 6
User instructions
6
CHANGING THE
PROGRAM
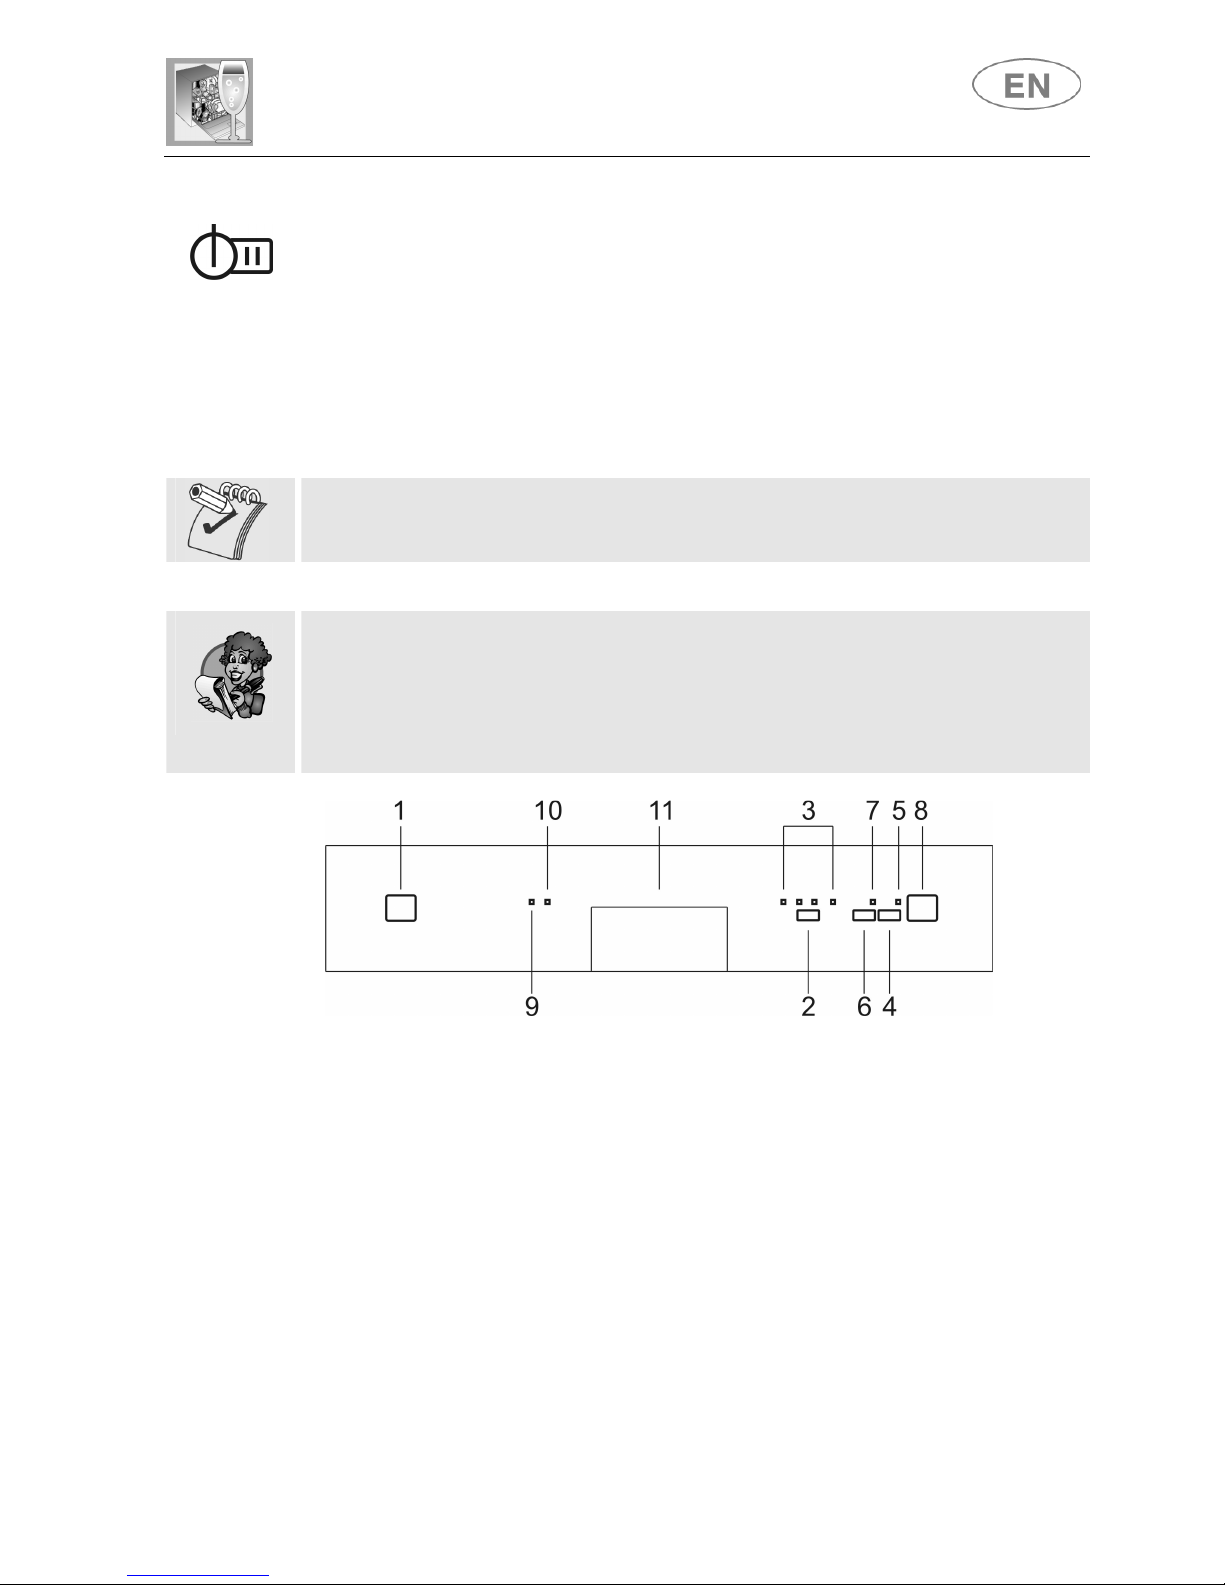
To modify the program keep the START/PAUSE button (4) pressed for a
few seconds, until the PROGRAM STARTED indicator light (5) stops
flashing, then select the new program following the instructions provided
above; press the START/PAUSE button (4) again and keep it pressed
for a few seconds, until the indicator light (5) starts to flash again.
DELAYING THE PROGRAM
The PROGRAM DELAY button (6) can be pressed to delay the start of
the washing program by up to 24 hours. This means that the dishwasher
can be operated at the time of day of your choice.
Press the PROGRAM DELAY button (6) again; the 3-FIGURE DISPLAY
(8) will show the number of hours of delay with which the appliance will
start. After setting the delay, start the program: press the
START/PAUSE button (4) for a few seconds, until the PROGRAM
STARTED light (5) starts flashing.
The appliance will prewash the dishes, after which the “program delay”
set previously will come into effect.
To cancel the program delay once the wash has started, proceed as
follows:
• Press the START/PAUSE button (4) for a few seconds, until the
PROGRAM STARTED light (5) stops flashing;
• Press the PROGRAM DELAY button (6) several times until the
program delay returns to zero;
• Press the START/PAUSE button (4) to start the program.
Page 7
User instructions
7
STARTING THE
DISHWASHER
After carrying out all the operations described above correctly, to start
the dishwasher simply press the START/PAUSE button (4) for a few
seconds until a beep sounds (the PROGRAM STARTED (5) light start to
flash). The 3-FIGURE DISPLAY (8) will show the duration of the
program in minutes. The duration time is only approximate, because it
depends on the washing conditions (quantity of dishes, water
temperature, etc.), and is also continually updated as the washing
program progresses.
The 3-FIGURE DISPLAY (8) shows the estimated duration of the
washing program.
If it is necessary to open dishwasher door during the washing cycle,
there will be a 1-minute delay before the program can be resumed. After
correctly closing the door, press the START/PAUSE (4) button again.
This operation may negatively affective the progress of the washing
cycle.
END PROGRAM
The end of the program is indicated by a short signal acoustic and from
the “End” visual notification on the 3-FIGURE DISPLAY (8).
By pressing the PROGRAM SELECTION button (2), the “End” visual
signal will vanish from the display and the dishwasher is ready to
continue a new cycle, the same thing happens when closing or opening
the door or by switching on-off the machine.
Page 8
User instructions
8
TO SAVE ENERGY AND PROTECT THE ENVIRONMENT
• Always use the dishwasher with a full load.
• Do not wash the dishes in running water.
• Use the wash program that is most appropriate for each type of
load.
• Do not perform preliminary rinsing.
• If available, connect the dishwasher to a hot water supply up to
60°C.
TO REDUCE DETERGENT CONSUMPTION AND PROTECT THE
ENVIRONMENT
The phosphates contained in dishwasher detergents are harmful to the
environment. To avoid using excessive amounts of detergent save on
electricity as well, observe the following recommendations:
• Sort your dishes, washing delicate items separately from those
more resistant to strong detergents and high temperatures.
• Do not pour detergent directly onto dishes.
ENERGY
MANAGEMENT
After 5 minutes of inactivity (wash cycle completed, stopped or set but
not started), the dishwasher switches to standby mode to reduce energy
consumption.
In this mode, the dishwasher indicator panel (lights or display depending
on model) functions more slowly (switch-on once every 5 seconds).
REMOVING THE DISHES
At the end of the washing program, wait at least 20 minutes before
removing the dishes, to allow them to cool down. To prevent any water
droplets on the upper basket from falling on the dishes in the lower
basket, it is advisable to unload the lower basket first, and then the
upper basket.
Page 9
User instructions
9
2. Operating instructions
Once the dishwasher has been correctly installed, prepare it for use as
follows:
• Adjust the water softening system
• Add salt
• Add rinse aid and detergent
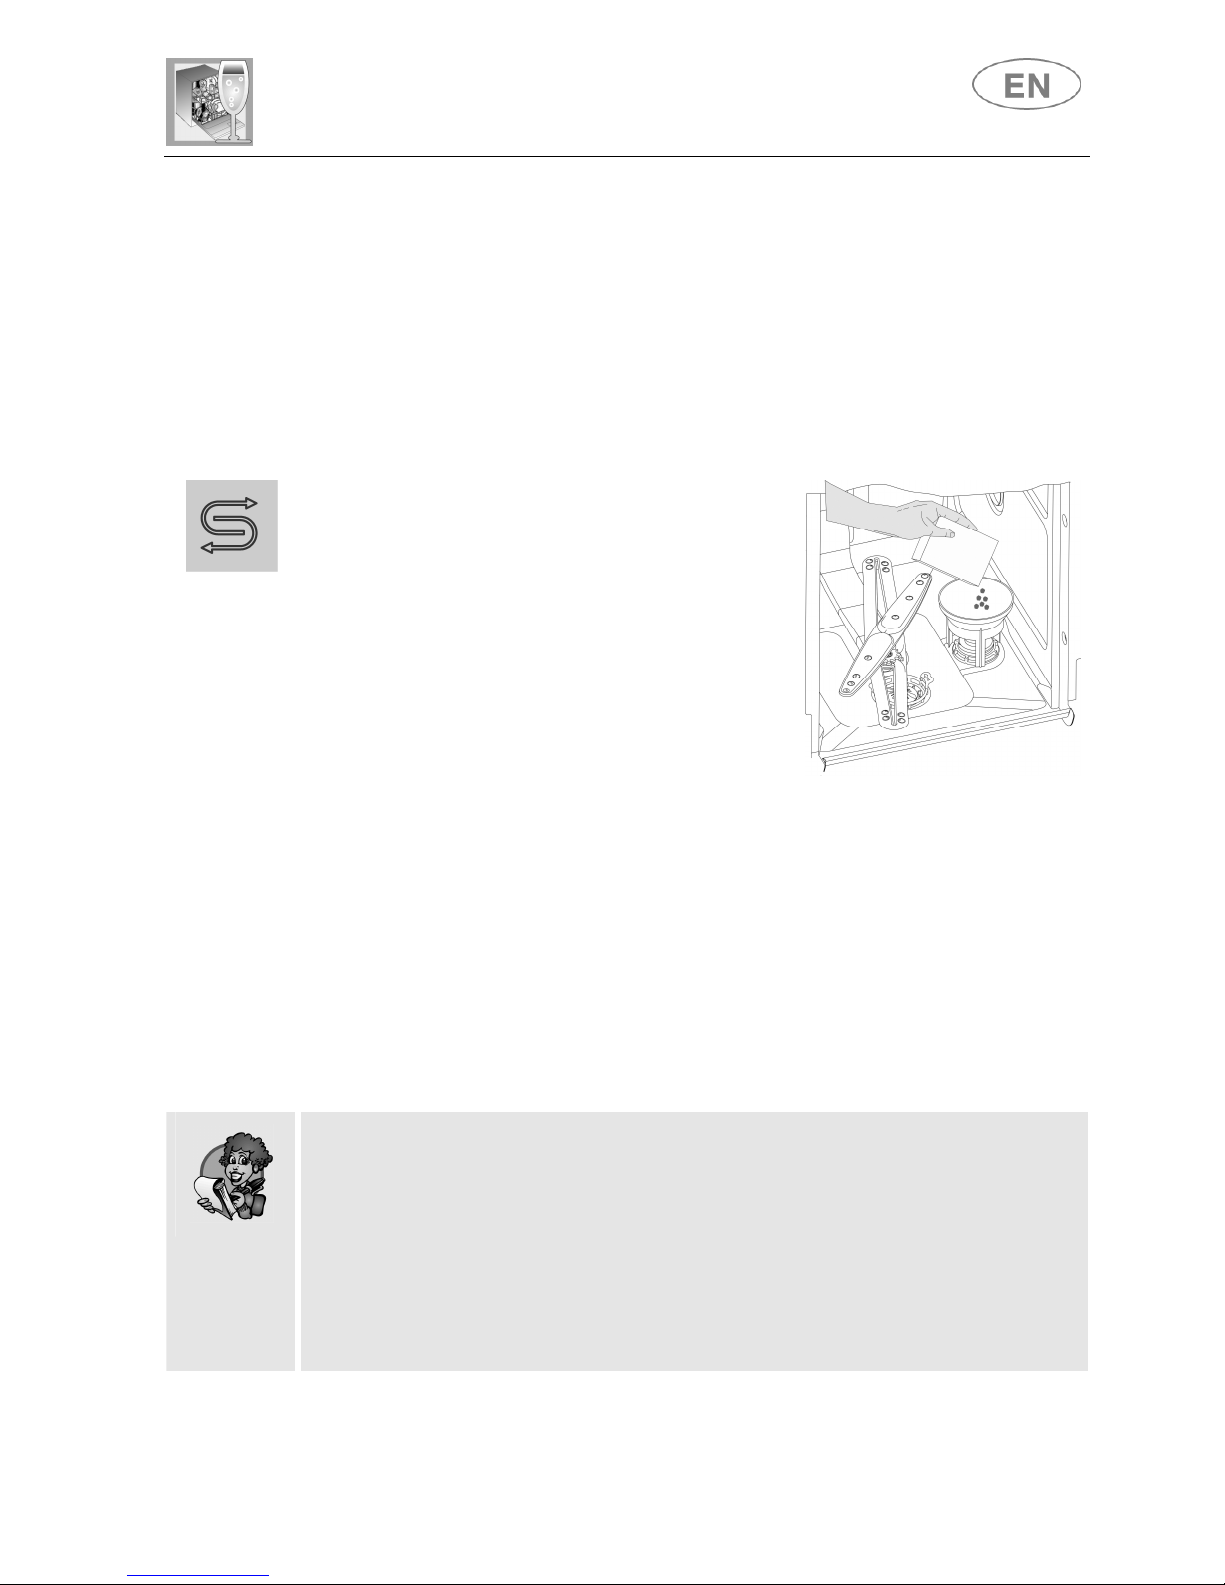
2.1 Using the water softening system
The dishwasher is equipped with an
automatic softening system which uses a
special regenerating salt to reduce the
hardness of the water, responsible for
whitish marks on dry dishes The
dishwasher is factory set for water
hardness level 3 (average hardness).
When using water of medium hardness, the salt container should be
refilled after approximately 20 wash cycles. The salt container can hold
approximately 1.5 kg of salt grains. Some models are equipped with a
cap with a no-salt optical indicator containing a green float which
descends as the salt concentration in the water drops. When the green
float can no longer be seen through the transparent cap, salt must be
added. The container is situated at the bottom of the dishwasher. After
removing the lower basket, unscrew the salt container cap by turning it
anticlockwise and pour in the salt using the funnel supplied. Before
replacing the cap, remove any salt residues from around the opening.
•
When using the dishwasher for the first time, in addition to the salt it
is also necessary to add one litre of water to the container.
• Each time the salt container is refilled, make sure that the cap is
securely closed. The mixture of water and detergent must never
enter the salt container, as this would compromise the operation of
the regeneration system. In the event of this occurring, the warranty
will be invalidated.
• Only use salt specially formulated for domestic dishwashers. If
using salt tablets, do not fill the container completely.
SALT
Page 10
User instructions
10
• Do not use table salt, as it contains insoluble substances which,
over time, may damage the water softening system.
• The salt container should be refilled before starting the wash
program. This way, the excess saline solution will be immediately
removed by the water; prolonged presence of salt water inside the
tank may lead to corrosion.
Be careful not to confuse the salt and detergent packages; adding
detergent to the salt container will damage the water softening system.
ADDITIONAL FUNCTIONS
(customizing the consumer parameters)
(available in all programs except the soak program)
The dishwasher is equipped with an electronic device for adjusting the
water softening setting according to the hardness of the water.
To adjust the water softening setting, proceed as follows.
• Keep the PROGRAM DELAY button (6) pressed for a few seconds,
until the H- symbol, followed by the set value, appears on the
3-FIGURE DISPLAY (8);
• The PROGRAM DELAY button (6) can be pressed again to select
the most suitable hardness value (H1, H2 …H5). Refer to the “Water
hardness table” to select the value;
• To exit the programming mode press the START/PAUSE button (4)
or do not touch the keypad for 2 seconds to allow the system to exit
the mode automatically.
Page 11
User instructions
11
WATER HARDNESS TABLE
WATER HARDNESS
SETTING
German Degrees (°dH) French Degrees (°dF)
0 - 6 0 - 11
h.
-
1 NO SALT
7 - 10 12 - 18
h.
-
1
11 - 15 19 - 27
h.
-
2
16 - 21 28 - 37
h.
-
3
22 - 28 38 - 50
h.
-
4
29 - 35 51 - 62
h.
-
5
36 - 50 63 - 90
h.
-
6
Contact your local water board for information on the hardness of your
water supply.
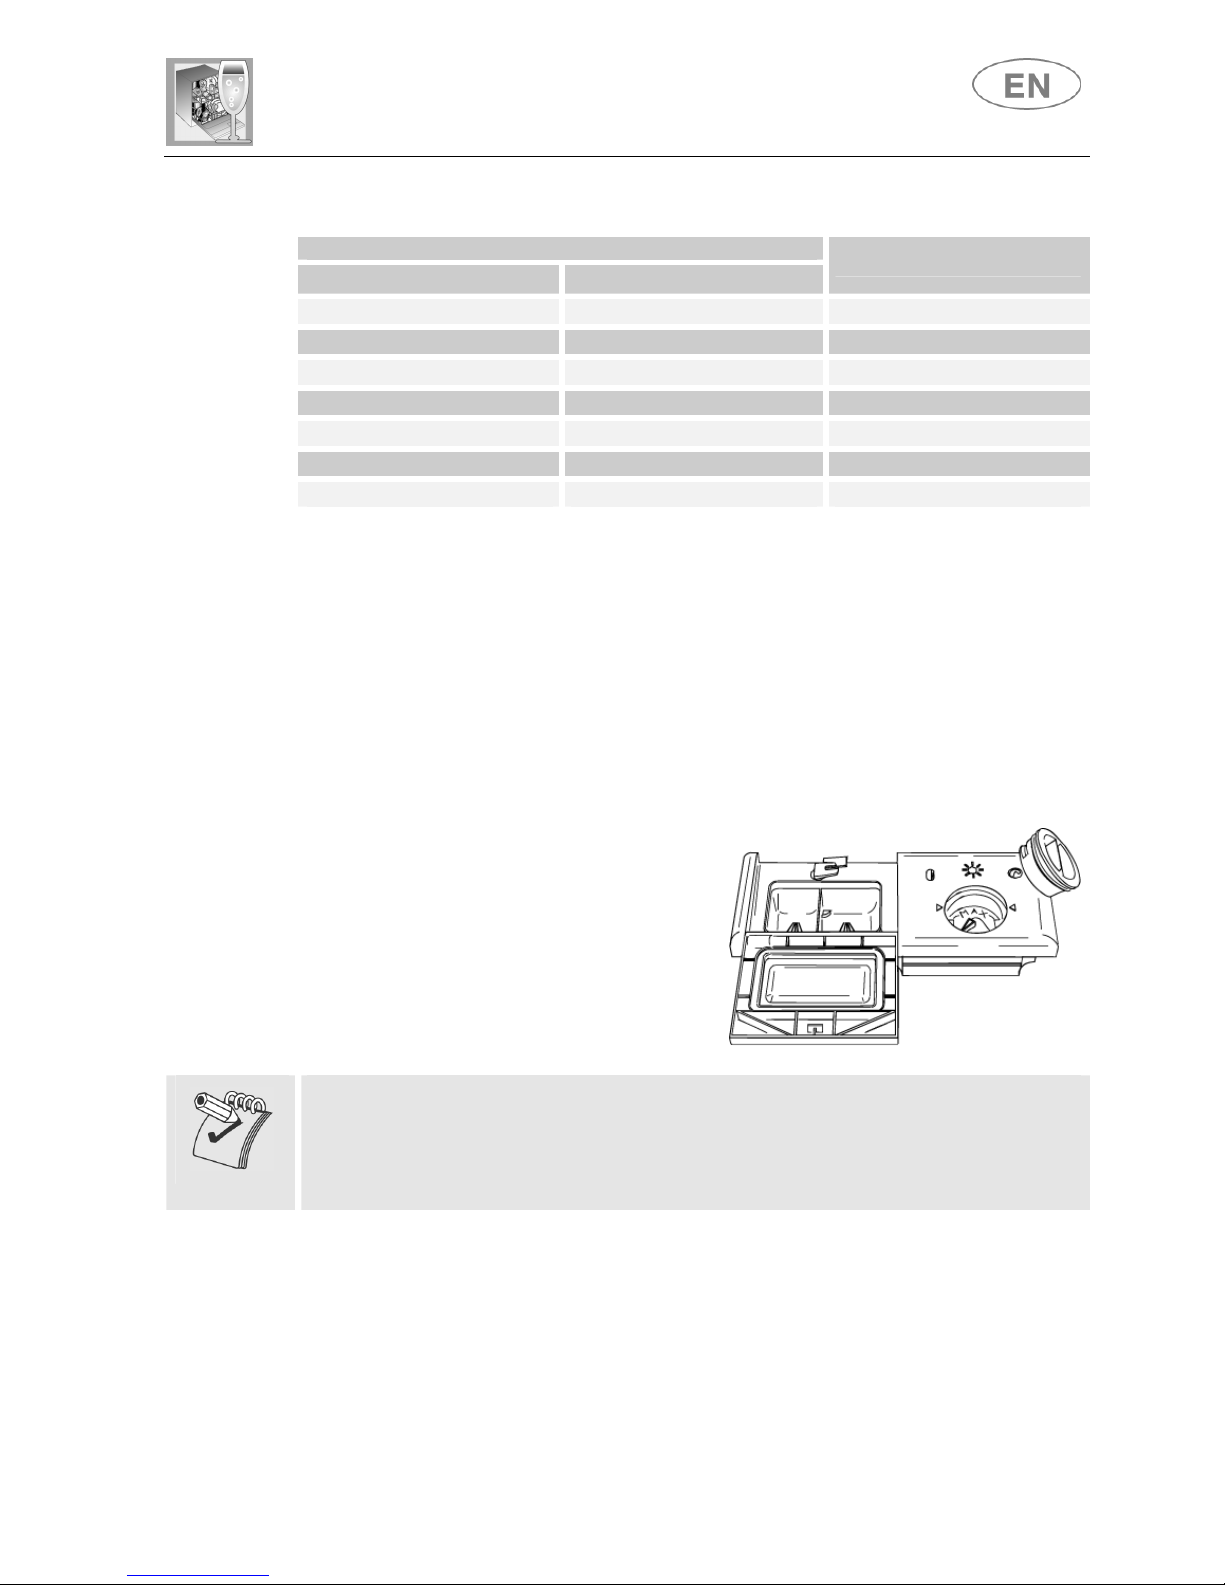
2.2 Using the rinse aid and detergent dispensers
The detergent and rinse aid
dispensers are situated on the inner
part of the door: the detergent
dispenser is on the left, and the
rinse aid dispenser is on the right.
With the exception of the SOAK program, it is necessary to add the
required amount of detergent to the detergent dispenser before every
wash cycle. The rinse aid, on the other hand, should only be added as
required.
Page 12
User instructions
12
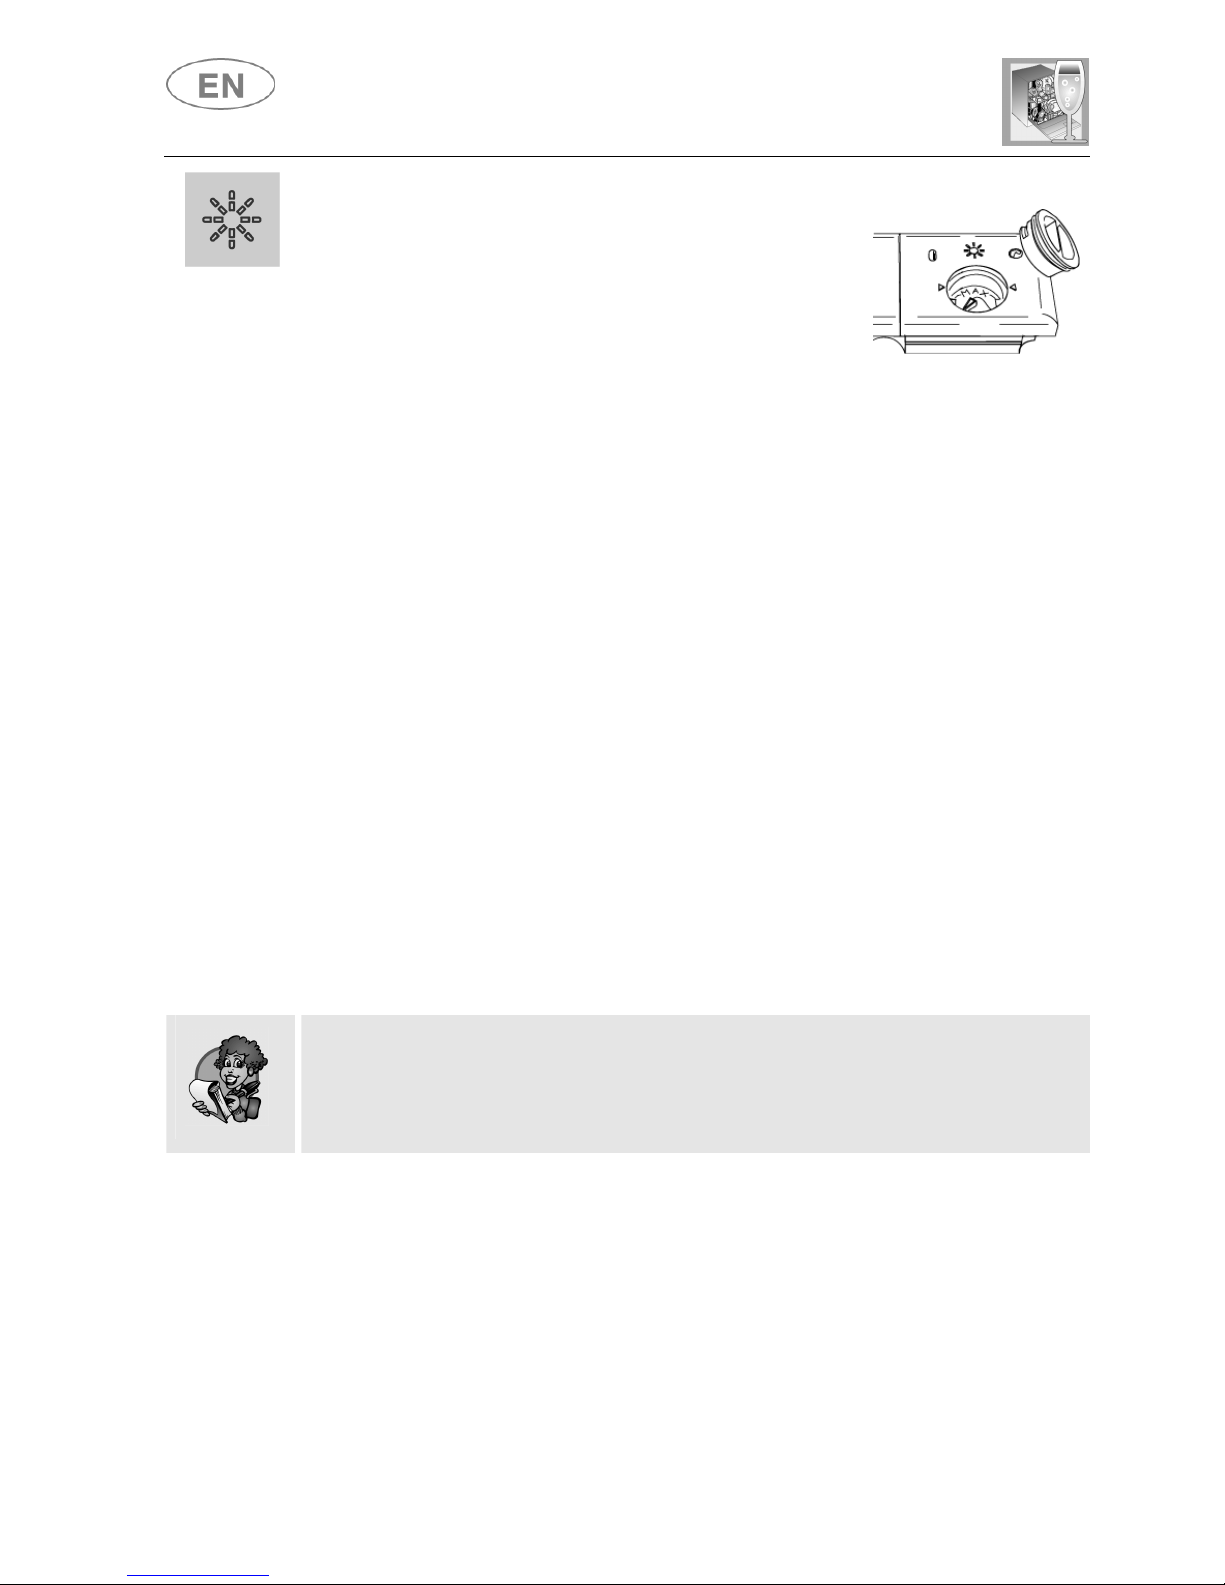
ADDING RINSE AID
Rinse aid helps the dishes dry faster and
prevents the formation of scale deposits and
staining; it is automatically added to the water
during the final rinse cycle.
To add rinse aid:
• Open the door.
• Rotate the container cap anticlockwise by ¼ of a turn and remove it.
• Add the rinse aid until the container is full (approximately 140 ml).
The optical level indicator on the side of the cap should be
completely dark. Refill the rinse aid when the optical level indicator
turns clear again, or when the rinse aid warning light turns on.
• Replace the cover and turn it clockwise.
• Use a cloth to remove any spillage of rinse aid which might lead to
the formation of excess foam.
ADJUSTING THE RINSE AID DISPENSER SETTING
The dishwasher is factory set for medium water hardness. It is possible
to change this setting by turning the dispenser selector to the required
position: the amount of rinse aid dispensed depends on the selector
position.
• To adjust the rinse aid setting, rotate the dispenser cap a quarter of
a turn anticlockwise and remove it.
• Then rotate the rinse aid selector to the desired position.
• Replace the cap, turning it clockwise.
• The amount of rinse aid must be increased if the washed dishes
appear dull or have circular stains.
• If, on the other hand, the dishes are sticky or have white streaks, it
is necessary to reduce the rinse aid dosage.
Page 13
User instructions
13
ADDING DETERGENT
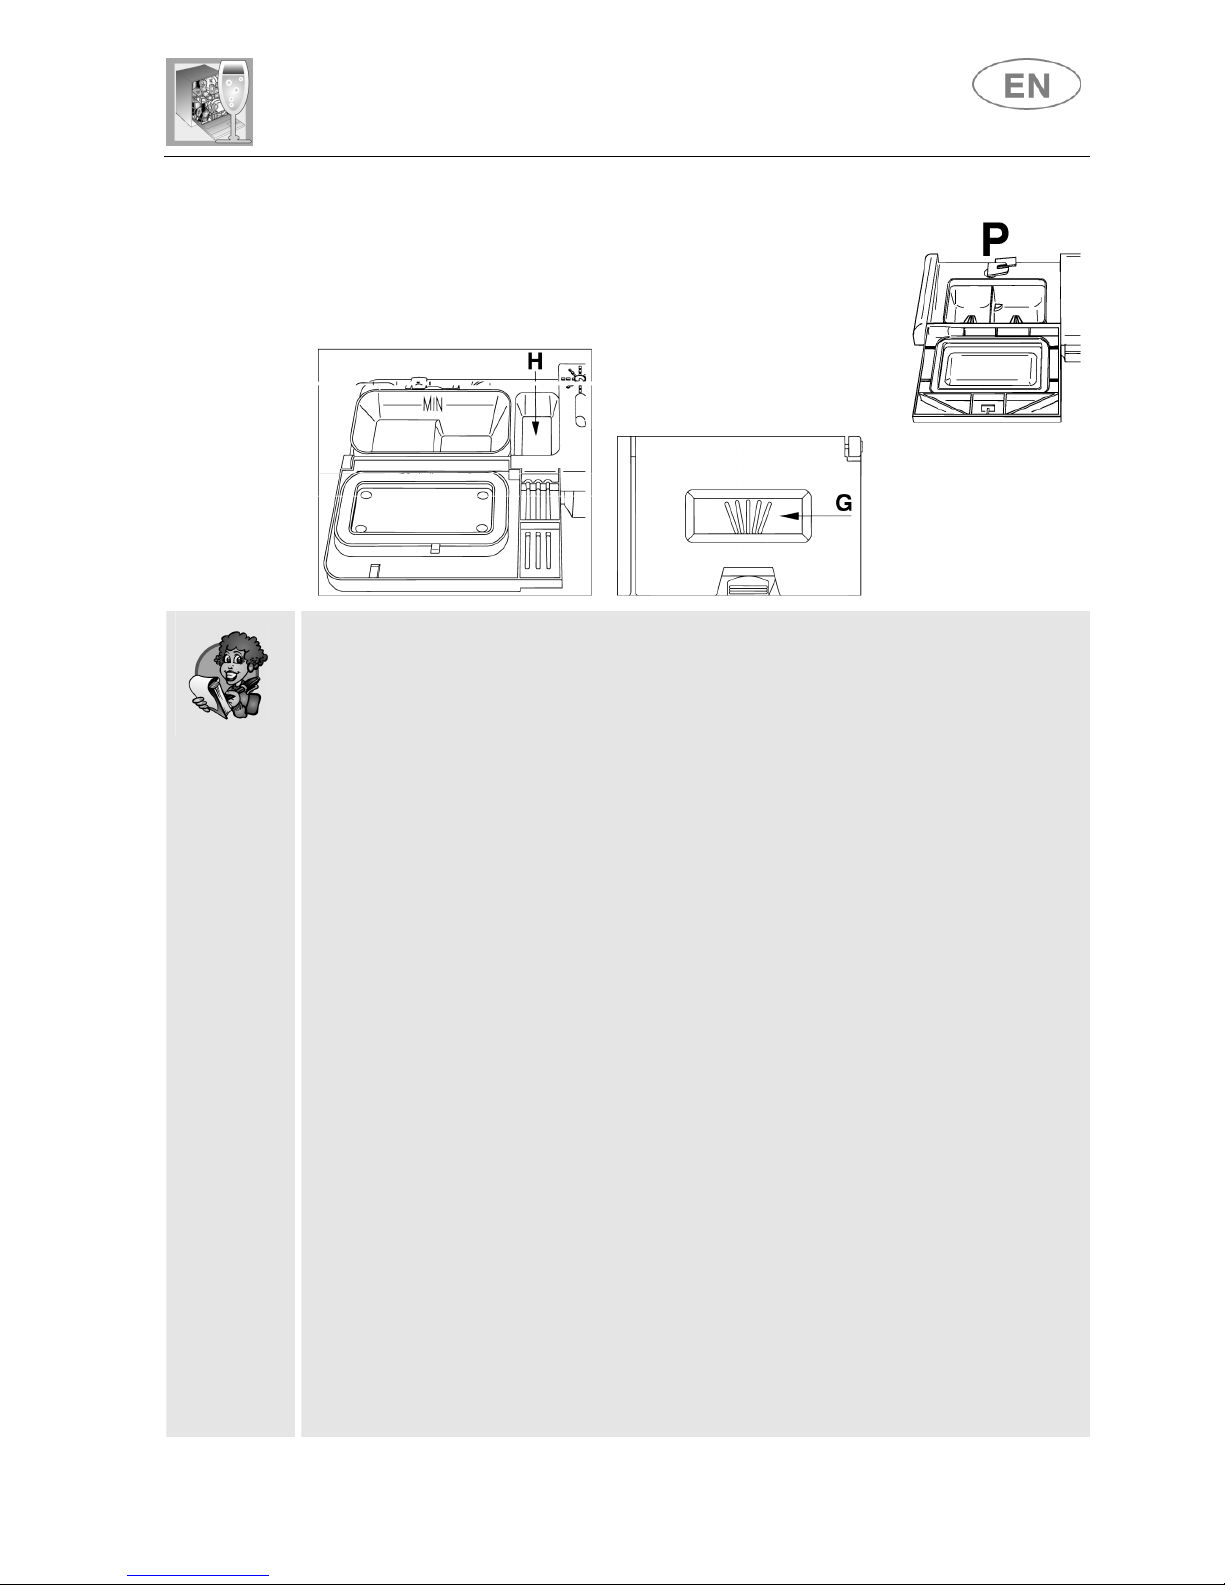
To open the detergent dispenser cap, lightly press
the button P. Add the detergent and close the cap
carefully.
During the wash cycle, the dispenser will open
automatically.
• When a program with hot prewash is selected (see program table),
extra detergent must be placed in the cavity G/H (depending on
model).
• Use only detergents specially formulated for dishwashers. For
optimal washing results it is important to use a good quality
detergent.
• The detergent packs must be sealed and stored in a dry place to
prevent the formation of lumps which may negatively affect wash
results. Once opened, the detergent packs should not be kept for
too long, otherwise the detergent will lose its effectiveness.
• Do not use detergents formulated for washing dishes by hand,
because they produce a great deal of foam and may negatively
affect the operation of the dishwasher.
• Add the correct amount of detergent. An insufficient amount of
detergent will result in a partial removal of dirt from the dishes,
whereas an excessive amount is wasteful and does not improve the
wash results.
• There are various liquid and powder detergents on the market with
differing chemical compositions, which may contain phosphates, or
be phosphate-free but contain natural enzymes.
- Detergents containing phosphates are more effective against
grease and starch at temperatures above 60°C .
- Enzyme detergents, on the other hand, are also effective at lower
temperatures (from 40 to 55°C ) and are more easily
biodegradable. Enzyme detergents provide comparable results at
low temperatures to those which can only be achieved at 65°C
using traditional detergents.
To protect the environment, we recommend the use of phosphate-
and chlorine-free detergents.
Page 14
User instructions
14
The introduction of detergent into the rinse aid dispenser, even in
liquid form, will damage the dishwasher.
2.3 General warnings and recommendations
Before using the dishwasher for the first time, it is advisable to read the
following recommendations concerning dish types and loading.
There are generally no constraints on washing of domestic dishes, but
in certain cases it is necessary to take their characteristics into account.
Before loading the dishes into the baskets it is necessary to:
• Remove large food remains, particularly bones, which may clog the
filter or damage the pump.
• Soak any pots or pans with burnt-on food to facilitate its removal,
then load them into the LOWER BASKET.
There is no need to pre-wash the dishes under running water before
loading them into the baskets since this only wastes water.
Correct loading of the dishes helps ensure optimal wash results.
Page 15

User instructions
15
WARNING!
• Make sure that the dishes are securely in place so that they cannot
tip over or obstruct the rotation of the spray arms during the wash
cycle.
• Do not place very small objects in the baskets as these could fall
and obstruct the spray arms or the pump.
• Containers such as cups, bowls, glasses and pots should always
be loaded with the opening facing downwards and with any cavities
at an angle, to allow the water to drain out.
• Do not stack dishes or place them in such a way that they cover
each other.
• Do not place glasses too close together because they may knock
against each other and break, or stains may remain at the point
where they touch.
MAKE SURE that the items being washed are dishwasher-safe.
Items which are not dishwasher-safe:
• Wooden dishes, pots or pans: these may be damaged by the
high wash temperatures.
• Handmade items: these are rarely suitable for washing in a
dishwasher. The relatively high water temperatures and the
detergents used may damage them.
• Plastic dishes: heat resistant plastic dishes must be washed in the
upper basket.
• Dishes and objects in copper, tin, zinc or brass: these tend to
stain.
• Aluminium dishes: items made from anodised aluminium may
lose their colour.
• Silverware: silver items may stain.
• Glass and crystal: in general, glass and crystal objects can be
washed in the dishwasher. However, certain types of glass and
crystal may become dull and lose their clarity after many washes.
Therefore, for these items we recommend using the most gentle
program available.
• Decorated items are generally able to withstand washing in the
dishwasher, although the colours may fade with frequent washing.
If in doubt as to the fastness of the colours, it is advisable to wash
just a few items at a time for approximately one month.
Page 16
User instructions
16
2.4 Using the baskets
The dishwasher has a capacity of 10 place-settings, including serving
dishes.
LOWER BASKET
Used for items with a heavier degree of soiling.
All types and combinations of loads are permitted, provided that the
dishes, pots and pans are arranged with all the soiled surfaces exposed
to the water jets coming from the bottom. In some models the bottom
basket is fitted with racks which can be lowered to make better use of
the space available.
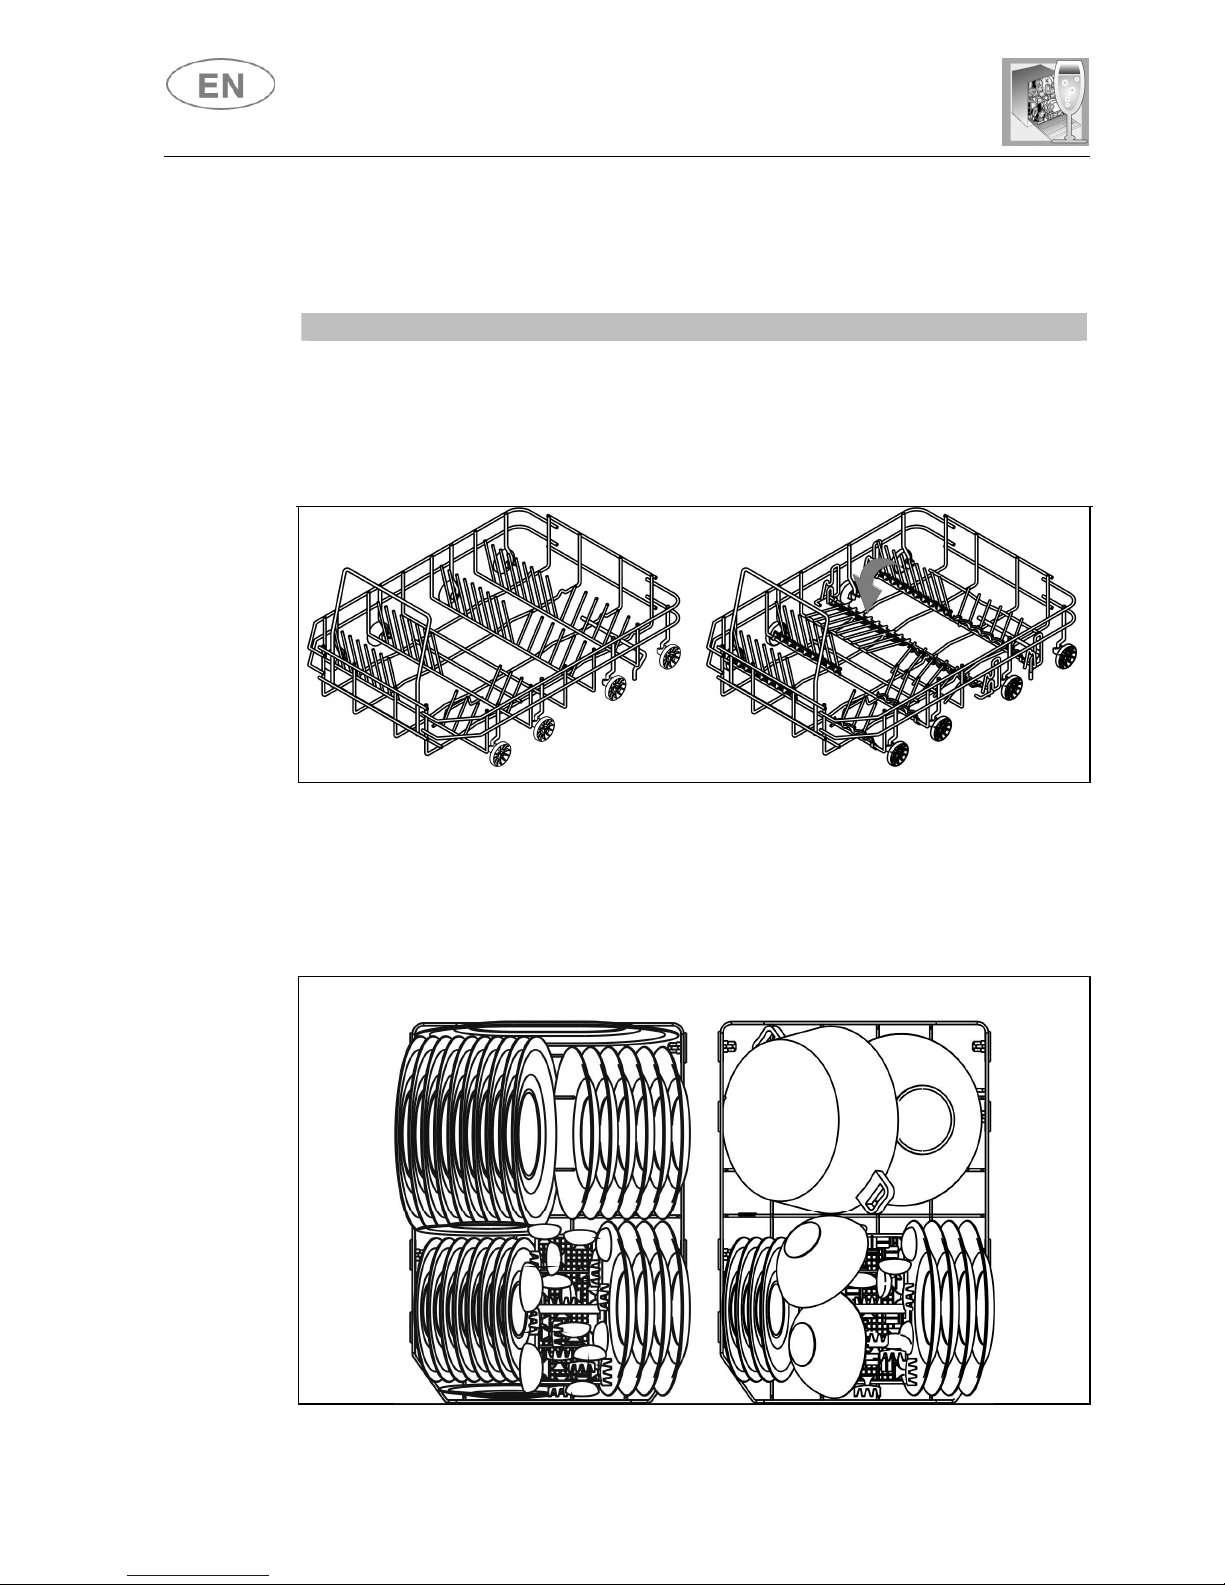
LOADING THE LOWER BASKET
Carefully load flat plates, soup bowls, dessert and serving dishes,
positioning them vertically. Pots, pans and their lids must be loaded
upside down. When loading soup and dessert bowls, be sure to leave a
gap between them.
Loading examples:
Page 17
User instructions
17
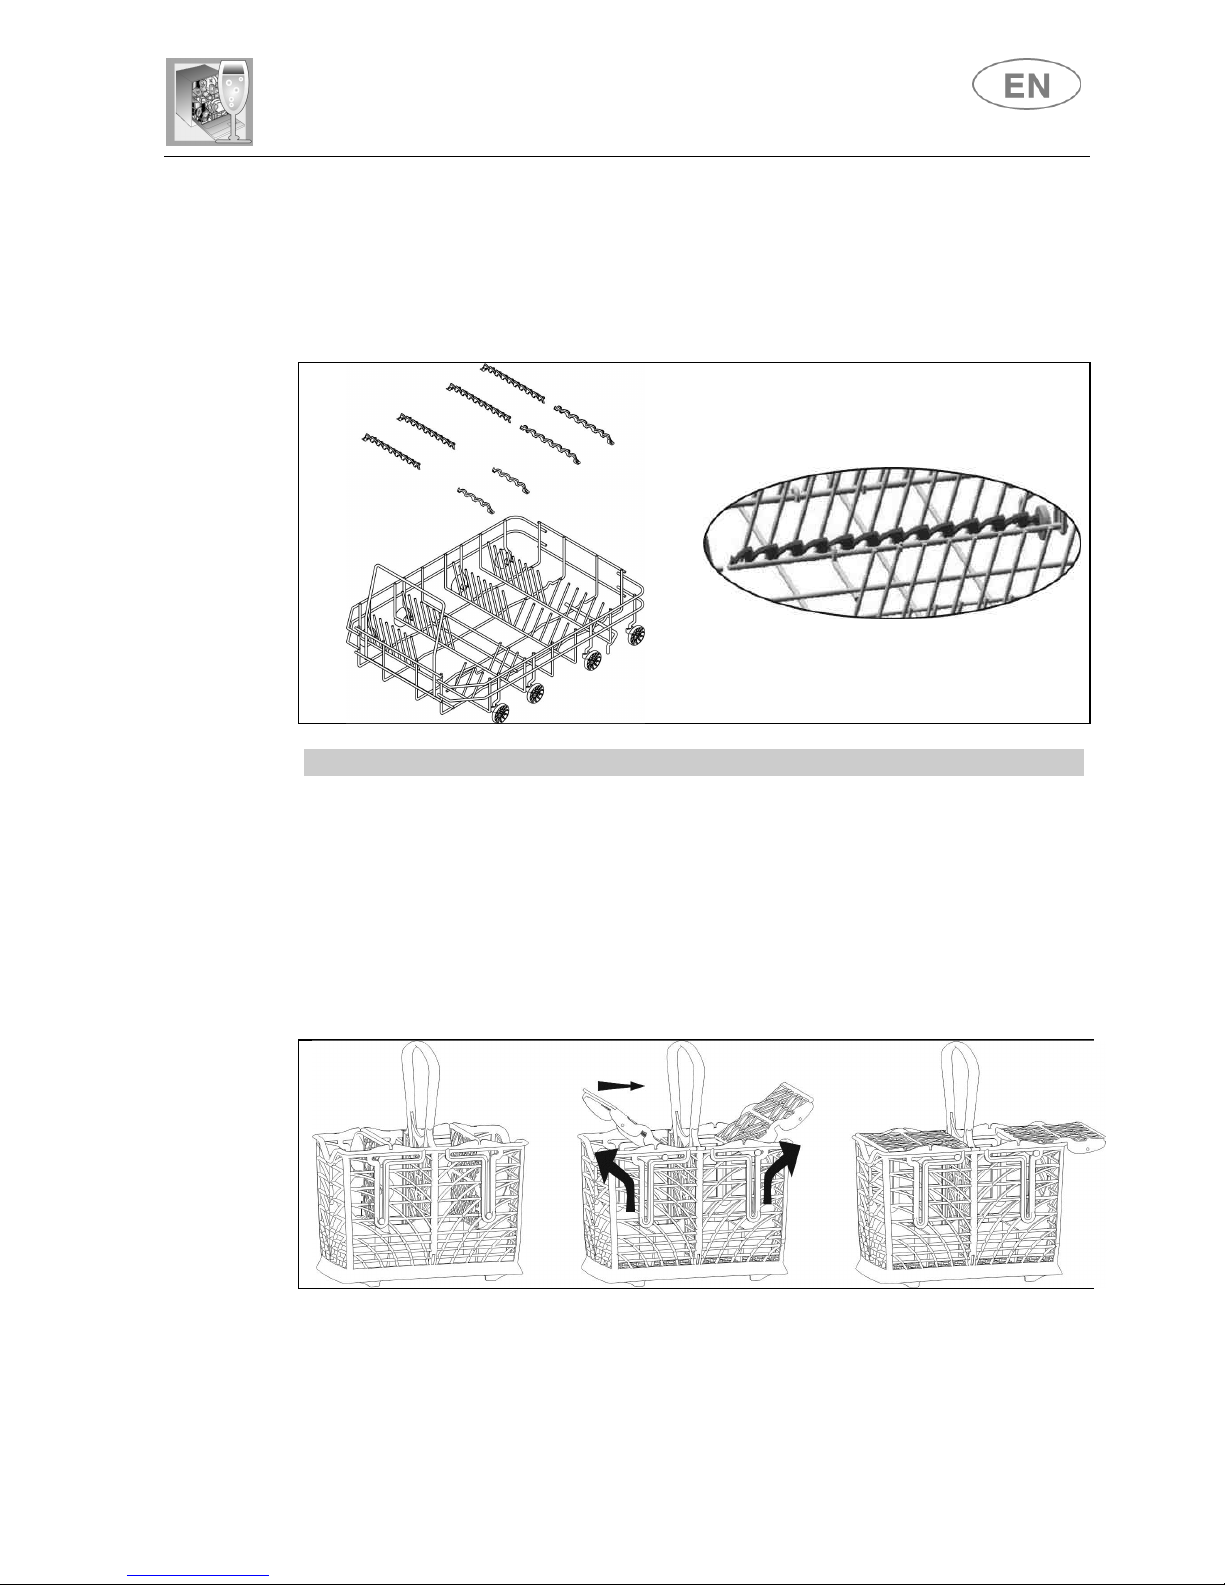
BOTTOM BASKET INSERTS
Some models are equipped with bottom basket inserts which improve
the drying of dishes. The inserts are supplied in the accessories bag; to
use them, simply fit them into place as shown.
CUTLERY BASKET
The cutlery should be arranged in an orderly manner inside the basket,
with the handles pointing downwards. Take care during loading to avoid
injury from the knife blades. The basket is suitable for all types of cutlery,
except those long enough to interfere with the upper spray arm. Ladles,
wooden spoons and kitchen knives can be placed in the upper basket,
making sure that the knife blades do not protrude from the basket.
The cutlery basket features an exclusive system of independent
sliding tip-up supports, offering a choice of possible combinations to
allow optimum use of the space available.
Page 18
User instructions
18
UPPER BASKET
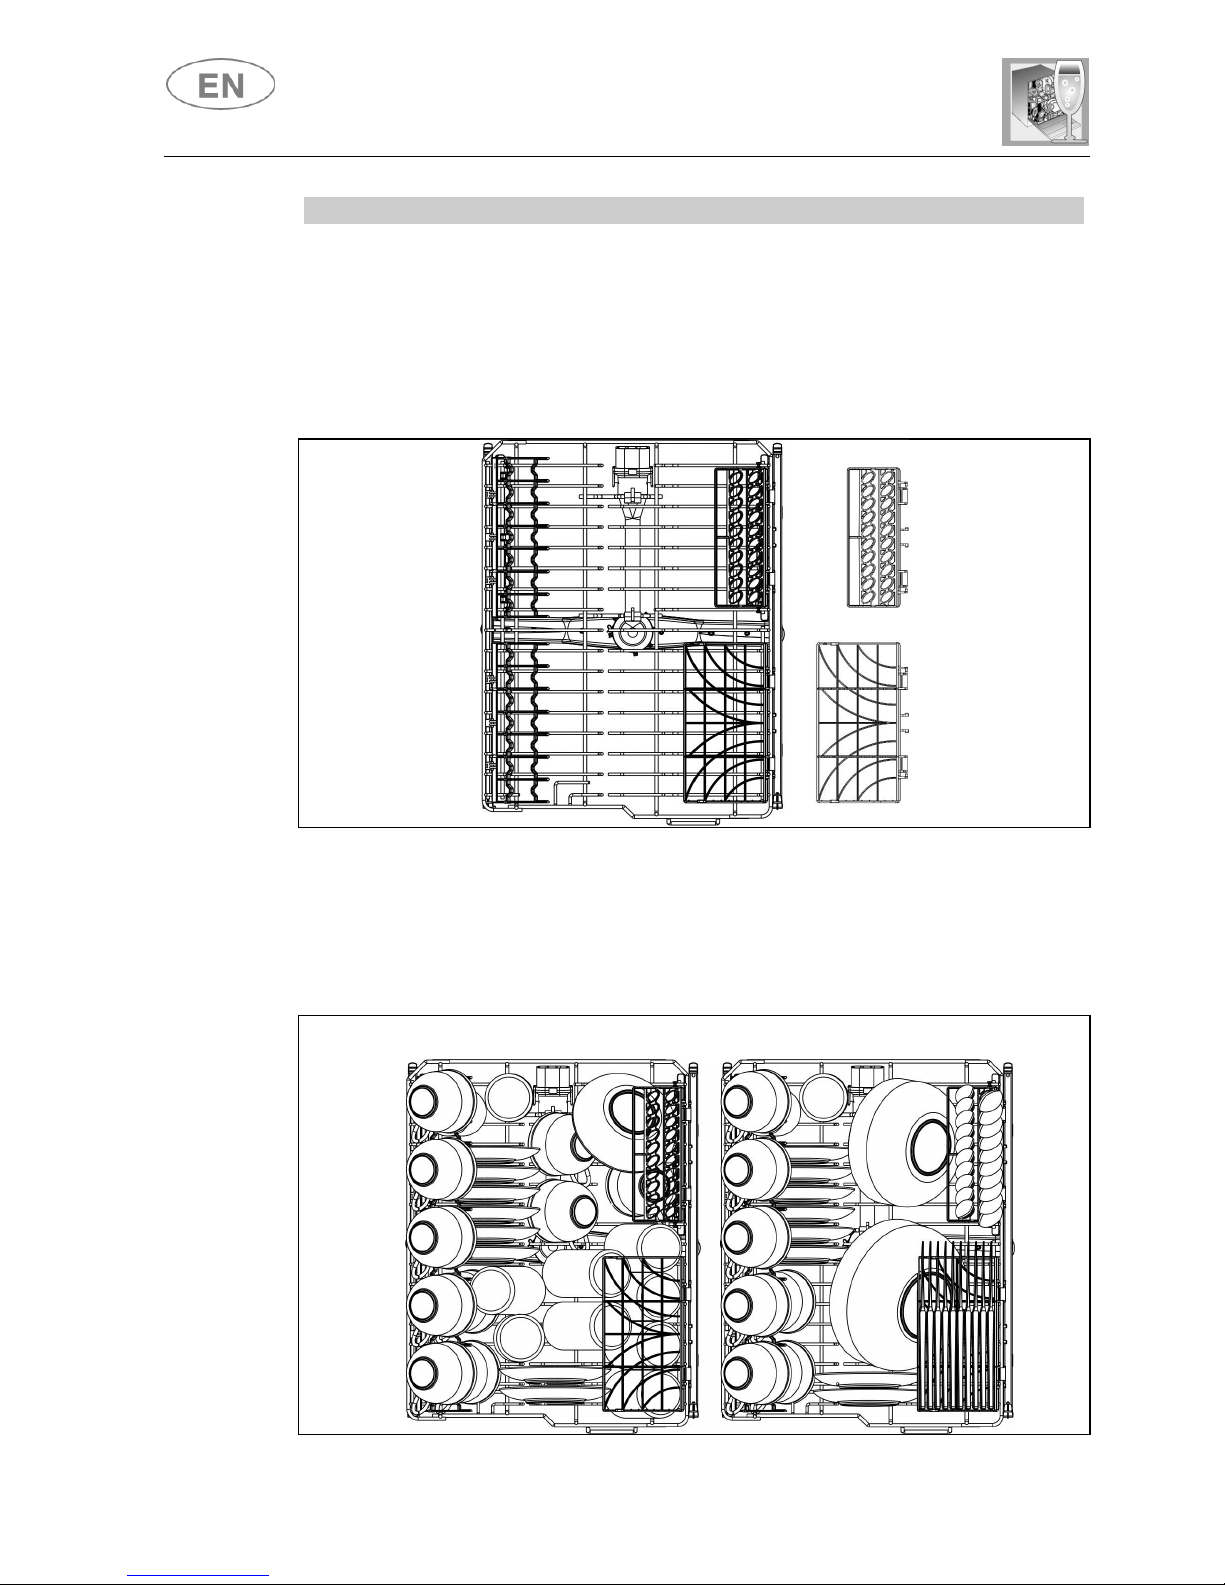
It is recommended to load the upper basket with small or medium-sized
items such as glasses, small plates and saucers, tea or coffee cups,
shallow bowls and light objects made from heat resistant plastic. If the
upper basket is used in the lowermost position, it can also be loaded
with serving dishes, provided they are only lightly soiled.
The basket is equipped with two tip-up cutlery supports which can be
raised or lowered as required. See illustrations below.
LOADING THE UPPER BASKET
Load plates facing forward; cups, bowls etc. must always be facing
downwards. The left-hand side of the basket can be loaded with two
layers of cups and glasses. On the right, plates and saucers can be
slotted vertically into the racks.
Loading examples:
Page 19
User instructions
19
ADJUSTING THE UPPER BASKET
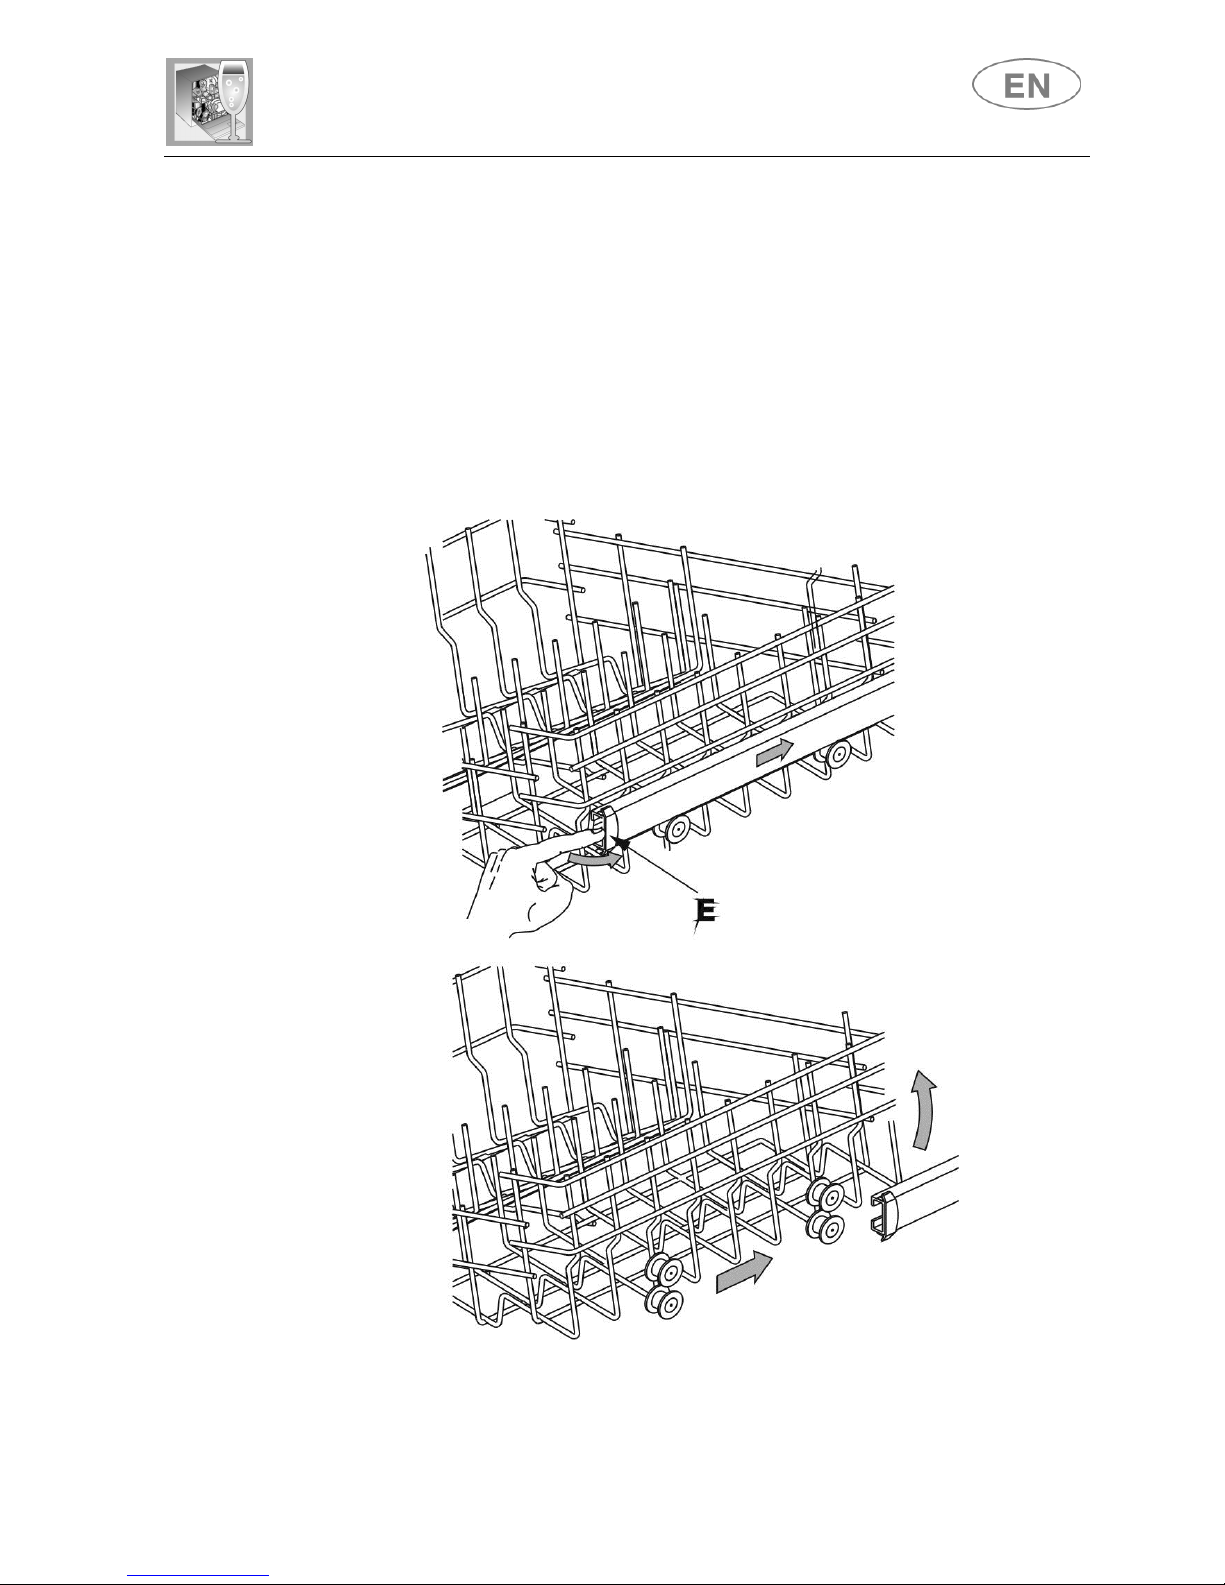
The height of the upper basket can be according to requirements and
the size of the dishes in the lower basket.
Pull-out adjustment system:
• Turn the retainer E on both runners, right and left, through 90°
• Remove the basket
• Lift the basket and fit the smaller pairs of wheels in the runners
• Return the retainers E to their original position
Page 20
User instructions
20
3. Cleaning and maintenance
Before carrying out any work, always unplug the appliance from the
electrical supply or turn off the dual-pole dedicated switch.
3.1 General warnings and recommendations
Avoid the use of acidic or abrasive
detergents.
Clean the outer surfaces and door-lining of the dishwasher regularly
using a soft, damp cloth or with a normal detergent suitable for painted
surfaces.
Clean the door seals with a damp sponge. Periodically (once or twice a
year) it is advisable to clean the tank and seals, using a soft cloth and
water to remove any deposits.
CLEANING THE WATER INTAKE FILTER
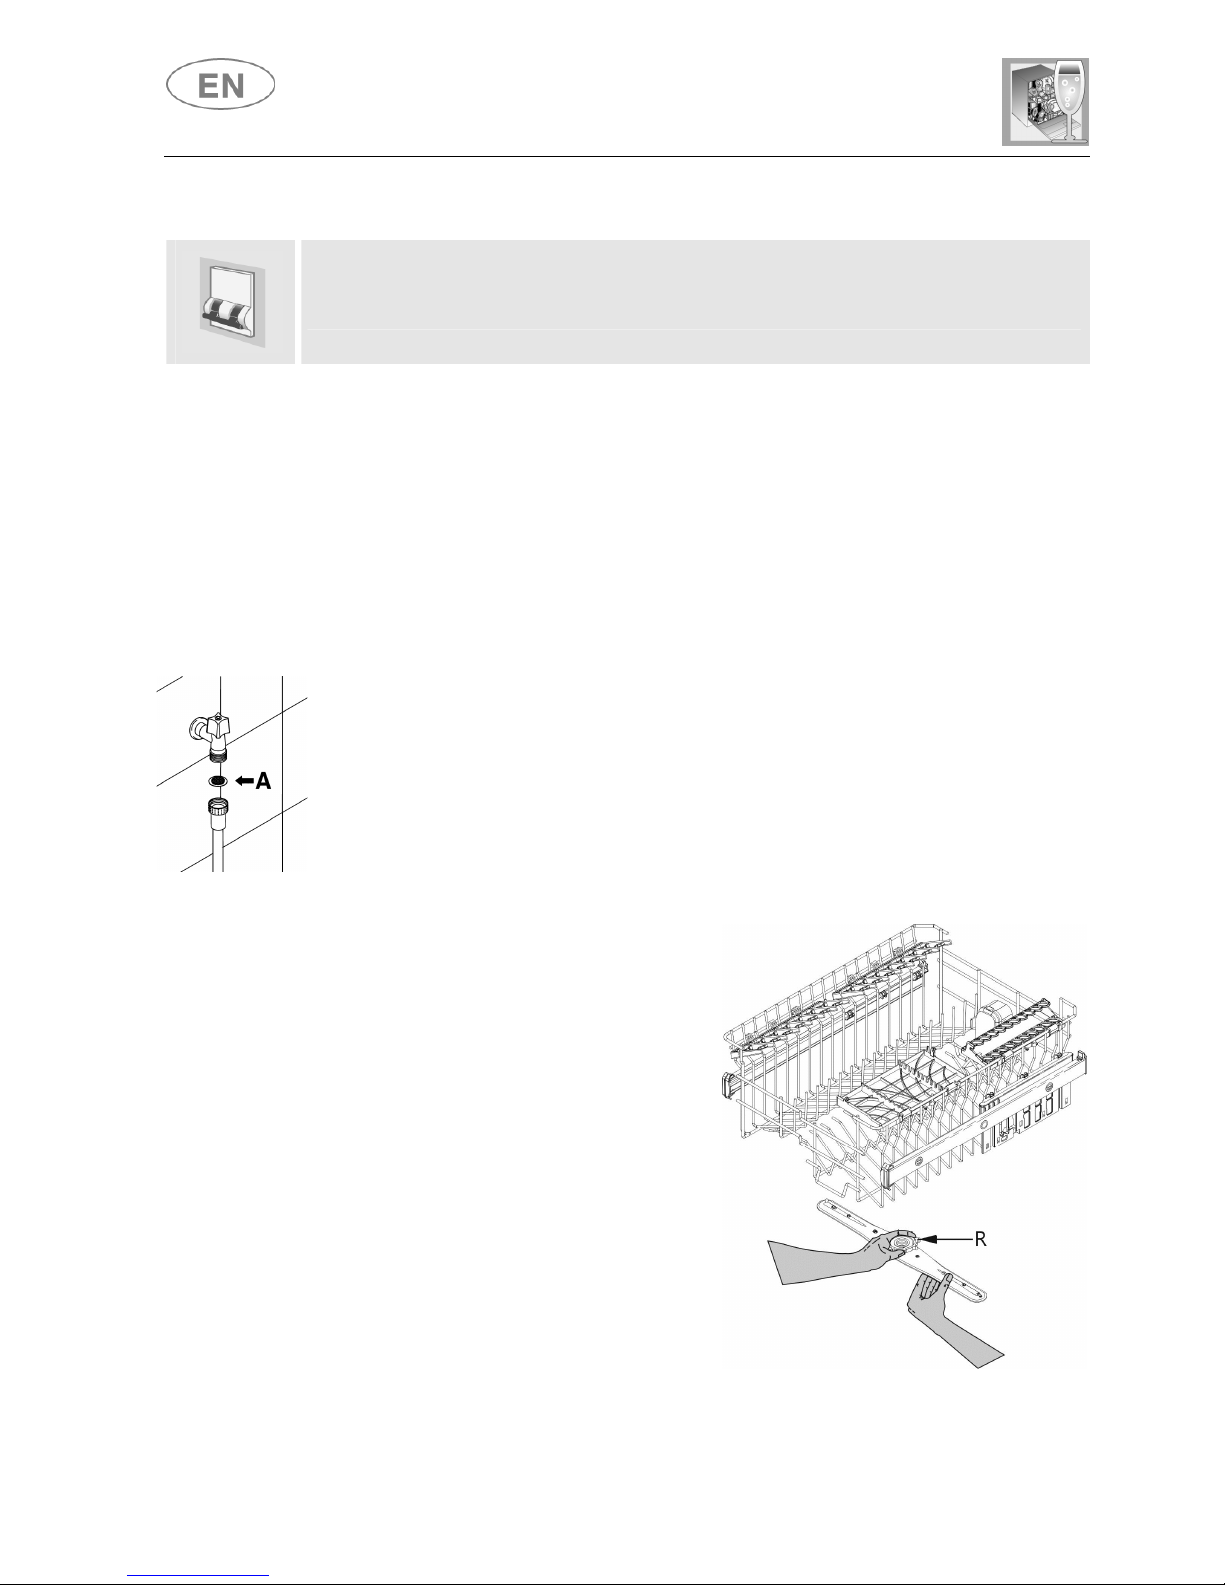
The water intake filter A located at the outlet of the water supply tap
needs to be cleaned periodically. After closing the water supply tap,
unscrew the end of the water intake hose, remove the filter A and clean
it carefully under running water. Reassemble filter A and carefully screw
the water intake hose back into position.
CLEANING THE SPRAY ARMS
The spray arms can be easily
removed for periodic cleaning of the
nozzles, to prevent possible
clogging. Wash them under running
water and carefully reinstall them,
checking that their rotation is in
no way impeded.
To remove the upper spray arm,
unscrew locking ring R.
Page 21
User instructions
21
CLEANING THE OSCILLATING BOTTOM SPRAY ARM
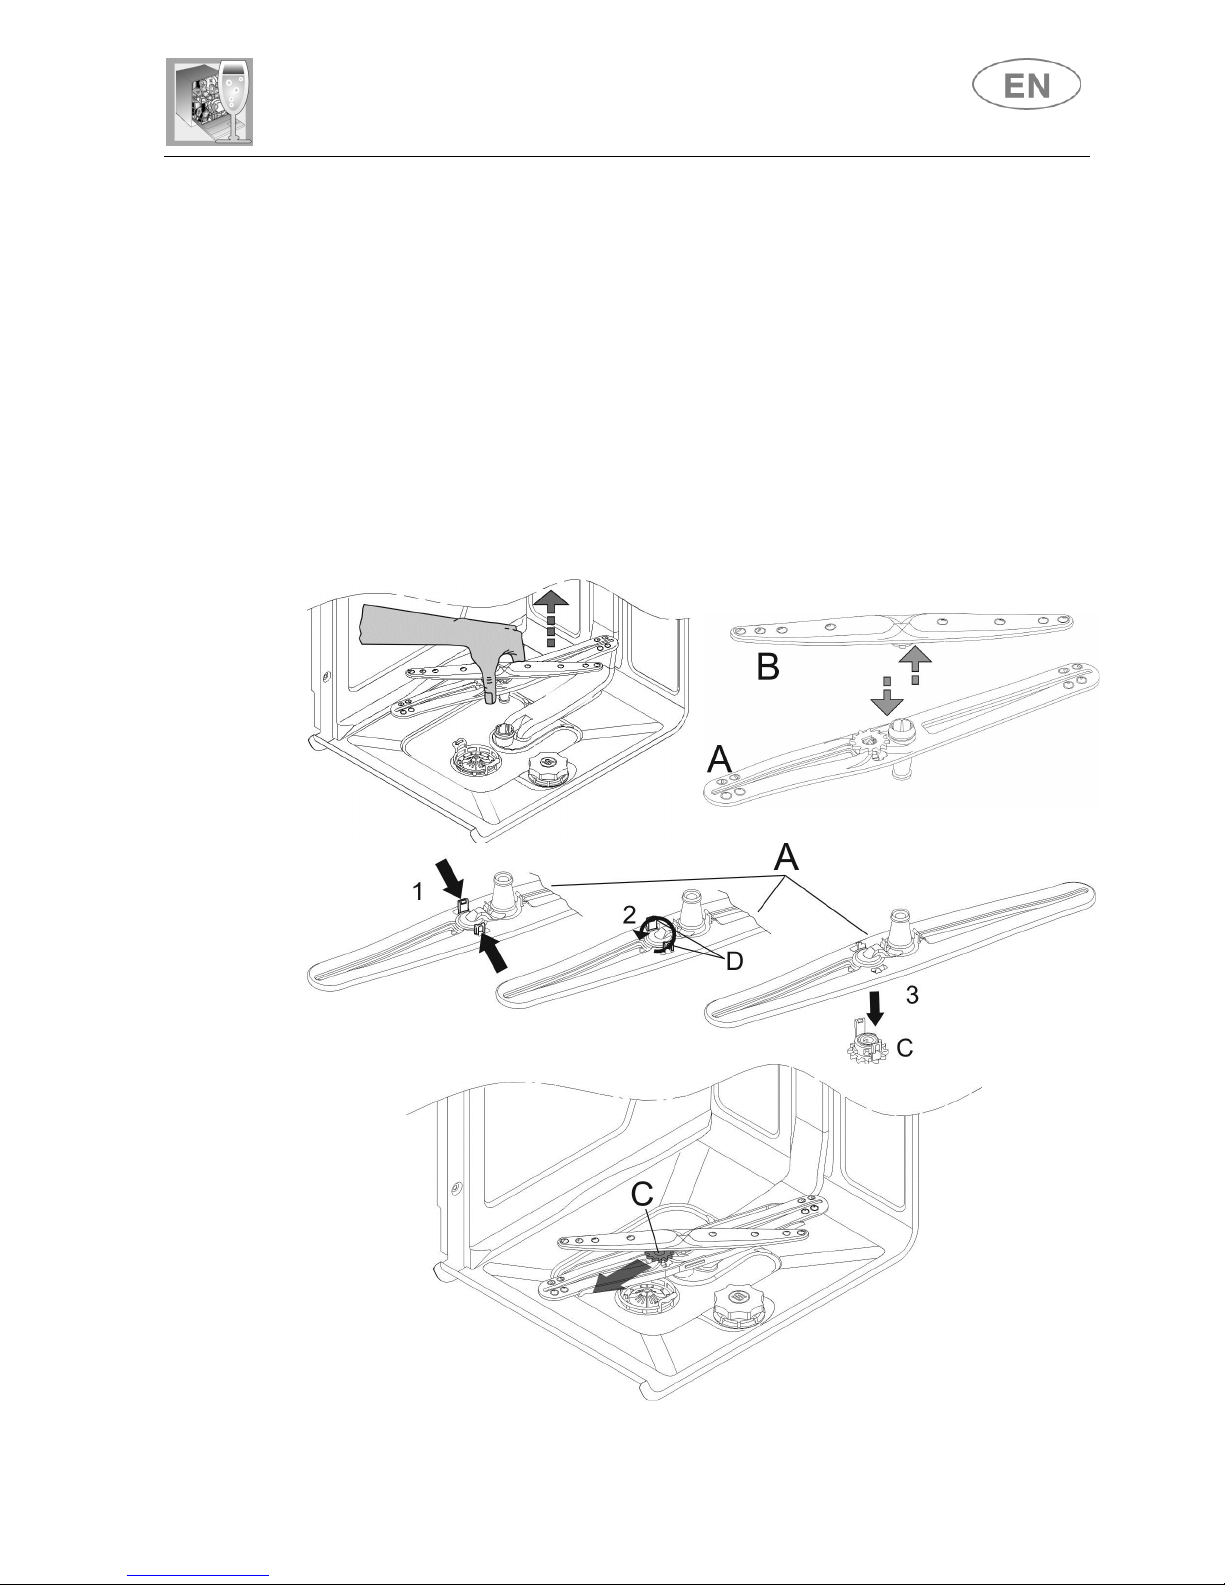
● Take hold of the bottom spray arm unit and pull it upward to release.
● Separate the oscillating arm A from the spray arm B.
● Turn the oscillating arm A upside down to release the toothed wheel C
by pressing the teeth D and turning them anticlockwise.
● Extract the wheel C and wash all components under running water.
Assemble the spray arm unit by reversing the sequence described
above.
Warning: The wheel C can only be mounted in one position; the teeth D
must engage properly.
Fit the unit so that the wheel C is facing towards the door of the
dishwasher.
Page 22
User instructions
22
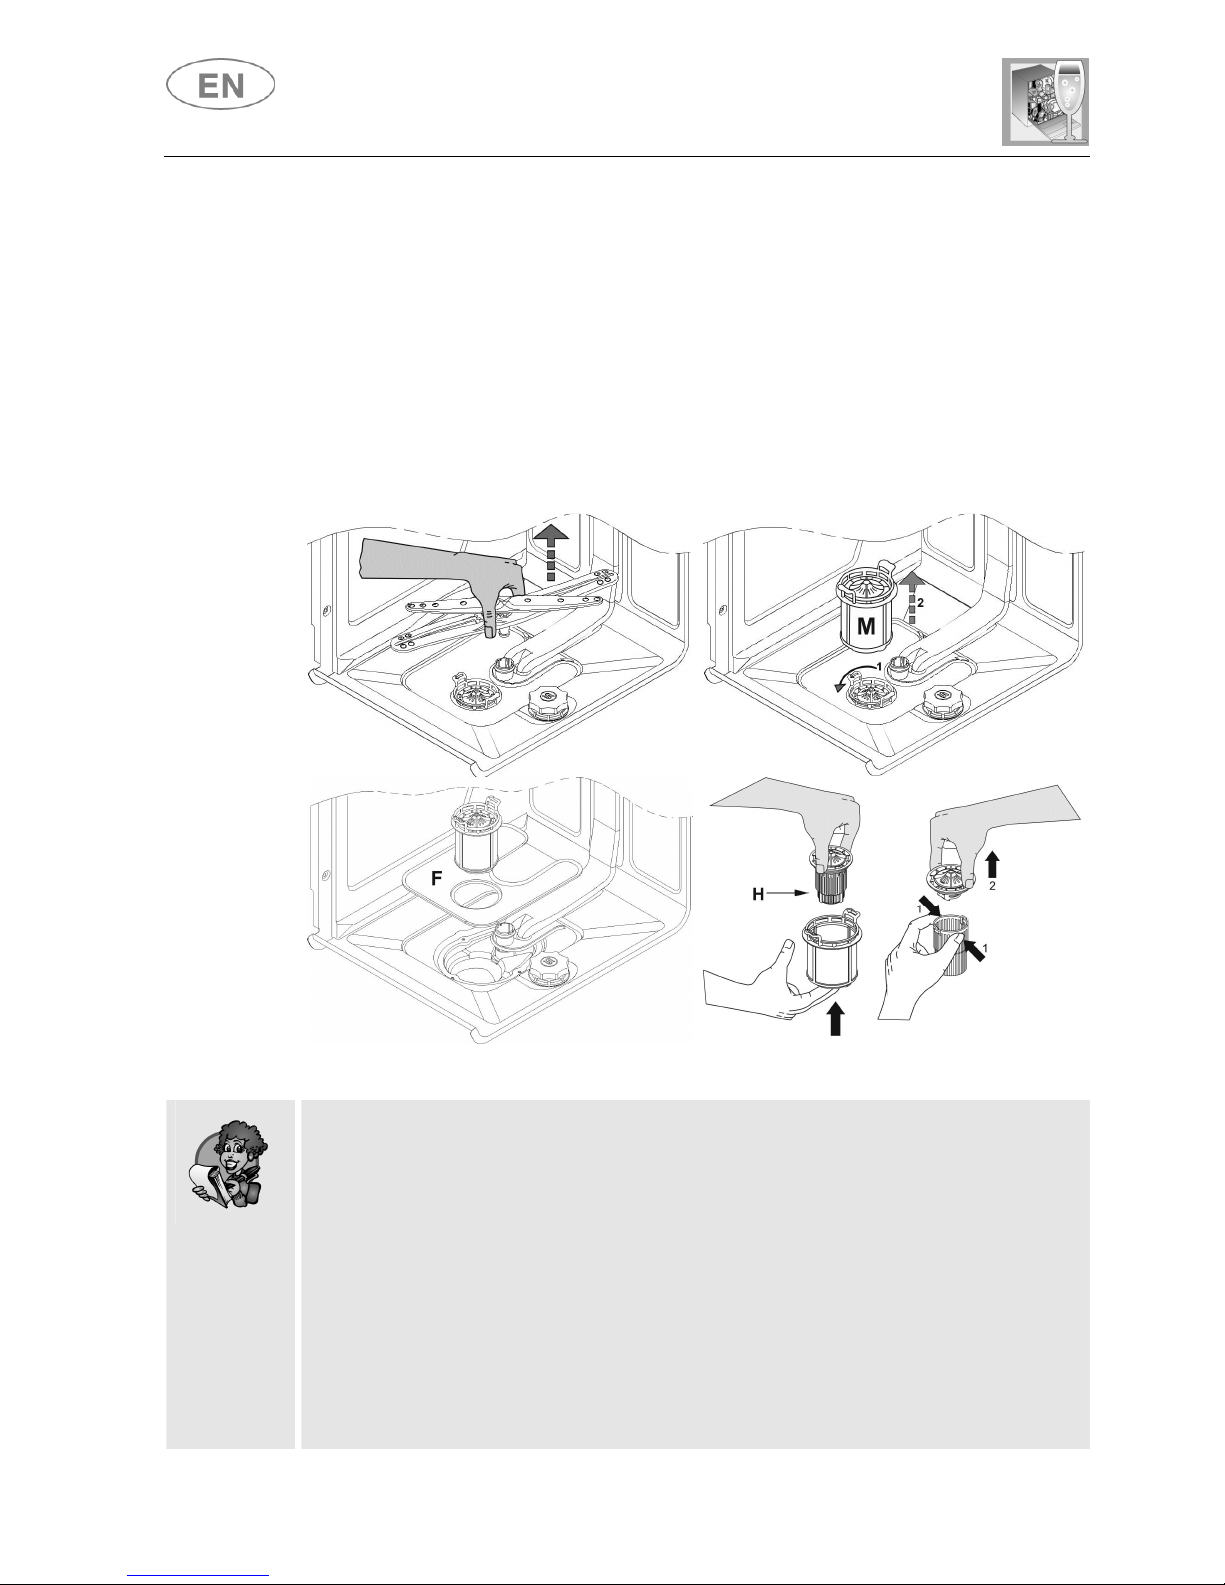
CLEANING THE FILTER UNIT
• The central filter should be cleaned regularly. To remove it, pull the
spray arm assembly upwards.
• Turn the microfilter M anticlockwise to release and extract it, then lift
the stainless steel filter F.
• Push the central filter H from below to extract it from the micro-filter.
• Separate the two parts of the plastic filter by pressing the body of
the filter in the zone shown by the arrows.
• Remove the central filter by lifting it.
GENERAL WARNINGS AND RECOMMENDATIONS FOR CORRECT
MAINTENANCE:
• The filters should be cleaned under running water using a stiff
brush.
• When removing the filter, take care that there are no food residues
on it. If any residues fall into the sump they might block hydraulic
components or the spray arm nozzles.
• It is essential to thoroughly clean the filters according to the
above instructions: the dishwasher cannot function if the filters are
clogged.
• Carefully replace the filters to avoid damaging the pump.
Page 23
User instructions
23
PROLONGED DISUSE:
• Run the soak program twice in succession.
• Unplug the power cord from the socket.
• Leave the door slightly open in order to prevent the formation of
unpleasant odours inside the wash tank.
• Fill the rinse aid dispenser.
• Shut off the water supply tap.
BEFORE STARTING THE DISHWASHER AFTER PROLONGED
DISUSE:
• Check that there are no deposits of sludge or rust inside the
water pipe: if there are, allow the water to run from the water supply
tap for a few minutes.
• Plug the power cord back into the socket.
• Reconnect the water intake hose and open the tap again.
TROUBLESHOOTING MINOR PROBLEMS
In some cases it is possible to remedy minor problems by referring to the
following instructions:
If the program fails to start, check that:
• The dishwasher is connected to the electricity supply
• There is no power outage
• The water tap is open
• The dishwasher door is properly closed
If water remains inside the dishwasher, check that:
• The drainage hose is not kinked
• The drainage trap is not blocked
• The dishwasher filters are not clogged
If the dishes do not come out clean, check that:
• The correct amount of detergent has been added
• The salt container is not empty
• The dishes have been loaded correctly
• The selected program is suitable for the dish types and their degree
of soiling
• All filters are clean and correctly installed
• The spray arm nozzles are not clogged
• There is nothing obstructing the rotation of the spray arms
Page 24
User instructions
24
If the dishes fail to dry or remain dull, check that:
• The rinse aid container is not empty
• The rinse aid dispenser setting is correct
• The detergent used is of good quality and has not lost its
effectiveness (for example, through incorrect storage, with the box
left open)
If the dishes show signs of streaking, staining etc., check that:
• The rinse aid dispenser setting is not too high
If there are visible traces of rust inside the tank:
• the tank is made of stainless steel, and therefore any rust marks are
due to external elements (fragments of rust from the water pipes,
pots, cutlery etc.). Special products are available to remove such
marks.
• Check that the detergent dose being used is correct. Certain
detergents can be more corrosive than others.
• Check that the cap of the salt container is securely closed, and that
the water softening setting is correct.
If the problem persists after following the troubleshooting instructions
above, call the nearest Authorised Service Centre.
WARNING: any operations performed on the appliance by
unauthorised technicians are not covered by the warranty and shall
be paid for by the user.
Page 25
User instructions
25
4. Troubleshooting
The dishwasher is equipped with a self-diagnostics system that is
capable of detecting and signalling a number of possible faults.
TABLE OF FAULTS DETECTED BY THE SELF-DIAGNOSTICS SYSTEM
FAULT DESCRIPTION
E1
The anti-flooding system (where present) has been tripped.
E2
The water level limitation system has tripped.
E3
The appliance cannot heat the water.
E4
The temperature sensor is disconnected.
E5
The appliance cannot take in the water.
E6
The appliance cannot drain the water from the tank.
E7
The dishwasher cannot measure the precise water quantity that has
been loaded.
E8
Problem on the water distribution system to the baskets.
E9
Water intake system malfunction
If an alarm situation occurs, the appliance interrupts the program in progress
and signals a fault.
•
Alarms E1, E2, E3, E4, E8 and E9 interrupt the current program
immediately.
•
Alarms E5 and E6 interrupt the current program; once the problem is
solved, the program will finish running.
•
Alarm E7 is displayed at the end of the cycle which is finished
regardless of the problem, as operation of the dishwasher is not
affected.
To reset an alarm:
•
open and close the door, or turn the machine off and on again. The
dishwasher can now be programmed again.
If the malfunction persists, contact your authorised Service Centre.
Page 26
User instructions
26
TECHNICAL DATA
Width
447 ÷ 449 mm
Depth measured flush with the
outer edge of the control panel
Free standing: 600 mm
Semi-integrated: 570 mm
Height Free standing: from 850 mm to 870 mm
Semi-integrated: from 820 mm to 870 mm
Capacity 10 Standard place settings
Water supply pressure min. 0,05 - max. 0,9 MPa (min. 0.5 – max. 9 bar)
Electrical characteristics See rating plate
Page 27
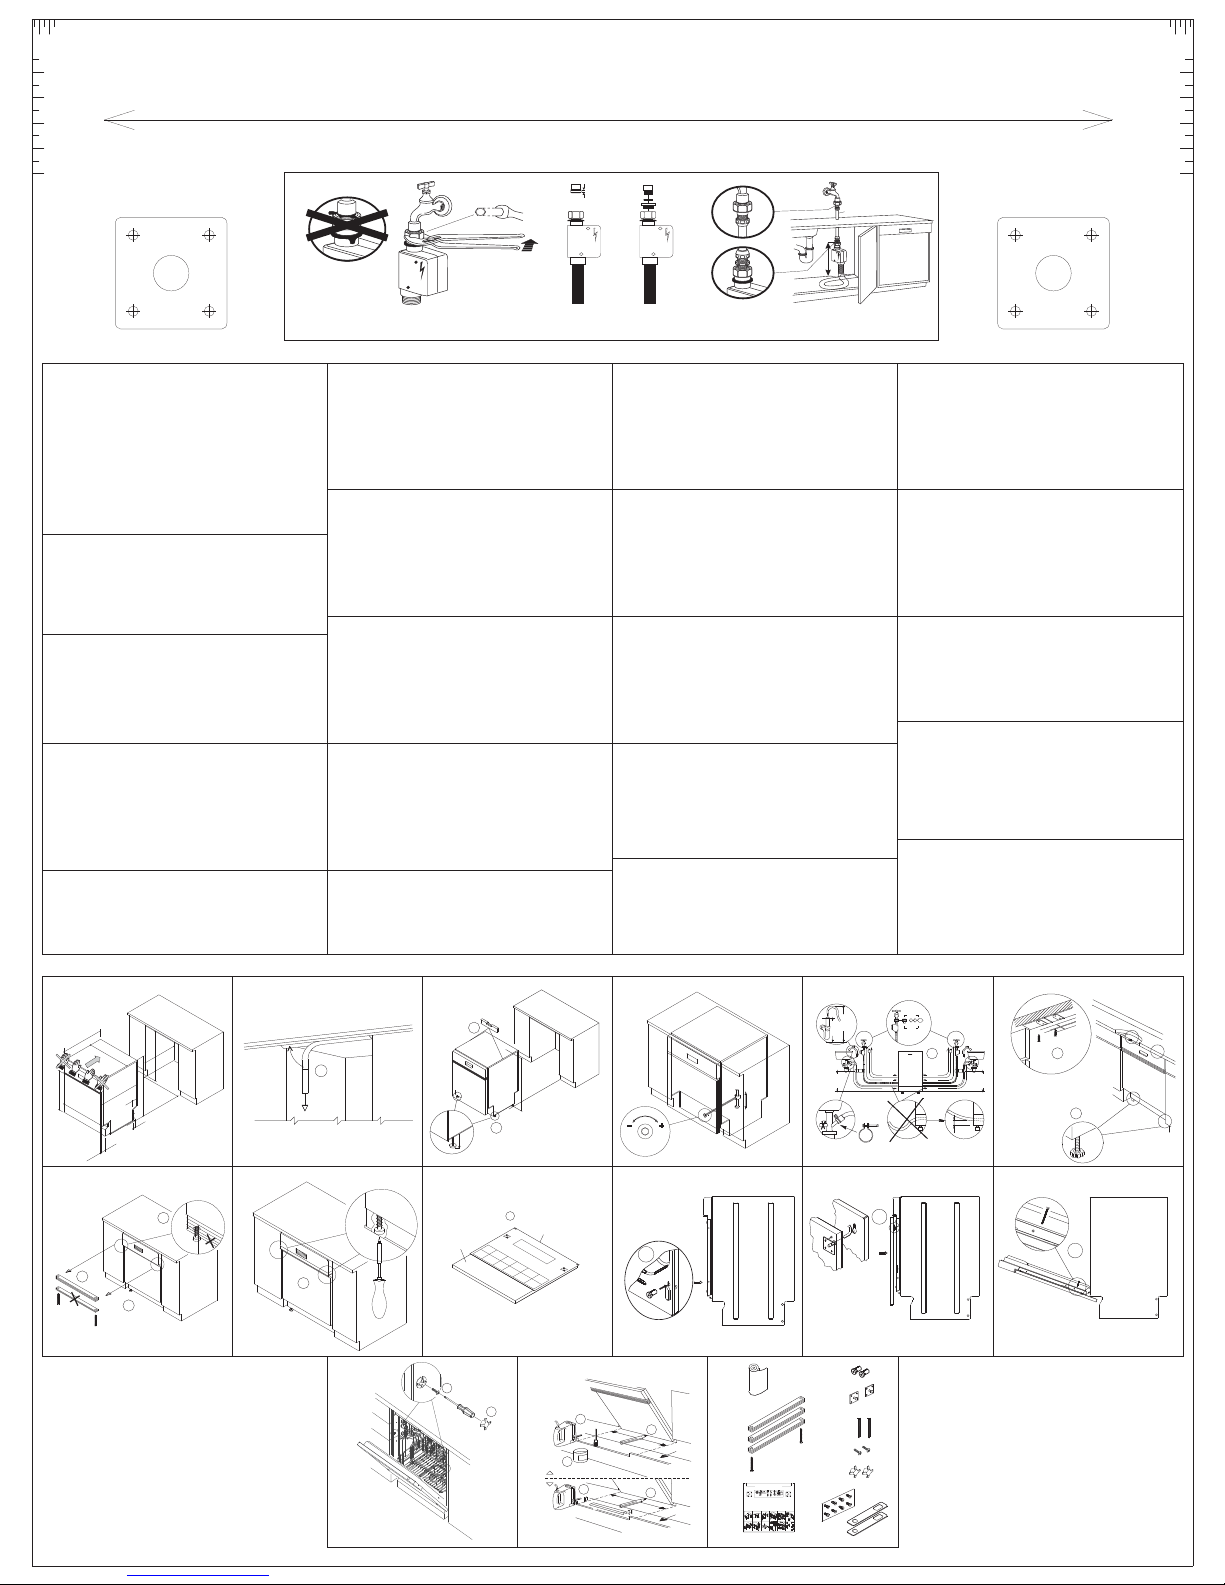
Misurare l’altezza del pannello comandi; fare coincidere l’indice relativo a tale valore conil profilo superiore della porta in legno; tracciare ilposizionamento degli agganci porta.
Measure the height of the control panel; bring the mark relating to thisvalue into line with the top edge of thewooden door; mark the positions of the door connections.
115
125
Measurer la hauteur du panneau de commandes; faire coïncider l’index relatif à cettevaleur avec le profil supérieur de la porte enbois; tracer le posi tionnement des crochets de la porte.
Die Höhe des Bedienfelds messen; Die diesem Wert entsprechende Markierung mit dem oberen Profil der Holztürzur Deckung bringen; Die Position der Türaufhängungen anzeichen.
Meet de hoogte van het bedieningspaneel; laat de markering die bij die waardehoort overeenstemmen met het bovenste profiel van de houtendeur; teken de positie van de deurhengsels af.
Medir la altura del panel de mandos; hacer coincidir el índice correspondiente adicho valor con el perfil superior de la puertade madera; trazar el posicionamiento de las bisagras dela puerta.
Meça a altura do painel de comandos; faça com que o indicador relativoa este valor coincida com o perfil superior daporta de madeira; marque a posição dos ganchos paraporta.
135
145
155
DE-Aquastop
DE-Aquastop
Wasserschutz/System schutz ihre Wohnung zuverlassing
Dieses
Dieses Wasserschutz/System schutz ihre Wohnung zuverlassing
Wasserschaden. Bei undichtem Wasserzulaufschlauch oder
vor
vor Wasserschaden. Bei undichtem Wasserzulaufschlauch oder
undichtem
Maschinensystem wird jeglicherweiterer Wasserzulauf
undichtem Maschinensystem wird jeglicherweiterer Wasserzulauf
unterbunden.
unterbunden.
Der Ventilkasten am Wasserstop Schlauch beinhaltet
Ventilkasten am Wasserstop Schlauch beinhaltet
Der
elektrisch
elektrisch gesteuerte Bauteile. Er darf deshalb nicht in Wasser
gesteuerte Bauteile. Er darf deshalb nicht in Wasser
getaucht
werden. Sollte das Ventilkastengehause beschadigt
getaucht werden. Sollte das Ventilkastengehause beschadigt
sein,
ist unbedingt der Netzstecker aus zu ziehen.
sein, ist unbedingt der Netzstecker aus zu ziehen.
Aquastop-Verlägerung
Aquastop-Verlägerung
Im
Handel
können längere Aquastopschläuche gekauft
Im Handel können längere Aquastopschläuche gekauft
werden,
die
von
einem
Fachmann
mit
werden, die von einem Fachmann mit dem bestehenden
Aquastopschlauch
Aquastopschlauch ausgetauscht werden müssen. Bei einer
elgenmächtigen
elgenmächtigen Verlängerung des Wasserzufuhrschlauches
trägt
der
trägt der Hersteller keine weitere Verantwortlichkelt.
CS-Systém Aquastop
CS-Systém Aquastop proti vyplavení
Tento bezpečnostní systém chrání váš byt před vyplavením.
bezpečnostní systém chrání váš byt před vyplavením.
Tento
V případě poruchy přívodní hadice nebo netěsnosti systému
V
případě poruchy přívodní hadice nebo netěsnosti systému
spotřebiče se přeruší přívod vody.
spotřebiče
Těleso bezpečnostního ventilu namontovaného na hadici
Těleso
Aquastop obsahuje elektrické prvky a nesmí se proto
Aquastop
namáčet do vody. V případě jakéhokoli poškození tělesa
namáčet
ventilu okamžitě vytáhněte zástrčku z elektrické zásuvky.
ventilu
DA-Sikkerhed
DA-Sikkerhed mod vandlækage
Dette sikkerhedssystem beskytter din lejlighed for vandskader.
sikkerhedssystem beskytter din lejlighed for vandskader.
Dette
Tilførslen af vand bliver afbrudt, hvis tilløbsslangen er defekt,
Tilførslen
eller hvis maskynsystemet er utæt.
eller
hvis maskynsystemet er utæt.
Sikkerhedsboksen på slangen indeholder elkomponenter.
Sikkerhedsboksen
Boksen må derfor ikke anbringes i vand.
Boksen
Hvis boksen bliver beskadiget, skal stikket øjeblikkeligt
Hvis
boksen bliver beskadiget, skal stikket øjeblikkeligt
tages ud af stikkontakten.
tages
ES-”Aquastop
ES-”Aquastop por septuplicado”
El sistema “AQUASTOP” por septuplicado protegesu vivienda de
sistema “AQUASTOP” por septuplicado protegesu vivienda de
El
forma fiable e de danos por escapes de agua. Se corta
forma
fiable e de danos por escapes de agua. Se corta
inmediatamente el suministro del tubo de agua en caso de
inmediatamente
cualquier fuga en tubos o en componentes del aparato.
cualquier
El cajòn de valvulas del tubo aquastop contiene
El
cajòn de valvulas del tubo aquastop contiene
componentes eléctricos. Por este motivo no debe sumergirse
componentes
en agua. En caso de que el cajòn de vàlvulas estruviera
en
agua. En caso de que el cajòn de vàlvulas estruviera
danado, debe desconectarse de la red eléctrica,
danado,
desenchufando la clavija.
desenchufando
HR AQUASTOP - Zašita pred poplavom
HR AQUASTOP -
sigurnosni sistem štiti vaš stan od štete koju može uzrokovati
Ovaj sigurnosni sistem štiti vaš stan od štete koju možeuzrokovati
Ovaj
voda.
U
voda.
U slučaju kvara na dovodnoj cijevi ili u slučaju propuštanja na
sistemu
sistemu stroja za pranje posuđa, prekida
dovod vode. č
se
se dovod vode. č
namještene
namještene na cijevi, sadrži elektri ne djelove. Zato je ne smijete
potopiti
potopiti u vodu. U slu aju da se kutija iz bilo kojeg razloga ošteti,
odmah
odmah isklju ite aparatiz elektri ne mreže.
ausgetauscht
Verlängerung
Hersteller
keine
proti vyplavení
se přeruší přívod vody.
bezpečnostního ventilu namontovaného na hadici
obsahuje elektrické prvky a nesmí se proto
do vody. V případě jakéhokoli poškození tělesa
okamžitě vytáhněte zástrčku z elektrické zásuvky.
mod vandlækage
af vand bliver afbrudt, hvis tilløbsslangen er defekt,
på slangen indeholder elkomponenter.
må derfor ikke anbringes i vand.
ud af stikkontakten.
por septuplicado”
el suministro del tubo de agua en caso de
fuga en tubos o en componentes del aparato.
eléctricos. Por este motivo no debe sumergirse
debe desconectarse de la red eléctrica,
la clavija.
Zašita pred poplavom
slučaju kvara na dovodnoj cijevi ili u slučaju propuštanja na
stroja za pranje posuđa, prekida
Ku ište
ventila, odnosno sigumosne naprave,
Ku ište ventila, odnosnosigumosne naprave,
na cijevi, sadrži elektri ne djelove. Zato je ne smijete
č
u vodu. U slu aju da se kutija iz bilo kojeg razloga ošteti,
č
isklju ite aparat izelektri ne mreže.
čč
čč
dem bestehenden
werden
des
Wasserzufuhrschlauches
weitere
Verantwortlichkelt.
č
č
müssen.
Bei
einer
min.10mm
blir skadet,
3/4”
og
må
SW 32
EN-Aquastop safety device
EN-Aquastop
The AQUASTOP is safety device. The aquastop assures that the
The AQUASTOP is
fresh water hose need only take the stress of water pressure
fresh
during the actual timer water is flowing. If the hose should begin
during
to leak during this time, the magnetic valve in the water spout
to
cuts
cuts off the flow, and the hose is relieved of pressure.
Operating pressure DIN 44995.
Operating
The valve casing on the water-stop hose contains
The
electrically controlled components. It is should not,
electrically
therefore, be submersed in water. If the housing becomes
therefore,
damaged the plug must be removed from the soket.
damaged
PT-Segurança
PT-Segurança contra os alagamentos
Este sistema de segurança protege o seu apartamento contra
Este
os danos provocados pela água.
os
A entrada da água é interrompida em caso de anomalia no tubo
A entrada
de entrada ou de permeabilidade do sistema da máquina.
de
A caixa de segurança anti/alagamento montada no tubo
A caixa
contém partes eléctricas.
contém
Não deve, por isso, ser mergulhada na água.
Não
Se, por algun motivo, a caixa ficar danificada retire
Se,
imediatamente a ficha da tomada.
imediatamente
NO-Sikring
NO-Sikring mot oversvømmelse
Dette sikkerhetssystemet beskytter boligen din mot vannskader.
Dette
Dersom det oppstår en feil på tilførselsrøret eller en lekkasje i
Dersom
maskinen, vil vanntilførselen stenges.
maskinen,
Boksen med sikkerhetssystemet er plassert pø slangen og
Boksen
inneholder elektriske deler.
inneholder
Boksen må erfor aldri dyppes i vann.
Boksen
Dersome boksen av en eller annen grunn blir skadet, må
Dersome
støpslet til maskinen snarest trekkes ut av stikkontakten.
støpslet
SK-Bezpeènost
SK-Bezpeènost proti zatopeniu
Tento bezpecnostny system chráni váš byt pred škodami
Tento
spôsobenými vodou.
spôsobenými
V prípade porušenia vstupnej rúry alebo priepustnosti na
V
systeme zariadenia, vstup vody sa pozastaví.
systeme
Bezpeènostná skrinka proti zatopeniu namontovaná na rúre
Bezpeènostná
obsahuje elektrické súèasti. Jet preto zakázané umiestnit
obsahuje
samotnú skrinku do vody. Ak sa skrinka z akasti.
samotnú
Jet preto zakázané umiestnit samotnú skrinku do vody.
Jet
Ak sa skrinka z akchkolvek dôvodov poškoddí,
Ak
ihned' uskutoènite vypojenie z elektrickej siete.
ihned'
SLO AQUASTOP - Zaščita pred poplavo
SLO AQUASTOP -
Ta
Ta varnostni sistem varuje vaše stanovanje pred škodo,ki bi jo
povzro ila
povzro ila voda. Vprimeru okvare na dovodni cevi aliv primeru
puš anja
puš anja na sistemupomivalnega stroja, se prekine dovod vode.
Ohišje
Ohišje ventila oz.
električ
električ
škatla
škatla iz kakršnegakoli razloga poškoduje, nemudoma izklopite aparat
iz
iz elektri nega omrežja.
safety device
water hose need only take the stress of water pressure
leak during this time, the magnetic valve in the water spout
off the flow, and the hose is relieved of pressure.
valve casing on the water-stop hose contains
sistema de segurança protege o seu apartamento contra
danos provocados pela água.
entrada ou de permeabilidade do sistema da máquina.
deve, por isso, ser mergulhada na água.
por algun motivo, a caixa ficar danificada retire
sikkerhetssystemet beskytter boligen din mot vannskader.
prípade porušenia vstupnej rúry alebo priepustnosti na
preto zakázané umiestnit samotnú skrinku do vody.
sa skrinka z akchkolvek dôvodov poškoddí,
varnostni sistem varuje vaše stanovanje pred škodo, ki bi jo
č
č
elektri nega omrežja.
safety device. The aquastop assures that the
the actual timer water is flowing. If the hose should begin
pressure DIN 44995.
controlled components. It is should not,
be submersed in water. If the housing becomes
the plug must be removed from the soket.
contra os alagamentos
da água é interrompida em caso de anomalia no tubo
de segurança anti/alagamento montada no tubo
partes eléctricas.
a ficha da tomada.
mot oversvømmelse
det oppstår en feil på tilførselsrøret eller en lekkasje i
vil vanntilførselen stenges.
med sikkerhetssystemet
elektriske deler.
må
erfor aldri dyppes
boksen
av en eller
til
maskinen snarest
proti zatopeniu
bezpecnostny system chráni váš byt pred škodami
vodou.
zariadenia, vstup vody sa pozastaví.
skrinka proti zatopeniu namontovaná na rúre
elektrické súèasti. Jet preto zakázané umiestnit
skrinku do vody. Ak sa skrinka z akasti.
er plassert pø slangen
i vann.
annen grunn
trekkes ut
av stikkontakten.
uskutoènite vypojenie z elektrickej siete.
Zaščita pred poplavo
č
voda. V primeru okvare na dovodni cevi ali v primeru
č
na sistemu pomivalnega stroja, se prekine dovod vode.
ventila oz.
dele. Zato je ne smete potopiti v vodo. V primeru,da se ta
ne
ne dele. Zato je ne smete potopiti v vodo. V primeru, da seta
iz kakršnegakoli razloga poškoduje, nemudoma izklopite aparat
č
č
naprave, ki je nameščena na cevi, vsebuje
Varnostne
Varnostne naprave, ki je nameščena na cevi, vsebuje
1/2”
3/4”
de sécurités pour empecher les fuites
FR-Paliers de sécurités pour empecher les fuites
FR-Paliers
Le système est doté de sept paliers de sécuritè pour éviter les
système est doté de sept paliers de sécuritè pour éviter les
Le
fuites d’eau et protége ainsi votre logement contre d’eventuels
d’eau et protége ainsi votre logement contre d’eventuels
fuites
dègats
dègats matériels.
matériels.
Si
le tuyau d’arrivée d’eau n’est pas étanche ou si la machine
Si le tuyau d’arrivée d’eau n’est pas étanche ou si la machine
fuit,
ce dispositif arrete l’ecoulement d’eau.
fuit, ce dispositif arrete l’ecoulement d’eau.
Le
boitier de sécuirité qui controle l’arrivée d’eau est situé
Le boitier de sécuirité qui controle l’arrivée d’eau est situé
sur
sur le tuyau et contient des parties électriques. Il ne faut
le tuyau et contient des parties électriques. Il ne faut
donc pas le tremper dans l’eau. S’il est endommagé pour
donc
pas le tremper dans l’eau. S’il est endommagé pour
une raison quelconque, débranchez immédiatement
raison quelconque, débranchez immédiatement
une
l’appareil en retirant la prise.
l’appareil
en retirant la prise.
IT-Sicurezza
IT-Sicurezza contro gli allagamenti
contro gli allagamenti
Questo sistema di sicurezza protegge il vostro appartamento da
sistema di sicurezza protegge il vostro appartamento da
Questo
danni dell’acqua.
danni
dell’acqua.
In caso di guasto al tubo di entrata o permeabilità del sistema
In
caso di guasto al tubo di entrata o permeabilità del sistema
della macchina, l’entrata dell’acqua viene interrotta.
della
macchina, l’entrata dell’acqua viene interrotta.
La scatola della sicurezza anti-allagamento montata sul tubo,
La
scatola della sicurezza anti-allagamento montata sul tubo,
contiene parti elettriche.
contiene
parti elettriche.
E’ pertanto proibito collocare la scatola stessa nell’acqua.
E’ pertanto
proibito collocare la scatola stessa nell’acqua.
Nel caso in cui per una ragione qualsiasi la scatola subisca
Nel
caso in cui per una ragione qualsiasi la scatola subisca
danni, togliere immediatamente la presa di collegamento
danni,
togliere immediatamente la presa di collegamento
dalla rete elettrica.
dalla
rete elettrica.
FI-Aquastop-turvajärjestelmä
FI-Aquastop-turvajärjestelmä
Tämä turvajärjestelmä suojaaasuntoasi vesivahingoilta.
turvajärjestelmä suojaaasuntoasi vesivahingoilta.
Tämä
Jos veden ottoletku tai koneen vesijärjestelmä vuotaa, vedenotto
Jos
veden ottoletku tai koneen vesijärjestelmä vuotaa, vedenotto
keskeytyy.
keskeytyy.
Aquastop/turajärjestelmän
Aquastop/turajärjestelmän kotelo on asennettu letkuun ja se
sisältää
sisältää sähköosia.
sähköosia.
Älä laita koteloa veteen.
Älä
laita koteloa veteen.
Jos kotelo jostain syystä vahingoittuu, kytke laite heti irti
Jos
kotelo jostain syystä vahingoittuu, kytke laite heti irti
sähköverkosta irrottamalla pistoke pistorasiasta.
sähköverkosta
HU-Az
eláradás ellen védő biztonsági berendezés.
HU-Az eláradás ellen védő biztonsági berendezés.
Ez a biztonsági berendezés megvédi a lakást a víz okozta
a biztonsági berendezés megvédi a lakást a víz okozta
Ez
károktól. Ha sérül a bemeneti cső, vagy a gép rendszere
károktól.
Ha sérül a bemeneti cső, vagy a gép rendszere
átereszti a vizet, a vízbemenet leáll.
átereszti
a vizet, a vízbemenet leáll.
Acsőre
A csőre szerelt eláradás ellen védő biztonsági doboz
szerelt eláradás ellen védő biztonsági doboz
elektromos alkotórészeket tartalmaz. Emiatt tilos a dobozt víz
elektromos
alkotórészeket tartalmaz. Emiatt tilos a dobozt víz
alá helyezni. Ha bármilyen okból megsérül a doboz, válassza
alá
helyezni. Ha bármilyen okból megsérül a doboz, válassza
le a csatlakozót az elektromos hálózatról.
le
a csatlakozót az elektromos hálózatról.
MK AQUASTOP - a
MK AQUASTOP - a
Oboj a ro o a a.
з штитен систем штити вaши т cтaн oд пoпл в
з штитен
Oboj a ro o a a.
Bo a
Bo ao y a e a o o a
cлyчajy н штeт в њ н д в днaтa цевк или пaк aкo
oyaeaoo a
cлyчajy н штeт в њ н д в днaтa цевк или
пpoпyштa систем в мaшинaтa з ми њ д ви, ce пpeкин в
пpoпyштa систем
д в д т н в д Кyкиштeт нa в нтл т oднocнo нa иrypнocнaт
ooo a oa. o e o c a
н в д Кyкиштeт нa в нтл т oднocнo нa иrypнocнaт
ooo a oa. o e o c a
двдт
нaп вa кoja e нaм т нa нa цевкaтa, coд жи лeктpични д л ви и
pa ec e p e e o
e нaм т нa нa цевкaтa, coд жи лeктpични длвии
нaп вa кoja
pa ec e p e e o
з тoa нe м т д тoпите вo вoд Aкo ce cл чи од билo кaкви
a c ee e a ja a. y
з тoa нe м т д тoпите
aceeea
п ичини кyкиштeт дa ce oштeти п т т вeд нaш иcкл ч те
po,
п ичини
p o , a apa o a y e ro
кyкиштeт дa ceoштeти п т т вeд нaш иcкл ч те
oд лeкт ичнaт м ж
ep apea.
ep apea.
oд лeкт ичнaт м ж
kotelo on asennettu letkuun ja se
irrottamalla pistoke pistorasiasta.
Заштитa oд пoплaв
Заштитa
oд пoплaв
систем штити вaши т cтaн oд пoпл в
o a e e ca o y a
oaee
в мaшинaтa з ми њ д ви, ce пpeкин в
ja a. y
вo вoд Aкo ce cл чиод билo кaкви
a apa o a y e ro
Cuø10
MIN
40cm
пaк aкo
ca o y a
115
125
135
145
155
NL-Dit
veiligheidssysteem beveiligt uw woning tegen
NL-Dit veiligheidssysteem beveiligt uw woning tegen
waterschade.
waterschade.
Bij lekage in de aanvoerslang of in de machine zelf wordt de
lekage in de aanvoerslang of in de machine zelf wordt de
Bij
wateraanvoer stopgezet. Het aflsuitmechanisme bevindt zich in
wateraanvoer
een doos op de aanvoerslang en bevat elektrische
een
componenten.
componenten.
Daarom
Daarom is het verboden het doosje in water onder te
dompelen.
dompelen.
Mocht de doos beschadigingen vertonen, dan dient de
Mocht
stekker onmiddellijk uit de contactdoos te worden
stekker
genomen om aldus de netverbinding uit te schakelen.
genomen
SV-Säkerhetssystem
SV-Säkerhetssystem mot översvämning
Detta sakerhetssystem skyddar din lägenhet mot vattenskador.
Detta
Om de ingående slangen går sönder eller om maskinen läcker
Om
vatten avbryts vattenintaget.
vatten
Lådan med översvämningsskyddet som är monterad på
Lådan
slangen innehåller elektriska komponenter.
slangen
Därför är det förbjudet att placera lådan i fråga i vatten.
Därför
Dra omedelbart ut stikkontakten ur eluttaget om lådan
Dra
skadas av någon anledning.
skadas
PL-System AQUA STOP
PL-System AQUA STOP
AQUA STOP to system zabezpieczaj cy przed zalaniem.
AQUA STOP to system zabezpieczaj cy przed zalaniem.
W przypadku awarii w a doprowadzaj cego wod lub
W przypadku awarii w a doprowadzaj cego wod lub
nieszczelno ci pralki, dopyw wody jest automatycznie odcinany.
nieszczelno ci pralki, dopyw wody jest automatycznie odcinany.
Urządzenie zabezpieczające przez zalaniem zamontowane na
Urządzenie zabezpieczające przez zalaniem zamontowane na
wężu zawiera części elektryczne i nie może być zanurzane w
wężu zawiera części elektryczne i nie może być zanurzane w
wodzie.
wodzie.
Jeśli z jakiegokolwiek powodu urządzenie zostanie
Jeśli z jakiegokolwiek powodu urządzenie zostanie
uskodzone, należy bezzwłocznie odłączyć je od zasilania.
uskodzone, należy bezzwłocznie odłączyć je od zasilania.
RU-Защита от затопления
RU-Защита от затопления
Эта предохранительная система предотвращает угрозу
Эта предохранительная система предотвращает угрозу
затопления Вашей квартиры.
затопления Вашей квартиры.
В случае неисправности шланга подачи воды или утечек
В случае неисправности шланга подачи воды или утечек
из машины подача воды в нее прерывается.
из машины подача воды в нее прерывается.
В состав коробки с предохранительным устройством,
В состав коробки с предохранительным устройством,
установленным на шланге, входят электрические
установленным на шланге, входят электрические
компоненты. Поэтому, запрещается погружать эту
компоненты. Поэтому, запрещается погружать эту
коробку в воду. В случае повреждения коробки по
коробку в воду. В случае повреждения коробки по
какой-либо причине следует немедленно отключить
какой-либо причине следует немедленно отключить
машину от сети элеткропитания.
машину от сети элеткропитания.
SR-Sigurnosni
SR-Sigurnosni uređaj protiv poplave
Ovaj sigurnosni uređaj je specijalno projektovan za sprečavanje
Ovaj
poplave. Dovod vode se zaustavlja ako je ulazno crevo oštećeno
poplave.
ili ako mašina za pranje veša više nije nepropusna za vodu.
ili
Kućište sigurnosnog uređaja protiv poplave, ugrađeno u ulazno
Kućište
crevo, sadrži električne komponente. Zato treba sprečiti da kućište
crevo,
uređaja protiv poplave dođe u dodir s vodom. Ukoliko se kućište
uređaja
uređaja protiv poplave na neki način ošteti, odmah izvucite utikač
uređaja
iz utičnice.
iz
stopgezet. Het aflsuitmechanisme bevindt zich in
doos op de aanvoerslang en bevat elektrische
is het verboden het doosje in water onder te
de doos beschadigingen vertonen, dan dient de
onmiddellijk uit de contactdoos te worden
om aldus de netverbinding uit te schakelen.
sakerhetssystem skyddar din lägenhet mot vattenskador.
de ingående slangen går sönder eller om maskinen läcker
avbryts vattenintaget.
med översvämningsskyddet som är monterad på
är det förbjudet att placera lådan i fråga i vatten.
omedelbart ut stikkontakten ur eluttaget om lådan
av någon anledning.
sigurnosni uređaj je specijalno projektovan za sprečavanje
ako mašina za pranje veša više nije nepropusna za vodu.
sigurnosnog uređaja protiv poplave, ugrađeno u ulazno
sadrži električne komponente. Zato treba sprečiti da kućište
protiv poplave dođe u dodir s vodom. Ukoliko se kućište
protiv poplave na neki način ošteti, odmah izvucite utikač
utičnice.
mot översvämning
innehåller elektriska komponenter.
ą
ęż ą ę
ęż ą ę
śł
śł
ą
uređaj protiv poplave
Dovod vode se zaustavlja ako je ulazno crevo oštećeno
19 570 0080 00
123456
m
1,10
m
0,5
570
580
-
510 - 580510
448
16-24
820
570
448
min. 570min.
min. 820min.
450
550
50
820÷870
25
145
1
90
3
H
2
H
max.1,10 mmax.
min.0,5 mmin.
m
0,4
min.0,4 mmin.
1/2”
S
N SF
3/4”
0,3-10bar0,3-10bar
1,14m1,14m
m
1,23m1,23
m
1,78m1,78
0,3-10bar0,3-10bar
4
1,25m1,25m
m
1,50m1,50
m
1,66m1,66
m
0,00
min.0,00 mmin.
3x16
6
m
0,4
min.0,4 mmin.
5
H
789101112
Lato
Latosuperiore
superiore
11
Bordsupérieure
Bord
7
8
10
9
13 14 15
supérieure
Upperedge
Upper
edge
Oberkante
Superficie
Superficieinterna
Surfaceinterne
Surface
Innersurface
Inner
surface
Innenfläche
Innenfläche
interna
interne
Oberkante
12
2 x (sx-dx)
15
16
18
17
1
8
19
Zet
Allineare
Zethemopéénlijnmetdebovensterandvanhet
hemopéénlijnmetdebovensterandvanhet
Allinearealbordosuperioredelpannelloporta.
albordosuperioredelpannelloporta.
durpaneel.
d
Alignwiththetopedgeofthedoorpanel.
A
urpaneel.
lign
withthetopedgeofthedoorpanel.
Alinear
Aligner
respectodelbordesuperiordelpanelpuerta.
aubordsupérieurdupanneaudelaporte.
Alinearrespectodelbordesuperiordelpanelpuerta.
Aligneraubordsupérieurdupanneaudelaporte.
Montare
Montarelaportaeregolarelatensionedellemolle lateraliprima dell’installazione.
ATTENZIONE:
ATTENZIONE:
laportaeregolarelatensionedellemollelaterali primadell’installazione.
115
115
Alinhe
Mit
Alinhecomabordasuperiordopaineldaporta.
MitderOberkantederDekorplattefluchten.
comabordasuperiordopaineldaporta.
derOberkantederDekorplattefluchten.
Doortemplate,donotdestroy.Fitdoorandadjust hingetension beforeinstallation.
IMPORTANT:
IMPORTANT:
Door
template,donotdestroy.Fitdoorandadjusthinge tensionbefore installation.
Apresmontàgedelaporte,reglerlatensiondes ressortslateraux avantl’installation.
AT
TENTION:
ATTENTION:
A
pres
montàgedelaporte,reglerlatensiondesressorts laterauxavant l’installation.
125
125125
Türmontieren,TürfedernvorEinbaueinstellen.
WICHTIG:
WICHTIG:
montieren,TürfedernvorEinbaueinstellen.
Tür
Antesdainstalação,monteaportaeregulea tensãodas molaslaterais.
ATENÇÃO:
ATENÇÃO:
Antes
dainstalação,monteaportaereguleatensão dasmolas laterais.
135
135135
Montarlapuertayregularlosmuellaslateralesentes dela instalación.
IMPORTANTE:
IMPORTANTE:
Montar
lapuertayregularlosmuellaslateralesentesde lainstalación.
145
145145
155155
155
m
m
m
0m
1/2”1/2”
in.1
m
min.10
3/4”
3/4”3/4”
Cuø10Cuø10
2
2
SW32SW32
18
17
11
Aquastop
Aquastopsafetydevice
safetydevice
Sicurezza
Sicurezzacontrogliallagamenti
controgliallagamenti
TheAQUASTOPis
TheAQUASTOPissafetydevice.Theaquastop
safetydevice.Theaquastop
Questosistemadisicurezzaproteggeilvostro
Q
u
esto
sistemadisicurezzaproteggeilvostro
thatthefreshwaterhoseneedonlytakethe
ssures
assuresthatthefreshwaterhoseneedonlytakethe
a
appartamentodadannidell’acqua.Incasodiguastoal
appartamento
dadannidell’acqua.Incasodiguastoal
ofwaterpressureduringtheactualtimerwater
stressofwaterpressureduringtheactualtimerwater
stress
tubodientrataopermeabilitàdelsistemadella
t
ubo
dientrataopermeabilitàdelsistemadella
flowing.Ifthehoseshouldbegintoleakduringthis
s
i
isflowing.Ifthehoseshouldbegintoleakduringthis
macchina,l’entratadell’acquavieneinterrotta.
macchina,
l’entratadell’acquavieneinterrotta.
time,
themagneticvalveinthewaterspoutcutsoffthe
time,themagneticvalveinthewaterspoutcutsoffthe
Lascatoladellasicurezzaanti-allagamento
L
a
scatoladellasicurezzaanti-allagamento
ow
andthehoseisrelievedofpressure.
l
f
,
flow,andthehoseisrelievedofpressure.
montata
sultubo,contienepartielettriche.
montatasultubo,contienepartielettriche.
pressureDIN44995.
perating
OperatingpressureDIN44995.
O
proibitocollocarelascatolastessa
E’pertanto
E’pertantoproibitocollocarelascatolastessa
valvecasingonthewater-stophosecontains
The
Thevalvecasingonthewater-stophosecontains
n
’a
nell’acqua.Nelcasoincuiperunaragionequalsiasi
Nelcasoincuiperunaragionequalsiasi
e
c
ll
qua.
controlledcomponents.Itisshould
lectrically
e
electricallycontrolledcomponents.Itisshould
la
scatolasubiscadanni,togliereimmediatamentela
lascatolasubiscadanni,togliereimmediatamentela
therefore,besubmersedinwater.Ifthe
not,
not,therefore,besubmersedinwater.Ifthe
p
presadicollegamentodallareteelettrica.
resa
dicollegamentodallareteelettrica.
using
becomesdamagedtheplugmustbe
o
h
housingbecomesdamagedtheplugmustbe
HRAQUASTOP-
Zašitapredpoplavom
HRAQUASTOP-Zašitapredpoplavom
fromthesoket.
removed
removedfromthesoket.
O
že
vaj
sigurnosnisistemštitivašstanodštetekojumo
Ovajsigurnosnisistemštitivašstanodštetekojumože
uzrokovati
voda.
uzrokovativoda.
MKAQUASTOP- aЗаштитaoдпoплaв
oäïoïëaâ
MKAQUASTOP- aЗаштитa
U
slučajukvaranadovodnojcijeviiliuslučaju
Uslučajukvaranadovodnojcijeviiliuslučaju
зaштитенсистемroштитивaшиoтcтaнoд
Obojзaштитенсистемroштитивaшиoтcтaнoд
Oboj
propuštanja
nasistemustrojazapranjeposuđa,prekida
propuštanjanasistemustrojazapranjeposuđa,prekida
ïoïëaâa.
ïoïëaâa.Bocëy÷ajyíaoøòeòyâaœeíaäoâoäíaòa
Bocëy÷ajyíaoøòeòyâaœeíaäoâoäíaòa
dovodvode.
sedovodvode.
se
илипaкaкoпpoпyштaсистемвoмaшинaтaзa
цевкaилипaкaкoпpoпyштaсистемвoмaшинaтaзa
öåâêa
č
ventila,odnosnosigumosnenaprave,
č
Kuište
Kuišteventila,odnosnosigumosnenaprave,
ìèeœe
caäoâè,ceïpeêèíyâaäoâoäoòíaâoäa.
ìèeœecaäoâè,ceïpeêèíyâaäoâoäoòíaâoäa.
nacijevi,sadržielektrinedjelove.
č
namještene
č
namještenenacijevi,sadržielektrinedjelove.
Z
č
č
jenesmijetepotopitiuvodu.Usluajudasekutija
ato
Zatojenesmijetepotopitiuvodu.Usluajudase kutija
íaâeíòëoòoäíocíoíacèrypíocíaòa
Êyêèøòeòo
Êyêèøòeòoíaâeíòëoòoäíocíoíacèrypíocíaòa
iz
bilokojegrazlogaošteti,odmahiskljuiteaparatiz
č
č
izbilokojegrazlogaošteti,odmahiskljuiteaparatiz
êojaeíaìecòeíaíaöåâêaòa,coäpæè
íaïpaâa
íaïpaâaêojaeíaìecòeíaíaöåâêaòa,coäpæè
mreže.
elektrine
č
č
elektrinemreže.
eëeêòpè÷íè
äeëoâèèçaòoaíecìeeòeäajaòoïèòå
eлeктpичнидeлoвиизaтoaнecмeeтeдajaтoпите
вoдa.Aкocecлyчиодбилoкaквипpичини
âo
вoвoдa.Aкocecлyчиодбилoкaквипpичини
äaceoøòeòè,aïapaòoòâeäaíaø
êyêèøòeòo
êyêèøòeòoäaceoøòeòè,aïapaòoòâeäaíaø
ècêëy÷eòå
rooäeëeêòpè÷íaòaìpeæa.
ècêëy÷eòårooäeëeêòpè÷íaòaìpeæa.
1 2 3 4 5
1
7 8 9 10 11
7
8
10
9
0
50
5
4
4
00
00
MIN
MIN
0
0cm
40cm
4
57
570
9
9
1
1
Paliersdesécuritéspourempecherlesfuites
Paliers
desécuritéspourempecherlesfuites
Aquastop
Aquastop
“Aquastop”por
septuplicado”
“Aquastop”porseptuplicado”
Le
Lesystèmeestdotédeseptpaliersdesécuritèpour
systèmeestdotédeseptpaliersdesécuritèpour
Dieses
El
Wasserschutz-SystemschutzihreWohnung
sistema“AQUASTOP”porseptuplicadoprotegesu
DiesesWasserschutz-SystemschutzihreWohnung
Elsistema“AQUASTOP”porseptuplicadoprotegesu
éviter
éviterlesfuitesd’eauetprotégeainsivotrelogement
lesfuitesd’eauetprotégeainsivotrelogement
zuverlassing
vivienda
zuverlassingvorWasserschaden.Beiundichtem
vorWasserschaden.Beiundichtem
deformafiableededanosporescapesde
viviendadeformafiableededanosporescapesde
d’eventuelsdègatsmatériels.
contred’eventuelsdègatsmatériels.
c
ontre
Wasserzulaufschlauchoderundichtem
oderundichtem
Secortainmediatamenteelsuministrodeagua
Wasserzulaufschlauch
agua.
agua.Secortainmediatamenteelsuministrodeagua
Si
letuyaud’arrivéed’eaun’estpasétancheousila
Siletuyaud’arrivéed’eaun’estpasétancheousila
MaschinensystemwirdjeglicherweitererWasserzulauf
Maschinensystem
en
encasodecualquierfugaentubosoencomponentes
wirdjeglicherweitererWasserzulauf
casodecualquierfugaentubosoencomponentes
machine
fuit,cedispositifarretel’ecoulementd’eau.
machinefuit,cedispositifarretel’ecoulementd’eau.
unterbunden.
delaparato.
aparato.
unterbunden.
del
boitierdesécuiritéquicontrolel’arrivéed’eau
Leboitierdesécuiritéquicontrolel’arrivéed’eau
Le
er
VentilkastenamWasserstopSchlauch
cajòndevalvulasdeltuboacquastopcontiene
l
D
DerVentilkastenamWasserstopSchlauch
E
Elcajòndevalvulasdeltuboacquastopcontiene
est
situésurletuyauetcontientdesparties
estsituésurletuyauetcontientdesparties
elektrischgesteuerteBauteile.
eléctricos.Porestemotivonodebe
beinhaltet
componentes
beinhaltetelektrischgesteuerteBauteile.
componenteseléctricos.Porestemotivonodebe
Ilnefautdoncpasletremperdans
é
électriques.Ilnefautdoncpasletremperdans
lectriques.
darfdeshalbnichtinWassergetauchtwerden.
enagua.Encasodequeelcajònde
Er
sumergirse
ErdarfdeshalbnichtinWassergetauchtwerden.
sumergirseenagua.Encasodequeelcajònde
l’eau.
S’ilestendommagépouruneraison
l’eau.S’ilestendommagépouruneraison
Sollte
vàlvulas
dasVentilkastengehausebeschadigtsein,
estuvieradanado,debedesconectarsede
SolltedasVentilkastengehausebeschadigtsein,
vàlvulasestuvieradanado,debedesconectarsede
débranchezimmédiatementl’appareil
q
quelconque,débranchezimmédiatementl’appareil
uelconque,
unbedingtderNetzsteckerauszuziehen.
redeléctrica,desenchufandolaclavija.
ist
la
istunbedingtderNetzsteckerauszuziehen.
laredeléctrica,desenchufandolaclavija.
en
retirantlaprise.
enretirantlaprise.
Aquastop-Verlägerung
Aquastop-Verlägerung
YUAQUASTOP-Заштитaпpeдпoплaвoм
SLOAQUASTOP-Zaščitapredpoplavo
Zaščitapredpoplavo
ïpeäïoïëaâoì
YUAQUASTOP-Заштитa
SLOAQUASTOP-
HandelkönnenlängereAquastopschläuche
Im
ImHandelkönnenlängereAquastopschläuche
Oвajбезбедноснисистемвaшстaнодштетеко¼у
Tavarnostnisistemvarujevašestanovanjepredškodo,
varnostnisistemvarujevašestanovanjepredškodo,
безбедноснисистемвaшстaнодштетеко¼у
Ta
Oâaj
gekauft
werden,dievoneinemFachmannmitdem
gekauftwerden,dievoneinemFachmannmitdem
č
ki
ìîæå
bijopovzroilavoda.Vprimeruokvarenadovodni
можедaузpкоуjeвoдa.Ycлyчajyквapaнaвoдoвoднoj
äaóçpêîójeâoäa.Ycëy÷ajyêâapaíaâoäoâoäíoj
kibijopovzroilavoda.Vprimeruokvarenadovodni
č
ausgetauscht
bestehendenAquastopschlauch
bestehendenAquastopschlauchausgetauscht
č
alivprimerupušanjanasistemupomivalnega
илиycлyчajyпрекидaceoвoдaвoдe.
cevi
цевиилиycлyчajyпрекидaceoвoдaвoдe.
öåâè
cevialivprimerupušanjanasistemupomivalnega
č
werden
müssen.Beieinerelgenmächtigen
werdenmüssen.Beieinerelgenmächtigen
troja,
øòå
seprekinedovodvode.
вeнтиaoднocнoбезбедноснeнaпрaвe,
s
Êyžè
Кyžиштевeнтиaoднocнoбезбедноснeнaпрaвe,
stroja,seprekinedovodvode.
desWasserzufuhrschlauchesträgt
Verlängerung
VerlängerungdesWasserzufuhrschlauchesträgt
íaöåâè,caäæèeëeêòpè÷íeäeëoâe.Çàòo
ìoíòèðaíe
ìoíòèðaíeíaöåâè,caäæèeëeêòpè÷íeäeëoâe.Çàòo
HerstellerkeineweitereVerantwortlichkelt.
er
d
derHerstellerkeineweitereVerantwortlichkelt.
ventilaoz.
naprave,kijename
a
äajeïoòaï
eyâoäy
ëy÷ajyäace
n
ò
c
nostne
i
šče
œa
.Y
r
cìeòå
h
e
Va
e
O
šj
í
íecìeòåäajeïoòaïœaòeyâoäy.Ycëy÷ajyäace
Ohišjeventilaoz.
Varnostnenaprave,kijenameščena
ne
na
êóòèja
dele.
cevi,vsebujeelektrič
избилoкorpaзлoraoштети,oдмaxиcкœyчите
кутиjaизбилoкorpaзлoraoштети,oдмaxиcкœyчите
nedele.
nacevi,vsebujeelektrič
jenesmetepotopitivvodo.Vprimeru,daseta
èçeëeêòpè÷íeìðeæå.
Zato
aïapaò
aïapaòèçeëeêòpè÷íeìðeæå.
Zatojenesmetepotopitivvodo.Vprimeru,daseta
atla
izkakršnegakolirazlogapoškoduje,nemudoma
šk
škatlaizkakršnegakolirazlogapoškoduje,nemudoma
aparatizelektrinegaomrežja.
izklopite
č
izklopiteaparatizelektrinegaomrežja.
č
6
1/2”
m
0m
0
S
NSF
,1
1,1
1
m
m
ax.
0,5
0,5
3/4”
max.
m
n.
in.
i
3
m
m
0,3-10bar0,3-10bar
0,3-10bar0,3-10bar
3x16
6
4
1,25m1,25m
1,14m1,14m
m
m
m
m
,4
m
m
1,50m1,50
1,23m1,23
0,4
0,4
0,4
0
.
n.
in.
in.
i
m
min
m
m
m
m
1,66m1,66
1,78m1,78
5
m
m
0
,00
0,0
.
.0
in
min
m
2
820-
820-
820-
820-
870
8
7
0
870
870
12
12
12
1
15
11
14
13
16
8
15
14
13
13
11
13
14
12
13
14
15
16
Page 28

COUNTRY COMPANY CC TELEPHONE E-MAIL / FAX
BULGARIA TEKA BULGARIA LTD. 359 2 9768 330 2 9768 332
FRANCE TEKA FRANCE S.A.S. 33 1 343 01597 1 343 01598
KOREA (SOUTH REP.) TEKA KOREA CO. LTD. 82 2 599 4444 222 345 668
MAROC TEKA MAROC, SA 34 942 355 286 942 355 260
PAKISTAN KÜPPERSBUSCH-TEKA PAKISTAN Pvt. Ltd. 92 42 5757676 42 631 2183
ROMANIA SC TEKA KÜCHENTECHNIK ROMANIA SRL 40 21 233 44 50 21 233 44 51
THAILAND TEKA (THAILAND) CO. LTD. 66 2 652 2999 2 652 2740 1
VENEZUELA TEKA ANDINA, S.A. 58 2 1229 12821 [email protected]
VIETNAM TEKA VIETNAM CO LTD 848 38 258 746 38 258 747
TEKA KÜCHENTECHNIK GmbH
Sechsheldener Str. 122
35708 Haiger (Germany)
Tel.: +49 2771 8141 0
Fax: +49 2771 8141 10
[email protected]
TEKA INDUSTRIAL, S.A.
C/ Cajo, 17
39011 Santander (Spain)
Tel.: +34 942 355050
Fax: +34 942 347694
[email protected]
www.teka.com
 Loading...