

Page 1

DW 605 S
12place settings
Hal f-loa d f unct ion
Page 2

Dear Customer,
Pleasecarefully readthismanualbeforeusingt he
dishwasher,it will help you to use and maintainthe
dishw ash er pro perl y.
Keepit torefertoitata laterdate.
Passitontoanysubsequentowneroftheappliance.
This manual con tain s sect ion s on safety In struction s,
Operating Instructions, Installation Instructions and
Troubles hooting Tip s , etc.
ControlPanel...................................................3
DishwasherFeatures.......................................3
A WaterSoften er............. .... .... ...... ....... .... .....4、
B LoadingtheSaltinto theSoftener.................5、
C FilltheRinse Aid Dispenser.........................5、
D Functionof Detergent.................................6、
Atten tion before or af ter loading the Dis hwas her
Baskets..........................................................9
The Method Loading Norm al Dish ware....... ......10
Toreview the section on t roublesho oting Tips
willhelp youtosolve somecommonproblems
byyourself .
Ifyou can not solve the problems b y you rself ,
please ask f or the help of professional technicians.
The manufac turer,f ollow ing a policy of con sta nt
development andupdating of the product, may
make modificatio ns witho ut gi ving prior notice.
This user manual shallalsobegotfromthe
manufactureror responsiblevendor.
WashCycle Table...........................................11
Turningon the Appliance................................12
ChangetheProgramme.............. ................12....
At theendoftheWashCycle...........................12
Filtering System.............................................13
Caringfor the Dishwasher..................... .........14.
..................................15Installationp reparation
...16Aes t h etic pan el's dimensi ons and instal l a tion
..............18Tension adjustment of t he door spr ing
..............................18Connection of drain hoses
.........................19Dishwasher i nstallationsteps
AboutElectricity Connecting...........................20
ColdWaterConnection..................................21
Beforecallingforservice........................... .....23.
Errorcodes.................................... ..............24.
Technicalinformation.............................. .....25..
Page 3

When using y ou r dishwasher,
follow the precautions listed below:
Thisappliance is intendedtobeused in household
andsimilarapplicationssuch as:
-staff kitchen areas in shops, offices an do ther
worki ng envir onment s;
-farm houses ;
-byclients inhotels,motels andother residentialtype
environments;
-bedand breakfast typeenvironments.
Thisappliance canbe used by childrenaged from 8
yearsand aboveand personswith reduced physical,
sensory or mental capabilit ies or lack of exper ience
andknowledgeif they havebeen givensupervision
or instruction concerninguse of the appliancein a
safe way andunderstand the hazardsinvolved.
Children shallnotplay with the appliance.Cleaning
andusermaintenance shallnot be madeby children
withoutsupervision. ForEN60335-1
()
This a ppliance is not inte nded for use byp ersons
(including children)withreduced physical, sensory
or me nta l c ap abi l it ie s, or lac k o f e xp er ie nc e a nd
knowled ge ,unless they have been gi vensupervi sion
or instruction concerninguse of the applianceby a
personresponsiblefor their safety. ForIEC60335-1
()
Thisapplianceis for indooruse only, forhousehold
useonly.
To prote ct agai nst th e risk of ele ctric al shoc k, do not
immerse theunit, cordor plug inwater oro therliquid.
Pleaseunplug beforecleaningand maintenancethe
appliance.
Use asoftclothmoistenwith mild soap,and then use
adryclothtowipeitagain.
Page 4

This appliance must be earthed. In the event of a
malfunction or breakdown, earthing will reduce the risk
of anelectric shock by providing a path of least
resistance of electric current. This appliance is equipped
with a cord having an equipment-earthing conductor
and a grounding plug.
The plug must be plugged into an appropriate outlet that
is installed and earthed in accordance with all local
codes and ordinances.
Improper connection of the equipment-earthing
conductor can result in the risk of an electric shock.
Check with a qualified electrician or service
representative if you are in doubt whether the appliance
is properly grounded.
Do not modify the plug provided with the appliance;
If it does not fit the outlet.
Have a proper outlet installed by a qualified electrician.
Do not abuse, sit on, or stand on the door or dish rack of
the dishwasher.
Do not operate your dishwasher unless all enclosure
panels are properly in place.
Open the door very carefully if the dishwasher is
operating, there is a risk of water squirting out.
Do not place any heavy objects on or stand on the door
when it is open. The appliance could tip forward.
When loading items to be washed:
1) Locate sharp items so that they are not likely to
damage the door seal;
Page 5

2) Warning: Knives and other utensils with shar p points
must be loaded in the basket with their points down or
placed in a horizontal position.
Check that the detergent powder is empty after
completion of the wash cycle.
Do not wash plastic items unless they are marked
dishwasher safe or the equivalent.
For plastic items n
ot so marked,
check the manufacturer's
recommendations.
Use only detergent and rinse additives designed for
an automatic dishwasher.
Never use soap, laundry detergent, or hand washing
detergent in your dishwasher.
Children should be supervised to ensure that they do not
play with the appliance.
The door should not be left open, since this could increase
the risk of tripping.
If the supply cord is damaged, it must be replaced by the
manufacturer or its service agent or a similarly qualified
person in order to avoid a hazard.
During installation, the power supply must not be
excessively or dangerously bent or flattened.
Do not tamper with controls.
The appliance is to be connected to the water mains using
new hose sets and that old hose-sets should not be reused.
The maximum number of place settings to be washed
is 12.
The max imum permissible inlet water pressure is 1MPa.
The minimum permissible inlet water pressure is 0.04MPa.
Page 6

Dispose of the dishwasher packaging material
correctly.
All packaging materialscan be recycled.
Plasticparts aremarkedwith the standard
international abbreviations:
PE forpolyethylene,e.g. sheetwrappingmaterial
PS for polystyren e, e.g. p adding mate rial
POM polyo xymethylene, e.g . plastic clips
PP poly propyl ene, e.g. Sa lt filler
ABS AcrylonitrileButadieneStyrene,e.g.Control
Panel.
Packag ing mate rial c ould be d angero us for childre n!
Fordisposing of packageand theapplianceplease
go to a recycl ing ce ntre. Ther efore cut off th e power
supply cable and make the d oor closing devi ce
unusab le.
Cardboard packagingis manufacturedfrom recycled
paper an dshould b e disposed i n the waste paper
collecti on for recyc ling.
Byensuringthisproduct is disposedof correctly, you
willhelp prevent potentialnegative consequences
forthe environmentand humanhealth,which could
otherw ise be caus ed by i nappro priate was te handli ng
of thi s prod uct.
Formore detailedinformationabout recycling ofthis
produc t, pleas econt act your local city offi ce an dyo ur
househ old waste d ispo sal serv ice.
DISPOSAL:Do not disposethisproductas unsorted
municipal waste. Collection of suchwaste separately
forspecialtreatment is necessary.
Page 7

Fordetailedoperatingmethodreadthe correspondingcontentonthe instructionmanual.
Switch on the appliance Press the Power switch button to switch on the appliance, Open the door.
Witheachwashcycle.
Fill the detergent dispenser
Compartment
For programmeswith pre-wash only.
(Follow the user instr uctions!)
C
B
A
Check the rinse aid level
Checkthe regeneration
salt level
Load the baskets
Select a programme
Running thedishwasher
Changing theprogramme
Add forgottendishes in the
dishwasher.
If the appliance is switched
off during a wash cycle.
Electric indicator on controlpanel(if provided).
(On models with water softener system only.)
Electricindicator on control panel (if provided).
If there is no salt warning light in the control panel
(for some models), you can estimate when to fill the salt into
the softener by the number of cycles the dishwasher has run.
Scrapeoff anylarge amountof leftoverfood. Soften remnants ofburnt food in pans,
thenload the baskets. Refer to the dishwasher loading instructions.
Close the door Press the programme button until the selected programme lights up.
( See the section entitled Operation instruction )
Turn on the water tap and press the Start/Pause button. The machine will start working
after about 10 seconds.
1.A runningcycle cano nly be modified if it has been running for a short time.O therwise the detergent
may have already been released and the water already drained. If this is the case, the detergent
dispenser mustbe refilled.
2. Press the Start/Pause button ,than press the program button morethan 3 seconds to cancel the
running programme.
3. Select a new programme.
4. Restart thedishwasher.
1.Press the start/pause button to stop the machine.
2.Open the door.
3.Add the forgotten dishes.
4.Close the door, then press the start/pause button, the dishwasher will
start running again after 10 seconds.
If the appliance is switched off during a wash cycle, when switched
on again, please re-select the washing cycle and operate the dishwasher
according to the original Power-on state ).
,
“”
Open the door carefully.
Hots t eam may escape
when the door is opened!
Switch off the appliance
Turn off the water tap,
unload the baskets
When the working cycle has finished, the buzzer of the
dishwasher will sound 8 times, then stop.
Turn off the appliance using the Power button.
Warning: wait a few minutes (about 15 minutes) before unloading the dishwasher to avoid handling
the dishes and utensils while they are still hot and more susceptible to break.
They will alsodry better.Unload t he appliance, startingfrom the lower basket.
Page 8

To g et the bestp erformance fromy ourdishwasher,read all operating ins tructions
beforeusing it fo rthe firsttime.
1.On/Off Butto n: To turn on /off the power supply.
2. Program Button :To Press th ebutton t o sele ct a
wash Prog ram.
3.Delay Bu t ton : ToPres s t h e bu tton to delay.
4.H alf load fu n c tionsBu tton : To s elec t Ha lf load
functions.
5..Start/Pause button:Tostart the selected
washing program or pa use the was hin g p rog ram
when th e machin e is working .
Front vie w
1
2
3
4
6.Power indicator: Toshow w hen the power on
7.Program in dicators : to show which program
you have ch ose;
8.D elay indicat ors: to sh o w th e de l ay ti me
(3h/ 6h/9h )
9.Half load/ salt warning indicators/Rins eA id ind icator:
when you choose Half load,the Half load indicato r light;
when th e salt war ning li ght t he s alt conta iner must only
be refil led;
needs to be refilled.
Whenrinse aidindicates when the dispenser
Back Vie w
6
7
8
5
9
10
11
Upper Basket
1
Inner pipe
2
Lower Baske t
3
SaltContainer
4
Dispenser
5
CupShelf
6
Sprayarms
7
Filter assembly
8
Inletpipe connector
9
99
10
11
Drainpipe
Adjus te r
Page 9

Before using you r di shwasher for the first time:
A. Se t the wa te r so ftene r
B. Add 1.5Kg dishw asher sa lt and then full fill the s alt con tainer with water
C. Filltherinseaiddispenser
D. Fill i n det e r gent
The water so ftener m ust beset manu ally,using the wa ter hard ness di al.
The water so ftener is designed to remove minera ls an d salts f rom t he water, which w ould ha ve
a detrimental o r adverse effect on theoperation of the app liance.
The higher t he conte nt of these minerals and salts , the har der yourwater is .
The softener sho uld beadjusted acco rding to the hard ness of t he wate r in you r area.Yourlocal WaterAuthority
can advise you on thehardness of thewaterin y our area.
AdjustingSalt Consumption
The dishwasher is designed to allow for adjustment in the am ount of salt co nsumed bas ed onthe ha rdness o f
the water us ed. This is intended t o op timise and customise th e level o f salt consumption.
Pleasefollow thestepsbelow foradjustmentin saltconsumption.
1. Press for more than 5 se conds t o start the water softener
2. Press the to select the proper s et according to y our local environment ,
3. Press the Power b ut ton to end the set up model.
Start /Pa use butt on
set model within 60secon dsafter t he ap pliance was switched on( TheSalt and
Rinse aid w arninglig hts wil l be onperiodically when it get in the set model ) ;
Start /Pau se b utton
the sets w ill chang e in the following sequence: H1->H 2->H3->H 4->H5->H6;
WATER HAR DNE SS
dH
6-11
12-17 2.1-3.0 12
18-22 31-40 22-28 3.1-4.0
23-34 4.1-6.0 30
35-55 61-98 43-69 6.1-9.8
°
°
dH=1.25Clarke=1.78fH=0.178mmol/l
1
DH: Germ a n degre e
°
fH: French degree
Clark:Britishdegree
°
°
fH
0~90~5 0~0.94 0
10-20
21-30
41-60
°
Clarke
0~6
7-14
15-21
29-42
mmol/l
1.0-2.0 9
Selector Position
H1( Rapid)
H2(1Hour)
H3(1Hour Rapid)、
H4(Glass)
H5(Glass Rapid)、
H6(Glass 1Hour)、
Saltconsumption
(gr am/c ycle )
20
60
The man ufactory setting: H4 (EN 50242)
Contact your local water board for i nformat ion on the hardness of your wat er suppl y.
Contact your local water board for i nformat ion on the hardness of your wat er suppl y.
If yo ur m odel doesno t haveany water softener,you mays kip this section.
WATER SO FTENER
Thehardness o f the water varie s from p lace to place. If hard water i s used inthe dis hwasher,deposits w ill
form on thedishes and utensils.
Theapplian ceis eq uipped with a special softener that uses a salt container spe cifically designed to el iminate
lime an d mi nera ls from the wate r.
Page 10

Always use the salt intended for use with dishwasher.
The salt c ontain er i s locat ed ben eath the lower basket and sh ould b e fill ed a s expla ined
inthe following:
Attention!
Only use salt specifically designed for t he usein dishwash ers! Every other type of
salt not specifically de signed for the use in a dishwa sher, especially t able salt, will
damage the w ater softener.In case of damages caused by the use of unsuitable
salt the manufacturer doe s notg ive any warranty nor is liable for a ny damages caused.
Only fill wi th sal t just b efore starting one of the co mplete washingprograms.
This will prevent any g rains ofsalt or salty wate r,w hi ch ma y have been spilled,
remaining on the bottom ofthe machine for anyperiod of time, which may c ause
corrosion.
A After th e low er ba sket ha s be en removed, un screw and remove the cap from the salt con tainer.
B Place the en d of the funn el (supp lied) into the hole and introdu ce abou t 1. 5kg o f di shwasher salt.
C
Fullfill t hesalt container with water,It is normal for asmallamount of waterto come out of the
salt c ontainer.
D After f illi ng th e co ntainer , screw the cap t igh tly bac k clockwise.
E The saltwarning lightwill stop being after the sa lt containerhas beenfilledwithsalt.
F Immediat ely aft er f illing t he salt into the sa lt co ntainer, a w ashing program should be started
program Other wise the filter system, p ump o r ot her i mport ant pa rts ofthe machine may b e damaged
bysalty water. This isoutofwarranty.
).
1.The salt con tainer must only be refilled w hen t he sal t warn ing ligh t in the control panel comes on.
Depending on how well the salt dissolves, th e sa lt warnin g light may still be on eventhough the
salt container is filled.
If there i s no sa lt w arning lightin the control panel (for some M ode ls),you can estimate when t o f ill
the salt i nto the softener by the cycles that the dishwasher has run.
2. If there are spills ofthe salt , a soa k or arapid pro gram shoul d be run to remove the excessive salt.
(Wesu ggesttouse a short
RinseAid Dispenser
The ri nse aid is rel ea sed d u ring t he final rin se to preve nt water fro m forming droplets on yo ur dis he s, w hich can
leave spots andstreaks. It also improve sdrying by allowing wate r to r oll off t he dishes. Your dishwasher is
designed to useliquidrinseaids. The rinse a iddispenserislocatedinsidethe doornext tothedetergent dispenser.
To fill the dispe ns er,open the cap and po ur t he rinse aid int o the dispens er until the le vel i ndi cator turns complete ly
black. The vol ume of the rinse ai dcontain eris about 110ml.
Function of RinseAid
Rinse aid is automa tically added d uring t he las t ri nse, ensuring thorough rinsing, and spot an d s treak fr ee drying.
Attention!
Only use brandedrinseaid fordishwasher. Never fill therinseaid dispenserwithany othersubstances
(e.g. Dishwasher cleaning agen t, liq uid d eterge nt). Th is would damage the app liance.
Page 11
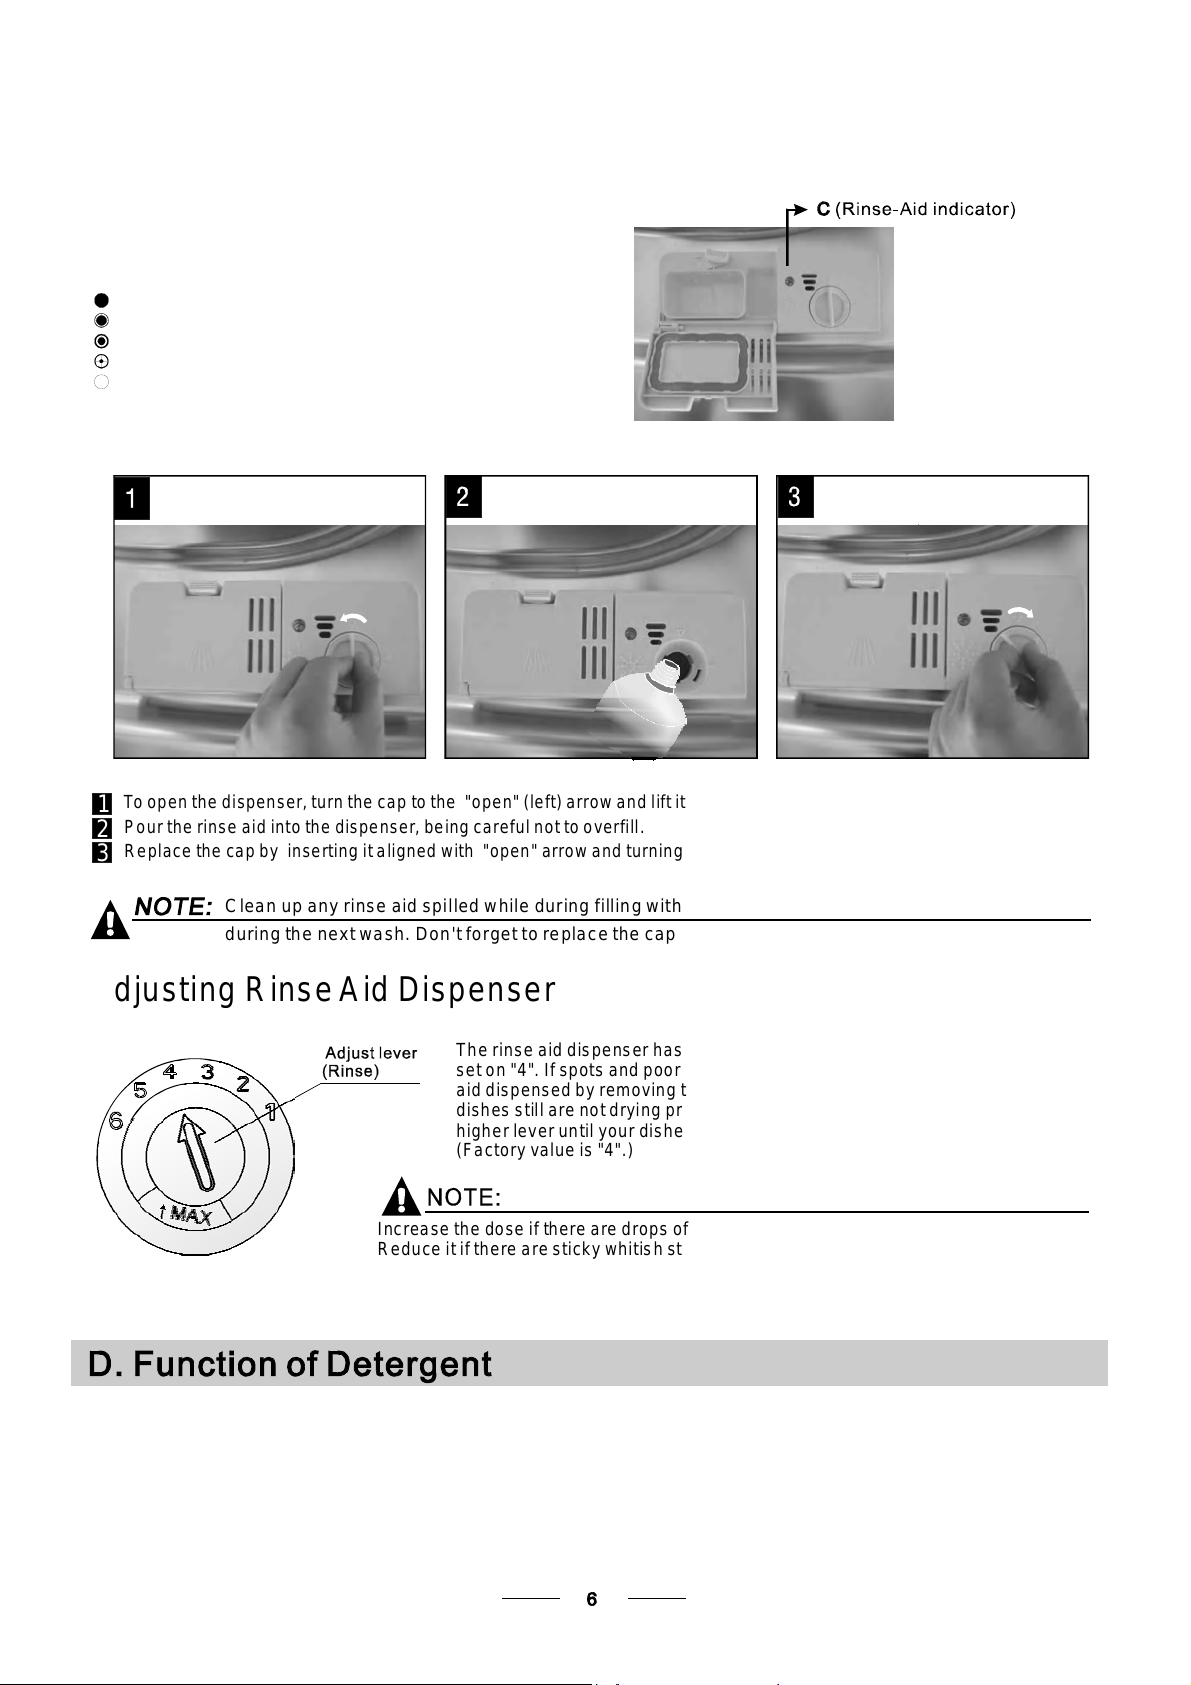
WhentoRefilltheRinseAidD ispenser
Ifthere i s no rinse-aid warnin g ligh t in thecontrol p anel, you can estimate the amount from the colour
ofthe opt ical l evel indi cator C located next to the c ap. When the rin se-aid c ontai ner is fu ll, the whole
indicator wil l be d ark .As the rinse-aid diminishes, t he size of the dark dot decr eases. Youshouldnever let
the ri ns e aid level fa ll 1 / 4 ful l.
Asthe ri nse aid d imin ishes, th e siz e of the black do t
onthe rinseaid level indicator changes,asillustrated below.
Full
3/4full
1/2full
1/4full-Should refill to eliminate spotting
Empty
""
To open t he dispens er, turn the cap to the "open" (left) arrow an d l ift it out.
1
Pour t he rinse ai d into th e dispenser, be ing careful not to overfi ll .
2
Replace the capby inserti ng it a ligned w ith "open " arrowand turning i t to t he cl osed (righ t) arrow.
3
Cl ean u p an y rinse aid spi lled w hile dur i n g filling wi th a n absorbent cl oth to a v oi d ex cess ive foam ing
during the next wa sh. Don' t for get to re plac e the cap before you close dis hwasher d oor.
Adjusti ng R inseAid Disp enser
The rinse aid dispe nser ha s six or four settings. Always start with the dispens er
set on " 4". I f spots and poor drying are a proble m, increa se t he amoun t of r inse
aid dispensed by rem oving thedispenser lid and r otating thedial to "5". If the
dishes st ill ar e not d rying properly o r are show spots , adjus t the dial to t he next
higher lev er un til your dishes a re sp ot-free. The recommend ed set ting is "4".
(Factoryvalueis "4".)
Increasethedose ifthere aredropsofwateror limespotson thedishesafterwashing.
Reduce it ifthereare sticky whitish stainson your dishes o rabluishfilm on glasswareo r
knifeblades.
Detergents with its c hemic al ingr edients are ne cessary to remove dirt, c rush dir t an d trans port it out of the di shw asher.
Mostof the commercial qualitydetergents a re suitableforthis purpose.
Attention!
Proper Use ofDetergent
Useonly det ergent s pecifical ly made for the u se in d ishwa shers. K eep yourdetergent fr esh anddry.
Don't put powdereddetergentinto thedispenseru ntilyou'rereadytowash dishes.
Page 12
Deterg ents
The re are 3 sorts of dete rgen ts
1.With phosphateandwith chlorine
2.Withphos phate and without c hlorine
3.Withoutph osphate and without chlorine
Normally new pu lverised detergent is without phos phate. T hus the water softener function of
phosphate i s no t given. In this c a se w e recomm e nd t o fi ll s a lt i n the salt con t a i ner e ven when
the hardness o f water is only 6 dH. If detergents witho ut phosphate are used in the case of hard wat er
often white s pots appear on d ishes an d glasse s. In this case pl ease add more d etergent toreach
better resu l ts. Dete rgen ts witho ut chlorine do onl y bl e ach a li ttl e. S tr o ng a nd coloured spo ts w i ll no t
beremoved completely.I n thi s ca se pleas e choos e a p rogram with a hi gher temperature.
°
Concentr ated Deterge nt
Based on their chemical composition, detergents canbesplitintwobasictypes:
conventional,alkalinedetergents withcaustic components
lo w al kaline concentrated deter ge nts wit h n atura l en zy mes
DetergentTablets
Dete rgent tablets of different brands dissolveatdifferent speeds.For t his reasonsome
detergent tablets cannot dissolve and dev elop the irfull cl eaning po wer dur ing s hort
programs. There fore plea se use l ong programs wh en usin g deterg ent t ablets, t o
ens ure the comp lete remova l of de terg e n t re siduals.
DetergentDispenser
The dispenser m ust b e refille d before the start of each was h cycle f ollowing the instructi ons
provided in t he w ash cycletable . Your dishwasher use s less detergent and rinse aid than
Conventionaldishwasher.Generally, onlyone tablespoonofdetergent is neededfor
anormalwashload.Moreheavilysoiled itemsneedmoredetergent. Alwaysadd the
detergen t j us t be fore starting the dishwas her, othe rwis e it coul d g et da mp and w ill not
dissolv e pr oper l y.
Amountof Detergentto Use
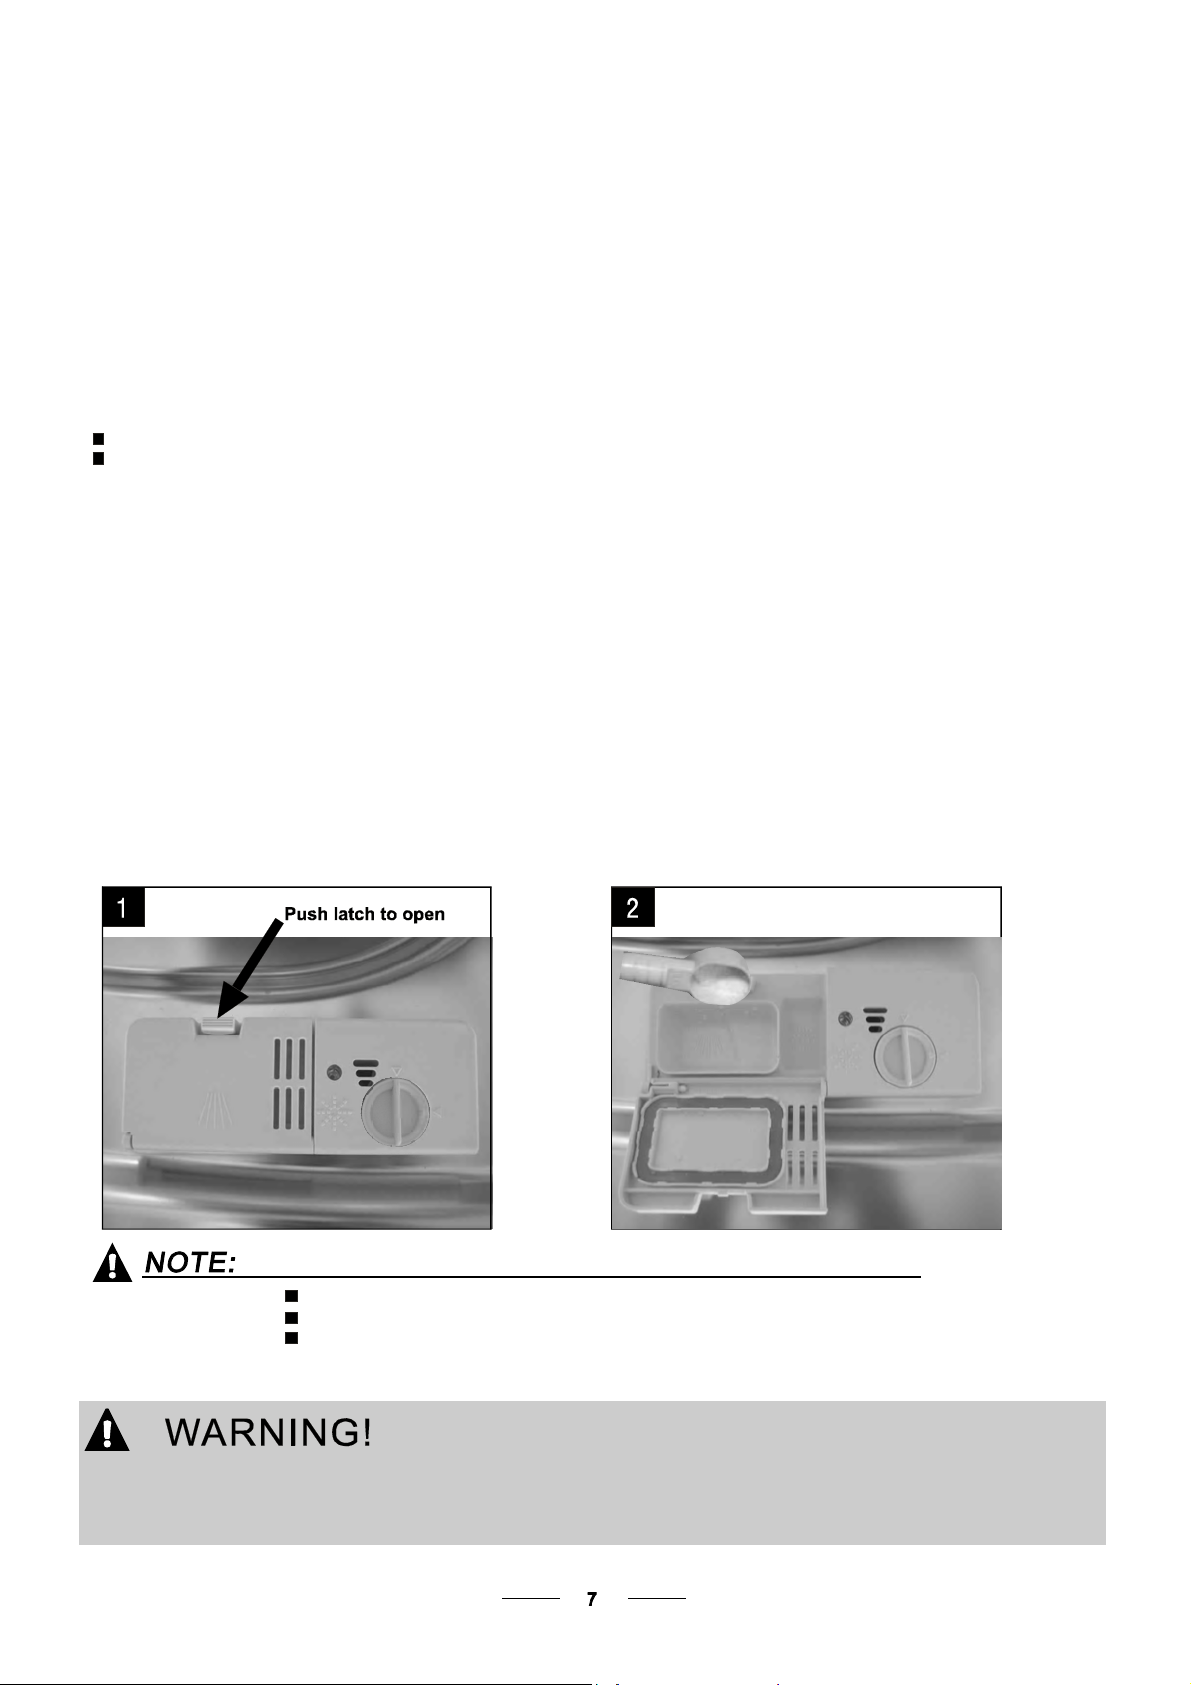
If the lid is closed: press release button.The li d wi ll spring open.
Always add thedetergent just before start ing each wash cycle.
Only usebranded detergentaidf ordishwasher.
Dishwas her deterg ent isco rrosive!
Take care toke epit out of reach of children.
Page 13
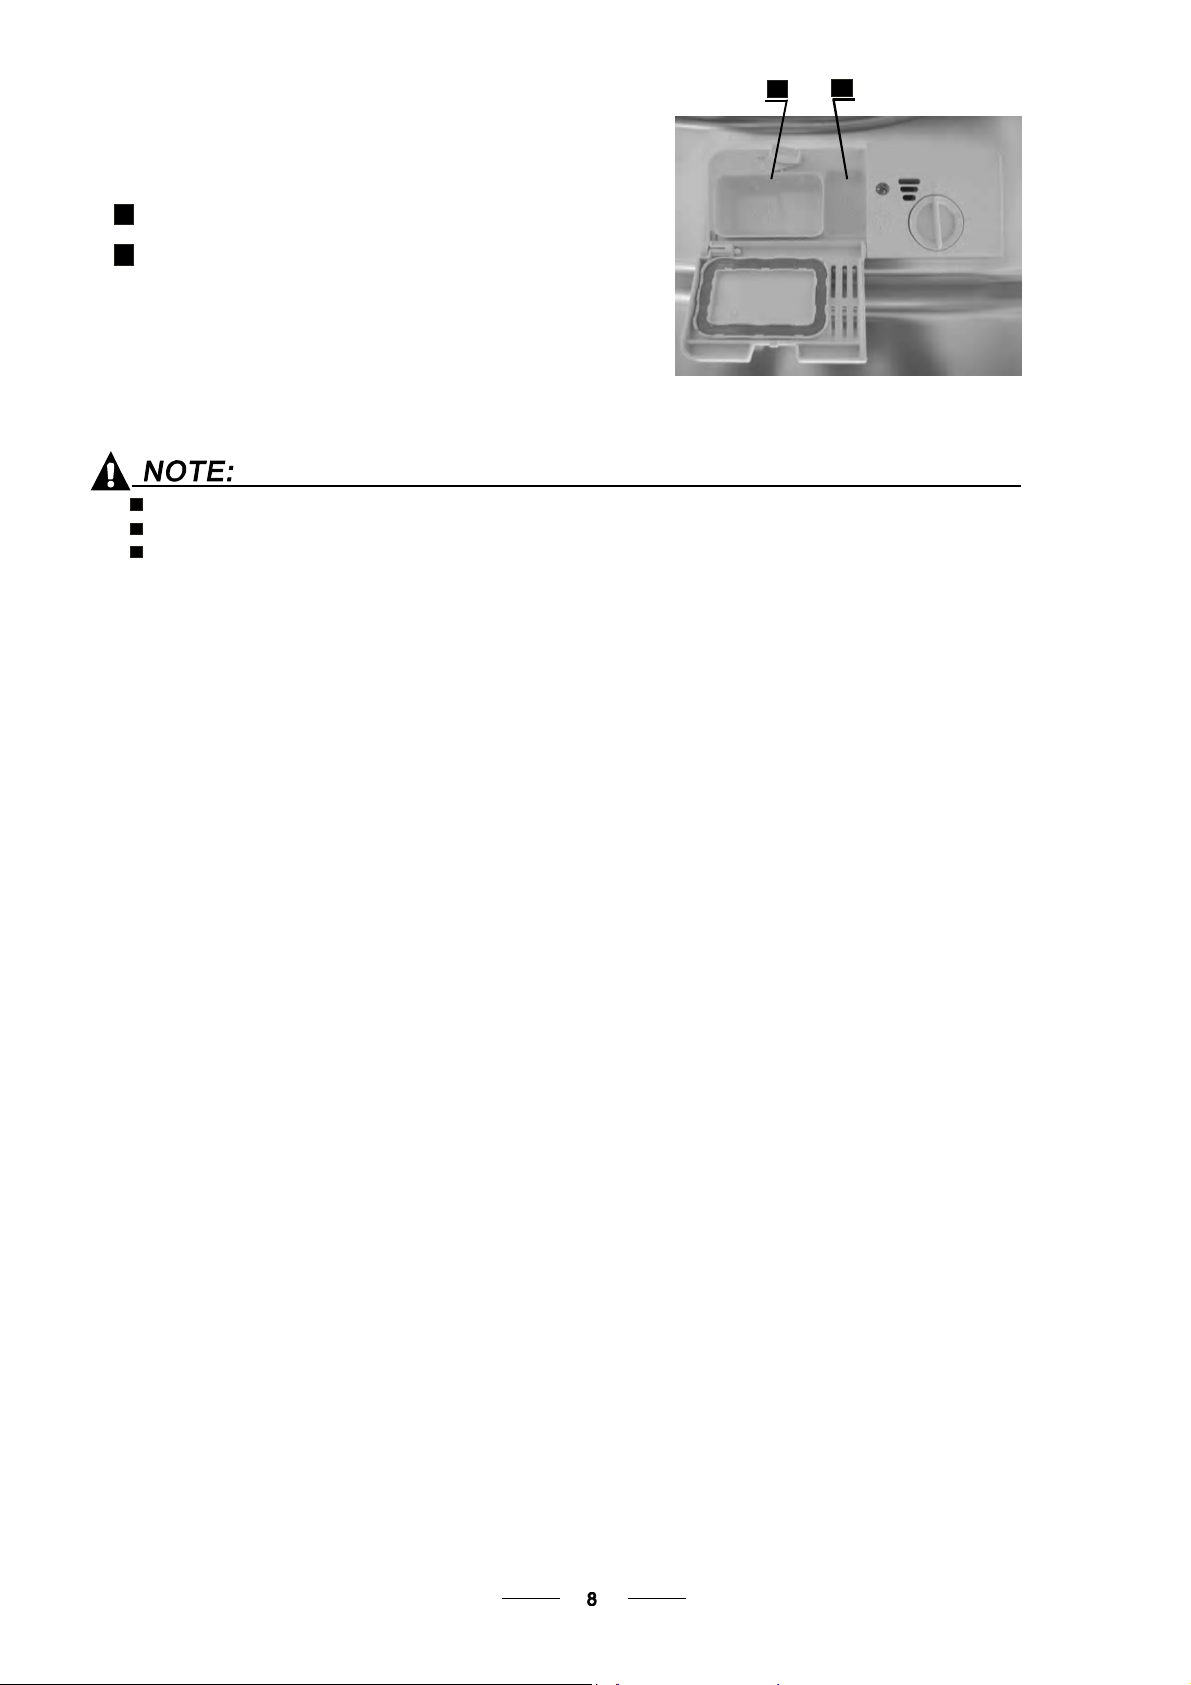
A
B
Fillin Detergent
Fillthe de tergent dispenser with d etergen t.
The marking i n d i cates th e dosing levels , as
illus t ra ted on the righ t:
The place o f main wash cycle dete rgent placed.
A
The place o f pr e-wash cycle detergent place d.
B
Pleaseobserve t he m anufacturer s dosing and storage
Recommendationsas stated on thedetergentpackaging.
Closethe lid and press untilit locksinplace.
If the dishes ar e heavily s o i l ed, pla ce a n additi o nal
detergent do se in the pre-wash detergent cha mber.Thisdetergen t will take effect durin g thepre-wash phas e.
Youfind information ab out the amount o f det ergent forthe single programme ont he last page.
Please aw are, tha t acc ording t o the level soiling and the specific hardnes s of water difference s are po ssible.
Please observethe manufacturer'srecommendationsonthe detergent packaging.
Page 14
Consider buyingutensilswhichareidentified as dishwasher-proof.
Use a mild detergentthatisdescribedas 'kindto dishes'. If necessary, seekfurther
informationfromthe detergentmanufacturers.
Forparticular items,selecta program withas lowa temperature as possible.
To prev ent damage, do not take glass a nd c utle ry out of the di shw ashe r i mmed iatel y
after the pr ogram me h as ended.
Are n otsu itable
Cutlerywith w ooden, hornchinaor
mother-of-pearl handles
Plastic i tems t hat are n ot heat resist ant
Older cutl ery with glued parts t hat arenot
temperature resistant
Bonded cutl ery ite ms or dishes
Pewter or cooper ite ms
Crystal glass
Steel item s subj ect to rusting
Wooden platte rs
Items madefrom synthetic fibres
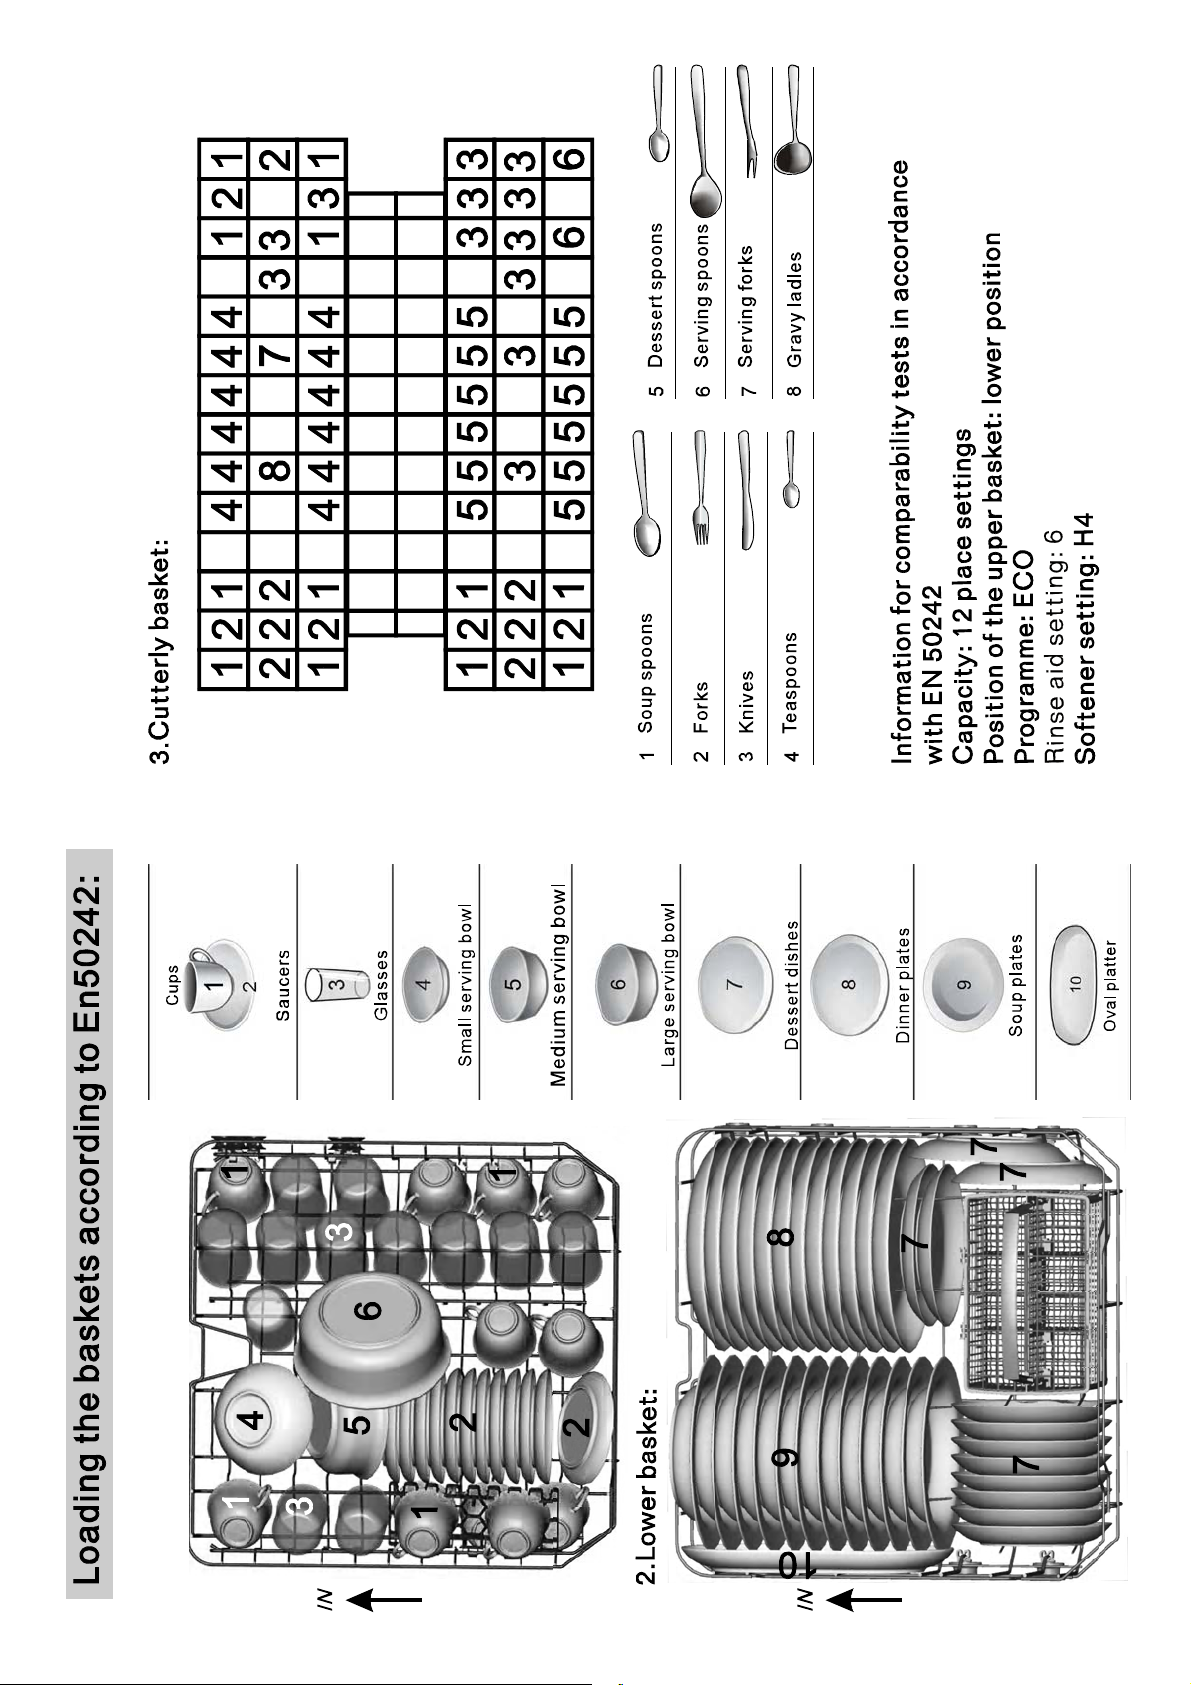
(For best per formance of the di shwasher, follow t he se loading gu ide lines.
Features and appearance ofbaskets and cutlery ba skets may v ary from your mod el.)
Scrape off any large amo unts o f left over foo d. Soften remnants o f burnt food in pa ns.
It is no t necess ary torinse t he dishes under running water.
Place obje cts in the dishwasher in followi ng way:
1.Itemssuch as cups, glasses, pots /pans, etc. a re fa ced dow nwards.
2.Curveditems, or ones with reces ses, sh ould be loaded aslant so that w ater can run off.
3.Allutensils are stacked secur ely and can not ti p ov er.
4.Allutensils are placed in t he way that the spray arms can rotate fr eely during washin g.
Very small items should n ot b e washed in the dishwasher as th ey could easily fall out of the basket.
Are of limited suitability
Some types ofglasses c an b ecome
dull after a large number of washes
Silver an d a l uminum part s ha ve a
tendency to discolour duringwashing
Glazedpatterns may fadeifmachine
washed frequent ly
Load hollow it ems such as cup s, glasses, pans etc. With the opening facing downwards so that
wat e r canno t collec t in the conta i n e r or a deepb a se.
Dishesanditems of cutlerymust not lieins ide one another, orcovereach other.
Toavoid da mage to glasses, th ey m ust not touch.
Load large items w hich are most difficult to clean in to the lower bask et.
The uppe r basket is designed to hold m ore delicate and lighter dishware such as glasses , coffee
andtea cups
Long bladedknives stored in a n upr ight po sition are a potent ial haza rd!
Long and/or sharp itemsof cutlery such a s carv ing knives must be positioned
horizon tally in the upp er b asket.
Please do not ove rload your dishwashe r. T his is importan t for g ood results and for
reasonab le consu mption o f en ergy.
To prevent wa ter drip ping fr om the upper ba sket into the lower basket, we recommend tha t you
empty the lower basket first and t he n the upp er ba sket.
Page 15
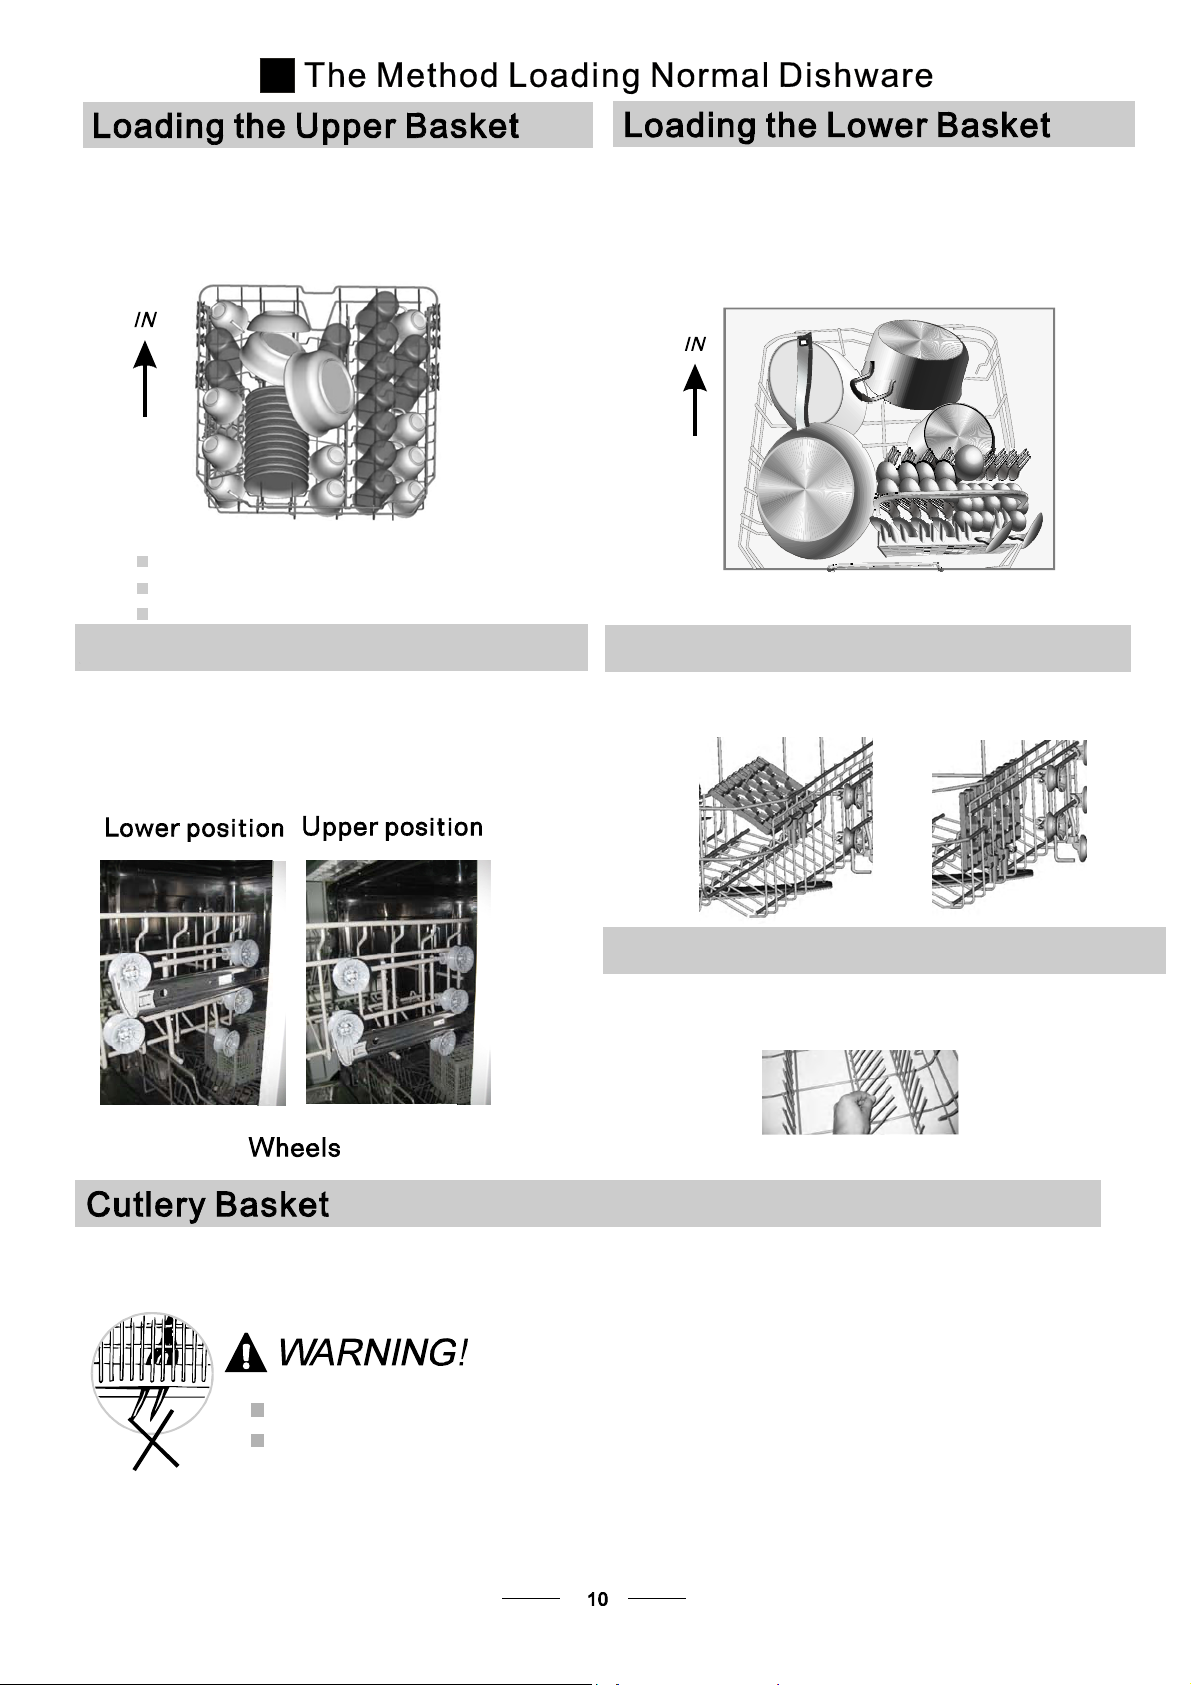
The u pper basket is design ed to holdmore delicate
and lighter d ishware s uch as g lasses, coffee and
teacupsand saucers, as well as plates, small bowls
andshallow pans(as longas theyare nottoo dirty).
Positionthe dishes and cookwaresothatt hey will
notgetmovedbythespray ofwater.
Please be r eminded that:
Pots,servingbowls,etc,mustalwaysbeplacedtopdown.
D eep pots s hould be slanted t o allow wate r to f low out .
The B otto m B ask et f eatur es foldin g sp ikes so tha t l arg er or more pots an d p ans can beloade d.
We sug gest that yo u pl a ce l arge items and t he m o st
difficult to clean items are tobeplaced into the lower
basket: su ch as po ts, pans , lids , se rving dishes and
bowls, as shown i n th e figur e be low. I t is preferable t o
pla ce s ervi n g di shes and lids on t he s id e of th e ra c ks
in order toavoid blocki ng the rotation of the top spray
arm.
Adju sting the Upper Basket
The h eight of the upper ba sket can be adjusted in order to
create mo re space for large uten sils b oth for the upper
/lower basket. The height of the upper basket can b e
adjusted by placingthewheels on different heightof the
rails. Long items, serving cutlery,s alad ser vers and knives
shouldbe placedonthe shelf so thattheydonot obstruct
therotationofthesprayarms..
Folding bac k the cup shelive s
For better s tacking ofpots and p ans,
the spikes c an b e fol de d down as
show in th e pict ure righ t .
Foldi ng S pikes of L ower Basket
For better stacking ofpots and pans,
the spi kes can b e folded down a s
show in the p ictu re right.
Cutlery shoul d be placed in t he cutlery basket with the handles a t thebottom. If the rack ha s side baskets, the
spoons should be loaded s eparate ly into the appropria te sl ots, espe cially long utensils sh ould b e place d in the
horizontal p osition at the fron t of the upper bask et as shown in the picture.
Do not let anyi tem extend through the bottom.
Always load sharp utensils with th esharp
point dow n!
Page 16
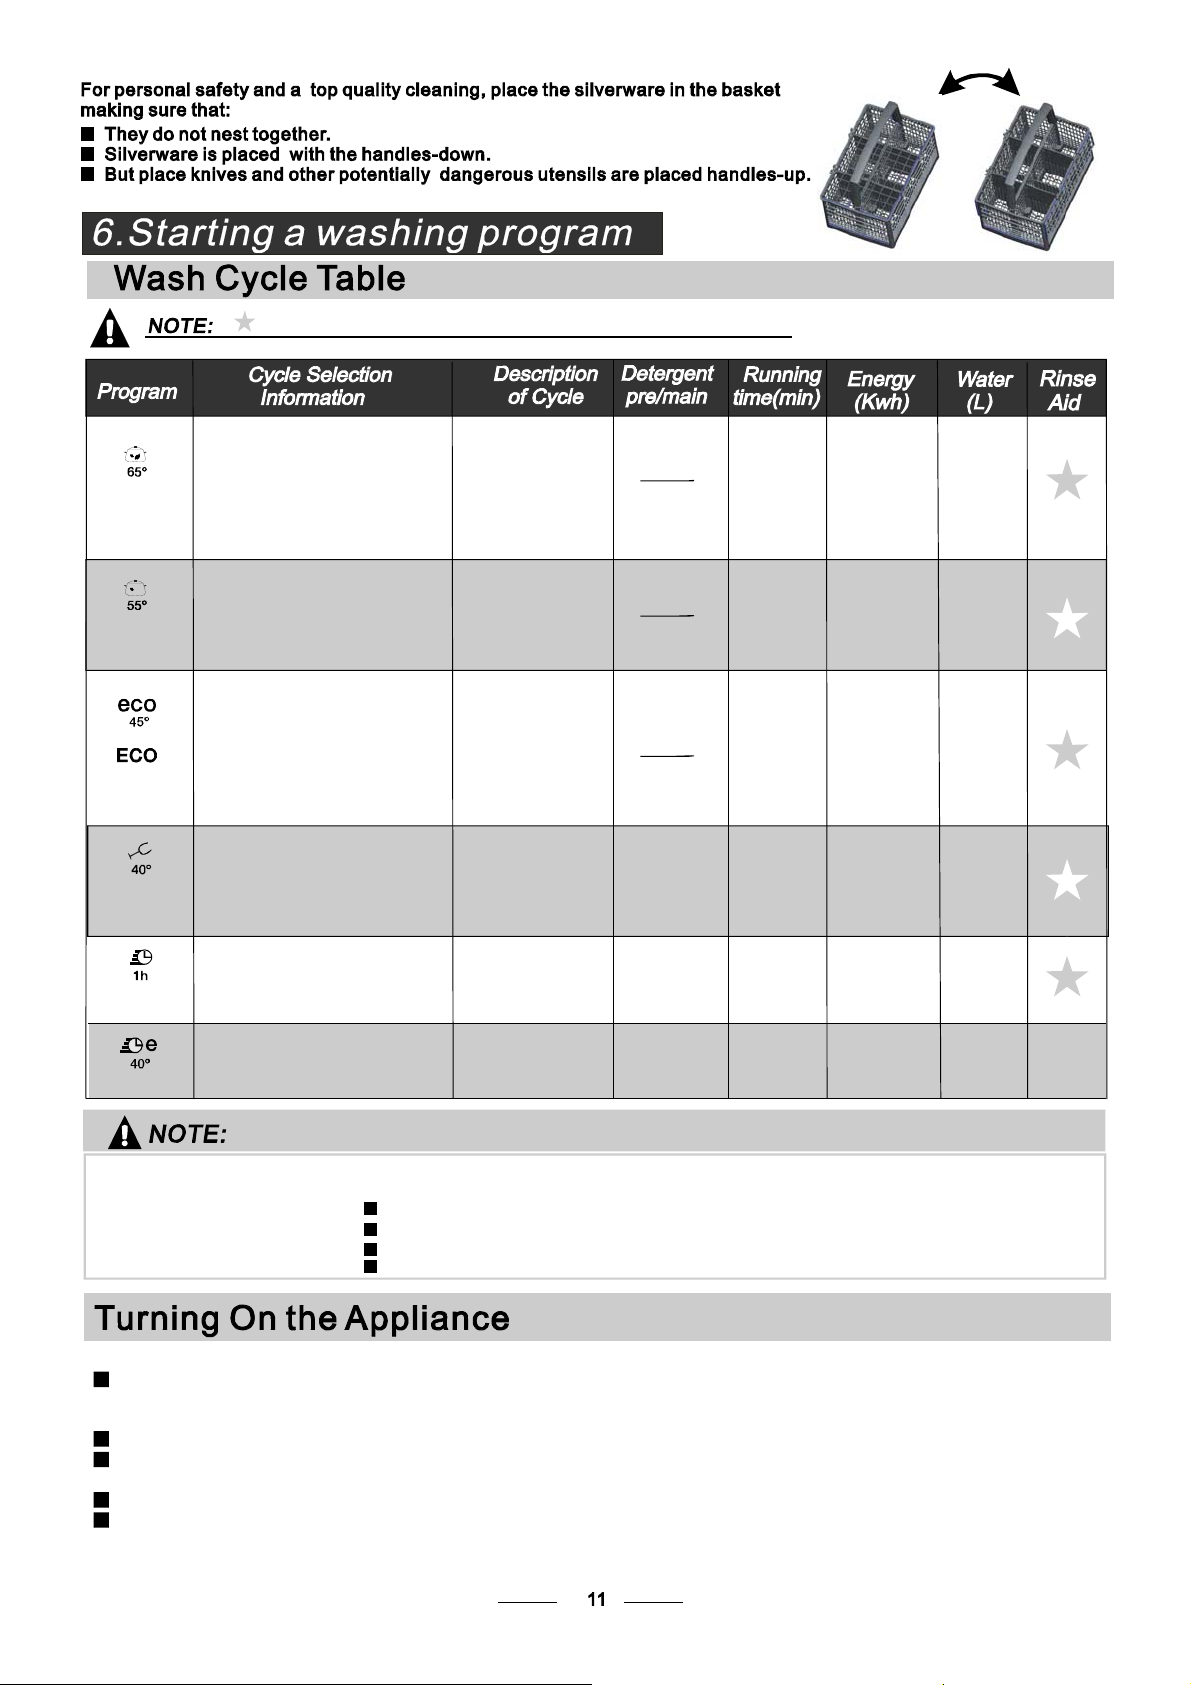
()
Means:need tofill rinsei ntothe Rinse-AidDispenser.
Intensive
Normal
(*EN 50242)
Glass
1Hour
Rapid
For heaviest soiled crockery,
andnormally soiled pots
pans dishes etc with dried
、
、
onsoiling.
For normallyso iled loads,
suchas , plates,glasses
pots
andlightly soiled pans.
This is st an dard p rogr amm e, i t is
suitable to clean normally soiled
tablewar e and it is the most
efficient p rogr amme int e rms of
its comb in ed ene rg y and w ate r
consum pti on for that type of
tablewar e
.
For lightly so iled crockery
and glas s.
For lightly soiledloads that
donotneed excellent drying
efficienc y.
Ashorter wash for lightly
soiled loadsthatdo not
need drying.
Pre-wash(50 )
Wash (65 )
℃
℃
Rinse
Rinse
Rinse(65 )
℃
Drying
Pre-wash( 45 )
Wash (55 )
℃
℃
Rinse
Rinse(65 )
℃
Drying
Pre-wash
Wash (45 )
Rinse(65 )
℃
℃
Drying
Pre-wash
wash(40 )
℃
Rinse
Rinse(60 )
℃
Drying
Pre-wash(50 )℃
Wash(60 )
Rinse(55 )
℃
℃
Drying
Wash (40 )
℃
Rinse
Rinse (45 )
℃
5/25g
(or )3in 1
5/25g
(or )3in 1
5/25g
(or )3in 1
5/25g
5/25g
20g
145
160
185
120
60
40
1.6
1.35
0.91
0.85
1
0.6
19
15
11
15
10
11.5
*EN50242 : Thisprogramme is thetestcycle.The informationforcomparabilitytest
in accordance withEN 50242,as follows:
Capacity: 12 setting
Position Uppe r basket : upper wheels on rai ls
Rinse aid sett ing: 6
Pl:0.49w;Po:0.45w.
Startin g a cycl e wash
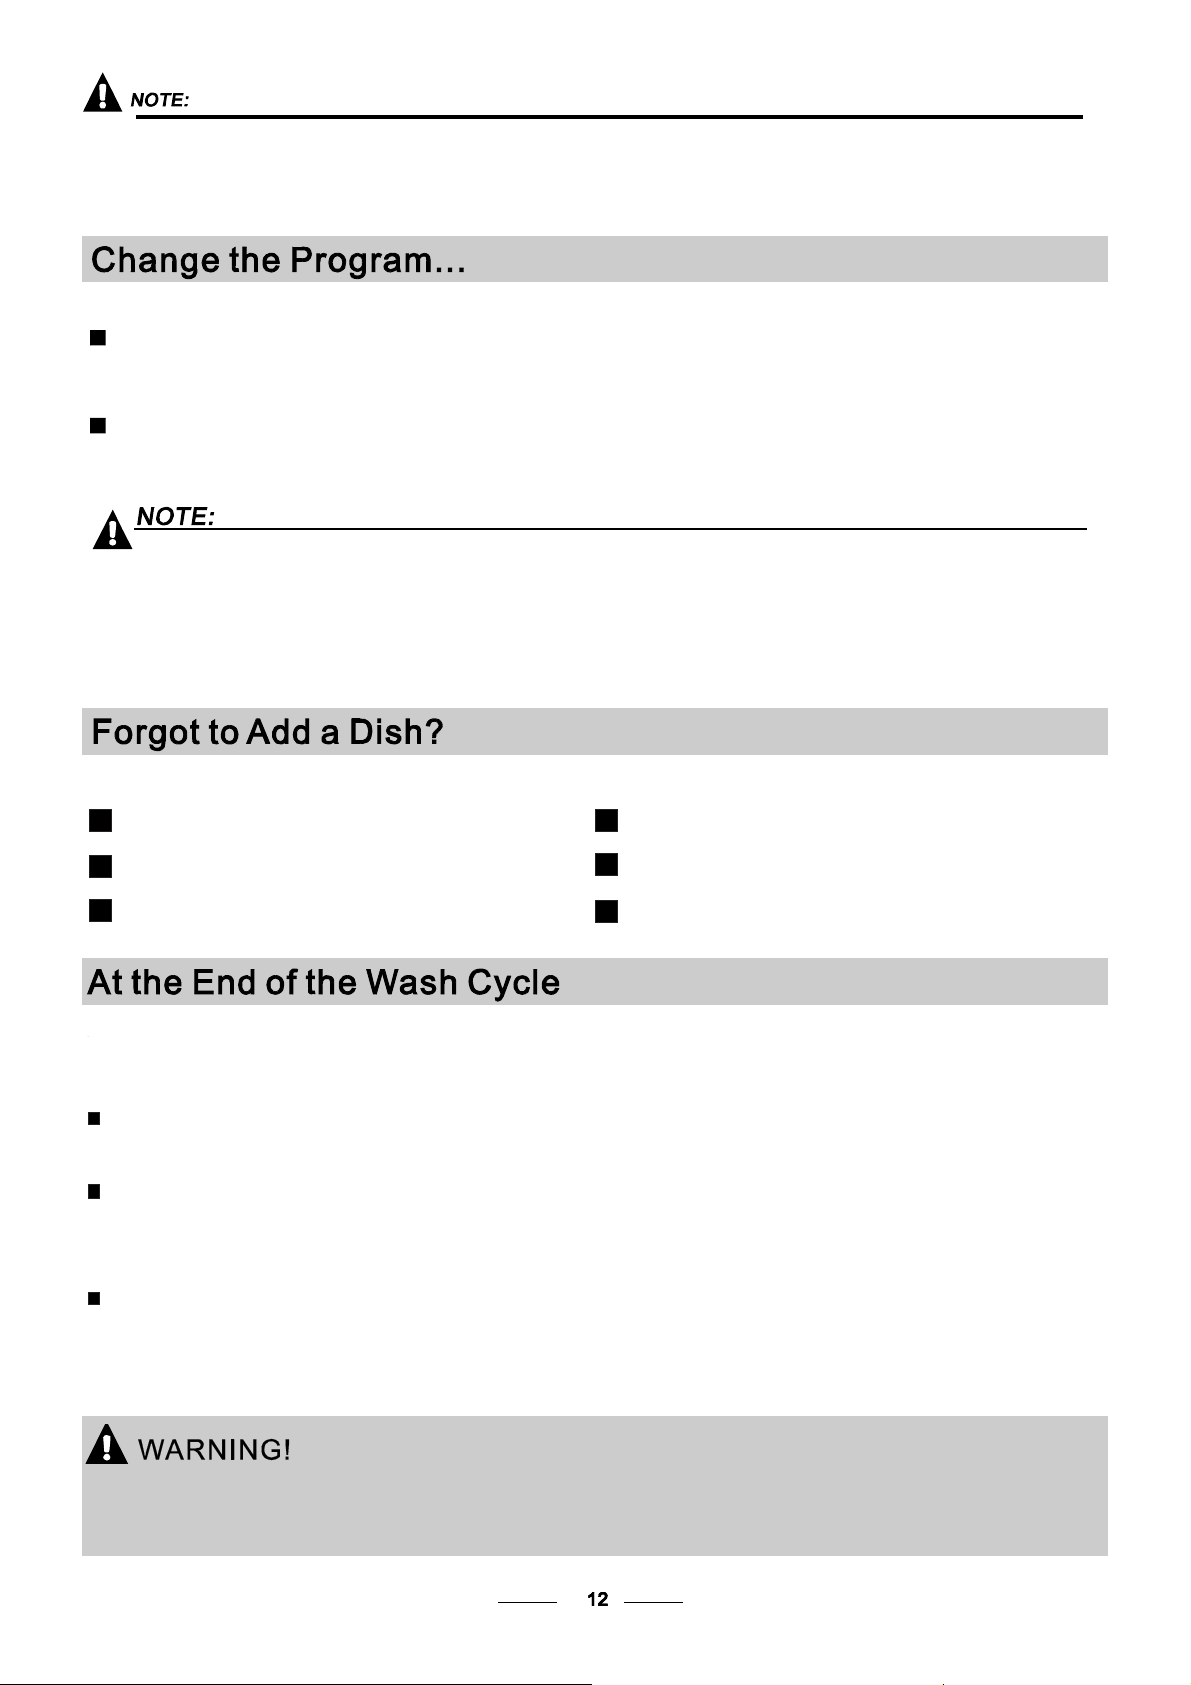
Draw out the lowe r and upperbasket, l oad thedishes an d pu sh them back.
1
It i s commend ed to load the lowerbasket fir st, then the uppe r one (seethe sec tion entitled
Loading the Dishwasher ).
“”
Pour in the det er gent (see the sec tio n ent i tle d Salt , Deterg e n t a nd R in se Ai d ).
2
Insert the plug into the socket. The pow er su pply is 220-240 VAC /50 HZ, the sp ecificat ion
3
“”
o f the so cket is 10 A 2 50VAC. Mak e su re that the wa t er s up ply is turned on to full pres s ure.
Close the door,press the ON/OFF Butto n, and the ON/OFF light will turn on.
4
Press the program Button , t he wash pr ogra m will be changed a s f ollows dire ction:
5
Intensive->No rmal-> ECO->Glass ->1Hou r ;->Rapid
If a progr am is s e lected, the r esponse light will ligh t. Then c l ose the door and
Button,the d ishw asher be gins tostart.
PresstheStart/Pause
Page 17
Whe n you pres s the St ar t /Pa us e butt on to pau se d urin g was h ing , th e run ning in d icat o r wi ll
stopblinkingandthe dishwasherwillmooingeveryminuteunless you press the
Start/Pausebuttonto start.
Premise:
Acycl e th at is underway ca n on ly be modified if it has on ly been running for a s hort time. Otherwise, the
1
detergent may have a lread y be en relea sed, a nd the appliance m ay have already drained the wash water.
If t his is t he case , th e dete rgent d ispenser must be refilled (see the sec tion entitled "Loading the
Detergent " ).
2 Press the Start/Pause button , the mach ine will be in st andby s tate, press the program b utton mo re tha n
3s then you can cha nge the program t o th e de sired cycl e set ting (see the s ection en titled "Startin g a wash
cycle. . ." ).
Ifyou open the door ,the machinewillpause. The program lightwill
stopblinkingand the buzzer will mooingeveryminuteu nless you close the door.After
you c lose the door ,the machin e will keep o n worki ng after 10 seconds.
Ifyour model has brokenrememberfunction,the machine will go on to finish theselected
programafterthe powercut.
Aforgottendish can be added any time before the detergent cup opens.
Press the Start/Pause button
1
Open the door a little to stop the washing.
2
After the spray arms stop working,you can open the door
3
completely.
When t he worki n g cy cle has finished, the bu z zer of the dish w a sher wi l l so u nd f or 8 seconds , th en stop . Turn off
the a ppliance usi ng the ON/OFF butto n, shut offthe wa ter s upply and open the door of th e di shwashe r.
Wait for a few minutes b efore unloading th e dishwashe r to a voi dhandlin g the di shes and utensils wh ile th ey
are s till hot a nd m ore suscept ible tobreakage. Theywill als o dry be tter.
duringawash cycle
Add forgotten dishes.
4
Close the door
5
Press the Start/Pause button, the dishwasher will run
6
after 10 seconds.
SwitchOff the Dishwasher
1.Switchoff the di shwasher by pressing the ON/OFF button.
2.Turnoffthe watertap!
Openthe door carefully.
Hot dishes are sensitive to knocks. The dishes should therefore be a llowed t o cool down around 15 minutes
beforeremoving from the appliance.
Open the d ishwasher 's door, leave it ajar and wait afew minutes before remov ing t he dis hes. In this way they
will be cooler and the drying will be improved.
Unloadingthe dishwasher
Itis norm al that the dishwashe r is wet inside.
Empty the l ower ba sket f irst and then the upperone. Thi s will avoid water dripping fro m the upper Basket onto
the dishes in the low er on e.
Itis dangerousto openthe doorwhenwashing,
because the hot wate rmay scald you.
Page 18
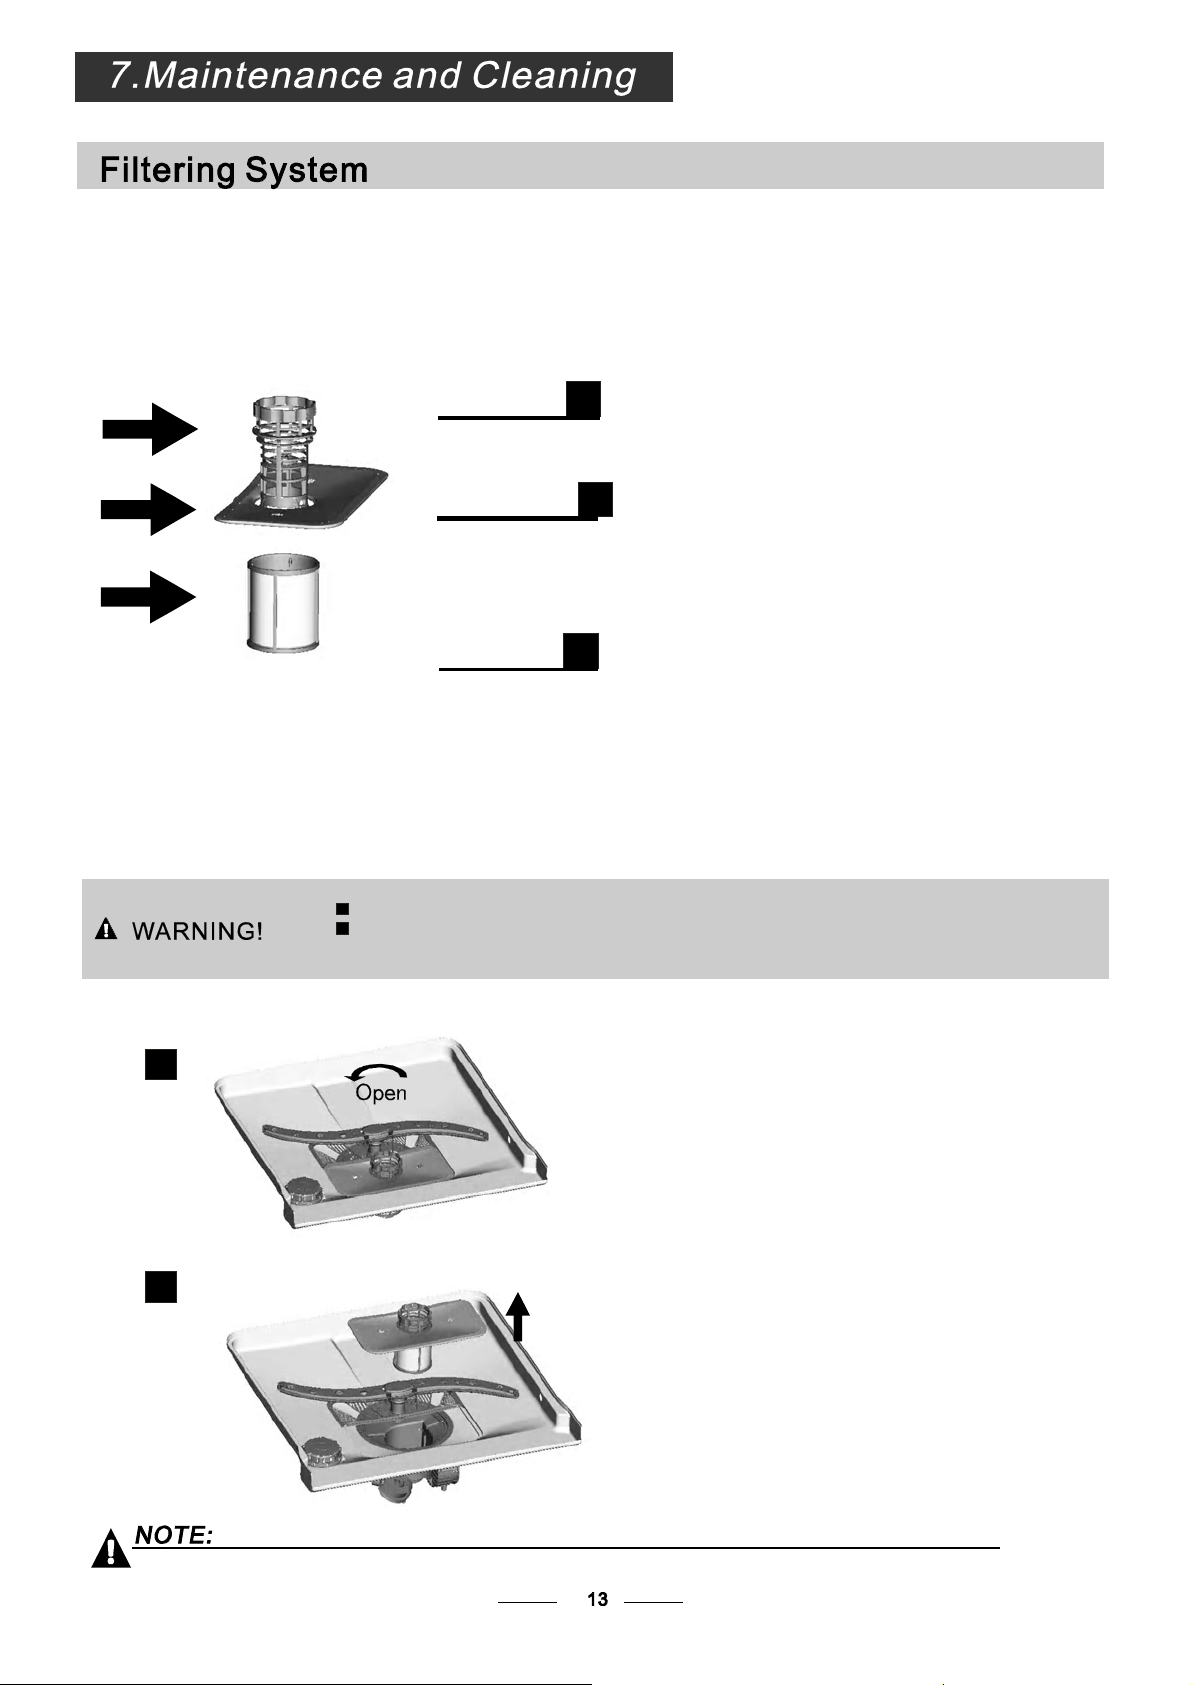
The fil ter prev ents lar ger remnants of food or ot her obj ects f rom gett ing insi de th e pump.
Theresiduesmayblockthefilter, inthiscase they mustbe removed.
The filter syst em consists of a coar se filter,a flat ( Main f ilter)
An d a mic rofilt er( F i ne fi lte r ) .
1
2
3
2
1
3
Main filter
Foodand soilparticles trappedin thisfilterarepulverized by a
special jet on the l ower sprayarm an d washe d down todrain.
Coarse filter
Large r items, suc h as p ie ces of bone s or glass, tha t c ould block
thedrain aretrappedin thecoarse filter. To removethei tems
caught by the fil ter,gently sque eze the tap on th e top of this
filterand liftout.
Fine filter
This filterholdssoilandfoodresiduesin the sump areaa nd
prevents it frombeingr edepositon the dishes duringwashcycle.
Filterassembly
Thefilterefficiently
For best performance and results, the filter mustbe cle aned re gular ly. thisr easo n, it isa goo d idea t o
remove t he lar ger foodparticles tr apped in the filte r aft er e ach was h cyc le by rin sing the semicirc ular f ilter an d
cup unde r runnin g wat er.To re move th e fil ter de vice, pull thecup ha ndle inthe upwar d direct ion.
removes food particles fro m the washwater, allowing it to be recycled dur ing the cycle.
For
Th e d ish washer must ne ver be u sed with out t he filters.
Improper replacement of the filter may reduce the performanc e level of the appliance
anddamagedishes and utensils.
2
1
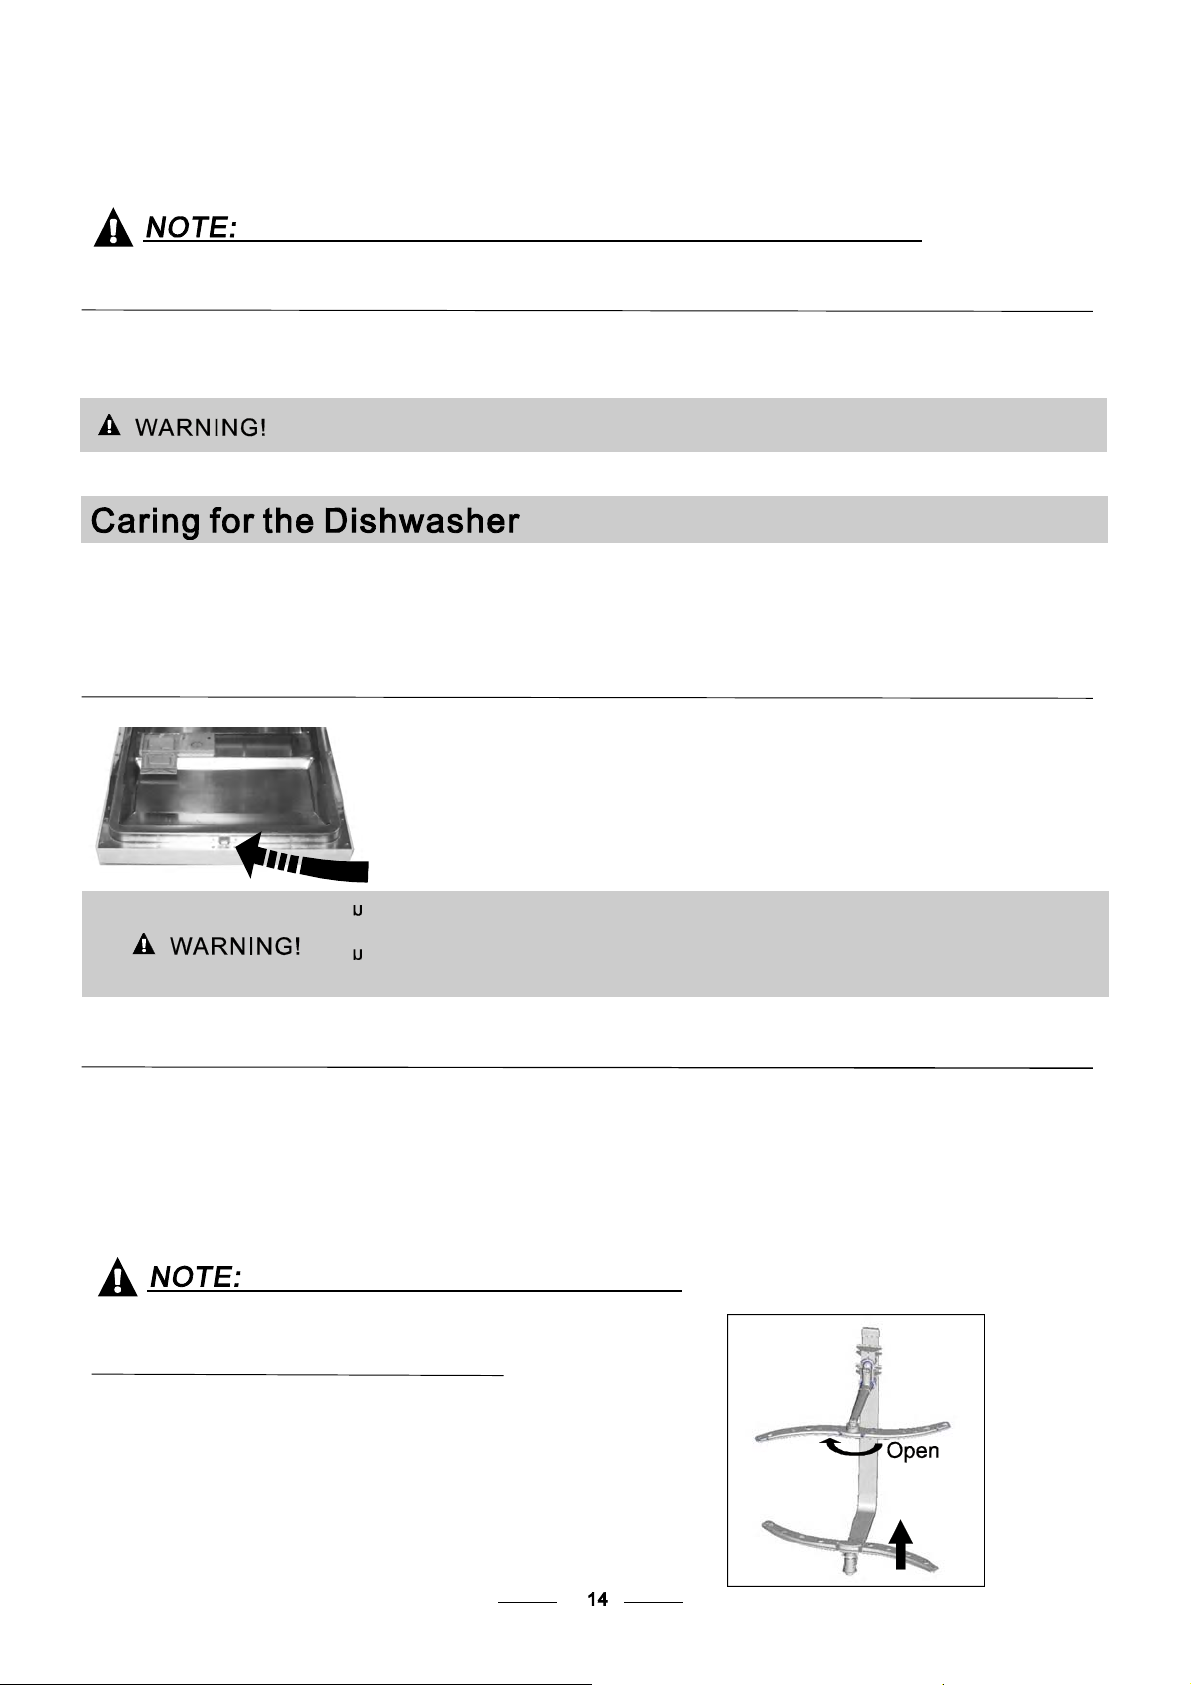
Step 1 Turn the fi lter in anti-clockwise d irection,:
Step 2 lift the filter assy up:
When following this procedure from step1 to step 2, the filter system will be removed;
when following it from Step 2 to Step 1, the filter system will be installed.
Page 19
Remarks:
- Inspect the filters for blocking a fter e very time t he di shwa sher has been used.
- By uns crewing thecoarse fi lter, you can remove the filter syst em. Re move any foo d re mna nts and
cleanthe filters underrunning water.
Theentirefilterassemblyshouldbecleanedonce a week.
Cleaning the Filter
To clean th e co a rse f ilt er a nd t he f i n e fi lter, use a clea ning bru sh. Reassemble the f ilt er p arts as shown i n th e f i gures
on the last pa ge a nd reinsert the e nti re assemb ly in the dishwasher, positio ning it in its seat and pressing downwa rds .
Whenc leaningthefilters, don'tknock on them. O therwise,thefilterscouldbe
contortedandthe performanceofthedishwashercouldbedecreased.
The control panel can be cleaned byusing a l ightly dampened cloth .
After cleaning, make sure to dry it t horoug hly.
For the ext e rior, use a good a pp lia nce pol i s h wax.
Neveruse sharp objects, sco uring pa ds or h arsh cleaners on a ny p art of the dishwasher.
CleaningThe Door
To clean the e dge around the door, you should use o nly a soft warm, damp cloth.
To avoid pene tration o f water i nto t he door lock and el ectrical components, do not
usea spray cleaner ofany kind.
Never use a spray cl eaner t o clean t he d oor panel as it m ay dam age the door loc k
and electricalcomponents.
Abrasive agent sor somepaper towels should not b e use d b ecause of t he ris k of
scra tching o r leaving spots on the stainless steel s urfa ce.
Protec tAgain st Freezing
please t ake fros t protect ion meas ures o nthe dishwasher in winter.Every fter washi ng cycles,
please op erate as follows
1.Cut offtheelectricalpower tothe dishwasher.
2.Turnoff the water supply and d isconnec t the w ater i nlet pi pe from the water valve.
3.Drain the wat er from the inlet pipe and w ater va lve. (Use a pan togather th e water)
4.Reconnect the water inlet pi pe t o the water valve.
5.Remove the fil ter at the bottom o f thetub and use a spong e to soak up wate r in the sump.
:
If your dishwasher cannot work because of t he ice,
please con tact professional service persons.
timea
Cleani ng the Sp rayArms
It is necess ary to c lean the sp ray arm s re g ular l y fo r ha r d
water chemicals willclogthesprayarmjets a ndbearings.
Tor e mov e the upper s p r a y a rm, ho ld the nut, rotate th e a rm
clockwiseto removei t.
To remove thelowersprayarm,pull out thesprayarmupward.
Washthe arms in soapy and warm water and use a soft brush t o
clean the j ets. R eplace th em aft er rinsin g the m thorough ly.
Page 20
AfterEveryWash
After ever y wa sh, turn offthe wa ter supp ly to the
appliance and leave th e doo r slight ly op en so th at
moisture a nd odou rs a re no t trapped inside.
Removethe Plug
Before cleani ng or performing maintenance, alw ays
remove the p lug from the socket.
No Solv ent s or Abrasiv e Cl eanin g
Toclean the exterior and rubberpartsof the dishwasher,
donot use solvents or abrasive cleaningproducts.
Only use a clo th with warm soapy wate r.
Torem ov e sp ots or st ains from the sur face of t he
interi or, use a clot h da mpe ned with wa ter an a little
vinegar,or a c leaning pro duct mad e sp ecifically f or
dishwashers.
Whennotin Use fora LongTime
It isrecommendt hat yourun a wash cycle withthe
dishwasher empt y and the n remov e th e plug fro m the
socket, turn o ff the wa ter supply and l eave the door of
the app lian c e sl ight ly open. This will hel p t h e d oor
sealsto lastl ongerandpreventodours fromforming
withinthe appliance.
Moving theA ppli ance
If the appliance must be moved, tr y to keep it in the
vertical position.If absolutely necessary, itcanbe
positioned on its back.
Seals
Oneofthefactorsthatcauseodourstoforminthe
dishwasher is f ood th at re mains tr apped in the seals .
Periodic cleaning with adamp sponge will prev ent t his
fro m occurr ing.
Theinstallationof the pipes
and electricalequipments
shouldbe done byprofessionals.
ElectricalShockHazard
Discon nect e lect rical power
beforeinstallingdishwasher.
Failuretodosocanresultin
deatho relectricalshock.
●
Installationpreparation
Theinstallationpositionof dishwashershouldbe nearthe existinginlet anddrain hoses
andpower cord.
Onesideof the cabinet sinkshouldbe chosen to facilitatethe connection ofdrainhoses
ofthe dishwasher.
Note:please checkthe accompanyinginstallationaccessories(hookfor aesthetic
panel,screw)
Page 21
Please carefullyread theinstallationinstruction.
●
Illustrationsof cabinet dimensions and installation positionof thedishwasher
Preparations should b emade b efore movi ng th e dish washer tothe ins tallation p lace.
Choose a place near the sink to facilitate the install ation ofinlet and drain hoses
1
(see figu re 1).
If dishwas her isinstalled a t the corner of th e cab inet, th ere sh ould be some sp ace
2
(illustrated in figure 2) whenthe dooris opened.
【】Figure1
Cabinetdimensions
Lessthan 5mm
between t he top
ofdishwashera nd
cabinetand the
outer dooraligned
tocabinet.
820mm
580mm
90 °
Electrical, drain and
watersupply line
entrances
Spacebetween cabinet
bottom and floor
600 mm
90 °
80
100
【】Figure2
Dishwasher
Minimumspacewhen
the door is opened
Door of
dishwasher
Minimum space of 50mm
●
Aesthetic panel's dimensions and installation
1
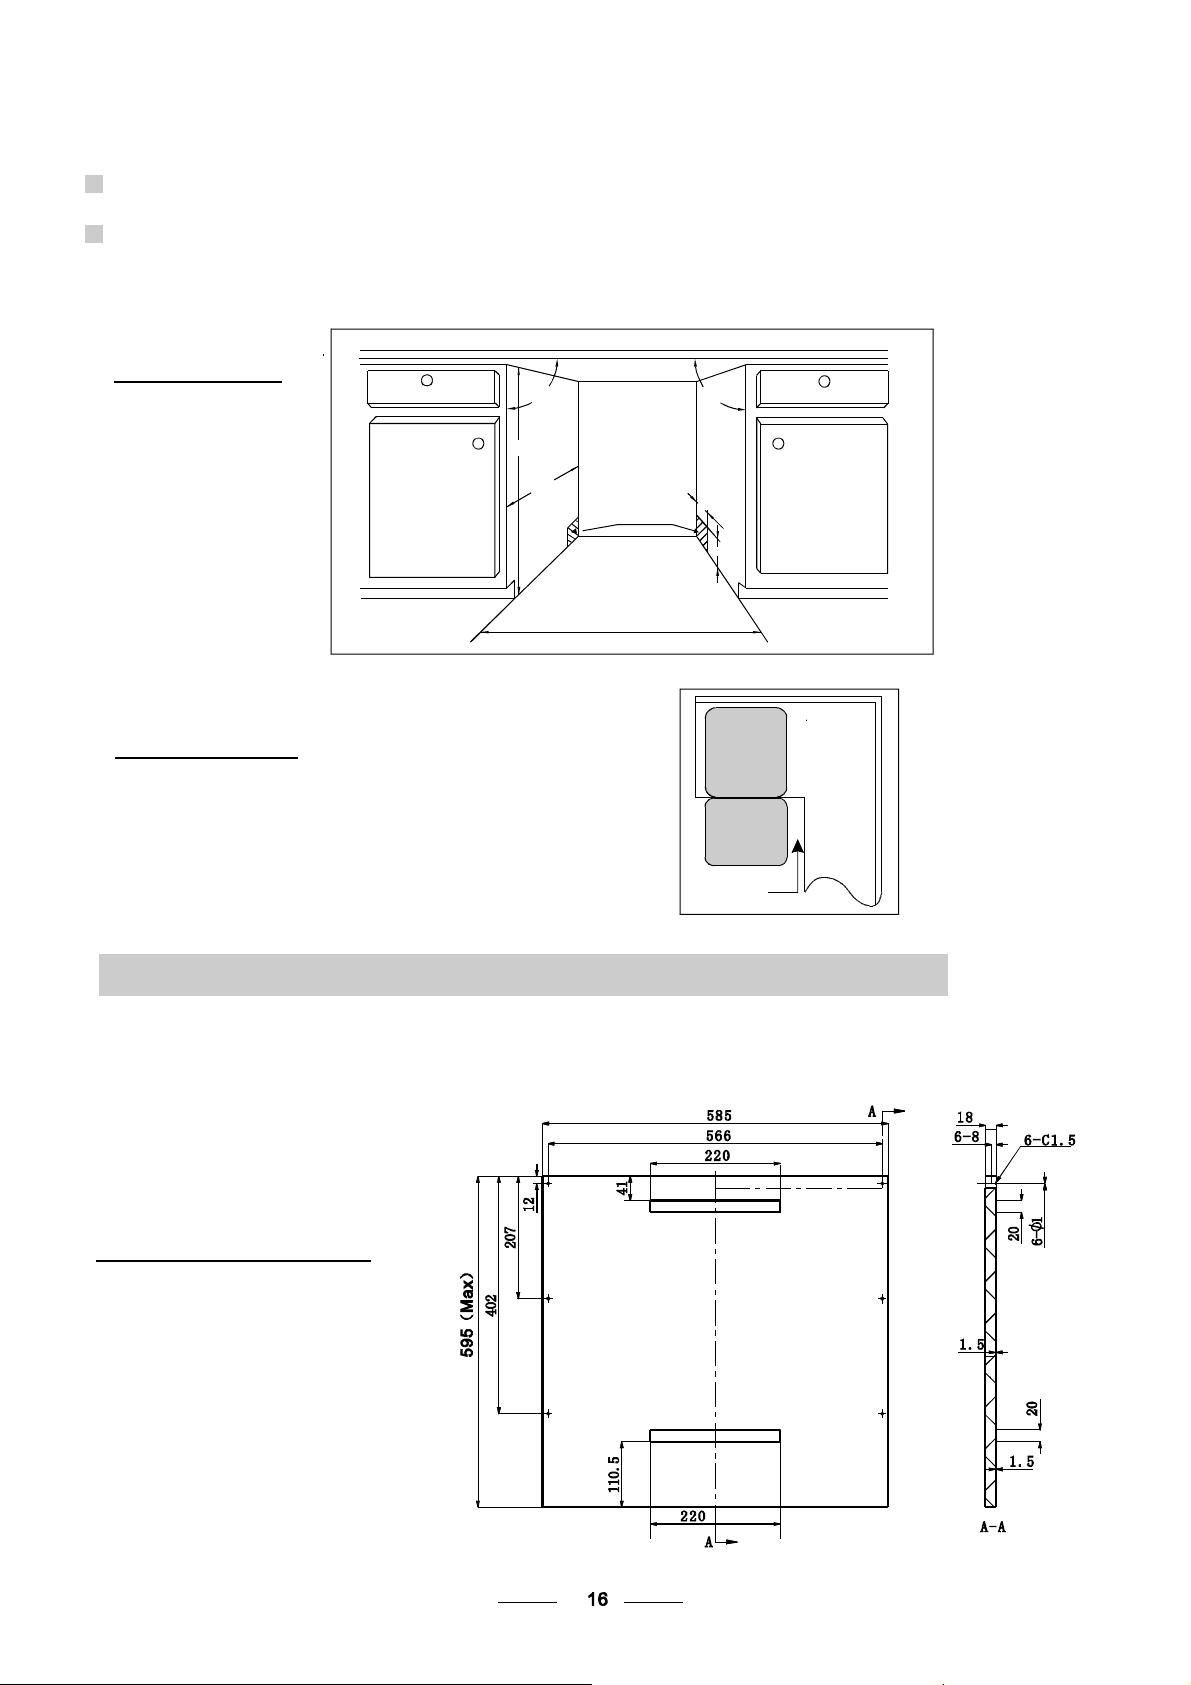
The aestheticwoodenpanelcould be processedaccording to the Figure3.
【】Figure 3
The ae sthe t ic pa nel sh ould
be proc ess e d in accor dan ce
withthe illustrateddimensions
Cabinet
(Unit: mm)
Page 22
2
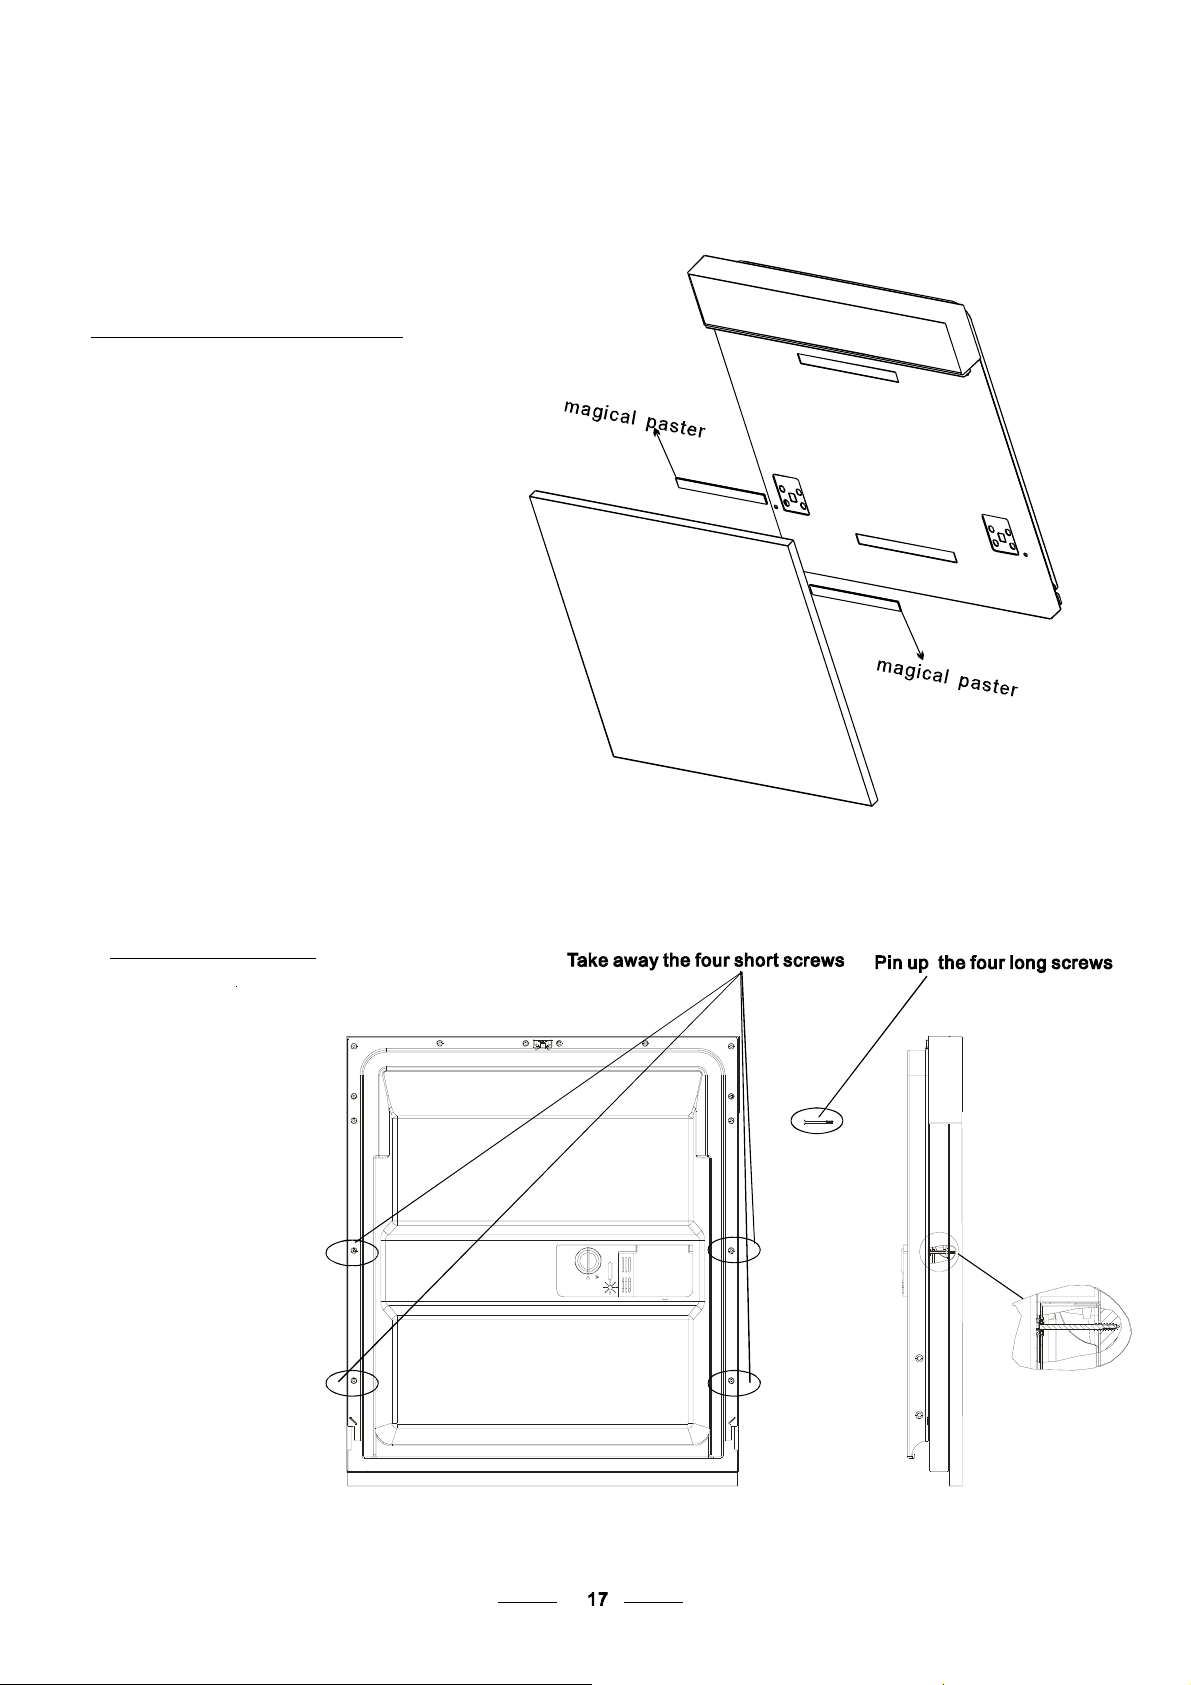
magical paster A and magical paster B be disjoinedon,magical paster A on the aestheticwooden paneland
feltedmagical paster B of theo uterdoor of dishwasher(seef igure4a). Afterpositioningofthepanel , fixthe panel
onto the ou te r door by s cr ews and bolts( Se e figu re 4b)
【】Figure 4a
Installationof aestheticpanel
【】Figure4b
Installationof aesthetic
woodenpanel
.takeaway thefour
1
sh ort screws
2
.pinupthefourlong
screws
Page 23
●
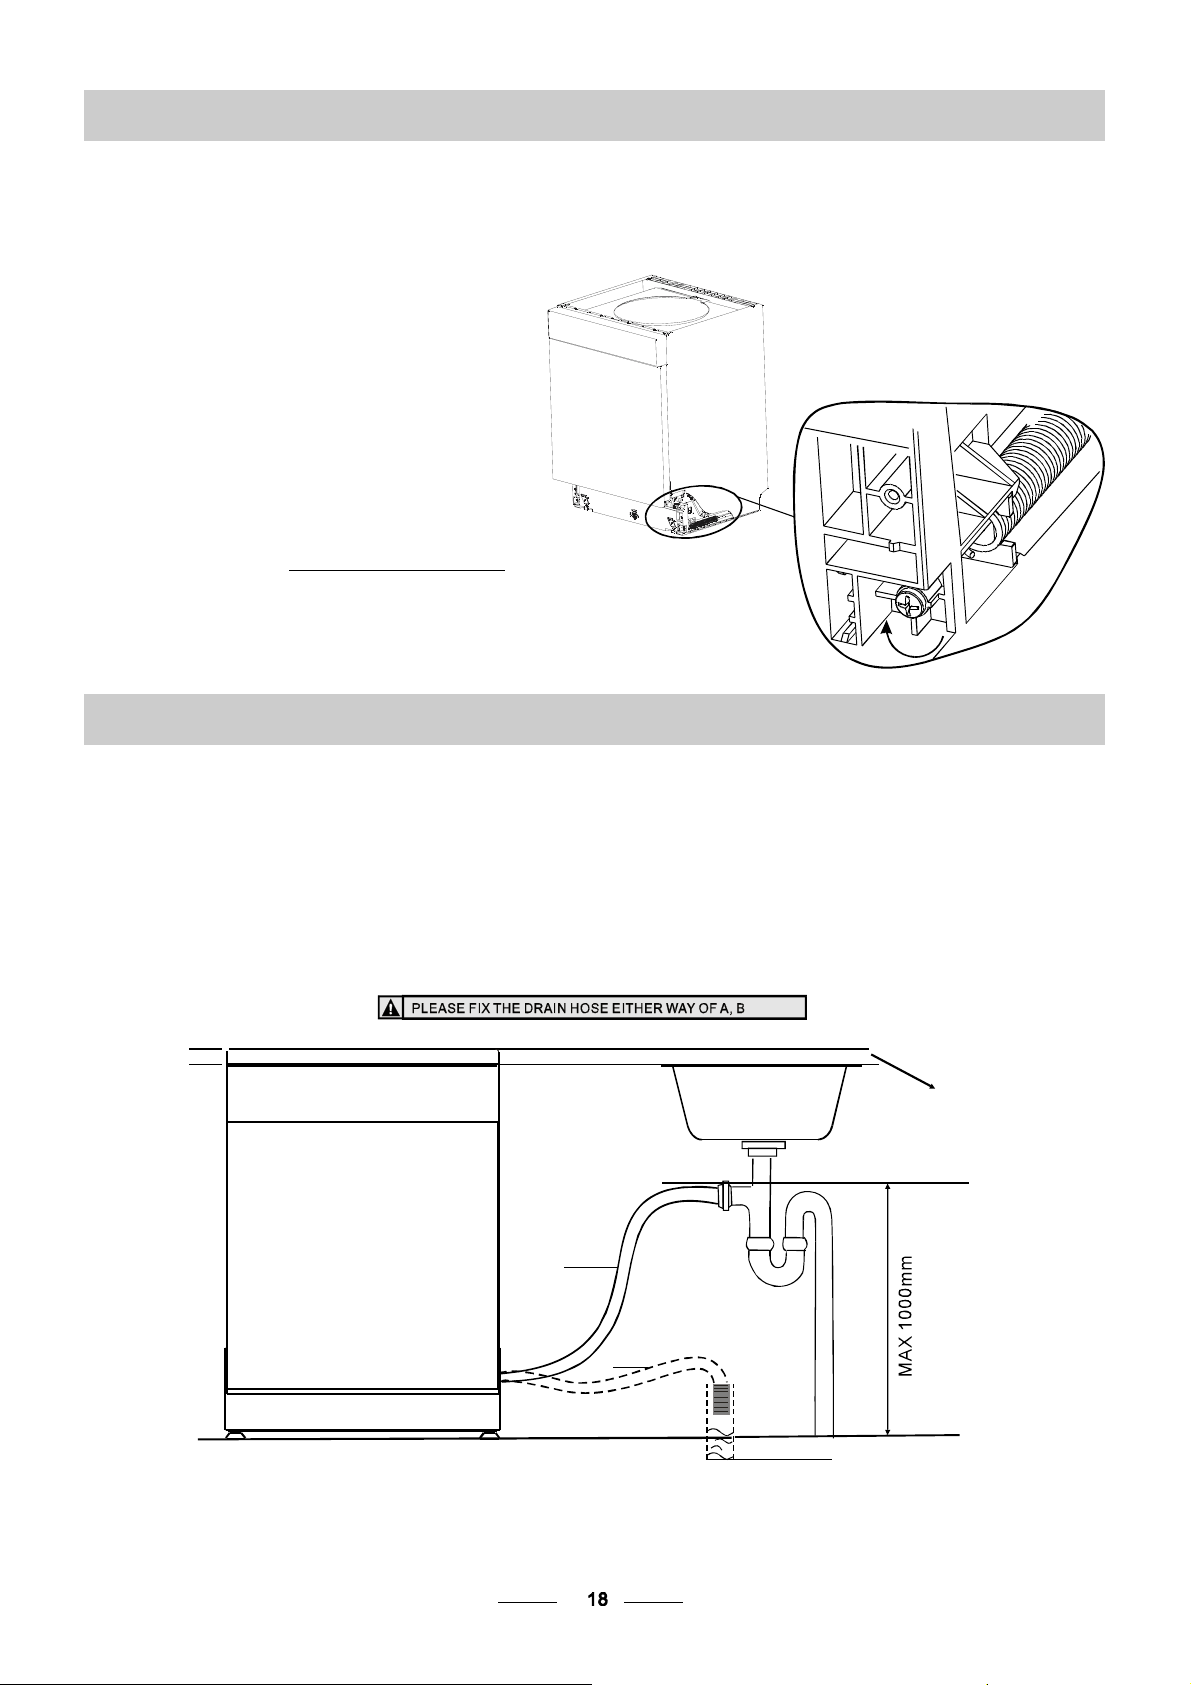
Tension adjustment of the door spring
Thedoor springsare set atthe factoryto thepropertension fortheouter door.
If ae sthet ic wooden pane l are i nst alle d, yo u wi ll ha ve t o adj ust the do o r spr ing t ens ion .
Rotatethe adjustingscrewto drivetheadjustorto strainorrelax the steelcable
(seefigure5).
Doo r spring ten sio n i s c orr ect when
the doorremainshorizontal in the
fullyo penedposition yetrises
toaclosewiththeslightliftofa
finger.
,
【】
Figure5
Tensionadjustment
ofthe door spring
●
Connectionof drainhoses
Insert the drainhose into a dra in pipe with a minim um diam eter of 40mm, or l et i t run into the sink, making sure to
avoidbendingor crimping it.The topof the hose mustbelesst han 1000mm.
Front
Counter
NOTE
The top of the hose
must be less than
A
1000mm.
Drain pipe
B
φ 40mm
Page 24
●
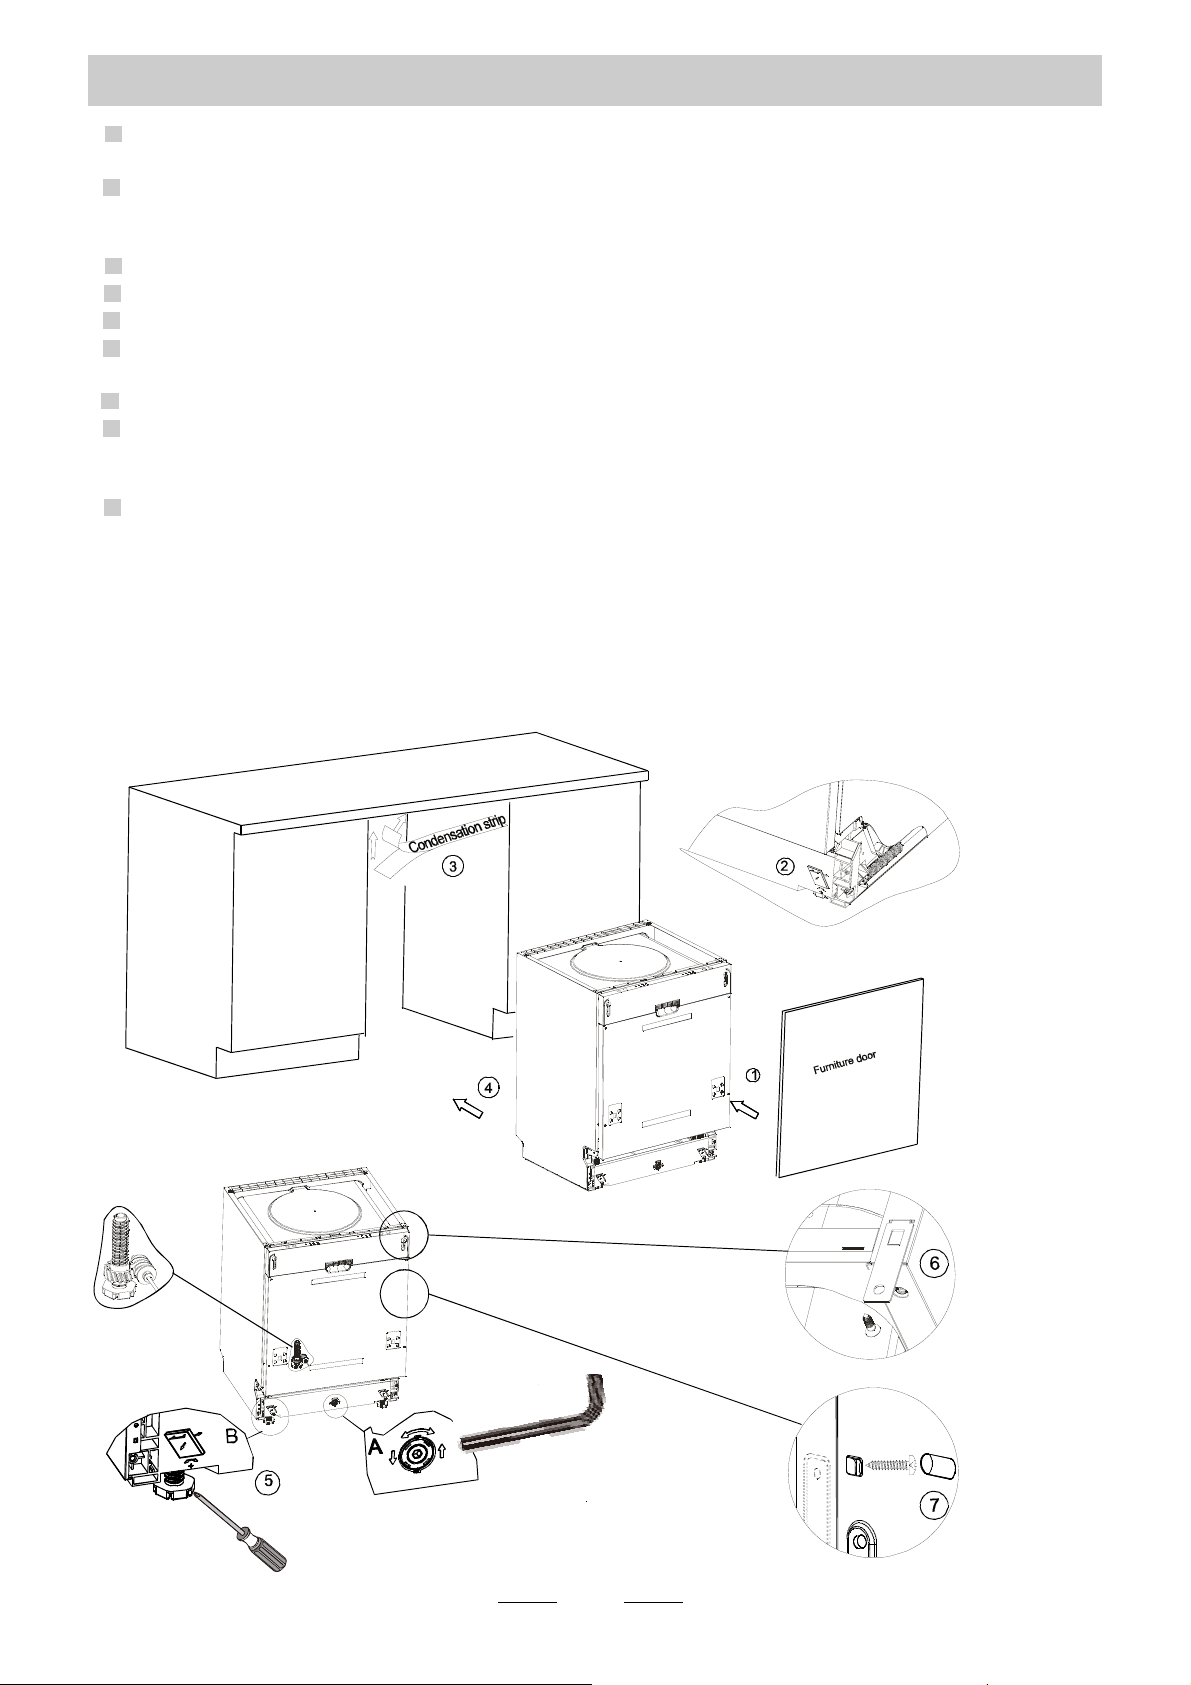
Dishwash er installat ion s teps
1
Install t he f urniture door to the outer door of t he di shwasher using t he br ackets provided. Refer
to the template for pos itioning ofthe brackets.
2
Adjust the tension of the door springs by using anAllen key turning in a clockwise motion to
tighten t he le ft andright door springs. Fai lure t o dothis could cause damag e to your dishwasher
(Illustration2)
3.
Connect the inlet hose t o the cold water sup ply
Connect the drain hose. Refer to diagram (Figure 6)
4.
Connect the power c ord
5.
Affix the condensation strip under the work surface of cabinet. Please ensure the condensation
6
stripis flush withedge of work surface.
Place the dishwasher into pos ition.(Illus tration 4)
7
Level the dishwasher.The rear food can be adjusted from the front of the dishwasher by turning
8
theA llen screw in the m iddle of the base o f dis hwasher use an Allen key (Illustration 5A). Toadjust
the fr ont feet , use a flat scre w driver and turn the f ront feet until the d ishwasher is level (Illus tration 5B).
9 The dishwashermustbe secured in place.There are two waysto do this:
A. Norma l work surface:Put the installation hook int o t he slot ofthe side plan e andsecure it t o t he
work surfac e wit h t he woo d sc rews (Illustration 6).
B. Marble or granite w ork top:Fix t he s ide wi th S crew.(Illus tration 7).
.
【】Figure7
19
Page 25
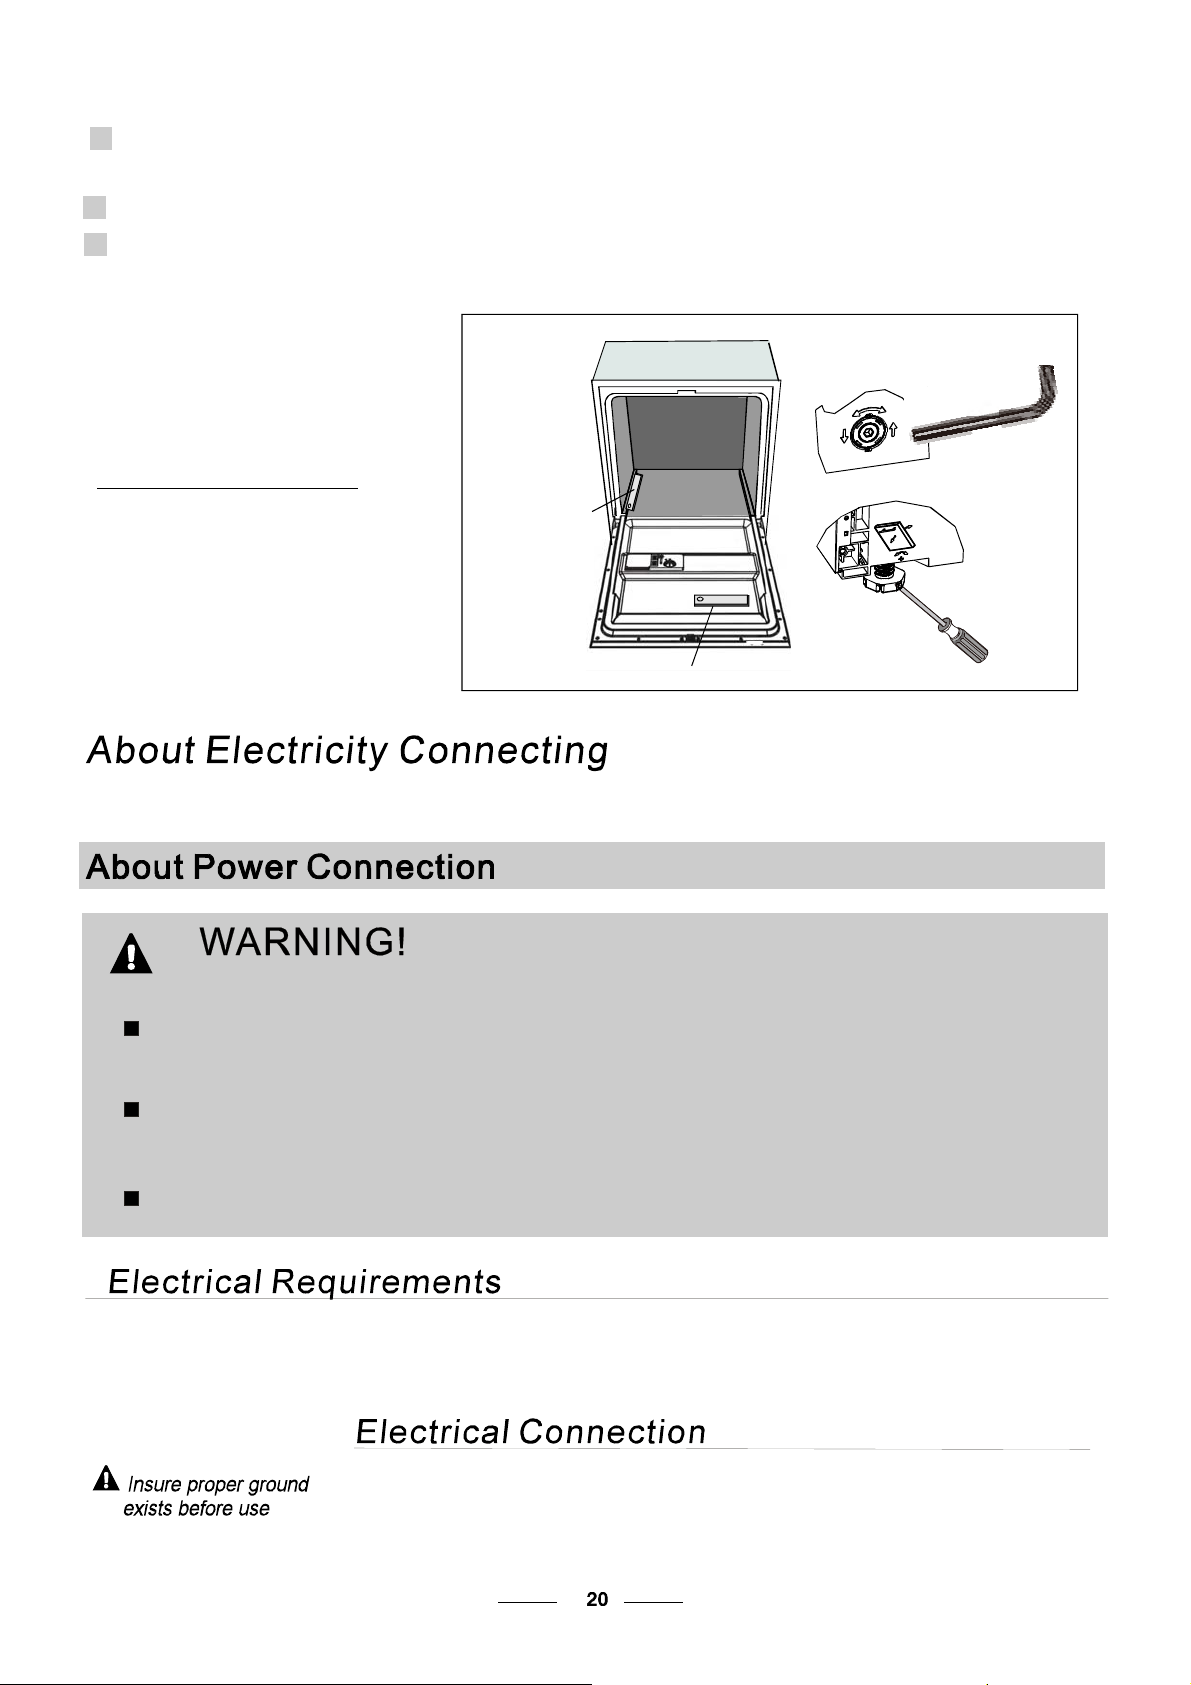
Dishw ashe r m ust be leve l for proper dish rack op erat ion and wa sh p erfo rman ce.
Placea spiritlevel on doorandrack trackinside the tubas shown tocheck thatthe
1
dishwasheris level.
levelthedishwasherby adjusting thethreelevelling legs individually.
2
3
Whenlevel the dishwasher,please pay attentionnot to let thedishwashertip over.
【】Figu re 8
Illustra tion of fe et adjus tment
NOTE:
Themaximum adjustment
heightof thefeet is 50mm.
For personal safety:
Do not use an extension cord or an adapter plug
with this appliance.
Check level Front t o Back
Spiritlevel
Check le vel si de to side
Do not, under any circumstances, cut or remove the
earthing
Connection from the power cord.
Please lo ok at the ra ting label to know th e rat ing volta ge a nd c onnect t he d ishwash er to the app ropriate power s upp ly.
Use ther equ ired fuse10 amp, time delay fuse or circuit bre aker rec ommen ded and provide separate circ uit ser ving
only this applianc e.
Ensure the voltage and frequencyof thepower being corresponds to
thoseon the rating plate. Only insert theplug into an electricalsocket whichisearthed
properly. If th e el ectrical socket to which the appli ance must be conne cted is not
appropriatefortheplug, replacethe socket,rather thanusing a adaptorsort he l ikeas
they coul d ca use ove rheating and bur ns.
Page 26
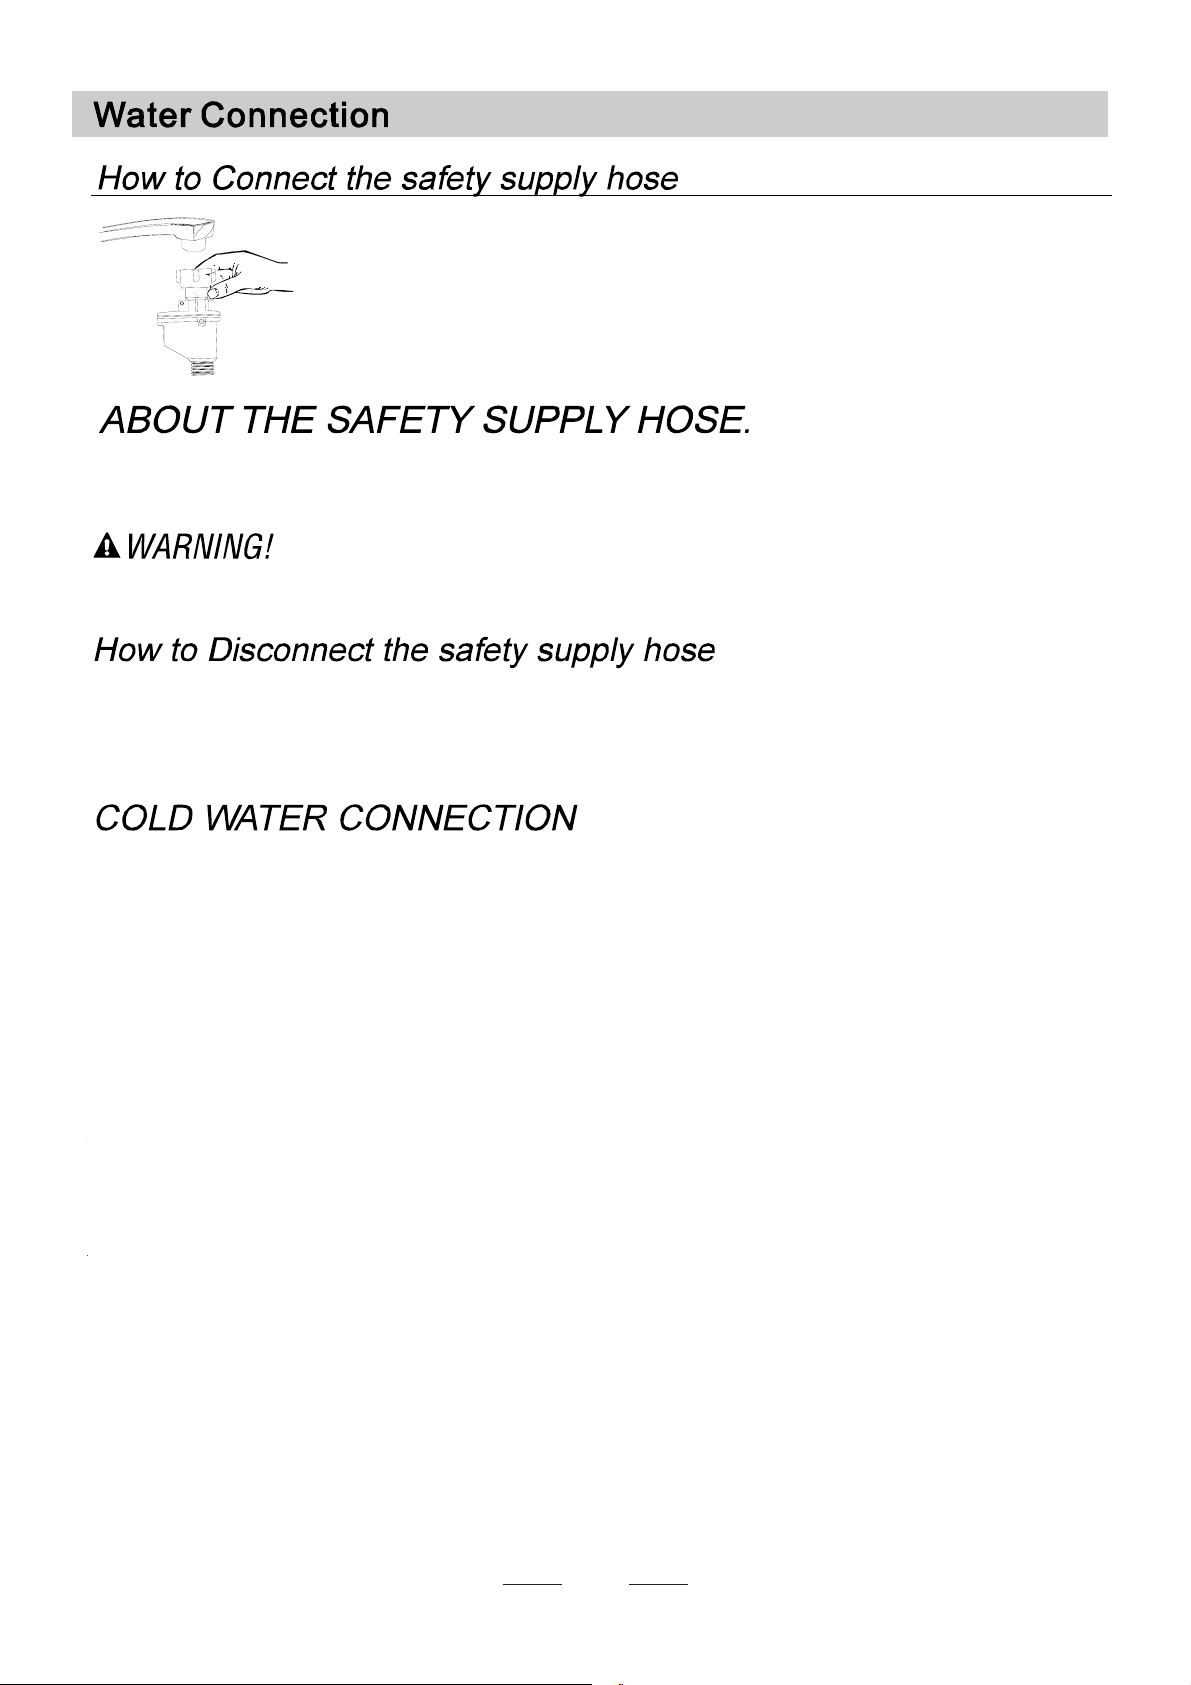
Th e ap plian c e must b e co n n ecte d to the wa ter main s us ing new hose-set s .
The old hose-sets s hould no t be reused.
Waterpressure mu st be between 0,04 M Pa and 1 MPa. I f the pressure i s below the
minimum consul t our Service Depar tment fo r advice.
Pull The safety supply hoses completely out from storage compartment located at rear of dishwasher.
1
Tighter the screws of the safety supply hose to the faucet with thread 3/4inch.
2
Turn water fully on before starting the dishwasher.
3
The safety supply hose consists ofthe double walls.The hose 's sy stem gu arantees i ts int ervention by block ing the
flow of water in caseof the s uppl y hose b reaking and when the air space b etween t he s upply hose itself and the oute r
corrugated hose is full of water.
Ahose t hat a ttaches to a sink spray can bur st ifit is in stalled on the same water line as the di shwasher. If yoursink
has one, it is recomm ended that the hose bedisconnected and the holeplugged.
Turn off the water.
1
Release the water pressure by depressing the pressure release button.This relieves water pressure and protects you, and the
2
room, from severe splashing.
Unscrew The safety supply hose from the faucet..
3
Connect the c old watersupply hoseto a thr eade d 3/4(inch) connector and make su re th at it isfastened t ightly inplace.
Ifthe wat er p ipes are new or ha ve not been used for an e xtended period of time , let the water runto makesure that the
water is c lear and free of im purities . If t his p recaution i s not taken, there is a ris k th at the water inlet c an g et bl ocked
and damage theappliance .
Positioni ng theA ppliance
Position the appliance in the de sired location. The back should r est ag ainst thewall behi nd i t, and t he si des,
along the adjacent cabi nets or walls. The dishwasher is equipped with water supply and drain h oses that can
be positio ned ei ther to the right ort he left sides to facilitate proper instal lation.
Howto Drain ExcessWaterFrom Hoses
If the s ink is 1000 higher from the fl oor, the exces s wat er in h oses cannot be dr ained directly
intothesink.It willbe necessarytodrain excesswaterfromhosesinto a bowl or suitable
conta iner that i s he ld outside and lo wer than t he sink.
Water O utlet
Connect thewater drain hose.The dra in hose mustbe correctly fitted to av oid w ater leaks.
Ensurethat the water inlethoseis n ot kinkedo rsquashed.
Extension Hose
If you n eed a drain ho se e xtension, make sure to use a similar d rain ho se.
It must b e no longer t han 4metres; o therw ise the c lean ing effect of the di shwasher could be reduced.
Syphon Co nnection
Insert the dr ain hose into ad ra in p ipe with a minim um d iam eter of 4 0mm, or let it ru n into the sink, m ak ing sure t o
avoid bendin g or crimping it. The top of thehose must be less than 1000mm.
21
Page 27
Thefollowingthingsshould be checkedbeforestartingthe dishwasher.
1 The dishwasheris leveland fixed properly
2 The inletvalve is open
3 There isaleakageat the connectionsof the conducts
4 The wiresare tightly connected
5 The poweris switched on
6 The inletand drain hoses areknotted
7 Allpacking materialsand printingsshould betaken out from thedishwasher
Afterinstallation,please make sureto keep this manual.
Thecontentof thismanualis very helpfulto the users.
22
Page 28
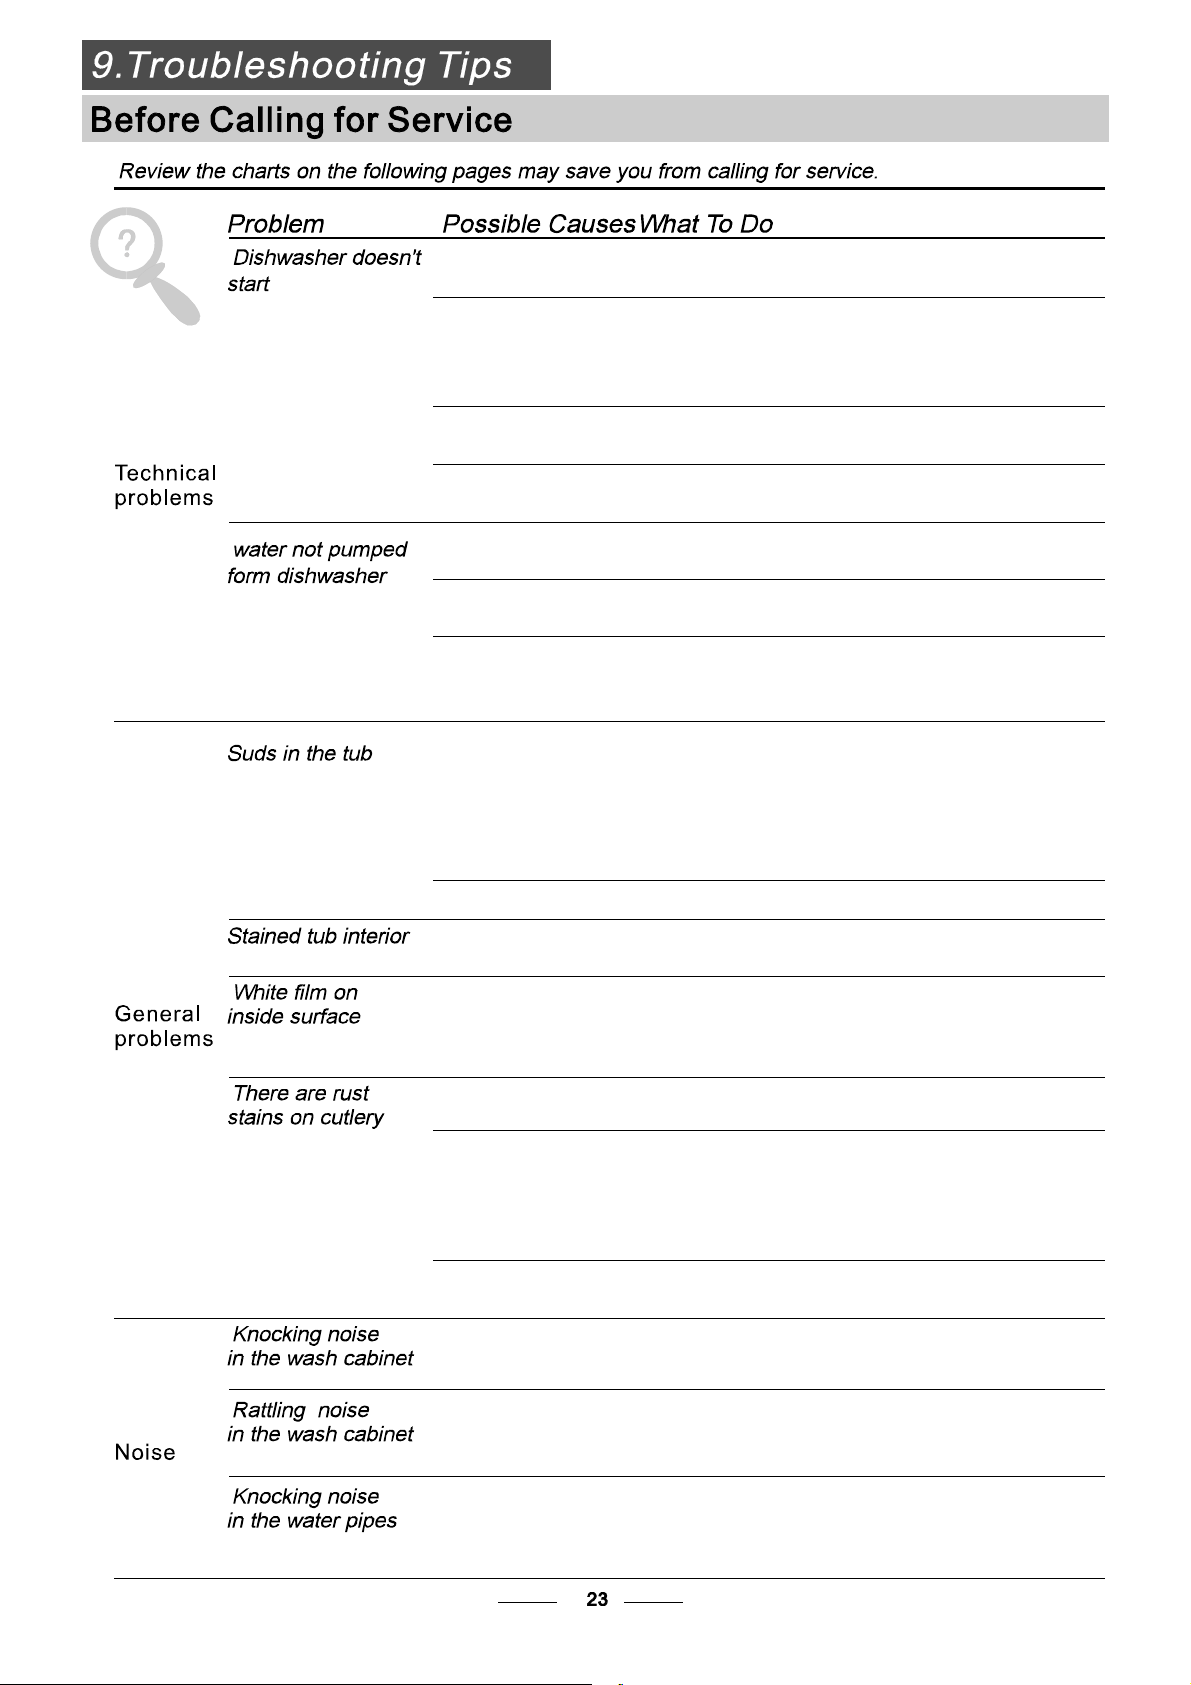
Fuse blown, or the
circuit breaker acted
Replace fuse or reset circuit breaker. Remove any other
appliance s sharing the same circuit with the dishwasher
Power supplyis not
turned on
Water pressure is low
Door of dishwasher
not properly closed.
Kink in drain hose
Filter clogged
Kitchen sink clogged
Improper detergent
Spilled rinse-aid
Make sure the dishwasher is turned on and the door is
closed securely.
Make sure the power cord is properly plugged into the
wall socket.
Check that the water supply is connected properly and
the water is turned on.
Make sure to close the door properly and latch it.
Check drain hose.
Check coarse the filter
(see section titled )" CleaningThe Filter"
Check the kitchen sink to make sure it is draining well.
If the problem is the kitchen sink not draining ,you may
need a plumber rather than a serviceman for dishwashers.
Use only the special dishwasher detergent to avoid suds.
If this occurs, open thedishwasher and let suds evaporate.
Add 1 gallon of cold water to the tub. Close and latch the
dishwasher, then selectanycycle. Dishwasherwilldrain
outthewater at the firststep.Openthe doorafter draining
is stop and check if the suds is disappeared.
Repeat if necessary.
Always wipe up rinse-aid spills immediately.
Detergent with
colourant was used
Hard water minerals
The affected items are
notcorrosion resistant.
A programme wasnot
run after dishwasher
salt was added.
Traces of salt have
gotten into the wash cycle.
The lid of the softer
is loose
Aspayarmis
r
knocking against
an itemin a basket
Items of crockery
are loose in the
wash cabinet
This may be caused
by on-site installation
or the cross-section of
the piping.
Make sure that the detergent is the one without
colourant.
To clean the interior, use a damp sponge with
dishwasher detergent and wear rubber gloves.
Never use any other cleaner than dishwasher
detergent for the risk of foaming or suds.
Always run the quick wash programme .
without any crockery in the dishwasher and
without selecting the Turbo function (if present),
after adding dishwasher salt.
Check the lip .Ensure the fix is fine.
Interrupt the programme, and rearrange the items
which are obstructing the sp ay arm.r
Interrupt the programme,
and rearrange the items of crockery.
This hasno influence on the dishwasher function.
if in doubt, contac ta suitably qualified plumber.
Page 29
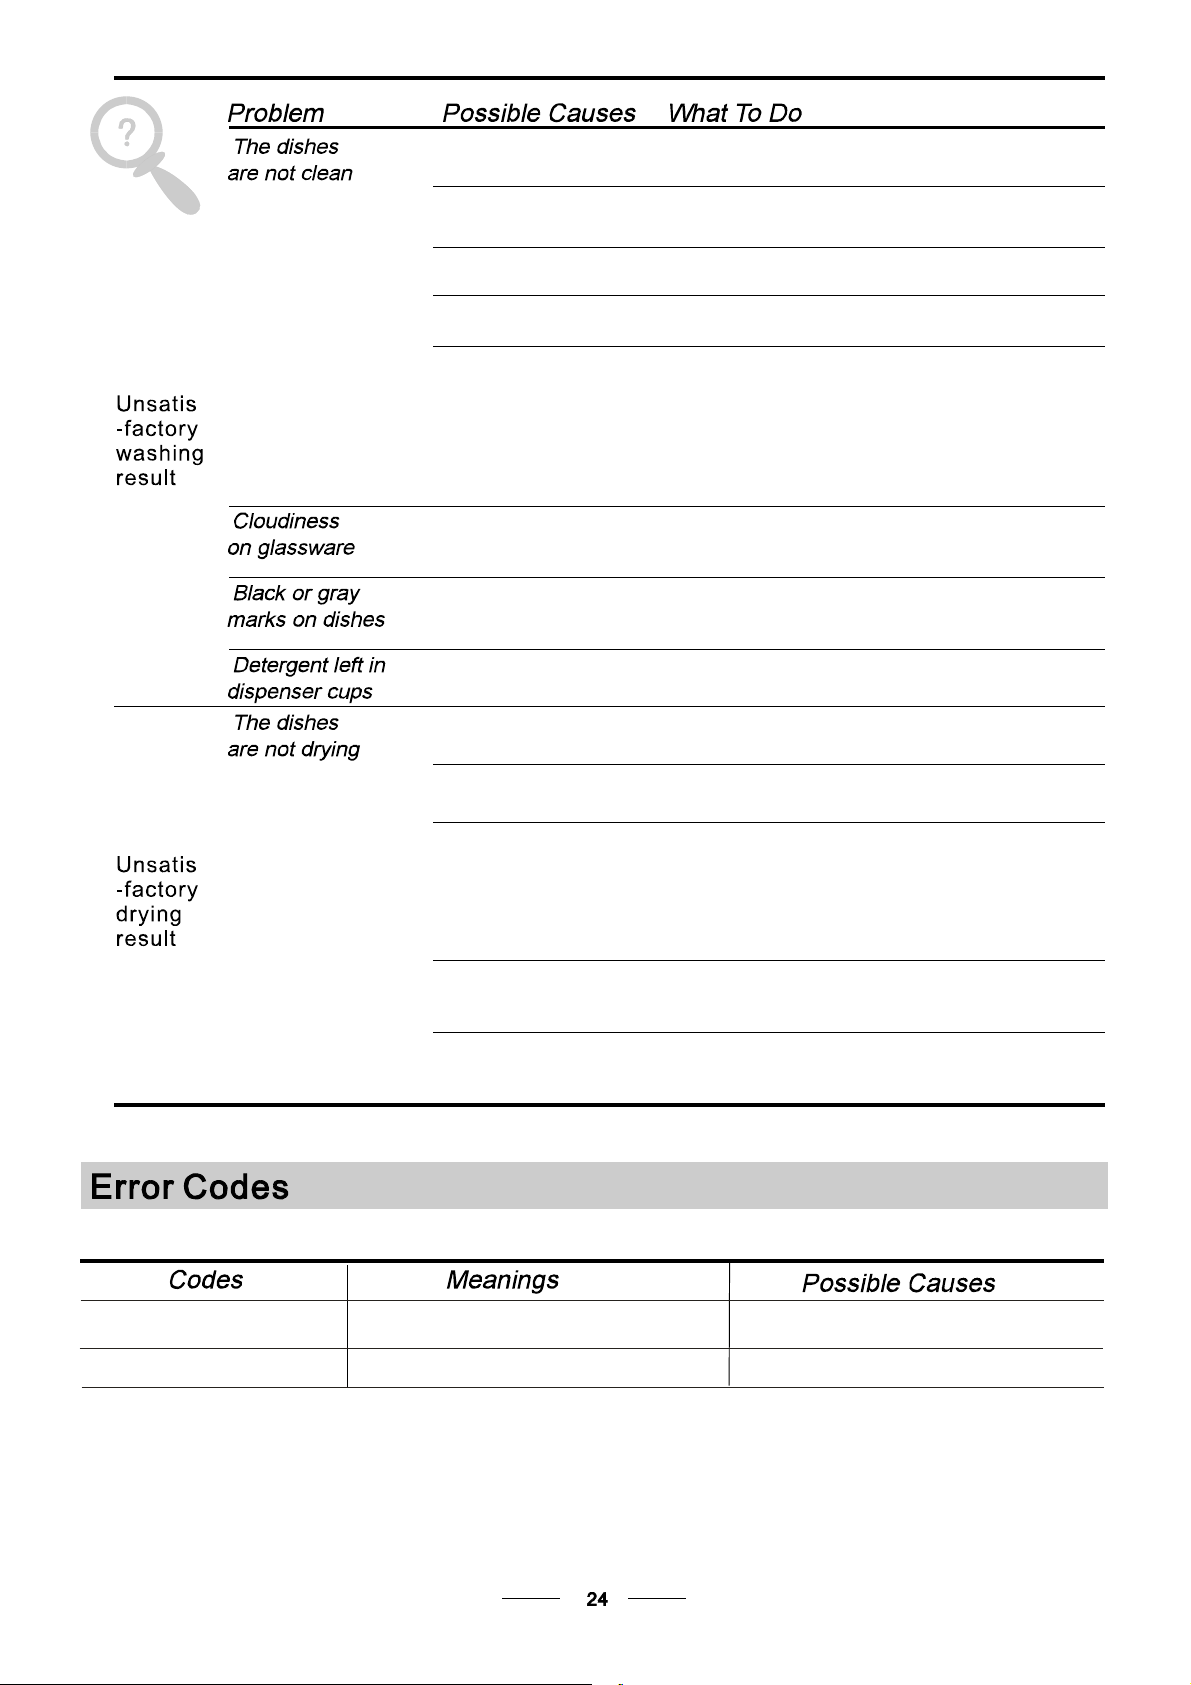
The dishes were not
loaded correctly.
See notes in " Loading the Dishwasher Baskets ".
Theprogramme was
notpowerful enough.
Not enough detergent
wasdispensed.
Items are blocking
the path of sp ay arms.r
The filter combination
inthebaseofwash
cabinet is not clean or
is not correctly fitted.
This may cause
the sp ay arm jets
r
to get blocked.
Combination of soft
water and too much
detergent.
Aluminum utensils
have rubbed against
dishes.
Dishes block
detergent cups.
Improper loading
Too little rinse-aid
Select a more intensive programme.
See" Wash CycleTable ."
Use more detergent, or change your detergent.
Rearrange the items so that the sp ay can rotate freely.r
Clean and/or fit the filter combination correctly.
Clean the sp ay arm jets. See "Cleaning the Spray
Arms".
Use less detergent if you have soft water and select
a shortestcycle to wash the glassware and to get
them clean.
Use a mild abrasive cleaner to eliminate those marks.
Re-loadin g the dishes properly.
Load the dishwasher as suggested in the directions.
Increase the amount of rinse-aid/refill the rinse-aid
dispenser.
r
Dishes are removed
too soon
Wrong program
has been selected
Use of cutlery with
a low-quality coating
Do not empty your dishwasher immediately after
washing. Open the door slightly so that the steam can
escape. Begin unloadingthe dishwasher only once t
he dishes are barely warm to the touch. Empty the low
basket first. This prevents water form dropping off
dishes in the upper basket.
In short program the washing temperature is lower.
This also lowers cleaning performance. Choose
a program with a long washing time.
Water drainage is more difficult with these items.
Cutlery or dishes of this type are not suitable for
washing in the dishwasher.
When some malfunctions come on, the appliance will display error codes to warn you:
The R ap id light flicke r fle et ly
TheGlass light fli cker fleetly
Longer inlet time.
Overflow.
Faucets is not opened, or water intake is
restricted,or water pressure is too low.
Some element of dishwasher leaks .lem
Page 30
If overflow occurs, turn off the main water supply before calling a service.
If there is water in the base pan because of an overfill or small leak,
the water should be removed before restarting the dishwasher.
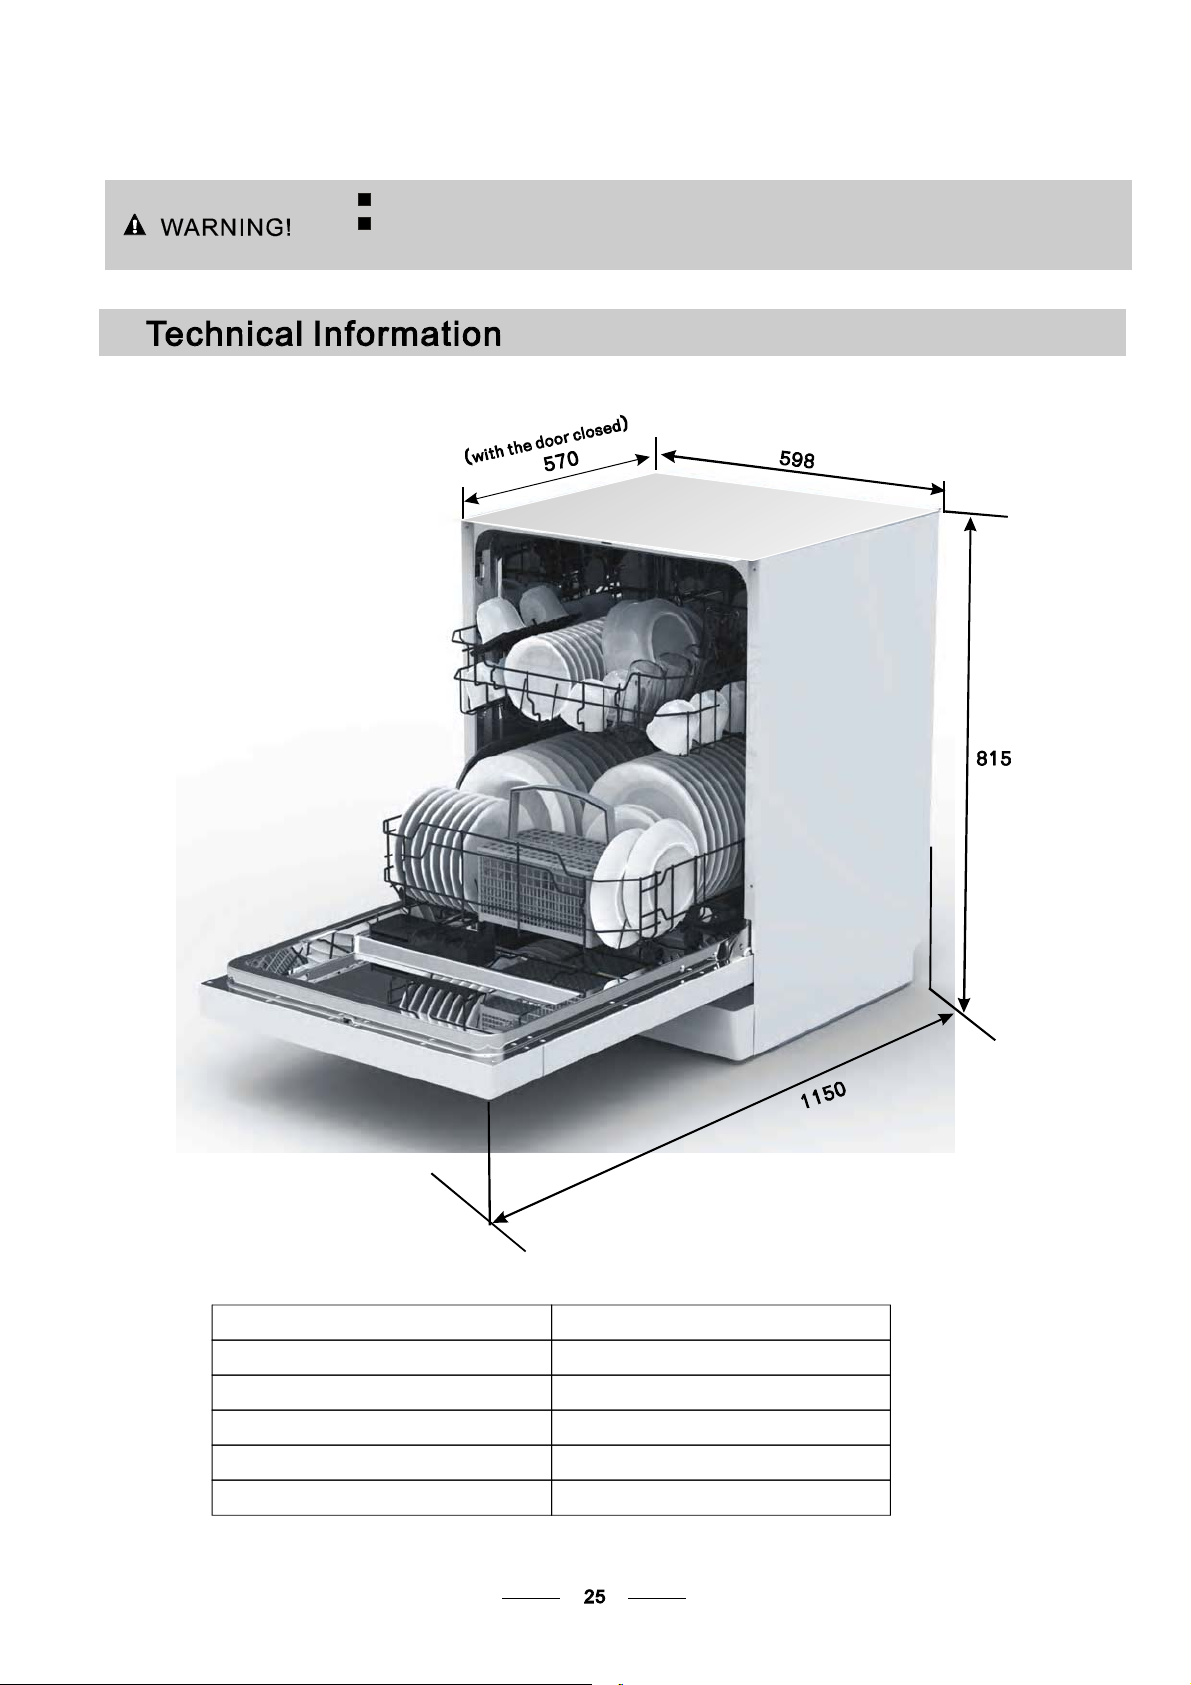
Height: 815mm
Width : 598mm
()
Depth: 570mm
with the door closed
Water pre ssur e: 0.04- 1.0M Pa
Pow er s up pl y: see r at in g la bel
Capacity: 12place settings
Page 31
Page 32
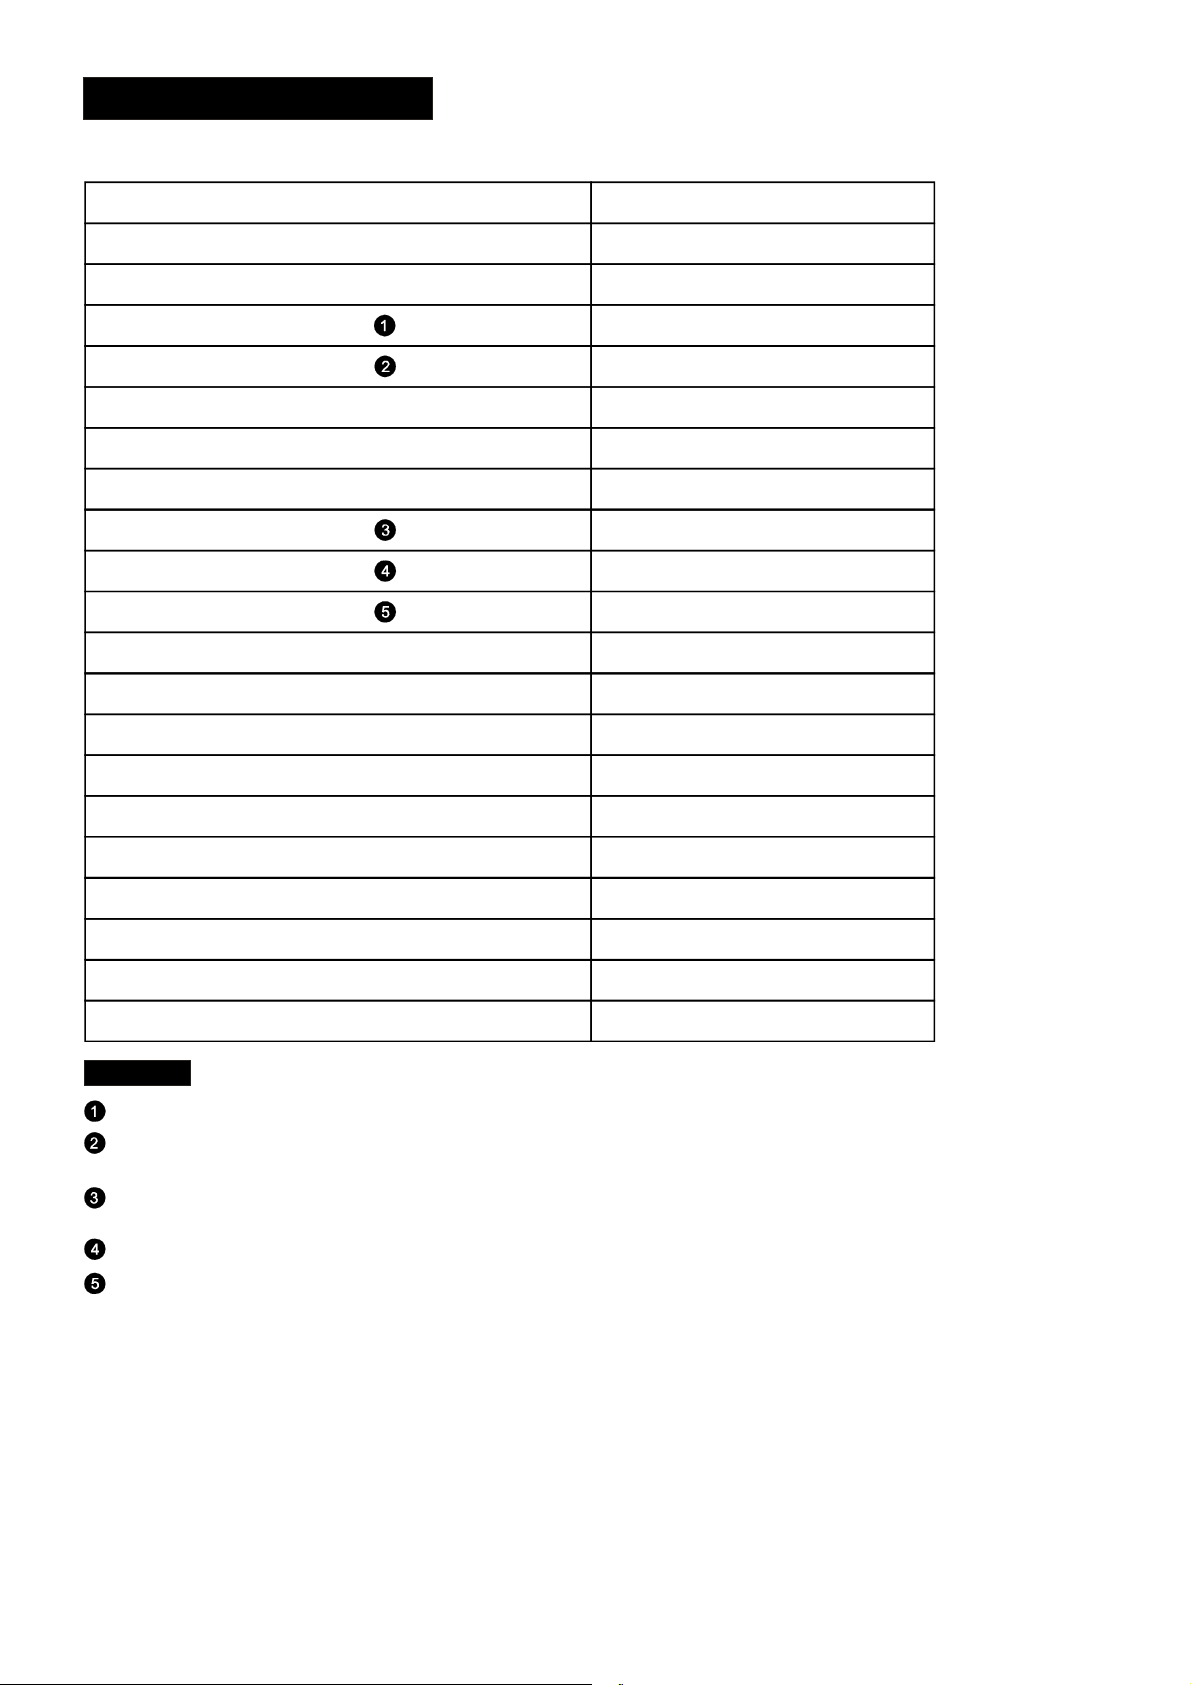
Technical Data Sheet
Sheet o f hous ehold d ishwas her a ccording t o EU Directive 1059/2010:
Manufacturer
Type/Description
Standard place settings
Energy efficiency class
Annual ener gy consu mption
Energy consumpt ion ofthe standard cleaning cycle
Power consu mption of off-mode
Power consu mption of left-on mode
Annual wat er consumption
Drying efficiency cl ass
Standard cleaning cycle
Program durat ion ofthe standard cleaning cycl e
Noise level
Mounting
Couldbebuild-in
TEKA
DW 605 S
12
A++
258 kWh
0.91 kWh
0.45 W
0.49 W
3080 li tre
A
ECO 45
185 mi n
49dB(A) re 1 pW
Bu ild- in
Yes
℃
Height
Width
Depth (with connectors)
Power consumption
Rated vol tage / frequency
Waterpressure (flow p ressure)
NOTE:
A+ ++ (highest efficiency) to D (lowest efficiency)
En e rgy cons umption 258 kWh per year, based on 280 stan dard cle a nin g cy cl es usin g co ld w ater fi l l an d
the consump tion of the low pow er mode s.Actual energy consumption wil l dep end on how the app liance is used.
Waterconsumption 3080 litreper year,basedon 280standardcleaningcycles. Actual waterconsumpt ion
will depen d on how t he a ppliance is use d.
A( highest e fficiency) to G(lowest e fficiency)
This program i s suitable for cleaning soile d norma lly soil ed table ware and that it i s the
mostefficient p rogramme i n t erms of its combined e nergy an d water consumption for
that ty pe of tab lew ar e.
Thedevice meetstheEuropean standardsandthedirectivesin thec urre ntversionatdelivery:
-LVD2006/95/EC
-EMC2004/ 108/EC
- ErP 2 0 09/1 25/EC
“”
“”
81.5 cm
59.8 cm
57 cm
1760-2100 W
AC220-240V/5 0Hz
0.4-10bar =0.04-1 Mpa
The above values have beenmeasured inaccordance with standards under spec ified oper ating co nditions .
Results may varygreatly according to q uantity a nd p ollution of the dis hes, wa ter ha rdness,
amount of detergent, et c.
The manual is based on the Eur opean U nion's s tandards and rules.
Page 33
Teka Subsidiaries
Country Subsidiary Address City Phone
Austria
Küppersbusch Austria
Belgium
Küppersbusch Belgium S.P.R.L.
Bulgaria
Teka Bulgaria EOOD
Chile
Teka Chile S.A.
China
Teka International Trading (Shanghai) Co. Ltd.
Czech Republic
Teka CZ S.R.O.
Denmark
Juvél A/S
Ecuador
Teka Ecuador S.A.
Germany
Teka Küchentechnik GmbH
Great Britain
Teka Products Ltd.
Greece
Teka Hellas A.E.
Hungary
Teka Hungary Kft.
Indonesia
PT Teka Buana
Malaysia
Teka Küchentechnik (Malaysia) Sdn Bhd
Mexico
Teka Mexicana S.A. de C.V.
Morocco
Teka Maroc S.A.
Netherlands
Teka B.V.
Norway
Intra, A.S
Poland
Teka Polska Sp. ZO.O.
Portugal
Teka Portugal S.A.
Romania
S.C. Teka Küchentechnik Romania S.R.L.
Russia
Teka Rus LLC
Singapore
Teka Singapore PTE Ltd
Spain
Teka Industrial, S.A.
Sweden
Intra Mölntorp AB
Thailand
Teka (Thailand) Co. Ltd.
Turkey
Teka Teknik Mutfak Aletleri Sanayi Ve
Ukraine
Teka Ukranie LLC
United Arab Emirates
Teka Middle East Fze
United Arab Emirates
Teka Küchentechnik U.A.E LLC
Venezuela
Teka Andina S.A.
Vietnam
TEKA Vietnam Co., Ltd.
Eitnergasse, 13
Doomveld Industrie, Asse 3, No. 11 - Boite 7
Blvd. “Tsarigradsko Shosse” 135
Avd El Retiro Parque los Maitenes, 1237. Parque Enea
6/F. Datong Business Center, No. 369 Fuxing Middle Rd.
V Holesovickách, 593
Københavnsvej 222
Parque Ind. California 2, Via a Daule Km 12
Sechsheldener Str. 122
177 Milton Park
Thesi Roupaki - Aspropyrgos
Bajcsy Zsilinszky u. 53
Jalan Menteng Raya, Kantor Taman A9 Unit A3
10 Jalan Kartunis U1/47, Temasya Park, Off Glenmarie
Ferrocarril 200, Esquina Norte 29, Col. Moctezuma
73, Bd. Slimane, Depôt 33, Route de Ain Sebaa
Wijkermeerstraat, 34
Storsand
ul. 3-go Maja 8 / A2
Estrada da Mota - Apdo 533
Sevastopol str., no 24, 5th floor, of. 15
Barklaya str. 6, bld. 3, Barklay plaza center, office 402
Clemenceau Avenue, 83, 01-33/34 UE Square
C/ Cajo,17
Säbyvägen, 8
364/8 Sri-Ayuttaya Road, Phayathai, Ratchatavee
Büyükdere Cad. 24/13
86-e, Bozhenko Str .2nd floor,4th entrance
Building LOB 16, Office 417
Bin Khedia Centre
Ctra. Petare-Santa Lucia, km 3 (El Limoncito)
803 Dai Minh Convention Tower, 8th Floor
1231 Wien
1731 Zellik
1784 Sofia
Pudahuel, Santiago de Chile
200025 Shanghai
182 00 Praha 8 - Liben
DK-4600 Køge
Guayaquil
35708 Haiger
OX14 4SE Milton, Abingdon
193 00 Athens
1065 Budapest
12950 Jakarta
40150 Shah Alam, Selangor Darul Ehsan
15500 Mexico D.F.
Casablanca
2131 HA Hoofddorp
7563 Malvik
05-800 Pruszków
3834-909 Ilhavo, Aveiro
010992 Bucharest Sector 1
121087 Moscow ∙ Russia
239920 Singapore
39011 Santander
734 93 Kolbäck
10400 Bangkok
80290 Mecidiyeköy, Istanbul
03150 Kyiv
P.O. Box 18251 Dubai
P.O. Box 35142 Dubai
racas
1070 Ca
77 Hoang Van Thai, District 7, Ho Chi Minh
+43 18 668 022
+32 24 668 740
+359 29 768 330
+ 56 24 386 000
+86 2 153 076 901
+420 284 691 940
+45 36 340 288
+593 42 100 311
+49 27 713 950
+44 1 235 861 916
+30 2 109 760 283
+36 13 542 110
+62 215 762 272
+60 376 201 600
+52 5 551 330 493
+212 22 674 462
+ 31 235 656 480
+47 73 980 100
+48 227 383 270
+35 1 234 329 500
+40 212 334 450
+7 495 64 500 64
+65 67 342 415
+34 942 355 050
+46 22 040 300
+66 -26 424 888
+90 2 122 883 134
+380 444 960 680
+971 48 872 912
+971 42 833 047
+58 2 122 912 821
+84 854 160 646
www.teka.com
“for further information and updated contact adresses,
please refer to the corporate website”
 Loading...