

Page 1

Z
R-4 i DNT
DAB/FM/Internet-radio with iPod Dock
OWNER’S MANUAL
Page 2

CAUTION: TO REDUCE THE RISK OF ELECTRIC SHOCK, DO
NOT REMOVE COVER (OR BACK). NO USER-SERVICEABLE
PARTS INSIDE. REFER SERVICING TO QUALIFIED SERVICE
PERSONNEL.
The lightning flash with arrowhead symbol, within
an equilateral triangle, is intended to alert the user
to the presence of uninsulated “dangerous voltage”
within the product’s enclosure that may be of sufficient
magnitude to constitute a risk of electric shock to
persons.
The exclamation point within an equilateral triangle is
intended to alert the user to the presence of important
operating and maintenance (servicing) instructions in
the literature accompanying the appliance.
IMPORTANT SAFETY INSTRUCTIONS
To reduce the risk of electrical shock, fire, etc.:
1) Read these instructions.
2) Keep these instructions.
3) Heed all warnings.
4) Follow all instructions.
5) Do not use this apparatus near water.
6) Clean only with dry cloth.
7) Do not block any ventilation openings. Install in accordance
with the manufacturer’s instructions.
8) Do not install near any heat sources such as radiators, heat
registers, stoves, or other apparatus (including amplifiers) that
produce heat.
9) Do not defeat the safety purpose of the polarized or groundingtype plug. A polarized plug has two blades with one wider
than the other. A grounding type plug has two blades and
a third grounding prong. The wide blade or the third prong
are provided for your safety. If the provided plug does not fit
into your outlet, consult an electrician for replacement of the
obsolete outlet.
10) Protec t the power cord from being walked on or pinched
particularly at plugs, convenience receptacles, and the point
where they exit from the apparatus.
11) Onl y u s e a t t achm ents/ acce ssori es specif ie d b y t he
manufacturer.
12) Use only with the c ar t, stand, tripo d,
brac ket, or tab le s p e cified by th e
manufacturer, or sold with the apparatus.
When a cart is used, use caution when
moving the cart/apparatus combination to
avoid injury from tip-over.
13) Unplug this apparatus during lightning storms or when unused
for long periods of time.
14) Refer all servicing to qualified ser vice personnel. Servicing is
required when the apparatus has been damaged in any way,
such as power-supply cord or plug is damaged, liquid has
been spilled or objects have fallen into the apparatus, the
apparatus has been exposed to rain or moisture, does not
operate normally, or has been dropped.
22
Page 3
< Do not expose this apparatus to drips or splashes.
< Do not place any objects filled with liquids, such as vases, on the
apparatus.
< Do not install this apparatus in a confined space such as a book
case or similar unit.
< The apparatus draws nominal non-operating power from the
AC outlet with its POWER or STANDBY/ON switch not in the ON
position.
< The apparatus should be located close enough to the AC outlet
so that you can easily grasp the power cord plug at any time.
< The main plug is used as the disconnect device, the disconnect
device shall remain readily operable.
< If the product uses batteries (including a battery pack or installed
bat teries), they should not be exposed to sunshine, fire or
excessive heat.
< Caution should be taken when using earphones or headphones
with the product because excessive sound pressure (volume)
from earphones or headphones can cause hearing loss.
This product contains software. You have the non-exclusive, nontransferable right to use this software in object code form only,
solely to operate this product.
Ownership of the intellectual property rights in the software in
this product remains in the ownership of the party who provided
it (or the respective licensor) and all of their respective rights are
reserved.
You are strictly forbidden from modifying, translating, reverse
engineering, decompiling, disassembling or using other means
to discover the source code of the software in this product or
otherwise replicate the functionality of the software in this product
except to the extent that this restriction is expressly prohibited by
applicable law.
Except where this is not possible in the territory where you
purchased this product, we do not give any warranties in relation to
the operation or performance of the software and neither we nor
any of our suppliers or licensors shall be liable to you for indirect,
special, incidental and consequential losses such as loss of profits
arising out of your use of the software in this product.
These terms apply to any updates to the software you may apply to
the product.
Portions o f this sof twa re are includ ed u nder license from
RealNetworks, Inc. Copyright 1995-2007, RealNetworks, Inc. All rights
reserved. RealAudio and the Real Enabled logo are trademarks or
registered trademarks of RealNetworks, Inc.
WARNING: TO PREVENT FIRE OR SHOCK HAZARD,
DO NOT EXPOSE THIS APPLIANCE TO RAIN OR
MOISTURE.
CAUTION
< DO NOT REMOVE THE EXT ERNAL CASES OR CABINETS TO
EXPOSE THE ELECTRONICS. NO USER SERVICEABLE PARTS ARE
WITHIN.
< IF YOU ARE EXPERIENCING PROBLEMS WITH THIS PRODUC T,
CONTACT TEAC FOR A SERVICE REFERRAL. DO NOT USE THE
PRODUCT UNTIL IT HAS BEEN REPAIRED.
iPod is a trademark of Apple Inc., registered in the U.S. and other
countries.
“Made for iPod” means that an electronic accessory has been
designed to connect specifically to iPod and has been certified by
the developer to meet Apple performance standards.
iPhone is a trademark of Apple Inc.
“Works with iPhone” means that an electronic accessory has been
designed to connect specifically to iPhone and has been certified
by the developer to meet Apple performance standards.
Apple is not responsible for the operation of this device or its
compliance with safety and regulatory standards.
NXT is a trademark of New Transducers Ltd.
MPEG Layer-3 audio coding technology licensed from Fraunhofer IIS
and Thomson.
MPEG-4 HE-AAC audio coding technology licensed by Fraunhofer
IIS.
http://www.iis.fraunhofer.de/amm/
This product is protected by certain intellectual property rights of
Microsoft.
Use or distribution of such technology outside of this product is
prohibited without a license from Microsoft.
Windows XP and Windows Vista are either registered trademarks
or trademarks of Microsoft Corporation in the United States and/or
other countries.
Content owners use Windows Media digital rights management
techn olog y (WMDRM) to protect their intellectual propert y,
including copyrights. This device uses WMDRM software to access
WMDRM-protected content. If the WMDRM software fails to protect
the content, content owners may ask Microsoft to revoke the
software's ability to use WMDRM to play or copy protected content.
Revocation do es not affec t unprotected content. When you
download licenses for protected content, you agree that Microsoft
may include a revocation list with the licenses. Content owners
may require you to upgrade WMDRM to access their content. If
you decline an upgrade, you will not be able to access content that
requires the upgrade.
If you download a software upgrade to your radio, additional
licence terms may apply and these are available at http://www.
frontier-silicon.com/audio/eula.htm
The information at this address can be replicated for use on your
own website or portal but may be updated without notice.
Windows Media is either a registered trademark or trademark of
Microsoft Corporation in the United States and/or other countries.
33
Page 4

Before UseContents
Thank you for choosing TEAC. Read this manual carefully to
get the best performance from this unit.
Before Use . . . . . . . . . . . . . . . . . . . . . . . . . . . . . . . . . . . . . . . . . . . . . . . . . . . . .4
Remote Control Unit . . . . . . . . . . . . . . . . . . . . . . . . . . . . . . . . . . . . . . . . . . .5
Connection . . . . . . . . . . . . . . . . . . . . . . . . . . . . . . . . . . . . . . . . . . . . . . . . . . . .6
Internet Connection ............................................7
Identifying the Parts ............................................8
Setup Wizard ..................................................10
System Settings . . . . . . . . . . . . . . . . . . . . . . . . . . . . . . . . . . . . . . . . . . . . . . .12
Setting the Clock ..............................................13
Basic Operation . . . . . . . . . . . . . . . . . . . . . . . . . . . . . . . . . . . . . . . . . . . . . . .14
AUX in
Listening to an External Source ................................16
iPod/iPhone
Getting Started with an iPod/iPhone . . . . . . . . . . . . . . . . . . . . . . . . . .16
Listening to an iPod/iPhone . . . . . . . . . . . . . . . . . . . . . . . . . . . . . . . . . . .17
Read this before attempting any operations.
< When this unit is on, turning on a TV nearby might cause lines to
appear on the TV screen, depending on the frequency of the TV
broadcast. This is not a malfunction of the unit or the TV. If you
see such lines, place this unit farther away from the TV set.
< Since the unit may become warm during operation, always leave
sufficient space around the unit for ventilation.
Make sure there is at least 20 cm of space above and at least
5 cm of space on each side of the unit. Do not place anything on
top of the unit.
< The voltage supplied to the unit should match the voltage that
is printed on the rear panel. If you are in any doubt regarding this
matter, consult an electrician.
< Choose the installation location of your unit carefully. Avoid
placing it in direct sunlight or close to a source of heat. Also
avoid locations that are subject to vibrations or excessive dust,
heat, cold or moisture.
< Do not place the unit on an amplifier or receiver or any other
device that generates heat.
DAB
Listening to the DAB Radio . . . . . . . . . . . . . . . . . . . . . . . . . . . . . . . . . . . .19
Using the DAB Menu . . . . . . . . . . . . . . . . . . . . . . . . . . . . . . . . . . . . . . . . . .19
Settings the DAB Display ......................................23
Internet Radio/Podcast
Listening to the Internet Radio/Podcast ........................24
Settings the Internet Radio/Podcast Display ...................25
Internet Radio/Podcast Menu Operations ......................26
Radio Portal . . . . . . . . . . . . . . . . . . . . . . . . . . . . . . . . . . . . . . . . . . . . . . . . . . .27
FM
Listening to the FM Radio. . . . . . . . . . . . . . . . . . . . . . . . . . . . . . . . . . . . . .28
Preset Tuning (FM) .............................................29
Last.fm
Listening to Music of Last.fm . . . . . . . . . . . . . . . . . . . . . . . . . . . . . . . . . .30
Music Player
Setting up the Music Player ....................................32
Listening to the Music Player . . . . . . . . . . . . . . . . . . . . . . . . . . . . . . . . . .33
< Do not open the cabinet as this might result in damage to the
circuitry or cause electrical shock. If a foreign object should get
into the unit, contact your dealer or service company.
< When removing the power plug from the wall outlet, always pull
directly on the plug. Never yank on the cord.
< Do not attempt to clean the unit with chemical solvents as they
might damage the finish. Use a clean, dry or slightly damp cloth.
< Keep this manual in a safe place for future reference.
Sleep Timer . . . . . . . . . . . . . . . . . . . . . . . . . . . . . . . . . . . . . . . . . . . . . . . . . . .34
Wake Up Timer ................................................34
Troubleshooting ...............................................36
Specifications . . . . . . . . . . . . . . . . . . . . . . . . . . . . . . . . . . . . . . . . . . . . . . . . .37
44
Page 5
Remote Control Unit
Confirm the supplied standard accessories.
Remote control unit (RC-1239) x 1
Batteries (AAA) x 2
AC adapter (PS-M1220) x 1
Power cord for AC adapter x 1
Stereo mini-plug cable x 1
Dock adapter x 4
The included remote control allows this unit to be operated from a
distance.
When using the remote control, point it towards the remote sensor
on the front panel of the main unit.
< Even if the remote control unit is used within its effective range,
operation by remote control might be impossible if there are any
obstacles between the unit and the remote control.
< If the remote control unit is operated near other devices that
generate infrared rays, or if other remote controls that use
infrared rays are operated near the unit, this unit might operate
incorrectly. The other devices might also operate incorrectly.
Battery Installation
1. Remove the battery compartment cover.
2. Insert two “AAA” (R03 or UM-4) dry batteries. Make sure that the
batteries are inserted with their positive “+” and negative “_”
poles positioned correctly.
3. Close the cover.
Dock cover x 1
Owner’s manual (this document) x 1
Warranty card x 1
Maintenance
If the surface of the unit gets dirty, wipe it with a soft cloth or use
diluted mild liquid soap. Never spray liquid directly on this unit.
Apply cleaner to the cleaning cloth and wipe gently. Be certain
to remove any excess completely. Do not use thinner, benzene or
alcohol as they could damage the surface of the unit. Allow the
surface of the unit to dry completely before using.
Battery Replacement
If the distance from the main unit that the remote control works
effectively decreases, the batteries are probably exhausted. Replace
the batteries with new ones when this happens.
For more information about the collec tion of batteries, please
contact your local municipality, your waste disposal service or the
place where you purchased them.
Precautions concerning batteries
< Be sure to insert the batteries with correct positive (+) and
negative (_) orientations.
< Use batteries of the same type. Never use different types of
batteries together.
< Both rechargeable and non-rechargeable batteries can be used.
Refer to the precautions on their labels.
< If the remote control will not be used for a long time (more than
a month), remove the batteries to prevent them from leaking.
< If the batteries leak, wipe away the leakage inside the battery
compartment and replace the batteries with new ones.
< Do not use batteries of types other than those specified. Do
not mix new batteries with old ones or use different types of
batteries together.
< Do not heat or disassemble batteries. Never throw batteries into
fire or water.
< Do not carry or store batteries with other metallic objects. The
batteries could short circuit, leak or explode.
< Never recharge a bat tery unless it is confirmed to be a
rechargeable type.
55
Page 6
A
C
B
D
iPod/iPhone
(back side)
R-4iDNT (back side)
PS-M1220
AC wall socket
E
Connection
Caution:
< Turn off the power (set to standby) before making connections.
< Read the instructions of each device you intend to use with this unit.
< Be sure to connect each plug securely. To prevent hum and noise, do not bundle the connection cords.
6
Page 7
ETHERNET
FM/DAB antenna
A
Extend fully and position for the best reception.
Ke ep anten na awa y f rom m eta lli c o bje c t s, ele c tric al
equipment and cords.
Internet Connection
Using the wireless LAN
When you connect the power cord into the wall socket for the
first time, select your region of the wireless LAN in “Setup wizard”.
(page 10)
< For DAB reception, you can check the antenna adjustment
or positioning for the best reception by viewing the signal
strength on the display (page 21).
ETHERNET port
B
To enjoy the Internet radio and the Music player function,
connect the unit to the broadband internet network.
This unit has both a built-in wireless LAN antenna and a
ETHERNET port for wired internet connection.
Before you continue, make sure that your wireless access
point is enabled and connected to your broadband Internet,
or your LAN cable is connected correctly. For details of the
system working, we recommend you to read the operating
instructions supplied with the wireless access point and LAN
connecting.
PHONES
C
To listen with headphones, first lower the volume level to
the minimum. Then, connect the headphones plug into the
PHONES jack, and adjust the volume by pressing the Volume
buttons (
The speakers will make no sound when headphones are
plugged in.
/ ).
< A wireless access point (Wi- Fi) must be connected to your
broadband Internet, preferably via a router.
< If your wireless network is configured to use Wired Equivalent
Privacy (WEP) or Wi-Fi Protected Access (WPA) data encryption,
you need to know the WEP or WPA code to communicate with
the network for getting the Internet radio.
< If your wireless network is configured for trusted stations you
will need to enter the R-4iDNT’s MAC address into your wireless
access point. To find the R-4iDNT’s MAC address, see page 12 to
13.
(“System Settings” w “Network” w “View settings” w “MAC address”)
< To enter the MAC address into your wireless access point, read
the instructions supplied with the wireless access point.
Using the LAN
To use a wired Internet connection, connect the ETHERNET port
of this unit to the ethernet network using a commercially available
ethernet cable.
Caution:
Do not turn the unit on or off, or connect or disconnect
headphones from this jack while wearing headphones.
Very loud sound could be output from the
headphones.
AVOID DAMAGING YOUR HEARING - Do not put on
headphones until after plugging them in.
AUDIO IN
D
You can connect a portable audio player to this jack.
DC IN
E
Connect the supplied AC adapter (PS-M1220) to this jack.
Th en connect the co nn ector of the power cord to AC
adapter.
After all other connections are complete, connect the power
cord's plug to the AC wall socket.
Caution:
Connect the supplied AC adaptor (PS-M1220).
Do not use any AC adaptors other than the one included
with this unit.
< Make sure the internet environment is ready and the network
settings is available for LAN (ADSL is highly recommended).
< To find the R-4iDNT’s MAC address, see page 12 to 13.
(“System Settings” w “Network” w “View settings” w “MAC address”)
77
Page 8
A A
BDC E F
GHL IJKH
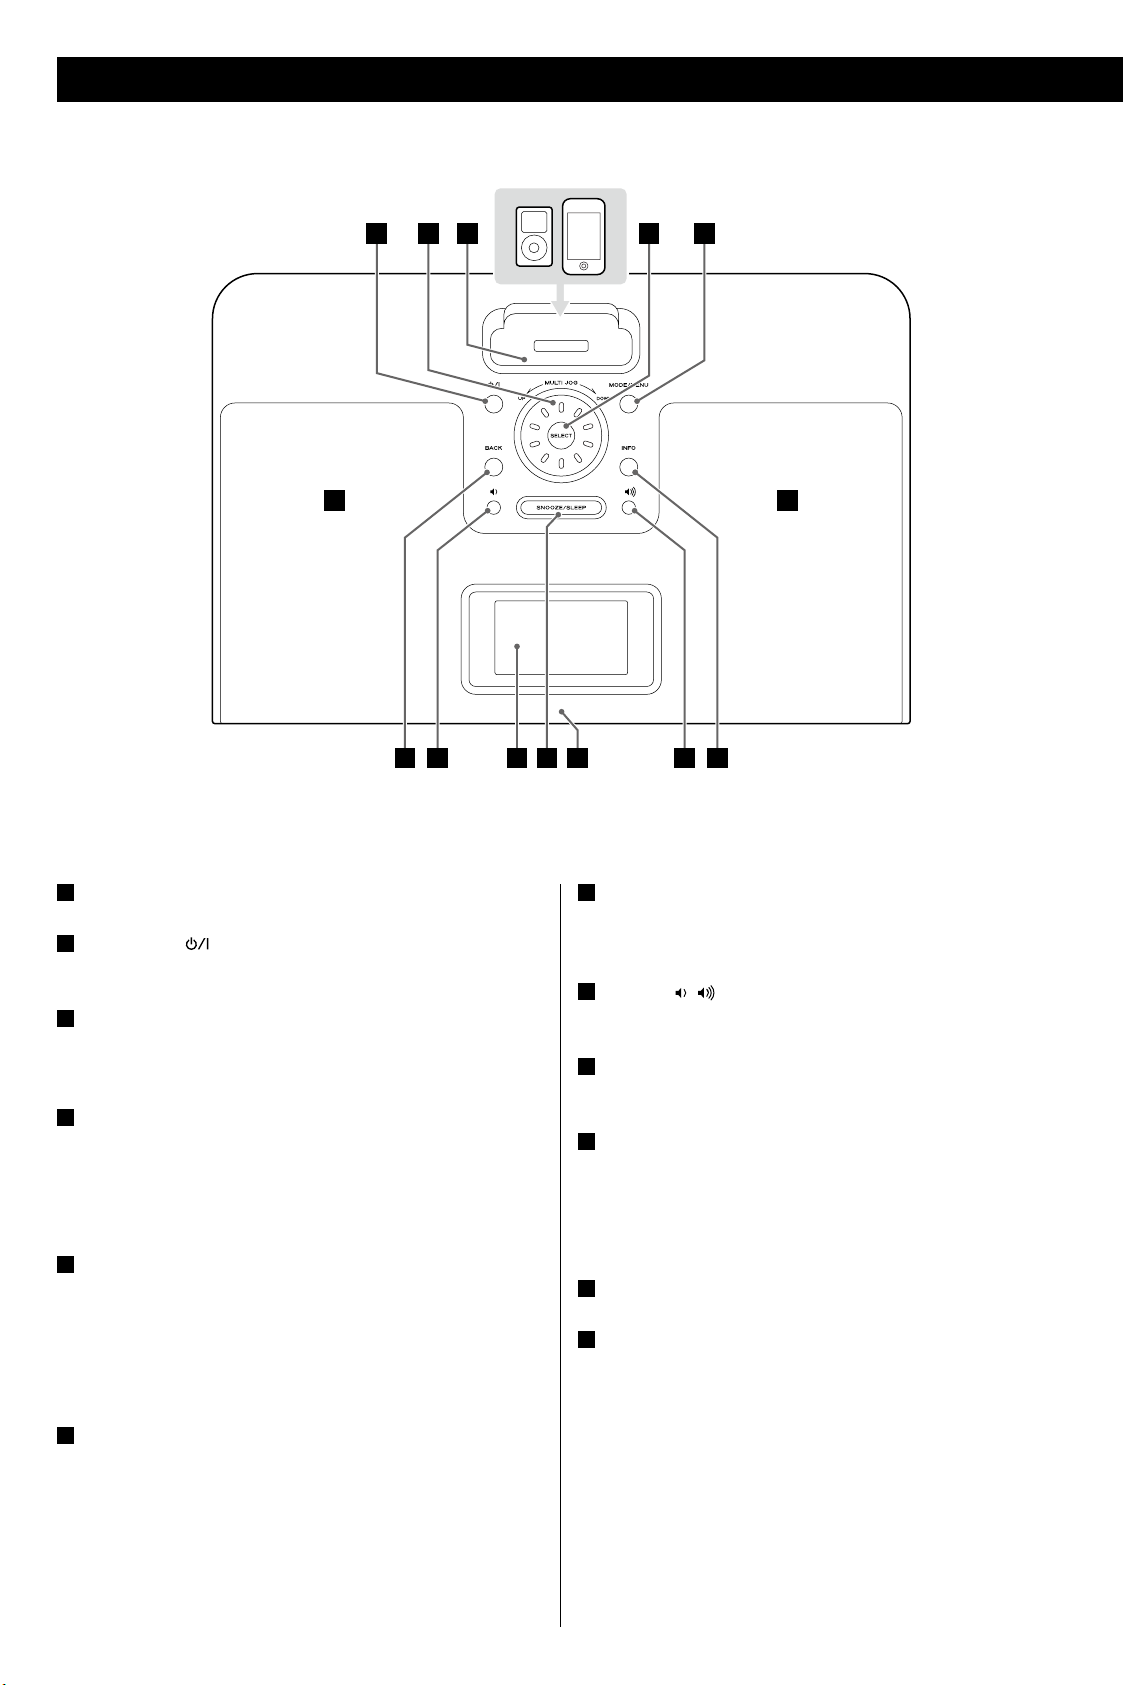
Identifying the Parts
A
Speakers (Stereo)
B
Standby/On ( )
Use this button to turn the unit on and standby.
C
MULTI JOG
Turn this knob to tune in FM stations or to select parameters in
menus.
D
Dock
Before use, insert an appropriate Dock adapter in the Dock
(page 16).
Insert an iPod/iPhone into this dock.
Set the supplied Dock cover when it is not being used.
E
SELECT
Use this button to enter your selection.
In iPod mode, use this button to confirm a selection in a menu.
This button has the same functions as the center button of the
Click Wheel of an iPod.
In FM mode, use this button to start the automatic tuning.
F
MODE
Use this button to select a source.
MENU
When in other than iPod mode, press and hold this button for
more than 2 seconds to open menus.
In iPod mode, press this button for more than 2 seconds to go
back to previous menu. This button is equivalent to the MENU
button on your iPod/iPhone.
G
INFO
In DAB, Internet radio or Music player mode, use this button to
change the information on the display.
H
Volume ( / )
Use these buttons to adjust the volume level.
I
Remote sensor
When operating the remote control unit, point it towards here.
J
SNOOZE
After the TIMER ON time is reached, press this button
repeatedly to select the temporary turn off time.
SLEEP
Use this button to set the sleep timer.
K
Display
L
BACK
When in other than iPod mode, use this button to return to the
previous menu.
8
Page 9
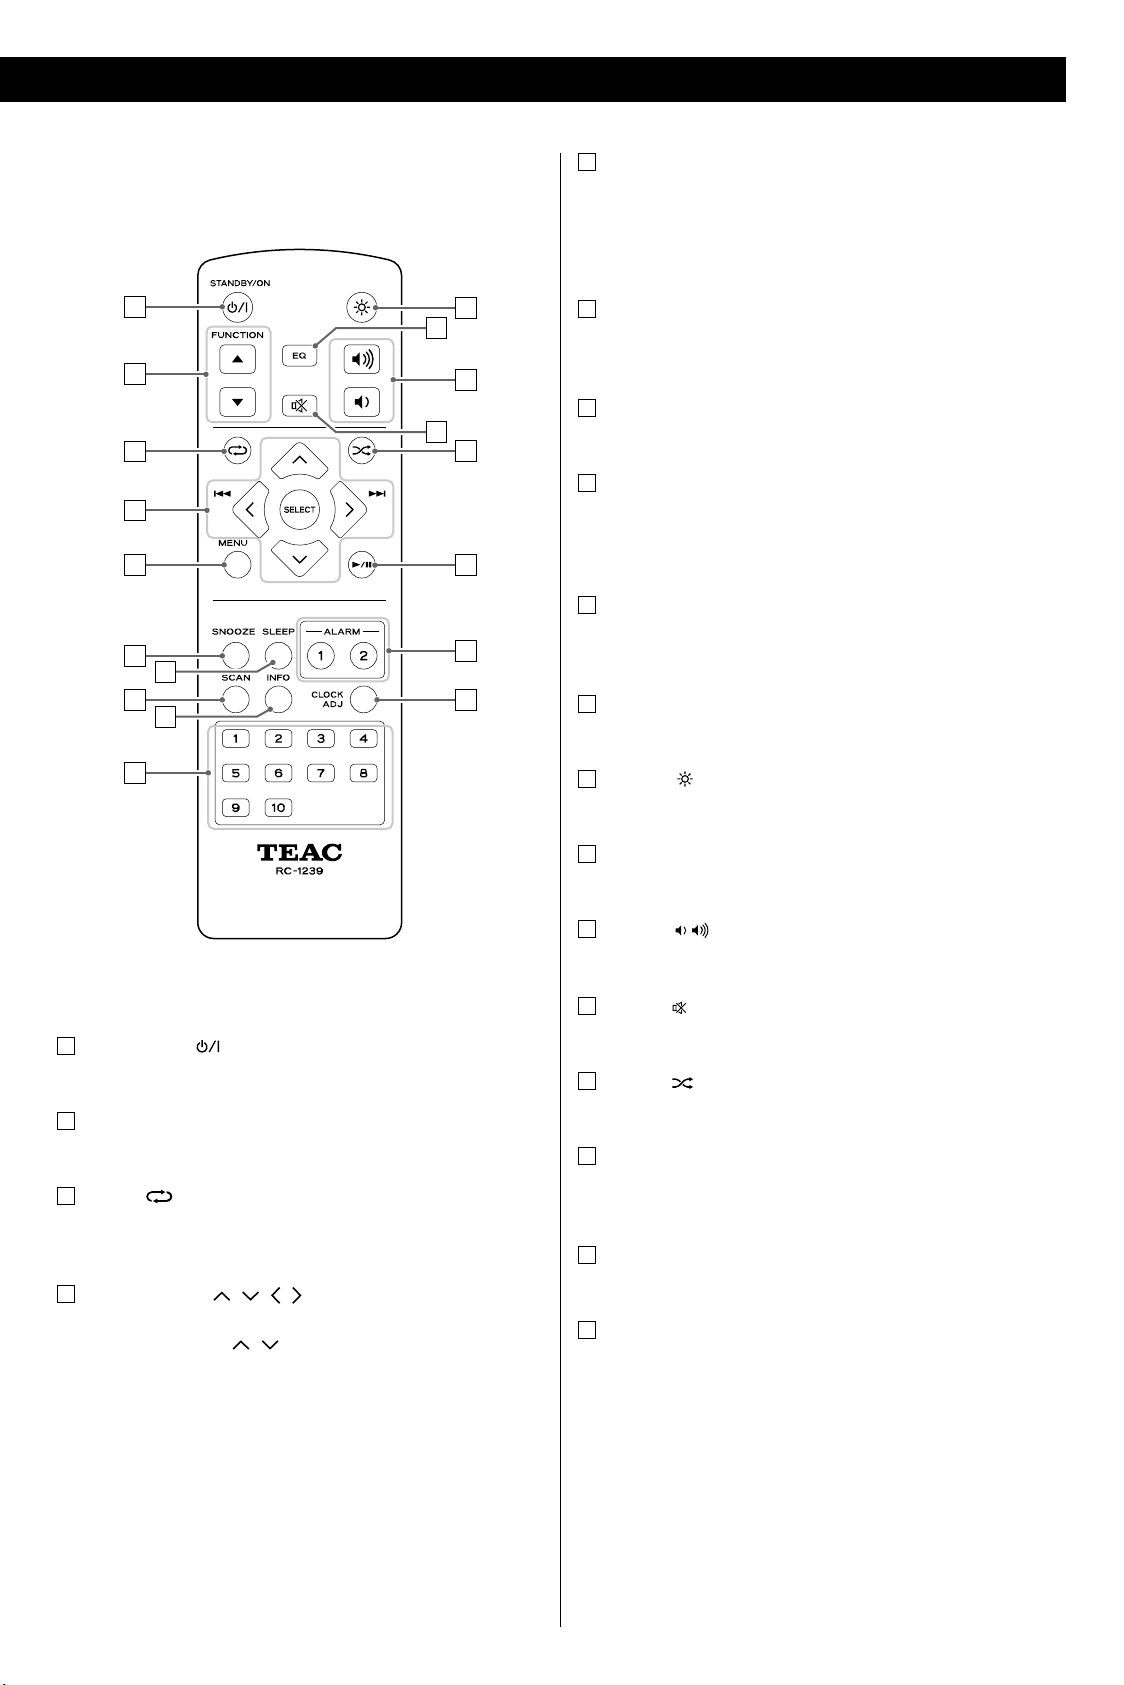
a
b
c
d
e
f
g
h
i
j
k
l
m
n
o
p
q
r
e
MENU
When in other than iPo d mode, press this button to open
menus.
In iPod mode, press this button to go back to previous menu.
This button is equivalent to the MENU button on your iPod.
f
SNOOZE
After the TIMER ON time is reached, press this button
repeatedly to select the temporary turn off time.
g
SLEEP
Use this button to set the sleep timer.
h
SCAN
In DAB mode, use this button to scan all the DAB bands and
make the station list.
In FM mode, use this button to start the automatic tuning.
i
INFO
In DAB, Internet radio or Music player mode, use this button to
change the information on the display.
j
Number buttons
Use these buttons to save or select the preset stations.
a
STANDBY/ON ( )
Use this button to turn the unit on and standby.
b
FUNCTION ( ˙, ¥)
Use these buttons to select a source.
c
Repeat ( )
In iPod and Music player mode, use this button to set the
repeat function.
d
Cursor buttons ( / / / )
Use these cursor buttons to select parameters in menus.
In FM mode, use the
Skip/Search (
In iPod mode, use these buttons to skip to songs. Hold down
these buttons to search for a part of a song.
SELECT
Use this button to enter your selection.
In iPod mode, use this button to confirm a selection in a menu.
This button has the same functions as the center button of the
Click Wheel of an iPod.
In FM mode, use this button to start the automatic tuning.
.//
/ buttons to tune in a station.
)
k
Dimmer ( )
Use this button to change the brightness of the display.
l
EQ (Equalizer)
Use this button to select a sound mode.
m
Volume ( / )
Use these buttons to adjust the volume level.
n
Muting ( )
Use this button to mute the sound.
o
Shuffle ( )
In iPod mode, use this button to start shuffle playback.
p
Play/Pause (G/J)
In iPod and Music player mode, use this button to start or
pause playback.
q
ALARM 1, ALARM 2
Use this button to enter the wake up timer setting mode.
r
CLOCK ADJ
Use this button to enter clock adjustment mode.
Note:
To simplify explanations, instructions in this manual might refer
to the main unit or remote control only. In such cases, the same
controls on the remote control and main unit will operate similarly.
99
Page 10
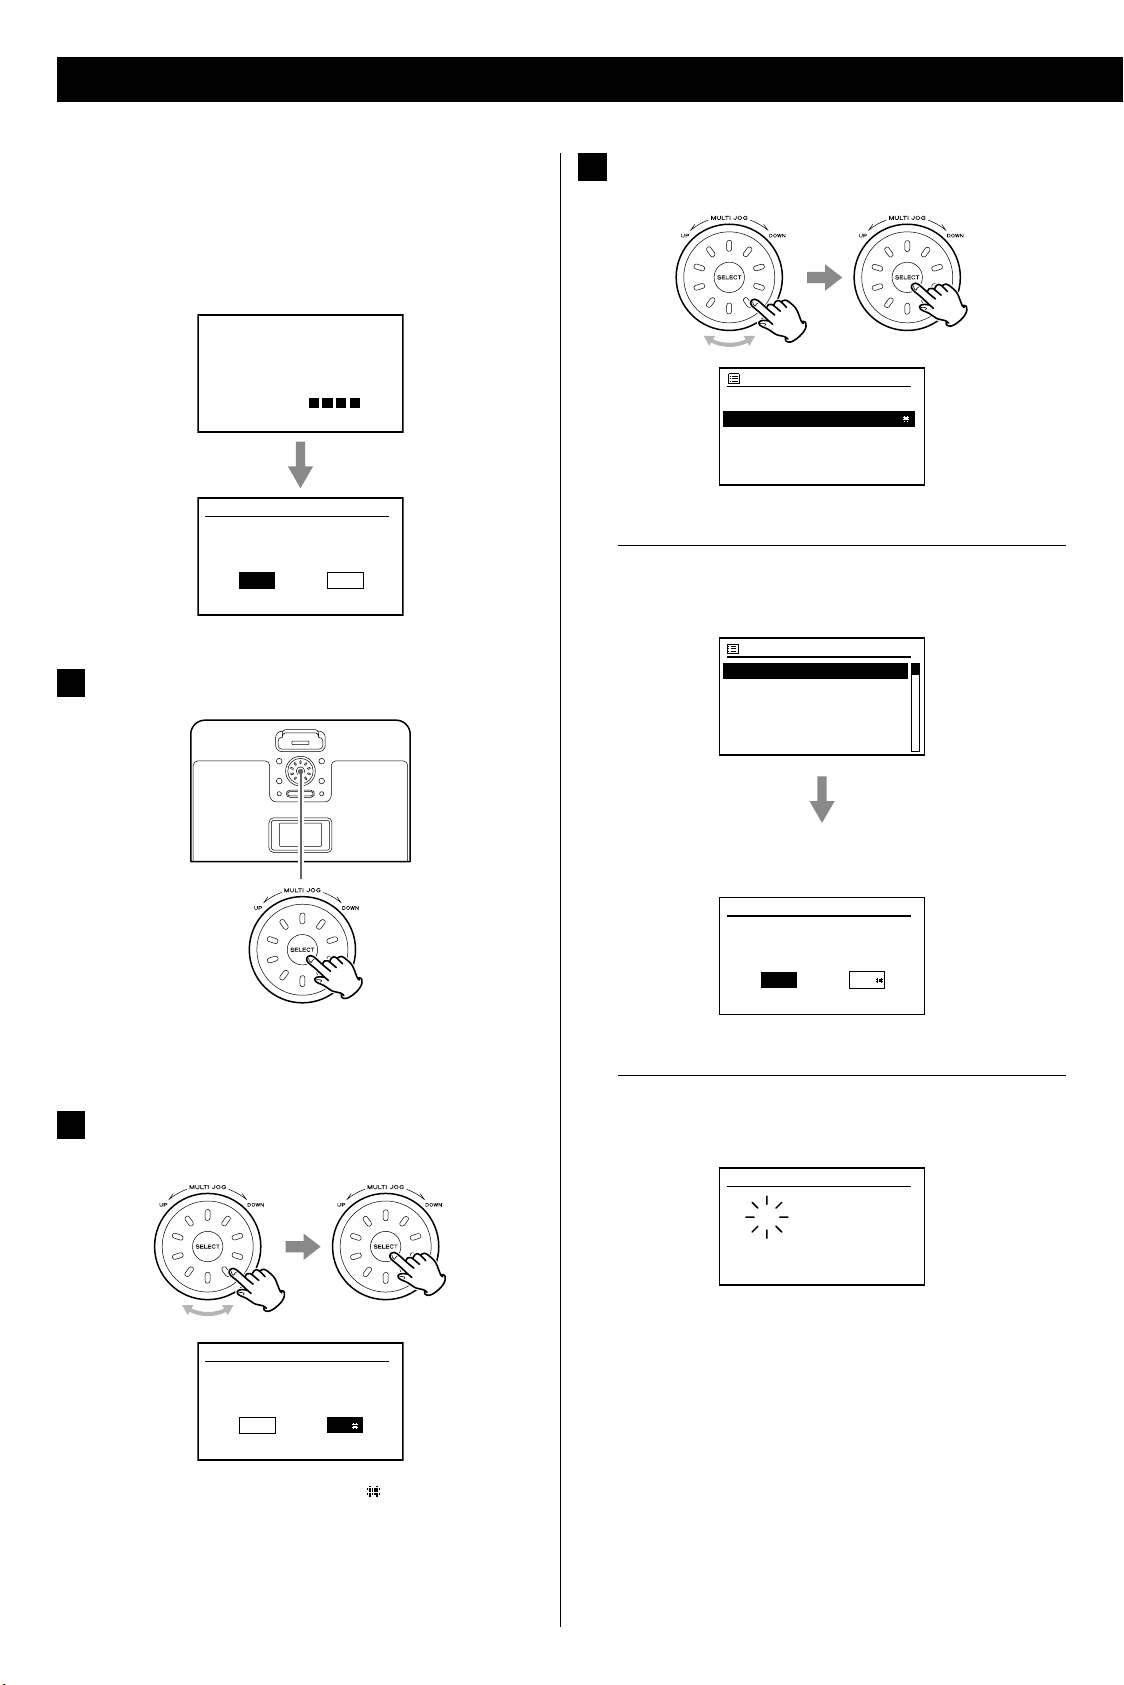
Z
STARTING
Setup wizard
Start now?
YES NO
Date / Time
12 / 24 hour format
2412
Auto update
Update from DAB
Update from Network
No update
Set timezone
UTC + 00:00: Dublin, Lon
UTC + 00:30 :
UTC + 01:00 : Madrid, Ar...
UTC + 01:30 :
UTC + 02:00 : Athens, Ci...
Daylight savings
Daylight savings
ON OFF
Set Time / Date
01 - 01 - 2009
00:00
Setup Wizard
When you connect the power cord into the wall socket and turn on
the unit for the first time, the Setup wizard appears on the display.
Follow the steps below to set the clock, the update method,
your local wireless LAN region
and t he network SSID
(Service Set ID).
Press the SELECT button to select “YES”.
1
Turn the MULTI JOG to select the auto update method
3
of the clock, and then press the SELECT button.
When you select “Update from Network”
Turn the MULTI JOG to select your local time zone, and then
press the SELECT button.
< If you want to cancel the Setup Wizard, turn the MULTI JOG to
select “NO”, and then press the SELECT button.
Turn the MULTI JOG to select the hour format, and then
2
press the SELECT button.
Turn the MULTI JOG to select the daylight savings status, and
then press the SELECT button.
When you select “No update”
Turn the MULTI JOG to to set the current day, and then press
the SELECT button.
Repeat step above to set “month”, “year”, “hour” and “minute”.
< The current setting is marked with a “ ”.
< If you want to return to the previous menu, press the BACK
button.
1010
Page 11
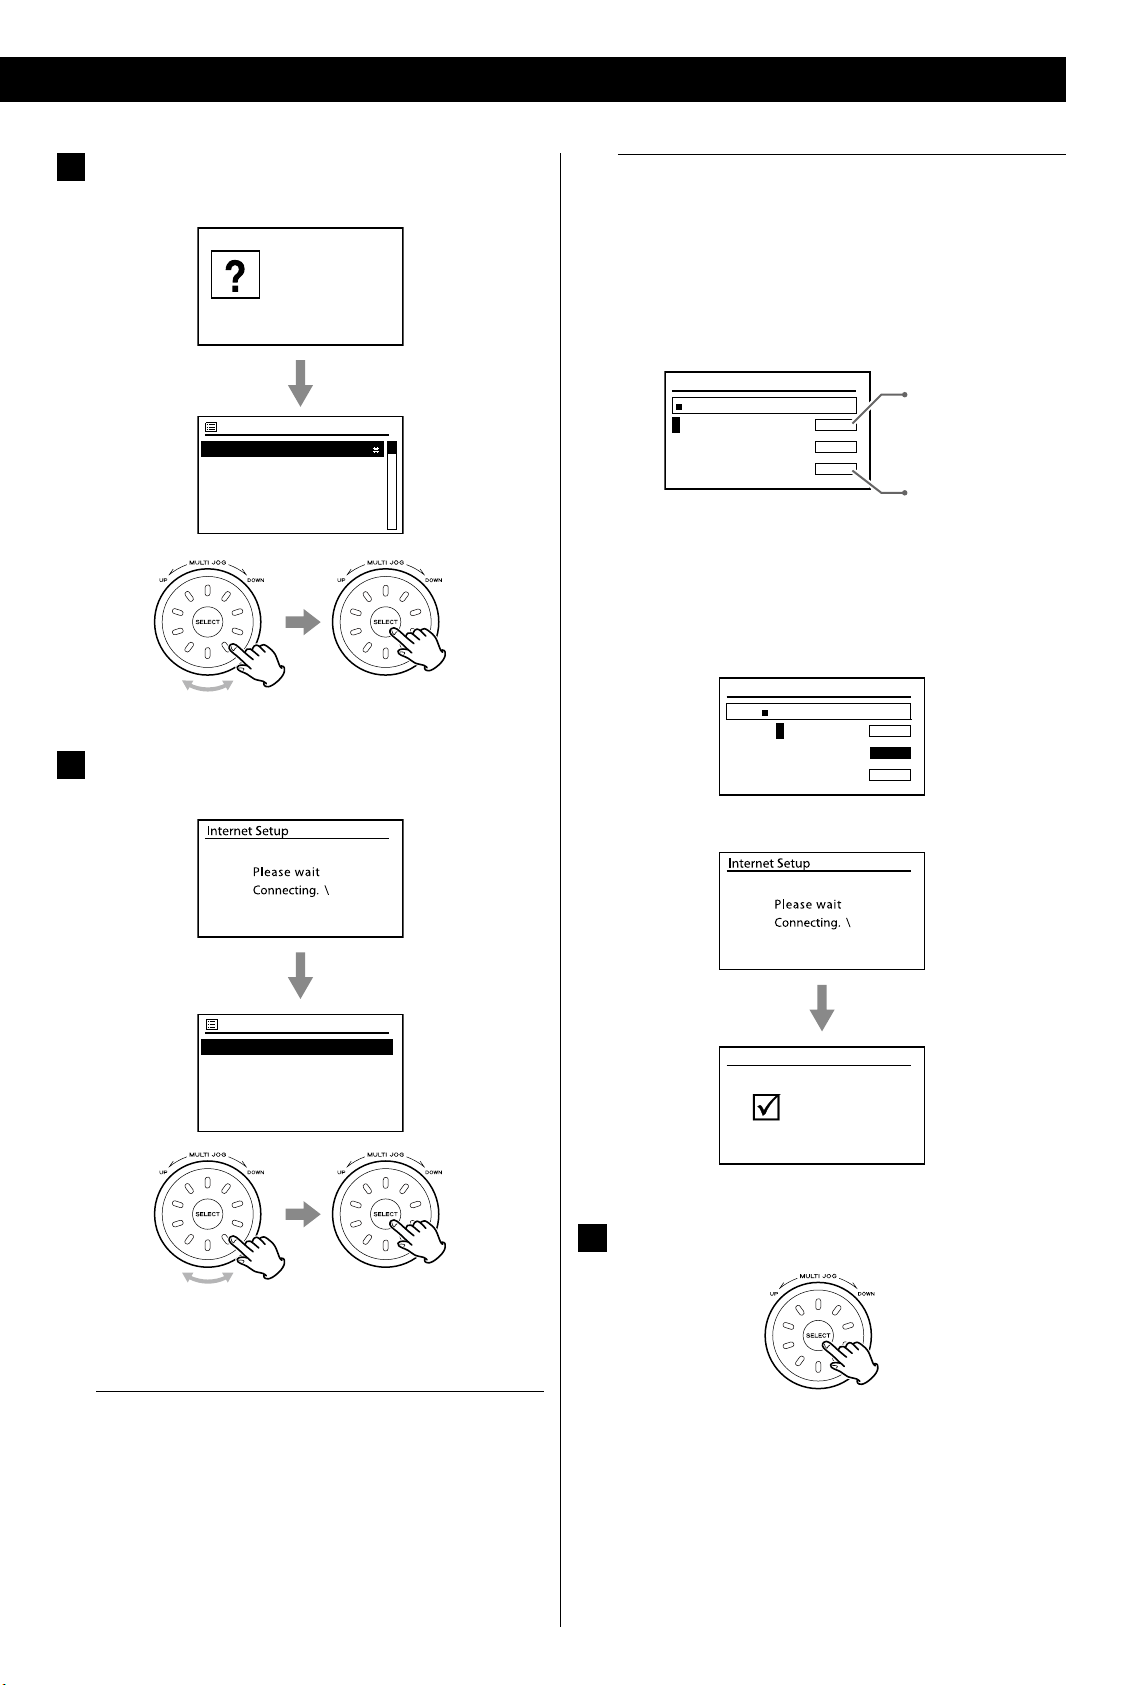
Turn the MULTI JOG to select your local wireless LAN
Please select
Wlan region
Wlan region
Most of Europe
USA
Canada
Spain
France
SSID
Customer
IR - 2F
default
WifiDev
Customer
Key
0123456789._-@,
abcdefghijklmn
opqrstuvwxyzABC
DEFGHIJKLMNOPQR
BKSP
OK
CANCEL
Deletes the last
character.
Cancel the operation
and goes back to the
previous screen.
Key
xxxxx
0123456789._-@,
abcdefghijklmn
opqrstuvwxyzABC
DEFGHIJKLMNOPQR
BKSP
OK
CANCEL
Setup wizard
completed
Press ‘SELECT’ to exit
Setup wizard
4
region, and then press the SELECT button.
When a WEP/WPA key (password) is required
The unit will ask you to input the WEP/WPA key and display
the password entry screen.
How to input characters
1. Turn the MULTI JOG to select the character you want to
input. And then, press the SELECT button to input the
selected character.
< WEP/WPA pass codes are case-sensitive.
2. Turn the MULTI JOG to select “OK” after selecting the final
character of your password.
Turn the MULTI JOG to select your network (SSID), and
5
then press the SELECT button.
< If the unit finds more than one network, turn the MULTI JOG
to select your favorite one, and then press the SELECT button.
3. Press the SELECT button.
Press the SELECT button to exit the Setup wizard.
6
When your network is not configured to request a
password (WEP/WPA)
The unit will connect to the network.
The setting is completed.
< You can re-enter to the Setup wizard from the System settings
after the first time (see next page).
1111
Page 12
Hold down
more than 2 sec.
Main menu >
Last lietened
Station list >
Internet radio
Main menu
Internet radio
Music player
Last.fm
DAB
FM
System settings
Equalizer >
Network >
Time/Date >
Language >
Factory Reset
System Settings
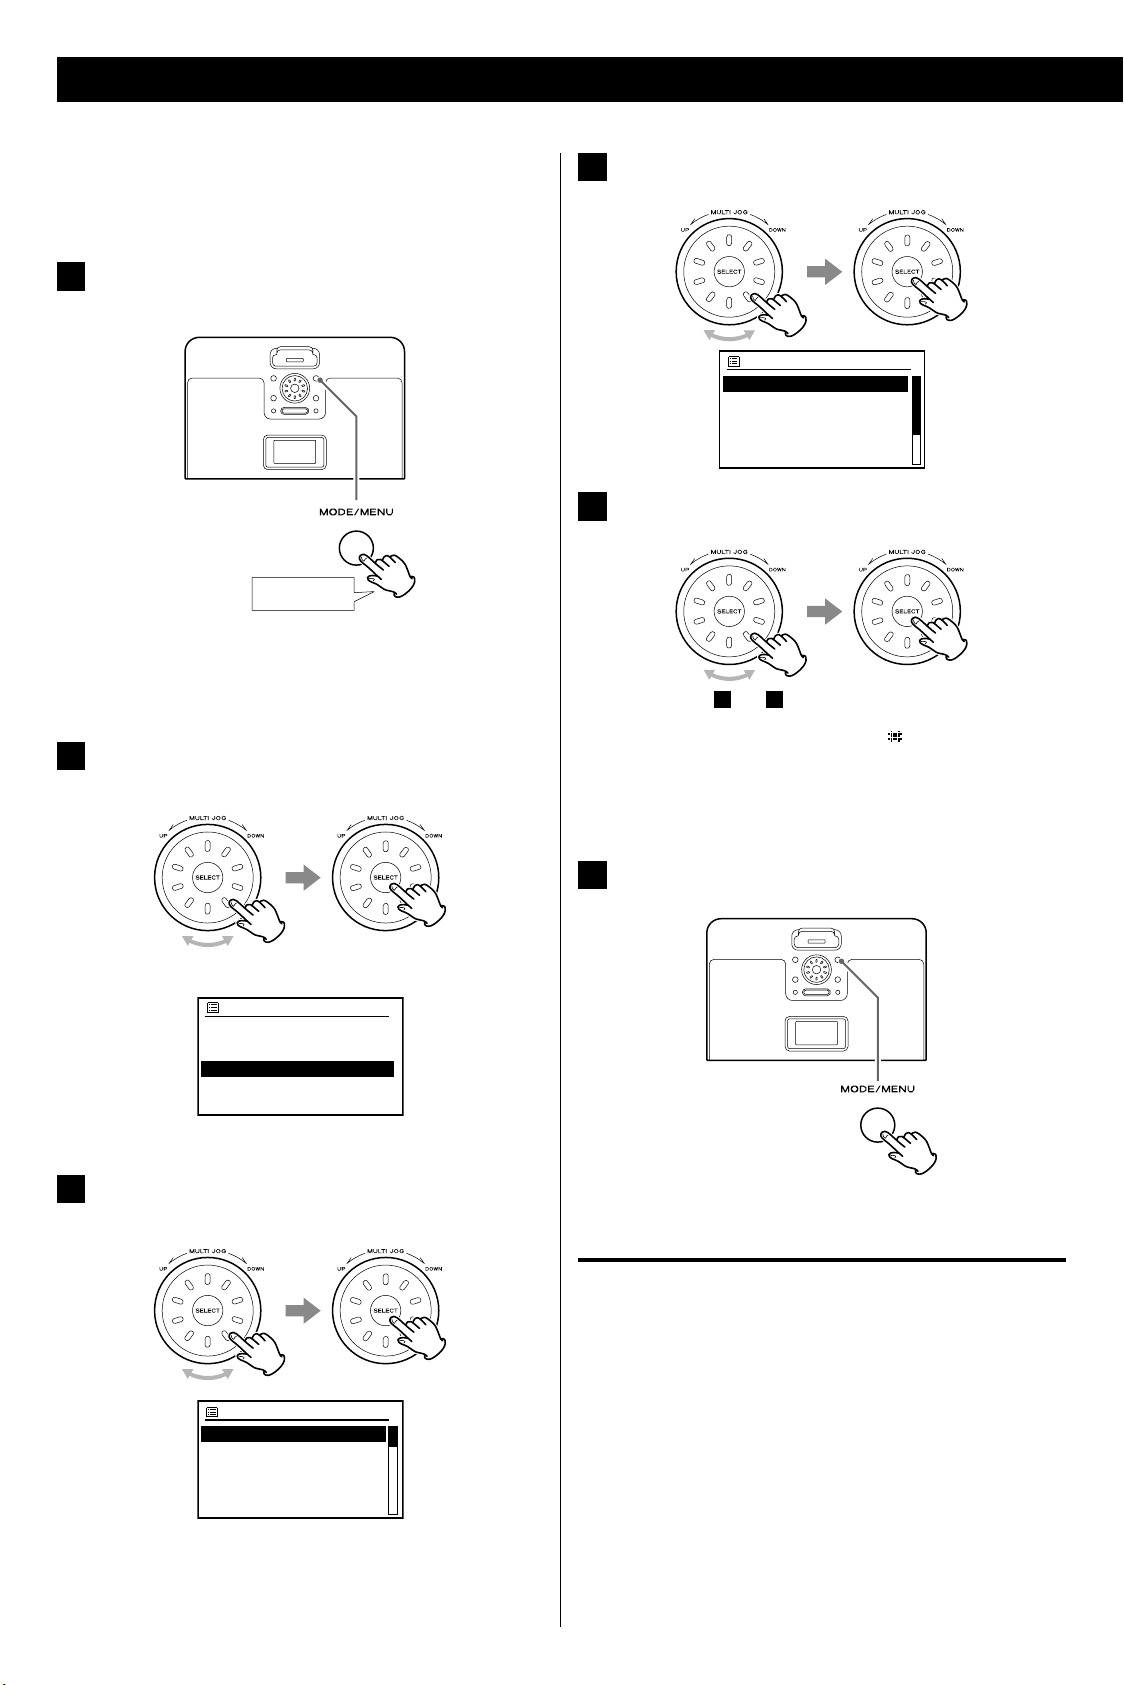
This chapter describes how to use the “System settings”.
Most settings and adjustments are required to be set when
you first use the unit.
In other than iPod mode, press and hold the MENU
1
button for more than 2 seconds.
< In iPod mode, you can not enter the System settings. Press the
Mode button to change the mode, and then press and hold
the MENU button for more than 2 seconds.
Turn the MULTI JOG to select “Main menu”, and then
2
press the SELECT button.
Turn the MULTI JOG to select the item you want to
4
change, and then press the SELECT button.
Turn the MULTI JOG to change the setting, and then
5
press the SELECT button.
Repeat steps 4 and 5 as required.
< The current setting is marked with a “ ”.
< See “Available menu items and settings” below for Individual
menu functions.
< If no button is pressed for more than 10 seconds, current
menu will be canceled and return to the previous display.
Example: In the Internet radio mode
Turn the MULTI JOG to select “System settings”, and
3
then press the SELECT button.
Press and hold the ME NU button to exit th e setup
6
mode.
< Settings are stored even when power is turned off and the
unit is unplugged.
Available menu items and settings
Equalizer
See “Equalizer” on page 15.
Network
Enable you to scan again for connec tion to another wireless
network, or to manually configure the network parameters.
< If you want to return to the previous menu, press the BACK
button.
1212
Internet Wizard
Proceeds to the internet wizard.
PBC Wlan setup
Setting the Wi-Fi Protected Setup (WPS) between the wireless
access point and R-4iDNT.
Select WPS on the wireless access point, and then press the
SELECT button on the R-4iDNT.
Page 13

Setting the Clock
Set Time / Date
01 - 01 - 2009
00:00
Set Time / Date
04 - 01 - 2009
00:00
View settings
Displays the current network settings . You can che ck the
setting of following items:
Active connection MAC address
Wlan region DHCP
SSID IP address
Subnet mask Gateway address
Primary DNS Secondary DNS
Wlan region
Selects the region of the wireless LAN.
Manual settings
Sets the Internet connection manually. Follow to navigate of
the menus.
Network profile
Displays the network profile.
Time/Date
Set Time/Date
To adjust the clock manually, use this menu. (See “Setting the
Clock“ on the right).
Auto update
Select the auto update method.
Set format
Select the hour format.
When you select “Auto update“ to “Update from Network “,
following menus appear.
Set timezone
Select your local time zone.
Daylight savings
Select the daylight savings status “ON“ or “OFF“.
If you set “Main menu” w “System settings” w “Time/Date” w
“Auto up date” to “No update”, the clock need to be adjusted
manually.
Press the CLOCK ADJ button.
1
The “day” value blinks.
Press the Cursor botton (
2
and then press the SELECT button.
/ ) to set the current day,
Language
Select the desired language for display menus from the following:
English, Danish, Dutch, Finnish, French, German, Italian,
Norwegian, Polish, Portuguese, Spanish, Swedish, Turkish
< If the unit is set to a foreign language and you find it impossible
to read the menu settings, you can restore all the factory default
settings, and the menus will appear in English again (all other
settings will be cleared).
Factory Reset
If you want to restart from a known set of options, restore the unit
to the factory settings.
To reset the setting, select “YES”.
< The unit completely erase all setting such as radio preset, WEP/
WPA codes and user setting.
Software update
Auto-check setting
Selects software update automatically or manually.
Check now
Executes the software update.
Setup wizard
See “Setup wizard” on page 10.
The “month” value blinks.
< You can also use the MULTI JOG instead of the Cursor button
( / ).
2
Repeat step
3
“minute”.
When “minute” is set, the clock starts.
to set “mont h”, “year”, “hour” and
Info
Displays the current software version and Radio ID.
1313
Page 14

This chapter describes the basic operation which is available in
Internet radio
Music player
last.FM
DAB radio
FM radio
iPod
Aux in
every mode.
Play the source, and adju st the volu me using the
3
Volume button ( or ).
Press the Standby/On button (
1
< The unit turns on with the source that was last selected.
Press the MODE button repeatedly to select a source.
2
) to turn the unit on.
The volume can be adjusted from Muted (00) to Max (20).
To reduce or turn up the volume continuously, hold down the
Volume button (
< Press the Standby/On button (
standby mode when it is not being used.
or ).
) to put the unit in the
Dimmer
You can change the brightness of the display.
The selected source is shown on the display.
Each time the MODE button is pressed, the source changes as
follows:
< You can also use the FUNCTION buttons ( ˙/ ¥) on the
remote control unit to select a source.
Use the DIMMER button ( ) to set the brightness one of three
levels.
Full brightness
Medium brightness
Minimum brightness
< Setting is cancelled if the Standby/On button ( ) is pressed.
Muting
You can mute the sound temporarily.
To mute the sound, press the Muting button ( ).
Press the Muting button (
< The Muting indicator (
engaged.
) again to restore the sound.
) appears on the display while muting is
1414
< If you change the volume when the sound is muted, it will be
unmuted.
Page 15

Equalizer
Normal
Flat
Jazz
Rock
Movie
My EQ profile setup
Bass: 0
Treble: 0
Loudness: Off
Equalizer
You can adjust the sound according to the genre of music or your
taste.
Press the EQ button to enter the equalizer mode.
1
Press the Cursor botton (
2
When you want to adjust “Bass” or “Treble”.
Press the SELECT button.
/ ) to select a item.
Press the Cursor botton (
2
equalizer and then press the SELECT button.
< The current setting is marked with a “ ”.
Normal Equalizer is off.
Flat Flat sound quality with the bass adjustment.
Jazz Suitable for jazz music.
Rock Provides a heavy powerful sound; suitable for
rock music.
Movie Suitable for movie.
Classic A balanced sound; suitable for classical music.
Pop Emphasizes vocal tones; suitable for popular
music.
News Suitable for News.
My EQ Equalizer you set by yourself.
My EQ profile setup
Set the equalizer by yourself (see below).
/ ) to select a preset
Press the Cursor button (
selected item, and then press the SELECT button.
When you want to adjust “Loudness”.
Press the SELECT button to change “On” and “Off”.
Press the EQ button.
3
/
) to adjust the value of the
Setting the equalizer by yourself
When you select “My EQ” in the equalizer mode, set the profile of
“My EQ” as follows:
Select “My EQ profile setup” in the equalizer mode (see
1
above), and then press the SELECT button.
“Save changes?” appears on the display.
Press the SELECT button to select “YES”.
4
Your customized equalizer is saved to “My EQ”.
And “My EQ” is selected as a current setting.
< If you want to cancel, Press the Cursor button (
“NO”, and then press the SELECT button.
/ ) to select
1515
Page 16

iPod/iPhoneAUX in
AUDIO IN
Aux in
1
2
Listening to an External Source
In addition to connecting other audio devices, you can use the
AUDIO IN to listen to an iPod that has no dock connector or when
an appropriate Dock adapter is not available.
Connect the PHONES jack or audio output jack of a
1
portable audio playe r to the AUDIO IN jack of the
R-4iDNT using the supplied stereo mini-plug cable.
Press the MODE button repeatedly to select “Aux in”.
2
Getting Started with an iPod/iPhone
To play your iPod/iPhone through the R-4iDNT, you must first insert
the Dock adapter for your model of iPod/iPhone.
Select the Dock adapter that fits your iPod/iPhone.
1
#7: iPod Photo (40 GB/60 GB),
iPod with Click Wheel 40 GB,
iPod with color display (iPod Photo) 40/60 GB,
iPod with color display 60 GB,
iPod with video 60/80 GB,
iPod Classic 160 GB (2007) 160 GB
#9: 5G iPod with video (30 GB)
iPod with video 30 GB,
iPod with video U2 Special Edition 30 GB,
iPod Classic 80/120 GB,
iPod Classic 160 GB (2009) 160 GB
#14: iPod Touch 1st generation
iPod Touch 8/16/32 GB
#15: iPhone (3G)
iPhone (3G) 8/16 GB,
iPhone (3G S) 16/32 GB
< You can also use the FUNCTION button ( ˙ / ¥ ) on the remote
control unit to select “Aux in”.
Play the source, and adju st the volu me using the
3
Volume button ( or ) of the R- 4iDNT and of the
audio player.
< Use the adapter that supplied with the iPod/iPhone or a
commercially available one to use the other types of iPod/
iPhone.
Insert the adapter into the R-4iDNT dock.
2
Fit the front edge of the adapter into the Dock, and then press
the back edge of the adapter onto the Dock until a slight
“click” is heard indicating the adapter is inserted correctly.
< When using the headphones jack of a device, if you do not
adjust its volume, you might not hear any sound from the
R- 4iD NT.
< Turning the volume of the connected device up too high
might cause the sound from your R-4iDNT to be distorted. In
this case, reduce the volume of the device until the distortion
stops and then adjust the volume level of the R-4iDNT to a
comfortable listening level.
1616
< To remove the adapter, hold its left and right sides and gently
pull it up.
Compatible iPod/iPhone Software
If your iPod/iPhone will not work with the R-4iDNT or with the
remote control unit, software update might solve the problem.
Visit the Apple website and download the latest iPod/iPhone
software.
http://www.apple.com/ipod/download/
Page 17

iPod
Hold down
iPod/iPhone
Listening to an iPod/iPhone (1)
Before use, insert an appropriate Dock adapter in the Dock.
Press the MODE button repeatedly to select “iPod”.
1
< You can also use the FUNCTION button ( ˙ / ¥ ) on the remote
control unit to select “iPod”.
Insert the iPod/iPhone into the Dock.
2
Stopping playback temporarily
(Pause mode)
During playback, press the Play/Pause button (G/J). Playback
stops at the current position.
To resume playback, press the Play/Pause button (G/J) again.
< You can also use the button on the iPod /iPhone to pause
playback.
Skipping to an earlier or later song
Press the Play/Pause button (y/J) on the iPod or the
3
R-4iDNT's remote control unit .
The R-4iDNT will start playback from the iPod/iPhone’s song
list.
< When the iPod/iPhone is inserted while a source other than
iPod mode is selected or while the R-4iDNT is in the standby
mode, “iPod attached – Switch to iPod mode?” is displayed.
In this case turn the MULTI JOG to select “YES”, and then press
the SELECT button.
< In iPod mode, if an iPod/iPhone that is in playback mode is
inserted into the dock, the R-4iDNT will automatically start
playback from the iPod/iPhone’s song list.
< Make sure to use an appropriate Dock adapter (see previous
page).
< The batter y of the iPod/iPhone is recharged to the full
whenever the iPod/iPhone is docked and the R-4iDNT is
connected to the AC line.
During playback, press the Skip buttons (.//) repeatedly
until you find the desired song. The selected song will be played
from the beginning.
< If the . button is pressed once during playback, the song
currently being played will be played from the beginning. To
return to the beginning of the previous song, press the .
button twice.
Searching for a part of a song
During playback, hold down the Search button (. or /) to
search a part of a song.
Release it when you find the part you want to hear.
< If headphones are also plugged into the iPod/iPhone, sound
comes from both the headphones and the R-4iDNT speakers.
1717
Page 18

(o)
REPEAT ONE REPEAT ALL
(o)
SONG ALBUM
iPod/iPhone
Listening to an iPod/iPhone (2)
Returning to the previous iPod/iPhone menu
Press the MENU button on the remote control unit.
This button has the same functions as its iPod counterpart.
Selecting the iPod/iPhone menu item
Press the Cursor button ( / ) to scroll to the menu item you
want, and then press the SELECT button.
Activating the shuffle mode
During playback , press the SHUFFLE button to change the
shuffle mode.
Each time the SHUFFLE button is pressed, the iPod/iPhone
shuffle setting changes as follows:
< If you select “SONG”, the iPod/iPhone shuffles songs within the
list you choose to play.
< If you select “ALBUM”, the iPod/iPhone plays all the songs on an
album in order, and then randomly selects another album in the
list and plays it through in order.
< During shuffle playback, the shuffle icon (
iPod/iPhone’s display.
) appears on the
Activating the repeat mode
During playback, press the REPEAT button to change the repeat
mode.
Each time the REPEAT button is pressed, the iPod/iPhone repeat
setting changes as follows:
< If you select “REPEAT ONE” to play only one song, the repeat
once icon (
< If you select “REPEAT ALL” to play all songs, the repeat icon (
appears on the iPod/iPhone’s display.
) appears on the iPod/iPhone’s display.
)
1818
Page 19

DAB
radio
Local scan
Stations: 0
Scanning
/
Full scan
Stations: 0
Scanning
/
Hold down
more than 2 sec.
DAB
Station list >
Local scan
Full scan
Manual tune >
DRC >
DAB DAB
Listening to the DAB Radio Using the DAB Menu (1)
Setting up your DAB tuner
When the unit is switched to DAB mode for the first time, the
automatic tuning process will start and create a station list.
(Autoscan: local scan)
< After the first time, when the unit is switched to DAB mode, the
last station listened to will be tuned in again.
Autoscan: Local scan (10A to 13F)
Press the MODE button repeatedly to select “DAB radio”.
< You can also use the FUNCTION button ( ˙ / ¥ ) on the remote
control unit to select “DAB”.
In DAB mode, use DAB menu to access various functions.
In DAB mode, press and hold the MENU but ton for
1
more than 2 seconds.
Turn the MULTI JOG to find the desired menu.
2
The unit will scan for ensembles broadcast in the local area and
create the station list. The scan should take about 40 seconds.
After broadcast services have been found the stations are listed
in alphanumeric order.
< If no broadcast services are found, please check the position of
the antenna.
Autoscan: full scan (5A to 13F)
If you want to search stations internationally, press the SCAN
button while DAB is selected as the source.
Try this if “Local Scan” does not find the stations you want.
< You can also use the Cursor buttons ( / ) on the remote
control unit to scroll through menu items.
DAB menu items
Station list
1
Local scan
2
Full scan
3
Manual tune
4
DRC (Dynamic Range Compression)
5
Station order
6
Main menu
7
For the detail of each item, see following pages.
The unit will scan for ensembles broadcast in the DAB bands
and create the st ation list. T he scan sho uld take abou t
50 seconds.
< You can also select and activate “Local scan” and “Full scan” in
the DAB function control menu (page 20, 21).
1919
Page 20

Local scan
Stations: 0
Scanning
/
DAB
Using the DAB Menu (2)
1
Station list
Once the station list is created, you can select a station from it.
In DAB menu mode, select “Station list” (page 19), and
1
then press the SELECT button.
The list of available stations is displayed.
Turn the MULTI JOG to scroll through the stations in the
2
station list.
< Stations are displayed in alphanumeric order in the station list,
with numbers coming first.
2
Local scan (Auto scan)
If you move the unit to a new area or you want to check to see if
there are new stations available in your area, you can scan DAB
bands to find new stations.
The unit will scan the DAB bands between 10A to 13F and add the
stations found to the station list.
In DAB menu mode, select “Local scan” (page 19), and then
press the SELECT button.
The unit will scan for ensembles broadcast in the local area and
create the station list. The scan should take about 40 seconds.
After broadcast services have been found the stations are listed
in alphanumeric order.
3
When you find a station that you want to listen to,
press the SELECT button.
The station is tuned in and station information is displayed.
< If a station is no longer broadcasting or the unit is moved out of
the area of a broadcast station, the unit will no longer be able to
tune in the station. If the station cannot be tuned in, a question
mark “?” is displayed in front of the station name. If you select
this station to tune in, “Service not available” is displayed.
< You can move a station that is no longer available to the end of
the station list. See “Station order” on page 22.
< To display the station list while listening to a DAB station, turn
the MULTI JOG or press the Cursor button (
/
).
< If no broadcast services are found, please check the position of
the antenna.
2020
Page 21

3
Full scan
Stations: 0
Scanning
/
Manual tune
9B 204.640MHz
Strength:
Full scan (Auto scan)
The unit will scan all the DAB bands between 5A to 13F and add
the stations found to the station list. Try this If you want to search
stations internationally or if “Local Scan” does not find the stations
you want.
In DAB menu mode, select “Full scan” (page 19), and then
press the SELECT button.
The unit will scan for ensembles broadcast in the DAB bands
and create the st ation list. T he scan sho uld take abou t
50 seconds.
4
Manual Tune
This option allows you to manually tune in a station and view a
continuously updated indication of the strength of the signal. This
could be useful when adjusting or positioning an antenna for better
reception.
In DAB menu mode, select “Manual Tune” (page 19), and
1
then press the SELECT button.
Turn the MULTI JOG to select the station you want to
2
tune in, and then press the SELECT button.
< You can also activate the “Full scan” by using the SCAN button
(page 19).
The signal strength indicator is displayed.
While viewing the indicator, adjust or reposition the
3
antenna until the best reception is indicated.
2121
Page 22

DRC
DRC high
DRC off
DRC low
DAB
Station order
Alphanumeric
Ensemble
Valid
Using the DAB Menu (3)
5
DRC (Dynamic Range Compression)
Use this option to set the DRC value to be applied to received
broadcasts.
DRC is used to reduce the range between high and low volumes of
audio. When you listen to the music at low volume, such as late at
night, reduce the DRC value so that you can hear the sound clearly.
In DAB menu mode, select “DRC” (page 19), and then
1
press the SELECT button.
The DRC value appears.
6
Station order
You can select the order in which stations are listed.
In DAB menu mode, select “Station order” (page 19), and
1
then press the SELECT button.
The setting option appears.
Turn the MULTI JOG to select the desired option, and
2
then press the SELECT button.
Turn the MULTI JOG to select the desired level of DRC,
2
and then press the SELECT button.
You can apply one of three DRC values.
DRC high Reduce the dynamic range at high level
DRC low Reduce the dynamic range at low level
DRC off No DRC is applied.
< The current setting is marked with a “ ”.
You can choose one of three station orders.
Alphanumeric
This is the default order.
Stations are listed by name with numbers first and
then alphabet.
Ensemble
Stations are listed by ensemble name.
Valid
This option will list active stations at the top of the
station list, and stations that are in the list but have
no service in your area at the end.
< The current setting is marked with a “ ”.
2222
7
Main menu
You can enter the Main menu of the unit.
Page 23

DLS (Dynamic Label Segment)
Programme type
Ensemble name and frequency
Signal strength
Bitrate mode
Time & Date
1
2
3
4
5
6
DAB
13:49
Classic
DLS message 3/5
DAB
13:49
Classic
Light Classical
DAB
13:49
Classic
RadioSawston
Freq: 220.352MHz
DAB
13:49
Classic
Signal error: 0
Strength:
DAB
13:49
Classic
Bit Rate: 256 kbps
Codec: MP2
Channels: Stereo
DAB
13:49
Classic
Today’s Date:
24/12/2009
DAB
Settings the DAB Display
You can choose the type of information displayed while listening
to DAB.
Each time the INFO but ton is pressed, the information is
displayed as follows:
DLS
1
The Dynamic Label Segment (DLS) is a scrolling text label
supplied by the radio station. It may be information about
music titles or details regarding the programme or station.
Programme type
2
This is a description of the type of music broadcast by the
radio station such as Pop, Rock or Classical music.
Ensemble name and frequency
3
This displays the name of the ensemble and frequency that is
broadcasting the programme.
Signal strength
4
This displays the signal strength of current ensemble.
Bitrate mode
5
The bitrate and sound mode of the broadcast currently being
received is displayed.
Time & Date
6
This displays the current time and date, which is supplied by
the radio station and should always be accurate.
2323
Page 24

Internet
radio
Internet radio
Last listened
Station list >
Main menu >
Stations
0123456789._-@,
abcdefghijklmn
opqrstuvwxyzABC
DEFGHIJKLMNOPQR
BKSP
OK
CANCEL
Deletes the last
character.
Cancel the operation
and goes back to the
previous screen.
Stations
xxxxx
0123456789._-@,
abcdefghijklmn
opqrstuvwxyzABC
DEFGHIJKLMNOPQR
BKSP
OK
CANCEL
Internet Radio/Podcast
Listening to the Internet Radio/Podcast
This chapter describes how to listen to an Internet radio station/a
Podcast.
Press the MODE button repeatedly to select “Internet
1
radio”.
The last listened station is received.
< You can also use the FUNCTION button ( ˙ / ¥ ) on the remote
control unit to select “Internet radio”.
Turn the MULTI JOG to select “Station list”, and then
2
press the SELECT button.
Turn the MULTI JOG to select the search method, and
4
then press the SELECT button.
You can choose one of five search methods.
Location Search by the location of the broadcaster.
Genre Search by the genre of music played on the
station/Podcasts.
Search stations
Search by the station’s name.
Popular stations
Select from a list of popular stations.
New stations
Select from a list of recently added stations.
When you select “Location” or “Genre”
Turn the MULTI JOG to select a location or genre, and then
press the SELECT button.
The Station list appears.
Turn the MULTI JOG to select “Stations”, and then press
3
the SELECT button.
A list of search methods appears.
When you select “Search stations”
Input a station name you want to listen to.
How to input characters
1. Turn the MULTI JOG to select the character you want to
input. And then, press the SELECT button to input the
selected character.
2. Turn the MULTI JOG to select “OK” after inputting the final
character of the station name.
2424
A list of stations is displayed.
Page 25

Internet Radio/Podcast
Description
Genre/Country
Reliability
Bit Rate /Codec / Sampling Rate
Playback buer
Today’s Date
Time bar
Episode name
Description
Genre and Country
Language
Episode URL
Bit Rate / Codec / Sampling Rate
Playback buer
Today’s Date
Settings the Internet Radio/Podcast Display
Turn the MULTI JOG to select a station or a Podcast you
5
want to listen to, and then press the SELECT button.
Now you can listen to the station.
You can choose the type of information displayed while listening to
the Internet Radio/Podcast.
Each time the INFO button is pressed, information on the display
changes as follows:
Internet radio
Podcast
< The types of information displayed may vary depending on the
stations/Podcasts.
2525
Page 26

Hold down
more than 2 sec.
Internet radio
Last listened
Station list >
Main menu >
Internet Radio/Podcast
Internet Radio/Podcast Menu Operations
You can access station lists or setup menus using the Internet radio
menu.
In Internet radio mo de, press and hold the MENU
1
button for more than 2 seconds.
Turn the MULTI JOG to find the desired menu.
2
Items of the Internet radio menu
Last listened
You can select the station/Podcast from the ones you listened
to recently.
Station list
My favorites
List of stations/Podcast you stored as favorite is displayed.
Select a station/Podcast you want to listen to (see next page).
Local
List of stations/Podcasts provided in your country is displayed.
Select a station/Podcast from your favorite genre.
Stations
List of Internet radio stations is displayed (page 24).
Podcasts
List of Podcasts is displayed.
My Added Stations
List of stations/Podcasts you personally added on the radio
portal is displayed. Select a station/Podcast you want to listen
to (see next page).
< You can also use the Cursor buttons ( / ) on the remote
control unit to scroll through menu items.
For the detail of each item, see right
Press the SELECT button to select a menu item.
3
Repeat steps
< Press the
the previous menu.
2
and
as required.
3
button on the remote control unit to go back to
Help
Get access code
The “access code” of the unit is displayed (see next page).
Each unit of R-4iDN T has it s “access code”. This code is
required to log in the Internet radio portal.
FAQ
Audio FAQ is available.
2626
Page 27

Internet Radio/Podcast
Radio Portal
Access the radio portal on the Internet using your computer to fully
enjoy the Internet radio function of this unit.
Accessing the radio portal
On your computer, open internet browser and access
1
following URL.
http://www.wifiradio-frontier.com
Click on the “Register” link to start registration.
2
Input your access code and log in.
3
My favorites
You can create a list of your favorite stations/Podcasts on the portal.
This list can be viewed from the R-4iDNT, making it easier for you to
find your usual programs.
You can see the list of your favorite stations in the Internet
radio menu as follows: (See previous page for details)
“Station list” w “My favorites”
Station list
If the station/Podcast you want to listen to is not in the station list,
you can create your own list.
You can see the list of your added stations in the Internet radio
menu as follows: (See previous page for details)
“Station list” w “My Added Stations”
Checking the “access code” of your unit
Each unit of R-4iDNT has its “access code”. This code is required to
log in the Internet radio portal.
You can see the access code of your R-4iDNT in the Internet
radio menu as follows: (See previous page for details)
“Station list” w “Help” w “Get access code”
2727
Page 28

FM
radio
FM
Hold down
more than 2 sec.
FM
Scan setting
Audio setting
Main menu >
Listening to the FM Radio
This chapter describes how to listen to the FM radio.
Press the MODE button repeatedly to select “FM radio”.
1
The last listened station is received.
< You can also use the FUNCTION button ( ˙ / ¥ ) on the remote
control unit to select “FM radio”.
Automatic Tuning:
2
Press the SELECT button to begin automatic tuning.
Switching the stereo and monaural mode
In FM mode, press and hold the MENU button for more
1
than 2 seconds to open the FM menu.
Turn the MULTI JOG to select “Audio setting”, and then
2
press the SELECT button.
When a station is found, the unit tunes in the st ation
automatically. Repeat this step until the station you want to
listen to is found.
< You can also use the SCAN button on the remote control unit
to begin automatic tuning.
Manual tuning:
Turn the MULTI JOG until you find the station that you
want to hear.
< You can also use the Cursor buttons ( / ) on the remote
control unit to select a station.
“Listen in mono only?” appears on the display.
< The current setting is marked with a “
3
Turn the MULTI JOG to select “YES” or “NO”, and then
press the SELECT button.
NO
FM stereo broadcasts are received in stereo.
< If the sound is distorted, the signal is not strong enough
for good stereo reception. In this case, select “YES” to
change to mono mode.
”.
2828
YES
Reception will now be forced into monaural, reducing
unwanted noise. To compensate for weak FM stereo
reception, select mono mode.
Page 29

Hold down
FM
Hold down
more than 2 sec.
FM
Scan setting
Audio setting
Main menu >
Preset Tuning (FM)
Changing the sensitivity
In FM mode, press and hold the MENU button for more
1
than 2 seconds to open the FM menu.
Turn the MULTI JOG to select “Scan setting”, and then
2
press the SELECT button.
You can store up to 10 FM stations.
How to preset stations
Tune in a station you want to store (see previous page).
1
2
Press and hold the Number buttons you want to store
the station.
“Preset stored” appears on the display.
“Strong stations only?” appears on the display.
< The current setting is marked with a “
Turn the MULTI JOG to select “YES” or “NO”,, and then
3
press the SELECT button.
When you select “YES”, the R-4iDNT receives strong signal
only.
”.
How to select preset stations
In FM mode, press the Number button.
The selected preset station is tuned in.
2929
Page 30

Last.fm
<User Accounts>
User name
0123456789._-@,
abcdefghijklmn
opqrstuvwxyzABC
DEFGHIJKLMNOPQR
BKSP
OK
CANCEL
Deletes the last
character.
Cancel the operation
and goes back to the
previous screen.
Password
xxxxx
0123456789._-@,
abcdefghijklmn
opqrstuvwxyzABC
DEFGHIJKLMNOPQR
BKSP
OK
CANCEL
Last.fm
Hold down
more than 2 sec.
Last.fm
Station list >
Last.fm setup >
Main menu >
Listening to Music of Last.fm
You can access Last.fm and listen to the radio music files.
To listen to the music files of Last.fm, you need to sign up for
Last.fm. For details, see the website of Last.fm.
http://www.last.fm/
This function may be unavailable in any country or region where
the Last.fm service is not provided. Part or all of the ser vice
may also become unavailable in the future due to the service
provider's circumstances.
Setting up the Last.fm
Press the MODE button repeatedly to select “last.fm”.
1
Turn the MULTI JOG to select “User Accounts”, and then
4
press the SELECT button.
Press the SELECT button.
5
< You can also use the FUNCTION button ( ˙ / ¥ ) on the remote
control unit to select “last.fm”.
2
Pr ess and h old the MENU b utt on for more t han
2 seconds to open the last.fm menu.
Turn the MULTI JOG to select “Last.fm setup”, and then
3
press the SELECT button.
Input your “User name” and “Password”, and then
6
press the SELECT button.
How to input characters
1. Turn the MULTI JOG to select the character you want to
input. And then, press the SELECT button to input the
selected character.
2. Turn the MULTI JOG to select “OK” after inputting the final
character of your “User name” or “Password”.
3030
When you log on successfully, the R-4iDNT will memorize your
account.
Page 31

Listening to the radio of Last.fm
Hold down
more than 2 sec.
Last.fm
Station list >
Main menu >
Last.fm setup >
Press the MODE button repeatedly to select “last.fm”.
1
Turn the MULTI JOG to select the search method, and
4
then press the SELECT button.
You can choose one of seven search methods.
Your Library*
List of music files you personally added on your library is
displayed.
< You can also use the FUNCTION button ( ˙ / ¥ ) on the remote
control unit to select “last.fm”.
2
Pr ess and h old the MENU b utt on for more t han
2 seconds to open the last.fm menu.
Turn the MULTI JOG to select “Station list”, and then
3
press the SELECT button.
Your Recommendations*
Lis t of music files in your recommendation folder is
displayed.
Your Loved Tracks*
List of music files in your loved tracks folder is displayed.
Your Neighbourhood*
List of music files in your neighb ourh ood folder is
displayed.
Artist Radio
Search the artist by artist name. Input the artist name
and search the artist.
Tag Radio
Search the radio station by name. Input the radio name
and search the radio station.
History
List of music files you already listened is displayed.
* You need to sign up for Last.fm. For details, see the
website of Last.fm.
http://www.last.fm/
Now you can listen to the radio music files
of Last.fm
.
3131
Page 32

Music Player
Setting up the Music Player
About the Music player function
Using the Music player function, you can play back the music files in
your computers on the same LAN.
Using this function, R-4iDNT can play back the music files in the
shared media library. Tag items such as artist names and album
names can be viewed from R-4iDNT as well.
You need a PC running on Windows XP or Windows Vista,
and Windows Media Player 11 or later on it.
Preparations for Music player
Selec t the “Jupiter 6. 2 XXXX X (Radio ID)” and click
6
“A l lo w ”.
Connect your computer to the LAN.
1
Connect the R-4iDNT to the LAN (page 7).
2
If the files you want to share are not yet added to the
3
media library of Windows Media Player, add them to
the media library.
< Refer to the manual of Windows Media Player for details.
On Windows Media Player, open “Library”, then “Media
4
sharing”.
The R-4iDNT can now access the shared library.
Click on “Settings...”, and configure detailed sharing
7
settings.
< To listen to music files regardless of their rating, set “Star
ratings” to “All ratings”.
< Ensure that “Music” is checked under the “Media types”
setting.
Media Sharing window opens.
Activate “Share my media to:”.
5
The R-4iDNT appears in the device list as “Jupiter 6.2 XXXXX
(Radio ID)”.
3232
For the procedure of playback, see next page.
Page 33

Music
player
Music player
Clear My playlist >
Shared media >
My playlist>
Repeat play: On
Shuffle play: Off
Shared media
TOM-PC: USER1: >
JEF-PC: USER2: >
Music Player
Music
player
Music player
Clear My playlist >
Repeat play: On
My playlist >
Shared media >
Shuffle play: Off
Listening to the Music Player
For the preparation of the Music player, see previous page.
Press the MODE button repeatedly to select “Music
1
p la ye r ”.
The Music player menu appears.
< You can also use the FUNCTION button ( ˙ / ¥ ) on the remote
control unit to select “Music player”.
Press the SELECT button to enter “Shared media”
2
menu.
Turn the MULTI JOG to select the file you want to listen
5
to, and then press the SELECT button.
Playback of the selected file starts.
Repeat playback/Shuffle playback
You can set the repeat or shuffle playback.
Press the MODE button repeatedly to select “Music
1
p la ye r ”.
A list of computer name and user account name appear.
Turn the MULTI JOG to select your computer name and
3
user account name, and then press the SELECT button.
Example:
Turn the MULTI JOG to select the folders until the file
4
you want to listen to appears, and then press the
SELECT button.
The Music player menu appears.
< You can also use the FUNCTION button ( ˙ / ¥ ) on the remote
control unit to select “Music player”.
Turn MULTI JOG to select “Repeat play ” or “Shuffle
2
play”, and then press the SELECT button.
Each time the SELECT button pressed, the repeat or shuffle
mode changes on and off.
Repeat this operation until the file you want appears.
< You can also search for files by selecting “<Search>”.
3333
Page 34

15 min.
30 min.
45 min.
60 min.
OFF
Sleep Timer
Alarm 1
Enable: Daily
Time: 00:00
Mode: Internet radio
Preset: Last listened
Volume: 12
Wake Up Timer
You can set the sleep timer so that the unit turns itself off after a
specified amount of time.
Each press of the SLEEP button cycles through timer options
(from 15 up to 60 minutes). The unit will automatically stop
playback and enter Standby mode when the time elapses.
You can set the unit to turn on at specific times. You can set two
separate timers with ALARM 1 and ALARM 2.
Setting the wake up timer
The procedures below are to set ALARM 1.
Follow similar steps to set ALARM 2.
Press the ALARM 1 button to enter the wake up timer
1
setting mode.
< During the sleep timer, the Sleep indicator ( ) appears on the
dis play.
< If you want to check the remaining time, press the SLEEP button
once. The remaining time will be displayed for 3 seconds, and
then return to the normal display.
< If the clock has not been set, clock setting display appears.
Follow the steps on page 13. (“Setting the Clock”)
Turn the MULTI JOG to select an item to set, and then
2
press the SELECT button.
< You can also use the Cursor buttons ( / ) on the remote
control unit to select an item.
Turn the MULTI JOG to set the value or select an item,
3
and then press the SELECT button.
3434
Items of the frequency value
off Timer off
Daily Works daily
Once Works once
Weekends Works on every weekend
Weekdays Works on every weekday
< “AUX” and “Music player” cannot be selected as a mode
value.
Page 35

2
Alarm 1
Save
Time: 00:00
Mode: Internet radio
Preset: Last listened
Volume: 12
5 min.
10 min.
15 min.
30 min.
Repeat steps
4
After all items are set, turn the MULTI JOG to select
5
“Save”, and then press the SELECT button.
“Alarm saved” appears on the display.
And then the Timer indicator (
Prepare the source.
6
If the mode is set to “iPod”, inser t an iPod/iPhone into the
Dock.
If the mode is set to “Internet radio”, “DAB”, “FM”, or “last.fm”,
tune in a station.
and 3 to set all the items.
) appears.
Checking the timer setting
Press the ALARM 1 or ALARM 2 button to enter the wake up
timer setting mode and check the details.
Using the snooze function
< If the source is set to “iPod” but no iPod/iPhone is set, the
buzzer will sound instead.
Note for use with an iPod Touch/iPhone
(When using the R-4iDNT wake up timer with an iPod
Touch/iPhone as the source)
< If you turn the power of an iPod Touch/iPhone off ("Slide to
power off"), you cannot use it with the wake up timer even if
it is docked in this unit. To use the wake up timer with an iPod
Touch/iPhone as the source, do not select "Slide to power off"
on the iPod Touch/iPhone. (The screen of the iPod Touch/
iPhone can be turned off without any problem.)
< If Video is displayed on an iPod Touch/iPhone’s screen, you
cannot use it with the wake up timer even if it is docked in
this unit. To use the wake up timer with your iPod Touch/
iPhone as a source, select any item other than Video on the
iPod Touch/iPhone.
After the ON time is reached, press the SNOOZE button
repeatedly to select the temporary turn off time.
3535
Page 36

Troubleshooting
If you experience any problems with the unit, please take a moment
to look through this chart and see if you can solve the problem
yourself before you call your dealer or a TEAC service center.
General
No power.
e Check the connection to the AC power supply. Check and
make sure the AC source is not a switched outlet and that, if it
is, the switch is turned on. Make sure there is power to the AC
outlet by plugging another item such as a lamp or fan.
e Press the Standby/On button (
Remote control does not work.
e Press the Standby/On button (
e If the batteries are dead, change the batteries.
e Use remote control unit within the range (5 m) and point at
the front panel.
e Clear obstacles between the remote control unit and the
main unit.
e If a strong light is near the unit, turn it off.
Severe hum or noise is heard.
e Place the unit as far away from a TV as possible.
e Make sure the line cords and speaker cables are as far away
from the AC supply as possible.
) to turn the unit on.
) to turn the unit on.
iPod/iPhone Player
Cannot insert the iPod/iPhone.
e Check if appropriate adapter is inserted to the Dock (page 16).
e Remove dust or obstacles from the Dock and the iPod/
iPhone.
DAB Tuner
No sound.
e Ensure that the unit has been able to locate DAB stations.
“No stations found” appears on the display.
e Check the position of the antenna.
e Ensure that DAB broadcast covers your area.
Cannot access secondary services.
e Not all services are accompanied by secondary services. If a
secondary service is available, the secondary indicator (“>>”)
is displayed next to the station name.
Display goes out or displayed “Service not available”.
e This may occur if a broadcaster changes the label of a service
or removes the label while you are listening to it. The unit will
try to retune to this station. If the problem persists, follow the
procedure for auto scan on page 19.
A burbling sound is heard on some stations.
e DAB system is able to produce quality audio from a low
level signal, but when the signal level is too low, a “burbling”
sound might be heard. To reduce this, try repositioning your
antenna to gain maximum signal strength.
Internet Radio/Podcast
Cannot connect to the Internet.
e Check if your computer can connect to the Internet using the
same network.
e Enter a correct pass key to the network.
e Check the settings of your network’s firewall. The unit needs
access to the following UDP and TCP ports as a minimum: 80,
554, 1755, 5000 and 7070.
The iPod/iPhone does not play.
e Remove the iPod/iPhone from the Dock, wait a few seconds,
and insert it again.
e Software up date may solve the problem. Visit the Apple
website and download th e latest iPod/iPhone sof tware
(page 16).
Cannot operate the iPod/iPhone on the unit.
e Select “iPod” as the source.
Cannot operate the iPod/iPhone.
e Make sure the HOLD switch of the iPod/iPhone is not set to
HOLD.
FM Tuner
Cannot listen to any station, or signal is too weak.
e Tune in the station properly.
e Rotate the FM/DAB antenna until you get stations clearly.
Cannot listen to a station/Podcast.
e The broadcaster is having temporary trouble with the Internet
connection.
e Che ck if you r Inter net con nec tio n is not tempo rar ily
disconnected or disturbed.
Cannot find a station/Podcast in the station list.
e The station/Podcast may not be broadcast at the moment.
e The link of the station/Podcast may be out of date.
e The allowed number of simultaneous listeners of station/
Podcast might have reached the maximum.
e The Internet connection speed is too slow.
e Add the station/Podcast to your own station list by accessing
the Internet radio portal.
3636
Page 37

Specifications
Last.fm
Cannot connect to the Internet.
e Check if your computer can connect to the Internet using the
same network.
e Enter a correct pass key to the network.
e Check the setting of your network’s firewall. The unit needs
access to the following UDP and TCP ports as a minimum: 80,
554, 1755, 5000 and 7070.
Cannot connect to the Last.fm.
e Check your user account and password.
Music Player
Cannot connect to the LAN.
e Check if your computer can connect to the Internet using the
same network.
e Enter a correct pass key to the network.
e Check the settings of your network’s firewall. The unit needs
access to the following UDP and TCP ports as a minimum: 80,
554, 1755, 5000 and 7070.
e Check if the computer is not shut down or in the sleep mode.
Set up the computer not to shut down or turn into the sleep
mode automatically.
e There may be a problem with the network authentication.
Press the MODE button repeatedly to select “Music player”
again.
Cannot find a track.
e Add the track to the media library of Windows Media Player.
e Set your R-4iDNT as a “Jupiter 6.2 XXXXX (Radio ID)” in the
device list of Windows (page 32).
e Select “Allow” for R-4iDNT (“Jupiter 6.2 XXXXX (Radio ID)”)
(page 32).
e Check the file format. Playable formats are MP3 and WMA.
e If you have antivirus secur it y software enabled on your
computer, the unit may fail to connect.
Amplifier
Output power
(Stereo, JEITA) . . . . . . . . . . . . . . . . . . . . . . . . . . . . . .10 W rms + 10 W rms
Total harmonic distortion ....................0.1 % (at 5 W, 1 kHz)
Frequency response .................20 Hz to 20 kHz, +0 / –3 dB
Signal-to-noise ratio .............................90 dB (IHF-A)
Speaker system
Typ e . . . . . . . . . . . . . . . . NXT Balanced Mode Radiator (BMR) system
Impedance .................................................. 4 Ω
FM Tuner section
Tuning range ...............87.5 MHz to 108.0 MHz (50 kHz steps)
Total harmonic distortion (1 kHz) . . . . . . . . . . . . . . . . . . . . . Mono: 1 %
Stereo: 1.5%
Frequency response ............................. 40 Hz to 10 kHz
Stereo separation (1 kHz) . . . . . . . . . . . . . . . . . . . . . . . . . . . . . . . . . . 45 dB
Signal-to-noise ratio ................................Mono: 60 dB
Stereo: 55 dB
DAB Tuner section
Tuning range
Band III: 5A to 13F (174.928 MHz to 239.200 MHz)
Usable sensitivity .......................................–90 dBm
Frequency response ............... 20 Hz to 20 kHz (+1 dB/–1 dB)
Distortion . . . . . . . . . . . . . . . . . . . . . . . . . . . . . . . . . . . . . . . . . . . . . . . . 0.08 %
Signal-to-noise ratio ....................................... 65 dB
Internet radio/Music player
Format ....................................MP3, WMA, RealAudio
Internet connection
ETHERNET terminal ....................................10 BASE-T
Wireless LAN . . . . . . . . . . . . . . . . . . . . . . . . . . . . . . . . . . . . . . IEEE 802.11b/g
Security . . . . . . . . . . . . . . . . . . . . . . . . . . . . . . . . . . . . . . . . WEP, WPA, WPA2
General
Power requirements ............................. AC 230 V, 50 Hz
Power consumption ....................... 20 W (Standby: <1 W)
Dimensions (W x H x D) ........................310 x 53 x 210 mm
Weight (net) ...............................................1.6 kg
Standard accessories
Remote control unit (RC-1239) x 1
Batteries (AAA) x 2
AC adapter (PS-M1220) x 1
Power cable for AC adapter x 1
Stereo mini-plug cable x 1
Dock adapter x 4
Dock cover x 1
Owner’s manual (this document) x 1
Warranty card x 1
M Design and specifications are subject to change without notice.
M Weight and dimensions are approximate.
M Illustrations may differ slightly from production models.
3737
Page 38

38
Page 39

39
Page 40

Z
TEAC CORPORATION
TEAC AMERICA, INC. 7733 Telegraph Road, Montebello, California 90640 U.S.A . Phone: (323) 726-0303
TEAC CANADA LTD. 5939 Wallace Street, Mississauga, Ontario L4Z 1Z8, Canada Phone: (905) 890-8008
TEAC MEXICO, S.A. DE C.V. Río Churubusco 364, Colonia Del Carmen, Delegación Coyoacàn, CP 04100, México DF, México Phone: (5255)5010-6000
TEAC UK LTD. Suites 19 & 20, Building 6, Croxley Green Business Park, Hatters Lane, Watford, Hert fordshire, WD18 8TE, U.K. Phone: (0845) 130-2511
TEAC EUROPE GMBH Bahnstraße 12, D-65205 Wiesbaden-Erbenheim, Deutschland Phone: 0611-71580
This appliance has a serial number located on the rear panel. Please record the
model number and serial number and retain them for your records.
Model number Serial number
1-47 Ochiai, Tama-shi, Tokyo 206-8530 Japan Phone: (042) 356-9156
0909.M1507A
 Loading...