

Page 1
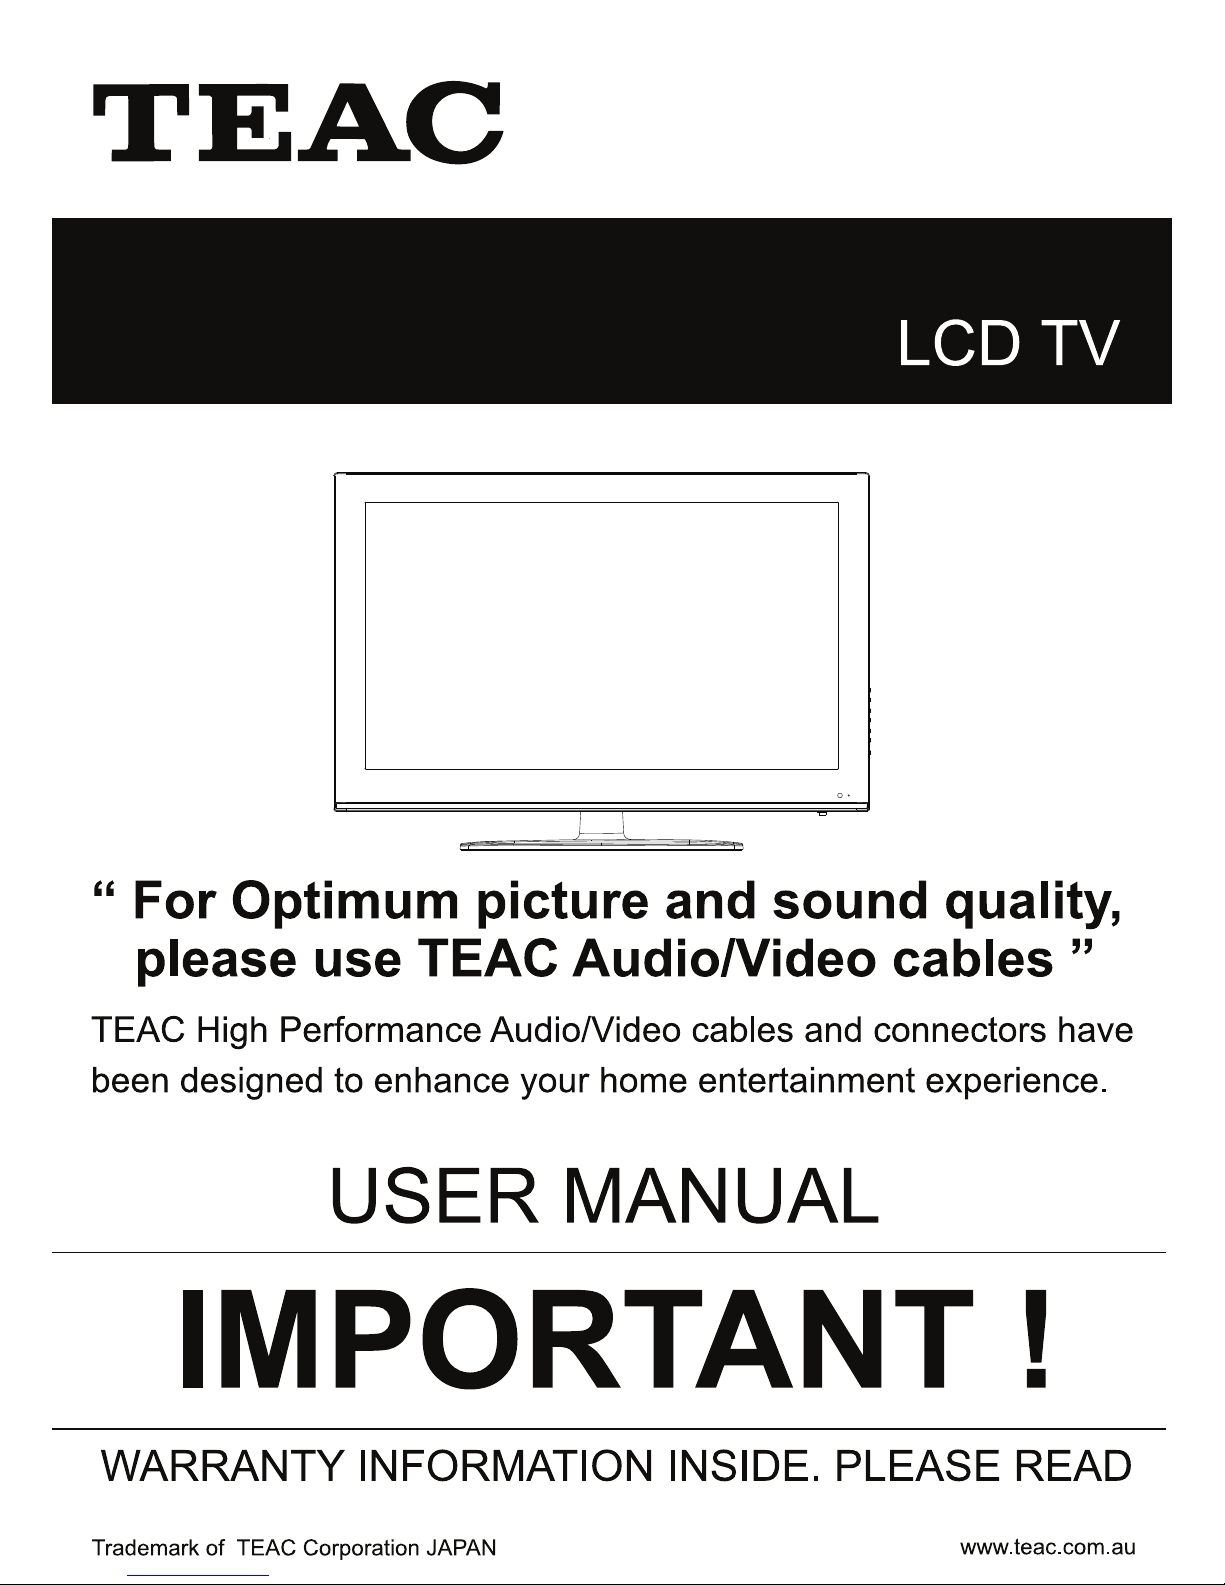
LCD3282FHD/LCD4282FHD
Page 2

WARRANTY PROCEDURE
v1.5.2: DEC 2011
Please read th e ow n er ’s m anu al caref ul l y and ensure that you have followed the correct installation and operating
procedures.
1. Please read this warranty card.
2. Keep your pur chase r ec eip t t o en abl e you t o pr oc eed qui ckly in th e even t of a Warranty Servic e.
3. If you require Warranty Service, please contact the TEAC Customer Support Hotline at 1300 553 315 for
assistance. Pl eas e ens u re that you h ave th e m odel number, serial number an d purchas e r ec eipt ready when
you call.
Please complete the section below and keep this information for your own records.
Owner’s Name
Owner’s Address
Postcode
Model Name/No. Serial No.
Dealer’s Name
Dealer’s Address
Postcode
Authorised Service Centr es in Major A ustralian Cities
NSW
151 Arthur Street
Homebush West, NSW 2140
Queensland
Unit 1, 320 Curtin Ave West
Eagle Farm, QLD 4009
Western A ust r alia
Unit 2, 50 Pilbara Street
Welshpool, WA 6106
South Australia
11 McInnes Street
Ridleyt on, SA 5008
Victoria
282 Normanby Road
South Mel b our n e, V IC 32 05
Thank you for selecting a TEAC product
.
If you should r equire assistance with your product r egar ding its setup
or operati on, or if any difficulties arise, please cal l us directly for advice
between Monday to Friday at 8.30AM – 6PM AEST at the
TEAC Customer Support Hotline
1300 553 315
teacservicesupport@awa.com.au
www.teac.com.au
Page 3
WARRANTY INFORMATION
v1.5.2: DEC 2011
Our g oods com e with guarantees that cannot be excluded under the Australian Consum er L aw . You are
entitled to a replacement or refund for a major failure and for compensation for any other reasonably
fo re se eable l os s or damage. Yo u are al s o en tit l e d t o h av e the goods repaired or replaced if the goods f ail
to be of acceptable quality and the failure does not amount to a major failure.
Warranty Terms & Conditions
1. TEAC war rant s t hat t his pr oduct is f r ee fr om def ects in mat eri al an d wor km ans hip u nder n ormal dom estic use with
reason able care and skill. Mainten ance and c leaning ( i.e. las er head) is not cover ed by this warrant y. The TEAC
warrant y on l y applies to TEAC products purchased, used and serviced in Australia.
2. The ben efits to t he c onsum er given b y this W arrant y ar e in addit ion to other r ights and r emedies of the c onsum er
under a law in rel at i on t o goods or s er vices to whic h th e w arranty rel ates, b ein g the Austral ian Consu m er Law.
3. Refund or replac emen t via y our r etail er is av ail able f or a peri od of 14 da ys after purch ase f or goods that h ave been
inspected and det ermined t o ha ve a m aj or failure. R efu nd and exch ange is not app licable f or ch an g e of mi nd.
4. Subject to the terms herein, this warran ty effecti vely covers the equip ment as sp ecified i n the Warr anty Periods
Table below from the date of purchase.
TEAC PRODUCT
WARRANTY PERIOD
LED/LCD TV 32” (80 cm) and above
1 Year (In-Home Service/ Pick up Available)*
All other TEAC products
1 Year (Carry-in Service)
5.
Th is s ervice will onl y b e provided as part of this w arranty if all the following conditions ar e met;
In Home Service/Pick up* Service
a) The produc t is in dicated in th e Warranty Period T able.
b) The product is within the warranty period.
c) The product is located within the normal service area of the local TEAC Authorised Service Centre.
If TEAC determines that the product is not repairable on site, TEAC can complete the repair by taking the product to
a TEAC Authorised Service Centre.
Where In-Home service/Pick up* is not available, the purchaser is required to send the product to the nearest TEAC
Author is ed Ser vic e C entr e f or r epair . In this e vent , pr o of of pur ch ase is r equir ed to s upp ort a warr ant y cl aim. Aft er
the rep air, t he pr od uct will be avail abl e for c oll ecti on by or retur n to the pur chas er at a fee upon req uest. TE AC inhome service can be made available at a fee upon request.
Carry-in Service
6. A 12-month replacement warranty is applicable to all Accessories such as Remote, Power Adaptors and Cables.
7. TEAC will ensure to t he best of its ab il it i es th at all req uired parts are mad e avai l ab le for any required s ervice/r ep air.
8. TEAC Aus tralia Pt y Ltd and its Au thorised S ervic e Centres will use their best endea vours to c omplete produc t
repairs within a reasonable period based on available resources and workload during the time when service is
request ed an d perform ed.
9. Refurbis hed p arts m ay be us ed to r epair t he prod uct. I n the c ase of a replac ement, the pr oduct may be r eplac ed,
with a ref urbished unit of the s ame type or , if one is unavailab le, a si milar refur bished m odel with equal or b etter
features & specifications.
10. Please b e advised that if th e prod uc t presented f or repair is capab le of r etainin g user-g en erated d at a, the d at a m ay
be lost during servicing. Customers are strongly encouraged to back up all important information/data before
sending the product in for service/repair.
11. Servic e will be pr ovided on ly dur ing norm al busin ess hour s and under saf ety condi tions and circ umstanc es. TEA C
and its aut h or ised ser vice agents can r efuse any r ep ai r if saf ety, i n relati on t o O H &S, bec om es a c oncern t o its s t af f
or author ised service agents ’ p ersonnel.
12. The warranty is void and warranty claims may be refused, subject to the Australian Consumer Law, if:
a) The product was not transported, ins talled, op erated or m aint ained a c c ordin g t o m an uf acturer ins tr uc t ion, or
b) The produc t w as abused, dam ag ed, tamp ered, alt ered or rep aired by any un au thoris ed p ersons, or
c) Product failure is due to accidents during use, installation or transit, power surges, use of defective or
incompat ib le exter nal devic es, exp os ure to abn orm al cond itions suc h as excess iv e temp erat ur es or humi dity, or
entry of liqu ids, obj ects or creatur es in to the produc t.
13. No one is au thoris ed t o ass u m e any liability on b eh alf of TEAC or impose any ob ligati on on it, in connecti on with the
sale of any eq ui p m ent other than as stated in th is w arr an t y and ou t l in ed ab ove.
14. TEAC reserves the right to inspect and verify whether the product is exhibiting a major failure as claimed by
customers/retailers.
15. LCD dead pixel policy, please contact TEAC Customer Support Hotline on 1300 553 315 for assistance.
Page 4
34
35-36
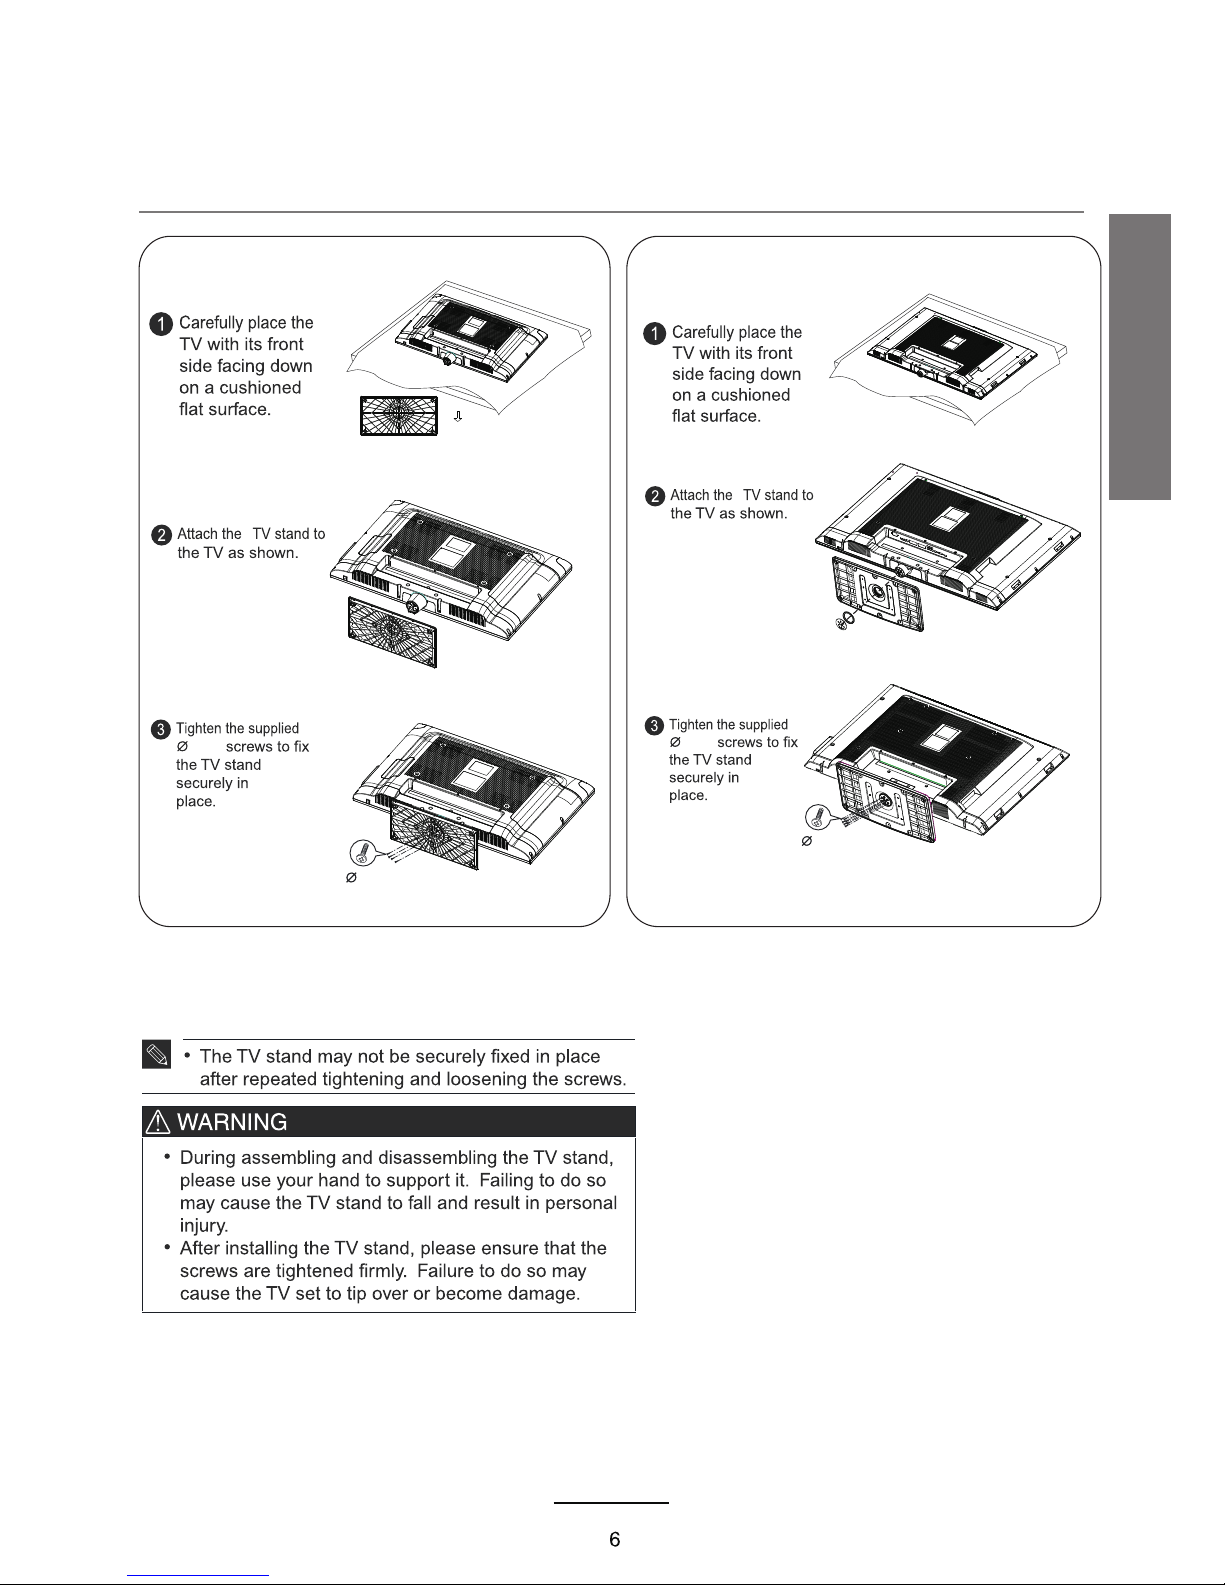
Stand Installation
14
Page 5
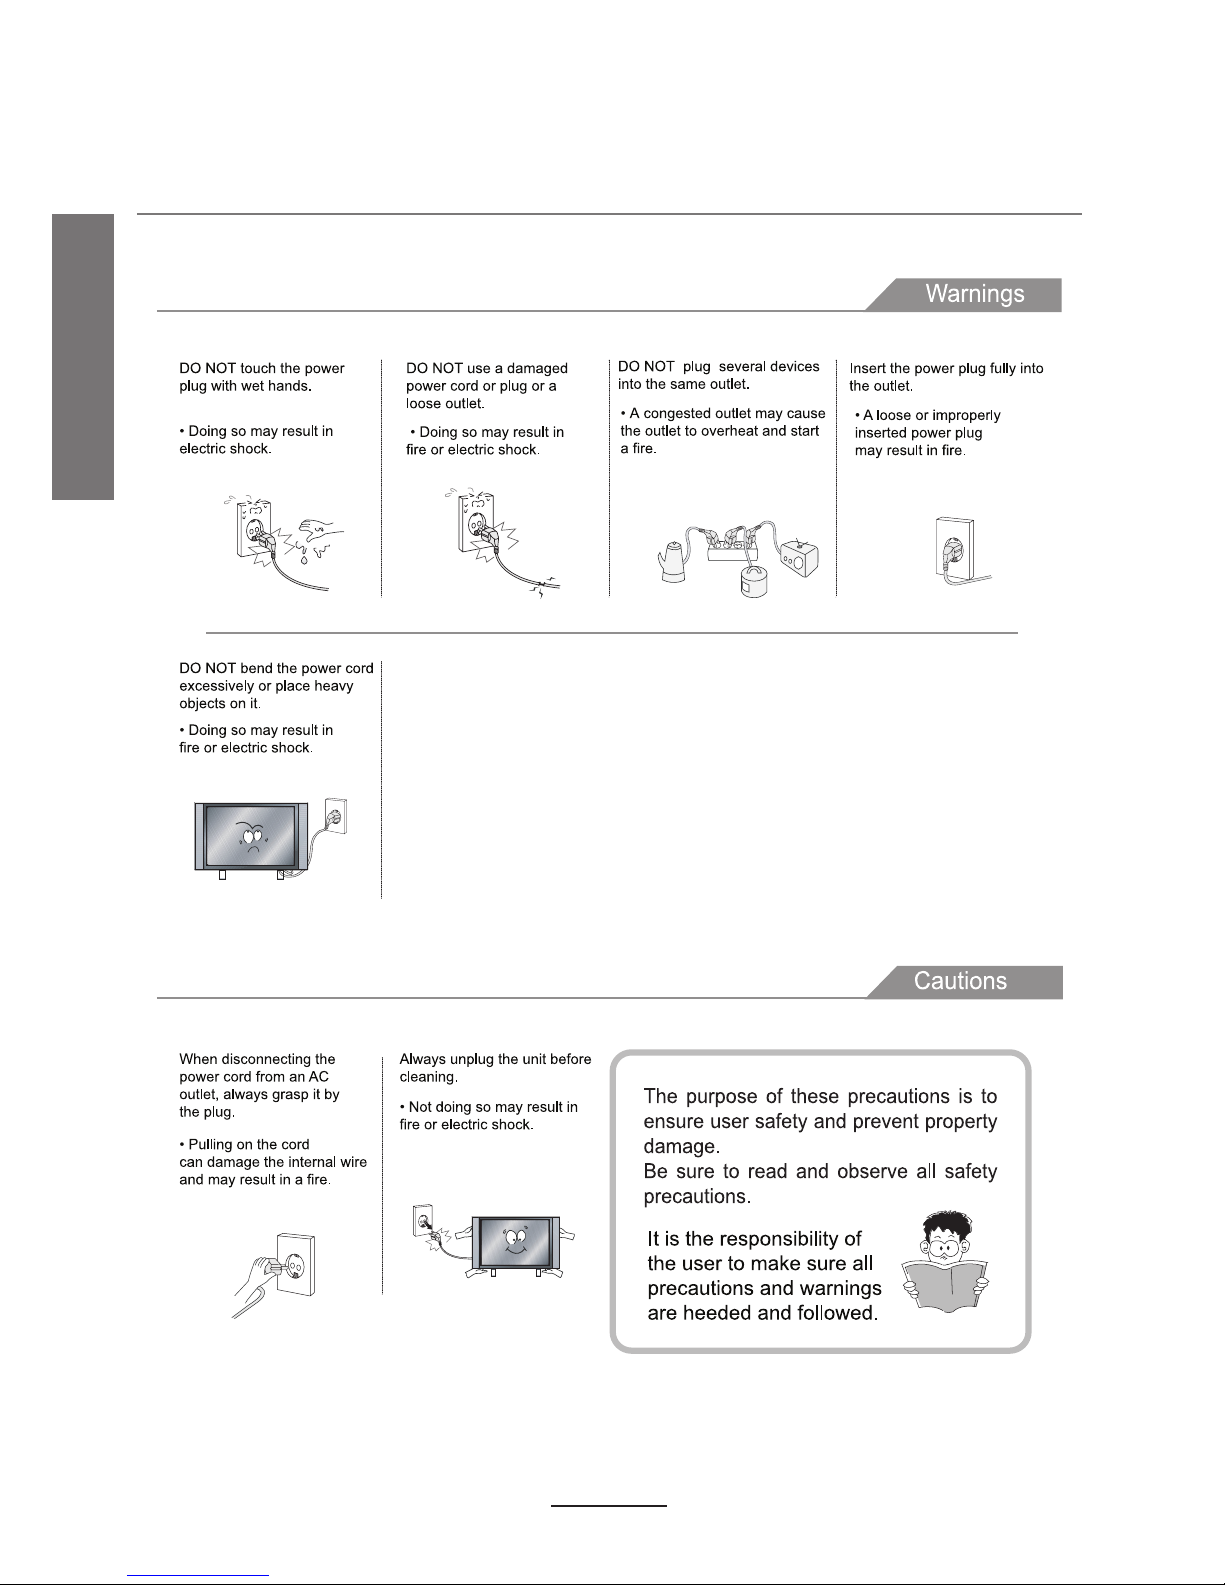
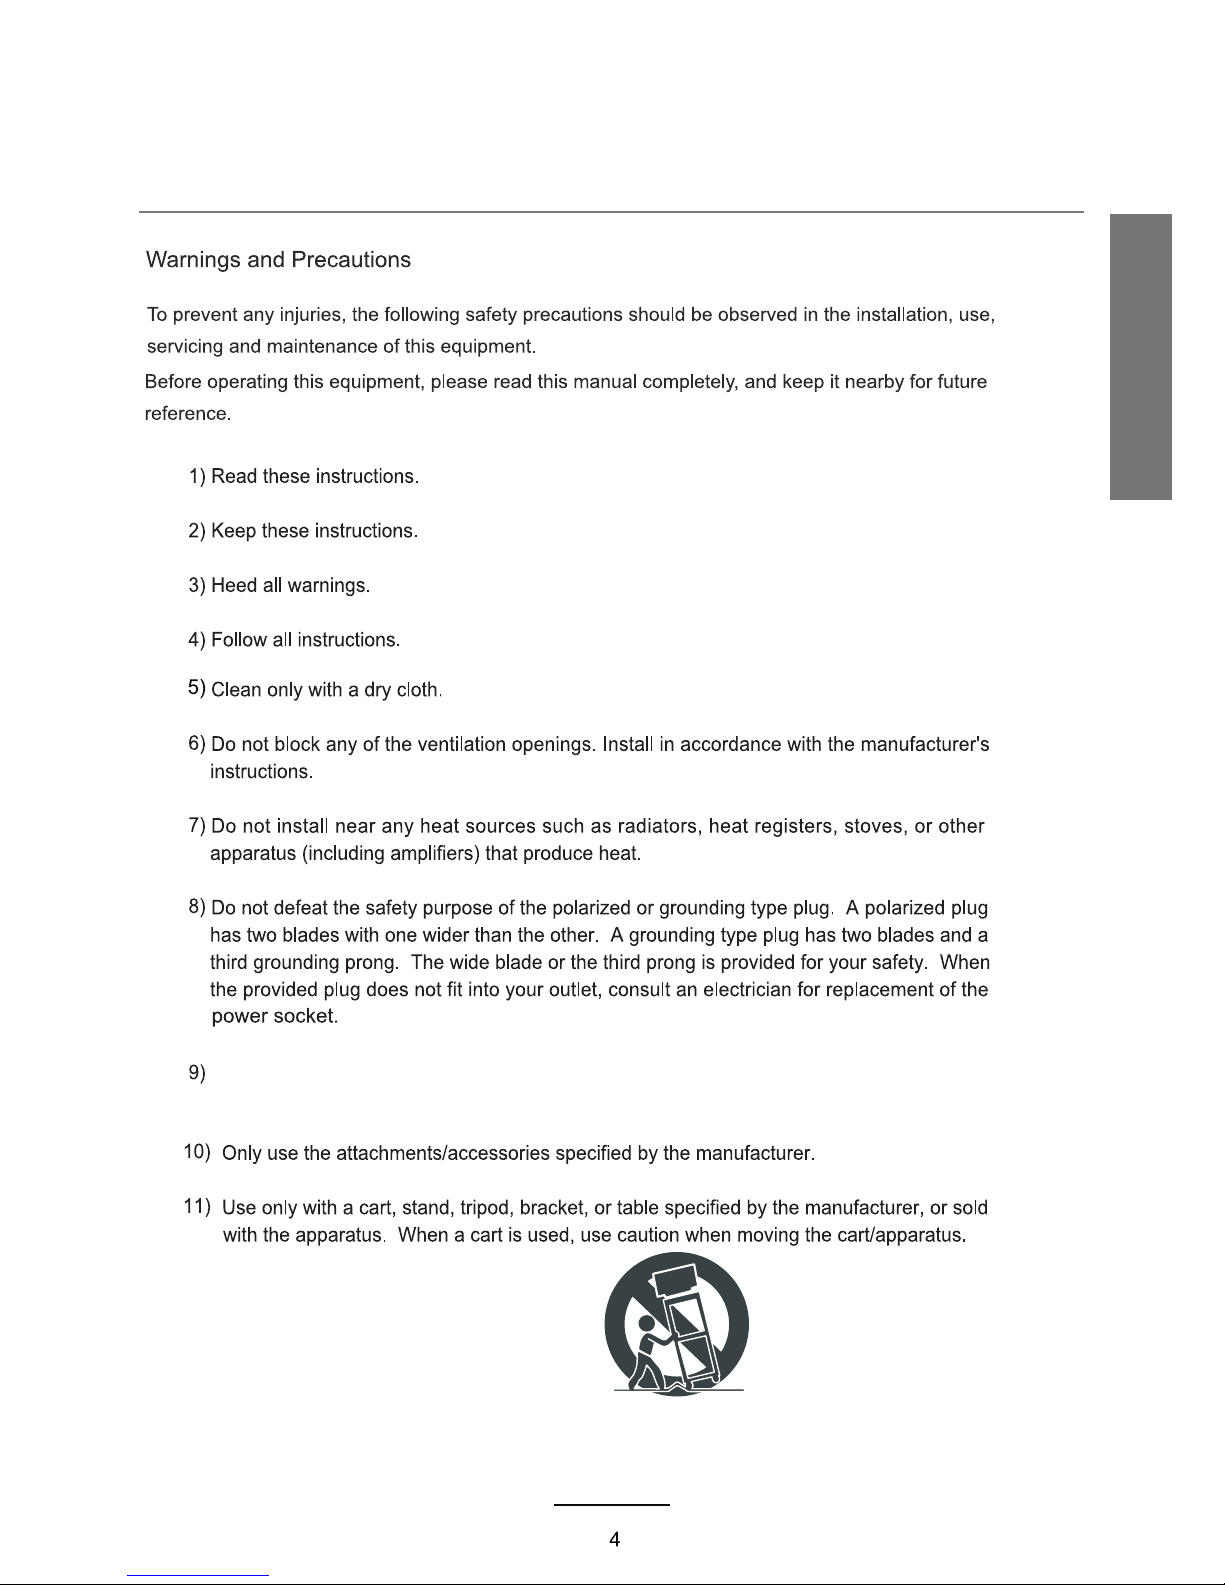
Safety Precautions
Power Supply
1
Page 6
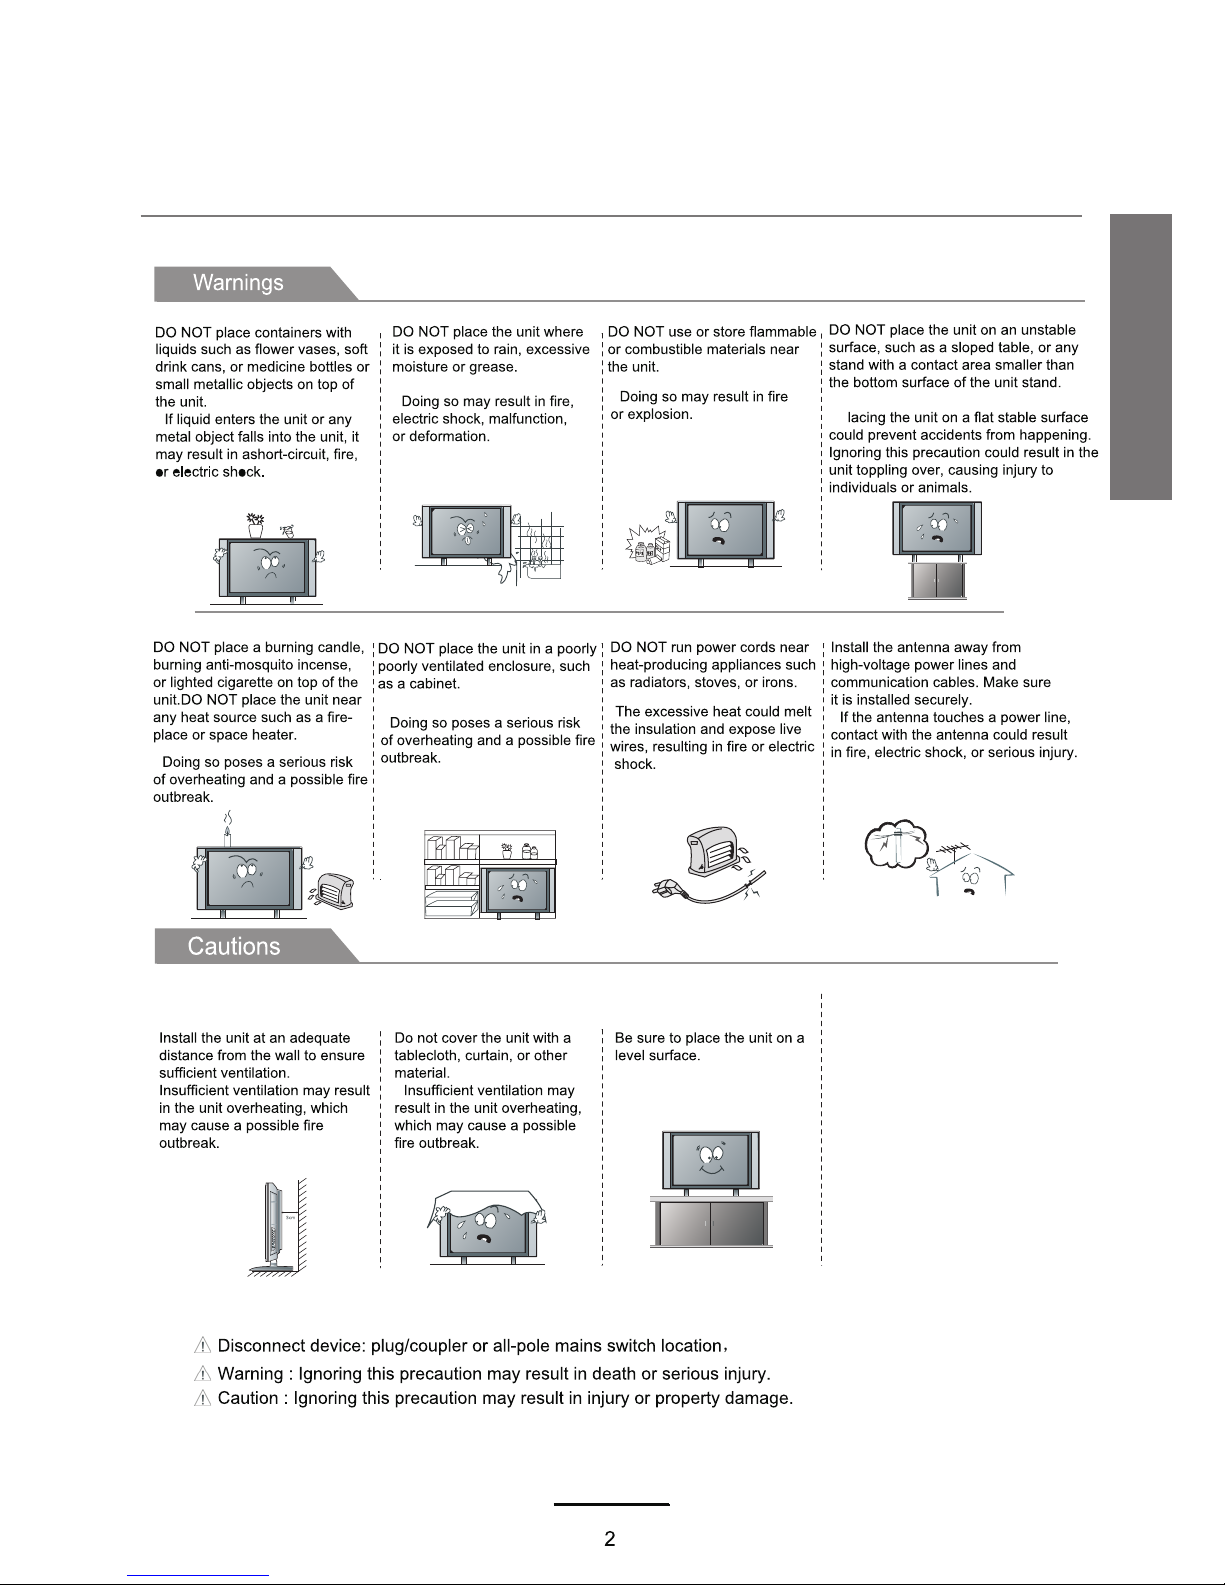
The fo llo win g pre cau tio ns ar e div ide d into "Warn ing s" an d "Ca uti ons "
Installation
·
Safety Precautions
Page 7
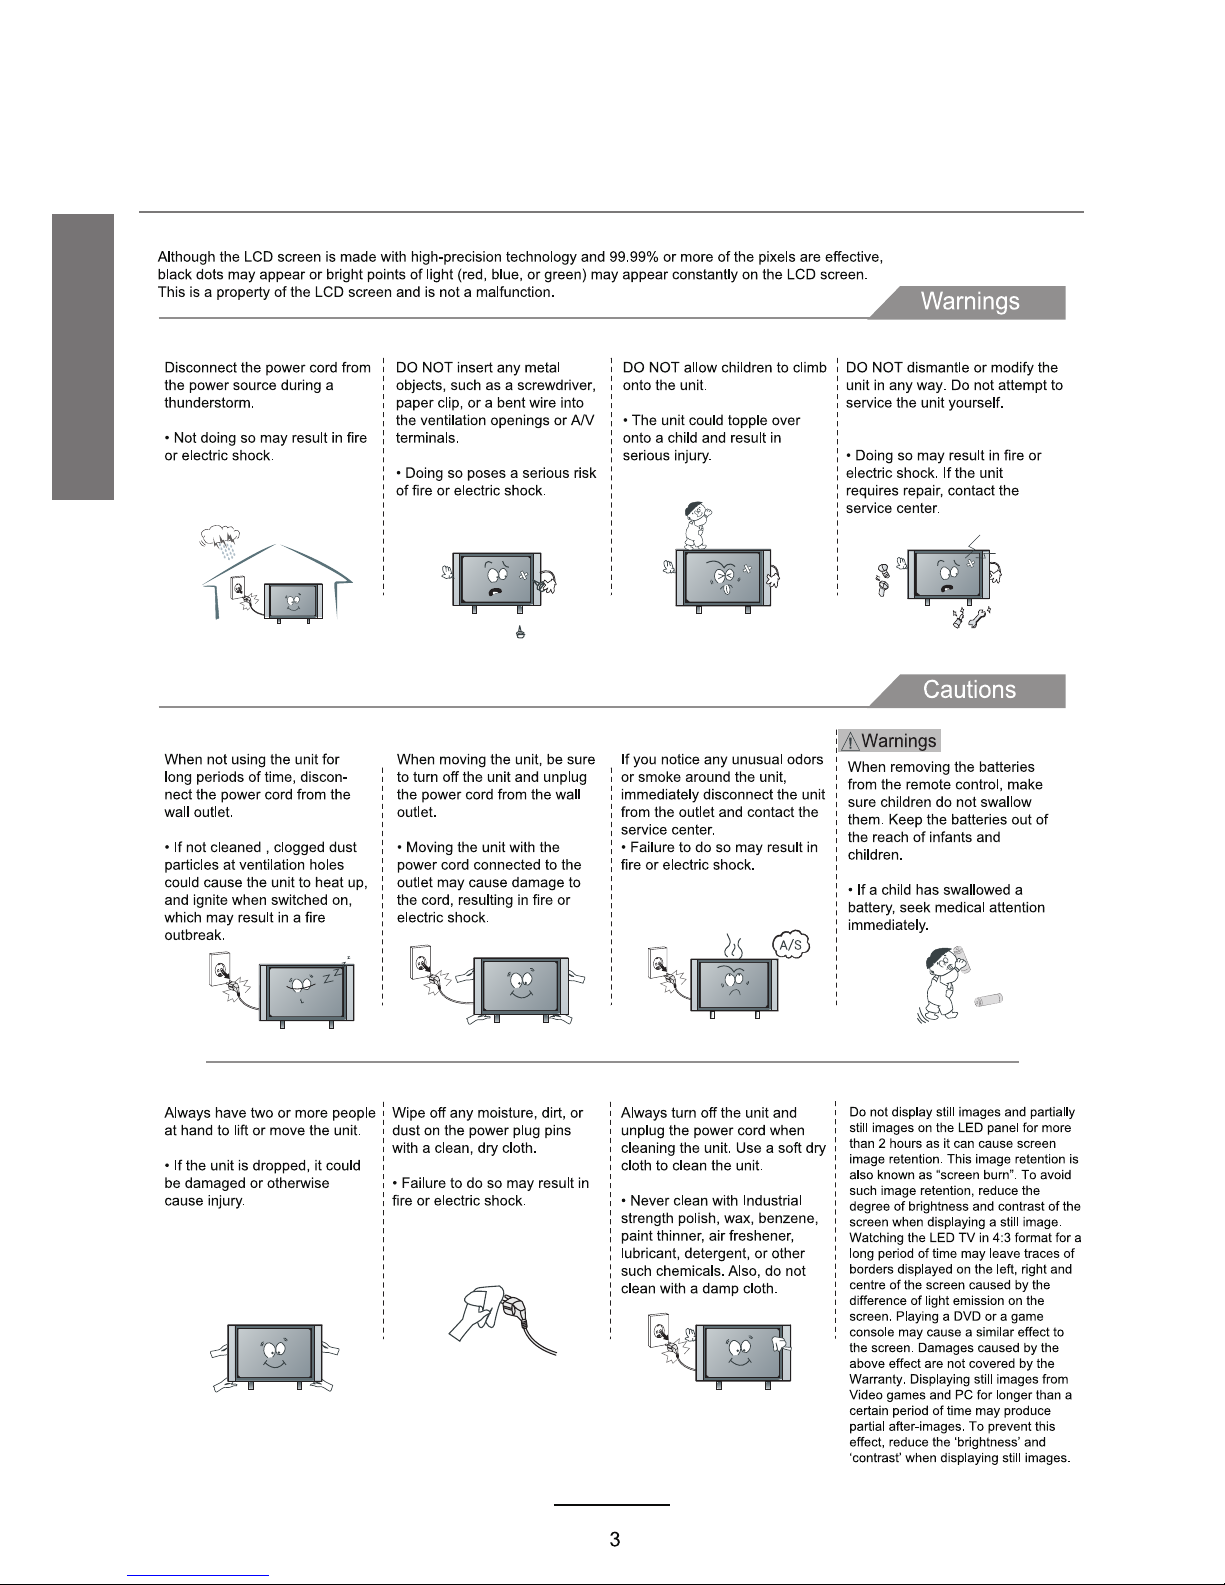
Use and Maintenance
Safety Precautions
Page 8
Do n o t bend the power plug excessively. Prevent th e cord from being walked
on o r pinched by weights placed on it.
Important Safety Instructions
Safety Precautions
Page 9
5
Important Safety Instructions
Safety Precautions
Page 10
4x16
4x16
4x14
4x14
For LCD3282FHD
For LCD4282FHD
Stand Installation
User Guidance Information
Page 11
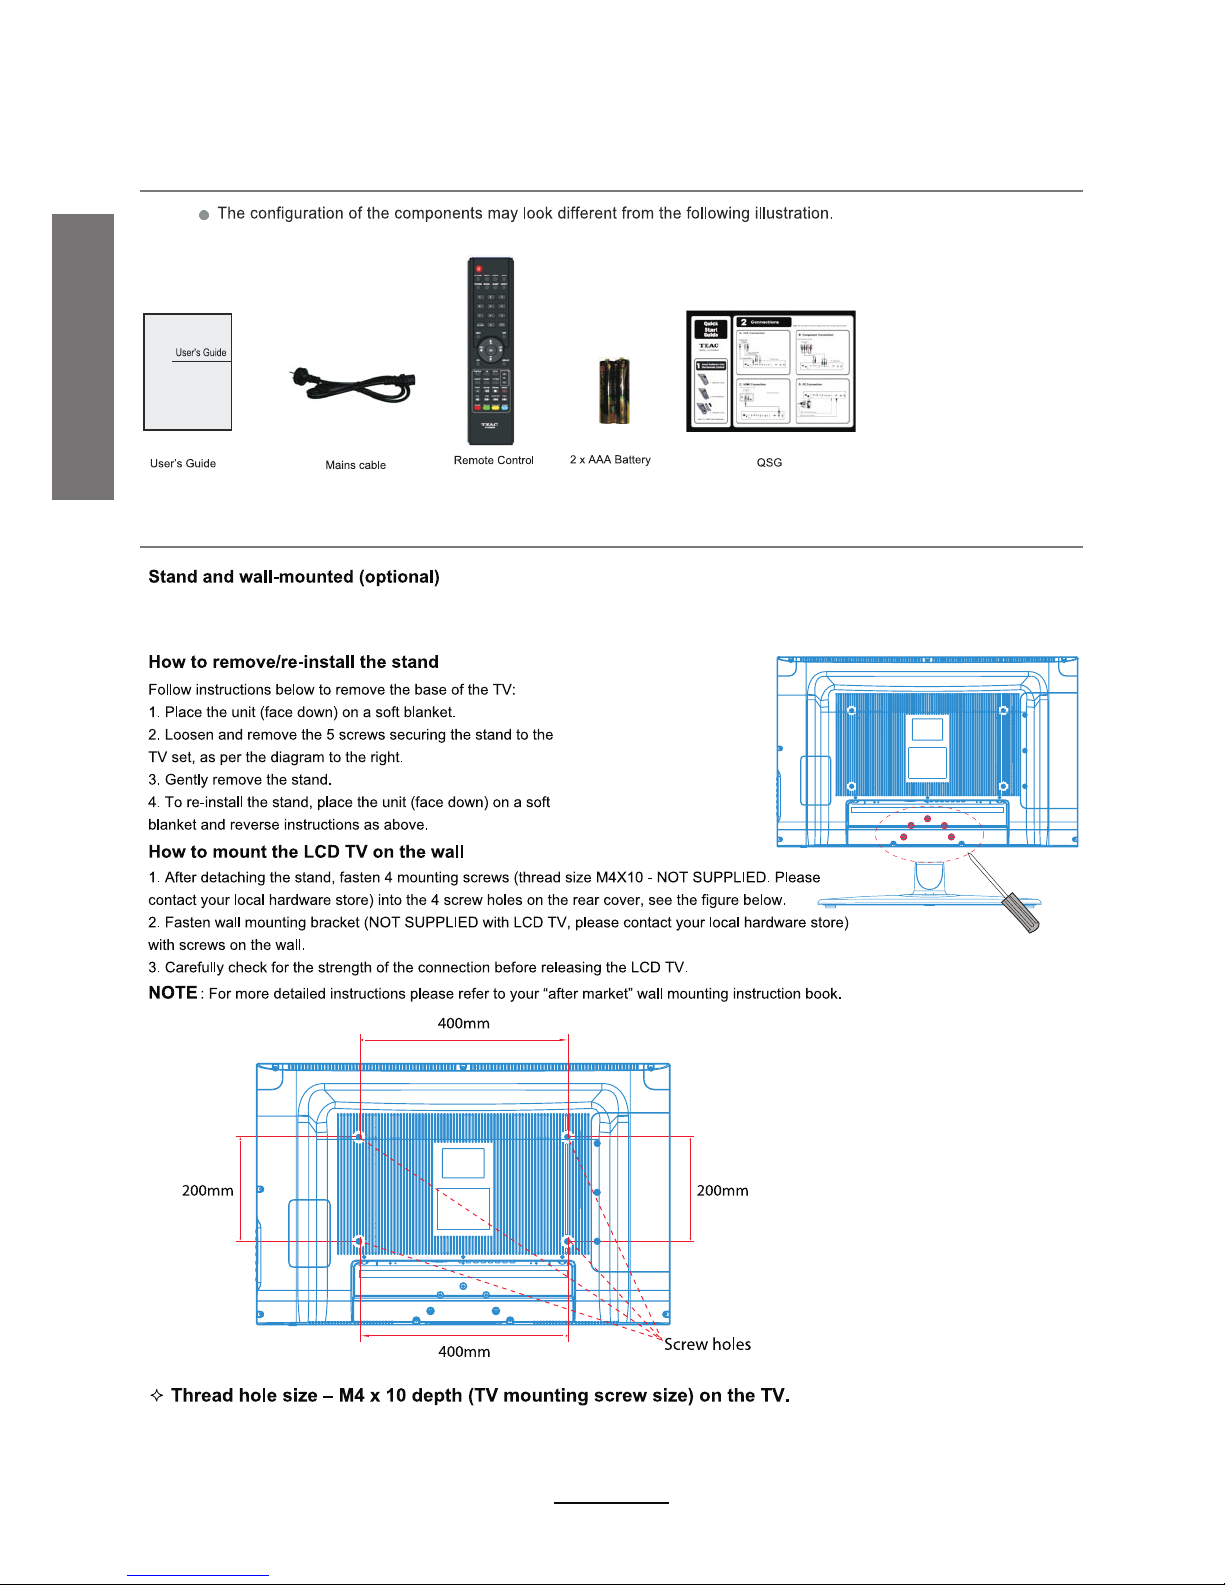
You r LCD T V is ab le to a cco mmod ate w all m oun ting w ith t he us e of a wa ll mou nt bracket (n ot su ppl ied w i th th is LC D TV, ple ase
co nta ct yo ur lo cal h ardware stor e) an d the m oun t ing h ole s (sc rew si ze M4 X10 ) on th e back o f the u nit .
We re comm end r emo vin g the T V s tan d pri or to m ount ing t he TV o n the w all. P lea se re fer t o the f igur es an d pro ced ure b elow.
Mounting Information
Accessories
User Guidance Information
7
Page 12
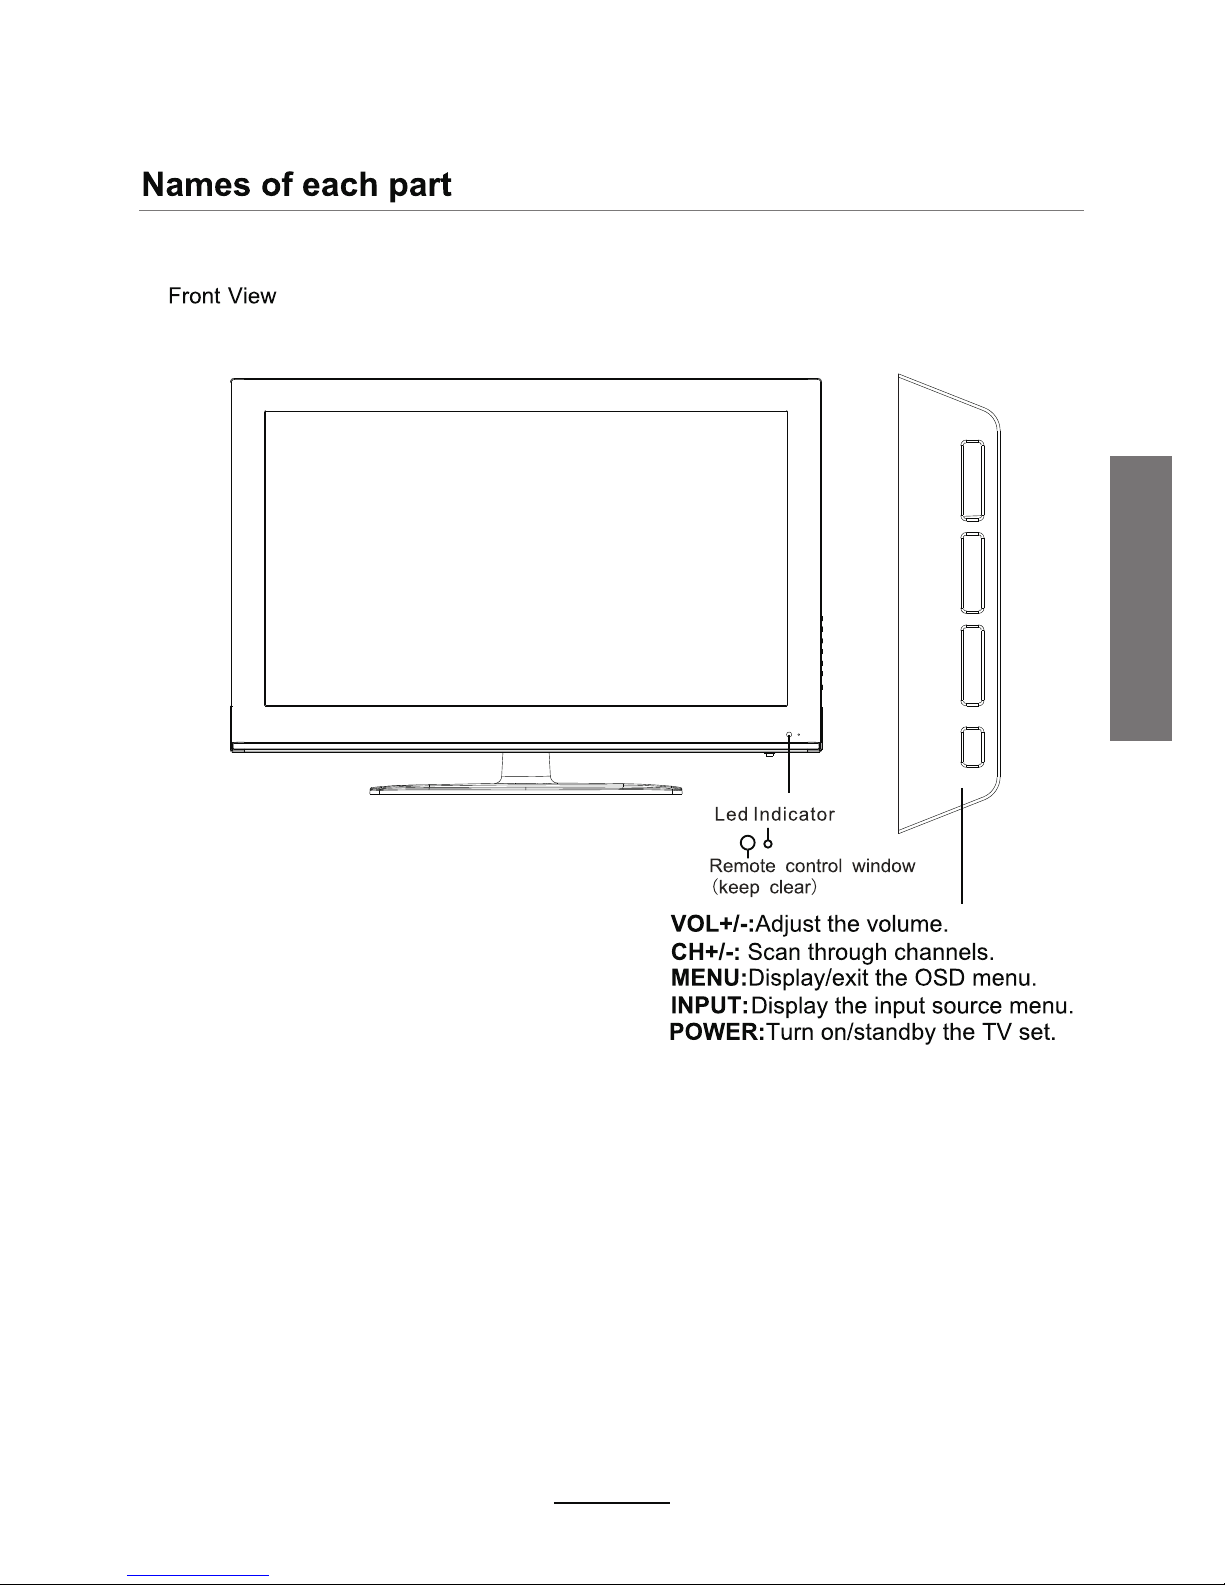
User Guidance Information
POW ERINP UT
MEN U
CH-
CH+VOL + VO L-
8
Page 13
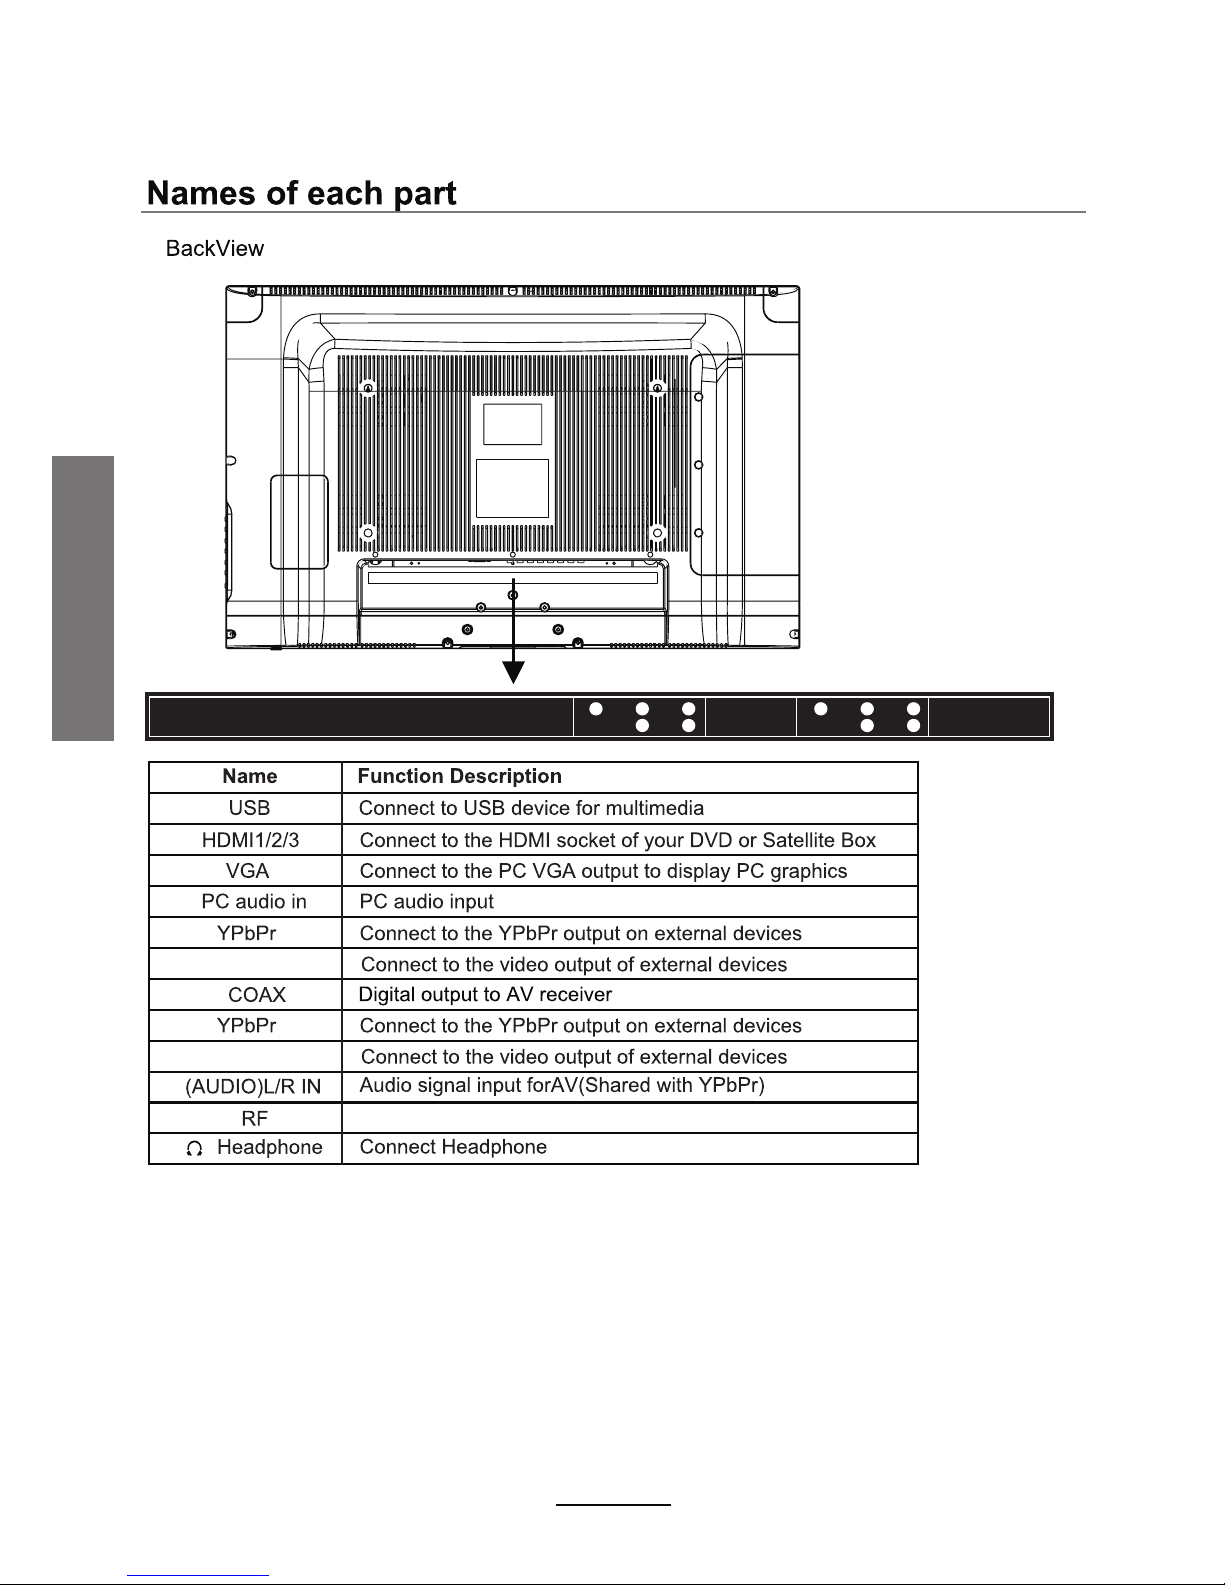
USB
HDM I 1
HDM I 2 VGA PC audio in Coax RF Headphone out
HDM I 3
Y1
Pb1
Pr1
AV1
R
L
Y2
Pb2
Pr2
AV2
R
L
1
AV1
2
AV2
Connec t to antenna or c able so urce
User Guidance Information
9
Page 14

Press number buttons to view
the channel.
Return t o the pr evious channel viewed .
INPUT: Display the input source/menu.
AUDIO: Select different audio languages, subject to availability from DTV/DVD.
MUTE: Press to mute the sound, press again or press VOL+ to unmute.
PICTURE: Press repeatedly to cycle through the available video picture modes.
SOUND: Press to cycle through the different sound settings.
SLEEP: Press repeatedly to scroll to preferred switch-off time.
Allows you to navigate through the on-screen menus and adjust the system settings
to your preference.
Show th e Ele ctronic P rog ramm e Gui de.
Press t o dis play the cu rrent mod e’s info rma tion.
favourite
1- While playing music, press this button to turn off LCDTV screen.
2- While in HDMI input, press this button to change between Video
and PC mode.
3- While in VGA (PC) input, press to auto-align screen.
User Guid ance Informat ion
10
Page 15

(REC): Press to start recording the programme in DTV mode.
Fast forward.
Shortcuts - follow the coloured links on the screen.
User Guid ance Informat ion
11
Page 16

Basic Operation
Basic Operation
12
Page 17

(Channel menu
Basic Operation
13
Page 18

OSD Menu
14
Page 19

OSD Menu
15
Page 20

Select the channel to delete and press the RED button. "Delete" will appear on the
right of the programme edit menu next to the channel. Press the RED button to
delete. If you decide not to continue with the deletion, press the menu button to
quit.
Select the channel to be moved and press the YELLOW button. Use buttons
to change the channel position, then press the YELLOW button again to confirm. Press
the menu button to save and exit.
the CH+/-
Select a channel, then press the FAV button to set or delete it as a favourite channel.
16
OSD Menu
Page 21

Picture display settings can be altered ac cording to the user's desired se ttings.
:
Press the OK button to enter the submenu and adj ust the fol lowing
picture settings: Horizonal /Vertica l position, Size and Phase.
s
OSD Menu
17
Page 22

:
Adjust the balance of the left and right soundtrack, or turn off the volume of the
left and right soundtrack.
between
OSD Menu
18
Page 23

Off Time: Press the OK button to enter the submenu and set the time and frequency for
the TV to turn off automatically.
On Time: Press the OK button to enter the submenu and set the time and frequency for
the TV to turn on automatically, as well as the desired volume and channel.
To activate the automatic standby function.
OSD Menu
19
Page 24

OSD Menu
Software Update (OAD)
Your LCD TV has been tuned for o ptimum pe rformance, however from time to time we may
choose to update the unit software to improv e the LCD TV performance. Turning on this op tion
will allow the LCD TV to automatically det ect and pop up a message if new software is avail able
for download. Alternatively, softwar e can also ben downloaded from the TEAC web site to
upgrade via the USB socket in the bac k of the LCD TV.
20
Page 25

OSD Menu
21
Page 26

Press the INPUT button to display the input source menu. Use the </> buttons to select "USB
source" and press OK to enter the Multimedia menu (shown below).
Press the </> buttons to select the type of media to be played from the USB device: PHOTO, MUSIC,
MOVIE or TEXT. Press the Λ/V buttons to select the device and confirm by pressing the OK button.
Multimedia Operation
22
Page 27

To access photo, audio, video or text files from an external drive, the right input has to be accessed
by pressing the INPUT button to select from a range of choices.
YELLOW
GREEN
Display the playlist on the scree n. You can select photos with the Λ/V buttons and press
the OK butto n to select. Press the </> buttons to return to the options menu.
Move aro und the photo i n Zoom In m ode.
To play audio files, select individual files to be added to the playlist, or select all files wby pressing
the GREEN button. Once the desired files are selected, press the Play button.
Multimedia Operation
23
Page 28

Press the </> buttons to select the menu optio ns, and the O K button to c onfirm.
Press the Λ/V buttons to search through music, and the OK buttons to s elect.
Stay music playback from a specific time int o the track .
Press the OK button to select this option, then input the e xact time from where to start
playing from.
YELLOW
GREEN
option on the menu, then press the OK button
Multimedia Operation
24
Page 29

Select and play from point A to point B in the program in a loop. There will be a symbol on the left
of the screen during this playback. Press the OK button again to cancel.
on
Move around the
vi ew text
YELLOW
GREEN
To exit multimedia mode and
Multimedia Operation
25
Page 30

Support ed Formats:
The max bitrate is 6Mbps. The max resoluti on is 720x576 pixels.
Mono colour, 16-colour, 256-colour, 16-bit, 24-bit, 32-bit. The max resolution is
3000x3000 pixels; min resolution is 100x100 pixels.
Special note:
1. the Media Unit can only support USB memory de vices, su ch as hard disk drives and
flash drives, and will not suppor t multime dia devices such as mobile phone s and camer as
for recording purposes.
2. Unit will only support hard disk drives wit h additio nal power supply, maximum disk
partition size of 400GB and a maximum capacity of 1.5TB. For optimum performance, it
is highly recommended that a hard d isk drive w ith an external power supply be used for
larger capacities.
3. The maximum number of files that each folder can con tain is 500 0 files.
5. When using external USB, it is suggested th at high qua lity USB ex tension cables
(supported 480mHz) be used to ens ure smoot h playing of video files.
6. The television unit can only support au dio formats of single and binary channels .
Multimedia Operation
26
Page 31

DVR will only record whe n there is an e xternal USB drive with sufficient mem ory available
connected to the unit. Recording can be done b oth manually on demand or using
Scheduled Recordin g.
This may damage your storage devi ce.
Before recording starts,
s
Recording Operation
27
Page 32

k
Recording Operation
28
Page 33

Press the OK button
message;
'PASS ' w ill be displ ayed.
'FAI L' w ill be displ ayed.
Choose the file system type:
'FAT32 ' is best for High Speed USB
storage devices
'High Speed FS' is best for Low Speed
USB storage devices
Note:
1- After formatting into 'FAT32' file system,
you will sti ll be able to store and share other
media file s on the same U SB storage device.
2- Storage devices formatted into 'High
Speed FS' file system can only be us ed for
video recording on this unit. You will not
be able to sto re other me dia files o n the
same storage device.
After formatting the USB storage device into a 'FAT32' file syst em, Time Shift cannot be altered.
During 'DVR File System Check' th e display will show that the whole U SB storag e device space
will be used tor Time Shift recordin g. However, Scheduled and Manua l Recording will still take
priority on storage space usage .
Recording Operation
29
Page 34

Recording will stop
pressi ng the OK butto n
Recording Operation
30
Page 35

RECORDING IN STANDBY MODE
NOTE:
·You can display or minimize th e Time shift menu by pressing the
EXIT butto n.
·Press the STOP button to exit the Time shift mode.
·Press the PLAY button to play the Time shi fted prog ram.
Recording Operation
31
Page 36

Press the INDEX button
Press the OK button
The TV will record the program automatically according to the
set time.
press the MENU button. Under the CHANNEL tab, scroll down to the Schedule
List, then press OK to view the recording schedule.
program to be recorded .
to
The program
schedule for the
current channel.
to
Information on
allprograms playing
on different
channels.
Recording Operation
e
e
32
Page 37

This unit is able to hold
scheduled
delete existing scheduled rec ordings to set up new schedules.
MENU
LIST
Displays the Recorded List menu and program
options.
RED
on
Recording Operation
33
Page 38

Picture appears too slowly after
power is turned on.
the TV has to run a number of diagnostic and
software checks before it can display any broadcast channels.
The picture should appear in approximately 15 seconds.
Perform Brightness or Contrast adjustments.
Stripes appear on the screen
and it shakes.
Keep any appliances that emit magnetic radiation away from
the TV.
Press the PAUSE button. Check if the PAUSE button is pressed
on external equipment.
after you have done the above, contact your dealer or an
authorized service centre.
3. Check for and remove any obstacles existing between the
LCD TV and the remote control.
with
.
.
.
.
Maintenance and Service
34
Page 39

35
LCD3282FHD LCD4282FHD
32" Diagonal (max.) 42" Diagonal (max.)
~
1
120W 250W
793×245.6×562mm
793×104×513mm
1049×292×727mm
1049×119×668mm
11kg
20.5kg
Maintenance and Service
Maximum CapacityUSB Drive
CCFL
576P,72 0P,1080I,1 080P
VESA
Page 40

36
Suppor ted Formats :
The max bitrate is 6Mbps. The max resolution is 720x576 pixels.
Mono colour, 16-colour, 256-colour, 16-bit, 24-bit, 32-bit. The max resolution is
3000x3000 pixels; min resolution is 100x100 pixels.
Maintenance and Service
Page 41

TEAC CUSTOMER SUPPORT HOTLINE (TCS)
1300 553 315
Between Monday to Friday – AEST 8.30AM to 6PM
 Loading...