


LCD2639HDLCD2639HD
LCD Digital TVLCD Digital TV


1
7
8
7
6
6
8
9
9
SOUN D MENU
PICT URE MENU
TIME M ENU
LOCK M ENU
CHAN NEL MENU
EPG an d Channel Lis t MENU
INPU T SOUR CE
15
20
21
23
22
25
18
27
26
15
Mult imedia(US B) MENU
33
DVR ME NU
OPTI ON MENU
Remo te control in struction s in TV mo de
Remo te control in struction s in DTV/USB mo de
Remo te control se tup
Remo te control in struction s in TEL ETEXT mode
10
14
11
12
Remo te control in struction s in DVD mode
13
INST ALLATION GU IDE
2
2
5
4
SAFE TY
PREC AUTIONS
SAFE TY
PREC AUTIONS
PREFA CEPREFA CE
FRON T BACK
CONN ECTIONS
OF LCD
FRON T BACK
CONN ECTIONS
OF LCD
44
55
REMO TE CONTROLREMO TE CONTROL
66
BASI CA
INST ALL TION
BASI C
INST ALLATION
IN THE CARTONIN THE CARTON
77
MENU
OPER ATION
MENU
OPER ATION
SPEC IFICATIONSSPEC IFICATIONS
99
88
TROUBLE SH OOTING
AND ADVICE
TROUBLE SH OOTING
AND ADVICE
39
40
11
22
33
Powe r Cord Connec tion
YPbP r Connectio n
HDMI C onnection
Anten nas Connect ion
AV Connecti on
COAX C onnection
VGA( P C) Connecti on
USB PO RT FUNCT ION
1 PREFACE. 1. PREFACE
2 SAFETY PRECAUTIONS. 2. SAFETY PRECAUTIONS
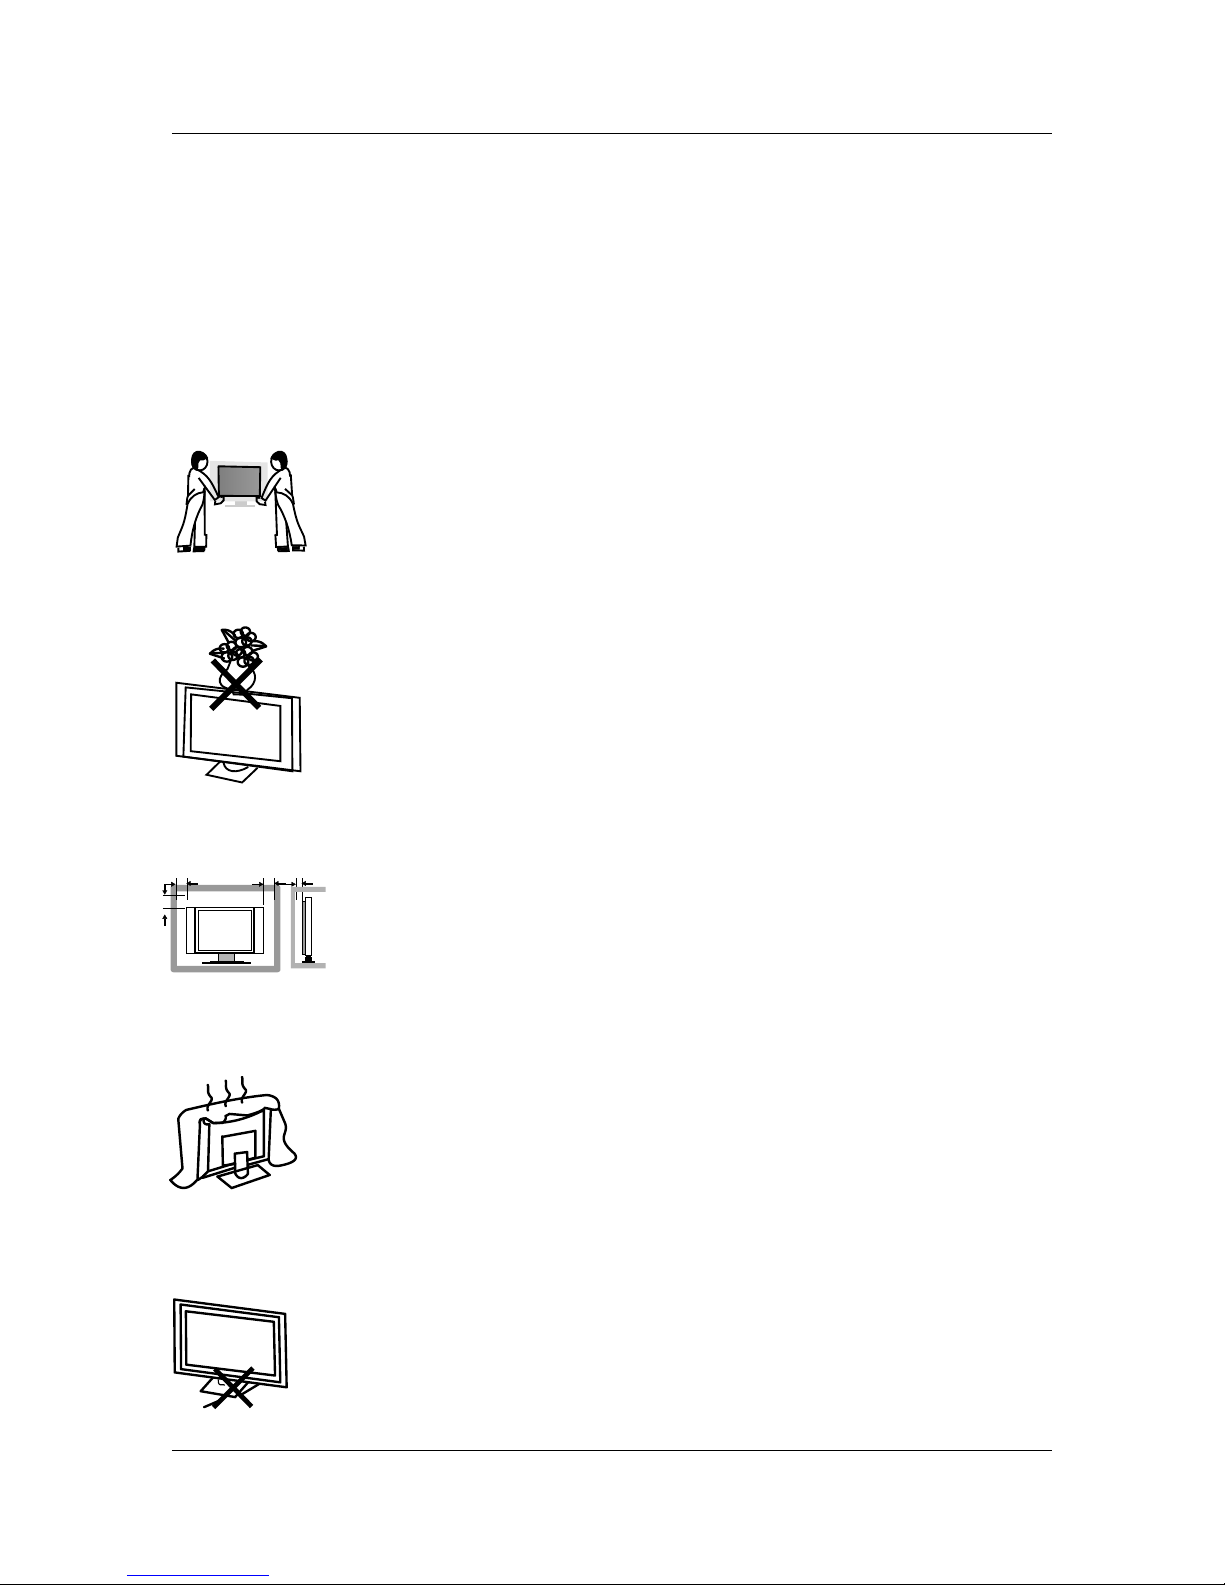
Powe r cord and cabl es must be prop erly routed a nd protecte d to prevent
peop le from stepp ing on them and c ausing the TV to fall.
Min imum dis tance s
10c m
20c m
10c m 5cm
Put th e TV on a st able surfac e.
Do not p lace any mate rial on the TV.
Do not b lock or cover t he ventilat ion opening s on the TV.
Do not u se the TV with fi xtures othe r than those pr ovided or
sugg ested by the ma nufacture r.
2
Than k you for Choos ing this TEAC produ ct. Before op erating the TV, please read an d follow all
inst ructions an d heed all warn ing.
Plea se keep these i nstructio ns for future r eference.
Plea se note the dia grams in this m anual are for r eference on ly, you r unit may differ sli ghtly.
Keep t he TV away from h eat sources .
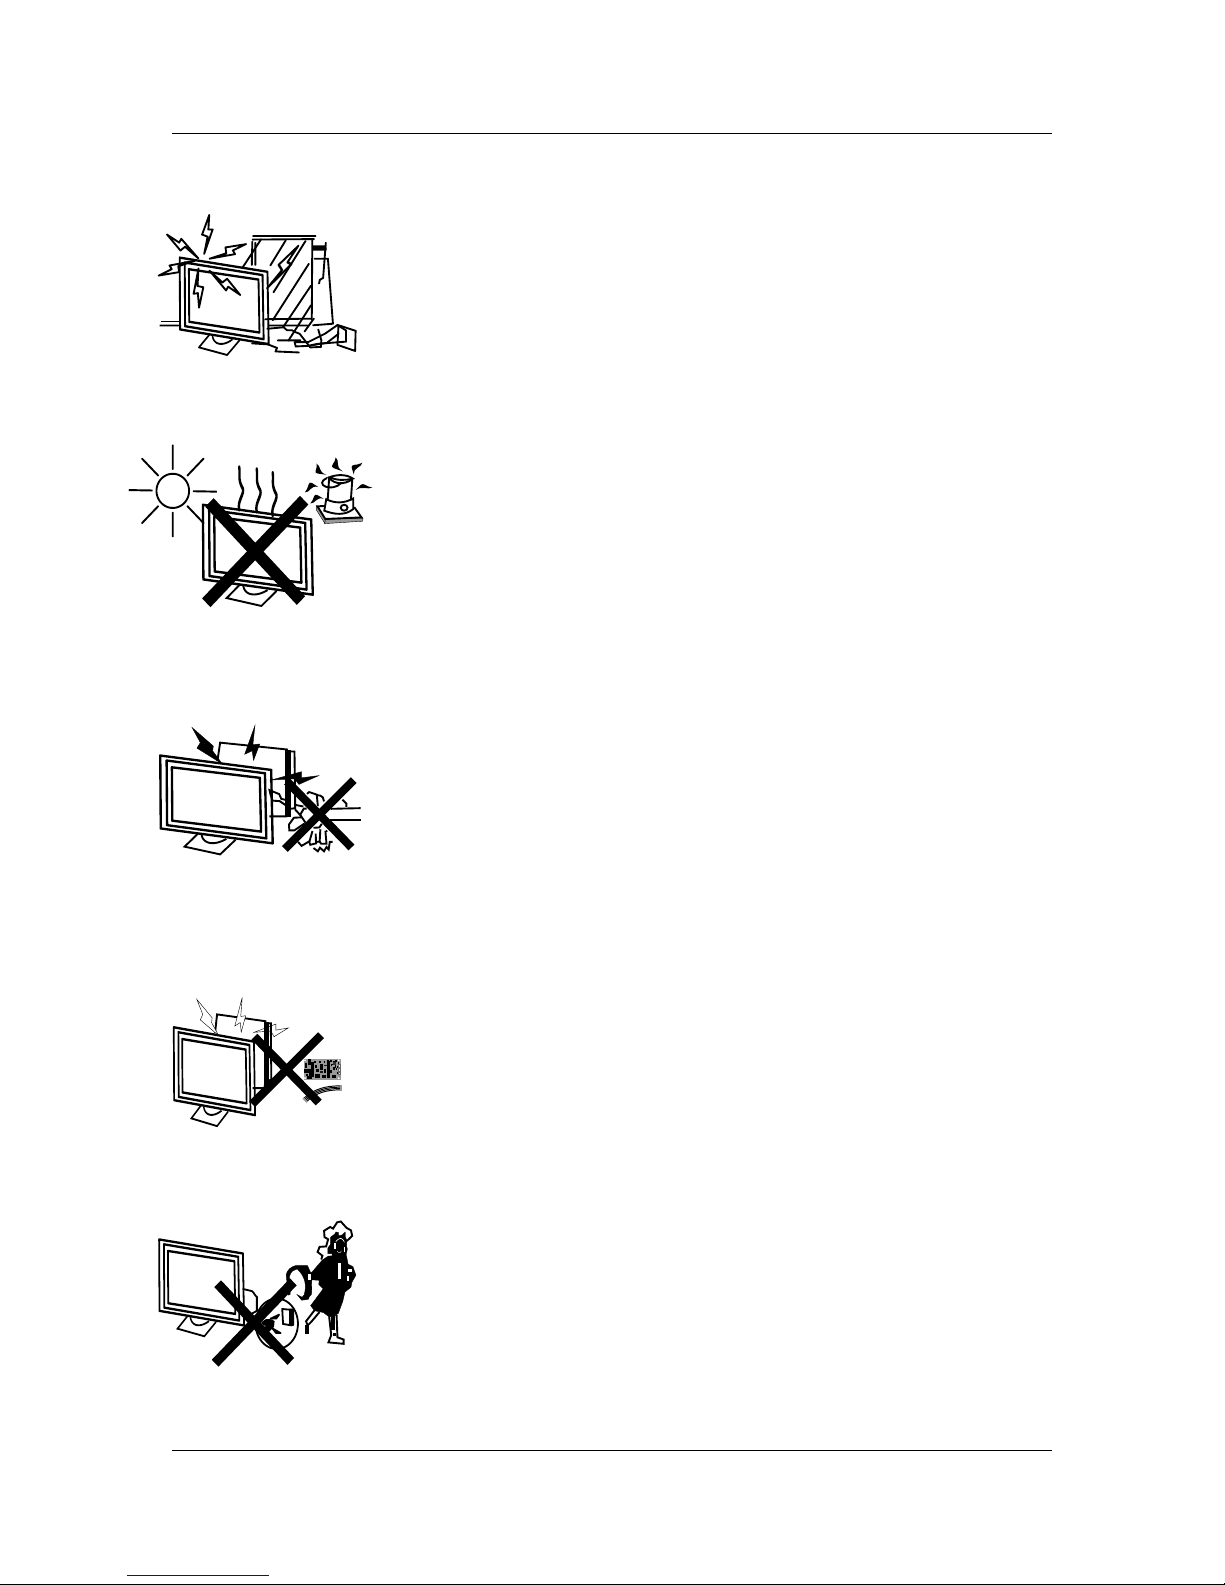
Unpl ug the TV before cleaning it. Do not use solvent or liquid to clean
the TV.
Only c lean the TV with a soft and dry cloth.
Unpl ug the TV during lightning storms or when unu sed for long pe riods
of tim e.
3
Keep t he TV dr y and away from h umidity.
Do not s ubject the TV to drip ping liquid s or moist envi ronments.
Do not p lace any vess els contain ing liquids o n or near the TV such as
vase s,cups, etc .
If the f ollowing pr oblems occu r,turn off the TV set and unpl ug the AC power
cord i mmediatel y:
- AC powe r cord is damag ed.
- Poor f itting AC powe r outlet.
- TV set is dama ged by being dr opped, hit or h aving somet hing thrown a t it.
- Any liq uid or solid ob ject has fall en through th e openings in t he cabinet.
NEVE R attempt to re pair the unit y ourself. Co ntact your dealer or the
TEAC C ustomer Car e Centre (see b ack page for de tails) to have your
unit c hecked and re paired by app roved servi ce personne l.

3 . IN THE CARTON. IN THE CARTON
Remote ControlRemote ControlLCD TV SETLCD TV SET
2 x AAA Battery2 x AAA Battery
1.5V
1
.5
V
4
Power CablePower Cable
Quick Start Guid eQuick Start Guid e
User ManualUser Manual
Quick Start GuideQuick Start Guide
User ManualUser Manual
Plea se make sure th e following i tems are incl uded in your pa ckage.
If any i tems are miss ing, please c ontact your d ealer.
4 FRONT, BACK, CONNECTIONS OF L D. C 4. FRONT, BACK, CONNECTIONS OF LCD
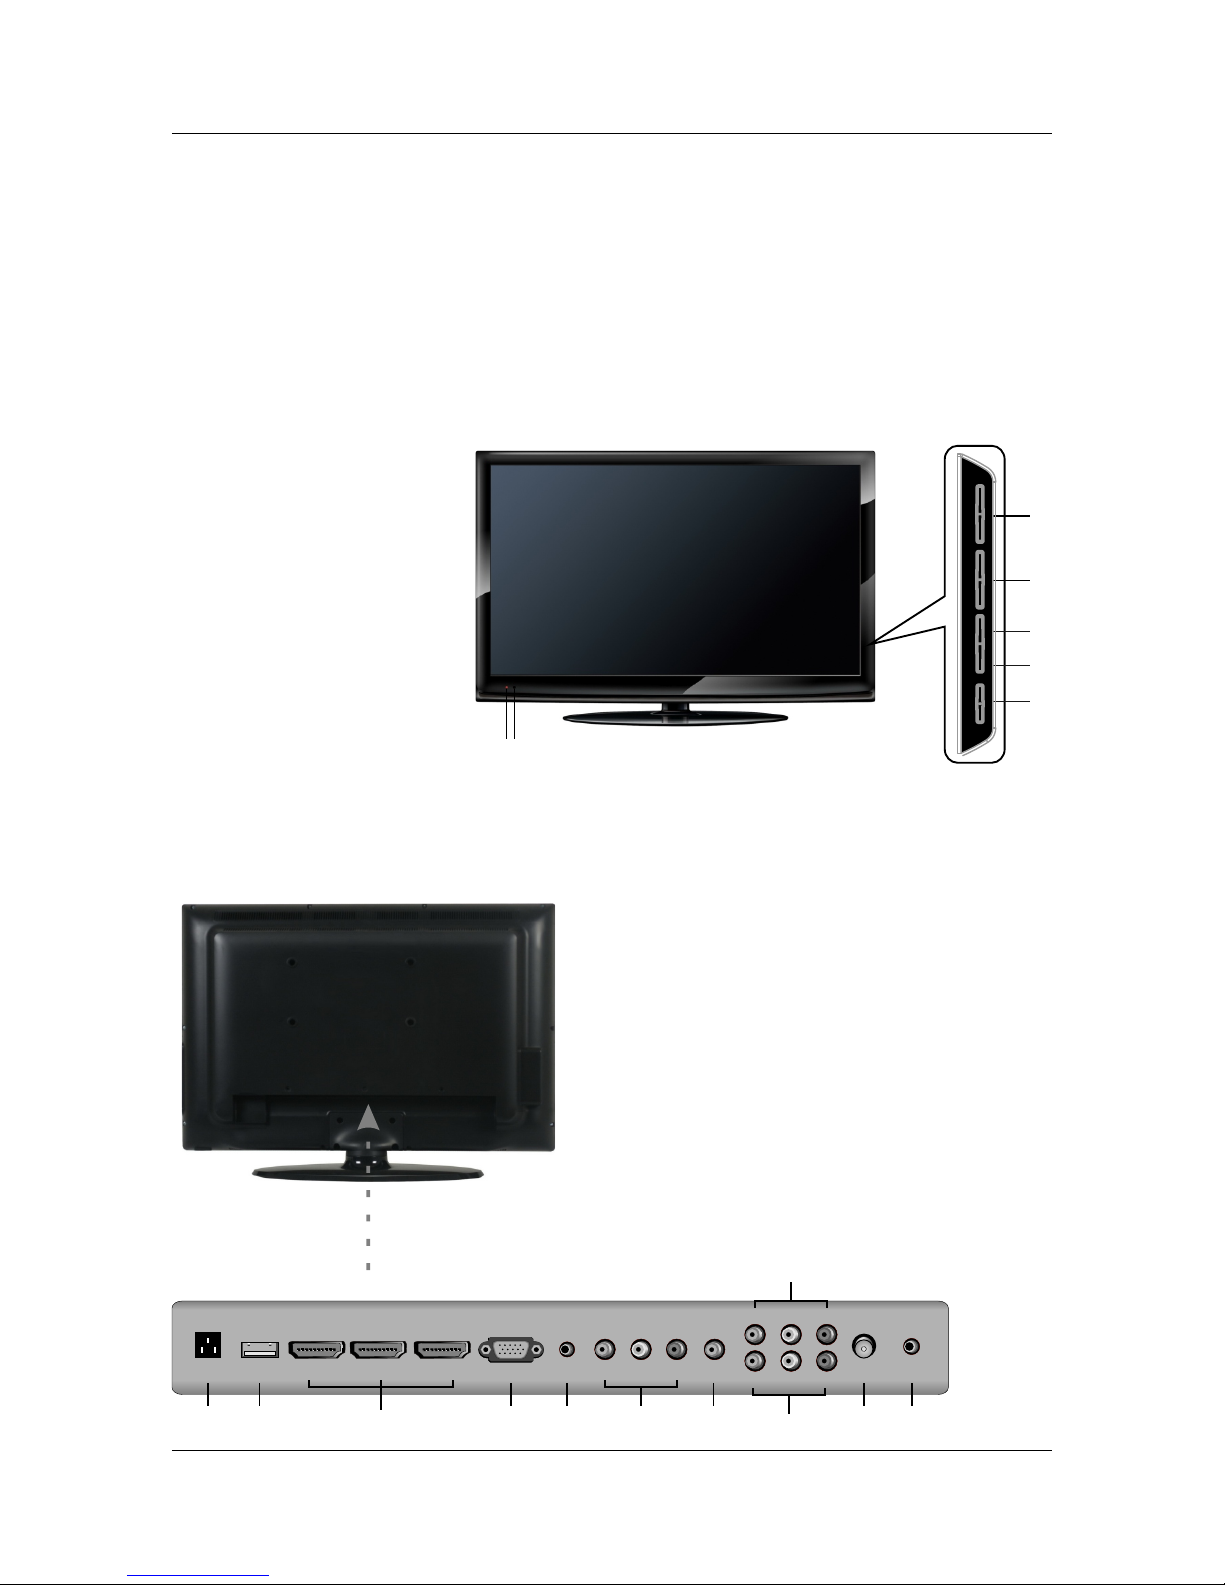
Front View
Back View and Control Connections
5
2
1
4
3
VOL + VOL - CH+ CH-
MENU
INPU T POWE R
6
7
5
1. Pre ss“VOL+/VOL -”to increase o r decrease th e sound level .
2. Pre ss“CH+/CH-”to s can through c hannels.
3. Pre ss “MENU”to brin g up the main men u on the screen .
4. Pre ss“INPUT”to sel ect the input s ource.
5. POWE R on or off.
6. POW ER INDICATO R: show red in st andby mode, s how green or bl ue when your TV i s switched on .
7. REM OTE SENSOR: i nfrared sen sor for the rem ote control .
Pres s“ ” butt on to turn the TV
1. AC IN: Main power input.
2. USB : Connect to the External drive.
3. HDMI1 HDMI2 HDMI3: Connect to the HDMI output jack
.
4. VGA(PC): Connect to the PC-RGB output jack of PC.
5. PC AUDIO : Connect the Audio output jack of PC.
6. YPbPr1/YPbPr2: Connect the YPbPr output jack of DVD
or VCR.
7. COAX: Connect the SPDIF receiver.
8. VIDEO Audio L R : Connect to the Video output jack
of DVD or VCR.
9. RF IN: Connect the antenna.
10. PHONE: Connect the headphone.
PORT
/ /
of DVD
/ ( / ) /Audio
2
3
VGA (PC)VGA (PC)
USBUSB
HDM I1HDM I1 HD MI2HD MI2
HDM I3HDM I3
PC
AUDIOPCAUDIO
CO XA
CO XA
PHO NEPHO NE
RF IN RF IN
4
5
8 9
Pb1Pb1
Pr1Pr1
Y1Y 1
Pb2Pb2
Pr2Pr2
Y2Y 2
LL RR
VID EOVID EO
AC INAC I N
1
6
7
6
10
75 OHM
ANTEN NA
PLUG
POWER P LUG OF
ANTEN NA
AMPLI FIER
OUTDO OR
ANTEN NA
AMPLI FIER
VHF ANT ENNA UHF ANT ENNA
INDOO R
ANTEN NA
AMPLI FIER
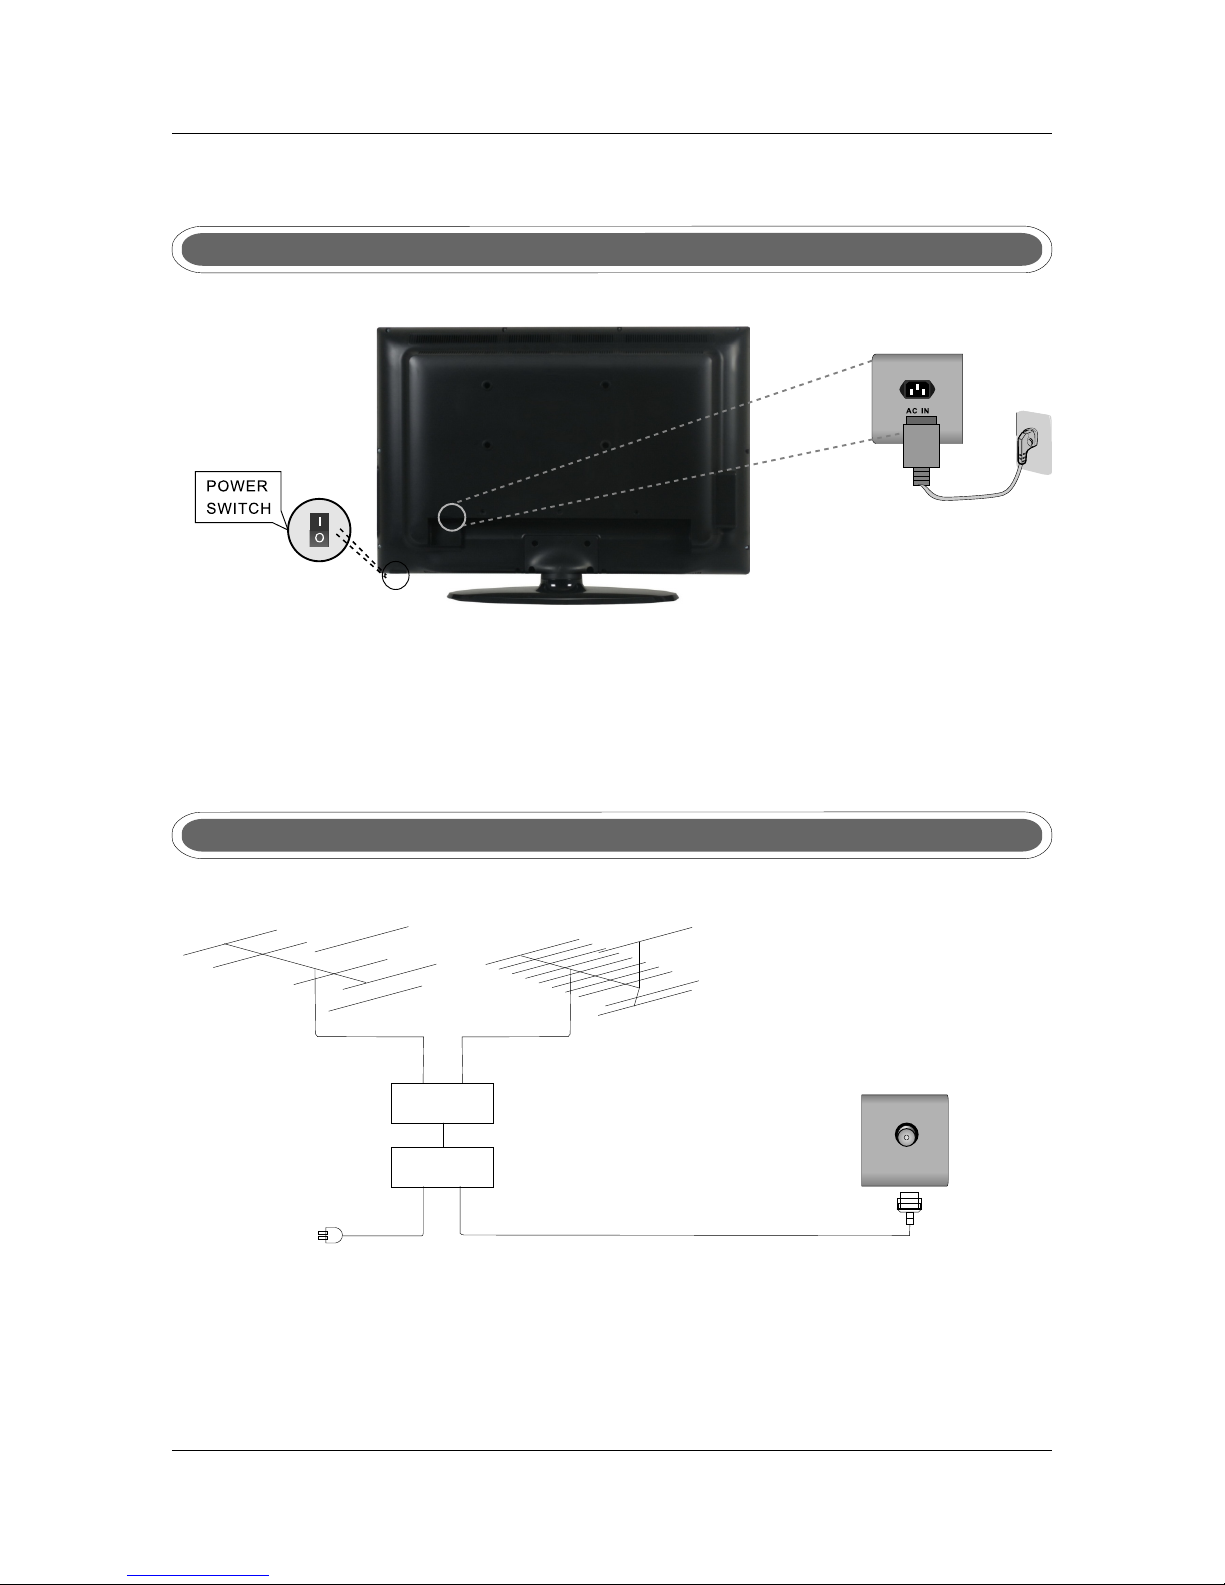
To ensure good picture and sound, TV antenna system needs to be installed. The antenna system as
Shown can be sourced from TV equipment shops, which wi ll provide service for correct installation
and connection. After installation, insert the 75-ohm antenna plug into the antenna jack as shown.
5. BASIC A INSTALL TION
Power Cord Connection
Antennas Connection
- Connect the p ower cord correctly as shown.
- Pres s t he POWE R s witc h o f y our LCD TV to s w itch on th e L CD TV. The power in dica tor
on the fr ont pan el ligh t s u p in red.
RF IN
6
On
Off
VGA (PC)VGA (PC)
USBUSB
HDM I1HDM I1 HD MI2HD MI2
HDM I3HDM I3
PC
AUDIO
PC
AUDIO
CO
AXCO
AX
PHO NEPHO NE
RF IN RF IN
Pb1Pb1
Pr1Pr1
Y1Y 1
Pb2Pb2
Pr2Pr2
Y2Y 2
LL RR
VID EOVID EO
VGA (PC)VGA (PC)
USBUSB
HDM I1HDM I1 HD MI2HD MI2
HDM I3HDM I3
PC
AUDIOPCAUDIO
C
O
A
X
C
O
A
X
PHO NEPHO NE
RF IN RF IN
Pb1Pb1
Pr1Pr1
Y1Y 1
Pb2Pb2
Pr2Pr2
Y2Y 2
LL RR
VID EOVID EO
Audio Cab leAudio Cab le
AUD IOAUDIORGB -PC OUT PUTRGB -PC OUT PUT
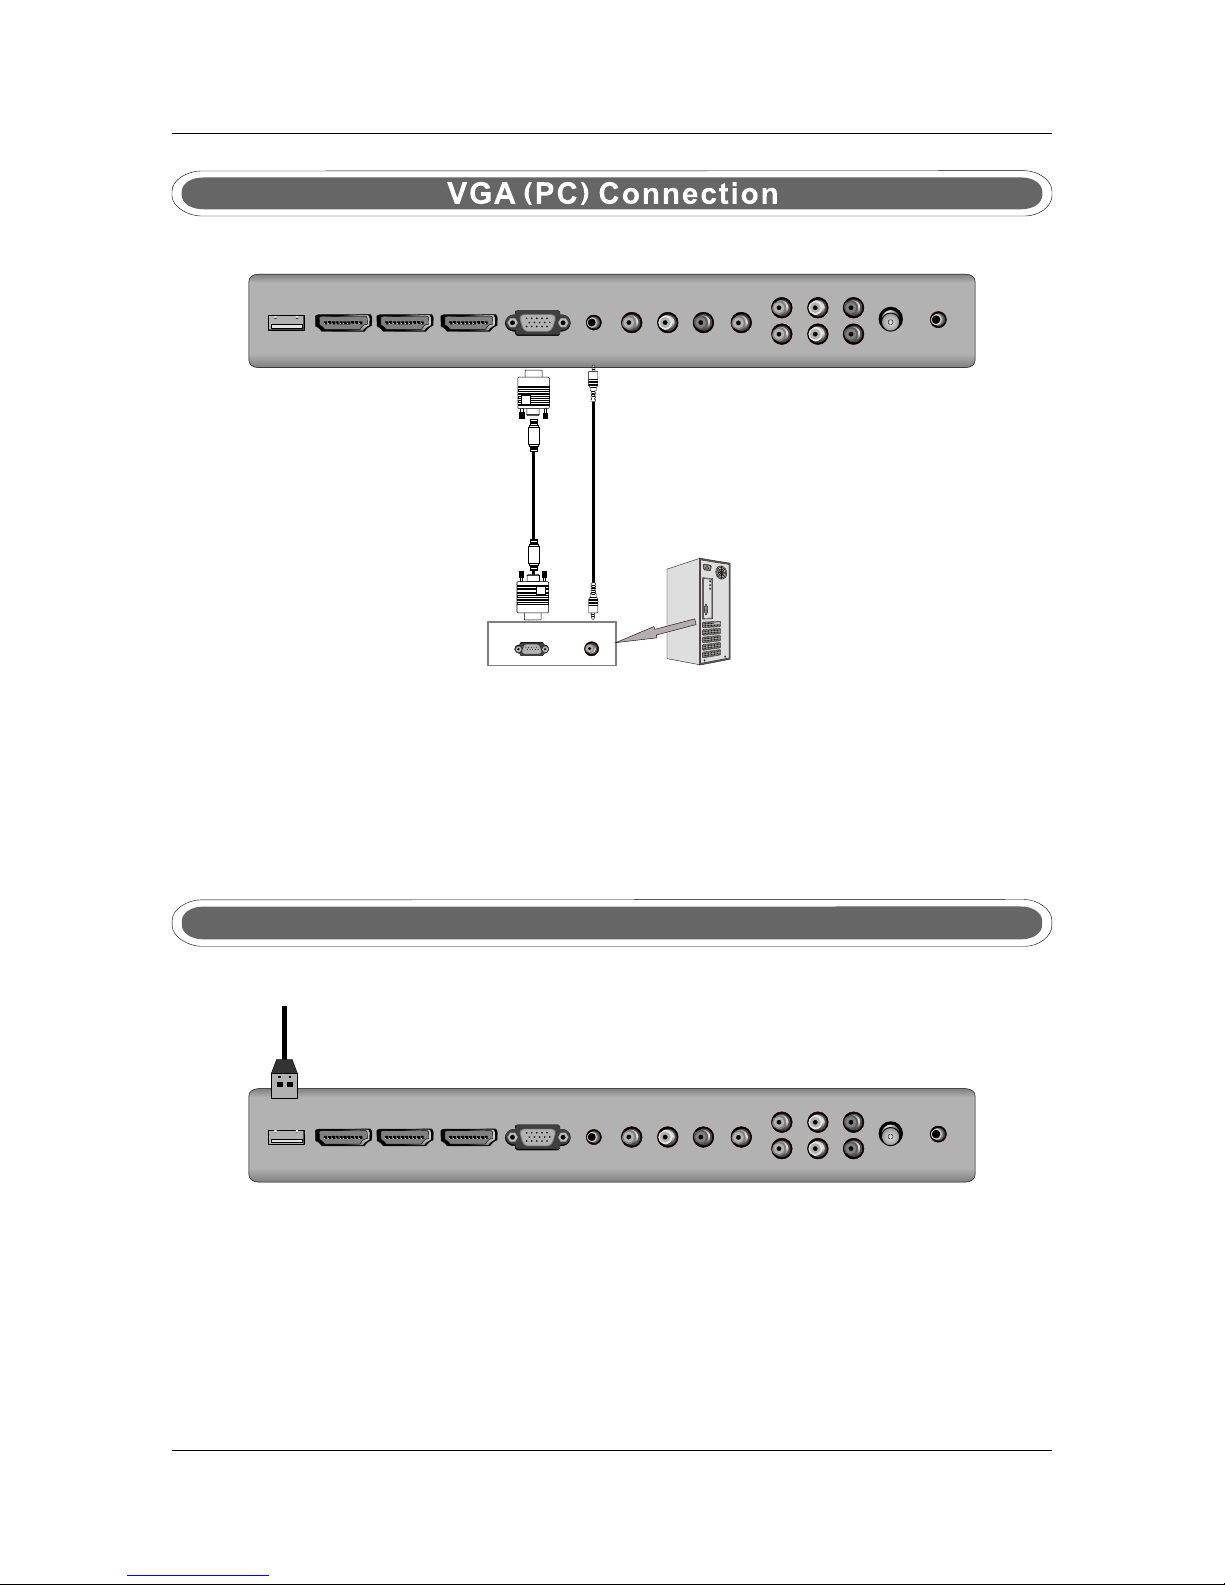
Co nnect the RGB out put of t he VGA to th e PC IN ja ck on th e set. C onn ect th e AUDIO o utp ut of th e
PC to the PC AUDIO jack o n th e set . Select the VGA input source wit h using SOURCE button on the
remote con trol.
7
TV BackTV Back
VGA CableVGA Cable
USB PORT FUNCTION
USB PORTUSB PORT
Put th e USB flash dri ve to the USB por t, Select USB c hannel sour ce with using t he SOURCE
butt on on the remot e control.
TV BackTV Back
VGA (PC)VGA (PC)
USBUSB
HDM I1HDM I1 HD MI2HD MI2
HDM I3HDM I3
PC
AUDIO
PC
AUDIO
C
OA
X
C
OA
X
PHO NEPHO NE
RF IN RF IN
Pb1Pb1
Pr1Pr1
Y1Y 1
Pb2Pb2
Pr2Pr2
Y2Y 2
LL RR
VID EOVID EO
VGA (PC)VGA (PC)
USBUSB
HDM I1HDM I1 HD MI2HD MI2
HDM I3HDM I3
PC
AUDIOPCAUDIO
COA XCOA X
PHO NEPHO NE
RF IN RF IN
Pb1Pb1
Pr1Pr1
Y1Y 1
Pb2Pb2
Pr2Pr2
Y2Y 2
LL RR
VID EOVID EO
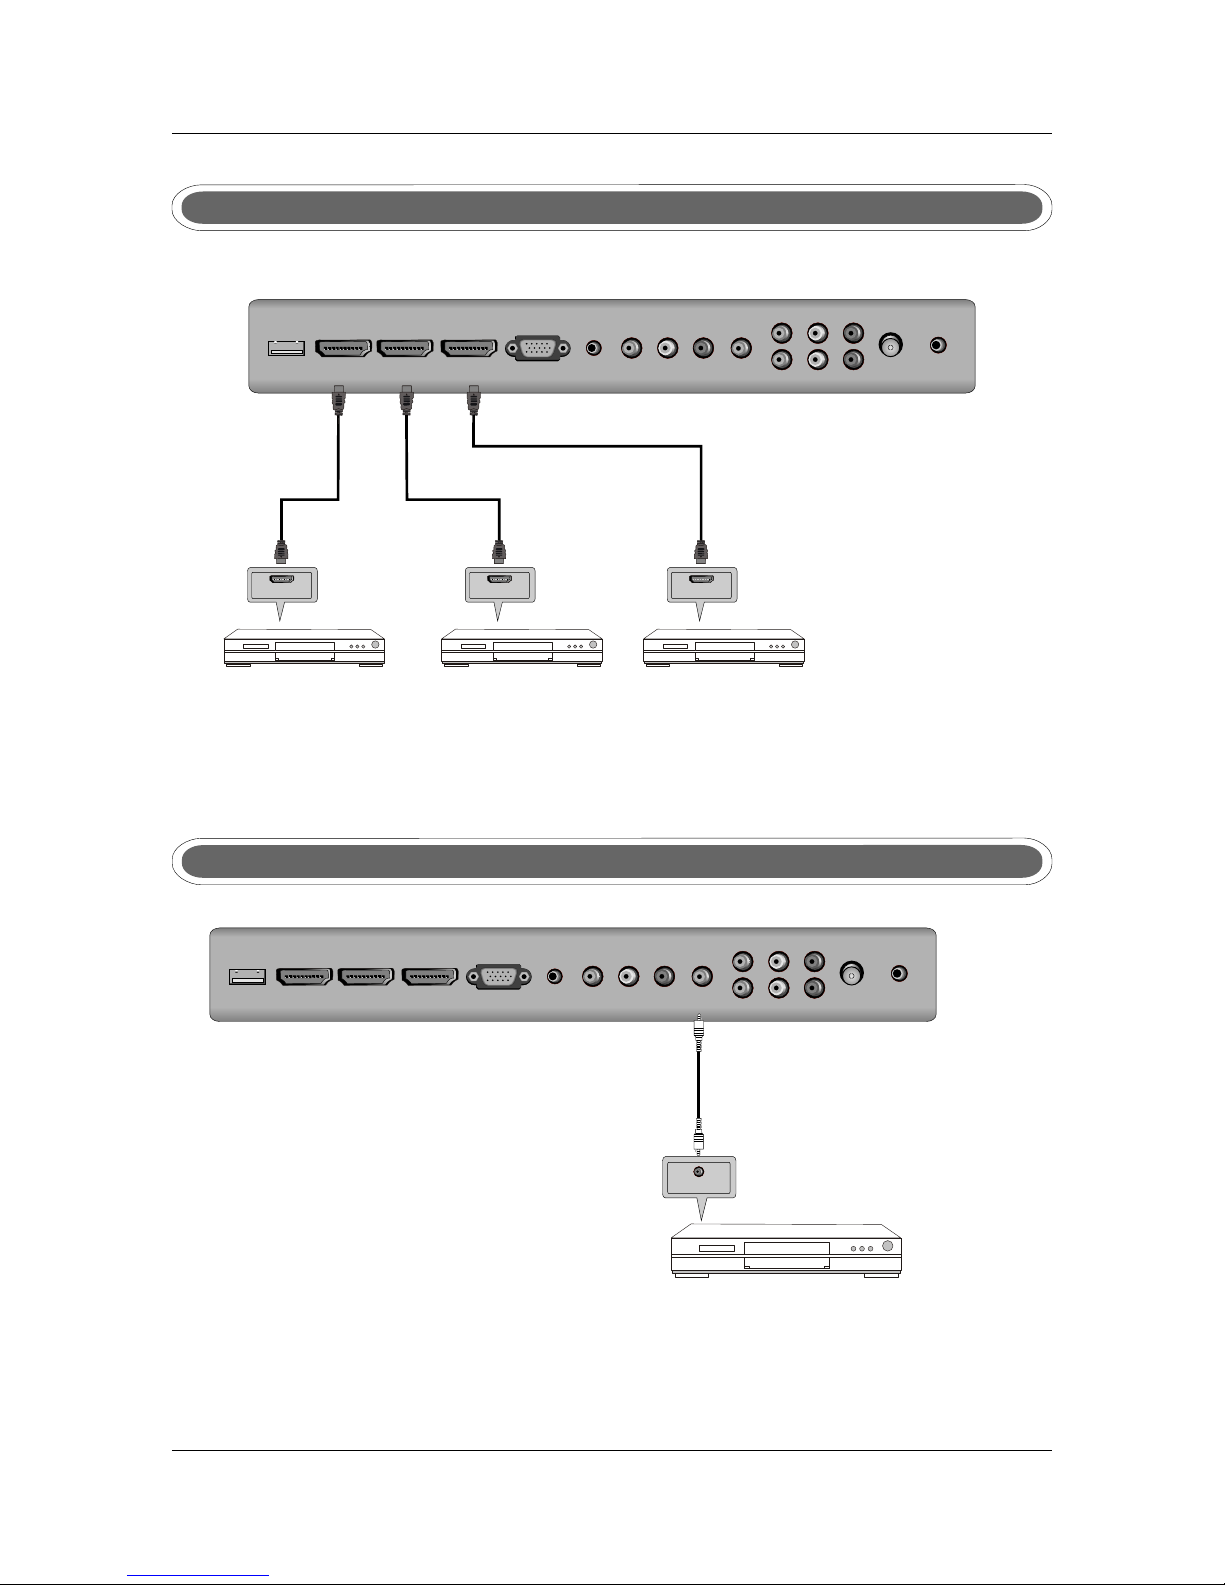
COAX Connection
Conn ect to Audio Ampl ifier devic e to the COAX out put jack on the TV.
Coax Cabl eCoa x Cable
SPD IF INPU T
Audi o AmplifierAudi o Amplifier
Audi o Amplifier B ackAudio Ampli fier Back
HDMI Connection
DVD o r VCR DVD o r VCR
DVD or VCR Ba ckDVD or VCR Ba ck
HDMI O UT
HDMI Cabl eHDMI C ab le
HDMI connection allow s the user to transfer all audio/video/contro l signals through one
cable only. These signa ls are transferred in digital.
8
TV BackTV Back
DVD o r VCR DVD o r VCR
DVD or VCR Ba ckDVD or VCR Ba ck
HDMI O UT
HDMI Cabl eHDMI C ab le
DVD o r VCR DVD o r VCR
DVD or VCR Ba ckDVD or VCR Ba ck
HDMI O UT
HDMI Cabl eHDMI C ab le
TV BackTV Back
VGA (PC)VGA (PC)
USBUSB
HDM I1HDM I1 HD MI2HD MI2
HDM I3HDM I3
PC
AUDIO
PC
AUDIO
C
O XACO X
A
PHO NEPHO NE
RF IN RF IN
Pb1Pb1
Pr1Pr1
Y1Y 1
Pb2Pb2
Pr2Pr2
Y2Y 2
LL RR
VID EOVID EO
VGA (PC)VGA (PC)
USBUSB
HDM I1HDM I1 HD MI2HD MI2
HDM I3HDM I3
PC
AUDIOPCAUDIO
CO
AXCO
AX
PHO NEPHO NE
RF IN RF IN
Pb1Pb1
Pr1Pr1
Y1Y 1
Pb2Pb2
Pr2Pr2
Y2Y 2
LL RR
VID EOVID EO
9
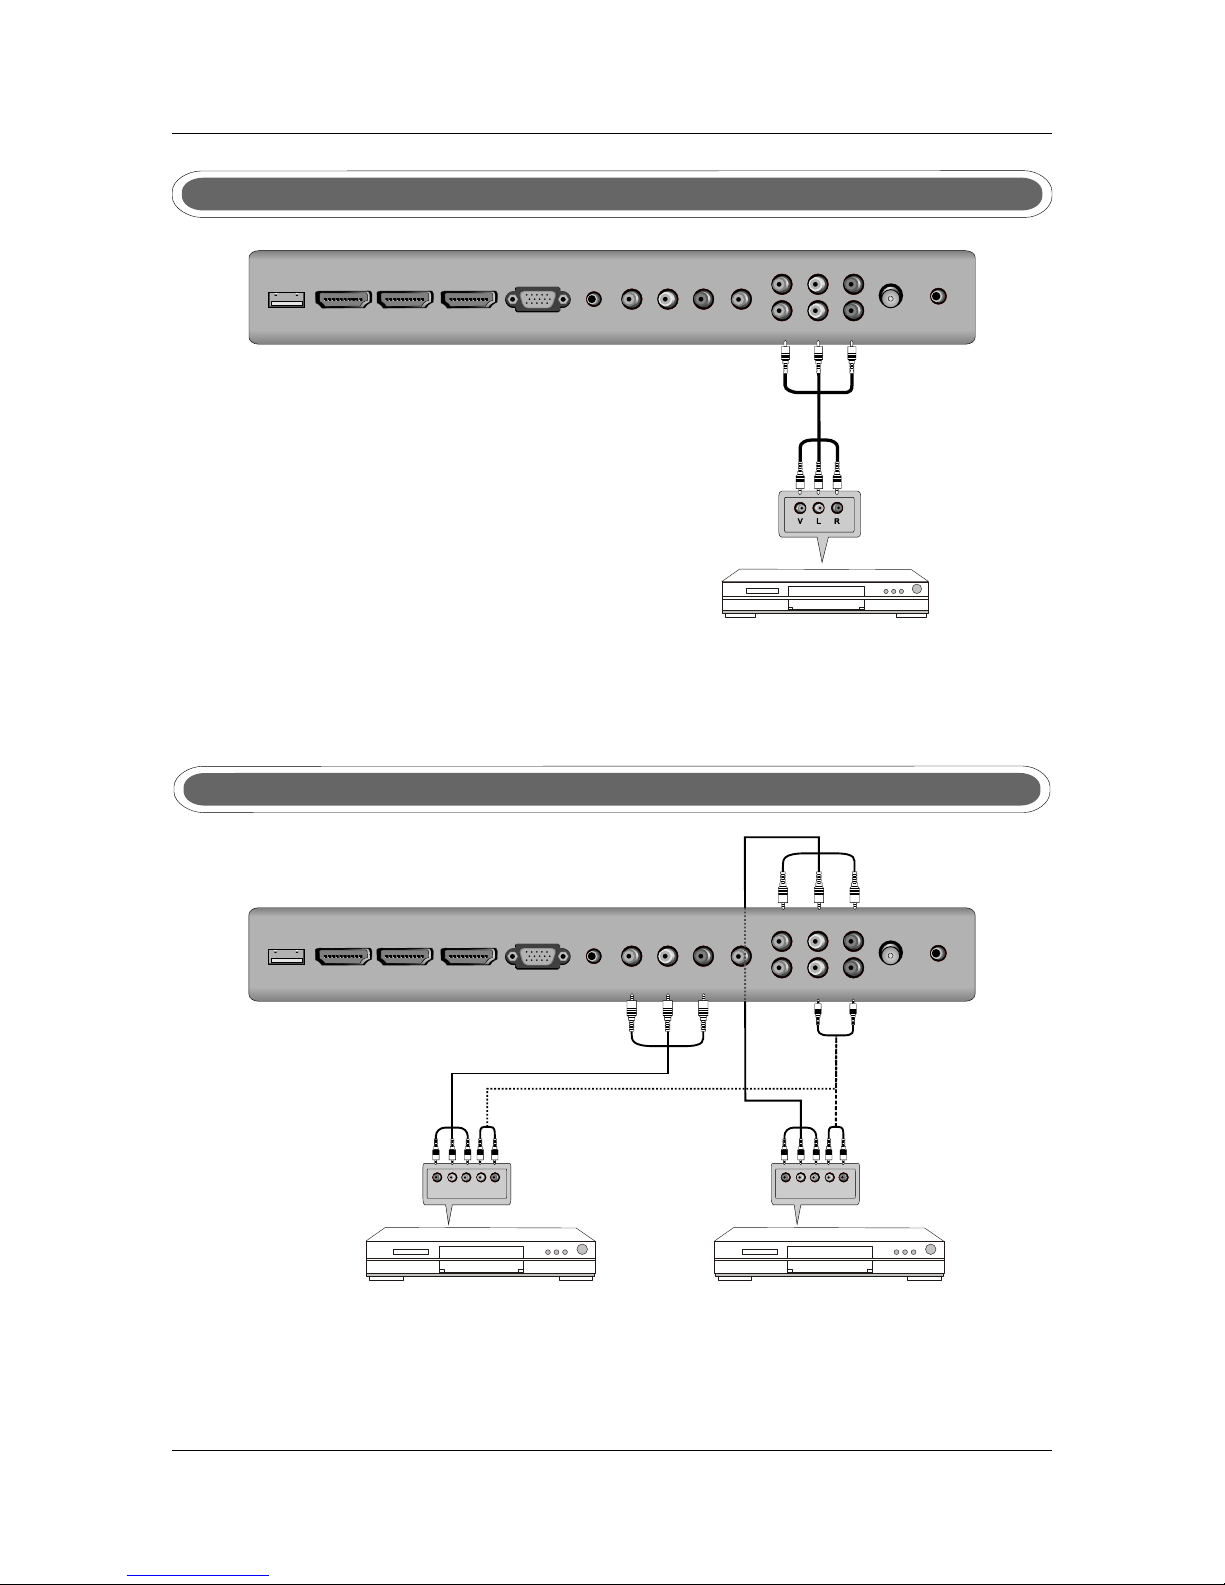
AV Connection
Connect the VIDEO and AUDIO output jack of the DVD or VCR to the VID EO jacks on the TV set
using the RCA cable. Match the jack colors: Vi de o is yello w, Audio left is white, and Audio right is red.
Select the AV input sourc e via the SOURCE button on the remote control.
TV BackTV Back
Video c ab leVideo ca bl e
DVD or VCR ba ckDVD or VC R ba ck
DVD o r VCRDVD o r VCR
YPbPr Connection
Pr Pr
PbPb
YY LL RR
TV BackTV Back
DVD o r VCR DVD or V CR
DVD or VCR Ba ckDVD or VCR Ba ck
Auido Cabl e Auido Cabl e
YPbPr Cab leYPb Pr C able
Conn ect the YPbPr outpu t of the DVD or VCR t o the YP bPr input on th e TV set. Conne ct the Audio
outp ut of the DVD or VC R to the Audio inp ut jacks on the TV set us ing the RCA cabl e.
Matc h the jacks col ors : Y is g reen, Pb is blu e, Pr is red, Audi o left is white a nd Audio righ t is red.
Sele ct YPb Pr input sour ce via the SOUR CE button on th e remote cont rol.
Pr Pr
PbPb
YY LL RR
DVD o r VCR DVD or V CR
DVD or VCR Ba ckDVD or VCR Ba ck
YPbPr Cab leYPb Pr C able
10
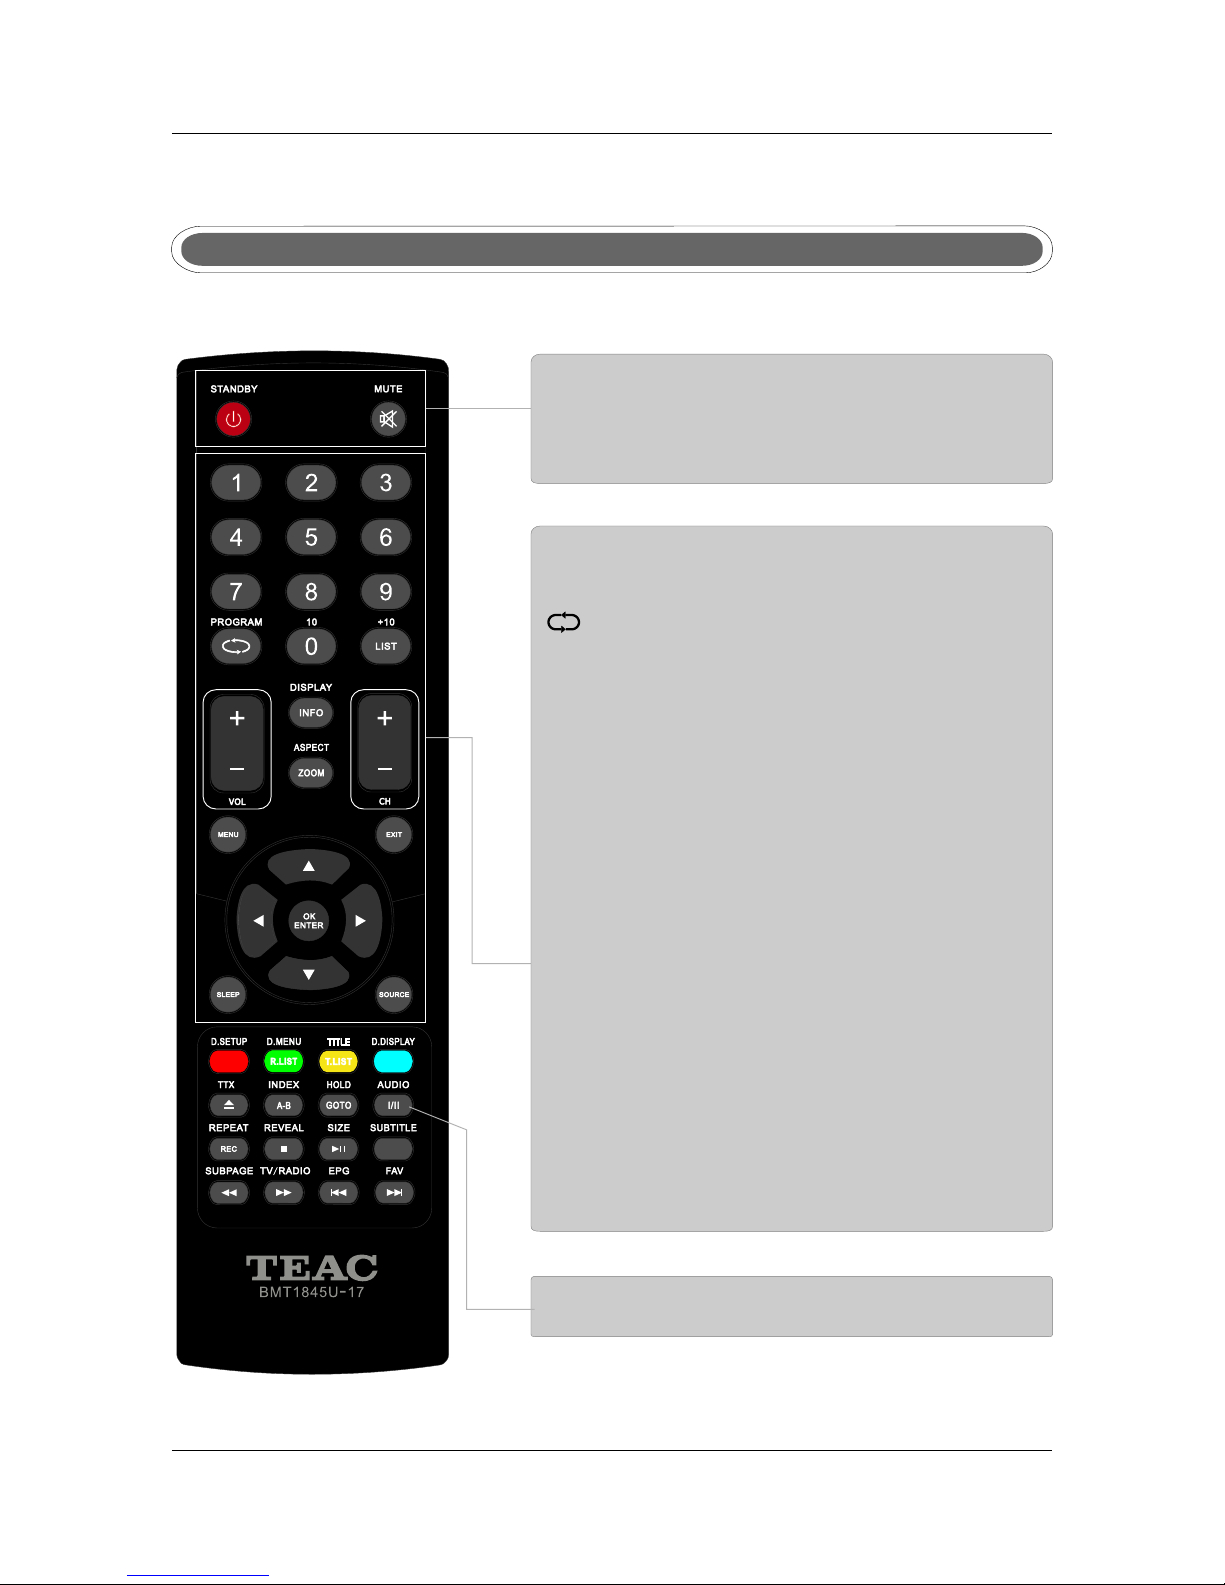
6 REMOTE CONTROL.6.REMOTE CONTROL
Remote control instructions in TV mode
STANDBY
Turn the LCD TV ON or OFF.
MUTE
Press to mute t he sound. Press ag ain or press VOL+ to
un-mute the TV.
AUDI O(I/II)
Pres s to search the N ICAM modes.
NUMB ER BUTTONS
Pres s 0-9 to select a TV chan nel directl y when you are
watc hing TV. The channel ch ange after 2 se conds.
MENU
Brin gs up the main TV menu to t he screen.
THUM BSTICK( ▲/ ▼/ ◄ / ►/ OK ENTER )
Allo ws you to navig ate the on-sc reen menus an d
adju st the system s ettings to yo ur preferen ce.
EXIT
Exit t he main TV menu to the sc reen.
CH+/ CH-
Pres s to scan throu gh channels .
VOL+ /VOL-
Pres s to increase / d ecrease the s ound level.
Retu rn to the previ ous channel v iewed.
DISP LAY
Pres s to display th e source and ch annel's inf ormation.
SLEE P
Lets y ou select amo unt of time bef ore your TV turn itse lf
off automa tically.
SOUR CE
Pres s SOURCE to dis play the OSD in put source,
Pres s▲▼to selec t an input spur ce,and then p ress
OK to co nfirm.
LIST
Pres s to display th e TV program li st.
ASPE CT
Sele cts screen di splay ratio .

11
Remote control instructions in DTV/USB mode
NUMB ER BUTTONS
Pres s 0-9 to select a c hannel.
CH+/ CH-
When w atching a cha nnel, chang es the channe l.
INFO
Pres s to display th e source and ch annel's inf ormation.
COLO R BUTTONS
Colo r buttons (re spectivel y red, green, y ellow and blu e)
used i n a few sub-men us.
SUBT ITLE
To displ ay subtitle i n DTV mode.
AUDI O
To dis play audio me nu.
TV/R ADIO
When w atching a cha nnel,allo ws you switch b etween
TV and R adio modes.
FAV
Favo rite progra m list.
REC
Pres s to record the T V program in DT V mode.
EPG
Laun ches the EPG( Electroni c Program Gui de)in DTV
mode .
REPEAT
Press to select the repeat mode in USB mode.
Stop playing or stop recording.
Fast reverse and Fast forward.
Previous / next chapter in USB mode,or play the Previous
Play o r pause.
Pres s to enter Timeshift, the i mage paused a nd it start
reco rd from the pau sed positio n.
(Timeshif t)
T.LI ST
Pres s to display th e Record Timer Schedule List.
R.LI ST
Disp lay the recor ded file list .
/next scene of the recorded programs, jump by 30 seconds.

12
Remote control instructions in TELETEXT mode
TTX
Press to switch between TV and Teletext mode.
SUBPAGE
TELE TEXT Subpage.
HOLD
Free ze the curren t page.
SUBT ITLE
To displ ay subtitle .
REVE AL
Reve al or hide the hi dden words.
COLO R BUTTONS
Sele ct 4 Preferre d TELE TEXT page.
NUMBER BUTTONS
Pres s 0-9 to select a tel etext page.
INDE X
Requ est index pag e when index li nk is valid.
CH+/ CH-
Page u p and Page down .
SIZE
Chan ge the pictur e size.

13
Remote control instructions in DVD mode
D.SE TUP
Used f or selecting pr ograms. It may al so be used to
exec ute commands.
REPE AT
Pres s REPEAT to cyc le through the re peat play opt ions.
A-B
This b utton enables y ou to repeat a sele cted section
from t he disc.
SUBT ITLE
Select a different subtitle language(the DVD disc must have
the subtitle you selected.
D.DI SPLAY
Press to display the DVD information of DVD mode.
PLAY/PAUSE in DVD mo de.
To eject t he disc.
DVD STOP
Jump t o previous an d next track.
Fast b ackward and for ward key.
D.ME NU
DVD di sc menu Access t o menu.
NUMBER BUTTONS
Numerical buttons for various data.
PROG RAM
Prog ram a disc play ing in a desire d sequence.
THUM BSTICK( ▲/ ▼/ ◄ / ►/ OK ENTER )
Allo ws you to navig ate the on-sc reen menus an d
adju st the system s ettings to yo ur preferen ce.
SIZE
Chan ge the pictur e format.
AUDI O(I/II)
AUDI O selection b uttons in DVD m ode.
GOTO
It is po ssible to get a ccess to any po int on the dire ctly
usin g the "GOTO" menu.
Pres s GOTO t o access the "G OTO" m enu.
ZOOM
In pla y state, pres s ZOOM, the pla yer will zoom
in the p icture one ti me.
Note : Please ensu re that the TV yo u have bought wit h DVD loader, o therwise, a ll these part s
with n o effect.

Remote control setup
1. Ope n the cover.
2. AAA size batteries, When inserting the batteries, make sure correct polarities as per”+“and ”-“marks
on the b atteries an d within the ba ttery compa rtment
3. Rep lace the batt ery cover.
To prevent ba ttery leaka ge which may re sult in bodil y injury or damage to the remote :
1. Ins tall all batt eries corre ctly, and as marked on t he remote con trol.
2. Do no t mix batteri es:(OLD and N EW or CARBON an d ALKALINE, etc)
Remo ve batterie s when the remo te is not used fo r a long time.
.
14

15
Mov e B ack
MENU
OK
Sel ect
Qui t
EXIT
Auto S can
Move
OK
OK Exit
EXIT
Country
Tun e Type
Australia
ATV+DT V
7 . MENU OPERATION7 . MENU OPERATION
CHANNEL MenuCHANNEL Menu
Note
CHAN NEL can be only s elected und er ATV/DTV mo de. The CHANN EL menu is disa bled
whil e in all other in put modes.
Note
CHA NNELCHA NNEL
Aut o Scan
DTV M anual Tu ning
ATV Ma nual Tun ing
Pro gram Ed it
Sig nal inf ormat ion
Rec ord Sta rt
Mov e B ack
MENU
OK
Sel ect
Qui t
EXIT
CHA NNELCHA NNEL
ATV Ma nual Tun ing
Pro gram Ed it
Sig nal inf ormat ion
Rec ord Sta rt
Rec orded L ist
Rec orded M ode
Sch edule L ist
DVR F ile Sys tem
Inst allation Guid e
Mov e
Sel ect
OK
Qui t
EXIT
Pleas e do so me se lects ,Th en
Press O K but ton t o begin a uto t uni ng.
Pleas e do so me se lects ,Th en
Press O K but ton t o begin a uto t uni ng.
When p owering up fo r the first tim e or after Fact ory Reset, the Installatio n Guide will ap pear on
scre en.
Pres s▲▼◄► to set th e OSD languag e/Country/Tune Type and press OK to begin a uto tuning.
OSD Lauguag e
Country
Tun e Typ e
Pres s MENU button display t he main menu, u se CHANNEL , ▼
, .
to ◄► to select menu press OK or
to enter and press menu to return to the main menu
English
Australia
ATV+DT V
In ATV/DTV mod e press the MEN U button to ent er the main men u. A window will ap pear, use ◄►
to scr oll through t he followin g menu headin gs: CHANNEL , PICTURE, SOUND, TIME, OPTION
and LO CK. Press ▼ or OK t o enter the sub m enus under the headings listed above.
Whil e in MENU mode, p ress the MENU b utton to retu rn to the previous menu window, or press
EXIT t o exit menu mod e completel y.
Auto ScanAuto Scan
INSTALLATION GUIDEINSTALLATION GUIDE

16
DTV manual tuningDTV manual tuning
In the A uto Scan menu t here are 2 opti ons for you sel ect from, Country and Tune Typ e.
Pres s ◄/► to select C ountry and Tu ne Type, press OK to start scann ing. If you sel ect ATV+DTV ,
the fi rst 50% of the pr ocessing is f or ATV tuning , while the second 50% represe nts DTV tunin g.
When A TV tuning, yo u can press MEN U to skip ATV tuning and start DTV tuning, or pre ss EXIT to
exit t uning.
Channel Tuning
Qui t
EXIT
Ski p
MENU
9%
474.00 MHz
(TV)
TV
DTV
Radio
:
:
:
0
0
0
Progr amme( s)
Progr amme( s)
Progr amme( s)
DTV Manual Tuning
UHF C H 27
Pre ss OK to se arch
Qui t
EXIT
Bac k
MENU
Bad Nor mal
Goo d
Auto ScanAuto Scan
You can manuall y tune DTV chan nels in the CHANNEL menu.
Pres s the ◄► button s to select the c hannel you wish to tune, then pr ess ENTER but ton to scan for
the ch annel.
ATV manual tuningATV manual tuning
You can manuall y tune ATV c hannels in th e CHANNEL menu.
ATV Manua l Tuning
Storage To 1
►◄
System DK
►◄
►◄
►◄
►◄
Current CH 1
Search
Fine-Tune
Frequ ency 51 1.3 1 Mh z
Qui t
EXIT
Mov e
Sav e

17
Storage to
pres s the ◄► button s to change the n umbered loc ation of the found channel.
System
Sele ct the system u sing the ◄► but tons.
Current CH
Disp lays the curr ent channel n umber, press t he ◄► buttons to choose the channel you wish to m odify.
Search
Pres s the ◄► button s to scan throu gh the frequencies to find new c hannels.
Fine tune
In cas e of bad recept ion, you can pr ess the ◄► buttons to make fine ad justments t o the tuning.
Afte r manual tuni ng is complet e, please pre ss the RED key to save any found channels.
Storage to
System
Current CH
Search
Fine tune
Use ▲▼ t o navigate th rough the Pro gram Edit win dow.
DELETE
Pres s the RED butto n to delete the h ighlighte d channel, a red circle will appear next to the c hannel
name .
Pres s the RED key aga in to confirm d elete.
Pres s MENU to retur n to the main men u.
DELETE
Program EditProgram Edit
CH.NA ME SKIP LOCK FAV Type
Program Edit
Radi o
ATV
ATV
ATV
702 BBC R adio 2
703 BBC R adio 3
704 BBC R adio 4
714 hea t
1 C-26
2 C-44
3 C-56
Radi o
Radi o
Radi o
2 ABC TV Me ihour
20 ABC HD TV
DTV
DTV
Mov e Bac k
MENU
OK
Sel ect
Del ete M ove
Ski p
Ren ame
FAV
FAV
MOVE
Pres s ▲▼ to select th e channel , pre ss yellow button to enter the mo ve mode, then p ress ▲/▼
to mov e the channel l ocation, pr ess yellow bu tton again or p ress OK to confirm.
Pres s MENU to retur n to the main men u.
MOVE
SKIP
Pres s ▲ ▼ to select the c hannel you wi sh to skip.
Pres s the BLUE butt on, a logo will a ppear next to t he channel na me and the channel will be skipped
when y ou scroll thr ough the chan nels.
Pres s the BLUE butt on again on the h ighlighte d channel to di sable the skip function.
Pres s MENU to retur n to the main men u.
SKIP

18
Rename(Only available in ATV)
Modi fy current ch annel name, o nly used in ATV m ode.
Pres s green butto n to enter RENA ME mode, then u se the ◄►▲▼ chang e name.
Pres s green butto n again or pres s menu button t o confirm.
Rename(Only available in ATV)
FAV
Set yo ur favorite c hannel by pre ssing the ▲ ▼ buttons to highlight the channe l, then press t he
FAV button.
A logo wi ll appear nex t to the channe l name. When yo u are viewing y ou can press th e FAV butt on
to see a l ist of your fav orite chann els.
FAV
Signal InformationSignal Information
Only a vailable in D TV mode, Sign al Informat ion include s:channel / network /modulation/qu ality
/str ength.
DVR MENU
Ente r DVR menu.(S ee page 33 for mo re details)
DVR MENU
Mov e B ack
MENU
OK
Sel ect
Qui t
EXIT
Mov e B ack
MENU
OK
Sel ect
Qui t
EXIT
PICTURE MenuPICTURE Menu
Picture ModePicture Mode
Picture Mode
Standard
Adj ust
Qui t
EXIT
Bac k
MENU
PIC TUREPICT URE
Pic ture Mo de
Con trast
Bri ghtne ss
Col or
Sha rpnes s
Tint
Col or Temper ature
Red
Sta ndard
50
50
50
50
50
Red
Gre en
Blu e
Asp ect Rat io
Noi se Redu ction
3D Di splay
Scr een
Ove r Scan
50
50
50
16: 9
Mid dle
Off
Vid eo
Pres s ◄► to select th e picture mod e,press MENU to return to the ma in menu.
You ca n select from t he followin g preset mode s - Dynamic, Standard or Mild.
Only U ser mode allo ws the adjust ment of Contr ast, Brightness, Colour and Sharpness , Tint is only
avai lable to adju st for NTSC.
Pres s MENU button display t he main menu, u se PICTURE , ▼
, .
to ◄► to select menu press OK or
to enter and press menu to return to the main menu
PIC TUREPICT URE
Contrast
Contrast / Brightness / Color / Sharpness/TintContrast / Brightness / Color / Sharpness/Tint
Adj ust
Qui t
EXIT
Bac k
MENU
50
In Use r mode, selec t from Contra st/Bright ness/Colour/Sharpnes s using ▲▼ and pr ess ◄► to
make a djustment s.

19
Color Temperature
Medium
Color TemperatureColor Temperature
Red/Green/Blue
In Use r mode press ▲▼ t o select Red/ Green or Blue , then press ◄► to ad just.
Pres s MENU to retur n to the main men u.
Red/Green/Blue
You ca n select from t he followin g preset mode s Cool, Mediu m or Warm. Only User mode allows
adju stment of Red , Green and Blu e values.
Adj ust
Qui t
EXIT
Bac k
MENU
Aspect Ratio
▲▼
◄►
Pres s t o highlight A spect Ratio a nd OK to enter. A w indow will ap pear at the bot tom of the screen,
pres s t o scroll thro ugh the follo wing option s to get the best f it picture on y our screen - 16:9,
ZOOM 1 , ZOOM 2, Pan Sca n, Panorama , Auto, 4:3.
Aspect Ratio
Noise Reduction
Pres s ▲▼ to highlig ht Aspect Rat io and OK to enter.
Use ◄► to select fro m noise reduc tion modes as follows: Off, Lo w, Middle, Hi gh.
Note
Nois e Reduction i s not availab le in PC mode.
Noise Reduction
Note
Auto Adjust
Sele ct “Auto Adjus t”and press , the un it will autom atically ad just all item s.
Horizontal Pos.
Allo ws you to use bu ttons to adju st the Horizo ntal Positi on.
Vertical Pos.
Allo ws you to use bu ttons to adju st the Vertica l Position.
Size
Allo ws you to adjus t the width of im age.
►
◄►
◄►
Auto Adjust
Horizontal Pos
Vertical Pos
Size
.
.
Screen
Auto Adju st
Horizon ta l Pos.
Vertica l Po s.
Size
Phase
50
50
50
30
Qui t
EXIT
Bac k
MENU
Mov e
Screen( Only available in PC mode). Screen( Only available in PC mode).
3D Display
In ord er to play 3D pro gramme, thi s switch can co nvert 3D signal to 2D signal, and indicate in o ur
tv set s.
3D Display

Move Back
MENU
OK
Selec t
Quit
EXIT
20
SOUND MenuSOUND Menu
Pres s MENU button display t he main menu, u se , ▼
, .
to ◄► to select SOUND menu press OK or
to enter and press menu to return to the main menu
Sound mode Sound mode
Pres s ◄► to select fr om the follow ing sound modes: User, Standard, Music, Mo vie and Sport s.
Pres s MENU or OK to con firm.
Sound Mo de
Tre ble
Bass
Balan ce
Auto Vol ume
Surro und Sou nd
SPDIF MO DE
Stand ard
50
50
0
Off
Off
Auto
SOUND
Sound Mode
Music
Adj ust
Qui t
EXIT
Bac k
MENU
Treble/ Bass /BalanceTreble/ Bass /Balance
Auto Volume
Auto s ound adjust , press ◄► to set O N/OFF.
Auto Volume
Use ▲/ ▼ to select the T reble /Bass /Balance, and press ◄► to adjus t.
Treb le and Bass are o nly adjusta ble in User mod e.
Surround sound
Surr ound sound se ttings, pre ss ◄► to set ON/OFF.
Surround sound
SPDIF MODE
Pres s OK to enter the s ub menu, use ▲▼ to select Off/PCM/ Auto, press MENU or OK to confir m.
SPDIF MODE
Phase
Allo ws you to adjus t the definit ion.
OVER SCAN
unde r HDMI SOURCE , user can sele ct the HDMI inp ut signal mod e: PC/VIDEO, se lect PC mode
used f or PC input, ot her signal so urce input pl ease select V IDEO mode;
Phase
OVER SCAN

Move Back
MENU
OK
Selec t
Quit
EXIT
21
31/Ma y 14: 25
Off
Off
Off
On
South A ust ralia G MT+ 9.5
TIME
I
I
I
I
I
I
I
I
Clock
Off Ti me
On Time
Sleep Ti mer
Auto Sl eep
Tim e Zon e
TIME MenuTIME Menu
Pres s MENU button display t he main menu, u se , ▼
, .
to ◄► to select TIME menu press OK or
to enter and press menu to return to the main menu
Clock
Date
Month
Year
Hour
Minute
Mov e Ba ck
MENU
Qui t
EXIT
ClockClock
◄ ►
20
◄ ►
May
◄ ►
2010
◄ ►
13
◄ ►
25
Pres s ◄►▲▼ to set the D ate/Month/Year/Hour/Minute, pre ss MENU to conf irm and retur n to
Time m enu.
Off timeOff time
Off Time
Repeat
Hour
Minute
Once
13
28
Mov e
Back
MENU
Quit
EXIT
Pres s MENU to confi rm and return t o TIME menu.
You can set a time fo r the TV t o turn off automati cally. Th e Repeat mode a llows the unit to be set to
turn ed off O nce, Every da y, Mon-Fri, Mon-Sa t, Sat-Sun or o nly Sun, use ◄► t o select your p reference .
Once t he Repeat set ting has been m ade, press ▲▼ to select Hour and Minute setti ngs, use ◄►
to adj ust.
Auto c lock update : please sele ct DTV to obtai ns the time.
I
I
I
I

22
On time On time
Pres s MENU to confi rm and return t o TIME menu.
Sleep time
Pres s OK to enter Sle ep Time sub men u, use ▲▼ to set the sleep time. You c an select fro m the
foll owing Sleep t imes: 10, 20, 3 0, 60, 90, 120, 1 80, 240 minutes or Off to disabl e the Sleep tim e
func tion. Then pr ess OK or MENU to c onfirm.
Sleep time
.
Time zone Time zone
Press OK to enter Time Zone sub menu, use ▲▼ to set time zone for your local area. Press OK or MENU
On Time
Repeat
Hour
Minute
Source
Channel
Volume
◄ ►
Once
◄ ►
12
◄ ►
00
◄ ►
DTV
◄ ►
1
◄ ►
30
Mov e
Back
MENU
Quit
EXIT
You can specify a t ime, input source, channel and volume for t he TV to turn on.
Pres s ▲▼ to select Re peat mode and u se ◄► to select your preferenc e as above.
Use ▲▼ t o select the ot her paramet ers and ◄► to adjust.
Auto Sleep
Pres s ◄►to select O N/OFF.
This f unction all ows you to set yo ur TV to a utomatica lly turn off after 10 m inutes if the TV dete cts
no sig nal from the in puts.
Auto Sleep
.
Mov e B ack
MENU
OK
Sel ect
Qui t
EXIT
Mov e B ack
MENU
OK
Sel ect
Qui t
EXIT
Eng lish
Eng lish
Eng lish
Eng lish
Eng lish
40S
OSD Language
Audio Languages 1st
Audio Languages 2nd
Subtitle Languages 1st
Subtitle Languages 2nd
OSD Duration
OPT ION
OPTION MenuOPTION Menu
Eng lish
Eng lish
Eng lish
40s
On
50
Aus trali a
Audio Languages 2nd
Subtitle Languages 1st
Subtitle Languages 2nd
OSD Duration
Blue Screen
Back Light
Country
Restore Factory Default
Pres s MENU to displ ay main menu, u se ◄►to selec t OPTION menu, th en press OK or ▼ to
ente r, press MENU t o return to mai n menu.
OSD LanguageOSD Language
Audio Language 1St/2ndAudio Language 1St/2nd
Pres s OK to enter OSD L anguage sub m enu, use ▲▼ to set OSD language.
Pres s OK to enter Aud io Language s ub menu, use ▲▼ t o set Audio language.
to confirm.
OPT ION

Move Back
MENU
OK
Selec t
Quit
EXIT
23
Subtitle Language 1st/2ndSubtitle Language 1st/2nd
Pres s OK to enter Sub title Langu age sub menu, u se ▲▼ to set Subtit le language .
Country
Disp lays your cou ntry as set in th e Installat ion Guide, not adjustable.
Country
OSD Duration
Press OK to enter OSD Duration sub menu, use ▲▼ to select the amount of time the OSD will remain on
the screen.
Blue Screen
Press ◄► to set the Blue Screen ON/OFF.
Back Light
Press OK and use ◄► to adjust the Back Light, press Menu or OK to confirm.
OSD Duration
Blue Screen
Back Light
LOCK
No Bloc k
Lock Ch ann el
Set Pas swo rd
Block P rog ram
Progr am Gu ide
LOCK MenuLOCK Menu
Pres s MENU to displ ay main menu, u se ◄►to select LOCK menu, then press OK or ▼ to ent er.
A passw ord is requir ed to enter the L ock setting s. Enter the default password '0000' to unl ock the menu.
Pres s ◄ to quite pass word and retu rn to main menu .
Pres s ► to clear any in correctly e ntered numb ers. The correct nu mbers will ne ed to be entere d to
ente r the LOCK sub me nu. Th e message 'Wrong Password' wil l be displaye d if the number s are
ente red incorre ctly.
Pres s Menu to retur n to Lock menu.
Off
Restore factory default
Pres s OK to enter sec ond menu, use ▲ ▼ to select “yes” or “no”,and pr ess OK again to c onfirm.
Note
Use Re store Facto ry Reset func tion with cau tion as it will erase all channels and return
your s ettings to fa ctory defau lt.
Restore factory default
Note
Please en ter passw or d
Cancel C le ar
Lock Channel
This s etting enab les a passwor d lock for the Pr ogram Edit function under the Channel men u.
Pres s ◄► or OK to turn th e lock On or Off.
Lock Channel

24
Set PasswordSet Password
Please en ter old pas sw ord
Cancel C le ar
Please en ter new pas sw ord
Confirm n ew passwo rd
Pres s OK to enter sub m enu.
Usin g the numeric k eys enter the o ld password f ollowed by yo ur new passwo rd.
Ente r the new passw ord again to co nfirm.
Block ProgramBlock Program
Use ▲▼ t o select the ch annel, and pr ess Green buttom to lock/unlock the chann el.
If the c hannel is loc ked you will be p rompted to en ter a passwor d before you can access the chan nel.
Input Source
DTV
ATV
YPBPR1
YPBPR2
PC
HDMI1
HDMI2
HDMI3
AV
USB
Mov e
Sel ect
OK
Qui t
EXIT
Change input
Pres s source butt on to display t he source men u . Use ▲▼ to select th e input sourc e, press OK to
conf irm.
Change input
INPUT SOURCEINPUT SOURCE

25
TIME --
TIM E
Program Guide
Mov e
Qui t
EXIT
OK
Sel ect
Sch edule
Rem ind
31 Ma y 13:36
700 BB C Radio 1 E dith Bo wman
31 May 20 10 13:0 0-1 8: 00
EPG and Channel List MenuEPG and Channel List Menu
Use ◄► to sel ec t
between T IME and
CHANNEL mode s
Detaile d in formati on
for the hig hl ighted
program .
Move
Use ▲▼ to select pro gramme.
Move
702 BB C Radio 2 S teve Wr ight in t he Afte rnoon
703 BB C Radio 3 A ftern oon on 3
704 BB C Radio 4 A ftern oon Pla y: JACK 's Love
721 he at Upte mp part y Pop
The b est roc k thran ks incl uding t he 3
for m 1S.
1/1
Ind ex
Index
Rec ord
RECORD
EXIT
exit E PG.
EXIT
Index
swit ch to type opti on.
Index
OK
View t he highligh ted program me.
OK
Schedule
Pres s YELLOW key to s how a list of sch eduled reco rdings.
Schedule
Record
Pres s REC button to e nter a window t o book a record ing, see page 3 5 for details.
Record
Remind
Pres s GREEN butto n to enter a sub wi ndow to book a re minder.
You can select th e channel, repeat mode, minute and hour, date and month usi ng the ◄►▲▼
butt ons.
When a r eminder has b een set and the t ime arrives , a window will a ppear on the di splay and the
chan nel will chan ge after 10 sec onds.
You ca n also interc ept and confi rm the change b y pressing ◄.
Remind
Favourite List
Pres s FAV button to d isplay the Fa vorite Chan nel List.
Favourite List
This is a lis t of
program s th at
are sched ul ed to
be shown by t he
broadca st er.
Reminder Setting
◄ - + ►
2 ABC TV Melb ou rne
◄ ►
12
◄ ►
00
◄ ►
DTV
◄ ►
1
◄ ►
30
Mov e
Back
MENU
Quit
EXIT
Mode
Minu te
Hour
Date
Mont h

Channel ListChannel List
Pres s LIST button t o display a lis t of tuned chan nels.
The st atus of the cha nnels (Skip /Lock/Fav ourite) will also be displayed, see below .
26
Channel List
DTV
ATV
ATV
ATV
ATV
DTV
DTV
DTV
DTV
Sel ect
Qui t
EXIT
OK
5 Five
6 abc1
7 abc2
8 abc3
9 abc5
1 C-01
2 2C-01
3 3S-02
4 4S-03
Mov e
PHO TO
Disc: C
Mult imedia main m enu style:
Multimedia(USB) MenuMultimedia(USB) Menu
Discs
Multime di a
Operati on
USB Statu s
Inserte d US B
device in fo
Mov e
Men u
MENU
OK
Sel ect
2.0
USB Status
If a com patible USB i s attached th e logo will app ear blue. If no t USB is attached the logo will be g rey.
USB Status
Multimedia style
Choo se from the men u across the to p of the screen w hich file type you would like to play: Photo,
Musi c, Movie or Tex t.
Multimedia style
DISC (HDD)
Show s the inserte d HDD Discs. Ea ch disc is assi gned a letter from C onwards.
DISC (HDD)
HDD Di scs.
PHO TO MUS IC MO VIE S TEXT

27
Inserted USB device info
Disp lays USB vers ion of the devi ce that is atta ched, for example if a USB 2.0 dev ice is attach ed,
2.0 wi ll be display ed. When no dev ice is attach ed it will disp lay 'No Devic e'.
Inserted USB device info
Operation guide
Oper ational but tons on the rem ote ◄►▲▼, Menu and OK.
Operation guide
◄ ►//
▲ ▼//
OK/EnterOK/Enter
Multimedia main board keypress instruction:
The fo llows only li st MM page and ot her relavan t function, M enu, sleep and other systerm
func tion is not inc luded.
Multimedia main board keypress instruction:
Enter submenu.
Turn up/down.
Move Focus to left/right, it can circle move.
Retur n 200* 20 0 1
UP.pn g
2. bm p
2
C:\
Res oluti on 1024 x768
Siz e 200KB ytes
Dat e ----/ --/--
Tim e --/- -/--
1/2
Del ete Cur rent Fi lt
1.bmp
Disc
File fold er s in disc,
press ok to e nt er
Picture o ve rview
Page
Prev iew
Pict ure
info rmation
PHOTOPHOTO
Mult imedia PHOT O’s submenu l ayout:
PagePage
DiscDisc
Show t he current di sc.
Indi cates the tot al number of pa ges contain ing files. example as per picture - '1/2' rep resents pag e
1 of 2.
Picture listPicture list
Preview windowPreview window
Disp lays a previe w of the highli ghted pictu re in the Pictu re list.
Use ◄►▲▼ t o sc ro ll t hr ou gh t he p ic tu re l is t. P re ss O K to s el ec t th e pi ct ur e, a t ic k wi ll a pp ea r on t he f il e.
Press PLAY to view picture in full screen.
Qui t
EXIT
Mov e Men u
MENU
Ful l Scree n
Add /Remo ve all
Add /remo ve to pla ylist
OK

28
ExitExit
RepeatRepeat
RotateRotate
Repea t ALL
Play L ist
Info .
Zoom O ut
Musi c
90
Rota teRotat e
90
Zoom I n
A
Exit playing,enter previous menu.
Full screen playing of photos.
Clockwise/ counter clockwise turn pictures.
Press once to repeat once, press again to repeat all photos, press three times to disable the repeat function.
Play next file.
Play previous file.
Stop playing,enter list menu.
Slide Show
When i n Picture Lis t mode you can se lect multip le pictures to be viewed as part of a Slide Show.
Use ◄► ▲▼ to scroll th rough the lis t, press OK when the desired pic tures are hig hlighted.
If you w ish to highli ght all pictu res, press th e GREEN button. Press the RED bu tton to de-se lect all
pict ures. Press t he PLAY butto n to enter Slid e Show mode, the pictures will s croll after
appr oximately 5 s econds.
Slide Show
Retur n 2... 200-2 00
EQ
2564
Put .mp3
Asd kj.mp 3
Dkj .mp3
2asd- 20 0
C:\
Alb um:
Tit le:
Bit r ate:
Art ist:
Sam pling :
Year :
Siz e:
Bou nce
Asd kj
48K
Sar ah
20K
200 8
600 KByte s
Mult imedia MUSI C submenu lay out.
When s elected son gs in the list, p ress OK to show t he songs preview, as follows:
Disc
File wind ow
Page
Prev iew
File s
info rmation
1/2
MUSI CMUSIC
Qui t
EXIT
Mov e Men u
MENU
Ful l Scree n
Add /remo ve to pla ylist
OK
Del ete Cur rent Fi lt
Add /Remo ve all

29
AUD. MP3
Alb um: Gov ergir l
Tit le: Far A may Fro m Home
Art ist: Gr oove Go verag e
Bit R ate: 96 k Sampl ing: 48 k
Yea r: 2002 S ize: 52 9KByt es
AUD .MP3
San ple.M P3
AUD _2.MP 3
Repe at ALL Go to Time
00: 01:00 /00:0 0:45
1/1
MUSIC submenu equip description:MUSIC submenu equip description:
Files information
Show s ongs name and s ize etc.
Files information
Preview window
Musi c picture.
Preview window
Page
Show p ages.
Page
MUSIC playing conditon and keys function
MUSI C playing is th e menu just lik e playing sof tware in PC, ma inly have Playlist、basic
info rmation, pr ocessing si gn, operati on guide part ,as follows:
MUSIC playing conditon and keys function
Songs nam e
Songs inf or
MUSIC ima ge
Operati on g uide
Songs lis t
Songs name
Curr ent songs nam e.
Songs name
MUSIC image
One im age used to sig n MUSIC.
MUSIC image
Songs list
Song s marked in Bro wser,from t he top files on , orders by letters.
Songs list
Playing time
Show p laying time a nd in total,s uch as 00:01: 23/00:04: 56 format.
Playing time
Operation guide
Show c urrent oper ation guide .
Operation guide
Processing sign
Show c urrent proc ession time a nd rate.
Processing sign
Scre en Mute
Rem ove all f orm pla ylist
Rem ove
Play Time
▲▼◄►
Scro ll through so ngs on file lis t.
Stop playing.
OK/EnterOK/Enter
Play selected files.
Play Previous/next files.
/
Exit MUSIC playing menu.
ExitExit

30
Repe at ALL Goto T ime
00: 00:00 /00:5 0:00
SetA
A/B
Play L ist
Info .
Slow
Step
Zoom I n
Retur n 200* 200 2 3
C:\
Res oluti on: 800 x336
Aud io Trac k: 1/ 1
Sub title :
Art ist:
Prp gram:
Siz e: 1223 11 KB yte s
1/2
Ente r the movie men u and scroll th rough the fil es using the ◄►▲▼ keys.
Pres s OK to select th e file and to vie w a preview as ab ove.
Pres s PLAY to view th e file in full sc reen.
MOVI EMOVIE
Fast forward and fast reverse.
RepeatRepeat
Repeat playing,can choose repeat 1, repeat all, and disable repeat mode.
Preview w in dow
File info rm ation
File list
Repeat
Can ch oose repeat 1,repeat al l, repeat non e.
Set A/B
Set A/ B circle play ing.
File list
You can scroll th rough the file list using ◄►▲▼ . Press OK to sel ect a file and vi ew a preview,
you ca n also select m ultiple fil es to be played i n sequence.
Pres s PLAY to view se lected file i n full screen .
Note
Larg er files may ta ke longer to lo ad, please wa it for the file to load.
Some f iles may not pl ay even thoug h they are the co rrect format.
Repeat
Set A/
list
B
File
Note
Qui t
EXIT
Mov e Men u
MENU
Ful l Scree n
Add /remo ve to pla ylist
OK
Vide o format: AVI e tc.
Del ete Cur rent Fi lt
Add /Remo ve all

31
#C z ech 0
#D a nis h 1
#G e rma n 2
#E n gel s h 3
#S p ani s h 4
#G r eek 5
en _ str _ Pi c tu r e_T e xt . 0= O BRA Z
en _ str _ Pi c tu r e_T e xt . 1= B ILL E DE
en _ str _ Pi c tu r e_T e xt . 2= B ILD
en _ str _ Pi c tu r e_T e xt . 3= P ICT U RE
Prev P age Next Pa ge
NextP rev. S top Mus ic Play L ist Info.
Retur n 2... 200-2 00
EQ
2564
put.t ex t
jack. text
2asd- 20 0
C:
Siz e:
60K Bytes
1/2
jack1 .text
Pet
Pup py Linu x
Mak e
jac k.txt
Choo se TEXT files , press OK and it s hows the abov e frame.
Pres s play to start f ull screen pl aying as foll ows:
Info
Disp lays the high lighted fil e's informa tion includ ing resolut ion, audio track, subtitle , artist and si ze.
Goto
This f unction all ows you to jump t o a preset time d uring playb ack. Press GOTO, a wi ndow will
appe ar displayi ng time in hour m inutes and se conds as foll ows 00:00:0 0.
Ente r the time you wo uld like to jum p to using the nu meric keys.
Pres s OK to confirm .
Info
Goto
TEXTTEXT
Prev page
Play p revious pag e.
Next page
Play n ext page.
Prev.
Play p revious fil es.
Next
Play n ext files.
Prev page
Next page
Prev.
Next
Rem ove all f orm pla ylist
Qui t
EXIT
Mov e Men u
MENU
Ful l Scree n
Add a ll to pla ylist
Add /remo ve to pla ylist
OK

32
DVR File Syetem
Select Disk C:
Mov e
Sel ect
OK
Bac k
MENU
Check DVR File Syetem Start
USB Disk
Format
Time Shift Size
Speed
DVR menu DVR menu
DVR fu nction is onl y available f or DTV,incl udes Record ,Timeshift and Playback fu nction.
DVR File System
Ente r DVR from CHAN NEL menu, as fo llows:
DVR File System
If a compatible USB device is attached, this will indicate 'PASS'. If no device is attached it will appear grey.
USB DiskUSB Disk
SpeedSpeed
Can’t be chosen. After Check DVR File System,it means the USB passed Mstar Format and can be used
At Timeshift space,the size is choosen by clients when doing format.
Time Shift SizeTime Shift Size
Stop
Stop p laying and Ex it to Browser m enu.
Playlist
Show p lay list.
Info
Disp lays the curr ent file's in formation i ncluding fi le name and size.
Stop
Playlist
Info
FormatFormat
Your USB device w ill need to be fo rmatted before it can be used fo r DVR functio ns.
Disp lays the spee d of the attach ed USB device .
Note
When D VR function i s in progress , please don’ t unplug the po wer and the external USB device at will.
When D VR function i s active, the p ower indica tor will blin k with red and blue consecutively.
Befo re start reco rding a progr am, please ma ke sure the external USB device is connecte d.
Whil e recording , if the availa ble storage s pace become s low, the recording will be automatically
stop ped.
Note
Note
Form atting a USB de vice will era se any existi ng data on the de vice, back up all existing dat a.
TEAC a ccepts no res ponsibili ty for any loss o f data.
Larg er devices wi ll take longe r to format.
Note

33
Channel - Recorded List
To vie w a list of recor ded program s, press the R. LIST button.
Channel - Recorded List
Recorded List
Programme
8 Simples R ul es
Before Wi nt er Comes
Before Wi nt er Comes
Love Come s So ftly
INF O
Ind ex
Del ete
OK
Sel ect
INFO
Inde x
File System Size
DVR File Sy st em Type
DVR File Sy st em Size
SD10 4 Mins
HD 29 Mi ns
Hi Sp eed FS
ALL
Mov e
Sel ect
OK
Select Disk
Choo se the drive fo r DVR, C: is the de fault drive .
Select Disk
Check DVR File System
Pres s 'OK' button t o check if your U SB device is re ady for DVR functions. If the di sc is formatt ed
and co mpatible it w ill display ' SUCCESS', i f the disc is not r eady it will display 'FAIL'.
Check DVR File System
Select Disk
USB
Disk
0
C:
Mov e
Sel ect
OK
Show c urrent cond ition,rec oreded prog ramme shows n o mark, if shows me ans recordi ng,and
if it sh ows ,it means o n the playing ,if Focused,it shows color i mage,othe rwise it is gra y.
Rec ord
Pla y
MarkMark
Recorded List.
TitleTitle
Prog ramme -> Channel -> Time,whi ch make order s by programm e name, chann el order and re cord
time .
Show i n title right ,means the cu rrent order ing way,Index key can switch option:
OrderingOrdering

34
DVR –Record ModeDVR –Record Mode
Choose recording mode; Switch order:Once -> Everyday -> Weekly -> Auto.
Start recording time;
Recording end time.
Title
Show s current cha nnel name.
Title
Reco rded Mode
09 Jun 18:1 4
Once
Start Tim e
Mode
Month
Date
Jan
2010/05/04
End Time
Minute
Hour
00
00
Month
Date
Jan
2010/05/04
Minute
Hour
00
00
20 ABC HDTV
Mov e
Sel ect
OK
Bac k
MENU
Prgramme name
The pr ogramme nam e is construc t by channel nu mber and reco rd channel nu mber.
Prgramme name
Oper ation guide
Show t he current av ailable ope ration.
Oper ation guide
Pop out or close the programme instruction.
DELETEDELETE
Dele te Focused pr ogramme.
When no menu, press to show Recorded List; When it show Recorded List menu,switch recording programme
orders.
R.LISTR.LIST
▲▼
Up and d own to move Foc us to select pr ogramme.
Close/pop out the programme instruction.
◄► /OK/Enter◄► /OK/Enter
Info/DisplayInfo/Display
ModeMode
Start TimeStart Time
End TimeEnd Time

35
DVR shortcut functionDVR shortcut function
Record
Reco rd menu inclu des two kind, o ne is Full Mode ,the other is S imple Mode. At Simple mode, th ere
is onl y power indic ator blinki ng but no opera tion menu dis play.
They c an switch by RE C/EXIT key.
At Rec ord mode, Rec ord menu show s still.
Record
Enter Timeshift mode;
DVR – Recorder ScheduleDVR – Recorder Schedule
Menu a nd functionMenu an d function
Schedule List
Mod e Ti me Dat e
Pro gramm e Title
Res ult
Cha nnel Na me
Del ete
Qui t
EXIT
Mov e Bac k
MENU
18: 14 09th J un
Note
1.Li st timer reco rding will st art accordi ng to date and time priority.
2.Ne wly added ite ms will be last o n the listed.
3.It e nter the menu w hen recordi ng,Focus on c urrent recording plans.
Note
AUTO
19:2 8-20: 20
Sato s Jun
New Ta nks
2 ABC TV
Exit menu;
ExitExit
Dele te Focus item s;
DeleteDelete
Move Focus up and down;
MoveMove
Exit Recorder Schedule List menu,enter DVR menu,Focus on Recorder Schedule List;
MenuMenu
Enter Record mode;
RECREC
Pop out Recorded List menu, enter OK/Enter to enter Playback,play it;
R.LISTR.LIST
Note
Reco rd and Record ed List can be en ter from DVR me nu.
Note
Pop out Recorded Timer Schedule List.
T.LISTT.LIST

Chan nel name and Pr ogramme nam e
Full M ode:Full M ode:
Play FB FF
NextPrev StopPau se
5 Five
Before Wi nt er Comes
[00:00:20]
14:30
[0000:10:20]
Record/ExitRecord/Exit
Enter Playback mode, play it from the start recorded programme Check Playback instruction in details;
Close Record menu,pop out Recorded List menu;when exit from Recorded List menu, it shows record again;
Max R ecord ing Tim e
Rec ordin g Time
The details is as follows:The details is as follows:
StopStop
Exit Record,shows Processing;
Switch Record menu mode;
PlayPlay
R.LISTR.LIST
Timeshift menu
Time shift is simi lar with Reco rd menu, incl udes two kind : one is Full Mode and the other is
Simp le Mode. They c an switch by Ex it key. At Timeshift mode, Tim eshift keep s still.
Timeshift menu
Note
At Sim ple Mode,it s hows curren t Timeshift p laying conditon, such as Play,Pause;
Simp le Mode shows o n the right dow n side;
Note
Play
FB F F
NextPrev
Stop
Pause
[00 :00:0 0/00: 50:00 ]
Simp le Mode:Simp le Mode:
S
S
Full M ode:F ull Mode:
TimeshiftTimeshift
SHI FT TIME /MAX SH IFT TIM E
36
Curr ent Time
Timeshift Start conditon
Ente r Timeshift t o press ,and th e image paused and it start reco rd from the pau sed positio n.
Timeshift Start conditon
Stop Timeshift.
Swich Timeshift menu mode.
Timeshift conditonTimeshift conditon
ExitExit
StopStop

37
Timeshift Play
At Tim eshift Play c ondition, t he system record DTV and play it at the same time .
Time shift Play is s tart by press , at Timeshift Pl ay conditio n, it can work Pa use,Fast Fo rward,
Fast R ewind,and i t would enter A ->B circle pl aying condi tion.
Timeshift Play
Playback
Play back is simil ar with Times hift,one is F ull Mode,an d the other is Simple Mode, they c an be
swit ch by Exit key.
At Pla yback mode, Playback sh ows still.
Playback
Note
At Sim ple mode, the re is only powe r indicator b linking but n o operation menu display.
Note
Play
FB FF
NextPrev
Stop
Pause
00: 00:00 /00:5 0:00
Full Mode:Full Mode:
18: 13
Enter Timeshift Play condition;
PlayPlay
Close Timeshift,pop out Recorded List;From Recorded List menu to enter Playback,and then exit
Timeshift;
R.LISTR.LIST
Timeshift Record
Time shift Recor d condition ,similar to R ecord mode.
Timeshift Record

38
8. TROUBLESHOOTING AND ADVICE8. TROUBLESHOOTING AND ADVICE
If you e ncounter pr oblems with y our TV, please ch eck the count ermeasure s below.
If the p roblem pers ists, pleas e contact you r dealer or the TEAC Customer Care Centre, see back
page f or details.
Cont rol
Troubleshooting
No sig nal
No col or
Interference on the
screen.
Doub le or multipl e
disp lay image
Snow o n the screen
The re mote contro l
does n ot work
No sou nd
Plea se check that a ll cables are c orrectly pl ugged in.
Adju st the contra st, the color a nd the bright ness
Mayb e result from a l ighting sig nal from car, mo tor, neon ligh t and
othe r electrica l devices or ap pliances.
Mayb e the result of a n electrica l wave distur bances from other TV,
Comp uter and Game m achine or Rad io
The ca bles of the ant enna are not co rrectly plu gged in.
Plea se check the ba tteries pol arity and ali gnment. Make sure the
sign al from the rem ote control t o the TV i b locked by any o bjects.
Make s ure that you ha ve not press th e MUTE button o f the panel
or of th e remote cont rol. Adjust t he volume set ting.

39
9. SPECIFICATIONS9. SPECIFICATIONS
De sign a nd spe cif ication s subject t o chan ge wit hou t noti ce. Weig ht and d imensio ns are a ppr oximate .
LCD2639HD
1366X768 Pixels
664 x 210 x 507 mm ( WxDx H)
About 12Kg
8W 8W
26-inch
DVR
Gro ss weight
Dimensio n(wit hout stand)
664 x 103 x 499 mm ( WxDx H)
4000 : 1
AC110 to 240V,50/60Hz
USB device MAX size 1TB
0
8ms
< 140
200 x 100mm ( WxDxH )
M4 x 12mm
< 1 W

 Loading...