

Page 1

Model: TEAC ITV-D500
OPERATOR’s MANUAL
INTERACTIVE PLAYER
Please read this manual carefully.
Software Revision 4.4.2
Page 2

Disclaimer
We make a sincere effort to ensure the accuracy of the materials
described herein; however, the author and TEAC Australia Pty Ltd
make no warranty expressed or implied with respect to the quality,
correctness, reliability, currentness, accuracy or freedom from error
of this document or the product it describes. We make no
representation or warranty with respect to the contents hereof and
specifically disclaim any implied warranties of fitness for any
purpose. The author and TEAC Australia Pty Ltd disclaim all liability
for any direct, indirect, incidental or consequential, special or
exemplary damages resulting from the use of this product or from
the use of any products described in this document.
Please refer to our website http://player.teac.com.au for any
correction or improvements to this manual.
Copyright Notice
This material is copyrighted and all rights reserved by TEAC Australia
Pty Ltd.
Copyright 2004 by TEAC Australia Pty Ltd
Dolby DigitalTM, the double D and AC-3 are trademarks of Dolby Laboratories.
Flash
TM
is a tradmark of Macromedia.
Windows
TM
and Windows Media PlayerTMis a trademark of Microsoft Corporation.
Page 3

PRODUCT SAFETY NOTICE.............................................
GETTING STARTED
Step-by-step setup......................................................
The remote controller..................................................
Using the joystick.......................................................
Accessory: Cordless keyboard.........................................
USB Device Compatibility...............................................
BASIC OPERATION
The LIST key..............................................................
New Services.............................................................
Logical Channel numbering............................................
The INFO function.......................................................
Closed Captioning & Subtitling........................................
Digital Audio..............................................................
Teletext...................................................................
Switching Wide Views...................................................
Picture Pause.............................................................
THE ELECTRONIC PROGRAM GUIDE
Introduction to What’s On.............................................
Using the Guide..........................................................
Program Reminders......................................................
Program Timers and Listings...........................................
Recording to a VCR......................................................
Other Guides.............................................................
THE MENU OPTIONS
Introduction..............................................................
Favourites.................................................................
AddressBook..............................................................
Messages (Read & Write E-mails)....................................
Services (Internet Access).............................................
THE INTERNET
Introduction to the TV Browser.......................................
Internet Servive Provider (ISP) Set-up...............................
Using the Internet (CH954)............................................
Broadband Connectivity................................................
Wifi Connectivity........................................................
WEP Security.............................................................
MULTIMEDIA
Exploring media.........................................................
Playing music.............................................................
Photos@TV................................................................
TABLE OF CONTENTS
5
8
10
11
11
12
14
14
15
15
16
17
18
18
18
21
22
23
23
24
24
25
27
28
28
29
31
32
33
36
37
39
42
43
44
Page
Page 4

TABLE OF CONTENTS continued....
MY PLAYER
Timers.....................................................................
Your Opinion..............................................................
Help........................................................................
Preferences...............................................................
- Tuning-in Services......................................................
- Favourite Channels....................................................
- Audio & Video Settings................................................
- Modem Settings........................................................
- Parental Lock...........................................................
- User Interface..........................................................
ADVANCED TOPICS
Interactive Hyper-channels............................................
Broadcaster Applications...............................................
Software Upgrades......................................................
USB Port Connectivity...................................................
Media Playback..........................................................
Web Programming.......................................................
TROUBLESHOOTING & FREQUENT QUESTIONS....................
46
46
46
47
47
47
48
50
51
52
54
55
56
56
56
57
58
Page
Page 5

PRODUCT SAFETY NOTICE
Warning! Do not open this product as there is a risk of electric
shock. Under no circumstances should you try to repair the receiver
yourself as this will invalidate your product warranty.
If a fault occurs, check the troubleshooting guide at the back of this
manual. Should problems continue to persist, contact TEAC Total
Care on 1800 656 700 EST between 9am to 5pm weekdays.
Always use the power cable supplied with your receiver.
Always allow minimum about 2.5cm (1 inch) of free space around the
product for adequate ventilation.
Always place the product on a firm flat surface before applying
power.
This product is not to be exposed to dripping, splashing or any
moisture. Be careful not to place liquids or vases close to this
product.
Do not place naked flame sources such as lighted candles near the
product.
Keep the product away from domestic heating equipment and direct
sunlight.
Always disconnect the power-cord from the wall socket before
cleaning it. Use a soft cloth and a mild solution of washing liquid to
clean the casing.
Your product consists of material, which can be recycled and reused
if disassembled by a specialized company. Please observe local
regulations regarding the disposal of packaging materials, exhausted
batteries and old equipment.
It is recommended to disconnect the aerial from this product during
a heavy storm as lightning can cause severe damage.
This product complies with the following Australian standards: AS/NZS 60065, AS/NZS 1053, ACA TS001, ACA TS002, ACA TS008
Page 6
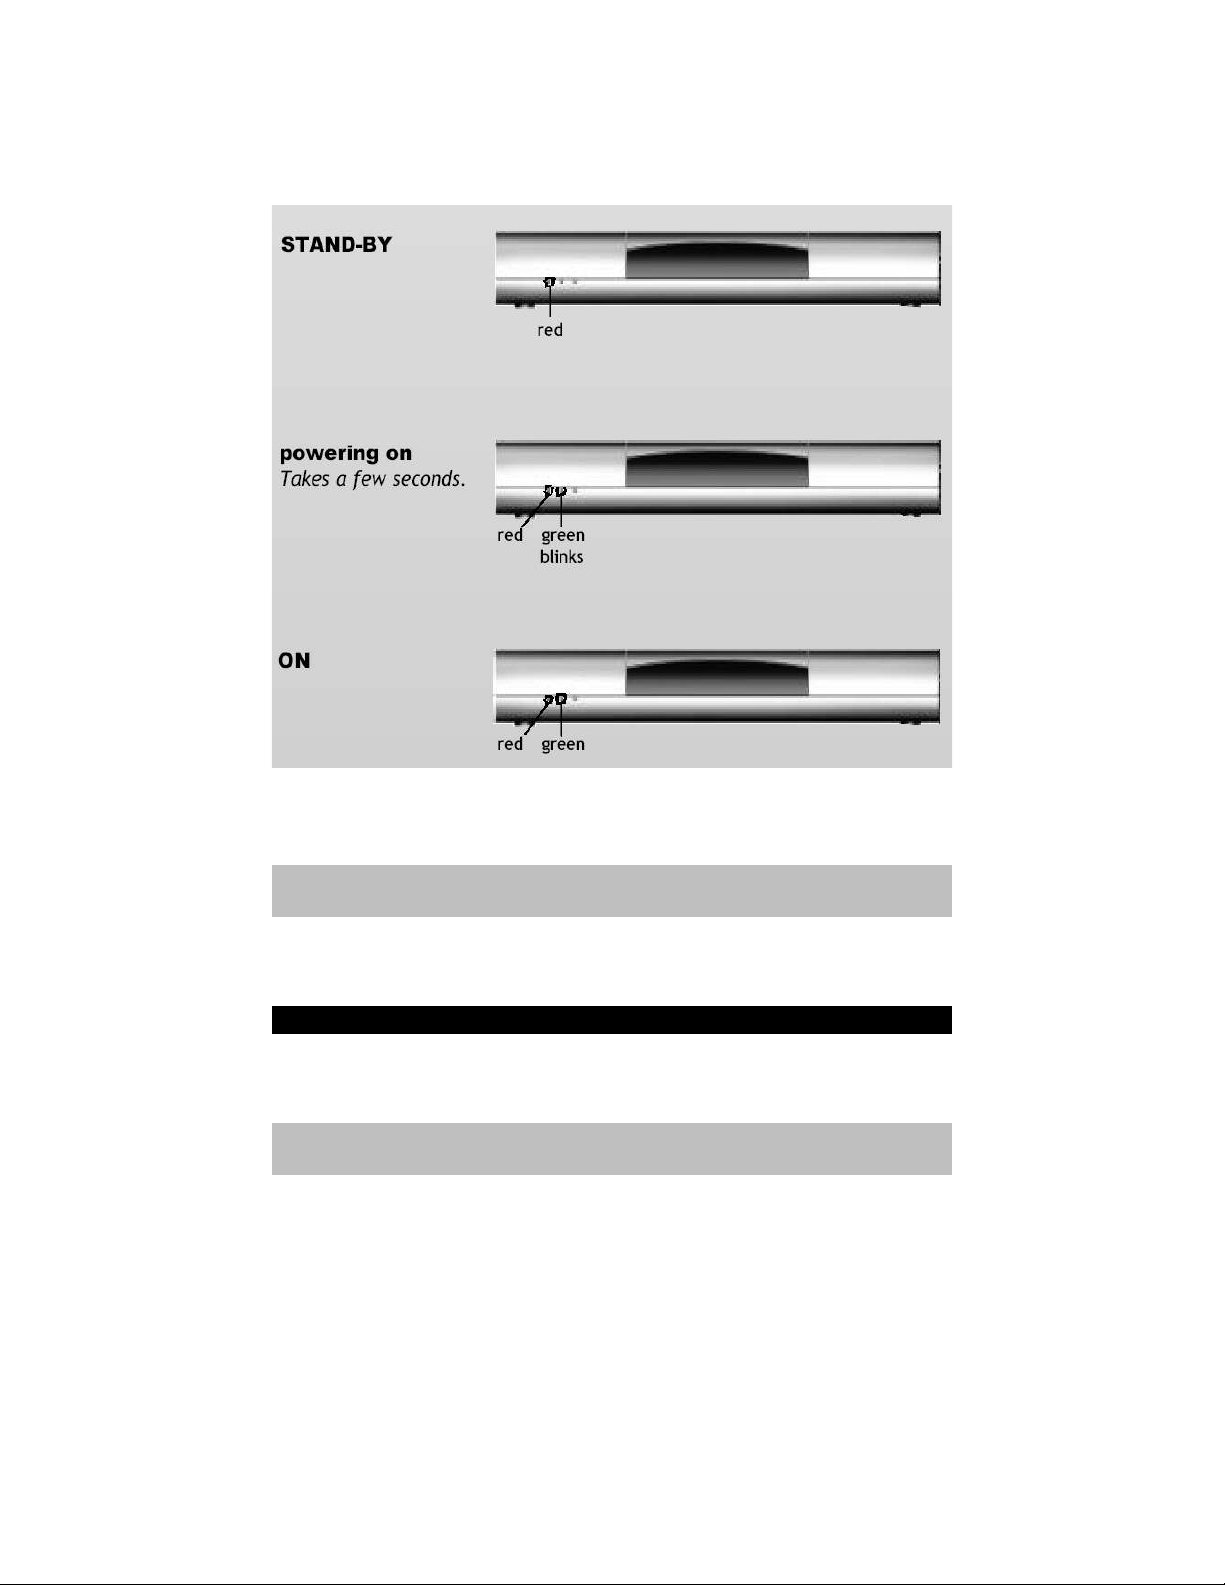
There are visual indicators on the front of your digital player. They
operate as follows: -
The 3rd led light is orange. This is used to indicate an Internet
connection. This is decribed later within this manual.
NOTE: There are no lights, indicators or any other displays from the
front lens. It is solely for cosmetics and infra-red reception.
FACTORY RESET
If for any reason you believe their is a problem with your set-top
box, you may wish to perform a factory reset.
WARNING: Record all your Internet settings, Favourites, Address
Book details before doing a reset. ALL information will be lost.
To do a reset,
1. Switch mains-power OFF
2. Switch mains-power ON
3. Wait for the Green light to begin flashing.
4. On the 3rd flash (green light), press and hold the round RED
button on the remote controller, pointed at the player.
5. Continue to hold down RED key until a special SAFEBOOT screen
appears on your TV.
6. Select the FULL RESET option.
Page 7

GETTING STARTED
Introduction
Digital Television begun January 2001 within Australia. Since this
time, digital television programs and services have evolved and all
Australians can now enjoy this exciting new technology.
You will find today there are extra channels and services over the
older analog system. Features such as program information,
electronic program guides, bitmapped subtitling, enhance the digital
viewing experience. Most importantly, viewers will get DVD quality
picture and digital quality sound all the time. In some cases 5.1
digital sound may be available.
In this section you will set-up your digital receiver step-by-step and
learn to use the remote control.
Please refer to the "Quick Start Installation Guide" on how to
connect the digital receiver to your television.
Page 8
STEP BY STEP SET-UP
Before proceeding, please ensure you have connected your digital
player as shown in the Quick Installation Guide and that you can see
the following screen on your television.
The joystick is the large grey
button in the centre of your
remote control. Using your
thumb, you can gently guide it up,
down, left and right. By pressing
the joystick firmly, you activate
the [OK] selection.
Your television may have S-Video
or RCA PAL video input. Select the
option by moving the joystick left
or right.
You can also use the RED or BLUE
buttons to make your selection.
You are now required to select the
shape of your television. Most
televisions are 4:3 format (square
in shape).
You may have purchased a new
widescreen television or plasma
screen. Press RED for this.
Page 9
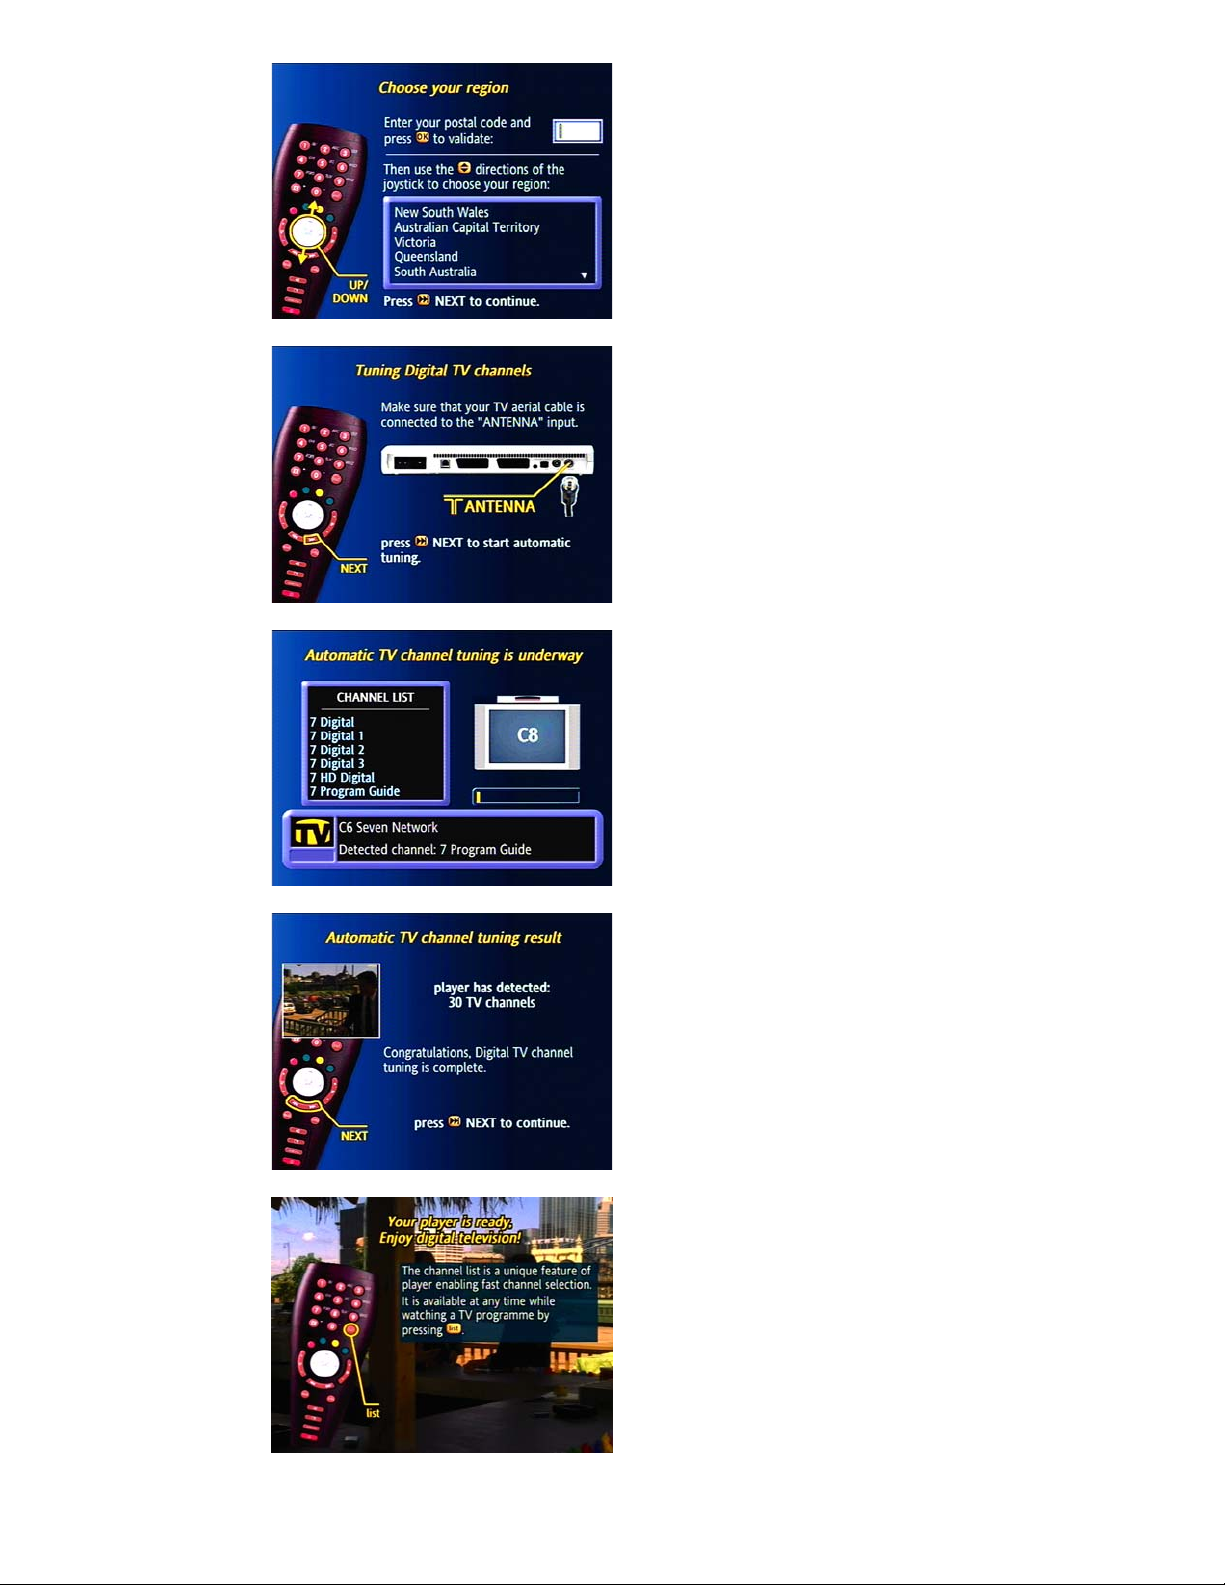
It is recommened that you enter
the postcode where indicated.
Specific services or information
may be available directly to you
depending upon your location
within Australia.
By guiding the joystick up and
down, you can select the state
you live in. Thus ensuring the
digital receiver is set to the
correct timezone.
We will now begin to tune in all
the digital channels available in
your area.
Connect your antenna as shown
and press NEXT.
The complete tuning process may
take up to 5 minutes to complete.
You will see the channel names on
the screen as the receiver finds
them.
The digital receiver will now
indicate how many channels have
been found.
Simply press NEXT to continue.
Now press the LIST key. This will
show all available services. Move
joystick up/down to press OK to
select and watch.
Page 10
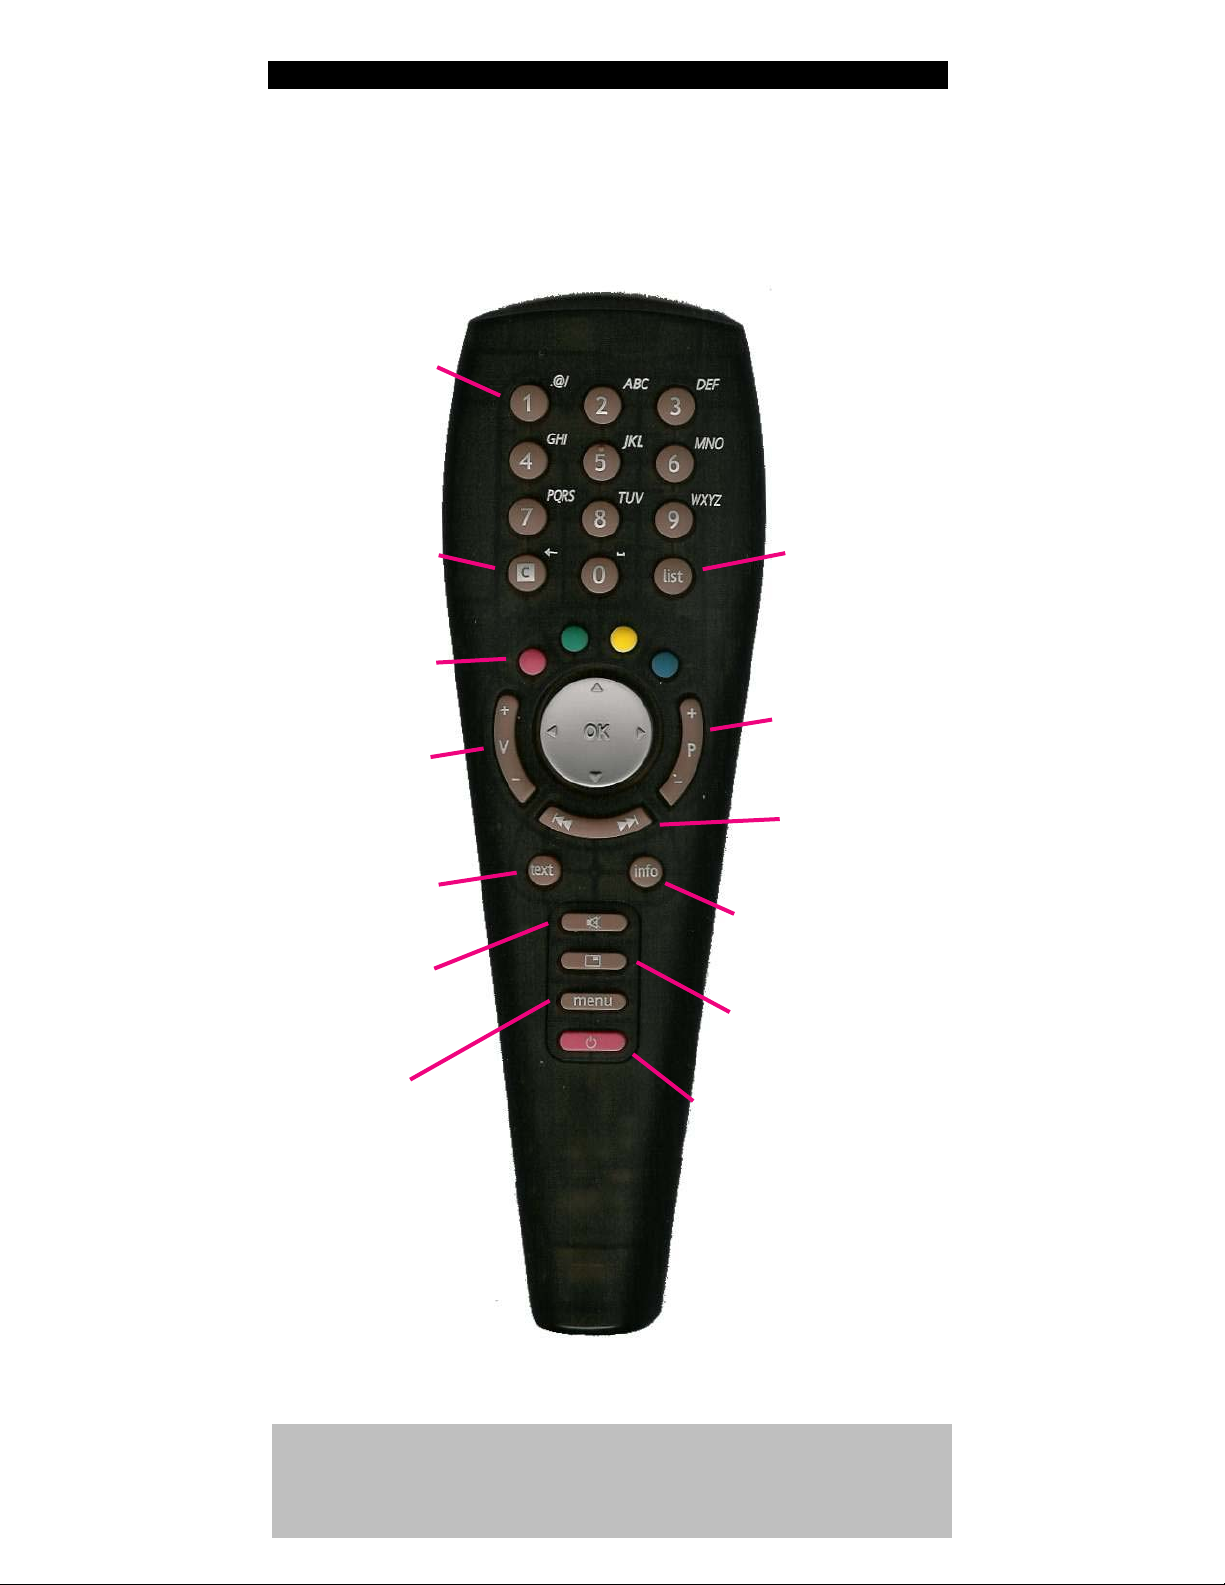
THE REMOTE CONTROL
Learning to use the remote control may be difficult at first. In time
however, you will learn to use it effectively along with all the new
features digital television has to offer.
[C]
Used to either Cancel or
CLose some menus and
applications.
[0-9] KEYS
Enter the channel number
to watch. Also, in some
input fields, pressing
more than once will allow
character entry A-Z in a
similar way to a mobile
telephone.
[1] KEY
The number 1 key is also
used for entry of special
characters when browsing
the web or writing an
email address.
COLOURED KEYS
To perform some actions
often indicated on the
television screen.
V+/VAdjusts the volume level
up and down.
TEXT
Enable and disable the
teletext feature.
Also may be used for
enhanced tv applications.
LIST
Displays the available
services.
P+/PChannels the channles up
and down.
PREV/NEXT
This button will either
return to the previous
screen or display the
next one.
INFO
Display information on
the current and next
programme.
PIP / PAUSE PICTURE
Display small TV picture when
viewing some interactive
channels.
MUTE
Switches the sound on and
off.
MENU
To access the receivers
options, and tuning
functions.
STANDBY
If connected to the Internet via the
modem, press this button to hang-up
the connection.
Also used to switch your receiver
on/off.
Troubleshooting
If remote control does not function properly, please check that
your batteries are inserted in the correct direction. Also check
that the batteries are still in good condition.
Page 11

USING THE JOYSTICK
The joystick is used to navigate with various menus.
Using your thumb, gently move the joystick up,
down, left and right. Firmly pressing in the middle
of the joystick will activate the [OK] selection.
You will find later in this manual, that the joystick is used
extensively when operating the channel list function, the electronic
program guide (EPG), playing games and broadcasted enhanced
program information.
CORDLESS KEYBOARD
The keyboard uses infrared (same as your remote control).
It may be available where you purchased this product or by
contacting TEAC. The keyboard is useful for Internet browsing and
using E-mail (electronic mail on your TV).
It is different to that of a computer keyboard. There are extra keys
such as Volume adjust, Channel selection, Menu, Service List,
Teletext, etc.
These features are explained later within the manual.
Troubleshooting
If you own a keyboard and it doesn’t function properly, please
check that your batteries are still in good condition and that it is
pointed directly at the player.
For this keyboard, contact your place of purchase. TEAC
product code is KEYBRD500 when ordering. Also check
our website http://player.teac.com.au for more details.
Page 12

USB DEVICE COMPATIBILITY
The TEAC player features a USB (Universal Serial Bus) connector.
This connector is compatible with a myriad of devices. In the
future, more devices will work with your player. We recommend
that you lookup the website http://player.teac.com.au before
purchasing any devices for your player.
Below is a list of devices based on software version 4.4.x.
Networking (Ethernet)
Belkin F5D5050
Compex UE202 A, UE202 B
D-link DU E100
Ebuyer UE 120
Wireless (WiFi802.11b)
Netgear MA101
Belkin F5D6050 Ver.2, F5F6050 / SMC 2662W-AR
D-Link DWL-120
Inventel PQP-WU221P-X
BT Voyager 1010
Compex iWavePort WLU11A
Stor
age (USB1.1 memory devices and memory card readers)
M-Systems DiskOnKey (32MB, 64MB, 128MB, 256MB)
Conquest pocket disk (64 MB, 128MB, 256MB)
PQI Traveling Disk (32MB, 64MB, 128MB, 256MB)
Linksys USB Disk (64 MB, 128MB, 256MB)
DMI USB 2.0-IDE adapter
Hyundai pocket hard disk drive
Sandisk Smard-Media Card reader
Datafab Memory Stick reader
Sandisk Smart-Media/Compact-Flash Dual Card Reader
Stor
age (USB hard drives)
Hard drive Freecom FHD-1 20GB
Maxtor 40GB
IOMega 20GB slim portable
Sarotech 30GB Cutie
Printers
Canon S100, S200, S400, S500, i550
HP DeskJet 3325, DeskJet 3420, DeskJet 3820
Epson Stylus C42, C62, C82
W
ebcams
Philips ToUCam Fun, ToUCam Pro
Logitech QuickCam 3000 Pro, QuickCam 4000 Pro, QuickCam Zoom
Troubleshooting
If you experience technical difficulties, switch off the player (by
power switch) and disconnect the USB device. Turn player on, wait
a minute and reinsert the USB device.
Recommendation:
External USB Hubs are compatible with your player. It is
recommended that a ‘powered version’ is used when multiple
devices are connected.
Page 13

BASIC OPERATION
Introduction
In the section you will learn how to use basic digital television
features and learn more about this new technology.
We will begin by using the service list and exploring what channels
(services) are available.
Page 14

LIST FUNCTION
Now that your digital receiver is set-up and working, you able able
to watch television by simply pressing the LIST key on the remote
control. Within seconds a channel list similar to the picture below
is shown.
Using the joystick, press down to scroll to the desired channel. To
watch it, simply press firmly to select [OK function].
This is known as ‘zapping to a channel.’ You may also zap to another
channel by simply pressing the desired channel number.
NEW SERVICES
The service list shown above has multiple channels. At the time of
printing this manual, many broadcasters were displaying more than
one channel.
Example: SBS is sending service numbers [3] [30] [31] [33]. In fact,
SBS is sending an extra new channel. Today, you can view SBS
DIGITAL1, SBS ESSENTIALS, & SBS DIGITAL2. Other broadcasters are
sending new program guides also.
In future, broadcasters may send multi-view channels. Imagine
watching your favourite football game with more than one camera!
You can become the director.
NOTE: The yellow telephone may be shown beside a channel. The
telephone symbol indicates that an internet connection is required
for this channel. Other symbols may indicate that the channel is
blocked from viewing.
Page 15
LOGICAL CHANNEL NUMBERING
Logical channel numbering is another new feature of digital
television. Broadcasters can send their channel numbers together
with their digital services.
It works like this: Press 2 for ABC, 7 for Network Seven, 9 for
Network Nine, 1 or 10 for Network TEN and 3 for SBS. Television
networks that offer other channels will start with their main number.
That is, any services available from Network Nine will all begin with
a 9. All services offered by Network Seven all begin with a 7 and so
on …..
NOTE: Some broadcasters today do not send their logical channel
number. These services are automatically given a number between
350 and 399 by the set-top box. You cannot change this.
Broadcasters control all channel numbers and services to be offered
for your viewing.
** Some networks may utilize special numbering which do not
coincide with the descriptions above. **
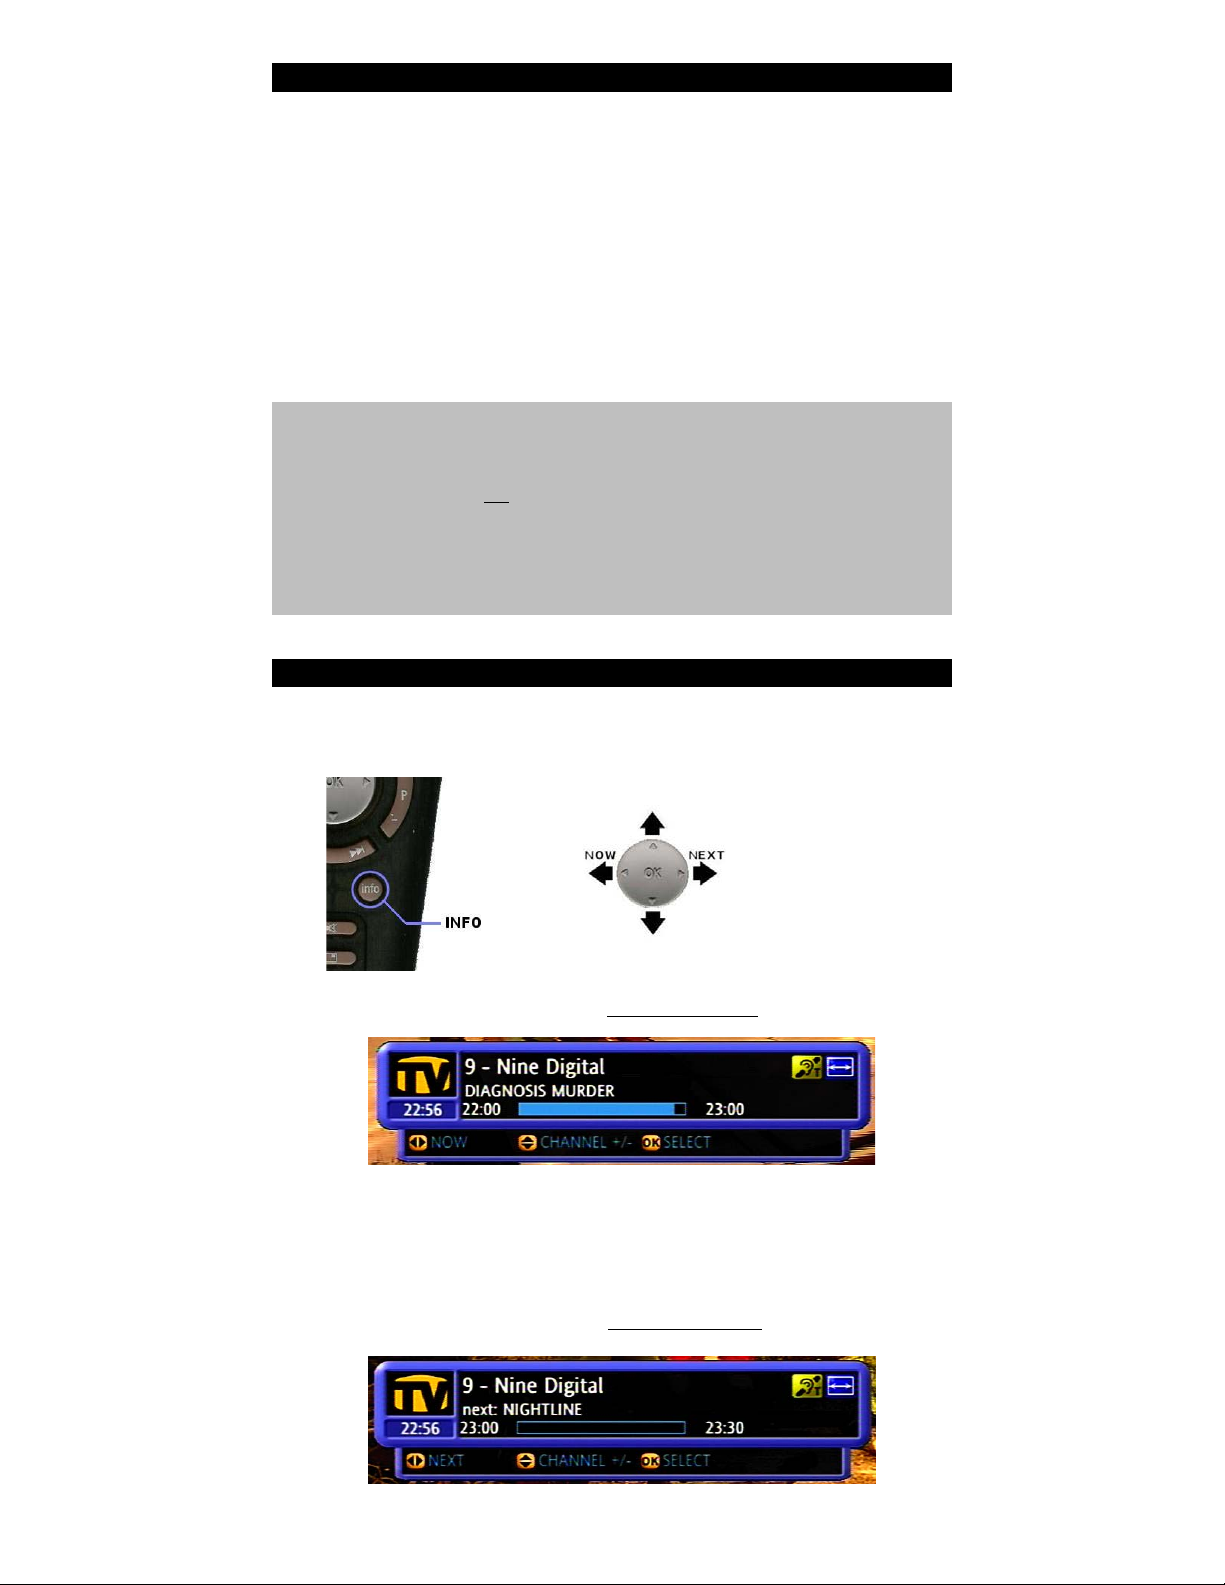
INFO FUNCTION
The [info] key gives you more information about the program you
are watching and the next program showing.
Press the [info] key once to get ' NOW PROGRAM banner as shown.
Shown in the picture above is the channel number, network
name, program start and end time, the current time and
subtitle indicator.
Press the [joystick right] to get ' NEXT
PROGRAM banner as shown.
Page 16

Press the [info] key again to get further detailed EVENT information
about the program.
Press [info] key
again to remove
this screen.
In the above picture, you are shown the current program is a drama
program called 24 and that mature audience 15+ is recommended.
It also shows that this service has subtitles available in English
(yellow icon) and that 7 Digital has teletext available (press TEXT).
Sometimes a green icon may appear. This will allow you to change
audio streams. Dolby Digital 5.1 may be available with some
programming.
CLOSED CAPTIONING & SUBTITLES
Captions provide access to television for people who are Deaf or
hard of hearing, by rendering the audio of the program as text,
usually near the bottom of the screen.
Captions are coloured and positioned to indicate who is speaking,
and provide information on music and sound effects which may be
crucial to the understanding of the program.
To enable this feature, you must press [info] so that the program
banner is showing.
You must see the subtitle icon. This indicates that
either closed captions or bitmapped subtitling is
available.
Now press the YELLOW key and you will see a message on the
bottom of the screen.
Page 17

Note: You may need to activate subtitles
for each channel individually.
Press the YELLOW key again to disable the feature.
For further information about captioning, visit the Australian
Caption Centre website at http://www.auscap.com.au.
NOTE: The yellow icon as shown is an indicator for subtitles. There
are times when the broadcaster will enable this feature and the icon
will display however, there are actually no captions available.
Therefore when selecting subtitles you may not get them on screen.
DIGITAL AUDIO
Your product is capable of playing different audio streams available
during the broadcast. Some programs allow you to select 'english'
and 'english5.1' sound. In future you may be able to select 'french',
'german', or other languages. This is dependant upon the broadcast.
The 'english' selection is the default. This is known as MPEG stereo
sound and is available at all times.
The 'english5.1' selection is actually Dolby Digital™ 5.1 sound. It is
only available via the optical TOSLINK connector found at the rear of
the digital receiver. A surround amplifier capable of decoding Dolby
Digital is required.
To change the audio stream, you must first ensure that the PROGRAM
NOW banner is showing by pressing the [info] key.
If you see the audio icon, then an
additional audio stream may be
available.
Press the GREEN key to change audio streams.
You will then see the "Audio changed"
message at the bottom of the screen
and the audio icon will change.
Page 18
If you see the 5.1 audio icon as
shown then 'english5.1' has been
selected.
TROUBLESHOOTING:
When 'english5.1' is selected, NO AUDIO can be heard through your
television. This is normal.
The digital receiver will pass the Dolby Digital stream to a
compatible external amplifier via the optical connection. The
digital receiver does not
perform a Mixdown L-R sound to your
television.
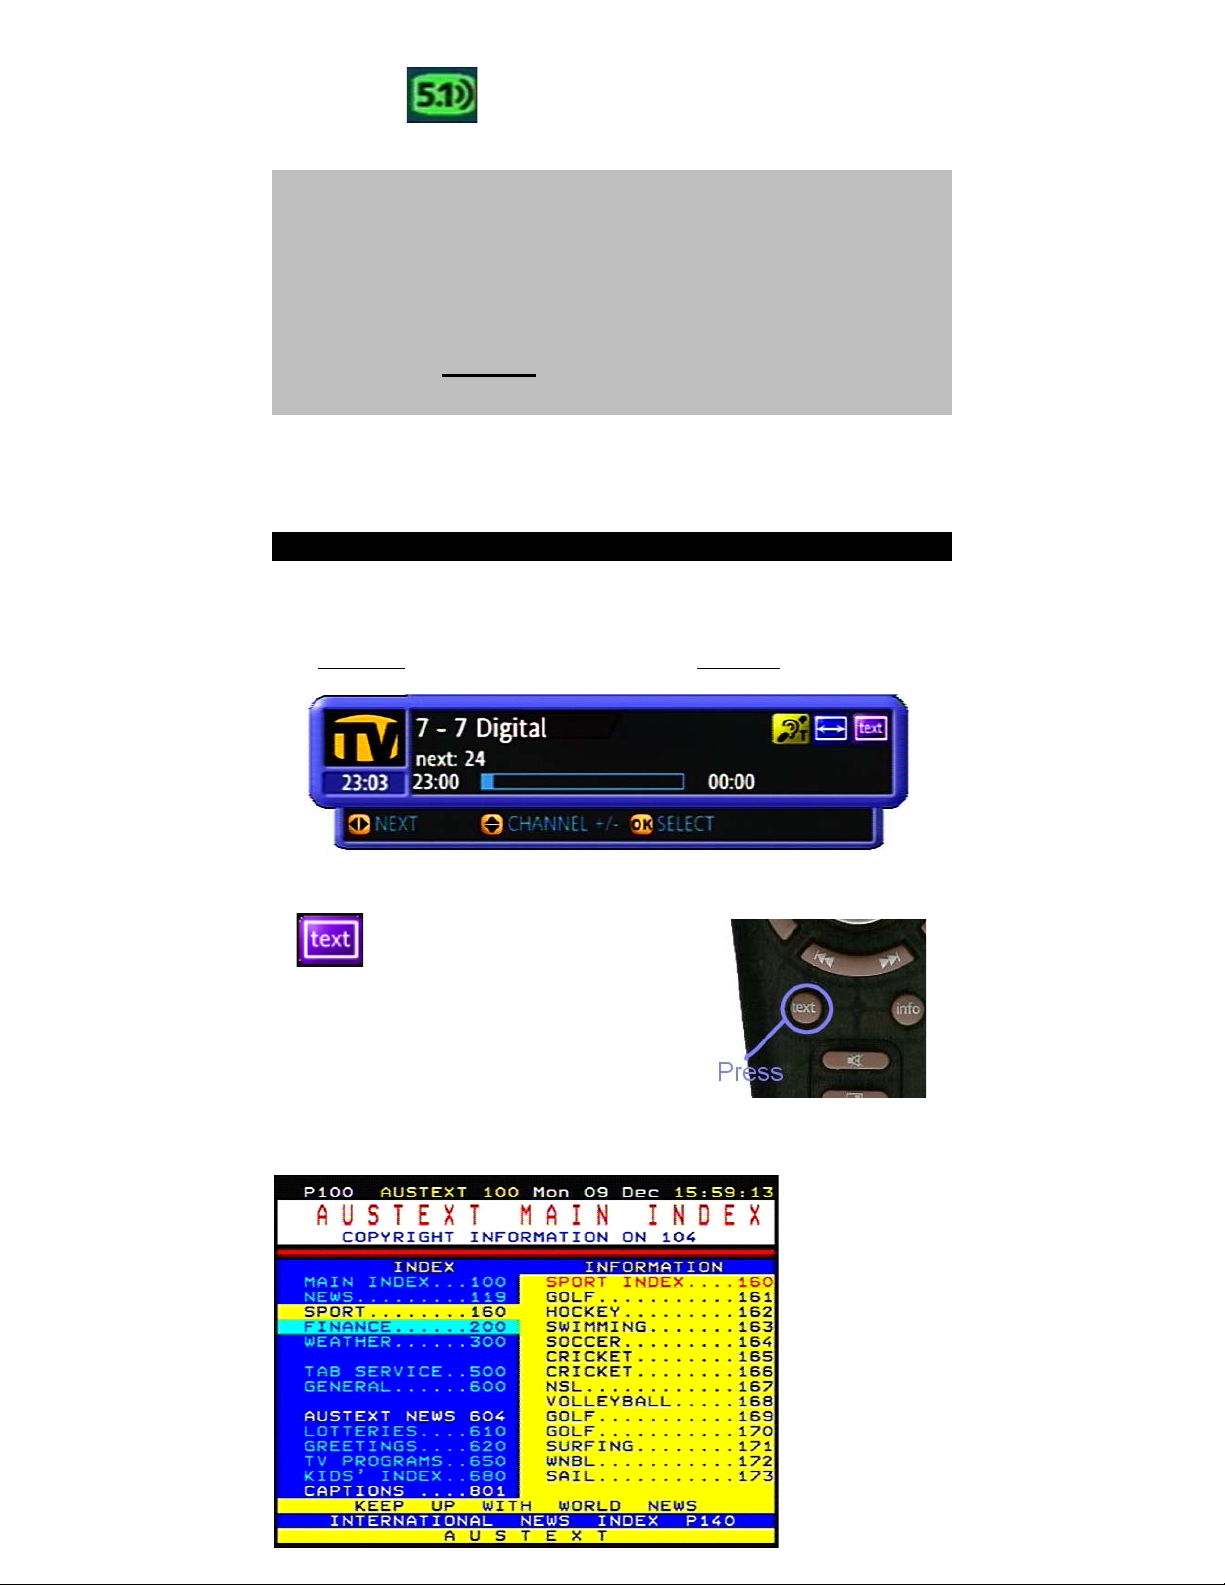
TELETEXT
Your digital receiver is capable of displaying teletext. Teletext was
available also on the analog television system.
The AUSTEXT service can be found on the 7 Digital service.
In the PROGRAM NOW banner
above, the text icon shows that
the teletext service is available.
Press the [text] key to activate teletext
Within a few seconds, you will see a screen similar to this.
AUSTEXT is
available on the
Seven Network.
Page 19

In the top left corner, you will see 'P100'. These are known as page
numbers. The 'main index page' is page 100.
You will find on the main index a myriad of information available at
your fingertips. Simply, type the number of the page you are
interested in.
Example:
If you want to lookup Lotteries, you will need to press 6 1 0 on the
remote. Within a few seconds your page will be shown.
The PREV/NEXT keys on the remote may
be used to move backward and forward
through the page numbers.
To deactivate the teletext function, simply press the [text] key
again.
SWITCHING WIDE VIEWS
When using a standard 4:3 television, it is possible to switch
between standard Pan & Scan (fullscreen) and 4:3 letterbox mode
(to see the widescreen picture)
Simply press [info].
Then press the BLUE
key until the desired picture format is
selected.
There is an extra selection called Letterbox (14:9). This is not used
in Australia. It allows switching of 14:9 content onto a standard 4:3
screen.
This logo will appear
(ONLY WITH 4:3 STANDARD TV SET)
PICTURE PAUSE
When watching television, you can pause the picture by pressing the
PIP button on the remote.
PIP KEY
The following menu may appear at the
bottom of the screen.
NOTE: The OPTIONS and RESIZE buttons will only appear if a USB flash memory
device is connected to the USB port.
Press the [GREEN] key to open the options. You
can select SEND EMAIL (picture will be attached)
to your mail or SAVE TO STORAGE which will
make a copy of the tv screen picture to the
memory chip attached to the USB port.
Press the [YELLOW] key to select FULL, HALF and QUARTER screen
sizes.
Page 20

The screen size options give the following pixel sizes:
FULL = 640x360
HALF = 320x180
QUARTER = 160x90
Images are capture in JPG format and are automatically labelled as
Grabbed Photo 000.jpg and so on..
Refer to the section on MULTIMEDIA for further information on using
the picture viewer Photos@TV, and the ability to delete and rename
your pictures.
Page 21

Introduction
One of the latest features available on digital television is the
electronic program guide. Broadcasters are now sending the NOW
and NEXT information. In addition, other information such as
program type, it’s duration and event data is available.
In this section, we will explore Channel 0 - What’s On.
THE ELECTRONIC
PROGRAM GUIDE
Page 22

NOTICE:
The information described here is based on software version 4.4.
If their are variations to the What’sOn guide you have, please refer
to our website http://player.teac.com.au for more details.
To activate What’sOn, press number 0. The guide is also available
by the service list. Press [LIST] and select channel zero.
A screen as below will appear.
Note: The information displayed will be
different ...
Information such as the
network, program name,
parental rating, start and
end times, event, etc. is
all shown.
To see what is showning now, move the joystick
control [UP] and [DOWN] to select the desired service.
Within a few seconds, the information on the screen (if available)
will be updated.
To watch the service, press [OK] on the joystick.
To see what is showing NEXT, move the joystick
[lLEFT] or [RIGHT].
NOTE: ONLY the current selection will display the NOW and NEXT
information. To see what is showning on other channels, you must
move the joystick [up] /[down] and wait a few seconds. This is
normal.
On the NEXT guide, you can
see that the program on 7
Digital will begin in about an
hour.
You can set a program
reminder by pressing the
[YELLOW] button.
Page 23

PROGRAM REMINDERS
It is possible to set a program reminder so you do not miss your
favourite program.
You must have the NEXT
GUIDE on screen. Move joystick [RIGHT].
Move joystick [UP] or [DOWN] to select the program you wish to be
reminded. Press the [YELLOW] button.
A yellow icon will appear
indicating that the program
reminder is set.
TROUBLESHOOTING:
If the reminder icon does not appear (or a red triangle), it may occur
for two reasons: -
1. Another reminder is already set for the same time period.
2. The broadcaster has blocked this program from reminder.
A screen such as this example
will appear when a program
is about to start.
There are two options. Press
[BLUE] to watch the program
and [RED] to cancel.
Program timers work in a similar way to program reminders however
there are some slight differences. Timers are used to turn-ON your
player at a defined time.
You must have the NEXT
GUIDE on screen. Move joystick [RIGHT].
PROGRAM TIMERS AND LISTINGS
Move joystick [UP] or [DOWN]
to select the program you
wish to timer set.
Press the [BLUE] button and a
blue icon will appear.
Page 24

To review what timers are set, press the GREEN button for timer
list.
When making changes to a timer, many options will appear. You
have the ability to change the channel, its occurrence (once,
weekly, weekdays, etc.), date, start and end times.
Press BLUE to save your timer or GREEN to delete it.
A screen such as this one will
appear.
To make changes or review
this timer, press joystick
[OK].
The BLUE button may be
used to add another timer.
NOTICE: When a timer has started; to stop it, press the STANDBY
key on your remote controller.
In order to record on a video recorder (or DVD recorder), you must
connect the video and audio outputs from the set-top box to the
video recorder’s input (labelled AV or EXT in)
For timer recordings, the video recorder
’s timer must ALSO BE SET
to the same time for recording.
Special case.....
Some video recorders (or DVD recorders) have SCART connections on
the rear and support a feature called RECORD-LINK. It is possible to
link the set-top box AUX SCART connection directly with the video
SCART connection (another SCART-SCART cable is required). In this
case, the timer on the video recorder does not need to be set as the
set-top box will activate the recording.
RECORDING ON A VCR
OTHER GUIDES
There are many TV guides available today. Some broadcasters send
their program information as another channel such as the Nine
Guide (99), 7 Guide (77) and SBS (31).
The Internet also has a myriad of resources of guide information.
You may want to try http://www.widescreentv.info
Page 25

THE MENU OPTIONS
Introduction
In this section, you will learn how to use the menu system on the
receiver and make changes to various settings.
We will cover how to change various TV, area, and telephone
settings, how to set the parental control on channels, and how to
skip and hide unwanted channels.
The MENU system on the TEAC player is dynamic. That is, whilst you
are connected to the internet, it is possible for the MENU to change
and extra features may appear.
Page 26

MAIN MENU
NOTICE:
The information contained in this section is based on the software
version available at the time of printing this manual. TEAC is
constantly improving this product and therefore you may find
additional features not described here. You should visit our website
for further details. (http://player.teac.com.au)
The MENU allows you to change settings and
customize your digital set-top box. To activate the
menu, press the [menu] key on the remote control.
To navigate within the
menus, use the joystick
to move up, and down.
Press the joystick firmly
[OK] to make your
selection.
WHAT’S ON
A direct link to the NOW and NEXT program guide as described
earlier.
FAVOURITES
Direct links to webpages, music and movie files.
ADDRESS BOOK
Keep you friends and relatives names, address and contact details
here.
MESSAGES
Refer to your incoming messages (E-mail).
SERVICES
Browse the Internet, or review the direct services available. The
Services menu may update/change periodically and therefore may
contain extra links.
MULTIMEDIA
Use USB memory stiick, card reader, or external harddisk to view
pictures, movies, webpages or listen to your favourite music in MP3
or WAV formats.
MY PLAYER
Contains many links to set-up Internet connectivity, adjust picture
and audio settings, diagnose the player, and many more preference
seetings.
Page 27

FAVOURITES
With Favourites, you can store many of your common links to the
Internet. You can also store and set direct links to music and video
files from memory devices or your home PC (advanced topics
section).
NOTICE
To navigate within the
favourites, use the joystick to
move up, and down.
Press the joystick firmly [OK]
to make your selection.
Internet set-up is required to
browse a webpages.
Home-networking is required
to play music from your home
PC.
To add a favourite, press GREEN key.
The options menu will appear. Select
the “Add a Favourite” option.
As shown, you are able to set the
name, URL link and also a channel
number to the Favourite.
Only channel numbers between 500
and 599 may be set this way.
ADVANCED USERS TOPIC
On your PC, you may run a personal web server. By doing so, a
Favourite channel may be set as a direct link to your music and
movie files. For example, your PC may be running a personal web
server and has an IP address of 192.168.2.1. Therefore the favourite
address would be written as http://192.168.2.1/
On your memory stick (USB flash) you may have a music file called
‘test.mp3’. A favourite may be set as a direct link to this by settings
the favourite address to storage://d/test.mp3
Favourites, when used correctly, can offer immediate access of
entertainment, whether it be via broadcast, your PC, a memory
stick, an external hard-drive or the Internet.
Only the TEAC digital player makes this possible.
Page 28

ADDRESS BOOK
The address book allows storage of personal contacts such as friends
and family.
NOTICE
To navigate within the
favourites, use the joystick to
move up, and down.
Press the joystick firmly [OK]
to make your selection.
E-mail set-up is required to
contact the person.
Internet connectivity must
already be set-up.
When adding a new entry, the following data may be stored.
Information for around
50 users may be stored.
Press BLUE to store your
new contact.
The accessory keyboard
is recommended.
MESSAGES
NOTICE:
The information contained in this section requires you to have an
Internet and E-mail connection set-up correctly. Refer to the section
MY-PLAYER to learn more on how to set-up connectivity.
Your Internet Service provider will give you details to set-up an Email account. The TEAC player uses the standard POP3
and SMTP
protocols.
To use the provider
details given to you,
press the BLUE key. This
will allow you to use an
existing E-mail account.
The following screen will
appear.
Page 29

Your Internet provider must give you the following details:
Email Address: e.g xyz@myisp.com.au
Email Login:
Email Password:
POP3 server: e.g. pop3.myisp.com.au OR mail.myisp.com.au
SMTP server: e.g. smtp.myisp.com.au OR mail.myisp.com.au
The SMTP information is entered on the Internet connection set-up.
More than one
account may
be entered.
When the account is selected the following screen will appear.
INBOX
To check for any E-mails,
press BLUE. Messages
will list themselves down
the screen.
To read, simply move
joystick DOWN and press
OK to select the
message.
Use the OPTIONS (press GREEN)
to mark messages for deletion.
A bin will appear beside those
messages that are marked.
To delete all the marked E-mails, select OPTIONS again and choose
DELETE MARKED.
COMPOSE AN E-MAIL
Press YELLOW to compose a new E-Mail.
NOTE: An accessory wireless keyboard is available and
recommended for heavy E-mail usage. Ask at your place of purchase
for more information. TEAC product code is KEYBRD500.
Page 30

Composing a new E-mail is easy. Simply write the E-mail address of
the person you want to contact in the to: bar. Within the larger area
write your message. Press BLUE to SEND it.
Press OPTIONS and choose SELECT ADDRESS to list the names of your
contacts.
If an address was typed into the to: bar, and you wish to keep it for
record, simply press OPTIONS and choose SAVE ADDRESS.
USB CAMERA!
When a USB webcam is
connected, a snapshot
may be taken from the
camera. Check USB
compatibility list for a
valid camera. Connect
the camera, wait for 20
seconds, and press
snapshot. Then select
‘Change Source’.
Only still images may be
taken.
NOTICE:
Only when a valid E-mail address is
entered, the SEND (BLUE) button will
appear.
SERVICES
The services menu is one of the most exciting. The services menu
will give access to the Internet and other links to exciting content.
In the next section, we will learn more about the Internet, a TV
browser and how to set-up your connection.
Page 31

THE INTERNET
Introduction
In this section, you will learn about the Internet and how this digital
receiver may be used to enhance your television viewing and
entertainment.
It is important to learn more about a ‘television browser’. It is
different to a PC and therefore to some experienced PC users it
seems limited. As you will learn over time, the TV browser has a
specific purpose and is not a direct replacement for your home
computer.
We shall also cover how to set-up you Internet Service Provider
details.
It is recommended that the accessory keyboard is purchased as it
make your experience more user-friendly.
Page 32

INTRODUCTION TO THE TV-BROWSER
tv-browser is very different to a home computer. It is
specifically designed for television sites and enhanced
broadcaster applications. There are many factors which make
the tv-browser interpret web-pages and display them differently on
the television screen.
The largest problem today in Australia is that many web-pages are
designed for a home computer. In other parts of the world (such as
the UK) television web devices have been around for some time.
Therefore web developers have designed websites for displaying on
both the television and a home computer. Over time, as more
television set-top boxes come to market, it will be in the interest of
many developers to ensure their websites also display effectively on
a TV screen. By using some smart programming, a web developer
can actually design the same web-page to fit both a computer
monitor and television screen without having to design two seperate
versions.
The tv-browser is based on world standards (W3C). These standards
comprise of HTML (Hypertext Markup Language), JavaScript, CSS
(Cascade Style Sheets) and the DOM (Document Object Model).
Many aspects of the home PC browser are not standardised. For
example, many websites will work on Internet Explorer but may
interpret differently on a Netscape browser (or vice versa).
The Interactive Player was specially designed to enhance your
television viewing by offering other information and services that
arrive to you either via an Internet connection (telephone line) or by
the television broadcaster.
What you will find:
A television screen has a lower resolution (less dots on the screens)
than a computer monitor. Therefore, sometimes a web-page may
appear to be actually bigger than the screen. Othertimes, the tvbrowser may try to wrap all information onto the tv screen size.
Web-pages designed specifically for a television viewer will be
shown correctly.
In addition, many home computers have 3rd party plugins such as
Macromedia Flash, Windows Media Player, etc. These plugins are not
W3C standards and therefore not available on this digital product at
the time of printing this manual.
More information regarding the tv-browser, W3C standards, can be
found by searching the Internet.
A
Page 33

INTERNET SERVICE PROVIDER (ISP) SET-UP
NOTICE:
Although not necessary, it is recommend for inexperienced users to
obtain the accessory keyboard. It will make this set-up procedure
and Internet browsing easier.
Experienced SMS mobilephone users can use the numbered keys
[0..9] on the remote controller to enter characters.
You need to have an Internet Service Provider (ISP) already prearranged to enter the required details.
Once you have the connection running and later find you have
dial-up problems, please contact your Internet provider hotline as
TEAC is unable to assist with this.
To set-up your provider details, press the [MENU] key and select MY
PLAYER by pressing [OK]. Then select PREFERENCES -> INTERNET ->
CONNECTION. You will see the following screen.
The “Open Phone
Account” is a standard dial-up Internet account.
ENTER DETAILS:
The Login, Password,
Phone number, DNS1,
SMTP server details are
given to you by your
Internet provider.
These are the minumum
details required by most
Internet providers.
If your Internet provider requires you to enter other details such as
a proxy server, press GREEN for OPTIONS and select ADVANCED. The
following screen shall be shown.
DNS2, Proxy Server and a
Time Server may be
entered.
The Time Server will
override the time from
the broadcaster.
To enter a proxy server with a port number, type something like
http://cache.myprovider.com.au:8080 whereby 8080 denotes the
port number.
REMEMBER:
Press BLUE to SAVE your
options.
Page 34

USING THE INTERNET - direct access by channel 954
Press the [MENU] key on the remote control or keyboard. Using the
joystick and pressing down you will find SERVICES. Press [OK] and
again select INTERNET. Select this by pressing OK.
The following screen is shown:
Where it says “Enter your destination:”, type a website link such as
http://www.teac.com.au and press [OK]. If your Internet provider
details are entered and telephone cable is connected, your player
will begin to dial. Noises will be heard from your TV speakers.
moments later, the webpage will appear on your TV screen.
You will notice the
coloured options on the
bottom of the screen.
Press BLUE to access your
Internet Favourites page
directly as shown below.
NOTICE:
Before you can access the Internet, you must set-up an Internet
connection. Please refer to the previous section called “INTERNET
SERVICE PROVIDER (ISP) SET-UP”.
Go back to exploring the web by pressing the BLUE key.
Using Favourites can make
Internet broswing easier.
You can store all your
personal links.
Press GREEN to add a
favourite website.
Sometimes favourites are
known as Bookmarks.
One of the most exciting
features is the ability to
assign a favourite to a
channel number.
Only numbers between
500~599 are available.
Page 35

Once you have entered a Favourite, press BLUE to save it. It will
appear in the Favourites list. This list is available anytime by
pressing MENU and selecting Favourites.
When browsing the Internet using the “Enter in desitination”
tecnique, you will find that there is no need to type http:// if front
or .com.au at the end of the address.
TEAC PLAYER WEBSITE
http://player.teac.com.au
Contains all the information
relating to this product.
When browsing the Internet, you can store a page directly into your
favourites by press the [INFO] key followed by press GREEN to add to
favourites.
This green logo denotes that the GREEN key may be
pressed to store the webpage into favourites.
The blue logo denotes that the BLUE key may be pressed
to toggle the ZOOM mode on and off.
A Telephone icon in
the bottom right
corner indicates your
telephone is in use.
Notice:
To hang-up your connection to the Internet, press the STANDBY key
on the remote controller (or on keyboard).
You can watch TV at the same time by pressing the PIP key. A small
TV image will appear in the top right corner of the screen.
Change services by pressing [CH+] and [CH-].
To watch full screen television, press and hold the PIP key for around
3 seconds.
PiP key
Page 36

Notice:
Broadband set-up may not be easy for some users. It is recommened
that some background knowledge of computer networking is
required before proceeding. TEAC’s ability to assist below is
limited. We recommend you refer to the website before contacting
us for assistance.
BROADBAND CONNECTIVITY
Using broadband on your player can be an exciting experience and
offers more possibilitites. Not only does the Internet become a
seemless experience with fast access; it offers services that are not
possible over a telephone connection.
Broadband services allow access to faster information, radio and
music channels, video footage, gaming and more......
To set-up a broadband connection, your player MUST connect to a
HOME PC or a ROUTER.
INTERNET SHARING USING WIN-XP
This section assumes you are connected to broadband using either a
Cable or ADSL modem attached to your home computer by USB.
In order to connect the player, you will need to purchase two
Ethernet cables, a compatible USB-Ethernet adaptor and an Ethernet
switch.
Shown above is an Ethernet 4 port switch (Figure 2). In one port is
an Ethernet cable connected to the LAN port on your home computer
(PC). A second Ethernet cable is required to connect into another
port, followed by the other end connecting into an adaptor as shown
(Figure 3).
Figure 3
Ethernet port switch
4/8/16/etc...
Figure 2
Player connected by USB/Ethernet adaptor
Figure 1
Home computer
Compex UE202B is shown in
this example connected into
the player’s USB port.
An Ethernet cable.
Page 37

Now that your player is connected to an Ethernet switch, the next
step is to allow access to your Internet provider from your computer.
You need to activate Internet sharing on Windows XP.
It will default an IP address of 192.168.0.1 to your computer.
Go to the player connection menu by pressing [MENU] and select MY
PLAYER. Then select PREFERENCES -> INTERNET and finally
CONNECTION.
Now select CONFIGURATION on the screen and change AUTOMATIC to
MANUAL.
As shown in the example, the
following parameters were typed
in.
IP Address as 192.168.0.5,
Netmask as 255.255.255.0,
Gateway as 192.168.0.1,
DNS1 as 192.168.0.1
The IP address (change the 5)
must be any number between 2
and 255.
The SMTP server information is provided by your Internet service
provider.
Press [BLUE] to save your options.
Troubleshooting:
If you experinece problems with connection to the Internet, change
the DNS1 value to the address number given by your Internet service
provider.
To check whether your player is connected to your PC, open a
COMMAND window on your computer. (Go to START->RUN and type
CMD -> then Enter). Type PING 192.168.0.5 and press Enter. Reply
message should appear. If not, check everything as per above and
try again. Also try restarting your player by the power switch.
To try your connection, go to the Internet page by typing channel
number 954 and type in a web address.
Connecting to a Router.....
If connecting directly to a router, simply activate DHCP serving on it.
Check the manual for the router on how to do this. Connect the
Ethernet cable to one of the ports and at the CONFIGURATION
option, select AUTOMATIC on the player.
To check whether your player is working on your Ethernet network,
at the Internet browser type the address as about:tcp .
Page 38

WIFI CONNECTIVITY
Notice:
Broadband Wi-Fi set-up may not be easy for some users. It is
recommened that some background knowledge of wireless computer
networking is required before proceeding. TEAC’s ability to assist
below is limited. We recommend you refer to the website before
contacting us for assistance.
Wireless connectivity is the most exciting feature of the player. In
order to use this feature, we highly recommend that you have a
wireless router (either 802.11b or 802.11g).
The example described below assumes you have a broadband
connection and the Cable/DSL modem is already connected and
working on your router.
Belkin F5D6050 adaptor
connected to the USB port.
To enter the connection set-up, press MENU -> MY PLAYER ->
PREFERENCES -> INTERNET then CONNECTION.
In the picture above the following setting were made.
CONFIGURATION was set to manual (i.e. enter a static IP address)
IP ADDRESS is the unique address for your player.
NETMASK is default set to 255.255.255.0
DNS1 is the domain name server setting. Set this to your Internet
Providers address.
GATEWAY is the IP address of your router.
SMTP is given by your Internet Provider.
Next you will need to set-up the type of wireless connection, and
various parameters such as the SSID (Service Set Identifier).
To enter wireless set-up, press MENU -> MY PLAYER -> PREFERENCES
-> INTERNET then WIRELESS.
The Access Provider changes
automatically to WiFi when a
compatible Wireless adaptor is
inserted.
Page 39

As shown above, when connecting to a router, the MODE is set to
managed.
ESSID is the Service Identifier. This must be the same as your
wireless router. Careful, it is case sensitive.
We recommend you set the Channel number (1~14) rather than
automatic.
The Bitrate may be left to automatic setting.
The SMTP information is given by your Internet Provider.
To enable security, press GREEN otherwise press BLUE to SAVE your
options.
To make wireless connection easier, we recommend you do not
enable WEP until your wireless connection is already working. By
default, this option is disabled.
Turning on encryption will require you to set each of your wireless
equipped devices with the same encryption code. The router and
TEAC player must have the same key code. There are generally two
types of encryption to choose from: 64-bit and 128-bit.
Using encryption will make your network more secure, but will slow
down performance. If using Internet banking, or your need to
disclose any personal details over the Internet, we highly
recommend you activate this feature.
To set WEP, select OPTIONS by pressing the GREEN key. An option
menu will appear. Select WEP CONFIGURATION. The following
screen will appear.
WEP SECURITY
Page 40

Select USE WEP - a tick will appear in the box.
Next select the WEP key length. We recommend using either 64 or
128 bit lengths.
For Example:
AF0F4BCCD5 = 64 bit key length
CC123FAF1F4BBBCCD544CDDDF6 = 128 bit key length
You may use only letters A-F and numbers 0-9.
You may enter 4 different security key, however be sure to select the
key (1 to 4) that is used also on your wireless router.
Press BLUE to SAVE your settings.
If you have trouble connecting, try turning the power switch OFF and
then ON again.
Troubleshooting:
If your wireless connection fails to work with WEP enabled, check
the key is correct and EXACTLY the same as the key on your wireless
router.
To check whether your player is connected by wireless, press MENU
-> MY PLAYER -> PREFERENCES -> INTERNET -> WIRELESS. On the
wireless entry screen, press GREEN for OPTIONS and select WIFI
DIAGNOSTICS.
Page 41

MULTIMEDIA
Introduction
In this section, you will learn about the multimedia playback
capabilities of the player.
It is possible to view photos, play music, watch movie files, and with
a broadband connection listen to Internet radio.
Page 42

- 42 -
The Multimedia player is an exciting feature of the TEAC player and
allows you to view pictures, listen to MP3 music, and watch MPEG
movies.
To use the mutlimedia application, press MENU and select
MULTIMEDIA.
The following screen will appear.
EXPLORING MEDIA
Notice:
The GREEN button “NEW FTP”
may not appear on your screen.
This is normal as this feature may
no longer be available.
To go further, you will need a USB flash memory stick (or USB
external harddisk). Check the USB compatibility listing.
When a USB memory stick is
connected to the USB port of the
player, SDA1 will appear. If using a
USB hub and more than one memory
device is connected, SDA1, SDA2,
SDA3, etc will be listed.
Press [OK] to see your files on the memory stick.
-> It is possible to use some card reader devices.
-> Check the USB compatibility listing.
Joystick control is used
extensively on the
multimedia application.
To play a media file, simply move the joystick [UP] or {DOWN] to
select the file. Press [OK] to play it.
Some files in the list above are folders (also known as directories).
To view a folder, select it and move the joystick [RIGHT]. A new list
of files will appear.
To go back a folder, press the joystick to the [LEFT].
Notice the VIEW: line at the bottom of the screen and how it
changes.
Page 43

- 43 -
The coloured keys provide various options and features.
FILTERS
The BLUE button opens a menu to select various filters. For
example, select SOUND FILES and only sounds files will be shown.
The default is ALL FILES.
SNAPSHOT
The YELLOW button opens a menu to capture the TVimage as a
picture file. This feature was described earlier in the book on pages
19 - refer to Picture Pause.
OPTIONS
The GREEN button gives you the ability to delete, rename and move
files. Folders (also known as directories) may not be deleted unless
the contents of it is empty.
Moving a file....
To move a file may seem difficult at first but actually quite easy.
Go to the file you wish to move. Press GREEN and of the options
select MOVE.
Now pressing the joystick [UP][DOWN][LEFT][RIGHT] to select where
the file is now to be located.
Press GREEN again, and this time select the option PASTE.
PLAYING MUSIC
When a music file is selected such as MP3 or WAV formats, the
following screen shall appear.
Notice:
Pressing the MUTE key
will turn off TV sound
only and does not
affect media sound
files.
Use the coloured key to select your songs or use joystick navigation.
Press [OK] to select a songs from your files.
If you press [RED] to EXIT, the song/sound will continue to play. You
must exit the multimedia application completely to turn the
song/sound off.
Page 44

- 44 -
PHOTOS@TV
When viewing an image (JPG, GIF, PNG, BMP, etc..), the following
screen options will appear.
The screen resolution is
640x520 so larger images
may appear squashed or
only a part of it may be
displayed.
Fullscreen mode [BLUE] displays the pictures only. You will need to
press the [PREV] and [NEXT] keys to view the images.
Pressing [YELLOW] will attach the picture directly to your E-mail so
you can send it to friends and family.
Pressing [GREEN] will automatically display all pictures one by one
approximately every 3 seconds. You may move quicker through the
pictures by pressing the [PREV] and [NEXT] keys.
At anytime to exit press [RED].
Page 45

- 45 -
Introduction
In this section, you will learn about the other options available to
the player to customize and configure it. Some options you have
already been introduced too earlier.
It is important to note that when connected to the Internet, TEAC
may introduce new menu items. This can only be done via the
hyperchannels syncronization. You will learn more on this soon.
MY PLAYER
Page 46

- 46 -
INTRODUCTION
Notice:
The items described below may change without notice. One of the
unique features of the TEAC player is the ability to change and
manage the selections.
MY PLAYER
PREFERENCES TIMERS YOUR OPINION HELP
YOUR OPINION
Selecting this option will send an E-mail directly to TEAC. You must
set-up your Internet provider connection and E-mail details. Refer
to pages 29~33.
TIMERS
This option gives direct access to the Timer listings. For more
information on timers, refer to pages 23~24.
HELP
Selecting this option for the “Diagnostics” menu to appear. Then
press [OK] again to enter the menu.
The product serial number,
software and hardware version
infomation may be found here.
TV SIGNAL
The TV signal screen can assist signal
performance when aligning your TV antenna.
Move the joystick [UP] and [DOWN] to view
the TV service signal.
As shown, TEN Digital’s quality is at 88%
however the signal strength is below 50.
NETWORK
The network option is for broadband
customers. It shows whether the Ethernet
or Wi-Fi link is still available between the
player and your home PC or router.
Network settings may be directly accessed
by pressing BLUE.
Page 47

- 47 -
USB
This option displays the USB devices that are
connected to your player. A USB hub may be
used to connect more than one device.
Only those USB devices compatible with
player will be detected and shown.
WIRELESS
Connect a Wi-Fi 802.11b device to display
information on the connection. Network
details may be accessed directly by pressing
the GREEN key.
Refer to the USB listing for a list compatible
devices.
The last option is CA MODULE. A Conditional Access (CA) module is
specifically used for scrambled PayTV programs. This system is not
used within Australia.
PREFERENCES
The Preferences options gives access to set-up of your Television,
Internet access, Parental configuration and changes to the interface.
To access; press MENU, select MY PLAYER -> PREFERENCES.
The following list will appear.
TELEVISION OPTIONS
TIMERS
Directly links to the timer list as described earlier. Refer to pages 23~24 for more
details.
TUNING-IN
Sometimes broadcasters may make changes to their transmission. It is
recommended to occassionally re-tune your set-top box in case extra services may
be available to you.
FAV CHANNELS
Using this option, you can select which programme services may be skipped or
hidden for the channel listings.
LANGUAGES
Some programs may be available in different languages. It is possible to default
subtitles or audio to these other languages if available
.
AUDIO & VIDEO
Set the players output to RGB, video, S-Video or Component YPbPr.
Page 48

- 48 -
TUNING-IN SERVICES
Tuning services may be done using two methods (Automatic and
Manual)
Below, manual tuning will be described.
Move joystick [LEFT] or
[RIGHT] to select the
broadcast channel. In the
example, Nine Digital is
broadcasted on CH8.
Select 8, wait 3~5 seconds
for the information and TV
picture to appear.
Press BLUE to save the
service tuning.
To tune more than one service, it is necessary to enter the Manualtuning screen again.
The automatic tuning option is better if more than one service needs
to be tuned.
When automatic tuning, within some areas it may be apossible to
pickup more than one service that is the same. For example, you
may live inbetween two ABC transmitters. The TEAC player during
automatic tuning is smart enough to list only the better signal for
you.
FAV CHANNELS
FAV channels allows you to hide (or skip) those unwanted duplicated
services that may appear on your channel list. Here is how it works.
Move joystick [UP] or
[DOWN] to select the
broadcast channel.
Press [OK] once to SKIP the
service.
Press [OK] again to HIDE
the service.
Press BLUE to save your options.
It is also possible to renumber a channel by pressing the GREEN key.
Press YELLOW to reset your numbering back to default settings.
Notice:
When doing a software upgrade, it may be necessary to rescan your
TV channels, and also redo your FAV. channel settings.
Page 49

- 49 -
AUDIO & VIDEO SETTINGS
The TV output allows RGB, S-Video, Composite Video and YPbPr
Component output. RGB (red green blue) and YPbPr offer the best
picture quality options. Televisions with a SCART connection should
accept the RGB signal. A Scart to Scart cable will be required for
purchase. The YPbPr output will require a SCART to 3 RCA adaptor
(such as TEAC ADP51) or a specific SCART cable.
The TV aspect ratio
may be new to many of us. There are generally
three formats: -
(a) The 4:3 (pan and scan) format is a standard square shape TV
screen.
(b)A 16:9 widescreen is the format most suitable for viewing digital
television. It however requires you to use a widescreen television.
(c) To enjoy the widescreen view on a standard television, select
the 4:3 letterbox option.
A 4th option also exists (14:9). This is not used within Australia.
Note: When using 4:3 letterbox mode, there may be white dots
on the top and bottom of some programs. These cannot be
removed and are related to the broadcast itself.
The Audio output
setting should only be changed if you are using a
TOSLINK cable from the digital decoder to a Dolby Digital surround
amplifier. If you select "5.1 digital to SPDIF" then when a 5.1 stream
is available you amplifier will decode it automatically.
Note: When in 5.1 mode, no audio is available on either line-out
or either SCART connection. This is normal
The TV centering option
allows you to centre the screen. When
using this feature with S-Video, some TV's may cause a black & white
picture to appear. This feature should be avoided where possible.
The Broadcast application
setting allows you to disable the
automatic appearance of markers, graphics, advertising material
and broadcaster messages on the screen. Broadcaster applications
are an advanced feature of this product and are described later
within this manual.
To make changes, move the
joystick up and down to select
the option. Then press firmly
the joystick [OK].
Press BLUE to save your options
when finished.
The TV Setting option allows you to adjust screen type, video output
type, audio output, centering of the screen, and automatic display
of broadcasted applications.
Page 50

- 50 -
INTERNET
Refer to pages 31~40 for further intformation on setting up an
Internet connection.
As shown, four options shall appear when Internet is
selected.
CONNECTION - to enter or change existing Internet
connection details.
EMAIL - to enter or change existing E-mail account
details.
MODEM - various settings such as indicators, etc.
WIRELESS - various settings for your Wi-Fi connection.
MODEM SETTINGS
The Auto hangup option sets a
modem cutout time. That is, if
there is no activity for 5
minutes, the modem will
disconnect. Same as hanging-up
your home phone.
The Dial sound
option enables
and disables the modem sound
to be heard through the
television speakers.
The Dial prefix may be added where the telephone system may use
another digit to access the outside line. Sometime telephone
systems require a zero to dial out, whereas other may require a code
to unlock the telephone. Normally, this option should be blank.
Example:
To set a zero (to dial out) and then pause for one second type '”0w” as the dial
prefix.
The W
ait for dial tone option should be left on automatic. If you
experience problems connecting to the Internet, try changing this
option to either 'never' or 'always'.
The Phone indicator option leaves a phone icon on the
screen when you are connected to the Internet. This
icon may be removed from the screen by selecting 'off'.
The Dialing mode
option should be set to tone. Pulse dialing is no
longer used and should only be selected if you are having problems
in your area connecting to the Internet.
WIRELESS SETTINGS
For wireless connectivity and set-up, refer to pages 38~40 for more
details. Also, for a list of compatible devices, refer to page 12.
Page 51

- 51 -
PARENTAL LOCK
The Parental Control menu is locked by a pin number.
The factory default pin code is:
0000
Simply, type the pin number
and press [OK] or [BLUE]. If
you make a mistake, press the
[RED] key to cancel.
The next screen gives you two
options: -
Restrict Channels - allows any
channel to be blocked from
viewing.
Restict TV Programmes allows to block programs by
program classification.
To restrict channels by program classification you must move the
joystick downward, then press firmly [OK]. You will now see a list
of program classifications used within Australia.
Simply move the joystick up
and down to make your
selection. Then press firmly
on the joystick [OK]. You will
see a small red icon to the left
to indicate that the program
rating you selected is blocked
and all other classifications
above it.
Once you have made your selection you must press either the [RED]
key to cancel or press the [BLUE] key to save your selection.
NOTICE:
Blocking of Internet content should be arranged with your Internet
Service Provider (ISP).
It is however possible to block MENU items such as INTERNET from
being accessed by children. Select the Restricted Channels option,
and move down the list. You will find INTERNET (channel 954) is
listed. Simply select this channel to be blocked from viewing.
Page 52

- 52 -
USER INTERFACE
The USER INTERFACE options allow your to customize how your settop box works and displays various features and information.
As shown, four options shall
appear when User Interface
is selected.
The DISPLAY menu allows
configuration of the infobar, menu
backgrounds, and changes to the
OPTIONS menus.
Press BLUE to SAVE your options.
The SERVICES menu allows various
settings including a screen saver.
What is a screen saver?
Showing the same non-moving
picture on a TV screen for a long
period of time can cause screen
burn-in. The picture will be seen on
the screen even when the TV is
turned OFF. this cannot be fixed. To
prevent this, a screen saver moves
the image after a fixed period of
time.
The REGION menu allows setting the
country your product is used. In
addition, the postcode may be set.
Some Interactive applications may be
specific for your area. In addition,
TEAC would like to use the postcode
information for research purposes.
The KEYBOARD menu allows the
selection of two types of keyboards.
Only the GREY type is used within
Australia.
Page 53

Introduction
In this section, you will learn many new features that make this settop box receiver unique.
We will cover items such as
Interactive Television and using USB devices.
Latest technology brings a new world of television entertainment to
lounge room sofa. In order to learn more about Interactive
television, it is improtant to understand that new services may be
divided into two categories: -
(a) Interactive Broadcaster Program Applications
&
(b) Interactive Hyper-Channels (from the Internet)
The two categories above have this in common. They both present
information to the screen to add more value and entertainment to
your viewing.
Let us continue.....
ADVANCED FEATURES
Page 54

The time taken to
receive hyper-channels
will vary depending upon
the number of channels,
their complexity and the
quality of your Internet
connection.
The number of interactive hyper-channels you can store will be
dependant upon the memory reserved within the Player.
INTERACTIVE HYPER-CHANNELS
What is an Interactive Hyper-Channel?
An interactive hyper-channel is a new channel service concept
available only on the TEAC Digital Player. A typical digital receiver
gives only television channels via your aerial. The TEAC Digital
Player however gives more channels from the Internet (static pages
of information, games, program guides, etc.) You will find your
Digital Player is pre-loaded with some hyper-channels.
They are: What'sOn ,
Games ,
MENU
More hyper-channels may be available occasionally. So you must
check for updates. Some interactive hyper-channels may be
available only from particular ISP providers. In time, you will have
a list of channels you may choose to load into your set-top box.
NOTICE: For the latest information on hyper-channel availability,
refer to http://player.teac.com.au.
Updating of interactive hyper-channels requires you to set-up your
Internet ISP connection. Please refer to the Internet set-up section
within this manual for details.
To check for new interactive hyper-channels visit the TEAC website
at http://player.teac.com.au.
To force a synchronize for hyper-channels,
press MENU -> MY PLAYER -> HELP -> DIAGNOSTICS -> MY PLAYER
...and press the GREEN button.
Page 55

BROADCASTER APPLICATIONS
NOTICE: For the latest information on broadcasted applications,
visit http://player.teac.com.au or visit the television networks
websites.
There are many ways a broadcaster can present information. Since
these services are new for Australia, there are no applications
available to describe here at the time of printing this manual.
Below is an example created by TEAC for demonstration. It is a
simple Grand Prix voting application.
Notice the top left corner
of the screen. There is a
message that appears over
the television picture. The
viewer is told to press [OK]
to continue.
This is better known as an
application launcher
.
Once you press [OK], more screens may appear for example...
Here, the joystick is moved
left/right to make your
selection of whom you
think will win the race.
By selecting [OK] again, the modem will dial (if phone account is
used) to connect to the Internet to send your response to the
television network. This will be followed by a reponse to see what
other viewers are voting.
Many programs are now
Interactive. That is, some
programs require you to
send an SMS mobilephone
message to respond.
The TEAC Player moves the
viewer to the next level of
entertainment.
Page 56

SOFTWARE UPGRADES
The TEAC Digital Player is the first set-top box within Australia
capable of upgrading itself over the Internet.
When connected to the internet, a message will be displayed on your
screen when an upgrade is available.
Check the website http://player.teac.com.au for more details.
USB PORT CONNECTIVITY
The Universal Serial Bus Port (USB) allows you to connect many
devices to your digital receiver such as Printers, Webcams, Flash
Memory, Harddrives, Ethernet adpators, Input devices, etc.
TEAC is constantly upgrading the number of devices that may be
connected to your digital set-top box. It is recommended that you
check the website for a list of compatible devices.
ITV-D500 has USB 1.1 specification.
WEBCAM
ETHERNET USB FLASH
The USB port on the digital player is hot-plug. Connecting devices
may be inserted or removed at any time.
TROUBLESHOOTING: If you experience any technical difficulty,
simply disconnect the USB device and switch off the main power
(switch on the rear of the box).
Due to the speed limitations of USB1.1, it may not be possible to use
multiple devices at the one time.
RECOMMENDATION: External USB Hubs are compatible. It is
recommended that a ‘powered version’ is used as to not cause
damage to your digital player.
WIRELESS
MEDIA PLAYBACK
It is possible to use external memory devices to playback video,
audio and picture files. See section on Multimedia.
Some of the supported file formats are MP3, JPG, BMP, GIF, MPEG,
WAV, HTML, JS, AIFF.
To playback MPEG movie files, they must be encoded in PAL standard
25frames/sec. Also, due to the limitation of USB 1.1, video streams
such as MPEG2 upto 3.5Mbps may be played.
When using the USB Flash Memory device or an external USB harddisk
case, they MUST
be formatted using FAT32 file system.
Page 57

Programming your own pages (channels) is possible. The player uses
standard HTML4.01, JavaScript, ECMAscripts, DOM, CSS, etc..
There are examples available on the website.
You will need a home PC, a HTML editor and a basic knowledge of
web programming.
Any standard HTML editor is capable of making examples for the
player. The screen graphic area is 640x520 pixels.
To place the TV image on screen, use TV: as the source.
e.g. <img src=“tv:” width=“188”>
the background can be set to tv picture...in the BODY have
background=“tv:”
WEB PROGRAMMING
// EXAMPLE TO MOVE SMALL TV PICTURE USING JOYSTICK LEFT & RIGHT
<html>
<head>
<title>MOVE PICTURE LEFT/RIGHT PROGRAM</title>
</head>
<script language="JavaScript">
var x=240;
function keyListen()
{
if (x<0) x=0;
if (x>440) x=440;
document.getElementById("pippos").style.left=x;
var evt = window.event;
switch (evt.nativeKey)
{
case evt.KEY_LEFT:
x=x-10;
break;
case evt.KEY_RIGHT:
x=x+10;
break;
default:
break;
}
}
</script>
<body bgcolor=#000000 onKeyDown="keyListen()">
<div id="pippos" style="position:absolute; top:170px; left:240px;">
<img src="tv:" width=188>
</div>
</body></html>
As shown above, the left and right keys are programmed. Actually,
any of the keys on the remote controller (or keyboard) may be
reprogrammed. For example use evt.KEY_DOWN, evt.KEY_UP,
evt.IRENTER, evt.ENTER, etc....
To try your examples, copy them to a USB memory stick, and insert.
Then select the file.
Some colours when placed together may not display properly on a TV
set. This is a limitation on a TV. Therefore you may need to
experiment with various colour schemes.
Page 58

TROUBLESHOOTING & FREQUENT QUESTIONS
Q. I have some channels numbered 350, 351, 352, etc. Why?
A. The STB supports logical-channel-numbering. In some areas the
broadcaster may not be sending their channel number. The Australian
requirement for STB design says that any services without a channel
allocation are to be given a number from 350 to 399. The digital player will
do this automatically for you.
Q. Teletext is not working. Why?
A. The teletext feature must be activated by the broadcaster and described
correctly in the transmission tables. If not, the TEXT icon will not display
itself.
Q. I can see the subtitle icon, but their are no subtitles. Why?
A. The subtitles may be described in the broadcaster transmissions, but not
actually being sent. This is not a problem with your set-top box.
Q. I have connected SCART to SCART, but the picture is a Green colour.
Why?
A. Make sure that your set-top box is not set to YPbPr component output.
Q. I have connected S-Video, but picture is in black & white. Why?
A. Check on your television that you have selected correctly the S-Video
input.
Q. I am unable to get a dial tone on my set-top box. Why?
A. There are many problems that can exist. Check these first: -
1. Telephone cable is correctly connected.
2. Telephone is on-hook at home.
3. Check that pre-fix is correct. In some homes, a pincode may be
required to get an outside line.
Q. The modem begins to dial, it connects but their is an Authentication
error. Why?
A. Double check that your username and password are correct.
Q. The picture on my TV screen is slightly bent (on an angle) towards
one side of the screen. Is this normal?
A. A TV screen generally cannot be adjusted in the same way as a computer
monitor. Therefore, many televisions will not display graphics perfectly
straight on the screen. This is known as poor geometry alignment. Check
with the television manufacturer as to whether it can be improved if
necessary.
Q. How do I know what is showing in Widescreen 16:9 format?
A. Check the DBA website (http://www.dba.org.au) for widescreen
programming.
Q. When I go to the blue Internet screen, the corners are redish in
colour. Why?
A. The television screen needs to be degaussed. This can be done by
switching the television off at the main power (not standby!), leave it off
for an hour, then switch on again. You may need to repeat this a few times.
If problems still persist, contact the manufacturer for details.
Q. The details in the EPG (Electronic Program Guide) are not always
correct. Why?
A. The informations comes from the broadcaster and may not be updated.
Page 59

Q. How do I get System Information about my product?
A. Press the MENU key, select MY PLAYER -> HELP -> DIAGNOSTICS -> MY
PLAYER. For further details, go to the Internet page (channel 954) and
enter a web address as about: [OK]
Q. Does the digital player support parental control of programs?
A. YES. The parental code can be set to block certain programs. It does
NOT however block content available from the Internet. Arrange this with
your Internet Service Provider. You can block the Internet channel for
complete access.
Q. When I select english5.1 sound, my amplifier will swicth to Dolby 5.1,
but sound is not available in all speakers. Why?
A. The broadcaster is describing 5.1 to be available within their
transmission, but sound encoded may not actually be in Dolby 5.1. Check
program guides for special screening that include 5.1 digital sound.
Q. When I am connected to the Internet, after 5 minutes I am
disconnected. Why?
A. Your telephone settings have been set to disconnect after this time.
Press the [MENU] key, go to Setup and Telephone Settings. There you can
increase this time.
Q. My player starts, and welcome message appears. A moment later the
player screen goes black. What can I do?
A. Press the STANDBY key on the remote to reactivate the player. If this
fails, then you must do the factory_reset procedure (see page 6). In doing
so, all information will be lost.
Record Your Serial Number Here:
: : : : :
YOUR NOTES
Record Your Pin Code:
Page 60

TEAC STATE OFFICES
TEAC Melbourne Office (Headoffice)
Former Royal Mint Building
280 William Street
Melbourne
VIC 3000
Phone:(03) 9672 2400
TEAC Sydney Office
Unit 8, 20-22 Foundary Rd
Seven Hills
NSW 2147
Phone: 1300 30 8322
TEAC Brisbane Office
335 Montague Road
West End
QLD 4101
Phone: (07) 30100100
TEAC Perth Office
273 Great Eastern Highway
Belmont
WA 6104
Phone: (08) 94796522
TEAC Adelaide Office
Cnr Sir Donald Bradman Dr & Marion Rd
Cowandilla
SA 5033
Phone: (08) 8234 6122
TEAC TOTAL CARE HOTLINE
1800 656 700
EST 9:00am to 5:00pm
info@teac.com.au
http://player.teac.com.au
 Loading...