

Page 1
Contents
HS-P82
Contents ..............................................................................................1
New functions in firmware V1.20 ................................................1
Line Input Trim function ..........................................................................2
Take Rename function ..............................................................................2
TC SYNC REC function ..............................................................................2
New pop-up message added in HS-P82 V1.20 ...............................2
New functions in firmware V1.10 ...............................................3
Mirror recording function added .........................................................3
Recording times when set to mirror recording ..............................5
Slate on status can now be retained ...................................................5
Addition of take end time code display .............................................5
New pop-up messages added in HS-P82 V1.10 .....................6
New functions in firmware V1.20
The following new functions have been added in rmware V1.20
• A function has been added that allows you to use the input
trim knobs to adjust the input levels of line inputs. (A detailed
explanation of the Line Input Trim function follows.)
• A function has been added that allows you to change the names
of takes. (A detailed explanation of the Take Rename function
follows.)
• A function has been added that allows you to make this unit
automatically start and pause recording in response to the state
of an external timecode signal. (A detailed explanation of the TC
SYNC REC function follows.)
• A function has been added that allows you to press the DATA
dial to show the MIC/LINE trim values briey beneath the meters
when the Home Screen,
screen,
CHANNEL SETUP screen or METER SETUP screen is
open.
•
EDIT NEXT TAKE PREFIX and EDIT NEXT TAKE NAME
options have been added to the
item
on the REMOTE SETUP screen.
• A function has been added when a character or number input
screen is open that allows you to clear all the characters/numbers
by pressing the BACKSPACE key while pressing and holding the
SHIFT key on an external keyboard. (Previously, on a number
input screen, pressing the Esc key cleared input numbers, but this
has been changed.)
• A function has been added that allows you to press the 2/
on an external keyboard to move the cursor to the beginning/end
of a line of characters when a character input screen is open.
• A function has been added that allows you to use the Esc key on
an external keyboard in the same way as the EXIT/CANCEL key
on the front panel of the unit.
• A function has been added that allows you to use the F1-F4 keys
on an external keyboard in the same ways as the F1-F4 keys on an
RC-F82.
• A function has been added that allows you to use the F5-F11 keys
on an external keyboard in the same ways as keys on the unit.
REC TRACKS page of the REC SETUP
Function Key Assign
x key
New functions added in firmware V1.04 .................................7
Mid-side (MS) microphone connection mode added ..................7
Trim group function addition ................................................................8
Zero trim function added .......................................................................8
Firmware V1.02 new functions ....................................................9
Changing the term “scene” to “folder” ..............................................9
Addition of project number, folder number and take number
indications ....................................................................................................9
Addition of a date input button ........................................................ 10
Next Take Name editing function added ....................................... 10
Mono file recording folder selection ...............................................11
Limitations to recording operations ................................................ 12
Change of the default reference level ............................................. 12
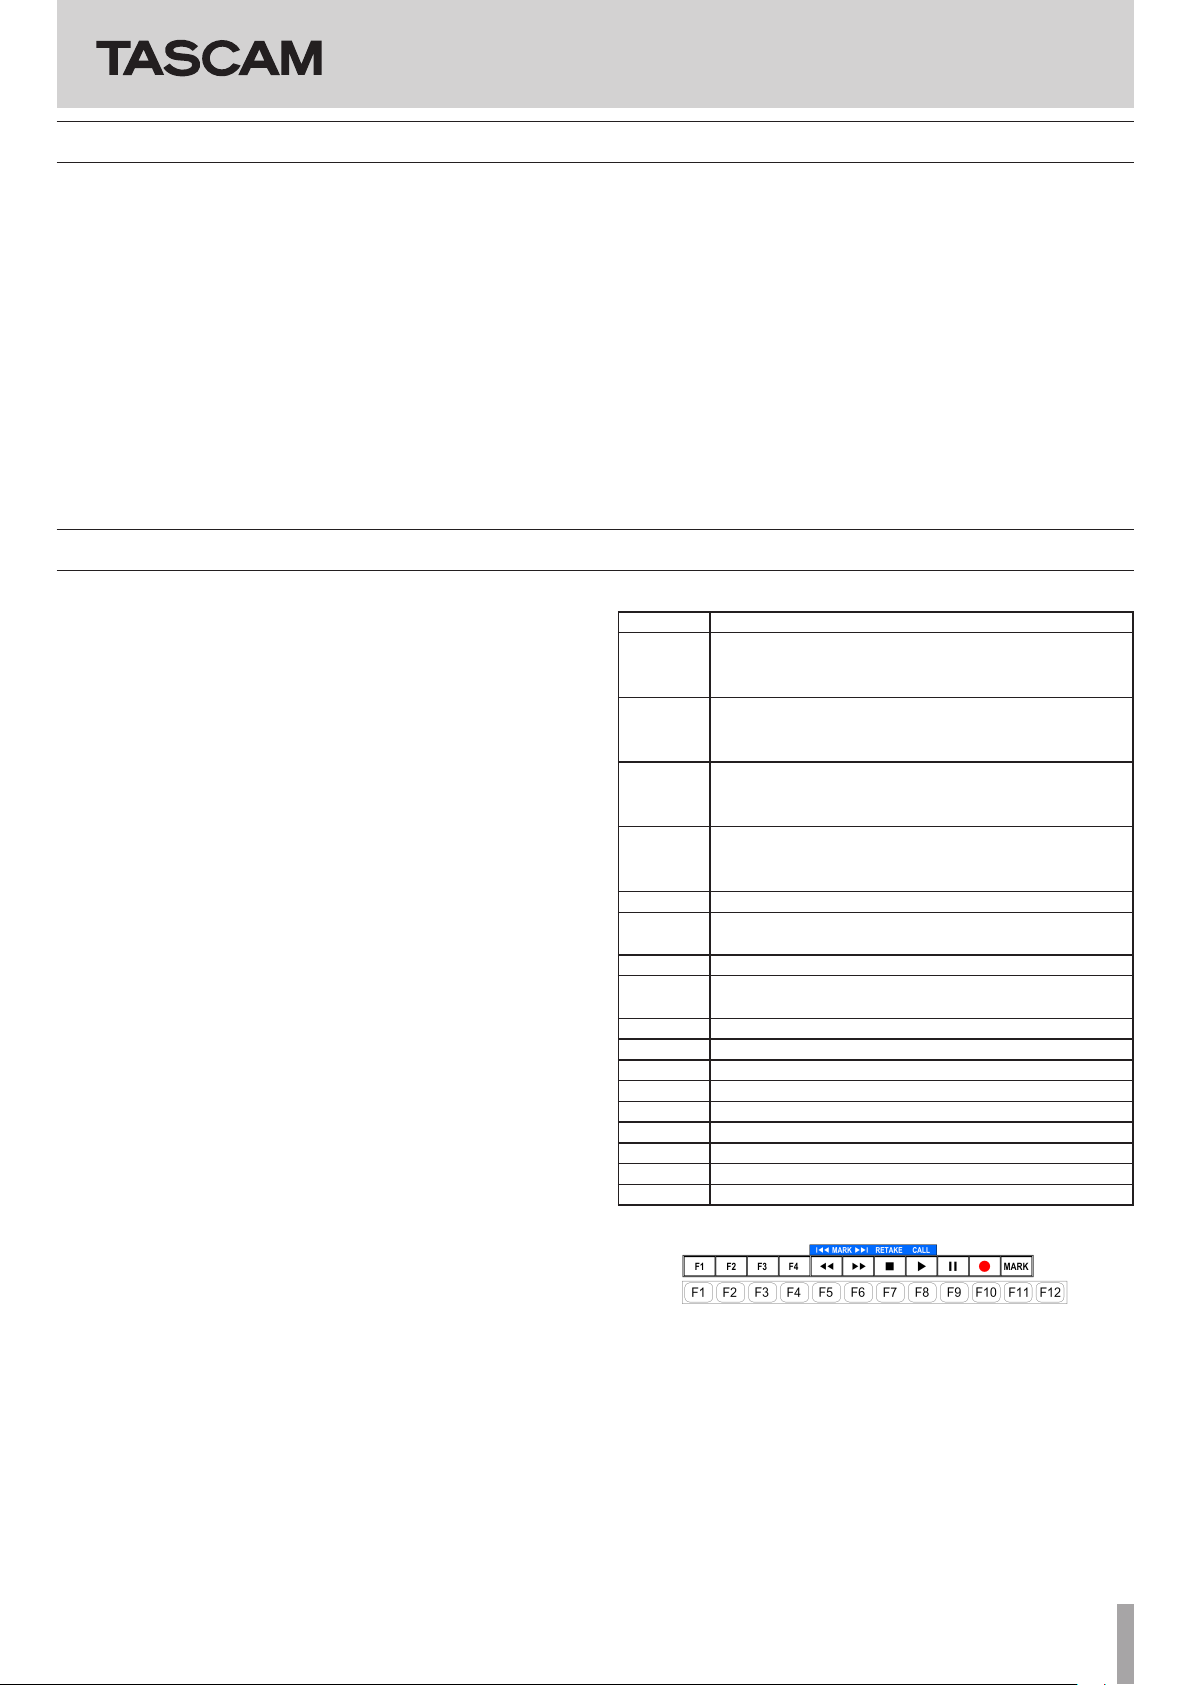
Assignments of F1-F11 keys on an external keyboard
Key Function
F1 Same as the RC-F82 F1 key
(Set by the F1 Function Key Assign setting on the RCF82 page of the REMOTE SETUP screen)
F2 Same as the RC-F82 F2 key
(Set by the F2 Function Key Assign setting on the RCF82 page of the REMOTE SETUP screen)
F3 Same as the RC-F82 F3 key
(Set by the F3 Function Key Assign setting on the RCF82 page of the REMOTE SETUP screen)
F4 Same as the RC-F82 F4 key
(Set by the F4 Function Key Assign setting on the RC-
F82 page of the REMOTE SETUP screen)
F5 SKIP REW
F5 (press
and hold)
F6 SKIP FF
F6 (press
and hold)
F7 STOP
F8 PLAY
F9 PAUSE
F10 REC
F11 MARK
SHIFT+F5 MARK SKIP REW
SHIFT+F6 MARK SKIP FF
SHIFT+F7 RETAKE
SHIFT+F8 CALL
REW
FF
D01166720B
TASCAM HS-P82 1
Page 2

HS-P82
Line Input Trim function
A function has been added that allows you to use the input trim
knobs to adjust the input levels of line inputs.
A Line Input Trim item that has been added to the PREFERENCE page
of the SYSTEM SETUP screen. If you set it to “Enable”, you can use
the input trim knobs to adjust the input levels of line level inputs.
Options include MUTE and a range from −20.0 dB to +20.0 dB.
NOTE
• In the same way as when adjusting the input level of a MIC input,
turning an input trim knob will cause the gain value to be shown
briey in the track name display area below the meter on the
Home Screen.
• If the INPUT SOURCE setting is set to a digital input, the input
level cannot be adjusted.
Take Rename function
TC SYNC REC function
A function has been added that allows you to make this unit
automatically start and pause recording in response to the state of
an external timecode signal.
• A TC SYNC REC button has been added to the TC GEN MODE item
on the SETUP page of the TC/SYNC screen.
When in TC SYNC REC mode, recording starts when the unit
synchronizes to external timecode, and recording pauses when
external timecode synchronization is lost.
• When TC SYNC REC mode is set, the TC indicator on the Home
Screen appears as follows.
A function has been added that allows you to change the names of
takes.
Follow the procedures below to do so.
1. On a take selection screen, select that take that you want to
rename.
2. Touch the MENU button on the take selection screen to
open a pull-up menu (An EDIT NAME button, which is shown
framed in red below, has been added to this pull-up menu).
3. Touch the EDIT NAME button in the pull-up menu to open
the TAKE NAME screen. (On this TAKE NAME screen, you can
change the input take name.)
Indicator when in TC
SYNC REC mode
TC locked
TC unlocked
NOTE
Use the same frame type for this unit’s project and the input
timecode.
Lit red Lit green
Blinking red Unlit
Indicator when not in TC
SYNC REC mode
New pop-up message added in HS-P82 V1.20
Message Details and
responses
Writing Mark Info... Mark
information is
being written
Remarks
If a Mark is added during
playback of a le of 1GB or
larger in size, this popup
appears when playback is
stopped.
NOTE
When multiple takes are selected, you cannot use the EDIT NAME
button in the pull-up menu.
4. Edit the take name.
5. Touch the Enter button on the TAKE NAME screen or press
the DATA dial to conrm the changed take name and return
to the take selection screen.
2 TASCAM HS-P82
Page 3
New functions in firmware V1.10
HS-P82
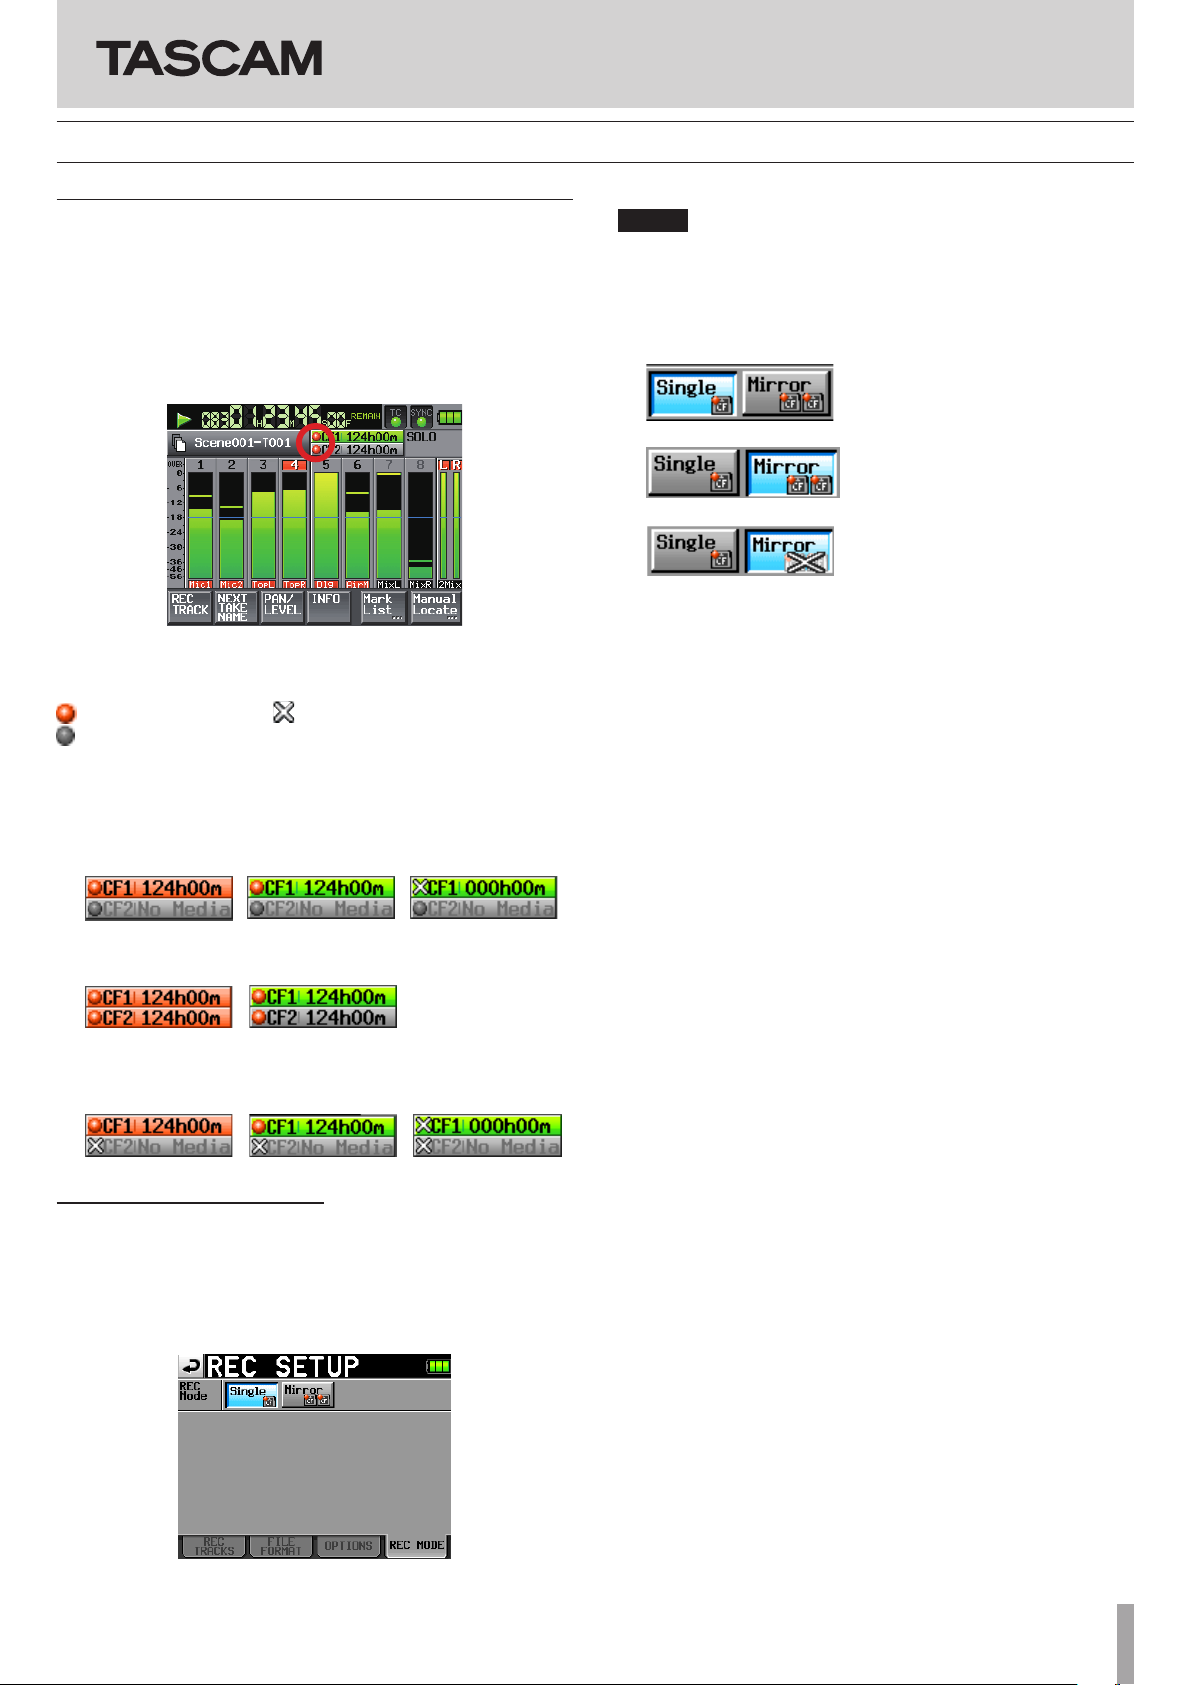
Mirror recording function added
A mirror recording function has been added that allows you to
record simultaneously to 2 CF cards.
In order to make the mirror recording setting easy to see on the
screen, indicators have been added to the CF card remaining time
display button on the Home Screen. These indicators show the status
of both CF cards: recording possible, recording not possible, or not
ready for recording.
Home Screen during playback
ª Indicator meaning
Recording possible Recording not possible
Not ready for recording
ª Examples of CF card remaining recording time button
indicators
1 When set to Single
When recording
When not
recording
When recording not
possible
1
NOTE
If the sampling frequency of the current project is 88.2, 96, 176.4 or
192 kHz, the
REC Mode setting is always set to Single and cannot
be changed.
ª Setting button display
1 When set to Single
2 When set to Mirror
3 When set to Mirror/Mirror disabled
1) Conditions that make recording not possible
• Current CF card has no remaining capacity
• Current CF card not loaded
• Current CF card is not supported (PIO mode)
• Current CF card format is not supported (not FAT16 or
FAT32)
• If a take with the same name as set on the
NAME
page and numbered 999 exists on either of the CF
cards (“---” appears in the take number area on the Home
Screen,
NEXT TAKE NAME page)
• The total number of entries (les and folders) in the
current folders of both CF cards exceed the system limits
(CF card remaining time display button shows “
Limit
”)
NEXT TAKE
Rec
2 When set to Mirror
When recording When not recording
3 When set to Mirror/Mirror disabled
When recording
When not recording When recording not
2
possible
1
Mirror recording settings
A REC MODE page has been added to the REC SETUP screen. This
page has a
REC Mode item that has Single and Mirror buttons.
Single: Recording can only be made to the currently selected
CF card (default setting).
Mirror: 2 CF cards can be recorded to simultaneously.
2) Conditions that disable mirror recording
• Non-current CF card has no remaining capacity (recording
not possible if the current CF card has no open space
• Non-current CF card is not loaded (recording not possible
if the current CF card is not loaded
1
)
• Non-current CF card is not supported (PIO mode)
(recording not possible if the current CF card is not
supported
1
)
• Non-current CF card format is not supported (not FAT16 or
FAT32) (recording not possible if the current CF card is an
unsupported format
1
)
• One of the CF cards is not compatible with UDMA
• One of the CF cards has not been formatted by this unit
(not formatted with the cluster size recommended for this
unit)
• If any of the above conditions apply, mirror recording will
not occur, but recording to the current CF card will occur.
1
)
TASCAM HS-P82 3
Page 4
HS-P82
NOTE
• When set to
unselected CF card to match the current project/folder on the
current CF card. When you start mirror recording, takes with the
same name will be recorded to the projects/folders of the same
name on both CF cards.
• If you retake when set to
CF card will be erased. The take on the other CF card will not be
erased.
• When set to
CF card, recording will not occur on the other CF card either,
regardless of its remaining space.
• During mirror recording, if the time counter display mode is
TOTAL REMAIN, the amount of recording time possible when
set to
the CF card with the least amount of open space). During mirror
recording, if one of the CF cards runs out of space, the amount
of time that can be recorded on the CF card that is still being
recorded to is shown.
Mirror, a project/folder will be created on the
Mirror, only the take on the current
Mirror, if recording is not possible on the current
Mirror is shown (in other words, the time available on
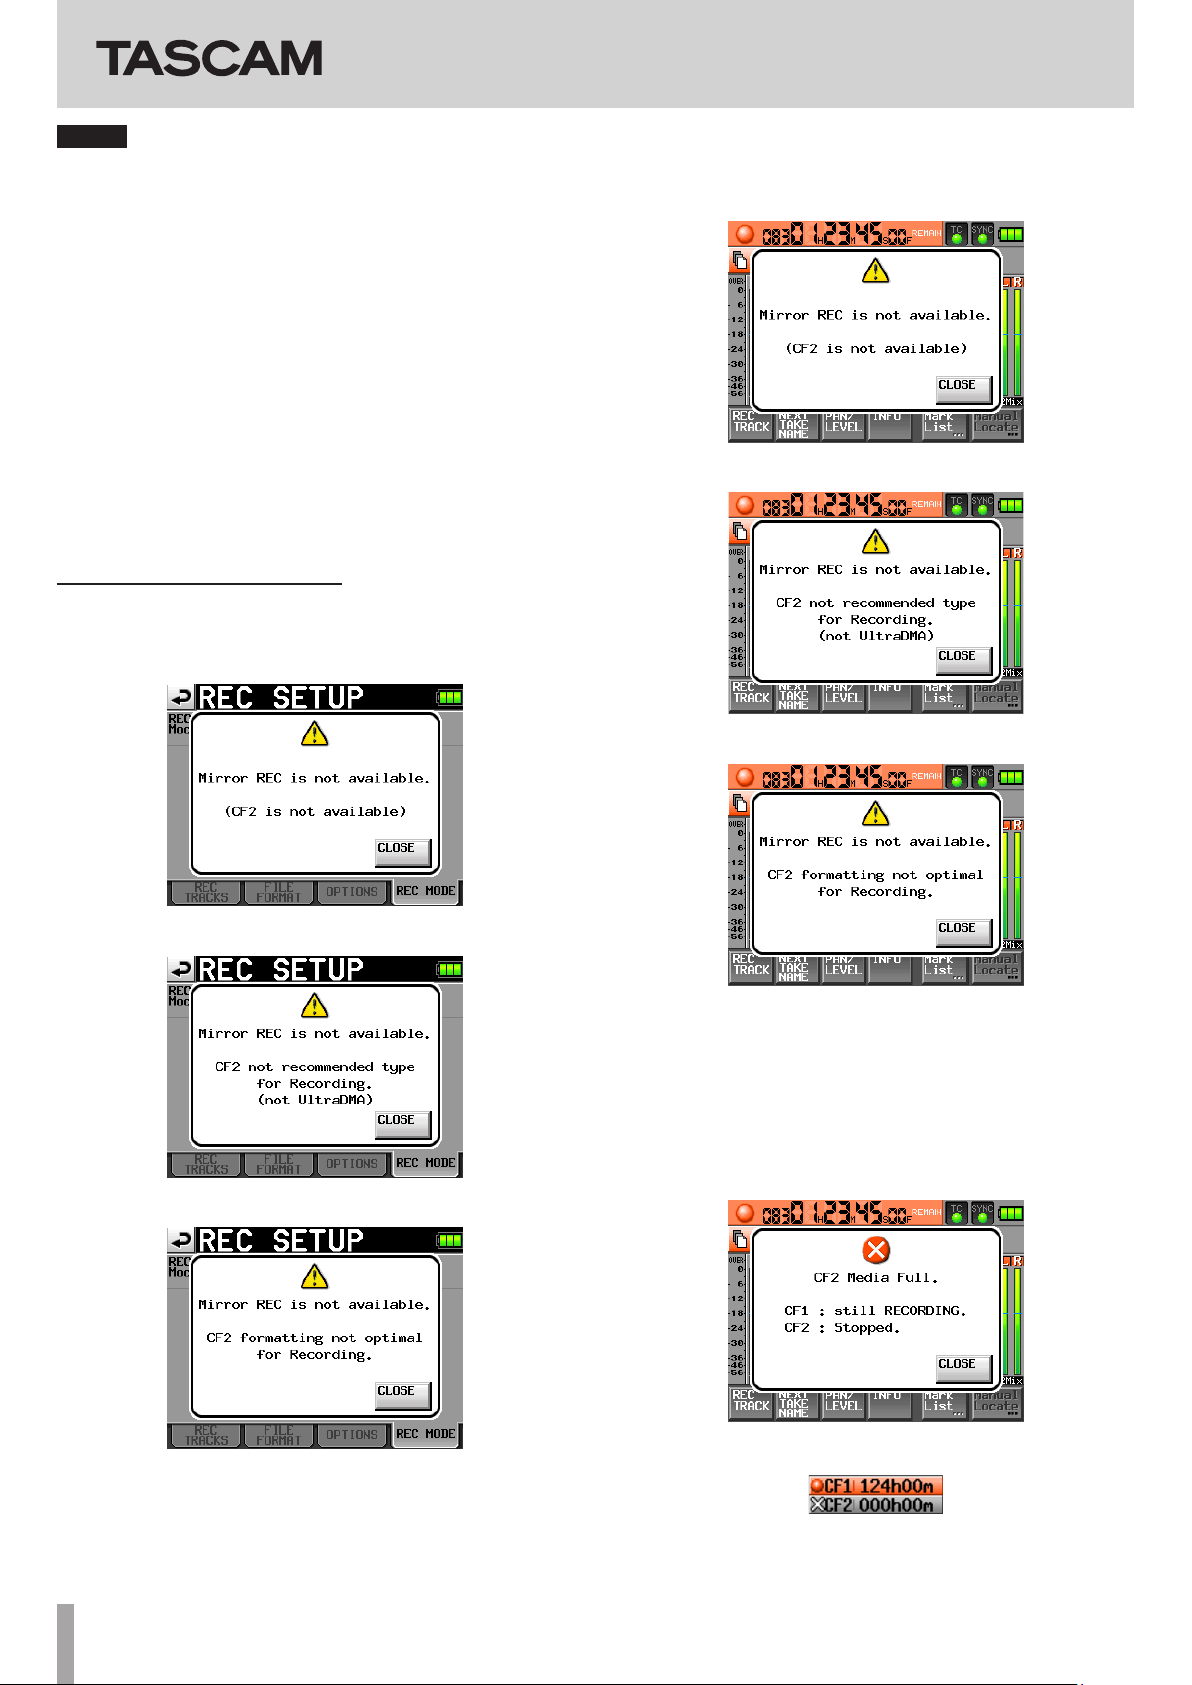
Mirror recording messages
ª If the REC Mode is set to Mirror when mirror recording is not
possible, one of the following messages appears.
1 When recording not possible to one of the CF cards
ª If recording is started when Mirror recording is disabled, one
of the following messages appears.
1 When Mirror recording is disabled for a reason other than
2 or 3 below
2 When one of the CF cards is not compatible with UDMA
2 When one of the CF cards is not compatible with UDMA
3 When one of the CF cards was not formatted by this unit
3 When one of the CF cards was not formatted by this unit
ª During mirror recording, if one of the CF cards runs out of
remaining space or has an error, recording to that CF card
will stop. Recording of the current take to the other CF card
will stop, but recording of a new take as a new le will start
immediately.
When this happens, a message will appear and the CF card
remaining time display buttons will be shown as follows
1 When one CF card runs out of open space
CF card remaining time buttons
4 TASCAM HS-P82
Page 5

HS-P82
2 When an error occurs with one CF card
CF card remaining time buttons
Recording times when set to mirror recording
Since mirror recording has a high processing load, the unit cannot
write to a CF card fast enough when the card’s remaining capacity
becomes low, so it is not possible to write to the media until it is
completely full. For this reason, compared to single recording, the
possible recording time is shorter. Moreover, when mirror recording,
the processing load also increases when the number of recorded
les is great, so the possible recording time is shorter when using
monophonic le mode compared to when using polyphonic mode.
When set to single recording
File format and
number of tracks
16-bit, 44.1 kHz,
8 tracks
16-bit, 44.1 kHz,
8 tracks + stereo mix
16-bit, 48 kHz,
8 tracks
16-bit, 48 kHz,
8 tracs + stereo mix
24-bit, 44.1 kHz,
8 tracks
24-bit, 44.1 kHz,
8 tracks + Stereo mix
24-bit, 48 kHz,
8 tracks
24-bit, 48 kHz,
8 tracks + Stereo mix
24-bit, 88.2 kHz,
8 tracks
24-bit, 96 kHz,
8 tarcks
24-bit, 176.4 kHz,
4 tracks
24-bit, 192 kHz,
4 tracks
8 GB 16 GB 32 GB
3 hours
8 minutes
2 hours
30 minutes
2 hours
53 minutes
2 hours
18 minutes
2 hours 5
minutes
1 hour
40 minutes
1 hour
55 minutes
1 hour
32 minutes
1 hour
2 minutes
0 hour
57 minutes
1 hour
2 minutes
0 hour
57 minutes
CF card capacity
6 hours
17 minutes
5 hours
2 minutes
5 hours
46 minutes
4 hours
37 minutes
4 hours
11 minutes
3 hours
21 minutes
3 hours
51 minutes
3 hours
4 minutes
2 hours
5 minutes
1 hour
55 minutes
2 hours
5 minutes
1 hour
55 minutes
12 hours
35 minutes
10 hours
4 minutes
11 hours
34 minutes
9 hours
15 minutes
8 hours
23 minutes
6 hours
42 minutes
7 hours
42 minutes
6 hours
10 minutes
4 hours
11 minutes
3 hours
51 minutes
4 hours
11 minutes
3 hours
51 minutes
When set to mirror recording/monophonic le mode
File format and
number of tracks
16-bit, 44.1 kHz,
8 tracks
16-bit, 44.1 kHz,
8 tracks + stereo mix
16-bit, 48 kHz,
8 tracks
16-bit, 48 kHz,
8 tracs + stereo mix
24-bit, 44.1 kHz,
8 tracks
24-bit, 44.1 kHz,
8 tracks + Stereo mix
24-bit, 48 kHz,
8 tracks
24-bit, 48 kHz,
8 tracks + Stereo mix
When set to mirror recording/polyphonic le mode
File format and
number of tracks
16-bit, 44.1 kHz,
8 tracks
16-bit, 44.1 kHz,
8 tracks + stereo mix
16-bit, 48 kHz,
8 tracks
16-bit, 48 kHz,
8 tracks + stereo mix
24-bit, 44.1 kHz,
8 tracks
24-bit, 44.1 kHz,
8 tracks + Stereo mix
24-bit, 48 kHz,
8 tracks
24-bit, 48 kHz,
8 tracks + Stereo mix
• The above recording times are estimates. They may dier
depending on the CF card being used.
• The above recording times are not continuous recording times.
They are the total amounts of recordable time on the CF card.
• When mirror recording, the sampling frequency of the recorded
le cannot be 88.2, 96, 176.4 or 192 kHz
8 GB 16 GB 32 GB
3 hours
4 minutes
2 hours
26 minutes
2 hours
49 minutes
2 hours
14 minutes
2 hours
2 minutes
1 hour
37 minutes
1 hour
52 minutes
1 hour
29 minutes
8 GB 16 GB 32 GB
3 hours
8 minutes
2 hours
30 minutes
2 hours
53 minutes
2 hours
18 minutes
2 hours
5 minutes
1 hour
40 minutes
1 hour
55 minutes
1 hour
32 minutes
CF card capacity
6 hours
13 minutes
4 hours
57 minutes
5 hours
42 minutes
4 hours
33 minutes
4 hours
8 minutes
3 hours
18 minutes
3 hours
48 minutes
3 hours
2 minutes
CF card capacity
6 hours
17 minutes
5 hours
1 minutes
5 hours
46 minutes
4 hours
37 minutes
4 hours
11 minutes
3 hours
21 minutes
3 hours
51 minutes
3 hours
4 minutes
12 hours
30 minutes
10 hours
0 minute
11 hours
29 minutes
9 hours
11 minutes
8 hours
20 minutes
6 hours
40 minutes
7 hours
39 minutes
6 hours
7 minutes
12 hours
35 minutes
10 hours
3 minutes
11 hours
34 minutes
9 hours
14 minutes
8 hours
23 minutes
6 hours
42 minutes
7 hours
42 minutes
6 hours
9 minutes
Slate on status can now be retained
Previously, the signal from the slate mic or the slate tone (built-in
oscillator) was only assigned to the armed tracks while the SLATE
key on the front panel was being pushed. Now, if you press the
SLATE key while pressing and holding the SHIFT key, the SLATE
function can be turned ON indenitely.
This operation can not be performed from the RC-F82 (fader unit
designed for the HS-P82).
Addition of take end time code display
End time code information (END T/C) has been added to the take
information pop-up.
TASCAM HS-P82 5
Page 6

New pop-up messages added in HS-P82 V1.10
Message Details and responses Remarks
Cannot Change Now
Fixed in current Fs.
CF1 Media Full.
CF1:Stopped.
CF2:still RECORDING.
CF1 Record Error.
CF1:Stopped.
CF2:still RECORDING.
CF2 Media Full.
CF1:still RECORDING.
CF2:Stopped.
CF2 Record Error.
CF1:still RECORDING.
CF2:Stopped.
Initializing ...
Mirror REC is not available.
(CFn is not available)
Mirror REC is not available.
CFn formatting not optimal
for Recording.
Mirror REC is not available.
CFn not recommended type
for Recording.
(not UltraDMA)
The current sampling frequency cannot be changed.
Because CF1 does not have enough space, recording to it has
stopped. Recording to CF2 is continuing.
Because an error occurred when recording to CF1, recording to it
has stopped. Recording to CF2 is continuing.
Because CF2 does not have enough space, recording to it has
stopped. Recording to CF1 is continuing.
Because an error occurred when recording to CF2, recording to it
has stopped. Recording to CF1 is continuing.
The card is being initialized.
Since the media cannot be used, mirror recording is disabled.
Because the media was not formatted by this unit, recording
properly cannot be guaranteed, so mirror recording is disabled.
Format the media with this unit to use it.
Because this card does not meet the required system specications,
recording properly cannot be guaranteed, so mirror recording is
disabled.
This occurs when the REC Mode is
set to Mirror.
This occurs when the REC Mode is
set to Mirror.
This occurs when the REC Mode is
set to Mirror.
This occurs when the REC Mode is
set to Mirror.
This occurs when the REC Mode is
set to Mirror.
n = 1 or 2
This occurs when the REC Mode is
set to Mirror.
n = 1 or 2
This occurs when the REC Mode is
set to Mirror.
n = 1 or 2
HS-P82
The wordings of the following pop-up messages have changed.
Old message New message Details and responses Remarks
n = 1 or 2
This occurs when the card
is formatted with a cluster
size that is smaller than
specied by this unit.
n = 1 or 2
CFn not recommended format
for Recording/Playing.
CFn not recommended
for Recording/Playing.
(not UltraDMA)
CFn formatting not optimal
for Recording/Search.
CFn not recommended type
for Recording/Search.
(not UltraDMA)
Because the media was not formatted by
this unit, recording/searching properly
cannot be guaranteed, so mirror recording
is disabled. Format the media with this unit
to use it.
Because this card does not meet the
required system specications, recording/
searching properly cannot be guaranteed.
6 TASCAM HS-P82
Page 7

New functions added in firmware V1.04
HS-P82
Mid-side (MS) microphone connection mode added
The unit can now decode signals from MS microphones. In addition
to decoding as it records, the unit can also record without decoding
and then decode during payback.
ª Setting the MS decoding mode
Set the MS decoding mode on the SETUP page of the MIXER
SETUP
screen.
To open the
the
MENU screen and touch the MIXER SETUP button.
On this page, touch the SETUP tab to open the SETUP page.
Use the MS MIC MODE item to set the decoding mode when
connecting MS microphones. This can be set for each channel pair
(1-2, 3-4, 5-6 and 7-8) separately.
OFF (default):
In the default mode, this function is o during recording and
playback.
INPUT:
Use this mode to decode while recording.
Decoding is not applied during playback.
MONITOR:
When MS mic signals are being recorded without decoding in order
to be decoded later, use this mode to decode just for monitoring
while recording.
Use this mode also when playing back takes that were recorded
using an MS mic without decoding.
MIXER SETUP screen, press the MENU key to open
ª Conduct MS decoding during recording
1 On the SETUP page of the MIXER SETUP screen, set the MS
MIC MODE
the MS microphone.
2 Push the HOME key to open the Home Screen and touch the
PAN/LEVEL button to open the screen where you can make
adjustments with the pan pots and level knobs.
The PAN knobs on the channel pairs that have MS MIC MODE
set to
the sound.
3 Touch the
that you went to adjust, so that its background appears
white.
4 Use the DATA dial to adjust the width as desired in a range
between 0 and 100 (default:
number becomes larger, the amount of side increases with
100 being 100% side.
NOTE
Values set are saved with the project even when the MS decode
mode is o (
decode mode to
decoding o will be used.
5 Use the
the
adjust, so that its background appears white. Use the DATA
dial to adjust the level as desired.
NOTE
You can also adjust the MS balance and output level on the
SETUP
screen.
to INPUT for the pair of channels connected to
INPUT become MS balance knobs that adjust the width of
PAN knob (MS balance knob) for the channel pair
0). 0 is 100% mid. As the
MS MIC MODE set to OFF). When you set the MS
INPUT again, the settings made before turning
2MixLVL knob to adjust the decoder output. Touch
2MixLVL knob for the pair of channels that you want to
CHx-x
NOTE
• When either
INPUT or MONITOR is on, channel link is also
turned on for the corresponding pair of channels, and the
CH LINK button for the pair becomes blue. When INPUT
and
MONITOR are turned o, channel link is not turned o.
When
INPUT or MONITOR are turned on for a pair of channels,
touching the
also turn o the
• During recording or playback, the
CH LINK button to turn o the channel link will
INPUT or MONITOR setting.
MS MIC MODE setting cannot
be changed. Always stop the unit before changing the setting.
ª Connecting a mid-side microphone
To use this unit’s MS decoding function, connect the mid to the odd
channel and the side to the even channel. If the mid and side are
connected in reverse, decoding will not be conducted correctly.
For example, connect mid to CH3 and side to CH4.
ª Recording without MS decoding
You can record a take without decoding (recording the mid and side
signals as is) and then decode it during playback.
By decoding during playback, the recording will be output as a
stereo mix.
To record without decoding, set the decode mode to
MONITOR. When set to MONITOR, you can monitor with decoding
even when the sound is recorded without it.
Adjust the MS balance and output in the same manner as when
recording with decoding. (The recorded les are not decoded.)
OFF or
TASCAM HS-P82 7
Page 8

HS-P82
Trim group function addition
This new trim group function allows you to adjust input trim levels of
multiple channels at the same time with one input trim knob set as
the master
NOTE
Along with the addition of the trim group function, the
Key Assign
screen has a new
item on the RC-F82 page of the REMOTE SETUP
MIXER (TRIM GROUP) setting.
Function
ª Setting trim groups
To use trim group operation, you must assign one channel as the
master of the group and other channels as slaves.
There are four groups, and multiple combinations are possible.
NOTE
• You cannot assign a channel to more than one group. The channel
is always assigned to the last group selected.
• Only the input trim knob of the designated master can be used to
adjust the input level. Turning the knobs of the slaves will have no
eect.
1 Press the MENU key to open the Menu Screen, and press the
MIXER SETUP button to open the MIXER SETUP screen.
2 Touch the
TRIM GROUP tab to open the TRIM GROUP page.
NOTE
• If the trim setting for any of the grouped channels reaches its
maximum or minimum value, continuing to turn the input trim
knob of the master in the same direction will have no further
aect on any of the channels. (The dierences in values between
channels are preserved.)
• Channels cannot be linked if they are in dierent groups
(including when one is not in a group). Touching the button for
those channels in the
pop-up warning to appear.
CH LINK item will cause the following
ª Clearing a trim group
To clear a trim group, touch the master button for that group
(the button that appears red and has the letter
group number).
A pop-up appears to conrm that you want to clear the group.
M next to the
The TRIM GROUP item contains buttons numbered 1–4 for
each channel. Touch the corresponding buttons to assign
each channel to groups 1–4.
In this example, we will make channel
1 and channels
3 Under the channel that you want to make the master, touch
the number button (
channels assigned to it yet.
The letter
button becomes red.
In the example, touch the
appears and the button becomes red.
NOTE
The rst channel assigned to a group becomes its master. The master
cannot be changed afterwards. If you want to change the master,
clear the grouping and start again, assigning the channel that you
want as the master to the group rst.
4 Touch the group number button under the channel that you
want to make a slave. The button becomes blue.
Slaves can be channels of numbers lower than the master
and channels that are not consecutive.
For example, if you press the
button becomes blue. Likewise, you can press the
under channels
indicating that they are slaves.
5 By turning the input trim knob for channel
the trim values for channels
2, 3-4 (link), 5 and 6 into slaves.
1–4) for a group that does not have any
M appears to the right of the number and the
1 button beneath channel 1. 1M
1 button under channel 2, that
3-4, 5 and 6 and they will also become blue,
2, 3-4, 5 and 6 together.
1 the master for group
1 buttons
1, you can adjust
Touch the OK button or press the DATA dial to clear the group.
Doing this clears the group setting from the slaves (channels with
blue buttons) at the same time.
If you try to assign a channel that is a group master to another group,
a pop-up appears to conrm that you want to clear its group and
assign it to a dierent group. Touch the
dial to clear the previous group and assign the channel that had
been its master to the other group.
OK button or press the DATA
Zero trim function added
Turning an input trim knob to its minimum setting now results in
that channel being muted.
Each trim knob functions the same as before, but when it reaches its
minimum setting, the channel is muted regardless of the reference
level setting.
8 TASCAM HS-P82
Page 9

Firmware V1.02 new functions
HS-P82
Changing the term “scene” to “folder”
Until now, the level beneath projects had been called scenes, but
since now it is possible to change the names of takes freely after
recording, the term “scene” is no longer suitable.
For this reason, what had been called a “scene” before is now called a
“folder”. Buttons and screen references have also been changed. For
example, the
However, the default folder name has not changed and is still
Scene plus three digits.
• The
and the
Folder Name button and the FOLDER NAME screen.
Folder Name button (formerly, the Scene Name button)
1st Folder (formerly, 1st Scene)
CREATE PROJECT screen 1
• MAKE FOLDER screen (formerly, MAKE SCENE screen)
MAKE FOLDER screen
•
NUM OF FOLDER (formerly, NUM OF SCENE) display
Project selection screen
In addition, when reading the Owners Manual, please replace the
term “scene” with the term “folder”.
CREATE PROJECT screen 2
•
1st FOLDER screen (formerly, 1st SCENE NAME screen)
1st FOLDER screen
•
MAKE FOLDER button (formerly, MAKE SCENE button)
Addition of project number, folder number and take number indications
Numbers have been added to projects, folders and takes, and these
numbers are now displayed.
Project numbers are assigned to projects in the order that they are
saved on the media. Folder numbers are assigned in order as they
are created inside each project. Take numbers are assigned in order
as they are saved in a folder.
ª Take number display on the Home screen
The take number is now shown in front of (to the left of) the time
counter.
Home screen
Folder selection screen
TASCAM HS-P82 9
Page 10

HS-P82
ª Each number is shown on the project
selection screen, folder selection screen
and take selection screen
The numbers are shown on the icons displayed in the list on each
selection screen.
Project selection screen
Folder selection screen
2. Press the Date button to replace the name with the date set
in the internal clock in the yyyy-mm-dd format.
Project name editing screen
NOTE
If the same project name or folder name already exists,
•
an “_” (underscore) followed by an unassigned number is
added.
After pressing the “Date” button and replacing the name
•
with the date, you can further edit the name on this
screen. (The name of an already created folder cannot be
edited later.)
Next Take Name editing function added
A NEXT TAKE NAME button has been added to the Home Screen.
Press this button to open a
where you can edit the name given to takes. This change will be
applied to the next recorded take.
NEXT TAKE NAME pop-up window
Take selection screen
Addition of a date input button
A Date button has been added to screens where project names,
for example, are edited. This new function allows the date set in the
internal clock to be inserted into the name.
The following screens have had a Date input button added.
• Project name editing screen when creating a new project
• 1st folder name editing screen when creating a new project
• Folder name editing screen when creating a new folder
• Project name editing screen when editing a project name
• User word editing screen when editing the next take name
1. To use this button, open the screen where you can edit the
project name, for example, as shown below.
ª Take name first half
The rst half of the take name can be set to either UserWord or
FolderName.
NOTE
The first half of the take name can only be edited when the
unit is stopped.
•
UserWord mode (button)
Select this to use the user name as the rst half of the take name.
Press the
user word. (This is like the project name editing screen.)
• FolderName mode (button)
Select this to use the folder name as the rst half of the take
name. This is the default setting.
EDIT button to open the screen where you can edit the
10 TASCAM HS-P82
Project name editing screen
Page 11

HS-P82
ª Take name second half
The second half of the take name is made of one alphabetical letter
and three numerical digits.
Press the
the one letter. You can also set the three numbers by using the “
and “
function accessed by the
and functions of parts” in the Owner’s Manual for details.)
•
•
•
EDIT button to open an editing screen where you can set
–”
+” buttons. (This functions in the same way as the NEXT TAKE
REC TRACKS button (q). See “2 – Names
NOTE
Since the “Next Take Name” setting is saved by project, if
the project is changed, that project’s setting will be used.
The numerical portion of the second half of the take name
can be changed even during playback and recording. (The
first half of the take name and the letter in the second
half can only be changed when the unit is stopped.)
If the first half of the take name or the letter in the second
half is different, it is now possible to create takes that
have the same three digits in the latter half.
Mono file recording folder selection
When the le mode is set to MONO mode, you can now select from
two types of folders for recording audio les. The default setting is
SubFolder.
NOTE
In either mode, subfolders are created for each take
inside folders, and this is where the management files are
generated.
Moreover, the following pop-up window opens when
switching back to Subfolder mode to let you know that
the maximum number of takes has been increased again
During recording, if you press the REC key to try to start
•
the next take, the next take can be recorded 4 seconds
after starting recording when in poly mode or mono
subfolder mode. In folder mode, however, some cases will
take more than 4 seconds.
ª SubFolder mode
In the same way as before, subfolders are created for each take inside
folders, and recorded audio les are saved in them.
ª Folder mode
Recorded audio les are saved directly inside the folder.
NOTE
Whether the file mode is set to “Poly” or “Mono,” when
•
Folder mode is selected, the maximum number of takes
that can be recorded in one folder might be significantly less than usual in some cases. For this reason, the
following pop-up window opens when switching to Folder
mode, warning that the maximum number of takes will be
reduced.
TASCAM HS-P82 11
Page 12

HS-P82
:
The folder structure shown in “8 – Transferring Data between the
Unit and a Computer” has been changed to the following. In addition
to these les, management les and folders are also created.
ROOT
Project01
Scene001 (Example of Poly)
Scene001-T001.wav
Scene001-T001_ST.wav
Scene001-T002.wav
Scene001-T002_ST.wav
:
:
Scene002 (Example of MONO & Sub Folder)
Scene002-T001
Scene002-T001_1.wav
Scene002-T001_2.wav
Scene002-T001_3.wav
Scene002-T001_4.wav
Scene002-T001_5.wav
Scene002-T001_6.wav
Scene002-T001_7.wav
Scene002-T001_8.wav
Scene002-T002
Scene002-T002_1.wav
Scene002-T002_2.wav
Scene002-T002_3.wav
Scene002-T002_4.wav
Scene002-T002_5.wav
Scene002-T002_6.wav
Scene002-T002_7.wav
Scene002-T002_8.wav
Scene002-T001_ST.wav
Scene002-T002_ST.wav
Project02
Scene001 (Example of MONO & Folder)
Limitations to recording operations
This unit can only handle a total of about 2000 items, including
les and subfolders, inside one folder. If this limit is exceeded,
further recording to that folder will not be possible. In this case, the
following types of things will occur.
• If the
• When loading a project or folder, recording to that folder might
REC key is pressed during recording, the unit might not
be able to start recording a new take. In this case, the following
pop-up messages will appear.
not be possible. In this case, the following pop-up messages will
appear.
Moreover, in these cases, the Home Screen will show Rec Limit
for the remaining recordable time of the currently selected CF
card.
Scene001-T001_1.wav
Scene001-T001_2.wav
Scene001-T001_3.wav
Scene001-T001_4.wav
Scene001-T001_5.wav
Scene001-T001_6.wav
Scene001-T001_7.wav
Scene001-T001_8.wav
Scene001-T001_ST.wav
Scene001-T002_1.wav
Scene001-T002_2.wav
Scene001-T002_3.wav
Scene001-T002_4.wav
Scene001-T002_5.wav
Scene001-T002_6.wav
Scene001-T002_7.wav
Scene001-T002_8.wav
Scene001-T002_ST.wav
:
:
Project03
:
Poly: When the File Mode is set to POLY (there is no Mono File
Place setting)
MONO & Sub Folder: When the
Mono File Place is set to Sub Folder
File Mode is set to MONO and
MONO & Folder: When the File Mode” is set to MONO and Mono
File Place is set to Folder
NOTE
The limit on the total number of items in one folder includes
files and folders not created by the unit. Moreover, this total
also includes management files, system files and other files
and folders that are not normally visible.
Change of the default reference level
With this version of the rmware, the default reference level has
been changed from –16 dB to –20 dB. (See “PREFERENCES page” on
page 46 of the Owner’s Manual.)
12 TASCAM HS- P82
 Loading...