

Page 1
HS-8
New functions in firmware V1.30
The following functions have been added in firmware V1.30
0 Network functions (FTP, Telnet and VNC)
REMOTE/KEYBOARD
0
0 Take Rename function
0 Rec Fn Stop Monitor function
0 Monitor muting function
0 Slate tone function
0 USER BITS Source setting function
0 Addition of take end time code display
0 Ability to receive digital input signals that are in consumer format
0 Clear function can be executed using the SHIFT and BACKSPACE keys on
an external keyboard
0 Cursor can be moved using the up and down arrow (2/x), HOME and END
keys of an external keyboard
0 Title display changes on the
0 PROJECT key now moves up a level when the PROJECT screen is open.
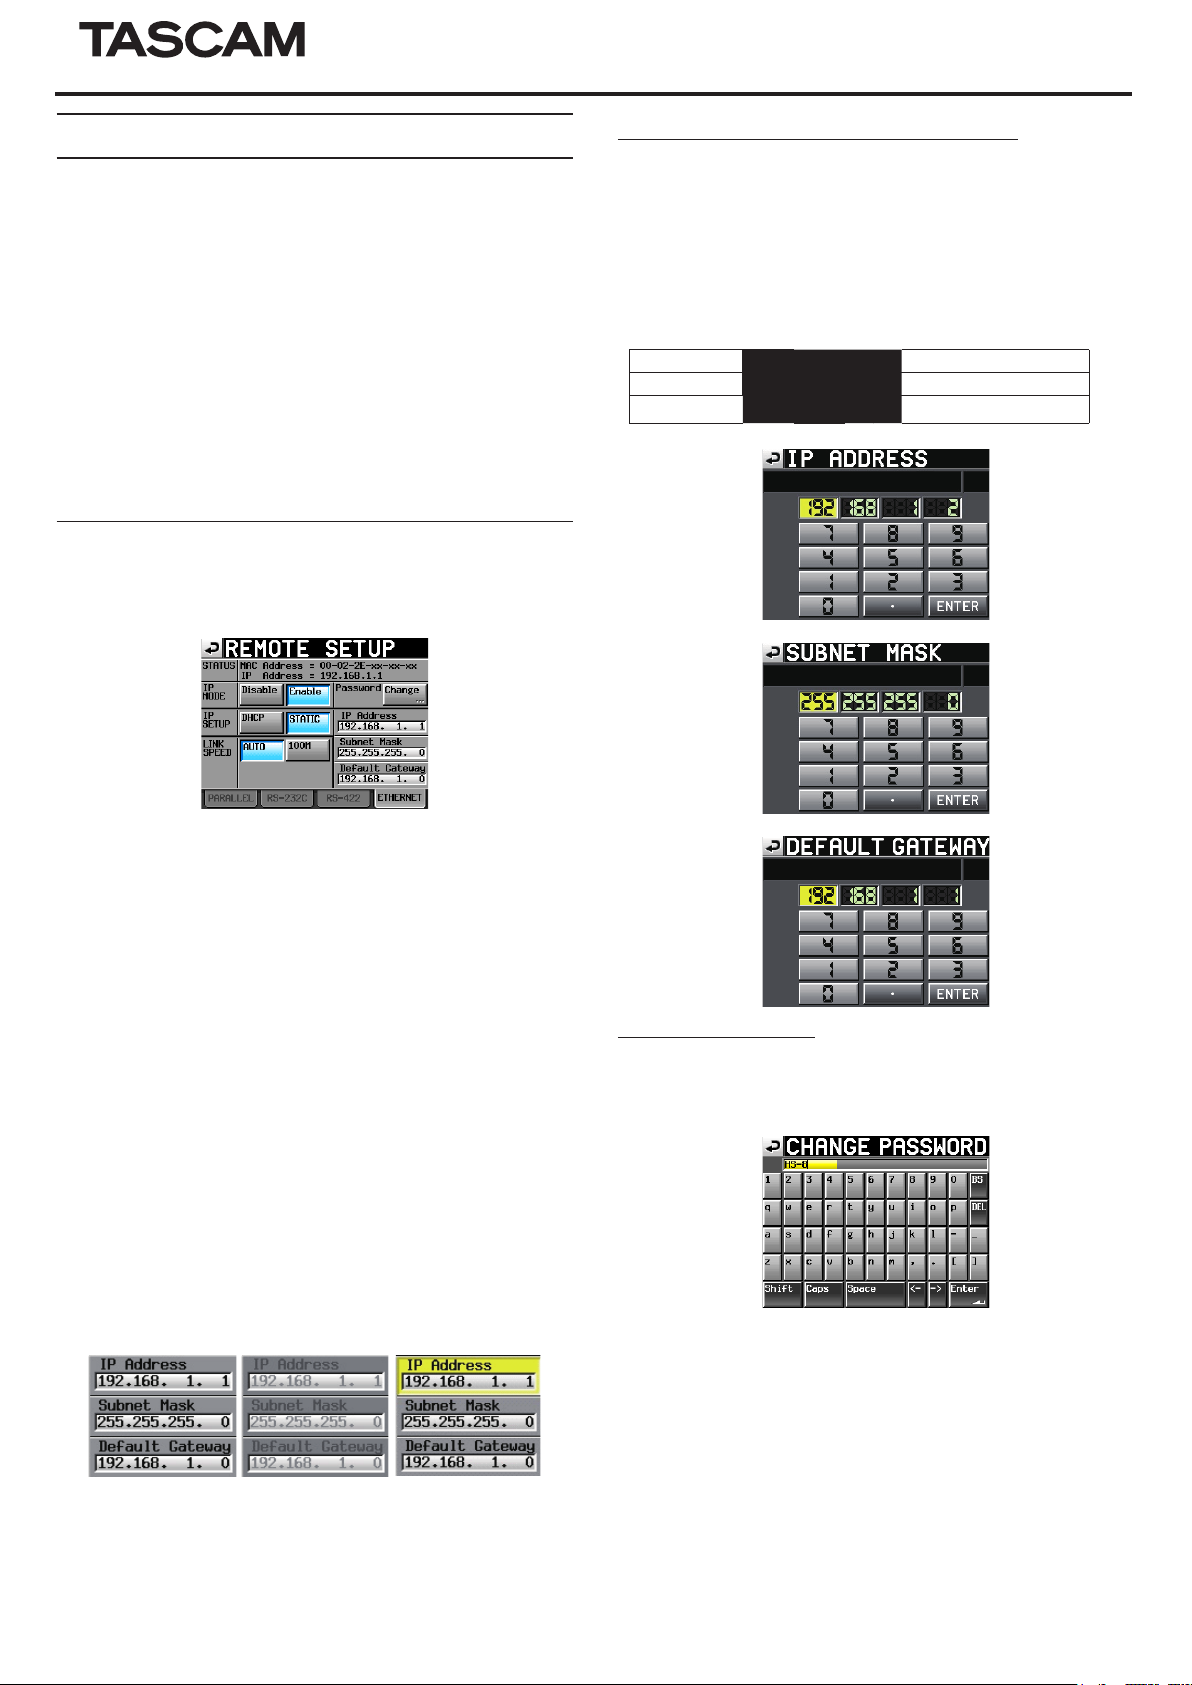
Network functions (FTP, Telnet and VNC) added
ETHERNET page added to the REMOTE SETUP screen
Use this to make settings related to Ethernet communication.
EXTERNAL Control
and
PROJECT
screen
Lock/Unlock settings
IP Address/Subnet Mask/Default Gateway editing screen
Touch the corresponding area of the
REMOTE SETUP
screen
ETHERNET
page to open its value setting screen.
0 Each field can contain up to 3 digits. (You do not need to input “0” before
values of 1–2 digits.)
0 The first field is selected when a screen opens.
0 After a field is selected, touching a number button will enter that digit.
When touched, further digits will be added to the end of the same field.
0 Touch the period (point) button to move to the next field.
Example
Screen opened 192. 168. 1. 1
“1234” input 234. 168. 1. 1 (First “1” is discarded)
“.” input 192. 168. 1. 1
STATUS
This shows the unit's MAC Address and current IP Address.
IP MODE
Use these buttons to enable or disable Ethernet functions.
Setting buttons:
Disable
(default value),
Enable
IP SETUP
Use to switch between DHCP and STATIC.
When set to
Address, Subnet Mask
DHCP
, and there is a DHCP server on the LAN, the
Default Gateway
and
automatically acquired.
When set to STATIC, you must set the
Default Gateway
and
Setting buttons:
items manually.
DHCP, STATIC
IP Address, Subnet Mask
(default value)
LINK SPEED
Use these buttons to set the link speed.
Setting buttons:
ing to connection),
AUTO
(default value automatically adjusts speed accord-
100M
(operates with fixed speed of 100 Mbps.)
Password
Set the password. (See "CHANGE PASSWORD screen” below.)
IP Address/Subnet Mask/Default Gateway
These show the current values of these settings. When
STATIC
to
, use these field to set the values. (See “IP Address/Subnet
Mask/Default Gateway editing screen” below.)
Default values: 0. 0. 0. 0
Depending on the
IP SETUP
setting, this area appears differently as
shown below.
IP
items should be
IP SETUP
is set
CHANGE PASSWORD screen
Touch the
SETUP
Change
screen
button in the
ETHERNET
Password
page to open the
section of the
CHANGE PASSWORD
REMOTE
screen
where you can set the password.
Up to 9 characters can be used.
D01219820A
DHCP STATIC Field selected
TAS CAM H S-8 1
Page 2
HS-8
Network function (FTP, Telnet and VNC) details
FTP (file transfer protocol)
By using an FTP client application, you can transfer files between this unit and
a computer.
Connect to this unit and login in the same way as with other FTP servers. After
connecting and logging in, “A:” and “B:” will appear in the root directory. These
correspond to the unit's CF1 and CF2 slots. If the corresponding slot does not
contain a card, the “A:” or “B:” will appear empty.
NOTE
i To display Japanese, use an FTP application that supports Unicode.
i Always set the maximum number of simultaneous transfers of the FTP client
application to “1”. If not set to “1” files cannot be transferred properly.
i For information about FTP client applications that have been confirmed to
work properly with this unit, please contact TASCAM customer support.
Required settings for connecting by FTP
The following settings are necessary for connecting to this unit by FTP.
IP address: This unit's IP address is shown in the
field of the
REMOTE SETUP
Port: 21
User name: HS-8 (cannot be changed, case sensitive)
Password: HS-8 (default, case sensitive)
This setting can be changed by using the
Change
ERNET
page.
button on the
REMOTE SETUP
NOTE
i The number of simultaneous connections is “1”. Depending on the FTP client
application, two simultaneous connections with this unit might be possible,
but files might not be transferred correctly, so we recommend that you do not
use two or more simultaneous FTP connections with this unit.
i FTP connections cannot be made when EXTERNAL Control has been set to
LOCK on the
Lock Setup
screen. Likewise, setting this to LOCK will end
any active FTP connection.
i Changing any settings on the
REMOTE SETUP
screen of the
page will also end any active FTP connection.
Working with files using an FTP client application
CAUTION
When adding, overwriting or deleting files/folders from this unit using an FTP
client application, always follow the procedures below to rebuild the entire CF
card that was changed.
If you do not rebuild the card, inconsistencies between the syetem files and
audio files will occur, leading to problems such as the following.
i Added files and folders will not appear
i Deleted files and folders will continue to appear
i Overwritten files will not play back properly
Procedures for rebuilding the entire CF card
1. Open the project selection screen.
2. While no project is selected, press the MENU button to open a pull-up
menu.
3. Press the REBUILD button in the pull-up menu.
4. When a confirmation message appears in a pop-up window, press the
OK button or the DATA dial.
Read files from the unit
p
You can read files from this unit at any time.
IP Address
ETHERNET
screen
page.
Password
ETH-
screen
ETHERNET
Delete a file on the unit
p
The current take can be deleted only when the unit is stopped. Files other
than the current take can be deleted at any time.
Add a new folder to this unit
p
You can add a new folder to this unit at any time.
Delete a folder from this unit
p
You can only delete the current folder when stopped.
You can delete any folder other than the current from this unit at any time.
Edit the names of files/folders on this unit
p
You cannot edit the names of files/folders on this unit.
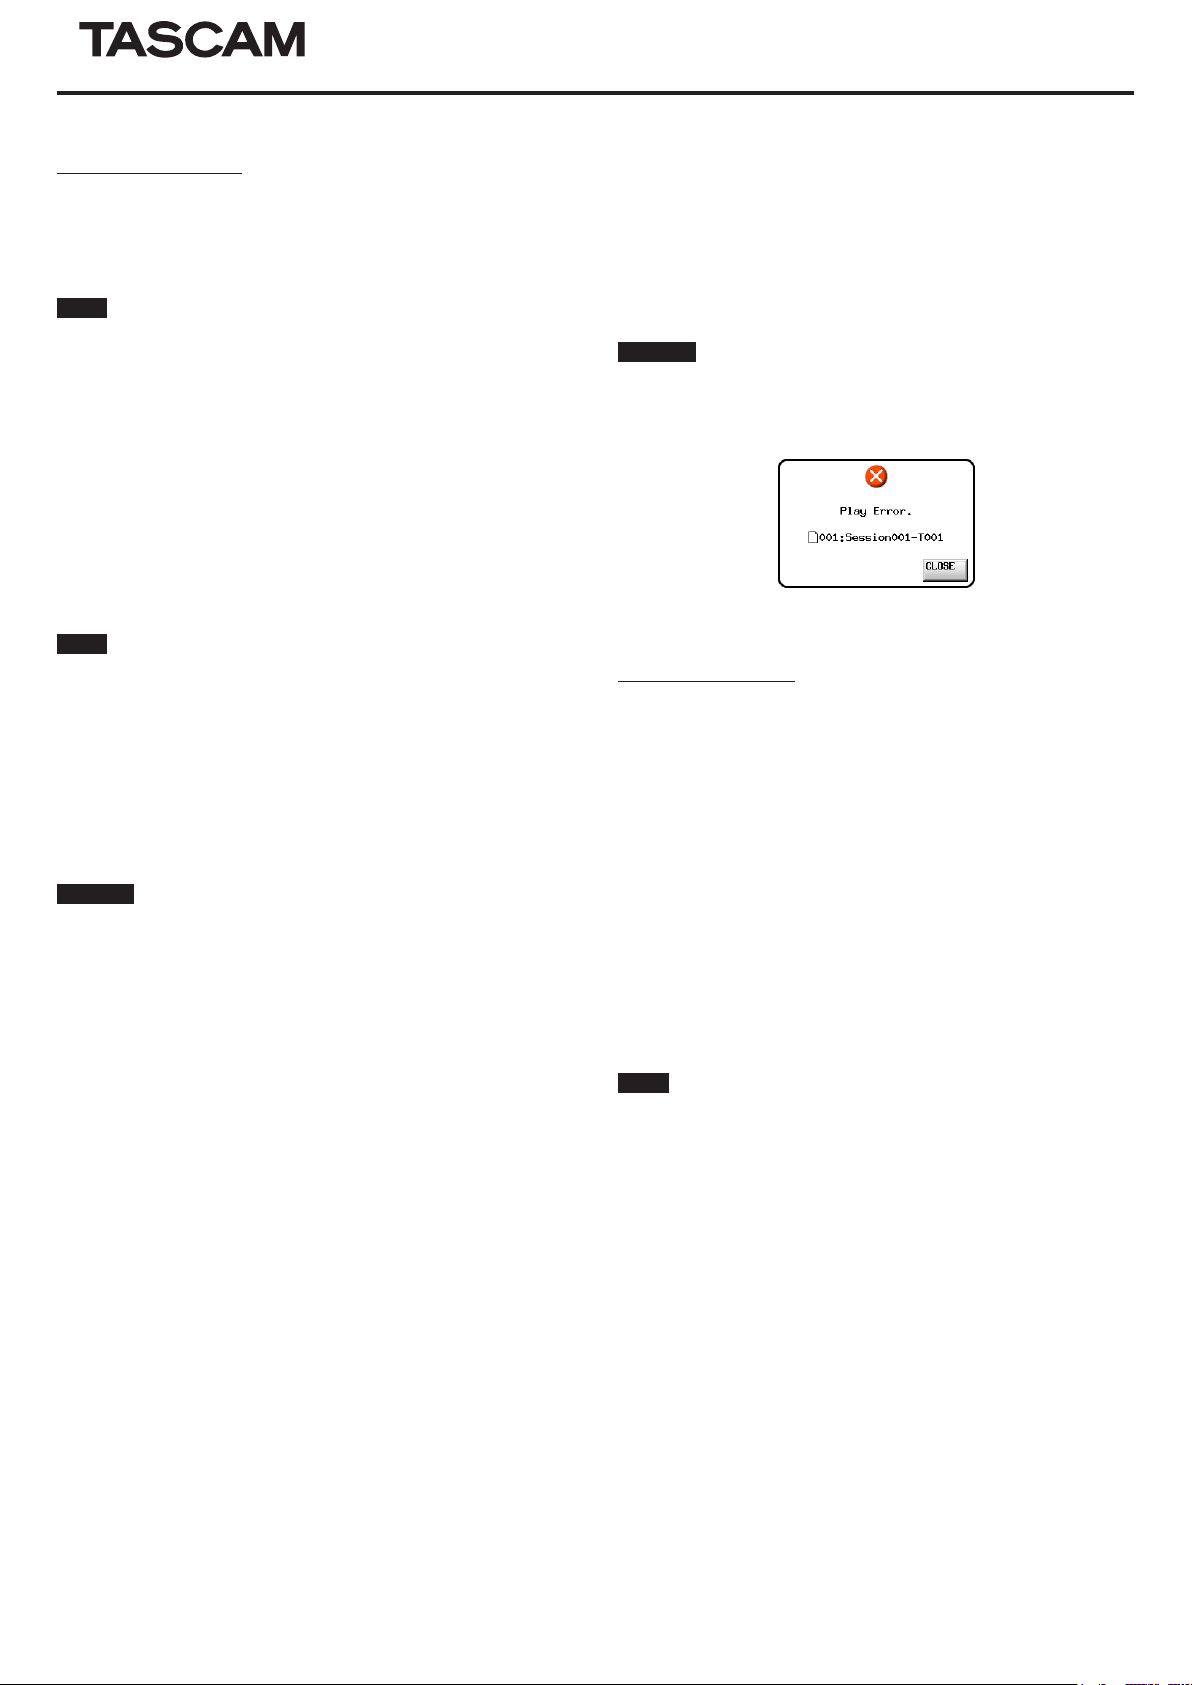
CAUTION
i If overwriting causes the size, number of channels, bit-rate or sampling
frequency of an audio file to be different from the previous file, inconsistencies
could occur between the system files and audio files. If such an inconsistency
occurs, the following error message will appear when you start playback.
i Do not overwrite an existing audio file with a file that uses a different sampling
frequency. The inconformity that results could become unresolvable.
Remote control by Telnet
Remote control of this unit is possible over Ethernet via port 23 using Telnet.
Necessary setting for connections by Telnet
The following settings are necessary for connecting to this unit by Telnet.
IP address: This unit’s IP address is shown in the
field of the
REMOTE SETUP
IP Address
ETHERNET
screen
page.
Port: 23
Password: HS-8 (default, case sensitive)
This setting can be changed by using the
Change
ERNET
page.
button on the
REMOTE SETUP
Password
ETH-
screen
Connecting to the unit by Telnet
1. After connecting with this unit by Telnet using the above IP address and
port number, press the computer Enter key.
2. When
3. When login succeeds,
NOTE
Enter Password
appears on the Telnet console, input the
above password and press the Enter key.
Login Successful
appears on the Telnet
console. Input “exit”and press the Enter key to end the Telnet connection.
i 2 simultaneous Telnet connections are possible.
i Telnet connections cannot be made when
set to
LOCK
Lock Setup
on the
EXTERNAL Control
has been
screen. Likewise, setting this to LOCK will
end any active Telnet connections.
i Changing any settings on the
REMOTE SETUP
screen of the
ETHERNET
page will also end any active Telnet connection.
i For information about this unit's RS-232C command protocol, please contact
TASCAM customer support.
Add new files to the unit
p
You can add files to this unit at any time.
When recording, if you add BWF files to the current session, they will be
shown in the list with existing files, recorded files and added files in that
order.
Overwrite existing files on the unit
p
You can only overwrite the current take when the unit is stopped.
You can overwrite other existing files at any time.
However, if the
All Take
ting is
PLAY SETUP
, during playback you might not be able to overwrite
screen
GENERAL
Play Mode
page
the take following the current take depending on the timing.
2 TAS CAM H S-8
set-
Page 3

HS-8
VNC (virtual network computing)
By using a VNC viewer application, you can view and operate the contents of
this unit's LCD screen on a computer.
In the VNC viewer application, you can use a mouse to conduct the following
operations.
i Mouse left click: Same as touching the unit's LCD.
i Mouse wheel click: Same as pressing the unit's ENTER key.
i Mouse wheel operation: Same as using the unit's D ATA dial.
i Mouse wheel push and turn: Same as using the unit's DATA dial while
pushing it to make large setting changes
(COARSE mode operation).
In addition, when the VNC viewer application is active, you can conduct the
following operations by using the computer keyboard.
i F1 to F12 keys: These work the same as an external keyboard con-
nected to the unit. For details see the “List of keyboard
operations” in “Operation using a computer keyboard”
in “12 – Other functions” of this unit's manual.
i Home key: This works the same as this unit's HOME key and opens
the Home Screen.
Press the End key while pressing and holding the Home
key to open the
LOCK SETUP
screen.
i End key: This works the same as this unit's MENU key and opens
the MENU screen.
Press the End key while pressing and holding the Home
key to open the
LOCK SETUP
screen.
i Page Down: This works the same as this unit's PROJECT key and
opens the
PROJECT
screen.
i Cursor 1 key: This works the same as turning this unit's D ATA dial
right.
i Cursor z key: This works the same as turning this unit's DATA dial left.
i Character input keys: Use to input characters when a keyboard screen
appears on the unit.
REMOTE/KEYBOARD and EXTERNAL Control Lock/Unlock settings added
REMOTE/KEYBOARD
have been added on the
REMOTE/KEYBOARD
0 When
keyboard connected to a remote connector is used, the following pop-up
message appears when remote/keyboard control is locked.
EXTERNAL CONTROL
0 When
ducted using RS–232C, RS–422, PARALLEL or ETHERNET, the following
pop-up message appears when external input is locked.
EXTERNAL Control
and
LOCK SETUP
is set to
is set to
screen.
LOCK
LOCK
Lock/Unlock settings
, if a remote control or
, if an operation is con-
Necessary setting for VNC connections
The following settings are necessary for connecting to this unit using a VNC
viewer application.
IP address: This unit’s IP address is shown in the
field of the
REMOTE SETUP
IP Address
ETHERNET
screen
page.
Password: HS-8 (default, case sensitive)
This setting can be changed by using the
Change
ERNET
page.
button on the
REMOTE SETUP
Password
ETH-
screen
NOTE
i 2 or more simultaneous VNC connections are not possible.
EXTERNAL Control
i When
has been set to
LOCK
Lock Setup
on the
screen, display is possible but operation is not when using a VNC viewer
application.
i Changing any settings on the
REMOTE SETUP
screen of the
ETHERNET
page will also end any active VNC connection.
i For information about VNC viewer application that have been confirmed to
work properly with this unit, please contact TASCAM customer support.
i When files are being transferred by FTP or when the system sampling fre-
quency is 88.2 or 96 kHz, VNC viewer application display and operation will not
be smooth.
A function has been added that allows you to change the names of takes.
Follow the procedures below to do so.
1. On a take selection screen, select that take that you want to rename.
2. Touch the
menu (An
been added to this pull-up menu).
3. Touch the
NAME
take name.)
MENU
button on the take selection screen to open a pull-up
EDIT NAME
EDIT NAME
screen. (On this
button, which is shown framed in red below, has
button in the pull-up menu to open the
TAKE NAME
screen, you can change the input
TAKE
Take Rename function
NOTE
When multiple takes are selected, you cannot use the
EDIT NAME
the pull-up menu.
4. Edit the take name.
5. Touch the
Enter
button on the
dial to confirm the changed take name and return to the take selection
screen.
TAKE NAME
screen or press the DATA
TAS CAM H S-8 3
button in
Page 4

HS-8
Rec Fn Stop Monitor function added
A Rec Fn Stop Monitor function has been added to the
SYSTEM SETUP
of the
toring of channels that are armed for recording when the unit is stopped.
screen. This function allows you to disable input moni-
PREFERENCES
page
Monitor muting function added
A RecPause Monitor function that allows input monitoring when recording
to be muted has been added to the
SETUP
screen
PREFERENCES
page of the
SYSTEM
Slate tone function added
A Slate Tone function has been added to the
SETUP
screen. This can be used to output a 1kHz sine wave at the reference
level on the channels that are armed for recording.
OUTPUT
page of the
MIXER
Receiving digital input signals that are in consumer format
The unit can now receive digital input signals that are in consumer format.
Clear function can now be executed using the SHIFT and BACKSPACE keys on an external keyboard
A function has been added when a character or number input screen is open
that allows you to clear all the characters/numbers by pressing the BACKSPACE key while pressing and holding the SHIFT key on an external keyboard.
(Previously, on a number input screen, pressing the Esc key cleared input
numbers, but this has been changed.)
Cursor can now be moved using the up and down arrow (2/x), HOME and END keys of an external keyboard
A function has been added that allows you to press the 2/x key on an external keyboard to move the cursor to the beginning/end of a line of characters
when a character input screen is open.
Title display changes on the PROJECT screen
PROJECT
The
TAKE
screen title display now switches to
according to which list is displayed.
PROJECT, FOLDER
or
PROJECT key now moves up a level when the PROJECT screen is open
Now, if the PROJECT key is pressed while the
the contents of the folder one level above the items shown currently will be
displayed.
PROJECT
screen is open,
New pop-up message
Message Details and responses Remarks
Cannot Edit read-only
file.
Cannot set Mark point
in read-only file.
--- Circle Take --Did not Edit N Take(s)
that (is/are) read-only.
This file has been set as readonly and cannot be edited.
Marks cannot be added to
a file that has been set as
read-only
Editing a number (N) of
takes that are set to readonly was not possible.
N = number of takes
This appears when
“CIRCLE TAKE” is
executed for takes
that are set to readonly or not yet set.
NOTE
When the “LR 2mix” record function is on, the sine wave will be input on all
channels along with the monitoring signals.
USER BITS Source setting function added
A USER BITS Source function that allows the type of timecode user bits recorded
and output to be set has been added to the
I/O
page of the
SYNC T/C
screen.
Addition of take end time code display
End time code information (END T/C) has been added to the take information
pop-up.
Addendum to the Owner’s Manual
Importing multiple mono files that have been recorded with
another device as a single take
Follow the procedures below to import multiple mono files that have been
recorded with another device to this unit as a single take.
1. Name the mono files that you want to be recognized as a single take
using the following format.
[mono take name]_[2-digit track number].wav
Example:
Scene001-T001_01.wav
Scene001-T001_02.wav
Scene001-T001_03.wav
Scene001-T001_04.wav
Scene001-T001_05.wav
Scene001-T001_06.wav
Scene001-T001_07.wav
Scene001-T001_08.wav
2. Copy the above files to the CF card by following the procedures in the
“Preparations before importing” section of “Importing files recorded by
other devices” on page 4 of the HS-8 firmware v1.20 Instruction Manual.
3. Rebuild the folder by following the procedures in the “Preparing imported files
for use with this unit (rebuilding the folder)” section of “Importing files recorded
by other devices” on page 4 of the HS-8 firmware v1.20 Instruction Manual.
NOTE
the unit to treat as a single take have the same sampling frequency, bit depth
and audio length.
4 TAS CAM H S-8
Printed in China
 Loading...