

Page 1
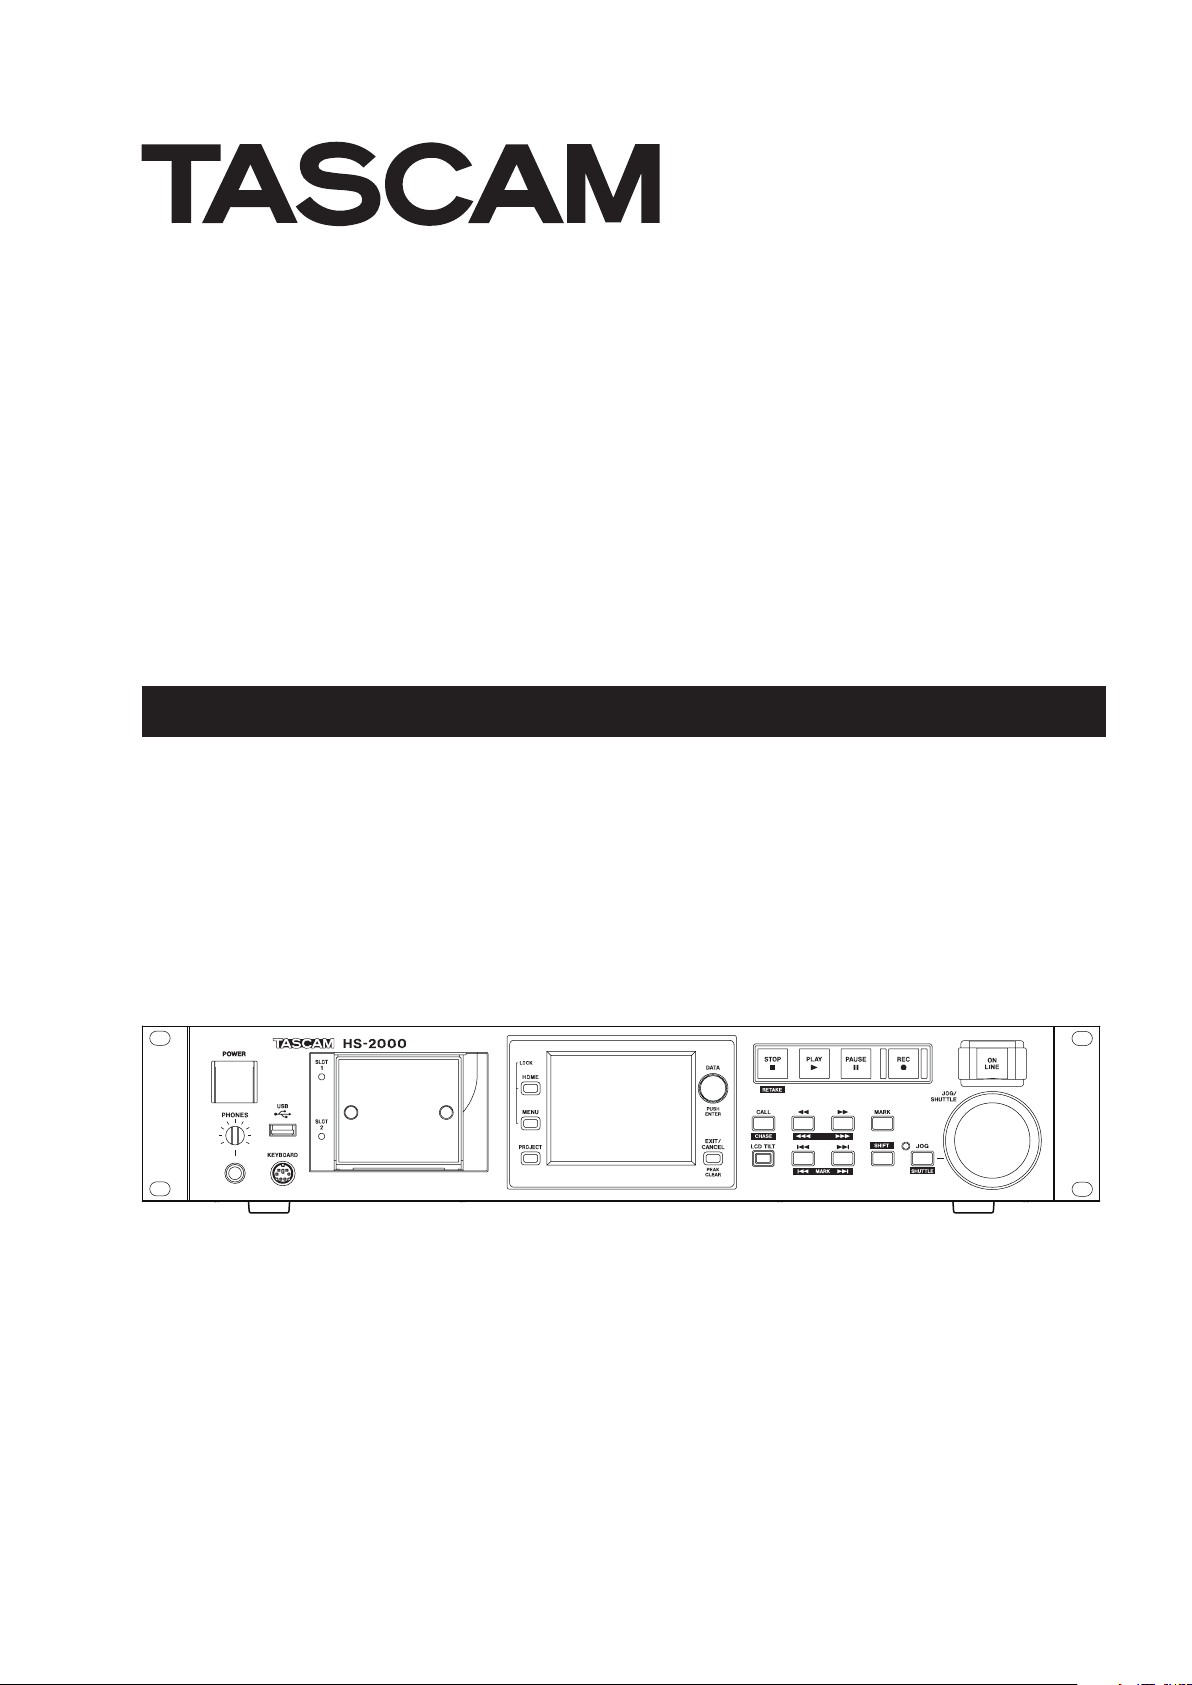
HS-2000
2-Channel Audio Recorder
OWNER’S MANUAL
D01152320A
Page 2
2
TASCAM HS-2000
Important Safety Informtion
CAUTION: TO REDUCE THE RISK OF ELECTRIC SHOCK, DO NOT REMOVE COVER (OR
BACK). NO USER-SERVICEABLE PARTS INSIDE. REFER SERVICING TO QUALIFIED SERVICE
PERSONNEL.
The lightning flash with arrowhead symbol, within equilateral triangle, is intended to alert
the user to the presence of uninsulated “dangerous voltage” within the product’s enclosure that may be of sufficient magnitude to constitute a risk of electric shock to persons.
The exclamation point within an equilateral triangle is intended to alert the user to the
presence of important operating and maintenance (servicing) instructions in the literature accompanying the appliance.
For European Customers
8
WARNING: TO PREVENT FIRE OR
SHOCK HAZARD, DO NOT EXPOSE THIS
APPLIANCE TO RAIN OR MOISTURE.
For U.S.A.
TO THE USER
This equipment has been tested and found to comply
with the limits for a Class A digital device, pursuant to Part
15 of the FCC Rules. These limits are designed to provide
reasonable protection against harmful interference when
the equipment is operated in a commercial environment.
This equipment generates, uses, and can radiate radio
frequency energy and, if not installed and used in accordance with the instruction manual, may cause harmful
interference to radio communications.
Operation of this equipment in a residential area is likely
to cause harmful inter ference in which case the user
will be required to correct the inter ference at his own
expense.
CAUTION
Changes or modifications to this equipment not expressly
approved by TEAC CORPORATION for compliance could
void the user's authority to operate this equipment.
In North America use only on 120V supply.
Disposal of electrical and electronic equipment
(a) All electrical and electronic equipment should be
disposed of separately from the municipal waste
stream via collection facilities designated by the
government or local authorities.
(b) By disposing of electrical and electronic equipment
correctly, you will help save valuable resources and
prevent any potential negative effects on human
health and the environment.
(c) Improper disposal of waste electrical and electronic
eq u ip ment c a n h a ve s er iou s e f fe cts o n t h e
environment and huma n health because of the
presence of hazardous substances in the equipment.
(d) The Waste Electrical and Electronic Equipment (WEEE)
symbol, which shows a wheeled bin that has been
crossed out, indicates that electrical and electronic
equ ipme nt m ust be co llec ted and dispos ed of
separately from household waste.
(e) Return and collection systems are available to end
us ers. Fo r mor e det ail ed information about the
disposal of old electrical and electronic equipment,
please contact your city office, waste disposal service
or the shop where you purchased the equipment.
WARNING
This is a Class A product. In a domestic environment, this
product may cause radio interference in which case the
user may be required to take adequate measures
This appliance has a serial number located on the
rear panel. Please record the model number and
serial number and retain them for your records.
Model number
Serial number
CE Marking Information
a) Applicable electromagnetic environment: E4
b) The average harf-cycle r.m.s. inrush current
1. On initial switch-on : 4.8A.rms
2. After a supply interruption of 5s : 3.8A.rms
Page 3
TASCAM HS-2000
3
Safety Precautions
1 Read these instructions.
2 Keep these instructions.
3 Heed all warnings.
4 Follow all instructions.
5 Do not use this apparatus near water.
6 Clean only with dry cloth.
7 Do not block any ventilation openings. Install in
accordance with the manufacturer's instructions.
8 Do not install near any heat sources such as radiators,
heat registers, stoves, or other apparatus (including
ampliers) that produce heat.
9 Do not defeat the safety purpose of the polarized
or grounding-type plug. A polarized plug has two
blades with one wider than the other. A grounding type plug has two blades and a third grounding
prong. The wide blade or the third prong are provided for your safety. If the provided plug does not
t into your outlet, consult an electrician for replacement of the obsolete outlet.
10 Protect the power cord from being walked on or
pinched particularly at plugs, convenience receptacles, and the point where they exit from the apparatus.
The apparatus draws nominal non-operating power
•
from the AC outlet with its POWER or STANDBY/ON
switch not in the ON position.
The mains plug is used as the disconnect device, the
•
disconnect device shall remain readily operable.
Caution should be taken when using earphones or
•
headphones with the product because excessive sound
pressure (volume) from earphones or headphones can
cause hearing loss.
If you are experiencing problems with this product,
•
contact TEAC for a service eferral. Do not use the
product until it has been repaired.
CAUTION
Do not expose this apparatus to drips or splashes.
•
Do not place any objects filled with liquids, such as
•
vases, on the apparatus.
Do not install this apparatus in a confined space
•
such as a book case or similar unit.
The apparatus should be located close enough to
•
the AC outlet so that you can easily grasp the power
cord plug at any time.
If the product uses batteries (including a battery
•
pack or installed batteries), they should not be
exposed to sunshine, fire or excessive heat.
CAUTION for products that use replaceable lithium
•
batteries: there is danger of explosion if a battery is
replaced with an incorrect type of battery. Replace
only with the same or equivalent type.
WARNING
11 Only use attachments/accessories specified by the
manufacturer.
12 Use only with the cart, stand, tripod, bracket, or table
specied by the manufacturer, or sold with the apparatus. When a cart is used, use caution when moving
the cart/apparatus combination to avoid injury from
tip-over.
13 Unplug this apparatus during lightning storms or
when unused for long periods of time.
14 Refer all servicing to qualified service personnel.
Servicing is required when the apparatus has been
damaged in any way, such as power-supply cord or
plug is damaged, liquid has been spilled or objects
have fallen into the apparatus, the apparatus has
been exposed to rain or moisture, does not operate
normally, or has been dropped.
Products with Class I construction are equipped with
•
a power supply cord that has a grounding plug. The
cord of such a product must be plugged into an AC
outlet that has a protective grounding connection.
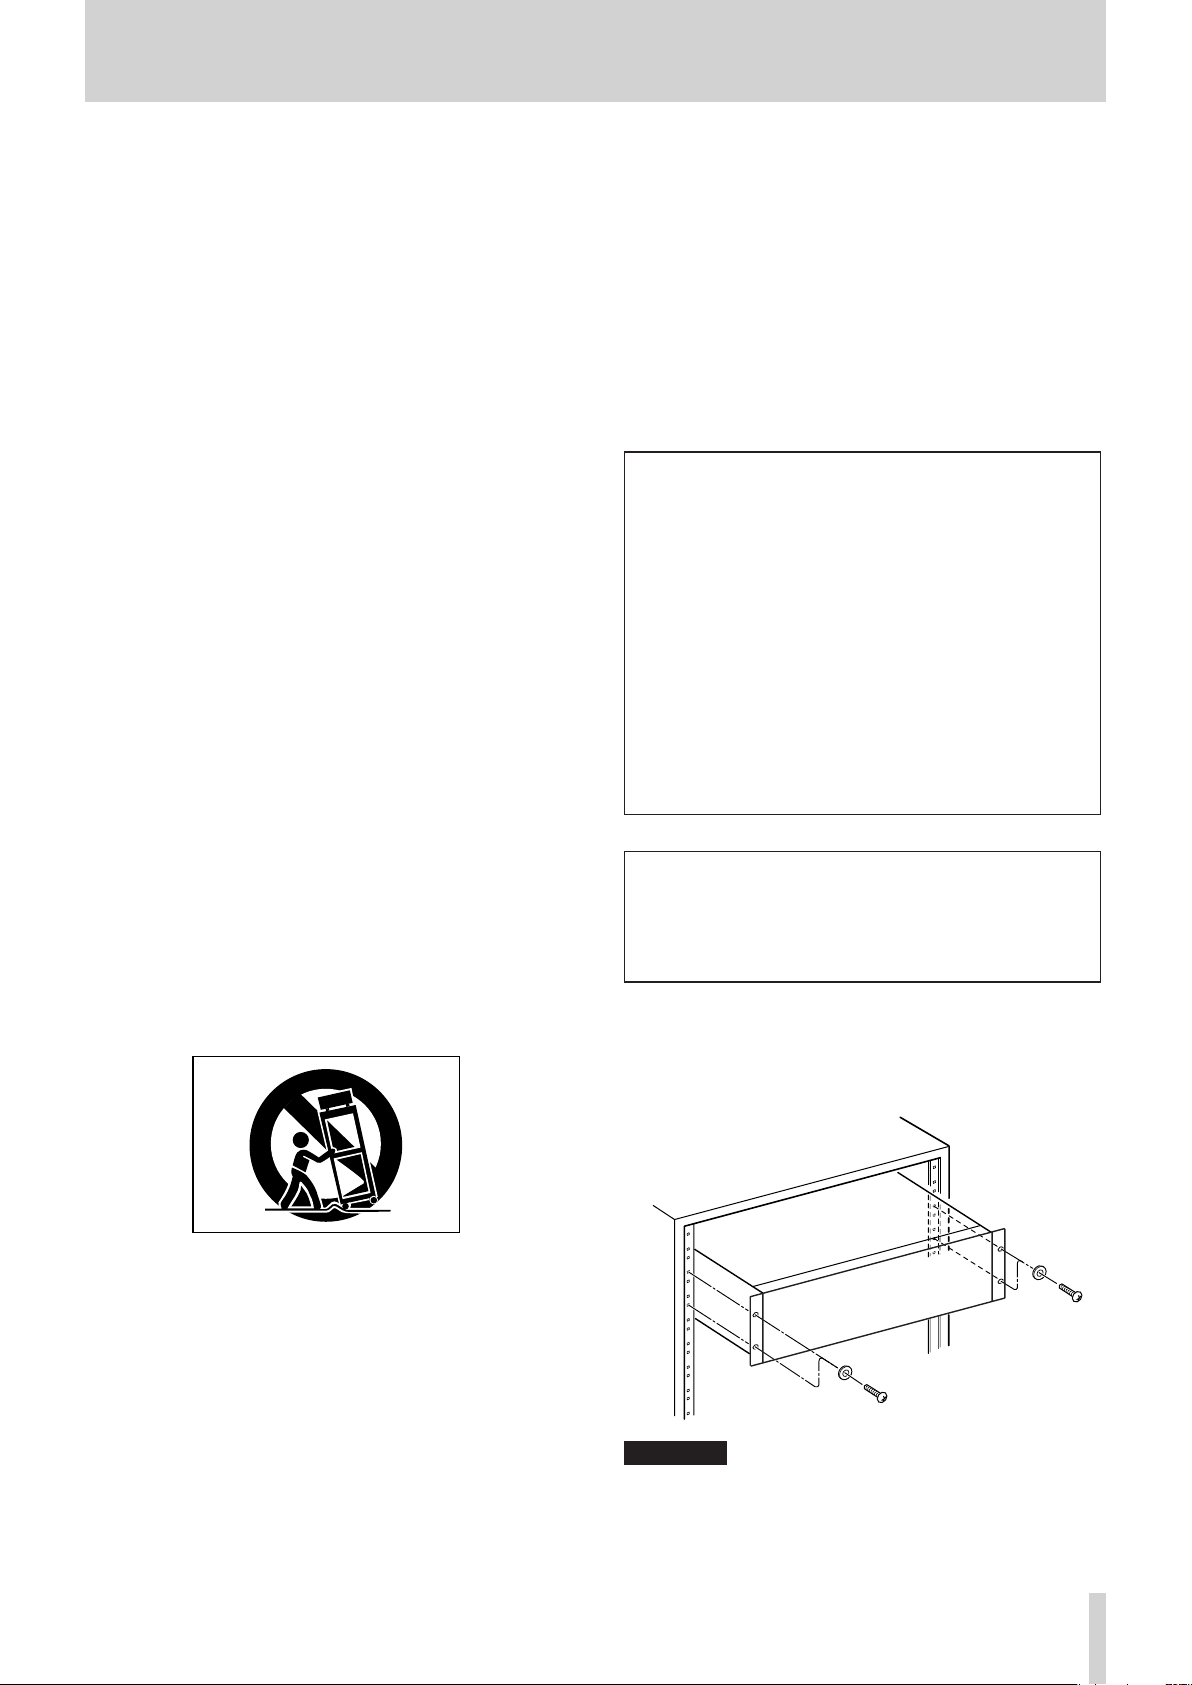
RACK-MOUNTING THE UNIT
8
Use the supplied rack-mounting kit to mount the unit in a
standard 19-inch rack, as shown below.
Remove the feet of the unit before mounting.
CAUTION
Leave 1U of space above the unit for ventilation.
•
Allow at least 10 cm (4 in) at the rear of the unit for
•
ventilation.
Page 4

4
TASCAM HS-2000
Contents
1 – Introduction .............................................7
Features ..................................................................................7
Included items .....................................................................7
Manual conventions ..........................................................7
Intellectual property rights .............................................8
Precautions for placement and use ..............................8
Beware of condensation ................................................... 8
Cleaning the unit.................................................................8
Cleaning the display....................................................8
About USB memory devices and CF cards ................. 9
Precautions for use ......................................................9
Media that has been confirmed for use with this
unit ....................................................................................9
Format .............................................................................. 9
2 − Names and functions of parts ................10
Front panel ..........................................................................10
Rear panel ............................................................................13
PARALLEL connector .................................................14
RS-232C connector ....................................................15
RS-422 connector .......................................................15
Home Screen .....................................................................16
In timeline mode ........................................................16
In take or playlist mode ..........................................20
In on-air mode .............................................................22
3 − Preparations............................................24
Inserting and removing CF cards ................................24
Inserting CF cards ......................................................24
Removing CF cards ....................................................24
Security screws ............................................................25
About the display ..............................................................25
Adjusting the display angle ....................................25
Adjusting display and indicator brightness......25
Cautions related to display use .............................25
Turning the power ON and OFF ...................................26
Setting the built-in clock ................................................26
Lock function ......................................................................27
Recording ties.....................................................................28
4 – Basic operation .......................................29
CF card preparation ..........................................................29
Card selection ..............................................................29
Formatting a CF card .................................................30
Creating a project automatically after quick
formatting .....................................................................31
Creating a new project .............................................31
Setting the master clock .................................................32
Setting inputs and outputs ...........................................32
Setting the inputs ......................................................32
Setting reference levels ............................................33
Connecting headphones .........................................33
Using online functions ...................................................34
Recording operation limitations..................................34
5 – Projects ....................................................35
Project organization .........................................................35
File formats ..........................................................................35
Using the PROJECT screen ............................................35
Project selection screen ..........................................35
Session selection screen .........................................36
AES31 file selection screen ....................................37
Take selection screen ...............................................37
Playlist selection screen ..........................................38
Project operations ............................................................38
Creating new projects ..............................................38
Editing project names ..............................................40
Changing project names later ...............................40
Editing the name of the first session ...................41
Loading projects .........................................................41
Rebuilding projects ...................................................41
Deleting a project ......................................................42
Session operations ...........................................................42
Creating new sessions ..............................................42
Loading sessions ........................................................43
Rebuilding sessions ...................................................43
Exporting sessions .....................................................44
Deleting sessions .......................................................45
Switching project screens ..............................................45
6 – Operation Modes ...................................46
Timeline mode functions ...............................................46
Take mode functions .......................................................46
Playlist mode functions ..................................................47
On-air mode functions ....................................................47
Selecting the operation mode .....................................47
7 – Timeline mode ........................................48
Preparing to record ..........................................................48
Basic preparations ......................................................48
Creating a new project .............................................48
Creating new sessions ..............................................48
Recording mode settings ........................................49
Setting the file format ..............................................49
Other recording settings .........................................49
Making a recording ..........................................................50
Locate to the recording start position ...............50
Recording ......................................................................50
Stopping recording ...................................................50
Retaking a recording ................................................50
Playback in timeline mode ............................................50
Selecting a project and session.............................50
Setting input monitoring ........................................51
Online function settings ..........................................51
Locate to the playback start position ................51
Playback control in timeline mode .....................51
Using the call function .............................................51
BWF-J cue point (timeline mode) .........................51
Loading, saving and creating AES31 editing
information .........................................................................52
Loading AES31 editing information ....................52
Saving AES31 editing information .......................53
Naming and saving AES31 editing information ..53
Creating new AES31 editing information ..........54
Importing all takes .....................................................55
Renaming AES31 file names ...................................56
Deleting an AES31 file ..............................................57
Timeline editing.................................................................58
Selecting the range to copy/cut/delete ....................58
Setting the editing start (IN) point ......................59
Setting the editing end (OUT) point ...................59
Clearing the start and end (OUT) points ...........59
Selecting a complete region for editing ............60
Page 5

TASCAM HS-2000
5
Contents
Copying the data of the selected area (Copy) .60
Cutting the data in a selected area (Cut) ...........61
Erasing the data in the selected area (Erase) ....61
Dividing regions at a specified position (Divide) .
..........................................................................................62
Inserting copy buffer data at a set position
(Insert) ............................................................................62
Inserting a file at a set position (Insert File) ......63
Inserting silence into a set area (Insert Mute) ..64
Pasting copy buffer data into the set position
(Paste) .............................................................................65
Pasting a file at a set position (Paste File) ..........65
Setting Fades for regions (Fade IN/FadeOut) ...66
Removing fades (Remove Fade IN/Remove
FadeOut) ........................................................................67
Setting the playback level of a region (Level) ..67
Undoing the previous edit (UNDO) .....................68
Redoing an edit (REDO) ...........................................68
Bouncing ..............................................................................69
8 – Take mode ...............................................70
Preparing to record ..........................................................70
Basic preparations ......................................................70
Creating a new project .............................................70
Creating new sessions ..............................................70
Recording mode settings ........................................71
Setting the file format ..............................................71
Other recording settings .........................................71
Making a recording ..........................................................72
Recording ......................................................................72
Stopping recording ...................................................72
Retaking a recording ................................................72
Playback in timeline mode ............................................72
Selecting a project, session and take ..................72
Online function settings ..........................................73
Setting input monitoring ........................................73
Playback control in take mode .............................73
Using the call function .............................................73
BWF-J cue point (take mode) .................................74
Using the flash start function ................................74
Take operations .................................................................74
Changing the start time of a take.........................74
Exporting takes ..........................................................75
Deleting a take ............................................................76
Sorting takes ................................................................76
Reordering takes ........................................................77
Editing take names ....................................................77
Dividing takes ..............................................................78
Combining takes ........................................................79
Undoing the previous take edit ............................80
Redoing a take edit ....................................................80
9 – Playlist mode ..........................................81
Playlist operations.............................................................81
Loading projects and sessions ..............................81
Creating a new playlist ............................................82
Changing playlist names later ...............................82
Loading playlists ........................................................83
Deleting a playlist ......................................................84
Editing playlists (adding, removing and working
with entries) ........................................................................84
ENTRY list screen .......................................................84
ASSIGN file screen .....................................................86
Assigning a take to an entry ...................................87
Allocation of entries to pages ................................87
Clearing entry assignments ....................................88
Editing entry names .................................................88
Editing playback starting/ending points ...........89
Setting playback to the BC$STANDBY/END
range ..............................................................................90
Editing the playback starting and ending points
using the number buttons and mark list screen ..
..........................................................................................91
Editing playback starting times ............................92
Editing lengths and levels of fade-ins/outs ......92
Playback on ADJUST screens .................................93
Saving playlists ............................................................94
Naming and saving playlists ..................................94
Playback in playlist mode...............................................95
Project, session and playlist selection ................95
Online function settings ..........................................95
Playback control in playlist mode .......................96
Using the call function .............................................96
BWF-J cue point (playlist mode) ...........................96
Using the flash start function ................................96
10 – On-air mode...........................................97
Selecting files for playback ............................................97
Playback area in on-air mode ...............................97
Using the ON AIR button to switch between
rehearsal/confirmation playback and broadcast
playback modes ..........................................................98
Playback control in on-air mode ...........................98
Credits playback .........................................................98
Using the call function .............................................99
BWF-J cue point (on-air mode) ..............................99
Changing the sampling frequency in on-air
mode ...............................................................................99
Limitations in on-air mode .....................................99
11 – Internal settings ..................................100
Menu screen ....................................................................100
Recording settings (REC SETUP) ............................... 100
REC MODE page ......................................................100
FILE FORMAT page .................................................101
OPTIONS page ......................................................... 101
Playback settings (PLAY SETUP) ................................ 102
GENERAL page (playback settings)...................102
CONTROL page ....................................................... 102
Sync and timecode settings (SYNC T/C) ................ 103
CLOCK page .............................................................103
SYNC page ................................................................ 104
T/C page ....................................................................105
SETUP page (Sync and timecode settings) .... 105
I/O page ......................................................................106
Remote settings (REMOTE SETUP) ...........................106
GENERAL page (Remote settings) ..................... 106
PARALLEL page ........................................................107
RS-232C page ...........................................................107
RS-422 page ............................................................. 108
ETHERNET page ......................................................108
Page 6
6
TASCAM HS-2000
Contents
Audio Signal Input and Output settings (AUDIO I/O)
.............................................................................................. 110
INPUT page ............................................................... 110
OUTPUT page .......................................................... 110
Setting audio signal inputs and outputs (SETUP
page) ............................................................................ 110
Level meter settings (METER SETUP) ......................111
System settings (SYSTEM SETUP) .............................112
PREFERENCES page ............................................... 112
ANALOG Ref LVL ADJUST page ......................... 113
Backup/Startup page ............................................ 113
CLOCK ADJUST page .............................................114
Viewing system and firmware versions (VERSION
INFO) ................................................................................... 115
Viewing and using folders and files (BROWSE) ... 115
Viewing folders and files.......................................115
Viewing folder and file information..................116
Copying a folder/file ..............................................117
Deleting a folder/file .............................................118
Managing media (MEDIA MANAGE) .......................120
Selecting the operation mode (OPERATION MODE) .
.............................................................................................. 120
Folder structure .............................................................. 121
File names ..................................................................121
12 – Mark and locate functions ..................122
Mark functions ................................................................ 122
Adding marks ...........................................................122
Using keys to locate to marks ............................122
Mark list screen .......................................................123
Locating to marks....................................................123
Viewing mark information ...................................123
Deleting marks .........................................................124
Editing mark positions ..........................................124
Editing mark names ...............................................125
Manual locate function ............................................... 125
13 – Other functions ..................................126
Confidence monitoring .............................................. 126
Mirror recording ............................................................ 126
Online function ............................................................... 129
Enabling the online function .............................. 129
Switching the online playback mode ..............129
Outputs during online playback ....................... 129
Flash start function ....................................................... 130
Setting the flash key function ............................. 130
Selecting the flash page .......................................130
Flash start playback ...............................................130
Standby playback (only with RC-HS32PD
remotes) .....................................................................131
Operation using a computer keyboard..................131
Setting the keyboard type ...................................131
Using a keyboard to input names .....................131
List of keyboard operations ................................. 132
Network functions (FTP/telnet/VNC) ...................... 133
FTP (file transfer protocol) ....................................133
Remote control by Telnet .....................................134
VNC (virtual network computing) .....................135
14 – Timecode synchronization .................136
Playback synchronized with timecode .................. 136
Timeline mode ........................................................ 136
Take mode ................................................................ 136
Playlist mode ...........................................................136
On-air mode ..............................................................136
Recording synchronized with timecode ................136
Timeline mode ........................................................ 136
Take mode ................................................................ 136
Playlist mode ...........................................................136
On-air mode ..............................................................136
Basic operation with timeline synchronization ...137
Timecode offset ............................................................. 137
Rechase .............................................................................. 137
15 – Importing files recorded by other devic-
es ...........................................................138
Preparation before importing ................................... 138
Using imported files on this unit ..............................138
16 – Troubleshooting .................................139
17 – Messages .............................................140
18 – Specifications ......................................150
General............................................................................... 150
Inputs and outputs ....................................................... 150
Analog audio inputs and outputs ....................150
Digital audio inputs and outputs ...................... 151
Control inputs and outputs .................................151
Audio performance .......................................................152
Other specifications ...................................................... 152
Dimensional drawings .................................................152
Block diagram .................................................................. 153
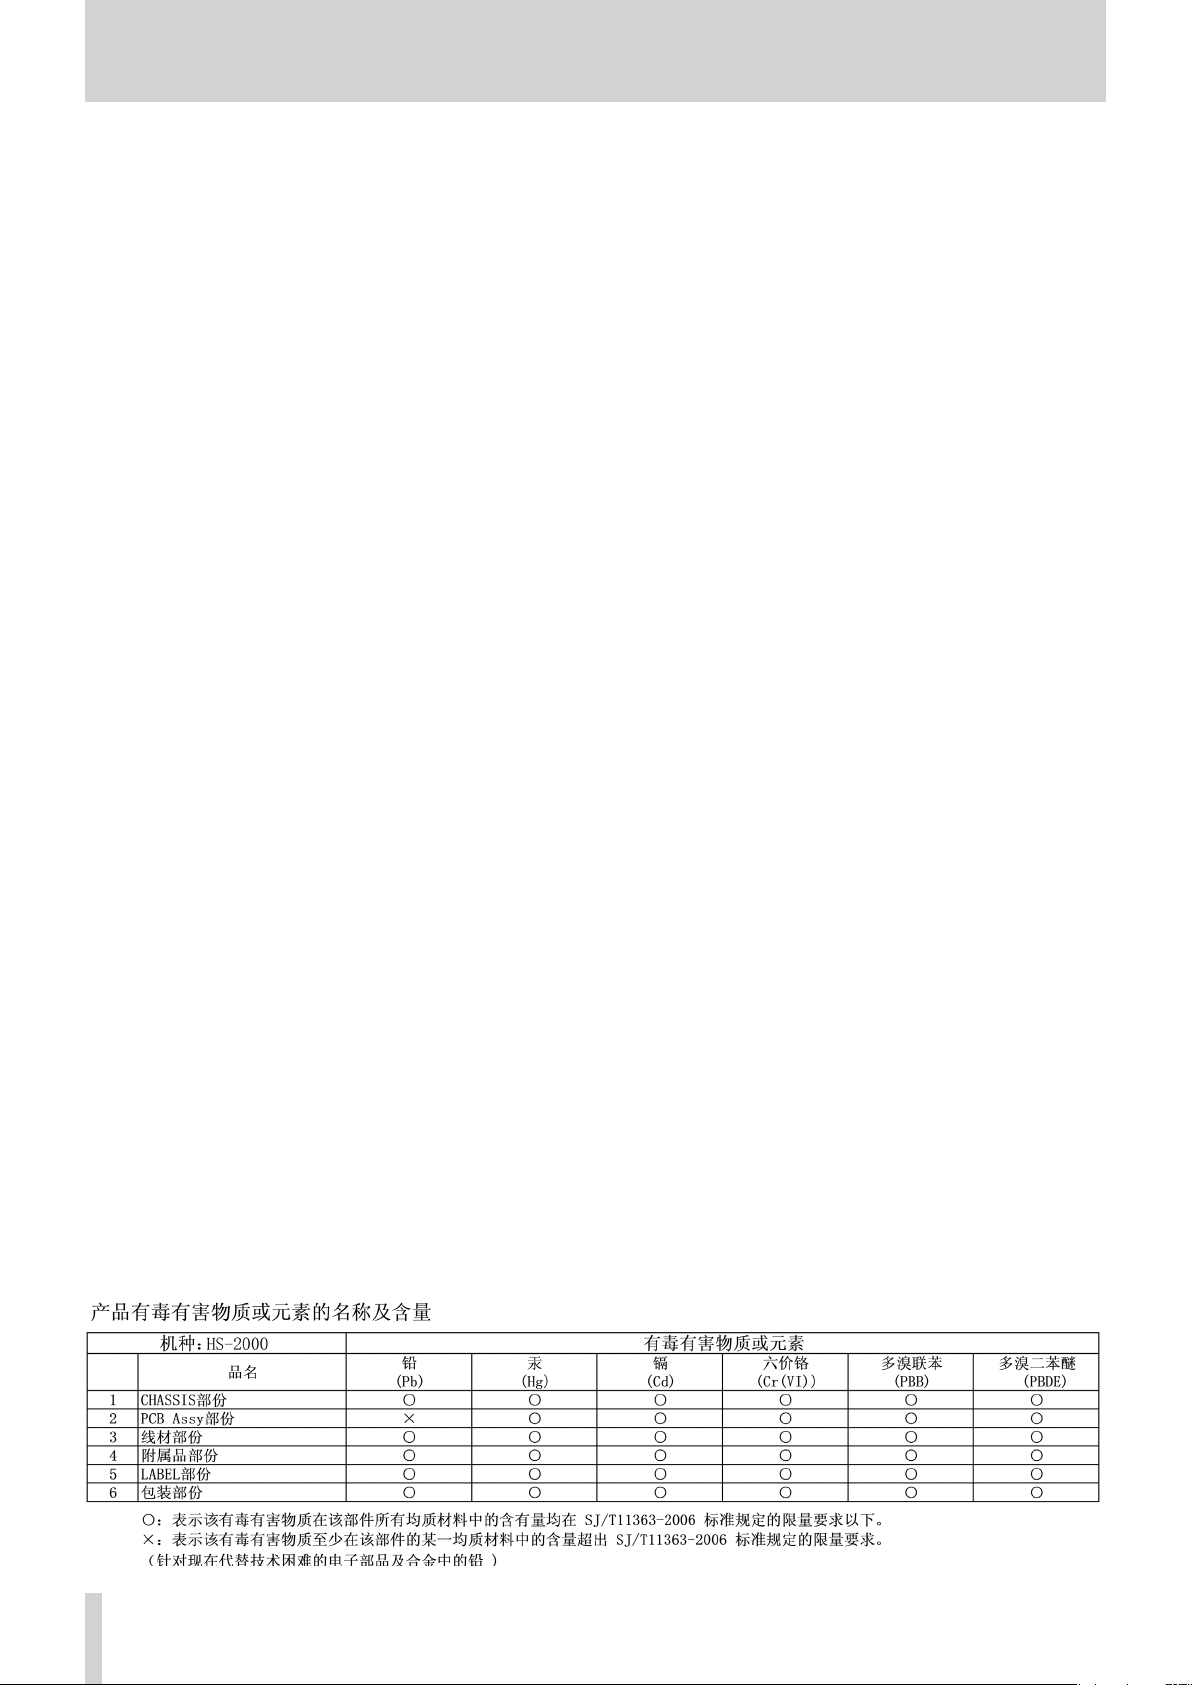
For China
8
Page 7

TASCAM HS-2000
7
1 – Introduction
Thank you very much for purchasing a TASCAM HS-2000
2-Channel Audio Recorder.
Please read this manual thoroughly before using the unit
so that you understand correct operating procedures and
can use its functions fully. We hope that you enjoy using
this unit for many years.
Please keep this manual so that you can read it at
any time. A digital copy of this manual can also be
downloaded from our website (http://tascam.com/)
Features
•
CompactFlash cards used as recording media (Ultra DMA
compatible)
•
Dual slots allow two cards to be loaded and used
simultaneously in mirror recording mode
•
Confidence monitoring allows the signal that is being
recorded to be played back almost instantly
•
2-track recording possible at up to 192kHz, 24-bit resolution
•
Four operation modes: timeline, take, playlist and on-air
•
In timeline mode, linear recording and playback possible
(similar to a tape recorder)
•
In take mode, playback and flash start of takes possible
•
In playlist mode, takes can be added to a list and played
back or activated using flash start in list order
•
In on-air mode, the root folder files can be on-air playback.
•
ON LINE key can be used for on-line playback and
monitoring playback
•
Broadcast Wave (BWF) and Waveform Audio (WAV) file
formats supported
•
Flash starting is possible using a TASCAM RC-HS32PD,
RC-HS20PD or RC-SS20 remote control (all sold separately)
•
In addition to using the remote controllers that are sold
separately, flash starting is also possible using PARALLEL
control or a keyboard
•
Auto cue, auto ready and incremental play functions
•
AES31 editing information can be imported and exported in
timeline mode
•
Playlist mode supports JPPA flash start playlist file loading
and writing
•
JOG/SHUTTLE function
•
Intuitive operation using TFT color touchscreen graphical
interface
•
XLR analog balanced inputs and outputs
•
XLR AES/EBU digital inputs and outputs
•
XLR analog balanced monitoring outputs
•
Headphones output
•
XLR timecode inputs and outputs
•
BNC video reference (NTSC/PAL black burst and HDTV
Tri–level signals) and word clock input/output/thru
•
48 kHz pull-up/pull-down operation supported
•
Files can be copied to connected USB memory
•
LAN (Gigabit Ethernet) enables file transmission and remote
control over a network
•
Parallel remote control supported
•
RS-232C serial remote control supported
•
RS-422 (9–pin serial protocol) serial remote control
supported
•
Rack mounting (2U) possible
Included items
This product includes the following items.
Take care when opening the package not to damage the
items.
Keep the packaging materials for transportation in the
future.
Please contact the store where you purchased this unit
if any of these items are missing or have been damaged
during transportation.
•
Main unit x1
•
Power cord x1
•
Rack-mounting screw kit x1
•
Security screws x3
•
Warranty card x1
•
Owner's manual (this manual) x1
Manual conventions
In this manual, we use the following conventions.
•
Keys, connectors and other parts on the main unit and
external devices are indicated like this: MENU
•
Messages and controls that appear on the touchscreen
display are shown like this:
•
“CompactFlash card” is abbreviated as “CF card.”
•
Additional information is provided as necessary as tips,
notes and cautions.
TIP
These are tips about how to use the unit.
NOTE
These provide additional explanations and describe
special cases.
CAUTION
Failure to follow these instructions could result in
injury, damage to equipment or lost recording data,
for example.
ON
Page 8

8
TASCAM HS-2000
1 – Introduction
Intellectual property rights
TASCAM is a trademark of TEAC Corporation, registered
•
in the U.S. and other countries.
CompactFlash is a US registered trademark of SanDisk
•
Corporation.
Other company names, product names and logos in
•
this document are trademarks or registered trademarks
of their respective owners.
Any DATA, including, but not limited to information,
described herein are intended only as illustrations
of such DATA and/or in formati on and not as the
spec ifications for such DATA and/or information.
TEAC Corporation disclaims any warranty that any use
of such DATA and/or information shall be free from
infringement of any third party’s intellectual property
rights or other proprietary rights, and further, assumes
no liability of whatsoever nature in the event of any
such infringement, or arising from or connected with
or related to the use of such DATA and/or information.
This product is designed to help you record and
rep roduce so und works to whi ch you own the
copyright, or where you have obtained permission
from the copyright holder or the rightful licensor.
Unless you own the copyright, or have obtained the
appropriate permission from the copyright holder
or the rightful licensor, your unauthorized recording,
reproduction or distribution thereof may result in
severe criminal penalties under copyright laws and
international copyright treaties. If you are uncertain
about your rights, contact your legal advisor. Under no
circumstances will TEAC Corporation be responsible
for the consequences of any illegal copying performed
using the recorder.
Precautions for placement and use
The guaranteed operating temperature range of this
•
product is 5º - 35º C (41º- 95º F).
Do not install in the following types of places. Doing
•
so could degrade the sound quality and/or cause
malfunctions.
Pla ces wi th s igni ficant v ibra tion s or that are
•
otherwise unstable
Near windows or other places exposed to direct
•
sunlight
Near heaters or other extremely hot places
•
Extremely cold places
•
Places with bad ventilation or high humidity
•
Dusty places
•
Make sure that the unit is mounted in a level position
•
for correct operation.
In order to promote the emission of heat, do not place
•
anything on top of this product.
Do not plac e this prod uct on to p of a powered
•
amplifier or other equipment that emits heat.
Beware of condensation
If the unit is moved from a cold to a warm place, or
used immediately after a cold room has been heated or
otherwise exposed to a sudden temperature change,
condensation could occur. Should this happen, leave the
unit for one or two hours before turning the unit on.
Cleaning the unit
Wipe the unit with a soft dry cloth to clean it. Do not use
paint thinner, alcohol or other chemical agents. Doing so
could damage the surface of the unit or cause fading.
Cleaning the display
Slightly wipe the display with a soft dry cloth that does
not shed dust (e.g. a cleaning cloth). Avoid wiping with a
stiff cloth or rubbing with force. Doing so could damage
the surface of the LCD. Do not use thinner, manicure
remover, alcohol or similar substances.
Page 9

TASCAM HS-2000
9
1 – Introduction
About USB memory devices and CF cards
This unit uses CF cards for recording and playback.
It uses USB memory devices for backing up DATA on CF
cards and for saving files to CF cards.
A list of USB memory devices/CF cards that we have
confirmed to work with this unit is provided on our
website (http://tascam.com/).
Precautions for use
USB memory devices and CF cards are precision devices.
To prevent damage to the memory devices or card, please
observe the following cautions:
Do not leave memory devices or cards in extremely hot
•
or cold locations.
Do not leave memory devices or cards in extremely
•
damp locations.
Do not allow memory devices or cards to become wet.
•
Do not place any objects on top of memory devices or
•
cards, or twist or bend them.
Do not subject memory devices or cards to strong
•
impacts.
Do not insert or remove a USB memory device or CF
•
card during recording, playback, DATA transfer or other
operations which access them
Be sure to use cases to protect the connectors of
•
memory devices and cards when carrying them.
Media that has been confirmed for use with this unit
This unit not only uses CF cards for recordin g and
playback, but also uses USB memory devices for backing
up DATA on CF cards and for saving files to CF cards.
We recommend using genuine TASCAM CF cards, but
use of other CF cards that are available commercially is
possible.
Microdrives cannot be used with this unit.
The capacities and performance of your HS-2000 will vary
based on the speed and capability of the CF cards used.
Older and some cheaper CF cards use slower memory
components and little internal buffering which may result
in poor recording performance.
Older and some cheaper USB memory devices use slower
memory components and little internal buffering which
may result in requiring more time to read and write DATA.
A list of USB memory devices/CF cards that we have
confirmed to work with this unit is provided on our
website. Otherwise please consult TASCAM Customer
Support Section. (http://tascam.com/).
Format
Whe n formatt i ng media s torag e de v ice, perfo r m
formatting on this unit. Media formatted on this unit
is optimized to improve recording per forma nce on
recording. If media is formatted on other device or PC, etc.
are used, this unit may not work optimally.
Page 10
10
TASCAM HS-2000
2 − Names and functions of parts
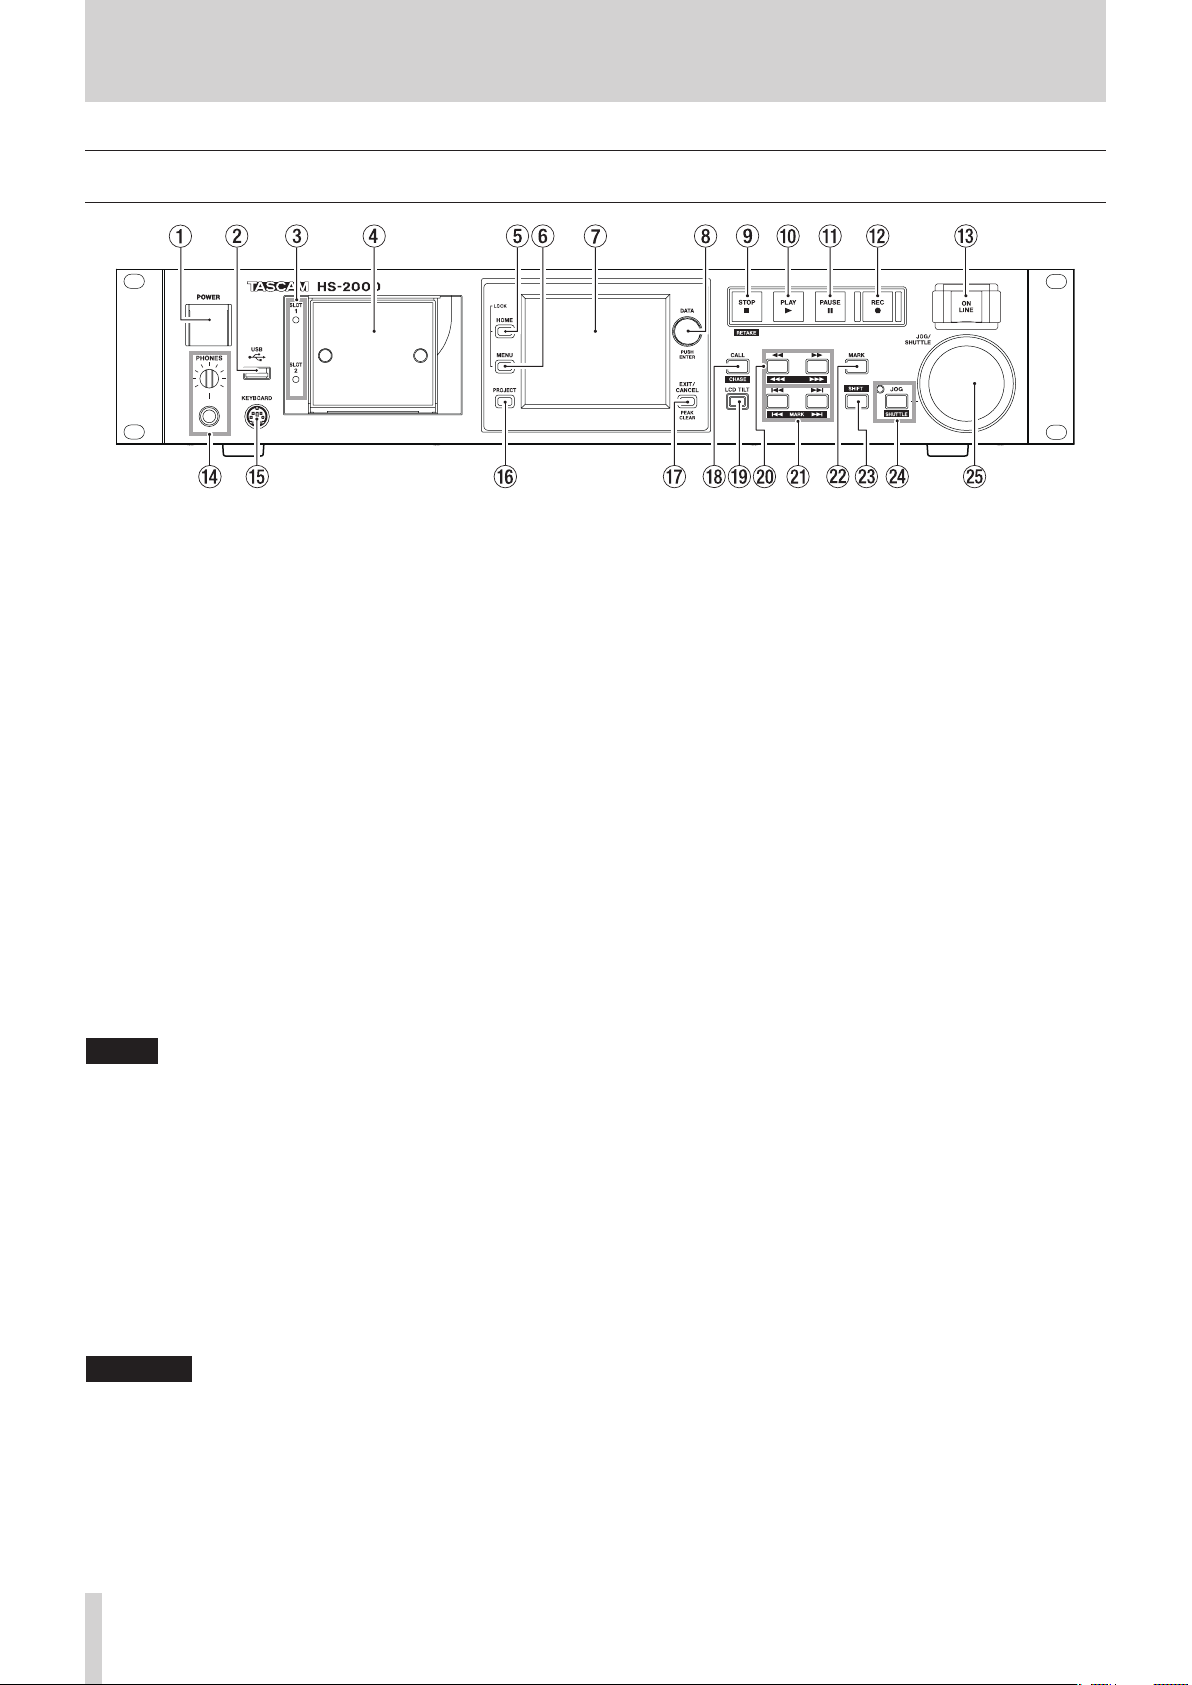
Front panel
1 POWER switch
Use to turn the power on and off.
This switch has a cover to prevent accidental
operation. Lift the cover from below to access and
operate the switch.
2 USB connector
By connecting a USB flash drive, for example, you can
back up data from a CF card and transfer files from the
drive to the card. (See "Viewing and using folders and
files (BROWSE)" on page 115.) (See "Managing media
(MEDIA MANAGE)" on page 120.)
Connect a USB keyboard to input the names of
projects and sessions, for example. (See "Operation
using a computer keyboard" on page 131.)
By default, the unit is set to use Japanese keyboards,
which have a different layout from US English
keyboards. To use a US English keyboard, change the
setting on the
SETUP
112.)
NOTE
Do not disconnect USB flash memory when
•
transfering files. You can connect and disconnect USB
flash memory at any other time.
You can connect and disconnect USB keyboards at
•
any other time.
This unit is not compatible with devices other than
•
USB flash drives and USB keyboards.
3 SLOT 1/SLOT 2 indicators
The indicator for the currently selected CF card slot
lights. When recording or copying, it blinks rapidly.
When no CF card is inserted in the current slot, it blinks
slowly.
CAUTION
Do not remove a CF card from a slot when its indicator is
blinking rapidly (because it is copying or recording).
4 CF card slots (SLOT 1/SLOT 2)
Insert CF cards here. (See "Inserting and removing CF
cards" on page 24.)
5HOME key
Press to open the Home Screen.
PREFERENCES
screen. (See "PREFERENCES page" on page
page of the
SYSTEM
Press the MENU key while pressing and holding the
HOME key to open the
"Lock function" on page 27.)
Turn the DATA dial while pressing and holding the
HOME key to adjust the brightness of the color display,
the PAUSE, REC, PLAY and ON LINE keys and the JOG
[SHUTTLE], SLOT 1 and SLOT 2 indicators.
Push and turn the DAT A dial while pressing and
holding the HOME key to adjust the brightness of only
the color display.
6MENU key
Press to open the
Press the MENU key while pressing and holding the
HOME key to open the
"Lock function" on page 27.)
7Color display
This 3.5–inch TFT touchscreen color display has a 320 x
240 resolution, and shows important information. It is
also used to access and perform many operations.
8DATA dial
Turn this to use as a DATA dial and press it to use it as
an ENTER key. When setting parameter values, press
while turning to change them in large increments
(coarse mode).
When the Home Screen is open in take mode, if
neither the number section on the
NAME
screen nor the Flash Page knob is selected, you
can use this to select a take.
When a pop-up window is open, press this to use it as
an OK or
Turn the DATA dial while pressing and holding the
HOME key to adjust the brightness of the color display,
the PAUSE, REC, PLAY and ON LINE keys and the JOG
[SHUTTLE], SLOT 1 and SLOT 2 indicators.
Push and turn the DAT A dial while pressing and
holding the HOME key to adjust the brightness of only
the color display.
9STOP [RETAKE] key
Press to stop recording or playback.
Press this while pressing and holding the SHIFT key to
retake the recording (erasing the last recorded take).
CLOSE
LOCK SETUP
MENU
screen.
LOCK SETUP
button.
screen. (See
screen. (See
NEXT TAKE
Page 11
TASCAM HS-2000
11
2 − Names and functions of parts
0PLAY key/indicator
When stopped or in playback standby, press this key
to start playback. This key lights during playback.
Press this key when in recording standby to start
recording.
In timeline mode, press the PLAY key while pressing
and holding the REC key to start recording from that
point.
The PLAY and REC keys both light during recording.
qPAUSE key/indicator
Press this key while stopped or during playback to put
the unit in playback standby. This key lights when in
standby.
Press this key while recording to put the unit in
recording standby. The PAUSE and REC keys both light
when in recording standby.
wREC key/indicator
When a recordable CF card is inserted and the unit is
stopped, press this key to put the unit into recording
standby. The PAUSE and REC keys both light during
recording standby.
In timeline mode, press the PLAY key while pressing
and holding the REC key to start recording from
that point. The PLAY and REC keys both light during
recording.
eON LINE key/indicator
Press to turn online playback mode on/off. The
indicator lights when on and is unlit when off.
The switch has a cover to prevent accidental operation.
Lift the cover from below to access and operate the
switch. (See "Online function" on page 129.)
rPHONES knob/jack
Connect stereo headphones to this standard stereo
1/4" phone jack, which outputs the monitoring signal.
Use the PHONES knob to adjust the headphones
output level.
CAUTION
Before connecting headphones, turn the PHONES knob
to the minimum volume. Failure to do so could result in
sudden loud noises, which might damage your hearing or
equipment.
tKEYBOARD connector
By connecting an IBM PC-compatible keyboard with
a PS/2 interface, you can input the names of projects
and sessions, for example.
By default, the unit is set to use Japanese keyboards,
which have a different layout from US English
keyboards. To use a US English keyboard, change the
setting on the
SETUP
112.)
yPROJECT key
Press to open the
last (PROJECT selection, SESSION selection, AES31 file
selection, TAKE selection or PLAYLIST selection). (See
"Using the PROJECT screen "on page 35.)
PREFERENCES
screen. (See "PREFERENCES page" on page
PROJECT
page of the
screen that was used
SYSTEM
uEXIT/CANCEL [PEAK CLEAR] key
Press to cancel input or item selection.
Press to close any open pull-up or pull-down menu.
On the Home Screen, when no pull-up/pull-down
menu is open, press this key to reset the peak hold
marks on the level meters
When the
use this key to return to the Home Screen.
On other screens, use this key to return to the previous
screen.
When a pop-up window is open, use this key to cancel
the operation.
iCALL [CHASE] key
Press to locate to and pause playback at the call point,
which is where playback last started from playback
standby.
Press this key while pressing and holding the SHIFT
key to turn timecode synchronization on and off.
oLCD TILT button
Press this button to unlock the color display, so that
you can adjust its angle by pulling the bottom of the
display outward.
To put the display away, press this button to unlock it
and push the bottom of the display inward.
pm
Press one of these keys to search.
m
,
Press one of these keys while pressing and holding the
SHIFT key to search at high speed.
a.//[
Use these keys to skip between regions, takes and
entries.
Press these keys while pressing and holding the SHIFT
key to move between marks.
After moving, the unit returns to its previous playback
state (stopped, playback standby or playback).
sMARK key
Press this key to add a mark at the currently located
time.
The maximum number of marks, including automatic
marks, possible in a single timeline or take is 99. (See
"Mark functions" on page 122.)
MENU
screen or
[ ]/,[ ]
[ ] key
[ ] key
: search backward
: search forward
.//]
MARK
PROJECT
keys (search)
key (skip)
screen is open,
Page 12

12
TASCAM HS-2000
2 − Names and functions of parts
dSHIFT key
When stopped, in playback standby or during
playback, press and hold this key and:
Press the • . key to move to the previous mark,
and resume the same playback state.
Press the • / key to move to the next mark, and
resume the same playback state.
Press the • m[ ] key or ,[ ] key to
search at high speed.
Press the • JOG [SHUTTLE] key to activate the shuttle
operation mode.
Press the • STOP [RETAKE] key to retake the recording
(erasing the last recorded take).
Press the • CALL [CHASE] key to turn timecode
synchronization ON/OFF.
fJOG [SHUTTLE] key/indicator
Use to enable jog and shuttle dial operation.
Press this key to enable the jog operation mode of the
JOG/SHUTTLE dial. When this mode is enabled, this
indicator lights.
Press this key while pressing the SHIFT key to enable
the shuttle operation mode of the JOG/SHUTTLE dial.
When this is enabled, this indicator blinks.
Press this key again to disable either mode.
gJOG/SHUTTLE dial
When in jog operation mode, turn this to change the
playback position by a corresponding amount.
When in shuttle operation mode, turn this to adjust
the playback speed according to the degree of
rotation.
In shuttle operation mode, returning to the original
position restores the transport status to how it was before
shuttle playback.
Page 13
TASCAM HS-2000
13
Rear panel
2 − Names and functions of parts
hANALOG IN [LINE] connectors (L/R)
These are balanced analog XLR connectors for line
input.(1: GND, 2: HOT, 3: COLD)
jDIGITAL IN [LINE] connector
This balanced XLR connector is for digital audio input
in AES3-2003/IEC60958-4 (AES/EBU) or IEC60958-3 (S/
PDIF) format.
Sampling frequencies of 88.2 and 96 kHz are
transmitted at double speed. Sampling frequencies of
176.4 and 192 kHz are transmitted at quadruple speed.
The built-in sampling rate converter can handle 32–
192 kHz.
kANALOG OUT [MONITOR] connectors (L/R)
These balanced analog XLR connectors output the left
and right monitoring signals. (1: GND, 2: HOT, 3: COLD)
lRS-232C connector
Connect an external controller, for example, to this
9-pin
D-sub connector for RS-232C serial control.
NOTE
It cannot be used at the same time as the RS-422
connector. (See “RS-232C page” on page 107.)
;PARALLEL connector
Connect a TASCAM RC-SS20 or other external
controller to this 25-pin D-sub parallel control
connector.
zAC IN connector
Connect the included power cord here.
xANALOG OUT [LINE] connectors (L/R)
These balanced analog XLR connectors are for line
output. (1: GND, 2: HOT, 3: COLD)
cDIGITAL OUT [LINE] connector
This balanced XLR connector is for digital audio output
in AES3-2003/IEC 60958-4 (AES/EBU) format.
Sampling frequencies of 88.2 and 96 kHz are
transmitted at double speed. Sampling frequencies of
176.4 and 192 kHz are transmitted at quadruple speed.
vREMOTE connector
Connect a TASCAM RC-HS32PD or RC-HS20PD remote
control (sold separately) here.
CAUTION
Never connect this to a network using an Ethernet cable.
Doing so could damage this unit or network equipment.
bRS-422 connector
Connect an external controller, for example, to this
9-pin D-sub connector for RS-422 serial control.
NOTE
It cannot be used at the same time as the RS-232C
connector. (See “RS-422 page” on page 108.)
nTIMECODE INPUT connector
This balanced XLR connector is for SMPTE timecode
input.
mTIMECODE OUTPUT connector
This balanced XLR connector is for SMPTE timecode
output.
,WORD/VIDEO IN connector
This BNC-type connector accepts a word clock signal
(44.1kHz, 48kHz, 48kHz pull-down, 48kHz pull-up,
88.2kHz, 96kHz, 176.4kHz, 192kHz) or a video reference
signal (NTSC/PAL black burst signal, HDTV Tri-Level
signal).
Use the switch to turn the integral 75Ω terminator on
or off.
.WORD/VIDEO THRU/OUT connector [cut “WORD”]
This BNC-type connector outputs a word clock signal
(44.1kHz, 48kHz, 48kHz pull-down, 48kHz pull-up,
88.2kHz, 96kHz, 176.4kHz, 192kHz or thru) or a video
reference signal (IN connector signal thru only).
Use the THRU/WORD OUT switch to set the signal
output.
/75Ω ON/OFF/THRU/WORD OUT switch
Use this three-way switch to make one of the following
settings.
Terminator OFF and WORD/VIDEO THRU
Terminator OFF and WORD OUT (no VIDEO OUT)
Terminator ON and WORD OUT (no VIDEO OUT)
!ETHERNET connector
Use this Ethernet connector to connect the unit with
a network for file transfer and to control this unit from
another device on the network.
Page 14
14
TASCAM HS-2000
2 − Names and functions of parts
@GROUND terminal
When using a TASCAM RC-HS32PD or RC-HS20PD
remote control (sold separately), depending on the
operating environment, the color display might flicker
or noise might be heard when monitoring. If this
occurs, use the GROUND terminal to ground the unit.
(No wire is provided for this use, so please prepare
your own.)
PARALLEL connector
The PARALLEL connector on the rear panel allows
external control of this unit.
You can also connect a TASCAM RC-SS20. (Connect to the
RC-SS20’s REMOTE 1 connector.)
The pin assignments are as follows.
Pin
No.
1 GND GND
2 PLAY FLASH 1 I
3 STOP FLASH 2 I
4 RECORD FLASH 3 I
5 SKIP FWD FLASH 4 I
6 SKIP BWD FLASH 5 I
7(Reserved
8 FADER_START FADER_START I
9 TALLY_BC_STOP TALLY_BC_STOP O
TALLY_PAUSE/TALLY_BC_
10
PAUSE
11 TALLY_RECORD RESERVED O
12 TALLY_STOP TALLY_STOP O
13 TALLY_PLAY TALLY_PLAY O
REMOTE_SELECT,
14
H or Open
15 PAUSE FLASH 6 I
16(Reserved
17 AUX1, FF FLASH 8 I
18 AUX2, REW FLASH 9 I
19 AUX3, MARK FLASH 10 I
20(Reserved
21 TALLY_BC_STANDBY TALLY_BC_STANDBY O
TALLY_CF1/TALLY_BC_CMTALLY_CF1/TALLY_BC_
22
23 TALLY_ONLINE TALLY_ONLINE O
TALLY_CF2/TALLY_BC_
24
END
25 +5V*** +5V***
I: Command input for transport control
Internal circuit, +5V pull-up
Operates with low commands of 50 msec or more
O: Command output, for tally output
The internal circuit is open collector (10Ω output impedance)
Outputs low commands when operating
20V maximum voltage, 35mA maximum current
*With an RC-SS20, assigned to the CF indicator
**With an RC-SS20, assigned to the CD indicator
***+5V: 50mA maximum supplied current
Normal
)
)
)
TASCAM
STOP I
TALLY_PAUSE/TALLY_BC_
PAUSE
REMOTE_SELECT, L I
FLASH 7 I
FLASH_PAGE I
CM*
TALLY_CF2/TALLY_BC_
END**
RC-SS20
PonMode
I/O
O
O
O
Page 15

TASCAM HS-2000
15
2 − Names and functions of parts
When REMOTE Select (pin 14) is set to high, it can be used
as an ordinary parallel controller.
When set to low, flash start mode is enabled. In addition,
depending on the Flash Page high/low setting (pin 20),
the key assignments are as follows.
Pin 14 Pin 20 Flash start take
Low High 1–10
Low Low 11–20
TALLY_BC_*: Use menu setting to switch output (OFF, ON)
(When an RC–SS20 is connected set output to OFF.)
TALLY_BC_STOP/CM/END: 250msec pulse output
TALLY_BC_STANDBY/PAUSE: Level output
The following example is of a connection that uses a fader
to start and stop playback of this device.
RS-422 connector
You can control this unit remotely by connecting the RS422 connector on its rear panel to a controller or editor
compatible with the SONY P2 protocol (RS-422).
Use the
settings related to operation. (See “RS-422 page” on page
108.)
Please contact TASCAM customer support for information
about this unit’s protocol compatibility.
REMOTE SETUP
NOTE
screen RS-422 page to make
For information about the assignment of AUX 1–3 (pins
17–19) functions, see the “PARALLEL page” of “Remote
settings (REMOTE SETUP)” on page 106.
NOTE
When controlling this unit with an external device
•
that is connected to the PARALLEL connector, by
simultaneously inputting PLAY and RECORD signals
while this unit is stopped, you can start recording
immediately.
In timeline mode, by simultaneously sending PLAY
•
and RECORD signals during playback, you can start
overwriting the recording.
RS-232C connector
The RS-232C connector on the rear panel can be
connected to an RS-232C connector on a computer to
allow control of this unit from that computer.
Make settings related to communication on the RS-232C
page of the
page” on page 107.)
NOTE
Please contact TASCAM customer support for information
about this unit’s RS-232C command protocol.
REMOTE SETUP
screen. (See “RS-232C
Page 16
16
TASCAM HS-2000
2 − Names and functions of parts
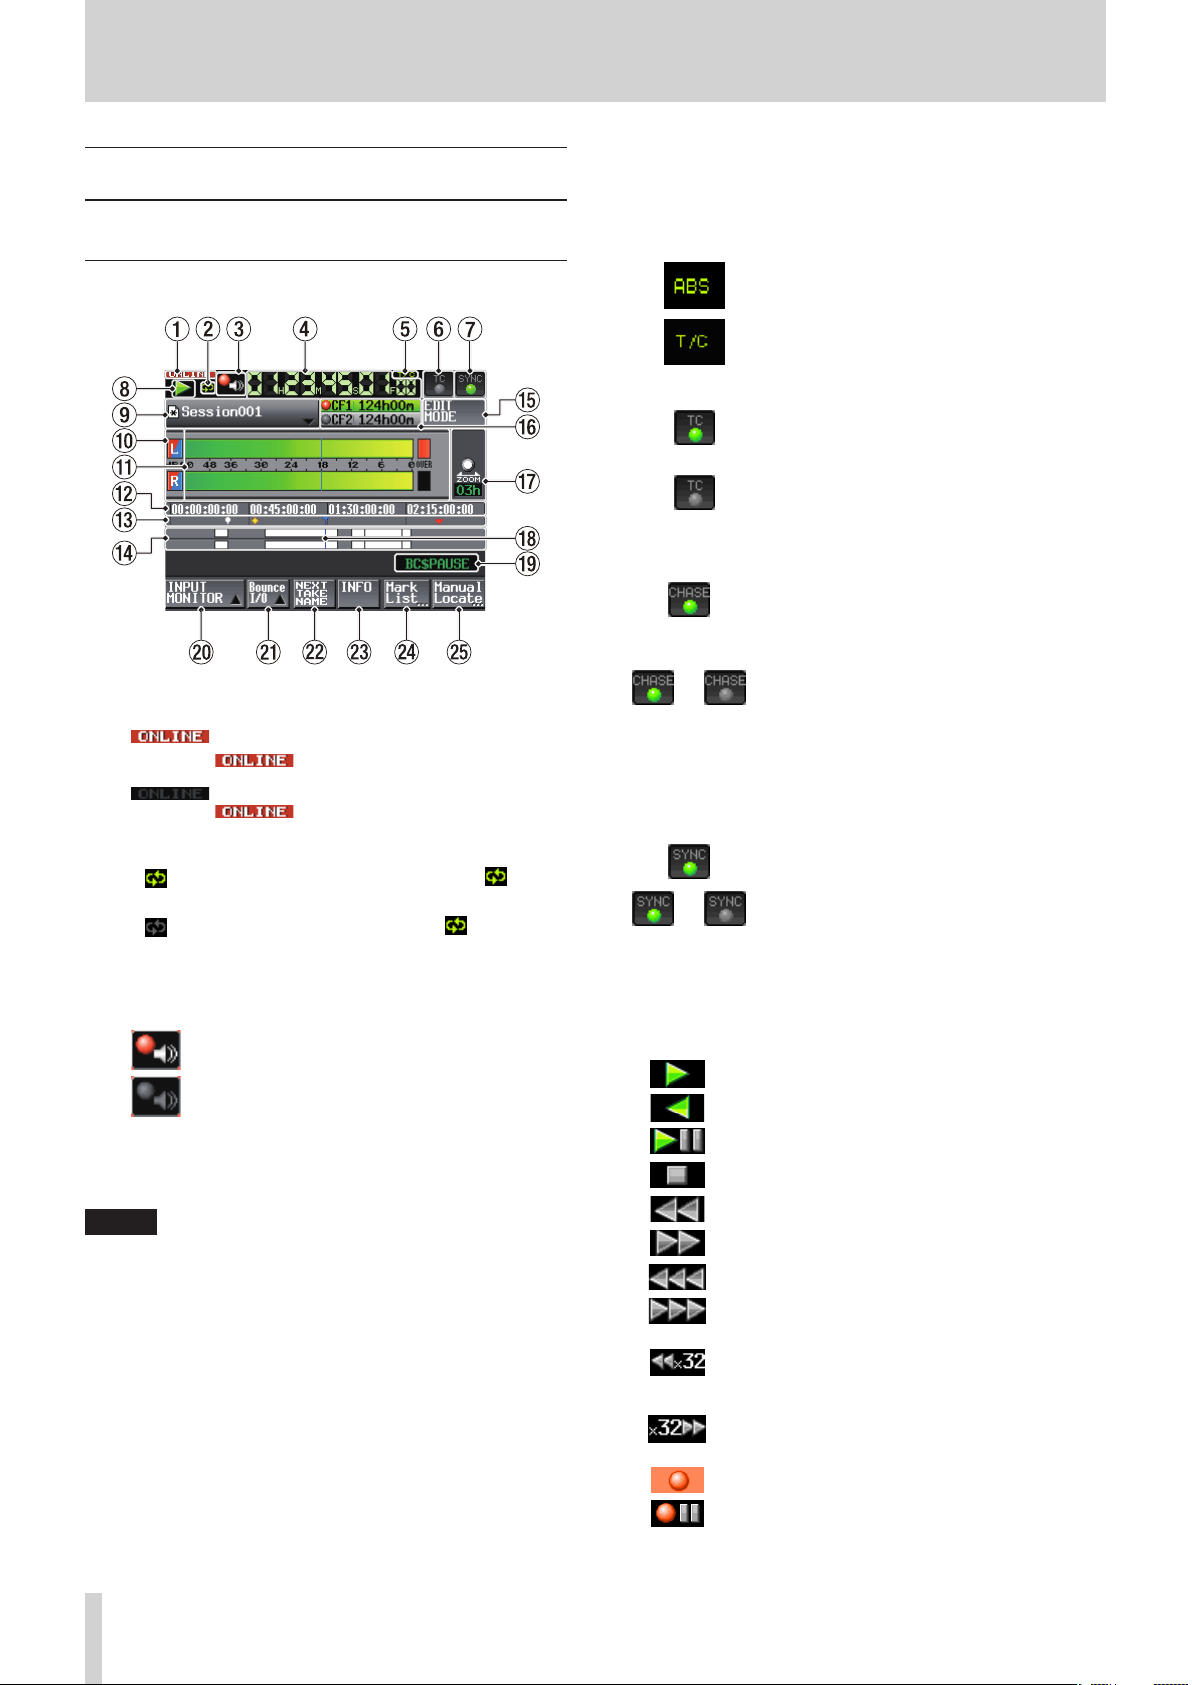
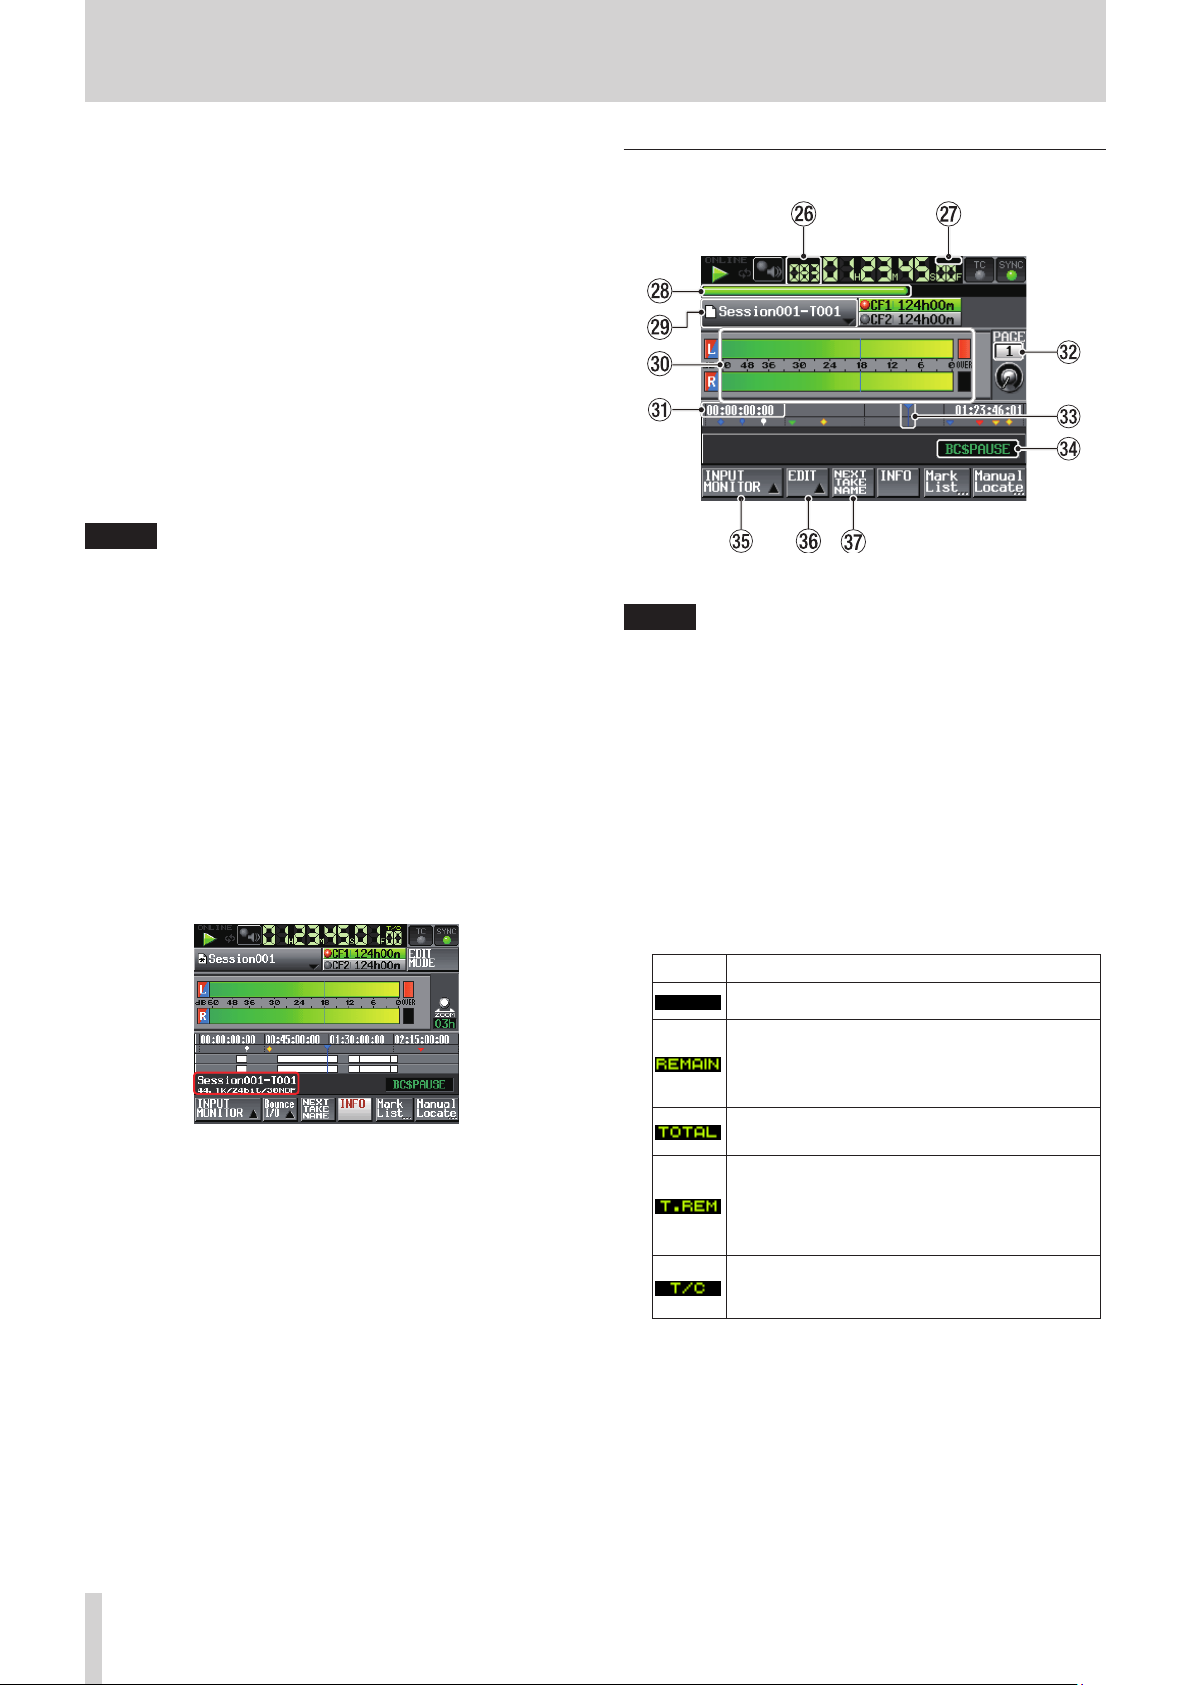
Home Screen
Press the HOME key to open the Home Screen.
In timeline mode
1ONLINE status indicator
When the online sending mode is ON, the red
When the online sending mode is ON, the
2Repeat status indication
When repeat playback is ON, the green icon
appears.
When repeat playback is OFF, the icon
appears dimmed.
3Confidence Monitoring status (button)
Thic icon shows the status of confidence monitoring.
Confidence monitoring enabled
Confidence monitoring disabled
Touch this button to open the “REC MODE” page of the
REC SETUP
screen where you can set confidence
monitoring.(See “REC MODE page” on page 100.)
NOTE
This button only appears in timeline mode and take
mode.
4Time counter (button)
The time displayed is the elapsed time or the timecode
time.
Touch the time counter to change the time display
mode.
icon appears.
icon appears unlit.
5Time mode indicator (button)
This shows the current time display mode.
Touch the time counter to change the time display
mode.
The time elapsed from the beginning of the
timeline is shown.
The timecode for the timeline is shown.
6 Timecode status (button/indicator)
When accurate timecode is input and
recognized correctly, the TC indicator appears
green.
When timecode is not recognized correctly, the
TC indicator appears dimmed.
The synchronized playback status is shown when
playback is synchronized to timecode.
The
CHASE
playback or recording is synchronized with
external timecode or the internal timecode
generator (selectable).
The
§
CHASE
synchronization is not being used and if not
synchronized when timecode synchronization
is being used.
Touch this area to open the
indicator appears green when
indicator blinks if timecode
SYNC T/C
screen. (See
“Sync and timecode settings (SYNC T/C)” on page 103.)
7Audio synchronization status (button/indicator)
When synchronized to a master clock,
the
SYNC
indicator appears green.
The
SYNC
§
synchronized to a master clock.
Touch this area to open the
indicator blinks when not
SYNC T/C
screen. (See
“Sync and timecode settings (SYNC T/C)” on page 103.)
8Transport status indicator (button)
This icon shows the current transport status.
Playing back or jog playback (forward)
Jog playback (reverse)
Playback standby
Stopped
Searching backward
Searching forward
Searching backward (high-speed search)
Searching forward (high-speed search)
Number shown when searching backward
(shuttle operation) reflects current speed: x2, x4,
x8, x16, x32.
Number shown when searching forward (shuttle
operation) reflects current speed: x2, x4, x8, x16,
x32.
Recording
Recording standby
Touch this area to open the
PLAY SETUP
screen.
Page 17
TASCAM HS-2000
17
2 − Names and functions of parts
9AES31 file name (button)
This shows the name of the currently loaded AES31 file
(AES31 editing information file).
A “*” appears in the icon when the file has not been
saved after timeline editing, a mark has been added or
removed, or other changes have been made.
Touch this area to open a pull-down menu.
START TIME EDIT button
Opens the
ST AR T TIME
screen where you can set
the timeline mode starting time.
This can only be selected when the transport is
stopped.
REBUILD button
Rebuilds the additional index files for HS-2000 when
files have been deleted or modified remotely using
FTP, for example.
This can only be selected when the transport is
stopped.
SAVE button
Saves the contents of the timeline.
This can only be selected when the transport is
stopped.
(See “Saving AES31 editing information” on page 53.)
SAVE AS button
Allows you to rename and save the contents of the
timeline.
This can only be selected when the transport is
stopped.
(See “Naming and saving AES31 editing information”
on page 53.)
CREATE AES31 button
Open the
AES31 NAME
screen to create a new
AES31 file.
This can only be selected when the transport is
stopped.
(See “Creating new AES31 editing information” on
page 54.)
IMPORT ALL TAKES button
Use to import all takes in a session.
This can only be selected when the transport is
stopped.
(See “Importing all takes” on page 55.)
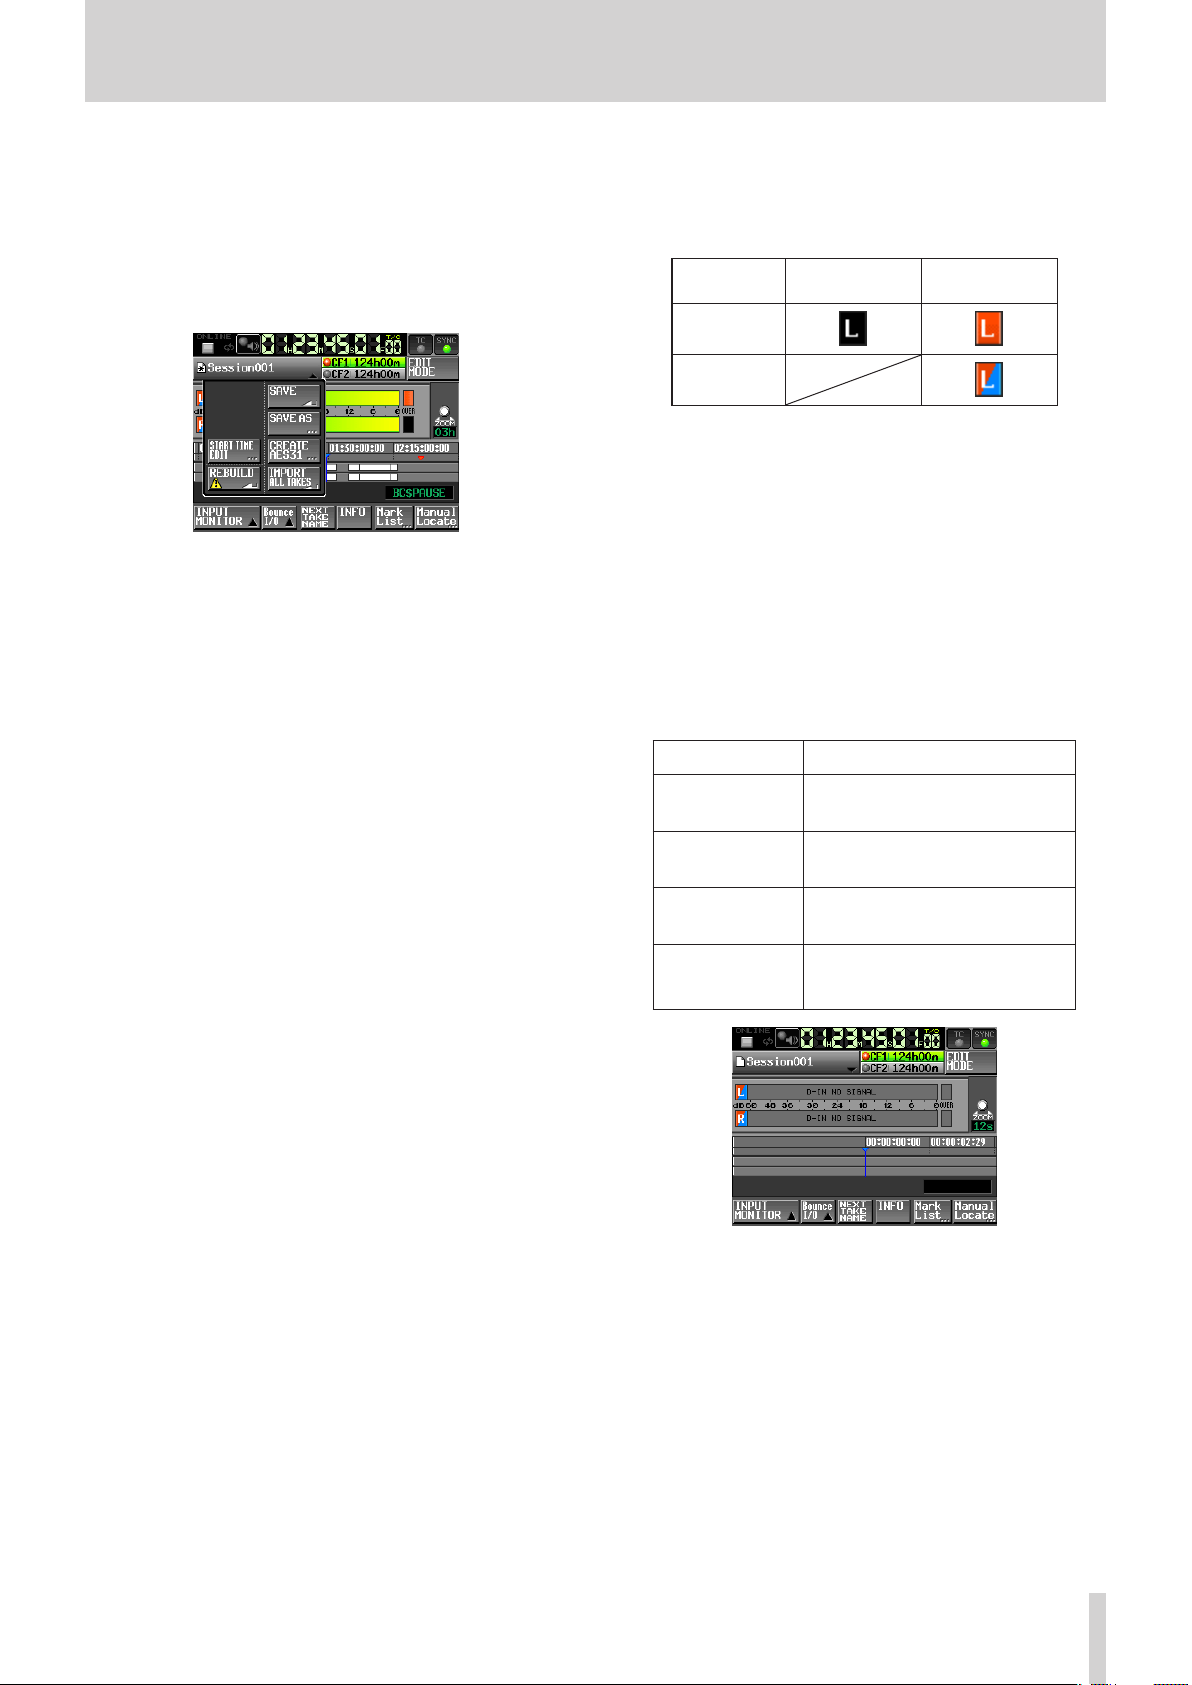
0Input monitoring indicators
The left ends of the level meters are input monitoring
indicators. Their background colors depend on the
input monitoring status, as shown below.
Playlist mode
Timeline or
take mode
MON OFF
MON ON
qLevel meters
When input monitoring is ON, the input signal level is
shown when in recording standby or when recording.
Each channel also has an overload indicator at its right
end that appears red when the input signal reaches an
overload level.
During playback, the playback level is shown if input
monitoring is OFF.
When a digital input is selected as the source, but
there is no input signal or if the actual input signal
differs from the internal settings, the channel meter
display area appears gray and one of the following
messages appears.
Message Meaning
D-IN NO SIGNAL No input signal
D-IN UNLOCK
D-IN NOT AUDIO
D-IN Cbit ERROR
Input signal is not synchronized
with the system
Cbit information of the input signal
is not audio
Other input signal Cbit information
differs from the actual operation
mode
D-IN NO SIGNAL message
The following level meter display settings can be made
on the
METER SETUP
Metering point
•
Peak hold time
•
Release time
•
Overload indicator peak level
•
Reference level line display on/off
•
page of the
MENU
screen.
Page 18
18
TASCAM HS-2000
2 − Names and functions of parts
wTime display area
The timeline is automatically divided into four equal
divisions that show times according to the time display
mode.
This area scrolls horizontally to correspond with the
time counter.
eMark display area
Timeline marks appear here.
This area scrolls horizontally to correspond with the
time counter.
BC$CM mark
BC$END mark
BC$FILE mark
BC$PAUSE mark
BC$STANDBY mark
BC$START mark
BC$STOP mark
IN mark
OUT mark
Other types of marks
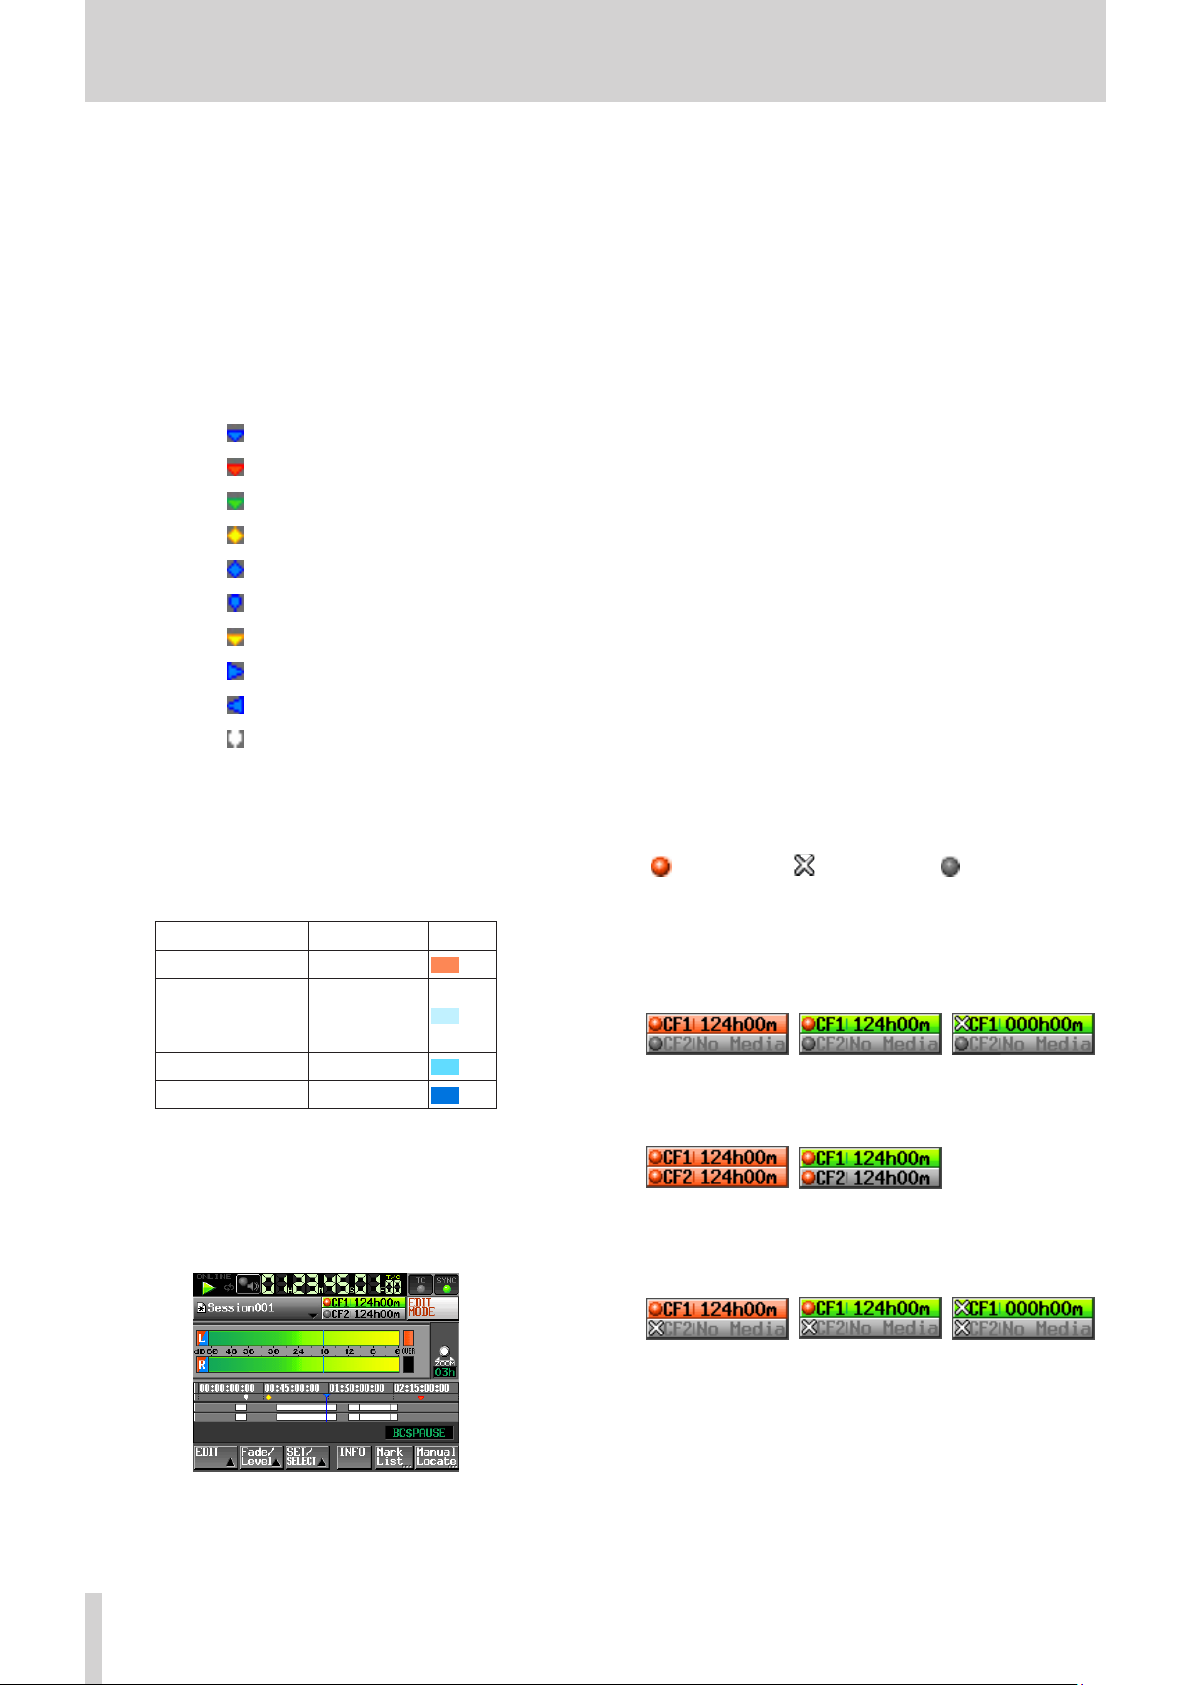
rTrack display area
The regions of each track are shown here, with the left
track above and the right track below.
Region fade-ins, fade-outs and cross-fades are shown
in light blue.
The following colors show the state of each region.
Ordinary state White
Recording Orange
Fade-in
Fade-out
Cross-fade area
Selected region Medium blue
Selected silence Dark blue
Light blue
This area scrolls horizontally to correspond with the
time counter.
tEDIT MODE button
Touch this to enable and disable the edit mode, which
allows you to divide, erase and cut parts of regions. (See
“Timeline editing” on page 58.)
yRecording media display (button)
This shows which CF card slot is currently in use and
remaining recording times.
The background of the media that currently in
use appears green during playback and red when
recording.
If there is no media in the CF card slot, No Media
appears on a light gray background.
If the CF card has no projects or sessions, No Project
appears. When an unformatted CF card is inserted,
UNFORMAT appears.
When a CF card is inserted in the slot that is not being
used during recording, UNMOUNT appears. When
recording stops, its remaining time will be shown
again.
If the total number of entries, including files and
subfolders, inside a session folder exceeds about
20,000, making recording impossible, Rec Limit
is shown. For details, see “Recording operation
limitations” on page 34.
Press this area to open the
MEDIA SELECT
(See “Card selection” on page 29.)
Media status indicators
These indicators show whether or not a card can be
used for recording, and is the selected media.
These appear in timeline and take modes, but not in
playlist mode.
Indicator display
•
Recordable Not recordable Not selected
Examples of media remaining time buttons
•
When REC MODE is set to Single
1
When recording When not recording
When REC MODE is set to Mirror
2
When recording When not recording
When REC MODE is set to Mirror, but Mirror not enabled*
3
When recording When not recording
When recording not
possible*
When recording not
possible*
screen.
*For details about when recording is not possible
and when Mirror is not enabled, see “Setting button
appearance” on page 127.
Page 19
TASCAM HS-2000
19
2 − Names and functions of parts
uZoom setting
This shows the track area zoom level, which is the
length of time displayed.
Turn the DATA dial right to zoom in (reduce the
displayed area) and turn it left to zoom out (increase
the displayed area).
iTimeline cursor
This cursor shows the recording or playback position.
It is always centered in the screen.
oMark name
This is the name of the mark at the current time or the
nearest preceding mark.
Touch this when a mark name other than the auto
mark is shown to open the mark name editing screen.
pINPUT MONITOR button
Touch to open a pull-up with buttons to turn input
monitoring ON/OFF.
When ON, the signal input through the input
connectors is always output from this unit.
aBounce I/O button
Touch to open the Bounce pull-up menu.
Bounce button
Touch to bounce. In the following circumstances, it
appears gray and cannot be used.
When neither IN or OUT points have been set
•
During playback or recording
•
SET IN button
Touch to set the current position as the bounce
starting (IN) point.
SET OUT button
Touch to set the current position as the bounce ending
(OUT) point.
CLEAR button
Touch to clear the currently set bounce starting (IN)
and ending (OUT) points.
For details about the use of these buttons, see
“Bouncing” on page 69.
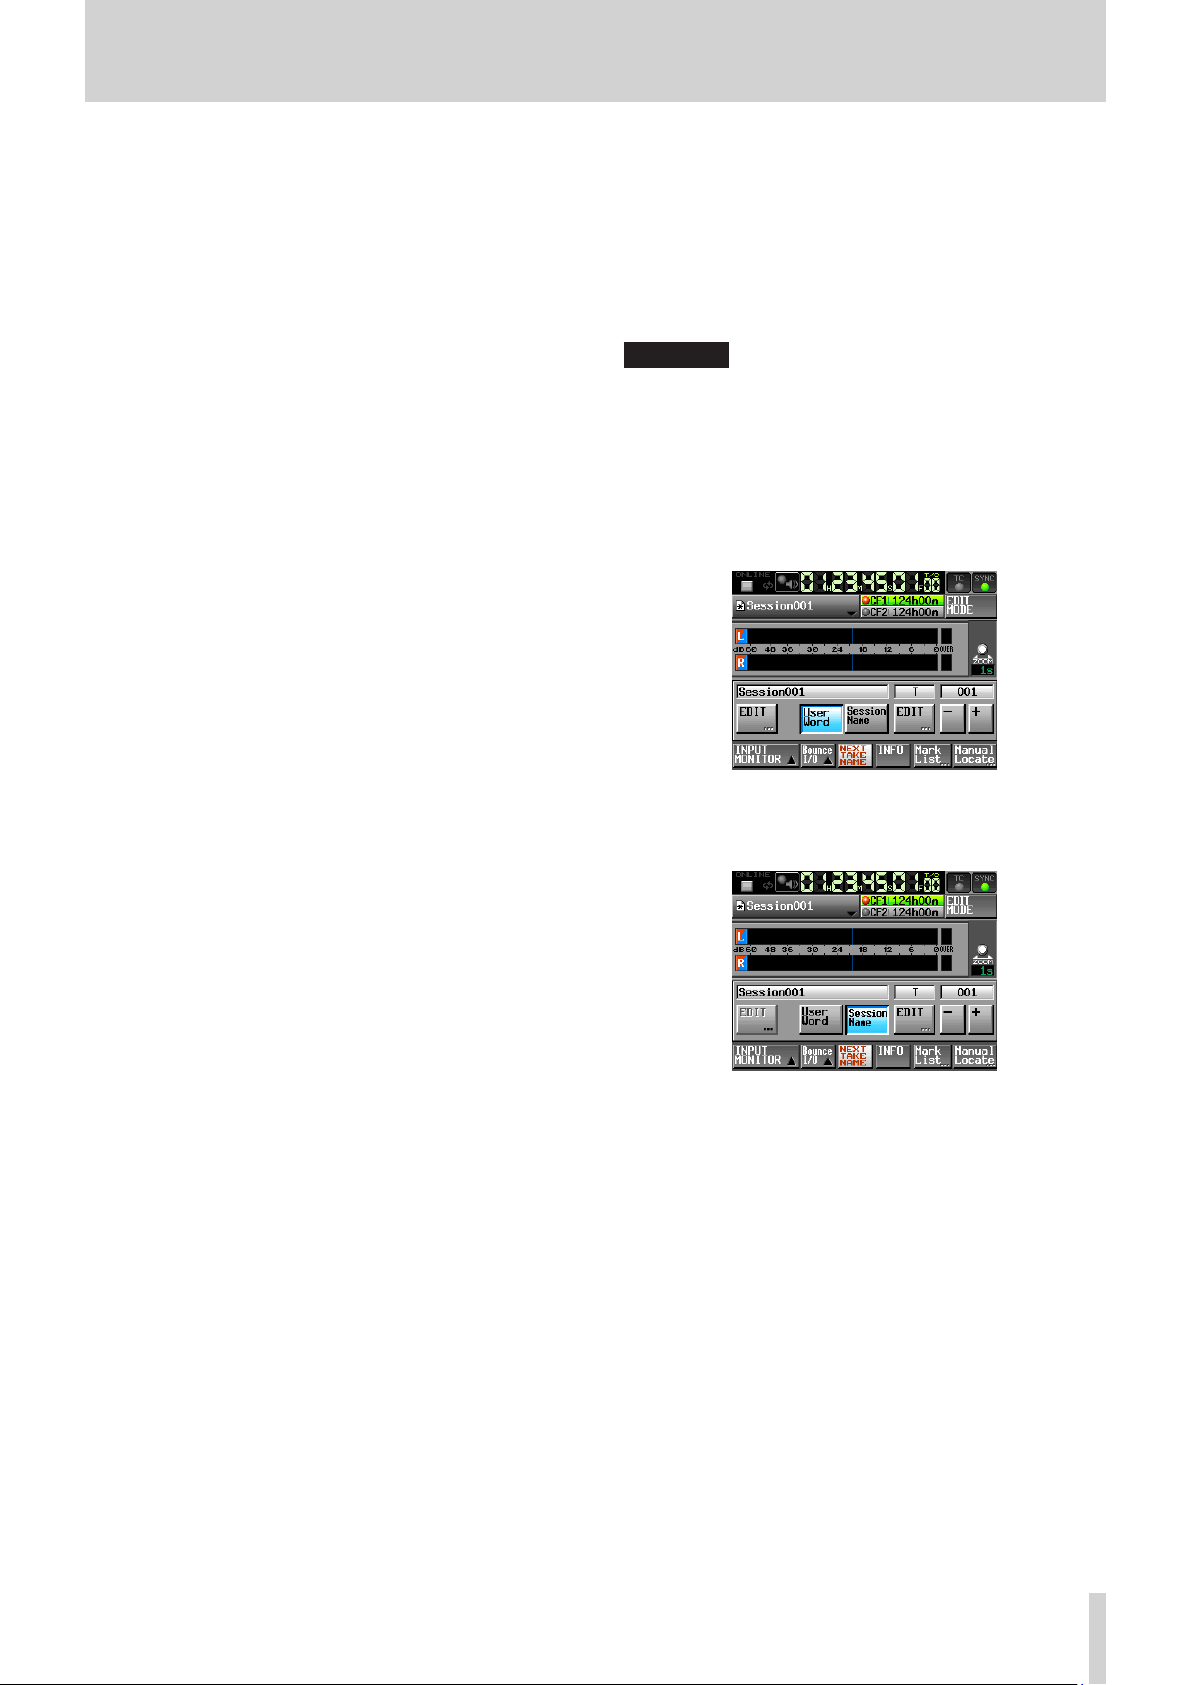
sNEXT TAKE NAME button
Touch to open the
where you can set the name that will be given to
future recorded takes and files.
First half of take names
•
The first half of the take name can be set to either the
User Word
CAUTION
The first half of the take name can only be changed when
the unit is stopped.
User Word mode (button)
•
Touch this to use the user word for the first half of the
take name.
Press the
can change the user word. (Operation is the same as
the screen for editing project names.)
Session Name mode (button)
•
Touch this to use the session name as the first half of
the take name.
E DIT
NEXT TAKE NAME
or the Session Name (default).
button to open a screen where you
screen
Page 20
20
TASCAM HS-2000
2 − Names and functions of parts
Second half of take names
•
The second half of the take name is comprised of one
letter and a three-digit number.
Press the
can change the letter.
Change the three-digit number with the + and –
buttons. You can also touch the numerical part to
highlight (yellow) it and use the DATA dial to change
the number.
In the following cases, “---” appears and the value
cannot be changed.
•
•
•
NOTE
The Next Take Name setting is saved with each project.
•
If you change projects, the setting of the loaded
project will be used.
The numerical part of the second half of the take name
•
can be changed even during playback and recording.
(The first half of the take name and the letter in the
second half can only be changed when the transport
is stopped.)
A take can be created that has the same three-digit
•
number in the second half as another take if the first
half of their names or the letters in their second halves
are different.
dINFO button
Opens an information display that shows the current
settings of the unit and the file name of the region
currently below the timeline cursor.
E DIT
button to open the screen where you
No project or session is loaded
The selected card is unavailable
The numerical part of the file name of the current take
is 999
In take or playlist mode
Take mode Home Screen
NOTE
In playlist mode, the
NEXT TAKE NAME
hTake/entry number
The number of the currently selected take or entry is
shown. When in recording standby, the file name that
will be given to the next recorded take is shown.
Takes are numbered in the order recorded within a
session.
jTime display mode (button)
This icon shows the current time display mode.
Touch the time counter display to change the time
display mode.
Mode Meaning
Elapsed time from the beginning of the take
INPUT MONITOR, E DIT
buttons do not appear.
and
The upper line shows the file name of the region under
the timeline cursor.
The lower line shows the current sampling frequency,
bit length and frame type settings.
fMark List button
Opens the mark list.
(See “Mark list screen” on page 123.).
gManual Locate button
Opens the
MANUAL LOCATE
screen.
(See “Manual locate function” on page 125.)
• During playback, the time remaining until the
end of the take
• During recording, the time remaining until the
maximum file size is reached
Elapsed time from the beginning of the session
• During playback, the time remaining until the
end of the session
• During recording, the time remaining until the
selected card will become full using the current
recording settings
Timecode of the recording/playing file
Page 21

TASCAM HS-2000
21
2 − Names and functions of parts
kTime bar
This shows the current playback position according to
the time display mode.
Mode Meaning Bar display
Current playback
position relative to the
length of the take or
entry
Current playback
position relative to the
length of all takes in the
session or the entire
playlist (white vertical
lines appear at take and
entry boundaries
)
Lengthens from left
end to right end
Shortens from left end
to right end
Lengthens from left
end to right end
Shortens from left end
to right end
Lengthens from left
end to right end
NOTE
During recording, a red progress bar lengthens from the
left end to the right end approximately every five seconds.
lTake/entry name display (button)
This shows the name and icon of the currently active
take or entry.
During recording standby, the file name that will be
given to the next recorded take is shown.
When in playlist mode, a “*” appears in the icon if the
playlist has not been saved after editing (including the
addition and removal of entries).
Touch to open a pull-down menu.
In take mode
TAKE List button
Opens the TAKE selection screen.
On the TAKE selection screen opened by this button,
pressing a session folder name area does not open the
SESSION selection screen. (See “Using the PROJECT
screen” on page 35.)
CIRCLE @ TAKE button
Adds or removes “@” at the beginning of the current
take name. (See “Take selection screen” on page 37.)
REBUILD button
Rebuilds the additional index files for HS-2000 when
files have been deleted or modified outside the unit
remotely using FTP, for example.
In playlist mode
ASSIGN FILE button
Opens the
ASSIGN
screen where you can assign files.
(See “ASSIGN File screen” on page 86.)
ENTRY LIST button
Opens the ENTRY list screen. (See “ENTRY list screen”
on page 84.)
ADJUST ENTRY button
Opens the
ADJUST ENTRY
*** screen where you
can edit entries. (See “Editing entry names” on page
88, “Editing playback starting/ending points” on page
89, “Editing playback starting times” on page 92 and
“Editing lengths and levels of fade-ins/outs” on page
92.)
REBUILD button
Rebuilds the additional index files for HS-2000 when
files have been deleted or modified outside the unit
remotely using FTP, for example.
SAVE button
Saves the current playlist. This can only be selected
when the transport is stopped.
(See “Saving playlists” on page 94.)
SAVE AS button
Rename and save the current playlist. This can only be
selected when the transport is stopped.
(See “Naming and saving a playlist” on page 94.)
CREATE PLAYLIST button
Opens the
PLAYLIST NAME
screen where you can
create a new playlist. (See “Creating a new playlist” on
page 82.)
;Level meters
These are the same as on the timeline mode Home
Screen.
Page 22
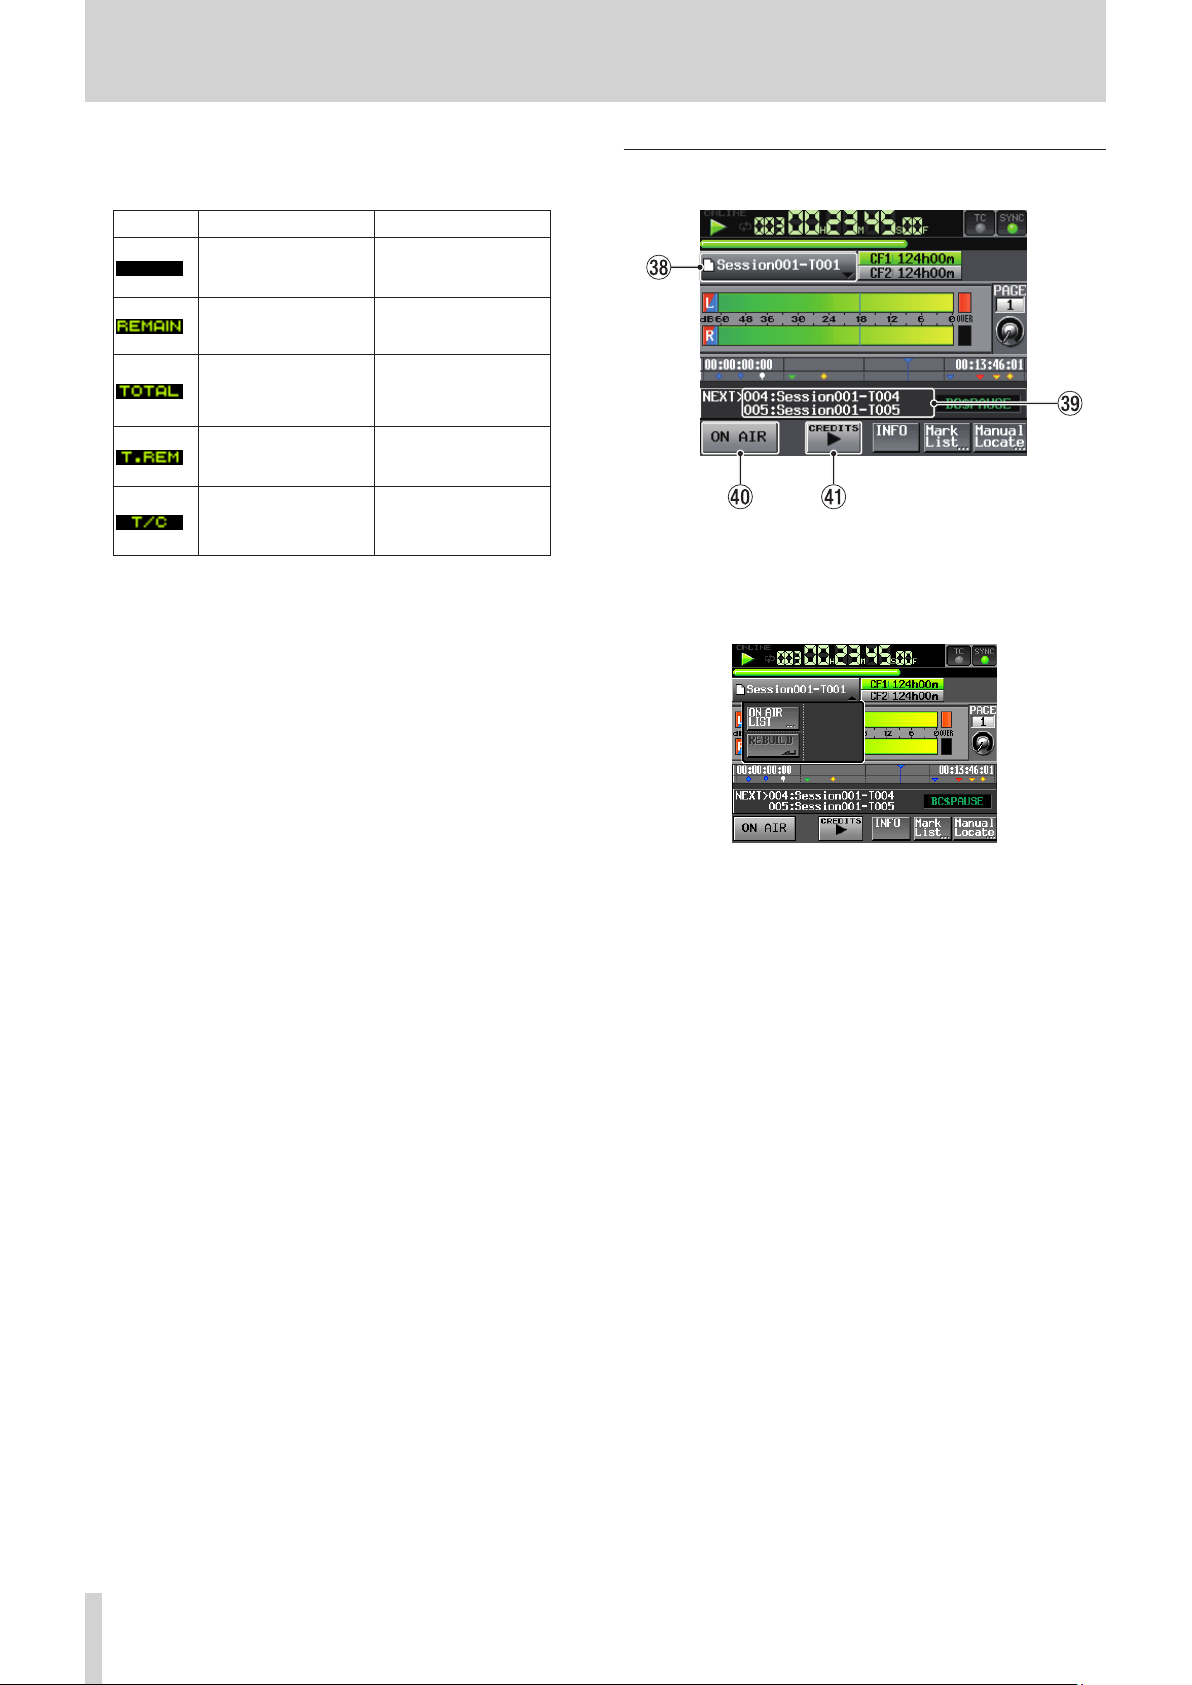
22
TASCAM HS-2000
2 − Names and functions of parts
zTime display area
The times displayed depend on the time display mode.
Mode Left end Right end
00:00:00:00
Total take or entry
length
00:00:00:00
Total session or playlist
length
Starting time of
session or playlist
Total take or entry
length
00:00:00:00
Total session or playlist
length
00:00:00:00
Ending time of session
or playlist
When recording or in recording standby, time and
division lines are not shown.
xFlash Page number and knob
Shows the Flash Page number. Touch to enable
selection (yellow background), and turn the DATA dial
to change the page number (turn right to increase and
left to decrease).
In on-air mode
On-air mode Home Screen
,Take name display (button)
Shows the icon and name of the currently active take.
Touch to open a pull-down menu.
cCurrent time cursor
Shows the playback position and scrolls horizontally
along with the time counter.
It is not shown during recording (take mode only).
vMark name
This is the name of the mark at the current time or the
nearest preceding mark.
When the name of a mark other than any automatic
mark is shown, Touch to open the
MARK NAME
editing screen.
bINPUT MONITOR button
This is the same as on the timeline mode Home
Screen.
nEDIT button
Opens a pull-up menu for take editing.
mNEXT TAKE NAME button
This is the same as on the timeline mode Home
Screen.
ON AIR LIST button
Touch to open the
(See “Selecting files for playback” on page 97.)
REBUILD button
This rebuilds the additional index files for HS-2000 when
files have been deleted or modified remotely using a FTP
client, for example.
ON AIR LIST
screen.
.Information area
On the on-air mode Home Screen, the information
area shows the names of the next two takes. Touch this
information area to open the
ON AIR LIST
screen.
/ON AIR button
Switch between broadcast playback mode and
rehearsal/confirmation playback mode.
(See “Using the ON AIR button to switch between
rehearsal/confirmation playback and broadcast
playback modes” on page 98.)
Page 23

TASCAM HS-2000
23
!CREDITS playback button
Touch to start credit playback, which plays back from
the beginning of the selected file and stops at the
appropriate mark.
(See “Credits playback” on page 98.)
NOTE
The
ON AIR
•
transport is stopped.
The
CREDITS
•
button is OFF and the transport is stopped or during
CREDITS
AIR
button is ON and during ordinary playback.
During credits playback, you can press the
•
button to stop playback. (Use to toggle credits
playback ON/OFF.)
button only functions when the
button can be used when the
playback. It cannot be used when the
CREDITS
ON AIR
ON
2 − Names and functions of parts
Page 24
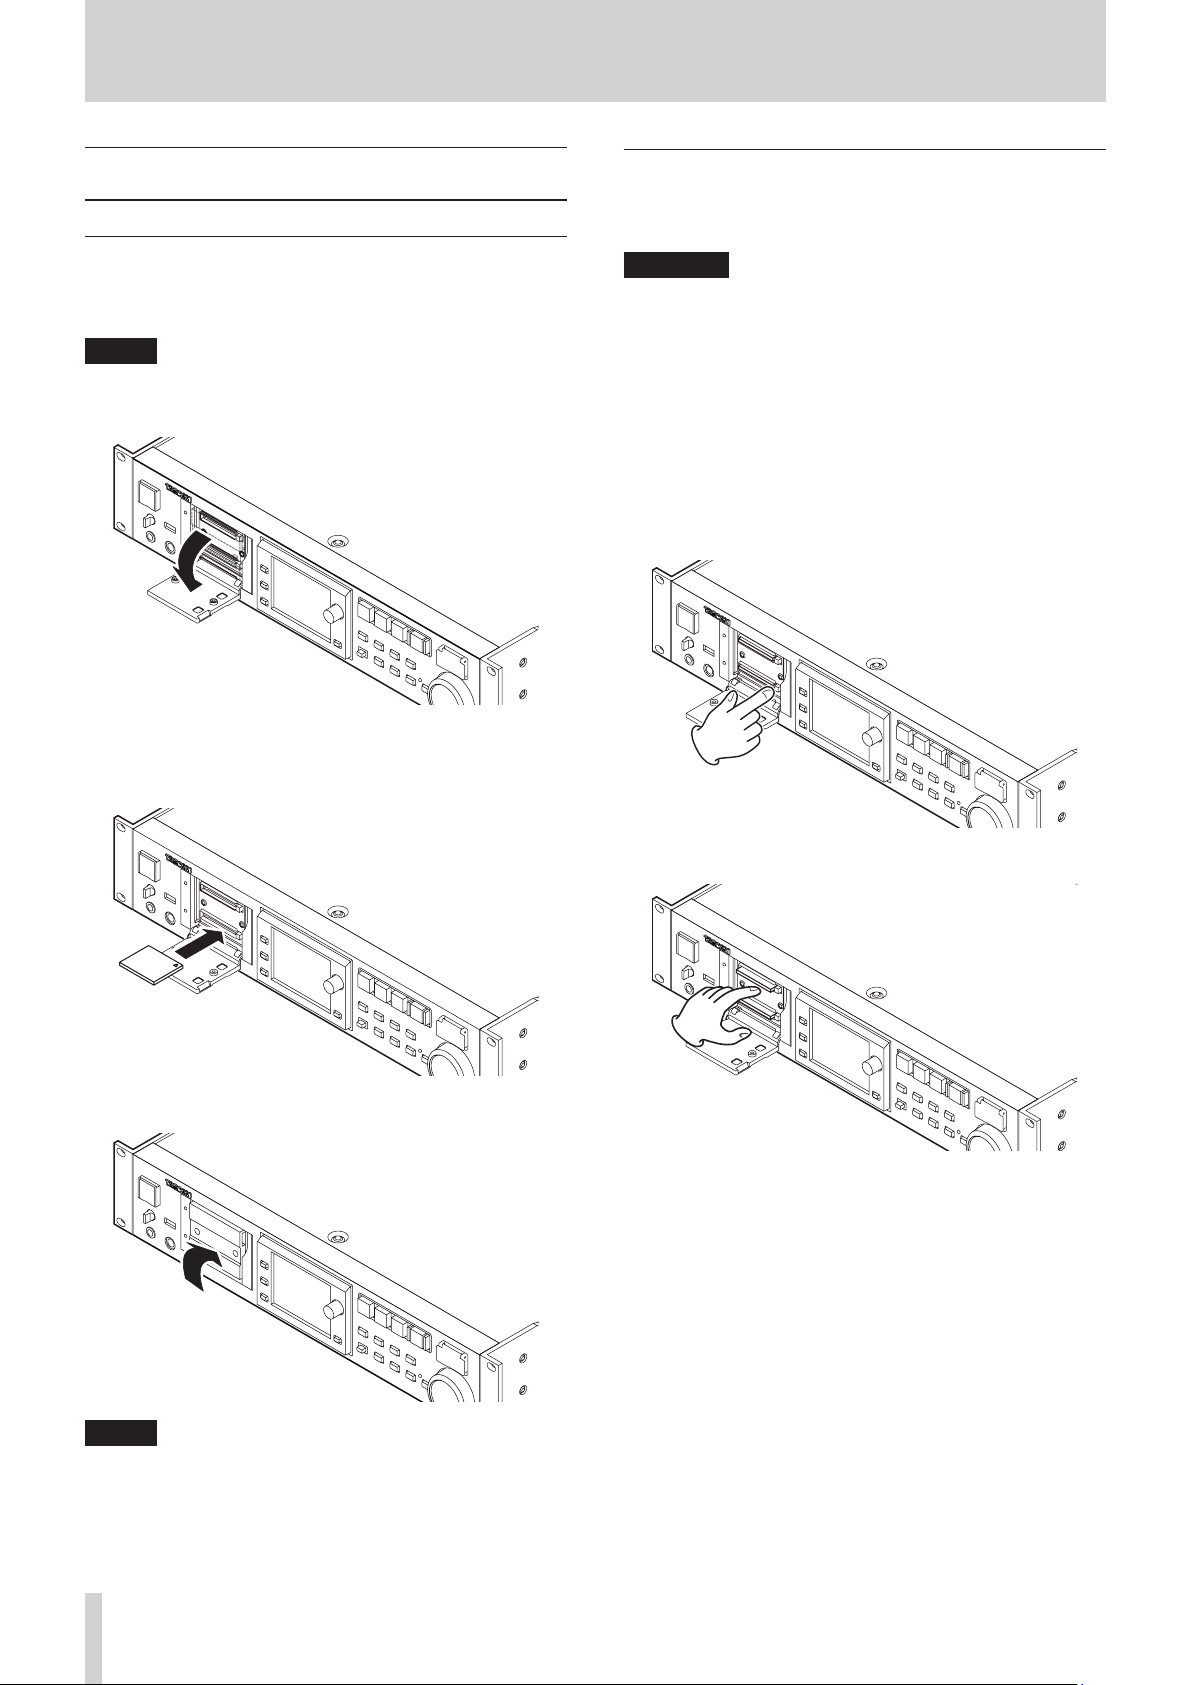
24
TASCAM HS-2000
3 − Preparations
Inserting and removing CF cards
Inserting CF cards
Insert a CF card into a CF card slot on the front of the unit
in order to use it for recording and playback.
NOTE
CF cards can be inserted whether the power is ON or OFF.
1. Pull the CF card slot cover forward to open it.
2. Insert the CF card with the correct orientation. With
the labeled side up, insert the end with the connector
completely.
Removing CF cards
Turn the unit power OFF or stop operations before
removing a CF card.
CAUTION
Never remove a CF card during recording, playback or any
other operation that accesses the CF card. Doing so could,
for example, cause recording errors, loss of recorded data,
and sudden loud noises to be output through monitoring
equipment, which could result in damaged equipment
and hearing loss.
1. Pull the CF card slot cover forward to open it.
2. Press the square button to the right of the CF card slot
to bring the button out.
3. Press the square button in again to partially eject the
CF card.
3. Close the cover.
NOTE
If you cannot close the slot cover, remove the CF card
once, press the square button to the right of the slot and
then reinsert the card.
4. Pull the CF card out by hand.
Page 25
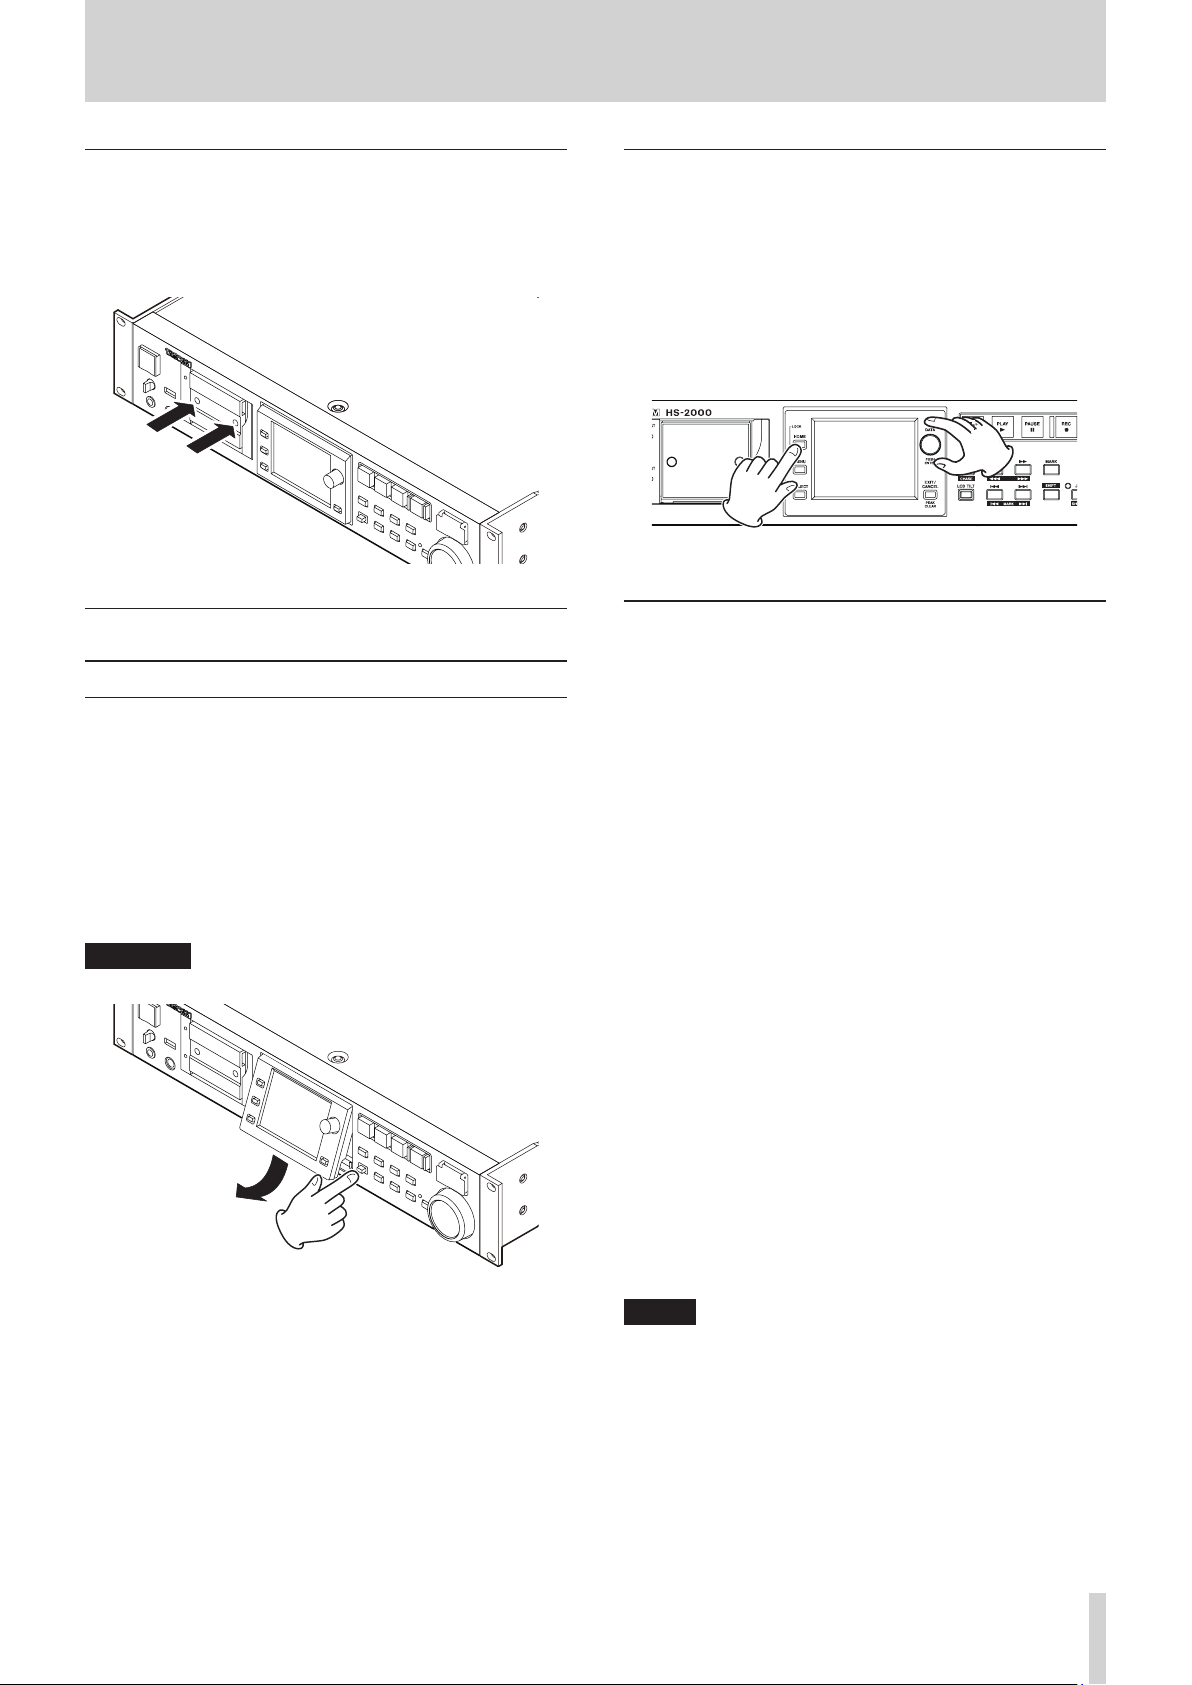
TASCAM HS-2000
25
3 − Preparations
Security screws
The included security screws can be used to lock the CF
card slot cover.
Use a Phillips head screwdriver to install or remove the
screws.
About the display
Adjusting the display angle
Push the LCD TILT button to unlock the display, and then
pull the bottom of the display forward to adjust the angle.
Pull the bottom of the display until you hear a clicking
sound.
To restore it to its flat position, push the LCD TILT button
again to unlock the display, and push the bottom of the
display. Push the bottom of the display until you hear a
clicking sound.
CAUTION
Do not push the display screen itself.
Adjusting display and indicator brightness
Turn the DATA dial while pressing and holding the
HOME key to adjust the brightness of the color display,
the PAUSE, REC, PLAY and ON LINE keys, and the JOG
[SHUTTLE], SLOT 1 and SLOT 2 indicators. Push and turn
the D ATA dial while pressing and holding the HOME key
to adjust only the brightness of the color display.
Cautions related to display use
The display can easily be scratched, so do not use
•
pointed objects, including fingernail tips, to touch it.
Always touch it with your fingers.
Do not press the display forcefully with a finger
•
or poke it with a pen, toothpick or other pointed
object. Doing so could scratch the display or cause
malfunction.
The display touch screen is constructed of a film and
•
glass. Do not apply strong force to its surface. Doing
so could break the glass.
When using the display, do not put a hand on the
•
panel or push around the display forcefully. Doing so
could prevent accurate position detection.
Do not place anything on top of the display or
•
otherwise put weight on the same place for a long
time. Doing so could cause the panel to warp or
result in inaccurate position detection.
Do not apply a commercially-available screen
•
protection film to the display. Doing so could prevent
normal operation.
Gently wipe the display with a soft dry cloth that
•
does not shed dust (e.g. a cleaning cloth). Avoid
wiping with a stiff cloth or rubbing with force. Doing
so could damage the surface of the LCD. Do not
use benzene, thinner, manicure remover, alcohol or
similar substances.
NOTE
The display is produced with extremely high-precision
manufacturing technologies, and 99.99% or more of
the pixels are effective, but sometimes pixels might not
appear or might appear as red or black dots. This is not a
malfunction.
Page 26
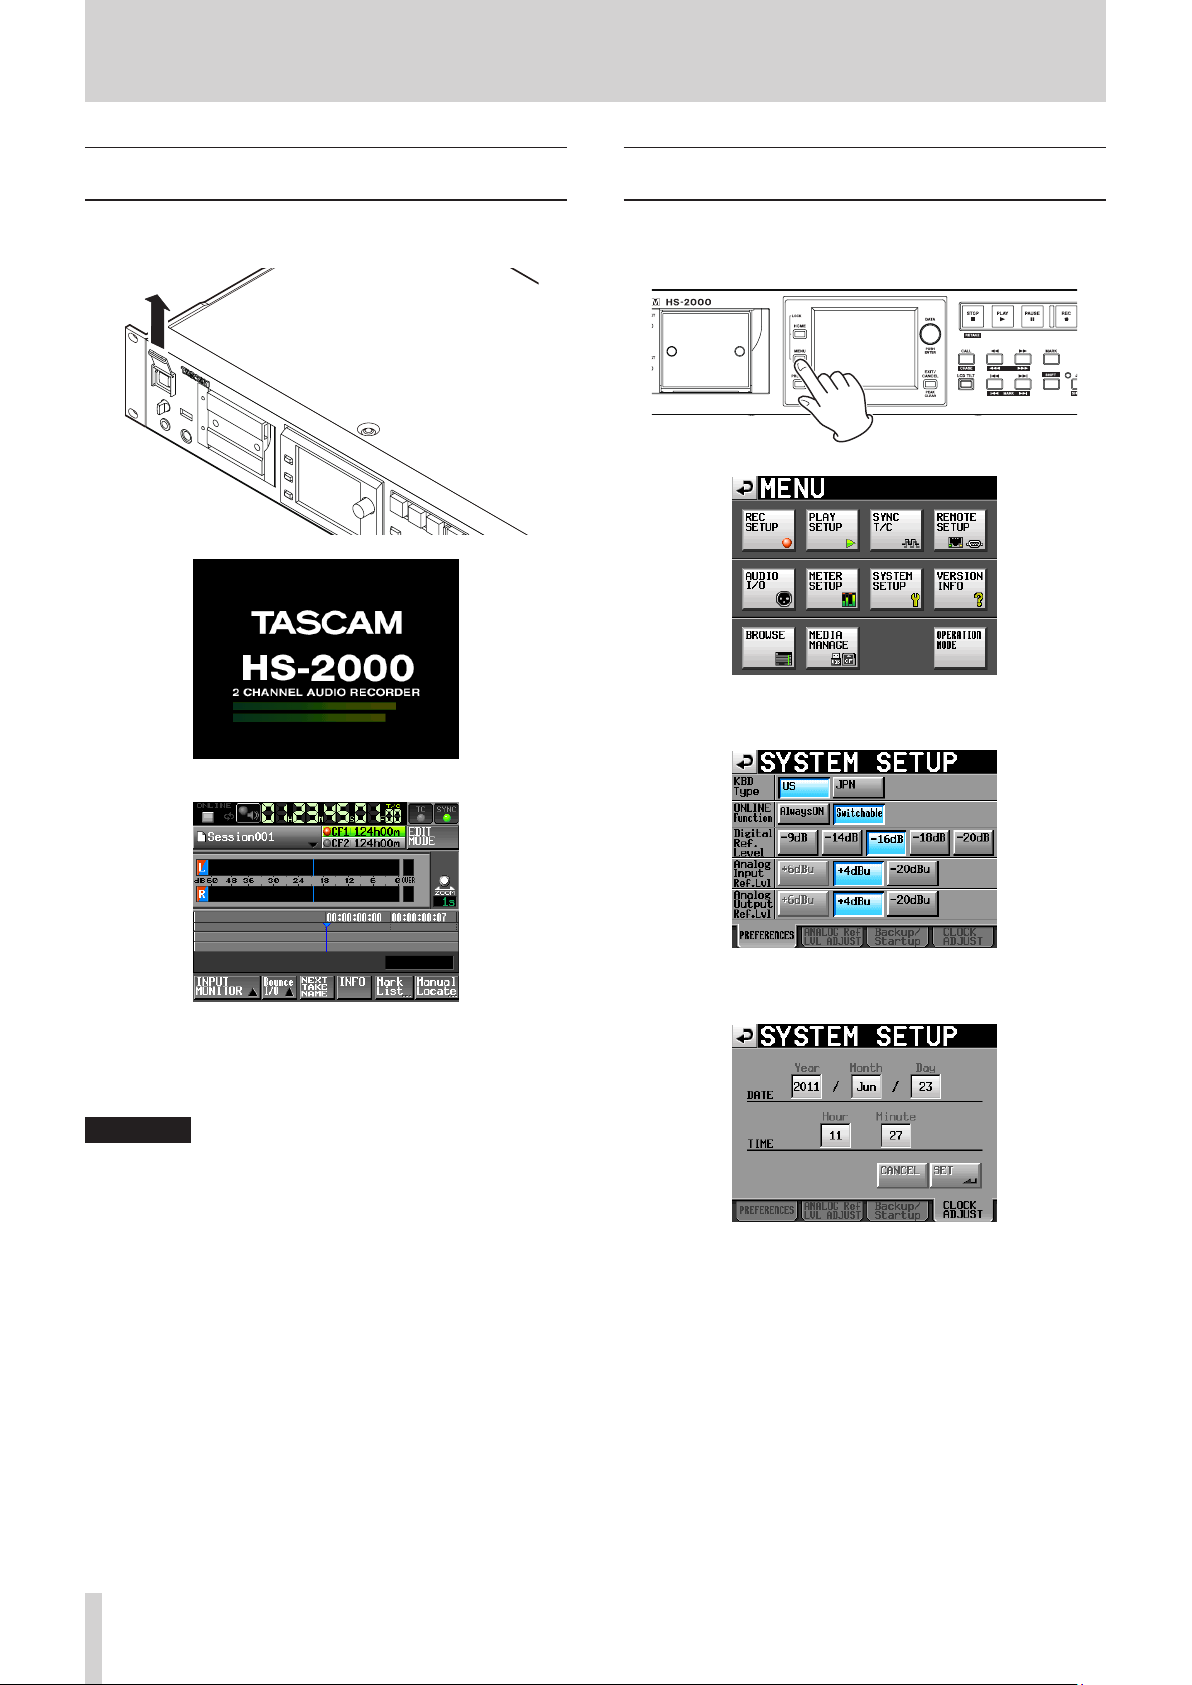
26
TASCAM HS-2000
3 − Preparations
Turning the power ON and OFF
Open the front panel POWER switch cover and press the
POWER switch.
Setting the built-in clock
1. Press the MENU key on the front panel to open the
MENU
screen.
2. Touch the
SYSTEM SETUP
SYSTEM SETUP
screen.
button to open the
Startup screen
Home Screen
To turn the power OFF, push the POWER switch on the
front panel again.
CAUTION
Never turn the power OFF during recording, playback,
or any other operation that accesses the CF card. Doing
so could, for example, cause recording errors, loss of
recorded data, and sudden loud noises to be output
through monitoring equipment, which could result in
damaged equipment and hearing loss.
3. Touch the
ADJUST
CLOCK ADJUST
page where you can set the built-in clock.
tab to open the
CLOCK
Page 27
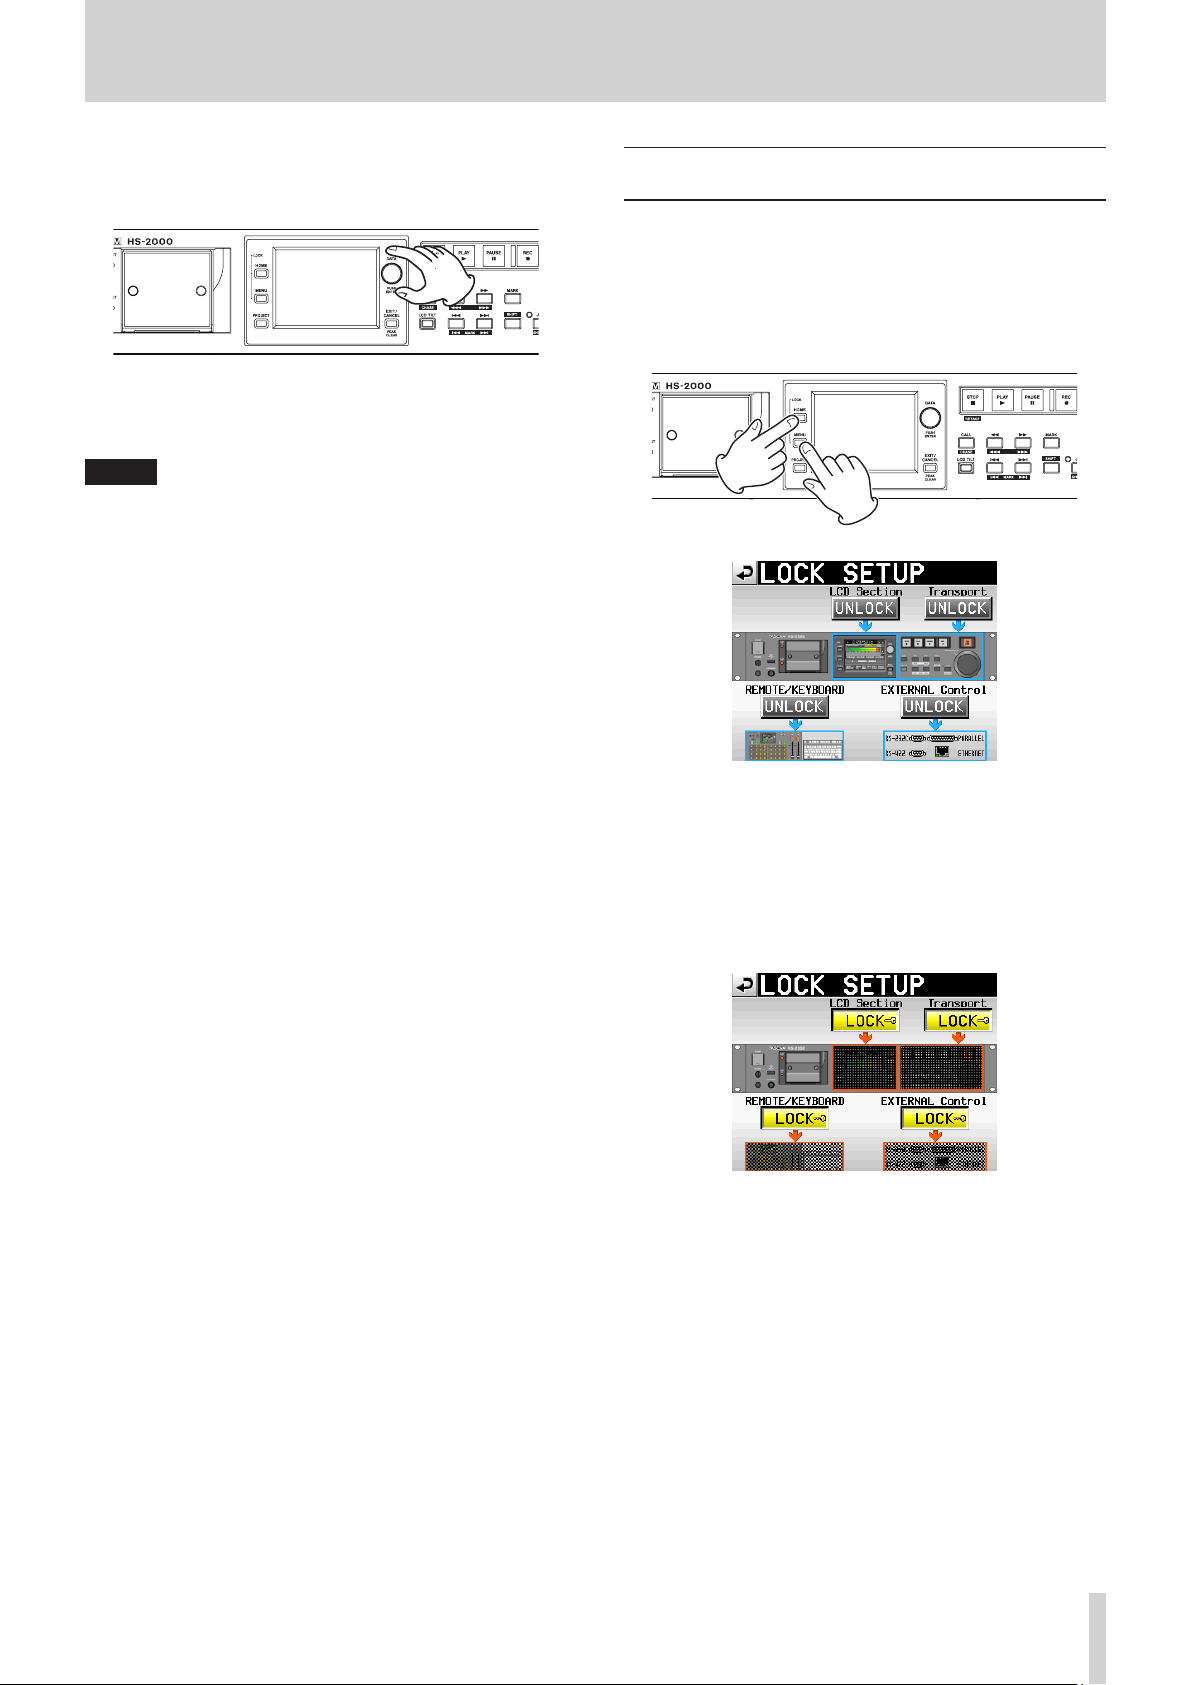
TASCAM HS-2000
27
3 − Preparations
4. Touch the item that you want to change, and use the
D ATA dial on the front panel to change the value.
5. Touch the SET button or push the DATA dial to confirm
the setting.
NOTE
After purchasing this unit, set the clock before making
your first recording. If you do not set the clock, the time
stamps on recording files will be incorrect.
Lock function
Press the MENU key while pressing and holding the
HOME key on the front panel to open the
screen where you can disable or enable operation from
the front panel and external devices.
LOCK SETUP
The front panel is divided into two sections, which can be
locked and unlocked separately.
Control from external devices is also divided into two
categories, which can be locked and unlocked separately.
If you press the button for a section, it changes from
UNLOCK
locked area appears dimmed.
to
LOCK
(with a yellow background) and the
LOCK SETUP screen with all sections locked
Page 28
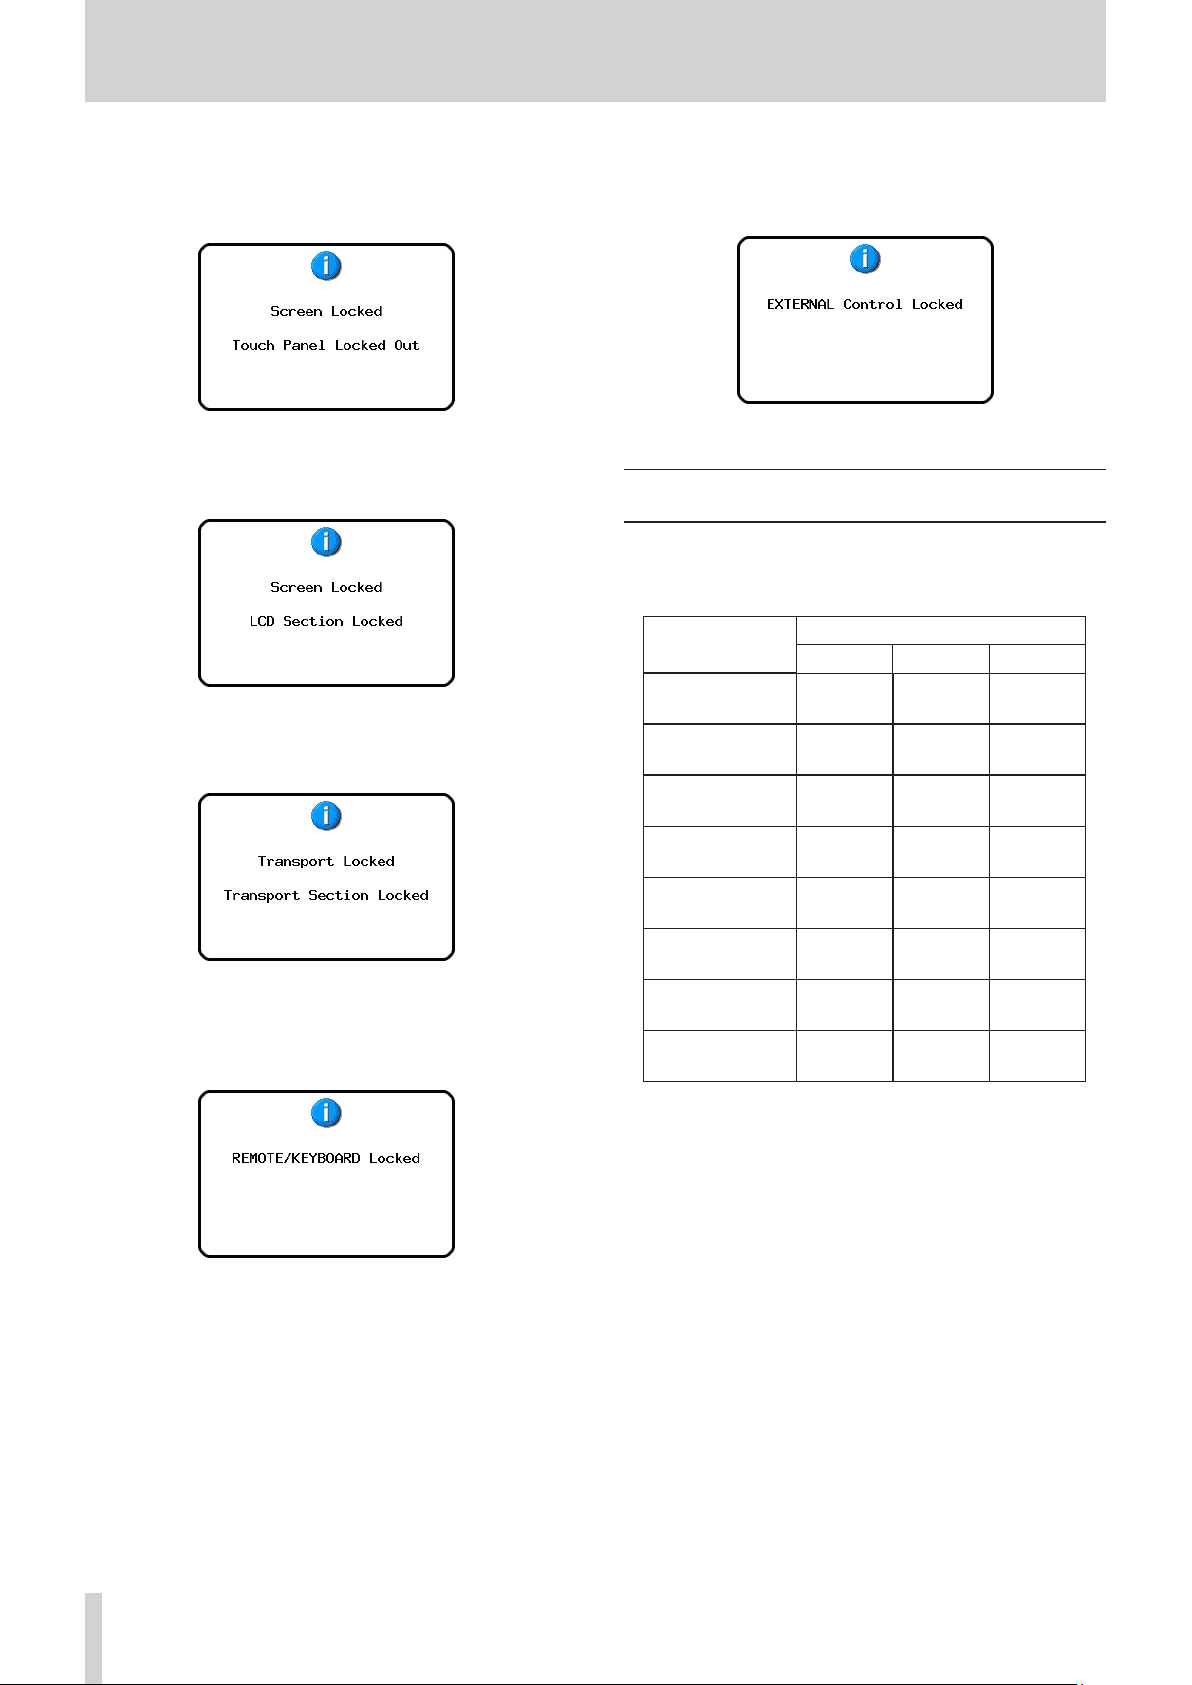
28
TASCAM HS-2000
3 − Preparations
When the LCD Section is set to LOCK:
0
If the display is touched, the following pop-up
•
message appears.
Touch panel display (LCD) locked
If one of the keys around the display is pressed, the
•
following pop-up message appears.
Keys around display (LCD) locked
When the Transport section is set to LOCK, if one of the transport
0
keys is pressed, the following pop-up message appears.
When the EXTERNAL CONTROL section is set to LOCK, if an
0
operation is conducted through the RS-232C, RS-422, PARALLEL or
ETHERNET connections, the following pop-up message appears.
Other external control locked
Recording ties
The table below shows the total amount of recording tie
(in hours and minutes) possible on CF cards of various
capacities for each recording format.
File recording
forat
16-bit/44.1kHz
16-bit/48kHz
Card capacity
8 GB 16 GB 32 GB
12:34 25:10 50:21
11:32 23:07 4616
Transport section locked
When the REMOTE/KEYBOARD section is set to LOCK, if a remote
0
control or keyboard connected to a remote connector is used, the
following pop-up message appears.
Remote/keyboard control locked
24-bit/44.1kHz
24-bit/48kHz
24-bit/88.2kHz
24-bit/96kHz
24-bit/176.4kHz
24-bit/192kHz
The recording times shown above are estimates. They
•
8:22 16:46 33:34
7:41 15:24 30:50
4:11 8:23 16:47
3:50 7:42 15:25
2:05 4:11 8:23
1:55 3:51 7:42
might differ depending on the CF card in use.
The recording times shown above are not continuous
•
recording times, but rather they are the total possible
recording times for the CF card.
Page 29
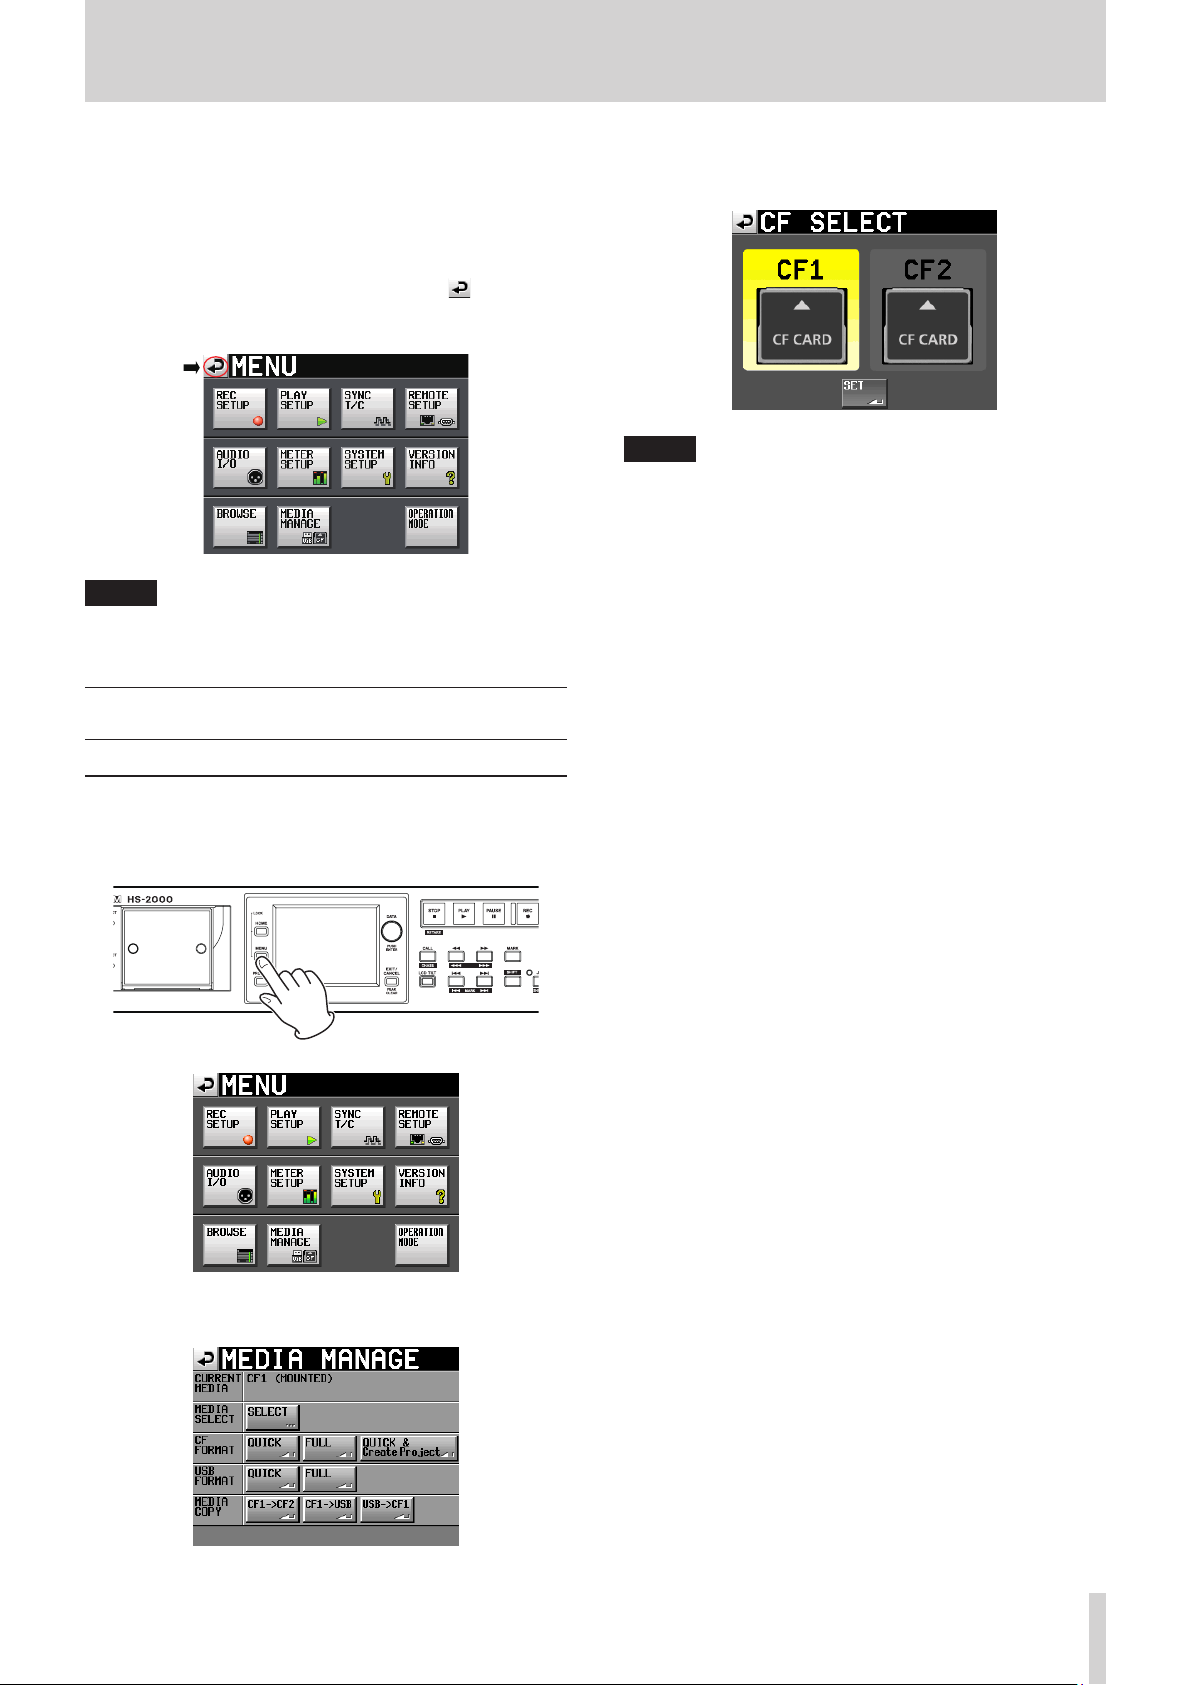
TASCAM HS-2000
29
4 – Basic operation
In this chapter, we explain the basic operation procedures
that are the same in each operation mode.
The display functions as a touchscreen.
Operate the unit using its keys, switches and touchscreen
display buttons.
On every screen except the Home Screen, a
appears at the top left. Touch to return to the previous
screen.
NOTE
You can also return to the previous screen by pressing the
EXIT/CANCEL [PEAK CLEAR] key.
button
CF card preparation
3. Touch the
SELECT item to open the
NOTE
You can also open
the recording media button on the Home Screen.
4. Touch the button for the card that you want to use to
select it. The background of the selected card appears
yellow
5. Touch the
MANAGE
6. If you also want to format the card now, follow the
procedure starting with step 3 in “Formatting a CF
card” in the next section
MEDIA SELECT
MEDIA SELECT
.
SET
button to return to the
screen.
button next to the
SELECT
screen.
screen by touching
M E DIA
Card selection
1. Press the MENU key on the front panel to open the
MENU
screen.
2. Touch the
MEDIA MANAGE
MEDIA MANAGE
screen.
button to open the
Page 30
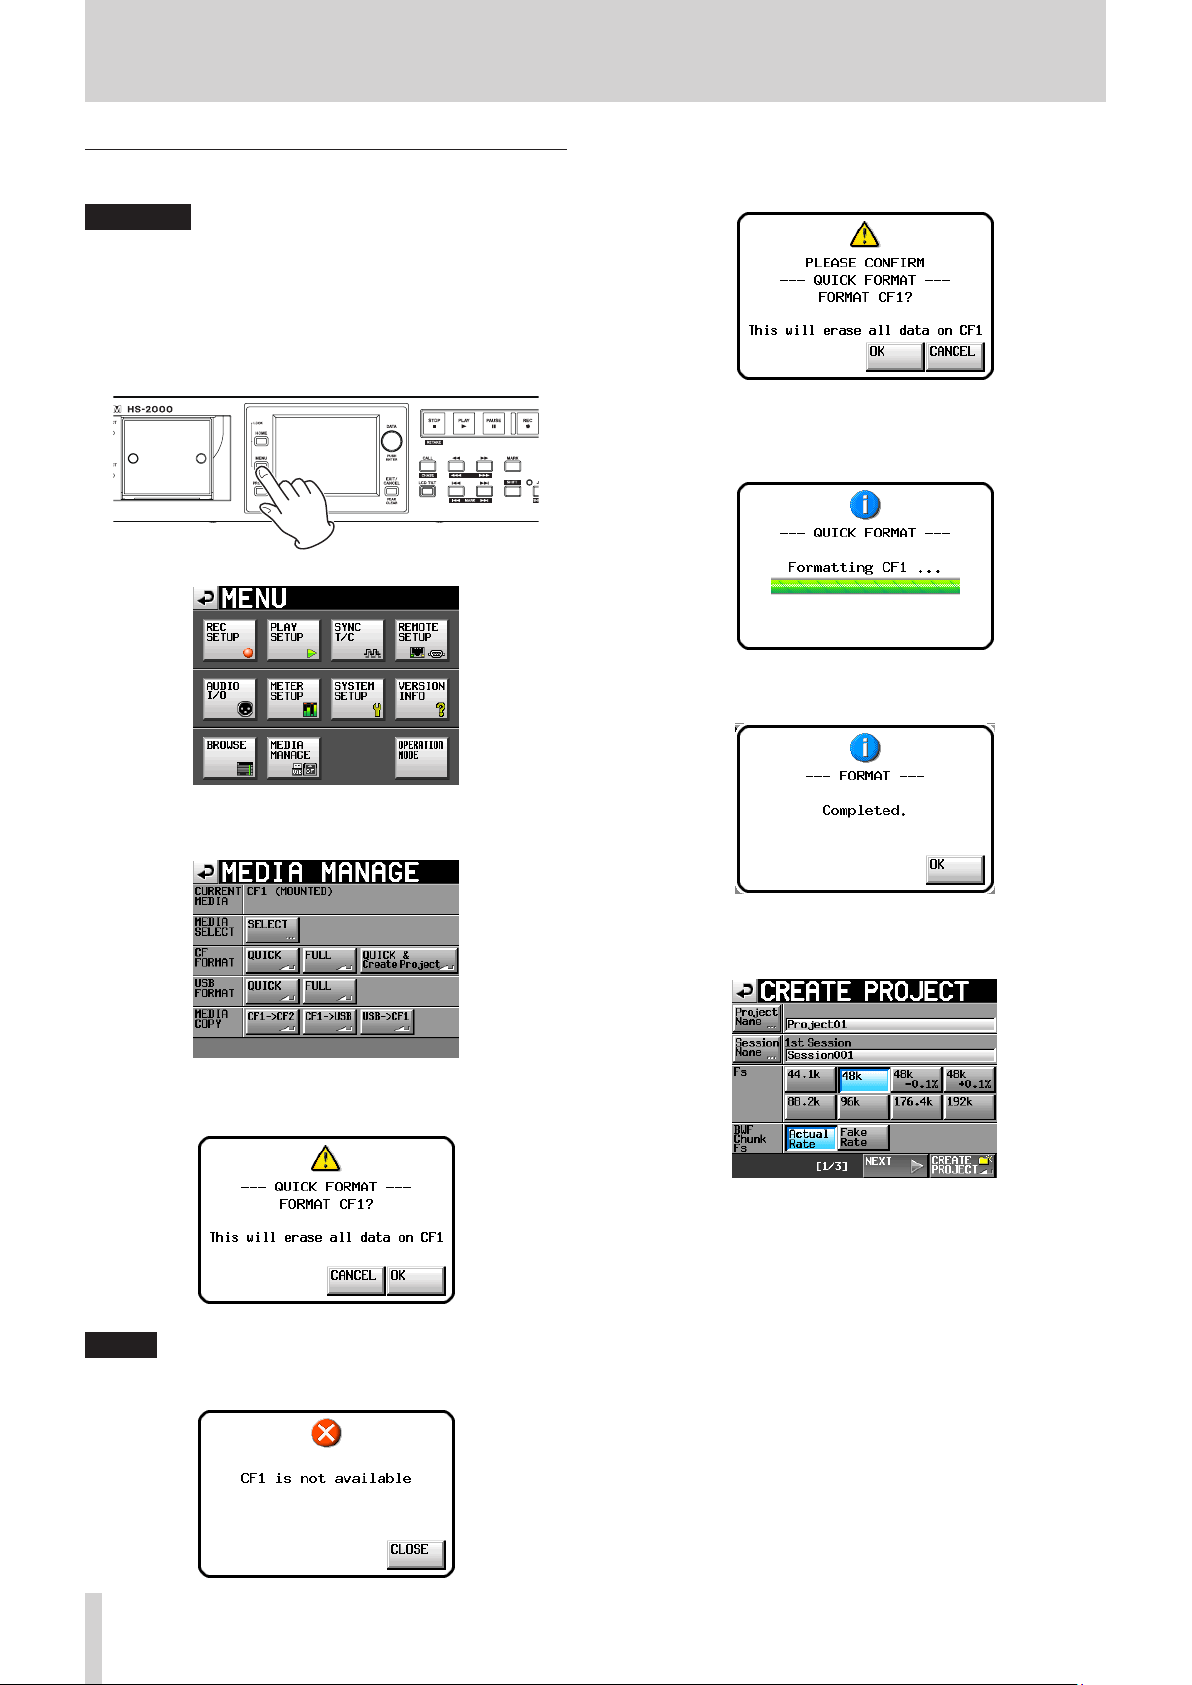
30
TASCAM HS-2000
4 – Basic operation
Formatting a CF card
CAUTION
Formatting a CF card erases all the data on it.
•
Always format a CF cards with this unit before using
•
them. If a CF card that has been formatted by another
device or PC is used, operation might be affected.
1. Press the MENU key on the front panel to open the
MENU
screen.
4. A reconfirmation pop-up window appears. Touch the
OK
button in the pop-up window.
5. Touch the OK button in the pop-up window.
During formatting, the following pop-up message
appears.
When formatting completes, the following pop-up
message appears.
2. Touch the
MEDIA MANAGE
3. Touch the
The following pop-up message appears.
NOTE
If no CF card is inserted in that slot, the following pop-up
message appears.
MEDIA MANAGE
screen.
QUICK
button next to the CF FORMAT item.
button to open the
6. Touch the OK button in the pop-up window.
The
CREATE PROJECT
7. To make a new project, follow the procedures starting
with step 2 in "Creating a new project" on page 31.
screen automatically opens.
Page 31

TASCAM HS-2000
31
4 – Basic operation
Creating a project automatically after quick formatting
If you press the
instead of the
a new project will be created after the CF card is quickformatted.
When doing this, however, you cannot change the project
settings. The new project will be created with the same
settings as the current project.
1. Press the MENU key on the front panel to open the
MENU
button on the
MANAGE
2. Touch the
next to the FORMAT item. The following pop-up
message appears.
QUICK & Create Project
QUICK
screen. Then, touch the
screen.
QUICK & Create Project
button next to the FORMAT item,
MEDIA MANAGE
MENU
screen to open the
button
M E DIA
button
Creating a new project
1. Press the PROJECT key on the front panel to open the
PROJECT
2. Touch the
CREATE PROJECT
screen.
CREATE PROJECT
screen.
button to open the
This window shows the project name, session name,
sampling frequency, bit rate and frame type in the
project to be created.
3. Touch the OK button in the pop-up window.
Another pop-up window appears to reconfirm.
4. Touch the OK button in the pop-up window to start
quick formatting.
After quick formatting completes, a new project is
created automatically.
After the project is created, the Home Screen
reappears
NOTE
Touch the
cancel formatting and return to the
screen.
.
CANCEL
button in the pop-up window to
MEDIA MANAGE
The
CREATE PROJECT
On the first page, you can change the project name,
the name of the first created session, the sampling
frequency, and the sampling frequency written to BWF
chunks.
For details about each item, see “Creating new
projects” on page 38.
3.
Touch the
On this page, you can change the frame type and bit
length.
NOTE
Instead of touching the
CREATE PROJECT
screen page one (1/3 at the bottom of the page) to create
a project with the current settings without adjusting
them on the following screens. Touching the
PROJECT
(2/3) has the same effect. In either case, continue the
procedures from step 6.
4. Touch the
where you can set the starting time in timeline mode, for
example.
For details about each item on
screens 1–3, see “Creating new projects” on page 38.
NEXT
button to open the next page.
button on
NEXT
button again to open the third page [3/3]
button on
CREATE PROJECT
screen has 3 pages.
NEXT
button, you can touch the
CREATE PROJECT
CREATE PROJECT
CREATE
page two
Page 32

32
TASCAM HS-2000
4 – Basic operation
5. After you complete making settings touch the
CREATE PROJECT
NOTE
If a project with the same project name already exists,
the
CREATE PROJECT
will not be able to create a new project. If this happens,
change the project name.
6. A confirmation pop-up will appear.
Confirm the settings, and touch the OK button in the
pop-up window to return to the Home Screen.
button.
button appears gray and you
Setting the master clock
1. Press the HOME key on the front panel to open the
Home Screen.
Setting inputs and outputs
Setting the inputs
1. Press the MENU key on the front panel to open the
MENU
screen.
2. Touch the
screen.
NOTE
You can also open the
the
SYNC T/C
SYNC
button to open the
button on the
SYNC T/C
MENU
SYNC T/C
screen by touching
screen.
2. Touch the
I/O
On the
input source. For details, see “INPUT page” on page
110.
3. If necessary, touch the
open the corresponding page where various settings
can be made.
On the
the output and signal routing. For details about this
screen, see “OUTPUT page” on page 110.
AUDIO I/O
screen.
INPUT
OUTPUT
button to open the
page, make settings for each channel's
OUTPUT
page, make settings related to
or
SETUP
AUDIO
tab to
3. Select the master clock that you want to use from the
MASTER item. (See “Sync and timecode settings (SYNC
T/C)” on page 103.)
Page 33

TASCAM HS-2000
33
4 – Basic operation
Headphones
On the
function for monitoring during online playback ON/
OFF. For details about this screen, see "Setting audio
signal inputs and outputs (SETUP page)" on page 110.
SETUP
page, you can turn the muting
Setting reference levels
1. Press the MENU key on the front panel to open the
MENU
screen.
3. If necessary, touch the
ADJUST
On the
can make precise adjustments to the reference levels
of the analog inputs and outputs for each channel
independently. For details about this screen, see
“ANALOG Ref LEVEL ADJUST page” on page 113.
NOTE
You can change the system time on the
ADJUST
tab and adjust each channel.
ANALOG Ref LEVEL ADJUST
page.
ANALOG Ref LEVEL
page, you
CLOCK
Connecting headphones
Connect headphones to the PHONES jack on the
front panel. Keep the headphones knob turned all the
way to the left (volume minimized) when connecting
headphones.
2. Press the
SYSTEM SETUP
On the
reference level, analog input reference level and
analog output reference level. (You can also set the
keyboard type and online function on this page.)
For details, see “PREFERENCES page” on page 112.
SYSTEM SETUP
screen.
PREFERENCES
page, set the digital
button to open the
CAUTION
Before connecting headphones, turn the PHONES knob
to the minimum volume. Failure to do so could result in
sudden loud noises, which might damage your hearing or
equipment.
Page 34

34
TASCAM HS-2000
4 – Basic operation
Using online functions
Turn the ON LINE key ON to enable sound to be output
through the output connectors. (The ON LINE key on the
front panel has a cover, so open this cover to press it.)
The ON LINE key lights when ON.
You can also connect a TASCAM HS32PD/RC-HS20PD
remote controller (sold separately), for example, and use
its master fader to adjust the level suitably. When the
master fader is lowered completely, sound is not output
from the output connectors.
Press the ON LINE key again to turn it OFF. That switch
becomes unlit, and sound ceases to be output from the
output connectors.
For details about the online function, see “Online function”
on page 129.
Recording operation limitations
With this unit, recording to a folder can become
impossible when the total number of files, subfolders and
other items in that folder becomes large. For this reason,
the following things might occur.
When the total number of items in one folder exceeds
0
about 20,000
Recording of a new take might not be possible when
starting from a stopped state. In addition, when a
project or session is loaded, recording to that session
might not be possible. In these cases, the following
pop-up message appears.
When recording/editing is repeated in timeline mode
0
and the available memory space is insucient
Repeated recording and editing can result in a
shortage of available memory necessary to manage
regions and editing history. In this case, recording
cannot be performed, and the following pop-up
message appears.
In this case, Rec Limit appears for the remaining
recording time for the currently selected card on the
Home Screen.
CAUTION
The total number of items inside one folder includes
files and folders not created by this unit. Management
files, system files and other files and folders that are not
ordinarily visible are also included in the total.
Page 35

TASCAM HS-2000
35
5 – Projects
Project organization
This unit manages audio files in projects.
A CF card contains project folders, and each project folder
contains session folders. The session folders contain audio
files, which are called “takes”.
Project Contains all materials for one program or work
Session Collection of materials within a project
Take Recorded materials in a session
CAUTION
Each project has a fixed sampling frequency, and can only
contain audio files of that sampling frequency.
File formats
This unit can record and play files of the following formats.
File format BWF/WAV*
Sampling
frequency
Bit-length 16/24-bit
Number of tracks 2
44.1, 47.952, 48, 48.048, 88.2, 96, 176.4, 192
kHz
(47.952, 48.048: 48 kHz ± 0.1% pull-down/
pull-up)
*This unit always records BWF files. It cannot record
standard WAV files, but can play them.
Using the PROJECT screen
Press the PROJECT key on the front panel to open the
PROJECT
(project selection, session selection, AES31 file selection,
take selection or playlist selection) opens.
The following explanations assume that the
selection screen is open.
screen. The last used
PROJECT
screen page
PROJECT
Project selection screen
Directory
o
The current directory level and the number of
projects are shown. (In the example above, the root
directory of the CF card contains five projects)
NUM OF SESSION
o
This shows the number of sessions in each project.
Fs
o
This shows the sampling frequency of the project.
Sampling frequency values are abbreviated as
follows.
Sampling frequency Fs abbreviation
44.1 kHz 44k
47.952 kHz (48 kHz – 0.1% pull-down) 48k–
48.048 kHz (48 kHz + 0.1% pull-up) 48k+
88.2 kHz 88k
176.4 kHz 176k
ENTER buttons
o
Touch the w button for the current project to view
the contents of that project. The icon of the
currently loaded project has the letter “C” and is
yellow.
If you touch the w button for any project other than
the current project a pop-up window will appear to
confirm that you want to load that project. Touch the
OK
button to load the project and show its contents
after it completes loading.
Project name buttons
o
Touch to select that project.
The icon of the currently loaded project has the
letter "C" and is yellow.
INFO button
o
Touch to open a pop-up window that shows information about the project that is currently selected.
If no project is selected, press this button to show
information about the entire card.
CREATE PROJECT button
o
Touch to open the
MULTI SELECT button
o
Touch to enable the selection of multiple projects.
CREATE PROJECT
screen.
Page 36

36
TASCAM HS-2000
5 – Projects
MENU button
o
Touch to open a pull-up menu where you can select
LOAD, REBUILD, EDIT NAME
Scroll buttons
o
Use these buttons to scroll to the beginning or end of
the project list or scroll one page (five lines) forward
or backward. You can also use the DATA dial to scroll
through the project list one line at a time.
Project and session names at top right
o
Touch to open the following screen according to the
current mode.
Timeline mode AES31 file selection screen for the
Take mode Take selection screen for the current
Playlist mode Playlist selection screen for the current
current session
session
session
Session selection screen
and
DELETE
If no session is selected, press this button to show
information about the current project.
.
MAKE SESSION button
o
Touch to open a screen where you can create a new
session.
MULTI SELECT button
o
Touch to enable the selection of multiple sessions.
MENU button
o
Touch to open a pull-up menu where you can select
LOAD, REBUILD, EXPORT
Scroll buttons
o
and
DELETE
.
Use these buttons to scroll to the beginning or end of
the session list or scroll one page (five lines) forward
or backward. You can also use the DATA dial to scroll
through the session list one line at a time.
Project and session names at top right
o
Touch to open the following screen according to the
current mode.
Timeline mode
Take mode
Playlist mode
AES31 file selection screen for the
current session
Take selection screen for the current
session
Playlist selection screen for the current
session
Project name
o
This shows the current project name.
Touch to open the project selection screen.
NUM OF TAKE (timeline and take modes)
o
This shows the number of takes in the session.
TOTAL TIME (timeline and take modes)
o
This shows the total time of the takes in the session.
NUM OF PLAYLISTS (playlist mode)
o
This shows the number of playlists in the session.
ENTER buttons
o
Touch the w button for the current session to view
its contents. The icon of the currently loaded
session has the letter “C” and is yellow.
If you touch the w button for any session other than
the current session a pop-up window will appear
confirming that you want to load that session. Touch
the OK button to load that session and show its
contents.
Session name buttons
o
Touch to select that session.
The icon of the currently loaded session has the
letter "C" and is yellow.
INFO button
o
Touch to open a pop-up window that shows information about the session that is currently selected.
Page 37

TASCAM HS-2000
37
5 – Projects
AES31 file selection screen
The AES31 file selection screen is only shown when in
timeline mode.
Session name
o
This shows the current session name.
Touch to open the session selection screen.
LOAD
o
AES31 le name buttons
o
INFO button
o
CREATE AES31 button
o
MENU button
o
w buttons
Touch the w button for the corresponding AES31
file to import its editing information.
Touch to select the corresponding AES31 file.
Touch when an AES31 file is selected to open a
pop-up window with information about the selected
file.
Press when no AES31 file is selected to show information about the current session.
Touch to open a screen for creating new AES31 files.
Touch to open a pull-up menu where you can select
LOAD, EDIT NAME
and
DELETE
.
Take selection screen
The take selection screen is only shown when in take
mode.
Session name
o
This shows the current session name.
Touch to open the session selection screen.
NOTE
The session selection screen cannot be opened from a
take selection screen opened by touching the
LIST
button in the pull-down menu that appears after
you touch a take name button on the Home Screen.
LENGTH
o
Shows the take length (time).
LOAD
o
w buttons
Press a take's w button to load that take.
Take name buttons
o
Touch to select a take.
The icon of the currently loaded take has the
letter "C" and is yellow.
INFO button
o
Touch to open a pop-up window that shows information about the selected take.
If no take is selected, press this button to show information about the current session.
CIRCLE @ TAKE button
o
Touch when a take is selected to add an "@" to the
beginning of that take's name. If that take already
has "@" at its beginning, touch this to remove it.
MULTI SELECT button
o
Touch to enable the selection of multiple takes.
MENU button
o
Touch to open a pull-up menu for selecting
REBUILD, EDIT TC, EXPORT, DELETE, SORT
MOVE
and
EDIT NAME
Scroll buttons
o
.
Use these buttons to scroll to the beginning or end
of the take list or scroll one page (five lines) forward
or backward. You can also use the DATA dial to scroll
through the take list one line at a time.
TAKE
LOAD
,
,
Page 38

38
TASCAM HS-2000
5 – Projects
Playlist selection screen
The playlist selection screen is only shown when in playlist
mode.
Session name
o
Shows the current session name.
Touch to open the session selection screen.
LOAD
o
Playlist name buttons
o
INFO button
o
CREATE PLAYLIST button
o
MENU button
o
Scroll buttons
o
w buttons
Touch a w button to open a pop-up to confirm that
you want to load that playlist.
Touch to select a playlist.
The icon of the currently loaded playlist has the
letter "C" and is yellow.
Touch to open a pop-up window that shows information about the selected playlist.
If no playlist is selected, press this button to show
information about the current session.
Shows the screen for creating a new playlist.
Touch to open a pull-up menu where you can select
LOAD, EDIT NAME
and
DELETE
.
Use these buttons to scroll to the beginning or end
of the playlist or scroll one page (five lines) forward
or backward. You can also use the DATA dial to scroll
through the playlist one line at a time.
Project operations
Creating new projects
1. Press the PROJECT key on the front panel to open the
PROJECT
2.
Touch the
PROJECT
screen.
This screen has three pages.
You can make the following settings on this screen.
8
8
8
8
screen.
CREATE PROJECT
screen to open the
CREATE PROJECT screen 1
Project Name
button on the
CREATE PROJECT
Touch the Project Name button to open a screen
where you can edit the project name.
Up to 31 characters can be used for project and
session names. Extra characters are discarded.
Session Name
Touch the
Session Name
button to open
the 1st Session screen where you can change the
name given to the first session created.
On the 1st Session screen, the maximum number
of characters allowed is indicated by a yellow
background.
Fs
Set that sampling frequency for the project.
BWF Chunk Fs
Set the sampling frequency written to the BWF
chunk of each recorded audio file. To use the
actual sampling frequency of the recordings,
select Actual Rate.
For pull-up/pull-down, select Fake Rate to write
48k instead of 48k ± 0.1%.
Page 39

TASCAM HS-2000
39
NEXT button
8
Touch to open the next page.
CREATE PROJECT button
8
Touch this to create a project with the current
settings.
If a project with the same name already exists, this
button appears gray and you will not be able to
create a new project.
3. After you complete making settings, press the
button.
NEXT
5 – Projects
5. After you finish making settings, touch the
PROJECT
button.
NOTE
If a project with the same project name already exists,
•
the
CREATE PROJECT
button appears gray and
you will not be able to create a new project. If this
happens, change the project name.
On screens 2 and 3, press the PREV button to return to
•
the previous screen.
6. When the confirmation pop-up appears, press the OK
button.
CREATE
CREATE PROJECT screen 2
You can make the following settings on this screen.
Frame Type
8
Set the timecode frame type.
Bit Length
8
Set the bit length used to record.
PREV button
8
Open the previous screen.
4. After you finish making settings, press the
NEXT
button.
CREATE PROJECT screen 3
You can make the following settings on this screen.
TIMELINE START TIME
8
Set the starting time used in timeline mode. Press
the
E DIT
button to open a screen where you can
change the starting time.
OTHERS
8
Touch the
Current Setting
button to use
the current settings for parameters other than
those that appear on the Create Project screens
when creating a project.
Touch Factory Preset to use the default settings
instead.
When project creation completes, the Home Screen
reappears.
NOTE
Immediately after creation, the new project becomes
•
the current (loaded) project.
On the
•
PROJECT
screen, the icon to the left of
the currently loaded project has the letter "C" and is
yellow.
Page 40

40
TASCAM HS-2000
5 – Projects
Editing project names
Similar procedures can also be used to enter and edit
session and take names, for example.
1. Touch the Project Name button on the
PROJECT
screen to open the
PROJECT NAME
screen.
CREATE
Enter button
8
Touch this to confirm the input name.
NOTE
When the
use an external keyboard to input names.
2. Touch the
PROJECT NAME
Enter
button on the
screen is open, you can also
PROJECT NAME
screen or press the DATA dial to confirm the project
name.
Character input limitation
The maximum number of characters allowed is
indicated by the yellow background in the project
name display area. Excess characters have a gray
background and are discarded when the
Enter
button is pressed.
CAUTION
Screens where names are inputs such as the
NAME
screen cannot display any characters other than
PROJECT
alphanumeric characters and symbols.
If characters other than alphanumeric characters and
symbols are contained in a name, those characters will
be removed when a name input screen such as the
PROJECT NAME
Date button
8
screen is displayed.
Touch to change the project name to the currently
set date in a “yyyy–mm–dd” format.
If the same project name or session name already
exists, an underscore (_) followed by a number not
already in use is added.
NOTE
After pressing the Date button to change the name to
•
the current date, you can further edit the name on this
screen.
Project name display area
8
The input project name is shown.
The maximum number of characters allowed is
indicated by a yellow background.
Character buttons
8
Use to input the project name.
BS button
8
Use to erase the character to the left of the cursor.
DEL button
8
Use to erase the character to the right of the
cursor.
Shift button
8
Touch to switch between numerals and symbols
and uppercase and lowercase letters.
Caps button
8
Use to input uppercase letters.
Space button
8
Use to input a space.
<–/–> button
8
Use these to move the cursor.
Changing project names later
1. Select the project that you want to change on the
PROJECT
project name appears yellow.
2. Touch the
open its pull-up menu.
3. Touch the
to open the
NOTE
When multiple projects are selected, the
button in the pull-up menu cannot be used.
4. Input the project name using the procedures
described above.
5. Touch the
screen or press the DATA dial to confirm the project
name and return to the
screen. The background of the selected
MENU
button on the
EDIT NAME
PROJECT NAME
Enter
button in the pull-up menu
button on the
PROJECT
PROJECT
screen to
screen.
EDIT NAME
PROJECT NAME
screen.
Page 41

TASCAM HS-2000
41
5 – Projects
Editing the name of the first session
Touch the
PROJECT
as shown below.
Follow the same procedures as in “Editing project names”
on page 40 to change the name.
NOTE
The name of a session cannot be changed after the
session is created.
Session Name
screen to open the
button on the
1st S ESSION
CREATE
screen,
Loading projects
1. Press the PROJECT key on the front panel to open the
PROJECT
screen.
Rebuilding projects
You should rebuild a project whenever there is an
inconsistency between the unit's project management file
and the audio files. This can occur when an audio file has
been deleted from the unit via FTP, for example.
1. Press the PROJECT key on the front panel to open the
PROJECT
2. Select the project that you want to rebuild.
You can use the
PROJECT
projects.
3. Touch the
open its pull-up menu.
screen.
MULTI SELECT
screen to allow the selection of multiple
MENU
button on the
One project selected
button on the
PROJECT
screen to
2. Select the project to load.
3. Touch the
open its pull-up menu.
4. Touch the
NOTE
When multiple projects are selected, the
cannot be used.
5. Touch the OK button or press the DATA dial when the
confirmation pop-up message appears.
After loading completes the Home Screen opens.
MENU
button on the
LOAD
button in the pull-up menu.
PROJECT
LOAD
screen to
item
Multiple projects selected
4. Touch the
5. When a confirmation pop-up appears, touch the OK
button or press the DATA dial.
During rebuilding, a progress status pop-up appears.
When rebuilding completes, the pop-up disappears.
NOTE
If you select
selected in the
the selected card will be rebuilt.
REBUILD
REBUILD
PROJECT
button in the pull-up menu.
when no project has been
screen, the entire content of
Page 42

42
TASCAM HS-2000
5 – Projects
Deleting a project
1. Press the PROJECT key on the front panel to open the
PROJECT
2. Select the project that you want to delete.
You can use the
PROJECT
projects.
3. Touch the
open its pull-up menu.
screen.
MULTI SELECT
screen to allow the selection of multiple
MENU
button on the
One project selected
button on the
PROJECT
screen to
Session operations
Creating new sessions
1. Press the PROJECT key on the front panel to open the
PROJECT
2. Touch the w button of the project to which you want
to add a session to open the session selection screen.
If the project is not the current project, a pop-up
window appears confirming that you want to load it.
Touch the OK button.
3. Touch the
MAKE SESSION
screen.
MAKE SESSION
screen.
button to open the
Multiple projects selected
4. Touch the
5. When a confirmation pop-up appears, touch the OK
button or press the DATA dial.
During deletion, a progress status pop-up appears.
When deletion completes, the pop-up disappears.
CAUTION
Deleting a project also deletes all session folders, timeline
data, takes and playlists in the project.
DELETE
button in the pull-up menu.
You can make the following settings on this screen.
Session Name
8
Touch to open a screen where you can change the
name of the session.
Session names can have up to 31 characters. Extra
characters are discarded. The maximum number
of characters allowed is indicated by a yellow
background.
TIMELINE START TIME
8
Touch the
you can change the starting time in timeline
mode.
CAUTION
The name of a session cannot be changed after the
•
session is created.
You cannot use the "@" symbol at the beginning of a
•
session name.
E DIT
button to open a screen where
Page 43

TASCAM HS-2000
43
5 – Projects
4. Touch the
5. When a confirmation pop-up appears, touch the OK
button or press the DATA dial.
While a session is being created, a progress status
pop-up appears. When session creation completes, the
pop-up disappears.
NOTE
Immediately after creation, the new session becomes
•
the current (loaded) session.
On the • session selection screen,
of the currently loaded session has the letter "C" and is
yellow.
MAKE SESSION
button.
the icon to the left
Loading sessions
1. Press the PROJECT key on the front panel to open the
PROJECT
2. Touch the w button for the project that contains the
session that you want to load to open the session list.
If this project is not the current project, a pop-up
window appears confirming that you want to load it.
Touch the OK button.
3. Select the session that you want to load.
4. Touch the
open a pull-up menu.
screen.
MENU
button on the
SESSION
screen to
Rebuilding sessions
You should rebuild a session whenever there is an
inconsistency between the unit's session management
file and the audio files. This can occur when an audio file
has been deleted from the unit via FTP, for example.
1. Press the PROJECT key on the front panel to open the
PROJECT
2.
Touch the w button for the project that contains the
session that you want to rebuild to open the session
selection screen.
If the selected project is not the current project, a popup window appears confirming that you want to load
it. Touch the OK button.
3. Select the session that you want to rebuild.
Touch the
selection of multiple sessions.
4. Touch the
screen to open a pull-up menu.
screen.
MULTI SELECT
MENU
button on the session selection
One session selected
button to enable the
5. Touch the
6. When a confirmation pop-up appears, touch the OK
button or press the DATA dial.
After loading completes, the Home Screen opens.
NOTE
On the
the currently loaded session has the letter "C" and is yellow.
LOAD
button in the pull-up menu.
session selection screen,
the icon to the left of
Multiple sessions selected
5. Touch the
6. When a confirmation pop-up appears, touch the OK
button or press the DATA dial.
During rebuilding, a progress status pop-up appears.
When rebuilding completes, the pop-up disappears.
NOTE
You can also rebuild a session from that session’s take
•
selection screen.
If you do not select a session on the Session screen,
•
the entire current project will be rebuilt.
REBUILD
button in the pull-up menu.
Page 44

44
TASCAM HS-2000
5 – Projects
Exporting sessions
You can export session folders from the selected media
to other media (two media devices are necessary). When
you export a session, the source directory structure is
duplicated to the export destination.
CAUTION
Do not export a session to a project with a different
sampling frequency. If you do so, the session will not be
able to be rebuilt and will not be usable in that project.
NOTE
You cannot export to USB flash memory, but you can copy
files to it. For details, see "Copying a folder/file" on page
117.
1. Press the PROJECT key on the front panel to open the
PROJECT
2. Touch the w button for the project that contains the
session that you want to export to open the session
selection screen.
If it is not the current session, a pop-up window
appears confirming that you want to load it. Touch the
OK
button.
3.
Select the session that you want to export
Touch the
selection of multiple sessions.
4. Touch the
screen to open a pull-up menu.
screen.
MULTI SELECT
MENU
button on the session selection
button to enable the
.
6. When a confirmation pop-up appears, touch the OK
button or press the DATA dial.
During export, a progress status pop-up appears.
When export completes, the pop-up disappears.
CAUTION
If a session with the same name already exists on the
destination media, the following confirmation pop-up will
appear.
Touch the OK button or press the DATA dial to delete the
existing session on the destination media and replace it
with the session being exported.
5. Touch the
One session selected
Multiple sessions selected
EXPORT
button in the pull-up menu.
Page 45

TASCAM HS-2000
45
5 – Projects
Project selection screen
Session selection screen
AES31 le selection screen
Take selection screen
Playlist selection screen
Timeline
mode
Take
mode
Playlist
mode
Deleting sessions
1. Press the PROJECT key on the front panel to open the
PROJECT
2. Touch the w button for the project that contains the
session that you want to delete to open the session
selection screen. If the selected project is not the
current project, a pop-up window appears confirming
that you want to load it. Touch the OK button.
3. Select the session that you want to delete.
Touch the
selection of multiple sessions.
4. Touch the
screen to open a pull-up menu.
screen.
MULTI SELECT
MENU
button on the session selection
One session selected
button to enable the
Switching project screens
When you press the
(project name or session name) button on a project
screen (project selection screen, session selection screen,
AES31 file selection screen, take selection screen, playlist
selection screen), a different screen will open as shown
below.
ENTER
button or a folder name
Multiple sessions selected
5. Touch the
6. When a confirmation pop-up appears, touch the OK
button or press the DATA dial.
DELETE
button in the pull-up menu.
During deletion, a progress status pop-up appears.
When deletion completes, the pop-up disappears.
CAUTION
When you erase a session, all timeline DATA , takes and
playlists in the folder are also erased.
Page 46

46
TASCAM HS-2000
6 – Operation Modes
This unit has the following four operation modes.
Timeline mode
0
Timeline mode provides a linear working
environment similar to a tape recorder. In timeline
mode, two tracks can be recorded and played back.
Marks, including BWF-J CUE points, can also be
edited.
Take mode
0
Take mode uses takes (files) as recording and
playback units. Two tracks can be recorded and one
or two tracks can be played back.
Marks, including BWF-J CUE points, can also be
edited.
Playlist mode
0
Playlist mode provides a playlist playback function.
One or two tracks can be played back.
On-air mode
0
This mode plays back audio files (that match the
unit's set sampling frequency) in the root folder of
the current card.
Two tracks can be played back.
Timeline mode functions
The following functions can be used in timeline mode.
Two-channel recording and playback possible at all
•
compatible sampling frequencies (Fs)
Confidence monitoring allows the audio being
•
recorded to be played back simultaneously (when
the sampling frequency is 44.1kHz, 48kHz or
48kHz±0.1% and the REC Mode is Single)
Mirror recording function using both CF card slots
•
Recording and playback synchronized to timecode
•
Bounce function can make a single file from a desig-
•
nated section of the timeline
Marks, including BWF-J CUE points, can be set,
•
managed, edited and used for playback
AES31 standard compatibility allows exchange of
•
data with other devices
In timeline mode, playback units are called “regions,” and
their extent is shown in the track area of the Home Screen.
NOTE
Because the AES31 file standard does not support
176.4kHz or 192kHz sampling frequencies, editing
information for projects created using these sample rates
will be saved using a TASCAM original format, based on
AES31. This format might not be compatible with other
products.
Take mode functions
The following functions can be used in take mode.
Two-channel recording and playback possible at all
•
compatible sampling frequencies (Fs)
Confidence monitoring allows the audio being
•
recorded to be played back simultaneously (when
the sampling frequency is 44.1kHz, 48kHz or
48kHz±0.1% and the REC Mode is Single)
Mirror recording function using both CF card slots
•
Auto cue, auto ready and incremental play functions
•
Flash start playback possible using TASCAM
•
RC-HS32PD (3 pages of 32 keys each) RC-HS20PD
(5 pages of 20 keys each) or other remote control
devices (all sold separately)
Marks, including BWF-J CUE points, can be set,
•
managed, edited and used for playback
Page 47

TASCAM HS-2000
47
6 – Operation Modes
Playlist mode functions
The following functions can be used in playlist mode.
Playlists can be edited and managed
•
Auto cue, auto ready and incremental play functions
•
Compatibility with JPPA flash start standards enables
•
the exchange of playlists with other devices.
Two-channel playback possible at all compatible
•
sampling frequencies (Fs)
Flash start playback possible using TASCAM
•
RC-HS32PD (3 pages of 32 keys each) RC-HS20PD
(5 pages of 20 keys each) or other remote control
devices (all sold separately)
On-air mode functions
The following functions can be used in on-air mode.
Two-channel playback possible at all compatible
•
sampling frequencies (Fs)
BWF-J CUE point playback
•
CREDITS playback
•
Selecting the operation mode
1. Press the MENU key on the front panel to open the
MENU
screen.
2. Touch the
OPERATION MODE
OPERATION MODE
screen.
button to open the
3. Select the mode you want to use by touching its
button.
The button for the selected mode appears yellow.
TIMELINE MODE
TAKE MODE
PLAYLIST MODE
ON AIR MODE
4. Touch the
and return to the Home Screen.
SET
button to enable the selected mode
Page 48

48
TASCAM HS-2000
7 – Timeline mode
In this chapter, we explain how to use the unit when its
operation mode is set to TIMELINE MODE. (See “Selecting
the operation mode” on page 47.)
Please refer to “4–Basic operation” when reading this
chapter.
Preparing to record
Basic preparations
Refer to “4–Basic operation” and make the basic
preparations for recording.
Creating a new project
1. Press the PROJECT key on the front panel to open the
PROJECT
2. Touch the
PROJECT
screen [1/3].
screen.
CREATE PROJECT
screen to open the
CREATE PROJECT
button on the
currently open project or whether the factory defaults
should be used instead.
For further details about these settings, see “Creating
new projects” on page 38.
3. After you complete making settings touch the
CREATE PROJECT
NOTE
If a project with the same project name already exists,
•
the
CREATE PROJECT
you will not be able to create a new project. If this
happens, change the project name.
You can also touch the
•
on
CREATE PROJECT
a project.
4. Touch the OK button when the confirmation pop-up
message appears.
button.
button appears gray and
CREATE PROJECT
screens 1/3 and 2/3 to create
button
Creating new sessions
Create new sessions as necessary.
1. Press the PROJECT key on the front panel to open the
PROJECT
2. Touch the w button of the project in which you want
to create a new session to open its session selection
screen.
If the selected project is not the current project, a popup window appears confirming that you want to load
it. Touch the OK button.
screen.
On this screen, set the project name, the name for the
first session, the sampling frequency and the sampling
frequency written to BWF chunks.
Touch the
Set the frame type and bit length.
Touch the
NEXT
button to open the next page [2/3].
NEXT
button to open the next page [3/3].
3. Touch the
MAKE SESSION
MAKE SESSION
button to open the
screen.
Finally, set the timeline mode starting time, and then
set whether other settings should be retained from the
Page 49

TASCAM HS-2000
49
7 – Timeline mode
4. Touch the
SESSION NAME
session name.
To input the session name follow the same procedures
as in “Editing project names” on page 40.
NOTE
You cannot start a session name with the “@” symbol.
5. Touch the
return to the
6. If necessary, set the timeline start time.
7. When you have finished making settings, touch the
MAKE SESSION
8. When a confirmation pop-up appears, touch the OK
button or press the DATA dial to return to the Home
Screen.
For details about session operations, see “Session
operations” on page 42.
Session Name
screen where you can change the
Enter
button or press the DATA dial to
MAKE SESSION
button.
button to open the
screen.
2. Touch the
SETUP
On the
recording mode. The background color for an active
setting is light blue. For more details, see “REC MODE
page” on page 100.
REC SETUP
screen.
REC MODE
button to open the
page, you can change the
Setting the file format
Touch the
screen to open the following screen.
FILE FORMAT
tab on the
REC SETUP
REC
Recording mode settings
1. Press the MENU key on the front panel to open the
MENU
screen.
On the
file size, and how files are treated when recording is
paused. The background color for an active setting is light
blue.
For details, see “FILE FORMAT page” on page 101.
FILE FORMAT
page, set bit length, maximum
Other recording settings
Touch the
open the following screen.
On the
recording time and auto marker settings. For details, see
“OPTIONS page” on page 101.
OPTIONS
OPTIONS
tab of the
page, you can change the pre-
REC SETUP
screen to
Page 50

50
TASCAM HS-2000
7 – Timeline mode
Making a recording
Locate to the recording start position
Use the m[ ] and , [ ] keys, jump to a mark
or use the manual locate function to locate to the time at
which recording will start.
If timecode synchronization is ON, recording will occur
at the point corresponding to the received timecode, so
locating as described above is not necessary.
Recording
When the unit is stopped, press the REC key to put the
unit into recording standby. The
transport status.
In recording standby, press the PLAY key to start
recording at the located point (current point). When
synchronized to timecode, recording starts at the received
timecode value when the PLAY key is pressed.
The transport status display at the top left of the Home
Screen changes into the recording status display and part
of the background of the Home Screen becomes red,
indicating that the unit is recording. The time counter also
starts.
If the elapsed time (ABS time) from the beginning of
the timeline reaches 23:59:59:MM (MM is the maximum
number of frames), recording stops and a pop-up warns,
“RECORD stopped. ABS time is over 24h”.
icon indicates this
Stopping recording
To stop recording, press the STOP [RETAKE] key.
Retaking a recording
Press the STOP [RETAKE] key while pressing and holding
the SHIFT key to erase the last recorded region. The
original recorded audio file itself will remain as a take that
can be reused later.
Playback in timeline mode
Selecting a project and session
1. Press the PROJECT key on the front panel to open the
PROJECT
screen.
NOTE
When stopped, pressing the PLAY key while pressing and
holding the REC key will also start recording.
Overwriting a recording
During playback, pressing the P L AY key while pressing
and holding the REC key will also start recording.
NOTE
Recording can also be controlled (except retaking)
•
using a remote control connected using the parallel
control connector.
When in recording standby, the unit outputs a high
•
parallel control signal on TALLY_RECORD and a low
one on TALLY_ PAUSE.
When in recording standby, the • REC and PAUSE keys
on the front panel will be lit.
2. Touch the w button next to the project that you want
to play to open the session selection screen.
If the selected project is not the current project, a popup window appears confirming that you want to load
it. Touch the OK button.
3. Touch a session name button to select that session.
4. Touch the
touch the
The “Load selected Session?” pop-up appears.
5. Touch the OK button.
When loading completes, the Home Screen opens.
MENU
button to open a pull-up menu and
LOAD
button.
Page 51

TASCAM HS-2000
51
7 – Timeline mode
Setting input monitoring
Turn input monitoring OFF during playback. If input
monitoring is ON, input signals will be output through all
output connectors.
1. Touch the
Screen to open a pull-up with the input monitoring
ON/OFF
2. If input monitoring is ON (button appears blue), touch
the
INPUT MONITOR
button.
OFF
button to turn it
button on the Home
OFF
(button appears blue).
Online function settings
Refer to "Online function" on page 129 to make online
output settings.
Locate to the playback start position
Use the m[ ] and , [ ] keys, jump to a mark
or use the manual locate function to locate to the time
where you want to start playback.
When timecode synchronization is ON, playback will occur
at the input timecode, so locating as described above is
not necessary.
Using the call function
Press the CALL [CHASE] key to locate to the point where
playback was last started from playback standby (call
point) and put the unit in playback standby mode.
BWF-J cue point (timeline mode)
When the Follow BWF-J item is set to ON, if a BWF-J
cue point is detected during playback, the following
corresponding operation will occur. In addition, if the
BWF-J Tally Out item is set to ON, in response to each
BWF-J cue point, the CUE signal and tally signal will be
output from the parallel connector. However, when
playback is synchronized with timecode, only the cue and
tally signals will be output and the following operations
will not occur.
When a session is loaded, the transport locates
BC$STANDBY
BC$CM
BC$END
BC$STOP
BC$FILE
BC$PAUSE
to the first BC$STANDBY point that occurs and
pauses. During playback, playback pauses
when this cue point is detected. In either case,
a BC$STANDBY tally is output.
During playback, when this cue point is
detected, a BC$CM CUE signal is output.
During playback, when this cue point is
detected, a BC$END CUE signal is output.
During playback, when this cue point is
detected, a BC$STOP CUE signal is output, and
playback stops.
During playback, when this cue point is
detected, a BC$END CUE signal is output.
During playback, when this cue point is
detected, a BC$PAUSE tally is output, and
playback pauses.
Playback control in timeline mode
Press the PLAY key to start playback.
Press the PAUSE key to pause playback.
Press the PLAY key again to resume playback.
Press the STOP [RETAKE] key to stop playback.
Press the . [MARK.] key or /[MARK/] key
to skip to the start of another region.
Press and hold the m[ ] or , [ ] key to search
backward or forward.
Press the . [MARK.] key or /[MARK/]
key while pressing and holding the SHIFT key to move
between marks.
Press and hold the m[ ] or , [ ] key while
pressing and holding the SHIFT key to search at highspeed.
While pressing and holding the STOP key, press the .
[MARK.] key or /[MARK/] key to skip to the
beginning of the first region recorded or the end of the
last region. (This only works with the front panel keys.)
NOTE
Playback functions can also be performed using a remote
control connected through the parallel connector.
Page 52

52
TASCAM HS-2000
7 – Timeline mode
Loading, saving and creating AES31 editing information
Loading AES31 editing information
You can load AES31 editing information in the current
session to the timeline.
When viewed on a computer, the directory of the card
should be as follows.
{drive name of the card}:\{project name}\{session
name}\{AES31 editing information}
NOTE
You cannot load an AES31 editing information file
•
from a folder other than that of the current session.
Because the AES31 file standard does not support
•
176.4kHz or 192kHz sampling frequencies, editing
information for projects created using these sample
rates will be saved using a TASCAM original format,
based on AES31. This format might not be compatible
with other products.
TIP
After touching a filename area to select a file, touch
•
the
INF O
button to show the date and time it was last
changed and its file size.
The icon for the currently loaded AES31 file has a “C” in
•
it and appears yellow ( ).
4. Press the w button next to the AES31 editing
information that you want to load.
5. When a confirmation pop-up appears, touch the OK
button or press the DATA dial.
1. Press the PROJECT key to open the
2. Touch the w button next to the project that contains
the session with the AES31 editing information that
you want to load to open the session selection screen.
If the selected project is not the current project, a popup window appears confirming that you want to load
it. Touch the OK button.
3. Touch the w button for the session with the AES31
editing information that you want to load to open the
session selection screen.
If it is not the current session, a pop-up window
appears confirming that you want to load it. Touch the
OK
button.
If AES31 editing data files are found in the session,
they appear in the list.
PROJECT
screen.
When AES31 editing information is loading, a progress
status pop-up appears.
When loading completes, the pop-up window
disappears and the Home Screen reappears.
The loaded information is now used by the timeline.
Page 53

TASCAM HS-2000
53
7 – Timeline mode
Saving AES31 editing information
You can save the current timeline as an AES31 file. The
saved file is created in the current session folder.
CAUTION
When you edit the timeline, save the AES31 editing
information where necessary. If you do not save it,
changes will be lost if other AES31 editing information is
loaded, the card is removed, or the unit is turned off.
If you have not saved the information after editing, a
“*” mark will be shown on the AES31 file name display
button.
When a “*” is shown, if you load other AES31 editing
information, create new AES31 editing information,
or change the operation mode, for example, a pop-up
message asking if you want to save the current AES31
editing information will appear.
1. Press the HOME key on the front panel to open the
Home Screen.
2. Touch the AES31 file name display button on the
Home Screen to open a pull-down menu.
Naming and saving AES31 editing information
You can name and save the current timeline as an AES31
file. The created file is saved in the current session folder.
1. Press the HOME key on the front panel to open the
Home Screen.
2. Touch the AES31 file name display button on the
Home Screen to open a pull-down menu.
3. Touch the
open the
the AES31 data file name.
SAVE AS
AES31 NAME
button in the pull-up menu to
screen where you can input
3. When you touch the SAVE button on the pull-down
menu, the information will be saved on the selected
card.
While saving, a progress status pop-up appears.
When saving is complete, the pop-up window will
disappear.
Input the file name. Follow the procedures in “Editing
project names” on page 40.
Page 54

54
TASCAM HS-2000
7 – Timeline mode
4. Touch the
screen or press the DATA dial to save the data with the
input name.
While saving, a progress status pop-up appears.
When saving is complete, the pop-up window will
disappear.
NOTE
If a file with the same name already exists, a pop-up
window opens to confirm that you want to overwrite the
existing file. Touch the OK button to overwrite existing
file, or touch the
NAME
screen.
Enter
CANCEL
button on the
button to return to the
AES31 NAME
AES31
Creating new AES31 editing information
You can create a new AES31 file in the current session
(loaded session).
1. Press the HOME key on the front panel to open the
Home Screen.
2. Touch the AES31 file name display button on the
Home Screen to open a pull-down menu.
3. Touch the CREATE AES31 button on the pull-down
menu item to open the
you can name the AES31 editing data file.
Input the file name. Follow the procedures in “Editing
project names” on page 40.
AES31 NAME
screen where
NOTE
You can also create a new AES31 file by touching the
CREATE AES31 button on the AES31 file selection screen.
4. Touch the
the
Enter
AES31 NAME
button or press the DATA dial on
screen.
Page 55

TASCAM HS-2000
55
7 – Timeline mode
5. When a confirmation pop-up message appears, touch
the OK button or press the DATA dial to create the
new AES31 data information file with the input name.
NOTE
If the a file with the same name already exists, a popup window warns, “This name already exists.” Touch the
CLOSE
and enter another name.
button to return to the
AES31 NAME
screen,
Importing all takes
Importing all takes clears the current timeline, and
imports the AES31 editing information of all takes in the
current session folder.
Each take is imported to the timeline at the timecode
value set for the take. If a timecode value is not set, the
take is imported to the beginning of the timeline (00 h 00
m 00 s 00 f).
NOTE
Takes are imported in take list order. If takes overlap, the
take added later will be played back in the overlapping
regions. If two takes overlap completely, the take closer to
the end of the list will be played back.
1. Press the HOME key on the front panel to open the
Home Screen.
2. Touch the AES31 file name display button on the
Home Screen to open a pull-down menu.
3. Touch the IMPORT ALL TAKES button on the pull-down
menu item
4. A confirmation pop-up will appear.
Touch the OK button or press the DATA dial to clear
the current timeline and import all the takes from the
current session folder.
Touch the
.
CANCEL
button to return to Home Screen.
Page 56

56
TASCAM HS-2000
7 – Timeline mode
Renaming AES31 file names
1. Press the PROJECT key on the front panel to open the
PROJECT
2. Touch the w button of the project containing the
AES31 file you want to rename to display the session
selection screen.
If the selected project is not the current project, a popup window appears confirming that you want to load
it. Touch the OK button.
3. Touch the w button of the project containing the
AES31 file that you want to rename to open the AES31
file selection screen.
screen.
6. Touch the
to open the
the AES31 file name.
Follow the procedures in “Editing project names” on
page 40.
NOTE
If the loaded AES31 file is selected, the
button on the pull-up menu is disabled.
7. Touch the
screen or press the DATA dial.
NOTE
If the entered file name already exists, a pop-up window
warns, “This name already exists.” Touch the
button to return to the
another name.
EDIT NAME
AES31 NAME
Enter
button on the
AES31 NAME
button in the pull-up menu
screen where you can edit
EDIT NAME
AES31 NAME
CLOSE
screen, and enter
If it is not the current session, a pop-up window
appears confirming that you want to load it. Touch the
OK
button.
4. Select the AES31 file that you want to rename.
The background of the selected AES31 file will become
yellow.
5.
Touch
the
MENU
button to open a pull-up menu.
Page 57

TASCAM HS-2000
57
7 – Timeline mode
Deleting an AES31 file
1. Press the PROJECT key on the front panel to open the
PROJECT
2. Touch the w button of the project containing the
AES31 file to be deleted to open the session selection
screen.
If the selected project is not the current project, a popup window appears confirming that you want to load
it. Touch the OK button.
3. Touch the w button of the project containing the
AES31 file to be deleted to open the AES31 file
selection screen.
screen.
6. Touch the
NOTE
If the loaded AES31 file is selected, the
on the pull-up menu is disabled
7 Touch the OK button or press the DATA dial when the
confirmation pop-up appears.
When deleting is complete, the pop-up window will
disappear.
DELETE
button in the pull-up menu.
DELETE
button
If it is not the current session, a pop-up window
appears confirming that you want to load it. Touch the
OK
button.
4. Select the AES31 file that you want to delete.
The background of the selected AES31 file becomes
yellow
.
5.
Touch
the
MENU
button to open a pull-up menu.
Page 58

58
TASCAM HS-2000
7 – Timeline mode
Timeline editing
You can cut, erase and divide regions.
The basic editing procedures are as follows.
For details about each operation, see its explanation.
NOTE
Editing in timeline mode is non-destructive. When you
edit regions, the original audio files are preserved.
1. Press the HOME key on the front panel to open the
Home Screen.
2. Touch the
The
lettering, and the REC/MON,
NEXT TAKE NAME
E DIT, Fade/Level
shown below.
EDIT MODE
EDIT MODE
button to enter edit mode.
button becomes white with red
Bounce I/O
buttons
and
are replaced with
SET/SELECT
and
buttons, as
NOTE
Repeated recording and editing can result in a shortage of
available system memory, which is necessary to manage
regions and editing history. In this case, recording is not
possible, and a pop-up message warns “Cannot Edit.
System limit reached.”
Selecting the range to copy/cut/ delete
If editing start (IN) and end (OUT) points are set, the
•
range between the points is selected (see below).
If editing start and end points are not set, the entire
•
region under the time cursor is selected.
Editing start and end points not set
When the timeline cursor is on a borderline between
•
regions, the region to the right of the cursor will be
edited unless it is muted, in which case nothing will
be selected.
3. Touch the
The pull-up menu includes nine editing function
buttons (
Insert File, Insert Mute, Past e
Past e File
CAUTION
If you do not save AES31 editing information, changes
will be lost if another project, session or AES31 editing
information file is loaded, the card is removed, or the unit
is turned off.
E DIT
button to open a pull-up menu.
Copy, Cut, Erase, Divide, Insert
) and
UNDO
and
REDO
buttons.
,
and
Page 59

TASCAM HS-2000
59
7 – Timeline mode
Setting the editing start (IN) point
1. Press the HOME key on the front panel to open the
Home Screen.
2. Touch the
mode.
3. Use the m/, keys (or other controls) to locate the
timeline cursor to the position (time) where you want
editing to start.
4. Touch the
menu.
5. Touch the
the editing start (IN) point.
The IN mark (
the current position.
EDIT MODE
SET/SELECT
SET IN
) will appear in the mark display area at
button to enter the edit
button to open a pull-up
button in the pull-up menu to set
Setting the editing end (OUT) point
6. Use the m/, keys (or other controls) to locate the
timeline cursor to the position (time) where you want
editing to end.
7. Touch the
menu.
8. Touch the
set the editing end (OUT) point.
The OUT mark (
at the current position.
The interval shown in light blue between the IN (
) and OUT ()
operations.
SET/SELECT
SET OUT
) will appear in the mark display area
marks will be affected by editing
button to open a pull-up
button in the pull-up menu to
Clearing the start and end (OUT) points
1. Touch the
menu.
2. Touch the
a confirmation pop-up appears, touch the OK button
or press the DAT A dial.
The current IN and OUT points are removed, and the
IN (
SET/SELECT
CLEAR
) and OUT ()
button to open a pull-up
button in the pull-up menu. When
marks disappear
Page 60

60
TASCAM HS-2000
7 – Timeline mode
Selected area
Copy buer
Selecting a complete region for editing
1. Press the HOME key on the front panel to open the
Home Screen.
2. Touch the
mode.
3. Move the timeline cursor to the region to be edited.
4. Touch the
menu.
EDIT MODE
SET/SELECT
button to enter the edit
button to open a pull-up
Copying the data of the selected area (Copy)
You can copy the selected area.
NOTE
Copied data is retained in the copy buffer.
•
If an entire fade (in/out) area is included, the fade
•
information is also be retained.
1. Press the HOME key on the front panel to open the
Home Screen.
2. Touch the
mode.
3. Move the timeline cursor to the area to copy.
4. Touch the
region you want to copy using the
OUT
menu.
EDIT MODE
SET/SELECT
or
SELECT Region
button to enter the edit
button and select the
SET IN
buttons in the pull-up
and
SET
5. When you touch the
the pull-up menu, the entire region below the timeline
cursor is selected and the beginning of that region is
set as the editing start (IN) point and its end is set as
the end (OUT) point.
The interval shown in light blue between the IN (
) and OUT ()
affected by editing operations.
SELECT Region
marks (the selected region) will be
button in
5. Touch the
6. Touch the
copying is complete, a pop-up window will appear
momentarily, and then the Home Screen will reopen.
E DIT
button to open a pull-up menu.
Copy
button in the pull-up menu. When
In this case, the EDIT pull-up menu will remain open.
Page 61

TASCAM HS-2000
61
7 – Timeline mode
Cutting the data in a selected area (Cut)
You can cut the data in a selected region. This copies it to
the copy buffer. The newly emptied area is then filled by
moving the session data after the OUT point of the cut
data forward to where its IN point was.
NOTE
Cut data will be retained in the copy buffer.
•
If an entire fade (in/out) area is included, the fade
•
information will also be retained.
If an IN or OUT point is within a region, any part of
•
the region outside of the cut area will become a new
region.
When the IN point or OUT point is within a fade in/out
•
area, the fade information will be deleted.
1. Press the HOME key on the front panel to open the
Home Screen.
2. Touch the
mode.
3. Move the timeline cursor to the area to be cut.
4. Touch the
you want to cut using the
SELECT Region
EDIT MODE
SET/SELECT
button to enter the edit
buttons in the pull-up menu.
button and set the area
SET IN
and
SET OUT
or
In this case, the EDIT pull-up menu will remain open.
Erasing the data in the selected area (Erase)
You can erase a selected region to make it silent. The
positions of any regions after the erased area will remain
unchanged.
NOTE
Erased data will be retained in the copy buffer.
•
If an entire fade (in/out) area is included, the fade
•
information will also be retained in the copy buffer.
When an IN or OUT point is within a region, any part
•
of the region outside of the area erased will become a
new region.
When the IN point or OUT point is set in a fade in/out
•
area, the fade information will be erased.
1. Press the HOME key on the front panel to open the
Home Screen.
2. Touch the
mode.
3. Move the timeline cursor to the area to be erased.
4. Touch the
want to erase using the
SELECT Region
EDIT MODE
SET/SELECT
button to enter the edit
SET IN
buttons in the pull-up menu.
button and set the area you
and
SET OUT
or
5. Touch the
6. Touch the
cutting is complete, a pop-up window will appear
momentarily, and then the Home Screen will reopen.
E DIT
button to open a pull-up menu.
Cut
button in the pull-up menu. When
5. Touch the
E DIT
button to open a pull-up menu.
Page 62

62
TASCAM HS-2000
7 – Timeline mode
Copy buer
6. Touch the
erasing is complete, a pop-up window will appear
momentarily, and then the Home Screen will reopen.
In this case, the EDIT pull-up menu will remain open.
Erase
button in the pull-up menu. When
Dividing regions at a specified position (Divide)
You can divide a selected region into two regions at the
position of the timeline cursor.
1. Press the HOME key on the front panel to open the
Home Screen.
2. Touch the
mode.
3. Move the timeline cursor to the point where you want
to divide the region.
4. Touch the
EDIT MODE
E DIT
button to open a pull-up menu.
button to enter the edit
Inserting copy buffer data at a set position (Insert)
NOTE
All regions after the inserted position will move backward
along the timeline by the amount of time of the inserted
data.
Inserting into a region creates three regions: a region
•
before the timeline cursor, the contents of the copy
buffer, and a region after the timeline cursor.
If the insertion position is within a fade in/out, the fade
•
information will be deleted.
1. Press the HOME key on the front panel to open the
Home Screen.
2. Touch the
mode.
3. Move the timeline cursor to the position where you
want to insert the data.
4. Touch the
EDIT MODE
E DIT
button to open a pull-up menu.
button to enter the edit
5. Touch the
dividing is complete, a pop-up window will appear
momentarily, and then the Home Screen will reopen.
In this case, the EDIT pull-up menu will remain open.
Divide
button in the pull-up menu. When
Touch the
NOTE
The
Insert
buffer contains data.
5. When insertion is complete, a pop-up window will
appear momentarily, and then the Home Screen will
reopen.
In this case, the EDIT pull-up menu will remain open.
Insert
button is available only when the copy
button in the pull-up menu.
Page 63

TASCAM HS-2000
63
7 – Timeline mode
bwf le
Inserting a file at a set position (Insert File)
You can insert an entire 2-channel BWF/WAV file into a set
position.
The file does not have to be in the same project, or even
on the same media, but it must be at the same sampling
frequency as the project.
NOTE
All regions after the inserted position will move
•
backward along the timeline by the amount of time of
the inserted data.
Inserting into a region creates three regions: a region
•
before the timeline cursor, the contents of the copy
buffer, and a region after the timeline cursor.
If the insertion position is within a fade in/out, that
•
fade information will be deleted.
1. Press the HOME key on the front panel to open the
Home Screen.
2. Touch the
mode.
3. Move the timeline cursor to the position where you
want to insert the file.
4. Touch the
EDIT MODE
E DIT
button to open a pull-up menu.
button to enter the edit
6. After selecting a file to insert on the
touch the
7. When the Select Insert Position pop-up window
appears, touch either the Current Position or
T/ C
You can also
the
NOTE
If the
•
file contains no timecode information, the file will be
inserted at the beginning (00 h 00 m 00 s 00 f ).
If you select a file from other than the current session
•
folder, the file is copied to the current folder and then
inserted.
If a file with the same name already exists in the
•
current session folder, “Cannot Copy for Insert” appears
in a pop-up window. In this case, you can touch the
RENAME
inserting. You can also touch the
cancel insertion.
Insert File
button to start inserting.
touch t
BROWSE
File T/ C
screen.
button is touched, but the selected
button to change the name of the file before
he
CANCEL
button.
BROWSE
button to return to
CANCEL
screen,
File
button to
Touch the
menu to open the
5. On the
the media containing the file to insert.
NOTE
If the top page of the
touch at the top of the screen to open the media
selection screen.
Insert File
BROWSE
BROWSE
screen, touch the w button to select
BROWSE
button in the pull-up
screen.
screen is not displayed,
8. When insertion is complete, a pop-up window will
appear momentarily, and then the Home Screen will
reopen. In this case, the EDIT pull-up menu will be
closed.
Page 64

64
TASCAM HS-2000
7 – Timeline mode
Inserting silence into a set area (Insert Mute)
You can insert silence into a designated area.
NOTE
All regions following the IN point will be moved
•
backward.
All regions after the IN position will move backward
•
along the timeline by the amount of time of the
inserted data.
Inserting into a region creates two regions: a region
•
before the timeline cursor and a region after the
timeline cursor
When the IN point is set in a fade in/out area, that fade
•
information will be deleted
1. Press the HOME key on the front panel to open the
Home Screen.
2. Touch the
mode.
3. Touch the
want to insert silence using the
OUT
menu.
EDIT MODE
SET/SELECT
or
SELECT Region
button to enter the edit
button and set the area you
SET IN
buttons in the pull-up
and
SET
5. Touch the
menu to insert silence. When completed, a pop-up
window will appear momentarily, and then the Home
Screen will reopen.
In this case, the EDIT pull-up menu will remain open.
Insert Mute
button in the pull-up
4. Touch the
E DIT
button to open a pull-up menu.
Page 65

TASCAM HS-2000
65
7 – Timeline mode
Copy buer
bwf le
Pasting copy buffer data into the set position (Paste)
You can paste copied data into a set position.
NOTE
When the area pasted into is set in a fade in/out area, the
fade information will be deleted.
1. Press the HOME key on the front panel to open the
Home Screen.
2. Touch the
mode.
3. Move the timeline cursor to the position where you
want to paste the copy buffer.
4. Touch the
EDIT MODE
E DIT
button to open a pull-up menu.
button to enter the edit
Pasting a file at a set position (Paste File)
You can paste an entire 2-channel BWF/WAV file into a set
position.
The file does not have to be in the same project, or even
on the same media, but it must be at the same sampling
frequency as the project.
NOTE
When the area pasted into is in a fade in/out area, the fade
information will be deleted.
1. Press the HOME key on the front panel to open the
Home Screen.
2. Touch the
mode.
3. Move the timeline cursor to the position where you
want to paste the file.
4. Touch the
EDIT MODE
E DIT
button to open a pull-up menu.
button to enter the edit
Touch the Paste button in the pull-up menu.
NOTE
The Paste button appears white and is available only
when the copy buffer contains data.
5. When pasting is complete, a pop-up window will
appear momentarily, and then the Home Screen will
reopen.
In this case, the EDIT pull-up menu will remain open.
Touch the Paste File button in the pull-up menu to
open the
5. On the
the media containing the file to paste.
NOTE
If the top page of the
touch at the top of the screen to open the media
selection screen.
BROWSE
BROWSE
screen
screen, touch the w button to select
BROWSE
screen is not displayed,
Page 66

66
TASCAM HS-2000
7 – Timeline mode
6. After selecting a file to paste on the
touch the
7. When the Select Paste Position pop-up window
appears, touch either the Current Position or
T/ C
You can also
the
NOTE
If the
•
file contains no timecode information, the file will be
pasted at the beginning (00 h 00 m 00 s 00 f ).
If you select a file from other than the current session
•
folder, the file is copied to the current folder and then
pasted.
If a file with the same name already exists in the
•
current session folder, “Cannot Copy for Paste” appears
in a pop-up window. In this case, you can touch the
RENAME
pasting. You can also touch the
cancel pasting.
Paste File
button to start inserting.
BROWSE
File T/ C
button to change the name of the file before
button
touch t
he
CANCEL
screen.
button is touched, but the selected
BROWSE
but
ton to re
CANCEL
screen,
File
turn to
button to
Setting Fades for regions (Fade IN/ FadeOut)
You can set the lengths of region fade-ins and fade-outs
as you like. These linear fades are non-destructive (they
only affect playback, not the actual data stored).
NOTE
Fade-i• n/out areas are indicated in light blue.
The fade-in lasts from the beginning of the region
•
until the set point.
The fade-out lasts from the set point until the end of
•
the region.
1. Press the HOME key on the front panel to open the
Home Screen.
2. Touch the
mode.
3. In the region where you want to set a fade-in or fadeout, move the timeline cursor to the end of fade-in or
the beginning of fade out.
4. Touch the
menu.
To set a fade-in, touch the Fade IN button.
•
To set a fade-out, touch the Fade Out button.
•
5. After the fade-in/out is set, a pop-up window will
appear momentarily, and then the Home Screen will
reopen.
EDIT MODE
Fade/Level
button to enter the edit
button to open a pull-up
8. When pasting is complete, a pop-up window will
appear momentarily, and then the Home Screen
will reopen.
closed.
In this case, the EDIT pull-up menu will be
In this case, the
remain open.
Fade/Level
pull-up menu will
Page 67

TASCAM HS-2000
67
7 – Timeline mode
Removing fades (Remove Fade IN/ Remove FadeOut)
1. Press the HOME key on the front panel to open the
Home Screen.
2. Touch the
mode.
3. Move the timeline cursor to the region with the fadein/out that you want to remove.
4. Touch the
menu.
To remove a fade-in, touch the Remove Fade IN
•
button.
To remove a fade-out, touch the Remove Fade Out
•
button.
5. When fade removal is complete, a pop-up window will
appear momentarily, and then the Home Screen will
reopen.
EDIT MODE
Fade/Level
button to enter the edit
button to open a pull-up
Setting the playback level of a region (Level)
You can set the playback level for an entire region (from
after the fade-in to before the fade-out). If no fades have
been set, the whole region is affected. This setting only
affects playback, not the actual data.
1. Press the HOME key on the front panel to open the
Home Screen.
2. Touch the
mode.
3. Move the timeline cursor to the region where you
want to set the playback level.
4. Touch the
menu.
5. Touch the Level button in the pull-up menu.
The yellow region under the timeline cursor will be the
subject of Level adjustment.
EDIT MODE
Fade/Level
button to enter the edit
button to open a pull-up
In t
his case, th
remain open.
e
Fade/Level
pull-up menu will
6. A level knob appears above the
the D ATA dial to set playback level.
Setting range
–∞, –120 dB to +10.0 dB
7. Touch the
(The playback level setting will be retained.)
Level
button again to hide the level knob.
Level
button. Use
Page 68

68
TASCAM HS-2000
7 – Timeline mode
Undoing the previous edit (UNDO)
You can undo the previous timeline edit.
1. Press the HOME key on the front panel to open the
Home Screen.
2. Touch the
mode.
3. Touch the
4. Touch the
the edit is undone
momentarily, and then the Home Screen will reopen
EDIT MODE
E DIT
button to open a pull-up menu.
UNDO
button in the pull-up menu. After
button to enter the edit
, a pop-up window will appear
Redoing an edit (REDO)
After undoing an edit, you can redo it.
1. Press the HOME key on the front panel to open the
Home Screen.
2. Touch the
mode.
3. Touch the
4. Touch the
the edit is redone,
.
momentarily, and then the Home Screen will reopen
EDIT MODE
E DIT
button to open a pull-up menu.
REDO
button in the pull-up menu. After
button to enter the edit
a pop-up window will appear
.
In this case, the EDIT pull-up menu will remain open.
NOTE
The Fade/Level pull-up menu also has an
•
UNDO
button that can be used to undo edits.
The
UNDO
•
possible to undo an edit. The
button appears with white letters when it is
UNDO
button is disabled
if no editing has been conducted.
In timeline mode, up to 10 of the most recent
•
recording/editing operations can be retained as an
editing history. You can undo and redo edits within
this history. However, as the numbers of edits and
regions increase, the number of operations that can be
stored may decrease.
The timeline mode editing history will be cleared by
•
the following actions:
Turning off the power of this unit
•
Loading a project or session
•
Loading AES31 edit information
•
Changing the operation mode
•
In this case, the EDIT pull-up menu will remain open.
NOTE
The Fade/Level pull-up menu also has an
•
REDO
button that can be used to redo edits.
If no edit has been undone, the
•
disabled. The
REDO
button appears with white letters
REDO
button is
when it is possible to redo an edit.
In timeline mode, up to 10 of the most recent
•
recording/editing operations can be retained as an
editing history. You can undo and redo edits within
this history. However, as the numbers of edits and
regions increase, the number of operations that can be
stored may decrease.
The timeline mode edit history will be cleared by the
•
following actions:
Turning off the power of this unit
•
Loading a project or session
•
Loading AES31 edit information
•
Changing the operation mode
•
Page 69

TASCAM HS-2000
69
7 – Timeline mode
Bouncing
You can save part of a region or an interval that crosses
multiple regions as a single take.
Setting the bounce starting point
1. Touch the HOME key to open the Home Screen.
2. Use the m and , keys (or other controls) to locate
the timeline cursor to the bounce starting point (time).
3. Touch the
menu.
4. Touch the
the bounce starting (IN) point.
The IN mark (
the current position.
Bounce I/O
SET IN
) appears in the mark display area at
button to open a pull-up
button in the pull-up menu to set
Bouncing the interval
8. Touch the
menu.
9. Touch the
open the
input the name of the file that will be bounced.
Input the file name. Follow the procedures in “Editing
project names” on page 40.
10. Touch the
pop-up will appear.
Bounce I/O
BOUNCE
BOUNCE NAME
Enter
button in the pull-up menu to
button. A confirmation message
button to open a pull-up
screen where you can
Setting the bounce ending point
5. Use the m and , keys (or other controls) to locate
the timeline cursor to the bounce ending point (time).
6. Touch the
menu.
7. Touch the
set the bounce ending (OUT) point.
The OUT mark (
the current position
Bounce I/O
SET OUT
) appears in the mark display area at
button to open a pull-up
button in the pull-up menu to
Touch the
•
file in the root directory of the current CF card.
Touch the
•
bounced file in the current session.
Touch the
•
NAME
While the file is being created, a progress status popup appears.
When file creation completes, the pop-up disappears.
NOTE
You can cancel a bounce by pressing the
while the progress pop-up window is open.
Clearing bounce starting and ending points
11. Touch the
menu.
12. Touch the
a confirmation pop-up appears, touch the OK button
or press the DAT A dial.
The IN and OUT points that had been set will be
cleared and the IN (
display area will disappear.
Ro ot dir
Current Session
CANCEL
screen without bouncing.
Bounce I/O
CLEAR
button to save the bounced
button to return to the
button to open a pull-up
button in the pull-up menu. When
) and OUT (
button to save the
BOUNCE
CANCEL
) marks in the mark
button
The interval shown in light blue between the IN (
and OUT ()
marks will be bounced.
)
Page 70

70
TASCAM HS-2000
8 – Take mode
In this chapter, we explain how to use the unit when its
operation mode is set to TAKE MODE. (See “Selecting the
operation mode” on page 47.)
Please refer to “4–Basic operation” on page 29 when
reading this chapter.
Preparing to record
Basic preparations
Refer to“4–Basic operation” on page 29 and make the
basic preparations for recording.
Creating a new project
Create new projects as necessary. You do not need to
create a new project if you plan to record into an existing
one.
1. Press the PROJECT key on the front panel to open the
PROJECT
2. Touch the
PROJECT
screen [1/3].
screen.
CREATE PROJECT
screen to open the
CREATE PROJECT
button on the
Finally, set the timeline mode starting time, and then
set whether other settings should be retained from the
currently open project or whether the factory defaults
should be used instead.
For further details about these settings, see “Creating a
new project” on page 31.
3. After you complete making settings touch the
CREATE PROJECT
NOTE
If a project with the same project name already exists,
the
CREATE PROJECT
will not be able to create a new project. If this happens,
change the project name.
4. Touch the OK button when the confirmation pop-up
message appears.
button.
button appears gray and you
Creating new sessions
Create new sessions as necessary. You do not need to
create a new session if you plan to record into an existing
one.
1. Press the PROJECT key on the front panel to open the
PROJECT
2. Touch the w button of the project in which you want
to create a new session to open its session selection
screen.
If the selected project is not the current project, a popup window appears confirming that you want to load
it. Touch the OK button.
screen.
On this screen, set the project name, the name for the
first session the sampling frequency and the sampling
frequency written to BWF chunks.
Touch the
Set the frame type and bit length.
Touch the
NEXT
button to open the next page [2/3].
NEXT
button to open the next page [3/3].
3. Touch the
MAKE SESSION
MAKE SESSION
button to open the
screen.
Page 71

TASCAM HS-2000
71
8 – Take mode
4. Touch the
SESSION NAME
session name.
To input the session name follow the same procedures
as in “Editing project names” on page 40.
NOTE
You cannot use the “@” symbol at the beginning of a
session name.
5. Touch the
return to the
6. If necessary, set the timeline start time.
7. When you have finished making settings, touch the
MAKE SESSION
8. When a confirmation pop-up appears, touch the OK
button or press the DATA dial to return to the
Screen
For details about session operations, see “Session
operations” on page 42.
Session Name
screen where you can change the
Enter
.
button or press the DATA dial to
MAKE SESSION
button.
button to open the
screen.
Home
2. Touch the
SETUP
On the
mode. The background color for an active setting is
light blue. For more details, see “REC MODE page” on
page 100.
REC SETUP
screen.
REC MODE
button to open the
page, you can select the recording
Setting the file format
Touch the
screen to open the following screen.
FILE FORMAT
tab on the
REC SETUP
REC
Recording mode settings
1. Press the MENU key on the front panel to open the
MENU
screen.
On the
file size, and how files are treated when recording is
paused. The background color for an active setting is light
blue.
For details, see “FILE FORMAT page” on page 101.
FILE FORMAT
page, set bit-length, maximum
Other recording settings
Touch the
screen.
On the
recording time and auto marker settings. For details, see
“OPTIONS page” on page 101.
OPTIONS
OPTIONS
tab of the REC open the following
page, you can change the pre-
Page 72

72
TASCAM HS-2000
8 – Take mode
Making a recording
Recording
When the unit is stopped, press the REC key to put the
unit into recording standby. At this time, the
indicates this transport status.
In recording standby, press the PLAY key to start
recording.
The transport status display at the top left of the Home
Screen changes into the recording status display and part
of the background of the Home Screen becomes red,
indicating that the unit is recording. The time counter
starts at the same time.
NOTE
When stopped, pressing the • PLAY key while pressing
and holding the REC key will also start recording.
Recording can also be controlled using parallel control
•
(except retaking).
Unlike timeline mode, pressing the • PLAY key while
pressing and holding the REC key during playback will
not start overwrite recording.
When in recording standby, the parallel control signals
•
output are high for TALLY_RECORD and low for TALLY_
PAUSE.
When in recording standby, the • REC and PAUSE keys
on the front panel will be lit.
Stopping recording
To stop recording, press the STOP [RETAKE] key.
Retaking a recording
Press the STOP [RETAKE] key while pressing and holding
the SHIFT key to erase the last recorded take. (The
recorded audio file itself will deleted.)
If you press the PAUSE key during recording to record
multiple consecutive takes (files) and the PAUSE MODE is
set to SPLIT, this will only erase the last take. If it is set to
NO SPLIT, the recording is not split into multiple takes, so
this will erase the entire recording from start to finish.
For details about the PAUSE MODE item see “FILE FORMAT
page” on page 101.
icon
Playback in timeline mode
Selecting a project, session and take
1. Press the PROJECT key on the front panel to open the
PROJECT
NOTE
You can also touch the session/take name area on the
Home Screen to open the
2. Touch the w button next to the project that contains
the take you want to load to open the session
selection screen
If the selected project is not the current project, a popup window appears confirming that you want to load
it. Touch the OK button.
3. Touch the w button for the session that contains
the take you want to load to open the take selection
screen.
If it is not the current session, a pop-up appears
confirming that you want to load it. Touch the OK
button.
NOTE
To load a take from the current session, instead of steps
1–4 above, you can also touch the session name button at
the top right of the
name button on the Home Screen and touch the TAKE List
button in the pull-down menu to open the take selection
screen for the current session.
screen.
PROJECT
PROJECT
screen.
screen, or touch the take
Page 73

TASCAM HS-2000
73
8 – Take mode
4. Select the take that you want to load.
5. Touch the
open the pull-up menu.
6. Touch the
7. When a confirmation pop-up appears, touch the OK
button or press the DATA dial.
When loading completes, the Home Screen opens.
NOTE
You can also press the w button for a take to load it.
In this case, no pop-up appears, and the take selection
screen remains open after loading (the Home Screen does
not reopen).
MENU
button in the take selection screen to
LOAD
button in the pull-up menu.
Online function settings
Refer to “Online function” on page 129 to make online
output settings.
Setting input monitoring
Turn input monitoring OFF when you are playing back. If
input monitoring is ON, sound from the input connectors
will be output through all the output connectors of this
unit.
1. Touch the
Screen to open a pull-up with the input monitoring
ON/OFF
2. If input monitoring is on (ON button appears blue),
touch the
appears blue).
INPUT MONITOR
button.
OFF
button to turn it off (
button on the Home
OFF
button
Playback control in take mode
Press the PLAY key to start playback.
Press the PAUSE key to pause playback.
Press the PLAY key again to resume playback.
Press the STOP [RETAKE] key to stop playback.
Press the . [MARK.] key or /[MARK /] key
to skip to the next take.
Press and hold them[ ] or ,[ ] key to search
backward or forward.
Press the . [MARK.] or /[MARK /] key
while pressing and holding the SHIFT key to move
between marks.
Press and hold the m[ ] or ,[ ] key while
pressing and holding the SHIFT key to search at highspeed.
NOTE
On the
•
•
PLAY SETUP
only the currently selected take is played or whether
all the takes within the current session are played.
You can also enable and disable repeat playback. (See
“Playback settings (PLAY SETUP)” on page 102.)
Playback functions can also be performed using
a remote control connected through the parallel
connector.
screen, you can set whether
Using the call function
Press the CALL [CHASE] key to locate to the point where
playback was last started from playback standby (call
point) and put the unit in playback standby mode.
Page 74

74
TASCAM HS-2000
8 – Take mode
BWF-J cue point (take mode)
When the Follow BWF-J item is set to ON, if a BWF-J
cue point is detected during playback, the following
corresponding operation will occur. In addition, if the
BWF-J Tally Out item is set to ON, in response to each
BWF-J cue point, the cue signal and tally signal will be
output from the parallel remote connector.
When a take is loaded, the transport locates
BC$STANDBY
BC$CM
BC$END
BC$STOP
BC$FILE
BC$PAUSE
to the first BC$STANDBY point as the playback
start point. During playback, playback pauses
when this cue point is detected. In either case,
a BC$STANDBY tally is output.
During playback, when this cue point is
detected, a BC$CM CUE signal is output.
During playback, when this cue point is
detected, a BC$END CUE signal is output.
During playback, when this cue point is
detected, a BC$STOP CUE signal is output, and
playback stops.
During playback, when this cue point is
detected, a BC$END CUE signal is output. If
there is a BC$STANDBY cue point in the next
take, playback will move to it and pause at that
point. A BC$STANDBY tally is output.
During playback, when this cue point is
detected, a BC$PAUSE tally is output, and
playback pauses.
Using the flash start function
Flash start playback is possible using a TASCAM RCHS32PD or RC-HS20PD (sold separately) or other remote
controller.
For details, see “Flash start function” on page 130.
Take operations
Multiple takes can be created in the same session folder.
For details about project and session operations, see
“5–Projects” on page 35.
The following operations are possible with takes.
Change take start times
•
Export takes
•
Delete takes
•
Sort takes
•
Change the order of takes
•
Edit take names
•
Divide takes
•
Combine takes
•
Undo the previous edit
•
Redo the cancelled edit
•
Changing the start time of a take
1. Press the PROJECT key on the front panel to open the
PROJECT
2. Touch the w button for the project that contains the
take for which you want to edit the start time to open
the session selection screen.
If the selected project is not the current project, a popup window appears confirming that you want to load
it. Touch the OK button.
3. Touch the w button for the session that contains the
take for which you want to edit the start time to open
the take selection screen.
If it is not the current session, a pop-up window
appears confirming that you want to load it. Touch the
OK
button.
screen.
NOTE
To load a take from the current session, instead of steps
2–3, touch the session name button at the top right of
the project screen, or touch the take name button on the
Home Screen, and touch the TAKE List button in the pulldown menu to open the take selection screen for the
current session.
4. Select the take for which you want to edit the start
time.
5. Touch the
MENU
button on the take selection screen
to open a pull-up menu.
6. Touch the
open the
EDIT TC
TAKE TC
button in the pull-up menu to
screen.
Page 75

TASCAM HS-2000
75
8 – Take mode
7. On the
TAKE T/C
screen, use the
FRAME EDIT
but- ton to set whether or not to edit the frame value.
Frame editing on
Frame editing o
8. Use the number buttons to input the take start time.
If you begin input without selecting a unit, input will
•
start from the smallest one.
To input a specific unit, touch it to make its background
•
yellow, and then use the number buttons or the DATA
dial to enter two digits at a time.
Touch the • CLEAR
9. Touch the
ENTER
button to set all values to 00.
button to confirm the setting.
Exporting takes
You can export takes from the current session to the
following destinations.
Root of the same CF card
•
Root of another CF card
•
Current session of another CF card
•
1. Select the take you want to export on the take selection
screen.
2. Touch the
MENU
button on the take selection screen
to open a pull-up menu.
3. Touch the
EXPORT
button in the pull-up menu to
open the following pop-up window.
Touch the button for the desired destination to export
the take to it.
Touch the OK button or press the DATA dial to export
the se- lected take.
Touch the
CANCEL
button on the pop-up window to
return to the take list screen.
TIP
This can also be edited using an external keyboard.
•
Press the keyboard’s ESC key to clear all values (set
•
them to 00).
10. When a confirmation pop-up appears, touch the OK
button or press the DATA dial.
NOTE
If the export destination is empty (no current session
•
when CFn Current selected) the same project/session
structure as the source will be created automatically
during the export.
If the export destination contains a file with the
•
same name, exporting will fail and a pop-up appears
warning, “Selected Take Already exists in Export
destination.”
If the total size of the export file exceeds the free space
•
of the export destination, exporting will fail and a pop-
up appears warning, “Cannot EXPORT. Not enough
space on CFn.”
If sampling frequency of the export destination
•
project differs, exporting will fail and a pop-up
appears warning, “Cannot
EXPORT
. Destination Project
is different Fs.”
Page 76

76
TASCAM HS-2000
8 – Take mode
Deleting a take
1. Select the take that you want to delete on the take
selection screen.
2. Touch the
to open a pull-up menu.
3. Touch the
4. When a confirmation pop-up appears, touch the OK
button or press the DATA dial.
MENU
button on the take selection screen
Take selection screen with pull-up menu open
DELETE
button in the pull-up menu.
Sorting takes
You can sort the playback order of takes by name.
1. Touch the
to open a pull-up menu.
2. Touch the
a confirmation pop-up.
MENU
button on the take selection screen
Take selection screen with pull-up menu open
SORT
button in the pull-up menu to open
Conrmation message
5. Touch the OK button or press the DATA dial again
when a second confirmation pop-up message appears.
Second conrmation message
During deletion, a progress status pop-up appears.
When deletion completes, the pop-up window will
disappear.
CAUTION
You can delete takes that are being used by timeline and
playlist modes.
If you delete such a take, an error pop-up will appear if
you attempt to play the corresponding region or entry.
Conrmation message
3. Touch the OK button on the pop-up or press the
ENTER key to sort the order of take playback by name.
Touch the
selection screen.
CANCEL
button to return to the take
Page 77

TASCAM HS-2000
77
8 – Take mode
TAKE-3TAKE-1 TAKE-2
TAKE-3
TAKE-4 TAKE-5
TAKE-4
TAKE-1 TAKE-2 TAKE-5
Reordering takes
You can move takes to change the playback order.
1. Select the take to move on the take selection screen.
2. Touch the
to open a pull-up menu.
3. Touch the
the
MENU
button on the take selection screen
Take selection screen with pull-up menu open
MOVE
button in the pull-up menu to open
TAKE MOVE
screen.
Editing take names
1. Select the take with the name that you want to edit on
the take selection screen.
2. Touch the
to open a pull-up menu.
3. Touch the
to open the
MENU
button on the take selection screen
Take selection screen with pull-up menu open
EDIT NAME
TAKE NAME
button in the pull-up menu
screen.
4. Use the DATA dial and scroll buttons to move the
selected take.
5. Touch the
MOVE
button or press the ENTER key to
move the take to the location shown.
Touch the button on the upper left on the screen
or press the EXIT/CANCEL key to return to the take
selection screen without moving the take.
TAKE NAME screen
NOTE
When multiple takes are selected, you cannot select the
EDIT NAME
button in the pull-up menu.
4. Edit the take name. See “Editing project names” on
page 40 for the input method.
5. Touch the
Enter
button on the
TAKE NAME
screen
or press the DAT A dial to determine the take name
and to return to the take selection screen.
CAUTION
You can change the names of takes that are being used by
timeline and playlist modes.
If you change the name of such a take, an error popup will appear if you attempt to play the corresponding
region or entry.
Page 78

78
TASCAM HS-2000
8 – Take mode
TAKE-2bTAKE-2a
TAKE-3
TAKE-3TAKE-1
TAKE-1
TAKE-2
Dividing takes
You can divide a take into two at the point you choose.
1. Press the HOME key on the front panel to open the
Home Screen.
2. Move the timeline cursor to the approximate point
where you want to divide the take.
3. Touch the
a pull-up menu.
4. Touch the
5. When -- Divide Mode -- is displayed, scrub playback is
enabled, and you can use the following operations to
find the exact division position.
E DIT
button on the Home Screen to open
Divide
Turn the • JOG/SHUTTLE dial
Press the • m/, key to move one sample
Press the • m[ ] or,[ ] key while pressing
and holding the SHIFT key to move one 1 ms
Press the • . [MARK.] or /[MARK /] key
while pressing and holding the SHIFT key to move to
the next mark
button in the pull-up menu.
6. When division completes, a pop-up window will
appear momentarily, and then the Home Screen will
reopen.
Take names and playback order after division
Take names are assigned as follows after division:
•
First half : <Take name before division>_a
Second half: <Take name before division>_b
The first half will be followed by the second half in
•
playback order.
The second half will become the current take.
•
Other takes that followed the take before division
•
will follow the second half take.
The total number of takes increases by one after
•
division.
If a mark point exists at the division point, it becomes
•
a mark at the beginning of the second half take.
Example of division
Take list before dividing Scene001-T001
When the division point is determined, touch the
Divide
To cancel division, touch the
button at the lower-left of the screen.
CANCEL
button at the
lower left of the screen, or press the STOP or EXIT/
CANCEL key.
If one of the new file names that will be assigned after
division already exists, the take cannot be divided, and
a pop-up appears, warning, “Cannot Divide.”
Take list after dividing Scene001-T001
CAUTION
You can divide takes that are being used by timeline and
playlist modes.
If you divide such a take, an error pop-up will appear if
you attempt to play the corresponding region or entry.
Page 79

TASCAM HS-2000
79
8 – Take mode
TAKE-1 TAKE-2 TAKE-3 TAKE-4 TAKE-5
TAKE-3 TAKE-4 TAKE-5
TAKE-1
Combining takes
You can combine two takes into one.
NOTE
You cannot combine takes in the following cases.
The bit lengths, numbers of channels or sampling
•
frequencies are different
The file size of the combined takes exceeds the Max
•
File Size shown on the
FORMAT
The open space on the media is less than the file size
•
of the second of the two takes to be combined
1. Press the HOME key on the front panel to open the
Home Screen.
2. Select a take as the current take. This will be the first
half of the combined take.
3. Touch the
a pull-up menu.
page
E DIT
REC SETUP
button on the Home Screen to open
screen
FILE
6. A confirmation message appears, and a 4-second
loop of before and after the combination point will be
played.
Touch the OK button or press the ENTER key to
combine the takes.
Touch the
key to stop the loop and reopen the take selection
screen.
7. While the takes are being combined, a progress status
pop-up appears.
When the combination completes, the pop-up window
closes and the Home Screen reopens
CANCEL
button or press the EXIT/CANCEL
.
4. Touch the
5. After the take selection screen opens, touch the w
button of the take to be combined with the current
take as the second half.
(The yellow icon indicates the take that was selected
in step 3 as the first half of the combined take.)
Co mbine
button in the pull-up menu.
NOTE
The file name of the first take will be used for the
•
combined take.
The time code information of the first take will be used
•
for the combined take.
If the number of mark points for the combined take
•
exceeds 100, all marks after the 100th in order will
be lost. These mark points cannot be recovered with
UNDO
.
CAUTION
You can combine takes that are being used by timeline
and playlist modes.
If you combine such a take, an error pop-up will appear if
you attempt to play the corresponding region or entry.
Page 80

80
TASCAM HS-2000
8 – Take mode
Undoing the previous take edit
You can undo the previous take divide or combine
operation.
1. Press the HOME key on the front panel to open the
Home Screen.
2. Touch the
3. Touch the
the edit is undone, a pop-up window will appear
momentarily, and then the Home Screen will reopen.
E DIT
button to open a pull-up menu.
UNDO
button in the pull-up menu. After
Redoing a take edit
After undoing a take edit, you can redo it, but only once.
1. Press the HOME key on the front panel to open the
Home Screen.
2. Touch the
3. Touch the
the edit is redone, a pop-up window will appear
momentarily, and then the Home Screen will reopen.
E DIT
button to open a pull-up menu.
REDO
button on the pull-up menu. When
In this case, the EDIT pull-up menu will remain open.
NOTE
If no editing has been conducted, the
•
disabled. The
UNDO
button appears with white letters
UNDO
button is
when it is possible to undo an edit.
The take mode edit history will be erased by the
•
following actions:
Turning off the power of this unit
•
Loading a project or session
•
Changing the operation mode
•
Recording
•
Page 81

TASCAM HS-2000
81
9 – Playlist mode
In this chapter, we explain how to use the unit when it’s
in playlist mode (See “Selecting the operation mode” on
page 47.)
Please refer to “4–Basic operation” on page 29 when
reading this chapter.
Playlist operations
Loading projects and sessions
Takes and files can only be added to the playlist from the
folder of the currently loaded session. When takes and
files from other session folders are added to a playlist,
they are first copied to the current session folder. Load the
session first.
1. Press the PROJECT key on the front panel to open the
PROJECT
screen.
5. Touch the
NOTE
You can also load a session by pressing its w button. In
this case, if it is not the current session, a pop-up window
appears confirming that you want to load it. Touch the OK
button.
6. When a confirmation pop-up appears, touch the OK
button or press the DATA dial.
When loading completes, the last loaded playlist
(or a playlist created by default for a new session) is
automatically loaded and the Home Screen reopens.
LOAD
button in the pull-up menu.
2. Touch the w button next to the project that you want
to select to open the session selection screen.
If the selected project is not the current project, a popup window appears confirming that you want to load
it. Touch the OK button.
3. Touch the name of the session to select it.
Its background appears yellow.
4. Touch the
screen to open a pull-up menu.
MENU
button on the session selection
Page 82

82
TASCAM HS-2000
9 – Playlist mode
Creating a new playlist
You can create a playlist (JPPA PPL file) in the folder of the
current session.
The path when viewing the card on a computer will be as
follows:
{Card drive name}:\{Project name}\{Session name}\{_
playlists}\{Playlist file}
1. Press the PROJECT key on the front panel to open the
PROJECT
2. Touch the w button for the project in which you want
to create a new playlist to open the session selection
screen.
If the selected project is not the current project, a popup window appears confirming that you want to load
it. Touch the OK button.
3. Touch the w button for the session in which you want
to create a new playlist to open the playlist selection
screen.
If it is not the current session, a pop-up window
appears confirming that you want to load it. Touch the
OK
button.
screen.
6. When the confirmation message pop-up appears,
touch the OK button or press the DATA dial to confirm
the playlist name.
While the playlist is being created, a progress status
pop-up appears. When playlist creation completes, the
pop-up will disappear.
NOTE
Immediately after a new playlist is created, it is loaded
•
as the current playlist.
You can also create a new playlist can by touching the
•
CREATE PLAYLIST
that is opened by touching an entry name button on
the Home Screen.
“C” (current) appears inside the • icon of the
currently loaded playlist.
button in the pull-down menu
NOTE
When you create a session, one JPPA PPL file is created
automatically.
4. Touch the
PLAYLIST NAME
Enter the playlist name.
To enter the playlist name, follow the procedures in
“Editing project names” on page 40.
5. Touch the
CREATE PLAYLIST
screen.
Enter
button or press the DATA dial.
button to open the
Changing playlist names later
You can change playlist names later.
1. Press the PROJECT key on the front panel to open the
PROJECT
2. Touch the w button for the project that contains the
playlist for which you want to change the name to
open the session selection screen.
If the selected project is not the current project, a pop-up
window appears confirming that you want to load it.
Touch the OK button.
3. Touch the w button for the playlist that contains the
session for which you want to change the name to
open the playlist selection screen.
If it is not the current session, a pop-up window
appears confirming that you want to load it. Touch the
OK
button.
4. Select the playlist that you want to change. The
background of the selected playlist name appears
yellow.
screen.
Page 83

TASCAM HS-2000
83
9 – Playlist mode
5. Touch the
6. Touch the
to open the
NOTE
If the loaded playlist is selected, the
in the pull-up menu cannot be selected.
7. Edit the playlist name. Follow the procedures in
“Editing project names” on page 40.
8. Touch the
screen or press the DATA dial to confirm the project
name and return to the
MENU
button to open a pull-up menu.
EDIT NAME
PLAYLIST NAME
Enter
button in the pull-up menu
screen.
EDIT NAME
button on the
PLAYLIST
PLAYLIST NAME
screen.
button
Loading playlists
You can load a playlist (JPPA PPL file) that is in the folder
of the current session.
The path when viewing the card on a computer will be as
follows:
{Card drive name}:\{Project name}\{Session name}\{_
playlists}\{Playlist file}
NOTE
You cannot load a playlist file that is not in the current
session.
1. Press the PROJECT key on the front panel to open the
PROJECT
2. Touch the w button for the project that contains the
playlist you want to load to open the session selection
screen.
If the selected project is not the current project, a popup window appears confirming that you want to load
it. Touch the OK button.
3. Touch the w button for the session that contains the
playlist you want to load to open the playlist selection
screen.
If it is not the current session, a pop-up window
appears confirming that you want to load it. Touch the
OK
button.
4. Select the playlist that you want to load.
5. Touch the
screen to open a pull-up menu.
screen.
MENU
button on the playlist selection
6. Touch the
NOTE
You can also load a playlist by touching its w button.
7. When a confirmation pop-up appears, touch the OK
button or press the DATA dial.
After loading completes, the Home Screen opens.
LOAD
button in the pull-up menu.
Page 84

84
TASCAM HS-2000
9 – Playlist mode
Deleting a playlist
1. Press the PROJECT key on the front panel to open the
PROJECT
2. Touch the w button for the project that contains
the playlist you want to delete to open the session
selection screen.
If the selected project is not the current project, a popup window appears confirming that you want to load
it. Touch the OK button.
3. Touch the w button for the session that contains
the playlist you want to delete to open the playlist
selection screen.
If it is not the current session, a pop-up window
appears confirming that you want to load it. Touch the
OK
button.
4. Select the playlist that you want to delete.
5. Touch the
screen to open a pull-up menu.
screen.
MENU
button on the playlist selection
Editing playlists (adding, removing and working with entries)
A playback unit in a playlist is called an “entry”.
A maximum of 100 entries can be added to a playlist.
Only takes (files) in the session in which the playlist was
created can be added as entries.
If a take (file) that is in another session folder of the same
project is added to a playlist, it will be copied to the folder
of the session where the playlist was made.
Even during playback of a playlist, entries can be added
to or removed from it and their names can be changed.
The entry that is currently playing, however, cannot be
changed.
Use the ENTRY list and ASSIGN file screens to edit playlists.
ENTRY list screen
To open this screen, touch a take or entry name button on
the Home Screen to open a pull-down menu and touch
the
ENTRY LIST
of the
ENTRY
screen.
button, or touch the
gt
ASSIGN
ENTRY
button on the ASSIGN file
g part
6. Touch the
NOTE
If you have selected the currently loaded playlist, you
cannot use the
item.
7. When a confirmation pop-up appears, touch the OK
button or press the DATA dial.
During deletion, a progress status pop-up appears.
When deletion completes, the pop-up window will
disappear.
DELETE
DELETE
button in the pull-up menu.
button on the pull-up menu
1 ENTRYgtASSIGN button
Switches between the ENTRY list screen and ASSIGN
file screen.
Touch the tASSIGN part to open the ASSIGN file
screen
.
2 Playlist name display
The current playlist name is shown.
is displayed if editing has been performed without
saving
.
3
START TC/LENGTH
Touch this area to switch between showing the
starting time (
in the
START TC/LENGTH
in white is currently displayed.
START TC
button
) and the length (
column. The one shown
LENGTH
)
Page 85

TASCAM HS-2000
85
9 – Playlist mode
4 Entry name button
Touch to select the corresponding entry.
Touch this button to display the take list on the right
side.
You can assign a take to this button by touching its
take name.
Take list on
The entry number appears inside the icon.
The status of the entry appears inside the icon. If
the format of the file is different or the file does not
exist, its name appears in gray.
Currently loaded entry
Entry okay
0 MENU button
Touch to open a pull-up menu where you can select
REBUILD, CAPTURE BC$, CLEAR, ADJUST
SAVE
and
SAVE AS
.
,
Entry in format that cannot be played
Entry missing because the registered file has
5
INF O
been deleted via FTP or on the
screen
No entry
button
BROWSE
When an entry is selected, press this button to open
an information pop-up for that entry.
When an entry is not selected, press this button to
show information about the current playlist.
6
PLAY
buttons
Touch to play the corresponding entry.
These turn green during playback of the
corresponding entries.
Touch one during playback to stop playback of the
corresponding entry.
7 Scroll buttons
Use these buttons to scroll to the beginning or end of
the entry list, or to scroll one page (five lines) forward
or backward. You can also use the DATA dial to scroll
through the entry list one line at a time.
8
START TC/LENGTH
display
The entry starting time or entry length (time) is shown.
The START TC/LENGTH button item shown in white is
currently displayed.
9
MULTI SELECT
button
Touch to enable the selection of multiple entries.
Page 86

86
TASCAM HS-2000
9 – Playlist mode
ASSIGN file screen
To open this screen, touch a take or entry name button on
the Home Screen to open a pull-down menu and touch
the
AS SIGN FILE
of the
ENTRY
screen.
RC-HS32PD connected/remote control not connected
q ENTRYgtASSIGN button
Switches between the ENTRY list screen and ASSIGN
file screen.
Touch the
screen.
w Current button
Touch this button to open the take name list of the
current session.
e Key set selection buttons
Set whether the key assignment buttons for the left or
right key set are shown.
When entries have been edited but not saved,
appears.
r Key assignment list buttons
These buttons are for entry assignments.
The flash page number and flash key number are
shown separated by a “–”.
button, or touch the t ASSIGN part
gt
ASSIGN
RC-HS20PD connected
ENTRY
g part to open the ENTRY list
button on the ASSIGN file
The playlist verification status also appears inside the
icon.
The icon for the currently playing entry is and its
button is highlighted in green.
Currently playing entry
Entry okay
Entry in format that cannot be played
Entry missing because the registered file has been
deleted via FTP or on the
No entry
BROWSE
screen
Touch one of these buttons, and then touch a take
name to assign that take to that button.
t Current folder button
This is the name of the folder that is shown in the take
list area.
Touch this button to show the session list in the take
list area.
y Take/session list buttons
This list usually shows the takes in the current session.
After touching a key assign button, touch a take name
to assign that take to that button.
Touch the current folder button to show the session
list for the current project here.
Touch the button of the session that you want to load
to open the list of takes in that session.
u Scroll buttons
Use these buttons to scroll to the beginning or end of
the take list or session list, or to scroll one page (five
lines) forward or backward. You can also use the DATA
dial to scroll through the list one line at a time.
i Page display and selection buttons
The current key assign button page is shown.
Use the + and – buttons to change the page.
o INFO button
When a key assignment button is selected, press this
button to open an information pop-up for that button.
When a take is not selected, press this button to show
information about the selected take.
When nothing is selected, touch this button to show
information about the current playlist.
p MENU button
Touch to open a pull-up menu where you can select
REBUILD, CAPTURE BC$, CLEAR, ADJUST
SAVE
and
SAVE AS
.
,
a Session and playlist name display
The current session name and playlist name are
shown.
When changes have been made but not saved,
appears.
NOTE
Explanations hereafter will use the screens shown when
an RC-HS32PD connected.
Page 87

TASCAM HS-2000
87
9 – Playlist mode
Assigning a take to an entry
1. Press the HOME key on the front panel to open the
Home Screen.
2. Touch the file name or title name button to open a
pull-down menu, and touch the
button to open the ASSIGN file screen where you can
assign entries.
AS SIGN FILE
CAUTION
If you do not save the playlist, all changes will be lost
when another playlist is loaded, the card is removed or
the unit’s power is turned off.
NOTE
If you touch a key assignment button that already
•
has an entry assigned to it, the corresponding take
appears yellow in the take list.
Only takes in the project where the playlist is can be
•
added to the playlist.
If the take that you want to add does not appear in
•
the list, use the scroll buttons and DATA dial to scroll
through the list until the take appears and then touch
its name.
If the take that you want to add is in a different session
•
in the same project, touch the current session name
button to open the session list. Then, touch the name
of the session that contains that take to open that
session’s take name list.
TIP
You can also assign takes to entries using the same
•
procedure on the
You can also touch the
•
ENTRY
screen to open the
ENTRY
t
screen.
ASSIGN
ASSIGN
button on the
screen.
On the left side are the buttons that can receive
assignments, and on the right side is the list of takes
that can be assigned.
3. Use the + and – buttons to open the page where you
want to assign the file.
4. Touch the key assignment button that you want to
assign a take to in the list on the left. The selected
button appears light blue.
5. Touch a take name in the take list to assign that take to
that button. When a take is assigned to a button, the
button’s icon changes from (no assignment) to .
6. Repeat steps 3–6 as necessary.
7. After you have completed making assignments, save
the playlist as necessary.
To save a playlist, touch the
ASSIGN file or ENTRY list screen to open a pull-up
menu, and touch the
from the Home Screen by touching a file name or title
name button to open a pull-down menu and touch
the SAVE button.
For details about saving, see “Saving playlists” on page
94.
MENU
button on the
SAVE
button. You can also save
Allocation of entries to pages
Playlist entry numbers appear on the pages as follows.
RC-HS32PD connected
Page number Entry numbers
1 1-32
2 33-64
3 65-96
RC-HS20PD connected
Page number Entry numbers
1 1-20
2 21-40
3 41-60
4 61-80
5 81-100
Page 88

88
TASCAM HS-2000
9 – Playlist mode
Clearing entry assignments
1. Press the HOME key on the front panel to open the
Home Screen.
2.
Touch the file name or title name and then touch the
ENTRY LIST
the
ENTRY
3. Select the entry for which you want to clear the
assignment. Its background will become yellow and
the take list will be shown on the right side.
When you select an entry to which a take has been
assigned, the background of the applicable take on
the take list will be yellow.
4. Touch the
open a pull-up menu.
button in the pull-down menu to open
list screen where you can work with entries.
MENU
button in the
ENTRY
list screen to
Editing entry names
1. Press the HOME key on the front panel to open the
Home Screen.
2. Touch the file name or title name and then touch the
ADJUST ENTRY
open the
ADJUST XXX
number.)
3. The characters shown next to the
is the title of the selected entry. Touch the
button to open the
can change the title of the entry.
button in the pull-down menu to
screen. (“
EDIT TIT LE
XXX
” is the entry
TITL E
button
TITL E
screen where you
5. Touch the
CLEAR
button in the pull-up menu to clear
the entry.
NOTE
You can also clear the selected entry assignment by
•
touching the highlighted take name.
On the ASSIGN file screen, when a button on the left
•
is selected, you can clear its entry by touching the
take name that appears yellow in the take list on the
right side or by touching the
touching the
CLEAR
button on the pull-up menu.
MENU
button and then
Input the title name. Follow the procedures in “Editing
project names” on page 40.
4. Touch the
Enter
button on the
EDIT TIT LE
screen or press the DATA dial to confirm the title
change.
NOTE
When a take is selected on the
ENTRY
screen or one
of the key assign buttons on the left is selected on the
ASSIGN file screen, you can also open the
screen by touching the
the
ADJUST
button in the pull-up menu.
MENU
button and then touching
ENTRY list screen
ADJUST
Page 89

TASCAM HS-2000
89
ASSIGN le screen
Editing playback starting/ending points
1. Press the HOME key on the front panel to open the
Home Screen.
2. Touch the file name or title name and then touch the
ADJUST ENTRY
open the
number.)
The Start End Point page will be shown automatically.
ADJUST XXX
button in the pull-down menu to
screen. (“
XXX
” is the entry
9 – Playlist mode
NOTE
When a take is selected on the
•
of the key assign buttons on the left is selected on the
ASSIGN file screen, you can also open the
screen by touching the
touching the
Touch the
•
playback position as the Start/End point.
Touch the
•
where you can either set the Start and End Point times
to the BC$STANDBY and END mark times or reset them
to the file beginning and end times.
Touch the • CAPTURE
Point times to the BC$STANDBY and END mark times.
Touch the • RESET
Point times to the file beginning and end times.
ADJUST
CURRENT
BC$
, button to open pop-up window
button in the pull-up menu.
button to capture the current
button reset the Start and End
ENTRY
MENU
button and then
button to set the Start and End
screen or one
ADJUST
3. When you touch a time display unit, its background
will become yellow and the corresponding cursor will
start blinking.
After a time display unit has been selected, use the
D ATA dial to change the Start and End points.
Changing a selected unit past its maximum (minimum)
limit will increase (decrease) the next larger (smaller)
unit by one.
4. Select the unit of resolution that you want to change.
Select the frame (f) unit to change by frame precision,
or select the sample (smpl) unit to change by sample
precision.
Page 90

90
TASCAM HS-2000
9 – Playlist mode
Setting playback to the BC$STANDBY/ END range
You to change the playback range to the BC$STANDBY–
BC$END mark interval with one operation.
1. Touch the
ASSIGN
2. Touch the
following pop-up window.
MENU
button on the playlist mode
or
ENTRY
CAPTURE BC$
screen to open the pull-up menu.
button to open the
4. In the confirmation pop-up, touch the
ALL
button to change the playback range to the
BC$STANDBY–BC$END interval.
NOTE
Touch the
return to the
5. In the pop-up window that appears after step 1, if you
6. Touch the
NOTE
Touch the
return to the
CANCEL
touch the
window appears.
window to reset the starting and ending times to the
beginning and end of the file.
CANCEL
button in the pop-up window to
ASSIGN
RESET ALL
RESET ALL
ASSIGN
or
ENTRY
button in the pop-up window to
or
ENTRY
screen.
button, the following pop-up
button in the pop-up
screen.
CAPTURE
NOTE
Touch the
return to the
3. Touch the
CANCEL
ASSIGN
CAPTURE ALL
confirmation pop-up.
button in the pop-up window to
or
ENTRY
screen.
button to open a
Page 91

TASCAM HS-2000
91
9 – Playlist mode
Editing the playback starting and ending points using the number buttons and mark list screen
1. When you touch the
Point page of the
START POINT
editing the playback start or end point is shown.
Use the
POINT
frame value.
2. Use the number buttons to input the playback start/
end point.
•
•
•
•
FRAME EDIT
screen to set whether or not you will edit the
If you begin input without selecting a unit, input will
start from the smallest one.
To input a specific unit, touch it to make its
background yellow, and then use the number
buttons and the DAT A dial to enter two digits at a
time.
Touch the
playback position to the input value.
Touch the
of the file as the value.
CURRENT
SET MAX
E DIT
button on the Start End
ADJUST XXX
or
EDIT END POINT
button on the
b button to copy the current
5 button to set the end time
screen, the
EDIT START
E DIT
screen for
3 Touch the
NOTE
When you change the playback start/end time, the length
of the interval between the playback start and end times
will be adjusted automatically so that it is longer than the
total length of the fade-in and fade-out.
TIP
You can also use the • PLAY key and other transport
keys while listening to the audio to find a location, and
then touch the
value.
This can also be edited using an external keyboard
•
on the
POINT
all values (set them to 00).
ENTER
EDIT START POINT
screens. Press the keyboard’s ESC key to clear
button to confirm the setting.
CURRENT
b button to input that
and
EDIT END
Touch the
•
Touch the
•
where you can copy the time from a specific mark.
On this screen, touch the w button of next to a mark
to copy its time to the playback start/end point and
return to the
CLEAR
Ma rk List
button to reset all values to 00.
ADJUST XXX
button to open the mark list
screen.
Page 92

92
TASCAM HS-2000
9 – Playlist mode
Editing playback starting times
1. Press the HOME key on the front panel to open the
Home Screen.
2. Touch a file name or title name and then touch the
ADJUST ENTRY
open the
ADJUST XXX
number).
NOTE
When a take is selected on the
of the key assign buttons on the left is selected on the
ASSIGN file screen, you can also open the
screen by touching the
the
ADJUST
3. Touch the
button in the pull-up menu.
Start TC Fade/Level
the page shown below. The value shown next to the
Start TC item is the playback starting time for the
selected entry.
button in the pull-down menu to
screen (“
ENTRY
MENU
button and then touching
XXX
” is the entry
screen or one
ADJUST
tab to open
5. Use the number buttons to input the playback starting
time.
If you begin input without selecting a unit, input will
•
start from the smallest one.
To input a specific unit, touch it to make its background
•
yellow, and then use the number buttons and the
DAT A dial to enter two digits at a time.
Touch the • CURRENT
timecode to the input value.
Touch the • CLEAR
7. Touch the
ENTER
button to confirm the setting.
b button to copy the current
button to reset all values to 00.
TIP
You can also use the • PLAY key and other transport
keys while listening to the audio to find a location, and
then touch the
CURRENT
b button to input that
value.
This can also be edited using an external keyboard.
•
Press the keyboard’s ESC key to clear all values (set
•
them to 00).
Editing lengths and levels of fade-ins/ outs
1. Press the HOME key on the front panel to open the
Home Screen.
2. Touch a file name or title name and then touch the
ADJUST ENTRY
open the
ADJUST XXX
number).
button in the pull-down menu to
screen (“
XXX
” is the entry
4. Touch the
T/ C
screen, and use the number buttons to change
the Start TC.
Use the
T/ C
FRAME EDIT
screen to set whether or not you will edit the
frame value.
E DIT
button to open the
EDIT START
button on the
EDIT START
3. Touch the
Start TC Fade/Level
the page shown below.
tab to open
Page 93

TASCAM HS-2000
93
9 – Playlist mode
4. Select the Fade In, Fade Out or Level knob, and turn
the D ATA dial to change the value.
Setting ranges:
Fade In / Out Length: 0–30 seconds
(0.1 second per step or 1.0 second per step when the
dial is pressed and rotated)
Level: -∞ to +10dB
NOTE
When the length of the fade-in or fade out is changed,
•
the value is automatically adjusted to stay within the
length set by the playback start and end time.
The playback level is shown by the solid red line.
•
The nominal level (0dB) is shown by the dotted orange
•
line.
Playback on ADJUST screens
You can use the transport controls while on an
XXX
screen to play a take while you are adjusting its
settings.
Operation is the same as during normal transport
•
operation expect that the. or / keys are used
to jump to the file beginning, Start Point, End Point
and file end.
If you change the Start Point or Fade In Length, the
•
playback point will move to the Start Point. If you
change these during playback, playback will resume
after the playback point has moved.
If you change the End Point or Fade Out Length, the
•
playback point will move to the point below. If you
change these during playback, playback will resume
after the playback point has moved.
ADJUST
Playback when PREVIEW is OFF
The original audio is played back without being
•
affected by the Fade IN/OUT and Level Adjust
settings.
You can move out of the range between the Start
•
and End Points.
When the End Point is reached during playback, the
•
playback position jumps back to the Start Point and
stops.
Press the • PLAY key to start playback from the Start
Point.
Move to positions after the End Point by using
•
the , key, / key, SHIFT+/ key and JOG/
SHUTTLE dial.
Playback when PREVIEW is ON
Only the range between the Start and End Points is
•
played back. L
not possible.
The audio is played back with the Fade IN/OUT and
•
Level Adjust settings applied.
ocating to points outside this range is
PREVIEW OFF PREVIEW ON
When
changing End
Point
When
changing Fade
Out Length
Touch the
•
playback occurs on the
Two seconds
before End Point
Two seconds
before Fade Out
start point
PREVIEW
Two seconds
before Fade Out
start point
Two seconds
before Fade Out
start point
button to change how
ADJUST XXX
scr
een
.
Page 94

94
TASCAM HS-2000
9 – Playlist mode
Saving playlists
You can save the current playlist in the session currently
loaded as a JPPA PPL file.
CAUTION
After editing a playlist, save it as necessary. If you do
not save a playlist after editing, all changes will be lost
when, for example, you load another playlist, remove the
selected card, or turn off the unit’s power.
An “*” appears in the file name or title name button when
editing has occurred but it has not been saved yet. When
an “*” is shown, a pop-up message asking if you want to
save the playlist will appear when you try to do something
that would clear the edits, including loading another
playlist, creating a new playlist or changing the operation
mode.
1. Press the HOME key on the front panel to open the
Home Screen.
2. Touch a file name or title name button to open a pulldown menu and touch the
saving the playlist.
SAVE
button to start
Naming and saving playlists
On the
MENU
AS
the playlist before saving it.
ENTRY
button to open the pull-up, if you touch the
button instead of the
or
ASSIGN
screen, after touching the
SAVE
button, you can rename
SAVE
1. Press the HOME key on the front panel to open the
Home Screen.
2. Touch a file name or title name button to open a pulldown menu and touch the
The
PLAYLIST NAME
SAVE AS
button.
screen where you can input a
new playlist name opens.
While saving, a progress status pop-up appears.
When saving completes, the pop-up disappears.
NOTE
You can also save a playlist by touching the
button on the
pull-up menu and touching the
ASSIGN
ENTRY list screen
or
ENTRY
screen to open a
SAVE
button.
MENU
3. Input the playlist name. Follow the procedures in
“Editing project names” on page 40.
4. Touch the
Enter
button on the
PLAYLIST NAME
screen or press the DATA dial to save the playlist with
this name.
While the file is being created, a progress status popup appears.
When file creation completes, the pop-up disappears.
NOTE
When a file with the input name already exists, a pop-up
window confirming whether you want to overwrite the
file is displayed.
Touch the OK button to overwrite the file. Touch the
CANCEL
button to return to the
PLAYLIST NAME
screen.
TIP
You can also name and save a playlist by touching the
MENU
button on the ASSIGN file or ENTRY list screen to
open a pull-up menu, and touch the
SAVE AS
button.
ASSIGN le screen
Page 95

TASCAM HS-2000
95
9 – Playlist mode
Playback in playlist mode
Project, session and playlist selection
1. Press the PROJECT key on the front panel to open the
PROJECT
2. Touch the w button next to the project that contains
the playlist that you want to play to open the session
selection screen.
If the selected project is not the current project, a popup window appears confirming that you want to load
it. Touch the OK button.
screen.
4. Touch the name of the playlist that you want to play to
select it. Its background becomes yellow.
5. Touch the
screen to open a pull-up menu.
6. Touch the
the playlist.
A confirmation pop-up window appears.
MENU
button on the Playlist selection
Playlist selection screen pull-up
LOAD
button in the pull-up menu to load
3. Touch the w button for the session that contains
the playlist that you want to play to open the playlist
selection screen.
If it is not the current session, a pop-up window
appears confirming that you want to load it. Touch the
OK
button.
TIP
You can also touch the current project/session name
button at the top right of the
the playlist selection screen for the current session.
PROJECT
screen to open
7. Touch the OK button or press the DATA dial.
When loading completes, the Home Screen opens.
NOTE
On the playlist selection screen, you can also touch the
w button for the playlist that you want to play to load
it instead of touching the
LOAD
button in the pull-up menu item,.
When the same pop-up message as shown above
appears, touch the OK button or press the DATA dial.
MENU
button followed by the
Online function settings
Refer to “Online function” on page 129 to make online
output settings.
Page 96

96
TASCAM HS-2000
9 – Playlist mode
Playback control in playlist mode
Press the PLAY key to start playback.
Press the PAUSE key to pause playback.
Press the PLAY key again to resume playback.
Press the STOP [RETAKE] key to stop playback.
Press the . [MARK .] key or /[MARK /] key
to skip to the next take.
Press and hold them m [ ] or , [ ] key to
search backward or forward.
Press the . [MARK. ] or /[MARK /] key
while pressing and holding the SHIFT key to move
between marks.
Press and hold them m [ ] or , [ ] key while
pressing and holding the SHIFT key to search at highspeed.
NOTE
On the
•
only the currently selected take is played or whether
all the takes in the current session are played. You can
also enable and disable repeat playback. (See “Playback
settings (PLAY SETUP)” on page 102.)
Playback functions can also be performed using
•
a remote control connected through the parallel
connector.
PLAY SETUP
screen, you can set whether
Using the call function
Press the CALL [CHASE] key to locate to the point where
playback was last started from playback standby (call
point) and put the unit in playback standby mode.
BWF-J cue point (playlist mode)
When the Follow BWF-J item is set to ON, if a BWF-J
cue point is detected during playback, the following
corresponding operation will occur. In addition, if the
BWF-J Tally Out item is set to ON, in response to each
BWF-J cue point, the cue signal and tally signal will be
output from the parallel remote connector.
When an entry is selected, the transport locates
to the first BC$STANDBY point as the playback
BC$STANDBY
BC$CM
BC$END
BC$STOP
BC$FILE
BC$PAUSE
start point. During playback, playback pauses
when this cue point is detected. In either case, a
BC$STANDBY tally is output.
During playback, when this cue point is
detected, a BC$CM CUE signal is output.
During playback, when this cue point is
detected, a BC$END CUE signal is output.
During playback, when this cue point is
detected, a BC$STOP CUE signal is output, and
playback stops.
During playback, when this cue point is
detected, a BC$END CUE signal is output. If
there is a BC$STANDBY cue point in the next
entry, playback will move to it and pause at that
point. A BC$STANDBY tally is output.
During playback, when this cue point is
detected, a BC$PAUSE tally is output, and
playback pauses.
Using the flash start function
Flash start playback is possible using a TASCAM RCHS32PD or RC-HS20PD (sold separately) or other remote
controller.
For details, see “Flash start function” on page 130.
Page 97

TASCAM HS-2000
97
In this chapter, we explain how to use the unit when
Playback area
Playback area
Playback area
Playback area
BC$STANDBY
BC$STANDBY
BC$STANDBY
BC$END
BC$END
BC$END
BC$END
1st take
2nd take
3rd take
4th take
Next take has BC$STANDBY,
so plays until BC$END
Next take has BC$STANDBY,
so plays until BC$END
Next take does not have
BC$STANDBY, so plays until end
No next take, so plays until end
it’s operation mode is on-air mode (See “Selecting the
operation mode” on page 47.)
Please refer to “4–Basic operation” on page 29 when
reading this chapter and “In on-air mode” on page 22.
Selecting files for playback
10 – On-air mode
In this mode, you can select audio files in the CF card
root folder for playback. (Only files that have the same
sampling frequency as the current unit setting can be
played back.)
1. Touch the information area or the take name button
on the Home Screen to open a pull-down menu, and
touch the
AIR LIS T
key to open the
The
ON AIR LIST
screen. You can also push the PROJECT
ON AIR LIST
ON AIR LIST
button to open the
ON
screen.
screen shows the audio files that
match the set sampling frequency in the root directory
of the CF card in file name order.
2. Touch the
AIR LIS T
SELECT
buttons on the left side of the
screen to check/uncheck files. Checked
files will be used for on-air playback.
Remove a check mark, making the box gray, to
deselect the file for on-air playback.
ON
If there is no take selected currently, or there are no valid
files at all, the Fs setting and card capacity information is
shown.
Playback area in on-air mode
ON AIR
button
OFF – – Entire take
ON OFF – Entire take
ON ON Normal Entire take
ON ON
BWF-J
Follow
BC$END
Mode
Jump to
Standby
Playable area
If next take has BC$STANDBY mark:
BC$STANDBY to BC$END
If next take does not have
BC$STANDBY mark:
BC$STANDBY to take end
NOTE
By default, all files in the root folder of the CF card are
•
checked.
Only files that match the currently set sampling
•
frequency (Fs) are shown.
Even if the Fs setting matches, files with more than 2
•
channels and other files that cannot be played back by
this unit will not be recognized or shown.
The maximum number of audio files that can be
•
recognized and shown is 100. If the root folder
contains more than 100 files with the currently set Fs,
the first 100 (in file name order) will be recognized.
The
SELECT
•
playback is stopped and the
The LENGTH column item shows the length of the
•
buttons can only be used when
ON AIR
button is OFF.
playable area of the file. Beneath the “LENGTH” column
name at the top right, the total playback time of all the
selected files is shown.
Touch the
•
INF O
button to open a pop-up window
that shows information about the file of the currently
selected take if there is one.
NOTE
If there is no BC$STANDBY mark, playback is from the
•
take beginning
If there is no BC$END mark, playback is until take end
•
Marks other than BC$STANDBY and BC$END have no
•
effect on the playback area.
For details about the use of BC$END MODE, see
•
“GENERAL page (playback settings)” on page 102.
Examples of playback areas when the ON AIR button is
8
ON, Follow BWF-J is ON and the BC$ END mode is Jump
to Standby
Page 98

98
TASCAM HS-2000
10 – On-air mode
Using the ON AIR button to switch between rehearsal/confirmation playback and broadcast playback modes
You can use the
ON AIR LIST
confirmation” and “broadcast” playback modes.
ON AIR
•
The
only the playback area can be played back. (The
CREDITS
check and file name buttons are also disabled.) When
you switch from OFF to ON, the Home Screen time
counter changes to total time display and playback
pauses at the beginning of the first take.
ON AIR
•
playback mode
The
locating to and playing back any part of a file (take) is
possible.
When you switch from ON to OFF, the Home Screen time
counter is automatically set to elapsed time display.
NOTE
The
ON AIR
transport is stopped.
ON AIR
screens to switch between “rehearsal/
button ON (red): broadcast playback mode
CREDITS
playback and
button OFF: rehearsal/confirmation
CREDITS
button can only be used when the
buttons on the HOME and
playback button is disabled, and
ON AIR LIST
playback button is enabled, and
screen
Playback control in on-air mode
Credits playback
This function makes it easy to play just the beginnings of
files.
The term “credits” is commonly used in Japan for the audio
played at the introduction of a program.
1. Turn off the
AIR LIS T
2. Set the current file (take) using the
screen file name buttons or the . and / keys.
NOTE
Only playable files can be set as the current take.
•
After starting up, changing the Fs or activating on-air
•
mode, the first playable file in the list will be selected
as the current take for playback.
3. Touch the
or
ON AIR LIST
of the current take from its beginning. Playback stops
when the appropriate mark is reached.
•
•
•
During playback, the take name button of the file
being played back appears green on the
LIST
ON AIR
screen.
CREDITS
When the Follow BWF-J setting is ON, playback
continues from the beginning of the file to the first
BC$STANDBY mark.
When the Follow BWF-J setting is OFF, playback
continues from the beginning of the file to the first
mark.
If neither of the above conditions apply, the file plays
until its end and then playback stops.
screen.
button on the HOME or
ON AIR LIST
playback button on the HOME
screen to start credits playback
ON
ON AIR
Press the PLAY key to start playback.
Press the PAUSE key to pause playback.
Press the PLAY key again to resume playback.
Press the STOP [RETAKE] key to stop playback.
Press the . [MARK .] key or / [MARK /] key
to skip to the next entry.
Press and hold the m [ ] or , [ ] key to
search backward or forward.
Press the . [MARK .] or / [MARK /] key
while pressing and holding the SHIFT key to move
between marks.
Press and hold the m [ ] or , [ ] key while
pressing and holding the SHIFT key to search at highspeed.
NOTE
On the
•
only the currently selected take is played or whether
all the takes in the root folder are played. You can also
enable and disable repeat playback. (See “Playback
settings (PLAY SETUP)” on page 102.)
Playback functions can also be performed using
•
a remote control connected through the parallel
connector.
PLAY SETUP
screen, you can set whether
4. During credit playback, you can press the
playback button to stop playback.
NOTE
The take name and
ON AIR LIST
AIR
button is OFF and playback is stopped or during
credit playback. They cannot be used when the
button is ON or during ordinary playback.
CREDITS
screen can only be used when the
playback buttons on the
CREDITS
ON
ON AIR
Page 99

TASCAM HS-2000
99
10 – On-air mode
Using the call function
Press the CALL [CHASE] key to locate to the point where
playback was last started from playback standby (call
point) and put the unit in playback standby mode.
BWF-J cue point (on-air mode)
When the Follow BWF-J item is set to ON, if a BWF-J
cue point is detected during playback, the following
corresponding operation will occur. In addition, if the
BWF-J Tally Out item is set to ON, in response to each
BWF-J cue point, the cue signal and tally signal will be
output from the parallel remote connector
BC$STANDBY
BC$CM
BC$END
BC$STOP
BC$FILE
BC$PAUSE
When the
transport locates to the first BC$STANDBY point
in the first take as the playback starting point.
During playback, playback pauses when this
type of cue point is detected.* In either case, a
BC$STANDBY tall is output.
*If BC$END Mode is set to Jump to Standby,
playback will pause.
During playback, when this cue point is
detected, a BC$CM CUE signal is output.
During playback, when this cue point is
detected, a BC$END CUE signal is output.
"If BC$END Mode is set to Jump to Standby
and the next take has a BC$STANDBY cue point,
playback will continue from that point.
During playback, when this cue point is
detected, a BC$STOP CUE signal is output, and
playback stops.
During playback, when this cue point is
detected, a BC$END CUE signal is output. If
there is a BC$STANDBY cue point in the next
entry, playback will move to it and pause at that
point. A BC$STANDBY tally is output.
During playback, when this cue point is
detected, a BC$PAUSE tally is output, and
playback pauses.
ON AIR
button is turned ON, the
Changing the sampling frequency in on-air mode
You can change the sampling frequency when playback
is stopped in on-air mode using the
SYNC T/C
1. Touch the
SYNC T/C
SYNC T/C
2. Touch the
screen to open the
screen.
SYNC
button on the Home Screen or the
button on the
screen
ON AIR Fs
ON AIR Fs
CLOCK
button at the top left of the
3. Touch the button for the desired sampling frequency
to open a confirmation message. Touch the OK button.
4. When a second confirmation message appears, touch
the OK button again.
NOTE
After you change the sampling frequency (Fs), only
•
files that match the selected Fs will be shown on the
ON AIR LIST
Even if the Fs setting matches, files with more than 2
•
screen.
channels and other files that cannot be played back by
this unit will not be recognized.
CLOCK
MENU
screen to open the
page.
screen.
page of the
Limitations in on-air mode
Certain settings (repeat mode, auto cue, auto ready,
•
incremental play) on the
be turned OFF when the operation mode is switched
to on-air mode. They can be turned ON, but this
change will not be retained.
In on-air mode, marks cannot be set, edited or
•
cleared. If you press the Mark key, a pop-up appears,
warning “Cannot set Mark point in ON AIR Mode.”
The
EDIT NAME, EDIT TIM E
•
buttons on the Mark list screen will appear disabled.
PLAY SETUP
and
DELETE
screen will
Page 100

100
TASCAM HS-2000
11 – Internal settings
In this chapter, we explain the internal settings of the unit
in detail.
Menu screen
Press the MENU key on the front panel to open the
screen as shown below.
REC SETUP button
8
Make recording settings.
PLAY SETUP button
8
Make playback settings.
SYNC T/C button
8
Make synchronization and timecode settings.
REMOTE SETUP button
8
Make settings for external remote control.
AUDIO I/O button
8
Make settings related to the input and output
audio signals.
METER SETUP button
8
Make level meter settings.
SYSTEM SETUP button
8
Make system settings.
VERSION INFO button
8
View the system version.
BROWSE button
8
View and perform operations on the folders and
files on CF cards and USB memory.
MEDIA MANAGE button
8
Perform operations, including copying and
formatting, on CF cards and USB memory.
OPERATION MODE button
8
Set the operation mode.
MENU
Recording settings (REC SETUP)
The
REC SETUP
MODE, FILE FORMAT
Touch a tab at the bottom of the screen to open the
corresponding page.
REC MODE page
Make settings related to the recording mode.
Confidence Monitor
Turn the confidence monitoring function, which
allows immediate playback of the recorded signal for
monitoring, ON (default) or OFF.
To use the confidence monitoring function, however,
the sampling frequency and number of tracks must be
set as follows.
Fs
(sampling frequency)
REC Mode Single
NOTE
If the current project Fs setting is 88.2k, 96k, 176.4k or
192kHz, or REC Mode is set to Mirror, the Confidence
Monitor setting will be fixed to OFF.
REC Mode
Single The unit records only to the currently selected CF
Mirror The unit records to both CF cards simultaneously.
NOTE
If the current project Fs setting is 88.2k, 96k, 176.4k or
192kHz, or Confidence Monitor is set to ON, the REC Mode
setting will be fixed to Single.
screen has three tabbed pages:
and
OPTIONS
44.1k, 48k, 48k–0.1% or
48k+0.1%
card (default).
.
REC
 Loading...