

Page 1

USER’S MANUAL
HDRM7250
Many thanks for purchasing your TEAC product. In order to get the best performance and experience
from your product, please read this manual thoroughly.
We also suggest you refer to our website for news and further updates.
Revision 1.03 – November 2006
Page 2

Disclaimer:
We make our sincere effort to ensure the accuracy of the material described herein; however the
author and TEAC Australia Pty Ltd make no warranty expressed or implied with respect to the quality,
correctness, reliability, currentness, accuracy or freedom of error of this document of the product it
describes. We make no representation or warranty with respect to the contents hereof and
specifically disclaim any implied warranties of fitness for any purpose. The author and TEAC
Australia Pty Ltd disclaim all liability for any direct, indirect, incidental or consequential, special or
exemplary damages resulting from the use of this product or from the use of any other products
described within this document.
Please refer to our website http://www.teac.com.au
manual.
Copyright Notice ©2006:
The material contained within this document is copyrighted and all rights reserved by the author.
Dolby Digital™, the double D and AC-3 are registered trademarks of Dolby Laboratories.
Windows™ and Windows Media™ are registered trademarks of Microsoft Corporation.
HDMI™, the HDMI logo and High Definition Multimedia Interface are trademarks or registered
trademarks of HDMI Licensing LLC.
for any corrections or improvements to this
ii
Page 3

TABLE OF CONTENTS
PRODUCT SAFETY NOTICE........................... ...................................................... .......................................3
PLEASE READ BEFORE USE........................................ ...............................................................................4
What happens when first time connected?....................................................................................... 4
Is Digital TV reception available in your home?................................................................................4
I don’t seem to have Digital TV reception in my home, what shall I do?........................................... 4
Going into Standby mode................................................................................................................. 4
WARRANTY STATEMENT...................................................................................................... .......................5
THE REMOTE CONTROLLER...................................................................................... ................................6
GETTING STARTED......................................................................................................... ................................7
SDTV ............................................................................................................................................... 7
HDTV ............................................................................................................................................... 8
HDMI CONNECTION.................................................................................................... ................................8
COMPONENT VIDEO CONNECTION....................................... ...............................................................8
THE SET-UP PROCESS ............................................................................................................ ..... 9
BASIC OPERATION................................................................................................... .....................................11
SERVICE LIST MODE................................................................................................................... 11
LOGICAL CHANNEL NUMBERING............................................................................................... 11
INFO MODE................................................................................................................................... 12
CLOSED-CAPTIONING................................................................................................................. 12
DIGITAL AUDIO............................................................................................................................. 12
SWITCHING LETTERBOX 4:3 MODE........................................................................................... 13
TURN-OFF INFO MODE................................................................................................................ 13
TELETEXT....................................................... .............................................................................. 13
PICTURE-IN-PICTURE.................................................................................................................. 13
THE DIGITAL RECORDER...........................................................................................................................14
PAUSE LIVE TELEVISION (TIME-SHIFTING)............................................................................... 14
FORWARD AND REWIND TELEVISION....................................................................................... 14
iii
Page 4

SLOW MOTION ............................................................................................................................. 15
RECORDING PROG RAMMES.....................................................................................................................16
HARD-DRIVE MANAGEMENT....................................................................................................................17
RECORDING TIMERS.............................................................................. ......................................................18
PLAYBACK RECORDINGS..........................................................................................................................19
ELECTRONIC PROGRAM GUIDE....................................................... ......................................................20
VIDEO PROGRAM GUIDES.......................................................................................................... 21
PARENTAL LOCK.................................................................................. ..........................................................22
PREFERENCES........................................................................... ......................................................................23
TUNING-IN .................................................................................................................................... 23
FAVOURITE CHANNELS .............................................................................................................. 24
AUDIO & VIDEO SETTINGS .........................................................................................................24
DISPLAY........................................................................................................................................ 25
NETWORKING................................ ...................................................... .............................................................26
EXPORT RECORDINGS............................................................................. ...................................................27
MEDIAPLAYER-HD....................................................................................... ...................................................29
INTERNET........................................... ...................................................... ..........................................................30
ACCESSING MEDIA FILES........................................................................................................... 30
BOOKMARKS................................................................................................................................ 31
NOTES....................................... ................................................................................ .......................... ..................32
SOFTWARE SERIAL NUMBER..................................................................................................... 32
FREQUENTLY ASKED QUESTIONS.............................. ........................................................................33
SPECIFICATIONS................................ ...................................................... ......................................................36
iv
Page 5

PRODUCT SAFETY NOTICE
WARNING! Do not open this product as there is a risk of electric shock. Under no circumstances
should you try to repair the receiver yourself as this will invalidate your product warranty.
If a fault occurs, check the troubleshooting guide at the rear of this manual. Should problems
continue to persist, contact the National Customer Service Centre on 1800 656 700 between 9am to
5pm weekdays.
• Always allow a minimum of 5cm of free space around the product for adequate ventilation.
• Always place the product on a firm flat surface before applying power.
• Do not expose this product to dripping, splashing or any moisture. Be careful not to place
liquids or vases too close to this product.
• Do not place naked flame sources such as lit candles near the product.
• Keep the product away from domestic heating equipment and direct sunlight.
• Always disconnect the power-cord from the wall socket before cleaning it. Use a soft and
mild solution of washing liquid to clean the casing.
• Your product consists of material which can be recycled and reused if disassembled by a
specialized company. Please observe your local regulations regarding the disposal of
packaging material, exhausted batteries and old equipment.
• It is recommended that you disconnect the aerial from this product during a heavy storm as
lightning can cause severe damage.
• Always disconnect power when not in use for long periods of time.
• Always place product in standby mode for at least 1 minute before disconnecting mains
power.
This product complies with Australian Regulatory requirements.
3
Page 6

PLEASE READ BEFORE USE
Product Installation Notice
What happens when first time connected?
When power is first applied, you product will introduce a step-by-step setup process on screen. At the
same time, the internal hard-drive will begin the checking process (takes about 10 minutes). Whilst
this process is taking place, the rewind, record and pause television functions cannot be used. In
addition, the USB ports may not available for use until approximately 2 minutes after the checking
process has completed.
Is Digital TV reception available in your home?
Generally speaking; if this receiver was on display (demonstration) by your local retailer and you live
within the same area/town/city, then it should work within your home.
If you experience break-up of picture or poor performance, it is recommended that you contact your
professional television antenna installer first. Many users assume that if the analogue television signal
is good then the digital television signal will also be good. This is rarely the case.
Your professional antenna installer will need to check your signal quality (not necessarily the signal
strength) for digital reception. The antenna installer may advise you to upgrade your television
antenna to a new digital ready antenna, and install new cabling such as RG6 quad shield cable.
For more information on digital television installations, visit the Digital Broadcast Australia website
found at http://www.dba.org.au
I don’t seem to have Digital TV reception in my home, what shall I do?
Digital Television is still considered relatively new to Australia and it will take time for it to be available
everywhere around Australia. If Digital Television reception is not available to you, neatly place
together all packaging and supplied cables back into the box. Have your receipt (proof of purchase
ready and contact your place of purchase for further details on what you should do.
Going into Standby mode
When you enter the standby mode; around 1 minute later, your set-top box will partially turn back on
by itself to do some additional network and hard-disk checking. This takes around 20 seconds and
the front display may go blank. This is normal. The set-top box will automatically go back to standby
mode when completed.
.
)
4
Page 7

WARRANTY STATEMENT
Terms & Conditions for HDRM7250 DVR set-top box
1. TEAC warrants to the original retail purchaser only, that this product is free from defects in material and workmanship
2. Subject to the terms herein, this warranty effectively covers the equipment for 12 months from the date of purchase.
3. All parts, except the external cabinet, are warranted as specified in Warranty Periods Table, and will be repaired or
4. Any normal customer maintenance as described in the owner’s manual is not covered by this warranty (such as
5. This warranty does not apply to equipment showing abuse, damage or that it may have been tampered with, altered
6. In the event that this unit or any defective parts must be returned to TEAC Service Centres, a copy of this warranty
7. In home service will only be provided only under special circumstances and must be authorized by TEAC Australia
8. TEAC National Service Centre in home service and installation is available at competitive rates.
9. No one is authorized to assume any liability on behalf of TEAC or impose any obligation on it, in connection with the
10. In no event will TEAC be responsible or liable for indirect or consequential damages from interrupted operations or
11. Warranty is not transferable to any subsequent purchaser if the product is sold during the warranty period,
Please keep this information for your own records.
Please refer to the owner’s manual to ensure that you have followed the correct installation and operating procedures.
1. Read owner’s manual carefully
2. If you require Warranty Service, please contact the TEAC Service Centre
3. Please have your purchase receipt as your proof of purchase and the following details completed for a valid Warranty.
4. Please ensure that your product is packed appropriately upon return to the service centre.
If you have any questions, please contact TEAC National Service by e-mailing us at service@teac.com.au
1800 656700 between 9:00am and 5:30pm EST weekdays.
Keep your purchase receipt to enable you to proceed quickly in the event of a Warranty Service.
under normal domestic use and authorizes free service during the warranty period at any TEAC Authorized Centre
only. TEAC warranty only applies to products purchased, used and serviced in Australia.
No in-home service is provided for Digital Set-top Box products.
replaced at the sole judgment of TEAC.
cleaning mechanical parts, etc.)
or repaired outside any TEAC Authorized Service Centre. If so, the warranty will be void.
statement and a copy of your purchase receipt
must be sent freight prepaid to the nearest authorized TEAC Service Centre. After the repair, the unit will be
available for collection by the owner or it will be returned to the owner. The warranty does not cover freight or
insurance. In all cases of in-transit damages or loss, a claim must be filed against the carrier by the purchaser.
National Service;
In a situation or circumstance, where an in home service call is made, a service fee will be charged by the Service
Provider (or TEAC) including travel fee if outside normal service area.
sale of any equipment other than as stated in this warranty and outlined above.
other causes.
Owner’s Name
Owner’s Address
Postcode
Model Name/No. Serial No.
Dealer’s Name
Dealer’s Address
Postcode
must be enclosed to be a valid warranty. Such equipment or parts
or telephone us on
5
Page 8

THE REMOTE CONTROLLER
HDTV – used to display information
about the HDTV mode.
CANCEL – either cancel or close some
menus and services.
MENU – to access the receivers
options, tuning functions and other
preferences.
GUIDE – toggle the electronic
program guide on and off.
V+ / V- adjust the volume level.
PIP – currently not used.
PREV – used to REWIND
recordings and visit previous
pages on some screens.
SUBMENU – used for special
menu features available with
some services and also to
activate teletext on 7 Digital.
MUTE – toggles the sound on
and off.
THE CENTRE JOYSTICK –
navigate in menus and special
services. Press down on the
joystick for the OK function.
Troubleshooting: If the remote fails to function properly, please check that your batteries are inserted
in the correct direction and that they are in good condition.
STANDBY – used to toggle
your receiver on and off.
[0-9] – directly access your
television channels.
On some input fields, multiple
pressing results in the character
entry [A-Z] similar to using a
mobile telephone.
LIST - displays a list of
services available for viewing.
COLOUR KEYS – perform
some actions often indicated
on the screen.
P+ / P- keys are used to
change channels.
INFO - used to display
information on the current now
and next programme.
NEXT – used to FORWARD
recordings and visit next pages
on some screens.
PLAY/PAUSE/REC/STOP –
used for digital recording
purposes.
6
Page 9

GETTING STARTED
INTRODUCTION
Digital Television had begun January 2001 within Australia. Since this time, digital television
programs and services have evolved and all Australians can now enjoy this exciting new technology.
You will find today additional television channels not available on the older analogue television system.
This product is compatible with both Standard Definition and High Definition viewing and recording
giving you the best possible digital experience.
In this section, you will learn how to connect your set-top receiver for the best performance.
Connect your outdoor antenna system to the antenna input. (ANT IN)
Unlike other products, no loop-through RF cable is required to link the two tuners. This is done
internally.
SDTV
For Standard Definition Televisions, you will require only the Yellow-White-Red lead.
Connect one end to the set-top box (Video-L-R). Connect the other end of this
lead to your AV input on your television. Most televisions have more than one
input so be sure to remember which input was used. Then press the AV button on
your television until you select the right input.
Next follow the set-up screens as shown in the Step-by-Step set-up section.
7
Page 10

HDTV
For High Definition Televisions, you have a choice of either Component Video (YPbPr) or a Digital
HDMI connection. Note that the HDMI lead is not supplied with this product.
HDMI CONNECTION
HDMI is the newest cable type designed specifically to provide an easy
method to connect digital video and audio signals between set-top boxes
(and some DVD players) to a new flat panel screen. Simply connect the
HDMI lead between the set-top box and your television. Make sure on your
television you select the right input source (press AV).
COMPONENT VIDEO CONNECTION
To connect via Component Video signals, you will require two leads as
supplied. Connect the Green-Red-Blue lead to the rear of the set-top box. It
is labeled Y Pb Pr. The Green lead connects to the Y signal. The Red lead
connects to the Pr signal. The Blue lead connects to the Pb signal.
The other end of this lead connects to the same colours on your television. Make sure the right input
is selected by pressing the AV key on your flat television screen.
For sound, you will need to use the Yellow-White-Red lead. Only the White and Red are required for
sound.
DOLBY SOUND
The HDRM7250 is capable of Dolby Digital surround sound. In order to use this feature, you must
connect either an optical or coaxial cable between your set-top box and a Dolby Digital home theatre
amplifier.
The signal source (either a channel your watching) or a media file your playing must be Dolby Digital
encoded for this feature to work.
Note: When Dolby is selected, you may expect to hear 5.1 sound. The broadcast however most times
is Dolby Digital 2/0.
8
Page 11

THE SET-UP PROCESS
Assuming you have connected a HDMI cable or Component Video cable between your set-top box
and you flat panel television screen, the following will automatically appear when using this product for
the first time. If no screen appears, unplug the HDMI cable and connect again. This will force the set-
top mode into this mode (i.e. it’ll automatically switch).
Every 10 seconds, the video screen mode will change to a lower
resolution. If you can see this screen, then your television screen
accepts a higher level of high definition vision.
Press the
box.
Once you have selected the resolution, the set-top box will ask you to accept it.
key to accept the resolution provided by the set-top
You must press the
The following step-by-step screens will now appear.
The following screens are presented to you to complete the set-up process.
Press the
Move the joystick
Then press the
key to go to the next screen.
blue key to accept your selection.
to select your type of television screen.
key to go to the next screen.
9
Page 12

Use the numerical keys to enter your 4 digit postcode.
The press joystick
Once finished, press the key to continue.
You must read the copyright disclaimer, then press
Use the coloured button keys to enter a 6 colour code. This
parental control code will be used later by you to block channels
and the time-shifting buffer from other viewers in the home.
When finished, press the
The last step is to tune your digital channels. You must connect
your antenna as shown in the picture. If you experience problems
when tuning, refer to page 4 of this manual.
Press
The services tuning process will begin and can take up to 5
minutes.
Once tuning has completed, continue by following the directions on the screen by press the
You will now be ready to start watching digital high definition television.
Note: During the set-up process, your internal hard-drive will be preparing itself. It may not be ready
to use immediately. Please wait an extra few minutes.
to continue.
to select the state you live in.
to continue.
key to continue.
key.
10
Page 13

BASIC OPERATION
SERVICE LIST MODE
Now that your digital receiver is set-up and working, you are
able to watch television by simply pressing the
remote controller. Within seconds, a channel list similar to the
picture is shown.
Using the joystick; press
desired channel. To watch it, simply press firmly
the centre of the joystick to select the
function.
This is known as “zapping to a channel.” You may also zap to another channel by pressing one or
combination of the numerical keys 0~9.
Other channel lists are available, by pressing the
include Radio Channels, Bookmarks, Interactive Channels, etc.
Channels may also be changed by pressing the P+ and P- keys on the remote controller.
You may exit this mode by pressing the
or to scroll to the
key on the
or keys on the remote. Additional lists may
key again.
LOGICAL CHANNEL NUMBERING
The term ‘logical channel numbering’ is a new feature for the first time digital television user.
Broadcasters now send their channel number together with their digital services.
It works like this: press 2 for the ABC, press 7 for the SEVEN Network, etc…. Broadcasters also offer
high definition channels in addition to their standard definition channels. For example the NINE
Network allocates logical channel number 9 for their standard definition channel and channel 90 for
the high definition service.
Troubleshooting: Some broadcasters today do not send their logical channel numbers. These
channels are automatically given a number between 350~399 by the set-top box.
11
Page 14
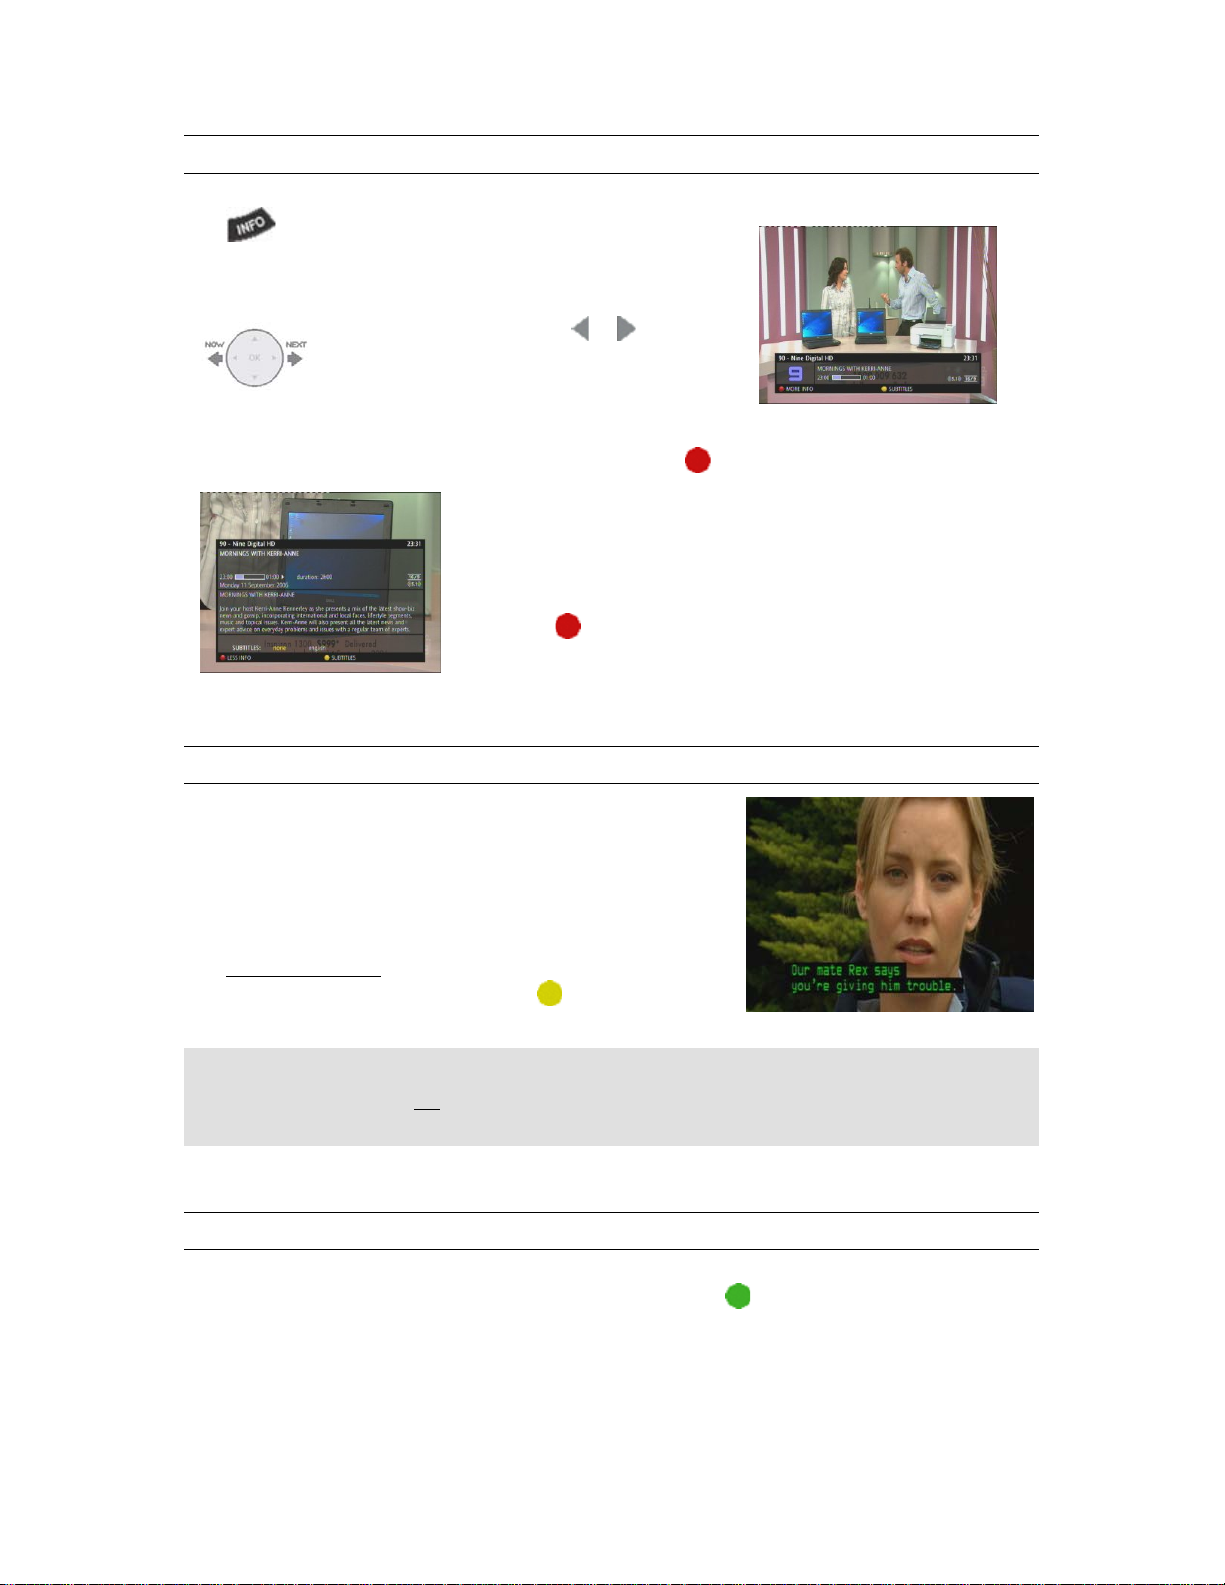
INFO MODE
The
you are watching.
You can get further programme information by pressing the
CLOSED-CAPTIONING
Some programs are closed captioned for the hearing impaired or
hard of hearing. It works by rendering the audio of the program
as text, usually near the bottom of the screen. Captions can be
coloured and provide information on music and sound effects
which may be crucial to the understanding of the programme.
The Closed-Captioning
key gives you more information about the program
Moving the joystick either
between NOW and NEXT programme
information from the broadcaster.
This shows an extended description about the program, including
its duration.
Press the
feature (also known as subtitles) may be
or will toggle
red (MORE INFO) key.
red key again for LESS INFO.
activated (or deactivated) by pressing the
Troubleshooting: In some cases the closed-captioning will not appear. This means that the
programme may actually not be captioned. For more information we recommend you the visit
Australian Caption Centre website at www.auscap.com.au.
DIGITAL AUDIO
Some programs also include an additional sound track (known as language) such as Dolby Digital 2/0
or 5.1 sound. This may be toggled on and off by pressing the
indicate when this is selected. The analogue audio output will also be lower. This is normal.
yellow key.
green key. The DOLBY logo will
12
Page 15

The ‘english’ selection is the default. This is known as MPEG stereo sound and is available at all
times for Standard Definition broadcasts.
The ‘english5.1’ option is available when either an (1) optical TOSLINK cable or (2) coaxial cable is
connected between the set-top box and a Digital Surround Sound Amplifier.
Troubleshooting: Although the set-top box will indicate 5.1 sound, most programmes however are 2/0
surround sound.
SWITCHING LETTERBOX 4:3 MODE
If you have a standard 4:3 ‘square screen’ type television, you can enjoy the widescreen view (whilst
in the ‘info’ mode) by pressing the
your television screen. This is normal. Note that this option only appears when ‘4:3 television’ is
selected in the Video & Audio preferences.
Notice: In this mode you may see white dots on the top or bottom of the screen for some programs.
These dots are broadcast related and cannot be removed by the set-top box.
TURN-OFF INFO MODE
Simply press the key again or press the cancel key on the remote controller to exit the ‘info’
mode.
TELETEXT
blue key. Black bars will appear across the top and bottom of
To view the AUSTEXT service, you must first select 7 Digital.
Press 7 on your remote controller. Then press the
key to toggle this feature on and off.
Use the joystick to move around the screen. It will automatically
select the numbered pages as you move. To view the desired
page, press the
key.
submenu
PICTURE-IN-PICTURE
The key is currently not used. Please check our website for further details.
13
Page 16

THE DIGITAL RECORDER
PAUSE LIVE TELEVISION (TIME-SHIFTING)
Imagine watching television and the phone rings. Simply press the
pause the picture. Once you have finished your telephone conversation, you may watch the program
from where you left off.
Pressing firmly on the joystick executes the
will immediately notice the information bar across the bottom of
the screen with the II (pause) symbol appearing to the left.
To start watching the picture, press the
key again.) The television picture you are watching is in a
delayed form. This type of feature is commonly known as ‘time-
shifting’ or sometimes ‘time-slipping’.
The time-shift buffer (the amount of space to pause live television) varies depending upon the size of
the hard-drive that is installed. The set-top box automatically reserves and manages the hard-drive
space required for this feature. The time-shift buffer may be deleted cleared anytime by accessing
the Menu->Preferences->Digital Recorder menu. This is described in more detail later.
The time-shifting feature will continue to operate if left on unattended. The set-top box has an
automatic time-shifting shutdown to preserve the longevity of the hard-drive.
To exit time-shift mode and return to normal television viewing, press the
key function. You
key (or press the
key (or the key) to
key.
FORWARD AND REWIND TELEVISION
Whilst you are watching live television, you may rewind the
picture immediately. Use
rewind at a standard play speed (x1). Press again and the
rewind speed will increase to x3.
Further faster speeds are also possible such as x10, x30, x100
and x600.
key once. The picture will now
14
Page 17

To stop rewinding and watch television, press the key. As described above you are now
watching time-shifted television.
To watch live
Whilst you are time-shifting (i.e. watching rewound television), it is also possible to make a recording.
television again, press either the key or use the key to forward to live picture.
Press the
Note: The rewind and forward feature sometimes may appear to you to give erratic results. The time-
shift buffer can be segmented with different programmes. This is normal and depends upon what you
have been viewing.
You may choose to move forward or back in blocks. Blocks are automatically created by your product
and the time-shifting buffer on the hard-drive will be full of them. Typically, if not changing channels,
blocks are approximately 15 minutes. Jumping blocks can be done by pressing either the joystick
keys.
or
Whilst you are watching a programme in time-shift
seconds forward. Pressing the joystick
SLOW MOTION
It is possible to view time-shifted picture or pre-recorded programs in slow motion. Press
then move the joystick either the
key again.
key and then press red to start the recording within a time-shift buffer.
, you can press the joystick key to jump 30
will go back 30 seconds.
and
or directions. To go back to normal speed, press the
15
Page 18

RECORDING PROGRAMMES
To record a programme, press the desired channel number. Press
recording options. There are two options available: -
key to display the
Selecting manual
later.
Selecting automatic
accuracy of the information from the broadcaster.
You may record a 2
Change channel by pressing
(manual) or
change channels. You can however press
program that was previously recorded.
To STOP a recording
following will appear.
Red key = manual recording Green key = automatic recording
will start a recording from the current time. The duration will be preset to 3 hours
will record the current program. The duration of recording is subject to the
nd
program as follows: -
and then select the key. Then press either the red
green (automatic) to record. Whilst a 2nd recording is made, you can no longer
, you must select the channel you wish to stop and press again and the
and select MY RECORDINGS to watch a
Now press
Alternatively, to stop a recording, you can press
The
red to STOP the recording.
yellow key is used to stop a recording.
and enter the RECORDING TIMERS menu.
16
Page 19

HARD-DRIVE MANAGEMENT
It is possible to enable (and disable) the hard-drive to prolong its performance. In addition, you have
the option to ERASE the hard-drive or just the TIMESHIFT buffer.
To access the DIGITAL RECORDER menu, press the
MENU
TV GUIDE
MEDIAPLAYER HD
MY RECORDINGS
RECORDING TIMERS
PARENTAL LOCK
PREFERENCES
DIAGNOSTICS
INTERNET
When the DIGITAL RECORDER option is selected, the following information will appear.
As shown, using
on the joystick allows you to enable and disable the internal hard-drive.
Move the joystick
press the
key to enter.
The information of importance is as follows: -
Disk Capacity
Existing Recordings
Free Space
Also given is the duration of existing recordings and
other recording timers yet to be performed.
key. The following options will appear.
to highlight the
DIAGNOSTICS
HDRM INFO
TV SIGNAL
NETWORK
USB
DIGITAL RECORDER
Diagnostics
option. Now
The hard-drive can be erased by pressing the
perform a basic restart.
Pressing the green button will erase only the time-shift buffer not utilized by the recordings.
yellow key. Once completed your set-top box will
17
Page 20

RECORDING TIMERS
It is possible to set a timer recording (similar to your old video-recorder). To set a recording timer,
press the
MEDIAPLAYER HD
MY RECORDINGS
RECORDING TIMERS
PARENTAL LOCK
PREFERENCES
DIAGNOSTICS
key. The following options will appear.
MENU
TV GUIDE
INTERNET
Move the joystick to highlight the
option. Now press the
RECORDING TIMERS
key to enter.
Press the
Once you have finished, save your Timer by pressing the
Your Timers will appear as a list every time you select the
changed or deleted from the list as you wish.
Note: Recording Timers can also be set directly from the Electronic Program Guide. This is better
explained later.
blue key to add a new timer.
Navigate the joystick to set the desired channel, its occurrence,
date, and start and end times. Note that not all programs start
exactly on time. Therefore we recommend you allow an extra
few minutes before and after the scheduled programme from
the broadcaster.
blue key again.
Recording Timers
option. Timers may be
18
Page 21

PLAYBACK RECORDINGS
To access your recorded programmes, press the
MENU
TV GUIDE
MEDIAPLAYER HD
MY RECORDINGS
RECORDING TIMERS
PARENTAL LOCK
PREFERENCES
DIAGNOSTICS
INTERNET
Move the joystick
Now press the
The following screen will appear.
The
name, date and time of the recordings.
To watch a pre-recorded programme, press the joystick
key. The following options will appear.
to highlight the
key to enter.
My Recording
or . Press to make your selection.
screen shows the network, program
MY RECORDINGS
option.
Recordings may be deleted
screen.
It is also possible to rename
pressing the number keys 0~9 on the remote controller. It works in a similar way to short messaging
on a mobile telephone. You may also connect a standard USB PC keyboard to the USB port in the
front of the set-top box.
Press the
must be connected via an Ethernet cable to your home router for this feature to operate. Refer to the
Networking section for more details.
blue key to set-up recording export. It is explained in more detail later. Your set-top box
by pressing the green key. A confirmation box will appear on the
a recording by pressing the yellow key. Enter the new name by
19
Page 22

ELECTRONIC PROGRAM GUIDE
One of the most important features of Digital Television is the Electronic Program Guide (commonly
known as the ‘EPG’). Today, broadcasters send within their transmission NOW and NEXT
programme information. In some areas, extended EPG information may be available.
An EPG can be represented in many ways. A basic NOW & NEXT guide is the most common. Your
product however is also compatible with a more advanced grid view showing all programmes during
the week (this is subject to broadcast data availability).
The television guide data is available by either the: -
i. Broadcast (subject to availability and cross-carry information),
ii. Internet (subject to licensing and availability).
To use the EPG, press the
available as shown below.
Note: Not all information will be shown simultaneously for all channels. This is because the
broadcasters do not cross-carry their EPG information. Therefore each channel must be selected
individually.
Use the joystick
keys to select the desired programme service.
key on the remote controller. By default, the GRID guide is
Press the
background. You will notice in a few seconds that the
programme information (if available) appears.
key to change the TV picture in the
It is also possible to set the program to record directly from the guide. Press the
desired program to automatically enter the Recording Timers feature. The programme name will be
highlighted in red.
Sometimes, you may want to receive only a reminder that your program is about to start. Press the
green key to enable the reminder feature on the programme. The programme name will be
highlighted in green.
20
red key on the
Page 23

Note: Currently, you cannot set dual timers that overlap (in time). Therefore a timer and reminder
feature cannot be simultaneously set at the same times.
To exit the guide, press the
The guide may also be accessed from the main menu. Press the key; the option
will be highlighted. Press the
VIDEO PROGRAM GUIDES
Broadcasters also broadcast extra television channels known as VPG’s (i.e. Video Program Guides).
Such guides may be accessed by selecting the appropriate service number.
For example, type 77 for the Seven Network guide. All other broadcasters also have guides available
to you.
key again.
TV GUIDE
key to select.
Press the
key to see the available services and video guides.
21
Page 24
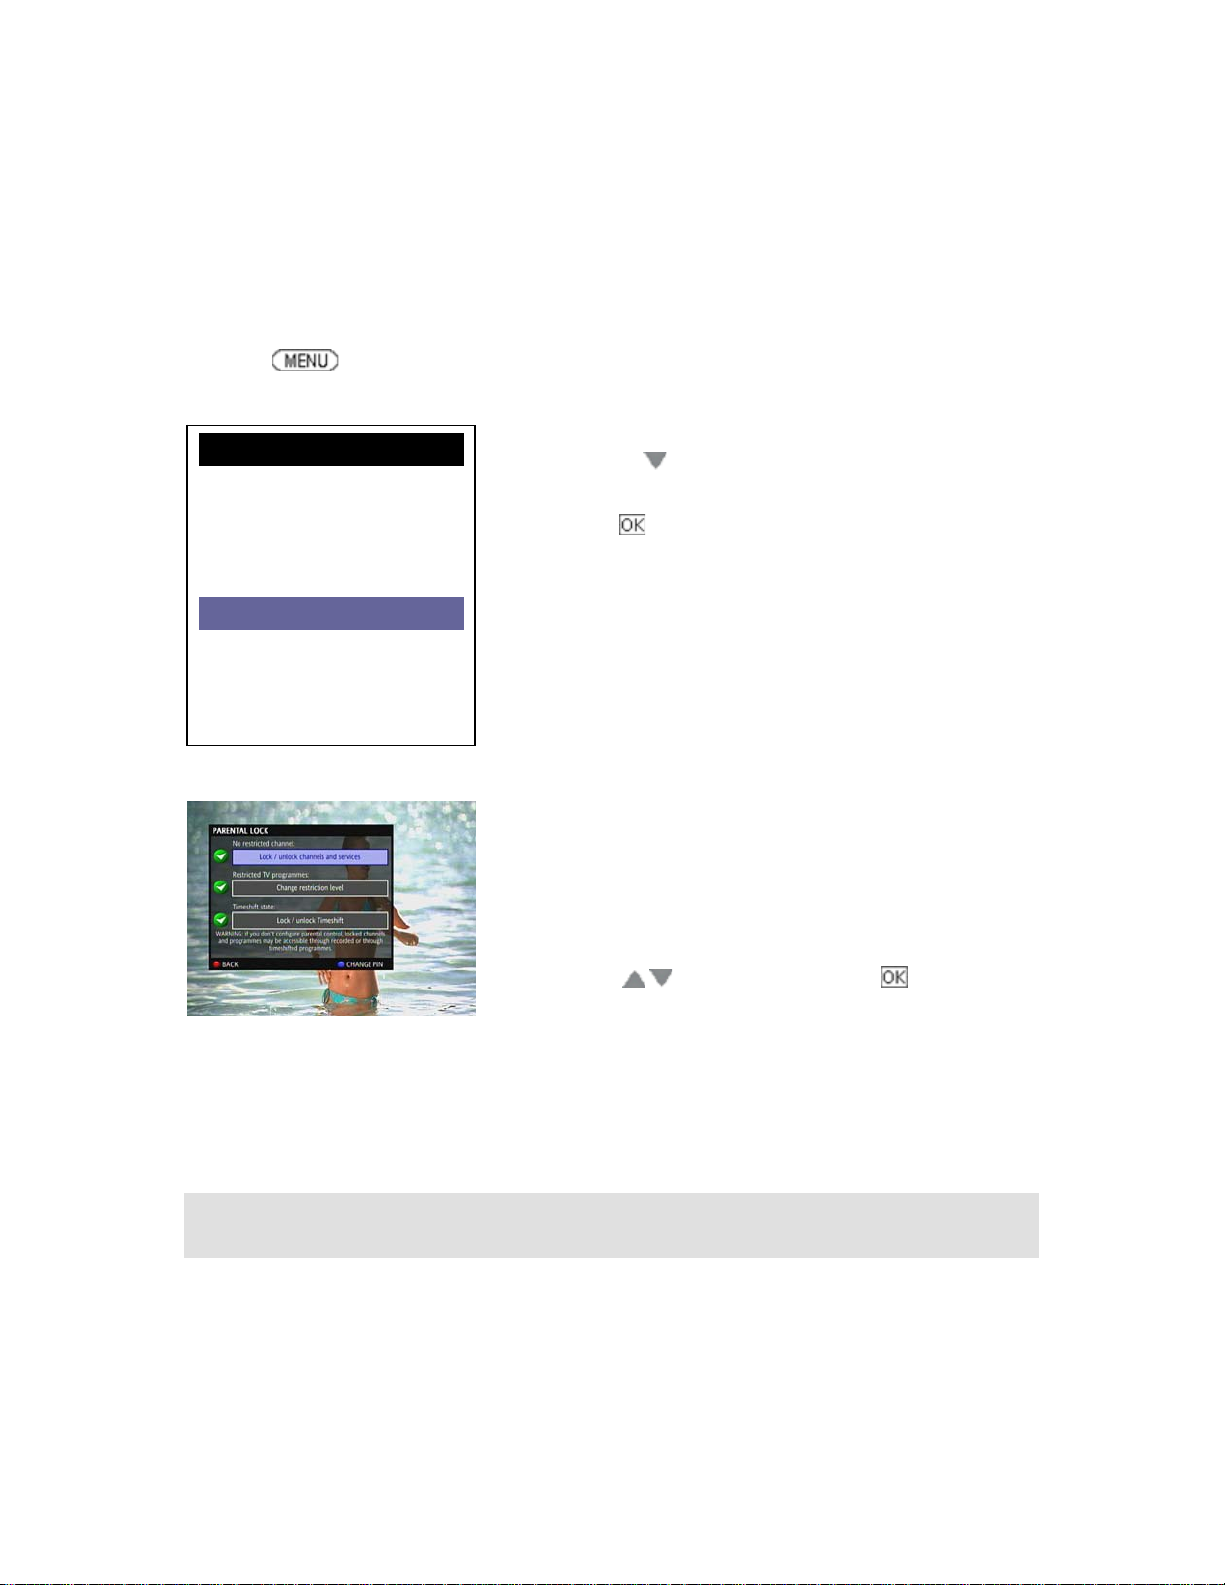
PARENTAL LOCK
The Parental Lock option allows you to block television channels and other interactive services. It
also allows you to restrict programs by their classification and block the time-shifting video on the
hard-drive from playback.
Press the
MEDIAPLAYER HD
MY RECORDINGS
RECORDING TIMERS
PARENTAL LOCK
PREFERENCES
DIAGNOSTICS
If you restrict program channels or services, you must enter the correct colour sequence in order to
view them again. Blocking programs by a restriction level will also require you also to enter the 6
colour code to unblock the picture.
Note: If you forget your colour code, the master code may be entered. The master code is red – blue
– red – blue – red - blue.
The Internet access page can be blocked by placing a channel block on channel 952. Internet
content however should be blocked by your Internet provider of by configuration of the home network.
key and the following options will appear.
MENU
TV GUIDE
INTERNET
Move the joystick
Now press the
Type in your 6 COLOUR CODE to access the next menu.
(Do you remember your code when you first set-up the set-top box?)
The following 3 options appear:
- lock / unlock channels and services
- restriction level
- lock / unlock timeshift
Move joystick
selection.
to highlight the
key to enter.
to choose and press to enter your
Parental Lock
option.
22
Page 25

PREFERENCES
To access the preferences, press the
MENU
TV GUIDE
MEDIAPLAYER HD
MY RECORDINGS
RECORDING TIMERS
PARENTAL LOCK
PREFERENCES
DIAGNOSTICS
INTERNET
TUNING-IN
Tuning services may be done using two methods: - Automatic and Manual.
For automatic
tuning, press the key to continue.
Move the joystick
press the
key. The following options will appear.
to highlight the
key to enter.
PREFERENCES
TUNING-IN
FAVOURITE CHANNELS
AUDIO & VIDEO
DISPLAY
NETWORK
RECORDINGS EXPORT
Preferences
option. Now
To activate manual
Press the
Press the
blue key to save the service tuning.
red key to exit manual tuning.
tuning press the yellow key.
Move joystick
channel. In the example picture shown, Nine Digital is
broadcasted on Channel 8.
Wait 3~5 seconds, the picture will appear and the broadcast
parameters will be shown.
or to select the desired broadcast
23
Page 26
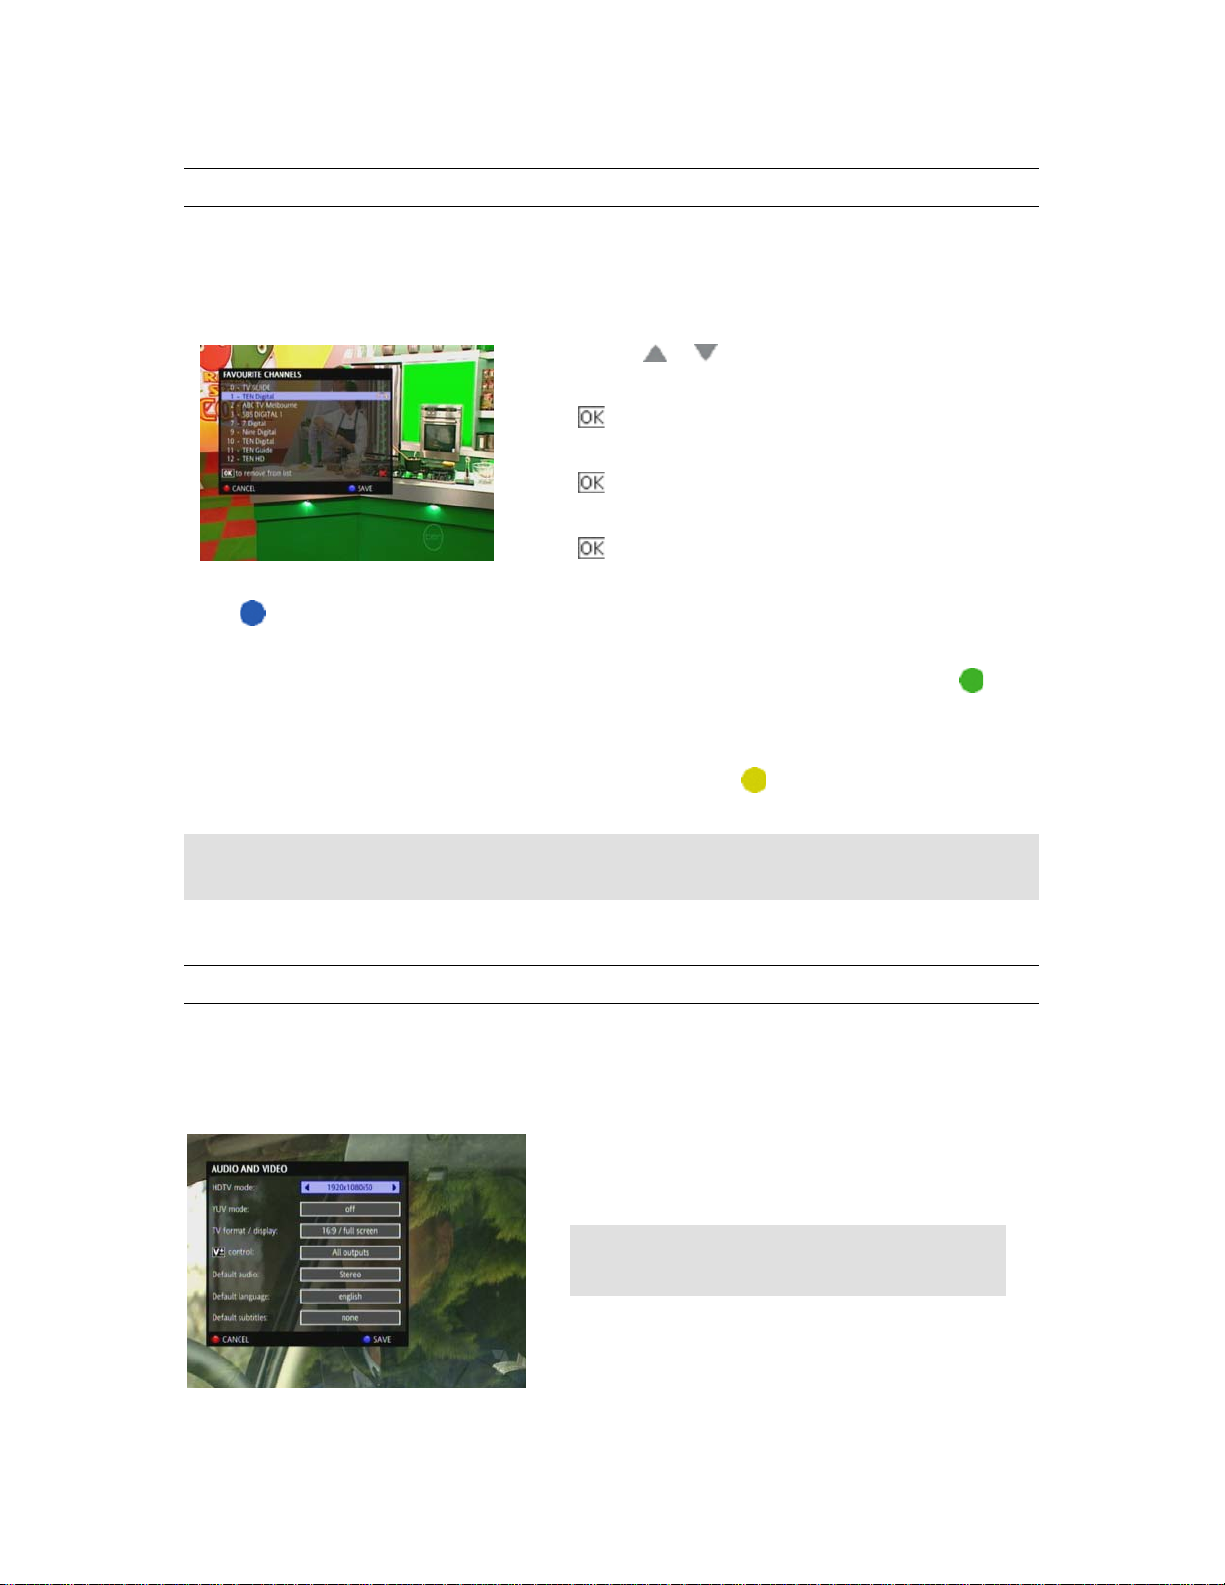
FAVOURITE CHANNELS
Favourite channels allow you to hide or skip those unwanted services that appear in your channel list.
Here is how it works.
Move joystick
Press
Press
Press
once to SKIP the service.
again to HIDE the service.
a third time to go back to normal.
or to select the broadcast channel.
Press
It is also possible to renumber channels by selecting the desired channel and pressing the
key.
You may choose to reset your channel numbering by pressing the
Notice: After doing some software upgrades, it may be necessary for you to rescan your channels and
redo you favourite channel selections.
AUDIO & VIDEO SETTINGS
The
output defaults.
blue to save your options.
Audio and Video
option allows you to adjust your screen type, video output modes, and audio
green
yellow key.
Note: HDMI and Component Video outputs cannot
be used simultaneously.
24
Page 27
The HDTV (HDMI) MODE selection is available only when a HDMI cable is connected. When the
HDMI cable is not connected, the YUV MODE (YPbPr) selection becomes available.
When using a HDMI connection, the available video modes are 576p, 720p and 1080i. You can
adjust the preferred mode by pressing the
Video the available video formats are 576p, 720p and 1080i.
The TV FORMAT option has generally two formats: -
(a) The 4:3 (pan & scan) format is a standard square shape TV screen.
(b) The 16:9 widescreen formats are suitable for watching digital television. TEAC provides
various variations for the 16:9 format including some zoom modes for programs that do not fill
the screen. We recommend experimenting with these options to best find your needs.
Notice: If you have only a 4:3 style television and you opt to use the 4:3 letterbox modes, there may
be white dots on the top and bottom of the screen for some programs. These dots are broadcast
related.
The DEFAULT AUDIO option setting should only be changed if you are using either an optical or
coaxial cable to a Dolby decoder. If you select ‘5.1 digital to s/pdif’ then when the broadcast has a
Dolby sound track available, the set-top box will automatically select it.
key on the remote controller. For Component
When finished adjusting your settings, press the
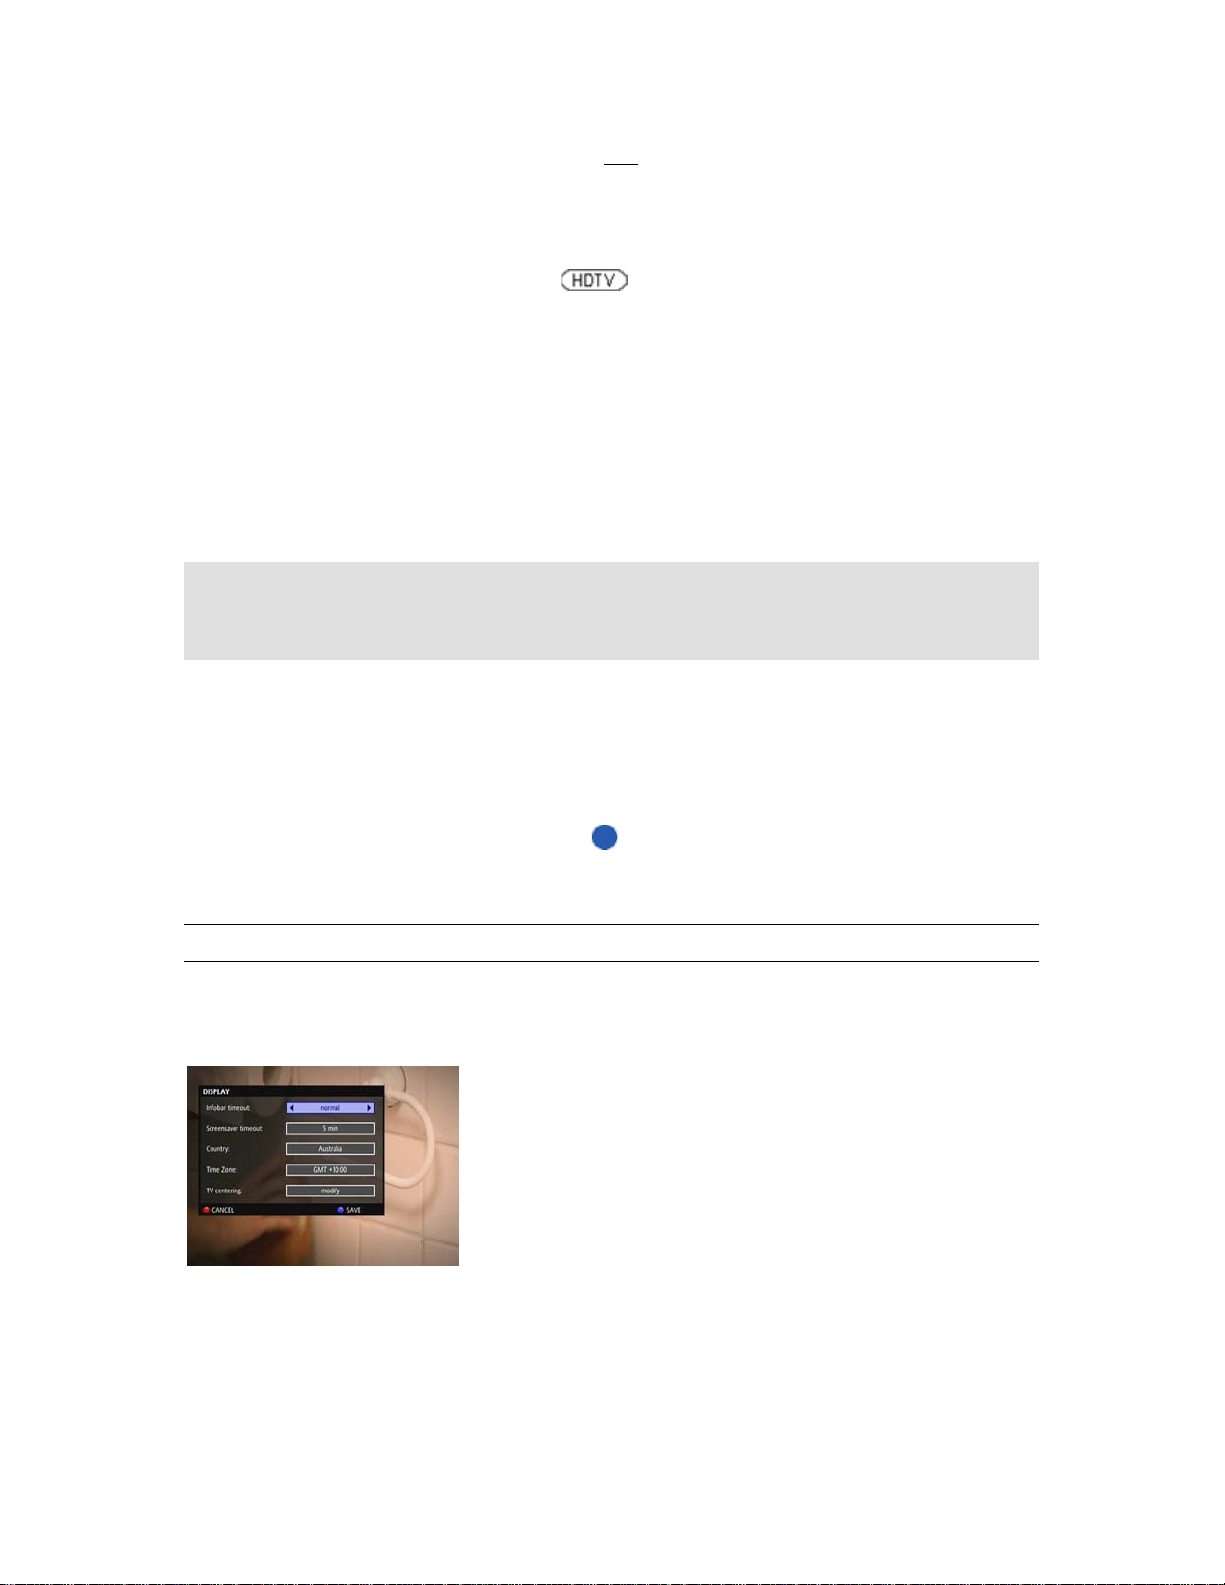
DISPLAY
The DISPLAY option allows you to modify some preferred settings.
- INFOBAR TIMEOUT gives you an option to toggle the length of
time for the bar to be displayed when changing channels.
- SCREENSAVER TIMEOUT prevents your television or plasma
display from being ‘screen burnt’ by prolonged graphics and logos
being shown on the screen.
- TV GUIDE setting allows you to toggle between ‘small grid view’
and ‘now & next view’
- TIMEZONE setting is the offset from the Greenwich Mean Time.
- TV CENTERING option is for the on-screen graphics. It may be fine-tuned to match your screen.
blue key to save your settings.
25
Page 28

NETWORKING
To connect your set-top box to your home network, you simply are required to connect a standard
Ethernet cable between the rear of the set-top box (labeled Ethernet) and to a spare port on the rear
of your home router.
Your home router is normally defaulted to DHCP mode (i.e. it assigns an IP address to computers and
other devices connected to it.)
To access the network settings on the set-top box, press the
appear.
MENU
TV GUIDE
MEDIAPLAYER HD
MY RECORDINGS
RECORDING TIMERS
PARENTAL LOCK
PREFERENCES
DIAGNOSTICS
INTERNET
When NETWORK is selected, the following screen will appear. The information will be different for
different home networks.
Network settings may also be manually entered. This feature is available for experienced computer
users that understand networking in more detail.
Move the joystick
press the
As shown, the status of the network is Connected
Ethernet Cable is also connected.
Internet Access is now available.
The set-up procedure is very easy in this case.
key to enter.
to highlight the
DIAGNOSTICS
HDRM INFO
DIGITAL RECORDER
key. The following options will
Diagnostics
TV SIGNAL
NETWORK
USB
option. Now
, and the
Press the
AUTOMATIC or MANUAL settings by moving
the website.
yellow key to select NETWORK SETTINGS. You can now toggle between
on the joystick. More information is available on
26
Page 29

EXPORT RECORDINGS
Note: This feature should be attempted by experienced PC users that understand how to create share
folders on a Windows XP system, or have a Network hard-drive (NAS device) that is supporting
SAMBA (SMB) protocol.
The export option allows you to transfer your recordings over the home network either to your home
PC or a network hard-drive. The method to configure this feature on a Windows XP machine is
explained below.
Your first step is to enable File and Printer sharing.
This is done within your Control Panel by
activating the Network Setup Wizard. You will be
presented with set-up screens. Follow the directions as given to
you.
You will need to turn on “File and Printer Sharing”
Continue to follow directions on the computer screen.
You need to enter a computer name such as HOMEPC.
Continue to follow the directions on the computer screen.
When completed, this will make folders now accessible such as
SharedDocs.
If you used the name “homepc”, you can check if sharing is working properly on your computer. Go to
Internet Explorer, and type the webaddress as \\homepc\ShareDocs
now appear on the computers screen.
You can check also your computer name (hostname or IP address) of your computer by following
. The ShareDocs folder should
these directions. Select
In the dialog box, type cmd as shown and select OK.
and then .
27
Page 30
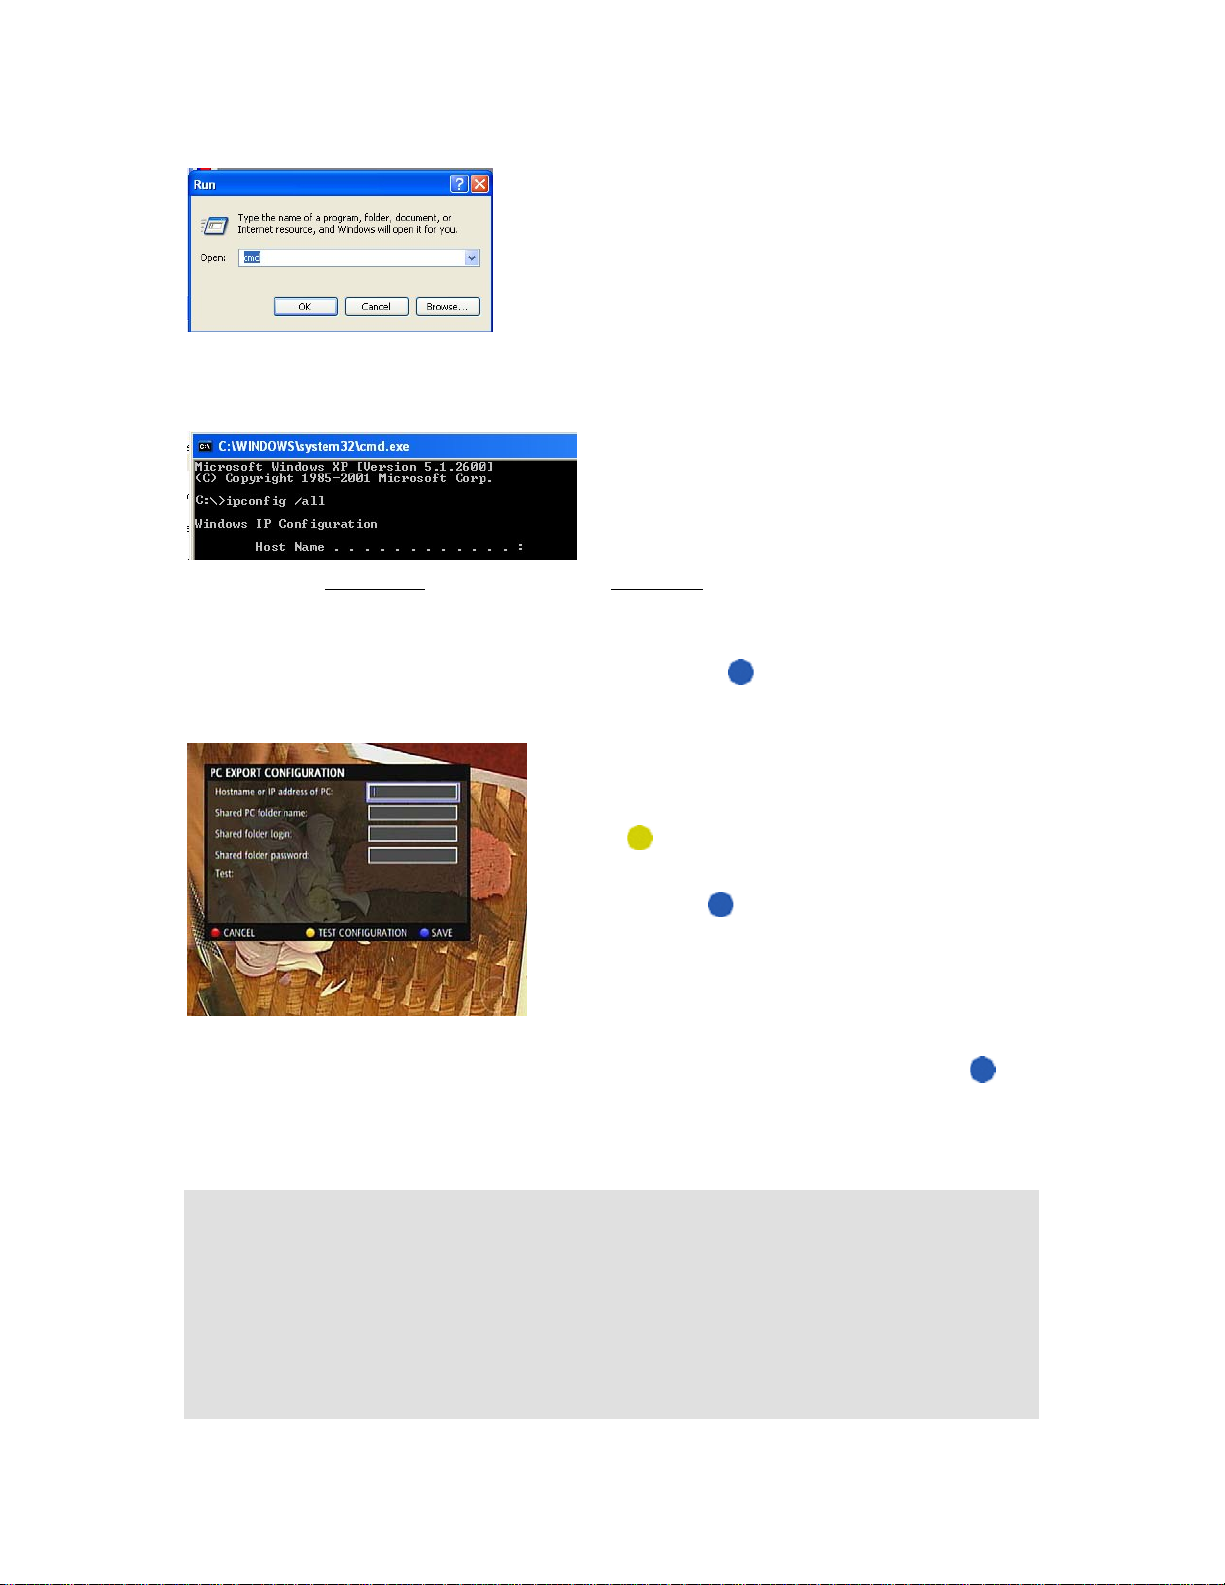
Next at the command prompt, type ipconfig /all
You will find the Host Name
other networking information.
(computer name) and IP Address for your home computer listed amongst
Look for the Host Name.
To set-up this feature, in MY RECORDINGS you must press the
will see the following screen appear.
You will need to enter your Hostname (or IP address of
your PC) and the Shared PC folder name.
Press the
If successful, press
Your pc-export configuration will now also appear in the
MEDIAPLAYER for recording playback.
Once your PC EXPORT feature is configured, recordings may be exported by pressing the
key on the MY RECORDINGS screen. As recording are exported, the percentage of file transfer will
be shown beside your programs.
Troubleshooting: Transferring recordings and trying to play recordings (or movies) over your network
may cause erratic results. Such simultaneous functions are dependant upon the overall performance
of your home network, your home computer and/or the network hard-drive unit.
Once transfers are completed, the share will disappear automatically from the Mediaplayer menu. To
enable again, you must enter the RECORDINGS EXPORT menu and retest the connection. This is
normal.
yellow key to test the configuration.
blue key. On the set-top box, you
blue to save the setting.
blue
28
Page 31

MEDIAPLAYER-HD
The Mediaplayer allows you to playback video, movie, music and view photos. In order to use the
Mediaplayer, you must have either have:-
(i) a compatible USB hard-drive connected to the USB port, or
(ii) a home network with a Windows XP PC running ‘Windows Media Connect’
The procedure below describes when an external USB drive is connected. It will be identified as
SDA1. To access the Mediaplayer, press , move down to MEDIAPLAYER-HD and press .
Select SDA1 a press
now be shown.
Simply move the joystick UP & DOWN to select the desired
music, video or photo file and press
If playing a music file, the Jukebox List will appear.
. The files on the USB device will
.
Press
Press
Press
Press
Note that after a few minutes (if screen saver is enabled) the screen will turn black and the name of
the song will be scrolling across the screen. This is done to prevent screen burn-in on plasma
displays.
If playing a video file, the video will start immediately. You may use the
rewind within the video file. To stop playing a video file
play WMV, MPEG-4 or MPEG-2 video files.
Note: The performance of the video files will be dependant upon its original frame rate. Therefore
some videos downloads from the Internet may not work properly.
blue to go back to the previous screen.
yellow to select random order for music playback.
green for the home screen for the Mediaplayer.
red to exit the Mediaplayer.
keys to forward and
, press then the blue key. You may
29
Page 32

INTERNET
The Internet browser on your set-top box is very different from
your home computer. It is not designed to be a substitute for
the home personal computer. It is based on W3C standards
and is designed for interactive television applications (better
known as a TV browser).
It allows you an easy method to access media files that may
be available on the Internet or on other devices.
Web addresses are entered using the remote controller. By pressing the numerical keys, multiple
times, the letters will change. Press
SMS messaging on a mobile telephone. If you have a standard USB keyboard, it may be connected
to the USB port.
Special characters such as . / : are entered by pressing the number 1 or number 0 keys multiple times.
The set-top box does not require http://. Therefore if you are looking for YAHOO Australia, all you
must do is type yahoo and press .
key to go back (erase) a letter. It works in a similar way to
ACCESSING MEDIA FILES
If you connect a USB external drive, the drive will automatically be recognized by the set-top box.
(Note: It is possible not all devices are compatible)
For example, you have a USB memory stick connected with a music file called sound.ogg. You may
play this file through the Internet browser. Simply type the destination URL as:
storage://d/sound.ogg and select
If the music (or video) file is available on the Internet, type the destination URL as something like: -
http://player.teac.com.au/demo/sound.ogg
You may also do a direct Google search by typing in your question and selecting
.
.
30
Page 33

BOOKMARKS
The Bookmarks feature allows you to store your own links. This is also known as storing your
favourites on a home computer. The set-top box has an added feature where you can also assign a
channel number to the destination link. Any number between 550~599 may be used for this purpose.
To access bookmarks press the
Note: The Internet channel may be accessed directly by typing channel 952. The Bookmarks may be
accessed by typing channel 953.
blue key. The following screen will be shown.
Simply type in the name and destination address to build a
bookmark.
An optional channel number can be assigned to it. Move the
blue bounding box down to number and press the
list of numbers will appear. Select a number by moving
down
When finished, press
To access your bookmark simply type the channel number.
the list and pressing again.
blue to save it.
key. A
31
Page 34

NOTES
SOFTWARE SERIAL NUMBER
When contacting TEAC for any support, please write down the information as shown below. You can
i
find this information by pressing the
For any servicing requirements, another serial number (the hardware serial number) is printed on a
sticker found at the rear of the product.
key on the front panel.
The MAC address is used by every computer or product
connected to the Internet. It uniquely identifies the product.
This is known as the ‘MAC serial number’ or ‘software
serial number’.
The software version helps us identify what features are
available to you and how they operate.
32
Page 35

FREQUENTLY ASKED QUESTIONS
Q. When I do an automatic tuning, not all channels are received. Why?
A. TEAC recommends you review your aerial and cabling set-up. Digital Broadcast Australia highly
recommends that you use RG6 Quad shield cabling from your television antenna directly to the set-
top box. It is best to consult a professional antenna installer for more information.
Q. Some channels break-up occasionally. Why?
A. As per above, your antenna set-up may not be adequate. Many users assume that if the analogue
television picture looks good, then digital reception must also be ok. This is not the case.
Q. Sometimes when I flick the light switch, I get sudden breakup in picture. What can I do?
A. As above, you are highly recommended to change the coaxial cable to RG6 Quad shielding type.
Q. When I browse the Internet, not everything is shown. Why?
A. To put it simply; the television browser is not designed to be a complete substitute for your home
computer. Some plugins such as Macromedia Shockwave and Flash are not supported by the set-top
box. In addition, the on-screen resolution is different causing some web-pages to display differently.
Q. When I select DOLBY sound, it is lower than the standard sound. Why?
A. This is normal and related to the broadcast.
Q. I type 28 and I do not get SBS. Why?
A. Broadcasters now automatically allocate channel numbers in their broadcast. SBS can be found
by typing 3 on the remote. SBS also has an additional channel. Type 33 for the SBS Digital 2 service.
Q. I make a recording, and need to stop it. I press the stop key but doesn’t do it. Why?
A. To stop a recording, select MENU, then RECORDING TIMERS and select the service. Then press
YELLOW to stop it.
Q. I set my networking to ‘automatic’ but still the Internet doesn’t work. Why?
A. Check that your router is set to DHCP enabled. Also check that your router is allowing the use of
the MAC address (serial number) of the set-top box.
Q. How do I get the serial number of the set-top box?
A. On the front panel, press the i key or select the ‘HDRM INFO’ option in the Diagnostics Menu. The
serial number is also known as the MAC ADDRESS of the product.
33
Page 36

Q. Some web pages I try to access will restart the set-top box. Why?
A. Many web pages include multiple pop-ups or other code intentionally designed to get data
(sometimes unauthorized) from you. These pages may be beyond the capabilities of this product.
Q. When I select the GUIDE, not all data is available. Why?
A. Currently, broadcasters do not provide cross-carry information. They also do not provide data
beyond what is showing now and what is showing next. This is normal. Some areas of Australia
however may have additional information.
Q. After an automatic tuning, not all channels were found. Why?
A. It is highly recommended you check your aerial installation. Digital Broadcast Australia highly
recommends that you use high quality RG6 cabling for all digital installations. In addition, you
antenna should be ‘Digital Ready.’ Some channels like the ABC are now broadcasted on Channel 12.
Older antennas were not designed to receive such a channel.
Q. I get no sound on one channel. Why?
A. Try pressing INFO, then GREEN key to change the audio source.
Q. I want to connect more than one set-top box in my home. Is this ok?
A. Yes, you can do this, but you should follow the installation recommendations given by Digital
Broadcast Australia. (see www.dba.org.au
for more details)
Q. I cannot find how to link the two tuners. My other recorder uses an RF link cable. Is it missing?
A. No. The HDRM series is a smarter design that uses a link internally. No external RF cable is
required.
Q. I connect my USB hard-drive and it is not recognized by the set-top box.
A. Either the hard-drive (or USB memory stick) you connected is not compatible, or there is not
enough power on the USB port to power the device. External USB hard-drives normally have another
power-supply that is required. In addition, whilst your product is performing “drive checking”, the USB
may not be available.
Q. When I go to standby mode, the unit will switch on by itself momentarily after around 1 minute.
Why?
A. This is normal. Your set-top box must perform some additional network and hard-drive tests whilst
it is in standby mode. It only takes around 20~30 seconds.
Q. When I disconnect mains power and connect again, the disk checking is done again. Is this right?
A. Yes. Before disconnecting mains power, put the box in standby. This will reduce the time.
34
Page 37

Q. When I record, the recording is not playing back properly. It is breaking-up.
A. This is possible if your signal level is too low. Check the Diagnostics->TV Signal menu. If SNR is
less than 20.0dB, then this problem may exist. As a rule, if the set-top box detects a low signal level,
it will give more signal to the first tuner so you may continue to watch digital television and timeshift.
You will need to improve your reception a little. Try using some small antenna signal booster.
Q. The time is shown incorrectly on my set-top box. How do I fix this?
A. Go to the MENU->PREFERENCES->DISPLAY menu option. Change the timezone. Victoria for
example is GMT+10 hours.
Q. When I go to standby, the Hard-disk continues to spin.
A. This is normal. It does not shutdown immediately.
Q. When I go to some websites, the Flash items are not displayed.
A. This is normal. The browser in the 7250 is set-up for television applications. The 3rd party plugins
such as Macromedia Flash are not supported.
Q. I am trying to set a reminder and timer recording from the GUIDE, but it displays an error.
A. This is normal. Only one timer may be set. A reminder is the same as a timer with equal start and
end times.
Q. When I use the GRID GUIDE VIEW, the information is not all displayed and is slow.
A. The grid view is designed for multi channel cross-carry information from broadcasters. This is
currently not available in Australia. We recommend using the NOW&NEXT view.
Q. When I complete PC exporting all my recordings, the share is no longer available in the
Mediaplayer.
A. This is normal. You must go back to the RECORDING EXPORT menu and press yellow to retest
and blue to save.
35
Page 38

SPECIFICATIONS
Hardware core system:
Processor: Sigma Designs SMP8635 Secure HDTV Processor
Graphics: True colour + alpha blending, flicker filtering, font anti-aliasing.
Memory: 16 MB Flash, 256 MB RAM
Software Core System:
Operating system: Embedded Linux
Middleware: NETGEM DVB/HTML, remote channel management
Remote management: Secure terminal management (settings, PKI, certificates)
Upgrade: Secure software downloading through network and USB key
System Applications:
Enhanced Content: HTML 4.01, ECMAScript ECMA-262 3rd Edition (JavaScript 1.5), DOM1, DOM2 Events, CSS
1, partial CSS 2
Video format: MPEG-1, MPEG-2, MPEG-4.2, MPEG-4.10 (H.264), WMV9, VC-1
Audio format: MP3, WAV, Dolby Digital output to S/PDIF outputs, Dolby Digital mixdown, WMA9 and MPEG-4
AAC audio
Image format: GIF, JPEG, PNG
Broadband Connectivity:
Ethernet: 10/100 Mbps MDI/MDIX, RJ45 for LAN connectivity
USB: USB Version 2.0 high speed
Network protocols: IGMP v2, HTTP/1.0, partial HTTP/1.1, SSL2&3, FTP client, DHCP, PPPoE, POP3, SMTP
DVB - MPEG & Windows Media format:
Video features:
- MPEG-1
- MPEG-2 MP@HL: up to 1920x1080p25, 1920x1080i30 or 1280x720p60
- MPEG-4.2 ASP@L5: up to 1280x720p30
- WMV9/VC-1 MP@HL: up to 1920x1080p25 or 1280x720p30
- VC-1 AP@L3: up to 1920x1080p24, 1920x1080i30 or 1280x720p60
- MPEG-4.10 (H.264) BP@L3: up to 720x480p3 0 or 720x576p25
- MPEG-4.10 (H.264) MP@L4.1: up to 1920x1080p25, 1920x1080i30 or 1280x720p60
- MPEG-4.10 (H.264) HP@L4.1: up to 1920x1080p25, 1920x1080i30 or 1280x720p60
HDMI video output format timing:
- 720x576p @ 50 Hz
- 1280x720p @ 50 Hz
- 1920x1080i @ 50 Hz
- Format and aspect ra tio: 4:3 and 16:9 (Letterbox - Pan & Scan)
Video output:
- Component YPbPr output
- Composite video output
- HDMI connector with HDCP for digital content protection
Audio features:
- MPEG-1 Layers I, II and III (MP3)
- MPEG-2 and MPEG-4 AAC-LC 2.0
- WMA
USB Connectivity:
- USB storage stick up to 2GB.
- External mass storage HDD may be used to playback content.
Composite Video:
- PAL standard.
- Available on all output modes.
36
Page 39

Power Consumption:
- Less than 35 watts when hard-drive is active.
- Input Voltage 240V, 50Hz
Tuning:
- Range 174 ~ 862 Mhz VHF+UHF (IEC Female Connector)
- Input Impedance 75ohm.
Dimensions & Weight:
- 70mm (h) x 405mm (w) x 315mm (d)
- 4.5kg
Disclaimer: Some specifications are subject to change without notice.
37
Page 40

NATIONAL CUSTOMER SERVICE CENTRE (NCSC)
Free call: 1800 656 700
Between Monday to Friday – EST 9AM to 5PM
TEAC AUSTRALIA PTY.,LTD.
HEAD OFFICE 30 Tullamarine Park Road, Tullamarine, VIC 3043 Phone : (03)8336 6500
SERVICE DIVISION
MELBOURNE, VIC 30 Tullamarine Park Road, Tullamarine, VIC 3043 Phone : (03)8336 6544
SYDNEY, NSW
BRISBANE, QLD 335 Montague Road, West End, QLD 4101. Phone : (07)3010 0100
PERTH, WA
A.B.N.: 11 113 998 048
Unit 41, 65 Marigold St., Revesby, NSW 2212. Phone : (02)9774 1075
273 Great Eastern Highway, Belmont, WA 6104. Phone : (08)9479 6522
E-mail
Website
service@teac.com.au
http://www.teac.com.au
38
 Loading...