

Page 1
HD-R1
Owner's Manual Addendum
Summary of new features
The following features were added in rmware version
1.10.
1 Web Server Based Control added
2 Automatic time adjustment function added
Manual conventions
This manual addendum uses the following conventions.
The names of keys, connectors and other parts of
•
this unit and external equipment are shown with this
typeface: MENU key
Text shown on the unit display is indicated with this
•
typeface:
Text shown on the computer display is indicated with
•
this typeface: Next.
Additional information is provided as necessary in TIP,
•
NOTE and CAUTION sections.
TIP
Tips provide advice about ways that you can use unit
features.
NOTE
Notes provide additional explanations, including special
cases.
CAUTION
Cautions indicate directions that must be followed to
avoid the possibility of injury, damage to equipment or
loss of data.
On
Web Server Based Control
function
An Internet browser can be used for some HD-R1
transport controls and settings.
The browsers that can be used are Internet Explorer 7 and
8, Firefox 3.5.6 or later and Safari.
CAUTION
Take care when connecting the HD-R1 to a network that is
route-able from the public internet. Telnet access requires
no password, so the HD-R1 can be controlled at any time
by anyone who knows the IP address.
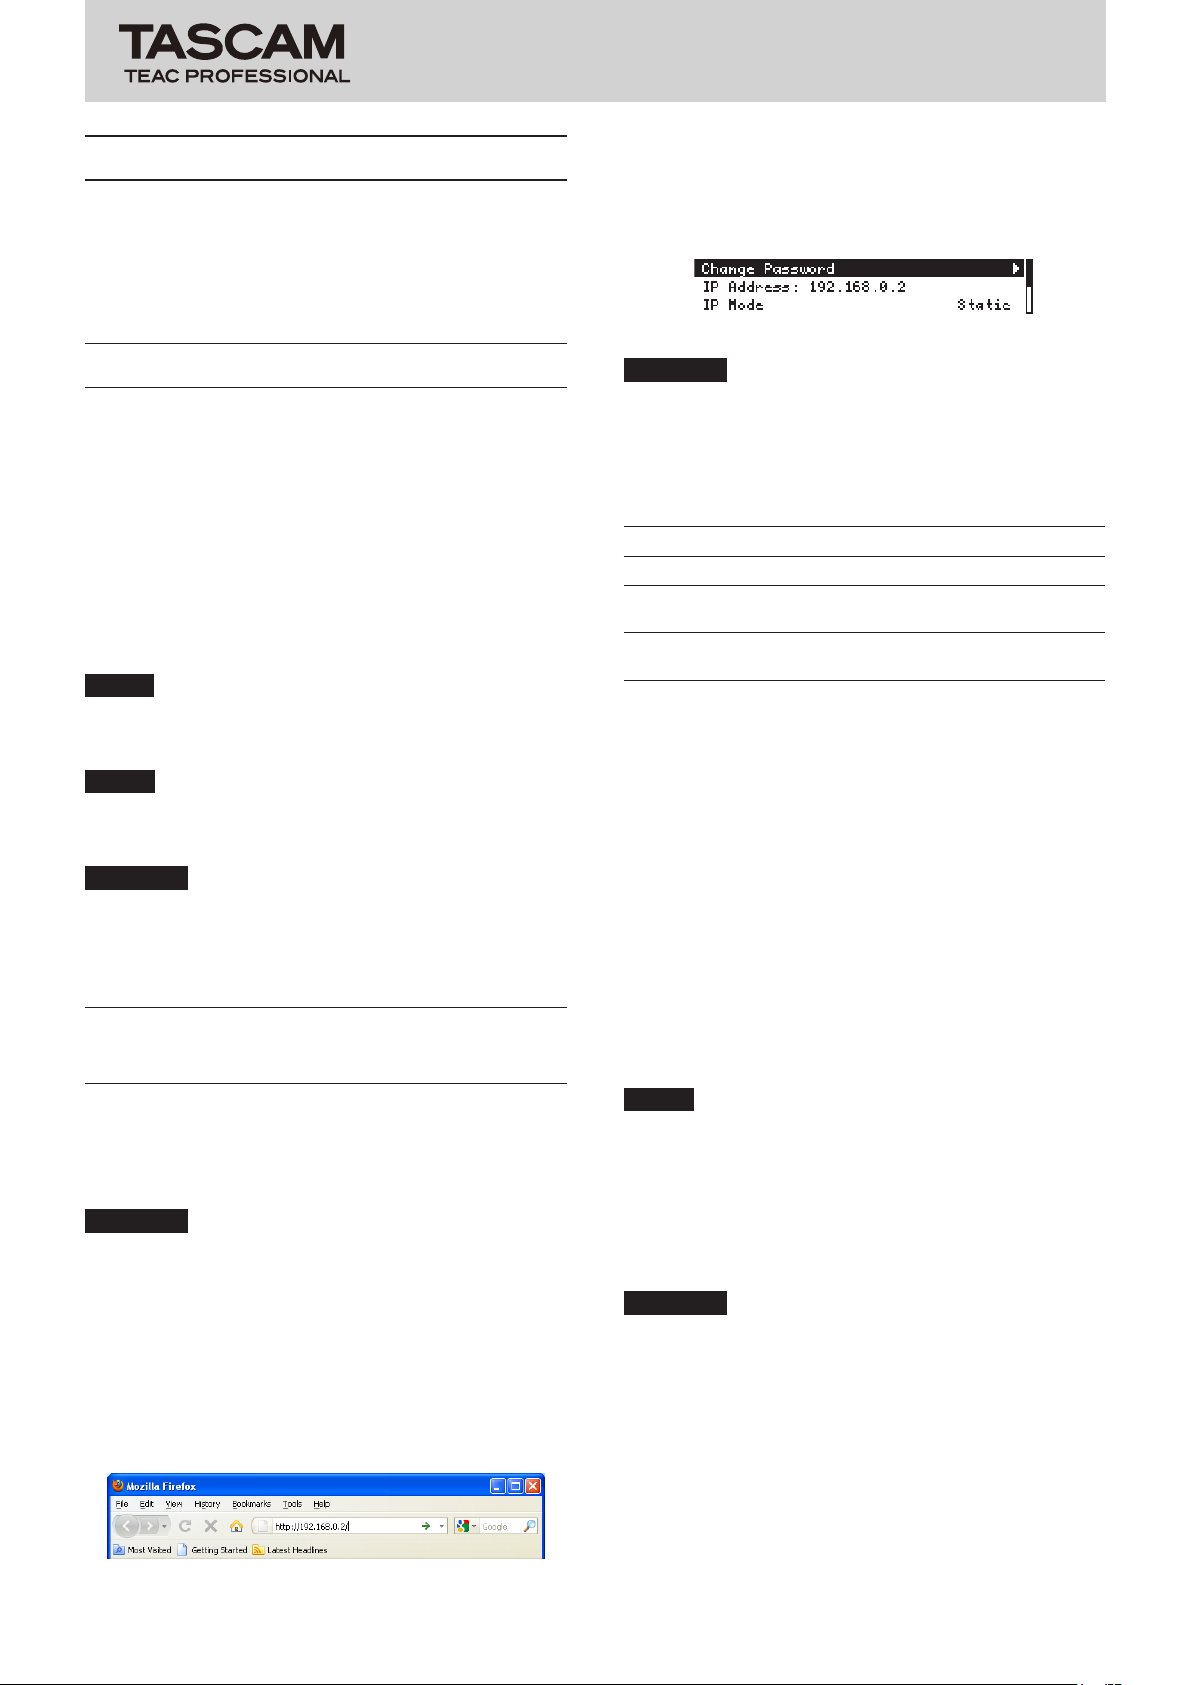
1 Start the computer and the Internet browser, and
enter the IP address assigned to the HD-R1 unit
after the http:// prex in the address (location) bar.
Example: http://192.168.0.2/
To check the IP address assigned to the HD-R1, check
IP Address
the
System Settings
the
from the
CAUTION
Use a private address when
(This limitation does not apply when a global address is
acquired.)
The ranges that can be used as private addresses are as
follows.
Class IP address Subnet mask
A
B
C
Be careful to avoid conicting IP addresses.
If your network has a LAN administrator, consult with the
administrator before making this setting.
When using DHCP, the DHCP server automatically
assigns IP addresses, so there is no need to worry about
global/private addresses. However, in many cases the
IP addresses dier each time that they are assigned, so
you will need to check and input the IP address each
time. (If the DHCP server uses MAC addresses for static
assignment, the IP address will not change.)
2 When the password entry screen appears on
the computer display, enter the user name
and password. The user name is HDR1 and the
password is hdr1. (Upper and lower case letters are
distinguished in these elds.)
NOTE
The user name and password are xed and cannot be
changed.
3 The transport screen (shown on the next page)
appears on the computer display. You can use this
screen almost in the same way as the transport
keys to control unit.
CAUTION
Not all of the key operations available on the front
panel of the unit can be conducted from this screen. For
example, skipping and searching backward and forward
by clicking and holding the
possible. Moreover, the screen has no equivalent to the
MODE key or the SHUTTLE/DATA wheel, for example.
MENU
10.0.0.0 – 10.255.255.255 255.0.0.0
172.16.0.0 –
172.31.255.255
192.168.0.0–
192.168.255.255
item in the
screen.
Network submenu
Network
menu, which is accessed
IP Mode
Prev
or
submenu of
is set to
255.255.0.0
255.255.255.0
Next
Static
buttons is not
.
D01140320A
4 To change the settings, click the Settings hyperlink
to open the settings screen.
TASCAM HD-R1
1
Page 2
HD-R1
Owner's Manual Addendum
2
TASCAM HD-R1
CAUTION
Not all of the settings that can be made on the unit can
be made from the setting screen. For example, network
settings cannot be made from this screen.
5 To return to the Transport Screen from the Setting
Screen, click the Transport hyperlink.
CAUTION
Do not open the Transport Screen and Setting Screen at
the same time using tabs, for example.
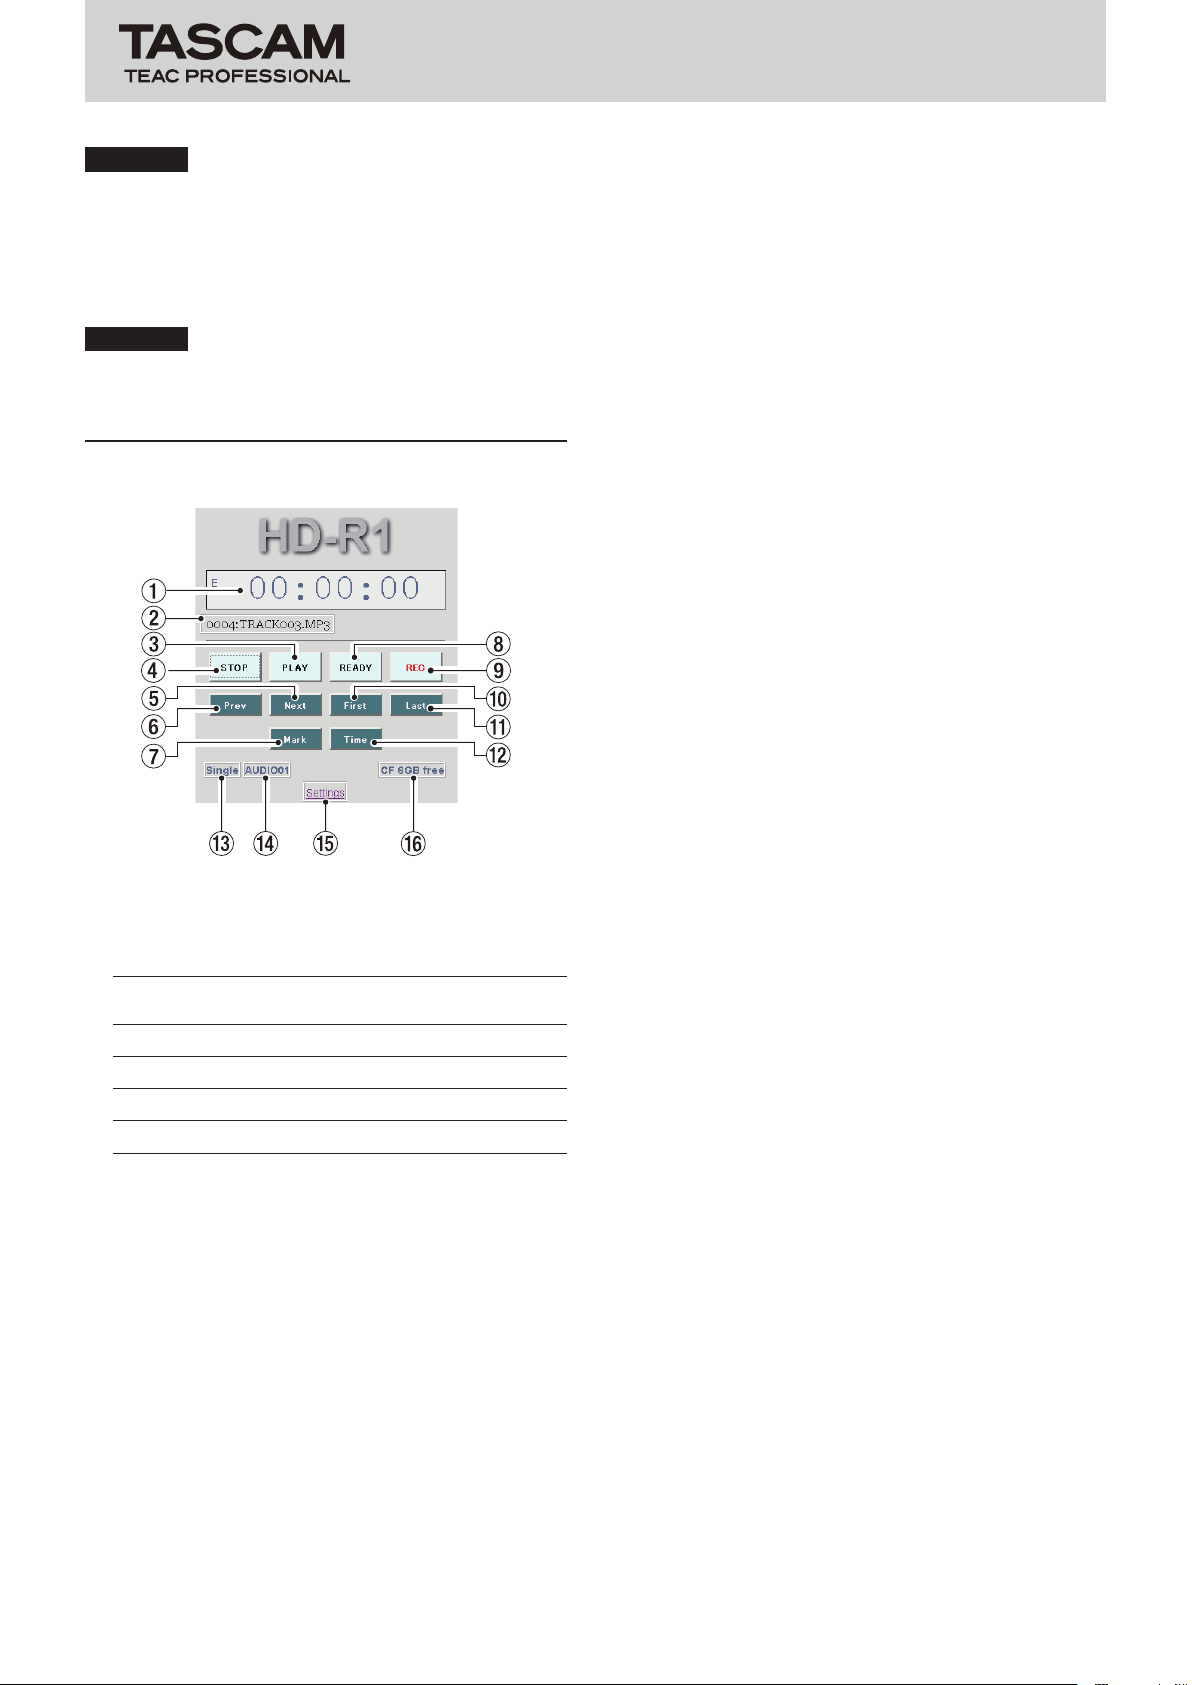
Transport Screen
1 Time Display
Displays the total time, total time remaining, current
track time, or current track remaining time as
"hours:minutes:seconds".
Icon(s)
shown
E
R
E and T
R and T
2 Current Track
Shows the current track.
3 PLAY button
Has the same functions as the unit's PLAY transport
key.
Press to start playback from the current transport
position. Press to start recording when the unit is
ready-to-record. This button appears green during
playback.
4 STOP button
Has the same functions as the unit's STOP transport
key.
Stops the transport and otherwise performs the same
roles as the unit's STOP transport key.
Elapsed time of current track
Remaining time of current track
Elapsed time from play area beginning
Remaining time in play area
Meaning of time shown
5 Next button
Functions like the SKIP ¯ transport key.
Skips to the beginning of the next track. If pressed
while located at the last track, locates to the rst track
beginning.
Unlike the SKIP ¯ key, clicking and holding will not
skip-play or search forward. It also does not function
as a shortcut key if pressed with the SHIFT key.
6 Prev button
Functions like the SKIP Â transport key.
Skips to the beginning of the current track if located
more than one second from its beginning. Skips to the
beginning of the previous track if located less than
one second from the beginning of the current track.
Skips to the beginning of the last track if located less
than one second from the beginning of the rst track.
Unlike the SKIP Â key, clicking and holding will not
skip-play or search backward. It also does not function
as a shortcut key if pressed with the SHIFT key.
7 Mark button
Functions like the MARK transport key.
Creates a new marker at the current time. The marker
is given a name beginning with
function as a shortcut key if pressed with the SHIFT
key.
8 READY button
Functions like the READY transport key.
While stopped, press to put the transport into a
ready-to-play state. While playing, press to pause the
transport and press PLAY to continue. While recording,
press to pause the transport while continuing to
monitor the input and press PLAY to create a new track
and continue recording.
Nothing happens if READY is pressed while the
transport is already in the ready-to-record or readyto-play state. Appears yellow when ready-to-play or
ready-to-record.
9 REC button
Functions like the RECORD transport key.
While stopped, press to make the unit ready-to-record,
turning on input monitoring. While ready-to-record,
press PLAY to start recording. When the unit is ready-
to-record or recording, the REC button appears red.
Pressing this key while already recording will cause the
HD-R1 to save the recording to that point and create a
new track from then on.
0 First button
Locate to the beginning of the rst track.
q Last button
Locate to the beginning of the last track.
w Time button
Functions like the TIME transport key.
Cycles through time display modes.
MARK
. It does not
Page 3
TASCAM HD-R1
3
HD-R1
Owner's Manual Addendum
e Playback mode indicator
Shows the current playback mode (All, Folder, Playlist
or Single).
r Current indicator
Shows the current folder or playlist.
t Settings hyperlink
Click this to open the Setting Screen.
y Media indicator
This shows the current type of media (CF or USB) and
its remaining open capacity.
Setting Screen
You can select the value for each setting from a pull-down
menu to change it. Click the pull-down menu to show the
setting options and click the desired value to set it.
Values can be input directly into items 5-14 File and 5-15
Mark.
These items can only be selected and set when the unit
is stopped (Transport Status Display is
that can be changed during playback using a menu
screen on the unit cannot be changed from the browser.
This screen has four sections: Media Setup, Play Settings,
Record Settings and System Settings. Since there are many
items that can be set, usually not all of them can be
viewed at once in the browser. Scroll through the browser
window to view the items that are not shown.
The items are based on the corresponding settings in the
menu system of the unit.
Stop
). Even items
button will be grayed out and it cannot be
selected.
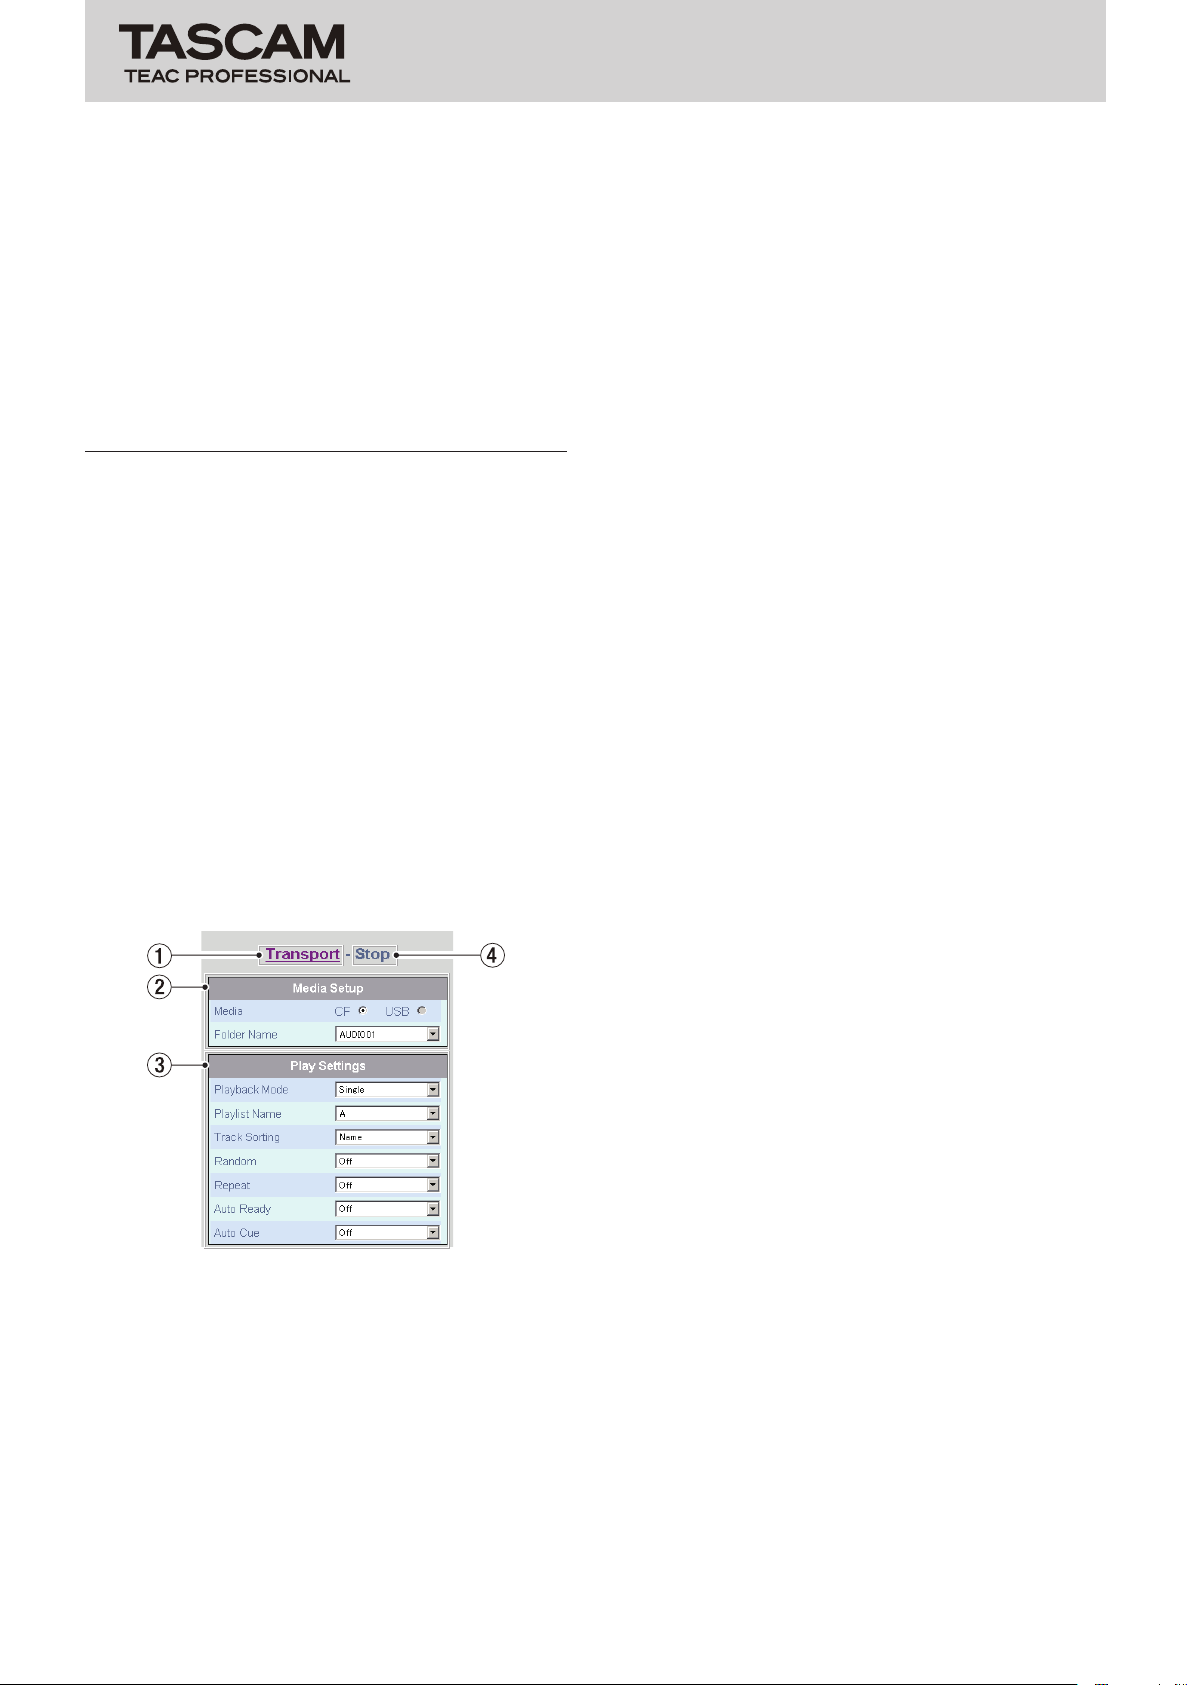
2-2 Folder Name
Select the desired folder from the pull-down menu.
The bottom item in the pull-down menu is
New Folder
and set it as the current folder. This folder will be
named automatically.
3 Play Settings section
3-1 Playback Mode
Select the playback mode from the pull-down
menu.
3-2 Playlist Name
Select the playlist from the pull-down menu.
The bottom item in the pull-down menu is
New Playlist
and set it as the current playlist. This playlist will be
named automatically. Playlists cannot be edited
using the browser.
3-3 Track Sorting
Use the pull-down menu to set the track sorting
order.
3-4 Random
Use the pull-down menu to turn random playback
On or O.
3-5 Repeat
Use the pull-down menu to turn repeat playback On
or O.
3-6 Auto Ready
Use the pull-down menu to turn the auto ready
function On or O.
3-7 Auto Cue
Use the pull-down menu to set the auto cue
threshold value or turn the function O.
. Select this to create a new folder
. Click this to create a new playlist
Create
Create
Setting Screen Media Setup and Play Settings sections
1 Transport hyperlink
Click this to open the Transport Screen.
2 Media Setup section
2-1 Media
Use this to select the type of media.
Click the radio button to the right of a media type
USB
(CF or
is currently selected.
If the media type is not available (CF card not
inserted or USB media not connected), its radio
) to select it. The one with the black dot
4 Transport status display
This shows the transport status:
Record
Settings on this page can be selected or changed only
when in the
.
Stop
state.
Stop, Play, Pause
or
Page 4

HD-R1
Owner's Manual Addendum
4
TASCAM HD-R1
Setting Screen Record Settings section
5 Record Settings section
5-1 File Format
Use the pull-down menu to set the recording le
format.
5-2 MP3 Sample Rate
Use the pull-down menu to set the MP3 le
recording sample rate.
5-3 Stereo Bitrate
Use the pull-down menu to set the stereo MP3 le
recording bit rate.
5-4 Mono Bitrate
Use the pull-down menu to set the mono MP3 le
recording bit rate.
5-5 WAVE Sample Rate
Use the pull-down menu to set the WAV le
recording sample rate.
5-6 Sample Width
Use the pull-down menu to set the WAV le
recording bit length.
5-7 Channels
Use the pull-down menu to set the input channels.
5-8 Input Source
Use the pull-down menu to set the input source.
5-9 Audio Overs
Use the pull-down menu to turn the automatic
creation of markers whenever the audio input
overloads On or O.
5-10 Time Interval
Use the pull-down menu to set the time interval of
markers created automatically or turn the function
O.
5-11 Pre-Record
Use the pull-down menu to turn pre-recording On
or O.
5-12 Auto Track
Use the pull-down menu to set the maximum size
of recorded audio les.
5-13 Sync Record
Use the pull-down menu to set the threshold value
of the sync record function or to turn it O.
5-14 File
Set the base name given to new audio les that are
created. This is not a pull-down menu. Enter up to
20 characters directly into the eld. Only singlebyte alphabetic or numeral characters can be used.
5-15 Mark
Set the base name given to new markers. This is
not a pull-down menu. Enter up to 20 characters
directly into the eld. Only single-byte alphabetic
or numeral characters can be used.
Page 5

TASCAM HD-R1
5
HD-R1
Owner's Manual Addendum
Setting Screen System Settings section
6 System Settings section
6-1 Ducking Mode
Use the pull-down menu to set the ducking mode.
6-2 Ducking Threshold
Use the pull-down menu to set the ducking
threshold.
6-3 Ducking Attenuation
Use the pull-down menu to set the amount of
attenuation when ducking.
6-4 Ducking Hold Time
Use the pull-down menu to set the amount of time
until the ducking function is turned o after the
input becomes lower than the ducking threshold.
6-5 Meter Clip Hold
Use the pull-down menu to set the amount of time
that the overload indicator stays lit after meter
clipping.
6-6 Meter Decay Rate
Use the pull-down menu to set the speed of meter
decay.
6-7 Meter Peak Decay
Use the pull-down menu to set the speed of meter
peak decay.
6-8 Meter Overload Threshold
Use the pull-down menu to set the threshold level
for lighting meter overload indicators.
6-9 Parallel Mode
Use the pull-down menu to set how tracks are
controlled from the parallel port.
6-10 Input Polarity
Use the pull-down menu to set the input signal
polarity of the parallel port.
6-11 Busy 1 Signal
Use the pull-down menu to set the condition for
generating a busy 1 signal.
6-12 Busy 1 Polarity
Use the pull-down menu to set the polarity of the
busy 1 relay when it is idle.
6-13 Busy 2 Signal
Use the pull-down menu to set the condition for
generating a busy 2 signal.
6-14 Busy 2 Polarity
Use the pull-down menu to set the polarity of the
busy 2 relay when it is idle.
6-15 Resume
Use the pull-down menu to turn the resume
function On or O.
6-16 Shuttle Mode
Use the pull-down menu to set the transport
control mode of the SHUTTLE/DATA wheel.
6-17 Ref Level
Use the pull-down menu to set the digital audio
level (dBFS) that corresponds to the analog
reference level (dBu).
6-18 CF Door Action
Use the pull-down menu to set what happens
when the CF card slot door is opened.
6-19 Keyboard Type
Use the pull-down menu to set the type of
keyboard that is connected to the unit's USB port.
6-20 Trigger Mode (Playlist Defaults setting)
Use the pull-down menu to set how external input
controls track playback.
6-21 Interruptible (Playlist Defaults setting)
Use the pull-down menu to set whether or not
receiving a playback trigger for another track will
interrupt the currently playing track.
6-22 Repeat Count (Playlist Defaults setting)
Use the pull-down menu to set the number
of times playback is repeated when a track is
triggered.
6-23 Attenuation (Playlist Defaults setting)
Use the pull-down menu to set the amount that
the level of a track is lowered during playback.
7 Transport hyperlink
Click this to open the Transport Screen.
Page 6

HD-R1
Owner's Manual Addendum
6
TASCAM HD-R1
Automatic time adjustment
function
This unit can automatically access an NTP server on the
Internet once per day to synchronize the current date and
time (system time).
CAUTION
Take care when connecting the HD-R1 to a network
•
that is route-able from the public internet. Telnet access
requires no password, so the HD-R1 can be controlled
at any time by anyone who knows the IP address.
The server access will automatically be set to tock.usno.
•
navy.mil, time.windows.com or pool.ntp.org. Other
servers cannot be selected.
Automatic time adjustment will occur 24 hours after
•
the last server access.
The addition of this function changes the System Time
item in the Utilities menu described in chapter 3–Screens
and Menus of the Owner's Manual.
Previously, selecting
the ENTER key opened the
submenu where you could manually set the date and
time.
Setup System Time
Setup System Time
and pressing
HD-R1 system time incorrectly by a large amount before
turning the
Use Time Server
item On.
Manually Set Time
This item only appears when
Off
.
Use this screen to set the current date and time (system
time) of the real-time clock.
When this screen is open, use the SKIP (Â/¯) keys to
move between data elds, and use the SHUTTLE/DATA
wheel to adjust the values.
When you are nished setting the time, use the SKIP
(Â/¯) keys to select
key to conrm the edited time and return to the
System Time
To cancel your changes, press the CANCEL key to return
Setup System Time
to the
system time to the previous setting.
NOTE
The system time is set at the factory at the time of
production. Be sure to reset it accurately before you rst
use the unit.
submenu.
Use Time Server
SAVE
, and press the ENTER
submenu and restore the
is set to
Setup
Time Zone
Use Time Server
When
disabled.
is set to
Off
, this item is
Setup System Time submenu with Use Time Server set to
O
The contents shown on the
submenu depend on whether the
item is On or
Off
.
Setup System Time
Use Time Server
When "Use Time Server" is "Off"
Current time display
The current date and time (system time) of the real-time
clock is shown. The date and time is shown in a 12-hour
format (am, pm) as h:mm:ss(am/pm) MMM DD, YYYY.
For example: 18:46:58 (24-hour time) on May 26, 2010
would be shown as:
Use Time Server
This function allows the unit to automatically access an
NTP server on the Internet to synchronize the current date
and time (system time). When On the unit accesses an NTP
server on the Internet every 24 hours to automatically
adjust the time. Moreover, the
light Saving Time
TIP
In order to conrm that the unit has correctly
synchronized its time with an NTP server, manually set the
6:46:58pm May 26, 2010
Time Zone
items become available.
and
.
Day-
Daylight Saving Time
Use Time Server
When
disabled.
is set to
Off
, this item is
When “Use Time Server” is “On”
Current time display
Same as when
Use Time Server
is set to
Use Time Server
Same as when
Use Time Server
is set to O.
Sync Time Now
This item only appears when
On
.
Select this item and press the ENTER key to access an
NTP server by the Internet and automatically adjust the
current date and time (system time).
Use Time Server
Time Zone
This item is enabled only when
to On.
Set the time zone to adjust the time to that of the current
location. The time zone can be set in a range between –11
and +12 hours compared to GMT/UTS. Generally, this is in
one hour intervals and is shown as the abbreviated time
zone name followed by
GMT+h
Use Time Server
GMT-h
or
Off
.
is set to
is set
with h being the
Page 7

TASCAM HD-R1
7
HD-R1
Owner's Manual Addendum
number of hours. When the time zone has a 30-minute
dierence, this is shown as,
NOTE
The automatic time adjustment function retrieves the
standard time and adjusts the internal clock. When
Time Server
to show the time accurately.
is On, the time zone must be set correctly
3:30
for example.
Use
Daylight Saving Time
This item is only enabled when
to On.
This allows the clock to be set for daylight saving time (DST
or summer time). Set it to On to adjust the current time
(system time) for daylight savings time.
NOTE
This feature is set for daylight saving time in North American
time zones (as of 2010).
Start: 2 AM on the second Sunday in March
End: 2 AM on the first Sunday in November
Adjustment: Sets the clock one hour ahead during the
above period.
Use Time Server
is set
Page 8

HD-R1
Owner's Manual Addendum
TASCAM HD-R1
8
Printed in China
 Loading...