

Page 1

Owner’s Manual
091806
Page 2

Copyright Information
Copyright 2006 TEAC America, Inc. All rights reserved. No part of this manual
may be reproduced or transmitted in any form or by any means for any
purpose other than the licensee’s personal use without the express written
permission of TEAC America, Inc.
All information in this manual is subject to change without notice and does
not represent a commitment on the part of TEAC America, Inc. The software
described in this manual is provided under the terms of a Software License
Agreement. The Software License Agreement specifies the terms and
conditions of use. TASCAM, GigaStudio, NemeSys, Giga VI, Giga Vi, and GVI
are trademarks of TEAC America, Inc.
All other trademarks are trademarks or registered trademarks of their
trademark holders.
2
Page 3

Contents
Copyright Information 2
CHAPTER 1: INSTALLING GVI
License Control Center 8
Installing the GVI software
Installing the eLicenser 1
9
3
8
CHAPTER 2: INSTALLING GVI IN HOST PROGRAMS 15
CAKEWALK SONAR 5 (PRODUCER OR STUDIO EDITION) 15
STEINBERG CUBASE SX 3 / NUENDO 3 1
CUBASE LE 1
ABLETON LIVE 5 1
SONY ACID PRO 6.0 1
DIGISEDIGN ProTools 1
5
6
6
6
5
CHAPTER 3: OPTIMIZING YOUR SYSTEM FOR GVI 17
HARD DRIVE CONSIDERATIONS 1
SEPARATE DRIVE FOR SAMPLE CONTENT 18
DEFRAGMENTATION 1
To defragment your drive: 1
3
8
9
8
Page 4

CHAPTER 4: GVI CONFIGURATION MANAGER 20
GVI SYSTEM AND STANDALONE SETTINGS 20
GENERAL PAGE 2
ENVIRONMENT SECTION 2
SYNTHESIZER ENGINE SECTION 2
STAND ALONE MODE PAGE 2
HARDWARE MIDI INTERFACE SECTION 2
WINDOWS DRIVER OPTIONS 2
HARDWARE OUTPUTS SECTION 2
ASIO DRIVER OPTIONS 2
APPLYING CHANGES 2
1
2
3
4
5
5
5
6
6
CHAPTER 5: USER INTERFACE BASICS 27
SLIDERS 27
KNOBS 2
7
DROP-DOWN MENUS 2
BUTTONS 2
8
8
CHAPTER 6: MIDI MIXER 29
MIDI MIXER CONTROLS 29
MIDI MIXER CONTROLS
THE VIRTUAL KEYBOARD 3
4
-Continued: 30
1
Page 5

COLOR CODED 31
VIRTUAL KEYBOARD NAVIGATION 3
VELOCITY SENSITIVITY CONTROLS 3
VIEWING AN INSTRUMENT’S LAYOUT 3
2
3
3
CHAPTER 7: LOADING INSTRUMENTS AND PRESETS 34
GVI FILE FORMATS 34
STACKING VS. LOADING 3
DETACHING VS. UNLOADING 3
LOADING A SINGLE FILE INTO A MIDI CHANNEL 3
GVI Instrument Browser 3
Factory Content 4
DETACHING A FILE FROM A MIDI CHANNEL 4
LOAD STATUS BAR 4
0
1
6
7
8
9
0
STACKING FILES ON A MIDI CHANNEL 4
DETACHING A SUB-CHANNEL INSTRUMENT 4
RENAMING A STACKED INSTRUMENT 4
ADDING A KEYSWITCH TO AN INSTRUMENT STACK 4
SHOW/HIDE SUB-CHANNELS 4
DRAG-AND-DROP LOADING OF INSTRUMENTS 4
LOADING FROM THE INSTRUMENT VIEWER 4
5
6
2
3
4
7
7
5
Page 6

CHAPTER 8: GVI TOOLBARS 48
THE GVI FILE MANAGEMENT TOOLBAR 48
LOAD/SAVE BUTTON (PRESET AND GSI MANAGEMENT) 4
SAVING PRESETS 4
LOADING PRESETS 5
ORGANIZE PRESETS 5
EXPORTING A GSI FILE 5
ARCHIVING USER PRESET DATA 5
UNLOAD BUTTON 5
RESET BUTTON 5
THE GVI NAVIGATION TOOLBAR 5
GVI PLAYBACK STATUS BAR 5
STANDALONE MODE STATUS METERS 5
VOICE METER 5
5
9
0
0
1
1
2
3
4
5
5
8
CHAPTER 9: STACK PROPERTIES 56
STACK PROPERTIES FIELDS AND MENUS 56
INSTRUMENT SELECT SECTION 5
PLAYZONES SECTION 5
TEMPLATE TOOLBAR 5
6
8
9
7
Page 7

CHAPTER 10: CHANNEL PROPERTIES WINDOW 60
Source Keys 60
Destination Keys 6
Channel Properties Tools 6
Template toolbar 6
Learn Mode menu 6
Display by menu 6
Saving Channel Properties settings 6
0
1
2
2
2
2
7
Page 8

CHAPTER 1: INSTALLING GVI
IMPORTANT:
Install the GVI software before inserting your eLicenser for the first time.
License Control Center
The GVI software uses a USB based eLicenser for license management. After
installation, the eLicenser must be attached to the system that is running
the GVI software. This eLicenser allows a user to install and run the GVI
software on multiple systems without requiring any further interaction
with the manufacturer by physically moving the eLicenser from system to
system.
An eLicenser must contain a GVI license to run the GVI software. Depending
on how the software and the eLicenser were acquired, the license may
be currently activated on the eLicenser or the user may be required to
download the license onto the eLicenser.
The GVI license management technology is provided by Syncrosoft
(www.syncrosoft.com), and is the same technology used by popular
workstations like Steinberg’s Cubase SX and Nuendo. Because of the
commonality of this copy protection it is possible to transfer your Syncrosoft
based licenses from one eLicenser to another. For example, if you already
have a Cubase SX eLicenser, it is possible to transfer the GVI license from
the original GVI eLicenser onto the Cubase SX eLicenser, and vice versa. This
helps reduce the number of USB devices connected to your system.
8
Page 9
Installing the GVI software
Insert the Disc labeled ‘GVI Installer Disc 1’ into your DVD drive.
Note: If you have the Window’s AutoPlay feature turned off, you will need to
open the DVD drive icon on your desktop or in ‘My Computer’, then doubleclick the file GVI_Install.exe.
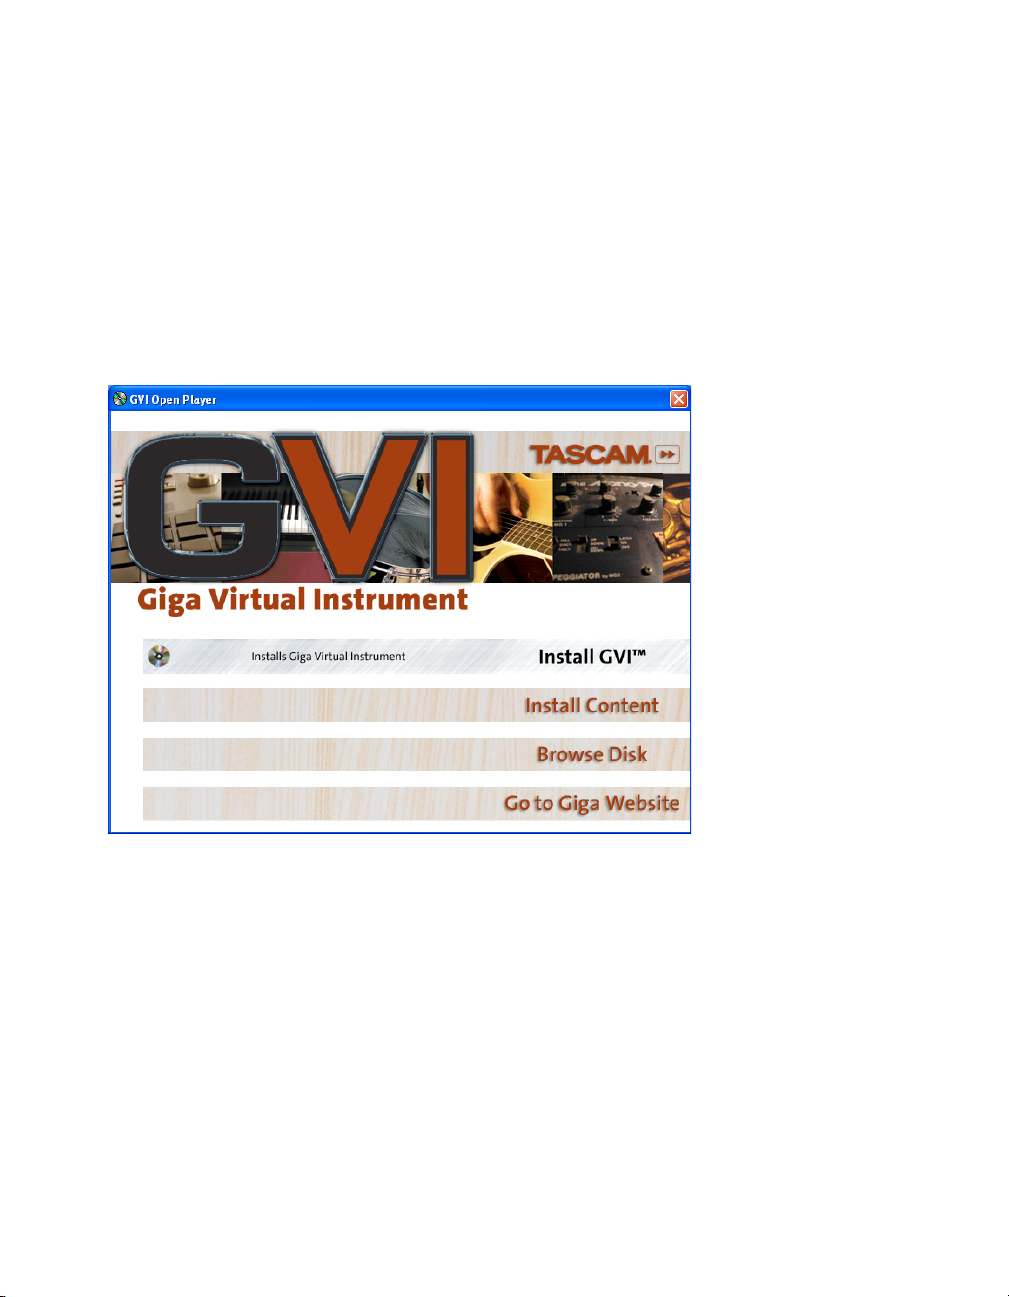
The following screen will be displayed:
There are two major components to the GVI installer, the GVI plug-in software and the factory sample content. The factory sample content includes
over six Gigabytes of sounds and instruments that can be loaded into the
GVI plug-in. Because of the large size of the factory sample content, the user
is given the option to disable this portion of the installer.
9
Page 10
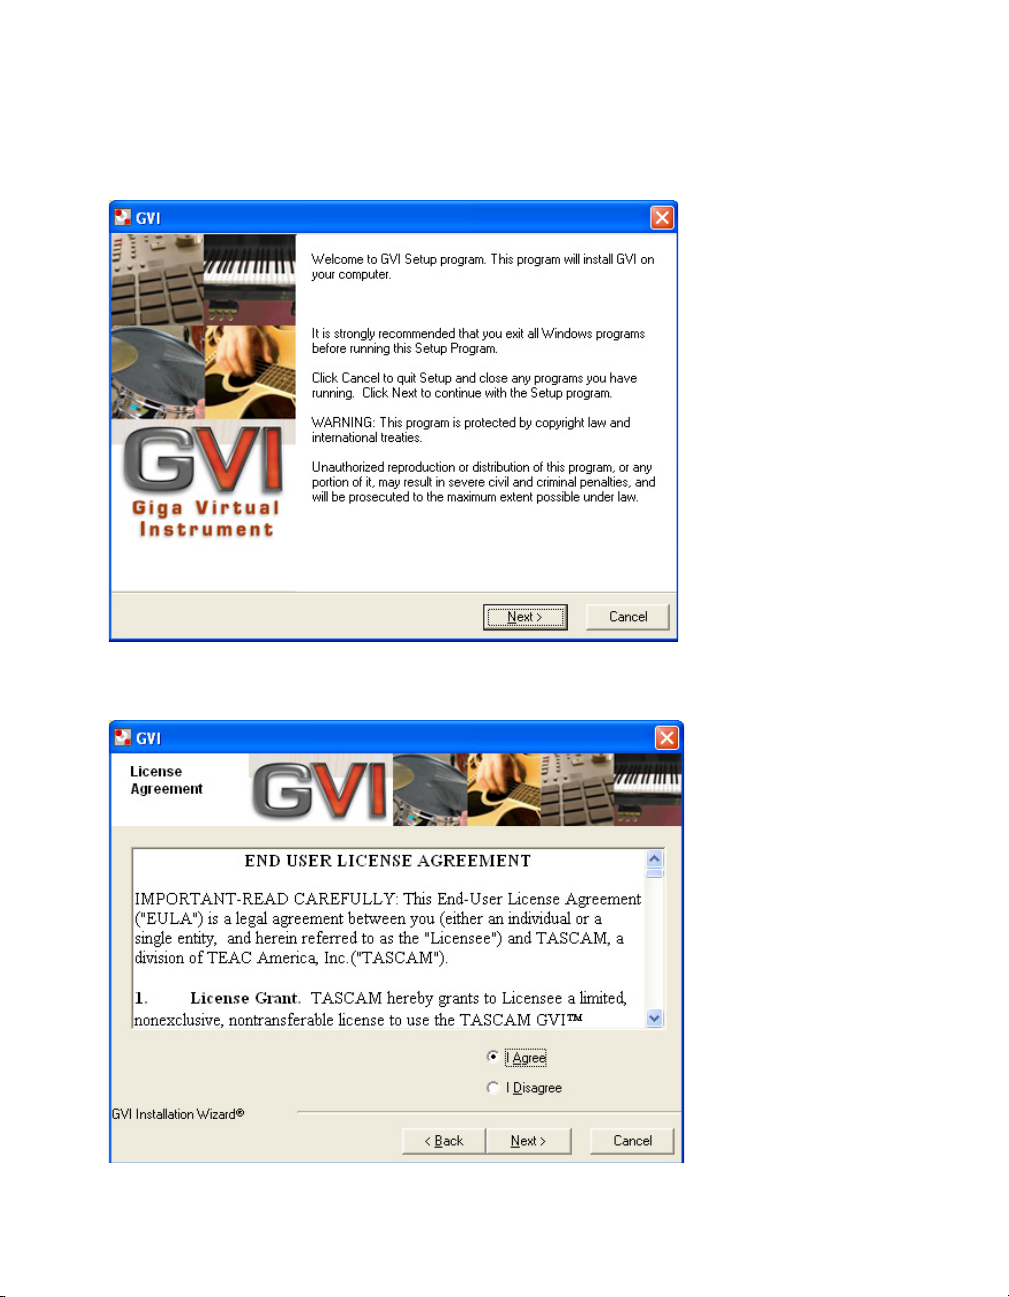
By selecting the ‘Install GVI’ option from the main GVI installer menu, the
user will be presented with the following screen.
Select the ‘Next’ button to proceed to the software license agreement page.
10
Page 11
Assuming you select the ‘I Agree’ option, the ‘Next’ button will become active. Click the ‘Next’ button to proceed to the component and destination
section of the installation.
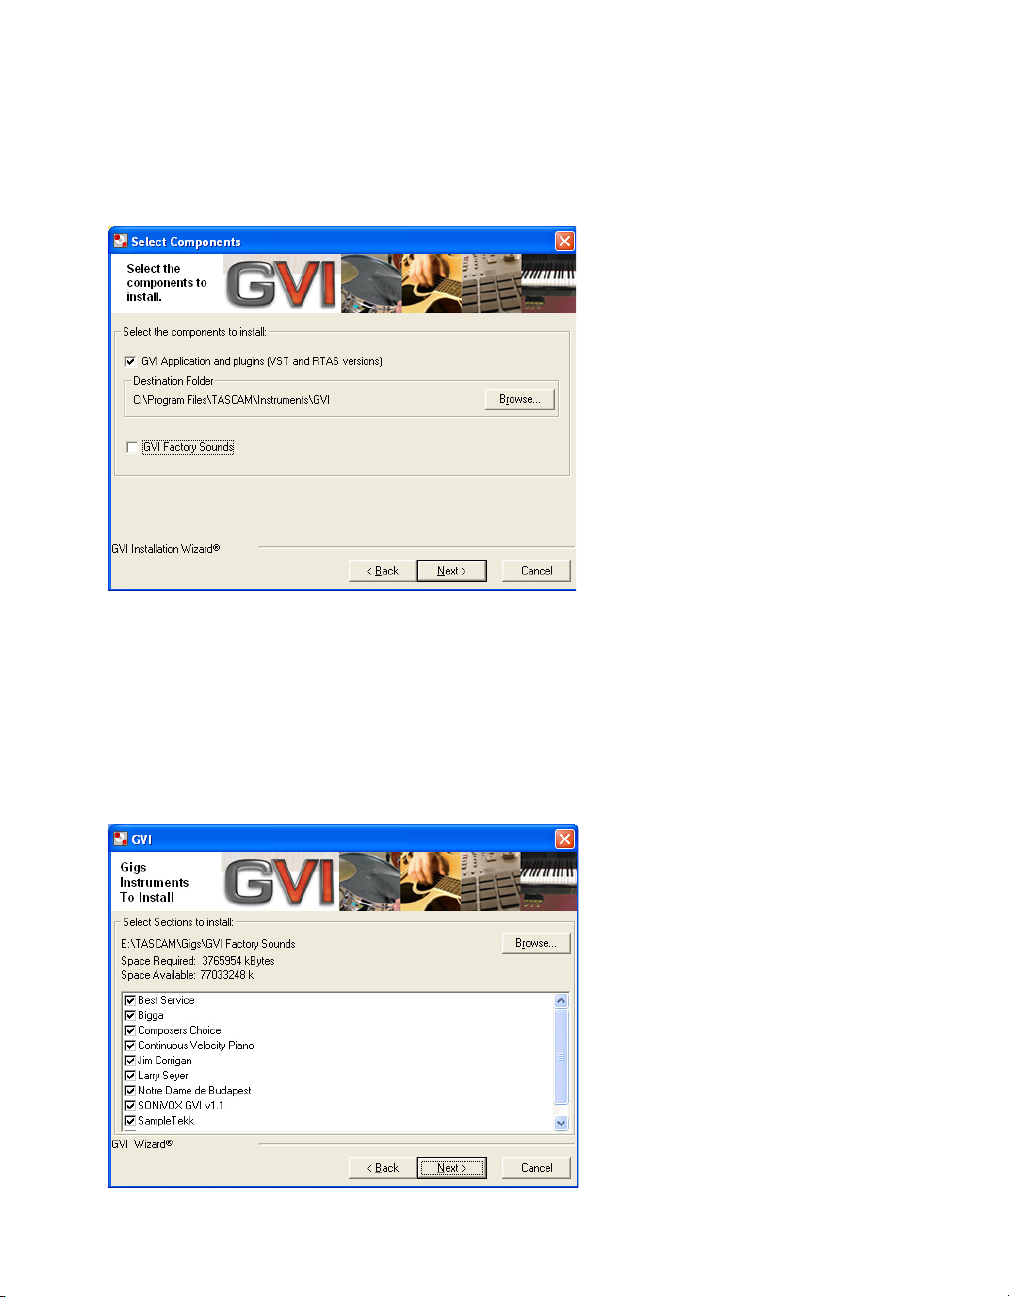
The ‘Select Components’ screen will allow the user to determine where
on the hard-drive the GVI software will be installed. If the default location
needs to be changed, use the ‘Browse’ button to select or create a new
location. This screen is also used to determine whether the setup is going
to install the GVI factory sample content. Remember, the content install is
fairly large and will require a bit of time. If the ‘GVI Factory Sounds’ option is
selected (checked) then the following dialog will be presented after pressing
‘Next’:
11
Page 12

The ‘Instruments to Install’ page allows you to choose whether or not to
install specific components included in the GVI factory sample content and
browse to an install location. After the desired content components have
been selected, clicking the ‘Next’ button will take the user to the installation
verification screen,which appears as follows:
The ‘Create a shortcut on the Desktop’ checkbox will put a shortcut to the
standalone version of GVI onto your Windows desktop. This does not affect
the plug-in version.
After verifying that the information is correct, click the ‘Next’ button
to begin the installation process. Once the installation has completed
successfully, the following ‘Finish’ screen will be displayed.
12
Page 13
Installing the eLicenser
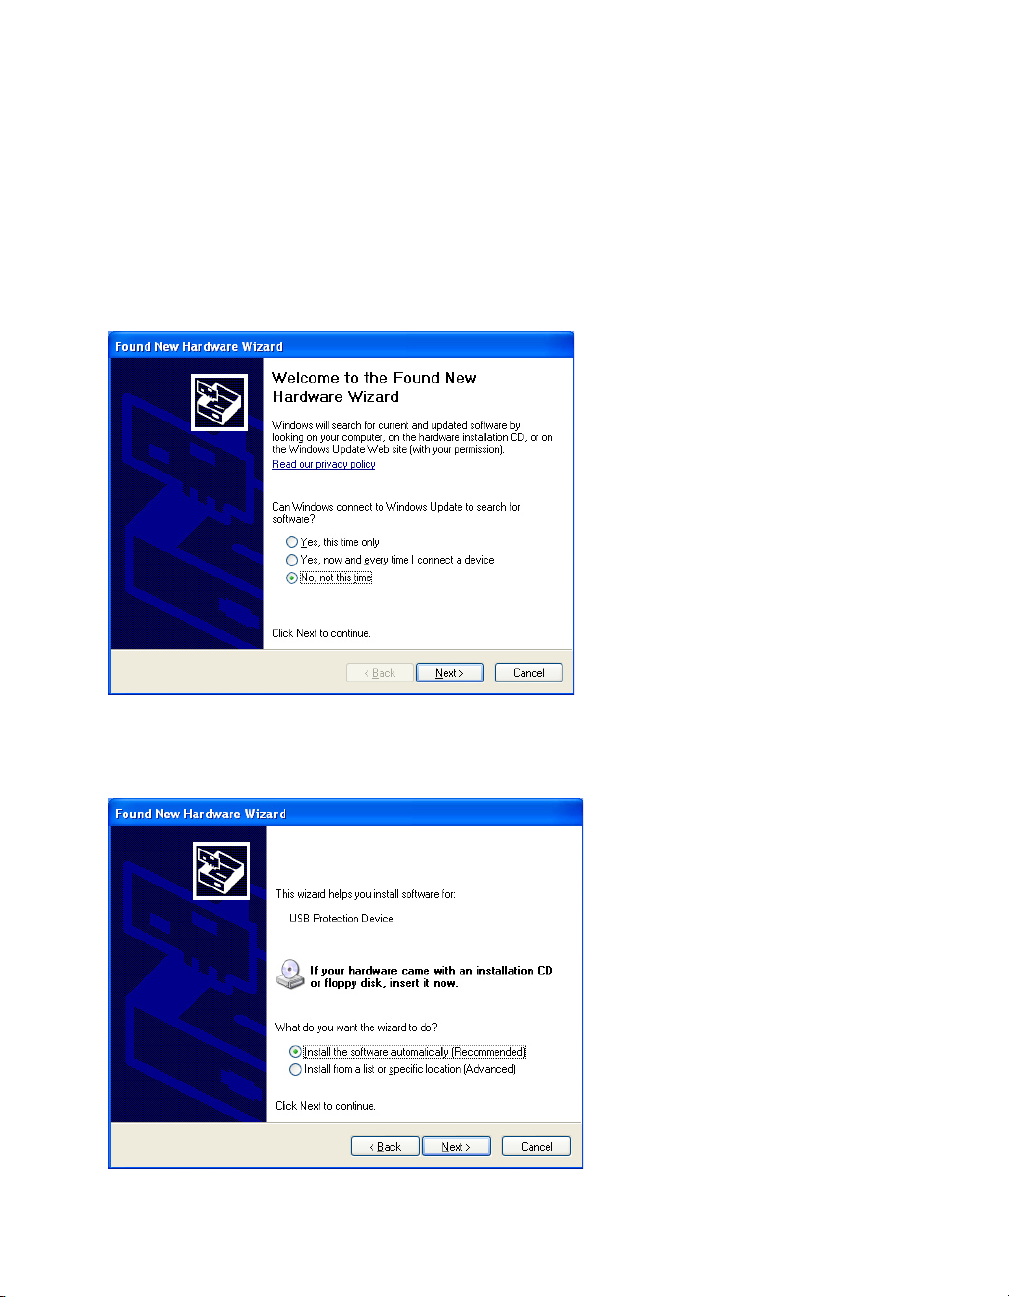
After the GVI software has been successfully installed, the user can now
connect the eLicenser to an available USB port. The eLicenser is compatible
with USB hubs. If this is the first time you are inserting the GVI copy
protection eLicenser, the Windows operating system will display the
following message:
When asked whether or not to connect to Windows Update to search for
software, select ‘No, not this time’. Click ‘Next’ to continue.
13
Page 14
Select ‘Install the software automatically (Recommended)’ and click the
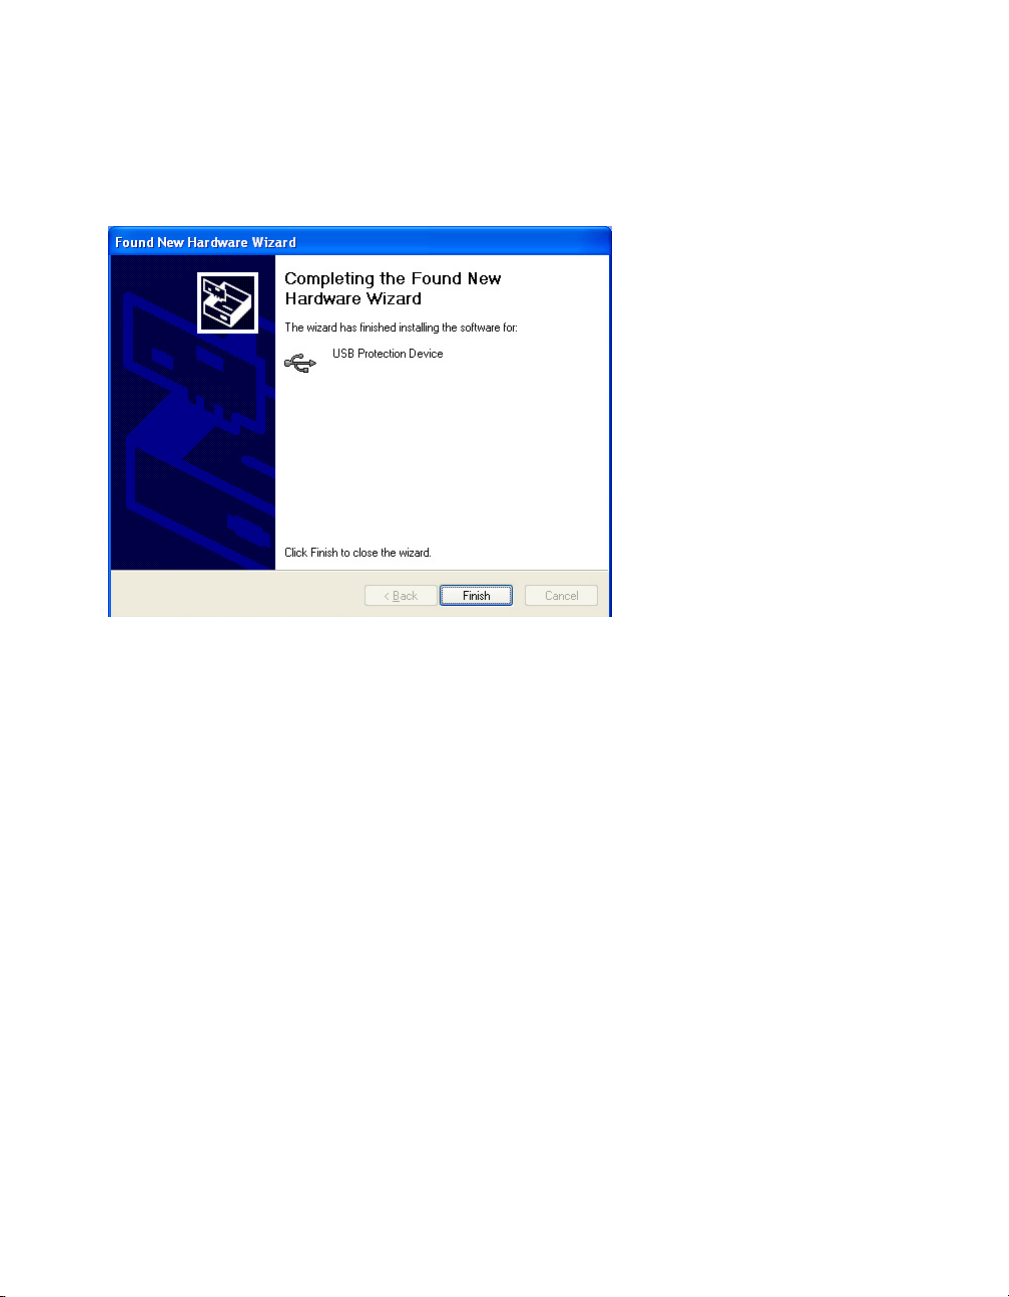
‘Next’ button to begin the driver installation. Once the installation is complete, the following screen will appear:
Click ‘Finish’ to exit the Hardware Wizard.
Once the wizard has completed, the next step is to verify that your eLicenser
was properly installed. You can access the Syncrosoft License Control Center
software that was installed with GVI through the Windows Start Menu as
follows:
Start > Programs > Syncrosoft > License Control Center
A properly installed and licensed eLicenser will appear yellow within the
Syncrosoft License Control Center. Please consult the Syncrosoft License
Control Center Help file for instructions on transferring licenses between
eLicensers.
14
Page 15

CHAPTER 2: INSTALLING GVI IN HOST PROGRAMS
In order for your VST/RTAS compatible DAW to recognize GVI as a plug-in instrument,
it must first be registered with the host application/sequencer.Your host software will
provide full instructions on installing plug-in instruments such as GVI. The following
guide is provided as a convenience so you can get up and running rapidly. If your DAW
software is not covered below, please refer to that application’s documentation regarding virtual instruments.
CAKEWALK SONAR 5 (PRODUCER OR STUDIO EDITION)
1. In order for Sonar to recognize GVI as a VST instrument, it is necessary
to run Sonar’s VST Configuration Wizard.The wizard can be accessed from
Sonar’s Tools menu (Tools > VST Configuration Wizard).
2. Click the Add button and navigate to the directory where GVI was
installed.
The default directory is C: > Program Files > Tascam > Instruments > GVI.
3. Click the Next button to begin the plug-in registration process.
4. Once the wizard is completed, GVI will be available to SONAR as a
VST instrument.
STEINBERG CUBASE SX 3 / NUENDO 3
1. From the Cubase/Nuendo Device Menu, choose Plug-in Information.
2. Click the Add button and navigate to the directory where GVI was
installed.
The default directory is C: > Program Files > Tascam > Instruments > GVI.
3. Click Apply then close the Plug-in Information window.
4. GVI will be available as a VST plug-in the next time you launch Cubase/
Nuendo.
CUBASE LE
1. Cubase LE only recognizes one user-definable VST Plug-in folder, therefore,
in order to host GVI within Cubase LE you must install GVI into the
Cubase LE VST Plug-in folder.
2. To install GVI into a directory other than the TASCAM default, direct the
GVI install wizard to the Cubase LE VST Plug-in folder on the installers
‘Select Components’ page.
15
Page 16

ABLETON LIVE 5
1. Ableton Live only recognizes one VST Plug-In Custom Folder. The default
directory is C: > Program Files > Steinberg > VST plugins.
Ableton’s VST folder can be changed under the Plug-In Tab in the
applications Preferences.
2. In order for Ableton to recognize GVI as a VST instrument, “GVI.dll” must
be present in Ableton’s VST Plug-In Custom Folder. This can done
manually by copying the file titled“GVI.dll”from the original GVI
install directory into Ableton’s VST Plug-In Custom Folder, or by installing
GVI directly into Ableton’s VST Plug-In Custom Folder using the GVI factory
installer.
SONY ACID PRO 6.0
1. From the Acid Options Menu, choose Preferences.
2. In the Preferences dialog, select the tab labeled ‘VST Instruments’
3. Enter the search path (install directory) for GVI into either
‘Alternative VSTi search folder 1’ or ‘Alternative VSTi Search folder 2’.
4. Hit the ‘Refresh’ button and exit Preferences.
DIGISEDIGN ProTools
Once Digidesign ProTools software has been installed on your system, the
GVI installer will automatically install into the proper RTAS directory.
Note: Because GVI is a Stereo plug-in, it can only be inserted into a Stereo Audio/Instrument track within ProTools. GVI will not appear in Mono Audio/Instrument tracks within
ProTools.
16
Page 17

CHAPTER 3: OPTIMIZING YOUR SYSTEM FOR GVI
GVI is a high-performance instrument. Fortunately, it is also very efficient.However, in
order to optimize GVI’s performance on your system, please observe the following recommendations:
● Although GVI streams samples directly from disk, it also preloads a
small portion of the loaded samples into RAM for a lower latency attack.
The more RAM you have installed in your computer, the more instruments
you will be able to load into GVI.
● Your installation of Windows XP (Home or Professional) must be
updated to Service Pack 2. GVI will not work with SP1. To find out what
your computer is running, right-click on My Computer, select Properties,
and check under System (General Tab). You can update your computer to
SP2 for free by going to www.windowsupdate.com.
● The DAW program hosting GVI may require significant computer
resources. Your computer must meet the recommended system
requirements of your host app before you start using GVI as a plug-in.
● GVI has 16 MIDI channels, and while opening up multiple instances of
GVI is possible, operation is more efficient if you load the instruments
you need into a single GVI instance. Ideally, a second instance of GVI
should be loaded only when all 16 channels of the first instance are being
used.
17
Page 18

HARD DRIVE CONSIDERATIONS
SEPARATE DRIVE FOR SAMPLE CONTENT
Because GVI performance depends on hard disk performance, TASCAM
strongly recommends you dedicate a separate physical hard drive to your
sample content.
Creating a separate partition for sample content on your system drive is not
the same as a separate physical drive.
DEFRAGMENTATION
Make sure you defragment your sample data drive after re-arranging the
data on it. For office applications defragmentation isn’t as crucial, but for
audio and video applications defragmentation remains very important for
optimum performance.
Before defragmenting, it is a good idea to make a back up copy of the data
on the drive being defragmented.
18
Page 19
To defragment your drive:
1. Go Start > Programs > Accessories > System Tools > Disk Defragmenter.
2. Click on the drive that contains your GVI sample data.
3. Click on the Defragment button.
This process may take a lot of time if a high-capacity disk has never been
defragmented before. Note that there still may be a few fragmented files
after the defragmentation process is complete; this is normal.
19
Page 20

CHAPTER 4: GVI CONFIGURATION MANAGER
GVI SYSTEM AND STANDALONE SETTINGS
GVI can be run either as a hosted VST virtual instrument or as a standalone
application, independent of a host program. For example, when performing
live, you can run GVI from a laptop, hook up a MIDI keyboard controller, and
treat it as you would any hardware sample player.
When using GVI as a plug-in, most of the global configuration settings are
handled by the host program including Midi input, audio driver selection,
sampling rate, bit depth, and latency preferences. However, when using GVI
in standalone mode, global configuration settings must be made using the
GVI Configuration Manager.
The GVI Configuration Manager can be launched either from theWindow’s
Start menu (Start > Programs > Tascam > GVI > GVI Configuration Manager)
or by selecting “Configuration…” from the GVI System menu while the
program is running.
20
Page 21

GENERAL PAGE
Click on the “General” tab to access the Environment and Synthesizer Engine
sections. The options found on the “General” tab apply to GVI in both hosted
and standalone modes while the options found on the “Stand Alone Mode”
tab apply only to GVI standalone.
21
Page 22

ENVIRONMENT SECTION
RECENTLY USED INSTRUMENTS
When you click on a channel’s “Click to Load…” Pop-up menu on the GVI
MIDI Mixer screen, within the “Load” menu you will see a list of recently
used instruments. The Recently Used Instruments parameter in the GVI
Configuration Manager sets the number that will be listed in this menu,
from 4 to 32. The following screen shot shows what the load menu looks like
when the list of recently used instruments is set to 4.
RECENTLY USED FOLDERS
The Recently Used Folders value in the GVI Configuration Manager sets the
number of folders that appear in the “Recent” drop-down menu when you
open the GVI file browser (Load > Browse), and can be set between 5 and 32.
22
Page 23

SYNTHESIZER ENGINE SECTION
MAXIMUM POLYPHONY FIELD
The GVI maximum polyphony, which defaults to 256 voices, is variable from
32 to 5,867 voices. Increasing the maximum polyphony demands greater
CPU resources, so avoid setting the maximum polyphony higher than
required. If your computer cannot handle the current maximum number of
voices, reduce this number until no audio interrupts occur.
POLYPHONY SLIDER
The Polyphony slider allows setting the amount of polyphony between 12
voices and the specified maximum.
23
Page 24

STAND ALONE MODE PAGE
The Stand Alone Mode page determines the MIDI interface, hardware
outputs, and type of audio driver that GVI will use when operating in
standalone mode.
(When GVI is used as a plug-in, these selections are not relevant)
24
Page 25

HARDWARE MIDI INTERFACE SECTION
This is where you choose the computer MIDI input port from which GVI will
receive MIDI data. Use the MIDI Input Port drop-down menu to select an
input from the available ports.
HARDWARE OUTPUTS SECTION
GVI can work with Windows (WDM) or ASIO drivers. Both are capable of lowlatency performance, although some audio interfaces will perform better
with one driver type than another, or may support only one driver type.
If multiple driver options are available, experiment to determine which
offers the best performance.
WINDOWS DRIVER OPTIONS
Windows Driver drop-down menu: This lists all available Windows drivercompatible interface drivers installed on your system; only one driver may
be selected at a time.
Audio Sampling Rate drop-down menu: This lists all sample rates supported
by your audio interface hardware. GVI always reads in samples at their
native sample rate and then upsamples/downsamples them to the
specified audio interface sample rate.
Audio Sample Depth drop-down menu: This Lists all bit resolutions
supported by your audio interface hardware. GVI always reads in samples at
their native resolution and then processes them at 32bit resolution.
Latency slider: All computer-based systems require some processing time.
Therefore, there is a slight delay between the time you trigger a note and
when you actually hear it. Lower latencies are desirable for the tightest
“feel” when playing, but require a faster CPU. Setting latency too low can
cause pops and breakups in the audio stream, so choose a value that
represents a good compromise between “feel” (faster) and performance
(safer).
25
Page 26

ASIO DRIVER OPTIONS
ASIO Driver drop-down menu: This lists all available ASIO-compatible
interface drivers. Only one ASIO driver may be selected or active at a time.
Audio Sampling Rate drop-down menu: Lists all sample rates supported
by your audio interface hardware. Changing this value may or may not be
reflected in your audio interface’s control panel,and these two settings
must be the same. To verify changes, click on the “ASIO Control Panel” button
and adjust your interface’s sample rate if necessary. After altering the
sample rate it may be necessary to close, then re-open GVI.
Status field: This is read-only and summarizes the characteristics of your
ASIO audio interface. Click on the ASIO Control Panel button for more
information on the performance and settings of your particular audio
interface.
APPLYING CHANGES
After making any changes to the GVI Configuration Manager, it is necessary
to apply them. Click on the Apply button, and then click on OK to exit the
Configuration Manager.
26
Page 27

CHAPTER 5: USER INTERFACE BASICS
GVI’s interface can be as simple or as complex as needed and is divided into three basic
sections: the MIDI Mixer (default), the Instrument editor (QuickEdit), and the GigaPulse/
FX editor. All three of these sections share the same set of graphical controllers and
fields.The following section explains the use of these basic controls.
SLIDERS
● Click on the slider button and drag right or left to adjust the value.
As soon as you click, the cursor hides to make for easier adjustments.
● Hold the Shift key while dragging for finer adjustments.
● Ctrl-click on the slider to set it to the default value.
● To enter a number directly, click within the slider’s value field and type
in a number. Be sure to hit ‘Enter’ to apply the value.
KNOBS
27
● Click on the knob and drag up or to the right to
move the knob clockwise.
● Click on the knob and drag down or to the left
to move the knob counter-clockwise.
● For fine adjustments, hold the Shift key while
dragging.
● Ctrl-click on the knob to set it to the default
value.
● To enter a number directly, click within the
knob’s value field and type in a number.
Be sure to hit ‘Enter’ to apply the value.
Page 28

DROP-DOWN MENUS
Downward-pointing arrows indicate a GVI
drop-down menu. To open a menu, click on
a field’s downward-pointing arrow, move
the cursor to the desired selection, then
click. When a menu item contains
additional options, a right-pointing arrow
will be present next to that selection.
Highlighting a menu item that contains
additional options will reveal its contents.
BUTTONS
Most buttons are toggles: Click once to enable, once to disable. When a
button is enabled it will be highlighted some obvious color (green, red,
yellow, etc), a gray button is disabled. If a button opens up a window, closing
the window turns the button off.
28
Page 29

CHAPTER 6: MIDI MIXER
MIDI MIXER CONTROLS
Each MIDI mixer Channel and Sub-Channel (Stacked Instrument member)
has a full complement of mixer-like controls. Following is a numbered
diagram and description of each parameter found in the MIDI Mixer view.
1. Channel Slot – The channel slot field is where you load and detach
instruments to a particular MIDI channel. Once an instrument has been
attached to a channel or sub-channel, the name of that instrument appears
in the channel slot field. Clicking on the Channel Slot drop-down menu
opens a channel specific menu that allows you to Load,Stack, or Detach
instruments, open the ‘Loaded Instruments’ dialog, or edit Stack and
Channel properties (keyboard mapping).
2.MIDI activity light – illuminates when the channel is receiving MIDI data
3. Mute – silences a channel’s incoming MIDI
4. Solo – silences the incoming MIDI of all other channels so you hear only
the soloed channel
5. FX – displays the GigaPulse view for instruments that have embedded
convolution. If there is more than one instance of GigaPulse embedded
in the instrument, a popup menu will appear allowing you to select
the desired instance. This button will appear green when embedded
convolution is present on a channel.
29
Page 30

MIDI MIXER CONTROLS-Continued:
6. Edit button – When a MIDI channel contains an attached instrument, the
Edit button will appear green (active). Clicking the Edit button opens the
QuickEdit View for the instrument loaded on that particular channel. Once
the QuickEdit view is opened, you can then select instruments loaded on
alternate MIDI channels using the drop-down menu located just under the
file management toolbar.
7. Assignable MIDI sliders – The three available MIDI sliders default to
controlling a channel’s Volume, Tune, and Pan, but can be assigned to any
MIDI controller from 1 to 119 as well as program change, fine tune and
course tune via the controller name’s drop-down menu. This provides a
convenient way to adjust MIDI CC data from the main MIDI Mixer view.
Changing a slider assignment does not alter the CC value of the previous
assignment. For example, if you set a Channel’s volume level, then change
the slider to control LFO modulation, the volume level remains where you
set it.
8. Output Assign – When hosted as a plug-in, GVI has sixteen stereo
output pairs that can appear in your host applications mixer, and each
MIDI Channel is assignable to one of these output pairs. When GVI is run
as a standalone application, the output assignments in the MIDI Mixer
correspond to the available physical outputs of the active audio interface.
If there are active effects (embedded GigaPulse) present, there will also be
one or more FX channels that you can assign your MIDI mixer (sub-)channel
to. You can control the output routing of the FX channels by clicking on the
GigaPulse button (on the menu bar).
30
Page 31

THE VIRTUAL KEYBOARD
The Virtual Keyboard, located at the bottom of the GVI interface serves
many functions. You can ‘play’ the keyboard with a mouse to audition
sounds rapidly, allowing you to test and edit sounds even if a hardware
keyboard isn’t connected. The Virtual Keyboard is also used to illustrate the
playable range of each instrument and any keyswitched articulations that
may be present in the instrument. With MIDI Select enabled in the QuickEdit
view, the Virtual Keyboard also enables you to select individual notes to be
edited.
COLOR CODED
Multiple colors are used to indicate the function of each active
Virtual Keyboard region. Following is a list of the colors used and their
corresponding function:
· Black/White – Indicates the playable range of an instrument
· Gray – Indicates that a key is unused
· Green – Indicates a Dimension keyswitch
(a black dot shows the currently active key)
· Blue – Indicates a Stacked Instrument keyswitch
(a black dot shows the currently active key)
· Bright Yellow (QuickEdit) – Indicates focus region, the single region whose
parameters are displayed
· Dim Yellow (QuickEdit) – Indicates selected regions (other than the focus)
to which edits will be applied
31
Page 32

VIRTUAL KEYBOARD NAVIGATION
The pair of controls found on both the left and right side of the Virtual
Keyboard performs the following functions:
Left Arrow
Scrolls the Virtual Keyboard left, so that lower notes come into view
Right Arrow
Scrolls the Virtual Keyboard right, so that higher notes come into view
32
Page 33

VELOCITY SENSITIVITY CONTROLS
The GVI Virtual Keyboard is also velocity sensitive. When the
Auto option is enabled (highlighted green), clicking toward
the bottom of a key produces a higher velocity while clicking
towards the top of a key produces a lower velocity. When the
Auto option is disabled, you can use the slider to set a fixed
velocity level.
VIEWING AN INSTRUMENT’S LAYOUT
The virtual keyboard only shows the layout of the instrument(s) on the
currently selected channel or sub-channel.
In the case of Stacked Instruments, when the Main MIDI channel is selected,
the virtual keyboard shows the union of all sub-channel regions (Stack
Members) in addition to any Keyswitches present. When a sub-channel
(Stack Child) is selected, the Virtual Keyboard shows only the playable
region of that single instrument in addition to any Keyswitch regions that it
contains or belongs to (including a global Stack Keyswitch).
It is possible for a Stack Child (sub-channel) to contain a dimension
keyswitch as well as be a member of a global Stacked Instrument keyswitch.
In these cases, both green and blue regions will be present in the Virtual
Keyboard layout when that sub-channel is selected.
33
Page 34

CHAPTER 7: LOADING INSTRUMENTS AND PRESETS
GVI FILE FORMATS
There are three main file types that can be used with the GVI platform.
Theses files include GIG files (GigaStudio Instrument files), GSI (GigaStudio
Stacked Instrument files),and Presets that are accessed through the native
GVI Load/Save Preset menu. GIG files would typically be stored on your
dedicated sample drive while GSI files can be stored anywhere on your
system. Presets are automatically stored in a single centralized
location.
The GVI UI defaults to a sixteen channel MIDI Mixer view when initialized.
Not only can you perform basic mixing and routing functions within the
MIDI Mixer, it’s also where you manage what instruments and files are
loaded on each MIDI channel. Following is a more detailed description of
GVI compatible file formats:
GIG Files -
GSI Files -
GIG (.gig) files can contain multiple (single) instruments and
are arranged in banks. These instruments may be loaded or
stacked into the MIDI mixer’s individual channels using the
MIDI Channel drop-down menus. When a GIG file is loaded
that contains multiple instruments, all of the contained
instruments are loaded into RAM, but only the first
instrument is attached to the specified MIDI channel.
GSI (GigaStudio Stacked Instrument) files can be either loaded
or exported (saved) from within GVI using the MIDI Channel
drop-down menus. GSI files are similar to GVI Presets in that
they remember much of the GVI interface including loaded
instruments, MIDI Mixer settings, audio routing, instrument
specific editor tweaks, and GigaPulse tweaks.The main
difference between a Preset and a GSI file is that the sampler
is reset (cleared) when a Preset is loaded while a GSI file can
be loaded into a session that already contains instrument
assignments.
GSI files can contain multiple instruments either loaded on
separate MIDI channels or loaded on a single MIDI channel as
a stacked instrument.
34
Page 35

PRESETS -
*GSP (GigaStudio Performance) files are not compatible with GVI since those
files reference multiple MIDI ports and the GigaStudio DSP Station Mixer,
both of which are not present in GVI. Transferring configurations between
GVI and GigaStudio is done via the GSI file format.
Preset files are loaded through the Global Load/Save Preset
Menu located in the GVI File Management toolbar. Presets
recall the entire state of GVI instance including loaded
instruments, MIDI Mixer settings, QuickEdit adjustments,
GigaPulse tweaks, audio routing, etc. When a preset is loaded,
the sampler is first fully reset to its default state before the
preset instruments and settings are recalled.
35
Page 36

STACKING VS. LOADING
In this picture, Channel 1 has loaded a stacked instrument with the default name of
‘Stacked Instrument – 0’, which contains two stack members (single instruments),
Melodica and Dallape Accordian. Channels 2, 3, and 4 each contain single instruments.
There are two ways to add instruments to a channel in the MIDI mixer
using the MIDI Channel drop-down menus. You can select which mode to
use by clicking on a channel’s drop-down menu.
Loading an Instrument replaces anything currently loaded on a MIDI Mixer
channel. The previous instruments are detached from the channel but not
“unloaded” (see below).
Stacking adds an Instrument to a MIDI mixer channel without detaching
any currently loaded instrument(s). When more than one instrument is
loaded on a single MIDI Mixer channel, a stacked instrument is created
containing all of the currently loaded instruments (stack members). The
“Stack” option is not available until at least one instrument is loaded on a
MIDI mixer channel.
36
Page 37

DETACHING VS. UNLOADING
There are two ways to remove instruments from the MIDI mixer using the
MIDI Channel drop-down menus.
Detaching clears the Instrument from a MIDI mixer channel, but it remains
loaded in memory (RAM). Therefore, it can be recalled by a program
change either into the original channel to which it was assigned, or into an
alternate channel.
Unloading removes the Instrument from memory altogether. Use this if you
don’t expect to use the Instrument any more, thus freeing up RAM.
37
Page 38

LOADING A SINGLE FILE INTO A MIDI CHANNEL
A MIDI channel that contains no instrument assignments displays “Click to
Load...” in its channel slot field. Here’s how to load a File:
1. Click on the Down Arrow located on the right border of the channel slot field of an
empty MIDI channel to open that channels drop-down menu.
Channel Load menu
2. Move the cursor over the “Load” menu item.
3. Under Load, a menu appears with two options: Browse followed by a list
of recently loaded files.
4. If you choose one of the files from the list of recently loaded instruments,
it will automatically load on the specified channel.If you choose Browse,a
new navigation window appears allowing you to browse for GIG and GSI
files.Refer to the numbered/lettered callouts below for what each section of
the screen shows.
38
Page 39

GVI Instrument Browser
1. The drop-down menu in “Recent” displays recently-accessed folders. If you select one
of these, it will appear in the “Look In” field.
2. The “Look In” field uses standard Windows navigation techniques to find folders
containing GVI-compatible files.The drop-down button (a) shows your computer’s file
tree; the four navigation buttons are Back button (b), Up One Level of the file tree (c),
create New Folder (d), and View Options (e).
3. Upon selecting a folder, this pane shows any .GIG or .GSI files within the folder.
4. In the Files of Type field, you can choose to display only .GIG, only .GSI,both types of
files,or All Files (including non-GVI compatible types).
5. If you hold your mouse over one of the file names,a “tooltip” shows the type of file,
date modified, and size.
6. Click on a file name,and its name appears in the File Name field.
7. If a .GIG file contains more than one instrument, the individual instruments show up
in the “Instruments to load” pane. Here you can select to load an individual
instrument or “All Instruments in Gig File.”
8. The Properties section shows the file name, version, and other information.
9. Once you’ve selected the instrument(s) you want to load, click on Open.
10. This option closes the “Open” dialog.
Note: You can also drag-and-drop a .GIG file from the desktop into a MIDI mixer
channel. If the channel already contains an instrument, the existing file will be
detached.
39
Page 40

Factory Content
If factory content was initially installed when GVI was installed, there will be
categorized pulldown menus for that content under the ‘Load’ menu.
To disable this display, uncheck “Show built-in content on the instrument
load menu” on the General tab of the GVI Configuration window, which is
checked by default.
DETACHING A FILE FROM A MIDI CHANNEL
Detaching removes an instrument from a channel but does not remove it
from memory (RAM).
To detach an instrument, click on the down arrow located near the right
border of the channel slot field, and select Detach from the drop-down
menu.
40
Page 41

LOAD STATUS BAR
A Status Bar along the bottom of the GVI interface monitors the progress of
an Instrument or Preset load. Note that MIDI messages received by GVI will
not trigger sound while instrument loading is in progress.
There are three components to the status bar. From left to right, these are:
● Pause button. Click here to pause or cancel the loading process.
● Status field. This field monitors the overall progress of all instruments cur
rently loading.
● Progress field. If multiple Instruments are being loaded, this field shows
which of the set of Instruments is being loaded (e.g., 2/7 means that the second of seven Instruments is being loaded), the Instruments name, and how
much of the Instrument has been loaded.
-
NOTE: when loading a multi-instrument GIG file, only the first instrument
contained in the GIG file will be attached to the specified MIDI channel. The
other instruments are loaded into memory and can be found in the Loaded
Instrument Viewer on the menu bar.
41
Page 42

STACKING FILES ON A MIDI CHANNEL
Once a channel contains one or more loaded instruments, the option to
Stack instruments appears in that channels drop-down menu. Stack works
similarly to Load, and uses the same type of browser. However, selecting a
file will not replace the existing instrument,but layer the newly selected
instrument on the same channel. Without defining a Keyswitch (see below),
MIDI messages sent to that channel are passed to all instruments on the
stack, which play back simultaneously.
Note: To drag-and-drop a .GIG file from the desktop into a mixer channel and
have it stack with an instrument instead of overwrite it, hold down the Ctrl
key as you drag-and-drop.
A Stacked Instrument can be seen as having two components, the “Main”
instrument stack and the subsequent stack “Members” that appear in “subchannels” beneath the Main Stacked Instrument MIDI channel. Changes
made to a stacked instrument’s Main MIDI Mixer parameters affect all of
the stacks sub-channels. Changes made to a sub-channel’s MIDI Mixers
parameters affect only that single instrument.
42
Page 43

DETACHING A SUB-CHANNEL INSTRUMENT
To detach one sub-channel instrument while leaving the other ones in
place, click on the downward pointing arrow toward the left of the
sub-channel field, and select Detach.
Note: when detaching one sub-channel instrument from a Stacked Instrument that contains a Keyswitch, it may be necessary to redefine the Keyswitch
within the channels Stack Properties (see below).
43
Page 44

RENAMING A STACKED INSTRUMENT
There are two ways to rename a Stacked instrument:
1. From the MIDI Mixer, simply click the current stack name within the Main
channels slot field and type in a new name. Be sure to hit the enter key to
apply your changes.
2. Open the Main channel’s Stack Properties dialog from within the channel
slot field drop-down menu. Replace the name in the“Stack Name” field with
the new name and hit enter to apply your changes. Then click “OK” to close
the Stack Properties dialog.
44
Page 45

ADDING A KEYSWITCH TO AN INSTRUMENT STACK
The default behavior for a Stacked Instrument is for all of the sub-channel
instruments to play back when a note is played, giving the user a simple
way to create layered instruments quickly. However, it is also possible to
limit Stacked Instrument playback to one sub-channel instrument at a time
and control which sub-channel is active using either a MIDI Controller or a
keyboard Keyswitch.
To enable MIDI switching for a Stacked Instrument, select “Stack Properties”
from the Main MIDI channel’s drop-down menu. Within the Stack Properties
dialog, choose either ‘Keyswitch’ or ‘MIDI Controller’ from the Instrument
Selector drop down menu.
If you choose ‘Keyswitch’, you can define the Keyswitch keyboard range by
either typing in the boundaries manually or by using the ‘Learn’ feature
(play the low boundary note first, then the upper boundary note).
If you choose ‘MIDI Controller’, you can either specify a controller using
the ‘Controller’ drop-down menu or by using the ‘Learn’ feature (simply
enable the ‘Learn’ button and toggle the desired controller to make the
assignment).
To the right of the ‘Learn’ button is a drop-down menu labeled “Use
(all) Instruments”. This is where you define how many of the Stacked
Instruments sub-channels are to be included in the Keyswitch. Unless
you are including an encoded GigaPulse FX module on your Stacked
Instrument, the default setting of ‘ALL’ should be used. Because GigaPulse
FX Modules are to be applied to all sub-channels and because they are not
sample-based instruments, they do not need to be included in a Keyswitch.
Therefore, you would exclude GigaPulse FX Modules from a Stacked
Instrument keyswitch.
Exit out of the stack properties dialogue by pressing OK
Note: See section titled STACK PROPERTIES DIALOG for additional Keyswitch
information.
45
Page 46

SHOW/HIDE SUB-CHANNELS
Because a stacked instrument can contain many sub-channels, it may be
useful to collapse a stacked instrument so that only the Main MIDI Mixer
channel is visible. The black arrow to the left of the Stacked Instrument
channel field is a toggle switch that shows or hides the sub-channels.
In the screenshot above, the upper view shows the sub-channels (notice the
arrow points downward) and the lower view hides the sub-channels (notice
the arrow points to the right).
46
Page 47

DRAG-AND-DROP LOADING OF INSTRUMENTS
You can also load an instrument by dragging a GIG or GSI file directly from
Windows Explorer into a MIDI channel. By default, when you drop a file onto
a MIDI channel that already contains a loaded instrument, the currently
loaded instrument is detached and replaced by the new instrument. In order to stack files on a MIDI channel,hold down the CTRL key while dragging
and dropping.
LOADING FROM THE INSTRUMENT VIEWER
Once an instrument is loaded into GVI, it remains loaded in memory (RAM)
whether it is attached to a MIDI channel or not. This makes it possible to
attach/detach loaded instruments quickly using MIDI program changes.
To view all instruments currently loaded into memory, click on
the’Instrument Viewer’ icon located under the GIGA logo on the menu bar.
This will launch the “Currently Loaded Instruments” display. You can drag
instruments directly from this display into the desired MIDI channel slot
field (hold down CTRL while dragging to stack an instrument).
You can also unload instruments from within the Instrument Viewer by
right-mouse clicking on an instrument and selecting one of the following
popup menu items:
· unload: unloads the single selected instrument
· unload all: unloads all loaded instruments
· unload unused: unloads all instruments that are not currently
attached to a channel
47
Page 48

CHAPTER 8: GVI TOOLBARS
THE GVI FILE MANAGEMENT TOOLBAR
The upper left portion of the GVI Toolbar contains a group of three file
management buttons: Load/Save, Unload, and Reset. This portion of the
Toolbar allows you to save and load Presets, manage the unloading of
instruments, and reset global aspects of GVI.
LOAD/SAVE BUTTON (PRESET AND GSI MANAGEMENT)
ABOUT PRESETS
GVI Presets are similar to GigaStudio GSP (GigaStudio performance) files in
that they save and recall the entire state of the GVI instance. Presets allow
for efficient loading of collections of instruments and MIDI mixer settings
that you use frequently, or as a template.
Individual Presets can be organized into user-defined Banks or they can
be saved directly into the default Preset menu. User-defined Banks appear
in the Load preset menu as folders. Presets contained within a Bank are
revealed when that Bank is highlighted in the Menu. Presets saved into the
default Preset menu appear in the root level of the Load Preset menu for
quick access.
48
Page 49

SAVING PRESETS
1. Click on the Load/Save button to open the drop-down menu.
2. Select Save Preset.
3. The ‘Save user preset’ dialog box appears.
4. To enter a new name, highlight the existing name in the ‘Name’ field and
type over it. It is also possible to replace an existing Preset by selecting that
preset’s name from the ‘Name’ field drop-down menu.
5. To save a Preset without a Bank (into the root level of the Load Preset
menu), select <No Bank> from the ‘Bank’ field.
6. To create a new Bank for your Preset, highlight the existing Bank name in
the ‘Bank’ field and type over it.
7. To save the Preset into an already existing Bank, use the ‘Bank’ field dropdown menu to choose the desired Bank.
8. Click ‘OK’ to save the Preset/Bank and exit the ‘Save user preset’ dialog.
Your newly saved Preset/Bank will now appear within the Load Preset
menu.
49
Page 50

LOADING PRESETS
NOTE: When a preset is loaded, all current instruments are unloaded and the sampler is
Reset to a default state.
1. Click on the Load/Save button to open the drop-down menu.
2. Highlight the Load Preset menu item to reveal a list of Presets and Banks.
Banks appear as folders indicated by a right arrow next to their name.
3. Highlight a Bank to reveal the Presets contained within. Click on a Preset
to load it.
ORGANIZE PRESETS
The Organize Presets option in the Load/Save menu opens the ‘Organize
presets’ dialog. This dialog allows you to delete Banks or Presets, create new
Banks, rename existing Banks, or move Presets from one bank to another.
50
Page 51

EXPORTING A GSI FILE
After creating a stacked instrument, save this as a .gsi file for later use in GVI
or GigaStudio:
1. Click on a stacked instrument to export
2. Click on the Load/Save field in the upper left corner.
3. Select “Export .GSI File.”
4. A “Save As...” dialog box opens up.
5. Navigate to where you want to save the file.
6. Click on Save.
ARCHIVING USER PRESET DATA
All user Preset information is stored in a folder titled ‘User presets’ in the
following windows directory:
C:\Documents and Settings\All Users\Application Data\TASCAM\Gvi\
Presets\TASCAM\GVI
Creating a back-up of the ‘User preset’ folder will allow you to restore or
transfer all of your Presets/Banks.
51
Page 52

UNLOAD BUTTON
The Unload Button provides quick access for removing particular
Instruments from memory (RAM).
Click on the Unload button to open the drop-down menu. The menu
contains the five following choices: Unload instruments,Unload files,
Unload all instruments, Unload unused, Unload all unused. If a particular
menu item is not available it will be grayed out.
● Unload Instruments allows you to remove individual loaded
Instruments from memory. Highlight the Unload instruments menu
item and then choose the Instrument to unload from the drop-down list
of loaded instruments.
● Unload Files removes entire GIG files from memory, including all
Instruments that are contained within that GIG file.
● Unload All Instruments removes all Instruments and GIG Files and
Stacked instruments from memory.
● Unload Unused provides a list of instruments currently loaded in
memory but not attached to a MIDI channel. Use this menu to remove
individual instruments that are no longer needed.
● Unload All Unused removes all instruments not currently attached to a
MIDI channel from memory.
Note: It is a good idea to unload unwanted instruments and GIG files from
memory before saving a Preset or GSI file to save system resources.
52
Page 53

RESET BUTTON
The Reset options provide shortcuts to returning GVI to various default
states.
● Reset Sampler unloads all instruments and returns all MIDI Controller
values (e.g., Volume and Pan) to their default positions.
● Reset MIDI Controllers retains all Instrument assignments and audio
routing, but returns all MIDI Controller values to their default positions .
● Reset Controller Slider Assignments returns all MIDI slider assignments
to their default assignments
(e.g., if you reassigned the ‘Pan’ slider to Foot Controller, invoking Reset
Controller Slider Assignments would return this to Pan).
53
Page 54

THE GVI NAVIGATION TOOLBAR
MIDI MIXER BUTTON
The MIDI Mixer view is the default state for GVI. The MIDI Mixer allows
you to attach and detach instruments to MIDI channels, control the audio
routing of each instrument, and gives you access to a wide range of MIDI
Controllers including Volume, Tune and Pan.
EDIT BUTTON
Clicking this brings up the QuickEdit view for the currently selected
instrument. The QuickEdit view is a tabbed UI exposing all editable
parameters of an instrument including envelopes, filter settings,LFO’s,
Loop-points, and velocity response curves.
GIGAPULSE BUTTON
This button will only be enabled if the currently selected instrument has
a GigaPulse effect built into it. Clicking this brings up the GigaPulse view
for the currently selected instrument. If the selected instrument has more
than one embedded GigaPulse effect, a popup menu will allow you select
which instance you wish to view. Pressing the GigaPulse button is the same
as pressing the (green) FX button on the MIDI mixer (sub-)channel of an
instrument containing embedded convolution.
INSTRUMENT BUTTON
This will launch the ‘Currently Loaded Instruments’ display. This display
lists all instruments currently loaded in memory. You can drag instruments
directly from this display into a MIDI channel slot field (hold down CTRL
while dragging to stack an instrument).
HELP BUTTON
· You can select ‘Help Topics’ to view this document via the Windows help
interface.
· You can select ‘About GVI’ for version and copyright information about this
application. Click anywhere on the ‘about’ screen to dismiss it.
54
Page 55

GVI PLAYBACK STATUS BAR
When GVI is hosted as a plug-in, the playback status bar below the right of
the keyboard displays information about voice playback.
VOICE METER
Voices – indicates the number of voices being played back at any given
moment.
Peak – indicates the maximum number of voices that have been used since
the samplers last reset. Clicking this display will reset it without resetting
the entire sampler.
STANDALONE MODE STATUS METERS
CPU Meter - In addition to the Voice Meter, in standalone mode, a green
“CPU meter” is provided to show how much of the system resources (CPU)
are being used at any given moment. If the CPU meter is peaking, you
may want to consider increasing the buffer size of your audio interface
or decreasing the maximum number of voices allowed in the GVI
configuration Manager.
Audio Output Meter – The stereo audio output meter monitors the highest
value of any stereo pair at a given instant.
MIDI Monitor – Between the Voice and Audio Output meters is the MIDI
Monitor. This Monitor lights green when MIDI information is received from
the MIDI input port specified in the GVI
55
Page 56

CHAPTER 9: STACK PROPERTIES
Once multiple instruments have been stacked on a MIDI channel, the ‘Stack Properties’
menu item becomes available in that MIDI channel’s drop-down menu. The Stack
Properties dialog is used to enable and define Key or MIDI Controller based instrument
switching (Keyswitching) as well as to perform global stack functions such as stack
renaming, modifying an instrument layers (stack child) active keyboard range, and
loading/saving/editing stack templates.
STACK PROPERTIES FIELDS AND MENUS
Stack name – this field can be used to rename a stacked instrument. Simply
click within the field to highlight the existing name and then type the
desired name. Be sure to hit the
‘Enter’ key to apply your changes.
56
Page 57

INSTRUMENT SELECT SECTION
Instrument Selector – This drop-down menu is used to enable instrument
switching by choosing either ‘MIDI Controller’ or ‘Keyswitch’. When ‘None’ is
selected, all stack members playback simultaneously when a note is played.
Controller - When ‘MIDI Controller’ is selected from the Instrument Selector
drop-down menu, the Controller drop-down menu appears. Use this menu
to choose which MIDI Continuous Controller will be used to perform the
stack’s instrument switching.
Keyswitch Range – When ‘Keyswitch’ is selected from the Instrument
Selector drop-down menu, the Keyswitch range input fields appear. You can
define the Keyswitch keyboard range by either typing in the boundaries
manually or by using the ‘Learn’ feature (play the low boundary note first,
then the upper boundary note). The Keyswitch range should include one
note for every instrument on the stack.
Use (X) Instruments – Use this drop-down list to specify how many of the
stack members are to be included in the instrument switching. Unless you
are including embedded GigaPulse instruments on your stack, this value
should be left at ‘All’.
57
Page 58

PLAYZONES SECTION
The virtual Keyboard in the PLAYZONES section of the Stack Properties
dialog can be used as a MIDI trigger as well as being a visual reference for
the various keyboard ranges of each instrument on the stack. The currently
selected instrument layer appears yellow while other layers appear light
purple. Stack Keyswitches appear light blue.
The active (playable) keyboard range of each instrument can be modified
using the triangular brackets located in the lower half of each instrument
layers window. First select the instrument layer you wish to modify by
clicking in its window, and then move the upper and lower boundary
brackets to the desired range.
Note regions on the stack that are beyond the range of the currently
selected instrument layer will appear on the virtual keyboard with diagonal
blue stripes.
58
Page 59

TEMPLATE TOOLBAR
Stack Properties templates store and recall all Stack Properties parameters
minus the stack name. They can be organized in Collections (banks) and
may contain user specified comments or descriptions.
Clear Settings – Resets all Stack Properties parameters to their default
settings.
Load Template – Clicking on load template produces a drop-down menu
used to load a previously saved template
Save Template – Clicking on save template brings up a dialog that allows
you to specify the Template and Collection name as well as add template
specific descriptions.
Edit Templates – the Edit Templates dialog can be used to rename templates,
reorganize templates, create new Collections, modify a templates
description, delete templates, or view a templates properties.
59
Page 60

CHAPTER 10: CHANNEL PROPERTIES WINDOW
Each of GVI’s 16 MIDI channels has a Channel Properties window that allows the user
to remap incoming MIDI data on a note by note basis. To open the Channel Properties
window select the Channel Properties menu item from the desired MIDI channel’s drop
down menu. Channel Properties can be viewed as a simple MIDI transform between
keyboard and sampler that allows the user to re-map incoming MIDI note values
(Source Keys) to alternate outgoing note values (Destination Keys).
Source Keys
The upper keyboard in the channel properties window represents the
channels Source Keys. You can view a Source Key as an incoming MIDI
note value that does not change regardless of if it’s Destination note. For
instance, when you change the Destination note of the Source Key C5 to
be D3, an incoming C5 Note On message will trigger the sample that is
mapped to D3 on that channel.
Destination Keys
The lower keyboard in the channel properties window displays the channels
Destination Keys.
Destination keys represent the note values that are passed on to the
sampler in place of the incoming Source Keys original note value.
60
Page 61

Channel Properties Tools
Remap/Play
The Remap/Play button (default) allows you to audition samples as well
as remap samples by dragging them from the Source Key window into the
Destination Key window.
Revert to original
When a Key is highlighted in the Destination Key window, it means that
it has been remapped. The highlighted key is the Source Key and the
Destination Key is displayed in text near the top of the keyboard. In order to
clear a remapped key, depress the Revert to Original button and click on the
remapped Source Key on either keyboard.
Map to silence
To disable incoming MIDI data on a particular key, depress the Map to silence
button and click on the key you would like to silence on either the source or
destination keyboard. Silenced keys appear dark grey in the Destination Keys
keyboard.
61
Page 62

Template toolbar
Channel Properties templates store and recall all remapped and silenced
keys. They can be organized in Collections (banks) and may contain user
specified comments or descriptions.
Clear Settings – Resets all remapped keys to their default mapping.
Load Template – Clicking on load template produces a drop-down menu
used to load a previously saved channel properties template.
Save Template – Clicking on save template brings up a dialog that allows
you to specify the Template and Collection name as well as add template
specific descriptions.
Edit Templates – the Edit Templates dialog can be used to rename templates,
reorganize templates, create new Collections, modify a templates
description, delete templates, or view a templates properties.
Learn Mode menu
Instead of using the Channel Properties virtual keyboards, you can select
a MIDI controller from the Learn Mode drop-down menu that allows you
to remap keys by toggling between source and destination input keys. For
instance, if the Sustain pedal is selected you can remap keys by depressing
the pedal, selecting the Source Key, releasing the pedal then selecting the
Destination Key.
Display by menu
This menu determines how a remapped key is labeled within the
Destination Keys keybard, either as a note name or as a MIDI note number.
Saving Channel Properties settings
In addition to being able to save Channel Properties templates and apply
them to any MIDI channel, Channel Properties are also saved by global GVI
Presets. Channel Properties are not recalled by exported GSI files.
62
 Loading...