

Page 1

»
GT-R1
D01035410B
Portable
Guitar/Bass
Recorder
This device has a serial
number located on the rear
panel. Please record it and
retain it for your records.
Serial number:
__________________
OWNER’S MANUAL
Page 2

2 TASCAM GT-R1
Table of Contents
1–Introduction 5
Main functions . . . . . . . . . . . . . . . . . . . 5
Supplied accessories . . . . . . . . . . . . . . . . 5
Recycling the rechargeable battery . . . . . . . . . 6
Copyrights . . . . . . . . . . . . . . . . . . . . . 6
Notes about this manual . . . . . . . . . . . . . . 6
2–Preparation 7
About SD cards . . . . . . . . . . . . . . . . . . . 7
Inserting the SD card . . . . . . . . . . . . . . . 7
Removing the SD card . . . . . . . . . . . . . . 8
Inserting a new card . . . . . . . . . . . . . . . 8
Other cases that require formatting . . . . . . . . 9
Powering the unit. . . . . . . . . . . . . . . . . . 9
Installing the battery . . . . . . . . . . . . . . . 9
Changing the battery . . . . . . . . . . . . . . 10
Charging the batter y . . . . . . . . . . . . . . 10
Turning the power on and off . . . . . . . . . . 11
Setting the date and time . . . . . . . . . . . . . 12
Resetting the unit. . . . . . . . . . . . . . . . . 12
3–Part Names and Functions 13
Top panel . . . . . . . . . . . . . . . . . . . . 13
Right side panel . . . . . . . . . . . . . . . . . 17
Left side panel . . . . . . . . . . . . . . . . . . 19
Front panel. . . . . . . . . . . . . . . . . . . . 20
Rear panel . . . . . . . . . . . . . . . . . . . . 20
Bottom panel. . . . . . . . . . . . . . . . . . . 21
4–Screen Overview 22
Home Screen . . . . . . . . . . . . . . . . . . . 22
Record Screen . . . . . . . . . . . . . . . . . . 25
Rhythm Screen . . . . . . . . . . . . . . . . . . 26
Setting Screens . . . . . . . . . . . . . . . . . . 27
Setting screen structure . . . . . . . . . . . . . 27
Operation basics . . . . . . . . . . . . . . . . 27
Operation example . . . . . . . . . . . . . . . 30
5–Practicing Music with this Unit 32
Select the input . . . . . . . . . . . . . . . . . 32
Use input monitoring . . . . . . . . . . . . . . . 32
Tune instruments . . . . . . . . . . . . . . . . . 33
Use effects . . . . . . . . . . . . . . . . . . . 33
Learn musical phrases. . . . . . . . . . . . . . . 33
Play along with the rhythm machine . . . . . . . . 33
Use a metronome . . . . . . . . . . . . . . . . . 33
Record as you play with the rhythm machine . . . . 34
Perform along with a track . . . . . . . . . . . . 34
Repeat and loop playback . . . . . . . . . . . . 34
Change track pitch . . . . . . . . . . . . . . . 34
Change track speed . . . . . . . . . . . . . . 35
Reduce guitar or bass sounds . . . . . . . . . . 35
Page 3

3 TASCAM GT-R1
Table of Contents
Overdub . . . . . . . . . . . . . . . . . . . . . 35
6–Making Connections 36
Connecting monitors . . . . . . . . . . . . . . . 36
Connecting with a computer. . . . . . . . . . . . 36
Disconnecting from a computer . . . . . . . . . . 37
Connecting a guitar or bass . . . . . . . . . . . . 38
Connecting mics and other audio devices . . . . . 38
Connecting an external mic . . . . . . . . . . . 38
Connecting mixers and other audio equipment . . 39
7–Recording 40
Selecting the file type and sampling frequency . . . 40
Setting the maximum file size . . . . . . . . . . . 41
Selecting the input source . . . . . . . . . . . . . 42
Setting the INT/ MIC IN input functions . . . . . . . 43
Display of input functions on the Record Screen . . 45
Adjusting the built-in microphone angle . . . . . . 46
Adjusting the input level . . . . . . . . . . . . . 47
About recording modes . . . . . . . . . . . . . . 49
Ordinary recording . . . . . . . . . . . . . . . . 49
Overdubbing . . . . . . . . . . . . . . . . . . . 50
Preparation for overdubbing . . . . . . . . . . . 50
Overdub recording . . . . . . . . . . . . . . . 51
8–Playback 54
Starting and stopping playback . . . . . . . . . . 54
Selecting tracks. . . . . . . . . . . . . . . . . . 54
Search forward and backward . . . . . . . . . . . 55
Using the wheel to change the playback position . . 55
Adjusting the volume . . . . . . . . . . . . . . . 56
9–Playback Area and Playlist 57
Setting the playback area . . . . . . . . . . . . . 57
Selecting a folder for the playback area . . . . . . 58
Selecting a file to set the playback area . . . . . . 59
Playlist . . . . . . . . . . . . . . . . . . . . . . 60
Adding tracks to the playlist . . . . . . . . . . . 60
Editing the playlist . . . . . . . . . . . . . . . 61
10–Browse Screen 63
Screen navigation. . . . . . . . . . . . . . . . . 63
Icons on the BROWSE screen . . . . . . . . . . . 64
File operations . . . . . . . . . . . . . . . . . . 64
Folder operations . . . . . . . . . . . . . . . . . 65
11–Special Playback Control Functions 66
Setting the playback control functions . . . . . . . 66
Changing the speed. . . . . . . . . . . . . . . . 67
Changing speed without changing pitch . . . . . . 67
Changing pitch without changing speed . . . . . . 68
Reducing guitar and bass sounds . . . . . . . . . 68
12–Loop, Repeat and Single Playback 70
Loop playback . . . . . . . . . . . . . . . . . . 70
Page 4

4 TASCAM GT-R1
Table of Contents
Repeat and single track playback modes . . . . . . 71
13–Copying Tracks from a Computer 72
Preparing audio files on a computer . . . . . . . . 72
Copying audio files from a computer . . . . . . . . 72
Managing the Music Folder from a computer . . . . 73
14–Using the Effects 74
Turning the effect ON and OFF. . . . . . . . . . . 74
Setting the effect . . . . . . . . . . . . . . . . . 74
Effect modules . . . . . . . . . . . . . . . . . . 76
Closing the Effect Screen . . . . . . . . . . . . . 76
15–Using the Tuner 77
Preparation. . . . . . . . . . . . . . . . . . . . 77
AUTO (chromatic tuner mode) . . . . . . . . . . . 77
GUITAR (guitar tuner mode) . . . . . . . . . . . . 78
BASS (bass tuner mode). . . . . . . . . . . . . . 78
OSC. (oscillator mode) . . . . . . . . . . . . . . 78
16–Using the Rhythm Machine 80
Rhythm mode . . . . . . . . . . . . . . . . . . 80
Rhythm Screen features . . . . . . . . . . . . . . 81
Setting the rhythm machine . . . . . . . . . . . . 83
Playing along with the rhythm machine . . . . . . 85
Preparation . . . . . . . . . . . . . . . . . . . 85
Practicing with a rhythm . . . . . . . . . . . . . 87
Record playing with a rhythm . . . . . . . . . . . 87
Apply effects to the rhythm machine. . . . . . . . 89
17–System Settings and Formatting 90
Making System Settings. . . . . . . . . . . . . . 90
Restoring the factory settings . . . . . . . . . . . 91
Formatting the SD card . . . . . . . . . . . . . . 91
Using QUICK FORMAT. . . . . . . . . . . . . . 92
Using FULL FORMAT . . . . . . . . . . . . . . 92
18–Viewing File Information 93
File information page . . . . . . . . . . . . . . . 93
Memory information page. . . . . . . . . . . . . 94
System information page . . . . . . . . . . . . . 94
19–Effects Preset List 95
20–Effect Module Parameters List 98
21–Rhythm Pattern List 102
22–GT-R1 Messages 104
23–Specifications 108
Audio Input and Output . . . . . . . . . . . . . .108
Audio performance . . . . . . . . . . . . . . . .109
Other specifications. . . . . . . . . . . . . . . .10 9
Computer requirements . . . . . . . . . . . . . .110
Dimensions. . . . . . . . . . . . . . . . . . . . 111
Page 5

5 TASCAM GT-R1
1–Introduction
Thank you very much for purchasing the TASCAM
GT-R1 Portable Recorder. Please read this Owner’s
Manual carefully in order to maximize your use of
all the unit’s features. We hope that you will enjoy
using this recorder for many years to come. Please
make copies of this manual and keep them in safe
places for future reference.
Main functions
Portable recorder designed for guitar and bass
•
players
Uses an SD card as the recording media
•
Record with the built-in microphones or by
•
connecting a guitar, bass, CD player or other
audio device
Choose MP3 (32 kbps–320 kbps, 44.1 kHz or
•
48 kHz) or WAV (16-bit or 24-bit, 44.1 kHz or
48 kHz) audio file types for recording
Mix and record the input signal with the
•
playing audio track (overdubbing)
Practice and record along with the built-in
•
rhythm machine
Special playback functions include decreasing
•
playback speed without changing pitch and
reducing the sound of a recorded guitar or bass
during playback
Built-in effects can be applied to the input
•
signal, rhythm machine or playback signal
Copy audio files from a computer to this unit’s
•
SD card by USB connection
Supplied accessories
Soft case• .............................1
SD card (in unit; contains copy of manual)• . 1
USB cable• . . . . . . . . . . . . . . . . . . . . . . . . . . . 1
Quick Start Guide• . . . . . . . . . . . . . . . . . . . . . 1
Warranty card• . . . . . . . . . . . . . . . . . . . . . . . . 1
BP-L2 (lithium ion battery)• ..............1
BP-L2 manual• . . . . . . . . . . . . . . . . . . . . . . . . 1
BP-L2 warranty card• ...................1
Please contact the store where you purchased this
unit if any of these accessories are missing or have
been damaged during transportation.
Page 6

6 TASCAM GT-R1
Li-ion00
1–Introduction
Recycling the rechargeable battery
This device uses a lithium ion battery. Please
do not throw away the battery when it is no
longer necessary.
If you have any questions, please contact us
(see the last page of this manual for contact
information).
Trademarks
Windows, Vista, Windows XP and Windows 2000
are trademarks of Microsoft Corporation.
Macintosh, Mac OS, and Mac OS X are trademarks of Apple Inc.
The SD Logo is a trademark.
Notes about this manual
Font use conventions
Controls, keys and other parts on the GT-R1
•
are written like this: MENU.
Messages shown on the display are written like
•
this:
Are y ou su re?
We use the term “key” to describe the push-
•
button controls on the GT-R1.
Tracks and files are the same
Tracks are les, and les are tracks.
In this manual, we usually use the word “track”
when we are describing the playback of a song, for
example, just as we would if talking about songs
on a CD or a portable music player. However,
when we talk about their data properties, such as
sampling frequencies and ID3 tags, we often refer
to the same “tracks” as “les” because they can be
manipulated in ways similar to les on a computer.
Page 7

7 TASCAM GT-R1
NOTE
2–Preparation
About SD cards
Since this unit uses an SD card for recording and
playback, you must insert an SD card into the unit
before use. You can use 64 MB–2 GB SD cards
and 4 GB–32 GB SD HC cards with this unit.
Please see the TASCAM web site (www.tascam.
com) for information about cards that have been
tested with the GT-R1.
When new, this unit comes with a 1GB SD card
inserted. This card can be used for recording
and playback as is. There is no need to reinsert
or format it.
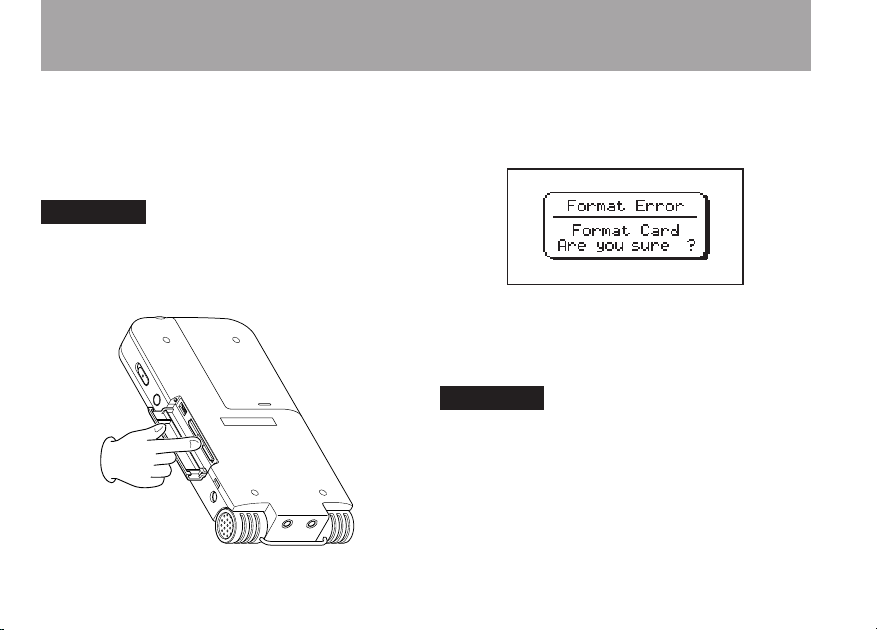
Inserting the SD card
The SD card slot and the USB connector are under
the cover on the left side of the unit.
Press the cover down in the direction of the arrow
to open it. Insert the included SD card in the SD
card slot and push it until it clicks fully into place.
Page 8
8 TASCAM GT-R1
CAUTION
CAUTION
2–Preparation
Removing the SD card
Press the inserted SD card in gently and it will
disengage from the unit so that you can pull it
out completely.
Do not remove the SD card during recording or
playback, or when the unit is connected to the
computer by USB.
Inserting a new card
The following pop-up screen appears if you insert
a new card in the unit.
Press the ¥/π key to format the card so that it can
be used with this unit.
Wh
en formatting nishes, the Home Screen ap
Formatting an SD card erases all files that are
on it. Make certain that you have copied any
files that you want to save from the card before
formatting it.
pears.
Page 9
9 TASCAM GT-R1
TIP
2–Preparation
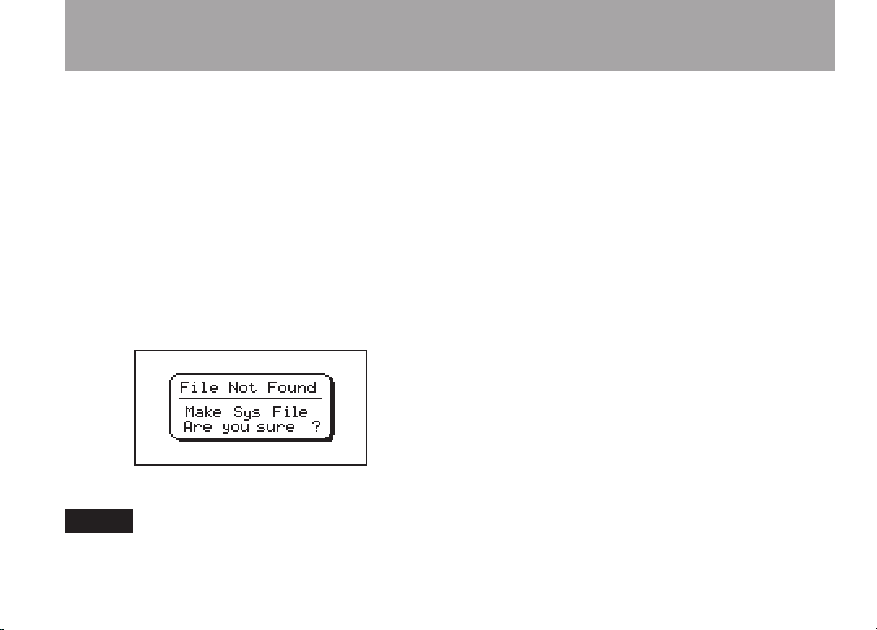
Other cases that require formatting
• The above “
appears if you install an SD card that was
formatted by a device other than the GT-R1.
Reformat the card to use it with this unit. However,
SD cards that have been formatted by TASCAM
DR-1 units are compatible with the GT-R1, so you
can use such cards as is and the above screen does
not appear.
• The following pop-up screen appears if a system
le or other crucial le was accidentally erased
from the SD card when used with a computer
In either case, press ¥/π to reformat the card.
Always make backup copies of important files as
soon as you can.
FORMAT ERROR
” screen also
Powering the unit
The GT-R1 can be operated using a special lithium
ion battery (BP-L2) or an AC adapter (PS-P520).
One battery is included with the unit and the AC
adapter and additional batteries are available for
purchase separately. You can charge the battery by
connecting the unit to a computer by USB or using
an AC adapter. When shipped new, the included
battery is not sufciently charged, so it must be
charged before using the unit. Charge the battery
or connect the AC adapter before using the unit.
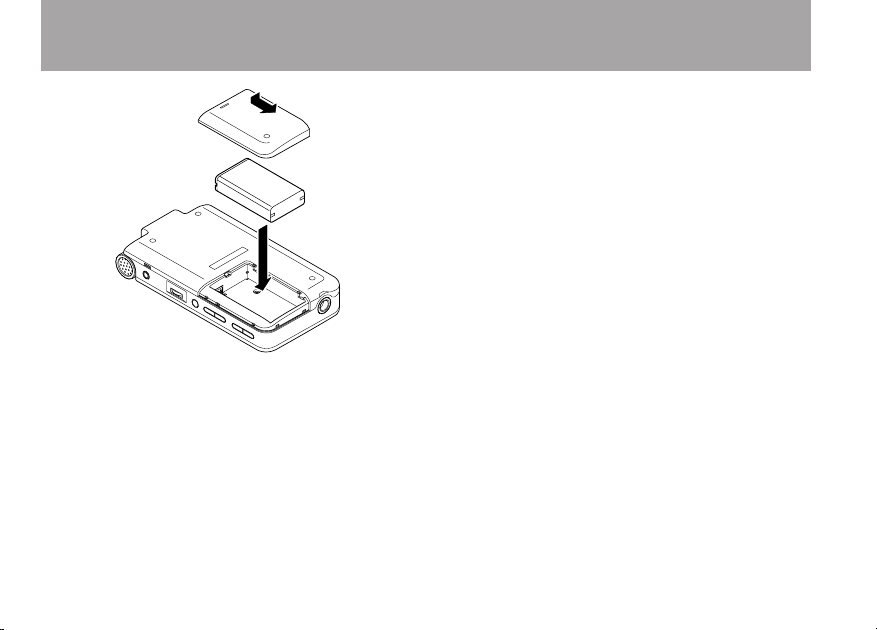
Installing the battery
Slide the battery case cover on the back of the unit
to open it, and insert the GT-R1 battery that was
included in the box.
Page 10
10 TASCAM GT-R1
2–Preparation
Changing the battery
You can purchase additional batteries (BP–L2)
that are identical to the one included with the unit.
You might want to purchase extra batteries if you
expect to use the GT-R1 for recording or other
applications for long periods of time when you will
not be able to recharge or use an AC adapter (also
sold separately).
To change the battery, slide and remove the battery
case cover on the bottom panel.
Charging the battery
Charging with a computer
Open the cover on the left side panel, and use the
included USB cable to connect the unit’s USB port
to a USB port on a computer.
Please connect this unit directly to a computer.
Proper charging and operation cannot be assured
when using a USB hub.
Even if the power for the unit is off, the battery
charges when connected to a computer by USB.
The computer may need to be ON to charge the
battery.
Complete charging by USB takes about 6 hours
(when the unit’s power is OFF).
If you connect this unit and a computer when the
unit’s power is ON, the unit automatically enters
USB connection mode. (See “Connecting with a
computer” on page 36).
Page 11
11 TASCAM GT-R1
NOTE
Charging
indicator
2–Preparation
Charging with an AC adapter
(purchased separately)
Connect an AC adapter to the DC IN 5V jack to
charge the unit.
Complete charging with the adapter takes about 3
hours (whether the unit’s power is ON or OFF).
You can use this unit normally as it is charged by
the connected AC adapter.
The charging indicator to the right of the display
lights orange during charging. The indicator
turns off when charging is complete.
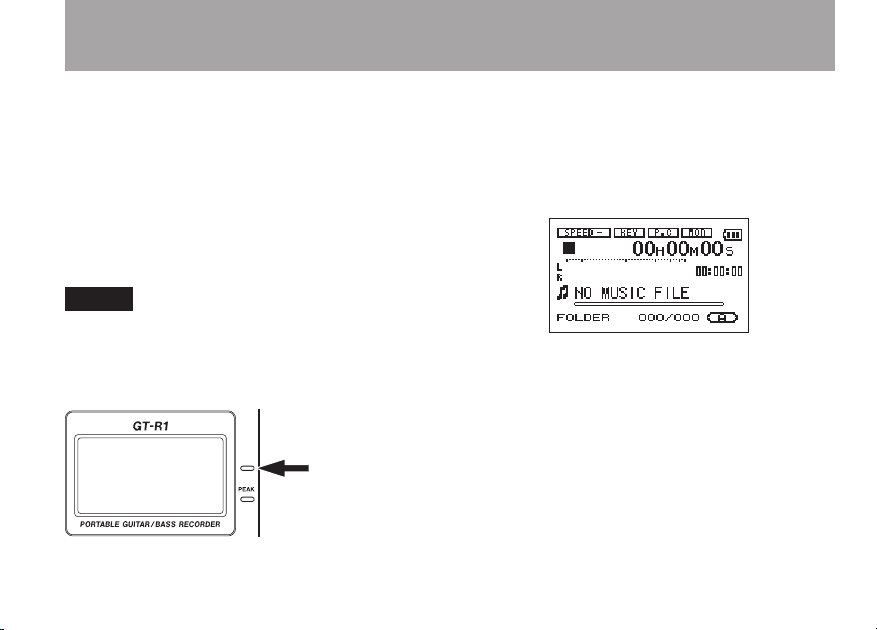
Turning the power on and off
To turn the power ON, press and hold the POWER
key on the left side panel until “
G T- R1
” appears on the display.
The Home Screen appears when the unit starts up.
To turn the power OFF, press and hold the POWER
key until “
RECORDER
PORTABLE GUITAR/BASS
” appears on the display.
TASCAM
Page 12
12 TASCAM GT-R1
CAUTION
2–Preparation
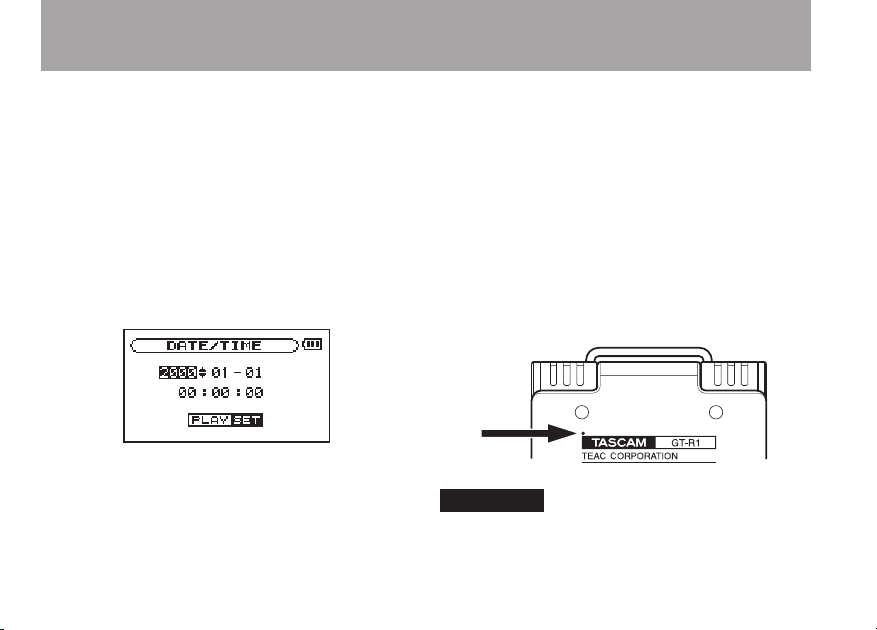
Setting the date and time
Follow these procedures to set the date and time
of the built-in clock. When you create an audio
le, date and time information is included in the
le data.
1 Press the MENU key to open the Menu
Screen.
2 Use the wheel to select
and press the ¥/ π key to open the
Date/Time Screen.
The clock stops while this screen is displayed.
3 Use the µ and ≤ keys to move the cursor
(the part highlighted in inverse)
and use the wheel to set the values.
DA TE/TIME
4 After making the setting, press the ¥/ π key
to restart the clock from the newly set value.
The display returns to the Menu Screen.
Resetting the unit
The back panel of the unit has a reset hole.
If the unit is operating abnormally, push the end of
a paperclip, ne pin or similar item into this hole to
press a button inside the unit. This turns the power
OFF and resets the GT-R1’s system.
Do not press the reset button when the unit is
functioning properly.
Page 13
13 TASCAM GT-R1
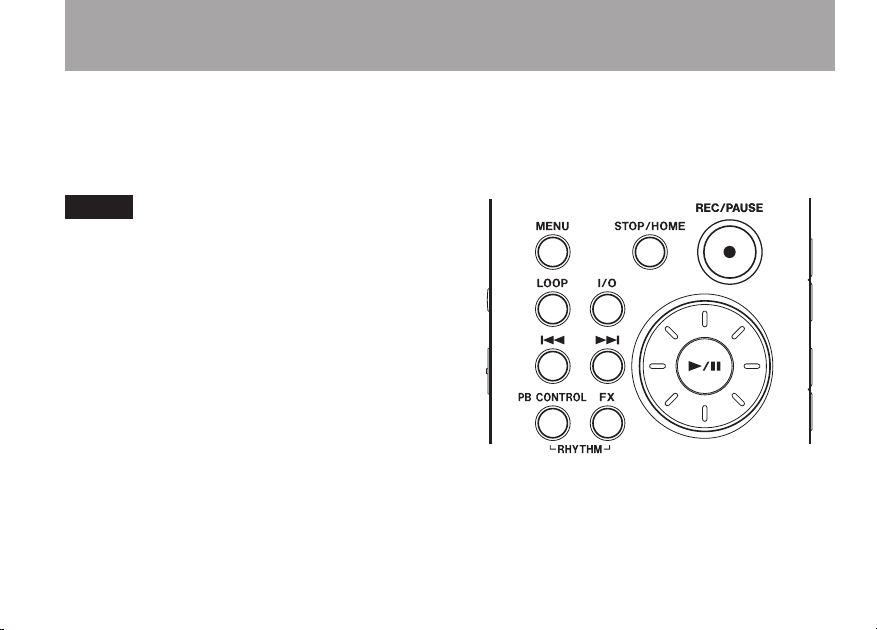
3–Part Names and Functions
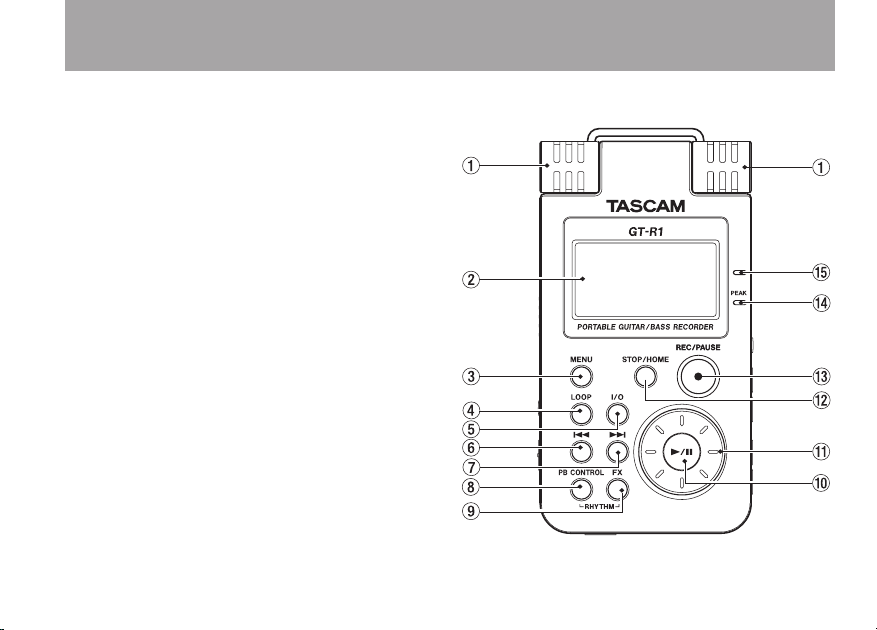
Top panel
1 Built-in stereo microphone
To use this stereo electret condenser
microphone as the input source, select “
MIC
” on the input setting screen. If you
connect an external microphone to the MIC IN
jack on the rear panel, the built-in microphone
becomes inactive.
2 Display
In addition to the Home Screen, this shows the
recording screen, various setting screens, and
other operation information. (See “4–Screen
Overview” on page 22.)
3 MENU key
When the Home Screen is displayed, press
this key to open the Menu Screen.
Press this key to return to the Menu Screen
from the various setting screens.
When the Menu Screen is displayed, press this
key to return to the Home Screen.
IN T/
Page 14

14 TASCAM GT-R1
NOTE
3–Part Names and Functions
4 LOOP key
Press this key to turn loop playback mode ON
and OFF, allowing you to repeat playback of
a selected interval. (See “Loop playback” on
page 70.)
5 I/O key
Use this key to set the IN (start) and OUT
(end) points of the interval that you want to
set for loop playback. When the IN and OUT
points are already set, press this key to erase
them. (See “Loop playback” on page 70.)
6 µ key
Press this key to return to the beginning of a
track that is playing or stopped in the middle.
If you press this key when a track is stopped
at its beginning, the unit will skip to the
beginning of the previous track.
Press and hold this key to search backwards.
On the setting screens, use this key to move
the cursor left. On the Browse Screen, press
this key to move up a level.
When the Rhythm Screen is open, use this
button to select patterns.
7 ≤ key
Press this key during playback or when
playback is stopped to skip to beginning of the
next track.
Press and hold this key to search forward.
On the setting screens, use this key to move
the cursor right.
On the Browse Screen, press this key to move
down a level.
When the Rhythm Screen is open, use this
button to select patterns.
Keys 6 and 7 may not work for all VBR
MP3 files. For some VBR MP3 files, operating
these keys may cause the sound to be not
synchronized with the elapsed time shown on
the display and the end parts of the file being
played back may be repeated at the end of the
track. In this case, stop playback to return to
normal operation.
Page 15

15 TASCAM GT-R1
NOTE
3–Part Names and Functions
8 PB CONTROL key
Press and hold this key to open the Playback
Control (
Playback Control Screen is open, press and
hold this key to return to the Home Screen.
(See “11–Special Playback Control Functions”
on page 66.)
Briefly press this key to turn the speed control
that is set on the Playback Control Screen
(VSA and/or SPEED) ON and OFF. When
ON, the icon appears at the top of
the Home Screen as light letters on a dark
background.
When the Rhythm Screen is open, press
the PB CONTROL key to open the Rhythm
Setting Screen.
9 FX key
Briefly press this key to turn the effect
function ON and OFF.
Press and hold this key to open the Effect
Setting Screen. When the Effect Setting
Screen is open, press and hold this key to
PB CONTROL
return to the Home Screen. (See “14–Using
the effects” on page 74.)
) Screen. When the
When the Home Screen is open, press the PB
CONTROL and FX keys at the same time to open
the Rhythm Screen and enter rhy thm mode. To
end rhythm mode, press the PB CONTROL and
FX keys at the same time to return to the Home
Screen.
0 ¥/π key
When the Home Screen is displayed and
playback is stopped, press this key to start
playback. During playback, press this key to
stop playback at the current position.
When using a setting screen, use this key,
for example, to confirm a selection, advance
a level in a menu and answer “YES” to a
confirmation message
When the Rhythm Screen is open, use this key
to star t and stop the rhythm machine.
Page 16

16 TASCAM GT-R1
3–Part Names and Functions
q Wheel
When a setting screen is open, use the Wheel
to change the setting of the selected item.
When the Home Screen is open, use the wheel
to adjust the file playback position.
When the Rhythm Screen is open, use this to
set the tempo.
w STOP/HOME key
Press this key to stop recording and playback
or to end recording standby.
When a setting screen is open, press to return
to the Home Screen.
On a setting screen, use this key to respond
“NO” to a conf irmation message.
e REC/PAUSE key
When playback is stopped, press this key to
put the unit into recording standby. When
in standby, this key flashes. If the Input
Setting Screen
Overdubbing ON/OFF pop-up appears. (See
“7–Recording” on page 40.)
MONITOR
item is ON, the
When in recording standby, press this key
to star t recording. The key lights while
recording.
When recording, press this key to pause
recording.
When the Rhythm Screen is open this works
in the same way. Press this key to put the
rhythm machine into record standby, and
press it again in record standby to start
recording. (See “Record playing with a
rhythm” on page 87.)
r PEAK indicator
This lights when the selected input signal
exceeds the maximum level.
t Charge indicator
This indicator lights orange when the lithium
ion batter y installed in this unit is charging.
The light turns OFF when the battery is fully
charged.
Page 17
17 TASCAM GT-R1
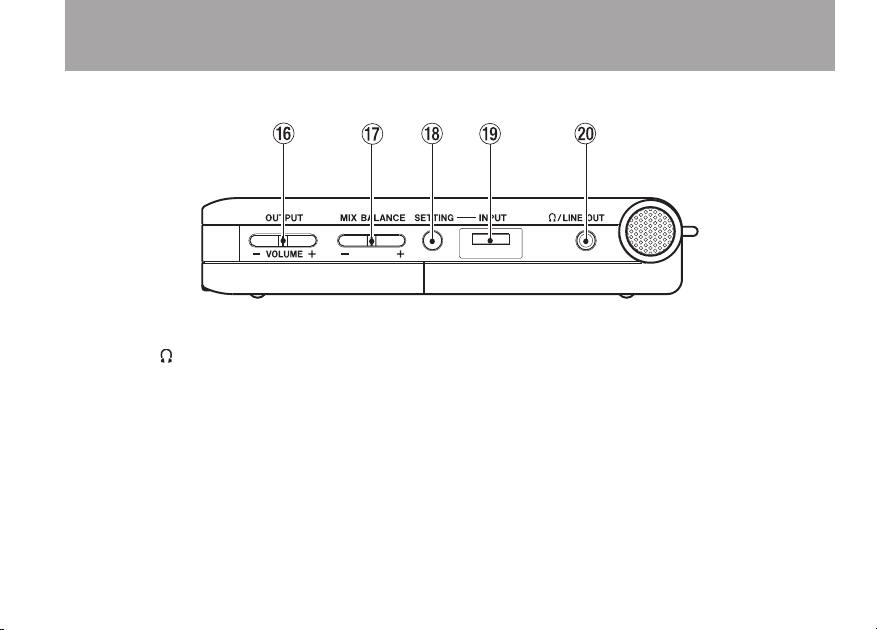
Right side panel
3–Part Names and Functions
y OUTPUT VOLUME (+, –) keys
Use these keys to adjust the signal level output
from the /LINE OUT jack. The volume level
appears on the display during adjustment.
u MIX BALANCE (–, +) keys
When the Input Setting Screen’s
item is set to ON, use these keys to adjust the
volume of the playback signal (including the
rhythm machine when in rhythm mode) that is
mixed with the input signal.
MONITOR
i SETTING key
The playback volume appears on the display
during adjustment. Use the + key to raise the
volume and the – key to lower the volume.
When
MONITOR
OFF
” appears on the screen and these keys
is set to
OFF
, “
MONITOR
have no effect.
Press this key to open the Input Setting
Screen where you can select the input, make
INT/MIC IN
settings and turn
MONITOR
ON and OFF.
Page 18

18 TASCAM GT-R1
3–Part Names and Functions
o INPUT volume
Use this to adjust the input signal level of the
built-in microphone, the GUITAR IN jack and
the MIC IN jack. This does not affect the input
signal level of the LINE IN jack
p /LINE OUT jack
Use this to connect with headphones or the
line input jack of an amp or other equipment.
Depending on the
recorder operation status, this outputs the
input signal, the playback signal or a mix of
both signals.
MONITOR
setting and
Page 19
19 TASCAM GT-R1
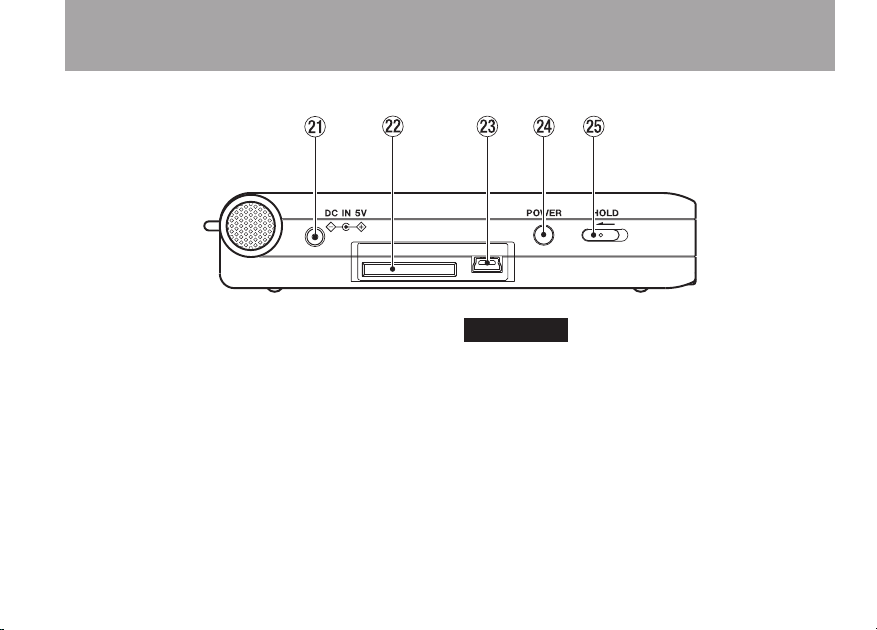
Left side panel
CAUTION
a DC IN 5V jack
Connect a TASCAM PS-P520 AC adapter
(purchased separately) to this jack.
s SD card slot
Insert an SD card into this slot. (See “About
SD cards” on page 7.)
d USB port
Use the included USB cable to connect with a
computer USB port. (See “Connecting with a
computer” on page 36.)
3–Part Names and Functions
Please connect the unit directly to a computer
without using a USB hub.
f POWER key
Press and hold this key to turn the unit’s
power ON and OFF.
g HOLD switch
Slide this to the left to turn the hold function
ON. All keys are inoperative when hold is ON.
Page 20
20 TASCAM GT-R1
NOTE
3–Part Names and Functions
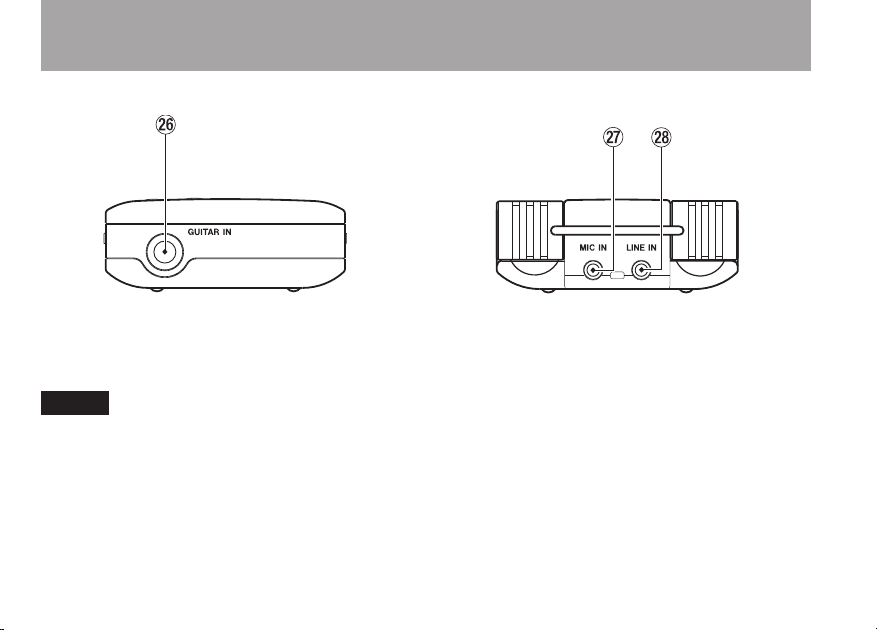
Front panel
h GUITAR IN jack
Use this standard mono phone jack to connect
a guitar or bass.
We call this the Front Panel because this is the
end that faces the operator of the unit when
placed on a table with the built-in mic directed
toward the sound source. Likewise, the Rear
Panel is the end that faces away from the
operator in this situation.
Rear panel
j MIC IN jack
Use this input jack to connect a stereo
mini-jack microphone. This jack provides
plug-in power when set to do so on the
Input Setting Screen.
k LINE IN jack
Use this stereo mini-jack for line input.
The input level is fixed at –10 dBV.
Page 21
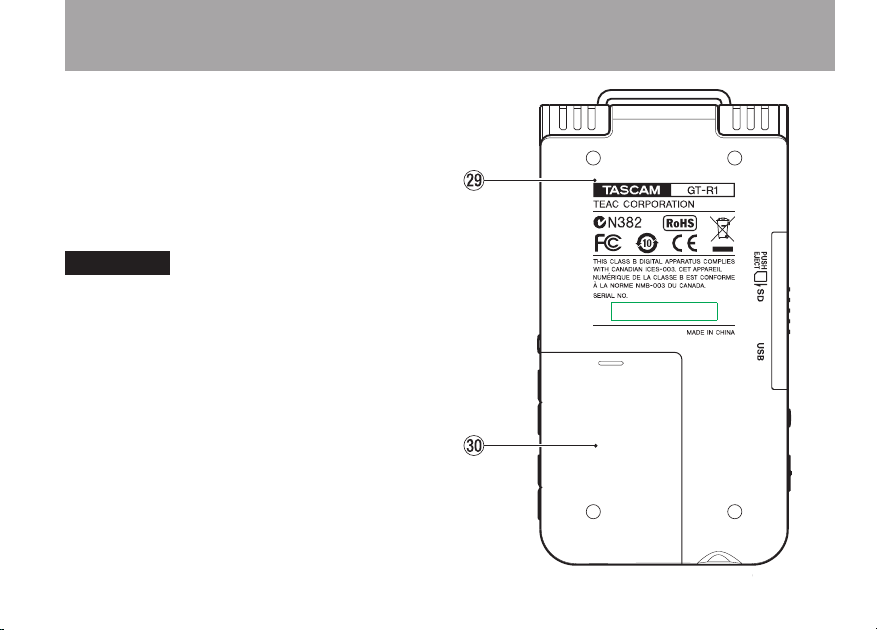
21 TASCAM GT-R1
Bottom panel
CAUTION
l Reset hole
If the unit is operating abnormally, push the
end of a paperclip, long fine rod or similar
item into this hole to press the system reset
button inside the unit. This turns the power
OFF and resets the unit’s system.
Do not press the reset button if the unit is
functioning properly.
; Battery case
This holds the specialized lithium ion battery
(BP-L2, included and available for purchase
sepa rately).
3–Part Names and Functions
Page 22
22 TASCAM GT-R1
4–Screen Overview
Various screens appear on the display.
The Home Screen is shown during ordinary
•
playback and when playback is stopped.
The Record Screen is shown when recording
•
and in record standby.
Appropriate setting screens are shown when
•
making various settings.
The Rhythm Screen is shown when using the
•
rhythm machine.
This section explains the display and operation of
the Home Screen and the Record Screen, as well
as the appearance and operation of the various
setting screens. Please see “16–Using the Rhythm
Machine” on page 80 for information about the
Rhythm Screen.
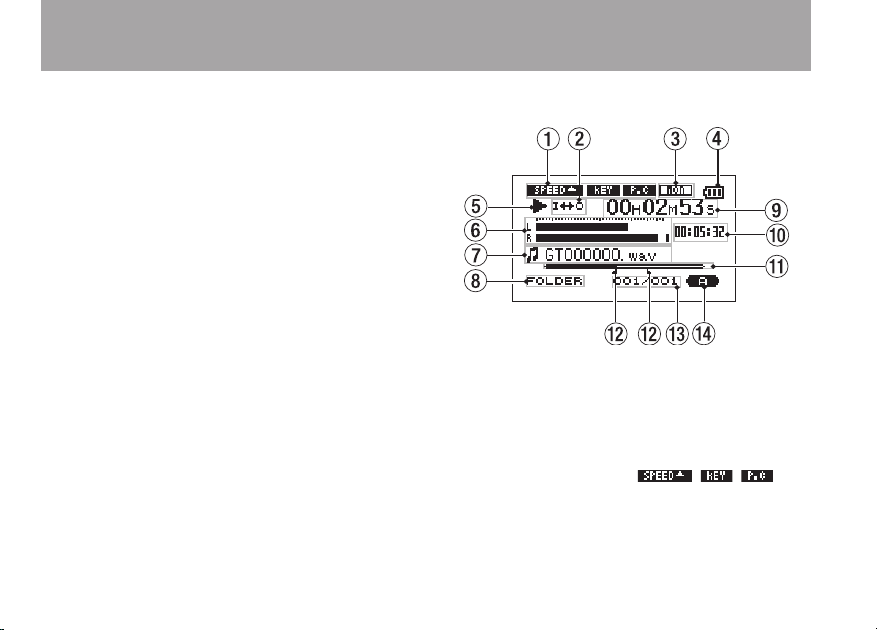
Home Screen
1 Status of playback control function settings
These show whether the various playback
control functions (speed control, key change,
part cancel) are currently active. When they
are active, their icons appear as light letters
on a dark background ( , , ).
(See “11–Special Playback Control Functions”
on page 66.)
Page 23

23 TASCAM GT-R1
4–Screen Overview
2 Loop/repeat setting status
The following icons appear depending on the
current loop/repeat setting.
Single playback
Repeat playback of 1 track
Repeat playback of all tracks
in the play area
Loop repeat active
3 Input monitor setting status
This shows the
(see page 32.)
MONITOR
ON/OFF status
4 Power indicator
The battery icon appears when the lithium
ion batter y is in use. The number of bars
shows the current level of remaining battery
power. The battery icon f lashes when
charging is necessary.
5 Unit status
This icon shows the current operation status.
¥ Track playing
π File stopped in progress (paused)
· File stopped at its beginning
˚ Fast forwarding
∆ Fast rewinding
≤ Skipping to the beginning of the
next track
µ Skipping to the beginning of the
current or previous track
6 Level meter
This shows the combined level of the selected
input signal and the currently playing file.
If the input level exceeds the maximum
allowable level, a bar appears at the right end
of the level meter.
7 File information
The tag information or file name of the
currently playing track is shown. If an MP3
Page 24

24 TASCAM GT-R1
4–Screen Overview
NOTE
file has ID3 tag information, the ID3 tag
information is given priority. The file name is
shown for WAV files and for MP3 files that do
not have ID3 tag information.
ID3 tag information includes the title, artist
name and other information that can be saved
in an MP3 file.
8 Selected playback area
Shows the currently selected playback area.
ALL
All files in the Music Folder
FOLDER
folder of the Music Folder
P.LIST
All files in the selected sub-
Files added to the playlist
9 Elapsed time
Shows the elapsed time (hours: minutes:
seconds) of the currently playing track.
0 Remaining time
Shows the remaining playback time of the
current track (hours: minutes: seconds).
q Playback position display bar
This bar shows the current playback position.
The bar darkens from the left as playback
proceeds.
w Status of loop IN and OUT points
This shows the status of the IN and OUT
point settings for loop playback.
If an IN point is set, the icon appears above
the display bar at the position equivalent to the
playback location.
If an OUT point is set, the icon appears
above the display bar at the position
equivalent to the playback location.
e Playback file number/total number of files
The total number of files in the selected
playback area and the number of the current
file are shown.
r Effect status
Shows whether the effect function is ON or
OFF. When the effect is ON, the effect icon
appears with a dark background.
Page 25
25 TASCAM GT-R1
4–Screen Overview
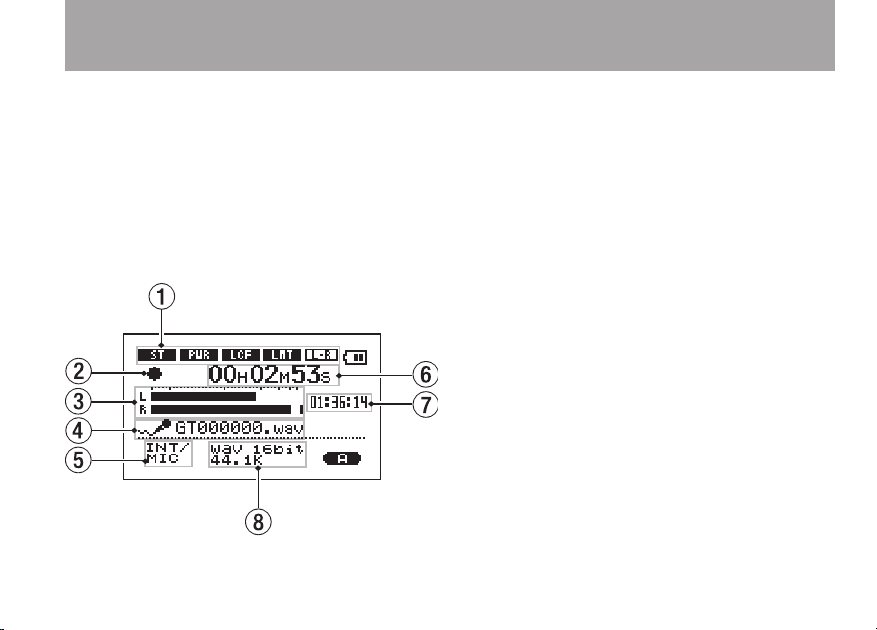
Record Screen
This screen opens when you press the REC/PAUSE
key to start recording standby mode and stays open
when you press the REC/PAUSE key again to start
recording.
This status of the power and the effect use appears
the same as on the Home Screen. This screen also
shows the following.
1 INT/MIC IN setting status
Shows the status of settings related to the
built-in microphone and MIC IN (stereo
recording, plug-in power, low cut filter, level
control and LR swap).
2 Recorder operation
º Recording
π Recording paused
ª Recording stopped
3 Record level meter
The input signal level of the selected input
appears as separate L and R channels.
4 File name
Shows the file name that is automatically
assigned to the file being recorded.
5 Input selection
Shows the input source.
6 Elapsed recording time
The elapsed recording time of the track
appears as hours: minutes: seconds. During
Page 26
26 TASCAM GT-R1
4–Screen Overview
recording standby, the maximum remaining
recording time appears.
7 Remaining recording time
The remaining recording time appears in
hours: minutes: seconds.
8 Record mode
Shows the recording file type and sampling
frequency. During overdubbing, the playback
file information (file name or MP3 ID3 tag)
appears.
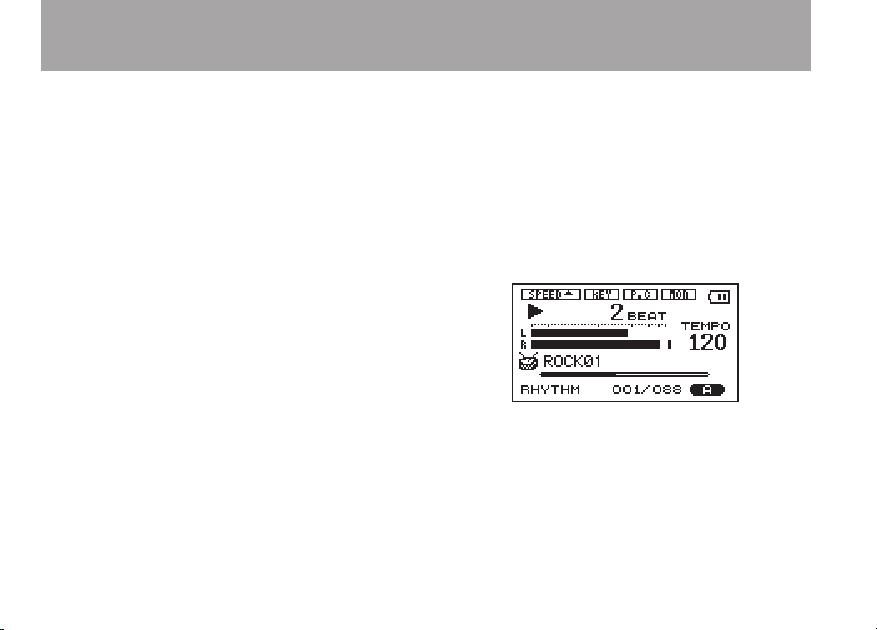
Rhythm Screen
When the Home Screen is open, press the PB
CONTROL and FX keys at the same time to start
rhythm mode and show this screen. When this
screen is open, you can use the rhythm machine.
See “16–Using the rhythm machine” on page 80
for details.
Page 27
27 TASCAM GT-R1
NOTE
4–Screen Overview
Setting Screens
Use this unit’s various setting screens to make
various settings, conduct operations and show
information.
Although the various setting screens are
also used to execute functions and display
information, for example, in addition to
making settings, we call them “setting
screens” in this manual.
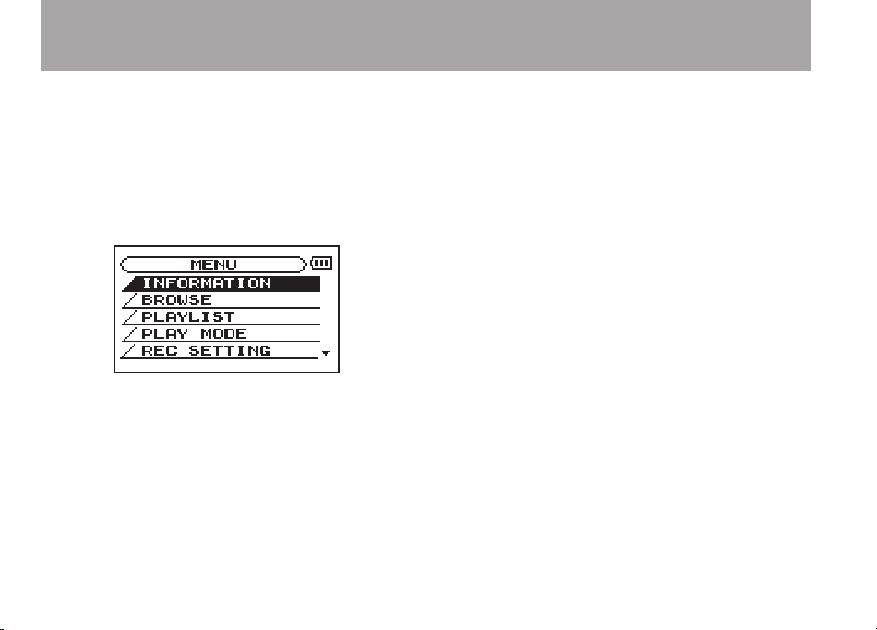
Setting screen structure
Most of the setting screens are accessed by rst
pressing the MENU button to open the Menu
Screen, but some screens can also be accessed
directly using dedicated keys.
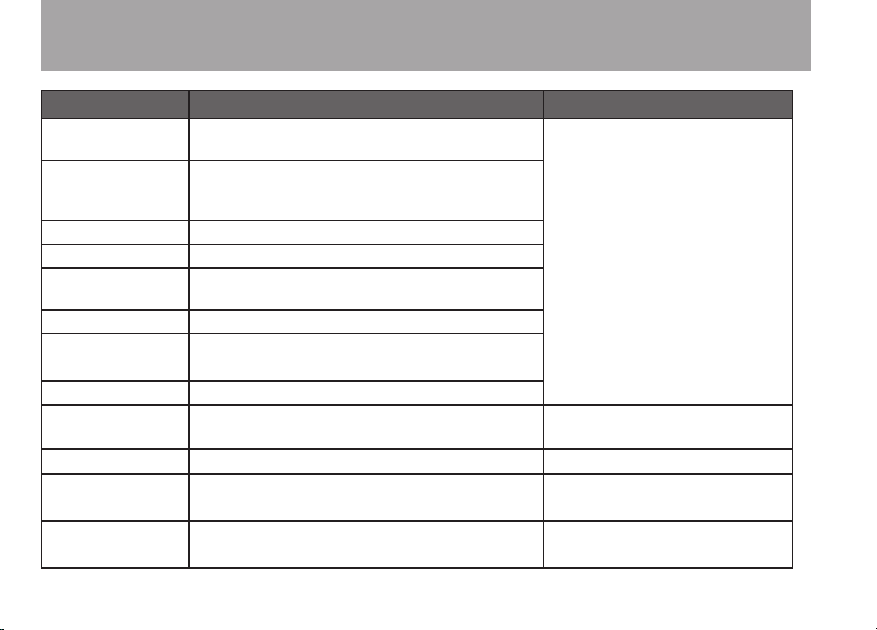
The following table provides an overview of the
setting screens.
Operation basics
Use the MENU, STOP/HOME, ¥/π , µ and ≤
keys and the wheel to conduct most operations on
the various setting screens.
Page 28
28 TASCAM GT-R1
4–Screen Overview
Setting Screen Overview Access method
INFORMATION
BROWSE
PLAYLIST Edit the playlist (erase and move tracks in it)
PLAY MODE Set playback mode; set single or repeat mode
REC SETTING
TUNER Access tuner and oscillator functions
SETUP
DATE/TIME Set the date and time of the built-in clock
INPUT SETTING
EFFECT Make effect settings Press and hold the FX key
PLAYBACK
CONTROL
RHYTHM Set and operate the Rhythm Machine
View le information, system setting information, and system information
View music les and sub-folders inside folders,
play and erase les, add les to the playlist,
create and select folders
Make settings related to recording (le type,
sampling frequency, maximum le size)
Make various system settings
Initialize and format the SD card
Select input source, make input monitoring,
built-in microphone and MIC IN settings
Set playback control function settings
Press the MENU key to open
the Menu Screen and select the
desired setting screen
Press the SETTING key
Press and hold the PB
CONTROL key
Press the PB CONTROL key
when the Rhythm Screen is open
Page 29

29 TASCAM GT-R1
4–Screen Overview
TIP
The keys have the following functions.
MENU key
Press this key to open the Menu Screen
(except when the Menu Screen is already
open or the Record screen is open).
When the Menu Screen is open, press this
key to return to the Home Screen. This key is
inoperative when the Record screen is open.
Wheel
Use the wheel to change the value of the
selected item.
¥/π key
Press this key to make an item selection and
to answer “YES” to a confirmation message.
(This functions like the “ENTER” key on a
computer).
µ key
When a setting screen is open, moves the
cursor (part highlighted in inverse) to the left
within the screen. Use this after setting the
value of an item to return to item selection,
for example.
≤ key
When a setting screen is open, moves the
cursor (part highlighted in inverse) to the right
within the screen. In many cases, the ¥/ π key
can also be used this way.
STOP/HOME key:
When a setting screen is open, press to return
to the Home Screen. Press this key to answer
“NO” to a conf irmation message.
You can also use menus during playback.
Page 30
30 TASCAM GT-R1
4–Screen Overview
Operation example
In this example, we will use the
SPEED
item in the Setup Screen to change the
forward/reverse search speed.
1 When the Home Screen is displayed, press
the MENU key to open the Menu Screen.
2 Turn the wheel to select
in inverse), and press the ¥/π key to open
the Setup Screen.
3 Turn the wheel to select the
SPEED
item, and press the ¥/π key to show
the current setting value (the factory setting
is “X8”) highlighted in inverse.
CUE/REV
SETUP
CUE/REV
(highlighted
4 Turn the wheel to select the desired setting.
The setting is changed immediately, so there
is no need to press the ¥/ π key again to
confirm it.
5 Press STOP/HOME to return to the Home
Screen.
Page 31

31 TASCAM GT-R1
NOTE
4–Screen Overview
When the • ¶ icon appears in the lower right
part of the screen, as shown in the preceding
image, there is additional information for the
current screen below what is shown on the
display.
When the • § icon appears, there is additional
information for the current screen above
what is shown on the display.
You can also use the • ≤ key instead of the
¥/π key in these steps.
When the • § icon appears to the right of a
setting value, you can change that value by
turning the wheel to the right. When the ¶
icon appears to the right of a setting value,
you can change that value by turning the
wheel to the left.
Page 32

32 TASCAM GT-R1
5–Practicing Music with this Unit
This unit has numerous useful functions for practicing guitar, bass and other instruments, as well
as singing. These functions are summarized here.
For details about each function read the appropriate
sections in this Owner’s Manual as necessary.
Select the input
Use the input appropriate for the part that you are
practicing. To practice electric guitar or electric
bass, select
input. To practice singing or a wind instrument, for
example, select
the mic input. To practice playing a synthesizer or
electric piano select
(See “Selecting the input source” on page 42.)
GUIT AR IN
MIC IN
LINE IN
for the dedicated guitar
for the built-in mic or
for the line input.
Use input monitoring
You can set the unit to always output the input
signal from the /LINE OUT jack. By doing this,
when practicing an instrument or singing, the
guitar, bass or other instrument connected to the
unit or the input from the mic can be monitored
constantly through headphones or speakers. As a
result, the input signal can be mixed with the signal
of a playing audio le or the rhythm machine and
they can be monitored together.
Follow these procedures to turn input signal
monitoring ON.
1 Press the SETTING key to open the Input
Setting Screen.
2 Use the wheel to select the
and press the ¥/ π key.
3 Use the wheel to select ON.
This status allows you to always monitor the
input signal.
4 Press STOP/HOME to return to the Home
Screen.
MONITOR
item
Page 33

33 TASCAM GT-R1
5–Practicing Music with this Unit
Tune instruments
You can tune instruments by using the tuner functions of this unit. In addition to tuning by watching
the tuning meter on the unit while inputting a
sound, the unit can also output a tuning tone,
allowing multiple musicians to tune at the same
time. (See “15–Using the Tuner” on page 77.)
Use effects
Using this unit’s built-in effects, you can apply
reverb and other effects to the input signal or the
playback signal. To apply it to the input signal, set
the
SOURCE
(See “14-Using the Effects” on page 74.)
item on the Effect Screen to
INPUT
Learn musical phrases
You can learn a fast phrase more easily by using
the speed and VSA functions, which are two of this
unit’s playback control functions.
Use the speed function to reduce the speed. If you
also turn the VSA function ON, the pitch stays the
same as you reduce the speed. (See “Changing the
speed” and “Changing speed without changing
pitch” on page 67.)
Play along with the rhythm machine
This unit has a built-in rhythm machine with 88
rhythm pattern presets. You can set the tempo and
count-in. (See “16–Using the Rhythm Machine” on
page 80.)
Use a metronome
This unit’s rhythm machine has preset patterns
.
(
COUNT1–COUNT9
metronome. (See “Setting the rhythm machine”
on page 83.)
) that can be used as a
Page 34

34 TASCAM GT-R1
5–Practicing Music with this Unit
Record as you play with the rhythm machine
You can record the sound of performing along
with the rhythm machine. You can also set the
count-in time. (See “16–Using the Rhythm
Machine” on page 80.)
Perform along with a track
With input monitoring ON, you can practice
guitar, bass, singing and other music along with
a musical track copied to this unit from a CD or
other source (See “13–Copying Tracks from a
Computer” on page 72).
The unit has various helpful functions for
practicing effectively.
Repeat and loop playback
You can loop a selected section of a musical track,
which is helpful if you want to practice repeatedly
a part that is difficult to play.
You can also repeat playback of a single track.
(See “12-Loop, Repeat and Single Playback” on
page 70.)
Change track pitch
You can change the pitch of a musical track. For
example, if you want to change the pitch to sing
along, use the
Screen to change it in semitone units. Moreover,
if the pitch of the musical track and the tuning
of your instrument are slightly different, for
example, you can use the
the Playback Control Screen to adjust the pitch of
the recorded track. (See “Changing pitch without
changing speed” on page 68.)
KEY
item on the Playback Control
FINE T UN E
item on
Page 35

35 TASCAM GT-R1
5–Practicing Music with this Unit
Change track speed
If a musical track is too fast to keep up with, you
can use the
Screen to reduce the speed. If you also turn the
VSA
you change the speed. (See “Changing the speed”
and “Changing speed without changing pitch” on
page 67.)
SPEED
item on the Playback Control
function ON, the pitch does not change when
Reduce guitar or bass sounds
You can reduce the guitar or bass sound in
a musical track. To do this, turn the
CANCEL
ON. This item has two sub-items. Adjusting these
could make the reduction more effective. (See
“Reducing guitar and bass sounds” on page 68.)
item on the Playback Control Screen
PAR T
Overdub
When you perform along with a playing audio
file, you can record a mix of the sounds of your
performance and the playing track. This creates
a new file. By repeating this procedure, you can
overdub multiple sounds. (See “Overdubbing” on
page 50.)
Page 36

36 TASCAM GT-R1
6–Making Connections
Headphones
Speakers with built-in amplifiers,
stereo systems, etc.
Computer
USB
Connecting monitors
Connect headphones, speakers with built-in
ampliers, an amp and speaker system or other
monitoring system to the GT-R1 /LINE OUT jack.
Connecting with a computer
By connecting this unit with a computer, you can
copy WAV or MP3 music les from the computer
to this unit. From the computer you can also erase
les on this unit and manipulate folders.
To connect to a computer, open the left side panel
cover and use the included USB cable to connect
the USB ports of the GT-R1 and the computer.
When connected, “
on the GT-R1 screen.
USB connected
” appears
Page 37

37 TASCAM GT-R1
The recorder appears on the computer screen as an
NOTE
external drive named “GT-R1.”
Disconnecting from a computer
To end the USB connection, rst follow the
procedures for your computer to disconnect the
GT-R1 and then remove the USB cable. The
GT-R1 automatically restarts.
See the computer manual for how to close the
connection on the computer.
6–Making Connections
When shipped from the factor y the “GT-R1”
drive contains the “MUSIC” and “UTILITY”
folders, as well as the “MANUAL” folder, which
contains a PDF copy of this Owner’s Manual.
Page 38

38 TASCAM GT-R1
6–Making Connections
Guitar
Bass guitar
NOTE
Connecting a guitar or bass
An electric guitar or electric bass can be connected
directly to the GUITAR IN jack (standard mono
phone jack) on the front panel.
You can apply built-in effects to the sound of
the connected instrument, and perform or
record along with the built-in rhythm machine.
Connecting mics and other audio devices
This unit has a built-in stereo microphone that
you can use to practice or record your singing, for
example, but you can also use an external mic. In
addition you can connect external sound sources,
including mixers and other audio equipment.
(See “7–Recording” on page 40 for more about
making settings related to connections and input
level setting.)
Connecting an external mic
You can connect a one-point stereo electret condenser microphone, for example, to the MIC IN
jack (stereo mini-jack) on the rear panel. Use the
Input Setting Screen to adjust the level control, the
low cut lter and other settings. (See “Selecting the
input source” on page 42.)
Page 39

39 TASCAM GT-R1
6–Making Connections
Mixer or other
audio equipment
NOTE
Connecting mixers and other audio equipment
You can connect the line output of an audio device
or mixer to the LINE IN jack (stereo mini-jack) on
the rear panel.
The GT-R1 does not have any controls to adjust
the input level of the LINE IN jack. Use the
output volume control on the connected device.
Page 40

40 TASCAM GT-R1
NOTE
7–Recording
In addition to using the built-in microphone, you
can record using an external microphone or record
the output signal from a mixer or other audio
source. You can select among MP3 (44.1/48 kHz,
32–320 kbps) and WAV (44.1/48 kHz, 16/24-bit)
audio recording formats. Moreover, with this unit,
you can mix and record a sound input through the
built-in mic or one of the input jacks with an audio
le that is played back using the overdubbing
function.
Selecting the file type and sampling frequency
Select the audio le type that you want to record
before you start recording.
1 Press the MENU key to open the Menu
Screen.
2 Select the
Recording Settings Screen.
REC SETTING
item to open the
3 Use the
from the following options: WAV at 16-bit
(factory setting) or 24-bit, or MP3 at 32
kbps, 64 kbps, 96 kbps, 128 kbps, 192 kbps,
256 kbps, or 320 kbps.
4 Use the
frequency of 44.1 kHz (factory setting) or
48 kHz.
For overdubbing, set the file type to WAV. •
You cannot use overdubbing when the
setting is MP3. (See “Overdubbing” on
page 50.)
FORMAT
SAMPLE
item to select the file type
item to select a sampling
Page 41

41 TASCAM GT-R1
TIP
WAV files do not use data compression and •
are truer to the character of the sound, but
they use more memory. Since MP3 files use
data compression, they do not use nearly as
much memory. For example, ordinary audio
CD tracks are 16-bit, 44.1 kHz WAV files. A
3.5–minute CD track uses about 35 MB of
space when copied to a hard drive. The same
track converted to a 128 kbps MP3 file uses
only about 3.2 MB.
If you are making a recording that you intend •
to use in the production of a CD, it is a good
idea to record WAV files. If you have enough
space, 24-bit recording gives you extra
headroom, allowing you to capture a greater
dynamic range. When recording rehearsals,
lectures and songwriting ideas, for example,
and higher quality audio is not as important
as smaller file size, MP3 may be a better
choice. There are many books (and resources
on the Internet) about digital recording if
you want to learn more about these formats.
7–Recording
Setting the maximum file size
On the Recording Settings Screen, where you
select the audio le type as described above, you
can also set the maximum size of the audio le.
Recording automatically stops if the maximum
le size is reached while recording audio.
1 Press the MENU key to open the Menu
Screen.
2 Select the
Recording Settings Screen.
3 With the
file size from the following options: 64M,
128M, 256M, 512M, 1G and 2G (factory
setting).
REC SETTING
SIZE
item, select the maximum
item to open the
Page 42

42 TASCAM GT-R1
7–Recording
NOTE
Under the file size value, the maximum
recording time for the selected size, format
and sample rate appears.
For the same file size, the possible recording
time differs depending on the file type selected.
Furthermore, if the recording time is 24 hours or
more, this will be displayed as 23:59:59.
Selecting the input source
Follow these procedures to select the input source.
1 Press the SETTING key to open the Input
Setting Screen.
2 Use the
following input sources.
INPUT
item to select one of the
INT/MIC
Sets the input source as the built-in microphone
when no microphone cable is connected to the MIC
IN jack (stereo mini-jack). When a microphone
cable is connected to the MIC IN jack, the input
microphone signal becomes the input source.
If you select
input functions. (See “Setting the INT/MIC IN
input functions” below.)
GUITAR
Sets the input source as the guitar or bass signal
input through the GUITAR IN jack (standard mono
phone jack) on the front panel. Left and right
channels are combined into the same signal.
LINE
Sets the source as the line level signal (–10 dBV)
input to the rear panel LINE IN jack (stereo
mini-jack).
INT/MIC
, you should also set the
Page 43

43 TASCAM GT-R1
CAUTION
Use headphones to monitor when you are
NOTE
TIP
recording with a microphone. If you use
speakers to monitor, the sound output from
the speakers may also be recorded, causing a
poor recording and even feedback.
The input source is the recording source when
recording.
Use the GT-R1’s built-in effects as necessary •
on the input source.
The EFFECT SOURCE, EFFECT ON/OFF and •
MONITOR ON/OFF settings are saved
separately for each input source. (See
“14–Using the Effects” on page 74.)
7–Recording
Setting the INT/MIC IN input functions
After selecting
press the µ key to highlight
the wheel right to open the
Setting Screen.
This screen has the following settings. Except for
POWER
phone. Among these, the
the MIC IN input. The other items affect both the
built-in mic and the MIC IN input.
INT/MIC
as the
INPUT
INPUT
, then turn
INT/MIC
item,
Input
, all items also affect the built-in micro-
POWER
item only affects
Page 44

44 TASCAM GT-R1
CAUTION
TIP
7–Recording
GAIN
Set the input sensitivity as
The factory default setting is
HIGH
if the input level is too low.
HIGH, MID
MID
. Change it to
, or
TYPE
Select
STEREO
or
MONO
according to the type
of connected microphone. The factory setting is
STEREO
. If you select
MONO
, the left and right
channels are combined into the same signal.
POWER
When connecting a microphone that requires
plug-in power set this to ON. The factory default
is
OFF
.
Set this to OFF when using the built-in mic or
connecting a dynamic microphone or microphone with a built-in battery. If set to ON, the
plug-in power might damage such microphones.
LOW
LOW CUT
.
The factory default setting of the low cut lter is
OFF
, but you can also select
120Hz
as the cut-off frequency for a low cut lter.
Try using one of the low cut filter settings when
recording outdoors or another place where the
unwanted sound of wind is being recorded.
40HZ, 80Hz
LEVEL CTRL
Use this to set the level control function.
Set it to
AUTO
to have the GT-R1 automatically
adjust the input gain according to the input level.
Loud sounds and quiet sounds are both adjusted
to the same level.
Set it to
LMT
to have the GT-R1 automatically
limit the input gain so that input level of loud
sounds are reduced to prevent distortion.
The factory default setting is
OFF
or
.
Page 45

45 TASCAM GT-R1
NOTE
When recording live performances and in other
TIP
situations where unexpected loud sounds might
occur, set this function to LMT to prevent input
clipping and allow recording without distortion.
LR SWAP
Use this to switch the stereo positions of the
built-in mics (left and right channels).
The default setting is
If you set it to
L- R
.
R-L
, the stereo positions of the
built-in mics (left and right channels) are switched.
If you stand the unit up and angle the built-in
mics toward the front of the unit, the stereo
position of the recording might be reversed
from that of the source. In such cases, set LR
SWAP to R-L to record with correct stereo
positioning.
7–Recording
Display of input functions on the Record Screen
Icons appear on the Record Screen to show the
status of the
LEVEL CTRL
ST
When
appears as light letters on a dark background.
POWER
When
light letters on a dark background.
TYPE, POWER, LOW CUT
settings.
TYPE
is set to
POWER
STEREO
is ON, the icon appears as
and
, the icon
Page 46

46 TASCAM GT-R1
7–Recording
Microphone
angle
90°
LCF
When
LOW CUT
120Hz
, the icon appears as light letters
on a dark background.
LMT
When
LEVEL CTRL
the icon appears as light letters on a dark
background.
LR SWAP
When
LR SWAP
appears. When set to
as light letters on a dark background.
is set to
is set to
40Hz, 80Hz
is set to
L- R
R-L
, the icon appears
AUTO
, the icon
or
or
LMT
Adjusting the built-in microphone angle
You can adjust the angle of the built-in microphone
to best suit the placement of the unit and the
location of the sound source during recording.
,
You can adjust the angle in a 90° range as shown in
the illustration.
Page 47

47 TASCAM GT-R1
Adjusting the input level
NOTE
You can adjust the level of the microphone and
guitar/bass inputs. (The signal input level of the
LINE IN jack is xed.)
The following procedures explain how to use the
Record Screen to set the levels.
1 Press the REC/PAUSE key to begin recording
standby. The key flashes red and the Record
Screen appears.
2 Use the INPUT volume control on the right
side of the unit to adjust the microphone
input level.
7–Recording
The PEAK indicator monitors the maximum •
input level. If the PEAK indicator lights, use
the INPUT volume control to lower the level.
The recording level is shown by the L/R meter. •
If a mark remains at the right end of the bar,
use the INPUT volume control to lower the
input level, or lower the level of the effect
that you are using with the LVL control on
the Effect Screen.
Page 48

48 TASCAM GT-R1
TIP
7–Recording
If the sound distorts when an active (built-•
in battery) guitar or bass is connected and
GUITAR is selected as the input source, turn
the volume down on the guitar or bass.
When you have selected INT/MIC as the input •
source and are using the built-in microphone
or MIC IN jack, if you find the level to be
too low even when the INPUT volume is at
maximum, use the INT/MIC Input Setting
Screen to set the GAIN item to MID or HIGH.
(See “Set ting the INT/MIC IN input functions”
on page 43.)
When LINE is selected as the input source, •
adjust the input level by changing the output
level of the sound source.
Press STOP/HOME to end recording standby. •
When using a mic, in addition to adjusting •
the INPUT volume, try changing the distance
and angle between the microphone and the
sound source. The angle and distance of the
microphone can also change the character of
the recorded sound.
An easy way to set the input level is to •
raise it until the PEAK indicator lights while
inputting as loud a noise as you expect to
record. When the PEAK indicator lights,
lower the input level until it no longer lights.
Page 49

49 TASCAM GT-R1
TIP
7–Recording
About recording modes
In addition to ordinary recording of the input
signal, with this unit, you can mix and record the
input sound with an audio le that is playing back
in overdubbing.
Overdubbing OFF
Ordinary recording of the input signal occurs and
a new le is automatically created.
Overdubbing ON
When overdubbing is ON, you can play an audio
le saved on the SD card and mix in and record
a new sound. For example, you can sing along to
a karaoke track or play an instrument over a
backing track.
Even when overdubbing a new le is created
automatically. The audio le that is played back
is not overwritten.
By recording repeatedly in OVERDUB mode, you
can use the unit as a simple multitrack recorder
to overdub multiple parts.
Ordinary recording
Before starting the following operation procedures,
input selection and level adjustment should be
completed, and the Home Screen should be open.
1 Press REC/PAUSE to begin recording
standby.
The screen shows the recording file name,
the input source, the recording audio
file type and sampling frequency. Please
confirm that these are as desired before
starting recording.
Page 50

50 TASCAM GT-R1
7–Recording
NOTE
If you have set the Input Setting Screen’s
MONITOR item to ON so that you can always
monitor the input, a pop-up appears that allows
you to turn overdubbing ON or OFF.
For ordinary recording, select OFF and continue
to step 2.
2 To start ordinary recording, press the
REC/PAUSE key again.
When recording starts, the REC/PAUSE
key lights continuously, and the display
shows the elapsed recording time and the
remaining recording time.
3 Press the STOP/HOME key to end recording
and create the audio file.
• Topauserecording,presstheREC/PAUSE
key. Press the REC/PAUSE key again to
restart recording in the same track. If you
press the STOP/HOME key after pausing a
recorded audio file up to the moment that
you paused recording is created.
Overdubbing
You can perform along while playing a saved audio
le and record the combined sound mixed together
as a new le. See “8–Playback” for information
about how to select the playback le, adjust the
monitoring volume and make other settings.
Preparation for overdubbing
Follow these procedures to prepare to overdub.
Set the file type to WAV
Only WAV les can be created by overdubbing.
1 Press MENU to open the Menu Screen.
2 Use the wheel to select
(highlighted in inverse) and press ¥/π .
REC SETTING
Page 51

51 TASCAM GT-R1
7–Recording
NOTE
TIP
3 Use the wheel to select
FORMAT
the ¥/π key.
4 Use the wheel to select
WAV 24-bit
.
WAV 16-bit
5 Press STOP/HOME to return to the Home
Screen.
The playback track can be an MP3 or WAV file.
Turn MONITOR ON in the Input Setting
Screen
1 Press the SETTING key to open the Input
Setting Screen.
2 Use the wheel to select the
and press the ¥/ π key.
3 Use the wheel to select ON.
This status allows you to always monitor
the input signal. In other words, you can
monitor a mix of the track being played
back and the input signal.
and press
MONITOR
or
item
4 Press STOP/HOME to return to the Home
Screen.
By making the above settings, in addition to
overdubbing, you can use a recorded (or copied)
audio track for instrument practice or karaoke.
Overdub recording
Before beginning these procedures, in addition to
setting the le type to
ON, set the input and adjust the level if necessary.
1 When the Home Screen is displayed, use
the µ and ≤ keys to select the track
for playback.
2 Press the ¥/π key to start playback, and
check the volume balance between the
playback and the input sounds.
3 Use the MIX BALANCE keys as necessary to
adjust the balance by increasing or decreasing the playback signal volume.
WAV
and turning
MONITOR
Page 52

52 TASCAM GT-R1
7–Recording
During adjustment using the keys, the
playback volume appears the lower part of
the display.
4 Press REC/PAUSE to begin recording
standby.
The screen overdubbing ON/OFF pop-up
appears.
The recording file name, input source,
recording audio file type and sampling
frequency also appear so that you can
confirm them before you start recording.
5 Use the wheel to select ON from the
overdubbing ON/OFF pop-up.
6 Press the REC/PAUSE key to start
overdubbing.
When recording starts, the REC/PAUSE key
lights and the display shows the elapsed and
remaining recording times.
The lower part of the screen shows the
name of the playing file that is being mixed
in the overdub.
Page 53

53 TASCAM GT-R1
7 To stop recording, press the STOP/HOME
CAUTION
NOTE
key.
You cannot pause when overdubbing (the
REC/PAUSE key is inoperative).
Set the file type to WAV for overdubbing •
(see “Selecting the file type and sampling
frequency” on page 40). If you try to overdub
when the file type is set to MP3 “Format is
MP3” appears and operation is prevented.
To play a track that is not in the currently •
selected playback area, you can select the
track directly on the Browse Screen (see
“10–Browse Screen” on page 60), or you can
change the selected playback area on the
Play Mode Screen before conducting the
above operation (see “Setting the playback
area” on page 57.).
7–Recording
Page 54

54 TASCAM GT-R1
NOTE
NOTE
NOTE
8–Playback
When the Home Screen is displayed, use the
¥/π , µ and ≤ keys to operate the GT-R1
as you would with an ordinary CD player or
other audio device. You can also use the wheel to
change the playback position.
When the Home Screen is not displayed, these
keys and the wheel have different functions.
The following procedures assume that there are
audio les that the unit can play on an SD card formatted for use with this unit inserted in the GT-R1.
SD cards formatted by the TASCAM DR-1 can
also be used with the GT-R1.
Starting and stopping playback
Play a track
When playback is stopped, press the ¥/π key
to start playback.
Stop playback
During playback, press the STOP/HOME or
¥/π key to stop (or pause) it at the current
position.
Selecting tracks
Use the µ and ≤ keys to select tracks both
during playing and when playback is stopped.
During playback or when a track is stopped in the
middle, press the µ key to return to the beginning
of the current track.
When stopped at the beginning of a track, press the
µ key to skip to the beginning of the previous
track, or press the ≤ key to skip to the beginning
of the next track.
Only files in the playback area that is •
currently set can be selected for playback.
(See “Set ting the playback area” on page 57.)
The track name, file number and other file •
information for the currently playing track
appear on the display.
Page 55

55 TASCAM GT-R1
NOTE
NOTE
8–Playback
The • ·icon appears on the display when
playback is stopped at the beginning of a
track, and the π icon appears when playback
is stopped in the middle of a track (paused).
Search forward and backward
Press and hold the µ key to search backwards
or the ≤ key to search forwards.
Use the CUE/REV SPEED item on the
Setup Screen to change the search speed.
(See “Making system settings” on page 90.)
Using the wheel to change the playback position
You can use the wheel to adjust the playback
position within a track. When you turn the wheel,
the position in the playback position display bar
changes, so you can visually conrm that the
playback position has been moved.
No sound is output while you turn the wheel.
Page 56

56 TASCAM GT-R1
NOTE
8–Playback
Adjusting the volume
Use the OUTPUT VOLUME keys to adjust the
volume of the monitoring signal output from the
/LINE OUT jack. The volume level appears on
the display while being adjusted.
If you used the MIX BALANCE keys to lower
playback volume during overdubbing, when you
play that recorded audio track, the monitoring
level will be relatively quiet compared to when
monitoring during recording. In this case,
use the MIX BALANCE + key to maximize the
playback level.
Page 57

57 TASCAM GT-R1
9–Playback Area and Playlist
TIP
On the Home Screen, you can use the µ and
≤ keys to select the playback track. The les
that you can select are determined by the playback
area setting.
Limiting the playback area makes track selection
easier when you have numerous recorded and
copied tracks on the SD card.
On the Play Mode Screen, you can select all les,
the current folder or the playlist as the playback
area. You can also use the Browse Screen to set a
folder as the playback area.
On the Browse Screen, regardless of the
playback area setting, you can select any file
on the card that you want.
Setting the playback area
Use the following procedures to select the
playback area on the Play Mode Screen.
1 Press the MENU key to open the Menu
Screen and select
¥/π key to open the Play Mode Screen.
2 Select the
3 Set the playback area to one of the following
options.
PLAY MODE
AREA
item and press ¥/ π.
. Press the
Page 58

58 TASCAM GT-R1
9–Playback Area and Playlist
NOTE
Selecting a folder for the
The current playback area setting appears in
the lower left of the Home Screen.
ALL
Set the playback area as all les in the Music
Folder on the SD card.
FOLDER
Set the playback area as all the les in the currently
selected folder.
PLAYLIST
Set the playback area as the tracks in the playlist.
(See “Playlist” on page 60.)
If there is no playlist dened, a “
pop-up appears.
No PLAYLIST
playback area
Regardless of the current playback area, if you
select a folder on the Browse Screen, the playback
area changes to the selected folder.
1. Press the MENU key to open the Menu
Screen, and select the
the ¥/π key to open the Browse Screen.
2 Select the desired folder.
For an explanation of how to use the Browse
Screen, see “Screen navigation” on page 63.
”
BROWSE
item. Press
Page 59

59 TASCAM GT-R1
9–Playback Area and Playlist
3 Press the ¥/π key to open the following
pop-up window.
4 Select the
The display returns to the Home Screen, and
the first file in the folder is selected. This
folder becomes the playback area regardless
of the previous playback area setting.
SELECT
item and press ¥/ π.
Selecting a file to set the playback area
When the playback area is set to
select a le on the Browse Screen, the folder that
contains the selected le becomes the playback
area.
1 Press the MENU key to open the Menu
Screen and select the BROWSE item. Press
the ¥/π key to open the Browse Screen.
2 Select the file you want.
For an explanation of how to use the Browse
Screen, see “Screen navigation” on page 63.
FOLDER
, if you
Page 60

60 TASCAM GT-R1
9–Playback Area and Playlist
3 Press the ¥/π key to open the following
pop-up window.
4 Select the PLAY item and press ¥/ π .
The display returns to the Home Screen,
and the selected track starts playing. In
addition, the folder that contains this track
becomes the playback area regardless of the
playback area folder set previously.
Playlist
You can make a list of tracks for playback
(playlist). On the Play Mode Screen if you select
PLAYLIST
playback to just the tracks in your playlist.
Adding tracks to the playlist
1 Press the MENU key to open the Menu
Screen. Select the
the ¥/π key to open the Browse Screen.
for the
AREA
item, you can set
BROWSE
item and press
Page 61

61 TASCAM GT-R1
9–Playback Area and Playlist
NOTE
2 Select a track that you want to add to the
playlist and press the ¥/ π key.
A pop-up window appears.
3 Select
The track is added to the playlist and the
4 Repeat steps 2 and 3 as necessary to add
For an explanation of how to use the Browse
Screen and how to select tracks, see “Browse
Screen” and “Screen navigation” on page 63.
AD D LIST
popup window closes.
more tracks to the playlist. The tracks are
numbered in the order that they are added.
and press the ¥/ π key.
Editing the playlist
You can view and edit the playlist you have made
on the Playlist Screen. You can also use this screen
to play tracks and to edit the playlist.
1 Press the MENU key to open the Menu
Screen. Select
¥/π key to open the Playlist Screen.
2 Select the file that you want to edit and press
the ¥/π key to open a pop-up window.
PLAYLIST
and press the
Page 62

62 TASCAM GT-R1
9–Playback Area and Playlist
Use the wheel to select the item you want
and press the ¥/ π key. Their functions are
shown following.
3 Press the ¥/π key to complete the move and
return to the ordinary Playlist Screen.
PLAY
Play the le and return to the Home Screen.
ALL CLR
A conrmation message appears to conrm that
you want to remove all the les from the playlist.
Press the ¥/π key to remove all the les or the
STOP/HOME key to cancel this operation.
For this operation, it does not matter which track
you select in step 2. All the les are removed
from the playlist, but they are not erased from
the SD card.
DELETE
Remove the selected track from the playlist.
The le is removed from the playlist, but it is not
erased from the SD card.
MOVE
Select this to change the order of tracks in the
playlist.
In addition to the le name, the track number also
appears highlighted in inverse.
In step 2, use the wheel to move the track to a
different position in the playlist.
In the above example, the 4th track has been
moved to the 3rd track position.
Page 63

63 TASCAM GT-R1
On the Browse Screen, you can view the contents
TIP
of the Music Folder, which contains the audio les
on the SD card that you can use with the GT-R1.
On this screen, you can also play and erase selected
audio les, create folders, add tracks to the playlist
and so on. (See “Playlist” on page 60.)
To open the Browse Screen, press the MENU key
to open the Menu Screen. Select
BROWSE
press the ¥/π key.
The contents of the folder that contains the le
that was selected on the Home Screen before the
Browse Screen was opened appears on the display.
and
10–Browse Screen
If you connect the GT-R1 with a computer by
USB, or mount the SD card on a computer using
a card reader or other input, you can change
the folder structure within the Music Folder and
erase files from the computer as you would the
contents of a hard drive. Furthermore, you can
change file names from the computer.
Screen navigation
On the Browse Screen, folders and music les
appear in a hierarchical structure much like they
would appear on a computer. On the GT-R1,
folders can only be used to two levels.
Use the wheel to select files and folders.
•
When a folder is selected, press the
•
show the contents of that folder.
When a file or folder is selected, press the
•
key to exit the currently open folder and go to a
higher level in the folder structure.
≤ key to
µ
Page 64

64 TASCAM GT-R1
10–Browse Screen
Icons on the BROWSE screen
The meanings of icons that appear on the Browse
Screen are as follows.
Root Music Folder
The Music Folder is the highest (root) level folder
in the hierarchy shown on the Browse Screen.
Audio file
This icon appears before the names of music les.
Plus folder
This icon shows folders that contain subfolders.
Plain folder
This icon shows folders that do not contain
subfolders.
Open folder
The contents of the folder marked with this icon
currently appear on this screen.
File operations
Select the desired audio le on the Browse Screen
and press the ¥/π key to open the pop-up window
that is shown below.
Use the wheel to select the item you want from the
following list and press ¥/π to execute it.
PLAY
Plays the le. The display returns to the Home
Screen. If the playback area is set to
playback area becomes the folder that contains the
playing le.
ADD LIST
Adds the selected le to the playlist. (See
“Playlist” on page 60.)
FOLDER
, the
Page 65

65 TASCAM GT-R1
10–Browse Screen
DELETE
A message appears to conrm that you want to
delete the le. Press the ¥/π key to erase the
le and the STOP/HOME key to cancel the
deletion operation.
CANCEL
No operation is conducted and the selected le is
left as is.
Folder operations
Select the desired folder on the Browse Screen and
press the ¥/π key to open the pop-up window that
is shown below.
Use the wheel to select the item you want from the
following list and press ¥/π to execute it.
SELECT
Returns to the Home Screen and selects the rst
le in the folder. This folder becomes the new
playback area regardless of the previous playback
area setting. When recording, les are created in
this folder.
CREATE
A pop-up appears to conrm that you want to
create a new folder. Press the ¥/π key to create a
new folder, or press the STOP/HOME key to cancel
the operation.
However, if you try to create a new folder inside
a second level subfolder the message, “
too deep
CANCEL
No operation is conducted and the selected folder
is left as is.
” appears and the folder is not made.
Layer
Page 66

66 TASCAM GT-R1
11–Special Playback Control Functions
Not only can you use the GT-R1 to change the
tempo of track playback, you can even do this
without changing the pitch. You can also change
the playback pitch of a track without changing
the tempo.
Furthermore, you can also reduce (cancel) the
sound of a guitar or bass in a track. You can use
these playback control functions effectively to
practice and learn parts.
Setting the playback control functions
Use the Playback Control Screen to set the playback control functions. When the Home Screen is
displayed, press and hold the PB CONTROL key to
open the Playback Control Screen.
After you nish making settings on this screen,
press the STOP/HOME key (or press and hold the
PB CONTROL key) to return to the Home Screen.
In the upper part of the Home Screen, the icons for
the playback control functions that are currently
active appear highlighted in inverse.
Page 67

67 TASCAM GT-R1
11–Special Playback Control Functions
NOTE
Changing the speed
Use the
SPEED
item to set the speed of playback.
However, setting the speed does not automatically
make the speed control function active. After
setting it, briey press the PB CONTROL key to
turn the speed control ON, making it active. When
ON, the icon appears as light letters on a
dark background in the upper part of the Home
Screen. You can turn the speed control ON and
OFF by briey pressing the PB CONTROL key,
so you can easily switch between the set speed
and the normal speed.
Since the speed adjustment range is –50% to +16%
(in 1% increments), the slowest speed setting is
half the original speed.
Most Playback Control functions in the GT-R1
are enabled when you change them from the
Playback Control menu. The exception is the
PB CONTROL function: you must press the PB
CONTROL button to turn it on.
Changing speed without changing pitch
Turn the Variable Speed Audition (VSA) function
ON to change the tempo of the playing track
without changing the pitch. Use the
turn the VSA function ON and OFF (the factory
setting is ON).
VSA
item to
Page 68

68 TASCAM GT-R1
NOTE
11–Special Playback Control Functions
Changing pitch without changing speed
Use the
KEY
item to change the pitch in semitones
without changing the tempo.
Use the
KEY
item to adjust the pitch up or down
by 1–6 semitones (Ã6–â6) (the factory setting is 0).
If you change the key to any value besides 0, the
key change function turns ON and the icon
appears on the Home Screen as light letters on a
dark background.
Use the
FINE
item to adjust the pitch up or down
in cents (100 cents = 1 semitone).
Even if you use the FINE item to adjust the key,
as long as the KEY item setting is 0, the icon
will not appear as light letters on a dark background on the Home Screen.
Reducing guitar and bass sounds
You can use the part cancel function to reduce the
sound levels of guitar and bass on commercially
available CDs and other recorded sound sources.
Use the
PART CANCEL
Use the wheel to select the
and open the Part Cancel Screen, which has three
items.
CANCEL
Set the CANCEL item to ON to turn the part cancel
function ON (the factory setting is OFF). The
icon appears as light letters on a dark background
on the Home Screen.
item to set this function.
PART CANCEL
item
Page 69

69 TASCAM GT-R1
11–Special Playback Control Functions
Depending on the music, the part cancel function
may not reduce the recorded guitar or bass sound
sufciently. If this is the case, changing the
and
RANGE
settings might make the reduction
more effective. Listen to the music as you adjust
the settings to achieve the best effect.
RANGE
Select
GUIT AR, BASS
or
ALL
for the frequency
range of sound reduction. The initial default setting
is
GUIT AR
.
PART
Adjust this setting to match the stereo position of
the sound that you want to reduce between
10
and
RIGH T 10
CENTER
.
. The initial default setting is
PART
LEFT
Page 70

70 TASCAM GT-R1
12–Loop, Repeat and Single Playback
NOTE
In ordinary playback mode, once playback starts,
it will stop when the end of the last track in the
current playback area is reached (or you press the
STOP/HOME key). By following the instructions
in this chapter, however, you can also make the
GT-R1 loop a section of a track that you choose,
repeat the entire sequence of tracks in the current
playback area, play a single track repeatedly or
play a single track once and stop.
Loop playback
With this function, you can continuously repeat
(loop) the playback of a selection that you make.
1 Press the IN/OUT key during playback to
set the point when you want to start loop
playback. The current position is set as
the IN point.
2 Press the IN/OUT key at the point when
you want loop playback to stop. The current
position is set as the OUT point, and loop
playback begins between the IN and OUT
points.
The current positions of the IN and OUT points are
shown by the and icons that appear below the
playback position display bar in the lower part of
the Home Screen. During loop playback the
indicator also appears.
To stop loop playback, press either the LOOP key
or the IN/OUT key.
If you press the LOOP key, the loop interval
settings are saved, and if you press the LOOP
key again loop playback of the set interval
begins again.
If you press the IN/OUT key, the loop interval
settings (IN and OUT point settings) are canceled.
Accurate assignment of IN and OUT points is
not always possible for variable bit rate (VBR)
MP3 files.
Page 71

71 TASCAM GT-R1
12–Loop, Repeat and Single Playback
NOTE
Repeat and single track playback modes
You can set the GT-R1 to repeatedly play the
current track or all tracks in the playback area, as
well as play just a single track once.
1 Press the MENU key to open the Menu
Screen. Select
the ¥/π key.
2 Select the
mode to one of the following options.
PLAY MODE
REPEAT
item to set the playback
and press
• OFF:
All tracks in the playback area are played in
sequence one time. (This setting is the ordinary
playback mode.)
• SINGLE:
The selected track is played once without
repeating. The icon appears on the
Home Screen.
• 1 REPEAT:
The current track is played repeatedly. The
icon appears on the Home Screen.
• ALL REPEAT:
All tracks in the selected playback area are played
back repeatedly.
The icon appears on the Home Screen.
If you start loop playback, the REPEAT item
automatically switches to OFF if it is in a
different mode.
Page 72

72 TASCAM GT-R1
13–Copying Tracks from a Computer
TIP
You can copy audio les from a computer to
this unit by USB, so that you can use them as
backing tracks for practice and to learn difcult
passages, for example. You can also use them for
overdubbing, as described later in this manual.
This unit can handle MP3 (32–320 kbps, 44.1/48
kHz) and WAV (44.1/48 kHz, 16/24-bit) audio
le types.
Preparing audio files on a computer
Use the abilities of your computer OS or a software
application to copy tracks from a CD or other
source to your computer.
When copying les to you computer, choose le
types that the GT-R1 can handle (the types of
MP3s and WAV les listed above).
You can also prepare your own tracks using
digital audio software, or use tracks you
previously recorded with the GT-R1 or
another device.
Copying audio files from a computer
1 Connect the GT-R1 to a computer (See
“Connecting with a computer” on page 36).
2 Click the GT-R1 drive on your computer
to see its contents, including the UTILITY,
MUSIC and MANUAL folders.
3 Drag-and-drop audio files from you
computer to the Music Folder to copy
them to the SD Card in the GT-R1.
4 After you finish copying f iles and ending
the connection with the GT-R1 on the
computer, disconnect the USB cable (or
remove the SD card if it is connected
directly to the computer).
See the computer manual for how to close
the connection on the computer.
The GT-R1 automatically restarts after it
has been disconnected.
Page 73

73 TASCAM GT-R1
NOTE
TIP
13–Copying Tracks from a Computer
Instead of using USB to connect the GT-R1 and
a computer, you can also conduct the same
operations by removing the SD card from the
GT-R1 and connecting it directly to a computer
that has a built-in SD card slot or by using a
card reader.
You can use more than one SD card with the •
GT-R1. Make certain that you format additional cards by inserting them in the GT-R1
and following the instructions about formatting (see "Formatting the SD card" on page
91) before you copy files from your computer.
Since all storage media, including SD cards, •
can fail, it is a good idea to make back-up
copies of your recordings on your computer
hard drive, CD-Rs or other media.
Managing the Music Folder from a computer
You can manage the contents of the Music Folder
on an SD Card in the GT-R1 from a computer.
You can create up two levels of sub-folders inside
the Music Folder. Since you can set the GT-R1
to only play the contents of a specic folder, you
can organize tracks into genres, artists or other
categories as you like. (See “Folder operations”
on page 65.)
• If you name the sub-folders and music tracks,
these names will appear on the screen of this unit.
Page 74

74 TASCAM GT-R1
14–Using the Effects
The GT-R1 has built-in effects that can be applied
to the input signal during recording and practice.
They can also be applied to the playback signal
during playback as well as the rhythm machine
when it is ON.
Turning the effect ON and OFF
Briey press the FX key to turn the effects ON and
OFF. When ON, the effect last set on the Effect
Screen becomes active, and the effect icon
appears as light letters on a dark background at the
bottom right of the Home Screen and shows the
selected effect bank (A–E), as shown in the following illustration.
Setting the effect
Press and hold the FX key to open the Effect
Screen.
As the illustration above shows, the Effect
Screen has three items—
PRESET
(
GUIT AR
selected input. The box-like icons show the effect
modules used by the current preset. The right
icon is the level adjustment knob. Except for the
input display icon, all of these icons have settings,
so when the above screen is open, you can turn the
wheel to select the effect modules and
icon. (The selected item appears darker.)
—above a series of icons. The left icon
in the illustration) shows the currently
SOURCE, BANK
LVL
and
LVL
knob
Page 75

75 TASCAM GT-R1
14–Using the Effects
Moreover, the types and number of effect modules
differ according to the selected preset. For information about the types of effect modules in each
preset, see “19–Effects Preset List” on page 95.
Although it appears different from other setting
screens, operation is the same.
1 Use the wheel to select the desired item
and press the ¥/ π key to access that
item’s settings.
2 Use the wheel to set the desired value.
3 Press the µ key when you are done making
the setting to return to item selection status.
SOURCE
Select whether the effect is applied to the input
signal (
INPUT
) or the playback signal (
PLAY
).
BANK
Effects are categorized in banks A to E. use the
following
the selected bank. The types of presets in each
bank are as shown below.
BANK A–C: guitar presets
BANK D: bass presets
BANK E: reverb presets
PRESET
Select the preset from the current bank. See
“19–Effects Preset List” on page 95 for details
about the preset effects.
PRESET
item to select presets inside
Page 76

76 TASCAM GT-R1
14–Using the Effects
Effect modules
After selecting an effect module icon, press the
¥/π key to open a pop-up window with multiple
parameter setting items like the one shown below.
The parameter types differ according to the module
type.
When a pop-up window is open, use the wheel and
the ¥/π key to select and set items in the pop-up.
After making a setting, press the STOP/HOME key
to close the pop-up.
Please see “20–Effect Module Parameters List” on
page 98 for the parameters of each type of module.
LEVEL knob
Use this to change the output level of the preset
effect selected in the
LEVEL
knob icon and press the ¥/π key to select
the numerical value in the upper part of
the icon. The level can be set to values between
0 and 100. The
changes in the value.
PRESET
LVL
knob icon turns in response to
item. Select the
Closing the Effect Screen
Press the STOP/HOME key (or press and hold the
FX key) to return to the Home Screen.
Page 77

77 TASCAM GT-R1
15–Using the Tuner
The GT-R1 has a built-in tuner. By inputting the
sound of an instrument, you can use the tuning
meter on the display to tune that instrument
accurately. In addition, you can output a tone for
tuning from the /LINE OUT jack to, for example,
tune multiple instruments simultaneously.
Preparation
1 Press the MENU key to open the Menu
Screen. Select the
2 Use the
AUTO
GUIT AR
Bass
OSC.
MODE
Chromatic tuner mode
Bass tuner mode
Oscillator mode
TUNER
and press ¥/ π .
item to select the tuner mode.
Guitar tuner mode
3 Use the
CA LIB
item to set the frequency of
A above middle C (A4) between 435 Hz
and 445 Hz.
The set value appears in the lower right
part of the screen. This setting affects all
tuner modes.
Use of these tuner modes is explained below.
AUTO (chromatic tuner mode)
This is the default mode. Use the tuning meter on
the GT-R1’s screen to tune your instrument.
The tuning meter and input signal pitch appear on
the screen. (“
1 Set the input source that you are using. (See
“Selecting the input source” on page 42.)
2 Play the instrument you are tuning. The
name of the closest pitch appears in the
upper part of the meter.
3 Tune the instrument until the desired pitch
---
” appears when there is no input).
Page 78

78 TASCAM GT-R1
15–Using the Tuner
is shown and the center of the meter is
highlighted. A bar appears to the left if the
tuning is too low and a bar appears to the
right if it is too high. The longer the bar is
the more out of tune the instrument is.
GUITAR (guitar tuner mode)
Change the setting for each string to be tuned.
1 Use the
2 The string is in tune when the center of the
The tuning procedure is the same as in the
NOTE
item to select the string that
you want to tune (1E, 2B, 3G, 4D, 5A, 6E).
meter is lit.
AUTO mode.
BASS (bass tuner mode)
Change the setting for each string to be tuned.
1 Use the
you want to tune (1G, 2D, 3A, 4E, 5B).
2 The string is in tune when the center of the
meter is lit.
The tuning procedure is the same as in the
AUTO mode.
NOTE
item to select the string that
OSC. (oscillator mode)
The built-in oscillator can output a sine wave of a
pitch in the three octaves between C3 and B5
through the /LINE OUT jacks. In addition to the
CA LIB
item described above, the oscillator mode
has the following three setting items.
NOTE
Set the pitch of the tuning tone (C3–B5).
Page 79

79 TASCAM GT-R1
OUT
Set whether or not the tuning tone is output (ON or
OFF). When ON, an image of a vibrating pitchfork
appears on the screen as shown.
If you switch from chromatic mode to oscillator
mode, the
switch from oscillator mode to chromatic mode,
the
LEVEL
Set the level of the tuning tone between 0 and 10.
OUT
item turns ON automatically. If you
OUT
item turns OFF automatically.
15–Using the Tuner
Page 80

80 TASCAM GT-R1
NOTE
16–Using the Rhythm Machine
This unit has a built-in rhythm machine with 88
preset patterns, including metronome patterns.
You can practice guitar, bass or another instrument
along with the rhythm machine and even record the
sound of the rhythm machine mixed with the sound
of your instrument.
Rhythm mode
You must turn the rhythm mode ON to use the
rhythm machine. When the Home Screen is open,
press the PB Control and FX keys at the same time
to open the Rhythm Screen and put the unit in
rhythm mode.
This screen shows a variety of information related
to the rhythm machine, and allows you to start
and stop it, set the tempo and select the pattern.
Moreover, when the Rhythm Screen is open, you
can record a mix of the rhythm machine and the
input signal.
When in rhythm mode, press the PB Control and
FX keys at the same time to end rhythm mode and
return to the Home Screen.
When using rhythm mode, music files on the •
SD card cannot be played.
During rhy thm mode, if you use the BROWSE •
screen or PLAYLIST screen to select an audio
file and then select “PLAY” from the pop-up
window, rhythm mode ends and the Home
Screen opens. (See “9–Playback Area and
Playlist” on page 57.)
Page 81

81 TASCAM GT-R1
16–Using the Rhythm Machine
NOTE
Rhythm Screen features
The power and input monitor settings, as well as
the effects ON/OFF status appear the same as on
the Home Screen. Moreover, in record standby or
during recording the top of the screen shows the
status of the INT/MIC IN setting in the same way
as the Record Screen. At other times, the status
of the input monitor setting is shown in the same
way as the Home Screen. In addition to these, the
Rhythm Screen shows the following items.
1 Playing/stopped status
When the rhythm machine is playing ¥
appears and when stopped ■ appears.
In rhythm mode, “when stopped” means when
the rhythm machine is stopped, and “when
playing” means when the rhy thm machine is
playing (without recording an audio file).
2 Current beat
Shows the current beat in the measure.
3 Temp o
Shows the current tempo in beats per minute
(BPM).
4 Pattern name
Shows the name of the currently selected
rhythm pattern.
5 Beat position bar
Shows the beat position in the measure as
a bar.
Page 82

82 TASCAM GT-R1
16–Using the Rhythm Machine
NOTE
6 RHYTHM indicator
Shows that this is the Rhythm Screen.
7 Pattern number/total number of patterns
Shows the number of the current rhythm
pattern and the total number of rhythm
patterns (88).
Rhythm Screen when recording
When in rhythm mode, recording means recording
an audio le while the rhythm machine is playing.
The sounds of both the rhythm machine and the
input signal are mixed together and recorded.
During recording, the screen appears almost the
same as the Record Screen in the ordinary mode,
but the following points are different.
1 Record indicator
During recording, – appears.
2 Count-in
Shows the count-in before the start of
recording. Disappears when the count-in
finishes.
3 RHYTHM indicator
Shows that this is the Rhythm Screen.
4 Pattern name
Shows the name of the currently selected
rhythm pattern.
During record standby, the same items are
shown as in the record standby screen of
ordinary mode.
Page 83

83 TASCAM GT-R1
16–Using the Rhythm Machine
NOTE
NOTE
Rhythm Screen operations
When the Rhythm Screen is open, the following
operations are possible.
– Press the ¥/π key to start and stop the rhythm
machine.
Once stopped, a rhythm pattern plays from the
beginning when restarted.
– Use the wheel to set the tempo.
The setting range is 20–250 (BPM).
– Use the µ/≤ keys to select the preset rhythm
pattern.
See "21– Rhythm Pattern List on page 102.
The tempo and rhythm pattern can also be •
set on the RHYTHM setting screen described
hereafter.
The rhythm patterns cannot be edited. •
Setting the rhythm machine
Tempo, rhythm pattern, count-in, and count
recording can be set on the Rhythm Setting Screen.
To open the Rhythm Setting Screen, press the PB
Control key when the Rhythm Screen is open.
This screen has 4 setting items. Among these, the
tempo and rhythm pattern can also be set on the
Rhythm Screen. (See “Rhythm Screen operations”
above.)
Operation of the Rhythm Setting Screen is the
same as for other setting screens. In short:
1 Use the wheel to select the desired item, and
press the ¥/ π key to select the value.
2 Use the wheel to change the value to the
Page 84

84 TASCAM GT-R1
16–Using the Rhythm Machine
NOTE
desired value.
3 After changing the value, press the µ key
to return to the selection of items.
Setting the tempo (TEMPO)
The rhythm machine tempo can be set between
20–250 beats per minute (BPM).
Selecting the rhythm pattern (PATTERN)
The rhythm machine pattern can be selected from
88 presets.
For details about the rhythm patterns, see the
“21–Rhythm Pattern List” on page 102.
The rhythm patterns cannot be edited. •
By selecting a pattern between COUNT1 and •
COUNT9, the rhythm machine can be used as
a metronome.
Setting the count-in (COUNT IN)
The count-in before a pattern starts can be set in a
range between –9 and +9.
The numerical value (0–9) shows the number of
beats in the count-in.
The “+” and “–” indicate whether recording in
rhythm mode starts before or after the count-in.
The “–” indicates that the recording starts after the
count-in and the “+” indicates that recording starts
at the same time as the count-in. (See “Record
playing with a rhythm” on page 87.)
Setting count recording (COUNT REC)
This sets whether or not the count-in is recorded
when the rhythm machine sound is recorded.
When set to ON the count-in is recorded, and when
OFF
it is not recorded. (See “Record playing with
a rhythm” on page 87.)
Page 85

85 TASCAM GT-R1
16–Using the Rhythm Machine
NOTE
Playing along with the rhythm machine
When the Rhythm Screen is open, you can practice
along with the rhythm machine, as well as record a
mix of the rhythm machine and the input signal.
Preparation
Before playing along with the rhythm machine,
you might need to prepare the input, set the rhythm
machine or change the monitor mode, for example.
1) Prepare the input
Select the input and set related functions as
necessary. For details, see “Selecting the input
source” in “7–Recording” on page 42, “Setting
the INT/MIC IN input functions” on page 43 and
“Adjusting the built-in microphone angle” on
page 46.
You can switch to rhythm mode before
preparing the input.
2) Switch to rhythm mode
When the Home Screen is open, press the PB
Control and FX keys at the same time to put the
unit in rhythm mode and open the Rhythm Screen.
3) Set the rhythm machine
Set the rhythm pattern and tempo of the rhythm
machine and the count-in settings as necessary.
See “Setting the rhythm machine” on page 83 for
details about making these settings.
4) Change the monitor mode
In order to monitor the sounds of both the rhythm
machine and the input source (guitar, bass, other
instrument or singing) and practice along with the
rhythm, you must turn the
Setting Screen ON in advance.
If this item is
signal (except when in record standby or when
recording). (For details, see "Use input monitoring"
on page 32.)
OFF
MONITOR
, you cannot monitor the input
item on the
Page 86

86 TASCAM GT-R1
16–Using the Rhythm Machine
TIP
5) Adjust the input level
Use the INPUT volume control on the right side
panel to adjust the input level.
If the PEAK indicator to the side of the display
lights, lower the input level.
If a mark remains at the right end of the L/R meter,
use the INPUT volume control to lower the input
level, or lower the level of the effect with the
knob on the Effect Screen if you are using an
effect.
LVL
If you hear distortion when you plug in an •
active guitar or bass (one that contains an
internal battery), turn the volume down on
the instrument.
If the level is still too low even when the •
INPUT volume is at the maximum when the
input source is set to INT/MIC and you are
using the built-in mic or the MIC IN input,
change the GAIN item to a higher setting on
the INT/MIC IN functions setting screen.
(See “Set ting INT/MIC IN input functions” on
page 43.)
When the input source is set to LINE, use the •
output volume control on the connected
device to adjust the level.
Page 87

87 TASCAM GT-R1
16–Using the Rhythm Machine
Practicing with a rhythm
The following procedures assume that you have
made the preparations in the “Preparation” section
above and have opened the Rhythm Screen.
1 Press the ¥/π key to start the rhythm
machine.
2 Play along with the rhythm machine.
3 Use the MIX BALANCE keys as necessary to
raise and lower the rhythm machine volume
and adjust the balance between the rhythm
machine and the input signal.
During adjustment with the MIX BALANCE
keys, the volume of the rhythm machine is
shown as a bar at the bottom of the display.
4 When you are finished, press the ¥/ π key to
stop the rhythm machine.
Record playing with a rhythm
You can record performing along with the rhythm
machine. The mixed signal of the rhythm machine
and the performance (input signal) are recorded.
The following procedures assume that you have
made the preparations in the “Preparation” section
above and have opened the Rhythm Screen.
1 Press the REC/PAUSE key.
The Record Screen appears as above and the
REC/PAUSE key flashes.
Page 88

88 TASCAM GT-R1
16–Using the Rhythm Machine
NOTE
2 Press the REC/PAUSE key again.
The rhythm machine starts and recording
begins. When recording begins, the REC/
PAUS E key stops flashing and stays lit.
The screen appears as below.
3. Play along with the rhythm machine.
4. When you are finished playing, press the
STOP/HOME key to stop the rhythm machine
and create a recording file.
5. Press the PB Control and FX keys at the same
time to leave rhythm mode and open the
Home Screen.
6. Press the ¥/π key to play the recorded file.
When recording in rhy thm mode, set the file •
type to WAV for overdubbing (see “Selecting
the file type and sampling frequency” on
page 40). If you try to overdub when the file
type is set to MP3 “Format is MP3” appears
and operation is prevented.
When recording in rhy thm mode, the •
sampling frequency is fixed at 44.1 KHz. (If
the sampling frequency is set to 48 KHz, it
will be automatically changed to 44.1 KHz
setting when recording.)
When recording in rhy thm mode (or during •
record standby) the ¥/π key does not
function.
To playback the recorded file, you must leave •
rhythm mode.
Page 89

89 TASCAM GT-R1
16–Using the Rhythm Machine
NOTE
Recording the count-in
Depending on the count-in and count recording
settings, the timing of the start of recording and
whether or not this count-in is recorded varies.
(See “Setting the rhythm machine” page 83.)
– When
COUNT IN
is set to –, recording starts
after the count-in regardless of the
setting.
– When
COUNT REC
is ON and
set to +, recording starts at beginning of the countin, and the count-in is also recorded.
– When
COUNT REC
is
OFF
and
set to +, recording starts at beginning of the countin, but the count-in is not recorded.
COUNT REC
COUNT IN
COUNT IN
Apply effects to the rhythm machine
You can apply reverb and other built-in effects to
the rhythm machine by setting the
Effect Screen to
on page 74 for details about setting effects.
is
is
When effects are applied to the rhythm •
machine, the effects are heard not only
during monitoring, they are also applied
when recording the rhythm machine.
Effects cannot be applied to both the rhythm •
machine and the input signal and recorded.
PLAY
. See “14–Using the Effects"
SOURCE
on the
Page 90

90 TASCAM GT-R1
17–System Settings and Formatting
From the Setup Screen, you can change various
settings to optimize the device for your use
environment and other requirements. You can
also initialize and format the SD card.
To open the Setup Screen, press the MENU key.
Select
SETUP
from the Menu Screen and press
the ¥/π key.
The following settings can be made for the items
on the Setup Screen.
Making System Settings
Setting the search speed
Use the
CUE/REV SPEED
of forward and backward searching when pressing
and holding the ≤ and µ keys during audio le
playback.
Options: x2, x4, x8 (factory setting),
Turning the unit power OFF automatically
Use the
AUTO OFF
item to set the time before
the unit power automatically turns OFF after
the last activity or use when powered by the
internal battery.
Options:
OFF
(factory setting—the unit does not
automatically turn OFF),
30 min
Backlight Auto OFF setting
Use
BACKLIGHT
to set the time until the
backlight automatically turns OFF after the last
operation when powered by the internal battery.
item to set the speed
x10
3min, 5min, 10min
,
Page 91

91 TASCAM GT-R1
17–System Settings and Formatting
CAUTION
Options:
(factory setting),
OFF
(backlight always on),
10sec, 15sec, 30sec
Adjust the display contrast
Use
CONTRAST
to adjust the display contrast.
Options: 1–20 (factory setting: 8)
Adjust the backlight brightness
Use
DIMMER
Options:
to adjust the backlight brightness.
HIGH
(factory setting),
backlight)
Restoring the factory settings
Use the
INITIALIZ E
settings of this unit to their factory settings.
1 Select
INITIALIZ E
to highlight “
2 Press the ¥/π key again to open a
confirmation pop-up window.
3 Press the ¥/π key to initialize the unit.
Press STOP/HOME to cancel initialization.
item to restore the various
and press the ¥/ π key
Exec
.”
5sec
LOW, OFF
(no
Formatting the SD card
Using
QUICK FORMAT
erases all music les on the card and automatically
creates new “MUSIC” and “UTILITY” folders as
well as the “dr-1.sys” le that is necessary to use
the SD card with the GT-R1.
When the unit is shipped new from the factory,
its SD card also has a “MANUAL” folder that
contains a PDF copy of this Owner’s Manual file.
These are erased and not restored when the
card is formatted.
or
FULL FORMAT
Page 92

92 TASCAM GT-R1
17–System Settings and Formatting
CAUTION
Using QUICK FORMAT
Use the
QUICK FORMAT
item to quickly format
the SD card.
1 Select the
the ¥/π key to highlight “
QUICK FORMAT
Exec
item and press
.”
2 Press ¥/ π to open a pop-up confirmation
window.
3 Press the ¥/π key to execute the quick
formatting, or press the STOP/HOME key
to cancel formatting.
Using FULL FORMAT
Use the
FULL FORMAT
format the SD card.
Full formatting checks the memory for errors
while formatting, so it takes more time than quick
formatting and you might have to wait a while.
item to completely
1 Select the
the ¥/π key to highlight “
FULL FORMAT
item and press
Exec
.”
2 Press ¥/ π to open a pop-up confirmation
window.
3 Press the ¥/π key to execute the full
formatting, or press the STOP/HOME key
to cancel formatting.
When using FULL FORMAT, use the AC •
adapter (sold separately) or confirm that the
battery is sufficiently charged. If the power
fails during formatting, the formatting may
not occur correctly.
Depending on the size of the SD card, FULL •
FORMAT could take an hour or more. Please
be patient and do not disconnect the power
during formatting.
Page 93

93 TASCAM GT-R1
18–Viewing File Information
Use the Information Screen to view various types
of information about your GT-R1.
To open the Information Screen, rst press the
MENU key to open the Menu Screen. Select
“
INFORMATION
” and press the ¥/π key.
Use the wheel to switch between the following
three information pages.
File information page (
FILE
)
Shows information about the currently playing le.
Memory information page (
MEMORY
)
Shows the use status of the currently inserted
SD card
System information page (
SYSTEM
)
Shows the unit’s system setting information and
rmware version
File information page
The
FILE
page shows information about the
currently selected le.
WAV or MP3
Shows the audio le type.
For WAV les, bit length, stereo/mono, and
sampling frequency (Hz) also appear.
For MP3 les, the bit rate (kbps), CBR (constant
bit rate) or VBR (variable bit rate) type, and
sampling frequency (Hz) also appear.
TITLE
Shows the le name. If an MP3 le has ID3 tag
title information that information appears.
Page 94

94 TASCAM GT-R1
18–Viewing File Information
ALBUM
If an MP3 le has ID3 tag album information that
information appears. Nothing appears for WAV
les and MP3 les without ID3 tag information.
ARTIST
If an MP3 le has ID3 tag artist information that
information appears. Nothing appears for WAV
les and MP3 les without ID3 tag information.
Memory information page
The
MEMORY
currently inserted SD card.
TOTAL MUSIC
Shows the number of playable les contained by
the Music Folder.
TOTAL FOLDER
Shows the total number of folders in the Music Folder.
page shows the status of the
TOTAL MEMORY
Shows the total SD card memory capacity.
REMAIN MEMORY
Shows the amount of unused memory on the SD card.
System information page
The
SYSTEM
GT-R1’s system settings and rmware version.
CUE/REV SPD
Shows the speed of forward and backward searching.
AUTO OFF
Shows the automatic power OFF setting.
BACKLIGHT
Shows the automatic backlight OFF setting.
System Ver.
Shows the system rmware version.
page shows information about the
Page 95

95 TASCAM GT-R1
19–Effects Preset List
No Name Module 1 Module 2 Module 3
Guitar Presets
TexasBoy
1
N.Y.Rock
2
U.K .Rock
3
J.Beck70
4
MetalBoy
5
MetalBoy2
6
N.Y.Blu es
7
N.Y.Blu es 2
8
Delta
9
L.A .Blue s
10
BoxMan
11
Fun kMa n
12
Fun kMa n2
13
WithBass
14
TexasFunk
15
80s
16
MorningJazz
17
EveningJazz
18
AutumnWind
19
Let it Guitar
20
G.AMP COMPRESSOR
G.AMP COMPRESSOR REVERB
G.AMP CHORUS REVERB
G.AMP FLANGER DELAY
G.AMP ENHANCER REVERB
G.AMP ENHANCER REVERB
G.AMP COMPRESSOR REVERB
G.AMP CHORUS REVERB
G.AMP ENHANCER REVERB
G.AMP ENHANCER REVERB
G.AMP FLANGER DELAY
G.AMP AUTO WAH DELAY
G.AMP AUTO WAH DELAY
G.AMP PITCH SHIFTER REVERB
G.AMP FLANGER REVERB
G.AMP PHASE SHIFTER REVERB
G.AMP CHORUS REVERB
G.AMP FLANGER
G.AMP FLANGER REVERB
G.AMP PHASE SHIFTER REVERB
REVERB
REVERB
Page 96

96 TASCAM GT-R1
19–Effects Preset List
No Name Module 1 Module 2 Module 3
L e slie .G
21
Standard.G
22
F-Comp
23
WarmClean
24
WarmPhase
25
Space
26
Chorus.G
27
Flanger.G
28
Pan ning.G
29
Tr e m olo .G
30
AutoWah.G
31
A C.G
32
AC.G2
33
Bass Presets
Standard.B
34
Rock Bass
35
H/R Bass
36
Metal Bass
37
Slap Bas s
38
Co ol Sla p
39
G.AMP FLANGER DELAY
G.AMP COMPRESSOR REVERB
COMPRESSOR CHORUS REVERB
COMPRESSOR CHORUS REVERB
COMPRESSOR PHASE SHIFTER REVERB
COMPRESSOR CHORUS REVERB
G.AMP CHORUS REVERB
G.AMP FLANGER DELAY
G.AMP TREMOLO REVERB
G.AMP TREMOLO DELAY
G.AMP AUTO WAH DELAY
COMPRESSOR CHORUS REVERB
COMPRESSOR CHORUS DELAY
B.AMP COMPRESSOR DELAY
B.AMP COMPRESSOR DELAY
B.AMP COMPRESSOR CHORUS
B.AMP COMPRESSOR CHORUS
B.AMP COMPRESSOR ENHANCER
B.AMP COMPRESSOR CHORUS
Page 97

97 TASCAM GT-R1
19–Effects Preset List
No Name Module 1 Module 2 Module 3
Funk B ass
40
Walking
41
Power Bass
42
Fat Bass
43
Chorus.B
44
Flanger.B
45
Phase.B
46
AutoWah.B
47
Reverb Presets
Reverb Hall
48
Reverb Room
49
Reverb Live
50
Drum Presets
Drum1
51
Drum2
52
Drum3
53
Drum4
54
Drum5
55
B.AMP COMPRESSOR AUTO WAH
B.AMP COMPRESSOR B.AMP COMPRESSOR FLANGER
B.AMP COMPRESSOR PHASE SHIFTER
COMPRESSOR CHORUS REVERB
COMPRESSOR FLANGER REVERB
COMPRESSOR PHASE SHIFTER REVERB
COMPRESSOR AUTO WAH DELAY
- - ST REVERB
- - ST REVERB
- - ST REVERB
G.AMP - -
- FLANGER -
- ENHANCER B.AMP COMPRESSOR CHORUS
B.AMP COMPRESSOR PHASE SHIFTER
Page 98

98 TASCAM GT-R1
20–Effect Module Parameters List
Guitar and bass effects
Module Effect Parameter Range
G.AMP
(AMP)
B.AMP
(AMP)
COMPRESSOR
(CMP)
CHORUS
(CHO)
Simulates a variety of guitar
amp sounds by combining the
tone qualities of 3 types of
preamps and 9 types of cabinets. (See page 101.)
Combines the tone qualities of
3 types of preamps and 8 types
of equalizer settings. (See page
101.)
Increases sustain by moderating the highs and lows of the
input sound.
Thickens the sound by adding
a slightly detuned copy to the
source sound.
GAIN Adjusts gain level 0–10
AMP Selects preamp tone quality 1–3
CAB Selects cabinet type 1–9
LVL Adjusts output level 0–20
GAIN Adjusts gain level 0–10
AMP Selects preamp tone quality 1–3
EQ Selects equalizer type 1–8
LVL Adjusts output level 0–20
COMP Adjusts effect depth 0–30
ATK Adjusts how fast effect starts
Higher values start slower
LVL Adjusts compressor volume 0–20
SW Turns effect ON (1) or OFF (0) 0, 1
SPD Adjusts speed of chorus effect 0–20
DPTH Adjusts chorus effect depth 0–20
LVL Adjusts volume of effect sound 0–20
SW Turns effect ON (1) or OFF (0) 0, 1
0–20
Page 99

99 TASCAM GT-R1
20–Effect Module Parameters List
Module Effect Parameter Range
FLANGER
(FLA)
PHASE
SHIFTER
(PHA)
TREMOLO
(TRM)
ENHANCER
(ENH)
Creates a rippling effect by
adding a delayed copy to the
source sound
Creates a phasing effect that
makes the sound source seem
to revolve like a rotary speaker
by adding a phase-shifted copy
to the source sound.
Adds a cyclical change to the
volume.
Makes the outlines of a sound
clear and gives a bright character by adding doubled elements to the source sound.
SPD Adjusts speed of ripple effect 0–20
DPTH Adjusts depth of ripple effect 0–20
RES Adds resonant peak to effect
Higher value adds more resonance
SW Turns effect ON (1) or OFF (0) 0, 1
SPD Adjusts rotation speed 0–20
RES Adds resonant peak to effect
Higher value adds more resonance
SW Turns effect ON (1) or OFF (0) 0, 1
SPD Adjusts cycle speed 0–20
DPTH Adjusts depth of volume change 0–20
WAVE Adjusts shape of cycle wave 0–20
MODE 1: Tremolo, 2: Autopan 1, 2
SW Turns effect ON (1) or OFF (0) 0, 1
FREQ Adjusts minimum frequency effected 0–20
LVL Adjusts volume of effect sound 0–20
SW Turns effect ON (1) or OFF (0) 0, 1
0–20
0–20
Page 100

100 TASCAM GT-R1
20–Effect Module Parameters List
Module Effect Parameter Range
AUTO WAH
(WAH)
PITCH
SHIFTER
(PIT)
DELAY
(DLY)
REVERB
(REV)
This wah effect responds automatically to picking strength.
This effect changes the pitch. PIT Adjusts pitch in semitones (±1 octave) ±12
Thickens sound or creates an
echo-like effect by adding a
delayed copy to the source
sound.
Creates a reverberation effect
and gives sound a sense of
depth.
SENS Adjusts sensitivity to picking strength. 0–20
MODE Selects tone quality: low pass lter (1),
band-pass lter (2), high-pass lter (3)
MIX Adjusts volume of source sound
Higher values increase source volume
SW Turns effect ON (1) or OFF (0) 0, 1
FINE Adjusts pitch in cents (±50 cents) ±50
LVL Adjusts volume of effect sound 0–20
SW Turns effect ON (1) or OFF (0) 0, 1
TIME Adjusts delay time of effect sound 0–50
F/B Adjusts volume of repeating sound
Higher values increase the repetitions
LVL Adjusts volume of effect sound 0–20
SW Turns effect ON (1) or OFF (0) 0, 1
TIME Adjusts sustain time of reverberation
sound
LVL Adjusts volume of effect sound 0–20
SW Turns effect ON (1) or OFF (0) 0, 1
1, 2, 3
0–10
0–20
0–20
 Loading...