

Page 1
Z
CQX1A1499Z
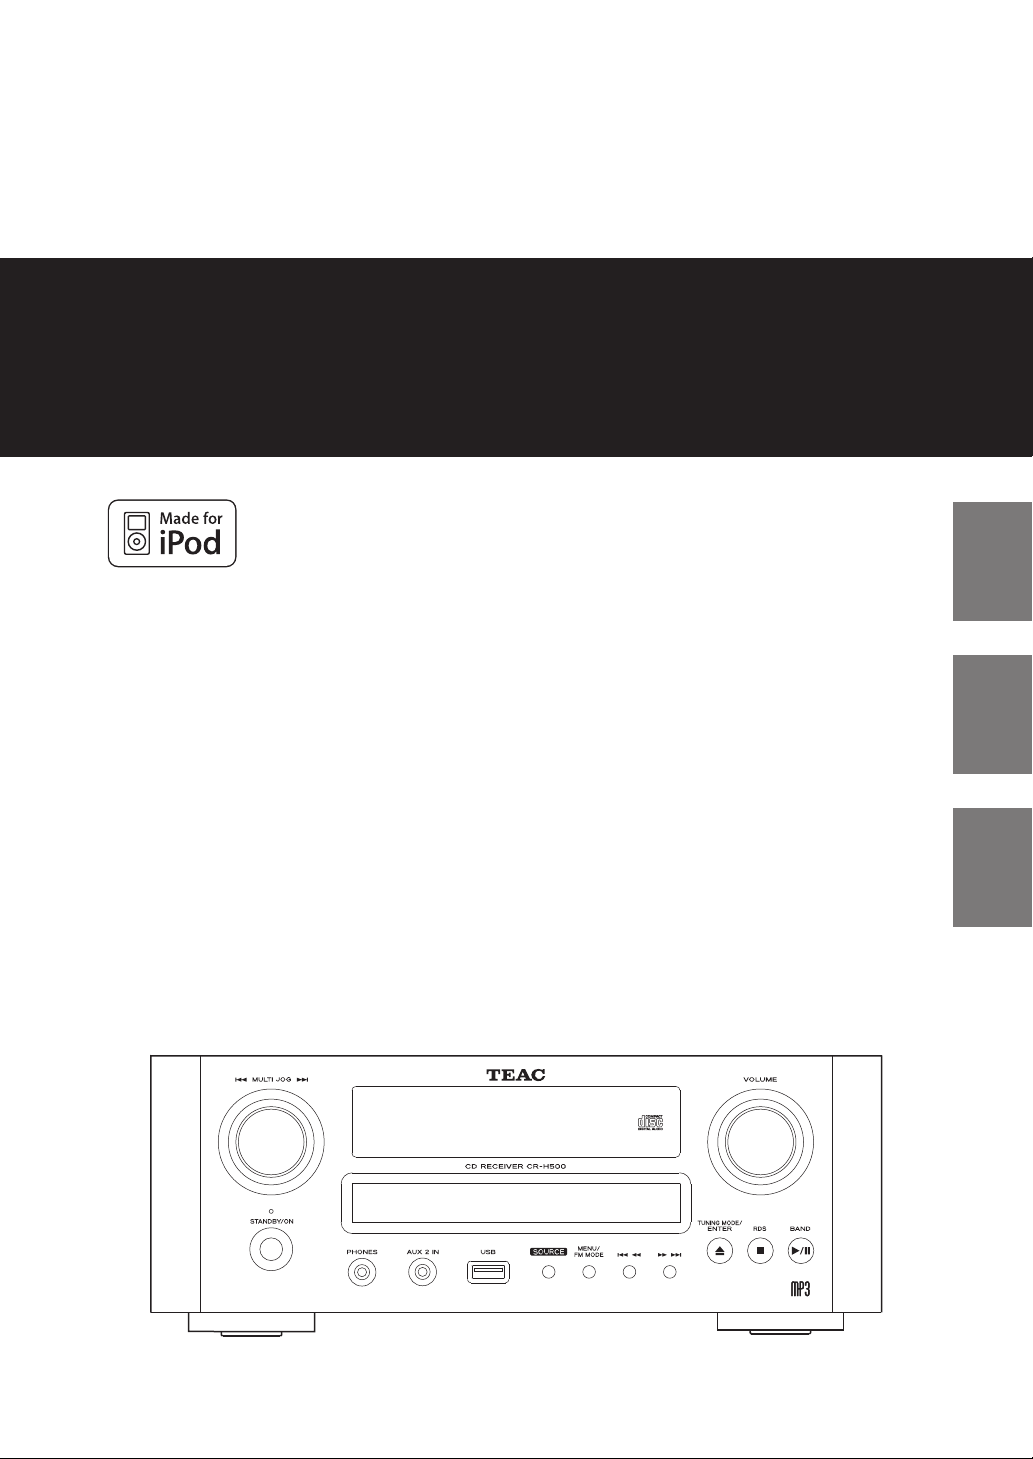
CR-H500
AM/FM Stereo CD Receiver
OWNER’S MANUAL
MODE D’EMPLOI
MANUAL DEL USUARIO
ENGLISH FRANÇAIS ESPAÑOL
Page 2
CAUTION: TO REDUCE THE RISK OF ELECTRIC
SHOCK, DO NOT REMOVE COVER (OR BACK). NO
USER-SERVICEABLE PARTS INSIDE. REFER SERVICING
TO QUALIFIED SERVICE PERSONNEL.
The lightning flash with arrowhead
symbol, within an equilateral triangle, is
intended to alert the user to the presence
of uninsulated “dangerous voltage” within
the product’s enclosure that may be of
sufficient magnitude to constitute a risk of
electric shock to persons.
The exclamation point within an equilateral
triangle is intended to alert the user to
the presence of important operating and
maintenance (servicing) instructions in the
literature accompanying the appliance.
IMPORTANT SAFETY
10) Protect the power cord from being walked on
or pinched particularly at plugs, convenience
receptacles, and the point where they exit from the
apparatus.
11) Only use attachments/accessories specified by the
manufacturer.
12) Use only with the cart, stand,
tripod, bracket, or table specified
by the manufacturer, or sold with
the apparatus. When a cart is
used, use caution when moving
the cart/apparatus combination
to avoid injury from tip-over.
13) Unplug this apparatus during lightning storms or
when unused for long periods of time.
14) Refer all servicing to qualified service personnel.
Servicing is required when the apparatus has been
damaged in any way, such as power-supply cord or
plug is damaged, liquid has been spilled or objects
have fallen into the apparatus, the apparatus has
been exposed to rain or moisture, does not operate
normally, or has been dropped.
INSTRUCTIONS
1) Read these instructions.
2) Keep these instructions.
3) Heed all warnings.
4) Follow all instructions.
5) Do not use this apparatus near water.
6) Clean only with dry cloth.
7) Do not block any ventilation openings. Install in
accordance with the manufacturer’s instructions.
8) Do not install near any heat sources such as radiators,
heat registers, stoves, or other apparatus (including
amplifiers) that produce heat.
9) Do not defeat the safety purpose of the polarized
or grounding-type plug. A polarized plug has two
blades with one wider than the other. A grounding
type plug has two blades and a third grounding
prong. The wide blade or the third prong are
provided for your safety. If the provided plug does
not fit into your outlet, consult an electrician for
replacement of the obsolete outlet.
2
Page 3

< Do not expose this apparatus to drips or splashes.
< Do not place any objects filled with liquids, such as
vases, on the apparatus.
< Do not install this apparatus in a confined space such
as a bookcase or similar unit.
< The apparatus draws nominal non-operating power
from the AC outlet with its POWER or STANDBY/ON
switch not in the ON position.
< The apparatus should be located close enough to the
AC outlet so that you can easily grasp the power cord
plug at any time.
< The mains plug is used as the disconnect device, the
disconnect device shall remain readily operable.
< If the product uses batteries (including a battery pack
or installed batteries), they should not be exposed to
sunshine, fire or excessive heat.
< Caution should be taken when using earphones or
headphones with the product because excessive
sound pressure (volume) from earphones or
headphones can cause hearing loss.
WARNING: TO PREVENT FIRE OR
SHOCK HAZARD, DO NOT EXPOSE THIS
APPLIANCE TO RAIN OR MOISTURE.
CAUTION
< DO NOT REMOVE THE EXTERNAL CASES OR CABINETS
TO EXPOSE THE ELECTRONICS. NO USER SERVICEABLE
PARTS ARE WITHIN!
< IF YOU ARE EXPERIENCING PROBLEMS WITH THIS
PRODUCT, CONTACT TEAC FOR A SERVICE REFERRAL.
DO NOT USE THE PRODUCT UNTIL IT HAS BEEN
REPAIRED.
< USE OF CONTROLS OR ADJUSTMENTS OR
PERFORMANCE OF PROCEDURES OTHER THAN THOSE
SPECIFIED HEREIN MAY RESULT IN HAZARDOUS
RADIATION EXPOSURE.
MPEG Layer-3 audio coding technology licensed from
Fraunhofer IIS and Thomson.
Supply of this product does not convey a license nor imply
any right to distribute MPEG Layer-3 compliant content
created with this product in revenue-generating broadcast
systems (terrestrial, satellite, cable and/or other distribution
channels), streaming applications (via Internet, intranets and/
or other networks), other content distribution systems (payaudio or audio-on-demand applications and the like) or
on physical media (compact discs, digital versatile discs,
semiconductor chips, hard drives, memory cards and the like).
An independent license for such use is required. For details,
please visit http://mp3licensing.com.
This product is protected by certain intellectual property
rights of Microsoft. Use or distribution of such technology
outside of this product is prohibited without a license from
Microsoft.
“Made for iPod” means that an electronic accessory has
been designed to connect specifically to iPod and has been
certified by the developer to meet Apple performance
standards.
Apple is not responsible for the operation of this device or its
compliance with safety and regulatory standards.
Apple and iPod are trademarks of Apple Inc., registered in the
U.S. and other countries.
3
Page 4

Contents
Before Use
Thank you for choosing TEAC. Read this manual
carefully to get the best performance from this
unit.
Before Use . . . . . . . . . . . . . . . . . . . . . . . . . . . . . . . . . . . . . . . . . . . . 4
Discs . . . . . . . . . . . . . . . . . . . . . . . . . . . . . . . . . . . . . . . . . . . . . . . . . 5
MP3 and WMA . . . . . . . . . . . . . . . . . . . . . . . . . . . . . . . . . . . . . . . . 6
iPod Compatibility . . . . . . . . . . . . . . . . . . . . . . . . . . . . . . . . . . . . 6
Connecting Antennas (AM/FM) . . . . . . . . . . . . . . . . . . . . . . . . 7
Speaker Connections . . . . . . . . . . . . . . . . . . . . . . . . . . . . . . . . . . 8
Connections . . . . . . . . . . . . . . . . . . . . . . . . . . . . . . . . . . . . . . . . . 10
Part Names (main unit) . . . . . . . . . . . . . . . . . . . . . . . . . . . . . . . 12
Part Names (remote control unit) . . . . . . . . . . . . . . . . . . . . . 14
Remote Control Unit . . . . . . . . . . . . . . . . . . . . . . . . . . . . . . . . . 16
Basic Operation . . . . . . . . . . . . . . . . . . . . . . . . . . . . . . . . . . . . . . 17
Disc Playback . . . . . . . . . . . . . . . . . . . . . . . . . . . . . . . . . . . . . . . . 18
USB Playback. . . . . . . . . . . . . . . . . . . . . . . . . . . . . . . . . . . . . . . . . 20
General Playback (disc/USB) . . . . . . . . . . . . . . . . . . . . . . . . . . 20
Folder Search . . . . . . . . . . . . . . . . . . . . . . . . . . . . . . . . . . . . . . . . 21
Programmed Playback . . . . . . . . . . . . . . . . . . . . . . . . . . . . . . . 22
Shuffle Playback . . . . . . . . . . . . . . . . . . . . . . . . . . . . . . . . . . . . . 24
Repeat Playback . . . . . . . . . . . . . . . . . . . . . . . . . . . . . . . . . . . . . 24
Display . . . . . . . . . . . . . . . . . . . . . . . . . . . . . . . . . . . . . . . . . . . . . . . . . 25
Listening to iPod . . . . . . . . . . . . . . . . . . . . . . . . . . . . . . . . . . . . . 25
Before Recording . . . . . . . . . . . . . . . . . . . . . . . . . . . . . . . . . . . . 28
Recording to USB . . . . . . . . . . . . . . . . . . . . . . . . . . . . . . . . . . . . 28
Deleting a file from USB . . . . . . . . . . . . . . . . . . . . . . . . . . . . . . 29
Listening to FM/AM . . . . . . . . . . . . . . . . . . . . . . . . . . . . . . . . . . 30
Preset Tuning . . . . . . . . . . . . . . . . . . . . . . . . . . . . . . . . . . . . . . . . 31
RDS . . . . . . . . . . . . . . . . . . . . . . . . . . . . . . . . . . . . . . . . . . . . . . . . . . 33
PTY Search . . . . . . . . . . . . . . . . . . . . . . . . . . . . . . . . . . . . . . . . . . . 34
Setting the Clock. . . . . . . . . . . . . . . . . . . . . . . . . . . . . . . . . . . . . 36
Setting the Timer . . . . . . . . . . . . . . . . . . . . . . . . . . . . . . . . . . . . 37
Timer Operation . . . . . . . . . . . . . . . . . . . . . . . . . . . . . . . . . . . . . 38
Sleep Timer . . . . . . . . . . . . . . . . . . . . . . . . . . . . . . . . . . . . . . . . . . 39
Listening to an External Source . . . . . . . . . . . . . . . . . . . . . . . 39
Troubleshooting . . . . . . . . . . . . . . . . . . . . . . . . . . . . . . . . . . . . . 40
Specifications . . . . . . . . . . . . . . . . . . . . . . . . . . . . . . . . . . . . . . . . 42
Read this before operations.
< When the unit is turned on, switching on the TV may
result in lines appearing on the TV screen, depending
on the condition of the electric waves of the TV
broadcast. This is not malfunction in the unit or the TV.
In this case, turn off the unit.
< As the unit may become warm during operation,
always leave sufficient space around the unit for
ventilation.
< The voltage supplied to the unit should match the
voltage as printed on the rear panel. If you are in any
doubt regarding this matter, consult an electrician.
< Choose the installation location of your unit carefully.
Avoid placing it in direct sunlight or close to a source
of heat. Also avoid locations subject to vibrations and
excessive dust, heat, cold or moisture.
< Do not place the unit on an amplifier/receiver.
< Do not open the cabinet as this might result in
damage to the circuitry or electrical shock. If a foreign
object should get into the set, contact your dealer or
service agency.
< When removing the power plug from the wall outlet,
always pull directly on the plug, never yank the cord.
< Do not attempt to clean the unit with chemical
solvents as this might damage the finish. Use a clean,
dry cloth.
< Keep this manual in a safe place for future reference.
DO NOT MOVE THE UNIT DURING PLAYBACK
During playback, the disc rotates at high speed. Do
NOT lift or move the unit during playback. Doing so
may damage the disc.
WHEN MOVING THIS UNIT
When changing places of installation or packing the
unit for moving, be sure to remove the disc and return
the disc table to its original position in the player.
Then, press the power switch to turn the power off,
and disconnect the power cord. Moving this unit with
the disc loaded may result in damage to this unit.
4
Page 5
Discs
Discs which can be played on this unit:
M Conventional audio CDs bearing the COMPACT DISC
DIGITAL AUDIO logo on the label.
M Properly finalized CD-R and CD-RW discs
M MP3/WMA CDs
Note:
< Depending on the quality of the disc and/or the
condition of the recording, some CD-R/CD-RW discs
may not be playable.
< Copy-protected discs and other discs which do
not conform to the CD standard may not play back
correctly in this player. If you use such discs in this
unit, TEAC Corporation and its subsidiaries cannot be
responsible for any consequences or guarantee the
quality of reproduction. If you experience problems
with such non-standard discs, you should contact the
producers of the disc.
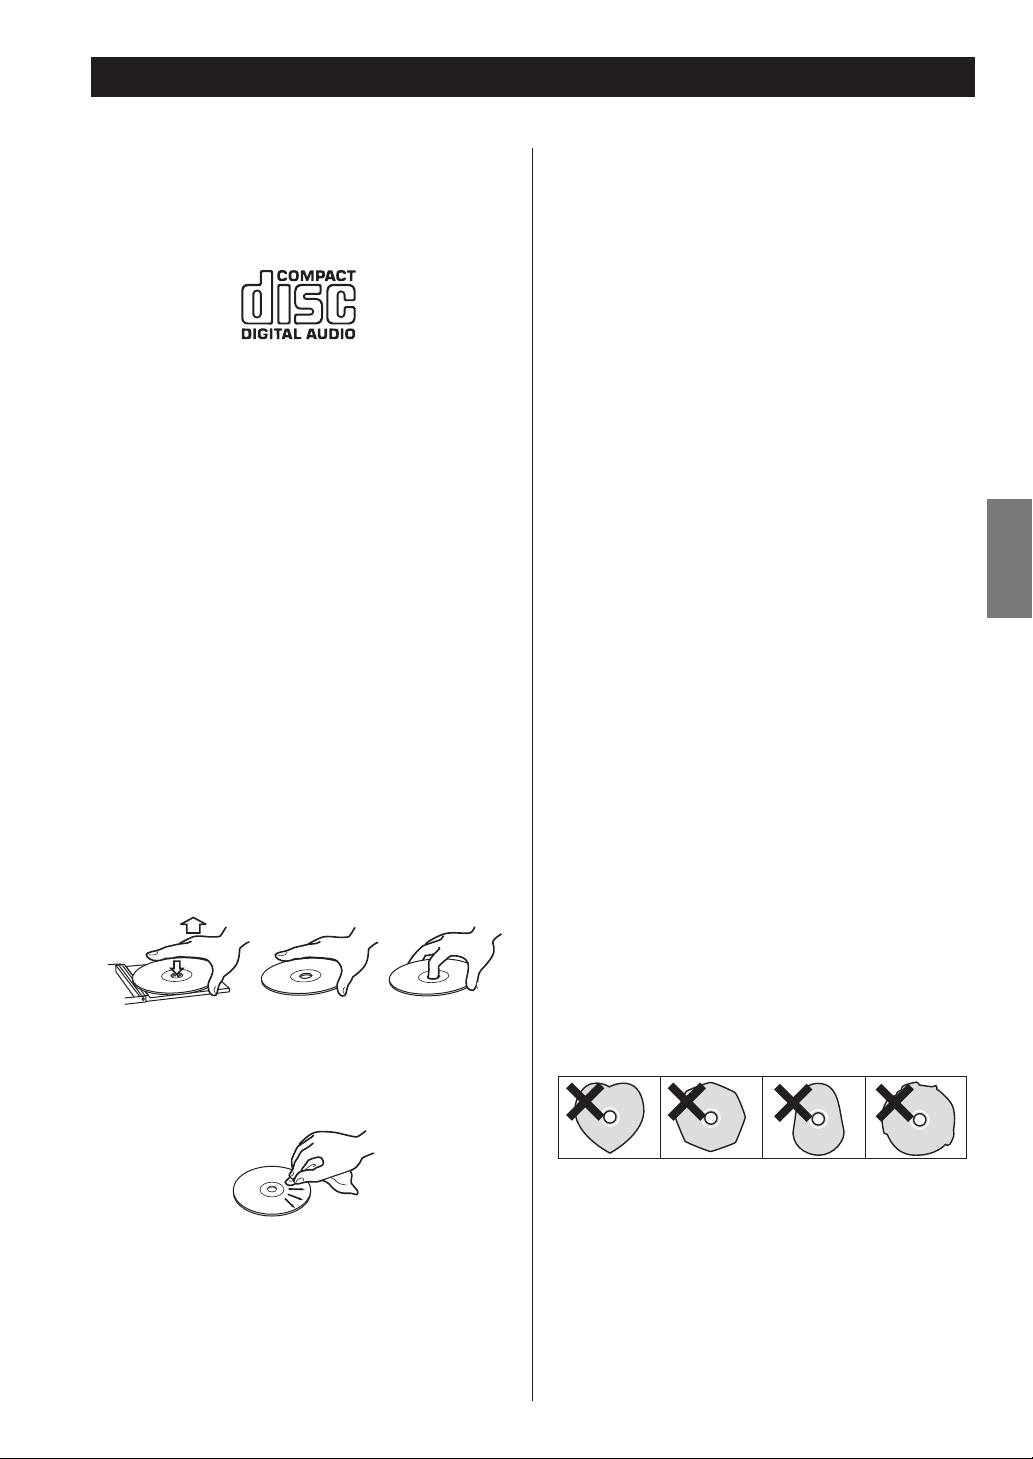
< Always place the disc on the disc tray with the label
side uppermost. (Compact discs can be played or
recorded only on one side.)
< To remove a disc from its storage case, press down on
the center of the case and lift the disc out, holding it
carefully by the edges.
< Discs should be returned to their cases after use to
avoid dust and scratches that could cause the laser
pickup to ”skip”.
< Do not expose discs to direct sunlight or high humidity
and temperature for extended periods. Long exposure
to high temperatures will warp the disc.
< Do not play any disc that is warped, deformed or
damaged. Playing such discs may cause irreparable
harm to the playing mechanisms.
< CD-R and CD-RW discs are more sensitive to the
effects of heat and ultraviolet rays than ordinary CDs.
It is important that they are not stored in a location
where direct sunlight will fall on them, and which is
away from sources of heat such as radiators or heatgenerating electrical devices.
< Printable CD-R and CD-RW discs aren’t recommended,
as the label side might be sticky and damage the unit.
< Do not stick papers or protective sheets on the discs
and do not use any protective coating spray.
< Use a soft oil-based felt-tipped pen to write the
information on the label side. Never use a ball-point
or hard-tipped pen, as this may cause damage to the
recorded side.
< Never use a stabilizer. Using commercially available CD
stabilizers with this unit will damage the mechanisms
and cause them to malfunction.
ENGLISH
< If the disc becomes dirty, wipe the surface radially
from the center hole outward towards the outer edge
with a soft and dry cloth.
< Never use such chemicals as record sprays, antistatic
sprays or fluid, benzine or thinner to clean the discs.
Such chemicals will do irreparable damage to the
disc’s plastic surface.
< Do not use irregular shape CDs (octagonal, heart
shaped, business card size, etc.). CDs of this sort can
damage the unit.
< If you are in any doubt as to the care and handling of a
CD-R/CD-RW disc, read the precautions supplied with
the disc, or contact the disc manufacturer directly.
5
Page 6

MP3 and WMA
iPod Compatibility
< This unit can play MP3 files recorded in various external
USB storage devices such as USB flash memory, MP3
player or HDD.
The HDD must be formatted FAT 16 or FAT 32, but not
NTFS.
< When more than 2000 files are recorded on the USB
memory, the unit might not be able to play them
correctly.
< File names of MP3 or WMA should be alphanumeric
characters. This unit cannot display symbols and fullsize or double-byte characters (such as Japanese,
Chinese, etc.) correctly. Also, be sure to use the file
extension. (“.mp3” for MP3 files, “.wma” for WMA files.)
< MP3 files are mono or stereo MPEG-1 Audio Layer 3
format. This unit can play MP3 files with a sampling
frequency of 44.1 kHz or 48 kHz, and a bit-rate of 320
kbps or less.
< This unit can play WMA files with a sampling frequency
of 44.1 kHz and a bit-rate of 192 kbps or less.
WMA stands for Windows Media Audio.
< Audio encoded at 128 kbps should sound close to
regular audio CD quality. Although this player will play
lower bit-rate MP3 files, the sound quality becomes
noticeably worse at lower bit-rates.
This unit can be connected to and used with the
following iPod models.
iPod (5th generation)
iPod classic
iPod nano (1st to 5th generation)
iPod touch (1st to 3rd generation)
< You cannot use following models in “Direct Mode” of
Display mode and for the timer:
iPod (5th generation)
iPod nano (1st/2nd generation)
See page 27 for information about Display mode.
< This unit cannot output video from a connected iPod.
< To connect an iPod, use the USB cable supplied with
the iPod.
< It cannot be played if you connect an iPod shuffle to
this port.
Compatible iPod Software
In case your iPod will not work with the CR-H500 or
with the remote control unit, software update may
solve the problem.
Visit the Apple website and download the latest iPod
software.
6
Page 7
Connecting Antennas (AM/FM)
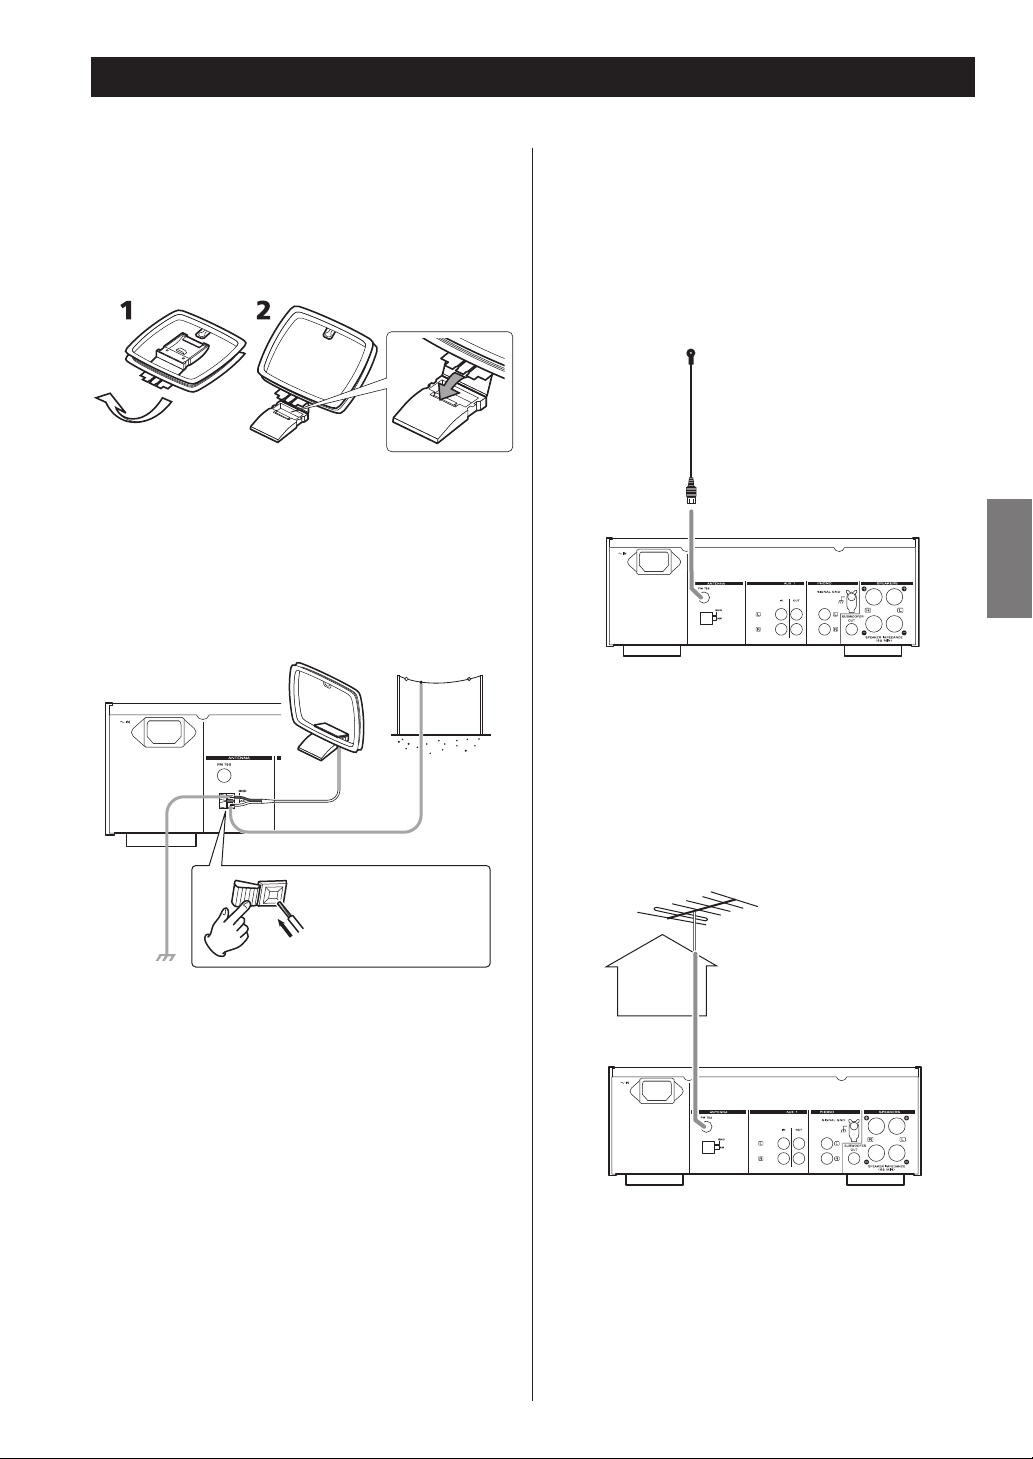
AM Indoor Loop Antenna
The high-performance AM loop antenna provided with
this unit is sufficient for good reception in most areas.
To stand the loop antenna on a surface, fix the claw to the
slot in the antenna base.
Connect the loop antenna’s wires to the AM antenna
terminals.
Place the antenna on a shelf or hang it on a window
frame, etc., in the direction which gives the best
reception. Keep all other wires such as power cords,
speaker wires or interconnect wires as far away as possible
from the antenna.
AM Outdoor
Antenna
FM Indoor Antenna
Connect the lead-type FM antenna to the FM 75 socket,
extend the lead and tune in your favourite station (see
page 30). Adjust the antenna in a suitable location like a
window frame or wall until the reception is best and then
affix the antenna in that position using thumb tacks, push
pins or any other suitable means.
ENGLISH
FM Outdoor Antenna
In an area where FM signals are weak, it may be necessary
to use an FM outdoor antenna.
Generally, a 3-element antenna will be sufficient; if you
live in an area where the FM signals are particularly weak,
it may be necessary to use one with 5 or more elements.
Make sure to connect
the black wire to the
GND terminal.
< If the AM loop antenna provided does not deliver
sufficient reception (often due to being too far from
the transmitter or in a concrete building, etc.), it may
be necessary to use an AM outdoor antenna.
Use either a high quality commercially available AM
antenna or, if not available, an insulated wire more
than 5 m long. Strip one end, and connect this to the
terminal as shown.
The antenna wire should be fitted outdoors or indoors
near a window. For better reception, connect the GND
terminal to a reliable ground.
Note:
Even when using an AM outdoor antenna, do not
disconnect the AM loop antenna.
< Disconnect the FM indoor antenna when using an
outdoor antenna.
7
Page 8
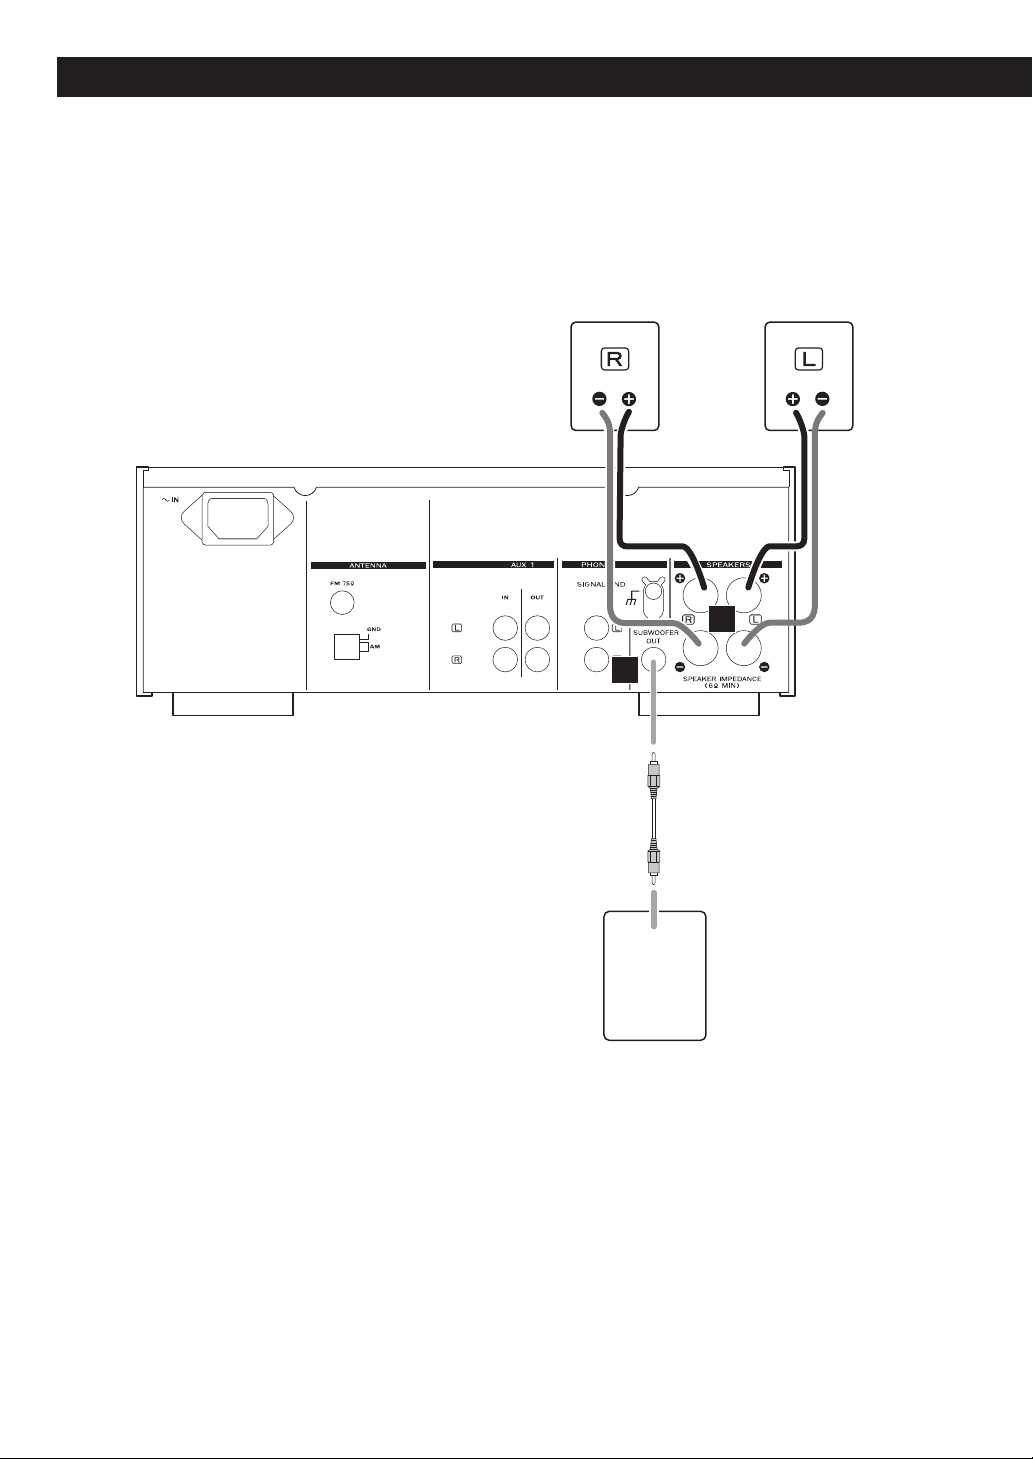
Speaker Connections
SPEAKER
A
B
LINE
IN
SUBWOOFER
8
Page 9
Speaker Connections
A
CR-H500’s + (positive) terminals are red ( for the
right speaker) and white (for the left speaker.) The _
(negative) terminals are black.
The + side of the speaker cable is marked to make it
distinguishable from the negative side of the cable.
Connect this marked side to the red and white +
terminals and the unmarked side to the black _
terminals of CR-H500 and speakers.
For European customers
In accordance with European safety regulations, it
is not possible to connect banana plugs into the
speaker terminals on European models. The holes
into which banana plugs are inserted have been
covered with black caps. Connect the speakers
using spades or bare wires. If the black caps become
separated from the terminals, return them to their
original position.
CAUTION
< To avoid damaging the speakers with sudden high-
volume sound, be sure to switch the power off
before connecting the speakers.
< Check the impedance of your speakers. Connect
speaker with an impedance of 6 ohms or more.
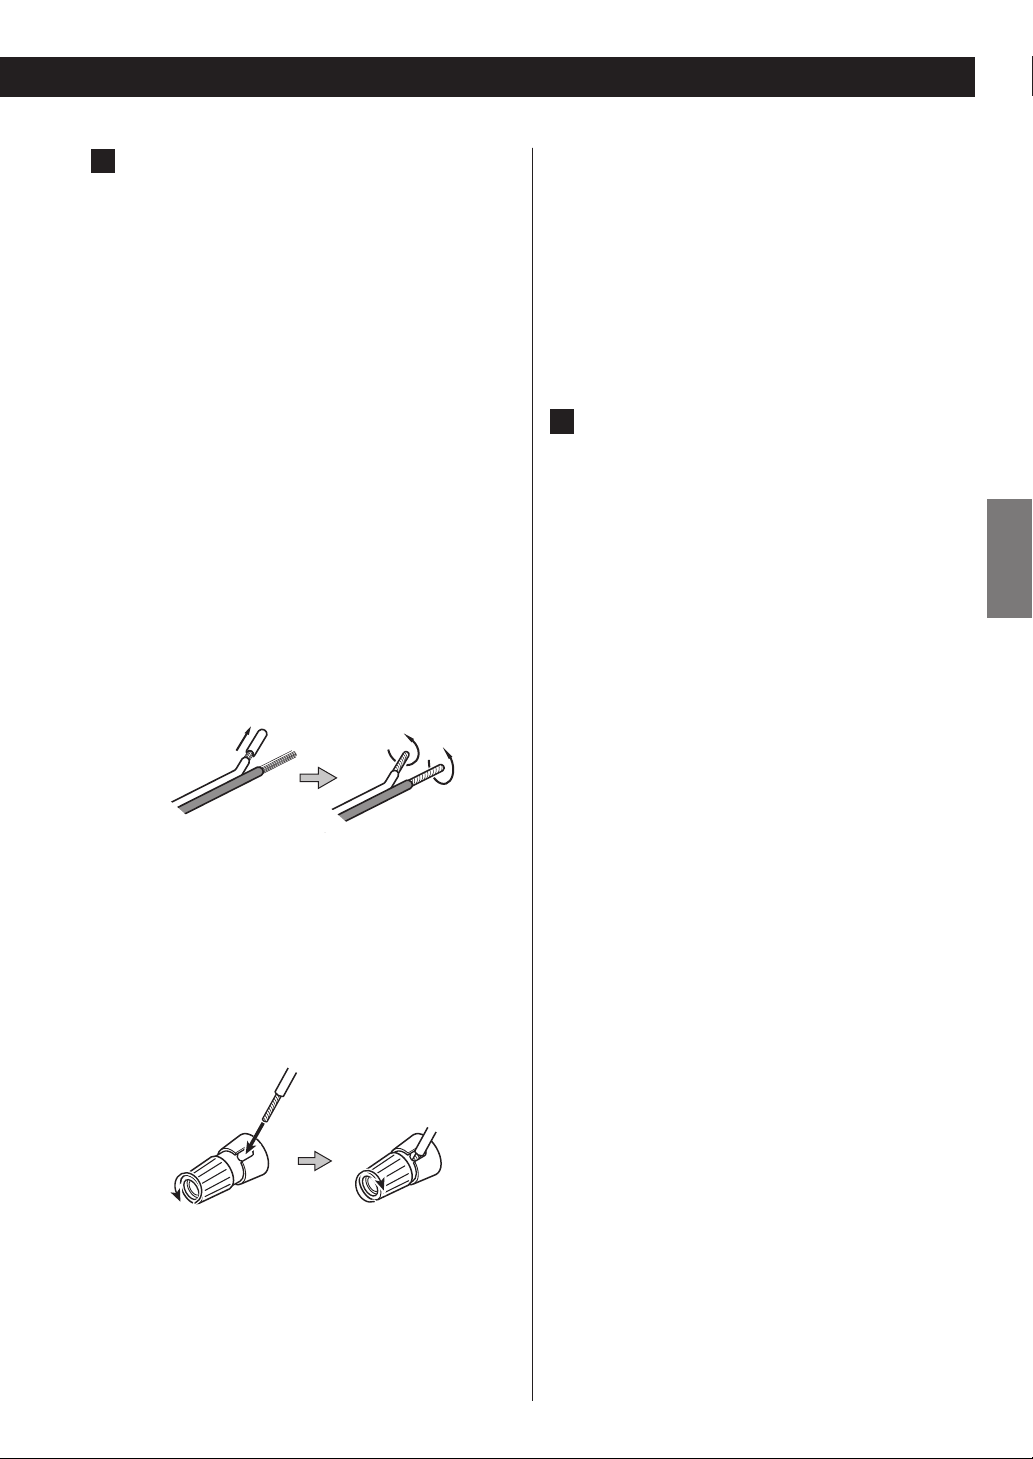
< Prepare the speaker cables for connection by
stripping off approximately 10 mm or less (no more
as this could cause a short-circuit) of the outer
insulation. Twist the wires tightly together to avoid
tangles:
How to connect
1. Turn the terminal cap counter-clockwise to loosen it.
The speaker terminal caps cannot be fully removed
from the base.
2. Insert the wire into the terminal fully and turn the
terminal cap clockwise to securely connect it:
B
SUBWOOFER OUT jack
Connect a commercially available powered
subwoofer.
ENGLISH
3. Make sure it is fastened firmly by pulling the cable
lightly.
9
Page 10
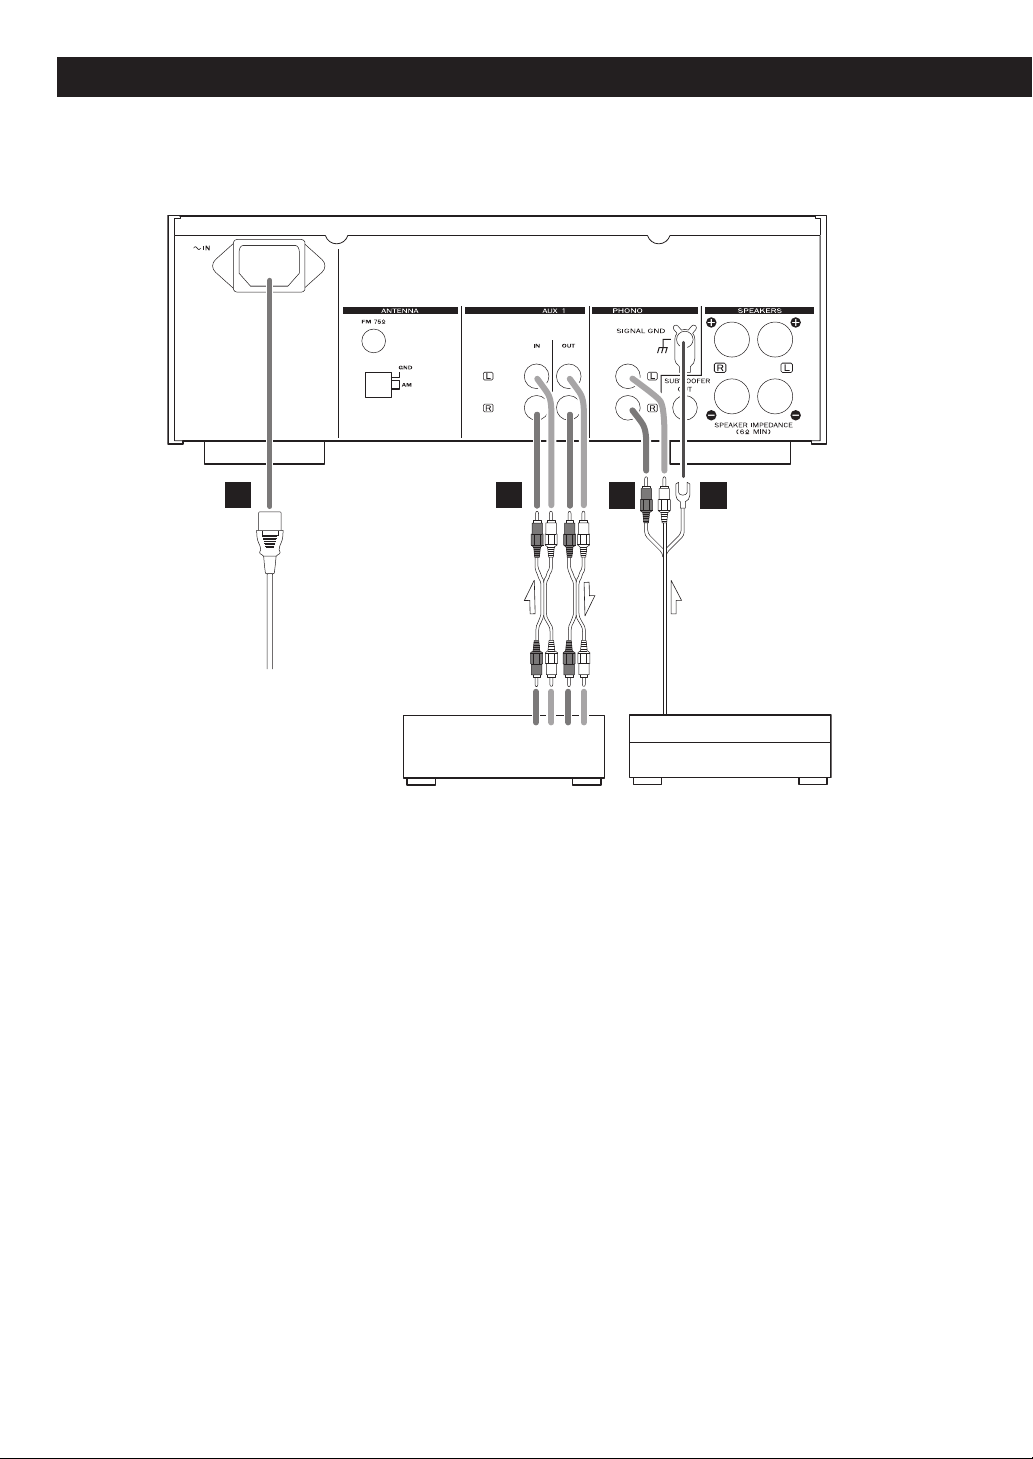
Connections
A
Cassette deck,
CD recorder, etc.
CAUTION
< Turn off the power of all the equipment before making connections.
< Read instructions of each component you intend to use with this unit.
< Be sure to insert each plug securely. To prevent hum and noise, do not bundle the connection cables with the power
cord or speaker cable.
B
LRLR
LINE
OUT
LINE
IN
C D
Tur nt able
10
Page 11
AC Power Cord
A
Plug this cord into an AC wall socket.
< Unplug the power cord when you are not going to
use the unit for long periods of time.
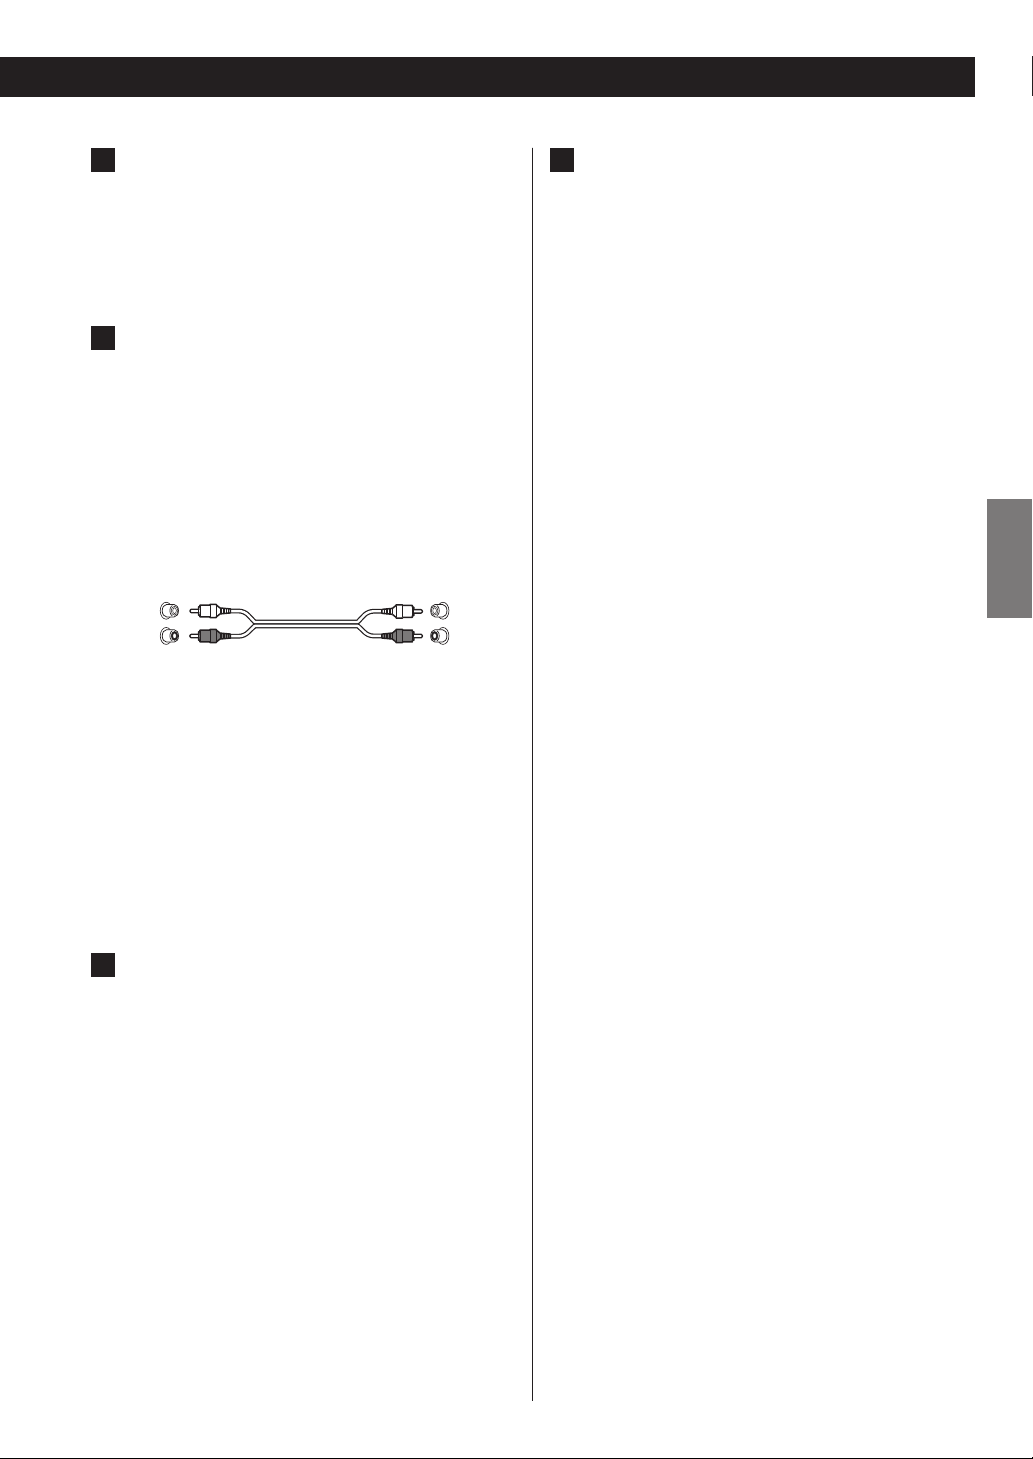
AUX 1 jacks
B
These jacks transmit an analog 2-channel audio
signal. Connect the components using commercially
available RCA pin cables.
Make sure to connect the cables as follows:
white plug w white jack
(L: left channel)
red plug w red jack
(R:right channel)
D
SIGNAL GND
Connect the ground lead of the turntable to this
terminal.
< This is not a safety earth.
< If the turntable’s ground lead is not connected to this
terminal, hum noise may be heard.
ENGLISH
White (L)
Red (R)
If you want to use a recorder (ex. a cassette deck or
a CD recorder, etc.) with the CR-H500, connect the
output jacks of the recorder to the AUX 1 IN jacks of
the CR-H500, connect the input jacks of the recorder
to the AUX 1 OUT jacks of the CR-H500.
< Be sure to insert each plug securely. To prevent
noise and humming, avoid bundling the signal
interconnection cables together with the AC power
cord or speaker cables.
PHONO jacks
C
Connect the turntable’s RCA pin cable to the PHONO
jacks.
Make sure to connect the cables as follows:
white plug w white jack
(L: left channel)
red plug w red jack
(R:right channel)
White (L)
Red (R)
< Be sure to insert each plug securely. To prevent
noise and humming, avoid bundling the signal
interconnection cables together with the AC power
cord or speaker cables.
< Moving Magnet (MM) cartridges can be used for this
unit.
11
Page 12
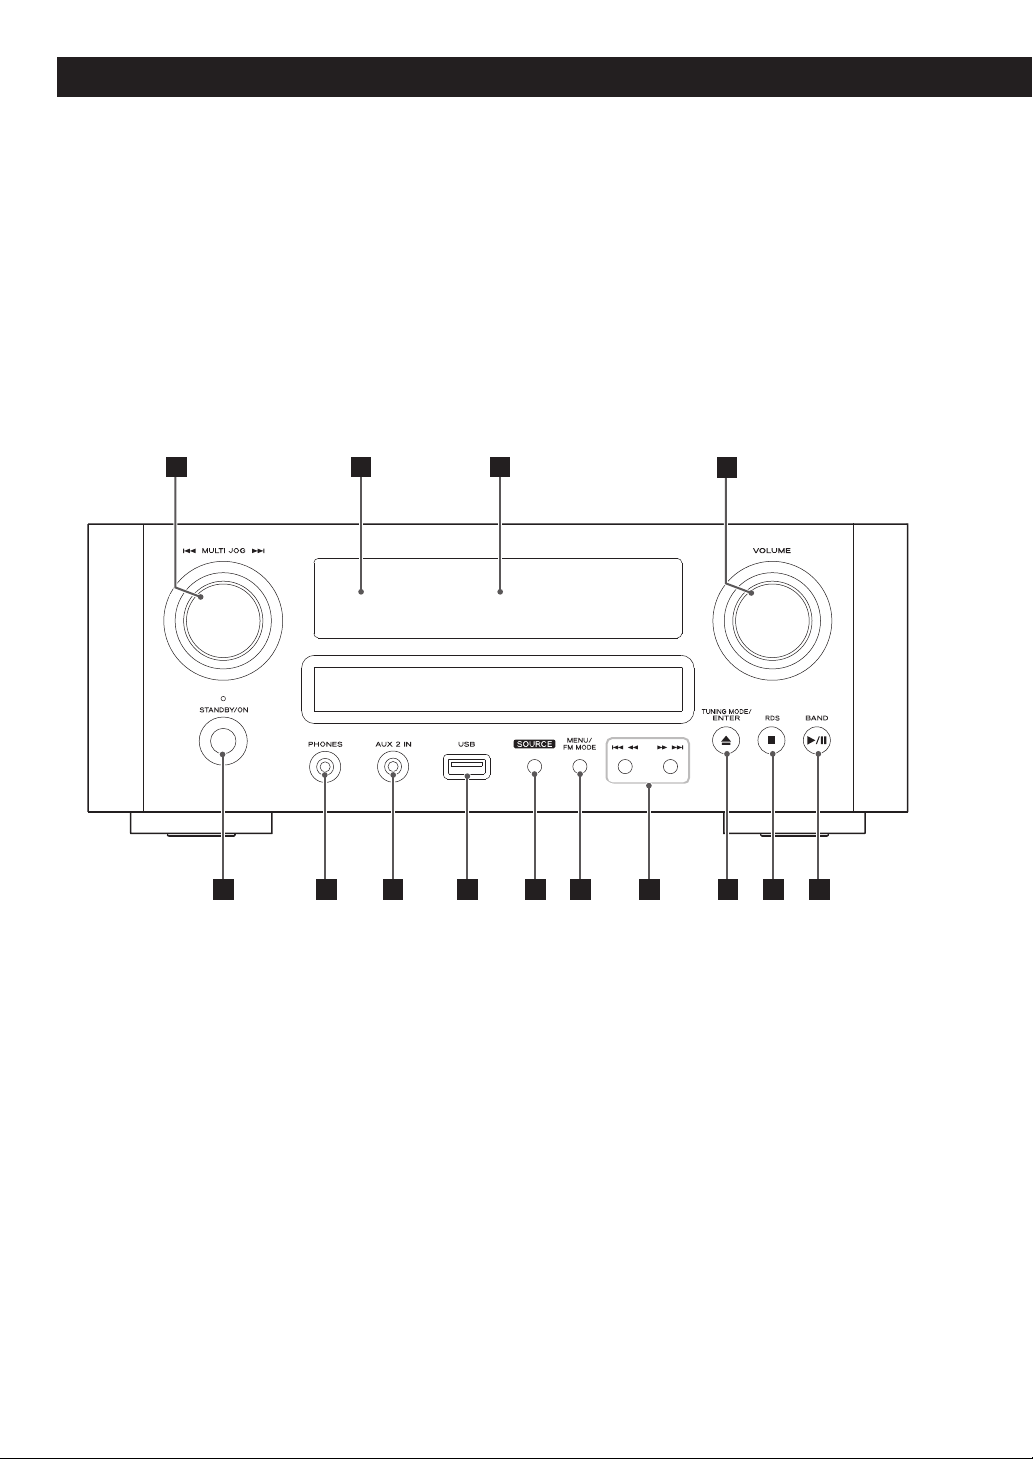
Part Names (main unit)
A
E
B
G H I J L NMKF
C
D
12
Page 13

A
MULTI JOG
In TUNER mode, use this knob to tune in stations or
select the preset stations.
In iPod mode, use this knob to scroll up and down the
menu.
In CD/USB mode, use this knob to skip tracks/files
during playback or in the stop mode.
K
Skip (.m/,/)
In CD/USB mode, use these buttons to skip tracks/files
during playback or in the stop mode of the CD or USB.
In iPod mode, use these buttons to skip songs during
playback or in pause mode of the iPod.
During playback, hold down these buttons to search
for a track/file/song.
B
Remote sensor
When operating the remote control unit, point it
towards the remote sensor.
C
Display
D
VOLUME
Turn this knob to adjust the volume.
< The volume level is memorized even if the unit turns
off.
E
STANDBY/ON
Press this switch to turn the unit on or off.
The standby indicator turns red when the unit is in
the standby mode. When the unit is turned on, the
indicator turns blue.
F
PHONES
For private listening, insert the headphones plug
into this jack, and adjust the volume by turning the
VOLUME knob.
G
AUX 2 IN
Connect equipment such as a portable audio player
using a 3.5 mm stereo mini plug cable.
L
TUNING MODE, ENTER, Open/Close (L)
In FM or AM mode, use this button to select the
tuning mode.
Use this button to set the time while setting the timer
or the clock.
In iPod mode, use this button to confirm selection in
menus.
In CD mode, use this button to open and close the
disc tray.
M
RDS, Stop (H)
In FM mode, use this button to select an RDS mode.
In USB/CD mode, use this button to stop playback.
N
BAND, Play/Pause (y/J)
Use this button to select FM, AM.
In USB/iPod mode, use this button to start or pause
playback of the iPod or USB.
In CD mode, use this button to start or pause playback
of the CD.
ENGLISH
H
USB port
Connect an iPod or external USB storage device.
I
SOURCE
Use this button to select a source.
J
MENU/FM MODE
Use this button to go back to previous menu of iPod.
This button is equivalent to the MENU button on your
iPod.
In FM mode, use this button to select stereo or
monaural.
13
Page 14
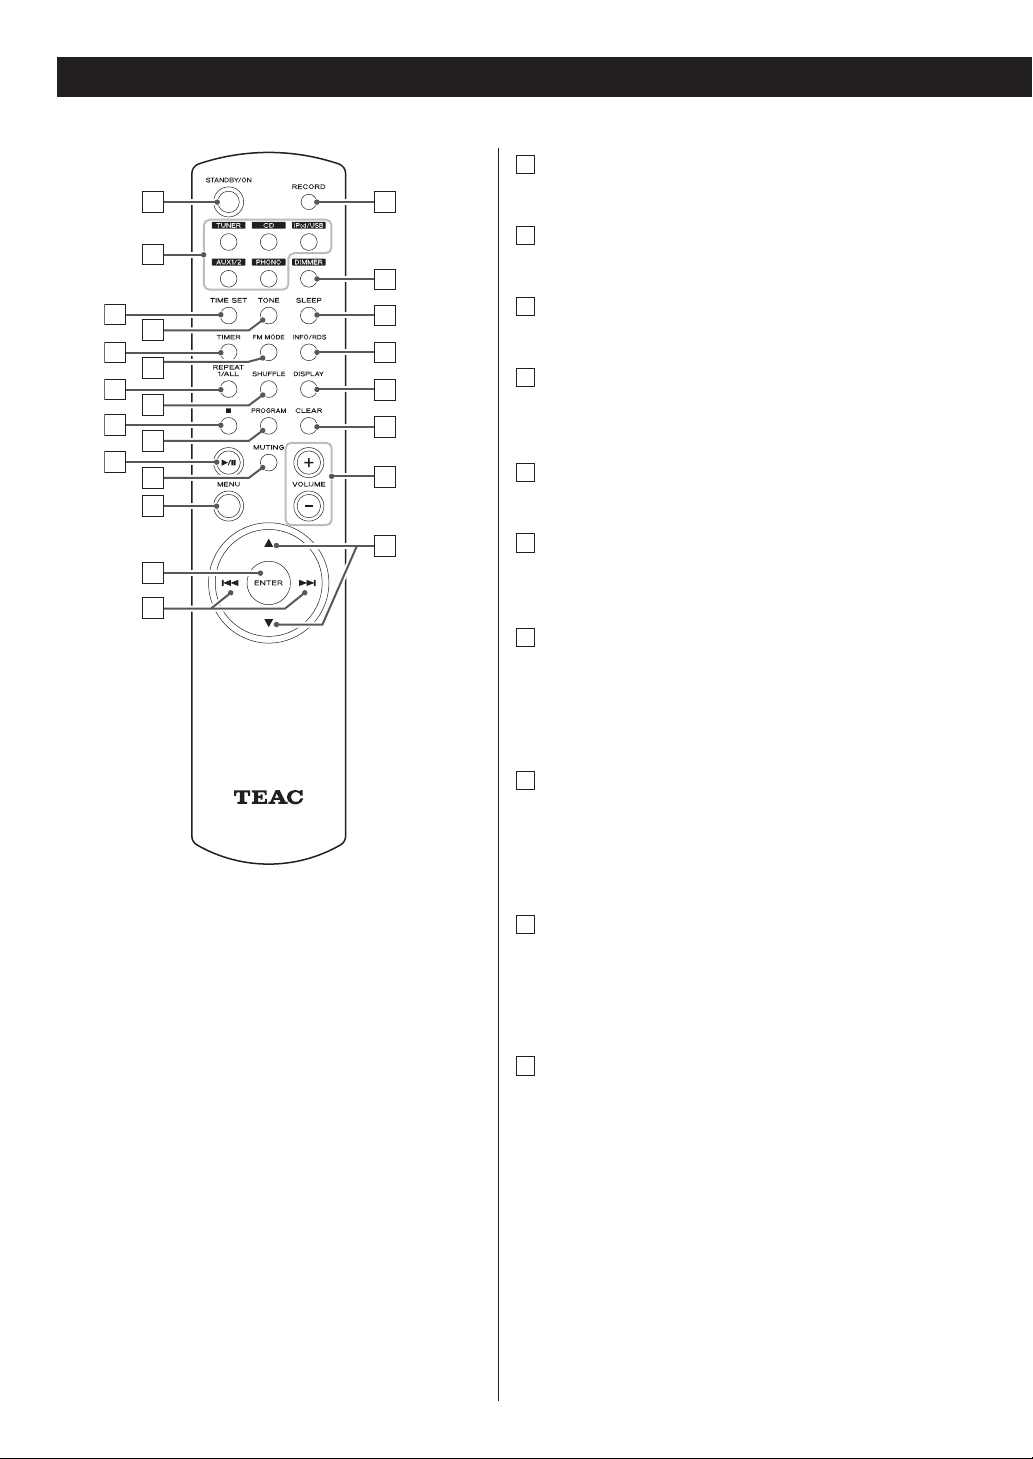
Part Names (remote control unit)
a
STANDBY/ON
a
p
b
q
c
r
d
e
s
f
g
h
i
j
k
l
t
u
v
m
w
n
o
Press this button to turn the unit on or standby.
b
TUNER, CD, iPod/USB, AUX 1/2, PHONO
Use these buttons to select a source.
c
TIME SET
Use this button to adjust the clock and to set a timer.
d
TONE
Use this button to adjust bass and treble together with
scroll button (˙ or ¥).
e
TIMER
Use this button to turn on or off the timer function.
f
FM MODE
In FM mode, use this button to select stereo or
monaural.
g
REPEAT 1/ALL
In USB/iPod mode, use this button to set the repeat
playback of the iPod or USB.
In CD mode, use this button to set the repeat playback
of the CD.
h
SHUFFLE
In USB/iPod mode, use this button to start shuffle
playback of the iPod or USB.
In CD mode, use this button to start shuffle playback
of the CD.
i
Stop (H)
In USB mode, use this button to stop playback of the
USB.
In CD mode, use this button to stop playback of the
CD.
j
PROGRAM
In USB/iPod mode, use this button to enter the
programme mode of the USB.
In CD mode, use this button to enter the programme
mode of the CD.
In programme mode, use this button to enter the
selection.
In TUNER mode, use this button to preset stations.
14
Page 15

k
Play/Pause (y/J)
In USB/iPod mode, use this button to start or pause
playback of the iPod or USB.
In CD mode, use this button to start or pause playback
of the CD.
l
MUTING
Use this button to mute the sound.
m
MENU
Use this button to go back to previous menu of iPod.
This button is equivalent to the MENU button on your
iPod.
n
ENTER
Use this button to set the time while setting the timer
or the clock.
o
Skip (.//)
In CD/USB mode, use these buttons to skip tracks/files
during playback or in the stop mode of the CD or USB.
In iPod mode, use these buttons to skip songs during
playback or in pause mode of the iPod.
p
RECORD
Use this button to start recording to an USB device.
u
CLEAR
Use this button to clear tracks/files in programme
mode.
v
VOLUME
Use these buttons to adjust the volume level.
Scroll (˙/¥)
w
In USB/iPod mode, use these buttons to select a folder
or file of USB.
Or use these buttons to scroll menu of the iPod.
After pressing the TONE button these buttons are
used to adjust treble and bass.
ENGLISH
q
DIMMER
Use this button to dim the display.
r
SLEEP
Use this button to set sleep timer.
s
INFO/RDS
In FM mode, use this button to select an RDS mode.
Please ignore “INFO” on the remote control unit.
(INFO function does not work on this unit.)
t
DISPLAY
Use this button to change what information is
displayed during USB/iPod playback.
15
Page 16

Remote Control Unit
The provided remote control unit allows the unit to be
operated from a distance.
When operating the remote control unit, point it towards
the remote sensor on the front panel of the unit.
< Even if the remote control unit is operated within the
effective range, remote control operation may be
impossible if there are any obstacles between the unit
and the remote control unit.
< If the remote control unit is operated near other
appliances which generate infrared rays, or if other
remote control devices using infrared rays are used
near the unit, it may operate incorrectly.
Conversely, the other appliances may operate
incorrectly.
Battery Installation
1. Remove the battery compartment cover.
2. Insert two “AAA” dry batteries. Make sure that the
batteries are inserted with their positive “+” and
negative “_” poles positioned correctly.
3. Close the cover.
Precautions Concerning Batteries
< Be sure to insert the batteries with positive “+” and
negative “_” polarities positioned correctly.
< Use batteries of the same type. Never use different
types of batteries together.
< Rechargeable and non-rechargeable batteries can be
used. Refer to the precautions on their labels.
< When the remote control unit is not to be used for a
long time (more than a month), remove the batteries
from the remote control unit to prevent them from
leaking.
< If the batteries leak, wipe away the liquid inside the
battery compartment and replace the batteries with
new ones.
< Do not use any other batteries not specified. Do not
mix new batteries with old ones or use different types
of batteries together.
< Do not heat or disassemble batteries and never throw
them in the fire or water.
< Do not carry or store batteries with other metallic
objects. The battery may short circuit, leak or explode.
Battery Replacement
If the distance required between the remote control unit
and main unit decreases, the batteries are exhausted. In
this case replace the batteries with new ones.
< For more information about collection of batteries,
please contact your local municipality, your waste
disposal service or the point of sale where you
purchased the items.
16
< Never recharge a battery unless it is a verified
rechargeable type.
Page 17
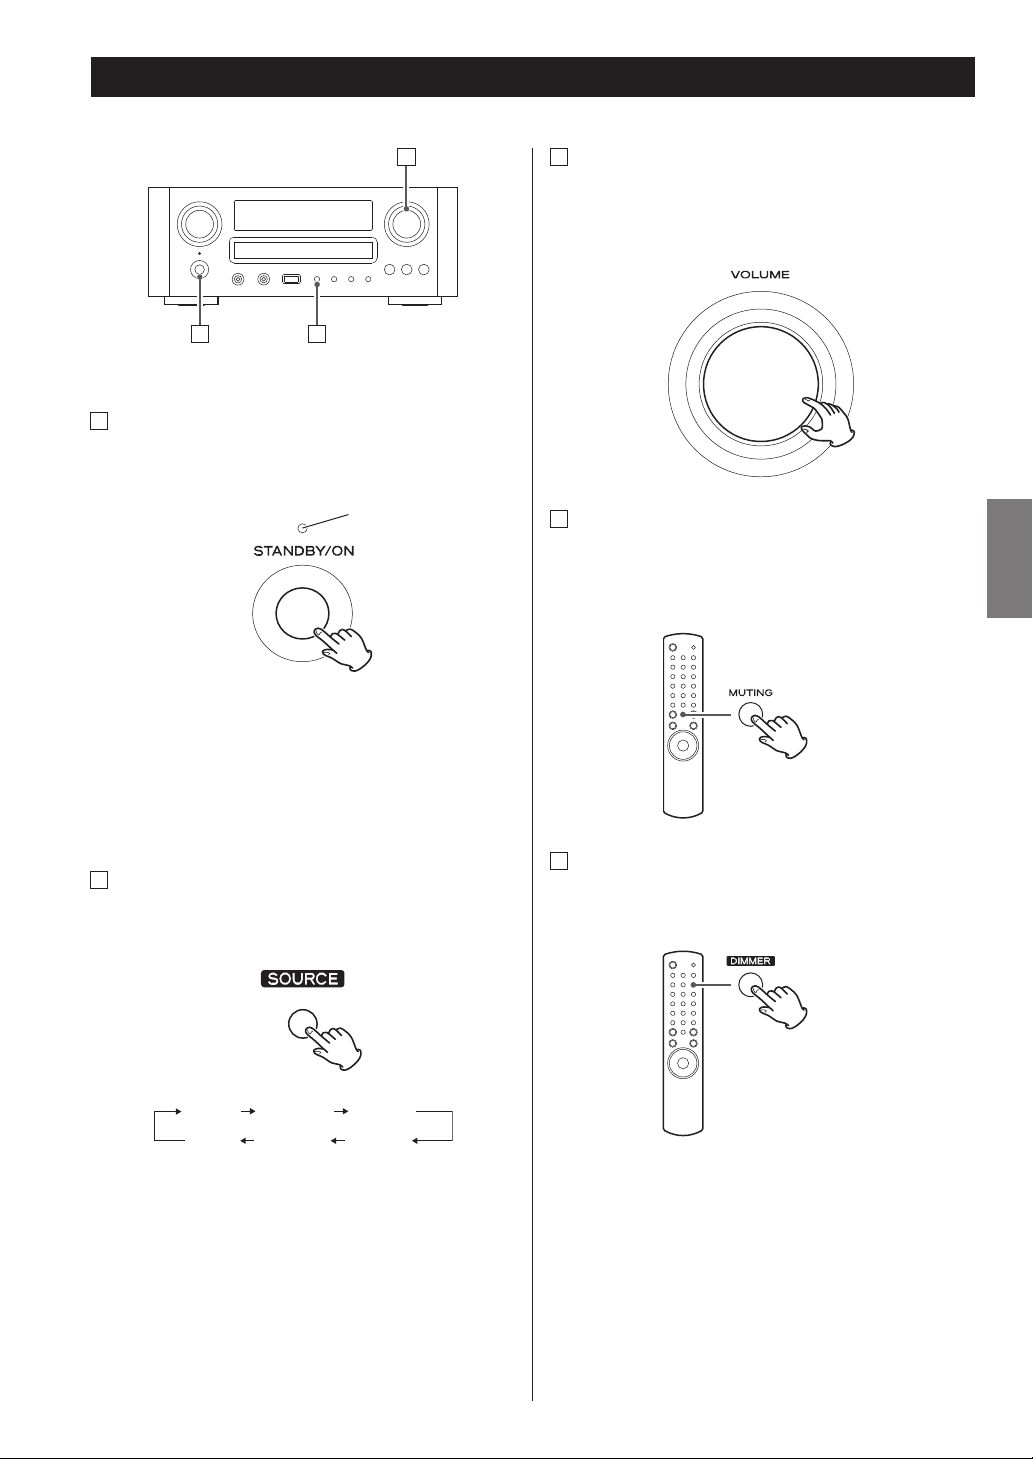
Basic Operation (1)
C
C
Adjust the volume
To protect the speakers from a sudden high-volume
sound, gradually turn up the volume to the required
level with the VOLUME knob.
A
A
How to turn the unit on or off
Press the STANDBY/ON switch to turn the unit on or
off.
The Standby/On indicator turns blue when the unit is
turned on.
< When you turn on the system, the source that was
selected last time will start playback automatically.
B
How to select source
Every time the SOURCE button is pressed, the mode is
changed as follows:
B
Standby/On indicator
D
Muting
To mute the sound temporarily, press the MUTING
button. To cancel muting, press the MUTING button
again or change the volume setting.
E
Dimmer
Press the DIMMER button to dim the display.
Press the button again to cancel the dimmer function.
ENGLISH
TUNER USB/iPod PHONO
CD AUX2 AUX1
Or press the TUNER, iPod/USB, PHONO, AUX 1/2 or CD
button on the remote control unit to select the source
directly.
< This function will be cancelled when the unit is turned
off.
17
Page 18
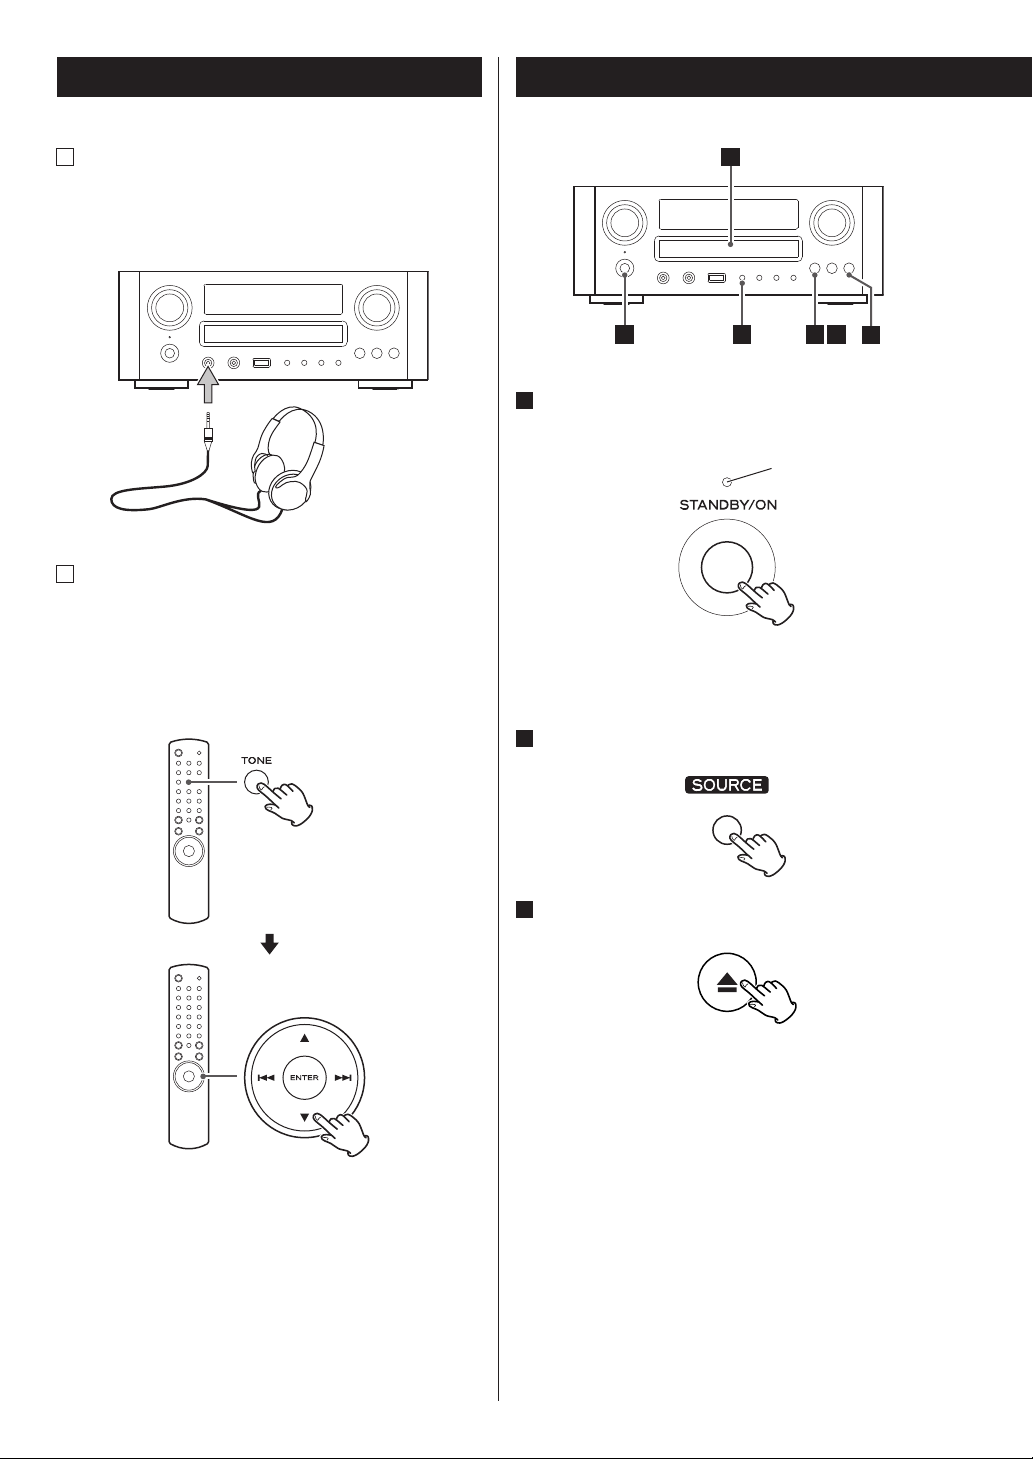
Basic Operation (2)
F
Listening through headphones
Insert the headphone plug into the PHONES jack,
and adjust the volume. The sound from speakers and
subwoofer will be cut off.
Disc Playback
4
G
How to adjust the bass and treble sound
You can change the bass and treble sound between
“-10” to “+10”.
Press the TONE button repeatedly to select BASS or
TREBLE. And then press the scroll buttons (˙/¥)
button to adjust the sound level within 5 seconds.
1
1
Press the STANDBY/ON button to turn the unit
on.
The Standby/On indicator turns from orange to blue.
“No disc“ will be displayed if no disc has been inserted.
2
Press SOURCE button to select “CD.”
3
Press the open/close button (L).
2
3 5
6
Standby/On indicator
18
Page 19
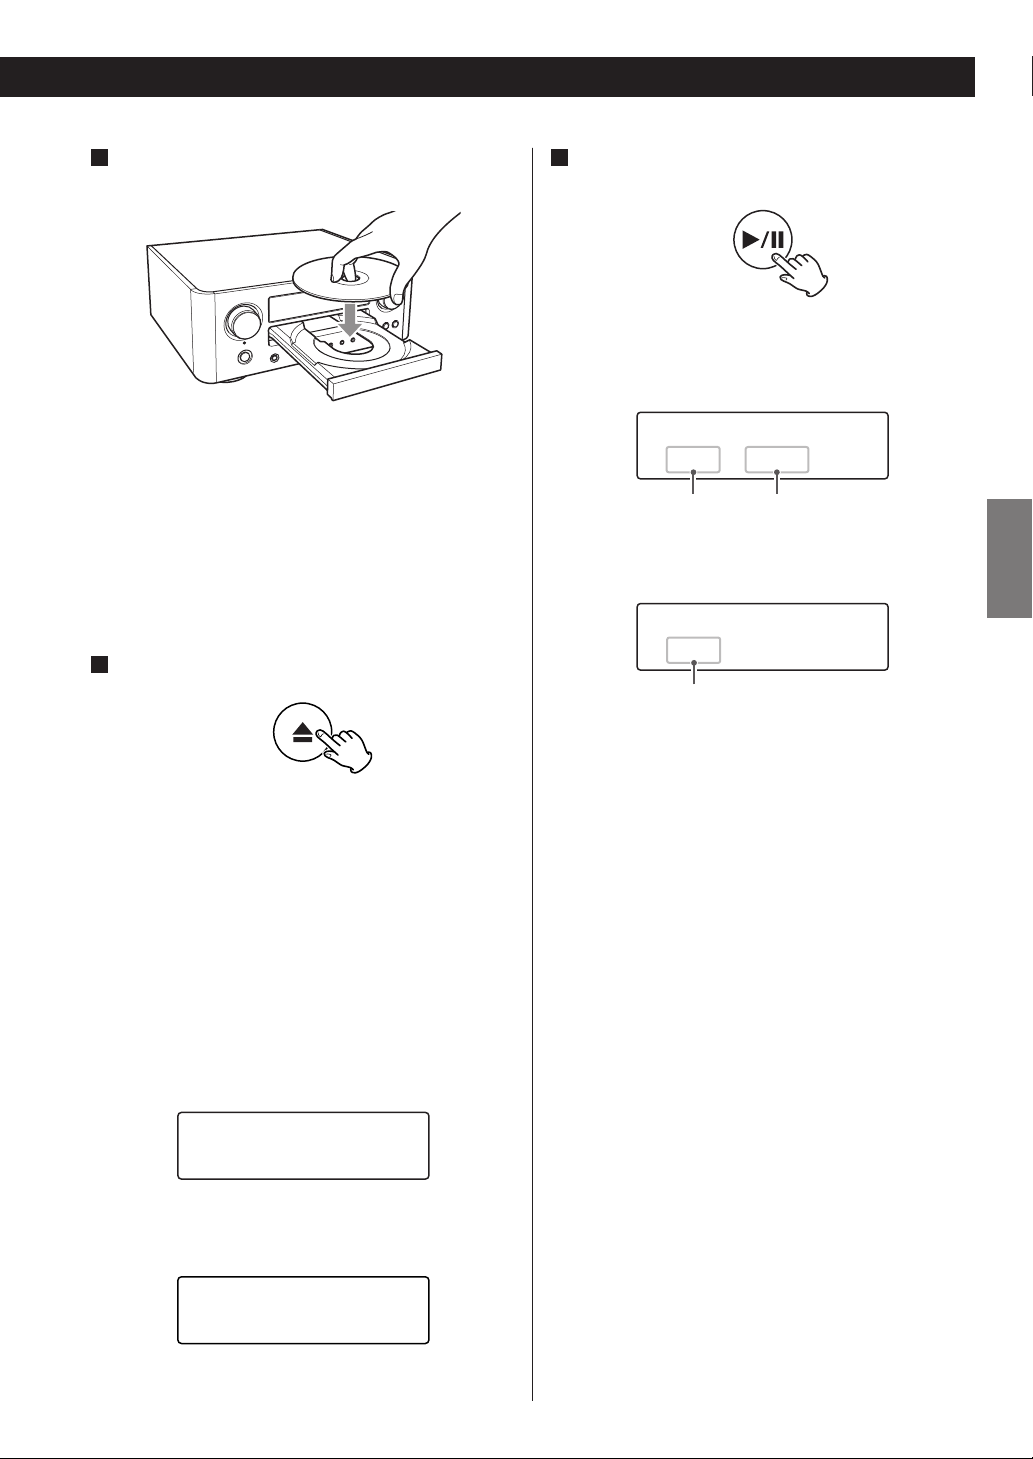
4
Place a disc on the tray with the printed label
facing up.
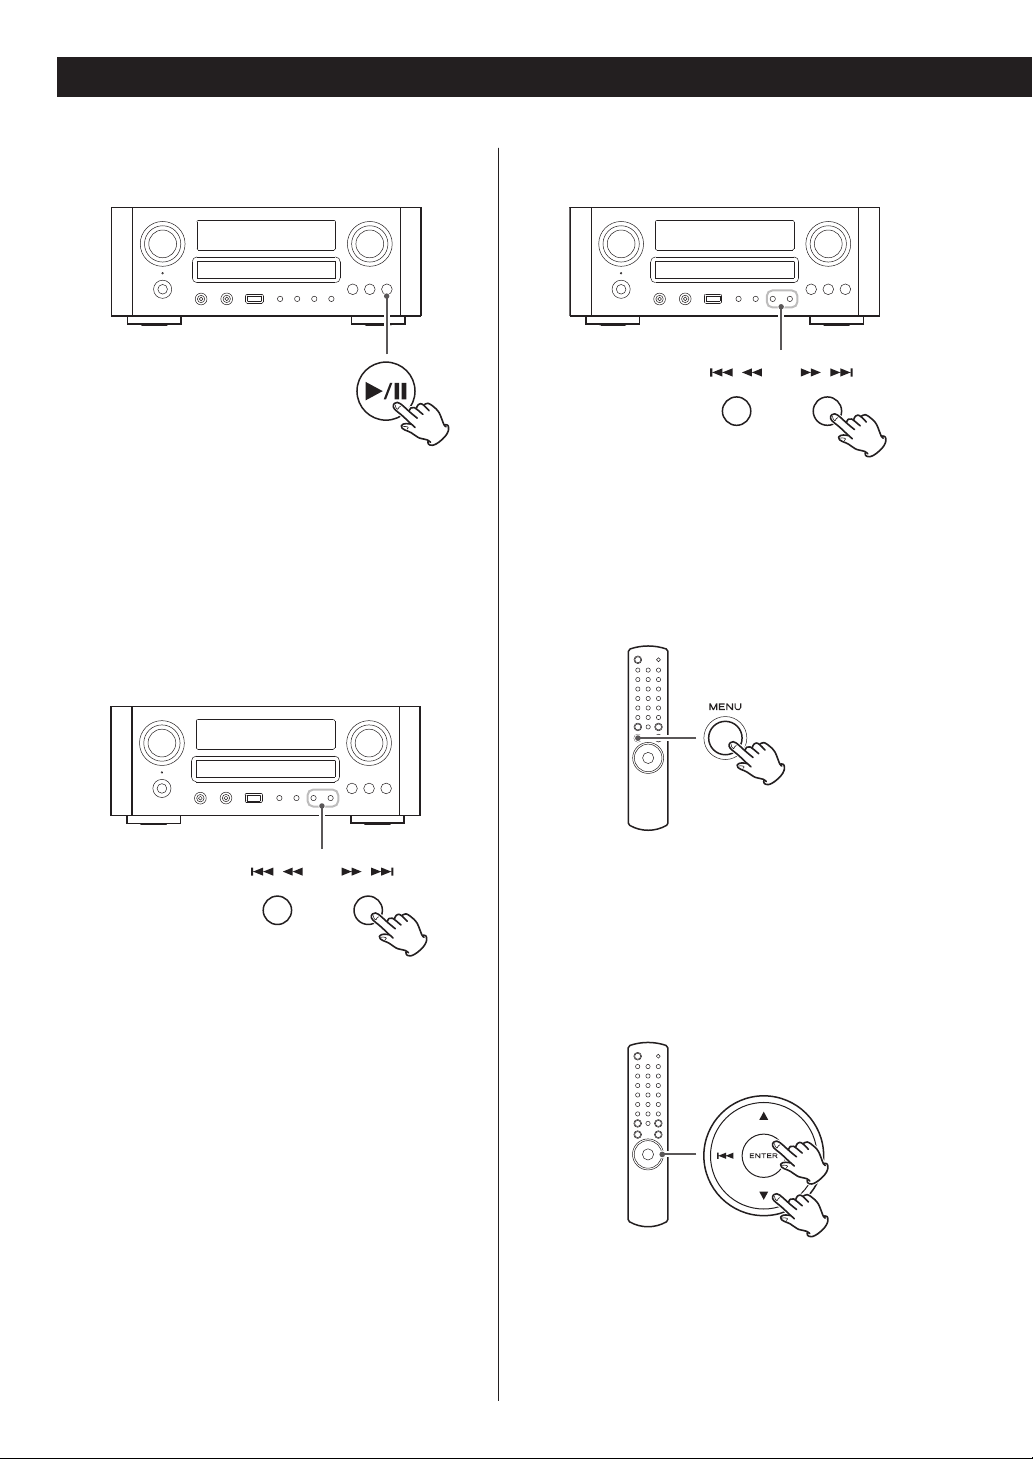
Press the play/pause button (y/J ) to start
6
playback.
Disc playback starts from the first track/file.
Audio CD
< The disc must be loaded centrally into the disc tray. If
the disc is not correctly loaded, it may not be possible
to open the tray again once it has closed.
< Never place more than one disc on the tray.
< Do not stick labels or tapes on the disc.
< Do not use irregularly-shaped discs.
5
Press the open/close button (L) to close the tray.
< Keep fingers clear of moving tray to avoid trapping
them.
< It takes a few seconds for the unit to load a disc. No
buttons will work during loading. Wait until the total
number of the tracks/files and the total play time of
the disc are displayed.
Audio CD
The total number of the tracks and total play time of
the disc are displayed.
CD/Stop
T016 72:00
CD/Play
T003 00:42
current track number elapsed time of the current track
MP3/WMA disc
CD/Play
T003 00:42 MP3
current file number
< MP3/WMA files recorded out of folders are
automatically put in the “ROOT“’ folder, and playback
starts from the first file of the ROOT folder.
< If there are folders that has no MP3/WMA file, this unit
skips them.
< During playback of MP3/WMA file, “title_artist_album“
is scrolled across the display.
< The unit stops automatically when playback of all the
tracks/files has finished.
< If you load a disc, and then press the play/pause
button (y/J) (or the SHUFFLE button of the remote
control unit) without having first closed the disc tray,
the disc tray closes and playback starts.
ENGLISH
MP3/WMA disc
The total number of files of the disc is displayed.
CD/Stop
Total file 010
19
Page 20
USB Playback
1
General Playback (disc/USB)
ED
3
AC B
You can play MP3/WMA files by connecting various
external USB storage devices such as USB flash memory.
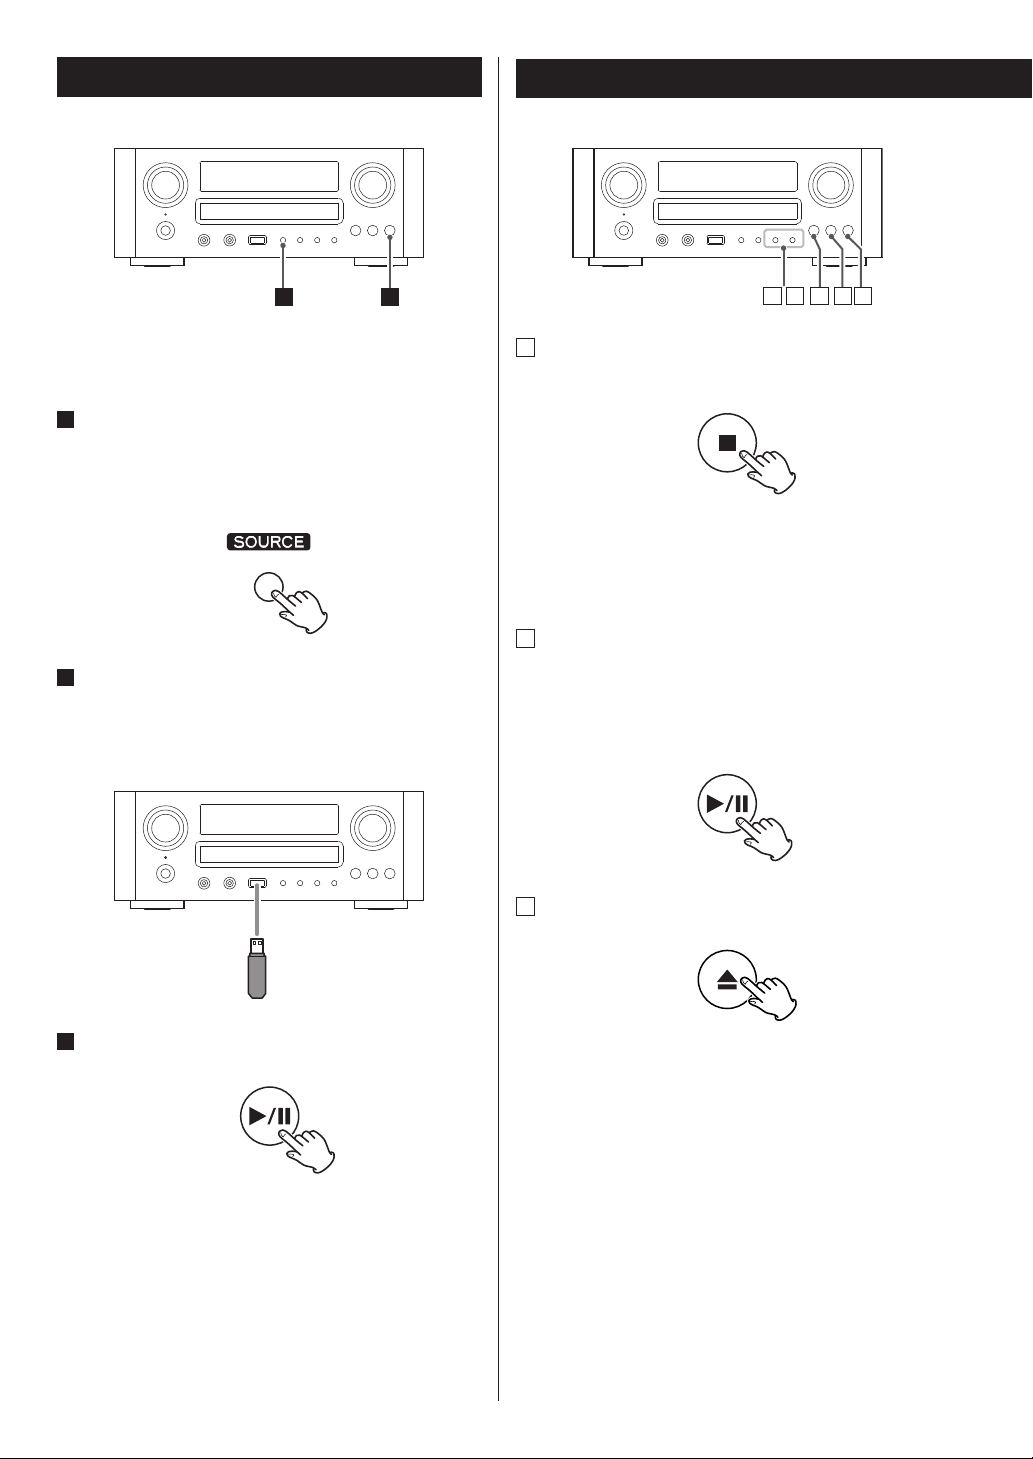
1
Press the SOURCE button repeatedly to select
“USB/iPod”.
“Not connected” will be displayed if no USB device is
connected.
2
Connect the external USB storage device to the
unit.
When an HDD device is connected to this unit, it may
take several minutes to display the number of files.
A
To stop playback
Press the stop button (H) to stop playback.
To start playback again, press the play/pause button
(y/J).
Playback starts from the first track/file.
B
To suspend playback temporarily (pause mode)
Press the play/pause button (y/J) during playback.
Playback stops at the current position.
To resume playback, press the play/pause button
(y/J).
C
To eject the disc
3
Press the play/pause button (y/J).
20
When the open/close button (L) is pressed, playback
stops and the tray will open.
Afer the disc is ejected, close the tray by pressing the
open/close button (L).
< When CD is selected as the source, you can eject the
disc.
Page 21
Folder Search
D
To skip to the next or a previous track/file
During playback, press the skip/scan buttons
(.m/,/) repeatedly until the desired track/
file is found. The selected track/file will be played from
the beginning.
On the remote control unit use the skip buttons
(.//).
In the stop or pause mode, press the skip/scan buttons
(.m/,/) repeatedly until the track/file you
want to listen to is found. Press the play/pause button
(y/J) to start playback the selected track/file.
< When the .button is pressed during playback,
the track/file being played will be played from the
beginning. To return to the beginning of the previous
track/file, press the .button twice.
You can select a folder and a file during playback or when
stopped.
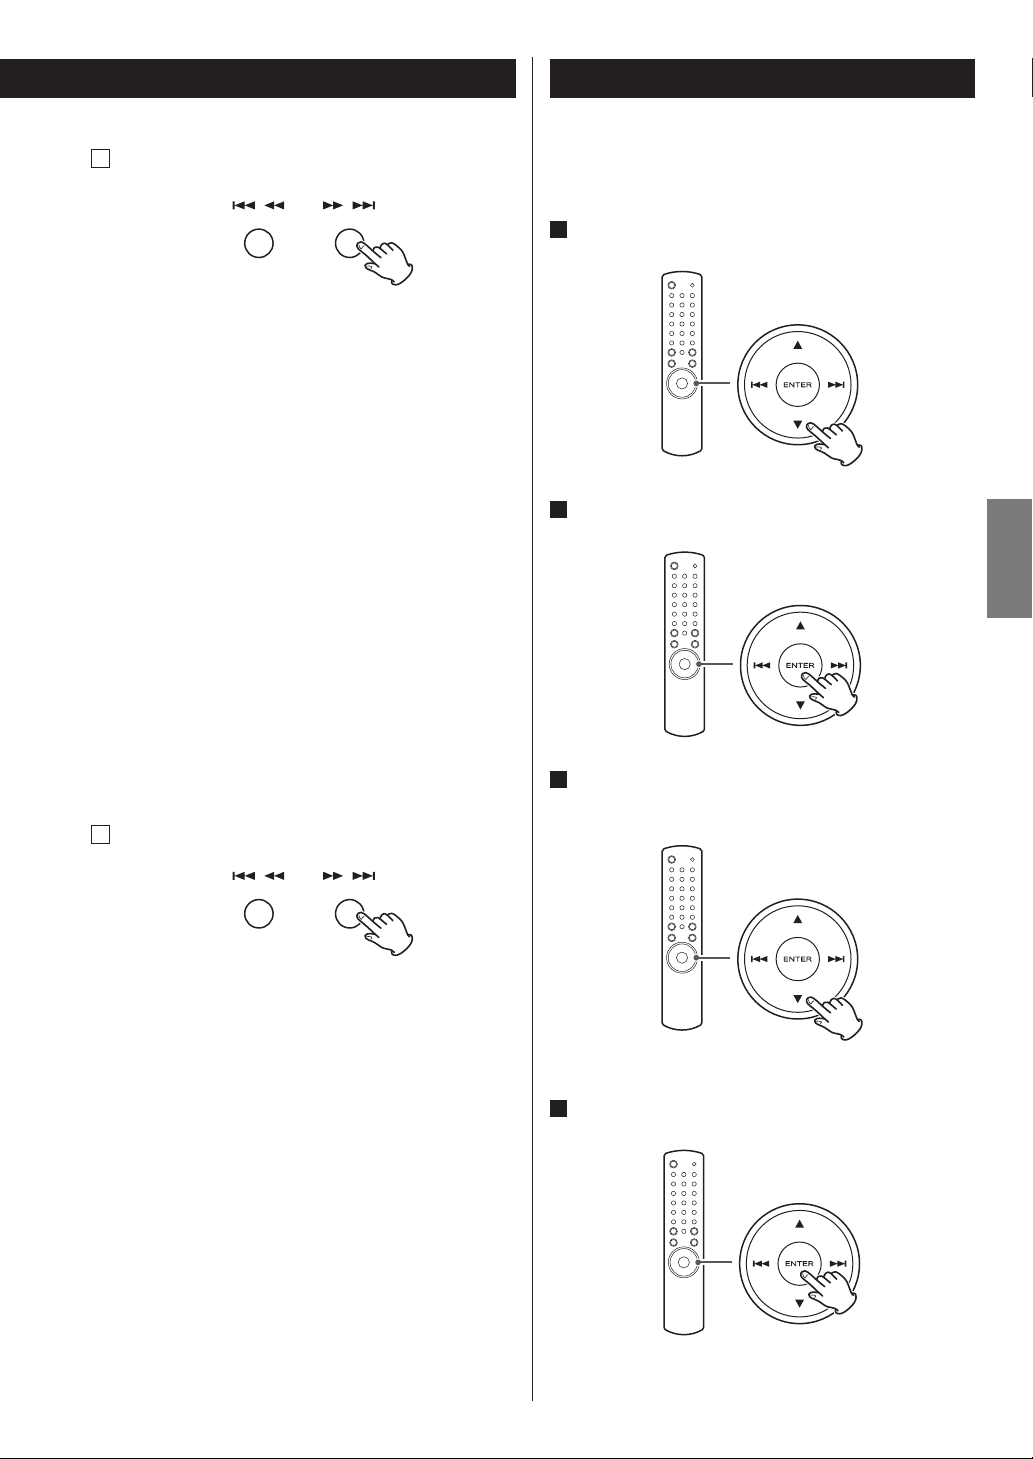
1
Press the scroll buttons (˙/¥) to select a folder.
2
Press the ENTER button.
ENGLISH
< During programmed playback, the next or previous
track/file in the program is played.
E
Search for a part of a track/file
During playback, hold down the skip/scan buttons
(.m/,/) and release it when the part you
want to listen to is found.
< In USB mode, no sound is emitted while searching.
< The unit stops when the end of the last track/file is
reached.
3
If you want to select a file, press the scroll
buttons (˙/¥).
< The selection moves within the folder.
4
Press the ENTER button.
Playback starts from the selected file.
21
Page 22
Programmed Playback
Up to 32 tracks/files can be programmed in the desired
order.
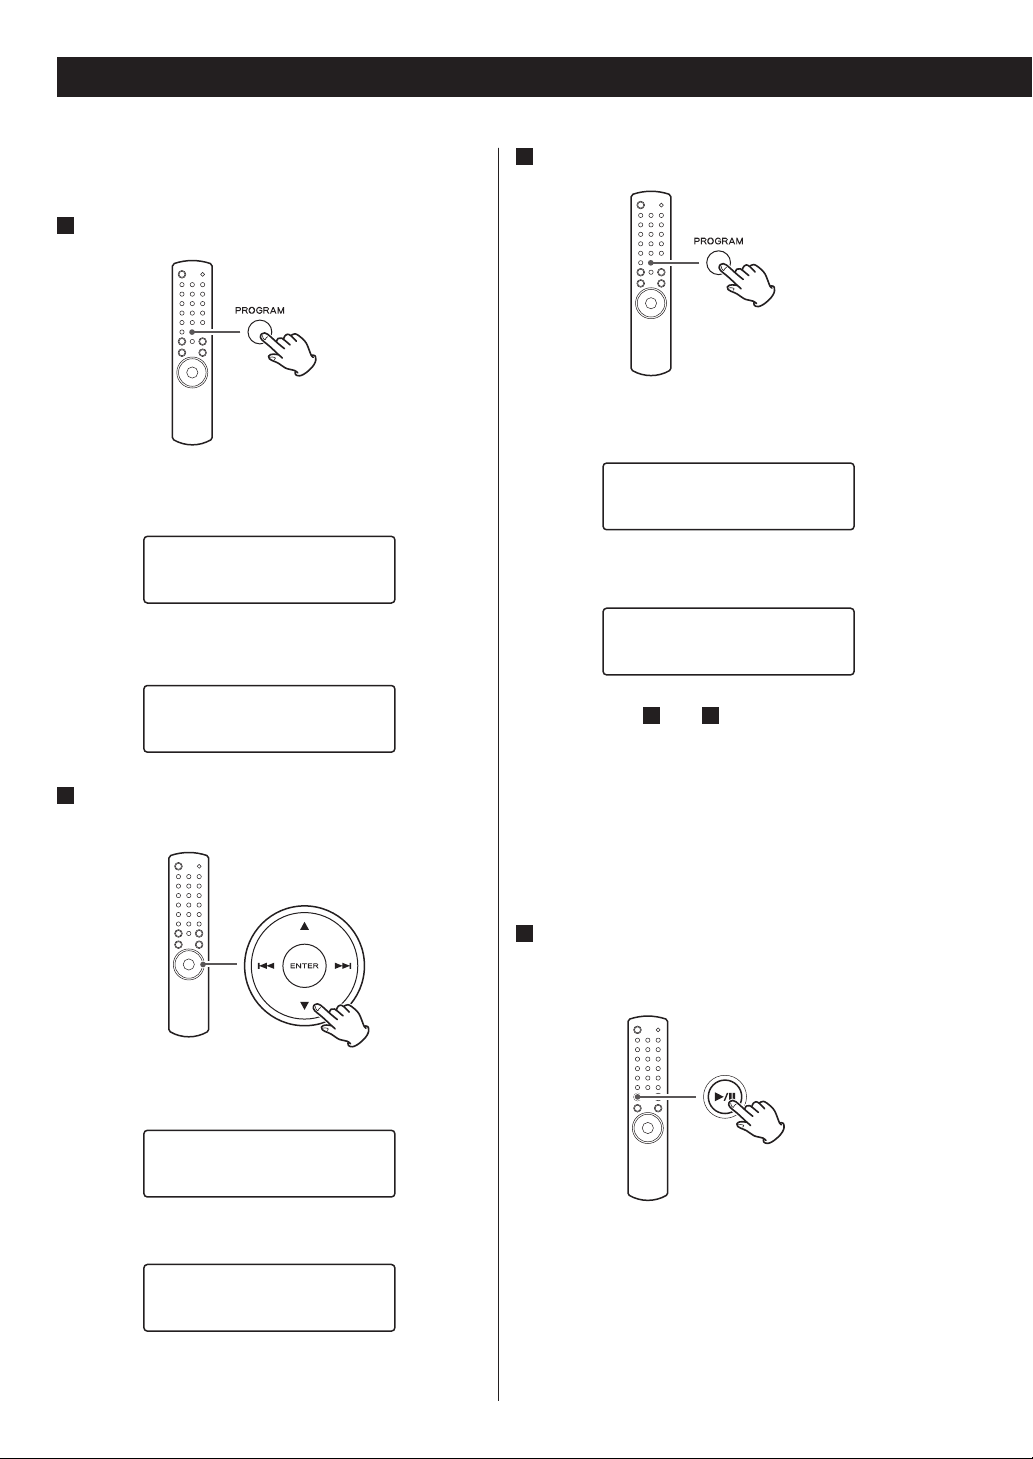
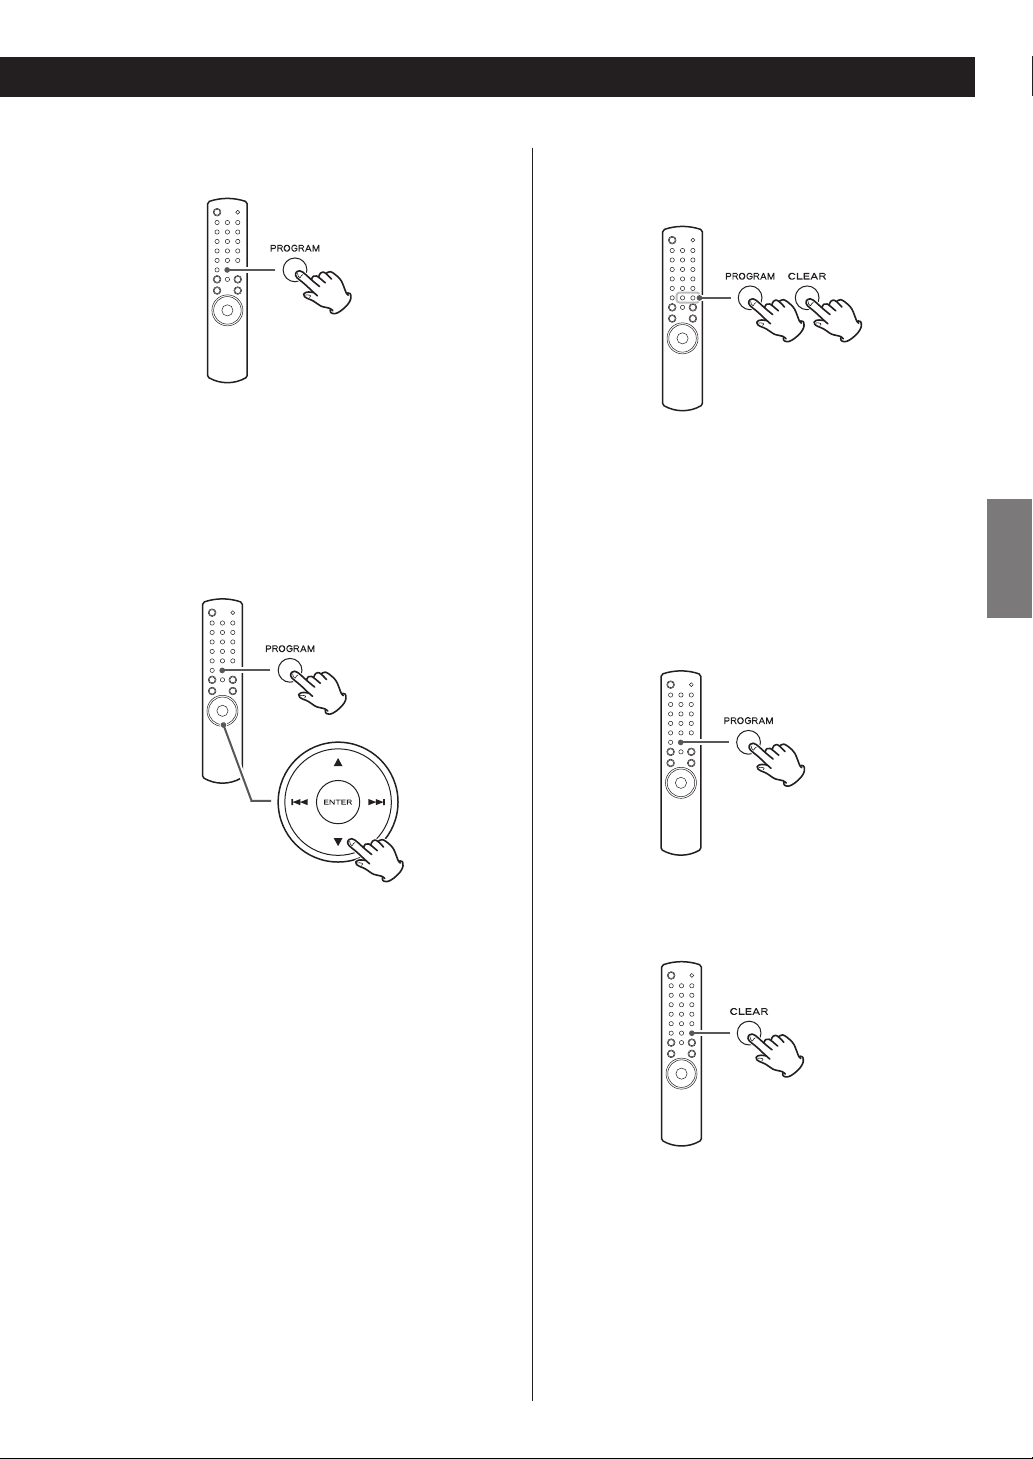
1
Press the PROGRAM button in the stop mode.
When CD is selected
P-00 T000
T016 72:00
When USB is selected
P00 T0000
Total File 0130
Press the scroll buttons (˙/¥) to select a track/
2
file.
3
Within 5 seconds, press the PROGRAM button.
When CD is selected
P-01 T012
T016 72:00
When USB is selected
P01 T0012
Total File 0130
< Repeat steps 2 and 3 to programme more tracks/
files.
< If you made a mistake, press the CLEAR button.
The last programmed number will be deleted.
< Up to 32 tracks/files can be programmed. If you
attempt to programme more than 32 tracks/files, “PFULL (Programme is full)” is displayed and no more
tracks/files can be programmed.
When CD is selected
P-01 T002
T016 72:00
When USB is selected
P01 T0012
Total File 0130
22
4
When programming has finished, press the
play/pause button (y/J) to start programmed
playback.
When the playback of all the programmed tracks/files
has finished, or if the stop button (H) or the STANDBY/
ON button is pressed, the programme mode will be
cancelled.
< If the unit is disconnected from the power supply, the
programmed contents will be erased.
Page 23
To check the programmed order
In the stop mode, press the PROGRAM button
repeatedly. The track/file number and programme
number will be shown on the display.
To change or add a track/file to the
programme
To delete a track/file from the
programme
In the stop mode, press the PROGRAM button
repeatedly until the programme number appears
to be deleted on the display, then press the CLEAR
button. The selected track/file is deleted from the
programme.
To clear the programme
1. In the stop mode, press the PROGRAM button.
ENGLISH
In the stop mode, press PROGRAM button repeatedly
until the program number for which you want to
change the track/file appears on the display. Then
select a track/file using the scroll buttons (5/b). The
previous track/file is replaced with the newly selected
one.
If you want to add a track/file to the end of the
programme, press the PROGRAM button repeatedly
until “P-END” briefly appears on the display. Then
select a track/file using the scroll buttons (5/b). The
track/file is added to the programme.
2. Hold down the CLEAR button for more than 4
seconds.
< In the following cases, the programmed contents will
also be cleared:
pressing the STANDBY/ON button
opening the disc tray
disconnecting the AC power cord
23
Page 24
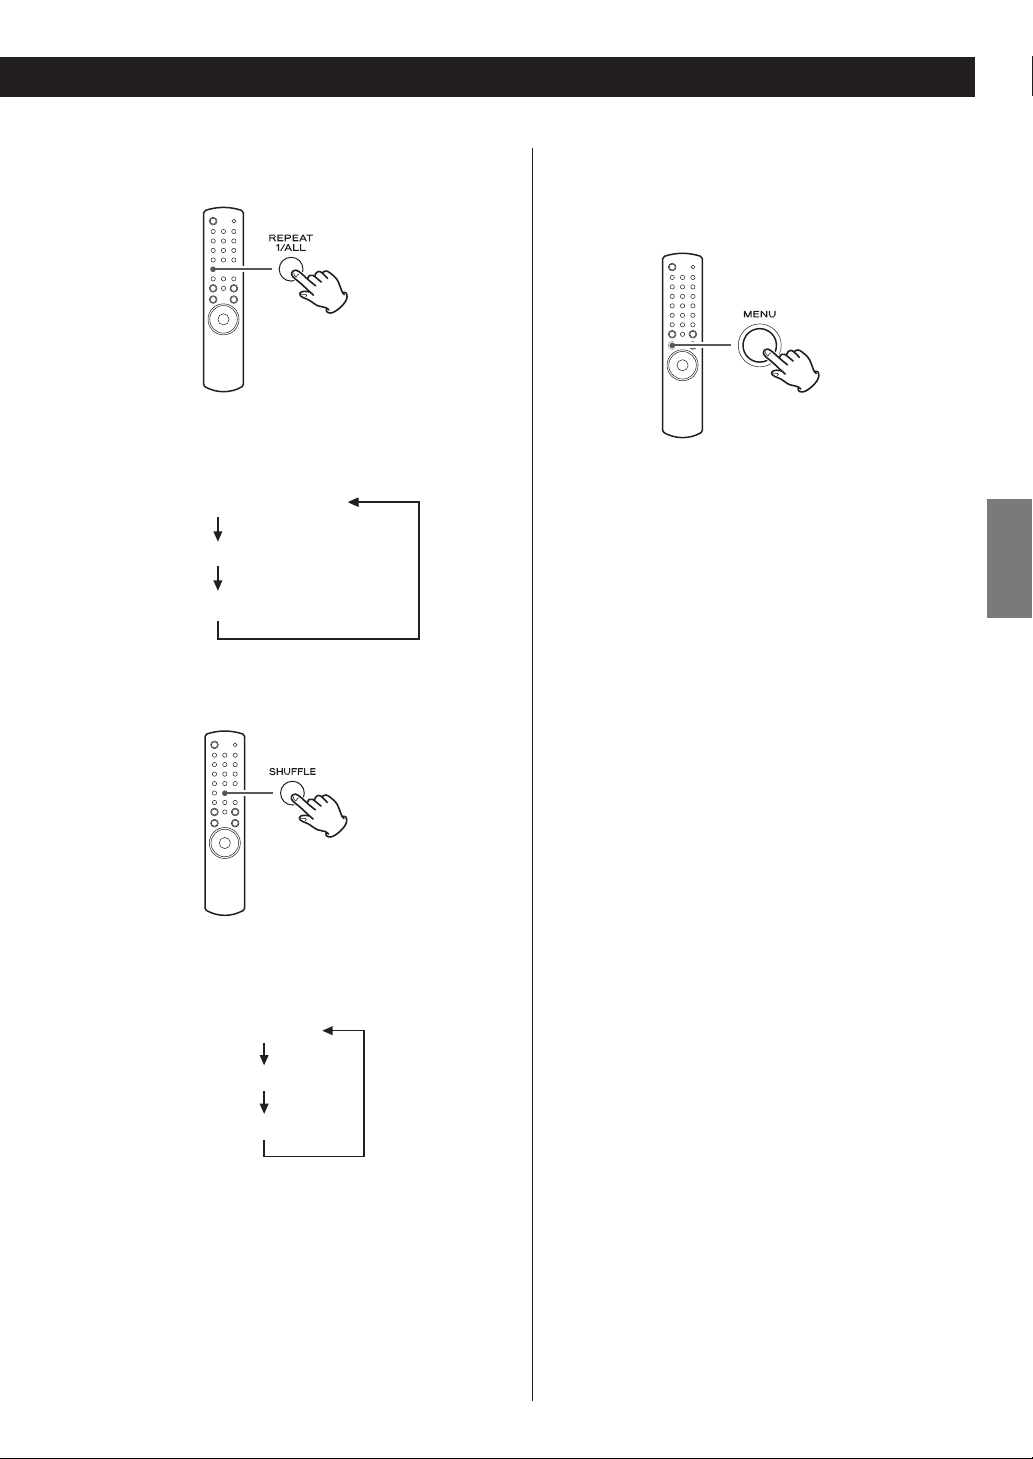
Shuffle Playback
Repeat Playback
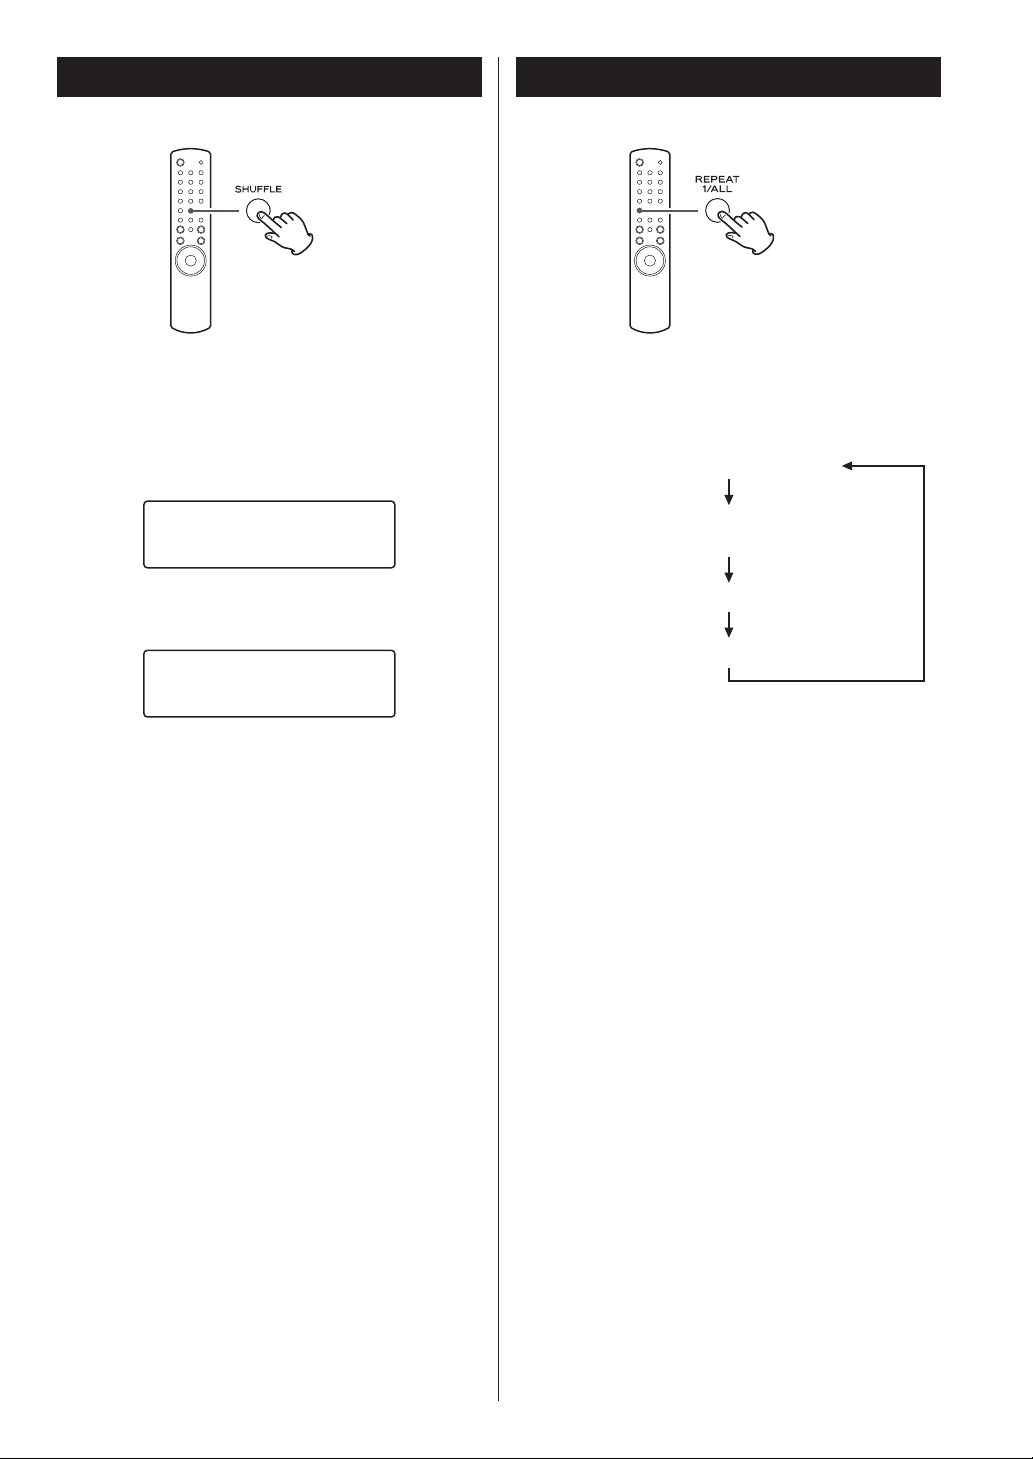
When the SHUFFLE button is pressed, the tracks/files on
the disc or USB device will be played randomly.
When CD is selected
CD/Random
T003 00:07
When USB is selected
USB/Random
T0003 00:07 WMA
< If you press the / button during shuffle playback,
next track/file will be randomly selected and played. If
you press the .button, the currently played track/
file will be played from the beginning. A track/file
cannot be replayed during shuffle playback.
< To cancel shuffle playback, press the SHUFFLE button.
< To stop shuffle playback, press the stop button (H).
Every time the REPEAT 1/ALL button is pressed, the mode
is changed as follows:
RPT 1 (repeat one track/file)
RPT Folder (repeat folder)
(Only MP3/WMA files)
RPT ALL (repeat all the tracks/files)
(Repeat Off )
< When the stop button (H) is pressed the repeat mode
is cancelled.
Repeat One Track/File (RPT 1)
The track/file being played will be played repeatedly.
If you select another track/file in “RPT 1” mode, the
track/file you selected will be played repeatedly.
If you select “RPT 1” mode in the stop mode and
select a track/file, the selected track/file will be played
repeatedly.
24
Repeat Folder (RPT Folder) (MP3/WMA files only)
All the files in the folder will be played repeatedly.
If you select another folder in “RPT Folder” mode, the
files in the folder will be played repeatedly.
< You can not select “RPT Folder” mode in the stop
mode.
Repeat All (RPT ALL)
All the tracks/files will be played repeatedly.
< In the program mode, the programmed contents are
played repeatedly.
Page 25
Display
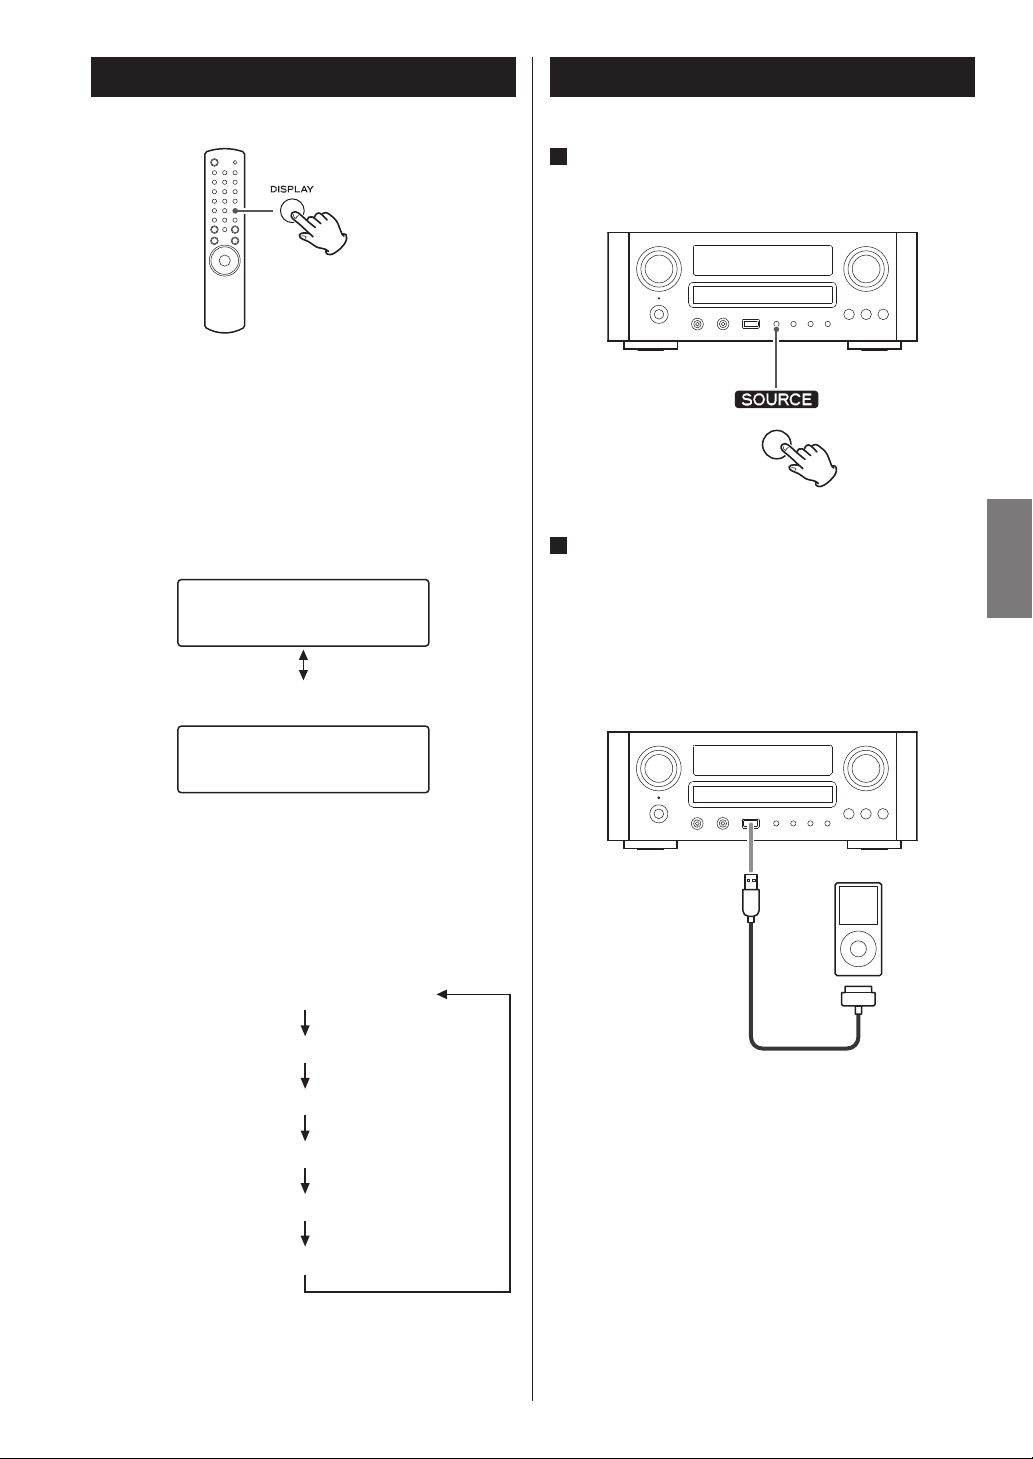
During playback, press the DISPLAY button repeatedly to
change the information on the display.
Audio CD:
Display changes as follows:
current track number and elapsed time of the current
track
CD/Play
T003 00:42
current track number and remaining time of the current
track
CD/Play
T003 -03:02
Listening to iPod (1)
1
Press the SOURCE button repeatedly to select
“USB/iPod”.
2
Connect your iPod using the USB cable supplied
with iPod.
The iPod automatically turns on and starts playback
from the iPod music list.
When the iPod is connected while the CR-H500 is set
to other source, the iPod will turn on and enter the
pause mode.
ENGLISH
MP3/WMA files:
Default display (scrolling):
Title - Artist Name - Album Name
Display changes as follows:
Default display (scrolling)
Current file number and elapsed time
File Name
Artist Name
Album Name
Title
< The iPod battery will be fully recharged when the iPod
is docked and the CR-H500 is on.
< When the iPod is connected to the CR-H500, the
headphones jack of the iPod can not output the
sound.
If you want to listen to the sound from your
headphones, connect your headphones to the CRH500’s PHONES jack.
25
Page 26
Listening to iPod (2)
To pause playback
During playback, press the play/pause button
(G/J) to pause playback. Playback stops at the
current position.
To resume playback, press the play/pause button
(G/J) again.
To skip to the next or a previous song
Search for a part of a song
During playback, hold down the skip buttons
(.//) and release it when the part you want to
listen to is found.
To go back to the previous menu
During playback or in pause mode, press the skip
buttons (.//) repeatedly until the desired song
is found.
< When the . button is pressed during playback, the
song being played will be played from the beginning.
If you want to play the previous songs, press the .
button twice or more.
26
Press the MENU button to go back to the previous
menu.
This button is equivalent to the MENU button on your
iPod.
Select the menu item
Press the scroll buttons (˙/¥) of the remote control
unit to scroll to the menu item you want, and then
press the ENTER button.
Page 27
Repeat playback
Every time the REPEAT 1/ALL button is pressed, the
mode is changed as follows:
Play (normal playback)
RPT 1 (repeat 1 song)
RPT ALL (repeat all the songs in the list)
Shuffle playback
Changing the display mode
You can select the iPod screen or CR-H500 display to
show the menu.
When the iPod is connected, hold down the MENU
button for more than 4 seconds to select which
display to be used.
Direct Mode (default)
Select this to use the screen of the iPod.
Menu appears on the screen of the iPod.
The display of the CR-H500 constantly shows “Direct
Mode”.
Extended mode
Select this to use the display of the CR-H500.
Information on the songs is displayed on the display of
the CR-H500.
ENGLISH
During playback, press the SHUFFLE button to change
the shuffle mode.
RDM o
RDM Songs
RDM Album
When you select “RDM Songs”, the iPod shuffles songs
within the list you choose to play.
When you select “RDM Album”, the iPod plays all
the songs on an album in order, and then randomly
selects another album in the list and plays through it
in order.
< Song/Album/Artist names of songs should be
alphanumeric characters. This unit cannot display
symbols and full-size or double-byte characters (such
as Japanese, Chinese, etc.) correctly.
27
Page 28
Before Recording
Recording to USB
CAUTION
< Do not disconnect the USB storage device during
recording.
Do not disconnect the power cord during recording.
It may cause damage to the products.
< Adjust the volume of the external audio source to
suitable level before recording. If not, the recording
quality becomes poor.
Note
< The recorded files are saved in the AUDIO folder.
< The FILE NAME is fixed up automatically in regular
sequence like “Audio001.MP3”, “Audio002.MP3”, …….
For Example:
If there are “Audio004.MP3” and “Audio009.MP3” files
in the AUDIO folder, and you make a recording, a new
file will be “Audio010.MP3”.
< Before recording check the remaining capacity of the
USB storage device using your PC.
You cannot check the remaining memory capacity
with this unit.
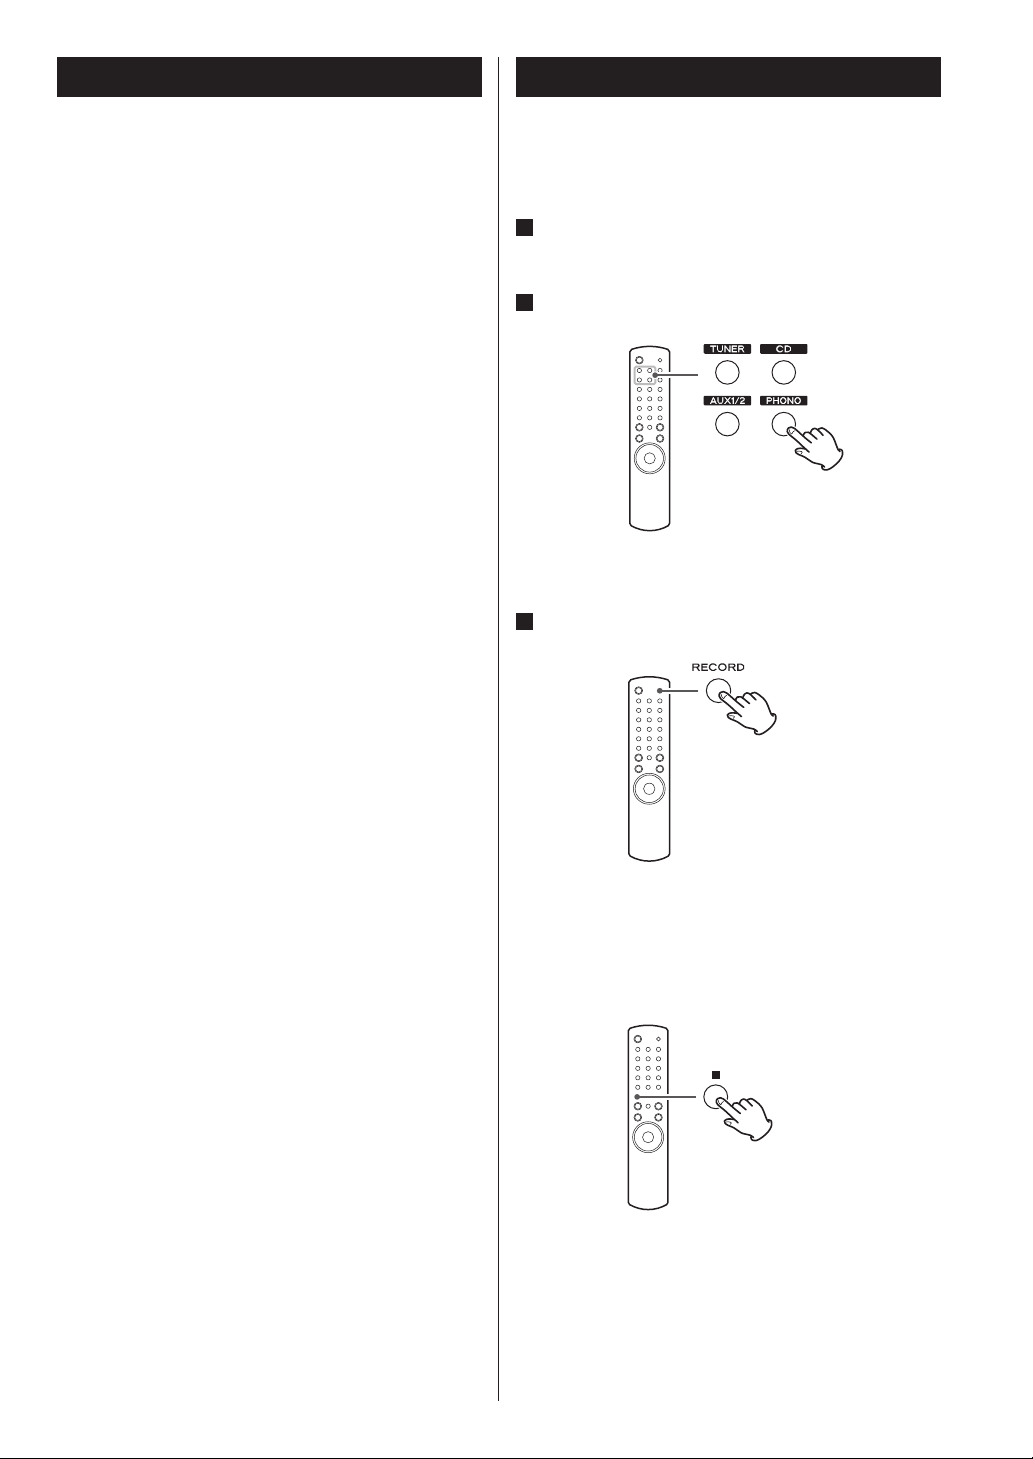
You can record a source of radio broadcast and external
device to the external USB storage device as MP3 files.
1
Connect the external USB storage device to the
USB port of the CR-H500.
2
Select a source to be recorded.
< iPod/USB can not be selected.
3
Press the RECORD button.
< This unit can record up to 2000 files to the USB device.
< The maximum time of the recorded file is 90 minutes
and new file is created when the time exceeds 90
minutes. When a new file is created, recording will
pause for a few second.
< You cannot record music from an iPod.
< A track recorded onto a USB storage device is
converted to a MP3 file at a bit rate of 128 kbps.
Recording starts.
< You cannot record to an external USB storage device if
there is no free space or the device is locked.
To stop recording
Press the stop button (H).
28
Page 29
Deleting a file from USB
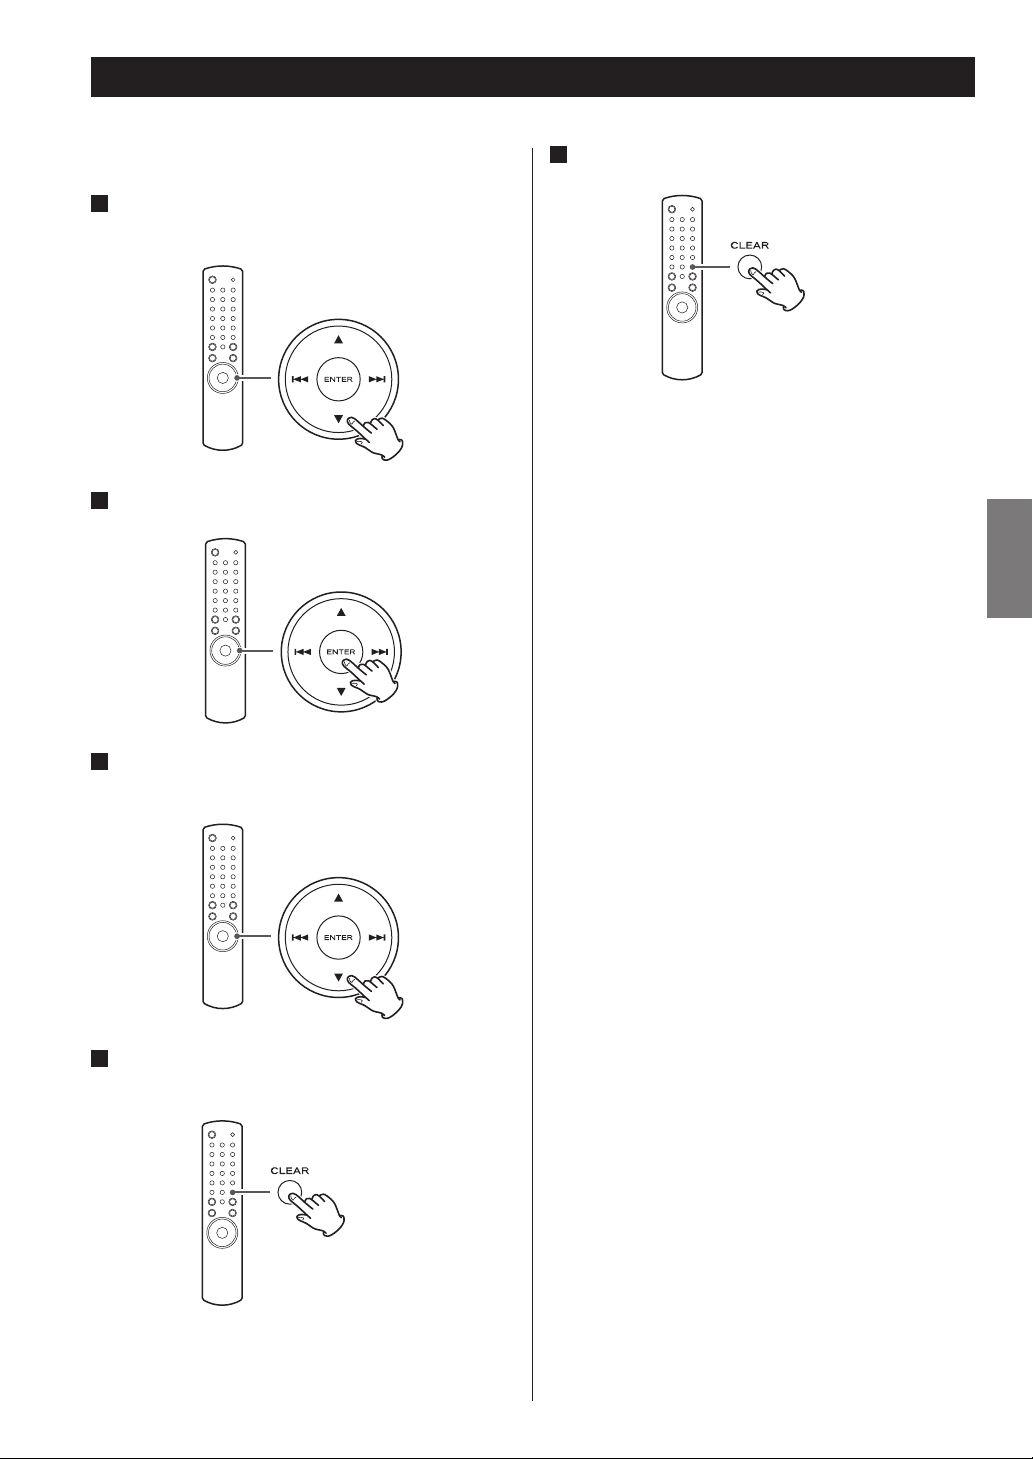
You can delete a file on the external USB storage device.
1
In the stop mode, press the scroll buttons (˙/¥)
to select a folder.
2
Press the ENTER button.
5
Within 3 seconds, press the CLEAR button.
< The delete mode will be cancelled if you do not press
the CLEAR button within 3 seconds.
ENGLISH
3
Press the scroll buttons (˙/¥) to select the file
which you want to delete from the USB device.
4
Hold down the CLEAR button for more than 4
seconds.
“Delete?” is displayed.
29
Page 30
Listening to FM/AM
4
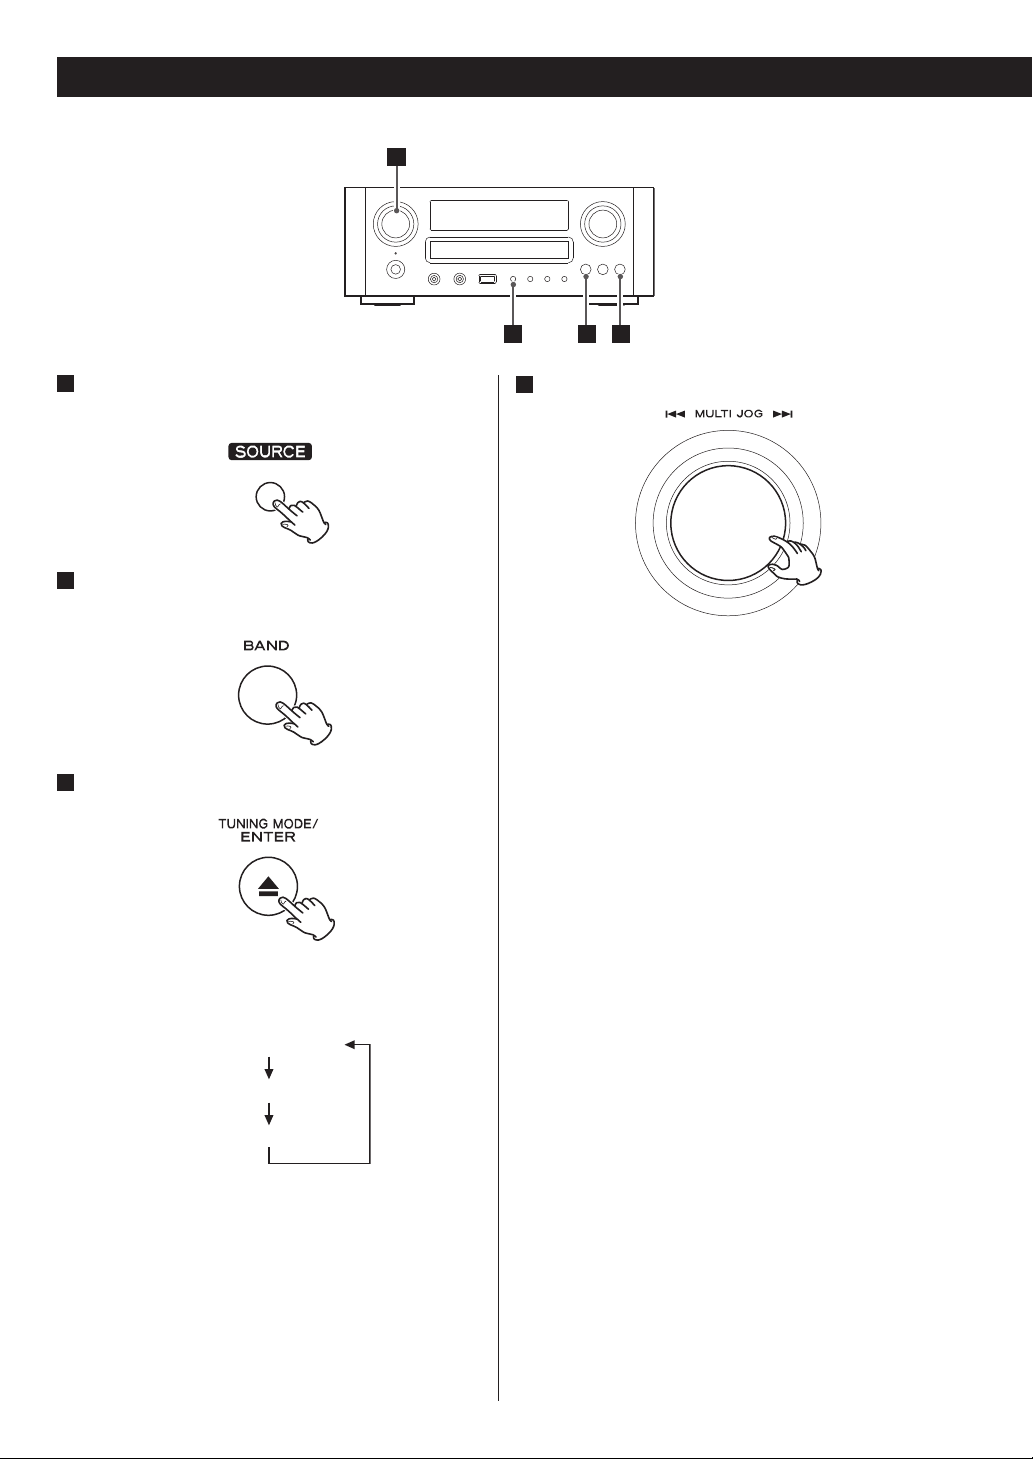
1
Press the SOURCE button repeatedly to select
TUNER mode.
2
Select FM or AM by pressing the BAND button
repeatedly.
3
Select the desired tuning mode.
Each time the TUNING MODE button is pressed, the
tuning mode changes as follows:
Manual Tune
Auto Tune
Preset Tune
1
Select the station you want to listen to.
4
Manual tuning mode
Turn the MULTI JOG knob until the station you want to
listen to is found.
On the remote control, press the scroll buttons (˙/¥)
repeatedly.
The frequency changes by a fixed step (FM: 50 kHz
steps, AM: 9 kHz steps).
Auto tuning mode
Turn the MULTI JOG knob to start auto tuning.
When a station is found, the unit tunes in the station
automatically. Repeat this step until the station you
want to listen to is found.
< Press the ENTER button to stop the auto tuning.
Preset tuning mode
Turn the MULTI JOG knob to select a preset channel.
On the remote control, press the skip buttons
(.//) repeatedly.
The selected preset channel is tuned in.
23
30
Page 31

Preset Tuning (1)
FM Mode
You can select between Stereo and Mono by pressing
the FM MODE button when a stereo FM program is
tuned in.
Stereo:
FM stereo broadcasts are received in stereo and “ST” is
displayed.
When a broadcast signal cannot be tuned in, the
sound is muted.
FM/ST 10:00
108.00MHz
Presetting Automatically (FM/AM)
You can store up to 30 FM, 30 AM.
1
Select FM or AM by pressing the TUNER button
repeatedly.
2
Hold down the PROGRAM button for more than
3 seconds.
ENGLISH
Mono:
Select this mode when the signal is weak. Reception
will be forced monaural, reducing unwanted noise.
When you try to listen to another broadcast but its
signal cannot be tuned in, the FM mode changes to
Stereo and the sound is muted.
Up to 30 of the best received stations in your area will
be stored automatically.
31
Page 32

Preset Tuning (2)
Presetting manually (AM/FM)
1
Select AM or FM by pressing the TUNER button
repeatedly.
5
Within 4 seconds, press the PROGRAM button.
The station is stored.
< To store more stations, repeat steps
2
to 5 .
2
Tune in the station you want to store.
See the previous page for the procedure of tuning.
3
Press the PROGRAM button.
FM
10:00
CH__ 108.00MHz
4
Within 4 seconds, select the preset number for
this station.
Press the scroll buttons (5/b).
< If you do not press the PROGRAM button within 4
seconds after selecting the preset number, presetting
will be cancelled.
32
FM
10:00
CH12 108.00MHz
Page 33

RDS
The Radio Data System (RDS) is a broadcasting service
which allows stations to send additional information
along with the regular radio programme signal.
RDS works on the FM waveband in Europe only.
1
Tune in an FM station (see page 30).
2
Press the RDS button.
Each time the RDS button is pressed, the RDS mode is
changed as follows:
PROGRAM SERVICE
When you select “PROGRAM SERVICE”, “PROGRAM
SERVICE” will blink for about 3 seconds and then the
programme service name or a station’s name will be
displayed. If there is no programme service data, the
frequency will be displayed.
TRAFFIC ANNOUNCE
When you select “TRAFFIC ANNOUNCE”, “TRAFFIC
ANNOUNCE” will blink for 3 seconds and then the unit
searches for a traffic announcement.
< When a traffic programme is found, the TRAFFIC
ANNOUNCE mode is switched to PROGRAM SERVICE
mode.
If the station currently selected is transmitting a traffic
programme signal, the RDS mode will be switched
to PROGRAM SERVICE mode without searching for a
traffic programme.
The clock setting of this unit is automatically adjusted
according to the CLOCK TIME (CT) data.
If you tune in an RDS station broadcasting incorrect
CT data, the clock might be wrongly adjusted, and
that may eventually affect the timer operation.
When you do not want the clock of this unit to be
set according to the CT data, turn off the auto clock
adjustment.
< No matter which RDS mode is selected, the unit
receives CT data and adjusts the clock.
To turn off the auto clock adjustment, hold
down the RDS button for more than 8 seconds.
ENGLISH
PROGRAM TYPE
When you select “PROGRAM TYPE”, “PROGRAM
TYPE” will blink for about 3 seconds and then the
programme type will be displayed.
CLOCK TIME
Displays the information about times provided from
the station.
When you select “CLOCK TIME”, “RDS CLOCK TIME” will
blink for about 3 seconds and then the clock time will
be displayed.
RADIO TEXT
When you select “RADIO TEXT”, “RDS RADIO TEXT”
will blink for about 3 seconds and then the news
of stations composed of up to 64 symbols will be
displayed.
If there is no radio text data, RDS mode will be
automatically switched to PROGRAM SERVICE mode.
< To turn on the auto clock adjustment again, hold
down the RDS button for more than 8 seconds.
< When the auto clock adjustment is turned off,
CLOCK TIME is not displayed.
33
Page 34

PTY Search
3
142
3
You can search for stations by programme type.
This function is available only on RDS services of FM
waveband in Europe.
1
Select FM by pressing the BAND button
repeatedly.
2
Hold down the RDS button for more than 3
seconds.
3
Select the desired programme type (PTY).
Turn the MULTI JOG knob to select an item, and then
press the ENTER button.
4
Turn the MULTI JOG knob within 3 seconds to
start searching.
< When the broadcast whose programme type you have
selected is found, searching stops and the programme
type will be displayed.
< If a broadcast of the selected programme type is not
found during PTY Search, it will stop at the very first
frequency.
< To stop searching, press the RDS button.
Select your desired one from among 31 kinds of PTY
programmes.
The programme type will blink.
34
Page 35

News:
brief announcements, events, public opinion, reports,
actual situations.
Current Affairs:
a kind of suggestion including practical
announcements other than news, documents,
discussion, analysis and so on.
Information:
daily information or reference such as weather forecast,
consumer guide, medical assistance and so on.
Sport:
sports related programmes.
Education:
educational and cultural information.
Drama:
all kinds of radio concert and serial drama.
Cultures:
all aspects of national or local culture including
religious events, philosophy, social science, language,
theatre, and so on.
Finance:
financial reports, commerce, trading.
Children’s Progs:
children’s programmes.
Social Affairs:
social affairs.
Religion:
religious programmes.
Phone In:
programme in which the public expresses its view by
phone.
Travel & Touring:
travel reports.
Leisure & Hobby:
programmes concerning recreational activities.
Jazz Music:
jazz music.
Country Music:
country music.
ENGLISH
Science:
programmes on natural science and technology.
Varied Speech:
popular programmes such as quiz, entertainment,
private interview, comedy, satire and so on.
Pop Music:
programme on commercial, practical and popular
songs, and sale volume of discs, etc.
Rock Music:
practical modern music generally composed and
played by young musicians.
Easy Listening:
popular music usually lasting for less than 5 minutes.
Light Classics M:
classical music, instrumental music, chorus, and light
music favoured by non-professionals.
Serious Classics:
orchestra including great operas, symphony, chamber
music and so on.
Other Music:
other music styles (Rhythm & Blues, Reggae, etc.).
National Music:
national music.
Oldies Music:
music from the so-called golden age of popular music.
Folk Music:
folk music.
Documentary:
documentaries.
Alarm Test
Alarm-Alarm!:
a programme notifying an emergency or a natural
disaster.
Weather & Meter:
weather reports, forecast.
35
Page 36

Setting the Clock
The clock setting of this unit is automatically adjusted
according to the CLOCK TIME data of an RDS
broadcasting.
If you adjust the clock manually, follow the following
steps.
1
Press the TIME SET button.
Each time the TIME SET button is pressed, the mode is
changed as follows.
Current Time
On Time
Off Time
3
Press the ENTER button.
The “minute” value blinks.
4
Press the scroll buttons (˙/¥) to set the current
minute.
Source select
< When no action is taken for 1 minute, the time adjust
mode will be cancelled.
< Press the stop button (H) to cancel the time setting.
2
Press the scroll buttons (˙/¥) to set the current
hour.
5
Press the ENTER button.
The clock starts from 00 seconds.
< The clock setting will not be saved when the AC
power cord is pulled out.
36
Page 37

Setting the Timer
< Adjust the clock before setting the timer.
< Select “Direct mode” before using the iPod for the
timer; otherwise, the iPod will not be played back
when the On time is reached. See page 27.
< When no action is taken for 1 minute, the timer setting
mode will be cancelled.
1
Press the TIME SET button repeatedly until “On
time” is displayed.
“On time” appears on the display, and the “hour” value
blinks.
3
Press the scroll buttons (˙/¥) to set the minute
value, and press the TIME SET button.
“Off time” appears on the display, and the “hour” value
blinks.
ENGLISH
2
Press the scroll buttons (˙/¥) to set the hour
value, and press the ENTER button.
The “minute” value blinks.
4
Repeat step 2 and 3 to set the Off time.
“Source select” appears on the display.
5
Press the scroll buttons (˙/¥) to select the
source, and press the ENTER button.
Now the timer setting is stored in memory.
37
Page 38

Timer Operation
Every time you press the TIMER button on the
remote control unit, the timer mode changes as
follows.
Timer off
Timer daily
Timer REC once
Timer REC daily
Timer Playback
1
Select “Timer daily” by pressing the TIMER
button on the remote control unit.
The timer indicator “
2
Prepare for the timer playback.
Adjust the volume, tune in a station, etc.
” lights on the display.
Timer Recording
You can set the various external USB storage devices such
as USB flash memory to record programme at the desired
time.
Connect the external USB storage device to the unit
beforehand.
1
Select “Timer REC once” or “Timer REC daily”
by pressing the TIMER button on the remote
control unit.
The timer indicator “
2
Prepare for the timer recording.
Tune in a station, etc.
3
Press the STANDBY/ON button to put the unit in
standby mode.
One minute before the set On time, the unit turns on
and starts recording at the On time.
When the Off time is reached the unit will return to
standby.
” and “ ” light on the display.
Timer off
When not using the timer, press the TIMER button
on the remote control unit to select “Timer off”.
The timer indicator “
” disappears from the display.
3
Press the STANDBY/ON button to put the unit in
standby mode.
Everyday when the On time is reached, the unit will
turn on and start playback, and when the Off time is
reached the unit will return to standby.
When you use iPod touch as the source for the timer,
do not turn it off. It will not be turned on when the On
time is reached.
38
Page 39

Sleep Timer
The power can be switched off after a specified amount
of time.
Press the SLEEP button repeatedly until desired time
appears on the display.
SLEEP-90 (80, 70 ... 10)
The power will be switched off 90 (80, 70 ... 10)
minutes later.
Listening to an External Source
You can listen to the sound from the external component
connected to the PHONO, AUX 1 IN, or AUX 2 IN jacks.
1
Press the SOURCE button to select “PHONO”,
“AUX 1” or “AUX 2”.
ENGLISH
SLEEP OFF
The sleep timer is off.
< The display is dimmed when you set the sleep timer.
< If you want to check the remaining time, press the
SLEEP button once. The remaining time will be
displayed for 3 seconds, and return to the normal
display.
2
Start playback on the external component.
3
Adjust the volume.
Turn the VOLUME knob to adjust the volume.
39
Page 40

Troubleshooting
In case of trouble with the unit, please take the time
to look through this chart and see if you can solve the
problem yourself before you call your dealer or TEAC
service center.
Amplifier
No power.
e Check the connection to the AC power supply.
No sound from speakers.
e Check the connection to the speakers.
e Adjust the volume.
e Select proper source.
e Pull out the headphones plug from PHONES jack.
e If muting is on, press the MUTING button.
The sound is noisy.
e The unit is too close to a TV set or similar appliances.
Install the unit apart from them, or turn them off.
Remote Control Unit
Remote control unit does not work.
e If the batteries are exhausted, change the batteries.
e Use remote control unit within the range (5 m) and
point at the front panel.
e Clear obstacles between the remote control unit and
the main unit.
e If a fluorescent light is near the unit, turn it off.
Tuner
Cannot listen to any station, or signal is too weak.
e Tune in the station properly.
e If a TV set is near the unit, turn it off.
e Install the antenna again after locating the best
reception position.
e An external antenna is recommended.
Though the broadcast is stereo, it sounds
monaural.
e Press the FM MODE button.
Sound skips.
e Place the unit on a stable place to avoid vibration
and shock.
e If the disc is dirty, clean the surface of the disc.
e Do not use scratched, damaged or warped discs.
iPod Player
Will not play.
e Remove the iPod from the USB jack, wait a few
seconds, and insert it again.
e Software update may solve the problem. Visit
the Apple website and download the latest iPod
software.
Cannot operate the iPod.
e Make sure the HOLD switch of the iPod is not set to
HOLD.
MP3/WMA
There is no sound even if the play/pause button
(y/J) is pressed.
e Check if there are MP3 or WMA files on the USB.
e Non-playable file formats (e.g MPEG 1 LAYER 2 file)
cannot be played.
“No title”, “No artist”, and “No album” appears on
the display.
e There is no ID3 tag information for the music file.
Edit the title, artist, and album information of
the song on a PC using the MP3 or WMA making
application.
Some unknown characters are displayed on the
display panel.
e This unit cannot display symbols and full-size or
double-byte characters (such as Japanese, Chinese,
etc.) correctly. File name of MP3 or WMA should be
alphanumeric characters.
If normal operation cannot be recovered, unplug
the power cord from the outlet and plug it again.
CD Player
Will not play.
e Load a disc with label side up.
e If the disc is dirty, clean the surface of the disc.
e A blank disc has been loaded. Load a prerecorded
disc.
e Depending on the disc, etc. it may not be possible
to play back CD-R/RW discs. Try again with another
disc.
e You cannot play back unfinalized CD-R/RW discs.
Finalize such a disc in a CD recorder and try again.
40
Page 41

Restoring factory settings
If the power supply is interrupted for 14 days or longer, all
the settings kept in memory (such as preset stations and
timer settings) will be erased.
It will take more than 3 days after plugging the power
cord into the outlet to charge enough electricity for the
memory backup function.
If you want to manually initialize the settings, hold
down the SOURCE button and play/pause button
(y/J) for more than 4 seconds in standby mode.
Maintenance
If the surface of the unit gets dirty, wipe with a soft cloth
or use diluted neutral cleaning liquid. Be sure to remove
any fluid completely. Do not use thinner, benzine or
alcohol as they may damage the surface of the unit.
ENGLISH
The unit will be turned on, and all the settings are reset to
the default settings.
41
Page 42

Specifications
AMPLIFIER Section
Output Power . . . . . . . . . . 40 W/ch (6 ohms, 0.5 %,1 kHz)
Input Sensitivity . . . . . . . . . . . . . . . . PHONO: 2.5 mV 47 k
AUX1, AUX2: 200 mV 47 k
Frequency Response . . . . 20 Hz to 60,000 Hz (+1/–3 dB)
TUNER Section
FM Section
Tuning Range . . . . . . . . . . . . . . . 87.50 MHz to 108.00 MHz
Signal-to-Noise Ratio . . . . . . . . . . . . . . . . . . . 65 dB (Mono)
60 dB (Stereo)
AM Section
Tuning Range . . . . . . . . . . . . . . . . . . . . 522 kHz to 1,629 kHz
Signal-to-Noise Ratio . . . . . . . . . . . . . . . . . . . . . . . . . . . . 35 dB
USB Section
Playback
Frequency Response . . . . . . . 20 Hz to 20,000 Hz (±2 dB)
Signal-to-Noise Ratio . . . . . . . . . . . . . . . . more than 85 dB
Recording
Frequency Response . . . . . . . .20 Hz to 15,000 Hz (±2 dB)
Signal-to-Noise Ratio . . . . . . . . . . . . . . . . . more than 85 dB
Standard Accessories
Power Cord x 1
Remote Control Unit (RC-1225) x 1
Batteries (AAA) x 2
AM Loop Antenna x 1
FM Lead-type Antenna x 1
Owner’s Manual x 1
Warranty Card x 1
< Design and specifications are subject to change
without notice.
< Weight and dimensions are approximate.
< Illustrations may differ slightly from production
models.
GENERAL
Power Requirements . . . . . . . . . . . . . . . . . . 230 V AC, 50 Hz
Power Consumption . . . . . . . . . . . . . . . . . . . . . . . . . . . 100 W
0.5 W (standby)
Dimension (W x H x D) . . . . . . . . . . . 290 x 113 x 340 mm
Weight . . . . . . . . . . . . . . . . . . . . . . . . . . . . . . . . . . . . . . . . 5.5 kg
42
Page 43

Information for Users on Collection and Disposal of Old Equipment and used Batteries
These symbols on the products, packaging, and/or accompanying documents mean that used electrical and
electronic products and batteries should not be mixed with general household waste. For proper treatment,
recovery and recycling of old products and used batteries, please take them to applicable collection points, in
accordance with your national legislation and the Directives 2002/96/EC and 2006/66/EC.
By disposing of these products and batteries correctly, you will help to save valuable resources and prevent any
potential negative effects on human health and the environment which could otherwise arise from inappropriate
waste handling.
For more information about collection and recycling of old products and batteries, please contact your local
municipality, your waste disposal service or the point of sale where you purchased the items.
Information on Disposal in other Countries outside the European Union
These symbols are only valid in the European Union. If you wish to discard these items, please contact your local
authorities or dealer and ask for the correct method of disposal.
Note for the battery symbol (bottom right two symbol examples):
This symbol might be used in combination with a chemical symbol. In this case it complies with the requirement
set by the Directive for the chemical involved.
ENGLISH
43
Page 44

Sommaire
Avant l’utilisation
Nous vous remercions d’avoir choisi TEAC. Lisez
ce manuel avec attention pour tirer les meilleures
performances de cet appareil.
Avant l’utilisation . . . . . . . . . . . . . . . . . . . . . . . . . . . . . . . . . . . . . 44
Disques . . . . . . . . . . . . . . . . . . . . . . . . . . . . . . . . . . . . . . . . . . . . . . 45
MP3 et WMA . . . . . . . . . . . . . . . . . . . . . . . . . . . . . . . . . . . . . . . . . 46
Compatibilité avec les iPod . . . . . . . . . . . . . . . . . . . . . . . . . . . 46
Raccordement des antennes (AM/FM) . . . . . . . . . . . . . . . . 47
Raccordement des enceintes . . . . . . . . . . . . . . . . . . . . . . . . . 48
Raccordements . . . . . . . . . . . . . . . . . . . . . . . . . . . . . . . . . . . . . . 50
Noms des commandes (appareil principal) . . . . . . . . . . . . 52
Noms des commandes (télécommande) . . . . . . . . . . . . . . 54
Boîtier de télécommande . . . . . . . . . . . . . . . . . . . . . . . . . . . . 56
Fonctionnement de base. . . . . . . . . . . . . . . . . . . . . . . . . . . . . 57
Lecture de disque . . . . . . . . . . . . . . . . . . . . . . . . . . . . . . . . . . . . 58
Lecture USB . . . . . . . . . . . . . . . . . . . . . . . . . . . . . . . . . . . . . . . . . . 60
Lecture générale (disque/USB) . . . . . . . . . . . . . . . . . . . . . . . . 60
Recherche de dossier . . . . . . . . . . . . . . . . . . . . . . . . . . . . . . . . 61
Lecture programmée . . . . . . . . . . . . . . . . . . . . . . . . . . . . . . . . 62
Lecture aléatoire . . . . . . . . . . . . . . . . . . . . . . . . . . . . . . . . . . . . . 64
Lecture en boucle. . . . . . . . . . . . . . . . . . . . . . . . . . . . . . . . . . . . 64
Affichage . . . . . . . . . . . . . . . . . . . . . . . . . . . . . . . . . . . . . . . . . . . . 65
Écoute d’iPod . . . . . . . . . . . . . . . . . . . . . . . . . . . . . . . . . . . . . . . . 65
Avant l’enregistrement . . . . . . . . . . . . . . . . . . . . . . . . . . . . . . . 68
Enregistrement sur USB . . . . . . . . . . . . . . . . . . . . . . . . . . . . . . 68
Suppression d’un fichier sur support USB . . . . . . . . . . . . . 69
Écoute d’une émission FM/AM . . . . . . . . . . . . . . . . . . . . . . . . 70
Sélection d’un préréglage . . . . . . . . . . . . . . . . . . . . . . . . . . . . 71
RDS . . . . . . . . . . . . . . . . . . . . . . . . . . . . . . . . . . . . . . . . . . . . . . . . . . 73
Recherche d’un type de programme . . . . . . . . . . . . . . . . . 74
Réglage de l’horloge . . . . . . . . . . . . . . . . . . . . . . . . . . . . . . . . . 76
Réglage de la minuterie . . . . . . . . . . . . . . . . . . . . . . . . . . . . . . 77
Fonctionnement de la minuterie . . . . . . . . . . . . . . . . . . . . . 78
Minuterie d’extinction . . . . . . . . . . . . . . . . . . . . . . . . . . . . . . . . 79
Écoute d’une source extérieure . . . . . . . . . . . . . . . . . . . . . . . 79
Lisez ce qui suit avant toute utilisation.
< Quand l’appareil est sous tension, mettre le téléviseur
sous tension peut entraîner l’apparition de ligne sur
l’écran du téléviseur, selon les conditions des ondes
électriques de la télédiffusion. Ce n’est pas un mauvais
fonctionnement de l’appareil ou du téléviseur. Dans ce
cas, mettez l’appareil hors tension.
< Il est possible que l’appareil devienne chaud durant
l’utilisation, laissez donc toujours un espace suffisant
autour de lui pour la ventilation.
< La tension d’alimentation doit correspondre à la
tension imprimée sur le panneau arrière. Si vous avez
des doutes concernant l’alimentation de l’appareil,
consultez un électricien.
< Choisissez soigneusement l’emplacement de l’appareil.
Évitez de l’exposer directement aux rayons solaires ou
à une source de chaleur. Évitez aussi les endroits sujets
aux vibrations, à une poussière excessive, à la chaleur,
au froid et à l’humidité.
< N’installez pas l’appareil au dessus d’un amplificateur/
récepteur.
< N’ouvrez pas le boîtier car cela peut endommager
le circuit ou causer un choc électrique. Si un objet
pénètre dans l’appareil, consultez votre revendeur ou
le SAV TEAC.
< Quand vous débranchez le cordon d’alimentation de
la prise secteur, tirez toujours la prise, jamais le cordon.
< N’essayez pas de nettoyer l’appareil avec des
dissolvants chimiques, cela peut endommager la
finition. Utilisez un chiffon propre et sec.
< Conservez ce livret dans un endroit sûr pour référence
ultérieure.
Guide de dépannage . . . . . . . . . . . . . . . . . . . . . . . . . . . . . . . . . 80
Caractéristiques techniques . . . . . . . . . . . . . . . . . . . . . . . . . . .82
44
Page 45

Disques(1)
NE DEPLACEZ PAS CET APPAREIL PENDANT LA
LECTURE
Pendant la lecture, le disque tourne à grande vitesse.
NE soulevez pas cet appareil et ne le déplacez pendant
la lecture. Vous risqueriez d’endommager ce disque.
CONSIGNES DE DEPLACEMENT DE CET APPAREIL
Lorsque vous changez de lieu d’installation ou lorsque
vous emballez cet appareil pour le déplacer, n’oubliez
pas de retirer le disque et de ramener le plateau à
disque à sa position d’origine dans ce lecteur. Ensuite,
appuyez sur l’interrupteur d’alimentation pour mettre
l’appareil hors tension et débranchez le cordon
d’alimentation. Si vous déplacez cet appareil alors qu’il
contient un disque, vous risquez de l’endommager.
< N’exposez pas cet appareil aux gouttes ni aux
éclaboussures.
< Ne placez pas d’objet rempli de liquide sur
l’appareil, comme par exemple un vase.
< N’installez pas cet appareil dans un espace confiné
comme une bibliothèque ou un meuble similaire.
< L’appareil tire un courant nominal de veille de la
prise secteur quand son interrupteur POWER ou
STANDBY/ON n’est pas en position ON.
< L’appareil doit être placé suffisamment près de
la prise de courant pour que vous puissiez à tout
moment attraper facilement la fiche du cordon
d’alimentation
< La fiche secteur est utilisée comme dispositif
de déconnexion et doit donc toujours rester
disponible.
< Si le produit utilise des batteries (y compris un
pack d’accus ou des piles), elles ne doivent pas
être exposées au soleil, au feu ou à une chaleur
excessive.
< Des précautions doivent être prises pour l’emploi
d’écouteurs ou d’un casque avec le produit car une
pression acoustique (volume) excessive dans les
écouteurs ou dans le casque peut provoquer une
perte d’audition.
Disques lisibles par cet appareil:
M CD audio conventionnels portant le logo COMPACT
DISC DIGITAL AUDIO.
M CD-R et CD-RW correctement finalisés
M CD de MP3 /WMA
Note:
< Selon la qualité du disque et/ou les conditions de la
gravure, certains CD-R/CD-RW peuvent ne pas être
lisibles.
< Les disques protégés contre la copie et les disques ne
se conformant pas au standard CD peuvent ne pas
être lus correctement par cet appareil. Si vous utilisez
de tels disques dans cet appareil, TEAC Corporation
et ses filiales ne peuvent être tenus pour responsables
d’aucune conséquence et ne garantissent pas
la qualité de reproduction. Si vous rencontrez des
problèmes avec de tels disques non standards, vous
devez contacter les fabricants du disque.
< Placez toujours le disque dans le lecteur avec ses
inscriptions sur le dessus. (Les Compact Discs ne
peuvent être lus ou enregistrés que sur une face.)
< Pour retirer un disque de son boîtier, appuyez sur la
rosace au centre du boîtier et sortez le disque, en le
tenant soigneusement par la tranche.
< En cas de salissure du disque, essuyez la surface de
façon radiale du trou central vers l’extérieur avec un
chiffon sec et doux.
< N’employez jamais de produits chimiques comme
des bombes pour disque, des bombes ou liquides
antistatiques, de la benzine ou du diluant pour
nettoyer les disques. Ils causeraient des dommages
irréparables à la surface plastique du disque.
45
FRANÇAIS
Page 46

Disques(2)
MP3 et WMA
< Les disques doivent être remis dans leur boîtier après
usage pour éviter la poussière et les rayures qui
pourraient causer des ”sauts” du capteur laser.
< N’exposez pas les disques directement au soleil ou
à une humidité et température élevées durant des
périodes prolongées. Une longue exposition à de
fortes températures fera se gondoler le disque.
< Ne faites pas reproduire un disque gondolé, déformé
ou endommagé. Faire reproduire de tels disques peut
causer des dommages irréparables aux mécanismes
de lecture.
< Les CD-R et CD-RW sont plus sensibles aux effets de la
chaleur et des rayons ultraviolets que les CD ordinaires.
Il est important de ne pas les conserver dans un lieu
soumis directement aux rayons du soleil, et de les tenir
éloignés de sources de chaleur comme des radiateurs
ou des appareils électriques producteurs de chaleur.
< Les disques imprimables ne sont pas recommandés
car la face avec étiquette peut être collante et risque
d’endommager l’appareil.
< Cette unité peut lire les fichiers MP3 enregistrés sur
divers supports de stockage USB externes tels qu’une
mémoire flash USB, un lecteur MP3 ou un disque dur.
Le disque dur doit être formaté en FAT 16 ou FAT 32,
pas en NTFS.
< Si plus de 2000 fichiers sont enregistrés dans la mémoire
USB, l’appareil risque de ne pas pouvoir les lire correctement.
< Le nom des fichiers MP3 ou WMA doit être constitué
de caractères alphanumériques. Cet appareil ne
peut pas correctement afficher les symboles ni les
caractères à double octet (Japonais, Chinois, etc.).
Veillez bien aussi à utiliser l’extension de fichier (“.mp3”
pour les fichiers MP3 et “.wma” pour les fichiers WMA.)
< Les fichiers MP3 sont au format MPEG-1 Audio Layer 3
mono ou stéréo. Cet appareil peut reproduire les fichiers
MP3 avec une fréquence d’échantillonnage de 44,1 kHz
ou 48 kHz et un débit binaire de 320 kbs ou moins.
< Cet appareil peut reproduire les fichiers WMA avec
une fréquence d’échantillonnage de 44,1 kHz et un
débit binaire de 192 kbs ou moins.
WMA signifie Windows Media Audio.
< L’audio encodé à 128 kbs doit avoir une qualité sonore
proche de celle d’un CD audio ordinaire. Bien que ce lecteur
puisse lire des morceaux MP3 à des débits binaires inférieurs,
la qualité sonore est alors notablement moins bonne.
< Ne collez pas de papiers ou de feuillets de protection
sur les disques et n’employez aucune bombe diffusant
un revêtement protecteur.
< Utilisez un stylo feutre doux à base d’huile pour
inscrire les informations du côté inscriptible. N’utilisez
jamais de stylo bille ou à pointe dure car cela pourrait
endommager la face enregistrée.
< N’employez jamais de stabilisateurs. L’emploi dans cet
appareil de stabilisateurs de CD disponibles dans le
commerce endommagera les mécanismes et conduira
à leur mauvais fonctionnement.
< N’employez pas de disque de forme particulière
(octogonal, en forme de coeur, de taille carte de visite,
etc.). Ce type de disque peut endommager l’appareil.
< En cas de doute sur l’entretien et le maniement d’un
CD-R/CD-RW disque, lisez les précautions données
avec le disque, ou contactez directement le fabricant
du disque.
46
Compatibilité avec les iPod
Cette unité peut être connectée aux modèles d’iPod
suivants et être utilisée avec eux.
iPod (5e génération)
iPod classic
iPod nano (1e à 5e génération)
iPod touch (1e à 3e génération)
< Vous ne pouvez pas utiliser les modèles suivants en
“Mode direct” du Mode d’affichage et pour la minuterie:
iPod (5e génération)
iPod nano (1e/2e génération)
Voir page 67 pour les informations sur le mode d’affichage.
< Cette unité ne peut pas produire la vidéo de l’iPod qui
lui est branché.
< Pour brancher l’iPod, utilisez le câble USB fourni avec l’iPod.
< Brancher un iPod shuffle à ce port ne permettra pas la
lecture.
Logiciel iPod compatible
Si votre iPod ne fonctionne pas avec l’CR-H500 ou
avec la télécommande, mettre à jour son logiciel peut
résoudre le problème.
Consultez le site Web Apple et téléchargez le dernier
logiciel pour iPod.
Page 47

Raccordement des antennes (AM/FM)
Antenne cadre AM intérieure
L’antenne cadre AM à hautes performances fournie avec
l’appareil est suffisante pour une bonne réception dans la
plupart des régions. Pour faire tenir l’antenne droite, fixez
la griffe sur la fente à la base de l’antenne.
Branchez les extrémités de l’antenne cadre aux prises
d’antenne AM.
Placez l’antenne sur une étagère ou suspendezla dans un encadrement de fenêtre, etc. et orientezla dans la direction qui donne la meilleure réception.
Éloignez autant que possible de l’antenne tous les fils
tels que les cordons secteur, les câbles d’enceinte ou
d’interconnexion.
Antenne AM
extérieure
Veillez bien à connecter
le fil noir au bornier
GND.
Antenne FM intérieure
Connectez l’antenne FM filaire à la prise FM 75Ω,
déployez-la et réglez votre station préférée (voir page 70).
Positionnez l’antenne à un endroit approprié tel qu’un
encadrement de fenêtre ou mur qui offre la meilleure
réception puis fixez-la en utilisant des punaises ou des
accessoires similaires.
FRANÇAIS
Antenne FM extérieure
Dans les zones où les signaux FM sont faibles, il peut être
nécessaire d’utiliser une antenne FM extérieure.
En général une antenne à 3 éléments suffira; si
vous résidez à un endroit où les signaux FM sont
particulièrement faibles, il peut être nécessaire d’utiliser
une antenne à 5 éléments ou plus.
< Si l’antenne cadre fournie ne permet pas une réception
satisfaisante (souvent en raison de l’éloignement de
l’émetteur, ou dans un immeuble en béton, etc.), il
peut être nécessaire d’utiliser une antenne AM
extérieure.
Utilisez une antenne AM haute qualité en vente dans
le commerce, ou sinon un fil isolé de plus de 5 m de
long. Dénudez une extrémité du cordon et raccordezle à l’entrée comme indiqué.
L’antenne filaire doit être fixée à l’extérieur ou
à l’intérieur près d’une fenêtre. Pour une meilleure
réception, raccordez la borne GND à une terre fiable.
Remarque :
Même quand vous utilisez une antenne AM extérieure, ne
déconnectez pas l’antenne AM cadre.
< Débranchez l’antenne FM intérieure lorsque vous
utilisez une antenne extérieure.
47
Page 48

Raccordement des enceintes
ENCEINTES
A
B
LINE
IN
CAISSON DE GRAVES
48
Page 49

Raccordement des enceintes
A
Les prises + (positives) du CR-H500 sont rouges
(pour l’enceinte droite) et blanches (pour l’enceinte
gauche). Les prises _ (négatives) pour les deux
enceintes sont noires.
Le côté + du câble d’enceinte est marqué pour
le distinguer du côté négatif. Connectez ce côté
marqué aux prises + rouge et blanche et le côté
sans marque aux prises _ noires du CR-H500 et des
enceintes.
ATTE NTI ON
< Pour éviter d’endommager les enceintes par l’entrée
soudaine d’un son de niveau élevé, assurez-vous de
mettre l’appareil hors tension avec de raccorder les
enceintes.
< Vérifiez l’impédance de vos enceintes. Branchez des
enceintes ayant une impédance d’au moins 6 ohms.
Pour les consommateurs européens
Conformément aux réglementations de sécurité
européennes, il n’est pas possible de brancher
des fiches banane dans les borniers d’enceinte
des modèles européens. Les orifices dans lesquels
s’insèrent les fiches banane ont été occultés par des
capuchons noirs. Branchez les enceintes à l’aide de
cosses à fourche ou de câbles nus. Si les capuchons
noirs sortent des borniers, remettez-les en place.
B
Prise SUBWOOFER OUT
Branchez ici un caisson de graves amplifié du
commerce.
< Préparez les câbles d’enceinte au raccordement en
les dénudant (en enlevant leur gaine extérieure) sur
un maximum de 10 mm (sous peine de risquer de
causer un court-circuit). Épissez le câble pour éviter
les brins épars :
Comment brancher
1. Dévissez le capuchon du bornier en le tournant dans
le sens anti-horaire. Il n’est pas possible de le retirer
complètement.
2. Insérez le câble dans le bornier et revissez le
capuchon en le tournant dans le sens horaire afin
que le câble soit bien en contact:
FRANÇAIS
FRANÇAIS
3. Assurez-vous que le câble est fixé solidement en
tirant légèrement dessus.
49
Page 50

Raccordements
A
Platine cassette,
enregistreur de CD, etc.
ATTE NTI ON
< Éteignez tous les appareils avant de faire les raccordements.
< Lisez les modes d’emploi de tous les éléments que vous comptez employer avec cet appareil.
< Assurez-vous que chaque fiche est bien enfoncée. Pour éviter tout ronflement ou bruit parasite, ne regroupez pas les
câbles de modulation avec le cordon d’alimentation ou les câbles d’enceinte.
B
LRLR
LINE
OUT
LINE
IN
C D
Tourne-disque
50
Page 51

Cordon d’alimentation secteur
A
Branchez ce cordon dans une prise secteur.
< Débranchez le cordon d’alimentation en cas de non
utilisation prolongée de l’appareil.
D
SIGNAL GND
Connectez le fil de terre du tourne-disque à ce
bornier.
< Ce n’est pas une terre de sécurité.
Prises AUX 1
B
Ces prises transmettent les signaux audio analogique
à 2 canaux. Raccordez les appareils à l’aide de câbles
Cinch (RCA) en vente dans le commerce.
Assurez-vous de connecter les câbles de la façon
suivante:
fiche blanche w prise blanche
(L: canal gauche)
fiche rouge w prise rouge
(R: canal droit)
Blanc (L)
Rouge (R)
Si vous désirez utiliser un enregistreur (par ex. une
platine cassette ou un enregistreur de CD, etc.) avec
l’CR-H500, reliez les prises de sortie de l’enregistreur
aux prises AUX 1 IN de l’CR-H500 et les prises d’entrée
de l’enregistreur aux prises AUX 1 OUT de l’CR-H500.
< Assurez vous que chaque fiche est bien enfoncée.
Pour éviter tout ronflement ou bruit parasite, ne
regroupez pas les câbles de modulation avec le
cordon d’alimentation secteur ou les câbles
d’enceinte.
Blanc (L)
Rouge (R)
< Si le fil de terre du tourne-disque n’est pas connecté
à cette prise, un ronflement peut se faire entendre.
FRANÇAIS
Prises PHONO
C
Connectez le cordon à fiches RCA du tourne-disque
aux prises PHONO.
Assurez-vous de connecter les câbles de la façon
suivante:
fiche blanche w prise blanche
(L: canal gauche)
fiche rouge w prise rouge
(R: canal droit)
< Assurez vous que chaque fiche est bien enfoncée.
Pour éviter tout ronflement ou bruit parasite, ne
regroupez pas les câbles de modulation avec le
cordon d’alimentation secteur ou les câbles
d’enceinte.
< Des cellules à aimant mobile (MM) peuvent être
employées avec cet appareil.
51
Page 52

Noms des commandes (appareil principal)
A
E
B
G H I J L NMKF
C
D
52
Page 53

A
MULTI JOG
En mode TUNER (syntoniseur), utilisez ce bouton
pour régler des stations ou sélectionner des stations
préréglées.
Elle sert aussi à sélectionner une station préréglée. En
mode iPod, utilisez-le pour faire défiler le menu.
En mode CD/USB, utilisez ce bouton pour sauter des
plages/fichiers d’un CD ou d’un périphérique USB
pendant la lecture ou en mode d’arrêt.
B
Capteur de télécommande
Pour utiliser la télécommande, pointez-la vers le
capteur de télécommande.
C
Écran
D
VOLUME
Tournez ce bouton pour régler le volume.
< Le niveau de volume est conservé même après
extinction de l’appareil.
E
STANDBY/ON
Appuyez sur cet interrupteur pour mettre l’appareil
sous ou hors tension.
L’indicateur de veille est allumé en rouge quand
l’appareil est en mode de veille. Quand l’unité est mise
sous tension, l’indicateur devient bleu.
F
PHONES
Pour bénéficier d’une écoute privée, insérez la fiche
d’un casque d’écoute dans cette prise et réglez le
volume en tournant le bouton VOLUME.
K
recherche (.m/,/)
En mode CD/USB, utilisez ces touches pour sauter
des plages/fichiers d’un CD ou d’un périphérique USB
pendant la lecture ou en mode d’arrêt. En mode iPod,
utilisez ces touches pour sauter des morceaux d’un
iPod pendant la lecture ou en mode pause.
Pendant la lecture maintenez ces touches pressées
pour rechercher une plage/fichier/morceau.
L
TUNING MODE, ENTER, ouverture/fermeture (L)
En mode FM ou AM, utilisez cette touche pour sélectionner
le mode de syntonisation.
Utilisez cette touche pour régler l’heure pendant le
réglage de la minuterie ou de l’horloge.
En mode iPod, utilisez cette touche pour valider une
sélection dans un menu.
En mode CD, utilisez cette touche pour ouvrir ou
fermer le plateau à disque.
M
RDS, arrêt (H)
En mode TUNER FM, utilisez cette touche pour
sélectionner un mode RDS.
En mode USB/CD, utilisez cette touche pour arrêter la
lecture.
N
BAND, lecture/pause (y/J)
Utilisez cette touche pour sélectionner FM ou AM.
En mode USB/iPod, utilisez cette touche pour démarrer
ou suspendre temporairement la lecture sur l’iPod ou
le périphérique USB.
En mode CD, utilisez cette touche pour démarrer ou
suspendre temporairement la lecture d’un CD.
FRANÇAIS
G
AUX 2 IN
Connectez un appareil tel qu’un lecteur audio portable
en utilisant un
H
Prise USB
câble stéréo à fiche min de 3,5 mm.
Connectez un iPod ou un périphérique USB à mémoire
extérieur à cette prise.
I
SOURCE
Utilisez cette touche pour sélectionner une source.
J
MENU/FM MODE
Utilisez cette touche pour revenir au menu précédent
de l’iPod. Cette touche est équivalente à la touche
MENU de votre iPod.
En mode FM, utilisez cette touche pour sélectionner
stéréo ou mono.
53
Page 54

Noms des commandes (télécommande)
a
STANDBY/ON
a
p
Appuyez sur cette touche pour mettre l’appareil sous
tension ou en veille.
b
q
c
r
d
e
s
f
g
h
i
j
k
l
t
u
v
m
w
n
o
b
TUNER, CD, iPod/USB, AUX 1/2, PHONO
Utilisez ces touches pour sélectionner une source.
c
TIME SET
Utilisez cette touche pour régler l’horloge et la
minuterie.
d
TONE
Utilisez cette touche conjointement avec la touche
de défilement (˙ ou ¥) pour régler les graves et les
aigus.
e
TIMER
Utilisez cette touche pour activer/désactiver la
minuterie.
f
FM MODE
En mode FM, utilisez cette touche pour choisir stéréo
ou mono.
g
REPEAT 1/ALL
En mode USB/iPod, utilisez cette touche pour régler la
lecture répétée sur l’iPod ou le périphérique USB.
En mode CD, utilisez cette touche pour régler la
lecture répétée sur le
CD.
54
h
SHUFFLE
En mode USB/iPod, utilisez cette touche pour démarrer
la lecture aléatoire sur l’iPod ou le périphérique USB.
En mode CD, utilisez cette touche pour démarrer la
lecture aléatoire d’un
i
arrêt (H)
En mode USB, utilisez cette touche pour arrêter la
lecture du périphérique USB.
En mode CD, utilisez cette touche pour arrêter la
lecture du
j
PROGRAM
En mode USB/iPod, utilisez cette touche pour entrer
en mode de lecture programmée du périphérique
USB.
En mode CD, utilisez cette touche pour entrer en
mode de lecture programmée du
En mode de lecture programmée, utilisez cette touche
pour entrer une sélection.
En mode TUNER, utilisez cette touche pour prérégler
des stations.
CD.
CD.
CD.
Page 55

k
lecture/pause (y/J)
En mode USB/iPod, utilisez cette touche pour démarrer
ou suspendre temporairement la lecture sur l’iPod ou
le périphérique USB.
En mode CD, utilisez cette touche pour démarrer ou
suspendre temporairement la lecture d’un
CD.
u
CLEAR
Utilisez cette touche pour annuler des plages/fichiers
en mode de lecture programmée.
v
VOLUME
Utilisez ces touches pour régler le niveau de volume.
l
MUTING
Utilisez cette touche pour couper le son.
m
MENU
Utilisez cette touche pour revenir au menu précédent
de l’iPod. Cette touche est équivalente à la touche
MENU de votre iPod.
n
ENTER
Utilisez cette touche pour choisir l’heure quand vous
réglez la minuterie ou l’horloge.
o
recherche (.//)
En mode CD/USB, utilisez ces touches pour sauter
des plages/fichiers d’un CD ou d’un périphérique USB
pendant la lecture ou en mode d’arrêt. En mode iPod,
utilisez ces touches pour sauter des morceaux d’un
iPod pendant la lecture ou en mode pause.
p
RECORD
Utilisez cette touche pour lancer l’enregistrement sur
USB.
q
DIMMER
Utilisez cette touche pour atténuer la luminosité
d’écran.
défilement (˙/¥)
w
En mode USB/iPod, utilisez ces touches pour
sélectionner un dossier ou fichier USB.
Ou utilisez-les pour faire défiler le menu de l’iPod.
Après avoir appuyé sur la touche TONE, ces touches
servent à régler les graves et les aigus.
FRANÇAIS
r
SLEEP
Utilisez cette touche pour régler la minuterie
d’extinction.
s
INFO/RDS
En mode TUNER FM, utilisez cette touche pour
sélectionner un mode RDS.
Veuillez ignorer la touche “INFO” sur la télécommande.
(La fonction INFO ne peut pas être utilisée sur cet
appareil.)
t
DISPLAY
Utilisez cette touche pour changer les informations
affichées durant la lecture sur USB/iPod.
55
Page 56

Boîtier de télécommande
Le boîtier de télécommande fourni permet la commande
à distance de l’appareil.
Pour utiliser le boîtier de télécommande, pointez-le
vers le capteur de télécommande du panneau avant de
l’appareil.
< Même si le boîtier de télécommande est employé à
portée de fonctionnement, la commande à distance
peut être impossible s’il y a des obstacles entre
l’appareil et le boîtier de télécommande.
< Si le boîtier de télécommande est employé à proximité
d’autres appareils générant des rayons infrarouges,
ou si d’autres télécommandes utilisant des rayons
infrarouges sont utilisées près de l’appareil, ce dernier
peut ne pas bien fonctionner.
Dans la situation inverse, les autres appareils peuvent
ne pas bien fonctionner.
Mise en place des piles
1. Retirez le couvercle du compartiment des piles.
2. Insérez deux piles sèches “AAA”. Assurez-vous que
les piles sont correctement insérées et respectent les
polarités plus “+” et moins “_”.
Précautions à observer concernant
les piles
< Assurez-vous d’insérer les piles en respectant les
polarités plus “+” et moins “_”.
< Utilisez des piles du même type. N’utilisez jamais des
types de pile différents ensemble.
< Des piles ou des batteries rechargeables peuvent
être utilisées. Référez-vous à leurs étiquettes pour les
précautions à respecter.
< Si la télécommande ne doit pas être utilisée durant
une période prolongée (plus d’un mois), retirez ses
piles pour éviter qu’elles ne coulent.
< Si les piles coulent, essuyez le liquide dans le
compartiment des piles et remplacez les piles par des
neuves.
< N’utilisez pas d’autres piles que celles spécifiées. Ne
mélangez pas des piles neuves avec des anciennes et
n’utilisez pas ensemble des types de pile différents.
< Ne chauffez pas et ne démontez pas les piles et ne les
jetez jamais dans un feu ou dans de l’eau.
3. Refermez le couvercle.
Remplacement des piles
Si vous remarquez que la distance de fonctionnement
correct entre le boîtier de télécommande et l’appareil
se réduit, c’est que les piles sont usées. Dans ce cas,
remplacez-les par des neuves.
< Pour plus d’informations sur la collecte des piles
usagées, veuillez contacter votre mairie, votre service
d’ordures ménagères ou le point de vente dans lequel
vous avez acheté les articles.
< Ne conservez et ne transportez pas les piles avec
d’autres objets métalliques. Une pile pourrait entrer en
court-circuit, couler ou exploser.
< Ne rechargez jamais une batterie sans avoir vérifié
qu’elle peut l’être.
56
Page 57

Fonctionnement de base (1)
C
C
Réglage du volume
Pour protéger les enceintes et éviter qu’elles ne
reçoivent brusquement un son de volume élevé,
augmenter progressivement le volume jusqu’à ce
que vous atteigniez le niveau désiré avec le bouton
VOLUME.
A
A
Comment allumer ou éteindre l’appareil
Appuyez sur l’interrupteur
l’appareil sous ou hors tension.
Si vous utilisez la fonction de contrôle du système,
réglez cet interrupteur sur On et mettez le système en
service/veille depuis la télécommande.
L’indicateur Veille/On devient bleu quand l’appareil est
mis en service.
< Quand vous allumez le système, la dernière source
sélectionnée démarre automatiquement sa lecture.
B
Comment sélectionner la source
Chaque fois que vous appuyez sur la touche SOURCE,
le mode change comme suit:
B
STANDBY/ON pour mettre
Indicateur Veille/On
D
Coupure du son
Pour couper le son provisoirement, appuyez sur la
touche MUTING. Pour annuler la coupure du son,
appuyez de nouveau sur la touche MUTING ou
changez le réglage du volume.
E
Atténuateur de luminosité (Dimmer)
Appuyez sur la touche DIMMER pour atténuer
l’affichage.
Appuyez à nouveau pour annuler la fonction
d’atténuation.
FRANÇAIS
TUNER USB/iPod PHONO
CD AUX2 AUX1
Ou appuyez sur la touche TUNER, iPod/USB, PHONO,
AUX 1/2 ou CD de la télécommande pour directement
sélectionner la source.
< Cette fonction est annulée à l’extinction de l’appareil.
57
Page 58

Fonctionnement de base (2)
F
Écoute au casque
Insérez la fiche du casque dans la prise PHONES et
réglez le volume. Le son des enceintes et du caisson
de graves sera coupé.
Lecture de disque
4
G
Comment régler les graves et les aigus
Vous pouvez régler le son des graves et des aigus
entre “-10” et “+10”.
Appuyez répétitivement sur la touche TONE pour
sélectionner BASS ou TREBLE. Puis, appuyez sur les
touches de défilement (˙/¥) avant 5 secondes pour
ajuster le niveau du son.
1
1
Appuyez sur la touche STANDBY/ON pour mettre
l’appareil en marche.
L’indicateur de veille/sous tension passe de l’orange
au bleu.
“No disc” apparaît s’il n’y a pas de disque dans le
lecteur.
2
Appuyez sur la touche SOURCE pour sélectionner
“CD”.
2
3 5
6
Indicateur de
veille/sous tension
58
3
Appuyez sur la touche d’ouverture/fermeture
(L).
Page 59

4
Placez un disque sur le plateau avec la face
imprimée dirigée vers le haut.
< Le disque doit être centré dans le plateau. Si le disque
n’est pas correctement positionné, le tiroir risque de
ne pas pouvoir s’ouvrir après s’être refermé.
Appuyez sur la touche lecture/pause (y/J) pour
6
démarrer la lecture.
La lecture du disque commence par la première plage/
fichier.
CD audio
CD/Play
T003 00:42
< Ne mettez jamais plus d’un disque sur le plateau.
< Ne collez pas d’étiquettes ni de ruban adhésif sur le
disque.
< N’utilisez pas des disques avec des formes irrégulières.
5
Appuyez sur la touche d’ouverture/fermeture
(L) pour fermer le plateau.
< Tenez vos doigts à l’écart du plateau à disque quand il
bouge pour éviter de vous les faire coincer.
< Il faut quelques secondes à l’appareil pour charger
un disque. Aucune touche ne fonctionne pendant
le chargement. Attendez que le nombre total de
plages/fichiers et la durée totale de lecture du disque
apparaissent.
CD audio
Le nombre total de plages et la durée totale de lecture
du disque apparaissent.
CD/Stop
T016 72:00
Numéro de la plage
en cours
Disque MP3/WMA
Temps écoulé de la plage
en cours
CD/Play
T003 00:42 MP3
Numéro du fichier actuel
< Les fichiers MP3/WMA enregistrés en dehors des
dossiers sont mis automatiquement dans le dossier
“ROOT“, et la lecture démarre à partir du premier
fichier du dossier ROOT.
< S’il y a des dossiers qui ne contiennent pas de fichier
MP3/WMA, cet appareil les saute.
< Pendant la lecture du fichier MP3/WMA, “title_artist_
album” défile sur l’affichage.
< L’appareil s’arrête automatiquement quand la lecture
de toutes les plages/fichiers est terminée.
< Si vous changez un disque puis appuyez sur la touche
lecture/pause (y/J) (ou sur la touche SHUFFLE de la
télécommande) sans avoir d’abord fermé le plateau à
disque, le plateau à disque se ferme automatiquement
et la lecture démarre.
FRANÇAIS
Disque MP3/WMA
Le nombre total de fichiers du disque apparaît.
CD/Stop
Total file 010
59
Page 60

Lecture USB
1
Lecture générale (disque/USB)
ED
3
AC B
Vous pouvez reproduire des fichiers MP3/WMA en
branchant divers dispositifs externes de stockage USB tels
qu’une mémoire flash USB.
1
Appuyez répétitivement sur la touche SOURCE
afin de sélectionner “USB/iPod”.
“Not connected” s’affichera si aucun dispositif USB
n’est branché.
2
Branchez le dispositif externe de stockage USB à
l’appareil.
Quand un disque dur est branché à cet appareil, il
peut falloir plusieurs minutes pour afficher le nombre
de fichiers.
A
Pour arrêter la lecture
Appuyez sur la touche d’arrêt (H) pour arrêter la
lecture.
Pour reprendre la lecture, appuyez sur la touche de
lecture/pause (y/J).
La lecture commence par la première plage/fichier.
B
Pour arrêter provisoirement la lecture (mode de
pause)
Appuyez sur la touche lecture/pause (y/J) pendant
la lecture. La lecture est interrompue à la position
actuelle.
Pour reprendre la lecture, appuyez sur la touche de
lecture/pause (y/J).
3
Appuyez sur la touche lecture/pause (y/J).
60
C
Pour éjecter le disque
Quand vous appuyez sur la touche d’ouverture/
fermeture (L), la lecture s’arrête et le plateau s’ouvre.
Après l’éjection du disque, fermez le plateau en
appuyant sur la touche d’ouverture/fermeture (L).
< Quand CD est sélectionné comme source, il est
possible d’éjecter le disque.
Page 61

Recherche de dossier
D
Pour passer directement à la plage/fichier suivant
ou précédent
Pendant la lecture, appuyez répétitivement sur les
touches de saut/balayage (.m/,/) jusqu’à
ce que la plage/fichier désiré soit trouvé. La plage ou
le fichier sélectionné est reproduit à partir du début.
Sur la télécommande, utilisez les touches de saut
(.//).
En mode d’arrêt ou de pause, appuyez répétitivement
sur les touches de saut/balayage (.m/,/)
jusqu’à ce que vous trouviez la plage/fichier souhaité.
Appuyez sur la touche lecture/pause (y/J ) pour
démarrer la lecture de la plage/fichier sélectionné.
< Si vous appuyez sur la touche . pendant la lecture,
la plage/fichier en cours de lecture est reproduite de
nouveau à partir du début. Pour revenir au début de
la plage/fichier précédent, appuyez deux fois sur la
touche ..
Vous pouvez choisir un dossier et fichier pendant la
lecture ou à l’arrêt.
1
Appuyez sur les touches de défilement (˙/¥)
pour sélectionner un dossier.
2
Appuyez sur la touche ENTER.
FRANÇAIS
< Pendant la lecture programmée, la plage/fichier
suivant ou précédent du programme est reproduit.
E
Recherche d’un passage sur une plage/fichier
Pendant la lecture, maintenez pressée la touche de
saut/balayage (.m /,/) , puis relâchez-la
quand vous avez atteint le passage que vous souhaitez
écouter.
< En mode USB, aucun son n’est sorti pendant la
recherche.
< L’appareil s’arrête quand la fin de la dernière plage/
fichier est atteinte.
3
Si vous souhaitez choisir un fichier, appuyez sur
les touches de défilement (˙/¥).
< La sélection se déplace dans le dossier.
4
Appuyez sur la touche ENTER.
La lecture commence à partir du fichier sélectionné.
61
Page 62

Lecture programmée
Un maximum de 32 plages/fichiers peuvent être
programmées dans l’ordre souhaité.
1
Appuyez à l’arrêt sur la touche PROGRAM.
Quand CD est sélectionné
P-00 T000
T016 72:00
Quand USB est sélectionné
P00 T0000
Total File 0130
2
Appuyez sur les touches de défilement (˙/¥)
pour sélectionner une plage ou un fichier.
3
Avant 5 secondes, appuyez sur la touche
PROGRAM.
Quand CD est sélectionné
P-01 T012
T016 72:00
Quand USB est sélectionné
P01 T0012
Total File 0130
< Répétez les étapes 2 et 3 pour programmer d’autres
plages/fichiers.
< Si vous avez fait une erreur, appuyez sur la touche
CLEAR. Le dernier numéro programmé sera supprimé.
< Un maximum de 32 plages/fichiers peuvent être
programmées. Si vous essayez de programmer plus
de 32 plages/fichiers, “P-FULL” (le programme est
complet) est affiché pour indiquer que plus aucune
plage/fichier ne peut être programmée.
Quand CD est sélectionné
P-01 T002
T016 72:00
Quand USB est sélectionné
P01 T0012
Total File 0130
62
4
Une fois la programmation terminée, appuyez
sur la touche lecture/pause (y/J) pour lancer la
lecture programmée.
Quand la lecture de toutes les plages/fichiers
programmées est terminée, ou si vous appuyez sur la
touche d’arrêt (H) ou la touche STANDBY/ON, le mode
de lecture programmée est annulé.
< Si l’appareil est débranché de l’alimentation secteur, le
contenu programmé est effacé.
Page 63

Pour vérifier l’ordre programmé
À l’arrêt, appuyez répétitivement sur la touche
PROGRAM. Le numéro de plage/fichier et le numéro
d’ordre du programme apparaissent sur l’affichage.
Pour changer ou ajouter une plage/
fichier au programme
Pour supprimer une plage/fichier du
programme
À l’arrêt, appuyez répétitivement sur la touche
PROGRAM jusqu’à ce que s’affiche la position à
supprimer dans le programme, puis appuyez sur la
touche CLEAR. La plage ou le fichier sélectionné est
supprimé du programme.
Pour effacer le programme
1. À l’arrêt, appuyez répétitivement sur la touche
PROGRAM.
FRANÇAIS
En mode d’arrêt, appuyez répétitivement sur la
touche PROGRAM jusqu’à ce que le numéro d’ordre
du programme pour lequel vous souhaitez changer
une plage/fichier apparaisse sur l’affichage. Puis,
sélectionnez une plage/fichier en utilisant les touches
de défilement (5/b). La plage/fichier précédente est
remplacée par la nouvelle plage/fichier sélectionnée.
Si vous souhaitez ajouter une plage/fichier à la
fin du programme, appuyez répétitivement sur la
touche PROGRAM jusqu’à ce que “P-END” apparaisse
brièvement sur l’affichage. Puis, sélectionnez une
plage/fichier en utilisant les touches de défilement (5/
b). La plage ou le fichier est ajouté au programme.
2.
Maintenez enfoncée la touche CLEAR plus de 4 secondes.
< Dans les cas suivants, le contenu programmé est aussi
annulé:
appuyer sur la touche STANDBY/ON
ouvrir le plateau à disque
déconnecter le cordon d’alimentation
63
Page 64

Lecture aléatoire
Lecture en boucle
Quand vous appuyez sur la touche SHUFFLE, les plages/
fichiers du disque ou du périphérique USB sont reproduits
aléatoirement.
Quand CD est sélectionné
CD/Random
T003 00:07
Quand USB est sélectionné
USB/Random
T0003 00:07 WMA
< Si vous appuyez sur la touche / pendant la lecture
aléatoire, la plage/fichier suivant est sélectionné de
façon aléatoire et reproduite. Si vous appuyez sur la
touche ., la plage ou le fichier en cours de lecture
est reproduit de nouveau à partir du début. Une plage
ou un fichier ne peut pas être reproduit répétitivement
pendant la lecture aléatoire.
<
Pour annuler la lecture aléatoire, appuyez sur la touche
SHUFFLE.
Chaque fois que vous appuyez sur la touche REPEAT 1/ALL,
le mode change comme suit :
RPT 1 (répétition d’une plage/fichier)
RPT Folder (répétition de dossier)
(Uniquement les fichiers MP3/WMA)
RPT ALL (répétition de toutes les plages/fichiers)
(Répétition hors service)
< Quand vous appuyez sur la touche d’arrêt (H) le mode
de lecture répétée est annulé.
Répétition d’une plage/fichier (RPT 1)
La plage ou le fichier en cours de lecture est reproduit
de façon répétée. Si vous sélectionner une autre plage
ou un autre fichier en mode “RPT 1”, la plage ou le
fichier sélectionné est reproduit répétitivement.
Si vous sélectionnez le mode “RPT 1” pendant le mode
d’arrêt puis que vous choisissez une plage/fichier, la
plage/fichier sélectionné est reproduit répétitivement.
< Pour arrêter la lecture aléatoire, appuyez sur la touche
d’arrêt
(H).
64
Répétition de dossier (RPT Folder) (fichiers MP3/
WMA uniquement)
Tous les fichiers du dossier sont reproduits
répétitivement. Si vous sélectionnez un autre dossier
en mode “RPT Folder” les fichiers dans le dossier sont
reproduits répétitivement.
< Vous ne pouvez pas sélectionner le mode “RPT Folder”
en mode d’arrête.
Répétition de tous les morceaux (RPT ALL)
Toutes les plages/fichiers sont reproduites répétitivement.
< En mode de lecture programmée, le contenu du
programme est reproduit de façon répétée.
Page 65

Affichage
Pendant la lecture, appuyez répétitivement sur la touche
DISPLAY pour changer les informations sur l’affichage.
CD audio
L’affichage change comme suit:
le numéro de la plage actuelle et la durée écoulée de la
plage actuelle
CD/Play
T003 00:42
le numéro de la plage actuelle et la durée restante de la
plage actuelle
Écoute d’iPod (1)
1
Appuyez répétitivement sur la touche SOURCE
afin de sélectionner “USB/iPod”.
2
Branchez votre iPod à l’aide du câble USB fourni
avec l’iPod.
L’iPod se met automatiquement sous tension et
démarre la lecture à partir de sa liste de titres.
Si l’iPod est branché alors que l’
une autre source, l’iPod s’allume et passe en mode
pause.
CR-H500 est réglé sur
FRANÇAIS
CD/Play
T003 -03:02
Fichiers MP3/WMA:
Affichage par défaut (défilement):
Titre - le nom de l’artiste - le nom de l’album
L’affichage change comme suit:
Affichage par défaut (défilement)
Numéro du fichier actuel et durée de lecture écoulée
Nom du fichier
Titre
Nom de l’artiste
Nom de l’album
< La batterie de l’iPod sera entièrement rechargée si
l’iPod est connecté avec l’
< Quand l’iPod est branché à l’
de l’iPod ne produit plus de son.
Pour écouter au casque, branchez ce dernier à la prise
PHONES de l’
CR-H500.
CR-H500 sous tension.
CR-H500, la prise casque
65
Page 66

Écoute d’iPod (2)
Pour mettre la lecture en pause
Pendant la lecture, appuyez sur la touche lecture/
pause (G/J) pour mettre en pause. La lecture s’arrête
à la position actuelle.
Pour reprendre la lecture, appuyez de nouveau sur la
touche lecture/pause (G/J).
Pour sauter au morceau suivant ou
précédent
Recherche d’un passage de morceau
Pendant la lecture, maintenez pressée la touche de
recherche (.//) puis relâchez-la lorsque vous
avez atteint le passage que vous souhaitez écouter.
Pour retourner au menu précédent
Pendant la lecture ou en mode de pause, appuyez
répétitivement sur les touches de saut (.//)
jusqu’à ce que le morceau désiré soit trouvé.
< Si la touche . est pressée durant la lecture, la
lecture du morceau en cours reprend au début. Si
vous souhaitez reproduire les morceaux précédents,
appuyez deux fois ou plus sur la touche ..
66
Appuyez sur la touche MENU pour revenir au menu
précédent.
Cette touche est équivalente à la touche MENU de
votre iPod.
Sélectionnez l’option de menu
Appuyez sur les touches de défilement (˙/¥) de la
télécommande pour arriver à l’option de menu voulue,
puis appuyez sur la touche ENTER.
Page 67

Lecture en boucle
Chaque fois que vous appuyez sur la touche REPEAT
1/ALL, le mode change comme suit:
Lecture (lecture normale)
RPT 1 (répétition d’un morceau)
RPT ALL (répétition de tous les morceaux de la liste)
Lecture aléatoire
Changement du mode d’affichage
Vous pouvez choisir l’écran de l’iPod ou l’affichage du CRH500 pour afficher le menu.
Quand l’iPod est connecté, maintenez enfoncée la
touche MENU plus de 4 secondes pour choisir quel
affichage utiliser.
Mode direct (par défaut)
Sélectionnez ce mode pour utiliser l’écran de l’iPod.
Le menu apparaît sur l’écran de l’iPod.
L’écran de l’CR-H500 affiche constamment “Direct
Mode”.
Mode étendu
Sélectionnez ce mode pour utiliser l’écran de l’CRH500.
Les informations sur les morceaux sont affichées sur
l’affichage du CR-H500.
FRANÇAIS
Pendant la lecture, appuyez sur la touche SHUFFLE
pour passer en mode aléatoire.
RDM o
RDM Songs
RDM Album
Si vous sélectionnez “RDM Songs”, l’iPod lit
aléatoirement les morceaux de la liste que vous avez
choisie de reproduire.
Si vous sélectionnez “RDM Album”, l’iPod reproduit
tous les morceaux de l’album dans l’ordre, puis
sélectionne aléatoirement un autre album dans la liste
et reproduit ses titres dans l’ordre.
< Les noms des morceaux/albums/artistes doivent
être composés de caractères alphanumériques.
Cet appareil ne peut pas correctement afficher les
symboles ni les caractères à double octet (Japonais,
Chinois, etc.).
67
Page 68

Avant l’enregistrement
Enregistrement sur USB
ATTE NTI ON
< Ne débranchez pas le périphérique USB à mémoire
durant l’enregistrement.
Ne débranchez pas le cordon d’alimentation durant
l’enregistrement.
Cela pourrait endommager les produits.
< Réglez le volume de la source audio externe à un
niveau convenable avant d’enregistrer. Sinon, la qualité
d’enregistrement sera mauvaise.
Note
< Les fichiers enregistrés sont sauvegardés dans le
dossier AUDIO.
< Le NOM DU FICHIER est automatiquement donné sous
forme d’une séquence régulière du type “Audio001.
MP3”, “Audio002. MP3”, …….
Par exemple:
S’il existe des fichiers “Audio004.MP3” et “Audio009.
MP3” dans le dossier AUDIO et si vous faites un
enregistrement, le nouveau fichier s’appellera
“Au dio 010. MP3 ”.
< Avant d’enregistrer, vérifiez la mémoire disponible
sur le dispositif de stockage USB à l’aide de votre
ordinateur.
Cet appareil ne permet pas de vérifier la mémoire
encore disponible.
Vous pouvez enregistrer une source de radiodiffusion
et un appareil externe sous forme de fichiers MP3 sur le
périphérique USB à mémoire.
1
Branchez le dispositif de stockage USB externe
au prise USB de l’
2
Sélectionnez une source à enregistrer.
< iPod/USB ne peuvent pas être sélectionnées.
3
Appuyez sur la touche RECORD.
CR-H500.
< Cet appareil peut enregistrer jusqu’à 2000 fichiers sur
le support USB.
< La durée maximale d’un fichier enregistré est de
90 minutes et un nouveau fichier est créé quand la
durée dépasse 90 minutes.
est créé, l’enregistrement fait une pause pendant
quelques secondes.
< Vous ne pouvez pas enregistrer de la musique à partir
d’un iPod.
< Une plage enregistrée sur un périphérique USB à
mémoire est convertie en fichier MP3 avec un débit
binaire de 128 kbps.
Quand un nouveau fichier
68
L’enregistrement démarre.
< Vous ne pouvez pas enregistrer sur un périphérique
USB à mémoire s’il n’a pas d’espace libre ou s’il est
verrouillé.
Pour arrêter l’enregistrement
Appuyez sur la touche d’arrêt (H).
Page 69

Suppression d’un fichier sur support USB
Vous pouvez supprimer un fichier sur le périphérique USB
à mémoire extérieur.
1
En mode d’arrêt, appuyez sur les touches de
défilement (˙/¥) pour sélectionner un dossier.
2
Appuyez sur la touche ENTER.
5
Avant 3 secondes, appuyez sur la touche CLEAR.
< Le mode de suppression sera annulé si vous n’appuyez
pas sur la touche CLEAR dans les 3 secondes.
FRANÇAIS
3
Appuyez sur les touches de défilement (˙/¥)
pour sélectionner le fichier que vous souhaitez
supprimer du périphérique USB.
4
Maintenez enfoncée la touche CLEAR plus de 4
secondes.
“Delete?” (supprimer?) s’affiche.
69
Page 70

Écoute d’une émission FM/AM
4
1
Appuyez répétitivement sur la touche
SOURCE afin de sélectionner le mode TUNER
(syntoniseur).
2
Sélectionnez FM ou AM en appuyant
répétitivement sur la touche BAND.
3
Sélectionnez le mode de syntonisation souhaité.
Chaque fois que vous appuyez sur la touche TUNING
MODE, le mode de syntonisation change comme suit:
1
Sélectionnez la station que vous souhaitez
4
écouter.
Mode de syntonisation manuelle
Tourn ez le bouton
ayez trouvé la station que vous souhaitez écouter.
Avec la télécommande, appuyez répétitivement sur les
touches de défilement (˙/¥).
La fréquence change par pas fixes (FM: 50 kHz, AM: 9
kHz).
Mode de syntonisation automatique
Tourn ez
automatique.
Dès qu’une station est trouvée, l’appareil accorde la
station automatiquement. Répétez cette étape jusqu’à
ce que vous ayez trouvé la station souhaitée.
23
MULTI JOG jusqu’à ce que vous
MULTI JOG pour lancer la syntonisation
Syntonisation manuelle
Auto Tune (syntonisation automatique)
Sélection d’un préréglage
70
< Appuyez sur la touche ENTER pour arrêter la
syntonisation automatique.
Appuyez sur la touche ENTER pour arrêter la
syntonisation.
Tournez la molette
fréquence préréglée.
Avec la télécommande, appuyez répétitivement sur les
touches de saut (.//).
Vous obtenez la station dont la fréquence est
préréglée.
MULTI JOG pour sélectionner une
Page 71

Sélection d’un préréglage (1)
Mode FM
Vous pouvez sélectionner Stéréo ou Mono en
appuyant sur la touche FM MODE quand un
programme FM stéré est syntonisé.
Stéréo:
Les émissions stéréo FM sont reçues en stéréo et “ST”
est affiché.
Quand un signal diffusé ne peut pas être syntonisé, le
son est coupé.
FM/ST 10:00
108.00MHz
Préréglage automatique (FM/AM)
Vous pouvez mémoriser un maximum de 30 stations FM
et de 30 stations AM.
1
Sélec tionnez FM o u AM en appuyant rép étit ivement
sur la touche TUNER.
2
Maintenez enfoncée la touche PROGRAM plus de
3 secondes.
FRANÇAIS
Mono:
Sélectionnez ce mode quand le signal est faible.
La réception est forcée en mono, ce qui réduit les
parasites indésirables.
Quand vous essayez d’écouter une autre émission
mais que le signal ne peut pas être syntonisé, le mode
FM change sur Stéréo et le son est coupé.
Un maximum de 30 stations parmi les mieux captées
de votre région sont mémorisées automatiquement.
71
Page 72

Sélection d’un préréglage (2)
Préréglage manuel (AM/FM)
1
Sélec tionnez AM ou FM en a ppuyant rép étit ivement
sur la touche TUNER.
2
Réglez la station que vous souhaitez mémoriser.
Reportez-vous à la page 70 pour la procédure de
syntonisation.
3
Appuyez sur la touche PROGRAM.
5
Avant 4 secondes, appuyez sur la touche PROGRAM.
La station est mémorisée.
< Pour mémoriser d’autres stations, répétez les étapes
5
à
.
< Si vous n’appuyez pas sur la touche
les 4 secondes après avoir sélectionné le numéro de
préréglage, le préréglage est annulé.
PROGRAM dans
2
FM
10:00
CH__ 108.00MHz
4
Dans les 4 secondes, sélectionnez le numéro de
préréglage (preset) pour cette station.
Appuyez sur les touches de défilement (5/b).
FM
10:00
CH12 108.00MHz
72
Page 73

RDS
Le système RDS (Radio Data System) est un service
de diffusion qui permet aux stations d’envoyer des
informations supplémentaires en même temps que le
programme radio normal.
Le RDS ne fonctionne sur la bande FM qu’en Europe.
1
Réglez-vous sur une station FM (voir page 70).
2
Appuyez sur la touche RDS.
Chaque fois que vous appuyez sur la touche RDS, le
mode RDS change comme suit:
PROGRAM SERVICE (Affichage du nom de la station)
Lorsque vous sélectionnez “PROGRAM SERVICE”,
“PROGRAM SERVICE” clignote pendant à peu près 3
secondes puis le nom du service de programme ou de
la station s’affiche. S’il n’y a pas de données de service
de programme, c’est la fréquence qui s’affichera.
TRAFFIC ANNOUNCE (Infos trafic)
Lorsque vous sélectionnez “TRAFFIC ANNOUNCE”,
“TRAFFIC ANNOUNCE” clignote pendant 3 secondes
puis l’appareil recherche des infos sur le trafic routier.
< Si un programme d’infos trafic est trouvé, le mode
TRAFFIC ANNOUNCE laisse la place au mode
PROGRAM SERVICE.
Si la station actuellement sélectionnée transmet
un programme d’infos trafic, le mode RDS bascule
en mode PROGRAM SERVICE sans rechercher de
programme d’infos trafic.
L’horloge de cet appareil est automatiquement réglée
par les données d’horloge CLOCK TIME (CT).
Si vous captez une station RDS diffusant des données
CT incorrectes, l’horloge peut être mal réglée et
risquer au final d’affecter le fonctionnement de la
minuterie.
Si vous ne voulez pas que l’horloge de cet appareil
soit réglée par les données CT, désactivez le réglage
automatique d’horloge.
< Quel que soit le mode RDS sélectionné, l’appareil
reçoit les données CT et règle l’horloge en
conséquence.
Pour désactiver le réglage automatique
d’horloge, maintenez la touche RDS enfoncée
plus de 8 secondes.
FRANÇAIS
PROGRAM TYPE (Type de programme)
Lorsque vous sélectionnez “PROGRAM TYPE”,
“PROGRAM TYPE” clignote pendant à peu près 3
secondes puis le type de programme s’affiche.
CLOCK TIME (Horloge)
Affiche l’heure émise par la station.
Lorsque vous sélectionnez “CLOCK TIME”, “RDS CLOCK
TIME” clignote pendant à peu près 3 secondes puis
l’heure s’affiche.
RADIO TEXT (Texte radio)
Lorsque vous sélectionnez “RADIO TEXT”, “RDS RADIO
TEXT” clignote pendant à peu près 3 secondes puis les
informations de station composées au maximum de
64 symboles s’affichent.
S’il n’y a pas de données de texte radio, le mode
RDS bascule automatiquement en mode PROGRAM
SERVICE.
< Pour réactiver le réglage automatique d’horloge,
maintenez la touche RDS enfoncée plus de 8
secondes.
< Quand le réglage automatique d’horloge est
désactivé, CLOCK TIME n’est pas affiché.
73
Page 74

Recherche d’un type de programme
3
Vous pouvez rechercher des stations par type de
programme.
Le RDS ne fonctionne sur la bande FM qu’en Europe.
1
Sélectionnez FM en appuyant répétitivement
sur la touche BAND.
142
3
4
Tournez le bouton MULTI JOG avant 3 secondes
pour démarrer la recherche.
2
Maintenez enfoncée la touche RDS plus de 3
secondes.
3
Sélectionnez le type de programme (PTY) désiré.
Tournez le bouton MULTI JOG pour sélectionner un
élément et appuyez sur la touche ENTER.
Choisissez parmi 31 types de programme PTY.
Le type de programme clignotera.
< Quand une émission du type de programme que vous
avez sélectionné est trouvé, la recherche s’arrête et le
type de programme est affiché.
< Si aucune émission du type de programme
sélectionné n’est trouvé pendant la recherche PTY,
l’appareil s’arrête à la toute première fréquence.
< Pour interrompre la recherche, appuyez sur la touche
RDS.
74
Page 75

News (nouvelles):
communiqués, événements, sondages, reportages,
situations vécues.
Current Affairs (informations générales):
suggestion incluant des annonces pratiques, à
l’exception des nouvelles, documents, débats,
analyses, etc.
Information (informations pratiques):
informations pratiques du jour ou informations de
référence, telles que prévisions météo, guide du
consommateur, informations médicales utiles, etc.
Sport:
émissions sportives.
Education:
informations culturelles et éducatives.
Drama (théâtre):
tous types de concerts et séries dramatiques
radiodiffusés.
Cultures:
émissions portant sur les cultures locales ou nationales,
y compris les émissions religieuses, la philosophie, les
sciences humaines, les langues, le théâtre, etc.
Science:
émissions sur les sciences de la nature et la
technologie.
Varied Speech (variétés):
émissions grand public telles que jeux, variétés,
interviews, émissions comiques ou satiriques, etc.
Pop Music (musique de variétés):
émissions de musique, de variété, ou hit-parade, etc.
Rock Music:
musique moderne, généralement composée et
interprétée par de jeunes musiciens.
Finance:
informations financières, commerciales, boursières.
Children’s Progs (enfants):
émissions pour enfants.
Social Affairs (société):
vie collective et sociale.
Religion:
émissions à caractère religieux.
Phone In:
émissions au cours desquelles les auditeurs
s’expriment en direct.
Travel & Touring (voyages):
émissions à caractère touristique.
Leisure & Hobby:
émissions sur les activités de loisirs.
Jazz Music:
musique de jazz.
Country Music:
musique country.
National Music:
musique militaire et patriotique.
Oldies Music:
musique de l’âge d’or de la musique pop.
Folk Music:
musique folk.
Documentary:
émissions documentaires.
Alarm Test (tonalité d’essai)
Alarm-Alarm!:
avis d’alerte ou de catastrophe naturelle.
FRANÇAIS
Easy Listening (musique grand public):
musique grand public durant généralement moins de
5 minutes.
Light Classics M (musique légère):
musique classique, instrumentale, chorale, et musique
légère s’adressant à un public de non spécialistes.
Serious Classics (musique classique):
musique orchestrale incluant opéras, musique
symphonique, musique de chambre, etc.
Other Music (autres styles musicaux):
autres styles musicaux (Rhythm & Blues, Reggae, etc.).
Weather & Meter (météo):
informations et prévisions météorologiques.
75
Page 76

Réglage de l’horloge
L’horloge de cet appareil est automatiquement réglée par
les données d’horloge CLOCK TIME (CT) d’une émission
RDS.
Pour régler l’horloge manuellement, suivez les étapes cidessous.
1
Appuyez sur la touche TIME SET.
Chaque fois que vous appuyez sur la touche TIME SET,
le mode change comme suit.
Heure actuelle
Heure de début de la minuterie
Heure de n de la minuterie
3
Appuyez sur la touche ENTER.
La valeur des “minutes” clignote.
4
Appuyez sur les touches de défilement (˙/¥)
pour régler les minutes actuelles.
SSélection de la source
< En cas d’absence d’action pendant 1 minute, le mode
de réglage d’heure est annulé.
< Appuyez sur la touche d’arrêt (H) pour annuler le
réglage d’heure.
2
Appuyez sur les touches de défilement (˙/¥)
pour régler l’heure actuelle.
5
Appuyez sur la touche ENTER.
L’horloge démarre à 00 seconde.
< Le réglage de l’horloge n’est pas sauvegardé quand le
cordon d’alimentation secteur.
76
Page 77

Réglage de la minuterie
< Réglez l’horloge avant la minuterie.
< Choisissez “Mode direct” avant d’utiliser l’iPod pour
la minuterie, car sinon, le iPod ne démarrera pas
la lecture quand l’heure de début de la minuterie
arrivera. Voir page 67.
< En cas d’absence d’action pendant 1 minute, le mode
de réglage de minuterie est annulé.
1
Appuyez répétitivement sur la touche TIME SET
jusqu’à l’affichage de “On time” (heure de début
de la minuterie).
“On time” s’affiche, et la valeur des “heures” clignote.
3
Appuyez sur les touches de défilement (˙/¥)
pour régler la valeur des minutes et appuyez sur
la touche TIME SET.
“Off time” (heure de fin de la minuterie) s’affiche, et la
valeur des “heures” clignote.
FRANÇAIS
2
Appuyez sur les touches de défilement (˙/¥)
pour régler la valeur des heures et appuyez sur
la touche ENTER.
La valeur des “minutes” clignote.
4
Répétez les étapes 2 et 3 pour régler l’heure de
fin de la minuterie.
“Source select” (sélection de source) s’affiche.
5
Appuyez sur les touches de défilement (˙/¥)
pour sélectionner la source et appuyez sur la
touche ENTER.
Le réglage de minuterie est maintenant mémorisé.
77
Page 78

Fonctionnement de la minuterie
Chaque fois que vous appuyez sur la touche TIMER
de la télécommande, le mode de minuterie change
comme suit.
Minuterie hors service
Minuterie quotidienne
Minuterie d'enregistrement Une fois
Minuterie d'enregistrement quotidienne
Lecture avec minuterie
1
Sélectionnez “Timer daily” (minuterie
quotidienne) en appuyant sur la touche TIMER
de la télécommande.
L’indicateur de minuterie “
2
Préparez la lecture avec minuterie.
Réglez le volume, réglez une station, etc.
3
Appuyez sur la touche STANDBY/ON pour mettre
l’appareil en mode de veille.
Chaque jour, à l’heure de début de la minuterie (On
time), l’appareil s’allume et commence la reproduction,
puis retourne en veille (standby) à l’heure de fin de la
minuterie (Off time).
” s’allume dans l’écran.
Enregistrement avec minuterie
Vous pouvez régler les divers dispositifs de stockage
USB tels qu’une mémoire flash USB pour enregistrer une
émission à l’heure désirée.
Branchez au préalable le dispositif externe de stockage
USB à l’appareil.
1
Sélectionnez “Timer REC once” (Minuterie
d’enregistrement une fois) ou “Timer REC daily”
(Minuterie d’enregistrement quotidienne)
en appuyant sur la touche TIMER de la
télécommande.
Les indicateurs de minuterie “
dans l’écran.
2
Préparez l’enregistrement avec minuterie.
Réglez une station, etc.
3
Appuyez sur la touche STANDBY/ON sur la
télécommande pour mettre l’appareil en veille.
Une minute avant l’heure de début de la minuterie
réglée (On time), l’appareil s’allume et l’enregistrement
démarre à l’heure programmée.
Quand l’heure de fin de la minuterie (Off time) est
atteinte, l’appareil repasse en veille (standby).
” et “ ” s’allument
Minuterie hors service (Timer off)
Si vous n’utilisez pas la minuterie, appuyez sur
la touche TIMER de la télécommande pour
sélectionner “Timer off”.
L’indicateur de minuterie “
” disparaît de l’écran.
Quand vous utilisez un iPod touch comme source
pour la minuterie, ne le mettez pas hors tension. Il
ne pourra pas être mis sous tension quand l’heure de
début de la minuterie arrivera.
78
Page 79

Minuterie d’extinction
L’alimentation peut être coupée après un temps défini.
Appuyez répétitivement sur la touche SLEEP jusqu’à ce
que le temps désiré s’affiche dans l’écran.
SLEEP-90 (80, 70 ... 10)
L’alimentation sera coupée après 90 (80, 70 ... 10)
minutes.
SLEEP OFF
La minuterie d’extinction est désactivée.
Écoute d’une source extérieure
Vous pouvez écouter le son d’un appareil extérieur
connecté aux prises PHONO, AUX 1 IN ou AUX 2 IN.
1
Appuyez sur la touche SOURCE pour sélectionner
“PHONO”, “AUX 1” ou “AUX 2”.
2
Démarrez la lecture sur l’appareil extérieur.
< L’écran est atténué quand vous utilisez la minuterie
d’extinction.
< Si vous voulez contrôler le temps restant, appuyez
encore une fois sur la touche SLEEP. Le temps restant
s’affichera durant 3 secondes et l’affichage normal
reviendra.
3
Réglage du volume
Tournez le bouton VOLUME pour régler le volume.
FRANÇAIS
79
Page 80

Guide de dépannage
En cas d’anomalie de fonctionnement, consultez le tableau qui
suit et voyez si vous pouvez résoudre votre problème avant de
faire appel à votre revendeur ou au service après-vente de TEAC.
Amplificateur
Pas d’alimentation.
e Vérifiez que l’appareil est bien branché à
l’alimentation secteur.
Aucun son ne sort des enceintes.
e Vérifiez le branchement des enceintes.
e Réglez le volume.
e Sélectionnez la bonne source.
e Retirez la fiche du casque de la prise PHONES.
e Si le son a été coupé, appuyez sur la touche MUTING.
Le son est parasité.
e L’appareil est trop proche d’un téléviseur ou appareil
similaire. Installez-le à distance de tels dispositifs ou
éteignez-les.
Boîtier de télécommande
La télécommande ne fonctionne pas.
e Si les piles sont usées, changez-les.
e Utilisez la télécommande dans les limites de sa portée (5
m) et pointez-la vers la face avant de l’appareil.
e Retirez les obstacles entre la télécommande et l’appareil.
e S’il y a un éclairage fluorescent près de l’appareil, éteignez-
le.
Tuner (syntoniseur)
Aucune station ne peut être captée, ou signal trop
faible.
e Réglez correctement la station.
e S’il y a un téléviseur près de l’appareil, éteignez-le.
e Installez de nouveau l’antenne après avoir repéré la
meilleure position de réception.
e Une antenne externe est recommandée.
Bien que l’émission soit en stéréo, le son est en mono.
e Appuyez sur la touche FM MODE.
Lecteur de CD
La lecture ne fonctionne pas.
e Mettez un disque en place avec l’étiquette dirigée
vers le haut.
e Si le disque est sale, nettoyez la surface du disque.
e Un disque vierge a été mis en place. Mettez en place
un disque préenregistré.
e En fonction du disque, etc., il peut ne pas être
possible de reproduire un disque CD-R/RW. Essayez
de nouveau avec un autre disque.
e Vous ne pouvez pas reproduire des disques CD-R/RW
non finalisés. Finalisez le disque dans un enregistreur
de CD et essayes de nouveau.
80
Le son saute.
e Placez l’appareil sur surface stable pour éviter les
vibrations et les chocs.
e Si le disque est sale, nettoyez la surface du disque.
e N’utilisez pas un disque rayé, endommagé ou
gondolé.
Lecteur iPod
Pas de lecture.
e Retirez l’iPod de la prise USB, attendez quelques
secondes et insérez-le de nouveau.
e Une mise à jour du logiciel peut résoudre le
problème. Consultez le site Web Apple et téléchargez
le dernier logiciel pour iPod.
Impossible de commander l’iPod.
e Assurez-vous que le commutateur HOLD de l’iPod
n’est pas réglé sur HOLD.
MP3/WMA
Pas de son même quand on appuie sur la touche
Lecture/pause (y/J).
e Vérifiez s’il y a des fichiers MP3 ou WMA sur le
support USB.
e Les formats de fichier non compatibles (par ex. MPEG
1 LAYER 2) ne peuvent pas être lus.
“No title”, “No artist” et “No album” apparaissent
sur l’affichage.
e Il n’y a pas d’informations dans la balise ID3 du
fichier musical. Modifiez le titre, le nom de l’artiste
et les informations du morceau sur un ordinateur en
utilisant un logiciel de création de fichiers MP3 ou
WMA.
Des caractères inconnus s’affichent à l’écran.
e Cet appareil ne peut pas correctement afficher les
symboles ni les caractères à double octet (Japonais,
Chinois, etc.). Le nom des fichiers MP3 ou WMA doit
être constitué de caractères alphanumériques.
Si vous ne parvenez pas à rétablir un
fonctionnement normal, débranchez le cordon
d’alimentation et rebranchezle.
Page 81

Rappel des réglages d’usine
Si l’alimentation électrique est coupée durant 14 jours ou
plus, tous les réglages conservés en mémoire (comme
les stations préréglées et les réglages de minuterie) sont
effacés.
Il faut plus de 3 jours après le branchement du cordon
d’alimentation à une prise secteur pour obtenir la charge
en électricité nécessaire à la fonction de sauvegarde de
mémoire.
Si vous désirez initialiser manuellement les
réglages, maintenez enfoncées les touches SOURCE
et lecture/pause (y/J) plus de 4 secondes en mode
de veille (standby).
Entretien
Si la surface de l’unité est sale, essuyez-la avec un chiffon
doux ou utilisez un savon liquide neutre dilué. Veillez à
enlever tout liquide. N’utilisez pas de diluant, benzine
ou alcool car ils peuvent endommager la surface de
l’appareil.
FRANÇAIS
L’appareil s’allumera et tous ses réglages retrouveront leur
valeur par défaut.
81
Page 82

Caractéristiques techniques
Section AMPLIFICATEUR
Puissance de sortie . . . 40 W/canal (6 ohms, 0,5 %,1 kHz)
Sensibilité d’entrée . . . . . . . . . . . . . .PHONO: 2,5 mV 47 k
AUX1, AUX2: 200 mV 47 k
Réponse en fréquence . . . .20 Hz à 60,000 Hz (+1/–3 dB)
Section TUNER (syntoniseur)
Section FM
Plage de syntonisation . . . . . . . .87,50 MHz à 108,00 MHz
Rapport signal/bruit . . . . . . . . . . . . . . . . . . . . 65 dB (mono)
60 dB (stéréo)
Section AM
Plage de syntonisation . . . . . . . . . . . ..522 kHz à 1,629 kHz
Rapport signal/bruit . . . . . . . . . . . . . . . . . . . . . . . . . . . .35 dB
Section USB
Lecture
Réponse en fréquence . . . . . . 20 Hz à 20,000 Hz (±2 dB)
Rapport signal/brui . . . . . . . . . . . . . . . . . . . . . plus de 85 dB
Enregistrement
Réponse en fréquence . . . . . . 20 Hz à 15,000 Hz (±2 dB)
Rapport signal/bruit . . . . . . . . . . . . . . . . . . . . plus de 85 dB
Accessoires standard
Cordon d’alimentation x 1
Télécommande (RC-1225) x 1
Piles (AAA) x 2
Antenne cadre AM x 1
Antenne filaire FM x 1
Mode d’emploi x 1
Carte de garantie x 1
< Conception et caractéristiques techniques sujettes à
des changements sans préavis.
< Poids et dimensions sont approximatifs.
< Les illustrations peuvent être légèrement différentes
des modèles de production.
GÉNÉRALES
Alimentation électrique . . . . . . . . . . . . . . . CA 230 V, 50 Hz
Consommation électrique. . . . . . . . . . . . . . . . . . . . . . 100 W
0,5 W (veille)
Dimensions (L x H x P) . . . . . . . . . . . . .
Poids . . . . . . . . . . . . . . . . . . . . . . . . . . . . . . . . . . . . . . . . . . .
290 x 113 x 340 mm
5,5 kg
82
Page 83

Information pour les utilisateurs sur le ramassage et la mise au rebut des vieux appareils et des piles
usées
Ces symboles sur les appareils, emballages et/ou accompagnant les documents signifient que les produits
électriques et électroniques usagers et les piles ne doivent pas être mis au rebut avec les déchets domestiques.
Pour un traitement, une récupération ou un recyclage des vieux produits et des piles usées, veuillez les apporter
aux points de ramassage correspondants, conformément avec la législation nationale et les Directives 2002/96/EC
et 2006/66/EC.
En mettant au rebut ces appareils et ces piles correctement, vous aiderez à protéger des ressources de valeur et
empêcherez tout effet négatifs sur la santé humaine et l’environnement qui aurait pu se produire à cause d’une
mise au rebut inappropriée.
Pour en savoir plus sur le ramassage et le recyclage des vieux produits et des piles, veuillez contacter votre
municipalité, votre service d’évacuation des déchets ou l’endroit où vous les avez achetés.
Informations sur la mise au rebut dans
d’autres pays situés en dehors de l’Union européenne
Ces symboles sont valables uniquement dans l’Union Européenne. Si vous souhaitez mettre au rebut ces
produits, veuillez contacter vos autorités locales ou votre revendeur et demander la méthode correcte de mise
au rebut.
Remarque pour le symbole de pile (deux examples en bas à droite):
Ce symbole peut être utilisé en combinaison avec un symbole chimique. Dans ce cas, il est conforme avec les
exigences de la Directive pour les produits chimiques utilisés.
FRANÇAIS
83
Page 84

Contenido
Antes de la utilización
Gracias por elegir TEAC. Lea este manual
detenidamente para obtener el mejor rendimiento
de esta unidad.
Antes de la utilización . . . . . . . . . . . . . . . . . . . . . . . . . . . . . . . . 84
Discos . . . . . . . . . . . . . . . . . . . . . . . . . . . . . . . . . . . . . . . . . . . . . . . 85
MP3 y WMA . . . . . . . . . . . . . . . . . . . . . . . . . . . . . . . . . . . . . . . . . . 86
Compatibilidad con iPod . . . . . . . . . . . . . . . . . . . . . . . . . . . . . 86
Conexión de antenas (AM/FM). . . . . . . . . . . . . . . . . . . . . . . . 87
Conexiones de altavoces . . . . . . . . . . . . . . . . . . . . . . . . . . . . . 88
Conexiones . . . . . . . . . . . . . . . . . . . . . . . . . . . . . . . . . . . . . . . . . . 90
Nombres de las partes (unidad principal) . . . . . . . . . . . . . 92
Nombres de las partes (mando a distancia). . . . . . . . . . . . 94
Mando a distancia . . . . . . . . . . . . . . . . . . . . . . . . . . . . . . . . . . . 96
Funcionamiento básico . . . . . . . . . . . . . . . . . . . . . . . . . . . . . . 97
Reproducción de discos . . . . . . . . . . . . . . . . . . . . . . . . . . . . . . 98
Reproducción USB . . . . . . . . . . . . . . . . . . . . . . . . . . . . . . . . . . 100
Reproducción en general (disco/USB) . . . . . . . . . . . . . . . . 100
Búsqueda de carpeta . . . . . . . . . . . . . . . . . . . . . . . . . . . . . . . . 101
Reproducción programada . . . . . . . . . . . . . . . . . . . . . . . . . . 102
Reproducción aleatoria . . . . . . . . . . . . . . . . . . . . . . . . . . . . . . 104
Reproducción repetida . . . . . . . . . . . . . . . . . . . . . . . . . . . . . . 104
Pantalla . . . . . . . . . . . . . . . . . . . . . . . . . . . . . . . . . . . . . . . . . . . . . 105
Escuchar un iPod . . . . . . . . . . . . . . . . . . . . . . . . . . . . . . . . . . . . 105
Antes de grabar . . . . . . . . . . . . . . . . . . . . . . . . . . . . . . . . . . . . . 108
Grabar en un dispositivo USB . . . . . . . . . . . . . . . . . . . . . . . . 108
Borrar un archivo de un dispositivo USB . . . . . . . . . . . . . . 109
Escuchar FM/AM . . . . . . . . . . . . . . . . . . . . . . . . . . . . . . . . . . . . 110
Presintonización . . . . . . . . . . . . . . . . . . . . . . . . . . . . . . . . . . . . 111
RDS . . . . . . . . . . . . . . . . . . . . . . . . . . . . . . . . . . . . . . . . . . . . . . . . . 113
Búsqueda por tipo de programa (PTY) . . . . . . . . . . . . . . . 114
Ajustar el reloj . . . . . . . . . . . . . . . . . . . . . . . . . . . . . . . . . . . . . . 116
Ajustar el temporizador . . . . . . . . . . . . . . . . . . . . . . . . . . . . . 117
Funcionamiento del temporizador . . . . . . . . . . . . . . . . . . . 118
Temporizador para función “Sleep” (dormir) . . . . . . . . . . 119
Para escuchar una fuente externa . . . . . . . . . . . . . . . . . . . . 119
Lea esto antes de intentar ninguna operación.
< Dependiendo de las condiciones de las ondas
eléctricas de las difusiones de televisión, pueden
aparecer líneas en la pantalla del televisor si lo
enciende mientras la unidad está encendida. Esto no
es ningún fallo de la unidad ni del televisor. En este
caso, apague la unidad.
< Dado que la unidad puede calentarse durante el
funcionamiento, deje siempre espacio suficiente
alrededor de la unidad para su ventilación.
< El voltaje de corriente suministrado a la unidad debe
ser el mismo que el que figura impreso en el panel
posterior. Si tiene alguna duda sobre esto, consulte a
un electricista.
< Elija el emplazamiento de esta unidad
cuidadosamente. Evite ponerla en exposición directa
a la luz del sol o cerca de una fuente de calor. Evite
también emplazamientos sujetos a vibraciones y
polvo, calor, frío o humedad excesivos.
< No coloque la unidad encima de un amplificador/
receptor.
< No abra la carcasa ya que podría ocasionar daños en
los circuitos o descargas eléctricas. Si se introdujese
cualquier objeto en la unidad, contacte con el
distribuidor o el servicio técnico.
< Al desenchufar el cable de alimentación de la toma
de corriente, tire siempre directamente de la clavija,
nunca del propio cable.
< No limpie la unidad con disolventes químicos porque
dañan el acabado. Use un paño limpio seco o
ligeramente humedecido.
Resolución de posibles problemas . . . . . . . . . . . . . . . . . . . 120
Especificaciones . . . . . . . . . . . . . . . . . . . . . . . . . . . . . . . . . . . . 122
84
< Conserve este manual en un lugar seguro para futuras
consultas.
Page 85

Discos(1)
NO MUEVA LA UNIDAD DURANTE LA
REPRODUCCIÓN
Durante la reproducción, el disco gira a altas
velocidades. NO levante ni mueva la unidad durante la
reproducción. El disco podría resultar dañado.
TRASLADO DE LA UNIDAD
Si tiene que cambiar de sitio la unidad o embalarla
para su traslado, no olvide extraer el disco y devolver
la bandeja del disco a su posición original. A
continuación, presione el interruptor de potencia
para apagar la unidad y desconecte el cable de
alimentación. Si traslada la unidad con el disco
insertado, podrían ocasionarse daños en esta unidad.
< No exponga este aparato a salpicaduras ni goteras.
< No coloque objetos que contengan líquidos, como
ejemplo vasos, sobre el aparato.
< No instale este aparato en lugares reducidos tales
como estanterías de librerías o similares.
< Este aparato libera corriente nominal no válida
para el funcionamiento a través de la toma de
corriente, aún cuando el interruptor de encendido
y activación (POWER o STANDBY/ ON) no esté en la
posición de encendido (ON).
< Este aparato debe situarse lo suficientemente
cerca de una toma de electricidad como para
poder alcanzar fácilmente el cable de corriente en
cualquier momento.
< El enchufe que se conecta a la red es el dispositivo
de desconexión, por lo que deberá permanecer
siempre en prefecto estado de uso.
< Si el producto utiliza pilas (esto incluye las baterías
incorporadas y los „packs” de pilas) se evitará su
exposición directa al sol, al fuego o a cualquier otra
fuente de calor excesivo.
< Deberá llevar cuidado si utiliza auriculares con
este producto, ya que una excesiva presión sonora
(volumen) procedente de los mismos puede causar
perdidas de audición.
Esta unidad puede reproducir los siguientes discos:
M CD-Audio convencionales con el logotipo COMPACT
DISC DIGITAL AUDIO en la etiqueta.
M Discos CD-R y CD-RW correctamente finalizados
M CD-MP3/WMA
Observación:
< Dependiendo de la calidad del disco o del estado de
la grabación, algunos CD-R y CD-RW es posible que no
puedan reproducirse.
< Los discos protegidos contra copia y otros que no
se ajustan al estándar de CD es posible que no se
reproduzcan correctamente en esta unidad. Si
usa tales discos en esta unidad, TEAC Corporation
y sus filiales no asumen responsabilidades por las
posibles consecuencias ni garantizan la calidad de
la reproducción. Si tiene problemas con tales discos,
póngase en contacto con sus fabricantes.
< Coloque el disco en la bandeja siempre con la cara de
la etiqueta hacia arriba. (Los discos compactos sólo se
graban y reproducen por una cara.)
< Para extraer un disco de su estuche, presione en el
centro de la caja, levante el disco y sosténgalo con
cuidado por los bordes.
< Si se ensucia el disco, limpie la superficie en sentido
radial (del orificio central hacia fuera) con un paño
suave y seco.
< No utilice nunca productos químicos, como aerosoles
para vinilo, líquidos o aerosoles antiestáticos, bencina
o aguarrás para limpiar los discos. Estos productos
químicos ocasionarán daños irreparables en la
superficie de plástico del disco.
85
ESPAÑOL
Page 86

Discos(2)
MP3 y WMA
< Los discos deberán devolverse a sus estuches después
de usarlos. De lo contrario podrían ensuciarse o rayarse
y provocar “saltos” del lector láser.
< No exponga los discos a la luz solar directa o a
elevados niveles de temperatura o humedad durante
períodos prolongados. La exposición prolongada a
temperaturas elevadas deformará el disco.
< No reproduzca ningún disco que esté curvado,
deformado o dañado. La reproducción de estos discos
puede causar daños irreparables en los mecanismos
de lectura.
< Los discos CD-R y CD-RW son más sensibles al calor
y a los rayos ultravioleta que los CD normales. Es
importante no guardarlos en lugares donde puedan
quedar expuestos a la luz directa del sol y deberán
mantenerse alejados de fuentes de calor como los
radiadores o los aparatos eléctricos que desprendan
calor.
< Se desaconseja el uso de discos CD-R y CD-RW
imprimibles, ya que la cara de la etiqueta podría
adherirse y dañar la unidad.
< Esta unidad puede reproducir archivos MP3 grabados
en diversos dispositivos de almacenamiento
USB externos, tales como memorias flash USB,
reproductores MP3 o discos duros externos.
Los discos duros han de estar formateados FAT 16 ó
FAT 32, pero no NTFS.
< Si hay más de 2000 archivos grabados en la memoria USB, la
unidad puede no ser capaz de reproducirlos correctamente.
< Los nombres de los archivos MP3 o WMA deben ser
caracteres alfanuméricos. Esta unidad no puede mostrar
en pantalla símbolos o caracteres a tamaño completo o de
doble byte (como los japoneses, chinos, etc.) correctamente.
Asegúrese también de usar la extensión de archivo (“.mp3”
para archivos MP3, “.wma” para archivos WMA).
< Los archivos MP3 están en formato MPEG-1 Audio Layer 3,
mono o estéreo. Esta unidad puede reproducir archivos
MP3 con una frecuencia de muestreo de 44,1 kHz o
48 kHz y una velocidad de bits de 320 kbps o menos.
< Esta unidad puede reproducir archivos WMA con una
frecuencia de muestreo de 44,1 kHz y una velocidad
de bits de 192 kbps o menos.
WMA es la sigla en inglés de Windows Media Audio.
< El audio codificado a 128 kbps debe sonar cercano a la calidad
estándar de un CD de audio. Aunque este reproductor puede
reproducir canciones MP3 con una velocidad de transmisión
menor, la calidad de sonido es manifiestamente peor a
velocidades de transmisión inferiores.
< No adhiera papeles ni láminas de protección
a los discos, ni aplique ningún tipo de aerosol de
revestimiento.
< Utilice un rotulador de punta blanda para escribir en
el lado de la etiqueta. No emplee nunca bolígrafos
ni lápices de punta dura, ya que podría dañar la cara
grabada del disco.
< No utilice nunca estabilizadores. Los estabilizadores de
CD existentes en el mercado producirán anomalías en
su funcionamiento.
< No utilice discos de diseño irregular (octogonales,
forma de corazón, tamaño tarjeta, etc.), ya que pueden
dañar la unidad.
< Si tiene alguna duda sobre el cuidado y manipulación
de un disco CD-R/CD-RW, lea las instrucciones
facilitadas con el mismo o póngase directamente en
contacto con el fabricante.
86
Compatibilidad con iPod
Esta unidad puede conectarse y utilizarse con los
siguientes modelos de iPod.
iPod (5ª generación)
iPod classic
iPod nano (1ª a 5ª generación)
iPod touch (1ª a 3ª generación)
< Los siguientes modelos no se pueden utilizar en “Modo
directo” del modo de visualización y para el temporizador:
iPod (5ª generación),
iPod nano (1ª /2ª generación)
Consulte la página 107 para obtener información
acerca del modo de visualización.
< Esta unidad no puede reproducir vídeo desde un iPod
conectado.
< Para conectar el iPod utilice el cable USB
proporcionado con el iPod.
< No es posible la reproducción si conecta un iPod
shuffle a este puerto.
Software compatible con iPod
En caso de que su iPod no funcione con el CR-H500 o
con el mando a distancia, la actualización del software
puede resolver el problema.
Visite la página web de Apple y descargue el ultimo
software para iPod.
Page 87

Conexión de antenas (AM/FM)
Antena de AM de bucle para interior
La antena de AM de bucle para interior suministrada con
esta unidad es de alto rendimiento y resulta suficiente
para una buena recepción en la mayoría de los sitios.
Para colocar la antena de bucle de pie sobre una superficie,
fije la pestaña en la ranura en la base de la antena.
Conecte los cables de la antena de bucle a los terminales
de antena de AM.
Sitúe la antena sobre un estante o cuélguela en el marco
de una ventana, etc., orientada en la dirección en la que
se obtenga la mejor recepción. Mantenga los restantes
cables (de corriente, de altavoces o de interconexiones) lo
más alejados posible de la antena.
Antena de AM
para exterior
Asegúrese de conectar
el cable negro al
terminal de tierra (GND).
Antena de FM para interior
Conecte la antena de FM de tipo cable al conector de
FM 75 , extienda el cable y sintonice su emisora favorita
(ver página 110). Coloque la antena en un emplazamiento
adecuado, como el marco de una ventana o una pared
hasta que obtenga la mejor recepción y después fíjela en
esa posición con chinchetas o similares.
Antena de FM exterior
Para zonas en las que las señales de FM sean débiles, será
necesario utilizar una antena de FM exterior. En la mayoría
de los casos, será suficiente una antena de 3 elementos; si
reside en una zona con señales de FM particularmente
débiles, es posible que necesite utilizar una antena de 5 o
más elementos.
ESPAÑOL
< Si la antena de AM de bucle suministrada no
proporciona recepción suficiente (a menudo debido
a que está demasiado alejada del transmisor o a las
características del edificio), sea necesario utilizar una
antena de AM para exterior.
Utilice una antena AM de buena calidad en venta en el
mercado o, en su defecto, un cable aislado de más de
5 m de largo. Pele un extremo y conéctelo al terminal,
tal como se observa en la ilustración.
El cable de antena debe instalarse en exteriores o
en interiores, cerca de una ventana. Para mejorar la
recepción, conecte el terminal GND a una toma de
tierra confiable.
Nota:
Incluso aunque utilice una antena de AM de exterior, no
desconecte la antena de AM de bucle.
< Desconecte la antena de FM interior cuando utilice
una antena exterior.
87
Page 88

Conexiones de altavoces
ALTAVOCES
B
LINE
IN
SUBWOOFER
A
88
Page 89

Conexiones de altavoces
A
Los terminales + (positivo) del CR-H500 son rojo
(para el altavoz derecho) y blanco (para el altavoz
izquierdo). Los terminales _ (negativo) para ambos
altavoces son negros.
El lado positivo + del cable de altavoz está marcado,
para así poderlo distinguir del lado negativo del
cable. Conecte el lado marcado a los terminales +
rojo y blanco y el lado no marcado a los terminales
_ negros del CR-H500 y los altavoces.
Para usuarios europeos
De acuerdo con las regulaciones de seguridad
europeas, no es posible conectar clavijas de tipo
“banana” en los terminales de altavoz en los modelos
europeos. Los agujeros en los que se insertarían
las clavijas “banana” han sido cubiertos con tapas
negras. Conecte los altavoces usando cables pelados
o conectores “spade” (de espada). Si las tapas negras
se salen de los terminales, vuelva a colocarlas en su
posición original.
PRECAUCIÓN
< Para evitar daños en los altavoces causados por un
sonido alto repentino, asegúrese de desconectar la
alimentación antes de conectar los altavoces.
< Compruebe la impedancia de los altavoces. Conecte
altavoces con una impedancia de 6 ohms o más.
< Prepare los cables de los altavoces para la conexión
dejando al aire, es decir sin plástico aislante,
aproximadamente unos 10 mm o menos de cable
(no más, ya que podría causar un cortocircuito).
Entrelace los hilos para que queden compactados,
sin hilos sueltos:
Cómo conectar
1. Gire la cubierta del terminal en dirección contraria
a las agujas del reloj para aflojarla. Las cubiertas de
los terminales no se pueden quitar totalmente de la
base.
2. Inserte por completo el cable en el terminal y gire la
cubierta en la dirección de las agujas del reloj para
que la conexión sea segura:
B
Conector SUBWOOFER OUT
Conecte aquí un subwoofer autoamplificado que
adquiera por su cuenta.
ESPAÑOL
3. Asegúrese de que queda firmemente sujeto tirando
levemente del cable.
89
Page 90

Conexiones
A
Platina de cassette,
Grabadora de CD, etc.
PRECAUCIÓN
< Apague todos los equipos antes de hacer las conexiones.
< Lea las instrucciones de cada componente que pretenda usar con esta unidad.
< Asegúrese de insertar correctamente todos los terminales. Para prevenir ruido y zumbidos, no entremezcle los cables
de las conexiones entre componentes con los de alimentación de corriente ni con los de los altavoces.
B
LRLR
LINE
OUT
LINE
IN
C D
Plato giradiscos
90
Page 91

Cable de corriente
A
Conecte este cable al enchufe de corriente eléctrica
de la pared.
< Desenchufe el cable de corriente cuando no vaya a
utilizar la unidad durante un largo período de tiempo.
Conectores AUX 1
B
Estas tomas transmiten una señal de audio analógica
de 2 canales. Conecte los componentes por medio
de cables a espiga RCA disponibles comercialmente.
Asegúrese de conectar los cables como sigue:
terminal blanco w conector blanco
(L: canal izquierdo)
terminal rojo w conector rojo
(R: canal derecho)
D
SIGNAL GND
Conecte el cable de tierra del plato giradiscos a este
conector.
< Esta no es una toma de tierra de seguridad.
< Si el cable de tierra del plato giradiscos no está
conectado a este terminal, se puede oír ruido o
zumbido.
Blanco (L)
Rojo (R)
Si desea utilizar una grabadora (por ejemplo una
platina de cassette, una grabadora de CD, etc.) con
el CR-H500, conecte los conectores de salida (out)
de la grabadora a los conectores de entrada auxiliar
1 (AUX 1 IN) del CR-H500 y conecte los conectores
de entrada (in) de la grabadora a los conectores de
salida auxiliar 1 (AUX 1 OUT) del CR-H500.
< Asegúrese de insertar correctamente todos los
terminales. Para prevenir ruido y zumbidos, no
entremezcle los cables de las conexiones con los de
alimentación de corriente ni con los de los altavoces.
Conectores PHONO
C
Conecte el cable del plato giradiscos con terminales
RCA a los conectores PHONO.
Asegúrese de conectar los cables como sigue:
terminal blanco w conector blanco
(L: canal izquierdo)
terminal rojo w conector rojo
(R: canal derecho)
Blanco (L)
Rojo (R)
ESPAÑOL
< Asegúrese de insertar correctamente todos los
terminales. Para prevenir ruido y zumbidos, no
entremezcle los cables de las conexiones con los de
alimentación de corriente ni con los de los altavoces.
< Se pueden utilizar cápsulas magnéticas móviles (MM)
con esta unidad.
91
Page 92

Nombres de las partes (unidad principal)
A
E
B
G H I J L NMKF
C
D
92
Page 93

A
MULTI JOG
En el modo de sintonizador (TUNER), utilice este
mando giratorio para sintonizar emisoras o seleccionar
las emisoras presintonizadas.
En modo iPod, utilice este mando giratorio para
desplazarse hacia arriba y hacia abajo por el menú.
En el modo CD/USB, utilice este mando para omitir
pistas/archivos durante la reproducción o en el modo
de parada de CD o USB.
K
Salto (.m/,/)
En el modo CD/USB, utilice estos botones para omitir
pistas/archivos durante la reproducción o en el modo
de parada de CD o USB.
En el modo iPod, utilice estos botones para omitir
canciones durante la reproducción o en el modo de
pausa del iPod.
Durante la reproducción, mantenga pulsados estos
botones para buscar una pista/archivo/canción.
B
Sensor remoto
Cuando utilice el mando a distancia, apúntelo hacia el
sensor remoto.
C
Pantalla
D
VOLUME (volumen)
Gire este mando para ajustar el volumen.
< El nivel de volumen queda memorizado incluso al
apagar la unidad.
E
STANDBY/ON (espera/encendido)
Pulse este interruptor para encender o apagar la
unidad.
El indicador se enciende en rojo cuando la unidad está
en modo de espera (standby). Cuando se enciende la
unidad, el indicador cambia a azul.
F
PHONES (auriculares)
Para una escucha privada, conecte los auriculares a
este conector y ajuste el volumen girando el mando
VOLUME.
G
AUX 2 IN
Para conectar un equipo, como un reproductor de
audio portátil, utilice un cable con miniclavija estéreo
de 3,5 mm.
L
TUNING MODE (modo de sintonización), ENTER
(intro), apertura/cierre (L)
En el modo FM o AM, utilice este botón para
seleccionar el modo de sintonización.
Utilice este botón para ajustar la hora mientras ajusta
el temporizador o el reloj.
En el modo iPod, utilice este botón para confirmar la
selección en los menús.
En el modo CD, utilice este botón para abrir y cerrar la
bandeja del disco.
M
RDS, parada (H)
En el modo de sintonizador (TUNER) de FM, utilice este
botón para seleccionar una modalidad de RDS.
En el modo USB/CD, utilice este botón para detener la
reproducción.
N
BAND (banda), reproducción/pausa (y/J)
Utilice este
botón para seleccionar FM o AM.
En el modo USB/iPod, utilice este botón para iniciar o
poner en pausa la reproducción del iPod o USB.
En el modo CD, utilice este botón para iniciar o poner
en pausa la reproducción del CD.
ESPAÑOL
H
Puerto USB
Conecte un iPod o un dispositivo de almacenamiento
USB externo.
I
SOURCE (fuente)
Utilice este control para seleccionar una fuente de
sonido.
J
MENU/FM MODE (menú/modo de FM)
Utilice este botón para volver al menú previo del iPod.
Este botón es equivalente al botón MENU de un iPod.
En modo FM, utilice este botón para seleccionar
estéreo o monoaural.
93
Page 94

Nombres de las partes (mando a distancia)
a
STANDBY/ON (espera/encendido)
a
p
b
q
c
r
d
e
s
f
g
h
i
j
k
l
t
u
v
m
w
n
o
Pulse este botón para encender la unidad o para
ponerla en modo de espera.
b
TUNER, CD, iPod/USB, AUX 1/2, PHONO (plato
giradiscos)
Utilice estos botones para seleccionar una fuente de
sonido.
c
TIME SET (ajuste de hora)
Utilice este botón para ajustar el reloj y el temporizador.
d
TONE (tono)
Utilice este botón para ajustar conjuntamente los graves
y agudos con el botón de desplazamiento (˙ o ¥).
e
TIMER (temporizador)
Utilice este botón para activar o desactivar la función
del temporizador.
f
FM MODE (modo de FM)
En el modo FM, utilice este botón para seleccionar
estéreo o monoaural.
g
REPEAT 1/ALL (repetir 1/todo)
En el modo USB/iPod, utilice este botón para ajustar la
reproducción repetida del iPod o USB.
En el modo CD, utilice este botón para ajustar la
reproducción repetida del
h
SHUFFLE (aleatoria)
En el modo USB/iPod, utilice este botón para iniciar la
reproducción aleatoria del iPod o USB.
En el modo CD, utilice este botón para iniciar la
reproducción aleatoria del
i
Parada (H)
En el modo USB, utilice este botón para detener la
reproducción del USB.
En el modo CD, utilice este botón para detener la
reproducción del
j
PROGRAM (programación)
En el modo USB/iPod, utilice este botón para ingresar
al modo de programación de USB.
En el modo CD, utilice este botón para ingresar al
modo de programación del
En el modo de programación, utilice este botón para
ingresar la selección.
En el modo TUNER, utilice este botón para
presintonizar emisoras.
CD.
CD.
CD.
CD.
94
Page 95

k
Reproducción/pausa (y/J)
En el modo USB/iPod, utilice este botón para iniciar o
poner en pausa la reproducción del iPod o USB.
En el modo CD, utilice este botón para iniciar o poner
en pausa la reproducción del CD.
l
MUTING
Utilice este botón para silenciar el sonido.
m
MENU
Utilice este botón para volver al menú previo del iPod.
Este botón es equivalente al botón MENU del un iPod.
n
ENTER
Utilice este botón para fijar la hora al ajustar el
temporizador o el reloj.
o
Salto (.//)
En el modo CD/USB, utilice estos botones para omitir
pistas/archivos durante la reproducción o en el modo
de parada de CD o USB.
En el modo iPod, utilice estos botones para omitir
canciones durante la reproducción o en el modo de
pausa del iPod.
u
CLEAR (borrar)
Utilice este botón para eliminar pistas/archivos en el
modo de programación.
v
VOLUME (volumen)
Utilice estos botones para ajustar el nivel del volumen.
Scroll (˙/¥)
w
En el modo USB/iPod, utilice estos botones para
seleccionar una carpeta o un archivo del dispositivo
USB.
O utilice estos botones para desplazarse por el menú
del iPod.
Después de pulsar el botón TONE, estos botones se
usan para ajustar los agudos y los graves.
p
RECORD (grabar)
Utilice este botón para comenzar la grabación en un
dispositivo USB.
q
DIMMER (atenuador de luz)
Utilice este botón para atenuar la iluminación de la
pantalla.
r
SLEEP (dormir)
Utilice este botón para ajustar el temporizador para la
función “Sleep” (dormir).
s
INFO/RDS
En el modo de sintonizador (TUNER) de FM, utilice este
botón para seleccionar una modalidad de RDS.
Por favor ignore “INFO” en el mando a distancia.
(La función INFO no se activa en esta unidad.)
t
DISPLAY (pantalla)
Utilice este botón para cambiar la información que
aparece en pantalla durante la reproducción del iPod/
USB.
ESPAÑOL
95
Page 96

Mando a distancia
El mando a distancia que se suministra permite el control
remoto de la unidad.
Cuando emplee el mando a distancia, apúntelo hacia el
sensor de control remoto situado en el panel frontal de
la unidad.
< Incluso cuando el mando a distancia se utilice dentro
del rango de alcance efectivo, puede dar problemas
de funcionamiento si hay obstáculos interpuestos
entre el mando y la unidad.
< Si el mando a distancia se usa cerca de otros aparatos
que generen rayos infrarrojos, o si se utilizan cerca de
la unidad otros mandos que funcionen por infrarrojos,
pueden producirse anomalías de funcionamiento en
cualquiera de las unidades implicadas.
Del mismo modo, es posible que los otros aparatos
tampoco funcionen correctamente.
Instalación de las pilas
1. Quite la tapa del compartimento de las pilas.
2. Introduzca dos pilas de tipo “AAA” . Asegúrese de
que las pilas se colocan con sus polos positivo “+” y
negativo “_” correctamente.
3. Cierre la tapa.
Precauciones con respecto a las pilas
< Asegúrese de insertar las pilas con las polaridades
positiva “+ ” y negativa “_ ” correctamente
posicionadas.
< Utilice pilas del mismo tipo. Nunca mezcle pilas de
diferentes tipos.
< Se pueden emplear pilas recargables y no recargables.
Remítase a las precauciones consignadas en sus
respectivas etiquetas.
< Cuando no se vaya a usar el mando a distancia durante
mucho tiempo (más de un mes), quite las pilas del
mando para evitar que se sulfaten.
< Si las pilas se sulfatan (rezuman líquido), limpie el
compartimento de las pilas y sustitúyalas por unas
nuevas.
< No utilice otras pilas que no sean las especificadas.
No mezcle pilas nuevas con viejas ni tipos de pilas
diferentes.
< No caliente ni desarme la pilas y nunca las tire al fuego
ni al agua.
< No transporte ni almacene pilas junto a otros objetos
metálicos. Las pilas pueden cortocircuitarse, rezumar o
explotar.
Cambio de las pilas
Si cada vez se acorta más la distancia entre el mando y la
unidad principal requerida para el buen funcionamiento,
las pilas están gastadas. En tal caso, cámbielas por unas
nuevas.
< Para más información sobre la recogida de pilas
usadas, por favor contacte con su ayuntamiento o con
el punto de venta donde las compró.
96
< Nunca recargue pilas sin verificar que son de tipo
recargable.
Page 97

Funcionamiento básico (1)
C
C
Ajuste el volumen
Para proteger los altavoces contra un sonido alto
repentino, aumente gradualmente el volumen hasta el
nivel requerido mediante el mando VOLUME.
A
A
Cómo encender y apagar la unidad
Pulse el interruptor
apagar la unidad.
El indicador Standby/On se ilumina en color azul
cuando la unidad está encendida.
< Al encender el equipo, la fuente de sonido que
estuviese seleccionada la última vez comenzará la
reproducción automáticamente.
B
Cómo seleccionar la fuente de sonido
Cada vez que se pulsa el botón SOURCE (fuente), el
modo cambia como sigue:
B
STANDBY/ON para encender o
Indicador de espera/
encendido (standby/on)
D
Enmudecimiento
Para silenciar temporalmente el sonido, pulse el botón
MUTING. Para cancelar el silencio, pulse de nuevo el
botón MUTING o cambie el ajuste de volumen.
E
Atenuador de iluminación
Pulse el botón DIMMER para atenuar la luz de la
pantalla.
Vuelva a pulsar el botón para cancelar la función de
atenuación.
ESPAÑOL
TUNER USB/iPod PHONO
CD AUX2 AUX1
O pulse el botón TUNER (sintonizador), iPod/USB,
PHONO (plato giradiscos), AUX 1/2 ó CD en el mando
a distancia para seleccionar la fuente de sonido
directamente.
< Esta función se cancelará al apagar la unidad.
97
Page 98

Funcionamiento básico (2)
F
Escucha por auriculares
Inserte el jack de los auriculares en el conector
rotulado PHONES y ajuste el volumen. El sonido de los
altavoces y del subwoofer quedará cortado.
Reproducción de discos
4
G
Cómo ajustar los graves y los agudos del sonido
Usted puede variar los graves y los agudos entre “-10”
y “+10”.
Pulse repetidamente el botón TONE para seleccionar
BASS o TREBLE. A continuación, pulse los botones de
desplazamiento (˙/¥) para ajustar el nivel de sonido
en menos de 5 segundos.
1
1
Pulse el botón STANDBY/ON para encender la
unidad.
El indicador Standby/On pasa de naranja a azul.
Se visualizará “No disc” si no hay un disco cargado.
2
Pulse el botón SOURCE para seleccionar “CD”.
3
Pulse el botón Apertura/cierre (L).
2
3 5
6
Indicador de espera/
encendido (standby/on)
98
Page 99

4
Deposite un disco en la bandeja con la cara de la
etiqueta hacia arriba.
< El disco deberá quedar centrado en la bandeja. Si el
disco no se inserta correctamente, la bandeja podría
quedar bloqueada y no abrirse, por lo que conviene
cargarlo debidamente centrado.
< No coloque nunca más de un disco en la bandeja.
Pulse el botón de reproducción/pausa (y/J)
6
para iniciar la reproducción.
La reproducción del disco se inicia desde la primera
pista/archivo.
CD de audio
CD/Play
T003 00:42
número de pista actual tiempo transcurrido de la
pista actual
< No pegue etiquetas ni cintas en el disco.
< No utilice discos con formas irregulares.
5
Pulse el botón Apertura/cierre (L) para cerrar la
bandeja.
< Mantenga los dedos alejados de la bandeja móvil para
evitar que queden atrapados.
< La unidad tarda algunos segundos en cargar un disco.
Ningún botón funcionará durante la carga. Espere a
que aparezca el número total de pistas/archivos y el
tiempo total de reproducción del disco.
CD de audio
Se visualizan el número total de pistas y el tiempo total
de reproducción del disco.
CD/Stop
T016 72:00
Disco MP3/WMA
CD/Play
T003 00:42 MP3
número del archivo actual
< Los archivos MP3/WMA grabados fuera de las carpetas
se ponen automáticamente en la carpeta “ROOT“; la
reproducción comienza con el primer archivo de la
carpeta “ROOT“.
< Si hay carpetas que no tienen archivos MP3/WMA, la
unidad saltará las mismas.
< Durante la reproducción de un archivo MP3/WMA,
“título_artista_álbum” se desplaza en la pantalla.
< La unidad se detiene automáticamente cuando
ha finalizado la reproducción de todas las pistas o
archivos.
< Si carga un disco, y, a continuación, pulsa el botón de
reproducción/pausa (y/J) (o el botón SHUFFLE del
mando a distancia) sin haber cerrado la bandeja para
discos, ésta se cierra y comienza la reproducción.
ESPAÑOL
Disco MP3/WMA
Se visualiza el número total de archivos del disco.
CD/Stop
Total file 010
99
Page 100

Reproducción USB
1
Reproducción en general (disco/USB)
ED
3
AC B
Puede reproducir archivos MP3/WMA conectando
diversos dispositivos de almacenamiento USB, como por
ejemplo una memoria flash USB.
1
Pulse el botón SOURCE repetidamente para
seleccionar “USB/iPod”.
“Not connected” (no conectado) aparecerá en la
pantalla si no hay ningún dispositivo USB conectado.
2
Conecte el dispositivo de almacenamiento
externo USB a la unidad.
Cuando se conecta un disco duro a esta unidad,
puede llevar varios minutos el que aparezca en
pantalla la enumeración de archivos.
A
Para detener la reproducción
Pulse el botón Parada (H) para detener la reproducción.
Para volver a iniciar la reproducción, pulse el botón de
reproducción/pausa (y/J).
La reproducción se inicia desde la primera pista/
archivo.
B
Para suspender la reproducción temporalmente
(modo de pausa)
Pulse el botón de reproducción/pausa (y/J) durante
la reproducción. La reproducción se detiene en la
posición actual.
Para reanudar la reproducción, pulse el botón de
reproducción/pausa (y/J).
3
Pulse el botón de reproducción/pausa (y/J).
100
C
Para expulsar el disco.
Cuando se pulsa el botón Apertura/cierre (L), la
reproducción se detiene y se abre la bandeja.
Una vez expulsado el disco, cierre la bandeja pulsando
el botón Apertura/cierre (L).
< El disco se puede expulsar cuando está seleccionado
CD como fuente.
 Loading...