

TEAC
AP-150
CD\DVD Disc Publishing System
Operational Manual
Re v i s i o n A . 0

Copyright
Copyright © 2008 TEAC Europe GmbH (TEAC). All rights reserved. This manual and the software described in
it are copyrighted with all rights reserved. No part of this publication may be reproduced, transmitted,
transcribed, stored in a retrieval system or translated into any language in any form by any means without
the written permission of TEACTM .
Limited Warranty
This product is warranted by TEAC Europe GmbH against defects in materials and workmanship. LENGTH
OF WARRANTY – This warranty will be effective for both labor and parts, and this warranty will be
effective for one (1) year from the date of original purchase.
WHO MAY ENFORCE THE WARRANTY - This warranty is valid only in the European Union, and enforceable
only by the original purchaser. This warranty is not valid outside the European Union. WHAT IS NOT
COVERED BY THIS WARRANTY
1. Damage to or deterioration of the external cabinet.
2. Damage resulting from accident, misuse, abuse, or neglect.
3. Damage resulting from failure to follow instructions contained in your user’s manual.
4. Damage occurring during shipment of the product (claims must be presented to the carrier).
5. Damage resulting from repair or attempted repair by anyone other than TEAC Service Department.
6. Damage resulting from modification or attempted modification of product not authorized by TEAC.
7. Damage resulting from causes other than product defects, including lack of technical skill,
competence, or experience of the user.
8. Damage to any unit that has been altered or on which the serial number has been defaced, modified
or removed.
9. Damage or malfunction resulting from installation and cabling.
10. For wireless configurations, TEAC cannot be responsible for interference or operation in locations
that restrict range.
11. Damage to or from interconnected network equipment.
12. Data integrity or loss of data.
HOW YOU CAN GET WARRANTY SERVICE
Please contact the TEAC service department for a Return Authorization number before shipping unit(s) to
TEAC. Information required for R/A request should include your name and/or company name, telephone
number, TEAC model, version and serial number(s). Return Authorization (R/A) number must be clearly
marked on the outside of each carton shipped to TEAC. Return merchandise must be packed in original
shipping containers or otherwise packed adequately to prevent damage in shipment. You are responsible for
all risk of damage to or loss of merchandise in transit to TEAC. TEAC reserves the right to reject any
merchandise that is not packaged and/or marked as instructed herein. You must pay any shipping charges if
it is necessary to ship the product for service. However, if the necessary repairs are covered by the warranty,
we will pay the return shipping charges to any destination within the European Union. Whenever warranty
service is required, you must present a copy of the original dated sales receipt as proof of warranty
coverage. Please contact us at the addresses listed at the end of this warranty statement.
WHAT TEAC WILL PAY FOR
We will pay all labor and material expenses for items covered by the warranty. Payment of shipping
charges is discussed in the next section of this warranty. LIMITATION OF IMPLIED WARRANTIES
ANY IMPLIED WARRANTIES, INCLUDING WARRANTIES OF MERCHANTABILITY AND FITNESS FOR A
PARTICULAR PURPOSE, ARE LIMITED IN DURATION TO THE LENGTH OF THIS WARRANTY
EXCLUSION OF DAMAGES
TEAC’S LIABILITY FOR ANY DEFECTIVE PRODUCT IS LIMITED TO REPAIR OR REPLACEMENT OF THE PRODUCT,
AT TEAC’S OPTION. TEAC SHALL NOT BE LIABLE FOR DAMAGES BASED UPON INCONVENIENCE, LOSS OF USE
OF THE PRODUCT, LOSS OF TIME, INTERRUPTED OPERATION OR COMMERCIAL LOSS, LOST PROFITS OR ANY
OTHER DAMAGES, WHETHER INCIDENTAL, CONSEQUENTIAL, PUNITIVE OR OTHERWISE.
SOME STATES DO NOT ALLOW LIMITATIONS ON HOW LONG AN IMPLIED WARRANTY LASTS AND/ OR DO NOT
ALLOW THE EXCLUSION OR LIMITATION OF INCIDENTAL OR CONSEQUENTIAL DAMAGES, SO THE ABOVE
LIMITATIONS AND EXCLUSIONS MAY NOT APPLY TO YOU.
THIS WARRANTY GIVES YOU SPECIFIC RIGHTS, AND MAY VARY FROM SOME OF THE RIGHTS PROVIDED BY
LAW. THESE RIGHTS MAY VARY FROM STATE TO STATE.

Piracy Statement
TrueNettm and the Publishing System are designed to help you easily reproduce material for which you
own the copyright or have obtained permission from the copyright owner to make copies. Unless you own
the copyright or have permission from the copyright owner to make copies, you are violating the software
license agreement, and may be violating copyright law and be subject to payment of fines, damages and / or
other remedies. R-Quest accepts no responsibility for the use or misuse of this equipment for illegal
purposes. If you are uncertain about your rights, contact your legal advisor.
TrueNet™ (all versions)
Software License Agreement
This is a legal agreement between you and R-Quest Technologies, LLC. (“R-Quest”), covering your
use of TrueNet (the "Software"). Be sure to read the following agreement before using the
Software. BY USING THE SOFTWARE (REGARDLESS IF YOU HAVE REGISTERED THE SOFTWARE OR
NOT), YOU ARE AGREEING TO BE BOUND BY THE TERMS OF THIS AGREEMENT. IF YOU DO NOT
AGREE TO THE TERMS OF THIS AGREEMENT, DO NOT USE THE SOFTWARE.
The Software is owned by R-Quest and is protected by United States copyright laws and
international treaty provisions. Therefore, you must treat the Software like any other copyrighted
material (e.g., a book or musical recording). Paying the license fee allows you the right to use the
Software simultaneously by up to five users for TrueNet LX or 25 users for TrueNet FX.
You may not use this Software to copy copyright material without the permission of the copyright
owner. You may not rent or lease the Software, nor may you (or allow others to) modify, adapt,
translate, reverse engineer, decompile, or disassemble the Software. If you violate any part of
this agreement, your right to use this Software terminates automatically and you must then
destroy all copies of the Software in your possession.
The Software and its related documentation are provided "AS IS" and without warranty of any
kind and R-Quest expressly disclaims all other warranties, expressed or implied, including, but not
limited to, the implied warranties of merchantability and fitness for a particular purpose. Under
no circumstances shall R-Quest be liable for any incidental, special, or consequential damages
that result from the use or inability to use the Software or related documentation, even if R-
Quest has been advised of the possibility of such damages. In no event shall R-Quest liability
exceed the license fee paid, if any.
Any written or oral information or advice given by R-Quest dealers, distributors, agents or
employees will in no way increase the scope of this license or warranty. Nor may you rely on
such oral or written communication. Some states do not allow the exclusion or limitation of
implied warranties or liability for incidental or consequential damages, so the above limitation or
exclusion may not apply to you. This warranty gives you specific legal rights, and you may also
have other rights which vary from state to state.
This Agreement shall be governed by the laws of the State of California. If for any reason a court
of competent jurisdiction finds any provision of the Agreement, or portion thereof, to be
unenforceable, that provision of the Agreement shall be enforced to the maximum extent
permissible so as to affect the intent of the parties, and the remainder of this Agreement shall
continue in full force and effect.

Limited 1 Year Warranty
TEAC Europe GmbH (hereinafter “TEAC”) warrants to the original end user that the AP-150 series
equipment purchased (Product) will be free from defects in material and workmanship for a period of one
year from the date of original purchase. Any part replaced under warranty is warranted to be free from
defects in material and workmanship until the expiration of the original warranty.
TEAC further warrants that the goods sold are as described, but no promise, description, affirmation of
fact, sample model or representation, oral or written shall be part of an order, unless set forth in these
terms and conditions, or are in writing and signed by an authorized representative of TEAC.
This warranty is subject to the following further conditions:
1) This warranty is limited to the electronic and mechanical performance only, as expressly detailed
in the Product specifications and NOT to the embedded software, firmware or to third party
software.
2) This warranty shall not apply to any Products which are stored, or utilized, in harsh environmental
or electrical conditions outside TEAC’s written specifications.
3) This warranty shall be valid only if the Product was purchased by the End User from an authorized
TEAC Distributor/Reseller.
4) This warranty shall not apply to any Product which has been modified, improperly repaired,
improperly installed, altered, or disassembled.
5) This warranty shall not apply to any Product that has been subject to misuse, negligence, accident
or normal wear and tear.
6) Heavy use may require consumable items such as Recorders and Print Engines to be serviced
within the warranty period. Examples of heavy use are:
• More than 12,000 discs burned per recorder
• More than 25,000 discs printed or more than 100 ink cartridges used for the FlashJet2 Print
Engine
Such service is not covered under warranty. Parts replaced in the course of a warranty service are subject
to the same service interval requirements.
7) Removal of the TEAC Label or Serial number from the product will void this warranty.
TEAC DISCLAIMS ALL IMPLIED WARRANTIES ON THE PRODUCT, INCLUDING WITHOUT LIMITATION
WARRANTIES OF MERCHANTABILITY, PERFORMANCE AND FITNESS FOR A PARTICULAR PURPOSE. TEAC
WILL NOT BE LIABLE FOR ANY ERROR, OMISSION, DEFECT, DEFICIENCY, OR NON-CONFORMITY IN ANY
SOFTWARE. AS A RESULT, THE PRODUCT IS SOLD “AS IS”, AND THE PURCHASER ASSUMES THE ENTIRE RISK
AS TO ITS QUALITY AND PERFORMANCE, AND IT IS UP TO THE PURCHASER TO DETERMINE SUITABILITY FOR
THE INTENDED PURPOSE. THE MAXIMUM LIABILITY IN ANY CASE SHALL BE LIMITED TO THE LESSOR OF
THE PURCHASE PRICE PAID FOR THE PRODUCT OR THE TEAC PUBLISHED RETAIL PRICE AT THE TIME OF
PURCHASE.
TEAC RESERVES THE RIGHT, AT TEAC’s SOLE DISCRETION, TO REFUSE TO PROVIDE, OR TO DISCONTINUE
PROVIDING TECHNICAL SUPPORT IF TEAC KNOWS, OR HAS REASON TO BELIEVE THAT SUCH TECHNICAL
SUPPORT WILL AID CIRCUMVENTING ENCRYPTION OR COPY PROTECTION TECHNOLOGY, OR OTHERWISE
ATTEMPTING TO VIOLATE THE LAWS OF ANY COUNTRY. TEAC SHALL NOT BE LIABLE FOR CIRCUMVENTING,
OR ATTEMPTING TO CIRCUMVENT SUCH TECHNOLOGY USING TEAC PRODUCTS, OR OTHERWISE AIDING
ANY ATTEMPT TO VIOLATE THE LAWS OF ANY COUNTRY.
TEAC SHALL NOT BE HELD LIABLE FOR THE INTEGRITY AND/OR LONGEVITY OF ANY TEXT, GRAPHICS, BAR

CODES OR COMBINATION THEREOF THAT ARE PRODUCED, GENERATED OR OTHERWISE TRANDFERRED TO
THE MEDIA BY THE USE OF TEAC PROVIDED PRODUCTS, NOR IS TEAC LIABLE FOR THE INTEGRITY, VIABILITY
OR LONGEVITY OF THE DATA ENCODED ON THE MEDIA.
TEAC SHALL IN NO EVENT BE LIABLE FOR DIRECT, INDIRECT, SPECIAL, INCIDENTAL, CONTINGENT, OR
CONSEQUENTIAL DAMAGES RESULTING FROM ANY DEFECT IN THE PRODUCT OR ITS DOCUMENTATION
INCLUDING DAMAGES FROM LOSS OF DATA, EVEN IF TEAC OR AN AUTHORIZED TEAC DEALER HAS BEEN
ADVISED OF THE POSSIBILITY OF SUCH DAMAGES. YOU AGREE THAT TEAC’s LIABILITY ARISING OUT OF
CONTRACT, NEGLIGENCE, STRICT LIABILITY IN TORT OR WARRANTY SHALL NOT EXCEED THE LESSOR OFANY
AMOUNTS PAID BY YOU FOR THIS PRODUCT OR THE TEAC PUBLISHED PRICE.
Any written or oral information or advice given by TEAC’s dealers, distributors, agents or employees will in
no way increase the scope of this warranty. Nor may you rely on such oral or written communication.
Some states do not allow exclusions or limitations of implied warranties or liability for incidental or
consequential damages, so the above limitations or exclusions may not apply to you. This warranty gives
you specific legal rights, and you may also have other rights that vary from state to state.
Purchaser’s Remedies
If an TEAC Distributor/Reseller or an End User desires to make a warranty Claim, the Distributor/Reseller or
End User shall, if requested by TEAC, ship the Product to TEAC’s authorized service facility, postage or
freight prepaid. TEAC shall, at its option, take one of the following two courses of action for any Products
which TEAC determines are defective in materials or workmanship:
1) Repair the Product with either new or refurbished parts; or
2) Replace with a new Product.
And if to a US Lower 48 Address (any United States address in the lower 48 contiguous states), ship the
product to the End User or to the authorized TEAC Distributor via Fed Ex Ground or other similar
transportation method freight prepaid.
PURCHASER’S REMEDIES SHALL BE LIMITED EXCLUSIVELY TO THE RIGHT OF REPLACEMENT OR REPAIR AS
PROVIDED AND DOES NOT INCLUDE ANY LABOR COST OR REPLACEMENT AT END USER’S SITE. TEAC SHALL
NOT BE LIABLE FOR ANY CONSEQUENTIAL DAMAGES RESULTING FROM ANY BREACH OF THIS WARRANTY,
INCLUDING WITHOUT LIMITATION, ANY DAMAGES RESULTING FROM PROPERTY DAMAGE, PERSONAL
INJURY OR BUSINESS INTERRUPTION.
Governing Law and Venue
The sale and purchase of Products covered hereby and all terms and conditions of this Warranty shall be
governed by the laws of the State of California, and any disputes hereunder shall be venued in the El
Dorado County District Courts in California.
If Your Product Requires Support
If your product requires servicing, you should first contact the place of purchase and request support. If
the service request cannot be completed by the place of purchase, you should contact TEAC directly using
one of the following methods:
E-Mail: dps-support@TEAC.de
Telephone: +49(611) 7158 657
Fax: +49(611) 7158 4657
Before shipping any item to TEAC, first obtain an RMA (Return Material Authorization) Number from TEAC

support. This number must be placed on the outside of the product packaging where it can be easily found
otherwise the item will be refused and returned at the sender’s expense.
All products returned to TEAC under warranty MUST be in original TEAC supplied packaging. If you do not
have the original packaging, new packaging can be supplied for a charge. Please contact TEAC for the cost
of replacement packaging, which may vary based on the product, and your location. Your warranty will be
voided if original TEAC packaging is not used.
Within the first 30 days of warranty, if to a US Lower 48 Address, TEAC will cover the cost of shipping to
the TEAC factory via Fed Ex Ground or other similar transportation method; otherwise you are responsible
for the cost of shipping the product to TEAC.
During the warranty period, if to a US Lower 48 Address, TEAC will cover the cost of returning the repaired
product to you via Fed Ex Ground or other similar transportation method. If you require a more urgent
transportation method, upgrades can be arranged for a charge, which in all cases must be pre-paid.

Table of Contents
1. Using TrueNet
1.1 Starting TrueNet via a Web Browser
1.2 How to find the System IP Adress
1.3 Default Login and Password
1.4 Home Page Area
1.4.1 Main Job Area
1.4.2 Loader Status
1.4.3 Media Status
1.4.4 Hopper Types
1.4.5 Network Status / Transfer Status
1.4.6 Ink Levels
1.4.7 Left Menu Bar
1.4.7.1 New Job
1.4.7.2 Edit Job
1.4.7.3 Delete Job
1.4.7.4 Disc Sets
1.4.7.5 System Images
1.4.7.6 Label Designer
1.4.7.7 User Settings
1.4.7.8 Administration
1.4.8 Creating a New Job
1.4.8.1 Job Reference
1.4.8.2 Quantity
1.4.8.3 Media
1.4.8.4 Disc Image
1.4.8.4.1 Local Image
1.4.8.4.2 System Image
1.4.8.4.3 Create Data Disc
1.4.8.4.3.1 File System
1.4.8.4.3.2 Media Type
1.4.8.4.3.3 Volume Label
1.4.8.4.3.4 New Folder
1.4.8.4.3.5 Disc Space Used Bar
1.4.8.4.4 Read New Master
1.4.8.4.5 Disc Set
1.4.8.5 Print Image
1.4.8.5.1 Local PRN
1.4.8.5.2 System PRN
1.4.8.5.3 Local Template
1.4.8.5.4 System Template
1.4.8.5.5 Create Label
1.4.8.5.6 About Template Files
1.4.8.6 Priority
1.4.8.7 Write Speed

1.4.9 Job Setting
1.4.9.1 Copy
1.4.9.2 Compare
1.4.9.3 Audit
1.4.9.4 Print
1.4.9.5 Fast Start
1.4.9.6 No Overlap
1.4.10 E-Mail Settings (all systems)
1.4.11 Dynamic Printing (TrueNet FX Only)
1.4.11.1 Embedded Label Tags
1.4.11.2 Dynamic User Form Fields
1.4.11.3 Dynamic Mail Merge Fields
1.4.11.4 Serialization
1.4.12 Editing Jobs
1.4.12.1 Changing the Quantity
1.4.12.2 Job Priority
1.4.12.3 Enable Compare / Audit
1.4.12.4 Enable / Disable No Overlap
1.4.12.5 E-Mail Notification Settings
1.4.13 System Images
1.4.13.1 Getting a Disc Image from the System
1.4.13.2 Sending an Disc Image to the System
1.4.13.3 Sending a Print Image to the System
1.4.13.4 Sending a Print Template to the System
1.4.13.5 Renaming an Image
1.4.13.6 Deleting an Image
1.4.13.7 Refreshing the Display
1.4.14 Disc Sets
1.4.14.1 Creating a Set
1.4.14.1.1 Add
1.4.14.1.2 Modify
1.4.14.1.3 Delete
1.4.14.1.4 Move Up / Move Down
1.4.14.1.5 Reverse
1.4.15 Using a Disc Set
1 . 4 .1 6 Using a Disc Set
2 The Label Designer
2.1 Overview – Limitations of the browser environment
2.2 Label Designer – Main Window Overview
2.3 Creating a Basic Label
2.4 Creating a Print Image (PRN)
2.5 Adding Text to a Design
2.6 Adjusting the Template Dimensions
2.6.1 Disc Margin
2.6.2 Hub Size
2.7 Saving as a Template
2.8 Creating a Design from Scratch

2.9 Displaying Rulers
3 User Settings
3.1 Password
3.2 E-Mail
3.3 Language
3.4 View Job Queue
3.5 Defaults
3.5.1 Disc Images
3.5.2 Labels
3.5.3 PRN Images
3.5.4 Set Files
3.5.5 CSV (Used by TrueNet FX Only)
3.5.6 Logging
4 Administrator Guide
4.1 System Setup
4.2 Hopper Settings
4.3 Retaining Rejects inside the machine – Rotating Hoppers
4.4 Sticky Disc Mode
4.5 Thresholds
4.6 Images Backup
4.6.1 Running Backup
4.6.2 Running Restore
4.7 E-Mail Server
4.7.1 Authentication
4.7.2 Copy-All E-Mails
4.7.3 Console E-Mail
4.8 Network
4.8.1 DHCP
4.8.2 System Name
4.9 Recorders
4.10 Time & Date
4.11 Logging
4.12 Firmware
4.13 System License
4.14 Printer Settings
4.15 PIP – Product Improvement Program
4.16 Users
4.16.1 SysAdmin
4.16.2 Administrator
4.16.3 User
4.16.4 User Name
4.16.5 Password / Confirm
4.16.6 E-Mail
4.16.7 Language
4.16.8 Max Priority
4.16.9 Max User Jobs (Quota)
4.16.10 Max Quantity per Job (Quota)

4.16.11 Max Combined Job Quantity (Quota)
4.16.12 Enabled
4.16.13 Administrator
4.16.14 View Job Queue
4.16.15 Allow Fast Start
4.16.16 Allow No Overlap
4.16.17 Edit User
4.16.18 Delete User
4.16.19 Backup
4.16.20 Restore
4.16.21 Save
4.16.22 Cancel
5 Optimizing your browser for TrueNet
5.1 Windows Vista & XP
5.2 Mac OSX
6 TrueNet Error Messages & Troubleshooting
7 Administration (Via the LCD/Touchpad)
7.1 Setup Menu
7.2 Job Options
7.2.1 Burn Discs
7.2.2 Compare Master
7.2.3 Compare Copy
7.2.4 Audit Copy
7.2.5 Ask Quantity
7.2.6 Async Copying
7.2.7 Check Blank Size
7.2.8 Master Drive
7.2.9 Printer
7.2.10 Stop Reject Full
7.2.11 Last Char Name
7.3 Network Setup
7.3.1 Network Active
7.3.2 DHCP
7.3.3 Set Network Name
7.3.4 Duplicator IP (DHCP = No)
7.3.5 Network Mask (DHCP = No)
7.3.6 DNS Server (DHCP = No)
7.3.7 Gateway IP Address (DHCP = No)
7.4 Time & Date
7.4.1 Set Time
7.4.2 Set Date
7.4.3 Set Date Format
7.5 Password Setup
8 Using the System in Standalone Mode
8.1 Turning On
8.2 Keyboard
8.3 LCD Display

8.4 Menu Structure
8.4.1 Copy
8.4.2 Compare
8.4.3 Image Menu
8.4.4 Load New Master
8.4.5 List Images
8.4.6 Show HD Free Space
8.4.7 Delete Image
8.4.8 Defragment HD
8.5 Utilities Menu
8.5.1 Hard Disk Utilities
8.5.1.1 Show HD Free Space
8.5.1.2 Show HD Info
8.5.1.3 Defrag HD
8.5.2 Firmware Utilities
8.5.2.1 Load System F/W
8.5.2.2 Load F/W XMODEM
8.5.2.3 Load F/W From USB
8.5.2.4 Load Drive F/W
8.5.2.5 Load Loader F/W
8.5.3 Loader Utilities
8.6 System Information
8.6.1 PCA Info
8.6.2 Writer Info
8.6.3 Hard Drive Info
8.6.4 Autoloader Info
8.7 Upgrade License
8.7.1 Show Current Key
8.7.2 Enter New Key
8.8 Quick Start Copying
8.9 Quick Start Comparing
9 TrueView
9.1 What is TrueView?
9.2 Supported Operating Systems
9.3 Installing TrueView
9.4 Running TrueView

1. Using TrueNet
1.1 Starting TrueNet via a Web Browser
TrueNet is loaded directly from the System using a Java-enabled web browser. To login
to the AP-150 using your web browser you will need four things:
1. A Computer with a Java-enabled Web Browser
2. The address of the System (this could be an IP address, or a Domain name)
3. Your Login Name (the factory default login is ‘admin’)
4. Your User Password (the factory default password is ‘admin’)
1.2 How to find the System IP Address
If the AP-150 is already in Network Mode, hold the
STOP
key until the message ‘Stop
(Y/N)’ appears. The current IP address will be shown on the bottom line of the LCD. If
you do not touch any keys for 30 seconds, the System will return to the ‘Online’ display.
Alternatively, press the NO key (a menu will appear) then the
STOP
key to exit the menu
and return to Network Mode.
If the System is at the main menu, use the down cursor key to move to the “Network
Mode” menu item and press
ENTER
to enter Network Mode. The System will display the
current IP address on the LCD for a few seconds, and then enter Network Mode.
The System must be in Network Mode to accept jobs from TrueNet.
1.3 Default Login and Password
The factory default login name is ‘admin’, and the default password is also ‘admin’.
However, if your System administrator has changed this login, or has created individual
user login/password settings, your System administrator will provide you with the new
login name and password. If you are the System administrator, please refer to the
Administrator Guide section (later in this manual) for complete setup information.
Once you have the System IP address, login and password information, open the web
browser and enter the IP address of the System in the browser address bar, just as if you
were accessing any other web site.
After a few moments the browser may display a Java logo, and a dialog box informing you
that you are loading a digitally signed Java Applet, signed by TEAC Technologies, the
manufacturer of the AP-150 and TrueNet. The purpose of this dialog is to let you know
that this applet will allow you to move data between your computer and the System.
This dialog box will appear every time you log on to TrueNet unless you click the check
box “Always Trust (the address of the System) from this Publisher”. By selecting this box
you are telling your browser that it is OK to load TrueNet in the future without having to
view this dialog. Click the Run button to proceed.
If for any reason the words ‘Requires Java’ appear on your browser window, this means
that your browser does not have Java enabled. To install the Java plug-in within your
browser, visit www.java.com.
After a few seconds, the TrueNet login screen will appear. Enter your login name and
password and click on the ‘Login’ button. A few moments later the main TrueNet screen
will appear.
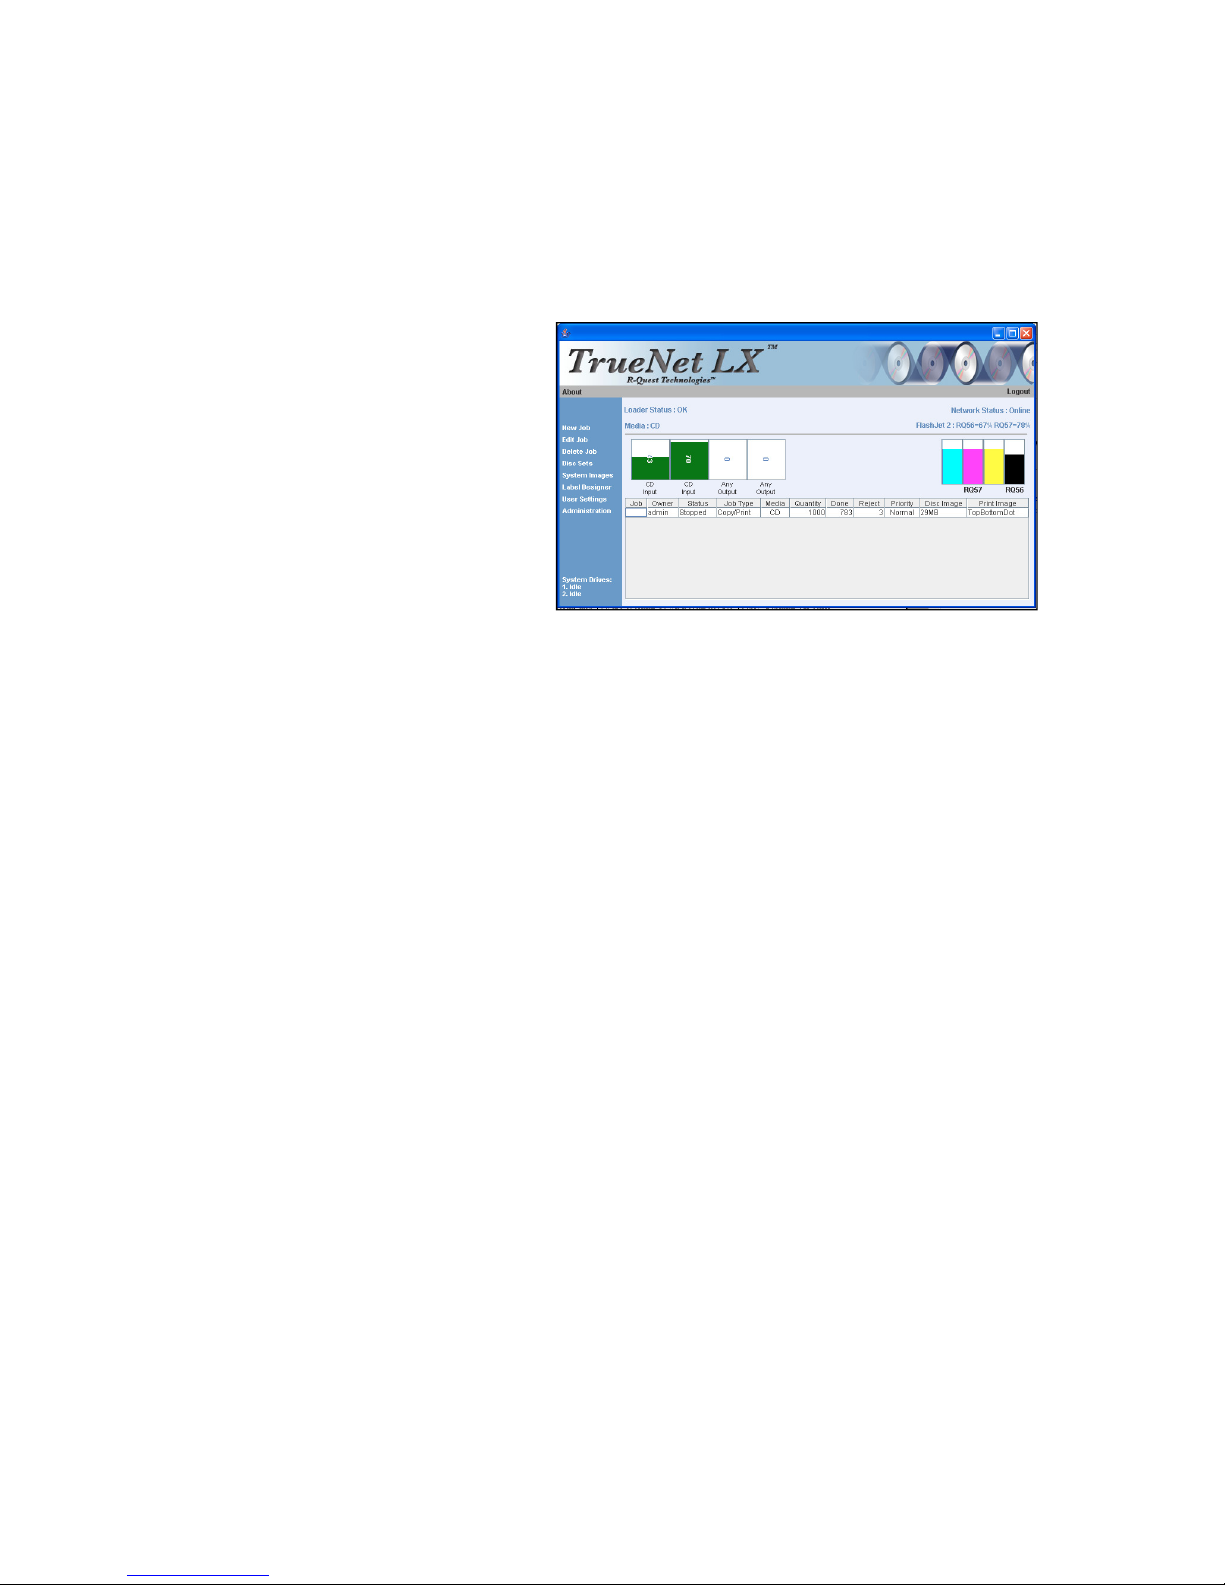
1.4 Home Page Area
The Home Page display may vary
depending on the specific model
you purchased. The Home Page
shown here is TrueNet LX on the
AP-150 which has four assignable
hoppers.
1.4.1 Main Job Area
This area of the screen is where
your jobs will appear, showing the
current status and progress of the
job. Any job reference you entered will also be shown, making it easy to keep track of
many jobs at the same time.
There are five main areas of the screen. The first is the Job Status window. This is the
largest area, and is where the status of all visible jobs will be shown. Depending on the
settings selected by the administrator, it may be that you cannot see all the other jobs on
the System. This is to provide some level of confidentiality between users on the System.
If the administrator allows you to see other jobs, you still have the option of viewing just
your own jobs by selecting to View Job Queue in User Settings. This may be desirable
when there are many jobs on the System, and you are looking down a long list for yours.
Turning off other people’s jobs makes yours the only ones displayed.
1.4.2 Loader Status
The current status of the System autoloader is shown whenever the user (or
administrator) is logged in to the System via TrueNet. Normally the status will show ‘OK’,
indicating that the System is ready. If the System is unable to operate normally, an error
message will be displayed (usually highlighted in red), and appropriate action must be
taken by the user to correct the problem.
An example is when the door is open, and the error message “Loader Status : Door Is
Open” is displayed. The System will not operate with the door open, so action must be
taken to close the door before normal operation can be resumed. See the section on
error messages for more information about this.
1.4.3 Media Status
The AP-150 has a very flexible hopper system, allowing the administrator to choose
different media types available in each of the input hoppers depending on the recorder
options purchased. The current options for CD/DVD machines are:
CD
DVD SL (single layer 4.7GB)
DVD DL (dual layer 8.5GB)
If the System was purchased with Blu-ray capability then the following media types will
also be available:
BD SL (Blu-ray single layer 25GB)
BD DL (Blu-ray dual layer 50GB)
The administrator is free to designate the hopper and media types as required. For
convenience, there are some predefined hopper configurations that allow very easy
selection and setup. For more information on media types see the Administrator Guide
section.
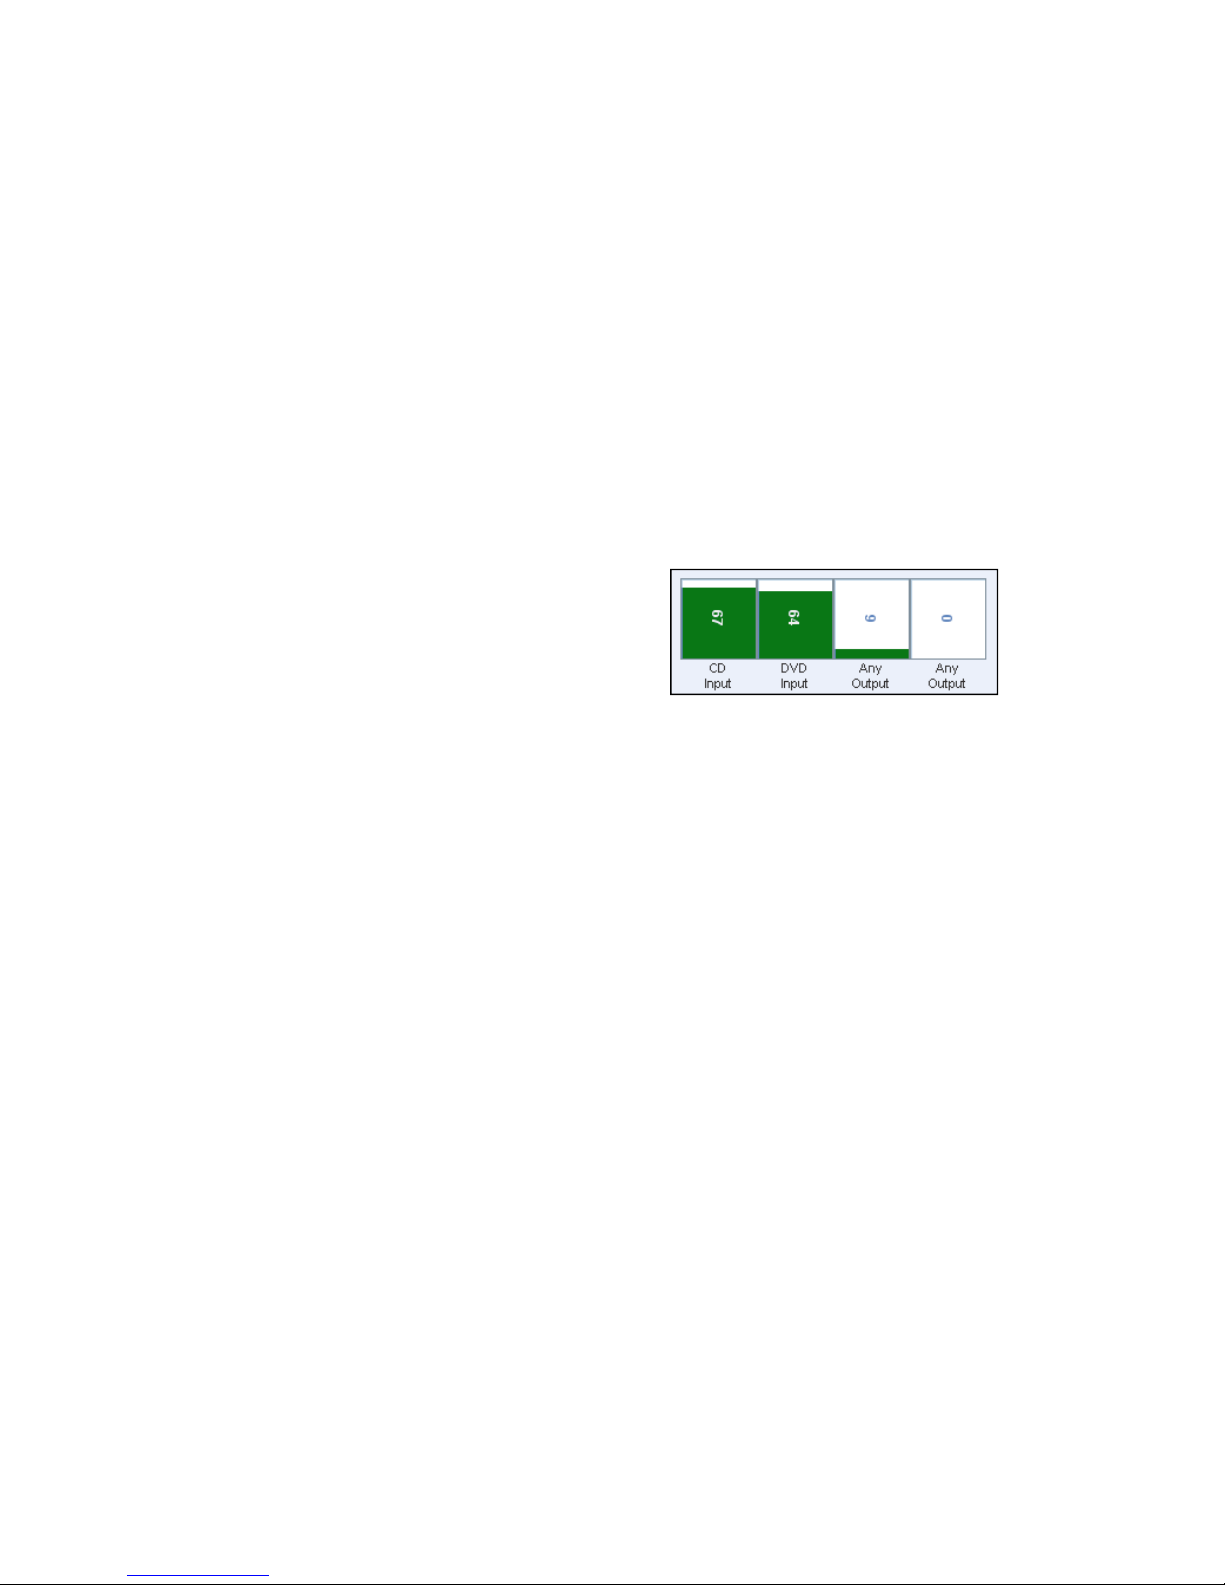
1.4.4 Hopper Types
The current hopper types and approximate
number of discs in each hopper are shown in the
hopper status display. Input hoppers that have
levels above the administrator-defined low-media
threshold will appear green, and input hoppers (or
‘group of input hoppers’) that are below this threshold will turn red. A ‘group of input
hoppers’ is where more than one hopper has the same input media type. As an example,
if there are two input hoppers with CD media, the hoppers will only turn red once the
combined number of discs in both hoppers falls below the administrator-defined lowmedia threshold. See Administrator Guide: Thresholds for more information about
System thresholds, which also affect e-mail notifications for low media and low ink levels.
Once output hoppers reach almost full, they will turn red to indicate they are almost full
and will soon need attention.
The output hoppers will display the number of discs placed in that hopped since the door
was last opened. The system will reset this count to zero whenever the door is opened.
Each hopper will have a media type associated with it and the current function of that
hopper is also indicated in the form of ‘Input’, or ‘Output’. Note that some hopper
configurations will allow a hopper to change from an ‘Input’ to an ‘Output’ automatically
once the input becomes empty. This feature is known as ‘rotating hoppers’ and the
hopper display will automatically update to show the new configuration. Hoppers can be
reset back to their original state at any time by opening the System door, emptying the
burned media, and placing new blank media in to the hoppers originally designated as
input. Once the door is closed, choose ‘Reset Hoppers = Yes’ on the System
LCD/Touchpad. By default the AP-150 does not operate in rotating hopper mode, and
this must be enabled by an administrator.
1.4.5 Network Status / Transfer Status
The current network status is shown at all times except for during file transfer. The
network status should be either ‘Online’ or ‘Offline’, and indicates the availability of the
System for network transfers and job control.
During image transfer the network status is replaced by the image file transfer status,
with the information being updated approximately once per second during a transfer
operation. The status will typically show the number of megabytes transferred so far,
and the total number of megabytes to send. At the same time, a progress bar will appear
on the main screen (not shown above), together with an approximate time remaining
based on the amount of data transferred so far, and the total amount left to transfer.
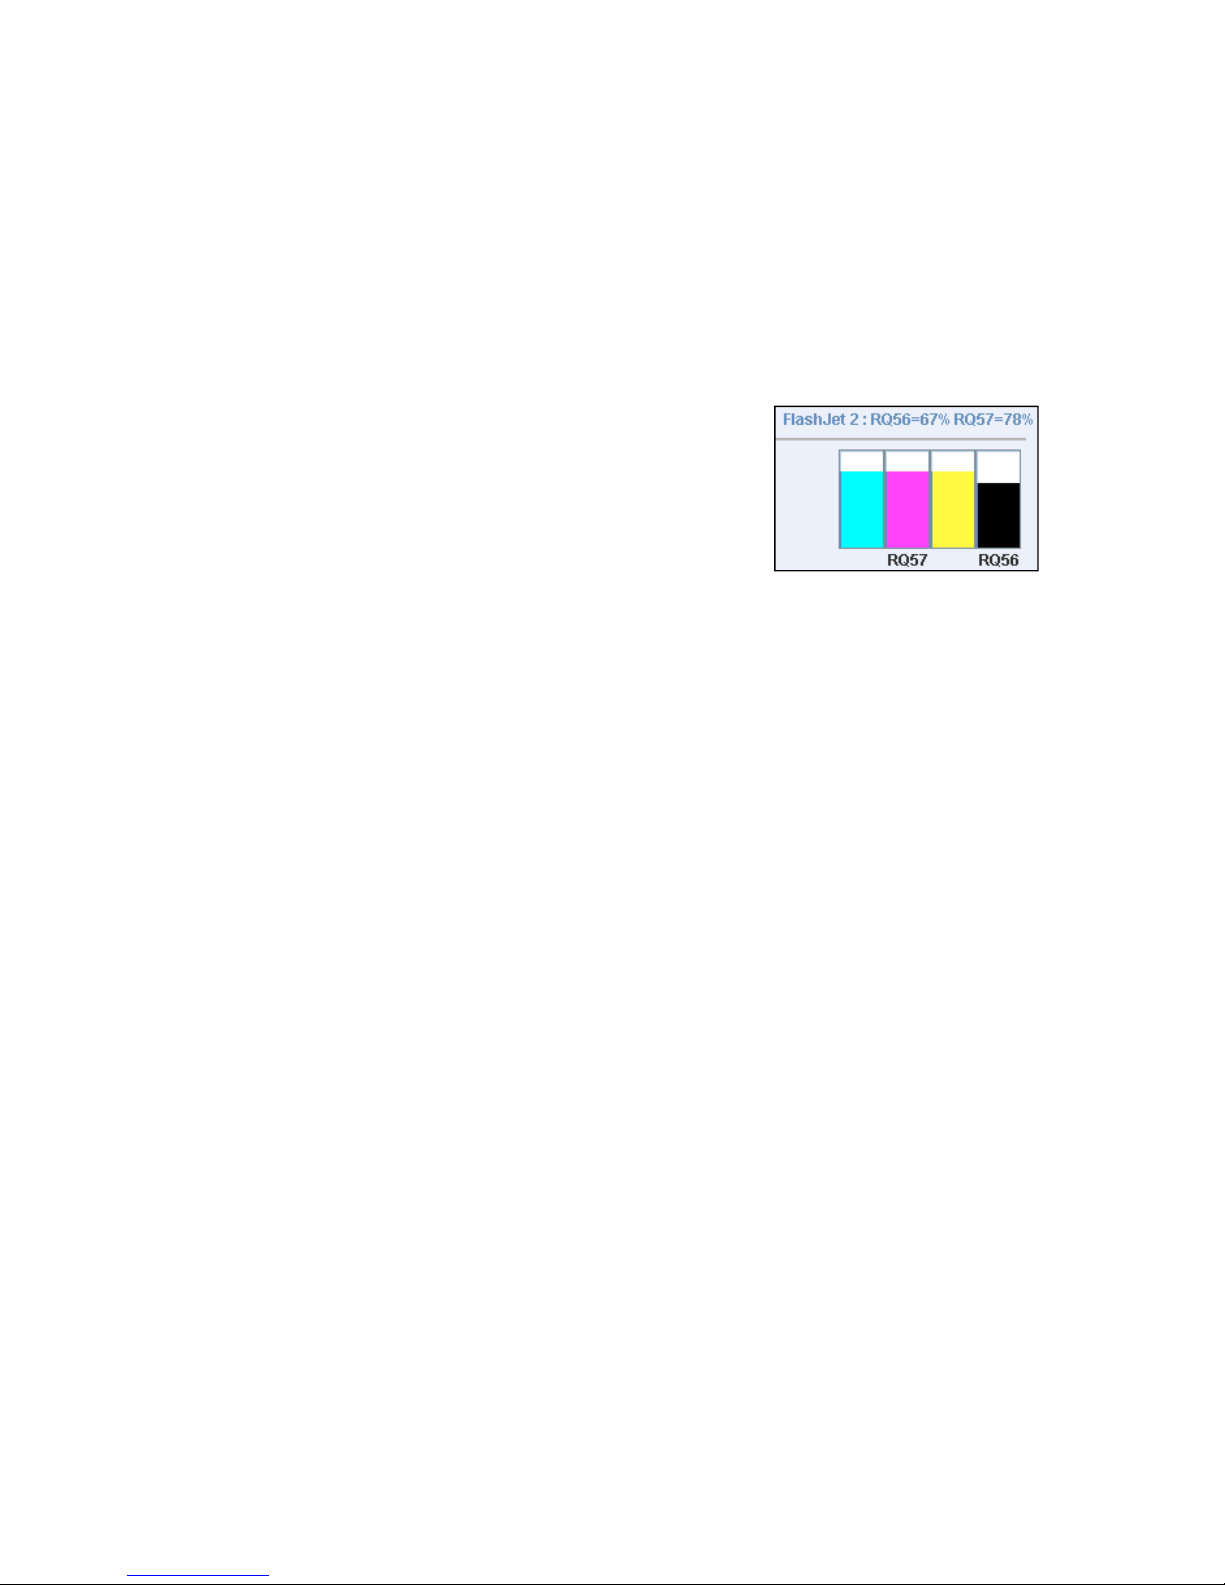
1.4.6 Ink Levels
The level of ink remaining is displayed graphically to make
it easy to recognize low ink status. The level is also
displayed in text form just above the graphic display. The
AP-150 includes an embedded FlashJet2 print engine, and
the bars represent the RQ56 (Black) and RQ57 (Color)
cartridge types.
1.4.7 Left Menu Bar
The left menu bar allows access to the various functions available within TrueNet. To
select an item in the menu, move the mouse over the item and single-click that item.
Each item in the menu will change color as the mouse is moved over it to show which
menu item would be activated if selected by the single mouse click.
If you are logged in as a System Administrator an additional menu (Administration) will
appear below ‘User Settings’ (which is the settings for the current user – see ‘User
Settings’ for more information). When this menu item is selected, the System Setup
window will open. See the Administrator Guide section for more information on System
Setup.
1.4.7.1 New Job
Selecting New Job on the left menu bar will launch the Create New Job dialog box. This is
only one of four ways to activate the Create New Job dialog box. You could also doubleclick the main Job Status area (do not double-click on a job because this will bring up the
Edit Job dialog!), or you can right-click in the same Job Status area. If there are jobs
already present in the Job Status area, right-clicking on any job will activate a pop-up
menu which also includes a Create New Job menu item.
1.4.7.2 Edit Job
Selecting a job in the Job Status window (single-click the job) followed by the Edit Job
item on the left menu bar will launch the Edit Job dialog box. This is one of three ways to
launch the Edit Job function. The other ways are to double-click the job in the Job Status
window or to right-click the job and choose ‘Edit Job’ from the pop-up menu that
appears. Editing a job allows real time changes to be made to a job that has already been
submitted, including changes to disc quantities, job priorities, and adding or removing
Compare/Audit functions. Additional functions include stopping a running job, restarting
a stopped job or starting a master disc reading. For more information on editing jobs,
see the Editing Jobs section.

1.4.7.3 Delete Job
To delete a job, select the job in the main Job Status window (single-click the job) then
select the ‘Delete Job’ item on the left menu bar. Another way to delete a job is to rightclick on the job and select ‘Delete Job’ from the pop-up menu that appears. Running jobs
cannot be deleted. If a job is running, it must first be stopped. Jobs in an error state,
jobs that have completed (‘Done’) and jobs that are in a ‘Queued’ state can all be
deleted. Note that when a job is deleted, any temporary disc images or print images that
were created as part of the job (and sent to the System as part of the New Job function)
will automatically be deleted from the System’s local storage.
1.4.7.4 Disc Sets
Disc Sets provide a way to select a Disc image and Print image together as a ‘Set’. This
allows the user to select the Set instead of having to find and select the disc image and
print image individually. TrueNet LX allows up to 3 discs per set. TrueNet FX allows up to
25 discs to be added to each Set. Disc sets make it easy to produce multi disc sets
without having to create a different job for each disc in the set.
1.4.7.5 System Images
The System Images dialog box can be accessed via the left menu bar and is used to select,
rename, delete or transfer images to/from the System internal storage. In most cases,
image transfers will be done automatically when you create new jobs, but the System
Images dialog box provides a way of doing this manually. It is also available in a limited
form from within the Create New Job dialog box to allow you to select images already
located on the System’s internal storage as part of a duplication or print job. This dialog
box shows the image name, type (CD/DVD/BD/Print/Template) and image size of all
images available on the System for use in duplication and/or printing jobs.
1.4.7.6 Label Designer
The Label Designer provides a way to create labels within the browser environment
without the need to learn complicated graphics editing packages, install printer drivers
on your local computer, or produce PRN files for use in printing jobs.
The Label Designer includes easy-to-use functions for creating both static and dynamic
text fields, simple graphics primitives as well as importing many standard graphics files
(e.g. JPEG, TIFF, PNG, BMP, etc.) for use as both background images and image inserts.
Labels can include automated tags for showing the Date and Time on the printed surface
of the disc, together with full support for both serialization and dynamic text (mailmerge) functions, and User-Defined Form Field Prompts.
The Label Designer can be launched from the left menu bar, or from the Create Job
Dialog for label creation as part of a wider Create New Job function. Designs are stored
as label template files and can be re-used over and over again, even with different printer
types simultaneously (which is something you can’t do with a PRN file!). For more
information see the Label Designer section.
1.4.7.7 User Settings
Each user has their own settings, including passwords, e-mail address and other shortcut
directory options. The user can edit many of the administrator assigned options by
selecting the User Settings menu from the left menu bar. See the section on ‘User
Settings’ for more information.
1.4.7.8 Administration
If you are logged on to the System as an administrator an additional menu item
(Administration) will appear and the end of the menu list in the left menu bar. By
selecting this menu item the System Setup dialog will appear and allow the general
administration of the System via a series of ‘tabs’.
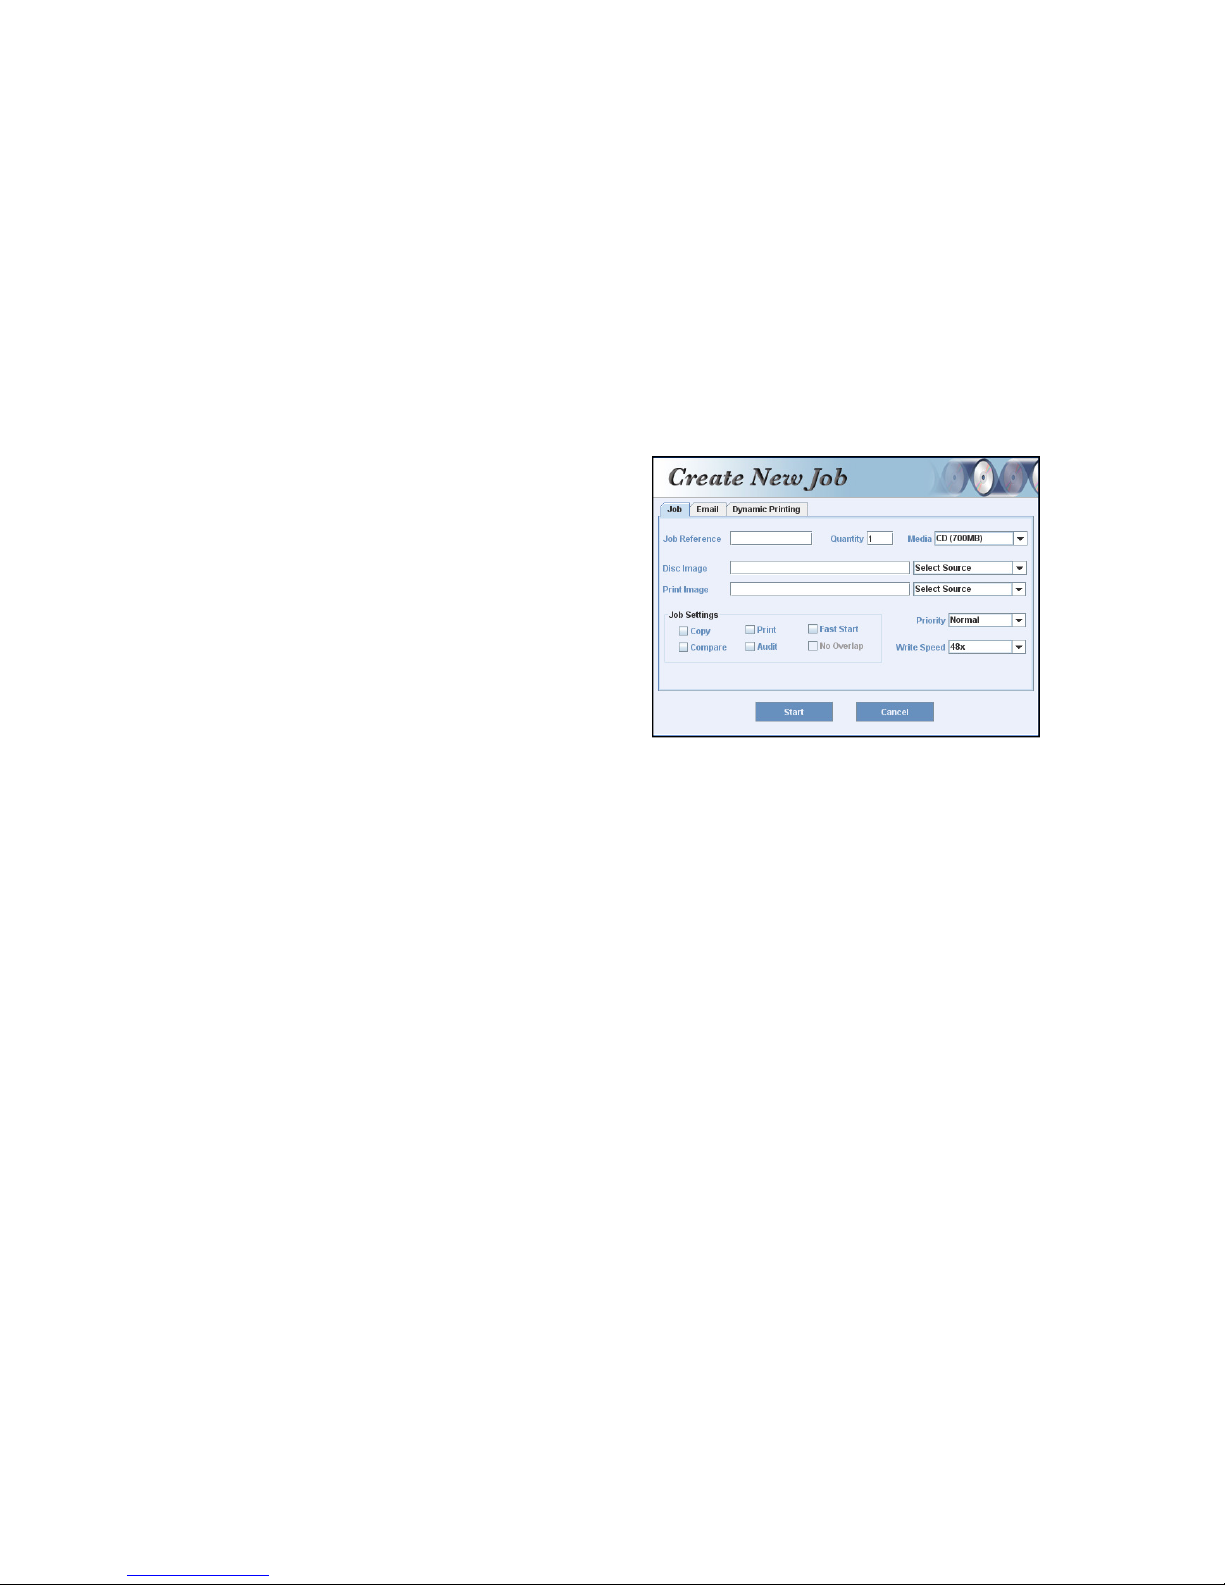
1.4.8 Creating a New Job
Running a publishing, duplication or printing
job on the System is very easy and takes just
a few mouse clicks. Jobs are created using
the ‘Create New Job’ dialog.
Selecting New Job on the left menu bar will
launch the Create New Job dialog box, and is
only one of four different ways to activate
this dialog box. You can also double-click
the main Job Status area (do not double-click
on a job because this will bring up the Edit
Job dialog!), or you can right-click in the same Job Status area. If there are jobs already
present in the Job Status area, right-clicking on any job will activate a pop-up menu which
also includes a Create New Job menu item.
Once you have selected all the required options, e.g. the disc image, print image,
quantity, etc., click the Start button to start the job.
1.4.8.1 Job Reference
The job reference is for user convenience only. It is not used by the System for anything
other than to help the user identify and keep track of their jobs. Any combination of
letters and numbers may be entered up to a maximum of 20 characters. This reference
will show as part of the Job Status, and may be seen by other System users if that is
allowed by the administrator. This field can also be automatically printed on a disc label
produced using the Label Designer (and saved/used as a template) when using the
dynamic tags fields. See “Dynamic Printing Using TrueNet FX” for more information.
Typical uses for Job Reference could include customer order number or internal job
tracking numbers. However, the use of this field is entirely optional.
1.4.8.2 Quantity
Enter a number between 1 and 9999 as the number of copies/prints required in this job.
Note that the administrator may restrict the number of discs allowed per job, and if you
request more than the designated limit, a warning will appear and the quantity will be
reduced to the maximum permitted number. All jobs, except those using dynamic ‘mailmerge’ labels can have their quantities edited after the job has been created, while the
job is running, and even after a job has already completed the requested number of
discs.
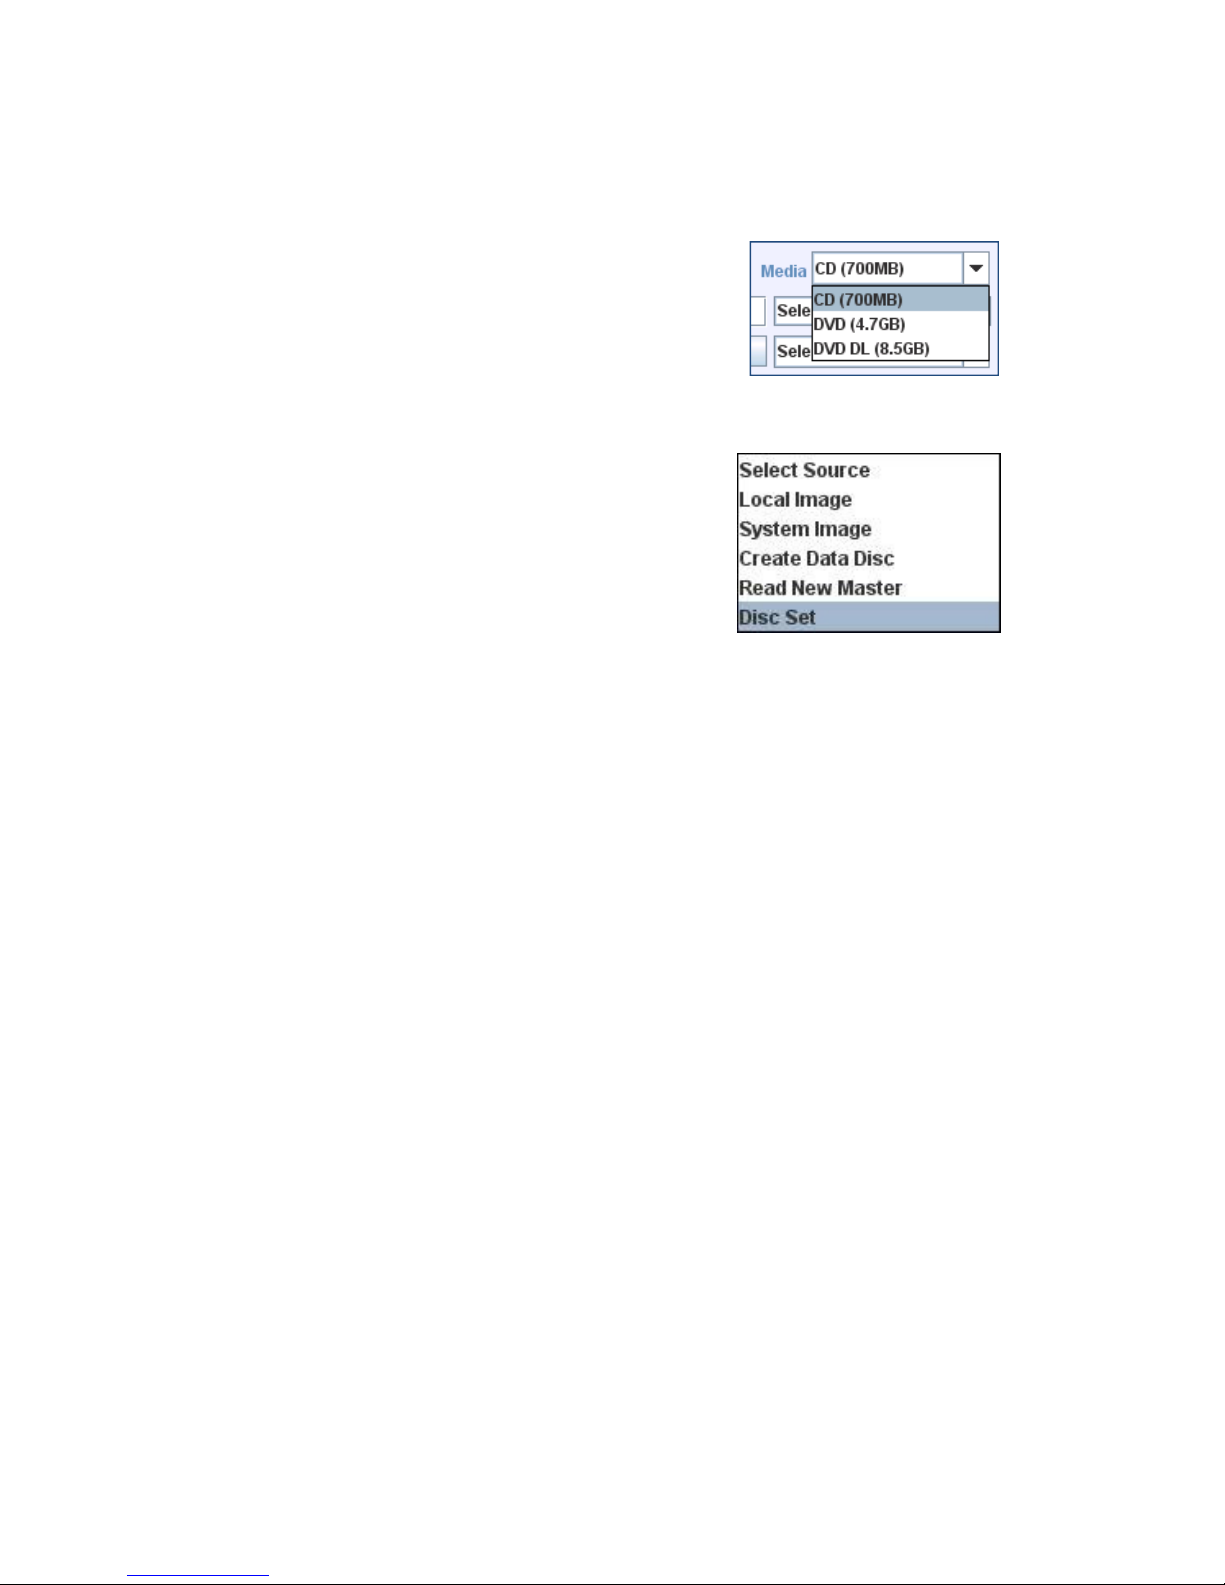
1.4.8.3 Media
The Media selector will include all the media types available
in the System at this time. If you are using a System image,
or an image that was originally created from a master disc
using the System reader, the media type is already
embedded within the image file, and the media type will be
selected automatically for you. However, if you are creating a new data disc, or selecting
an ISO image file as part of a job, you must select the media type required before starting
the job. Note that the media type can also be changed
while creating a data disc (see Create Data Disc). Once a
job has been started, the media type can no longer be
changed.
1.4.8.4 Disc Image
The Disc Image selector provides a convenient way to
select one of several possible sources for the disc image
data.
1.4.8.4.1 Local Image
If you want to make copies from an ISO file created by another mastering application
(e.g. Data or Video authoring package), or you have a disc image originally created in the
System reader and then transferred to your local hard disk, you should select Local
Image. A File Open dialog box will allow you to select the file by browsing your computer
for the file. If you have designated a ‘shortcut’ directory to your image files (See User
Settings: Shortcuts) the File Open dialog box will automatically open in that directory. If
you have not set the shortcut yet, the File Open dialog box will typically open up in your
user home directory.
If you select an ISO image file, TrueNet then asks you what type of media this ISO file is
being targeted for, e.g. CD or DVD, or if you have purchased the Blu-ray option, then BD
will also be available. It is important that you select the correct media type, or you may
end up with unusable discs.
If you select an TEAC Image File (.rqi) then the media type will automatically be selected
using the embedded image file information. This media selection cannot be changed.
1.4.8.4.2 System Image
The System can store many master disc images on its internal hard disk system. The
storage capacity will depend on the model and options purchased. Images stored on the
System are available for any user to select as part of their jobs. Storing an image on the
System has the advantage that no time is required transferring the disc image to the
System prior to starting a new job, and users who regularly run repeated jobs of the same
disc images can take advantage of this to speed up starting repeated jobs.
Selecting System Image will launch the System Images dialog box and allow you to select

an image on the System. To select an image, single-click on the image name and then
click the OK button. The media type is automatically detected from the selected image.
1.4.8.4.3 Create Data Disc
TrueNet includes a drag & drop
mastering tool that allows you to
create ISO 9660 data discs within the
browser window. When you select
this option a new Create Data Disc
window will appear.
You can browse your local computer
and all of the available directories
including hard drives and network
resources from this window. When
you find the files that you want to
copy, drag them from the left
window into the right window.
1.4.8.4.3.1 File System
The currently supported file systems include ISO9660 (strict) and ISO9660 + Joliet (allows
long file names), UDF 1.02 (for DVD Video) and UDF 2.60 (for Blu-ray Video).
1.4.8.4.3.2 Media Type
Select the type of media you will be recording to here. All available media types will be
listed here based on your input media hopper setup.
1.4.8.4.3.3 Volume Label
This is where you can label your disc volume.
1.4.8.4.3.4 New Folder
Select this button to add a new folder in your new master.
1.4.8.4.3.5 Disc Space Used Bar
This graphical indicator will build left to right in green showing the approximate size of
your data in comparison to the total size of your selected media capacity.
1.4.8.4.4 Read New Master
If you have a master disc that you need to make copies of, place the disc on top of the
first input hopper and then select Read New Master in TrueNet as the source of the disc
image. Once selected, the cursor will automatically move to the Disc Image name entry
box to allow you to enter the image name to use. This image name can be any
combination of letters or numbers up to 14 characters long. Once the Create New Job
dialog has been completed (i.e. by choosing the Start button) the job will be created in a
‘Need Master’ state. To start the master reading, right-click on the job (in the Job Status
window) and choose Start Reading from the pop-up menu, or double-click the job and
choose the Start Reading button from within the Edit Job dialog box.
Unless other options are chosen, a Read New Master job will read a master to the System
internal storage and then stop (job completed). To start copying immediately once the
master has been read, select the ‘Copy’ checkbox within the Create New Job dialog box at
the same time you select to read a new master, and enter a copy quantity. You may also
select a print image to print on to the copies made.
It is also possible to add the Copy flag, and add a quantity to this read job by editing the
job after it is created, but you will not be able to add a print image once you leave the
Create New Job dialog box. If you want to print on the copies that are started
automatically after a read master is complete, remember to select a print image before
starting the job.
1.4.8.4.5 Disc Set
Multi disc sets can be produced (in disc set order) by selecting a single set entity. Up to
100 discs can be added to a ‘Set’. For more information on Disc Sets, please see the Disc
Sets section.
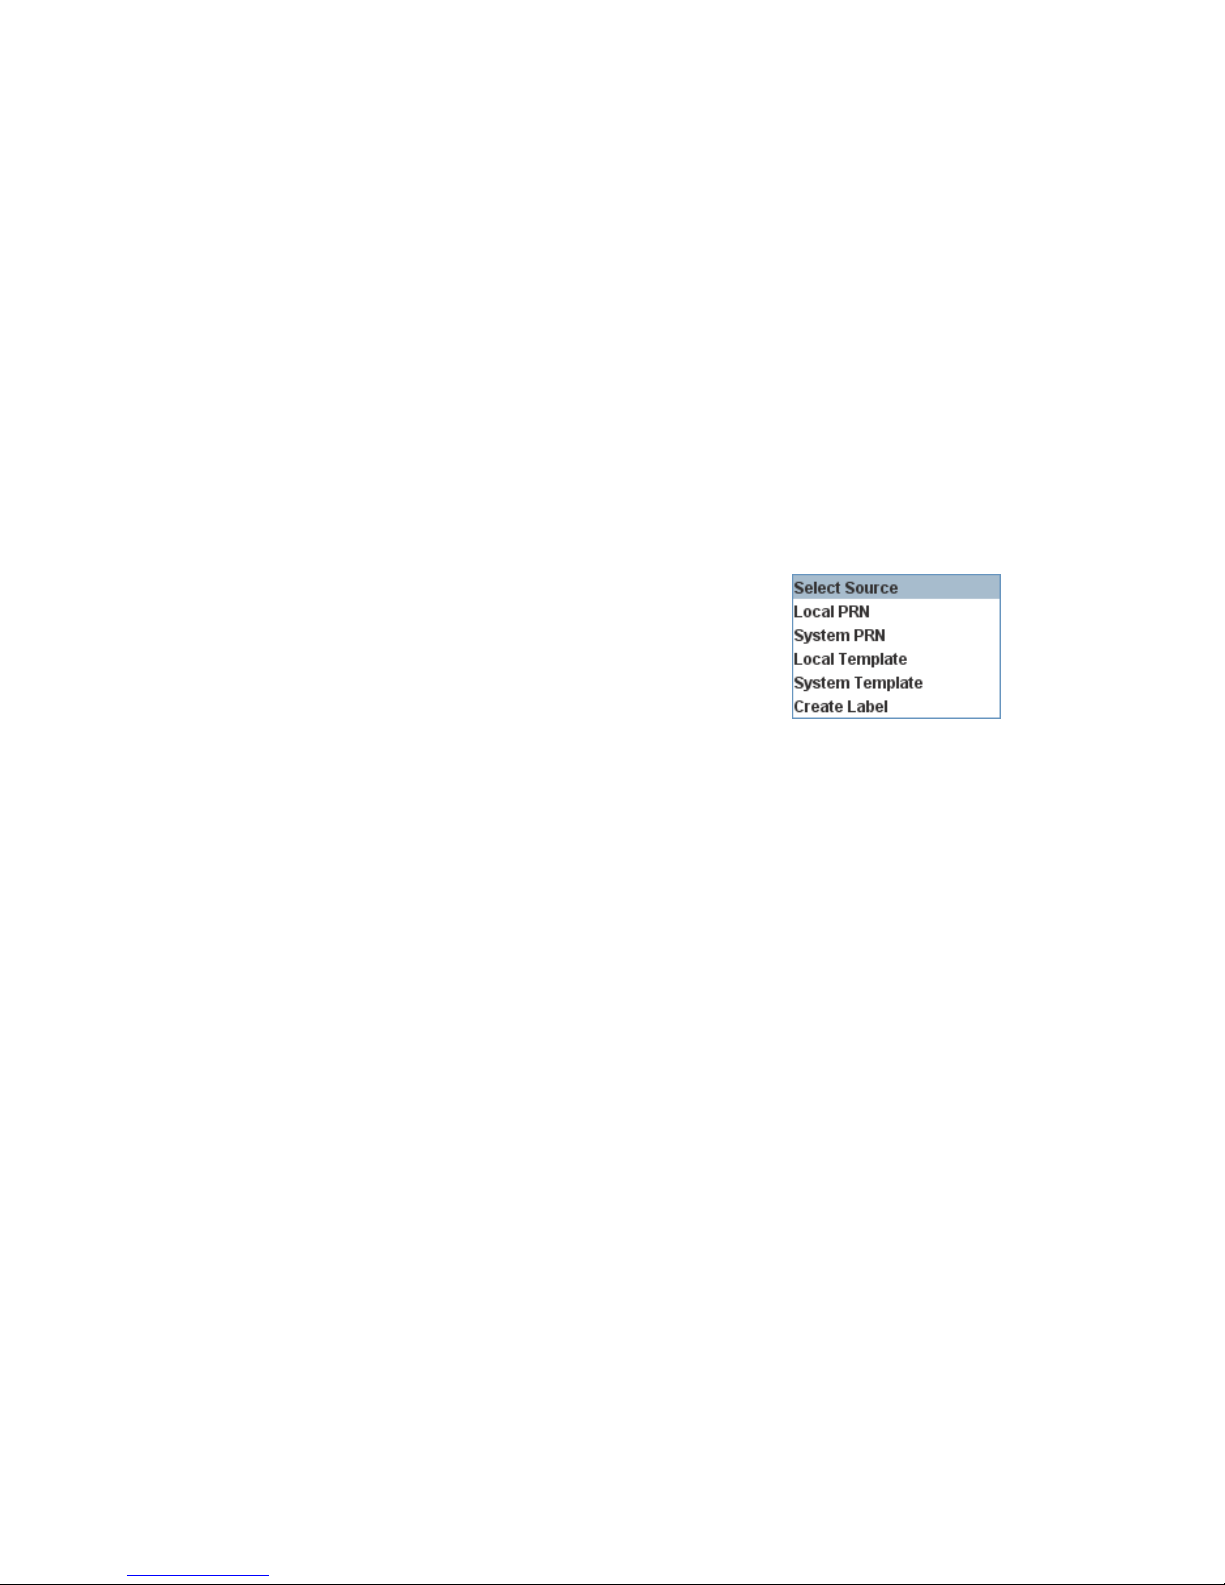
1.4.8.5 Print Image
The AP-150 includes a built-in disc printer (FlashJet2) so that
discs can be printed automatically as part of the copy process.
There are several sources for print images, and the Print Image
selector allows you to choose which one to use.
1.4.8.5.1 Local PRN
If you already have a PRN file created by another label designer application (and using
the proper printer driver) you should choose ‘Local PRN’. A File Open dialog box will
allow you to browse for the PRN file. If you selected a shortcut directory as part of the
System Setup then the File Open dialog box will open in your shortcut directory,
otherwise it will open in your home directory.
It is important that the correct PRN file type is selected, and if you are in any doubt,
please contact your authorized TEAC reseller for more information about PRN files.
TrueNet includes a built in Label Designer that does not need to use PRN files if you are
using one of the supported printers.
1.4.8.5.2 System PRN
If you have a print image file already stored on the System’s internal storage, you can
select it as part of a job. Choosing ‘System PRN’ will launch the System Images dialog box
and allow you to choose the file by single-clicking on the file name, and then clicking the
OK button.
Note that print image files stored on the System are in PRN format, and if you choose to
copy these images to your local hard disk for offline storage, you would choose Local PRN
to re-use them when starting a new job.
1.4.8.5.3 Local Template
TrueNet includes a Label Designer that stores label designs as ‘template’ files. These can
be used by TrueNet to create print images in real time when starting a new job. Selecting
Local Template will launch the File Open dialog box and allow you to select any template

(.rpt) file. If you have selected a shortcut directory for your template files in User
Settings, the File Open dialog box will open at that shortcut directory; otherwise it will
open at your user home directory. See the section on Dynamic Printing Using TrueNet
FX.
1.4.8.5.4 System Template
Labels designed using the TrueNet label designer can be stored on the System HDD and
retrieved as part of creating a new job. See the section on Dynamic Printing Using
TrueNet FX.
1.4.8.5.5 Create Label
TrueNet includes a label editor allowing you to create label designs within the browser
environment. The label editor is covered in detail later in this user guide, so only the
basics are covered here. Selecting the Create Label option will launch the Label Designer
in a new window. Once you have created your new design, click on the Save & Exit
button on the tool bar to exit the designer. Save & Exit will prompt you for a template
file name. If you have designated a shortcut directory in User Settings the File Save
dialog box will open there, otherwise it will open in your user home directory. Once the
template file is saved the Create New Job dialog will automatically select the saved file,
and change your selection to Local Template (remember the file was now saved as a
template file).
1.4.8.5.6 About Template Files
Template files offer a wealth of options, including serialization, dynamic ‘mail-merge’
functions and User-Defined Form Fields, so further reading about the Label Designer is
recommended.
1.4.8.6 Priority
A priority is assigned to all jobs on the System. The
Administrator will set the user priority levels when creating
the user account. The options include Low, Normal, High
and Highest. The default setting for all jobs is ‘Normal’.
Different priorities cause the job to be placed at different
places within the job queue as follows:
Highest – The job is placed at the very top of the queue and as soon as a recorder
becomes free, this will be the next job to run.
High – This job is placed above all normal priority jobs, but after all other high priority
jobs.
Normal – This is placed in the queue at the end of the current list of Normal priority jobs,
but ahead of all Low priority jobs.
Low – This is placed as the very last job in the queue.
1.4.8.7 Write Speed
The System has user selectable write (recording)
speeds, according to the type or recorders fitted. The
available write speeds are shown in the Write Speed
selector, and may vary based on the media type
selected. As an example, selecting CDs may allow up to a 48x write speed, whereas
selecting DVD media may limit the speed to 16x or 18x. In any event, if the user selects a
speed that is higher than the media is rated for (e.g. selecting 16x write speed when
using 4x DVD media) the System will automatically reduce the write speed to match the
media. This setting should be considered as the ‘maximum’ speed, rather than the
definitive write speed to use.
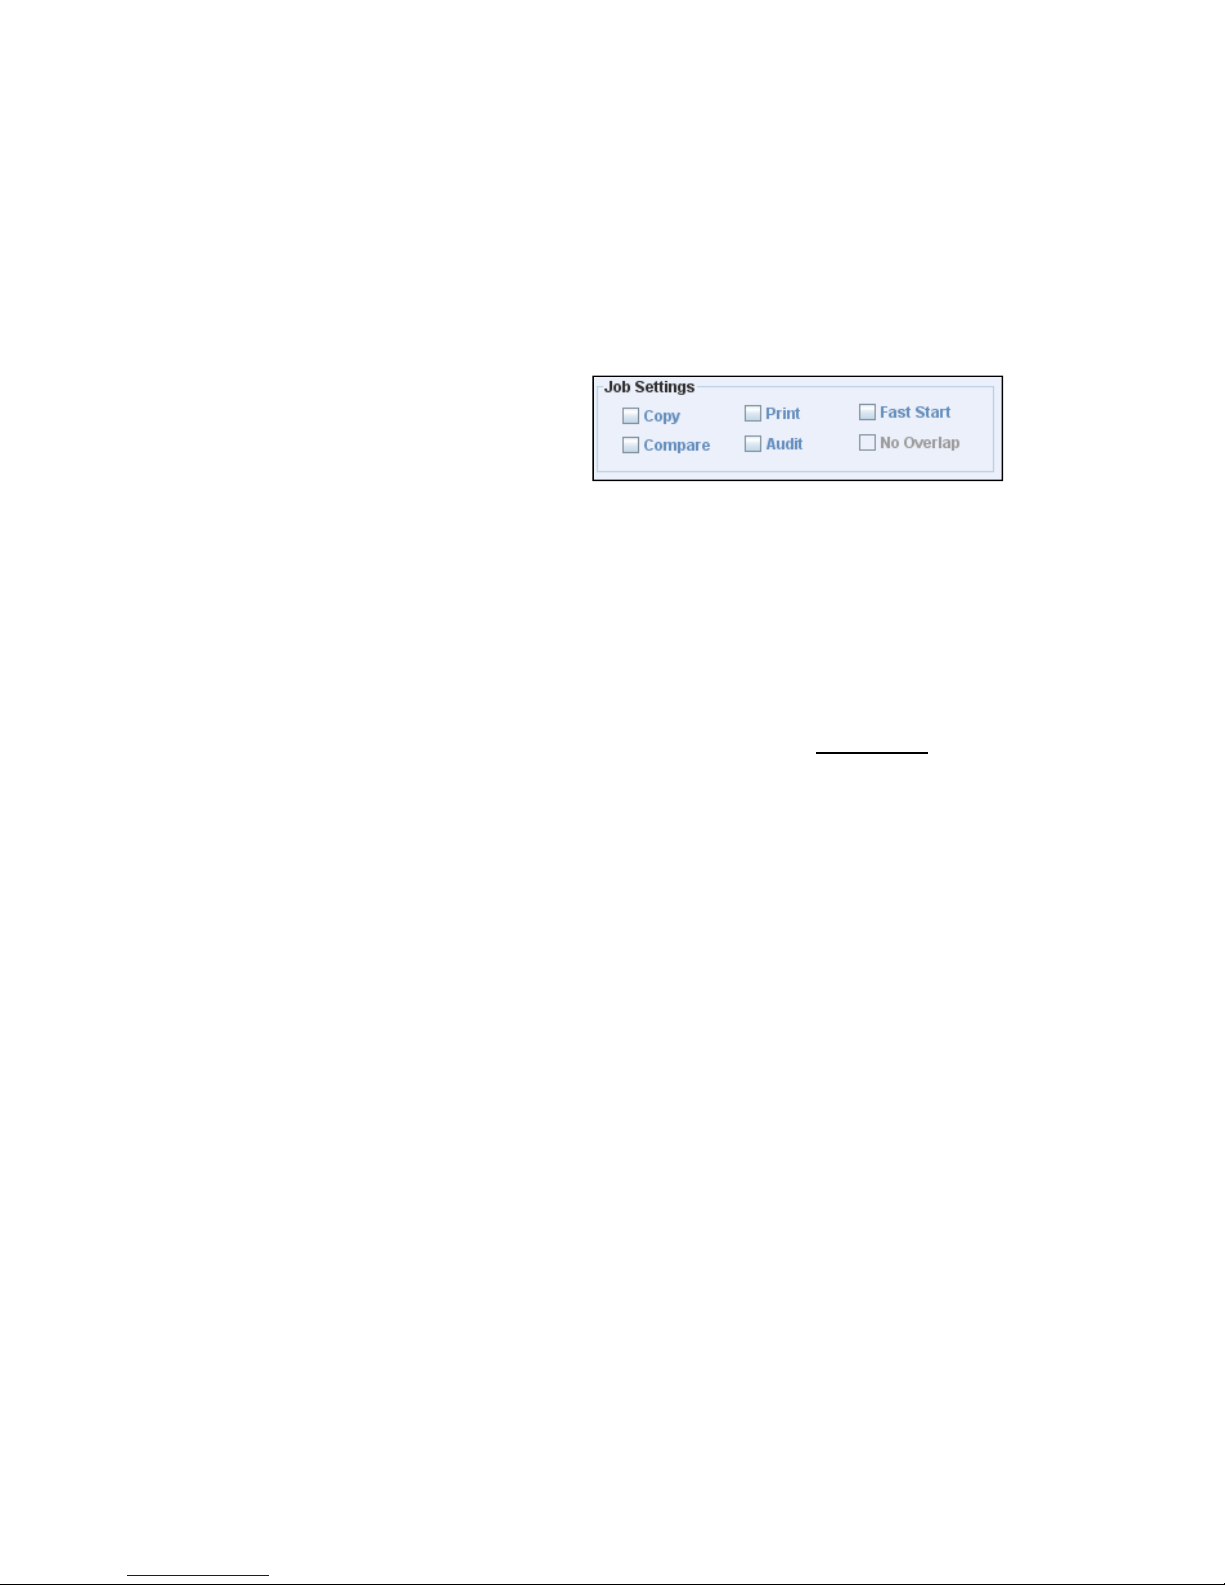
1.4.9 Job Settings
Starting a job in TrueNet can be very
simple, and many users will never need to
venture further than selecting an image,
entering a quantity and clicking Start.
However, for those wanting to use the System to its full potential, additional options are
included. Many job features can be enabled and disabled directly within the Create New
Job dialog box.
1.4.9.1 Copy
For your convenience the Copy check box is selected automatically when you choose a
disc image (Local, System, or Create Data Disc), but is not selected if you choose ‘Read
New Master’. If you want to make copies of a master disc as soon as the master is read,
select the Copy check box and enter a quantity in the Quantity box.
If you are selecting a disc image to ‘Compare’ copies to, but don’t want to write any
copies as part of this job you should make sure the Copy check box is not selected.
Once a Copy job has been created, the Copy flag cannot be removed.
1.4.9.2 Compare
If you want the System to compare the data on a copied disc against a master data disc
check the Compare check box. Selecting the Compare function as part of a Copy job will
cause the System to first write the data to the blank media, then re-read all the data on
the copied disc and compare it (bit for bit) against the master image. If any part of the
data is incorrect the disc will be rejected.
The Compare function can be used on its own, without the Copy function, to allow you to
compare discs already produced against a master image.
Comparing discs to the master image can significantly increase the time it takes to
produce discs, because it requires that the copied disc is 100% read again after being
created. Often, DVD media can be written faster than it can be read, so a full Compare
may take more than twice as long as a Copy without Compare. However, performing a
full (100%) Compare is the only way to guarantee that the copy discs are free from data
defects.
The Compare function can be enabled/disabled via the Edit Job function at any time
before a job starts, or while it is running! Users may choose to start a Copy job with
Compare enabled, and after a few discs when they are satisfied that everything is normal,
they can disable the Compare function to speed up the duplication process. In addition,
the Audit function can be used as a fast alternative to Compare.

1.4.9.3 Audit
Audit provides a fast way to ensure that the disc in the recorder has actually been
recorded without performing a time consuming full Compare option. The Audit function
will read the start of the disc and then read the end of the disc to make sure that both
the start and end are fully recorded. This adds only a few seconds to the copy time.
Audit can be enabled or disabled at any time during a Copy job via the Edit Job dialog.
Audit and Compare are mutually exclusive, meaning you can only have one of them
selected at any given time.
The Audit function can only be used in conjunction with Copy, and cannot be used as a
standalone operation.
1.4.9.4 Print
The Print check box is automatically selected when a print image (Local PRN, System PRN
or Template) is selected.
1.4.9.5 Fast Start
The Fast Start option allows the System to load blank media and start writing as soon as
the disc image begins transmitting over the network. This feature can save huge
amounts of time when sending large image files (e.g. 50GB Blu-ray) because without Fast
Start the entire image needs to be moved to the System before the job can begin. It is
recommended for use only where you have a fast (recommended Gigabit) and reliable
connection to the System, and where not many other users are logged on (which can
create a busy network). If you are on a slow or unreliable connection, or if the network
the System is connected to is extremely busy, Fast Start is not recommended. If you find
that image transfers are failing due to network time out problems, do not use Fast Start.
This option may be disabled by the Administrator on a user-by-user basis.
1.4.9.6 No Overlap
If the System is running multiple jobs at the same time, it is possible to have jobs
interwoven (mixed) in the output hoppers. To prevent jobs from being mixed, and to
force this job to wait until all of the jobs ahead of it in the queue are completed and to
force all jobs below in the queue to wait until this job is completed, choose the ‘No
Overlap’ feature.
Under normal running conditions all discs from this No Overlap job will now be together
as consecutive discs in the output hoppers. The only time that this option can be
overridden is where a higher priority job is sent to the machine after this job has already
started. The higher priority job will always take precedence even over No Overlap jobs.
1.4.10 E-Mail Settings (all systems)
TrueNet provides easy access to the System
e-mail notification options (Email
notifications must be enabled by the
Administrator before any e-mails can be
sent by the System). The Create New Job
dialog box includes an ‘Email’ tab (top left)
that gives access to your personal e-mail
selections. Select the e-mails you want to
receive for this job, and if you want to
receive these e-mails for all jobs, click on

the ‘Set Default’ button to set this selection as your default choice. Once a default has
been set, you will not need to select your e-mail options again unless you want to change
them. To select all e-mails with a single click, click the ‘All’ button, and to deselect all emails click the ‘None’ button.
Once enabled, the user has the option to receive e-mails based on the following events:
1. Job Started – Sent to advise you that your job has started to run.
2. Job Completed – Sent to advise you that your job is now complete and your discs
are ready for collection.
3. Job Modified – Sent if your job is modified in any way, either by you or by an
administrator. Modifications to jobs include changes to job quantities,
Audit/Compare flags, job priorities, etc.
4. Loader Error – Sent if for any reason the job has encountered an error which
requires user attention.
5. Low Media – Sent when the administrator-defined low input media threshold is
reached for the type of media your job is using. This will be sent even if your job
is not yet running to advise you that your job may be delayed if media is not
refilled soon.
6. Hopper Empty – Sent when the System no longer has any input media for the type
of media used on your job. This will also be sent even if this error occurs before
your job has started to warn you that your job is being delayed because the
System is out of media.
7. Low Printer Supplies – Sent when the printer supplies of ink or ribbon have
reached the administrator defined threshold for low print supplies. This will be
sent even if it occurs before your job is running to advise that your job may be
delayed.
8. Delayed/Resumed – Sent when your job is delayed by another job ahead of yours
in the queue.
1.4.11 Dynamic Printing (TrueNet FX Only)
1.4.11.1 Embedded Label Tags
Label Templates may contain user-embedded tags that are automatically replaced by
specific System or user information when the template is selected as part of a new job.
The supported tags are:
%Time% - Every instance of this text within the selected template will be replaced by the
user’s computer time at the time the template is used to create a new job. Note that this
will remain constant through the job, even if the job is later restarted, paused or
resumed.
%Date% - Every instance of this text will be replaced by the user’s computer date at the
time the template is used to create a new job. Note that this will remain constant
through the job, even if the job is later restarted, paused or resumed. The date format
(DD/MM/YYYY, MM/DD/YYYY or YYYY/MM/DD) is set by the administrator in the
Administration: Time & Date tab.

%JobOwner%
by the user’s login name.
%JobDesc%
the text entered in to the Job Reference box i
entered, the text is not replaced and will print as shown.
These tags provide an easy way to add simple tracking information to discs at run
Labels can be previewed prior to starting a job using the
For more information on creating and editing labels using the TrueNet Label Designer,
see the Label Designer section.
1.4.
TrueNet FX Label Templates provide an easy way
to automatically prompt users to complete
spe
label template. This allows specific corporate
design templates to be created (and optionally
stored on the System storage) with dynamic text
fields, without every user needing to create
and/or edit their own l
Form fields are defined as ‘user prompts’.
Enclosing any text between two ‘#’ characters
automatically creates a user
and whenever the template is used in a job, the
user is automatically prompted for data to fill
those fields
Patient: #Patient Name#
then every time the template is selected, a dialog will appear prompting for the text field
‘Patient Name’. Up to 99 form fields can be added to a label template, and the
prompt for all fields at the same time, using the user
prompt.
In the example label shown here, the
following form fields have been defined
(bottom of the label):
#Patient Name#
#Doctor#
#Date Of Birth#
#Departme
#Treatment#
-
11.2
Dynamic User Form Fields
cific label form fields when printing from a
. For example, if a template contains the following text:
nt#
- Every instance of this text within the selected template will be replaced
Every instance of this text within the selected template will be replaced by
abels.
-
defined form field,
n the Create New Job dialog. If no text is
button.
-
defined field name as a user
-time.
dialog will

Selecting this template as part of a job would generate the following prompt for the user
to complete:
Entering the text shown in the ‘User
Text’ boxes (right) would produce the
label shown below.
N
ote how the data entered in t
Entry dialog has been merged with the label,
replacing the form fields.
Label Templates can be previewed using the
button.
If the data is entered incorrectly, the data can
be edited using the
New Job dialog. For
creating and editing labels using the TrueNet
Label Designer, see the Label Designer section.
1.4.11
.3
TrueNet FX can ‘mail
when starting a job using an appropriately
designed template.
each disc individually in the job from a CSV or
other delimited file. This means that each
label in the job can be unique. Using this
method, it is easy to merge data exported
from a database or spreadsheet program such
as Mic
rosoft
Access to the mail merge functions is via the
‘Dynamic Printing’ tab in the create new job dialog. This tab is present only on FX
systems.
Creating Dynamic Labels ready for Mail Merge is easy. When creating a label, add a
numbered fiel
should be numbered sequentially starting at ‘1’, so that %1% would be the first merge
field, %2% would be the second, %3% would be the third and so on.
Example: Merging a CSV fi
the data is in the form:
Line 1 Field 1
Line 2 Field 2
Line 3 Field 3
Etc…
Dynamic Mail Merge Fields
®
Excel.
d surrounded by percent (%) characters for each field to be merged. Fields
,
Line 1 Field 2
,
Line 2 Field 2
,
Line 3 Field 2
button in the Create
more information on
-
merge’ data to a label
Unique data is merged for
le that was exported from Microsoft
,
Line 1 Field 3
,
Line 2 Field 3
,
Line
he Label Field
3 Field 3
,
Line 1 Field 4
,
Line 2 Field 4
,
Line 3 Field 4
®
Excel (as a CSV file) where

In this example there are
on the label template (%1%, %2%, %3%, %4%). Where more fields exist in the CSV file
than the template, the extra fields in the CSV
fields in the CSV file than the template, any extra template fields are filled with blank
spaces.
To select the import data click the ‘Browse’ button, then select the file that contains the
data to be imported. Th
the supported delimiter characters (see below). Click the ‘Test’ button to read the first
line of data from the file (starting at the line in the ‘Start Line’ input box). The number of
fields found on that line is shown, followed by a preview of the label with the mail merge
data added. Click once anywhere on the preview label to close the preview. If the Start
Line is incorrect, change the start line in the dialog and re
Supported delimiters are a Comma, Colon, Semi Colon or a Tab. The chosen delimiter can
also be saved as the default delimiter for future jobs.
A data import file must contain a line of data for each disc produced by this job. Each
disc will includ
insufficient lines in the import file an error will be generated. Additional/surplus lines are
ignored.
Using the ‘Start Line’ input box, the data can be parsed differently each
e.g. enter ‘1’ to start at line 1 for this job of (e.g.) 100 discs, then next time enter 101 to
start at line 101 for the second job of 100 discs, then line 201 for the following job and so
on. All data on lines prior to the start line
Once the data
data set to the job.
Note: While jobs created using dynamic mail merge functions can be edited in real time,
the quantity within the job cannot be increased. This is because TrueNet FX creates a
sealed print bundle that contains the print data for all discs when
it is not possible to append additional print file data to this bundle later.
For more information on creating and editing labels using the TrueNet Label Designer,
see the Label Designer section.
1.4.1
In additio
automatically. The serial number is always inserted on the label as the first field of any
Mail Merge operation. This means that the serial number is always placed in the %1%
Mail Merg
the Mail Merge data will be placed in the field %2% onwards when Serialization is active.
To preview the label (including the data that will be merged on the first disc) click
the preview button in the Create New J
1.4
Serialization
n to regular Mail Merge functions, disc labels can also be serialized
e field. If additional Mail Merge data is being imported as part of the same job,
e the data merged from exactly one line of the import file. If there are
-
file, Delimiter and Start Line have been set, click the OK button to add this
four
fields on each line, so
is should be a plain ASCII text file with fields delimited by one of
are ignored.
ob Dialog.
four
file are ignored. Where there are fewer
ob Dialog.
merge fields would be required
-
test if requi
the job is created, and
red.
time a job is run,

Serial numbers are generated starting with the ‘Start Number’ entered in to the
Se
rialization dialog, and incremented by 1 for each disc in the job. To use more
complicated serialization number sequences, create an ASCII text file with one serial
number per line and import it as a Dynamic Mail Merge instead of using the built in
Serial
ization function.
The built in Serialization allows up to 8 digits, with or without leading zeros. As an
example, an 8 digit number sequence starting at 1000 with leading zeros would produce
the following sequence:
00001000
00001001
00001002
etc.
Wit
hout leading zeros, this sequence would be:
1000
1001
1002
etc.
There can be only one serial number generated for each disc in the job, but this serial
number can placed on the label multiple times, e.g. as simple text, and a bar code.
Once the serial nu
the Create New Job dialog box.
To preview the serial number on the label click the
dialog, then click once anywhere in the preview window to close the pre
For more information on creating and editing labels using the TrueNet Label Designer,
see the Label Designer section.
1.4.12
Editing Jobs
Editing jobs is possible not only for jobs
that are queued, but also for jobs that
are currently running, and
that have completed (increasing the
quantity will re
the additional discs required).
There are three ways to launch the Edit
Job dialog box. Select the job in the Job
Status window by single
and th
en select Edit Job from the left
menu bar. Another way is to double
click a job in the Job Status window and select Edit Job from the pop
-
queue the job to run only
en select Edit Job from the left
mber information has been entered, click the OK button to return to
even for jobs
-
clicking on it,
-
click on a job in the Job Status window, or to right
button in the Create New Job
-
up menu.
view.
-

1.4.12.1 Changing the Quantity
You can change the quantity of most jobs at any time by entering the new quantity in the
Quantity box. The exception to this is where the job includes dynamic mail-merge or
serialization. This is because the print bundle was created and sealed prior to starting
the job, and it is therefore not possible to increase the number of discs required because
there would be no print labels available for the extra discs. However, changing quantities
is the only limitation that applies to such dynamic jobs. All other changes can be applied.
If you want to simply add a number of additional discs to the job, right-click on the
Quantity box and a new ‘Add’ box will appear. Simply enter the additional quantity in to
this box and this number will be added to the original quantity. Select the Update button
when done.
1.4.12.2 Job Priority
The priority of a job can be changed at any time. By selecting an alternative priority
setting and clicking Update, the job will be updated and moved within the job queue
appropriate to the new setting. The priority levels are controlled by administrators, and
not all users will have the ability to select all priority levels.
To send a job to the very front of the queue, select ‘Highest’ as the priority level. This
will put it into the very next available drive, even in the middle of a running job.
1.4.12.3 Enable Compare / Audit
The Compare and Audit functions can be enabled and disabled in real time. They will not
affect the discs currently in the Audit/Compare phase, but will affect all discs that are
part of this job that are currently in the write phase, and all discs loaded from here on.
Audit and Compare functions are mutually exclusive. Selecting one will deselect the
other. For more information on Compare and Audit functions see Creating a New Job.
1.4.12.4 Enable / Disable No Overlap
The No Overlap function can be enabled or disabled by selecting the check box. The No
Overlap function will make sure that all the discs from this job are placed consecutively in
the output hopper. Note that this function can be overridden by a higher priority job
being run after this job has already started.
1.4.12.5 E-Mail Notification Settings
All the e-mail notification selections available
when creating a new job can also be added
or removed while editing jobs. To enable a
notification type, select the check box. To
disable a notification type, deselect the
checkbox.
1.4.13 System Images
The System Images dialog box can be used to
view the images that are stored on the
System’s internal storage, as well as for
transferring images to and from the System
as required.

Each image shown includes its name, image type (Print/Template/CD/DVD/BD) and
approximate size in Megabytes. All images shown are available for use as part of
duplication and/or print jobs.
In addition to the normal view, there is an option to view the temporary images stored
on the System as part of user jobs. These files are not available to select for use in other
jobs, and are automatically deleted when a job is deleted (usually by the user).
1.4.13.1 Getting a Disc Image from the System
To transfer an image located on the System’s internal storage from the System to your
local computer (or other network storage), select the image and click on the ‘Get Image’
button. A Save File dialog box will appear allowing you to choose the name and location
for the image file. Do not change the file extension given to the files when saving, or
they may not be correctly recognized by TrueNet in the future.
1.4.13.2 Sending an Disc Image to the System
Images previously moved from the System to your local computer or other network
storage can be sent back to the System at any time using the System Images dialog box
(assuming there is enough internal hard disk space on the System). To transfer an image
from your local computer (or other network storage) to the System, select the ‘Send
Image’ button. A File Open dialog box will appear allowing you to choose the file you
wish to send to the System. Select the file and click the ‘Open’ button. If the file is an
ISO, you will be asked to select the intended media type (CD/DVD/BD). After selecting
the media type and clicking the OK button, a progress meter will appear displaying the
progress of the transfer.
ISO images (or some other binary disc images) can also be sent to the System using this
option, and they will be converted to .rqi (TEAC Image) images on-the-fly. Once an image
has been sent to the System, the image is no longer a raw ISO file.
Note that ISO image files must be Mode 1 (2048 bytes per logical block). No other image
type (e.g. CD-XA or Audio) is supported at this time.
Raw Disc images produced by most Video Authoring packages will meet the standards
required for TrueNet to use them without any further modification. The images must
however be uncompressed, because TrueNet will not modify the contents of the ISO/Raw
image files in any way.
1.4.13.3 Sending a Print Image to the System
TrueNet will allow the import of pre-built PRN files. Print image files previously moved
from the System to your local computer or other network storage are in PRN file format.
Be sure to only send PRN files intended for the printer type installed in your System.
Other PRN file types will not work and may cause damage to the printer which is not
covered by warranty.
To transfer a print image from your local computer (or other network storage) to the
System, select the ‘Send Print’ button. A File Open dialog box will appear allowing you to

choose the print file you wish to send to the System. Select the file and click the ‘Open’
button. A progress meter will appear displaying the progress of the transfer.
1.4.13.4 Sending a Print Template to the System
TrueNet will allow a Print Template (.rpt) file to be stored on the System for use when
creating new jobs. The System does not directly print the Template file, but instead will
retrieve the Template file from the System at run time in order to create a usable PRN file
suitable for the installed printer (only TEAC printers are supported by this feature).
To transfer a print template from your local computer (or other network storage) to the
System, select the ‘Send Print’ button. A File Open dialog box will appear allowing you to
choose the print template you wish to send to the System. Select the file and click the
‘Open’ button. A progress meter will appear displaying the progress of the transfer.
1.4.13.5 Renaming an Image
To rename an image on the System’s internal storage, select the image and click the
‘Rename’ button. Enter the new name (any combination of letters, numbers, or spaces
up to 14 characters) and click OK.
1.4.13.6 Deleting an Image
To delete an image, select it and click the ‘Delete’ button. Note that images that are
currently in use by a job, or used by a ‘Set’ (see Disc Sets) will not be deleted. Where
images are used by a Set, you will need to delete the Set first.
1.4.13.7 Refreshing the Display
If you have reason to believe that the images on the System are not the same as currently
displayed in this dialog box, click the Refresh button.
1.4.14 Disc Sets
A Disc Set is a user-defined collection of disc and print images, organized in to a product
‘Set’. The user need only select the 'Set', and all disc and print images within that Set are
produced automatically in ‘Disc Set’ order. TrueNet LX allows up to 3 discs per Set and
TrueNet FX allows up to 25 discs per set.
1.4.14.1 Creating a Set
To create a Set, select ‘Disc Sets’ on the left menu bar. A
Disc Sets dialog box will open, showing all the Sets
currently on the System.
Sets that are already on the System can be edited,
renamed, or deleted using the buttons located here.
To create a new Set, click the ‘Create Set’ button. A
‘Create Disc Set’ dialog box will open and allow disc and print images to be added.

Enter a name for this Disc Set. Up to 14 characters are allowed.
1.4.14
.1.1
To add a disc and print image to the Set, click
the ‘Add’ button. A new dialog will appear
allowing both the disc and print image to be
selected fr
your computer hard disk) or images that are
already on the System. Any local images
selected as part of a Set will be moved to the
System automatically when the Set is saved.
Once the disc and print images have been se
the Set. The images will now be listed in the ‘Create Disc Set’ dialog.
1.4.14
.1.2
To modify the discs in a Set, choose the ‘Modify’ button. The ‘Choose Set Images’ dialog
will re-
open showing the dis
images as required, then click OK to save.
1.4.14
.1.3
To delete a disc and print image from the Set, click on the disc/print image to select it,
then click on the ‘Delete’ button.
1.4.14
.1.4
To move a disc within the Set sequence, select it (by clicking on it once) then use the
‘Move Up’ and ‘Move Down’ button as required.
1.4.14
.1.5
Sets are produced in disc order, so that disc 1 will be followed by disc 2,
Due to the nature of the output hoppers, the first disc produced will be on the bottom of
the stack of discs, so it may be desirable to produce the discs in reverse order so that the
first disc in the Set is on the top of the stack, rath
order of a Set, simply click the ‘Reverse’ button.
Add
om either local images (images on
Modify
Delete
Move Up / Move Down
Reverse
c and print images currently selected. Select the alternative
lected, click the OK button to add these to
er than the bottom. To reverse the
then disc 3, etc.

Once all the disc and print images have been selected click the OK button to save the Set
on the System. If any of the chosen disc or print images are not already on the System,
they will be moved to the System automatically when creating a new Set.
1.4.15 Using a Disc Set
Select ‘New Job’ from the left menu on the main TrueNet screen, then ‘Disc Set’ as the
source of the Disc Image. The Disc Sets dialog box will appear and allow the selection of
the required Set. On the Create new Job dialog, the ‘Print Image’ source selector will
become disabled because the print image is already configured as part of the Set.
Once all other job requirements are set, e.g. quantity, compare and e-mail flags, click the
Start button to start the job using this Disc Set.

2. The Label Designer
2.1 Overview – Limitations of the browser environment
TrueNet runs entirely within the web browser environment, and this may impose some
restrictions such as the amount of memory available for extensive graphics or
complicated designs. If you are experiencing problems importing graphics files, consult
the section ’Optimizing your browser for TrueNet’, or consider using TrueView as an
alternative to your web browser. See the section on TrueView for more information.
2.2 Label Designer – Main Window Overview
The main window of the Label Designer is filled with the design view, showing the disc
and mask for the center hole (or entire disc hub), and the mask on the outside of the
disc. To the right is the main text and graphics import tool bar. Along the top is a toolbar
that includes File Open & Save buttons, together with a font selector, color selector and
other text related tools.
The Label Designer (above) enables the creation of a label design which can be sent to
any of the supported printer types attached to TrueNet compatible Network Devices,
without the need to install printer drivers.
The Label Designer is a basic label design tool. If you need advanced graphics features
for your design, select your favorite graphics design tool to create your label, and export
the label as a JPEG, TIFF (8 bit), or BMP file (all types should use the RGB color palette).
These can be imported into the Label Designer as a background image and automatically
scaled with the edges and center hole being masked for the printer type. The imported

images can also be manually sized and aligned using the Insert Graphics function.
recommend that
when imported as a background. Images that are larger than necessary may cause out
of
-
Text and graphics can then be added to create cust
the System as part of a job, or as a label template available for other users.
Clicking the Label Designer menu item in the left panel of TrueNet will launch the Label
Designer component. After a few seconds, the Labe
There are several toolbar buttons along the top and also the right side.
memory errors and/or slow the rendering process.
New Design
Save Design
Print
Bold Text
Pointer / Selection
Show / Hide Graphics Toolbar
Add Arced Text
Add Arced Text Box
Center Text
Add Background Imag
images are no larger than 1410x1410 pixels, either individually or
e
om disc labels which can be sent to
l Designer window will be displayed.
Open Existing Design
Save Design As...
Character Map
I
talic Text
Edit Pointer
Add Text
Add Text Box
Align Text Left
Align Text Right
Insert Graphics
We
-

When the Graphics Toolbar is visible, an additional set of buttons are visible at the
bottom of the Label Designer window. These are:
2.3
Creating a Basic Label
The most basic way to use the Label Designer is to use your preferred design application
to create the desired label layout, then save it as a JPE
file can then be imported directly into the Label Designer as a background. Note that any
imported image will be centered within the Label Designer view automatically, so this
must be considered when preparing the file fo
Insert Graphics function to size and center the image manually.
Adding an image as a
From the main Label Designer window (right), select the 'Add
Background' button.
Browse for the graphic file y
background image.
Once the background image is set, you can either use the design
as is, or you can add text and/or graphics to further customize
the label.
2.4
Creating a Print Image (PRN)
To create a PRN file, first s
Next, select the printer model and print options, then click the Print button. Select a
location where you would like to save the PRN. (Note: In User Settings, this output
Add Barcode
Delete Selection
Line Tool
Box Tool
Curve Area Tool
b
ackground:
ou wish to use, and select it as the
elect the Print Icon
r export. Alternatively, you may use the
Rotate Selection
Curve Tool
Filled Box Tool
Filled Curve Area Tool
G, TIFF, PNG, or BMP image. This

directory can be set as the default location that TrueNet
starting a job that involves print files.) Finally, name your PRN file and click 'Save'.
2.5
On the top bar above the design, first choose the desired font, font size, and color for the
text you are
Next, click the Add Text
cursor on the design where you wish to place the text.
Type onto the design.
Note: As you enter the text, it will be displayed in the
edit mode, and will not appear as desired
have pressed Enter or clicked elsewhere.
2.6
With some
this reason, the dimensions of the template are user
the
When you select the ‘
follo
The image to the right shows the default settings.
Disc Margin is the outer non
The Disc Center Ring Diameter and Width refer to the
disc stacking ring. The Hub Size is the combined
diameter o
2.6.1
Adding Text to a Design
about to add to the design.
Tip:
already committed to the design, select the
Edit Pointer, then select the text box you wish to alter.
Adjusting the Template Dimensions
media / printer combinations, the default template may not be suitable. For
Options | Settings
wing window is displayed:
f the center hole and the non
Disc Margin
If you want to edit text that you have
menu.
Settings’
button, then place the
option, the
-
printable edge of the disc.
until after you
-
printable hub.
goes to for print images when
-
definable. The sizes are set using
The

Setting the Disc Margin to 0.5 results in the outer
mask ‘closing in’ around the design (see right).
2.6.2 Hub Size
Setting the Hub Size to a smaller value will reduce the
size of the center mask on the design (see right).
2.7 Saving as a Template
When a supported printer is used, templates can be used instead of '.PRN' Print Image
files when starting a job involving a print file. The advantage to this is that the print file is
generated based on the printer type TrueNet finds on the device; if you change the type
of printer on your Network Device, you will not necessarily need to change the artwork
file.
To save a design as a template, use File | Save As (or the corresponding ‘Save As’ button)
and then choose a location and name for the file. TrueNet will automatically save the file
with a '.RPT' extension. When selecting a print source file for a job within TrueNet, either
a '.PRN' or '.RPT' file is valid. Another advantage to using a template file is that dynamic
text is possible. Please see the 'Dynamic Text Entry' and API sections for further details
on this.
2.8 Creating a Design from Scratch
Basic blocks of color can be added to the design using the Graphics Toolbar functions.
These can be used to create a design by themselves or by using these to create
backgrounds for text and text boxes within your design.
An example can be seen below:

2.9 Displaying Rulers
To aid with lining up multiple
components, it is possible to display a
pair of ‘rulers’ – one at the top, and one
to the left of the design. To enable this
option, select ‘Show Rulers’ from the
‘Options’ menu.

3. User Settings
Select User Settings from the left menu bar to launch the User Settings dialog box. This
dialog allows users to change their passwords, set or change their e-mail address, choose
the language, and if enabled by the administrator, to choose whether to view the entire
job queue, or just their own jobs.
In addition, the Defaults button allows the user to set Shortcut directories (also known as
Folders on some systems) to Disc Images, Print Templates, PRN Images, Job Files, CSV
files and Local Logging. Taking a few moments to set up these shortcuts can save a lot of
time later.

3.1 Password
Each user should have a unique password. The password can be any sequence of letters
or numbers (a mixture is recommended), with a minimum of 6 characters and a
maximum of 20 characters. New passwords must be confirmed by typing them a second
time (in the Confirm box) before being saved.
3.2 E-Mail
To enable e-mails, select the Enable E-Mail check box, and enter your e-mail address.
Note: E-mails must have been configured by the System administrator before any e-mails
will be sent by the System, regardless of whether each user enables their individual emails or not.
3.3 Language
The default language for the System is English. Other languages may be added from time
to time.
3.4 View Job Queue
If the administrator has enabled this function for you, the View Job Queue check box will
allow you to control whether you see other users’ jobs on the System. If this box is not
selected, or if the administrator has disabled this feature, you will only be able to see
your own jobs in the job queue. This can be helpful when searching for your jobs when
the System is very busy and has a lot of other users’ jobs queued in the Home Page.
3.5 Defaults
Click on the ‘Defaults’ button to launch the Default Directories dialog box.
TrueNet will allow the user to configure several shortcut directories (also known as
folders), including where Disc Images, Print Templates, PRN Images, Saved Job Files, CSV
(Mail-Merge) files and Local Logging files are located.
The first tab allows the selection of the Disc Images location. Clicking on the Browse
button will launch a directory browser / selection dialog box. If the directory (folder)
already exists, browse to the folder, select it and click the Select button. If you would like
to create a new directory, click on the Create New Folder button, and a new directory
(folder) will be created for you. You have the opportunity to rename this directory
(folder) as soon as it is created. In the same way that an existing directory (folder) was
selected, select the new folder then click on the Select button.
The Enable checkbox will be selected automatically for you, but should you wish to
remove this shortcut at any time, uncheck this and the shortcut will be ignored.
The same selection method applies to all the other tabs in this dialog box. Here is a brief
description of the file types stored at each location.

3.5.1 Disc Images
These are complete disc images, ready to write to a disc on the System. Typical file types
would be .rqi (TEAC Image) or .ISO (a standard for storing Mode 1 discs images, including
Data CDs, Data and Video DVDs, and also Data and Video Blu-ray discs). Whenever you
choose to start a job using a ‘Local Image’ in the Create New Job: Disc Image selector
menu, this is the directory (folder) that the file browser will open up to. In the same way,
sending images to the System using the System Images dialog box, or getting images from
the System using the System Images dialog will also open to this directory. If you want to
select an alternate location, use the file browser to browse to the alternate location.
3.5.2 Labels
The template files created by the TrueNet Label Designer are .rpt files (TEAC Print
Templates). Whenever you choose to save from the Label Designer, reload a design in to
the Label Designer, or select a Local Template within the Create New Job dialog box, the
file browser will open to the directory (folder) chosen here.
3.5.3 PRN Images
PRN files are binary print data image files that are intended for a specific printer type.
They cannot be edited and cannot be used on other printers. If you have PRN files
targeted for the printer included in your System, this is where TrueNet should look for
them.
3.5.4 Set Files
TrueNet will allow you to save some job types for later recall. This is where TrueNet
should save those files, or look for them when loading the saved job.
3.5.5 CSV (Used by TrueNet FX Only)
TrueNet can import CSV files as part of Mail-Merge type functions to create unique
labels. This is done in the Create New Job dialog box. If you want to store all your CSV
files in one easy-to-remember location, configure this shortcut and TrueNet will always
look here first.
3.5.6 Logging
In some cases, you may be asked to keep a log of TrueNet actions, and such logs will be
placed within the directory (folder) selected for logging. Your administrator will be able
to give you more details about this if this function is ever requested.

4. Administrator
Guide
4.1 System Setup
Select ‘Administration’ from the left menu bar to launch the System Setup
dialog box.
The names and positions of the tabs within this dialog may vary based on the
System features and configuration.
4.2 Hopper Settings
The AP-150 has four hoppers, two of
which can be individually assigned to
either the same type or different types of
input media. The type of media available
for selection will depend on the System.
For DVD Systems the media types will be
CD,
DVD SL and DVD DL. If the System is
Blu-ray enabled, media types will also
include BD SL and BD DL.
Each of the bottom two hoppers can be
selected as an Output or a Reject. Input
hoppers remain as input only regardless of whether they contain media or not. Likewise,
Output hoppers will remain as Output hoppers. In/Out hoppers allow for ‘rotating
media’ style hopper configurations.
When hoppers are ‘reset’, an In/Out hopper will be reset to an Input hopper, and blank
media will be taken from this hopper and placed in the recorders and/or printer as
required by the jobs, and then placed in an Output hopper. Once an In/Out hopper
becomes empty the function changes from Input to an Output hopper, and is now
available to receive recorded/printed media.
4.3 Retaining Rejects inside the machine – Rotating Hoppers
Using the rotating hoppers method, rejects can be retained inside the machine (using one
of the Output hoppers). An example would be where Hopper 1 is an ‘In/Out’, Hopper 2 is
an Input, Hopper 3 is an Output and Hopper 4 is dedicated to Rejects (normally rejects
would be output on the side of the machine). The System will take discs from Hopper 1
(blank media) and after recording/printing those discs will place them in Hopper 3. Once
Hopper 1 becomes empty, it will convert to being an Output, and discs will now be taken
from Hopper 2, and after processing will be placed in Hopper 1. Resetting the hoppers
will convert Hopper 1 back to an Input ready for blank discs.
4.4 Sticky Disc Mode
The AP-150 has the option of operating in ‘Sticky Disc Mode’. This mode is useful when
the media being placed in the input hopper is unusually ‘sticky’ or where it is difficult to
split one disc from another.

Using sticky media is not recommended, nor is the AP-150 guaranteed to operate with
this type of media. If you are experiencing problems with sticky media, try using an
alternative brand of media.
When Sticky Disc Mode is enabled, the robot will perform additional movements
designed to help separate discs when picking blank media from the Input hoppers.
This feature can be enabled and/or disabled in real time, and will take effect on the next
disc to be picked from an Input hopper.
4.5 Thresholds
The AP-150 can provide individual low media
and low ink threshold notifications via e-mail,
both to users with active jobs and also to third
party service personnel (who do not need to
have jobs in the System to receive the emails). The threshold levels are the number of
discs remaining for a given disc type (e.g. CD
or DVD), and the ink/ribbon level being a
percentage of ink/ribbon remaining.
4.6 Images Backup
The AP-150 includes a Backup and Restore utility allowing all the Disc Images, Print Image
and Disc Sets to be backed up to other network storage and later restored if required.
Backups can be made to any storage device that you have access to from your computer,
including Network Attached Storage (NAS) or internal/external hard disks attached
directly to your own computer (e.g. external USB or FireWire hard disks).
When backing up DVD or BD images it is recommended that the backup hard disk is
formatted with NTFS (Windows), Mac OS Extended (Macintosh) or one of the several file
systems available on Linux that handles large files (>2GB).
Note that DOS partitions such as FAT,
FAT12, FAT16 and FAT32 are not
suitable for storing large disc images
because they severely limit the file
sizes that can be stored.
4.6.1 Running Backup
To backup the images from the AP150 select the Image Backup tab then
click on the Browse button to choose
a directory for the backup files. You
should always backup to a sub
directory and not the root of a hard disk, because root file systems often limit the
number of files that can be stored, whereas sub directories do not have this limit.

Choose the target directory then click the ‘Select’ button. The path will now be shown on
the Images Backup pane, and the Backup and Restore buttons enabled.
Click the Backup button to begin
backing up the system. While it is
possible to run a backup while the
system is running, it is recommended
that the system be ‘offline’ and idle.
Users should not be allowed to add or
remove images to/from the system
during a backup or a restore.
Progress bars will indicate the
progress of the current image transfer,
and also how many images have been
backed-up so far.
Note that the Backup procedure will never over write files on your hard disks, so if you
backup to the same directory again, without first deleting the images, Backup will create
additional copies of the image files. It is therefore recommended that you only backup to
directories where no images currently exist.
4.6.2 Running Restore
To restore images to the system, click the browse button to select the directory where
the backup exists. Once the source path is chosen, click the ‘Restore’ button to begin
restoring images. Note that the Restore program will never overwrite images already on
the system, so if you restore an Image with a name that is the same as an image already
on the system, a new image will be created with a unique name. It is recommended that
you delete all images from the system (or format the system hard disk) prior to running a
Restore.
4.7 E-Mail Server
The System is capable of sending e-mail
notifications for a variety of events,
including start job, job complete, low ink
levels, etc. For these notifications to
reach the user, the System needs to know
about your e-mail server. This will
typically be the same as the e-mail server
you use on your personal e-mail programs
when you collect your personal e-mail
(e.g. Outlook on Windows and Mail on
Mac OS). The ‘E-Mail Server’ is the name
of your outgoing SMTP server. ‘E-Mail From’ is the alias (i.e. your name rather than your
e-mail address). The Login and Password are those used when you send e-mails.

4.7.1 Authentication
Many e-mail servers require the user to be
authenticated before sending any e-mails.
TrueNet provides for two authentication
methods. The first is using a Login and
Password.
The second method is ‘POP before SMTP’,
which logs in to the POP server (without
retrieving any mail) to authenticate the
user before sending e-mail via the SMTP
server (hence POP before SMTP). This
method also allows you to specify your POP server if it’s different than your SMTP server
(most are the same). In either case, the address of your POP server must be entered
here.
Troubleshooting: If your System is unable to send e-mail, check with the e-mail service
provider for any logs of why this may be failing. They will usually be able to tell you how
to correct the problem (i.e. your password is wrong) or configure the server to allow emails to be sent correctly.
Note: E-mails require access to the network, and often to the Internet. It is important
that your network settings are correct, and that a valid DNS server and Gateway are
entered. When using DHCP mode, these will usually be set automatically.
In addition to users receiving e-mail notifications about their own jobs, there is a ‘Copy
ALL E-Mails to’ address that will receive copies of all e-mails sent to users by the System.
This is useful for administrators to monitor the System usages. A further e-mail address
is provided for e-mails specific to System errors in addition to an e-mail address
dedicated to jobs run via the LCD/Touchpad (also known as the ‘Console’).
4.7.2 Copy-All E-Mails
TrueNet allows the administrator to setup some ‘Copy All’
e-mail addresses. The first of these is the ‘Copy all Errors’
setting. In the event the system generates ‘unhandled
error’ e-mails, the System can send a copy of those e-mails
to a specified address in addition to the user whose job has
encountered the error. This is useful if you need a
technician to attend the machine automatically in cases of
hardware errors, such as a recorder failure. Recorders are consumable items and may
need replacing from time to time.
In addition to error e-mails, there is an option to copy ALL e-mails to a given e-mail
account so that all e-mails for job start, job complete, etc. are also copied to this address
as well as to the user whose job the e-mails apply to.

4.7.3 Console E-Mail
When the AP-150 is being run in standalone mode (where jobs are started via the build in
keypad rather than via the network), any e-mails generated
by the system are sent to the ‘Console’ address. Job Start
and Job Complete e-mails are
not
generated in standalone
mode, but the System will continue to generate low media
and low ink level e-mails if those have been set up.
4.8 Network
When shipped from the factory, the System will be set
to DHCP mode. This will normally allow the System to
acquire an IP address and other network settings
automatically. When the machine is powered on, a
series of information is displayed on the machine LCD.
Part of the information includes the IP address that the
System is using. This is the IP address used to log in to
the System via your web browser. For example, if the
System said IP = 192.168.7.33 then enter
http://192.168.7.33 in your browser address bar to log in to the System. It is likely that
the address of your System will be different than the address shown here, so please
check the address during power on.
4.8.1 DHCP
DHCP is useful for obtaining initial network settings (such as DNS and Gateway), but if
your DHCP server does not issue the same IP address to the System every time, you may
find you have difficulty logging on. It is therefore recommended that once the System is
installed and running, DHCP mode is disabled and the System converted to a fixed IP
address.
For convenience, the System MAC address is also shown to aid DHCP server or other
security configuration if required.
4.8.2 System Name
The System name should also be set in this dialog box. The System name is normally
displayed on the browser window title bar. When using a tabbed browser the System
name is shown on the tab. This allows multiple machines to be viewed from within a
single browser (using tabs), with the System name identifying which tab applies to each
machine. The name should different on each machine.
4.9 Recorders
The number of available recorders varies depending
on the System you have purchased. Recorders can be
enabled and disabled in real time via the Recorders
tab. Individual recorders can also be disabled
automatically based on an administrator-selected
number of consecutive rejects. For example, if a
recorder rejects 3 consecutive discs, the recorder will

be disabled, and the System will continue to run without using the disabled recorder. All
recorders can be re-enabled at any time by selecting them within this tab. The number
of consecutive rejects allowed prior to automatic-disable can be set to any number
between 3 and 16 (inclusive). This feature can also be disabled by selecting ’Feature
Disabled’ in the ‘Disable recorders’ option.
4.10 Time & Date
The System Time and Date can be set using the
provided Time & Date tab. The date format allows for
any of the following formats: DD/MM/YYYY,
MM/DD/YYYY or YYYY/MM/DD. The time & date are
used when sending e-mails, and also for System
logging (see the Logging tab). To set the System time
to the same time as your computer, check ‘Copy time
and date from this computer’, and then click Apply.
4.11 Logging
The System automatically keeps an internal log of all
actions, including robot moves, recorder activity and job
activity. To view this log, choose the Logging tab and
then click the ‘View system log’ button. A new window
will appear displaying the last 500 lines of the System
log. The System log can contain more than 500,000 lines
and so would be difficult to navigate in its entirety. For
this reason, the log is displayed in sections containing
approximately 500 lines each. Use the navigation arrows below the log to skip forward or
backward through the sections.
Copies of the log can also be saved to your local computer as text files. Use the ‘Save
Section’ button to save the page that is currently displayed, or use the ‘Save All’ button
to save the entire System log. Note that the entire log can be quite large and may take
some time to save.
In addition to viewing the log, the log can be e-mailed directly to
TEAC
technical support
staff using the ‘E-Mail’ button. This can be done in the event that the System appears to
be operating abnormally, to assist the support staff in diagnosing any issues.
4.12 Firmware
Periodically
TEAC
may release firmware updates for your
System. Using the Firmware tab, choose the System
firmware or Robot firmware to update. If you need to
update both System firmware and Robot firmware, it is
recommended to update the Robot firmware first, and
then power-off the machine, power-on again and then
update the System firmware. When updating System
firmware it is important that you also close the web
browser (all windows) and then re-open the browser again after the update is completed,

and the machine is back Online. If you do not exit the web browser completely, the
browser may not load the new version of TrueNet from the System. Simply refreshing
the page will not work.
4.13 System License
Future System upgrades may depend on new license
keys being obtained for the System. New license keys
can be entered using the System License tab. The
System must be restarted before any License changes
will take effect. You may also need to completely exit &
restart your web browser for new features to appear.
Simply refreshing the page will not work.
4.14 Printer Settings
FlashJet 2 Brightness (Gamma) is adjusted
up or down based on how light or dark the
print appears to be compared to when
viewed on a color calibrated monitor.
Brightness range is -50 to +50. X & Y offsets
should normally be left at 0 unless
instructed otherwise by
TEAC
support.
4.15 PIP – Product Improvement Program
Please help us to improve this product further by
allowing the System to send any unexpected error
information directly to the
TEAC
Engineering Group.
Doing so could help us provide timely improvements and
notifications to you. The information received is used
solely for product improvements. This feature can be
disabled at any time.
4.16 Users
Users are at the heart of the TrueNet System. Each
user must login to the System, and must therefore
have both a user name, and a valid password. In
addition, there are several security and
performance configuration features that can be
selected on a user-by-user basis.
TrueNet LX allows up to 5 unique users.
TrueNet FX allows up to 25 unique users.
There are three types of users available within the
System.

4.16.1 SysAdmin
The System must always have a ‘SysAdmin’, which is the root administrator for the entire
System. The SysAdmin cannot be deleted, although the login name and password can be
changed. Every time the System is powered on, it checks for the presence of the
SysAdmin user, and if for any reason one is not found, a new SysAdmin will be created
with the default login of ‘admin’ and a default password of ‘admin’. This is how the
System comes from the factory. It is recommended that at least one additional
administrator account is created so that in the event you change the SysAdmin login and
subsequently lose/forget the new login/password, you can use the alternative login to
gain access to administrator functions.
4.16.2 Administrator
The second type of user is an Administrator. All
administrators have the same level of access
granted to the SysAdmin, but unlike the SysAdmin,
other administrators can be disabled or deleted.
4.16.3 User
The System does not need to have any additional
users configured in order to operate. Smaller
installations may have only one operator, or may
wish to configure all users as equal administrators,
but other installations may choose to restrict the
access that some users of the System have, and they
should be configured as a ‘User’ rather than an
Administrator.
To add a new User (or Administrator), click the ‘New
User’ button to launch the User Settings dialog box. The ‘Full Name’ and ‘Department’
are optional entries at this time. Future versions of TrueNet may enforce the use of
these fields, so it is recommended that they be completed during setup.
4.16.4 User Name
This can be any combination of letters or numbers, between 6 and 20 characters.
4.16.5 Password / Confirm
This can be any combination of letters or numbers between 6 and 20 characters. The
Password and Confirm fields should match perfectly before saving this user.
4.16.6 E-Mail
The System can send e-mail notifications to individual users, and to allow this to happen
the user e-mail address needs to be configured. Each user can do this themselves (via
their own User Settings dialog box after logging in). From an administrator’s point of
view, these settings are optional.

4.16.7 Language
The first version of TrueNet will ship with only English installed. Additional languages
may be added from time to time, and the administrator has the option of configuring the
user’s default language.
4.16.8 Max Priority
The System with TrueNet can allow jobs to run at one of four job priority levels: Low,
Normal, High and Highest. The System allows the Max Priority to be set on a user-byuser basis, so that one user may be restricted to Low & Normal, while another may be
allowed Low, Normal and High, with others being allowed to set the Highest priority,
allowing jobs to always move to the very front of the job queue and take precedence
over all other jobs. The level selected here is the highest level that this user will be
permitted to select.
4.16.9 Max User Jobs (Quota)
In some installations, the administrator may wish to restrict the number of jobs each user
can submit to the System before deleting their other jobs, e.g. those jobs that have
completed. Perhaps not all users will diligently delete their older jobs, and TrueNet can
enforce that no more than the number of jobs entered here can be started by this user
without first deleting their older jobs. The number range is from 1 (only one job can be
queued at a time by this user) up to 99 (up to 99 jobs can be queued by this user). This
number is configured on a user-by-user basis.
4.16.10 Max Quantity per Job (Quota)
If required, the administrator may wish to restrict the number of discs that a user can run
in any given job. Entering a number in this box (1-9999) will restrict all jobs to this
maximum. As an example, by setting this limit to 50, this user will not be allowed to
request more than 50 discs in any one job. This number is configured on a user-by-user
basis.
4.16.11 Max Combined Job Quantity (Quota)
In addition to restricting the number of discs in each individual job, the overall number of
discs totalled across all of this user’s jobs can be set. As an example, the administrator
may wish to restrict each job to only 50 discs, but limit this user to 150 total discs across
all jobs. This would allow the user to start three jobs of 50, or 6 jobs of 25 (subject to the
maximum number of jobs per user). This number is configured on a user-by-user basis.
4.16.12 Enabled
Each user must be enabled before they can log in to the System using TrueNet. Select
the ‘Enabled’ check box to enable a user, and to disable this user without deleting them
from the System, deselect the Enabled checkbox.
4.16.13 Administrator
Each user can be elevated to administrator by selecting the ‘Administrator’ checkbox.
Once elevated to Administrator status, they have the same administrator rights as any
other Administrator.

4.16.14 View Job Queue
For security reasons, the user can be prevented from seeing jobs created by other users.
When this option is disabled, the user will only be able to view jobs that they created.
When enabled (View Job Queue is selected), the user will be able to see other jobs in the
System job queue.
4.16.15 Allow Fast Start
Fast Start is discussed in the ‘Creating a New Job’ section of the user manual. To allow a
user to select Fast Start, select this Allow Fast Start check box. If they are encountering
problems using this function, disable it here.
4.16.16 Allow No Overlap
No Overlap is discussed in the ‘Creating a New Job’ section of the user manual. To allow
a user to create (or edit) a job to include the No Overlap attribute, select this check box.
4.16.17 Edit User
To edit a user that already exists, select the user in the user list box and click the ‘Edit
User’ button. Alternatively, right-click on the user and choose Edit User from the pop-up
menu. Note that the changes made to the user configuration are not saved until you
save all users using the Save button.
4.16.18 Delete User
To delete a user, select the user in the list box and click on the Delete User button.
Alternatively, right-click on the user and choose Delete User from the pop-up menu.
Note that the user is not actually deleted until you save all users using the Save button.
4.16.19 Backup
TrueNet allows you to backup your user settings to a file on your local computer. This is
useful both for general backup purposes, but also for copying the User settings from one
machine to another. Use the Restore function to restore a previously saved User Settings
file.
4.16.20 Restore
This option allows you to restore a previously saved User Settings file to a machine. This
is also useful when transferring the User Settings to another machine, by first performing
a Backup of the User Settings to a local file, and then using the restore function on the
second machine.
4.16.21 Save
Any changes made to users are not transferred to the System until you choose to save
them. Clicking on the Save button will update the System User Settings, and completely
overwrite any previous settings that were there.
4.16.22 Cancel
To exit the User Setup dialog box without saving changes to the System, select the Cancel
button.

5.
Optimizing your browser for TrueNet
If you see this dialog box:
Your browser is not allowing TrueNet enough memory to use some graphics files, and this
may cause unpredictable results if you attempt to create or use Label Templates that use
graphics.
If you do not need to use graphics within your Label Templates, or if you are not using
any labels, then you can ignore this message.
If you want to use graphics within your Label Templates then we recommend that you
follow these simple steps.
5.1 Windows Vista & XP
From the Start menu, choose Control Panel. If your Control Panel is not in ‘Classic’ mode,
choose ‘Switch to Classic View’ on the left side of the Control Panel. Once in Classic View,
your Control Panel should look similar to the one shown below. Note that the icons
shown in your Control Panel may vary based on your computer, and any installed
peripherals.
From the Control Panel, select (double-click) the ‘Java’ icon to launch the Java Control
Panel.

Within the Java Control Panel, choose the Java tab, then the ‘View…’ button under Java
Applet Runtime Settings.
Enter the following text in the Java Runtime Parameters column (note that this text must
match exactly):
-Xmx150m –Xms128m
Note that if there is more than one Java version installed (as in the screen shot above),
enter this text against all versions if you are not sure which version is running TrueNet.
If you have only one Java version installed that will automatically be used by TrueNet.
Click on OK, and then exit all browsers. Next time the browser is run, the new settings
will apply.

Windows appears to limit the amount of memory allowed for a Java Applet, so 150m is
approximately the largest memory allocation available.
If you find that you need more memory than can be provided through your browser,
TEAC
supplies an alternative way to launch TrueNet, called TrueView. Please refer to the
TrueView section for more information.
5.2 Mac OSX
Note: A recent update to the Java system on the Macintosh has removed this dialog, and
users that require heavy graphics usage are recommended to use ‘TrueView’ to run the
system instead of a browser.
From the Finder window, choose Applications Utilities Java, then run Java
Preferences to launch the Java Preferences dialog. Note that this may take a few
moments to appear. Unlike Windows, Max OSX does not suffer from severe memory
restrictions for Java applets. However, you should not allocate more memory than you
really need.
The memory requirements are entered into the Java Applet Runtime Parameters box,
and the recommended options are:
-Xmx150m –Xms128m (small memory model)
or
-Xmx512m –Xms512m (large memory model)

If your Mac has 1GB or more RAM, we recommend the large memory model, because
this will give you much more flexibility for graphics files within the TrueNet Label
Designer, and for Label Templates.
Too little memory may cause unpredictable results, and if you are experiencing
difficulties, we recommend trying the large memory model.
If you find that you need more memory than can be provided through your browser or if
the Label Designer does not respond when importing certain graphics files,
TEAC
supplies
an alternative way to launch TrueNet, called TrueView. Please refer to the TrueView
section for more information.

6. TrueNet Error Messages & Troubleshooting
Unable to create a new job while file transfer is in progress
You are unable to create new jobs until the previous job has been completely transferred
to the System. Please wait for the last job to transfer, and then try again.
You can only edit your own jobs!
Only administrators are allowed to edit other users’ jobs.
You already have the maximum number of scheduled discs allowed by the
administrator.
The administrator had placed a limit on the total number of discs you are allowed to
schedule on this System. To create more jobs you will need to delete other (non-running)
jobs.
You already have the maximum number of jobs allowed by the administrator.
The administrator has placed a limit on the number of jobs you are allowed to create,
and you have now reached that limit. In order to create more jobs you will need to
delete other (non-running) jobs to make room.
Network Status: OFFLINE
The System is Offline (not in Network Mode) or is unreachable. Check the System for
power, and return it to Network Mode.
Loader Status: INPUT HOPPER EMPTY
The Input hoppers of the System are empty. Refill the hoppers and then choose ‘Reset
Hoppers = Yes’ on the System LCD/Touchpad.
Loader Status: ACCEPT HOPPER FULL
The Accept (output) hoppers in the System are full and there are no more Accept
(output) hoppers available for use. Empty the Accept hoppers then choose ‘Reset
Hoppers = Yes’ on the System LCD/Touchpad.
Loader Status: REJECT HOPPER FULL
The Reject hopper in the System is full. Empty the Reject hopper then choose ‘Reset
Hoppers = Yes’ on the System LCD/Touchpad.
Loader Status: JOB ABORT
The System aborted due to an unrecoverable error. Check the System LCD for more
information.
Loader Status: PRINT CLAMP FAILED
The printer failed to clamp the disc that was just inserted, and was unable to recover.
Check the System LCD and, if required, remove any discs from the printer.

Loader Status: PRINTER ERROR
The printer encountered an unrecoverable error. Check the System LCD and, if required,
cycle the power on the printer and wait for it to initialize before continuing.
Loader Status: DOOR IS OPEN
The door on the System is open. Jobs cannot continue while the door is open. Close the
System door, and choose ‘Reset Hoppers = Yes/No’ to continue.
Loader Status: DOOR WAS OPENED
The door on the System was opened, but now appears to be closed. However, the
System needs to know if the hoppers should be reset or not, so choose either yes or no
to the message ‘Reset Hoppers = Yes/No’ on the System LCD/Touchpad.
Loader Status: CHECKING HOPPERS
The System is currently checking the hoppers. This is not an error, and is displayed for
informational purposes. This happens whenever the door has been opened. The System
will continue processing jobs as soon as the checking hoppers operation is completed.
Loader Status: PRINTER SUPPLIES OUT
The printer Ink (FlashJet 2) supplies are exhausted, and need to be refilled.
Loader Status: ACTIVATE CARTRIDGE
A new cartridge has been inserted in to the print engine and requires activation.
Loader Status: POSITIONING ERROR
The System encountered a robot positioning error. Check the LCD/Touchpad for more
information.
Loader Status: ERROR GETTING DISC FROM DRIVE
The System robot was unable to get a disc from one of the recorders. Check the
LCD/Touchpad for more information.
Loader Status: ERROR GETTING DISC FROM PRINTER
The System robot was unable to get a disc from the printer. Check the LCD/Touchpad for
more information.
Loader Status: ERROR INSERTING PRINTER
The System robot was unable to place a disc in the printer. Check the LCD/Touchpad for
more information.
Loader Status: ERROR INSERTING DRIVE
The System robot was unable to place a disc in one of the recorders. Check the
LCD/Touchpad for more information.
Loader Status: ERROR LOADING FROM INPUT
The System robot was unable to get a disc from one of the Input hoppers. Check the
LCD/Touchpad for more information.

Loader Status: ERROR
The System robot has encountered an unrecoverable error. Check the LCD/Touchpad for
more information.

7. Administration (Via the LCD/Touchpad)
7.1 Setup Menu
The System Setup Menu is located near the bottom of the Main Menu screen.
7.2 Job Options
These functions set up options used during the duplication process. Use the up arrow /\
key to scroll up or press the down arrow key \/ to scroll down. Press the
YES
or NO key to
select the desired values.
When the displayed selections are correct press the
ENTER
key to save or press the
STOP
key to exit and leave the options unchanged.
7.2.1 Burn Discs
If set to ‘No’ the System is in simulate mode and will not actually write a disc. It goes
through all the motions and is a good test to see if the autoloader is in operating
condition.
NOTE:
When this is set to ‘No’ a warning message will be displayed when you attempt to create
a job and the BURN/SIM field of the LCD will show SIM (for Simulate Burn) while copying
discs.
7.2.2 Compare Master
If set to ‘Yes’ the master disc will be read a second time and the new read compared with
the first. If the data are not the same a BAD MASTER error will be displayed.
NOTE:
This feature is disabled for any Audio or Video tracks on the CD. This is not a limitation of
the System, but a limitation of the CD format low-level error correction systems.
7.2.3 Compare Copy
If set to ‘Yes’ every disc recorded (burned) will be re-read and compared to the master
data (the disc will be verified for correct data). If the data are not the same or there is a
read error the disc will be rejected.
NOTE:
This feature is disabled for any Audio or Video tracks on the CD. This is not a limitation of
the System , but a limitation of the CD format low-level error correction systems.
7.2.4 Audit Copy
If set to ‘Yes’ every disc recorded will be audited to confirm that the entire disc was
actually recorded. This involves reading the first and last part of the discs to ensure that
they are readable. Other parts of the disc are not read. This function is useful for
checking that discs were actually burned (all the way to the end) by the recorder, and
adds only a few seconds to the cycle time.

7.2.5 Ask Quantity
If set to ‘Yes’ the user will be prompted (in standalone mode) for a quantity at the start of
a Copy/Compare job. If set to ‘No’ the machine will copy until told to stop by pressing
and holding the
STOP
key.
7.2.6 Async Copying
When set to ‘Yes’ the System will run the drives asynchronously. Setting this to ‘No’ will
increase the time taken for duplication, since all drives must be loaded or unloaded
before duplication can continue (synchronous operation). The Async option only applies
when running in standalone mode. All Network Mode jobs are run in an asynchronous
mode.
7.2.7 Check Blank Size
If set to ‘Yes’ the System will check that the image will fit on the blank disc before starting
to write. If set to ‘No’ the System will attempt to write the image to the disc, even if the
blank is not large enough. This may mean that copies are rejected, because the blank
disc did not have sufficient room. Setting this feature to ‘No’ allows discs to be over
burned.
7.2.8 Master Drive
This option allows the user to select which drive (recorder or CD-ROM drive if installed)
will be used to read master discs. Use the left and right arrow keys to select the desired
drive and press the
ENTER
key to save the settings.
7.2.9 Printer
This selects the printer type. Cycle through the options until the one specific to your
printer type is displayed. (Only used for Parallel and not for USB connected printers.)
7.2.10 Stop Reject Full
This should be set to ‘Yes’. The rejected disc count is kept, and once it reaches a trigger
level, duplication will halt - waiting user intervention to clear the reject. This prevents
the fouling of the lower drives by the reject pile, and it is recommended that this be
always set to ‘Yes’. The count is made on a ‘per job’ basis, and so it is expected that the
reject area be cleared at the start of any duplication job.
7.2.11 Last Char Name
This option determines the behavior exhibited on entering image names on the
duplicator. If this is set to ‘Yes’ the cursor carries forward the previous character
entered. This allows for faster entering of names – through fewer button presses. If a
space is required, or the next letter you need is closer to the start of the alphabet than
the previous character entered, then moving the cursor back one space and then forward
two spaces will reset the cursor character. The cursor only carries forward the previous
character if it was changed, and so by first shuffling backwards, you have a blank. It does
take some getting used to – but with use, it provides an improved way of quickly naming
images.

When set to ‘No’ the System behaves in the way described in the ‘Entering Text’ section
further through this manual.
7.3 Network Setup
For the System to appear on the network, the network settings must be correctly
configured. The System can be configured to use either a fixed IP address, or to receive
an address from an external DHCP server on your network. When using DHCP, be careful
not to allow the IP address of the System to change, because this would prevent users
from logging on to the System using their web browsers, unless they know the new
address.
The Network Setup menu is located in the ‘Setup Menu’ at the bottom of the main menu
screen. The contents of the Network Setup menu change based on the current network
mode (DHCP or Fixed IP). To configure the DHCP setting, enter the Network Setup menu,
then choose the Network Options sub menu. There are two settings:
7.3.1 Network Active
Setting Network Active to ‘Yes’ will force the System into Network Mode as it powers on.
Any jobs that are currently stored in the System that are not completed will automatically
resume (or enter the Queued state). This is desirable in case of power failure, because
the System will resume jobs where it left off when the power failed. Setting Network
Active to ‘No’ means that the System will not automatically enter Network Mode on
power up, but will instead go to the main standalone menu by default. In this case, to
enter Network Mode, the user must choose ‘Network Mode’ from the main menu, and
manually restart any jobs that were previously queued.
7.3.2 DHCP
If you require the System to obtain an IP address automatically, set this option to ‘Yes’.
The System must be able to locate a DHCP server on your local network, and that server
must supply the IP address, the Network Mask, a Gateway address and a DNS (Domain
Name Server) address (required for e-mail notifications to work).
If you change this setting, we recommend that you reboot the System.
7.3.3 Set Network Name
Each System must have a unique network name. By default the name is “TEAC” + the
machine serial number. Change this as required, but make sure that if you have more
than one System on the same network, each machine has a unique name. This System
name is only visible by TrueNet and not by other networking applications.
7.3.4 Duplicator IP (DHCP = No)
Enter the fixed IP address for the machine, including any leading zeros as required. The
address must be different from any other computer on this network.

7.3.5 Network Mask (DHCP = No)
Enter the network mask (also called the subnet mask) for the machine, including any
leading zeros as required. This would normally be the same as used by any other
computer on this network.
7.3.6 DNS Server (DHCP = No)
Enter the DNS address for the machine, including any leading zeros as required. This
would normally be the same for all computers on the network, and is required to allow
the System to send e-mails using an external e-mail server.
7.3.7 Gateway IP Address (DHCP = No)
Enter the gateway address for the machine, including any leading zeros as required. This
would normally be the same for all computers on the network, and is required to allow
the System to send e-mails using an external e-mail server.
7.4 Time & Date
The System includes a real time clock. The time and date may need to be adjusted from
time-to-time, or if the System autoloader is delivered to a different time zone from the
TEAC
factory.
7.4.1 Set Time
Enter the time in 24 hour clock format.
7.4.2 Set Date
Enter the current date. Three date formats are available, and the currently selected date
format is shown on the bottom line of the LCD. See ‘Set Date Format’ to select a
different date format if required.
7.4.3 Set Date Format
The System supports three different date formats to suit most areas of the world. These
are:
DD / MM / YYYY (Europe & others)
MM / DD / YYYY (USA & others)
YYYY / MM / DD (Japan & others)
Select the format as required.
7.5 Password Setup
The System allows access to be restricted by passwords. A different password can also
be set for general use (Operator Password), and for System setup (Setup Password). The
passwords operate independently of each other, so it is possible, for instance, to have a
password required for setup, but no password required for Operator use. It is also

possible to have a single Operator Password to give access to the whole machine,
without additional password requirements for the Setup Menu. Passwords are optional.
Many users never need to use passwords.
Each password must be set up separately. By default, no password is active, and the
machine can be used without passwords. To enable a password, choose either
Operator Password or Setup Password from the Password Setup menu, then select
Enable Password.
The system will request a default password. This is a password that is fixed within every
machine – and cannot be changed. The default password is
YES ENTER YES ENTER YES ENTER
.
The reason for a default password is to prevent passwords being enabled accidentally.
Now enter any six-key sequence. The same key sequence will need to be repeated to
confirm the new password. From now on this password will need to be entered when
prompted. Remember, a different password can be set for Operator and Setup, so be
sure to use the correct password. Each password can be changed or disabled via
additional menu items that are displayed once Passwords have been enabled.

8. Using the System in Standalone Mode
This section provides detailed operating instructions for your autoloader in standalone
mode. Your autoloader has many options and features designed to make it more
productive and easier to use. Please read through this section carefully so that you can
take full advantage of all the features of your System.
8.1 Turning On
When the autoloader is turned on it performs a series of self-tests and displays several
messages.
Following are two messages displayed during a normal power-up:
First:
xxxxx Series (depends on the System model)
by
TEAC Technologies
Firmware vX.YZ
Then several status messages will be displayed. And Finally:
>Copy
Compare
Image Menu
Network Mode
If this (or similar) series of messages are displayed then your Publisher is ready for use. If
this series of messages is not displayed or different messages are displayed see the Error
Messages section of this manual.
8.2 Keyboard
A USB keyboard may be connected to the rear of the System autoloader to make the
entry of complicated image names and menu navigation easier. However, this is not
required, and following is the function of each key on the integrated keypad:
< YES Key (left cursor or ‘Y’ on a USB keyboard)
Left arrow or
YES
– If being prompted to enter a number or character this key moves the
cursor 1 character to the left. If prompted with a question this key answers
YES
.
> NO Key (right cursor or ‘N’ on a USB keyboard)
Right arrow or NO – If being prompted to enter a number or character this key moves the
cursor 1 character to the right. If prompted with a question this key answers NO.
/\ Key (up cursor on a USB keyboard)
/\ (Up arrow) – If being prompted to enter a number or character this key increments the
character at the cursor to the next higher character or number. If a menu is being

displayed this key moves the cursor to the next menu selection up. Numbers and
characters can also be entered directly using a USB keyboard.
\/ Key (down cursor on a USB keyboard)
\/ (Down arrow) – If being prompted to enter a number or character this key decrements
the character at the cursor to the next lower character or number. If a menu is being
displayed this key moves the cursor to the next menu selection down. Numbers and
characters can also be entered directly using a USB keyboard.
ENTER Key (Enter or Return key on a USB
keyboard)
If being prompted to enter a number or name this key accepts the currently displayed
selection. If a menu is being displayed the
ENTER
key moves 1 level deeper into the menu
structure. If the next item is executable it starts that process.
Stop Key (use the escape key on a USB keyboard)
This key stops or aborts whatever is going on. When recording discs the System is busy
and this key may not respond immediately, so press and hold it down until prompted to
do something else.
While a menu is being displayed the
STOP
key (escape on a USB keyboard) backs up 1 level
higher in the menu structure.
8.3 LCD Display
The LCD display is used either to display menus or to show status. For instance while
copying it shows what it is doing, the number it has to do, how many it has done, and the
current mode (such as Burn or Simulate).
8.4 Menu Structure
Use the up /\ and down \/ arrow keys to position the cursor (a > character on the left
most column of the display) to the desired menu item. Then use the
ENTER
key to select
it.
Following is a description of each menu selection.
8.4.1 Copy
Use this menu option to start copying discs by reading the master to the hard disk and
then copy from the hard disk image. See the Quick Start Copying section of this chapter
for further instructions.
8.4.2 Compare
Use this menu option to start verifying copies. See the Quick Start Comparing section of
this chapter for further instructions.
8.4.3 Image Menu
This menu option is used to maintain image files kept on the hard drive.
8.4.4 Load New Master
Read a Master Disc and put the image on the hard drive without copying or verifying.

8.4.5 List Images
Show all disc images currently stored on the hard drive.
8.4.6 Show HD Free Space
Display the currently available hard drive space. If disc images have been erased more
usable space may be created by defragmenting the hard drive using the Image Menu |
Defragment HD function.
8.4.7 Delete Image
Delete an image stored on the hard drive.
8.4.8 Rename Image
Rename an image currently stored on the hard drive. See the Entering Text section of
this chapter for instructions on inputting text.
8.4.9 Defragment HD
Recover all hard drive space associated with erased images. Depending on the hard drive
size and the number and size of erased images this function can take several minutes to
complete.
8.5 Utilities Menu
The Utilities Menu provides several useful functions required to maintain and set up your
System.
8.5.1 Hard Disk Utilities
These utilities are used to set up and maintain the hard drive in your System. The hard
drive provides a temporary storage buffer for the discs and print files you will be using.
8.5.1.1 Show HD Free Space
Display the currently available hard drive space. If disc images have been erased more
space may be created by defragmenting the hard drive using the Image Menu |
Defragment HD function.
8.5.1.2 Show HD Info
Display the installed hard disk information. This includes manufacturer, model, drive
firmware revision, and total space in megabytes (MB).
8.5.1.3 Defrag HD
Recover all hard drive space associated with erased disc images. Depending on the hard
drive size and the number and size of erased disc images this function can take several
minutes to complete.
8.5.1.4 Format Hard Disk
This function re-initializes the hard drive directory structure. It should be run anytime a
new hard drive is installed in a System. This function can also be used to quickly erase all
images in the hard drive.
NOTE:
This function does not actually remove images from the hard drive and is not a secure
erase of the image data. Instead it marks all the hard drive as unused and available for
new images. The data remain on the disk until overwritten by another image file.

8.5.2 Firmware Utilities
Firmware Utilities allows the firmware used by the System controller, Autoloader
controller and the drives to be updated (depending on the drive model). The preferred
method to update System and Loader firmware is via TrueNet. If required these utilities
allow firmware to be updated from firmware files stored in the root directory of a FAT32
formatted USB memory stick installed in any USB port on the System.
8.5.2.1 Load System F/W
The System software that is used to copy discs may be updated from time to time, to add
new features or support for new drives. The following functions are used to update the
firmware in the machine.
8.5.2.2 Load F/W XMODEM
This function is not available on the System. It is included for the use of
TEAC
approved
service personnel.
8.5.2.3 Load F/W From USB
This function reads firmware from a USB memory stick connected to the System via a USB
port. This option will only appear if the USB stick is already connected to the System and
contains a valid firmware file (*.rqf). Selecting this option then allows the System to read
this firmware and update accordingly. Once the System firmware is updated, the System
will automatically restart.
8.5.2.4 Load Drive F/W
The recorder manufacturer may update the software that is used by the CD-R or
recorders from time to time. This could be for bug fixes, new features or format support,
or to optimize the recording quality on new media as it becomes available.
A file containing
TEAC-
approved recorder firmware can be obtained from the
TEAC
web
site, or
TEAC
authorized distributors. This is the ONLY file that should be used to update
the drives. Do not attempt to use any other file, as it may contain firmware that has not
been approved by
TEAC
, and may cause the System to function incorrectly.
VERY IMPORTANT NOTE:
It is VERY IMPORTANT that you DO NOT turn off the power while this function is running.
Turning off the power before the System has completed the drive upgrade may leave
your recorders in a state where they no longer function correctly. If you are in any doubt
about this, please contact
TEAC
or an authorized
TEAC
distributor before using this
feature.
The update process is very simple, but user confirmation is requested several times
before the drives are actually updated. Choose the menu item Utilities Menu |
Firmware Utilities | Load Drive F/W and follow the prompts on the LCD.
8.5.2.5 Load Loader F/W
Occasionally, there may be an updated version of loader firmware available for
download. This is the menu entry that will allow you to load this onto your autoloader.
For the reliability of your System, only install official firmware released by
TEAC
onto your
System.
VERY IMPORTANT NOTE:

It is VERY IMPORTANT that you DO NOT turn off the power while this function is running.
Turning off the power before the System has completed the loader upgrade may leave
your autoloader in a state where it no longer functions correctly. If you are in any doubt
about this, please contact
TEAC
or an authorized
TEAC
distributor before using this
feature.
8.5.3 Loader Utilities
Loader Utilities provide a means by which the loader mechanism can be tested or
diagnosed. These utilities are meant for
TEAC
approved service personnel and advanced
users only. If in doubt, do not use these utilities.
8.6 System Information
These functions are used to display information about the various components installed
in the System.
8.6.1 PCA Info
This displays the installed firmware level, amount of RAM and the number of recorders
found in the System, and the number of recorders licensed in this System. In addition,
network information including IP address, network mask and MAC address are displayed.
8.6.2 Writer Info
This displays the recorder manufacturer, model number, and firmware version. While it
is possible to use different writer types, and different firmware revisions,
TEAC
recommends using the same writer type and the latest approved writer firmware.
8.6.3 Hard Drive Info
This will display the manufacturer, model number, and capacity of the installed hard
drive or drives.
8.6.4 Autoloader Info
This displays the Autoloader information.
8.7 Upgrade License
Enabled options can be changed via these functions. To get a new key that will enable
new options, contact
TEAC
or an authorized
TEAC
distributor.
8.7.1 Show Current Key
This will display the currently installed options Key String. You MUST have this key string
available when contacting
TEAC
or an authorized
TEAC
distributor.
8.7.2 Enter New Key
Use this option to enter a new installed options Key String. Entering this key string can
change your installed options. Contact
TEAC
or an authorized
TEAC
distributor to get a
new key string. See the Entering Text section of this chapter for instructions on entering
text.
8.8 Quick Start Copying
This quick start section assumes the System is ready and in the main standalone menu.
Use the up /\ or down \/ arrow keys to put the > cursor (on the Left of the LCD display)
next to the Copy
menu line. Press the
ENTER
key to select that menu function. If there is

already an image on the hard drive the following prompt will be displayed:
Read New Master?
Press the
YES
key. The next prompt will be for an image name (this will be the first
prompt if there are no images on the hard disk):
Enter Image Name
[ ]
To use the default name just press the
ENTER
key at this point (see the Entering Text
section of the Operation chapter for instructions on entering an image name). The
default name will be the current time & date on the System. Next the System will ask for
the number of copies to record:
Enter Quantity
[ ]
Press the up arrow key /\ to set the quantity to
[0001].
Then press the
ENTER
key to accept
the quantity. The top drive tray will open and the following prompt will be displayed:
Insert Master Disc...
Press any key.
Put the master disc in the Input Hopper on top of the blank disc and press the
ENTER
key.
The autoloader will pick the master disc, and place it in the drive tray. The tray will close
and the master disc will be analyzed and then read. When the master read is complete,
the tray will open and the autoloader will remove the disc from the tray and place it into
the Accept Hopper. The autoloader will then return to the Input hopper, take the blank
disc placed there earlier, and load it into the first recorder.
The recorder tray will close and you are copying your first disc! There is a percentage bar
indicator at the top right corner of the display that shows the progress of each job.
The above instructions will work for all printer configurations. Input hoppers can be
loaded with blank discs and the robot will automatically change hoppers once the first
Input Hopper becomes empty. Once the first Input Hopper becomes empty, and the
robot starts loading from the second Input Hopper, the first Input Hopper becomes an
‘Accept Hopper’. This is known as ‘rotating hoppers’.
8.9 Quick Start Comparing
Using the Compare function is essentially the same as copying. The only difference is
that you use the Compare menu selection, and you will be using written discs, rather
than blank ones. Please see the Quick Start sections above.
NOTE:
Because of the way Audio and Video CDs are recorded, CDs containing Audio or Video

tracks cannot be verified. This is not a limitation of the System Autoloader equipment,
but a limitation of the formats.

9
. TrueView
9.1 What is TrueView?
For users who prefer not to run TrueNet in a browser window, or are having problems
within the browser environment due memory restrictions,
TEAC
provides an alternative
way to launch and host the TrueNet applet.
TrueView is an installed application “Viewer”. This means that TrueView is not the
application itself, but instead a way to load the application from the System instead of
using a Web Browser.
If the System firmware is updated in the future, there is no need to update TrueView,
because TrueView always gets the latest application version from the System each time
TrueView is launched.
9.2 Supported Operating Systems
TrueView is available for Windows XP/Vista, Windows XP 64 bit, Windows Vista 64 bit,
Apple Macintosh (Mac OS 10.4 or later – Universal App) and Linux (Intel 32/64 bit).
9.3 Installing TrueView
To install TrueView, run the installer application applicable to your operating system, and
follow the on-screen instructions.
9.4 Running TrueView
To run TrueView, select TrueView in the ‘Start / All
Programs’ menu on Windows, from the ‘Applications’
menu on the Mac, or from its installed location on
Linux.
Enter the System IP address or URL in to the System
Address input box that you would normally have
entered in to the web browser address bar, then click
the ‘Run’ button. TrueView will now load the TrueNet
applet from the System and launch it in a new window.
The System name will be shown on the window title bar, and the original TrueView
window will now be hidden. To exit TrueView without running TrueNet simply click the
‘Exit’ Button.

Powered by
TEAC
AP-150 User Manual
Part Number TE-MA-AP-150 Revision A
Copyright © 2002-TEAC Europe GmbH
All rights reserved.
www.teac.de
 Loading...