

Page 1
Page 2
EE NN GG LL II SS HH
TC Support Interactive
The TC Support Interactive website www.tcsupport.tc is designed as an online support
and information center. At the site you can find answers to specific questions regarding TC software and hardware. All known issues are stored in a database searchable by
product, category, keywords, or phrases. Under the section "My Stuff" you can login to
check the status of your questions, download materials such as product manuals, software updates and new presets.
This site has been specifically designed to meet the needs of our users. We constantly
update the database and you will find the site to be a huge resource of information.
Browse through Q&A's and discover new aspects of your TC product.
If you can't find an answer online, you have the option of submitting a question to our
technical support staff who will then reply to you by e-mail. The TC Support Team is
on constant alert to help you in any way they can.
Contact Details
Alternatively, you may contact the TC Electronic distributor in your area, or write to:
TC ELECTRONIC A/S
Customer Support
Sindalsvej 34
Risskov DK-8240
Denmark
USA:
TC Electronic, Inc.
5706 Corsa Avenue, Suite 107
Westlake Village, CA 91362
www.tcelectronic.com
© BY TC ELECTRONIC A/S 2006. ALL PRODUCT AND COMPANY NAMES ARE
TRADEMARKS OF THEIR RESPECTIVE OWNERS. ALL SPECIFICATIONS SUBJECT
TO CHANGE WITHOUT NOTICE.ALL RIGHTS RESERVED.
TC ELECTRONIC IS A TC GROUP COMPANY.
Page 3

TABLE OF CONTENTS
TABLE OF CONTENTS . . . . . . . . . . . . . . . . . . . . . . . . . . . . . . . . . . . . . . . . . . . . . . . .1
INTRODUCTION TO MD3 Stereo Mastering Package . . . . . . . . . . . . . . . . . . . . . . . . .2
GETTING STARTED . . . . . . . . . . . . . . . . . . . . . . . . . . . . . . . . . . . . . . . . . . . . . . . . . .3
SYSTEM REQUIREMENTS . . . . . . . . . . . . . . . . . . . . . . . . . . . . . . . . . . . . . . . . . . . . .3
GLOBAL PLUG-IN CONTROLS . . . . . . . . . . . . . . . . . . . . . . . . . . . . . . . . . . . . . . . . . . .3
PROCESSING DELAY . . . . . . . . . . . . . . . . . . . . . . . . . . . . . . . . . . . . . . . . . . . . . . . . .4
PARAMETER OVERVIEW . . . . . . . . . . . . . . . . . . . . . . . . . . . . . . . . . . . . . . . . . . . . . .5
MAIN PAGE . . . . . . . . . . . . . . . . . . . . . . . . . . . . . . . . . . . . . . . . . . . . . . . . . . . . . . .6
EXPANDER COMPRESSOR . . . . . . . . . . . . . . . . . . . . . . . . . . . . . . . . . . . . . . . . . . . . .8
EQ PAGE . . . . . . . . . . . . . . . . . . . . . . . . . . . . . . . . . . . . . . . . . . . . . . . . . . . . . . . . .9
NORMALIZER PAGE . . . . . . . . . . . . . . . . . . . . . . . . . . . . . . . . . . . . . . . . . . . . . . . . .12
EXPANDER PAGE . . . . . . . . . . . . . . . . . . . . . . . . . . . . . . . . . . . . . . . . . . . . . . . . . .13
COMPRESSOR PAGE . . . . . . . . . . . . . . . . . . . . . . . . . . . . . . . . . . . . . . . . . . . . . . . .15
OUTPUT PAGE . . . . . . . . . . . . . . . . . . . . . . . . . . . . . . . . . . . . . . . . . . . . . . . . . . . .17
BRICKWALL LIMITER . . . . . . . . . . . . . . . . . . . . . . . . . . . . . . . . . . . . . . . . . . . . . . . .19
PRESET MANAGEMENT . . . . . . . . . . . . . . . . . . . . . . . . . . . . . . . . . . . . . . . . . . . . . .21
CONVERTING MD3 PRESETS FROM SYSTEM 6000 . . . . . . . . . . . . . . . . . . . . . . . . . .22
COMPARE SETTINGS WITH A/B MEM FUNCTION . . . . . . . . . . . . . . . . . . . . . . . . . . . .24
PARAMETER LOCK AT PRESET RECALL . . . . . . . . . . . . . . . . . . . . . . . . . . . . . . . . . . .25
EE NN GG LL II SS HH
MD 3
/
1
Page 4

Introduction
TC Electronic is proud to introduce the MD3 Stereo package for Pro Tools. This package includes both our MD3 Multi-Band Dynamics and BrickWall Limiter algorithms,
the finest stereo mastering tools from our award winning System 6000.
MAIN FEATURES
• Four band Parametric EQ (Dual Mono capability)
• Normalizer
• Three band Exp/Comp/Lim
• MS Encode/Decode
• Sample accurate BrickWall Limiter
MD3
The MD3 plug-in features both Dual Mono and Stereo dynamics processing in three
frequency bands. It's pristine signal-path uses 48 bit processing.
Make-up gain can be applied automatically or manually, so the algorithm can be setup to do everything from strictly limiting to level maximization.
By offering a true side-chain split structure, MD3 is also capable of demanding mono
material compression/limiting on two separate channels , not found in other multiband dynamics processors.
Used for mastering, MD3 can be regarded as a high-end mastering tool. M and S components of a stereo signal can be processed separately and provide even more control
making full use of the Spectral Stereo Enhancer.
I/O PAGE / HEAD ROOM
In case you are working with very hot signal levels in your audio application, you might
experience clipping of the input of the MD3 or BrickWall limiter algorithm.
In that case, we recommend that you lower the output level of the previous plug-in ,
or turn down your input channel or send level.
If this does not help, you can use the build-in headroom parameter on the plug-in I/O
page, to get an additional head room. Please be aware that this results in a loss of bit
resolution.
Setting the Head Room parameter to a value different from 0 dB will change two
gains: the native input gain is set to reduce the signal level,
while the gain at the input to the 48 bit algorithm is set to make up that reduction.
The advantage of this is that any of the algorithm parameters (especially thresholds)
will affect the signal in the same way, independent of the headroom setting.
EE NN GG LL II SS HH
2/
MD3-TDM
Page 5

MD3-TDM
/
3
EE NN GG LL II SS HH
The disadvantage is that some of the lower bits are lost in the 24 bit path to the algorithm. On the other hand, the same loss would happen when you would reduce the
signal via an input level parameter.
The The MD3 TDM version runs on Pro Tools|HD and Pro Tools|HD Accel hardware,
including the Venue console, at sample rates from 44.1 kHz to 96kHz, with Pro Tools
software 6.9 or higher.
TOOLTIPS
If you are just getting started with the MD3 Stereo Mastering Package and you want to
know what all the parameters do, press the question mark Icon to activate the tooltip
function.When activated, moving the mouse over the different parameters will display
information about the parameter functionality. Of course you can disable the tooltips,
as soon as you know your way around.
SYSTEM REQUIREMENTS
• Mac OS X (10.4 or higher) / Windows XP
• Pro Tools TDM 7.2.1 software (or higher)
• Pro Tools HD or HD Accel hardware
• iLok USB key
• iLok.com account and internet access required for product authorization
• System must meet Digidesign’s system requirements for Pro Tools TDM systems!
Global Plug-In Controls
KEYBOARD COMMANDS
The TDM versions of MD3 & BrickWall Limiter supports keyboard commands for certain functions. The following key commands are available for all plug-in parameters:
Key Commands in Mac OS X:
Fine Adjust = Apple key + mouse movement
Reset To Default = Option + mouse click
Key Commands in Windows:
Fine Adjust = Ctrl + mouse movement
Reset To Default = Alt + Control + mouse click
AUTOMATION
Please be aware that automation of certain parameters, can cause audible artifacts.
In case you need to automate these parameters, you should take care that
changes only take place in parts where no audio is sent to the plug-in.
Page 6

FOCUS FIELDS
You can place your own set of parameters in the 6 focus fields at the bottom
of the plug-in.
Making use of the focus fields can give you a better workflow, since you will not have
to switch pages all the time to find the parameters that you work with.
You can assign any parameter to the focus fields, and the focus fields are stored with
the session as well as when you save your presets.
To change the assignment:
• Press the Assign button. The Assign button as well as one of the Focus Fields will
be highlighted.
• Select the Focus Field you wish to link a parameter to, by clicking on that field.
• Click on the parameter you wish to link to the selected Focus Field.
• To get an unassigned (empty) Focus Field, click again on the selected parameter.
• Once you have finished the assignments, click again on the Assign button to leave
the assign mode.
EE NN GG LL II SS HH
4/
MD3-TDM
Page 7
MD3-TDM
/
5
EE NN GG LL II SS HH
PARAMETER OVERVIEW
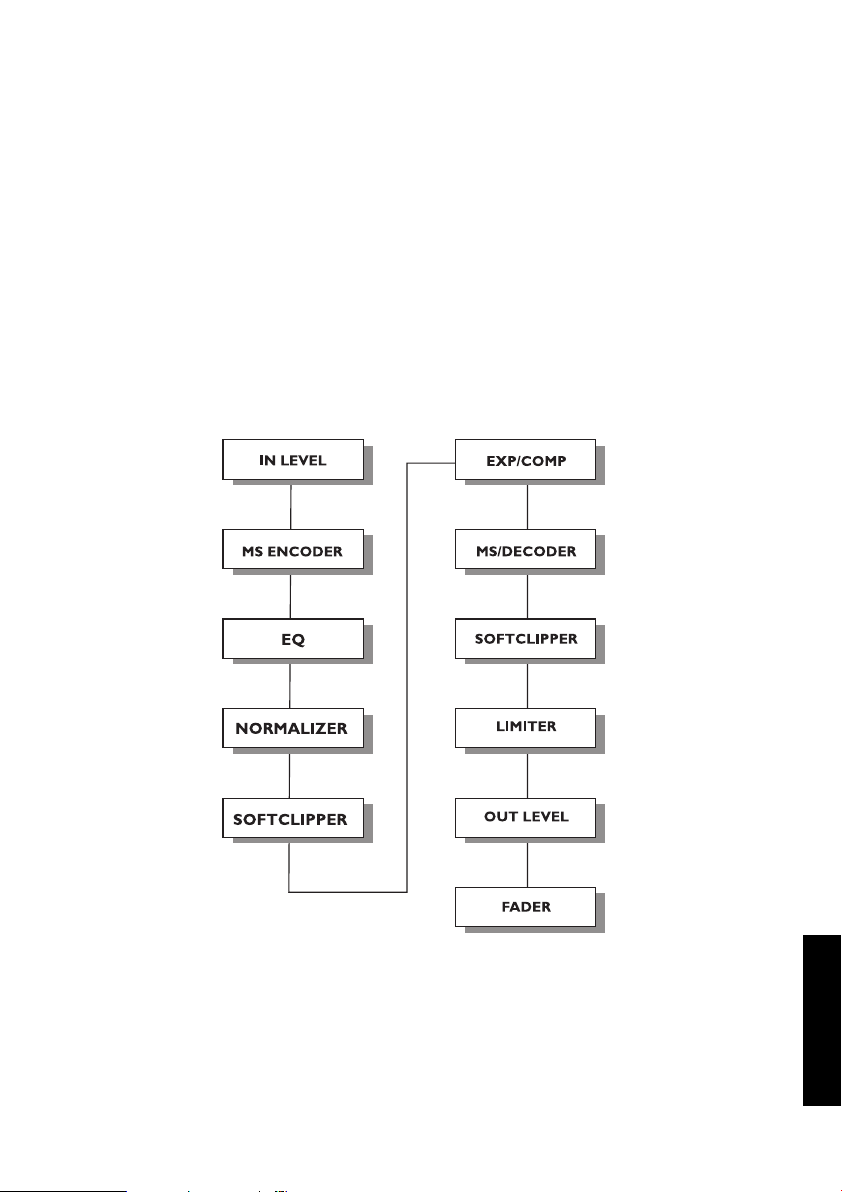
The MD3 is a 3-band 2-Channel Dynamics processing algorithm. The algorithm contains:
• Stereo four band precision EQ (Linked or Dual-mono operation)
• Stereo 3-band compression with linked or separate SideChains
• MS-Encode/Decode at the Input and Output
The MD3 will run at sample rates up to 96kHz
Signal flow through the algorithm:
Page 8
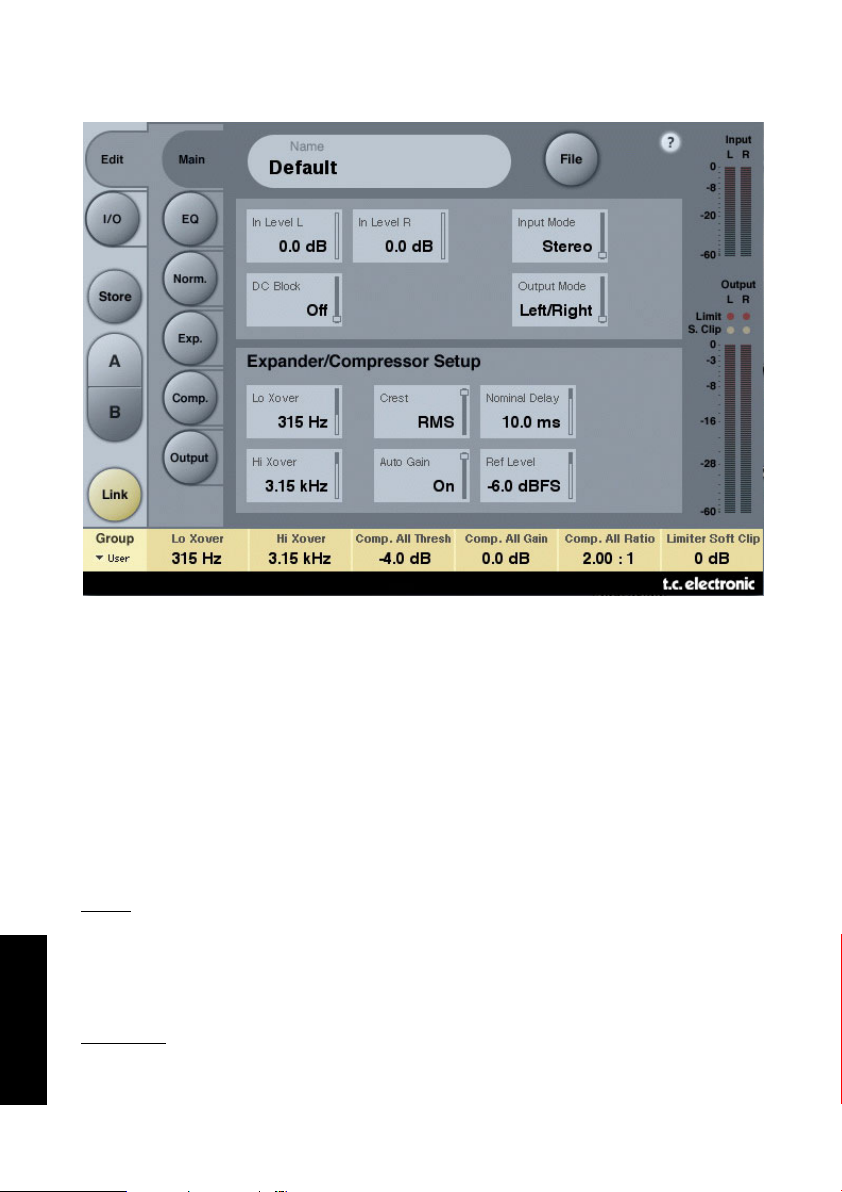
Main Page
Inlevel Left and Inlevel Right
Range: Off to 0dB
<-40dB: in 3dB steps
>-40dB in 0.5dB steps
Sets the Input level for the two Input channels
Input Mode
Range: Stereo, Dual Mono, MS Linked, MS Unlink.
Selects the Input mode.
Ster
eo
In Stereo Mode the Expander/Compressor section of the algorithm uses one common
SideChain for both Left and Right channels and the EQ section is linked.
Please note that when coming from e.g. Dual Mono mode EQ settings from the Left
channel will be copied to the right channel.
Dual Mono
In Dual Mono mode the Expander/Compressor section of the algorithm uses separate
SideChains for the Left and Right Channel and they can be operated individually.
EE NN GG LL II SS HH
6/
MD3-TDM
Page 9

MD3-TDM
/
7
EE NN GG LL II SS HH
Linked
In the MS Linked mode the MS Encoder is activated and the Expander/Compressor
section of the algorithm uses one common SideChain for both Left and Right channels. EQ is unlinked.
MS Unlinked
In the MS Unlinked mode the MS Encoder is activated and the Expander/Compressor
section of the algorithm uses separate SideChains for the Left and Right Channels. EQ
is unlinked.
NOTE : When a mono signal is processed, only the left channel of the algorithm is
active
Output Mode
Range: Left/Right, MS
Left/Right : Straight Output without MS Decode.
MS : MS decode before the limiter section.
DC block
Range: Off, On
The DC block is a Lo Cut filter used to remove potential DC-noise at 2Hz.
Page 10

EXPANDER/COMPRESSOR SETUP
Lo Xover
Range: Off, 25, 32, 40, 50, 63, 80Hz ......... 16kHz
Sets the Cross-over frequency between the Lo and Mid Expander/Compressor bands for
the two channels.
Hi Xover
Range: Off, 25, 32, 40, 50, 63, 80Hz ......... 16kHz
Sets the Cross-over frequency between the Mid and the Hi Expander and Compressor
bands for the two channels.
NOTE : The Lo Xover value can not be higher than the Hi Xover.
Crest
Range: Peak, 6, 10, 12, 14, 16, 20, 24, RMS
Select compression method between RMS and PEAK for all three bands. The dB steps
between RMS and Peak are number of dBs needed for a peak-value to override RMS
measurement and can be perceived as a Threshold setting.
Example:
If the Crest parameter is set to 6dB, the Compressor will respond to RMS values and
to peaks 6dB higher than the current RMS value.
Auto Gain
Range: Off/On
Switches the Automatic Make-up gain on or off for the Compressor bands. When set to
on the gain for each band is adjusted according to Threshold and Ratio settings. When
set to off, no automatic gain adjustments are performed
Nominal Delay
Range: 0 to 15ms
<2ms in 0.1ms steps
>2ms in 0.5 ms steps
Sets the nominal Delay of the signal compared to the Sidechain signal. This is also
known as "Look ahead delay", enabling the compressor section to become more
responsive to the incoming signal thereby performing a more precise compression.
Reference Level
Range: -24dBFS to 0dBFS in 0.5dB steps
This parameter sets the reference level in the algorithm.
The reference level is the level at which the Compressor Threshold parameters will
start operating when set to 0dB.
EE NN GG LL II SS HH
8/
MD3-TDM
Page 11

MD3-TDM
/
9
EE NN GG LL II SS HH
EQ Page
INTRODUCTION
This digital EQ features a four-band parametric EQ with high- and low-pass filters
switchable between Notch, Parametric, Shelving and Cut filters. The needle sharp
notch filter has a range down to 0.01 octave and the shelving filters has a variable
slope, ranging from gentle 3 dB/oct over 6 and 9 to 12dB/oct. Cut filters are switchable between 12dB/oct maximum flat amplitude (Butterworth) or flat group delay
(Bessel) types. The parametric equalizer features a natural and well defined bandwidth behavior at all gain and width settings:
BASIC OPERATION
• Press keys Lo, Mid1, Mid2 and Hi to activate/deactivate the EQ bands.
• Select Freq, Gain, Type or Lo/Hi to access all four parameters on individual bands.
• Press Bypass EQ to bypass all four bands.
Page 12

TYPE SELECTOR
• Press Type and use faders 1-4 to select
filter types.
Lo and Hi filter options::
Parametric, Notch, Shelve and Cut.
EE NN GG LL II SS HH
10 /
MD3-TDM
Parametric Filter - Broad type
Shelving Filter
Notch Filter - Narrow Type
Cut Filter - Bessel type
Cut Filter - Butterworth type
Mid 1 and Mid 2 filters options:
Parametric and Notch.
Page 13

MD3-TDM
/
11
EE NN GG LL II SS HH
Freq
Press Freq and use Faders 1 to 4 to adjust frequence for each of the four bands.
Range - Lo band : 20Hz to 20kHz
Range - Mid1 band : 20Hz to 20kHz
Range - Mid2 band : 20Hz to 20kHz
Range - Hi band : 20Hz to 40kHz
Gain
Press Gain and use Faders 1 - 4 to adjust gain for each of the four EQ bands.
Range for the Parametric, Shelve and Cut type:
Lo Gain : -12dB to +12dB
Mid1 Gain : -12dB to +12dB
Mid2 Gain : -12dB to +12dB
Hi Gain : -12dB to +12dB
Range for the Notch filter:
Lo Gain : -inf; -97dB to 0dB
Mid1 Gain : -inf; -97dB to 0dB
Mid2 Gain : -inf; -97dB to 0dB
Hi Gain : -inf; -97dB to 0dB
Range for the Notch filter:
Lo BW : 0.02oct to 1oct
Mid1 BW : 0.02oct to 1oct
Mid2 BW : 0.02oct to 1oct
Hi BW : 0.02oct to 1oct
Range for the Parametric filter:
Lo BW : 0.1oct to 4oct
Mid1 BW : 0.1oct to 4oct
Mid2 BW : 0.1oct to 4oct
Hi BW : 0.1oct to 4oct
Range for the Shelve filter:
Lo BW : 3dB/oct to 12dB/oct
Hi BW : 3dB/oct to 12dB/oct
Range for the Cut filter:
Lo BW : Bessel or Butterworth
Hi BW : Bessel or Butterworth
Bandwidth/Q - Key-V
alues:
BW Q
0.5 - 2.87
0.7 - 2.04
1.0 - 1.41
TYPE
Page 14

EE NN GG LL II SS HH
12 /
MD3-TDM
Normalizer
When using the EQ section (located just before the Normalizer) the gain might have
been increased or decreased. The Normalizer is used to optimize the gain
before hitting the Expander/Compressor section.
Trim Left and Trim Right
Range: -6 to +18dB in 0.1dB steps
Level parameter between the EQ and Exp/Comp section.
When Input Mode is set to Stereo the parameters will be linked.
Soft clip
Range: +5dB; Off
The Soft clipper is placed between the Normalizer and Exp/Comp section. By enabling
the Soft clipper you are able to reduce potential overshoots.
Page 15

MD3-TDM
/
13
EE NN GG LL II SS HH
Expander
Pressing Threshold, Range, Ratio, Attack and Release keys will immediately assign Lo,
Mid, Hi and Master values for these parameters to Faders 1-4. Press the L/R key to
see all parameters at the same time.
Threshold parameters
Range: -50dB to 0dB (in 0.5dB steps)
When the signal drops below the set Threshold point the Expander is activated.
Range
Range: -40dB to 0dB in 0.5dB steps
The Range parameter sets the Max attenuation relative to the Ref level setting.
Example: With a Ref Level setting of -6 dB and Range set to -10 the max attenuation
can be -16dB.
Ratio parameters
Range: Off to Infinity
The Ratio of the Gain Reduction.
Example: If the signal drops 1 dB below the Threshold with a Ratio set to 1:3 the
actual attenuation will be 3dB.
Page 16

EE NN GG LL II SS HH
14 /
MD3-TDM
Attack
Range: 0.3 to 100ms (Exponential)
The Attack time is the time the Expander uses to release its gain reduction when the
Input signal rises above the set Threshold point.
Release
Range: 20ms to 7sec. (Exponential)
The Release time is the time the Expander uses to achieve the attenuation
specified by the Ratio parameter when the signal drops below the set Threshold point.
Meter Zoom
Press to zoom on the range of the Gain Reduction meters.
L/R
Press to view all algorithm parameters at the same time.
Page 17

MD3-TDM
/
15
EE NN GG LL II SS HH
Compressor Page
Pressing Threshold, Gain, Ratio, Attack and Release keys will immediately assign Lo,
Mid, Hi and Master values for these parameters to Faders 1-4. Press the L/R key to
see all parameters at the same time.
Threshold
Range: -25dB to 20dB (in 0.5dB steps)
Relates to the Ref.Level setting.
General explanation - when the Input signal exceeds the Threshold value the
Compressor starts to reduce the dynamic content of the signal according to the set
Ratio.
Gain
Range: Off, -18dB to 12dB in 0.5dB steps.
Manual Makeup-gain for each compression band.
Where the Auto Gain control in the Main page compensates for the total gain reduction caused by the Compressor, the Gain controls in the Compressor pages are used as
additional gain controls on the individual bands.
Page 18

EE NN GG LL II SS HH
16 /
MD3-TDM
Ratio
Range: Off to Infinity
Specifies the Ratio of the performed compression.
Example: With a Ratio setting of 2:1 the compressor will reduce every 2dB above the
Threshold point to only 1dB.
Attack
Range: 0.3 to 100ms
The Attack time is the time the Compressor uses to reach the gain reduction specified
by the Ratio parameter.
Example: If the Input signal increases by 4dB above the set Threshold with a Ratio
set to 2:1 and the Attack time set to 20ms, the Compressor will use 20ms to reach a
Gain reduction of 2dB.
Release
Range: 20ms to 7s
The fallback time. The time it takes for the Compressor to release the attenuation of
the signal.
Meter Zoom
Press to zoom on the range of the Gain Reduction meters.
L/R
Press to view all algorithm parameters at the same time.
Page 19

MD3-TDM
/
17
EE NN GG LL II SS HH
Output page
FULL RANGE LIMITER
Soft clip
Range: -6dB to 0 dB in 1-dB-steps; +3dB; off.
Soft clipper after the Compressor.
Threshold is relative to 0dBFS - not to the Ref Level.
Threshold
Threshold is relative to 0dBFS - not to the Ref Level.
Range: -12 to +3 dB
-6 to + 3 in 0.1dB increments
-12 to -6 in 0.5dB increments
Release
Range: 20ms to 7sec
Release time for the Limiter.
Page 20

EE NN GG LL II SS HH
18 /
MD3-TDM
Ceiling
Range: 0 to -0,10dB in 0.01dB steps.
Fine-tuning parameter setting the Ceiling for the Limiter.
This parameter prevents the Output signal from ever exceeding the adjusted
Threshold. It can be used to "hide" overloads to downstream
equipment, but it does not remove the distortion associated with an over.
TRIM LEVELS
Trim L
Range: 0 to -12dB in 0.1dB steps
Left channel Output level trim after the Compressor and Output mode parameter (M/S)
and before the Limiter section.
Trim R
Range: 0 to -12dB in 0.1dB steps
Right channel Output level trim after the Compressor and Output mode parameter
(M/S) and before the Limiter section.
OUTPUT FADER
Output Level
Range: Off to 0dB (<-40dB: in 3dB steps, >-40 in 0.5dB steps)
Output fader for both Outputs.
Balance
Range: -6dBL to -6dBR
Changes the Output balance between the Left and Right channel.
Compare key
Due to the difference in level, "in-circuit" and "out-of-circuit" comparisons are often
difficult to make using the BYPASS key. Use the Compare Level parameter to compensate. Press to activate compare function.
Compare Level
Range: -20 to 0dB
Processing with MD3 will most often also mean raisng the level of the signal.
To make a realistic comparison of processed and unprocessed signal it is important to
compare at equal levels. Use the Compare level to set a level for the processed signal.
Bypass Lim.
Press to bypass the Limiter section.
Page 21

EE NN GG LL II SS HH
MD3-TDM
/
19
BRICKWALL LIMITER
GETTING STARTED
The BrickWall limiter cannot prevent destruction of dynamic range from happening at
earlier stages in the production process, but it can get rid of the signals we know are
going to get distorted in consumer CD players, radio processors or data reduction
codecs.
Precision in Level and Time
The BrickWall limiter operates with extended precision in both level (48 bit throughout) and time (5 times oversampling). Double precision calculations are always used,
while hyper-precision in limiter timing can be turned
on or off using the Upsample key.
Level meters are always upsampled in order to identify intersample and 0dBFS+ peaks
on Inputs as well as Outputs. The meter scale is extended to +3dBFS because excessive level normally falls between 0 and +3dBFS, and
most consumer equipment already exhibits severe distortion at +0.5 dBFS.
We recommend using the BrickWall limiter in Upsample mode. However, if you wish to
just limit the signal based on sample by sample values like a normal digital limiter,
the function can be turned off. When turned off the limiter does
not protect against 0dBFS+ peaks from occurring.
Page 22

EE NN GG LL II SS HH
20 /
MD3-TDM
Limiter Time constants
The Limiter employs adaptive time constants to combat distortion at low frequencies
while maintaining quick adoption to occasional peaks.
A manual Release time can be set if the Auto Release key is turned off. We recommend using the Auto setting with Release set at Default. If quick recovery and loudness is an issue, move the Release setting in the Fast direction.
Processing of very sensitive material might sound better with Release settings in the
Slow direction.
Absolute Bit Transparency
Whenever the BrickWall limiter is not attenuating the signal, it is passed completely
unaffected, transparent to the 24th bit. Consequently, the BrickWall limiter may be
used to remove 0dBFS+ peaks on already mastered and finally dithered material.
When the Limiter is bit transparent, a green indicator next to the Threshold control
lights up.
Input and Output gain controls have 0.1dB increments, but snap to bit shifts at 0, 6,
12, 18 and 24dB settings. When a bit shift value is selected, a green indicator is lit
on the screen. Bit transparency from Input to Output is obtained when Input Gain and
Output Fader hit these values and sum to 0dB, e.g. Input/Output 0/0dB, -6/+6 dB, 12/+12dB etc.
Bit Pattern Transparency
When only bit shift gain settings are used on Input and Output, bit patterns remain
unchanged through the algorithm, but can be shifted up (in the MSB direction) or
down (in the LSB direction) as desired. E.g. Input/Output +6/0 (one up), 0/-12 (two
down).
Linking
The two channels BrickWall limiters can be operated independently or linked. If pronounced limiting is performed on stereo material, linking should be considered to
avoid L/R image shifts. If only mild and occasional limiting is
being done, un-linked operation even on stereo material
may sound the best.
Page 23

MD3-TDM
/
21
EE NN GG LL II SS HH
Preset Management
TC's comprehensive file based preset architecture makes archiving presets a simple
process. This allows you to organize your presets the way you find most comfortable
for your workflow, and to exchange presets with other users, no matter the platform or
application. Presets are saved as discrete files on your hard drive. Once a preset is
saved into the default location, it will automatically appear in the 'File' menu every
time you use the plug-in. The files can then be organized into sub-folders, where you
can delete, rearrange or create your own sub-folders to accommodate your needs.
NOTE: A folder will appear in the Preset File Menu if it contains at least one preset.
NEXT/PREVIOUS PRESETS
From the plug-in's Main page, you can directly jump from one preset to the next (or
previous) by clicking on the UP/DOWN arrows to the right of the preset name.
All presets available at the default plug-in preset location will be considered, so you
could in theory reach every preset this way. Direct access to specific presets is done
via the "File" button:
PRESET FILE MENU
Pressing the 'File' button will open the plug-in's File menu. The following options are
available from the File menu.
Loading a Preset
By selecting 'Load', you can navigate to any folder on the system that you have read
access to, including any shared folder. By default, these will be loaded from the
default location for MD3 presets. Only presets located in the default file location will
appear in the MD3 pop-up preset menu.
Naming a Preset
• Double click on the name field
• Type in the new name
• Press Enter
Saving a Preset
By selecting 'Save', you can save your preset to any folder on the system that you have
write access to, including any shared folder. By default, presets are saved to the
default location for the MD3 presets.
Page 24

EE NN GG LL II SS HH
22 /
MD3-TDM
DEFAULT PRESET LOCATIONS
The following locations will describe where you can find the MD3 presets. The presets
are stored in a folder that is unique to each plug-in:
The plug-in’s own preset handling is storing the presets in the following locations:
Mac OS
Factory Presets:
/Library/Application Support/TC Electronic/MD3/Presets/
/Library/Application Support/TC Electronic/BrickWall Limiter/Presets/
User Pr
esets:
~/Library/Application Support/TC Electronic/MD3/Presets/
~/Library/Application Support/TC Electronic/BrickWall Limiter/Presets/
Windows
Factor
y Presets:
{System Drive}/Program Files/TC Electronic/MD3/Presets/
{System Drive}/Program Files/TC Electronic/BrickWall Limiter/Presets/
User Pr
esets:
My Documents/TC Electronic/MD3/Presets/
My Documents/TC Electronic/BrickWall Limiter/Presets/
• To delete a file, simply move it to the 'Trash' or 'Recycle bin'.
• To create a new sub-folder that appears in the plug-in menu, simply create a new
folder in the plug-in folder that resides in the PRESETS folder of the MD3/BrickWall
default preset location.
NOTE: A folder will not appear in the Preset File Menu unless it has at least one preset inside.
CONVERTING MD3 PRESETS FROM SYSTEM 6000
In case you are the happy owner of the MD3 algorithm for System 6000, here is
something to get you in an even better mood: The MD3 plug-in is able to read your
System 6000 presets.
In order to convert presets from System 6000 to MD3, you need to store the System
6000 presets in a preset file. The file extension has to be either ".syx" (for example:
MyPresets.syx) or .mid for a MIDI file.
The easiest way to export System 6000 presets is to use the "export to file" function
from the Icon Editor for Mac/Windows (requires version 3.5 or higher).
Alternatively, you can save a bank to a floppy disk (System 6000 only) or do a SysExDump to a MIDI file in your sequencer.
Page 25

MD3-TDM
/
23
EE NN GG LL II SS HH
NOTE: For details regarding the export of presets from System 6000, please refer to
your System 6000 and Icon Editor documentation.
The generated SysEx/MIDI preset file needs to be placed in the default MD3 Preset
folder (at the root level; sub-folders are not considered). The file needs to have either
the extension ".syx" (for example: MyPresets.syx) or .mid for a MIDI file.
Note: In case you are running the Icon Editor on the same computer as the MD3 plugin, the MD3 will automatically search for preset files in the default locations for and
System 6000 files. You do not need to copy the files!
Once your preset file has been placed in the default MD3 Preset folder, it will show
up the next time you click the "File" button. At the top of the pop-up list you'll find a
section called "Convert", and the name of your preset file will be listed here.
To convert your preset file to MD3 presets, simply select the name of the preset file.
The conversion will only take a few seconds and only needs to be done once.
When the conversion is done, all presets from your preset file will be available in a
sub-folder that has the same name as the preset file had. The presets will show up in
the same bank structure as on the System 6000, and presets that are not based on
the MD3 algorithm will not be converted.
The preset file will disappear from the Convert section of the file menu.
Page 26

EE NN GG LL II SS HH
24 /
MD3-TDM
COMPARE SETTINGS WITH A/B MEM FUNCTION
With the A/B compare function you can easily compare different parameter settings
when you work with your music.
You have two buttons: the "Mem" and the "A/B" button.
When you start working with your preset, the A/B button is grayed out. This state indicates that the settings in both memory locations A and B are identical - so there is
actually nothing to compare.
As soon as you touch one of the parameters, the memory location "A" will get active,
and the "A"-part of the A/B button will light up. All parameter changes will be applied
to memory location "A". If you switch to memory location "B", you get back to your
starting point, and all further changes will now be applied to memory location "B".
Every time you press the A/B button, you will toggle between these two memory locations.
NOTE: The A/B memory locations are temporary settings only! Saving a preset (e.g. via
the File button or with your session) will only save the currently selected memory location. The setting of the other (hidden) memory location will not be saved!
The "Mem" button will reset the A/B memory locations to the current setting.
Page 27

MD3-TDM
/
25
EE NN GG LL II SS HH
PARAMETER LOCK AT PRESET RECALL
The parameter lock function allows you to lock the Dry Level, In Level and Out Level,
from changing when you change preset.
By using the parameter lock, you can easily browse through the extensive set of presets that comes with the MD3, without having to change the Dry Level, In Level or Out
Level all the time.
To lock a parameter, simply click on the small lock in the parameter field. To unlock
it, click again.
The parameter lock only affects parameter changes made with the mouse. The parameter lock does not affect automation data or preset changes initiated from the host
application. These changes will always pass.
 Loading...