

Page 1

English Manual
LCn
Page 2

Introduction 1
About this manual 2
Loudness website 2
Getting support 2
System requirements and installation 3
System requirements 4
Supported hosts 4
Supported sample rates 4
Supported audio formats 4
Supported file formats 4
Installation and authorization 4
Using LCn 9
One-step loudness normalization
for your DAW 10
LCn features 10
Using LCn in Pro Tools 11
Using the stand-alone version of LCn 11
Interface and feature reference 12
LCn user interface overview 13
LCn settings page 21
Watch Folder mode 24
About the LCn True Peak Limiter 27
Frequently asked questions 28
Appendix:
Level versus loudness 30
The path to BS.1770 31
Meter calibration 32
Display 32
Postscript 33
LCn Manual a
Product LCn
Product version 1.1
Document Manual
Document version / date 2015-03-01
Page 3

Introduction
Introduction
LCn Manual 1
Page 4

Introduction
About this manual
Read this manual to learn how to install and use
your TC Electronic software.
This manual is only available in PDF format from
the TC Electronic website.
You can print this manual, but we encourage you
to use the PDF version, which has both internal
and external hyperlinks. For example, clicking
the TC Electronic logo in the upper left corner
of each manual page will take you to the table
of contents.
To get the most from this manual, please read it
from start to finish, or you may miss important
information.
To download the most current version of this
manual, visit the web page
tcelectronic.com/support/manuals/
Loudness website
Keeping track of the multitude of issues around
loudness can be a challenge. That’s why we
have created a one-stop dedicated loudness
website where you’ll find critical information on
the most important issues. This site is an answer
to the highly relevant question:
“What is loudness, and why is it important?”
Visit the Loudness website at
tcelectronic.com/loudness/
Getting support
If you still have questions about your TC Electronic product after reading its manual, please
get in touch with TC Support:
tcelectronic.com/support/
LCn Manual 2
Page 5

System requirements and installation
System requirements
and installation
LCn Manual 3
Page 6

System requirements and installation
System requirements
Two plug-in versions
Please note that there are two versions of this
plug-in:
– LC2n: for processing mono and stereo sig-
nals
– LC6n: for processing mono, stereo and 5.1
surround signals
This manuals refers to both LC2n and LC6n
as “LCn”, unless a description only applies to
one version.
System requirements for Mac OSX
– Intel CPU (2 GHz or faster recommended)
– 2 GB RAM
– Mac OS X version 10.6.8 or higher
– Pro Tools version 8 or higher
(for the plug-in version)
Supported plug-in formats
– AAX AudioSuite (32 Bit/64 Bit)
– RTAS AudioSuite (32 Bit)
System requirements for Windows
– Intel-compatible CPU
(2 GHz or faster recommended)
– 2 GB RAM
– Windows version 7 or higher
– Pro Tools version 8 or higher
(for the plug-in version)
Supported plug-in formats
– AAX AudioSuite (32 Bit/64 Bit)
– RTAS AudioSuite (32 Bit)
Supported hosts
You can use LCn either as a native Pro Tools
plug-in or as a stand-alone version.
You can use the plug-in version of LCn with:
– Avid Pro Tools 8 & 9 (Mac & PC): RTAS
– Avid Pro Tools 10 & 11 (Mac & PC): AAX
For more information, see “Pro Tools and standalone versions”.
Supported sample rates
(Applies to plug-in and stand-alone versions)
– 44.1kHz
– 48kHz
– 96kHz
Supported audio formats
– LC2n: Mono, Stereo
– LC6n: Mono, Stereo, 5.1 Surround
Supported file formats
You can use the stand-alone version of LCn to
process the following audio file formats:
– WAV
– Broadcast WAV
– AIFF
The stand-alone version of LC6n can process
5.1 surround recordings stored as discrete mono
files if these files follow Pro Tools naming conventions. For more information, see “Processing
of 5.1 surround files in LC6n (stand-alone version)” on page 11.
Installation and authorization
You may be familiar with software licensing and
authorization based on the iLok hardware. LCn
uses a new license management concept/technology that allows you to authorize your plug-ins
without a physical iLok key.
Instead of the iLok key, you can use your computer as a “key”. All you need is a (free) iLok ID,
and the license(s) you purchase will be associated with this ID.
You then install the iLok License Manager software on your computer and use your iLok ID to
activate the plug-in(s) you have purchased on
this computer. Licenses can later be deactivated and then activated on another computer, allowing you to easily use your LCn wherever you
need it. No iLok key to lose – one less thing to
worry about.
During installation, both the plug-in version for
Pro Tools and the stand-alone version of LCn
will be installed on your computer. Your license
co vers both product versions, but you cannot
activate and use the plug-in and stand-alone
versions on two different computers simultaneously. If you want to use LCn on another computer, you need to deactivate your license on
the first computer and activate it on the second
computer.
Of course, you can still use an iLok 2 device to
store your licenses if this is what you prefer. In
that case, you can use your license on another
computer simply by attaching your iLok 2 to it.
LCn Manual 4
Page 7
System requirements and installation
Obtaining an iLok ID
Please note that you only need to create one account for all your PACE-based software licenses.
If you already have an iLok ID, proceed with “Obtaining and installing the iLok License Manager”
on page 5.
– Go to the iLok website: www.ilok.com
– Click on “Create Free Account”.
– Fill the Free Account Setup form and click
“Create Account”.
After finishing the registration process, a confirmation message will be sent to the e-mail account that you have specified when registering
on the iLok website. You can now use this account to log into the iLok website and activate
software licenses on your computer using the
iLok License Manager application.
Obtaining and installing the
iLok License Manager
Please note that describing all iLok License Manager features is beyond the scope of this manual.
If you need more information on account management, activation, deactivation and transfer
of licenses, please install the iLok License Manager as described below and refer to its Help file
or go to
www.ilok.com/support.html
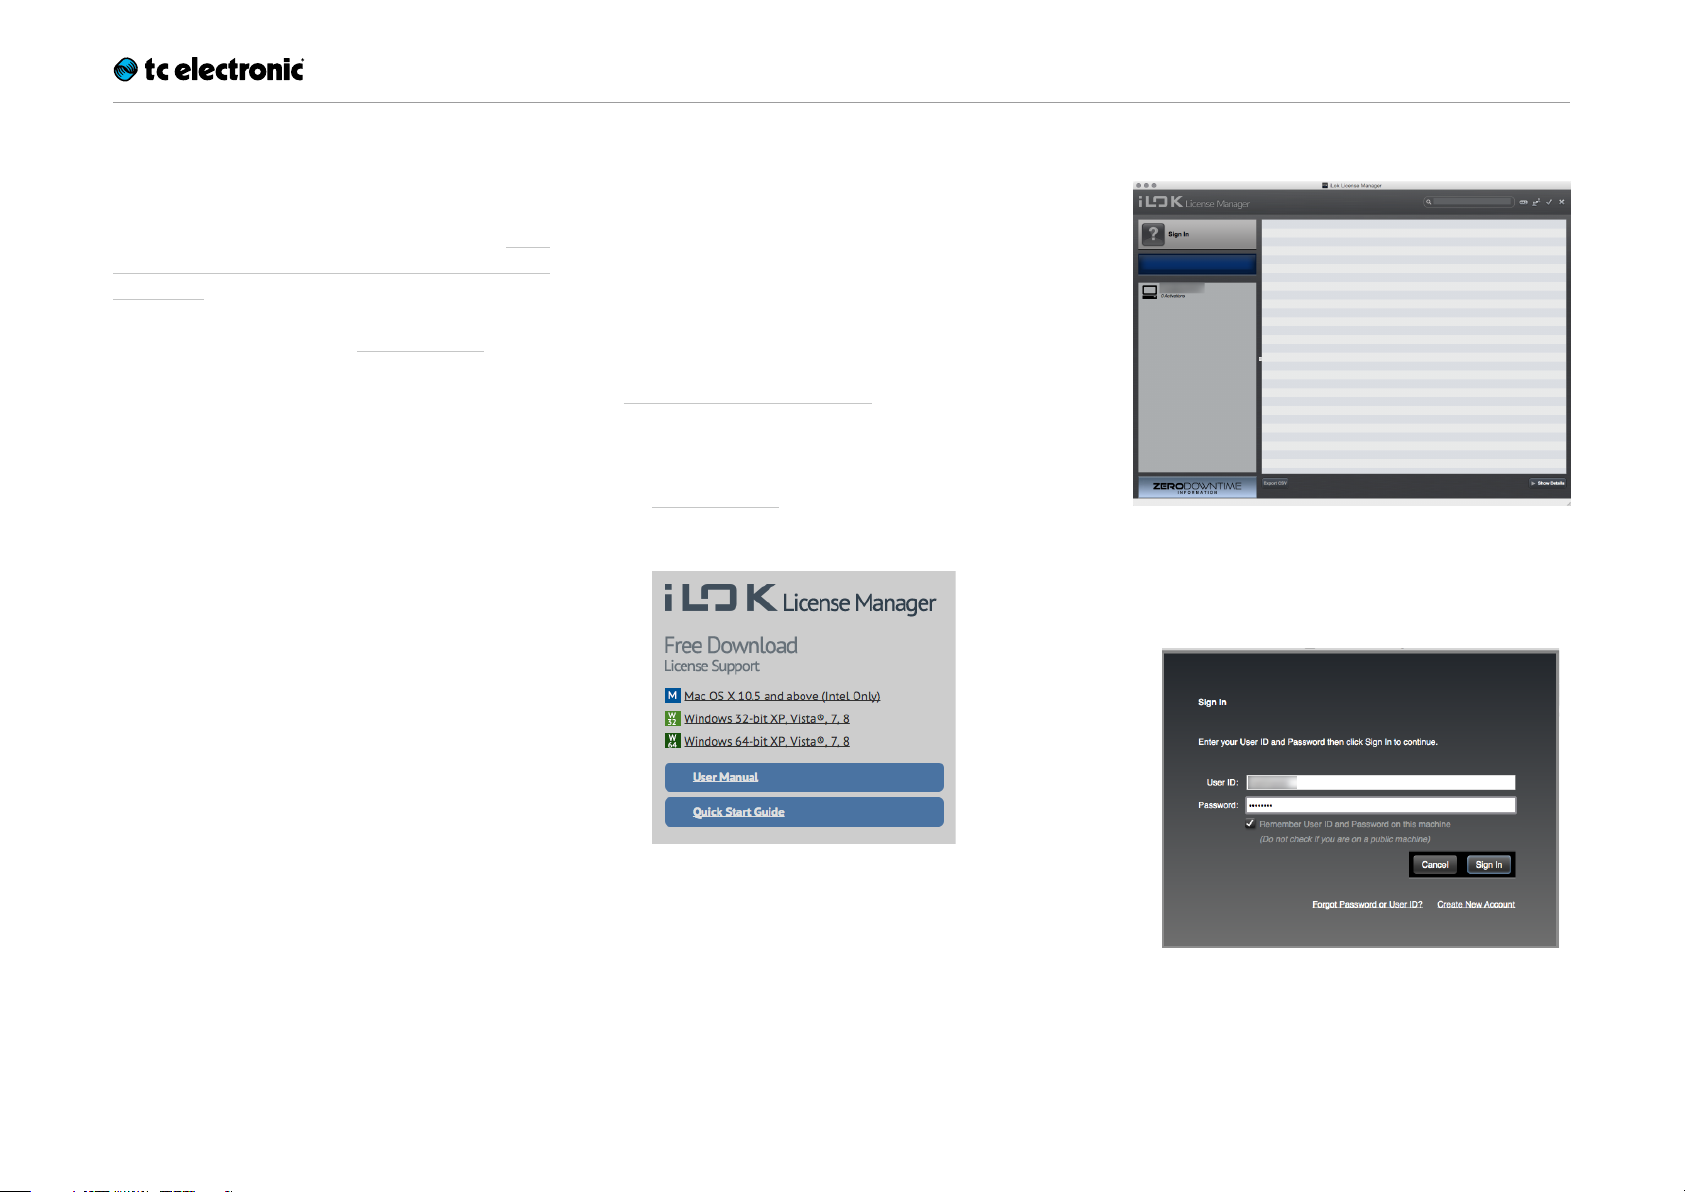
– Go to the iLok website to download the iLok
License manager:
www.ilok.com
– Download the iLok License Manager installer
for your operating system.
Fig. 1.: The iLok License Manager
– Click on “Sign in” and provide the credentials
(your account name and your password) that
you entered when you created your iLok ID.
– After downloading the iLok License Manager
installer, unZIP it and run it.
– Follow the iLok License Manager installer’s
instructions. During installation, you may be
asked to enter your user account password.
– After the installer is finished, launch the iLok
License Manager.
LCn Manual 5
Fig. 2.: iLok License Manager: Sign In dialog
Page 8
System requirements and installation
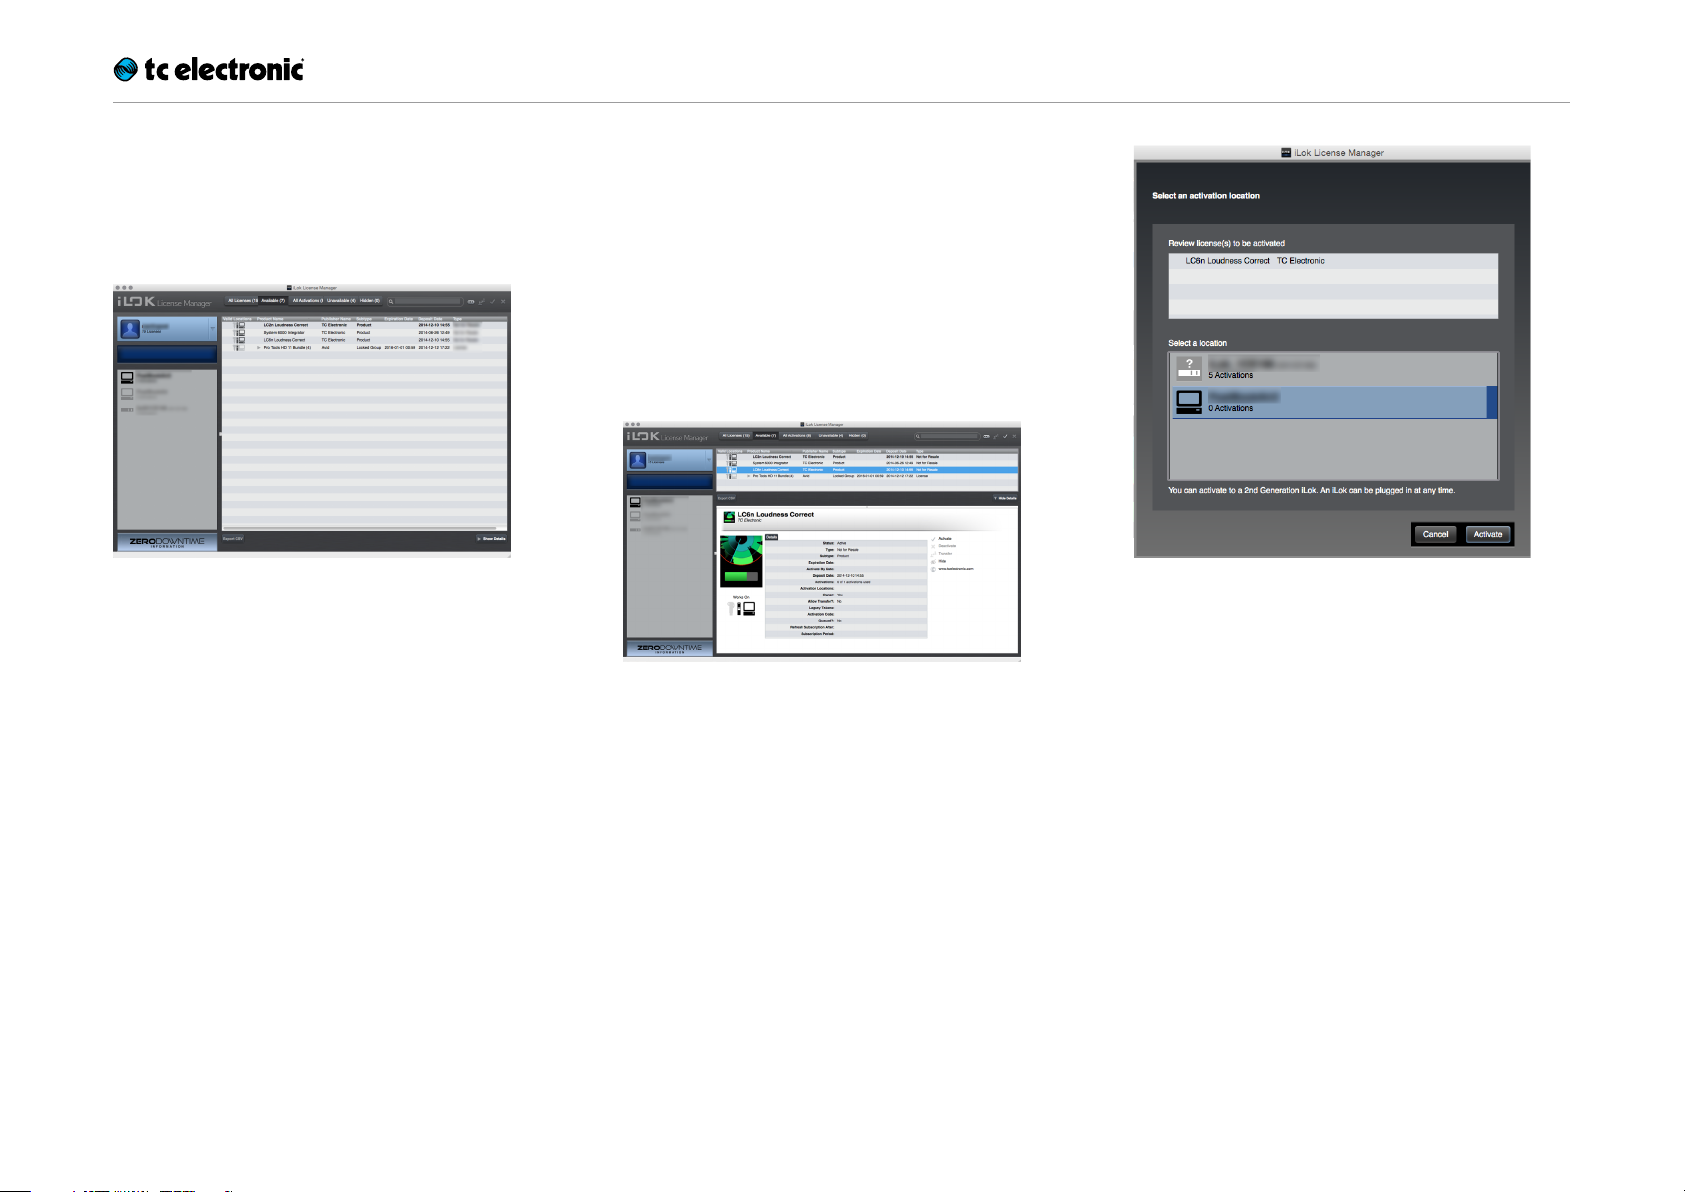
Managing plug-in activation
– After signing in, the plug-ins that were regis-
tered to your iLok ID will be available for acti-
vation and deactivation.
Fig. 3.: iLok License Manager after signing into
an account
– Select a plug-in in the license list.
– Click on “Show Details” to display additional
information, including options to Activate and
Deactivate your plug-in(s).
Activating your plug-in from
the iLok License Manager
To activate your plug-in from the iLok License
Manager, proceed as follows:
– Select the plug-in in the license list.
– Click on “Show Details”.
Additional information about the plug-in and a
sidebar with license-related functions will be
shown.
Fig. 4.: iLok License Manager with details for a
LC6n license
– Click on “Activate”.
– In the next dialog (“Select an activation loca-
tion”), select the activation location (the computer or your iLok 2 device) and click “Next”.
Fig. 5.: Plug-in activation from
iLok License Manager
You will be asked to confirm the activation
process.
– Click on “OK” to confirm activation.
After a few seconds, the activation of your li-
cense will be confirmed.
– You can now quit iLok License Manager (this
application does not have to run while you are
using your plug-ins) and continue with the in-
stallation of LCn.
LCn Manual 6
Page 9
System requirements and installation
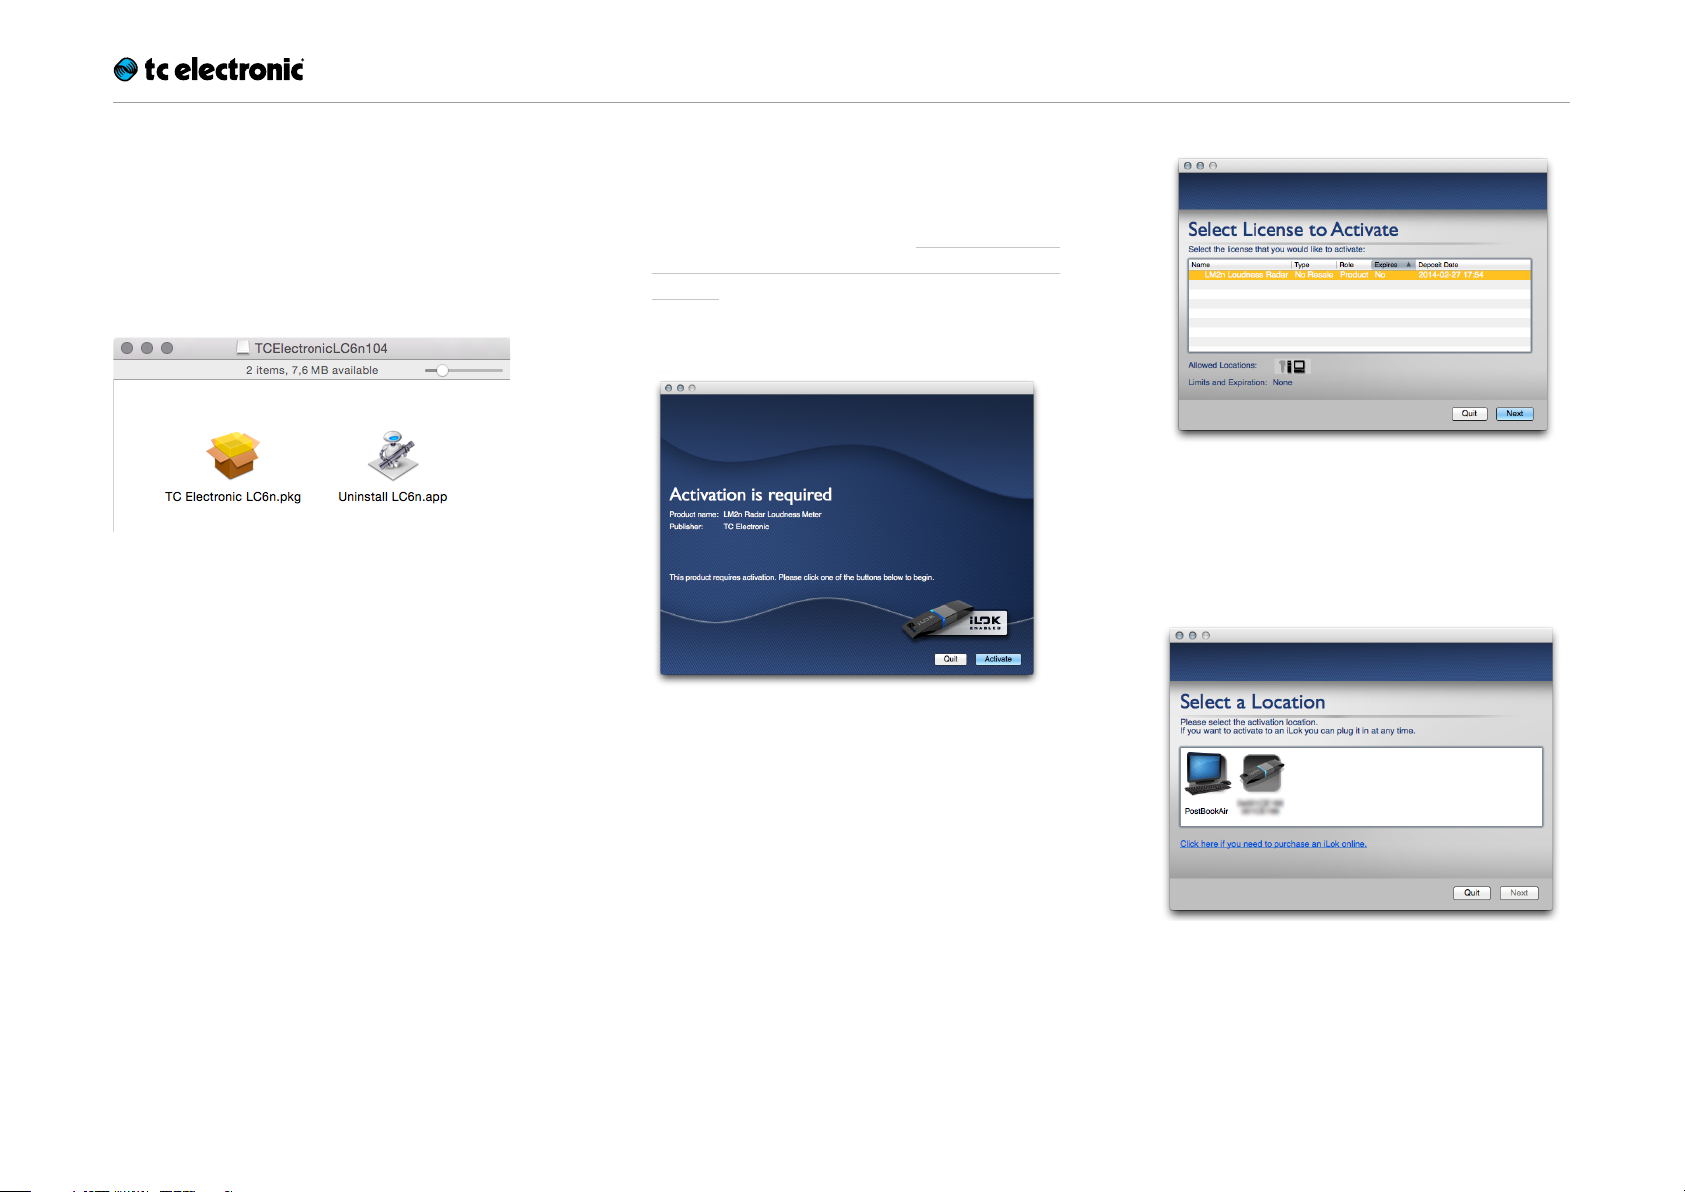
Installing LCn
– Make sure your host software (Pro Tools) is
not running.
– Run the installer for the LCn plug-in. You may
need an administrator account name and
password to run the installer.
–
Fig. 6.: The LCn installer
– Read and accept the Software License Agree-
ment presented by the installer.
– Finish the installation of the LCn plug-in and
quit the installer.
– Launch your host software (Pro Tools) to use
the LCn plug-in or
– Launch the stand-alone version of the plug-
in:
– “LC2n Loudness Correct” or
– “LC6n Loudness Correct”
Activating your plug-in when
launching the host application
– If you have not activated the recently installed
plug-in as described under “Activating your
plug-in from the iLok License Manager” on
page 6, you will now be presented with a
dialog telling you that the plug-in needs to be
activated.
Fig. 8.: Selecting a license to activate
– In the next dialog, select the activation loca-
tion (the computer or your iLok 2 device) and
click “Next”.
Fig. 7.: iLok Activation prompt in Pro Tools
– Review the plug-in name, make sure that this
is the correct computer to activate and click
on the “Activate” button.
– In the next dialog, select the plug-in you wish
to activate and click “Next”.
Fig. 9.: Selecting a license location
LCn Manual 7
Page 10
System requirements and installation
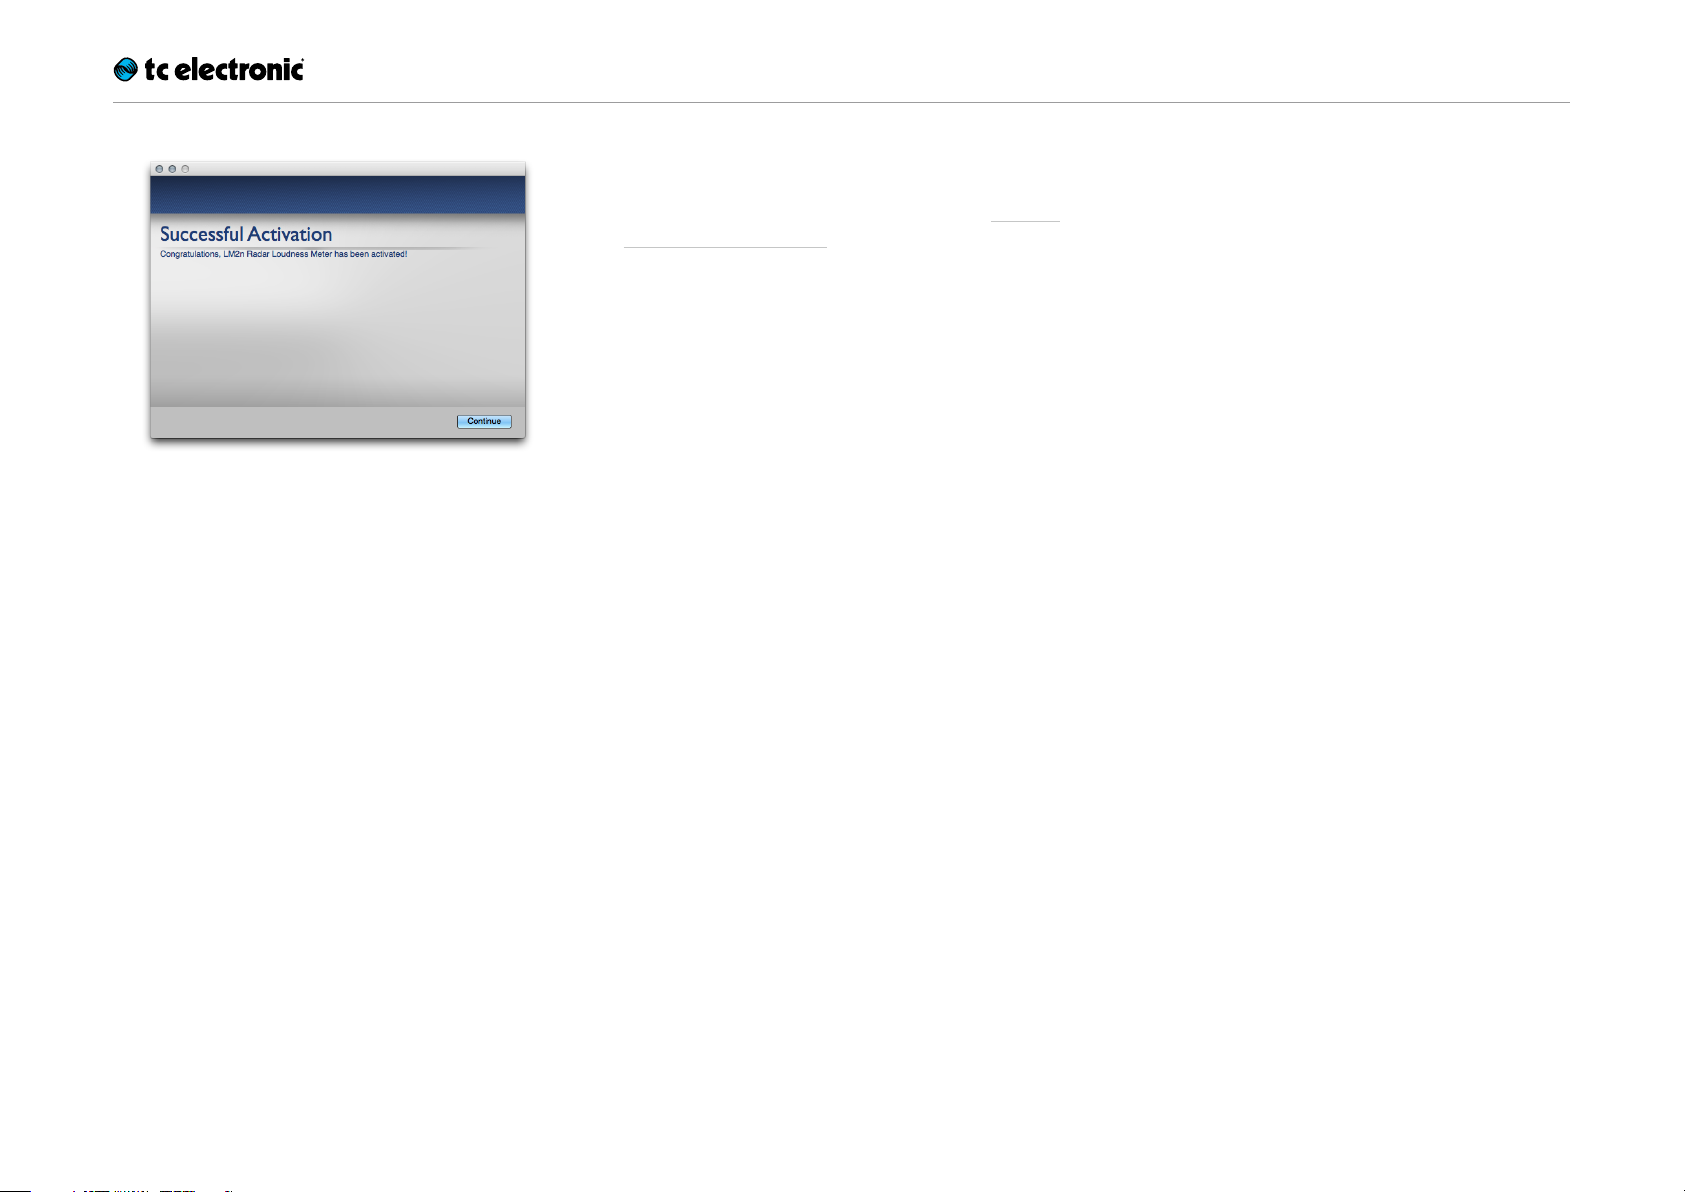
Fig. 10.: Plug-in activation confirmation
– When your host software has finished launch-
ing, the newly activated plug-in(s) will be
available.
Updating LCn
To update LCn to a newer version, just run the installer for the update as described under “Installing LCn” on page 7. The currently installed
software version will be replaced by the new
version. You do not have to activate the plug-in
again after updating.
LCn Manual 8
Page 11

Using LCn
Using LCn
LCn Manual 9
Page 12

Using LCn
One-step loudness normalization for your DAW
Whether you deliver for HDTV, Mobile TV, podcast, radio, iTunes, Spotify and/or other modern
platforms: Hitting the right loudness target is
essential. LCn makes this as easy as clicking a
button or dragging a file to a folder. These are
high-quality plug-ins that will measure and correct the loudness of your tracks.
The plug-in versions of LCn allows you to apply faster-than-real-time, two-pass, off-line processing of your tracks in Pro Tools. In addition,
stand-alone versions for Windows and Mac
are available. These stand-alone versions have
watch folder capabilities, allowing you to simply
drag and drop audio files into a target folder for
fast and easy loudness normalization and true
peak limiting. You can even paste multiple audio files into your watch folder, making the LCn a
highly efficient loudness batch processor.
LCn is part of a universal and ITU-standardized
loudness control concept, whereby audio may
easily and consistently be measured and controlled at various stages of production and distribution. LCn works coherently with other TC
equipment or with products from other manufacturers adhering to the same global standard.
LCn features
– Enjoy precise loudness normalization:
LCn is your shortcut to loudness-normalized
audio files, targeted at any delivery platform
you could ever think of.
– Integrate consistent loudness in your work-
flow
– Native Pro Tools plug-in versions
– Separate stand-alone versions
– Stand-alone versions offer watch folder ca-
pability for automatic batch normalization
of multiple audio files
– Comes with integrated mastering-grade
Brickwall2 true-peak limiter
New in LCn version 1.1
– Watch Folder mode (see “Watch Folder
mode” on page 24) has been enhanced. It
now has a Start/Stop feature, allowing you to
switch batch processing on or off as required.
– Graphical feedback has been enhanced.
– The Target loudness parameter can now be
set to a maximum value of -12 LUFS.
Differences between LC2n and LC6n
The only difference between the LC2n and LC6n
plug-ins is the number of channels. LC2n is the
stereo version, LC6n is the surround version.
Pro Tools and stand-alone versions
LCn is a Pro Tools RTAS/AAX plug-in supporting
offline processing. This means that tracks are
not processed in real-time, but when initiated by
th e us er.
You can also run the plug-in in a stand-alone version – i.e., without having to use a digital audio
workstation. You can drag and drop audio files to
the stand-alone version, which will then measure
and process these files.
In addition, the stand-alone version has watch
folder functionality, which means that it can be
set to watch activity in a given source folder. This
Watch Folder mode offers various options for
deleting source files and renaming destination
files if they already exist. For more information,
see “Watch Folder mode” on page 24.
LCn Manual 10
Page 13

Using LCn
Using LCn in Pro Tools
– Install and activate the plug-in as described in
“Installation and authorization” on page 4.
– Launch Pro Tools, open your project and se-
lect a clip for processing.
– Open Audio Suite > Sound Field >
LC2n Loudness Correct or
LC6n Loudness Correct
– Click “Analyze” to analyze the selected clip
or click “Render” to analyze and process the
clip.
Fig. 11.: LC6n in Pro Tools’ AudioSuite menu
For more information, see the following chapter:
“Interface and feature reference” on page 12.
Using the stand-alone version of LCn
– Install and activate the plug-in as described in
“Installation and authorization” on page 4.
This will also install the stand-alone version of
the plug-in.
– Launch the stand-alone version of the plug-in
and select a file for processing by clicking the
“Choose” button.
– Click the “Analyze & Process” (or “Auto Ana-
lyze & Process”)button.
– If the file is compliant, it will be processed,
and you will find the processed, loudness-
normalized version in the Destination folder
(see “Destination folder chooser” on page
22).
If you want to use the stand-alone version of
LCn to process all files that you copy or move
to a specific folder (often called “batch processing”), you can active Watch Folder mode. For
more information, see “Watch Folder mode” on
page 24.
Processing of 5.1 surround files
in LC6n (stand-alone version)
Please note that the following information only
applies to LC6n. LC2n cannot process surround
files.
Channel String to append to filename
Left .L
Right .R
Center .C
LFE .LFE
Left surround .Ls
Right surround .Rs
Example: To have LC6n process a surround
track called “INTRO” successfully, the files need
to be named as follows:
– INTRO.L.WAV
– INTRO.R.WAV
– INTRO.C.WAV
– INTRO.LFE.WAV
– INTRO.Ls.WAV
– INTRO.Rs.WAV
When you add files to LC6n for processing and
these files do not follow the naming convention
described here, they will be seen and processed
as mono files.
While the naming convention has to be followed,
the order in which you add the mono files does
not ma t ter.
When you use LC6n to process 5.1 surround files
that are separated into six separate mono files,
LC6n will use Pro Tools naming conventions to
determine which file represents which channel.
The naming convention is:
LCn Manual 11
Page 14

Interface and feature reference
Interface and feature reference
LCn Manual 12
Page 15

Interface and feature reference
LCn user interface overview
LCn is available as a native Pro Tools plug-in and as a stand-alone version. While the parameters and processing features for both versions are identical, there are
minor user interface differences. In the PDF version of this manual, you can click on a user interface element below to learn more about it.
File chooser
(stand-alone version only)
To select an audio file for processing, click the
Choose button on top of the LCn window. A file
dialog opens. Select a file for processing and
click OK to confirm. The name of the chosen file
will be displayed to the left of the button.
Please note that the File chooser will be disabled
when you activate Watch Folder mode on the
settings page. In Watch Folder mode, you do not
select individual files for analysis and processing, but have LCn monitor a folder and process
its contents according to the settings on the Settings page. For more information, see “Watch
Folder mode” on page 24.
Fig. 13.: LCn – Stand-alone version
Fig. 12.: LCn – Pro Tools plug-in
LCn Manual 13
Settings button
To see and adjust LCn plug-in settings, click the
Settings button.
For more information, see “LCn settings page”
on page 21.
Page 16

Interface and feature reference
Analyze button
To have LCn analyze the currently selected clip
or file, click the Analyze button.
When analysis is started, the Radar Meters are
set to an adequate range, so that the loudness
landscape for the full clip or file can be displayed.
After analysis, the left Radar Meter will display the short-term loudness landscape for the
source clip or file. For more information, see
“Source Radar Meter” on page 17.
Analyze & Process (stand-alone) /
Render button (Pro Tools)
To have the stand-alone version of LCn analyze
and loudness-normalize the currently selected
clip or file, click the “Analyze & Process” (or
“Auto Analyze & Process”) button.
To have the Pro Tools plug-in version of LCn analyze and loudness-normalize the current selection, click the plug-in’s “Render” button in Pro
Tool s .
As the clip or file is processed, you will see the
Processed file Radar Meter draw the loudness
landscape for the processed clip or file.
After analysis and processing,
– the left Radar Meter will display the short-
term loudness landscape for the source clip
or file
– the right Radar Meter will display the short-
term loudness landscape for the processed
clip or file
– (stand-alone version only) the processed file
will be placed in the folder selected with the
Destination Folder parameter on the Settings
page.
How processed files are named
If you use the stand-alone version of LCn to process audio files, information about the applied
settings will be appended to the destination file
names as follows:
– For Program Loudness, the string “INT” and
the numerical value is appended to the file
name.
– For Loudness Range, the string “LRA” and
the numerical value is appended to the file
name.
– If the loudness target cannot be met due to
plug-in settings, the string “_warning_” is
added before the file name.
Naming example
– Name of the source file: “promo.wav”
– Program Loudness: -22.6LUFS
– LRA: 3.8LU
– Resulting destination file name:
“promo_INT-22.6_LRA3.8.wav”
If a warning is triggered because the Target
Loudness setting cannot be met, the resulting
destination file name will be:
– “_warning_promo_INT-22.6_LRA3.8.wav”
The leading underscore ensure that these problematic files will be moved to the top of the window in your operating system’s file manager
(Windows Explorer or Finder) when it is sorted
by name.
LCn Manual 14
Page 17

Interface and feature reference
Radar Meter inspector
The Radar Meter inspector shows the length of
the analyzed clip or file and the amount of time
that the radar circle represents.
E.g., when analyzing and processing a 45 second clip, the inspector would show:
“00:00:45 Stereo Full Circle: 1 min”.
Descriptors
The four pairs of descriptors between the two
Radar Meters show essential loudness-related
values for the source clip or file (once it has been
analyzed) and the processed clip or file (once
you have processed the source file).
Source and target Int
(Program loudness) descriptors
The Int descriptors show the Program Loudness
(or “Integrated Loudness”) for the unprocessed
and the processed clip or file. Its unit is LUFS.
Some vendors and countries use the unit “LKFS”
instead of “LUFS”, but they are identical: An absolute measure of loudness in the digital domain,
where the region around “0” is overly loud and
not relevant for measuring anything but test signals. Expect readings of broadcast programs in
the range between -28 and -20 LUFS.
Program Loudness is used as a production
guideline and to set loudness metadata in delivery if so required. For delivery or transmission of
AC3 format, the “Dialnorm” metadata parameter
should reflect Program Loudness. The easiest
way to handle multiple broadcast platforms is
to normalize programs at the station to a certain
value, thereby being able to take advantage of
the normalization benefits across platforms, at
the same time enabling static metadata.
LCn Manual 15
Page 18

Interface and feature reference
Source and target LRA descriptors
The Loudness Range (abbreviated as “LRA”) descriptors show the loudness range of the unprocessed and the processed clip or file as standardized in EBU R128. The unit is LU.
The Loudness Range descriptor quantifies the
variation of the loudness measurement of a program. It is based on the statistical distribution
of loudness within a program, thereby excluding
the extremes. Thus, for example, a single gunshot is not able to bias the LRA number.
EBU R128 does not specify a maximum permitted LRA. R128 does, however, strongly encourage the use of LRA to determine if dynamic treatment of an audio signal is needed and to match
the signal with the requirements of a particular
transmission channel or platform.
Source and target Short
Term Max descriptors
The Short Term Max (abbreviated as “SMax”)
descriptors show the maximum momentary val-
ue for the unprocessed and the processed clip
or file.
Source and target True
Peak Max. descriptors
The True Peak Max (abbreviated as “TPMax”)
descriptors show the maximum true-peak value
for the unprocessed and the processed clip or
file.
LCn Manual 16
Page 19

Interface and feature reference
Source Radar Meter
The left radar meter shows the loudness landscape of the source clip or file.
You may already have used other TC Electronic
products that employ our famous Radar Meter,
such as the LM2n/LM6n plug-ins or the LM6
Loudness Radar Meter in DB6. But even if you
don’t, you should be able to intuitively understand the dual Radar feature.
The Radar Meter on the left shows the loudness
landscape over time (i.e. short-term loudness)
of the original content. When this clip or file has
been processed, the Radar Meter on the right
will show the loudness landscape of the new,
loudness-normalized clip or file. In other words:
Pre and Post processing states are displayed simultaneously.
This side-by-side comparison is helpful for all
kinds of program types, but it is indispensable
when processing long-duration programs, as it
allows you to check literally at a glance if everything is in order.
Source “LED”
The round colored “LED” on the left side of the
plug-in window shows the status of the source
clip or file as follows:
Source “LED” grey
Nothing has been analyzed yet.
Source “LED” green
If the source “LED” is green, the source clip or
file has already been loudness-normalized to the
same target that you have specified.
Source “LED” yellow
If the source “LED” is yellow, the source clip or
file has already been analyzed, but it has not yet
been processed (loudness-normalized).
Source “LED” red
If the source “LED” is red, the clip or file you have
selected for processing is not in a supported format (AIFF, WAV or BWAV).
Processed Radar Meter
The right radar meter shows the loudness landscape of the processed clip or file. For more information, see “Source Radar Meter” on page
17.
Processed “LED”
The round colored “LED” on the right side of
the plug-in window shows the status of the processed clip or file as follows:
Processed “LED” grey
Nothing has been processed yet.
Processed “LED” green
If the Processed “LED” is green, the processed,
loudness-normalized clip or file meets your target specifications.
Processed “LED” yellow
If the Processed “LED” is yellow, the settings of
some parameters (such as Max Boost, SMax or
Max Reduction) have kept the plug-in from hitting the specified loudness target.
LCn Manual 17
Page 20

Interface and feature reference
Preset drop-down menu
Use the Preset drop-down menu to select the
platform and/or region for the processed clip or
file. The available options are:
– Default (BS 1770.3)
– ATSC A/85
– ARIB TR-B32
– EBU R128 Normal
– EBU R128 Short Form Cnt
– OP-59
– CD Master
– Film
– Mobile
– iTunes
These presets cannot be modified, and you cannot add user presets.
Max Boost parameter
Use the Max Boost slider to specify the maximum amount of gain that should be added to the
signal during processing.
Please note that Max Boost is one of the parameters that may prevent you from being
able to hit your loudness target. For example,
if you audio clip or file is very soft and you only
allow LCn to boost it by, say, 6 dBTP, it might not
be possible to reach the specified target.
Max Reduction parameter
Use the Max Reduction slider to specify the
maximum amount of gain reduction.
Please note that Max Reduction is one of the
parameters that may prevent you from being
able to hit your loudness target. For example,
if you audio clip or file is very loud and you only
allow LCn to reduce it by, say, 6 dBTP, it might
not be possible to reach the target specified.
LCn Manual 18
Page 21

Interface and feature reference
Surr. Ch. Order drop-down menu
(applies to LC6n only)
If you use the plug-in to process a 5.1 signal, use
the Surr. Ch. Order drop-down menu to specify
the order of the channels.
Target parameter
Use the Target slider to adjust the Program
Loudness target.
When you select a preset using the Preset dropdown menu, the Target parameter will be set to
the required/adequate value – but if you want to
hit a different target, you can set a custom target here.
S Max parameter
According to new EBU R128 revisions, there is
a recommendation for short-form content such
as commercials and promos. Broadcasters can
now set a limit for the short-term loudness they
want to accept – e.g. -18 LUFS.
When you work with content that is not shortform content, set the S Max slider to “Disregard”.
LCn Manual 19
Page 22

Interface and feature reference
Limiter Threshold parameter
Use the Limiter Threshold slider to set the threshold for the built-in True Peak Limiter. For more information on the True Peak Limiter, see “About
the LCn True Peak Limiter” on page 27.
Limiter Profile parameter
Use the Limiter Profile drop-down menu to select
a profile for the True Peak Limiter: PCM Linear or
AC3 Protect.
Version information
Click the TC Electronic logo to display LCn version information. Click in the version information
dialog to dismiss it.
Fig. 14.: LC6n version information
LCn Manual 20
Page 23

Interface and feature reference
LCn settings page
The parameters shown on the Settings page will
change based on the setting of the Watch Folder
Mode parameter. For the parameters that are
only available when Watch Folder Mode is enabled, see “Watch Folder mode” on page 24.
Fig. 15.: LCn settings in File mode
(Watch Folder mode disabled)
Watch Folder Mode parameter
To enable Watch Folder mode, click the Watch
Folder mode check box. For more information,
see “Watch Folder mode” on page 24.
“When file is added”
drop-down menu
This parameter is only available when Watch
Folder mode is disabled.
To specify what should happen when you have
selected a file for processing, use the “When file
is added” drop-down menu. The available options are:
– Do nothing
– Analyze
– Analyze and Process
When you set this parameter to “Analyze”, the
“Analyze” button on the main page will be displayed as “Auto Analyze”, thereby indicating that
a file will immediately be analyzed when selected
or dropped on the LCn user interface.
When you set this parameter to “Analyze and
Process”, the “Analyze & Process” button on the
main page will be displayed as “Auto Analyze &
Process”, thereby indicating that a file will immediately be analyzed and processed with the current settings when selected or dropped on the
LCn user interface.
Fig. 16.: LCn settings with Watch Folder mode
enabled
LCn Manual 21
Page 24

Interface and feature reference
Destination folder chooser
To specify the folder where LCn should save processed files, click the Destination folder: Choose
button. A file dialog will open, allowing you to select a folder. Click the OK button to confirm the
selected folder.
To have processed files saved to the location of
the source file, enable the “Same as source file
location” check box.
Reveal (destination folder) in
Finder/Explorer button
To show the selected destination folder in your
operating system’s file manager (Windows Explorer or OS X Finder), click the Reveal button.
This will allow you to select individual or multiple
files for deletion, copying etc.
Temp folder chooser
To specify the folder where LCn should save
temporary files during processing, click the
Temp Folder: Choose button. A file dialog will
open, allowing you to select a folder. Click the
OK button to confirm the selected folder.
A temporary folder on your computer’s boot
drive will be selected by default, but you may
want to select a folder on a different drive (e.g. a
fast SSD disk) to ensure faster processing, or if
there is not enough space left on your computer’s boot drive.
LCn Manual 22
Page 25

Interface and feature reference
“If file exists in destination folder”
drop-down menu
If you repeatedly process a file with the same
settings, you need to tell the plug-in how the resulting naming conflict in the target folder should
be resolved by choosing the desired mode from
the “If file exists in destination folder” drop-down
menu.
Overwrite setting
If you repeatedly analyze and process a file with
the same settings, the newest version will overwrite (replace) the existing file with the same
name.
Rename setting
If you repeatedly analyze and process a file with
the same settings, numbers in brackets will be
appended to the file names in the Destination
folder:
– “promo_INT-22.6_LRA3.8.wav”
– “promo_INT-22.6_LRA3.8(1).wav”
– “promo_INT-22.6_LRA3.8(2).wav”
“Application window always
on top” parameter
Processing large audio files – especially surround files – may take considerable time. If you
want to monitor conversion, enable the “Application window always on top” checkbox.
Keeping the window on top also makes it easier
to drag and drop files onto it from your computer’s file manager (Finder or Windows Explorer).
Abort setting
If you analyze and process a file and storing it
will lead to a naming conflict with an existing
file in the Destination folder, the process will be
aborted.
LCn Manual 23
Page 26

Interface and feature reference
Watch Folder mode
A key functionality in the LCn stand-alone version is the dedicated watch folder capability.
Using Watch Folder Mode, you can simply drag
and drop your audio files into a user-defined target folder for fast and easy loudness normalization and true peak limiting. The new, normalized
file will then be saved in a user-defined destination folder. You can also have LCn automatically
delete the original file or keep it in the source
folder.
Activating Watch Folder Mode
To enable Watch Folder mode, click the “Watch
Folder mode” checkbox on the LCn settings
page.
Fig. 17.: Watch Folder mode enabled
This will replace the “When file is added” parameter by two additional parameters:
Source folder chooser
To specify the folder that LCn should monitor
for files that can be processed, click the Source
folder: Choose button. A file dialog will open, allowing you to select a folder. Click the OK button
to confirm the selected folder.
Reveal (source folder) in
Finder/Explorer button
To show the selected source folder in your operating system’s file manager (Windows Explorer
or OSX Finder), click the Reveal button.
You may want to create a shortcut or alias for
the selected source folder on your computer’s
desktop, allowing you to easily copy/move files
to this folder without having to navigate the folder structure.
– In Microsoft Windows, right-click the folder
to open the context menu and select “Create
shortcut”. Move the shortcut to the desktop.
– In OSX, open the context menu for a folder
and select “Make alias”. Move the alias to the
desktop.
LCn Manual 24
Page 27

Interface and feature reference
Watch Folder mode Start/
Stop button
Activating Watch folder Mode will display a Start/
Stop button on the plug-in’s main page.
Fig. 18.: Watch Folder mode enabled,
but not started
Click the “Start Watching” button to activate
Watch Folder mode.
The button will now read “Stop Watching”, and
the “Watching…” message is displayed on top
of the page.
Fig. 19.: Watch Folder mode enabled
and running
Being able to start and stop Watch Folder allows
you to activate or pause file processing from the
main page without having to switch to settings
first.
How files are processed in
Watch Folder mode
If you activate Watch Folder mode on the LCn
Settings page and move or copy audio files to
the specified Source folder, the stand-alone version of LCn will monitor this folder while it is running. When new files are detected, the plug-in
will proceed as follows:
If a file can be analyzed, LCn will…
– analyze and process it,
– store the processed (loudness-normalized)
file in the Destination folder and then
– move the unchanged source file to the “Pro-
cessed” subfolder (within the Watched folder)
if “Delete source file when processed” has
been disabled or
– delete the source file if “Delete source file
when processed” has been enabled.
If a file cannot be analyzed and processed, LCn
will move it to the “Rejected” subfolder in the
Watched Folder.
This approach ensures that there are no ambiguities in Watch Folder mode:
– Files that are still in the selected Source folder
have not yet been processed, but are queued
for processing.
– Files that are moved to the “Rejected” sub-
folder cannot be processed – usually because they are not in a supported file format.
– Files that are moved to the “Processed” sub-
folder have been successfully processed.
Please note that the “Processed” subfolder
contains the original, untouched file, while the
processed and renamed version will be saved
to the selected Destination folder.
LCn Manual 25
Page 28

Interface and feature reference
Deleting source files after processing
If you want to have LCn delete files after they
have been processed (instead of moving them to
the “Processed” subfolder), enable the “Delete
source file when processed” checkbox.
LCn will only delete files after they have been
successfully processed. Rejected files will not
be deleted.
Watch Folder Mode and
network shares
Instead of a Source folder on a local hard disk,
you can also select a shared folder on a local
area network, allowing you to batch-process
files contributed by multiple users.
Please note that sending large uncompressed
audio files over a network for processing can use
considerable bandwidth.
LCn Manual 26
Page 29

Interface and feature reference
About the LCn True Peak Limiter
True peak limiting is an essential part of normalizing to loudness. TC Electronic has a long
history of providing the absolute finest, mastering-grade true peak limiting algorithms, and our
legendary Brickwall 2 True Peak Limiter is an
integrated part of LCn, complete with true peak
limiter profiles (Linear and AC3 Protect) and linking functionality.
Using the True Peak Limiter, you can be absolutely certain that your material will pass the
broadcast ingest stage on both loudness and
true peak targets and thereby eliminate virtually
any risk of having your content rejected.
If you are a broadcaster delivering to multiple
platforms such as HD TV and Mobile TV, it is essential to be able to hit two very different loudness targets, typically -23/-24 LUFS and -16
LUFS. In that process a true peak limiter is absolutely key. With the LCn True Peak Limiter handling the peaks, audio quality is kept at its finest
– regardless of the delivery platform.
LCn Manual 27
Page 30

Frequently asked questions
Frequently asked questions
LCn Manual 28
Page 31

Frequently asked questions
“Why does LCn not support
Audio Units and VST hosts?”
To measure and process signals, LCn requires
two processing passes. Currently, only Pro Tools
supports two-pass signal processing.
LCn Manual 29
Page 32

Appendix: Level versus loudness
Appendix:
Level versus loudness
LCn Manual 30
Page 33

Appendix: Level versus loudness
The path to BS.1770
When level normalization in audio distribution is
based on a peak level measures, it favors low
dynamic range signatures. This is what has happened to the CD format.
Quasi-peak level meters have this effect. They
tell little about loudness and also require a headroom in order to stay clear of distortion. Using
IEC 268-18 meters, the headroom needed is
typically 8-9 dB.
Sample based meters are also widely used,
but tell even less about loudness. Max sample
detection is the general rule in digital mixers and
DAWs. The side effect of using such a simplistic
measure has become clear over the last decade,
and CD music production stands as a monument over its deficiency. In numerous TC papers,
it has been demonstrated how sample-based
peak meters require a headroom of at least 3 dB
in order to prevent distortion and listener fatigue.
The only type of standard level instrument that
does not display some sort of peak level is the
VU meter. Though developed for another era,
this kind of meter is arguably better at presenting
an audio segment’s center of gravity. However, a
VU meter is not perceptually optimized, or ideal
for looking at audio with markedly different dynamic range signatures.
Unlike electrical level, loudness is subjective,
and listeners weigh its most important factors
– SPL, frequency contents and duration – differently. In search of an “objective” loudness
measure, a certain Between Listener Variabil-
ity (BLV) and Within Listener Variability (WLV)
must be accepted – meaning that even loudness
assessments by the same person are only consistent to some extent, and depends on the time
of day, her mood etc. BLV adds further to the
blur, when sex, culture, age etc. are introduced
as variables.
Because of the variations, a generic loudness
measure is only meaningful when it is based on
large subjective reference tests and solid statistics. Together with McGill University in Montreal,
TC Electronic has undertaken extensive loudness model investigation and evaluation.
The results denounce a couple of Leq measures,
namely A and M weighted, as generic loudness
measures. In fact, a quasi-peak meter showed
better judgement of loudness than Leq(A) or
Leq(M). Even when used just for speech, Leq(A)
is a poor pick, and it performs worse on music and effects. An appropriate choice for a
low-complexity, generic measurement algorithm
which works for listening levels used domestically has been known as Leq(RLB).
Combined loudness and peak level meters exist
already, for instance the ones from Dorroughs,
but BS.1770 now offers a standardized way of
measuring these parameters.
In 2006, ITU-R Working Party 6J drafted a new
loudness and peak level measure, BS.1770, and
the standard has subsequently come into effect. It has been debated if the loudness part is
robust enough, because it will obviously get exploited where possible. However, with a variety
of program material, Leq(RLB) has been verified in independent studies to be a relatively accurate measure, and correlate well with human
test panels. It therefore seems justified to use
Leq(RLB) as a baseline measure for loudness,
especially because room for improvement is also
built into the standard. The final BS.1770 standard included a multichannel annex with a revised weighting filter, R2LB – now known as “K”
weighting – and a channel weighting scheme.
These two later additions have been less verified
than the basic Leq(RLB) frequency weighting.
The other aspect of BS.1770, the algorithm to
measure true-peak, is built on solid ground. Inconsistent peak meter readings, unexpected
overloads, distortion in data-reduced delivery
and conversion etc. have been extensively described, so in liaison with AES SC-02-01, an
over-sampled true-peak level measure was included with BS.1770.
LCn Manual 31
Page 34

Appendix: Level versus loudness
In conclusion, BS.1770 is an honorable attempt
at specifying loudness and peak level separately,
instead of the simplistic (sample peak) and mixed
up measures (quasi-peak) in use today. The loudness and peak level measurement engine of LCn
follows the standard precisely. Possible updates
to the ITU standard may be released as updates
to LCn (provided that processing requirements
doesn’t exhaust the system).
Technical papers from AES, SMPTE, NAB and
DAFX conferences with more information about
loudness measurement, evaluation of loudness
models, true-peak detection, consequences of
0 dBFS+ signals etc., are available from the TC
website.
For details, visit the TC Tech Library at
tcelectronic.com/tech-library/
Meter calibration
Because of the frequency and channel weighting, and of the way channels sum, only specific
tones and input channels should be used for
calibration.
The most transparent results are obtained using a 1 kHz sine tone for calibration. Other frequencies or types of signal may be used (square
wave, noise etc.), but don’t expect similar results.
The beauty of the system lies in its RMS foundation, so this is a feature, not an error. The same
feature enables the loudness measure to identify
overly hot CDs or commercials, and to take outof-phase signals into account just as much as
signals that are in phase.
If we stick to standard methods for measuring
peak audio level in a digital system (where a sine
wave asynchronous of the sample rate with digital peaks at 0dBFS is regarded a 0dBFS tone),
BS.1770 and LCn output these results:
– One front channel fed with a -20 dBFS, 1kHz
sine tone: Reading of -23.0 LUFS.
– Two front channels fed with a -20 dBFS,
1kHz sine tone: Reading of -20.0 LUFS.
– All 5.1 channels fed with a -20 dBFS, 1kHz
sine tone: Reading of -15.4 LUFS.
Display
LCn may use either the measurement unit of LU
(Loudness Units) or LUFS (Loudness Units
Full Scale).
LU and LUFS are measurements in dB, reflecting the estimated gain offset to arrive at a certain
Reference Loudness (LU) or Maximum Loudness
(LUFS) as defined in BS.1770. Since a common
reference point for LU has not been agreed on
at the time of writing, LUFS (or “LKFS”, pointing specifically to the Leq(R2LB) weighting of
BS.1770), might be favored initially to avoid ambiguous use of the term LU.
The effectiveness of any loudness meter depends on both the graphical appearance and dynamic behavior of its display, as well as on its underlying measurement algorithms. A short-term
loudness meter also relies on the measurement
algorithm’s ability to output pertinent loudness
information using different analysis windows, for
instance, 200-800 ms for running real-time updates. It should be noted how the optimum size
of this window varies from study to study, possibly because the objective of a running display
hasn’t been fully agreed upon.
Formal evaluation of a visualization system is
challenging: First of all, one or more metrics
must be defined by which the display should
be evaluated. The correspondence between the
sound heard and the picture seen is one aspect
to be evaluated. Another metric could characterize the speed of reading the meter reliably.
LCn Manual 32
Page 35

Appendix: Level versus loudness
Postscript
Control of loudness is the only audio issue that
has made It to the political agenda. Political regulation is currently being put into effect in Europe
to prevent hearing damage and disturbances
from PA systems, and to avoid annoying level
jumps during commercial breaks in television. In
Australia, something similar may happen.
Many years of research into loudness of not only
dialog, but also of loudness relating to any type
of audio programming, has brought TC to the
forefront of companies in the world to perform
real-time loudness measurement and control.
Therefore, TC has taken active part in loudness standardization efforts in Japan, the United
States, Europe and other areas.
In broadcast, digitization is driving the number
of AV channels and platforms up, while the total
number of viewers remains roughly the same. On
the sound production side, it is therefore important that delivery criteria can be easily specified
and met, even by people not primarily concerned
with audio: Journalists, musicians, video editors,
marketing professionals etc.
LCn can be used to control level and improve
sound – not only in Dolby AC3-based transmis-
sions, but also on other broadcast platforms,
such as analog TV, mobile TV and IPTV.
To summarize:
LCn is part of a holistic and universal approach
to loudness control, starting at the production
or live engineer. When she realizes the dynamic
range at her disposal, less processing is needed
at later stages of a distribution chain. The chain
ends with the capability of quality controlling everything upstream by applying the same loudness measure for logging purposes: A closed
loop.
Welcome to a new, standardized world of audio leveling – across genres, across formats,
across the globe.
Using only dialog-based audio measurements
in digital broadcast has led to ambiguous level
management, more level jumps between programs, and extra time spent on audio production
and management in general. Non-dialog based
level jumps are currently creating havoc in digital
TV, and LCn helps correct that situation.
LCn Manual 33
Page 36

Appendix: Level versus loudness
LCn Manual 34
 Loading...