

Page 1
20" Digital LCD TV
built-in DVD Player
Owner's Manual
CONNECTION
LD200SL9
INITIAL SETTING DVD SETTING INFORMATION
WATCHING TV
OPTIONAL SETTING
OPERATING DVDINTRODUCTION
TO RECEIVE DIGITAL/ANALOG SIGNAL, YOU MUST CONNECT ANTENNA.
IF YOU NEED ADDITIONAL ASSISTANCE WITH SETUP OR OPERATING AFTER
READING OWNER’S MANUAL, PLEASE CALL TOLL FREE 1-800-968-3429, OR
VISIT OUR WEB SITE AT www.sylvania-ce.com
© 2008 Funai Electric Co., Ltd.
TROUBLESHOOTING
Page 2
NTRODUCTION
I
WARNING: TO REDUCE THE RISK OF FIRE OR ELECTRIC SHOCK, DO NOT EXPOSE THIS
APPLIANCE TO RAIN OR MOISTURE.
CAUTION
RISK OF ELECTRIC SHOCK
DO NOT OPEN
CAUTION: TO REDUCE THE RISK OF ELECTRIC SHOCK,
DO NOT REMOVE COVER (OR BACK). NO USER SERVICEABLE
PARTS INSIDE. REFER SERVICING TO QUALIFIED SERVICE
PERSONNEL.
The important note is located on the rear of the cabinet.
Important Safeguards
1. READ INSTRUCTIONS - All the safety and operating instructions should be
read before the appliance is operated.
2. RETAIN INSTRUCTIONS - The safety and operating instructions should be
retained for future reference.
3. HEED WARNINGS - All warnings on the appliance and in the operating
instructions should be adhered to.
4. FOLLOW INSTRUCTIONS - All operating and use instructions should be
followed.
5. CLEANING - Unplug TV from the wall outlet before cleaning. Do not use
liquid cleaners or aerosol cleaners. Use a damp cloth for cleaning.
EXCEPTION: A product that is meant for uninterrupted service and, that for
some speci c reason, such as the possibility of the loss of an authorization
code for a CATV converter, is not intended to be unplugged by the user for
cleaning or any other purpose, may exclude the reference to unplugging the
appliance in the cleaning description otherwise required in item 5.
6. ATTACHMENTS - Do not use attachments not recommended by the TV
manufacturer as they may cause hazards.
7. WATER AND MOISTURE - Do not use this TV near water, for example, near a
bath tub, wash bowl, kitchen sink, or laundry tub, in a wet basement, or near
a swimming pool, and the like.
8. ACCESSORIES - Do not place this TV on an unstable cart,
stand, tripod, bracket, or table. The T V may fall, causing
serious injury to someone, and serious damage to the
appliance. Use only with a cart, stand, tripod, bracket, or table
recommended by the manufacturer, or sold with the TV.
Any mounting of the appliance should follow the
manufacturer’s instructions and should use a mounting
accessory recommended by the manufacturer. An
appliance and cart combination should be moved with care. Quick stops,
excessive force, and uneven surfaces may cause the appliance and cart
combination to overturn.
AMEUBLES - Cet appareil ne doit être placé que sur un
meuble (avec ou sans roulettes) recommandé par le
fabricant. Si vous l’installez sur un meuble à roulettes,
déplacez les deux ensembles avec précaution. Un arrêt
brusque, l’utilisation d’une force excessive et des surfaces
irrégulières risquent de déstabiliser l’ensemble et de le
renverser.
9. VENTILATION - Slots and openings in the cabinet and the back or bottom
are provided for ventilation and to ensure reliable operation of the TV and to
protect it from overheating, these openings must not be blocked or covered.
The openings should never be blocked by placing the TV on a bed, sofa, rug,
or other similar surface. This TV should never be placed near or over a radiator
or heat register. This TV should not be placed in a built-in installation such as
a bookcase or rack unless proper ventilation is provided or the manufacturer’
s instructions have been adhered to.
10. POWER SOURCES - This T V should be operated only from the type of power
source indicated on the marking label. If you are not sure of the type of
power supply to your home, consult your appliance dealer or local power
company. For T Vs intended to operate from battery power, or other sources,
refer to the operating instructions.
11. GROUNDING OR POLARIZATION - This TV is equipped with a polarized
alternating-current line plug (a plug having one blade wider than the other).
This plug will t into the power outlet only one way. This is a safety feature.
If you are unable to insert the plug fully into the outlet, try reversing the
plug. If the plug should still fail to t, contact your electrician to replace your
obsolete outlet. Do not defeat the safety purpose of the polarized plug.
12. POWER-CORD PROTECTION - Power-supply cords should be routed so
that they are not likely to be walked on or pinched by items placed upon
or against them, paying particular attention to cords at plugs, convenience
receptacles, and the point where they exit from the appliance.
13. OUTDOOR ANTENNA GROUNDING - If an outside antenna or cable system
is connected to the TV, be sure the antenna or cable system is grounded so
as to provide some protection against voltage surges and built-up static
charges. Article 810 of the National Electrical Code, ANSI/NFPA No. 70,
provides information with respect to proper grounding of the mast and
2
EN
THIS SYMBOL INDICATES THAT DANGEROUS
VOLTAGE CONSTITUTING A RISK OF ELECTRIC
SHOCK IS PRESENT WITHIN THIS UNIT.
THIS SYMBOL INDICATES THAT THERE ARE
IMPORTANT OPERATING AND MAINTENANCE
INSTRUCTIONS IN THE LITERATURE
ACCOMPANYING THE APPLIANCE.
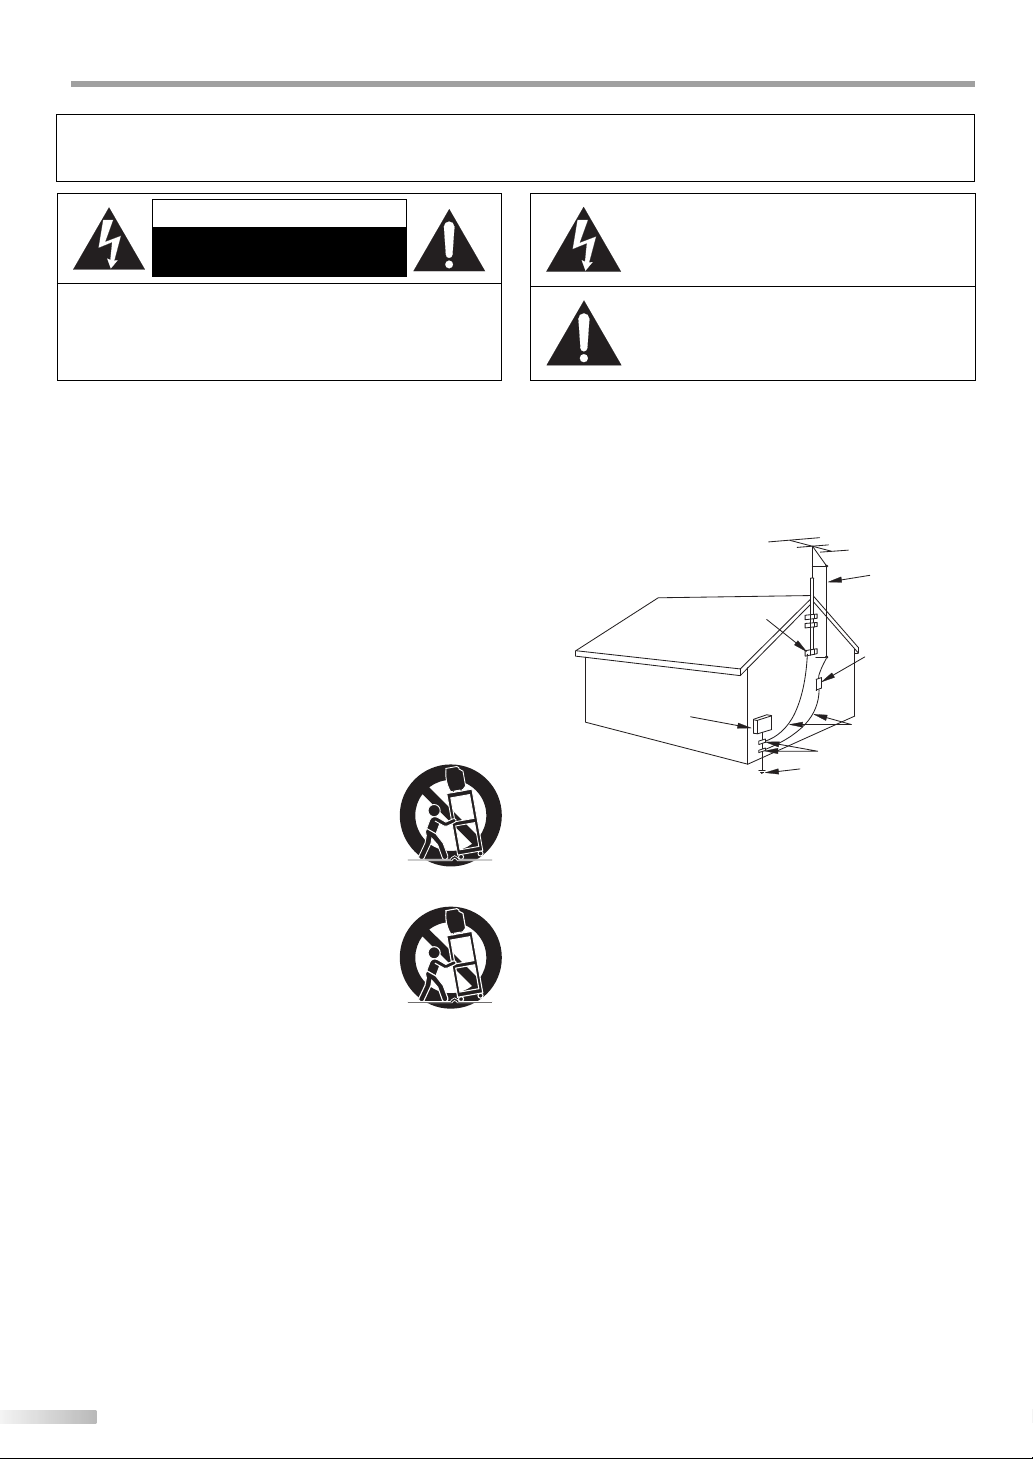
supporting structure, grounding of the lead-in wire to an antenna discharge
unit, size of grounding conductors, location of antenna-discharge unit,
connection to grounding electrodes, and requirements for the grounding
electrode. (Fig. A)
EXAMPLE OF ANTENNA GROUNDING AS PER
14. LIGHTNING - For added protection for this T V receiver during a lightning
storm, or when it is left unattended and unused for long periods of time,
unplug it from the wall outlet and disconnect the antenna or cable system.
This will prevent damage to the TV due to lightning and power-line surges.
15. POWER LINES - An outside antenna system should not be located in the
vicinity of overhead power lines or other electric light of power circuits, or
where it can fall into such power lines or circuits. When installing an outside
antenna system, extreme care should be taken to keep from touching such
power lines or circuits as contact with them might be fatal.
16. OVERLOADING - Do not overload wall outlets and extension cords as this
can result in a risk of re or electric shock.
17. OBJECT AND LIQUID ENTRY - Never push objects of any kind into this TV
through openings as they may touch dangerous voltage points or short out
parts that could result in a re or electric shock. Never spill liquid of any kind
on the TV.
18. SERVICING - Do not attempt to service this TV yourself as opening or
removing covers may expose you to dangerous voltage or other hazards.
Refer all servicing to quali ed service personnel.
19. DAMAGE REQUIRING SERVICE - Unplug this T V from the wall outlet and
refer servicing to quali ed service personnel under the following conditions:
a. When the power supply cord or plug is damaged or frayed.
b. If liquid has been spilled, or objects have fallen into the T V.
c. If the TV has been exposed to rain or water.
d. If the TV does not operate normally by following the operating
instructions. Adjust only those controls that are covered by the operating
instructions, as improper adjustment of other controls may result in
damage and will often require extensive work by a quali ed technician
to restore the TV to its normal operation.
e. If the TV has been dropped or damaged in any way.
f. When the TV exhibits a distinct change in performance, this indicates a
need for service.
20. REPLACEMENT PARTS - When replacement parts are required, be sure the
service technician uses replacement parts speci ed by the manufacturer that
have the same characteristics as the original part. Unauthorized substitutions
may result in re, electric shock, injury to persons or other hazards.
21. SAFETY CHECK - Upon completion of any service or repairs to this TV, ask
the service technician to perform routine safety checks to determine that the
TV is in proper operating condition.
22. HEAT - This TV product should be situated away from heat sources such as
radiators, heat registers, stoves, or other products (including ampli ers) that
produce heat.
FIGURE A
NATIONAL ELECTRICAL CODE
ELECTRIC
SERVICE
EQUIPMENT
S2898A
NEC - NATIONAL ELECTRICAL CODE
GROUND
CLAMP
ANTENNA
LEAD IN WIRE
ANTENNA
DISCHARGE UNIT
(NEC SECTION 810-20)
GROUNDING CONDUCTORS
(NEC SECTION 810-21)
GROUND CLAMPS
POWER SERVICE GROUNDING
ELECTRODE SYSTEM
(NEC ART 250, PART H)
Page 3
Precautions
5
Do not place the unit on the furniture that is capable of being tilted by a child and an adult leaning, pulling, standing or climbing
on it. A falling unit can cause serious injury or even death.
LAMP IN LCD CONTAINS MERCURY, DISPOSE ACCORDING TO LOCAL, STATE OR FEDERAL LAW.
CAUTION: TO PREVENT ELECTRIC SHOCK, MATCH WIDE BLADE OF PLUG TO WIDE SLOT, FULLY INSERT.
ATTENTION: POUR ÉVITER LES CHOCS ÉLECTRIQUES, INTRODUIRE LA LAME LA PLUS LARGE DE LA FICHE DANS LA
BORNE CORRESPONDANTE DE LA PRISE ET POUSSER JUSQU’AU FOND.
INTRODUCTION
CONNECTION
INITIAL SETTING DVD SETTING INFORMATION
FCC WARNING
RADIO-TV INTERFERENCE
This equipment has been tested and found to comply with the limits for a Class B digital device, pursuant to Part 15 of the
FCC Rules. These limits are designed to provide reasonable protection against harmful interference in a residential installation.
This equipment generates, uses, and can radiate radio frequency energy and, if not installed and used in accordance with the
instructions, may cause harmful interference to radio communications. However, there is no guarantee that interference will not
occur in a particular installation. If this equipment does cause harmful interference to radio or television reception, which can be
determined by turning the equipment off and on, the user is encouraged to try to correct the interference by one or more of the
following measures:
1) Reorient or relocate the receiving antenna.
2) Increase the separation between the equipment and receiver.
3) Connect the equipment into an outlet on a circuit different from that to which the receiver is connected.
4) Consult the dealer or an experienced radio/TV technician for help.
This Class B digital apparatus complies with Canadian ICES-003.
Cet appareil numérique de la classe B est conforme à la norme NMB-003 du Canada.
Note to CATV system installer:
This reminder is provided to call the CATV system installer's attention to Article 820-40 of the NEC that provides guidelines
for proper grounding and, in particular, specifies that the cable ground should be connected to the grounding system of the
building as close to the point of cable entry as practical.
LASER SAFETY
This unit employs a laser. Only a qualified service person should remove the cover or attempt to service this device, due to
possible eye injury.
CAUTION: USE OF CONTROLS OR ADJUSTMENTS OR PERFORMANCE OF PROCEDURES OTHER THAN THOSE SPECIFIED
CAUTION: VISIBLE AND INVISIBLE LASER RADIATION WHEN OPEN AND INTERLOCK DEFEATED. DO NOT STARE INTO BEAM.
LOCATION: INSIDE, NEAR THE DECK MECHANISM.
IMPORTANT COPYRIGHT INFORMATION
Unauthorized copying, broadcasting, public performance and lending of discs are prohibited. This product incorporates
copyright protection technology that is protected by U.S. patents and other intellectual property rights. Use of this copyright protection technology must be authorized by Macrovision, and is intended for home and other limited viewing uses
only unless otherwise authorized by Macrovision. Reverse engineering or disassembly is prohibited.
This equipment may generate or use radio frequency energy. Changes or modifications to this equipment
may cause harmful interference unless the modifications are expressly approved in the manual. The user
could lose the authority to operate this equipment if an unauthorized change or modification is made.
HEREIN MAY RESULT IN HAZARDOUS RADIATION EXPOSURE.
WATCHING TV
OPTIONAL SETTING
OPERATING DVD
TROUBLESHOOTING
Manufactured under license from Dolby Laboratories. “Dolby” and the double-D
symbol are trademarks of Dolby Laboratories.
EN
3
Page 4
NTRODUCTION
I
LOCATION
For safe operation and satisfactory performance of the unit, keep the following in mind when selecting a place for its installation:
• Shield it from direct sunlight and keep it away from sources of intense heat.
• Avoid dusty or humid places.
• Avoid places with insufficient ventilation for proper heat dissipation. Do not block the ventilation holes at the top and bottom of the
unit. Do not place the unit on a carpet because this will block the ventilation holes.
• Install the unit in a horizontal position.
• Avoid locations subject to strong vibration.
• Do not place the unit near strong magnetic fields.
• Avoid moving the unit to locations where temperature differences are extreme.
• Be sure to unplug the AC power cord from the outlet before carrying the unit.
TO AVOID THE HAZARDS OF ELECTRICAL SHOCK AND FIRE
• Do not handle the power cord with wet hands.
• Do not pull on the power cord when disconnecting it from an AC outlet. Grasp it by the plug.
• If, by accident, water is spilled on the unit, unplug the power cord immediately and take the unit to our authorized service center for
servicing.
• Do not place anything directly on top of the unit.
MOISTURE WARNING
• Moisture condensation may occur inside the unit when it is moved from a cold place to a warm place, or after heating a cold
room or under conditions of high humidity.
When the condensation occurs inside the unit, turn the unit on and leave it at least 2 hours to dry out.
The serial number of this product may be found on the back of the unit. No others have the same serial number as yours. You
should record the number and other vital information here and retain this book as a permanent record of your purchase to aid
identification in case of theft.
date of purchase
dealer purchase from
Note about recycling:
This product’s packaging materials are recyclable and can be reused. Please dispose of any materials in accordance with your
local recycling regulations.
Batteries should never be thrown away or incinerated but disposed of in accordance with your local regulations concerning
chemical wastes.
dealer phone No.
model No.
serial No.
dealer address
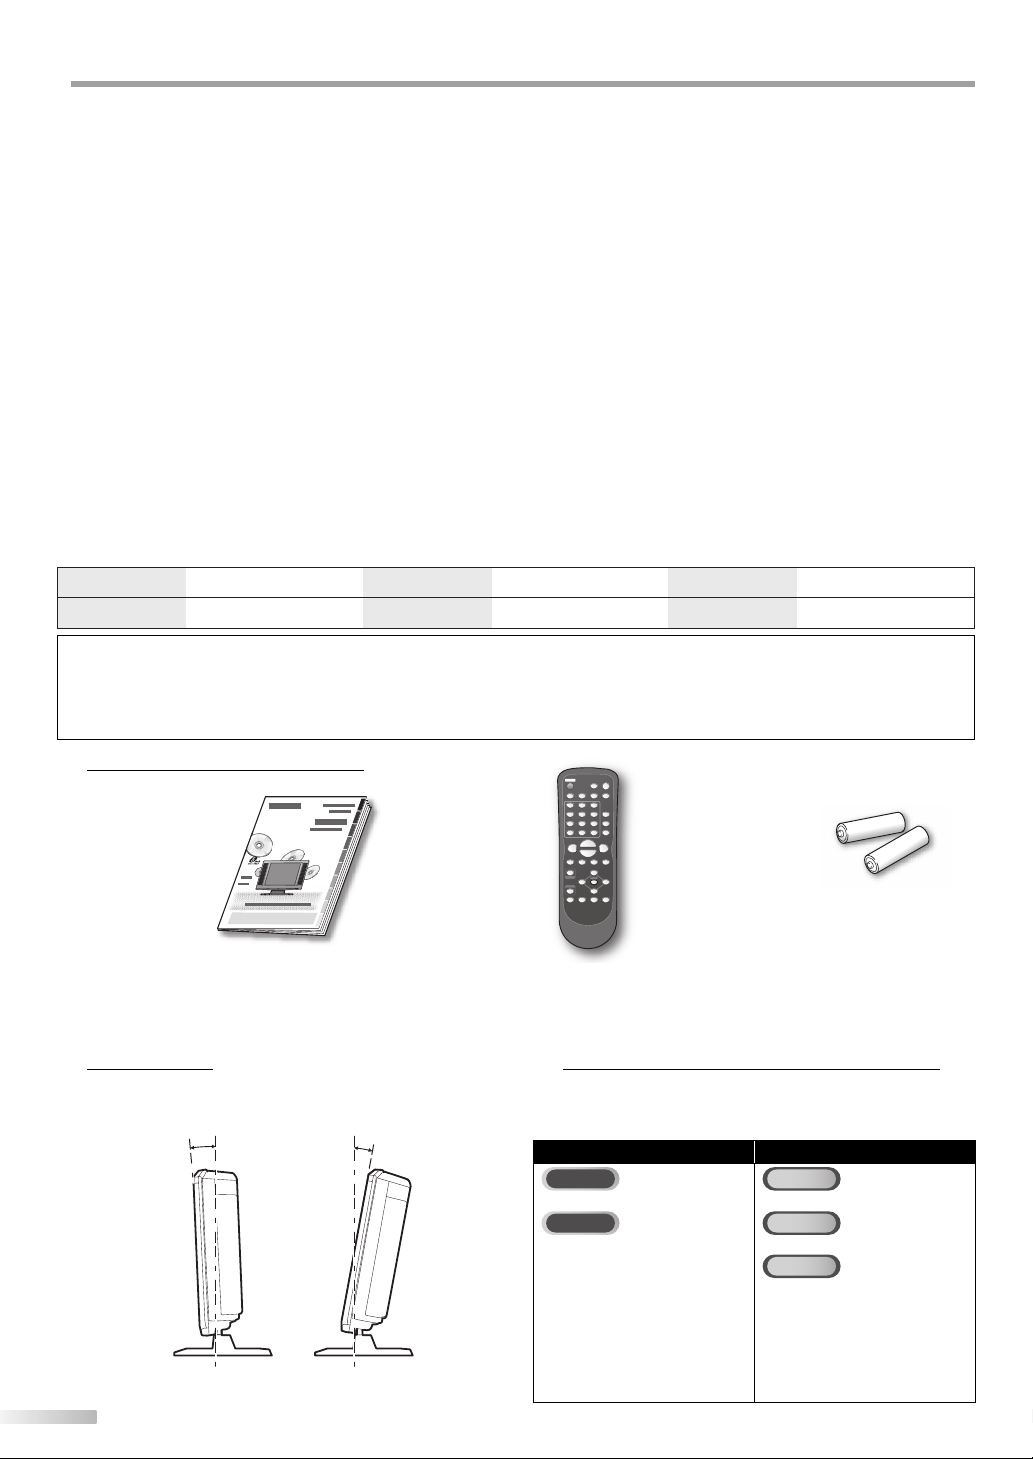
Supplied Accessories5
owner’s manual
(1EMN23980)
• If you need to replace these accessories, please refer to the part No. with the illustrations and call our toll free
customer support line found on the cover of this manual.
• Depending on your antenna system, you may need different types of combiners (mixers) or separators (splitters).
Contact your local electronics store for these items.
Tilt Stand
5 Symbols Used in this Manual5
You can adjust the stand to change the angle
of the TV (-2.5° to 10°).
-2.5°
4
EN
remote control
(NF603UD)
10°
batteries
(AA x 2)
The following is the description for the symbols used
in this manual.
Description refers to:
TV FUNCTIONS DVD FUNCTIONS
TV
: Analog TV
operation
DTV
: Digital TV
operation
• If neither symbol appears
under the function
heading, operation is
applicable to both.
DVD
CD
MP3
• If no symbol appears
under the function
heading, operation is
applicable to all.
: Playback of
DVD-video
: Playback of
audio CD
: Playback of
CD-RW/-R with
MP3 files
Page 5

INTRODUCTION
Contents5
INTRODUCTION
Important Safeguards . . . . . . . . . . . . . . . . . . . . . . . . . . . . . . . . . . . . . . . . . . . . . 2
Precautions . . . . . . . . . . . . . . . . . . . . . . . . . . . . . . . . . . . . . . . . . . . . . . . . . . . . . . 3
Supplied Accessories . . . . . . . . . . . . . . . . . . . . . . . . . . . . . . . . . . . . . . . . . . . . . . 4
Tilt Stand . . . . . . . . . . . . . . . . . . . . . . . . . . . . . . . . . . . . . . . . . . . . . . . . . . . . . . . . 4
Symbols Used in this Manual . . . . . . . . . . . . . . . . . . . . . . . . . . . . . . . . . . . . . . . 4
Features . . . . . . . . . . . . . . . . . . . . . . . . . . . . . . . . . . . . . . . . . . . . . . . . . . . . . . . . . 6
Remote Control Function . . . . . . . . . . . . . . . . . . . . . . . . . . . . . . . . . . . . . . . . . . 7
Installing the Batteries . . . . . . . . . . . . . . . . . . . . . . . . . . . . . . . . . . . . . . . . . . . . 7
Control Panel . . . . . . . . . . . . . . . . . . . . . . . . . . . . . . . . . . . . . . . . . . . . . . . . . . . . . 8
Rear Panel . . . . . . . . . . . . . . . . . . . . . . . . . . . . . . . . . . . . . . . . . . . . . . . . . . . . . . . 8
CONNECTION
Basic Connection . . . . . . . . . . . . . . . . . . . . . . . . . . . . . . . . . . . . . . . . . . . . . . . . . . 9
External Device Connection . . . . . . . . . . . . . . . . . . . . . . . . . . . . . . . . . . . . . . . 10
TV Functions
INITIAL SETTING
Initial Setup . . . . . . . . . . . . . . . . . . . . . . . . . . . . . . . . . . . . . . . . . . . . . . . . . . . . . 12
Main Menu . . . . . . . . . . . . . . . . . . . . . . . . . . . . . . . . . . . . . . . . . . . . . . . . . . . . . . 13
Auto Channel Scan . . . . . . . . . . . . . . . . . . . . . . . . . . . . . . . . . . . . . . . . . . . . . . . 13
Language Selection . . . . . . . . . . . . . . . . . . . . . . . . . . . . . . . . . . . . . . . . . . . . . . 14
WATCHING TV
Channel Selection . . . . . . . . . . . . . . . . . . . . . . . . . . . . . . . . . . . . . . . . . . . . . . . . 15
Volume Adjustment . . . . . . . . . . . . . . . . . . . . . . . . . . . . . . . . . . . . . . . . . . . . . . 15
Switching Each Mode . . . . . . . . . . . . . . . . . . . . . . . . . . . . . . . . . . . . . . . . . . . . . 16
Switching Audio Mode . . . . . . . . . . . . . . . . . . . . . . . . . . . . . . . . . . . . . . . . . . . 16
Screen Information . . . . . . . . . . . . . . . . . . . . . . . . . . . . . . . . . . . . . . . . . . . . . . 17
TV Screen Display Mode. . . . . . . . . . . . . . . . . . . . . . . . . . . . . . . . . . . . . . . . . . . 18
Sleep Timer . . . . . . . . . . . . . . . . . . . . . . . . . . . . . . . . . . . . . . . . . . . . . . . . . . . . . 18
DVD Functions
OPERATING DVD
Playable Media . . . . . . . . . . . . . . . . . . . . . . . . . . . . . . . . . . . . . . . . . . . . . . . . . . 26
Unplayable Media . . . . . . . . . . . . . . . . . . . . . . . . . . . . . . . . . . . . . . . . . . . . . . . 26
Playback . . . . . . . . . . . . . . . . . . . . . . . . . . . . . . . . . . . . . . . . . . . . . . . . . . . . . . . . 27
DVD Menu . . . . . . . . . . . . . . . . . . . . . . . . . . . . . . . . . . . . . . . . . . . . . . . . . . . . . . 27
Resume Playback . . . . . . . . . . . . . . . . . . . . . . . . . . . . . . . . . . . . . . . . . . . . . . . . 27
Pause . . . . . . . . . . . . . . . . . . . . . . . . . . . . . . . . . . . . . . . . . . . . . . . . . . . . . . . . . . 27
Step-by-step Playback . . . . . . . . . . . . . . . . . . . . . . . . . . . . . . . . . . . . . . . . . . . . 28
Fast Forward / Fast Reverse . . . . . . . . . . . . . . . . . . . . . . . . . . . . . . . . . . . . . . . 28
Slow Forward / Slow Reverse . . . . . . . . . . . . . . . . . . . . . . . . . . . . . . . . . . . . . . 28
Zoom . . . . . . . . . . . . . . . . . . . . . . . . . . . . . . . . . . . . . . . . . . . . . . . . . . . . . . . . . . . 28
MP3 Playback . . . . . . . . . . . . . . . . . . . . . . . . . . . . . . . . . . . . . . . . . . . . . . . . . . . 29
Search Functions . . . . . . . . . . . . . . . . . . . . . . . . . . . . . . . . . . . . . . . . . . . . . . . . . 30
Repeat Playback . . . . . . . . . . . . . . . . . . . . . . . . . . . . . . . . . . . . . . . . . . . . . . . . . 31
Repeat A-B Playback . . . . . . . . . . . . . . . . . . . . . . . . . . . . . . . . . . . . . . . . . . . . . 31
Programmed Playback . . . . . . . . . . . . . . . . . . . . . . . . . . . . . . . . . . . . . . . . . . . 32
Random Playback . . . . . . . . . . . . . . . . . . . . . . . . . . . . . . . . . . . . . . . . . . . . . . . . 32
On-screen Display . . . . . . . . . . . . . . . . . . . . . . . . . . . . . . . . . . . . . . . . . . . . . . . . 33
Special Settings . . . . . . . . . . . . . . . . . . . . . . . . . . . . . . . . . . . . . . . . . . . . . . . . . . 34
DVD SETTING
DVD Language Setting . . . . . . . . . . . . . . . . . . . . . . . . . . . . . . . . . . . . . . . . . . . 37
Display Setting . . . . . . . . . . . . . . . . . . . . . . . . . . . . . . . . . . . . . . . . . . . . . . . . . . 38
DVD Audio Setting . . . . . . . . . . . . . . . . . . . . . . . . . . . . . . . . . . . . . . . . . . . . . . . 39
Parental Setting . . . . . . . . . . . . . . . . . . . . . . . . . . . . . . . . . . . . . . . . . . . . . . . . . 40
Others . . . . . . . . . . . . . . . . . . . . . . . . . . . . . . . . . . . . . . . . . . . . . . . . . . . . . . . . . . 41
Reset to the Default Setting . . . . . . . . . . . . . . . . . . . . . . . . . . . . . . . . . . . . . . . 42
Language Code List . . . . . . . . . . . . . . . . . . . . . . . . . . . . . . . . . . . . . . . . . . . . . . 42
TROUBLESHOOTING
Troubleshooting Guide . . . . . . . . . . . . . . . . . . . . . . . . . . . . . . . . . . . . . . . . . . . 43
CONNECTION
INITIAL SETTING DVD SETTING INFORMATION
WATCHING TV
OPTIONAL SETTING
OPERATING DVD
OPTIONAL SETTING
Channel Add/Delete . . . . . . . . . . . . . . . . . . . . . . . . . . . . . . . . . . . . . . . . . . . . . . 19
Picture Adjustment . . . . . . . . . . . . . . . . . . . . . . . . . . . . . . . . . . . . . . . . . . . . . . 19
Closed Caption. . . . . . . . . . . . . . . . . . . . . . . . . . . . . . . . . . . . . . . . . . . . . . . . . . . 20
DTV Closed Caption. . . . . . . . . . . . . . . . . . . . . . . . . . . . . . . . . . . . . . . . . . . . . . . 21
DTVCC Style . . . . . . . . . . . . . . . . . . . . . . . . . . . . . . . . . . . . . . . . . . . . . . . . . . . . . 21
Back Light Setting . . . . . . . . . . . . . . . . . . . . . . . . . . . . . . . . . . . . . . . . . . . . . . . 22
Color Temperature . . . . . . . . . . . . . . . . . . . . . . . . . . . . . . . . . . . . . . . . . . . . . . . 23
V-chip . . . . . . . . . . . . . . . . . . . . . . . . . . . . . . . . . . . . . . . . . . . . . . . . . . . . . . . . . . 23
© 2008 Funai Electric Co., Ltd.
All rights reserved. No part of this manual may be reproduced, copied, transmitted, disseminated, transcribed, downloaded or stored in
any storage medium, in any form or for any purpose without the express prior written consent of Funai.
Furthermore, any unauthorized commercial distribution of this manual or any revision hereto is strictly prohibited.
Information in this document is subject to change without notice. Funai reserves the right to change the content herein without the
obligation to notify any person or organization of such changes.
with the design is a registered trademark of Funai Electric Co., Ltd and may not be used in any way without the express written
consent of Funai. All other trademarks used herein remain the exclusive property of their respective owners. Nothing contained in this
manual should be construed as granting, by implication or otherwise, any license or right to use any of the trademarks displayed herein.
Misuse of any trademarks or any other content in this manual is strictly prohibited. Funai shall aggressively enforce its intellectual property
rights to the fullest extent of the law.
INFORMATION
Glossary . . . . . . . . . . . . . . . . . . . . . . . . . . . . . . . . . . . . . . . . . . . . . . . . . . . . . . . . 45
Maintenance . . . . . . . . . . . . . . . . . . . . . . . . . . . . . . . . . . . . . . . . . . . . . . . . . . . . 45
Cable Channel Designations . . . . . . . . . . . . . . . . . . . . . . . . . . . . . . . . . . . . . . . 46
General Speci cations . . . . . . . . . . . . . . . . . . . . . . . . . . . . . . . . . . . . . . . . . . . . 46
Electrical Speci cation . . . . . . . . . . . . . . . . . . . . . . . . . . . . . . . . . . . . . . . . . . . . 46
Other Speci cations . . . . . . . . . . . . . . . . . . . . . . . . . . . . . . . . . . . . . . . . . . . . . . 46
Limited Warranty . . . . . . . . . . . . . . . . . . . . . . . . . . . . . . . . . . . . . . . .Back cover
TROUBLESHOOTING
EN
5
Page 6

NTRODUCTION
I
Features5
TV DVD
• DTV/TV/CATV
- You can use your remote control to select channels
which are broadcast in digital, conventional analog,
standard definition. Also, cable subscribers can
access their cable TV channels.
• Program Information Display (DTV only)
- You can display the title, contents and other
information of the current DTV program on the TV
screen.
• Auto Channel Scan
- This unit automatically scans and memorizes
channels available in your area, eliminating difficult
setup procedures.
• V-chip
- This feature allows you to block children’s access to
inappropriate TV programs.
• Closed Caption Decoder
- Built-in closed caption decoder displays text for
closed caption supported programming.
• MTS/SAP Tuner
- Audio language or stereo sound function can be
selected from the remote control.
• Auto Shut Off Function
- If there is no signal input from the antenna terminal
and no operation for 15 minutes, the unit will turn
itself off automatically.
• Sleep Timer
- This feature will automatically turned off the power
of the unit at a specific time.
• Choices for On-screen Language
- Select your on-screen language:
English, Spanish or French.
• PLL Frequency Synthesized Tuning
- Provides free and easy channel selection and lets
you tune directly to any channel using the channel
number buttons on the remote control.
• Component Video Input
• S-video Input
• AV Input
• Digital Audio Coaxial Output
• Dolby Digital Sound
- Enjoy Dolby Digital multi-channel surround sound
when you connect the unit to your Dolby Digital
decoder.
• Still / Fast / Slow / Step Playback
- Various playback modes are available including still
pictures, fast forward/reverse, slow motion and step
frames.
• DVD Menus in a Desired Language
- You can display DVD menus in a desired language, if
available on a DVD-video.
• Screen Saver
- If there is no operation for 5 minutes, the screen
saver program starts.
• Parental Lock
- Block the viewing of DVD-video unsuitable for
children.
• Resume Play
- Lets you resume play back from the point at which
playback was stopped.
• Bit Rate Indication
• Dynamic range control (DRC)
- You can control the range of sound volume.
¨ Accessing from [MODE] button
During playback
• Subtitles in a Desired Language
- You can select a desired language for displaying
subtitle, if that language is available on a DVD-video.
• Selecting a Camera Angle
- You can select the desired camera angle, if a DVD
contains sequences recorded from different angles.
• Zoom
- Allows you to enlarge the size of picture image.
• Black Level Adjustment
• Virtual Surround
• Search
- chapter search / title search / track search / time
search
• Marker
- The part designated by user can be called back.
• Repeat
- chapter / title / track / group / all / A-B
In stop mode
• Program Playback for audio CD and MP3
- You can program the order of tracks/files to play
them back in designated order.
• Random Playback for audio CD and MP3
- This unit can shuffle the order of tracks/files to play
them back in randomly.
¨ Accessing from [AUDIO] button
During playback
• Choices for Audio Language and Stereo Sound
Function
- Select your desired language or stereo sound
function when different options are available on
your disc.
6
EN
Page 7
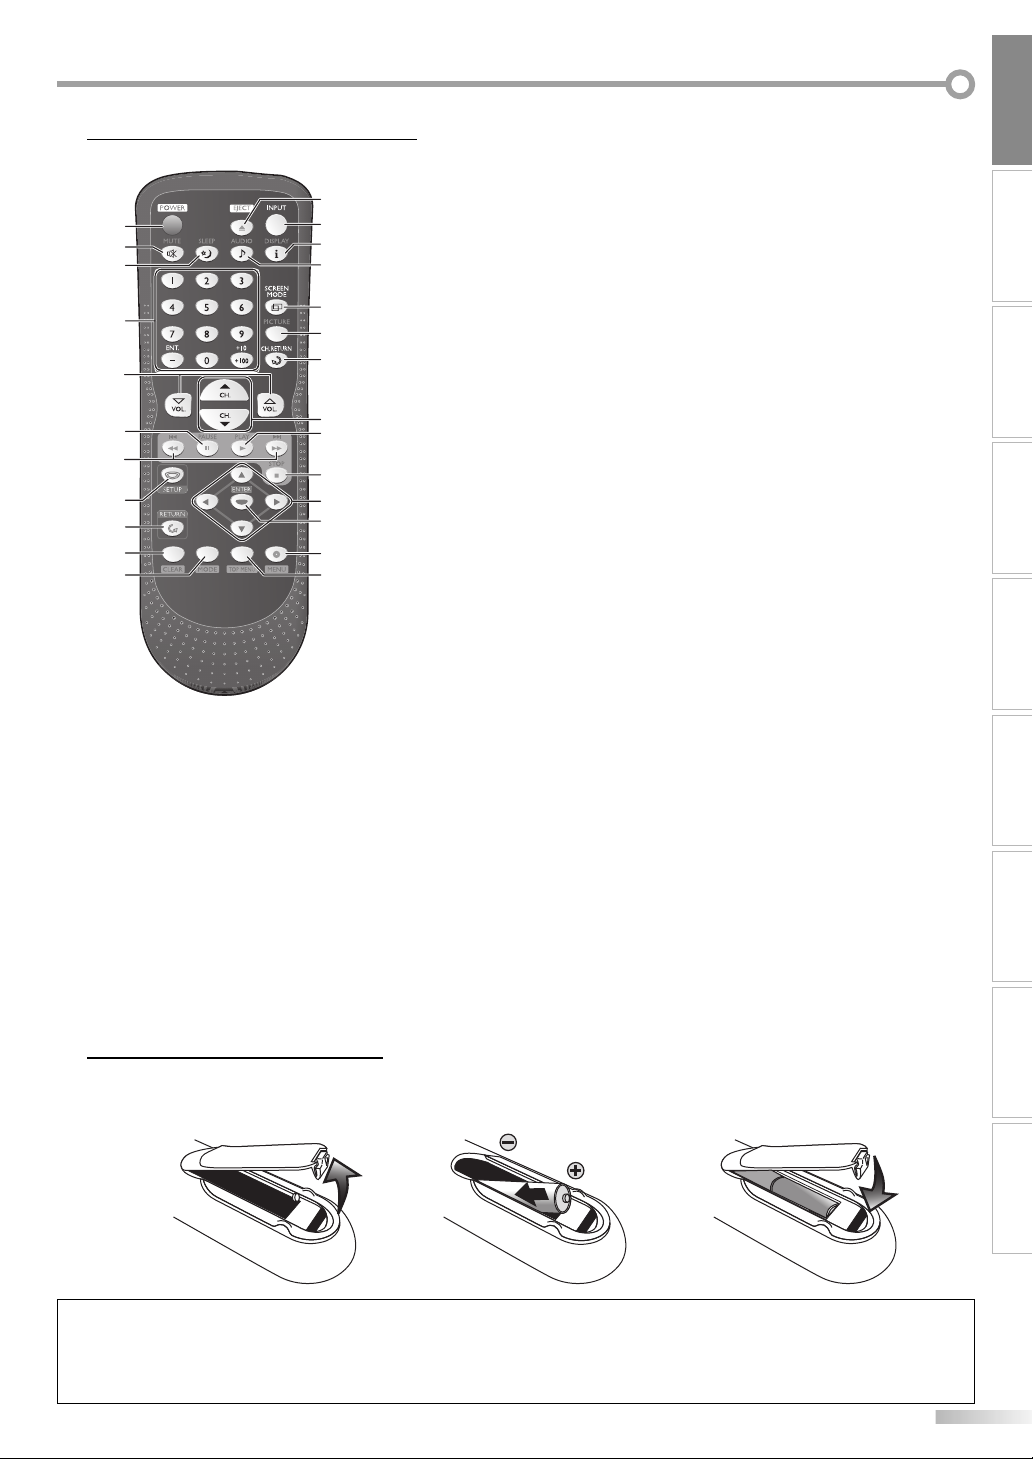
Remote Control Function5
Remote Control Function5
12
1
2
3
4
5
6
13
14
15
16
17
18
19
20
7
21
8
9
10
11
1. POWER button (p12)
Press to turn the unit on and off.
2. MUTE button (p15)
Press to turn the sound on and off.
3. SLEEP button (p18)
Press to activate the sleep timer.
4. Number buttons (p15)
• Press to select channels.
• Press to select chapter, title (DVD), or track/
file (CD, MP3) directly.
-/ENT button
• Press to shift the minor channel from the
major channel.
+10/+100 button
•
Press to select 100 or higher channels. (CATV)
•
Press to search if there are minor channels on
the currently selected major channel. (DTV)
22
23
24
25
5. VOL. X/Y buttons (p15)
Press to adjust the volume.
6. PAUSE F button (p27)
Press to pause disc playback.
7. SKIP H / G button (p30)
Press to skip forward or backward
•
chapters, titles (DVD) or tracks/files (CD,
MP3).
REV E button (p28)
•
Press and hold to begin slow reverse
playback during the pause mode (DVD)
and search backward through a disc.
FWD D button (p28)
•
Press and hold to begin slow forward
playback during the pause mode (DVD)
and search forward through a disc.
8. SETUP button (p13 / p37)
Press to display the main menu.
9. RETURN button (p19)
Press to return to the previous menu
operation.
10. CLEAR button (p31)
• Press to clear the numbers entered
incorrectly.
• Press to cancel the point A for A-B
repeat (DVD, CD).
• Press to remove the track/file number
in program input (CD, MP3).
11. MODE button (p6)
• Press to arrange the playing order or
playback randomly (CD, MP3).
•
Press to set the black level (DVD) and
the virtual surround (DVD, CD, MP3) on
or off.
• Press to change the camera angle to
see the sequence being played back
from different angle (DVD-video).
• Press to search chapter, title (DVD),
time (DVD, CD) or track/file (CD, MP3).
• Press to set the marker (DVD, CD).
• Press to repeat playback chapter,
title (DVD), track/file, disc (CD, MP3),
group (MP3) repeatedly or between
designated point A and B (DVD, CD).
• Press to magnify the part of picture
(approx. 1.3x, 2x and 4x : DVD).
• Press to select the subtitles on a disc
(DVD).
12. EJECT A button (p27)
Press to eject the disc.
13. INPUT button (p16)
Press to access a connected external device
like a video game, camcorder or VCR.
14. DISPLAY button (p17 / p33)
Digital Mode (DTV)
• Press to display the channel number
and the program information.
Analog Mode (TV)
• Press to display the channel number.
External Input Mode
• Press to display the currently selected
external input mode.
15. AUDIO button (p16 / p34)
Digital Mode (DTV)
• Press to select the audio language.
Analog Mode (TV)
• Press to select the audio mode.
DVD Mode
• Press to select the audio language
(DVD), or sound mode (CD).
16. SCREEN MODE button (p18)
Press to select aspect ratio available for
the TV screen.
17. PICTURE button (p19)
Press to adjust the picture quality.
18. CH. RETURN button (p15)
Press to return to previous channel.
19. CH. K/L buttons (p15)
Press to select channels.
20. PLAY B button (p27)
Press to begin disc playback.
21. STOP C button (p27)
Press to stop disc playback.
22. s / B / K / L buttons (p12)
Press to move left/ right/ up/ down
through the items.
23. ENTER button (p12)
Press to confirm your selection.
24. MENU button (p27)
• Press to call up the menu on a disc.
• Press to call up the file list. (MP3)
25. TOP MENU button (p29)
• Press to call up the top menu on a
disc. (DVD-Video)
• Press to return to the top file of the
highest hierarchy in the program and
file list. (MP3)
INTRODUCTION
CONNECTION
INITIAL SETTING DVD SETTING INFORMATION
WATCHING TV
OPTIONAL SETTING
OPERATING DVD
TROUBLESHOOTING
Installing the Batteries
5
Install the batteries (AA x 2) matching the polarity indicated inside battery compartment of the remote control.
21 3
Battery Precautions:
• Be sure to follow the correct polarity as indicated in the battery compartment. Reversed batteries may cause damage to the device.
• Do not mix different types of batteries together (e.g., Alkaline and Carbon-Zinc) or old batteries with fresh ones.
• If the device is not to be used for a long period of time, remove the batteries to prevent damage or injury from possible battery leakage.
• Do not try to recharge batteries; they can overheat and rupture.
7
EN
Page 8

NTRODUCTION
I
Control Panel5
STOP PLAY
SETUP
EJECT
DVD
VOLUME CHANNEL
INPUT
POWER
1. SETUP button (p13 / p37)
1
2
3
4
5
6
7
8
Press to display the main menu.
2. STOP C button (p27)
Press to stop disc playback.
3. PLAY B button (p27)
Press to begin disc playback.
4. EJECT
A
button (p27)
Press to eject the disc.
5. VOLUME X / Y buttons (p15)
Press to adjust the volume.
6. CHANNEL
K/L
buttons (p15)
Press to select channels or move up/down through
the main menu items.
7. INPUT button (p16)
Press to select the digital, analog or external input.
8. POWER button (p12)
Press to turn the unit on and off.
9. Infrared Sensor Window
Receives infrared rays transmitted from the remote
control.
10. Disc Loading Slot (p27)
Insert the disc with label facing back of this unit.
9
10
Rear Panel5
1. ANT jack (p9)
RF coaxial cable connection for your antenna or cable
receiver.
2. HEADPHONE jack
Headphone connection for personal listening.
3. COMPONENT and AUDIO input jack (p10)
Component video cable connection for an external
device.
Use component video and audio output jack of an
external device.
4. AUDIO input jack (p10)
RCA audio cable connection for an external device.
5. VIDEO input jack (p11)
RCA video cable connection for an external device.
1
6. S-VIDEO input jack (p10)
S-video cable connection for an external device.
7. COAXIAL (digital audio) output jack (p11)
2
Digital audio coaxial cable connection for a decoder or
3
an audio receiver.
Use digital audio input jack of an external device.
8. AC power cord
4
Connect to a standard AC outlet to supply power to
5
this unit.
6
7
8
rear of the unit
COMPONENT
VIDEO 2
VIDEOS-VIDEOCOAXIAL
PrPbY
VIDEO 1
PrPbY
COMPONENT
VIDEO 2
COAXIAL
VIDEO 1
LR
AUDIO
LR
AUDIO
LR
LVIDEOS-VIDEO
ANT
HEADPHONE
AUDIO
R
AUDIO
side of the unit
8
EN
Page 9
ONNECTION
(red)
(blue)
(green)
C
Cables not included.
Please purchase the necessary cables at your local store.
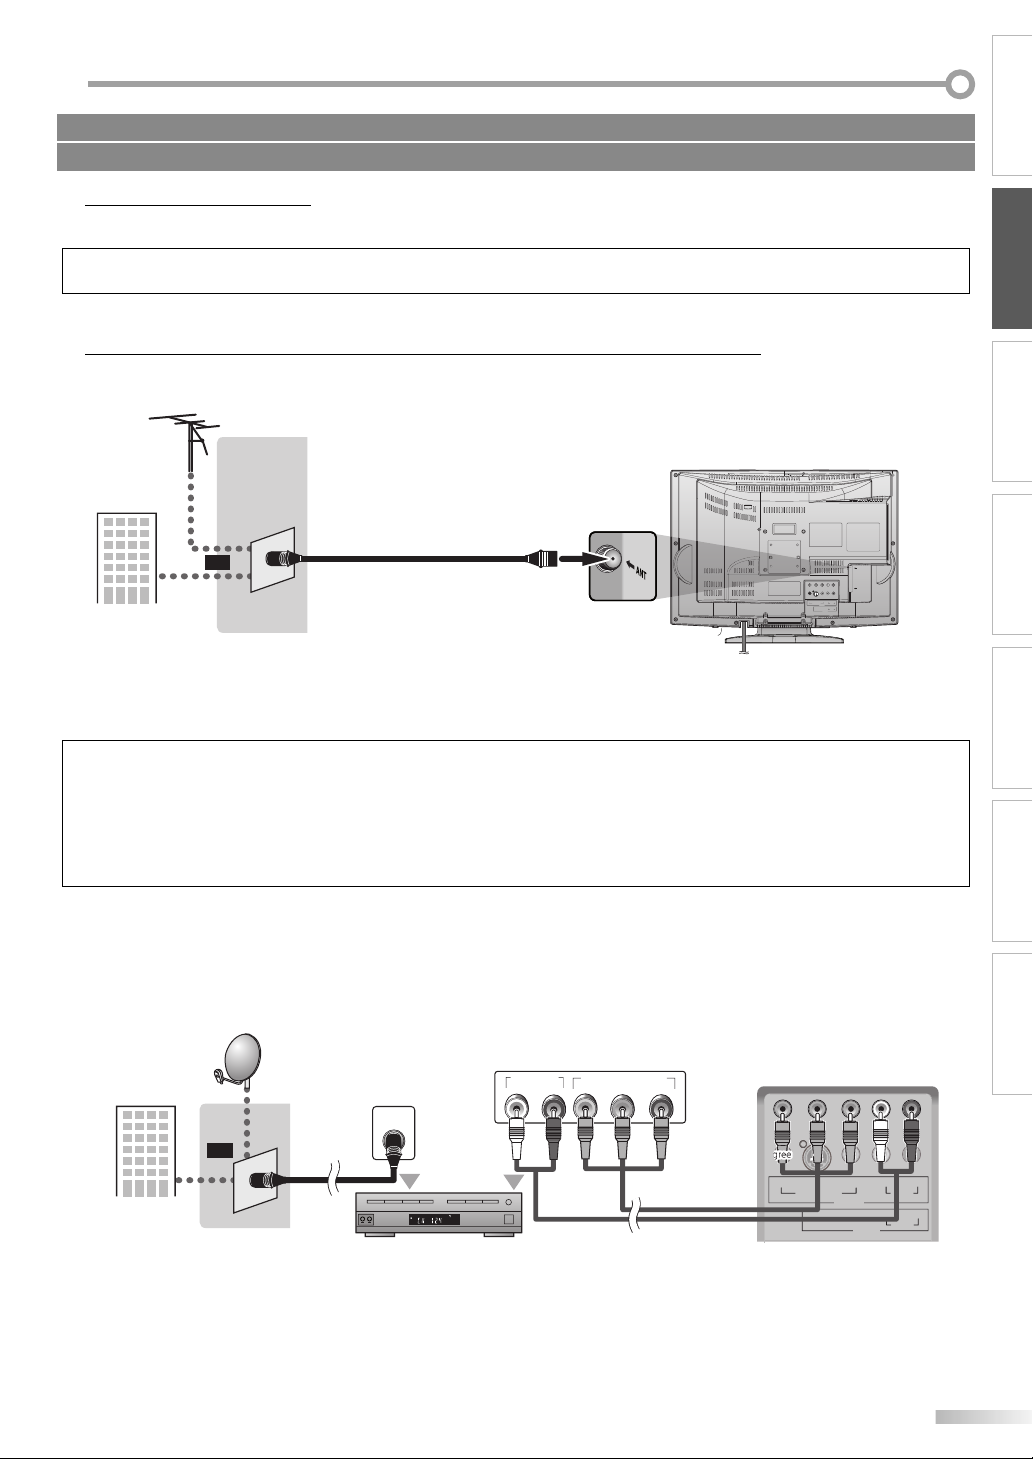
Basic Connection
5
This section describes how to connect the unit to an antenna, cable receiver or satellite box.
Note:
• Be sure your antenna or other device is connected properly before plugging in the power cord.
[Antenna Cable Connection]
When connecting the unit to an antenna or cable TV signal (without receiver/satellite box)
Connect the RF coaxial cable on your home outlet to the antenna input jack of this unit.
e.g.)
VHF / UHF
antenna
RF coaxial cable
or
cable TV
signal
* Once connections are completed, turn on the unit and begin initial setup.
Channel scanning is necessary for the unit to memorize all available channels in your area.
(Refer to “Initial Setup” on page 12.)
rear of this unit
CONNECTION
INITIAL SETTING
WATCHING TVINTRODUCTION
ANT
HEADPHONE
LR
PrPbY
O
AUDI
COMPONENT
VIDEO 2
R
LVIDEOS-VIDEO
COAXIAL
AUDIO
VIDEO 1
OPTIONAL SETTING
Note:
• If you have any question about the DTV’s antenna, visit www.antennaweb.org for further information.
• For your safety and to avoid damage to device, please unplug the RF coaxial cable from the antenna input jack before moving the unit.
• If you use an antenna to receive analog TV, it should also work for DTV reception. Outdoor or attic antennas will be more effective than settop versions.
• To easily switch your reception source between antenna and cable, install an antenna selector.
• If you connect to the cable system directly, contact the CATV installer.
[Connection to Cable Receiver or Satellite Box]
Use an RCA component video cable to connect the component video input jack of the unit to the component video
output jack of the cable receiver / satellite box.
If you connect to the unit’s component video input jack, connect RCA audio cable to the audio L/R jack of VIDEO2.
e.g.)
satellite
cable TV signal
including PPV
dish
or
cable
RF coaxial
ANT IN
STEREO
PCM
AUDIO OUT
RL
COMPONENT VIDEO OUT
cable receiver / satellite box
You can also connect this unit to the cable receiver or satellite box other than the component video output jack
*
because they might have different output jacks.
Required cables and connecting methods of the cable receiver / satellite box, or the availability channel for the clear
*
QAM may differ depending on the cable/satellite provider. For more information, please contact your cable/satellite
provider.
(red)(blue)(green)
Pr/CrPb/CbY
RCA
component
video cable
RCA audio cable
rear of this unit
(blue)
(green)
COMPONENT
(red)
(red)(blue)(green)
VIDEO 2
PrPbY
VIDEOS-VIDEOCOAXIAL
VIDEO 1
LR
AUDIO
LR
AUDIO
TROUBLESHOOTING
INFORMATION
9
EN
Page 10
ONNECTION
(red)
(blue)
(green)
C
Cables not included.
Please purchase the necessary cables at your local store.
External Device Connection
5
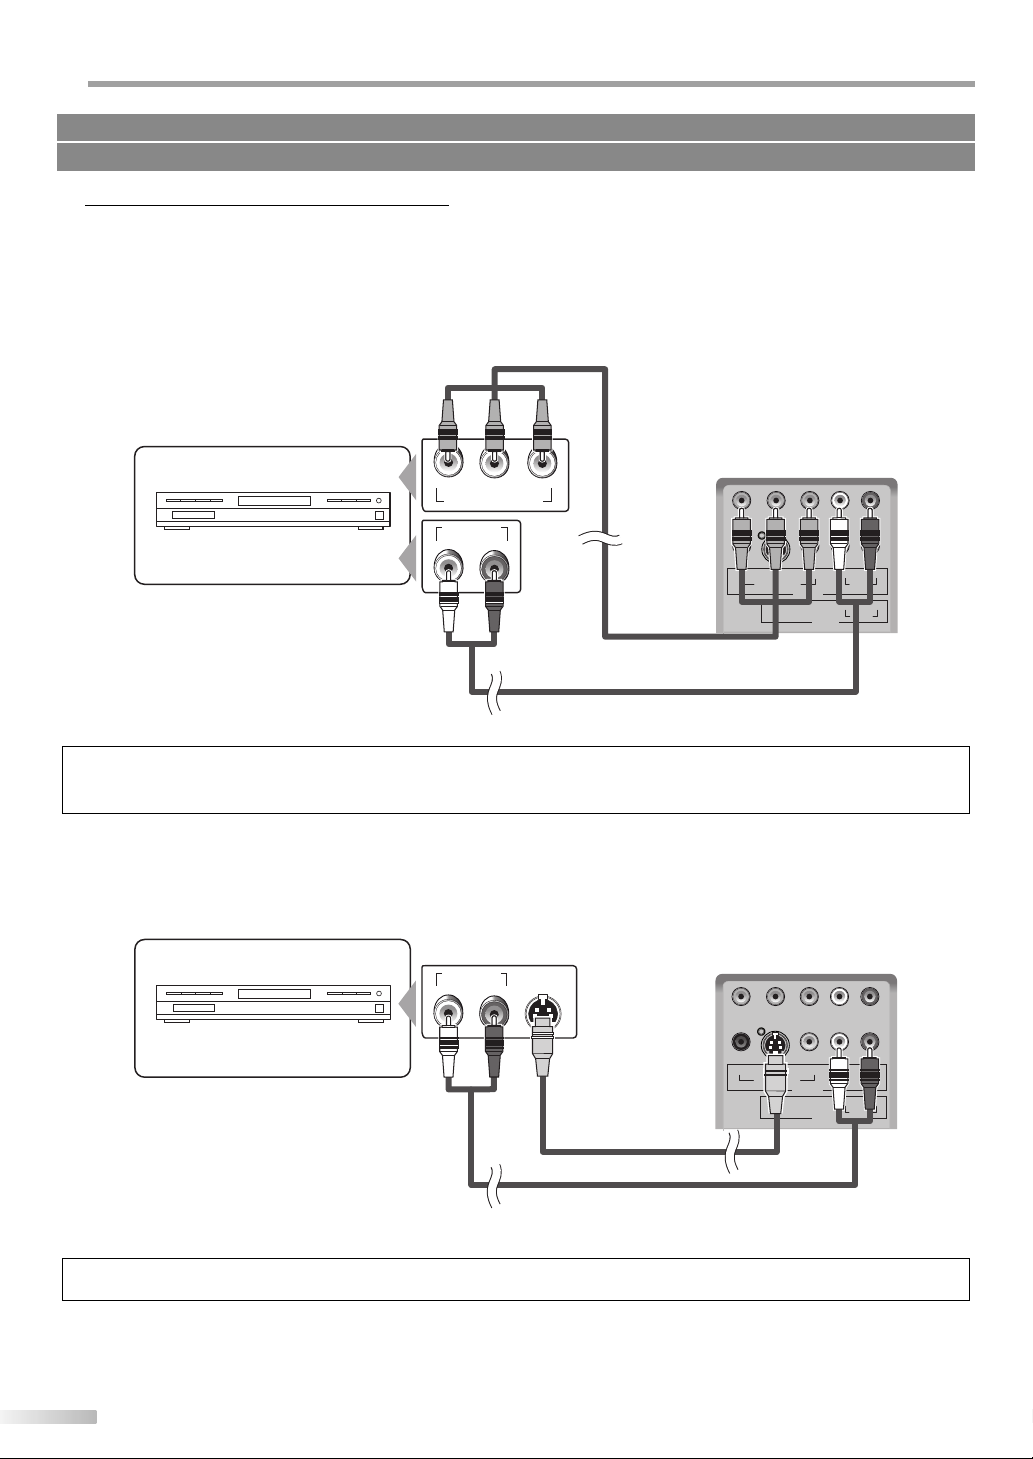
[Component Video Cable Connection]
Component video connection offers better picture quality for video devices connected to the unit.
Use an RCA component video cable to connect the unit to external video devices equipped with component video
output jack.
If you connect to the unit’s component video input jack, connect RCA audio cable to the audio L/R jack of VIDEO2.
RCA component
video cable
(red)(blue)(green)
e.g.)
DVD player with the component
video output jacks
COMPONENT VIDEO OUT
AUDIO OUT
RL
PrPbY
rear of this unit
(blue)
(green)
COMPONENT
VIDEO 2
(red)
(red)(blue)(green)
VIDEOS-VIDEOCOAXIAL
PrPbY
VIDEO 1
LR
AUDIO
LR
AUDIO
RCA audio cable
Note:
• This unit accepts 480i / 480p / simplified 1080i video signals.
• Simplified 1080i video signal differs to the original 1080i video signal because it is displayed after converted into 480p signal.
[S-video Cable Connection]
S-video connection offers good picture quality for video devices connected to the unit.
Use an S-video cable to connect the unit to external video devices equipped with S-video output jack.
If you connect to the unit’s S-video input jack, connect RCA audio cable to the audio L/R jack of VIDEO1.
e.g.)
DVD player with the S-video
output jack
AUDIO OUT
S-VIDEO
OUT
RL
rear of this unit
COMPONENT
VIDEO 2
PrPbY
VIDEOS-VIDEOCOAXIAL
VIDEO 1
LR
AUDIO
LR
AUDIO
S-video cable
RCA audio cable
Note:
• If you connect to the S-video jack and the video jack at the same time, the S-video connection will have priority.
10
EN
Page 11
Cables not included.
Please purchase the necessary cables at your local store.
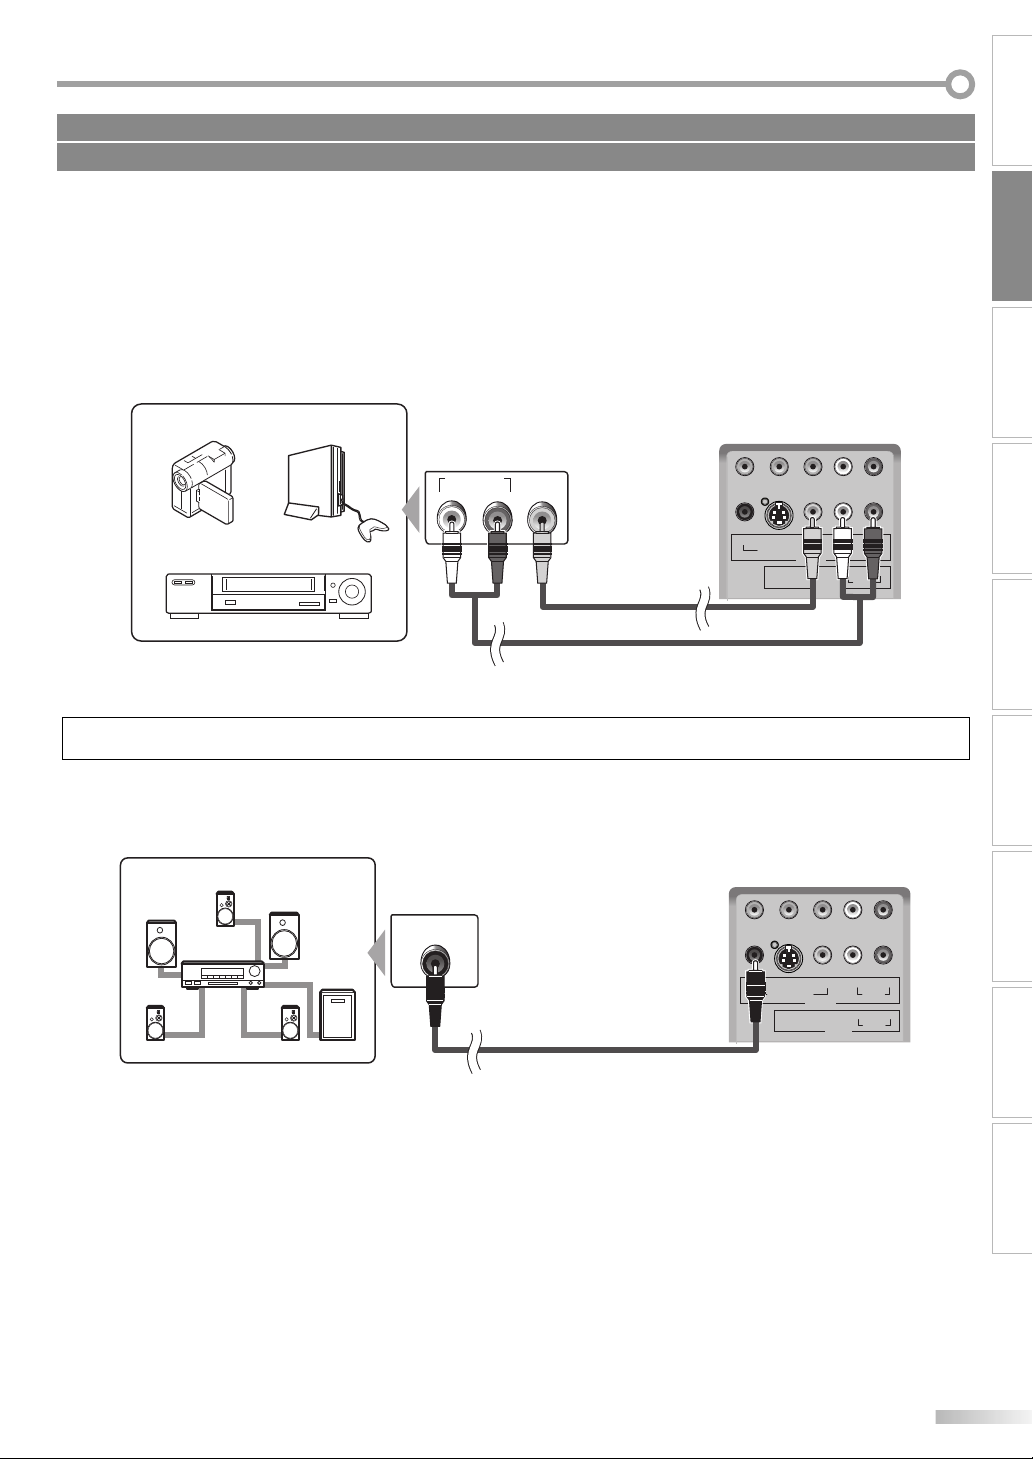
[Video Connection]
Video connection offers standard picture quality for video devices connected to the unit.
If you connect to the unit’s video input jack, connect RCA audio cables to the audio L/R jack of VIDEO1.
When the audio jack of the video device is monaural, connect the RCA audio cable to the audio L input jack.
CONNECTION
INITIAL SETTING DVD SETTING INFORMATION
e.g.)
camcorder video game
VCR
AUDIO OUT
RL
VIDEO
OUT
RCA video cable
RCA audio cable
rear of this unit
COMPONENT
VIDEO 2
PrPbY
VIDEOS-VIDEOCOAXIAL
VIDEO 1
LR
AUDIO
LR
AUDIO
Note:
• If you connect to the S-video jack and the video jack at the same time, the S-video connection will have priority.
[Digital Audio Output Connection]
If you connect this unit to an external digital audio device, you can enjoy multi-channel audio like 5.1ch digital
broadcasting sound.
e.g.)
Dolby Digital decoder
DIGITAL AUDIO
COAXIAL IN
digital audio coaxial cable
rear of this unit
COMPONENT
VIDEO 2
PrPbY
VIDEOS-VIDEOCOAXIAL
VIDEO 1
LR
LR
AUDIO
AUDIO
WATCHING TV
OPTIONAL SETTING
OPERATING DVDINTRODUCTION
TROUBLESHOOTING
EN
11
Page 12
NITIAL SETTING
I
These operations are accessible by remote control. Some may also be accessible by controls on the main unit.
Initial Setup
5
This section will guide you through the unit’s initial setting which includes
selecting a language for your on-screen menu and “AUTO PRESET CH”, which
automatically scans and memorizes viewable channels.
Before you begin:
Make sure if the unit is connected to antenna or cable.
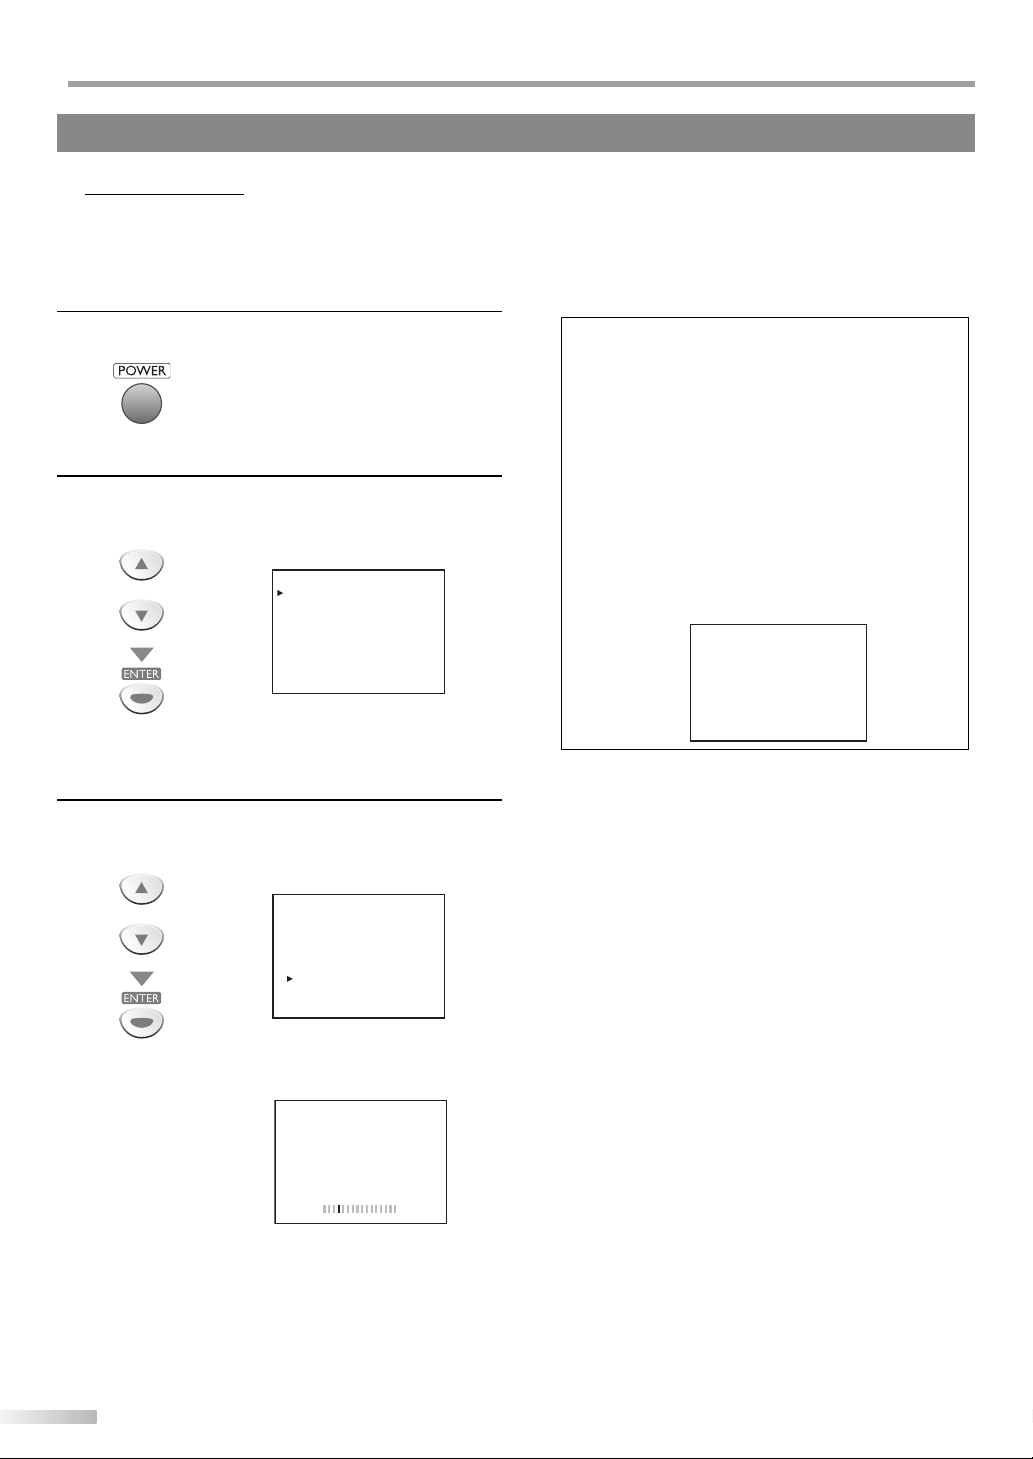
After making all the necessary connections, press
1
[POWER] to turn on the unit.
• This operation may take a few moments.
Use [Cursor K /L] to select the on-screen language
2
from the choices on the right side of the TV screen.
(ENGLISH / ESPAÑOL / FRANÇAIS)
or
SELECT LANGUAGE
SELECCIONE EL IDIOMA
CHOISIR LA LANGUE
SELECT : K,
SELECCIONE : K,
CHOIX : K,
• “INITIAL SETUP“ menu on step 3 will be displayed in
the selected language after you press [ENTER].
, L
, L
, L
ENGLISH
ESPAÑOL
FRANÇAIS
SET
AJUSTE
VALIDER
:
ENTER
:
ENTER
:
ENTER
Note:
• If you connect the cable system directly, contact the CATV
installer.
• If you press [POWER] or [SETUP] during “AUTO PRESET CH”,
this setting will be canceled.
• The initial auto channel scan function can be executed for
either TV/DTV or CATV only once. If you want to scan both
TV/DTV and CATV, you need to select “CHANNEL SETUP” in
the main menu to scan and memorize other channels after
initial presetting is completed. (Refer to page 13.)
• When no channel can be received by “AUTO PRESET CH”,
“NO TV SIGNALS” is displayed on the TV screen.
• If there is no signal input from the antenna terminal and
no operation for several seconds after you turn on the unit,
“HELPFUL HINTS” appears. Follow the instructions listed on
the TV screen.
- HELPFUL HINTS -
1. PLEASE CHECK TO SEE IF THE
ANTENNA / CABLE / SATELLITE IS
PROPERLY CONNECTED.
2. DID YOU PERFORM “AUTO PRESET CH”?
3. PLEASE REFER TO FRONT PAGE OF THE
OWNER’S MANUAL OR REAR PANEL FOR
SUPPORT LINE INFORMATION.
Use [Cursor K /L] to select “AUTO PRESET CH(TV/DTV)”
3
for TV channels or “AUTO PRESET CH(CATV)“ for CATV
channels, then press [ENTER].
or
- INITIAL SETUP -
PLEASE CONNECT ANTENNA OR CABLE
OR SATELLITE TO THIS UNIT.
AUTO PRESET CH(TV/DTV)
AUTO PRESET CH(CATV)
• Scanning and memorizing the channels automatically
start.
25
AUTO PRESET CH(TV/DTV)
• When the scanning and memorizing are completed,
the lowest memorized channel in the broadcasting
will be displayed.
12
EN
Page 13
Main Menu
5
This section describes the overview of the main menu displayed when you
press [SETUP]. For more details, see the reference page for each item.
The main menu consists of the function setting items below.
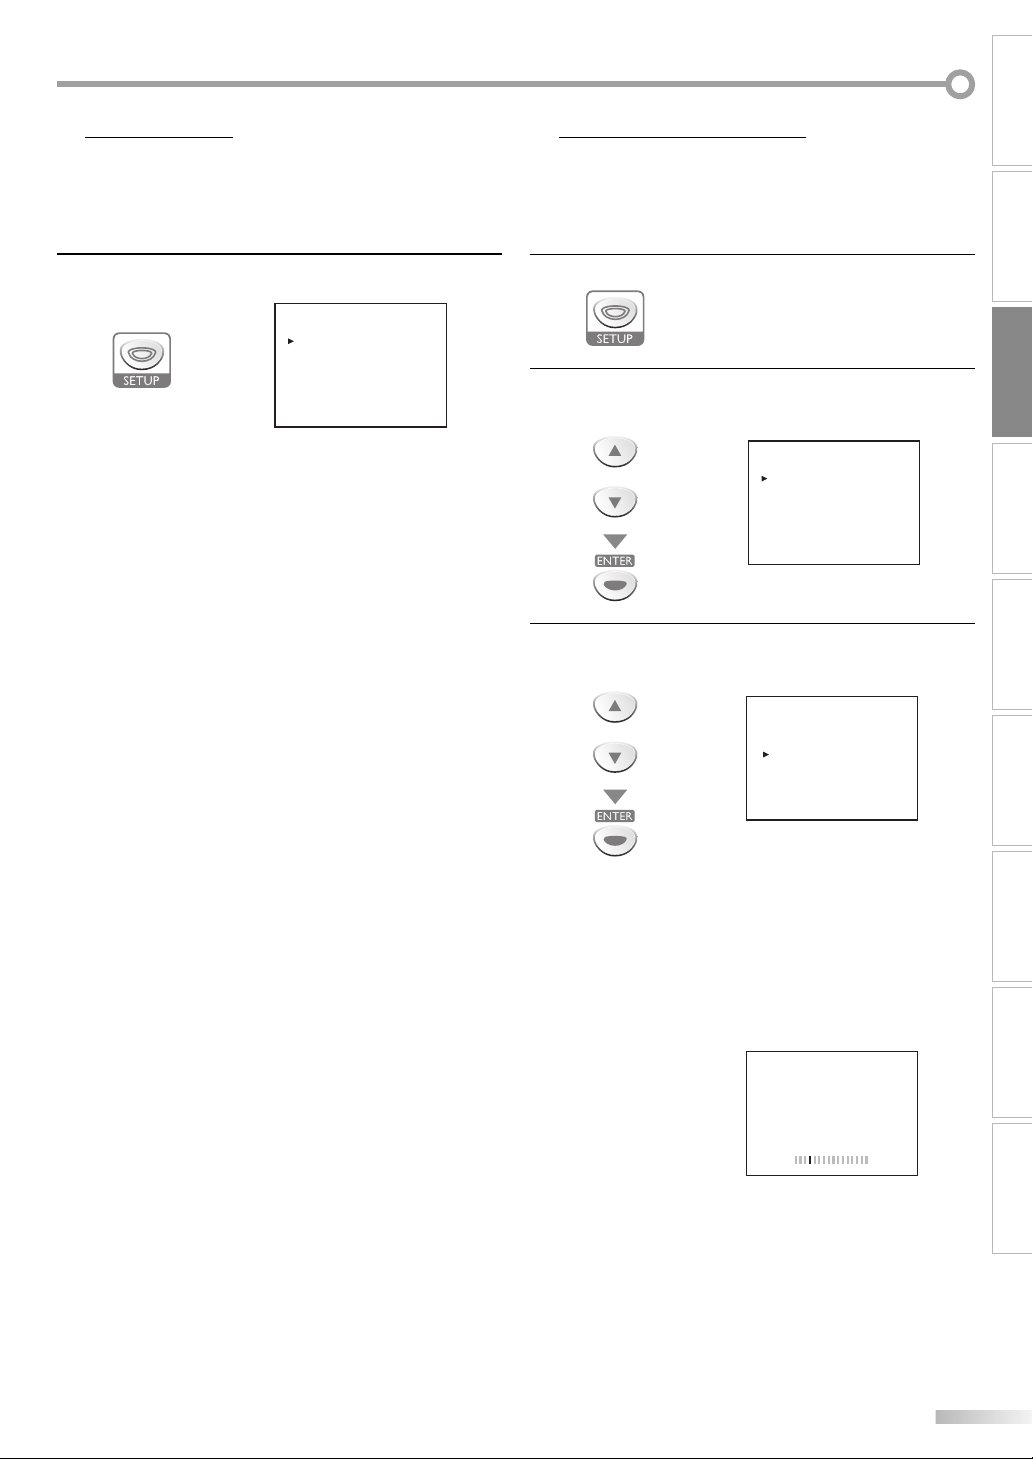
Press [SETUP].
e.g.) digital TV mode
- TV SETUP -
CHANNEL SETUP
V-CHIP SETUP
LANGUAGE [ENGLISH]
CAPTION [OFF]
BACK LIGHT [BRIGHT]
COLOR TEMP. [NORMAL]
DTVCC
• CHANNEL SETUP
You can automatically scan the viewable channels and
remove those that are undesired.
(Refer to “Auto Channel Scan” on page 13.)
• V-CHIP SETUP
You can set the viewing limitations.
(Refer to “V-chip” on page 23.)
• LANGUAGE
You can change the language (English, Spanish,
French) displayed on the main menu.
(Refer to “Language Selection” on page 14.)
• CAPTION
You can change the display format for closed caption,
which displays the dialogue of a TV program or other
information across the TV screen.
(Refer to “Closed Caption” on page 20.)
• BACK LIGHT
You can set the desired brightness mode. (Refer to
“Back Light Setting” on page 22.)
• COLOR TEMP.
You can adjust color temperature (“NORMAL”, “WARM”
and “COOL”)
(Refer to “Color Temperature” on page 23.)
• DTVCC
In addition to the basic closed caption described
on page 20, DTV has its own closed caption called
DTVCC.
(Refer to “DTV Closed Caption” on page 21.)
Auto Channel Scan
5
If you switch wires (e.g., between antenna and CATV) or if you move the TV
to a di erent area after the initial setting, or if you restore the DTV channel
you deleted, you will need to perform auto channel scan.
Before you begin:
Make sure if the unit is connected to antenna or cable.
Press [SETUP] to display the main menu.
1
Use [Cursor K/L] to select “CHANNEL SETUP”, then
2
press [ENTER].
e.g.) digital TV mode
- TV SETUP -
or
Use [Cursor K/L] to select your desired preset type,
3
then press [ENTER].
e.g.) digital TV mode
or
• When aerial antenna is connected, select “AUTO
PRESET CH(TV)”, “AUTO PRESET CH(DTV)” or “AUTO
PRESET CH(TV/DTV)”.
• When connected to CATV, select “AUTO PRESET CH
(CATV)”.
• Scanning and memorizing the channels automatically
start.
e.g.) digital TV mode
CHANNEL SETUP
V-CHIP SETUP
LANGUAGE [ENGLISH]
CAPTION [OFF]
BACK LIGHT [BRIGHT]
COLOR TEMP. [NORMAL]
DTVCC
--- CHANNEL SETUP ---
ADD/DELETE (DTV)
AUTO PRESET CH (DTV)
AUTO PRESET CH (TV/DTV)
AUTO PRESET CH (CATV)
! CATV takes approx. 50min.
D25
CONNECTION
INITIAL SETTING
WATCHING TV
OPTIONAL SETTING
OPERATING DVDINTRODUCTION
DVD SETTING INFORMATION
TROUBLESHOOTING
AUTO PRESET CH(DTV)
• When the scanning and memorizing are completed,
the lowest memorized channel will be displayed.
• When you selected “AUTO PRESET CH(TV/DTV)”, the
lowest memorized analog channel will be displayed
when the scanning and memorizing are completed.
If there is no analog channel, the lowest memorized
digital channel will be displayed.
13
EN
Page 14
NITIAL SETTING
I
Note:
• If you connect the cable system directly, contact the CATV
installer.
• If you press [POWER] or [SETUP] during auto channel scan,
the setting will be canceled.
• When no channel can be received by auto channel scan,
“NO TV SIGNALS” will be displayed on the TV screen.
• Channel settings will be saved even if the power fails.
• If you have Spanish or French menus and need English,
press [SETUP]. Use [Cursor K/L] to select “IDIOMA”
or “LANGAGE”. Press [ENTER] to select “ENGLISH”. Press
[SETUP] to remove the main menu.
• With regard only to the digital channel, even after the
scanning is complete if you unplug the AC power cord
before turning off the unit by pressing [POWER], the
channel setting may be lost.
Language Selection
5
You can choose English, Spanish, or French as your on-screen language.
Press [SETUP] to display the main menu.
1
Use [Cursor K /L] to select “LANGUAGE”, then press
2
[ENTER] repeatedly to change the setting.
e.g.) digital TV mode
- TV SETUP -
or
CHANNEL SETUP
V-CHIP SETUP
LANGUAGE [ENGLISH]
CAPTION [OFF]
BACK LIGHT [BRIGHT]
COLOR TEMP. [NORMAL]
DTVCC
Press [SETUP] to exit.
3
[ENGLISH]
[ESPAÑOL]
[FRANÇAIS]
14
EN
Page 15
ATCHING TV
W
Channel Selection
5
Select channels by using [CH.
• To select the memorized channels, use [CH.
[the Number buttons].
• To select the non-memorized channels, use
[the Number buttons].
To Use [the Number buttons]
TV
- When selecting analog channel 12
DTV
- When selecting digital channel 12-1
Be sure to press [–/ENT.] before entering the minor
channel number.
• Press [CH. RETURN] to return to the previously
viewed channel.
• When you select a channel larger than 100, press
[+10/+100] first. Then use [the Number buttons] to
press the lower 2-digit numbers.
About digital TV broadcasting:
With its high definition broadcast, digital broadcasting
far surpasses analog broadcasting in both its picture
and sound quality.
What is the minor channel?
By using high compression technology, digital
broadcasting offers a service that enables multiple
signals to send simultaneously.
Therefore, you can select more than one program per
major channel since digital broadcasting technology
distinguishes between multiple channels broadcast by
a single network.
NTSC (analog mode)
CH4
K
] or [the Number buttons].
/L
[Air Time]
18:00
18:30
19:00
19:30
20:00
20:30
ATSC (digital mode)
CH4
(high denition TV)
CH4
CH4
K
No signal No signal
CH4
CH4-1
No signal
CH4-1CH4 CH4-2
/L] or
No signal
CH4-2
Volume Adjustment
5
This section describes how to adjust the volume. The mute function, which
turns the sound off and on, is also described.
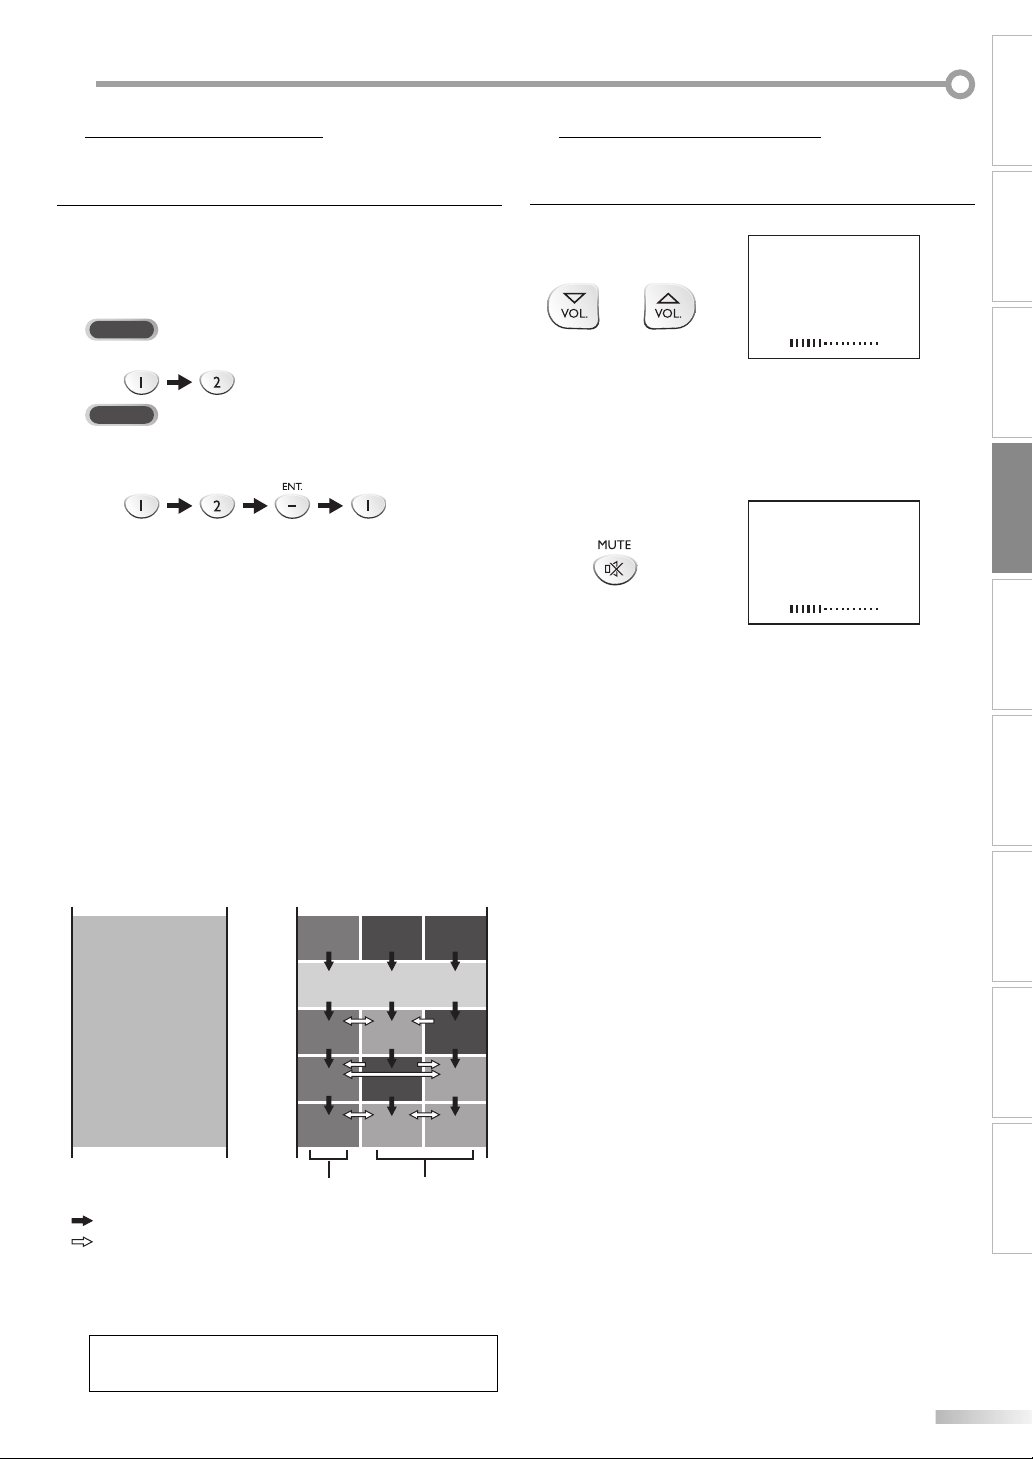
Use
[VOL. X/Y] to adjust the audio volume
.
or
VOLUME 20
• The volume bar will be displayed at the bottom of the
TV screen when adjusting the volume.
• The volume bar display will automatically disappear in
a few seconds.
Press [MUTE] to turn off and on the sound.
• “MUTE” is displayed on the TV screen for a few
seconds.
Press [MUTE] again or use [VOL. X/Y] to recover the
original volume.
MUTE 20
CONNECTION
INITIAL SETTING DVD SETTING INFORMATION
WATCHING TV
OPTIONAL SETTING
OPERATING DVDINTRODUCTION
TROUBLESHOOTING
major channel
: change automatically
: change manually by using [CH. K/L]
Although, you cannot watch the high definition TV
(HDTV) program, the unit converts the HDTV signal
down to the standard definition TV signal.
minor channel
Note:
• “NO SIGNAL” will appear on the TV screen after the minor
channel broadcast is over.
15
EN
Page 16
ATCHING TV
NOW SCANNING
W
Switching Each Mode
5 Switching Audio Mode
You can easily switch with the remote control to the DTV (ATSC) and TV
(NTSC) or to access an external device when they are connected to the unit.
5
This section describes how to switch the audio in the analog mode and how
to switch the audio language in the digital mode.
TV
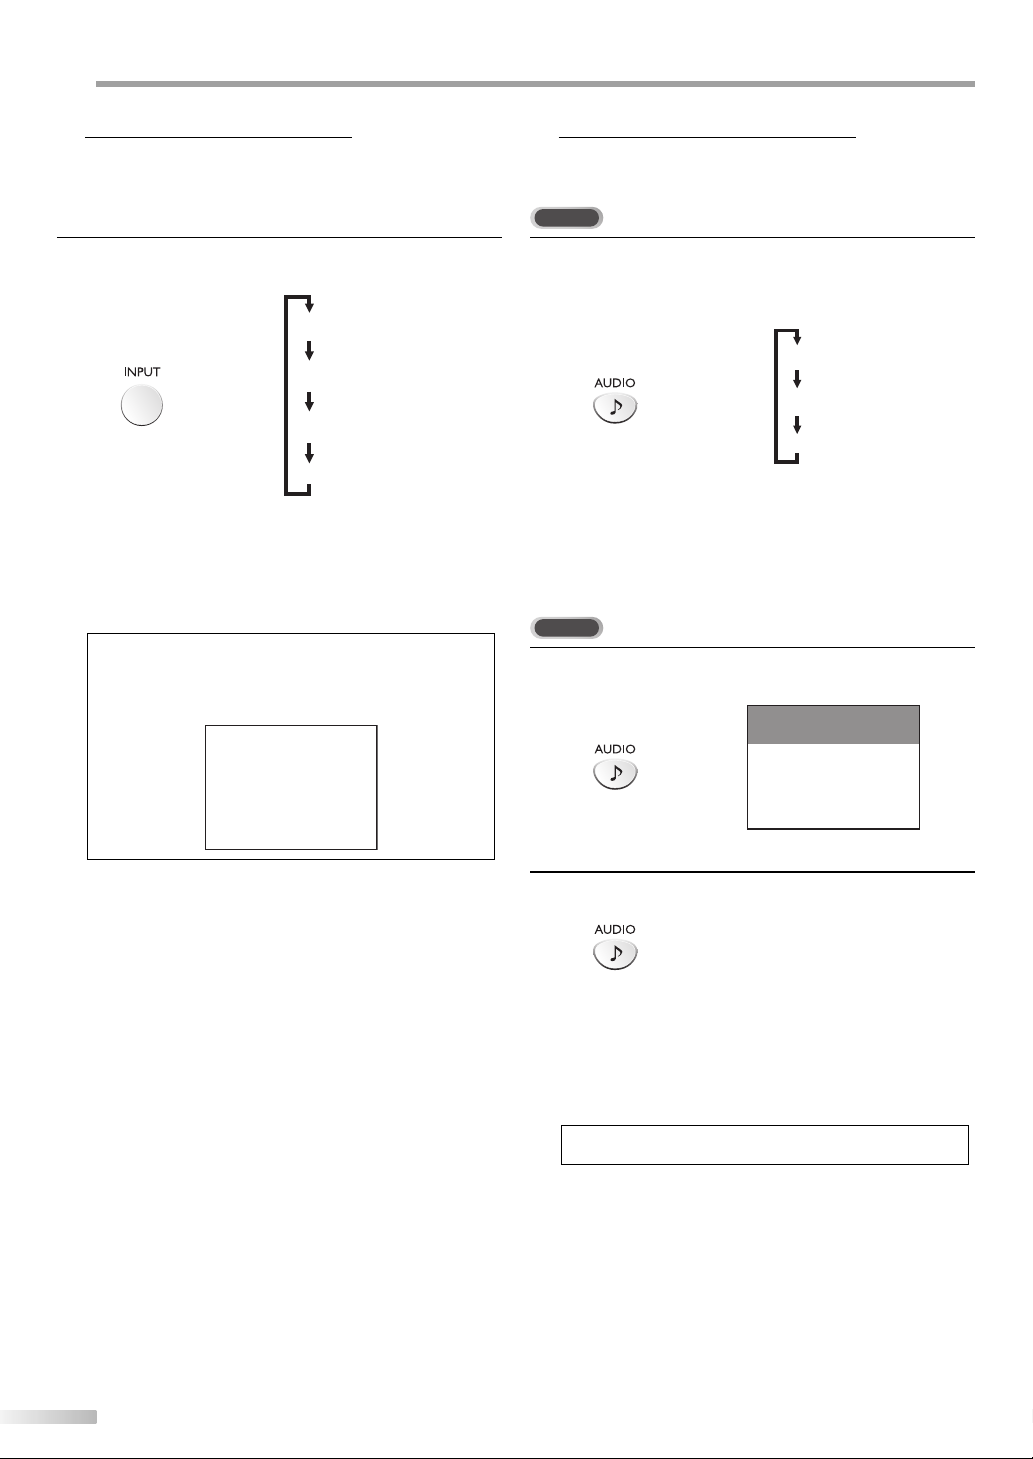
Press [INPUT] repeatedly to cycle through input
1
modes.
[ANALOG MODE]
[DIGITAL MODE]
[VIDEO1]
• To use the video or S-video input jack on the unit,
select “VIDEO1”.
• To use the component video input jack on the unit,
select “VIDEO2”.
[VIDEO2]
Note:
• When you switch the analog mode to the digital mode,
it may take a while until the digital channel selection is
completed. The following TV screen is displayed while
switching the mode.
While receiving an MTS broadcast, press [AUDIO]
repeatedly to cycle through the available audio
channel.
[MAIN]
[SAP]
MAIN : Outputs main-audio
SAP : Outputs second audio program
MONO : Outputs mono-audio
• The information display will automatically disappear
in a few seconds.
DTV
Press [AUDIO] to display the currently selected
1
language and the number of available languages.
[MONO]
KABC CH 95-03
A Day of Memories
ENGLISH 1/3
16
EN
Press [AUDIO] repeatedly to cycle through the available
2
audio languages.
• Available languages differ depending on the
broadcast. “OTHER” is displayed when the audio
language cannot be acquired, or the acquired
languages are other than English, Spanish or French.
• The information display will automatically disappear
in a few seconds.
Note:
• Pressing [AUDIO] does not control external audio device.
Page 17

Screen Information
[OFF]
[BROADCASTING INFORMATION]
[PROGRAM GUIDE]
VIDEO 1
5
You can display the currently selected channel or other information such as
the audio mode on the TV screen.
TV
In the analog mode, the current channel number is displayed.
DTV
In the digital mode, the detailed broadcasting information for the current
channel such as program title, program guides are displayed.
CONNECTION
Press [DISPLAY].
• The current channel number is displayed at the topright corner of the TV screen.
• To clear the display, press [DISPLAY] again.
CH 10
Press [DISPLAY] repeatedly to cycle through the
available display modes.
[Broadcasting Information]
• The following information is displayed.
1 channel number
2 broadcast station
3 program title
4 audio language
(Refer to “Switching Audio Mode” on page 16.)
2
KABC CH 95-03
A Day of Memories
3
ENGLISH 1/3
4
[Program Guide]
• The program guide added to broadcasting
information is displayed.
KABC CH 95-03
A Day of Memories
ENGLISH 1/3
A quarter-century ago, which may now
program
guide
qualify as the good old days of newspapering, run-of-paper sales accounted
for 80 percent of the industry’s advertising revenues.
Next - Push L Key Back - Push K Key
INITIAL SETTING DVD SETTING INFORMATION
WATCHING TV
OPTIONAL SETTING
1
OPERATING DVDINTRODUCTION
TROUBLESHOOTING
Note:
• When the program guide consists of more than 6 lines, use
[Cursor K/ L] to scroll.
• “No description provided” is displayed when the program
guide is not provided.
• While the program guide is displayed, the closed caption
function is interrupted.
• In external input mode, the following screen is displayed;
e.g.) When an external device is connected to VIDEO1 input
jack.
• The information display will automatically disappear in a
few seconds when the closed caption is on.
17
EN
Page 18
ATCHING TV
ZOOMLETTERBOX
W
TV Screen Display Mode
5 Sleep Timer
DTV
2 types of display modes can be selected in the digital mode when the
broadcasting station is sending 16:9 video signal.
5
The sleep timer can be set to automatically turn o the unit after an
incremental period of time.
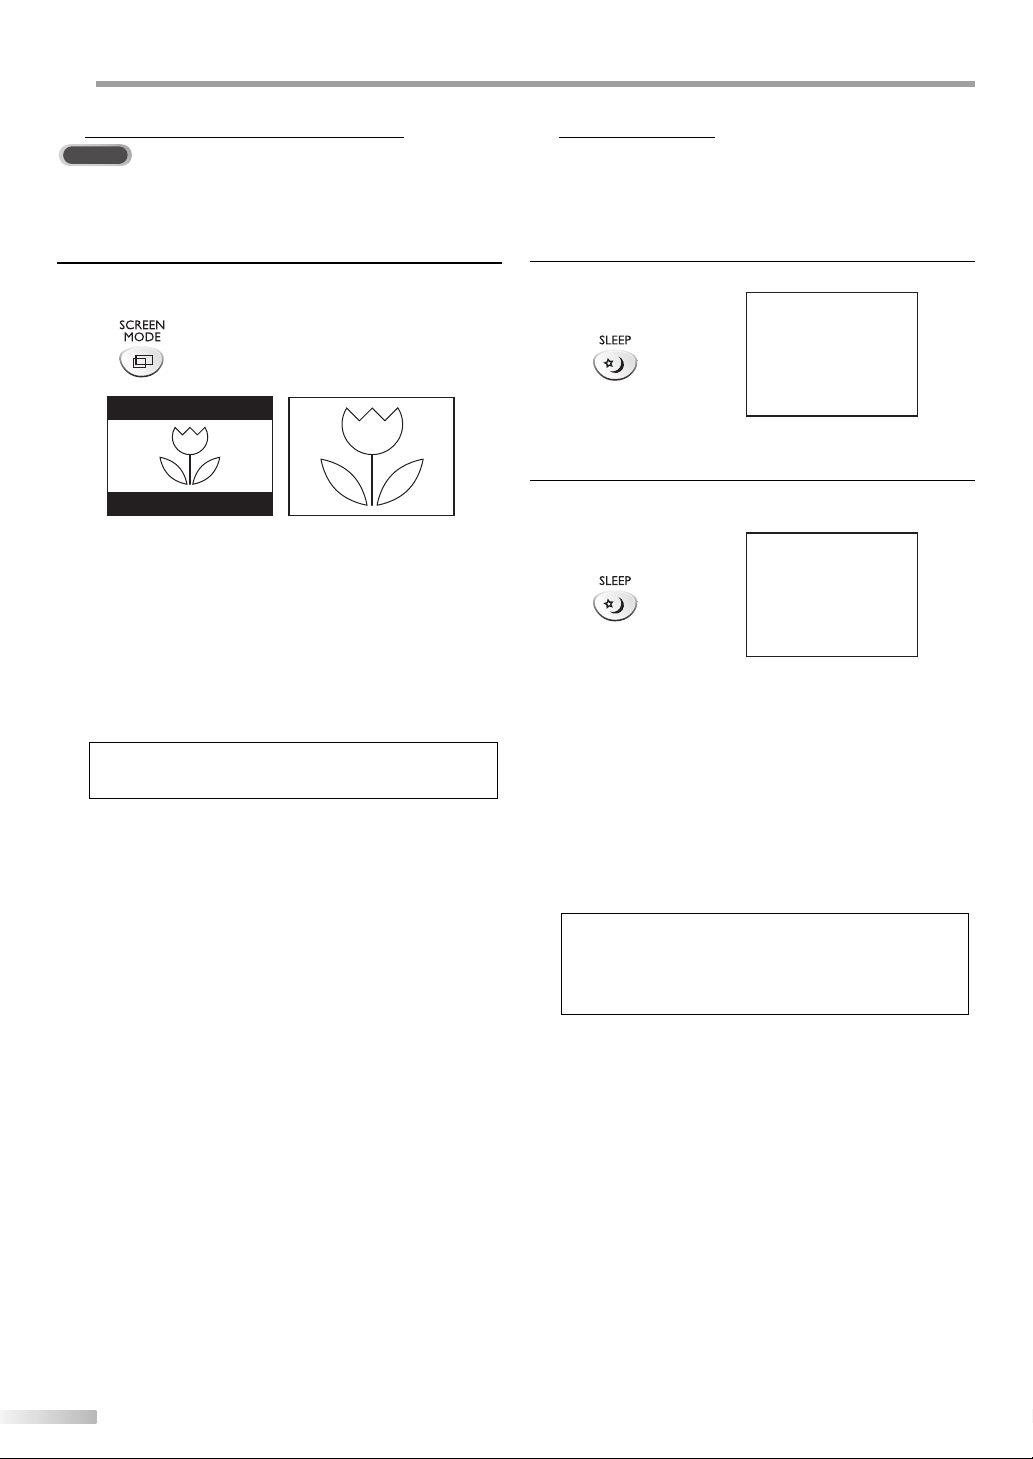
Press [SCREEN MODE] repeatedly to switch the TV
aspect ratio.
[LETTERBOX]
Display the digital-supported program in full-screen.
Black borders will spread in the upper and lower
screen.
[ZOOM]
Enlarge and display the center area of the digital-
supported program.
The right and left side of image will be cut off.
Note:
• You may not switch the display mode depending on the
program.
Press [SLEEP] to set the sleep timer.
1
SLEEP OFF
• Sleep timer display appears on the TV screen.
Press [SLEEP] repeatedly to change the amount of
2
time until shut off.
SLEEP 120MIN.
• You can set your unit to turn off after a set period of
time (from 30 to 120 minutes).
• Each press of [SLEEP] will increase the time by 30
minutes.
• After set up, the sleep timer display can be called up
for checking by pressing [SLEEP].
To Cancel the Sleep Timer
Press [SLEEP] repeatedly until “SLEEP OFF“ is displayed
on the TV screen.
18
EN
Note:
• The sleep timer setting display will automatically disappear
in 10 seconds.
• When you disconnect the unit from the AC outlet or when a
power failure occurs, the sleep timer setting will be canceled.
Page 19
PTIONAL SETTING
O
Channel Add/Delete
5
The channel add/delete function lets you add the channel that was not
added by the auto channel scan due to the reception status at the initial
setting. You can also delete the unnecessary channels.
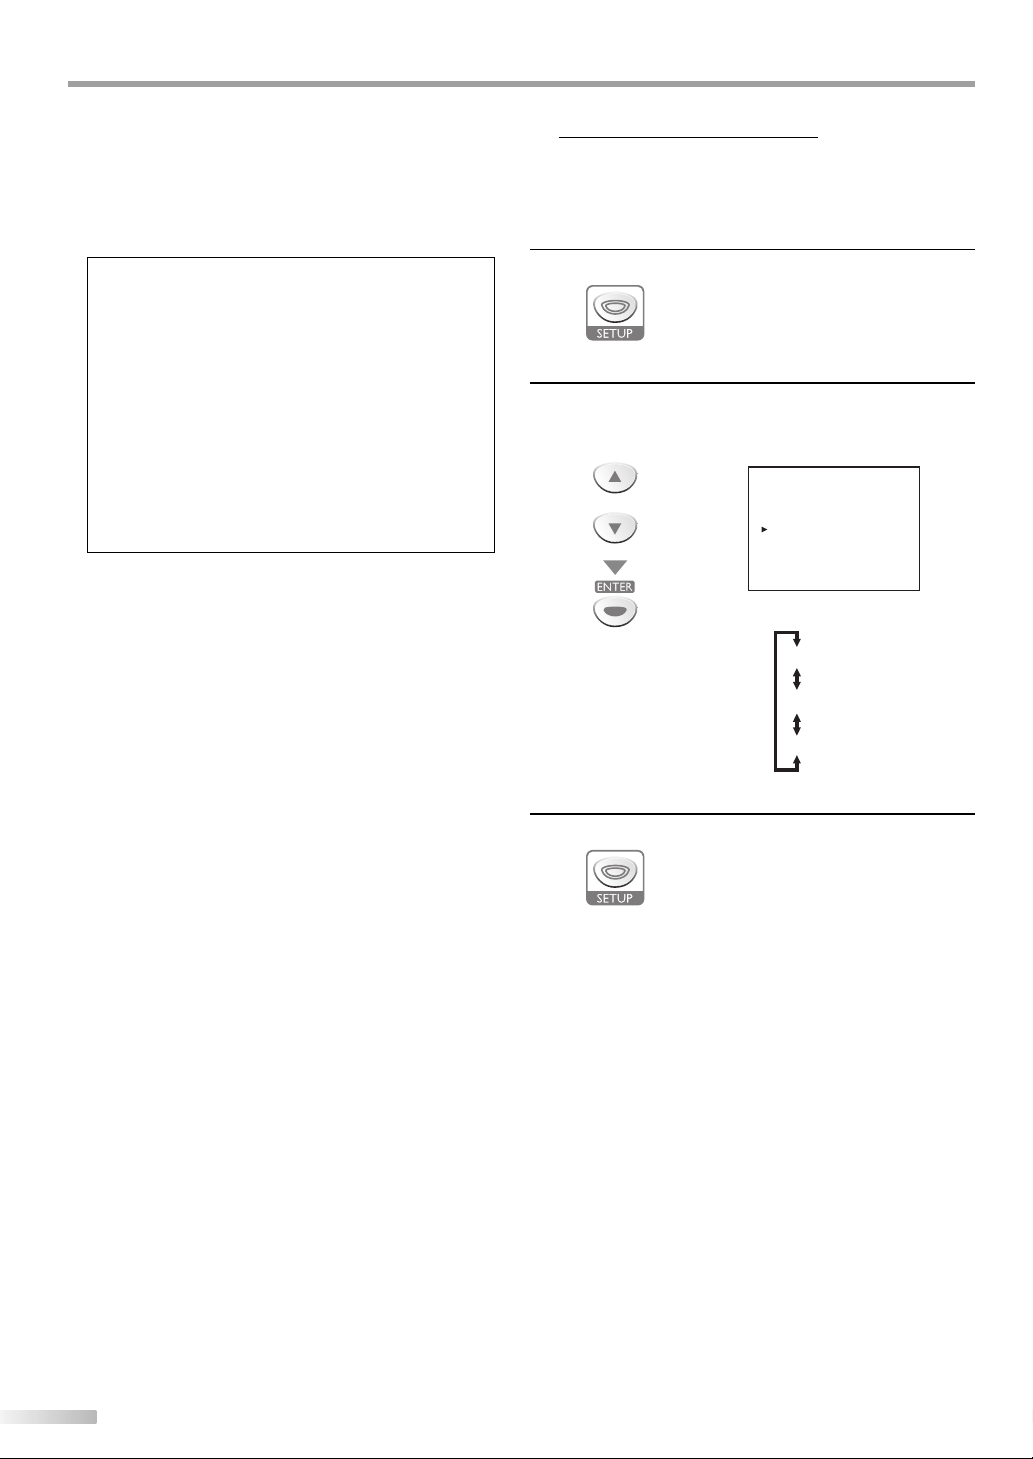
Press [SETUP] to display the main menu.
1
Use [Cursor K/L] to select “CHANNEL SETUP”, then
2
press [ENTER].
e.g.) digital TV mode
- TV SETUP -
or
Use [Cursor K/L] to select “ADD/DELETE(DTV)” or
3
“ADD/DELETE”, then press [ENTER].
e.g.) digital TV mode
or
CHANNEL SETUP
V-CHIP SETUP
LANGUAGE [ENGLISH]
CAPTION [OFF]
BACK LIGHT [BRIGHT]
COLOR TEMP. [NORMAL]
DTVCC
--- CHANNEL SETUP ---
ADD/DELETE (DTV)
AUTO PRESET CH (DTV)
AUTO PRESET CH (TV/DTV)
AUTO PRESET CH (CATV)
! CATV takes approx. 50min.
Note:
• ”ADD/DELETE(DTV)” or “ADD/DELETE” menu will disappear
automatically in a few seconds.
• In the digital mode (DTV), you can add or delete channels
only for major channel.
• Once you delete a DTV channel, you cannot recover the
channel without performing auto channel scan again.
(Refer to “Auto Channel Scan” on page 13.)
Picture Adjustment
5
You can adjust brightness, contrast, color, tint and sharpness.
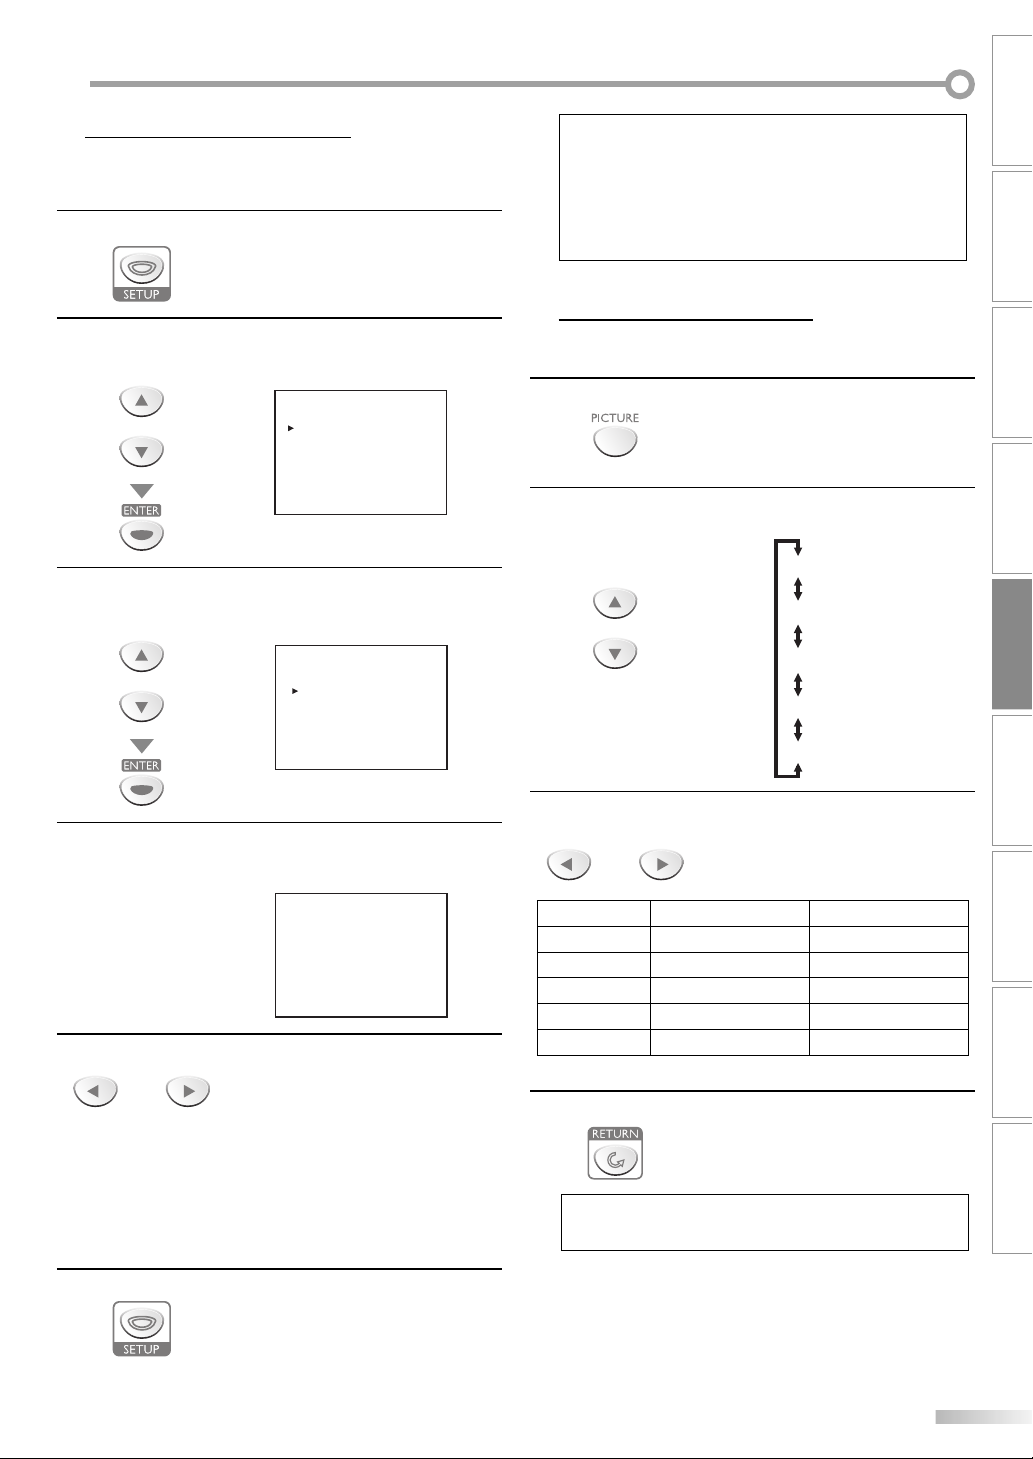
Press [PICTURE] to adjust the picture quality.
1
Use [Cursor K /L] to select the picture quality type you
2
want to adjust.
[BRIGHTNESS]
or
[CONTRAST]
[COLOR]
[TINT]
[SHARPNESS]
CONNECTION
INITIAL SETTING DVD SETTING INFORMATION
WATCHING TV
OPTIONAL SETTING
OPERATING DVDINTRODUCTION
Select the channel you want to add or delete. (Refer to
4
“Channel Selection“ on page 15.)
e.g.) digital TV mode
Use [Cursor s/ B] to select “ADD” or “DELETE”.
5
• To add or delete another channels, repeat steps 4-5.
• Color of channel number displayed at the right top of
the TV screen indicates;
- Blue: The selected channel will be added.
- Red: The selected channel will be deleted.
Press [SETUP] to exit.
6
D25
ADD/DELETE : DTV
or
Within 5 seconds, use [Cursor s / B] to adjust the
3
quality.
BRIGHTNESS
CONTRAST
COLOR
TINT
SHARPNESS
4
or
Cursor
to decrease brightness to increase brightness
to decrease contrast to increase contrast
to decrease color to brighten color
to add red to add green
to make soft to make clear
Press [RETURN] to exit.
3
Cursor
Note:
• The picture adjustment setting display will automatically
disappear in a few seconds.
4
TROUBLESHOOTING
EN
19
Page 20
PTIONAL SETTING
O
Closed Caption
5
TV
You can view closed captioning (cc) for TV programs, movies and news.
Closed caption refer to text of dialogue or descriptions displayed on-screen
for the hearing impaired.
Press [SETUP] to display the main menu.
1
Use [Cursor K /L] to select “CAPTION”, then press
2
[ENTER] repeatedly to change the setting.
e.g.) digital TV mode
- TV SETUP -
CHANNEL SETUP
V-CHIP SETUP
LANGUAGE [ENGLISH]
CAPTION [OFF]
or
BACK LIGHT [BRIGHT]
COLOR TEMP. [NORMAL]
DTVCC
[OFF]
[CAPTION1]
[CAPTION2]
[CAPTION3]
[CAPTION4]
[TEXT1]
[TEXT2]
[TEXT3]
[TEXT4]
[Caption Mode]
CAPTION1 and TEXT1;
are the primary caption and text services.
The captioning or text is displayed in the same
language as the program’s dialogue
(up to 4 lines of script on the TV screen, where it
does not obstruct relevant parts of the picture).
CAPTION3 and TEXT3;
serve as the preferred data channels.
The captioning or text is often a secondary language.
CAPTION2, CAPTION4, TEXT2 and TEXT4;
are rarely available and broadcasters use them only
in special conditions, such as when “CAPTION1”
and “CAPTION3” or “TEXT1” and “TEXT3” are not
available.
There are 3 display modes according to programs:
•
Paint-on mode:
Displays input characters on the TV screen
immediately.
Pop-on mode:
Once characters are stored in memory, they are
displayed all at once.
Roll-up mode:
Displays the characters continuously by scrolling
(max. 4 lines).
20
EN
Press [SETUP] to exit.
3
Note:
• To show the closed caption on your TV screen, broadcast
signal must contain the closed caption data.
• Not all T V programs and commercials have the closed
caption or all types of the closed caption.
• Captions and texts may not match the T V voice exactly.
• Changing channels may delay the closed caption for a few
seconds.
• Adjusting or muting the volume may delay the closed
caption for a few seconds.
• Abbreviations, symbols and other grammatical shortcuts
may be used in order to keep pace with the on-screen
action. This is not a problem with the unit.
• The caption or text characters will not be displayed while
the main menu or functions display is shown.
• If a black box appears on the TV screen, this means that the
closed caption is set to TEXT mode. To clear the box, select
“CAPTION 1”, “CAPTION 2”, “CAPTION 3, “CAPTION 4” or
“OFF”.
• If the unit receives poor quality television signals, the
captions may contain errors, or there might be no captions
at all. Some possible causes of poor quality signals are:
- Automobile ignition noise
- Electric motor noise
- Weak signal reception
- Multiplex signal reception (ghosts or screen flutter)
• The unit retains the closed caption setting if the power fails.
Page 21
DTV Closed Caption
5
DTV
In addition to the basic closed caption described on page 20, DTV has its
own closed caption called DTVCC. Use this menu to change the settings for
DTVCC.
DTVCC Style
5
DTV
You can change the style of DTV CC such as font, color or size, etc.
CONNECTION
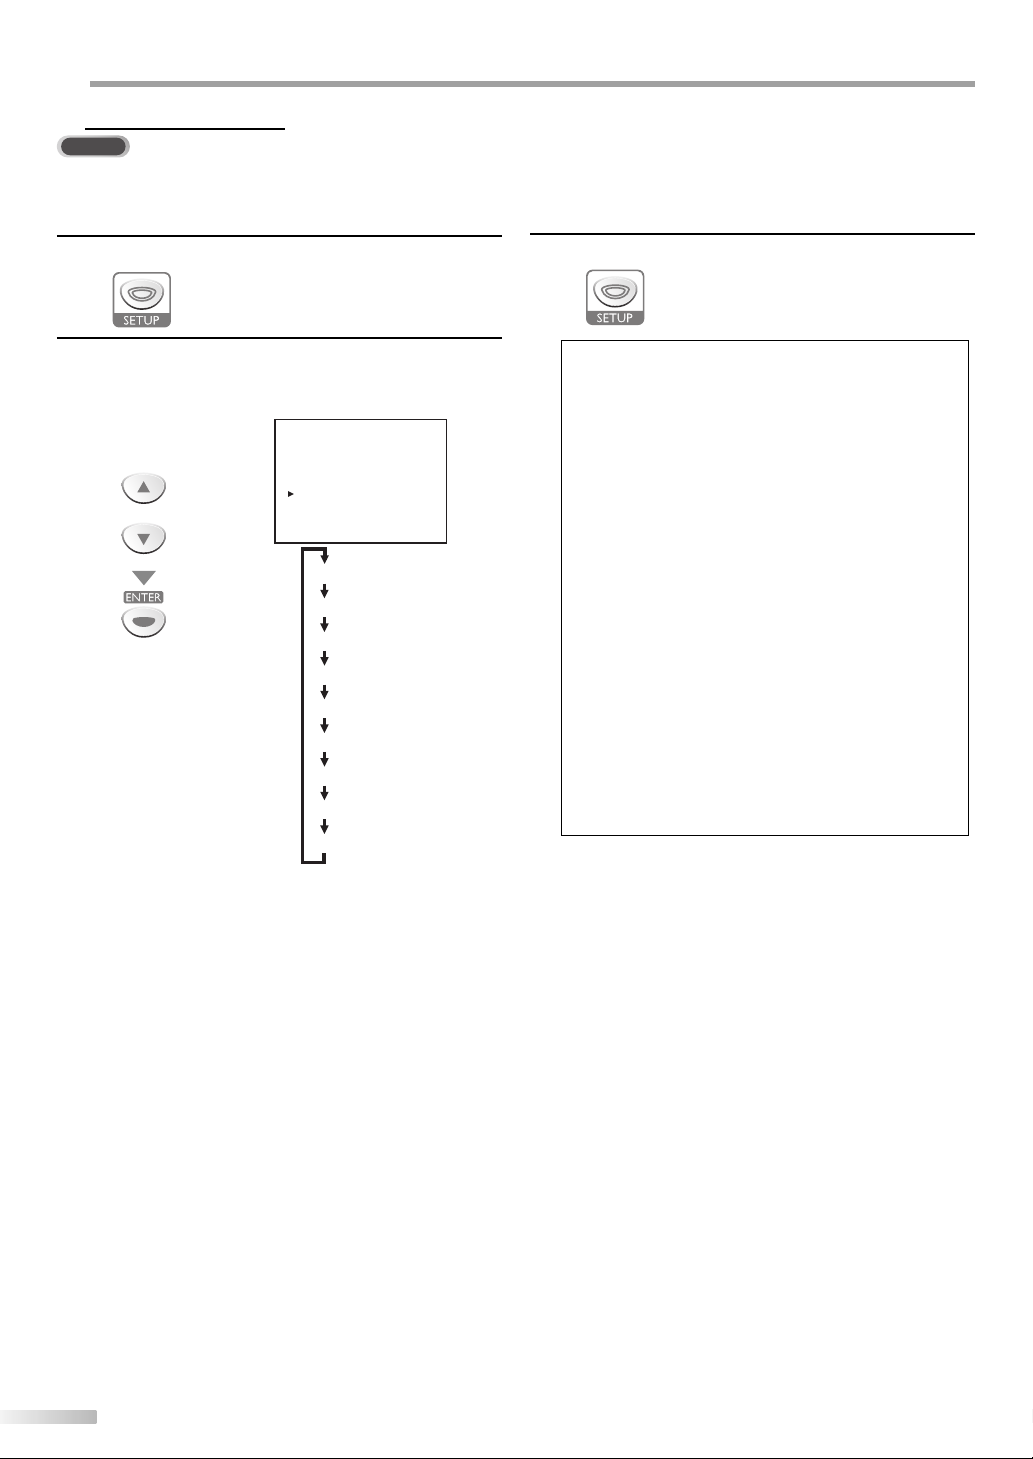
Press [SETUP] to display the main menu.
1
Use [Cursor K /L] to select “DTVCC“, then press
2
[ENTER].
e.g.) digital TV mode
- TV SETUP -
or
Use [Cursor K /L] to select “CAPTION SERVICE“, then
3
CHANNEL SETUP
V-CHIP SETUP
LANGUAGE [ENGLISH]
CAPTION [OFF]
BACK LIGHT [BRIGHT]
COLOR TEMP. [NORMAL]
DTVCC
press [ENTER] repeatedly to change the setting.
- DTVCC -
or
CAPTION SERVICE
Press [SETUP] to exit.
4
OFF
SERVICE1~6
CAPTION SERVICE [SERVICE1/6]
USER SETTING [ON]
CAPTION SIZE [MIDDLE]
FONT STYLE [STYLE1/8]
CHARACTER EDGE [NONE]
FORE OPACITY [SOLID]
FORE COLOR [WHITE]
BACK OPACITY [SOLID]
BACK COLOR [BLACK]
Select if you do not want
DTVCC. This is the default.
Select one of these before
changing any other item in
“CAPTION” menu. Choose
“SERVICE1/6” under normal
circumstances.
Press [SETUP] to display the main menu.
1
Use [Cursor K /L] to select “DTVCC“, then press
2
[ENTER].
e.g.) digital TV mode
- TV SETUP -
or
Use [Cursor K /L] to select “USER SETTING“, then press
3
CHANNEL SETUP
V-CHIP SETUP
LANGUAGE [ENGLISH]
CAPTION [OFF]
BACK LIGHT [BRIGHT]
COLOR TEMP. [NORMAL]
DTVCC
[ENTER] repeatedly to set to “ON”.
• Items in the dotted box are available only when “USER
SETTING“ is “ON“.
- DTVCC -
or
Use [Cursor K /L] to select an item, then press
4
CAPTION SERVICE [SERVICE1/6]
USER SETTING [ON]
CAPTION SIZE [MIDDLE]
FONT STYLE [STYLE1/8]
CHARACTER EDGE [NONE]
FORE OPACITY [SOLID]
FORE COLOR [WHITE]
BACK OPACITY [SOLID]
BACK COLOR [BLACK]
[ENTER] repeatedly to change the setting for the item.
- DTVCC -
or
CAPTION SERVICE [SERVICE1/6]
USER SETTING [ON]
CAPTION SIZE [MIDDLE]
FONT STYLE [STYLE1/8]
CHARACTER EDGE [NONE]
FORE OPACITY [SOLID]
FORE COLOR [WHITE]
BACK OPACITY [SOLID]
BACK COLOR [BLACK]
INITIAL SETTING DVD SETTING INFORMATION
WATCHING TV
OPTIONAL SETTING
OPERATING DVDINTRODUCTION
TROUBLESHOOTING
Note:
• “CAPTION SERVICE” that you can switch differs depending
on the broadcast description.
21
EN
Page 22
PTIONAL SETTING
O
• CAPTION SIZE
Closed captioning font size can be changed as below.
• FONT STYLE
Font style of the displayed caption can be switched as
below.
• CHARACTER EDGE
Edge type of the displayed caption can be switched
as below.
• FORE COLOR, BACK COLOR
Font and background color of the displayed caption
can be switched as below.
• FORE OPACITY, BACK OPACITY
Text and background opacity of the displayed caption
can be switched as below.
CAPTION SIZE MIDDLE, LARGE, SMALL
STYLE1/8
STYLE2/8 Monospaced with serifs.
STYLE3/8
FONT STYLE
CHARACTER EDGE
FORE OPACITY SOLID, TRANSLUCENT, FLASH
FORE COLOR
BACK OPACITY SOLID, TRANSLUCENT, FLASH
BACK COLOR
STYLE4/8 Monospaced with serifs.
STYLE5/8
STYLE6/8 Casual font type.
STYLE7/8 Cursive font type.
STYLE8/8 Small capitals.
NONE, RAISED, DEPRESSED, UNIFORM,
SHADOW LEFT, SHADOW RIGHT
WHITE, BLACK, RED, GREEN, YELLOW,
BLUE, MAGENTA, CYAN, TRANSPARENT
BLACK, RED, GREEN, BLUE, YELLOW,
MAGENTA, CYAN, TRANSPARENT, WHITE
Proportional font used in the
menu screen.
Proportionally spaced with
serifs.
Proportionally spaced
without serifs.
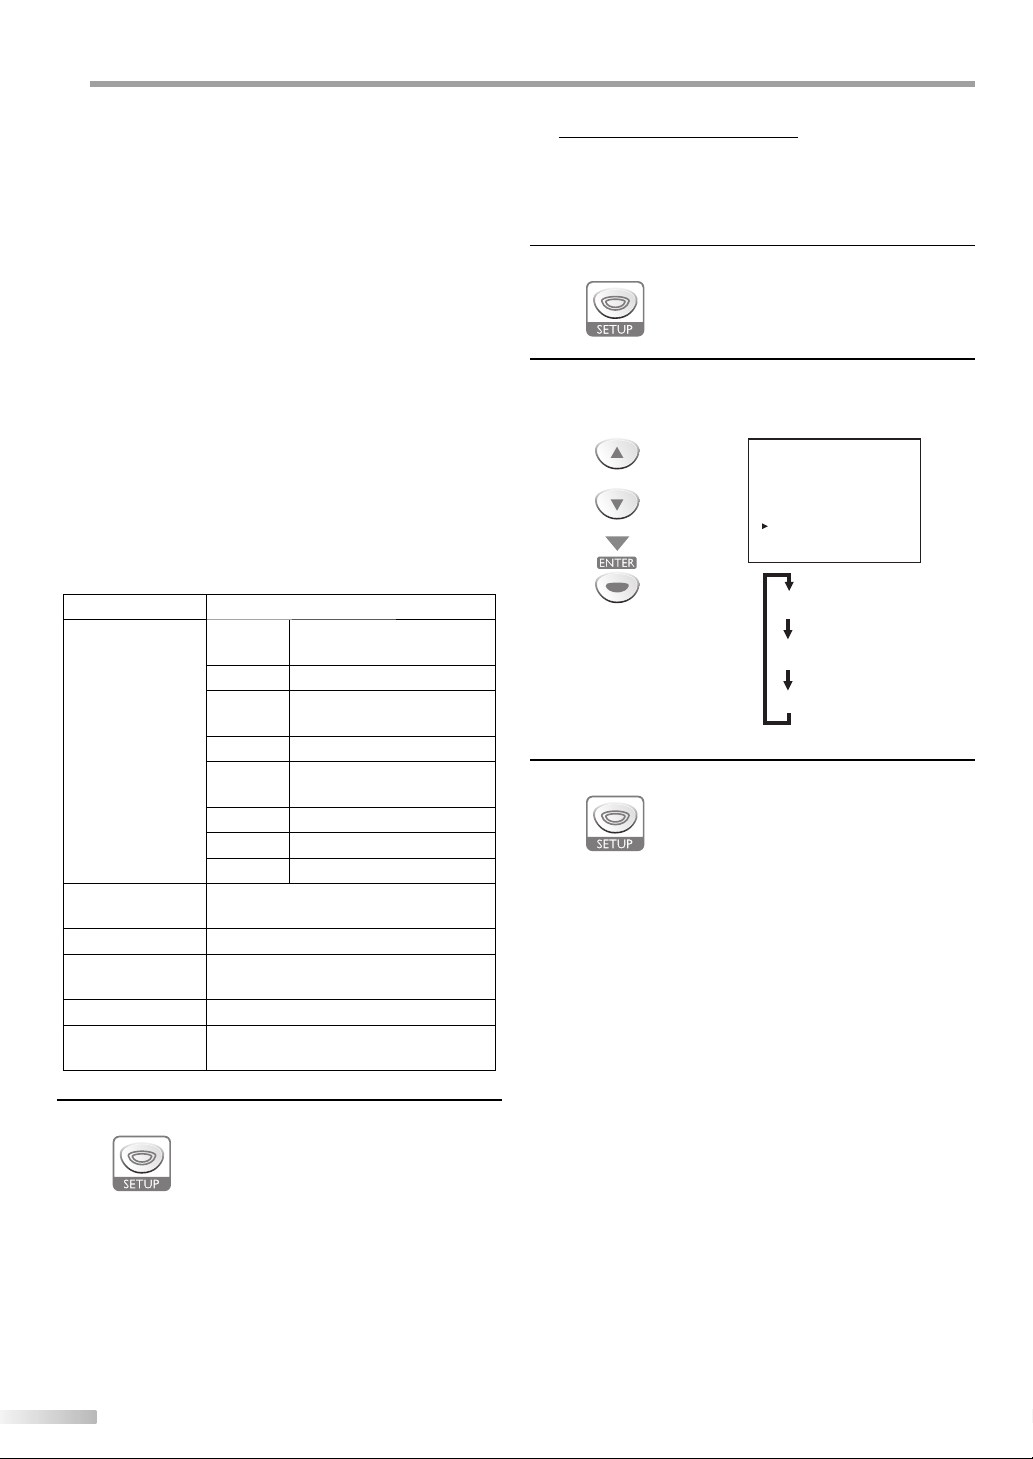
Back Light Setting
5
You can set the desired brightness mode.
Press [SETUP] to display the main menu.
1
Use [Cursor K /L] to select “BACK LIGHT”, then press
2
[ENTER] repeatedly to change the setting.
e.g.) digital TV mode
- TV SETUP -
or
CHANNEL SETUP
V-CHIP SETUP
LANGUAGE [ENGLISH]
CAPTION [OFF]
BACK LIGHT [BRIGHT]
COLOR TEMP. [NORMAL]
DTVCC
[BRIGHT]
[NORMAL]
[DARK]
Press [SETUP] to exit.
3
Press [SETUP] to exit.
5
22
EN
Page 23

Color Temperature
5 V-chip
You can adjust color temperature of the T V screen.
5
V-chip reads the ratings for programs, then denies access to the programs
which exceed the rating level you set. With this function, you can block
certain programming inappropriate for children.
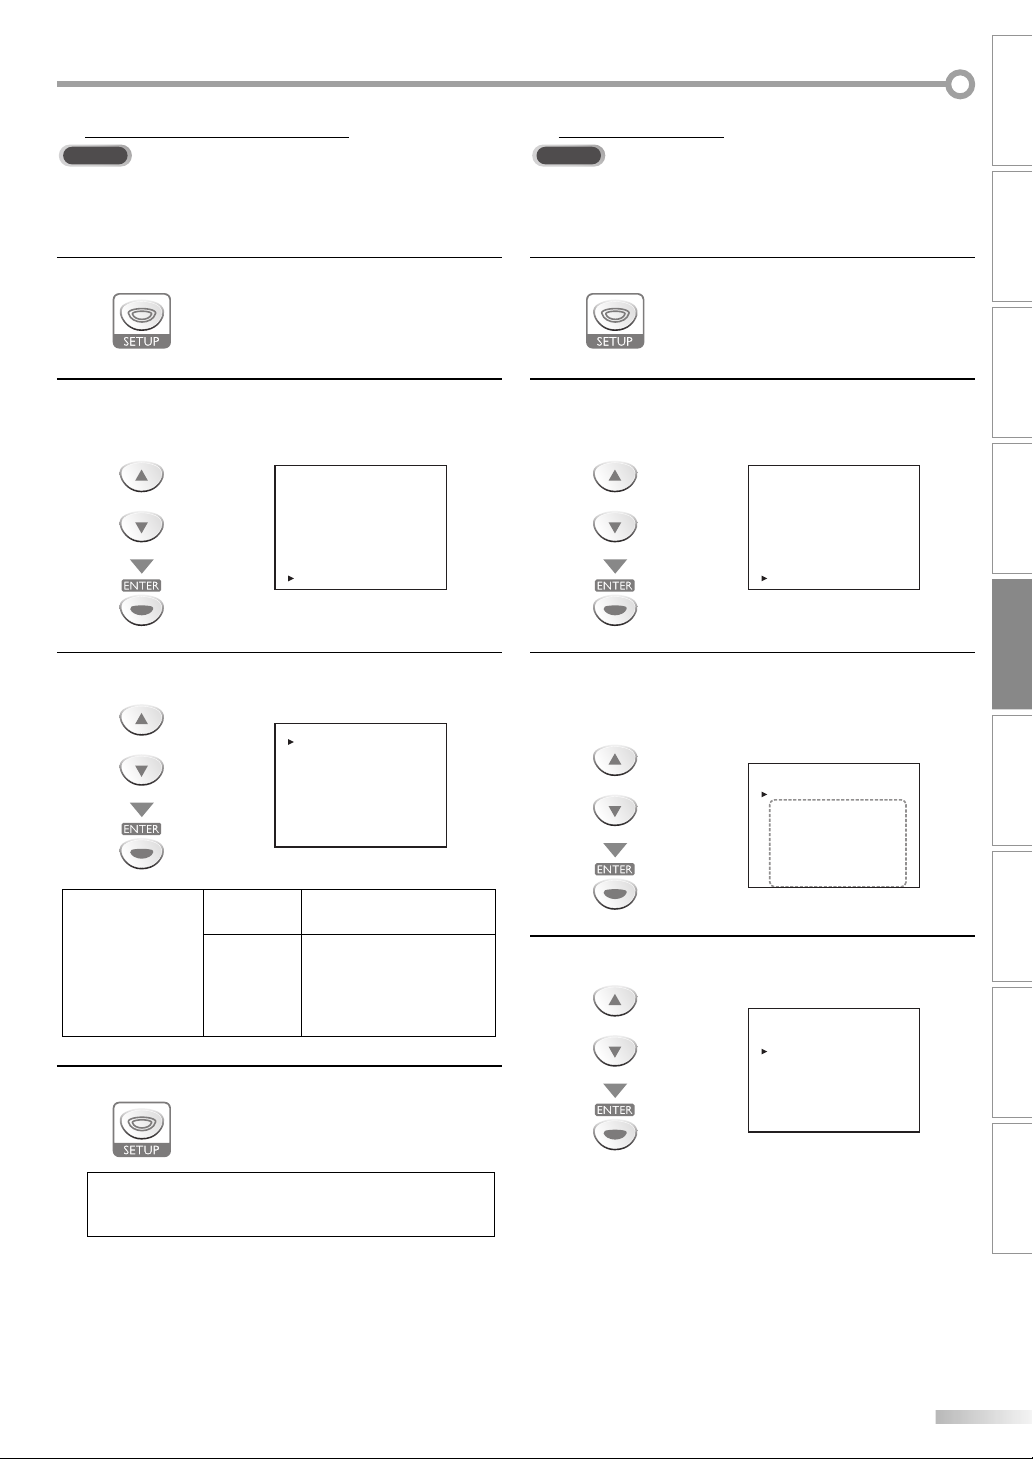
Press [SETUP] to display the main menu.
1
Press [SETUP] to display the main menu.
1
Use [Cursor K /L] to select “COLOR TEMP.”, then press
2
[ENTER] repeatedly to change the setting.
e.g.) digital TV mode
- TV SETUP -
CHANNEL SETUP
V-CHIP SETUP
LANGUAGE [ENGLISH]
CAPTION [OFF]
BACK LIGHT [BRIGHT]
COLOR TEMP. [NORMAL]
DTVCC
Use [Cursor K /L] to select “V-CHIP SETUP“, then press
2
[ENTER].
e.g.) digital TV mode
or
- TV SETUP -
CHANNEL SETUP
V-CHIP SETUP
LANGUAGE [ENGLISH]
CAPTION [OFF]
BACK LIGHT [BRIGHT]
COLOR TEMP. [NORMAL]
DTVCC
CONNECTION
INITIAL SETTING DVD SETTING INFORMATION
WATCHING TV
or
[NORMAL]
[WARM]
[COOL]
Press [SETUP] to exit.
3
Use [the Number buttons] to enter the 4-digit
3
numbers for your password.
PASSWORD
- - -
-
• When you have not set up your password, enter 0000.
• When the password is correct, the following
“V-CHIP SETUP” menu is displayed.
See the following description for setting each item.
e.g.) digital TV mode
...
A
“A. TV Rating” D page 24
...
B
“B. MPAA Rating”D page 25.
...
C
“C. Change Password”
D page 25
- V - CHIP SETUP -
TV RATING
MPAA RATING
DOWNLOADABLE RATING
CHANGE PASSWORD
Note:
• “DOWNLOADABLE RATING“ will be available when the unit
receives a digital broadcast using the new rating system.
• When you select a rating and set it to “BLOCK”, the higher
ratings will be blocked automatically. The lower ratings will
be available for viewing.
• When you set the highest rating to “VIEW”, all ratings turn
to “VIEW” automatically.
• If the “PROTECTED PROGRAM” message appears during
your TV viewing, change to a channel that is not blocked.
Then, you can access “V-CHIP SETUP” menu and change the
setting to allow all TV viewing.
• To block any inappropriate programming, set your limits in
both “TV RATING” and “MPAA RATING”.
• The V-chip setting will be retained after a power failure
(except the access code reverts to 0000).
OPTIONAL SETTING
OPERATING DVDINTRODUCTION
A
B
C
TROUBLESHOOTING
EN
23
Page 24
PTIONAL SETTING
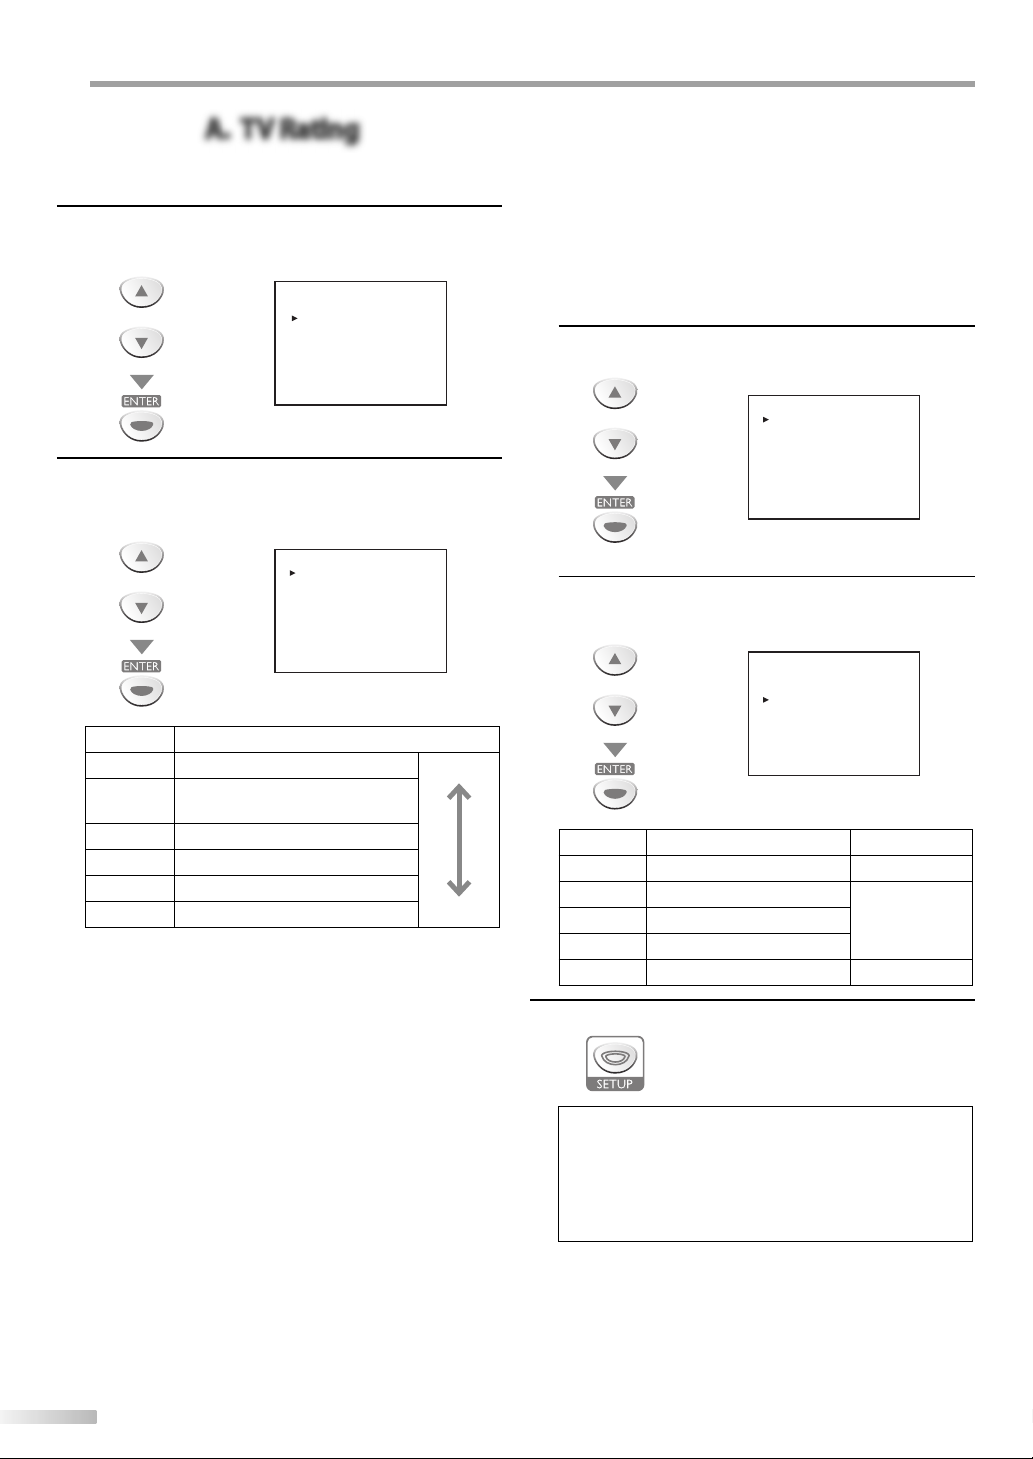
A. TV Rating
TV-Y [VIEW]
TV-Y7 (DLSV) [VIEW]
TV-G [VIEW]
TV-PG (DLSV) [BLOCK]
TV-14 (DLSV) [BLOCK]
TV-MA (DLSV) [BLOCK]
O
A. TV Rating
Use [Cursor K /L] to select “TV RATING”, then press
4
[ENTER].
e.g.) digital TV mode
- V - CHIP SETUP -
or
Use [Cursor K /L ] to select the desired rating, then
5
TV RATING
MPAA RATING
DOWNLOADABLE RATING
CHANGE PASSWORD
press [ENTER] repeatedly to switch between “VIEW”
and “BLOCK”.
or
TV-Y Appropriate for all children lower
TV-Y7
TV-G General audience
TV-PG Parental guidance suggested
TV-14
TV-MA Mature audience only higher
Rating Category
Appropriate for all children 7 and
older
Unsuitable for children under 14
TV-Y [VIEW]
TV-Y7 ( ) [VIEW]
TV-G [VIEW]
TV-PG ( ) [VIEW]
TV-14 ( ) [VIEW]
TV-MA ( ) [VIEW]
[To Set the Sub Ratings]
As for TV-Y7, TV-PG, TV-14 or TV-MA, you can further
set the sub ratings to block specific elements of
programming. To set the sub ratings, follow the steps
below.
Use [Cursor K /L ] to select the desired main rating,
1
then press [ENTER] twice to show its sub ratings.
or
2
e.g.) TV-PG
Sub Rating Category Rating
FV Fantasy Violence TV-Y7
V Violence
S Sexual Situation
L Coarse Language
D Suggestive Dialogue TV-PG, TV-14
Use [Cursor K /L ], then press [ENTER] repeatedly
to change the setting.
or
TV-PG [BLOCK]
D [BLOCK]
L [BLOCK]
S [BLOCK]
V [BLOCK]
TV-PG
TV-14
TV-MA
24
EN
Press [SETUP] to exit.
6
Note:
• Blocked sub ratings will appear beside the main rating
category in “TV RATING” menu.
• You cannot block a sub rating (D, L, S or V) if the main rating
is set to “VIEW”.
• Changing the category to “BLOCK” or “VIEW” automatically
changes all its sub ratings to the same (“BLOCK” or “VIEW”).
Page 25
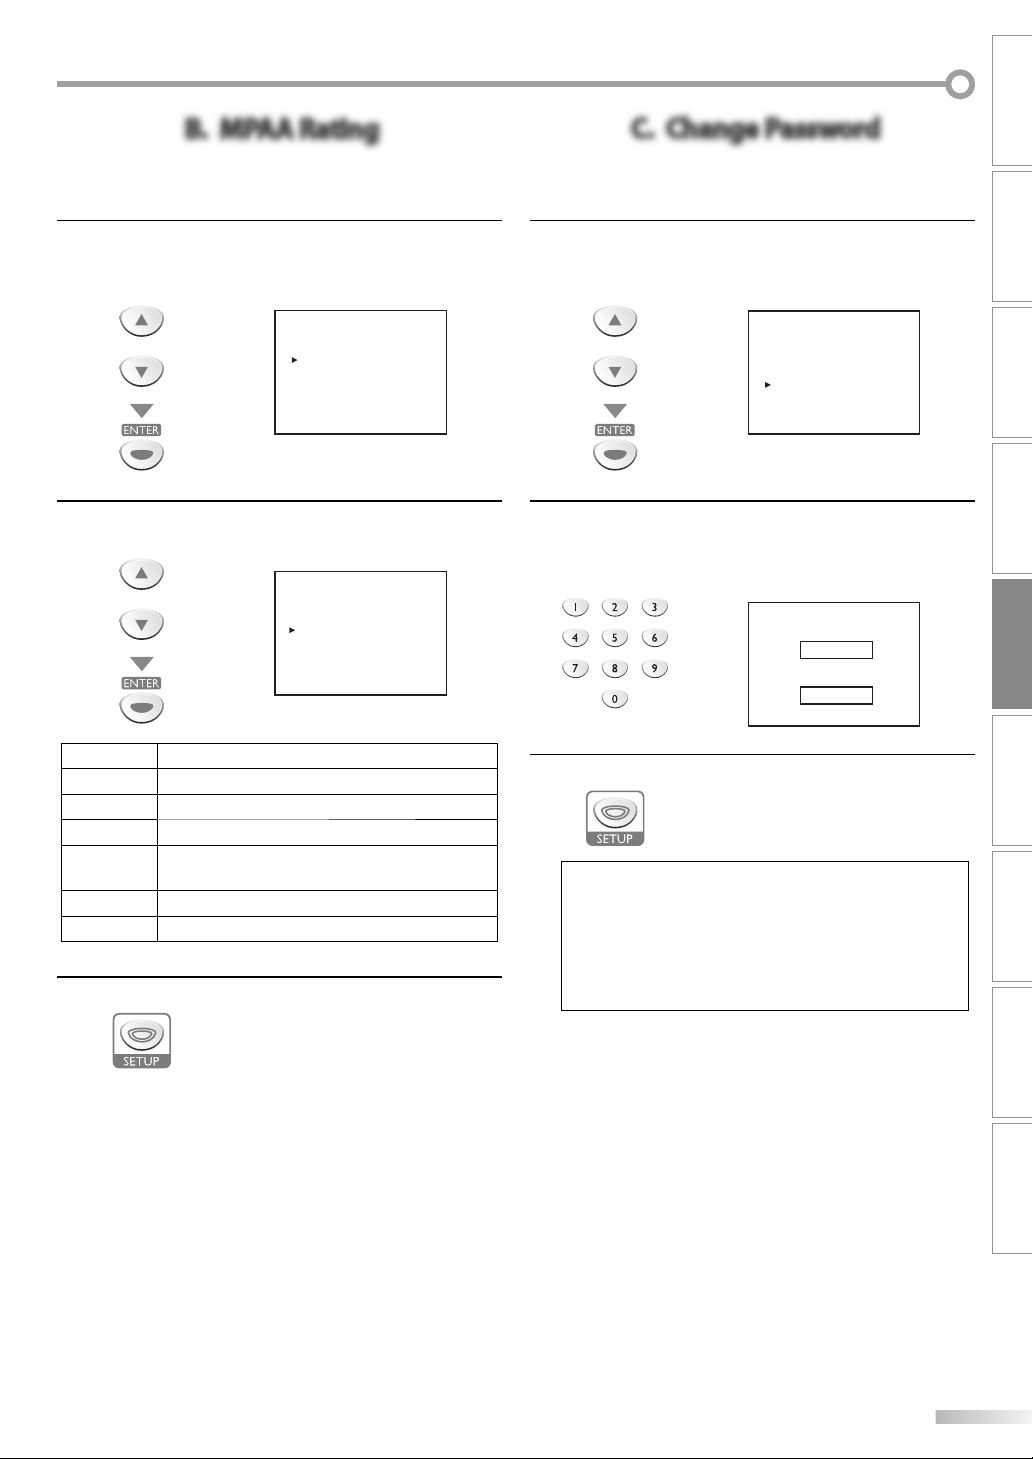
B. MPAA Rating
B. MPAA Rating
- V - CHIP SETUP -
TV RATING
MPAA RATING
DOWNLOADABLE RATING
CHANGE PASSWORD
G [VIEW]
PG [VIEW]
PG-13 [VIEW]
R [BLOCK]
NC-17 [BLOCK]
X [BLOCK]
C. Change Password
- V - CHIP SETUP -
TV RATING
MPAA RATING
DOWNLOADABLE RATING
CHANGE PASSWORD
NEW PASSWORD
_ _ _ _
CONFIRM PASSWORD
_ _ _ _
MPAA Rating is the rating system created by MPAA (Motion Picture
Association of America).
C. Change Password
Although the default code “0000” is supplied with the unit, you can set
your own password.
CONNECTION
Use [Cursor K /L] to select “MPAA RATING”, then press
4
[ENTER].
e.g.) digital TV mode
or
Use [Cursor K /L], then press [ENTER] repeatedly to
5
change the setting.
or
Rating Category
G
PG
PG-13
R
NC-17
X
Press [SETUP] to exit.
6
General audience
Parental guidance suggested
Unsuitable for children under 13
Restricted; under 17 requires accompanying
parent or adult guardian
No one under 17 admitted
Mature audience only
Use [Cursor K /L] to select “CHANGE PASSWORD”, then
4
press [ENTER].
e.g.) digital TV mode
or
Press [the Number buttons] on the remote control to
5
enter the new 4-digit password.
• Enter password again in “CONFIRM PASSWORD”
space.
Press [SETUP] to exit.
6
Note:
• Make sure new password and confirm password must be
exactly the same. If they are different, the space is cleared
for reentering.
• Your password will be erased and return to the default
(0000) when a power failure occurs. If you forget the
password, unplug the power cord for 10 seconds to restore
the password to 0000.
INITIAL SETTING DVD SETTING INFORMATION
WATCHING TV
OPTIONAL SETTING
OPERATING DVDINTRODUCTION
TROUBLESHOOTING
25
EN
Page 26
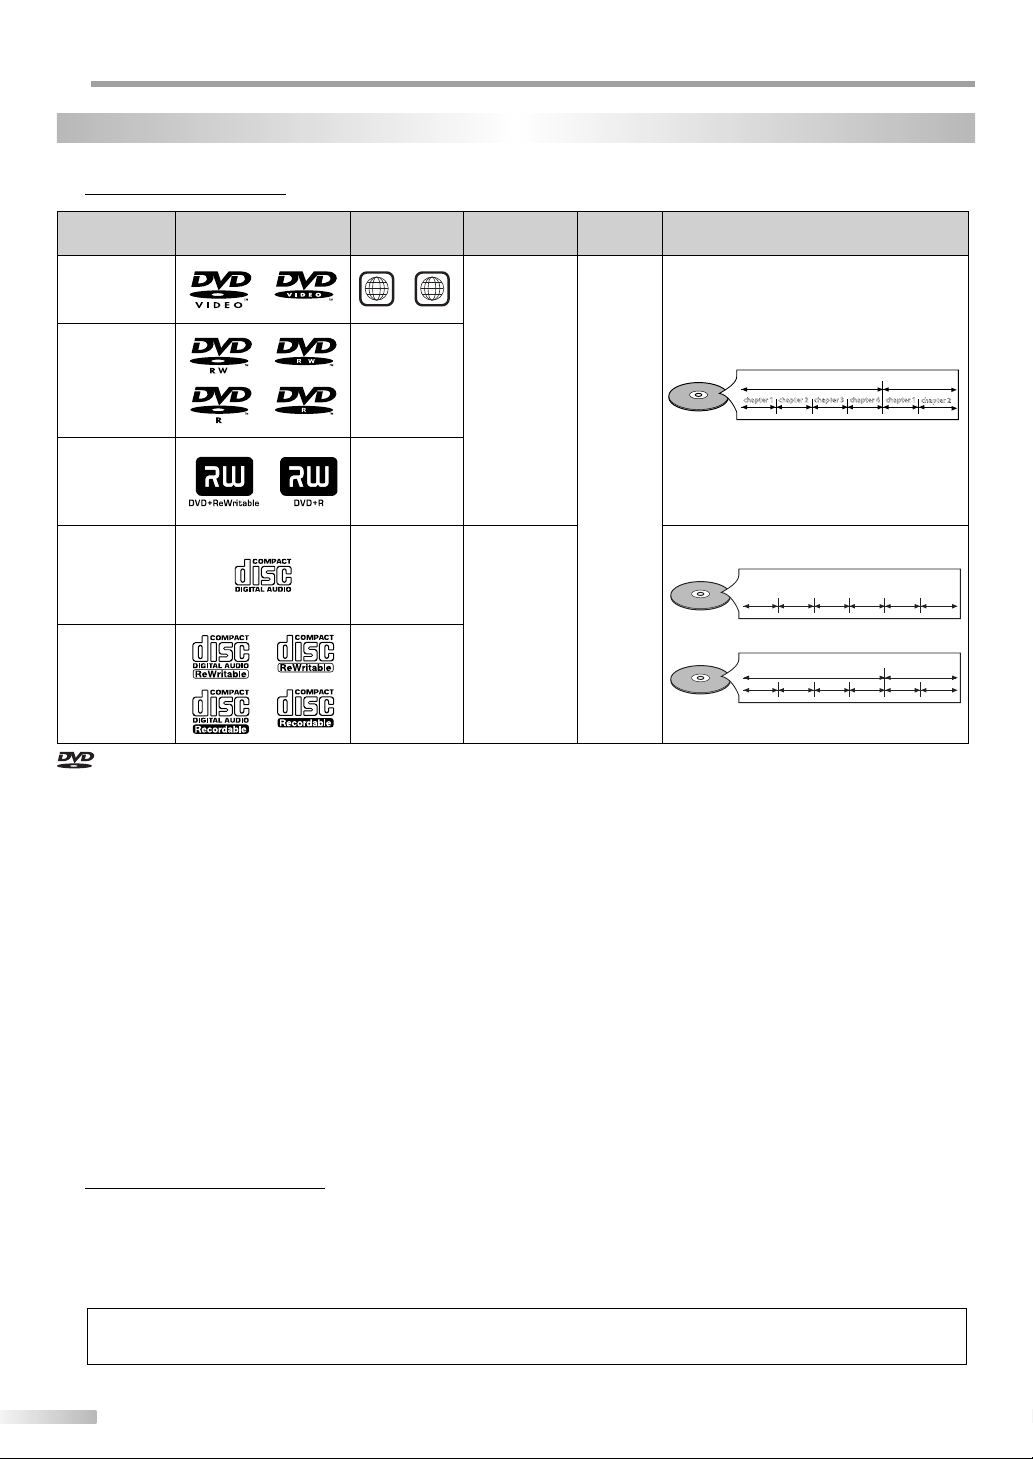
PERATING DVD
ALL
O
Playable Media
5
DVD Functions
Type of media Mark (logo) Region code
DVD-video
*1, 2, 4, 6, 10, 11
DVD-RW
DVD-R
* 1, 3, 4, 5,
6, 7, 8, 9, 10
DVD+RW
DVD+R
* 1, 4, 5, 6, 9, 10
audio CD
* 4, 6, 10
CD-RW
CD-R
* 4, 5, 6, 9,10
ALL
or
1
-
-
-
-
Recorded
signals
digital video
(MPEG2)
digital audio
or
MP3
Media size Disc types
e. g.)
title 1 title 2
5 inches
(12 cm)
audio CD
MP3
chapter 1 chapter 2 chapter 1
e. g.)
track 1 track 2 track 5
e. g.)
chapter 3 chapter 4
track 3 track 4
folder 1
le 1 le 2 le 5
le 3
chapter 2
track 6
folder 2
le 4
le 6
is a trademark of DVD Format/Logo Licensing Corporation.
If you cannot play back a disc which bears one of the marks above, check the following notes.
*1: This unit conforms to the NTSC color system. Discs recorded in other color system such as PAL cannot be played back.
*2: Certain DVD-video does not operate as described in this manual due to the intentions of the disc’s producers.
*3: Discs recorded in VR (video recording) format cannot be played back.
*4: Scratched or stained discs may not be played back.
*5: Some discs cannot be played back because of incompatible recording conditions, characteristics of the recorder or special properties of discs.
*6: You can play back discs which bear the marks above. If you use non-standardized discs, this unit may not play them back. Even if they are
played back, the sound or video quality will be compromised.
*7: You may play back the unfinalized DVD-RW/-R recorded in the video format on our brand’s DVD recorder. However, depending on the
recording status of a disc, the disc may not be played back at all or normally (the picture or sound may not be smooth, etc.). In this case,
you need to finalize the disc with the DVD recorder. Refer to the manual accompanying the DVD recorder.
*8: Only the discs recorded in the video format and finalized can be played back. Unfinalized discs cannot be played back. Depending on the
recording status of a disc, the disc may not be played back at all or the picture or sound may not be smooth, etc.
*9: If the recorded portion of the disc is too small (less than 2 3/16 inches (55 mm) across), it may not play back properly.
*10: Do not glue paper or put stickers on to the disc. These may damage the disc, and the unit may not read it correctly.
*11: The number inside the symbol refer to region of the world and disc encoded in a specific region format can only be played back on unit
with the same region code.
Unplayable Media
5
• NEVER play back the following discs. Otherwise, malfunction may result!
Blu-ray Disc, HD DVD, DVD-RAM, DVD-audio, CD-i, photo CD, video CD, DVD with region codes other than 1 or ALL,
DTS-CD, DVD-ROM for personal computers, CD-ROM for personal computers.
• On the following disc, the sound MAY NOT be heard.
super audio CD
Note:
• Only the sound recorded on the normal CD layer can be delivered. The sound recorded on the high density super audio CD layer cannot be delivered.
• Any other discs without compatibility indications
26
EN
Page 27
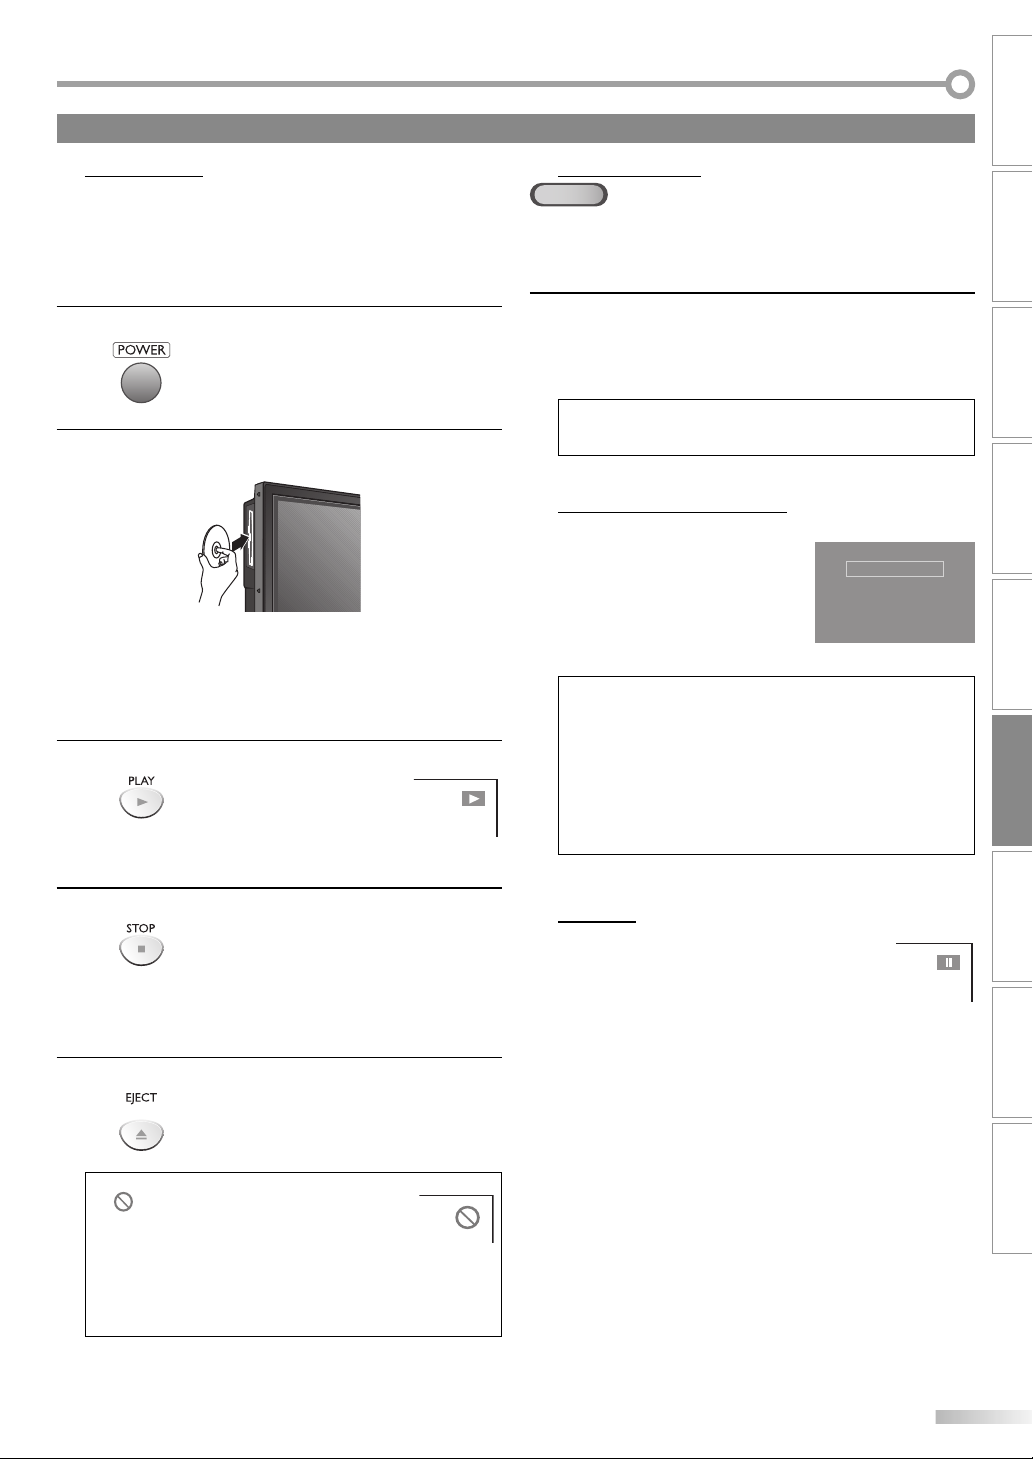
These operations are accessible by remote control. Some may also be accessible by controls on the main unit.
Playback
5 DVD Menu
Before you begin:
Turn on the ampli er and any other equipment which is connected to this
unit. Make sure the external audio receiver are set to the correct input
mode.
Press [POWER] to turn on the unit.
1
5
DVD
Some discs contain disc menus which describe the contents of the disc or
allow you to customize disc playback, or title menu which lists the titles
available on the DVD.
Press [MENU] to call up the disc menu.
Use [Cursor K / L / s / B] to select an item, then press
[ENTER] (or [PLAY B]).
INTRODUCTION
CONNECTION
INITIAL SETTING DVD SETTING INFORMATION
Insert a disc with label facing back from the left side of
2
the unit.
• In case the DVD was recorded on both sides, make
sure the label of the side you want to play back is
facing back.
• The unit switches to the DVD mode when the unit
was in TV mode.
Press [PLAY B]. Playback will start.
3
• If playback does not start automatically,
press [PLAY B] again.
Press [STOP C] to stop playback temporarily.
4
• If playback remains stopped for 5 minutes, the screen
saver program will activate automatically, when
“SCREEN SAVER“ is set to “ON“.
Press [EJECT A] to eject the disc.
5
Note:
• Menu operations may vary depending on the disc.
Refer to the manual accompanying the disc for more details.
Resume Playback
5
Press [STOP C] during playback.
Resume message will appear on
the TV screen.
Press [PLAY B]. Playback will
resume from the point at which
playback was stopped.
Resume ON
Press 'PLAY' to play from here.
To play the beginning,
press 'STOP' first and then 'PLAY'.
Note:
•
To cancel resume, press [STOP C] one more time in the stop
mode. On some discs, [STOP C] will not work while the resume
message appears. Please wait until the message disappears.
• For MP3 files, playback will resume from the beginning of the
current file.
• The resume information will be kept even when unit is turned
off. However, ejecting the disc will cancel the resume feature.
Playback will start at the beginning the next time you insert
the disc.
Pause
5
Press [PAUSE F] during playback.
• Playback will be paused and sound will be
muted.
To continue playback, press [PLAY B].
WATCHING TV
OPTIONAL SETTING
OPERATING DVD
TROUBLESHOOTING
Note:
• “ ” may appear at the top-right on the TV
screen when the operation is prohibited by
the disc or this unit.
• Some DVD may start playback from title 2 or 3 due to specific
programs.
• During the playback of a 2-layered disc, pictures may stop for
a moment. This happens while the 1st layer is being switched
to the 2nd layer. This is not a malfunction.
27
EN
Page 28
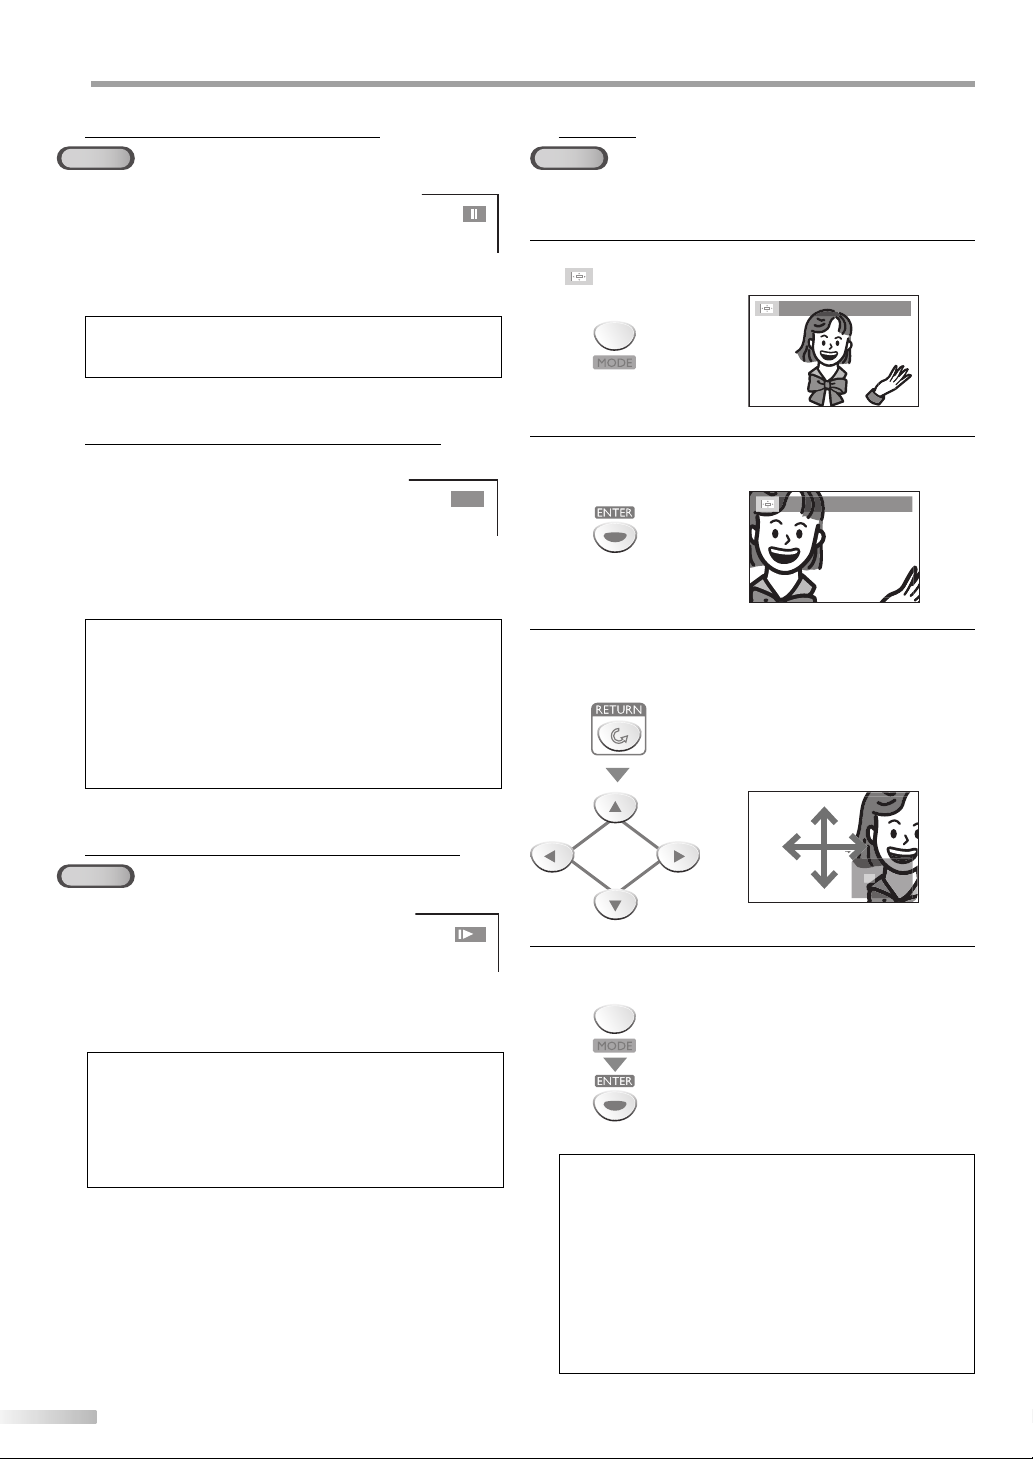
PERATING DVD
O
Step-by-step Playback
5
DVD
5
Zoom
DVD
Each time you press [PAUSE F] in the pause
mode, the disc goes forward one frame at a
time.
To continue playback, press [PLAY B].
Note:
• Set “STILL MODE” to “FIELD” in “DISPLAY“ menu if pictures in
the pause mode are blurred. (Refer to page 38.)
Fast Forward / Fast Reverse
5
Press and hold [REV /h] or [FWD /g]
during playback to select the required
forward or reverse speed.
To continue playback, press [PLAY B].
Note:
• Set “STILL MODE” to “FIELD” in “DISPLAY“ menu if pictures in
the fast playback mode are blurred. (Refer to page 38.)
• Fast forward / fast reverse speed varies with disc.
Approximate speed is 1(2x), 2(8x), 3(20x), 4(50x) and 5(100x)
on DVD and 1(2x), 2(8x) and 3(30x) on audio CD and MP3.
• For DVD, sound will be muted during the search.
• For audio CD and MP3, sound will be intermittent during the
search.
E
The zoom function allows you to enlarge the video image and to pan
through the enlarged image.
During playback, press [MODE] repeatedly until
1
“ ” appears.
1.3 × (ZOOM)
Press [ENTER] repeatedly to change the zoom factor;
2
“OFF (ZOOM)“, “1.3x (ZOOM)”, “2x (ZOOM)“ or “4x (ZOOM)“.
1
Once a desired zoom factor is set, press [RETURN] to dis-
3
play the position guide, then use [Cursor K/ L/ s / B]
to slide the zoomed picture across the TV screen.
2 ×(ZOOM)
Slow Forward / Slow Reverse
5
DVD
Press and hold [REV /h] or [FWD /g]
during the paused mode to select the
required forward or reverse speed.
To continue playback, press [PLAY B].
Note:
• Slow forward / slow reverse speed varies with disc.
Approximate speed is 1(1/16x), 2(1/8x) and 3(1/2x).
• Set “STILL MODE” to “FIELD” in “DISPLAY“ menu if pictures in
the slow playback mode are blurred. (Refer to page 38.)
• The sound will be muted during slow forward/slow reverse
playback.
28
EN
1
To exit zoom, repeat steps 1 to 2 above and press
4
[ENTER] until “OFF (ZOOM)“ appears.
Note:
• The gray box with an inner blue box that shows during
• Zoom function does not work while the disc menu is dis-
• 4x zoom is not available on some discs.
• Zoom function is also available during pause mode.
zoomed playback is the position guide indicates the position
of the zoomed image within the overall image.
Position guide stays on the TV screen until you press [ENTER].
Press [ENTER] one more time to recall the position guide
when disappears.
played.
Page 29
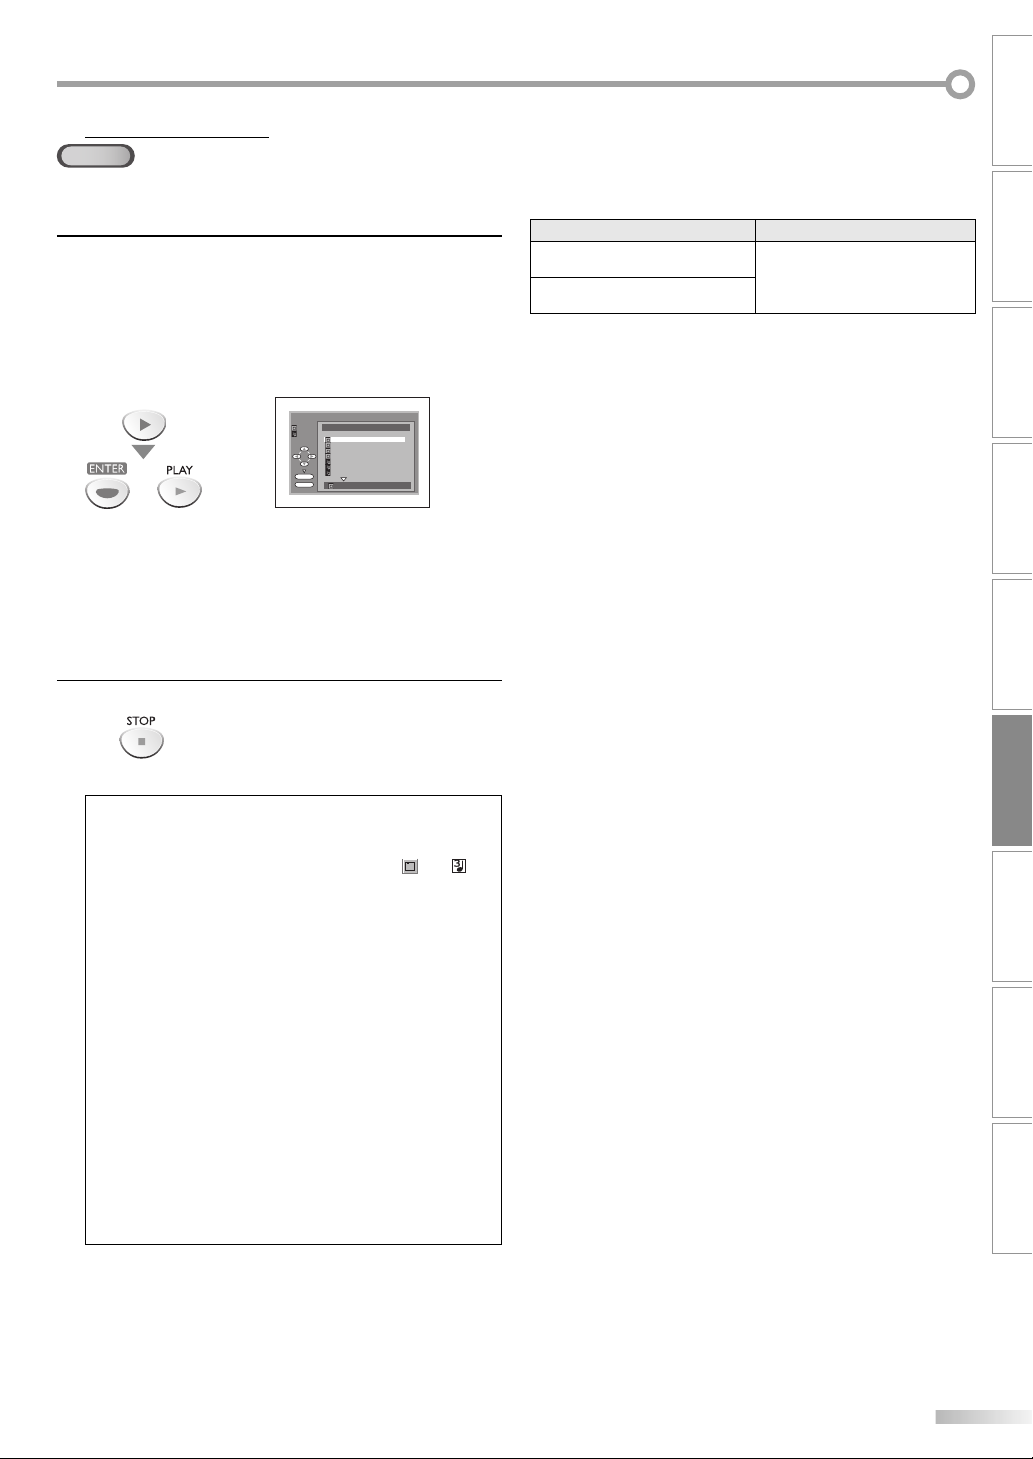
MP3 Playback
5
MP3
MP3 is a method of compressing les. You can copy MP3 les on CD-RW/-R
from the personal computer and play the les on this unit.
Insert an CD-RW/-R with MP3 les, playback starts
1
automatically.
• Press [PLAY B] if the disc is already inserted.
• Press [MENU] when you want to call up the file list.
When selecting the folder:
• Press [Cursor B] when you want to go to the next
hierarchy.
FILE LIST
DISC NAME
FOLDER
MP3
folder name 1
folder name 2
folder name 3
folder name 4
file name 1
file name 2
file name 3
ENTER
PLAY
or
folder name 1
1/ 2
• Press [Cursor s] when you want to go back to the
previous hierarchy (except for the top hierarchy).
• If [TOP MENU] is pressed when a file list is displayed,
the 1st item in the top hierarchy will be highlighted.
• Press [MENU] or [RETURN] to go back to playback
display.
This unit recommends the files recorded under the
following circumstances:
Applicable MP3 le Remarks
Sampling frequency:
44.1 kHz or 48 kHz
Constant bit rate:
32 kbps ~ 320 kbps
For MP3 file recorded in Variable Bit
Rate (VBR), the unit may not display
the actual elapsed time.
INTRODUCTION
CONNECTION
INITIAL SETTING DVD SETTING INFORMATION
WATCHING TV
OPTIONAL SETTING
Press [STOP C] once to stop playback temporarily.
2
• Refer to “Resume Playback“ on page 27.
Note:
• Some selections may take a while to be recognized.
• Folders are known as Groups; files are known as Tracks.
• Folders, MP3 files are displayed respectively as
• A maximum of 255 folders or 999 files may be recognized in
one disc.
• Up to 8 hierarchies can be recognized in one folder. Files in
the 9th or deeper hierarchies cannot be played back.
• This unit can play back picture and sounds from data recorded in MP3 formats on CD-RW/-R discs.
• A file with an extension of “.mp3 (MP3)” is called an “MP3 file”.
• The unit can run an image file conforming to the Exif specification. Exif is a file format, Exchangeable Image File format
established by Japanese Electronic Industry Development
Association (JEIDA).
• Files whose extension is other than “.mp3 (MP3)” will not be
listed in the file list.
• If the file is not recorded in MP3 format, noise may be produced even if the file extension is either “.mp3 (MP3)”.
• The name of folder and file can be displayed in up to 25
characters. Unrecognizable characters will be replaced with
asterisks.
• Unplayable folders or files may be displayed depending on
the recording conditions.
OPERATING DVD
and .
TROUBLESHOOTING
EN
29
Page 30

PERATING DVD
Chapter / Title Search
Track Search
O
Search Functions
5
Chapter / Title Search
Track Search
DVD
Using [MODE]
During playback, press [MODE] repeatedly until
1
“ “ appears.
• If you want to perform the title search, press
[Cursor K / L] repeatedly until “
Press [the Number buttons] to select your desired
2
chapter or title within 60 seconds.
To play back a single-digit chapter or title when there
are more than 10 chapters or titles, press [ENTER] after
entering the chapter or title number.
Playback will start automatically from the chapter or
3
title you selected.
“ appears.
_ _ /12 (SEARCH)
_ _ /12 (SEARCH)
Note:
• The total number of chapters/titles in your disc; with less than
10 chapters/titles, press the chapter/title number directly.
With 10 or more chapters/titles, to play a single digit chapter/
title, press [0] first, then the chapter/title number. (e.g., for
chapter 3, press [0] and [3].) To play a double-digit chapter/
title, press the chapter/title number.
Using [SKIP H / G]
During playback, press [SKIP H / G] repeatedly
1
until a desired chapter or title will be selected.
current chapter
(CH)
CH 1 CH 2 CH 3 CH 4
or
Playback will start automatically from the chapter or
2
title you selected.
[SKIP H] [SKIP G]
[SKIP H] [SKIP G]
(If the disc has no chapters.)
Note:
• [SKIP H / G] are not available when playback is stopped.
• Chapter/title search can only be performed during playback or
when the unit has kept the resume information. It cannot be
performed in the stop mode.
• Chapter/title search is not available with some DVD.
or
current title
(TT )
TT 1 TT 2 TT 3 TT 4
CD
MP3
Using [MODE]
During playback, press [MODE] repeatedly until
1
“ “ appears.
_ _ /29 (SEARCH)
Press [the Number buttons] to select your desired
2
track within 60 seconds.
To play back a single-digit track/file when there are
more than 10 tracks/files, press [ENTER] after entering
the track/file number.
Playback will start automatically from the track/file you
3
selected.
_ _ /29 (SEARCH)
Note:
• The total number of tracks/files in your disc;
With less than 10 tracks/files, press the track/file number
directly.
With 10 or more tracks/files, to play a single digit track/file,
press [0] first, then the track/file number. (e.g., for track/file 3,
press [0] and [3].) To play a double-digit track/file, press the
track/file number.
With 100 or more files, to play a single or double digit file,
press [0] first, then the file number directly. (e.g., for file 3,
press [0], [0] and [3]. For file 26, press [0], [2] and [6]).
To play a triple digit file, press the file number.
• Track search is not available for programmed or random
playback.
Using [SKIP H / G]
During playback, press [SKIP H / G] repeatedly
1
until your desired track/file will be selected.
current track/le
or
Playback will start automatically from the track/file you
2
selected.
Note:
• [SKIP H / G] are not available when playback is stopped.
• Track search can only be performed during playback or
when the unit has kept the resume information. It cannot be
performed in the stop mode.
(TR)
TR 1 TR 2 TR 3 TR 4
[SKIP H] [SKIP G]
30
EN
Page 31

INTRODUCTION
Time Search
Direct Search
MP3
Time Search
DVD
During playback, press [MODE] repeatedly until
1
“ “
e.g.) DVD
Use [Cursor K / L] repeatedly until “ “ appears.
2
Press [the Number buttons] to select your desired
3
time lapse within 60 seconds.
Playback will start automatically from the time you
4
selected.
CD
“ “ appears.
/
or
_ _ /12 (SEARCH)
TOTAL
1:29:00
TOTAL
1:29:00
Note:
• When there is no need to enter a number, “0” appears
automatically. For example, “0: 0_ : _ _” appears in time search
menu if the total time of the title or track/file is less than 10
minutes.
• Press [CLEAR] to erase the incorrect input at step 3.
• Time search can only be performed during playback or
when the unit has kept the resume information. It cannot be
performed in the stop mode.
Repeat Playback
5
You can repeat playback chapters, titles or tracks/ les on a disc.
During playback, press [MODE] repeatedly until
1
“
“ appears.
OFF (REPEAT)
Press [Cursor K / L] to change the repeat mode.
2
DVD
CD
Press [RETURN] to exit.
3
OFF (repeat off)
CHAPTER (current chapter repeat)
TITLE (current title repeat)
OFF (repeat off)
TRACK (current track repeat)
ALL (entire disc repeat)
OFF (repeat off)
TRACK (current file repeat)
GROUP (current folder repeat)
ALL (entire disc repeat)
CONNECTION
INITIAL SETTING DVD SETTING INFORMATION
WATCHING TV
OPTIONAL SETTING
OPERATING DVD
Direct Search
Press [the Number buttons] to select your desired
chapter, title, track/file.
Note:
• To select a single-digit chapter, title, track/file number, press
the number directly.
• To select double digit chapter, title, track/file number:
-
If the disc contains more than 9 and less than 100
tracks/files, press [+10/+100] first, then enter the double digit
chapter, title,
(e.g., for track 26, press [+10/+100], [2] and [6].)
- If the disc contains more than 99 files, press [+10/+100] then
press [0]. Then enter the double digit files number. Or press
[+10/+100] first, enter the files number, then press [ENTER]
at the last.
• To select triple digit files number, press [+10/+100] first, then
enter the triple digit files number.
track/file number.
chapter, title,
5
Repeat A-B Playback
DVD
You can repeat playback between A and B on a disc.
During playback, press [MODE] repeatedly until
1
AB
AB
“
Press [ENTER] at your desired starting point (A).
2
Press [ENTER] at your desired ending point (B).
3
• Point B should be in the same title or track as point A.
• Within a few seconds, the section A-B will begin to
play back repeatedly.
To cancel repeat A-B playback, press [MODE] repeat-
4
edly until “
Press [ENTER] so “
CD
OFF” appears.
AB
AB
A-B“ appears.
AB
AB
AB
AB
AB
AB
OFF” appears.
TROUBLESHOOTING
A- (A-B REPEAT)
A-B (A-B REPEAT)
31
EN
Page 32

PERATING DVD
O
Note:
• Repeat setting (except “ALL“) will be cleared when moving to
another title, chapter, track/file or folder.
• During programmed playback, repeat setting will be effective
for the tracks/files in the program.
• Repeat playback or repeat A-B playback may not available
with some discs.
• Repeat A-B playback does not function during other repeat
mode.
• To cancel point A, press [CLEAR] at step 2
“Repeat A-B Playback“.
• Stopping playback will cancel repeat A-B playback.
Programmed Playback
5
CD
MP3
You may determine the order in which tracks/ les will be played back.
In stop mode, press [MODE] repeatedly until the
1
“PROGRAM” menu appears.
e.g.) audio CD
PROGRAM
Use [Cursor K / L] to select a desired track/file, then
2
ENTER
PLAY
CLEAR
press [ENTER] to store.
• Additional tracks/files may be on other screens. Use
[Cursor K/ L] to go on to the next / previous pages.
• Repeat this step until you have selected all the tracks/
files you wish to play back in the program.
or
• Up to 99 tracks/files can be ordered.
• If 8 or more tracks/files were in a program, use
[SKIP H / G] to see all the tracks/files.
Press [PLAY B] to start programmed playback.
3
in
CD-DA TOTAL 0:00:00
T 1 3:31
T 2 4:28
T 3 4:19
T 4 3:58
T 5 4:12
T 6 4:02
T 7 3:55
T 1 3:31
PROGRAM
1/ 3
CD-DA TOTAL 0:08:22
T 15 3:18
T 16 4:24
ALL CLEAR
ENTER
PLAY
T 16 4:24
CLEAR
1/ 1
3/ 3
T 4 3:58
T 16 4:24
1/ 1
Note:
• Press [CLEAR] to erase the last track in the program if you
make an error.
• To erase all programmed tracks/files at once, select “ALL
CLEAR’’ and press [ENTER] at step 2.
• While a program is being played back, [STOP C] works as
follows:
- Pressing [STOP C] once: The track/file will be in the resume
standby mode. Next time you press [PLAY B], the playback
will resume from the point where it is stopped in the
programmed playback. (For MP3 file, playback will resume
from the beginning of the current file.)
- Pressing [STOP C] twice: Resume mode will be canceled. Next
time you press [PLAY B], playback will restart from the first
track/file in the original order. However, your programmed
playback can be restarted when you follow the above steps.
(Your programs are still stored until either the disc is ejected
or the unit is turned off.)
- On some discs, [STOP C] will not work while the resume
message appears. Please wait until the message disappears.
• To repeat the current track/file in the program, follow the
steps 1 and 2 in “Repeat Playback“ on page 31 and select
TRACK“.
“
• To repeat the entire program, follow the steps 1 and 2 in
“Repeat Playback“ on page 31 and select “
• Turning off the unit or ejecting the disc will erase the
program.
• You cannot use [the Number buttons] to select another
track during programmed playback. Use [SKIP
select other tracks/files in the program.
• You cannot combine random playback with programmed
playback.
• You cannot alter a programmed order during playback.
• You can start programmed playback only while in
“PROGRAM “ menu.
Random Playback
5
CD
MP3
This function shu es the playing order of tracks/ les instead of playback
in the sequence.
In stop mode, press [MODE] repeatedly until
1
“RANDOM” menu appears.
e.g.) audio CD
RANDOM
CD-DA TOTAL 0:45:55
PLAY
RANDOM PROGRAM
--no indication--
ALL“.
j/ i
] to
32
Press [PLAY B] to start random playback.
2
Note:
• To repeat the current track/file in the random mode, follow
the steps 1 and 2 in “Repeat Playback“ on page 31 and select
“ TRACK“.
• To repeat the entire random selections, follow the steps 1 and
2 in “Repeat Playback“ on page 31 and select “
• Random playback will be kept until you press [STOP C].
EN
ALL“.
Page 33

On-screen Display
5
You can check the information about the current disc by pressing [DISPLAY] on
the remote control.
DVD
appears only when multi-
angle is available on the DVD
current playback status
11/16 0:00:00 - 0:03:30
1
remaining time of the current
chapter
elapsed time of the current
chapter
CH (chapter):
current chapter number /
total chapters
1/3 0:00:00 - 1:23:45
2
remaining time of the current title
elapsed time of the current title
TT (title):
current title number / total titles
CD
1
2
4/12 0:03:21 - 0:02:15
4/12 0:13:45 - 0:45:40
current playback status
T
remaining time of the current
track
elapsed time of the current track
TR (Track):
current track number /
total tracks
ALL:
current track number /
total tracks
T
current repeat setting
appears only when the
repeat setting is active
T : Track repeat
A : All tracks repeat
A B : A-B repeat
remaining time of the entire disc
elapsed time of the entire disc
INTRODUCTION
CONNECTION
INITIAL SETTING DVD SETTING INFORMATION
WATCHING TV
OPTIONAL SETTING
3
TL1
layer number appears only when
playing a 2-layered disc
L0 : Layer 0 is playing
L1 : Layer 1 is playing
current repeat setting appears
only when the repeat setting is
active
C : Chapter repeat
T : Title repeat
A B : A-B repeat
bit rate indication for the amount
of audio and video data currently
being read
4
Note:
•
Some DVD will not allow you to set chapter playback correctly.
3
Note:
• When you are playing a disc in program or random mode,
“ PROGRAM” (or “ RANDOM”) will be displayed
instead of 2.
MP3
current playback status
TRACK 01
1
1/36 0:01:15
2
PROGRAM
3
* Only when you are playing a disc in program or
random mode.
the name of the file currently in
playback will be displayed
TR (File):
current file number / total files
T
current repeat setting if active
T : Track repeat
G : Group (folder) repeat
A : All files repeat
elapsed playing time of the
current file
RANDOM
or
OPERATING DVD
TROUBLESHOOTING
4
33
EN
Page 34

PERATING DVD
Subtitle Language
Audio Language
Camera Angles
or
O
Special Settings
5
Subtitle Language
Audio Language
DVD
This unit allows you to select a subtitle language (if available) during DVD
playback.
During playback, press [MODE] repeatedly until
1
“ “ appears.
Use [Cursor K / L] repeatedly until your desired lan-
2
guage appears.
1.ENG/6 (SUBTITLE)
or
• Each time you press [Cursor K / L], the subtitle lan-
guage changes as example below.
OFF (no subtitles)
ENG (English subtitles)
FRE (French subtitles)
...
subtitles can be varied on
the displayed number.
current subtitle language.
To cancel the subtitle
During playback, press [MODE] repeatedly until
1
“ “ appears.
1.ENG/6 (SUBTITLE)
Use [Cursor K / L] repeatedly until “ OFF
2
(SUBTITLE)“ appears.
Note:
• If your language is not shown after pressing [Cursor K / L]
• When “NOT AVAILABLE” appears on the TV screen, it means
• If you choose a language that has 3-letter abbreviation, the
• Ejecting the disc will cancel your subtitle setting.
or
several times, the disc may not have that language. However,
some discs only allow you to change subtitle languages setting in the disc menu. (Operation varies depending on the
disc, so refer to the manual along with the disc.)
no subtitle is recorded on the scene.
abbreviation will be displayed every time you change the
subtitle language setting. If you choose any other languages,
“---” will be displayed instead. (Refer to page 42.)
OFF (SUBTITLE)
DVD
This unit allows you to select an audio language (if multiple languages are
available) during DVD playback.
During playback, press [AUDIO] repeatedly
until the desired language appears.
3/2.1ch 48k/3
1.ENG
Dolby D
• Each time you press [AUDIO], the audio language
changes as example below.
ENG (English audio)
SPA (Spanish audio)
FRE (French audio)
...
audio can be varied on
the displayed number.
current audio language.
Note:
• Some discs will only allow you to change the audio setting
from the disc menu. Refer to the manual accompanying the
discs for details.
• If your language is not shown after pressing [AUDIO] several
times, the disc may not have that language. However, some
discs allow you to change multiple audio languages setting
in the disc menu. (Operation varies depending on the disc, so
refer to the manual along with the disc.)
• When “NOT AVAILABLE“ appears on the TV screen, it means
audio language is not available.
Camera Angles
DVD
Some DVD may contain scenes which have been shot
simultaneously from various angles. You can change the
camera angle if “ ” appears on the TV screen. If “ANGLE ICON”
is set to “OFF” in “OTHERS” menu, “ ” will not appear.
(Refer to page 41.)
During playback, press [MODE] repeatedly until
1
“ “ appears.
Use [Cursor K / L] repeatedly until your desired
2
camera angle appears.
1 / 8 (ANGLE)
angles can be varied on
the displayed number.
34
EN
Page 35

INTRODUCTION
Black Level Setting
Stereo Sound Mode
Virtual Surround
Black Level Setting
DVD
Adjust the black level to make the dark areas of the TV picture brighter.
During playback, press [MODE] repeatedly until
1
“ “ appears.
OFF (BLACK LEVEL)
or
ON (BLACK LEVEL)
Use [Cursor K / L] to adjust the black level.
2
ON : Makes the dark areas brighter.
OFF : Shows the original picture as recorded.
Press [RETURN] to exit.
3
Note:
• The setting will be kept even if the unit is turned off.
Stereo Sound Mode
CD
This unit allows you to select a sound mode during audio CD playback.
Virtual Surround
You can enjoy virtual surround on your existing 2 channel stereo system.
During playback, press [MODE] repeatedly until
1
“ “ appears.
OFF (SURROUND)
Use [Cursor K / L] to select the sound level.
2
1 : Natural effect
2 : Emphasized effect
OFF : No effects (original sound)
Press [RETURN] to exit.
3
or
1 (SURROUND)
Note:
• The setting will be kept even if the unit is turned off.
• For audio CD, virtual surround will not be effective if the
sound mode is set to something other than “STEREO”.
See “Stereo Sound Mode”.
• Turn down the level or select “OFF” if the sound is distorted.
CONNECTION
INITIAL SETTING DVD SETTING INFORMATION
WATCHING TV
OPTIONAL SETTING
OPERATING DVD
During playback, press [AUDIO] repeatedly until the
desired sound mode appears.
STEREO
• Each time you press [AUDIO], the sound mode
changes as example below.
STEREO
L-ch (left channel sound only)
R-ch (right channel sound only)
(stereo sound with left and right channels)
Note:
• Virtual surround cannot be changed when the sound mode is
set to either “L-ch” or “R-ch”.
TROUBLESHOOTING
35
EN
Page 36

PERATING DVD
Marker Setup
O
Marker Setup
This feature allows you to assign a speci c point on a disc to be called back
later.
DVD
CD
To set a marker
During playback, press [MODE] repeatedly until
1
“ ”/“ ” appears.
e.g.) DVD
_ _ /12 (SEARCH)
Use [Cursor K /L] repeatedly until marker search menu
2
appears.
Use [Cursor s / B] to select an available marker within
3
60 seconds.
When the playback reaches the point at which you
4
want to set a marker, press [ENTER].
• Marker is now set.
or
or
To return to the marker later
To select a desired marker, repeat steps 1 to 3 in
1
“To set a marker“.
e.g.) DVD
or
Press [ENTER] at the desired marker to start playback
2
from the specific point which you set.
Note:
• Marker Search menu will disappear in about 60 seconds
when there is no input.
• You can mark up to 10 points.
• To clear a marker, select the marker to be cleared, and then
press [CLEAR].
• Ejecting the disc or turning off the power will erase all markers.
• Selecting “
will also erase all markers.
” at step 3 in the section “To set a marker”
Press [RETURN] to exit.
5
36
EN
Page 37

VD SETTING
QUICK MENU AT A GLANCE
D
Settings are only effective when the unit is in DVD mode and any discs should not be played back.
QUICK MENU AT A GLANCE
If you make setting for “TV MODE“ or “DOLBY DIGITAL”, you
can also enter from the “QUICK“ menu. Use [Cursor K /L] to
select “QUICK” and press [ENTER] at step 3.
SETUP QUICK
TV MODE
DOLBY DIGITAL
SELECT:K/
EXIT:SETUP CANCEL:RETURN
DVD Language Setting
5
4:3 LETTER BOX
BITSTREAM
L SET:ENTER
You can change the desired language when playing back the disc.
In stop mode, press [SETUP] to display “TV SETUP”.
1
--- TV SETUP --LANGUAGE [ENGLISH]
BACK LIGHT [BRIGHT]
COLOR TEMP. [NORMAL]
DVD SETUP
Use [Cursor K /L] to select “DVD SETUP”, then press [ENTER].
2
Use [Cursor K /L] to select the desired item, then press
6
[ENTER].
[AUDIO] *1, *2 (Default: ORIGINAL)
Select the desired audio language.
SETUP LANGUAGE
or
AUDIO
ORIGINAL
ENGLISH
FRENCH
SPANISH
GERMAN
ITALIAN
SWEDISH
L SET:ENTER
SELECT:K/
EXIT:SETUP CANCEL:RETURN
[SUBTITLE] *1, *2 (Default: OFF)
Select the desired subtitle language.
SETUP LANGUAGE
or
SUBTITLE
OFF
ENGLISH
FRENCH
SPANISH
GERMAN
ITALIAN
SWEDISH
L SET:ENTER
SELECT:K/
EXIT:SETUP CANCEL:RETURN
CONNECTION
INITIAL SETTING
WATCHING TV
OPTIONAL SETTING
or
Use [Cursor K /L] to select “CUSTOM”, then press [ENTER].
3
or
Use [Cursor K /L] to select “LANGUAGE”, then press [ENTER].
4
or
Use [Cursor K /L] to select the desired item, then press
5
--- TV SETUP --LANGUAGE [ENGLISH]
BACK LIGHT [BRIGHT]
COLOR TEMP. [NORMAL]
DVD SETUP
SETUP
QUICK
CUSTOM
INITIALIZE
L SET:ENTER
SELECT:K/
EXIT:SETUP CANCEL:RETURN
SETUP CUSTOM
LANGUAGE
DISPLAY
AUDIO
PARENTAL
OTHER S
L SET:ENTER
SELECT:K/
EXIT:SETUP CANCEL:RETURN
[ENTER].
[DISC MENU] *1 (Default: ENGLISH)
Select the desired language in DVD menu.
SETUP LANGUAGE
or
DISC MENU
ENGLISH
FRENCH
SPANISH
GERMAN
ITALIAN
SWEDISH
DUTCH
L SET:ENTER
SELECT:K/
EXIT:SETUP CANCEL:RETURN
Note:
•
To change the on-screen language, call up “TV SETUP” menu
by pressing [SETUP] once and set the desired language.
(Refer to “Language Selection“ on page 14.)
*1
• Language options are not available with some discs.
• If “OTHER” is selected in “AUDIO”, “SUBTITLE” or “DISC MENU”
menu, press 4-digit number to enter the code for the desired
language. (Refer to “Language Code List” on page 42.)
• Only the languages supported by the disc can be selected.
*2
•
Use [MODE] to select subtitles available on the DVD.
•
Use [AUDIO] to select audio available on the DVD.
•
If the DVD’s default settings for audio and subtitle are the
same language, the subtitles may not show unless you turn
them on.
Press [SETUP] to exit.
7
OPERATING DVDINTRODUCTION
DVD SETTING
TROUBLESHOOTING
INFORMATION
or
SETUP LANGUAGE
AUDIO
SUBTITLE
DISC MENU
L SET:ENTER
SELECT:K/
EXIT:SETUP CANCEL:RETURN
ORIGINAL
OFF
ENGLISH
37
EN
Page 38

VD SETTING
D
Display Setting
5
You can change the TV aspect ratio and still mode clarity in “DISPLAY”
menu.
In stop mode, press [SETUP] to display “TV SETUP”.
1
--- TV SETUP --LANGUAGE [ENGLISH]
BACK LIGHT [BRIGHT]
COLOR TEMP. [NORMAL]
DVD SETUP
Use [Cursor K /L] to select the desired item, then press
6
[ENTER].
[TV MODE] (Default: 4:3 LETTER BOX)
Select the desired TV aspect ratio.
SETUP DISPLAY
or
TV MODE
4:3 LETTER BOX
4:3 PAN & SCAN
Use [Cursor K /L] to select “DVD SETUP”, then press
2
[ENTER].
or
Use [Cursor K /L] to select “CUSTOM”, then press
3
--- TV SETUP --LANGUAGE [ENGLISH]
BACK LIGHT [BRIGHT]
COLOR TEMP. [NORMAL]
DVD SETUP
[ENTER].
or
Use [Cursor K /L] to select “DISPLAY”, then press
4
SETUP
QUICK
CUSTOM
INITIALIZE
L SET:ENTER
SELECT:K/
EXIT:SETUP CANCEL:RETURN
[ENTER].
or
SETUP CUSTOM
LANGUAGE
DISPLAY
AUDIO
PARENTAL
OTHER S
L SET:ENTER
SELECT:K/
EXIT:SETUP CANCEL:RETURN
L SET:ENTER
SELECT:K/
EXIT:SETUP CANCEL:RETURN
[STILL MODE] (Default: AUTO)
Select the desired still mode.
SETUP DISPLAY
or
STILL MODE
AUTO
FIELD
FRAME
L SET:ENTER
SELECT:K/
EXIT:SETUP CANCEL:RETURN
Note:
TV MODE:
• Select “4:3 LETTER BOX”, so that black bars may appear on
the top and bottom of the TV screen.
• Select “4:3 PAN & SCAN” for a full height picture with both
sides adjusted.
STILL MODE:
• Select “AUTO” usually.
• If you select “FIELD”, the picture in the still mode will be
stabilized.
• If you select “FRAME”, the picture in the still mode will be
highly defined.
Press [SETUP] to exit.
7
Use [Cursor K /L] to select the desired item, then press
5
[ENTER].
or
SETUP DISPLAY
TV MODE
STILL MODE
L SET:ENTER
SELECT:K/
EXIT:SETUP CANCEL:RETURN
4:3 LETTER BOX
AUTO
38
EN
Page 39

DVD Audio Setting
5
Choose the appropriate audio settings for your equipment. It only a ects
during the playback of DVD.
In stop mode, press [SETUP] to display “TV SETUP”.
1
--- TV SETUP --LANGUAGE [ENGLISH]
BACK LIGHT [BRIGHT]
COLOR TEMP. [NORMAL]
DVD SETUP
Use [Cursor K /L] to select “DVD SETUP”, then press
2
[ENTER].
or
Use [Cursor K /L] to select “CUSTOM”, then press
3
--- TV SETUP --LANGUAGE [ENGLISH]
BACK LIGHT [BRIGHT]
COLOR TEMP. [NORMAL]
DVD SETUP
[ENTER].
or
Use [Cursor K /L] to select “AUDIO”, then press
4
SETUP
QUICK
CUSTOM
INITIALIZE
L SET:ENTER
SELECT:K/
EXIT:SETUP CANCEL:RETURN
[ENTER].
or
Use [Cursor K /L] to select the desired item, then press
5
SETUP CUSTOM
LANGUAGE
DISPLAY
AUDIO
PARENTAL
OTHER S
L SET:ENTER
SELECT:K/
EXIT:SETUP CANCEL:RETURN
[ENTER].
or
SETUP AUDIO
DRC
DOWN SAMPLING
DOLBY DIGITAL
L SET:ENTER
SELECT:K/
EXIT:SETUP CANCEL:RETURN
ON
ON
BITSTREAM
Use [Cursor K /L] to select the desired item, then press
6
[ENTER].
[DRC] (Default: ON)
Sets the dynamic range control.
This function is available only on the discs which are
recorded in the Dolby Digital format.
or
SETUP AUDIO
DRC
DOWN SAMPLING
DOLBY DIGITAL
L SET:ENTER
SELECT:K/
EXIT:SETUP CANCEL:RETURN
ON
ON
BITSTREAM
ON : Compress the range between soft and loud
sounds.
OFF : No effects (original sound).
[DOWN SAMPLING] (Default: ON)
This function is available only on digital outputting of a
disc recorded in 96kHz.
or
SETUP AUDIO
DRC
DOWN SAMPLING
DOLBY DIGITAL
L SET:ENTER
SELECT:K/
EXIT:SETUP CANCEL:RETURN
ON
ON
BITSTREAM
ON : When outputting in 48kHz.
OFF : When outputting the original sound.
Note:
• When playing back a 96 kHz disc with the copyright protection or when virtual surround is set to 1 or 2, the sound will
be down sampled at 48 kHz even if “DOWN SAMPLING” is
“OFF”.
[DOLBY DIGITAL] (Default: BITSTREAM)
Sets “BITSTREAM“ when this unit is connected to a
Dolby Digital decoder. Available on DVD only.
or
BITSTREAM : Outputs Dolby Digital signals.
PCM : Converts the Dolby Digital into PCM.
Press [SETUP] to exit.
7
(2 channel)
SETUP AUDIO
DRC
DOWN SAMPLING
DOLBY DIGITAL
L SET:ENTER
SELECT:K/
EXIT:SETUP CANCEL:RETURN
ON
ON
BITSTREAM
CONNECTION
INITIAL SETTING
WATCHING TV
OPTIONAL SETTING
OPERATING DVDINTRODUCTION
DVD SETTING
TROUBLESHOOTING
INFORMATION
39
EN
Page 40

VD SETTING
or
D
Parental Setting
5
Parental setting prevents your children from viewing inappropriate materials.
(password protected.) Playback will stop if the ratings exceed the levels you set.
In stop mode, press [SETUP] to display “TV SETUP”.
1
--- TV SETUP --LANGUAGE [ENGLISH]
BACK LIGHT [BRIGHT]
COLOR TEMP. [NORMAL]
DVD SETUP
Use [Cursor K /L] to select “DVD SETUP”, then press [ENTER].
2
--- TV SETUP --LANGUAGE [ENGLISH]
BACK LIGHT [BRIGHT]
COLOR TEMP. [NORMAL]
DVD SETUP
Use [Cursor K /L] to select “CUSTOM”, then press [ENTER].
3
or
SETUP
QUICK
CUSTOM
INITIALIZE
Use [Cursor K /L] to select the desired item, then press
7
[ENTER].
SETUP PARENTAL
or
PARENTAL LEVEL
ALL
8 [ADULT]
7 [NC-17]
6 [R]
5 [PGR]
4 [PG13]
3 [PG]
L SET:ENTER
SELECT:K/
EXIT:SETUP CANCEL:RETURN
PARENTAL LEVEL
ALL : all parental locks are canceled.
8 [ADULT] : all ratings (adult/general/children) can
be played back.
7
[NC-17]-2 [G]
: only DVD intended for general use and
children can be played back.
1 [KID SAFE] : only DVD intended for children can be
played back.
Press [SETUP] to exit.
8
L SET:ENTER
SELECT:K/
Use [Cursor K /L] to select “PARENTAL”, then press
4
[ENTER].
or
Use [the Number buttons] to enter the 4-digit
5
number for your password, then press [ENTER].
EXIT:SETUP CANCEL:RETURN
SETUP CUSTOM
LANGUAGE
DISPLAY
AUDIO
PARENTAL
OTHER S
L SET:ENTER
SELECT:K/
EXIT:SETUP CANCEL:RETURN
SETUP PARENTAL
PAS S WO R D
Please enter a 4-digit password.
EXIT:SETUP CANCEL:RETURN
• If you have set password already, use [the Number buttons]
to enter the current 4-digit password.
•
You cannot use the default password (4737) to play a DVD.
Use [Cursor K /L] to select “PARENTAL LEVEL“, then
6
press [ENTER].
or
SETUP PARENTAL
PARENTAL LEVEL
PASSWORD CHANGE
ALL
To change the password
6
Follow steps 1 to 5. Use [Cursor K /L] to select
“PASSWORD CHANGE“, then press [ENTER].
or
Use [the Number buttons] to enter the new 4-digit
7
password, then press [ENTER].
Note:
• DVD-video may not respond to parental lock settings. Make
sure this function works with your DVD-video.
• Record the password in case you forget it.
• If you forget the password, press [4], [7], [3], [7], then enter
your new password. Password will be cleared and parental
levels will be set to “ALL”.
• A power failure will not erase your password.
Press [SETUP] to exit.
8
SETUP PARENTAL
PARENTAL LEVEL
PASSWORD CHANGE
SELECT:K/
EXIT:SETUP CANCEL:RETURN
SETUP PARENTAL
PASSWORD
Please enter a 4-digit password.
0000
Don’t forget the password.
Press “ENTER” to activate password.
EXIT:SETUP CANCEL:RETURN
ALL
L SET:ENTER
40
L SET:ENTER
SELECT:K/
EN
EXIT:SETUP CANCEL:RETURN
Page 41

Others
5
You can change the other functions.
In stop mode, press [SETUP] to display “TV SETUP”.
1
--- TV SETUP --LANGUAGE [ENGLISH]
BACK LIGHT [BRIGHT]
COLOR TEMP. [NORMAL]
DVD SETUP
Use [Cursor K /L] to select “DVD SETUP”, then press
2
[ENTER].
Use [Cursor K /L] to select the desired item, then press
6
[ENTER].
[ANGLE ICON] (Default: ON)
Set to “ON” to show the angle icon when multiple camera angles are available during DVD playback.
or
SETUP OTHERS
ANGLE ICON
SCREEN SAVERONOFF
L SET:ENTER
SELECT:K/
EXIT:SETUP CANCEL:RETURN
CONNECTION
INITIAL SETTING
or
Use [Cursor K /L] to select “CUSTOM”, then press
3
--- TV SETUP --LANGUAGE [ENGLISH]
BACK LIGHT [BRIGHT]
COLOR TEMP. [NORMAL]
DVD SETUP
[ENTER].
or
Use [Cursor K /L] to select “OTHERS”, then press
4
SETUP
QUICK
CUSTOM
INITIALIZE
L SET:ENTER
SELECT:K/
EXIT:SETUP CANCEL:RETURN
[ENTER].
or
SETUP CUSTOM
LANGUAGE
DISPLAY
AUDIO
PARENTAL
OTHER S
L SET:ENTER
SELECT:K/
EXIT:SETUP CANCEL:RETURN
[SCREEN SAVER] (Default: OFF)
If you select “ON”, the screen saver program starts when
there is no input from the unit for 5 minutes in stop
mode.
or
Press [SETUP] to exit.
7
SETUP OTHERS
ANGLE ICON
SCREEN SAVERONOFF
L SET:ENTER
SELECT:K/
EXIT:SETUP CANCEL:RETURN
WATCHING TV
OPTIONAL SETTING
OPERATING DVDINTRODUCTION
DVD SETTING
TROUBLESHOOTING
Use [Cursor K /L] to select the desired item, then press
5
[ENTER].
or
SETUP OTHERS
ANGLE ICON
SCREEN SAVERONOFF
L SET:ENTER
SELECT:K/
EXIT:SETUP CANCEL:RETURN
INFORMATION
41
EN
Page 42

VD SETTING
D
Reset to the Default Setting
5 Language Code List
You can reset all the settings except for the parental setting and
on-screen menu language.
In stop mode, press [SETUP] to display “TV SETUP”.
1
--- TV SETUP --LANGUAGE [ENGLISH]
BACK LIGHT [BRIGHT]
COLOR TEMP. [NORMAL]
DVD SETUP
or
or
or
--- TV SETUP --LANGUAGE [ENGLISH]
BACK LIGHT [BRIGHT]
COLOR TEMP. [NORMAL]
DVD SETUP
SETUP
QUICK
CUSTOM
INITIALIZE
L SET:ENTER
SELECT:K/
EXIT:SETUP CANCEL:RETURN
SETUP INITIALIZE
Initialize?
NO
YES
L SET:ENTER
SELECT:K/
EXIT:SETUP CANCEL:RETURN
Use [Cursor K /L] to select “DVD SETUP”, then press
2
[ENTER].
Use [Cursor K /L] to select “INITIALIZE”, then press
3
[ENTER].
Use [Cursor K /L] to select “YES”, then press [ENTER].
4
Note:
• When you want to cancel the initialization, select “NO” at
step 4, then press [SETUP].
Press [SETUP] to exit.
5
5
Language Code
Abkhazian 4748
Afar 4747
Afrikaans 4752
Albanian 6563
Amharic 4759
Arabic 4764
Armenian 5471
Assamese 4765
Aymara 4771
Azerbaijani 4772
Bashkir 4847
Basque 5167
Bengali;Bangla 4860
Bhutani 5072
Bihari 4854
Bislama 4855
Breton 4864
Bulgarian 4853
Burmese 5971
Byelorussian 4851
Cambodian 5759
Catalan 4947
Chinese [CHI] 7254
Corsican 4961
Croatian 5464
Czech [CZE] 4965
Danish [DAN] 5047
Dutch [DUT] 6058
English [ENG] 5160
Esperanto 5161
Estonian 5166
Faroese 5261
Fiji 5256
Finnish [FIN] 5255
French [FRE] 5264
Frisian 5271
Galician 5358
Georgian 5747
German [GER] 5051
Greek [GRE] 5158
Greenlandic 5758
Guarani 5360
Gujarati 5367
Hausa 5447
Hebrew 5569
Hindi 5455
Hungarian [HUN] 5467
Icelandic [ICE] 5565
Indonesian 5560
Interlingua 5547
Interlingue 5551
Inupiak 5557
Irish [IRI] 5347
Italian [ITA] 5566
Japanese [JPN] 5647
Javanese 5669
Kannada 5760
Kashmiri 5765
Kazakh 5757
Kinyarwanda 6469
Kirghiz 5771
Kirundi 6460
Korean [KOR] 5761
Kurdish 5767
Laothian 5861
Latin 5847
Latvian;Lettish 5868
Lingala 5860
Lithuanian 5866
Macedonian 5957
Malagasy 5953
Malay 5965
Malayalam 5958
Maltese 5966
Maori 5955
A-B
C-E
F-H
I-K
L-N
Language Code
Marathi 5964
Moldavian 5961
Mongolian 5960
Nauru 6047
Nepali 6051
Norwegian [NOR] 6061
Occitan 6149
Oriya 6164
Oromo(Afan) 6159
Panjabi 6247
Pashto;Pushto 6265
Persian 5247
Polish [POL] 6258
Portuguese [POR] 6266
Quechua 6367
Rhaeto-Romance 6459
Romanian [RUM] 6461
Russian [RUS] 6467
Samoan 6559
Sangho 6553
Sanskrit 6547
Scots Gaelic 5350
Serbian 6564
Serbo-Croatian 6554
Sesotho 6566
Setswana 6660
Shona 6560
Sindhi 6550
Singhalese 6555
Siswat 6565
Slovak 6557
Slovenian 6558
Somali 6561
Spanish [SPA] 5165
Sundanese 6567
Swahili 6569
Swedish [SWE] 6568
Tagalog 6658
Tajik 6653
Tamil 6647
Tatar 6666
Telugu 6651
Thai 6654
Tibetan 4861
Tigrinya 6655
Tonga 6661
Tsonga 6665
Turkish [TUR] 6664
Turkmen 6657
Twi 6669
Ukrainian 6757
Urdu 6764
Uzbek 6772
Vietnamese 6855
Volapuk 6861
Welsh 4971
Wolof 6961
Xhosa 7054
Yiddish 5655
Yoruba 7161
Zulu 7267
Note:
• If you choose a language that has a 3-letter abbreviation,
they will be displayed every time you change the audio or
subtitle language setting above. If you choose any other
language, ‘---’ will be displayed instead. (3-letter abbreviation is written in bracket.)
42
EN
O-R
S
T
U-Z
Page 43

ROUBLESHOOTING
T
Troubleshooting Guide
5
If the unit does not perform properly when operated as instructed in this owner’s manual, check the following chart
once before calling for service.
Symptom Remedy
No power • Be sure the power cord is plugged in.
No picture or sound • Check if the power is on.
No color • Check the antenna or cable connection to the main unit.
Sound OK, picture poor • Check the antenna or cable connection to the main unit.
Picture distorted • When the outside antenna is used, check the wire condition and connection.
Weak picture • Check the antenna or cable connection to the main unit.
Lines or streaks in picture • When the outside antenna is used, check the wire condition and connection.
T
Picture blurred • When the outside antenna is used, check the wire condition and connection.
V
Ghosts in picture • Check the antenna or cable connection to the main unit.
Bars on TV screen • When the outside antenna is used, check the wire condition and connection.
Picture rolls vertically • When the outside antenna is used, check the wire condition and connection.
Different color marks on TV
screen
Poor reception on some channels
Picture OK, sound poor • View other TV channels. The problem might be limited to the broadcasting station.
No reception of digital signals •
• If a power failure occurs, unplug the power cord for 30 minutes to allow the unit to
reset itself.
• Check the outlet connection.
• Check the antenna or cable connection to the main unit.
• When the outside antenna is used, check the wire condition and connection.
• View other TV channels. The problem might be limited to the broadcasting station.
• Turn off the power and wait for about 1 minute, then turn it on again.
• When the outside antenna is used, check the wire condition and connection.
• View other TV channels. The problem might be limited to the broadcasting station.
• Adjust the “COLOR” in the main menu.
• When the outside antenna is used, check the wire condition and connection.
• Electrical interference from nearby appliances may affect picture quality.
• Adjust “CONTRAST” and “BRIGHTNESS” in the main menu.
• View other TV channels. The problem might be limited to the broadcasting station.
• View other TV channels. The problem might be limited to the broadcasting station.
• When the outside antenna is used, check the wire condition and connection.
• Adjust “CONTRAST” and “BRIGHTNESS” in the main menu.
• View other TV channels. The problem might be limited to the broadcasting station.
• Electrical interference from nearby appliances may affect picture quality.
• View other TV channels. The problem might be limited to the broadcasting station.
• View other TV channels. The problem might be limited to the broadcasting station.
• When the outside antenna is used, check the wire condition and connection.
• Electrical interference from nearby appliances may affect picture quality.
• View other TV channels. The problem might be limited to the broadcasting station.
• Electrical interference from nearby appliances may affect picture quality.
• Electrical interference from nearby appliances may affect picture quality.
• View other TV channels. The problem might be limited to the broadcasting station.
• Move the unit away from nearby electric appliances. Turn off the power and wait
30 minutes before turning it back on.
• View other TV channels. The problem might be limited to the broadcasting station.
• Check the antenna or cable connection to the main unit.
• When the outside antenna is used, check the wire condition and connection.
• Electrical interference from nearby appliances may affect picture quality.
• View other TV channels. The problem might be limited to the broadcasting station.
Make sure auto channel scan has been completed. (Refer to “Auto Channel Scan” on
page 13.)
Auto channel scan must be completed when you set up the unit for the first time
or move it to a location where previously unavailable channels are broadcast.
• The selected channel may not be broadcasting.
• When auto channel scan is interrupted and not completed, some channels will not
be received. Make sure to complete.
(Refer to “Auto Channel Scan” on page 13.)
CONNECTION
INITIAL SETTING DVD SETTING INFORMATION
WATCHING TV
OPTIONAL SETTING
OPERATING DVDINTRODUCTION
TROUBLESHOOTING
EN
43
Page 44

ROUBLESHOOTING
T
Symptom Remedy
The entered channel number
changes automatically
Remote control does not work • Check the antenna or cable connection to the main unit.
Many digital channels have alternate channel numbers. The unit changes the numbers
•
automatically to the ones signifying the broadcasting stations. These are the numbers used
for analog broadcasts.
• Check the batteries of the remote control.
• Check if there is an obstacle between the infrared sensor window and the remote
control.
• Test the signal output. If OK, then possible remote sensor trouble.
(Refer to “IR Signal Check” on page 45.)
Aim the remote control directly at the infrared sensor window on the front of the unit.
•
• Reduce the distance to the unit.
• Re-insert the batteries with their polarities (+/– signs) as indicated.
Problems with Closed Caption Feature
Misspelled captions are dis-
T
played.
V
Captions are not entirely displayed, or captions are delayed
behind the dialogue.
Captions are displayed as a
white box.
No caption is displayed in the
Closed Caption-supported
program.
No caption is displayed when
playing the videotape containing captions.
Black box is displayed in the
screen.
Completely distorted picture
or black/white picture with
DVD
Picture freezes momentarily
during playback.
Disc cannot be played. • Clean the disc.
D
V
Buttons do not work or the
unit stops responding.
D
The unit does not respond to
some operating commands
during playback.
Angle does not switch. • The angle cannot be switched for DVD which do not contain multiple angles. In
Playback does not start
when the title is selected.
The password for rating level
has been forgotten.
• Closed captioning production companies may broadcast programs without correcting the misspelling in a live broadcast.
Captions that are delayed a few seconds behind the actual dialogue are common for live
•
broadcasts. Most captioning production companies can display a dialogue to a maximum of 220 words per minute. If a dialogue exceeds that rate, selective editing is used to
insure that the captions remain up-to-date with the current TV screen dialogue.
• Interference from buildings or weather conditions may cause captioning to be
incomplete.
• Broadcasting station may shorten the program to insert advertisement. The closed
caption decoder cannot read the information of the shortened program.
• The videotape may be illegally copied, or the caption signal might not have been
read during copying.
• The text mode is selected for caption. Select “CAPTION1”, “CAPTION2”, “CAPTION3”,
“CAPTION4” or “OFF”.
• Make sure the disc is compatible with the unit.
• Check the disc for nger prints/scratches and clean with a soft cloth wiping from
center to edge.
• Ensure the disc is correctly inserted.
• Check if the disc is defective by trying another disc.
• Cancel the parental lock or change the control level.
• Insert a correct disc that plays on this unit.
• Handle a disc with special care so that it does not have ngerprints, scratches, or
dusts on its surface.
• To completely reset the unit, unplug the power cord from the power outlet for
5-10 seconds.
• Operations may not be permitted by the disc. Refer to the instructions of the disc.
some cases multiple angles are only recorded for speci c scenes.
• Check the “PARENTAL” setting.
• Enter the default password “4737”, then your forgotten password will be cleared.
Note:
• The LCD panel is manufactured to provide many years of useful life. Occasionally a few non active pixels may appear as a fixed point of
blue, green or red. This is not to be considered a defect in the LCD screen.
• Some functions are not available in specific modes, but this is not a malfunction. Read the description in this owner’s manual for more
details on correct operations.
• Playback from a desired track/file and random playback are not available during program playback.
• Some functions are prohibited on some discs.
44
EN
Page 45

NFORMATION
I
Glossary5
ATS C
Acronym that stands for Advanced Television
Systems Committee and the name of the
digital broadcasting standards.
Aspect ratio
The width of a TV screen relative to its
height. Conventional TVs are 4:3 (in
other words, the screen is almost square);
widescreen models are 16:9 (the screen is
almost twice as wide as its height).
Component Video
This is a video signal format that conveys
each of 3 principal colors of light (red,
blue and green) through different signal
lines. This allows the viewers to experience
picture colors as original as it is. There are
several signal formats, including Y / Pb / Pr
and Y / Cb / Cr.
Maintenance5
Dolby Digital
The system developed by Dolby Laboratories to compress digital sound. It offers
stereo sound (2ch) or multi-channel audio.
EDTV (enhanced definition TV)
Enhanced digital format that takes 480-line
progressive signal.
HDTV (high definition TV)
Ultimate digital format that produces high
resolution and high picture quality.
NTSC
Acronym that stands for National Television
Systems Committee and the name of the
current analog broadcasting standards.
Password
A stored 4-digit number that allows access
to parental control features.
Region Code
Regions associate discs and players with
particular areas of the world. this unit will
only play back discs that have compatible
region codes. You can find the region code
of your unit by looking on the rear panel.
Some discs are compatible with more than
one region (or all regions).
SAP (secondary audio program)
Second-audio channel delivered separately from main-audio channel. This audio
channel is used as an alternate in bilingual
broadcasting.
SDTV (standard definition TV)
Standard digital format that is similar to the
NTSC picture quality.
S-video
Offers higher quality images by delivering each signal, color (c) and luminance
(y) independently of each other through
separate cables.
CONNECTION
INITIAL SETTING DVD SETTING
WATCHING TV
OPTIONAL SETTING
Cabinet Cleaning
• Wipe the front panel and other exterior surfaces of the unit with a soft
cloth immersed in lukewarm water and wrung dry.
•
Never use a solvent or alcohol. Do not spray insecticide liquid near the unit.
Such chemicals may cause damage and discoloration to the exposed surfaces.
Servicing
Should your unit become inoperative, do not try to correct the problem
yourself. There are no user serviceable parts inside. Turn o the unit,
unplug the power cord and call our toll free customer support line found on
the cover of this manual to locate an authorized service center.
Panel Cleaning
Wipe the panel with a soft cloth. Before cleaning the panel, disconnect the
power cord.
If the Laser Optical Pickup Unit is Dirty
• If the unit still does not perform properly when it is operated, while
referring to the relevant sections and to "Troubleshooting Guide" in this
owner’s manual, the laser optical pickup unit may be dirty. Consult your
dealer or an Authorized Service Center for inspection and cleaning of the
laser optical pickup unit.
Disc Handling
• Handle the discs so that ngerprints and dust do not adhere to the
surfaces of the discs.
• Always store the disc in its protective case when it is not used.
• To clean-o , use a soft cloth.
• Do not use a hard cloth since this will mar the disc.
• Wipe the disc in a straight line from center to edge.
• Never wipe with a circular motion.
• Do not use detergent or abrasive cleaning agents.
IR Signal Check
If the remote control is not working properly, you can use an AM radio or
digital camera (including a cellular phone with built-in camera) to see if it
is sending out an infrared signal.
• With an AM radio:
Tune the AM radio station to a non-broadcasting
frequency. Point the remote control towards it,
push any button and listen. If the sound from
the radio utters, it is receiving the remote
control’s infrared signal.
OPERATING DVDINTRODUCTION
TROUBLESHOOTING
INFORMATION
• With a digital camera
(including built-in cell phone cameras)
Point a digital camera towards the remote control.
Push any button on the remote control and look
through the digital camera. If the infrared light
appears through the camera, the remote control is
working.
45
EN
Page 46

NFORMATION
I
Cable Channel Designations5
If you subscribe to cable TV, the channels are displayed as 1-135.
Cable companies often designate channels with letters or letter-number combinations. Please check with your local cable company.
The following is a chart of common cable channel designations.
CATV channel
TV Display
CATV channel
TV Display
CATV channel
TV Display
CATV channel
TV Display
CATV channel
TV Display
CATV channel
TV Display
CATV channel
TV Display
5 Electrical Specification
Television Format: ATSC / NTSC-M TV Standard
Closed caption
system: §15.122/FCC (Digital CC)
§15.119/FCC (Analog CC)
Channel coverage (ATSC/NTSC):
VHF: 2 ~ 13
UHF: 14 ~ 69
CATV: 2 ~ 13, A ~ W, W+1 ~ W+94,
(analog W+1 ~ W+84), A-5 ~ A-1, 5A
Tuning system: Channel frequency
synthesized tuning system
Channel access: Direct access keyboard,
Programmable scan, and Up/down
Discs playback compatibility:
DVD Video, DVD-RW/-R,
DVD+RW/+R, audio CD, CD-RW/-R
Frequency response:
DVD (linear sound): 20 Hz to 20 kHz (sample rate: 48 kHz)
20 Hz to 44 kHz (sample rate: 96 kHz)
CD: 20 Hz to 20 kHz
Signal-to-noise ratio (S/N ratio):
CD: 75 dB (JEITA)
Total distortion factor:
DVD: 1 kHz 0.008% (JEITA)
CD: 1 kHz 0.008% (JEITA)
5A122334455667788991010111112121313A14B15C16D17E18F19G20H
I22J23K24L25M26N27O28P29Q30R31S32T33U34V35W36W+1
W+743W+844W+945W+1046W+1147W+1248W+1349W+1450W+1551W+16
W+2864W+2965W+3066W+3167W+3268W+3369W+3470W+3571W+3672W+3773W+3874W+3975W+4076W+4177W+4278W+4379W+4480W+4581W+4682W+4783W+48
W+4985W+5086W+5187W+5288W+5389W+5490W+5591W+5692W+5793W+5894A-595A-496A-397A-298A-199W+59
W+65
W+66
W+67
W+68
W+69
W+70
W+71
W+72
106
W+86
127
107
W+87
128
108
W+88
129
109
W+89
130
110
W+90
131
111
W+91
132
112
W+92
133
113
W+93
134
W+73
114
W+94
135
General Specifications
TV
W+1753W+1854W+1955W+2056W+2157W+2258W+2359W+2460W+2561W+2662W+27
52
W+74
W+75
W+76
W+77
W+78
115
116
117
118
119
W+79
120
5
Sound output: 1W, 8Ω x 2
5
Other Specifications
W+2 W+339W+440W+541W+6
37 38
W+60
101
W+81
122
W+61
102
W+82
123
100
W+80
121
Terminals:
Antenna input: VHF/UHF/CATV
75Ω unbalanced (F-type)
Video input: RCA jack x 1 1 Vp-p (75Ω)
Audio input: RCA jack x 4 500mV rms
(input impedance: more than 22kΩ)
S-Video input: Mini DIN 4-pin jack x 1 Y: 1Vp-p (75Ω)
C: 286mVp-p (75Ω)
Component video input:
RCA jack x 3
Y: 1 Vp-p (75Ω)
Pb: 700mVp-p (75Ω)
Pr: 700mVp-p (75Ω)
Digital audio coaxial output:
DVD
Pin jack: 500mVp-p x 1
Headphone:
1
/8 inches (3.5mm)
Remote control: Digital encoded
infrared light system
Operating temperature:
41°F (5°C) to 104°F (40°C)
Power requirements:
120 V AC +/- 10%, 60 Hz +/- 0.5%
Power consumption (Maximum):
65W
LCD: 20 inches
Dimensions:
H : 17.9 inches (454mm)
W : 23.4 inches (594mm)
D : 8.1 inches (204mm)
Weight: 13.0 lbs. (5.9 kg)
W+62
103
W+83
124
W+63
104
W+84
125
21
42
63
84
W+64
105
W+85
126
46
• Designs and speci cations are subject to change without notice and
without our legal obligation.
• If there is a discrepancy between languages, the default language will
be English.
EN
Page 47

CONNECTION
INITIAL SETTING DVD SETTING
WATCHING TV
OPTIONAL SETTING
OPERATING DVDINTRODUCTION
TROUBLESHOOTING
INFORMATION
47
EN
Page 48

LIMITED WARRANTY
FUNAI CORP. will repair this product, free of charge in the USA in the event of defect in materials or
workmanship as follows:
DURATION:
PARTS: FUNAI CORP. will provide parts to replace defective parts without charge for one (1) year
from the date of original retail purchase. Certain parts and LCD image burn-in are excluded
from this warranty.
LABOR: FUNAI CORP. will provide the labor without charge for a period of ninety (90) days from the
date of original retail purchase.
LIMITS AND EXCLUSIONS:
THIS WARRANTY IS EXTENDED ONLY TO THE ORIGINAL RETAIL PURCHASER. A PURCHASE RECEIPT OR
OTHER PROOF OF ORIGINAL RETAIL PURCHASE WILL BE REQUIRED TOGETHER WITH THE PRODUCT TO
OBTAIN SERVICE UNDER THIS WARRANTY.
This warranty shall not be extended to any other person or transferee.
This warranty is void and of no effect if any serial numbers on the product are altered, replaced, defaced,
missing or if service was attempted by an unauthorized service center. This limited warranty does not
apply to any product not purchased and used in the United States.
This warranty only covers failures due to defects in material or workmanship which occur during
normal use. It does not cover damage which occurs in shipment, or failures which are caused by repairs,
alterations or products not supplied by FUNAI CORP., or damage, which results from accident, misuse,
abuse, mishandling, misapplication, alteration, faulty installation, improper maintenance, commercial use
such as hotel, rental or office use of this product, or damage which results from fire, flood, lightning or
other acts of God.
THIS WARRANTY DOES NOT COVER PACKING MATERIALS, ANY ACCESSORIES (EXCEPT REMOTE CONTROL),
ANY COSMETIC PARTS, COMPLETE ASSEMBLY PARTS, DEMO OR FLOOR MODELS.
FUNAI CORP. AND ITS REPRESENTATIVES OR AGENTS SHALL IN NO EVENT BE LIABLE FOR ANY GENERAL,
INDIRECT OR CONSEQUENTIAL DAMAGES ARISING OUT OF OR OCCASIONED BY THE USE OF OR THE
INABILITY TO USE THIS PRODUCT. THIS WARRANTY IS MADE IN LIEU OF ALL OTHER WARRANTIES, EXPRESS
OR IMPLIED, AND OF ALL OTHER LIABILITIES ON THE PART OF FUNAI, ALL OTHER WARRANTIES INCLUDING
THE WARRANTY OF MERCHANTABILITY AND FITNESS FOR A PARTICULAR PURPOSE, ARE HEREBY
DISCLAIMED BY FUNAI AND ITS REPRESENTATIVES IN THE UNITED STATES.
ALL WARRANTY INSPECTIONS AND REPAIRS MUST BE PERFORMED BY AN AUTHORIZED SERVICE CENTER.
THIS WARRANTY IS ONLY VALID WHEN THE UNIT IS CARRIED-IN TO AN AUTHORIZED SERVICE CENTER.
THE PRODUCT MUST BE ACCOMPANIED BY A COPY OF THE ORIGINAL RETAIL PURCHASE RECEIPT. IF NO
PROOF OF PURCHASE IS ATTACHED, THE WARRANTY WILL NOT BE HONORED AND REPAIR COSTS WILL BE
CHARGED.
IMPORTANT:
THIS LIMITED WARRANTY GIVES YOU SPECIFIC LEGAL RIGHTS. YOU MAY HAVE OTHER RIGHTS THAT VARY
FROM STATE TO STATE. IF, AT ANY TIME DURING THE WARRANTY PERIOD, YOU ARE UNABLE TO OBTAIN
SATISFACTION WITH THE REPAIR OF THIS PRODUCT, PLEASE CONTACT FUNAI CORP.
ATTENTION:
FUNAI CORP. RESERVES THE RIGHT TO MODIFY ANY DESIGN OF THIS PRODUCT
WITHOUT PRIOR NOTICE.
WARRANTY STATEMENT REGARDING NON AUTHORIZED REPAIRS:
To obtain warranty service, you must take the product, or deliver the product freight prepaid, in either its
original packaging or packaging affording an equal degree of protection, to any AUTHORIZED SERVICE
CENTER. FUNAI CORP. will not reimburse you for any service done by unauthorized service providers
without prior written approval.
To locate your nearest AUTHORIZED SERVICE CENTER or for general service inquiries,
please contact us at:
FUNAI SERVICE CORPORATION
Customer Service
Tel : 1-800-968-3429
www.sylvania-ce.com
5653 Creekside Parkway, Suite A, Lockbourne, OH 43137
Printed in China
A7444UH
1EMN23980 *****
Page 49

Televisor Digital con Pantalla LCD
de 20" y Reproductor DVD Incorporado
Manual del Usuario
INTRODUCCIÓN
CONEXIÓN
Discos de 5 pulgadas
solamente
LD200SL9
AJUSTE INICIAL AJUSTE DE DVD INFORMACIÓN
PARA VER LA TELEVISIÓN
AJUSTE OPCIONAL
UTILIZACIÓN DEL DVD
PARA RECIBIR LA SEÑAL DIGITAL/ANALÓGICA, DEBE CONECTAR LA ANTENA.
SI NECESITA AYUDA ADICIONAL CON LA INSTALACIÓN O CON EL FUNCIONAMIENTO
DESPUÉS DE LEER EL MANUAL DEL USUARIO, LLAME AL TELÉFONO GRATUITO
1-800-968-3429, O VISITE NUESTRO SITIO WEB EN www.sylvania-ce.com
© 2008 Funai Electric Co., Ltd.
SOLUCIÓN DE PROBLEMAS
Page 50

NTRODUCCIÓN
I
ADVERTENCIA: PARA REDUCIR EL RIESGO DE INCENDIO O DESCARGA ELÉCTRICA, NO
EXPONGA ESTE APARATO A LLUVIA O HUMEDAD.
CAUTION
RISK OF ELECTRIC SHOCK
DO NOT OPEN
CUIDADO: PARA REDUCIR EL RIESGO DE DESCARGA ELÉCTRICA, NO
RETIRE LA CUBIERTA (NI LA PLACA TRASERA). EL INTERIOR DE ESTE APARATO
NO CONTIENE PIEZAS REPARABLES POR EL USUARIO. DEJE LA REPARACIÓN
EN MANOS DE PERSONAL DE SERVICIO TÉCNICO CUALIFICADO.
ESTE SÍMBOLO INDICA QUE EL INTERIOR DEL
APARATO CONTIENE TENSIÓN PELIGROSA CON
RIESGO DE DESCARGA ELÉCTRICA.
ESTE SÍMBOLO INDICA QUE LA DOCUMENTACIÓN
QUE ACOMPAÑA A ESTE APARATO CONTIENE
IMPORTANTES INSTRUCCIONES DE
FUNCIONAMIENTO Y MANTENIMIENTO.
Las notas importantes están ubicadas en la parte trasera del mueble.
Importante para su Seguridad
1. LEA LAS INSTRUCCIONES - Deben leerse todas las instrucciones de
seguridad y de funcionamiento antes de utilizar el aparato.
2. CONSERVE LAS INSTRUCCIONES - Las instrucciones de seguridad y de
funcionamiento deben conservarse para futura consulta.
3. HAGA CASO DE LAS ADVERTENCIAS - Todas las advertencias que
aparezcan en el aparato y en las instrucciones de funcionamiento
deben ser tenidas en cuenta.
4. SIGA LAS INSTRUCCIONES - Deben seguirse todas las instrucciones de
funcionamiento y de uso.
5. LIMPIEZA - Desenchufe el televisor de la toma de pared antes de su
limpieza. No utilice limpiadores líquidos ni limpiadores en aerosol. Utilice
un paño húmedo para la limpieza.
EXCEPCIÓN: Un producto destinado a su servicio interrumpido y que,
por alguna razón especí ca, por ejemplo la posibilidad de pérdida
de un código de autorización para un convertidor de CATV, no debe
ser desenchufado para su limpieza o cualquier otro n, puede excluir
la referencia a desenchufar el aparato en la descripción de limpieza
requerida en el elemento 5.
6. CONEXIONES - No utilice conexiones no recomendadas por el
fabricante del televisor, dado que podrían provocar riesgos.
7. AGUA Y HUMEDAD - No utilice este televisor cerca de agua, por
ejemplo, cerca de una bañera, un lavabo, un fregadero o una pila de
lavado de ropa, en un suelo húmedo o cerca de una piscina o lugares
similares.
8. ACCESORIOS - No coloque este televisor sobre
un mueble con ruedas, un soporte, un trípode, un
soporte vertical o una mesa inestables. El televisor
puede caerse, provocando lesiones graves a alguien y
serios daños en el propio aparato. Utilícelo solamente
con un mueble con ruedas, soporte, trípode, soporte
vertical o mesa recomendados por el fabricante o
vendidos junto con el televisor.
Cualquier instalación del aparato debe seguir las instrucciones del
fabricante y debe utilizar un accesorio de montaje recomendado por el
fabricante.
El conjunto de aparato y mueble con ruedas debe moverse con
precaución.
Las paradas bruscas, la fuerza excesiva o las super cies irregulares
pueden provocar la caída del conjunto de aparato y mueble con ruedas.
9. VENTILACIÓN - El mueble y la parte trasera o inferior del aparato
incluyen ranuras y aberturas para ventilación; para garantizar un
funcionamiento able del televisor y para protegerlo de un posible
sobrecalentamiento, dichas aberturas no deben bloquearse ni taparse.
Las aberturas no deben bloquearse nunca colocando el televisor sobre
una cama, un sofá, una alfombra u otra super cie similar. Este televisor
no debe colocarse nunca cerca o encima de un radiador o una rejilla
de aire caliente. Este televisor no debe colocarse en una instalación
empotrada, por ejemplo una librería o estantería, a menos que se
facilite la ventilación adecuada o que se hayan seguido las instrucciones
del fabricante.
10. FUENTES DE ALIMENTACIÓN - Este televisor debe utilizarse solamente
con el tipo de fuente de alimentación indicada en la etiqueta de fábrica.
Si no está seguro del tipo de suministro de alimentación eléctrica de
su hogar, consulte con el distribuidor de su aparato o con la empresa
eléctrica local. Para televisores destinados a funcionar con alimentación
por pilas u otras fuentes, consulte las instrucciones de funcionamiento.
11. PUESTA A TIERRA O POLARIZACIÓN - Este televisor está equipado con
un enchufe de línea de corriente alterna polarizada (un enchufe con
un contacto plano más ancho que el otro). Este enchufe encajará en la
toma de corriente solamente en un sentido. Esto es una característica
de seguridad. Si no puede insertar el enchufe totalmente en la toma,
intente invertir la posición del enchufe. Si el enchufe sigue sin encajar,
2
ES
póngase en contacto con un electricista para sustituir su toma obsoleta.
No subestime la nalidad de seguridad del enchufe polarizado.
12. PROTECCIÓN DEL CABLE DE ALIMENTACIÓN - Los cables de
alimentación eléctrica deben extenderse de manera que resulte
improbable que nadie los pise o que queden pinzados por elementos
colocados encima o contra ellos, prestando especial atención a
enchufes de los cables, sus tomas de corriente y su punto de salida del
aparato.
13. PUESTA A TIERRA DE ANTENA EXTERIOR - Si hay una antena exterior
o un sistema de cable conectado al televisor, asegúrese de que la
antena o el sistema de cable está puesto a tierra de manera que
proporcione protección contra las subidas de tensión y las cargas de
electricidad estática acumulada. El artículo 810 del National Electrical
Code (Código Eléctrico Nacional), ANSI/NFPA número 70, proporciona
información con respecto a la adecuada puesta a tierra del mástil y la
estructura de soporte, puesta a tierra del cable de entrada de corriente
a una unidad de descarga de antena, tamaño de los conductores de
puesta a tierra, ubicación de la unidad de descarga de antena, conexión
a electrodos de puesta a tierra y requisitos para el electrodo de puesta
a tierra. (Fig. A)
EJEMPLO DE PUESTA A TIERRA DE ANTENA
SEGÚN EL CÓDIGO ELÉCTRICO NACIONAL
14. RAYOS - Para protección añadida de este receptor de televisión en
caso de tormenta eléctrica, o cuando permanezca desatendido y sin
utilizar durante largos periodos de tiempo, desenchúfelo de la toma de
corriente y desconecte la antena o el sistema de cable. Esto impedirá
que se produzcan daños en el televisor debido a daños provocados por
rayos y sobretensiones de la línea eléctrica.
15. LÍNEAS DE CONDUCCIÓN ELÉCTRICA - Un sistema de antena exterior
no debe colocarse en las proximidades de líneas de conducción
eléctrica aéreas u otras líneas de conducción de circuitos eléctricos, o
de manera que puedan caer sobre dichas líneas o circuitos eléctricos.
Cuando se instale un sistema de antena exterior, debe tenerse el
máximo cuidado para no tocar dichas líneas o circuitos eléctricos, dado
que el contacto podría resultar mortal.
16. SOBRECARGA - No sobrecargue las tomas de pared ni los cables
alargadores, dado que esto puede suponer un riesgo de incendio o
descarga eléctrica.
17. ENTRADA DE OBJETOS Y LÍQUIDOS - No fuerce la entrada de objetos
de ningún tipo en el interior de este televisor a través de sus aberturas,
dado que pueden tocar puntos peligrosos de tensión o provocar un
cortocircuito, lo cual podría dar lugar a incendio o descarga eléctrica.
Nunca derrame líquidos de ningún tipo sobre el televisor.
18. REPARACIÓN - No intente reparar usted mismo este televisor, ya que
el hecho de abrir o extraer las cubiertas puede exponerle a tensión
peligrosa u otros riesgos. Deje toda reparación en manos de personal
de servicio técnico cuali cado.
FIGURA A
EQUIPO DE
SERVICIO
ELÉCTRICO
NEC — CÓDIGO ELÉCTRICO NACIONAL
ABRAZADERA DE
CONEXIÓN A TIERRA
CABLE DE ENTRADA
DE ANTENA
UNIDAD DE DESCARGA
DE ANTENA
(NEC SECCIÓN 810-20)
CONDUCTORES DE
CONEXIÓN A TIERRA
(NEC SECCIÓN 810-21)
ABRAZADERAS DE
CONEXIÓN A TIERRA
SISTEMA DE CONEXIÓN A TIERRA DEL
ELECTRODO DE SERVICIO ELÉCTRICO
(NEC ART. 250, APARTADO H)
Page 51

INTRODUCCIÓN
19. DAÑOS QUE EXIGEN UNA REPARACIÓN - Desenchufe este televisor de
la toma de pared y llévelo a un servicio de reparación cuali cado en las
situaciones siguientes:
a. Cuando el cable o el enchufe de distribución de corriente esté dañado
o desgastado.
b. Si se ha derramado líquido o han caído objetos en el interior del
televisor.
c. Si el televisor ha estado expuesto a lluvia o agua.
d. Si el televisor no funciona normalmente cuando se siguen las
instrucciones de funcionamiento. Ajuste únicamente los controles
a los que se re eran las instrucciones de funcionamiento, dado que
el ajuste inadecuado de otros controles puede provocar daños y
a menudo exigirá una gran cantidad de trabajo por parte de un
técnico cuali cado para que el televisor pueda volver a funcionar
normalmente.
e. Si el televisor se ha caído o ha sufrido cualquier tipo de daño.
f. Cuando el televisor deje de funcionar con normalidad, esto indica
que necesita una reparación.
Precauciones
5
20. PIEZAS DE REPUESTO - Cuando se necesiten piezas de repuesto,
asegúrese de que el personal de servicio técnico utiliza piezas de
repuesto especi cadas por el fabricante y de las mismas características
que la pieza original.
Las sustituciones no autorizadas pueden provocar incendio, descarga
eléctrica, lesiones personales u otros riesgos.
21. COMPROBACIÓN DE SEGURIDAD - Al nalizar cualquier servicio o
reparación de este televisor, pida al personal de servicio técnico que
realice unas comprobaciones de seguridad de rutina para determinar
que el televisor está en condiciones correctas de funcionamiento.
22. CALOR - Este televisor debe situarse lejos de fuentes de calor tales como
radiadores, rejillas de aire caliente, estufas u otros productos (incluidos
ampli cadores) emisores de calor.
No coloque la unidad sobre un mueble que pueda volcar si algún niño o adulto lo inclina, empuja, se coloca encima o trepa por
él. La caída de la unidad puede provocar lesiones graves e incluso la muerte.
LA LÁMPARA DE LA PANTALLA LCD CONTIENE MERCURIO. SE DEBE TIRARLA DE ACUERDO A LA
NORMATIVA LOCAL O LA LEY FEDERAL.
CUIDADO: PARA EVITAR LA DESCARGA ELÉCTRICA, HAGA COINCIDIR EL CONTACTO
ANCHO DEL ENCHUFE CON LA RANURA ANCHA E INSERTE FIRMEMENTE.
ADVERTENCIA DE LA FCC Este equipo puede generar o utilizar energía de radiofrecuencia. Los cambios o modificaciones
INTERFERENCIA DE RADIO-TELEVISIÓN
Este equipo ha sido probado y declarado conforme con los límites de un dispositivo digital Clase B, de acuerdo con la Parte 15
de las Normas de la FCC. El objetivo de estos límites es proporcionar una protección razonable contra interferencias perjudiciales
en una instalación residencial. Este equipo genera, utiliza y puede emitir energía de radiofrecuencia y, si no se instala y se utiliza
de acuerdo con las instrucciones, puede causar interferencias perjudiciales en las comunicaciones por radio. No obstante, no
existe garantía de que no pueda producirse una interferencia en una instalación concreta. Si este equipo provoca interferencia
perjudicial en la recepción de radio o televisión, lo cual puede determinarse apagando y encendiendo el equipo, el usuario
puede intentar corregir la interferencia mediante una o más de las siguientes medidas:
1) Reorientar o reubicar la antena receptora.
2) Aumentar la separación entre el equipo y el receptor.
3) Conectar el equipo a una toma de corriente en un circuito distinto de aquel en el que está conectado el receptor.
4) Solicitar la ayuda del distribuidor o de un técnico experimentado de radio/televisión.
Este aparato digital Clase B es conforme con la norma canadiense ICES-003.
Nota para el instalador del sistema CATV:
Esta recordatorio se facilita para llamar la atención del instalador del sistema CATV sobre el Artículo 820-40 de la NEC, que
proporciona pautas para una apropiada puesta a tierra, y en particular especifica que la toma de tierra del cable debe estar
conectada al sistema de puesta a tierra del edificio lo más cerca posible del punto de entrada del cable.
SEGURIDAD DEL LÁSER
Esta unidad emplea un láser. Sólo el personal de servicio calificado deberá quitar la cubierta o intentar reparar este aparato, ya que de lo contrario podrían producirse lesiones en los ojos.
PRECAUCIÓN
: EL USO DE CONTROLES, AJUSTES O PROCEDIMIENTOS DIFERENTES DE LOS ESPECIFICA-DOS EN ESTE
MANUAL PUEDE PRODUCIR UNA EXPOSICIÓN PELIGROSA A LA RADIACIÓN.
PRECAUCIÓN
: CUANDO SE ABRE LA UNIDAD Y SE ANULA EL ENCLAVAMIENTO SE PRODUCE UNA RADIACIÓN LÁSER VISIBLE
E INVISIBLE. EVITE MIRAR FIJAMENTE AL RAYO.
UBICACIÓN: EN EL INTERIOR, CERCA DEL MECANISMO DE LA PLATINA.
PROTECTION DE COPYRIGHT
No se permiten las copias no autorizadas, las emisiones al aire, la reproducción en público y el préstamo de los discos.
Este producto incorpora tecnología de protección de copyright que está protegida por patentes de los EE. UU. y otros
derechos de propiedad intelectual. El empleo de esta tecnología de protección de copyright debe estar autorizado por
Macrovision, y está concebido solamente para domicilios y otros lugares de visión limitada a menos que sea autorizado
para otros casos por Macrovision. Se prohiben la descompilación o el desensamblaje.
en este equipo pueden provocar interferencia perjudicial a menos que las modificaciones estén
expresamente aprobadas en el manual. El usuario podría perder la autorización para utilizar este
equipo si realiza cambios o modificaciones para los que no tiene autorización.
CONEXIÓN
AJUSTE INICIAL AJUSTE DE DVD INFORMACIÓN
PARA VER LA TELEVISIÓN
AJUSTE OPCIONAL
UTILIZACIÓN DEL DVD
SOLUCIÓN DE PROBLEMAS
Fabricado bajo licencia de Dolby Laboratories. ”Dolby” y el símbolo de la doble
D son marcas comerciales de Dolby Laboratories.
3
ES
Page 52

NTRODUCCIÓN
I
UBICACIÓN
Para un funcionamiento seguro y un rendimiento satisfactorio del aparato, tenga en cuenta lo siguiente a la hora de seleccionar un lugar
para su instalación:
• Debe protegerlo de la luz solar directa y mantenerlo apartado de fuentes de calor intenso.
• Evite lugares polvorientos o húmedos.
• Evite lugares con ventilación insuficiente para una disipación de calor adecuada. No bloquee los orificios de ventilación situados en la
parte superior e inferior del aparato. No coloque el aparato sobre una alfombra, porque esto bloqueará los orificios de ventilación.
• Instale el aparato en posición horizontal.
• Evite lugares sometidos a intensas vibraciones.
• No coloque el aparato cerca de campos magnéticos intensos.
• Evite trasladar el aparato a lugares con diferencias extremas de temperatura.
• Asegúrese de desenchufar el cable de alimentación de CA de la toma de corriente antes de transportar la unidad.
PARA EVITAR LOS RIESGOS DE DESCARGA ELÉCTRICA E INCENDIO
• No manipule el cable de alimentación con las manos húmedas.
• No tire del cable de alimentación para desconectarlo de una toma de CA. Agárrelo por el enchufe.
• Si por accidente se derrama agua sobre el aparato, desenchufe inmediatamente el cable de alimentación y lleve el aparato a nuestro
centro de servicio autorizado para su reparación.
• No coloque ningún objeto directamente encima del aparato.
ADVERTENCIA SOBRE LA CONDENSACIÓN DE HUMEDAD
• Puede tener lugar condensación de humedad dentro del aparato cuando éste es trasladado desde un lugar frío a otro cálido
o luego de calefaccionar una habitación fría o bajo condiciones de alta humedad. Cuando se produzca la condensación en
el interior de la unidad, encienda la unidad y déjela secar durante al menos 2 horas.
El número de serie de este producto puede encontrarse en la parte trasera del aparato. Ningún otro producto tiene el mismo
número de serie que el suyo. Debe anotar aquí el número y otros datos esenciales y conservar este libro como registro
permanente de su compra con el fin de ayudar a su identificación en caso de robo.
fecha de compra
comprado en
Nota sobre reciclado:
Los materiales de embalaje de este producto son reciclables y pueden ser reutilizados. Cualquier material debe eliminarse de
acuerdo con la normativa local sobre reciclado.
Las pilas nunca deben tirarse a la basura ni incinerarse, sino ser eliminadas de acuerdo con las normativas locales sobre
residuos químicos.
nº de teléfono del distribuidor
nº de modelo
nº de serie
dirección del distribuidor
Accesorios Suministrados5
manual del usuario
(1EMN23980)
• Si necesita cambiar estos accesorios, consulte el número de pieza que aparece junto a las ilustraciones y llame a
nuestro teléfono de atención al cliente, que encontrará en las páginas de garantía de este manual.
• Según su sistema de antena, puede necesitar tipos diferentes de combinadores (mezcladores) o separadores
(divisores). Para obtener estos elementos, acuda a su establecimiento de electrónica local.
Base Inclinable
5 Símbolos Utilizados en este
Puede ajustar la base para cambiar el ángulo del
televisor (-2,5° a 10°).
-2.5°
10°
4
ES
mando a distancia
(NF603UD)
5
pilas
(AA x 2)
Manual
Ésta es la descripción de los símbolos utilizados en este
manual.
La descripción se refiere a:
FUNCIONES DEL TV FUNCIONES DEL DVD
TV
:
Funcionamiento
de TV analógica
DTV
:
Funcionamiento
de TV digital
•
Si no aparece ninguno
de los símbolos bajo el
encabezamiento de función,
el funcionamiento es
aplicable a ambos.
DVD
: Reproducción
de DVD-video
CD
:
Reproducción
de CD de audio
MP3
:
Reproducción
de CD-RW/R con
archivos MP3
•
Si no aparece un símbolo
debajo del encabezamiento
de la función, la operación se
puede aplicar a todas.
Page 53

INTRODUCCIÓN
Contenido5
INTRODUCCIÓN
Importante para su Seguridad . . . . . . . . . . . . . . . . . . . . . . . . . . . . . . . . . . . . . . 2
Precauciones . . . . . . . . . . . . . . . . . . . . . . . . . . . . . . . . . . . . . . . . . . . . . . . . . . . . . 3
Accesorios Suministrados . . . . . . . . . . . . . . . . . . . . . . . . . . . . . . . . . . . . . . . . . . 4
Base Inclinable . . . . . . . . . . . . . . . . . . . . . . . . . . . . . . . . . . . . . . . . . . . . . . . . . . . 4
Símbolos Utilizados en este Manual . . . . . . . . . . . . . . . . . . . . . . . . . . . . . . . . . 4
Características . . . . . . . . . . . . . . . . . . . . . . . . . . . . . . . . . . . . . . . . . . . . . . . . . . . . 6
Función de Mando a Distancia . . . . . . . . . . . . . . . . . . . . . . . . . . . . . . . . . . . . . . 7
Instalación de las Pilas . . . . . . . . . . . . . . . . . . . . . . . . . . . . . . . . . . . . . . . . . . . . . 7
Panel de Control . . . . . . . . . . . . . . . . . . . . . . . . . . . . . . . . . . . . . . . . . . . . . . . . . . 8
Panel Trasero . . . . . . . . . . . . . . . . . . . . . . . . . . . . . . . . . . . . . . . . . . . . . . . . . . . . . 8
CONEXIÓN
Conexión Básica . . . . . . . . . . . . . . . . . . . . . . . . . . . . . . . . . . . . . . . . . . . . . . . . . . 9
Conexión de Dispositivo Externo . . . . . . . . . . . . . . . . . . . . . . . . . . . . . . . . . . . 10
Funciones del TV
AJUSTE INICIAL
Con guración Inicial . . . . . . . . . . . . . . . . . . . . . . . . . . . . . . . . . . . . . . . . . . . . . 12
Menú Principal . . . . . . . . . . . . . . . . . . . . . . . . . . . . . . . . . . . . . . . . . . . . . . . . . . 13
Exploración Automática de Canales . . . . . . . . . . . . . . . . . . . . . . . . . . . . . . . . 13
Selección de Idioma . . . . . . . . . . . . . . . . . . . . . . . . . . . . . . . . . . . . . . . . . . . . . . 14
PARA VER LA TELEVISIÓN
Selección de Canal . . . . . . . . . . . . . . . . . . . . . . . . . . . . . . . . . . . . . . . . . . . . . . . 15
Ajuste de Volumen . . . . . . . . . . . . . . . . . . . . . . . . . . . . . . . . . . . . . . . . . . . . . . . 15
Para Cambiar entre Cada Modo . . . . . . . . . . . . . . . . . . . . . . . . . . . . . . . . . . . . 16
Para Cambiar el Modo de Audio . . . . . . . . . . . . . . . . . . . . . . . . . . . . . . . . . . . . . 16
Información de Pantalla . . . . . . . . . . . . . . . . . . . . . . . . . . . . . . . . . . . . . . . . . . 17
Modo de Visualización de Pantalla del Televisor . . . . . . . . . . . . . . . . . . . . . 18
Temporizador de Apagado . . . . . . . . . . . . . . . . . . . . . . . . . . . . . . . . . . . . . . . . 18
Funciones del DVD
UTILIZACIÓN DEL DVD
Medios que se Pueden Reproducir . . . . . . . . . . . . . . . . . . . . . . . . . . . . . . . . . 26
Medios que no se Pueden Reproducir . . . . . . . . . . . . . . . . . . . . . . . . . . . . . . 26
Reproducción . . . . . . . . . . . . . . . . . . . . . . . . . . . . . . . . . . . . . . . . . . . . . . . . . . . 27
Menú DVD . . . . . . . . . . . . . . . . . . . . . . . . . . . . . . . . . . . . . . . . . . . . . . . . . . . . . . 27
Reanudación de la Reproducción . . . . . . . . . . . . . . . . . . . . . . . . . . . . . . . . . . 27
Pausa . . . . . . . . . . . . . . . . . . . . . . . . . . . . . . . . . . . . . . . . . . . . . . . . . . . . . . . . . . 27
Reproducción Paso a Paso . . . . . . . . . . . . . . . . . . . . . . . . . . . . . . . . . . . . . . . . 28
Avance Rápido / Retroceso Rápido . . . . . . . . . . . . . . . . . . . . . . . . . . . . . . . . . 28
Avance Lento / Retroceso Lento . . . . . . . . . . . . . . . . . . . . . . . . . . . . . . . . . . . 28
Zoom . . . . . . . . . . . . . . . . . . . . . . . . . . . . . . . . . . . . . . . . . . . . . . . . . . . . . . . . . . . 28
Reproducción MP3 . . . . . . . . . . . . . . . . . . . . . . . . . . . . . . . . . . . . . . . . . . . . . . . 29
Funciones de Búsqueda. . . . . . . . . . . . . . . . . . . . . . . . . . . . . . . . . . . . . . . . . . . 30
Repetición de Reproducción . . . . . . . . . . . . . . . . . . . . . . . . . . . . . . . . . . . . . . . 31
Repetición de Reproducción A-B . . . . . . . . . . . . . . . . . . . . . . . . . . . . . . . . . . . 31
Reproducción Programada . . . . . . . . . . . . . . . . . . . . . . . . . . . . . . . . . . . . . . . . 32
Reproducción Aleatoria . . . . . . . . . . . . . . . . . . . . . . . . . . . . . . . . . . . . . . . . . . . 32
Visualización en Pantalla . . . . . . . . . . . . . . . . . . . . . . . . . . . . . . . . . . . . . . . . . 33
Ajustes Especiales . . . . . . . . . . . . . . . . . . . . . . . . . . . . . . . . . . . . . . . . . . . . . . . . 34
AJUSTE DE DVD
Ajuste de Idioma en DVD . . . . . . . . . . . . . . . . . . . . . . . . . . . . . . . . . . . . . . . . . . 37
Ajuste de la Pantalla . . . . . . . . . . . . . . . . . . . . . . . . . . . . . . . . . . . . . . . . . . . . . 38
Ajuste de Audio de DVD . . . . . . . . . . . . . . . . . . . . . . . . . . . . . . . . . . . . . . . . . . . 39
Ajuste Paterno . . . . . . . . . . . . . . . . . . . . . . . . . . . . . . . . . . . . . . . . . . . . . . . . . . 40
Otros . . . . . . . . . . . . . . . . . . . . . . . . . . . . . . . . . . . . . . . . . . . . . . . . . . . . . . . . . . . 41
Reposición de los Ajustes Predeterminados . . . . . . . . . . . . . . . . . . . . . . . . . 42
Lista de Códigos de Idiomas . . . . . . . . . . . . . . . . . . . . . . . . . . . . . . . . . . . . . . . 42
SOLUCIÓN DE PROBLEMAS
Guía de Solución de Problemas . . . . . . . . . . . . . . . . . . . . . . . . . . . . . . . . . . . . 43
CONEXIÓN
AJUSTE INICIAL AJUSTE DE DVD INFORMACIÓN
PARA VER LA TELEVISIÓN
AJUSTE OPCIONAL
UTILIZACIÓN DEL DVD
AJUSTE OPCIONAL
Agregar/Borrar Canales . . . . . . . . . . . . . . . . . . . . . . . . . . . . . . . . . . . . . . . . . . . 19
Ajuste de Imagen . . . . . . . . . . . . . . . . . . . . . . . . . . . . . . . . . . . . . . . . . . . . . . . . 19
Subtítulos Cerrados . . . . . . . . . . . . . . . . . . . . . . . . . . . . . . . . . . . . . . . . . . . . . . 20
Subtítulos Cerrados en DTV . . . . . . . . . . . . . . . . . . . . . . . . . . . . . . . . . . . . . . . 21
Estilo DTVCC . . . . . . . . . . . . . . . . . . . . . . . . . . . . . . . . . . . . . . . . . . . . . . . . . . . . . 21
Ajuste de Luz de Fondo . . . . . . . . . . . . . . . . . . . . . . . . . . . . . . . . . . . . . . . . . . . 22
Temperatura de Color . . . . . . . . . . . . . . . . . . . . . . . . . . . . . . . . . . . . . . . . . . . . 23
V-chip . . . . . . . . . . . . . . . . . . . . . . . . . . . . . . . . . . . . . . . . . . . . . . . . . . . . . . . . . . 23
© 2008 Funai Electric Co., Ltd.
Todos los derechos reservados. No se permite la reproducción total o parcial de este manual, ni su copia, transmisión, difusión,
transcripción, descarga o almacenamiento en ningún soporte de almacenamiento, en forma alguna o con fin alguno sin la autorización
expresa y previa por escrito de Funai.
Además, toda distribución comercial no autorizada de este manual o toda revisión del mismo queda estrictamente prohibida.
La información contenida en este documento puede ser objeto de cambios sin previo aviso. Funai se reserva el derecho de cambiar el
contenido de este documento sin la obligación de notificar dichos cambios a ninguna persona u organización.
con el diseño es una marca comercial registrada de Funai Electric Co., Ltd y no se puede utilizar en modo alguno sin la
autorización expresa por escrito de Funai. Todas las restantes marcas comerciales utilizadas en este documento siguen siendo propiedad
exclusiva de sus respectivos propietarios. Nada de lo contenido en este manual debe ser entendido como concesión, implícita o de otro
tipo, de cualquier licencia o derecho de uso de cualquiera de las marcas comerciales en él visualizadas. El uso indebido de cualquier marca
comercial o de cualquier otro contenido de este manual queda estrictamente prohibido. Funai hará cumplir enérgicamente sus derechos
de propiedad intelectual dentro de los límites máximos establecidos por la ley.
INFORMACIÓN
Glosario . . . . . . . . . . . . . . . . . . . . . . . . . . . . . . . . . . . . . . . . . . . . . . . . . . . . . . . . . 45
Mantenimiento . . . . . . . . . . . . . . . . . . . . . . . . . . . . . . . . . . . . . . . . . . . . . . . . . . 45
Denominaciones de Canales de Cable . . . . . . . . . . . . . . . . . . . . . . . . . . . . . . 46
Especi caciones Generales . . . . . . . . . . . . . . . . . . . . . . . . . . . . . . . . . . . . . . . . 46
Especi cación Eléctrica . . . . . . . . . . . . . . . . . . . . . . . . . . . . . . . . . . . . . . . . . . . 46
Otras Especi caciones . . . . . . . . . . . . . . . . . . . . . . . . . . . . . . . . . . . . . . . . . . . . 46
Garantía Limitada . . . . . . . . . . . . . . . . . . . . . . . . . . . . . . . . . . . . . . Tapa trasera
ES
SOLUCIÓN DE PROBLEMAS
5
Page 54

NTRODUCCIÓN
I
Características5
TV DVD
• DTV/TV/CATV
- Puede utilizar su mando a distancia para seleccionar
canales emitidos en formato digital, analógico
convencional y definición estándar. Además, los
suscriptores de cable pueden acceder a sus canales
de televisión por cable.
•
Pantalla de Información de Programas (solamente DTV)
- Puede visualizar el título, el contenido y otra
información del actual programa DTV en la pantalla
del televisor.
• Exploración Automática de Canales
- Este aparato explora y memoriza automáticamente
los canales disponibles en su zona, eliminando
complicados procedimientos de configuración.
• V-chip
- Esta función le permite bloquear el acceso de los
niños a programas inapropiados.
• Decodificador de Subtítulos Cerrados
- El decodificador de subtítulos cerrados incorporado
muestra el texto de la programación que contiene
subtítulos cerrados.
• Sintonizador MTS/SAP
- Puede seleccionarse el idioma de audio desde el
mando a distancia.
• Función de Apagado Automático
- Si no hay entrada de señal desde el terminal de
antena y no se realiza ninguna operación durante 15
minutos, el aparato se apagará automáticamente.
• Temporizador de Apagado
- Esta función apagará automáticamente el aparato a
una hora especificada.
• Opciones para Idioma de Pantalla
- Seleccione el idioma que aparecerá en la pantalla:
Inglés, Español o Francés.
• Sintonización de Frecuencia PLL Sintonizada
- Proporciona una selección de canales gratuita y
sencilla y le permite sintonizar directamente con
cualquier canal mediante los botones de número de
canal del mando a distancia.
• Entrada de Vídeo en Componentes
• Entrada de S-video
• Entrada AV
• Salida de Audio Digital Coaxial
• Sonido Dolby Digital
-
Disfrute del sonido surround multicanal Dolby Digital
cuando conecte la unidad a su decodificador Dolby Digital.
• Imagen Fija / Avance Rápido / Cámara Lenta /
Reproducción Paso a Paso
- Se encuentran disponibles varios modos de
reproducción, incluyendo imágenes fijas, avance/
retroceso rápido, cámara lenta y paso a paso.
• Menús DVD en un Idioma Deseado
- Puede visualizar menús DVD en un idioma deseado,
si éste se encuentra disponible en un DVD-video.
• Salvapantalla
-
Si no se realiza ninguna operación durante 5 minutos,
el salvapantalla se activa.
• Bloqueo Paterno
- Bloquee la visión de los DVD-video inapropiados
para los niños.
• Reanudación de la Reproducción
- Le permite reanudar la reproducción desde el punto
donde ésta se detuvo.
• Indicación de la Velocidad de Bits
• Control de gama dinámica (DRC)
- Puede controlar la gama del volumen del sonido.
¨ Acceso desde el botón [MODE]
Durante la reproducción
• Subtítulos en un Idioma Deseado
- Puede seleccionar un idioma deseado para visualizar
subtítulos, si ese idioma se encuentra disponible en
el DVD-video.
• Selección de un Ángulo de Cámara
-
Puede seleccionar el ángulo de cámara deseado, si un DVD
contiene secuencias grabadas desde ángulos diferentes.
• Zoom
- Le permite ampliar el tamaño de la imagen.
• Ajuste del Nivel del Negro
• Surround Virtual
• Búsqueda
- Búsqueda de Capítulos / Búsqueda de Títulos /
Búsqueda de Pistas / Búsqueda por Tiempo
• Marcador
- La parte designada por el usuario puede volver a ser
llamada.
• Repetición
- Capítulo / Título / Pista / Grupo / Todo / A-B
En el modo de parada
•
Reproducción de Programas para CD de Audio y MP3
- Puede programar el orden de las pistas/archivos
para reproducirlas en el orden designado.
• Reproducción Aleatoria para CD de Audio y MP3
- Esta unidad puede cambiar el orden de las pistas/
archivos para reproducirlas aleatoriamente.
¨ Acceso desde el botón [AUDIO]
Durante la reproducción
• Opciones para las Funciones de Idioma de Audio y
Sonido Estéreo
-
Seleccione su función de idioma o sonido estéreo deseada
cuando su disco disponga de opciones diferentes.
6
ES
Page 55

Función de Mando a distancia5 Función de Mando a Distancia5
5. Botones VOL. X/Y (p15)
12
1
2
3
4
5
6
13
14
15
16
17
18
19
20
7
21
8
9
10
11
1. Botón POWER (p12)
Presione para activar y desactivar la unidad.
2. Botón MUTE (p15)
Presione para activar y desactivar el sonido.
3. Botón SLEEP (p18)
Presione para activar el temporizador de
apagado.
4. Botones numéricos (p15)
• Presione para seleccionar los canales.
• Presione para seleccionar capítulo o título
(DVD) o pista/archivo (CD, MP3).
Botón -/ENT
• Presione para cambiar de canal inferior a
superior.
Botón +10/+100
• Presione para seleccionar el canal 100 o
superiores. (CATV)
• Presione para buscar si hay los canales
menores en el canal mayor actualmente
seleccionado. (DTV)
Instalación de las Pilas
5
22
23
24
25
Presione para ajustar el volumen.
6. Botón PAUSE F (p27)
Presione para hacer pausa en la
reproducción del disco.
7. Botón SKIP H / G (p30)
• Presione para saltar hacia delante o
hacia atrás capítulos, títulos (DVD),
pistas/archivos (CD, MP3).
Botón REV E (p28)
• Presione y mantenga presionado
comenzar la reproducción de retroceso
lento durante el modo pausa (DVD) y la
búsqueda hacia atrás en un disco.
Botón FWD D (p28)
• Presione y mantenga presionado
comenzar la reproducción de avance
lento durante el modo pausa (DVD) y la
búsqueda hacia delante en un disco.
8. Botón SETUP (p13 / p37)
Presione para visualizar el menú principal.
9. Botón RETURN (p19)
Presione para volver a la operación del
menú anterior.
10. Botón CLEAR (p31)
• Presione para borrar los números
introducidos incorrectamente.
• Presione para cancelar el punto A para
repetición A-B (DVD, CD).
•
Presione para eliminar el número de pista o archivo
en la introducción de programas (CD, MP3).
11. Botón MODE (p6)
•
Presione para establecer el orden de reproducción
o reproducir aleatoriamente (CD, MP3).
• Presione para activar o desactivar el
nivel de negro (DVD) y el surround
virtual (DVD, CD, MP3).
•
Presione para cambiar el ángulo de cámara
para ver la secuencia reproducida desde un
ángulo diferente (DVD).
•
Presione para buscar capítulo, título (DVD),
tiempo (DVD, CD) o pista/archivo (CD, MP3).
• Presione para establecer el marcador
(DVD, CD).
•
Presione para repetir la reproducción de
capítulo, título (DVD), pista/archivo, disco
(CD, MP3), grupo (MP3) repetidamente o
entre los puntos designados A y B (DVD, CD).
•
Presione para ampliar una parte de la imagen
(aproximadamente 1,3x 2x y 4x : DVD).
• Presione para seleccionar los subtítulos
en un disco (DVD).
12. Botón EJECT A (p27)
Presione para expulsar el disco.
13. Botón INPUT (p16)
Presione para acceder a un dispositivo
externo conectado, por ejemplo un
Instale las pilas (AA x 2) de manera que coincida la polaridad indicada en el interior del compartimento de las pilas del mando
a distancia.
videojuego, una cámara de vídeo o un
reproductor/grabador de vídeo (VCR).
14. Botón DISPLAY (p17 / p33)
Modo digital (DTV)
• Presione para mostrar el número de
canal y la información de programa.
Modo analógico (TV)
• Presione para mostrar el número de
canal.
Modo de entrada externa
• Presione para visualizar el modo
de entrada externa actualmente
seleccionado.
15. Botón AUDIO (p16 / p34)
Modo Digital (DTV)
• Presione para seleccionar el idioma de
audio.
Modo Analógico (TV)
• Presione para seleccionar el modo de
audio.
Modo DVD
•
Presione para seleccionar el idioma de
audio (DVD) o el modo de sonido (CD).
16. Botón SCREEN MODE (p18)
Presione para seleccionar las relaciones
de aspecto disponibles para la pantalla
del televisor.
17. Botón PICTURE (p19)
Presione para ajustar la calidad de
imagen.
18. Botón CH. RETURN (p15)
Presione para volver al canal anterior.
19. Botones CH. K/L (p15)
Presione para seleccionar los canales.
20. Botón PLAY B (p27)
Presione para comenzar la reproducción
del disco.
21. Botón STOP C (p27)
Presione para detener la reproducción
del disco.
22. Botones s / B / K / L (p12)
Presione para desplazarse por los
elementos a izquierda/derecha/arriba/
abajo.
23 Botón ENTER (p12)
Presione para confirmar su selección.
24. Botón MENU (p27)
• Presione para llamar al menú del disco.
• Presione para llamar a la lista de los
archivos. (MP3)
25. Botón TOP MENU (p29)
• Presione para llamar al menú superior
del disco. (DVD)
• Presione para volver al archivo superior
de la jerarquía más alta en la lista de
programas y de archivos. (MP3)
INTRODUCCIÓN
CONEXIÓN
AJUSTE INICIAL AJUSTE DE DVD INFORMACIÓN
PARA VER LA TELEVISIÓN
AJUSTE OPCIONAL
UTILIZACIÓN DEL DVD
SOLUCIÓN DE PROBLEMAS
21 3
Precauciones Sobre las Pilas:
• Asegúrese de seguir la polaridad correcta según lo indicado en el compartimento de las pilas. Unas pilas en posición invertida pueden causar
daños en el dispositivo.
• No mezcle diferentes tipos de pilas (por ejemplo, alcalinas y de carbono-zinc) ni pilas viejas con pilas nuevas.
•
Si el dispositivo no se va a usar durante un periodo prolongado de tiempo, quite las pilas para evitar daños o lesiones por posibles fugas de las pilas.
• No intente recargar las pilas; podrían sobrecalentarse y romperse.
ES
7
Page 56

NTRODUCCIÓN
I
Panel de Control5
STOP PLAY
SETUP
EJECT
DVD
VOLUME CHANNEL
INPUT
POWER
1. Botón SETUP (p13 / p37)
1
Presione para visualizar el menú principal.
2
2. Botón STOP C (p27)
3
4
Presione para detener la reproducción del disco.
5
3. Botón PLAY B (p27)
6
Presione para comenzar la reproducción del disco.
7
4. Botón EJECT
8
Presione para expulsar el disco.
A
(p27)
5. Botón VOLUME X / Y (p15)
Presione para ajustar el volumen.
6. Botón CHANNEL K/L (p15)
Presione para seleccionar canales o desplazarse arriba/
abajo por los elementos del menú principal.
7. Botón INPUT (p16)
Presione para seleccionar la entrada digital, analógica
o externa.
8. Botón POWER (p12)
Presione para activar y desactivar la unidad.
9. Ventana del Sensor de Infrarrojos
Recibe los rayos infrarrojos transmitidos desde el
mando a distancia.
10. Ranura de Carga de Disco (p27)
9
Insert un disco con la etiqueta hacia abajo de la
10
unidad.
Panel Trasero5
1. Toma ANT (p9)
Conexión de cable coaxial RF para su antena o
receptor de cable.
2. Toma HEADPHONE
Conexión de auriculares para escuchar en privado.
Toma de entrada COMPONENT y AUDIO (p10)
3.
Conexión de cable de vídeo componente para un
aparato externo.
Utilice las toma de salida de audio y vídeo
componente de un aparato externo.
4. Toma de entrada AUDIO (p10)
Conexión de cable de audio RCA para un aparato
externo.
5. Toma de entrada VIDEO (p11)
1
Conexión de cable de vídeo RCA para un aparato
externo.
6. Toma de entrada S-VIDEO (p10)
2
Conexión de cable de S-video para un aparato
externo.
3
7. Toma de Salida COAXIAL (audio digital) (p11)
Conexión de cable de audio digital coaxial para un
4
5
6
7
8
decodificador o receptor de radio.
Utilice una toma de entrada de audio digital de un
aparato externo.
8. Cable de Alimentación de CA
Conéctelo a una toma estándar de CA para suministrar
alimentación eléctrica a este aparato.
parte trasera del aparato
LR
PrPbY
VIDEO 2
VIDEOS-VIDEOCOAXIAL
VIDEO 1
AUDIO
LR
AUDIO
COMPONENT
ANT
HEADPHONE
LR
PrPbY
AUDIO
COMPONENT
VIDEO 2
R
LVIDEOS-VIDEO
COAXIAL
AUDIO
VIDEO 1
parte lado del aparato
8
ES
Page 57

ONEXIÓN
(rojo)
(rojo)
(azul)
(azul)
(verde)
(verde)
C
Cables No Incluidos.
Deberá adquirir los cables necesarios en su establecimiento local.
Conexión Básica
5
Esta sección describe cómo conectar la unidad a una antena, caja de satélite o receptor de cable.
Nota:
• Asegúrese de que su antena u otra dispositivo está conectada correctamente antes de enchufar el cable de alimentación.
INTRODUCCIÓN
CONEXIÓN
[Conexión de Cable de Antena]
Cuando conecte la unidad a una antena o señal de televisión por cable (sin receptor de cable/ caja de satélite)
Conecte el cable coaxial RF de su toma de corriente a la toma de entrada de antena de este aparato.
p. ej.)
antena
VHF/UHF
cable coaxial RF
o
señal de televisión
por cable
* Una vez completadas las conexiones, encienda el aparato e inicie la configuración inicial.
La exploración de canales es necesaria para que el aparato memorice todos los canales disponibles en su zona.
(Consulte “Configuración lnicial” en página 12).
parte trasera del aparato
ANT
HEADPHONE
LR
PrPbY
AUDI
O
COMPONENT
VIDEO 2
R
LVIDEOS-VIDEO
COAXIAL
AUDIO
VIDEO 1
Nota:
• Si tiene alguna duda acerca de la antena del DTV, visite la página www.antennaweb.org para obtener más información.
• Para su seguridad, y para evitar dañar el dispositivo, desenchufe el cable coaxial de RF del conector de entrada de antena antes de cambiar
de sitio el aparato.
• Si utiliza una antena para recibir televisión analógica, ésta debería funcionar también para recepción de DTV. Las antenas de exterior o de
tejado serán más eficaces que las de versiones de sobremesa.
• Para cambiar fácilmente su fuente de recepción entre antena y cable, instale un selector de antena.
• Si se conecta directamente al sistema de cable, póngase en contacto con el instalador de CATV.
AJUSTE INICIAL AJUSTE DE DVD INFORMACIÓN
PARA VER LA TELEVISIÓN
AJUSTE OPCIONAL
UTILIZACIÓN DEL DVD
[Conexión al Receptor de Cable o Caja de Satélite]
Utilice
el cable RCA de vídeo en componentes para conectar la toma de entrada del vídeo en componentes de la unidad a la
toma de salida del v
í
deo en componentes del receptor de cable/caja de satélite.
Si se conecta a la toma de entrada de vídeo en componentes de la unidad, conecte un cable RCA de audio a la toma
de audio L/R (izquierda/derecha) de VIDEO2.
p. ej.)
plato de
satélite
cable
o
coaxial RF
señal de televisión por cable
incluyendo la televisión de pago
También puede conectar esta unidad al receptor de cable o caja de satélite, en lugar de a la toma de salida del vídeo
*
ANT IN
STEREO
PCM
receptor de cable / caja de satélite
AUDIO OUT
RL
COMPONENT VIDEO OUT
en componentes porque quizá tengan tomas de salida diferentes.
Los cables y métodos de conexión del receptor de cable / caja de satélite, o el canal de disponibilidad para una QAM clara
*
pueden variar en función del proveedor de cable/satélite. Para más información, consulte a su proveedor de satélite/cable.
(rojo)(azul)(verde)
Pr/CrPb/CbY
cable RCA de
vídeo en
componentes
cable RCA
de audio
parte trasera del aparato
(azul)(azul)
(azul)(verde)
(verde)(verde)
(verde) (rojo)(azul)(verde)
Y
COMPONENT
(rojo)
(rojo)(rojo)
(rojo)(azul)
VIDEO 2
PrPb
VIDEOS-VIDEOCOAXIAL
VIDEO 1
LR
AUDIO
LR
AUDIO
SOLUCIÓN DE PROBLEMAS
9
ES
Page 58

ONEXIÓN
(rojo)
(rojo)
(azul)
(azul)
(verde)
(verde)
C
Cables No Incluidos.
Deberá adquirir los cables necesarios en su establecimiento local.
Conexión de Dispositivo Externo
5
[Conexión de Cable de Vídeo en Componentes]
La conexión de vídeo en componentes ofrece una mejor calidad de imagen para dispositivos de vídeo conectados al
aparato.
Utilice un cable de vídeo en componentes para conectar el aparato a dispositivos de vídeo externos equipados con
toma de salida de vídeo en componentes.
Si se conecta a la toma de entrada de vídeo en componentes del aparato, conecte el cable RCA de audio a la toma de
audio L/R (izquierda/derecha) de VIDEO2.
cable RCA de vídeo
en componentes
(rojo)(azul)(verde)
p. ej.)
reproductor de DVD con las tomas
de salida de vídeo en componentes
COMPONENT VIDEO OUT
AUDIO OUT
RL
PrPbY
parte trasera del aparato
LR
PrPbY
(rojo)
(rojo)(rojo)
(rojo)(azul)
(azul)(azul)
(azul)(verde)
(verde)(verde)
(verde)
COMPONENT
(rojo)(azul)(verde)
VIDEO 2
VIDEOS-VIDEOCOAXIAL
VIDEO 1
AUDIO
LR
AUDIO
cable RCA de audio
Nota:
• Este aparato acepta señales de vídeo de 480i/480p/1080i simplificadas.
• La señal de vídeo 1080i simplificada es diferida a la señal de vídeo original 1080i porque se muestra después de ser convertida a señal
480p.
[Conexión de Cable de S-video]
La conexión S-video ofrece una buena calidad de imagen para dispositivos de vídeo conectados al aparato.
Utilice un cable S-video para conectar el aparato a dispositivos de vídeo externos equipados con toma de salida
S-video.
Si se conecta a la toma de entrada S-video del aparato, conecte el cable RCA de audio a la toma de audio L/R
(izquierda/derecha) de VIDEO1.
p. ej.)
AUDIO OUT
S-VIDEO
OUT
RL
parte trasera del aparato
reproductor de DVD
con toma de salida S-video
cable S-video
cable RCA de audio
Nota:
• Si se conecta a la toma S-video y a la toma de vídeo al mismo tiempo, tendrá prioridad la conexión S-video.
10
ES
COMPONENT
VIDEO 2
PrPbY
VIDEOS-VIDEOCOAXIAL
VIDEO 1
LR
AUDIO
LR
AUDIO
Page 59

Cables No Incluidos.
Deberá adquirir los cables necesarios en su establecimiento local.
[Conexión de Vídeo]
La conexión de vídeo ofrece una calidad normal de imagen para dispositivos de vídeo conectados al aparato.
Si se conecta a la toma de entrada de vídeo del aparato, conecte cable RCA de audio a la toma de audio L/R
(izquierda/derecha) de VIDEO1.
Cuando la toma de audio del dispositivo de vídeo sea monoaural, conecte el cable RCA de audio a la toma de entrada
de audio L (izquierda).
INTRODUCCIÓN
CONEXIÓN
AJUSTE INICIAL AJUSTE DE DVD INFORMACIÓN
p. ej.)
cámara
de vídeo
videojuego
aparato de vídeo
AUDIO OUT
VIDEO
RL
OUT
cable RCA de vídeo
cable RCA de audio
parte trasera del aparato
LR
PrPbY
COMPONENT
VIDEO 2
VIDEOS-VIDEOCOAXIAL
VIDEO 1
AUDIO
LR
AUDIO
Nota:
• Si se conecta a la toma S-video y a la toma de vídeo al mismo tiempo, tendrá prioridad la conexión S-video.
[Conexión de Salida de Audio Digital]
Si conecta este aparato a un dispositivo de audio digital externo, podrá disfrutar de audio multicanal, como el sonido
de emisiones digitales de 5+1 canales (5.1ch).
p. ej.)
decodicador Dolby Digital
DIGITAL AUDIO
COAXIAL IN
parte trasera del aparato
LR
PrPbY
VIDEO 2
VIDEOS-VIDEOCOAXIAL
VIDEO 1
AUDIO
LR
AUDIO
COMPONENT
cable coaxial de audio digital
PARA VER LA TELEVISIÓN
AJUSTE OPCIONAL
UTILIZACIÓN DEL DVD
SOLUCIÓN DE PROBLEMAS
11
ES
Page 60

JUSTE INICIAL
A
Se puede acceder a estas operaciones mediante el mando a distancia. Algunas también pueden ser
accesibles mediante los mandos del aparato principal.
Configuración Inicial
5
Esta sección le guiará a través del ajuste inicial del aparato, que incluye la
selección de un idioma para sus menús de pantalla y “PREA. AUTO CA.”, que
explora y memoriza automáticamente los canales visibles.
Antes de empezar:
Asegúrese de que el aparato está conectada a la antena o al cable.
Después de hacer todas las conexiones necesarias,
1
presione [POWER] para encender el aparato.
• Esta operación tardará unos momentos.
Utilice [Cursor K /L] para seleccionar el idioma de
2
pantalla entre las opciones de la derecha de la pantalla
del televisor. (ENGLISH/ESPAÑOL/FRANÇAIS)
o
SELECT LANGUAGE
SELECCIONE EL IDIOMA
CHOISIR LA LANGUE
SELECT : K,
SELECCIONE : K,
CHOIX : K,
• Aparecerá en pantalla el menú “INSTALACIÓN INICIAL”
en el paso 3, en el idioma seleccionado después de
presionar [ENTER].
, L
, L
, L
ENGLISH
ESPAÑOL
FRANÇAIS
SET
AJUSTE
VALIDER
:
ENTER
:
ENTER
:
ENTER
Nota:
• Si se conecta directamente al sistema de cable, póngase en
contacto con el instalador de CATV.
• Si presiona [POWER] o [SETUP] ] durante “PREA. AUTO CA.”,
se cancelará este ajuste.
• La función de exploración automática inicial de canales
puede ejecutarse, para TV/DTV o CATV, solamente una
vez. Si desea explorar ambos (TV/DTV y CATV), deberá
seleccionar “AJUSTE DE CANAL” en el menú principal para
explorar y memorizar otros canales una vez finalizado el
preajuste inicial. (Consulte la página 13.)
• Cuando no pueda recibirse ningún canal mediante “PREA.
AUTO CA.”, en la pantalla del televisor aparece “NO HAY
SEÑAL DE TV”.
• Si no hay entrada de señal desde el terminal de antena y
no se produce ninguna operación durante varios segundos
después de encender el aparato, aparecerá “SUGERENCIAS
ÚTILES”. Siga las instrucciones de la pantalla del televisor.
Siga las instrucciones de la pantalla del televisor.
- SUGERENCIAS ÚTILES -
1. VERIFIQUE ANTENA / CABLE / SATÉLITE
ESTÁ BIEN CONECTADO.
2. VERIFIQUE “PREA. AUTO CA.” ESTÁ
BIEN AJUSTADO.
3. LEA LA PÁGINA FRONTAL DEL MANUAL
DEL USUARIO O PANEL TRASERO PARA
EL NO. TEL DE AYUDA A LOS
CLIENTES.
Utilice [Cursor K /L] para seleccionar “PREA. AUTO
3
CA.(TV/DTV)” para canales de televisión o “PREA. AUTO
CA.(CATV)” para canales de CATV, y luego presione
[ENTER].
o
- INSTALACIÓN INICIAL -
CONECTE LA ANTENA O CABLE O
SATÉLITE EN ESTA UNIDAD.
PREA. AUTO CA. (TV/DTV)
PREA. AUTO CA. (CATV)
• Comienza automáticamente la exploración y la
memorización de los canales.
PREA. AUTO CA. (TV/DTV)
• Cuando la exploración y la memorización han
finalizado, se muestra el canal memorizado más bajo
de la emisión.
12
ES
25
Page 61

Menú Principal
5
En esta sección se describen los aspectos generales del menú principal
que aparece al presionar [SETUP]. Para más detalles, consulte la página
de referencia de cada elemento. El menú principal se compone de los
siguientes elementos de ajuste de función.
Presione [SETUP].
p. ej.) modo TV digital
- INSTALACIÓN TV -
AJUSTE DE CANAL
AJUSTE DE V-CHIP
IDIOMA [ESPAÑOL]
TITULO [OFF]
LUZ DE FONDO [BRILLO]
TENPE. DE COLOR [NORMAL]
DTVCC
• AJUSTE DE CANAL
Puede explorar automáticamente los canales visibles
y eliminar los no deseados.
(Consulte “Exploración Automática de Canales” en
página 13.)
• AJUSTE DE V-CHIP
Puede ajustar las limitaciones de visión.
(Consulte “V-chip” en página 23.)
• IDIOMA
Puede cambiar el idioma (Inglés, Español, Francés)
visualizado en el menú principal.
(Consulte “Selección de Idioma” en página 14.)
• TITULO
Puede cambiar el formato de pantalla para subtítulos
cerrados, que muestran el diálogo de un programa
de televisión u otra información en la pantalla del
televisor.
(Consulte “Subtítulos Cerrados” en página 20.)
• LUZ DE FONDO
Puede ajustar el modo de brillo deseado.
(Consulte “Ajuste de Luz de Fondo” en página 22.)
• TENPE. DE COLOR
Puede ajustar la temperatura de color (“NORMAL”,
“CALIENTE” y “FRÍO”).
(Consulte “Temperatura de Color” en página 23.)
• DTVCC
Además de los subtítulos cerrados básicos descritos en
la página 20, DTV tiene sus propios subtítulos cerrados
denominados DTVCC.
(Consulte “Subtítulos Cerrados en DTV” en página 21.)
Exploración Automática de Canales
5
Si cambia los cables (por ejemplo, entre antena y CATV) o si mueve el
televisor a otro lugar después del ajuste inicial, o si recupera un canal DTV
eliminado, tendrá que realizar la exploración automática de canales.
Antes de empezar:
Asegúrese de que el aparato está conectada a la antena o al cable.
Presione [SETUP] para visualizar el menú principal.
1
Utilice [Cursor K/L] para seleccionar “AJUSTE DE
2
CANAL”, y luego presione [ENTER].
p. ej.) modo TV digital
- INSTALACIÓN TV -
o
Utilice [Cursor K/L] para seleccionar su tipo de
3
presintonía deseado, y luego presione [ENTER].
p. ej.) modo TV digital
o
• Cuando tenga una antena aérea conectada,
seleccione “PREA. AUTO CA. (TV)”, “PREA. AUTO CA.
(DTV)” o “PREA. AUTO CA. (TV/DTV)”.
• Cuando esté conectado a CATV, seleccione
“PREA. AUTO CA. (CATV)”.
• Comienza automáticamente la exploración y la
memorización de los canales.
p. ej.) modo TV digital
• Cuando la exploración y la memorización han
finalizado, se muestra el canal memorizado más bajo.
• Cuando haya seleccionado, “PREA. AUTO CA. (TV/
DTV)”, se mostrará el canal analógico memorizado
más bajo cuando la exploración y la memorización
hayan finalizado.
Cuando no haya ningún canal analógico, se mostrará
el canal digital memorizado más bajo.
AJUSTE DE CANAL
AJUSTE DE V-CHIP
IDIOMA [ESPAÑOL]
TITULO [OFF]
LUZ DE FONDO [BRILLO]
TENPE. DE COLOR [NORMAL]
DTVCC
--- AJUSTE DE CANAL ---
AGREGAR/BORRAR (DTV)
PREA. AUTO CA. (DTV)
PREA. AUTO CA. (TV/DTV)
PREA. AUTO CA. (CATV)
! CATV demora unos 50min.
D25
PREA. AUTO CA. (DTV)
INTRODUCCIÓN
CONEXIÓN
AJUSTE INICIAL
PARA VER LA TELEVISIÓN
AJUSTE OPCIONAL
UTILIZACIÓN DEL DVD
AJUSTE DE DVD INFORMACIÓN
SOLUCIÓN DE PROBLEMAS
13
ES
Page 62

JUSTE INICIAL
A
Nota:
• Si se conecta directamente al sistema de cable, póngase en
contacto con el instalador de CATV.
• Si presiona [POWER] o [SETUP] durante la exploración
automática de canales, se cancelará este ajuste.
• Cuando no pueda recibirse ningún canal mediante la
exploración automática de canales, en la pantalla del
televisor aparece “NO HAY SEÑAL DE TV”.
• Los ajustes de canal se guardarán incluso aunque se
produzca un corte de energía.
• Si tiene menús en inglés o en francés y necesita en español,
presione [SETUP]. Utilice [Cursor K/L] para seleccionar
“LANGUAGE” o “LANGAGE”. Presione [ENTER] para
seleccionar “ESPAÑOL”. Presione [SETUP] para eliminar el
menú principal.
• Con respecto al canal digital solamente, si usted desenchufa
el cable de alimentación de CA antes de apagar esta unidad
presionando [POWER] es posible que se pierda el ajuste del
canal, incluso después de terminar el escaneado.
Selección de Idioma
5
Puede elegir INGLÉS, ESPAÑOL o FRANCÉS como idioma de pantalla.
Presione [SETUP] para visualizar el menú principal.
1
Utilice [Cursor K /L] para seleccionar “IDIOMA”, y luego
2
presione [ENTER] repetidamente para cambiar el
ajuste.
p. ej.) modo TV digital
- INSTALACIÓN TV -
o
AJUSTE DE CANAL
AJUSTE DE V-CHIP
IDIOMA [ESPAÑOL]
TITULO [OFF]
LUZ DE FONDO [BRILLO]
TENPE. DE COLOR [NORMAL]
DTVCC
[ESPAÑOL]
[FRANÇAIS]
Presione [SETUP] para salir.
3
[ENGLISH]
14
ES
Page 63

ARA VER LA TELEVISIÓN
CA4
CA4
(televisión de alta definición)
18:00
18:30
19:00
19:30
20:00
20:30
CA4-1
CA4
CA4
Sin señal
Sin señal Sin señal
CA4-2
ATSC (modo digital)
CA4
NTSC (modo analógico)
[Hora de
emisión]
Sin señal
CA4-1CA4 CA4-2
: cambia automáticamente
canal mayor
canal menor
: cambia manualmente mediante [CH. K/L]
P
Selección de Canal
5 Ajuste de Volumen
Seleccione los canales utilizando [CH.
• Para seleccionar los canales memorizados, utilice
K
CH.
[
• Para seleccionar los canal es no memorizados, utilice
Para utilizar [los botones numéricos]
- Cuando seleccione el canal analógico 12
- Cuando seleccione el canal digital 12-1
Asegúrese de presionar [–/ENT.] antes de introducir el
número de canal menor.
• Presione [CH. RETURN] para volver al canal
• Cuando seleccione un canal superior a 100,
Acerca de la emisión de televisión digital:
Con su emisión de alta definición, la emisión digital
es muy superior a la emisión analógica en su calidad
tanto de imagen como de sonido.
¿Qué es el canal menor?
Mediante una tecnología de alta compresión, la
emisión digital ofrece un servicio que permite el envío
simultáneo de múltiples señales. Por tanto, puede
seleccionar más de un programa por canal mayor, dado
que la tecnología de emisión digital distingue entre
múltiples canales emitidos por una determinada red.
/L] o [los botones numéricos].
[los botones numéricos].
TV
DTV
anteriormente visualizado.
presione [+10 / +100] primero. A continuación, utilice
[los botones numéricos] para presionar los números
inferiores de 2 dígitos.
K
] o [los botones numéricos].
/L
5
En esta sección se describe cómo ajustar el volumen. También se describe
la función de silenciamiento, que activa y desactiva el sonido.
Utilice
[VOL. X/Y] para ajustar el volumen de audio.
o
VOLUMEN 20
• La barra de volumen se mostrará en la parte inferior
de la pantalla del televisor cuando ajuste el volumen.
• La barra de volumen desaparecerá automáticamente
dentro de unos segundos.
Presione [MUTE] para activar y desactivar el sonido.
MUDE 20
• “MUDE” aparece en la pantalla del televisor durante
unos segundos.
Presione nuevamente [MUTE] o utilice [VOL. X/Y]
para recuperar el volumen original.
INTRODUCCIÓN
CONEXIÓN
AJUSTE INICIAL AJUSTE DE DVD INFORMACIÓN
PARA VER LA TELEVISIÓN
AJUSTE OPCIONAL
UTILIZACIÓN DEL DVD
Aunque no pueda ver el programa de TV de alta
definición (HDTV), el aparato convierte la señal HDTV
en señal de TV de definición estándar.
Nota:
• Aparecerá “SIN SEÑAL” en la pantalla del televisor una vez
terminada la emisión del canal menor.
SOLUCIÓN DE PROBLEMAS
15
ES
Page 64

ARA VER LA TELEVISIÓN
ESCANEANDO
P
Para Cambiar entre Cada Modo
5
Puede cambiar fácilmente entre DTV (ATSC) y TV (NTSC) o acceder a un
dispositivo externo con el mando a distancia cuando estén conectados al
aparato.
Presione [INPUT] repetidamente para cambiar los
1
modos de entrada.
[MODO ANALÓGICO]
Para Cambiar el Modo de Audio
5
En esta sección se describe cómo cambiar el audio en el modo analógico y
cómo cambiar el idioma de audio en el modo digital.
TV
Durante la recepción de una emisión MTS, presione
[AUDIO] repetidamente para recorrer los canales de
audio disponibles.
[MODO DIGITAL]
[AUX1]
• Para utilizar la toma de entrada de vídeo o de S-video
del aparato, seleccione “AUX1”.
• Para utilizar la toma de entrada de vídeo en
componentes del aparato, seleccione “AUX2”.
[AUX2]
Nota:
• Cuando cambie del modo analógico al digital, puede
tardar un poco en finalizar la selección de canales digitales.
Durante el cambio de modo se muestra la siguiente
pantalla en el televisor.
[MAIN]
[SAP]
MAIN : Emite el audio principal
SAP : Emite un segundo programa de audio
MONO : Emite audio en mono
• La pantalla de información desaparecerá
automáticamente dentro de unos segundos.
DTV
Presione [AUDIO] para visualizar el idioma actualmente
1
seleccionado y el número de idiomas disponibles.
Presione [AUDIO] repetidamente para recorrer los
2
idiomas de audio disponibles.
[MONO]
KABC CA 95-03
Un día de recuerdos
ESPAÑOL 1/3
16
ES
• Los idiomas disponibles difieren según la emisión.
Se muestra “OTRO” cuando no puede obtenerse el
idioma de audio o si los idiomas obtenidos no son
inglés, español o francés.
• La pantalla de información desaparecerá
automáticamente dentro de unos segundos.
Nota:
• Presionando [AUDIO] no se controla el dispositivo de audio
externo.
Page 65

Información de Pantalla
AUX 1
5
Puede visualizar el canal actualmente seleccionado u otra información, por
ejemplo el modo de audio, en la pantalla del televisor.
TV
En el modo analógico se visualiza el número del canal actual.
DTV
En el modo digital se visualiza la información de emisión detallada para
el canal actual como, por ejemplo, el título del programa y las guías de
programas.
INTRODUCCIÓN
CONEXIÓN
Presione [DISPLAY].
CA 10
• Se muestra el número del canal actual en la esquina
superior derecha de la pantalla del televisor.
• Para borrar la pantalla, presione [DISPLAY]
nuevamente.
Presione [DISPLAY] repetidamente para recorrer los
modos de visualización disponibles.
[OFF]
[Información de Emisión]
• Se muestra la siguiente información.
1 número de canal
2 emisora
3 título de programa
4 idioma de audio
(Consulte “Para Combiar el Modo de Audio” en página 16.)
[Guía de Programas]
• Se muestra la guía de programas añadida a
información de emisión.
[INFORMACIÓN DE EMISIÓN]
[GUÍA DE PROGRAMAS]
2
KABC CA 95-03
Un día de recuerdos
3
ESPAÑOL 1/3
4
KABC CA 95-03
Un día de recuerdos
ESPAÑOL 1/3
Guía de
programas
A quarterHace un cuarto de siglo, en una
época que ahora puede considerarse como
los viejos tiempos de la prensa, los anuncios
en medios impresos suponían el 80 % de los
ingresos por publicidad de la industria.
Sig - Pulse L Atrás - Pulse
K
AJUSTE INICIAL AJUSTE DE DVD INFORMACIÓN
PARA VER LA TELEVISIÓN
AJUSTE OPCIONAL
1
UTILIZACIÓN DEL DVD
SOLUCIÓN DE PROBLEMAS
Nota:
• Cuando la guía de programas tenga más de 6 líneas, utilice
[Cursor K/ L] para desplazarse.
• Se visualiza “No se proporciona descripción.” cuando no se
facilita la guía de programas.
• Mientras se visualiza la guía de programas se interrumpe la
función de subtítulos ocultos.
• En el modo de entrada externa, se muestra la siguiente
pantalla;
p. ej.) Cuando se ha conectado un dispositivo externo a la
toma de entrada VIDEO1.
• La pantalla de información desaparecerá automáticamente
dentro de unos segundos cuando los subtítulos cerrados
están activados.
17
ES
Page 66

ARA VER LA TELEVISIÓN
ZOOMANCHO BUZÓN
P
Modo de Visualización de
5 Temporizador de Apagado
Pantalla del Televisor
DTV
En el modo digital pueden seleccionarse 2 tipos de modos de
visualización cuando la emisora envíe una señal 16:9.
5
El temporizador de apagado puede con gurarse para apagar
automáticamente la unidad después de un periodo incremental de
tiempo.
Presione [SCREEN MODE] repetidamente para cambiar
la relación del aspecto del televisor.
[ANCHO BUZÓN]
Visualiza el programa de soporte digital en pantalla
completa.
Aparecen unas franjas negras en la parte superior e
inferior de la pantalla.
[ZOOM]
Amplía y muestra la zona central del programa de
soporte digital.
Se recortan los lados izquierdo y derecho de la
imagen.
Nota:
• Según el programa, es posible que el modo de visualización
no cambie.
Presione [SLEEP] para ajustar el temporizador de
1
apagado.
• El temporizador de apagado aparece en la pantalla
del televisor.
Presione [SLEEP] repetidamente para cambiar el
2
tiempo que debe transcurrir hasta el apagado.
• Puede preparar su unidad para que se apague
después de transcurrir un periodo de tiempo (de 30 a
120 minutos).
• Cada presión de [SLEEP] aumentará el tiempo en 30
minutos.
• Después del ajuste, puede visualizarse el
temporizador de apagado, para su comprobación,
presionando [SLEEP].
REPOSAR OFF
REPOSAR 120MIN.
18
Para Cancelar el Temporizador de Apagado
Presione [SLEEP] rrepetidamente hasta que aparezca
“REPOSAR OFF” en la pantalla del televisor.
Nota:
• La pantalla de ajuste del temporizador de apagado
desaparecerá automáticamente en 10 segundos.
• Cuando desconecte el aparato de la toma de CA o cuando
se produzca un fallo de suministro eléctrico, el ajuste del
temporizador de apagado quedará anulado.
ES
Page 67

JUSTE OPCIONAL
A
INTRODUCCIÓN
Agregar/Borrar Canales
5
La función de agregar/borrar canales le permite agregar el canal que
no se haya agregar mediante la exploración automática de canales
debido al estado de la recepción en el ajuste inicial. También puede
eliminar los canales innecesarios.
Presione [SETUP] para visualizar el menú principal.
1
Utilice [Cursor K/L] para seleccionar “AJUSTE DE
2
CANAL”, y luego presione [ENTER].
p. ej.) modo TV digital
- INSTALACIÓN TV -
o
Utilice [Cursor K/L] para seleccionar “AGREGAR/
3
BORRAR(DTV)” o “AGREGAR/BORRAR”, y luego presione
[ENTER].
p. ej.) modo TV digital
o
Seleccione el canal que desea agregar o borrar.
4
(Consulte “Selección de Canal” en página 15.)
p. ej.) modo TV digital
Utilice [Cursor s/ B] para seleccionar “AGREGAR” o
5
“BORRAR”.
•
Para agregar o borrar otros canales, repita los pasos 4-5.
• El color del número de canal visualizado en la parte
superior derecha de la pantalla del televisor indica;
- Azul: Se agregará el canal seleccionado.
- Rojo: Se borrará el canal seleccionado.
o
AJUSTE DE CANAL
AJUSTE DE V-CHIP
IDIOMA [ESPAÑOL]
TITULO [OFF]
LUZ DE FONDO [BRILLO]
TENPE. DE COLOR [NORMAL]
DTVCC
--- AJUSTE DE CANAL ---
AGREGAR/BORRAR (DTV)
PREA. AUTO CA. (DTV)
PREA. AUTO CA. (TV/DTV)
PREA. AUTO CA. (CATV)
! CATV demora unos 50min.
AGREGAR/BORRAR : DTV
D25
Nota:
• El menú “AGREGAR/BORRAR (DTV)” o “AGREGAR/BORRAR“
desaparecerá automáticamente dentro de unos segundos.
• En el modo digital (DTV), podrá agregar o borrar canales
solamente en el canal mayor.
Una vez borrado un canal DTV, no podrá recuperar el canal sin
•
realizar nuevamente la exploración automática de canales.
(Consulte “Exploración Automática de Canales” en página 13.)
Ajuste de Imagen
5
Puede ajustar el brillo, el contraste, el color, el matiz y la nitidez.
Presione [PICTURE] para ajustar el menú principal.
1
Utilice [Cursor K /L] para seleccionar el tipo de calidad
2
de imagen que desea ajustar.
[CLARIDAD]
o
En 5 segundos, utilice [Cursor s / B] para ajustar la
3
calidad.
CLARIDAD
CONTRASTE
COLOR
MATIZ
AGUDEZA
Presione [RETURN] para salir.
4
o
Cursor s Cursor B
para reducir el brillo para aumentar el brillo
para reducir el contraste
para reducir el color para intensi car el color
para agregar rojo para agregar verde
para suavizar para aclarar
[CONTRASTE]
[COLOR]
[MATIZ]
[AGUDEZA]
para aumentar el contraste
Nota:
• La pantalla de ajuste de imagen desaparecerá
automáticamente en dentro de unos segundos.
CONEXIÓN
AJUSTE INICIAL AJUSTE DE DVD INFORMACIÓN
PARA VER LA TELEVISIÓN
AJUSTE OPCIONAL
UTILIZACIÓN DEL DVD
SOLUCIÓN DE PROBLEMAS
Presione [SETUP] para salir.
6
19
ES
Page 68

JUSTE OPCIONAL
A
Subtítulos Cerrados
5
TV
Puede ver los subtítulos cerrados (cc) para programas de televisión,
películas e informativos.
Subtítulo cerrado se re ere al texto de diálogo o descripciones
visualizadas en pantalla para personas con problemas auditivos.
Presione [SETUP] para visualizar el menú principal.
1
Presione [SETUP] para salir.
3
Utilice [Cursor K /L] para seleccionar “TITULO”, y luego
2
presione [ENTER] repetidamente para cambiar el ajuste.
p. ej.) modo TV digital
- INSTALACIÓN TV -
AJUSTE DE CANAL
AJUSTE DE V-CHIP
IDIOMA [ESPAÑOL]
TITULO [OFF]
LUZ DE FONDO [BRILLO]
TENPE. DE COLOR [NORMAL]
DTVCC
o
[OFF]
[SUBTIT1]
[SUBTIT2]
[SUBTIT3]
[SUBTIT4]
[TEXTO1]
[TEXTO2]
[TEXTO3]
[Modo de Subtítulos]
SUBTIT1 y TEXTO1:
son los servicios primarios de subtítulos y texto.
Los subtítulos o el texto se muestran en el mismo
idioma que el diálogo del programa
(hasta 4 líneas de escritura sobre la pantalla del
televisor, sin tapar zonas relevantes de la imagen).
SUBTIT3 y TEXTO3;
sirven como canales de datos preferidos.
Los subtítulos o el texto se muestran con frecuencia
en un idioma secundario.
SUBTIT2, SUBTIT4, TEXTO2 y TEXTO4;
están raramente disponibles y las emisoras los utilizan
solamente en circunstancias especiales, por ejemplo
cuando “SUBTIT1” y “SUBTIT3” o “TEXTO1” y “TEXTO3”
no están disponibles.
• Hay 3 modos de visualización según los programas:
Modo “Paint-on”
Modo “Pop-on”: Una vez que los caracteres son
Modo “Roll-up”: Muestra los caracteres
20
ES
: Visualiza inmediatamente en la
pantalla del televisor los caracteres
introducidos.
almacenados en memoria, se
muestran todos a la vez.
continuadamente mediante
desplazamiento de líneas (máximo 4
líneas).
[TEXTO4]
Nota:
• Para mostrar los subtítulos cerrados en la pantalla de su
televisor, la señal de emisión debe contener los datos de los
subtítulos cerrados.
• No todos los programas y anuncios de TV contienen
subtítulos cerrados o todo tipo de subtítulos cerrados.
• Los subtítulos y textos pueden no coincidir exactamente con
la voz del televisor.
• El cambio de canales puede retrasar los subtítulos unos
segundos.
• Ajustar o silenciar el volumen puede retrasar los subtítulos
unos segundos.
• Pueden utilizarse abreviaciones, símbolos y otras
abreviaturas gramaticales para sincronizar el texto con
la acción en pantalla. Esto no supone un problema del
aparato.
• Los subtítulos o caracteres de texto no se visualizarán
mientras se muestren el menú principal o la pantalla de
funciones.
• Si aparece un recuadro negro en la pantalla del televisor,
esto significa que los subtítulos cerrados están configurados
en modo TEXTO. Para borrar ese recuadro, seleccione
“SUBTIT1”, “SUBTIT2”, “SUBTIT3”, “SUBTIT4” u “OFF”.
• Si el aparato recibe señales de televisión de calidad
deficiente, los subtítulos podrán contener errores, o es
posible que no aparezcan los subtítulos. Algunas posibles
causas de señales de calidad deficiente son:
- Ruido de ignición de automóviles
- Ruido de motor eléctrico
- Recepción de señal débil
- Recepción de señal multiplex (imágenes fantasmas o
fluctuaciones en pantalla)
• El aparato conserva la configuración de subtítulos cerrados
si se produce un corte de suministro eléctrico.
Page 69

Subtítulos Cerrados en DTV
5
DTV
Además de los subtítulos cerrados básicos descritos en la página 20,
DTV tiene sus propios subtítulos cerrados denominados DTVCC. Utilice
este menú para cambiar la con guración de DTVCC.
Estilo DTVCC
5
DTV
Puede cambiar el estilo de DTV CC, por ejemplo fuente, color o tamaño, etc.
INTRODUCCIÓN
CONEXIÓN
Presione [SETUP] para visualizar el menú principal.
1
Utilice [Cursor K /L] para seleccionar “DTVCC”, y luego
2
presione [ENTER].
p. ej.) modo TV digital
- INSTALACIÓN TV -
o
Utilice [Cursor K /L] para seleccionar “SERVICIO
3
AJUSTE DE CANAL
AJUSTE DE V-CHIP
IDIOMA [ESPAÑOL]
TITULO [OFF]
LUZ DE FONDO [BRILLO]
TENPE. DE COLOR [NORMAL]
DTVCC
TITULO”, y luego presione [ENTER] repetidamente para
cambiar el ajuste.
- DTVCC SERVICIO TITULO [SIRVE1/6]
o
SERVICIO TITULO
Presione [SETUP] para salir.
4
OFF
SIRVE1~6
CONFIG. USUARID [ON]
TAMAÑO TITULO [MEDIANO]
ESTILO FUENTE [ESTILO1/8]
BORDE CARACTER [NINGUNO]
OPACO ADELANTE [RELLENA]
COLOR ADELANTE [BLANCO]
OPACO ATRÁS [RELLENA]
COLOR FONDO [NEGRO]
Selecciónelo si no desea
DTVCC. Éste es el ajuste
predeterminado.
Seleccione uno de
ellos antes de cambiar
cualquier otro elemento
del menú “TITULO”.
Seleccione “SIRVE1/6” en
circunstancias normales.
Presione [SETUP] para visualizar el menú principal.
1
Utilice [Cursor K /L] para seleccionar “DTVCC” y
2
presione [ENTER].
p. ej.) modo TV digital
- INSTALACIÓN TV -
o
Utilice [Cursor K /L] para seleccionar “CONFIG.
3
AJUSTE DE CANAL
AJUSTE DE V-CHIP
IDIOMA [ESPAÑOL]
TITULO [OFF]
LUZ DE FONDO [BRILLO]
TENPE. DE COLOR [NORMAL]
DTVCC
USUARID”, y luego presione [ENTER] repetidamente
para ajustarlo en “ON”.
• Los elementos del recuadro de puntos están
disponibles solamente cuando “CONFIG. USUARID”
está en “ON”.
- DTVCC SERVICIO TITULO [SIRVE1/6]
o
Utilice [Cursor K /L] para seleccionar un elemento y
4
CONFIG. USUARID [ON]
TAMAÑO TITULO [MEDIANO]
ESTILO FUENTE [ESTILO1/8]
BORDE CARACTER [NINGUNO]
OPACO ADELANTE [RELLENA]
COLOR ADELANTE [BLANCO]
OPACO ATRÁS [RELLENA]
COLOR FONDO [NEGRO]
luego presione [ENTER] repetidamente para cambiar el
ajuste del elemento.
- DTVCC SERVICIO TITULO [SIRVE1/6]
o
CONFIG. USUARID [ON]
TAMAÑO TITULO [MEDIANO]
ESTILO FUENTE [ESTILO1/8]
BORDE CARACTER [NINGUNO]
OPACO ADELANTE [RELLENA]
COLOR ADELANTE [BLANCO]
OPACO ATRÁS [RELLENA]
COLOR FONDO [NEGRO]
AJUSTE INICIAL AJUSTE DE DVD INFORMACIÓN
PARA VER LA TELEVISIÓN
AJUSTE OPCIONAL
UTILIZACIÓN DEL DVD
SOLUCIÓN DE PROBLEMAS
Nota:
• “SERVICIO TITULO” se puede cambiar dependiendo de la
descripción de la emisión.
21
ES
Page 70

JUSTE OPCIONAL
A
• TAMAÑO TITULO
El tamaño de fuente de los subtítulos cerrados puede
elegirse entre los siguientes:
• ESTILO FUENTE
El estilo de fuente del subtítulo mostrado puede
elegirse entre los siguientes:
• BORDE CARACTER
El tipo de borde del subtítulo mostrado puede
elegirse entre los siguientes:
• COLOR ADELANTE, COLOR FONDO
El color de fuente y de fondo del subtítulo mostrado
puede elegirse entre los siguientes:
• OPACO ADELANTE, OPACO ATRÁS
La opacidad del texto y del fondo del subtítulo
mostrado puede elegirse entre las siguientes:
TAMAÑO TITULO MEDIANO, GRANDE, PEQUEÑO
ESTILO1/8
ESTILO2/8
ESTILO3/8
ESTILO FUENTE
BORDE CARACTER
OPACO ADELANTE RELLENA, TRANSLUCIDA, DESTELLO
COLOR ADELANTE
OPACO ATRÁS RELLENA, TRANSLUCIDA, DESTELLO
COLOR FONDO
ESTILO4/8
ESTILO5/8
ESTILO6/8
ESTILO7/8
ESTILO8/8
NINGUNO, ELEVADO, HUNDIDO,
UNIFORME, SOMBRA IZQ., SOMBRA DER.
BLANCO, NEGRO, ROJO, VERDE,
AMARILLO, AZUL, MAGENTA, CYAN,
TRANSPARENTE
NEGRO, ROJO, VERDE, AZUL, AMARILLO,
MAGENTA, CYAN, TRANSPARENTE,
BLANCO
Fuente proporcional utilizada
en la pantalla de menú
A un espacio con remates
Espacio proporcional con
remates
A un espacio con remates
Espacio proporcional sin
remates
Tipo de fuente informal
Tipo de fuente cursiva
Minúsculas
Ajuste de Luz de Fondo
5
Puede ajustar el modo de brillo deseado.
Presione [SETUP] para visualizar el menú principal.
1
Utilice [Cursor K /L] para seleccionar “LUZ DE FONDO”,
2
y luego presione [ENTER] repetidamente para cambiar
el ajuste.
p. ej.) modo TV digital
- INSTALACIÓN TV -
o
AJUSTE DE CANAL
AJUSTE DE V-CHIP
IDIOMA [ESPAÑOL]
TITULO [OFF]
LUZ DE FONDO [BRILLO]
TENPE. DE COLOR [NORMAL]
DTVCC
[BRILLO]
[NORMAL]
Presione [SETUP] para salir.
3
[OSCURO]
Presione[SETUP] para salir.
5
22
ES
Page 71

Temperatura de Color
- AJUSTE DE V-CHIP -
CLASE DE TV
CLASE DE MPAA
CLASE DESCARGADA
CAMBIAR CÓDIGO
A
B
C
5
Puede ajustar la temperatura de color de la pantalla del televisor.
Presione [SETUP] para visualizar el menú principal.
1
V-chip
5
V-chip lee las clases de los programas, y niega el acceso a los programas
que exceden el nivel de clasi cación establecido. Con esta función,
puede bloquear determinados programas inapropiados para niños.
Presione [SETUP] para visualizar el menú principal.
1
INTRODUCCIÓN
CONEXIÓN
Utilice [Cursor K /L] para seleccionar “TENPE. DE
2
COLOR”, y luego presione [ENTER] repetidamente para
cambiar el ajuste.
p. ej.) modo TV digital
- INSTALACIÓN TV -
o
AJUSTE DE CANAL
AJUSTE DE V-CHIP
IDIOMA [ESPAÑOL]
TITULO [OFF]
LUZ DE FONDO [BRILLO]
TENPE. DE COLOR [NORMAL]
DTVCC
[
NORMAL
[CALIENTE]
[FRÍO]
Presione [SETUP] para salir.
3
AJUSTE INICIAL AJUSTE DE DVD INFORMACIÓN
Utilice [Cursor K /L] para seleccionar “AJUSTE DE V-
2
CHIP”, y luego presione [ENTER].
p. ej.) modo TV digital
- INSTALACIÓN TV -
o
Utilice [los botones numéricos] para introducir los
3
AJUSTE DE CANAL
AJUSTE DE V-CHIP
IDIOMA [ESPAÑOL]
TITULO [OFF]
LUZ DE FONDO [BRILLO]
TENPE. DE COLOR [NORMAL]
DTVCC
PARA VER LA TELEVISIÓN
AJUSTE OPCIONAL
números de 4 dígitos de su contraseña.
]
CÓDIGO DE ACCESO
- - -
-
UTILIZACIÓN DEL DVD
• Cuando no haya configurado su contraseña,
introduzca 0000.
• Cuando la contraseña sea correcta, se muestra el
siguiente menú de “AJUSTE DE V-CHIP”.
Consulte la siguiente descripción para ajustar cada elemento.
p. ej.) modo TV digital
...
A
“A. Clase de TV”
D página 24
...
B
“B. Clase de MPAA”
D página 25
...
C
“C. Cambiar Contraseña”
D página 25
SOLUCIÓN DE PROBLEMAS
Nota:
• “CLASE DESCARGADA” estará disponible cuando el aparato
reciba una emisión digital utilizando el nuevo sistema de
clasificación.
• Cuando seleccione una clasificación y la ajuste en “BLOQ.”,
las clasificaciones más altas quedarán bloqueadas
automáticamente. Las clasificaciones más bajas estarán
disponibles para su visión.
• Cuando seleccione la clasificación más alta en “MIRAR”,
todas las clases cambian automáticamente a “MIRAR”.
•
Si aparece el mensaje “PROGRAMA PROHIBIDO” mientras está
viendo la televisión, cambie a un canal que no esté bloqueado.
Luego, podrá acceder al menú “AJUSTE DE V-CHIP” y cambiar el
ajuste para poder ver todos los canales de televisión.
•
Para bloquear cualquier programa inapropiado, establezca sus
límites tanto en “CLASE DE TV” como en “CLASE DE MPAA”.
• El ajuste V-chip se mantendrá después de producirse un
corte en el suministro eléctrico (pero el código de acceso
vuelve a 0000).
23
ES
Page 72

JUSTE OPCIONAL
A. Clase de TV
TV-Y [MIRAR]
TV-Y7 ( ) [MIRAR]
TV-G [MIRAR]
TV-PG (DLSV) [BLOQ.]
TV-14 (DLSV) [BLOQ.]
TV-MA ( LSV) [BLOQ.]
A
A. Clase de TV
Utilice [Cursor K /L] tpara seleccionar “CLASE DE TV”, y
4
luego presione [ENTER].
p. ej.) modo TV digital
- AJUSTE DE V-CHIP -
o
Utilice [Cursor K /L ] tpara seleccionar la clasificación
5
CLASE DE TV
CLASE DE MPAA
CLASE DESCARGADA
CAMBIAR CÓDIGO
deseada y luego presione [ENTER] repetidamente para
cambiar entre “MIRAR” y “BLOQ.”.
o
Clasificación
TV-Y Apto para todos los niños inferior
TV-Y7
TV-G Todos los públicos
TV-PG
TV-14
TV-MA
Apto para todos los niños desde
los 7 años
Se sugiere orientación de los
padres
No apto niños menores de 14 años
Exclusivamente para público adulto
TV-Y [MIRAR]
TV-Y7 ( ) [MIRAR]
TV-G [MIRAR]
TV-PG ( ) [MIRAR]
TV-14 ( ) [MIRAR]
TV-MA ( ) [MIRAR]
Categoría
superior
[Para Ajustar las Subcategorías]
En lo referente a TV-Y7, TV-PG, TV-14 ó TV-MA, puede
seguir ajustando las subcategorías para bloquear
elementos específicos de la programación. Para ajustar
las subcategorías, siga los pasos indicados.
Utilice [Cursor K /L ] para seleccionar la
1
clasificación principal deseada y luego presione
[ENTER] dos veces para mostrar sus subcategorías.
o
2
Subclasificación
FV Fantasía Violencia T V-Y7
V Violencia
S Situación sexual
L Lenguaje grosero
D Diálogo sugerente TV-PG, TV-14
Utilice [Cursor K /L ] y luego presione [ENTER]
repetidamente para cambiar el ajuste.
p. ej.) TV-PG
o
TV-PG [BLOQ.]
D [BLOQ.]
L [BLOQ.]
S [BLOQ.]
V [BLOQ.]
Categoría Clasificación
TV-PG
TV-14
TV-MA
24
ES
Presione [SETUP] para salir.
6
Nota:
• Las subcategorías bloqueadas aparecerán junto a la
categoría de clasificación principal en el menú “CLASE DE
TV”.
• No podrá bloquear una subcategoría (D, L, S o V) si la clase
principal está ajustada en “MIRAR”.
• Al cambiar la categoría a “BLOQ.” o “MIRAR”, cambia
automáticamente todas sus subcategorías a lo mismo
(“BLOQ.” o “MIRAR”).
Page 73

INTRODUCCIÓN
B. Clase de MPAA
- AJUSTE DE V-CHIP -
CLASE DE TV
CLASE DE MPAA
CLASE DESCARGADA
CAMBIAR CÓDIGO
C. Cambiar Contraseña
- AJUSTE DE V-CHIP -
CLASE DE TV
CLASE DE MPAA
CLASE DESCARGADA
CAMBIAR CÓDIGO
CÓDIGO NUEVO
_ _ _ _
CÓDIGO CONFIRMADO
_ _ _ _
B. Clase de MPAA
Clase de MPAA es el sistema de clasi cación creado por la MPAA (Motion
Picture Association of America).
Utilice [Cursor K /L] para seleccionar “CLASE DE MPAA”
4
y luego presione [ENTER].
p. ej.) modo TV digital
o
Utilice [Cursor K /L] y luego presione [ENTER]
5
repetidamente para cambiar el ajuste.
Clasificación
G
PG
PG-13
R
NC-17
X
Presione [SETUP] para salir.
6
o
G [MIRAR]
PG [MIRAR]
PG-13 [MIRAR]
R [BLOQ.]
NC-17 [BLOQ.]
X [BLOQ.]
Categoría
Todos los públicos
Se sugiere orientación de los padres
No apto para niños menores de 13 años
Restringido; menores de 17 años tienen que estar
acompañados por un progenitor o un tutor adulto
No apto para menores de 17 años
Exclusivamente para público adulto
C. Cambiar Contraseña
Aunque el código predeterminado “0000” viene incorporado con el
aparato, usted puede ajustar su propia contraseña.
Utilice [Cursor K /L] para seleccionar “CAMBIAR
4
CÓDIGO” y luego presione [ENTER].
p. ej.) modo TV digital
o
Presione [los botones numéricos] del mando a
5
distancia para introducir la nueva contraseña de
4 dígitos.
• Vuelva a introducir la contraseña en el espacio
“CÓDIGO CONFIRMADO”.
Presione [SETUP] para salir.
6
Nota:
• Asegúrese de que la nueva contraseña y la contraseña de
confirmación son exactamente iguales. Si son diferentes, el
espacio queda en blanco para volver a introducirla.
• Su contraseña se borrará y volverá a la predeterminada
(0000) cuando se produzca un fallo en la alimentación.
Si olvida la contraseña, desenchufe el cable de alimentación
durante 10 segundos para restaurar la contraseña en 0000.
CONEXIÓN
AJUSTE INICIAL AJUSTE DE DVD INFORMACIÓN
PARA VER LA TELEVISIÓN
AJUSTE OPCIONAL
UTILIZACIÓN DEL DVD
SOLUCIÓN DE PROBLEMAS
25
ES
Page 74

TILIZACIÓN DEL DVD
ALL
capítulo 1
capítulo 2
chapter 1
chapter 2
capítulo 3
capítulo 4
archivo 1
archivo 2
archivo 5
archivo 6
archivo 3
archivo 4
U
Funciones del DVD
Medios que se Pueden Reproducir
5
Tipo de medios Marca (logotipo)
DVD-video
*1, 2, 4, 6, 10, 11
Código
regional
o
1
ALL
Señales
grabadas
Tamaño de
los medios
Tipo de discos
DVD-RW
DVD-R
* 1, 3, 4, 5,
6, 7, 8, 9, 10
-
vídeo digital
(MPEG2)
p. ej.)
título 1 título 2
capítulo 1
capítulo 2
capítulo 3
capítulo 4
chapter 1
chapter 2
DVD+RW
DVD+R
* 1, 4, 5, 6, 9, 10
CD de audio
* 4, 6, 10
-
audio digital
5 pulgadas
(
12 cm
)
CD de audio
p. ej.)
pista 1 pista 2 pista 5
pista 3 pista 4
pista 6
o
CD-RW
CD-R
-
MP3
MP3
e. g.)
p. ej.)
carpeta 1 carpeta 2
archivo 1
archivo 2
archivo 3
archivo 4
archivo 5
archivo 6
* 4, 5, 6, 9,10
es una marca registrada de DVD Format/Logo Licensing Corporation.
Si no puede reproducir un disco que tiene las marcas indicadas más arriba, verifique las notas siguientes.
*1:
Esta unidad emplea el sistema de color NTSC. Los discos grabados con otros sistemas de color como, por ejemplo, PAL no se pueden reproducir.
*2: Ciertos DVD-video no funcionan como se describe en este manual debido a las intenciones de los productores del disco.
*3: Los discos grabados con el formato VR (grabación de vídeo) no se pueden reproducir.
*4: Los discos rayados o sucios no se pueden reproducir.
*5: Algunos discos no se pueden reproducir debido a que las condiciones de grabación son incompatibles, a las características de la grabadora o
a las propiedades especiales del disco.
*6: Puede reproducir los discos que tienen las marcas indicadas más arriba. Pero si utiliza discos no estandarizados, puede que la unidad no los
reproduzca. Y aunque se reproduzcan, la calidad del sonido o de la imagen se reducirá.
En las grabadoras DVD de nuestra marca puede reproducir los DVD-RW/-R sin finalizar grabados en el formato de vídeo. Sin embargo, dependi-
*7:
endo del estado de la grabación de un disco, el disco puede que no se reproduzca en absoluto o normalmente (la imagen y el sonido no serán
adecuados, etc.). En este caso, necesitará finalizar el disco con la grabadora DVD. Consulte el manual entregado con la grabadora DVD.
*8:
Sólo se pueden reproducir los discos grabados en el formato de vídeo y finalizados. Los discos sin finalizar no se pueden reproducir. Dependiendo
del estado de la grabación de un disco, éste puede que no se reproduzca en absoluto, la imagen y el sonido no sean adecuados, etc.
*9: Si la parte grabada del disco es demasiado pequeña [menos de 55 mm (2 3/16 de pulgada) a lo ancho] puede que el disco no se repro-
duzca correctamente.
*10: No pegue papel ni ponga pegatinas en el disco. Éstos pueden dañar el disco, y la unidad puede que no los lea correctamente.
*11: El número dentro del símbolo indica la región del mundo, y el disco codificado con un formato de región específica sólo puede ser repro-
ducido en una unidad que tenga el mismo código de región.
Medios que no se Pueden Reproducir
5
• NUNCA reproduzca los discos siguientes. ¡De lo contrario podrán producirse fallas en el funcionamiento!
disco Blu-ray, HD DVD, DVD-RAM, DVD-audio, CD-i, photo CD, CD de vídeo, DVD con otros códigos de región que no
sean el 1 o la palabra ALL (todos), DTS-CD, DVD-ROM para computadoras personales, CD-ROM para computadoras
personales.
• En los discos siguientes PUEDE QUE NO se oiga el sonido.
CD de super audio
Nota:
• Sólo se puede reproducir el sonido grabado en la capa CD normal. El sonido grabado en la capa de “CD de super audio” de alta
densidad no se puede reproducir.
26
ES
Page 75

Se puede acceder a estas operaciones mediante el mando a distancia. Algunas también pueden ser accesibles mediante los mandos del aparato principal.
INTRODUCCIÓN
Reproducción
5
Antes de empezar:
Encienda el ampli cador y cualquier otro equipo que esté conectado a esta
unidad. Asegúrese de que el receptor de audio externo está ajustado en el
modo de entrada correcto.
Presione [POWER] para encender el aparato.
1
Inserte un disco con la etiqueta orientada hacia abajo,
2
desde el lado izquierda de la unidad.
• En caso de que el DVD fue grabado en ambos lados,
asegúrese de que la etiqueta del lado que desea
reproducir está orientada hacia abajo.
•
El aparato pasa al modo DVD cuando estaba en modo TV.
Presione [PLAY B]. La bandeja se cerrará y empezará la
3
reproducción.
• Si la reproducción no comienza automáticamente,
presione otra vez [PLAY B].
Presione [STOP C] para interrumpir la reproducción
4
temporalmente.
• Si la reproducción se mantiene interrumpida durante
5 minutos, se activará automáticamente el programa
del protector de pantalla cuando “SALVA PANTALLA”
esté ajustado en “ENC.”.
Presione [EJECT A] para expulsar el disco.
5
Nota:
• Puede aparecer “ ” en la zona superior
derecha de la pantalla del televisor cuando
la operación esté prohibida por el disco o
por esta unidad.
• Algunos discos DVD pueden iniciar la reproducción desde el
título 2 ó 3 debido a programas específicos.
• Durante la reproducción de un disco de 2 capas, las imágenes
pueden interrumpirse durante un instante. Esto sucede
mientras la primera capa está cambiando a la segunda capa.
Esto no es un fallo de funcionamiento.
Menú DVD
5
DVD
Algunos discos contienen menús de disco que describen el contenido del
disco o le permiten personalizar la reproducción del disco, o menú de
títulos que enumeran los títulos disponibles en el DVD.
Presione [MENU] para llamar al menú del disco.
Utilice [Cursor K / L / s / B] para seleccionar un
elemento y luego presione [ENTER] (o [PLAY B]).
Nota:
• Las operaciones con menús pueden cambiar dependiendo
del disco.
Consulte el manual que acompaña al disco para conocer
más detalles.
Reanudación de la Reproduc-
5
ción
Presione [STOP C] durante la
reproducción.
En la pantalla del televisor
aparecerá un mensaje de reanudación.
Presione [PLAY B]. La reproducción se reanudará
desde el punto donde se detuvo la reproducción.
Nota:
•
Para cancelar la reanudación, presione [STOP C] una vez más en
el modo de parada. En algunos discos, [STOP C] no funcionará
mientras aparece el mensaje de reanudación. Espere a que
desaparezca el mensaje.
• Para MP3 la reproducción se reanudarán desde el comienzo
de la pista actual.
• La información de reanudación se mantendrá aunque se
apague la unidad. No obstante, la función de reanudación
se cancelará si se expulsa el disco. La reproducción empezará
desde el principio la próxima vez que introduzca el disco.
REANUDACIÓN ACTIVADA
Presione 'PLAY' para reproducir desde aquí.
Para reproducir desde el inicio,
primero presione 'STOP' y luego 'PLAY'.
CONEXIÓN
AJUSTE INICIAL
PARA VER LA TELEVISIÓN
AJUSTE OPCIONAL
UTILIZACIÓN DEL DVD
AJUSTE DE DVD INFORMACIÓN
SOLUCIÓN DE PROBLEMAS
Pausa
5
Presione [PAUSE F] durante la
reproducción.
• La reproducción hará una pausa y el
sonido se silenciará.
Para continuar con la reproducción, presione [PLAY B].
27
ES
Page 76

TILIZACIÓN DEL DVD
U
Reproducción Paso a Paso
5
DVD
Cada vez que presiona [PAUSE F] en el
modo de pausa, el disco avanza un cuadro
cada vez.
Para continuar con la reproducción, presione [PLAY B].
Nota:
• Si las imágenes en el modo de pausa están borrosas, ponga
“MODO VISTA FIJA” en “IMAGEN” en el menú “PANTALLA”.
(Consulte la página 38.)
Avance Rápido / Retroceso Rápido
5
Mantenga presionado [REV h] o
[FWD g] durante la reproducción para
seleccionar la velocidad de avance o retroceso requerida.
Para continuar con la reproducción, presione
[PLAY B].
Nota:
• Si las imágenes en el modo de reproducción rápida están
borrosas, ponga “MODO VISTA FIJA” en “IMAGEN” en el menú
“PANTALLA”. (Consulte la página 38.)
• La velocidad de avance rápido / retroceso rápido cambia
según el disco.
La velocidad aproximada es de 1(2×), 2(8×), 3(20×), 4(50×) y
5(100×) en DVD y 1(2×), 2(8×), 3(30×) en CD de audio y MP3.
• Para DVD, el sonido se silenciará durante la búsqueda.
• Para CD de audio y MP3, el sonido saldrá intermitentemente
durante la búsqueda.
E
Zoom
5
DVD
La función del zoom le permite ampliar la imagen y moverse en sentido
horizontal por la imagen ampliada.
Durante la reproducción, presione repetidamente
1
[MODE] hasta que aparezca “ ”.
1.3× (ZOOM)
Presione repetidamente [ENTER] para cambiar el factor
2
del zoom: “APDO. (ZOOM)”, “1,3× (ZOOM)”, “2× (ZOOM)” o
“4× (ZOOM)”.
1
Una vez establecido el factor de zoom deseado, pre-
3
sione [RETURN] para visualizar la guía de posiciones, y
luego utilice [Cursor K/ L/ s / B] para mover la imagen focalizada a lo ancho de la pantalla del televisor.
2× (ZOOM)
Avance Lento / Retroceso Lento
5
DVD
Mantenga presionado [REV /h] o
[FWD /
g
] durante el modo de pausa para
seleccionar la velocidad de avance o retroceso requerida.
Para continuar con la reproducción, presione
Nota:
• La velocidad de avance lento / retroceso lento cambia según
el disco.
La velocidad aproximada es de 1(1/16×), 2(1/8×) y 3(1/2×).
• Si las imágenes en el modo de reproducción lenta están
borrosas, ponga “MODO VISTA FIJA” en “IMAGEN” en el menú
“PANTALLA”. (Consulte la página 38.)
• El sonido se silenciará durante la reproducción de avance
lento/retroceso lento.
28
ES
1
[PLAY B].
P
ara salir del zoom, repita los pasos 1 y 2 de más arriba y
4
presione [ENTER] hasta que aparezca “APDO. (ZOOM)”.
Nota:
•
El recuadro gris con un recuadro azul interior que se visualiza
durante la reproducción con zoom es la guía de posición que indica
la posición de la imagen focalizada dentro de la imagen total.
La guía de posición permanece en la pantalla del televisor
hasta que usted presiona [ENTER].
Presione [ENTER] una vez más para recuperar la guía de
posición cuando ésta desaparezca.
• La función del zoom no se activa mientras se visualiza el
menú del disco.
• El zoom 4× no está disponible en algunos discos.
• La función del zoom también está disponible durante el
modo de pausa.
Page 77

Reproducción MP3
5
MP3
INTRODUCCIÓN
MP3 es un método de compresión de archivos. Puede copiar
archivos MP3 en discos CD-RW/-R desde la computadora personal
y reproducir los archivos en esta unidad.
Inserte un CD-RW/-R con archivos MP3, y la reproduc-
1
ción comenzará automáticamente.
• Presione [PLAY B] si ya hay un disco insertado.
• Presione [MENU] cuando quiera llamar a la lista de
archivos.
Cuando seleccione la carpeta:
• Presione [Cursor B] cuando quiera ir a la siguiente
jerarquía.
LISTA DE ARCHIVOS
DISC NAME
FOLDER
MP3
folder name 1
folder name 2
folder name 3
folder name 4
file name 1
file name 2
file name 3
ENTER
PLAY
o
folder name 1
1/ 2
• Presione [Cursor s] cuando quiera volver a la jerar-
quía anterior (excepto para la jerarquía superior).
• Si está presionado [TOP MENU] cuando se visualiza
una lista de archivos, el primer elemento de la jerarquía superior resaltará.
• Presione [MENU] o [RETURN] para volver a la visual-
ización de la reproducción.
Presione una vez [STOP C] para detener temporal-
2
mente la reproducción.
Para utilizar con esta unidad se recomiendan los archivos
grabados bajo las circunstancias siguientes:
• Consulte “Reanudación de la Reproducción” en la
página 27.
Frecuencia de muestreo:
44,1 kHz ó 48 kHz
Velocidad de bits constante:
32 kbps - 320 kbps
Nota:
• Algunas selecciones tardarán un rato en ser reconocidas.
• A las carpetas se les llama grupos; y a los archivos se les
llama pistas.
• Las carpetas y los archivos MP3 se visualizan respectivamente
como
•
•
• Esta unidad puede reproducir imágenes y sonidos de datos
• A un archivo con una extensión de “.mp3 (MP3)” se le llama
• La unidad puede ejecutar un archivo de imagen que cumpla
• Los archivos cuya extensión sea otra diferente de “.mp3
•
• El nombre de la carpeta o archivos se puede visualizar con un
•
y .
En un disco se puede reconocer un máximo de 255 carpetas o 999
archivos.
En una carpeta se pueden reconocer hasta 8 jerarquías. Los archivos
de las jerarquías 9 o más profundas no se pueden reproducir.
grabados en los formatos MP3 en discos CD-RW/-R.
“archivo MP3”.
con la especificación Exif. Exif es un formato de archivo,
un formato Exchangeable Image File (Archivo de Imagen
Intercambiable) establecido por la Japanese Electronic
Industry Development Association (Asociación para el
Desarrollo de la Industria Electrónica Japonesa) (JEIDA).
(MP3)” no se enumerarán en la lista de archivos.
Si el archivo no está grabado en el formato MP3 puede que se
produzca ruido aunque la extensión del archivo sea “.mp3 (MP3)”.
máximo de 25 caracteres. Los caracteres que no se puedan
reconocer serán reemplazados por asteriscos.
Los carpetas o archivos que no se puedan reproducir puede
que sean visualizados dependiendo de las condiciones de la
grabación.
Archivo MP3 aplicable Observaciones
Para el archivo MP3 grabado con
velocidad de bits variable (VBR), la
unidad puede que no visualice el
tiempo transcurrido realmente.
CONEXIÓN
AJUSTE INICIAL AJUSTE DE DVD INFORMACIÓN
PARA VER LA TELEVISIÓN
AJUSTE OPCIONAL
UTILIZACIÓN DEL DVD
SOLUCIÓN DE PROBLEMAS
29
ES
Page 78

TILIZACIÓN DEL DVD
Búsqueda de Capítulos / Títulos
Búsqueda de Pistas
[SKIP H ] [SKIP G ]
pista/archivo actual
(TR)
TR 1 TR 2 TR 3 TR 4
U
Funciones de Búsqueda
5
Búsqueda de Capítulos / Títulos
DVD
Utilizando [MODE]
Presione repetidamente [MODE] durante la reproduc-
1
ción hasta que aparezca “
•
Si desea realizar la búsqueda de títulos, presione
repetidamente [Cursor K / L] hasta que aparezca “
Presione [los botones numéricos] antes de que pasen 60
2
segundos para seleccionar el capítulo o el título deseado.
Para reproducir un capítulo o un título de un solo dígito
cuando haya más de 10 capítulos o títulos, presione [ENTER]
después de introducir el número del capítulo o del título.
La reproducción comenzará automáticamente desde el
3
capítulo o título que haya seleccionado.
“.
_ _ /12 (BÚSQUEDA)
_ _ /12 (BÚSQUEDA)
Nota:
•
El número total de capítulos/títulos de su disco; con menos
de 10 capítulo/título, presione directamente el número de la
capítulo/título. Con 10 o más capítulos/títulos, para reproducir
una capítulo/título de un solo dígito, presione primero [0] y
luego el número de la capítulo/título. (p. ej., para la capítulo 3,
presione [0] y [3].) Para reproducir una capítulo/título de dos
dígitos, presione el número de la capítulo/título.
Utilizando [SKIP H / G]
Presione repetidamente [SKIP H / G] durante la
1
reproducción hasta seleccionar un capítulo o título
deseado.
capítulo actual
(CH)
CH 1 CH 2 CH 3 CH 4
o
La reproducción empezará automáticamente desde el
2
capítulo o el título que haya encontrado.
[SKIP H ] [SKIP G ]
[SKIP H
(Si el disco no tiene capítulos.)
Nota:
• [SKIP H / G] no se encuentran disponibles cuando la
reproducción está parada.
• La búsqueda de capítulos/títulos descrita más arriba sólo puede
realizarse durante la reproducción o cuando la unidad ha mantenido la
información de reanudación. No puede realizarse en el modo de parada.
• Con algunos DVD no se pueden reproducir capítulos/títulos.
o
título actual
(TT )
TT 1 TT 2 TT 3 TT 4
] [SKIP G ]
Búsqueda de Pistas
CD
MP3
Utilizando [MODE]
Presione repetidamente [MODE] durante la reproduc-
1
ción hasta que aparezca “
“.
Presione [los botones numéricos] antes de que pasen
2
60 segundos para seleccionar la pista deseada.
Para reproducir una pista/archivo de un solo dígito cuando
haya más de 10 pistas/archivos, presione [ENTER] después
de introducir el número de la pista/archivo.
La reproducción empezará automáticamente desde la
3
pista/archivo que haya seleccionado.
Nota:
• El número total de pistas/archivos de su disco;
Con menos de 10 pistas/archivos, presione directamente el
número de la pista/archivo.
Con 10 o más pistas/archivos, para reproducir una pista/
archivo de un solo dígito, presione primero [0] y luego el
número de la pista/archivo. (p. ej., para la pista/archivo 3,
presione [0] y [3].) Para reproducir una pista/archivo de dos
dígitos, presione el número de la pista/archivo.
Con 100 ó más archivos, para reproducir una archivo de
uno o dos dígitos, presione primero [0], y luego presione
directamente el número de la archivo. (p. ej., para la archivo 3,
presione [0], [0] y [3]. Para la archivo 26, presione [0], [2] y [6].)
Para reproducir una archivo de tres dígitos, presione
directamente el número de la archivo.
• La búsqueda de pistas no está disponible para la reproducción
programada o aleatoria.
Utilizando [SKIP H / G]
Presione repetidamente [SKIP H / G] durante la
1
reproducción hasta seleccionar la pista/archivo que
usted desee.
o
La reproducción empezará automáticamente desde la
2
pista/archivo que usted seleccionó.
Nota:
• [SKIP H / G] no se encuentran disponibles cuando la
reproducción está parada.
• La búsqueda de pistas descrita más arriba sólo puede
realizarse durante la reproducción o cuando la unidad
ha mantenido la información de reanudación. No puede
realizarse en el modo de parada.
“.
_ _ /29 (BÚSQUEDA)
_ _ /29 (BÚSQUEDA)
30
ES
Page 79

INTRODUCCIÓN
Búsqueda por Tiempo
Dirija la búsqueda
Búsqueda por Tiempo
DVD
CD
Presione repetidamente [MODE] durante la repro-
1
ducción hasta que aparezca “
p. ej.) DVD
Utilice repetidamente [Cursor K / L] hasta que apa-
2
rezca “
“.
o
Presione [los botones numéricos] antes de que pasen 60
3
segundos para seleccionar el intervalo de tiempo deseado.
La reproducción empezará automáticamente a partir
4
de pasar el tiempo que usted haya seleccionado.
Nota:
• Cuando no es necesario introducir un número aparece “0”
automáticamente. Por ejemplo, “0:0_:__” aparece en el menú
de búsqueda por tiempo si el tiempo total del título o de la
pista/archivo es inferior a 10 minutos.
Presione [CLEAR] para borrar la entrada incorrecta en el paso 3.
•
• La búsqueda por tiempo sólo se puede realizar durante la
reproducción o cuando la unidad ha mantenido información
de reanudación. No se puede realizar en el modo de parada.
Dirija la búsqueda
Presione [los botones numéricos] para seleccionar el
número de la pista deseada.
Nota:
• Para seleccionar un número de
uno dígito, presione directamente el número.
• Para seleccionar un número de capítulo, título, pista/archivo
de dos dígitos:
- Si el disco tiene más de 9 pistas y menos de 100, presione primero
[+10/+100]
pista/archivo
(p. ej., para la pista 26, presione [+10/+100], [2] y [6].)
-
Si el disco tiene más de 99 archivos, presione [+10/+100] y
luego presione [0]. Luego introduzca el número de archivos de
dos dígitos. O presione primero [+10/+100], luego introduzca el
número de la archivos y finalmente presione [ENTER].
• Para seleccionar un número de archivos de tres dígitos,
presione primero [+100/+10] y luego introduzca el número de
archivos de tres dígitos.
y luego introduzca el número de
de dos dígitos.
“ / “ “.
_ _ /12 (BÚSQUEDA)
TOTAL
1:29:00
TOTAL
1:29:00
capítulo, título,
capítulo, título,
pista/archivo de
Repetición de Reproducción
5
Puede repetir la reproducción de capítulos, títulos o pistas/archivos de un disco.
Presione repetidamente [MODE] durante la repro-
1
ducción hasta que aparezca “
Presione [Cursor K / L] para cambiar el modo de repetición.
2
DVD
CD
MP3
Presione [RETURN] para salir.
3
Repetición de Reproducción A-B
5
DVD
Puede repetir la reproducción entre los puntos A y B de un disco.
Presione repetidamente [MODE] durante la reproduc-
1
ción hasta que aparezca “
Presione [ENTER] en el punto de inicio deseado (A).
2
Presione [ENTER] en el punto de finalización deseado (B).
3
•
El punto B deberá estar en el mismo título o pista que el punto A.
• Dentro de unos pocos segundos, la sección A-B
empezará a reproducirse repetidamente.
Para cancelar la repetición de reproducción A-B, presione
4
repetidamente [MODE] hasta que aparezca “
Presione [ENTER] para que aparezca “
APDO. (repetición desactivada)
repetición
CAPÍTULO
TÍTULO (repetición del título actual)
APDO.
PISTA (repetición de la pista actual)
TODO (
APDO.
PISTA (repetición de la pista actual)
GRUPO
TODO (
(
(repetición desactivada)
repetición del disco completo
(repetición desactivada)
(repetición de la carpeta actual)
repetición del disco completo
CD
“.
APDO. (REPETICIÓN)
del
AB
AB
APDO.”.
AB
AB
A- (REPETICIÓN A-B)
AB
AB
A-B (REPETICIÓN A-B)
capítulo actual
AB
AB
A-B
AB
APDO.”.
AB
)
)
)
”.
31
ES
CONEXIÓN
AJUSTE INICIAL
PARA VER LA TELEVISIÓN
AJUSTE OPCIONAL
UTILIZACIÓN DEL DVD
AJUSTE DE DVD INFORMACIÓN
SOLUCIÓN DE PROBLEMAS
Page 80

TILIZACIÓN DEL DVD
U
Nota:
• El ajuste de repetición (excepto “TODO”) se cancelará cuando
pase a otro título, capítulo, pista/archivo o carpeta.
• Durante la reproducción programada, el ajuste de repetición
será efectivo para las pistas/archivos del programa.
• La repetición de reproducción o la repetición de reproducción
A-B puede no estar disponible con algunos discos.
• La repetición de reproducción A-B no funciona durante otro
modo de repetición.
• Para cancelar el punto A, presione [CLEAR] en el paso 2 de
“Repetición de Reproducción A-B”.
• Al parar la reproducción se cancelará la repetición de
reproducción A-B.
Reproducción Programada
5
CD
Puede determinar el orden de la reproducción de las pistas/archivos.
Presione repetidamente [MODE] en el modo de parada
1
hasta que aparezca el menú “PROGRAMA”.
p. ej.) CD de audio
Utilice [Cursor K / L] para seleccionar una pista/archi-
2
vo deseada y luego presione [ENTER] para guardarla.
• Puede haber pistas/archivos adicionales en otras
pantallas. Utilice [Cursor K/ L] para ir a las páginas
siguientes / anteriores.
• Repita este paso hasta que haya seleccionado todas
las pistas/archivos que quiera reproducir del programa.
• Se pueden ordenar hasta 99 pistas/archivos.
• Si un programa tiene 8 o más pistas/archivos, utilice
[SKIP H / G] para ver todas las pistas/archivos.
MP3
PROGRAMA
CD-DA TOTAL 0:00:00
T 1 3:31
T 2 4:28
T 3 4:19
T 4 3:58
T 5 4:12
T 6 4:02
T 7 3:55
ENTER
PLAY
T 1 3:31
CLEAR
PROGRAMA
o
1/ 3
CD-DA TOTAL 0:08:22
T 15 3:18
T 16 4:24
BORRA TODO
ENTER
PLAY
T 16 4:24
CLEAR
1/ 1
T 4 3:58
T 16 4:24
1/ 1
3/ 3
Nota:
• Presione [CLEAR] para borrar la última pista del programa si
ha cometido un error.
Para borrar todas las pistas/archivos programadas de una vez,
•
seleccione “BORRA TODO” y presione [ENTER] en el paso 2.
• Mientras está reproduciéndose un programa, [STOP C]
funciona de la forma siguiente:
-
Al presionar una vez [STOP C]: La pista/archivo estará en el modo
de espera de reanudación. La próxima vez que presione [PLAY B],
la reproducción se reanudará desde el punto donde se paró en la
reproducción programada. (Para archivos MP3, la reproducción se
reanudará desde el principio del archivo actual.)
-
Al presionar dos veces [STOP C]: El modo de reanudación
se cancelará. La próxima vez que presione [PLAY B], la
reproducción se reiniciará desde la primera pista/archivo en
el orden original. Sin embargo, su reproducción programada
podrá volver a empezar cuando usted siga los pasos de arriba.
(Sus programas estarán aún guardados hasta que el disco sea
expulsado o hasta que se apague la unidad.)
-
En algunos discos, [STOP C] no funcionará mientras aparezca
el mensaje de reanudación. Espere a que desaparezca el
mensaje.
• Para repetir la pista/archivo actual del programa, siga los
pasos 1 y 2 de “Repetición de Reproducción” en la página 31 y
seleccione “
• Para repetir todo el programa, siga los pasos 1 y 2 de
“Repetición de Reproducción” en la página 31 y seleccione “
TODO“.
Al apagar la unidad o al abrir la bandeja del disco se borrará el programa.
•
•
No puede utilizar [los botones numéricos] para seleccionar otra
pista durante la reproducción programada. Utilice [SKIP j/ i]
para seleccionar otras pistas/archivos del programa.
• No puede combinar la reproducción aleatoria con la
reproducción programada.
•
No puede alterar el orden de un programa durante la reproducción.
• Sólo puede iniciar la reproducción programada mientras está
en el menú “PROGRAMA”.
Reproducción Aleatoria
5
CD
MP3
Esta función cambia el orden de reproducción de las pistas/archivos en
lugar de la reproducción en orden.
Presione repetidamente [MODE] en el modo de parada
1
hasta que aparezca el menú “ALEATORIO”.
p. ej.) CD de audio
PISTA
“.
ALEATORIO
CD-DA TOTAL 0:45:55
PROGRAMA ALEATORIO
--SIN INDICACIÓN--
PLAY
Presione [PLAY B] para iniciar la reproducción pro-
3
gramada.
32
ES
Presione [PLAY B] para iniciar la reproducción aleatoria.
2
Nota:
• Para repetir la pista/archivo actual en el modo aleatorio, siga
los pasos 1 y 2 de “Repetición de Reproducción” en la página
31 y seleccione “ PISTA“.
• Para repetir toda la reproducción aleatoria, siga los pasos 1 y
2 de “Repetición de Reproducción” en la página 31 y
seleccione “
• La reproducción aleatoria se mantendrá hasta que presione
[STOP C].
TODO“.
Page 81

Visualización en Pantalla
5
Presionando [DISPLAY] en el mando a distancia puede verificar la información
relacionada con el disco actual.
DVD
aparece solamente cuando
múltiples ángulos están
disponibles en el DVD.
estado de reproducción actual
11/16 0:00:00 - 0:03:30
1
tiempo restante del capítulo
actual
tiempo transcurrido del capítulo
actual
CH (capítulo):
número del capítulo actual /
total de capítulos
1/3 0:00:00 - 1:23:45
2
tiempo restante del título actual
tiempo transcurrido del título actual
TT (título):
número del título actual / total de
títulos
CD
1
2
4/12 0:03:21 - 0:02:15
4/12 0:13:45 - 0:45:40
estado de reproducción actual
T
tiempo restante de la pista actual
tiempo transcurrido de la pista
actual
TR (Pista):
número de la pista actual /
total de pistas
TODO:
número de la pista actual /
total de pistas
T
el ajuste de repetición actual
aparece solamente cuando el
ajuste de repetición está activado
T : Repetición de pista
A :
Repetición de todas las pistas
A B : Repetición A-B
tiempo restante de todo el disco
tiempo transcurrido de todo el disco
INTRODUCCIÓN
CONEXIÓN
AJUSTE INICIAL AJUSTE DE DVD INFORMACIÓN
PARA VER LA TELEVISIÓN
AJUSTE OPCIONAL
3
TL1
número de capa, sólo aparece cuando
se reproduce un disco de 2 capas
L0 : Se reproduce la capa 0
L1 : Se reproduce la capa 1
el ajuste de repetición actual
aparece solamente cuando el
ajuste de repetición está activado
C : Repetición de capítulo
T : Repetición de título
A B : Repetición A-B
indicación de velocidad de bits para
la cantidad de datos de audio y vídeo
que está siendo leída actualmente
4
Nota:
•
Algunos DVD no le permitirán establecer correctamente la
reproducción de capítulos.
3
Nota:
• Cuando está reproduciendo un disco en un modo de
programa o aleatorio, “
ALEATORIO
MP3
PISTA 01
1
1/36 0:01:15
2
PROGRAMA
3
* Sólo cuando está reproduciendo un disco en el
”) se visualizará en lugar de 2.
PROGRAMA
estado de la reproducción actual
El nombre del archivo actualmente
en reproducción se visualizará
TR (Pista):
número de la archivo actual /
T
archivos en total
ajuste de repetición actual, si está
activado
T : Repetición de pista
G :
A : Repetición de totas archivos
tiempo de reproducción
transcurrido de la archivo actual
o
modo programa o aleatorio.
” (o “
Repetición de grupo (carpeta)
ALEATORIO
UTILIZACIÓN DEL DVD
SOLUCIÓN DE PROBLEMAS
4
33
ES
Page 82

TILIZACIÓN DEL DVD
Idioma de Subtítulos
Idioma de Audio
Ángulos de la Cámara
U
Ajustes Especiales
5
Idioma de Subtítulos
Idioma de Audio
DVD
Esta unidad le permite seleccionar un idioma de subtítulos (si está disponible) durante la reproducción de DVD.
Presione repetidamente [MODE] durante la reproduc-
1
ción hasta que aparezca “ “.
Utilice repetidamente [Cursor K / L] hasta que apa-
2
rezca su idioma deseado.
1.ENG/6 (SUBTÍTULO)
o
• Cada vez que presiona [Cursor K / L], el idioma de
los subtítulos cambia como se indica en el ejemplo
siguiente:
APDO. (no hay subtítulos)
ENG (subtítulos en inglés)
FRE (subtítulos en francés)
...
los subtítulos se pueden cambiar en el número visualizado.
idioma de subtítulos actual.
Para cancelar los subtítulos
Presione repetidamente [MODE] durante la
1
reproducción hasta que aparezca “ “.
1.ENG/6 (SUBTÍTULO)
Utilice repetidamente [Cursor K / L] hasta que aparez-
2
ca “ APDO. (SUBTÍTULO)“.
Nota:
• Si su idioma no se visualiza después de presionar varias veces
• Cuando aparece “NO DISPONIBLE” en la pantalla del televi-
• Si elige un idioma que tiene una abreviatura de 3 letras, la
• El expulsa de del disco cancelará el ajuste de los subtítulos.
o
[Cursor K / L], puede que el disco no tenga ese idioma.
Sin embargo, algunos discos sólo le permiten cambiar el
ajuste de los idiomas de subtítulos en el menú del disco. (La
operación cambia dependiendo del disco, así que consulte el
manual entregado con el disco.)
sor, esto significa que no hay subtítulo grabado en la escena.
abreviatura se visualizará cada vez que se ajuste el idioma de
los subtítulos. Si elige otros idiomas se visualizará “---” en su
lugar. (Consulte la página 42.)
APDO. (SUBTÍTULO)
DVD
Esta unidad le permite seleccionar un idioma de audio (si se encuentran
disponibles múltiples idiomas) durante la reproducción de DVD.
Presione repetidamente [AUDIO] durante la
reproducción hasta que aparezca su idioma
deseado.
3/2.1ch 48k/3
1.ENG
Dolby D
• Cada vez que presiona [AUDIO], el idioma de audio
cambia como se indica en el ejemplo siguiente:
ENG (audio en inglés)
SPA (audio en español)
FRE (audio en francés)
...
el audio se puede cambiar
en el número visualizado.
idioma de audio actual.
Nota:
• Algunos discos sólo le permiten cambiar el ajuste de audio
desde el menú del disco. Consulte el manual entregado con
los discos para conocer detalles.
• Si su idioma no se visualiza después de utilizar varias veces
[AUDIO], puede que el disco no tenga ese idioma. Sin embargo, algunos discos le permiten cambiar el ajuste de múltiples
idiomas de audio en el menú del disco. (La operación cambia
dependiendo del disco, así que consulte el manual entregado
con el disco.)
• Cuando aparece “NO DISPONIBLE” en la pantalla del televisor, esto significa que el idioma de audio no está disponible.
Ángulos de la Cámara
DVD
Algunos DVD pueden tener escenas que han sido lmadas
simultáneamente desde varios ángulos. Usted puede cambiar
el angulo de la cámara si aparece “ ” en la pantalla del
televisor. Si “ICONO DE ÁNGULO” está en “APDO.” en el menú
“OTROS”, “ ” no aparecerá. (Consulte la página 41.)
Presione repetidamente [MODE] durante la
1
reproducción hasta que aparezca “ “.
Utilice repetidamente [Cursor K / L] hasta que apa-
2
rezca el ángulo de cámara deseado.
1 / 8 (ÁNGULO)
o
los ángulos pueden variar dependiendo del número visualizado.
34
ES
Page 83

INTRODUCCIÓN
Ajuste del Nivel del Negro
Modo de Sonido Estéreo
Surround Virtual
Ajuste del Nivel del Negro
DVD
Ajuste el nivel del negro para hacer que las áreas oscuras de la imagen del
televisor tengan más brillo.
Presione repetidamente [MODE] durante la
1
reproducción hasta que aparezca “ “.
APDO.
(NIVEL DEL NEGRO)
Utilice [Cursor K / L] para ajustar el nivel del negro.
2
ENC. :
APDO. : Visualiza la imagen original como fue grabada.
Presione [RETURN] para salir.
3
ENC.
o
Hace que las áreas oscuras aparezcan más brillantes.
(NIVEL DEL NEGRO)
Nota:
• El ajuste se mantendrá aunque se apague la unidad.
Modo de Sonido Estéreo
CD
Esta unidad le permite seleccionar un modo de sonido durante la reproducción de CD de audio.
Surround Virtual
En su sistema estéreo de 2 canales actual puede disfrutar surround virtual.
Presione repetidamente [MODE] durante la
1
reproducción hasta que aparezca “ “.
APDO. (SURROUND)
Utilice [
2
sonido.
1 : Efecto natural
2 : Efecto realzado
APDO. : Sin efectos (sonido original)
Presione [RETURN] para salir.
3
Cursor
o
K / L] para seleccionar el nivel del
1 (SURROUND)
Nota:
• El ajuste se mantendrá aunque se apague la unidad.
• Para CD de audio, surround virtual no será efectivo si el modo
de sonido es otro diferente de “ESTÉREO”.
Consulte “Modo de Sonido Estéreo”.
• Si el sonido se distorsiona, baje el nivel o seleccione “APDO.”.
CONEXIÓN
AJUSTE INICIAL
PARA VER LA TELEVISIÓN
AJUSTE OPCIONAL
UTILIZACIÓN DEL DVD
AJUSTE DE DVD INFORMACIÓN
Presione repetidamente [AUDIO] durante la reproduc-
ción hasta que aparezca el modo de sonido deseado.
ESTÉREO
• Cada vez que presione [AUDIO], um modo de sonido
cambiará como se visualiza en el ejemplo siguiente.
ESTÉREO (sonido mezclado con los canales derecho e izquierdo)
L-ch (sonido del canal izquierdo solamente)
R-ch (sonido del canal derecho solamente)
Nota:
• Surround virtual no se puede cambiar cuando el modo de
sonido está ajustado en “L-ch” (canal izquierdo) o “R-ch”
(canal derecho).
SOLUCIÓN DE PROBLEMAS
35
ES
Page 84

TILIZACIÓN DEL DVD
Puesta de Marcador
U
Puesta de Marcador
Esta característica le permite poner un punto especí co en un disco que será
llamado posteriormente.
DVD
CD
Para poner un marcador
Presione repetidamente [MODE] durante la reproduc-
1
ción hasta que aparezca “ ”/“ ”.
p. ej.) DVD
_ _ /12 (BÚSQUEDA)
Utilice repetidamente [Cursor K /L] hasta que apa-
2
rezca el menú de búsqueda de marcador.
Utilice [Cursor s / B] para seleccionar un marcador
3
disponible dentro de 60 segundos.
Cuando la reproducción alcance el punto donde quiera
4
poner un marcador, presione [ENTER].
• El marcador queda puesto ahora.
o
o
Para volver al marcador posteriormente
Para seleccionar un marcador deseado, repita los pasos
1
1-3 de “Para poner un marcador” explicados anteriormente.
p. ej.) DVD
o
Presione [ENTER] en el marcador deseado para iniciar
2
la reproducción desde el punto específico que usted
puso.
Nota:
• El menú de búsqueda de marcador desaparecerá en unos 60
segundos cuando no se introduzca nada.
• Puede marcar hasta 10 puntos.
• Para borrar un marcador, seleccione el marcador que quiera
borrar y luego presione [CLEAR].
• Al expulsar el disco o desconectar la alimentación se borrarán todos los marcadores.
• Al seleccionar “
un marcador” también se borrarán todos los marcadores.
” en el paso 3 de la sección “Para poner
Presione [RETURN] para salir.
5
36
ES
Page 85

JUSTE DE DVD
MENÚ RÁPIDO A SIMPLE VISTA
A
Los ajustes sólo son eficaces cuando la unidad está en el modo DVD y no se reproduce ningún disco.
MENÚ RÁPIDO A SIMPLE VISTA
Si desea ajustar “MODO TV” o “DOLBY DIGITAL”, también lo puede
hacer entrando desde el menú “RÁPIDO”. Utilice [Cursor K /L]
para seleccionar “RÁPIDO” y luego presione [ENTER] en el paso 3.
AJUSTE RÁPIDO
MODO TV
DOLBY DIGITAL
SELECCIONAR
Ajuste de Idioma en DVD
5
SALIR
:K/
:SETUP
L
4:3 LETTER BOX
BITSTREAM
:ENTER
AJUSTAR
:RETURN
CANCELAR
Puede cambiar el idioma deseado para reproducir el disco.
En el modo de parada, presione[SETUP] para mostrar el
1
menú “INSTALACIÓN T V”.
--- INSTALACIÓN TV --IDIOMA [ESPAÑOL]
LUZ DE FONDO [BRILLO]
TENPE. DE COLOR [NORMAL]
INSTALACIÓN DVD
Utilice [Cursor K /L] para seleccionar “INSTALACIÓN
2
DVD”, y presione [ENTER].
o
Utilice [Cursor K /L] para seleccionar “PERSNALIZ.” y
3
presione [ENTER].
o
Utilice [Cursor K /L] para seleccionar “IDIOMA” y
4
presione [ENTER].
o
Utilice [Cursor K /L] para seleccionar el elemento
5
deseado y presione [ENTER].
o
--- INSTALACIÓN TV --IDIOMA [ESPAÑOL]
LUZ DE FONDO [BRILLO]
TENPE. DE COLOR [NORMAL]
INSTALACIÓN DVD
AJUSTE
RÁPIDO
PERSNALIZ.
INICIALIZAR
L
SELECCIONAR
:K/
SALIR
SALIR
:SETUP
:K/
:SETUP
L
AJUSTAR
CANCELAR
AJUSTAR
CANCELAR
ORIGINAL
APDO.
INGLÉS
AJUSTE PERSNALIZ.
IDIOMA
PANTALLA
AUDI O
PATE R N O
OTROS
SELECCIONAR
AJUSTE IDIOMA
AUDI O
SUBTÍTULO
MENÚ DE DISCO
:ENTER
:RETURN
:ENTER
:RETURN
Utilice [Cursor K /L] para seleccionar el elemento
6
deseado y presione [ENTER].
[AUDIO] *1, *2 (Predeterminado: ORIGINAL)
Seleccione el idioma de audio deseado.
AJUSTE IDIOMA
o
AUDIO
ORIGINAL
INGLÉS
FRANCÉS
ESPAÑOL
ALEMÁN
ITALIANO
SUECO
SELECCIONAR
SALIR
:K/
:SETUP
L
:ENTER
AJUSTAR
:RETURN
CANCELAR
[SUBTÍTULO] *1, *2 (Predeterminado: APDO.)
Seleccione el idioma de subtítulos deseado.
AJUSTE IDIOMA
o
SUBTÍTULO
APDO.
INGLÉS
FRANCÉS
ESPAÑOL
ALEMÁN
ITALIANO
SUECO
SELECCIONAR
SALIR
:K/
:SETUP
L
:ENTER
AJUSTAR
:RETURN
CANCELAR
[MENÚ DE DISCO] *1 (Predeterminado: INGLÉS)
Seleccione el idioma deseado en el menú de disco.
AJUSTE IDIOMA
o
MENÚ DE DISCO
INGLÉS
FRANCÉS
ESPAÑOL
ALEMÁN
ITALIANO
SUECO
HOLANDÉS
SELECCIONAR
SALIR
:K/
:SETUP
L
:ENTER
AJUSTAR
:RETURN
CANCELAR
Nota:
•
Para cambiar el idioma de la pantalla, llame el menú
“INSTALACIÓN TV” presionando una vez [SETUP] y seleccione el idioma deseado. (Consulte “Selección de idioma” en
página 14).
*1
• Las opciones de idioma no están disponibles en determinados discos.
• Si se selecciona “OTRO” en el menú “AUDIO”, “SUBTÍTULO”
o “MENÚ DE DISCO”, presione el número de dígito 4 para
introducir el código del idioma deseado. (Consulte “Lista de
códigos de idiomas” en página 42).
• Solamente pueden seleccionarse los idiomas compatibles
con el disco.
*2
•
Utilice [MODE] para seleccionar los subtítulos disponibles en
el DVD.
•
Utilice [AUDIO] para seleccionar el audio disponibles en el
DVD.
•
Si los ajustes predeterminados de audio y subtítulos del DVD
están en el mismo idioma, es posible que los subtítulos no
aparezcan a menos que usted los active.
Presione [SETUP] para salir.
7
INTRODUCCIÓN
CONEXIÓN
AJUSTE INICIAL
PARA VER LA TELEVISIÓN
AJUSTE OPCIONAL
UTILIZACIÓN DEL DVD
AJUSTE DE DVD
SOLUCIÓN DE PROBLEMAS
INFORMACIÓN
L
SELECCIONAR
:K/
SALIR
:SETUP
AJUSTAR
CANCELAR
:ENTER
:RETURN
37
ES
Page 86

JUSTE DE DVD
A
Ajuste de la Pantalla
5
Puede cambiar la relación de aspecto de la pantalla del televisor y la
claridad del modo de imagen ja con el menú “PANTALLA”.
Presione [SETUP] en el modo de parada para visualizar
1
INSTALACIÓN TV
“
Utilice [Cursor K /L] para seleccionar “INSTALACIÓN
2
”.
--- INSTALACIÓN TV --IDIOMA [ESPAÑOL]
LUZ DE FONDO [BRILLO]
TENPE. DE COLOR [NORMAL]
INSTALACIÓN DVD
DVD” y luego presione [ENTER].
o
Utilice [Cursor K /L] para seleccionar “PERSONALIZ.” y
3
--- INSTALACIÓN TV --IDIOMA [ESPAÑOL]
LUZ DE FONDO [BRILLO]
TENPE. DE COLOR [NORMAL]
INSTALACIÓN DVD
luego presione [ENTER].
o
Utilice [Cursor K /L] para seleccionar “PANTALLA” y
4
AJUSTE
RÁPIDO
PERSNALIZ.
INICIALIZAR
SELECCIONAR
SALIR
:K/
:SETUP
L
:ENTER
AJUSTAR
:RETURN
CANCELAR
luego presione [ENTER].
o
Utilice [Cursor K /L] para seleccionar el elemento
5
AJUSTE PERSNALIZ.
IDIOMA
PANTALLA
AUDIO
PATERNO
OTROS
L
SELECCIONAR
:K/
SALIR
:SETUP
CANCELAR
AJUSTAR
:ENTER
:RETURN
deseado y luego presione [ENTER].
Utilice [Cursor K /L] para seleccionar el elemento
6
deseado y luego presione [ENTER].
[MODO TV]
(Ajuste predeterminado: 4:3 LETTER BOX)
Seleccione la relación de aspecto del televisor deseada.
AJUSTE PANTALLA
o
[MODO VISTA FIJA]
MODO TV
4:3 LETTER BOX
4:3 PAN & SCAN
L
SELECCIONAR
:K/
SALIR
:SETUP
AJUSTAR
CANCELAR
:ENTER
:RETURN
(Ajuste predeterminado: AUTO)
Seleccione el modo de imagen fija deseado.
AJUSTE PANTALLA
o
MODO VISTA FIJA
AUTO
IMAGEN
CUADRO
SELECCIONAR
SALIR
:K/
:SETUP
L
:ENTER
AJUSTAR
:RETURN
CANCELAR
Nota:
MODO TV:
• Seleccione “4:3 LETTER BOX” para que puedan aparecer barras negras en la parte superior e inferior de la pantalla del
televisor.
• Seleccione “4:3 PAN & SCAN” para que la imagen ocupe
toda la pantalla con ambos lados ajustados.
MODO VISTA FIJA:
• Seleccione normalmente “AUTO”.
• Si selecciona “IMAGEN”, la imagen del modo de imagen fija
se estabilizará.
• Si selecciona “CUADRO”, la imagen del modo de imagen fija
tendrá una definición alta.
Presione [SETUP] para salir.
7
38
o
AJUSTE PANTALLA
MODO TV
MODO VISTA FIJA
L
SELECCIONAR
:K/
SALIR
:SETUP
4:3 LETTER BOX
AUTO
:ENTER
AJUSTAR
:RETURN
CANCELAR
ES
Page 87

Ajuste de Audio de DVD
5
Elija el ajuste de audio apropiado para su equipo. Éste sólo se aplicará
durante la reproducción de discos DVD.
Presione [SETUP] en el modo de parada para visualizar
1
INSTALACIÓN TV
“
”.
Utilice [Cursor K /L] para seleccionar el elemento
6
deseado y luego presione [ENTER].
INTRODUCCIÓN
CONEXIÓN
--- INSTALACIÓN TV --IDIOMA [ESPAÑOL]
LUZ DE FONDO [BRILLO]
TENPE. DE COLOR [NORMAL]
INSTALACIÓN DVD
Utilice [Cursor K /L] para seleccionar “INSTALACIÓN
2
DVD” y luego presione [ENTER].
o
Utilice [Cursor K /L] para seleccionar “PERSONALIZ.” y
3
--- INSTALACIÓN TV --IDIOMA [ESPAÑOL]
LUZ DE FONDO [BRILLO]
TENPE. DE COLOR [NORMAL]
INSTALACIÓN DVD
luego presione [ENTER].
o
Utilice [Cursor K /L] para seleccionar “AUDIO” y luego
4
AJUSTE
RÁPIDO
PERSNALIZ.
INICIALIZAR
SELECCIONAR
SALIR
:K/
:SETUP
L
:ENTER
AJUSTAR
:RETURN
CANCELAR
presione [ENTER].
o
AJUSTE PERSNALIZ.
IDIOMA
PANTALLA
AUDIO
PATERNO
OTROS
L
SELECCIONAR
:K/
SALIR
:SETUP
CANCELAR
AJUSTAR
:ENTER
:RETURN
[DRC] (Ajuste predeterminado: ENC.)
Ajusta el control de la gama dinámica.
Esta función sólo se encuentra disponible en los discos
que están grabados en el formato Dolby Digital.
o
AJUSTE AUDIO
DRC
SUB MUESTREO
DOLBY DIGITAL
L
SELECCIONAR
:K/
SALIR
:SETUP
ENC.
ENC.
BITSTREAM
:ENTER
AJUSTAR
:RETURN
CANCELAR
ENC. : Comprime la gama entre los sonidos suaves y
altos.
APDO. : Sin efectos (sonido original).
[SUB MUESTREO] (Ajuste predeterminado: ENC.)
Esta función sólo se encuentra disponible en la salida
digital de un disco grabado en 96kHz.
o
AJUSTE AUDIO
DRC
SUB MUESTREO
DOLBY DIGITAL
L
SELECCIONAR
:K/
SALIR
:SETUP
ENC.
ENC.
BITSTREAM
:ENTER
AJUSTAR
:RETURN
CANCELAR
ENC. : Cuando se da salida en 48kHz
APDO. : Cuando se da salida en sonido original.
Nota:
•
Cuando se reproduzca un disco de 96 kHz con protección de
derechos de autor o cuando surround virtual se ajuste en 1 o 2,
el sonido se muestreará descendentemente a 48 kHz y saldrá
como audio digital aunque “SUB MUESTREO” esté en “APDO.”.
[DOLBY DIGITAL]
Elija “BITSTREAM” cuando esta unidad esté conectada a un
decodificador Dolby Digital. Sólo disponible en DVD.
(Ajuste predeterminado: BITSTREAM)
AJUSTE INICIAL
PARA VER LA TELEVISIÓN
AJUSTE OPCIONAL
UTILIZACIÓN DEL DVD
AJUSTE DE DVD
SOLUCIÓN DE PROBLEMAS
Utilice [Cursor K /L] para seleccionar el elemento
5
deseado y luego presione [ENTER].
o
AJUSTE AUDIO
DRC
SUB MUESTREO
DOLBY DIGITAL
L
SELECCIONAR
:K/
SALIR
:SETUP
ENC.
ENC.
BITSTREAM
AJUSTAR
CANCELAR
:ENTER
:RETURN
o
AJUSTE AUDIO
DRC
SUB MUESTREO
DOLBY DIGITAL
L
SELECCIONAR
:K/
SALIR
:SETUP
ENC.
ENC.
BITSTREAM
:ENTER
AJUSTAR
:RETURN
CANCELAR
BITSTREAM : Da salida a señales Dolby Digital.
PCM : Convierte Dolby Digital en PCM.
(2 canales)
Presione [SETUP] para salir.
7
INFORMACIÓN
39
ES
Page 88

JUSTE DE DVD
A
Ajuste Paterno
5
El ajuste paterno impide que sus hijos puedan ver programas que no sean
apropiados para ellos. (Protección mediante contraseña.) La reproducción
se detiene si la cali cación excede los niveles que usted ha establecido.
Presione [SETUP] en el modo de parada para visualizar
1
“INSTALACIÓN TV”.
--- INSTALACIÓN TV --IDIOMA [ESPAÑOL]
LUZ DE FONDO [BRILLO]
TENPE. DE COLOR [NORMAL]
INSTALACIÓN DVD
Utilice [Cursor K /L] para seleccionar “
2
DVD
” y luego presione [ENTER].
o
--- INSTALACIÓN TV --IDIOMA [ESPAÑOL]
LUZ DE FONDO [BRILLO]
TENPE. DE COLOR [NORMAL]
INSTALACIÓN DVD
INSTALACIÓN
Utilice [Cursor K /L] para seleccionar el elemento
7
deseado y luego presione [ENTER].
AJUSTE PATERNO
o
NIVEL PATERNO
TODO
8 [ADULTO]
7 [NC-17]
6 [R]
5 [PGR]
4 [PG13]
3 [PG]
SELECCIONAR
SALIR
:K/
:SETUP
L
AJUSTAR
CANCELAR
NIVEL PATERNO
TODO
: todos los bloqueos paternos están
cancelados.
8 [ADULTO]
:
se pueden reproducir programas de todas
las calificaciones (adultos/general/niños).
7 [NC-17]-2 [G]
: sólo se pueden reproducir DVD para
uso general y niños.
1 [TOLERADO]
:
sólo se pueden reproducir DVD para niños.
:ENTER
:RETURN
Utilice [Cursor K /L] para seleccionar “PERSONALIZ.” y
3
luego presione [ENTER].
Utilice [Cursor K /L] para seleccionar “PATERNO” y
4
luego presione [ENTER].
Utilice [los botones numéricos] para introducir un número
5
de 4 dígitos para su contraseña y luego presione [ENTER].
o
o
AJUSTE
RÁPIDO
PERSNALIZ.
INICIALIZAR
L
SELECCIONAR
:K/
SALIR
:SETUP
AJUSTE PERSNALIZ.
IDIOMA
PANTALLA
AUDIO
PATERNO
OTROS
SELECCIONAR
:K/
SALIR
:SETUP
AJUSTE PATERNO
CÓDIGO DE ACCESO
Ingrese un código de acceso de 4 dígitos.
:ENTER
AJUSTAR
:RETURN
CANCELAR
L
:ENTER
AJUSTAR
:RETURN
CANCELAR
Presione [SETUP] para salir.
8
Cambio de la contraseña
6
Siga los pasos 1 a 5. Utilice [Cursor K /L] para seleccionar “CAMB. CONTRAS.” y luego presione [ENTER].
o
Utilice [los botones numéricos] para introducir
7
la nueva contraseña de 4 dígitos y luego presione
[ENTER].
AJUSTE PATERNO
NIVEL PATERNO
CAMB. CONTRAS.
SELECCIONAR
AJUSTE PATERNO
CÓDIGO DE ACCESO
Ingrese un código de acceso de 4 dígitos.
0000
No se olvide del código de acceso.
Presione 'ENTER' para activar el código de acceso.
SALIR
:K/
:SETUP
TODO
L
:ENTER
AJUSTAR
:RETURN
CANCELAR
SALIR
:SETUP
•
Si ya ha puesto la contraseña, utilice [los botones numéricos]
CANCELAR
para introducir la contraseña actual de 4 dígitos.
• Para reproducir un DVD no puede utilizar la contraseña
preajustada (4737).
Utilice [Cursor K /L] para seleccionar “NIVEL PATERNO”
6
y luego presione [ENTER].
AJUSTE PATERNO
NIVEL PATERNO
CAMB. CONTRAS.
L
SELECCIONAR
:K/
SALIR
:SETUP
TODO
AJUSTAR
CANCELAR
40
o
ES
:RETURN
:ENTER
:RETURN
SALIR
:SETUP
CANCELAR
Nota:
•
DVD-video puede no responder a los ajustes de bloqueo paterno. Asegúrese de que esta función se active con su DVD-video.
• Anote su contraseña por si la olvida.
• Si olvida su contraseña, presione [4], [7], [3] y [7] y luego
introduzca la contraseña nueva. La contraseña se borrará y
los niveles paternos se ajustarán en “TODO”.
Un fallo en el suministro de alimentación no borrará su contraseña.
•
Presione [SETUP] para salir.
8
:RETURN
Page 89

Otros
5
Puede cambiar otras funciones.
INTRODUCCIÓN
Presione [SETUP] en el modo de parada para visualizar
1
“INSTALACIÓN TV”.
--- INSTALACIÓN TV --IDIOMA [ESPAÑOL]
LUZ DE FONDO [BRILLO]
TENPE. DE COLOR [NORMAL]
INSTALACIÓN DVD
Utilice [Cursor K /L] para seleccionar “INSTALACIÓN
2
DVD” y luego presione [ENTER].
o
Utilice [Cursor K /L] para seleccionar “PERSONALIZ.” y
3
--- INSTALACIÓN TV --IDIOMA [ESPAÑOL]
LUZ DE FONDO [BRILLO]
TENPE. DE COLOR [NORMAL]
INSTALACIÓN DVD
luego presione [ENTER].
o
AJUSTE
RÁPIDO
PERSNALIZ.
INICIALIZAR
Utilice [Cursor K /L] para seleccionar el elemento
6
deseado y luego presione [ENTER].
[ICONO DE ÁNGULO] (Ajuste predeterminado: ENC.)
Póngalo en “ENC.” para visualizar el icono de ángulo
cuando se encuentren disponibles múltiples ángulos
de cámara durante la reproducción de un DVD.
o
[SALVA PANTALLA]
AJUSTE OTROS
ICONO DE ÁNGULO
SALVA PANTALLA
SELECCIONAR
SALIR
:K/
:SETUP
ENC.
APDO.
L
:ENTER
AJUSTAR
:RETURN
CANCELAR
(Ajuste predeterminado: APDO.)
Si selecciona “ENC.” el salvapantalla se activará cuando
no se introduzca nada desde la unidad durante 5
minutos en el modo de parada.
o
AJUSTE OTROS
ICONO DE ÁNGULO
SALVA PANTALLA
L
SELECCIONAR
:K/
SALIR
:SETUP
ENC.
APDO.
AJUSTAR
CANCELAR
:ENTER
:RETURN
CONEXIÓN
AJUSTE INICIAL
PARA VER LA TELEVISIÓN
AJUSTE OPCIONAL
UTILIZACIÓN DEL DVD
L
SELECCIONAR
:K/
SALIR
Utilice [Cursor K /L] para seleccionar “OTROS” y luego
4
:SETUP
AJUSTAR
CANCELAR
:ENTER
:RETURN
presione [ENTER].
o
Utilice [Cursor K /L] para seleccionar el elemento
5
AJUSTE PERSNALIZ.
IDIOMA
PANTALLA
AUDIO
PATERNO
OTROS
L
SELECCIONAR
:K/
SALIR
:SETUP
CANCELAR
AJUSTAR
:ENTER
:RETURN
deseado y luego presione [ENTER].
o
AJUSTE OTROS
ICONO DE ÁNGULO
SALVA PANTALLA
L
SELECCIONAR
:K/
SALIR
:SETUP
ENC.
APDO.
AJUSTAR
CANCELAR
:ENTER
:RETURN
Presione [SETUP] para salir.
7
AJUSTE DE DVD
SOLUCIÓN DE PROBLEMAS
INFORMACIÓN
41
ES
Page 90

JUSTE DE DVD
AJUSTE
RÁPIDO
PERSNALIZ.
INICIALIZAR
SELECCIONAR
SALIR
AJUSTAR
CANCELAR
:K/
L
:SETUP
:ENTER
:RETURN
A
Reposición de los Ajustes
5 Lista de Códigos de Idiomas
Predeterminados
Puede reponer todos los ajustes, a excepción del ajuste paterno y el idioma
del menú en pantalla.
Presione [SETUP] en el modo de parada para visualizar
1
“INSTALACIÓN TV”.
--- INSTALACIÓN TV --IDIOMA [ESPAÑOL]
LUZ DE FONDO [BRILLO]
TENPE. DE COLOR [NORMAL]
INSTALACIÓN DVD
Utilice [Cursor K /L] para seleccionar “INSTALACIÓN
2
DVD” y luego presione [ENTER].
Utilice [Cursor K /L] para seleccionar “INICIALIZAR” y
3
luego presione [ENTER].
Utilice [Cursor K /L] para seleccionar “SÍ” y luego
4
presione [ENTER].
Nota:
• Cuando quiera cancelar la inicialización, seleccione “NO” en
el paso 4, y luego presione [SETUP].
Presione [SETUP] para salir.
5
o
--- INSTALACIÓN TV --IDIOMA [ESPAÑOL]
LUZ DE FONDO [BRILLO]
TENPE. DE COLOR [NORMAL]
INSTALACIÓN DVD
o
o
AJUSTE INICIALIZAR
¿Ejecuta la inicialización?
NO
SÍ
L
SELECCIONAR
:K/
SALIR
:SETUP
CANCELAR
AJUSTAR
:ENTER
:RETURN
5
Idioma Código
Abcaciano 4748
Afarí 4747
Afrikaans 4752
Alemán [GER] 5051
Albanés 6563
Amárico 4759
Árabe 4764
Armenio 5471
Assamés 4765
Aymará 4771
Azerí 4772
Bashkirio 4847
Bengalí; Bangla 4860
Butanés 5072
Bihari 4854
Bislama 4855
Bretón 4864
Búlgaro 4853
Birmano 5971
Bielorruso 4851
Cachemir 5765
Camboyano 5759
Catalán 4947
Chino [CHI] 7254
Cingalés 6555
Corso 4961
Coreano [KOR] 5761
Croata 5464
Checo [CZE] 4965
Danés [DAN] 5047
Eslovaco 6557
Esloveno 6558
Español [SPA] 5165
Esperanto 5161
Estonio 5166
Feroe 5261
Fiyiano 5256
Finlandés [FIN] 5255
Francés [FRE] 5264
Frisio 5271
Gaelico escocés 5350
Gallego 5358
Galés 4971
Georgiano 5747
Griego [GRE] 5158
Groenlandés 5758
Guaraní 5360
Gujarati 5367
Hausa 5447
Hebreo 5569
Hindi 5455
Holandés [DUT] 6058
Húngaro [HUN] 5467
Islandés [ICE] 5565
Indonesio 5560
Interlingua 5547
Inglés [ENG] 5160
Interlingue 5551
Inupiak 5557
Irlandés [IRI] 5347
Italiano [ITA] 5566
Japonés [JPN] 5647
Javanés 5669
Kannada 5760
Kazako 5757
Kinyarwanda 6469
Kirguiz 5771
Kirundi 6460
Kurdo 5767
Laosiano 5861
Latín 5847
Latvio, letón 5868
Lingala 5860
Lituano 5866
Macedonio 5957
A-B
C-E
F-H
I-K
L-N
Idioma Código
Malgache 5953
Malayo 5965
Malayálam 5958
Maltés 5966
Maori 5955
Marathi 5964
Moldavo 5961
Mongol 5960
Nauru 6047
Nepalí 6051
Noruego [NOR] 6061
Occitano 6149
Oriya 6164
Oromo (Afan) 6159
Punjabí 6247
Pashto, pushto 6265
Persa 5247
Polaco [POL] 6258
Portugés [POR] 6266
Quechua 6367
Rhaeto-Romance 6459
Rumano [RUM] 6461
Ruso [RUS] 6467
Samoano 6559
Sangho 6553
Sánscrito 6547
Serbio 6564
Serbocroata 6554
Sesotho 6566
Setswana 6660
Shona 6560
Sindhi 6550
Siswat 6565
Somalí 6561
Sundanés 6567
Suahili 6569
Sueco [SWE] 6568
Tagalo 6658
Tajik 6653
Tamil 6647
Tártaro 6666
Telugo 6651
Tailandés 6654
Tibetano 4861
Tigriña 6655
Tonga 6661
Tsonga 6665
Turco [TUR] 6664
Turcomano 6657
Twi 6669
Ucraniano 6757
Urdu 6764
Uzbeco 6772
Vascuence 5167
Vietnamita 6855
Volapuk 6861
Wolof 6961
Xhosa 7054
Yídish 5655
Yoruba 7161
Zulú 7267
Nota:
• Si elige un idioma que tiene abreviatura de 3 letras, ellos
se visualizará cada vez que usted cambie el ajuste de
idioma de audio o de subtítulos indicado más arriba. Si
elige cualquier otro idioma se visualizará ‘---’ en su lugar.
(Abreviatura de 3 letras está escrito entre corchetes.)
42
ES
O-R
S
T
U-Z
Page 91

OLUCIÓN DE PROBLEMAS
S
Guía de Solución de Problemas
5
Si el aparato no funciona correctamente cuando se siguen las instrucciones de este manual del usuario, compruebe la
siguiente tabla antes de llamar al servicio técnico.
Síntoma Solución
No hay corriente • Asegúrese de que el cable de alimentación está enchufado.
No hay imagen ni sonido • Compruebe si el aparato está encendido.
No hay color • Compruebe la conexión de antena o de cable con el aparato principal.
Sonido correcto, imagen
deficiente
Imagen distorsionada •
Imagen débil • Compruebe la conexión de antena o de cable con el aparato principal.
Líneas o rayas en la imagen •
Imagen borrosa •
T
Imágenes fantasmas en la imagen
V
Barras en la pantalla del televisor •
La imagen se desplaza
verticalmente
Marcas de diferente color en la
pantalla del televisor
Recepción deficiente en
determinados canales
Imagen correcto, sonido
deficiente
No se reciben señales digitales • Asegúrese de que la exploración automática ha finalizado.
El número de canal introducido
cambia automáticamente
• Si se produce un corte de alimentación, desenchufe el cable de alimentación durante
30 minutos para permitir que el aparato se reinicie.
• Compruebe la conexión eléctrica.
• Compruebe la conexión de antena o de cable con el aparato principal.
Cuando se utilice la antena exterior, compruebe el estado del cable y de la conexión.
•
• Vea otros canales de televisión. El problema podría limitarse a una emisora.
• Apague el aparato y espere aproximadamente 1 minuto para volver a encenderlo.
Cuando se utilice la antena exterior, compruebe el estado del cable y de la conexión.
•
• Vea otros canales de televisión. El problema podría limitarse a una emisora.
• Ajuste el “COLOR” en la pantalla de configuración.
• Compruebe la conexión de antena o de cable con el aparato principal.
Cuando se utilice la antena exterior, compruebe el estado del cable y de la conexión.
•
•
La interferencia eléctrica de aparatos cercanos puede afectar a la calidad de la imagen.
• Ajuste “CONTRASTE” y “CLARIDAD” en el menú principal.
• Vea otros canales de televisión. El problema podría limitarse a una emisora.
Cuando se utilice la antena exterior, compruebe el estado del cable y de la conexión.
•
Vea otros canales de televisión. El problema podría limitarse a una emisora.
Cuando se utilice la antena exterior, compruebe el estado del cable y de la conexión.
•
• Ajuste “CONTRASTE” y “CLARIDAD” en el menú principal.
• Vea otros canales de televisión. El problema podría limitarse a una emisora.
Cuando se utilice la antena exterior, compruebe el estado del cable y de la conexión.
•
La interferencia eléctrica de aparatos cercanos puede afectar a la calidad de la imagen.
• Vea otros canales de televisión. El problema podría limitarse a una emisora.
Cuando se utilice la antena exterior, compruebe el estado del cable y de la conexión.
• Vea otros canales de televisión. El problema podría limitarse a una emisora.
• Compruebe la conexión de antena o de cable con el aparato principal.
Cuando se utilice la antena exterior, compruebe el estado del cable y de la conexión.
•
•
La interferencia eléctrica de aparatos cercanos puede afectar a la calidad de la imagen.
• Vea otros canales de televisión. El problema podría limitarse a una emisora.
Cuando se utilice la antena exterior, compruebe el estado del cable y de la conexión.
•
La interferencia eléctrica de aparatos cercanos puede afectar a la calidad de la imagen.
•
Cuando se utilice la antena exterior, compruebe el estado del cable y de la conexión.
•
La interferencia eléctrica de aparatos cercanos puede afectar a la calidad de la imagen.
• Vea otros canales de televisión. El problema podría limitarse a una emisora.
• Separe el aparato de los aparatos eléctricos cercanos. Apague el aparato y espere
aproximadamente 30 minutos para volver a encenderla.
• Vea otros canales de televisión. El problema podría limitarse a una emisora.
• Compruebe la conexión de antena o de cable con el aparato principal.
Cuando se utilice la antena exterior, compruebe el estado del cable y de la conexión.
•
•
La interferencia eléctrica de aparatos cercanos puede afectar a la calidad de la imagen.
• Vea otros canales de televisión. El problema podría limitarse a una emisora.
• Vea otros canales de televisión. El problema podría limitarse a una emisora.
(Consulte “Exploración Automática de Canales” en página 13).
La exploración automática de canales debe haberse finalizado cuando configure el
aparato por primera vez o cuando la traslade a un lugar donde se emitan canales
anteriormente no disponibles.
• Es posible que el canal seleccionado no se esté emitiendo.
• Cuando la exploración automática se interrumpe y no se finaliza, algunos canales no se
recibirán. Asegúrese de finalizar. (Consulte “Exploración Automática de Canales” en página 13).
• Muchos canales digitales tienen números de canal alternativos. El aparato cambia
dichos números automáticamente a los correspondientes a las emisoras activas. Estos
son los números utilizados para emisiones analógicas .
INTRODUCCIÓN
CONEXIÓN
AJUSTE INICIAL AJUSTE DE DVD
PARA VER LA TELEVISIÓN
AJUSTE OPCIONAL
UTILIZACIÓN DEL DVD
SOLUCIÓN DE PROBLEMAS
INFORMACIÓN
43
ES
Page 92

OLUCIÓN DE PROBLEMAS
S
Síntoma Solución
El mando a distancia no funciona
• Compruebe la conexión de antena o de cable con el aparato principal.
• Compruebe las pilas del mando a distancia.
• Compruebe si hay algún obstáculo entre el sensor y el mando a distancia.
• Pruebe la salida de la señal. Si es correcta, es posible que haya algún problema con el
sensor de infrarrojos.
(Consulte “Comprobación de la señal de infrarrojos (IR)” en página 45.)
• Con el mando a distancia, apunte directamente hacia la ventana del sensor de infrarrojos en la parte delantera del aparato.
• Reduzca la distancia con respecto al aparato.
• Reinserte las pilas con sus polaridades (signos +/–) como indicadas.
Problemas con la Función de Subtítulos Cerrados
Aparecen subtítulos con faltas
de ortografía.
T
Los subtítulos no se muestran
enteros, o aparecen retrasados
V
con respecto al diálogo.
Los subtítulos aparecen en un
recuadro blanco.
No aparece ningún subtítulo
en el programa de soporte de
Subtítulos cerrados.
No aparece ningún subtítulo
cuando se reproduce una cinta
de vídeo con subtítulos.
Aparece un recuadro negro en la
pantalla.
Imagen completamente
distorsionada o imagen en
blanco y negro con DVD.
La imagen se congela momentáneamente durante la reproducción.
No se puede reproducir el disco. • Limpie el disco.
D
V
Los botones no funcionan o la
unidad no responde.
D
La unidad no responde a algunos comandos de operación
durante la reproducción.
No cambia el ángulo. • No se puede cambiar el ángulo de los DVD que no tienen imágenes tomadas desde
La reproducción no empieza cuando se ha seleccionado el título.
Ha olvidado la contraseña para
el nivel de cali cación.
• Las empresas de producción de subtítulos cerrados pueden emitir programas sin corregir la ortografía en una emisión en directo.
Los subtítulos que se retrasan unos segundos con respecto al diálogo real son habituales en
•
las emisiones en directo. La mayoría de las empresas de producción de subtítulos pueden
mostrar un diálogo hasta un máximo de 220 palabras por minuto. Si un diálogo supera ese
límite, se utiliza una edición selectiva para garantizar que los subtítulos se mantienen actualizados con el diálogo de la pantalla del televisor en cada momento.
• Las interferencias procedentes de edificios o condiciones climatológicas pueden hacer
que los subtítulos aparezcan incompletos.
• La emisora puede acortar el programa para insertar publicidad. El decodificador de subtítulos cerrados no puede leer la información del programa acortado.
• Es posible que la cinta de vídeo se haya copiado ilegalmente o que la señal de subtítulos no se haya leído durante la copia.
• Se ha seleccionado el modo “Texto” para subtítulos. Seleccione “SUBTIT1”, “SUBTIT2”,
“SUBTIT3”, “SUBTIT4” u “OFF”.
• Asegúrese de que el disco es compatible con la unidad.
• Inspeccione el disco por si tiene huellas dactilares/rayas, y límpielo con un paño blando
pasándolo desde el centro hacia el borde.
• Asegúrese de que el disco esté introducido correctamente.
• Compruebe si el disco está defectuoso probando con otro disco.
• Cancele el bloqueo paterno o cambie el nivel del control.
• Introduzca un disco que se pueda reproducir en esta unidad.
• Maneje el disco con un cuidado especial para que no se manche con huellas dactilares,
se raye o acumule polvo en su super cie.
• Para reponer completamente la unidad, desenchufe el cable de la alimentación de la
toma de corriente entre 5 y 10 segundos.
• Puede que las operaciones no sean permitidas por el disco. Consulte las instrucciones
del disco.
múltiples ángulos. En algunos casos, los ángulos múltiples sólo han sido grabados para
escenas especí cas.
• Compruebe el ajuste “PATERNO”.
• Introduzca la contraseña predeterminada “4737” y la contraseña que usted ha olvidado
se borrará.
Nota:
• El panel LCD ha sido fabricado de manera que puede tener muchos años de vida útil. Ocasionalmente, pueden aparecer píxeles inactivos,
como un punto fijo de color azul, verde o rojo. Esto no debe considerarse un defecto de la pantalla LCD.
• Algunas funciones no se encuentran disponibles en ciertos modos específicos pero esto no significa un fallo en el funcionamiento. Lea la
descripción en este manual del usuario para conocer más detalles de las operaciones correctas.
• La reproducción desde una pista/archivo deseada o la reproducción aleatoria no se encuentran disponibles durante la reproducción
programada.
• Algunas funciones están prohibidas en algunos discos.
44
ES
Page 93

NFORMACIÓN
I
Glosario5
ATS C
Acrónimo de “Advanced Television Systems
Committee” (Comité de sistemas avanzados
de televisión) y el nombre de unas normas de
emisión digital.
Código de Región
Las regiones asocian discos y reproductores con
específicas regiones del mundo. Este aparato reproducirá únicamente discos que tengan códigos
compatibles de región. Usted puede encontrar
el código de región de su equipo mirando en el
panel trasero. Algunos discos son compatibles
con más de una región (o todas las regiones).
Contraseña
Un número almacenado de 4 dígitos que
permite el acceso a las funciones de control
parental.
Dolby Digital
El sistema desarrollado por Dolby Laboratories
para comprimir el sonido digital. Ofrece un
sonido estéreo (2 canales) o audio multicanal.
Mantenimiento5
EDTV
(televisión de definición mejorada)
Formato digital mejorado que utiliza la señal
progresiva de 480 líneas.
HDTV (televisión de alta definición)
Reciente formato digital que produce una alta
resolución y una elevada calidad de imagen.
NTSC
Acrónimo de “National Television Systems
Committee” (Comité de sistemas nacionales
de televisión) y el nombre de unas normas
de emisión analógica.
Relación de Aspecto
La anchura de una pantalla de televisión
con respecto a su altura. Los televisores
convencionales son de 4:3 (en otras
palabras, la pantalla del televisor es casi
cuadrada); los modelos de pantalla ancha
son de 16:9 (la pantalla del televisor es casi
dos veces más ancha que alta).
INTRODUCCIÓN
SAP (programa de audio secundario)
Segundo canal de audio transmitido por separado
del canal de audio principal. Este canal de audio se
utiliza como alternativo en la emisión bilingüe.
SDTV
(televisión de definición estándar)
Formato digital estándar similar a la calidad
de imagen de NTSC.
S-video
Ofrece imágenes de mayor calidad al transmitir cada señal, color (c) y luminancia (y)
de manera independiente entre sí a través
de cables separados.
Vídeo en Componentes
Se trata de un formato de señal de vídeo que
transmite cada uno de los 3 colores principales
de luz (rojo, azul y verde) a través de diferentes
líneas de señal. Esto permite a los espectadores
experimentar colores de imagen muy similares
a los originales. Existen diversos formatos de
señal, incluidos el denominado Y/Pb/Pr y el
denominado Y/Cb/Cr.
CONEXIÓN
AJUSTE INICIAL AJUSTE DE DVD
PARA VER LA TELEVISIÓN
AJUSTE OPCIONAL
Limpieza del Mueble
• Limpie el panel delantero y otras super cies exteriores del aparato con un
trapo suave inmerso en agua templada y bien escurrido.
• No utilice nunca disolvente ni alcohol. No suelte líquido insecticida en
aerosol cerca del aparato. Estos productos químicos pueden causar daños
y decoloración en las super cies expuestas.
Reparación
Si su aparato deja de funcionar, no intente corregir el problema usted
mismo. En su interior no contiene piezas que puedan ser reparadas por el
usuario. Apague el aparato, desenchufe el cable de alimentación y llame
a nuestro teléfono gratuito de atención al cliente, que encontrará en la
portada de este manual para localizar un centro de servicio autorizado.
Limpieza de la Pantalla LCD
Limpie la pantalla LCD del aparato con un paño suave. Antes de limpiar la
pantalla LCD, desconecte el cable de alimentación.
Si Está Sucia la Unidad del Lente Óptico de Láser
• Si la unidad sigue sin funcionar correctamente al utilizarla, mientras se
consultan las secciones pertinentes y la “Guía de Solución de Problemas”
del Manual del propietario, puede que la unidad del lector óptico de láser
esté sucia. Consulte a su concesionario o centro de servicio autorizado
para inspeccionar y limpiar la unidad del lector óptico de láser.
Manejo de los Discos
• Maneje los discos con cuidado de no manchar sus super cies con huellas
dactilares y polvo.
• Guarde siempre los discos en sus cajas de protección cuando no los utilice.
• Para limpiarlos, utilice un paño suave.
• No utilice un paño duro porque estropeará el disco.
•
Limpie el disco pasando el paño en línea recta desde el centro hacia el borde.
• No pase nunca el paño en sentido circular.
• No utilice detergente ni agentes de limpieza abrasivos.
Comprobación de la Señal de Infrarrojos (IR)
Si el mando a distancia no funciona correctamente,
puede utilizar una radio AM o una cámara digital
(incluso un teléfono móvil con cámara incorporada)
para comprobar si está enviando una señal de
infrarrojos.
• Con una radio AM:
Sintonice la emisora de radio AM en una frecuencia
de no emisión. Apunte con el mando a distancia hacia
ella, presione cualquier botón y escuche. Si el sonido
de la radio uctúa, signi ca que está recibiendo la
señal de infrarrojos del mando a distancia.
• Con una cámara digital
(incluidas las cámaras incorporadas en teléfonos
móviles)
Apunte con la cámara digital hacia el mando a distancia.
Presione cualquier botón del mando a distancia y mire
en el visor de la cámara digital.
Si la luz infrarroja aparece en la cámara, el mando a
distancia funciona.
ES
UTILIZACIÓN DEL DVD
SOLUCIÓN DE PROBLEMAS
INFORMACIÓN
45
Page 94

NFORMACIÓN
I
Denominaciones de Canales de Cable5
Si se suscribe a la televisión por cable, los canales se muestran como 1-135. Las empresas de cable a menudo denominan los canales con letras o combinaciones de letra-número. Compruebe este detalle con su empresa local de cable. La tabla siguiente incluye las denominaciones de canal de cable habituales.
Canal CATV
Pantalla de TV
Canal CATV
Pantalla de TV
Canal CATV
Pantalla de TV
Canal CATV
Pantalla de TV
Canal CATV
Pantalla de TV
Canal CATV
Pantalla de TV
Canal CATV
Pantalla de TV
5 Especificación Eléctrica
Formato de TV: ATSC / NTSC-M TV estándar
Subtítulos cerrados (CC) sistema:
§15.122/FCC (Subtítulos cerrados digitales)
§15.119/FCC (Subtítulos cerrados analógicos)
Cobertura de canales (ATSC/NTSC):
VHF: 2 ~ 13
UHF: 14 ~ 69
CATV: 2 ~ 13, A ~ W, W+1 ~ W+94
Sistema de sintonización
frecuencia de canales
Acceso a los canales: Teclado de acceso directo, exploración
programable y arriba/abajo
Discos (compatibilidad de reproducción):
DVD Video, DVD-RW/-R,
DVD+RW/+R, CD de audio, CD-RW/-R
Respuesta de frecuencia:
CD: 20 Hz a 20 kHz
Relación señal a ruido (relación S/N)
CD: 75 dB (JEITA)
Factor de distorsión total:
DVD: 1 kHz 0,008% (JEITA)
CD: 1 kHz 0,008% (JEITA)
5A122334455667788991010111112121313A14B15C16D17E18F19G20H
I22J23K24L25M26N27O28P29Q30R31S32T33U34V35W36W+1
W+743W+844W+945W+1046W+1147W+1248W+1349W+1450W+1551W+1652W+1753W+1854W+1955W+2056W+2157W+2258W+2359W+2460W+2561W+2662W+27
W+2864W+2965W+3066W+3167W+3268W+33
W+4985W+5086W+5187W+5288W+5389W+5490W+5591W+5692W+5793W+5894A-595A-496A-397A-2
W+65
W+66
W+67
W+68
106
W+86
127
107
W+87
128
108
W+88
129
109
W+89
130
W+69
110
W+90
131
Especificaciones Generales
TV
W+3470W+3571W+3672W+3773W+3874W+3975W+4076W+4177W+4278W+4379W+4480W+4581W+4682W+4783W+48
69
W+70
111
W+91
132
W+71
112
W+92
133
W+72
113
W+93
134
W+73
114
W+94
135
W+74
115
W+75
116
W+76
117
W+77
118
98
W+78
119
A-199W+59
W+79
120
5
Salida de sonido: 1W, 8 x 2
5
Otras Especificaciones
37 38
100
W+80
121
W+60
W+81
W+2 W+339W+4
W+61
102
W+82
123
W+62
W+83
101
122
Terminales:
Entrada de antena: VHF/UHF/CATV
75 desequilibrados (tipo F)
Entrada de vídeo: Toma RCA x 1 1Vp-p (75Ω)
Entrada de audio: Toma RCA x 4 500mV rms
(impedancia de entrada: más de 22 kΩ)
(analógico W+1 ~ W+84), A-5 ~ A-1, 5A
: Sistema de sintonización sintetizada de
Entrada de S-video: Minitoma DIN de 4 patillas x 1
C:
Entrada de vídeo en componentes:
Y: 1Vp-p (75Ω)
Toma RCA x 3
Y: 1Vp-p (75Ω)
Pb: 700mVp-p (75Ω)
Pr: 700mVp-p (75Ω)
DVD
Salida de audio digital coaxial:
Toma RCA x 1: 500mVp-p (75Ω)
Headphone:
1
/8 pulg. (3,5mm)
Mando a distancia: Sistema de luz infrarroja
codi cada digitalmente
DVD (sonido lineal): 20 Hz a 20 kHz (frecuencia de muestreo: 48 kHz)
20 Hz a 44 kHz (frecuencia de muestreo: 96 kHz)
Temperatura de funcionamiento:
41°F (5°C) a 104°F (40°C)
Potencia: 120 V AC +/- 10%, 60 Hz +/- 0,5%
Consumo de potencia (máximo):
65W
LCD: 20 pulg.
Dimensions:
H : 17,9 pulg. (454mm)
W : 23,4 pulg. (594mm)
D : 8,1 pulg. (204mm)
W+541W+6
40
W+63
103
104
W+84
124
125
286mVp-p (75Ω)
21
42
63
84
W+64
105
W+85
126
46
Peso: 13,0 lbs. (5,9 kg)
• Los diseños y las especi caciones pueden ser objeto de modi caciones
sin previo aviso y sin obligaciones legales por nuestra parte.
• Si se produce una discrepancia entre idiomas, el idioma predeterminado
será el inglés.
ES
Page 95

INTRODUCCIÓN
CONEXIÓN
AJUSTE INICIAL AJUSTE DE DVD
PARA VER LA TELEVISIÓN
AJUSTE OPCIONAL
UTILIZACIÓN DEL DVD
SOLUCIÓN DE PROBLEMAS
INFORMACIÓN
47
ES
Page 96

GARANTÍA LIMITADA
FUNAI CORP. reparará este producto, de forma gratuita en Estados Unidos, en caso de defecto de materiales o
fabricación, del modo siguiente:
DURACIÓN:
PIEZAS: FUNAI CORP. suministrará piezas de repuesto de las piezas defectuosas de forma gratuita
durante un (1) año desde la fecha de compra minorista original. Determinadas piezas y el
efecto de persistencia de la imagen en la pantalla LCD están excluidas de esta garantía.
MANO DE OBRA:
LÍMITES Y EXCLUSIONES:
ESTA GARANTÍA SE EXTIENDE SOLAMENTE AL COMPRADOR MINORISTA ORIGINAL. UN RECIBO
DE COMPRA U OTRA PRUEBA DE COMPRA MINORISTA ORIGINAL SERÁ EXIGIDA JUNTO CON EL
PRODUCTO PARA OBTENER SERVICIO BAJO ESTA GARANTÍA.
Esta garantía no se extenderá a ninguna otra persona o beneficiario.
Esta garantía quedará invalidada y sin efecto en caso de alteración, sustitución, borrado o pérdida de
los números de serie del producto o si se intentó una reparación por parte de un centro de servicio no
autorizado. Esta garantía limitada no se aplica a ningún producto no comprado y utilizado en Estados Unidos.
Esta garantía solamente cubre los fallos debidos a defectos de material o fabricación que se produzcan
durante su uso normal. No cubre daños producidos durante el transporte, ni daños ocasionados por
reparaciones, alteraciones o productos no suministrados por FUNAI CORP., o daños resultantes de accidente,
uso indebido, abuso, trato indebido, aplicación indebida, alteración, instalación defectuosa, mantenimiento
inadecuado, uso comercial (por ejemplo, el uso de este producto en hoteles, establecimientos de alquiler u
oficinas)o daños resultantes de incendio, inundación, tormenta eléctrica o catástrofes naturales.
ESTA GARANTÍA NO CUBRE LOS MATERIALES DE EMBALAJE, NINGÚN TIPO DE ACCESORIOS (EXCEPTO EL
MANDO A DISTANCIA), NINGUNA PIEZA DE ADORNO, PIEZAS DE MONTAJE COMPLETAS, MODELOS DE
DEMOSTRACIÓN O DE TALLER.
FUNAI CORP. Y SUS REPRESENTANTES O AGENTES NO SERÁN EN NINGÚN CASO CONSIDERADOS RESPONSABLES
DE DAÑOS GENERALES, INDIRECTOS O CONSECUENCIALES, RESULTANTES DE O PROVOCADOS POR EL USO O
LA IMPOSIBILIDAD DE USO DE ESTE PRODUCTO. ESTA GARANTÍA SUSTITUYE A CUALQUIER OTRA GARANTÍA,
EXPRESA O IMPLÍCITA, Y CUALQUIER OTRA RESPONSABILIDAD CIVIL POR PARTE DE FUNAI, CUALQUIER OTRA
GARANTÍA QUE INCLUYA LA GARANTÍA DE COMERCIABILIDAD E IDONEIDAD PARA UN FIN CONCRETO, QUEDAN
POR LA PRESENTE EXCLUIDAS POR DE FUNAI Y SUS REPRESENTANTES EN ESTADOS UNIDOS.
TODAS LAS INSPECCIONES Y REPARACIONES BAJO GARANTÍA DEBEN SER EFECTUADAS POR UN CENTRO
DE SERVICIO AUTORIZADO.
ESTA GARANTÍA ES VÁLIDA EXCLUSIVAMENTE CUANDO EL APARATO SEA ENTREGADO A UN CENTRO DE
SERVICIO AUTORIZADO.
EL PRODUCTO DEBE IR ACOMPAÑADO POR UNA COPIA DEL RECIBO DE COMPRA MINORISTA ORIGINAL. SI
NO SE ADJUNTA PRUEBA DE COMPRA, LA GARANTÍA NO SE APLICARÁ Y SE COBRARÁN LOS COSTES DE LA
REPARACIÓN.
IMPORTANTE:
ESTA GARANTÍA LIMITADA LE OTORGA DERECHOS LEGALES ESPECÍFICOS. ES POSIBLE QUE SEA USTED
BENEFICIARIO DE OTROS DERECHOS QUE VARÍEN DE UN ESTADO A OTRO. SI, EN CUALQUIER MOMENTO
DURANTE EL PERIODO DE GARANTÍA, NO PUEDE USTED OBTENER SATISFACCIÓN CON RESPECTO A LA
REPARACIÓN DE ESTE PRODUCTO, LE ROGAMOS QUE SE PONGA EN CONTACTO CON FUNAI CORP.
ATENCIÓN:
FUNAI CORP. SE RESERVA EL DERECHO DE MODIFICAR CUALQUIER DISEÑO DE ESTE
PRODUCTO SIN PREVIO AVISO.
DECLARACIÓN DE GARANTÍA CON RESPECTO A REPARACIONES NO AUTORIZADAS:
Para obtener servicio de garantía, debe usted aceptar el producto, o hacer entrega del producto con
portes pagados, ya sea en su embalaje original o en un embalaje que proporcione el mismo grado de
protección, a cualquier CENTRO DE SERVICIO AUTORIZADO. FUNAI CORP. no efectuará reembolso por
ningún servicio realizado por proveedores de servicio no autorizados sin autorización previa por escrito.
Para localizar su CENTRO DE SERVICIO AUTORIZADO más próximo o para solicitudes generales
de servicio, puede ponerse en contacto con nosotros en:
FUNAI CORP. suministrará la mano de obra de forma gratuita durante un periodo de
noventa (90) días desde la fecha de compra minorista original.
FUNAI SERVICE CORPORATION
Servicio de atención al cliente
Tel : 1-800-968-3429
www.sylvania-ce.com
5653 Creekside Parkway, Suite A, Lockbourne, OH 43137
A7444UH
 Loading...