

Page 1

e
KEY HANDBOOK
Page 2

Contents
About this Book ......................................................................................1
Introducing the SUPRA® Syst em Componen ts....................................3
System Requirements ...........................................................................5
Minimum requirements....................................................................5
How the System Works........................................................................6
eKEY ........................................................................................................7
SUPRA handheld computer components ......................................8
eKEY shell..........................................................................................12
eSYNC Cradle ......................................................................................16
KeyBox..................................................................................................19
Getting Started.....................................................................................23
Setting up your eSYNC Cradle..........................................................24
Charging the eKEY Batteries..............................................................26
Battery considerations.....................................................................26
Installing Palm Desktop Software ....................................................27
Installing add-on applications........................................................29
Removing applications....................................................................31
Entering Data in Your SUPRA Handheld Computer...........................33
Tapping and Typing ...........................................................................33
Tap with the stylus to get things done..........................................33
Elements of the SUPRA handheld co mput er interface ..............34
Opening applications ......................................................................35
Entering Data .......................................................................................37
TwowaystoenterdataintoeKEY applications..........................37
Using Graffiti Writing to Enter Data ................................................40
Writing Graffiti characters..............................................................40
Graffiti tips ........................................................................................42
The Graffiti alphabet........................................................................43
Writing capital letters ......................................................................44
Writing numbers..............................................................................44
Graffiti numbers...............................................................................45
Writing punctuation marks ............................................................45
Navigation strokes ...........................................................................46
Using the onscreen keyboard ............................................................46
Using the eSYNC Application..............................................................49
Performing an eSYNC.........................................................................51
How often to eSYNC........................................................................51
Automatic eSYNC ............................................................................51
Contents Page i
Page 3

Manual eSYNC.................................................................................51
Viewing messages following eSYNC............................................53
Changing the eSYNC dial-up configuration ................................53
Configuring whether to download listings and roster ..............55
Using the eKEY Application..................................................................57
Navigating the eKEY Application ....................................................58
Viewing menu options....................................................................58
Viewing sub-menu options............................................................59
Getting Help in the eKEY Application.............................................60
Understanding Audio Tones.............................................................61
Obtaining th e Listing Key from a KeyBox ......................................62
Releasing the key container............................................................62
Attaching listing keys to the key container .................................62
Replacing the key container...........................................................63
eFeedback..........................................................................................63
Releasing the Shackle .........................................................................66
Removing the shackle .....................................................................66
Reading KeyBox Information............................................................67
Incident report..................................................................................67
Reading new KeyBox access information....................................67
Reviewing KeyBox access information ........................................68
Programming with your eKEY .........................................................70
Changing the PIN code in an eKEY ..............................................70
Changing the shackle code in a KeyBox ......................................71
Changing access hours in a KeyBox .............................................72
Using Call Before Showing (CBS) .................................................76
Reading a KeyBox’s settings ..........................................................81
Performing a Manual Update ...........................................................83
Entering the update code into your eKEY....................................83
Viewing Error Codes..........................................................................84
Using the eDATA Application...............................................................85
Navigating the eDATA application..................................................86
Using the Listings Database..............................................................87
Viewing the listin g menu ...............................................................87
Performing a custom search...........................................................88
Viewing custom search results......................................................94
Setting up profiles............................................................................96
Searching for a listing by address .................................................99
Searching for a listing by MLS ID ...............................................100
Viewing personal listings.............................................................101
Viewing Hotsheet listings ............................................................102
Using the Roster function................................................................103
Page ii Contents
Page 4

Viewing roster entries ...................................................................103
Searching for roster members ......................................................104
Using the KeyBox Inventory function............................................106
Adding KeyBox information........................................................106
Viewing KeyBox inventory information ....................................108
Deleting a KeyBox from your inventory record........................108
Using the Showing Activity function.............................................110
Viewing showing activity.............................................................110
Viewing Messages.............................................................................113
Viewing messages immediately after eSYNC............................113
Viewing messages after using your eKEY..................................113
eFeedback............................................................................................116
Sending feedback after showing a listin g...................................116
Viewing feedback from a showing agent...................................119
Using KIMweb ................... ..................................................................121
Logging on to the Agent Website ...................................................122
Obtaining an Update Code from KIMweb....................................123
Downloading Listings ......................................................................124
Defining your market area............................................................124
Transfer listings to your eKEY......................................................125
Downloading Roster.........................................................................126
Downloading SUPRA Applications ...............................................127
Setting KeyBox Assignments...........................................................128
Maintaining K eyBox assignments ...............................................128
Viewing KeyBox assignments......................................................128
Generating Reports ...........................................................................129
Showing activity report.................................................................129
Key activit y report .........................................................................129
KeyBox information report...........................................................130
Selecting Links ...................................................................................131
Using KIMvoice..................... ... ............................................................133
Obtaining an Update Code from KIMvoice ..................................134
Entering yo ur update code...........................................................135
Requesting Reports ...........................................................................137
Showing activity reports...............................................................138
eKEY activity report.......................................................................141
KeyBox Shackle Codes and CBS Codes......................................143
Names of showing agents.............................................................145
Troubleshooting..................................................................................147
Before Calling Field Support... ........................................................147
Troubleshooting Tips........................................................................148
KeyBox container will not open...................................................148
Contents Page iii
Page 5

KeyBox shackle will not release ..................................................148
Key container will not close.........................................................148
Code: forgotten or lost ..................................................................148
Bad code time-out..........................................................................148
eSYNC Cradle cannot dial out.....................................................149
Resetting your eSYNC Cradle......................................................150
Resetting your SUPRA handheld computer..............................150
Restoring Data................................................................................152
Beaming app lications....................................................................153
SUPRA handheld computer doesn’t responding to taps ........154
Error Codes..........................................................................................157
Broker Messages.................................................................................165
Sending Broker messages.............................................................165
Cooperating System s....................... ...................................................167
Accessing KeyBoxes in a Cooperating SUPRA KeyBox System 167
Adding a cooperating system code to your eKEY ....................167
Receiving an update code for a cooperating KeyBox system 168
Accessing Cooperating Advantage Express KeyBoxes...............169
Updating in Advantage Express systems ..................................169
Knowing when to update in Advantage Express systems......169
Entering update codes for cooperating KeyBox systems ........170
Using your eKEY to access cooperating KeyBoxes...................170
Updating in other SUPRA systems.............................................170
KeyBox Information.........................................................................172
FCC Statements.................... ...............................................................173
Consumer Note Regarding the eKEY ............................................173
Consumer Note Regarding the eSYNC Cradle.............................173
Page iv Contents
Page 6

About this Book
This eKEY Handbook is designed to help you get up and running
quickly using your SUPRA eKEY. It describes all you need to know
about using the eKEY and the other SUPRA system components. This
handbook:
! Introduces you to the SUPRA system components: eKEY, eSYNC
Cradle, KeyBox, KIMnet, KIMweb, KIMvoice, eSYNC, HotSync,
and the SUPRA software applications.
! Instructs you in setting up your eKEY and eSYNC Cradle.
! Guides you through the process of installing Palm Desktop
software on a PC.
! Walks you through viewing and entering data on your eKEY.
! Describes how to use the three SUPRA software applications on
your eKEY. These programs are: eSYNC, eKEY, and eDATA.
! Directs you in using KIMweb, the agent website.
! Explains using KIMvoice to retrieve information.
! Provides additional information you need to know to operate
within the SUPRA system.
Please read through this handbook and follow the instructions for
using yo ur SUPRA system components. Practice ensures that
operations run smoothly when you are working with a client.
About this Book Page 1
Page 7

Page 2 About this Book
Page 8

Chapter 1
Introducing the SUPRA® System
Components
In this chapter you are introduced to the SUPRA system components.
The components include:
! eKEY™ -TheeKEY i s composed of a SUPRA handheld computer
and the eKEY shell. Together they form a single unit called the
eKEY. The eKEY has a pre-assigned PIN code that allows you to
access the keys from the KeyBox to show a listed property. The
eKEY displays messages and information on an easily readable
screen display. The display allows you to view and select
programs and menu functions stored in the eKEY. The eKEY
contains two non-replaceable, rechargeable batteries, one in the
SUPRA handheld computer and one in the eKEY shell. They are
charged whenever the eKEY is placed on the eSYNC Cradle.
! eSYNC™ Cradle - The Cradle contains a modem that connects to
a standard telephone jack. It charges the eKEY's batteries and
transmits data during the eSYNCoperationwhentheeKEY is
placed on the Cradle.
Note: You cansetup your eSYNC Cradle at either your home or
office.
! KeyBox - The KeyBox, installed at listings, has a key containe rthat
holds the listing's keys. A shackle is located on top of the KeyBox.
! KIMnet™ - KIMnet is the database that stores agent and office
information, eKEY and KeyBox assignments,andshowingactivity
information.
! KIMweb™ - KIMweb can be accessed at www.supraekey.com
using a PC with Internet Explorer™ version 4.0 or greater or
Netscape™ version 4.6 or greater. Log onto KIMweb to save a
market area, obtain an update code, set up KeyBox assignments,
and view activity information. You must choose your
Association/MLS and enter your eKEY's serial number and PIN
code to access the site.
! KIMvoice™ - KIMvoice is the automated voice system for
KIMnet. Call KIMvoice to obtain reports, identify keyholders who
have shown your listings, and obtain update codes.
Chapter 1 Page 3
Page 9

! eSYNC - Information is transmitted during a nightly operation
called eSYNC. Place your eKEY on the eSYNC Cradle before
midnight. Between the hours of midnight and 6
AM,theeKEY dials
KIMnet, information is exchanged between your eKEY and
KIMnet, and your eKEY is automatically updated for use the next
day.
! HotSync™ - Like eSYNC, HotSync is also a communication
process. HotSync synchronizes data between your eKEY and Palm
Desktop software installed on a PC.
! SUPRA® software applications - eSYNC, eKEY, and eDATA are
the three SUPRA software applications that reside on your eKEY.
The eSYNC application controls the process of transmitting
information between your eKEY and KIMnet. The eKEY
application enables you to access SUPRA KeyBoxes with your
eKEY. eDATAenables youtoview information aboutcurrent MLS
listings, member roster information, and KeyBox activity.
Page 4 Introducing the SUPRA System Components
Page 10

System Requirements
To install and operate the Palm Desktop software your PC system
must meet the following requirements:
Minimum requirements
! Windows 98, Windows 95, or Windows NT 4.0
! IBM-compatible 486 computer or higher
! 8MBRAM(memory)minimum,
16 MB recommended (required with Windows NT 4.0)
! 20 MB available hard disk space
! VGA monitor or better
! CD-ROM drive(you can also order 3.5" diskettes from SUPRA by
calling 1-877-699-6787)
! Mouse
! One available serial port
Optional equipment
! Windows-compatible printer
! Infrared communication device
Macintosh compatibility
You can connect your eKEY to your Macintosh using the
PalmConnect
®
Serial Kit or PalmConnect®USB Kit (sold separately).
Chapter 1 Page 5
Page 11

How the System Works
The eKEY allows access to SUPRA KeyBoxes at listings. The eKEY
keeps track of the KeyBoxes it has opened during the day. At the end
of the day, the eKEY is placed on the Cradle for the nightly eSYNC
operation.
The Cradle dials out to KIMnet through a telephone line at a
designated time during the night. During eSYNC, showing data
stored in your eKEY is sent to KIMnet. Your eKEY is updated and
messagesand showing informationare downloaded onto your eKEY.
Page 6 Introducing the SUPRA System Components
Page 12
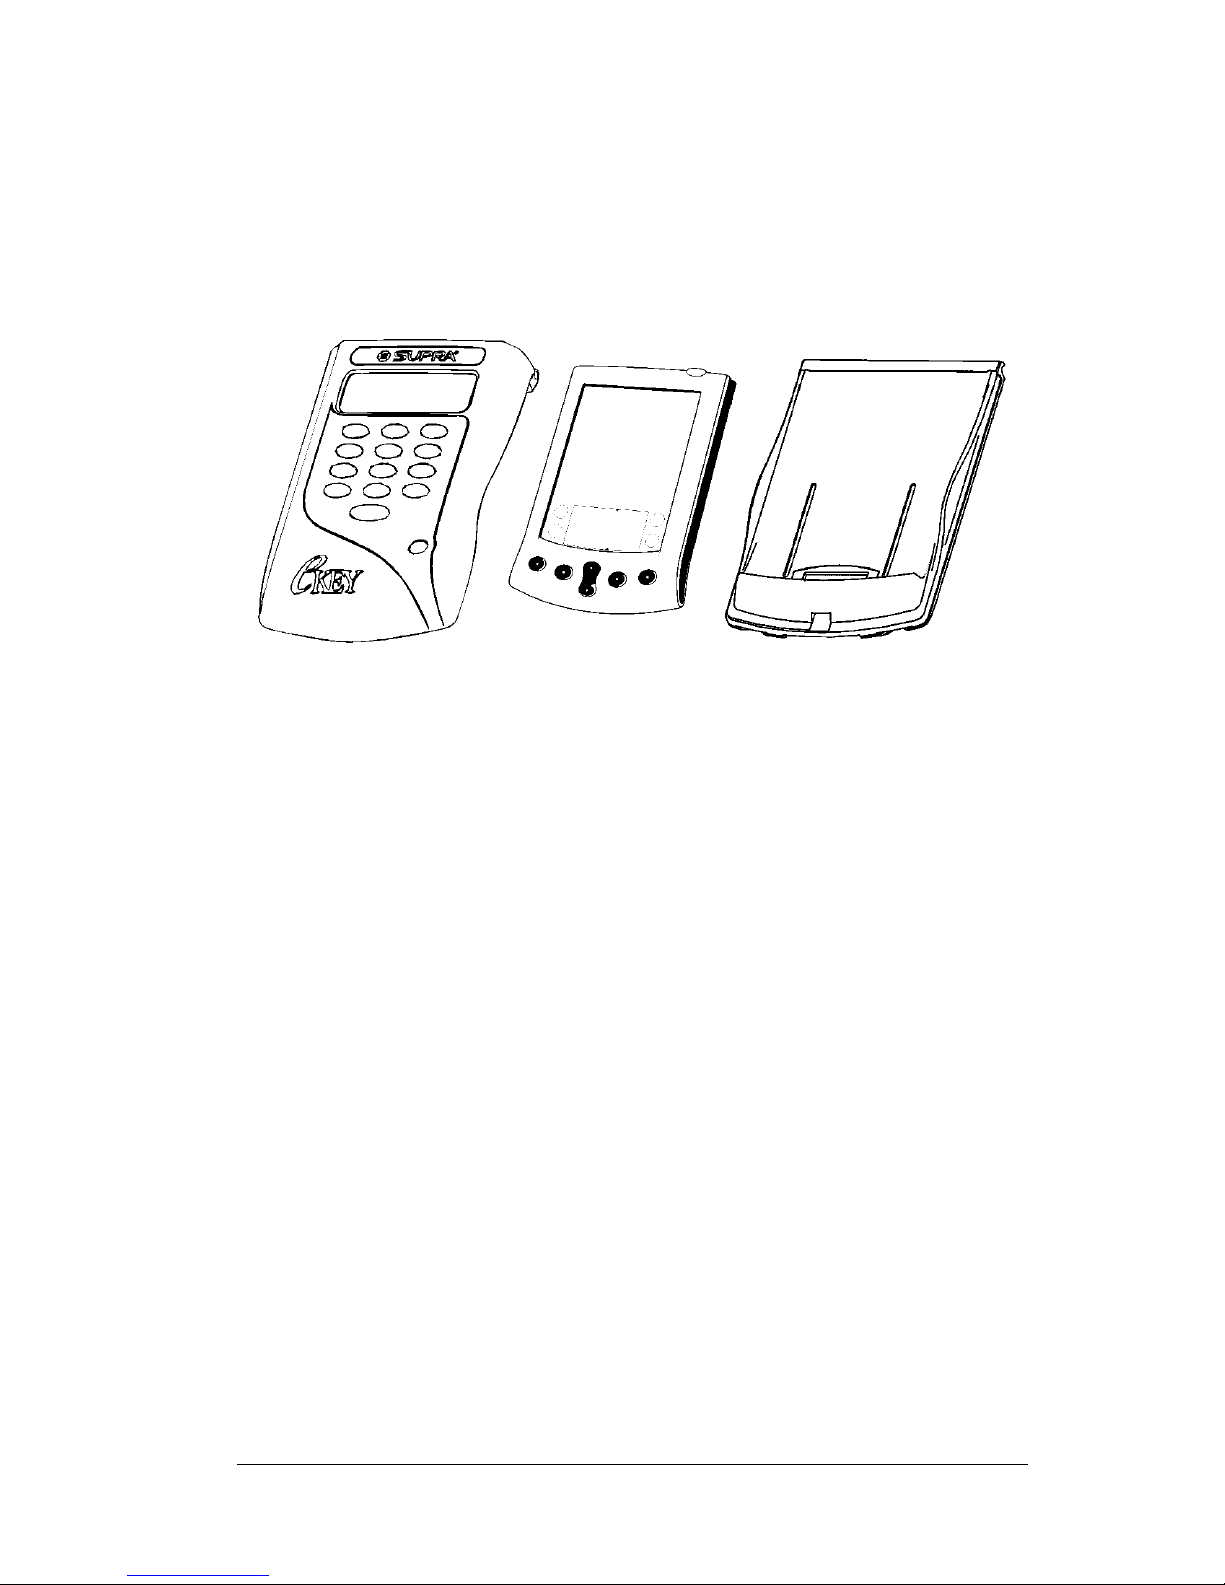
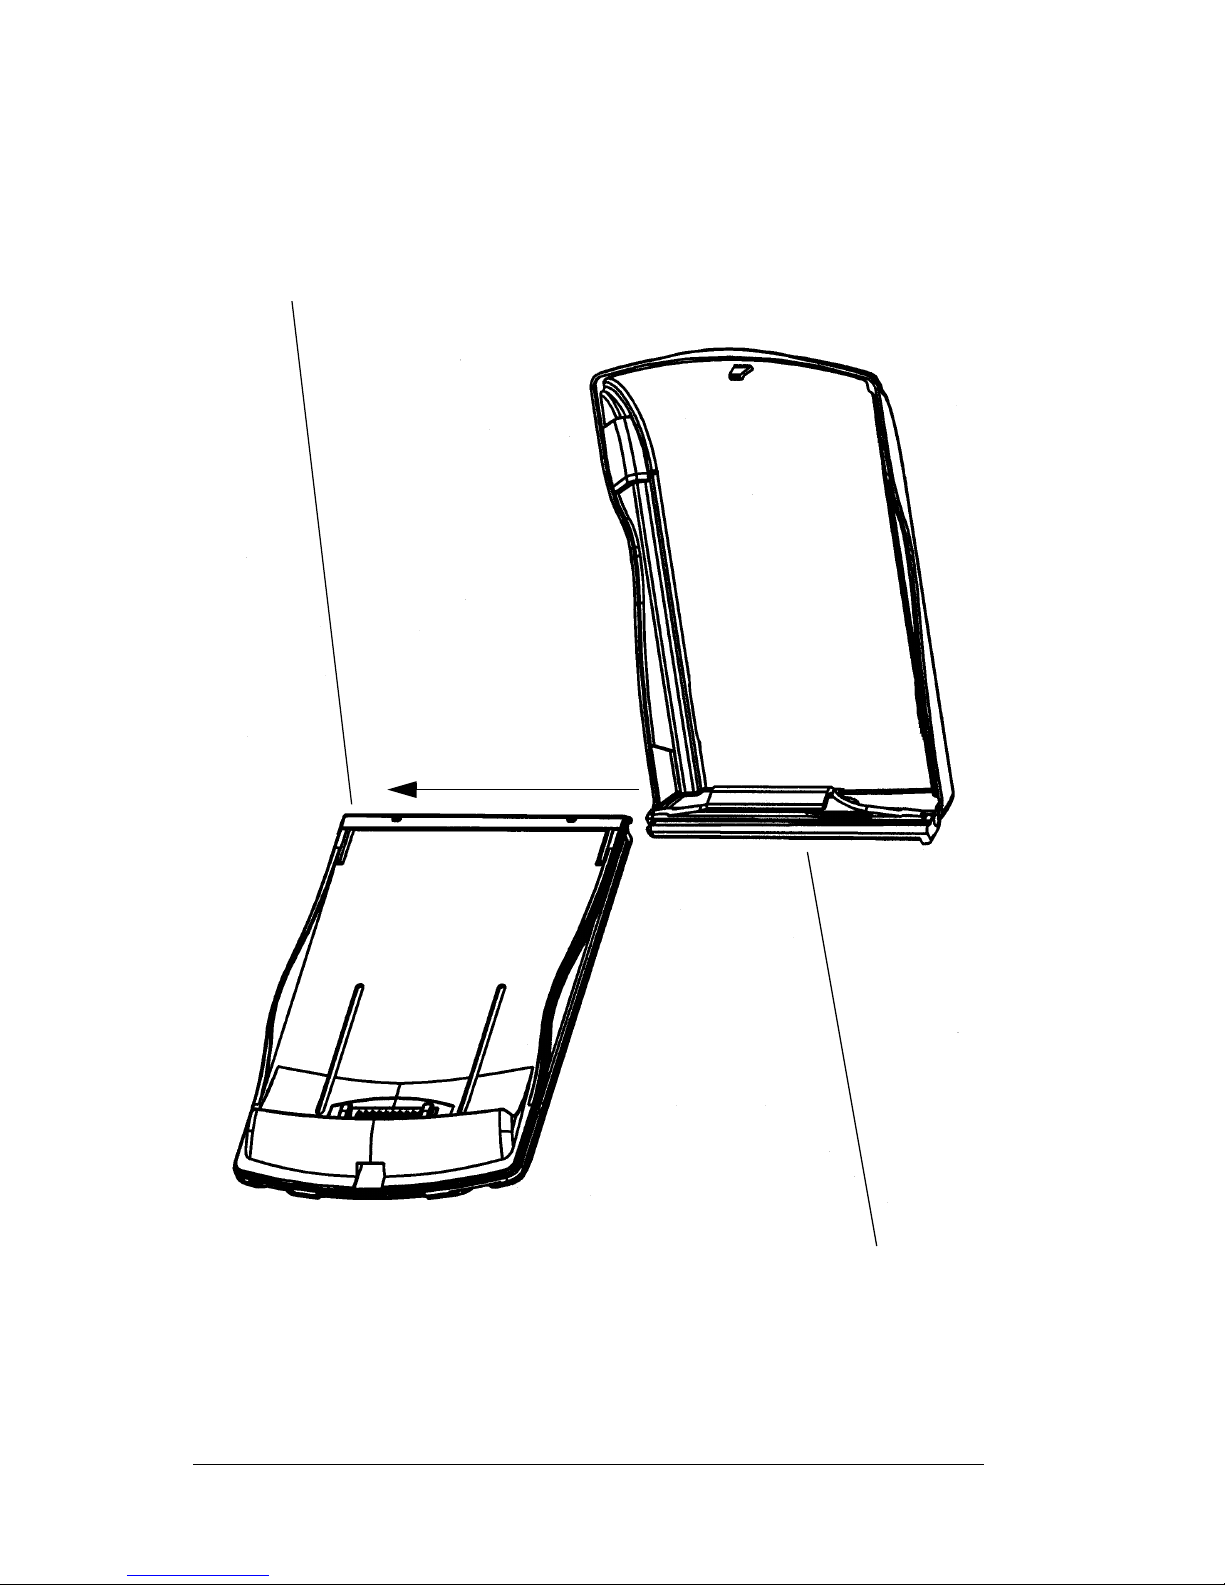
eKEY
The eKEY is composed of the SUPRA handheld computer, based on
the Palm OS, and the eKEY shell front and shell back. Together they
form a single unit called the eKEY.
SUPRA
eKEY shell front
handheld computer
eKEY shell back
Chapter 1 Page 7
Page 13
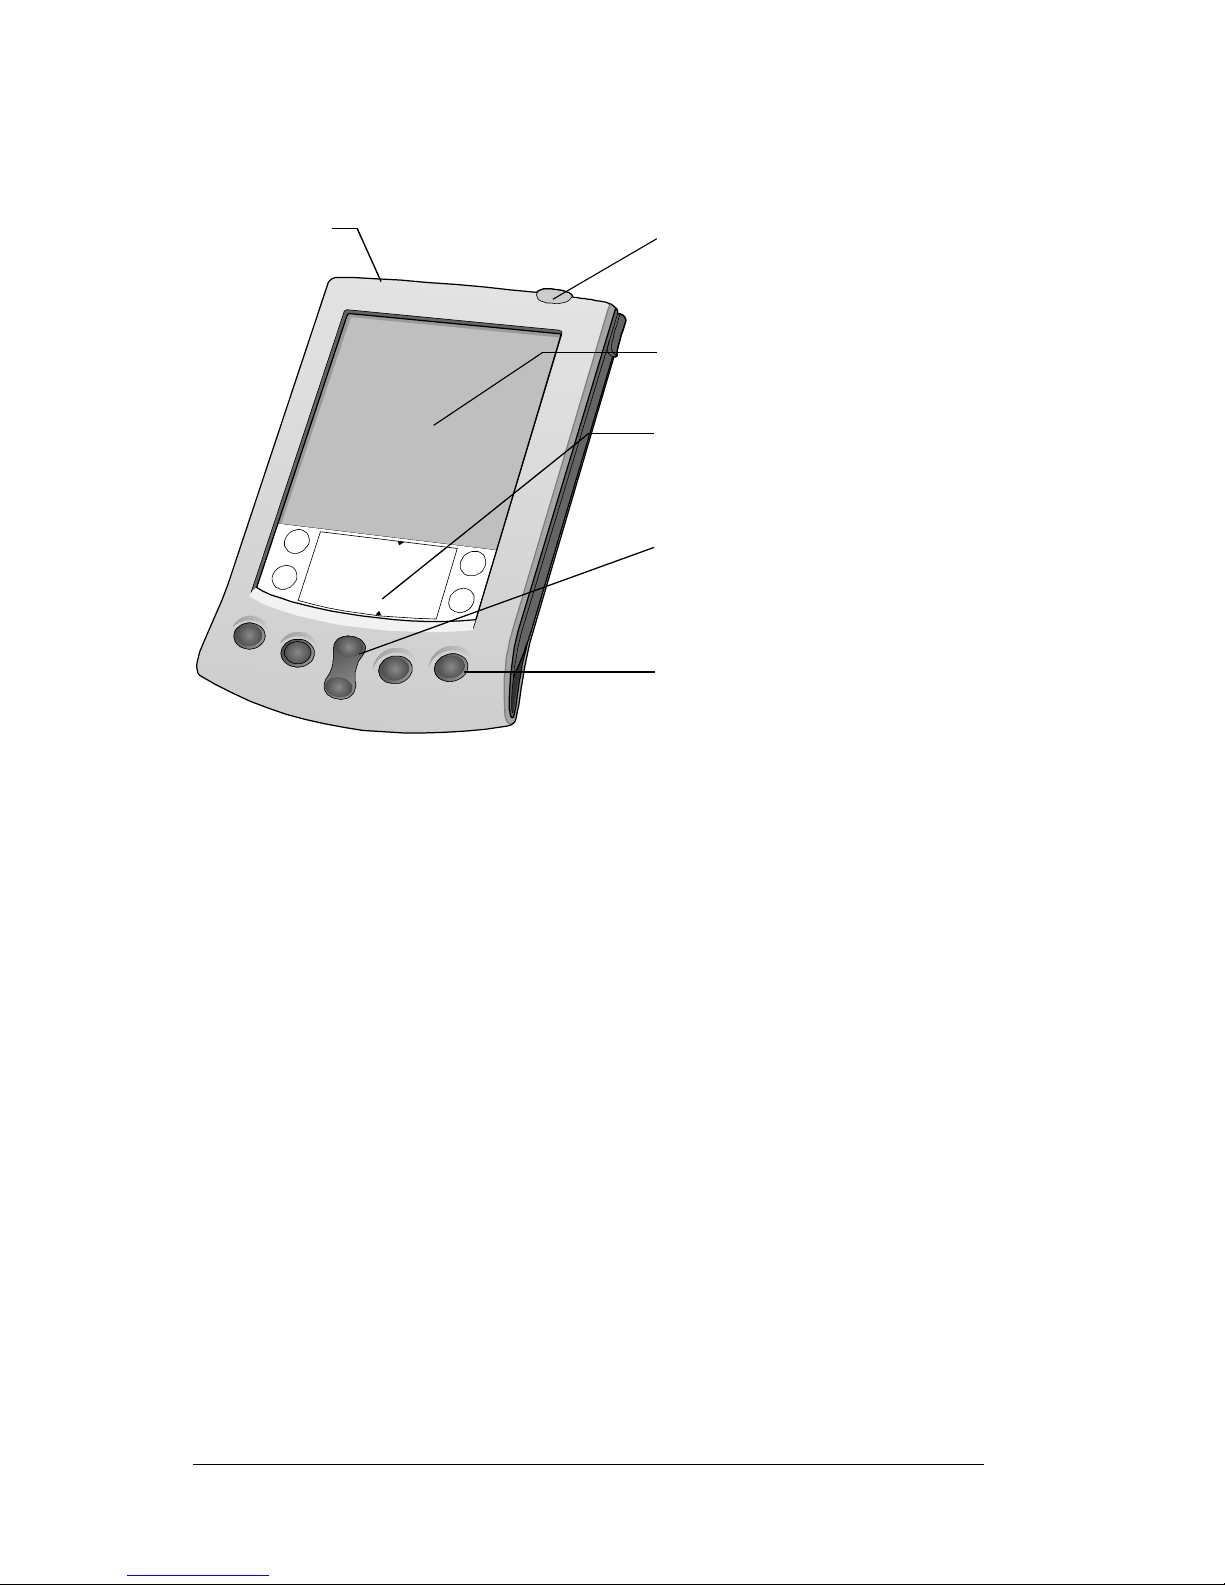
SUPRA handheld computer components
Cont
Locating front panel controls
rast
control button
Contrast
control
button
Power button
Screen
Graffiti writing area
Scroll button
Application buttons
Turns on the onscreen contrast control. This enables
you to adjust the screen forthe clearest screen display
as required by the lighting conditions or
environmental temperature where you use your
handheld. See Using the onscreen contrast control
following this table for more information.
Turns yourSUPRA handheld computer on or off and
controls the backlight feature.
If your handheld is turnedoff, press the power button
to turn on the handheld. The last screen you viewed
Power
button/
Backlight
control
is displayed. Press the power button to turn off the
handheld.
If you have difficulty seeing the information
onscreen, use thebacklight to illuminate yourscreen.
Press the power button and hold it down for about
two seconds to turn the backlight on or off.
Page 8 Introducing the SUPRA System Components
Page 14

Screen Displays the applications and information stored in
your handheld. It is touch-sensitive and responds to
the stylus that accompanies your handheld.
Graffiti
writing
area
Scroll
button
®
The area where you write letters and numbers using
the Gra ffiti
®
alphabet. See Entering Data in Chapter 3
to learn how to write Graffiti characters.
Displays text and other information that extends
beyond the area of the handheld screen. Press the
lower half of the scroll button to view information
below the viewing area. Press the upper half of the
button to view the information above the viewing
area.
Application
buttons
Activates the individualapplications that correspond
to the icons on the buttons: Date Book, Address Book,
To Do List, and SUPRA eKEY applications.
Tip: If your handheld is turned off, pressing any
applicationbuttonactivatesthehandheldand
opens the corresponding application.
Using the onscreen contrast control
Furtheradjustments can be made by changing the amount of contrast
on the screen.
To adjust the contrast:
1. Press the CONTRAST control button.
2. Tap to the left or right of the Adjust Contrast slider to change the
contrast in small increments, or drag the sliderto the left orright to
change the contrast in larger increments.
Tip: You can also press the scroll button to move the slider
incrementally.
3. Tap
Done
.
Chapter 1 Page 9
Page 15
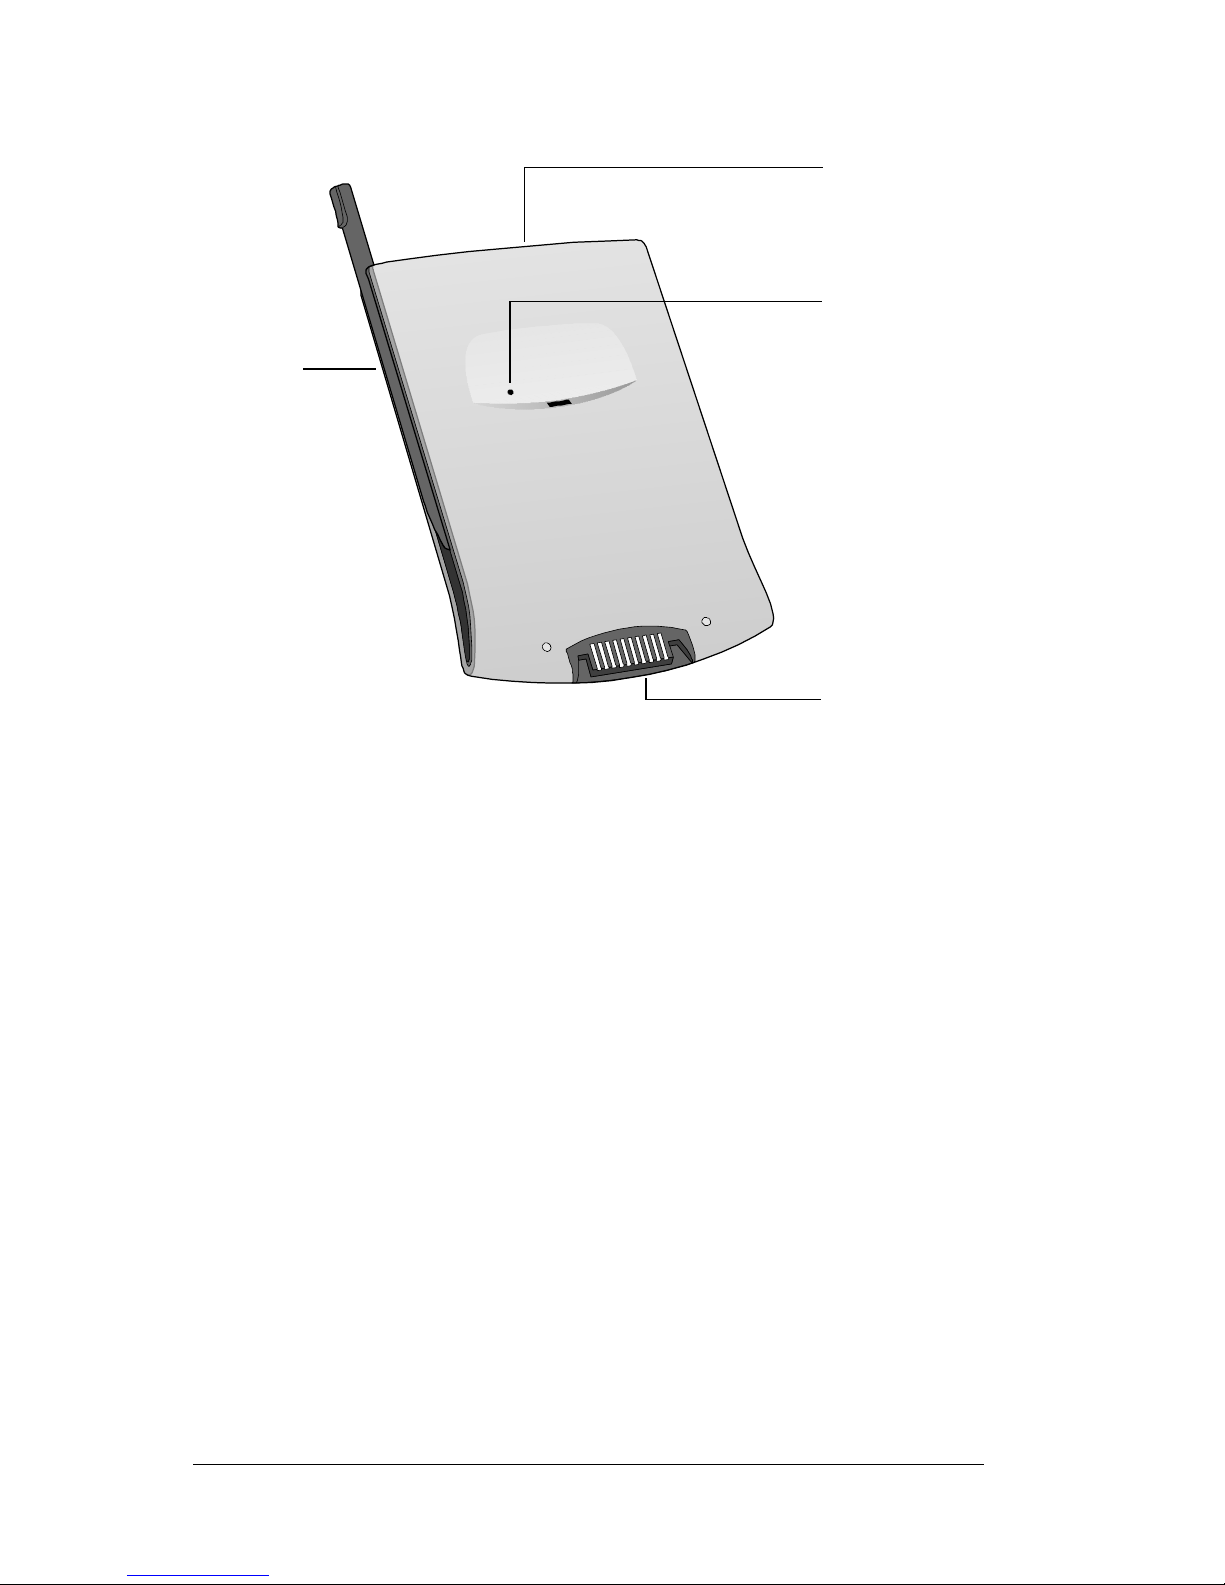
Locating back panel components
Side
channel
for stylus
or cover
IR port
Reset
button
Serial
connector
Side channels Hold the stylus which slides in and out of either
side channel and clicks into place. To use the
stylus, remove it from the side channel and hold
it as you would a pen or pencil.
IR port Uses infrared technology to transmit and receive
data from other Palm Computing
®
platform
handhelds. See Beaming applications in Chapter 9
for more information.
Reset button See Resetting your handheld computer in Chapter 9
for information about when and how to use the
reset button.
Page 10 Introducing the SUPRA System Components
Page 16

Serial connector Connects your eKEY to the Cradle, which in turn
connectsto the back of your PC and through the
AC adapter to the wall outlet. This allows you to
recharge your eKEY and update the information
between your handheld and PC using HotSync
technology. It also communicates information
between your eKEY and KIMnet using eSYNC
technology.
Taking care of your SUPRA handheld computer
Please observe the following general tips when using your SUPRA
handheld computer.
! Take care not to scratch the screen of your handheld. K eep the
screen clean. When w orkingwit h your handheld, use the supplied
stylus or plastic-tipped pens intended for use with a touchsensitive screen. Never use an actual pen or pencil or other sharp
object on the surface of the screen.
! Your handheld is not waterproof and should not be exposed to
rain or moisture. Under extreme conditions, water may enter the
circuitry through the front panel buttons. In general, treat your
handheld as you would a pocket calculator or other small
electronic instrument.
! The touch-sensitive screen of your handheld contains a glass
element. Take care not to drop your handheld or subject it to any
strong impact.
! Protect your handheld from tem perature extremes. Do not leave
your handheld on the dashboard of a car on a hot day, and keep it
away from heaters and other heat sources.
! Donot store or use your handheld in any location thatis extremely
dusty, damp, or wet.
! Use a soft, dampcloth to clean your handheld. If the surface ofthe
handheld screen beco mes soiled, clean it with a soft cloth
moistened with a diluted window-cleaning solution.
Chapter 1 Page 11
Page 17
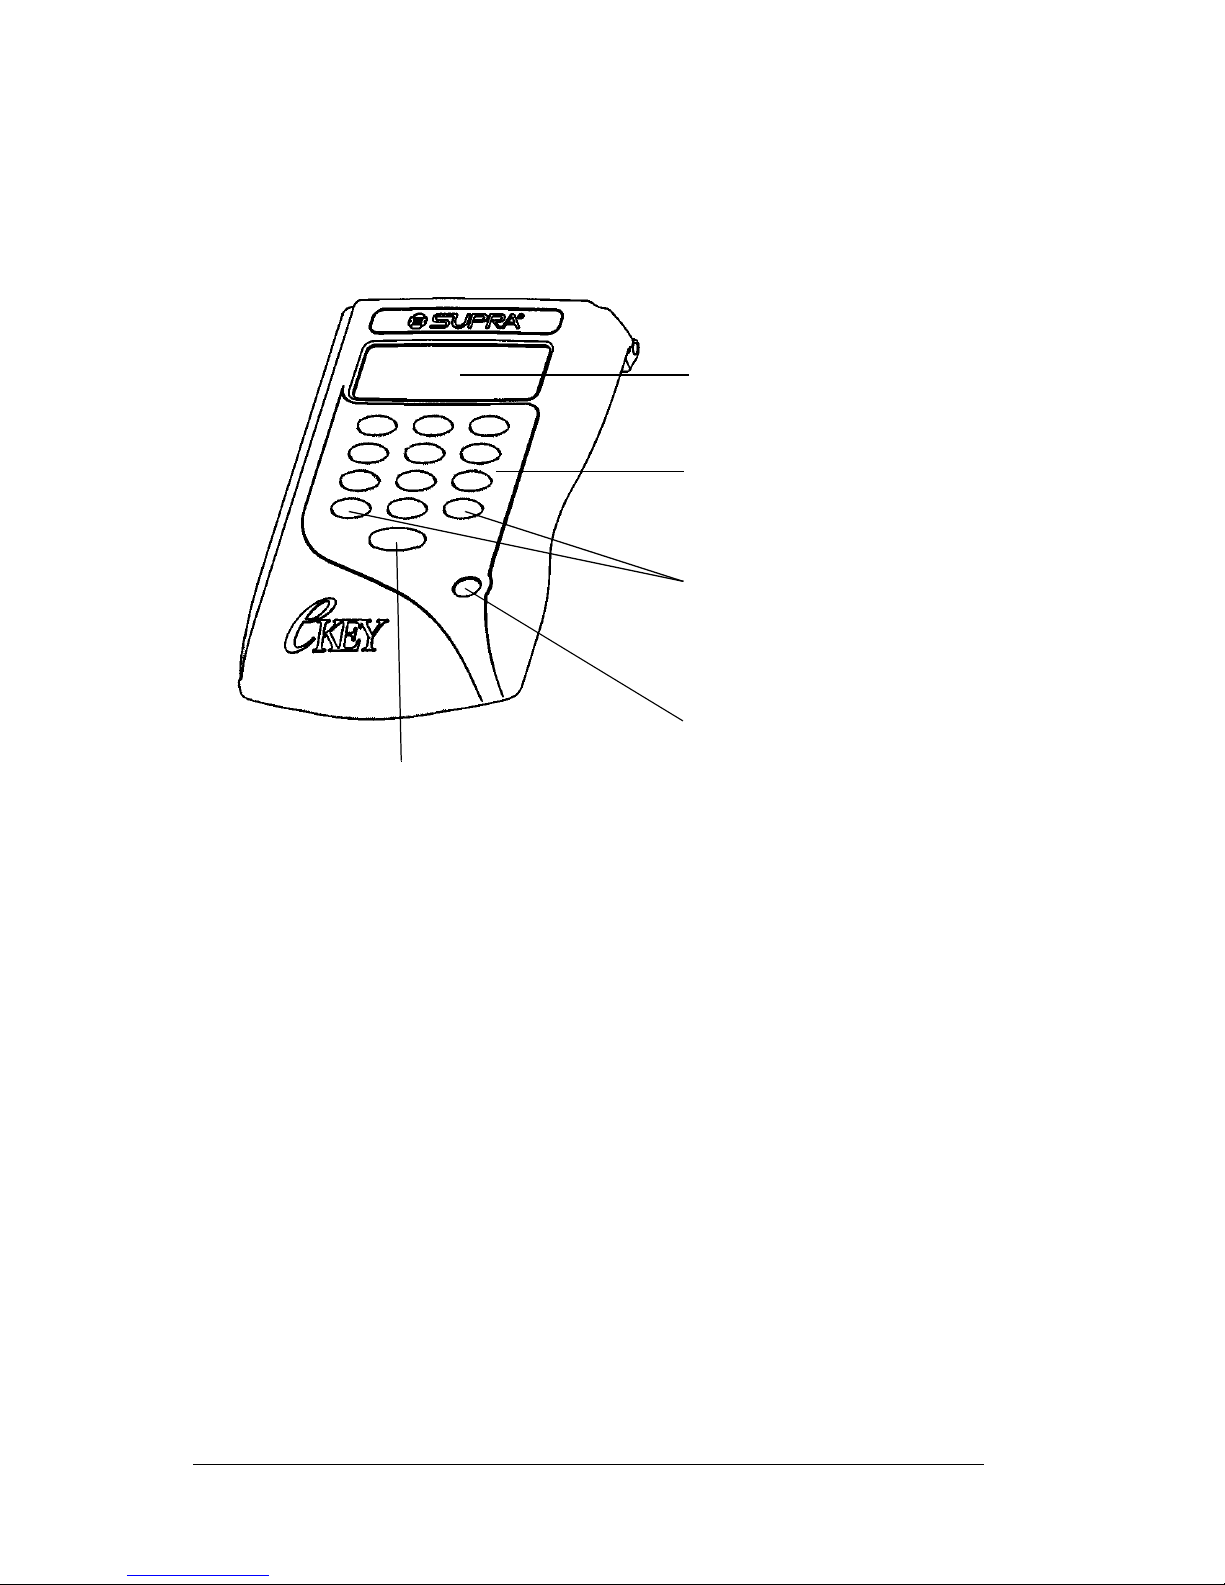
eKEY shell
The eKEY shell case is plastic and fits over the SUPRA handheld
computer. It consists of two pieces.
Shell front
Viewing
port
Numeric
buttons
Arrow
buttons
On button
Enter button
Viewing Port Anopening on the front of theshellallowsyou to
viewaportionof the SUPRAhandheldcomputer
screen when the shell front is closed.
Numeric
Buttons 0
Enable you to enter various numeric codes for
eKEY menu options.
through 9
Arrow Buttons Enable you to scroll through the eKEY's menu
options.
On Button Turns t he eKEY on and off.
Enter Button Allows you to select menu options.
Page 12 Introducing the SUPRA System Components
Page 18
Shell back
Serial connector
Serial
Connector
Connects the SUPRA handheld computer to the
shellbacksotheunitcanbeplacedontheeSYNC
Cradle to charge the batteries and perform
eSYNC and HotSync operations.
Label A label including the eKEY serial number, field
support contact number, the KIMnet agent
website address, and an update number is
affixed to the shell back.
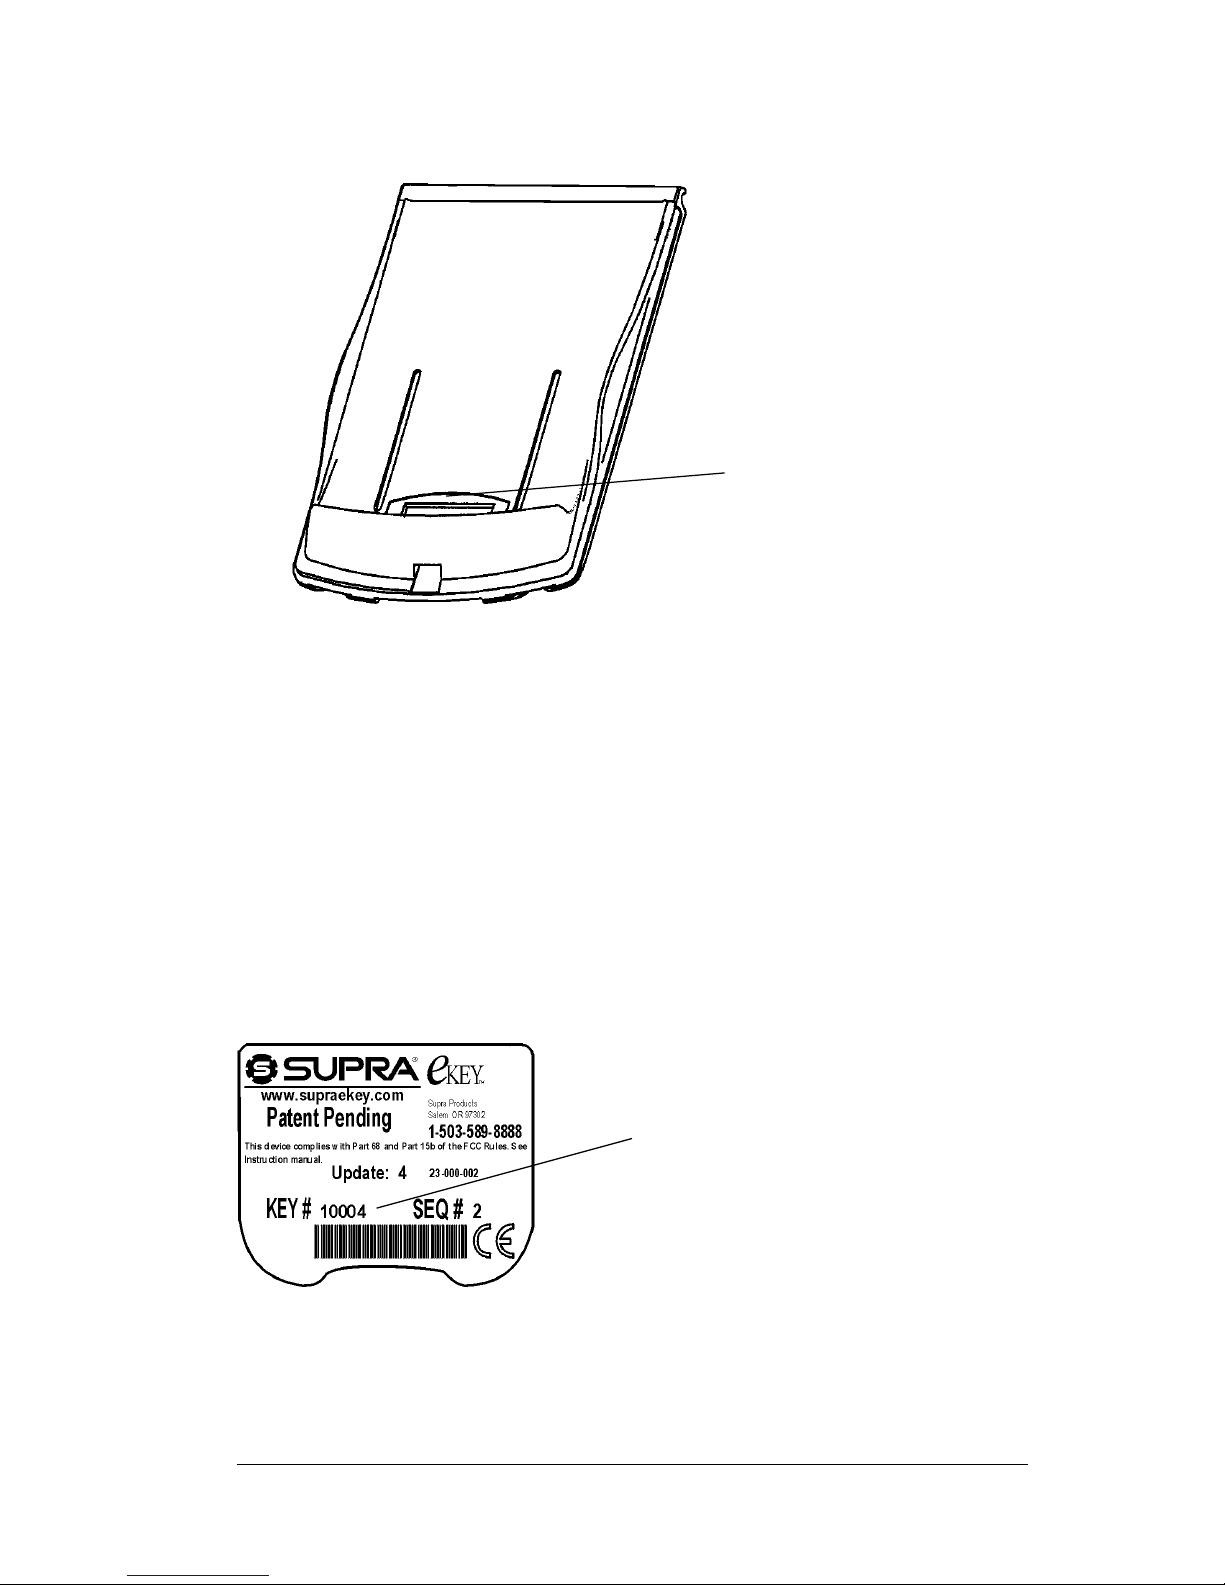
eKEY label
eKEY serial
number
Chapter 1 Page 13
Page 19
The shell front attaches to the shell back by a hinge. The hinge allows
the shell front to be opened so the full screen of the SUPRA handheld
computer can be viewed when using other applications.
Shell back
Hinge receptacle on top of
shell back
Page 14 Introducing the SUPRA System Components
Shell front
Hinge on bottom of shell front
slides onto shell back
Page 20

Note: eKEY functions are performed with the shell closed over the
SUPRA handheld computer. eDATA functions and manual
eSYNC are performed with the shell o pen.
Taking care of your eKEY shell
! Your eKEY is designed to work within a temperature range of -4
to 132 degrees Fahrenheit. Keep your eKEY with you. Do not leave
it in your car as temperatures inside a car can exceed 200 degrees
Fahrenheit in hot weather!
! Always place your eKEY in the Cradle when you return home at
the end of the day. This guarantees your eKEY is charged and
updated every night.
! Avoidgettingmoistureon the eKEY. If a KeyBox is wet, wipe it off
before inserting the eKEY into it.
! Do not subject your eKEY to extreme temperature changes.
! Commercialcleaners such asWindex,Clorox,409, and Whiskmay
be used to clean the eKEY shell.
Chapter 1 Page 15
Page 21
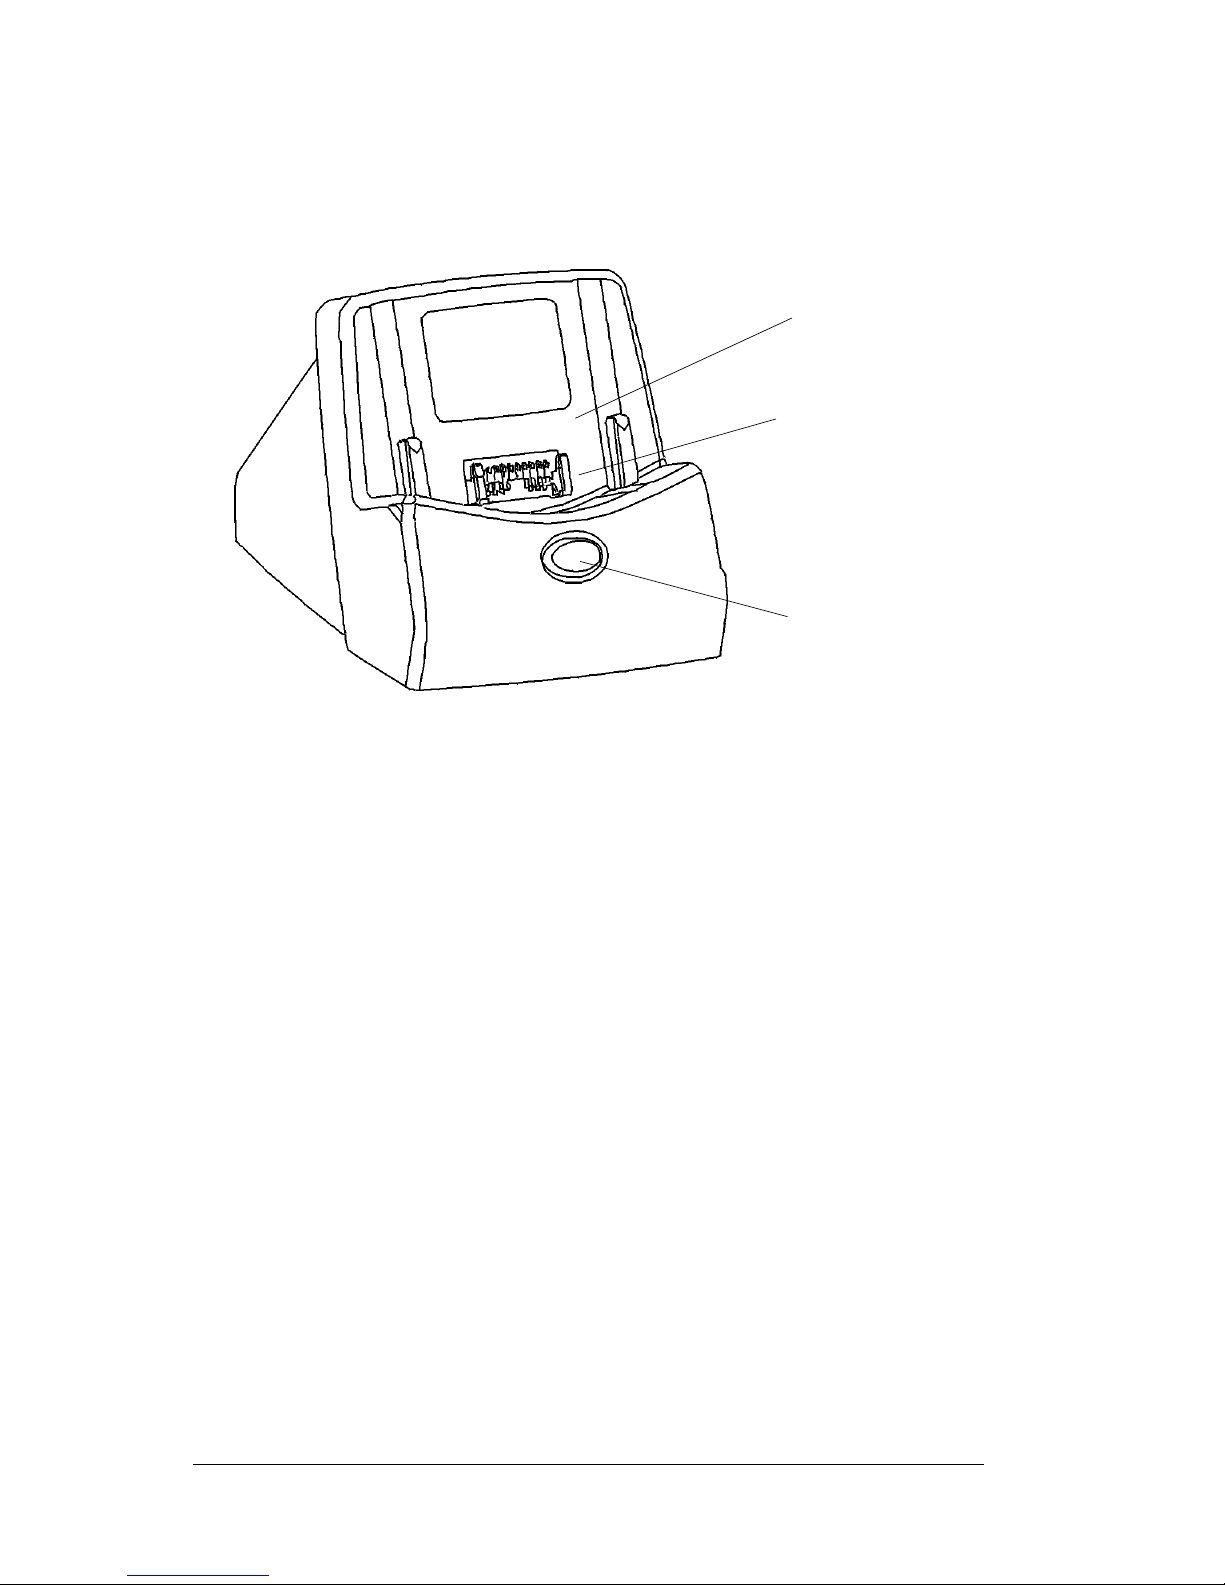
eSYNC Cradle
The eSYNC Cradle is equipped with a modem and battery charging
capability. It transmits data between theeKEY and the KIMnet system.
eKEY docking
and retention
area
Serial connector
LED and HotSync
button
External Features
eKEY Docking
and Retention
Therecessedareaon thefrontof theCradle holds
the eKEY to maintain contact for communication
and battery charging.
Serial connector Connects your handheld to the Cradle, which in
turn connectsto the backof your PC andthrough
the AC adapter to the wall outlet.This allows you
to recharge your eKEY and update the
information between your handheld and PC
using HotSync technology. It also communicates
information between your eKEY and KIMnet
using eSYNC technology.
LED (Light
Emitting Diode)
& HotSync
button
A small buttonon front of the Cradle illuminates
whentheCradleisinuse.Thisisalsothe
HotSync button that is pressed to synchronize
information between your eKEY and your Palm
Desktop software.
Page 16 Introducing the SUPRA System Components
Page 22
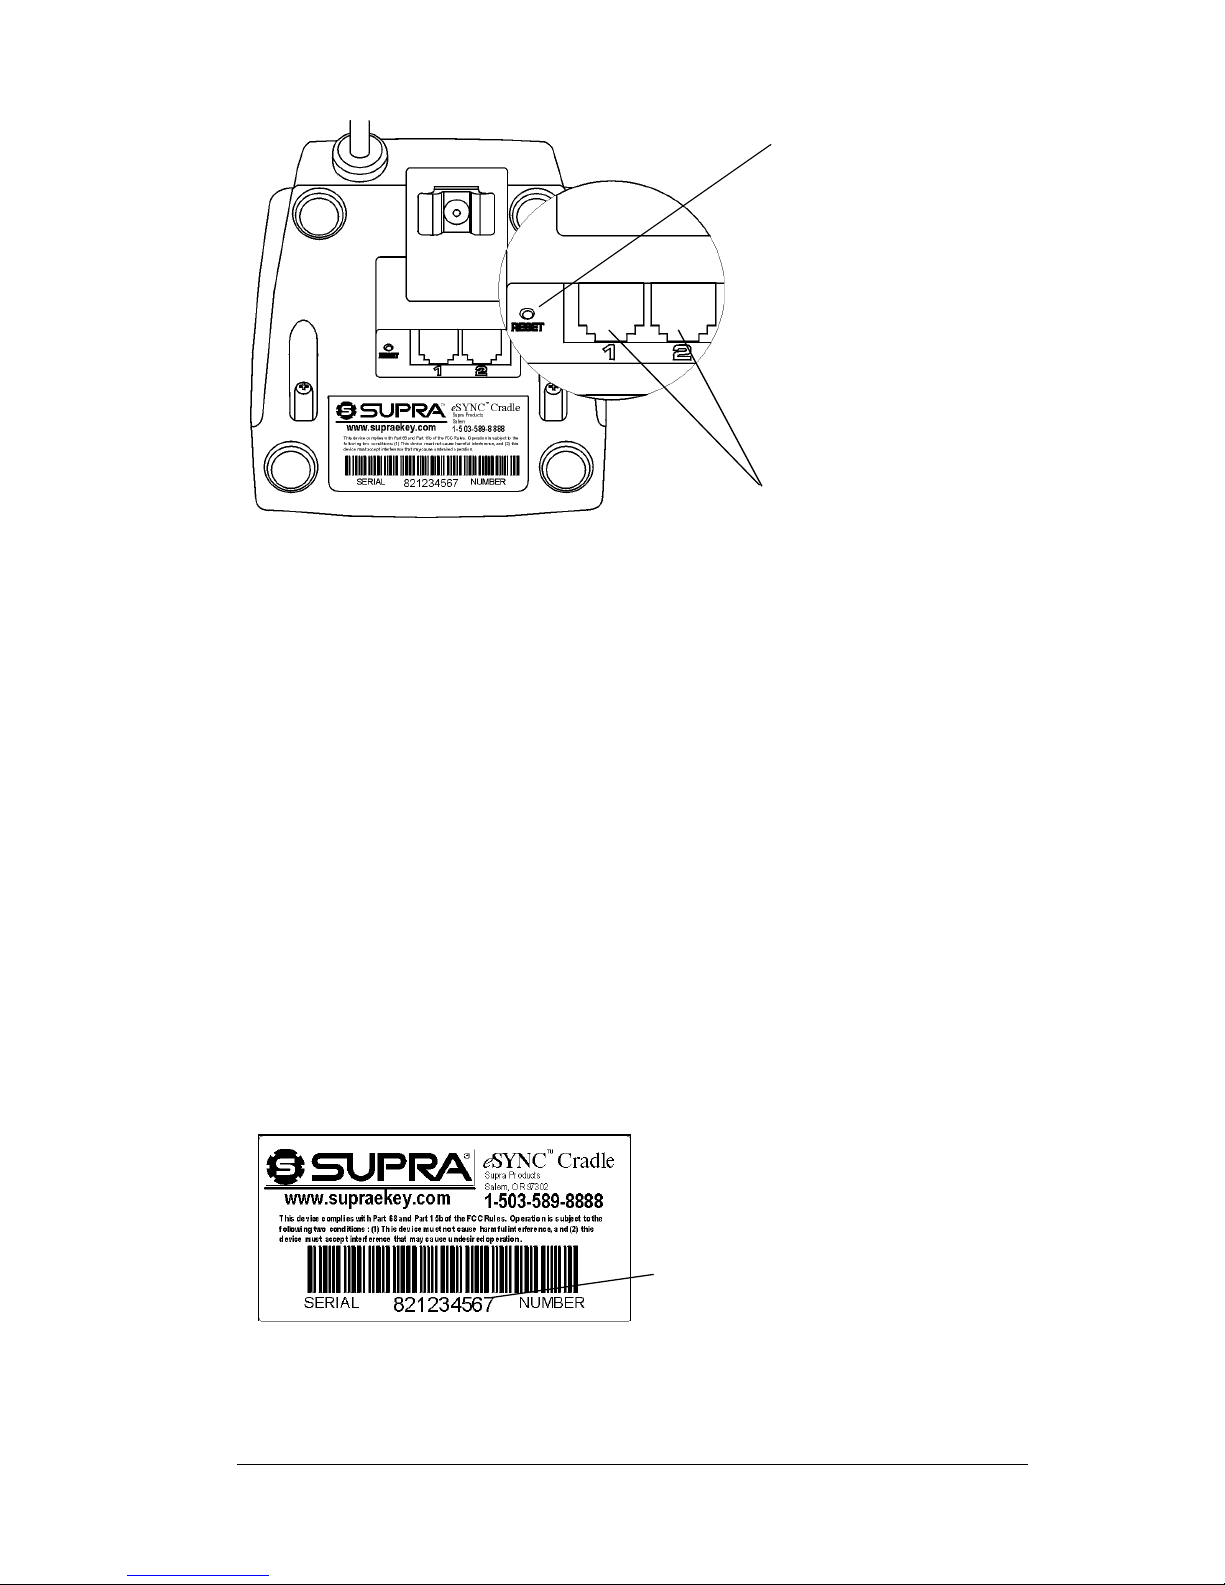
Reset switch
Telephone ports
Reset switch A tiny opening located next to the telephone
ports houses the reset switch. It is designed to
reactivate the Cradle should it become locked
and not function. Under normal use you should
nothave to use the resetswitch. SeeResettingyour
eSYNC Cradle inChapter9formoreinformation.
Telephone ports Two telephone ports enable the eKEY Cradle to
connect to an open phone line or to a phone line
in use.
eSYNC Cr adle
serial number
TheuniquenumberassignedtotheeSYNC
Cradle issued to you. It is located on the bottom
of the Cradle on a label that includes the address,
phone number, and KIMnet agent website
address.
serial number
Chapter 1 Page 17
Page 23

Internal Features
Nonreplaceable
battery charger
The eKEY contains two lithium-ion batteries that
are recharged each time you place the eKEY on
the eSYNC Cradle. When you receive your eKEY,
place it on the Cradle to charge for at least four
hours before you use it.
Modem A modem contained in theeKEY Cradle dials out
to KIMnet to perform the eSYNC operation.
Taking care of your eSYNC Cradle
TheCradlerequireslittleinthewayofmaintenancebutthereare
some things you should know about its care:
! Route power and phone cords attached to the Cradle so that they
are not located in traffic areas or easily pulled off a desk or table.
! The Cradle can operate within a temperature range of 32 to 122
degrees Fahrenheit. Keep it away from heaters a nd other heat
sources. Do not subject the Cradle to extreme temperature
changes.
! Do not plug the Cradle into the same outlet where blenders,
vacuums, and other appliances are plugged in. These devices may
interfere with the Cradle's modem communications.
! Do not place the Cradle in any dusty, damp, or wet location.
! Clean the Cradle using a soft cloth slightly dampened with a
diluted window cleaning solution. Do not use isopropyl alcohol.
Do not clean with water or harsh cleaning agents.
Page 18 Introducing the SUPRA System Components
Page 24
KeyBox
The KeyBox, installed at listings, encloses the key container that holds
the listing's keys.
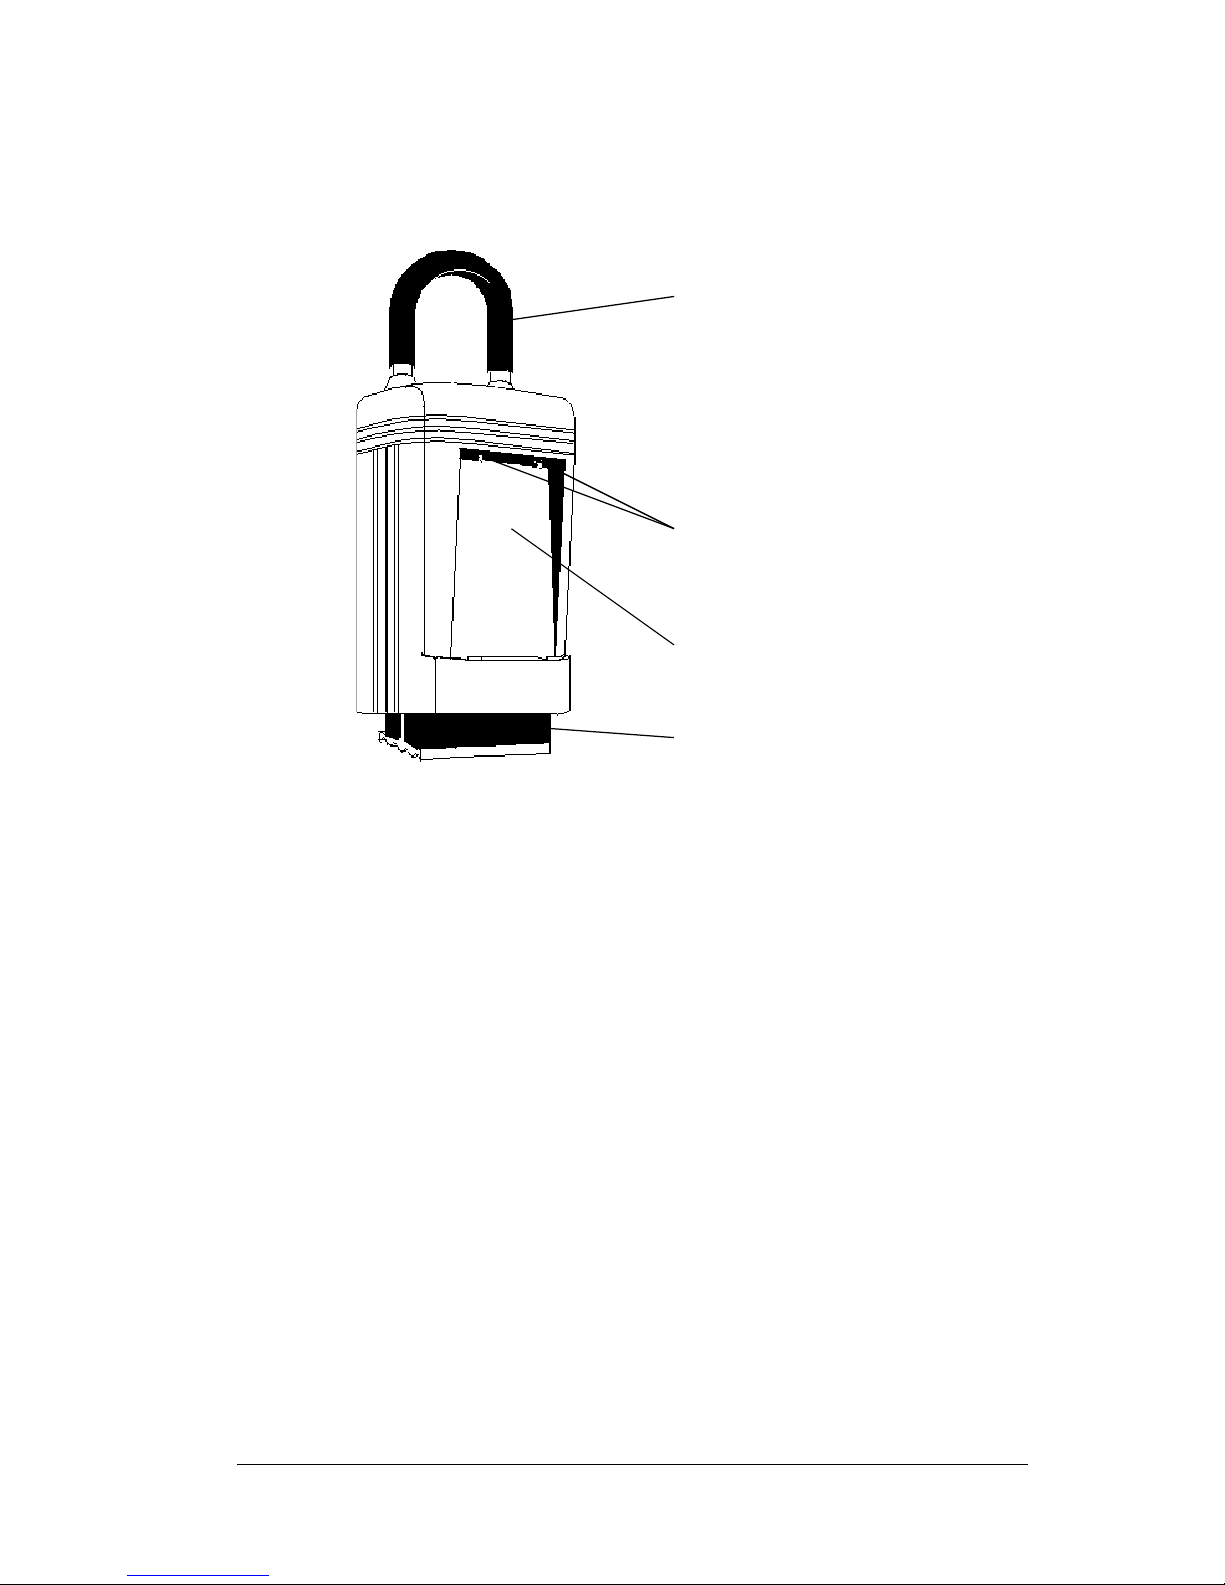
Shackle
Contacts
eKEY receptacle
Key container
Learning the parts of your KeyBox
Shackle The looped attachment ontop of the KeyBoxthat
secures the Key Box to the property.
Contacts The two small metal pins located in the top of the
recessed area that form an electronic connection
between theeKEY and the KeyBox whenthey are
joined. This enables them to communicate with
each other.
eKEY re c e ptacle The recessed area on the front of the KeyBox that
holds the eKEY.
Chapter 1 Page 19
Page 25

Key container The container inserted in the bottom of the
KeyBox that is used to store the listing key. It
dropsdown, but remainsintheKeyBoxuntilyou
pull down on the container to remove it
completely. A chain, attached to the container,
assures that the listing keyremains attached to it.
KeyBox
covering
The KeyBox is encased in plastic to reduce
potential door damage and to assure protection
from th e weather. This covering can be cleaned
with mild cleaner when needed.
KeyBox label The serial number located on the back panel of
the KeyBox, is unique to each KeyBox. Use this
number and the shackle code to obtain reports.
KeyBox
serial
number
Taking care of the KeyBox
Your KeyBox is designed to operate in temperatures ranging from -40
degrees to 185 degrees Fahrenheit.
! In extrem ely hot climates, place the KeyBox in the shade to
preventitfromoverheating.
! In extrem ely cold weather conditions, place the KeyBox where it
can be protected from precipitation.
! If the key container or shackle does not release, call for assistance.
Donothit,pound,ordropyourKeyBox.
! Make s ure all keys are on the key chain and fit loosely inside the
key container. Do not place tags, key rings, or loose objects in the
key container.
Page 20 Introducing the SUPRA System Components
Page 26

Important! Always hang the KeyBox in a vertical position and place
it where moisture from rain or snow cannot run into the
key container. Avoid hanging the KeyBox where
sprinklers or faucets will spray the key container.
Chapter 1 Page 21
Page 27

Page 22 Introducing the SUPRA System Components
Page 28

Chapter 2
Getting Started
Before usingyour eKEY and eSYNC Cradle youmust preparethem for
operation. In this chapter you learn how to:
! Set up your eSYNC Cradle
! Charge your eKEY
! Install Palm Desktop software
! Perform a HotSync
! Install add-on applications
! Remove applications
Chapter 2 Page 23
Page 29
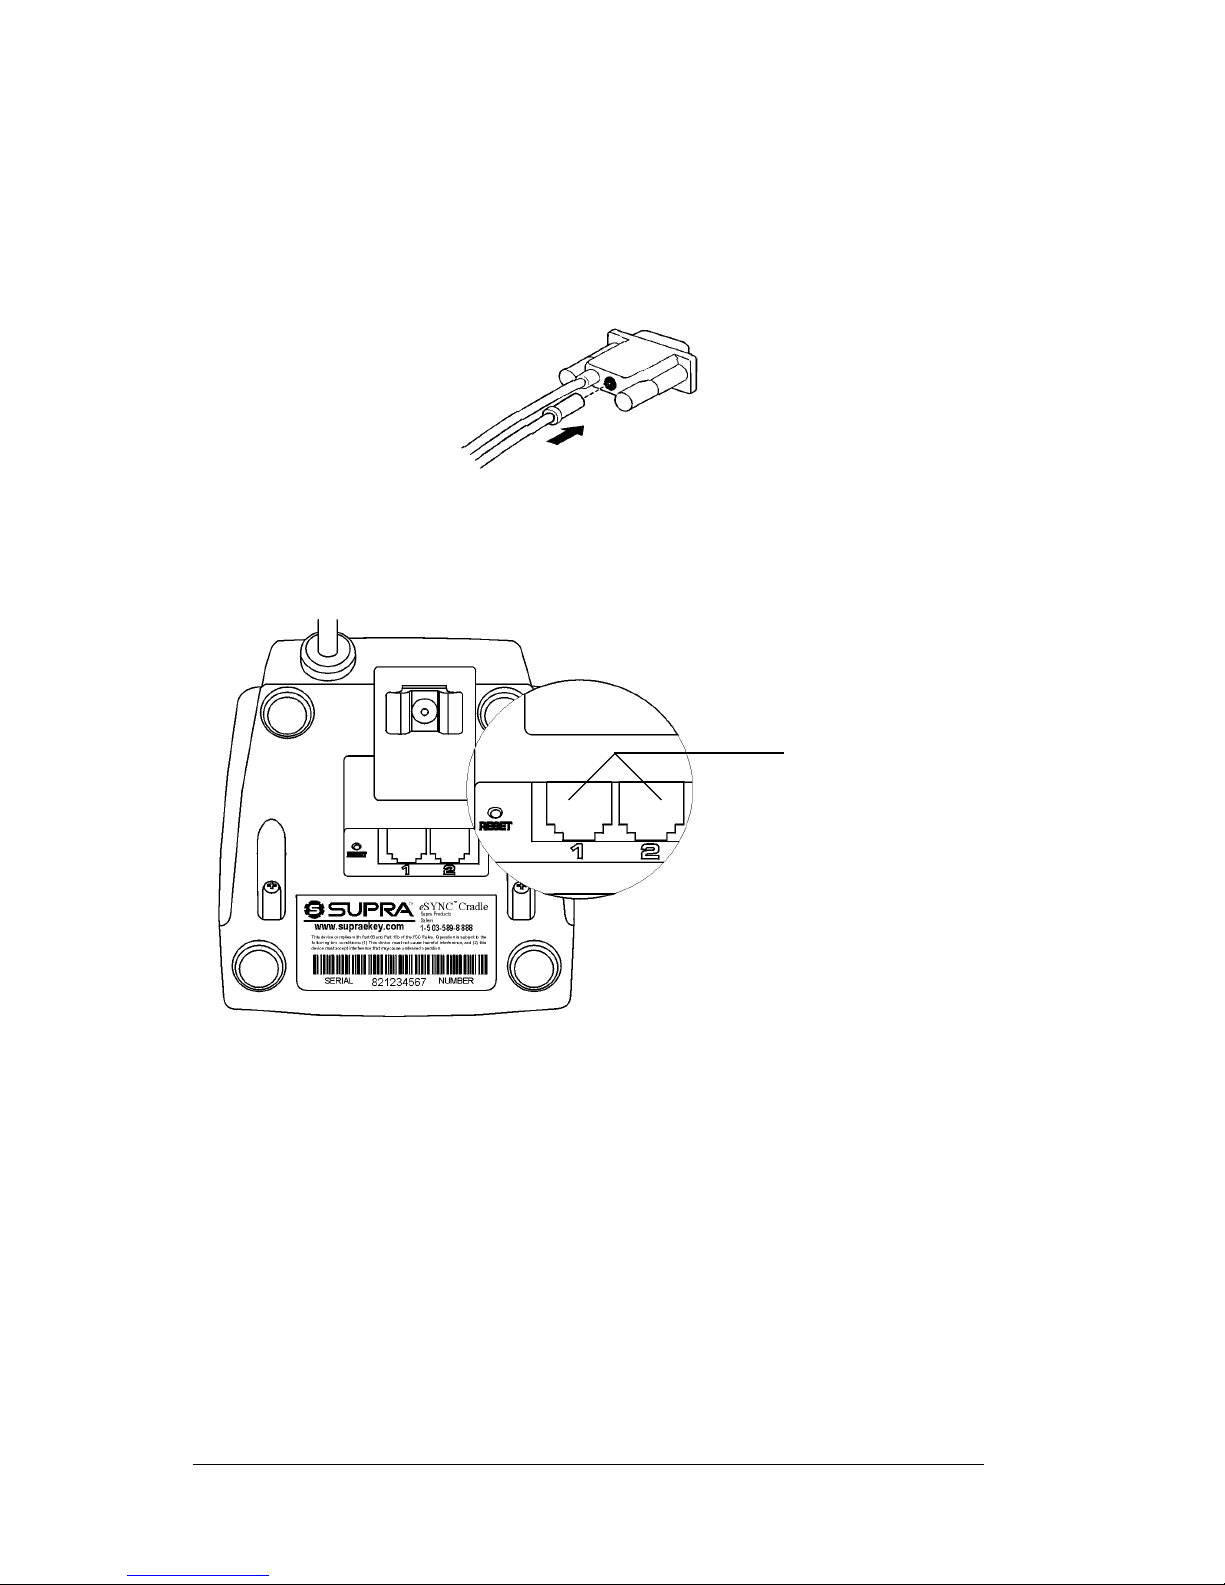
Setting up your eSYNC Cradle
The Cradle must be connected to a power source and a telephone line
before the eKEY can be used for eSYNC and battery charging. The
Cradle may also optionally be connected to a PCto perform a HotSync
operation.
1. Insert the AC adapter cable into the back of the Cradle connector.
2. Insert one end of the phone line, provided with your eKEY, into
eitherof the two phone ports on the bottom of the Cradle. Insert the
other end of the phone line into an open phone jack.
Phone ports
3. If you are connecting your Cradle to a PC, turn off the PC and
connect the Cradle to a COM (serial) port on your PC.
Important! Do not c onnect the Cradle to a COM port or disconnect
theCradlefromaCOMportwhilethePCisturnedon.
4. Plug the AC adapter into a wall outlet.
Page 24 Getting Started
Page 30
Note: If you do not have an open phone jack, you can have your
phone and eKEY Cradle plugged in simultaneously. Unplug
your existing phone line from the wall and plug it into either
of the phone ports on the back of the Cradle.Plug the provided
phone line into the remaining open port in the Cradle and
connect the other end into the phone jack in the wall.
Chapter 2 Page 25
Page 31

Charging the eKEY Batteries
Each night the eKEY batteries are automatically charged when you
place the Key on the eSYNC Cradle before midnight. The Key is
recharged and updated during the nightly eSYNC for use the next
day.
The Key displays a warning message if the batteries get low. When
you see this message, immediately place your eKEY on the eSYNC
Cradle to recharge it.
Note:BeforeusingyoureKEY,werecommendthatyouplaceiton
the eSYNC Cradle and charge it for at least four hours. This
ensures that the Key is fully charged and ready for use. The
batteries cannot be overcharged.
Battery considerations
Please note the following battery considerations:
! Under normal conditions, the batteries charge when you place the
eKEY on the Cradle each day. Conserve battery life by minimizing
the use of the backlight feature, andchanging the Auto-off setting
that automatically turns the eKEY off after a period of inactivity.
! If the batteries drain so much that the eKEY cannot operate, it
storesyour data safelyfor about a week. Data is stored in your Key
during this period but there is not enough residual energy
remaining in the batteries to turn onyour eKEY. If your eKEY does
notturnonwhenyoupressthepowerbutton,rechargetheunit
immediately.
! If you leave the eKEYinanunchargedstateforanextendedperiod
of time, you may lose all the data stored in your Key.
! There are no serviceable parts inside your eKEY. You never need
to replace the batteries.
Page 26 Getting Started
Page 32

Installing Palm Desktop Software
Palm Desktop software is installed on a PC and includes some of the
sameapplicationsas youreKEY: Address Book,DateBook, To DoList,
Memo Pad, and Expense. You can enter data for these applications
directly into the Palm Desktop software. The built-in HotSync
technology synchronizes the information in your eKEY with the
information onyour PC and creates a backup of data from your eKEY
onto your PC.It is a good idea to back up your data in case something
happens to the data on your eKEY. Changes you make on your eKEY
or Palm Desktop software appear in both places after you HotSync.
Note: Only the data from the Address Book, Date Book, To Do List
and Memo Pad are backed up with the Palm Desktop
software.
The Palm Desktop software also includes an Install utility that allows
you to add applications and data to your eKEY.
The following instructions guide you through installing Palm
Desktop software. After installation, go to online Help in Palm
Desktop software for information about using the software.
To ensure a safe and uninterrupted installation of Palm Desktop
software, please do the following before installing:
! Turn off your PC and connect the Cradle to it. Do not connect or
disconnect the Cradle while your PC is turned on.
! If you are installing from diskettes (rather than the CD-ROM
included in the box), make sure the original Palm Desktop
software diskettes are write-protected, and then make backup
copies of them. Use the copies to install thesoftware and store the
original diskettes in a safe place. See your PC's manual or
operating system documentation if you need information about
locking or copying diskettes.
! Do not simply copy the Palm Desktop software files to your PC's
hard disk. You must use the installer to decompress the files and
place them in their proper locations.
To install Palm Desktop software:
1. Exit any open programs, including those that run automatically at
startup such as Microsoft Office, and disable any virus-scanning
software.
2. Insert the Palm Desktopsoftware CD-ROM into the PC's CD-ROM
drive (or insert the diskette labeled
Chapter 2 Page 27
SETUP into the diskette drive).
Page 33

3. When the Palm Desktop Installer Menu appears, click the
Install
button to begin the installation procedure.
4. Follow the onscreen instructions to complete the installation.
During installation you are prompted to insert your SUPRA
handheld computer into the Cradle.
5. Perform a HotSync to determine that the application has been
successfully installed and is fully functional.
To perform a local HotSync operation :
1. Insert your eKEY into the cradle.
Tip: ThebottomedgeoftheeKEYshould align smoothly with
the Cradle when it is inserted p roperly.
2. Start HotSync Manager if it is not running: On the Windows
desktop, click Start, and then choose Programs. Navigate to the
Palm Desktop software program group and choose HotSync
Manager. You can also start the Palm Desktop software which
automatically opens the HotSync Manager.
3. Press the HotSync button on the cradle.
Important: The first time you perform a HotSync operation, you
must enter a user name in the New User dialog box and
click OK. Every handheld should havea unique name. To
prevent loss of a user's records, never try to synchronize
more than one handheld to the same user name.
The HotSyncProgress dialogbox appears andsynchronization
begins.
Page 28 Getting Started
Page 34

4. Wait for a messageon your handheld indicating thatthe processis
complete.
After the HotSync process is complete and the light is green on the
Cradle, remove your eKEY from the cradle.
Installing add-on applications
Your eKEY contains 8 MB of memory. The eKEY comes with the Date
Book,AddressBook,ToDoList,MemoPad,Expense,Calculator,
Mail, eDATA, eSYNC, and eKEY applications installed and ready to
use. These applications along with your MLS listing database, roster,
and KeyBox activity could take up to 6 MB of the eKEY's memory.
You can install additional applications such as games and other
software in the remaining 2 MB on your handheld. The Install Tool
makes it easy to install software on your handheld during a HotSync
operation. There are a variety of third-party applications available for
your eKEY. To learnmore about these applications, goto the website:
http://www.palm.com.
Note: Any game or application that you install on your handheld
resides in RAM memory; you can delete these applications at
any time.
To install add-on software on your SUPRA handheld computer:
1. On your PC, copy or download the application you want to install
into the add-on folder in your Palm Desktop directory on your PC.
Note: If the software you download is compressed, you must
decompress it into this folder. If you prefer to place the
application into another folder, navigate to that folder
before you complete step 5.
2. Double-click the
Chapter 2 Page 29
Palm Desktop
icon on your desktop.
Page 35
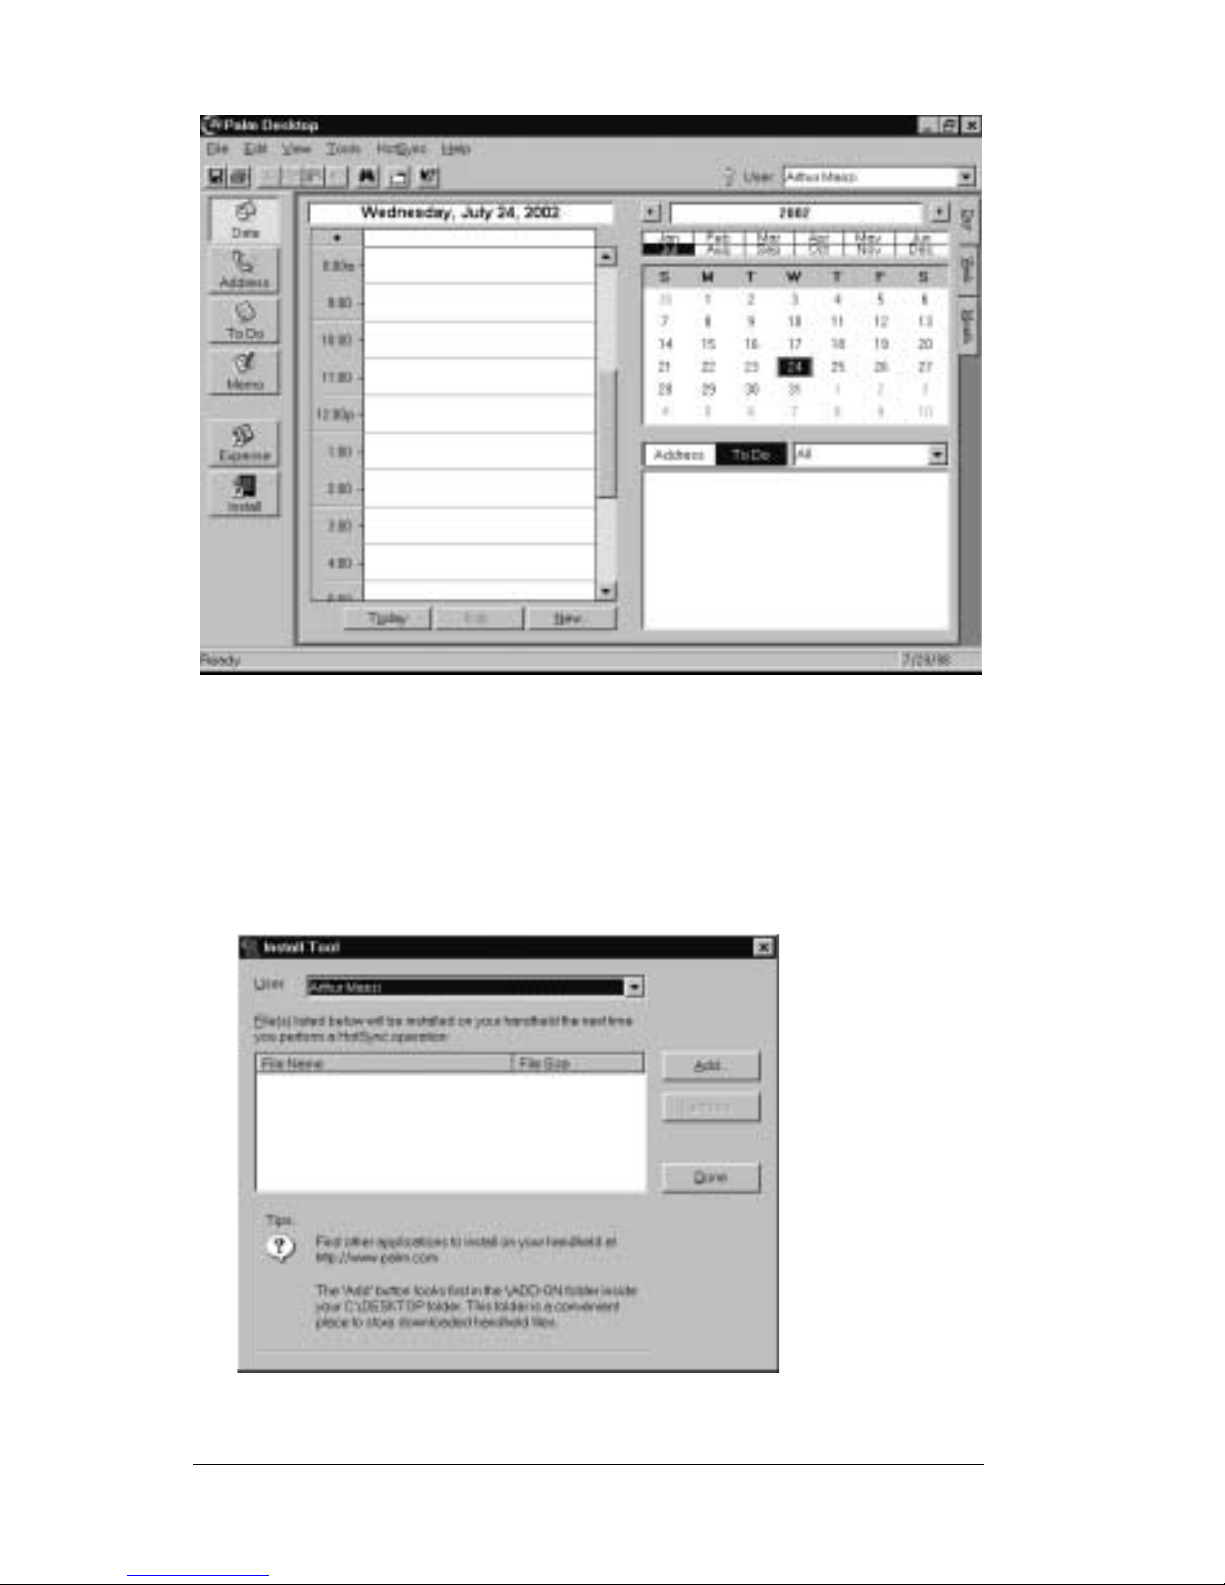
3. Click
Install
.
Tip: Access the
from the Palm Desktop program group or by doubleclicking any file with a PRC file extension.
Install Tool
dialog by selecting
Install Tool
Page 30 Getting Started
Page 36

4. SelectthenamethatcorrespondstoyoureKEY in the
down list.
User
drop-
5. Click
Add
.
6. Select the application(s) that you want to install on your handheld.
Open
7. Click
Note: Review the list of applications you selected in the
.
Tool
dialog box. If you do not want to install an
application, select it, and then click
Remove
Install
.(Thisdoesnot
remove the application from your PC; it simply removes
it from the list of applications to install.)
8. Perform a HotSync operation to install the application(s) you
selected in Step 6.
Removing applications
Remove applicationsfrom yourhandheldif you run out ofmemoryor
decide that you no longer need an application. Only add-on
applications,patches,andextensionsthatyouinstallmay be removed.
You cannot remove the applications that reside in theROM portion of
your handheld.
To remove an ad d-on application:
1. Tap the APPLICATIONS icon .
2. Tap the
3. Tap
4. Tap the application that you want to remove.
MENU icon .
App
,andthentap
Delete
.
Chapter 2 Page 31
Page 37

5. Tap Delete.
6. Tap Yes.
7. Tap Done.
Page 32 Getting Started
Page 38

Chapter 3
Entering Data in Your SUPRA
Handheld Computer
Tapping and Typing
Tap with the stylus to get things done
Use the stylus to tap elements on your SUPRA handheld computer
screen lik e you would use a mouse to select elements on a PC screen.
Setup instructions appear on the screen the first time you start your
handheld. These instructionsinclude a calibrationscreen, or digitizer.
Calibration aligns the internal circuitry of your handheld with its
touch-sensitive screen so when you tap an element on the screen, the
handheld can detect exactly which task you want to perform.
Important: Always use the point of the stylus for tapping or making
strokes on the handheld screen. Never use an actual pen,
pencil, or other sharp object to write on the handheld
screen.
With your handheld turned on, you can tap the handheld screen to
perform many operations, such as the following:
! Open applications
! Choose menu commands
! Initiate a global find operation
! Select options in dialog boxes
! Open the onscreen keyboards
Just as you can drag the mouse to select text or move objects on your
PC, you can also drag the stylus to select text. Use the stylus to drag
the slider of any scroll bar.
Chapter 3 Page 33
Page 39

Elements of the SUPRA handheld computer interface
Menu
bar
Check
box
Icons
Pick list
Command
buttons
Menu bar A set of commands used in an application. Not all
applications have a menu bar.
Command
buttons
Tap a button to perform a command. Command
buttons appear in dialog boxes and at the bottom of
application screens.
Icons
Tap the icons to open applications , menus ,
calculator , and to find text anywhere in your data
.
abc Withthecursorinaninputfield,tapthedotbelow
the abc field to activate the alphabetic keyboard.
123 Withthecursorinaninputfield,tapthedotbelow
the 123 field to activate the numeric keyboard.
Check box W hen a check mark appears in a check box, the
corresponding option is activated. If a check box is
empty, tappingit inserts a check mark. If a check box
is checked, tapping it removes the check mark.
Pick list Tap the arrow to display a list of choices, then tap an
item in the list to select it.
Page 34 Entering Data in Your SUPRA Handheld Computer
Page 40

Previous/next
arrows
Scroll
bar
Scroll bar Drag the slider, or tap the top or bottom arrow, to
scroll through the display one line at a time. To scroll
to the previous page, ta p the scroll bar just above the
slider.Toscrolltothenextpage,tapthescrollbarjust
below the slider.
You can also scroll to the previous and next pages by
pressing the upper and lower portions of the scroll
button on the front panel of the handheld.
Next/
previous
arrows
Tap the up and down arrows to display the previous
and next page of information. Tap the left and right
arrows to display the previous and next record.
Opening applications
Use the Applications Launcher to open any application installed on
your SUPRA handheld computer. Open thefour mainapplications—
Date Book, Address Book, To Do List, and eKEY — with the
application buttons on the front panel of your handheld.
Applications
Launcher
Date
Book
Address
Book
eKEY
To Do
List
Chapter 3 Page 35
Page 41
Tip: Whenyoupressanapplicationbuttononthefrontpanel,you
have instant access to the selected application. It isn't
necessarytoturnonyourhandheldfirst.
In addition to providing a way for you to open applications, the
Applications Launcher displays the current time, battery level, and
application category.
To open an appl i c ation:
1. Tap the Applications icon .
2. Tap the icon of the application that you want to open. If you have
many applications installed on your handheld,tap the scrollbar to
see all of your applications.
Tip: To find an application quickly, you can write the Graffiti
character for the first letter of its name. The Applications
Launcher scrolls to the first application with a name that
begins with that letter.
Page 36 Entering Data in Your SUPRA Handheld Computer
Page 42

Entering Data
Enter data into your SUPRA handheld computer by writing with the
stylus in the Graffiti writing area or by using the onscreen keyboard.
Two ways to enter data into eKEY applications
There are two ways to enter dat a into your handheld:
! Using the onscreen keyboard
! Using Graffiti
Onscreen keyboard
When you create or edit a record in an application such as Address
Book, you can open the onscreen alphabetic and numeric keyboards
to enter data.
Tap here for
alphabetic keyboard
Tap here for numeric
keyboard
After a keyboard is open, tap to open any of the other keyboards,
including the international keyboard.
Note: You cannot enter Graffiti characters while using the onscreen
keyboard.
Chapter 3 Page 37
Page 43

Alpha
Tab
Caps lock
Caps shift
Numeric
Tap here to display
numeric keyboard
Tap here to display
alphabetic keyboard
Backspace
Carriage return
International
Tap here to display
international keyboard
Graffiti writing
Your handheld includes Graffiti writing software as the primary
system for entering text and numbers. With Graffiti, you writesimple
strokes with the stylus. They are recognized as letters or numbers.
Write letters here Write numbers here
Division marks
The Palm Desktop software CD-ROM includes Giraffe, a game you
can use to practiceGraffiti. S ee Installing add-on applications in Chapter
2 for more information. The Memo Pad application i s ideal for
practicing Graffiti.
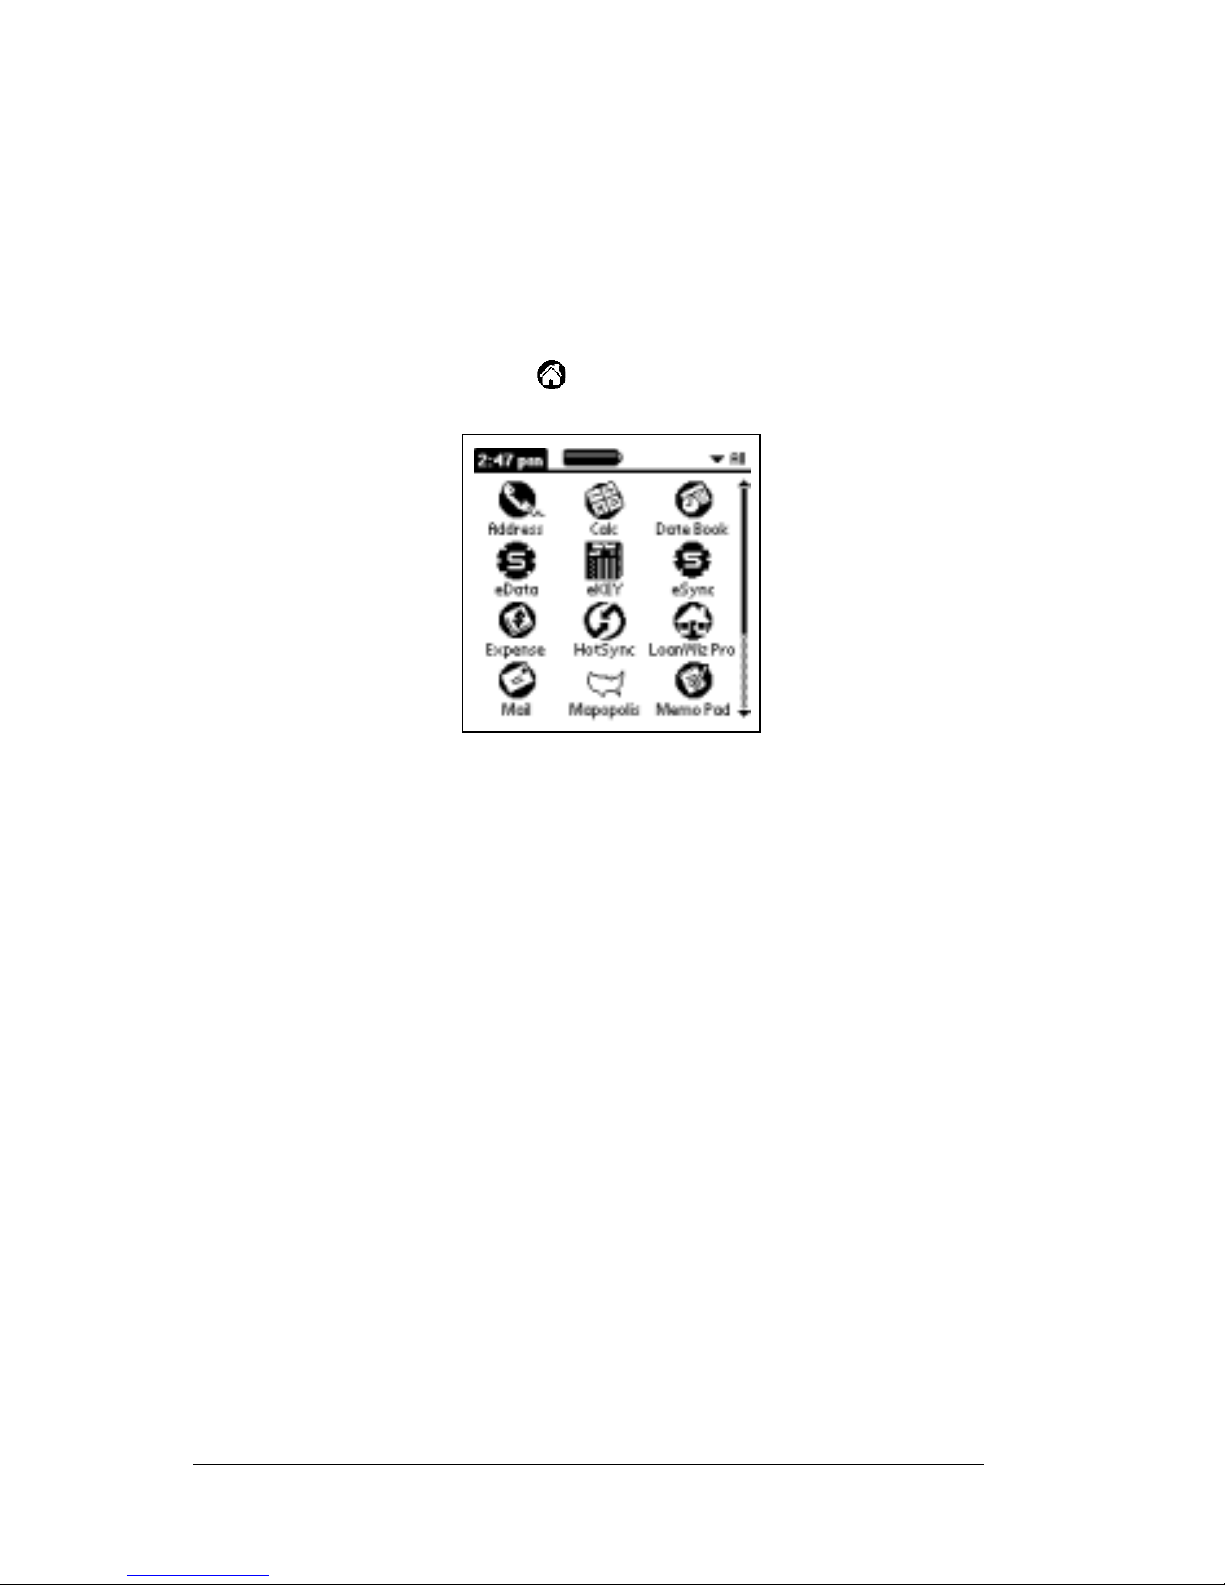
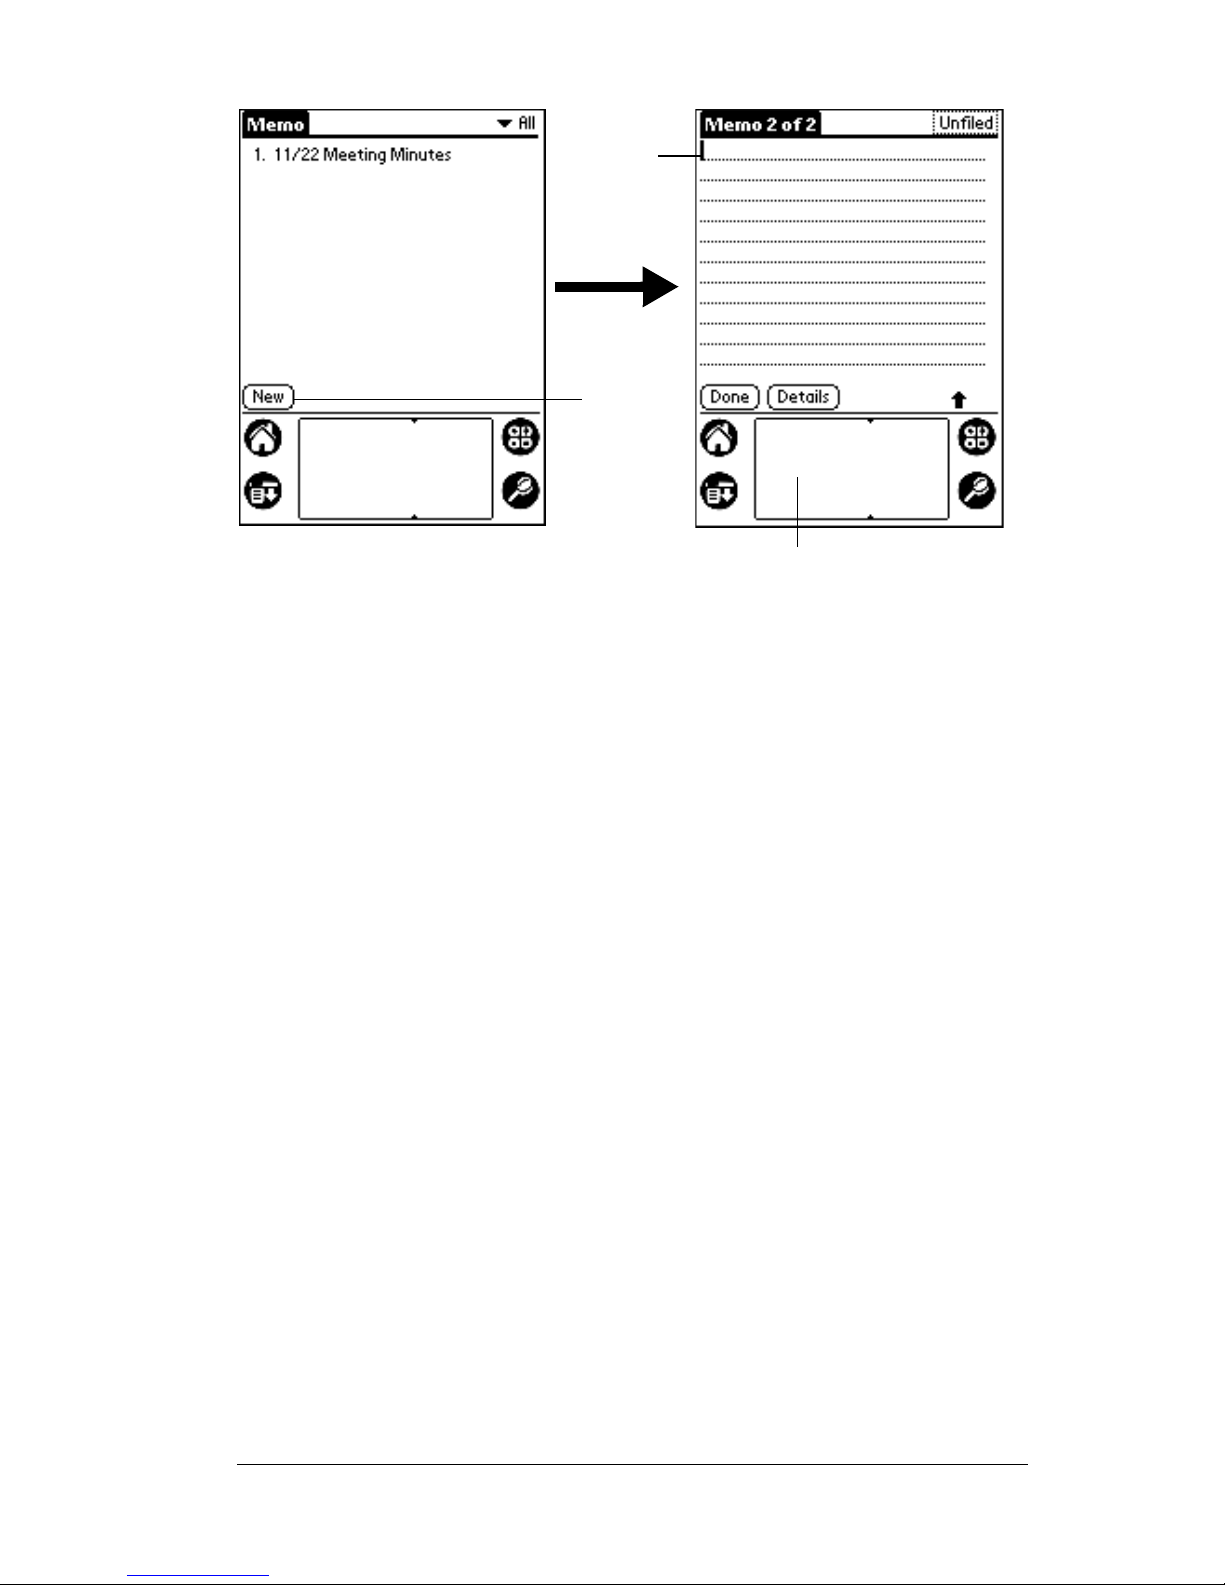
To open Memo Pad:
1. Tap the Memo Pad application icon.
2. Tap New.
Note: Ablinking cursorappears on the firstline of the new memo to
indicate where new text will appear.
Page 38 Entering Data in Your SUPRA Handheld Computer
Page 44
New
memo
cursor
Tap
New
Write in Graffiti area
Chapter 3 Page 39
Page 45

Using Graffiti Writing to Enter Data
Use Graffiti to learn the procedures for creating letters, numbers,
punctuation, and symbols, as well as some Graffiti tips and tricks.
Writing Graffiti charact ers
Most people find they can enter text quickly and accurately with only
minutes of practice. Graffiti writing includes any character you can
type on a s tand ard keyboard. The Graffiti strokes closely resemble the
uppercase letters of the alphabet.
There are four ba s i c con c epts for success with Graffit i wri ting:
! If you draw the character shape correctly, you a chieve 100%
accuracy.
! The heavy dot on each shape shows where to begin the stroke.
Certain characters have similar shapes, but different beginning
and end points. Always begin the stroke at the heavy dot. You
should not createthe heavy dot;it is only thereto show you where
to begin the stroke.
! Most characters require only a single stroke. When you lift the
stylus from the Graffiti writing area, your handheld recognizes
and displays thetext character immediately. To accomplish single
strokes, some Graffiti strokes are portions of the regular alphabet
equivalents.
! The Graffiti writing area is divided into two parts: onefor writing
the letters of the alphabet and one for writing numbers. The small
marks at the top and bottom of the Graffiti writing area indicate
the two areas.
Page 40 Entering Data in Your SUPRA Handheld Computer
Page 46

Write letters here Write numbers here
Division marks
To write Graffiti letters:
1. Tap the screen where you want your text to go.
Note: Tap above the Graffiti writing area. You must see a
blinking cursor before you write the text.
2. Use the tables on the following pages to find the stroke shape for
the letter you wantto create. Forexample, the stroke shown below
creates the letter n.
Note: There are two different strokes available for some letters.
For these letters, choose the one that's easiest for you.
Lift stylus
here
Start stroke
at heavy dot
Asyou'llseelater,youusethesameshapetocreateboththe
uppercase and lowercase version of a letter.
3. Position the stylus in the left-hand side of the Graffiti writing area.
4. Start your stroke at the heavy dot and draw the stroke shape as it
appears in the tables.
5. Lift the stylus from the screen at the end of the stroke shape.
When you lift the stylus from the screen, your handheld recognizes
your stroke immediately and prints the letter at the insertionpoint on
the screen.
Onceyouliftthestylusfromthescreen,beginthestrokeforthenext
character you want to write.
Important: Begin the character strokes in the Graffiti writing area or
Chapter 3 Page 41
Page 47

your handheld doesnot recognize themas textcharacters.
Graffiti tips
When using Graffiti, keep these tips in mind:
! Accuracy improves when you write large characters. Yo u should
draw strokes that nearly fill the Graffiti writing area.
! To delete characters, simply set the insertion point to the right of
the character you want to delete and make the backspace stroke
(draw a line from right to left) in the Graffiti writing area.
! Write at natural speed. Writing too slowly can generate errors.
! Do not write on a slant. Vertical strokes should be parallel to the
sides of the Graffiti writing area.
! Press firmly.
Page 42 Entering Data in Your SUPRA Handheld Computer
Page 48

The Graffiti alphabet
Letter Strokes Letter Strokes
AN
BO
CP
DQ
ER
FS
GT
HU
IV
JW
KX
LY
MZ
Space Back Space
Carriage
Return
Chapter 3 Page 43
Period
tap twice
Page 49

Writing capital letters
Make capital letters with thesame stroke shapes as the basic alphabet
characters. To make capital letters, you must first shift to caps, just as
you p ress the Shiftkey on a keyboard, then write the character strokes.
Note: Graffiti includes a feature that automatically capitalizes the
first letter when you create a new sentence or a new record (by
tapping New or a blank line).
To draw the first lett er of a word as a cap i tal letter:
! Use the Caps Shift stroke:
Caps
Shift
Tip: When Caps Shift is active, an up arrow symbol appears in the
lower-right corner of the handheld screen. If you accidentally
activate Caps Shift, backspace will cancel it.
Caps Shift
To enter only capital letter s (Caps Lock ):
! Use the Caps Lock stroke:
Caps
Lock
Tip: When Caps Lock is active, an underlined up arrow symbol
appears in the lower-right corner of the handheld screen. To
return to lowercase, make the Caps Shift stroke.
Caps Lock
Writing numbers
Writing numbers with Graffiti is similar to writing letters of the
alphabet, except you makethe character strokeson the right-handside
(numbers side) of the Graffiti writing area.
Page 44 Entering Data in Your SUPRA Handheld Computer
Page 50

Graffiti numbers
Number Strokes Number Strokes
05
16
27
38
49
Writing punctuation marks
Graffiti writing creates punctuation symbols like those on a standard
keyboard. All punctuation marks begin with a single tap on the
Graffiti writing area. When you make this tap, you activate
Punctuation Shift and a dot appears to show it is active. The next
stroke you make with the stylus creates a punctuation mark.
Punctuation shift
Note: When Punctuation Shift is active, you can make a symbol
stroke anywhere in the Graffiti writing area (the letters or
numbers side).
Chapter 3 Page 45
Page 51

Symbol Stroke Symbol Stroke
Period
.
Comma
,
Apostrophe
'
Question
?
Exclamation
!
Dash
—
Left Paren
(
Right Paren
)
Slash
/
Dollar
$
Navigation strokes
In addition to character symbols, Graffiti writing includes special
strokes that you use to navigate within text or fields in your
applications.
Command Stroke
Move cursor right
Move cursor left
Using the onscreen keyboard
Open the onscreen keyboard anytime you need to enter text or
numbersonyourhandheld.You cannot enter Graffiti characterswhile
using the onscreen keyboard.
To use the onscreen ke y bo ard:
1. Open any application.
2. Tap any record, or tap New.
3. Tap abc to open the alphabetic keyboard, or tap 123 to open the
numeric keyboard.
Page 46 Entering Data in Your SUPRA Handheld Computer
Page 52

Tap here for alpha
keyboard
Tap here for numeric
keyboard
4. Tap the characters to enter text and numbers.
Note: The onscreen key board also includes a dialog box for
international characters. Switch among the three dialogs
at any time to enter the exact text you need.
5. After you finish, tap Done to close the onscreen keyboard and
place the text in the record.
Chapter 3 Page 47
Page 53

Page 48 Entering Data in Your SUPRA Handheld Computer
Page 54

Chapter 4
Using the eSYNC Application
eSYNC i s the communication process that takes place between your
eKEY and KIMnet for an exchange of information.
During eSYNC your eKEY sends to KIMnet:
! Listings your Key has accessed since the last eSYNC
! Feedback you entered after showing a listing since the last eSYNC
And your eKEY receives from KIMnet:
! An update code that reactivates your eKEY for use each day
! Changes to the membership roster
! Changes to the MLS listing information in your market area
Note: Youdefineyour marketarea in KIMweb. See Downloading
Listings in Chapter 7 for more information.
Important! You must h ave listingandroster data already on your
eKEY in order for changes to be received during
eSYNC. If you do not have roster and listing data on
your eKEY, see Downloading Listings in Chapter 7 for
more information.
! Feedback sent by other eKEY holders that have shown your
listings
! Any messages from your Board, Broker office and SUPRA that
have been composed since your last eSYNC
! A messageindicating the number of showingsthat have occurred
at your listings since your last eSYNC
! Detailed showing activity for your listings
Note: Showinginformationstoredineachagent'seKEY is sent
during their eSYNC operation. There may be a delay in
receiving agent's showing information and feedback
dependingonwhentheagent'seKEY performs an
eSYNC.
Important! Only the activity for those KeyBoxes you have
Chapter 4 Page 49
designated on the agent website to be included in
eSYNC are included in the number of new showings
Page 55

messageandtheKeyBoxactivitysentfromKIMnet.
See Setting KeyBox Assignments in Chapter 7 for more
information.
Page 50 Using the eSYNC Application
Page 56

Performing an eSYNC
How often to eSYNC
In order to ensure that your eKEYisalwaysupdated,charged,and
contains all of the latest listing and roster information, place your
eKEY on the Cradle every night.
You must set up your market area on KIMweb and perform a manual
eSYNC to have listing and roster informationdeliveredto your eKEY.
Once the listing and roster informationhas been initially delivered to
your eKEY, the automatic nightly eSYNC provides you with accurate
listing and roster information on a daily basis.
Important! If three days h ave lapsed since you have performed an
eSYNC,you mustperform a manual eSYNC to receive the
entire listing database for your market area. If 14 days
have lapsed since you have performed an eSYNC, you
must perform a manual eSYNC to receive a new roster
database and the entire listing database for your market
area. See Downloading Listings in Chapter 7 for
information on downloading new roster and listing files.
Automatic eSYNC
The eSYNC operation lasts only a fewminutes and takes placeduring
a preset time between midnight and 6
AM. Only changes are sent to
youreKEY.
To perform an automatic eSYNC:
! Place your eKEY on the eSYNC Cradle. During eSYNC, the eKEY
dials KIMnet and completes an eSYNC.
! Remove the eKEY from the Cradle when you are ready to leave for
work the next day. It is updated, charged, and ready to use.
Manual eSYNC
There are two reasons for performing a manual eSYNC:
! An automatic eSYNC was either not performed or was not
successful
! To deliver initial or entire listing and roster data to the eKEY
See Downloading Listings in Chapter 7 for more information on
downloading roster and listing databases.
Chapter 4 Page 51
Page 57

To perform a manual eSYNC:
1. Press the ON button.
2. Open the eKEY shell front and place the eKEY on the eSYNC
Cradle.
3. Tap the main menu icon if the main application screen is not
activated.
4. Tap the eSYNC application icon . The Welcome screen is
displayed.
5. Tap the word eSYNC which appears between the two arrows on
the screen. The red light on the front of the Cradleilluminates and
the eSYNC operationbegins. As eSYNCbegins, the screen displays
the status of the operation.
Note: A red light illuminates on the eSYNC Cradle indicating the
Cradle is communicating with KIMnet.
A green light indicates the eKEY is connected to the Cradle or
is in the process of being re-charged.
Important! Do not remove the eKEY from the eSYNC Cradle when the red
light is illuminated. When the green light illuminates, the
eSYNC operation is complete. You mayremove the eKEY
from the Cradle however you may not use the Key until the
information received during eSYNC is processed.
Offline listing and roster data processing
Data is delivered during eSYNCandissortedafterdisconnectingfrom
KIMnet. I nformati on processing is finished when the message
Update Status: Updated
appears. The duration of both eSYNC and
Key
information processing is determined by the amount of data
transmitted. The entire processing time can last up to 15 minutes.
Page 52 Using the eSYNC Application
Page 58

eSYNC Log
The eSYNC applicationstores a log of the last 20 eSYNC attempts. The
log displaysthe date, thebeginning time of the eSYNC, whetherit was
amanualorautomaticeSYNC, and whether the eSYNCwas successful
or resulted in an error.
To view more information about a particular eSYNC, tap on the
eSYNCrecordanddetailedinformationabouttheeSYNC is displayed.
Viewing messages following eSYNC
When you first turn on your eKEY following an eSYNC, a message is
displayed informing you if the eSYNC was successful.
A series of additionalmessages follow the successful update message.
You must view your messages before you can continue using your
eKEY.
When an eSYNC is not successful, a message appears prompting you
to perform a manual eSYNC or call the KeyBox office managing the
KeyBox system.
Changing the eSYNC dial-up configuration
You may change presetconfiguration options for the eSYNC function
when necessary. Follow the instructions below to access, view and
change configuration options:
1. Open the eKEY shell front and turn on the SUPRA handheld
computer.
2. Tap the Applications icon .
3. Tap the eSYNC icon .
4. Tap the Menu icon . A menu bar displays two options:
Configuration
already highlighted. Two options,
the drop down list.
and
Options
. Tap the Configuration option if it is not
Dial Up
and
MLS Info
appear in
Chapter 4 Page 53
Page 59

5. Tap
Dial Up
. A list of fields with preset options appears.
The fol low ing fields appear on the screen:
DNS This field is pre-programmed with information. Do
notmakechangestothisfieldunlessinstructedtodosoby
SUPRA Field Support staff.
Phone
numbers
Two phonenumber entriesare availablefor eSYNC to
dialKIMnet.The phonenumberthat is checkedis the
phone number for dialing KIMnet during an eSYNC.
You can enter phone numbers for dialing both from
home and from the office. These numbers can also be
changed if you travel outside the local dialing area
and must enter another phone number to access
KIMnet.
Dial prefix Check thisboxto enable a dialingprefix and enter the
necessary dialing prefix. The dialing prefix is dialed
prior to the eSYNC phone number. This could be a 8
or 9 where needed to access an outside line or a 1 to
place a long distance call.
Page 54 Using the eSYNC Application
Page 60

Disable
Call waiting
Check this box to disable call waiting and enter the
appropriate code determined by your telephone
service in the space provided.
Wait for
Dial Tone
Check this box and enter a number from 1 to 99 to
have the eSYNC Cradle wait the specified number of
seconds for a dial tone before dialing KIMnet. This
can be used if your telephone service uses voice
messaging.
Configuring whether to download listings and roster
You may choose whether or not to receive listing and roster changes
during an eSYNC. Your eKEY is automatically configured to receive
listing and roster changes. You may elect not to download listing or
roster changes to save time during an eSYNCor to save space on your
SUPRA handheld computer.
To set your eKEY to not receive listing or roster changes :
1. Open the eKEY shell front and turn on the SUPRA handheld
computer.
2. Tap the Applications icon .
3. Tap the eSYNC icon .
4. Tap the Menu icon . A menu bar displays two options:
Configuration
and
already highlighted. Two options,
Options
. Tap the Configuration option if it is not
Dial Up
and
MLS Info
appear in
the drop down list.
Chapter 4 Page 55
Page 61

5. Tap
MLS Info
.The
MLS Info Configuration
screen is displayed.
6. Tap the check box next to
Download Listings
to indicate whether
you want listings sent to your eKEY during each eSYNC.
7. Tap the check box next to
Download Roster
to indicate whether you
want listings sent to your eKEY during each eSYNC.
8. Tap
OK
.
Delete Listing or Roster Database
If you are not using the listings or roster feature and want to save
space on your SUPRA handheld computer you can delete the current
listings or roster database.
Page 56 Using the eSYNC Application
Page 62

Chapter 5
Using the eKEY Application
Inthis chapter we focus on the eKEYapplicationand youlearn how to:
! Navigate the eKEY application
! Use the eKEY help screens
! Interpret the meaning of audio tones programmed intoyour eKEY
! Obtain a listing key from a KeyBox
! Enter feedback after showinga listingto be sentto the listingagent
! Release a shackle on a KeyBox
! Read KeyBox information
! Make programming changes to your eKEY or KeyBox
! Perform a manual update
! View error codes
Chapter 5 Page 57
Page 63
Navigating the eKEY Application
There are two ways to start the eKEY application:
! Press the
! Open the shell front, tap the eKEY icon on the screen, then close
on
buttonontheeKEY shell front, or
the shell front.
Note:TheeKEY application is designed to be used with the eKEY
shell front in the closed position. There are some options
where information is displayed on the entire SUPRA
handheld computer screen. Open the shell front to view the
full display screen.
Viewing menu options
When the eKEYapplication is started, the menuoption last usedinthe
application is highlighted. To select an option press the up or down
arrow button on the shell front until the selection you want is
highlighted and press
on the shell front.
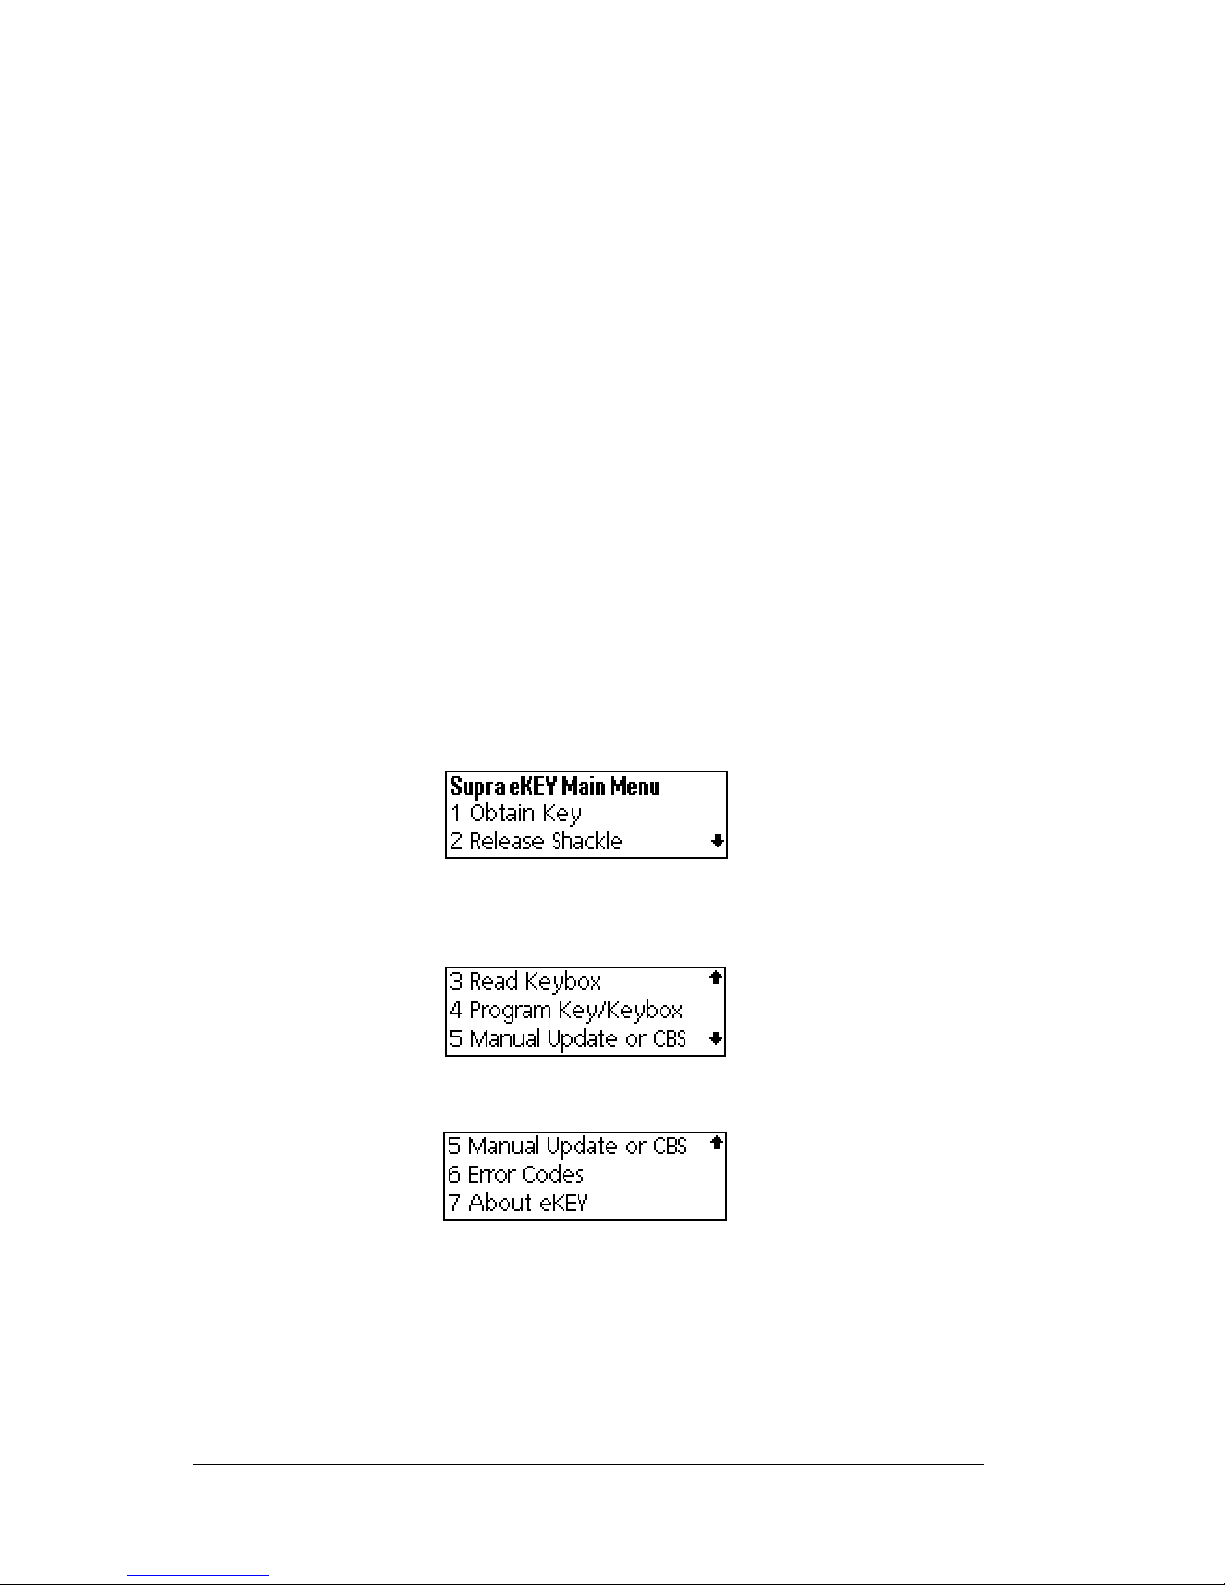
There are seven menu options on the Supra eKEY Main Menu.
enter
, or press the number button of the option
From the first screen of options, press the down arrow on the shell
front to view more options.
Press the down arrow again to view the last screen of optio ns.
Tip: To back out of a menu option once you have selected it, press
the up arrow button on the shell front.You are returnedto the
previous menu.
Page 58 Using the eKEY Application
Page 64

Viewing sub-menu options
Two eKEY options,
Read Keybox
and
Program Key/Keybox
,containsub-
menus. To view sub-menu options:
1. Scrollto highlightthemain option. Forexample,scroll tothe
Key/Keybox
2. Press
enter
option.
to select the option. Sub-options that are available
Program
appear in the viewing port.
3. Press 0 on the shell front to return to the eKEY main menu, or press
the arrow button until
enter
.
O Return to Main Menu
is highlightedand press
Chapter 5 Page 59
Page 65

Getting Help in the eKEY Application
Help screens are available throughout the eKEY application. If you
need help while using the application, open the shell front and view
the help information displayed at the bottom of the viewing area.
Note: Usethe scroll barsto view help information below the viewing
area. Scroll bars also return you to the top of the h elp screen.
For additional help, tap the Field Support tab and call the number
displayed to contact SUPRA's Field Support Hotline.
Page 60 Using the eKEY Application
Page 66

Understanding Audio Tones
Audio tones are sounds your eKEY makes to indicate the status of an
operation. They alert you when an operation has been performed
successfully. They also help you determine the cause of an
unsuccessful operation.
There are six audio tones used by the eKEY:
When you hear It means
1beep Youhave pressed buttons on the keypad to
select functions or enter information. (The
beep soun ds each time a button is pressed
on the keypad.)
2 beeps You have entered a code sequence on the
keypad.
4 beeps A keypad function is completed.
1buzz ! You have entered an i ncorrect code, or
! You have incorrectly entered 10
consecutivecodeentrieswithina10minute period. When this happens, the
eKEY locks up for 10 minutes and you
arenotabletousetheKey.Attheendof
this time period, the Key self-activates
and is ready for use.
2buzztones The batteries are low and need charging.
3buzztones Your eKEY has shut down and is no longer
usable. This happens if there is an error in
the programming insidethe Key. You must
take your eKEY to your Association/MLS
office to be reprogrammed.
Chapter 5 Page 61
Page 67
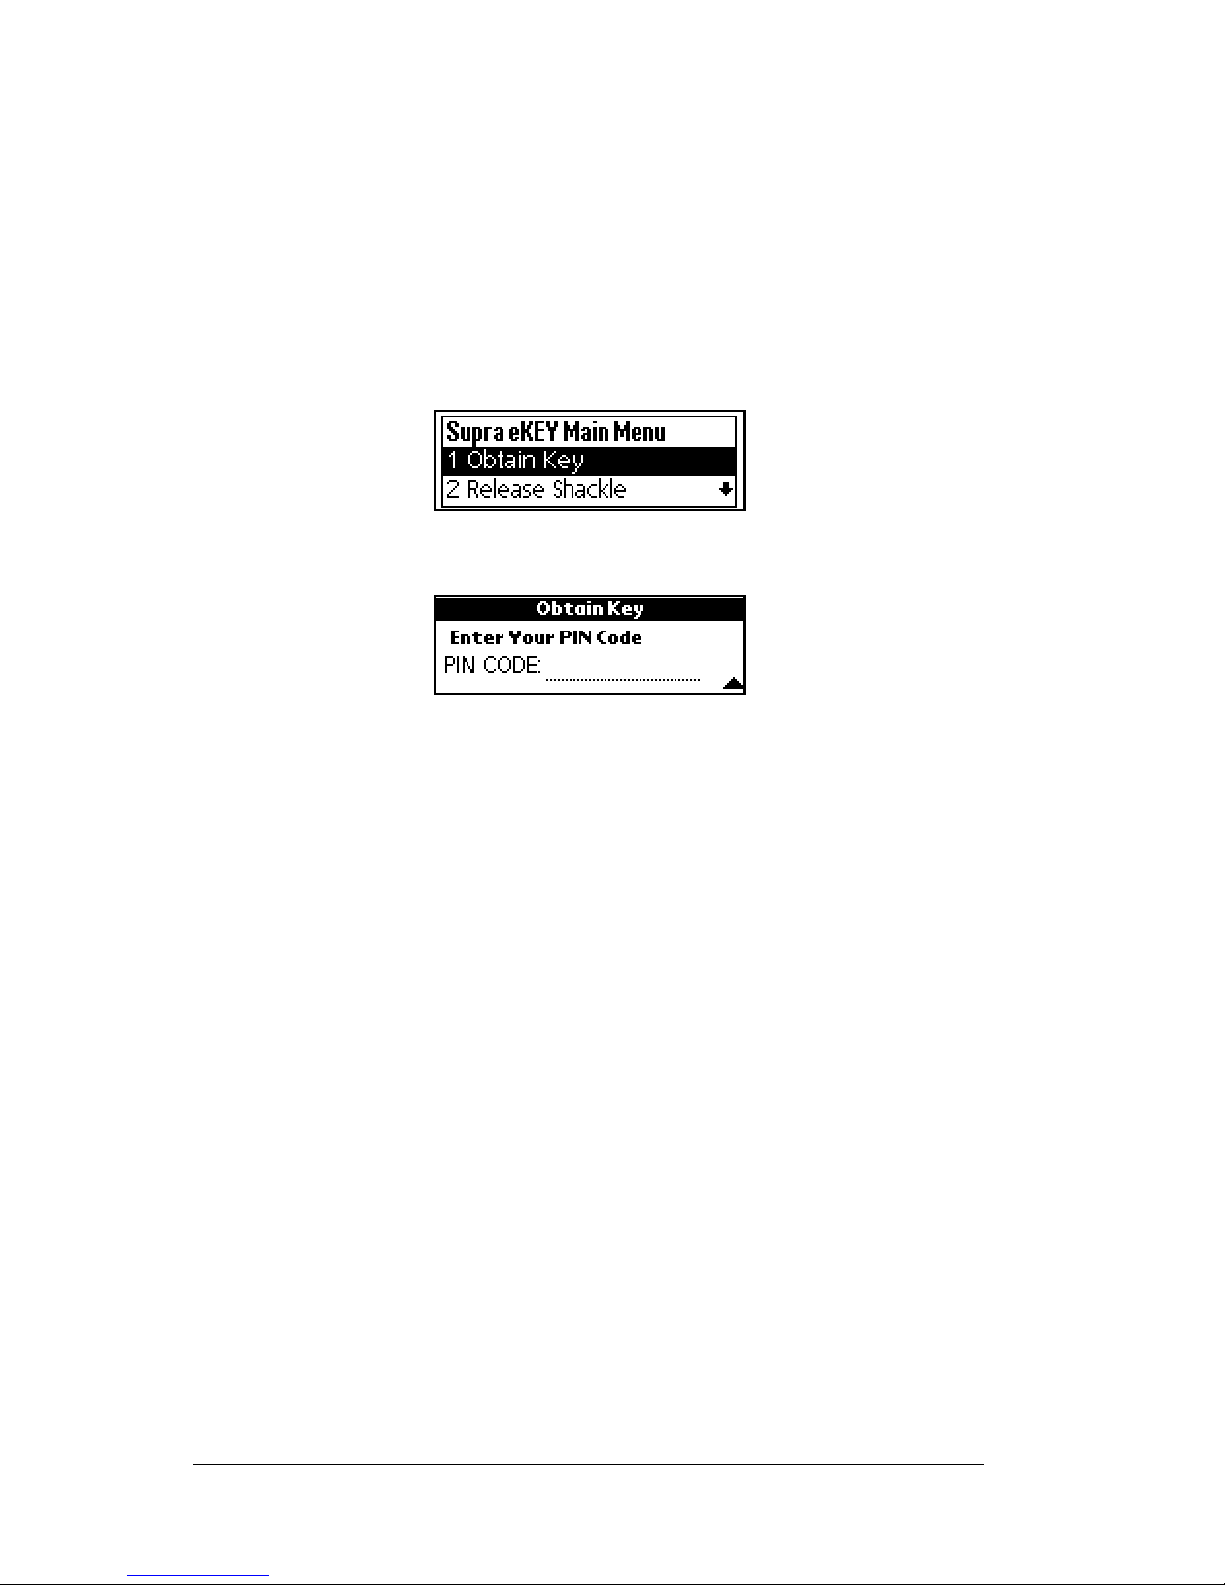
Obtaining the Listing Key from a KeyBox
Once your eKEY is updated and the batteries are charged, you are
ready to show listings.
Releasing the key container
1. Close your eKEY shell.
2. Press the
3. Highlight the
4. Press
5. Enter your four-digit PIN code.
Tip: Press the down arrow button on the shell front to
6. InsertthebackofyourKeyintotheKeyBoxso thatthebackportion
of the Key fits snuglyintotherecessed portion of the KeyBox. After
a few seconds the key container drops partially from the KeyBox.
on
button.
Obtain Key
enter
.The
backspace if you enter an incorrect number.
PIN CODE
option.
prompt appears.
Tip: The gold contacts on the Key must match the contacts on
the KeyBox receptacle.
7. Grasp the sides of the key container and pull i t straight down to
remove it completely from the KeyBox.
Once the key is obtained, the eKEY displays an
message on t he display. If you receive an error message, see Appendix
A: Error Codes for help in determining how to correct the error.
Operation Successful
Attaching listing keys to the key container
A chain inside the key container attaches the listing keys to the key
container. The key container is designed to hold up to three keys. Be
sure the keys are tucked carefully inside the key container before
closing it in the KeyBox.
Page 62 Using the eKEY Application
Page 68

Tip: Ifitisyourlisting,itisagoodideatohaveasparesetofkeys
from the homeowner in case of an emergency or KeyBox
problem.
Replacing the key container
Once keys are placed inside the key container, turn it so the
compartment that holds the keys is facing you. Insert the key
container into the bottom of the KeyBox and push up on the key
container until it closes. The listing keys are now secure.
eFeedback
The eFeedback option allows you to provide feedback to the listing
agent. If the eFeedback option is turned on, an eFeedback Alert screen
appears a few seconds after you obtain a key from the KeyBox.
You can indicate to create feedback now, later, or not at all. If you
indicate you do not want to create feedback, you cannot return and
enter feedback later unless you release the key container again.
If you indicate you want to enter feedback later you are pro mpted to
create a name for the feedback.
At any time you can go to your eDATA application and choose the
eFeedback menu option to enter the information. The KeyBox serial
number, the date you showed the listing, and the name you gave the
showing are displayed so you can recognize the showing.
If you indicate you want to enter feedback information now a screen
provides you with some drop-down menus so you can enter:
! The prospective buyer’s level of interest in the property
Chapter 5 Page 63
Page 69

! Whether the price was in or out of the buyer’s range
! A recommended price for the listing
! Whether youwillcontactthe listingagentorwantthelistingagent
to contact you or if no contact is needed
! Any additional notes you want to send to the listing agent
The feedback is sent during your next eSYNC operation. A listing
agent with an eKEY will receive the feedback after their next eSYNC.
A listing agent witha DisplayKEYcan view the feedback on the agent
website in the Showing Activity Reports option.
Turning eFeedback on or off
The eFeedback option can be turned on or off from the eKEY menu.
To turn the eFeedback option on or off:
1. Open the eKEY shell.
2. Turn on the SUPRA handheld computer.
3. Tap the Applications icon .
4. Tap the eKEY icon to start the application.
5. Tap the Menu icon in the lower left corner of the screen. The
Options
tab drop down screen displays several options.
Page 64 Using the eKEY Application
Page 70
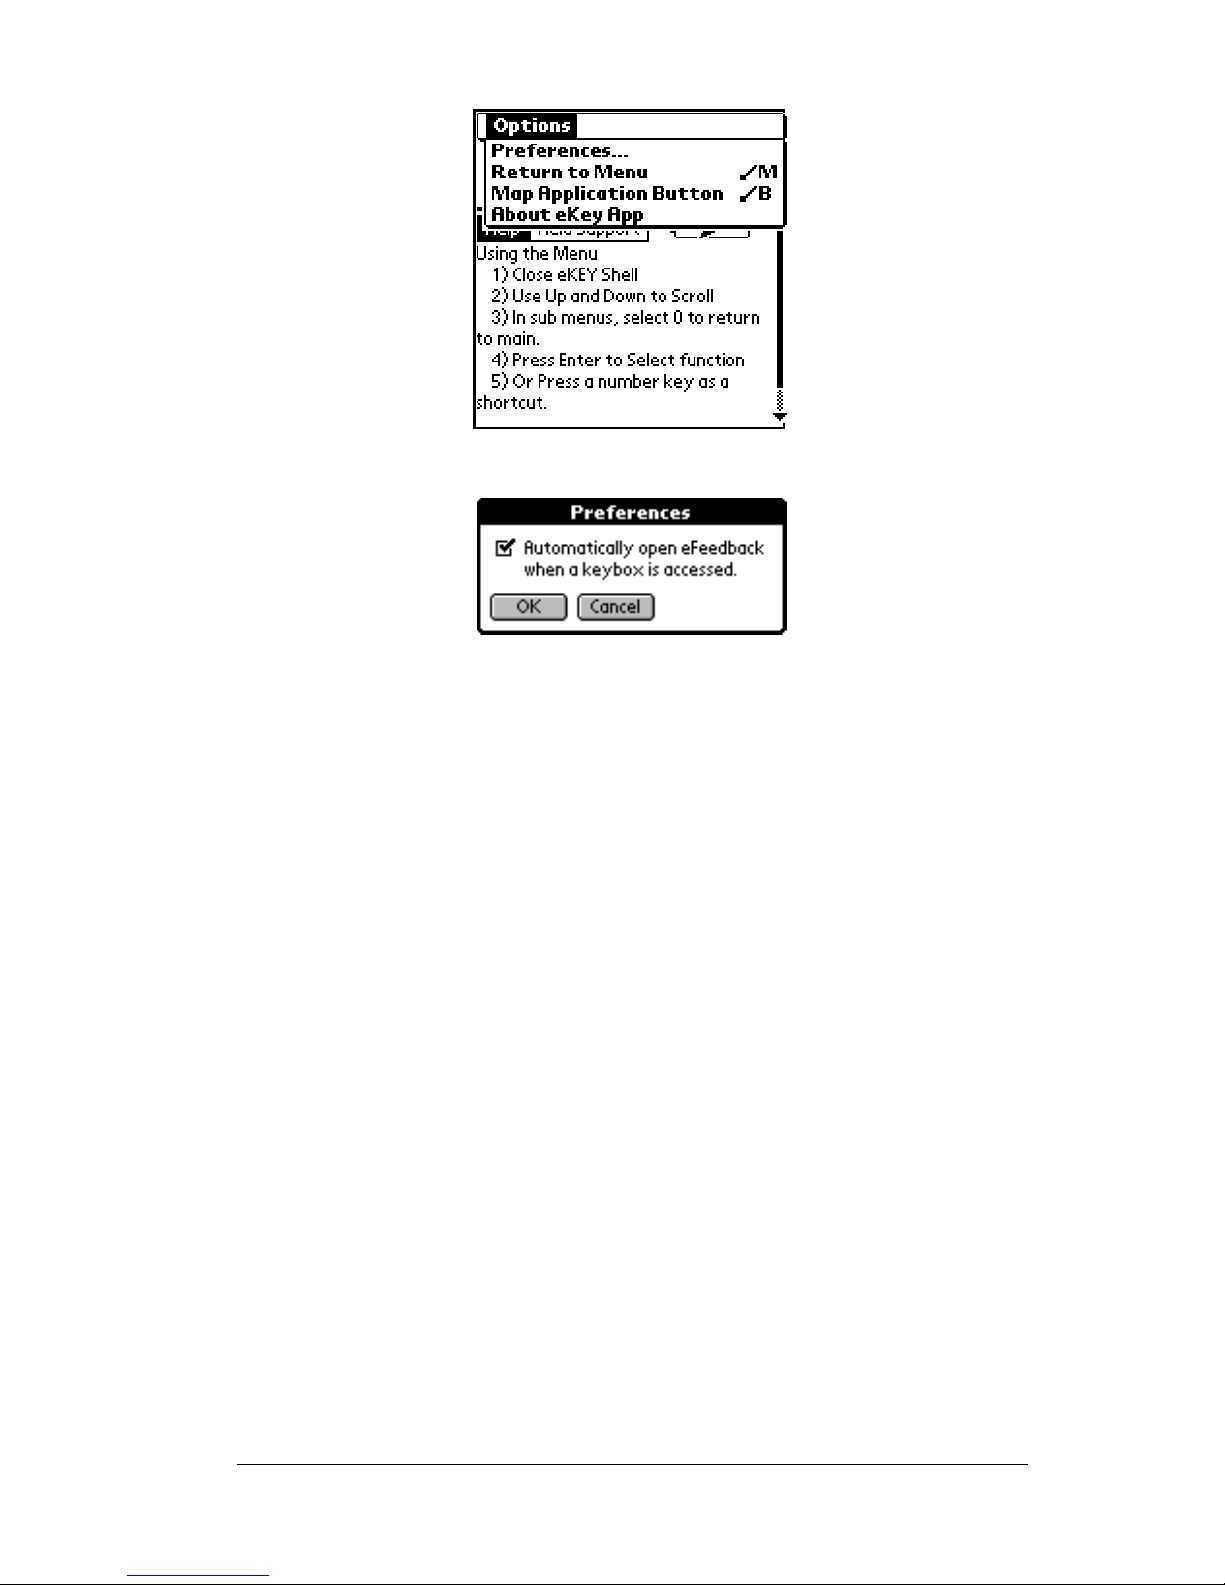
6. Tap
Preferences
.The
Preferences
screen appears.
7. Check the box to have the eFeedback alert appear after obtaining a
key from a KeyBox. Uncheck the box if you do not want to have the
eFeedback alert appear after showing a listing.
Chapter 5 Page 65
Page 71

Releasing the Shackle
Each KeyBox has a shackle code which is used to release the shackle
for installation or removal from a listing. Follow these instructions to
release a shackle:
1. Close your eKEY shell.
2. Press the
3. Highlight the
4. Press
5. Enter the four-digit shackle code for the KeyBox.
6. Insert the back of your eKEY into the KeyBox so that it fits snugly
into the KeyBox receptacle. The gold contacts on the eKEY must
match the contacts on the KeyBox. The shackle releases after a
short delay. A Successful message appears in the display screen. If
you receive an error message, see Appendix A: Error Codes for help
in determining how to correct the error.
on
button.
Release Shackle
enter
. You are prompted to enter the KeyBox shackle code.
option.
Removing the shackle
Once th e shackle has been opened, it can be completely removed from
the KeyBox by repeating steps 1 through 5 in the above section
Releasing the Shackle.
Page 66 Using the eKEY Application
Page 72

Reading KeyBox Information
The KeyBox stores the Key serial numbers of each agent who has
accessed the KeyBox. It also records the dates and times the property
is shown. This information is transferred to your Key through the
Read KeyBox function.
Incident report
Anincident report can be generatedif a situation arises at a listing that
requiresimmediate attention. To determine who has recentlyaccessed
the listing you must go to the listing and perform a Read KeyBox
operation.
Reading new KeyBox access information
1. Close your eKEY shell.
on
2. Press the
button.
3. Highlight the
4. Press
5. Press
6. Enter the shackle code when prompted.
7. Insert the back of your eKEY into the KeyBox so that it fits snugly
inside the KeyBox receptacle. The gold contacts on the eKEY must
match the contacts on the KeyBox.
enter
enter
Read Keybox
.The
Read Keybox
to select it. The shackle code prompt appears.
option.
sub-option is highlighted.
Note: If you receive an error message, see AppendixA: Error Codes for
help in determining how to correct the error.
8. Open the eKEYshell front to viewthe KeyBoxactivityinformation
or press the down arrow button to view additional information
Chapter 5 Page 67
Page 73

below the vi ewing area.
Done
9. Tap
when you are finished reading new KeyBox activity
information.
The eKEY displays up to 43 showing entries beginning with the most
recent K eyB ox access. Use the arrow keys on the keypad to scroll up
and down to view showing information. Entries contain the showing
agent's Key serial number and the date and time the listing was
shown.
Call KIMvoice to hear the name and contact phone number of the
agent assigned to the serial number or to request a fax report. See
Names of showing agents in Chapter 8 for instructions on using
KIMvoice.
Reviewing KeyBox access information
YoureKEYstoresinformationfor the last fiveKeyBoxesyou have read
so you can review it later.
1. Close your eKEY shell.
2. Press the
3. Highlight the
4. Press
on
button.
Read Keybox
enter
. The sub-option list appears.
option.
Page 68 Using the eKEY Application
Page 74
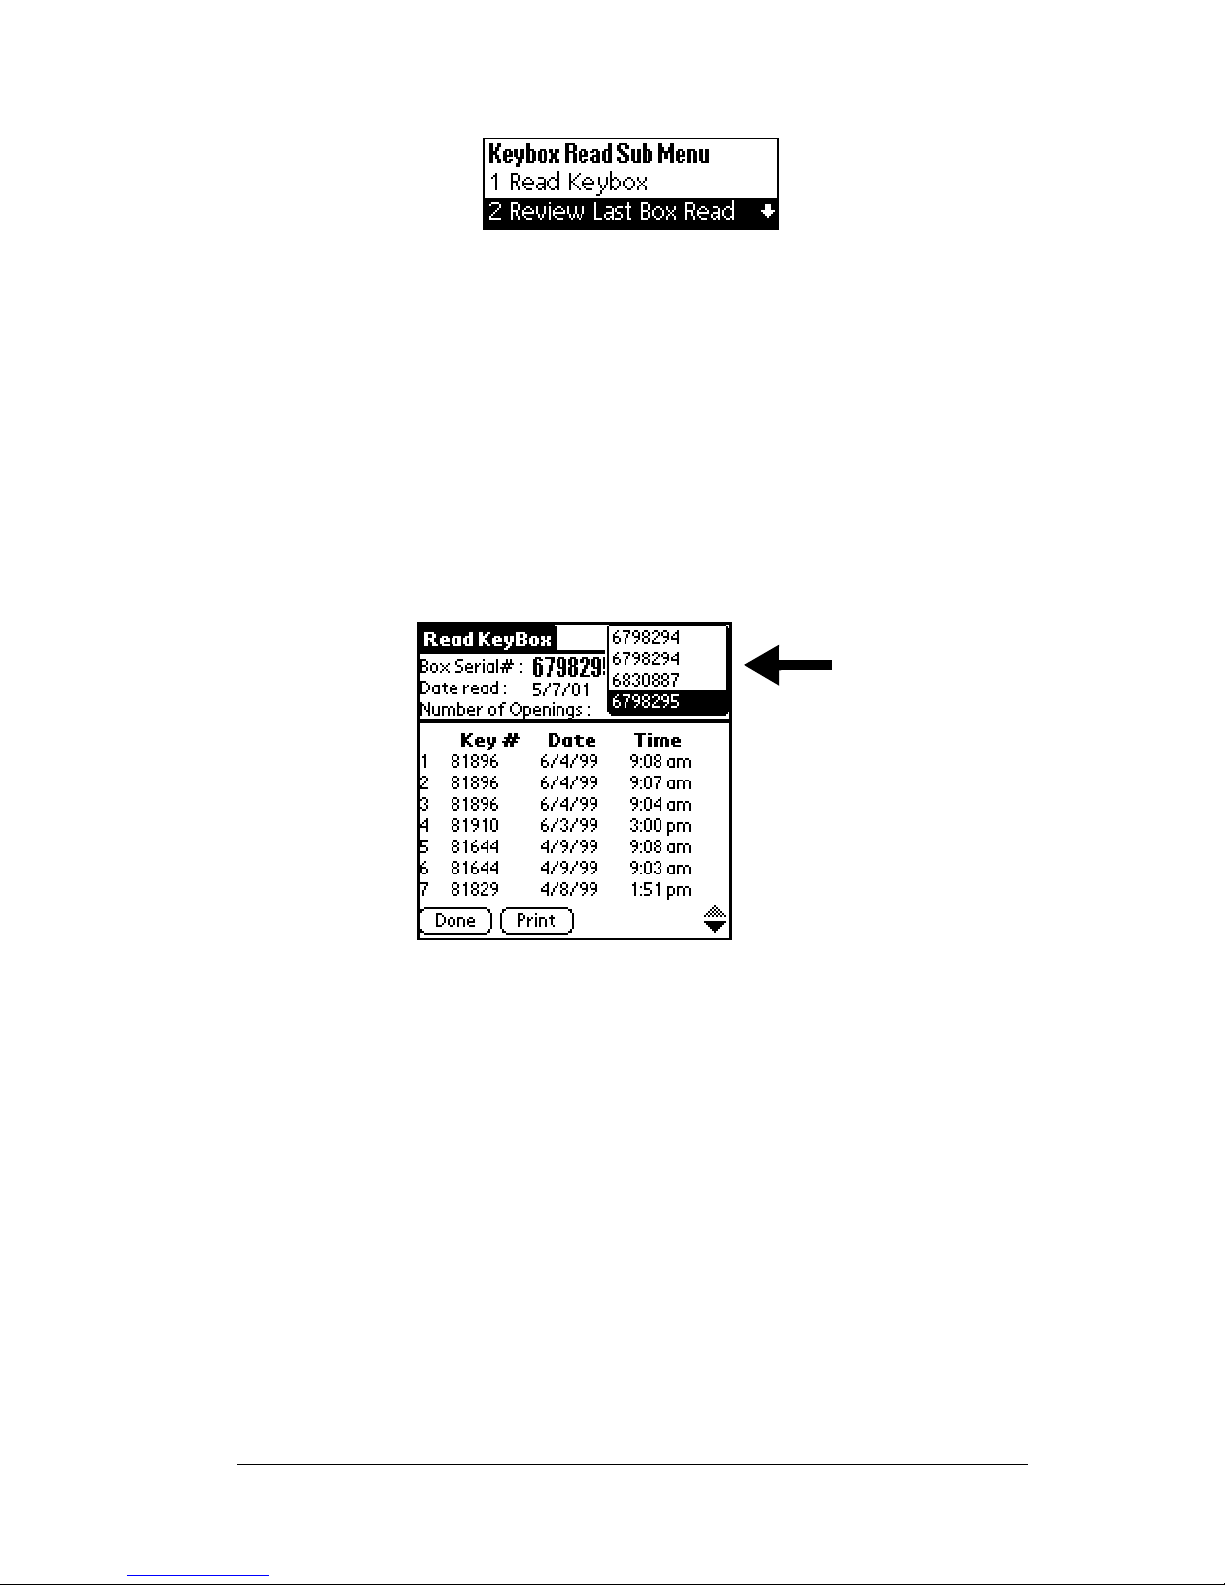
5. Highlight the
Review Last Box Read
sub-option.
6. Press
enter
to view KeyBox entries th at have already been read into
your eKEY. The information from the most recent KeyBox read
appears on the Key's display screen.
7. Open theeKEYshelltoviewtheinformation.Iftherearemorethan
sevenshowingstapthedownarrowinthebottomrightcornerof
the screen to display additional showing information. Up to 43
entries are displayed.
8. To view information from previous KeyBox reads, tap the down
arrow in the upper rightcorner of the screenand selectthe KeyBox
serial number you want to view.
9. Press
Done
to return to the
10. Highlight the
Chapter 5 Page 69
Read Keybox
Return to Main Menu
sub-options screen.
option and press
enter
.
Page 75

Programming with your eKEY
Your eKEY can make programming changes in both your eKEY and
Keyboxes. Use the programming option to:
! Change the four-digit PIN code in your eKEY
! Change the four-digit shackle code i n a KeyBox
! Activate 24-hour access in a KeyBox
! Activate timed access hours in a KeyBox
! Change listing access times in a KeyBox
! Turn the CBS code on in a KeyBox
! Turn t he CBS code off in a KeyBox
! Change the CBS code in a KeyBox
! Read the settings of a KeyBox
Note: All programmingchanges are effectiveimmediately,however
you must perform an eSYNC before the changes are recorded
in KIMnet.
Changing the PIN code in an eKEY
You received your PIN code when you received your eKEY. If you
want to change the PIN code issued to you, you can reprogram it to
another number.
Important! DO NOT attach your PIN code to your eKEY in any way.
Keep your PIN code confidential.
1. Close the eKEY shell.
2. Press the
3. Highlight the
4. Press
5. Highlight the
menu.
on
enter
button.
Program Key/Keybox
.
Change PIN Code
option.
option from the Programming sub-
Page 70 Using the eKEY Application
Page 76

6. Press
enter
.The
PIN CODE
promptappears.
7. Enter your current four-digit PIN code.
8. Enter your new PIN code when prompted.
9. Re-enter your new PIN code when prompted. An
Successful
message appears in the display screen if the new PIN is
Operation
changed successfully. If youreceive an errormessage, see Appendix
A: Error Codes for help i n determining how to correct the error.
Important! Youcan use your new PINright away however, you must
eSYNC before the new PIN code is recorded in KIMnet.
Changing the shackle code in a KeyBox
Each KeyBox has a four-digit shackle code that is used to place or
remove a KeyBox, set a KeyBox to open during assignedtimed access
hours or 24 hours a day, and to read a KeyBox.
You received the KeyBox shackle code when you received your
KeyBox. You can reprogram your KeyBox with a different shackle
code if you prefer.
Important! DO NOT attach shackle codes to your KeyBoxes in any
way. Keep your shackle codes confidential.
1. Close your eKEY shell.
2. Press the
3. Highlight the
4. Press
5. Highlight the
on
enter
button.
Program Key/Keybox
.
Change Shackle Code
option.
option from the Programming
sub-menu.
Chapter 5 Page 71
Page 77

6. Press
enter
.
7. Enter the current shackle code when prompted.
8. Enter the new shackle code when prompted.
9. Re-enter your new shackle code when prompted.
10.Insert the back of your eKEY into the KeyBox so that it fits snugly
into the KeyBox receptacle. The gold contacts on the eKEY must
match the contacts on the KeyBox. An
Operation Successful
message appears in the display screen if the new shackle code is
changed su ccessfully.If you receive an error mes sage s e e Appendix
A: Error Codes for help in determining how to correct the e rror.
Important! You can use your new shackle code right away, however
you must eSYNC before the new shacklecode is recorded
in KIMnet.
Changing access hours in a KeyBox
Access hours, established by your Association/Board/MLS, are
programmed into each Key Box when the KeyBox is manufactured.
Contact your Association/Board/MLS to determine the timed access
hours programmed into your KeyBox.
Access hours are set at Standard Time (ST).If your area participates in
Daylight Savings Time (DST), it is important to remember that access
hours are one hour later during DST than the pre-set access hours for
the KeyBox. For example, if KeyBoxes are programmed to open
between 8
AM to 10 PM.
You can change yourKeyBox to allow access during theprogrammed
times (timed access) or to allow access 24 hours a day. You can also
change the programmed access hours.
Note: If you change theprogrammed access hours, be sure to record
AM and 9 PM (ST) during DST, the actual access hours are 9
the change in the KeyBox Inventory function in the eDATA
Page 72 Using the eKEY Application
Page 78

application. See Chapter 6: Using the eDATA Application for
more information.
Setting a KeyBox to open 24 hours a day
TochangeaKeyBoxtoopen24hoursaday,completethisprocedure.
1. Close your eKEY shell.
2. Press the
on
3. Highlight the
enter
4. Press
.
5. Highlight the
enter
6. Press
.
button.
Program Key/Keybox
Change Access Hours
option.
option.
7. Enter the shackle code when prompted. The
Program Time
sub-
menu displays with three options.
8. Press 1 to select the
Activate 24-Hour Access
option.
9. Insert the back of your eKEY into the KeyBox so that it fits snugly
inside the KeyBox receptacle. The gold contacts on the eKEY must
match the contacts on the KeyBox. An
Operation Successful
message appears confirming that the 24-Hour Access feature is
successfully activated in the KeyBox.
Note:IfyoureceiveanerrormessageseeAppendixA: Error Codes for
help in determining how to correct the error.
Important! The new 24-hour access option is activated immediately
Chapter 5 Page 73
Page 79

in the KeyBox, however you must eSYNC to record the
change in KIMnet.
Setting a KeyBox to open during timed access hours
To change a KeyBox to open during the timed access hours
programmed into a KeyBox, complete this procedure.
1. Close your eKEY shell.
2. Press the
on
3. Highlight the
enter
4. Press
.
5. Highlight the
enter
6. Press
.
button.
Program Key/Keybox
Change Access Hours
option.
option.
7. Enter the shackle code when prompted. The
Program Time
sub-
menu displays with three options.
8. Press 2 to select the
Activate Daytime Hours
option.
9. Insert the back of your eKEY into the KeyBox so that it fits snugly
inside the KeyBox receptacle. The gold contacts on the eKEY must
match the contacts on the KeyBox. A Successful Operation
message appears confirmingthe daytime hours the KeyBox can be
accessed.
Note: If you receive an error message see Appendix A: Error Codes for
help in determining how to correct the error.
Page 74 Using the eKEY Application
Page 80

Important! The
Activate Daytime Hours
option is activated
immediately in the KeyBox, however you must eSYNC
before the change is recorded in KIMnet.
Customizing access hours in a KeyBox
To change the programmed access hours in a KeyBox, complete this
procedure.
1. Close your eKEY shell.
2. Press the
on
3. Highlight the
enter
4. Press
.
5. Highlight the
enter
6. Press
.
button.
Program Key/Keybox
Change Access Hours
option.
option.
7. Enter the shackle code when prompted. The
menu displays with three options.
8. Press 3 to select the
9. When prompted, enter an hour in the
minutesafter the colon. For example enter 9 or 09 for the hour and
15 for the minutes in the
at 9:15
AM.Enter00fortheminutesifyouwantthetimetobeon
the hour. Press
Chapter 5 Page 75
Customize Access Hours
START fieldif you want to set the starttime
enter
.
Program Time
sub-
option.
START time field. Enter the
Page 81

Tip: Press the down arrow to backspace.
10. Press 1 to select
11.Enter an hour (and minutes if applicable) in the
AM or press 2 select PM.
END time field
when prompted following the same procedure used in step 7.
Press
12. Press 1 to select
enter
.
AM or press 2 select PM.
13.Insert the back of your eKEY into the KeyBox so that it fits snugly
inside the KeyBox receptacle. The gold contacts on the eKEY must
match the contacts on theKeyBox. A
Successful Operation
message
appears confirming the hours the KeyBox can be accessed.
Note: If you receive an error message see Appendix A: Error Codes for
help in determining how to correct the error.
Important! The new access hours are effective immediately in the
KeyBox, however you musteSYNC before the new hours
are recorded in KIMnet.
Tip: Record the new access hours programmed in the KeyBox in
the eDATA inventory option.
Using Call Before Showing (CBS)
EachKeyBox hasa Call Before Showing (CBS) code feature that allows
the listing agent to control access to a listing. When the feature is
activated in a KeyBox, the CBS code must be entered into an eKEY
before the KeyBox can be accessed. Once the showing agent enters the
CBS code into his or her eKEY, they can access the KeyBox just asthey
would any other.
Activating the CBS code in a KeyBox
Toactivate the CBS code in a KeyBox, you must know the shackle code
for the KeyBox.
1. Close your eKEY shell.
2. Press the
3. Highlight the
on
button.
Program Key/Keybox
option.
4. Press
Page 76 Using the eKEY Application
enter
.
Page 82

5. Highlight the
menu.
Change CBS Code
option from the Programming sub-
6. Press
enter
.
7. When prompted, enter your four-digit shackle code for the
KeyBox. The
8. Press 1 to select the
Program CBS
Turn CBS ON
menu is displayed.
option.
9. Insert the back of your eKEY into the KeyBox so that it fits snugly
inside the KeyBox receptacle. The gold contacts on the eKEY must
match the contacts on the KeyBox. An
Operation Successful
messageappearsiftheCBScodehasbeensuccessfullyactivated.It
confirms that the CBS code is turned on in the KeyBox.
Note:IfyoureceiveanerrormessageseeAppendixA: Error Codes for
help in determining how to correct the error.
Important! The CBS code option is activated immediately in the
KeyBox, h owever you must eSYNC before the change is
recorded in KIMnet.
Deactivating the CBS code in a KeyBox
1. Close your eKEY shell.
2. Press the
3. Highlight the
4. Press
on
enter
button.
Program Key/Keybox
.
option.
Chapter 5 Page 77
Page 83

5. Highlight the
menu.
Change CBS Code
option from the Programming sub-
6. Press
enter
.
7. When prompted, enter your four-digit shackle code for the
KeyBox. The
8. Press 2 to select the
Program CBS
Turn CBS OFF
menu is displayed.
option.
9. Insert the back of your eKEY into the KeyBox so that it fits snugly
inside the KeyBox receptacle. The gold contacts on the eKEY must
match the contacts on the KeyBox. A Successful Operation
message appears if the CBS code has been successfully deactivated. It confirms that the CBS codeis turned off in the KeyBox.
Note: If you receive an error message see Appendix A: Error Codes for
help in determining how to correct the error.
Important! The CBS code is turned off immediately in the KeyBox,
however you must eSYNC before the change is recorded
in KIMnet.
Changing a CBS code in a KeyBox
1. Close your eKEY shell.
2. Press the
3. Highlight the
4. Press
on
enter
button.
Program Key/Keybox
.
option.
Page 78 Using the eKEY Application
Page 84

5. Highlight the
menu.
Change CBS Code
option from the Programming sub-
6. Press
enter
.
7. When prompted, enter your four-digit shackle code for the
KeyBox. The
8. Press 3 to select the
Program CBS
Change CBS Code
menu is displayed.
option.
9. Enter the last four digits of the new CBS code.
Note: The KIMnet system creates a seven-digit CBS code for the
four-digit code you enter. Only you know the four-digit CBS
code used by your KeyBoxes. When other showing agents
want to access one of your listings that has the CBS code
activated, gi ve them the seven-digit code provided by the
system.
10. Re-enter the last four digits of the new CBS code.
11. Insert the back of your eKEY into the KeyBox so that it fits snugly
inside the KeyBox receptacle. The gold contacts on the eKEY must
match the contacts on the Ke yBox.A
Successful Operation
message
appears if the CBS code has beensuccessfullychangedandthe new
seven-digit CBS code is displayed.
Note: If yo u receive an error message, verify that you are entering
the co rrect shackle code and repeat the procedure.
Important! The CBS code is changed immediately in the KeyBox,
however you must eSYNC before the new CBS code is
Chapter 5 Page 79
Page 85
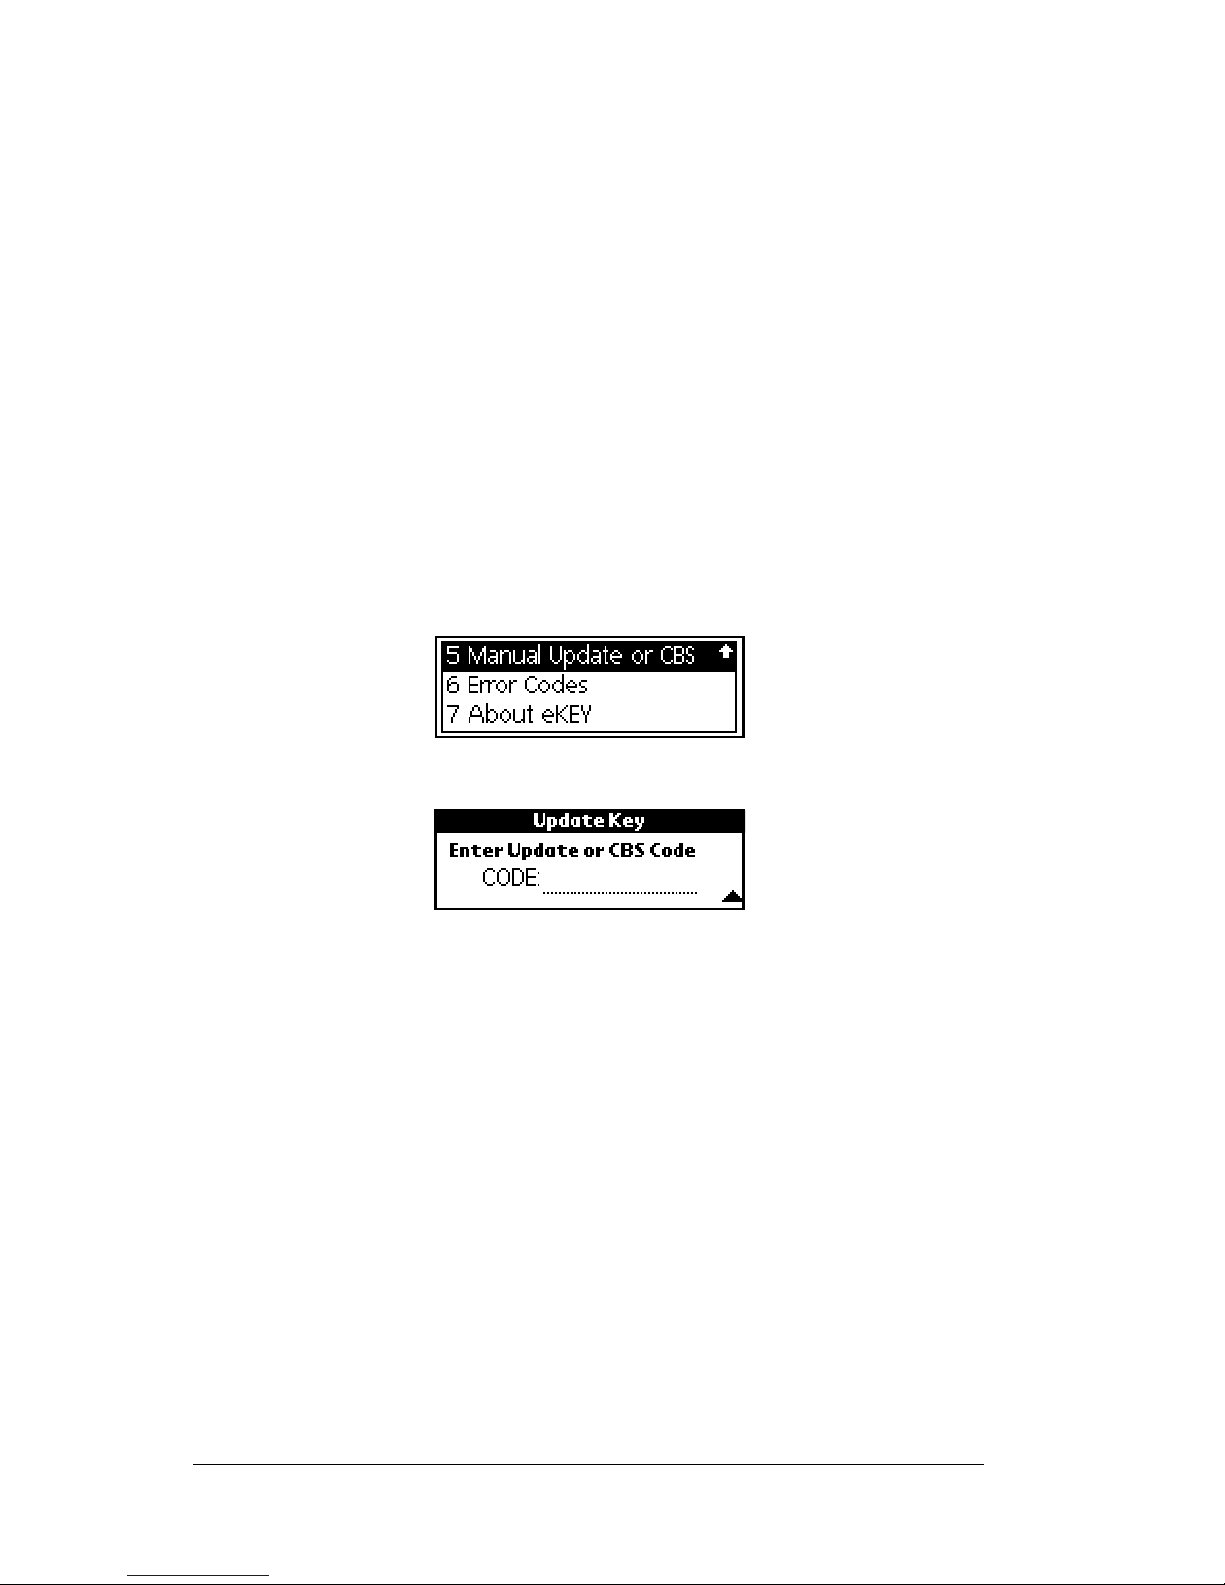
recorded in KIMnet.
Obtaining a CBS code for another agent's KeyBox
When you showa property that has a KeyBox withCBS activated, you
must call the listing agent to request the CBS code for the particular
KeyBox. Once the CBS code is entered into your eKEY, youmay access
the KeyBox as you would access a KeyBox that do es not have CBS
activated. The CBS code is unique to each KeyBox. This code does not
allow you access to any other KeyBox programmed for CBS.
Entering a CBS code into your eKEY
Once you have obtained a CBS code for a KeyBox, you must enter the
code into your eKEY.
1. Close your eKEY shell.
2. Press the
3. Highlight the
4. Press
5. Enter the CBS code forthe KeyBox in the
screen. Press
on
enter
button.
Manual Update or CBS
.The
Update Key
enter
.
screen appears.
option.
CODE
Note: Ifyou entered the CBScode correctly,the
message appears. If you receive an error message see Appendix
A: Error Codes for help in determining how to correct the error.
field on the
Update Key
Operation Successful
Accessing a KeyBox Activated with CBS
Once your eKEY is activated with the CBS code for a particular
KeyBox, release the key container as you wo uld for any other KeyBox.
You can access this KeyBox until the listing agent changes the CBS
code or until you enter a CBS code for a different KeyBox.
Additional CBS Information
As a listing agent you receive the CBS codes when you receive your
KeyBoxes. You can also call KIMvoice or log onto the agent website to
Page 80 Using the eKEY Application
Page 86

receive a list of the CBS codes for your KeyBoxes.
Your eKEY stores only one CBS code at a time. Once you enter a
differentCBS code into your eKEY, the first code is no longer available
in your eKEY.
Entering a CBS code in your eKEY does not affect how your eKEY
works with other KeyBoxes.You can continueto access KeyBoxes not
programmed for CBS.
Reading a KeyBox’s settings
The
Read KeyBox
settings on the KeyBox. The screendisplays the KeyBoxserial number,
the shackle code, the CBS code, whether CBS is on or off in the
KeyBox, w hether timed access is on or off in the KeyBox, and the
KeyBox access starting and ending times.You mustknow the shackle
code in order to read a KeyBox’s settings.
1. Close your eKEY shell.
option allows you to read a KeyBox and view the
2. Press the
on
3. Highlight the
enter
4. Press
.
5. Highlight the
6. Press
enter
.
button.
Program Key/Keybox
Read KeyBox Settings.
option.
7. Entertheshacklecodewhenprompted.TheKeyBoxSettings
Chapter 5 Page 81
Page 87

screen displays the settings for the KeyBox.
Page 82 Using the eKEY Application
Page 88

Performing a Manual Update
Your eKEY must be activated manually with a current update code if
you forget to eSYNC overnight. Use one of the following methods to
update your eKEY:
1. Log on to the agent website to obtain the update code. See Logging
onto the Agent Website inChapter7forinstructionsonaccessing
KIMweb to obtain the update code.
2. Call KIMvoice to obtain an update code. See Obtaining an Update
Code from KIMvoice in Chapter 8 for instructions on accessing the
update code through KIMvoice.
Entering the update code into your eKEY
Onceyouhaveobtainedthenewupdatecodeusingoneoftheabove
options, you must enter the code into your eKEY.
1. Close your eKEY shell.
on
2. Press the
button.
3. Highlight the
4. Press
5. Enterthenumericupdatecode(thecodeyoureceivedthrough
either KIMvoice or KIMnet). Press
Note: If you entered the update code correctly, the
Important! IfyouobtainanupdatecodefromeitherKIMvoiceor
enter
Successful
see Appendix A: Error Codes for help in determining how to
correct the error.
Manual Update or CBS
.The
KIMweb, you must eSYNC before you can obtain an
update code a second consecutive day from KIMvoice or
KIMweb.
Update Key
message appears. If you receive an error message
screen appears.
option.
enter
.
Operation
Chapter 5 Page 83
Page 89

Viewing Error Codes
The eKEYstores the five most recent errors that have occurred in your
Key. View error codes using the Error Codes fun c tion.
1. Close your eKEY shell.
2. Press the
3. Highlight the
screen appears.
4. Open your eKEY shell to view the entire screen.
5. Tape
Note: For more information on error codes See Appendix A: Error
Done
Codes.
on
button.
Error Codes
to return to the eKEY functions screen.
option. Press
enter
.The
Review Errors
Page 84 Using the eKEY Application
Page 90

Chapter 6
Using the eDATA Application
eDATA is a software application that is available only on the SUPRA
eKEY. The eDATA application enables the eKEY user to:
! Search and view current MLS listings
! View personal listings
! View Hotsheet information
! Create profiles and view matching listings
! Search and view the membership roster
! View and maintain KeyBox inventory
! View showing information
! View eFeedback information
! View messages from the Association/MLS, your Broker office,
and SUPRA.
Chapter 6 Page 85
Page 91

Navigating the eDATA application
All eDATA functions are performed while the shell front is open.
1. Open the eKEY shell.
2. Turn on the SUPRA handheld computer.
3. Tapthe Applications icon until
corner.
4. When
displayed.
5. Tap the eDATA icon to start the application.
All
is showing in the upper right corner all of the icons are
All
is shown in the upper right
6. The main eDATA screen appears.
7. TherearesixoptionsonthemaineDATA screen: Listings, Roster,
Inventory, Showings, Messages, and eFeedback. Tap any of these
options to view related information.
Page 86 Using the eDATA Application
Page 92

Using the Listings Database
The listings database containsthe listingsdetermined by the selection
of areas, classes, statuses, and the price range you chose for your
market area in KIMweb. Th e detailed information di splayed for each
listing is cho sen by your Association/MLS. Due to storage capacity,
the listing database is not an exact mirror of the MLS system but is
intended to be a portable collection of listing records that fit your
usage criteria.
Note: No data appears in the listings function on your eKEY until
your market area has been created in KIMweb and you have
performed a manual eSYNC. See Defining your Market Area in
Chapter7formoreinformation.
Viewing the listing menu
1. Open the eKEY shell.
2. Turn on the SUPRA handheld computer.
3. Tap the Applications icon .
4. Tap the eDATA icon to start the application.
5. Tap the
LISTINGS
button on the main eDATA screen.
Chapter 6 Page 87
Page 93

There are six options on the listings screen: Custom Search, Profile
Search, Address Search, MLS ID Search, Personal Listings, and
Hotsheet Listings. Tap any of these options to view related
information.
Performing a custom search
The custom search allows you to specify which listings in your
database to view.
1. Tap the eDATA icon from the SUPRA handheld computer
main menu to start the application.
2. Tap the
3. Tap the
LISTINGS
buttononthemaineDATA screen.
Custom Search
button on the
Listing Selection
screen.
4. Youcan create a custom search to display listingsby specific areas,
price ranges, classes, statuses, minimum number of bedrooms,
minimum number of bathrooms, and up to three of the additional
searchable fields.
Page 88 Using the eDATA Application
Page 94

5. If youleave a selection criteriablank, all records for the criteria are
selected. At least one search criteria on the Custom Search screen
must be specified.
6. To select specific areas in your customsearch tap the Area selection
on thecustom search screen. All areas are included in your custom
search if you do not choose specific areas.
7. All of the areas i n your Association/MLS are displayed in the left
box. Tap the area you want to include in your search and tap the
Add
button. To remove an area you have selected, tap the area inthe
box on the right and tap the
area selection tap the
Clear
Remove
button.To start over with your
button at the bottom of the screen. To
return to the Custom Search screen without selectingspecific areas
for your search, tap the
Cancel
button. TapOKwhen you have
finished selecting areas.
8. To select a price range for your custom search, tap one of the
selection boxes to the right of
Price
in the
Custom Search
screen. All
prices are included in your search if you do not set a specific price
range.
9. Tap the
Chapter 6 Page 89
Start Price
box and then tap thenumbers on the keyboard
Page 95
shown to entera minimum listingprice. Tap the
End Price
box and
tap thenumbers on the keyboard to entera maximumlisting price.
If you make a mistake when enteringa price, tap the back arrow to
backspace or the
Clr
button to clear the field. To return to the
Custom Search screen without specifying a price range for your
search, tap the
Cancel
button. TapOKwhen you have finished.
10. Tap the Class selection to select specific classes for your custom
search. All classes are included in your custom search if youdo not
choose specific classes.
11. Allof the classesselected by your Association/MLSfor displayon
the eKEYare listed in the left box. To select a class, tap the class you
want to include in your search
and tap the
Add
button. To remove a
class you have selected, tap the classin the box on the rightand tap
the
Remove
Clear
button. To start over with your class selection tap the
button at the bottom of the screen.
To return to the Custom
Search screenwithout selecting specificclassesfor your search,tap
Tap
OK
the
Cancel
button.
when you have finished selecting classes.
12. To select specific statuses in your custom search tap the Status
selection. All statuses are includedin your customsearch if you do
not choose specific statuses.
Page 90 Using the eDATA Application
Page 96

13. All of the statuses selected by your Association/MLS for display
on the eKEY are listed in the left box. To select a status, tap the
Add
status you want to include in
your search and tap the
button.
To remove a status you have selected, tap the status in the box on
the right and tap the
selection tap the
Clear
Remove
button at the bottom of the screen.
button. To start over with your status
To return
to the Custom Search screen without selecting specific statuses for
Tap
OK
your search, tap the
Cancel
button.
when you have finished
selecting statuses.
14. You can select the minimum number of bedrooms and bathrooms
for your search. Click the down arrows in the
Bdrs
and
Bath
fields
to select options from the drop down menus.
15. Select the fields and the search criteria for up to three additional
fields.
Additional searchable fields
Your Association/MLS defines the additional searchable fields in the
Custom Search
screen. Some examples of common searchable fields are
city and zip code.
16. To display the additional searchable fields for your Association,
tap the down arrow to the left of one of the three optional fields at
the bottom of the
Custom Search
screen.
Chapter 6 Page 91
Page 97

Tap a down arrow next to one of the three fields at the
bottom of the Custom Search screen to display the
searchable optional fields chosen by your Association/MLS.
17. To select a field to include in your search, choose the field fromthe
list of additional searchable fields.
Once you have chosen the field, the field name is displayed at the
bottom of the
Custom Search
screen. There are three types of
searchable fields.
Yes/No search
In a Yes/No searchable field, a down arrow is displayed to the right
of the field name. When you t ap on thedown arrow, three options are
displayed: Blank, Y for yes, and N for no.
The Yes/No search allows you to include listings with a particular
feature in your search or exclude listings with a particular feature
from your search. For example, if the field you chose to sear chon was
Pool, and you selected ‘Y’,then all listings with a pool are included in
your search results.
Page 92 Using the eDATA Application
Page 98

Text searc h
You can recognize a text searchable field when you select it by the
blank line to the right of the field name.
The Text search allows you to enter text either using Graffiti or the
onscreen keyboard to find all listings that match what you enter.
Whether you enter part or all o f the text in the field depends on the
criteria for the searchable field determined by your Association/MLS.
On some Text search fields there may be an option to choose whether
you want t he text you enter to be an equal match, a minimum match,
or a maximum match.
For example, if the field you chose to search on was Approximate
Square Footage, you mi ght enter 1400 for y our text and then choose it
to be a minimum value, then all listings with at least 1400 square feet
are included in your search r esults.
Pick list
The Pick list type of search allows you to choose from a list of fields.
In a Pick listsearchable field, a down arrowis displayed to the right of
Chapter 6 Page 93
Page 99

the field name. When you tap on the down arrow, all of the available
choices are displayed.Selectoneofthe choicesandalllistingswith the
value you chose are included in your search results.
Viewing custom search results
1. Once you have entered all of the custom search selection criteria,
tap the
Search
button to display the search results.
2. Use the scroll bar on the right to scroll through the listings in the
search results.
3. To change the sort criteria tap the down arrow in the bottom right
corner of the screen. You may sort by area o r price.
Tap the down arrow to change the sorting of the search
results.
4. Tap a listing to view details about that listing. The first screen of
Page 94 Using the eDATA Application
Page 100

listing information is displayed.
5. Use the scroll bar o n the right to display additional fields chosen
by your Association/MLS.
6. Tap the down arrowagain to view additional fields chosen by your
Association/MLS.
Note: You may have a different number of pages of information for
each list ing based on the fields and the number of characters
in each field displayed as chosen by your Association/MLS.
Chapter 6 Page 95
 Loading...