

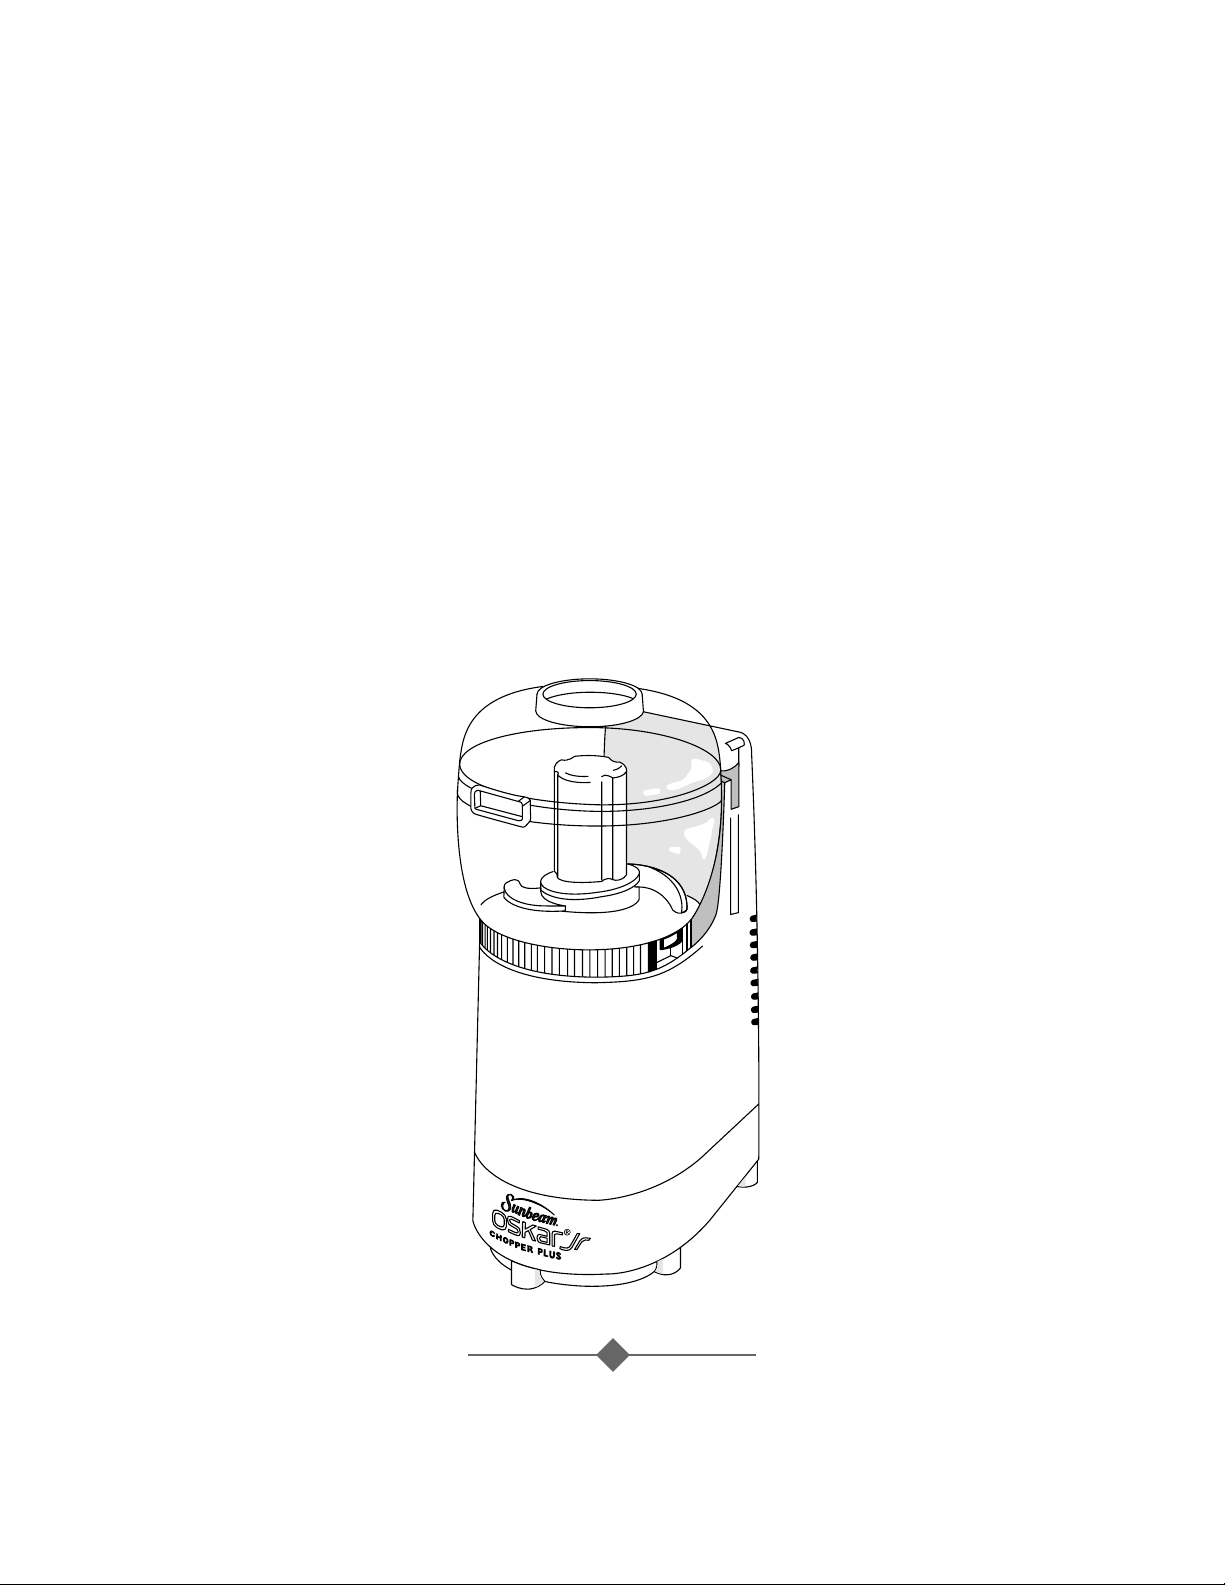
Page 1
MODEL/MODELO
MODÈLE/MODELO
4816-8
Instruction Manual
SUNBEAM®OSKAR®JR. CHOPPER PLUS
Manuel d’Instructions
HACHOIR PLUS SUNBEAM®OSKAR®JR.
Manual de Instrucciones
PICADOR PLUS SUNBEAM®OSKAR®JR.
Manual de Instruções
TRITURADOR PLUS SUNBEAM®OSKAR®JR.
■
■
■
MODEL/MODELO
MODÈLE/MODELO
4816-8
Page 2

When using electrical appliances, basic safety precautions should always be followed
including the following:
1. READ ALL INSTRUCTIONS BEFORE USING THIS FOOD PROCESSOR.
2. To protect against risk of electrical shock, do not put Food Processor in water or other
liquid. This may cause personal injury or damage to the product.
3. Close supervision is necessary when any food processor is used by or near children or
incapacitated persons.
4. Unplug from outlet while not in use, before putting on or taking off parts and
before cleaning.
5. Do not contact moving parts. Keep hands, hair, clothing, and other utensils away from
chopping blade during operation to reduce the risk of injury to persons and/or damage
to the Food Processor.
6. Do not operate Food Processor with a damaged cord or plug or after the appliance
malfunctions, or is dropped or damaged in any manner. Return appliance to the nearest
Sunbeam Appliance authorized service center for examination, repair or electrical
or mechanical adjustment.
7. The use of attachments not recommended or sold by Sunbeam Appliance Company
may cause fire, electrical shock or injury.
8. Do not let cord touch hot surfaces or hang over table edges and counters.
9. Do not use outdoors or for commercial purposes.
10. Remove chopping blade from food processor before washing.
11. Do not place food processor on or near a hot burner or in a heated oven.
12. Do not use food processor other than for intended use.
13. Do not leave food processor unattended while it is operating.
14. Do not attempt to defeat the cover interlock mechanism.
This Unit for Household Use Only
FOR PRODUCTS PURCHASED IN THE U.S. & CANADA ONLY:
To reduce the risk of electrical shock, this appliance has a polarized plug (one blade is
wider than the
other). As a safety feature, this plug will fit in a polarized outlet only one
way. Iftheplug does not fit fully in the outlet, reverse the plug. If it still does not fit, contact
a qualified electrician.
DO NOT ATTEMPT TO DEFEAT THIS SAFETY FEATURE.
IMPORTANT SAFEGUARDS
2
SAVE THESE INSTRUCTIONS
Page 3

3
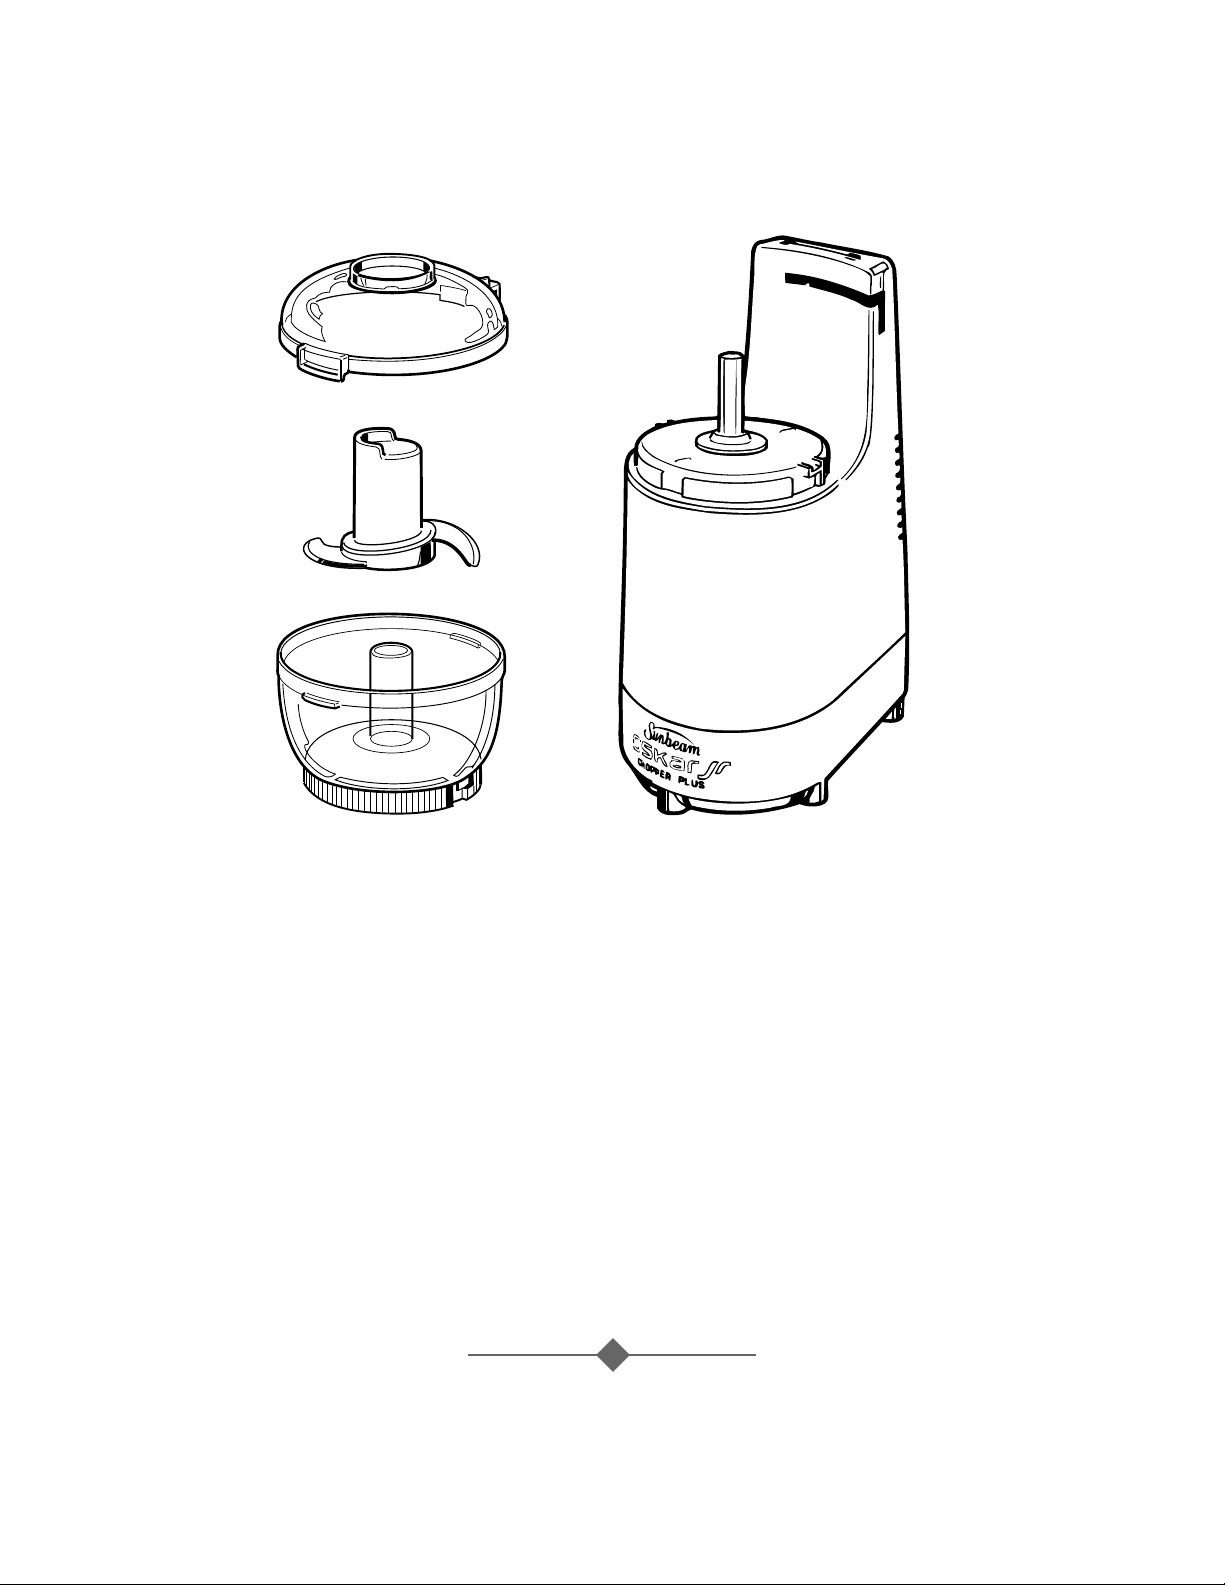
Parts of Your Oskar®Jr. Chopper Plus
As you unpack your new Oskar®Jr. Chopper Plus, take a moment to identify each of the
various parts as shown in these illustrations. BE SURE TO HANDLE THE BLADE
CAREFULLY, AS IT IS VERY SHARP.
By following the simple, step-by-step instructions in this booklet, you will learn how
things go together and how wonderfully convenient your new Oskar
®
Jr. Chopper Plus
really is to use.
Cover
Chopping
Blade
Container Motor Base
Page 4
4
Assembling Your Oskar®Jr. Chopper Plus
Before you begin, please BE SURE THAT THE ELECTRIC CORD
IS UNPLUGGED.
Set up the motor base facing you on a dry, level surface
with the tallest side of the motor housing to the rear.
NOTE: An "ON" and "OFF" switch is located on the
back of the motor base.
Place the clear Container over the drive shaft on the motor base
and rotate the Container until it drops down evenly on the base.
Now turn the Container counter-clockwise until it locks firmly
into position.
Place the Chopping Blade over the drive shaft, rotating it slightly
until it drops into place. THE BLADE IS EXTREMELY SHARP.
USE CAUTION WHEN HANDLING THIS BLADE.
To attach the cover, place the cover on the container so that
the large locking tab of the Cover is to the right-hand side near
the horizontal slot at the back of the motor base. When turned
counter-clockwise, the tab will engage the automatic switch
and the Oskar
®
Jr. Chopper Plus will turn ON. By moving
the Cover in the opposite direction it will turn OFF.
Using Your Oskar®Jr. Chopper Plus
Pulsing techniques:
The Oskar®Jr. Chopper Plus processes food ver y quickly; in most
cases, in seconds! Therefore, foods can easily become over
processed if you don't watch carefully. We suggest that when
using the unit, you chop foods no more than a few seconds at
a time. Turn the cover ON and OFF frequently until the desired
results are obtained. To use this "Pulsing Technique," simply rotate
the cover so that the locking tab moves in and out of the automatic
switch slot. Pulsing ensures excellent results every time.
Page 5
5
Placing food into the container:
For the best, most consistent results, you should try to chop pieces of food that are of
about equal size. When you cut, break or tear foods into uniform pieces before you begin
chopping, the finished results will be more uniform too. You will get faster, more
consistent results if you do not overload the Container. Chop foods in small amounts.
Chopping meats:
Pre-cut meats into pieces about 3/4 inch. Place the pieces
in the Container, replace the Cover and process them using
the pulse technique for 5 or 7 seconds. Never process more
than 1/2 cup of meat cubes at one time.
Chopping vegetables:
When processing vegetables such as onions,
green peppers, and celery, cut into 3/4-inch pieces.
Place 4 to 6 pieces into the container, turning the Oskar
®
Jr.
Chopper Plus ON and OFF 1 to 2 times to coarsely chop,
3 to 4 times more to finely chop.
Adding liquid ingredients:
Liquid ingredients may be added while the Oska r®Jr.
Chopper Plus is operating by pouring them through the
pouring hole in the cover.
Chopping:
Now you can mince garlic, chop parsley and chop herbs in
seconds. Simply drop halved garlic cloves or parsley sprigs
into the container and mince. Chopped foods that cling to
the container are easily swept out with a spatula.
Page 6
6
Removing the Blade:
When you have finished chopping, UNPLUG THE
ELECTRICAL CORD FROM THE OUTLET. Remove the Cover.
Remove the Chopping Blade with food clinging to it before
removing any food from the Container. The blade is extremely
sharp. Use caution when removing this blade. Clean the blade
with a scraper over the bowl.
NOTE: ALWAYS WAIT FOR THE BLADE TO COME TO
A COMPLETE STOP BEFORE REMOVING THE COVER
Removing the Container:
Place the Cover on the Container. Use the Cover to help
remove the Container. Rotate the Cover clockwise 180 degrees
until the two tabs on the cover meet the two Container tabs.
Continue to turn the Cover, using firm pressure, with your
thumb against the tabs until the Container is released. Empty
the remaining food from the Container.
Cleaning, Storing, and Caring for Oskar®Jr.
When you have finished chopping, unplug the unit from the electrical outlet and remove
the Cover, Chopping Blade and the Container from the Motor Base. Wipe the base of your
unit with a damp cloth, then polish it lightly with a dry one. NEVER IMMERSE THE
MOTOR BASE IN ANY LIQUID.
DO NOT WASH ANY PARTS IN AN AUTOMATIC DISHWASHER.
Wash the Container and Cover in warm, soapy water. Rinse and dry immediately.
Wash the Chopping Blade by hand. Avoid placing the Chopping Blade in soapy water
where it can be lost from sight.
REMEMBER TO USE EXTREME CAUTION WHEN HANDLING THE CHOPPING BLADE.
IT IS VERY SHARP!
Cleaning the internal shaft of your Chopping Blade is most important. We suggest the use
of a small percolator or baby bottle brush to remove any food particles, then wash and dry
the shaft thoroughly.
Sunbeam suggests that you store the Oskar®Jr. Chopper Plus on a dr y counter or table top
in your kitchen, where it will always be ready for immediate use. Store the Chopping Blade
in the clear Container (OUT OF THE REACH OF CHILDREN). The Blade is EXTREMELY sharp!
Use caution when handling the blade.
Page 7
7
After washing and drying the Container, you may wish to apply a small amount of
vegetable oil to the rim of the cover and container. This lubrication allows the cover
to move freely when in contact with the container.
ALWAYS STORE BLADE OUT OF REACH OF CHILDREN!
A Few Things to Remember
1. Use the Oskar®Jr. Chopper Plus only on a dr y level surface - never outdoors,
on a damp surface, or on a table edge.
2. Never remove the cover until the Blade has come to a complete stop and the unit
has been unplugged from an electrical outlet.
3. The motor in the Oskar
®
Jr. Chopper Plus has been permanently lubricated at the
factory and requires no further attention. Other than recommended cleaning, no further
user maintenance should be necessary. Return your unit to the nearest Sunbeam
authorized independent service center if servicing or repairs become necessary.
Page 8

8
Chopping Guide
TASK GENERAL INSTRUCTIONS SUGGESTED FOODS
Chop Foods such as meat should be Apples, cabbage, cooked fish,
pre-cut into 3/4 inch cubes. ham, meat or poultry, corn chips,
Do not process more than 1/2 cup hard cooked eggs, mushrooms,
of meat cubes at one time. nuts, olives, onions, parsley,
Place all ingredients into container. pickles, pimento, raw meat,
Chop using the PULSE technique scallions. Dried fruits such as
until the desired consistency apricots, apples, pitted dates and
is reached. Do not chop more than pitted prunes.
5 ounces of dried fruits.
Crumb Place pieces of food into the Chocolate wafers, dr y or fresh
container. Crumb using the bread, gingersnaps, graham
PULSE technique until the crackers, saltine crackers,
desired consistency is reached. vanilla wafers.
Grate Food should be cut into 3/4 inch Hard cheeses such as Parmesan
cubes. (Hard cheeses should be or Romano. Fresh horseradish
at room temperature.) Do not and ginger root.
grate more than 3 ounces of hard
cheeses at one time. Place all
ingredients into container.
Grate using the PULSE technique
until desired consistency is reached.
Mince Place ingredients into the Garlic, scallions, parsley, dill,
container. Mince. chives, and other herbs.
NOTE: Food minces very quickly.
Purée Place all ingredients into container. Fresh cooked or canned fruits,
Purée until smooth. such as apples, bananas,
peaches, pears, strawberries.
Fresh, cooked or canned
vegetables, such as beans,
carrots, corn, peas, potatoes or
tomatoes. Peanut butter.
Page 9

9
2 Year Limited Warranty
Sunbeam Products Inc. warrants to the original purchaser, subject to the limitations and exclusions
set forth below, that this product shall be free, in all material respects, of mechanical and electrical
defects in material and workmanship from the date of purchase for two years. This warranty does
not cover normal wear of parts or damage resulting from any of the following: negligent use or
misuse of the product, use on improper voltage or current, use contrary to operating instructions
or disassembly, repair or alteration by any person other than an authorized service center.
Our obligation hereunder is limited to repair or replacement, at manufacturer's option, of the
product during the warranty period, provided that the product, along with the model number
and original dated proof of purchase, is sent postage prepaid, directly to the following address:
For products purchased in the United States:
SUNBEAM APPLIANCE SERVICE STATION
117 Central Industrial Row
Purvis, MS 39475
For products purchased in Canada:
SUNBEAM APPLIANCE SERVICE STATION (KND)
Please call 1-800-663-8623 or email us
consumeraffairs@consumer.sunbeam.com
Do not return this product to the place of purchase or to the manufacturer; doing so may delay the
processing of your warranty claim.
Answers to questions regarding this warranty or for your nearest authorized service location may
be obtained by calling toll-free 1-800-597-5978 or by writing to Sunbeam – Consumer Affairs, at
P.O. Box 948389, Maitland, FL 32794-8389. Answers to questions regarding this warranty or for
your nearest Canadian authorized service location may be obtained by calling toll-free in Canada
1-800-667-8623. For warranty information or for an authorized service location outside of the
United States and Canada, please see the warranty service card inserted in the product packaging.
DISCLAIMER
Product repair or replacement as provided under this warranty is your exclusive remedy.
SUNBEAM PRODUCTS, INC. SHALL NOT BE LIABLE FOR ANY INCIDENTAL
OR CONSEQUENTIAL DAMAGES FOR BREACH OF ANY EXPRESS OR IMPLIED
WARRANTY ON THIS PRODUCT OR ANY PART THEREOF. EXCEPT TO THE EXTENT
PROHIBITED BY APPLICABLE LAW, SUNBEAM PRODUCTS, INC. DISCLAIMS ANY
IMPLIED WARRANTY OF MERCHANTABILITY OR FITNESS FOR A PARTICULAR
PURPOSE OF THIS PRODUCT OR ANY PART THEREOF. Some states and provinces do not
allow the exclusion or limitation of incidental or consequential damages, or allow limitations on
how long an implied warranty lasts, so the above limitations or exclusions may not apply to you.
This warranty gives you specific legal rights, and you may also have other rights, which vary
from State to State or Province to Province.
Page 10

10
Il est important d'observer un certain nombre de règles de sécurité élémentaires pendant
l'utilisation de tout appareil électrique:
1. LISEZ TOUTES LES DIRECTIVES AVANT D'UTILISER LE ROBOT CULINAIRE.
2. Pour vous protéger des risques d'électrocution, ne plongez jamais le Robot Culinaire
dans l'eau ou tout autre liquide. Peut causser des blessures et/ou de dégâts à l'appareil.
3. Faites particulièrement attention lorsque l'appareil est utilisé par, ou en présence d'enfants
ou d'invalides.
4. Débrancher l'appareil lorsqu'il n'est pas utilisé, avant d'y placer ou y retirer des pièces
et avant de le nettoyer.
5. Ne pas toucher aux pièces mobiles. Garder les mains, les cheveux, les vêtements et les
autres ustensiles loin de la lame à hacher lorsque l'appareil est en opération afin d'éviter
le risque de blessure sérieuse aux personnes ou de dommage au Robot Culinaire.
6. Ne pas faire fonctionner le Robot Culinaire dont le fil ou la fiche est endommagé ou après
que l'appareil ait mal fonctionné, qu'il ait été échappé ou endommagé d'une façon
quelconque. Retourner l'appareil au Centre de Service Autorisé Sunbeam le plus près
aux fins d'inspection, de réparation, de réglage électrique ou mécanique.
7. L'utilisation d'accessoires non conseillés ou vendus par Sunbeam Appliance Company
présente des risques d'incendie, d'électrocution ou de blessure.
8. Ne pas laisser le cordon pendre du rebord de la table ou du plan de travail ni entrer au
contact de surfaces chaudes.
9. Ne pas utiliser à l'extérieur ou à des fins commerciales.
10. Retirer la lame à hacher du robot culinaire avant le lavage.
11. Ne pas placer l'appareil sur ou à proximité d'un brûleur chaud ou d'un four allumé.
12. Ne pas utiliser l'appareil à des fins autres que celles pour lesquelles il est destiné.
13. Ne jamais laisser l'appareil en marche sans surveillance.
14. Ne pas essayer de rendre inopérant le mécanisme de verrouillage du couvercle.
Cet Appareil Est Conçu pour Usage Domestique Seulement
PRODUITS ACHETÉS AUX ÉTATS-UNIS ET AU CANADA UNIQUEMENT:
Cet appareil est doté d'une fiche polarisée (une broche est plus large que l'autre). Pour réduire
le risque de choc électrique, cette fiche ne va que dans un sens seulement sur une prise de
courant polarisée. Si la fiche ne s'enfonce pas complètement dans la prise, la retourne et
essayer de nouveau. Si elle ne s'adapte toujours pas à fond, consulter un électricien qualifié.
VEILLEZ À RESPECTER LES MESURES DE SECURITÉ DE LA PRISE POLARISÉE.
CONSERVEZ CES INSTRUCTIONS
PRÉCAUTIONS IMPORTANTES
Page 11
11
Les Pièces de Hachoir Oskar®Jr. Plus
Au cours du déballage de votre nouveau Hachoir Oskar®Jr. Plus, veuillez prendre un
moment pour bien identifier chacune des pièces montrées ci-dessous. S'ASSURER DE
MANIPULER LA LAME AVEC SOIN PUISQU'IL EST TRÈS TRANCHANTE.
En suivant les simples instructions, étape par étape, vous apprendrez comment les articles
vont ensemble et comment votre nouveau Hachoir Oskar
®
Jr. Plus est mer veilleusement
pratique à utiliser.
Couvercle
Lame à
Hacher
Contenant Base du Moteur
Page 12

12
Assemblage de Votre Hachoir Oskar®Jr. Plus
Avant de commencer, s'assurer QUE LE CORDON ÉLECTRIQUE
EST DÉBRANCHÉ.
Placer la base du moteur en face de vous, sur une surface sèche
et de niveau, avec le côté le plus haut du logement du moteur
vers l'arrière.
REMARQUE: Un commutateur de MARCHE/ARRÊT (ON/OFF)
est situé à l'arrière de la base du moteur.
Placer le Contenant transparent sur l'arbre d'entraînement de la base
du moteur et faire tourner le Contenant jusqu'à ce qu'il descende
uniformément sur la base. Tourner maintenant le contenant dans le
sens anti-horaire jusqu'à ce qu'il se verrouille solidement en place.
Placer la Lame à Hacher sur l'arbre d'entraînement en la
tournant légèrement jusqu'à ce qu'elle descende en place.
LA LAME EST EXTRÊMEMENT TRANCHANTE.
IL FAUTLAMANIPULER AVEC PRUDENCE.
Pour attacher le couvercle, placer le couvercle sur le contenant
de façon à ce que la grande patte de sûreté du Couvercle soit sur
le côté droit près de la fente horizontale à l'arrière de la base du
moteur. Lorsque tournée dans le sens antihoraire, la patte engagera
le commutateur automatique et mettra le Hachoir Oskar
®
Jr. Plus
en MARCHE. Déplacer le couvercle dans la direction opposée
pour mettre en position d'ARRÊT.
Utilisation de Votre Hachoir Oskar® Jr. Plus
Techniques à Pulsation:
Le Hachoir Oskar®Jr. Plus transforme les aliments très rapidement, la plupart du temps,
en quelques secondes! Il peut, par conséquent, se produire une surtransformation
des aliments si l'on ne fait pas attention. Lors de l'utilisation,
nous vous suggérons de ne pas hacher plus que quelques secondes
à la fois. Tourner fréquemment le couvercle à la position de
MARCHE et d'ARRÊT jusqu'à ce que les résultats désirés soient
obtenus. Pour utiliser cette «Technique à Pulsation», faire pivoter
tout simplement le couvercle de sorte que la patte de verrouillage
entre et sorte de la fente du commutateur automatique. La technique
de pulsation assure d'excellents résultats à chaque fois.
Page 13

13
Placer les aliments dans le contenant:
Pour de meilleurs résultats, les morceaux d'aliment à transformer devraient être de la même
grosseur. Quand vous coupez, brisez et déchirez des aliments en morceaux uniformes de la
même grosseur avant de commencer à hacher, les résultats finis seront également uniformes.
Vous obtiendrez des résultats constants plus rapides si vous ne surchargez pas le contenant.
Hacher les aliments en petites quantités.
Hachage des miandes:
Précouper les viandes en morceaux d'environ 3/4 de
pouce carré (2 cm.). Placer les morceaux dans le
Contenant, remettre le Couvercle en place et procéder
à la transformation en utilisant la technique de pulsation
pendant 5 à 7 secondes. Ne jamais transformer plus
de 1/2 tasse de cubes de viandes à la fois.
Hachage des légumes:
Lors de la transformation de légumes comme les oignons,
les piments verts et le céleri, les couper en morceaux de
3/4 de pouce (2 cm.). Placer 4 à 6 pièces dans le
contenant en tournant le Hachoir Oskar
®
Jr. Plus à la
position de MARCHE et d'ARRÊT 1 à 2 fois pour couper
gros, 3 à 4 fois pour couper finement.
Ajouter des Ingrédients Liquides:
Les ingrédients liquides peuvent être ajoutés à l'appareil
pendant son fonctionnement en les versant dans le trou
de coulée du couvercle.
Hachage:
Vous pouvez maintenant hacher de l'ail, du parsil et des
herbes en quelques secondes. Laisser tomber des moitiés
de gousses d'ail ou des brindilles de persil dans le
contenant et transformer. Les aliments hachés qui adhèrent
au contenant s'enlèvent facilement à l'aide d'une spatule.
Page 14

14
Enlèvement de la Lame:
Une fois la transformation terminée, DÉBRANCHER LE CORDON
ÉLECTRIQUE DE LA PRISE. Enlever le Couvercle. Enlever la Lame
à Hacher avec la nourriture s'y accrochant avant d'enlever tout
aliment du Contenant. La lame est extrêmement tranchante.
Se servir de prudence en enlevant cette lame. Nettoyer la lame
au-dessus du Bol à l'aide d'une raclette.
REMARQUE: ATTENDRE TOUJOURS QUE LA LAME
ARRÊTE COMPLÈTEMENT DE BOUGER AVANT
D'ENLEVER LE COUVERCLE.
Enlèvement du Contenant:
Placer le Couvercle sur le Contenant. Utiliser le Couvercle pour
vous aider à enlever le Contenant. Faire pivoter le Couvercle
180 degrés dans le sens horaire jusqu'à ce que les deux pattes
sur le couvercle rencontrent les deux pattes du Contenant.
Continuer à tourner le Couvercle en effectuant une pression
ferme avec le pouce contre les pattes jusqu'à ce que le Contenant
soit relâché. Vider le reste des aliments du Contenant.
Nettoyage, Rangement et Entretien de Votre Hachoir Oskar® Jr. Plus
Une fois la transformation des aliments terminée, débrancher le Hachoir Oskar®Jr. Plus de la
prise électrique et enlever le Couvercle, la Lame à Hacher, ainsi que le Contenant de la Base
du Moteur. Essuyer la base de votre unité avec un chiffon humide puis la polir légèrement
avec un chiffon sec. NE JAMAIS IMMERGER LA BASE DU MOTEUR DANS AUCUN LIQUIDE.
NE PAS LAVER AUCUNE PIÈCE DANS LE LAVE-VAISSELLE.
Laver le Contenant et le Couvercle dans de l'eau savonneuse tiède. Rincer et sécher
immédiatement. Laver la Lame à Hacher à la main. Éviter de placer la Lame à Hacher dans de
l'eau savonneuse où elle peut disparaître de la vue.
NE PAS OUBLIER DE SE SERVIR DE PRUDENCE LORS DE LA MANIPULATION DE LA LAME
À HACHER. IL EST TRÈS COUPANTS!
Le nettoyage de l'axe interne de votre Lame à Hacher est le plus important. Nous suggérons
d'utiliser une petite brosse de percolateur ou de bouteille de bébé afin d'enlever tous les
particules de nourriture, puis laver l'axe et sécher entièrement.
Sunbeam suggère de ranger le Hachoir Oskar®Jr. Plus dans un endroit sec sur un comptoir
ou un dessus de table où il sera facilement accessible pour usage immédiat. Ranger la Lame
à Hacher dans le Contenant transparent. (HORS DE LA PORTÉE DES ENFANTS). La lame est
EXTRÊMEMENT TRANCHANTE! Se servir de prudence lors de la manipulation de la lame.
Page 15

15
Une fois le Contenant lavé et séché, vous pouvez appliquer une petite quantité d'huile sur le
bord du couvercle et du contenant. Cette lubrification laisse le couvercle bouger plus
librement quand en contact avec le contenant.
TOUJOURS RANGER LA LAME HORS DE LA PORTÉE DES ENFANTS!
À ne pas Oublier
1.
Utiliser le Hachoir Oskar®Jr. Plus uniquement sur une surface sèche et de niveau –
jamais à l'extérieur, sur une surface humide ou sur le bord d'une table.
2. Ne jamais enlever le couvercle ou le robot avant que la lame ou le disque soit
complètement arrêté et que l'unité ait été débranchée de la prise électrique.
3. Le moteur de votre Hachoir Oskar
®
Jr. Plus a reçu une lubrification permanente à l'usine
et n'exige aucune autre attention. Autre que le nettoyage recommandé, aucun autre
entretien d'utilisateur ne devrait être nécessaire. Retourner votre robot culinaire
au centre de service après-vente indépendant autorisé par Sunbeam si de l'entretien
ou de la réparation devient nécessaire.
Page 16

16
Guide du Hachoir
TÂCHE INSTRUCTIONS GÉNÉRALES ALIMENTS SUGGÉRÉS
Hacher Les aliments comme la viande devraient Pommes, choux, poisson cuit,
être précoupés en cubes de 3/4 de pouce jambon, viande ou volaille,
carré (2 cm.). Ne pas transformer plus croustilles au maïs, oeufs durs,
de 1/2 tasse de cube de viande à la fois. champignons, noix, olives,
Placer tous les ingrédients dans le contenant. oignons, persil, marinades,
Hacher en utilisant la technique à pulsation piments, viande crue, échalotes.
jusqu'à consistance désirée. Ne pas hacher Fruits secs comme les abricots,
plus de 5 onces (140 gr.) de fruits secs. pommes, dattes et pruneaux
dénoyautés.
Émietter Placer les morceaux d'aliments Gaufrettes au chocolat,
dans le contenant. Émietter en utilisant
pain frais ou sec, buicuits graham,
la technique à PULSATION jusqu'à biscotins salés,
consistance désirée. gaufrettes à la vanille.
Râper Les aliments devraient être coupés en cubes
Fromages durs comme le Parmesan
de 3/4 de pouce carré (2 cm.). ou le Romano. Raifort frais
(Les fromages durs devraient être et racine de gingembre
à la température de la pièce.)
Ne pas râper plus de 3 onces (85 gr.)
de fromages durs à la fois. Placer tous
les ingrédients dans le Contenant.
Utiliser la technique à PULSATION
jusqu'à consistance désirée.
Couper Placer les ingrédients dans le contenant. Ail, échalottes, parsil, aneth,
Couper. REMARQUE: Le procédé ciboulette et autres herbes.
est très rapide.
Purée Placer les ingrédients dans le contenant.
Purée jusqu'à consistance lisse.
Fruits frais, cuits ou en conserve
(comme les pommes, bananes,
pêches, poires, fraises).
Les légumes frais, cuits ou
en conserve (comme les fèves,
carottes, maïs, pois, pommes
de terre ou tomates),
beurre d'arachide
Page 17

17
GARANTIE LIMITÉE 2 ANS
Sunbeam Products Inc. garantit à l'acheteur initial, sous couvert des limitations et exclusions stipulées
ci-après, que ce produit est exempt, sous tous les aspects matériels, de tout défaut mécanique et électrique
de matériel ou de fabrication pendant deux ans à compter de la date d'achat. Cette garantit ne couvre pas
l'usure
normale des pièces ni les dommages résultant des situations suivantes: usage négligent ou abusifdu produit,
courant ou tension d'alimentation inadaptés, utilisation en contradiction avec le mode d'emploi ou démontage,
réparation ou modification par toute personne autre que le personnel d'un centre de réparation agréé.
Nos obligations dans le cadre de cette garantie se limitent à la réparation et au remplacement, au choix du
fabricant, du produit pendant la durée de la garantie, à condition que le produit soit renvoyé en port payé,
accompagné de son numéro de modèle et de l'original du justificatif d'achat daté, à l'adresse suivante:
Produits achetés aux États-Unis:
SUNBEAM APPLIANCE SERVICE STATION
117 Central Industrial Row
Purvis, MS 39475
Produits achetés au Canada:
SUNBEAM APPLIANCE SERVICE STATION (KND)
S'il vous plait l'appel 1-800-663-8623 ou email nous
consumeraffairs@consumer.sunbeam.com
Ne pas renvoyer l'appareil au revendeur ou au fabricant; ceci aurait pour effet de retarder le traitement de la
demande de garantie.
Pour toute question relative à cette garantie ou pour obtenir l'adresse du centre de réparation agréé le plus
proche, appeler sans frais le 1-800-597-5978 ou écrire au Sunbeam – Consumer Affairs, P.O. Box 948389,
Maitland, FL 32794-8389.
Au Canada, pour toute question relative à cette garantie ou pour obtenir l'adresse du centre de réparation agréé
canadien le plus proche, appeler sans frais le 1-800-667-8623. Pour toute question relative à cette garantie ou
pour obtenir l'adresse du centre de réparation agréé le plus proche en-dehors des États-Unis et du Canada,
consulter la carte de service de la garantie jointe à l'emballage du produit.
AVERTISSEMENT
La réparation ou le remplacement du produit suivant les termes de cette garantie constituent votre unique
recours.
SUNBEAM PRODUCTS, INC. NE POURRA ÊTRE TENUE RESPONSABLE DE DOMMAGES
ACCESSOIRES OU INDIRECTS POUR RUPTURE D'UNE QUELCONQUE GARANTIE EXPRESSE OU
IMPLICITE CONCERNANT CE PRODUIT OU UNE PARTIE DE CE PRODUIT. DANS LES LIMITES DE
LA RÉGLEMENTATION EN VIGUEUR, SUNBEAM PRODUCTS, INC. N'OFFRE AUCUNE GARANTIE
I
MPLICITE QUANT À L'ADÉQUATION DE CE PRODUIT OU D'UNE PARTIE DE CE PRODUIT À UN
USAGE PARTICULIER OU À LA COMMERCIALISATION. Certains états ou provinces n'autorisant pas
l'exclusion ou la limitation des dommages accessoires ou indirects ou autorisant uniquement des limitations
sur la durée de validité d'une garantie implicite, les limitations et exclusions ci-dessus peuvent ne pas
s'appliquer à votre situation. Cette garantie vous accorde des droits juridiques particuliers et il est possible que
vous ayez d'autres droits, différents d'un état ou d'une province à l'autre.
Page 18

18
Cuando use aparatos eléctricos, algunas precauciones básicas de seguridad siempre
deben de tomarse:
1.
LEA TODAS LAS INSTRUCCIONES ANTES DE USAR ESTE PROCESADOR DE ALIMENTOS.
2.
Para proteger contra una descarga eléctrica y lesiones a personas, no coloque
el Procesador de Alimentos en agua o en otros líquidos. Esto puede causar lesiones
a personas o daños al producto.
3. Supervisión extrema es necesaria cuando el aparato es usado por o cerca de niños
o personas incapacitadas
4. Desconecte el aparato de la toma de corriente cuando no esté en uso, antes de poner
o quitar partes y antes de limpiarlo.
5. Evite el contacto con las partes en movimiento. Mantenga las manos, el cabello,
la ropa y otros utensilios lejos de la cuchilla para picar durante la operación para reducir
el riesgo de lesiones a personas y/o daño al Procesador.
6. No opere el Procesador de Alimentos con un cordón dañado o después de que el aparato
ha funcionado inadecuadamente o ha sido dañado en cualquier forma. Regrese el aparato
a un Centro de Servicio Autorizado de Sunbeam para su examinación, reparación o ajuste.
7. El uso de accesorios o aditamentos no recomendados por Sunbeam Appliance Company
pueden causar incendios, descargas eléctricas o lesiones personales.
8. No permita que el cordón cuelgue sobre la orilla de la mesa o del mostrador o toque
superficies calientes.
9. No se use en exteriores o con propósitos comerciales.
10. Quite la cuchilla para picar del Procesador de Alimentos antes de lavar
11. No coloque el Procesador de Alimentos en o cerca de un horno caliente o quemador.
12. No use este Procesador de Alimentos mas que para lo que ha sido diseñado.
13. No deje el Procesador de Alimentos funcionando sin su supervisión.
14. No intente modificar el mecanismo de seguridad de la tapa.
Esta Unidad Es para Uso Doméstico Solamente
PARA PRODUCTOS COMPRADOS EN ESTADOS UNIDOS Y CANADÁ ÚNICAMENTE:
Para reducir el riesgo de descarga eléctrica, este aparato cuenta con una clavija polarizada
(una cuchilla es más ancha que la otra). Como medida de seguridad, esta clavija entra sólo
de una manera en un enchufe polarizado. Si la clavija no encaja en el enchufe simplemente
colóquela al revés. Si aún así no encaja llame a un electricista de su confianza.
DE NINGUNA MANERA INTENTE MODIFICAR ESTA MEDIDA DE SEGURIDAD.
GUARDE ESTAS INSTRUCCIONES
MEDIDAS IMPORTANTES DE SEGURIDAD
Page 19

19
Partes de Su Picador de Alimentos Oskar®Jr. Plus
Mientras desempaca su nuevo Picador de Alimentos Oskar
®
Jr. Plus, tome un
momento para identificar cada una de las diferentes partes que se muestran en estas
ilustraciones. ASEGÚRESE DE MANEJAR LA CUCHILLA CON MUCHO CUIDADO,
YA QUE ES MUY FILOSA.
Al seguir paso a paso las sencillas instrucciones de este manual, usted aprenderá
como armar el aparato y cuán verdaderamente maravilloso y conveniente es su
nuevo Picador de Alimentos Oskar
®
Jr. Plus.
Tapa
Cuchilla
para Picar
Contenedor Base del Motor
Page 20

20
Ensamblando Su Picadora de Alimentos Oskar® Jr. Plus
Antes de que usted empiece, por favor VERIFIQUE QUE EL CORDÓN
ELÉCTRICO ESTÉ DESCONECTADO.
Coloque la base del motor frente a usted sobre una superficie seca
y nivelada acomodando la base con el lado más alto hacia atrás.
NOTA:Un interruptor de "ON" ENCENDIDO Y "OFF" APAGADO está
localizado en la base del motor.
Coloque el Contenedor transparente sobre la barra en la base del
motor y gire el Contenedor hasta que esté bien colocado sobre la
base. Ahora gire el Contenedor en sentido contrario a las manecillas
del reloj hasta que esté firmemente en su lugar.
Ponga la cuchilla para picar sobre la barra, gírela un poco hasta que
caiga en su lugar. LA CUCHILLA ES EXTREMADAMENTE FILOSA.
TENGA CUIDADO CUANDO LA MANEJE.
Para colocar la tapa, póngala sobre el Contenedor de manera que la
lengüeta grande de la tapa esté a mano derecha, cerca de la ranura
horizontal en la parte trasera de la base del motor. Cuando gire en
sentido contrario de las manecillas de reloj, la lengüeta se acoplará
con el interruptor automático del Picador de Alimentos Oskar
®
Jr.
Plus y ENCENDERÁ el aparato. Cuando mueva la tapa en dirección
opuesta, el aparato se APAGARÁ.
Usando Su Picador de Alimentos Oskar® Jr. Plus
Usando la Técnica de Pulso:
El Picador de Alimentos Oskar®Jr. Plus procesa alimentos muy rápidamente; en la mayoría de
los casos, ¡En solamente segundos! Por lo tanto, los alimentos pueden fácilmente
ser procesados de más, si usted no observa cuidadosamente. Le sugerimos que cuando
use la unidad, usted no pique los alimentos por más de algunos
segundos a la vez. Gire la tapa ENCENDIENDO y APAGANDO hasta
que se obtengan los resultados deseados. Para usar esta "Técnica
de Pulso", simplemente gire la tapa de manera que la lengüeta de
seguridad se mueva dentro y fuera de la ranura del interruptor
automático. Las pulsaciones aseguran excelentes resultados todas
las veces que se usen.
Page 21

21
Colocando los Alimentos dentro del Contenedor:
Para mejores y más consistentes resultados, usted debe intentar picar piezas de alimento
que son aproximadamente del mismo tamaño. Cuando corte alimentos en piezas de
tamaño uniforme antes de iniciar a picarlas, los resultados finales serán más uniformes
también. Usted obtendrá resultados rápidos, consistentes y mejores si usted no
sobrecarga el Contenedor. Pique los alimentos en pequeñas cantidades.
Cortando Carnes:
Corte las carnes previamente en trozos cuadrados de
3/4 pulgada (2 cm.). Coloque las piezas dentro del
Contenedor, coloque la Tapa de nuevo y procese usando
la técnica de pulso durante 5 a 7 segundos. Nunca
procese más de 1/2 taza de trozos de carne a la vez.
Cortando Verduras:
Cuando procese verduras como cebollas, pimientos
verdes y apio, córtelos en piezas de 3/4 pulgada (2 cm.).
Coloque de 4 a 6 piezas dentro del contenedor, ENCIENDA
y APAGUE el Picador de Alimentos Oskar
®
Jr. Plus una
o dos veces para cortes gruesos, tres a cuatro veces
más para cortes finos.
Añadiendo Ingredientes Líquidos:
Los ingredientes líquidos pueden agregarse mientras
el Picador de Alimentos Oskar
®
Jr. Plus está operando,
al vertirlos por el orificio central en la tapa.
Picando:
¡Ahora usted puede picar ajo, perejil y especias en
segundos! Simplemente esparza dientes de ajo o perejil
en el contenedor y procéselos. Los alimentos picados
que se peguen al contenedor, se pueden remover
fácilmente con una espátula.
Page 22

22
Quitando la Cuchilla:
Cuando termine de picar alimentos, DESCONECTE
EL CORDÓN ELÉCTRICO DE LA TOMA DE CORRIENTE.
Quite la tapa. Antes de sacar los alimentos ya procesados,
quite la Cuchilla para picar con los alimentos pegados a ésta.
La cuchilla es extremadamente filosa. Tenga cuidado cuando
quite esta cuchilla. Limpie la cuchilla sobre el tazón usando
una espátula.
NOTA:SIEMPRE ESPERE A QUE LA CUCHILLA SE DETENGA
COMPLETAMENTE ANTES DEQUITAR LA TAPA.
Quitando el Contenedor:
Coloque la Tapa sobre el Contenedor. Use la Tapa para
remover el Contenedor. Gire la Tapa 180 grados hasta que las
dos lengüetas de la tapa se encuentren con las dos lengüetas
del Contenedor. Continúe girando la Tapa, presionando
firmemente, con el dedo pulgar sobre las lengüetas hasta
que el Contenedor sea liberado. Vacíe los alimentos
del Contenedor.
Limpieza, Almacenamiento y Cuidados para Su Picador
de Alimentos Oskar® Jr. Plus
Cuando termine de picar alimentos, desconecte la unidad de la toma de corriente eléctrica
y quite la Tapa, la Cuchilla para Picar y el Contenedor de la Base del Motor.
Limpie la base del motor con un paño húmedo, después púlalo con uno seco.
NUNCA SUMERJA LA BASE DEL MOTOR EN NINGÚN LÍQUIDO.
NO LAVE NINGUNA PARTE EN UNA MÁQUINA LAVAVAJILLAS
Lave el Contenedor y la Tapa en agua tibia y jabonosa. Enjuague y seque inmediatamente
Lave la Cuchilla para picar a mano. Evite colocar la Cuchilla para picar dentro de agua
jabonosa donde pueda perderse de vista.
RECUERDE TENER EXTREMO CUIDADO CUANDO MANEJE LA CUCHILLA PARA PICAR.
¡ES MUY FILOSA!
La limpieza de la barra interna de la Cuchilla para picar es muy importante.
Sugerimos usar un pequeño cepillo o un cepillo para limpiar las botellas de bebé
para remover todas las partículas de alimento, después lave y seque la barra muy bien.
Sunbeam sugiere que usted almacene su Picador de Alimentos Oskar
®
Jr. Plus sobre
cualquier mostrador o mesa en su cocina, donde siempre pueda estar listo para uso
inmediato. Almacene la Cuchilla para picar dentro del Contenedor transparente
(FUERA DEL ALCANCE DE LOS NIÑOS). ¡La Cuchilla es EXTREMADAMENTE filosa!
Tenga cuidado cuando las maneje.
Page 23

23
Después de lavar y secar el Contenedor, aplique un poco de aceite vegetal a la orilla
de la Tapa y del Contenedor. Esta lubricación permite que la tapa se mueva más
fácilmente cuando está en contacto con el Contenedor.
SIEMPRE ALMACENE LA CUCHILLA FUERA DEL ALCANCE DE LOS NIÑOS.
Algunas Cosas que Debe Recordar
1.
Use el Picador de Alimentos Oskar®Jr. Plus solamente sobre una superficie seca
y nivelada – nunca en el exterior o sobre una superficie húmeda o cerca de la orilla
de la mesa.
2. Nunca remueva la tapa hasta que la Cuchilla se detenga completamente y la unidad
se ha desconectado de la toma de corriente eléctrica.
3. El motor de su Picador de Alimentos Oskar®Jr. Plus ha sido lubricado permanentemente
en la fábrica y no requiere mayor atención. No es necesario otro tipo de limpieza mas que
la recomendada anteriormente. Regrese su Picador de Alimentos al centro de servicio
independiente autorizado por Sunbeam si es necesario servicio o reparación.
Page 24

24
Guía para Picar
TAREA INSTRUCCIONES GENERALES ALIMENTOS SUGERIDOS
CORTAR Los alimentos como carnes deben Manzanas, col o repollo,
cortarse previamente en trozos pescado cocinado, jamón,
cuadrados de 3/4 de pulgada (2 cm.). carne o pollo, frituras de maíz,
No procese más de 1/2 taza de trozos huevos duros cocidos,
de carne a la vez. Coloque todos champiñones, nueces,
los ingredientes dentro del contenedor aceitunas, cebollas, perejil,
para picar. Pique usando la técnica pepinillos, pimientos,
del PULSO hasta que se alcance carne cruda, cebollinos.
la consistencia deseada. No pique más Frutas secas como chabacanos,
de 5 onzas (140 gr.) de frutas secas. manzanas dátiles y pasas.
D
ESMIGAJAR
Coloque las piezas de alimentos Galletas de chocolate,
dentro del contenedor. Haga migas pan fresco o seco,
usando la técnica del PULSO galletas de jengibre,
hasta que se alcance galletas saladas,
la consistencia deseada. galletas de vainilla.
R
ALLAR Los alimentos deben cortarse Queso duros como Parmesano
previamente en trozos cuadrados y Romano. Rábano fresco
de 3/4 de pulgada (2 cm.). y raíces de jengibre.
(Los quesos duros deben estar a
temperatura ambiente). No muela
más de 3 onzas (85 gr.) de queso
duro a la vez. Coloque todos los
ingredientes dentro del contenedor.
Pique usando la técnica del
PULSO hasta que se alcance
la consistencia deseada.
P
ICAR Coloque los ingredientes dentro Ajo, pepinillos, perejil,
del contenedor. Pique. cebollinos y otras hiervas.
NOTA:Los alimentos
se pican rápidamente.
P
URÉ Coloque los ingredientes dentro Frutas frescas, cocidas o enlatadas
del contenedor. Procese hasta (como manzanas, plátanos,
que tenga una consistencia suave. duraznos, peras o fresas).
Verduras frescas cocidas o
enlatadas (como frijoles,
zanahorias, chícharos, papas
o jitomates), mantequilla de maní.
Page 25

25
GARANTÍA DE 2 AÑOS
Sunbeam Products Inc. garantiza al comprador original, sujeto a limitaciones y exclusiones que se estipulan
en seguida, que este producto estará libre de defectos mecánicos y eléctricos en el material y en la mano
de obra durante dos años a partir de la fecha de compra. Esta garantía no cubre el desgaste de partes
o
daños resultantes de cualquiera de lo siguiente: uso negligente o mala utilización del producto, uso con
un
voltaje
o corriente no adecuado, uso contrario a las instrucciones de operación, desensamble,
reparaciones
o alteraciones hechas por cualquier persona que no sea de un centro de servicio autorizado.
Nuestra obligación está limitada a la reparación o a la reposición, bajo la opinión del fabricante,
de este producto durante el período de la garantía, si el producto se envía gastos previamente pagados,
con el numero de modelo y la fecha original de compra, directamente a la siguiente dirección:
Para productos comprados en Estados Unidos:
SUNBEAM APPLIANCE SERVICE STATION
117 Central Industrial Row
Purvis, MS 39475
Para productos comprados en Canadá:
SUNBEAM APPLIANCE SERVICE STATION(KND)
Please call 1-800-663-8623 o envienos um email a
consumeraffairs@consumer.sunbeam.com
No regrese este producto al lugar de compra o al fabricante; al hacer esto retrasará el proceso
del reclamo de su garantía.
Respuestas a sus preguntas sobre esta garantía o sobre la estación de servicio autorizado más cercano se pueden
obtener llamando sin costo al 1-800-597-5978 o escriba a Sunbeam – Consumer Affairs, al P.O. Box 948389,
Maitland, FL 32794-8389. Respuestas a preguntas sobre esta o sobre la estación de servicio autorizado
canadiense más cercano se pueden obtener llamando sin costo al 1-800-667-8623. Para información sobre
la garantía o sobre la localización de un centro de servicio autorizado fuera de los Estados Unidos y Canadá,
por favor revise la tarjeta garantía del servicio que se incluye en el empaque del producto.
RECHAZO DE RESPONSABILIDADES
Reparación de productos o reposiciones como se ofrecen en esta garantía es su único remedio.
SUNBEAM PRODUCTS, INC. NO SE HACE RESPONSABLE POR CUALQUIER DAÑO INCIDENTAL
O CONSECUENTE QUE OCURRA POR LA VIOLACIÓN DE LOS TÉRMINOS EXPLÍCITOS
O IMPLÍCITOS DE LA GARANTÍA DE ESTE PRODUCTO O DE CUALQUIER PARTE DE ESTE.
A EXCEPCIÓN DEL ALCANCE PROHIBIDO POR LA LEY APLICABLE, SUNBEAM PRODUCTS, INC.
RECHAZA TODA RESPONSABILIDAD DE CUALQUIER GARANTÍA IMPLÍCITA O COMERCIAL,
O AJUSTES HECHOS PARA UN PROPÓSITO EN PARTICULAR SOBRE ESTE PRODUCTO
O CUALQUIER PARTE DE ESTE.
Algunos estados y provincias no permiten la exclusión o limitación de daños imprevistos o consecuentes,
o permiten limitación en la duración de una garantía implícita, así que las limitaciones o exclusiones arriba
mencionadas pueden no ser aplicables para usted. Esta garantía le da a usted derechos legales específicos,
y puede también tener otros derechos que pueden variar de estado a estado o de provincia a provincia.
Page 26

26
Ao usar os aparelhos elétricos deverá seguir as seguintes medidas de precaução básicas:
1. LEIA TODAS AS INTRUÇÕES ATENTAMENTE.
2. Para evitar risco de choque elétrico, não submerja o multiprocessador em água ou
qualquer outro líquido. Isto pode causar danos pessoais e/ou danificar o produto.
3. É necessário manter uma supervisão muito próxima quando este aparelho for usado por,
em ou perto de crianças ou pessoas incapacitadas.
4. Desconecte o aparelho, sempre que ele não estiver em uso, antes de efetuar sua limpeza
e antes de colocar ou retirar partes de aparelho.
5. Não faça contato com as partes moventes. Mantenha as mãos, cabelo, roupas e outros
utensílios afastados da lâmina de cortar durante a operação, para reduzir o risco de
ferimento e/ou dano ao Multiprocessador.
6. Não use o Multiprocessador que tenha o fio ou a tomada danificada, ou após ter
apresentado algum defeito ou após caído no chão. Neste caso, leve o aparelho à
assistência técnica autorizada Sunbeam Appliance Company para revisão ou conserto.
7. O uso de peças de reposição não recomendadas pelo Sunbeam Appliance Company,
eles podem causar fogo, descargas elétricas ou acidentes.
8. Não deixe o fio pendurado para fora de mesa ou superfície onde o aparelho estiver
sendo utilizado, ou em contato com superfícies quentes.
9. Não use o aparelho ao ar livre e não use o aparelho comercialmente.
10. Remova a lâmina de cortar do processador antes de lavá-lo.
11. Não coloque a suo multiprocessador perto do fogão quente ou do forno aquecido.
12. O multiprocessador só deve ser usado para o seu fim específico
13. Nunca deixe seu eletro-doméstico sozinho quando em uso.
14. Não tente ultrapassar o mecanismo de bloqueio de segurança da tampa.
Este Aparelho Somente para Uso Doméstico
PARA PRODUTOS COMPRADOS SOMENTE NOS ESTADOS UNIDOS & CANADÁ:
Este aparelho conta com um plug polarizado (um dos contatos é mais largo do que outro).
Para evitar risco de choque elétrico, este plug encaixa-se somente em um plug unidirecional
polarizado. Se o plug não se encaixar totalmente dentro da tomada, inverta o mesmo.
Se ainda assim não encaixar, contate um eletricista competente. NÃO TENTE DESATIVAR
ESTE RECURSO DE SEGURANÇA.
PRECAUÇÕES IMPORTANTES
GUARDE ESTAS INTRUÇÕES
Page 27

27
Peças de O Cortador Oskar® Jr. Plus
Para desembalar o seu novo Cortador Oskar®Jr. Plus, tire um momento para
identificar cada uma das várias peças conforme ilustradas abaixo. CERTIFIQUE-SE DE
MANUSEAR A LÂMINA DO DISCO CUIDADOSAMENTE, POIS SÃO BEM AFIADOS.
Por seguir estas simples instruções passo por passo neste folheto, você aprenderá
como as peças se ajuntam e quão magnificamente conveniente o seu novo Cortador
Oskar
®
Jr. Plus é para usar.
Tampa
Lâmina
de Cortar
Recipiente Base do Motor
Page 28

28
Montagem do Seu Cortador Oskar® Jr. Plus
Antes de começar, favor de CERTIFICAR-SE DE QUE A CORDA
ELÉTRICA ESTÁ DESCONECTADA.
Coloque a base do motor numa superfície seca e plana com a parte
mais alta do suporte do motor ao posterior.
NOTA:Há um interruptor "ON" (Ligar) e "OFF" (Desligar) na parte
posterior da base do motor.
Coloque o Recipiente sobre o eixo de acionamento na base do
motor e gire o cilindro até que ele fique bem assentado sobre a
base. Agora gire o Recipiente de sentido anti-horário até que fique
travado firmemente em posição.
Coloque a Lâmina de Cortar sobre o eixo de acionamento, gire-o
levemente até que caia no seu lugar. A LÂMINA É EXTREMAMENTE
AFIADA. USE DE CAUTELA AO MANUSEAR A LÂMINA.
Para afixar a tampa, ponha a tampa sobre o recipiente para que a
aba grande de travar da Tampa fique do lado direito, próximo à
fenda horizontal na parte posterior da base do motor. Quando girado
numa direção em sentido antihorário, a aba engatará o interruptor
automático e o Cortador Oskar
®
Jr. Plus estará LIGADO. Por
retroceder a tampa na direção contrária, estará DESLIGADO.
Como Usar o Seu Cortador Oskar® Jr. Plus
Técnicas de pulsação:
O Cortador Oskar®Jr. Plus processa os alimentos muito rapidamente,
e na maioria dos casos, em segundos! Portanto, os alimentos podem
ficar facilmente processados demais se você não ficar de olho.
Sugerimos que ao usar a unidade , que cortar os alimentos por não
mais do que alguns segundos de uma vez. Gire a tampa para LIGAR
e DELIGAR até que os resultados desejados sejam obtidos. Para usar
esta "Técnica de Pulsação", simplesmente gire a tampa para que
a aba de travar mova por dentro e por fora da fenda do interruptor
automático. A pulsação assegura excelentes resultados cada vez.
Page 29

29
Como colocar alimentos no recipiente:
Para os melhores e mais consistentes resultados, você poderá tentar processar pedaços de
alimentos que são de tamanho iguais. Quando você cortar, quebrar ou rasgar os alimentos
em pedaços uniformes antes de começar a cortar, os resultados finais também serão mais
uniformes. Obterá resultados mais rápidos e consistentes se não sobrecarregar o Recipiente.
Corte os alimentos em pequenas quantidades.
Como cortar carnes:
De avanço, corte a carne em pedaços de mais ou
menos 3/4 polegada (2 cm.) Coloque os pedaços
no recipiente, reposicione a tampa e processe-os
usando a técnica de pulsação por 5 à 7 segundos.
Nunca processe mais de 1/2 xícara de cubos
de carne de uma vez.
Como cortar legumes:
Ao processar os legumes tais como cebolas, pimentas
verdes e aipo, corte-os em pedaços de 3/4 polegada
(2 cm.). Coloque 4 à 6 pedaços dentro do recipiente,
girando o Cortador Oskar
®
Jr. Plus até ligar e desligar
1 ou 2 vezes para cortá-lo mais grosso, e 3 ou 4 vezes
mais para cortá-lo mais fino.
Como adicionar ingredientes líquidos:
Ingredientes líquidos podem ser adicionados
enquanto que o Cortador Oskar
®
Jr. Plus estiver
em operação, por despejá-los pelos buraco
despejador em cima da tampa.
Como Picar:
Agora poderá picar alho, triturar salsa e ervas no em
segundos. Simplesmente deixe cair os dentes de alho
divididos em dois, ou raminhos de salsa dentro do
recipiente e processe-os. Os alimentos picadinhos
que ficam apegados as beiras podem ser facilmente
tirados com uma espátula.
Page 30

30
Como Remover a Lâmina:
Quando tiver terminado de processar, DESCONECTE A CORDA
ELÉTRICA DA TOMADA. Remova a tampa. Remova a Lâmina
de cortar, com o alimento ainda apegado a ela, antes de remover
o alimento do recipiente. A lâmina é extremamente afiada.
Use de cautela ao remover esta lâmina. Limpe a lâmina com
um raspador por cima da tijela.
NOTA:SEMPRE ESPERE ATÉ QUE A LÂMINA ESTEJA PARADA
COMPLETAMENTE ANTES DE REMOVER A TAMPA.
Como Remover o Recipiente:
Coloque a Tampa sobre o Recipiente. Use a Tampa para ajudar a
remover o Recipiente. Gire a Tampa na direção em sentido horário
180º até que as duas abas da tampa encontrarem-se com as abas
do Recipiente. Continue a girar a Tampa, usando a pressão firme,
com o seu polegar sobre as abas até que o Recipiente esteja solto.
Esvazie o restante do alimento do Recipiente.
Como Limpar, Guardar e Cuidar do Seu Cortador Oskar®Jr. Plus
Quando tiver terminada de processar, desconecte o Cortador Oskar®Jr. Plus da tomada
elétrica e remova a Tampa, a Lâmina de Cortar, e o Recipiente da Base do Motor.
Esfregue a base de sua unidade com um pano úmido, daí polí-a levemente com
um pano seco. NUNCA IMIRJA A BASE DO MOTOR EM QUALQUER LÍQUIDO.
NÃO LAVE QUAISQUER PEÇAS NUMA LAVADEIRA DE LOUÇA AUTOMÁTICA
Lave o Recipiente e a Tampa em água morna e ensaboada. Enxague e seque imediatamente.
Lave a Lâmina de Cortar à mão. Evite colocar a Lâmina de Cortar em água ensaboada onde
ela poderá ficar perdida de vista.
LEMBRE-SE DE USAR EXTREMA CAUTELA AO MANUSEAR A LÂMINA DE CORTAR É
MUITO AFIADA!
A limpeza do eixo interno de sua lâmina de cortar é muito importante. Sugerimos o uso de um
pequeno percolador ou uma escovinha de limpar garrafas para remover quaisquer partículas
de alimento e daí, lave e seque o eixo completamente.
A Sunbeam sugere que você guarde o seu Cortador Oskar
®
Jr. Plus sobre um balcão ou
tampo de mesa seco em sua cozinha onde estará sempre pronto para ser usado imediatamente
quando necessário. Guarde a lâmina de cortar dentro do recipiente transparente (FORA DO
ALCANCE DE CRIANÇAS). A lâminas é EXTREMAMENTE afiada! Use de cautela quando
manusear a lâmina.
Page 31

31
Depois de lavar e secar o Recipiente, talvez desejará aplicar uma pequena quantia de óleo
vegetal na borda da tampa e do recipiente. Esta lubrificação permitirá a tampa de mover-se
livremente ao ficar em contato com o recipiente.
SEMPRE GUARDE A LÂMINA FORA DO ALCANCE DE CRIANÇAS!
Algumas Coisas à Lembrar
1
. Use o Cortador Oskar®Jr. Plus somente em superfícies secas e planas – nunca ao
ar livre, ou numa superfície úmida ou na beira da mesa.
2. Nunca remova a tampa do processador antes que a Lâmina esteja parada completamente
e que a unidade esteja desconectada da tomada elétrica.
3. O motor do seu Cortador Oskar
®
Jr. Plus tem sido permanentemente lubrificado
na fábrica e não requer qualquer outra atenção. Fora a limpeza recomendada,
não terá mais necessidade de fazer qualquer outra manutenção. Retorne o
ser Cortador ao centre de serviço autorizado da Sunbeam mais próximo
de você caso necessite de serviços ou reparos.
Page 32

32
Guia de Cortar
TAREFA INSTRUÇÕES GERAIS ALIMENTOS SUGERIDOS
CORTAR Alimentos como as carnes devem ser Maçãs, repolho, peixe cozido,
cortados de antemão em cubos presunto, carnes ou aves,
3/4 polegada (2 cm.). Não processe salgadinhos, ovos cozidos,
mais de 1/2 xícara de uma vez. cogumelos, nozes, azeitonas,
Coloque todos os ingredientes cebolas, salsa, picles, pimento,
no recipiente. Corte usando a técnica carne crua, chalotas.
de PULSAÇÃO até atingir Frutas secas tais como abricós,
a consistência desejada. maçãs, tâmaras descaroçadas
Não triture mais de 140 gr. e ameixas descaroçadas.
(5 onças) de frutas secas.
E
SMIGALHAR Coloque pedaços de alimento dentro Filhó de chocolate,
do recipiente. Esmigalhe usando pão seco ou fresco,
a técnica de PULSAÇÃO até atingir bolacha de gengibre,
a consistência desejada. crem crackers
R
ALAR O alimento deve ser cortado em cubos Queijos duros como Parmesão
de 3/4 polegada (2 cm.). ou Romano.
(Queijos duros devem estar Raiz-forte fresca, gengibre.
à temperatura ambiente).
Não rale mais de 85 gr. (3 onças)
de queijo duro de uma vez.
Coloque todos os ingredientes
no recipiente . Rale em usar a técnica
de PULSAÇÃO até atingir
a consistência desejada.
M
OER
Coloque os ingredientes dentro Alho, chalota, salsa, endro,
do recipiente. Mói-os. cebolinha-capím e outras ervas.
NOTA:O alimento fica moído
muito rápidamente.
P
URÊ Coloque os ingredientes dentro Frutas frescas ou enlatadas tais
do recipiente. Faça o purê até como maçãs, bananas, pêssegos,
que esteja pastoso. pêras e morangos. Legumes
frescos, cozidos ou enlatados tais
como feijões, cenouras, milho,
ervilhas, batatas ou tomates.
Pasta de amendoim.
Page 33

33
GARANTIA LIMITADA DE 2 ANOS
A Sunbeam Products Inc. concede garantia ao comprador original, sujeita às limitações e exclusões
estipuladas abaixo, de que este produto não apresentará fisicamente defeitos mecânicos e elétricos devido
ao material ou mão de obra, durante dois anos a partir da data de compra. Esta garantia não cobre o
gasto normal das peças ou os danos devidos às seguintes causas: uso negligente ou inadequado do
produto,
uso de voltagem ou corrente inapropriada, uso que contrarie as instruções operacionais, ou
desmontagem,
reparo ou alteração realizada por pessoa que não pertença ao quadro de profissionais
do centro de
assistência técnica autorizada.
Nossa responsabilidade pelo presente se limita ao reparo ou substituição, a critério do fabricante,
do produto
durante o período de garantia, contanto que o produto, acompanhado do número de
modelo e do comprovante de compra com a data original, seja enviado com porte postal pago,
diretamente ao seguinte endereço:
Para produtos comprados nos Estados Unidos:
SUNBEAM APPLIANCE SERVICE STATION
117 Central Industrial Row
Purvis, MS 39475
Para produtos comprados no Canadá:
SUNBEAM APPLIANCE SERVICE STATION (KND)
Por chamado de favor 1-800-663-8623 ou email nos
consumeraffairs@consumer.sunbeam.com
Não devolva o produto ao local de compra ou ao fabricante; se o fizer poderá atrasar o seu processo
de reivindicação de garantia.
No caso de dúvidas sobre a garantia ou para saber o local do nosso serviço autorizado mais próximo poderá
ligar grátis para 1-800-597-5978 ou escrever para: Sunbeam – Consumer Affairs, P.O. Box 948389, Maitland,
Fl 32794-8389. No caso de dúvidas sobre a garantia ou para saber o local do nosso serviço autorizado mais
próximo no Canadá poderá ligar grátis dentro do Canadá para 1-800-667-8623. Para informação sobre
garantia fora dos Estados Unidos ou do Canadá queira procurar o telefone e endereço no cartão de serviço
de garantia incluído na embalagem do produto.
EXONERAÇÃO DE RESPONSABILIDADE
De acordo com esta garantia, o cliente tem como único recurso jurídico o reparo ou a substituição do produto.
A SUNBEAM PRODUCTS INC. NÃO SERÁ RESPONSÁVEL POR QUALQUER DANO INCIDENTAL
OU QUE OCORRA COMO CONSEQUÊNCIA DA VIOLAÇÃO DOS TERMOS EXPLÍCITOS OU
IMPLÍCITOS DA GARANTÍA DESTE PRODUTO OU DE QUALQUER PARTE DESTE. SALVO NO QUE
FOR PROIBIDO PELA LEI PERTINENTE, A SUNBEAM PRODUCTS, INC. EXONERA-SE DA
RESPONSABILIDADE DE QUAISQUER GARANTÍAS IMPLÍCITAS DE PODER DE VENDA OU DE
ADEQUAÇÃO PARA UM DETERMINADO FIM DESTE PRODUTO OU DE QUALQUER PARTE DESTE.
Alguns estados e províncias não permitem a exclusão ou limitação de danos incidentais ou consequenciais,
nem permitem limitações sobre o tempo de duração de uma garantia implícita, portanto as limitações ou
exclusões citadas acima poderão não ser pertinentes ao caso do cliente. Esta garantia concede direitos
jurídicos específicos ao cliente, entretanto este poderá ter outros direitos que poderão variar de acordo
com o estado e a província em questão.
Page 34

34
NOTE S/NOTAS
Page 35

35
NOTE S/NOTAS
Page 36

©1997 Sunbeam Corporation or its affiliated companies. All rights reserved.
Sunbeam
®
and Oskar®are registered trademarks of Sunbeam Corporation or its affiliated companies.
Distributed by Sunbeam Products Inc., Delray Beach, Florida 33445, or an affiliated company.
© 1997 Sunbeam Corporation ou ses sociétés apparentées. Tous droits réservés.
Sunbeam®et Oskar®sont marques déposées de Sunbeam Corporation ou de ses sociétés apparentées.
Distribué par Sunbeam Products Inc., Delray Beach, Florida 33445, ou une société apparentée.
©1997 Sunbeam Corporation o sus compañías afiliadas. Todos los derechos reservados.
Sunbeam
®
y Oskar®son marcas registradas de Sunbeam Corporation o de sus compañías afiliadas.
Distribuido por Sunbeam Products Inc., Delray Beach, Florida 33445, o alguna compañía afiliada.
©1997 Sunbeam Corporation ou suas empresas afiliadas. Todos os direitos reservados.
Sunbeam®e Oskar®são marcas registradas da Sunbeam Corporation, ou de suas empresas afiliadas.
Distribuído pela Sunbeam Products Inc., Delray Beach, Florida 33445, ou uma empresa afiliada.
P.N. 100468
■
■
■
 Loading...