

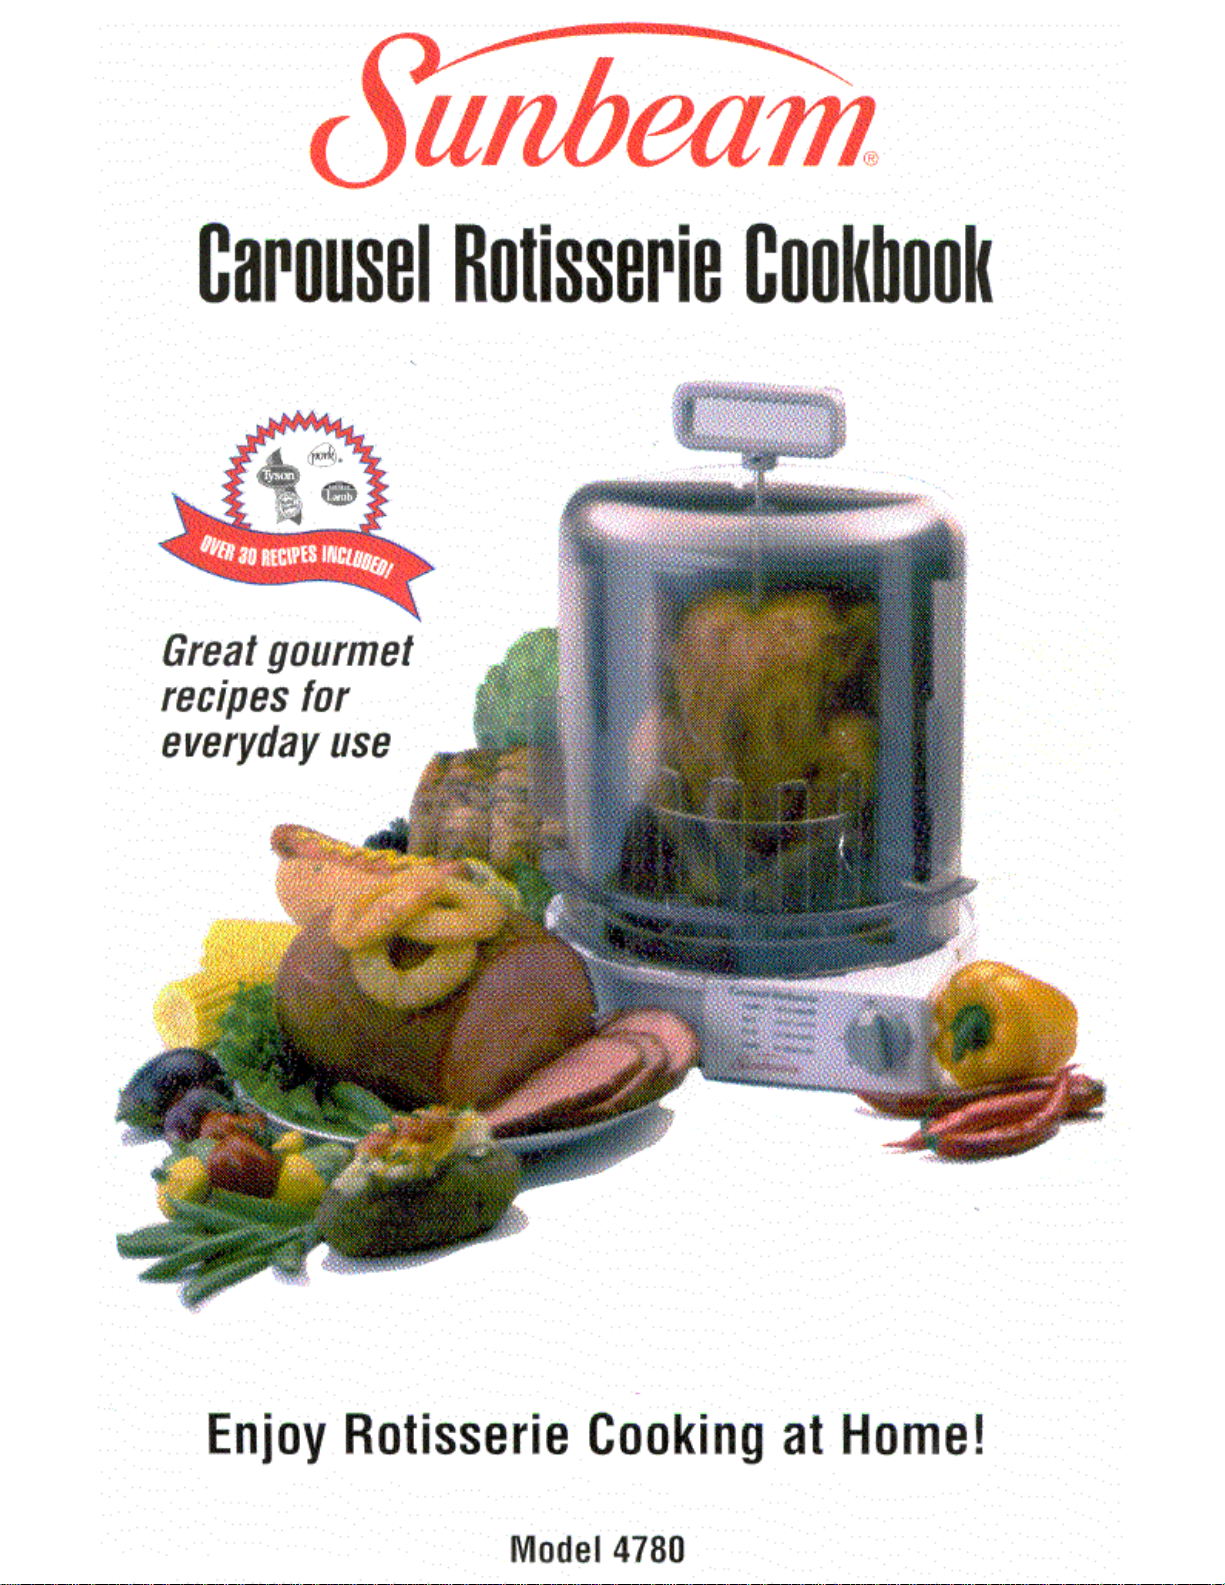
Page 1
Page 2

Congratulations!
Enjoy rotisserie cooking at home in just a few, easy
steps with your new Sunbeam Carousel Rotisserie.
We’ve done everything we can to make rotisserie cook-
ing a breeze. Our instruction book is designed to give
you helpful information, tips and a host of great recipes.
Your Sunbeam Carousel Rotisserie will:
!
Seal in natural juices while unwanted fats
drip away.
chicken to be moist and flavorful inside,
crispy and golden brown outside.
brown and cook a wide variety of foods
to perfection.
a smokeless cooking environment with
see through door.
up easily with dishwasher safe
components.
Page 3

Table of Contents
Introduction
Using
Your
Important Safeguards
. . . . . . . . . . . . . . . . . . . . . . . . . . . . . . . . . . . . . . . .
Rotisserie Safely . . . . . . . . . . . . . . . . . . . . .
. . . . . . . . . . . . . . . . . . . . . .
Know your Sunbeam Carousel Rotisserie.
Assembly Instructions
. . .
1
3
4
6
Step-by-Step Directions
. . . .
Cleaning and Caring Your Rotisserie...
Cooking Times
Warranty
. . . . . . . . ...................................
. . . .....................................
8
11
Page 4

IMPORTANT SAFEGUARDS
When using electrical appliances, to reduce the risk of fire, electric shock,
and/or injury to persons basic safety precautions should always to be fol-
lowed, including the following:
Read all instructions carefully.
2.
Do not touch hot surfaces, use the handles or knobs. Always use oven
mitts when handling hot
Allow metal parts to cool before
cleaning. Allow the Rotisserie to cool thoroughly before putting in or
removing parts.
3.
When unit is not in use and before cleaning, unplug the Rotisserie from
wall outlet.
4.
To protect against electric shock, do not place cord, plug or appliance in
water or other liquids.
5.
Close supervision is always necessary when this or any appliance is
used by or near children.
6.
Do not allow anything to rest on the power cord. Do not plug in cord
where people may walk or trip on it.
7.
Do not operate this or any appliance with a damaged cord or plug or
after the appliance malfunctions or has been damaged in any manner.
Return appliance to an authorized service facility for examination, repair
or adjustment.
8. Avoid contact with moving parts.
9. Do not use attachments that are not recommended by the manufacturer;
they may cause fire, electric shock or injury.
IO. Do not use outdoors or for commercial purposes.
Do not let the cord hang over the edge of a table or counter or touch hot
surfaces. Do not
the appliance on an unsteady or cloth-covered
surface.
12. Do not place the appliance near a hot gas or electric burner or in a
heated oven.
13. To unplug, grip plug and pull from wall outlet.
14. Extreme caution must be used when moving an appliance containing
hot oil or other hot liquids.
15. Do not use appliance for other than intended use.
16. Use removing drip pan or disposing of hot
grease.
Page 5
Page 5

Use of extension cords:
a) A short power supply cord (or detachable power-supply cord) is to be
provided to reduce the risk resulting from becoming entangled in or
tripping over a longer cord.
b) Longer detachable power-supply cords or extensions cords are
available and may be used if care is exercised in their use.
c) If a longer detachable power-supply cord or extension cord is used,
1) The marked electrical rating of the cord set or extension cord
should be at least as great as the electrical rating of the appliance,
and
2) The cord should be arranged so that it will not drape over the
countertop or where it can be pulled on by children or
tripped over unintentionally.
d) If the appliance is of the grounded type, the extension cord
should be a grounding-type 3-wire cord.
Electrical power: If electric circuit is overloaded with other appliances, your
Rotisserie may not operate properly. The Rotisserie should be operated on
a separate electrical circuit from other appliances.
This appliance has a polarized alternating current plug (one blade is wider
than the other). To reduce the risk of electric shock, as a safety feature, this
plug will fit in a polarized outlet only one way. If the plug does not insert
fully in the outlet, reverse the plug. If it still fails to fit, contact a qualified
electrician to replace the obsolete outlet. DO NOT ATTEMPT TO DEFEAT
THIS SAFETY FEATURE.
SAVE THESE INSTRUCTIONS
NO USER MAINTENANCE
RETURN TO SERVICE STATION
HOUSEHOLD USE ONLY
Page 6
Page 6
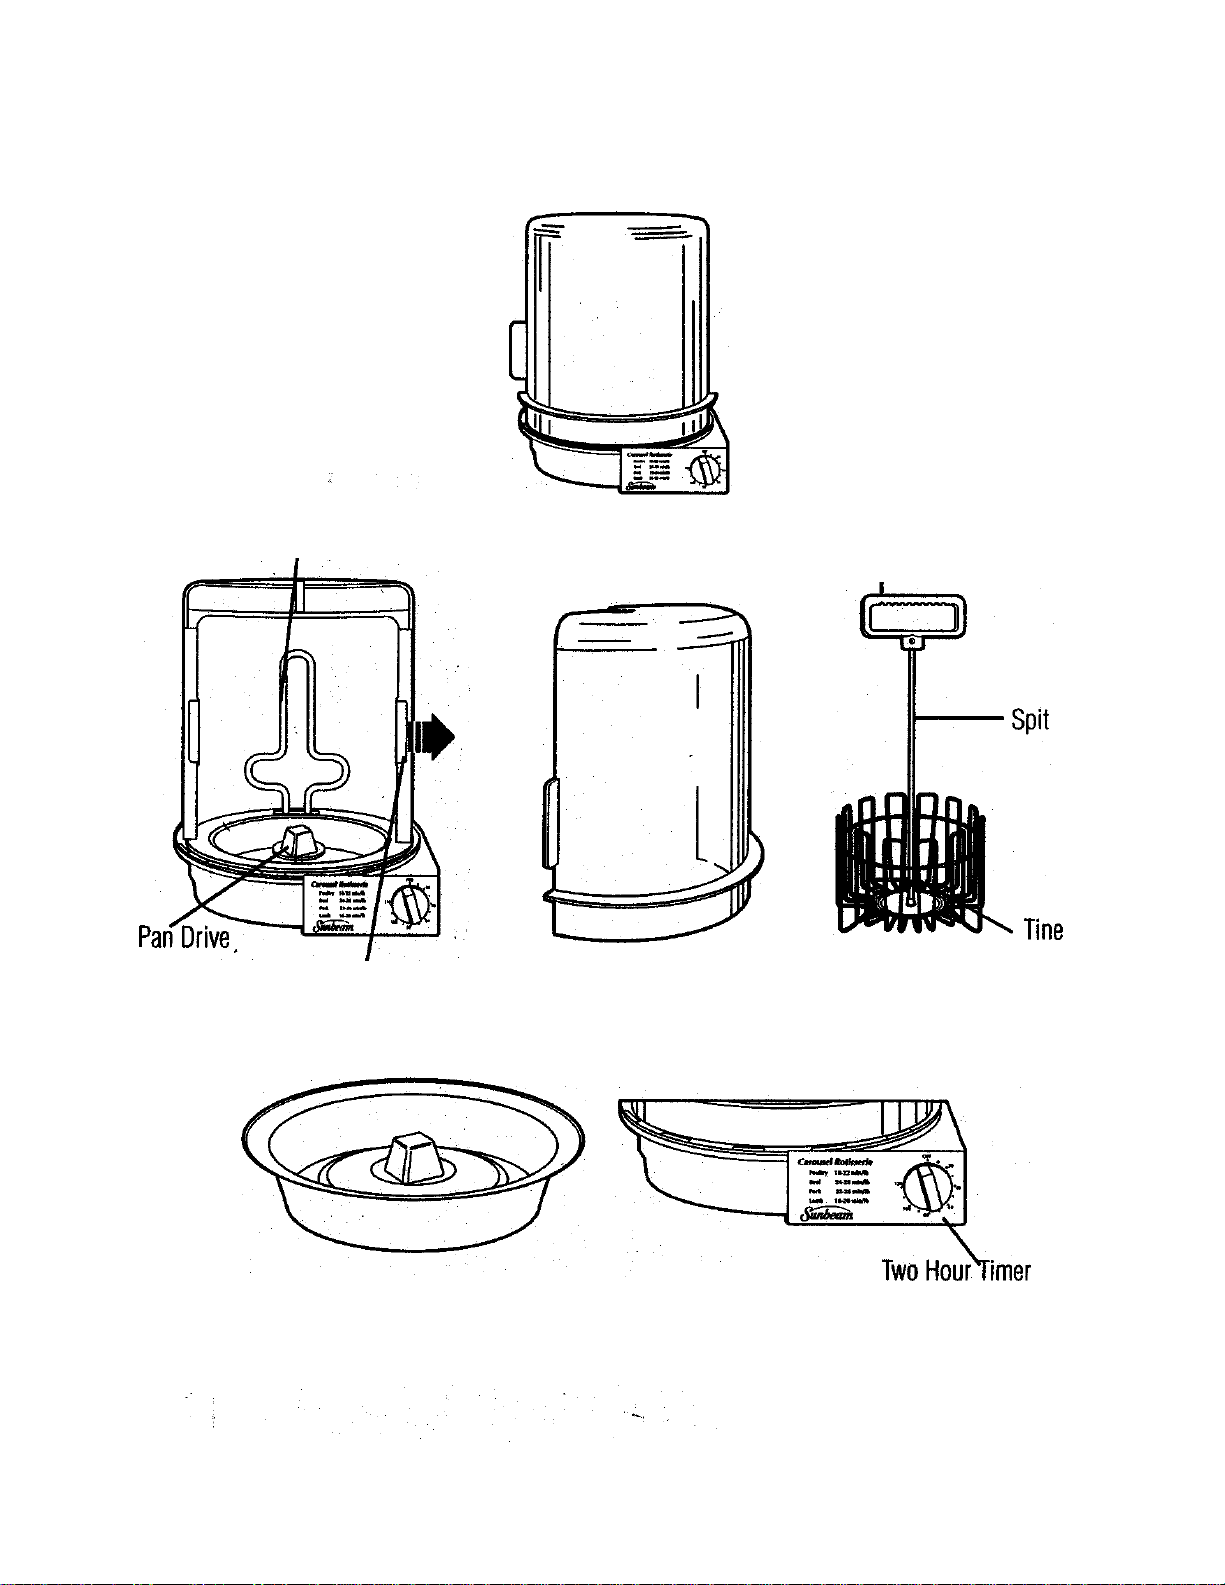
KNOW YOUR
ROTlSSERlE
Heating Element
Removable
deflector Shield
“Door
Handle
I
Cooking Basket
Non Stick Drip Pan
6
Page 7

ASSEMBLY INSTRUCTIONS
Remove the following parts from foam insert:
Spit with handle
.
Tine
Cooking basket
Aluminum drip pan
Black pan drive
2.
Place the pan drive on top of the drive shaft in the base of the rotisserie. Make sure
the flat side of the drive shaft meets with the flat side of the pan drive.
3.
Remove the drip pan from the plastic bag, then place drip pan on top of the pan drive.
4.
The assembly of the spit, tine and cooking basket will vary depending on what type
of food will be prepared. Follow the step-by-step directions on page 7 of the
Carousel Rotisserie
assemble the cooking basket.
STEP-BY-STEP DIRECTIONS
Place unit on a clean, dry surface with at least six inches of clearance on all sides.
1.
Peel off the static label from the door.
2.
To open the door, slide it counterclockwise.
3.
Cooking basket should be removed from the unit before loading with food.
4.
Vegetables or cut-up pieces of meat must be placed inside the basket around the spit.
5.
Chicken, roasts or other large cuts of meat should be skewered through the
6.
spit as follows:
!
Lift tine to the top of the spit.
!
By holding the tine with one hand, skewer the spit through the meat.
!
Screw the spit into the cooking basket until spit stops turning. DO NOT
SCREW THE SPIT TOO TIGHTLY.
!
Once the spit is secured, lower the tine and press them into the meat
CAUTION: THE SPIT AND TINE HAVE SHARP ENDS.
Note: Chicken or other poultry should be placed with the neck end up, legs down.
Position drip pan inside the Rotisserie.
7.
Lower basket onto center of the drip pan.
8.
Plug cord into 120 volt outlet.
9.
Set the timer for correct cooking time.
Cooking times vary by the size and type of food and recipes. The maximum
11
capacity for the rotisserie is 8 pounds. (See recipes section for cooking times).
The unit needs to cool for at least one half hour before using it again. Allow.
12
your Rotisserie to cool before cleaning and storing.
7
Page 8

CLEANING THE ROTISSERIE
Before using your Oster Carousel Rotisserie for the first time:
Wash the cooking basket, spit, drip pan, reflector shield and door in hot, soapy water.
Rinse and dry.
NOTE: The following items are dishwasher safe: door (top rack only), drip pan, cooking
basket, and reflector shield. To remove the door from the rotisserie, turn the door
counter-clockwise until it has been rotated to the back of the unit. Then, lift it straight
up from the unit. When replacing the door onto the rotisserie
door so that it will be on the back side of the unit when it is installed. Locate the pin on
the door into the hole that is on the top of the rotisserie. Once the pin and hole are
engaged, the door can be rotated clockwise to the front of the unit.
The reflector shield can be removed by grasping the handle on either side and pulling in
either direction until it is pulled clear of the unit.
CAUTION: REFLECTOR SHIELD HAS A SHARP EDGE.
Always make sure rotisserie is unplugged and cool, before attempting to clean.
To clean, wipe with a damp,
Do not immerse in water! Wash individual parts as instructed above.
cloth. Do not use any abrasive materials.
be sure to locate the
CARING ROTISSERIE
1. Keep your Rotisserie clean.
Do not use metal utensils.
2.
Make sure that the unit is completely cool and dry before storing.
3.
COOKING TIMES
The cooking times provided in this chart are only a guideline to the approximate
cooking times, based on test averages. Cooking times
ferences in meat, shape, size, and amount of fat and bone.
When cooking with the Oster Rotisserie, use a meat thermometer. Insert the
point of the thermometer stem at least 2 inches into the thickest part of the
not near the bone or gristle. The meat thermometer must not touch the
heating element while the basket is rotating. See the chart below for the temperatures required for the meat to be cooked.
Page 9
vary because of dif-
Page 9

SUNBEAM CAROUSEL ROTISSERIE
COOKlNG
CHART
.
FOOD
POULTRY
Chicken, whole
Chicken, whole
Cornish hens
Duck
Turkey breast
Turkey breast
PORK
Crown roast of pork
Loin roast
Pork tenderloin
Rolled pork roast 3 to 6 Ibs.
Spareribs
HAM
Ham, canned
Ham Shank
Weight
2 to 3 Ibs.
3
l/2
to 5 Ibs.
1
or 2 hens
3 to 5 Ibs.
4 to 6 Ibs. 185°F
6 to 8 Ibs.
4 to 5 Ibs.
2
l/5
to 5
3/4
to 1
l/2
2
l/2
to 4
2 to 7 Ibs.
3 to 6 Ibs.
l/2
Ibs.
l/2
Ibs.
Ibs.
Temperature
Meat Thermometer
185°F
185°F
185°F
185°F
185°F
Approximate
Cooking Time*
30 min. 60 min.
60 min. - 110 min.
60 min.
110 min. - 2 hr. 10 min
70 min. - 100 min.
100 min. - 3 hrs.
100 min. - 2 hrs. I0 min.
60 min. - 70 min.
20 min.- 40 min.
80 min. -2 hrs. 35 min.
60 min. - 120 min.
45 min. - 60 min.
50 min.
LAMB
Leg
of lamb
Rolled lamb roast
VEAL
Leg of veal
Rolled veal roast
BEEF
Beef tenderloin roast 2 to 6 Ibs.
Rolled rib roast
Rolled sirloin tip
or rump roast
Standing rib roast
OTHER
Hot dogs
Pre-cooked bratwurst
New potatoes
Baked potatoes
Corn on the cob
Vegetables
4 to 6 Ibs.
3 to 6 Ibs.
3 to 6 Ibs.
3 to 6 Ibs.
4 to 6 Ibs.
4 to 8 Ibs.
4 to 8 Ibs.
170°F
170°F
150°F160°F
150°F -160°F
-
80 min.
60 min.
70 min. - 120 min..
75 min. - 120 min..
55 min. 100 min. - 2 hrs. 50 min..
100 min. - 3 hrs. 45 min.
100 min. - 3 hrs. 45 min.
7 min. - 10 min.
15 min. - 17 min.
60min.-80min.
60 min. 80 min.
60 min. 80 min.
20 min. 30 min.
120 min.
-
120 min.
2 hrs.
50 min..
Page 10

NOTE
When preparing poultry and other meats int he Carousel Rotisserie, be sure to use
a meat thermometer to verify that the food is properly cooked.
If the food takes longer than to cook, the timer will have to be reset as
it shuts off automatically after 2 hours.
Please refer to the Carousel Rotisserie Cookbook for detailed directions before
using the Carousel Rotisserie.
,
Carving Poultry
Arrange the chicken or other poultry on a carving board with the legs to the right.
Starting at the side facing the carver, cut the leg off body by grasping the leg with
your left hand pulling gently while cutting through the meat and the joint at the thigh.
Place the leg on the carving board and cut through the joint to sever the thigh bone
from the drumstick. Slice the meat from the leg and thigh, carving parallel to the bone.
Insert the meat fork into the breast meat to secure the body. Sever the wing from
the body by carving through the joint.
Start carving the breast just above the joint where the wing was removed. Cut thin
slices of white meat, carving upward and cutting parallel to the breast bone.
Carving a Whole Ham, Pork Roast or Roast leg of lamb
Place a whole ham, pork roast or leg of lamb on the carving board with the shank
end to the right of the carver. For a ham, turn the scored fat side up. For the leg of
lamb, place the roast so that the meaty section faces away from the carver.
Insert a meat fork into the heavy part of the meat and cut several lengthwise slices
from the less meaty side.
Turn the ham, pork roast or leg of lamb so that it rests upright on the cut surface. Cut a
wedge from the shank end by starting at the base of the bulge and slicing down to the leg
bone. Then, make another cut at an angle to this, close to the shank end. Lift out the wedge.
Starting
at the shank end, cut thin uniform slices down to the leg bone.
Carving Rib Roast
Arrange the roast on a platter or a cutting board with the largest end of the roast
down, and the rib side to your left. The small end of the roast is nearest the carver.
Insert a carving fork between the two top
Slice across the roast from the fat edge of the rib bone. Free the slice from the bone
using the tip of the knife.
10
Page 11

LIMITED WARRANTY
What is Covered and For How long
Congratqtations on your recent purchase’of a quality Sunbeam product. We are confident that our
product will perform well and therefore warrant to you, as the original retail purchaser, for a period of
2 years from the date of original purchase, that your new product will be free of mechanical and electrical defects in material and workmanship.
What Sunbeam Will Do & How to Get Service
If your product is covered during the warranty period, we will repair or replace you new product (at
our option), which will be your exclusive remedy under this warranty. Simply send your product
postage prepaid, with proof of purchase and a short description of the problem directly to our factory
service center at the following address:
SUNBEAM HOUSEHOLD
Service Station
117Central
Industrial Row
Purvis, MS 39475
PRODUCTS
1-800-663-8623 o email us at
SUNBEAM CANADA
Please call to:
consumeraffairs@consumer.sunbeam.com
What is Not Covered
Our warranty for your product will not cover normal wear of parts, damage resulting from negligent
use or misuse of the product, use on improper voltage or current, use contrary to operation instruc-
tions, glass breakage (if applicable), disassembly, repair, or alteration by any person other than an
authorized service station. Any implied warranty of merchantability of fitness for a particular purpose
on your product is limited to the duration of this written warranty. We shall not be liable for any inci-
dental or consequential damages for breach of any express or implied warranty on your product.
How Your State’s or Province’s Law May Apply
Some states/provinces do not allow limitations on how long an implied warranty lasts or the exclu-
sion or limitation of incidental or consequential damages, so the above limitation may not apply to
you. This warranty gives you specific legal rights, and you may also have other rights which vary from
state to state or province to province.
1996 Sunbeam Corporation or its affiliated companies, all rights reserved. Sunbeam is a
tered trademark of Sunbeam Corporation or its affiliated companies.
Distributed by: Sunbeam Household Products, Schaumburg, Illinois 60173
L5R
Sunbeam Corporation Canada Ltd., Mississauga, Ontario
Model 4780
P.N. 67185
11
regist.
Page 12

R E CIPES
GARLIC LOVERS' CHICKEN
4 servings
1 whole Tyson Holly Farms Fresh Young Chicken (broiler-fryer) (3 to 3
3 heads garlic, peeled (about 35 garlic cloves)
1 cup chicken broth
Rinse chicken in cold running water. Drain, pat dry inside and out with paper towel.
Combine garlic and broth in small saucepan. Bring to a boiling; cook 5 minutes. With
slotted spoon, remove garlic and place inside whole chicken. Reserve broth for basting.
Spray inside of rotisserie basket with nonstick vegetable coating spray; place chicken on
the spit and screw spit into the basket. Center chicken on spit with wings downward,
legs upward. Place basket with chicken inside the rotisserie.
Close the rotisserie door. Plug in, be certain unit rotates freely. Cook until juices run
clear and internal thermometer inserted in the breast reads 185°F (approximately 60 to,
65 minutes). Brush with reserved broth every
IO
minutes; discard any remaining broth.
l/2
Ibs.)
Open rotisserie door. Grasp end of spit and basket with pat holders and place on a
heatproof work surface. Remove chicken to a warm platter to serve. Refrigerate leftovers.
HERB-RUBBED SAVORY CHICKEN
4 servings
1 whole Tyson Holly
l/4
cup vegetable oil
teaspoon dried basil
l/2
teaspoon dried oregano
l/2
teaspoon dried sage
teaspoon dried thyme leaves
Farms Fresh
Young Chicken (broiler-fryer) (3 to 3
Page 14
l/2
Ibs.)
Page 13

Rinse chicken in cold running water. Drain, pat dry inside and out with paper towel.
Combine oil and seasonings. Rub skin evenly with this mixture.
Spray inside of rotisserie basket with nonstick vegetable coating spray; place chicken on
the spit and screw spit into the basket.
Center chicken on spit with wings downward,
legs upward. Place basket with chicken inside the rotisserie.
Close the rotisserie door. Plug in, be certain unit rotates freefy. Cook until juices run
clear and thermometer inserted in breast registers 185°F (approximately 60 to 65 min-
utes).
Open rotisserie door. Grasp end of spit and basket with pot holders and place on a
heatproof work surface. Remove chicken to a warm platter to serve. Refrigerate left-
overs.
CITRUS-BASTED
4
servings
1 whole Tyson Holly Farms Fresh Young Chicken (broiler-fryer) (3 to 3
CHICKEN
l/2
Ibs.)
1 orange, halved, cut into slices
1 lemon, halved, cut into slices
3/4 cup orange juice, divided
3 tablespoons lemon juice, divided
1 tablespoon lime juice
2 tablespoons honey
1 teaspoon cornstarch
Rinse chicken in cold running water. Drain, pat dry inside and out with paper towel.
Place orange and lemon slices inside chicken,
Spray inside of rotisserie basket with nonstick vegetable coating spray; place chicken on
the spit and screw spit into the basket. Center chicken on spit with wings downward,
legs upward. Place basket with chicken inside the rotisserie.
Combine
cup orange juice, 1 tablespoon lemon juice, and lime juice. Brush
one-third of mixture over chicken. Reserve remaining mixture.
Page
15
,
Page 14

Close rotisserie door. Plug in be certain unit rotates freely. Cook until juices run clear
and thermometer inserted in breast registers
185°F
(approximately 60 to 65 minutes).
Brush with remaining mixture during last 15 minutes of cooking.
Meanwhile, combine remaining
cup orange juice, 2 tabtespoons lemon juice, honey
and cornstarch in small saucepans. Cook over medium heat until boiling. Cook 2
minutes, stirring constantly until thickened and clear. Serve as sauce with chicken.
Open rotisserie door. Grasp end of spit and basket with’ pot hofders and place on a
heatproof work surface. Remove chicken to warm platter to serve. Refrigerate leftovers.
CHILI BUTTER CHICKEN
4 servings
1 whole Tyson Holly Farms Fresh
2 tablespoons butter or margarine, softened
Young Chicken
(broiler-fryer) (3 to 3
l/2
Ibs.)
l/2
teaspoon chili powder
Rinse chicken in cold running water. Drain, pat dry inside and out with paper towel.
Blend butter and chili powder. Gently loosen skin from chicken at breasts. Rub chili
butter evenly under skin of chicken.
Spray inside of rotisserie basket with nonstick vegetable coating spray; place chicken on
the spit and screw spit into the basket., Center chicken on spit with wings downward,
legs upward. Place basket with chicken inside the rotisserie.
Close rotisserie door. Plug in, be certain unit rotates freely. Cook until juices run clear
and thermometer inserted in breast registers 185°F (approximately 60 to 65 minutes).
Open rotisserie door. Grasp end of spit and basket with pot holders and place on a
heatproof work surface. Remove chicken to a warm platter to serve. Refrigerate leftovers.
Page 16
Page 15

BROTH-BASTED CHICKEN
4 servings
1
whole Tyson Holly Farms Fresh Young Chicken (broiler-fryer) (3 to 3
2 whole carrots, peeled, cut in 2-inch lengths
2 ribs celery, cut in two-inch lengths
1 small onion, peeled, cut in chunks
1 cup double-strength chicken-broth
Rinse chicken in cold running water. Drain, pat dry inside and out with paper towel.
Combine carrots, celery, onion and broth in small saucepan. Cook over medium heat
until boiling; cook 5 minutes or until vegetables are tender. With slotted spoon, remove
vegetables and place inside whole chicken. Reserve broth for basting.
l/2
Ibs.)
Spray inside of rotisserie basket with nonstick vegetable cooking spray; place on spit
and fit unit on hub of drip tray. Center chicken on spit with wings downward, legs
upward.
Close rotisserie door. Plug in; be certain unit rotates freely. Cook until juices run clear
and thermometer inserted in breast registers 185°F (approximately 60 to 65 minutes).
Brush with reserved broth every 10 minutes; discard any remaining broth.
Open rotisserie door. Grasp end of spit and basket with pot holders and place on a
heatproof work surface. Remove chicken to a warm platter to serve. Refrigerate leftovers.
APRICOT GLAZED CORNISH HENS
2 servings
2
Tyson Rock Cornish game hens (3
l/2
to 4 Ibs. for two)
l/2
cup apricot preserves
2 tablespoons vinegar
1 tablespoon soy sauce
If frozen, place hens in refrigerator 24 hours to defrost or use microwave.
. .
Page17
Page 16

Rinse defrosted hens in cold running water. Drain, pat dry inside and out with paper
towel.
Combine preserves, vinegar and soy sauce. Divide sauce in half.
Spray inside of rotisserie-basket with nonstick vegetable coating spray; place on spit and
fit unit on hub of drip tray.
Center one hen on spit with wings downward; center second
hen on spit with wings upward.
Close rotisserie door. Plug in; be certain unit rotates freely. Cook until juices run clear
and thermometer inserted in breast registers 185°F (approximately 55 to 60 minutes).
Brush hens with half of sauce during last 10 minutes of cooking.
Open rotisserie door. Grasp end of spit and basket with pot holders and place on a
heatproof work surface. Remove
hens to
a warm platter to serve. Heat the reserved half
of sauce and serve with hens. Refrigerate leftovers.
TANGY BBQ GLAZED CORNISH HENS
2 servings
2 Tyson Rock Cornish game hens (3
1 cup red wine
l/2
to 4 Ibs. for two)
l/2
cup catsup
2 tablespoons Dijon mustard
2 tablespoons sugar
2 teaspoons cornstarch
If frozen, place hens in refrigerator 24 hours to defrost or use microwave.
Rinse defrosted hens in cold running water. Drain, pat dry inside
and out
with paper
towel. Place two 36-inch lengths on flat work surface.
Combine wine, catsup, mustard, sugar and cornstarch in small saucepan. Cook over
medium heat until boiling, stirring constantly. Cook 2 minutes or until thickened. Use
l/2
cup of sauce for basting hens; reserveremaining sauce.
Spray inside of rotisserie basket with nonstick vegetable coating spray; place on spit and
fit unit on hub of drip tray. Center on spit with Wings downward; center second;
hen on spit with wings upward.
Page18
Page 17

Close rotisserie door. Plug in, be certain unit rotates freely. Cook until juices run clear
and thermometer inserted in breast registers 185°F (approximately 55 to 60 minutes).
Brush hens
with cup of sauce during last 20 minutes of cooking.
Open rotisserie door. Grasp end of spit and basket with pot holders and place on a
heatproof work surface. Remove hens to a warm platter to serve. Heat the reserved
sauce and serve with hens. Refrigerate leftovers.
HONEY-LEMON GLAZED HENS
WITH PECAN
2 servings
2 Tyson-Rock Cornish game hens (3
3 cups cornbread stuffing, prepared according to package directions, divided
1
l/2
cups chopped pecans
l/4
cup lemon juice
2 tablespoons honey
STUFFING
l/2
to 4 Ibs. for two)
If
frozen, place hens in refrigerator 24 hours to defrost or use microwave.
Rinse hens in cold running water. Drain, pat dry inside and out with paper towel.
Combine-stuffing and pecans. Reserve 2 cups mixture in refrigerator until ready to heat.
Divide remaining mixture; stuff hens.
Combine lemon juice and honey.
Spray inside of rotisserie basket with nonstick vegetable cooking spray; place on spit
and fit unit on hub of drip tray. Center one hen on spit with wings downward; center
second hen on spit with wings upward.
Close rotisserie door. Plug in, be certain unit rotates freely. Cook until juices run clear
and thermometer inserted in breast registers 185°F (approximately 55 to 60 minutes).
Brush hens with lemon-honey mixture during last 15 minutes of cooking.
Open rotisserie door. Remove rotisserie cover to heatproof surface. Grasp end of spit
and basket with pot holders and place on a heatproof work surface. Remove hens to a
warm platter to serve. Serve with stuffing. Refrigerate leftovers.
Paae 19
Page 18

CHICKEN KIEV ROLL-UPS
4 servings
4 Fresh Tyson Holly Farm boneless skinless chicken breasts (about 2 tbs.)
1 teaspoon dried parsley flakes
teaspoon garlic salt
teaspoon pepper
4 teaspoons plus 2 tablespoons butter or margarine
Rinse chicken in cold running water. Drain, pat dry with paper towel. Place between
two sheets of plastic wrap; flatten with wooden mallet.
Combine parsley, garlic salt and pepper. Coat each of four teaspoons butter with parsley
mixture. Place one teaspoon coated butter in center of each breast. Roll up breast
around butter.
Spray inside of rotisserie basket with nonstick vegetable cooking spray. Arrange chicken
roll-ups in basket, seam side down.
Close rotisserie door. Plug in, be certain unit rotates freely. Cook until juices run clear
and thermometer inserted in breast registers 165°F (approximately 40 to 45 minutes).
Melt 2 tablespoons butter; brush chicken during last 5 minutes of cooking.
Open rotisserie door. Grasp end of spit and basket with pot holders and place on a
heatproof work surface. Remove chicken to a warm platter to serve. Refrigerate leftovers.
TARRAGON THIGHS
3 servings
6 Fresh Tyson Holly Farms chicken thighs (about 2 tbs.)
l/2
cup white wine
1 tablespoon Dijon mustard
1 teaspoon dried tarragon leaves
teaspoon salt
Page20
Page 19

Rinse chicken in cold running water. Drain, pat dry with paper towel.
Combine wine, mustard, tarragon and salt for sauce.
Spray inside of rotisserie basket with nonstick vegetable cooking spray; skewer on spit
and fit unit on hub of drip tray.
Arrange chicken upright, skin side out, around outer edge of rotisserie basket. Brush
chicken with sauce.
Close rotisserie door. Plug in, be certain unit rotates freely. Cook until juices run clear
and thermometer inserted in thigh registers 185°F (approximately 45 to 50 minutes).
Brush with sauce every 10 minutes during cooking.
Open rotisserie door. Grasp end of spit and basket with pot holders and place on a‘
heatproof work surface. Remove chicken to a warm platter to serve. Refrigerate leftovers.
4 servings
4 Fresh Tyson Holly Farms bone-in split chicken breasts (about 2 Ibs.)
1 package (1
l/4
ounces) taco seasoning mix
Rinse chicken in cold running water. Drain, pat dry with paper towel. Rub chicken
evenly with seasoning mix to coat.
Spray inside of rotisserie basket with nonstick vegetable cooking spray. Arrange chicken
upright, meaty side out, around outer edge of rotisserie basket.
Close rotisserie door. Plug in, be certain unit rotates freely. Cook until juices run clear
and thermometer inserted in breasts registers 40 to 45 minutes).
Open rotisserie door. Grasp end of spit and basket with pot
holders
and place on a
heatproof work surface. Remove chicken to a warm platter to serve. Refrigerate leftovers.
Paae 21
Page 20

CHICKEN
VEGGIE ROLL-UPS
4 servings
4 Fresh Tyson Holly Farms boneless skinless chicken breasts (about 2 Ibs,)
1 cup shredded raw vegetables (carrots, broccoli, zucchini)
l/2
cup dry bread crumbs
1
teaspoon dried parsley flakes
l/2
teaspoon dried basil
l/2
teaspoon salt
l/4
teaspoon pepper
l/2
cup double-strength chicken broth
2 tablespoons butter or margarine, melted
Rinse chicken in cold running water. Drain, pat dry with paper towel. Place between
two sheets of plastic wrap; flatten with wooden mallet.
Combine vegetables, bread crumbs, parsley, basil, salt; pepper, and broth. Divide mixture
evenly among chicken breasts. Roll up, enclosing filling. Secure with string.
Spray inside of rotisserie basket with nonstick vegetable cooking spray; place on spit
and fit unit on hub of drip tray. Arrange chicken roll-ups in basket, seam side down.
Close rotisserie door. Plug in, be certain unit rotates freely, Cook until juices run clear
and thermometer inserted in breast registers 165°F (approximately 40 to 45 minutes).
Brush chicken with butter during last 5 minutes of cooking.
Open rotisserie door. Grasp end of spit and basket with pot holders and place on a
heatproof work surface. Remove chicken to a warm platter to serve. Refrigerate leftovers.
MARINARACHICKEN
4 servings
One package Fresh Tyson Holly Farms Pick of the Chix (9 pieces-about 4 Ibs.)
1 can (6 oz.) Italian-style tomato paste
1 cup red or white
wine
1 package (8 ounces) fresh mushrooms, sliced
2 tablespoons butter or margarine
Page 22
Page 21

Rinse chicken in cold running water. Drain, pat dry with paper towel,
Combine tomato paste and wine. Reserve 1 cup for sauce; use remaining mixture for
basting.
Spray inside of rotisserie basket with nonstick vegetable cooking spray; place on spit
and fit unit on hub of drip tray. Arrange chicken upright, skin side out, around outer
edge of rotisserie basket; stack to create a single layer.
Close rotisserie door. Plug in, be certain unit rotates freely. Cook until juices run clear
and thermometer inserted in inner chicken pieces registers 185°F (approximately 55 to
60 minutes). Baste chicken with tomato mixture every 15 minutes during cooking.
Meanwhile, saute mushrooms in butter until softened. Stir in reserved sauce and heat
thoroughly.
Open rotisserie door. Grasp end of spit and basket with pot holders and place on a
heatproof work surface. Remove chicken to a warm platter. Serve with tomato-
mushroom sauce. Refrigerate leftovers.
4 servings
4 Fresh Tyson Holly Farms bone-in split chicken breasts (about 2 Ibs.)
3/4 cup teriyaki sauce
l/4
cup pineapple juice
Rinse chicken in cold running water. Drain, pat dry with paper towel.
Combine teriyaki sauce and pineapple juice.
Spray inside of rotisserie basket with nonstick vegetable cooking spray, place on spit
and fit unit on hub of drip tray. Arrange chicken upright, meaty side out, around outer
edge of rotisserie basket. Brush with sauce.
Page 23
Page 22

Close rotisserie door. Plug in, be certain unit rotates freely, Cook until juices run clear
and thermometer inserted in breast registers 185°F (approximately 40 to 45 minutes).
Brush with sauce every 15 minutes during cooking. Unplug rotisserie,
Open rotisserie door. Grasp end of spit and basket with pot holders and place on a
heatproof work surface. Remove chicken to a warm platter to serve, Refrigerate leftovers.
PARMESAN CHICKEN
4 servings
1 package Fresh Tyson Holly Farms whole chicken, cut up (about 3 Ibs.)
1 cup dry bread crumbs
l/4
cup grated Parmesan cheese
1 egg, beaten
2 tablespoons water
Rinse chicken in cold running water. Drain, pat dry with paper towel.
Combine bread crumbs and Parmesan cheese on plate. Combine egg and water in shal-
low bowl. Dip chicken pieces in egg mixture; coat with crumb mixture.
Spray inside of rotisserie basket with nonstick vegetable cooking spray; skewer on spit
and fit unit on hub of-drip tray. Arrange coated chicken pieces, skin side out, around
outer edge of rotisserie basket.
Place cover on rotisserie broiler. Plug in, be certain unit rotates freely. Cook until
juices run clear and thermometer inserted in chicken pieces registers 185°F (approximately 45 to 50 minutes).
Open rotisserie door. Grasp end of spit and basket with pot holders and place on a
heatproof work surface. Remove chicken to a warm platter to serve. Refrigerate leftovers.
Paoe 24
Page 23

CITRUS
6 servings6 servings
cup orange marmalade cup orange marmalade
1 tablespoon lemon juice1 tablespoon lemon juice
1 teaspoon Worcestershire sauce1 teaspoon Worcestershire sauce
teaspoon dried marjoram or chervil, crushed teaspoon dried marjoram or chervil, crushed
teaspoon pepper teaspoon pepper
1
to 2 pound boneless lamb leg roast, trimmed and tied or1 to 2 pound boneless lamb leg roast, trimmed and tied or
boneless top round lamb roast, trimmedboneless top round lamb roast, trimmed
2 small leeks, sliced (1 1 cups)2 small leeks, sliced (1 1 cups)
cup chicken broth cup chicken broth
1 tablespoon cornstarch1 tablespoon cornstarch
Combine orange marmalade, lemon juice, Worcestershire sauce, marjoram and pepper.Combine orange marmalade, lemon juice, Worcestershire sauce, marjoram and pepper.
ROAFT
LAMB WITH LEEKSCITRUS LAMB WITH LEEKS
Brush roast with marmalade mixture; skewer on spit in rotisserie. Close door and cookBrush roast with marmalade mixture; skewer on spit in rotisserie. Close door and cook
15 minutes. Toss leeks with marmalade mixture and add to basket. Continue cooking15 minutes. Toss leeks with marmalade mixture and add to basket. Continue cooking
until internal temperature
Remove meat from rotisserie; cover loosely with foil.Remove meat from rotisserie; cover loosely with foil.
Remove juices from drip pan, juices and in small saucepan. Combine brothRemove juices from drip pan, juices and in small saucepan. Combine broth
and cornstarch; add to saucepan along with any remaining marmalade mixture. Bringand cornstarch; add to saucepan along with any remaining marmalade mixture. Bring
to a boil. Cook and stir until thlckened and bubbly. Cook and stir 2 minutes more.to a boil. Cook and stir until thlckened and bubbly. Cook and stir 2 minutes more.
Slice meat; serve with citrus-leek sauce.Slice meat; serve with citrus-leek sauce.
145°F to 150°F (approximately 1 hour) and leeks are tender,until internal temperature 145°F to 150°F (approximately 1 hour) and leeks are tender,
Let stand for 10 minutes.Let stand for 10 minutes.
NEW ENGLAND LAMB ROASTNEW ENGLAND LAMB ROAST
6 servings6 servings
cup currant jelly cup currant jelly
1 tablespoon lemon juice1 tablespoon lemon juice
teaspoon pumpkin pie spice teaspoon pumpkin pie spice
teaspoon salt teaspoon salt
1
pound boneless lamb top round roast: trimmed or boneless leg, trimmed and tied1 pound boneless lamb top round roast: trimmed or boneless leg, trimmed and tied
In a small bowl whisk jelly until smooth. Add juice, spice and salt; mix well.In a small bowl whisk jelly until smooth. Add juice, spice and salt; mix well.
Brush jelly mixture on all sides of lamb roast, Place meat on skewer, insert into basketBrush jelly mixture on all sides of lamb roast, Place meat on skewer, insert into basket
and then into rotisserie. Close door and cook until 145°F to 150°F internal temperatureand then into rotisserie. Close door and cook until 145°F to 150°F internal temperature
(approximately 1 to 1 hours), brushing with mixture occasionally. Remove(approximately 1 to 1 hours), brushing with mixture occasionally. Remove
Page 24

from rotisserie and cover loosely with foil. Let stand 10 minutes. Slice and serve with from rotisserie and cover loosely with foil. Let stand 10 minutes. Slice and serve with
sweet potatoes and sauteed apple wedges, if desired.sweet potatoes and sauteed apple wedges, if desired.
ROTISSERIE
3 to 4 servings3 to 4 servings
12 ounces lean lamb leg12 ounces lean lamb leg
cup beef or chicken broth cup beef or chicken broth
2 tablespoons red wine vinegar2 tablespoons red wine vinegar
1 tablespoon Worcestershire sauce1 tablespoon Worcestershire sauce
1 tablespoon olive oil1 tablespoon olive oil
1 garlic clove, minced1 garlic clove, minced
Dash bottled hot pepper sauceDash bottled hot pepper sauce
8 tiny new potatoes, halved (about 1 pound)
8 tiny new potatoes, halved (about 1 pound)
1 medium carrot, cut into 2” matchsticks
1 medium carrot, cut into 2” matchsticks
1 medium celery stalk cut into 1” pieces
1 medium celery stalk cut into 1” pieces
LAMB
LAMB
STEWROTISSERIE
STEW
cup chicken or beef’broth cup chicken or beef’broth
3 tablespoons all-purpose flour3 tablespoons all-purpose flour
cup whole milk or light cream cup whole milk or light cream
teaspoon dried thyme, crushed teaspoon dried thyme, crushed
teaspoon dried rosemary, crushed teaspoon dried rosemary, crushed
Trim lamb and cut into 1 to 2” chunks. For marinade, combine the cup broth,
Trim lamb and cut into 1 to 2” chunks. For marinade, combine the cup broth,
vinegar, Worcestershire sauce, olive oil, garlic and hot pepper sauce. Add lamb, cover
vinegar, Worcestershire sauce, olive oil, garlic and hot pepper sauce. Add lamb, cover
and refrigerate 2 hours.
and refrigerate 2 hours.
Remove lamb from marinade, reserving marinade. Skewer lamb chunks on spit and
Remove lamb from marinade, reserving marinade. Skewer lamb chunks on spit and
secure into basket. Brush potatoes, carrots and celery with marinade; place
secure into basket. Brush potatoes, carrots and celery with marinade; place
in basket. Close door and cook about 1 hour or until vegetables and meat are tender.
in basket. Close door and cook about 1 hour or until vegetables and meat are tender.
In a saucepan combine cup broth, cup of the remaining marinade, thyme and
In a saucepan combine cup broth, cup of the remaining marinade, thyme and
rosemary; add juices from drip pan. Bring to boiling. Combine milk and flour; mix
rosemary; add juices from drip pan. Bring to boiling. Combine milk and flour; mix
well. Add to hot mixture. Cook and stir until thickened and bubbling. Cook and stir 1
well. Add to hot mixture. Cook and stir until thickened and bubbling. Cook and stir 1
minute more.
minute more.
Page 26Page 26
Page 25

To serve, place hot meat and vegetables mixture in a serving bowl.
stir to coat well.
HONEY-CURRY LAMB ROAST
4 to 6 servings
1 tablespoon curry powder
1 tablespoon honey
teaspoon salt
1 teaspoon apple or orange juice
Pour hot gravy over,
1
to 2 pound boneless lamb leg roast, rolled and tied
or boneless lamb top round roast
In a small bowl combine curry powder, honey, salt and apple juice, mix well. Rub onto
all sides of lamb roast. Skewer
on spit and screw the spit into the basket.
Place in rotisserie. Close door and cook until internal temperature of roast reaches
145°F to 150°F (approximately 1 to 1
hours). Cover loosely with foil and let stand
for 10 minutes. Slice and serve with juices.
6 servings
1 tablespoon red wine vinegar
1 teaspoon dried oregano, crushed
teaspoon garlic powder
teaspoon black pepper
teaspoon salt
teaspoon onion powder
teaspoon ground cumin
1, 1
to 2 pound boneless lamb leg roast, trimmed and tied or boneless lamb top
round roast
1 carton (8 ounce) plain yogurt
medium cucumber, peeled, seeded and chopped cup)
2 green onions, thinly sliced
1 tablespoon
fresh mint or 1 teaspoon dried mint, crushed
teaspoon sugar
pita bread rounds
1 cup chopped fresh spinach or leaf lettuce
Page 27
Page 26

In a bowl combine vinegar, oregano, garlic powder, pepper, salt, onion powder and
cumin; mix well. Untie roast, if tied. Rub herb mixture onto all sides of roast. Roll up-,
and tie roast. Skewer vertically on spit, secure in basket and place in rotisserie. Close
door and cook until internal temperature of roast reaches 145°F to 150°F (approximately
1 to 1
l/4
hours).
Meanwhile, combine yogurt, chopped cucumber, green onions, mint and sugar. Cover
and chill for 1 hour.
Remove meat from rotisserie cover loosely with foil. Let stand 10 minutes. Halve pita
rounds and split open. Thinly, slice meat and place in open pita pockets. Top each with
chopped spinach and yogurt mixture.
If desired, use 6 pita rounds and place meat mixture in center of each round. Fold in
half and top with spinach and yogurt mixture.
2 to 3 servings
12 ounces boneless lamb round steak,
thick
3 tablespoons balsamic vinegar
2 tablespoons water
1 tablespoon olive oil
2 garlic cloves, minced
1 teaspoon rosemary, crushed
l/2
teaspoon ground cumin
teaspoon salt
l/4
teaspoon pepper
l/4
teaspoon ground coriander
l/8
teaspoon cayenne pepper
1 small sweet red pepper
1 small sweet yellow pepper
1 small sweet green pepper
8 green onions
Hot cooked rice or rice pilaf (optional)
Paae 28
Page 27

Trim lamb round steak and bias-slice into long thick slices. Stir together the
bal-
samic vinegar, water, olive oil, garlic, rosemary, cumin, salt, pepper, coriander and
cayenne pepper. Cut peppers lengthwise into wide strips. Bias slice green onions
3” lengths. In a medium bowl combine lamb strips, pepper strips, green onions
and marinade; toss to coat. Cover and refrigerate 2 hours. Stir occasionally to coat
evenly.
Drain marinade from mixture; discard. Thread lamb strips back and forth on spit and
secure into basket. Place pepper strips and green onions in the basket. Close door and
for 30 minutes. Remove lamb from skewer and peppers from basket. Serve with
hot rice or rice pilaf, if desired.
As an option, try this Lamb/Pepper mixture in pita bread rounds or flour tortillas. Omit
the hot rice and serve with a crisp green salad.
6 servings
1
l/2
to 2 pound single pork loin
2 tablespoons sesame seeds
1 tablespoon poppy seeds
1 tablespoon caraway seeds
l/4
teaspoon coarsely ground pepper
1 tablespoon teriyaki sauce
On a sheet of waxed paper combine seeds and pepper.
Brush pork roast with teriyaki
sauce and roll in seed mixture to coat well on all sides, Center roast vertically on spit.
Close door and cook until internal temperature of roast reaches 150°F to 155°F
(approximately 35 to 45 minutes). Slice to serve.
Page 28

BACON WRAPPED PORK AND APPLE PATTIES
4 servings
3/4
cup quick-cooking rolled oats
teaspoon ground sage
l/2
teaspoon salt
l/4
teaspoon pepper
l/4
teaspoon dried thyme, crushed
l/3
cup applesauce
1 egg, slightly beaten
l/4
cup finely chopped green onion
1 pound lean ground pork
4 slices bacon
1 large tart green apple, cut in thin wedges
l/2
medium onion, cut in small wedges
1 tablespoon olive oil
In a large bowl combine oats, sage,
salt, pepper,
and thyme. Stir in applesauce, egg and
green onion; mix well. Stir in ground’meat until well blended. Form into 4 patties about
3/4
to l-inch thick. Wrap a bacon strip around each patty; secure with a toothpick.
Skews
patties horizontally on spit, one on top of another. Close door and cook until no pink
remains or until internal temperature reaches 165°F (approximately 45 to 50 minutes).
Meanwhile in a small skillet, cook and stir apples and onions in hot oil until tender.
Sprinkle lightly with salt. Serve with patties.
PEPPERED PORK ROAST WITH CHERRY SALSA
6 to 8 servings
cup chopped onion
cup chopped green pepper
cup chopped green chilies
cup dried cherries, chopped
cup red cherry jam
1 tablespoons vinegar
1
tablespoons chopped cilantro
2 to 3 pound pork double loin roast, tied
1 to 2 tablespoons cracked black pepper
2 teaspoons garlic salt
Page
30
Page 29

green chilies, dried cherries, jam vinegar and
For salsa, combine onion, green pepper,
cilantro; mix well. Cover and chill several hours or overnight.
Rub pepper and garlic salt into pork roast covering ail surfaces.
Place vertically on spit
and screw spit onto the basket. Close door and cook until internal temperature of roast
reaches 150°F to
155°F
(approximately 60 minutes). Slice and serve with Cherry
Salsa.
PORK LOIN
WITH SPINACH-BACON- STUFFING
6 servings
2 pound single pork loin.
l/2
cup chopped onion
2 cloves garlic, minced or 1 teaspoon bottled minced garlic
1 tablespoon olive oil
l/2,
lo-ounce frozen chopped spinach, thawed, well drained
6 slices bacon, cooked well done, drained and crumbled.
3 tablespoons grated Parmesan cheese
1 tablespoon
country
Dijon mustard
1 teaspoon dried basic, crushed
l/4
teaspoon pepper
Place pork loin with curved side down.
Make 3 cuts lengthwise in the meat to within
about
l/4-inch
of the other side. Do not cut all the way through. Open out and pound
to 8x8-inch rectangle.
Meanwhile cook onion and garlic in hot oil until tender; remove from heat. Press
welldrained spinach between several sheets of paper towels to remove moisture. Add to
onion mixture along with crumbled bacon, Parmesan cheese, mustard, basil and pepper.
Mix well. Spread spinach mixture on pork rectangle. Roll up into a spiral. Tie with
string to secure. Place vertically on spit and screw spit onto the basket. Close door and
cook until internal temperature reaches 150°F to 155°F (approximately 40 minutes).
Slice to serve.
Page 30

PORK
TENDERLOIN
WITH
APRICOT
GLAZE
4 to 6 servings
3/4 cup apricot preserves
2 tablespoons soy sauce
1 tablespoon vinegar
1 tablespoon Dijon-style mustard
1 teaspoon ground ginger
l/4
teaspoon ground black pepper
2 pork tenderloins, about 1
l/2
to 1
3/4
pounds
1 tablespoon Dijon-style mustard
For glaze, in blender container combine preserves, soy sauce, vinegar, 1 tablespoon
mustard, ginger, and pepper. Blend until smooth. Set aside. Brush pork tenderloins
with the remaining mustard. Tie together lengthwise with string, place on the spit and
screw the spit onto the basket.
Close door and cook until internal temperature reaches
150°F to 155°F (approximately 30 to 40 minutes). Brush meat with apricot mixture
every 15 minutes and again at the end. Slice to serve. Pass remaining glaze mixture, if
desired.
MAPLE-MUSTARD PORK
RIBS
l/4
cup maple syrup or
l/4
cup dark corn syrup and a few drops maple flavoring
2 tablespoons prepared mustard
1 tablespoon Worcestershire sauce
l/8
to
l/4
teaspoon Tabasco sauce
2 to 2 pound pork loin back ribs
Combine maple syrup, mustard, Worcestershire sauce and Tabasco sauce. Mix well
with wire whip. Place ribs on spit by weaving onto spit in an
“S”
shape. Close door
and cook until tender or until internal temperature reaches 150°F to 155°F (approxi-
mately 1 hour). Brush with maple mixture after 30 minutes in rotisserie and occasionally during remaining cooking time. Brush again at end of cooking period. Cut into 2 to
3 rib portions to serve.
Page 32
Page 31

,.eSESAME
6 servings to 6 servings
cup soy sauce
cup soy sauce
3 tablespoons balsamic vinegar3 tablespoons balsamic vinegar
2 tablespoons Oriental sesame oil2 tablespoons Oriental sesame oil
1 tablespoon brown sugar1 tablespoon brown sugar
2 garlic cloves, minced2 garlic cloves, minced
2 pork tenderloins, about 1 to 1 pounds2 pork tenderloins, about 1 to 1 pounds
3 tablespoons sesame seeds3 tablespoons sesame seeds
3 or 4 green, onions, quartered lengthwise3 or 4 green, onions, quartered lengthwise
In a plastic bag combine soy sauce, vinegar, sesame oil, sugar and garlic. Add porkIn a plastic bag combine soy sauce, vinegar, sesame oil, sugar and garlic. Add pork
tenderloins, seal and marinate in refrigerator for 4 to 8 hours. Remove pork from mari-tenderloins, seal and marinate in refrigerator for 4 to 8 hours. Remove pork from
PORK PORK
nade and roll in sesame seeds. Place onion strips lengthwise between the two pieces ofnade and roll in sesame seeds. Place onion strips lengthwise between the two pieces
meat; tie together and place vertically on spit. Close door and cook until internal tem-meat; tie together and place vertically on spit. Close door and cook until internal
perature reaches 150°F to
(approximately 30 to 40 minutes). Slice to serve.perature reaches 150°F to (approximately 30 to 40 minutes). Slice to serve.
of
tem-
SHAVED PORK LOIN SANDWICH WITH CARAMELIZED ONIONSSHAVED PORK LOIN SANDWICH CARAMELIZED ONIONS
6 to 8 servings6 to 8 servings
1 teaspoon dried basil1 teaspoon dried basil
1 teaspoon dried oregano1 teaspoon dried oregano
teaspoon salt teaspoon salt
teaspoon pepper teaspoon pepper
teaspoon paprika teaspoon paprika
1, 2 to 2 pound pork double loin roast, tied1, 2 to 2 pound pork double loin roast, tied
3 large onions, sliced and separated into rings3 large onions, sliced and separated into rings
1 tablespoon olive or cooking oil1 tablespoon olive or cooking oil
cup chili sauce (tomato base) cup chili sauce (tomato base)
cup apple or currant cup apple or currant
1 tablespoon vinegar1 tablespoon vinegar
6 8 Kaiser split and toasted6 8 Kaiser split and toasted
Combine basil, oregano, salt, pepper and paprika. Rub mixture on all surfaces of theCombine basil, oregano, salt, pepper and paprika. Rub mixture on all surfaces of the
pork roast. roast on spit. Close door and cook until internalpork roast. roast on spit. Close door and cook until internal
Page 33Page 33
Page 32

temperature reaches 150°F to 155°F (approximately 60 minutes). Slice to serve.
Meanwhile, in a large skillet heat oil.
Cook onion rings over medium heat for about 20
minutes, stirring frequently, until tender and golden. Stir in chili sauce, jelly and vine-
gar. Cook and stir 10 minutes more.
Thinly slice pork roast; stack on toasted bun halves. Top with caramelized onions and
top of roll.
PORK CHOPS WITH SPICY RED PEPPER SAUCE
4 servings
1 medium-large sweet red pepper (8 ounces)
cup cilantro leaves
1 clove garlic, chopped
1
teaspoon unsweetened cocoa powder
l/2
teaspoon anise seed
teaspoon chili powder
teaspoon sugar
to teaspoon ground red pepper
cup plain low fat yogurt
teaspoon chili powder
teaspoon salt
teaspoon pepper
4, America’s Cut loin chops, 1 to 1 pound
medium sweet red pepper, cut into slices
Place whole red pepper on spit of rotisserie, stem-side up. Cover and cook for 20 to 25
minutes or until charred. Remove from spit and place in a paper bag. Close bag and
allow to cool. When cool, remove and discard stem, skin, and seeds. Place cooked
pepper in a blender container. Add cilantro, garlic, cocoa powder, anise seed, chili powder, sugar and ground red pepper. Cover and blend until chopped. Add yogurt, blend
until smooth, scraping down sides. Pour into a bowl, cover and chill 1 to 2 hours.
Combine the
teaspoon chili powder, salt and pepper. Rub into loin chops. Place on
spit, horizontally with a slice of red pepper on top of each chop. Close door and cook
until internal temperature
150°F to 155°F (approximately 35 to 40 minutes).
Bring Red Pepper Sauce to room temperature or warm carefully, do not boil. Serve
chops with pepper ring and sauce.
Page 34
Page 33

PORK ROAST
PORK ROAST
to
to
servings
servings
1 cup chopped fresh mushrooms1 cup chopped fresh mushrooms
cup finely chopped onions cup finely chopped onions
1 tablespoon butter or margarine1 tablespoon butter or margarine
1 tablespoon lemon juice1 tablespoon lemon juice
teaspoon rosemary, crushed teaspoon rosemary, crushed
1 egg yolk, beaten1 egg yolk, beaten
cup grated cheese cup grated cheese
cup finely chopped walnuts cup finely chopped walnuts
1 pound single pork loin1 pound single pork loin
For filling, in saucepan cook mushroom and onion in melted butter over medium-low heatFor filling, in saucepan cook mushroom and onion in melted butter over medium-low heat
until tender and liquid has evaporated, stirring frequently. Stir in lemon juice and rose-until tender and liquid has evaporated, stirring frequently. Stir in lemon juice and rosemary. Cool slightly. Stir in beaten egg yolk, cheese and walnuts. Set aside.mary. Cool slightly. Stir in beaten egg yolk, cheese and walnuts. Set aside.
Place pork loin with curved side down. Make 3 cuts lengthwise in the meat to withinPlace pork loin with curved side down. Make 3 cuts lengthwise in the meat to within
about of the other side. Do not cut all the way through. Open out and poundabout of the other side. Do not cut all the way through. Open out and pound
to a
rectangle.to a rectangle.
Spread filling evenly on meat rectangle. Roll up lengthwise; tie with string to secure.Spread filling evenly on meat rectangle. Roll up lengthwise; tie with string to secure.
Place vertically on spit. Close door and cook until internal temperature reaches 150°F
Place vertically on spit. Close door and cook until internal temperature reaches
to 155°F (approximately 35 to 40 minutes). Slice to serve.to 155°F (approximately 35 to 40 minutes). Slice to serve.
CURRY BARBECUED PORK CURRY BARBECUED PORK
3 to 4 servings3 to 4 servings
1 tablespoon creamy peanut butter1 tablespoon creamy peanut butter
1 tablespoon curry powder1 tablespoon curry powder
1 tablespoon soy sauce1 tablespoon soy sauce
1 tablespoon cooking oil1 tablespoon cooking oil
cup catsup
cup catsup
cup orange juice cup orange juice
2 pound pork
back ribs2 pound pork back ribs
For sauce, in a bowl combine peanut butter and curry powder. Stir to mix well. Stir inFor sauce, in a bowl combine peanut butter and curry powder. Stir to mix well. Stir in
soy sauce and oil until well blended. Stir in catsup and orange juice. Brush ribs lightlysoy sauce and oil until well blended. Stir in catsup and orange juice. Brush ribs lightly
Page 35Paae 35
Page 34

with sauce.
Place ribs on spit by
weaving into an "S”
shape or
cut
into
2
or 3
rib por-
tions and place on spit, ‘leaving air space between pieces.
tender or until internaltemperature reaches
150°F
to
Close door and cook until
l55 F-(approximately
Brush ribs with sauce twice during cooking.
If using country ribs,
you
will get 4 or 5
servings.
Cut into
individual
place on spit one on top of another.
PORK CHOPS
WITH BARLEY ORANGE STUFFING
4 servings
3 tablespoons quick-cooking barley
2 tablespoons finely chopped onion
l/3
cup water
1
teaspoon instant chicken granules
1 garlic clove, minced or
l/2
teaspoon bottled
,
minced garlic.
1-hour).
portions and
,
l/4
teaspoon pepper
2 tablespoons finely chopped green pepper
1 tablespoon frozen orange juice concentrate, thawed
1
teaspoon grated orange peel
1 tablespoon fine dry bread crumbs
4, America’s Cut
In a small saucepan combine barley, onion,
Bring to a boil; reduce heat.
stand covered,-for 5 minutes. Stir in green pepper, orange
peel.
Mix
well. Stir in bread crumbs.
Make a horizontal slit in each pork loin chop, forming-a pocket.
through. Stuff chops with barley mixture,
the spit. Close door and cook until
loin
chops, I
I/4
to 1
1/2
Cover and
internal
pounds
water,
chicken
granules, garlic
simmer I0 minutes.Remove from heat, let
juice concentrate, and orange,
Do not cut all
press
temperature reaches
to
close pocket.
Place horizontally on
150°F to l55 F
and pepper,
the
way
(approximately 35 to 40 minutes).
Page 35

Page 36

Félicitations!
Vous goûterez chez vous les délices de la rôtisserie; le
procédé est tout simple, tout court, avec votre nouvelle
Rôtissoire Carrousel Sunbeam. Nous avons tout prévu
pour vous simplifier le rôtissage à la broche.
Votre Rôtissoire Carrousel sait:
Emprisonner les sucs de la viande; seules
la graisse indésirable s’en écoule.
Cuire un poulet à chair
tout
Cuire une variété d’aliments à la perfection
et les brunir uniformément.
Assure un milieu sans fumée, grâce à sa
porte transparente.
Elle comporte des pièces. qui vont
au lave-vaissel le.
croustillant et d’un beau doré.
juteuse et
succulente,
Elle est d’emploi facile.
Page 37

Table des matières
Introduction
Avant de vous en servir
. . . .
1
. . . . . . . . . . . . . . . . . . . . . . . . . . . . . . . . . . . . .
3
Mises en garde importantes
Étudiez votre Rôtissoire Carrousel Sunbeam....
Mode d’emploi
. . . . . . . . . . . . . . . . . . . . . . . . . . . . . . . . . . . . . . . . . . . . . . . . . .
6
7
Nettoyage de la Rôtissoire
Prenez soin de, votre Rôtissoire . . . . . . . . . . . . . . . . . . . . . .
Tableau de cuisson.
Trucs de dépeçage
. . . . . . . . . . . . ..*...........*.................
. . . . . . . . . ..*......*.........*....*..........*
Garantie
. . . . . . . . . . . . . . . .
8
8
10
11
12
Page 38

Usage sécuritaire de votre Rôtissoire
Avant l’usage
Lire toutes les instructions.
2. Bien débarrasser la lèchefrite de tout corps étranger.
3. Décoller l’étiquette de la porte.
4. Brancher la Rôtissoire sur une prise de courant appropriée.
Où l’utiliser
1. Ne l’utiliser que sur une surface stable résistant à la chaleur.
2. Ne pas utiliser la Rôtissoire en plein soleil ni à un endroit où
elle serait exposée à d’autres sources de chaleur, tel que sur
la cuisinière ou dans un four.
3. Tenir la Rôtissoire hors de la portée des enfants
très chaude!
4. Placer l’appareil à une distance d’au moins six pouces des murs.
elle devient
Durant l’usage
1. La, température est très élevée durant l’opération. Prendre soin
de se tenir les mains et le visage à l’écart
2. Ne pas faire fonctionner la Rôtissoire sans l’écran réflecteur en place.
3. Ne pas ouvrir la porte ni sortir le panier de cuisson durant l’opération
de rôtissage.
de
l’appareil.
Après l’usage
1. Se servir de gants calorifugés ou de carrés de molleton pour sortir
le panier et la lèchefrite après la cuisson.
Page 39

12.
13.
14.
15.
16.
Ne pas laisser le cordon pendre au bord d’une table ou d’un plan de
travail ni toucher à des surfaces chaudes. Ne pas placer l’appareil
sur une surface branlante ou recouverte d’un tissu quelconque.
Ne pas placer l’appareil près d’un brûleur chaud, à gaz ou
électrique, ni dans un four chauffé.
Pour le débrancher, saisir la fiche et la sortir de la prise de courant.
Ne jamais tirer sur le cordon.
Ce n’est qu’avec extrême prudence qu’on doit déplacer un appareil
qui contient de I’huile chaude ou d’autres liquides chauds.
S’en tenir uniquement à l’usage auquel cet appareil est destiné.
Une très grande prudence s’impose au moment d’enlever la
lèchefrite ou de se débarrasser de la graisse chaude.
Courant électrique: Si le circuit est surchargé par d’autres appareils, la Rôtissoire
pourrait ne pas bien fonctionner. La Rôtissoire devra fonctionner sur un circuit
indépendant de celui des autres appareils.
Cet appareil est doté d’une fiche polarisée pour courant alternatif (une broche est
que l’autre). Pour réduire le risque de choc electrique, cette fiche ne va que dans un
sens dans une prise de courant
Si la fiche ne s’enfonce pas complètement dans la
prise, la retourner et essayer de nouveau. Si elle ne s’adapte toujours pas, faire remplacer la
prise hors d’usage par un
qualifie. NE PAS ESSAYER DE DEJOUER CE DISPOSITIF
DE SÉCURITÉ.
Utilisation des cordons de rallonge:
a) Un cordon électrique (ou un cordon d’alimentation amovible) de faible longueur doit être
fourni, afin de réduire le risque de s’empêtrer et
sur un cordon plus long.
b) Des cordons d’alimentation amovibles ou des cordons de rallonge plus longs sont livrables et
pourront être utilisés, pourvu qu’on le fasse avec prudence.
c) Si on utilise un cordon d’alimentation amovible ou de rallonge,
1) La tension nominale indiquée sur celui-ci doit être au moins aussi
que la tension
nominale de l’appareil, et
2) Le cordon devra être dispose de façon qu’il ne puisse pendre au bord du plan de travail ou
table, car les enfants pourraient tirer dessus ou quelqu’un pourrait s’y empêtrer par
CONSERVER CES INSTRUCTIONS
AUCUN ENTRETIEN PAR L’UTILISATEUR
RENVOYER AU CENTRE DE SERVICE
‘POUR USAGE DOMESTIQUE
SEULEMENT
5
Page 40

Poignée
IL
Écran réflecteur amovible
Lèchefrite
--Broche
Porte Panier de cuisson
deux heures
Page 41

, INSTRUCTIONS. D’ASSEMBLAGE
1.
Retirer du carton-mousse plastique pièces suivantes:
Broche rotative avec poignée
Fourchons
Panier de cuisson
Lèchefrite en aluminium
Organe noir d’entraînement de la lèchefrite
2.
Placer l’organe d’entraînement sur l’arbre de transmission au fond de
la rôtissoire. S’assurer que le côte plat de l’arbre de transmission joint
exactement le côté plat de l’organe d’entraînement.
3.
Sortir la lèchefrite de sac de plastique: l’installer ensuite sure l’organe
4.
L’assemblage de la broche rotative, des fourchons et du panier de cuisson
variera selon le genre de nourriture qu’on fera rôtir. Pour l’installation du panier
de cuisson, bien observer le mode d’emploi point-par-point à la page 7 du Livre
d’instructions de la Rôtisserie Carrousel.
D’EMPLOI POINT PAR POINT
1.
2.
3.
4.
5.
6.
Placer l’appareil sur une surface propre, en assurant un
dégagement
d’au moins six pouces sur tous les côtés.
Détacher de la porte l’étiquette statique.
Pour ouvrir la porte, la faire glisser dans le sens anti-horaire.
Installer la lèchefrite dans la Rôtissoire.
Saisir la poignée et dévisser la broche du panier de cuisson.
Déposer la nourriture dans le panier. Le poulet et toute autre
volaille doivent être placés le cou en haut et les pattes en bas.
(Consulter les recettes pour détails).
Page 42

7. Pour enfiler le poulet sur la broche:
!
Remonter les fourchons jusqu’au haut sur la broche.
!
En tenant d’une main les fourchons, enfiler le poulet
sur la broche.
!
Bien assujettir la broche dans le panier de cuisson.
!
Une fois la en place, abaisser les
fourchons et les enfoncer dans le poulet ATTENTION: La broche
et les fourchons sont pointus.
8.
Installer le panier au centre de la lèchefrite.
9.
Pour fermer la faire glisser dans le sens horaire.
10.
Brancher l’appareil sur une prise de courant de 120 volts.
11.
Les temps de cuisson varient selon la grosseur de la pièce à rôtir,
sa nature et la recette. Pour le poulet, la charge maximale est de 8
livres (4 kilos). (Consulter les recettes pour détails).
12.
II faudra laisser refroidir l’appareil au moins une
demi-heure avant de l’utiliser de nouveau. Laisser refroidir la
‘Rôtissoire avant de la’nettoyer et de la ranger.
NETTOYAGE DE LA RÔTISSOIRE
Avant d’utiliser votre Rôtissoire Carrousel Sunbeam pour la première fois: Lavez le
panier de cuisson, la broche, la lèchefrite, l’écran
et la porte l’eau chaude
savonneuse. Rincez et asséchez.
NOTA, Les articles suivants vont au lave-vaisselle: porte, lèchefrite, panier de cuisson
et écran
Pour la porte la tourner dans le sens anti-horaire. Dès
se dégage, la soulever pour l’enlever. L’écran réflecteur s’enlève en le faisant
glisser dans le sens anti-horaire, puis en le soulevant pour le sortir de l’appareil.
.
Page 43

ATTENTION: Le bord de l’écran réflecteur est coupant.
‘Toujours s’assurer que la rôtissoire est debranchée et refroidie au moment de la nettoyer.
Pour la nettoyer, essuyez-la à la main, avec un linge doux humide.
N’utilisez aucune matière abrasive.
Ne la plongez pas dans l’eau!
Lavez les pièces détachées comme indiqué ci-dessus.
PRENEZ SOIN DE VOTRE RÔTISSOIRE
Tenez votre Rôtissoire propre.
2.
N’utilisez aucun ustensile de métal.
3.
Assurez-vous que l’appareil est bien refroidi et sec avant de le ranger.
DE CUISSON
Les temps de cuisson figurant au tableau ne sont que des régles générales basées
sur les temps approximatifs détermines par des essais. Les temps de cuisson
varieront en fonction des différences que présentent les viandes, leur forme, leur
taille ainsi que la quantité de gras et d’os.
l’usage de la Rôtissoire Sunbeam, servez-vous d’un thermomètre viande.
Enfoncez la pointe du thermomètre d’au moins 2 pouces dans la partie la plus
épaisse de la viande, à l’écart de l’os et du cartilage. Le thermomètre à viande ne
doit pas venir en contact avec l’élément chauffant quand le panier tourne. Consultez
le tableau ci-dessous pour connaître les températures que doivent atteindre les
viandes cuites.
Page 44

TABLEAU BE CUISSON DE LA SUNBEAM
ALIMENT Poids
VOLAILLE
Poulet entier
Poulet entier 2 à kg
Poule de Cornouailles 1 ou 2
Canard
de dinde
Poitrine de dinde
PORC
Rôti en couronne
Rôti de longe
Filet de porc 375 g à 700 g
Rôti de. porc roulé
Côtes levées
à kg
2 à
1 kg
kg
90°C (185°F)
Température Temps de cuisson
Thermomètre approximatif
à viande
90°C (185°F)
90°C (185°F)
(185°F)
90°C (185°F) 70 mn mn
90°C (185°F)
75°C (165°F)
60 mn
110 mn 2 h 10 mn Poitrine
20 mn à 40 mn
60 mn 120 mn
JAMBON
Jambon en conserve
Jambon, jarret
AGNEAU
Gigot d’agneau
Rouleau d’agneau
BOEUF
Filet de boeuf rôti
Entrecôte (150 à 160°F)
Pointe de roulée
ou Rosbif de croupe 2 à 4 kg
Rôti de côte (150 à 160°F)
AUTRES
Hot-dogs 7 mn à 10 min
Saucisson Bratwurst pre-cuit
Pommes de terre nouvelles
Pommes de terre en robe
en épis
à kg
à 3 kg
,
(150 à 160°F)
(150 à 160°F)
50 mn
80 mn à 120 mn
75 mn à 120 mn
--
Les temps de cuisson figurant sur le tableau sont à partir d’aliments non ou
* Si la minuterie doit être réglée pour moins de 10 minutes, tourner le bouton passe le repère de 10
minutes et régler ensuite.
Page 45

NOTA
Au rôtisserie des volailles et autres viandes dans la Carrousel, ne manquez pas de vérifier
leur degré de cuisson
Si l’aliment exige plus de 2 heures de cuisson, la minuterie devra remise en marche, car elle
s’arrête automatiquement après 2 heures.
Avant d’utiliser la Rôtisserie Carrousel pour la première fois, veuillez consulter le Livre d’instructions
de la Rôtissoire Carrousel pour bien connaître son mode
l’aide d’un
TRUCS DE DÉPEÇAGE
Dépeçage de la volaille
Coucher le poulet ou autre volaille sur la planche à decouper, les pilons s’étendant droite.
En commençant par le côté en face du dépeceur, détacher la patte en la saisissant avec la main
gauche et en tirant délicatement dessus, tout en coupant dans la chair, entre le corps et
l’articulation de la cuisse.
Placer la patte sur ta planche
Trancher la chair de la cuisse et du pilon
et trancher l’articulation, pour séparer pilon et cuisse.
à l’os.
Piquer une fourchette à viande dans la poitrine pour immobiliser le corps. Couper l’aile en glissant
le couteau dans l’articulation,
Découper la poitrine, en commençant juste au-dessus de l’articulation de l’aile qu’on a enlevée.
Tailler la viande blanche en tranches minces, par mouvements ascendants et parallèles au bréchet.
Dépeçage d’un jambon, d’un rôti de porc d’un gigot d’agneau
Placer le jambon, le rôti de porc ou le gigot d’agneau sur la planche à le bout de à la
droite du dépeceur. Pour le jambon, tourner le côté
le placer de façon que la partie charnue se trouve en
Piquer une fourchette dans le gros de la pièce de viande et tailler plusieurs tranches en longueur
dans la partie moins charnue.
Retourner ensuite le jambon, le rôti de porc ou le gigot d’agneau pour qu’il se tienne verticalement sur
la face entamée. Entailler en coin la viande du bout de l’os, à partir de la base du bourrelet. Couper
d’abord tout droit jusqu’à l’os, puis faire une autre coupe faisant angle à la première, en longeant le
bout de l’os. Enlever la section triangulaire.
En partant du bout entaillé, tailler des tranches minces et uniformes en descendant jusqu’à l’os.
entaillé en dessus. Pour le gigot d’agneau,
Dépeçage d’un rôti de boeuf de
Placer le rôti sur un plateau ou une planche à découper, le bout le plus gros en dessous et les côtes
à gauche. La partie étroite du rôti est alors le côté qui s’offre au Piquer la fourchette à
dépecer entre les deux côtes supérieures.
Trancher le rôti en travers, à partir du bord gras. la tranche de avec la pointe du couteau.
11
Page 46

GARANTE LI M IT É E
Ce qui est couvert et pour combien de temps
Nous vous d’avoir récemment fait l’achat d’un produit Sunbeam de qualité. Nous savons
que notre produit fonctionnera bien et,
jouir de sa garantie contre tous défauts
la
de 2 ans, à partir de la date de l’achat initial.
Ce que fera Sunbeam et comment se prévaloir du service
Si votre appareil est sous le couvert de la garantie, nous le réparerons ou le remplacerons (à notre
discrétion) durant cette période. Ceci constitue votre seul et unique recours en vertu de cette garantie.
Envoyez appel:
SUNBEAM CANADA
1-800-663-8623 ou email nous
consumeraffairs@consumer.sunbeam.com
titre de premier acquéreur au détail du produit, vous pourrez
et électriques de matériau ou de fabrication pour
Ce que la garantie ne couvre pas
La garantie de notre produit ne couvre pas l’usure normale des pièces, les dommages imputables la
négligence, l’usage abusif, l’utilisation sur courant ou sous tension non appropries, l’utilisation
l’encontre des instructions, au bris de verre (s’il y a lieu), ou au démontage, la réparation ou la
modification par d’autres qu’un centre de service agréé. Toute garantie implicite portant sur la
loyale et marchande ou l’adaptabilité du produit une fin se limite durée de la
présente garantie écrite. Nous nous dégageons de toute responsabilité en cas de dommages consécutifs ou indirects pour rupture de toute garantie explicite ou implicite du produit.
législation provinciale applicable
Certaines provinces ne permettent pas la limitation de la durée d’une garantie implicite, l’exclusion ni
la limitation des dommages
s’applique peut-être pas
pourriez avoir d’autres droits légaux qui varient d’une province à l’autre.
votre cas. Cette garantie vous donne des droits spécifiques et vous
ou indirects; par conséquent, la limitation susmentionnée ne
1996 Sunbeam Corporation ou ses filiales. Tous droits
est une marque de Sunbeam Corporation ou de ses filiales.
Distribué par: Sunbeam Househoid
Sunbeam Corporation (Canada) Ltd, Mississauga, Ontario
Pour obtenir /es recettes en version française, veuillez notre Service la
en composant
Schaumburg, IL 60173.
12
Page 47

Notes/Notas
Page 48

 Loading...