


SafetyInformation................................ |
2-6 |
Operating Instructions |
|
Surface Units ........................................... |
7 |
Cookware.................................................. |
8 |
Oven........................................................... |
9 |
Oven................................................... |
11,12 |
Thermostat.............................................. |
10 |
Care and Cleaning ......................... |
11-16 |
Installation Instructions ..................... |
18 25 |
TroubleshootingTips......................... |
26 -29 |
Accessories............................................. |
30 |
Warranty............................................ |
31-32 |
Write the model and serial numbers here:
Model #
Serial #
You can find them on a label behind the storage drawer on the oven frame.
Owner's Manual and
Installation Instructions
Coil Top and Ceramic Top Models
295D3817P005
Safety Instructions
IMPORTANT SAFETY INFORMATION.
READ ALL INSTRUCTIONS BEFORE USING.
 WARNING! READ ALL SAFETY INSTRUCTIONS BEFORE USING THE PRODUCT. FAILURE TO FOLLOW THESE INSTRUCTIONS MAY RESULT IN FIRE, ELECTRIC SHOCK SERIOUS INJURY OR DEATH.
Consumer Support Troubleshooting Tips Instructions Care and Cleaning Instructions
Installation Operating
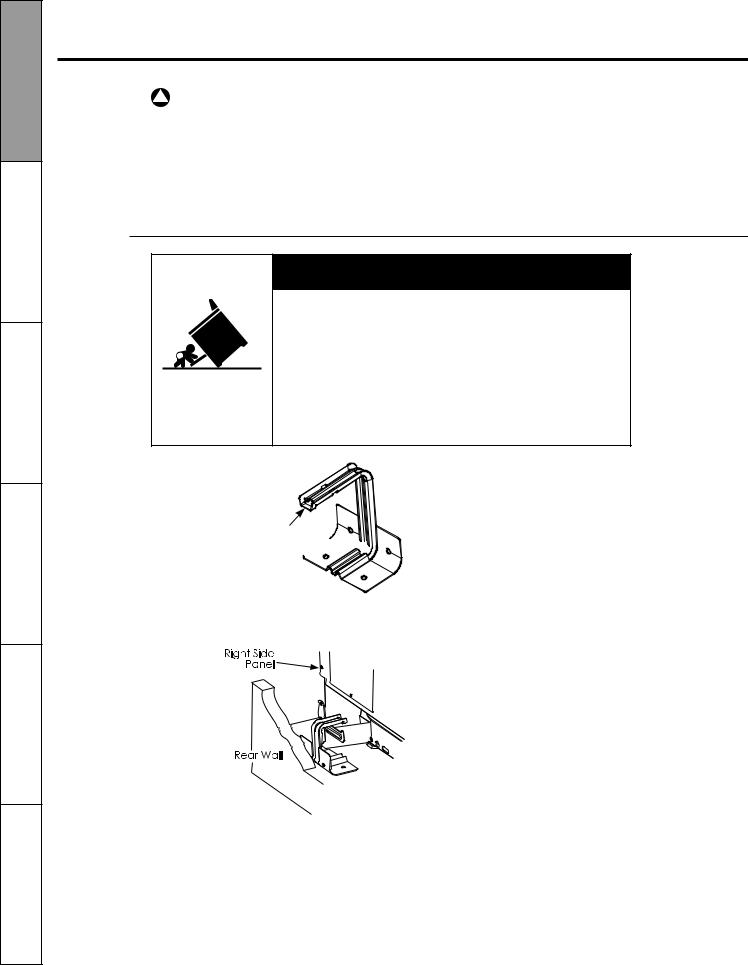
ANTI-TIP DEVICE
 WARNING
Tip-Over Hazard
A child or adult can tip the range and be killed. Verify the anti-tip bracket has been properly installed and engaged.
Ensure the anti-tip bracket is re-engaged when the range is moved.
Do not operate the range without the anti-tip bracket in place and engaged.
Failure to follow these instructions can result in death or serious burns to children or adults.
Anti-Tip
Bracket 


Free-Standing Ranges
To reduce the risk of tipping the range, the range must be secured by a properly installed anti-tip bracket. See installation instructions shipped with the bracket for complete details before attempting to install.
For Freestanding Ranges
To check if the bracket is installed and engaged properly, look underneath the range to see that the anti-tip arm attached to the side panel is engaged in the bracket. On some models, the storage drawer or kick panel can be removed for easier inspection. If visual inspection is not possible, slide the range forward, confirm the anti-tip bracket is securely attached to the floor or wall, and slide the range back so the antitip arm slides just under the anti-tip bracket. If the range is pulled from the wall for any reason, always repeat this procedure to verify the range is properly secured by the anti-tip bracket.
2
COOK MEAT AND POULTRY THOROUGHLY...
Cook meat and poultry thoroughly—meat to at least an INTERNAL temperature of 160° F and poultry to at least an INTERNAL temperature of 180°F. Cooking to these temperatures usually protects against foodborne illness.
Instructions Safety
 WARNING
SAFETY PRECAUTIONS
•Never wear loose-fitting or hanging garments while using the appliance. Be careful when reaching for items stored over the range. Flammable material could be ignited if brought in contact with hot surface units or heating elements and may cause severe burns.
•Use only dry pot holders-moist or damp pot holders on hot surfaces may result in burns from steam. Do not let pot holders touch hot surface units or heating elements. Do not use a towel or other bulky cloth.
•For your safety never use your appliance for warming or heating the room.
•Do not let cooking grease or other flammable materials accumulate in or near the range.
•Do not use water on grease fires. Never pick up a flaming pan. Turn the controls off. Smother a flaming pan on a surface unit by covering the pan completely with a well fitting lid, cookie sheet or flat tray. Use a multipurpose dry chemical or foam-type fire extinguisher.
Flaming grease outside a pan can be put out by covering it with baking soda or, if available, by using a multipurpose dry chemical or foam type fire extinguisher. Flame in the oven can be smothered completely by closing the door and turning the oven off or by using a multipurpose dry chemical or foam type fire extinguisher.
• Do not touch the surface units, the heating elements or the interior surface of the oven. These surfaces may be hot enough to burn even though they are dark in color. During and after use, do not touch or let clothing or other flammable materials contact the surface units, areas nearby the surface units or any interior area of the oven; allow sufficient time for cooling first.
Potentially hot surfaces include the cooktop, areas facing the cooktop, oven vent opening, surfaces near the opening, crevices around the oven door and metal trim parts above the door.
REMEMBER: The inside surface of the oven may be hot when the door is opened.
•Do not store or use combustible materials, gasoline or other flammable vapors and liquids in the vicinity of this or any other appliance.
•Keep the hood and grease filters clean to maintain good venting and to avoid grease fires.
•Never block the vents (air openings) of the range. They provide the air inlet and outlet that are necessary for the range to operate properly with correct combustion. Air openings are located at the rear of the cooktop, at the top and bottom of the oven door, and at the bottom of the range under the storage drawer.
Support Consumer Tips Troubleshooting Installation Cleaning and Care Operating
Instructions Instructions
3
Consumer Support Troubleshooting Tips Instructions Care and Cleaning Instructions Safety Instructions
Installation Operating
IMPORTANT SAFETY INFORMATION. READ ALL INSTRUCTIONS BEFORE USING.
 WARNING
OVEN
•Stand away from the range when opening the oven door. Hot air or steam which escapes can cause burns to hands, face and/or eyes.
•Do not heat unopened food containers. Pressure could build up and the container could burst, causing an injury. Keep the oven vent unobstructed.
•Keep the oven free from grease buildup.
•Place the oven shelf in the desired position while the oven is cool. If shelves must be handled when hot, do not let pot holder contact the heating elements.
•Pulling out the shelf to the stop-lock is a convenience in lifting heavy foods. It is also a precaution against burns from touching hot surfaces of the door or oven walls.
 WARNING
SURFACE UNITS-ALL MODELS
•When using cooking or roasting bags in the oven, follow the manufacturer’s directions.
•Do not use the oven to dry newspapers. If overheated, they can catch on fire.
•Do not use the oven for a storage area. Items stored in an oven can ignite.
•Do not leave paper products, cooking utensils or food in the oven when not in use.
Use proper pan size-select cookware having flat bottoms large enough to cover the surface unit heating element. The use of undersized cookware will expose a portion of the surface unit to direct contact and may result in ignition of clothing. Proper relationship of cookware to surface unit will also improve efficiency.
•Never leave the surface units unattended at high heat settings. Boilovers cause smoking and greasy spillovers that may catch on fire.
•Only certain types of glass, glass/ceramic, earthenware or other glazed containers are suitable for cooktop service, others may break because of the sudden change in temperature.
•To minimize the possibility of burns, ignition of flammable materials and spillage, the handle of a container should be turned toward the center of the range without extending over nearby surface units.
•Always turn the surface units off before removing cookware.
•Do not flame foods on the cooktop. If you do flame foods under the hood, turn the fan on.
•Keep an eye on foods being fried at high or medium high heat settings.
•Foods for frying should be as dry as possible. Frost on frozen foods or moisture on fresh foods can cause hot fat to bubble up and over the side of the pan.
•Use little fat for effective shallow or deep fat frying. Filling the pan too full of fat can cause spillovers when food is added.
•If a combination of oils or fats will be used in frying, stir together before heating, as fats melt slowly.
•Always heat fat slowly, and watch as it heats.
•Use a deep fat thermometer whenever possible to prevent overheating fat beyond the smoking point.
4
IMPORTANT SAFETY INFORMATION.
READ ALL INSTRUCTIONS BEFORE USING.
 WARNING!
RADIANT SURFACE UNITS (on some models)
Use care when touching the cooktop. The glass surface of the cooktop will retain heat after the controls have been turned off.
•Avoid scratching the glass cooktop. The cooktop can be scratched with items such as sharp instruments, rings or other jewelry and rivets on clothing.
•Large scratches or impacts to glass doors or cooktops can lead to broken or shattered glass.
•Do not operate the radiant surface units if the glass is broken. Spillovers or cleaning solution may penetrate a broken cooktop and create a risk of electrical shock. Contact a qualified technician immediately should your glass cooktop become broken.
•Never use glass cooktop surface as a cutting board.
•Do not place or store items that can melt or catch fire on the glass cooktop, even when it is not being used.
•Be careful when placing spoons or other stirring utensils on the glass cooktop surface when it is in use. They may become hot and could cause burns.
•Clean the cooktop with caution. If a wet sponge or cloth is used to wipe spills on a hot surface unit, be careful to avoid steam burns. Some cleaners can produce noxious fumes if applied to a hot surface.
NOTE: We recommend that you avoid wiping any surface unit areas until they have cooled and the indicator light has gone off. Sugar spills are the exception to this. Please see Cleaning the glass cooktop section.
•When the cooktop is cool, use only the recommended cleaning cream to clean the cooktop.
•To avoid possible damage to the cooking surface, do not apply cleaning cream to the glass surface when it is hot.
•After cleaning, use a dry cloth or paper towel to remove all cleaning cream residue.
•Read and follow all instructions and warnings on the cleaning cream labels.
•Do not lift the cooktop. Lifting the cooktop can lead to damage and improper operation of the range.
 WARNING!
COIL SURFACE UNITS (on some models)
•Clean the cooktop with caution. If a wet sponge is used to wipe spills on a hot cooktop, be careful to avoid steam burns.
•To avoid the possibility of a burn or electric shock, always be certain that the controls for all surface units are at the OFF position and all coils are cool before attempting to lift or remove a unit.
•Do not immerse or soak the removable surface units. Do not put them in a dishwasher.
•Be sure the drip pans and the vent duct are not covered and are in place. Their absence during cooking could damage range parts and wiring.
•Do not use aluminum foil to line the drip pans or anywhere in the oven except as described in this manual. Misuse could result in a shock, fire hazard or damage to the range.
READ AND FOLLOW THIS SAFETY INFORMATION CAREFULLY
SAVE THESE INSTRUCTIONS
Support Consumer Tips Troubleshooting Installation Cleaning and Care Operating Instructions Safety
Instructions Instructions
5

Consumer Support Troubleshooting Tips Instructions Care and Cleaning Instructions Safety Instructions
Installation Operating
Using the surface units.
Throughout this manual, features and appearance may vary from your model.
Surface Cooking Controls
Your surface units and controls are designed to give you a variety of heat settings for surface unit cooking.
At both LO and HI positions, there is a slight notch so control clicks at those positions; HI marks the highest setting; LO, the lowest setting.
In a quiet kitchen, you may hear slight clicking sounds during cooking, indicating heat settings selected are being maintained.
Switching heats to higher settings always shows a quicker change in temperature than switching to lower settings.
How to Set the Controls
1.Push the control knob in.
2.Turn either clockwise or counterclockwise to desired heat setting.
Control must be pushed in to set only from the OFF position.
When control is in any position other than OFF, you can turn it without pushing in.
Be sure you turn control to OFF when you finish cooking. An indicator light will glow when ANY surface unit is on.
A Burner On indicator light will glow when ANY surface unit is on.
Heat Setting Guide
MAX - Quick start for cooking; bring water to boil.
MEDIUM HIGH - Fast fry, pan broil; maintain fast boil on large amount of food.
MED - Sauce and brown; maintain slow boil on large amount of food.
MEDIUM LOW - Cereal; maintain serving temperature of most foods.
MIN - Cook after starting at HI; cook with little water in covered pan. Use to steam rice.
NOTES:
1.At MAX or MEDIUM HIGH, never leave food unattended. Boilovers cause smoking; greasy spillovers may catch fire.
2.At MIN, melt chocolate, butter on small unit.
Cooking Tips
Use mediumor heavyweight cookware. Aluminum cookware conducts heat faster than other metals. Cast-iron and coated cast-iron cookware is slow to absorb heat, but generally cooks evenly at low or medium heat settings. Steel pans may cook unevenly if not combined with other metals.
Do not overfill cookware with fat that may spill over when adding food. Frosty foods bubble vigorously. Watch foods frying at high temperatures. Keep range and hood clean from accumulated grease.
To conserve the most cooking energy, pans should be flat on the bottom, have straight sides and tight-fitting lids. Match the size of the saucepan to the size of the surface unit. A pan that extends more than an inch beyond the edge of the drip pan traps heat, which causes "crazing" (fine hairline cracks) on porcelain, and discoloration ranging from blue to dark gray on chrome drip pans.
6

Using the surface units.
Throughout this manual, features and appearance may vary from your model.
Indicator Lights (on radiant glass models only).
A Hot indicator light will glow when any radiant element is turned on, and will remain on until the surface is cool enough to touch.
A Burner On indicator light will glow when any surface unit is on.
NOTE: The Hot indicator light may glow between the surface control settings of Min and OFF, but there is no power to the surface units.
Using the radiant surface units. (on some models)
Never cook directly on the glass. Always use cookware.
Always place the pan in the center of the surface unit you are cooking on.
About the radiant surface units...
The radiant cooktop features heating units beneath a smooth glass surface.
NOTE: A slight odor is normal when a new cooktop is used for the first time. It is caused by the heating of new parts and insulating materials and will disappear in a short time.
The surface unit will cycle on and off to maintain your selected control setting.
It is safe to place hot cookware from the oven or surface on the glass surface when the surface is cool.
Even after the surface units are turned off, the glass cooktop retains enough heat to continue cooking. To avoid overcooking, remove pans from the surface units when the food is cooked. Avoid placing anything on the surface unit until it has cooled completely.
Do not slide cookware across the cooktop because it can scratch the glass - the glass is scratch resistant, not scratch proof.
•Water stains (mineral deposits) are removable using the cleaning cream or full-strength white vinegar.
•Use of window cleaner may leave an iridescent film on the cooktop. The cleaning cream will remove this discoloration.
•Do not store heavy items above the cooktop. If they drop onto the cooktop, they can cause damage.
•Do not use the surface as a cutting board.
Temperature Limiter
Every radiant surface unit has a temperature limiter. The temperature limiter protects the glass cooktop from getting too hot.
The temperature limiter may cycle the units off for a time if:
•The pan boils dry.
•The pan bottom is not flat.
•The pan is off center.
•There is no pan on the unit.
Support Consumer Tips Troubleshooting Installation Cleaning and Care Operating Instructions Safety
Instructions Instructions
7
Consumer Support Troubleshooting Tips Instructions Care and Cleaning Instructions Safety Instructions
Installation Operating
Selecting types of cookware.
The following information will help you choose cookware that will give good performance on glass cooktops.
Check for flat bottoms by using a straight edge.
Pans with rounded, curved, ridged or warped bottoms are not recommended.
Stainless Steel: recommended
Aluminum:
heavy weight recommended.
Good conductivity. Aluminum residues sometimes appear as scratches on the cooktop, but can be removed if cleaned immediately. Because of its low melting point, thin-weight aluminum should not be used.
Copper Bottom: recommended
Copper may leave residues which can appear as scratches. The residues can be removed, as long as the cooktop is cleaned immediately. However, do not let these pots boil dry. Overheated metal can bond to glass cooktops. An overheated copper bottom pot will leave a residue that will permanently stain the cooktop if not removed immediately.
Porcelain Enamel Covered Cast Iron: recommended
As long as the cookware is covered completely with porcelain enamel, this cookware is recommended. Caution is recommended for cast-iron cookware that is not completely covered with smooth porcelain enamel, as it may scratch the glassceramic cooktop.
Glass-ceramic:
usable, but not recommended
Poor performance. May scratch the surface.
Stoneware:
usable, but not recommended
Poor performance. May scratch the surface.
Home Canning Tips:
Be sure the canner is centered over the surface unit.
Make sure the canner is flat on the bottom.
Use recipes and procedures from reputable sources. These are available from manufacturers such as Ball® and Kerr® and the Department of Agriculture Extension Service.
To prevent burns from steam or heat, use caution when canning.
The following information will help you choose cookware which will give food performance on coil cooktops.
Surface Cookware Tips
|
|
|
|
|
|
Use mediumor heavy-weight cookware. |
|
|
|
|
|
|
Aluminum cookware conducts heat faster |
|
|
|
|
|
|
than other metals. Cast-iron and coated |
|
|
|
|
|
|
cast-iron cookware are slow to absorb |
|
|
|
|
|
|
heat, but generally cook evenly at low to |
|
|
|
|
|
|
medium heat settings. Steel pans may |
|
|
|
||||
|
|
|
|
|||
Not over 1 inch |
|
|
|
cook unevenly if not combined with other |
||
|
|
|
metals. |
|||
|
|
|
|
|
|
|
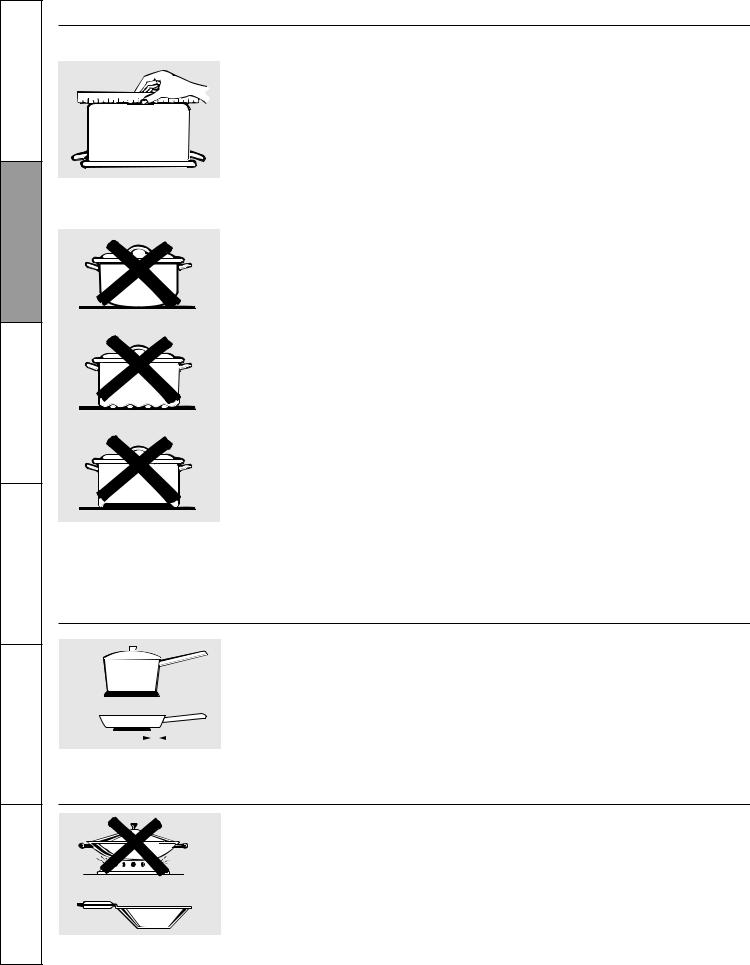
For best cooking results, pans should be flat on the bottom. Match the size of the saucepan to the size of the surface unit. The pan should not extend over the edge of the surface unit than 1 inch.
Wok Cooking
We recommend that you use only a flatbottomed wok.
They are available at your local retail store. Do not use woks that have support rings. Use of these types of woks, with or without the ring in place, can be dangerous.
Use only flat-bottomed woks
Placing the ring over the surface unit will cause a buildup of heat that will damage the porcelain cooktop. Do not try to use such woks without the ring. You could be seriously burned if the wok tips over.
8

The oven has 4 shelf positions.
Oven Temperature Knob (on some models) |
Safety |
||
Turn this knob to the setting you want. |
|
Instructions |
|
|
|
||
The oven cycling light glows until the oven |
|
|
|
reaches your selected temperature, then |
|
|
|
goes off and on with the oven element(s) |
|
|
|
during cooking. |
|
|
|
|
|
|
|
The shelves have stop-locks, so that when |
(stop-locks) on the support, tilt up the front |
Instructions |
|
Before you begin... |
|
Operating |
|
To avoid possible burns, place the shelves |
To remove a shelf, pull it toward you, tilt |
|
|
in the desired position before you turn the |
the front end up and pull it out. |
|
|
oven on. |
To replace, place the end of the shelf |
|
|
placed correctly on the shelf supports (A |
and push the shelf in. |
|
|
through D), they will stop before coming |
NOTE: The shelf is not designed to slide out |
|
|
completely out, and will not tilt. |
at the special low shelf (R) position. |
|
|
Care |
|||
When placing and removing cookware, |
|
||
|
|
||
pull the shelf out to the bump on the shelf |
|
|
|
support. |
|
and |
|
Oven shelf positions |
|
||
|
Cleaning |
||
The oven has four shelf supports—A (bot- |
|
||
tom), B, C and D (top). |
|
|
|
|
|
|
|
|
|
Instructions |
|
|
|
Installation |
|
Preheating and Pan Placement |
|
|
|
Preheat the oven if the recipe calls for it. |
Baking results will be better if baking pans |
|
|
TipsTroubleshooting |
|||
Aluminum Foil |
are centered in the oven as much as pos- |
||
To preheat, set the oven at the correct |
|
||
temperature. Preheating is necessary for |
sible. Pan should not touch each other or |
|
|
good results when baking cakes, cookies, |
the walls of the oven. If you need to use |
|
|
pastry and breads. |
two shelves, stagger the pans so one is not |
|
|
For ovens without a preheat indicator light |
directly above the other, and leave ap- |
|
|
or tone, preheat 10 minutes. |
proximately 1 ½" between pans, from the |
|
|
|
front, back and sides of the wall. |
|
|
|
|
|
|
Do not use aluminum foil on the bottom of |
|
Consumer |
|
the oven. |
|
||
|
|
||
Never entirely cover a shelf with aluminum |
|
|
|
foil. This will disturb the heat circulation |
|
|
|
and result in poor baking. |
|
|
|
A smaller sheet of foil may be used to |
|
Support |
|
catch a spillover by placing it on a lower |
|
||
shelf several inches below the food. |
|
|
|
|
|
|
|
9
Consumer Support Troubleshooting Tips Instructions Care and Cleaning Instructions Safety Instructions
Installation Operating
Adjust the oven thermostat – Easy to do yourself!
You may find that your new oven cooks differently that the one it replaced. Use your new oven for a few weeks to become more familiar with it. If you still think your new oven is too hot or too cold, you can adjust the thermostat yourself.
Do not use thermometers, such as those found in grocery stores, to check the temperature setting of your oven. These thermometers may vary 20-40°F.
NOTE: This adjustment will not affect the broiling or the self-cleaning temperatures (on some models). The adjustment will be retained in memory after a power failure.
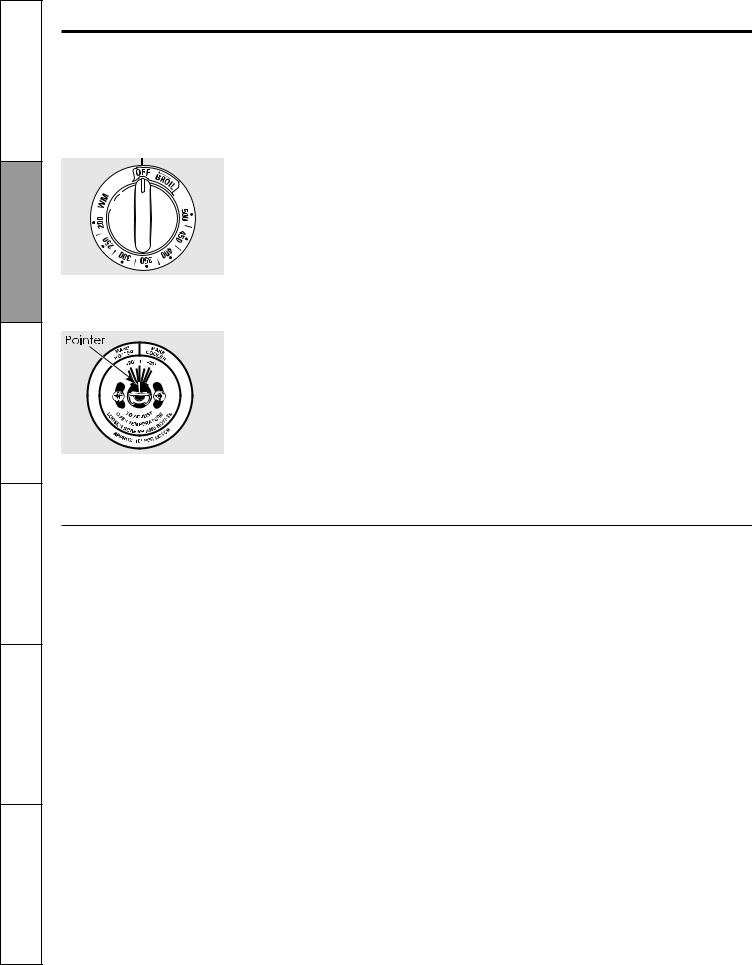
To Adjust the Thermostat with this Type of Knob
Front of OVEN TEMP knob (knob appearance may vary).
Back of OVEN TEMP knob.
1.Pull the Oven Temp knob off the shaft, look at the back of the knob and note the current setting before making any adjustments.
2.Loosen both screws on the back of the knob.
3.To increase the oven temperature, move the pointer toward the words "MAKEHOTTER."
To decrease the oven temperature, turn the pointer toward the words "MAKE COOLER."
Each notch changes the temperature by 10°F.
4.Tighten the screws.
5.Replace the knob matching the flat area of the knob to the shaft.
The type of margarine will affect baking performance!
Most recipes for baking have been developed using high fat products such as butter or margarine (80% fat), If you decrease the fat, the recipe may not give the same results as with a higher fat product.
Recipe failure can result if cakes, pies, pastries, cookies or candies are made with low fat spreads. The lower the fat content of a spread product, the more noticeable these differences become.
Federal standards require products labeled "margarine" to contain at least 80% fat by weight. Low-fat spreads, on the other hand, contain less fat and more water. The high moisture content of these spreads affects the texture and flavor of baked goods. For best results with your old favorite recipes, use margarine, butter or stick spreads containing at least 70% vegetable oil.
10
 Loading...