


WINE CELLAR
Models:
SWC1127B |
SWCP2116 |
SWC1926B |
SWC1996B |
SWCP2163 |
LWC1Z96 |
LWC2Z97 |
LWC1Z193 |
LWC2Z194 |
LWC2Z195 |
User Manual/Mode d’emploi
BEFORE USE, PLEASE READ AND FOLLOW ALL SAFETY RULES AND OPERATING
INSTRUCTIONS IN THIS MANUAL.
AVANT L'UTILISATION, VEUILLEZ LIRE ET SUIVRE TOUTES LES RÈGLES DE SÉCURITÉ ET LES
INSTRUCTIONS D'UTILISATION DE CE MANUEL.
|
|
|
|
|
Write Model and Serial Numbers here: |
|
|
|
|
|
Summit Division of Felix Storch, Inc. |
|
Model: _____________________ |
|
|
|
|
An ISO 9001:2015 registered company |
|
|
|
|
|
|
|
770 Garrison Avenue |
|
|
Serial No.: __________________ |
|
|
|
|
|
Bronx, NY 10474 |
|
|
|
www.summitappliance.com |
|
|
|
|
TABLE OF CONTENTS
Appliance Safety |
3 |
Important Safeguards |
4-5 |
Location of Parts |
6-8 |
Installation Instructions |
9-16 |
Before Using your Appliance |
9 |
Installing your Appliance |
9 |
Installing the Door Handle |
10 |
Reversing the Door Swing |
11 |
Built-in Cabinet Instructions |
12-13 |
Electrical Connection |
14 |
Extension Cord |
14 |
Rearranging the Shelves |
15 |
Placement and Storage of Wine |
15-16 |
Operating your Appliance |
17-18 |
Care and Maintenance |
19 |
Troubleshooting |
20 |
Limited Warranty |
21 |
2
APPLIANCE SAFETY
Your safety and the safety of others are very important.
We have provided many important safety messages in this manual and on your appliance. Always read and obey all safety messages.
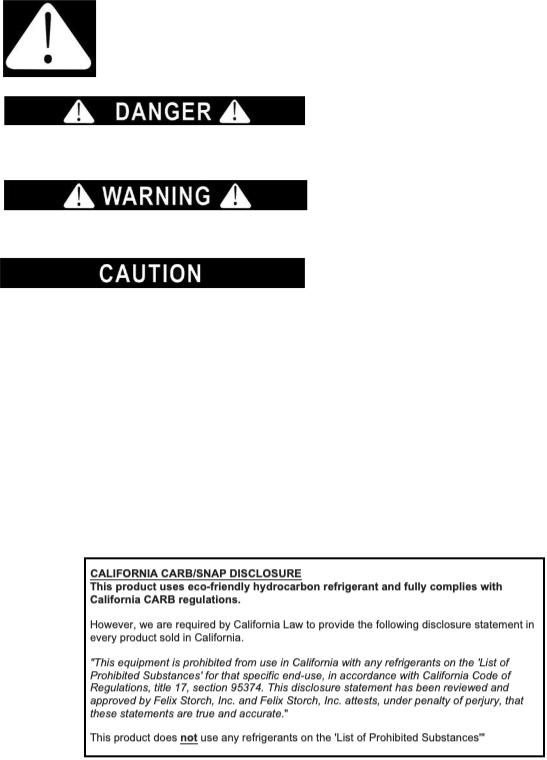
This is the Safety Alert Symbol. This symbol alerts you to potential hazards that can kill or injure you and others. All safety messages will follow the Safety Alert
Symbol and either the words “DANGER”, “WARNING” or “CAUTION”.
DANGER means that failure to heed this safety statement may result in severe personal injury or death.
WARNING means that failure to heed this safety statement may result in extensive product damage, serious personal injury, or death.
CAUTION means that failure to heed this safety statement may result in minor or moderate personal injury, or property or equipment damage.
All safety messages will alert you to what the potential hazard is, tell you how to reduce the chance of injury, and let you know what can happen if the instructions are not followed.
3

IMPORTANT SAFEGUARDS
Before the appliance is used, it must be properly positioned and installed as described in this manual, so read the manual carefully. To reduce the risk of fire, electrical shock or injury when using the appliance, follow basic precaution, including the following:
•Plug into a grounded 3-prong outlet, do not remove grounding prong, do not use an adapter, and do not use an extension cord.
•Replace all panels before operating.
•It is recommended that a separate circuit, serving only your appliance, be provided. Use receptacles that cannot be turned off by a switch or pull-chain.
•Never clean appliance parts with flammable fluids. These fumes can create a fire hazard or explosion. And do not store or use gasoline or other flammable vapors and liquids in the vicinity of this or any other appliance. The fumes can create a fire hazard or explosion.
•Before proceeding with cleaning and maintenance operations, make sure the power line of the unit is disconnected.
•Do not connect or disconnect the electric plug when your hands are wet.
•Unplug the appliance or disconnect power before cleaning or servicing. Failure to do so can result in electrical shock or death.
•Do not attempt to repair or replace any part of your appliance unless it is specifically recommended in this manual. All other servicing should be referred to a qualified technician.
•This appliance is CFCand HFC-free and contains small quantities of Isobutane (R600a) which is environmentally friendly, but flammable. It does not damage the ozone layer, nor does it increase the greenhouse effect. Care must be taken during transportation and setting up of the appliance that no parts of the cooling system are damaged. Leaking coolant can ignite and may damage the eyes.
•In the event of any damage:
o Avoid open flames and anything that creates a spark, o Disconnect from the electrical power line,
o Air the room in which the appliance is located for several minutes, and o Contact the Service Department for advice.
•The more coolant there is in an appliance, the larger the room it should be installed in. In the event of a leakage, if the appliance is in a small room, there is the danger of combustible gases building up. For every ounce of coolant, at least 325 cubic feet of room space is required. The amount of coolant in the appliance is stated on the data plate on the back of the appliance. It is hazardous for anyone other than an authorized Service Person to carry out servicing or repairs to this appliance.
•Take serious care when handling, moving, and using the appliance to avoid either damaging the refrigerant tubing or increasing the risk of a leak.
•Replacing component parts and servicing shall be done by factory authorized service personnel so as to minimize the risk of possible ignition due to incorrect parts or improper service.
4
FOLLOW WARNING CALL OUTS BELOW ONLY WHEN APPLICABLE TO YOUR MODEL
•Use two or more people to move and install appliance. Failure to do so can result in back or other injury.
•To ensure proper ventilation for your appliance, the front of the unit must be completely unobstructed. Choose a well-ventilated area with temperatures above 60°F (16°C) and below 100°F (38°C). This unit must be installed in an area protected from the elements, such as wind, rain, water spray or drips.
•The appliance should not be located next to ovens, grills or other sources of high heat.
•The appliance must be installed with all electrical, water and drain connections in accordance with state and local codes. A standard electrical supply (115 V AC only, 60 Hz), properly grounded in accordance with the National Electrical Code and local codes and ordinances is required.
•Do not kink or pinch the power supply cord of appliance.
•The fuse (or circuit breaker) size should be 15 amperes.
•It is important for the appliance to be leveled in order to work properly. You may need to make several adjustments to level it.
•Never allow children to operate, play with or crawl inside the appliance.
•Do not use solvent-based cleaning agents or abrasives on the interior. These cleaners may damage or discolor the interior.
•Do not use this apparatus for other than its intended purpose.
Risk of child entrapment!
Child entrapment and suffocation are not problems of the past. Junked or abandoned appliances are still dangerous, even if they will “just sit in the garage a few days”.
•Before discarding your old refrigerator: o Take off the doors
o Leave the shelves in place so that children may not easily climb inside.
– SAVE THESE INSTRUCTIONS –
5

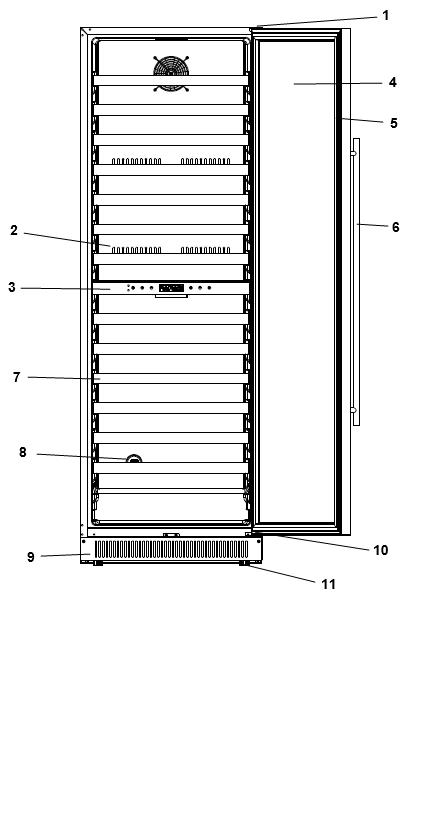
LOCATION OF PARTS
SWC1127B/LWC1Z96
SWC1926B/LWC1Z193
1 |
Right Upper Hinge |
|
|
2 |
Control Panel |
|
|
3 |
Door |
|
|
4 |
Door Seal |
|
|
5 |
Door Handle |
|
|
6 |
Charcoal Filters |
|
|
7 |
Wooden Shelf |
8 |
Air Channel Plate |
|
|
9 |
Vent Kick Plate |
|
|
10 |
Right Lower Hinge |
|
|
11 |
Adjustable Feet |
|
|
6
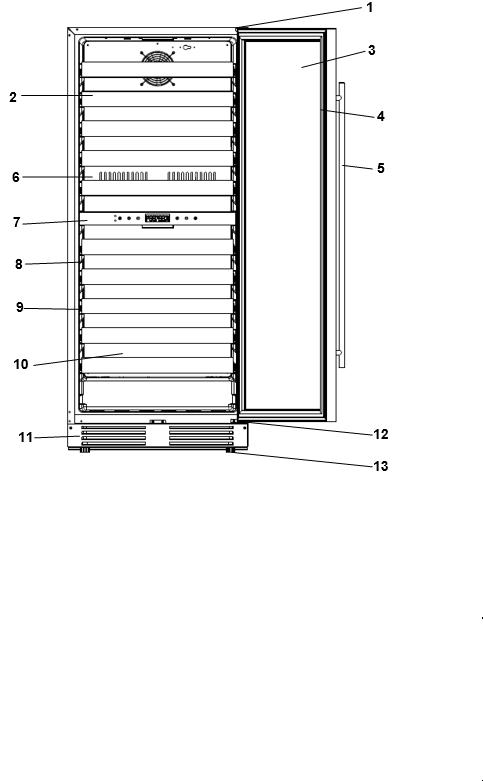
SWC1966B/LWC2Z194
1 |
Right Upper Hinge |
2 |
Air Channel Plate |
|
|
3 |
Control Panel |
|
|
4 |
Door |
|
|
5 |
Door Seal |
|
|
6 |
Door Handle |
|
|
7 |
Wooden Shelf |
|
|
8 |
Charcoal Filters |
|
|
9 |
Vent Kick Plate |
|
|
10 |
Right Lower Hinge |
|
|
11 |
Adjustable Feet |
|
7 |
SWCP2116/ LWC2Z97
SWCP2163/ LWC2Z195
1 |
Right Upper Hinge |
|
|
2 |
Wire Shelf with S.S. Front Edge |
|
|
3 |
Door |
|
|
4 |
Door Seal |
|
|
5 |
Door Handle |
|
|
6 |
Air Channel Plate |
7 |
Control Panel |
|
|
8 |
Slide Light |
|
|
9 |
Rolling Slideway |
|
|
10 |
Charcoal Filters |
|
|
11 |
Vent Kick Plate |
|
|
12 |
Right Lower Hinge |
|
|
13 |
Adjustable Feet |
8
INSTALLATION INSTRUCTIONS
Before Using your Appliance
Remove the exterior and interior packaging, and check to make sure you have the following parts:
SWC1127B & SWC1926B & SWC1966B |
SWCP2116 & SWCP2163 |
(LWC1Z96 & LWC1Z193 & LWC2Z194) |
(LWC2Z97 & LWC2Z195) |
|
|
Instruction Manual |
Instruction Manual |
Wooden Shelves |
Wire Shelves with Rolling Slideways |
|
|
Door Handle |
Door Handle |
|
|
•Before connecting this appliance to the power source, let it stand upright for approximately 2 hours. This will reduce the possibility of a malfunction in the cooling system from handling during transportation.
•Clean the interior surface with lukewarm water using a soft cloth.
•The appliance is specially designed for wine storage; please do not put in other goods or food.
Installing your Appliance
•This appliance is designed for freestanding or built-in (fully recessed) installation.
•Place your appliance on a floor that is strong enough to support it when it is fully loaded. To level your appliance, adjust the front leveling legs at the bottom of the appliance.
•Locate the appliance away from direct sunlight and sources of heat (stove, heater, radiator, etc.). Direct sunlight may affect the acrylic coating and heat sources may increase electrical consumption. Extremely cold ambient temperatures may also cause the unit not to perform properly.
•Avoid locating the unit in moist areas.
•Plug the appliance into an exclusive, properly installed-grounded wall outlet. Do not under any circumstances cut or remove the third (ground) prong from the power cord. Any questions concerning power and/or grounding should be directed toward a certified electrician or a service center authorized by Felix Storch, Inc.
9
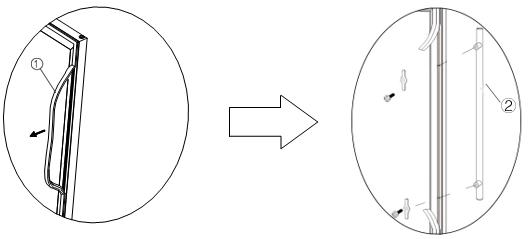
Installing the Door Handle
This cooler includes one stainless steel handle that is not installed by the factory.
NOTE: The door handle is packaged inside, between the inner foam and the outer box. Do not discard packaging until you have removed the handle.
To install the handle please follow these instructions:
1.Pull the door gasket (1) away from the door where the handle is to be installed, as shown in the first illustration below. The gasket is easily displaced by hand, no tools are necessary.
2.Align the handle (2) with the screws pre-installed on the backside of the door. Tighten the screws using a Phillips head screwdriver until the handle sets both flush and secured tightly against the door frame. (DO NOT over-tighten as this will cause damage to the handle assembly).
3.Replace the door gasket to its original position.
10

Reversing the Door Swing
The diagram below will explain how to reverse the door swing of your beverage cooler. Be careful to pay attention to the numbering of the steps below. Before reversing the door, please make sure unplug the appliance and must be let it stand upright for approximately 2 hours before connecting to the power source.
11
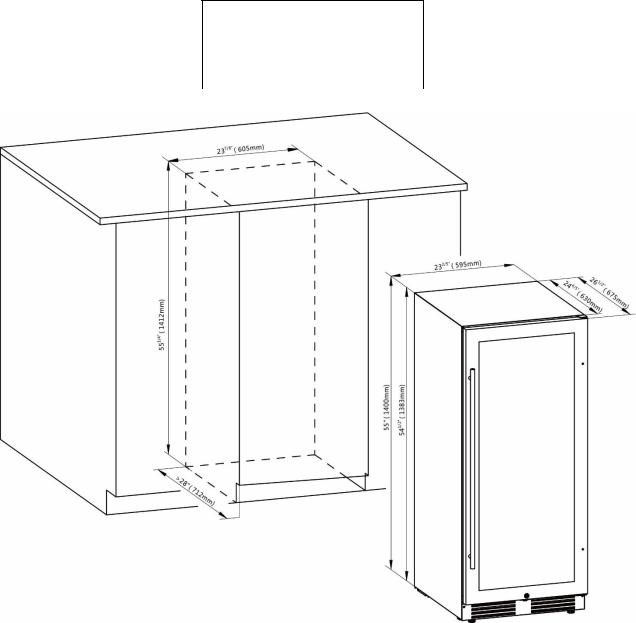
Built-In Cabinet Instructions
This unit is designed for both built-in and freestanding installation. If you plan to use this unit in a built-in application, please follow the requirements shown below. Be sure that airflow under the appliance is not blocked.
SWC1127B/LWC1Z96 and SWCP2116/LWC2Z97
Cabinet Opening Dimensions
|
IN (min) |
CM (min) |
Width |
23 7/8” |
60.5 cm |
|
|
|
Depth |
28” |
71.2 cm |
Height |
55 3/4” |
141.2 cm |
12
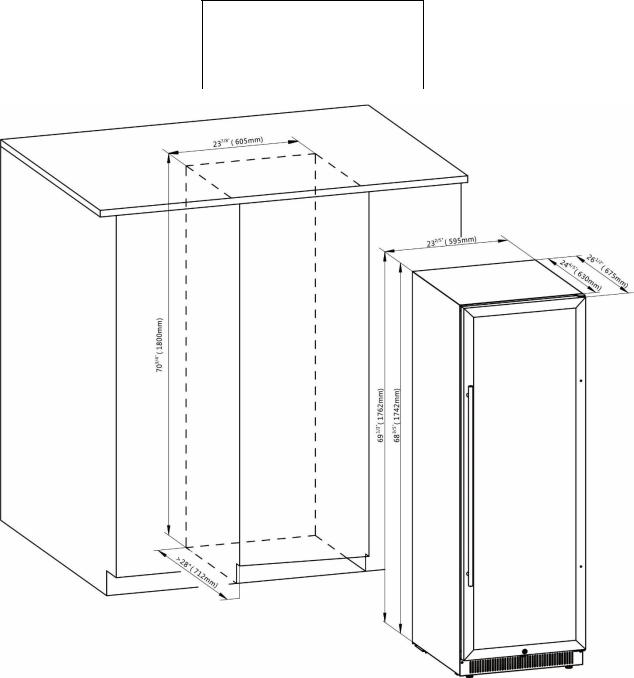
SWC1926B/LWC1Z193. SWC1966B/LWC2Z194, and SWCP2163/LWC2Z195
Cabinet Opening Dimensions
|
IN (min) |
CM (min) |
|
|
|
Width |
23 7/8” |
60.5 cm |
Depth |
28” |
71.2 cm |
Height |
70 3/4” |
180 cm |
13
 Loading...