


NOTES
This manual contains information for:
• Important Safeguards
• Installation
• Use and Care
Certain ranges come equipped with special features. Determine from a study of your range which of the instructions given in this booklet pertain to your range.
This booklet gives valuable instructions covering the installation, adjustment and use of your range.
HOW TO OBTAIN SERVICE AND/OR PARTS
When your range does not operate in accordance with the instructions in the manual, you should contact the dealer in the immediate vicinity for service. Or,
the purchaser may contact the service organization noted on the warranty.
IMPORTANT
TO THE OWNER OF THE RANGE: Retain this owner's manual for future reference.
TO THE INSTALLER: Leave this owner's manual with the range.
Gas Range
Read and Save These Instructions

Range
Record in the space provided below the Model No. and Serial No. of this appliance. These numbers are found on the serial plate located below the lift-up cooktop.
Model No._______________________ Type Number _____________________
Serial No. _______________________ Purchase Date_____________________
Record these numbers for future use.
IMPORTANT: Keep a copy of your bill of sale. The date on the bill establishes the warranty period should service be required. If service is performed, it is in your best interest to obtain and keep all receipts.
PLEASE DO THIS NOW!
The PRODUCT REGISTRATION CARD should be filled in completely, signed and returned. This information will register your product and help us to serve you quickly in the future if necessary.
Contents
Important Safeguards . . . . . . . . . . . . . . . . . . . . . . . . . . . . . . . . . . . . . . . . . . . . . . . . . . . 3-7 Energy Saving Ideas . . . . . . . . . . . . . . . . . . . . . . . . . . . . . . . . . . . . . . . . . . . . . . . . . . . . . 7 Installation Instructions . . . . . . . . . . . . . . . . . . . . . . . . . . . . . . . . . . . . . . . . . . . . . . . . 8-9 Backguard Installation Instructions . . . . . . . . . . . . . . . . . . . . . . . . . . . . . . . . . . . . . . . . . . 10 Wall Clearances . . . . . . . . . . . . . . . . . . . . . . . . . . . . . . . . . . . . . . . . . . 11 Alignments and Adjustments. . . . . . . . . . . . . . . . . . . . . . . . . . . . . . . . . . . . . . . . . . . . . . 12-21 Operation of Range . . . . . . . . . . . . . . . . . . . . . . . . . . . . . . . . . . . . . . . . . . . . . . . . . . . . 22-24 Broiling . . . . . . . . . . . . . . . . . . . . . . . . . . . . . . . . . . . . . . . . . . . . . . . . . . . . . 24 Optional Equipment . . . . . . . . . . . . . . . . . . . . . . . . . . . . . . . . . . . . . . . . . . . . . . . . . . 25-26 Cleaning the Range . . . . . . . . . . . . . . . . . . . . . . . . . . . . . . . . . . . . . . . . . . . . . . . . . . 27-28 Lift-Off Doors . . . . . . . . . . . . . . . . . . . . . . . . . . . . . . . . . . . . . . . . . . . . . . . . . . . . . . . . . . 29 Trouble Shooting Guide . . . . . . . . . . . . . . . . . . . . . . . . . . . . . . . . . . . . . . . . . . . . 30 Wiring Diagram . . . . . . . . . . . . . . . . . . . . . . . . . . . . . . . . . . . . . . . . . . . . . . . . . . . . . 31 Built-In Cooktops . . . . . . . . . . . . . . . . . . . . . . . . . . . . . . . . . . . . . . . . . . . . . . . . . . . . . . . . 33 Built-In Wall Ovens . . . . . . . . . . . . . . . . . . . . . . . . . . . . . . . . . . . . . . . . . . . . . . . . . . . . . . . . 41
Note:For warranty and service information, please see attachments packaged with range.
If the information in this manual is not followed exactly, a fire or explosion may result causing property damage, personal injury or death.
Do not store or use gasoline or other flammable vapors and liquids in the vicinity of this or any other appliance.
WHAT TO DO IF YOU SMELL GAS:
•Do not try to light any appliance.
•Donottouchanyelectricalswitch;donotuseanyphoneinyourbuilding.
•Immediately call your gas supplier from a neighbor's phone. Follow the gas supplier's instructions.
•If you cannot reach your gas supplier, call the fire department.
Installation and service must be performed by a qualified installer, service agency or the gas supplier.
2
GAS RECESSED WALL OVEN
Slide the oven unit into the cabinet recess as shown in the diagram. Secure the oven unit to the cabinet with wood screws. Be sure to use the cabinet spacer with the wood screw as a
“washer” between the wood cabinet and the oven front frame.
The recess in which the oven is installed shall be constructed so as to provide a complete closure around the recessed portion of the unit and any openings around gas and
electrical service outlets MUST be closed at time of installation. The installation must conform with local codes. In the absence of local codes, the National Fuel Gas Code Z223.1 latest edition.
A MANUAL GAS VALVE MUST BE INSTALLED IN AN ACCESSIBLE LOCATION IN THE GAS LINE EXTERNAL TO THE UNIT FOR THE PURPOSE OF TURNING ON OR SHUTTING OFF GAS TO THE UNIT.
electrical grounding instructions
This appliance is equipped with a three prong
grounding plug for your |
protection |
against |
shock hazard and should |
be plugged |
directly |
into a properly grounded receptacle. Do not cut or remove the grounding prong from this plug.
INSURE PROPER GROUND EXISTS BEFORE USE.
FLEXIBLE CONNECTORS - If the gas range/oven is connected to a gas supply with a metal flexible connector, move the range/oven with CAUTION for service or cleaning.
Flexible connectors are not intended for repeated bending. Do not allow cleaners to make contact with flexible connectors.
The connector and its fittings are designed for use only on the original installation and are not to be reused for another appliance or at another location. Connectors must comply with ANSI Z21.24.
39

INSTALLATION INSTRUCTIONS BUILT-IN GAS AND ELECTRIC RECESSED WALL OVENS
IMPORTANT – Read and save these instructions. Save for local electrical inspector’s use.
38
READ THE IMPORTANT SAFEGUARDS AND ALL INSTRUCTIONS BEFORE USING THE APPLIANCE.
Remove all tape and packaging wrap before using the oven. If any glue remains, touch the residue with the sticky side of the tape already removed, or use a cloth soaked with rubbing alcohol. Use caution because rubbing alcohol is flammable. Rinse with warm water and wipe dry.
Destroy the carton and plastic bags after the range is unpacked. Children should not use packaging material for play. Cartons covered with rugs, bedspreads, or plastic sheets can become air-tight chambers. Remove all staples from the carton. Staples can cause severe cuts and destroy finishes if they come in contact with other appliances or furniture.
Besafetyconscious.Thepreparationoffoodinanovenrequirestemperaturesthatcouldcause severe burns. Before using this new appliance, carefully read and follow all instructions.
The California Safe Drinking Water and Toxic Enforcement Act of 1986 (Proposition 65)requires the Governor of California to publish a list of substances known to the State of California to cause cancer or reproductive harm. In addition, businesses must warn customers of potential exposure to such substances.
Users of this appliance are hereby warned there may be some low level exposure to some of the listed substances including formaldehyde, benzene, soot and carbon monoxide. This is caused primarily from the incomplete combustion of natural gas or LP fuel. Properly adjusted burners will minimize incomplete combustion. Exposure to these substances can also be minimized by properly venting the burners, by opening a window or using a ventilating hood or fan.
Notice: Never keep pet birds in the kitchen. Birds have a very sensitive respiratory system. Fumes released during the self-cleaning cycle, overheated cooking oil, fat, margarine or overheated non-stick cookware may be harmful or fatal to birds.
PROPER INSTALLATION: Be sure your appliance is properly installed and grounded by a qualified technician in accordance with the National Fuel Gas ANSI Z223.1 - latest
edition, and National Electrical Code ANSI/NFPA No. 70 - latest edition. Install only per installation instructions provided in the literature package for this range. Be sure leveling legs are in place at the bottom corners of the range. If necessary, raise or lower the leveling legs at the base of the range by turning clockwise or counterclockwise to insure a level range.
Ask your dealer to recommend a qualified technician and an authorized repair service.
Have the technician familiarize you with the locations of the manual gas shut off valve and gas meter in the event it is necessary to shut off gas supply to the unit during an emergency.
The following situations may cause serious bodily harm, death or property damage.
•TO REDUCE THE RISK OF TIPPING OF THE RANGE, THE RANGE MUST BE SECURED BY A PROPERLY INSTALLED ANTI-TIP BRACKET PROVIDED WITH THE RANGE. TO CHECK IF THE DEVICE IS INSTALLED AND ENGAGED PROPERLY, CAREFULLY TIP THE RANGE FORWARD. THE ANTI-TIP DEVICE SHOULD ENGAGE AND PREVENT THE RANGE FROM TIPPING OVER. REFER TO THE INSTALLATION INSTRUCTIONS PACKAGED WITH THE ANTI-TIP BRACKET FOR PROPER ANTI-TIP BRACKET INSTALLATION.
•Never leave children alone or unattended in the area where an appliance is in use.
They should never be allowed to sit or stand on any part of the appliance. Never leave the oven door open when the range is unattended.
•Do not store items of interest to children in the cabinets above a range or on the backguard of a range. Children climbing on the range to reach items could be
seriously injured. |
3 |

IMPORTANT SAFEGUARDS, Continued
•Do not allow children to climb or play around the range. The weight of a child on an open oven door may cause the range to tip, resulting in serious burns or other injury.
•USER SERVICING: Do not repair or replace any part of the appliance unless it is specifically recommended in this owner’s guide. All other servicing should be done only by a qualified technician. This will reduce the risk of personal injury and damage to the range.
•Storage in or on appliance: Flammable materials should not be stored in an oven, near surface elements or in the broiler section. This includes paper, plastic and cloth items, such as cookbooks, plastic ware and towels, as well as flammable liquids. Do not use the oven for storage. Do not store explosives, such as aerosol cans, on or near the range.
•Remove the oven door from any unused range if it is to be stored or discarded.
•Stepping, leaning or sitting on the doors or drawers of this range can result in serious injuries and cause damage to the range.
The following situations could cause bodily injury or property damage.
•DO NOT TOUCH SURFACE BURNERS, AREAS NEAR THESE BURNERS, OVEN BURNERS OR INTERIOR SURFACES OF THE OVEN. Both surface burners and oven burners may be hot even though the flame is not visible. Areas near surface burners may become hot enough to cause burns. During and after use, do not touch, or let clothing or other flammable materials touch these areas until they have had sufficient time to cool. Among these areas are the cooktop, surfaces facing the cooktop, the oven vent openings and surfaces near these openings, oven door and windows.
•NEVER use this appliance as a space heater to heat or warm the room. Doing so may result in carbon monoxide poisoning and overheating of the oven.
•Wear proper apparel. Loose fitting or hanging garments should never be worn while using the appliance. Do not let clothing or other flammable materials contact surface burners or interior surfaces of the oven until they have had sufficient time to cool.
•Never modify or alter the construction of the range. Do not remove leveling legs, panels, wire covers, anti-tip brackets or any other permanent part of the product.
•When heating fat or grease, watch it closely. Fat or grease may catch fire if allowed to become too hot.
•Do not use water or flour on grease fires. Smother the fire with a pan lid, baking soda or use a dry chemical or foam-type extinguisher.
•Operation of Surface Burners. When burners are operated for the first time, a small amount of smoke may be generated due to tape residue or manufacturing lubrication.
THIS IS NOT DANGEROUS. Operate the burners for about five minutes to rid the burners of all material before cooking.
4 |
37 |
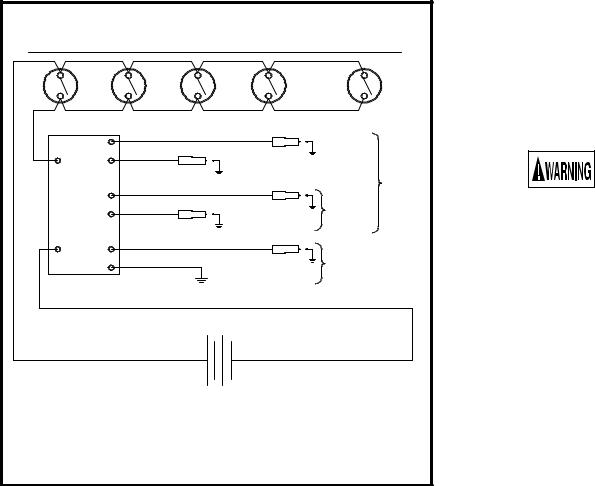
WIRING DIAGRAM FOR GAS RANGES AND SURFACE UNITS WITH BATTERY EQUIPMENT
|
|
|
|
IGNTION |
RR |
RF |
LR |
LF |
SWITCHES |
T'STAT |
||||
|
|
|
|
(IF EQUIPPED) |
|
|
TOP |
|
|
BURNER |
|
THIS |
IGNITION |
|
LEADS |
|
IGNITION |
SECTION |
|
EQUIPPED |
|
|
MODULE |
|
|
ON RANGES |
|
|
|
WITH |
|
|
SEALED |
|
|
BURNERS |
|
OVEN IGN. |
THIS |
|
SECTION |
|
|
LEAD |
EQUIPPED |
|
G |
ON |
|
RANGES |
|
|
|
|
R |
BK |
9 VOLT
DC SUPPLY
REFER ONLY TO FEATURES WHICH ARE EQUIPPED ON YOUR RANGE
180-6C162
TOP BURNER VALVES
Built-in top burner valves are operated by pressing the knob and turning it 90 degrees counter clockwise to the "LITE" position. This position is also the "HI" position where maximum gas flow is obtained. Hold the knob in this position until the burner successfully lights.
If the burner fails to light within 10 seconds, turn the knob back to the "OFF" position. Let the unit sit at least 5 minutes to allow unburned gas to dissipate before attempting to light the burner again. If the problem persists, refer to the troubleshooting guide in your instruction manual or contact a service technician.
Once the burner has successfully lit, turn the knob to adjust the flame size as needed for the amount of food being cooked, or the size of the utensil.
36
IMPORTANT SAFEGUARDS, Continued
•Use only dry potholders. Wet or damp potholders on hot surfaces could result in burns from steam. Do not let the potholder touch hot heating areas. Do not use a towel or other bulky cloth instead of a potholder.
•Use proper flame size. Adjust flame size so it does not extend beyond the edge of the utensil. The use of undersized utensils will expose a portion of the burner flame and may result in severe burns or direct contact and ignition of clothing. Also, proper relationship of utensil to burner will improve efficiency.
•NEVER cover any slots, holes or passages in the oven bottom or cover an entire rack with materials such as aluminum foil. Doing so
blocks air f low through the oven and may cause carbon monoxide poisoning. Aluminum foil linings may also trap heat, causing a fire hazard. Refer to the cleaning section of this manual for more information on the use of aluminum foil.
•Placement of oven racks: Always place an oven rack in the desired location while the oven is cool. If a rack must be moved when the oven is hot, use potholders and grasp the rack with both hands to reposition. Do not let potholders contact hot oven walls. Remove all utensils from the rack before moving.
•Do not heat unopened food containers. Build-up of pressure may cause the container to burst and result in injury.
•Keep the oven vent duct unobstructed. The oven vent is located along the bottom of the backguard. Touching the surfaces in the vent area when the oven is being operated may cause severe burns. Also, do not place plastic or heat-sensitive items on or near the oven vents. These items could melt or ignite.
The range requires fresh air for proper burner combustion. Do not block the flow of air around the base or beneath the lower front panel of the range.
•Use care when opening oven door: Stand to the side of the oven when opening the oven door. Slowly open the door to allow hot air or steam to escape before removing or replacing food.
•Know which knob controls each burner. Place a pan of food on the burner before turning it on, and turn the burner off before removing the pan.
Always turn to the full LITE position when igniting top burners. Then adjust the flame size so it does not extend beyond the edge of the utensil.
•Utensil handles should be turned inward and not extend over adjacent surface burners. To reduce the risk of burns, ignition of flammable materials, and spillage due to unintentional contact with the utensil, the handle of a utensil should be positioned so that it is turned inward, and does not extend over adjacent surface burners.
•Never leave the surface burners unattended. Boilovers may cause smoking, greasy spillovers may catch fire or a pan which has boiled dry may melt.
5

IMPORTANT SAFEGUARDS, Continued
•Do not place hands between the spring tension hinge and the oven door frame when you are removing the oven door. You could pinch your fingers.
•Do not use the broiler pan without its insert. The broiler pan and its insert allow dripping fat or grease to drain and be kept away from the high heat of the broiler. Do not cover the insert with foil. Exposed fat or grease could ignite.
•Do not touch a hot oven light bulb with a damp cloth. A hot oven light bulb could break it touched with a damp cloth. Disconnect the electrical service cord or shut off the power to the oven before removing and replacing the bulb.
•Allow parts to cool to room temperature before touching or removing them from the range. When a surface burner is first turned off, the burner and grate are hot enough to cause burns.
•Clean the range regularly to keep all parts free of fat or grease which could catch fire. Pay particular attention to the area underneath each surface burner. Exhaust fan ventilating hoods and grease filters should be clean. Do not allow fat or grease to accumulate. Greasy deposits in the fan could catch fire. Refer to the hood manufacturer’s instructions for cleaning.
•An overhead ventilation hood that directs air in a downward manner toward the appliance is not to be installed in conjunction with this range.Ventilation hoods that direct air toward a gas range may cause ignition or combustion problems with a gas cooking appliance resulting in personal injury or unintended operation.
•Glazed cooking utensils: Only certain types of glass, glass/ceramic, ceramic, earthenware, or other glazed utensils are suitable for rangetop service without breaking, due to the sudden change in temperature. Check the manufacturer’s recommendations for rangetop use.
•Do not place plastic salt and pepper shakers, spoon holders or plastic wrappings on top of the range. These items could melt or ignite. Potholders, towels or wooden spoons could catch fire if place too close to the flame.
•Do not use a wok equipped with a metal ring that extends beyond the burner.
Because this ring traps heat, the burner and grate could be damaged. Also, the burner may not work properly, creating a carbon monoxide level above current health standards.
•Do not clean the oven door gasket. The door gasket is essential for a good seal. Care should be taken not to rub, damage or move the gasket.
•This product is only to be used for the purpose of cooking food. Do not use this cooking product in any way other than it is intended. It is not to be used to process laundry, ignite fireworks or pyrotechnic displays, or produce illegal substances banned by law, or perform any other non-cooking related function that may be deemed reckless in nature.
6
Manifold Pipe and
Burner Valves
Top Burner Pilots
Pilot Adjustment
BuiltBuilt-In-InTopTopUnitUnitwith Pilotsts (MainBurnersNotNotShown)Shown)
On unitswithbatterypoweredpoweredignition,gnition,therethereare noaretopnoburnertop burnerpilots. Therepilotsare. Theretop ignitorare electrodestop ignitorinelectrodesthe same locationin the sameas the ltopcationburneraspilotsthe .topThisburignitioner pilotssystem. Thisrequiresgnitionone
(1)system9 voltrequiresalkaline batteryone (1)for9operationvolt alkaline. The batteryis housedf r operinantionenclosure. The underneathbattery is thehousedswitchin panelenclosurecover. It isunderneathrecommendedthe thatswitchyoupanelcheck coverand/or. replaceIt is recommendedthe battery at leastthat youoncecheckper yearnd/or. replace the battery at least once per year.
Switch Panel Cover
Spark Module
Top Ignitor
Electrodes
 9V
9V
Battery Enclosure
Built-In Top Unit with Battery Ignition (Main Burners Not Shown)
Access the battery for periodic servicing as follows:
•Remove the burner grates and top burner knobs from the unit.
•Raise the main top by lifting it by the front edge.
•Use a hex driver to remove four (4) screws from the switch panel cover.
•Gently lay the switch panel cover over to the left.
•Use a hex driver to remove one (1) screw from the battery enclosure.
•Check and/or replace the battery as recommended.
•Reinstall the battery enclosure.
•Reinstall the switch panel cover.
•Lower the main top and replace the grates and knobs.
35
 Loading...