


BUILT-IN HOUSEHOLD REFRIGERATOR-FREEZERS
RÉFRIGÉRATEURS-CONGÉLATEURS ENCASTRÉS pour USAGE DOMESTIQUE
Models / Modèles
CT661BI/CT661WBI Series CT663BBI/CT663BKBI Series
Instruction Manual / Mode d’emploi
BEFORE USE, PLEASE READ AND FOLLOW ALL SAFETY RULES AND OPERATING INSTRUCTIONS
AVANT UTILISATION, S'IL VOUS PLAÎT LIRE ET SUIVRE LES RÈGLES DE SÉCURITÉ
ET INSTRUCTIONS DE FONCTIONNEMENT
Write the Serial Number here:
Écrivez le numéro de série ici:
_________________________
FELIX STORCH, INC. 770 Garrison Avenue Bronx, NY10474 www.summitappliance.com

IMPORTANT SAFEGUARDS
Your safety and the safety of others are very important.
Before the appliance is used, it must be properly positioned and installed as described in this manual, so read the manual carefully. To reduce the risk of fire, electrical shock or injury when using the appliance, follow basic precautions, including the following:
•Plug into a grounded 3-prong outlet. Do not remove grounding prong, do not use an adapter, and do not use an extension cord.
•It is recommended that a separate circuit, serving only your appliance, be provided. Use receptacles that cannot be turned off by a switch or pull chain.
•Never clean appliance parts with flammable fluids. These fumes can create a fire hazard or explosion. And do not store or use gasoline or other flammable vapors and liquids in the vicinity of this or any other appliance. The fumes can create a fire hazard or explosion.
•Before proceeding with cleaning and maintenance operations, make sure the power line of the unit is disconnected.
•Do not connect or disconnect the electric plug when your hands are wet.
•Unplug the appliance or disconnect the power before cleaning or servicing. Failure to do so can result in electrical shock or death.
•Do not attempt to repair or replace any part of your appliance unless it is specifically recommended in this material. All other servicing should be referred to a qualified technician.
•Use two or more people to move and install the appliance. Failure to do so can result in back or other injury.
•To ensure proper ventilation for your appliance, the front of the unit must be completely unobstructed. Choose a well-ventilated area with temperatures above 60°F (16°C) and below 90°F (32°C). This unit must be installed in an area protected from the elements, such as wind, rain, water spray or drips.
•The appliance should not be located next to ovens, grills or other sources of high heat.
•The appliance must be installed with all electrical connections in accordance with state and local codes. A standard electrical supply (115V AC only, 60 Hz), properly grounded in accordance with the National Electrical Code and local codes and ordinances, is required.
•Do not kink or pinch the power supply cord of the appliance.
•The fuse (or circuit breaker) size should be 15 amperes.
•It is important for the appliance to be leveled in order to work properly. You may need to make several adjustments to level it.
•Never allow children to operate, play with or crawl inside the appliance.
•Do not use solvent-based cleaning agents or abrasives on the interior. These cleaners may damage or discolor the interior.
•Do not use this apparatus for other than its intended purpose.
2

Risk of child entrapment!
Child entrapment and suffocation are not problems of the past. Junked or abandoned refrigerators and freezers are still dangerous, even if they will “just sit in the garage a few days.”
•Before you throw away your old refrigerator or freezer: Take off the doors. Leave the shelves or drawers in place so that children may not easily climb inside.
•Never allow children to operate, play with, or crawl inside the appliance.
THIS APPLIANCE IS NOT INTENDED FOR USE BY YOUNG CHILDREN OR INFIRM PERSONS UNLESS THEY HAVE BEEN ADEQUATELY SUPERVISED BY A RESPONSIBLE PERSON TO ENSURE THAT THEY CAN USE THE APPLIANCE SAFELY. YOUNG CHILDREN SHOULD BE SUPERVISED TO ENSURE THAT THEY DO NOT PLAY WITH THE APPLIANCE.
- SAVE THESE INSTRUCTIONS –
To save energy and maintain optimum performance:
Your appliance may be installed as a free-standing unit or built into an enclosure or below a countertop.
When positioning this unit: If used freestanding allow at least 2 inches of clearance on top, at the sides and in the rear for sufficient airflow. If unit is built in, allow 2” of air space between the rear of the unit and the wall and leave at least 1/8” on both sides and 1/16” at the top. Be sure that airflow under the appliance is not blocked.
3

TABLE OF CONTENTS
Location of Parts |
4 |
Technical Information |
5 |
Installation Instructions |
5-8 |
Before Using your Appliance |
5 |
Installing your Refrigerator-Freezer |
5 |
Electrical Connection |
6 |
Extension Cord |
6 |
Reversing the Door Swing |
7 |
Operating your Refrigerator-Freezer |
8-9 |
Temperature Control |
8 |
Defrosting |
9 |
Care and Maintenance |
9-10 |
Cleaning your Appliance |
9 |
Power Failure |
10 |
Vacation Time |
10 |
Moving your Appliance |
10 |
Energy-saving Tips |
10 |
Troubleshooting |
11 |
Limited Warranty |
12 |
LOCATION OF PARTS
4

TECHNICAL INFORMATION
Model Numbers |
CT661BI/CT661WBI (white) |
|
CT663BBI/CT663BKBI (black exterior) |
||
|
||
Capacity |
5.1 cu. ft. |
|
Electrical Input |
115V AC/60Hz |
|
Rated Current |
1.3A |
|
Temperature of Freezer |
5°F |
|
Refrigerant |
R134a: CT661BI, CT663BBI |
|
R600a: CT661WBI, CT663BKBI |
||
|
||
Installation |
Built-in or free-standing |
|
Ship Weight |
102 lbs. |
|
Unit Dimensions (W x D x H) |
23.63" x 23" x 33.25" |
*Units with suffix "ADA" or prefix "AL" are sized at 32" for use under in ADA compliant applications
NOTE: Specifications are subject to change without notice.
INSTALLATION INSTRUCTIONS
Before Using Your Appliance
•Remove the exterior and interior packing.
•Before connecting the unit to a power source, let it stand for approximately 2 hours. This will reduce the possibility of a malfunction in the cooling system from handling during transportation.
•Remove the crisper, drip tray and shelves and clean them and the interior surfaces of the unit with lukewarm water using a soft cloth.
Installing the Refrigerator-Freezer
•Place the unit on a floor that is strong enough to support the appliance when it is fully loaded. To level the unit, adjust the two leveling legs at the front.
•These models can be installed either free-standing, recessed or built into an enclosure. When installing as a free-standing unit, allow at least 2” (51mm) of space at the sides, top and rear of the unit to allow for proper air circulation to cool the
compressor and condenser. Even when built in, the unit requires at least 2” of clearance at the back, 1/8” (3mm) at both sides and 1/16” (1.6mm) at the top. Take care that the air vents at the front of the appliance are never covered or blocked in any way.
•This appliance is supplied with spacers that have to be mounted onto the condenser tube to make sure there is sufficient clearance between the appliance and the wall.
5

•Locate the unit away from direct sunlight and sources of heat (oven, heater, radiator, etc.). Direct sunlight may affect the acrylic coating and heat sources may increase electrical consumption. Extremely cold ambient temperatures may also affect the unit's performance.
•Avoid locating the unit in moist areas. Too much moisture in the air will cause frost to form quickly on the evaporator, requiring more frequent defrosting of the freezer compartment.
•Plug the unit into an exclusive, properly installed and grounded wall outlet. Any questions concerning power and/or grounding should be directed toward a certified electrician or authorized service center.
Electrical Connection
This unit should be properly grounded for your safety. The power cord of this unit is equipped with a three-prong plug which mates with a standard three-prong wall outlet to minimize the possibility of electrical shock.
Do not under any circumstances cut or remove the third ground prong from the power cord supplied. For personal safety, this appliance must be properly grounded.
This unit requires a standard 115-volt AC/60Hz electrical outlet with three-prong ground. Have the wall outlet and circuit checked by a qualified electrician to make sure the outlet is properly grounded. When a standard 2-prong wall outlet is encountered, it is your responsibility and obligation to have it replaced with a properly grounded 3-prong wall outlet.
To prevent accidental injury, the cord should be secured behind the unit and not left exposed or dangling.
The unit should always be plugged into its own individual electrical outlet which has a voltage rating that matches the rating label on the appliance. This provides the best performance and also prevents overloading house wiring circuits that could cause a fire hazard from overheated wires. Never unplug the unit by pulling on the power cord. Always grip the plug firmly and pull straight out from the receptacle. Repair or replace immediately any power cord that has become frayed or otherwise damaged. Do not use a cord that shows cracks or abrasion damage along its length or at either end. When moving the unit, be careful not to damage the power cord.
Extension Cord
Do not use an extension cord with this appliance. If the power cord is too short, have a qualified electrician or service technician install an outlet near the appliance.
6
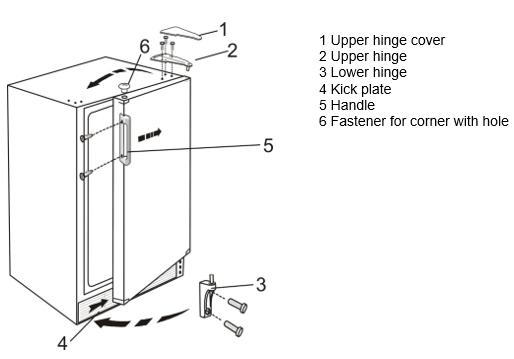
Reversing the Door Swing (Units with suffix TB, HV, CSS, and IF are not userreversible)
If you find the direction of opening the door of the appliance inconvenient, you can change it. Holes on the opposite side have already been prepared at the factory.
This appliance can be opened from either the right side or the left. By default, the door hinge is on the right side. If you prefer it on the left, please follow these instructions:
1.Take off the upper hinge cover from the door and remove the screws that hold the top hinge.
2.Lift the hinge straight up to free the hinge pin from the socket in the top of the door.
3.Lift the door up and away to free its bottom socket from the hinge pin.
4.Remove the screws to the bottom hinge.
5.Remove the decorative caps from the opposite side and plug the holes from the original side with the decorative caps.
6.Move the bottom hinge to the opposite side and tighten the screws. Use any lock washers or nuts if they were installed in the original installation.
7.Replace door onto the hinge pin on the bottom hinge. Place top hinge pin into door. Insert screws into the top hinge and tighten.
8.Check the gasket. It should not be creased and should seal well.
Switching the Door Handle
The door has two screw holes on each side, allowing you to move the handle from one side to the other. To do so, unscrew the handle from its original location and align the handle with the screw holes on the opposite side. Fix the handle in place with the screws, then cover the screw heads with the handle seal.
7

Changing the Direction of Door Opening on the Low Temperature Compartment:
•Unscrew the blocking element and the hinge of the low temperature compartment and take off the door.
•Plug the holes with plastic caps provided.
•Turn the door 180° and replace it on the opposite side of the low temperature compartment. Fix the hinge and the blocking element of the door (position of holes already provided).
OPERATING YOUR REFRIGERATOR-
FREEZER
Temperature Control
•A unique dual evaporator system separately cools the refrigerator while keeping the freezer at 5°F. (Ice cream and other food items in the freezer stay frozen and free of freezer burn.)
•The refrigerator temperature is controlled with a thermostat knob located inside the unit, towards the upper right-hand corner. Turn the knob clockwise
from the STOP (0) position toward the higher numbers for colder temperatures. Higher settings on the knob (higher numbers) mean lower temperatures (colder) in the refrigerator.
•On the coldest settings, temperatures in some spots of the refrigerator compartment may drop below 32°F. Use higher thermostat settings only when required or recommended. When the ambient temperature is normal, we recommend a medium setting.
•Changes in the ambient temperature affect temperature in the refrigerator compartment so choose an appropriate setting of the thermostat knob, depending on ambient conditions.
•In the STOP (0) position, the appliance does not operate (the cooling system is switched off), yet the power supply is not interrupted (the light goes on when you open the refrigerator door).
•The temperature in the refrigerator compartment also depends on how often you open the door.
•In all small refrigerators and freezers without interior fans, temperatures are coldest near the bottom, and occasionally near the rear. Place contents accordingly. It is best not to operate these units mostly empty. If temperatures are erratic, try putting some water bottles or freezer packs inside to create a load for the compressor.
8
 Loading...