

Page 1

Operation Manual
Page 2

Cristina Bachmann, Heiko Bischoff, Christina Kaboth, Insa Mingers, Sabine Pfeifer,
Benjamin Schütte
This PDF provides improved access for vision-impaired users. Please note that due to the
complexity and number of images in this document, it is not possible to include text descriptions
of images.
The information in this document is subject to change without notice and does not represent a
commitment on the part of Steinberg Media Technologies GmbH. The software described by
this document is subject to a License Agreement and may not be copied to other media except
as specifically allowed in the License Agreement. No part of this publication may be copied,
reproduced, or otherwise transmitted or recorded, for any purpose, without prior written
permission by Steinberg Media Technologies GmbH. Registered licensees of the product
described herein may print one copy of this document for their personal use.
All product and company names are ™ or ® trademarks of their respective holders. For more
information, please visit www.steinberg.net/trademarks.
© Steinberg Media Technologies GmbH, 2013.
All rights reserved.
Release Date: June 18, 2013
Page 3

Table of Contents
5 Introduction
5 The Help System
6 About the Program Versions
7 Typographical Conventions
7 How You Can Reach Us
8 Setting Up Your System
8 Connecting Audio
8 About Audio Cards and Background
Playback
9 About Latency
9 Defining VST Audio Connections
13 Remote Devices
19 WaveLab LE Concepts
19 General Editing Rules
20 Basic Window Handling
22 Selecting Audio
27 Sliders
27 Renaming Items in Tables
28 File Browser
29 Peak Files
30 Program Overview
30 Command Bars
31 Status Bar
33 Context Menus
34 Time Ruler and Level Ruler
38 Value Editing
39 Drag Operations
41 Undoing and Redoing
41 Zooming
48 Managing Tabs
49 Presets
52 Saving a Picture of the Active Window
53 File Operations
53 Recently Used Files
53 Save and Save As
56 File Renaming
58 Deleting Files
58 Special Menu
59 Temporary Files
59 Work Folders vs. Document Folders
61 Setting the Focus on the Current File
62 About Workspaces
62 Elements of a Workspace
63 Audio Files Workspace
63 Audio Montage Workspace
64 Podcast Workspace
64 Opening Files in a Workspace
64 Organizing Workspace Windows
65 About Tool Windows
68 Playback
68 Transport Bar
73 Playing Back Only One Channel
73 Starting Playback From the Ruler
74 Using the Play Tool
74 Playback Scrubbing
75 Scroll During Playback
76 About Playback in the Audio Montage
Workspace
77 Audio File Editing
77 Wave Window
81 File Handling in the Audio Files
Workspace
97 Changing the Audio Properties
99 Silence Generator Dialog
3
Page 4

101 Offline Processing
101 Applying Processing
102 Gain Dialog
102 Normalize Level Dialog
104 Fades in Audio Files
105 Crossfades
106 Inverting the Audio Phase
107 Reversing Audio
107 DC Offset
108 Resample
109 Audio Montage
109 Basic Terminology
110 Montage Window
112 Signal Flow in the Audio Montage
112 Creating a New Audio Montage
113 Creating an Audio Montage from an
Audio File
114 Import Options for Audio Montages
115 Missing Files in Audio Montage Dialog
116 Assembling the Audio Montage
120 Rearranging Clips
122 Clip Editing
129 Track Activity Indicator
129 Envelopes for Clips
132 Fades and Crossfades in the Audio
Montage
136 About Cloning Audio Montages
137 Mixing Down - The Render Function
137 Notes Window
138 Recording
138 Setting Up the Recording Dialog
139 Dropping Markers During Recording
139 Recording Dialog
143 Master Section
144 Master Section Window
151 Rendering
155 About Monitoring Background Tasks
155 About Dropouts
157 Markers
157 Marker Types
158 Markers Window
160 About Creating Markers
164 Deleting Markers
165 Moving Markers
165 Navigating to Markers
165 Hiding Markers of a Certain Type
166 Renaming Markers
166 About Selecting Markers
167 Selecting the Audio Between Markers
168 Binding Markers to Clips in the Audio
Montage
168 How Marker Information is Stored
169 Importing Audio CD Tracks
169 Import Audio CD Dialog
171 Importing Audio CD Tracks
172 Podcasts
173 Podcast Workspace
176 Creating a Podcast
176 Setting Up a FTP for Podcast Publishing
177 Publishing a Podcast
177 FTP Site Dialog
179 Checking the Podcast
180 Customizing
180 Customizing the Wave Window and the
Montage Window
189 About Customizing Shortcuts
193 Configuring the Software
193 About Global Preferences
196 Audio File Editing Preferences Dialog
198 Plug-in Reference
198 Built-in Plug-ins
201 Steinberg VST 3 Plug-ins
213 Index
4
Page 5

The Help System
The detailed help system of WaveLab LE makes it easy to look up
interface features and get information from within the program.
Three main types of help are available:
• The help provides detailed information on the features and
functionality of WaveLab LE. You can set bookmarks, and use the
search function and index to quickly find information.
Introduction
• “What’s This” tooltips give detailed information on the functionality
of a specific user interface element.
• The status bar at the bottom of each workspace window gives
detailed information on menu items when moving the mouse over
an item.
• In the Audio Montage workspace, the status bar shows what kind
of editing can be performed when using the mouse and modifier
keys.
Accessing the Help System
There are several ways of accessing the help system.
• To open the WaveLab LE help, select Help > Contents.
• To open the manual in PDF format, browse to the installation
folder. The documents are located in the Documentation folder.
• To show tooltips, move the mouse over an interface icon.
• To open the help for the active dialog, click the question mark icon
on the title bar (Windows) or in the dialog (Mac OS) to show the
Help button, and then click the Help button, or press [F1]
(Windows) or [Command]-[?] (Mac OS).
5
Page 6

Introduction
About the Program Versions
• To use the menu help, move the mouse over a menu item. The help
text is displayed on the status bar at the bottom of the workspace
window.
• To see information on what kind of editing can be performed when
using the mouse and modifier keys in the audio montage window,
move the mouse over the montage window. The help text is
displayed on the status bar at the bottom of the workspace
window.
• To activate/deactivate the help texts on the status bar, select
Options (WaveLab menu on Mac) > Global preferences >
Display tab, and in the Workspaces section, select Display
status bar.
To open the “What’s This” help, you have the following possibilities:
• In any workspace, press [Shift]-[F1], and move the mouse over an
interface item, or select Help > What is this?.
• In a dialog, select the question mark icon on any title bar
(Windows) or in the dialog (Mac OS), and move the mouse over
an interface item or a menu option.
• Some “What’s this” tooltips have a different background color to
indicate that a dedicated help topic is available in the WaveLab LE
help. Click the link in the tooltip to open the corresponding
information in the help.
About the Program Versions
The documentation covers two different operating systems, Windows
and Mac OS X. Some features and settings are specific to one of the
operation systems.
This is clearly stated in the applicable cases. If nothing else is said, all
descriptions and procedures in the documentation are valid for all
WaveLab LE versions for both Windows and Mac OS X.
The screenshots are taken from the English Windows version of
WaveLab LE.
6
Page 7

Introduction
NOTE
Typographical Conventions
Typographical Conventions
Many of the default key commands in WaveLab LE use modifier keys,
some of which are different depending on the operating system. For
example, the default key command for Undo is [Ctrl]-[Z] on Windows
and [Command]-[Z] on Mac OS X.
When key commands with modifier keys are described in this manual,
they are shown with the Windows modifier key first, in the following way:
• [Win modifier key]/[Mac modifier key]-[key]
For example, [Ctrl]/[Command]-[Z] means “press [Ctrl] on Windows or
[Command] on Mac OS X, then press [Z]”.
Similarly, [Alt]/[Option]-[X] means “press [Alt] on Windows or [Option]
on Mac OS X, then press [X]”.
This manual often refers to right-clicking, for example, to open context
menus. If you are using a Mac with a single-button mouse, hold down
[Ctrl] and click.
How You Can Reach Us
On the Help menu in WaveLab LE, you find items linking to additional
information.
The menu contains links to various Steinberg web pages. Selecting a
menu item automatically launches your browser and opens the page. On
these pages, you can find support and compatibility information,
answers to frequently asked questions, information about updates and
other Steinberg products, etc. This requires that you have a web
browser installed on your computer, and a working internet connection.
7
Page 8

Setting Up Your System
IMPORTANTIMPORTANTIMPORTANTIMPORTANT
Before you start working, you need to make some settings.
Make sure that all equipment is turned off before making any
connections.
Connecting Audio
Your system setup depends on many different factors, for example, the
kind of project that you want to create, the external equipment that you
want to use, or the computer hardware available to you.
About Audio Cards and Background Playback
When you activate playback or recording in WaveLab LE, other
applications cannot access the audio card. Likewise, if another
application uses the audio card, WaveLab LE is unable to play back.
The Windows MME driver is an exception from this.
You can run WaveLab LE together with other applications and always
give the active application access to the audio card.
To do so, select Options > VST Audio Connections, and on the
Options tab, activate Release driver when WaveLab is in
background.
8
Page 9

Setting Up Your System
About Latency
About Latency
Latency is the delay between when audio is sent from the program and
when you actually hear it. While a very low latency can be crucial in a
real-time DAW application such as Steinberg Nuendo or Cubase, this
is not strictly the case with WaveLab LE.
When working with WaveLab LE, the important issues are optimum and
stable playback and editing precision. You should not try to reach the
lowest possible latency figures.
The latency in an audio system depends on the audio hardware, its
drivers, and settings. In case of dropouts, crackles, or glitches during
playback, raise the Buffer Number setting on the VST Audio
Connections dialog, or increase the buffer size in the ASIO control
panel, specific to the audio card.
Defining VST Audio Connections
To be able to play back and record audio in WaveLab LE, you must
specify how the internal input and output channels in WaveLab LE are
connected to your sound card and which device you intend to use for
audio playback and recording.
You can define the buffer settings for your device as well as set up
connections to external gear, such as external effects units. You should
select at least two channels for stereo playback and recording.
If you have no third-party audio card, you can select the Windows MME
driver or Built-in Audio (Mac) options. You can also use MME with most
third party audio cards, with the advantage that you can record and play
at different sample rates. However, Windows MME drivers do not allow
audio monitoring in the Recording dialog or multichannel operation, and
other drivers generally offer better sound quality and performance.
9
Page 10

Setting Up Your System
PROCEDURE
PROCEDURE
Defining VST Audio Connections
Selecting an ASIO Driver
Audio Stream Input/Output (ASIO) is a computer device driver protocol
for digital audio specified by Steinberg. It provides a low-latency and
high fidelity interface between a software application and the soundcard
of a computer.
1. In any workspace, except the Podcast workspace, select Options
> VST Audio Connections.
2. From the Audio Device menu, select your ASIO driver.
The ASIO plug-ins tab and the Control panel button are activated.
3. Optional: Click the Control panel button and make your settings.
4. On the ASIO plug-ins tab, select the audio ports that are used for
recording and monitor input of the ASIO plug-ins.
5. Click OK.
Selecting a Windows MME Driver
1. In any workspace, except the Podcast workspace, select Options
> VST Audio Connections.
2. From the Audio Device menu, select the Windows MME driver.
3. On the Playback tab, select the audio ports that are used for
playback.
4. On the Recording tab, select the audio ports that used for
recording and monitor input.
5. Click OK.
10
Page 11
Setting Up Your System
Defining VST Audio Connections
VST Audio Connections Dialog
This dialog allows you to specify how the internal input and output
channels in WaveLab LE are connected to your sound card and which
device you want to use for audio playback and recording.
In any workspace, except the Podcast workspace, select Options >
VST Audio Connections.
Global Settings
Audio device
Here, select the audio device that you want to use for playback and
recording audio. If you do not have a third-party audio card, you
can select the Windows MME driver or Built-in Audio (Mac)
options.
Control panel
Refresh
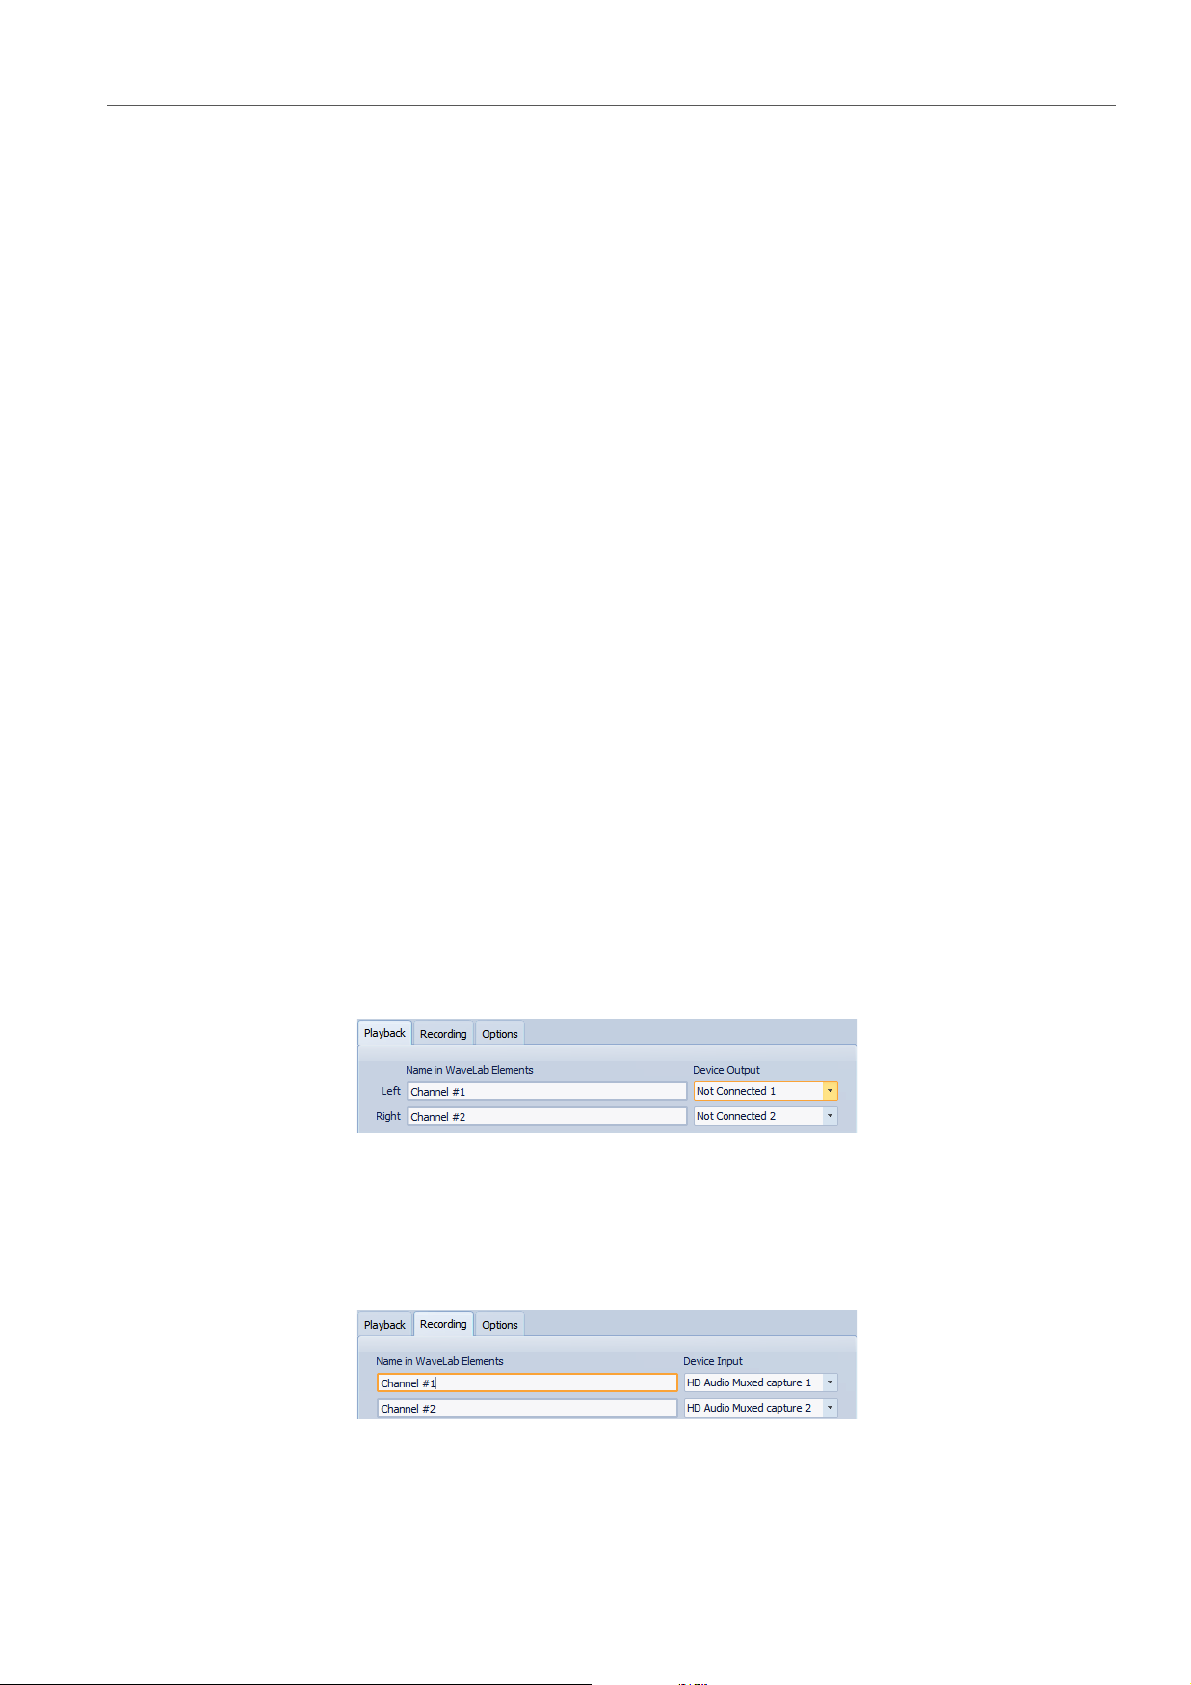
Playback Tab
This tab allows you to select and name audio ports that are used for
playback.
When you select an ASIO driver, the Control panel button is
activated. Click the button to open the settings application of your
sound card, which is usually installed with the sound card.
Depending on your sound card and driver, this provides settings
for buffer size, digital formats, additional I/O connections, etc.
This button causes audio devices to be evaluated again to reflect
device changes.
Recording Tab
This tab allows you to select and name your audio ports that are used
for recording and input monitoring. The inputs that you define here are
then available in the Recording dialog.
11
Page 12

Setting Up Your System
Defining VST Audio Connections
Options Tab
This tab allows you to specify the number of buffers and the control
driver functionality.
Buffer Number
MME Specific - Buffer size
Reset driver when changing sample rate
Increasing this value improves the elasticity of audio streaming to
avoid dropouts.
Increasing this value improves the elasticity of audio streaming to
avoid dropouts. This is only available when an MME driver is
selected.
Resets the driver when sample rate is changed. When playback or
recording must be set to a new sample rate, certain audio device
drivers must be fully reset to work properly. This operation takes
some time.
Perform short fade-in/out when starting/stopping playback
Performs a short fade-in when starting playback and a short
fade-out when stopping playback. This avoids clicks that are
caused by waveforms that are not starting on a zero-crossing
point.
Release driver when WaveLab LE is in background
Closes the audio device when WaveLab LE is no longer the front
application. This allows other audio applications to use the same
audio device.
12
Page 13
Setting Up Your System
Remote Devices
Remote Devices
You can use remote devices to remote-control WaveLab LE.
Several commands can be controlled with knobs and sliders of your
remote control device.
Remote Devices Dialog
This dialog allows you to select a device to remote-control WaveLab LE,
and see the control map of MIDI control devices.
In any workspace, except the Podcast workspace, select Options >
Remote devices.
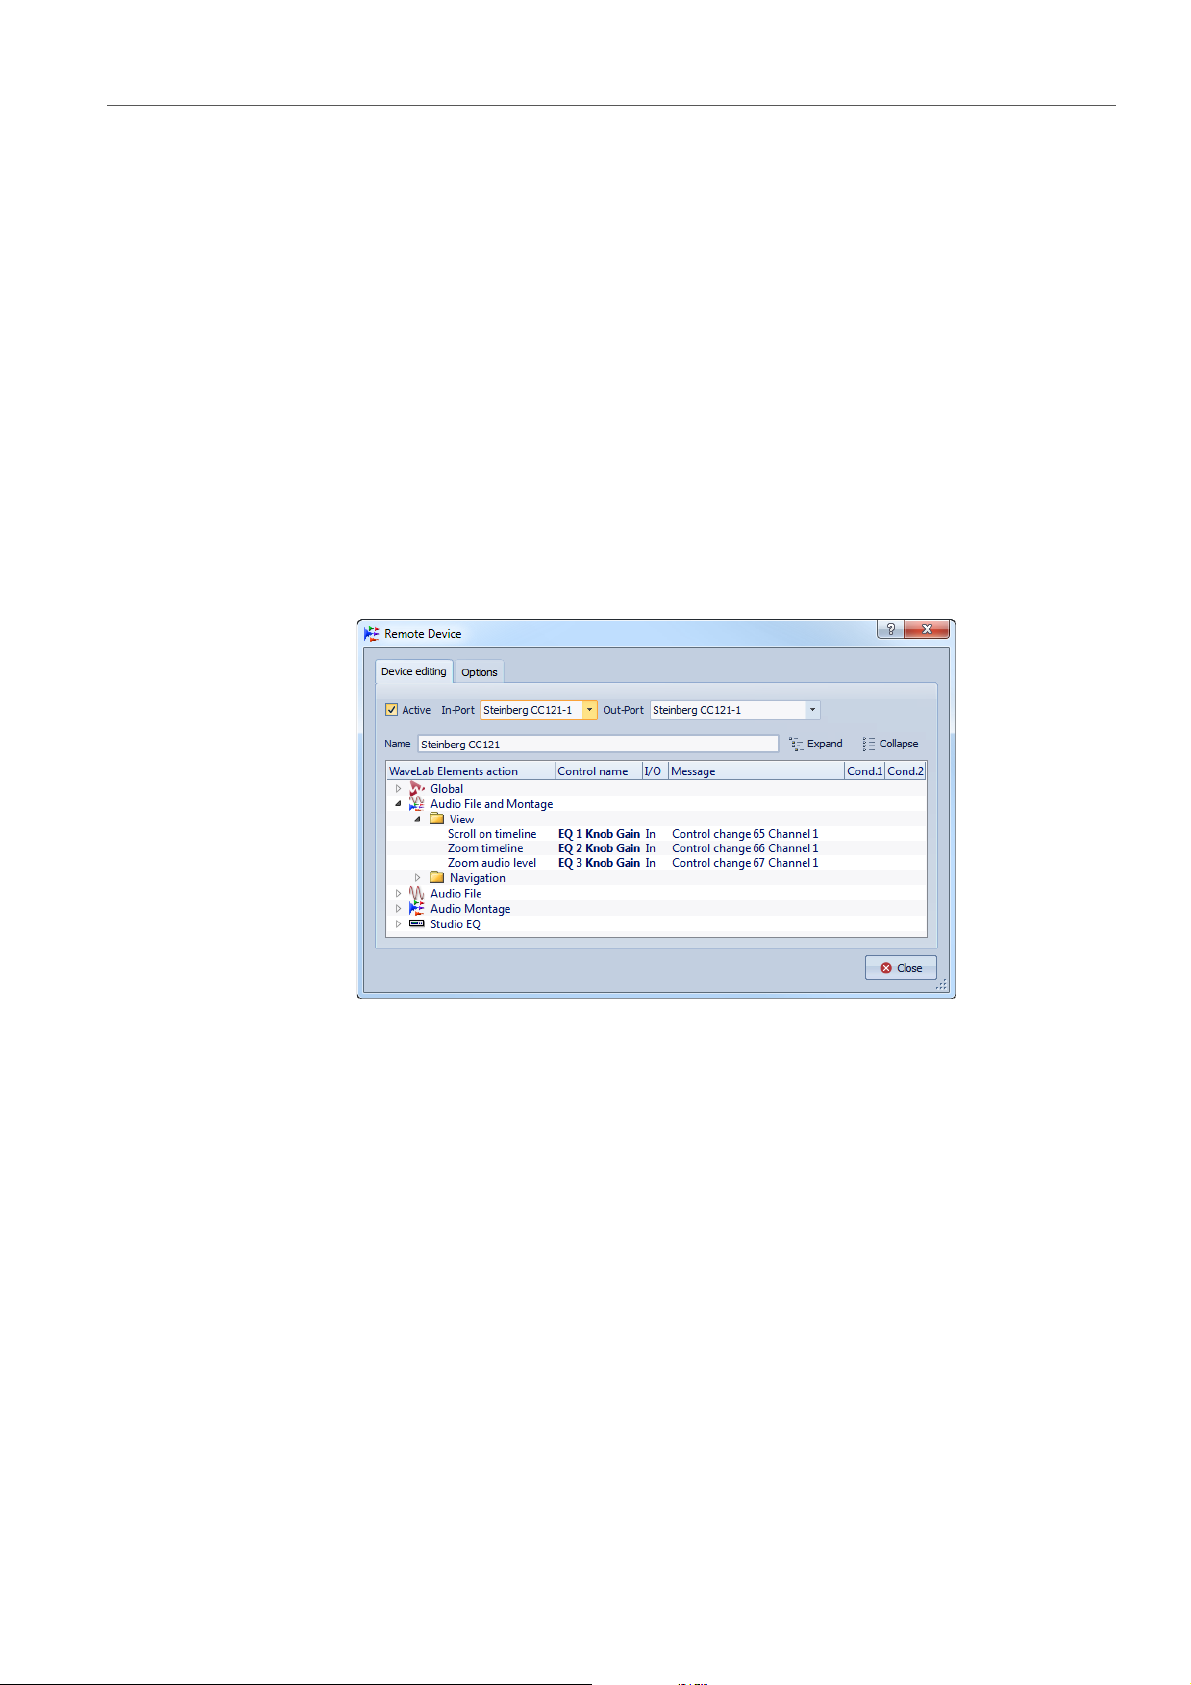
Device Editing Tab
This tab lets you select a MIDI control device and see the control map.
Active
Activates the selected device and scans the MIDI ports.
In-Port/Out-Port
Select the MIDI input/output ports of the device that you want to
use.
Name
Lets you enter a map name.
Expand/Collapse
Expands/collapses the folder tree of the control map.
13
Page 14

Setting Up Your System
Remote Devices
Options Tab
WaveLab LE action list
This folder tree lists the parameters that you can remote-control.
The top folder represent contexts. The related parameters can only
be controlled if the context is active. For example, if an audio file is
active.
A remote control can be used in several contexts if these are
exclusive. For example, parameters that can be used for an active
audio file or an active audio montage.
The Global folder contain the parameters that can always be
controlled.
This tab lets you use the MIDI Learn function to assign a control of a
MIDI remote control device to a function.
Emulate mouse wheel
If this option is activated, the AI knob acts as a mouse wheel in the
WaveLab LE user interface, except for plug-ins.
Edit focused numeric field
If this option is activated, the AI knob can be used to edit the
focused numeric field that you find in many WaveLab LE windows
and dialogs.
CC121 Advanced Integration Controller
You can use Steinberg's CC121 Advanced Integration Controller to
control WaveLab LE.
This section describes the WaveLab LE factory preset for the CC121.
For detailed information on how to use the controller, refer to the manual
that came with the CC121. Note that the CC121 was originally
designed for Cubase. The following mapping combines the WaveLab
LE functionality with the CC121 controls. The controls that are not listed
in the following paragraph are not assigned to a parameter.
Channel Section
You can use all controls of the CC121 channel section, except the
fader, to control the elements of the selected track in a WaveLab LE
audio montage. You can use the fader for the Master Section.
Fader
Controls the Master Section fader.
14
Page 15

Setting Up Your System
Remote Devices
PAN knob
Controls the gain of the selected track.
Mute
Mutes/unmutes the selected track.
Solo
Activates/deactivates solo for the selected track.
CHANNEL SELECT
Selects the previous/next track in the audio montage.
To move the cursor to the previous/next clip edge in the audio
montage, hold [Alt]/[Option]. To move the cursor to the
previous/next region edge, hold [Shift]. To move the cursor to the
previous/next marker in the Audio Files workspace, hold
[Ctrl]/[Command].
EQ Section
With the EQ section you can easily control the Steinberg Studio EQ
plug-in.
If the EQ TYPE button is activated on the CC121, you can adjust the
parameters of the focused Studio-EQ. All necessary EQ parameters,
such as Q/F/G of each band, EQ TYPE selection, and ALL BYPASS
on/off can be set. You can switch to WaveLab LE navigation mode by
turning off the EQ TYPE button. In WaveLab LE navigation mode, you
get access to alternative functions, such as scrolling, zooming, and
switching between workspaces.
EQ Type activated:
Bandwidth knobs (Q)
Adjusts the Q (bandwidth) of each EQ band.
Frequency knobs (F)
Adjusts the center frequency of each EQ band.
Gain knobs (G)
Adjusts the gain of each EQ band
ON
Activates/deactivates the EQ bands.
ALL BYPASS
Activates/deactivates bypass for all plug-ins in the Master Section.
15
Page 16

Setting Up Your System
Remote Devices
EQ Type deactivated:
LOW ON
Opens the Audio Files workspace.
LOW-MID ON
Opens the Audio Montage workspace.
HIGH-MID ON
Opens the Batch Processors workspace.
HIGH ON
Opens the Control Window.
EQ-1 knob for the EQ Gain (G)
Scrolls left/right on the timeline.
EQ-2 knob for the EQ Gain (G)
Adjusts the horizontal zoom on the timeline.
EQ-3 knob for the EQ Gain (G)
Adjusts the vertical zoom on the timeline.
EQ-4 knob for the EQ Gain (G)
Scrolls tracks on the Audio Montage workspace or scrolls
vertically on the Audio Files workspace.
EQ-1 knob for the EQ Frequency (F)
Scrolls left/right on the overview timeline of the Audio Files
workspace.
EQ-2 knob for the EQ Frequency (F)
Horizontally zooms in/out on the overview timeline of the Audio
Files workspace.
EQ-3 knob for the EQ Frequency (F)
Vertically zooms in/out on the overview timeline of the Audio Files
workspace.
EQ-4 knob for the EQ Frequency (F)
Vertically scrolls on the overview timeline of the Audio Files
workspace.
16
Page 17

Setting Up Your System
Remote Devices
Transport Section
In this section you can control the transport functions of WaveLab LE.
Previous button
Moves the cursor position to the beginning of the project.
Rewind button
Rewind
Forward button
Forward
Next button
Moves the cursor position to the end of the project.
Cycle button
Activates/deactivates Cycle mode.
Stop button
Play button
Record button
Function Section
In this section, you can adjust certain functions, such as fades and
envelope level, by using the VALUE knob.
VALUE knob/button
Stops playback. Press again to move the cursor to the previous
start position. Press a third time to move the cursor to the
beginning of the project.
Starts playback.
Press once to open the Recording window. Press again to start
the recording. Press a third time to stop recording. The recorded
file opens in the Audio Files workspace.
Rotate this knob to adjust the assigned function. Press the knob to
reset the parameter to its default value.
FUNCTION button 1
Adjusts the fade-in settings of the focused clip.
FUNCTION button 2
Adjusts the fade-out settings of the focused clip.
FUNCTION button 3
Adjusts the envelope level of the focused clip.
17
Page 18

Setting Up Your System
NOTE
Remote Devices
AI Knob Section
FUNCTION button 4
The element clicked last on the Edit > Nudge menu in the Audio
Montage workspace is assigned to this button.
WaveLab LE can be controlled with the AI knob of Steinberg’s CC121,
CI2+, and CMC-AI controllers. With the AI knob, you can control the
parameter that the mouse points to.
The AI knob only works on parameters that are automatable.
In this section you can control parameters via the AI knob.
AI KNOB
Controls the VST 3plug-in parameters, emulates the mouse wheel,
for example, for scrolling, and lets you edit a focused numeric field.
To control a parameter with the AI knob, move the mouse cursor
over the parameter that you want to control, and move the AI knob.
You can activate/deactivate the emulation of the mouse wheel and
the editing of the focused numeric field in the Options tab.
LOCK
When the mouse cursor points to a parameter, press LOCK to
control this parameter regardless of the position of the mouse
cursor.
CUBASE READY Indicator
The CUBASE READY indicator has no function in WaveLab LE.
Foot Switch Section
The foot switch has the same function as [Shift]. Press and hold the foot
switch while turning the AI knob to fine tune parameters.
18
Page 19

WaveLab LE Concepts
NOTE
This chapter describes general concepts that you will use when
working with WaveLab LE. Getting accustomed with these procedures
allows you to work more effectively with the program.
General Editing Rules
The common editing operations can be used in any Steinberg product.
• To select and move interface items, and to select ranges, click and
drag with the mouse.
• Use the keys of your computer keyboard to enter numeric values
and text, to navigate lists and other selectable interface items, and
to control the transport functions.
• Common operations like cut, copy, paste, or the selection of
multiple items can be performed using standard keyboard
shortcuts.
The behavior of your product is also governed by your preference
settings.
RELATED LINKS:
“Global Preferences Dialog” on page 193
19
Page 20

WaveLab LE Concepts
Basic Window Handling
Basic Window Handling
WaveLab LE follows the basic guidelines for the Windows/Mac OS
interface, which means that Windows/Mac OS standard procedures
apply.
Closing Windows
• To close a tabbed window, click the “X” button of the
corresponding tab or press [Ctrl]/[Command]-[W].
• To close a tabbed window without saving your changes, hold
[Ctrl]/[Command]-[Shift], and click the “X” button. This avoids
having to confirm a warning message whenever you want to close
an unsaved window.
• To close all tabbed windows at once, right-click a tab, and select
Close all.
• To close all tabbed windows but the selected tabbed window,
right-click a tab, and select Close all but this one.
• To individually select the tabbed windows that you want to close,
right-click a tab, and select Select files to close. This opens the
Files to close dialog, where you can select the files that you want
to close.
RELATED LINKS:
“Files to Close Dialog” on page 49
“Managing Tabs” on page 48
Switching Between Files
You can have multiple files open and switch between them.
• To bring a file to the front, click the corresponding tab.
• To cycle between all open files in a workspace, hold
[Ctrl]/[Command], and press [Tab] continuously.
• To cycle back and forth between the last two active files, press
[Ctrl]/[Command]-[Tab]. Between each step you have to release
all keys.
• To cycle backwards, press [Ctrl]/[Command]-[Shift]-[Tab].
20
Page 21
WaveLab LE Concepts
Basic Window Handling
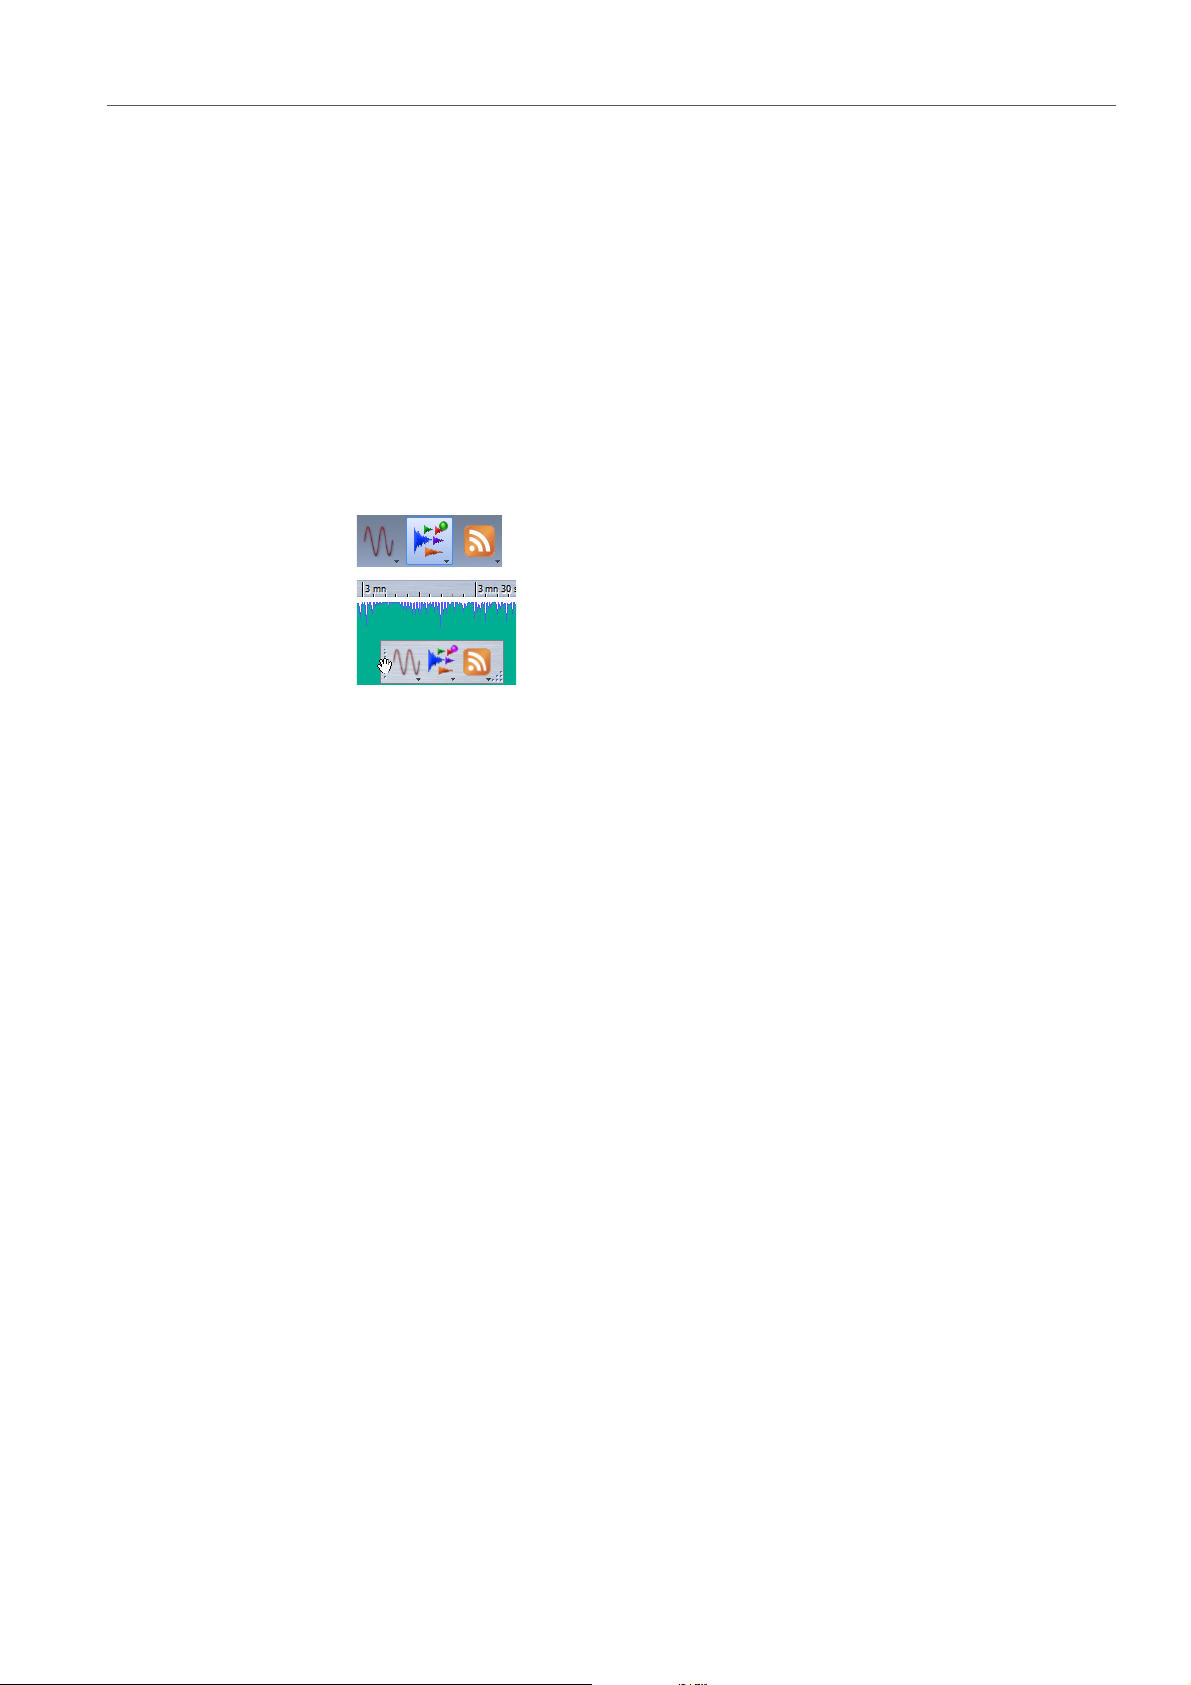
Window Switcher
The window switchers let you easily switch between workspaces,
create new workspaces, or open existing projects. There are two types
of window switchers: The central switcher bar and the floating window
switcher.
The floating window switcher behaves like the central switcher bar, but
takes less room and floats above other windows.
• To activate/deactivate the central switcher bar, in the Audio Files
workspace or the Audio Montage workspace, select Workspace
> Command bars > Central switcher bar.
Using the Central Switcher Bar
You can use the central switcher bar to navigate through your
workspaces.
• To copy a file from one workspace to another, drag it to the button
of the workspace that you want to open, wait until the workspace
becomes active, and release the file where you want.
• To create a new file in any workspace, press [Ctrl]/[Command],
and click a workspace button.
• To open the Open window to select a file, press [Shift], and click
a workspace button.
• To display a menu listing the files that have recently been used in
a particular workspace, right-click any workspace icon.
• To create a new file or open a file, right-click any workspace icon,
and select New or Open. While left-clicking activates a
workspace, right-clicking does not activate a workspace.
21
Page 22
WaveLab LE Concepts
Selecting Audio
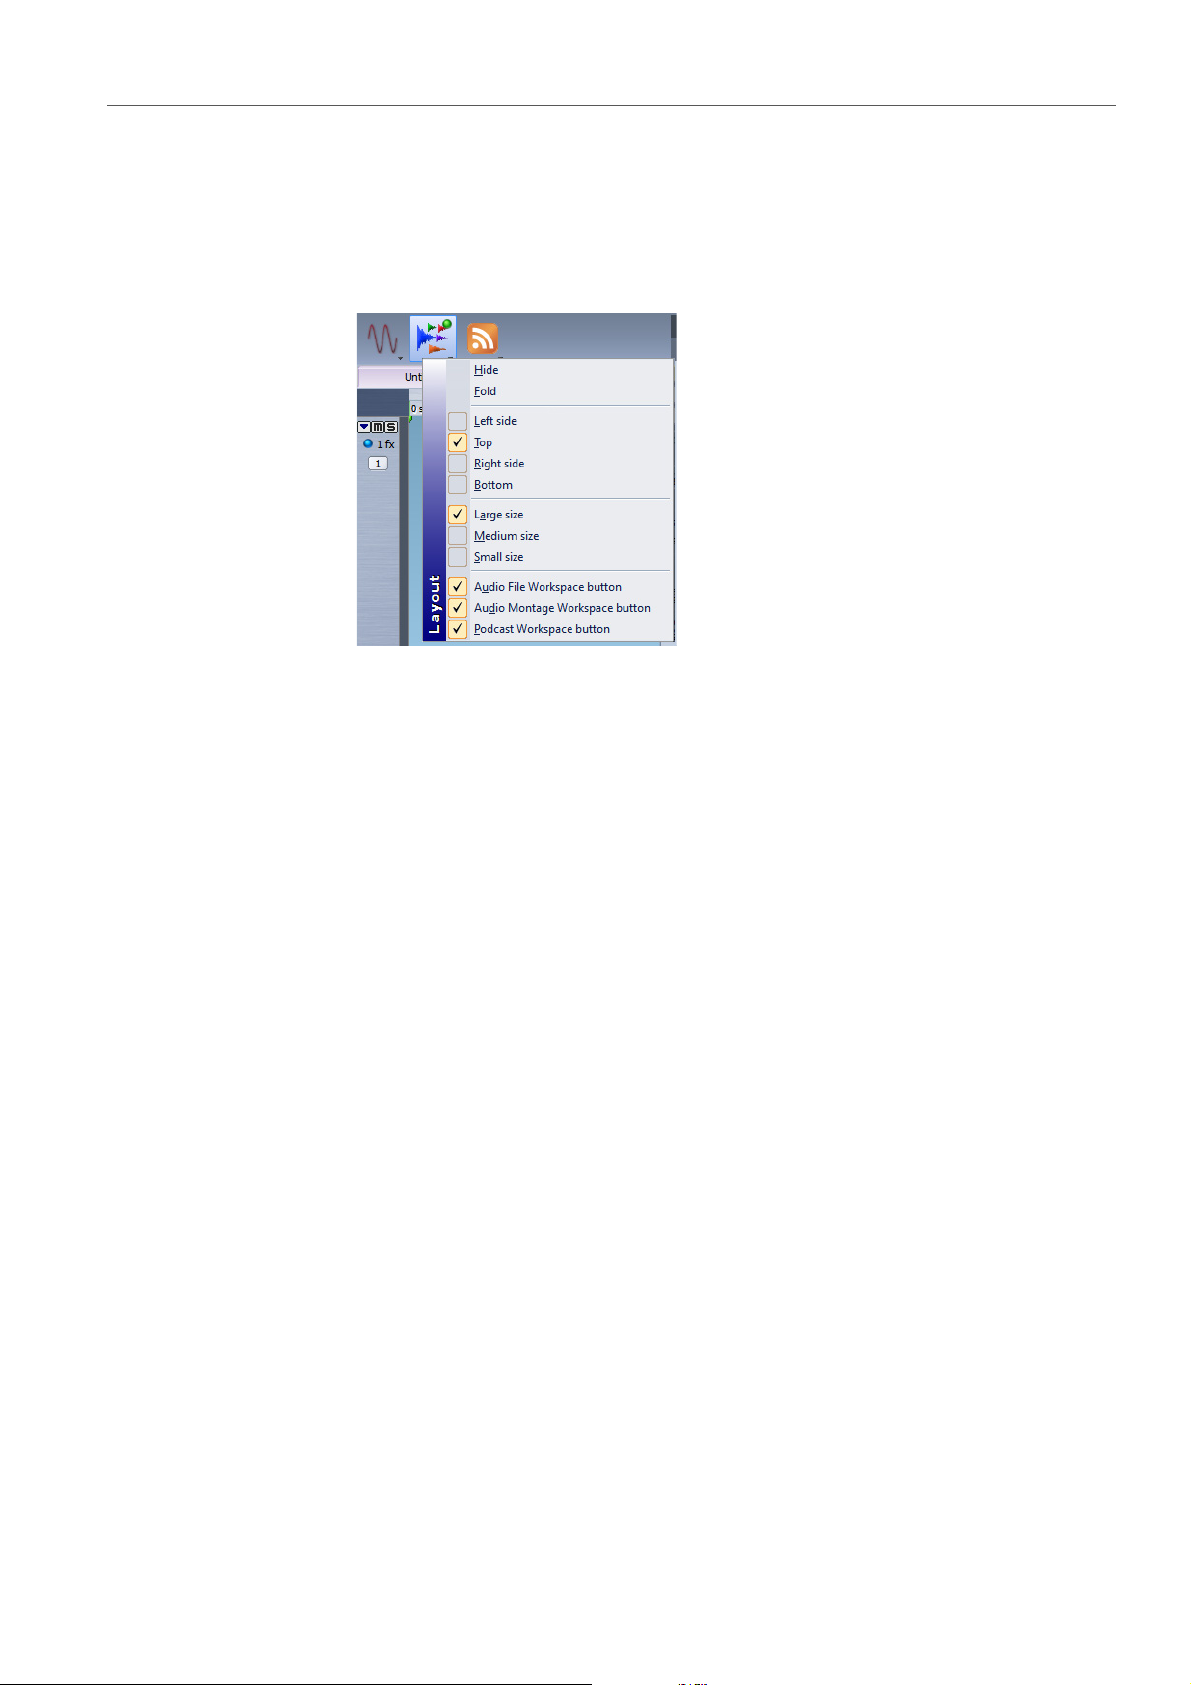
Customizing the Central Switcher Bar
You can customize the central switcher bar using the settings menu.
To open the settings menu, right-click an empty part of the central
switcher bar.
Hide
Hides the central switcher bar.
Fold
Minimizes the central switcher bar to a thin line. To unfold the bar,
click the thin line.
Left side/Top/Right side/Bottom
Determines the location of the central switcher bar.
Large/Medium/Small size
Determines the size of the central switcher bar.
Workspace buttons
Determines which workspace buttons are visible on the central
switcher bar.
Selecting Audio
Almost all types of editing and processing that you perform in WaveLab
LE operate on the audio selection. There are numerous ways to make an
audio selection.
To select the whole audio file, double-click it. If the audio file contains
markers, triple-click it.
22
Page 23

WaveLab LE Concepts
Selecting Audio
Selecting a Range by Dragging
The standard way to select a range in a wave window is to click and
drag.
If you drag all the way to the left or right side of the window, it scrolls
automatically, allowing you to select larger sections than what can be
shown in the window. The speed of the scrolling depends on how far
from the window edge you are.
Audio Range Selection in an Audio File
You can edit, process, or play back selection of an audio file.
In the Audio Files workspace, select Edit > Select time range.
All
Selects the entire waveform.
Toggle
Toggles the current audio selection on/off.
Extend to start of file
Extends the selection to the start of the audio file. If there is no
selection, a selection is created from the edit cursor position.
Extend to end of file
Extends the selection to the end of the audio file. If there is no
selection, a selection is created from the edit cursor position.
Extend to previous marker
Extends the left edge of the selection to the nearest marker to the
left or the start of the audio file. If there is no selection, a selection
is extended until the edit cursor position.
Extend to next marker
Extends the right edge of the selection to the nearest marker to the
right or the end of the audio file. If there is no selection, a selection
is extended until the next marker position.
Extend to cursor
Extends the selection to the edit cursor position.
From start of file until cursor
Selects the range between the start of the audio file and the edit
cursor position.
23
Page 24

WaveLab LE Concepts
Selecting Audio
From cursor to end of file
Selects the range between the edit cursor position and the end of
the audio file.
From cursor to previous marker
Selects the range between the edit cursor position and the nearest
marker to the left or the start of the audio file.
From cursor to next marker
Selects the range between the edit cursor position and the next
marker or the end of the audio file.
Playback position => Selection start
Creates a selection range from the playback position to the end of
the audio file. If no playback is taking place, the position of the edit
cursor is used.
Playback position => Selection end
Creates a selection range from the playback position to start of the
audio file. If no playback is taking place, the position of the edit
cursor is used.
Double length
Doubles the length of the current selection range.
Halve length
Halves the length of the current selection range.
Extend to all channels
Extends the current selection range to all channels.
Left channel only
Reduces the current selection range to the left channel only.
Right channel only
Reduces the current selection range to the right channel only.
Generic region
Selects the range between the two generic markers that
encompass the edit cursor.
24
Page 25
WaveLab LE Concepts
PROCEDURE
PROCEDURE
Selecting Audio
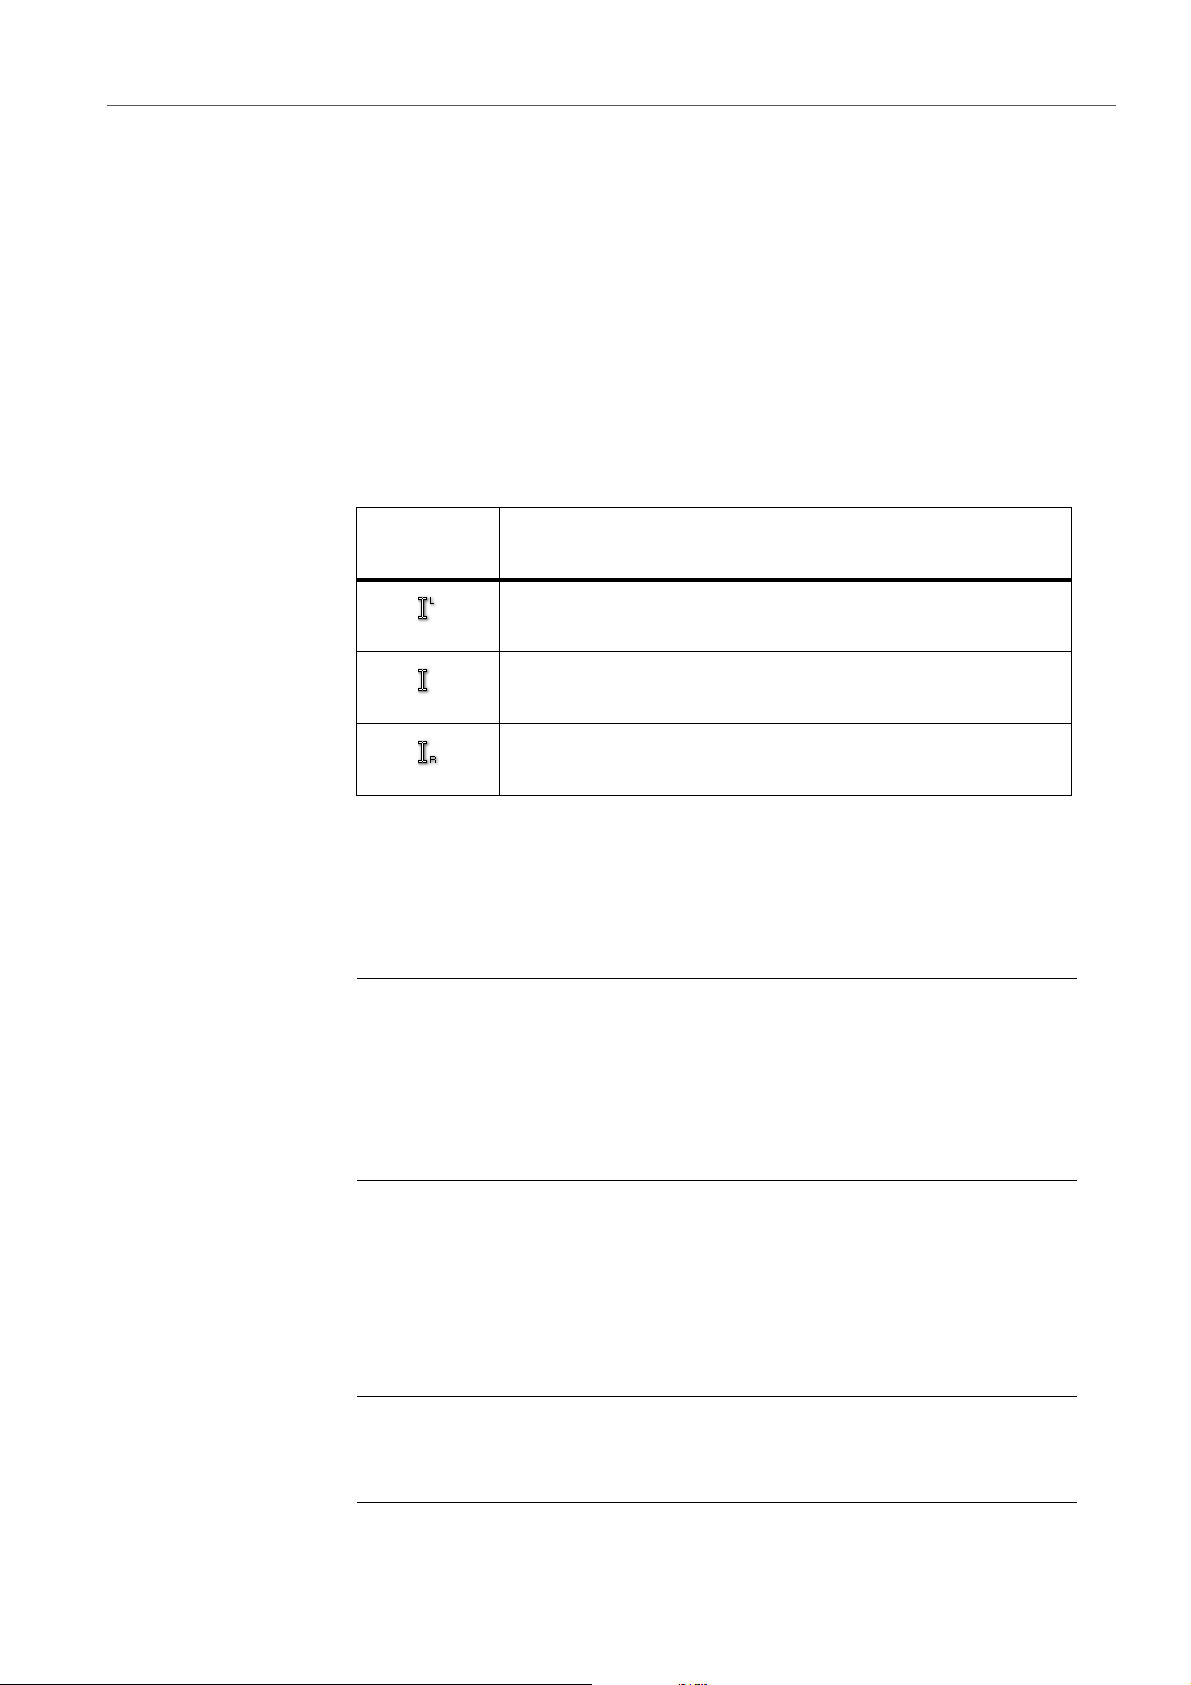
Selecting in Stereo Files
If you are working on stereo material in the Audio Files workspace, you
can apply an operation to one channel only or to the entire stereo
material.
Which channel is selected when you click and drag in the wave window
depends on where you position the mouse cursor, as indicated by the
pointer shape. The pointer shape indicates which channel will be
affected.
The following pointer shapes are available:
Pointer
Shape Description
Clicking in the upper half of the left channel selects the left
channel.
Clicking in the middle area between the left and the right channel
selects both channels.
Clicking in the lower half of the right channel selects the right
channel.
Switching the Selection Between Channels
You can switch the selection that you have made for a channel to all
channels or switch the selection to the other channel.
1. In the Audio Files workspace’s wave window, make a selection
range.
2. Select Edit > Select time range, and select Extend to all
channels, Left channel only, or Right channel only, or press
[Tab] to cycle between the different channel selections.
Selecting in the Overview of the Audio Files Workspace
The selection ranges that you make in the overview of the Audio Files
workspace also apply to the main view.
• In the Audio Files workspace’s wave window, hold down
[Ctrl]/[Command], and click and drag in the overview.
25
Page 26

WaveLab LE Concepts
PROCEDURE
Selecting Audio
Moving a Selection Range
If a selection range is the right length, but at the wrong position, you can
move it.
1. In the wave window, hold down [Ctrl]/[Command]-[Shift].
2. Click in the middle of the selection and drag to the left/right.
Extending and Reducing the Selection
You can resize a selection range in the wave window without having to
make a new one.
There are several ways to extend/reduce the selection:
• Make a selection range, [Shift]-click outside the selection range,
• To extend the selection to the previous/next boundary (marker or
Extending and Reducing the Selection Using the Cursor Keys
• To move the start/end of a selection in the wave window to the
• To extend a selection to the previous/next boundary in the wave
Deleting Selections
and drag to the left/right, or click and drag the edges of the
selection range to the left/right.
start/end of file), press [Shift] and double-click the non-selected
area between the boundaries.
left/right, hold down [Shift] and press the left/right cursor keys. To
move it in bigger steps, press the [Page Up]/[Page Down] keys.
window (marker or start/end of the audio file), hold down
[Ctrl]/[Command]+[Shift] and press the left/right cursor keys.
There are several options for deleting a selected time range.
Audio Files Workspace
The following options can be found on the Edit menu:
Trim
Removes the data outside the selection.
26
Page 27

WaveLab LE Concepts
Sliders
Sliders
Remove
Removes the selection. The audio to the right of the selection is
moved to the left to fill the gap.
At various places in WaveLab LE, slider controls are available to change
parameters. There are a number of ways to change the value of a slider.
• Position the mouse over the slider and use the mouse wheel (no
click is required). Hold [Ctrl]/[Command] while using the mouse
wheel to scroll faster. This modifier also applies to the zoom
wheels. To move the button of a slider, click and drag it.
• To move the slider handle directly to a position, click the slider at
any position.
• To move the slider handle in smaller steps, right-click or below the
handle. Keep the mouse button pressed to automatically step to
the next value.
• To reset the slider to the default value, if available,
[Ctrl]/[Command]-click the slider, or click using the third mouse
button, or double-click the handle.
Renaming Items in Tables
You can rename items in tables in the Markers window, and in the Clips
window.
• To rename an item, double-click it or select it, and press [Return],
and enter the new name.
• To rename the previous/next item, press [Arrow Up] or [Arrow
Down] instead of [Return]. This way you move the focus on the
previous/next item, while staying in the edit mode.
27
Page 28

WaveLab LE Concepts
File Browser
File Browser
The File Browser window in the Audio Files workspace and the Audio
Montage workspace allows you to browse files directly from within
WaveLab LE. It can be very useful in speeding up the process of
auditioning sound files.
The File Browser window provides you with all the standard browsing
functions as well as additional controls to audition audio files and any
marker defined regions. You can use it to open or insert files or regions
of files by dragging them onto an open workspace.
You can also choose to only view certain types of files.
File Browser Window
In this window, you can browse files and open them in WaveLab LE.
In the Audio Files workspace or the Audio Montage workspace, select
Workspace > Specific tool windows > File Browser.
You can add your favorite folders to the left pane by dragging them from
the middle pane.
The following options are available in the File Browser windows:
Look in
Lets you select a file location to browse and lists the recently used
locations.
Back/Forward/Parent Directory
Let you navigate through the list and file hierarchy.
List View
Shows only the file name in the file list.
Detail View
Shows the file name, size, type, and modification date in the file list.
28
Page 29

WaveLab LE Concepts
PROCEDURE
Peak Files
File name
Shows the file name of the selected file.
File format list
Lets you select which file format to display.
The following options are only available in the File Browser window in
the Audio Montage workspace:
Select Audio Files
Shows only audio files.
Select Audio Montages
Shows only audio montages.
Auto-Play mode
Starts playback automatically for the selected file.
Play selected audio file
Plays the selected audio file.
Peak Files
A peak file (extension “.gpk”) is automatically created by WaveLab LE
each time an audio file is modified or opened in WaveLab LE for the first
time. The peak file contains information about the waveform and
determines how it is drawn in the wave window or the montage window.
Peak files speed up the time it takes to draw the corresponding
waveform.
By default, the peak file is stored in the same location as the audio file.
Rebuilding Peak Displays
Normally, peak files are automatically updated when the peak file’s date
is older than the audio file’s date. However, it can happen that the date
of the audio file is wrong and therefore not automatically updated. In this
case you can force a rebuild of the peak file.
• In the Audio Files workspace, select View > Rebuild peak
display.
29
Page 30
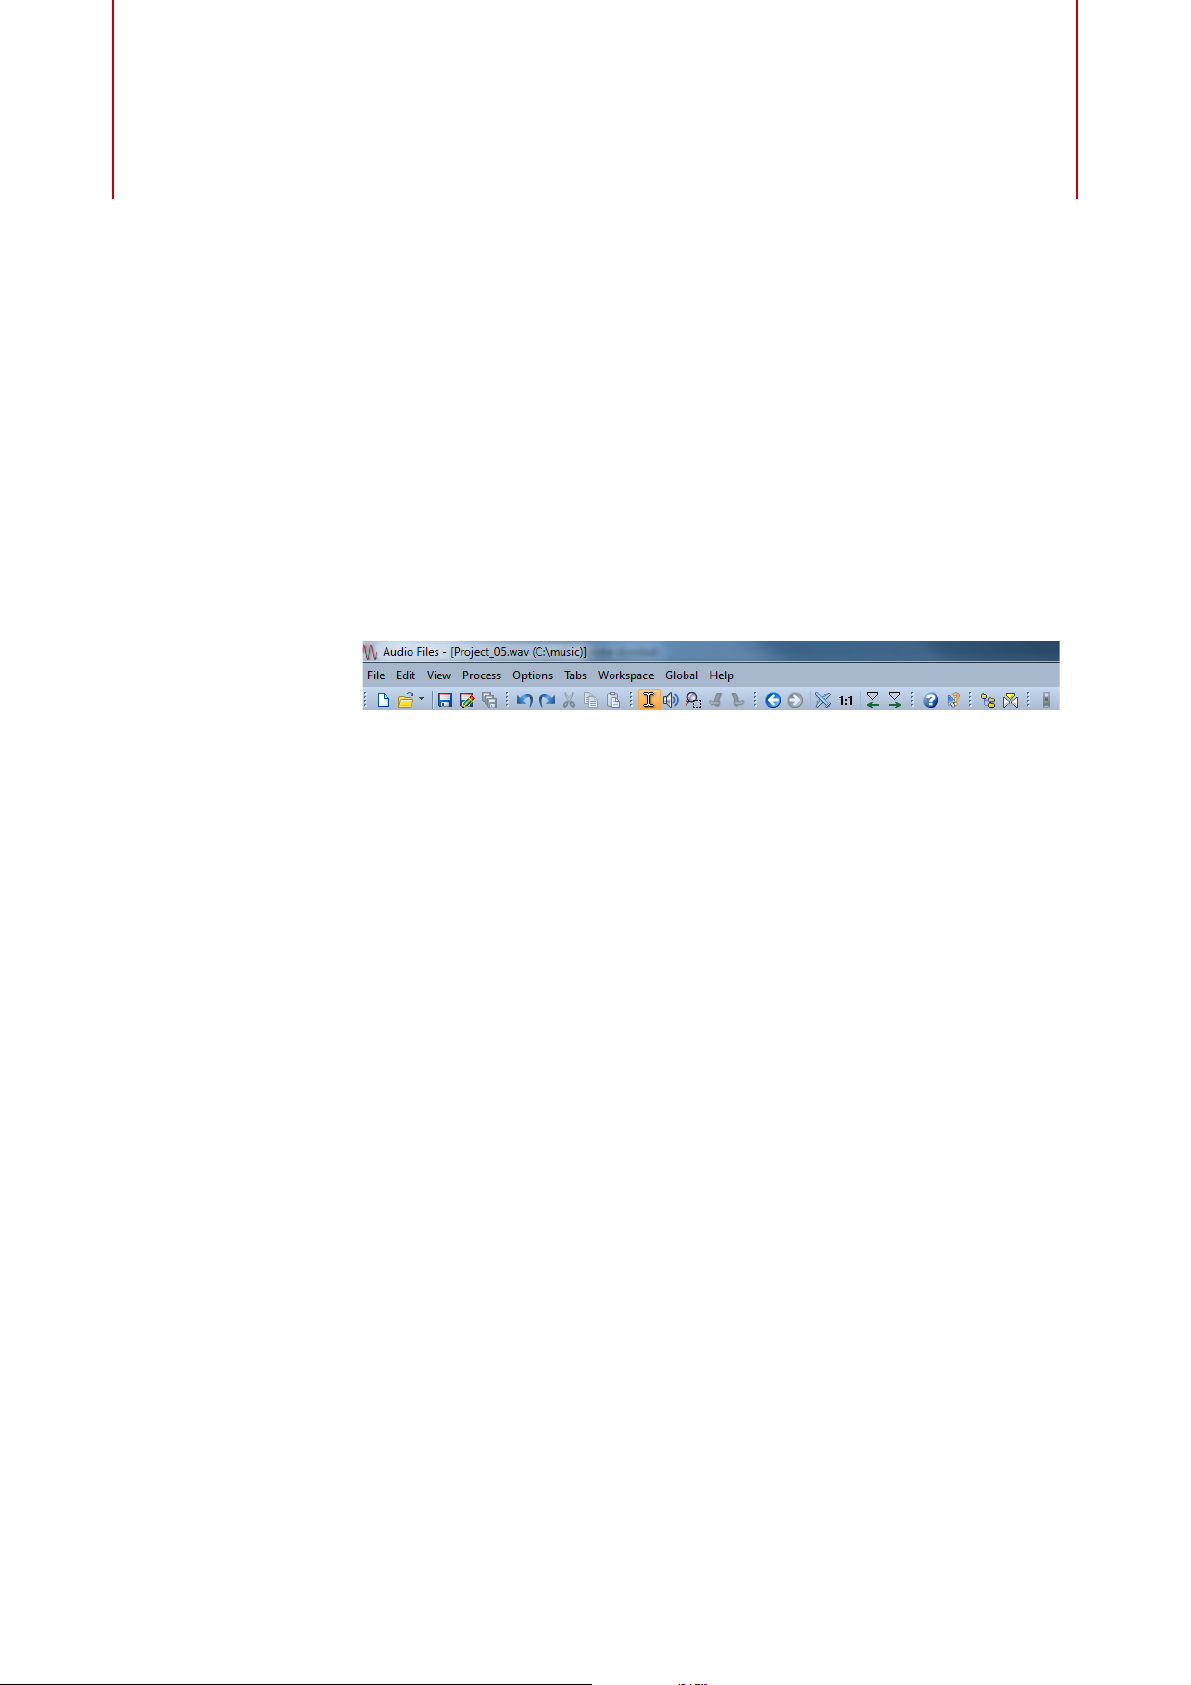
Command Bars
Commonly used tools, shortcuts, and commands are represented by
command buttons. Related buttons are grouped into various
Command bars.
Command bars in the Audio Files workspace
Program Overview
You can dock Command bars to any window edge or open them in a
separate window, and rearrange them freely. Each workspace has an
appropriate set of command bars that can be displayed. All the
commands that are represented by the command buttons are also
available on the menus.
Hiding and Showing Command Bars
You can hide command bars that are irrelevant for your project.
• To view a list of available command bars, in the Audio Files
workspace or the Audio Montage workspace, right-click an empty
part of the top edge of the workspace, or select Workspace >
Command bars.
30
Page 31

Program Overview
Status Bar
Docking Command Bars
Command bars can either be used as separate floating windows or
docked at the top, bottom, left, or right side of the workspace window.
• To make a command bar floatable, right-click the bar, and select
Floatable. Then click the dots on the left side or the top of the
command bar to drag the bar to another location.
• To dock a floating command bar, right-click the bar, and select
Floatable. Then click the dots on the left side of the command bar
to drag the bar to the top, bottom, left, or right side of the
workspace window.
Status Bar
The status bar at the bottom of the screen of the Audio Files workspace
and the Audio Montage workspace shows information about the active
window using the units specified in the rulers.
The information displayed on the status bar is updated depending on
the cursor position and on the audio selection that you have made.
Time/Level (dB)
Displays the time of the audio file at the mouse cursor position. In
the Audio Files workspace, it also displays the level.
Audio information at edit cursor
Displays the time at the position of the edit cursor. This information
changes when you reposition the cursor.
• To define the cursor position, click the indicator to open the
Cursor position dialog.
• To focus the cursor position, right-click the indicator.
Audio selection indicator (Audio Files workspace)
In the Audio Files workspace, this displays the length of the current
selection, or the total length of the audio file if no selection has
been made.
31
Page 32

Program Overview
Status Bar
When you have zoomed in, you can right-click the indicator to
display the selected audio range, the focused clip, or the whole file.
Left-click the indicator to open the Audio Range dialog, where you
can define or refine a selection.
Zoom indicator
Displays the current zoom factor.
• To open a pop-up menu, where you can make additional zoom
settings, click the indicator.
• To open the Zoom factor dialog, where you can edit the zoom
factor, right-click the indicator.
Sampler key indicator (Audio Files workspace only)
Indicates the key of the current audio file (if defined). Click the
indicator to open the Sample Attributes window.
Audio properties indicator
In the Audio Files workspace, this displays the bit resolution and
the sample rate. It also indicates whether the audio file is mono or
stereo. Click the indicator to open the Audio properties dialog.
In the Audio Montage workspace, this displays the number of
audio channels and the sample rate of the audio montage. Click
the indicator to open the Audio Montage properties dialog.
Play through Master Section
If this button is activated, the audio is played through the Master
Section. If the button is deactivated, the Master Section is ignored.
Document button (drag and drop)
Allows you to drag the current file into another file, for example, an
audio file to the Audio Montage workspace. This is equivalent to
dragging the file tab.
Background information
The status bar shows the progress of some background
operations, such as rendering an effect. The operation can be
paused or canceled using the provided buttons.
32
Page 33

Program Overview
Context Menus
Context Menus
Throughout WaveLab LE, various context menus are available. These
menus group the commands and/or options that are specific to the
current working window.
The context menus appear when you right-click certain areas and are
useful for speeding up your workflow.
For example, right-click a file tab to open a context menu with some
relevant file options. Right-click the ruler of the waveform window brings
up the Time Ruler context menu that allows you to access a number of
options for changing the time ruler display format.
You can find most context menu commands in the main menus, but
some commands are only available in context menus. When you search
for a function, right-click the current working window to check if it has a
context menu.
Context menu in the montage window
33
Page 34

Program Overview
Time Ruler and Level Ruler
Time Ruler and Level Ruler
In the Audio Files workspace, you can display a time and a level ruler in
the wave window. In the Audio Montage workspace, you can display a
time ruler in the montage window.
You can also determine which time and level units the rulers show.
Time ruler
Level ruler
(Audio Files workspace only)
Time Ruler and Level Ruler Options
You can specify the time and level (amplitude) formats for each ruler in
each wave window and the time formats for each ruler in the montage
window separately by right-clicking the ruler, and selecting a format
from the pop-up menu.
Time Ruler Menu
Timecode
Displays a list of frames per second for various SMPTE timecodes
and for CD resolution.
Clock
Displays time units.
Samples
Positions are shown as number of samples. The number of
samples per second depends on the sample rate of the audio file.
For example, at 44.1
kHz, there are 44100 samples per second.
Bars and beats
If this is selected, the ruler is linear relative to the meter position.
34
Page 35

Program Overview
Time Ruler and Level Ruler
File size (Audio Files workspace only)
Shows positions in MegaBytes. Decimals represent KiloBytes.
Show grid (Audio Montage workspace only)
Displays vertical lines in the montage window, aligned with time
ruler marks.
Time format
Opens the Time format dialog, where you can edit the
appearance of the time ruler formats.
Save current settings as default
If this option is activated, the time ruler uses the current time format
in all new wave windows or montage windows.
Set ruler’s origin to start of file
If this option is activated, the ruler’s zero position is set to the
beginning of the first sample.
Set ruler’s origin at cursor
If this option is activated, the ruler’s zero position is set to the
current cursor position.
Set ruler’s origin to BWF reference (Audio Files workspace only)
If this option is activated, the first sample matches the BWF time
reference, provided that the time reference is available.
Level Ruler Menu (Audio Files workspace only)
dB
Sets the level format to decibels.
+-100 %
Sets the level format to percentage.
Normalized +1/-1
Sets the level format to a ruler gradation corresponding to 32-bit
float audio.
16-bit range
Sets the level format to a ruler gradation corresponding to 16-bit
audio.
24-bit range
Sets the level format to a ruler gradation corresponding to 24-bit audio.
Save current settings as default
If this option is activated, the level ruler uses the current level
format in all new wave windows.
35
Page 36

Program Overview
Time Ruler and Level Ruler
Time Format Dialog
In this dialog, you can customize the time format. The time format of the
ruler is also used in various time fields, for example, the status bar and
certain dialogs.
In the Audio Files workspace, depending on whether you want to set the
time format for the overview display or the main view display, select
View > Overview display > Time ruler > Time format or View >
Main view display > Time ruler > Time format.
In the Audio Montage workspace, select View > Time ruler > Time
format.
Timecode Tab
On this tab, you can configure the appearance of the Timecode option.
Frames per second
List of standard frame rates. From the drop-down menu, select
Other to enter a custom frame rate. You can also choose which
frames/units are displayed.
Show absolute frames
Shows the time format as a number of frames, without other time
elements.
Show quarter frames
Adds the quarter frame number to the time format.
Show hundredth frames
Adds the number of a hundredths of a frame to the time format.
Show units
Adds time units to the time format of the ruler.
36
Page 37

Program Overview
Time Ruler and Level Ruler
Clock Tab
On this tab, you can configure the appearance of the Clock option.
Show Units
Adds time units to the time format of the ruler.
Compact
Shows the time without unit indicators.
Meter Tab
On this tab, you can configure the appearance of the Bars and beats
option.
Time signature
Lets you edit the time signature used to display the time
represented as a musical notation.
Tempo
Lets you edit the tempo used to display the time represented as a
musical notation.
Ticks per quarter note
Lets you edit the number of ticks per quarter note that are used to
display times that are compatible with your sequencer.
Setting the Cursor Position
Many operations, such as playback and selection, depend on the
current cursor position. For example, playback often starts at the cursor
position. The current cursor position is indicated by a vertical flashing
line.
There are various ways to move the cursor:
• Click somewhere in the wave window, the montage window, or the
time ruler. If you have made a selection, click the time ruler to
prevent deselecting.
37
Page 38

Program Overview
PROCEDURE
Value Editing
• Click and drag in the time ruler.
• Use the transport controls.
• Select View > Move cursor to, and select an option.
• Use the cursor keys.
• Double-click a marker.
Working With a Meter-Based Display
If your working material is tempo-based, you can select the meter format
(bars, beats, and ticks) for the ruler legend. This makes it easier to find
musically related cutting points.
1. In the wave window or the montage window, right-click the time
ruler, and select Bars and beats.
2. Right-click the time ruler, and select Time format.
3. On the Meter tab, set the Time signature and Tempo to values
4. Set the Ticks per quarter note setting to a number that you feel
5. Click OK.
Value Editing
At various places in the program, numerical values can be edited by
using a combination of text fields and spin controls.
These values are sometimes composed of several parts, for example,
12 mn 30 sec 120 ms. Each value can be edited by using any of the
following methods:
that match your audio file.
comfortable with.
For example, this can be the same value that is used by your MIDI
sequencer.
• To change a value, click in a value field and type a new value, or
click the small arrows in the value field.
• To change the value by one unit at a time, press the [Left Arrow]
and [Right Arrow] keys.
38
Page 39

Program Overview
NOTE
Drag Operations
• To change the value by several units, press the page up and page
down keys.
• To change the value using the mouse wheel, position the mouse
cursor over a value, and spin the mouse wheel, or use the AI knob
of your MIDI controller.
• To change the value with the mouse, click a value and drag the
mouse up or down.
• To jump to the maximum and minimum values, press the [Home]
and [End] keys.
• To move from one part of the value to another, press the [Left
Arrow] and [Right Arrow] keys.
Drag Operations
WaveLab LE makes much use of drag-and-drop techniques to perform
various operations, some of which cannot be performed otherwise.
These are referred to as drag operations in this documentation.
• To drag an object, click and hold with the mouse when positioned
on the object and drag it. Drop the object by releasing the button.
Many types of objects can be dragged between different source and
destination locations including files, text, clips, items in a list, and markers.
It is also possible to drag and drop files from WaveLab LE to Steinberg’s
Nuendo.
Drag objects within and between workspaces to perform the following
operations:
• To dock a tool window, drag its title bar to any side of the
workspace, beside or above another tool window.
• To move a command bar, drag the bar grip at the left-hand end of
a command bar and reposition it.
• To reorder a tab within its own tabbed group, drag horizontally. To
move a tab to another workspace, drag vertically.
• To drag any object to another workspace, use the Central
Switcher bar. Drag the object over the corresponding workspace
icon in the Central Switcher bar, wait until the new workspace
becomes active, and drag the tab in the target workspace.
39
Page 40

Program Overview
Drag Operations
• To open a file, drag a compatible file from the File Browser
window of WaveLab LE, from the file browser of the operation
system, or from another application to the tab bar.
• To create a copy of a file, drag its tab vertically to another position
of the tab bar, then press [Ctrl]/[Option], and release the mouse
button.
Dragging in the Audio Files Workspace and Audio Montage
Workspace
• To insert an audio file in another audio file, drag the title bar tab or
document button of the file onto the waveform area of another file.
You can also drag an audio file directly from the File Browser
window, the file browser of your system, or from another
application into the Audio Files workspace.
• To move a marker, drag it along the time ruler.
• To create a copy of this marker, press [Shift], and drag it to another
position on the time ruler.
• To delete a marker, drag it above the time ruler.
• To copy an audio selection, drag a selected region of audio onto
the waveform area of the same file or another file.
• To change the extent of a selection range, position the edit cursor
at the start/end of the selection range, and drag to the left or right.
• To move the edit cursor without losing the current selection, and
to snap it to an anchor, press [Shift], and move the mouse near the
audio file/montage cursor. The mouse cursor shape changes and
you can drag the cursor left and right.
• To move the edit cursor without changing or losing the current
selection, press [Shift], click the edit cursor, and drag it to another
position.
• To scroll the waveform horizontally, click the bar above the time
ruler and drag left or right. You can also click anywhere on the
waveform using the 3rd mouse button, and drag left or right.
• To create a generic marker from a selected text, drop text that you
have selected in an external application onto the time ruler. The text
becomes the marker’s name.
• To create a stereo copy of a mono file, or a mixed copy of a stereo
file, drag a tab to another position of the tab bar, press [Ctrl]-[Alt]
(Windows) or [Options]-[Ctrl] (Mac), and release the mouse button.
40
Page 41

Program Overview
Undoing and Redoing
Dragging in the Podcast Workspace
• To reorder episodes in the episodes list, drag them to another
position.
Dragging in the Master Section
• To change the order of processing, drag effects between different
effects slots.
Undoing and Redoing
Zooming
You can undo and redo as many steps as you like. The only limitation is
the available hard disk space.
By default, when undoing or redoing any operation in the Audio Files
workspace or the Audio Montage workspace, the zoom factor, cursor
position, scroll position, clip selection status, and time range are
restored to the state before the operation occured.
• To undo a step, in the Audio Files workspace or Audio Montage
workspace, select Edit > Undo.
• To redo a step, in the Audio Files workspace or Audio Montage
workspace, select Edit > Redo.
There are several zooming functions in the Audio Files workspace and
Audio Montage workspace.
Horizontal Zooming
• When you zoom out as far as possible, the entire file fits in the window.
• When you zoom in as far as possible, each sample occupies
several pixels on the screen. This allows for single
sample-accurate editing of waveforms.
41
Page 42

Program Overview
Zooming
Vertical Zooming
• When you zoom out as far as possible, the height of the wave fits
• As you progressively zoom in, the display only shows a part of the
• To optimize the vertical zoom of the waveform, press
High Zoom Level
• When the zooming level is very high, each sample is shown with a
in the window.
total height. The vertical scrollbars lets you adjust exactly which
section is shown. Check the ruler to see which part of the
waveform is currently shown in the display.
[Ctrl]/[Command], click and hold the time ruler, and move the
mouse up or down.
step and a bullet. The steps show the real digitized state, while the
bullets make it easier to see the samples, especially for zeroed
samples.
• The curve also represents an estimation of the analog
reconstructed signal to give hints on true peaks.
Zooming in the Overview and Main View Sections (Audio Files
Workspace Only)
• You can have different zoom levels in the overview and main view
section. In the overview, a range indicator on the time ruler
indicates which section of the file is currently displayed in the main
view. The range indicator is only shown if the option Sync with
other view is deactivated.
• To adjust the zoom level, drag the edges of the range indicator.
42
Page 43

Program Overview
Zooming
• To scroll in the main view, drag the range indicator.
Range indicator at the top of the overview display
• To adjust the zoom level using the scrollbar, drag the edges of the
scrollbar.
Zooming Using the Zoom Controls
Both the main view and the overview have horizontal and vertical zoom
controls.
• To zoom horizontally, click the Horizontal zoom control, and drag
left or right, or use the mouse wheel.
• To zoom vertically, click the Vertical zoom control, and drag up or
down, or use the mouse wheel.
• To fully zoom-out, double-click the zoom controls.
43
Page 44

Program Overview
PROCEDURE
PROCEDURE
Zooming
Zooming Using the Magnifying Glass Tool
The Magnifying Glass tool is used to zoom in a specific section of the
waveform so that is occupies the entire wave window. This is only
available in the Audio Files workspace.
Using the Magnifying Glass Tool in the Main View
The selection that you make in the main view of the wave window is
magnified and fills up the entire main view.
1. In the Audio Files workspace, activate the Magnifying Glass tool by
doing one of the following:
• Click the Magnifying Glass icon.
• Hold down [Ctrl]/[Command].
2. In the main view of the wave window, click and drag left or right,
and release the mouse button.
The selected part of the wave now occupies the entire main window.
Using the Magnifying Glass Tool in the Overview
The selection that you make in the overview of the wave window is
displayed in the main view.
• In the overview of the wave window, click and drag left or right, and
release the mouse button.
RESULT
The selected range of the waveform is shown in the main view.
44
Page 45

Program Overview
Zooming
Zooming Using the Mouse
With the mouse, you can change the zoom factor by clicking and
dragging or by scrolling the mousewheel.
• To zoom horizontally, in the wave window or the montage window,
position the mouse cursor over the time ruler, click, and drag up or
down.
• To zoom horizontally while maintaining the cursor position, position
the mouse cursor over the time ruler, press [Shift], and drag up or
down.
• To zoom horizontally using the mousewheel, press
[Ctrl]/[Command], point at a waveform, and move the
mousewheel.
• To zoom vertically using the mousewheel, press [Shift], point at a
waveform, and move the mousewheel.
Audio Files Workspace Only
• To zoom vertically, in the wave window, position the mouse cursor
over the level ruler, click, and drag left or right.
• To reset the vertical zoom to 0 dB, double-click the level ruler.
• To set the vertical zoom to the best value that is the current
minimum and maximum displayed samples, make sure that the
level ruler is set to 0 dB, and double-click the level ruler.
Zooming Using the Keyboard
A quick way to zoom the active wave or montage window is to use the
arrow keys on the computer keyboard.
• To zoom horizontally in the active wave window or montage
window, press [Arrow Up] or [Arrow Down].
• To zoom vertically in the active wave/montage window, hold [Shift],
and press [Arrow Up] or [Arrow Down].
• To zoom vertically to fit the available height, press
[Ctrl]/[Command]-[Shift]-[Arrow Up].
• To zoom out fully, press [Ctrl]/[Command]-[Arrow Down]. To zoom
in fully, press [Ctrl]/[Command]-[Arrow Up].
45
Page 46

Program Overview
Zooming
Zoom Menu
The zoom menu allows you to quickly access various zoom settings.
In the Audio Files workspace or the Audio Montage workspace, select
View > Zoom.
View all
Zooms out as far as possible.
Zoom in on 1 minute/30 seconds/10 seconds/.../500 ms
Adjusts the zoom to display the selected time range.
Zoom in 1:1
Zooms in so that one pixel on the screen represents one sample.
Microscope
Zooms in as far as possible.
Zoom selection
Zooms the window so that the current selection occupies the
entire wave/montage window.
Zoom in on selected clips (Audio Montage workspace only)
Zooms in to display all selected clips in the wave/montage
window.
Zoom in audio
Zooms in in small steps.
Zoom out audio
Zooms out in small steps.
Edit
Opens the Zoom factor dialog, where you can edit the zoom
factor.
• Samples per screen point allows you to specify how many audio
samples are summarized in each screen point.
• Screen points per sample allows you to specify how many
screen points are used to represent a single audio sample.
46
Page 47

Program Overview
Zooming
Reset vertical zoom to 1:1
Adjusts zoom to display audio levels up to 0 dB.
Optimize vertical zoom
Changes the vertical zoom factor so that the peaks are clearly
visible. This adjustment is done according to the section of the
wave that is currently visible in the wave/montage window.
Optimize vertical zoom (Audio Files workspace only)
Zooms in to display all audio peaks in the wave window.
Zoom to -12 db/-24 db/.../-96 db
Adjusts the zoom to only display samples below the selected dB
value.
Zoom in vertically
Zooms in to show waveforms with a lower level.
Zoom out vertically
Zooms out to show waveforms with a higher level.
About Zooming in the Audio Montage Workspace
Zooming options in the Audio Montage workspace are almost similar to
those in the Audio Files workspace. However, there are additional
zooming options for tracks and the Zoom window for displaying a
close-up view of the beginning of the focused track.
Zoom Buttons in the Audio Montage Workspace
The zoom buttons in the Audio Montage workspace allow you to apply
zoom presets.
• To only display the focused track, or also the tracks below and/or
above the focused track, click the corresponding buttons.
• To set the zoom setting to fit the focused clips in 25 %, 50 %, or
100
% of the available space, click the corresponding buttons.
47
Page 48

Program Overview
Managing Tabs
Displaying More or Less Tracks
• To select a certain area, click [Ctrl]/[Command], and drag the
rectangle over the tracks and clips that you want to zoom in.
The number of tracks that are displayed in the Audio Montage
workspace can be changed with the magnification controls in the lower
right corner of the montage window.
• To display more tracks, click the smaller magnifying glass icon.
• To display less tracks, click the larger magnifying glass icon.
• To make a single track fit the whole montage window, click the
numbered button to the left of a track, and select Zoom from the
pop-up menu. You can also right-click the lower area of a track,
and select Whole clip from the pop-up menu.
Managing Tabs
A tab is a container for a file in WaveLab LE. You can open several tabs,
but only one can be active at a time. The Tabs menu allows you to sort
and close tabs and navigate between the tabs.
Close/Close all but active/Close all
Closes the active tab, all tabs except the active tab, or all tabs.
Select files to close
Opens a dialog in which you can specify the files to be closed.
Sort
Lets you sort the tabs by name, date, or modification date. If
several tab groups exist, only the active tab group is sorted.
Activate next/previous
Selects the next/previous tab.
Pick list
Opens a list of all open tabs. To open a tab, double-click it.
48
Page 49

Program Overview
Presets
Files to Close Dialog
In this dialog, you can specify which files you want to close.
In any workspace, except the Control Window workspace, select Tabs
> Select files to close.
Files list
Displays all open files. You can set a checkmark for the files that
you want to close. By default, only the active file will remain open
and all other files will be closed.
Presets
Select all
Select all files in the list.
Select none
Deselects all files in the list.
Close files
Closes the files.
You can create presets to save commonly used settings. WaveLab LE
provides a selection of presets that can be used by most dialogs.
You can save customized presets. The next time that you load the
program, the presets are available.
Presets are saved as single files and can be organized in subfolders.
The root folder of the preset is different for each type of preset and
cannot be changed.
49
Page 50

Program Overview
PROCEDURE
PROCEDURE
PROCEDURE
Presets
Saving a Preset
Loading Presets
Saved presets can be used to apply commonly used settings to dialogs
or plug-ins.
1. Open the dialog that you want to use, and modify the parameters.
2. Select the Preset menu, and select Save as.
3. Optional: Click the folder icon, and select a name for a subfolder
in which you want to save the preset.
4. Type in a name, and click Save.
To apply a saved preset to a dialog or plug-in, you must load the preset.
• Inside a dialog, click the Presets menu, and select the preset that
Modifying a Preset
You can modify a preset and save the changes.
1. Open the dialog that you want to use, and load the preset that you
2. Modify the parameters of the dialog.
3. Click the Preset menu, and select Save.
you want to apply to the dialog.
want to modify.
50
Page 51

Program Overview
PROCEDURE
PROCEDURE
PROCEDURE
Presets
Deleting a Preset
1. Open the dialog that you want to use and select the preset that you
want to delete.
2. Click the Presets menu, and select Organize presets.
3. In the Explorer window, select the preset file that you want to
delete, and press [Delete].
Storing and Restoring Temporary Presets
Some dialogs allow you to save and load up to 5 temporary presets. This
is useful if you want to quickly test and compare different settings.
Storing Presets
1. Open the dialog that you want to use, and make your settings.
2. Click the Presets menu, and from the Store temporarily
submenu, select a slot.
Restoring Presets
1. Open the dialog in which you have saved a preset.
2. Click the Presets menu, and from the Restore submenu, select a
preset.
51
Page 52

Program Overview
NOTE
PROCEDURE
Saving a Picture of the Active Window
Saving a Picture of the Active Window
You can save a picture of the active window in the BMP, JPG/JPEG, or
PNG file format, or copy it to the clipboard.
Plug-in windows are not included in the picture.
1. Click in the window for which you want to save a picture.
For example, click in the wave window or the montage window.
2. In the Audio Files workspace or the Audio Montage workspace,
select View > Save picture of active window.
The Save picture of active window dialog opens.
3. In the Save picture of active window dialog, you have the
following options:
• To copy the picture to the clipboard, activate Copy to clipboard.
• To save the picture in a specified file format, activate Save as file.
Optionally, you can activate Open picture after saving.
4. Click OK.
• If you have activated Copy to clipboard, the picture is copied to
the clipboard.
• If you have activated Save as file, the Save as dialog opens where
you can specify the file location, file format, and file name. Click
Save to confirm your settings.
If you have set the montage window as the active window, the resulting picture
could look like this.
52
Page 53

File Operations
PROCEDURE
Recently Used Files
All files that you have recently used in WaveLab LE are saved in a list.
This helps you to gain fast access to recent projects. You can open
recently used files via the File menu.
Setting the Number of Recently Used Files
1. In any workspace, select Options (WaveLab menu on Mac) >
Global preferences > Display.
2. In the Miscellaneous options section, set the maximum number
of items that you want to list in the following areas:
• Recent file menus
3. Click OK.
Save and Save As
• When you save a file for the first time, it does not matter whether
you select Save or Save as.
• Once a file has been saved, select File > Save, or press
[Ctrl]/[Command]-[S] to update the file and make the changes
permanent.
• If you want to specify a new name, location, and/or file format,
select File > Save as.
53
Page 54

File Operations
Save and Save As
• In the Audio Files workspace, all save operations except Save
About Tab Colors
Tab colors give information on whether a file is saved or not.
The following colors can be shown:
Orange
Green (Audio Files workspace only)
Copy clear the undo history, which means that after saving you
cannot undo or redo.
The file is saved.
The file uses a decoded file format and is saved.
Purple
A new file that is not empty but has not been saved yet. For
example, when creating a new file and pasting content into it.
Red
The file has been modified and changes have not been saved yet.
Unsaved Changes Indicator
When you have made changes to a file, an asterisk is displayed next to
the file name until you save the file and the tab changes its color.
54
Page 55

File Operations
PROCEDURE
PROCEDURE
Save and Save As
Save Multiple Files at Once
You can save some or all open files at once.
1. In any workspace, except the Control Window, select File > Save
all.
2. Select the files that you want to save.
3. Click Save.
Reverting to Saved File
You can revert the file you are working on back to its last saved state.
This undoes all the changes made to the file since it was last saved.
1. In any workspace, except the Control Window, select File >
Revert to saved.
2. In the warning dialog, click Yes to revert to the last saved state.
RESULT
The last saved version of the file is loaded from disk.
Automatic Backups
Backups are created automatically if a file with the same name already
exists.
For example, if you select Save As and specify a file name already used
in that folder, you will be asked if you want to back up the existing file
first. If you click Yes, the backup name will be the original name, with
“.bak” added at the end.
55
Page 56

File Operations
PROCEDURE
File Renaming
About Saving Audio Montages
The saving operations for audio montages are the same as for audio
files. However, there are things to note when saving audio montages.
• Audio montage files only contain references to audio files. If you
want to rename audio files referenced by audio montages, use the
Rename dialog. All clip references are updated automatically.
• If the audio montage contains clips that refer to untitled audio files,
save these audio files before saving the audio montage.
File Renaming
Renaming a File
The Rename function allows you to rename a file and update all
references automatically. For example, if you rename an audio file named
“India” to “Sitar”, all currently open files that reference the file “India” are
updated to reference the file as “Sitar”.
Audio files, peak, and marker files are also renamed accordingly.
1. Select the file that you want to rename.
2. In any workspace, except the Control Window, select File >
Rename.
3. Enter the new name and/or a new file location.
4. Select a file suffix from the drop-down list.
5. Click OK.
56
Page 57

File Operations
NOTE
File Renaming
Rename File Dialog
In this dialog, you can choose a new file name, file extension, and folder
location for the active file.
In any workspace, except the Control Window, select File > Rename.
Name
Type in the new name.
File extension drop-down list
Select a case for the file extension.
Change folder
If this option is activated, you can change the folder location of the
file.
This is only possible within the same drive partition.
Keep as default
If this option is activated, the same path is selected next time you
open the dialog. This is useful if you need to move several files
successively.
57
Page 58

File Operations
PROCEDURE
Deleting Files
Deleting Files
You can delete the currently active file from within WaveLab LE.
PREREQUISITE
The file that you want to delete is not copied to the clipboard, is not
pasted into another file that is open, and is not open in another
application.
1. Select the file that you want to delete.
2. In any workspace, except the Control Window, select File >
Delete.
3. Click OK.
RESULT
The file, including it’s peak and marker files, is deleted.
Special Menu
From this menu you can select various file related options, for example,
you can add the active file to a Podcast.
In any workspace, except the Control Window, select File > Special.
Depending on the workspace, not all options are available.
Information
Displays information about the active file.
Add to Podcast
Adds the active file to a Podcast.
Reveal in Windows Explorer/Mac OS Finder
Opens the Windows Explorer/Mac OS Finder to show the location
of the active file.
Copy to clipboard
Opens a menu, from which you can select which information about
the active file you want to copy to the clipboard.
58
Page 59

File Operations
PROCEDURE
Temporary Files
Create a file link on the desktop (Windows only)
Creates a file link on the desktop. The link opens the file with the
default application associated with the file type.
Temporary Files
Temporary files are used for certain operations, such as the undo/redo
functions. You can specify where WaveLab LE saves its temporary files.
For example, if your source files are located on the C: drive, you could
specify D:\temp and E:\temp as temporary folders. This improves the
performance and reduces disc fragmentation.
RELATED LINKS:
“Specifying Folders” on page 59
Work Folders vs. Document Folders
WaveLab LE distinguishes between two types of folders: work folders
and document folders.
In work folders, temporary files are stored. Document folders contain
WaveLab LE-specific files, such as wave files, audio montages, etc.
Specifying Folders
You can specify which folder should open when you perform any open
or save operation (document folder). You can also specify up to three
folders for temporary files (work folder).
1. Open the workspace for which you want to specify document
folders.
2. Select Options > Folders.
3. Click the type of folder for which you want to specify a location.
4. Specify a location in the Folder field.
59
Page 60

File Operations
Work Folders vs. Document Folders
5. Optional: Depending on the selected type of folder, you can make
6. Click OK.
Folders Dialog
In this dialog, you can specify default document folders and work folders
for each workspace.
In any workspace, select Options > Folders.
additional settings.
In the list to the left, you specify the folder type that you want to make
settings for. The following options are available:
Folder for temporary files
Specify a folder for storing temporary files.
Cache folder
Activating Use cache folder for decoded files allows you to
specify a cache folder. The cache folder contains wave files that
are created when you are working with files in compressed file
formats, such as MP3 files. To prevent the cache folder to grow
indefinitely, WaveLab LE checks the date of each file in this folder
and deletes files that were created before a certain number of
days.
When Use cache folder for decoded files is deactivated, the
compressed files are decoded each time they are opened.
Audio File - Open Folder/Save Folder
The default open and save folders for audio files.
Audio Montage - Open folder/Save folder
The default open and save folders for audio montage files.
60
Page 61

File Operations
PROCEDURE
Setting the Focus on the Current File
Depending on the selected item, different settings are available on the
right side of the dialog:
Current Folder
Keep last used
Change when save-folder/open-folder changes
On opening the application, revert to this folder
In this field, the folder that is currently used as default is displayed.
You can click the folder button to the right to navigate to a folder,
or to create a new folder.
Uses the last folder for saving or opening files of the selected type.
Updates the default open folder when you change the default save
folder, and vice versa. Activate this option for both the save folder
and the open folder for a specific file type to use the same folder
for saving and for opening this type of file.
Activate this option to restore a specific folder each time you open
WaveLab LE. This way changes to save/open folders are only
temporary and reset when you restart WaveLab LE.
Setting the Focus on the Current File
If you are editing inside a floating window or a tool window and want to
switch back the focus to a wave/montage window, you can use the Set
focus on current file option.
• In any workspace, press [Win]/[Ctrl]-[ESC], to set the focus on the
wave/montage window.
61
Page 62

About Workspaces
A workspace provides an editing and playback environment for a
particular audio file type. Each type of workspace has functions for its
specific file types.
In WaveLab LE, each file type has its own workspace designed for a
specific purpose:
• Audio Files workspace for viewing and editing audio files.
• Audio Montage workspace for assembling and editing audio
montages.
• Podcast workspace for preparing and uploading Podcasts.
A workspace is highly customizable to match your workflow. A
workspace can appear as a simple window with a single menu or as a
sophisticated arrangement of command bars, tool windows, tab
groups, and active meters.
When a file is opened from a given workspace, it is added to the active
tab group of this workspace.
You can drag files between workspaces if their formats are compatible.
For example, you can drag an audio file from the Audio Files workspace
to the Audio Montage workspace by using its tab bar or its document
button.
Elements of a Workspace
The center of the workspace is about the data that you want to edit, and
all the menus, command bars, tool windows, controls, and tools to help
you with that.
Each workspace contains the following elements:
• A menu bar. Each workspace has a different menu bar, but certain
menus are common for all workspaces and each menu can be
customized in various ways. The workspace menu has a submenu
to show/hide the available Command bars and tool windows.
62
Page 63

About Workspaces
Audio Files Workspace
• One or more Command bars with buttons for instant access to
functions. Command bars can be customized extensively.
• Tab groups to host the files to edit. This is the central part of the
workspace. You can move a tab to another workspace, create a
new empty tab, display the file path, and access other functions by
right-clicking.
•A set of Specific tool windows. Which tools are available
depends on the workspace. They can be activated/deactivated
individually.
•A set of Shared tool windows. The shared tools vary according
to the workspace, and can be turned on or off individually. A shared
tool window is a global window that is located in one workspace
at a time.
Audio Files Workspace
This workspace provides tools and functions for sample-accurate audio
editing. It is the environment commonly known as an audio editor.
It includes various metering tools.
The wave window gives you a graphical representation of the audio file
and allows you to view, play back, and edit the file.
Audio Montage Workspace
In this workspace, you assemble audio clips into a montage. You can
arrange, edit, and play back clips on both stereo or mono tracks.
You can place any number of clips, on an audio track. A clip contains a
reference to a source audio file on your hard disk, as well as start and
end positions in the file.
The montage window gives you a graphical representation of clips on
tracks. In it you can view, play back, and edit the tracks and clips.
63
Page 64

About Workspaces
Podcast Workspace
Podcast Workspace
In this workspace, you assemble, define, and publish your Podcast to
the internet.
RELATED LINKS:
“Podcasts” on page 172
Opening Files in a Workspace
You can open files in the workspace that you are working in and in any
other workspace, without having to switch workspaces first.
• To open a file in a workspace, select File > Open. From the file
browser, select the workspace file that you want to open, and click
Open.
•On the Central switcher bar, click a workspace icon, and select
Open. From the file browser, select the file that you want to open,
and click Open.
Organizing Workspace Windows
For working with several workspace windows, WaveLab LE offers
functions to organize the windows.
• To lock a workspace layout, activate Workspace > Lock layout.
This prevents you from moving or closing tool windows.
• To automatically move the shared tool windows to the newly
activated workspace, every time you switch between workspaces,
activate Workspace > Auto move shared tool windows.
• To activate full screen view, select Workspace > Full screen
view.
• To specify the workspace position on the screen, select
Workspace > Position on screen, and select an option.
• To bring all workspace windows to front, select Workspace >
Bring all to front.
64
Page 65

About Workspaces
About Tool Windows
• To cascade all workspace windows, select Workspace >
Cascade all.
• To switch between the previously selected workspace window
and the active workspace window, select Workspace > Switch to
previous workspace, or press [F5].
• To close the active workspace, select Workspace > Close.
About Tool Windows
Throughout WaveLab LE there are various tool windows available that
allow you to view, analyze, and edit the active file.
Generally, the content of a tool window is synchronized with the active
file, with the exception of the audio meters which displays the audio file
being played back. Tool windows can be docked and undocked, and
saved in your custom layouts. There are two types of tool windows
available:
• Specific tool windows
• Shared tool windows
The tool windows can be accessed via the Workspace menu.
Specific Tool Windows
Specific tool windows are windows that are specific to the current
workspace. The following specific tool windows are available:
Audio Files
workspace
Audio Montage
workspace
Podcast
workspace
65
Page 66

About Workspaces
About Tool Windows
Shared Tool Windows
The difference between specific and shared tool windows is that there
can only be a single instance of a shared window in WaveLab LE. For
example, a single Master Section, or a single level meter.
When you open a shared tool window in another workspace it undocks
and moves from its original workspace, if this option is activated. An
empty tab container with a title bar remains in its previous workspace.
You can set the moving behavior by activating/deactivating Workspace
> Auto move shared tool windows.
A shared tool window, if docked, can only appear in a single workspace
at a time. To retrieve a shared tool window from another workspace,
click the tool window.
The following shared tool windows are available:
Audio Files workspace and Audio Montage workspace
Opening and Closing Tool Windows
You can close all tool windows you do not need for your project.
• To open or close a specific tool window, select Workspace >
Specific tool windows, and select a tool window, or use the
Specific Tool Windows command bar.
• To open or close a shared tool window, select Workspace >
Shared tool windows, and select a tool window, or use the
Shared Tool Windows command bar.
• To close a tool window, move the mouse on the left side or the top
of the window, and on the toolbar that appears, click Close.
Tool Windows Command Bar
On the Specific Tool Windows and Shared Tool Windows command
bars you can quickly switch tool windows on and off, without having to
navigate through a menu.
To open or close the Shared Tool Windows command bar, select
Workspace > Command bars > Shared Tool Windows.
Shared Tool Windows command bar in the Audio Montage workspace
66
Page 67

About Workspaces
About Tool Windows
To open or close the Specific Tool Windows command bar, select
Workspace > Command bars > Specific Tool Windows.
Specific Tool Windows command bar in the Audio Montage workspace
Docking and Undocking Tool Windows
Tool windows can be used as docked windows or as floating windows.
They can be freely dragged around and docked at various locations.
Command bars can also be freely moved around and docked along the
edges of most windows.
To dock/undock a tool window, use one of the following methods:
• Double-click the title bar, located on the left or the top of the tool
window.
• Click the double window icon at the top left corner of the window.
• Drag the tool window title bar of a specific tool window. To dock
the tool window, drag it by its title bar to another position.
To prevent an undocked tool window from docking, use one of the
following methods:
• Hold down [Ctrl]/[Command] before dragging the tool window.
• Activate the Floating versus docking priority icon on the left or
the top of the tool window.
Differences Between Windows and Mac OS
Floating windows behave slightly different on Windows and Mac OS.
• On Windows systems, a floating window is hidden when its
dependent workspace is minimized or covered by another window.
If WaveLab LE is not the active application, all its independent
floating windows are hidden.
• On Mac OS X systems, a tool window is always on top of all other
windows and a floating window remains visible even if its
dependent workspace is not active or is minimized. If WaveLab LE
is not the active application, all its floating windows are hidden.
67
Page 68

Playback
WaveLab LE offers numerous playback functions.
There are 4 playback modes available:
• Traditional playback, with playback starting from the cursor
position and stopping anywhere when stopping playback.
• Play range, where playback starts from a given point and stops at
another point of interest.
RELATED LINKS:
“Playback Shortcuts” on page 71
Transport Bar
With this command bar you can control playback of an audio file or
audio montage, navigate between various positions in an audio file or
audio montage, and open the Recording dialog.
In the Audio Files workspace or the Audio Montage workspace, select
Workspace > Command bars > Transport bar.
Transport bar in the Audio Files workspace
Transport bar in the Audio Montage workspace
Ranges
• Selected time range
Lets you select one of the following ranges:
• Marked region where edit cursor is located
Play range
Plays the selected range.
68
Page 69

Playback
Transport Bar
Move cursor to previous/next anchor
Moves the edit cursor position to the previous/next anchor. To set
the type of anchor, right-click the next anchor button and select an
option from the menu. If you click during playback, playback
continues from the anchor position.
Move playback position backwards/forwards
Moves the edit cursor position to the left/right. If you click during
playback, playback jumps to the new edit cursor position.
To move the edit cursor to the start/end of the file, press
[Ctrl]/[Command], and click the Move playback position
backwards/forwards button.
Loop
Activates the loop mode. Right-click the loop button to select
whether to loopforever or only a few times.
Stop
Stops the audio being played. If playback is already stopped, the
edit cursor is moved to the previous start position.
Play
Starts playing the active audio file or audio montage from the edit
cursor position.
If the audio being played back is not the active audio file, the Play
button has a different color. This happens if you switch to another
workspace during playback, for example.
The playback button when playing back in the active window (left) and when playing
in another window or workspace (right).
Record
Opens the Recording dialog.
Time display
Displays the edit cursor or playback position. Click to select
another time unit.
Fold bar
Minimizes the transport bar. To unfold the transport bar again, click
the thin line where the transport bar was located.
69
Page 70

Playback
Transport Bar
Settings
Opens layout menu of the transport bar and lets you edit shortcuts
for the transport bar. You can also right-click the transport bar to
open this menu.
Transport Bar in the Podcast Workspace
In the Podcast workspace, a simplified transport bar allows you to play
back the selected Podcast episode.
Play Button
Stop Button
Clicking the Play button on the transport bar starts playing back the
active audio file or audio montage from the edit cursor position.
You can also use the Space bar or the Enter key on your keyboard to
start playback. Pressing the Space bar during playback stops playback,
while pressing Enter during playback makes playback restart from the
last start position.
When loop is activated, the audio selection is looped, if available.
Otherwise, the region defined by loop markers is looped, if available. If
there are no selection ranges or loop markers, the entire file is looped.
The result of clicking the Stop button or on the transport bar or [0] on
your numeric keypad depends on the current situation.
• If you trigger Stop in stop mode, the edit cursor moves either to
the previous Playback start marker, or to the selection start
(whatever is closer), until the start of the file is reached.
• If there is no selection or if the edit cursor is positioned to the left
of the selection, it is moved to the beginning of the file instead.
70
Page 71

Playback
PROCEDURE
Transport Bar
Playing Back Audio Ranges
You can play back audio ranges using the Ranges options on the
transport bar.
1. On the transport bar, select the type of range that you want to play
back.
2. Position the edit cursor inside the range that you want to play back
or make a selection range.
3. To play back the selected range, click the Play range button on the
transport bar or press [F6].
RESULT
The selected range is played back.
About Loops
Loop points are updated continuously during playback. If you change
the loop start or end during playback, the loop changes. This way you
can audition selection points for rhythmic material.
If you loop a section in an audio montage, playback loops within the
boundaries of the current selection range. This selection range may be
on any track, even if empty. The vertical position of the selection range
is of no relevance for loop playback, only the left and right selection
boundaries matter.
Playback Shortcuts
In addition to the buttons on the transport bar, there are shortcuts that
can be used even when the wave window or montage window is not the
active window.
Space bar
Start/stop playback.
0 on numeric keypad.
Stop. If the program is stopped and you trigger Stop again, the edit
cursor moves either to the previous Playback start marker, or to the
selection start (whatever is closer), until the start of the file is reached.
This is the same as clicking the Stop button on the transport bar.
71
Page 72

Playback
Transport Bar
Enter
Starts playback. If pressed during playback, playback restarts from
the previous start position. This is the same as clicking the Play
button on the transport bar.
[F6]
Starts playback of the selected range, depending on the selected
option in the Ranges section of the transport bar.
Transport Bar Settings
In the transport bar settings menu, you can customize the transport bar.
This is useful to optimize the transport bar according to the available
screen space.
To open the settings menu, right-click the transport bar, or click the
Settings button on the transport bar.
Hide
Hides the transport bar. To make it visible again, select
Workspace > Command bars > Transport bar.
Fold
Minimizes the transport bar. To unfold the transport bar again, click
the thin line where the transport bar was located.
Top/Bottom
Aligns the transport bar at the top/bottom of the wave window or
the montage window.
Large transport buttons/Small transport buttons
Determines the size of the transport bar buttons.
Align buttons left/Align buttons right/Center button
Moves the transport bar buttons to the corresponding position.
Edit shortcuts
Opens the Customize commands dialog, where you can edit the
shortcuts for the transport bar commands.
72
Page 73

Playback
PROCEDURE
Playing Back Only One Channel
Playing Back Only One Channel
You can choose to play only the left or the right channel of an audio file
in the Audio Files workspace.
• In the Audio Files workspace, select Options, and
activate/deactivate Play left channel and/or Play right channel.
Starting Playback From the Ruler
You can use the ruler to quickly jump to a position and start playback
from there.
• Double-clicking the ruler starts playback from that position.
Playback continues until you click Stop or until the end of the audio
file or audio montage.
• To set the playback position to a certain position, click the ruler
during playback. This also applies for clicking the time rulers of
another audio file or audio montage, which allows you to quickly
switch playback between audio files or audio montages.
• To start playback from a marker position, press [Ctrl]/[Command]
and double-click a marker.
73
Page 74

Playback
PROCEDURE
PROCEDURE
Using the Play Tool
Using the Play Tool
This tool allows you to play back from any position on one or both stereo
channels.
1. In the Audio Files workspace, select the Play tool from the Edit
tools command bar, or press and hold [Alt]/[Option].
2. In the wave window, click at the position where you want playback
to start.
The cursor shape indicates whether the left (L), the right channel (R), or
both channels are played back.
RESULT
Playback continues for as long as you keep the mouse button pressed,
or until the audio file ends. After playback has stopped, the cursor is
moved to the playback start position.
Playback Scrubbing
Playback scrubbing helps you find a certain position in an audio file, by
restarting playback repeatedly when you click and drag on the time ruler
during playback or use the Play tool.
Scrubbing Using the Play Tool
1. In the Audio Files workspace, select the Play tool from the Edit
tools command bar, or press and hold [Alt]/[Option].
2. Click in the wave window, or click and drag the time ruler.
If you click in the wave window, playback starts at the position where you
clicked. If you click and drag in the time ruler, the audio is played back
from the edit cursor position and a small section is looped once.
74
Page 75

Playback
PROCEDURE
Scroll During Playback
Scrubbing Using the Time Ruler
1. Optional: In the Audio Files workspace, activate Options > Stop
after playback scrubbing, to stop playback after scrubbing.
The edit cursor then jumps back to the start position.
2. Start playback.
3. Click the time ruler and hold the mouse button pressed, and drag
left or right.
4. When you are done scrubbing, release the mouse button.
Playback Scrubbing Preferences
You can define the behavior of the Play tool in the Audio file editing
preferences.
In the Audio Files workspace, select Options > Audio file editing
preferences > Editing tab.
•If Restrict to Play Tool is activated, scrubbing is not available
when you click and drag on the time ruler during playback.
• The Sensitivity setting determines the length of the audio loop that
is played once when click and drang on the time ruler with the Play
tool activated.
Scroll During Playback
You can determine how the view should be scrolled in Play mode.
In the Audio Files workspace or the Audio Montage workspace, select
View > Scroll during playback.
The following options are available:
Immobile view
Disables scrolling.
75
Page 76

Playback
PROCEDURE
About Playback in the Audio Montage Workspace
View follows cursor
The view automatically changes to keep the playback cursor visible.
About Playback in the Audio Montage
Workspace
Playback in the Audio Montage workspace works the same way as in the
Audio Files workspace. However, there are some things to note.
Mute and Solo Tracks
You can mute or solo tracks in an audio montage by using the
corresponding menu in the track control area.
Click the number, and select Mute and/or Solo.
Playing Back Individual Clips
You can play back an individual clip on a track. Overlapping clips or clips
on other tracks are muted.
1. In the Audio Montage workspace, right-click the lower part of the
clip that you want to play back.
2. On the menu, select one of the following play options:
• To play back the clip, select Play focused clip.
• To play back the clip with pre-roll, select Play focused clip with
pre-roll.
76
Page 77

Audio file editing refers to opening, editing, and saving audio files.
Wave Window
The wave window displays audio files graphically. Here, you view, play
back, and edit individual audio files.
Audio File Editing
The wave window consists of two displays. You can use one display as
an overview to navigate through the project and the other as the main
view for editing.
You can synchronize the waveform displays so that they display the
same part of the audio file, by clicking the Sync with other view button.
77
Page 78

Audio File Editing
Wave Window
Magnetic Bounds in Audio Files
Certain positions, such as markers or selection edges, can be defined
as magnetic. Dragged elements can snap to these positions. This makes
it easier to position items accurately.
For example, when you move a marker and it gets close to one of the
magnetic bounds, the marker snaps to this position. A label is displayed,
indicating the snap position.
Magnetic Bounds Menu
On this menu, you can specify which positions should be magnetic.
When Snap to magnetic items is activated, items that you move snap
to these positions.
In the Audio Files workspace, select Options > Magnetic bounds.
You can let items snap to the following positions:
Start/End of file
Moved elements snap to the start/end of the file when they are
moved near these positions.
Time ruler marks
Moved elements snap to the time ruler grid when they are moved
near these positions.
Markers
Moved elements snap to marker positions when they are moved
near these positions.
Selection edges
Moved elements snap to the selection edges when they are moved
near these positions.
Cursor
Sets the edit cursor magnetic when moved near this position.
78
Page 79

Audio File Editing
Wave Window
Zero Crossing
A zero crossing is a point where the waveform crosses the zero level
axis.
If you cut out a portion of a wave and paste it in somewhere else, there
often is discontinuity where the two waves are joined. This discontinuity
results in a transient in the wave, which is perceived as a click or bump
in the sound.
To avoid this, you must make the splice at a zero crossing, especially if
you do not use crossfades.
If you activate Options > Snap selection to zero crossings, the
selections that you make are always adjusted so that they start and end
at the nearest zero crossing.
WaveLab LE can automatically search for zero crossings and extend the
selection outwards so that it begins and ends at a zero crossing. This
helps avoid clicks, pops, and bumps.
When you perform editing operations, such as cutting, pasting, or
dragging, make sure that the material is inserted at a zero crossing.
79
Page 80

Audio File Editing
PROCEDURE
PROCEDURE
Wave Window
Setting Up the Zero Crossing Detection
You can let selection edges automatically snap to the nearest zero
crossing point when making a selection. In the Audio file editing
preferences dialog, you can specify whether to allow snap at high zoom
factors, and specify the scan range for the zero crossing detection.
1. In the Audio Files workspace, select Options > Snap selection
to zero crossing.
2. Select Options > Audio file editing preferences.
3. On the Editing tab, fill out the Snap selection to zero crossing
options.
4. Click OK.
Moving the Cursor Position to the Closest Zero Crossing
You can automatically move the cursor position to the closest zero
crossing.
1. In the Audio Files workspace, position the cursor in the waveform.
2. Select View > Move cursor to > Snap position.
80
Page 81

Audio File Editing
File Handling in the Audio Files Workspace
File Handling in the Audio Files
Workspace
About Mono/Stereo Handling
WaveLab LE is very flexible in its handling of stereo. All editing
operations can be performed on either one channel or on both.
Supported File Formats
WaveLab LE can open and save audio files in a number of file formats.
The following table gives you some basic information about the formats:
Format Description
Wave (.wav) The following bit resolutions are supported: 8 bit, 16 bit,
20 bit, 24 bit, and 32 bit (float)
AIFF (.aif, .aiff, .snd) Audio Interchange File Format, a standard defined by
Apple Computers Inc.. The following bit resolutions are
supported: 8 bit, 16 bit, 20 bit, and 24 bit
MPEG-1 Layer 3
(.mp3, read only)
Original Sound
Quality (.osq)
Ogg Vorbis (.ogg) Ogg Vorbis is a compressed file format that is open,
The most common audio compression format. The major
advantage of MPEG compression is that the file size is
significantly reduced, while there is little degradation of
sound quality. WaveLab LE can both open and save files in
this format.
This is available on Windows 32/64-bit systems and on
Mac 32-bit systems.
This is the proprietary lossless compressed audio format of
WaveLab LE. By saving files in this format, you can save
considerable disk space without compromising audio
quality.
patent-free, and creates very small audio files maintaining
comparatively high audio quality.
Windows Media
Audio (.wma, .asf)
FLAC (.fla) Free Lossless Audio Codec (FLAC) is a codec which
Microsoft’s own compressed format. WaveLab LE lets you
import/export audio in this format (Windows only). To
import/export audio in WMA surround format, Windows
Media Player 9 or later must be installed on your system.
allows digital audio to be losslessly compressed.
81
Page 82

Audio File Editing
NOTE
PROCEDURE
PROCEDURE
File Handling in the Audio Files Workspace
Format Description
Apple formats
(.aac, .m4a, .mp4,
.m4b, .caf, .3gp,
.3g2, .caf)
If Quicktime is installed on your system, these formats are
available (read-only and only on 32-bit Windows or MAC
systems).
The “$$$” file type is a temporary file format of WaveLab LE. In case you
experience a computer, crash you may restore some of your work by
opening any stray “$$$” files on your hard disk.
About 20-bit, 24-bit, and 32-bit Float Files
You do not need a 20-bit or 24-bit audio card to take advantage of the
fact that WaveLab LE can handle 20-bit and 24-bit audio files. Any
processing or editing performed on the files is always done at full
resolution (32-bit float), even if your card does not support the full
resolution.
For playback, WaveLab LE automatically adapts to the card that you
have installed.
Creating a New Audio File
You can create an empty audio file, to assemble material from other
audio files, for example.
1. In the Audio Files workspace, select File > New.
2. In the dialog, specify the audio properties, and click OK.
Saving an Audio File
1. In the Audio Files workspace, do one of the following:
• To save an audio file that has never been saved before, select File
> Save as.
• To save an audio file that has been saved before, click the Save
button, or select File > Save.
2. In the Save Audio File dialog, specify a file name and location.
82
Page 83

Audio File Editing
PROCEDURE
File Handling in the Audio Files Workspace
3. Set up the available options:
• Keep this format for next time
• Save copy
• Open standard file selector before this dialog
4. Click Save.
Saving in Another Format
You can change the file format, sampling frequency, bit resolution, and
stereo/mono status when saving.
1. In the Audio Files workspace, select File > Save as.
2. Specify the file name and location.
3. Click in the Output Format field.
4. In the Audio File Format dialog, set the file format and specify the
properties.
5. Click OK.
6. Click Save.
RESULT
A new file is created. The original file is not affected by the operation.
Audio File Format Dialog
In this dialog, you can change various file settings when saving.
In the Audio Files workspace, select File > Save as, and click the
Output Format field. This dialog can also be opened from various other
locations in WaveLab LE.
83
Page 84

Audio File Editing
IMPORTANT
IMPORTANT
File Handling in the Audio Files Workspace
Type
Select an audio file type. This affects the options available on the
Audio format menu.
File extension
Select a file extension compatible with the current file type.
Audio format
Select an audio format compatible with the current file type.
Channels
Specify the number of audio channels for the files to be created.
For multichannel audio montages, you can create multiple files.
Sample rate
Select a sample rate for the audio file. If you change this setting, a
sample rate conversion takes place.
Use this only for simple conversions. For professional results, use the
Resample plug-in to add limiting and dithering.
Bit resolution
Select a bit resolution for the audio file. This option is only available
for certain file types.
Reducing the bit resolution is only advised for simple conversions. For
professional results, it is recommended to add dithering in the Master
Section.
Meta-data
Lets you make meta-data settings that are saved with the file. This
option is only available for certain file types.
The following options are available:
• When Do not save anything is selected, no meta-data are saved
with the file.
• When Inherit from source file is selected, the meta-data of the
source file are used. If this option is selected and the source
meta-data is empty, the default meta-data will be used, if available.
84
Page 85

Audio File Editing
PROCEDURE
File Handling in the Audio Files Workspace
• When selecting Specific to this configuration, you can edit the
meta-data, or replace it with a meta-data preset. To edit the
meta-data, open the meta-data pop-up menu again, and select
Edit.
About Changing the Format
When changing the sample rate, bit resolution, and number of channels
of an audio file, several operations are performed.
Property Action
Sample rate If a new sample rate is specified, a sample rate conversion is
performed.
Bit
resolution
Mono/
Stereo
• If you only want to change the bit resolution, you can do this
directly in the Edit > Audio properties dialog instead, and then
save the audio file.
• For high quality mastering purposes, it is not recommended to
change the sample rate and number of channels using the Audio
properties dialog, but instead use plug-ins and functions of the
Master Section.
• For the available compressed file formats (WMA, and Ogg Vorbis),
you can specify various options, such as bit rate and compression
method, and also enter text tags for the file.
Saving as OSQ File
If a different bit resolution is specified, the file is either “truncated”
down to 8 bits, or “padded” up to 24 bits. If you are converting to a
lower bit resolution, you should consider adding dithering.
If the file is converted from mono to stereo, the same material is
used in both channels. If the conversion is from stereo to mono, a
mix of the two channels is created.
OSQ (Original Sound Quality) is a lossless audio compression format,
which can significantly reduce the audio file size without affecting the
audio quality.
1. In the Audio Files workspace, select File > Save as.
2. Specify the file name and location.
3. Click in the Output Format field.
4. In the Audio File Format dialog, set the type to Original Sound
Quality (OSQ) and specify the properties.
85
Page 86

Audio File Editing
PROCEDURE
PROCEDURE
File Handling in the Audio Files Workspace
5. Click OK.
6. Click Save.
Saving a Selection as an Audio File
You can save a selection in the currently open audio file as a new audio
file.
1. In the wave window, make a selection range.
2. Select File > Export > Selected time range.
3. Specify a file name, location, and output format.
4. Click Save.
Saving Left/Right Channel as Audio File
You can save each channel individually into a separate file. Use this
option when you have been editing dual mono files, for example.
1. In the Audio Files workspace, select File > Export > Left channel
or Right channel.
2. Specify a file name, location, and output format.
3. Click Save.
86
Page 87

Audio File Editing
File Handling in the Audio Files Workspace
Encoding Audio Files
Audio can be stored in different formats. The process of converting
audio to another format is called encoding. When saving audio files, you
can specify various encoding options for some file formats.
Ogg Vorbis Dialog
You can edit the encoding options when you save an Ogg Vorbis audio
file.
You can open the Ogg Vorbis dialog from most places where you can
select an output file format. For example, in the Audio Files workspace,
select File > Save as, click the Output Format field, select Ogg Vorbis
as type, click the Encoding field, and select Edit.
Average bit rate
If this option is activated, the average bit rate in the file remains
constant during encoding. Because the file size is proportional to
time, the localization of a given point is easier, but it can result in a
lower quality compared to the Variable bit rate option.
Variable bit rate
If this option is activated, the bit rate in the file will vary during
encoding, depending on the complexity of the material. This can
give a better quality/size ratio in the resulting file.
In the Quality field, select the quality. Lower quality settings result
in smaller files.
87
Page 88

Audio File Editing
File Handling in the Audio Files Workspace
Windows Media Audio Encoding Dialog
You can edit the encoding options when you save a Windows Media
Audio (WMA) audio file. This dialog is only available in on Windows
systems.
You can open the Windows Media Audio dialog from most places
where you can select an output file format. For example, in the Audio
Files workspace, select File > Save as, click the Output Format field,
select Windows Media Audio (WMA) as type, click the Encoding field,
and select Edit.
Encoder
Lets you select the encoder.
Output sample rate
Lets you specify the output sample rate of the encoded file. The
higher the sample rate, the higher the quality, but the larger the
output file.
Output bit resolution
Lets you specify the output bit resolution of the encoded file. This
parameter is not available for all encoders.
Channels and bit rate
The available items here depend on the selected encoding method
and the output sample rate.
VBR (Variable bit rate)
If this option is activated, the bit rate in the file will vary during the
encoding, depending on the complexity of the material. This can
produce a better quality/size ratio in the output file.
In the Quality field, select the quality. Lower quality settings result
in smaller files.
Two-pass encoding (better, but twice as long)
If this option is activated, the encoding quality increases, but the
process takes twice as long.
88
Page 89

Audio File Editing
PROCEDURE
PROCEDURE
File Handling in the Audio Files Workspace
Constrained bit rate
This option is available when the VBR and Two-pass encoding options
are activated. This is used to maintain the bit rate within limits to avoid
peaks. This is recommended for certain media, such as CD or DVD.
Creating an Audio Montage from an Audio File
You can export audio files to an audio montage, including all markers
that you have set in the audio file.
1. Optional: If you only want to use a certain time range of the audio
file, create a selection range in the wave window.
2. In the Audio Files workspace, select File > Export > Create
audio montage from active file.
3. Select whether to export the whole file or the selected time range.
4. Optional: Decide if you want to perform any of the following marker
operations:
• Transcribe markers
• Split at generic region markers
5. Click OK.
Inserting Audio Files into Another Audio File
You can assemble an audio file from several audio files.
1. In the Audio Files workspace, open the audio file in which you want
to insert another audio file.
2. If you want to insert an audio file at the edit cursor position, select
View > Move cursor to > Snap position.
The edit cursor snaps to the nearest zero crossing. This avoids glitches.
3. Select File > Import and choose one of the following options:
• Insert audio file at start
• Insert audio file at end
• Insert audio file at cursor position
When you select Insert audio file at cursor position, the audio file is
cut at the insert position. The part after the cut is moved to the right.
4. Select the audio file that you want to insert, and click Open.
89
Page 90

Audio File Editing
PROCEDURE
PROCEDURE
File Handling in the Audio Files Workspace
Turning Selections Into New Files
You can turn selections into new files via dragging, or by using the Edit
menu.
Turning Selections Into New Files By Dragging
1. In the Audio Files workspace, make a selection in the wave
window.
2. Drag the selection to the WaveLab LE tab bar, and release the
mouse button.
RESULT
The selection appears in a new stereo window.
Turning Selections Into New Files Using the Menu
1. In the Audio Files workspace, make a selection in the wave
window.
2. Select Edit > Copy selection to new window > As is.
RESULT
The selection appears in a new stereo window.
90
Page 91

Audio File Editing
PROCEDURE
PROCEDURE
File Handling in the Audio Files Workspace
Converting From Stereo to Mono and From Mono to Stereo
You can convert audio files from mono to stereo and from stereo to
mono. Converting a mono file into a stereo file produces an audio file
that contains the same material in both channels, for example for further
processing into real stereo.
Converting a Selection From Stereo to Mono Using the Menu
1. In the Audio Files workspace, make a stereo selection in the wave
window.
2. Select one of the following options:.
• To mix the left and right stereo channels when converting to mono,
select Edit > Copy selection to new window > Convert to Mono
(Mix).
• To mix the left channel with the inverse of the right channel when
converting to mono, select Edit > Copy selection to new window
> Convert to Mono (Subtract right channel from left channel).
The resulting mono wave contains the difference between the
channels. For example, this allows you to verify that a wave file
really is a true stereo file rather than a mono file converted to stereo
format.
RESULT
The selection appears in a new stereo window.
Converting From Stereo to Mono While Saving
1. In the Audio Files workspace, select File > Save as.
2. Click in the Output Format field.
The Audio File Format dialog opens.
3. From the Channels menu, select one of the mono settings.
For example, when selecting Mono (Mix -3 dB), the resulting audio file is
attenuated by 3
introduce clipping. These two settings can be used to remedy this.
dB. Because mixing two channels into mono can
4. Click OK.
5. Click Save.
91
Page 92

Audio File Editing
PROCEDURE
File Handling in the Audio Files Workspace
Converting a Selection From Mono to Stereo
1. In the Audio Files workspace, make a mono selection in the wave
window.
2. Select Edit > Copy selection to new window > Convert to
Stereo.
RESULT
The selection appears in a new stereo window.
Swapping Channels in a Stereo File
You can move the audio in the left channel to the right channel, and vice
versa.
• To swap the channels of the whole audio file in the Audio Files
workspace, select Edit > Swap stereo channels.
• To swap only a selected range of the audio file, make a selection
range in the wave window, and select Edit > Swap stereo
channels.
Special Paste Operations
On the Paste special menu, you find additional paste options.
In the Audio Files workspace, select Edit > Paste special.
Overwrite
Overwrites data in the destination file, rather than moving data to
make room for the inserted audio. How much is overwritten
depends on the selection in the destination file:
• If there is no selection in the destination file, a section with the
same length as the pasted selection is overwritten.
• If there is a selection in the destination file, the pasted selection
replaces that selection.
Append
Adds the pasted audio after the end of the file.
Prepend
Adds the pasted audio before the beginning of the file.
92
Page 93

Audio File Editing
PROCEDURE
File Handling in the Audio Files Workspace
Multiple copies
Opens a dialog in which you can enter the number of copies that
you want to create.
Mix
Blends two files into each other, starting at the selection or, if there
is no selection, at the cursor position.
• When you select the Mix option, a dialog opens, allowing you to
specify the gain for the audio on the clipboard and at the
destination.
• All the data on the clipboard is always mixed in, regardless of the
length of the selection.
Moving Audio
You can rearrange the order of audio in a file by dragging, and cutting
and pasting.
Moving Audio by Dragging
PREREQUISITE
Decide whether you want to use Snap selection to zero-crossing.
1. In the wave window, make a selection.
2. Click in the middle of the selection.
3. Drag to a position outside the selection in the same file, or to
another wave window.
4. Release the mouse button.
93
Page 94

Audio File Editing
PROCEDURE
NOTE
PROCEDURE
File Handling in the Audio Files Workspace
Moving Audio Using Cut and Paste
PREREQUISITE
Decide whether you want to use Snap selection to zero-crossing.
1. In the wave window, make a selection.
2. Use one of the following copy methods:
•Select Edit > Cut.
• Press [Ctrl]/[Command]-[X].
• Drag the selection onto the Cut icon.
3. Select how you want to insert the selection:
• If you want to insert the audio, click once at the position in the same
• If you want to replace a section of audio, select it.
file or in another file.
4. Select Edit > Paste or press [Ctrl]/[Command]-[V].
RESULT
The selection is removed from its original position and inserted where
you drop it.
To completely undo a move between two files you must first undo the
paste in the destination window and then undo the cut in the source
window.
Moving Audio by Nudging
The Nudge left/right tools can be used to move the audio in small steps
within a file.
1. In the wave window, make a selection.
2. Depending on whether you want to nudge the selection to the left
or to the right, select one of the following tools:
•Select Edit > Tools > Nudge left, or click the Nudge left icon on
the toolbar.
•Select Edit > Tools > Nudge right, or click the Nudge right icon
on the toolbar.
94
Page 95

Audio File Editing
File Handling in the Audio Files Workspace
3. Click the selection.
Pressing [Shift] switches nudge left to nudge right and vice versa.
4. To exit the nudge tool mode, click anywhere outside of the
selection.
RESULT
The audio is moved one pixel. Exactly how much this is depends on how
far you are zoomed in. For example, if the status bar displays x1:256, the
selection is moved 256 samples. The moved section overwrites the
audio at that position.
Copying Audio
You can copy sections of audio within the same file or between audio
files.
Stereo/Mono Handling
Stereo/mono is handled as follows when you drag between files:
Dragged
section Drop wave Action
Stereo Stereo The dragged audio is always inserted into
Stereo Mono Only the left channel is inserted.
Mono Stereo What happens depends on the vertical
Stereo/mono is handled as follows when you copy and paste files:
both channels.
drop position. This is indicated by the
cursor shape. The selection can be
inserted into only one of the channels, or
the same material can be inserted into
both channels.
Copied section Paste wave Action
Stereo Stereo If the wave cursor extends across both
channels of the destination file, the
material is inserted into both channels.
95
Page 96

Audio File Editing
PROCEDURE
File Handling in the Audio Files Workspace
Copied section Paste wave Action
Stereo Stereo If the wave cursor is only in one channel,
Stereo Mono Only the left channel is pasted.
Mono Stereo What happens depends on whether the
Sample Rate Conflicts
If you copy or move audio from one window to another, and the sample
rates of the two files are not the same, the copied/moved sound plays
back at the wrong pitch (speed). The program warns you if this is about
to happen.
the audio is only pasted in that channel.
Material from the left channel is pasted in
the left channel and vice versa.
wave cursor is in one channel or both. The
audio is either pasted in one of the
channels, or the same material is inserted
into both channels.
While mixing sample rates can be used as an effect, it is most often not
intended. There are two ways to get around this:
• Convert the sample rate of the source file to the same rate as the
destination file before editing.
• Convert the sample rate of the destination file to the same rate as
the source file before adding the audio.
Copying Audio Using Copy and Paste
PREREQUISITE
Decide whether you want to use Snap selection to zero-crossing.
1. In the Audio Files workspace, make a selection.
2. Use one of the following copy methods:
•Select Edit > Copy.
• Press [Ctrl]/[Command]-[C].
• Drag the selection onto the Copy icon.
96
Page 97

Audio File Editing
PROCEDURE
PROCEDURE
Changing the Audio Properties
Copying Audio by Dragging
3. Select how you want to insert the selection:
• If you want to insert the audio, click once at the position in the same
file or in another file.
• If you want to replace a section of audio, select it.
4. Select Edit > Paste, or press [Ctrl]/[Command]-[V].
PREREQUISITE
Decide whether you want to use Snap selection to zero-crossing.
1. In the Audio Files workspace, make a selection.
2. Click the middle of the selection, and drag it to a position outside
the selection in the same file, or to another wave window.
3. Release the mouse button.
RESULT
The selection is inserted at the indicated point. The audio that previously
began at that point is moved to the right.
Information About the Active Audio File
You can open a dialog that shows the name, file location, size, date, and
file format of the active audio file.
• In the Audio Files workspace, select File > Special >
Information.
Changing the Audio Properties
You can change the declared sample rate and sample accuracy of audio files.
Changing these values does not process the audio file in any way (in
contrast to using Save as). However, the following rules apply:
97
Page 98

Audio File Editing
NOTE
PROCEDURE
Changing the Audio Properties
• If you change the sample rate, the file plays back at a new pitch.
• If you change the bit resolution, the file is converted to the new
resolution the next time you save it.
There is no undo for this. If you save with a lower bit resolution, the file
is converted permanently.
1. In the Audio Files workspace, open an audio file.
2. Select Edit > Audio properties.
3. Specify a new Sample rate and/or Accuracy.
4. Click OK.
Audio Properties Dialog
This dialog reports the audio properties of the active audio file. It allows
you to change the number of audio samples per second (sample rate)
and the accuracy of samples in the audio stream (bit rate).
In the Audio Files workspace, select Edit > Audio properties.
Channels
The number of audio channels (mono/stereo).
Sample rate
The number of audio samples per second.
Accuracy
The accuracy of samples in the audio stream.
98
Page 99

Audio File Editing
Silence Generator Dialog
Silence Generator Dialog
This dialog allows you to insert silence or background noise in an audio
file.
In the Audio Files workspace, select Edit > Silence (advanced).
Silence Duration - As selection
Uses the duration of the active audio selection as the duration of
the silent section. Specify the duration of the silent section in the
value field below.
Edges - Fade-in/out
Performs a crossfade at the start and end of the silent section for
smoother transitions. Specify the fade time in the value field below.
Destination - Replace selection
Replaces the current audio selection with the silent section.
Destination - Insert at cursor
Inserts the silent section at the cursor position.
Destination - From end of file until cursor
Extends the audio file with silence up to the cursor position.
Activating this option also defines the silence duration and ignores
the Silence Duration setting.
99
Page 100

Audio File Editing
PROCEDURE
PROCEDURE
PROCEDURE
Silence Generator Dialog
Replacing a Selection with Silence
You can replace a section of an audio file with silence.
1. In the Audio Files workspace, make a selection.
2. Select Edit > Silence (advanced).
3. Set the silence duration to As selection, and the destination to
Replace selection.
4. Click Apply.
Inserting Silence
You can insert a specified length of silence at any position of the audio
file.
1. In the Audio Files workspace, set the cursor where you want the
inserted silence to begin.
2. Select Edit > Silence (advanced).
3. Deactivate As selection, and specify the length.
4. Set the destination to Insert at cursor.
5. Click Apply.
Fast Muting a Selection
The Fast mute function replaces the selection with true silence without
needing to write any audio sample to the media.
• In the Audio Files workspace, make a selection, and select Edit >
Fast mute.
100
 Loading...