

Page 1
Operation Manual
Page 2

Operation Manual by Anders Nordmark,
Revision for WaveLab Essential by Stefan Zachau
The information in this document is subject to change without notice and does not represent a commitment on the part
of Steinberg Media Technologies GmbH. The software described by this document is subject to a License Agreement
and may not be copied to other media except as specifically allowed in the License Agreement. No part of this publication may be copied, reproduced or otherwise transmitted or recorded, for any purpose, without prior written permission
by Steinberg Media Technologies GmbH.
All product and company names are ™ or ® trademarks of their respective owners. Windows XP is a trademark of
Microsoft Corporation. The Mac logo is a trademark used under license. Macintosh and Power Macintosh are registered
trademarks.
© Steinberg Media Technologies GmbH, 2007.
All rights reserved.
Page 3

Table of Contents
Page 4

7 Introduction
8 Welcome!
8 Key command conventions
8 How you can reach us
9 Requirements
10 This is what you need…
10 Computer requirements
11 About audio cards
11 About the System Information feature
12 Installing and setting up
13 Setting up the computer
13 Installation procedure
13 Register your software!
13 Program settings
16 Installing a CD/DVD recorder
16 Installation done! Where do I go next?
16 About the Tracer application
17 Overview
18 Get to know WaveLab Essential
18 The windows and what you can do with them
20 Find your way around in WaveLab Essential
21 Basic methods
22 Why you should read this chapter
22 Getting help
22 Undo and Redo
23 Working with windows
25 Dockable control bars
27 Speed menus
27 The status bar
28 Units of time and level
28 Setting values
30 Presets
31 About non-modal dialogs
31 Using the computer keyboard
32 Editing in the Wave window
33 About this chapter
33 Creating new empty documents
33 Opening Waves
35 Window overview and adjustments
35 Setting the zoom factor
38 Navigating through the file
39 Snapshots
39 Setting the ruler start position
39 Working with a meter based display
40 Setting the wave cursor position
40 Selecting
44 Basic editing commands
49 File handling in Wave windows
55 Editing audio properties and file attributes
56 Playback and recording
57 Playing back
59 Recording
63 Metering
64 Introduction
64 The meters
67 Off-line processing
68 Introduction
68 Applying processing
68 Level Normalizer
69 Gain Change
69 Dynamics
71 Level envelope
72 Fade-in and fade-out
73 Crossfade
74 Invert Phase
74 Reverse
74 Eliminate DC Offset
75 Waveform Restorer
75 Time Stretch
77 Pitch Correction
78 Harmonization
78 Hi-fi Chorus
79 EQ
79 Convert sample rate
80 Support for reNOVAtor™
4
Table of Contents
Page 5

81 Master Section
82 Introduction
82 The Master Section window
83 About the signal path
83 The Master level pane
85 The Effects pane
88 The Dithering pane
89 Master Section presets
91 Rendering
93 The Monitor window
95 Batch file encoding
96 Basic procedure
97 Markers
98 Introduction
99 Creating markers
99 About the marker list
100 Marker appearance and visibility
100 Editing, converting and naming markers
101 Moving and duplicating markers
101 Deleting markers
101 Operations involving markers
103 The Audio CD Montage
104 Introduction
104 The Audio CD Montage window
106 Assembling the Montage
109 Zooming and navigating
111 Playing back
113 Rearranging clips
117 Managing clips and source files
117 The volume envelope
121 Using fades and crossfades in the Montage
124 Adding effects to clips
126 The Meta Normalizer
127 Using markers in the Montage
129 File handling in the Audio CD Montage
130 Using video tracks
131 Mixing down – The Render function
132 Preparing the Audio CD Montage for CD burning
134 Burning an audio CD
135 Introduction
135 Selecting a CD-R unit
135 Testing an audio CD before burning
136 Writing a CD
137 The audio CD format – Background information
139 Data CD/DVD Projects
140 Introduction
140 Creating a new Data CD/DVD Project
140 Source window settings
141 Destination window settings
142 The Write dialog for the Data CD/DVD
143 Importing audio CD tracks
144 Importing audio CD tracks into WaveLab Essential
147 Creating labels
148 Introduction
148 Using the Label Editor
150 Positioning objects
152 Defining user variables
153 Printing labels
155 Analysis
156 Global analysis
161 3D Frequency Analysis
163 Podcasting
164 Introduction
164 Creating a new Podcast
165 The Podcast window
167 Publishing the Podcast
169 Sampling and creating loops
170 Introduction
170 Using WaveLab Essential with Steinberg HALion
170 Editing sample attributes
171 Basic looping
172 Using the Crossfade Looper
176 Using the Loop Tone Equalizer
178 Customizing
179 What is customizing?
179 Preferences
179 Folder editing
180 Saving the window layout
180 Styling WaveLab Essential – Wave windows
181 Styling WaveLab Essential – Audio CD Montage
windows
183 Working with window layouts
184 Setting default size and position for windows
184 Creating a Favorites menu
184 Customizable key commands
186 Organizing plug-in processors
5
Table of Contents
Page 6

190 Plug-in processor reference
191 About WaveLab Essential plug-ins
194 VST Plug-ins
203 Troubleshooting
204 General problems
204 Problems with opening files
204 Problems with saving files
205 Recording problems
205 Playback problems
206 Editing problems
206 Troubleshooting and precautions
206 Problems and solutions
206 Questions and Answers
207 Day to day precautions for trouble-free CD writing
207 Hardware and setup issues
209 Key commands
210 File handling
210 View
210 Zooming
210 Processing
211 Playback and cursor position
211 Selecting
212 Editing and Recording
212 Markers
212 Miscellaneous
213 Index
6
Table of Contents
Page 7

1
Introduction
Page 8

Welcome!
Congratulations on your choice of WaveLab Essential,
which is the audio editor of choice for any serious engineer or musician.
WaveLab Essential is continuously developed and refined,
in collaboration with our users – from professional audio
engineers to hobbyists. Your input helps making this program one of the most flexible and user-friendly ever!
Find out about the ease of use and workflow that makes
working with WaveLab Essential so effective.
Your Steinberg Team.
Key command conventions
Many of the default key commands in WaveLab Essential
use modifier keys. For example, the default key command
for Undo is [Ctrl]-[Z] under Windows.
When key commands with modifier keys are described in
this manual, they are shown with the Windows modifier
key first, in the following way:
[Win modifier key]-[key]
For example, [Ctrl]-[Z] means "press [Ctrl] , then press
[Z]".
Similarly, [Alt]-[X] means "press [Alt] then press [X]".
How you can reach us
After having installed and launched the program, you will
find a number of useful Steinberg Web links on the Help
menu (“Steinberg on the internet” submenu). These allow
you to get online support, check for updates, get answers
to frequently asked questions, etc.
!
These features require that you have a working Internet connection.
Introduction
8
Page 9

2
Requirements
Page 10

This is what you need…
To use WaveLab Essential you need the following:
• A PC with Windows XP or Windows Vista Home Premium or Ultimate (32-bit only) installed and ready.
An Internet connection is also required. For more details about the computer requirements, see below.
• A Multimedia PC compatible, 16-bit (or better) audio
card.
By audio card we mean a card capable of recording and playing back
audio, using the computer’s hard disk as storage media. See “About au-
dio cards” on page 11.
To take advantage of WaveLab Essential’s more advanced features, you need the following:
• To utilize WaveLab Essential’s CD burning capabilities,
you will need a CD recorder.
Your CD recorder must support the disc-at-once write mode.
• DirectX 9 or later must be installed.
Computer requirements
Below, the minimum computer requirements are listed,
with recommendations where applicable. The following
sections describe each system component (processor,
RAM, etc.) in more detail.
Minimum requirements
• Intel Pentium III/AMD Athlon 800 MHz (Intel Pentium IV/AMD
Athlon or AMD Opteron 2,4GHz or faster recommended).
• 256 MB RAM (1GB recommended).
• A monitor and video card with a resolution of 24 bit
(32bit recommended).
• Display resolution 1024 x 768 pixels (1280 x 1024 pixels and
a dual-monitor setup are recommended).
• 80MB of free hard disk space.
• Windows XP or Windows Vista Home Premium or Ultimate
(32-bit only).
• Windows MME compatible audio hardware (ASIO compatible
audio hardware recommended).
• CD or DVD ROM drive for installation (CD/DVD writer recommended).
• Internet connection required for product activation and the
Podcast feature.
• The Product can only be used on the system on which it was
activated.
RAM
Since WaveLab Essential is disk based, the amount of
RAM does not limit the size of audio files you can work
with. Even with moderate amounts of RAM, you can have
many files open at the same time. However, when more
RAM is available, some processes can be accelerated by
WaveLab Essential.
Processing power
The difference between running WaveLab Essential on a
faster computer and a slower one is noticeable in many
cases:
• More real-time processing
The faster the computer, the more real-time plug-ins you will be able to
use.
• Faster “off-line” processing and analysis tasks
Certain types of processing which make heavy demands on the computer will be completed more quickly on a faster machine.
• Screen updates
Scrolling, editing and manipulating objects is “snappier” on a faster machine.
Hard disk
Audio files are relatively big. Approximately 10.6 MB of
hard disk space is used up for every minute of 16 bit stereo/44.1 kHz audio recorded. For 24 bit/48 kHz audio or
higher, the audio files are of course a lot bigger. Therefore
we recommend that you get the largest hard disk you can
afford. The speed of the hard disk will affect some of the
processing operations. This is mainly noticeable when you
work with very long files.
In addition, a fast hard disk is absolutely crucial for CD-R
and DVD-R burning. If the hard disk is slow, your recorder
might not be able to write at its maximum possible speed.
!
Do not use file compression on hard disks where audio files are stored!
10
Requirements
Page 11

About audio cards
WaveLab Essential works with any Multimedia PC compatible audio card. However, the audio quality varies dramatically between cards.
For serious work with WaveLab Essential, we recommend
that you get a card with the highest possible specifications.
However, if you use WaveLab Essential to edit files for
use with other hardware (such as a hard disk based recording system using its own audio converters) any loss in
audio quality that you experience when listening to
files in WaveLab Essential (due to deficiencies in the audio card) will not
For professional use (mastering, etc.) we recommend that
you get a card capable of playing back files in 24 bit resolution.
affect the final audio files in any way.
the
About the System Information feature
After having installed and launched WaveLab Essential,
you can get a very detailed report describing your computer system by selecting “System Information” on the
Help menu. This function analyses your system and lists
operating system specifics; processor(s), memory, hard
drives, and much more. This is especially useful if you
need to contact Technical Support, since this allows you
to describe your computer configuration accurately.
11
Requirements
Page 12

3
Installing and setting up
Page 13

Setting up the computer
Before proceeding, your computer should be set up and
the following items should be installed:
•Windows (see “This is what you need…” on page 10 for details on which version to use).
• The audio card and its driver.
Checking the audio card
To make sure the audio card will work as expected, you
can perform the following two tests:
• Use the software included with the audio card to make
sure you can record and play back without problems.
• Use the Media Player application (included with Win-
dows and described in the Windows documentation) to
record and play back audio.
Colors
At this point you might want to check and for example
change the number of colors you use on your computer
screen. See your Windows documentation for instructions
on how to do this. The recommended setting for WaveLab
Essential is 24 or 32 bit mode (“True Color”).
Installation procedure
Installing the software
The installation procedure unpacks all the files and automatically puts them in the right places.
1. Insert the CD-ROM disk in the drive.
The installation program should start automatically after a few seconds.
If, for some reason it doesn’t – for instance if you have “Auto Insert Notification” deactivated for your CD drive – perform steps 2-4 below. Otherwise, proceed to step 5.
2. Launch the Explorer, open the “My Computer” window
or select “Run” from the Start menu.
3. Locate and double click on the drive symbol for the
CD-ROM drive.
4. Double click on the “setup” symbol (setup.exe).
5. Follow the instructions on screen.
6. Finally, a dialog informs you that the installation was
successful.
A restart may be requested – but if no dialog requests a restart it is not
necessary to do so.
When the installation is finished, the program is found
among your other programs on the Start menu and/or the
desktop.
This completes the installation of your WaveLab Essential
program! But, you’re not really done yet…
Activating WaveLab Essential
After installing WaveLab Essential you can use the program for 30 days without any restrictions. After this period, you will have to enter your permanent activation
code. You will find this code in the “Essential Product Licence Information” document that is included in the
WaveLab Essential package. Otherwise, WaveLab Essential will not run anymore.
Proceed as follows:
1. Open the Syncrosoft License Control Center (which
can be found in the Start/Programs menu under Windows
or in the Applications folder on a Mac).
2. In the Syncrosoft License Control Center, open the
Wizards menu and select the “License Download” option.
Follow the instructions and enter your WaveLab Essential
activation code.
You are now ready to permanently run WaveLab Essential!
Register your software!
Registering your software will make sure you are entitled
to technical support and kept aware of updates and news
regarding WaveLab Essential.
Program settings
Before you start working, you should make some settings:
13
Installing and setting up
Page 14

Audio card settings
You need to specify which audio card and driver you intend to use. WaveLab Essential can communicate with
the audio card via any of the standard protocols; ASIO,
MME or WDM.
Selecting an ASIO driver
1. Open the Preferences–Audio device tab.
2. Select the ASIO driver from the “Playback device”
pop-up menu.
Note that the “Playback device” menu heading has now changed to
“Playback/Record device” and the Recording device section has been
greyed out. This is because with ASIO, the same driver is always used
both for output and input.
3. If you click the “Control Panel” button the audio card
settings application (usually installed with the audio card)
for the ASIO driver opens.
In the Control Panel you may find settings for buffer size, digital formats,
additional I/O connections, etc. depending on the audio card and the
driver.
4. Click on the “Connections” button.
The ASIO Audio connections dialog will appear, listing all available channel inputs and outputs in WaveLab Essential. Select the channels you
want to use for stereo output and input.
5. Close the dialog.
• When using ASIO, the playback resolution is set from
the ASIO driver (you may find a setting for this in the ASIO
Control Panel, depending on the hardware and driver).
Therefore, the Playback Resolution settings will be greyed out.
Selecting an MME/WDM driver
1. Select “Preferences…” from the Options menu.
2. Click on the Audio device tab.
3. Select the audio card you want to use for recording
and playback from the pop-ups.
If you only have one audio card you can also select the “Microsoft Sound
Mapper” options (the sound mapper is a “virtual audio card” which “maps”
all audio to your real card). However this does not let you take full advantage of the card’s driver when recording audio and is not recommended.
4. Choose your “Playback Resolution”.
Additional audio settings
There are other settings in the Preferences that affect audio playback and recording. We recommend that you try
the default settings before you change anything, since
these work well in most cases.
On the “Audio Card” tab, you will find the following settings:
• Playback Buffer Number and Size.
These determine how much RAM memory is used for buffering when
playing back. If you get playback problems such as dropouts or glitches,
you should try to increase these values.
!
With ASIO drivers, you may find these settings in the
ASIO Control Panel.
• Recording Buffer Number and Size (not available when
using ASIO).
These determine how much RAM is used for buffering when recording. If
you get dropouts in the recorded audio, you should try increasing these
values.
On the Preferences–File tab, you will find the following
settings:
• Disk block buffer size.
Governs the buffer size used when WaveLab Essential is reading data
from the hard disk. If you experience problems in a read intensive scenario (such as playing back an Audio CD Montage with a lot of simultaneous clips), you should try changing this value.
If you change this setting, playback will stop when you leave the dialog.
• Use system cache.
When this is deactivated (default), WaveLab Essential reads files directly
from the hard disk, bypassing Windows’ file cache.
!
We recommend that you leave this option deactivated!
The option is available since it may remedy problems on certain systems
with slow disk drives. Note:
• If you activate this, avoid using large disk block buffer
size values!
• After activating this option, you need to close and reopen all open files, for the setting to take effect!
About latency
In the Playback section of the Audio device tab, you will
find an indication of the current latency (at 16bit/44.1kHz
stereo). Latency is the delay between when audio is “sent”
from the program and when you actually hear it. The la-
14
Installing and setting up
Page 15

tency in an audio system depends on the audio hardware,
its drivers and their settings. It’s usually possible to reduce
latency by lowering the number and size of the playback/
recording buffers. However, please note:
!
While a very low latency can be crucial in a real-time
DAW application such as Steinberg Nuendo or Cubase, this is not strictly the case with WaveLab Essential. Here the important issues are optimum and
stable playback and editing precision. Therefore, you
should not try to reach the lowest possible latency
figures when working with WaveLab Essential. And
again, should you get dropouts, crackles or glitches
during playback, raise the Buffer Number setting on
the Preferences–Audio device tab.
Temporary files
You also need to specify where WaveLab Essential
should store its temporary files. Temporary files are used
for certain operations, such as WaveLab Essential’s extensive Undo function (see “Undo and Redo” on page
22).
If you have access to more than one drive, saving your
temp files on a separate drive (not partition) can considerably speed up performance. For example, if your source
files are located on the C: drive, you could specify
D:\temp as temporary folder.
This will not only improve performance, but also reduce
disk fragmentation.
1. In Windows, create a separate folder in which to store
your “temp” files.
!
The folder should be on your fastest hard disk and
you should make sure you have plenty of room available on that hard disk (or partition). Putting the
“temp” files on a separate drive (that is, not the same
drive as your regular files) will speed up file operations considerably.
2. Select “Folders…” from the Options menu.
This opens the Folders dialog, where you can edit how various WaveLab
Essential folders are handled .
3. Click on the plus sign beside the “Temporary folders”
item (this is located in the “Work folders” category).
4. Selecting the Temporary Folder item will show the current location where the temp files will be created in the
Folder field to the right.
5. Either type in the path to the directory or you can
browse the drives to locate and select the folder via a
standard Windows file dialog.
Click OK to select a folder and exit the file dialog.
Peak and view memories
A peak file is a small file with the extension “.gpk” automatically created by WaveLab Essential each time a file is
modified or opened in WaveLab Essential (if it hasn’t been
previously). The peak file contains information about the
waveform, and determines how it is drawn in the wave
window.
View memory files (extension “.mem”) store view information relating to a specific audio file such as window and
scroll positions, etc. – see “Saving view settings” on page
54.
By default, peak files and view memory files are stored in
the same folder as the related audio file. Setting this to another folder on a different drive will also improve performance to a certain degree. Regardless of whether this
folder is on a different drive or not you also get the advantage of not having the audio file folder cluttered with nonaudio files if a separate folder is used.
This folder can be specified from the Folders dialog, either
directly or via the Preferences–Wave edit tab:
• Select Preferences from the Options menu and select
the Wave edit tab.
• If the “Save view settings in companion file” option is
activated, view memory files will be saved in the same
folder as the related audio file.
• If you select “Save in independent folder” you can click
the “Edit” button, which will open the Folder dialog with
the “Peak and view memories” work folder selected.
From here you can navigate to a new folder location to store the peak
and view memory temp files.
15
Installing and setting up
Page 16
Installing a CD/DVD recorder
Hardware installation/connection
For general instructions on installing internal or connecting external recorders via USB or Firewire, please refer to
the instructions that came with the computer, or the
recorder itself.
For WaveLab Essential, please just check the following
points:
• Make sure to have the latest firmware version installed in your
recorder unit. For CD recorders, the firmware you have must
support Disc-at-Once mode! In addition, running a unit with
older firmware might for example prevent you from writing CDText information into the tracks.
Checking the installation of the CD/DVD
recorder
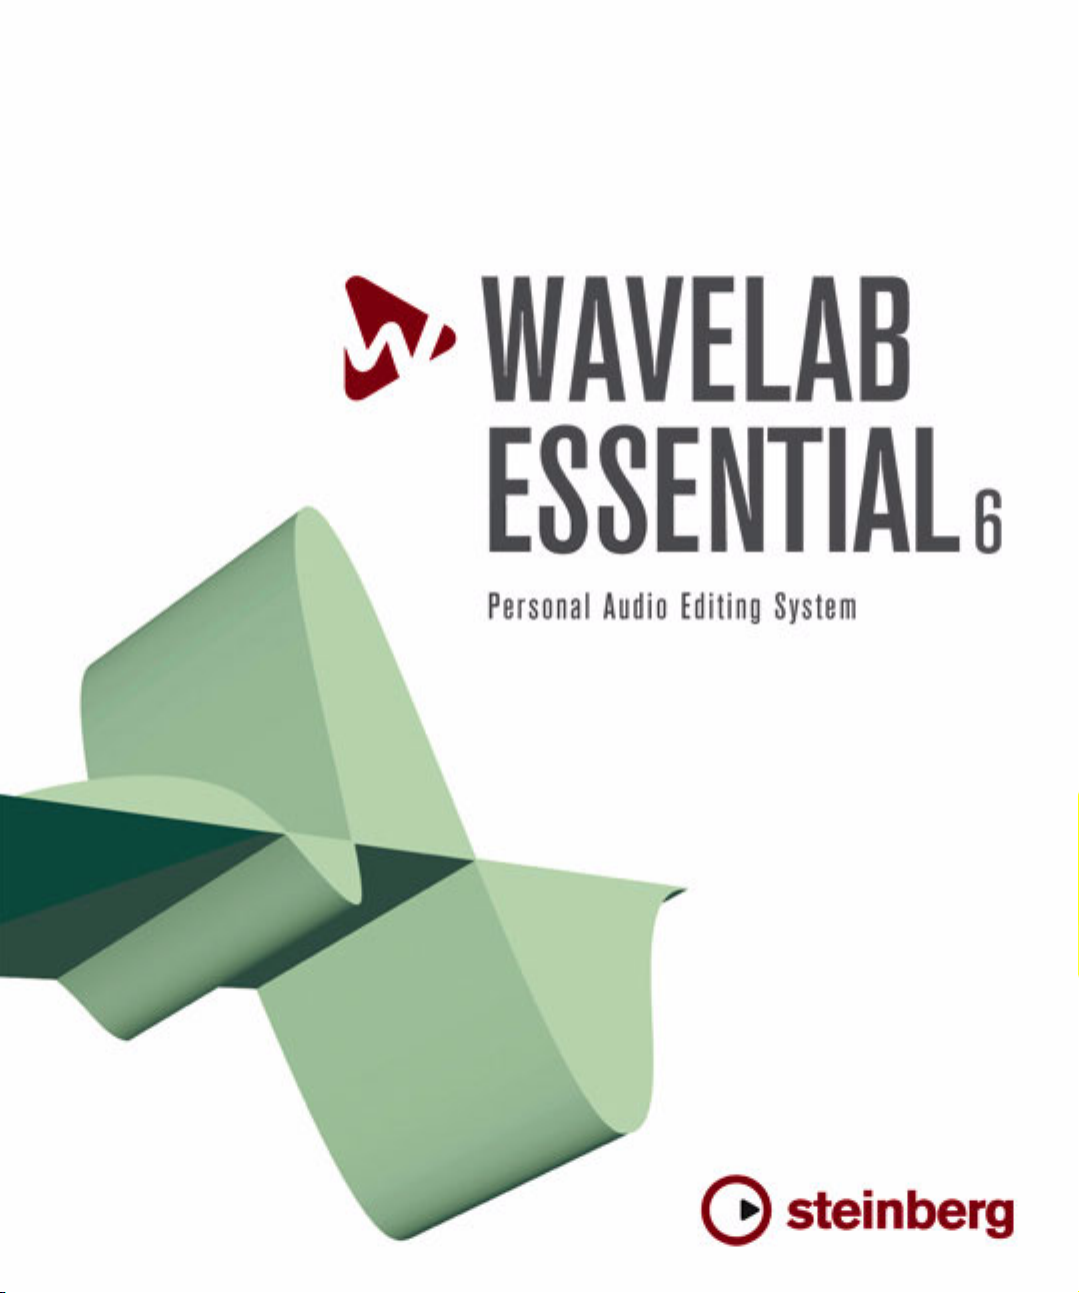
You might want to check that the recorder unit was actually found by the program. Proceed as follows:
1. Select “CD/DVD Information…” from the Tools menu.
The CD/DVD Info dialog appears.
• Examine your WaveLab Essential directory and other
disks included in this package for files that might be useful
to you.
• If you run into problems, check the Troubleshooting
chapter in the Operation Manual.
About the Tracer application
In the WaveLab Essential directory created on your hard
disk during installation, you will find a folder called “Tools”.
Among other things, this folder contains a small application called Tracer. This is a diagnostic tool that tracks and
logs various procedures that WaveLab Essential executes
when it is launched, e.g. the loading of plug-ins.
Should you run into problems with WaveLab Essential
and need to contact technical support, you can use the
Tracer application and pass on the information it displays
to the technical support staff. This could be of great assistance since it might be possible to see exactly which operation caused a problem.
• To use the Tracer, locate the file Tracer.exe in the Windows
Explorer and double click on it – or use the Run command on
the Start menu to browse for the file.
• After you have activated the Tracer application, launch WaveLab Essential.
• All loading procedures are displayed as plain text, and you can
copy this information and then paste it into, for example, an email.
2. Check that your recorder unit appears in the list to the
left.
The list will also contain any regular DVD-ROM drives, etc. If your CD/
DVD recorder isn’t listed, there’s either something wrong with the installation or the unit is not supported by WaveLab Essential.
Installation done! Where do I go next?
There are three things we suggest you do:
• Read through the rest of this book and try out the different possibilities as you go along.
Installing and setting up
16
Page 17

4
Overview
Page 18
Get to know WaveLab Essential
Welcome to WaveLab Essential!
This chapter is intended to get you acquainted with the
program. We will here briefly describe its fundamental
functions and main features, so as to point you in the right
direction on your road to mastering all of the possibilities
that WaveLab Essential offers.
The windows and what you can do with them
Working with WaveLab Essential, you will encounter a
number of different windows that let you do different
things. Editing audio files, compiling files for burning CDs
or DVDs, applying effects and much, much more. This is
an overview of the main windows in the program.
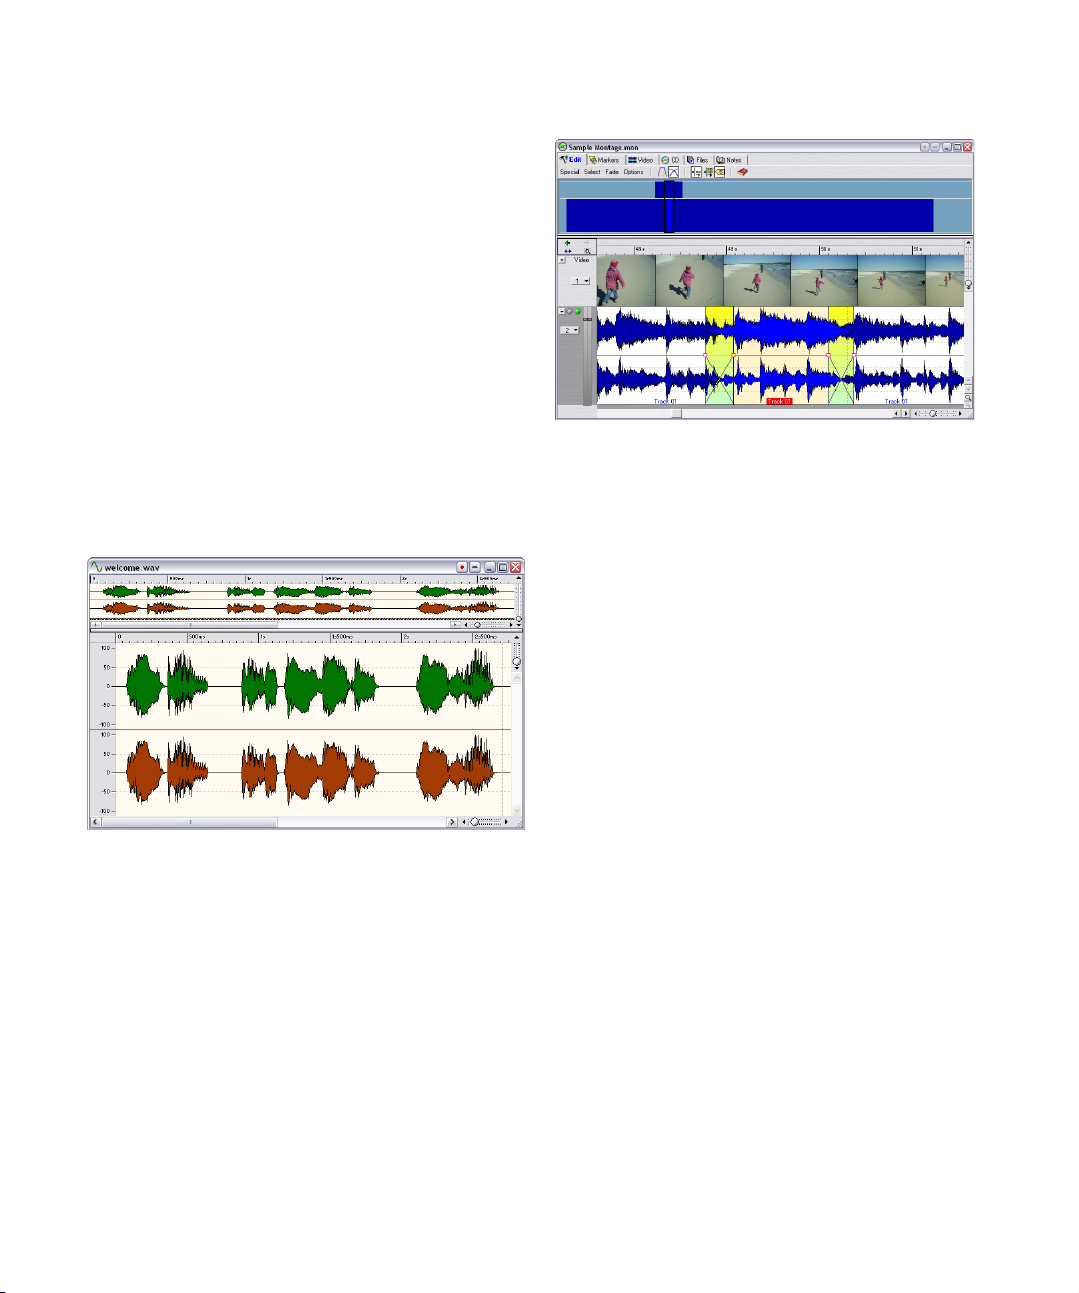
The Wave window
This is a Wave window, a graphical representation of an
audio file. It consists of two parts – the lower is the Main
view, and this is where you can perform various audio editing operations such as copying, cutting, pasting, moving,
deleting, etc.
The upper part is the Overview and serves to let you easily
navigate through long files.
You can read more about the Wave window and the operations you can perform in it in the chapter “Editing in the
Wave window” on page 32.
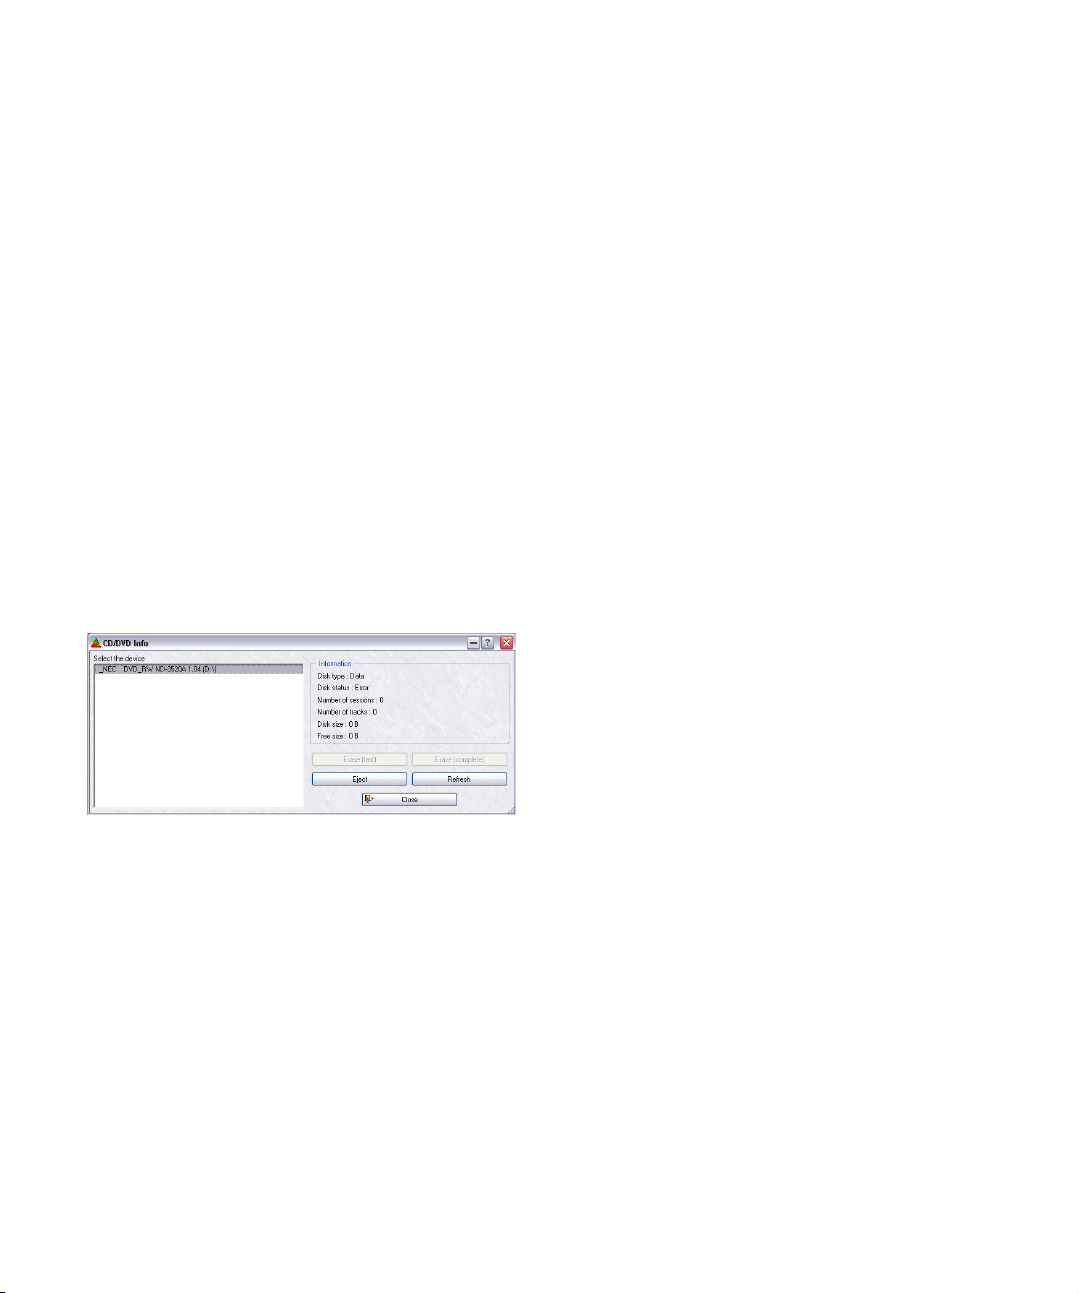
The Audio CD Montage window
This is an Audio CD Montage window. An Audio CD Montage lets you compile and edit multiple clips (references to
audio files on disk) on one or two tracks.
As you can see, the window consists of two panes. The
lower one is called the Track View, and this is where you
assemble the clips. The appearance of the upper pane depends on which of the six tabs at the very top of the window is selected. These tabs give you access to various
functions.
After you have imported audio files as clips into an Audio
CD Montage, you can arrange, edit and play back the
clips. You can also apply effects, fades or crossfades, and
much more, and last but not least, you can directly create
CDs. All in all, the Audio CD Montage is an excellent tool
for advanced music CD creation.
Read more about the Audio CD Montage and its features
in the chapter “The Audio CD Montage” on page 103.
18
Overview
Page 19
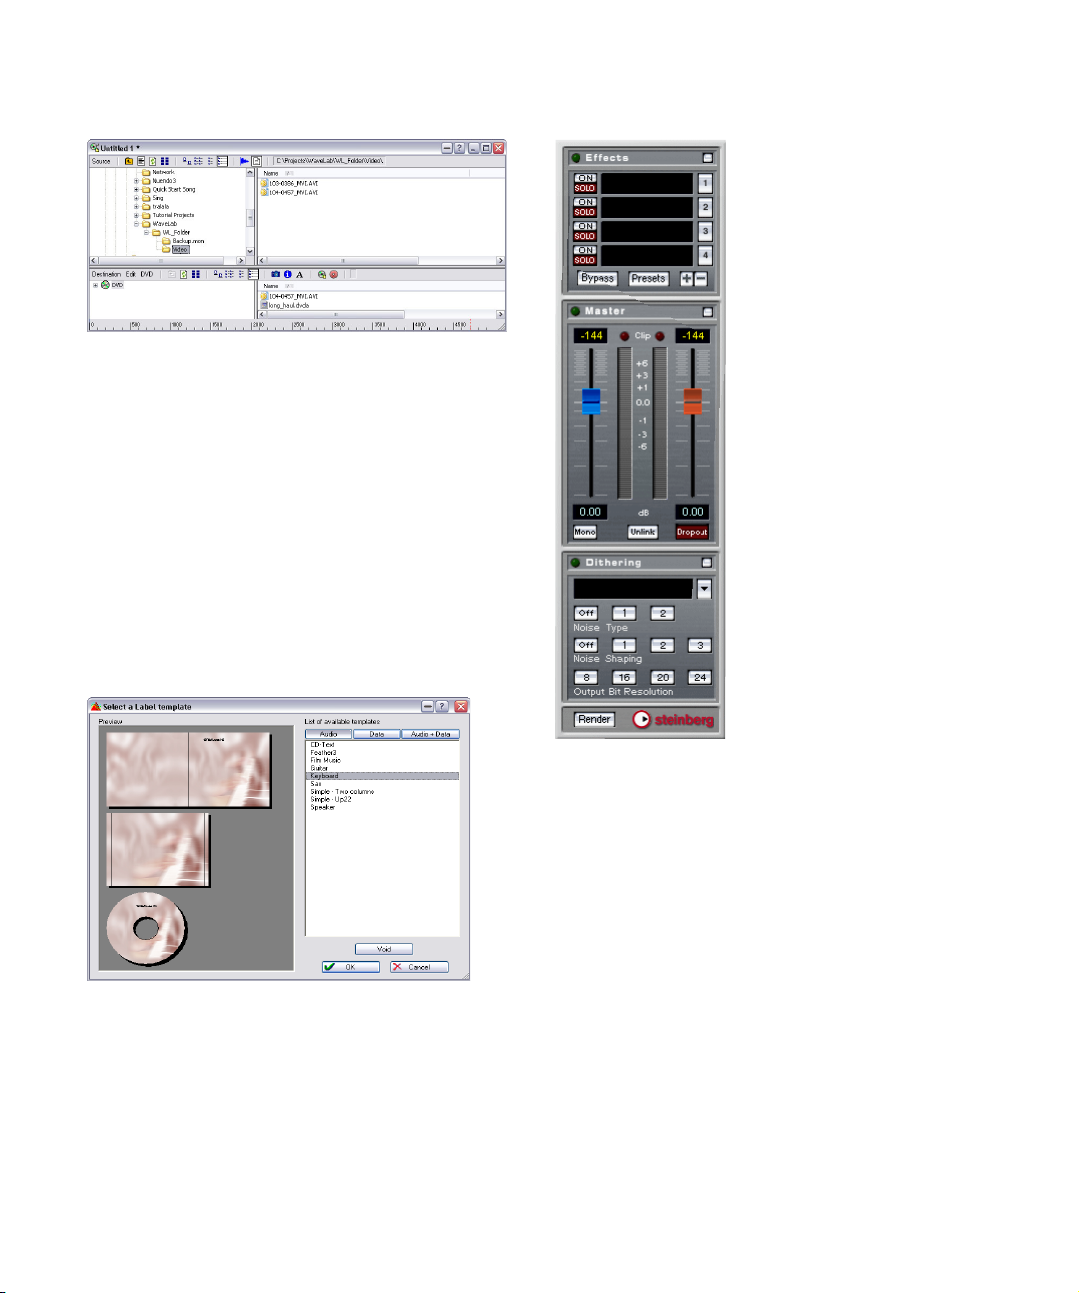
The Data CD/DVD window
The Data CD/DVD window can be used for compiling and
creating data CDs/DVDs (discs that exclusively contain
computer data) and Mixed Mode CDs (discs that contain
both data and audio).
The window is divided into two panes; the upper is called
the source window, and the lower is the destination window. You drag files from the source window to the destination window, in which you can rename, remove and
move files before burning a CD or DVD.
For a detailed description of the Data CD/DVD window and
what you can do with it, see “Data CD/DVD Projects” on
page 139.
The CD/DVD Label Editor
The Master Section
This window is the Label Editor. Here you can design and
print custom labels for the CDs or DVDs you create. You
can create labels for both the front and back of a jewel
case, as well as for the discs.
Read more about this in the chapter “Creating labels” on
page 147.
This is a very important part of WaveLab Essential, called
the Master Section. It has a number of uses including:
• Adding real-time effect plug-in processors such as Chorus,
Reverb, etc.
• Applying effects to files so that they are permanently made a
part of the files (as opposed to using them in real-time).
• Monitoring and controlling the WaveLab Essential output
level.
• Adding dithering.
For details, see “Master Section” on page 81.
19
Overview
Page 20

Find your way around in WaveLab Essential
Editing and processing
Where do I go if I want to…
• Edit an existing audio file?
When you open an audio file, it appears in a Wave window, in which you
can edit it in various ways. See “Editing in the Wave window” on page 32.
• Compile and edit several audio files on two independent tracks?
Create an Audio CD Montage. See “The Audio CD Montage” on page
103.
• Apply processing to a wave file?
The Process menu contains a number of options for manipulating wave
files, including fade-in/out, normalize, time stretch and much more – see
“Off-line processing” on page 67. You can also use the Render function
in the Master Section to apply effects to a file.
• Convert an audio file into another audio format?
There are several ways: You can use either the “Save as” command or
the “Save Special” command on the File menu (see “Saving in another
format (Save as…)” on page 51), or the “Render” function in the Master
Section (see “Rendering” on page 91). Finally, batch file encoding lets
you convert multiple files to another format – see “Batch file encoding”
on page 95.
CD/DVD creation
Where do I go if I want to…
• Create an audio CD that can be played back in a regu-
lar CD player?
You create an Audio CD Montage and insert audio files as clips into it,
with each clip representing one track on the audio CD (see “The Audio
CD Montage” on page 103).
• Create a data CD/DVD or a Mixed Mode CD/DVD con-
taining audio, data and video?
You do this in a Data CD/DVD window. See “Data CD/DVD Projects” on
page 139.
• Create labels for the CDs/DVDs I make?
This is done in the Label Editor. See “Creating labels” on page 147.
The above are just a few pointers to some of the fundamental functions in WaveLab Essential. While using them,
you will discover a multitude of other features and functions that let you make full use of the possibilities of this
amazing program.
Have fun exploring WaveLab Essential!
Playback and recording
Where do I go if I want to…
• Play back with real-time effects?
Effects are added in the Master Section, see “Master Section” on page 81.
In Audio CD Montages you can also add individual clip effects, see “Add-
ing effects to clips” on page 124.
• Record new audio files?
Use the Record button on the Transport bar. The new file will appear in a
Wave window, see “Recording” on page 59.
• Record songs from an audio CD into WaveLab Essential?
You don’t – you import them directly from the disc. On the Tools menu
there is an option called “Import Audio CD tracks” (see “Importing audio
CD tracks into WaveLab Essential” on page 144).
Overview
20
Page 21

5
Basic methods
Page 22
Why you should read this chapter
This chapter describes general methods that you will use
when working with WaveLab Essential. Getting accustomed with these procedures will allow you to work more
effectively with the program.
Getting help
WaveLab Essential comes with a detailed help system,
making it easy to look up procedures and descriptions
from within the program. There are two ways to access
the help system:
• By selecting “Operation Manual” from the Help menu.
This takes you to the help in Adobe Acrobat format (extension “.pdf”).
This PDF file contains all chapters of the manual including additional
sections describing plug-ins, key commands and troubleshooting procedures.
• By pressing [F1].
Undo and Redo
For this reason, WaveLab Essential will need to store files
on your hard disk, in the folder you have specified for the
temporary files (see “Temporary files” on page 15). These
files are automatically deleted each time you close or save
the related document.
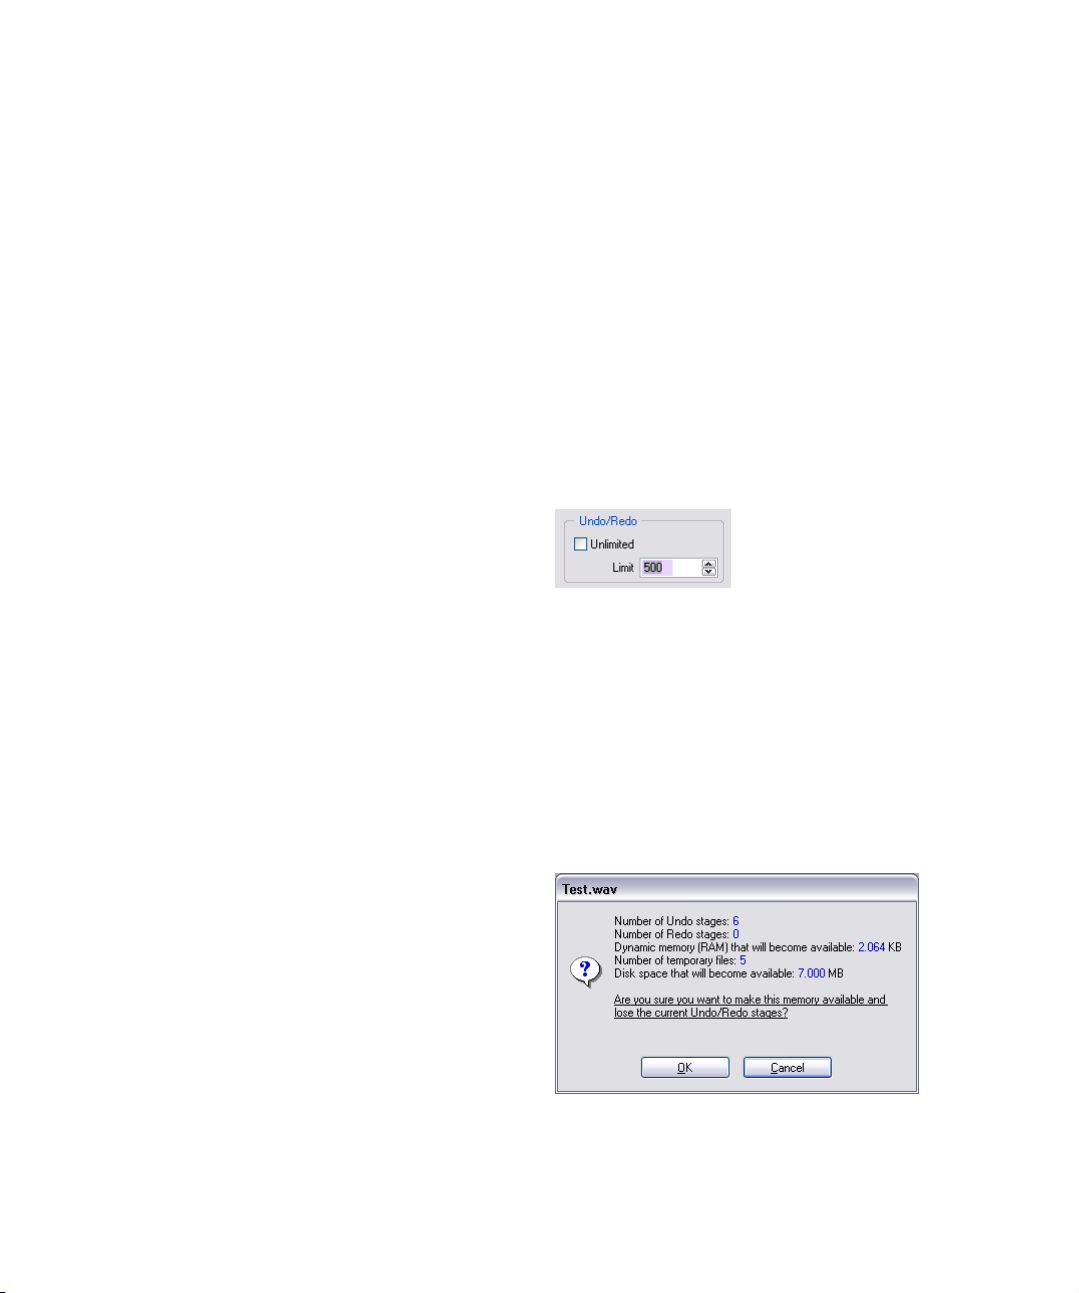
Limiting the Undo function
If you run out of hard disk space or if you are applying processing to extremely long sections of waves, you might
want to put a limit on the Undo function (applicable to
Wave windows only):
1. Select “Preferences” from the Options menu and click
the Wave edit tab.
2. Uncheck the “Unlimited” option in the Undo/Redo
section.
3. Change the Limit number to the desired value.
WaveLab Essential has an extremely extensive Undo function, applicable when working in Wave windows, Audio
CD Montages or the CD Label Editor. You can:
• Undo as many steps back as you like, by using the Undo
item on the Edit menu.
The only limitation is the available hard disk space. You can also use the
shortcuts [Ctrl]-[Z] or [F3] to undo. [F3] has the added advantage in that
you can undo even if a modal dialog is currently open.
• Redo as many steps as you like, by using the Redo item
on the Edit menu (or by pressing [Ctrl]-[Y] or [F4]).
Furthermore, each window has its own undo “history”, so
you can click on any window and undo the last changes
made there, even if you afterwards worked in another window.
About Undo and disk space
Many undo operations require no memory or disk space.
However, operations that modify actual wave data (like
time stretch, EQ, etc.) require that a file copy of the selected part of the wave is stored, so that it can be brought
back when you need to redo.
Basic methods
Clearing the undo
There might be situations where you have “collected” a
large number of undo possibilities that you know you don’t
need. You might then clear the whole undo “buffer” for
one file at a time. This will free up some primary memory
(RAM) but more importantly it will also delete all the “undo
files” from your hard disk, to free up space.
1. Select “Clear undo” from the Edit menu.
A window appears informing you of how much RAM and hard disk space
you will gain by this operation.
2. Click OK.
22
Page 23

!
Please note that this function works on one document at a time. It is only the undo buffer for the file in
the active window that will be cleared. Also note that
it only applies to Wave windows.
Working with windows
Quick window switching
• To “cycle” between all open windows, press [Ctrl]-[Tab]
or [Ctrl]-[F6].
• If you release the [Ctrl] key, and use any of these com-
mands again, you will switch to the previous window,
rather than the next window in the stack.
This allows you to quickly move back and forth between two windows.
Basic window handling
WaveLab Essential follows the basic guidelines for the
Windows interface, which means standard “Windows
procedures” apply.
Closing Wave windows
You can close a document window by clicking its close
button, by selecting Close from the File menu or by pressing [Ctrl]-[W]. If document window(s) contain unsaved
changes, you will be asked whether you want to save
those changes before closing.
Ö If you hold down [Ctrl]+[Shift] when clicking the close
button, the window closes immediately. Any changes you
have made will not be saved.
Ö You can also close all windows in one go (either all
Wave windows, or all windows regardless of type), by selecting the corresponding option from the Windows
menu.
Minimizing Wave windows
WaveLab Essential windows are minimized like any other,
but there are also options for minimizing all Wave windows or all windows (regardless of type, as with closing,
see above), from the Window menu.
The document switch bar
A quick way to switch between the open document windows is to use the document switch bar.
In this example, clicking on the tab will bring the “MoonProject”
window to front.
Ö You can position the document switch bar at the top,
bottom, left or right side of the screen by using the document switch bar submenu on the View menu.
This submenu also lets you hide the document switch bar, if you like.
Panes
Several of WaveLab Essential’s windows are divided into
panes. Panes are separated by dividers. For example, a
Wave window can have two panes, the Overview and the
Main view.
Panes
Dividers
Quitting
When you quit the program, and have files with unsaved
changes, the “Exiting with modified documents” dialog,
see “Save All” on page 52, appears. Selecting all files in
the list and clicking Save Selected, ensures that all
changes made to any and all files, are saved.
Basic methods
The panes and dividers in an Audio CD Montage window.
23
Page 24
Adjusting the size of a pane
1. Position the mouse over the divider between the two
panes.
The pointer turns into a two-way arrow.
2. Drag the divider to adjust the pane size.
Hiding and revealing a pane
In some windows, a pane can be hidden altogether.
To hide a pane, drag the border between the two panes all
the way up or double click it. To reveal the pane again,
drag the miniature divider symbol down or double click it.
The miniature divider symbol
You can also hide/show the Overview pane in the Wave
window by pressing [O] on the computer keyboard.
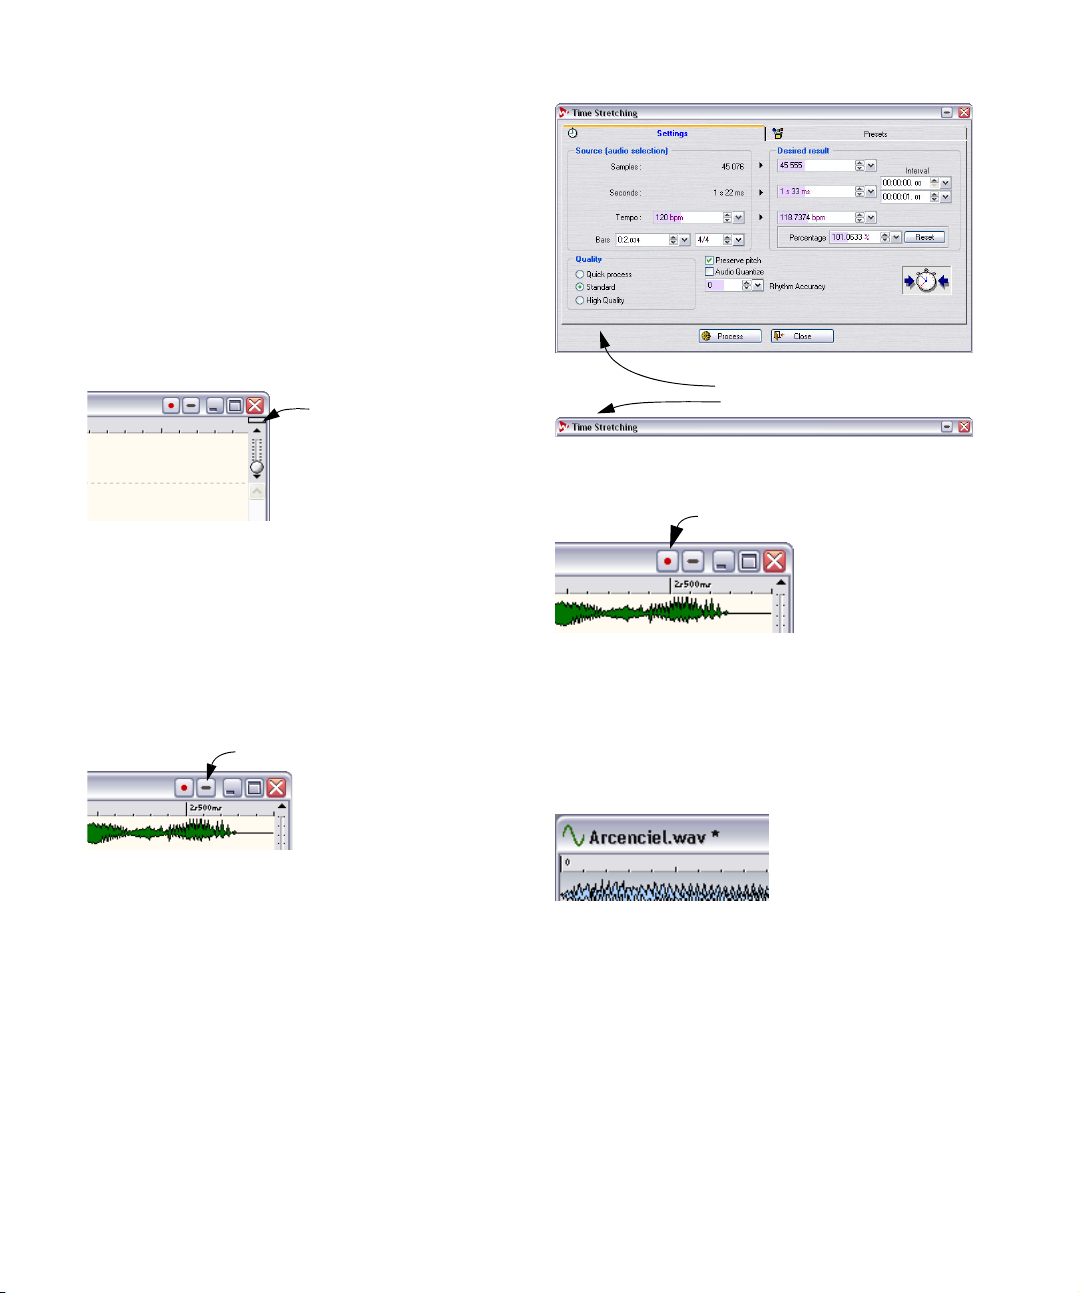
“Folding” windows
If you find a window takes up too much screen space, but
you still don’t want to close it, you can “fold it in” by clicking on the fold-in icon on the title bar. For dialogs, you can
also double click on the title bar.
The fold-in icon
The normal Time Stretch dialog…
…and when “folded in”.
The Document icon
The Document icon
WaveLab Essential adds another symbol to some document windows, the Document icon. This is used to drag
the whole document to various other windows, such as
Audio CD Montages or Data CD/DVD windows.
To return to normal size, just click again.
Unsaved changes indicator
When you have made changes to a document window, an
asterisk will be displayed after the document name in the
title bar until you save the document.
24
Basic methods
Page 25
Working with multiple windows
You can edit the same data in more than one Wave window. Among other things this allows you to work on different sections of a wave file (for example the start and end),
without scrolling back and forth.
Ö The two windows are views of exactly the same data.
Any change you make in one Wave window is immediately apparent in the
other.
Creating a second window using menus
1. Make sure the desired window is the active one.
If it isn’t, click once in its title bar.
2. Select Duplicate View from the View menu.
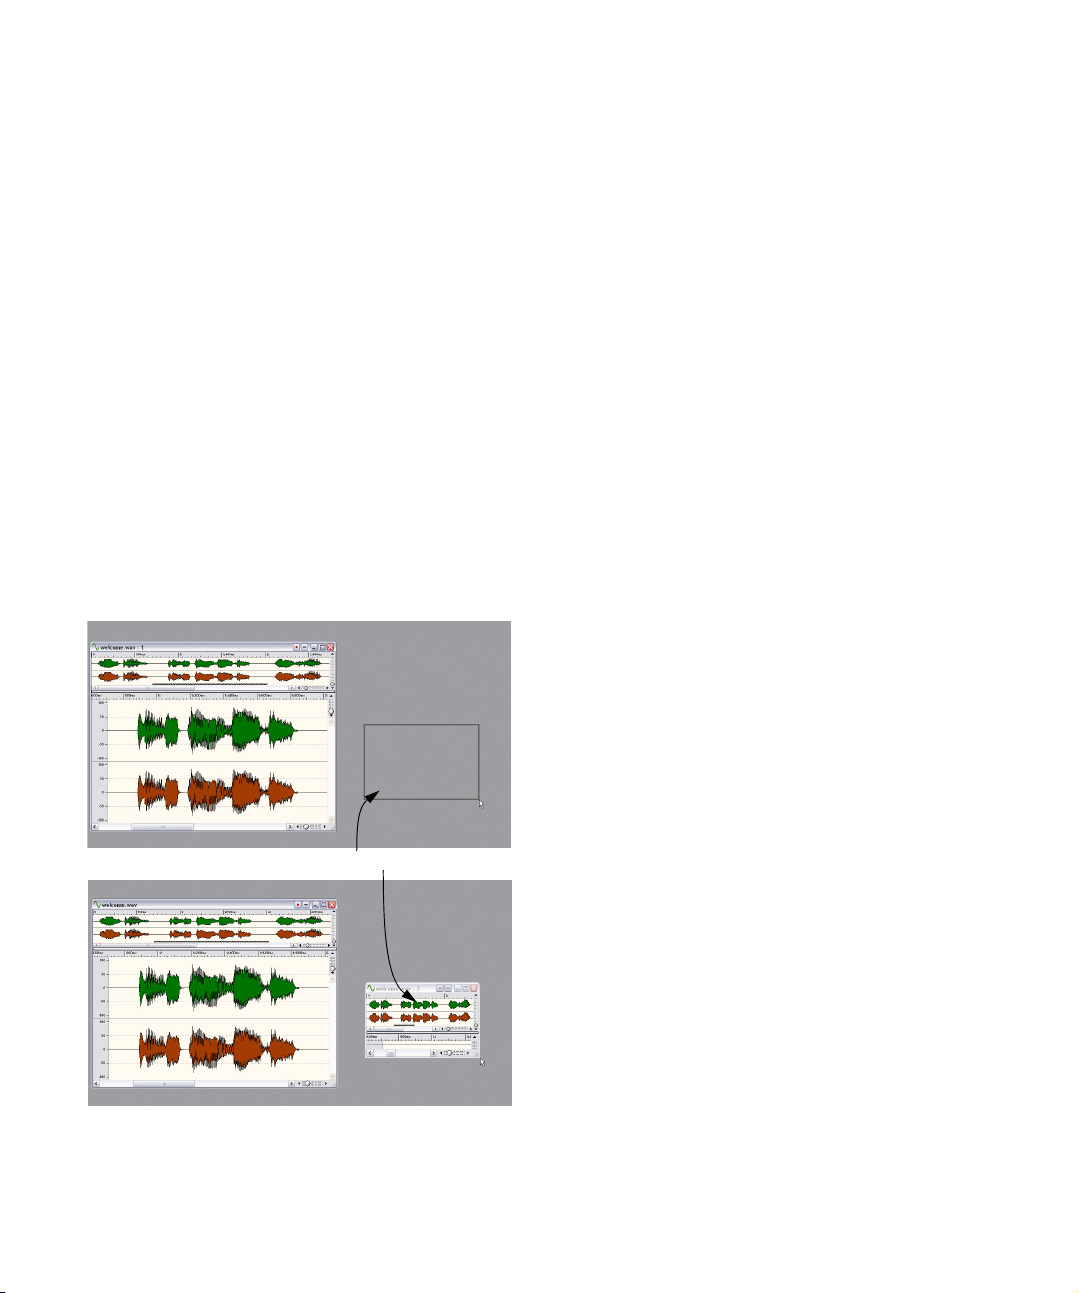
Creating a second window by dragging
1. Make sure “Create windows using mouse” is activated
on the Preferences–Wave edit tab.
2. Click and drag a rectangle in an empty area of the
WaveLab Essential window.
This must be of a certain minimum size or bigger. If you don’t get a new
window, try again with a bigger rectangle.
Windows sets, snapshots and Wave view
settings
In addition to the above, there are other ways to manage
windows:
• Snapshots store individual settings for one Wave window at a
time, which allows you to quickly move between various views
of a file. See “Snapshots” on page 39.
• Screen layouts store document window and dialog box positions and sizes. See
183.
• View settings can be automatically stored (Preference setting)
when saving wave audio files. This will store all view settings
for an individual Wave window; i.e. window size & placement,
time ruler style, scroll positions, selection ranges and snapshots. See “Saving view settings” on page 54.
“Working with window layouts”
on page
Dockable control bars
Various tools, shortcuts and commands are gathered on
“control bars” (strips with symbols). These can be used either as “palettes” (separate windows) or you can “dock”
them to the window edges.
The following control bars are available:
• The Standard Commands
• The Transport bar
• The Wave toolbox
• The Wave Snapshots control bar
• The Marker toolbar
Dragging a box like this will create a new window for this audio file.
Docking a control bar
There are two ways to dock a control bar:
• Drag the control bar window (by its title bar) to any of
the sides of the application window and release the
mouse button.
The outline shows you the shape of the control bar at the docked position.
• Double click the title bar of a control bar to return it to its
last docked position.
25
Basic methods
Page 26
Please note that you can stack control bars and put them
side by side, to create any type of layout you desire.
In this example, the Standard Commands, Toolbox and Transport control bars have all been docked to the upper part of the application window.
Turning a docked control bar into a separate
window
To “un-dock” a control bar, drag it out from the docked
position, or double click somewhere on its handle.
Ö Control bar windows are moved by dragging the title
bar, just as with any other window.
To drag a control bar on side of the application window, without docking
it, hold down [Ctrl] when dragging.
Showing/hiding a control bar
There are different ways to show/hide a control bar:
• Pull down the View menu, select Control Bars, and from the
submenu that appears, select the desired control bar, or…
• Hide a control bar by clicking its Close box.
4. Move the pointer over an item on the control bar and
wait a moment.
A text showing the name of the button appears.
An example of a “Tip” pop-up for the control bar.
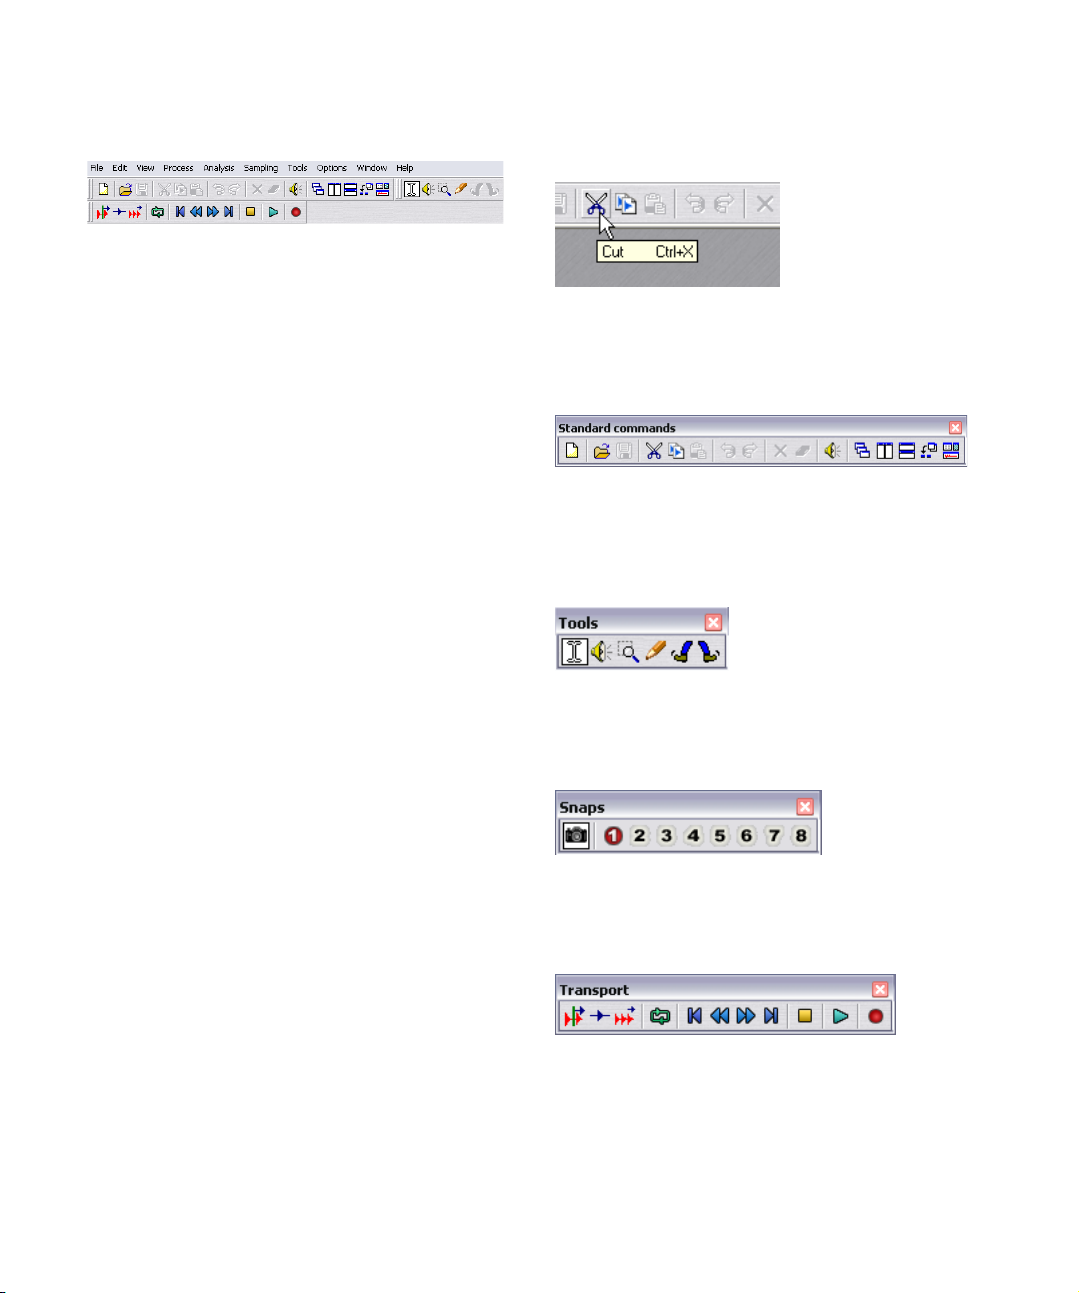
The various control bars
The Standard Commands
The Standard Commands bar supplies shortcuts for the
most commonly used menu items, as well as some unique
functions.
The Toolbox
Changing the appearance of a control bar
To change the shape of a control bar to either horizontal,
square or vertical, drag the right or bottom edge as when
resizing any other window.
To change the size of the buttons in the control bar, open
the Preferences–Environment tab and adjust the “Button
size” setting.
Finding out what a button on a control bar
does
1. Select Preferences from the Options menu and click
on the Environment tab.
2. Make sure “Show Tips” is activated.
3. Close the Preferences dialog.
Basic methods
The tools are used to perform various operations on the
data in the window, like selecting, playing, etc.
The Snapshots control bar
This is used to store and recall window “layouts”, see
“Snapshots” on page 39.
The Transport bar
The Transport bar is used for various playback commands,
see “Using the Transport bar” on page 57.
26
Page 27
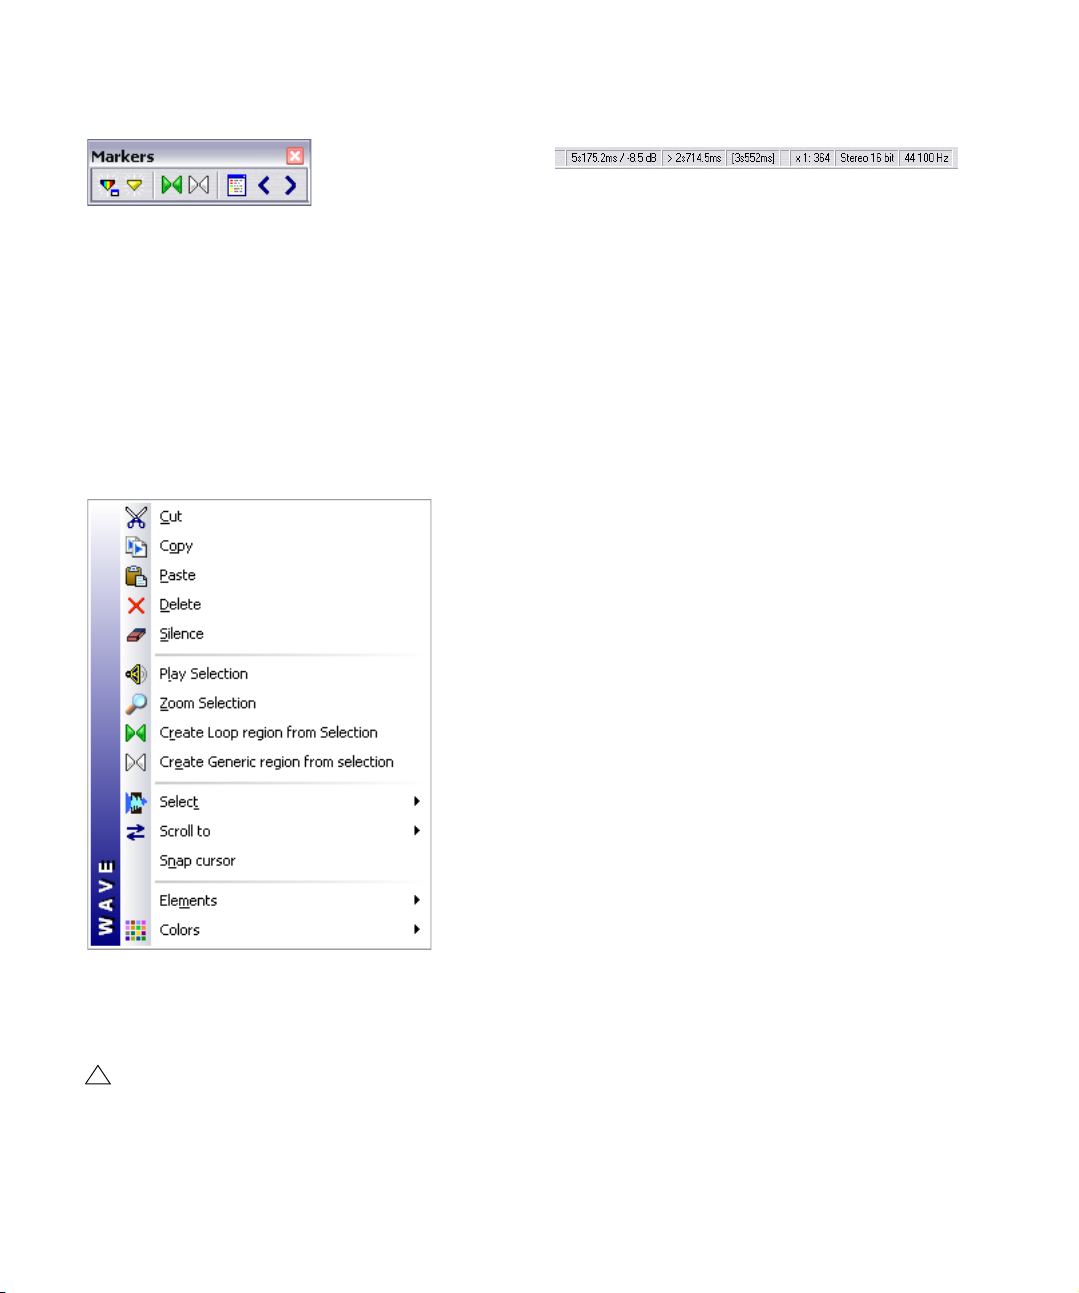
The Marker toolbar
This is used for various commands related to markers, see
“Introduction” on page 98.
Speed menus
Most displays have speed menus associated with them.
Ö To bring up a speed menu, right-click in the desired
area.
In the Wave windows for example, there is one speed menu for the level
ruler, one for each of the time rulers and one for each of the waveform
displays.
The status bar
This is normally displayed at the bottom of the screen, but
it can be hidden on the Preferences–Environment tab.
The status bar shows information related to the active window. Exactly what information appears depends on the
window type – for Wave windows it shows various information about the file. See “The status bar” on page 35.
• For some of the fields you can also click to perform operations
related to that field.
• The status bar also indicates the progress of operations that
take some time to finish.
The Wave window main view “speed menu”
The Speed menus contain the same items that can be
found on the main menus, but some speed menus also
contain unique items.
!
When searching for a function, don’t forget to check
the speed menus in the window in which you are
working!
27
Basic methods
Page 28
Units of time and level
Setting values
For rulers
You can specify the time and level (amplitude) formats for
each ruler in each window, by right-clicking on the ruler and
selecting a format from the pop-up menu that appears.
Time formats
Menu name Description
Time Positions are shown as hours, minutes, seconds and
Samples Positions are shown as number of samples. How many
Time code Also called SMPTE. Positions are shown in the follow-
Meter Positions are shown as bars, beats and ticks, as speci-
File size Positions are shown in file size units, MegaBytes, where
Level formats
Menu name Description
% Amplitude (level) is shown as a percentage of full level.
dB Amplitude is shown in decibels, a logarithmic scale
Decimal This is the actual value of the amplitude as stored in
Ö To make a ruler format the default (to be used in new
Wave windows), you need to save it as part of the default
window style.
See “Styling WaveLab Essential – Wave windows” on page 180.
milliseconds. At large magnification factors, hundredths
of milliseconds are shown.
samples there are to a second depends on the sample
rate of the wave. For 44.1 kHz for example, there are
44100 samples for each second.
ing format:
hours:minutes:seconds:frames.
The number of frames per second is set on the Preferences–Wave Edit tab.
fied on the Preferences–Wave Edit tab.
the decimals represent kiloBytes.
used in audio engineering.
computer memory (always displayed as 16 bits). Please
note that the range is from negative to positive with “0”
representing “no signal”.
In dialog boxes, you will find yourself adjusting values. The
following techniques apply:
Typing values
As in most other Windows programs you can “tab to” or
click directly on a value and type in a new one.
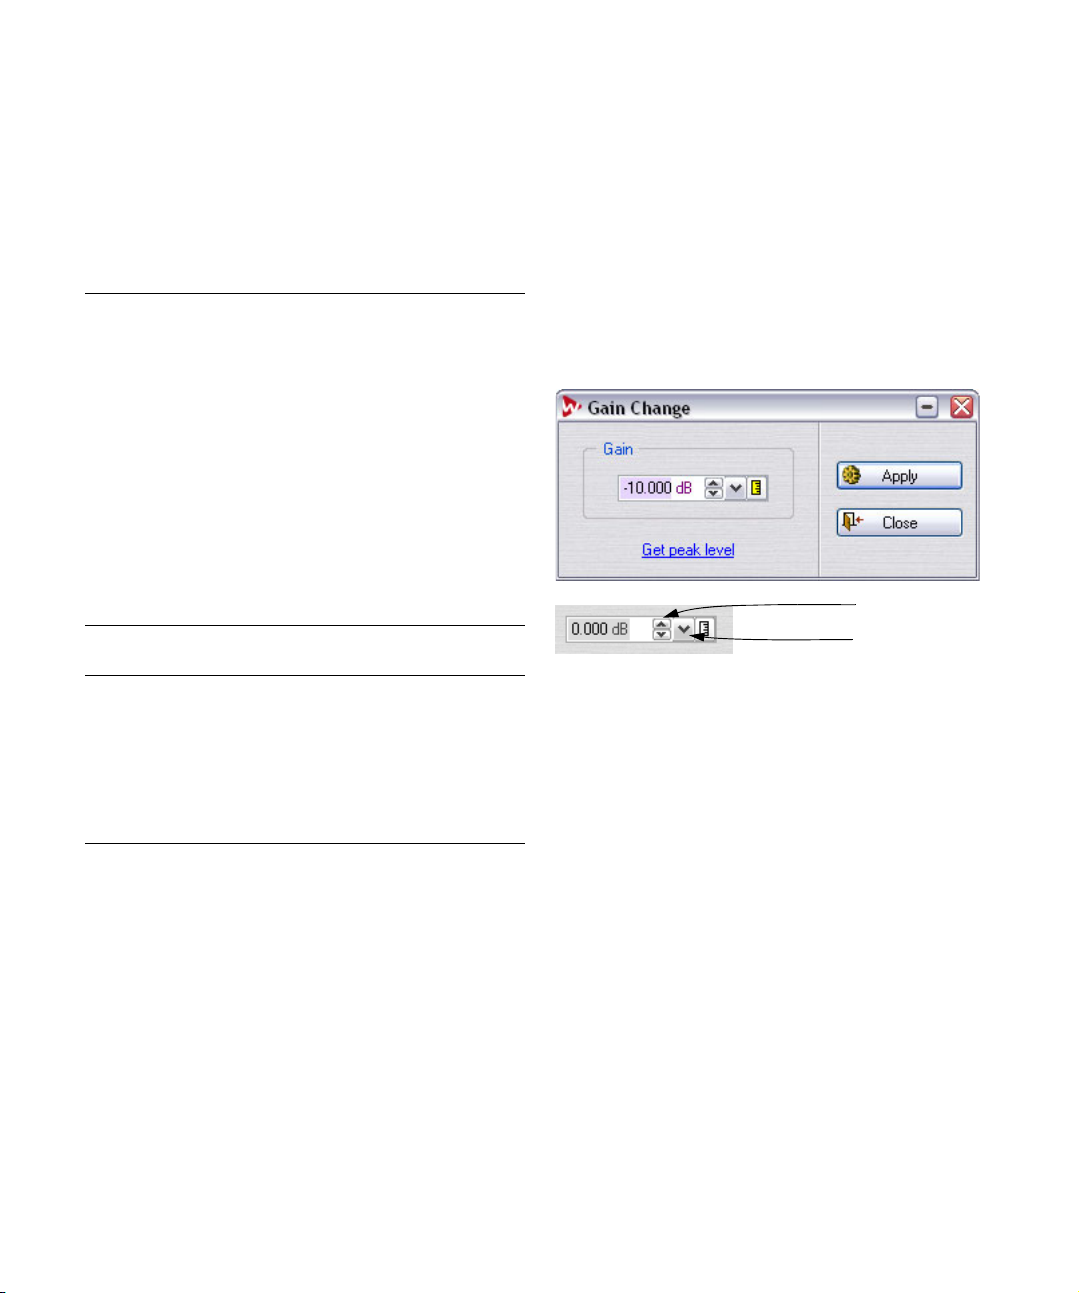
Using the spin controls/value fields
Values can be set using either the regular Windows spin
controls, or any of the other methods described below.
The spin controls
The history pop-up
• Clicking either arrow raises/lowers the value.
• Keeping the mouse button pressed over an arrow will “scroll”
the value.
• Holding down [Ctrl] makes the value change in larger steps.
• Holding down [Ctrl]+[Shift] changes the value to its minimum/
maximum.
↑
• The last adjusted control can be changed using the [
] and [↓]
keys, also in combination with [Ctrl] or [Ctrl]+[Shift] as described above.
• You can also click and hold in the value field and move the
pointer up or down to change values.
• Pointing in a value field will display the available parameter
range.
• The down arrow to the right of the spin controls brings up a
history pop-up where the last applied value change(s) in the
current dialog are shown and can be selected.
28
Basic methods
Page 29
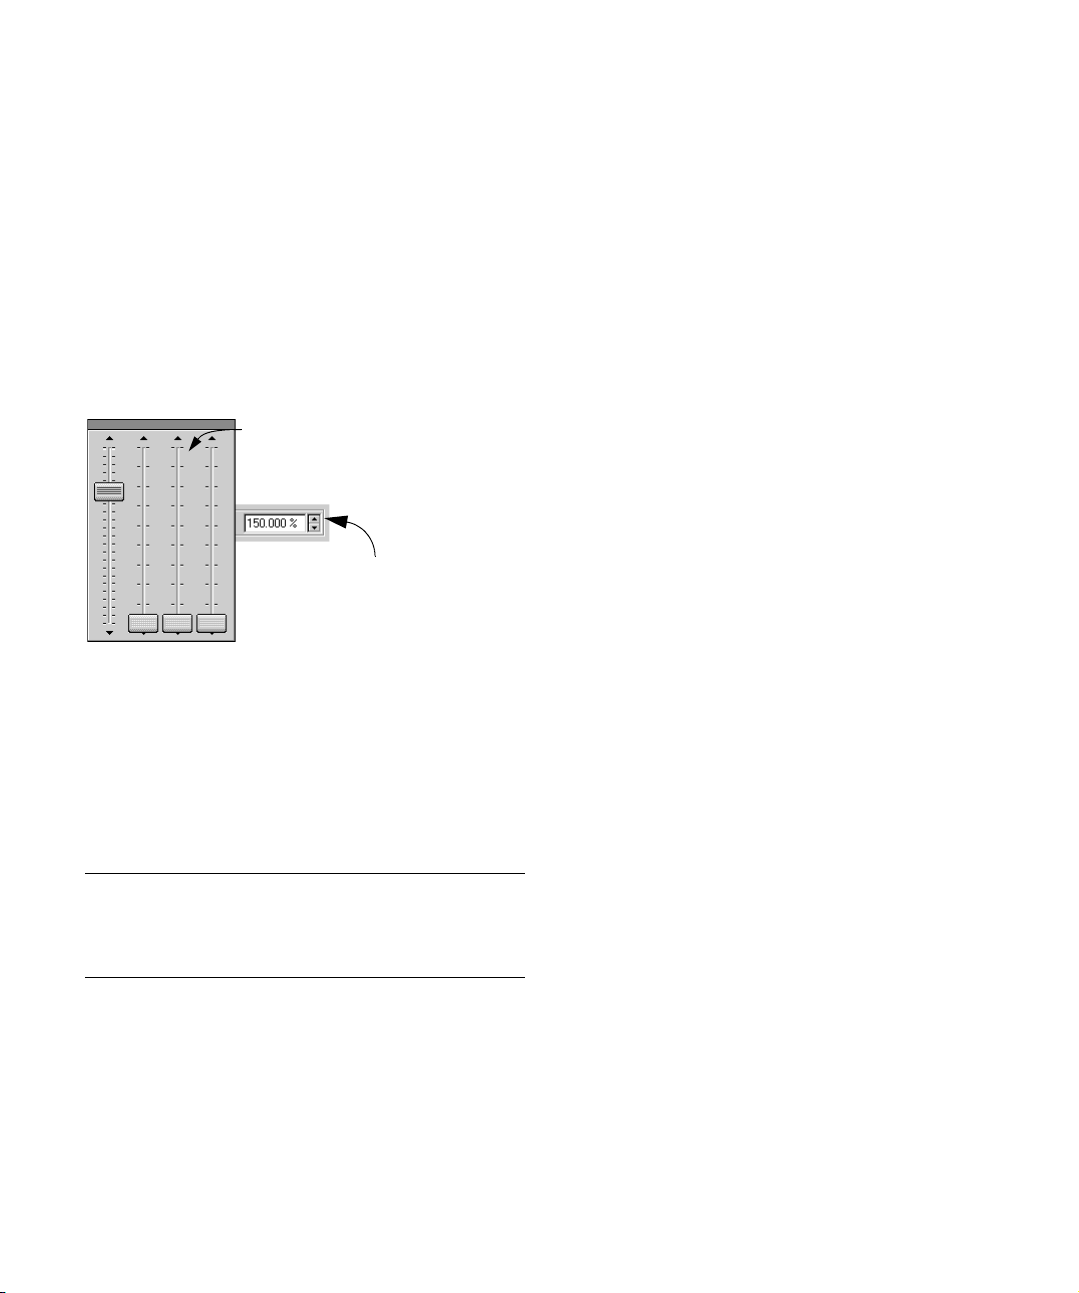
Using sliders and pop-ups
Many times, the most convenient way of changing a value is
using WaveLab Essential’s proprietary sliders and popups:
1. Click with the right mouse button on the spin control
(in some windows you can also double-click with the left
mouse button).
2. If a pop-up menu appears, select one of the options
on it.
3. If one or more sliders appear, drag the handle(s) or
click the arrows to set the value.
The setting is shown in the value box “behind” the slider window.
In this case, four faders appear, one
for the integer and three for the decimals.
The value gets updated when you
move the sliders.
4. When you have finished, click outside the slider window.
• If the value is “segmented” (for example divided into minutes
and seconds, etc.), more than one slider will appear, each
used for adjusting one of the “segments”.
• The slider window can be dragged to any position on the
screen, using the “title bar” at the top.
• The last-used slider can also be adjusted using the computer
keyboard:.
These keys Move the slider handle
[↑] and [↓] One step up/down.
[Page Up] and [Page Down] A few steps up/down.
[Home] and [End] To the top/bottom.
In effect processor panels
In the Master Section you will find either generic or custom effect panels for each effect processor. In custom
panels, values are adjusted using special methods, see
“The Effects pane” on page 85.
Using a wheel mouse
If you are using a mouse with a scroll wheel or similar, you
can take advantage of the wheel for various operations in
WaveLab Essential:
Scrolling
If you point at a waveform, the wheel scrolls the view horizontally.
Zooming
If you hold down [Ctrl] and point at a waveform, the wheel
zooms the view horizontally.
If you hold down [Ctrl] and [Shift] and point at a waveform,
the wheel zooms the view vertically.
Changing values
If you point at an edit field in a dialog, the wheel can be
used to adjust the value.
• If you hold down [Ctrl], the value changes in bigger increments.
• If you hold down [Ctrl]+[Shift] the value jumps to the minimum
or maximum.
Master Section
• When working in the Master Section window, the wheel
can be used to adjust the master volume.
You have to point in the Master Section for this to work.
Ö This functionality can be turned off in the Preferences–
Environment tab.
29
Basic methods
Page 30
Presets
Many dialogs in WaveLab Essential have either a Presets
tab or a Presets pop-up menu. If you think of the dialogs
as forms, presets allow those forms to be filled out automatically. WaveLab Essential comes with a selection of
presets for most dialogs that use them, but the real power
of presets becomes evident when you start creating your
own!
Ö For some WaveLab Essential effect panels there is a
Preset button instead of a Presets tab or pop-up menu.
Clicking the button opens the Presets dialog which has
the same items as described below.
Depending on how presets are displayed in a certain dialog (tab or menu) they are handled slightly differently, but
both cases are described below.
Creating a preset
1. Open the dialog you wish to use and set up the dialog
as desired.
2. Click on the Presets tab or pull down the Preset menu.
3. Click on the name line and type in a name for the pre-
set or click the Save As… menu item and type in a name in
the dialog that appears.
4. Where applicable, click the Add button.
Modifying a preset
1. Load the preset you want to modify, as described
above.
2. Make the desired settings in the dialog.
3. Click the Update button or click the Save item.
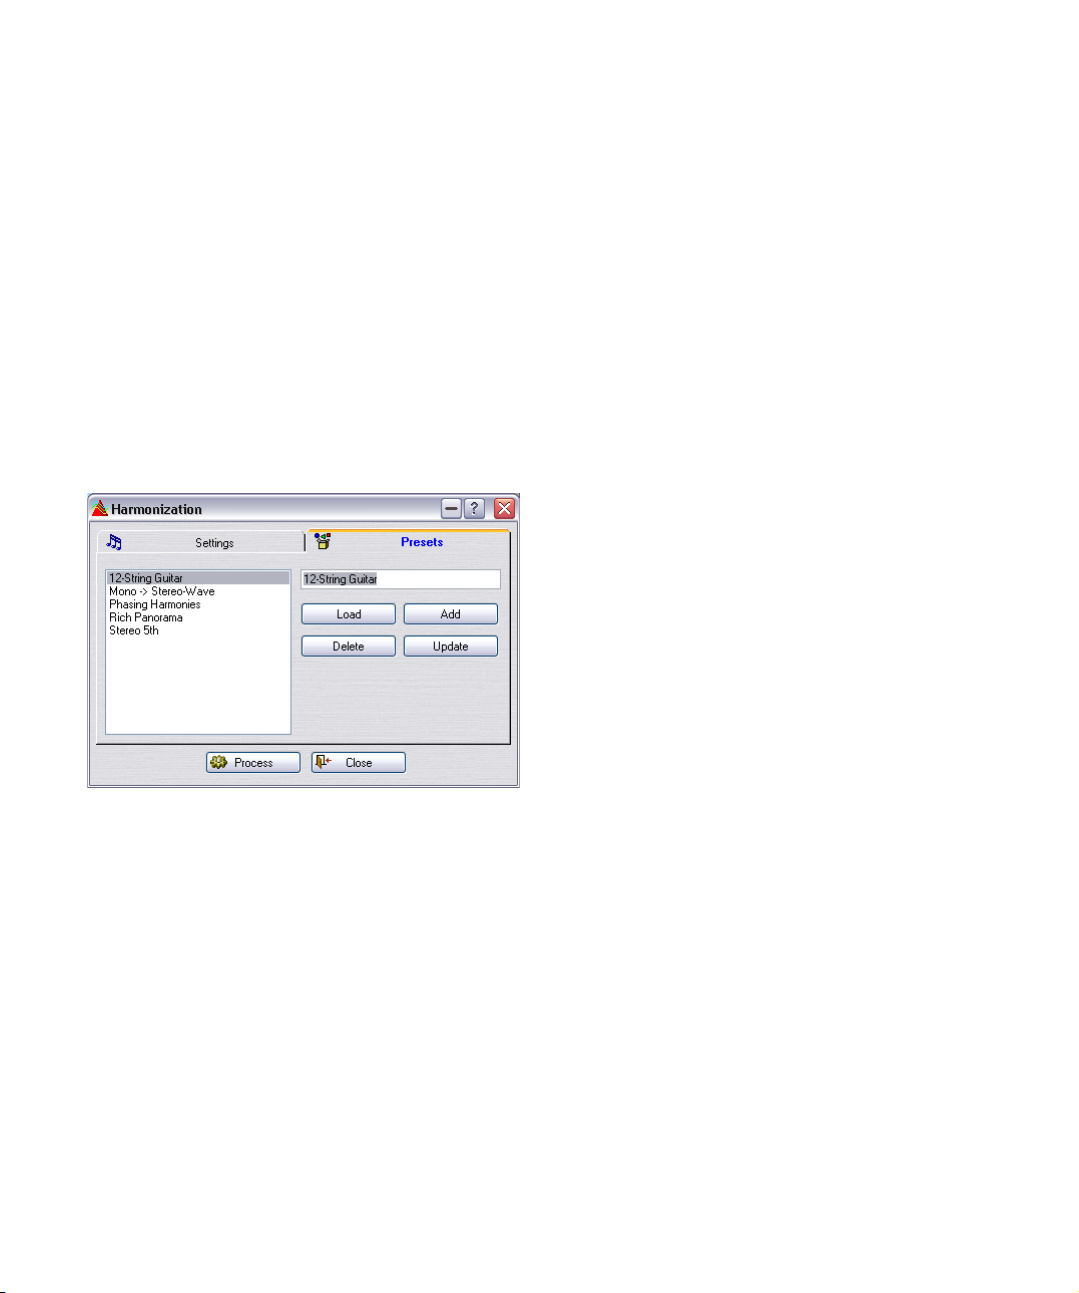
Deleting a preset
1. In the Presets tab, click on the preset you want to de-
lete.
2. Click the Delete button.
Or…
1. From the Presets menu, select the option Explore pre-
sets.
2. In the Explorer window that appears, select the preset
file you want to delete and press [Delete].
A number of presets in the Harmonization dialog
Loading presets
1. Open the dialog you wish to use and click on its Presets tab or pull down its Presets menu.
2. Select the preset you want to use.
3. Where applicable, click the Load button.
Ö A quick way to load a preset is to right-click on the
Preset tab and select a preset from the menu that appears.
Basic methods
Store temporarily and Restore
Some dialogs also allow you to quickly save and load up
to 5 presets with the Store temporarily and Restore menu
items. This is useful if you want to quickly test and compare different settings.
1. Select the option “Store temporarily” and from the sub-
select the number under which you want to save (#1
menu
#5).
–
2. To quickly load the saved settings again, select the
corresponding number from the Restore submenu.
30
Page 31

How presets are saved
The presets are automatically saved when you quit the
program. The next time you load the program, the presets
are ready and waiting, just as you left them. Furthermore
the presets are “global” to all files. No matter which file
you are working on, you still have access to all your presets.
About non-modal dialogs
Many of the dialog boxes in WaveLab Essential are “nonmodal”. This means that the window behind the dialog can
be operated even though the dialog box is still up on the
screen.
For example, when you have a Processing dialog up on
screen, you can still work with the Wave window and the
main menus. For example, this allows you to perform the
following operations without closing the dialog.
• Play back the wave to hear the effect of any applied processing.
• Adjust the selection before re-processing.
• Use the menu to undo the last processing.
Keyboard commands
Windows normally does not allow you to select from
menus and use keyboard accelerators when a dialog box
is the active window. However, we have provided a few
special key shortcuts for the most crucial commands:
Key Command
[F3] Undo
[F4] Redo
[F6] Play selection
[Shift]+[F6] Activate loop and play selection
[F7] Stop
[F8] Play
Using the computer keyboard
When you are working with WaveLab Essential, the computer keyboard has several different uses:
Transport controls
The Transport functions (such as Play, Stop, Record and
so on) can all be managed from the computer keyboard.
The keyboard commands for these functions are located
on the numeric keypad, to the right on the computer keyboard. See “Using the Transport bar” on page 57.
Keyboard shortcuts
Shortcuts for menus
Many of the items in WaveLab Essential’s menus have a
computer keyboard equivalent – an “accelerator”, listed
on the menu. Some abbreviations might need an explanation:
Abbreviation Description
KP The numeric keypad. “KP 2” for example means
BkSp The Backspace key.
F1 to F12 The Function keys.
Due to the large number of functions in WaveLab Essential, some key commands consist of double or triple key
strokes (known as “key sequences”). These are displayed
with the different keys separated by comma signs.
For example, “Alt+F12, T” means “hold down [Alt] and
press [F12], release, then press [T]”.
Customizable shortcuts
You can define your own key shortcuts for a number of
functions in the program, see “Customizable key com-
mands” on page 184.
Additional shortcuts
In addition to the above, there are key commands that are
not listed on the menus or in this manual. Check the Key
Commands chapter in the online documentation for a full
list.
the “2” key on the numeric keypad.
31
Basic methods
Page 32

6
Editing in the Wave window
Page 33

About this chapter
Opening Waves
The Wave window is the heart of WaveLab Essential’s audio editing capabilities. This is where you view, play back
and edit individual audio files. This chapter describes how
to open and save audio files, how to perform wave editing
and how to handle the Wave window itself.
Creating new empty documents
If you want to start with an empty file, for assembling material from other files for example, proceed as follows:
Using menus
1. Select New from the File menu, and Wave from the
submenu that appears.
Or, right-click the New icon on the Standard Commands control bar.
2. Fill out the dialog that appears.
See “Supported file formats” on page 49 for details about the various
options.
By dragging
This is only possible if the currently active window is a
Wave window (or if no document windows are open).
1. Make sure “Create window using mouse” is activated
in the Preferences–Wave edit tab.
2. Drag to make up a box in an empty free area of the
WaveLab Essential application window.
This must be of a certain minimum size. If you don’t get a new window, try
again with a bigger box. The new window “inherits” its attributes from the
last active window. If no window is open, the dialog box settings for units
are used instead.
About display options
There are a number of options that govern how a window
will look when it is first created. These are all found on the
Preferences–Wave edit tab.
!
For a list of supported file formats, see “Supported
file formats” on page 49.
Using the Open dialog
1. Select Open Wave from the File menu, press [Ctrl]-[O]
or click the Open icon on the Standard commands control
bar and select “Wave…” from the pop-up menu that appears.
2. Use the standard controls to locate and select the desired file.
The file format pop-up allows you to only view files in a certain format and
the buttons in the upper left half provide various views of the files on the
disk.
3. Click Open.
The Wave appears in a new window.
Below follow descriptions of the items/procedures which
are not standard for all Windows Open dialog boxes:
The Recent Folders pop-up menu
At the top of the dialog, you will find a pop-up menu which
lists the most recently accessed folders. Select one to
open it.
The playback functions
Once you have selected a file in the list you can audition it
by clicking Play. Click again to Stop.
You can also have files play back automatically as soon as
they are selected. To do this, activate the Auto button.
Opening multiple files
As in many other Windows programs, you can select and
open as many files as you wish. The [Shift] key is used for
making continuous selections and [Ctrl] is used for selecting any combination of files.
When you click Open the selected files will be opened,
each in an individual window.
The Open in Audio CD Montage window option
If you check this option at the bottom of the dialog, the
file(s) you open will be placed in an automatically created
new Audio CD Montage.
33
Editing in the Wave window
Page 34

Inserting a file into the current document
You may have a file that you want to insert into an existing
file. The two must have the same attributes (e.g. sample
rate), or a warning will appear.
1. Locate the document into which you want to add ma-
terial, and make it active.
2. If you want to add the file at some arbitrary position in
the document (rather than at the beginning or end), click
to move the wave cursor to that position.
3. Pull down the Edit menu and select Insert Audio File
and then one of the options from the submenu that appears.
4. Select a file and click Open.
The file is added. If you used the “at cursor position” option, a temporary
marker is added at the insertion point.
Using drag and drop
To open files from the Windows desktop, use one of the
following possibilities:
• Drag and drop the file(s) on the WaveLab Essential ap-
plication window.
• Drag and drop the file(s) on the WaveLab Essential pro-
gram icon or a shortcut for it.
If the program isn’t already running, it will be launched. This works even if
the application is running but minimized.
To Nuendo
Ö It is also possible to drag and drop files from WaveLab
Essential to Steinberg’s Nuendo!
This should be done using the Document icon.
Using the Recent Files lists
On the bottom of the File menu you will find one or several
hierarchical menu items that allow you to open recently
used document files. There are different submenus for different file types, as indicated by the menu items (“Recent
Audio Files”, “Recent Audio CD Montages”, etc.). Each
section holds up to twenty files. Selecting an item on one
of the submenus opens the corresponding file.
Using Favorites
Just above the “Recent…” items is the Favorites menu.
This lets you create a “library” of files that you want to be
able to open quickly.
• The “Add current document” option, adds the currently
active document to the menu.
The list is sorted alphabetically.
• “Validate list” checks whether each document on the
menu is still residing in the specified location on your hard
disk(s).
If a document can’t be found, it is removed from the list.
• “Clear list” removes all files from the menu.
Opening Wave files from within other windows
You can also open files from Audio CD Montage windows. See the respective chapter for details.
Importing tracks from an audio CD
This is described in the section “Importing audio CD
tracks into WaveLab Essential” on page 144.
Opening files from the desktop
To open a file in WaveLab Essential by double-clicking on
it, you must have created an association between the file
format and the WaveLab Essential application.
• You can do this from within WaveLab Essential at any
time by selecting “Associate all files of this type with
WaveLab Essential” on the File menu–Special submenu.
This association is made according to the currently selected file’s format,
and will ensure that all files of this format always opens with WaveLab
Essential.
Editing in the Wave window
34
Page 35

Window overview and adjustments
Left audio channel
Right audio channel
Overview
Main view
Zoom controls
• The “Selection length” field shows the length of the entire
wave if nothing is selected, and the length of the selection (in
brackets) if there is one. If you click this value with the right
mouse button the window zooms in on the selected range.
Sizing, moving and minimizing
WaveLab Essential uses standard Windows techniques
for resizing, moving, maximizing and minimizing windows.
See your Windows documentation for details.
Maximizing width
Selecting the Maximize Width item on the View menu
makes the window as big as the screen (or any other factor) permits.
About the window sections
Main view
The lower waveform area is where the main action is going
on. It is here that you select, apply tools, drag and drop,
etc.
• There are both time and level rulers. These can be hidden and
displayed (see the ruler and wave display speed menus). You
can also set which units of time and level they show (see
“Units of time and level” on page 28).
Overview
The overview is mainly used for navigating through long
files. Since you can have different zoom factors in the two
areas, the Overview can display the entire wave while the
Main view only shows you a short portion.
The status bar
The status bar can be hidden. This is done on the Preferences–Environment tab. The status bar provides the following information:
Mouse cursor position/Level
Wave cursor position/Selection length
• The Wave and Mouse cursor time positions are shown using
the same unit of time as in the rulers and dialog boxes.
• Level positions are always shown in dB.
File format details (see “Supported
file formats” on page 49)
Zoom factor
The divider
The divider between the Main view and the Overview can
be dragged to change the view sizes. See “Panes” on
page 23 for details.
Setting the zoom factor
About zooming
Horizontal zoom
• When you zoom out all the way the entire file fits the window.
• When you zoom in as far as possible, each sample will occupy
several pixels on the screen. This allows for single sample-accurate editing of waveforms.
Zoom out all the
way to see the
entire wave.
Zoom in until
you can see
each individual
sample point,
for very detailed
editing.
35
Editing in the Wave window
Page 36

Vertical zoom
• When you zoom out all the way, the complete height of the
wave fits into the window. You can note this by checking the
ruler on the left side.
• As you progressively zoom in, the display will only show you a
smaller part of the total height. Exactly which section you see
can be adjusted with the vertical scroll bars. Again, check the
ruler to see which part of the waveform is currently shown in
the display.
For example, to check the peaks of the waveform in great
detail, zoom in and scroll all the way up and down.
Detailed view of
waveform peaks
Using the zoom controls
Both the Main view and the Overview have horizontal and
vertical zoom controls. These behave just like scroll bars:
Using the Magnifying Glass tool
The Magnifying Glass tool is used to specify any section
of the waveform and have it occupy the entire window.
The Magnifying Glass tool selected.
Selecting the tool
The Magnifying Glass tool can of course be selected from
the tool box, but there are two other options:
• When you hold down [Ctrl] and move the pointer over
the Main view, the Magnifying Glass is automatically selected.
This is just a momentary selection. As soon as you release [Ctrl] you get
the previous tool back.
• When you move the pointer over the overview, it turns
into the Magnifying Glass automatically.
Using the tool in the Main view
1. Press the mouse button with the pointer somewhere in
the waveform.
2. Drag left or right to make up a box, and then release
the button.
The area encompassed in the box now fills up the entire window.
Vertical and horizontal zoom
controls
• You can drag the handle to any position.
• You can click anywhere on the scale to move the handle
there.
• You can click on the arrows at either end to change the
zoom factor in smaller steps.
Either way, the zoom factor on the status bar is updated continuously.
Editing in the Wave window
36
Making a box like this…
…zooms in so that the
“boxed” area will span the
entire display.
Page 37

Using the tool in the Overview
The Magnifying Glass can be used in the Overview, just as
in the Main view. However, even though you use the tool in
the Overview, it is the Main view that gets zoomed.
You can for example use this as follows: keep the Overview zoomed out all the way and use the Magnifying Glass
tool to display any section in the Main view.
Mouse zooming
Using the mouse, you can continuously change the zoom
factor by dragging:
1. Position the mouse pointer over the ruler in the Main
view.
2. Press the mouse button and drag up or down.
The zoom factor changes continuously.
Dragging to change the zoom factor.
• To zoom with the cursor in a fixed center position, hold
down [Shift].
• To make vertical zoom adjust automatically to the peaks
in the waveform, hold down [Ctrl].
• To switch to scrolling, hold down [Alt].
This technique works very well in combination with the
fact that you can move the song position by dragging horizontally in the ruler. By dragging in both directions, you
can quickly find a certain position in the file and display it
at the desired magnification factor.
Using mouse zooming to its full effect requires some practice – but it is worth the effort!
Using a wheel mouse
• If you hold down [Ctrl] and point at a waveform, the wheel
zooms the view horizontally.
• If you hold down [Ctrl] and [Shift] and point at a waveform, the
wheel zooms the view vertically.
Using the Zoom menu
The Zoom submenu can be invoked from two places:
• From the main view menu.
• By clicking on the Zoom factor on the status bar.
It provides the following options:
Option Description
Restore last zoom Brings back the last zoom factor set using this
Overview Zooms the view out as far as possible.
Zoom in 1:1 Zooms in so that one pixel (dot) on the screen rep-
Microscope Zooms in as far as possible, so that one sample oc-
Zoom selection Zooms the window so that the current selection
Custom… This brings up a dialog that allows you to enter any
Optimize vertical
zoom
menu or the Magnifying Glass tool.
resents one sample.
cupies several pixels.
(see “Selecting” on page 40) fills the entire display.
You can also click the selection range (in brackets)
with the right mouse button on the Status bar.
zoom factor.
This changes the vertical zoom factor so that the
peaks are clearly visible. This adjustment is done
according to the section of the wave currently visible in the window, not the whole file.
Using the keyboard
A quick way to zoom the active Wave window is to use the
arrow keys on the computer keyboard: Press [arrow up] or
[arrow down] to zoom in or out (respectively) horizontally.
Hold down [Shift] and use the arrow keys to zoom in or
out vertically.
There are also additional key commands for zooming –
check the Key Commands chapter in the online documentation for a full list.
Setting sensitivity for mouse zooming
On the Preferences–Environment tab, there’s a Sensitivity
setting for mouse zooming. The higher the value, the less
sensitive the function. You might want to raise this value
when you first try out the function.
Editing in the Wave window
37
Page 38

Using auto zoom for Overview
This setting, found on the Preferences–Wave edit tab, allows you to have the zoom factor automatically adjusted,
so that it always shows the entire wave.
1. Activate “Auto zoom for overview” in the Preferences
dialog.
2. Zoom out on the overview so that you see the entire
wave.
Now, when you resize the window, the overview zoom factor is automatically adjusted so that the entire wave is always shown.
Which part of the file do I see?
In the overview, a striped line called the “range indicator”
tells you which section of the file is currently displayed in
the Main view.
Furthermore, the range indicator moves while you drag the
scroll bar handle. This means that by observing the overview you can easily find positions in the Main view when
scrolling, even though the Main view might be zoomed in
very closely.
When you drag the scroll bar, the range indicator continuously
shows you which part of the wave is shown in the Main view.
The range indicator can be displayed at the top or bottom
of the overview, see “Range Indicator at top/bottom” on
page 181.
Navigating through the file
There are several ways to move the view to a certain position in the file:
Scroll bars
This is the most evident option. These work exactly as in
any other Windows program. Please note that the waveform scrolls while you drag the scroll bar handle.
Furthermore, WaveLab Essential uses proportional scroll
bars, that is, the size of the handle shows you how much
of the entire document you see. To get a feeling for how
this works, drag the horizontal zoom control while observing the size of the scroll bar “handle”.
Centering the view vertically
If you have zoomed in vertically, you might want to center
the waveform view. To do so, double click in the level ruler.
Clicking in the Overview
If you click once in the Overview, the Main view is scrolled
so that the position where you clicked is shown on the left
side of the window.
Using the Scroll to menu
To bring up the Scroll to menu, either select “Scroll to”
from the Main view menu, or right-click in the Overview or
the Main view.
The difference between the methods is that the main
menu always affects the Main view, whereas the speed
menus affect either view depending on where you clicked.
The following options are available on the menu:
Option Scrolls the view to
Start/End The beginning or end of the wave.
Selection start/end The beginning or end of the current selection, if
any.
Cursor The wave cursor.
38
Editing in the Wave window
Page 39

Clicking on the status bar
If you click on the cursor position on the status bar, the
view is scrolled so that the wave cursor becomes visible.
If you right-click instead, a dialog appears to let you specify a certain time position to scroll the view to.
Using a wheel mouse
If you move the wheel down the scroll bar will move forward and vice versa. You can also hold down the wheel
and drag the view in either horizontal direction.
Snapshots
Snapshots store the Main view’s “layout” – essentially two
things:
• How a window is scrolled (which part of the wave you see).
• The window’s zoom factor.
If you move back and forth between various positions in a
file, or if you zoom in and out for detailed or overview editing, using snapshots will save you a lot of time. Snapshots
are created and managed on the Wave Snapshots control
bar, opened from the View menu.
To create a snapshot, you first set up the view as desired
(by scrolling and/or zooming). Then click the camera icon
on the Wave Snapshots control bar, followed by one of
the numbers. The snapshot is now stored under that button. The fact that the snapshot is used is indicated by a
red circle around the number.
Setting the ruler start position
Normally, the ruler is set so that the beginning of the file
represents position “0”. However, for editing purposes
you may want to set the “0” position at some other point in
the file. The picture sequence below shows you how to do
this:
1. Set the wave cursor where you want the “0” position.
2. Right-click
the ruler to bring
up this pop-up
menu.
3. Select “Set
origin at cursor”.
The ruler start
position is
moved.
This snapshot is “programmed”.
You use the same procedure to “reprogram” existing
snapshots.
To recall a stored snapshot, simply click on its number on
the Wave Snapshots control bar.
Ö Snapshots will be automatically saved with the individual file if “Save view settings in companion file” is activated in the Preferences–Wave edit tab, see “Saving view
settings” on page 54.
Editing in the Wave window
Working with a meter based display
If the material on which you are working is tempo based,
and you know the tempo, you can make the ruler show positions in meter format (bars, beats and ticks), to make it
easier to find musically related cutting points:
1. Select Meter for the ruler time format, see “Units of
time and level” on page 28.
2. Open the Preferences–Wave edit tab.
3. Set the Time Signature and Tempo to match the file.
39
Page 40

4. Set the “Ticks per quarter note” setting to a number
you feel comfortable with.
This might for example be the same value as that used by your MIDI sequencer.
Using magnetization
If you have “Magnetize bounds” on the Options menu activated and drag the cursor on the time ruler, it will “snap”
to the following positions:
• The start and end of the entire wave.
• The start and end of the selection.
•Markers (see “What are markers for?” on page 98).
In this example, a meter ruler with 96 ticks per quarter note is used.
Setting the wave cursor position
Many operations, such as playback and selection depend
on the current cursor position – for example, playback often starts at the cursor. The current cursor position is indicated by a vertical flashing line, both in the Main view and
in the Overview. There are various ways to move the wave
cursor:
• By clicking once somewhere in the Main view or on the
time ruler.
If you have a selection, click on the ruler, since clicking in the waveform
deselects all.
• By clicking and dragging in the time ruler.
• By using the Transport controls (see “Setting the start
point for playback” on page 58).
• By using the “Move cursor to” menu on the View menu.
The options on this are similar to the “Scroll to” menu, see above. There’s
also a “Position” option which allows you to specify any position in the
format selected for dialogs and a “Snap Cursor” option described in the
section “Using “Snap Cursor”” on page 40.
• By using the Cursor keys:
These keys Move the wave cursor
[←] and [→] One “pixel” (screen dot) in either di-
[Ctrl] + [←] and [→] Twenty “pixels” in either direction.
[Home] and [End] To the beginning and end of the
• By using markers
Markers allow you to pre-define positions and move the cursor there, see
“What are markers for?” on page 98.
rection.
wave.
Using “Snap Cursor”
This function – which can be reached from the “Move cursor to” item on the View menu and from the main wave
display speed menu – moves the cursor position automatically for you. There are two options:
• Move to the closest zero crossing (see “Snapping to
zero crossings” on page 42) to the left of the cursor posi-
tion.
To get this effect, make sure “Snap to time unit” is turned off on the Options menu.
• Move to the zero crossing closest to a major time unit.
For example, this can be to the zero crossing closest to a whole second
on the time ruler. To get this effect, make sure “Snap to time unit” is activated on the Options menu.
In the last case, the “time unit” mentioned depends on
which type of scale is selected for the ruler:
Option Cursor moves to
Time Closest whole second
Samples Function not available
Time code Closest frame
Meter Closest whole beat
Selecting
Almost all types of editing and processing you perform in
WaveLab Essential operate on the selection. There are
numerous ways to make a selection:
By dragging or [Shift]-clicking
The standard way to select a range in a Wave window is
to click and drag. If you drag all the way to the left or right
side of the window, it scrolls automatically, allowing you to
select larger sections than what can be shown in the window. The speed of the scrolling depends on how far from
the window edge you are.
40
Editing in the Wave window
Page 41

You can also press [Shift] and click in the Wave window
to make a selection between the position of the wave cursor and the click position.
Selecting in stereo files
If you are working on stereo material you can select either
channel or both so that you can apply an operation to one
channel only or to the entire stereo material. Which channel will be selected when you drag or [Shift]-click depends on where you position the mouse pointer, as
indicated by the pointer shape:
Position Pointer
Upper half of left channel Only the left channel will be
Middle area Both channels will be selected.
Lower half of right channel Only the right channel will be
Shape
Ö To select a single channel by [Shift]-clicking, you need
to set the wave cursor in only one channel (by clicking in
the upper or lower part of the wave) and then [Shift]-click
in the same channel.
Switching the selection between channels
If you have made a selection, you can move this to the
other channel or extend it to both channels by selecting
the corresponding items from the Select submenu (on the
Edit menu). Or, you can press [Tab] to move the selection
between channels (if there is no selection, [Tab] moves
the cursor between channels).
Description
selected.
selected.
To select… You can…
The entire waveform
From the cursor to the following or previous marker
From the cursor to the beginning or end of the file
All data between two start/end
loop or region markers
Half or double the current selection length
What was previously selected
• If there are no markers, double click.
• Triple click.
• Press [Ctrl]-[A].
• Select “All” from the Select menu on the
Edit menu.
• Select “From cursor to previous/next
edge” from the Select menu (on the Edit
menu).
• Hold down [Shift] and double click between the cursor and the marker.
• Select “From cursor to start/end of file”
from the Select submenu (on the Edit
menu).
• Hold down [Shift] and double click to
the left/right of the cursor position.
• Press [Shift]+[Home] or [Shift]+[End].
• Hold down [Shift] and double click on
either marker head.
• Click between the start/end region
markers and select the type (loop or generic region) from the Select menu on the
Edit menu.
• Select “Halve selection length” or “Double selection length” from the Select menu
on the Edit menu. These options are useful
if you are working with measures.
• Select “Toggle” from the Select menu
on the Edit menu.
• Press [Esc].
Selecting in the Overview
You can select in the Overview, just as in the Main view.
To get the selection tool in the overview, hold down [Ctrl]
and move the pointer into the overview.
Selection shortcuts
There are a number of ways to quickly make certain selections (for many options there is more than one method):
To select… You can…
The area between two consecutive markers
The area between any two
markers
• Double click between them.
• Depending on the type of marker, use
one of the last two options on the Select
menu (on the Edit menu).
• Double click between two markers,
keep the mouse button pressed and drag
left or right.
Editing in the Wave window
Extending and shrinking the selection
Very often you will have made a selection only to find it isn’t
completely perfect. In this case you can extend or shrink
the selection. In fact you can very well use this as a
method: make a coarse selection with a lower zoom factor,
then zoom in and adjust the start and end in more detail.
By dragging
1. Move the mouse pointer to the beginning or end of the
selection.
It turns into a double arrow.
41
Page 42

2. Press the mouse button and drag left/right.
Dragging the end of the selection.
Using [Shift]
• Hold down [Shift] and click outside (extend) or inside
(shrink) the current selection.
If you click inside the first half of the selection, this will change the start
point, if you click inside the latter half, this will change the end point.
Using the cursor keys
• If you hold down [Shift] and press the [←] or [→] keys, the
start or end of the selection is moved one pixel (screen dot) to
the left/right. If you also hold down [Ctrl] it is moved twenty
pixels instead.
• If you hold down [Shift] and press [Page Up]/[Page Down], it
will also move 20 pixels.
• If you hold down [Shift] and press the [Home]/[End] keys, the
selection will extend from the current cursor position to the
start/end of the file respectively.
Which end of the selection you change depends on which
end of the selection the cursor is closest to.
Exactly how much one pixel represents depends on the
zoom factor. If for example the zoom factor is “x1:64”, the
cursor keys alone move 64 samples, and together with
[Ctrl] they move 1280 samples.
Using the Select menu
The Select submenu (on the Edit menu) has a number of
options for extending the selection to various points in the
waveform.
Moving the selection
If the selection is the right length, but at the wrong position, you can move it:
1. Hold down [Ctrl] and [Shift].
2. Point at the selection and drag left/right.
Snapping to zero crossings
About zero crossings
If you cut out a portion of a wave and paste it in somewhere else, chances are there will be a discontinuity
where the two waves are joined. See the example below.
This discontinuity will result in a transient in the wave
when it is played back, which is perceived as a “click” or
“bump” in the sound.
At this point, there
will be a click in
the sound, due to
the discontinuity in
the splice.
To avoid this you need to make the splice at a zero crossing.
A zero crossing is – a point where the wave crosses the
zero level axis, the point where the wave is considered to
have “zero level”.
Furthermore we recommend that joins are made with the
splice points of the two waves heading from opposite directions to the zero crossing. That is, one should be on its
way up (below the zero level axis), and the other should be
on its way down (above the zero level axis).
WaveLab Essential can help!
If you wish, WaveLab Essential can automatically search
for zero crossings, and extend the selection “outwards”
(make it bigger at both ends) so that it begins and ends at
a zero crossing. Normally this will not be noted in the editing precision (since there are usually hundreds or thousands of zero crossings per second), but it will help avoid
“clicks” and “pops” and “bumps”.
42
Editing in the Wave window
Page 43

But just making the selection start and end at zero crossings is not enough. When you actually perform the editing
operation (cut and paste or dragging, for example) you
need to make sure the material is inserted at a zero crossing. See “By dragging” on page 44.
Setting up zero crossing detection
1. Pull down the Options menu and activate “Snap to
zero crossing”.
2. Select Preferences from the Options menu.
3. Click on the Wave edit tab.
4. Fill out the “Snap to Zero crossing” options.
Checking the effect of Snap to Zero crossing
1. Make sure that “Off at high zoom factor” is not activat-
ed and zoom in until the zoom factor is 1:1.
2. Make a selection and observe how it is extended left
and right.
If you make a selection like this…
…it is automatically
extended at both
ends, to the closest
zero crossings.
The “time unit” mentioned depends on which type of scale
is selected for the ruler:
Option Cursor moves to
Time Closest whole second
Samples Function not available
Time code Closest frame
Meter Closest whole beat
File size Function not available
Using Magnetization
If you have “Magnetize bounds” on the Options menu activated and create or adjust a selection, it will “snap” to the
following positions (or to the zero crossing closest to the
position, see above):
• The wave cursor.
• The start and end of the entire wave.
•Markers (see “What are markers for?” on page 98).
Level selections
For some of WaveLab Essential’s level processing functions, it is useful to make a selection not only in time, but in
level.
By dragging
1. Make a regular “time” selection.
2. Hold down [Shift].
3. Move the mouse to the top or bottom of the selection
box.
The pointer changes into a vertical double arrow.
Snapping to time units
When “Snap to time units” is activated on the Options
menu, selections will automatically be extended to the left
and right so that they start and end at whole time units
(and also at the closest zero crossing, if that option is activated, see above). This allows you to easily make selections spanning a certain number of seconds for example.
!
Note that this means that you must drag across a
certain “time area” (for example more than half a second) to get any selection at all.
Editing in the Wave window
43
Page 44

4. Press the mouse button and drag up/down.
Make a regular selection, move
the pointer to its top or bottom
and hold down [Shift]…
Basic editing commands
Mono/stereo
WaveLab Essential is totally flexible in its handling of stereo. All editing operations can be performed on either
channel or both.
…drag up/down,
and release the
mouse button.
If you then extend the selection time-wise, the level selection still remains the same.
Extend to peaks
To automatically set the level selection to the highest peak
in the current selection, make a time selection as desired
and select “Extend to peaks” from the Select submenu on
the Edit menu.
Copying audio
The following operations allow you to make copies of sections of audio within the same file or from one file to another.
!
Please note that any existing markers (see “What are
markers for?” on page 98) in the source audio sec-
tion also will be copied.
By dragging
1. Decide whether you want to use “Snap to Zero crossing” (activated from the Options menu) for this operation.
When this is activated, both the selection start and end as well as the
drop position will always occur at zero crossings. See “Snapping to zero
crossings” on page 42 for details.
2. Make a selection.
3. Point at the selection, press the mouse button and
hold it down.
4. Drag to a position outside the selection (in the same
file) or to another Wave window.
When you have the cursor over a valid area, the pointer will turn into a
single or double waveform (see below). The status bar will show the exact position at which the selection will be inserted.
!
Make sure you don’t drop on a selection in the destination window, or you will perform a crossfade, see
“Crossfade” on page 73.
44
Editing in the Wave window
Page 45

5. Release the mouse button.
The selection is inserted at the indicated point. The audio that previously
began at that point is moved forward so that it is now played after the inserted section.
Make a selection, position the mouse pointer over it…
…drag and drop…
…the dragged section is inserted at the drop point.
Stereo/mono “conflicts”
Stereo/mono is handled as follows when you drag between files:
Dragged
section
Stereo Stereo The dragged audio is always inserted into both
Stereo Mono Only the left channel is inserted.
Mono Stereo What happens depends on the vertical position
“Drop”
wave
Action
channels.
in the destination window at which the drop is
made. This is indicated by the cursor shape (see
“Selecting in stereo files” on page 41). The se-
lection can be inserted into only one of the channels, or the same material can be inserted into
both channels.
Sample rate conflicts
If you copy or move audio from one window to another,
and the sample rates of the two files are not the same, the
copied/moved sound will play back at the wrong pitch
(speed). The program will warn you if this is about to happen.
While mixing sample rates can sometimes be used as an
effect, it is most often not desired. There are two ways to
get around this:
• Sample rate convert the source file to the same rate as the
destination file before doing the editing.
You might go back later and undo this conversion if necessary.
• Sample rate convert the destination file to the same rate as the
source file before adding the audio to it.
Please note that you are then partly “stuck” with this new sample rate,
since rate converting back and forth too many times is not recommended, see “Convert sample rate” on page 79.
Using “Magnetize Bounds”
If you have “Magnetize bounds” on the Options menu activated when you drag, the cursor will “snap” to the following positions:
• The wave cursor.
• The start and end of the entire wave.
•Markers (see “What are markers for?” on page 98).
Editing in the Wave window
By using Copy and Paste
1. Make a selection.
2. Select Copy from the Edit menu, press [Ctrl]-[C] or
drag the selection onto the Copy icon on the Standard
Commands control bar.
3. If you want to insert the audio, click once at some po-
sition in the same file or in another file.
The wave cursor appears at that point.
4. If you would rather replace a section of audio, select it.
In this case, the position of the cursor is of no relevance.
45
Page 46

5. Select Paste from the Edit menu or press [Ctrl]-[V].
The material you copied is either inserted at the indicated point (no selection) or it replaces the current selection (if you have a selection).
Make a selection, and select Copy…
…click for an insertion point…
Copied
section
Stereo Mono Only the left channel is pasted.
Mono Stereo What happens depends on whether the wave
Paste
wave
Action
cursor is in one channel or both. The Paste can
either happen in one of the channels, or the
same material can be inserted into both channels.
Moving audio
The following commands allow you to rearrange the “order” of the audio in a file.
By dragging
This is just like drag copying (see above). The only difference is that you hold down [Alt] and [Ctrl] while dragging
to move audio. The material you dragged is removed from
its original position and inserted where you drop it.
By using Cut and Paste
This is just like using Copy and Paste (you can for example
drag the selection to the Cut symbol on the Standard
Commands control bar – see above). The only difference
is that when you select Cut, the audio is removed from the
window. The material after the cut section will be moved
to fill out the gap.
…and select Paste. The copied section is inserted at the cursor position.
Stereo/mono “conflicts”
Stereo/mono is handled as follows when you paste:
Copied
section
Stereo Stereo If the wave cursor extends across both chan-
Stereo Stereo If the wave cursor is only in one channel, the
Paste
wave
Action
nels of the destination file, the material will be
inserted into both channels.
Paste will only happen in that channel. Material
from the left channel will be pasted in the left
channel and vice versa.
Editing in the Wave window
!
Please note that to completely undo a move between
two files you must first undo the paste in the destination window and then undo the cut in the source window.
By nudging
The Nudge tools
The Nudge left/right tools in the Toolbox (also known as
“Kicker tools”) can be used to move the audio in small
steps within a file.
1. Make a selection.
2. Click on the selection with one of the Nudge tools (de-
pending on the direction in which you want to move it).
The audio is moved one pixel (screen dot). Exactly how much this is depends on how far you are zoomed in. If for example the status bar says
x1:256, the selection will be moved 256 samples.
46
Page 47

Ö The moved section “overwrites” the audio originally at
that position.
For example, when you nudge a selection to the right, silence will appear
before the nudged section while audio to the right will be replaced by the
nudged section. This is different from moving by dragging.
Ö If you nudge many times in a row and then undo, all the
moves are undone in one go.
Repeating an audio selection
To repeat a section of audio, proceed as follows:
1. Make a selection, select Cut or Copy and place a new
insertion point, just as when performing a normal Cut or
Copy (see above).
2. Select “Multiple copies…” from the Paste Special
submenu on the Edit menu.
3. In the dialog that appears, enter the number of copies
you desire (up to 1000), and click OK.
Other Paste operations
On the Paste Special menu you will find some additional
options:
Overwrite
This will overwrite data in the destination file, rather than
moving data to make room for the inserted audio. The actual amount that will be overwritten depends on the selection in the destination file:
• If there is no selection in the destination file, a section
with the same length as the pasted data will be overwritten.
If there is a selection, the pasted data will replace that selection, just as
when making a regular paste.
Append
This will add the pasted audio after the end of the file, just
as if you had placed the wave cursor there and selected
Paste.
Prepend
This will add the pasted audio before the beginning of the
file.
Mix
This will blend the two files into each other, starting at the
selection (if you have one) or at the cursor position (if
there is no selection).
• When you select the Paste Special – Mix option, a dia-
log appears, allowing you to specify the desired gain for
the audio on the clipboard and at the destination, respectively.
A setting of 0 dB means the level will be unaffected.
• All the data on the clipboard is always mixed in, regard-
less of the length of the selection.
It doesn’t matter whether or not you have a selection in the destination
file when you paste.
Deleting selections
Delete
You can use the following methods to delete a selection
of audio:
• Select Delete from the Edit menu.
• Click the Delete icon on the Standard Commands control bar.
• Press [Backspace] or [Delete].
• Drag the selection to the Delete icon on the Standard Commands control bar.
Trim
To remove all the audio except the current selection, select Trim from the Edit menu (or press [Ctrl]-[Backspace]).
Silence
The Silence function offers two different methods for inserting silence:
• You can “insert” silence into a section, i.e. to space two sections further apart.
• Or, you can select to “replace” a selection or time range with
silence.
Insert silence
If you intend to insert silence, proceed as follows:
1. Make a selection that encompasses the range where
you wish to insert the silence.
2. Select Insert Silence from the Edit menu or press
[Ctrl]+[Shift]-[Space].
47
Editing in the Wave window
Page 48

Replace selection
If you intend to replace a specific range with silence, proceed as follows:
1. Make a selection that encompasses the range you
wish to replace with silence.
2. Select Silence from the Edit menu or press [Ctrl][Space].
There are four ways to replace a section of audio with
silence:
• Select it and select Silence from the Edit menu.
• Select it and click the Silence icon on the Standard Commands control bar.
• Select it and press [Ctrl]-[Space].
• Select it and drag the selection to the Silence icon on the
Standard Commands control bar.
Turning selections into new documents
If you want to turn a section of wave into a new document,
proceed as follows.
1. Make a selection.
2. Drag the selection out of the window and onto an
empty section of the WaveLab Essential application window.
The cursor turns into a “new document” icon.
3. Release the mouse button.
The selection appears in a new window. You can also use this function to
create stereo waves out of mono waves, see below.
Converting from mono to stereo
You may convert a mono file into a stereo file that contains
the same material in both channels, for example for further
processing into “real” stereo.
1. Make a selection.
2. Drag the selection out to the WaveLab Essential
“desktop”.
3. When the pointer is outside the window, hold down
[Ctrl] and release the mouse button.
Converting from stereo to mono
You may mix the two channels in a stereo file into a mono
document.
This can be done in two ways. Which method to use
mainly depends on whether you want to convert the entire
file or just a selection:
By dragging
1. Make a stereo selection.
2. Drag the selection out to the WaveLab Essential
“desktop”.
3. When the pointer is outside the window, hold down
[Ctrl] and release the mouse button.
By saving (converting an entire file)
1. Open the stereo file.
2. Select “Save as” from the File menu and click the
Properties button at the bottom of the dialog to open the
“Audio File Format” dialog.
3. Change the Channels setting to the “Mono (Mix)” option, but leave the other settings as they are.
You can of course change the other settings too, but this will have other
effects, see “Saving in another format (Save as…)” on page 51.
Ö The other two “Mono (Mix)” options will also convert a
stereo file to mono, but the amplitude of the resulting file
will be attenuated by 3 or 6 dB respectively.
Since the mixing of the two channels when converting a stereo file to
mono might often result in the amplitude increasing to a point where clipping occurs, these two options can be useful to remedy such a situation.
4. Click OK and save the file.
5. Open the file you just saved.
Swapping channels in a stereo file
You may move the material in the left channel to the right
channel, and vice versa:
1. Make a selection across both channels.
Only the material in the selected section will be swapped.
2. Select “Swap channels” from the Edit menu.
48
Editing in the Wave window
Page 49

Waveform restoration with the Pencil tool
The Pencil tool allows you to redraw the waveform directly
in the Wave window. This can be used to quickly repair
waveform errors.
This error in the right channel (red waveform) can be corrected quickly
by using the Pencil tool.
• The Pencil tool can be used if the Zoom resolution is set
to at least 1:8 (one pixel on the screen equals 8 samples)
or a higher resolution.
Resolution values can be set in the Zoom pop-up menu. You can open it
by clicking on the Zoom factor field in the Status bar, located at WaveLab Essential’s bottom window rim.
Click here to open the
Zoom pop-up menu.
• Select the Pencil tool from the Toolbox and redraw the
waveform.
If you wish to redraw the waveform of both channels at once, press
[Shift] on your computer keyboard during the drawing process.
File handling in Wave windows
!
This section describes file handling in the Wave window (i.e. handling audio files). File handling of other
document types (e.g. Audio CD Montages) is described in the respective chapter.
Supported file formats
WaveLab Essential can open and save audio files in a
number of file formats. The table below gives you some
basic information about the various formats available (note
that additional file formats may have been added after this
document was written).
• The Format column also lists the typical file name extensions
for each format.
• All sample rates are supported, for all file formats.
• All file types can handle mono and stereo.
Format Description
Wave (.wav) The most common file format on the PC platform. If
AIFF (.aif, .aiff, .snd) Audio Interchange File Format, a standard defined
MPEG-1 Layer 3
(.mp3)
MPEG-1 Layer 2
(.mp2/.mpa/.mpg/
.mus))
Original Sound
Quality (.osq)
Sound
Designer II (.sd2)
you plan to load the files into any other PC program,
Wave files are a safe bet. 8, 16, 20, 24 bit and 32 bit
(float) resolutions are supported.
by Apple Computers Inc. 8, 16, 20, or 24 bit resolutions are supported.
The most common audio compression format. The
major advantage of MPEG compression is that the
file size is significantly reduced, while there is little
degradation of sound quality. WaveLab Essential
can both open and save files in this format.
- Note that when you open an MPEG compressed
file in WaveLab Essential, the file is converted to a
temporary wave file that is much larger than the original compressed file. Therefore, make sure that you
have enough free space on your hard disk when
opening MPEG compressed files.
- When you save, the temporary wave file will be
converted back to MP3, so from a user perspective
the file handling is transparent apart from the size
difference mentioned above.
MP2 (sometimes referred to as “Musicam files”) is a
common file format in the broadcast industry. With
regard to file sizes the same applies as with MP3
files.
This is WaveLab Essential’s proprietary lossless
compressed audio format. By saving files in this format, you can save considerable disk space without
compromising audio quality. See “About saving
OSQ files” on page 51.
This audio file format is used by Digidesign applications (such as Pro Tools). 8, 16 or 24 bit resolutions
supported.
49
Editing in the Wave window
Page 50

Format Description
U-LAW
(.ulaw, .vox)
A-LAW
(.alaw, .vox)
Sun/Java
(.snd, .au)
ADPCM –
Microsoft/
Dialogic (.vox)
Ogg Vorbis
(.ogg)
Text/Excel (.txt) This is a text representation of a waveform. By sav-
Windows Media Audio (.wma, .asf))
Ensoniq Paris (.paf) Used by the Ensoniq Paris™ system (16 bit resolu-
This is an audio encoding and compression technique supported by Windows and Web phones, using 8 bit resolution. The U.S. telephone system uses
U-law encoding for digitization.
This is an audio encoding and compression technique for telephony, using 8 bit resolution. The EU
telephone system uses A-law encoding for digitization.
This is an audio file format used on Sun and NeXT
computers. Files in this format can often be found on
the Internet. 8, 16 or 24 bit resolutions are supported.
This is a format commonly used for games and telephony applications that offers a lower bit rate than
linear PCM and thus requires less storage space/
bandwidth.
Ogg Vorbis is a relatively new compressed file format that is open and patent-free and offers very
small audio files maintaining comparatively high audio quality.
ing an audio file as a text file and then opening it in a
spreadsheet application such as Excel, you can view
it in textual, decimal form and edit the sample values.
When you open a text file representing a waveform
in WaveLab Essential, it will be decoded and
opened as an audio file. Note that these files are not
compressed in any way, so they can get very large!
Therefore, avoid creating and opening extremely
large .txt files. Also note that when using 32 bit float
files, the .txt format is not 100% lossless – i.e. information may be lost! This is because it is not possible
to express a binary floating point value in textual
decimal form without some precision loss.
Microsoft’s own compressed format. WaveLab Essential lets you import/export audio in this format,
provided that you have Windows Media Player 9 (or
later) installed on your system.
tion).
About temporary files
As you work in WaveLab Essential, temporary files (file
name extension .$$$) used for Undo, etc. are created on
your hard disk, see “Temporary files” on page 15.
You can decide whether these files should be in 16-, 24or 32 bit format. This is done on the Preferences–File tab.
The higher this value, the better the quality of the temporary file. However, 32-bit files are also twice as big as 16bit files and take longer to process.
• If you ever plan to export your files in 24-bit or 32-bit format,
use this format or a better one (higher number) for your temporary files as well.
• Use 32-bit if you want to create files with levels exceeding
0dB.
• Even if you only work with 16-bit files, selecting 24-bit for your
temporary files can improve audio quality slightly.
• For less critical applications where speed and disk space are
crucial factors, use 16-bit temporary files.
Opening files
The various methods for opening an audio file in a Wave
window are described in the section “Opening Waves” on
page 33. Importing CD tracks from an audio CD is de-
scribed in the section “Importing tracks from an audio CD”
on page 34.
Save and Save as – General information
Ö When you save a new document for the first time, it
doesn’t matter whether you select Save or Save as.
The “Save as” dialog will appear, since you need to specify a file format,
folder, and file name.
About 20-, 24- and 32-bit float files
You do not need a 20- or 24-bit audio card to take advantage of the fact that WaveLab Essential can handle 20and 24-bit audio files. Any processing or editing performed on the files is always done at full resolution, even if
your card doesn’t support the full resolution. For playback,
WaveLab Essential automatically adapts to whatever card
you have installed.
Editing in the Wave window
Ö Once a file has been saved, you can continue to edit it
and then select Save from the File menu, or press [Ctrl][S], to update the file and make the changes permanent.
Ö If you want to specify a new name, location and/or file
format, you should select Save As from the File menu.
See “Saving in another format (Save as…)” on page 51.
Ö All save operations except “Save a Copy” clear the
Undo buffers, which means that after saving you cannot
undo or redo.
50
Page 51

Automatic backups
For all save operations except a regular “Save”, backups
are created automatically if a file with the same name already exists.
If for example you select Save As and specify a file name
already used in that folder, the program will ask you if you
want to back up the existing file first. If you click Yes, the
first letter in the file’s extension will be changed to “~”.
“AIF” for example, will become “~IF”.
Saving in another format (Save as…)
If you want to change the format (file format, sampling frequency, bit resolution and stereo/mono status) when saving, proceed as follows:
1. Select Save as… on the File menu.
2. A regular file dialog appears where you can specify a
file name, folder and a file format (see “Supported file for-
mats” on page 49).
3. If you wish to change other attributes of the file (e.g.
mono/stereo status, bit resolution or sample rate), click
the button at the bottom of the dialog.
This opens the Audio File Format dialog where you can specify the desired properties of the converted file.
If you change the sample rate, bit resolution and number
of channels, the following operations are performed:
Property Action
Sample Rate If a new sample rate is specified, a sample rate conver-
Bit Resolution If a different bit resolution is specified, the file is either
Mono/Stereo If the file is converted from mono to stereo, the same
sion will be performed (see “Convert sample rate” on
page 79).
“truncated” down (e.g. to 8 bits), or “padded” up (e.g. to
24 bits).
If you are converting to a lower bit resolution, you should
consider adding dithering – see “The Dithering pane”
on page 88.
material will appear in both channels. If the conversion is
from stereo to mono, you can either select to only save
the left or right channel, or create a mix of the two channels.
• If you only wish to change the bit resolution you can do
this directly in the “Audio Properties” dialog (see “Editing
audio properties” on page 55) instead and perform a stan-
dard save.
• For high quality mastering purposes, it is not recom-
mended to change the sample rate and number of channels this way, but instead use plug-ins and functions of the
Master Section (see “The Effects pane” on page 85).
• For the available compressed file formats (MP3, MP2,
WMA and Ogg Vorbis), you can select “Edit…” from both
the Encoding and Attributes pop-up menus in the Audio
File Format dialog.
This opens additional settings dialogs, where you can specify various options such as bit rate and compression method, and also enter text tags
for the file.
The Audio File Format dialog
4. After making the desired settings, close the Audio File
Format dialog and click Save.
A new file is created. The original file is not affected by the operation.
Editing in the Wave window
Ö It is also possible to convert several files to another
format in one go (batch encoding).
See “Batch file encoding” on page 95.
Ö Note that you can also save as WMA files, MP3 files
and MP2 files via the “Encode to…” options on the Save
Special submenu.
About saving OSQ files
OSQ (Original Sound Quality) is a lossless audio compression format, which can significantly reduce the audio
file size without affecting the audio quality at all.
51
Page 52

• You can save any audio file as an OSQ file by using the
Save As function.
The audio will play back exactly the same as in the original, uncompressed file.
• Similarly, if you open an OSQ file in WaveLab Essential
and save it as an uncompressed audio file in its original
format (e.g. WAV), the audio will play back exactly the
same.
• You can also convert several files to OSQ format in a
batch. See “Batch file encoding” on page 95.
Save selection as
This is a menu item on the Save Special submenu. It
works exactly as Save As, except that only the current selection is saved as a new file.
Save a Copy
This item, also on the Save Special submenu, allows you
to save a copy of the file, in its current state, without affecting the original. A regular file dialog is used as with
Save As.
Save left/right channel as
These two menu items are also located on the Save Special submenu. They allow you to save each channel individually, into a separate file. A regular file dialog is used as
with Save As.
This menu command is used when you have been editing
“dual mono” files for example, and wish to save the channels into separate files.
Save All
The Save All dialog
This menu item brings up a dialog that allows you to save
some or all of the open documents, in one go.
The list displays all open documents that currently contain
unsaved changes. The “Show paths” check box allows
you to display/hide the complete file paths.
1. Select /deselect files by clicking on them or by using
the Select/Deselect button.
Only the selected files will be saved.
2. Click “Save selected”.
Revert to saved
This menu option, on the File menu, allows you to revert
the file back to its last saved state (actually, the last saved
version of the file is loaded from disk). This can be used as
a kind of “super undo” which undoes all the changes
made to the file since it was last saved.
1. Select “Revert to saved” from the File menu.
2. Click “Yes” in the warning dialog that appears.
The file is restored to its previously saved state.
52
Editing in the Wave window
Page 53

Renaming files and documents (Rename)
The Rename function is available from most WaveLab Essential documents, not just Wave windows. The function
is however of particular importance when renaming audio
files. If you rename an audio file outside WaveLab Essential, and this file is referenced to an Audio CD Montage or
Data CD/DVD project, the reference will be lost the next
time you open the document that references this file.
But WaveLab Essential allows you to handle file renaming
in an intelligent way so that all the documents that reference this renamed file are automatically updated! This
works as follows:
Ö All open documents that reference the file or document to be renamed will be automatically updated to reference the new name.
E.g. if you rename an audio file named “India” to “Sitar”, all currently open
documents that reference the file “India” will be updated to reference the
file as “Sitar”!
For audio files, peak and marker files will also be renamed
accordingly.
• Documents that use audio file references are Audio CD
Montages and Data CD/DVD projects.
• WaveLab Essential documents can also refer to the
names of other documents, e.g. a Data CD/DVD project
will contain references to Audio CD Montages.
This will work in the same way – if the document/project that references
the document to be renamed is open, the references will be updated.
To rename a file or document proceed as follows:
1. Select the audio file/document to be renamed.
Make sure all documents that reference this particular file are open. This
is not mandatory, but if they aren’t, the file references will not be updated.
2. Select “Rename…” from the File menu, or press [F2].
The Rename dialog opens.
The dialog contains the following items:
Item Description
Name text field This is where you type in the new name.
Change folder It is also possible to change the folder location
Keep as default path If you check this option, the same path will be
Extension pop-up The file extension can be changed, but only if
of the file when renaming. If Change folder is
ticked, you can navigate to a new location. Note
that this is only possible within the same drive
partition.
selected the next time you open the dialog. This
is useful if you need to move several files successively.
corresponds to the original file format (certain
file formats can have different possible file extensions, e.g. “aif” or “snd”).
Deleting files and documents
It is possible to delete whole files or documents from
within WaveLab Essential. This function is available from
the File menu and will delete the currently selected file or
document from disk. Make sure the file or document you
wish to delete is in focus.
1. Select “Delete…” from the File menu.
A dialog appears as a warning, allowing you to cancel or proceed with
the operation.
2. Select whether to permanently delete the file or to
move it to the Recycle bin by clicking the appropriate button in the Method section of the dialog.
Only select to permanently delete if you are absolutely certain – you
won’t be able to retrieve the file!
• Any Data CD/DVD project that is open in WaveLab Es-
sential and has a reference to this file will be updated accordingly.
The file will get removed from the Data CD/DVD project(s).
53
Editing in the Wave window
Page 54

• However, if a file is being referenced by a currently open
Audio CD Montage, you will not be able to delete the file
and a warning will appear.
In addition, you will not be able to delete the file in the following circumstances:
• If it is currently copied to the clipboard.
• If a part of it is has been pasted into another file that is open.
• If the file is open in another application.
• Deleting an audio file will also automatically delete its
peak and marker file names.
Saving view settings
WaveLab Essential can automatically save all settings associated with a Wave file. This includes:
• Window size and position.
• Zooming.
• Scroll position.
• Snapshots.
The view setting information is stored in a companion file
(extension “.mem”) either together with your audio files or
in a separate folder.
• This feature is activated/deactivated (on by default) in
the Preferences–Wave edit tab (“Save view settings in
companion file”).
If the feature is activated and you save a file, the settings
will be recreated exactly as you had them when later reloading the same file!
Compression encoded export formats
Apart from the formats available in the Save As dialog and
the Save special encode MP3/MP2/WMA options, WaveLab Essential allows you to export files in a number of
compression encoded audio formats, suitable for multimedia, web publishing, etc. (see “Supported file formats” on
page 49). The basic functionality for this is part of a soft-
ware technology called Microsoft ACM (Audio Compression Manager) which is included with Microsoft Media
Tools.
The number of formats you can export, depends on which
ACM drivers you have installed on your computer.
For more information, see www.microsoft.com/windows/
windowsmedia.
About “lossy” and “non-lossy” compression
There are two types of compression methods. When you
use a “non-lossy” method (like saving as an OSQ file –
see above), all information about the file is preserved,
which means that when you decompress the file, you get it
back exactly as it was.
However, most audio compression techniques are “lossy”.
This means that once the file has been compressed, some
information has been lost. This type of compression always results in some kind of audio degradation, albeit in
many cases a very small one.
WaveLab Essential can also import any file supported by
ACM, provided that the correct ACM drivers are installed.
!
If you need audio file compression with uncompromised audio quality, you should use the OSQ (Original Sound Quality) lossless audio compression
format instead (see “About saving OSQ files” on
page 51).
Exporting to encoded formats
The menu item “Encode (ACM)” uses the Microsoft MediaTools technology to convert the file to one of a number of
compressed formats.
1. Select “Encode (ACM)…” from the Save Special sub-
menu.
The dialog that appears is a MediaTools dialog, not a WaveLab Essential
dialog.
2. Select one of the formats from the pop-up in the mid-
dle and chose a setting for it from the pop-up below.
The dialog also provides possibilities for creating “presets” of formats
and settings, using the upper row of controls.
!
The options which are available depend on the original format of the file, its sample rate, the number of
channels, etc. However, we have noted problems
with some ACM drivers. Even though a certain format can be selected, an error message appears
when you try to save the file. If this happens, please
use another encoding method.
3. Click OK.
A regular file dialog appears.
4. Specify a name and location for the file, as with any
Save operation.
54
Editing in the Wave window
Page 55

Note: When you export to compressed files using the “Encode (ACM)” option, the file that is created will technically
be a Wave file, regardless of the compression format (the
files will have the extension “wav”). But instead of the regular “linear” audio data that usually makes up a wave file, a
special audio data “chunk” is included that contains the
compressed audio.
This is normally not a problem, but something to be aware
of when planning for usage of files in other programs and
on other computer platforms.
Editing audio properties and file attributes
Editing audio properties
Each audio file has a certain set of properties, that is, information about the sample rate at which it was recorded,
what the bit resolution is, etc. The “Audio Properties” dialog allows you to change that information.
There are two ways to bring up this dialog:
• Select “Audio Properties” from the Edit menu.
• Click on the properties information field, on the status
bar.
• If you change the bit resolution the file will be converted to the
new resolution the next time you save it.
!
There is no Undo for this item. If you save with a
lower bit resolution, the file is permanently converted.
File attributes
If you select this option on the Edit menu, a dialog opens
in which you can specify various information about the
wave file.
The Wave Attributes dialog
You can enter information on either the Standard tab or
the Broadcast Audio Extension tab. The information you
enter here is added to the header of the file, and thereby
labels it as either a Standard wave file or a Broadcast
wave file. A Broadcast wave file is essentially the same
thing as a Standard wave file, the difference is what information the file headers can contain.
• On the Standard tab in the dialog, you can enter infor-
mation that will be displayed for instance when viewing
the file’s properties in the Windows explorer.
The Audio Properties dialog
About changing the values
Changing the values in this dialog does not process the
file in any way, unlike Convert File (see “Saving in another
format (Save as…)” on page 51). However, the following
rules apply:
• If you change the sample rate, the file will play back at the
wrong pitch.
Editing in the Wave window
Ö Note that you can instruct WaveLab Essential to automatically fill out the text fields for “Originator software”
(WaveLab Essential) and “Creation Date” (the current), by
clicking the small buttons to the right of the fields.
• On the Broadcast Audio Extension tab you can also enter information to be embedded in the file, such as title,
author, etc. A Timecode position is included in the file as
well. This makes it possible to insert audio at precise positions in other applications. By default, the Timecode position is set to the start position of the audio.
55
Page 56

7
Playback and recording
Page 57

Playing back
Background information
About sample rates
If the wave file is recorded at a sample rate not supported
by your audio card you will not be able to play it back. You
might then opt to use sample rate conversion, see “Con-
vert sample rate” on page 79. Also see “Supported file
formats” on page 49 for more on file formats.
About the playback cursor position and
appearance
Great care has been taken to achieve synchronization between what you hear and what you see (the wave cursor
position in the wave during playback). However, by nature,
this precision depends to a large extent on the audio card
and its driver. In case you run into problems you may want
to adjust the settings on Preferences–Audio device tab.
About audio cards and playing in the background
When you activate playback or recording in WaveLab Essential, it will “grab” the audio card so that other applications cannot access it. The opposite is also true: if another
application has grabbed the card, WaveLab Essential will
be unable to play.
Ö If you want to run WaveLab Essential together with
another audio program, and make sure whichever application is active gets access to the audio card, activate the
“Release audio hardware…” option in the Preferences–
Audio device tab.
When you do, WaveLab Essential will “let go” of the audio card when
another application is made active (provided that this doesn’t happen
during playback or recording in WaveLab Essential).
Using the Transport bar
Displaying the Transport bar
If the Transport is hidden, select Transport from the Control bars submenu on the View menu.
The Transport controls
Start
Point
Skip
Goto beginning
Stop Point/Loop
Rewind
Loop On/Off
Record
Play
Stop
Goto End
Fast Forward
The Stop button
The result of clicking on the stop button depends on the
current situation:
• If the program is stopped and you click the Stop button,
the wave cursor is moved to the beginning of the last start
position. A second click will move the cursor to the start of
current selection (if any and if this is located before the
last start position).
• If there is no selection, or if the wave cursor is already to
the left of the selection, it is moved to the beginning of the
file instead.
• If there is no selection, and you activate playback from a
point and then stop so the wave cursor is to the right of
the original point, the cursor will move to the place you last
started when you click Stop again.
• If you click on the Stop Point/Loop button and activate
the “On stop, move cursor back to start” option on the
menu, the cursor will be automatically moved back to the
beginning of the selection when you click Stop (from playback).
If there is no selection, it will automatically move back to the place you
started from.
57
Playback and recording
Page 58

Transport control settings for separate windows
By default, open windows in WaveLab Essential (wave
windows and montage windows) all use the same Transport control settings (loop settings, playback speed, etc.).
You can however choose to use separate settings for
separate windows if you want: open the Preferences–Audio device tab and make sure the option “Transport settings are global to all windows” is not activated.
When this option is deactivated, the following transport
controls can be set differently for each open wave or montage window:
• Start point (see “Setting the start point for playback” on page
58).
•Skip (see “Skipping sections during playback” on page 58).
• Stop point/loop (see “Setting the Stop point/loop” on page
58).
• Loop On/Off (see “Looping” on page 58).
Setting the start point for playback
The Start point button on the transport brings up a menu
that allows you to specify where playback will start.
For example, if you select “Play from start of file”, as soon
as you hit Play, the wave cursor will jump back to the beginning of the file and playback starts from there.
About loop updating and short loops
The loop points are updated continuously during playback, which means that if you change the loop start or end
during playback, the loop changes. This is a great feature
for auditioning selection points for rhythmic material!
Please note that it takes some time for positions to be updated (0.3 to 1 second, depending on the file’s bit resolution and sample rate). If you don’t want to wait, activate
“Restart on loop/selection change” on the Options menu.
When this is activated, the loop starts over as soon as you
adjust the selection or move a loop start marker.
Also please note that WaveLab Essential handles playback of extremely short loops without problems. However,
the cursor position might not be updated correctly.
Skipping sections during playback
You can also have playback automatically jump past certain positions during playback. This way, you will be able
to audition what the material would sound like with certain
sections cut out, before the actual edits are made.
This selection is done from the menu invoked by clicking
the Skip button on the Transport bar.
• If you have made a selection range, you can select “Skip
selection” to skip the selected area.
Setting the Stop point/loop
The Stop point/loop button on the Transport bar allows
you to select where playback should stop and whether it
should loop indefinitely.
Automatic Stop
For example, if you select “Stop at next marker”, playback
will stop as soon as the program reaches a marker or the
end of the file, whichever comes first.
Looping
Let’s say you have chosen “Loop selection” mode. Now, if
some piece of the wave is selected, this will be repeated
indefinitely (as long as you don’t start playback from a position later than the selection).
If no selection is made, the entire wave is looped.
Playback and recording
Play tool – Playing one or both channels in
stereo files
Selecting the Play tool momentarily
The Play tool can of course be selected by clicking in the
Toolbox, but there are situations when you are working
with another tool and just momentarily want to use the
Play tool.
• To momentarily select the Play tool, hold down [Alt].
When you have finished playing, release [Alt].
Using the Play tool
The Play tool allows you to play back from any position:
1. Point at the position where you want playback to start.
2. If the wave is in stereo, move the pointer up or down to
decide whether only one channel should be played back.
Watch the cursor shape, it indicates what will be played back (L, R or
both).
58
Page 59

3. Press the mouse button.
Playback continues for as long as you keep the mouse button pressed,
or until the wave ends. After playback has stopped, the cursor will be
moved to the playback start position, making this a quick way to locate to
certain positions in the audio.
Using the Playback Browser
The Playback Browser feature helps you find a certain position in an audio file, by restarting playback repeatedly
when you click or drag to move the wave cursor.
1. Activate playback using the regular Play function, or
select the Play tool.
Note that depending on your Preferences settings, Playback Browsing
may only be available for the Play tool.
2. Click or drag in the ruler.
If you click, playback jumps immediately to the position at which you
clicked. If you drag continuously, a short snippet of audio from each new
position is played (looped).
Playback Browser preferences
On the Preferences–Wave edit tab you will find two preferences for Playback Browsing:
• The Sensitivity setting is used to determine the size of the
“snippets of audio” played back when you drag.
• When the “Restrict to Play tool” option is activated, Playback
Browsing is not available when you activate Playback using
the transport bar or computer keyboard.
On the Options menu you will also find an option called
“Stop after playback browsing”, which determines what
happens when you release the mouse button: playback
continues (deactivated) or stops (activated). Note that
when this option is activated, the cursor will automatically
be moved back to the playback start position on stop, allowing you to use this function for locate positions in the
audio.
Playing the selection only
There are several ways to play the selected part of the
wave only:
• Press the right mouse button in the Overview or the
Main view and select Play Selection from the menu that
appears.
• Hold down [Ctrl] and click on the Play button.
• Press [F6].
If you hold down [Shift] and press [F6], the selection will be played back
repeatedly (looped).
• Drag and drop the selection on the Play button on the
Transport.
Scrolling during playback
The “Scrolling during playback” submenu on the Options
menu contains several options for how the view should be
scrolled in Play mode:
Option Description
Immobile view This disables scrolling completely.
View follows cursor In this mode, the waveform view will automati-
Scroll wave (partial) In this mode, the waveform view is scrolled con-
Scroll wave (always) In this mode, the waveform view is scrolled con-
cally change when the Wave cursor reaches the
right side of the window during playback.
tinuously, attempting to keep the Wave cursor in
the middle of the view. However, if loop mode is
activated and the loop range fits on the screen,
no unnecessary scrolling takes place, allowing
for a more stable view of the loop. The program
will also “sense” the end of a file and stop scrolling when it is “in view”, rather than when the end
is reached.
tinuously, attempting to keep the Wave cursor in
the middle of the screen.
Ö Note: these options do not apply to playback using the
Play tool, and the last two options require a fast computer
and graphics card.
If you get dropouts during playback, please select another Scrolling
mode.
Recording
!
For details on connections, recording levels, etc.
please refer to the documentation that came with
your audio card.
About automatic gain controls
Some audio cards may have a feature which automatically
sets the recording level for the microphone input. This feature is often called AGC (Automatic Gain Control). For
“professional” results we recommend that you deactivate
this feature using the software that came with the card.
59
Playback and recording
Page 60

Please note that if you leave this feature activated, the Microphone input gain control in the Mixer (see later in this
text) will have less effect on the recording level.
Preparations
To record a new file, proceed as follows:
1. Click the Record button, or press [*] on the numeric
key pad.
The Record dialog appears.
The Record dialog
2. Decide whether you want to record to a “named” or a
“temporary” file, by selecting from the pop-up at the top of
the dialog.
Temporary files are practical to use, since you don’t need to name the file
beforehand, you just “hit record and go”. On the other hand, you will
need to save the file at a later stage. Temporary files are always wave
files, while named files allow you to choose to record files in a number of
different formats. Also note that if you plan to make a recording over several minutes we recommend that you record a named file.
3. If you have selected one of the “Named File” options in
the step above, type in the path to the desired destination
for the file on the line below the pop-up or click the folder
button and specify a file location.
If you activate the Auto number checkbox, a three-digit number will be
added to the file name. Starting at the number you specify in the value
field to the left of the checkbox, the Auto number will be increased in increments with each new recording, to prevent existing files from being
overwritten.
4. Click the file format button at the top of the Record dialog, and decide on a recording format. WaveLab Essential lets you record directly into a number of different
formats (see “Supported file formats” on page 49 for details).
In the Audio File Format dialog that appears, you can among other things
choose the desired format, sample rate, number of channels to record
and bit resolution.
The Audio File Format dialog
!
If you choose a bit resolution not supported by your
audio card, you will not be able to record.
5. Click OK to close the Audio File Format dialog.
6. If needed, activate the desired recording options in the
dialog.
There are also additional settings in a separate dialog, opened by clicking the Settings button.
At this point, you can start recording (see “Start record-
ing!” on page 61) if you like.
Setting up the mixer (MME/WDM drivers)
At this point you may want to click the Mixer button to adjust the relative volume of your card’s inputs.
Ö For the mixer to appear, you must have specifically selected the card on the Preferences–Audio device tab.
If the Input and Output are set to “Microsoft Sound Mapper” a mixer cannot be created.
Exactly what controls will appear in the mixer depends on
the card, but here are some possibilities:
• Master Gain (output-fader)
• Synth In (input-fader plus on/off check box)
60
Playback and recording
Page 61

• CD (input-fader plus on/off check box)
• Line (input-fader plus on/off check box)
• Mic (input-fader plus on/off check box)
In addition to the above, the card might have custom controls for monitoring, etc., which cannot be accessed from
the WaveLab Essential mixer. Again, please use the application(s) included with the card.
!
Not all audio cards have a mixer application and can
therefore not access the WaveLab Essential mixer.
This is especially true with digital I/O cards.
Using the meters
In the lower part of the Record dialog, you will find a meter
display. This is useful for checking the input level, as well
as the frequency spectrum of the input signal.
Ö The meters in the Record dialog are “miniature” versions of the Level and Spectrum Meters in the Meter windows.
For detailed descriptions of the functionality and features, see “Level
meter” on page 64.
For the meters to register the signal, you need to activate
the Monitor checkbox. This can be done automatically, if
the option “Activate meters when opening record window” is activated in the Record Settings dialog. The popup menu in the lower left corner allows you to select between Level or Spectrum metering.
You can reset the meters by clicking the Reset button –
this instantly resets all meters and numerical indicators, including the Maximum Peak and RMS values to the right in
the Level Meter.
You can also select one of five presets for the Level Meter
on the pop-up menu next to the Reset button. These presets (containing settings for meter ranges, colors, etc.)
can be edited by selecting “Settings…” from the pop-up
menu. The options are described in the chapter “Making
settings for the level meter” on page 65.
!
Use the Level Meter to check the audio input level.
Adjust this (with the mixer controls or the audio
card’s applications), so that the Peak Level Meters
go as high as possible without ever reaching 0dB!
Checking disk capacity
The Disk Capacity indicator above the meters helps you
make sure you have enough disk space for the recording.
This indicator shows the amount of available disk space
on the hard disk specified in the Named File path, or the
hard disk you have selected for your temporary files (see
“Temporary files” on page 15). Please note that this value
is approximate.
!
When there is less than ten seconds of available
hard disk space, the disk capacity indication is displayed in red.
• When the Level Meter is selected, horizontal bars show
the peak level (outer bars) and average loudness (VU, inner bars) of each channel.
Values are also shown numerically. If the Phase Scope option is activated on the pop-up menu next to the Reset button, a Phase Meter is
displayed to the right of the Level Meter.
• When the Spectrum Meter is selected, a “bar diagram”
will be shown, providing a continuous graphical representation of the frequency spectrum.
See “Spectrum meter (60 bands)” on page 65.
Playback and recording
Start recording!
When all the preparations are done, click Record to start
the actual recording.
• If you have selected one of the Auto-start options, the
recording will go into Pause mode (the Record button will
blink), until the specified Auto-start criteria are met.
When recording starts, the Record button will be “lit” and the Recorded
Time value will indicate how much you have recorded.
• If you have selected the “Auto-stop after given duration”
option, the “Remaining Time” value will indicate how much
recording time you have left.
• If you like, you can pause the recording by clicking the
Pause button at any time.
The Record button will blink to indicate Pause mode. To resume recording, click the Pause or Record button again. A short section of audio just
before you resume recording (according to the Pause memory value in
the Record Settings dialog) will be captured.
61
Page 62

• You can drop markers in the file during recording by
clicking the Drop Marker buttons.
See below.
• If you want to abort the recording, click the Discard but-
ton.
This terminates recording and discards the recorded file.
• When you have finished, click Stop. You can also have
recording stop automatically by using one of the Autostop options. Either way, the recording by default appears
in a new window behind the dialog.
If you want to perform more recordings after the first, click
the Record button and record again. If you have selected
the Named File option, and the Auto number option is deactivated, you have to specify another file name to avoid
overwriting the previously recorded file.
When you have finished recording completely, click the
Close button (in the lower right corner) to close the dialog.
Ö If you have created temporary files, and want to save
the file(s) permanently, click on each document you have
created and use Save As on the File menu to save each
one.
See “Saving in another format (Save as…)” on page 51 for details.
About dropping markers during recording
When you are recording, you can click the marker buttons
at any time, to add a marker to the recorded file. The yellow button will generate a numbered, generic marker (see
“The various marker types” on page 98), while the white
buttons will generate numbered, generic region start and
end markers.
If you want to name the markers you drop rather than using generic, numbered markers, you can do this in the following way:
• Type in the desired name in the box below the buttons.
You can type in a new name for each marker before you drop. This works
well if you know beforehand where you want to drop the markers and
what their names should be. If you want to be able to drop markers not
planned beforehand though, use the dialog that will appear each time
you click a button to drop a marker. In this dialog, you can either type in a
name for the marker, or you can confirm that you want to use an already
entered name. The benefit of using this method is that the marker will be
dropped at the time position when you clicked the marker button, regardless of how long you take to type in a name for the marker.
Furthermore, this dialog also allows you to specify a delay value for the
marker. The marker will then be dropped at the position when you clicked
the marker button, minus the delay value you specify. So if you clicked
the marker button after 10 seconds of recording and specify a delay
value of 2 seconds, the marker will be dropped 8 seconds into the recording.
Ö Note: if you insert two or more region start markers in
a row (with no region end markers in between), only the
last of these start markers will be kept (the first marker(s)
will be removed).
In other words, the last region start marker doesn’t become “permanent”
until you insert a region end marker.
The same goes for region end markers – if you insert several end markers
in a row, only the last one will be kept.
This is a very useful function, because it allows you to
“change your mind” when inserting markers during recording. For example, let’s say you are recording a continuous performance and want to mark all takes worth
keeping. At the start of a take you insert a region start
marker. However, this turns out to be a false start or a
flawed take. When the next take starts you insert a new region start marker again and the previous, unwanted start
marker is removed.
62
Playback and recording
Page 63

8
Metering
Page 64

Introduction
WaveLab Essential offers very detailed and versatile metering, allowing you to monitor level and spectrum during
playback, and also featuring an oscilloscope display. This
chapter describes how to display, set up and use the various meters.
Monitor playback
The meters reflect the audio being played back. Note that
metering occurs after the Master Section, which means
the results of effects, dithering and Master faders are
taken into account.
The meters can be used for monitoring all kinds of audio
playback: Wave windows, Audio CD Montage, audio CD
track lists, audition in file dialogs, etc.
• The Peak Level meters display the peak levels of each
channel, graphically and numerically.
By default, the meter segments and numerical peak values are displayed
in green for low levels, yellow for levels between –6dB and –2dB, and
red for levels above –2dB. You can change both the colors and the
range boundaries if you wish, as described on “Making settings for the
level meter” on page 65.
• The VU (Volume Unit) meters measure the average
loudness (RMS) of each channel.
These meters have a built-in inertia, evening out loudness variations over
a user-defined time span.
If you are monitoring playback, you will also note two vertical lines following each VU meter bar, seemingly “trying to reach” the current RMS
value. These lines indicate the average of the most recent minimum RMS
values (left line) and the average of the most recent maximum RMS values (right line). To the left, the difference between the minimum and maximum average values is displayed (the level value in brackets) – this gives
you an overview of the dynamic range of the audio material.
The meters
There are three different meters in WaveLab Essential,
each with its separate window. The meters are opened
and closed from the Analysis menu.
As with any standard window, you can resize the meter
windows by dragging the window borders, and fold the
windows by clicking the fold icons (or by double clicking
the title bars).
On the following pages, the available meters are described.
Level meter
This meter window shows the peak level and average
loudness, in the following way:
Meter presets (see “Selecting meter presets” on page 65)
Reset button
Peak level
meters
VU meters
Difference value
Recent minimum Recent maximum
• If you are monitoring audio playback, the maximum peak
and loudness values are displayed numerically to the right
of the meter bars.
Numbers in brackets to the right of the Maximum Peak values indicate
the number of successive clips (0dB signal peaks). 1 or 2 clips can be
acceptable, but if you get a larger number, you should lower the master
level to avoid digital distortion.
Resetting the meters
You can reset the level meters by clicking the Reset icon,
or by selecting Reset from the Options pop-up menu. This
instantly resets all meters and numerical indicators, including the Maximum Peak and RMS values and the number of
signal clips.
The Reset icon
64
Metering
Page 65

Making settings for the level meter
You can adjust the behavior, scale and color of the meters
as desired. It is also possible to save five sets of meter
settings as presets, for instant access. Proceed as follows:
1. Pull down the Options pop-up menu and select “Set-
tings” (or click the “tool” icon).
The Level Meter Settings dialog appears.
2. Adjust the settings as desired.
By using the Apply button, you can check the results of your changes
without closing the dialog. The following settings are available:
Setting Description
Global colors Click these buttons to select colors for the meter back-
Global range This is where you specify the low and high end of the
Peak meter –
Ballistics
Peak meter –
Zones
VU meter –
Show
ground, marks (scale units) and grid lines.
displayed level range. Typically, you may want to create
a preset showing the full level range, and other presets
for detailed view of a smaller range.
These settings determine how fast the peak level meter
falls after a peak (Release rate) and for how long the
numerical peak indication remains displayed after a
peak (Peak hold time).
The color buttons allow you to select colors for the
peak level meters’ low, middle and top zones. You can
also define what should be considered “middle” and
“top” zones, by changing the “Middle zone from” and
“Top zone from” values.
Allows you to activate or deactivate the VU meters.
Setting Description
VU meter –
Ballistics
VU meter –
Color
These settings determine how the VU meter responds:
Resolution is the sample width of the “average window” for the VU meter (the number of samples continuously evaluated to calculate the average). The smaller
this is, the more the VU meter behaves like the peak
meter.
Range inertia determines the “average windows” for
the recent minimum and maximum value lines, and will
therefore affect how quickly these respond to changes
in loudness.
The color button allows you to select the color for the
VU level meter.
3. If you want to store your settings for later use (or assign them to a preset), select “Save as…” from the popup menu at the bottom of the dialog, and specify a name
for the preset in the file dialog that appears.
4. To make the settings instantly available for selection in
the Meter window, use the “Assign to preset button” submenu on the pop-up menu.
5. When you are finished, click OK to close the dialog.
Clicking Cancel closes the dialog and discards any changes you have
made (even if you have used the Apply button to apply them to the
meters).
Selecting meter presets
If you have assigned your settings to the Preset buttons in
the Settings dialog, you can quickly switch between different level scales and display modes, by clicking one of the
Preset icons [1]-[5], or selecting the desired preset from
the Options pop-up menu.
Spectrum meter (60 bands)
The Spectrum meter shows a continuous graphical representation of the frequency spectrum, in the shape of a “bar
diagram” with 60 frequency bands.
65
Metering
Page 66

Oscilloscope
The Oscilloscope is a “microscope” version of the level
meter, showing the area around the cursor position at
large magnification.
If you are analysing stereo audio, the Oscilloscope will
normally show the separate levels of the two channels.
However, if you activate the option “Show Mix and Subtraction” on the Options pop-up menu (or click the +/–
icon) the upper half of the Oscilloscope will show the mix
of the two channels and the lower half will show the subtraction.
Making settings
Selecting “Settings” from the Options pop-up menu (or
clicking the “tool” icon) will open the Oscilloscope settings dialog. Here you can adjust the display colors, and
choose whether Auto-zoom should be active or not.
When Auto-zoom is activated, the display will be optimized so that the highest level reaches the top of the display at all times.
66
Metering
Page 67

9
Off-line processing
Page 68

Introduction
When we refer to off-line processing, we mean functions
that “permanently” alter the file, to make it sound more or
less different. This is in opposition to “real-time processing”, which makes the file play back differently, without
making any permanent changes to it. Real-time processing is described in the next chapter.
Applying processing
Processing can be applied to a selection or to a whole file.
For certain processing operations processing the entire
file is necessary. This will be indicated in the respective
section.
Ö If “Process whole file if no selection exists” is activated
in the Preferences–Wave edit tab, the whole file will automatically be processed if no selection exists.
To apply processing to a selection, proceed as follows:
1. Make a selection.
Note that you will “Select All” to process the entire file. If the file is in stereo, you can apply processing to either channel or both, by selecting one
channel or both, see “Selecting in stereo files” on page 41.
2. Select the desired type of processing from the menus.
3. If a dialog appears, fill it out.
If the dialog uses presets, you can load one of them to fill out the settings
automatically, see “Presets” on page 30.
4. When you have finished with the settings in the dialog,
click the Apply/Paste/Process button.
The status bar shows the progress of the operation. If you need to interrupt a long process, click the “Stop” button on the status bar or press
[Esc].
Getting the most out of the non-modal dialogs
The processing dialogs are non-modal, which means they
stay on screen even after the processing has been applied. This, together with the Undo allows you to try different types of processing without ever leaving the dialog (or
even stopping playback!):
• When the dialog is still the active window you can use
the computer keyboard for the following operations:
Key Command
[F3] Undo
[F4] Redo
[F6] Play selection
[Shift]+[F6] Loop selection
[F7] Stop
[F8] Play
• While the dialog is still open (but inactive) you can select from menus and use other dialogs and palettes (for
example the Transport bar).
• You can “fold in” and “fold out” non-modal dialogs, as
described in the section ““Folding” windows” on page 24.
Presets
As described in the section “Loading presets” on page
30, you can use presets for most processing dialogs, to
save and recall settings. In addition, the program comes
with a number of useful presets for each processing option.
Level Normalizer
Undo/Redo
No matter how long the selection is or how elaborate the
processing may be, you have access to unlimited Undo/
Redo for all processing. The only limitation to this is the
available hard disk space, as described in the section
“Undo and Redo” on page 22.
Off-line processing
This allows you to change the amplitude (volume) of the
selection. The value is always related to the maximum level
that can be obtained.
68
Page 69

Gain Change
This also allows you to change the amplitude (volume) of
the selection, just like the Level Normalizer. The difference
here is that the gain change is set in absolute numbers,
plus/minus the current level (which is indicated as 0dB).
Clipping
This processor lets you do something that most other
functions in WaveLab Essential never do: introduce clipping.
Clipping is when the gain is raised to a point where distortion is added. While this is normally not wanted, mild clipping in for example the attack of a drum sound can add
some “punch”.
If you try to raise the
level of a wave above
0dB (100%)…
…it will get distorted
(the peaks are
“clipped”).
Dynamics
This dialog allows you to tailor the dynamics of the audio,
to create effects like compression, expansion, limiting and
noise gating. Since dynamic processing of audio is a big
subject, we will not be able to describe all the possibilities
in this short text. Please study the included presets which
implement examples of the above-mentioned functions
and experiment with the controls to get a feeling for what
they do.
The Time Response controls
The settings in this section apply regardless of whether
you use the graphic editing possibilities or not. These controls govern how a variation in sound level in the material
affects the amount of processing.
The Attack parameter, for example, is related to the beginning of new sounds in the material (for example each new
“hit” in a drum recording). Raising the Attack time means
that more of the beginning of each sound (the attack) will
pass through unprocessed.
We recommend that you try the Auto feature first, and if
that doesn’t give the desired result, use the individual controls instead.
69
Off-line processing
Page 70

The Normalize controls
These are used to normalize the sound before and/or after
processing. Please note the following:
• The effect of all dynamic processing depends on the amplitude (level) of the material to be processed. Therefore, if you
process a number of files with slightly different levels (for example using presets or batch processing) the effect of the
processing will be different from file to file. To avoid this, activate “Normalize before”.
• On the other hand if you are experimenting with different settings, this means that after activating “Normalize before” you
may have to re-adjust the Threshold level. See “Level Normal-
izer” on page 68 for more information on normalizing.
• One reason for setting the “Normalize before” value to less
than 0 dB (full level) is if you are expanding, which might introduce clipping if the signal is too strong to start with.
The Dynamics controls
When the Graphic Editing switch is deactivated, the dynamics processor works very much like a simple compressor. Use the Threshold and Ratio settings to set the
amount of compression.
About graphic editing
When the Graphic Editing check box is activated, you can
specify any input to output function. This allows you to
“draw” limiters, noise gates, expanders, etc. and combinations of all these. See the presets for examples.
• The curve shows input level along the horizontal axis and output level along the vertical axis. With a straight line diagonally,
each input level is represented by the same output level (the
signal is not processed at all).
• If the curve starts at 45° and then tilts downwards from any
point, signals above this point will have a lower output level
than input level. In other words, a gain (compression) reduction is performed.
Compression
• If the curve is tilted upwards instead, the output level will be
higher than the input level, which is referred to as expanding.
Expansion
• If the curve is horizontally flat from some point, the output level
will be the same regardless of input level. This is referred to as
limiting.
No processing
Limiting
70
Off-line processing
Page 71

• If the curve starts out horizontally flat and then rises upwards,
signals in the flat area will be eliminated completely. This is
called (noise) gating.
Gating
Setting up the curve
• You can drag any breakpoint in the curve to any posi-
tion, using the left mouse button.
• When you move breakpoints closer to the left side or
the bottom of the graph, you will note that the number of
positions is more limited. This is due to the nature of digital
audio, where, for lower levels, a smaller number of “bits” is
used to represent the data.
• You can add a new breakpoint by clicking anywhere on
the curve with the left mouse button.
• You can delete a breakpoint by clicking on it with the
right mouse button.
• The Reset button restores the curve to a straight line
with only one breakpoint.
• The “Add point at level selection” button adds a break-
point at the level indicated by the current level selection
(see “Level selections” on page 43 and the example below).
2. Select “Extend to peaks” from the Select submenu on
the Edit menu.
The selection height now represents the level of the background noise.
3. Open the Dynamics dialog and set it up for graphic
editing.
4. Remove all breakpoints from the graph.
5. Click on the “Add point at level selection” button.
6. Add a second breakpoint, “manually”, to the left of the
one that just appeared.
7. Drag this second breakpoint so that it appears directly
below the other one, at the bottom of the graph.
See the noise gate example above.
8. Adjust the Attack, Hold and Release settings as desired.
9. Go back to the Wave window and select the section
to be gated.
10. Open the Dynamics window and click the Process
button.
11. Listen to the result, and if necessary, Undo, adjust the
settings and Process again.
Expert settings
The Dynamics dialog also has a special tab devoted to
“expert” settings.
Level envelope
An example of using “Add point at level selection”
The “Add point at level selection” function can be used to
create a noise gate with a threshold at a certain level. Let’s
say you have a recording of narration, with noise between
the phrases that you’d like to remove:
1. Make a regular selection in a section that only contains
background noise.
The longer this selection, the more accurate the result will be.
Off-line processing
This dialog allows you to create a volume envelope which
can be applied to a selected range or a whole file.
71
Page 72

The dialog consists of a waveform view in the middle, with
an envelope curve (initially a straight line) running through
it. A vertical ruler displays the level change in dB, and the
horizontal ruler displays the time line. You can boost the
level up to 6 dB and decrease it down to silence.
Option Description
Flip Horizontal This will flip the current envelope horizontally (in
Smooth envelope This allows you to create spline curves, for
the time axis).
smoother level changes.
Basic operation procedure
By adding points to the envelope curve you can create an
envelope curve that will change the volume of the material
over time.
1. Double click on the envelope curve to add a point.
A point will be added where you click.
2. If you click on the point it will be selected (red color)
and by click-dragging you can move it in any direction.
The curve changes accordingly in the waveform display.
• When you point the mouse in the display (or move a
point), the current position and level change is shown
continuously in the field above the display.
3. You can keep adding as many points as you like to the
curve.
You cannot move a point past a another point in the horizontal direction.
4. You can select several points using [Shift] and move
them together.
By clicking on the envelope curve itself (not on a point) you can move the
whole curve up or down.
Envelope functions in the dialog
The functions are selectable in three ways (the same options in all cases):
• From the Functions menu.
• By clicking the icons above the display.
• By right-clicking in the display.
The following options are available in the dialog:
Option Description
Deselect all points This will deselect all selected points.
Delete selected points Deletes all selected points.
Reset selected points Resets all selected points to 0dB.
Reset whole envelope This removes all added points.
Flip Vertical This will flip the current envelope vertically (in the
level axis).
Fade-in and fade-out
A fade-in is a gradual increase in level and a fade-out is of
course the opposite. There are two ways of applying fades
in WaveLab Essential: by using the Easy Fade function or
by using the Fade dialog.
Easy Fades
The Easy Fade function allows you to very quickly apply a
fade-in or fade-out to an audio file, without having to make
any settings:
1. To create a fade-in, make a selection from the start of
the audio file to where you want the fade-in to end.
Similarly, to create a fade-out, you should make a selection from the position where you want the fade to start, to the end of the audio file.
2. Select “Easy Fade” from the Process menu, or press
[Ctrl]-[D].
A fade is applied to the selection. The shape of the fade is governed by
the Default fade/crossfade setting in the Preferences–Wave edit tab.
Using the Fade dialog
The Fade dialog allows you to specify the desired shape
of the fade, and to create fade-ins or fade-outs anywhere
in a file:
1. Make a selection that spans from where you want the
fade to start to where you want it to end.
2. Select fade-in/out from the Process menu to open the
Fade dialog.
72
Off-line processing
Page 73

3. Use the Type options to select a fade-in or a fade-out.
4. Set the Offset and Damping parameters.
A graph in the waveform indicates the resulting shape. The Damping
value indicates how much the wave will be attenuated at the Offset point.
A 6dB Damping with a 50% Offset normally gives the most natural results. See “Crossfade” below for more details.
Crossfade
A crossfade is a gradual fade between two sounds, where
one is faded in and the other faded out. This function allows you to do just that. It also lets you create plain mixes
of two sounds.
Performing a regular crossfade
The material you want to crossfade can either be in two
different sections of the same file, or it can be in two different files.
Since the crossfade is a type of paste operation, you must
start by getting the section into which you want to fade
(the later part of the fade) onto the clipboard.
1. Select the section into which you want to fade.
2. Select Copy, from the Edit menu.
Now it’s time to move over to the section from which you
want to fade, which might very well be in another Wave
window:
3. Select the section from which you want to fade-out.
4. Select Crossfade from the Process menu.
The dialog appears and crossfade slope indicators are shown in the current selection.
5. Make sure that “Mix without fading” is not activated in
either section.
6. Adjust the Offset and Damping parameters as desired.
The shape of the two curves is indicated in the selection. See below for
details.
7. Click the Paste button.
!
Please note that if both waves already have full level
sections in the crossfade area (for example if you
have normalized both waves), clipping (and hence
distortion) might occur! If this happens, reduce the
amplitude of both waves by 3 to 6 dB and try again.
Also note however, that if one of the “Inverse of Fade
In/Out” boxes is checked, clipping can never occur.
!
This selection cannot be longer than the selection
you just copied, or the program will not be able to
perform the crossfade!
The length of this selection will determine the length of the
actual crossfade (check the length on the status bar). In a
typical case, this selection will be at the end of the wave.
See below for details.
Off-line processing
How the fade is done
• As described above, the length of the fade is determined by
the size of the selection in the file into which you paste.
• The pasted material has to be longer than the selection you
paste “into” (or there won’t be enough material to finish the
fade).
• Any “excess” material in the copied selection will appear after
the fade (at “full level”). The wave is lengthened as needed.
• Any material that originally appeared after the selection in the
file into which you paste, will be moved so that it now appears
after the newly pasted material.
About the curves
The design of the fade and crossfade curves is based on
psycho-acoustic research material, in order to give as
pleasant and harmonic a result as possible.
73
Page 74

For each of the two sections – the fade-out and the fadein – you can select an Offset and a Damping value. When
you adjust these values, the curves in the wave are adjusted accordingly so that you can see what kind of crossfade you will get.
The Offset factor determines where in the fade section the
file will play at its “mid level” (normally half the level, see
below).
The Damping parameters adjust the “steepness” of the
fade. For example, a -6dB setting for the fade-in will result
in a normal fade, where the level is half the original when it
reaches the Offset point. Values closer to 0dB will emphasize the beginning of the fade-in wave. Values closer
to -18dB will make the fade-in sound drop drastically at
the beginning of the fade.
Here, the default -6dB Damping curves with 50% Offsets are selected.
This gives you a normal crossfade with the focus on the middle of the
fade.
1. Select the entire “restaurant” wave and copy it.
2. Make a selection in the “city” wave, from a point close
to the end.
The length of this selection is equal to the length of the fade.
3. Open the crossfade dialog, set both Offsets to 50%,
both Damping settings to -6dB, deactivate both “Mix without fading” options and click the Paste button.
The “city” wave is now lengthened, so that it starts as it originally did,
then fades over to the beginning of the “restaurant” wave and ends like
the “restaurant” wave.
Invert Phase
This turns the signal “upside down”, which is the same as
inverting the phase by 180°. No settings are needed for
the operation.
There is no audible change when you invert the phase of a
mono signal. However, if one channel in a stereo pair is
out of phase with the other, this will lead to artifacts such
as a drop in the bass register and a “blurred” stereo image.
The most common use for this function is therefore to fix a
stereo recording where one of the channels has accidentally been recorded out of phase with the other.
In this example, the Offsets have been moved so that the focus of the
fade is more to the left. This means the fade-out is faster than the fadein. However, both Damping factors are still set to the standard -6dB.
Mix without fading
If you activate “Mix without fading” for either section, it will
play at full level throughout the entire fade.
An example
Let’s say you have two environmental sound effects you
want to fade between, “city” and “restaurant”. You want to
fade from “city” to “restaurant”. The two sounds are in different windows.
Off-line processing
Reverse
This function reverses the selection, as if playing a tape
backwards. No settings are needed.
Eliminate DC Offset
This function removes a problem that most often appears
due to mismatches between various types of recording
equipment.
!
This function should be applied to whole files, since
the problem is normally present throughout the entire
recording.
74
Page 75

A DC offset is when there is too large a DC (direct current) component in the signal. If the DC offset is really
bad, it can be visible as the signal not being visually centered around the “zero level axis”. However, the DC offset
can be significant without actually being seen.
A wave with a serious DC offset
A DC offset is problematic for two reasons:
• It affects where the zero crossings appear, which in turn affects the smoothness of splices between audio files.
• Certain processing options do not give optimal results when
performed on files with a DC offset.
Time Stretch
Time stretch is an operation that allows you to change the
length of a recording without affecting its pitch. Actually
the standard term “time stretch” is a bit misleading since
you can of course also make the material shorter.
This function is most often used to make a section of audio fit in with some other material. Therefore this dialog is
set up exactly for that. You select the material to be
stretched and use the options in the dialog to find a
stretch factor (the “Percentage”). This is done by specifying the desired length, or the desired tempo, all according
to what the situation requires.
Opening the dialog
When you open the dialog, the following information
about the selection is displayed:
Checking for and eliminating DC Offset
1. Select the wave you want to check and fix.
2. Select “Eliminate DC Offset” from the Process menu.
A dialog appears stating the amount of DC offset.
3. Click OK or Cancel.
Waveform Restorer
This lets you remove intermittent clicks and pops in an audio file. First make a selection encompassing the artefact
you want to remove, then apply one of the available methods. Usually, you will have to use a high zoom factor to be
able to locate and select the undesired element.
The Waveform Restorer lets you select one of several
available restoration methods. The selected method is described in the dialog.
The original length
in samples.
The original length
in seconds.
The calculated original tempo according to the set length
and time signature.
Specifying a percentage directly
If you know by how many percent you want to change the
length, you can enter this value in the “Percentage” field.
Calculating the percentage by specifying a new length
• If you know the desired length in samples, adjust the
Samples value in the “Desired result” section.
• If you know the desired length in minutes, seconds and
milliseconds, adjust the corresponding value in the “Desired result” section.
Regardless of which you choose, the other values and the Ratio are updated accordingly.
75
Off-line processing
Page 76

Calculating the ratio by specifying a time code range
If you want to fit the selection to a certain range, for example in a video or film sequence, you can specify the start
and end of this range as time code values:
Enter the start
position here.
Enter the desired
end position here.
The other values and the Percentage are updated accordingly.
Calculating the Percentage by specifying a new tempo
If you know you want the selection to play back in a certain
tempo, after the stretch, proceed as follows:
1. If you know the current tempo of the selection, type it
in the Tempo field in the Source part of the dialog.
2. If you don’t know the exact current tempo, but the
length of the selection and the time signature, you can
specify these instead, in the Bars and signature fields, and
the Source tempo will be calculated for you.
!
Please note for these operations to work properly,
the exact specified source tempo or length must be
selected. Any deviation from the real values will be
transferred to the stretched audio.
3. Type in the desired tempo in the Tempo field in the
“Desired result” section.
Reset
The Reset button resets the Percentage to “100%”.
Additional settings
Setting Description
Quality There are three Quality settings, “Quick Process”,
Preserve pitch When this option is activated, the pitch of the audio
Audio quantize When this option is activated, the length of the re-
Rhythm accuracy This is only available if “Standard” or “High Quality”
“Standard” and “High Quality”. The High Quality
mode provides very high quality pitch correction,
but the process will take longer. For most uses, the
Standard mode is probably sufficient.
material will not be affected when you apply Time
stretch. This is the normal mode of operation. If you
turn this off, the pitch will change proportionally
with the Time stretch ratio, much like when speeding up or slowing down a tape recorder.
sulting file will be exactly the one displayed in the
“Desired result” section of the dialog. When it is
deactivated, the actual file length may differ by a
few milliseconds.
If you don’t need this accuracy, you should leave
the option deactivated, for a slightly better audio
quality.
mode is selected. Set this parameter according to
whether the rhythmic feel of the audio material has
a high priority or not. If you set this to a high value,
the timing and rhythmic feel will be preserved as far
as possible, which is important for drum tracks, etc.
If you set it to a low value, the audio quality can be
slightly better, but sections of audio might be
moved slightly (in the milliseconds region) in the
process.
Limitations
Time stretch is a very complicated Digital Signal Processing (DSP) operation. It requires complicated mathematical
operations and always affects the sound quality to some
extent:
• For speech, stretch factors within a ±30% limit will normally
provide very good results.
• For composite music, try to limit the range to ±10%.
• For sensitive material, like solo piano, try not to exceed ±3%.
76
Off-line processing
Page 77

Pitch Correction
Pitch Correction is a function which allows you to detect,
and to change, the pitch of a sound, with or without affecting its length.
Amount of shift
This allows you to specify the amount of pitch change in
semitones and/or cents.
Pitch detection
WaveLab Essential can analyze an audio selection and
detect the pitch of the audio. Click the “Find current pitch
of audio selection” button to perform the detection. The
found pitch is displayed below the button.
You also have the option to automatically compute the required pitch shift, based on the currently detected pitch
and the pitch specified in the value field below the “According to the current pitch, etc.” button. When the button
is clicked the “Amount of Shift” parameters are automatically adjusted to the computed pitch shift.
Length compensation
This allows you to set how the length of the selection
should be affected by the operation.
• A setting of 100 means that the length will be the same after
the operation.
• A setting of 0 means that the program will behave like a tape
recorder does when the speed of its tape is varied. For example, if you raise the pitch by one octave, the sound will become
half as long.
• Intermediate values will give results in between these two extremes.
• For large transposition values, the lower this setting is, the
better the quality of the effect will be.
Additional settings
Setting Description
Quality There are three Quality settings, “Quick Pro-
Audio Quantize When this option is activated, the processed file
Preserve Formants When this option is activated, changing the
Rhythm Accuracy This is only available if “Standard” or “High
cess”, “Standard” and “High Quality”. The High
Quality mode provides very high quality pitch
correction, but the process will take longer. For
most uses, the Standard mode is probably sufficient.
will have the exact same sample length as the
original. When it is deactivated, the resulting file
length may differ by a few milliseconds.
If you don’t need this length accuracy, you
should leave the option deactivated, for a slightly
better audio quality.
pitch of vocal material will give a more realistic
result. When you are processing non-vocal material, you should leave this option deactivated,
since it uses a slightly slower processing algorithm.
Warning: this algorithm might increase the signal level. If your audio material has a high level,
you may need to lower its level before pitch
shifting.
Quality” mode is selected. Set this parameter
according to whether the rhythmic feel of the audio material has a high priority or not. If you set
this to a high value, the timing and rhythmic feel
will be preserved as far as possible, which is important for drum tracks, etc. If you set it to a low
value, the audio quality can be slightly better, but
sections of audio might be moved slightly (in the
milliseconds region) in the process.
77
Off-line processing
Page 78

Harmonization
This is a variation of the Pitch Correction, which allows
you to create not only one shifted voice, but up to sixteen!
Setting up the voices
1. Set the scroll bar to the voice for which you want to
make settings.
Which voice is currently shown is indicated just above the scroll bar.
2. Activate the voice by clicking the check box.
3. Set up the amount of pitch shift for this voice, by ad-
justing the Semitones and Cents values.
The maximum range is ±36 semitones (±3 octaves). The cents value adjusts the pitch within one semitone, that is, 50 means a quarter tone.
4. If you want one of the voices to play back the original
wave (at the recorded pitch), activate one voice for this
and set both its Semitones and Cents settings to 0.
5. If you are processing a stereo selection or if you have
activated “Create stereo wave” (see below), you can adjust the stereo position of the voice by using the Pan control.
If you pull the slider all the way left or right, this voice will be played in that
channel only.
6. Use the scroll bar to select the next voice and set this
up like the first.
The text to the right of the Pan control tells you how many voices are activated.
Additional controls
Control Description
Preserve level When this is activated, the resulting audio will have the
Create stereo
wave
same level as the original, even though a number of
voices have been added.
If you are operating from a mono selection you can still
create a stereo wave by activating this option. The processed wave will then open in a new window.
Please note that by specifying very small pitch shift
amounts (a few cents only) and panning the detuned
voices hard left and right, you can create stereo material
out of mono recordings without a noticeable change in
pitch. Please try to keep a balance in the detuning. If for
example you set one voice to +5 cents, set another to -5
cents.
Hi-fi Chorus
This chorus works slightly differently from many others.
Often chorusing is achieved by delaying a copy of the signal, continuously varying the amount of delay and mixing
the delayed signal back in with the original.
While this is adequate for many purposes, WaveLab Essential takes a more natural approach to creating chorus.
Since a chorus effect is about making a recording sound
as if it was performed by many “identical musicians”,
WaveLab Essential takes just that approach. It multiplies
the recording up to 100 times and detunes and delays
each “voice” slightly and – if so desired – pans the voices
across the stereo image.
78
Off-line processing
Page 79

EQ
This is a three-band equalizer with high and low shelving
filters and a full parametric mid-frequency band. The following parameters are available on the Settings tab:
Parameter Description
High Shelf Gain Determines the boost or cut (in dB) of the high
High Shelf
Frequency
Mid Shelf Gain Determines the boost or cut (in dB) of the Mid
Mid Shelf
Frequency
Mid Q Use this parameter to set the width of the Mid
Low Shelf Gain Determines the boost or cut (in dB) of the low
Low Shelf
Frequency
shelving filter.
Sets the frequency of the high shelving filter. Frequencies above this value will gradually be increased or reduced in level, according to the High
Gain setting.
range EQ.
Sets the center frequency of the Mid range EQ.
Frequencies around this value will be affected by
the Mid Gain.
range, i.e. how wide a frequency range around the
Mid Frequency should be affected by the Mid range
EQ. The higher this value, the “narrower” the Mid
range.
shelving filter.
Sets the frequency of the low shelving filter. Frequencies below this value will gradually be increased or reduced in level, according to the Low
Gain setting.
Presets tab
The Presets tab features a list of EQ presets, with self-explanatory names.
• To load a preset, select it in the list and click the “Load”
button.
• If you have modified a preset which you wish to save,
use the “Update” button.
• You can also save your own presets by typing in a name
and clicking the “Add” button.
Convert sample rate
This function allows you to change the sample rate of a recording. This is very convenient if you have a file that you
wish to use in a certain audio system and find that the file
was recorded at a sample rate this system doesn’t support. Please note that Sample rate conversion can also be
done as part of the Saving process (see “Saving in an-
other format (Save as…)” on page 51).
Please note the following:
• Sample rate conversion from a low frequency upwards does
not improve sound quality. The high frequencies that were lost
due to a low recording frequency cannot be restored by a
conversion.
• When you sample rate convert down to a lower frequency,
high frequency material will be lost (this is part of the mathematics behind digital audio). Therefore, do not convert down
and then up again, since this will lead to a degradation in
sound quality (unless that’s exactly what you’re after). Instead,
use the Undo and Redo functions.
Performing the sample rate conversion
1. Select Convert sample rate from the Process menu.
This opens the Sample Rate dialog.
79
Off-line processing
Page 80

2. Select the desired sample rate from the pop-up menu
and click OK.
If you want to change any other audio properties (e.g. the bit resolution or
stereo/mono status), you can do this in one of two ways:
• Open the Audio Properties dialog from the Edit menu and
make the desired settings (see “Editing audio properties” on
page 55).
• Open the Audio File Format dialog by selecting “Save as” on
the File menu and clicking the Properties button in the lower
section of the dialog (see “Saving in another format (Save
as…)” on page 51).
!
Sample rate conversion is always applied to the entire file. Any selection you have made is not used in
any way for this operation.
Support for reNOVAtor™
If this audio restoration plugin is installed on your system,
you can select it from the Tools menu.
This menu option is enabled if a wave window is open and
an audio selection is active (it can be both channels or a
single channel).
Selecting “reNOVAtor…” from the menu opens this plugin and the active audio range is edited. The plug-in window is non-modal, hence you can work in WaveLab Essential without closing the plug-in.
Go to http://www.algorithmix.com/en/renovator.htm for
more info.
80
Off-line processing
Page 81

10
Master Section
Page 82

Introduction
The Master Section is the heart of WaveLab Essential’s
“Real-time Engine” and the final block in the signal path,
before the audio is sent to the audio hardware (or to an
audio file on disk). This is where you adjust master levels,
add effect processors and dither.
The settings and processors in the Master Section are
taken into account in the following cases:
There are four slots for inserting effect processors. Effects can be
turned on or off with the On buttons, and reordered by dragging the
slots.
Indicates that an effect is activated.
The Effects pane allows you to
add and manage effect processors. See “The Effects
pane” on page 85.
Ö When playing back an audio file in a Wave window.
Ö When playing back an Audio CD Montage.
Note that the Master Section effects are global for all clips and tracks in
a Montage, as opposed to the individual clip effects.
Ö When using the Render function with any of the above.
The Render function writes the output of the Master Section to a file on
disk, allowing you to apply Master Section processing to a Wave or mix
down a Montage to an audio file. See “Rendering” on page 91.
About the “Use Master Section” option
If you don’t need the Master Section at all, you can turn it
off completely by deactivating the Use Master Section
setting on the Options menu. This will save processor
power, but makes the following sections of the program
unavailable:
• The Master Section window, including processors and dithering.
• The functions of the Monitor window.
• Audio CD Burning from the Audio CD Montage.
The Master Section window
To open the Master Section window, you can either select
it from the Specialized Windows submenu on the View
menu or press [Ctrl]-[F9].
Indicates that the level faders are
active (any setting other than
0.00), or that the Mono button is
activated.
Level faders.
The Master Level pane. This is
where you adjust the final output
level. See “The Master level pane”
on page 83.
Activate this for mono output.
Here you can insert a post-master
fader effect or other dithering plugins, replacing the internal dithering.
Indicates that dithering is on.
The Dithering pane lets you add dithering when mixing down to a lower
bit resolution. See “The Dithering
pane” on page 88.
Options for the internal dithering
algorithm.
Click here to render the output to a file.
Ö When you open the Master Section, active effect processor panels will also appear (if they haven’t been hidden).
To close the Master Section, select it from the menu again
or press [Ctrl]-[F9].
82
Master Section
Page 83

Showing and hiding panes
You can independently hide the three Master Section
panes in any combination:
• Clicking on the Hide button for a pane will “fold” it, leav-
ing only the pane title bar visible.
This is useful for saving screen space, if you e.g. don’t need to see the
Dithering settings. Note that the green indicator for the pane will still be
visible when the pane is hidden, allowing you to see at a glance whether
effects, master volume or dithering are used or not.
• To show a hidden pane, click its Hide button again.
• Right-clicking (or [Ctrl]-clicking) a Hide button will hide the
other two panes and bring the clicked pane to view (if hidden).
• Double clicking a Hide button will hide or show that pane and
the pane(s) below it.
About the signal path
The three panes in the Master Section window correspond to the Master Section’s three “processing blocks”:
Effects, Master Level and Dithering. The signal passes
through these blocks from top to bottom, as shown in this
figure:
Audio from WaveLab
Note that the signal passes
Slot 1
Slot 4
Master Level
Dithering
(or post-master effect)
Audio Hardware
(or file on disk)
through the effects in series
(from top to bottom) – reordering the effect slots affects the
signal path.
Master Section meters monitor
the signal here.
Meters in the Meter windows
monitor the signal here.
The Master level pane
The Faders
The faders in the Master level pane govern the final output
level. Use these in conjunction with the level meters (those
next to the fader, or even better, the meters in the Level
Meter window) and the clip indicators to optimize the level
of the signal sent to the audio hardware.
!
It’s particularly important to avoid clipping (signal levels exceeding the available headroom), especially
when mastering. Clipping is indicated by the Master
Section’s clip indicators (see below) and by the
number of clip indicators in the Level Meter.
To adjust the level, use the following methods:
1. To make coarse adjustments, click a fader handle and
drag it.
You can also click directly anywhere along the fader scale to move the
fader handle there immediately.
2. For fine adjustments, click on the upper or lower half
of the fader handle.
This raises or lowers the level by a small amount.
• To reset a fader to 0.00 dB, press [Ctrl] and click anywhere on the fader.
When both faders are set to 0.00 (and the Mono button isn’t activated),
the Master level section will not affect the signal at all. This is indicated
by the green indicator for the Master pane going dark.
• You can control the faders using a wheel mouse.
This has to be activated in the Preferences–Environment tab.
The fader settings are shown numerically below each
fader.
83
Master Section
Page 84

About the Unlink mode
The Unlink button determines whether the faders should
be individually adjustable (indicated by a lit Unlink button)
or “ganged”. Normally, you will probably want Unlink deactivated, so that moving one fader also moves the other
by the same amount. Turning on Unlink allows you to correct improper stereo balancing by adjusting the channels’
levels individually. Note:
Ö If you offset the faders (with Unlink turned on) and
then deactivate Unlink again, you can adjust the overall
level without changing the level offset between the channels.
In other words, moving one fader will move the other one by the same
amount, relative to its current setting. Note that the faders use an exponential scale – this means that when you move one fader, the other does
not follow in a linear fashion on the screen. However, the audio result is
what you expect.
Ö Fader offsets are not preserved at the end of the range
of movement.
The Meters
The Master Section meters show the signal level of the
signal before dithering (or any other plug-in you have applied post-master fader – see “Adding other plug-ins to
the Dithering pane” on page 89). Use these to get an
overview of the signal levels.
• The numeric fields above the faders show the peak lev-
els (the highest signal levels reached) for each channel.
They will hold these values until you click on them to reset them.
• The red “LEDs” above the meters are clip indicators,
which will light up whenever the signal clips (exceeds the
maximum available headroom).
If this happens, you should lower the faders, reset the clip indicators by
clicking on one of them, and play back the section again until no clipping
occurs.
!
For critical level metering, we recommend using the
Level Meter (see “The meters” on page 64). Not only
is this more detailed, it’s also applied after the whole
Master Section (after dithering) and will thus show
the actual signal level sent to the audio hardware.
The Mono button
If you activate the Mono button, the two channels will be
summed to mono. Furthermore, the output level is automatically reduced by -6dB, to avoid clipping. The Mono
button is useful for checking mono compatibility of stereo
mixes, etc.
Ö If the Mono button is activated, the green indicator for
the Master level pane will be lit, even if the master level
isn’t adjusted.
This helps you avoid accidentally leaving the Mono button activated.
The Dropout indicator
This indicator lights up whenever WaveLab Essential fails
to properly play back as little as a single sample of the currently selected wave. A dropout is most likely to occur
when your computer does not have the processing power
to adequately handle all effect processors you have inserted.
To avoid dropouts, try the following:
• Use fewer effects.
You might be running out of processing power.
• Consider “Rendering” the processing rather than running it in real time. Then master from the processed file
without any processors plugged in. See “Rendering” on
page 91.
Dropouts never occur when “Rendering” to a file.
• Do not process any files in the background while mastering digitally to a DAT for example. See “Working with
multiple files” on page 92.
• If neither of the above helps, please check the audio
card preference settings, you might need to adjust the audio buffer settings.
If a dropout occurs during a real-time mastering process
(and if your master needs to be flawless) we recommend
that you re-master. Stop playback, click on the dropout indicator to reset it, and try again.
Ö As mentioned above, this indicator lights up as soon
as even a single sample is not played back correctly. This
type of precision is not often required, but it’s there if you
need it.
84
Master Section
Page 85

The Effects pane
WaveLab Essential allows you to insert up to four effect
plug-ins in series (plus an additional, post-master fader
plug-in, normally used for dithering, see “The Dithering
pane” on page 88). Three plug-in formats are supported in
the Master Section:
• WaveLab Essential-specific plug-ins, included with the
program.
• VST plug-ins.
Steinberg’s VST plug-in format is supported by a lot of programs and
plug-in manufacturers. You will find a number of VST plug-ins included
with WaveLab Essential; other plug-ins can be purchased separately
from Steinberg or other manufacturers or in some cases downloaded
from the Internet.
Note that if you have additional VST plug-ins installed on your computer,
these can optionally be available in WaveLab Essential (provided that
they are installed in the “Shared VST Plug-ins” folder). Whether the effects in the “Shared VST Plug-ins” folder should be available in WaveLab Essential or not is set in the Preferences–VST tab. You can also
specify an extra VST plug-ins folder in the Preferences if you wish, meaning that you can have access to both the effects in the “Shared VST
Plug-ins” folder and the effects in some other folder containing VST
plug-ins.
• Plug-ins that adhere to the Microsoft DirectX standard.
These are known as DirectX or DX plug-ins and are also widely available.
Selecting effects and managing slots
To select an effect plug-in for a slot, click on the slot (or
the numbered button to the right of the slot) and select an
effect from the pop-up menu that appears. Note that effects can be organized in groups (see “Organizing plug-in
processors” on page 186), in which case they will appear
in hierarchical submenus.
Selecting an effect from the VST group.
!
The number of effects available on the menu depends on which plug-ins you have installed. It’s also
possible to globally deactivate or exclude effects you
don’t need, as described in the section “Activating
and deactivating plug-ins and groups” on page 187.
When you have selected an effect, it is automatically activated (the On button lights up), and its control panel appears as a separate window (see “Making settings – The
Effect control panels” on page 86 for more on effect con-
trol panels).
• You can turn off an effect (without removing it) by clicking its On button.
To activate the effect again, click the On button so that it lights up.
• To hide the control panel for an effect, right-click its On
button (or right-click the effect slot and select Hide from
the pop-up menu that appears).
A hidden control panel can be shown by right-clicking the On button
again (or by selecting Show from the same pop-up). You can also have
one effect panel shown and automatically hide all the other panels, by
right-clicking the Solo button for the slot.
• Clicking the Solo button for an effect will bypass all
other effect slots, allowing you to check the sound of that
effect only.
You can also bypass effects manually in their control panels – see below.
85
Master Section
Page 86

• You can change the order of the slots (and thus the or-
der in which the signal passes through the effects) by
clicking a slot and dragging it to a new position.
When you drag, a dotted outline shows the position of the slot.
• To remove an effect from a slot, right-click the slot and
select Remove from the pop-up menu that appears.
This is the same as selecting “None” from the effect selection pop-up
menu.
Making settings – The Effect control panels
The control panel window is where you make settings for
an effect. Plug-ins can either have specialized control
panels (with any combination of knobs, sliders, buttons
and displays) or use standard panels.
Bypass, Mute and Preset
As you can see in the figure above, the three buttons
above the actual panel are common to both kinds of control panel windows. They have the following functionality:
• Clicking the Bypass button will temporarily bypass the
effect.
Unlike turning off the On button for the slot, the bypass function does not
free up any processing power. Note that you can bypass all effects except one by using the Solo button for a slot. It’s also possible to bypass
all effects by using the global bypass button in the Effects pane. Also
note that bypassing effects is for playback only, and does not affect rendering. To deactivate an effect when rendering, use the On/Off buttons
in the Master Section effect pane.
• The Mute button turns off the signal output from the effect.
This means that you will no longer hear your signal because it won’t even
reach the next stage (either another slot or the master faders).
• The Preset button allows you to select and edit presets
for the effect.
This is described in the section “Working with effect processor presets”
on page 87.
Standard panels
A standard panel shows parameter names and values in
the display to the left. To make settings, use the slider beside the corresponding parameter.
Custom panels
An effect plug-in can actually have any control panel that
the plug-in designer desires. There are several examples
of custom panel plug-ins included with WaveLab Essential.
For information about the panels for additional plug-ins,
see the documentation for each plug-in.
86
Master Section
Page 87

Working with effect processor presets
With WaveLab Essential comes a number of “factory presets” for the included processors, which you can either
select and use as is, or use as a starting point for your own
settings. Additional plug-in processors may provide their
own “factory presets”.
Ö To access the presets for an effect, click the Preset
button in its control panel window.
The result and available functions depend on the type of plug-in:
WaveLab Essential specific plug-ins
Applying and saving presets for WaveLab Essential specific processors works exactly as with any other preset,
apart from the fact that there are no preset “tabs” or menu
items as in dialogs. Instead, clicking the Preset button will
open a separate Preset dialog. The options in this dialog
are exactly the same as for dialogs with Preset tabs. See
“Presets” on page 30 for more details.
VST-compatible plug-ins
VST plug-ins have their own preset handling. When you
click the Preset button for this type of effect, a pop-up
menu with the following options appears:
Item Description
Load/Save Bank… This allows you to load and save complete sets of
Load/Save Default
Bank
Load/Save Effect Lets you load or save one preset at a time. Also
Edit name of current
program…
Preset List This allows you to select one of the currently
presets. The file format is compatible with Cubase.
This allows you to load the default set of presets
(as will appear when first loading the plug-in) or
save the current set of presets as the default bank.
compatible with Cubase.
This allows you to define a name for the preset,
which might be displayed in the panel (depending
on the plug-in).
loaded presets.
About the effect plug-ins supplied with
WaveLab Essential
Included with WaveLab Essential is a large number of
plug-ins for all kinds of purposes, audio compression,
chorus, stereo enhancement, reverb, etc. The parameters
for each plug-in are described in the “Plug-in Processor
Reference” in the online documentation.
Installing additional effect plug-ins
If you have purchased or downloaded additional plug-ins
(VST or DirectX), you need to install these to be able to
use them in WaveLab Essential. Normally, plug-ins come
with an installer application of some kind, along with a
manual or installation notes – make sure to follow the instructions in these when installing the plug-in.
About installing DirectX plug-ins
Normally if the DirectX plug-in has been installed properly,
it will automatically be “visible” in WaveLab Essential. If it
isn’t, you need to “update the Windows registry” so that it
is. Proceed as follows:
1. In Windows, locate the actual plug-in file on your hard
disk.
These are “dll” (dynamic link library) files, which means they normally
have the extension “.dll”. Sometimes other extensions are used as well.
2. Drag and drop the file icon, either onto the WaveLab
Essential program icon, or somewhere in the WaveLab
Essential application window.
A dialog box will ask you whether you want to register the plug-in or not.
Organizing plug-ins
You can specify which plug-ins should be available in the
program and how these should be organized on the menus.
See “Organizing plug-in processors” on page 186.
DirectX plug-ins
Here, the same functionality is provided as for WaveLab
Essential plug-ins. In addition, you can import “native” presets created for the plug-in.
Master Section
87
Page 88

The Dithering pane
The Dithering pane allows you to add dithering to the signal before it’s sent to the audio hardware or to a file on
disk. You can choose between WaveLab Essential’s internal dithering algorithm or any external dithering plug-in of
your choice. First, some theory:
What is dithering?
Dithering is a method for reducing quantization errors in
digital recordings. In the case of WaveLab Essential, dithering is applied when reducing the number of bits in a recording, for example when moving from 24 to 16 bits, and
when applying processing.
The theory behind this is that during low level passages,
only a few bits are used to represent the signal, which
leads to quantization errors and hence distortion. To the
ear, this is perceived as “graininess” during low level passages in a recording.
When “truncating bits”, as a result of moving from for example 24- to 16-bit resolution, such quantization noise is
added to an otherwise immaculate recording.
By adding a special kind of noise at an extremely low level,
the quantization errors are minimized. Indeed, the added
noise can be perceived as a very low-level quiescent hiss
added to the recording. However, this is hardly noticeable
and much preferred to the distortion that otherwise occurs.
Ö The reason for the dithering block to be last in the
Master Section is that the output level must not be
changed after dithering a signal.
When should I apply dithering?
The basic rule-of-thumb is that you should dither when
moving to a lower bit resolution. One obvious instance of
this is when converting an audio file to a lower resolution
(e.g. preparing a 24-bit file for mastering to CD, which
uses 16-bit format).
However, even if you’re playing back or rendering a 16-bit
file to the same resolution, you need to dither if you’re using any real-time processing whatsoever in WaveLab Essential! The reason for this is that WaveLab Essential
works with an internal resolution of 32-bit (floating point),
for supreme audio quality. This means that as soon as you
perform any kind of real-time processing, the audio data
will be treated at this high resolution instead of the original
16 bits, thus making dithering necessary.
Examples of real-time processing include level adjustments, any effects, mixing of two or more clips in a Montage, etc. In fact, the only time when a 16-bit file will be
played back at 16-bit resolution is if you play it without any
fades or effects, and with the Master Faders set to 0.00
(no level adjustment – Master level indicator turned off).
Selecting a dithering algorithm
To select and activate a dithering algorithm, click on the
arrow button next to the plug-in slot in the Dithering pane,
and select one of the options from the pop-up menu that
appears. The default option is “Intern” (WaveLab Essential’s internal dithering algorithm). However, you can also
add other plug-ins to this list, see “Adding other plug-ins
to the Dithering pane” on page 89.
Once you have selected a dithering algorithm, dithering is
active (as indicated by the green indicator for the Dithering pane). It will apply to all playback (through the Master
Section) or rendering.
Ö To turn off dithering completely, right click in the slot
and select “Remove” from the pop-up menu that appears.
This is the same as selecting “None” from the effect selection pop-up
menu.
88
Master Section
Page 89

Making settings
When dithering, there are no hard and fast rules for how to
set up the parameters – this largely depends on the type
of material. We recommend that you experiment and let
your ears be the final judge.
Internal dithering
Parameter Description
Noise Type Determines the dithering method used:
Noise Shaping This parameter alters the character of the noise added
Output Bit
Resolution
In “Off” mode, no dithering is applied – use this as a
Bypass function.
The “Type 1” mode is the most “all-round” type of
method.
The “Type 2” mode emphasizes higher frequencies
more than Type 1.
when dithering. Again, there are no hard and fast rules,
but you may notice that the higher the number you select here, the more the noise is moved out of the ear’s
most sensitive range, the mid-range.
This is where you specify the intended bit resolution for
the final audio, after dithering, regardless of whether
you will “Render” the settings or play back in real-time.
It is very important to set this to the correct resolution!
Dithering will change the sample resolution, but not the
sample size. E.g. when dithering 24-bit to 16-bit, the
file will be still be 32-bit in size, although only 16 bits of
information will have significance.
Hence, when rendering to a 16-bit file, specify the desired file resolution to avoid wasting space!
To make a plug-in available on the plug-in slot pop-up
menu in the Dithering pane, proceed as follows:
1. Pull down the Options menu and select “Organize
Master Section plug-ins…”.
A dialog appears, listing all plug-ins installed in your system. See “Orga-
nizing plug-in processors” on page 186.
2. Locate the plug-in in the list.
Note that plug-ins can be placed in groups (folders) in the list – click the
plus sign next to a folder to view the contents of a group if needed.
3. Activate the checkbox in the PM column for the plugin.
PM stands for “Post Master fader”.
4. Click OK to close the dialog.
Now, the plug-in will appear on the pop-up menu in the
Dithering pane, and can be inserted after the Master Level
faders (as with the regular dithering types). You make settings for the plug-in like you would for effects in the Effects pane. Note also that the plug-in will still be available
for selection as a regular, pre-master effect.
Master Section presets
Adding other plug-ins to the Dithering pane
If you have purchased another dithering plug-in that you
prefer, you can use this instead of the internal dithering.
It’s also possible to insert some other type of plug-in in the
Dithering pane – it will be applied after the Master level
faders (possible useful plug-ins would be maximizers, limiters, etc.).
!
Please remember that the meters in the Master Section monitor the signal before the Dithering pane! To
avoid clipping, check the Level Meter and adjust the
output level setting of the plug-in, if available.
Master Section
You can turn all settings currently made in the Master
Section into a preset. This includes which processors
were used, what settings were made for each one of
them, and dithering options.
89
Page 90

Creating presets
To create a new preset, proceed as follows:
1. Set up the Master Section as you want it.
This includes selecting Processors, making settings, and setting dithering options.
2. Click the Presets button in the Effects pane.
3. Type in a name for the preset in the upper right corner.
4. If you want the dithering options and Master level set-
tings to be part of the preset, make sure “Save Dither/
Level settings” is activated.
This is the default.
5. Click Add.
Ö The presets are saved automatically when you quit the
program. The next time you load the program, the presets
are ready and waiting, just as you left them.
Loading a preset
To load a preset, select it in the list to the left, and click on
one of the Load buttons, depending on the desired load
method:
• The Replace method replaces all settings in the Master
Section with the setting in the preset.
• The Mask method replaces only those slots in the Mas-
ter Section that are actually used in the preset.
• The Append method fills the unused slots in the Master
Section with the settings in the preset.
If there are not enough free slots available to load the entire preset, a
warning message will appear.
Modifying a preset
1. Set up the Master Section as desired.
If you only want to adjust a few settings in an existing preset, you may
want to load this first, as described above.
2. Go back to the “Master Section Presets” window.
3. Select the preset you want to overwrite with the new
settings.
4. Click the Update button.
• To update settings for the last loaded preset you can
[Ctrl]-click the Presets button.
This will save any changes without having to open the dialog.
Deleting a preset
To delete a preset, select it in the list to the left and click
the Delete button.
Using key sequences for presets
If you want to invoke a preset via a key command sequence, you can do this by defining key sequences.
A key sequence contains between one and three keys that
must be pressed in a certain order to recall the preset.
Defining key sequences
1. Select the preset for which you want to create a key
sequence, and click the key sequence button.
2. If you want to clear the current key sequence, click
Clear.
3. Make sure Catch mode is active.
4. Press the first combination of keys that you want to
use.
You can include modifiers ([Shift], [Ctrl], [Alt], etc.) if you like. There is
also a setting that makes the program distinguish between two modifiers
with the same label, on each side of the space bar.
5. Proceed with the following key(s).
6. Disable Catch mode.
This is just a safety measure so that you don’t accidentally erase or add
to your current key sequence, when pressing more keys.
7. Close the dialog.
8. Use the Default Key Action buttons to decide whether
your key sequences will invoke the “Replace”, “Mask” or
“Append” load method.
This setting is global to all Key sequences.
Using key sequences
Key sequences can only be invoked when the Master
Section Presets dialog is closed. Press the keys in the order they were entered in the dialog, and the preset is
loaded.
Saving and loading preset groups
You can save one or more created presets as a preset
group for easy access. If you have added presets to the
Preset window and want to save them as a group, use the
drop-down menu at the bottom of the dialog to enter a
name for the group and save it.
90
Master Section
Page 91

This function is useful if you are working on several
projects, since it makes for a convenient way to keep specific Master Section presets for specific projects well organized and easily accessible.
Rendering
While the Master Section can perform all processing in
real time during playback, it’s also possible to save the audio output to a file on disk. This is done with the Render
function.
There are several uses for Rendering:
• Mix down a complete Audio CD Montage to an audio
file.
This can be a goal in itself, but can also be necessary if your Montage
uses e.g. more effects than the system can handle in real time. By Rendering it to a file first, and creating a CD from this file instead, you can
avoid dropouts and CD burning failure.
• Mix down a file in a Wave window to a new audio file,
complete with Master Section effects, dithering and other
settings.
You can freely choose the format of the new audio file, allowing you to
create an mp3 file and add effects at the same time, for example.
• “Apply” all settings in the Master Section to a file in a
Wave window.
This is the same as the previous option, but the Master Section processing will transparently and permanently be “applied” to the current file instead.
!
Rendering Audio CD Montages is described in the
Audio CD Montage chapter (see “Mixing down – The
Render function” on page 131). This section de-
scribes Rendering waves.
What is rendered?
When you use Render, all Master Section settings (effects, master levels, dithering, etc.) are included in the resulting audio file. In other words, what you hear is what
you get.
Ö One thing to note: the Bypass switch affects playback
only, while the effect On switches affect both playback
and Rendering.
Calling up the Render dialog and filling out the
options
Click the Render button to call up the following dialog:
The Render dialog for Wave windows (for information on Rendering Audio CD Montages, see “Mixing down – The Render function” on page
131).
Here is what the options mean:
Range
This is where you specify what part of the wave to render.
Option Description
Selection Process only the portion that is currently selected
Whole file Process the entire file.
Result
Here, you can choose whether the original wave file
should be changed (“applying” the Master Section settings) or whether a new audio file should be generated.
Option Description
Process in place Modifies the original file. If you wish to keep the
No tail If this is activated, the resulting file will end where the
Copy markers If this is ticked, the resulting new file will contain all
in the Main view.
changes, you need to save the file again. Note: if you
use this for adding effects to a file, you may want to
activate the “Activate Global Bypass” option on the
Schedule tab (see below).
original did, even if the processing adds material (like
for example echoes or reverb tails).
markers present in the original file.
91
Master Section
Page 92

Create named file
If this is activated, the resulting new file will be saved (not
temporary). The field below the checkbox allows you to
specify a name and location for the file, and you can click
the audio properties button to set the desired audio format. Clicking the “Rename as source” button will set the
file name to the same as the file being processed (but retaining any path you have specified above).
Ö If you click the audio properties button at the bottom
of the dialog, you open the Audio File Format dialog in
which you can choose the desired format of the file and
make settings for the conversion and encoding.
Options on the Schedule tab
• The On Start options determine what WaveLab Essential
should do before rendering:
Stop playback Stops playback to free up some processing
Open Monitor window Opens the Monitor window, see “The Monitor
Minimize window The file window is minimized to free up screen
power. This option is not available if playback is
already stopped.
window” on page 93.
space.
• The On Completion options determine what should happen
after rendering:
Beep WaveLab Essential will beep to signal that the opera-
Show
message box
Restore
audio window
Activate
Global Bypass
tion is completed.
WaveLab Essential will display a message to confirm
the operation. Click OK to continue.
Upon completion, WaveLab Essential will restore a
minimized window (see above) to its original size.
WaveLab Essential will automatically activate the Bypass switch in the Master Section’s Effects pane (see
“Bypass, Mute and Preset” on page 86) upon comple-
tion. This allows you to play the processed file back after rendering, without hearing the effects “twice”
(applied to the file and activated in the Master Section).
• The Priority setting lets you specify how fast the file should be
processed.
Relax
Background
Background The file is processed in the background but with a lower
Fast Processing is given a high priority. A fairly high-perfor-
!
The file is processed in the background, but priority is
given to audio playback and to your continued work on
other files. This makes WaveLab Essential as responsive
as possible, but slows down processing.
priority given to your continued work on other files. This
makes processing faster but the program less responsive.
Try this mode when several files should be processed in
the background.
mance computer may be required to avoid dropouts in
playback.
Any dropouts that occur as a result of too little processing power left will only affect the played file.
Files processed in the background will always be
free of dropouts!
Processing the file
Once everything is set up correctly, click OK to initiate the
processing. Or, if you change your mind, click Cancel.
Ö Tip: If you just need to process the current audio selection in place, you can press [Ctrl] while clicking on the
Render button. This will process the audio selection in
place without opening the dialog.
Other settings are kept from the last time you accessed the dialog.
Working with multiple files
Once you have applied settings to one wave, as described below, you can continue with processing the next.
The processing of the first wave will continue in the background. This way you can apply processing to as many
waves as desired. Please also note that each wave can
have its own priority setting, as described below.
!
If you are rendering to MP3 format, you should only
render one file at a time.
92
Master Section
Page 93

The Monitor window
This window allows you to monitor the ongoing processes
and check how hard your computer’s CPU is working with
various tasks.
To open this window, select “Monitor” from the Specialized Windows submenu on the View menu or press [Ctrl][F10].
The window has two displays, selected by clicking the
corresponding tab at the bottom of the window.
The Progress display
The Progress display shows a list with the following columns:
Column Description
Name The name of each wave or montage being pro-
Progress How much of the wave has been processed so far.
Remaining time This indicates how much time is required to finish
Priority Boost The priority assigned to this particular processing
cessed.
the processing.
(see “The Priority setting lets you specify how fast
the file should be processed.” on page 92 and be-
low).
Process menu
Even while a wave is being processed, you can change its
settings. Position the pointer in the monitor window and
press the right mouse button.
The following options are available:
Option Description
Suspend/Resume Suspends processing of the wave. The menu
Suspend/Resume All Halts/starts processing of all waves.
Relax Background, Background, Fast
Cancel Cancels the processing operation for the se-
option changes to Resume so that you can activate processing again. When a process is suspended, more CPU power will be available to
the other processes.
Changes the priority status for the wave, see
“Relax Background” on page 92.
lected wave, in which case the message in the
Priority Boost column reads Cancelled until
WaveLab Essential has performed all the necessary clean up operations.
The Performance display
The Performance display provides an overview of the processing power currently being used.
93
Master Section
Page 94

• The yellow lines refer to the power used for providing input to
the Master Section, i.e. reading waves from disk. Please note
that the values are an approximation.
• The purple lines indicate the processing power that is required for all processors currently running in the Master Section. The shorter the line, the less the load on the CPU. This is
a very precise measurement.
• The blue lines reflect the processing power required by the
output device.
• There is also a number indicating processor usage in percent.
Customizing the Performance display
You can customize the way the processing information is
displayed. If you want to see more of what is going on, resize the window.
Other options are available if you position the cursor anywhere in the black part of the window and press the right
mouse button.
The following options are available:
• You can activate/deactivate the Input, Process, and Output information (see above).
• To get an exact (but not as smooth) picture of the processor
usage, deactivate Average.
• You can select a Zoom factor for the display (50%~400%).
• You can change the direction of the status information flow
(horizontal or vertical).
Master Section
94
Page 95

11
Batch file encoding
Page 96

Basic procedure
WaveLab Essential can open and play both uncompressed and compressed files in a number of different formats, including WAV, AIFF, MP3, WMA (Windows Media
Audio) and OSQ (Original Sound Quality), which is
WaveLab Essential’s proprietary lossless audio format.
It’s also possible to convert WAV or AIFF files to another
format. While this can be done by opening a file and selecting “Save As” or “Save Special/Encode” on the File
menu, you can also convert several files in one go (batch
conversion).
Proceed as follows:
1. Select “Batch file encoding…” from the Tools menu.
The “Encode audio files” dialog opens.
2. Click on the green “plus” symbol.
A file selector opens, where you can select the desired audio files (WAV
or AIFF). Files must have the same sample rate and number of channels
(e.g. stereo/mono).
Click here to add files.
3. In the file type pop-up select one of the available for-
mats (WAV or AIFF) and then – in the file list – select the
desired files. If necessary, use the [Ctrl] and/or [Shift] keys
to select several files. Confirm your selection by clicking
“Open”.
This brings you back to the “Encode audio files” dialog.
4. Select the destination folder for the converted files
from the corresponding pop-up menu.
5. Select the desired destination format by clicking the
audio properties button at the bottom of the dialog.
This opens the Audio File Format dialog in which you can select the desired format and make settings for it.
6. For some compressed file formats, clicking on the arrow button to the right of the Encoding and Attributes
menus calls up dialogs where you can set the encoding
parameters and enter text strings.
!
Note that it is possible to simultaneously batch encode audio files of different formats, given that all the
files have the same sample rate and number of channels.
96
Batch file encoding
Page 97

12
Markers
Page 98

Introduction
About marker pairs
Two of the marker types come in pairs: Loop and Region.
Since you can’t have a region that starts but never ends, a
loop end point without a start, etc., special rules exist for
creating, deleting and moving these types of markers.
• Loop and region markers only have a functionality when
balanced.
You can enter just a start marker, but its purpose will be defeated by the
lack of a corresponding end marker. Furthermore, if you delete a start
marker, the corresponding end marker will also be deleted.
What are markers for?
Markers allow you to save and name certain positions in a
file. You can use these positions later on in various ways:
• Set the wave cursor to a marker.
• Select all audio between two markers.
• Loop the section between two markers, etc.
There is no limit to the amount of markers you can have in
a file.
!
This chapter describes how to use markers in Wave
windows.
Audio CD Montages have their own markers, see
“Using markers in the Montage” on page 127.
The various marker types
The following marker types are available:
Marker type Description
Generic This is mainly used for locating certain important
Loop start and
end
Region start and
end
positions and for editing (for example selecting all
audio between two positions). Generic markers
can be created directly during recording if needed
(see “About dropping markers during recording”
on page 62).
These are used for defining loop points. This is
useful for editing purposes as well as when creating loop sounds (e.g. for samplers).
Use these to define start and end points for generic regions. This is useful for editing purposes
and can be created directly during recording if
needed (see “About dropping markers during re-
cording” on page 62).
About importing and saving loop markers
There are a few points to be aware of when importing files
with loops into WaveLab Essential. This is because the
loops can be defined in two places: Wave and AIFF file
formats have the ability to contain loop points, and WaveLab Essential stores loop points as markers separately for
each file, in “.MRK” files. So, there’s a potential risk for
conflict:
• When you import a file that has never been used in WaveLab
Essential before, and which contains loops, the loops are “imported” and displayed as loop markers (in addition, the sample
note and detune information described in the section “Editing
sample attributes” on page 170 is imported, if present).
• When you then save the file in AIFF or Wave format, the loop
points are stored, both as part of the actual file (so that other
applications can read them) and in the “.MRK” file (for WaveLab Essential).
• When you open a file that has been used in WaveLab Essential before, loop indications that were originally in the file, before you used it in WaveLab Essential, are ignored. Only the
loop information in the “.MRK” file is used.
98
Markers
Page 99

The Marker toolbar
This is a special control bar for markers. It can be brought
up from the Control Bars submenu on the View menu.
4. Fill out the other options in the dialog and click OK.
Open marker list
Add new
marker
Drop Generic marker
Go to previous
marker
Add region markers
Add loop markers
Go to next
marker
Creating markers
Dropping markers on the fly
To add a marker on the fly, proceed as follows:
1. Play back the file.
2. When the cursor reaches the position where you want
a marker, do one of the following:
• Press [Insert].
• Click the Drop marker button on the Marker toolbar.
• Select Drop Marker from the time ruler speed menu.
You can give the marker a proper name later.
Ö The markers dropped this way are generic.
Creating a marker from “stop mode”
1. Set the wave cursor to where you want the marker to
appear.
2. Do one of the following:
• Click on the New Marker button on the Marker toolbar.
• Click with the right mouse button on the time ruler and
select New Marker from the menu that appears.
• Press [Ctrl]+[Insert] as a shortcut for the “New Marker”
operation described above.
3. Select a marker type.
The new marker appears at the wave cursor position.
Dropping markers while recording
You can drop markers during a recording. For example, if
you are auditioning some material while transferring it from
DAT tape to WaveLab Essential, you can add markers at
important positions, as they are coming up. The marker
types you can add are: Generic, Region start and Region
end. See “About dropping markers during recording” on
page 62.
Creating marker pairs from the Marker toolbar
To create a loop or a generic region, you can use the
Marker toolbar:
1. Make a selection that spans the area you want to en-
close by a marker pair.
2. Click on the corresponding marker pair symbol on the
Marker toolbar.
Markers are added at the start and end of the selection.
About the marker list
There is a marker list window that displays all markers in a
wave. This can be used for various purposes, for editing,
deleting and locating to markers, as described in the following sections.
99
Markers
Page 100

Opening the list
To open the marker list, either select “Specialized Windows”/”Wave Marker List” from the View menu, or click
the corresponding button on the Marker toolbar.
The marker list
• To sort the list alphabetically, click on the “Name” heading.
• To sort the list according to position, click the “Position”
heading.
This is the default when you first open the window.
Marker appearance and visibility
Hiding marker heads
To hide/display the marker triangles from the ruler, click
with the right mouse button in the ruler and select Hide/
Show Marker Heads.
Hiding all markers of a certain type
There’s a special dialog for hiding markers of certain
types. To open it:
• Click with the right mouse button on the time ruler and
select Visibility, or…
• Open the marker list, click with the right mouse button
on a marker and select Visibility.
In this dialog you can show/hide markers of any type.
Editing, converting and naming markers
The Edit Marker window can be used to change existing
marker’s properties. There are several ways to open this
window with settings for a certain marker:
• Right click on the marker in the time ruler and choose “Edit
Marker” from the menu that appears.
• Hold down [Alt] and double click on the marker.
• Open the marker list, select a marker and click with the right
mouse button on a marker and select Edit or press [Return].
Changing the appearance of marker lines
To hide the marker lines in the waveform, click with the
right mouse button in the waveform and select Elements.
From the menu that appears, set things up so that neither
Solid markers, nor Dotted markers are activated.
To transform a marker into any other type, select that type
in the list to the left.
100
Markers
 Loading...