

Page 1
Page 2

Operation Manual
Page 3

Cristina Bachmann, Heiko Bischoff, Marion Bröer, Sabine Pfeifer, Heike Schilling
Thanks to: Matthias Klag, Michael Ruf
The information in this document is subject to change without notice and does not represent a commitment on the part
of Steinberg Media Technologies GmbH. The software described by this document is subject to a License Agreement
and may not be copied to other media except as specifically allowed in the License Agreement. No part of this publication may be copied, reproduced or otherwise transmitted or recorded, for any purpose, without prior written permission
by Steinberg Media Technologies GmbH.
Steinberg, The Grand, VST and ASIO are registered trademarks of Steinberg Media Technologies GmbH. Windows,
Windows Vista and DirectX are registered trademarks of Microsoft Corporation in the United States and other countries.
Macintosh, Mac and Mac OS are trademarks of Apple Inc., registered in the U.S. and other countries. Pentium and Intel
Core are trademarks or registered trademarks of Intel Corporation in the U.S. and other countries. All other product and
company names are ™ and ® of their respective holders.
Release Date: June 29, 2009
© Steinberg Media Technologies GmbH, 2009.
All rights reserved.
Page 4

Table of Contents
5 Welcome
5 Key command conventions
6 How you can reach us
6 Installation
6 The USB-eLicenser
7 System requirements
7 Installing The Grand
8 Register your software!
8 Getting ready to play
8 Setting up The Grand as a VST instrument in
Cubase
8 Using The Grand in an AU compatible application
9 The Grand standalone and ReWire
10 Missing content
11 The content
11 The recording of The Grand
11 The models
12 Parameters
12 General plug-in controls
15 The Model page
16 The Equalizer page
17 The Ambience page
18 The Control page
19 The Options page
21 Additional controls when using The Grand as a
standalone instrument
24 Performance issues
26 Using MIDI controllers
26 MIDI controllers
27 Automation parameters
28 Index
4
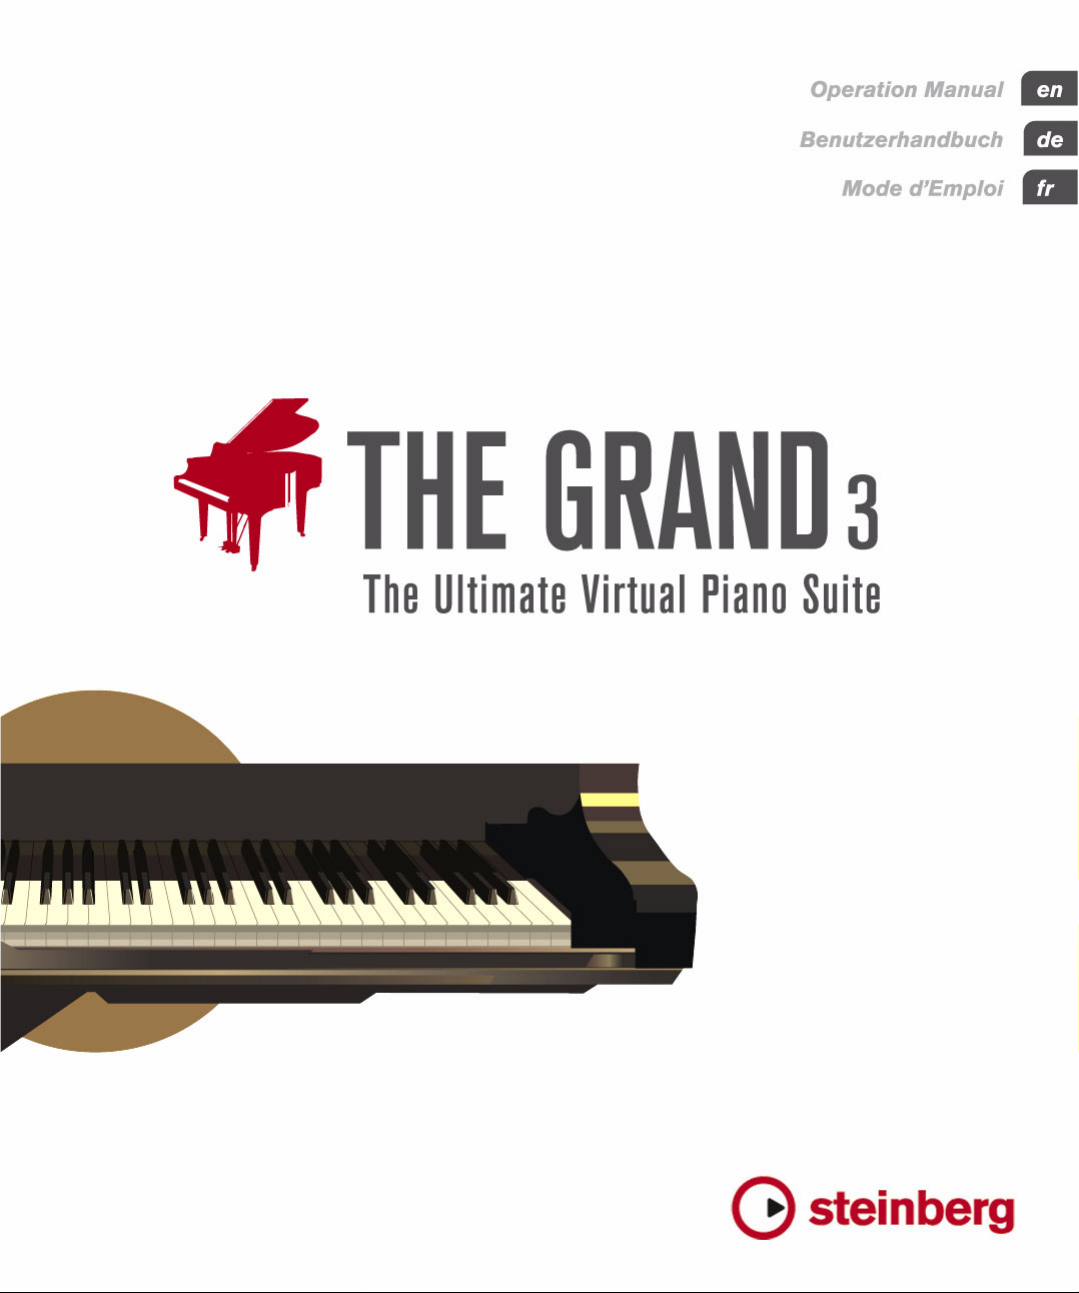
The Grand 3
Page 5

Welcome
Congratulations and thank you for purchasing The Grand 3
by Steinberg.
Both its previous versions have established The Grand as
one of the leading virtual piano instruments worldwide.
Now in 2009, The Grand is returning with a third version
to claim its rightful place at the forefront of virtual piano
software on the market today.
With the purchase of The Grand 3 you have chosen a premium virtual piano suite which comes with five virtual pianos perfectly recorded to meet your demands, providing
stunning sound quality unrivaled by current standards. The
Yamaha C7, Bösendorfer 290 Imperial, and Steinway D
grand pianos plus the classic Yamaha CP80 Electric
Grand, as well as the charismatic upright piano by Nordiska
Pianofabriken have been recorded to offer you an entire
palette of virtual piano greatness.
Thanks to the incorporated intelligent sample architecture
and latest recording technology, The Grand 3 does not
simply play back samples, but responds to your individual
playing behavior as well as adding natural full-length sustain and decay, distinctive pedal and hammer noises, and
key thumps in order to recreate the sound of acoustic pianos so perfectly. And it doesn’t stop here. To further enhance the effectiveness of your system, both ECO Mode
and RAM Save technology featured in The Grand 3 help
you to reduce the RAM consumption and improve CPU
performance.
Whether you are a musician, arranger or composer, The
Grand 3 is certainly your first choice when it comes to
breathtaking authenticity, extraordinary dynamic response
and the breadth and depth of tones only made available in
this virtual piano software conceived and designed by
Steinberg.
Based on the same technology used by REVerence, the
world’s first VST3-based convolution reverb processor already featured in Cubase 5, The Grand 3 enables you to
make your piano sound as if you were playing in an ancient
cathedral or in a live music venue – simply at the flick of a
switch. You also get an algorithmic reverb with more than
60 reverb presets to round out your options, giving you
absolute freedom to explore your acoustic environment.
The standalone version allows you to use The Grand 3
without a host application – a great choice for performing
live. It has two additional features: the quick-idea scratch
pad, which lets you instantly store spontaneous ideas, and
the metronome.
Please don’t forget to register on MySteinberg in order to
gain access to online support offers and additional exclusive services. And check out the The Grand 3 community
at Cubase.net, our online forum, for tips and other useful
information.
We wish you a lot of musical inspiration!
Your Steinberg The Grand Team
Key command conventions
Many of the default key commands in The Grand use
modifier keys, some of which are different depending on
the operating system. For example, the default key command for Undo is [Ctrl]-[Z] under Windows and [Command]-[Z] under Mac OS X.
When key commands with modifier keys are described in
this manual, they are shown with the Windows modifier
key first, in the following way:
[Win modifier key]/[Mac modifier key]-[key]
For example, [Ctrl]/[Command]-[Z] means “press [Ctrl]
under Windows or [Command] under Mac OS X, then
press [Z]”.
Similarly, [Alt]/[Option]-[X] means “press [Alt] under Windows or [Option] under Mac OS X, then press [X]”.
Please note that this manual often refers to right-clicking,
e.g. to open context menus. If you are using a Mac with a
single-button mouse, hold down [Ctrl] and click.
5
The Grand 3
Page 6
How you can reach us
!
!
Clicking the Steinberg logo in the top right corner of The
Grand opens a pop-up menu where you will find items for
getting additional information and help:
• On this menu, you can find links to various Steinberg
web sites. Selecting one automatically launches your
browser application and open the page.
On the web sites you can find support and compatibility information, answers to frequently asked questions, links for downloading new drivers,
etc. This requires that you have a browser application installed on your
computer, and a working Internet connection.
• When you choose the Help item, an online version of
the documentation opens.
• You will also find a menu item for the registration of your
product.
For further information see “Register your software!” on page 8.
Installation
Please read the following section before installing
The Grand.
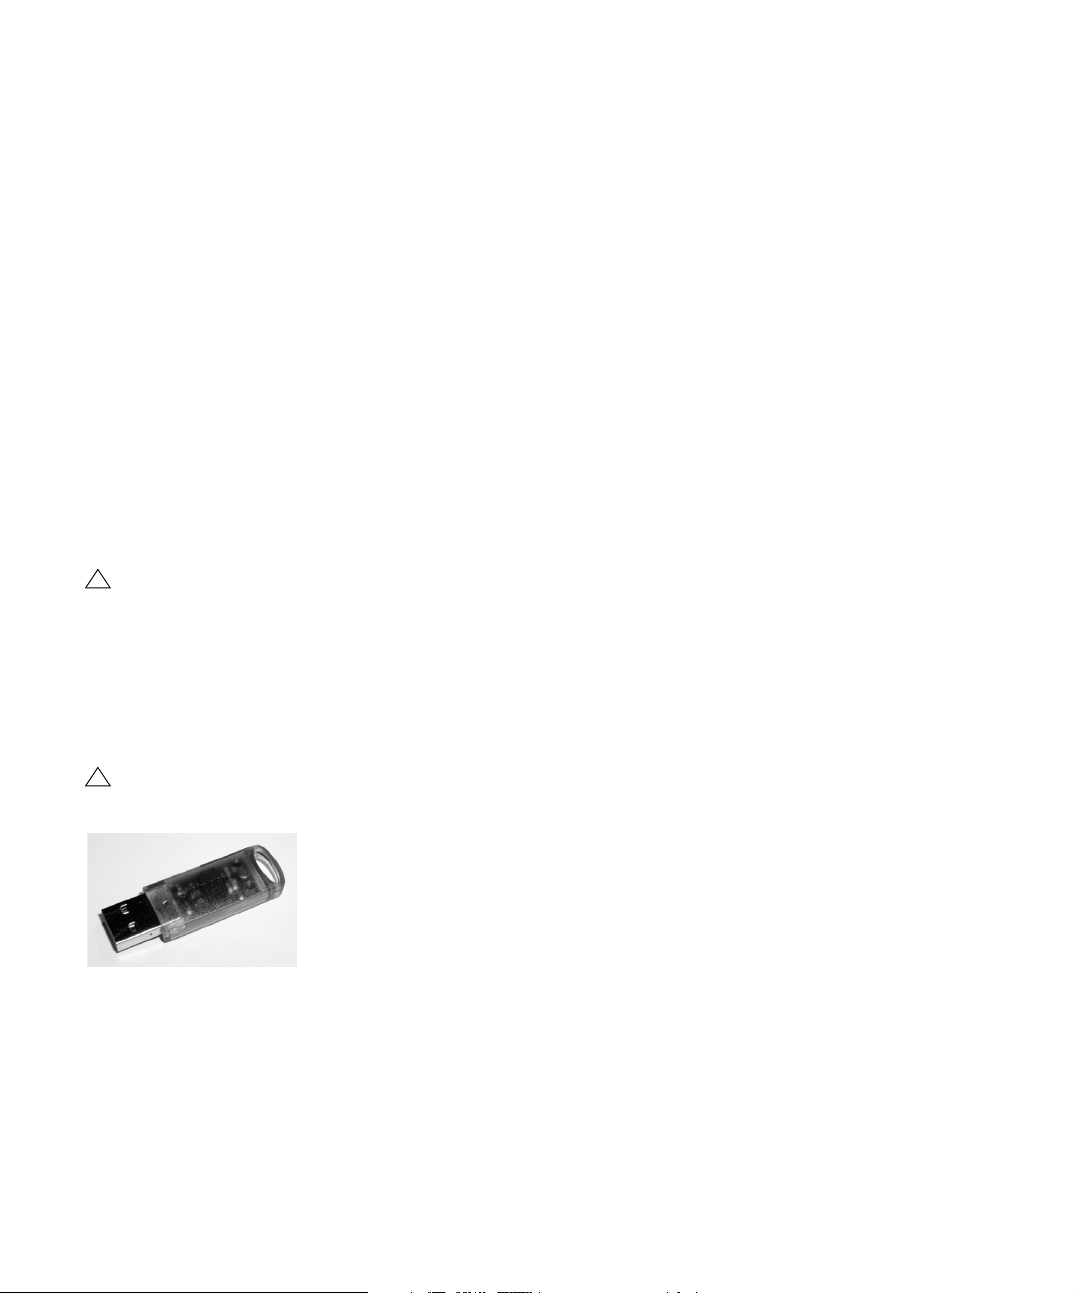
The USB-eLicenser
Many Steinberg products, including The Grand, use the
USB-eLicenser, a hardware copy protection device. The
Grand will not run without an eLicenser containing an activated license.
The USB-eLicenser is a USB device on which your Steinberg software licenses are stored. All hardware-protected
Steinberg products use the same type of device, and you
can store more than one license on one device. Also, licenses can (within certain limits) be transferred between
USB-eLicensers – which is helpful, e.g. if you want to sell
a piece of software.
The product package of The Grand contains an activation
code, which is found on the Essential Product License Information card within the product package. To make unlimited use of your version of The Grand, you must manually
download a license to an USB-eLicenser connected to
your computer, and activate your permanent license using
the activation code.
The License Control Center (which can be found on the
Start menu on Windows systems or in the Applications
folder on a Mac after installation of The Grand) is the place
where you can check the licenses installed on your USBeLicenser, and activate new licenses.
To do so, launch the License Download wizard of the
License Control Center and follow the instructions.
• If you are using other copy-protected Steinberg products, you may want to transfer all licenses for your applications to one USB-eLicenser, thus using up only one
USB port of your computer.
To transfer licenses between USB-eLicensers, launch the License Transfer wizard of the License Control Center and follow the instructions.
The USB-eLicenser is a separate product, and is not
included in the product package of The Grand.
The USB-eLicenser
6
The Grand 3
Page 7
System requirements
!
!
To use The Grand, your computer must meet the following
requirements:
Windows
• Windows XP (SP2) or Windows Vista
• Pentium/Athlon 2.0GHz dual core mobile (2.5GHz recom-
mended) or dual core 2.0GHz processor (3GHz recommended)
• 2 GB RAM (3 GB recommended)
• Up to 32 GB of free hard disk space
• Display resolution 1024 x 768 pixels (1280 x 800 pixels
recommended)
• Windows DirectX compatible audio hardware (ASIO compati-
ble audio hardware recommended for low-latency performance)
• DVD-ROM drive with dual-layer support
• USB port for USB-eLicenser (license management)
• USB-eLicenser
• Internet connection for license activation
• VST2, VST3, AU (tested in Cubase SX3, Cubase 4, Cubase 5,
Nuendo 4, Ableton Live 8 and SONAR 8), or ReWire compatible host for use as plug-in or ReWire slave-device
Macintosh
• Mac OS X 10.5
• Power Mac G5 dual 2.0 GHz or Intel Core Duo 2.0 GHz pro-
cessor (Intel Core Duo 2.66 GHz recommended)
• 2 GB RAM (3 GB recommended)
• Up to 32 GB of free hard disk space
• Display resolution 1024 x 768 pixels (1280 x 800 pixels
recommended)
• CoreAudio compatible audio hardware
• DVD-ROM drive with dual-layer support
• USB port for USB-eLicenser (license management)
• USB-eLicenser
• Internet connection for license activation
• VST2, VST3, AU (tested in Cubase SX3, Cubase 4, Cubase 5,
Nuendo 4, Ableton Live 8 and Logic 8), or ReWire compatible
host for use as plug-in or ReWire slave-device
Installing The Grand
The product package of The Grand contains several
DVDs for installation. Since The Grand provides a large
amount of content, more than one DVD is needed for the
installation process. Please have all DVDs ready, because
you will be asked to remove one DVD and insert the next
one during the installation.
The installation process may take some time. To keep
it short you might want to start by installing only one
model. During the installation process you also have
the possibility to select the content you wish to install.
You can add more models or content later by restarting the installation process.
The installer of The Grand allows you to save the
content files on a different hard drive than the program files.
Proceed as follows:
1. Insert the first DVD into your DVD drive.
An interactive start screen appears. If the interactive start screen is not
opened automatically or if you have a Macintosh computer, you can manually open the interactive start screen by double-clicking the file
“The_Grand_3_Start_Center.exe” under Windows or “The Grand 3
Start Center.app” on a Macintosh computer.
2. Follow the instructions on screen to start the installation of The Grand and browse through the additional options and information presented.
If you don’t want to install The Grand via the interactive
start screen, follow the instructions below:
Windows
1. Double-click the file called “Setup.exe”.
2. Follow the instructions on screen.
Macintosh
1. Double-click the file called “The Grand 3.mpkg”.
2. Follow the instructions on screen.
7
The Grand 3
Page 8

Register your software!
We encourage you to register your software! By doing so
you are entitled to technical support and kept aware of updates and other news regarding The Grand.
Proceed as follows:
• Click the Steinberg logo in the top right corner of the
control panel and select “Register The Grand 3” from the
menu that appears.
This option is an Internet link that opens the Registration page of the
Steinberg web site. To register, simply follow the instructions on screen.
Getting ready to play
To access The Grand via an instrument track, proceed as
follows:
1. Open the Project menu, and on the Add Track submenu select “Instrument”.
2. The Add Instrument Track dialog is opened.
Select The Grand from the instrument pop-up menu.
3. Click OK to create the instrument track.
Click the Edit Instrument button in the Cubase Inspector to open the
control panel of The Grand.
The Grand has now been set up as a VST instrument in
Cubase. For more details about the handling of VST instruments, see the Cubase Operation Manual.
The following sections describe how to use The Grand as
a plug-in in different host applications, or as a standalone
instrument.
Setting up The Grand as a VST instrument in Cubase
Ö The following information refers to the use of The Grand
in Cubase. We assume that you have correctly set up Cubase as well as your MIDI and audio hardware, and that Cubase receives MIDI data from your external MIDI keyboard.
If you want to use The Grand in another VST host application, please refer to the documentation of this application.
Cubase provides two ways of working with VST instruments: the VST Instruments window, or instrument tracks.
To access The Grand via the VST Instruments window,
proceed as follows:
1. In Cubase, open the Devices menu and select the VST
Instruments option.
The VST Instruments window opens.
2. Click in one of the empty slots to open the instrument
pop-up menu and select The Grand.
3. You will be asked if you want to create an associated
MIDI track connected to the VST instrument. Click Create.
The Grand is loaded and activated, and its control panel is opened. A
MIDI track called The Grand is added to the Track list. The output of this
track is routed to The Grand.
Using The Grand in an AU compatible application
You can use The Grand in an AU host application (e.g.
Logic).
The AU version of The Grand is installed in your AU plugins folder and lets The Grand work in an AU environment –
without any performance loss or incompatibilities.
For Logic Pro 8, proceed as follows:
1. Open the Track Mixer and select the desired Instrument channel.
2. [Command]-click the I/O field, and in the pop-up
menu that opens select either Multi-Channel or Stereo.
3. In the submenu that appears, select All Instruments
and then The Grand.
The Grand is now loaded as AU instrument.
8
The Grand 3
Page 9
The Grand standalone and ReWire
!
!
Click here to open the
Preferences dialog.
The Grand can be used as a standalone application, independently of any host application. This also makes it possible to use The Grand with sequencer applications that
do not support one of the provided plug-in formats of The
Grand (i.e. VST and AU), but allow for data exchange using ReWire.
Note that to use the ReWire functionality, the corresponding ReWire files must be installed. If you don’t
have these files already, you can download them
from www.propellerheads.se.
ReWire2 is a special protocol for streaming audio and
MIDI data between two computer applications. When using ReWire, the order in which you launch and quit the
two programs is very important, as the first audio application launched will capture the audio card resources.
Proceed as follows:
1. Launch the sequencer application you wish to use
(e.g. Ableton Live, ProTools).
If your sequencer supports ReWire, it will provide a way to assign audio
and MIDI channels for the exchange of data. See the documentation of
your sequencer application for details.
2. Launch The Grand as a standalone application.
You can launch the program like any other application on your computer
via the Start menu or desktop icon (Win) or by double-clicking the application symbol in the Applications folder (Mac). You can also double-click
the file “The Grand 3.exe” in the program folder (Win).
When you are using a Mac, you have to launch the
program in standalone mode once after the installation to activate the ReWire functionality.
When you now play a sample with The Grand, the sound
is streamed via ReWire to the assigned mixer channels in
your host application.
Ö Note that you are now running two completely separate applications. When you save your sequencer project,
this will include the overall channel and bus configuration,
but none of the settings in The Grand!
• To retain your The Grand settings, you have to save
them as a preset (click the disk symbol to the right of the
The Grand logo).
You may want to use a file name that indicates that the file contains settings created for a particular sequencer project. This way, you can easily
reload your settings when reopening a particular sequencer project. For
more information, see “Preset handling” on page 12.
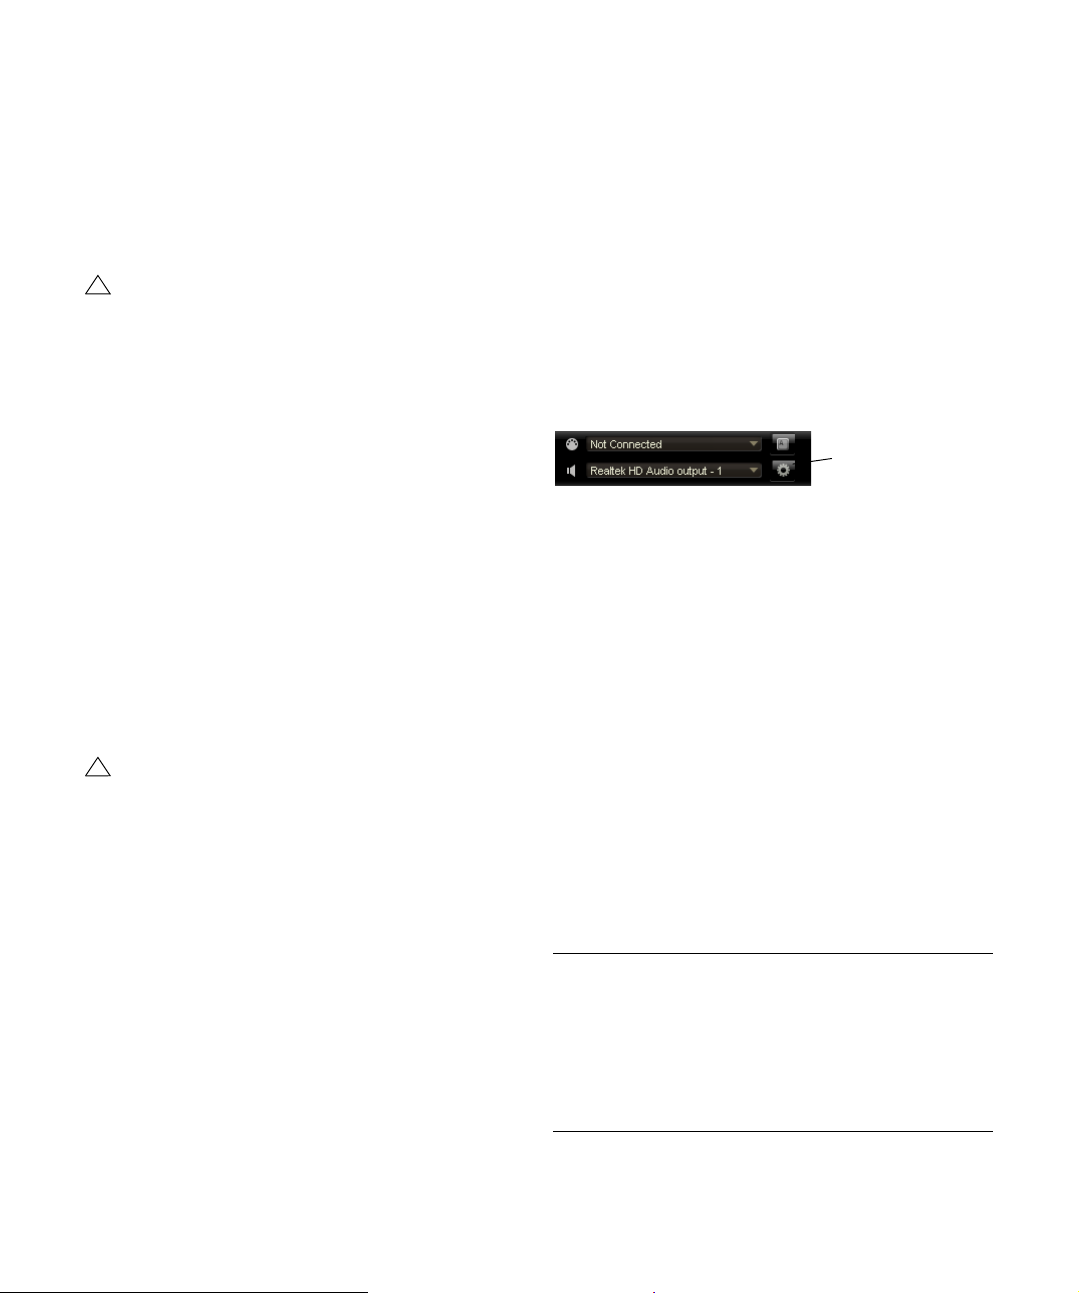
The Preferences dialog
When running The Grand as a standalone application, you
can configure the application in the Preferences dialog. To
open the Preferences dialog, proceed as follows:
• Click the Open Preferences button (the cogwheel symbol) to the right of the audio output field.
• Right-click in the topmost section of the control panel
and select “Preferences” on the context menu.
The Preferences dialog has several pages on which you
can make the following settings:
• On the MIDI Routing page, use the MIDI Input Port popup menu to specify a MIDI input.
• On the Audio Routing page, use the Audio Output Port
pop-up menus to assign different audio outputs.
The Grand supports four channels: two front channels (left and right)
and two rear channels (left and right). You can assign different audio outputs for each channel. Selecting an audio output on the pop-up menu
maps that output to the corresponding channel.
If you press [Shift] and select an audio output, the front and rear channels
are set to incrementing audio output ports – e.g. 1, 2, 3, 4 or 5, 6, 7, 8.
If you press [Alt]/[Option]-[Shift] and select an audio output, the audio outputs are assigned in pairs to the front and rear channels – e.g. 1, 2, 1, 2 or
5, 6, 5, 6.
• On the Metronome page you can make a number of settings regarding the use of a metronome:
Option Description
Mode Here you can turn the metronome on and off or set it to
Accent Activate this to accentuate the first beat of each bar.
Level Use this fader to adjust the volume level of the metro-
Connections Here you can select a separate stereo output for the met-
Count In mode.
nome.
ronome.
9
The Grand 3
Page 10
• On the General page, activate “Don’t prompt for confir-
!
!
mation when quitting The Grand 3” if you want The Grand
to close without prompting when quitting the program.
• On the ASIO Driver page, select your audio hardware
driver from the ASIO Driver menu.
If you plan to use several audio applications simultaneously, you may
want to activate the option “Release Driver when Application is in Background”. This will allow another application to play back via your audio
hardware even though The Grand is running.
The input and output latency values for your audio hardware are displayed. “Latency” is the amount of time it takes for your system to respond to whatever messages are sent to it. High latency results in a
noticeable delay between when you press a key and when you hear the
sound. Below the latency values, the sample rate that is set for the connected audio hardware is displayed.
When you run The Grand, there are several processes fighting for access to processor time in your computer. The parameter “Audio Priority”
allows you to determine which processes have priority:
Option Description
Normal In this mode non-audio processes and audio playback
Boost In this mode, audio precedes MIDI in priority. Try this
get roughly equal priorities (default setting).
mode if audio playback problems occur when playing
back MIDI and audio material.
Under Windows, we strongly recommend that you
access your hardware via an ASIO driver written
specifically for the hardware, if available. If no ASIO
driver is installed, we recommend that you check
with your audio hardware manufacturer if they have
an ASIO driver available, for example for download
via the Internet.
On Windows Vista systems, you can also use the
Generic Low Latency ASIO driver if no specific
ASIO driver is available.
• Once you have selected the driver, open the Advanced
page to specify which inputs and outputs should be used
and name these. Click the Control Panel button to bring
up the control panel for the audio hardware and adjust the
settings as recommended by the audio hardware manufacturer.
Missing content
There might be situations where a model or a content file
becomes unavailable. The reason can be a closed encrypted partition or a detached removable hard drive, for
example. In these cases you will be prompted that a specific VST Sound Library cannot be found. To access the
content again, proceed as follows:
1. Click Ignore.
The Grand is loaded, containing the content that could be found.
2. Quit The Grand.
3. Reattach the removable hard drive or reopen the en-
crypted partition.
4. Launch The Grand.
If content files or models are missing for another reason
(e.g. if you moved them onto another hard drive after installation or if you have added a hard drive, thereby “shifting” the partitions), proceed as follows:
1. In the window with the message about the missing
VST Sound Library, click Locate if you want to choose a
different file location.
A file dialog opens.
2. Browse to the directory where the content is located.
3. Select the file and click Open.
All content files that are found in this location become available.
Ö If you have installed the content files on multiple drives,
the dialog might open again asking for further content files.
• Click Remove if you don’t want The Grand to search for
a particular file in the future.
This way, you can avoid that The Grand searches for missing content after having uninstalled a specific model.
Ö You can activate the “Do not ask again” option if you
want to ignore or remove all missing files at once.
10
The Grand 3
Page 11
The content
The recording of The Grand
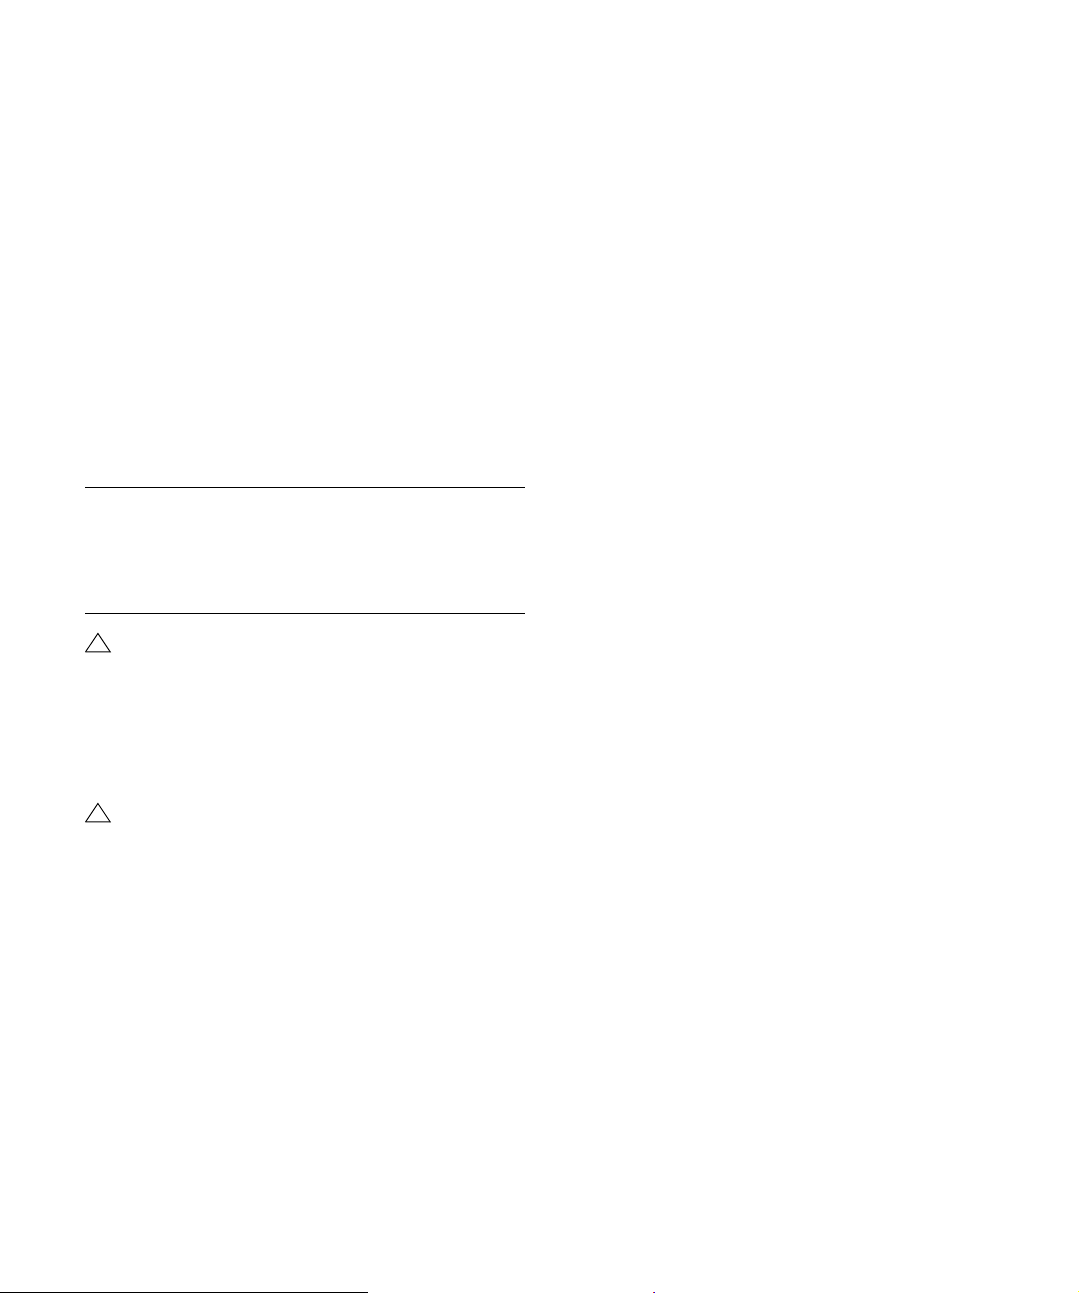
The four acoustic piano models were recorded in Sweden
by highly experienced recording specialists, in a large studio with a high ceiling well suited for the recording of
acoustic instruments. The piano models were recorded
using top-of-the-line recording equipment, and no filters
or effects were applied during mixing to preserve the natural piano sound. For all keys of each of the 4 acoustic piano models, up to 20 velocities were recorded.
The models
The Grand 3 includes five different piano models, each
characterized by individual attributes. You can choose between 3 grand pianos, one upright model and an electric
grand piano. The virtual acoustic pianos are available in
the two recording perspectives “Close” and “Player”:
Option Description
Close In this recording perspective the focus is nearer to the
Player The focus of this recording perspective is closer to the
The following section gives you an overview of the characteristics of the different piano models.
keyboard, delivering a very bright and shiny sound with a
minimum of ambience. It is ideal for adding a reverb effect
(see “The Ambience page” on page 17).
strings and hammers and offers a mellower, pleasing
sound with natural ambience.
sustain, and response with super realistic playing behavior
delivers the musical equivalent of perfection. This virtual
piano is truly in a class of its own and conveys the expressiveness of the player. If you prefer a brilliant, crisp piano
sound, you should use the Yamaha C7.
Model D
A Steinway D Grand was recorded to obtain the Model D
samples. The enchanting depth of tone and ultra-responsive touch of the Steinway D grand piano is reflected in
the Model D. Its warm and vibrantly rich sound and its
overall performance simply make playing this virtual piano
a pure joy.
Bösendorfer 290
The wider register of the Bösendorfer 290 Imperial Grand
adds to the piano’s timbre which has intricately been sampled to give you the required control when playing the softest pianissimo through crescendos to the reserves of
power needed for the loudest fortissimo. This virtual piano
model shines in every musical aspect, providing the exuberant sound quality and assertiveness of its corresponding
real piano pendant. The recording for The Grand includes
the full extended key range of eight full octaves (97 keys)
provided by the 290 Imperial Grand.
Upright Piano
The upright by Nordiska Pianofabriken definitely has personality of the right sort! And its characteristic tone has
been captured in the virtual upright piano model, designed
to get the job done when looking for that little extra edge
to your song. It might be rock, blues, jazz, gospel or any
other style that simply needs some attitude — when your
track requires a less “grand” sound this model is definitely
your first choice.
Yamaha CP80
The Yamaha CP80 Electric Grand is one of the most favorable classic electric grand pianos around and comes
with the built-in effects tremolo, phaser, flanger and chorus. Here, the samples come directly from the source: the
content experts at Yamaha.
Yamaha C7
The unparalleled tone of a Yamaha C7 Grand was recorded in its whole beauty and musical range. Its incredible sound, resulting from the tonal projection and long
The Grand 3
11
Page 12
Parameters
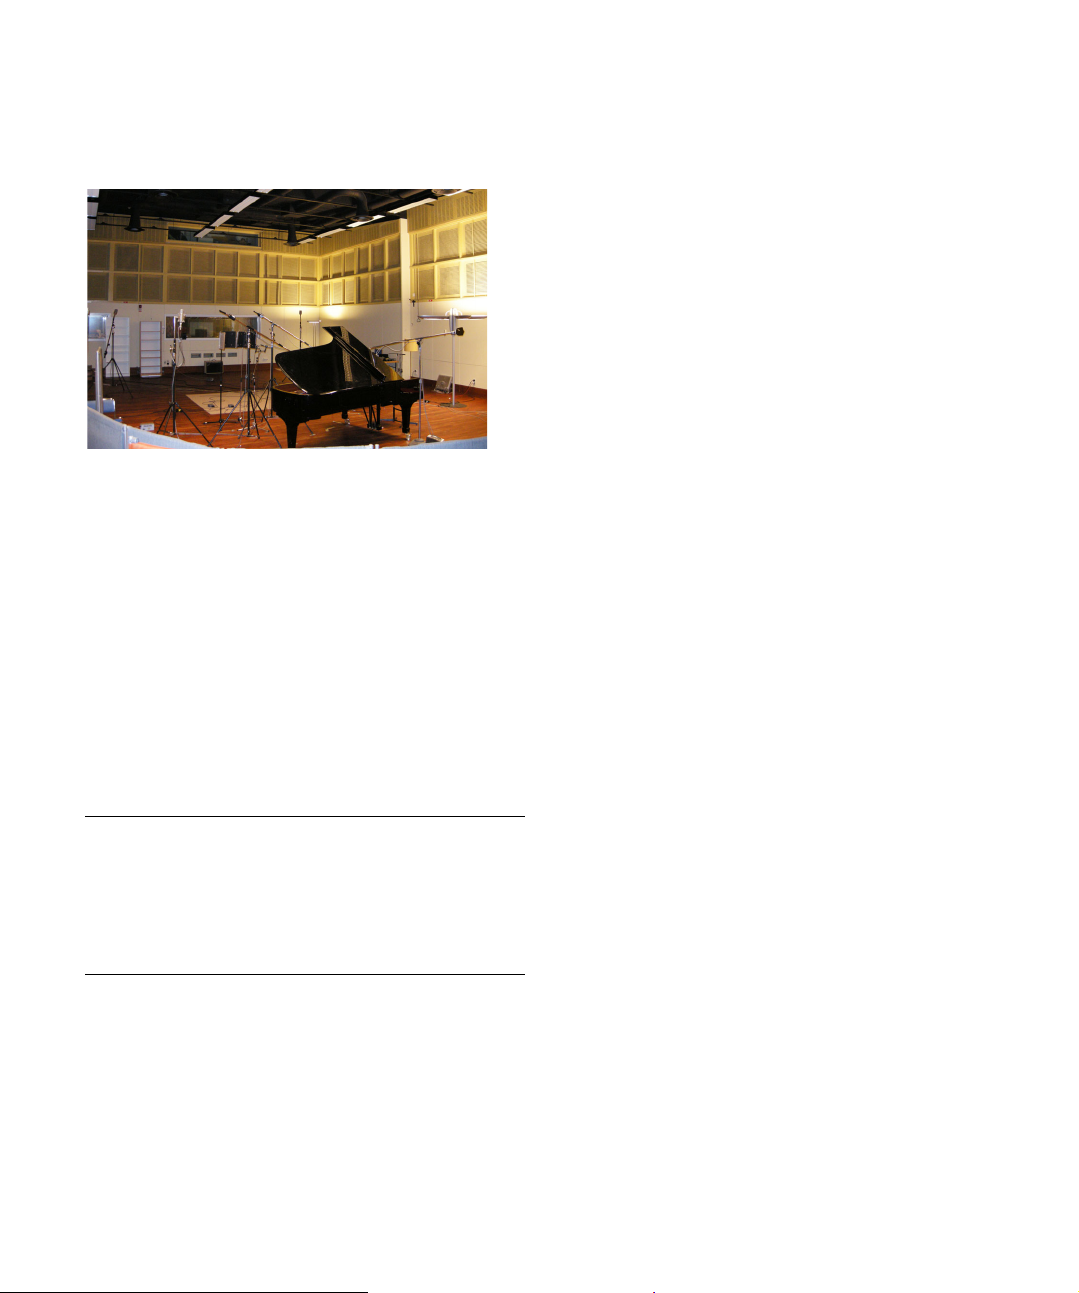
Performance
meters (see “Per-
formance meters”
on page 25)
Editor view (see
“Switching views”
on page 13)
Keyboard display
and pedals (see
“Preview keyboard and pedals”
on page 14)
General plug-in controls
The controls for the
standalone player (see
“Additional controls
when using The Grand
as a standalone instrument” on page 21).
General plug-in controls
In the upper section of the plug-in window, you will find a
number of general controls. Here you can load and save
presets and adjust the main volume. In addition, there are
buttons to activate the ECO Mode (see “ECO Mode (gen-
eral controls)” on page 24) and the RAM Save functions
(see “RAM Save (general controls)” on page 24). The Reset MIDI function (the “lightning” icon) allows you to reset
the plug-in. Use this function when you lose the MIDI connection, for example, while performing on stage. On the
upper left, you will find a button for switching between the
Editor and the Player view. Finally, you can click the plug-in
and company logos to open the about box or to get in contact with Steinberg. The general plug-in controls are described in detail on the following pages.
Ö All controls in The Grand can be set to their default
value by holding down [Ctrl]/[Command] and clicking on
the control.
Preset handling
To the right of the plug-in logo, you will find the preset
pop-up menu of The Grand. The presets you load and
save here include any sound settings of The Grand, i.e.
the settings on the Model page, the Equalizer page, the
Ambience page, etc. You will find the factory presets for
each piano model on separate submenus. The factory presets are separated from your user presets by a line.
Ö The presets do not include the setting of the Disk versus RAM usage on the Options page.
To load a preset, proceed as follows:
1. Click the arrow button to the right of the preset field to
open the preset pop-up menu.
2. Open the submenu for the desired piano model.
3. Select the preset you wish to load.
12
The Grand 3
Page 13

Ö When you select a preset from a different model than
the one that is loaded, the respective samples have to be
replaced. Therefore, the loading process will take longer.
To save a preset, proceed as follows:
1. Click the disk icon to the left of the preset pop-up
menu.
2. Specify a location and file name in the file dialog.
3. Click Save to store the preset and close the dialog.
Click Cancel to close the dialog without saving the preset.
To delete a preset, proceed as follows:
1. Select the preset you wish to delete from the preset
pop-up menu.
If necessary, wait until it has been loaded.
2. Click the trash icon to the left of the preset menu.
A dialog opens.
3. Click Yes to delete the preset and close the dialog.
Click No to close the dialog without deleting the preset.
Ö Factory presets cannot be deleted.
Adjusting the main volume
Use the Main Volume knob to adjust the overall volume of
The Grand. The maximum value is +12dB (the default
value is ±0dB).
• Turn the control clockwise by clicking on it and dragging upwards to raise the volume.
• Turn the control clockwise by clicking on it and dragging downwards to lower the volume.
Switching views
The Grand includes two views: the Editor and the Player
view.
The Editor view
The Editor view shows the piano viewed from above. Instead of a lid there is a display with controls for accessing
the sound parameters and plug-in settings. Below the display there are buttons for switching between the Model,
Equalizer, Ambience, Control and Options pages. The
keyboard and the three pedals in the lower section can be
used to preview the pianos.
The Player view
The Player view focuses on the piano display. It shows a
high-quality 3D model of the selected piano model. Above
the piano display, there are the general plug-in controls,
which give access to the presets and the main volume.
Apart from that, there are no distracting controls in the
Player view. Just load a preset from the pop-up menu
above and start playing.
13
The Grand 3
Page 14

Ö When you load the plug-in, it always opens in the Editor view.
Before you can switch to the Player view, you must load a
piano in the Editor view.
To switch to the Player view, proceed as follows:
1. From the Editor view, load a piano model or a preset.
2. In the upper left section of the control panel, click the
“p” button to the left of the plug-in logo.
The Player view opens, showing the selected piano model.
To switch back to the Editor view, click the “e” button in
the upper left of the Player view.
Reset MIDI
Sometimes, notes can get stuck, e.g. because the plug-in
lost the MIDI connection, or the plug-in receives the wrong
MIDI controller data. In such a case, you can “emergencyreset” the plug-in:
• Click the Reset MIDI button (the lightning icon) to the
right of the Main Volume knob, to send an “All Sound Off”
and “Reset All Controllers” message to the plug-in.
This is the same as sending the MIDI controllers 120 (All Sound Off) and
121 (Reset All).
The plug-in stops playback immediately and resets the
controllers to their default values.
Steinberg logo and about box
If you click on the Steinberg logo in the upper right corner
of the plug-in, a pop-up menu opens. You can open the
manual in pdf format by selecting Help. Selecting one of
the other options opens your default internet browser and
direct you to the Steinberg web site. To check for software updates and to find information for trouble shooting,
select the appropriate link from the menu.
Ö To open the manual in pdf format a pdf reader application must be installed on your computer.
If you click on the plug-in logo in the upper left of the control panel, the about box opens. It contains information
about the version and build number of the plug-in. With
the plug-in version and build number you can verify if your
software is up-to-date. Please visit www.steinberg.net
regularly to check for updates. To close the about box,
click on it or press [Esc] on your computer keyboard.
Preview keyboard and pedals
Typically, you will play the pianos with your MIDI controller
keyboard and MIDI pedals. However, you can also preview
the pianos by clicking on the keys of the keyboard and the
three pedals below it in the Editor view.
• To play the piano with your mouse, click the desired
note on the keyboard.
In the Editor view, the closer you click to the tip of the key, the higher the
velocity and vice versa.
In the Player view, the keyboard always plays with full velocity.
• To play the pedals with your mouse, click the desired
pedal to press it. Click the pedal again to release it.
The order of the pedals is as follows (from left to right):
soft pedal, sostenuto and sustain. The four acoustic piano
models support all three pedals. The CP80 only supports
sustain.
The function of the pedals is as follows:
Pedal MIDI controller
number
Soft pedal 67 This modifies the tone quality towards a
Sostenuto 66 Notes that are held while pressing the
Sustain 64 This lifts all dampers from the strings
Function
softer sound.
sostenuto pedal will sustain. Any successive notes (after pressing the sostenuto pedal) will not sustain.
Either the pedal or the keys must be
controlled externally to produce the
sostenuto effect.
adding sustain resonances to the
sound. All notes played will sustain.
Ö Your computer needs an active and working Internet
connection for accessing the Steinberg homepage.
14
The Grand 3
Page 15
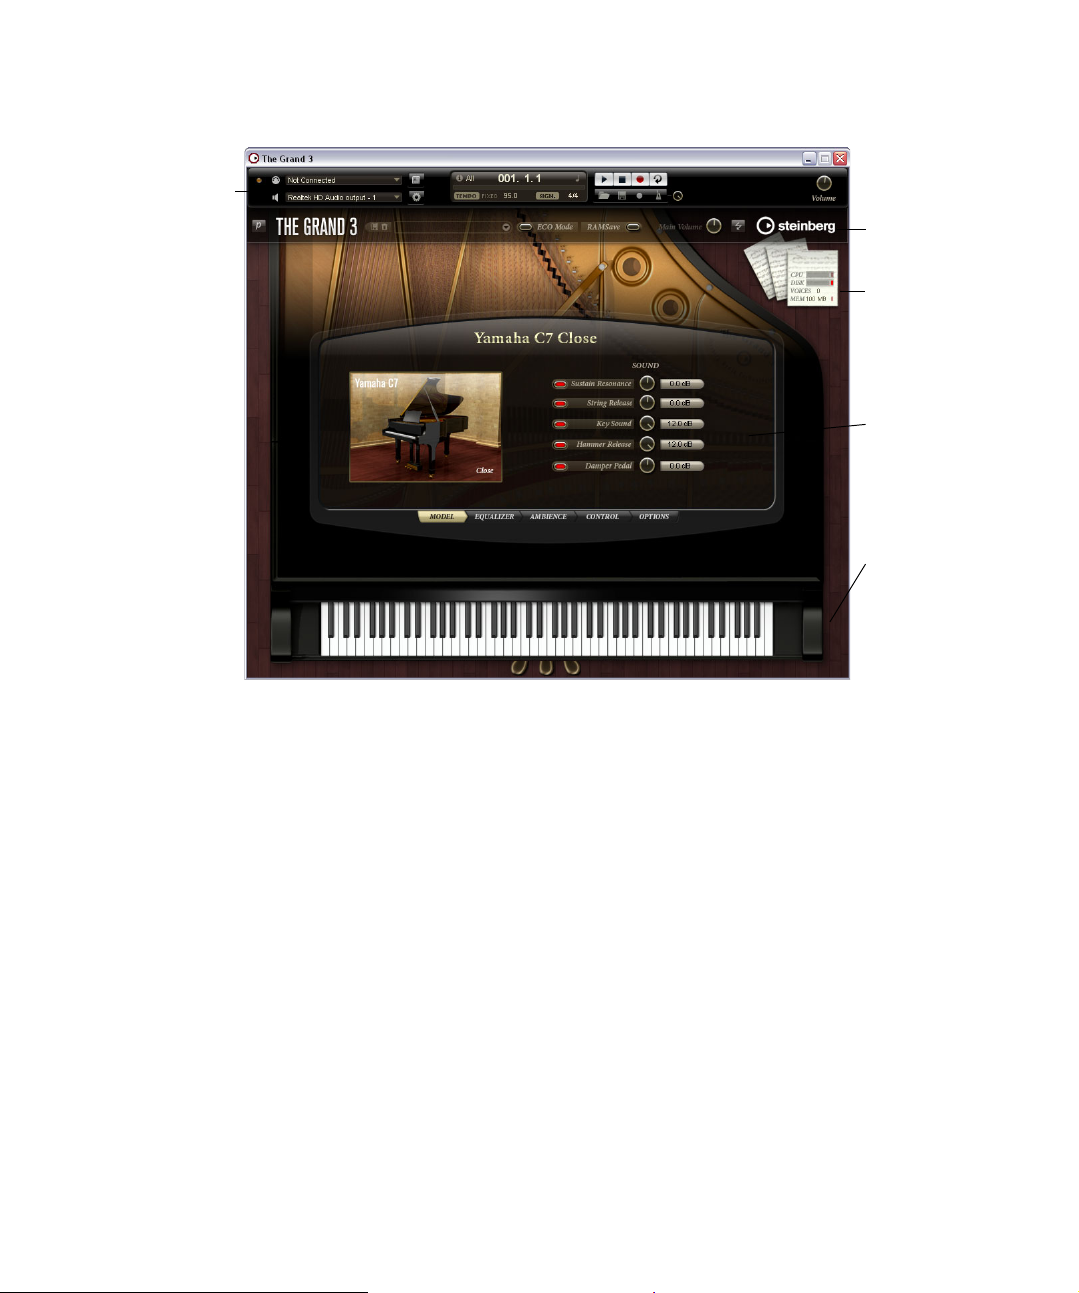
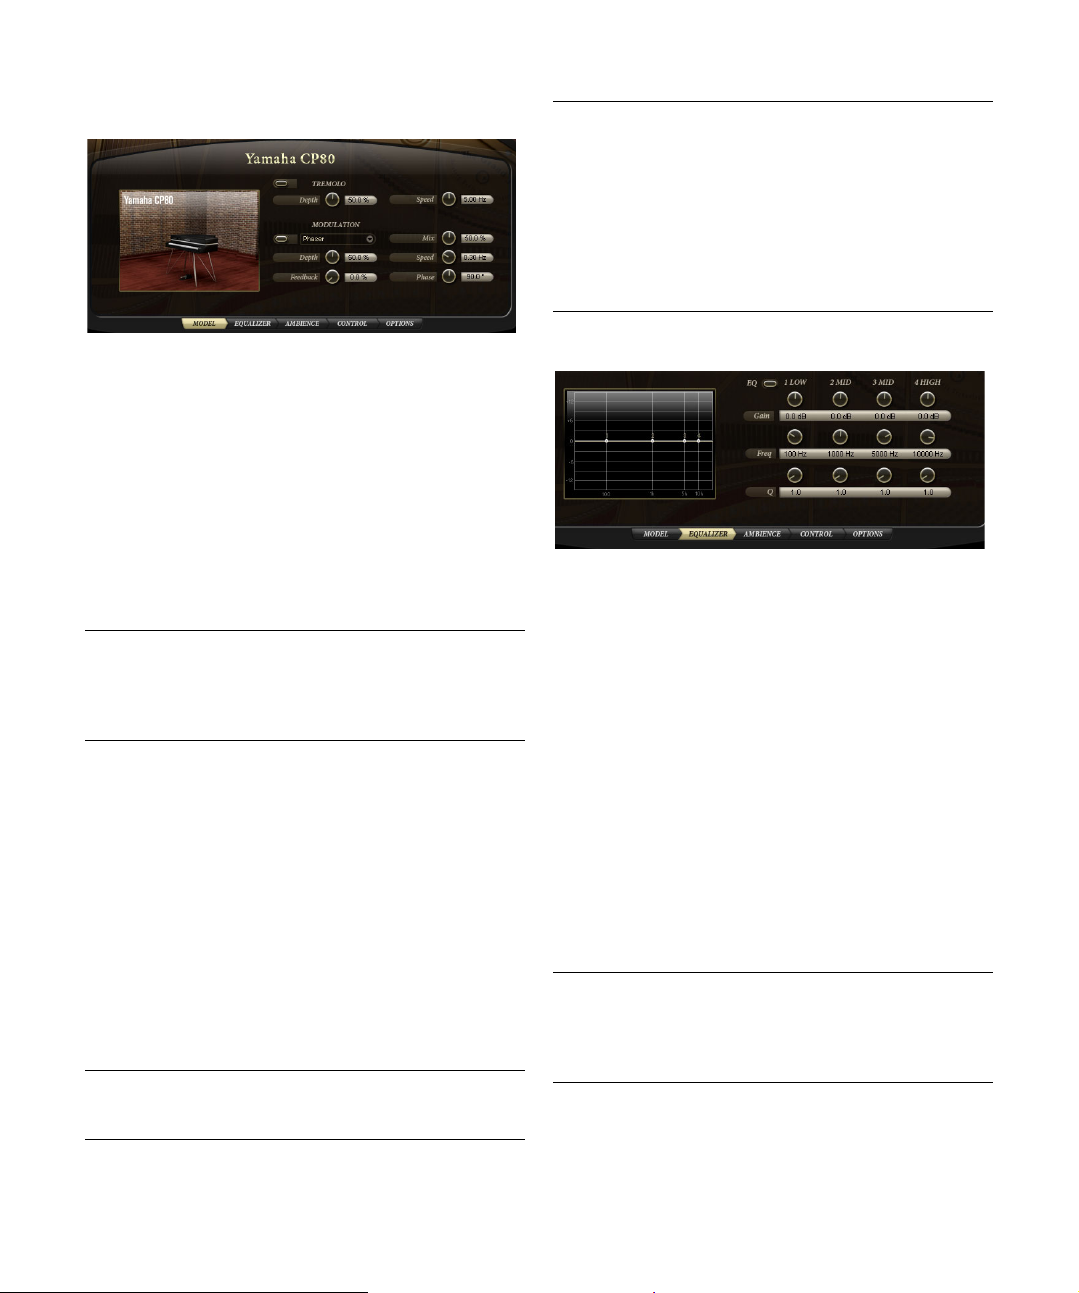
The Model page
On this page you can select the piano model and adjust
its sound. All important aspects of the acoustic pianos
were sampled separately. This does not only include the
sustain resonances, but also release sounds and mechanical noises from the keys and pedals. You can control the
loudness for each of these aspects separately. This way,
you can adjust the character and sense of playing of the
piano to your liking. For example, if you want a more intimate character and sense of playing, just like sitting in
front of the piano, you can increase the mechanical noises
of the keys and pedals.
Note that this page is different for the CP80 model. Since
the CP80 is an electro-acoustic instrument, it does not
produce any mechanical noises that would be of interest.
For creating sound variations, the Model page of the CP80
provides a tremolo and a modulation effect (Chorus,
Flanger and Phaser) instead.
The virtual acoustic piano models
By selecting the piano model, you choose the basic character and sound of your piano. The virtual acoustic pianos
are available in two recording perspectives: Close and
Player, see “The models” on page 11.
Ö If you change the piano model, only the samples are
exchanged. All other settings, e.g. on the Equalizer and
Ambience pages, remain unchanged.
To select the piano model, proceed as follows:
1. In the Editor view, click the Model button to open the
Model page.
If the Player view is active, click the “e” button in the upper left corner to
open the Editor view.
2. Click on the picture of the piano model.
The five available piano models are displayed above the picture.
3. Select the desired piano model and recording perspective.
During the recording of the acoustic pianos not only the
notes were recorded, but also every sound produced by
the piano, e.g. by damping vibrating strings, releasing the
hammer, the sound of the pedals when stepping them. On
the Model page you can activate or deactivate these “additional” sounds by clicking the corresponding buttons
and set their volume with the knobs. The following parameters are available:
Option Description
Sustain
Resonance
String Release When a key on a piano is released, the felt damper falls
Hammer
Release
(Yamaha C7,
Model D and
Bösendorfer
only)
Key Sound
(Yamaha C7,
Model D and
Bösendorfer
only)
Damper Pedal
Sound
(Yamaha C7,
Model D and
Bösendorfer
only)
When you press a key on an acoustic piano, only the
damper of that key is raised. All other strings are damped
and only the sound of the string hammered by that key is
audible.
When you step on the sustain pedal, all the dampers of
all keys are lifted from all strings. Now when you hit a key,
the vibration of its string causes surrounding strings and
the housing to resonate. The sound produced by this
could be described as something similar to a reverb. This
effect is only audible when the sustain pedal is used.
on a string that is still vibrating. It doesn’t stop vibrating
abruptly, but continues to travel to complete that last oscillation thus producing a sound that we call String Release.
Note that when you deactivate this option, the response
of the instrument will sound a little less natural.
When a key is released, the hammer returns to its initial
position and generates a sound best described as low
and woody. We call this effect Hammer Release. The
pianist seated at the grand piano hears this sound very
clearly, though, depending on the position of the microphones, it may not be audible in recordings.
When this option is activated, you get the pianist’s sonic
perspective: The Grand sounds as if you were seated in
front of a real concert grand. When it is disabled, The
Grand sounds like what the audience hears.
When you press a key on a real piano, the sound is also
shaped by a subliminal noise that is produced by moving
the key and its mechanics. This noise can be described
as wooden, soft and unobtrusive. Use this feature to emulate a listener’s position close to the piano.
This sound is produced when you step on one of the
pedals.
15
The Grand 3
Page 16
CP80 model
Option Description
Feedback This adds resonance to the effect. The control range is
Mix This controls the mix between the dry and the wet sig-
Speed Use this to specify the frequency of the modulation in
Phase This widens the sound image of the effect from mono to
from -100% to +100%.
nals. The control range is from 0 % to 100 %. At 100 %,
you will hear the wet signal only.
Hertz (Hz). The control range is from 0.01Hz to 10.0 Hz.
stereo. The control range is from 0° to 180°.
Modulation effects are a vital part of the CP80 sound. The
CP80 model offers a tremolo and a modulation effect. You
can use these effects for sound variations.
Tremolo produces amplitude (volume) modulation. The
modulation signals for the left and right channels have a
fixed offset of 180°. Hence, the sound image is moving
between left and right.
1. Click the button at the top left of the Tremolo section
to activate the Tremolo effect.
The button turns red.
2. Adjust the Speed and Depth controls to your liking:
Option Description
Depth This sets the intensity of the effect. The control range is
Speed Use this to specify the frequency of the modulation in
from 0% to 100 %.
Hertz (Hz). The control range is from 0.01Hz to 10.0Hz.
Modulation effects thicken and broaden the sound by
means of pitch or phase modulation. The CP80 model allows you to add Chorus, Flanger, or Phaser as a modulation effect.
1. In the Modulation section, click on the button to the left
of the pop-up menu to activate the modulation effect.
The button turns red.
2. From the pop-up menu, select a modulation effect:
Phaser, Chorus or Flanger.
3. Adjust the controls to your liking.
The following parameters are available for the modulation
effects:
Option Description
Depth This sets the intensity of the effect. The control range is
from 0% to 100 %.
The Equalizer page
The Equalizer page gives you access to a high-quality
4-band parametric stereo equalizer. With the four frequency bands, 1 Low, 2 Mid, 3 Mid and 4 High, you can
shape the tone color of the piano, e.g. for a brighter or
darker sound. The two midrange bands act as peak filters,
while the low and high bands act as shelving filters. All
bands are fully parametric with adjustable Gain, Frequency and Q factor.
Adjusting the equalizer settings
1. Click the EQ button to the left of the equalizer controls
to activate the equalizer.
This activates all 4 EQ bands.
2. Adjust the Gain, Freq, and Q parameters as desired.
To adjust Gain and Frequency simultaneously, drag the
points in the EQ graph to the left.
Each frequency band offers the following controls:
Option Description
Gain Use this to set the amount of cut or boost for the EQ
Freq This sets the frequency that is cut or boosted by the Gain
band. The control range is from -24dB to +24dB.
parameter. The control range is from 20Hz to 20000Hz.
16
The Grand 3
Page 17
Option Description
Click here to activate
surround panning.
Click here to activate
stereo panning.
Q This sets the quality factor. Use this to adjust the band-
width of the midrange peak filters from wide to narrow.
By increasing the Q value on the low and high shelving
filters, you can add a dip to their shape. The control range
is from 0.5 to 10.0.
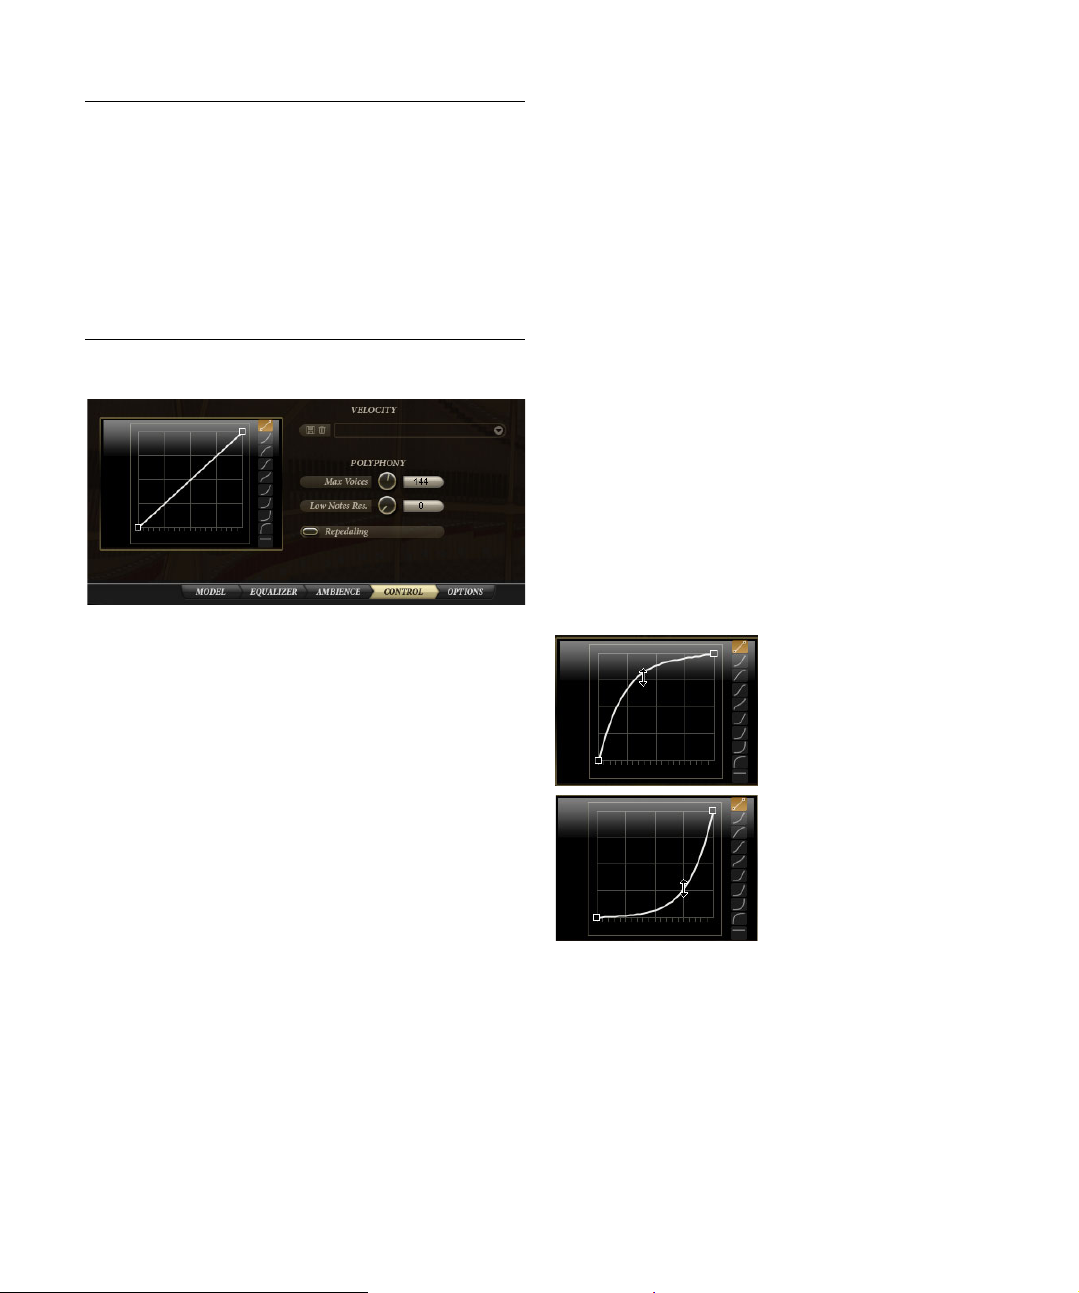
The Ambience page
The settings on the Ambience page allow you to position
the piano in the room and to add reverb to the dry piano
sound.
Positioning the piano
With its two stereo outputs, The Grand supports quad
surround (4.0 channels). You can activate this to the right
of the graphical control.
• Rear/Front
Use this parameter to adjust the position of the piano between the front
and rear boundaries of the room. The control range is from -100% to
+100%. Positive values move the piano towards the front, negative values towards the rear.
Ö The Rear/Front parameter only comes into effect when
the rear channels have been assigned to an output and
the surround option is activated.
The graphical control on the left indicates the position of
the piano in the room when viewing it from above. With
the graphical control, you can adjust the Left/Right and
Rear/Front parameters simultaneously.
Applying reverb
You can process the dry piano sound with the built-in
high-quality reverb. With the reverb parameters, you can
specify different ambient spaces, e.g. concert halls,
churches, or studios. In addition, you can adjust the characteristics of the reverb.
Ö To hear the reverb in surround, the surround option
must be activated.
To add reverb to the piano sound, proceed a follows:
1. From the reverb pop-up menu, select an ambience
preset.
The On/Off button to the left of the pop-up menu turns red.
2. If necessary, adjust the parameters Room Size, Time,
Pre-Delay, and Mix, see below.
When surround panning is activated, you can position the
piano between the front and rear of the room.
Ö To hear the rear channels, you must assign the second
stereo output of the plug-in to the physical outputs of your
audio hardware.
You can position the piano in the stereo or surround panorama by using the Left/Right and Rear/Front parameters
or by dragging the piano to the desired position in the
graphical control on the left.
• Left/Right
Use this parameter to adjust the position of the piano between the left
and right boundaries of the room. The control range is from -100 % to
+100%. Positive values move the piano right, negative values left.
The Grand 3
Ö To deactivate the selected preset, click the On/Off
button to the left of the pop-up menu.
The following reverb parameters are available:
Option Description
Reverb pop-up
menu
Room Size This parameter lets you scale the dimensions of the room.
Time Use this parameter to shorten or extend the reverb time.
17
The integrated reverb effect can use two different reverb
engines, a convolution and an algorithmic reverb. For
both, the Reverb menu offers various ambient spaces, organized in correspondingly named submenus. When you
change the Reverb preset, the parameters Room Size,
Time and Pre-Delay are updated accordingly to match
the characteristics of the selected room. Only the Mix
parameter remains unchanged.
The control range is from 0% to 100%. For example, by
decreasing the Room Size you can turn a concert hall
into a small room.
The control range is from 0% to 100%. With lower settings, the reverb decays earlier and vice versa.
Page 18
Option Description
Drag the curvature up
for a harder sound of
the piano.
Drag the curvature
down for a softer
sound of the piano.
Pre-Delay With Pre-Delay, you can add a short delay to the reverb
Mix This determines the mix of the piano and the reverb. The
signal. The greater the delay, the later the reverb will start
and the more separated the reverb signal will be from the
direct sound of the piano. The control range is from 0ms
to 500ms.
control range is from 0% to 100%. At a setting of 0%
you will hear only the piano, just like the player sitting
close to the piano. At a setting of 100 % yo u will hear only
the reverb, just like sitting in the audience. Hence, by increasing this parameter, you increase the distance between the listener and the player.
The Control page
Unlike an acoustic grand piano, The Grand is played using
a MIDI-enabled keyboard or digital piano. We recommend
the use of an instrument with weighted keys to benefit
from its sensitive and complex dynamic response. However, not everyone has this type of instrument at hand and
response and handling vary from keyboard to keyboard.
Therefore, you can adapt The Grand to suit your MIDI keyboard and style of playing by means of ready-to-use velocity curve presets. In addition, you can create your own
velocity curves and save and load them as presets.
On the left of the Control page you will find the velocity
curve editor. The editor plots the incoming velocity (the horizontal axis) against the outgoing velocity (the vertical axis).
By default, the curve is a straight line from the lower left to
the upper right corner. This means, the incoming velocity is
mapped one-to-one to the outgoing velocity. You will hear
the piano with its original dynamic range. By changing this
curve, you change the dynamic response of the piano. For
example, if you prefer a harder sound of the piano, select an
inward bent curve. If you prefer a softer sound, select an
outward bent curve. You can even create your own curve
by editing the user-definable curve with the mouse.
To the right of the velocity curve editor you will find buttons for selecting the shape of the velocity curve. The topmost button selects the user-definable curve. The other
buttons select the nine factory preset curves.
Selecting velocity curves
• To select a velocity curve, click on the button for the desired curve to the right of the velocity curve editor.
The button indicates the shape of the curve.
Editing the user-definable curve
You can create your own velocity curve by editing the
user-definable curve. Proceed as follows:
1. Activate the topmost button to the right of the velocity
curve editor.
2. In the velocity curve editor, double-click to add curve
points.
• Click and drag each curve point to the desired position.
• To delete a curve point, double-click on it.
• Drag the curvature up and down for a more inward or
outward bent curve.
Ö The nodes in the bottom left and top right corners can
only be moved up and down.
18
The Grand 3
Page 19
Saving a user-definable curve
To save a user-definable curve, proceed as follows:
1. Click the disk icon to the left of the velocity preset popup menu.
2. In the file dialog that appears, specify a location and a
file name.
3. Click Save to store the preset.
Loading a user-definable curve
• To load a previously saved user-definable curve, select
it from the velocity preset pop-up menu.
Ö If you modify a velocity preset, an asterisk is shown
behind its name to indicate that the settings of the preset
have changed. The asterisk will disappear when you save
or recall the preset.
Deleting a user-definable curve
To delete a previously saved user-definable curve, proceed as follows:
1. Select the preset you wish to delete from the velocity
preset pop-up menu.
2. Click the trash icon.
A dialog opens.
3. Click Yes to delete the preset and close the dialog.
Polyphony settings
Using the Polyphony settings below the velocity preset
pop-up menu you can specify how many voices, or samples The Grand will play simultaneously.
The following settings are available:
Option Description
Max Voices Here, you can specify a hard limit for the total number of
Low Notes
Reserved
voices The Grand will be able to play simultaneously. Each
sample counts as a voice. When the number of simultaneously played voices exceeds this limit, The Grand starts
excluding notes from playback. You can specify a value
between 1 and 256 voices. This setting is particularly helpful to limit the system load when using The Grand.
You can use this setting to prioritize low notes over high
notes when The Grand has to exclude notes. For example, if you play a long left-hand chord together with a
right-hand solo, you might need to reserve a certain number of notes for the left-hand chord to avoid that it suddenly gets cut. Use the control to adjust the number of
notes to be reserved for low notes.
Option Description
Repedaling On a real acoustic piano, after releasing the sustain
pedal, you can repedal the sustain as long as the strings
are not yet completely damped and still vibrate. The effect is that the strings continue vibrating with the remaining energy. You can achieve a similar effect by activating
the Repedaling option. Please note that this feature demands more performance and should be turned off on
less powerful systems.
Ö To avoid drop-outs during playback, The Grand excludes voices automatically when the CPU load exceeds
95%.
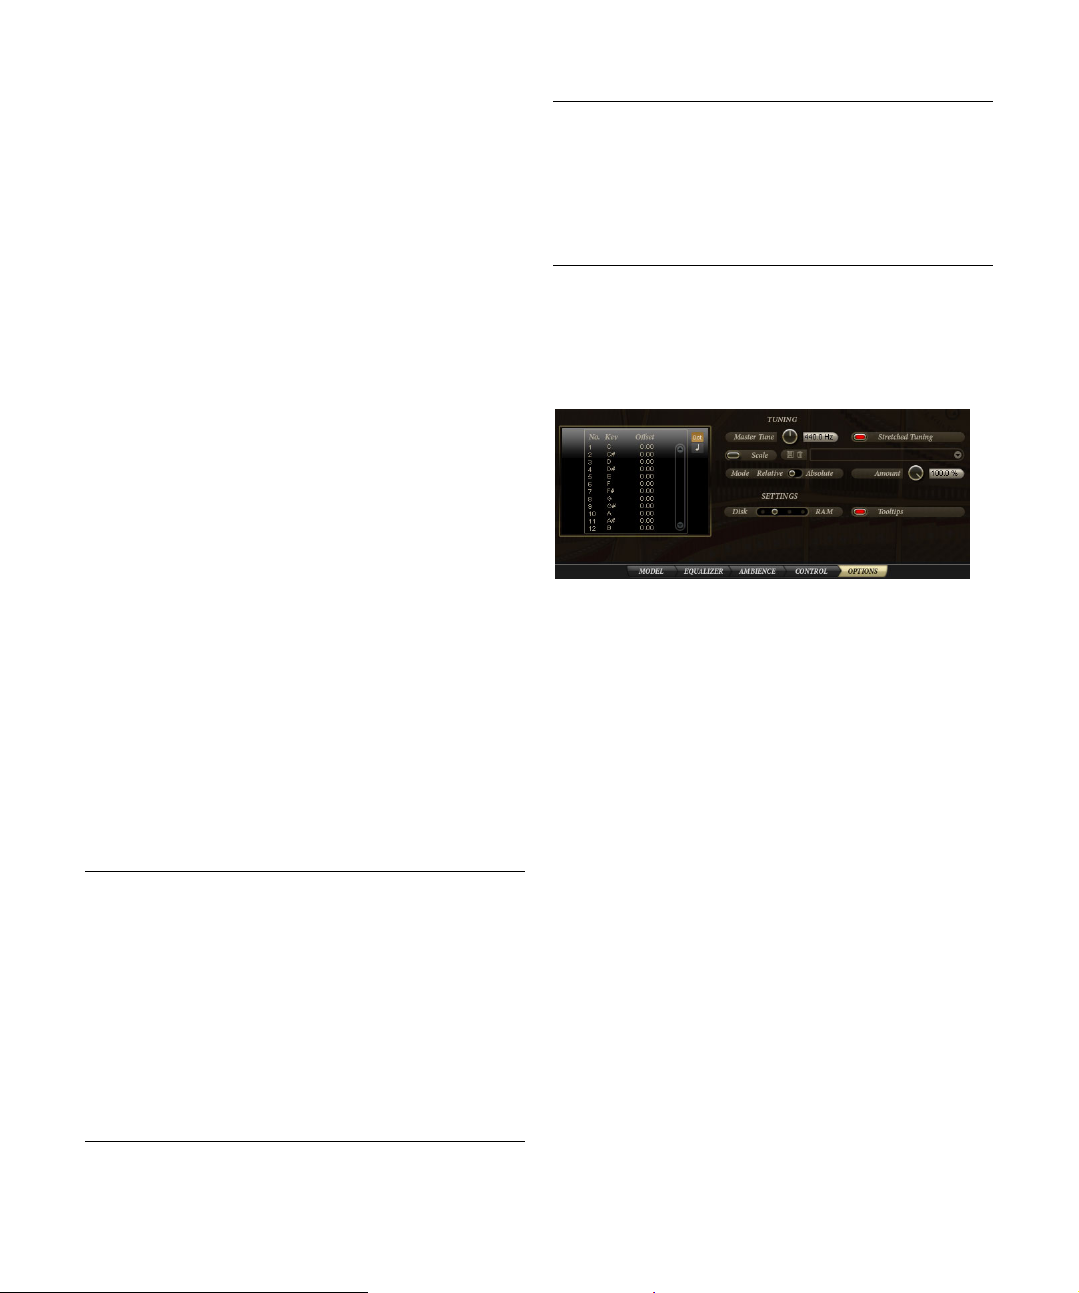
The Options page
Tuning
To match The Grand with the tuning of accompaniment instruments or recordings, use the Master Tune control. The
control range is from 415.3Hz to 466.2Hz, which equals
-100 cents to +100 cents. The default value is 440Hz,
which in The Grand corresponds to A3 and is the commonly used pitch for tuning.
The default tuning of The Grand is the tuning the pianos
have originally been recorded with. This is a “stretched
tuning”, i.e. in order to compensate for the inharmonicity
of the piano strings, the upper notes are tuned increasingly higher and the lower notes are tuned increasingly
lower. For the most genuine sound of the piano, leave the
tuning as it is. By deactivating the Stretched Tuning button you can apply an equal temperament. This can be necessary when you want to layer the piano with other sounds
that come with a pure equal temperament.
Additionally, The Grand comes with many ready-to-use
tuning scale presets, e.g. historical tuning scales in different keys like the Werckmeister, Kirnberger, and other
scales.
19
The Grand 3
Page 20

Loading scale presets
• To load a scale preset, select it from the pop-up menu
to the right of the Scale button.
The pop-up menu lists factory scale presets and user scale presets. Factory and user scale presets are separated by a line.
Ö To deactivate the selected preset, click the On/Off
button to the left of the pop-up menu. When turned off, no
tuning scale is applied and the piano sounds with its originally recorded stretched tuning.
Saving user-defined scale presets
To save a user-defined scale preset, proceed as follows:
1. Click the disk icon to the left of the scale preset menu.
2. In the file dialog that appears, specify a location and a
file name.
3. Click Save to store the preset and close the file dialog.
Deleting scale presets
To delete a scale preset, proceed as follows:
1. Select the preset you wish to delete from the scale
preset menu.
2. Click the trash icon to the left of the scale preset menu.
A dialog opens.
3. Click Yes to delete the preset and close the dialog.
Ö Factory presets cannot be deleted.
Ö If you modify a scale preset, the preset name is shown
with an asterisk to indicate that the settings of the preset
have changed. The asterisk will disappear when you save
the preset.
The factory tuning scale presets
The most common tuning scale in western music and the
basis for all other tuning scales is the “equal” scale, where
adjacent notes on the scale have an equal distance of 100
cents. This scale is particularly useful if you want to layer
The Grand with other instruments that are tuned to equal
temperament, e.g. strings, synthesizer pads, etc.
Additionally, The Grand provides the following scales:
• Arabic 1 (for all basic keys)
• Arabic 2 (for all basic keys)
• Arabic 3 (for all basic keys)
• Indian 1
• Kirnberger (for all basic keys)
• Pure Major (for all basic keys)
• Pure Minor (for all basic keys)
• Vallotti and Young (for all basic keys)
• Werckmeister (for all basic keys)
Editing tuning scales
You can create your personal tuning scales by editing the
notes per octave (the tune offsets are applied equally to all
octaves on the keyboard) or by editing the MIDI notes individually (the tune offsets are applied only to individual
notes). Editing the scale per octave is particularly useful
for creating different temperaments. Editing the scale per
note is mainly useful for creating stretched tunings.
To edit the scale per octave, proceed as follows:
1. Click the Oct button to the right of the scale editor.
2. In the scale editor, click in the Offset text field of the
note you wish to adjust in the scale editor.
3. Set the tune offset within the range of -100.00 cent to
+100.00 cent.
The offsets of the 12 notes are applied to all octaves
equally.
To edit the scale per note, proceed as follows:
1. Click the Note button to the right of the scale editor.
2. In the scale editor, click in the Offset value field of the
note you wish to adjust.
3. Set the tune offset within the range of -100.00 cent to
+100.00 cent.
The offsets are applied to the 128 MIDI notes individually.
Absolute and Relative Mode
MIDI notes can contain microtuning information, i.e. tune
offsets per note. The Absolute or Relative Mode setting
determines the way the incoming microtuning information
is handled:
Option Description
Absolute The incoming microtuning information is filtered out and
Relative The incoming microtuning information is kept and offset
The Grand applies only its own scale settings.
by the scale settings of The Grand.
20
The Grand 3
Page 21
Importing scala files
Click here…
…to open the Key Commands dialog.
The Grand allows you to import tuning scales in the popular scala file format (with the extension .scl). This gives you
access to literally thousands of tuning scale presets.
To import a scala file, proceed as follows:
1. Select “Import Scale…” from the scale preset menu.
2. In the file dialog that appears, select the scala file you
wish to import.
3. Click Open to import the scala file and close the dialog.
The imported scales are stored in the user preset folder and can now be
loaded from there as any other user scale.
Ö You can also import multiple scala files at the same
time this way.
Adjusting the amount
The amount setting determines how the tuning scale is
applied. The control range is from 0% to 100%. At a setting of 100%, the tune offsets are applied as specified in
the tuning scale. Lower values reduce the tune offsets relatively. At an amount of 0% the tuning scale is not applied
at all.
Performance settings
On the Options page, you will also find a slider for balancing disk vs. RAM usage. This is described in the section
“Balancing Disk vs. RAM (Options page)” on page 25.
Additional controls when using The Grand as a standalone instrument
At the top of the program window you will find some additional controls for using The Grand as a standalone instrument.
For information on how to set up The Grand as a standalone instrument see “The Grand standalone and ReWire”
on page 9.
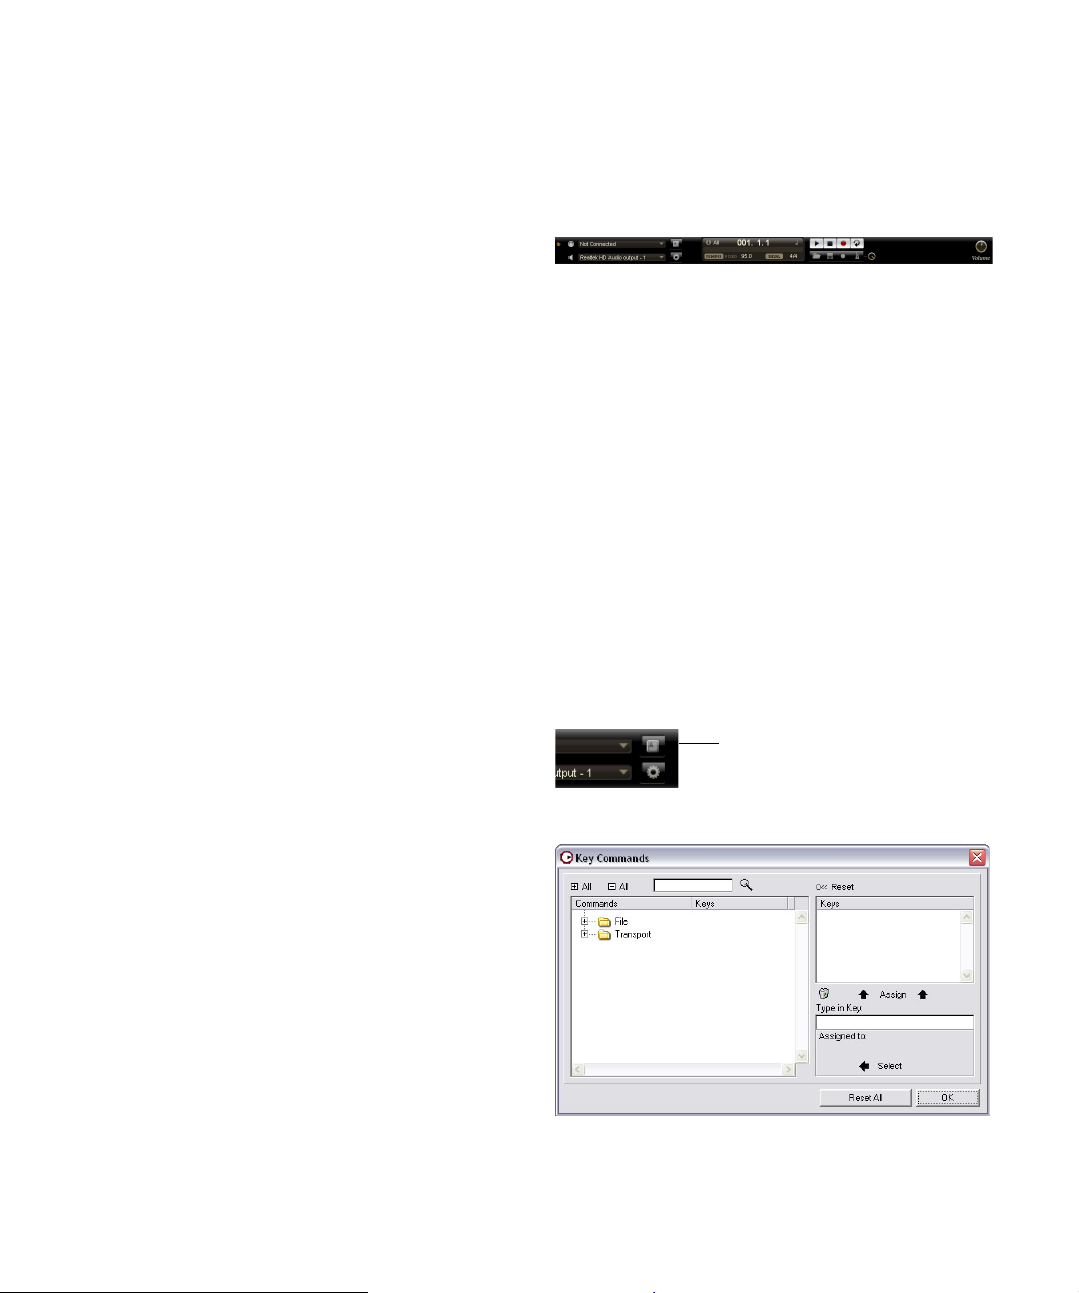
The Key Commands dialog
You can assign key commands to most operations that
can be performed via the standalone panel of The Grand.
The Key Commands dialog lists all available commands
and any key commands assigned to them.
The commands are arranged in a hierarchical folder structure, similar to the Windows Explorer and Mac OS Finder.
When you open a category folder by clicking the plus sign
beside it, the items and functions are displayed with any
currently assigned key commands.
To set up a key command, proceed as follows:
1. In the top left corner of the standalone panel, click on
the button to the right of the MIDI input pop-up menu.
The Key Commands dialog opens.
Tooltips
When you point at a control with the mouse, a short info
about the control is shown. Deactivate the Tooltips option
if this is not what you want.
21
The Grand 3
Page 22
2. In the Commands list to the left, select a category.
Play
Stop Record Loop
Load MIDI file
Save MIDI file Select record
mode
Metronome
setting
Song position
fader
Tempo track Tempo
value
Adjust
Tempo
Time
signature
Info icon
Song position
display
Time
format
MIDI channel filter
3. Click the plus sign to open the category folder and
display the items it contains.
Note that you can also click the “global” plus and minus signs in the top
left corner to open and close all category folders at once.
4. In the list, select the item to which you want to assign
a key command.
Already assigned key commands are shown in the Keys column as well
as in the Keys section in the top right corner.
You can also search for a specific function by entering its name in the
search field at the top of the dialog and clicking the search button (the
magnifying glass button).
5. When you have found and selected the desired item,
click in the “Type in Key” field and enter a new key command.
You can choose any single key or a combination of one or several modifier keys ([Alt]/[Option], [Ctrl]/[Command], [Shift]) plus any key.
6. Click the Assign button above the field to assign the
key command to the function.
The new key command is displayed in the Keys list.
7. Click OK to close the dialog.
• If a key command is already used for another function, a
message is displayed allowing you to reassign the key
command or cancel the operation.
• You can set up several key commands for the same
function.
• To delete a key command, select the corresponding
command, select the key command in the Keys list and
click the Delete button (the trash icon).
The orange MIDI Activity LED in the upper left corner of
the plug-in indicates incoming MIDI messages via the currently selected MIDI input. The LED lights up on note-on
and controller messages. This way, you can check if the
plug-in and your MIDI keyboard are connected to the
same MIDI device input.
The Audio output pop-up menu lists all outputs of the selected ASIO Device.
• Open the Audio output pop-up menu to select an audio
output for the main stereo channel of the plug-in.
If you select an audio output, the front and rear channels are set to incrementing audio output ports – e. g. 1, 2, 3, 4 or 5, 6, 7, 8.
Pressing [Alt]/[Option]-[Shift] and selecting an audio output assigns the
audio outputs in pairs to the front and rear channels – e.g. 1, 2, 1, 2 or 5,
6, 5, 6.
Ö Use the Preferences dialog to select the ASIO device
and other audio outputs. For information on the Preferences dialog, see “The Preferences dialog” on page 9.
Scratch pad
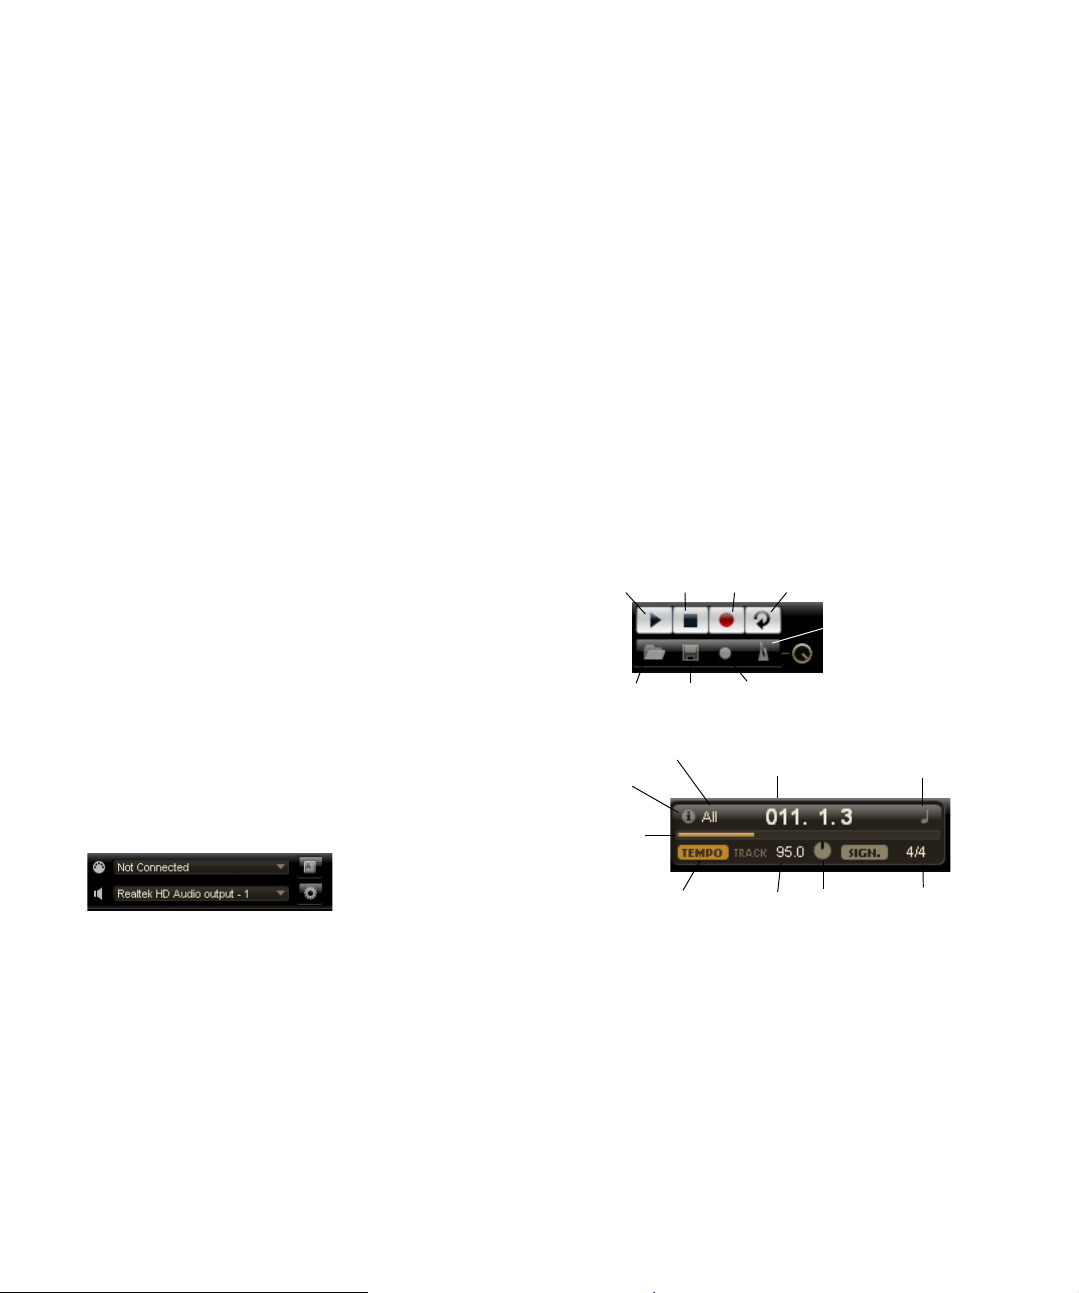
Selecting the MIDI input and the audio outputs
In the upper left corner of the plug-in panel in standalone
mode, you will find two pop-up menus for selecting the
MIDI input and the main audio output of the plug-in.
The MIDI input pop-up menu lists all MIDI devices that are
installed on your system.
• Open the MIDI input pop-up menu to select the MIDI
device you want to use.
The Grand 3
The scratch pad allows you to record and play back MIDI
files in standard MIDI file format (file name extension .mid).
You can load existing MIDI files and you can record your
own files and save them. The transport section provides
buttons for play, stop, record and cycle. The display shows
the song position, the tempo and the time signature of the
MIDI file. In addition, there is a metronome which you can
use for recording and practising.
22
Page 23

Using the transport controls
• Click the Play button to start playback of the MIDI file.
Playback always starts at the song position.
• Click the Stop button to pause the MIDI file at the current position.
Click the Stop button twice to reset the song position to the start.
• Click the Record button to start recording.
• Click the Loop button to play the whole MIDI file in a loop.
Loading a MIDI file
To load a standard MIDI file (.mid), proceed as follows:
1. Click the Load File button below the transport buttons.
2. In the file dialog that appears, select the desired file.
3. Click Open to load the MIDI file.
Saving a MIDI file
To save the performance you recorded as a MIDI file, proceed as follows:
1. Click the Save File button (the disk icon) below the
transport buttons.
2. In the file dialog that appears, specify a location and a
file name.
3. Click Save to store the MIDI file.
The info icon
To check which MIDI file is currently loaded, point with the
mouse at the info icon in the upper left corner of the song
position display. A tooltip appears, showing the name of
the MIDI file.
Using the MIDI channel filter
When a multi-track MIDI file is loaded, you can decide
whether “all” or only the events of a specific MIDI channel
are played back. The control can be found to the right of
the info icon in the song position display.
Song position
The song position fader indicates the position of the transport. Above the song position fader, the position is displayed numerically.
Ö After loading a MIDI file, the display shows the full
length of the file and the song position fader is positioned
at the end. However, playback will start from the beginning when you click Play.
• To move the transport to a different song position, drag
the song position fader to the desired position.
• To change the format, click the time format symbol in
the top right corner of the display to switch between the
time formats. When “Time” format is selected, a clock is
displayed. In “Bars” format a note is displayed.
Tempo and Time Signature
Below the song position display, you will find the Tempo
and Time Signature fields which provide the plug-in with
tempo and time signature information. In standalone mode,
such information is not available via a host application. In
this case, the settings are used by the scratch pad and the
metronome.
Option Description
Tempo
Track/Fixed
Tempo value Determines the tempo of the MIDI file. The control range
Adjust Tempo When the Tempo Track option is selected, an additional
Sign.
(time signature)
Set this to “Track” to follow the original tempo of the MIDI
file. Set this to “Fixed” to specify a tempo manually.
is from 1.000BPM to 300.000BPM.
control is displayed that allows you to scale the playback
relatively to the original tempo of the MIDI file. The control
range is from 0.5x (-50%) to 2x (+100%) of the original
tempo.
Determines the time signature of the plug-in. You can
type in the desired signature as a fraction, e.g. 3/4, 6/8,
4/4, etc.
Recording your performance
1. Click on the record symbol below the Record button to
select the desired record mode from the pop-up menu:
Option Description
Direct The recording starts immediately when you click the
MIDI The recording starts with the first MIDI note.
Count In 1 The recording starts after a count-in of one bar.
Count In 2 The recording starts after a count-in of two bars.
record button.
2. Click the Record button to start the recording.
3. When you are done recording, press the stop button.
23
The Grand 3
Page 24

• Now you can save your performance as a MIDI file, see
“Saving a MIDI file” on page 23.
Ö To indicate that the recording is running, the song position fader is being animated (a small bar moves from left
to right).
Activating the metronome
To select the playback mode of the metronome, click the
Metronome button. You can select one of the following
modes from the pop-up menu:
Option Description
Off The metronome is switched off.
Count In The metronome plays only during the count-in of a
On The metronome plays always.
recording.
The volume control next to the metronome icon allows you
to set the volume of the metronome. The Preferences dialog also provides metronome settings, see “The Prefer-
ences dialog” on page 9.
Volume
Use this control to set the overall volume of the outputs of
the standalone plug-in. This includes the volume of the
main outputs, the rear outputs and the output of the metronome.
Performance issues
Each of the piano models comes with several GB of samples. That is quite a large amount of data your computer
system has to deal with. The Grand offers several possibilities that help optimizing your computer performance.
These are described in the following sections.
ECO Mode (general controls)
In ECO Mode only 7 of the up to 20 velocity layers the
grand pianos have been sampled with are available. With
less velocity layers, the ECO Mode is less demanding on
your computer system. You should use it whenever you
want to run many sequencer audio tracks or plug-ins together with The Grand.
• To switch on ECO mode, click the ECO Mode button in
the general controls bar.
When ECO mode is activated, the button lights up.
Ö Loading the ECO mode piano models may take a
while.
When you deactivate ECO Mode, the pianos will load with
the full set of samples again. In case of the grand pianos,
this can be up to 20 velocity layers on 97 keys.
RAM Save (general controls)
The RAM Save function is essential for optimizing the performance of your system. It scans the playback of your
current project and unloads any unused samples.
To use RAM Save, proceed as follows:
1. In the general controls bar, click the RAM Save button.
When this button is activated, a dialog opens asking whether you want to
start collecting the necessary samples.
2. Click Yes to apply RAM Save.
The RAM Save button starts blinking.
3. Play back the project in your host application from the
beginning to the end (or to the point where no new notes
are played).
4. Click the RAM Save button again.
A dialog opens asking if you want to unload all unused samples.
5. Click Yes to unload the unused samples.
The button stops blinking and remains lit to indicate that RAM Save is
active.
6. To reload the unused samples, click the RAM Save
button again to deactivate the function.
A dialog opens asking if you want to disable RAM Save mode. Click Yes.
The button turns dark and the samples are reloaded.
Ö Reloading the samples may take a while, depending
on how many samples have been unloaded.
Sound parameters (Model page)
Turning any of the parameters off reduces the details of
the piano emulation, which puts less strain on RAM and
disk streaming. On slower systems, this might allow you to
play more voices at the same time.
24
The Grand 3
Page 25

Balancing Disk vs. RAM (Options page)
Your computer cannot load all samples completely into
the RAM. Therefore, The Grand loads only the first milliseconds of each sample into the RAM and constantly
loads more manageable portions from the hard disk while
you play. Because the hard disk has to work harder for every additional note you play, it is a good idea to load as
much material as possible into the RAM beforehand. This
of course leaves less RAM for other applications. For an
optimum performance of your system, you can balance the
hard disk versus the RAM usage of The Grand.
To do so, use the Disk vs. RAM slider on the Options page:
• If your hard disk is not supplying data fast enough, drag
the slider to the right, to increase RAM usage.
• If you need more RAM for other applications, drag the
slider to the left, to use less RAM and rely more on the
hard disk.
The memory display in the upper right of the plug-in panel
is updated accordingly, see below.
Ö If you experience no problems with the system performance, leave this setting as it is.
Ö If you keep running into performance problems, no
matter which settings you choose, activate the ECO
Mode. This will load less velocity layers, see “ECO Mode
(general controls)” on page 24.
Performance meters
In the upper right of the plug-in panel, you find meters and
text displays that indicate the system load of the plug-in.
Option Description
CPU The upper meter shows the processor load during play-
Disk This meter shows the hard disk transfer load from stream-
back of voices. The more voices you play, the higher the
processor load will be. If the red overload indicator lights
up, reduce the Max Voices setting on the Control page.
Alternatively, you can switch off articulations on the
Model page to reduce the processor load.
ing samples or loading models. If the red overload indicator lights up, the hard disk is not supplying data fast
enough to the computer. In such a case, adjust the Disk
vs. RAM slider on the Options page towards RAM. You
may also decrease the Max Voices setting on the Control
page. Alternatively, you can switch off sound parameters
on the Model page to reduce the disk load.
Option Description
Voices This display indicates the number of samples currently
MEM MEM is an abbreviation for Memory. This display indi-
played back, to help you to trace performance problems.
For example, if you have to reduce the Max Voices setting
on the Control page, you can verify your settings by monitoring the Voices display.
cates the overall amount of RAM currently used by the
plug-in and the loaded model. The amount you see results from the streaming buffer and the preloaded samples. The MEM display will help you to trace performance
problems. For example, if you need to free memory for
other applications, you can do so by adjusting the Disk
vs. RAM slider on the Options page towards Disk. You
can verify your settings by monitoring the MEM display.
Ö If you keep running into performance problems, you
can activate the ECO Mode. This will load less velocity
layers, see “ECO Mode (general controls)” on page 24.
Low memory situations
In some situations, especially when you are working with
lots of sample-based plug-ins, there might not be enough
RAM to add an instance of The Grand. In this case, a dialog will warn you that there is not enough memory left.
The dialog offers the following options, which might allow
you to load The Grand anyway:
Option Description
Switch to
ECO Mode
Disable
Sustain Resonance Layer
Reduce RAM
usage
(Disk<>RAM)
The Grand will be opened in ECO mode, see “ECO Mode
(general controls)” on page 24.
The Grand will load without the sustain resonance samples.
Selecting this option will change the Disk vs. RAM usage
setting on the Options page by one step towards Disk.
• Start by activating one of the options and clicking OK.
If the reduction of RAM usage is sufficient, you can now start playing The
Grand. If the low memory situation still persists, the dialog opens again
so that you can select another option.
25
The Grand 3
Page 26

Using MIDI controllers
By default, most of the parameters of the plug-in are already mapped to a MIDI controller. You can customize the
default mapping by assigning your own MIDI controllers
with a convenient learn function. This way, you can adapt
the mapping to your MIDI keyboard or controller. To provide much better control, you can set the minimum and
maximum range for each assignment separately.
Assigning MIDI controllers
1. Right-click the control you want to control remotely.
2. From the context menu, select Learn CC.
3. On your MIDI keyboard or controller, use the potentio-
meter, fader, or button.
Ö The next time you right-click the control, the menu
shows the assigned MIDI controller.
Ö You can assign the same MIDI controller multiple
times to different parameters. However, you cannot assign
different MIDI controllers to the same parameter.
Removing MIDI control assignments
To remove a MIDI control assignment, right-click on the
control and select Unassign from the context menu.
Setting the parameter range
You can specify the minimum and maximum value of the
parameter separately for each assignment. This way, you
have much better control over the parameter, e.g. when
performing on stage.
• To set the minimum value of the parameter, set the parameter to the desired minimum value, right-click the control and select Set Minimum from the context menu.
• To set the maximum value of the parameter, set the parameter to the desired maximum value, right-click the control and select Set Maximum from the context menu.
MIDI controllers
The following parameters on the plug-in surface can be
controlled using an external MIDI controller (the controller
numbers and names refer to the factory default assignments of these parameters):
Page Parameter Controller
All pages Main Volume 07 Main Volume
Model Sustain Resonance 75 Sound Controller #6
String Release 76 Sound Controller #7
Key Sound 77 Sound Controller #8
Hammer Release 78 Sound Controller #9
Damper Pedal 79 Sound Controller #10
Modulation On/Off
(CP80 only)
Modulation Depth
(CP80 only)
Modulation Speed
(CP80 only)
Modulation Feed-
back (CP80 only)
Modulation Phase
(CP80 only)
Modulation Mix
(CP80 only)
Tremolo On/Off
(CP80 only)
Tremolo Depth
(CP80 only)
Tremolo Speed
(CP80 only)
Equalizer EQ On/Off - -
Low Gain - Low Frequency - Low Q - Mid 1 Gain - Mid 1 Frequency - Mid 1 Q - Mid 2 Gain - Mid 2 Frequency - Mid 2 Q - High Gain - High Frequency - High Q - -
No.
93 Effect 3 Depth
75 Sound Controller #6
76 Sound Controller #7
77 Sound Controller #8
78 Sound Controller #9
79 Sound Controller #10
14 -
12 Effect Control 1
13 Effect Control 2
Name
26
The Grand 3
Page 27

Page Parameter Controller
Ambience Left/Right 10 Pan
Rear/Front - Reverb On/Off - Room Size - Reverb Time - Pre-Delay - Reverb Mix 91 Effect 1 Depth
No.
Name
Automation parameters
The following parameters can be automated from your
host software:
Page Parameter
All pages Main Volume
Model Sustain Resonance
String Release
Key Sound
Hammer Release
Damper Pedal
Modulation On/Off (CP80 only)
Chorus Depth (CP80 only)
Chorus Speed (CP80 only)
Chorus Feedback (CP80 only)
Chorus Phase (CP80 only)
Flanger Depth (CP80 only)
Flanger Speed (CP80 only)
Flanger Feedback (CP80 only)
Flanger Phase (CP80 only)
Phaser Depth (CP80 only)
Phaser Speed (CP80 only)
Phaser Feedback (CP80 only)
Phaser Phase (CP80 only)
Modulation Mix (CP80 only)
Tremolo On/Off (CP80 only)
Tremolo Depth (CP80 only)
Tremolo Speed (CP80 only)
Equalizer EQ On/Off
1 Low Gain
1 Low Frequency
Page Parameter
1 Low Q
2 Mid Gain
2 Mid Frequency
2 Mid Q
3 Mid Gain
3 Mid Frequency
3 Mid Q
4 High Gain
4 High Frequency
4 High Q
Ambience Left/Right
Rear/Front
Reverb On/Off
Room Size
Reverb Time
Pre-Delay
Reverb Mix
27
The Grand 3
Page 28

Index
A
Ambience page 17
Automation
Parameters 27
C
Content
About 11
Missing VST Sound Library 10
Control page 18
Copy protection 6
E
ECO Mode 24
Equalizer page 16
H
Host application
AU compatible applications 8
Cubase 8
K
Key commands
Assigning 21
Conventions 5
L
Locate 10
M
Main volume
Adjusting 13
MIDI controllers 26
Missing content 10
Model page 15
Models 11
O
Options page 19
P
Performance issues 24
Piano models 11
Polyphony 19
Preset
Velocity curve 18
Presets
About 12
Scale 20
Preview keyboard 14
R
RAM Save 24
Reset MIDI 14
ReWire
The Grand standalone and ReWire 9
S
Scale presets 20
Scratch pad 22
Standalone
Controls 21
Preferences 9
The Grand standalone and ReWire 9
System requirements
About 7
T
Transport controls 23
Tuning 19
U
USB-eLicenser
About 6
V
Velocity curve 18
Views
Switching 13
VST Sound Library
Missing 10
28
The Grand 3
Page 29

Benutzerhandbuch
Page 30

Cristina Bachmann, Heiko Bischoff, Marion Bröer, Sabine Pfeifer, Heike Schilling
Dank an: Matthias Klag, Michael Ruf
Die in diesem Dokument enthaltenen Informationen können ohne Vorankündigung geändert werden und stellen keine
Verpflichtung seitens der Steinberg Media Technologies GmbH dar. Die hier beschriebene Software wird unter einer Lizenzvereinbarung zur Verfügung gestellt und darf ausschließlich nach Maßgabe der Bedingungen der Vereinbarung (Sicherheitskopie) kopiert werden. Ohne ausdrückliche schriftliche Erlaubnis durch die Steinberg Media Technologies
GmbH darf kein Teil dieses Handbuchs für irgendwelche Zwecke oder in irgendeiner Form mit irgendwelchen Mitteln reproduziert oder übertragen werden.
Steinberg, The Grand, VST und ASIO sind eingetragene Marken der Steinberg Media Technologies GmbH. Windows,
Windows Vista und DirectX sind eingetragene Marken der Microsoft Corporation in den USA und/oder anderen Ländern. Macintosh, Mac und Mac OS sind Marken von Apple Inc., eingetragen in den Vereinigten Staaten von Amerika und
anderen Ländern. Pentium und Intel Core sind Marken oder eingetragene Marken der Intel Corporation in den Vereinigten Staaten von Amerika und anderen Ländern. Alle weiteren Produkt- und Firmennamen sind ™ und ® Marken der jeweiligen Eigentümer.
Stand: 29. Juni 2009
© Steinberg Media Technologies GmbH, 2009.
Alle Rechte vorbehalten.
Page 31

Inhaltsverzeichnis
32 Willkommen
32 Tastaturbefehle
33 So können Sie uns erreichen
33 Installation
33 Der USB-eLicenser
34 Systemanforderungen
34 Installieren von The Grand
35 Registrieren Sie Ihre Software!
35 Vorbereitungen
35 Einrichten von The Grand als VST-Instrument in
Cubase
35 Verwenden von The Grand in einer
AU-kompatiblen Host-Anwendung
36 The Grand als Standalone-Anwendung und
ReWire
37 Fehlende Content-Dateien
38 Der Content
38 Die Aufnahmen von The Grand
38 Die Modelle
40 Parameter
40 Allgemeine PlugIn-Bedienelemente
43 Die Model-Seite
45 Die Equalizer-Seite
45 Die Ambience-Seite
46 Die Control-Seite
48 Die Options-Seite
50 Zusätzliche Bedienelemente bei der Verwendung
von The Grand als Standalone-Instrument
54 Faktoren, die die Systemleistung beeinflussen
56 Verwenden von MIDI-Controllern
56 MIDI-Controller
57 Automationsparameter
58 Index
31
The Grand 3
Page 32

Willkommen
Herzlichen Glückwunsch und vielen Dank, dass Sie sich
für The Grand 3 von Steinberg entschieden haben.
Mit den beiden Vorgängerversionen hat sich The Grand
als eines der weltweit führenden virtuellen Klavierinstrumente etabliert. 2009 kehrt The Grand in der nunmehr
dritten Version auf den Markt zurück, um seine Position
unter den Top-Produkten im Bereich virtueller Klaviere
wieder einzunehmen.
Mit dem Kauf von The Grand 3 haben Sie eine hochwertige Klavier-Software mit perfekt aufgenommenen virtuellen Klavieren gewählt, deren Klangqualität ihresgleichen
sucht. Mit den Konzertflügeln Yamaha C7, Bösendorfer
290 Imperial und Steinway D, dem klassischen elektrischen Flügel CP80 von Yamaha sowie dem charismatischen Upright-Piano der Nordiska Pianofabriken wurden
5 Instrumente aufgenommen, die Ihnen eine umfassende
Palette an virtuellen Klaviersounds bieten.
Dank der integrierten intelligenten Sample-Architektur und
der neuesten Recording-Technologie gibt The Grand 3
nicht nur Samples wieder, sondern reagiert auf Ihre individuelle Spielweise und fügt natürliche Sustain- und DecayPhasen in voller Länge hinzu. Außerdem können die charakteristischen Geräusche von Hammer und Tastenanschlag
sowie der Pedale wiedergeben, um den Klang akustischer
Klaviere perfekt nachzubilden. Und das ist noch längst nicht
alles. Um die Effektivität Ihres Systems weiter zu verbessern, können Sie mit den Funktionen »ECO Mode« und
»RAM Save« von The Grand 3 die RAM-Nutzung und CPULeistung optimieren.
Nicht nur für Musiker, sondern auch für Arrangeure und
Komponisten ist The Grand 3 die erste Wahl, wenn es um
Authentizität, einzigartiges dynamisches Antwortverhalten
und klangliche Breite und Tiefe geht, die Sie so nur bei
Steinberg finden.
The Grand 3 basiert auf einer neuartigen Technologie, die
schon in Cubase 5 verwendet wurde: REVerence ist der
erste Faltungshall als VST3-Effekt. Mit diesem Effekt können Sie das Klavier durch einfaches Umschalten so klingen lassen, als würden Sie es in einer Kathedrale oder live
in einem Konzertsaal spielen. Darüber hinaus steht Ihnen
noch ein algorithmischer Hall-Effekt mit über 60 Presets
zur Verfügung, so dass Sie Ihre akustische Umgebung
völlig frei gestalten können.
Die Standalone-Version von The Grand 3 kann ohne
Host-Anwendung verwendet werden. Dies ist nützlich,
wenn Sie das Instrument live spielen möchten. In dieser
Version stehen Ihnen zwei zusätzliche Funktionen zur Verfügung: das Metronom und das Scratch Pad, mit dem Sie
Ideen schnell umsetzen und speichern können.
Vergessen Sie nicht, sich unter MySteinberg zu registrieren, um Zugriff auf Online-Support-Angebote und weitere
exklusive Serviceleistungen zu erhalten. Besuchen Sie auch
die Community von The Grand 3 in unserem Online-Forum
auf Cubase.net, um Tipps und andere nützliche Informationen zu erhalten.
Wir wünschen Ihnen viel musikalische Inspiration!
Das The Grand-Team von Steinberg
Tastaturbefehle
Für viele Standardtastaturbefehle in The Grand werden
Sondertasten verwendet, die sich je nach Betriebssystem
unterscheiden. Der Standardtastaturbefehl für »Rückgängig« ist z.B. unter Windows [Strg]-[Z] und unter Mac
OS X [Befehlstaste]-[Z].
Wenn in diesem Handbuch Tastaturbefehle mit Sondertasten beschrieben werden, stehen die Windows-Sondertasten an erster Stelle:
[Windows-Sondertaste]/[Mac-Sondertaste]-[Taste]
So bedeutet z.B. [Strg]-Taste/[Befehlstaste]-[Z]: »Drü-
cken Sie die [Strg]-Taste unter Windows bzw. die [Befehlstaste] unter Mac OS X und dann die Taste [Z]«.
Entsprechend bedeutet [Alt]-Taste/[Wahltaste]-[X]: »Drücken Sie die [Alt]-Taste unter Windows bzw. die [Wahltaste] unter Mac OS X und dann die Taste [X]«.
Sie werden in diesem Handbuch oft dazu aufgefordert, mit
der rechten Maustaste zu klicken, z.B. um ein Kontextmenü
zu öffnen. Wenn Sie auf dem Mac mit einer Eintastenmaus
arbeiten, müssen Sie dafür beim Klicken die [Ctrl]-Taste
gedrückt halten.
32
The Grand 3
Page 33

So können Sie uns erreichen
!
!
Klicken Sie auf das Steinberg-Logo oben rechts im Bedienfeld von The Grand, um ein Einblendmenü zu öffnen,
über das Sie zusätzliche Informationen und Hilfe erhalten:
• In diesem Menü finden Sie Links zu verschiedenen
Websites von Steinberg. Wenn Sie einen dieser Links
auswählen, wird die entsprechende Webseite in Ihrem
Browser geöffnet.
Hier erhalten Sie technische Unterstützung und Informationen zur Kompatibilität, Antworten auf häufig gestellte Fragen, Adressen zum Herunterladen neuer Treiber aus dem Internet usw. Dazu muss auf Ihrem
Computer ein Webbrowser installiert sein und Sie benötigen ein aktive
Internetverbindung.
• Wenn Sie den Hilfe-Eintrag wählen, wird die OnlineVersion der Dokumentation geöffnet.
• Außerdem finden Sie hier einen Menüeintrag zur Registrierung des Produkts.
Weitere Informationen hierzu finden Sie unter »Registrieren Sie Ihre Soft-
ware!« auf Seite 35.
Installation
Bitte lesen Sie den folgenden Abschnitt, bevor Sie
The Grand installieren.
Der USB-eLicenser
Wie viele andere Steinberg-Produkte auch verfügt The
Grand über einen hardware-gestützten Kopierschutz auf
Basis des USB-eLicensers. The Grand kann nur zusammen einem eLicenser mit einer aktivierten Lizenz gestartet
werden.
Der USB-eLicenser ist ein USB-Stick, auf dem Ihre Steinberg-Software-Lizenzen gespeichert sind. Alle SteinbergProdukte, die mit USB-eLicensern geschützt sind, verwenden dieselbe Art von USB-Stick und es ist möglich, mehrere Lizenzen auf einem Stick zu speichern. Außerdem
können Lizenzen (innerhalb gewisser Grenzen) zwischen
USB-eLicensern übertragen werden. Dies ist sinnvoll,
wenn Sie z.B. eine Software wieder verkaufen möchten.
The Grand wird zusammen mit einem Aktivierungscode
ausgeliefert, der sich auf einer Karte namens Essential Product License Information in der Packung befindet. Damit
Sie Ihre Version von The Grand unbegrenzt nutzen können,
müssen Sie die Lizenz manuell auf Ihren USB-eLicenser
herunterladen und Ihre permanente Lizenz mit Hilfe des Aktivierungscodes aktivieren.
Im License Control Center (das Sie unter Windows im
Start-Menü und auf dem Mac im Applications-Ordner finden, nachdem Sie The Grand installiert haben) können Sie
überprüfen, welche Lizenzen sich auf Ihrem USB-eLicenser befinden, und neue Lizenzen aktivieren.
Starten Sie dazu den Assistenten zum Herunterladen von
Lizenzen des License Control Centers und befolgen Sie
die Anweisungen.
• Wenn Sie andere kopiergeschützte Steinberg-Produkte
verwenden, können Sie die Lizenzen für Ihre Anwendungen auf denselben USB-eLicenser übertragen und so nur
einen USB-Anschluss des Computers verwenden.
Starten Sie dazu den Assistenten für die Lizenzübertragung des License
Control Centers und befolgen Sie die Anweisungen.
Der USB-eLicenser ist ein separates Produkt, das
nicht im Lieferumfang von The Grand enthalten ist.
Der USB-eLicenser
33
The Grand 3
Page 34

Systemanforderungen
!
!
Für die Arbeit mit The Grand benötigen Sie Folgendes:
Windows
• Windows XP (SP2) oder Windows Vista
• Prozessor: Pentium/Athlon 2GHz Dual Core Mobile (2,5GHz
empfohlen) oder Dual Core 2GHz (3GHz empfohlen)
• 2 GB RAM (3 GB empfohlen)
• Bis zu 32 GB freier Speicherplatz
• Bildschirmauflösung von 1024 x 768 Pixeln (1280 x 800
empfohlen)
• Mit Windows DirectX kompatible Audio-Hardware; ASIO-kom-
patible Audio-Hardware empfohlen (geringere Latenz)
• DVD-ROM-Laufwerk mit Dual-Layer-Unterstützung
• USB-Anschluss für den USB-eLicenser (Lizenzverwaltung)
• USB-eLicenser
• Internetverbindung für die Aktivierung der Lizenz
• VST2-, VST3- oder AU-fähiger Host (mit Cubase SX3, Cu-
base 4, Cubase 5, Nuendo 4, Ableton Live 8 und SONAR 8
getestet) bzw. ReWire-fähiger Host für die Verwendung als
PlugIn oder ReWire-Slave
Macintosh
• Mac OS X 10.5
• Prozessor: Power Mac G5 dual 2.0 GHz oder Intel Core Duo
2.0 GHz (Intel Core Duo 2,66 GHz empfohlen)
• 2 GB RAM (3 GB empfohlen)
• Bis zu 32 GB freier Speicherplatz
• Bildschirmauflösung von 1024 x 768 Pixeln (1280 x 800
empfohlen)
• CoreAudio-kompatible Audio-Hardware
• DVD-ROM-Laufwerk mit Dual-Layer-Unterstützung
• USB-Anschluss für den USB-eLicenser (Lizenzverwaltung)
• USB-eLicenser
• Internetverbindung für die Aktivierung der Lizenz
• VST2-, VST3- oder AU-fähiger Host (mit Cubase SX3, Cu-
base 4, Cubase 5, Nuendo 4, Ableton Live 8 und Logic 8 getestet) bzw. ReWire-fähiger Host für die Verwendung als
PlugIn oder ReWire-Slave
Installieren von The Grand
Im Lieferumfang von The Grand sind mehrere Installations-DVDs enthalten. Da The Grand einen sehr umfangreichen Content beinhaltet, wird mehr als eine DVD für den
Installationsvorgang benötigt. Halten Sie bei der Installation diese DVDs bereit, da Sie dazu aufgefordert werden,
die DVDs nacheinander einzulegen.
Der Installationsvorgang kann einige Zeit in Anspruch
nehmen. Um die Zeit zu verkürzen, können Sie zunächst auch nur ein einzelnes Modell installieren. Außerdem haben Sie bei der Installation die Möglichkeit
festzulegen, welche Content-Dateien Sie installieren
möchten.
Sie können zu einem späteren Zeitpunkt weitere Modelle oder Content-Dateien hinzufügen, indem Sie
einfach den Installationsvorgang erneut starten.
Der Installer von The Grand ermöglicht es Ihnen, die
Content-Dateien und die Programmdateien auf unterschiedlichen Festplatten zu speichern.
Gehen Sie folgendermaßen vor:
1. Legen Sie die erste DVD in ihr DVD-Laufwerk ein.
Das interaktive Start Center wird geöffnet. Wenn das Start Center
nicht automatisch geöffnet wird oder wenn Sie mit einem Macintosh
arbeiten, können Sie das Start Center öffnen, indem Sie auf die Datei
»The_Grand_3_Start_Center.exe« (Windows) oder »The Grand 3 Start
Center.app« (Mac) doppelklicken.
2. Befolgen Sie die Anweisungen auf dem Bildschirm, um
die Installation von The Grand zu starten, und klicken Sie
sich durch die zusätzlichen Optionen und Informationen.
Wenn Sie The Grand nicht über das interaktive Start Center installieren möchten, gehen Sie folgendermaßen vor:
Windows
1. Doppelklicken Sie auf die Datei »Setup.exe«.
2. Befolgen Sie die Anweisungen auf dem Bildschirm.
Macintosh
1. Doppelklicken Sie auf die Datei »The Grand 3.mpkg«.
2. Befolgen Sie die Anweisungen auf dem Bildschirm.
34
The Grand 3
Page 35

Registrieren Sie Ihre Software!
Wir empfehlen Ihnen, Ihre Software zu registrieren. Auf
diese Weise stellen Sie sicher, dass Sie Anspruch auf
technische Unterstützung haben und stets über Programm-Updates und andere Neuigkeiten zu The Grand informiert werden.
Gehen Sie folgendermaßen vor:
• Klicken Sie auf das Steinberg-Logo oben rechts im Bedienfeld und wählen Sie im angezeigten Menü die Option
»Register The Grand 3«.
Die Seite zum Registrieren der Software auf der Steinberg-Website öffnet sich in Ihrem Browser. Befolgen Sie einfach die Anweisungen auf
dem Bildschirm.
Vorbereitungen
In den folgenden Abschnitten wird beschrieben, wie Sie
The Grand als PlugIn in unterschiedlichen Host-Anwendungen oder als eigenständiges Instrument (»Standalone«) verwenden.
3. Sie werden gefragt, ob Sie automatisch eine MIDISpur erzeugen möchten, die dem VST-Instrument zugewiesen ist. Klicken Sie auf »Create«.
The Grand wird geladen und eingeschaltet und das Bedienfeld wird geöffnet. Eine MIDI-Spur mit dem Namen »The Grand« wird zur Spurliste
hinzugefügt. Der Ausgang der Spur wird an The Grand geleitet.
Wenn Sie The Grand über eine Instrumentenspur verwenden möchten, gehen Sie folgendermaßen vor:
1. Wählen Sie im Projekt-Menü aus dem Untermenü
»Spur hinzufügen« die Option »Instrument«.
2. Der Dialog »Instrumentenspur hinzufügen« wird geöffnet.
Wählen Sie im Instrument-Einblendmenü den Eintrag »The Grand« aus.
3. Klicken Sie auf »OK«, um die Instrumentenspur zu erzeugen.
Klicken Sie im Inspector von Cubase auf den Schalter »Instrument bearbeiten«, um das Bedienfeld von The Grand zu öffnen.
The Grand ist nun als VST-Instrument in Cubase eingerichtet. Weitere Informationen zu VST-Instrumenten finden
Sie im Benutzerhandbuch von Cubase.
Einrichten von The Grand als VST-Instrument in Cubase
Ö Im Folgenden wird die Verwendung von The Grand in
Cubase beschrieben. Dabei wird vorausgesetzt, dass Sie
Cubase sowie die MIDI- und Audio-Hardware korrekt eingerichtet haben und dass Cubase MIDI-Daten von Ihrem
externen MIDI-Keyboard empfängt. Wenn Sie The Grand
mit einer anderen VST-Host-Anwendung verwenden möchten, lesen Sie in der dazugehörigen Dokumentation nach.
In Cubase können VST-Instrumente auf zwei Arten verwendet werden: über das Fenster »VST-Instrumente«
oder über Instrumentenspuren.
Wenn Sie The Grand über das Fenster »VST-Instrumente«
verwenden möchten, gehen Sie folgendermaßen vor:
1. Öffnen Sie in Cubase das Geräte-Menü und wählen
Sie die Option »VST-Instrumente«.
Das Fenster »VST-Instrumente« wird geöffnet.
2. Klicken Sie in eine der leeren Schnittstellen und wählen
Sie im Instrument-Einblendmenü die Option »The Grand«.
The Grand 3
Verwenden von The Grand in einer AU-kompatiblen Host-Anwendung
Sie können The Grand in AU-kompatiblen Host-Anwendungen verwenden (z.B. Logic).
Die AU-Version von The Grand wird im AU-PlugIns-Ordner installiert und ermöglicht die Verwendung von The
Grand in einer AU-Umgebung – ohne Leistungseinbußen
oder Kompatibliltätsprobleme.
Wenn Sie Logic Pro 8 verwenden, gehen Sie folgendermaßen vor:
1. Öffnen Sie den Track Mixer und wählen Sie den gewünschten Instrumentenkanal aus.
2. Klicken Sie mit gedrückter [Befehlstaste] in das I/OFeld und wählen Sie im angezeigten Einblendmenü »MultiChannel« oder »Stereo«.
3. Wählen Sie im Untermenü die Option »All Instruments« und dann »The Grand«.
The Grand ist jetzt als AU-Instrument geladen.
35
Page 36

The Grand als Standalone-Anwendung und
!
!
Klicken Sie hier, um den
Preferences-Dialog zu
öffnen.
ReWire
The Grand kann auch unabhängig von einer Host-Anwendung als eigenständige Anwendung verwendet werden.
Auf diese Weise können Sie The Grand mit SequenzerAnwendungen verwenden, die nicht mit den PlugIn-Formaten von The Grand kompatibel sind (d.h. VST und AU),
jedoch den Datenaustausch über ReWire unterstützen.
• Wenn Sie die Einstellungen in The Grand erhalten
möchten, müssen Sie sie als Preset speichern (klicken Sie
dazu auf das Diskettensymbol rechts neben dem Logo
von The Grand).
Sie sollten das Preset unter einem Namen speichern, der anzeigt, für
welches Sequenzer-Projekt es erstellt wurde. Auf diese Weise können
Sie Ihre Einstellungen schnell und einfach wiederherstellen, wenn Sie
bestimmte Sequenzer-Projekte öffnen. Weitere Informationen hierzu finden Sie unter »Arbeiten mit Presets« auf Seite 40.
Wenn Sie die ReWire-Funktionalität nutzen möchten, müssen die entsprechenden ReWire-Dateien
auf Ihrem Computer installiert sein. Wenn diese Dateien nicht bereits installiert sind, können Sie sie von
www.propellerheads.se herunterladen.
ReWire2 ist ein Protokoll, mit dem Audio- und MIDI-Daten
zwischen verschiedenen Computeranwendungen ausgetauscht werden können. Beim Arbeiten mit ReWire ist es
von größter Wichtigkeit, in welcher Reihenfolge die zwei
Programme gestartet werden, da die zuerst gestartete Anwendung die Ressourcen der Audiokarte belegt.
Gehen Sie folgendermaßen vor:
1. Starten Sie die gewünschte Sequenzer-Anwendung
(z.B. Ableton Live, ProTools).
ReWire-kompatible Anwendungen ermöglichen das Zuweisen von Audiound MIDI-Kanälen für den Datenaustausch. Nähere Informationen dazu
entnehmen Sie bitte der Dokumentation zu Ihrer Sequenzer-Anwendung.
2. Starten Sie The Grand als Standalone-Anwendung.
Sie können das Programm wie jede andere Anwendung auf Ihrem Computer über das Start-Menü oder das entsprechende Desktop-Symbol
(Win) bzw. über das Anwendungssymbol im Anwendungen-Ordner
(Mac) starten. Sie können auch auf die Datei »The Grand 3.exe« im Programmordner doppelklicken (Win).
Wenn Sie einen Mac verwenden, müssen Sie die
Standalone-Anwendung nach der Installation einmal
starten, um die ReWire-Funktionalität zu aktivieren.
Wenn Sie nun mit The Grand ein Sample wiedergeben,
werden die entsprechenden Signale über ReWire an die
zugewiesenen Mixerkanäle des Sequenzers übertragen.
Ö Beachten Sie, dass jetzt zwei voneinander unabhängige Anwendungen auf Ihrem Computer laufen. Wenn Sie
das Sequenzer-Projekt speichern, werden die Kanal- und
Buskonfigurationen gespeichert, jedoch keine der Einstellungen in The Grand!
Der Preferences-Dialog
Wenn Sie The Grand als Standalone-Anwendung verwenden, können Sie zusätzliche Programmeinstellungen
im Preferences-Dialog vornehmen. Wenn Sie den Preferences-Dialog öffnen möchten, gehen Sie folgendermaßen vor:
• Klicken Sie auf den Schalter mit dem Zahnrad rechts
neben dem Feld für den Audioausgang.
• Klicken Sie mit der rechten Maustaste im obersten Bereich des Bedienfelds und wählen Sie im Kontextmenü die
Option »Preferences«.
Der Preferences-Dialog hat mehrere Seiten, auf denen
Sie die folgenden Einstellungen vornehmen können:
• Auf der Seite »MIDI Routing« können Sie im Einblendmenü einen MIDI-Eingang auswählen.
• Auf der Seite »Audio Routing« können Sie in den Einblendmenüs unterschiedliche Audioausgänge zuweisen.
The Grand unterstützt vier Kanäle: zwei, die vorne im Klangbild angeordnet sind (Front – Links und Rechts), und zwei, die hinten angeordnet sind
(Rear – Links und Rechts). Jedem Kanal können Sie unterschiedliche
Audioausgänge zuweisen. Wenn Sie im Einblendmenü einen Audioausgang auswählen, wird dieser dem entsprechenden Kanal zugewiesen.
Wenn Sie die [Umschalttaste] gedrückt halten und einen Audioausgang
wählen, werden den vorderen und hinteren Kanälen Ausgänge mit ansteigenden Nummern zugewiesen – z.B. 1, 2, 3, 4 oder 5, 6, 7, 8.
Wenn Sie die [Alt]-Taste/[Wahltaste] und die [Umschalttaste] gedrückt
halten, werden die Audioausgänge in Paaren jeweils den vorderen und hinteren Kanälen zugewiesen – z.B. 1, 2, 1, 2 oder 5, 6, 5, 6.
36
The Grand 3
Page 37

• Auf der Metronome-Seite können Sie Einstellungen für
!
!
den Metronom-Click vornehmen:
Option Beschreibung
Mode Hier können Sie den Metronom-Click ein- und ausschal-
Accent Schalten Sie diese Option ein, wenn Sie die erste Zähl-
Level Mit diesem Regler können Sie die Lautstärke des Metro-
Connections Hier können Sie einen separaten Stereoausgang für das
ten oder einen Vorzähler (Count In) verwenden.
zeit im Takt betonen möchten.
nom-Clicks einstellen.
Metronom einstellen.
• Schalten Sie auf der General-Seite die Option »Don’t
prompt for confirmation when quitting The Grand 3« ein,
wenn Sie möchten, dass The Grand beim Beenden keine
Warnmeldung anzeigt.
• Wählen Sie auf der Seite »ASIO Driver« im Einblendmenü den Treiber für Ihre Audio-Hardware aus.
Wenn Sie verschiedene Audioanwendungen gleichzeitig verwenden
möchten, ist es sinnvoll, die Option »Release Driver when Application is
in Background« (ASIO-Treiber deaktivieren, wenn Programm im Hintergrund läuft) einzuschalten. Auf diese Weise können Sie auch dann, wenn
The Grand gerade läuft, Ton aus einer anderen Anwendung heraus über
Ihre Audio-Hardware wiedergeben.
Die Werte für die Eingangs- und Ausgangslatenz Ihrer Audio-Hardware
werden angezeigt. Unter »Latenz« versteht man die Zeit, die das System
benötigt, um auf eingehende Signale zu reagieren. Eine hohe Latenz
führt zu einem merklichen Versatz zwischen dem Zeitpunkt, zu dem Sie
eine Taste drücken, und dem Zeitpunkt, zu dem Sie den Ton hören. Unterhalb der Latenzwerte wird die Samplerate der angeschlossenen Audio-Hardware angezeigt.
Wenn Sie The Grand verwenden, konkurrieren verschiedene Prozesse
um die Prozessorleistung Ihres Computers. Mit dem Parameter »Audio
Priority« können Sie einstellen, welche Prozesse dabei Priorität haben
sollen:
Option Beschreibung
Normal In diesem Modus erhalten Nicht-Audio-Prozesse und Au-
Boost Bei dieser Einstellung erhält Audio eine höhere Priorität
diowiedergabe ungefähr die gleiche Priorität (Standardeinstellung).
als MIDI. Wählen Sie diesen Modus, wenn bei der Wiedergabe von Audio- und MIDI-Material Probleme bei der
Audiowiedergabe auftreten.
Verwenden Sie unter Windows einen ASIO-Treiber,
der speziell für Ihre Hardware geschrieben wurde.
Wenn Sie keinen ASIO-Treiber installiert haben,
überprüfen Sie, ob der Hersteller Ihrer Audio-Hardware einen ASIO-Treiber bereitstellt (z.B. per Internet-Download).
Unter Windows Vista können Sie auch den generischen ASIO-Treiber für geringe Latenz verwenden,
wenn kein spezieller ASIO-Treiber verfügbar ist.
• Wenn Sie den Treiber ausgewählt haben, öffnen Sie die
Advanced-Seite, um die zu verwendenden Ein- und Ausgänge auszuwählen und diese zu benennen. Klicken Sie
auf den Schalter »Control Panel«, um das Bedienfeld für
die Audio-Hardware zu öffnen, und passen Sie die Einstellungen so an wie vom Hersteller empfohlen.
Fehlende Content-Dateien
Es können Situationen auftreten, in denen auf ein Modell
oder eine Content-Datei nicht zugegriffen werden kann.
Grund dafür kann zum Beispiel eine verschlüsselte Partition oder ein externes Laufwerk sein, das nicht mehr an
den Rechner angeschlossen ist. In diesem Fall wird eine
Warnmeldung angezeigt, in der Sie informiert werden,
dass eine bestimmte VST Sound Library nicht gefunden
werden kann. Gehen Sie folgendermaßen vor, um den
Content wieder verfügbar zu machen:
1. Klicken Sie auf »Ignore«.
The Grand wird ohne die nicht gefundenen Content-Dateien geöffnet.
2. Beenden Sie The Grand.
3. Schließen Sie die fehlende externe Festplatte wieder
an oder öffnen Sie die verschlüsselte Partition.
4. Starten Sie The Grand.
37
The Grand 3
Page 38

Wenn die Content-Dateien oder Klaviermodelle aus einem anderen Grund nicht gefunden werden (z.B. weil Sie
die entsprechenden Dateien auf eine andere Festplatte
verschoben haben oder ein neues Laufwerk hinzugefügt
und dadurch die Namen der Laufwerke »geschoben« haben), gehen Sie folgendermaßen vor:
1. Klicken Sie in der Fehlermeldung auf den LocateSchalter, wenn Sie an einer anderen Stelle nach den Dateien suchen möchten.
Ein Dateiauswahldialog wird geöffnet.
2. Öffnen Sie das Laufwerk, auf dem sich die ContentDateien befinden.
3. Wählen Sie die Dateien aus und klicken Sie auf
»Open«.
Alle Content-Dateien, die an diesem Speicherort gefunden wurden, sind
nun wieder im Programm verfügbar.
Ö Wenn Sie auf weiteren Festplatten Content-Dateien
gespeichert haben, wird ggf. erneut der Dialog angezeigt,
über den Sie die restlichen Content-Dateien suchen
können.
• Klicken Sie auf »Remove«, wenn Sie möchten, dass The
Grand nach bestimmten Dateien zukünftig nicht mehr sucht.
Auf diese Weise können Sie verhindern, dass The Grand nach fehlenden
Dateien sucht, wenn Sie ein bestimmtes Modell deinstalliert haben.
Ö Wenn Sie die Option »Do not ask again« (Nicht mehr
nachfragen) einschalten, können Sie festlegen, dass nicht
nach den fehlenden Dateien gesucht werden soll, und
zwar einmal (Ignore) oder dauerhaft (Remove).
Der Content
Die Aufnahmen von The Grand
Die vier akustischen Klaviermodelle wurden in Schweden
von erfahrenen Aufnahmespezialisten in einem großen
Studio mit hoher Decke gesampelt, das sich gut für die
Aufnahme akustischer Instrumente eignet. Die Klaviere
wurden mit hochentwickeltem Recording-Equipment
aufgenommen und während des Mixings wurden keine
Filter oder Effekte auf das Material angewendet, um den
natürlichen Klang zu erhalten. Für jede einzelne Taste der
4 akustischen Klaviermodelle wurden bis zu 20 Anschlagstärken aufgenommen.
Die Modelle
The Grand 3 beinhaltet die Aufnahmen von fünf unterschiedlichen Klaviermodellen mit sehr unterschiedlichen
Eigenschaften. Sie können zwischen 3 Flügeln, einem Upright-Piano und einem elektrischen Flügel wählen. Die virtuellen akustischen Klaviere sind in zwei
Aufnahmeperspektiven verfügbar: »Close« und »Player«:
Option Beschreibung
Close Bei diesen Aufnahmen liegt der Fokus näher an der Klavi-
Player Bei diesen Aufnahmen liegt der Fokus näher an den Kla-
atur, so dass ein klarer heller Klang mit einem Minimum an
Raumeindruck erzeugt wird. Diese Perspektive ist ideal für
das Hinzufügen von Reverb-Effekten (siehe »Die Ambi-
ence-Seite« auf Seite 45).
viersaiten und Hämmern, so dass ein weicherer Klang mit
natürlichem Raumeindruck entsteht.
Im Folgenden werden die einzelnen Modelle kurz vorgestellt.
38
The Grand 3
Page 39

Yamaha C7
Der unvergleichlich schöne Klang und die außergewöhnliche musikalische Bandbreite verleihen den Aufnahmen des
C7-Flügels von Yamaha ihre Besonderheit. Mit langen
Sustain-Phasen und verblüffend realistischem Antwortverhalten sowie der Anpassung an Ihre Spielweise bietet das
Yamaha C7 musikalische Perfektion. Dieser virtuelle Flügel
ist eine Klasse für sich und vermittelt die Ausdrucksstärke
des Spielers. Für einen kristallklaren und brillanten Klavierklang sollten Sie das Yamaha C7 verwenden.
Model D
Ein Steinway D Flügel wurde aufgenommen, um die
Samples für das Model D zu erhalten. Die zauberhafte
Klangfülle und das unnachahmliche Ansprechverhalten
des Steinway D finden sich im Model D wieder. Sein warmer und reicher Klang sowie das stimmige Gesamtkonzept machen es zu einem reinen Vergnügen, diesen
virtuellen Flügel zu spielen.
Bösendorfer 290
Das umfangreichere Register des Bösendorfer 290 Imperial Flügels macht das reiche Timbre des Instruments aus.
Bei der Aufnahme wurde darauf geachtet, Ihnen genau
diese Möglichkeiten zur Verfügung zu stellen: So haben Sie
die Möglichkeit, zarteste Pianissimos über Crescendi hin zu
ausdrucksstarken Fortissimos zu steigern. Dieser virtuelle
Flügel glänzt in jedem musikalischen Aspekt und bietet die
einzigartige Klangqualität und die Ausdrucksstärke seines
echten Gegenstücks. Die Aufnahmen für The Grand beinhalten die vollen acht Oktaven Tastenumfang (97 Tasten)
eines 290 Imperial Grand.
Yamaha CP80
Das Yamaha CP80 Electric Grand ist einer der erfolgreichsten klassischen elektrischen Flügel auf dem Markt
und wird mit den eingebauten Effekten Tremolo, Phaser,
Flanger und Chorus ausgeliefert. Hier kommen die Samples
direkt von der Quelle: den Content-Experten von Yamaha.
Upright
Das Upright-Piano aus der Nordiska Pianofabriken hat
eine ganz besondere Persönlichkeit! Sein charakteristischer Klang wurde im virtuellen Modell eingefangen, so
dass Sie auch die außergewöhnlichsten klanglichen Herausforderungen spielerisch meistern. Welcher Stil auch
immer gewünscht ist, ob Rock, Blues, Jazz, Gospel oder
eine andere anspruchsvolle Stilrichtung — wenn Ihre Aufnahmen etwas weniger »klassisch« klingen sollen, ist dieses Modell genau das Richtige für Sie.
The Grand 3
39
Page 40

Parameter
Systemleistungsanzeigen (siehe
»Die Systemleistungsanzeigen«
auf Seite 55)
Editor-Ansicht
(siehe »Umschal-
ten zwischen den
Ansichten« auf
Seite 41)
Klaviatur und Pedale (siehe »Klavia-
tur und Pedale für
die Vorhör-Funktion« auf Seite 42)
Allgemeine PlugInBedienelemente
Die Bedienelemente
für die StandaloneAnwendung (siehe
»Zusätzliche Bedienelemente bei der Verwendung von The
Grand als Standalone-Instrument« auf
Seite 50).
Allgemeine PlugIn-Bedienelemente
Im oberen Bereich des PlugIn-Bedienfelds finden Sie die
allgemeinen Bedienelemente. Hier können Sie Presets laden und speichern und die Gesamtlautstärke anpassen.
Darüber hinaus können Sie hier den ECO Mode (siehe
»ECO Mode (allgemeine Bedienelemente)« auf Seite 54)
und die Funktion »RAM Save« (siehe »RAM Save (allge-
meine Bedienelemente)« auf Seite 54) aktivieren. Mit der
Funktion »Reset MIDI« (der Schalter mit dem Blitz-Symbol
links neben dem Steinberg-Logo) können Sie das PlugIn
zurücksetzen. Diese Funktion ist nützlich, wenn Sie die
MIDI-Verbindung verlieren, zum Beispiel bei einem LiveAuftritt. Mit dem Schalter oben links können Sie zwischen
zwei Ansichten umschalten: der Editor- und der Player-Ansicht. Wenn Sie auf das PlugIn-Logo klicken, öffnet sich
die »About box« mit Informationen zur Programmversion.
Durch Klicken auf das Firmenlogo öffnet sich ein Einblend-
menü, über das Sie mit Steinberg in Kontakt treten können.
Die allgemeinen PlugIn-Bedienelemente werden in den folgenden Abschnitten detailliert beschrieben.
Ö Alle Bedienelemente von The Grand können auf ihre
Standardwerte zurückgesetzt werden, indem Sie mit gedrückter [Strg]-Taste/[Befehlstaste] darauf klicken.
Arbeiten mit Presets
Rechts neben dem PlugIn-Logo finden Sie das Einblendmenü zum Laden und Speichern von Presets in The Grand.
Die Presets beinhalten alle Klangeinstellungen von The
Grand, d.h. die Einstellungen, die Sie auf der Model-Seite,
der Equalizer-Seite, der Ambience-Seite usw. vornehmen.
Die mitgelieferten Presets für die einzelnen Modelle finden
Sie in den entsprechenden Untermenüs. Diese Presets
sind durch eine Linie von den benutzerdefinierten Presets
getrennt.
Ö Die Presets beinhalten nicht die Einstellungen für die
Option »Disk vs. RAM« auf der Options-Seite.
40
The Grand 3
Page 41

Wenn Sie ein Preset laden möchten, gehen Sie folgendermaßen vor:
1. Klicken Sie auf den Pfeilschalter rechts im Preset-Feld,
um das Presets-Einblendmenü zu öffnen.
2. Öffnen Sie das Untermenü für das gewünschte Klaviermodell.
3. Wählen Sie das Preset aus, das Sie laden möchten.
Ö Wenn Sie ein Preset für ein anderes Klaviermodell
wählen, müssen zunächst die Samples ersetzt werden.
Daher dauert das Laden in diesem Fall länger.
Wenn Sie ein Preset speichern möchten, gehen Sie folgendermaßen vor:
1. Klicken Sie auf das Diskettensymbol links neben dem
Presets-Einblendmenü.
2. Legen Sie im angezeigten Dialog einen Namen und einen Speicherort für das Preset fest.
3. Klicken Sie auf »Save«, um das Preset zu speichern
und den Dialog zu schließen. Klicken Sie auf »Cancel«, um
den Dialog zu schließen, ohne das Preset zu speichern.
Wenn Sie ein Preset löschen möchten, gehen Sie folgendermaßen vor:
1. Wählen Sie das zu löschende Preset im Einblendmenü
aus.
Gegebenenfalls müssen Sie warten, bis alle Einstellungen geladen sind.
2. Klicken Sie auf das Papierkorbsymbol links neben
dem Presets-Einblendmenü.
Ein Dialog wird geöffnet.
3. Klicken Sie auf »Yes«, um das Preset zu löschen und
den Dialog zu schließen. Klicken Sie auf »No«, um den
Dialog zu schließen, ohne das Preset zu löschen.
• Klicken Sie auf den Regler und ziehen Sie nach unten
(der Regler wird gegen den Uhrzeigersinn gedreht), um
die Lautstärke zu verringern.
Umschalten zwischen den Ansichten
In The Grand können Sie zwischen zwei Ansichten wählen: der Editor- und der Player-Ansicht.
Die Editor-Ansicht
Die Editor-Ansicht zeigt die Klaviatur von oben. An der
Position des Klavierdeckels werden verschiedene Bedienelemente angezeigt, mit denen Sie die Sound-Parameter
und PlugIn-Einstellungen anpassen können. Unter den
Bedienelementen finden Sie Schalter, mit denen Sie zwischen den unterschiedlichen Seiten umschalten können:
der Seite für das Klaviermodell, der Equalizer-, Ambience-,
Control- und der Options-Seite. Mit der Klaviatur und den
drei Pedalen im unteren Bereich können Sie die Klaviere
vorhören.
Ö Mitgelieferte Presets können nicht gelöscht werden.
Anpassen der Gesamtlautstärke
Mit dem Regler »Main Volume« können Sie die Gesamtlautstärke von The Grand anpassen. Der Maximalwert ist
+12dB (der Standardwert ±0dB).
• Klicken Sie auf den Regler und ziehen Sie nach oben
(der Regler wird im Uhrzeigersinn gedreht), um die Lautstärke zu erhöhen.
The Grand 3
Die Player-Ansicht
41
Page 42

In der Player-Ansicht steht die Darstellung des Klaviers im
Mittelpunkt. Sie zeigt ein qualitativ hochwertiges 3D-Modell des ausgewählten Klaviers an. Oberhalb der Darstellung finden Sie die allgemeinen PlugIn-Bedienelemente,
über die Sie auf Presets zugreifen und die Gesamtlautstärke einstellen können. Davon angesehen enthält diese
Ansicht keine weiteren »Ablenkungen«. Wählen Sie einfach im Einblendmenü das gewünschte Preset aus und
beginnen Sie zu spielen.
Ö Wenn Sie das PlugIn laden, wird zunächst immer die
Editor-Ansicht geöffnet.
Bevor Sie in die Player-Ansicht wechseln können, müssen
Sie in der Editor-Ansicht ein Modell auswählen.
Wenn Sie in die Player-Ansicht wechseln möchten, gehen
Sie folgendermaßen vor:
1. Laden Sie in der Editor-Ansicht ein Klaviermodell oder
ein Preset.
2. Klicken Sie oben links im Bedienfeld neben dem
PlugIn-Logo auf den p-Schalter.
Das ausgewählte Klaviermodell wird in der Player-Ansicht angezeigt.
Wenn Sie wieder zur Editor-Ansicht wechseln möchten,
klicken Sie erneut auf den Schalter oben links im Bedienfeld (auf dem nun »e« angezeigt wird).
Reset MIDI
Es kann vorkommen, dass MIDI-Noten »hängen«, z.B. weil
das PlugIn die MIDI-Verbindung verloren hat oder nicht
unterstützte Controller-Daten empfangen wurden. In diesem Fall können Sie einen »Notfall-Reset« des PlugIns
durchführen:
• Klicken Sie auf den Reset-Schalter (Blitz-Symbol) rechts
neben dem Regler »Main Volume«, um die Klangerzeugung
zu unterbrechen und alle MIDI-Controller zurückzusetzen.
Dies entspricht dem Senden der MIDI-Befehle 120 (All Sound Off) und
121 (Reset All).
Das PlugIn stoppt sofort die Wiedergabe und setzt alle
Controller auf ihre Standardwerte zurück.
Das Steinberg-Logo und die »About box«
Wenn Sie oben rechts im PlugIn-Bedienfeld auf das
Steinberg-Logo klicken, wird ein Einblendmenü geöffnet.
Über den Eintrag »Help« können Sie das Handbuch im
PDF-Format öffnen. Wenn Sie eine der anderen Optionen
wählen, wird die Steinberg-Website in Ihrem StandardWebbrowser geöffnet. Wenn Sie nach Software-Updates
oder Hilfe suchen, wählen Sie die entsprechenden Links.
Ö Damit Sie das Handbuch im PDF-Format lesen können,
muss auf Ihrem Computer ein PDF-Reader installiert sein.
Ö Damit Sie die Steinberg-Homepage öffnen können,
muss Ihr Rechner mit dem Internet verbunden sein.
Wenn Sie oben links im PlugIn-Bedienfeld auf das PlugInLogo klicken, wird die »About box« geöffnet. Dieses Fenster enthält Informationen über die Programmversion und
Build-Nummer des PlugIns. Mit diesen Informationen können Sie überprüfen, ob Sie die neuste Version des PlugIns
haben. Informieren Sie sich regelmäßig unter www.steinberg.net über Programm-Updates. Wenn Sie das Fenster
wieder schließen möchten, drücken Sie die [Esc]-Taste
auf der Computertastatur.
Klaviatur und Pedale für die Vorhör-Funktion
Normalerweise werden Sie die Klaviere über Ihr MIDI-Keyboard und MIDI-Pedale spielen. Sie haben jedoch auch
die Möglichkeit, die Klaviere über die Klaviatur und die drei
Pedale in der Editor-Ansicht vorzuhören.
• Klicken Sie auf eine Taste der Klaviatur, um die entsprechende Note zu spielen.
In der Editor-Ansicht erzielen Sie eine höhere Anschlagstärke, wenn Sie
weiter unten auf die Taste klicken, und eine niedrigere, je weiter oben Sie
klicken.
In der Player-Ansicht werden die Noten immer mit voller Anschlagstärke
wiedergegeben.
• Klicken Sie auf eins der Pedale, um die entsprechende
Funktion auszulösen. Klicken Sie erneut auf das Pedal, um
sie zu beenden.
Die Pedale sind folgendermaßen angeordnet (von links
nach rechts): Soft-Pedal, Sostenuto und Haltepedal (Sustain). Die vier akustischen virtuellen Klaviere unterstützen
alle drei Pedale. Das CP80 unterstützt nur das Haltepedal.
42
The Grand 3
Page 43

Die Pedale haben die folgenden Funktionen:
Pedal MIDI-Controller-
Soft-Pedal 67 Mit diesem Pedal wird ein gedämpfter
SostenutoPedal
Haltepedal 64 Mit diesem Pedal werden die Dämpfer
Nummer
66 Bereits angeschlagene Noten werden
Funktion
Klang erzielt.
durch Drücken des Sostenuto-Pedals
gehalten. Dies gilt nicht für Noten, die
nach dem Drücken des Pedals angeschlagen werden. Diese werden nicht
gehalten.
Ein Sostenuto-Effekt kann nur erzielt
werden, wenn entweder das Pedal
oder die Tasten über ein externes Gerät
gespielt werden.
für alle Saiten aufgeh oben, wodurch die
Töne auch weiterschwingen, wenn die
Tasten nicht mehr gedrückt sind. Dies
wirkt sich auf alle Tasten aus, die gespielt werden.
Die Model-Seite
Auf dieser Seite können Sie das Klaviermodell auswählen
und den Klang einstellen. Alle wichtigen Aspekte der
akustischen Klaviere wurden separat aufgenommen. Das
bezieht sich nicht nur auf die Sustain-Resonanzen, sondern auch auf mechanische Geräusche der Tasten und
Pedale. Sie können die Lautstärke dieser Aspekte einzeln
steuern. So können Sie Charakter und Spielweise des
Klaviers ganz nach Ihren Wünschen einrichten. Wenn Sie
zum Beispiel das Klavier so hören möchten, als säßen Sie
direkt davor, verstärken Sie die mechanischen Geräusche
von Tasten und Pedalen.
Diese Seite ist für das Modell CP80 anders. Da es sich bei
dem CP80 um ein elektroakustisches Instrument handelt,
erzeugt es keine hörbaren mechanischen Geräusche. Deshalb finden Sie auf der Seite für das CP80 einen TremoloEffekt und einen Modulationseffekt (Chorus, Flanger und
Phaser), mit denen Sie den Klang anpassen können.
Die akustischen Klaviermodelle
Mit der Auswahl des Modells legen Sie den grundlegenden Charakter und Klang Ihres virtuellen Klaviers fest. Die
akustischen Klaviere wurden in zwei Mikrofonpositionen
aufgenommen: »Close« und »Player«, siehe »Die Modelle«
auf Seite 38.
Ö Wenn Sie das Klaviermodell wechseln, werden nur die
Samples ausgetauscht. Alle anderen Einstellungen, z.B. auf
der Equalizer- und der Ambience-Seite, ändern sich nicht.
Wenn Sie ein Klaviermodell auswählen möchten, gehen
Sie folgendermaßen aus:
1. Klicken Sie in der Editor-Ansicht auf den Schalter für
ein Modell, um die entsprechende Seite zu öffnen.
Wenn die Player-Ansicht ausgewählt ist, klicken Sie auf den e-Schalter
oben links im Fenster, um die Editor-Ansicht zu öffnen.
2. Klicken Sie auf das Bild für das Klaviermodell.
Die fünf verfügbaren Modelle werden über dem Bild angezeigt.
3. Wählen Sie das gewünschte Modell und die Mikrofonposition aus.
Bei den Aufnahmen der akustischen Klaviere wurden nicht
nur die Noten aufgenommen, sondern auch jeder andere
vom Klavier produzierte Ton, z.B. das Dämpfen von schwingenden Saiten und der Klang, der beim Heben des Hammers von der Saite oder beim Treten eines der Pedale
entsteht. Auf der Model-Seite können Sie diese zusätzlichen Geräusche ein- und ausschalten, indem Sie auf die
entsprechenden Schalter klicken. Die Lautstärke für diese
Geräusche wird mit den Drehreglern eingestellt. Die folgenden Parameter sind verfügbar:
Option Beschreibung
Sustain
Resonance
String Release Wenn eine Taste bei einem Klavier losgelassen wird,
Wenn Sie eine Taste auf einem akustischen Klavier drücken, wird nur die Dämpfung für diese Taste aufgehoben.
Alle anderen Saiten bleiben gedämpft und nur der Klang
der Saite, auf die der Hammer fällt, ist hörbar.
Wenn Sie das Haltepedal treten, werden alle Dämpfer
von allen Saiten genommen. Wenn Sie nun eine Taste
drücken, werden durch das Schwingen einer Saite die
daneben liegenden Saiten und das Gehäuse ebenfalls in
Schwingung versetzt. Dadurch entsteht ein Klang vergleichbar mit einem Hall. Dieser Effekt ist nur hörbar,
wenn das Haltepedal verwendet wird.
fällt der Filzdämpfer auf eine Saite, die noch schwingt.
Die Saite hört nicht abrupt auf zu schwingen, sondern
schwingt noch kurz weiter, was diesen Klang erzeugt.
Beachten Sie, dass der Klang etwas unnatürlicher wird,
wenn Sie diese Option ausschalten.
43
The Grand 3
Page 44

Option Beschreibung
Hammer
Release (nur
verfügbar für
Yamaha C7,
Model D und
Bösendorfer)
Key Sound (nur
verfügbar für
Yamaha C7,
Model D und
Bösendorfer)
Damper Pedal
Sound (nur
verfügbar für
Yamaha C7,
Model D und
Bösendorfer)
Wenn eine Taste losgelassen wird, kehrt der Hammer in
seine Ursprungsposition zurück und erzeugt dabei einen
dumpfen hölzernen Klang. Dieser Effekt wird als »Hammer Release« bezeichnet: das Anheben des Hammers.
Der Pianist, der vor dem Flügel sitzt, hört dieses Geräusch sehr deutlich, obwohl es je nach Position des Mikrofons nicht in den Aufnahmen zu hören ist.
Wenn diese Option eingeschaltet ist, versetzen Sie sich
in die akustische Perspektive des Pianisten: The Grand
klingt, als säßen Sie direkt vor einem Konzertflügel. Wenn
diese Option ausgeschaltet ist, entspricht der Klang von
The Grand der Hörsituation des Publikums.
Wenn Sie eine Taste an einem echten Klavier drücken,
wird neben dem Ton noch ein Geräusch produziert, das
durch das Bewegen der Taste selbst und ihrer Mechanik
entsteht. Dabei handelt es sich um einen hölzernen, leisen und unaufdringlichen Klang. Wenn Sie diese Option
einschalten, erhalten Sie den Höreindruck eines Zuhörers, der nah am Klavier sitzt.
Dieses Geräusch wird erzeugt, wenn Sie ein Pedal treten.
CP80
Die Modulationseffekte sind ein integraler Bestandteil des
Klangs beim CP80. Dieses Modell bietet einen TremoloEffekt und einen Modulationseffekt, mit denen Sie Klangvariationen erzeugen können.
Mit dem Tremolo-Effekt modulieren Sie die Amplitude
(Lautstärke). Die Modulationssignale für den rechten und
den linken Kanal haben einen festen Versatz von 180°.
Daher bewegt sich der Ton im Klangbild zwischen links
und rechts.
1. Klicken Sie auf den Schalter links oben im TremoloBereich, um den Effekt einzuschalten.
Der Schalter wird rot.
2. Passen Sie die Parameter »Speed« und »Depth« wie
gewünscht an:
Option Beschreibung
Depth Mit diesem Parameter stellen Sie die Intensität des Ef-
Speed Mit diesem Parameter stellen Sie die Modulationsfre-
fekts ein. Sie können Werte zwischen 0% und 100%
einstellen.
quenz in Hertz (Hz) ein. Sie können Werte zwischen
0,01Hz und 10,0 Hz einstellen.
Modulationseffekte sorgen für einen dichteren, breiteren
Klang, indem sie die Tonhöhe oder die Phase modulieren.
Für das Modell CP80 stehen Ihnen die Modulationseffekte
Chorus, Flanger und Phaser zur Verfügung.
1. Klicken Sie im Modulation-Bereich auf den Schalter
links neben dem Einblendmenü, um den Effekt einzuschalten.
Der Schalter wird rot.
2. Wählen Sie im Einblendmenü den gewünschten Effekt
aus: Phaser, Chorus oder Flanger.
3. Passen Sie die Parameter wie gewünscht an.
Folgende Parameter sind für die Modulationseffekte ver-
fügbar:
Option Beschreibung
Depth Mit diesem Parameter stellen Sie die Intensität des Ef-
Feedback Dieser Parameter bestimmt die Resonanz des Effekts. Sie
Mix Mit diesem Parameter stellen Sie das Verhältnis zwi-
Speed Mit diesem Parameter stellen Sie die Modulationsfre-
Phase Hiermit können Sie das Klangbild von Mono auf Stereo
fekts ein. Sie können Werte zwischen 0% und 100%
einstellen.
können Werte zwischen -100% und +100% einstellen.
schen dem Original- und dem Effektsignal ein. Sie können Werte zwischen 0% und 100% einstellen. Wenn
Sie 100% einstellen, hören Sie nur das Effektsignal.
quenz in Hertz (Hz) ein. Sie können Werte zwischen
0,01Hz und 10,0 Hz einstellen.
verbreitern. Sie können Werte zwischen 0° und 180°
einstellen.
44
The Grand 3
Page 45

Die Equalizer-Seite
Klicken Sie hier, um SurroundPanning einzustellen.
Klicken Sie hier, um StereoPanning einzustellen.
Die Ambience-Seite
Auf der Equalizer-Seite steht Ihnen ein hochwertiger parametrischer Equalizer mit 4 Frequenzbändern zur Verfügung. Mit den Frequenzbändern 1 Low, 2 Mid, 3 Mid und
4 High können Sie die Klangfarbe des Klavier verändern,
z.B. um einen helleren oder dunkleren Klang zu erzeugen.
Die beiden mittleren Frequenzbänder werden als Peakoder Glocken-Filter verwendet, die anderen beiden als
Shelving-Filter. Ale Bänder sind vollparameterisch und
verfügen über einstellbare Gain-, Frequency- und Q-Parameter.
Anpassen der Equalizereinstellungen
1. Klicken Sie auf den EQ-Schalter oben links im Steuerelemente-Bereich, um den Equalizer einzuschalten.
Dadurch werden alle 4 Frequenzbänder aktiviert.
2. Stellen Sie die Parameter »Gain«, »Freq« und »Q« wie
gewünscht ein. Sie können Gain und Frequency auch
gleichzeitig einstellen, indem Sie die EQ-Punkte in der
grafischen Anzeige nach links ziehen.
Für jedes Frequenzband stehen Ihnen die folgenden Parameter zur Verfügung:
Option Beschreibung
Gain Mit diesem Parameter stellen Sie die Verstärkung/Dämp-
Freq Mit diesem Parameter legen Sie den Frequenzbereich
Q Dieser Parameter steuert die Qualität, indem Sie die
fung für das EQ-Band ein. Sie können Werte zwischen
-24dB und +24 dB einstellen.
fest, der mit dem Gain-Parameter verstärkt/gedämpft
wird. Sie können Werte zwischen 20Hz und 20000Hz
einstellen.
Bandbreite der mittleren Peak-Filter breiter oder schmaler einstellen. Durch Erhöhen des Q-Werts für den hohen
und den tiefen Shelving-Filter erzeugen Sie eine Vertiefung in der EQ-Kurve. Sie können Werte zwischen 0,5
und 10,0 einstellen.
Mit den Einstellungen auf der Ambience-Seite können Sie
das Klavier im Raum positionieren und einen Hall (Reverb)
auf das Material anwenden.
Positionieren des Klaviers
Mit seinen zwei Stereoausgängen unterstützt The Grand
die vierkanalige Surround-Ausgabe (4.0 Quadro). Schalten Sie dazu den Schalter rechts neben der grafischen
Anzeige ein.
Wenn das Surround-Panning eingeschaltet ist, können
Sie das Klavier vorn oder hinten im Raum positionieren.
Ö Wenn Sie die hinteren Kanäle hören möchten, müssen
Sie den zweiten Stereoausgang des PlugIns an die Ausgänge Ihrer Audiokarte leiten.
Sie können das Klavier im Stereo- oder im SurroundKlangbild verschieben, indem Sie die Parameter »Left/
Right« und »Rear/Front« verwenden oder indem Sie das
Klaviersymbol in der grafischen Anzeige an die gewünschte Position ziehen.
• Left/Right
Mit diesem Parameter verschieben Sie die Position des Klaviers im Raum
nach rechts/links. Sie können Werte zwischen -100% und +100% einstellen. Mit positiven Werten verschieben Sie das Klavier nach rechts
und mit negativen Werten nach links.
45
The Grand 3
Page 46

• Rear/Front
Mit diesem Parameter verschieben Sie die Position des Klaviers im Raum
nach vorn/hinten. Sie können Werte zwischen -100% und +100% einstellen. Mit positiven Werten richten Sie das Klavier weiter vorne aus und
mit negativen Werten weiter hinten.
Ö Der Parameter »Rear/Front« kann nur dann verwendet
werden, wenn die hinteren Kanäle mit einem Ausgang verbunden sind und das Surround-Panning aktiviert wurde.
Die graphische Anzeige links stellt die Position des Klaviers im Raum dar. In der grafischen Anzeige können Sie
die Parameter »Left/Right« und »Rear/Front« gleichzeitig
einstellen.
Hinzufügen eines Reverb-Effekts (Hall)
Sie können auf den ursprünglichen Klaviersound einen
Reverb-Effekt anwenden. Mit den Reverb-Parametern erzielen Sie unterschiedliche Raumeindrücke, z.B. Konzerthallen, Kirchen oder Studios. Darüber hinaus können Sie
die Einstellungen des Reverb-Effekts selbst anpassen.
Option Beschreibung
Room Size Mit diesem Parameter legen Sie die Dimensionen des
Time Mit diesem Parameter verkürzen oder verlängern Sie die
Pre-Delay Mit diesem Parameter stellen Sie einen kurzen Delay
Mix Mit diesem Parameter stellen Sie das Verhältnis zwischen
Raums fest. Sie können Werte zwischen 0% und 100%
einstellen. Indem Sie die Raumgröße verringern, können
Sie zum Beispiel eine Konzerthalle in einen kleinen Raum
verwandeln.
Reverb-Dauer. Sie können Werte zwischen 0% und
100% einstellen. Mit niedrigeren Einstellungen endet der
Reverb früher und mit höheren Einstellungen erhalten Sie
einen längeren Hall.
(Verzögerung) für den Reverb ein. Je höher dieser Wert
ist, desto später setzt der Delay ein und desto mehr wird
er vom eigentlichen Klavierklang getrennt. Sie können
Werte zwischen 0ms und 500ms einstellen.
dem Klavier- und dem Reverb-Sound ein. Sie können
Werte zwischen 0% und 100 % einstellen. Bei einem
Wert von 0% hören Sie nur das Klavier (wie ein Pianist,
der direkt am Klavier sitzt). Bei einem Wert von 100% hören Sie nur den Reverb-Sound (als säßen Sie im Publikum). Mit diesem Parameter vergrößern Sie also den
Abstand zwischen dem Pianisten und dem Zuhörer.
Ö Wenn Sie den Reverb-Effekt in Surround hören möchten, muss das Surround-Panning eingeschaltet sein.
Wenn Sie einen Reverb-Effekt auf das Klavier anwenden
möchten, gehen Sie folgendermaßen vor:
1. Wählen Sie im Reverb-Einblendmenü ein Preset aus.
Der Ein-/Aus-Schalter links neben dem Einblendmenü wird rot.
2. Nehmen Sie ggf. Einstellungen für die Parameter
»Room Size«, »Time«, »Pre-Delay« und »Mix« vor, siehe
unten.
Ö Wenn Sie das ausgewählte Preset deaktivieren möchten, klicken Sie auf den Ein-/Aus-Schalter links neben
dem Einblendmenü.
Die folgenden Reverb-Parameter sind verfügbar:
Option Beschreibung
ReverbEinblendmenü
Der integrierte Reverb-Effekt steht Ihnen entweder als
Faltungshall (Convolution Reverb) oder als algorithmischer Hall zur Verfügung. Aus den entsprechenden Untermenüs können Sie die verfügbaren Presets wählen.
Wenn Sie ein anderes Reverb-Preset auswählen, werden die Parameter »Room Size«, »Time« und »Pre-Delay«
automatisch angepasst, um den Eigenschaften des ausgewählten Raums zu entsprechen. Nur der Mix-Parameter wird nicht angepasst.
Die Control-Seite
Anders als ein akustischer Flügel wird The Grand über ein
MIDI-Keyboard oder ein Digitalpiano gespielt. Es empfiehlt
sich, ein Instrument mit gewichteten Tasten zu verwenden,
um das einzigartige dynamische Antwortverhalten nutzen
zu können. Nicht jedem steht jedoch ein solches Instrument zur Verfügung, darüber hinaus variieren Antwortverhalten und Handhabung von Keyboard zu Keyboard.
Deshalb können Sie The Grand mit Hilfe von mitgelieferten, vorkonfigurierten Presets für die Anschlagstärkekurve
an Ihr MIDI-Keyboard und Ihr Spielverhalten anpassen.
Zusätzlich können Sie eigene Anschlagstärkekurven erzeugen und als Presets speichern.
46
The Grand 3
Page 47

Links auf der Control-Seite finden Sie den Editor für die
Ziehen Sie nach oben,
um einen härteren
Klang zu erhalten.
Ziehen Sie nach unten,
um einen weicheren
Klang zu erhalten.
Anschlagstärkekurve. Hier werden die eingehende Anschlagstärke und die resultierende Anschlagstärke angezeigt. Standardmäßig wird hier eine gerade Linie von der
unteren linken in die obere rechte Ecke angezeigt. Das bedeutet, die eingehende Anschlagstärke wird unverändert
für die resultierende Anschlagstärke übernommen. Sie hören das Klavier in seinem ursprünglichen Dynamikumfang.
Durch Anpassen der Kurve verändern Sie das dynamische
Ansprechverhalten des Klaviers. Wenn Sie zum Beispiel einen härteren Klang bevorzugen, wählen Sie eine nach oben
gekrümmte Kurve aus. Wenn Sie einen weicheren Klang
bevorzugen, wählen Sie eine nach unten gekrümmte Kurve.
Sie können sogar eigene Anschlagstärkekurven einzeichnen, indem Sie die benutzerdefinierte Kurve mit der Maus
bearbeiten.
Mit den Schaltern rechts neben der Anschlagstärkekurve
können Sie einen Kurvenverlauf auswählen. Der oberste
Schalter ermöglicht es Ihnen, eine eigene Anschlagstärkekurve zu definieren. Mit den anderen Schaltern können Sie
zwischen den neun vordefinierten Anschlagstärkekurven
wählen.
Auswählen von Anschlagstärkekurven
• Sie wählen eine Anschlagstärkekurve aus, indem Sie
rechts neben dem Editor auf den Schalter für die gewünschte Kurvenform klicken.
Die Kurvenform wird auf dem Schalter angezeigt.
Erstellen einer benutzerdefinierten Kurve
Sie erzeugen eigene Anschlagstärkekurven, indem Sie die
benutzerdefinierte Kurve bearbeiten. Gehen Sie folgendermaßen vor:
1. Aktivieren Sie den obersten Schalter rechts neben
dem Kurveneditor.
2. Doppelklicken Sie im Editor, um Kurvenpunkte hinzuzufügen.
• Klicken Sie auf einen Kurvenpunkt und ziehen Sie ihn an
die gewünschte Position.
• Sie können Kurvenpunkte löschen, indem Sie darauf
doppelklicken.
• Richten Sie je nach gewünschtem Klang eine nach
oben oder nach unten gekrümmte Kurve ein.
Ö Die Kurvenpunkte in der linken unteren und der rechten oberen Ecke können nur nach oben/unten verschoben
werden.
Speichern einer benutzerdefinierten Kurve
Wenn Sie eine benutzerdefinierte Kurve speichern möchten, gehen Sie folgendermaßen vor:
1. Klicken Sie auf das Diskettensymbol links neben dem
Presets-Einblendmenü.
2. Legen Sie im angezeigten Dialog einen Namen und einen Speicherort für die Datei fest.
3. Klicken Sie auf »Save«, um das Preset zu speichern.
Laden einer benutzerdefinierten Kurve
• Wenn Sie eine zuvor gespeicherte benutzerdefinierte
Anschlagstärkekurve laden möchten, wählen Sie sie im
Presets-Einblendmenü aus.
Ö Wenn Sie ein Anschlagstärke-Preset bearbeiten, wird
neben dem Preset-Namen ein Sternchen angezeigt. Es
weist darauf hin, dass die Einstellungen verändert wurden.
Das Sternchen wird nicht mehr angezeigt, wenn Sie das
Preset speichern oder neu laden.
47
The Grand 3
Page 48

Löschen einer benutzerdefinierten Kurve
Wenn Sie eine benutzerdefinierte Kurve löschen möchten,
gehen Sie folgendermaßen vor:
1. Wählen Sie das zu löschende Preset im Einblendmenü
aus.
2. Klicken Sie auf das Papierkorbsymbol.
Ein Dialog wird geöffnet.
3. Klicken Sie auf »Yes«, um das Preset zu löschen und
den Dialog zu schließen.
Polyphony-Einstellungen
Mit den Polyphonie-Einstellungen unterhalb des PresetsEinblendmenüs können Sie festlegen, wie viele Stimmen
bzw. Samples The Grand gleichzeitig wiedergibt.
Die folgenden Einstellungen sind verfügbar:
Option Beschreibung
Max Voices Hier können Sie die maximale Anzahl der Stimmen ange-
Low Notes
Reserved
Repedaling Auf einem echten akustischen Klavier können Sie das
ben, die in The Grand gleichzeitig wiedergegeben werden
können. Jedes Sample entspricht dabei einer Stimme.
Wenn die Anzahl der wiedergegebenen Stimmen diesen
Wert überschreitet, beginnt The Grand damit, Noten von
der Wiedergabe auszuschließen. Sie können einen Wert
zwischen 1 und 256 einstellen. Diese Einstellung ist besonders hilfreich, um die Systemauslastung durch The
Grand zu verringern.
Mit dieser Einstellung können Sie festlegen, dass tiefere
Noten bevorzugt werden, wenn The Grand Noten von der
Wiedergabe ausschließen muss. Wenn Sie zum Beispiel
mit der linken Hand einen Akkord spielen und mit der
rechten Hand ein Solo, sollten Sie eine bestimmte Anzahl
Noten für den Akkord reservieren, um sicherzustellen,
dass die Noten nicht abrupt abgeschnitten werden. Mit
dieser Option stellen Sie die Anzahl der Noten ein, die für
die unteren Noten reserviert werden.
Haltepedal nach dem Loslassen noch so lange wiederholt
heruntertreten, wie die Saiten nicht komplett gedämpft
sind und noch schwingen. Dadurch schwingen die Saiten
mit der zur Verfügung stehenden Energie noch länger weiter. Denselben Effekt erzielen Sie, indem Sie diese Option
einschalten. Beachten Sie, dass diese Funktion viel Rechenleistung benötigt und deshalb bei weniger leistungsstarken Systemen ausgeschaltet werden sollte.
Die Options-Seite
Tuning – Stimmen des Instruments
Wenn Sie The Grand so stimmen möchten, dass es der
Stimmung der Begleitinstrumente oder -aufnahmen entspricht, verwenden Sie den Regler »Master Tune«. Sie
können Werte zwischen 415,3Hz und 466,2Hz einstellen, was einem Bereich von -100 Cents bis +100 Cents
entspricht. Der Standardwert ist 440Hz, was in The
Grand der Tonhöhe A3 entspricht, die normalerweise für
das Stimmen von Instrumenten verwendet wird.
Die Standardstimmung von The Grand ist die des jeweils
aufgenommenen Klaviers. Dabei handelt es sich um eine
»gedehnte Stimmung« (stretched tuning), d.h. die hohen
Töne werden sukzessiv etwas höher und die tiefen Töne
sukzessiv etwas tiefer gestimmt, um die Inharmonizität der
Klaviersaiten auszugleichen. Sie erhalten den natürlichsten Klang des Klaviers, wenn Sie die Stimmung nicht verändern. Durch Ausschalten des Schalters »Stretched
Tuning«, erhalten Sie eine gleichstufige Stimmung. Dies
eignet sich z.B., wenn das Klavier mit anderen Instrumenten kombiniert werden soll, die gleichstufig gestimmt sind.
Darüber hinaus verfügt The Grand über eine Reihe von
Presets für die Stimmung, z.B. historische Stimmungen
wie Werckmeister oder Kirnberger in unterschiedlichen
Tonhöhen.
Ö Um Aussetzer während der Wiedergabe zu vermeiden, schließt The Grand automatisch Stimmen aus, wenn
die CPU-Auslastung 95% übersteigt.
The Grand 3
48
Page 49

Laden von Scale-Presets
• Wenn Sie ein Preset laden möchten, wählen Sie es im
Einblendmenü rechts neben dem Scale-Schalter aus.
Im Einblendmenü stehen Ihnen die mitgelieferten Presets und Ihre eigenen Presets zur Verfügung. Die mitgelieferten Presets sind durch eine Linie von den benutzerdefinierten Presets getrennt.
Ö Wenn Sie das ausgewählte Preset deaktivieren möchten, klicken Sie auf den Ein-/Aus-Schalter links neben
dem Einblendmenü. Wenn die Option ausgeschaltet ist,
wird das Klavier mit der ursprünglich aufgenommenen gedehnten Stimmung wiedergegeben.
Speichern von benutzerdefinierten Presets
Wenn Sie die benutzerdefiniertes Preset speichern möchten, gehen Sie folgendermaßen vor:
1. Klicken Sie auf das Diskettensymbol links neben dem
Presets-Einblendmenü.
2. Legen Sie im angezeigten Dialog einen Namen und einen Speicherort für die Datei fest.
3. Klicken Sie auf »Save«, um das Preset zu speichern
und den Dialog zu schließen.
Löschen von Scale-Presets
Wenn Sie ein Preset löschen möchten, gehen Sie folgendermaßen vor:
1. Wählen Sie das zu löschende Preset im Einblendmenü
aus.
2. Klicken Sie auf das Papierkorbsymbol links neben dem
Presets-Einblendmenü.
Ein Dialog wird geöffnet.
3. Klicken Sie auf »Yes«, um das Preset zu löschen und
den Dialog zu schließen.
Ö Mitgelieferte Presets können nicht gelöscht werden.
Ö Wenn Sie ein Preset verändern, wird neben dem Pre-
set-Namen ein Sternchen angezeigt. Es weist darauf hin,
dass die Einstellungen verändert wurden. Das Sternchen
wird nicht mehr angezeigt, wenn Sie das Preset speichern.
Die mitgelieferten Scale-Presets
In der westlichen Musik trifft man am häufigsten auf die
»gleichstufige« Stimmung, bei der nebeneinander liegende Noten einen gleichen Abstand von 100 Cents haben. Diese Stimmung bildet gleichzeitig die Grundlage für
alle anderen Stimmungen. Diese Stimmung ist besonders
sinnvoll, wenn Sie The Grand mit anderen Instrumenten
verwenden möchten, die gleichstufig gestimmt sind, wie
z.B. Streicher-Sounds oder Synthesizer-Pads.
Darüber hinaus bietet The Grand noch folgende Stimmungen:
• Arabic 1 (für alle Grundtöne)
• Arabic 2 (für alle Grundtöne)
• Arabic 3 (für alle Grundtöne)
• Indian 1
• Kirnberger (für alle Grundtöne)
• Pure Major (für alle Grundtöne)
• Pure Minor (für alle Grundtöne)
• Vallotti and Young (für alle Grundtöne)
• Werckmeister (für alle Grundtöne)
Bearbeiten von Stimmungen
Sie können Ihre eigenen Stimmungen erzeugen, indem Sie
die Noten oktavweise bearbeiten (der Versatz für die Stimmung betrifft alle Oktaven des Keyboards gleichermaßen)
oder indem Sie die einzelnen MIDI-Noten bearbeiten (der
Versatz betrifft nur die einzelnen Noten). Wenn Sie die Oktaven bearbeiten, können Sie unterschiedliche Stimmungen
erzeugen. Die Stimmung der einzelnen Noten zu ändern ist
sinnvoll, wenn Sie gedehnte Stimmungen (»stretched tunings«) erzeugen möchten.
Wenn Sie die Stimmung oktavweise bearbeiten möchten,
gehen Sie folgendermaßen vor:
1. Klicken Sie auf den Oct-Schalter rechts neben dem
Editor.
2. Klicken Sie im Editor in das Offset-Feld der Note, die
Sie im Editor anpassen möchten.
3. Geben Sie einen Versatzwert zwischen -100,00 Cent
und +100,00 Cent ein.
Die Versatzwerte der 12 Noten werden auf alle Oktaven
gleichermaßen angewendet.
49
The Grand 3
Page 50

Wenn Sie die Stimmung für einzelne Noten bearbeiten
möchten, gehen Sie folgendermaßen vor:
1. Klicken Sie auf den Notenschalter rechts neben dem
Editor.
2. Klicken Sie im Editor in das Offset-Wertefeld der
Note, die Sie anpassen möchten.
3. Geben Sie einen Versatzwert zwischen -100,00 Cent
und +100,00 Cent ein.
Diesen Versatz können Sie individuell für die 128 MIDINoten einstellen.
Die Modi »Absolute« und »Relative«
MIDI-Noten können Microtuning-Informationen enthalten,
d.h. Stimmungs-Versatzwerte für einzelne Noten. Die
Modi »Absolute« und »Relative« bestimmen, wie eingehende Microtuning-Informationen behandelt werden:
Option Beschreibung
Absolute Die eingehenden Microtuning-Informationen werden her-
Relative Die eingehenden Microtuning-Informationen werden bei-
ausgefiltert und The Grand wendet nur die eigenen Einstellungen an.
behalten und um den Wert angehoben/abgesenkt, der in
The Grand eingestellt ist.
Importieren von Scala-Dateien
Mit The Grand können Sie Dateien mit definierten Stimmungen im verbreiteten Scala-Dateiformat (Dateinamenerweiterung .scl) importieren. Dadurch können Sie
buchstäblich auf Tausende von Scale-Presets zugreifen.
Wenn Sie eine Scala-Datei importieren möchten, gehen
Sie folgendermaßen vor:
1. Wählen Sie im Preset-Einblendmenü den Befehl »Import Scale…«.
2. Wählen Sie im angezeigten Dialog die Datei aus, die
Sie importieren möchten.
3. Klicken Sie auf »Open«, um die Scala-Datei zu importieren und den Dialog zu schließen.
Die importierten Dateien werden im Ordner für benutzerdefinierte Presets gespeichert und können wie andere Scale-Presets geladen werden.
Ö Sie können auf diese Weise auch mehrere Scala-Dateien gleichzeitig importieren.
Amount-Einstellungen
Mit dieser Einstellung legen Sie fest, wie die Stimmung
angewendet werden soll. Sie können Werte zwischen 0%
und 100% einstellen. Mit einer Einstellung von 100%,
werden die Versatz-Einstellungen genauso übernommen
wie im Preset festgelegt. Mit niedrigeren Einstellungen
wird der Versatz relativ vermindert. Wenn Sie hier 0% einstellen, wirken sich die Preset-Einstellungen nicht aus.
Einstellungen für die Systemleistung
Auf der Options-Seite finden Sie außerdem noch einen
Regler, mit dem Sie das Verhältnis von Disk- und RAMAuslastung einstellen können. Dies wird unter »Verteilen
der Last zwischen Festplatte (Disk) und RAM (OptionsSeite)« auf Seite 54 beschrieben.
Tooltips
Wenn Sie den Mauszeiger über ein Element bewegen,
wird in einem Tooltip eine kurze Information zu diesem
Element angezeigt. Schalten Sie diese Option aus, wenn
Sie keine Tooltips sehen möchten.
Zusätzliche Bedienelemente bei der
Verwendung von The Grand als StandaloneInstrument
Ganz oben im Fenster finden Sie zusätzliche Bedienelemente für die Verwendung von The Grand als StandaloneInstrument.
Informationen über das Einrichten von The Grand als
Standalone-Instrument finden Sie unter »The Grand als
Standalone-Anwendung und ReWire« auf Seite 36.
Einrichten von Tastaturbefehlen
Für die meisten Bedienelemente von The Grand können
Sie im Standalone-Bedienfeld Tastaturbefehle einrichten.
Im Dialog »Key Commands« werden die verfügbaren Befehle und die zugewiesenen Tasten aufgelistet.
Die Befehle sind, ähnlich wie im Windows Explorer und im
Finder von Mac OS, in einer hierarchischen Ordnerstruktur aufgeführt. Wenn Sie einen übergeordneten Ordner
öffnen, indem Sie auf das Pluszeichen klicken, werden die
darin enthaltenen Befehle und Funktionen gemeinsam mit
den zugewiesenen Tastaturbefehlen angezeigt.
50
The Grand 3
Page 51

Wenn Sie einen Tastaturbefehl einrichten möchten, gehen
Klicken Sie
hier…
…um den Dialog zum Einrichten von Tastaturbefehlen zu öffnen.
Sie folgendermaßen vor:
1. Klicken Sie oben links im Bedienfeld auf den Schalter
rechts neben dem Einblendmenü für den MIDI-Eingang.
Der Dialog »Key Commands« wird geöffnet.
2. Wählen Sie in der Commands-Liste links eine Kategorie aus.
3. Klicken Sie auf das Pluszeichen für den Ordner, um
die Befehle für diese Kategorie anzuzeigen.
Sie können auch die übergeordneten Plus- und Minus-Schalter (»+ All«
und »- All«) oben im Dialog verwenden, um alle Ordner gleichzeitig zu öffnen bzw. zu schließen.
4. Wählen Sie in der Liste den Befehl aus, für den Sie einen Tastaturbefehl einrichten möchten.
Bereits zugewiesene Tastaturbefehle werden in der Keys-Spalte angezeigt und im Keys-Bereich oben rechts im Dialog.
Sie können auch nach einer bestimmten Funktion suchen, indem Sie deren Namen im Feld für die Textsuche oben im Dialog eingeben und auf
den Suchen-Schalter (das Lupe-Symbol) klicken.
5. Wenn Sie das gewünschte Element ausgewählt haben, klicken Sie in das Feld »Type in Key« und drücken Sie
die Tasten für den neuen Tastaturbefehl.
Sie können entweder eine beliebige einzelne Taste oder eine Tastenkombination aus einer Sondertaste ([Alt]-Taste/[Wahltaste], [Strg]Taste/[Befehlstaste], [Umschalttaste]) und einer beliebigen anderen
Taste wählen.
6. Klicken Sie auf den Assign-Schalter über dem Feld,
um den Tastaturbefehl der Funktion zuzuweisen.
Der neue Tastaturbefehl wird in der Liste angezeigt.
7. Klicken Sie auf »OK«, um den Dialog zu schließen.
• Wenn ein Tastaturbefehl bereits einer anderen Funktion
zugewiesen ist, wird eine Warnmeldung angezeigt, über
die Sie entweder den alten Tastaturbefehl mit dem neuen
überschreiben oder die Aktion abbrechen können.
• Sie können mehrere Tastaturbefehle für dieselbe Funktion einrichten.
• Wenn Sie einen Tastaturbefehl löschen möchten, wählen Sie den dazugehörigen Befehl in der Liste im KeysBereich aus und klicken Sie auf den Löschen-Schalter
(das Papierkorbsymbol).
Auswählen von MIDI-Eingang und Audioausgang
Im Standalone-Modus enthält das Bedienfeld oben links
zwei Einblendmenüs, über die Sie den MIDI-Eingang und
den Audioausgang des PlugIns einstellen können.
Im Einblendmenü für den MIDI-Eingang werden alle MIDIGeräte angezeigt, die in Ihrem System eingerichtet sind.
• Öffnen Sie das Einblendmenü für den MIDI-Eingang
und wählen Sie das MIDI-Gerät aus, das Sie verwenden
möchten.
Wenn die orangefarbene MIDI-Aktivitätsanzeige oben
links im Fenster aufleuchtet, gehen MIDI-Daten über den
ausgewählten Eingang ein. Die Anzeige leuchtet auf,
wenn Note-On- und Controller-Befehle empfangen werden. So können sie überprüfen, ob das PlugIn und Ihr
MIDI-Keyboard mit demselben MIDI-Port verbunden sind.
Im Einblendmenü für den Audioausgang werden alle verfügbaren Ausgänge des ausgewählten ASIO-Geräts angezeigt.
51
The Grand 3
Page 52

• Öffnen Sie das Einblendmenü für den Audioausgang
Wiedergabe
Stop Aufnahme Loop
MIDI-Datei
laden
MIDI-Datei
speichern
Aufnahmemodus
wählen
MetronomEinstellung
Songpositionsregler
Tempospur Tempo-
Wert
Temposkalierung
Taktart
Info-Schalter
Songpositionsanzeige
Format für die
Zeitanzeige
MIDI-Kanal-Filter
und wählen Sie einen Ausgang für den Haupt-Stereokanal
des PlugIns aus.
Wenn Sie einen Audioausgang wählen, werden die vorderen und hinteren Kanäle an aufsteigende Audioausgänge geleitet, z. B. 1, 2, 3, 4 oder
5, 6, 7, 8.
Wenn Sie die [Alt]-Taste/[Wahltaste]-[Umschalttaste] gedrückt halten,
werden die Audioausgänge in Paaren jeweils den vorderen und hinteren
Kanälen zugewiesen – z.B. 1, 2, 1, 2 oder 5, 6, 5, 6.
Ö Das ASIO-Gerät sowie weitere Audioausgänge können Sie im Preferences-Dialog einrichten. Weitere Information zum Preferences-Dialog finden Sie unter »Der
Preferences-Dialog« auf Seite 36.
Das Scratch Pad
• Klicken Sie auf den Stop-Schalter, um die Wiedergabe
der Datei an der aktuellen Position zu unterbrechen.
Klicken Sie zweimal auf den Stop-Schalter, um die Songposition an den
Anfang zu verschieben.
• Klicken Sie auf den Aufnahme-Schalter, um die Aufnahme zu starten.
• Klicken Sie auf den Schalter für die Loop-Wiedergabe
um die gesamte MIDI-Datei geloopt wiederzugeben.
Laden von MIDI-Dateien
Wenn Sie eine Standard-MIDI-Datei laden möchten, gehen Sie folgendermaßen vor:
1. Klicken Sie auf den Schalter »Load File…« unterhalb
der Transportschalter.
2. Wählen Sie im angezeigten Dateiauswahldialog die
gewünschte MIDI-Datei aus.
3. Klicken Sie auf »Open«, um die MIDI-Datei zu laden.
Speichern von MIDI-Dateien
Wenn Sie Ihre Aufnahme als MIDI-Datei speichern möchten, gehen Sie folgendermaßen vor:
1. Klicken Sie auf den Schalter »Save MIDI File…« (das
Diskettensymbol) unterhalb der Transportschalter.
2. Legen Sie im angezeigten Dialog einen Namen und einen Speicherort für die Datei fest.
3. Klicken Sie auf »Save«, um die MIDI-Datei zu speichern.
Mit dem Scratch Pad können Sie Standard-MIDI-Dateien
(Dateinamenerweiterung .mid) aufnehmen und wiedergeben, bestehende MIDI-Dateien laden und eigene Dateien
aufnehmen und speichern. Das Transportfeld enthält Schalter für Wiedergabe, Stop, Aufnahme und Cycle-Wiedergabe. In der Anzeige werden die Songposition, das Tempo
und die Taktart der MIDI-Datei angezeigt. Darüber hinaus
steht Ihnen hier ein Metronom zur Verfügung, das Sie während der Aufnahme oder beim Üben verwenden können.
Verwenden der Transportfunktionen
• Klicken Sie auf den Wiedergabe-Schalter, um die MIDIDatei wiederzugeben.
Die Wiedergabe beginnt immer an der Songposition.
The Grand 3
Der Info-Schalter
Wenn Sie prüfen möchten, welche MIDI-Datei gerade geladen ist, fahren Sie mit der Maus über den Info-Schalter
in der oberen linken Ecke der Songpositionsanzeige. In einem Tooltip wird der Name der MIDI-Datei angezeigt.
Filtern der MIDI-Kanäle
Wenn Sie eine MIDI-Datei laden, die mehrere Spuren enthält, können Sie festlegen, ob alle Events oder nur die
Events eines bestimmten Kanals wiedergegeben werden.
Das Einblendmenü hierzu finden Sie rechts neben dem
Info-Schalter in der Songpositionsanzeige.
52
Page 53

Songposition
Der Songpositionsregler zeigt an, an welcher Position im
Song Sie sich gerade befinden. Oberhalb des Reglers
wird die Position numerisch angezeigt.
Ö Wenn Sie eine MIDI-Datei geladen haben, wird in der
Anzeige die volle Länge der Datei angezeigt und der
Songpositionsregler wird an das Ende der Datei gesetzt.
Wenn Sie auf den Wiedergabe-Schalter klicken, beginnt
die Wiedergabe am Anfang der Datei.
• Wenn Sie an eine andere Position im Song springen
möchten, ziehen Sie den Songpositionsregler an die gewünschte Position.
• Wenn Sie zwischen den Zeitformaten wechseln möchten, klicken Sie auf das Symbol oben rechts in der Anzeige. Wenn eine lineare Zeitbasis ausgewählt ist, wird
hier eine Uhr angezeigt. Wenn als Format Takte und Zählzeiten verwendet werden, wird eine Note angezeigt.
Tempo und Taktart
Unterhalb der Songpositionsanzeige befinden sich die
Felder, in denen Tempo und Taktart für das PlugIn festgelegt sind. Im Standalone-Modus sind solche Informationen
nicht über eine Host-Anwendung verfügbar. In diesem Fall
werden diese Informationen für das Scratch Pad und das
Metronom verwendet.
Option Beschreibung
Tempo
Track/Fixed
Tempo-Wert Dieser Parameter bestimmt das Tempo der MIDI-Datei.
Temposkalierung
Sign.
(Taktart)
Stellen Sie hier »Track« ein, wenn das Tempo der MIDIDatei beibehalten werden soll. Stellen Sie »Fixed« ein,
wenn Sie das Tempo manuell festlegen möchten.
Sie können Werte zwischen 1,000BPM und
300,000BPM einstellen.
Wenn die Option »Track« ausgewählt ist, wird ein zusätzliches Bedienelement angezeigt, mit dem Sie die Wiedergabe relativ zum Ursprungstempo der MIDI-Datei skalieren
können. Sie können Werte zwischen 0,5x (-50%) und 2x
(+100%) des ursprünglichen Tempos einstellen.
Dieser Parameter legt die Taktart der MIDI-Datei fest. Sie
können den gewünschten Wert als Bruch eingeben, z.B.
3/4, 6/8 oder 4/4.
Aufnehmen Ihrer Performance
1. Klicken Sie auf das Aufnahmesymbol unterhalb des
Aufnahme-Schalters, um im Einblendmenü einen Aufnahmemodus zu wählen:
Option Beschreibung
Direct Die Aufnahme beginnt, sobald Sie auf den Aufnahme-
MIDI Die Aufnahme beginnt mit der ersten empfangenen MIDI-
Count In 1 Die Aufnahme beginnt nach einem Vorzähler von einem
Count In 2 Die Aufnahme beginnt nach einem Vorzähler von zwei
Schalter klicken.
Note.
Takt.
Takten.
2. Klicken Sie auf den Aufnahme-Schalter, um die Aufnahme zu starten.
3. Wenn Sie die Aufnahme beenden möchten, klicken
Sie auf den Stop-Schalter.
• Nun können Sie die Aufnahme als MIDI-Datei speichern, siehe »Speichern von MIDI-Dateien« auf Seite 52.
Ö Wenn die Aufnahme aktiv ist, wird dies durch einen
animierten Positionszeiger gekennzeichnet (ein kleiner
Balken läuft von links nach rechts).
Verwenden des Metronoms
Sie können den Wiedergabemodus für das Metronom
wählen, indem Sie auf den Metronom-Schalter klicken.
Die folgenden Modi sind im Einblendmenü verfügbar:
Option Beschreibung
Off Das Metronom ist ausgeschaltet.
Count In Das Metronom ist nur während des Vorzählers einer Auf-
On Das Metronom ist während der gesamten Aufnahme zu
nahme zu hören.
hören.
Mit dem Regler neben dem Metronom-Schalter können
Sie die Lautstärke für das Metronom einstellen. Weitere
Metronomeinstellungen befinden sich im PreferencesDialog, siehe »Der Preferences-Dialog« auf Seite 36.
53
The Grand 3
Page 54

Volume
Verwenden Sie diesen Regler, um die Gesamtlautstärke
der Ausgänge des Standalone-PlugIns einzustellen. Dies
beinhaltet die Lautstärke der Hauptausgänge, der hinteren
Ausgänge (Rear) und des Metronomausgangs.
Faktoren, die die Systemleistung beeinflussen
Für jedes Klaviermodell sind einige GB an Samples verfügbar. Dies ist eine umfangreiche Menge an Daten, die
Ihr Computer verwalten muss. The Grand bietet Ihnen unterschiedliche Möglichkeiten für die Optimierung der
Computerleistung. Diese werden in den folgenden Abschnitten beschrieben.
ECO Mode (allgemeine Bedienelemente)
Wenn der ECO Mode aktiviert ist, stehen Ihnen nur 7 der
bis zu 20 Anschlagstärke-Layer zur Verfügung, mit denen
die Flügel aufgenommen wurden. Die Reduzierung der
Anschlagstärke-Layer führt zu einer weniger starken Auslastung des Computersystems. Verwenden Sie diesen
Modus, wenn Sie sehr viele Sequenzer-Audiospuren oder
PlugIns zusammen mit The Grand verwenden möchten.
• Wenn Sie diesen Modus einschalten möchten, klicken
Sie im Bereich mit den allgemeinen Bedienelementen auf
den Schalter »ECO Mode«.
Wenn der ECO Mode eingeschaltet ist, leuchtet der Schalter auf.
Ö Das Laden der Klaviermodelle für den ECO Mode
kann eine gewisse Zeit dauern.
Wenn Sie »ECO Mode« ausschalten, werden wieder alle
Samples geladen. Für die Flügel können das bis zu 20 Anschlagstärke-Layer für 97 Tasten sein.
RAM Save (allgemeine Bedienelemente)
Mit der Funktion »RAM Save« können Sie die Leistung des
Systems optimieren. Dabei wird die Wiedergabe des aktuellen Projekts analysiert und alle nicht benötigten
Samples werden aus dem Speicher gelöscht.
Wenn Sie die Funktion »RAM Save« anwenden möchten,
gehen Sie folgendermaßen vor:
1. Klicken Sie im Bereich mit den allgemeinen Bedienelementen auf den Schalter »RAM Save«.
Wenn Sie diesen Schalter einschalten, wird ein Dialog geöffnet, in dem
Sie gefragt werden, ob die benötigten Samples ermittelt werden sollen.
2. Klicken Sie auf »Yes«, um RAM Save anzuwenden.
Der Schalter »RAM Save« beginnt zu blinken.
3. Geben Sie das Projekt in Ihrer Host-Anwendung von
Anfang bis Ende wieder (oder bis zu der Position, an der
keine neuen Noten gespielt werden).
4. Klicken Sie erneut auf den Schalter »RAM Save«.
Sie werden gefragt, ob alle nicht benötigten Samples aus dem Speicher
entfernt werden sollen.
5. Klicken Sie auf »Yes«, um die Samples aus dem Speicher zu entfernen.
Der Schalter hört auf zu blinken und leuchtet, um anzuzeigen, dass die
Funktion aktiv ist.
6. Wenn Sie alle Samples erneut laden möchten, klicken
Sie noch einmal auf den Schalter, um »RAM Save« zu
deaktivieren.
Sie werden gefragt, ob Sie die Funktion deaktivieren möchten. Klicken
Sie auf »Yes«. Der Schalter leuchtet nun nicht mehr und alle Samples
werden wieder geladen.
Ö Je nachdem, wie viele Samples aus dem Speicher gelöscht wurden, kann das Laden der Samples eine gewisse
Zeit in Anspruch nehmen.
Sound-Parameter (Model-Seite)
Wenn Sie einen der Sound-Parameter ausschalten, verringern Sie die Detailtreue der Klavier-Emulation, wodurch
weniger Systemleistung für RAM- und Disk-Streaming
aufgewendet werden muss. Auf langsameren Systemen
haben Sie dadurch die Möglichkeit, mehr Stimmen gleichzeitig zu verwenden.
Verteilen der Last zwischen Festplatte (Disk) und RAM
(Options-Seite)
Ihr Computer kann nicht alle Samples vollständig in den Arbeitsspeicher (RAM) laden. Deswegen lädt The Grand nur
die ersten Millisekunden jedes Samples in den RAM und
lädt während der Wiedergabe konstant weitere Teile von
der Festplatte. Da die Festplatte dadurch mit jeder weiteren
gespielten Note mehr arbeiten muss, ist es sinnvoll, zu Beginn so viel Material wie möglich in den RAM zu laden. Dadurch steht jedoch weniger RAM für andere Anwendungen
zur Verfügung. Um eine optimale Systemauslastung zu erzielen, können Sie in The Grand das Verhältnis von Festplatten- und RAM-Belastung einstellen.
54
The Grand 3
Page 55

Verwenden Sie dazu den Regler »Disk vs. RAM« auf der
Options-Seite:
• Wenn Ihre Festplatte die Daten nicht schnell genug zur
Verfügung stellt, ziehen Sie den Regler nach rechts, um
mehr Daten im RAM vorzuhalten.
• Wenn Sie mehr RAM für andere Anwendungen benötigen, ziehen Sie den Regler nach links, damit mehr Last auf
die Festplatte verteilt wird.
Die MEM-Anzeige oben rechts im Bedienfeld wird entsprechend angepasst (siehe unten).
Ö Wenn keine Probleme mit der Systemleistung auftreten, sollten Sie diese Einstellung nicht verändern.
Ö Wenn Sie Probleme mit der Systemleistung haben,
egal welche Einstellungen Sie hier vornehmen, sollten Sie
den ECO Mode einschalten. Dadurch werden für die Klaviere weniger Anschlagstärke-Layer geladen, siehe »ECO
Mode (allgemeine Bedienelemente)« auf Seite 54.
Die Systemleistungsanzeigen
Oben rechts im PlugIn-Bedienfeld finden Sie Anzeigen,
die die Systemauslastung durch das PlugIn anzeigen.
Option Beschreibung
CPU Die obere Anzeige stellt die Prozessorauslastung wäh-
Disk Diese Anzeige zeigt an, wie hoch die Belastung der Fest-
rend der Wiedergabe mehrerer Stimmen dar. Je mehr
Stimmen Sie wiedergeben, desto höher ist die Prozessorlast. Wenn die rote Überlastungsanzeige rechts neben der Option aufleuchtet, stellen Sie auf der ControlSeite einen niedrigeren Wert für »Max Voices« ein. Sie
können auch Optionen auf der Model-Seite ausschalten,
um die Prozessorlast zu verringern.
platte beim Streaming von Samples oder beim Laden von
Modellen ist. Wenn die rote Überlastungsanzeige aufleuchtet, werden die Daten nicht schnell genug von der
Festplatte zur Verfügung gestellt. In diesem Fall verschieben Sie den Regler »Disk vs. RAM« auf der Options-Seite
weiter in Richtung RAM. Sie können auch die Einstellung
für »Max Voices« auf der Control-Seite verringern. Darüber
hinaus können Sie Sound-Parameter auf der Model-Seite
ausschalten, um die Festplattenbelastung zu reduzieren.
Option Beschreibung
Voices Hier wird angezeigt, wie viele Samples gerade wiederge-
MEM Hier sehen Sie, wie viel RAM gerade vom PlugIn und
geben werden. Dies dient als Indikator für PerformanceProbleme. Wenn Sie zum Beispiel die Anzahl der Stimmen
auf der Control-Seite heruntersetzen mussten, können Sie
Ihre Einstellungen anhand dieser Anzeige überprüfen.
dem geladenen Modell benötigt wird. Der angezeigte
Wert ergibt sich aus den Streaming-Speichern und den
vorgeladenen Samples. Über die MEM-Anzeige können
Sie leicht Performance-Probleme aufspüren. Wenn Sie
zum Beispiel freien Speicher für andere Anwendungen
benötigen, können Sie auf der Options-Seite den Regler
»Disk vs. RAM« in Richtung »Disk« verschieben. Überprüfen Sie die Einstellungen, indem Sie die MEM-Anzeige im
Auge behalten.
Ö Wenn Sie Probleme mit der Systemleistung haben,
können Sie auch den ECO Mode einschalten. Dadurch
werden für die Klaviere weniger Anschlagstärke-Layer geladen, siehe »ECO Mode (allgemeine Bedienelemente)«
auf Seite 54.
Situationen, in denen nicht genügend Speicher zur
Verfügung steht
Insbesondere bei der Arbeit mit vielen sample-basierten
PlugIns kann es vorkommen, dass nicht genügend RAM für
das Laden von The Grand verfügbar ist. In diesem Fall wird
ein Dialog mit einer entsprechenden Warnung angezeigt.
Im Dialog stehen Ihnen folgende Optionen zur Verfügung,
die es Ihnen ggf. ermöglichen, The Grand dennoch zu
laden:
Option Beschreibung
Switch to
ECO Mode
Disable
Sustain Resonance Layer
Reduce RAM
usage
(Disk<>RAM)
The Grand wird mit aktiviertem ECO Mode geöffnet, siehe
»ECO Mode (allgemeine Bedienelemente)« auf Seite 54.
The Grand wird ohne Samples für Sustain Resonance geladen.
Wenn Sie diese Option wählen, wird die Einstellung »Disk
vs. RAM« auf der Options-Seite um einen Schritt in Richtung Disk verschoben.
• Schalten Sie eine der Optionen ein und klicken Sie auf
»OK«.
Wenn auf diese Weise ausreichend RAM verfügbar wird, können Sie
The Grand jetzt verwenden. Wenn für das Programm immer noch nicht
genügend RAM zur Verfügung steht, wird der Dialog erneut geöffnet, so
dass Sie eine weitere Option aktivieren können.
55
The Grand 3
Page 56

Verwenden von MIDI-Controllern
Standardmäßig sind die meisten PlugIn-Parameter bereits
bestimmten MIDI-Controllern zugewiesen. Sie können die
Standardzuweisungen anpassen, indem Sie Ihre eigenen
Controller-Zuweisungen mit der Lernen-Funktion vornehmen. Auf diese Weise können Sie die Einstellungen an Ihr
MIDI-Keyboard oder Ihr externes MIDI-Gerät anpassen.
Für jede Zuweisung können Sie den genauen Bereich eingrenzen, um eine noch bessere Kontrolle über die Parameter zu erhalten.
Zuweisen von MIDI-Controllern
1. Klicken Sie mit der rechten Maustaste auf das Bedienelement, das Sie über das externe Gerät steuern möchten.
2. Wählen Sie im Kontextmenü den Befehl »Learn CC«.
3. Verwenden Sie auf Ihrem MIDI-Keyboard oder MIDI-
Gerät den entsprechenden Drehregler, Schieberegler
oder Schalter.
Ö Wenn Sie das nächste Mal mit der rechten Maustaste
auf das Bedienelement klicken, wird der zugewiesene
MIDI-Controller angezeigt.
Ö Sie können denselben MIDI-Controller unterschiedlichen Parametern zuweisen. Sie können jedoch nicht unterschiedliche MIDI-Controller für denselben Parameter
einrichten.
Aufheben von MIDI-Controller-Zuweisungen
Wenn Sie eine MIDI-Controller-Zuweisung wieder aufheben möchten, klicken Sie mit der rechten Maustaste auf
das Bedienelement und wählen Sie im Kontextmenü den
Befehl »Unassign«.
Einstellen des Parameterbereichs
Sie können den höchsten und den tiefsten Parameterwert
für jede neue Zuweisung separat einstellen. So haben Sie
z.B. bei Live-Auftritten mehr Kontrolle über die Parameter.
• Zum Einstellen des tiefsten Werts setzen Sie den Parameter auf den gewünschten Minimalwert, klicken mit der
rechten Maustaste auf das Bedienelement und wählen im
Kontextmenü den Befehl »Set Minimum«.
• Zum Einstellen des höchsten Werts setzen Sie den Parameter auf den gewünschten Maximalwert, klicken mit
der rechten Maustaste auf das Bedienelement und wählen
im Kontextmenü den Befehl »Set Maximum«.
MIDI-Controller
Die folgenden Parameter auf der PlugIn-Oberfläche können
über einen externen MIDI-Controller gesteuert werden (die
Controller-Nummern beziehen sich dabei auf die werkseitig
verwendeten Nummern und Namen für die Parameter):
Seite Parameter Controller-
Alle
Seiten
ModelSeite
Equalizer EQ ein/aus - -
Main Volume 07 Main Volume
Sustain Resonance 75 Sound-Controller #6
String Release 76 Sound-Controller #7
Key Sound 77 Sound-Controller #8
Hammer Release 78 Sound-Controller #9
Damper Pedal 79 Sound-Controller #10
Modulation On/Off
(nur CP80)
Modulation Depth
(nur CP80)
Modulation Speed
(nur CP80)
Modulation Feed-
back (nur CP80)
Modulation Phase
(nur CP80
Modulation Mix (nur
CP80)
Tremolo On/Off
(nur CP80)
Tremolo Depth (nur
CP80)
Tremolo Speed (nur
CP80)
Low Gain - Low Frequency - Low Q - Mid 1 Gain - Mid 1 Frequency - Mid 1 Q - -
Nr.
93 Effect 3 Depth
75 Sound-Controller #6
76 Sound-Controller #7
77 Sound-Controller #8
78 Sound-Controller #9
79 Sound-Controller #10
14 -
12 Effect Control 1
13 Effect Control 2
Name
56
The Grand 3
Page 57

Seite Parameter Controller-
Mid 2 Gain - Mid 2 Frequency - Mid 2 Q - High Gain - High Frequency - High Q - -
Ambience Left/Right 10 Pan
Rear/Front - Reverb ein/aus - Room Size - Reverb Time - Pre-Delay - Reverb Mix 91 Effect 1 Depth
Nr.
Name
Automationsparameter
Die folgenden Parameter können über die Host-Software
automatisiert werden:
Seite Parameter
Alle Seiten Main Volume
Model-Seite Sustain Resonance
String Release
Key Sound
Hammer Release
Damper Pedal
Modulation On/Off (nur CP80)
Chorus Depth (nur CP80)
Chorus Speed (nur CP80)
Chorus Feedback (nur CP80)
Chorus Phase (nur CP80)
Flanger Depth (nur CP80)
Flanger Speed (nur CP80)
Flanger Feedback (nur CP80)
Flanger Phase (nur CP80)
Phaser Depth (nur CP80)
Phaser Speed (nur CP80)
Phaser Feedback (nur CP80)
Phaser Phase (nur CP80)
Modulation Mix (nur CP80)
Seite Parameter
Tremolo On/Off (nur CP80)
Tremolo Depth (nur CP80)
Tremolo Speed (nur CP80)
Equalizer EQ ein/aus
1 Low Gain
1 Low Frequency
1 Low Q
2 Mid Gain
2 Mid Frequency
2 Mid Q
3 Mid Gain
3 Mid Frequency
3 Mid Q
4 High Gain
4 High Frequency
4 High Q
Ambience Left/Right
Rear/Front
Reverb ein/aus
Room Size
Reverb Time
Pre-Delay
Reverb Mix
57
The Grand 3
Page 58

Index
A
Ambience-Seite 45
Anschlagstärkekurve 47
Ansichten
Umschalten 41
Automation
Parameter 57
C
Content
Beschreibung 38
Fehlende VST Sound Library 37
Control-Seite 46
E
ECO Mode 54
Equalizer-Seite 45
F
Fehlende Content-Dateien 37
H
Host-Anwendung
AU-kompatible Anwendung 35
Cubase 35
I
Instrument stimmen 48
K
Klaviermodelle 38
Kopierschutz 33
M
Main Volume
Anpassen 41
MIDI-Controller 56
Modelle 38
Model-Seite 43
O
Options-Seite 48
P
Polyphonie 48
Preset
Anschlagstärkekurve 47
Presets
Beschreibung 40
Stimmung 49
R
RAM Save 54
Reset MIDI 42
ReWire
The Grand Standalone und ReWire 36
S
Scratch Pad 52
Standalone
Bedienelemente 50
Preferences 36
The Grand Standalone und ReWire 36
Stimmungs-Presets 49
Suchen 37
Systemanforderungen
Beschreibung 34
Systemleistung 54
T
Tastaturbefehle
Beschreibung 32
Einrichten 50
Transportfunktionen 52
U
USB-eLicenser
Beschreibung 33
V
Vorhör-Klaviatur 42
VST Sound Library
Fehlende Dateien 37
58
The Grand 3
Page 59

Mode d’Emploi
Page 60

Cristina Bachmann, Heiko Bischoff, Marion Bröer, Sabine Pfeifer, Heike Schilling
Remerciements à : Matthias Klag, Michael Ruf
Traduction : Gaël Vigouroux
Les informations contenues dans ce document sont sujettes à modification sans préavis et n’engagent aucunement la
responsabilité de Steinberg Media Technologies GmbH. Le logiciel décrit dans ce document fait l’objet d’un Accord de
Licence et ne peut être copié sur un autre support sauf si cela est autorisé spécifiquement par l’Accord de Licence.
Aucune partie de cette publication ne peut en aucun cas être copiée, reproduite ni même transmise ou enregistrée, sans
la permission écrite préalable de Steinberg Media Technologies GmbH.
Steinberg, The Grand, VST et ASIO sont des marques déposées de Steinberg Media Technologies GmbH. Windows,
Windows Vista et DirectX sont des marques déposées de Microsoft Corporation aux États-Unis et dans d’autres pays.
Macintosh, Mac et Mac OS sont des marques de commerce d’Apple Inc. déposées aux États-Unis et dans d’autres
pays. Pentium et Intel Core sont des marques de commerce ou des marques déposées d’Intel Corporation aux ÉtatsUnis et dans d’autres pays. Tous les autres produits et noms de sociétés sont des marques de commerce ™ ou déposées ® de leurs détenteurs respectifs.
Date de publication : 29 Juin 2009
© Steinberg Media Technologies GmbH, 2009.
Tous droits réservés.
Page 61

Table des Matières
62 Bienvenue
62 Conventions appliquées aux
raccourcis clavier
63 Comment nous joindre
63 Installation
63 La clé USB-eLicenser
64 Configuration système
64 Installation de The Grand
65 Enregistrez votre logiciel !
65 Préparez-vous à jouer
65 Configuration de The Grand en tant qu’instrument
VST dans Cubase
65 Utilisation de The Grand dans une application
compatible AU
65 The Grand en mode autonome et ReWire
67 Contenus manquants
68 Les contenus
68 L’enregistrement de The Grand
68 Les modèles
69 Paramètres
69 Commandes générales du plug-in
72 La page Model
74 La page Equalizer
74 La page Ambience
75 La page Control
77 La page Options
79 Commandes supplémentaires de la version
autonome de The Grand
83 À propos des performances
84 Utilisation des contrôleurs MIDI
85 Contrôleurs MIDI
86 Paramètres d’automatisation
87 Index
61
The Grand 3
Page 62

Bienvenue
Félicitations et merci d’avoir fait l’acquisition de The
Grand 3 de Steinberg.
Grâce à ses deux précédentes versions, The Grand s’est
acquis une réputation de leader sur le marché mondial
des pianos virtuels. En 2009, The Grand revient sous une
troisième version pour démontrer qu’il est largement à la
hauteur de cette réputation.
Avec The Grand 3, vous bénéficiez d’une suite de cinq
pianos virtuels de qualité supérieure, dont les sons ont été
soigneusement enregistrés dans une qualité sonore inégalée à l’heure actuelle. Les pianos à queue Yamaha C7,
Bösendorfer 290 Imperial et Steinway D, ainsi que le fameux piano électrique Yamaha CP80 et le piano droit
Nordiska Pianofabriken vous donnent accès à toute la palette des plus grands sons de pianos.
Alliant une architecture d’échantillons intelligente et entièrement intégrée à des technologies d’enregistrement de
pointe, The Grand 3 ne se cantonne pas à la simple lecture
d’échantillons de pianos, il s’adapte à votre façon de jouer
et ajoute aux notes un sustain et un decay naturels. Il reproduit les bruits des pédales et des marteaux des différents
pianos, de même que la frappe des touches afin de recréer
le plus fidèlement possible la sonorité des véritables pianos
acoustiques. Mais ce n’est pas tout. Afin d’optimiser les
capacités de votre système, The Grand 3 intègre des technologies d’économie des performances (ECO Mode) et de
la mémoire vive (RAM Save) qui allègent la charge imposée
à la RAM et au processeur de votre ordinateur.
Que vous soyez musicien, arrangeur ou compositeur, The
Grand 3 est le piano virtuel qu’il vous faut si vous recherchez l’authenticité sonore, une extraordinaire réponse dynamique et cette tonalité à la fois ample et profonde que
seul Steinberg réussit à recréer.
Basé sur la même technologie que REVerence, le premier
processeur de reverb à convolution VST 3 déjà utilisé dans
Cubase 5, The Grand 3 reproduit le contexte sonore d’une
cathédrale ou d’une salle de concert via un simple commutateur qu’il suffit d’actionner. Vous disposez également
d’une reverb algorithmique riche de plus de 60 préréglages
qui accroîtront encore vos possibilités et vous permettront
d’explorer votre environnement acoustique en toute liberté.
The Grand 3 peut également être utilisé en version autonome, c’est-à-dire sans application hôte, ce qui peut
s’avérer utile pour jouer en live. Il offre alors deux fonctions
supplémentaires : un aide-mémoire (Scratch pad) qui
vous permet d’enregistrer spontanément vos idées et un
métronome.
Pensez à vous enregistrer sur MySteinberg afin d’accéder
à des exclusivités et à des services d’assistance en ligne.
Vous pouvez également vous adresser à la communauté
The Grand 3 sur Cubase.net, notre forum en ligne riche en
astuces et en informations pratiques.
Nous vous souhaitons une riche inspiration musicale !
Votre équipe The Grand Steinberg
Conventions appliquées aux raccourcis clavier
De nombreux raccourcis clavier par défaut paramétrés
dans The Grand utilisent des touches mortes, dont certaines diffèrent en fonction du système d’exploitation. Par
exemple, la fonction d’annulation correspond au raccourci
clavier par défaut [Ctrl]-[Z] sous Windows et à [Commande]-[Z] sous Mac OS X.
Lorsque des raccourcis clavier employant des touches
mortes sont mentionnés dans ce manuel, ils indiquent
d’abord la touche morte Windows, selon la formule
suivante :
[Touche morte Win]/[Touche morte Mac]-[Touche]
Par exemple, [Ctrl]/[Commande]-[Z] signifie “enfoncez la
touche [Ctrl] sous Windows ou [Commande] sous Mac
OS X, puis pressez [Z]”.
De même, [Alt]/[Option]-[X] signifie “enfoncez la touche
[Alt] sous Windows ou [Option] sous Mac OS X, puis
pressez [X]”.
Veuillez noter que ce manuel fait souvent référence au clic
droit, par ex. pour ouvrir des menus contextuels. Si vous
utilisez un ordinateur Macintosh avec une souris à un seul
bouton, maintenir [Ctrl] et cliquer.
62
The Grand 3
Page 63

Comment nous joindre
!
!
En cliquant sur le logo Steinberg situé dans le coin supérieur droit de The Grand, vous pouvez accéder à un menu
local dont les options vous permettent d’obtenir davantage d’aide et d’informations :
• Dans ce menu, vous trouverez des liens vers différents
sites web de Steinberg. Sélectionner l’un d’eux lancera
automatiquement votre navigateur et ouvrira la page.
Sur les sites web, vous trouverez une assistance technique et des informations sur la compatibilité, des réponses aux questions les plus fréquentes, des liens pour télécharger de nouveaux pilotes, etc. Cette
option nécessite que vous ayez un navigateur installé sur votre ordinateur, et une connexion Internet en état de marche.
• En sélectionnant l’option Aide, vous pourrez accéder à
une version en ligne de la documentation.
• Vous trouverez également dans ce menu une option qui
vous permet d’enregistrer votre produit.
Pour de plus amples informations, voir “Enregistrez votre logiciel !” à la
page 65.
Installation
Veuillez lire la section suivante avant d’installer The
Grand.
La clé USB-eLicenser
De nombreux produits Steinberg, y compris The Grand,
utilisent un dispositif matériel de protection contre la copie. Ce dispositif est appelé USB-eLicenser. The Grand
ne pourra pas fonctionner si vous ne disposez pas d’une
clé USB-eLicenser contenant une licence activée.
La clé USB-eLicenser est un périphérique USB sur lequel
sont stockées vos licences de logiciels Steinberg. Tous
les produits Steinberg protégés de cette manière utilisent
la même clé et il est possible de stocker plusieurs licences sur une seule clé. D’autre part, il est possible (dans
certaines limites) de transférer des licences d’une clé
USB-eLicenser à une autre. Ceci peut s’avérer utile si
vous souhaitez revendre l’un de vos logiciels.
The Grand est fourni avec un code d’activation inscrit sur
la carte “Essential Product License Information” comprise
dans la boîte du produit. Pour pouvoir utiliser votre version
de The Grand sans limitations, il vous faut télécharger manuellement une licence sur la clé USB-eLicenser connectée à votre ordinateur, puis activer votre licence définitive
à l’aide du code d’activation.
L’application License Control Center (qui apparaît dans le
menu Démarrer des systèmes Windows et dans le dossier Applications sur Mac une fois l’installation de The
Grand terminée) vous permet de savoir quelles licences
ont été installées sur votre clé USB-eLicenser, mais également d’activer vos nouvelles licences.
Pour ce faire, lancez l’Assistant de téléchargement de licence de l’application License Control Center et suivez
les instructions fournies.
• Si vous utilisez d’autres produits Steinberg protégés
contre la copie, il est sans doute préférable de transférer
toutes les licences de vos applications sur une même clé
USB-eLicenser afin de n’occuper qu’un seul port USB sur
votre ordinateur.
Pour transférer des licences d’une clé USB-eLicenser à une autre, lancez
l’Assistant de transfert de licence de l’application License Control Center
et suivez les instructions fournies.
La clé USB-eLicenser est vendue séparément et
n’est pas livrée dans la boîte du logiciel The Grand.
La clé USB-eLicenser
63
The Grand 3
Page 64

Configuration système
!
!
Pour utiliser The Grand, la configuration minimale de votre
ordinateur doit être la suivante :
Windows
• Windows XP (SP2) ou Windows Vista
• Processeur Pentium/Athlon 2,0 GHz dual core mobile
(2,5 GHz recommandés) ou dual core 2,0 GHz (3 GHz recommandés)
• 2 Go de RAM (3 Go recommandés)
• Jusqu’à 32 Go d’espace disponible sur le disque dur
• Résolution d’affichage de 1024 x 768 pixels (1280 x 800
pixels recommandé)
• Carte audio compatible Windows DirectX (pour une latence fai-
ble, il est recommandé d’utiliser une carte audio compatible
ASIO).
• Lecteur de DVD-ROM double couche
• Port USB dédié à la clé USB-eLicenser (gestion de licences)
• USB-eLicenser
• Connexion internet pour l’activation de la licence
• VST2, VST3, AU (testé dans Cubase SX3, Cubase 4, Cu-
base 5, Nuendo 4, Ableton Live 8 et SONAR 8), ou application hôte compatible ReWire pour l’utilisation en tant que
plug-in ou esclave ReWire
Macintosh
• Mac OS X 10.5
• Processeur Power Mac G5 dual 2,0 GHz ou Intel Core Duo
2,0 GHz (Intel Core Duo 2,66 GHz recommandé)
• 2 Go de RAM (3 Go recommandés)
• Jusqu’à 32 Go d’espace disponible sur le disque dur
• Résolution d’affichage de 1024 x 768 pixels (1280 x 800
pixels recommandé)
• Carte audio compatible CoreAudio
• Lecteur de DVD-ROM double couche
• Port USB dédié à la clé USB-eLicenser (gestion de licences)
• USB-eLicenser
• Connexion internet pour l’activation de la licence
• VST2, VST3, AU (testé dans Cubase SX3, Cubase 4, Cu-
base 5, Nuendo 4, Ableton Live 8 et Logic 8), ou application
hôte compatible ReWire pour l’utilisation en tant que plug-in
ou esclave ReWire
Installation de The Grand
La boîte du logiciel The Grand contient plusieurs DVD
d’installation. Comme The Grand intègre un grand volume
de contenus, le processus d’installation requiert plusieurs
DVD. Veillez à ce que tous vos DVD soient à portée de
main car il vous sera demandé de les insérer successivement au cours de l’installation.
Le processus d’installation peut prendre un certain
temps. Si vous souhaitez qu’il soit moins long, vous
pouvez commencer par installer un seul modèle. Au
cours du processus, vous aurez aussi la possibilité
de sélectionner les contenus devant être installés.
Vous pourrez ajouter les autres modèles ou l’ensemble des contenus en relançant ultérieurement le processus d’installation.
Le programme d’installation de The Grand vous permet de stocker les fichiers de contenus sur un autre
disque dur que celui sur lequel les fichiers de l’application ont été installés.
Procédez comme ceci :
1. Insérez le premier DVD dans votre lecteur de DVD.
Un écran de démarrage interactif apparaît. Si cet écran de démarrage interactif ne s’ouvre pas automatiquement ou si vous travaillez sur Macintosh, vous pouvez l’ouvrir manuellement en double-cliquant sur le fichier
“The_Grand_3_Start_Center.exe” sous Windows ou sur “The Grand 3
Start Center.app” sur Macintosh.
2. Suivez les instructions fournies à l’écran pour lancer
l’installation de The Grand et parcourir les options et informations supplémentaires qui vous sont proposées.
Si vous ne désirez pas installer The Grand via la fenêtre de
démarrage interactif, suivez la procédure ci-dessous :
Windows
1. Double-cliquez sur le fichier “Setup.exe”.
2. Suivez les instructions à l’écran.
Macintosh
1. Double-cliquez sur le fichier “The Grand 3.mpkg”.
2. Suivez les instructions à l’écran.
64
The Grand 3
Page 65

Enregistrez votre logiciel !
Nous vous encourageons vivement à enregistrer votre
logiciel ! Vous bénéficierez ainsi de notre assistance technique et serez tenu informé des mises à jour et autres nouveautés concernant le logiciel The Grand.
Procédez comme ceci :
• Cliquez sur le logo Steinberg situé dans le coin supérieur droit de l’interface et sélectionnez “Register The
Grand 3” dans le menu qui apparaît.
Cette option contient un lien Internet qui vous permet d’accéder à la
page Registration du site web de Steinberg. Pour vous enregistrer, il suffit de suivre les instructions à l’écran.
Préparez-vous à jouer
Pour accéder à The Grand via une piste d’instrument, procédez comme suit :
1. Ouvrez le menu Projet et sélectionnez “Instrument”
dans le sous-menu Ajouter une Piste.
2. La boîte de dialogue Ajouter piste d’Instrument
s’ouvre.
Sélectionnez The Grand dans le menu local Instrument.
3. Cliquez sur OK afin de créer une piste d’instrument.
Cliquez sur le bouton Éditer Instrument dans l’Inspecteur de Cubase afin
d’accéder à l’interface de The Grand.
The Grand est désormais configuré en tant qu’instrument
VST dans Cubase. Pour de plus amples informations sur
l’utilisation des instruments VST, consultez le Mode d’Emploi de Cubase.
Les sections suivantes décrivent l’utilisation de The Grand
en tant que plug-in dans différentes applications hôtes ou
en tant qu’instrument autonome.
Configuration de The Grand en tant qu’instrument VST dans Cubase
Ö Les informations suivantes décrivent l’utilisation de
The Grand dans Cubase. Nous présupposons que vous
avez correctement paramétré vos interfaces MIDI/audio et
configuré Cubase pour que le logiciel reçoive bien les
données transmises par votre clavier MIDI externe. Si vous
désirez utiliser The Grand dans une autre application hôte
VST, veuillez vous reporter à la documentation de cette
application.
Il existe deux moyens d’utiliser les instruments VST dans
Cubase : la fenêtre VST Instruments et les pistes d’instrument.
Pour accéder à The Grand via la fenêtre VST Instruments,
procédez comme suit :
1. Dans Cubase, ouvrez le menu Périphériques et sélectionnez l’option VST Instruments.
La fenêtre VST Instruments s’ouvre.
2. Cliquez sur l’une des cases vides afin d’ouvrir le menu
local des instruments, puis sélectionnez The Grand.
3. Vous serez invité à créer une piste MIDI associée et
connectée à cet instrument VST. Cliquez sur Create.
The Grand se charge et s’active. Son interface apparaît. Une piste MIDI
dénommée The Grand s’ajoute à la liste des pistes. La sortie de cette
piste est routée sur The Grand.
Utilisation de The Grand dans une application compatible AU
The Grand peut être utilisé dans les applications hôtes
compatibles AU (comme Logic, par exemple).
La version AU de The Grand s’installe dans le dossier des
plug-ins AU. The Grand fonctionne parfaitement dans les
environnements AU et n’entraîne aucune diminution des
performances, ni aucun problème de compatibilité.
Pour Logic Pro 8, procédez ainsi :
1. Ouvrez la Console de Voies et sélectionnez le canal
d’instrument de votre choix.
2. Faites un [Commande]-clic dans le champ E/S et sélectionnez Multi-Canal ou Stéréo dans le menu local qui
apparaît.
3. Dans le sous-menu qui s’affiche, sélectionnez Tous
les Instruments, puis The Grand.
The Grand est désormais chargé en tant qu’instrument AU.
The Grand en mode autonome et ReWire
Il est possible d’utiliser The Grand en tant qu’application
autonome sans recourir à une application hôte. Ce mode
vous permet également d’utiliser The Grand avec des applications de séquenceur non compatibles avec les formats de plug-ins disponibles dans The Grand (VST et AU),
mais qui supportent l’échange de données en ReWire.
65
The Grand 3
Page 66

!
Pour utiliser la fonctionnalité ReWire, il est néces-
!
Cliquez ici pour accéder
à la boîte de dialogue
Preferences.
saire d’installer les fichiers ReWire appropriés. Si
vous ne disposez pas de ces fichiers, vous pouvez
les télécharger depuis le site www.propellerheads.se.
ReWire2 est un protocole spécialement dédié à l’échange
de flux de données audio et MIDI entre deux applications
informatiques. En mode ReWire, l’ordre dans lequel les
deux programmes sont lancés et fermés est très important. En effet, la première application audio à être lancée
capte les ressources de la carte audio.
Procédez comme ceci :
1. Lancez l’application de séquenceur que vous souhaitez utiliser (ex : Ableton Live, ProTools).
Si votre séquenceur est compatible ReWire, il assignera les canaux
audio et MIDI de manière à permettre l’échange de données. Référezvous à la documentation de votre application de séquenceur pour en savoir plus à ce sujet.
2. Lancez The Grand en mode autonome.
Le programme se lance comme n’importe quelle application informatique, c’est-à-dire via le menu Démarrer, l’icône du bureau (Win) ou en
double-cliquant sur le symbole de l’application dans le dossier Applications (Mac). Vous pouvez également double-cliquer sur le fichier “The
Grand 3.exe” dans le dossier du programme (Win).
Si vous utilisez un Mac, pour activer la fonctionnalité
ReWire il vous faudra lancer le programme en mode
autonome au moins une fois après l’installation.
Dès lors, quand vous jouerez un échantillon sur The Grand,
le son sera transmis en direct via ReWire aux canaux assignés de la console dans votre application hôte.
Ö À noter que dans ce mode, les applications sont entièrement distinctes. Quand vous enregistrez votre projet
dans le séquenceur, la configuration générale des canaux
et des bus est prise en compte, mais pas les paramètres
de The Grand !
• Pour conserver les paramètres configurés dans The
Grand, il vous faut les enregistrer dans un préréglage (cliquez sur l’icône de disque située à droite du logo The
Grand).
Vous pouvez utiliser un nom de fichier indiquant que le préréglage contient des paramètres spécialement créés pour un projet particulier du séquenceur. De cette manière, vous n’aurez pas de difficultés à retrouver
vos paramètres quand vous rouvrirez ce projet. Pour de plus amples informations, voir “Gestion des préréglages” à la page 69.
La boîte de dialogue Preferences
Quand vous utilisez The Grand en application autonome,
vous pouvez configurer le programme dans la boîte de
dialogue Preferences. Voici comment accéder à cette
boîte de dialogue :
• Cliquez sur le bouton Open Preferences (l’icône en
forme de roue dentée) située à droite du champ de sortie
audio.
• Faites un clic droit dans la section située tout en haut de
l’interface et sélectionnez “Preferences” dans le menu
contextuel.
La boîte de dialogue Preferences comporte plusieurs pages qui vous permettent de configurer les paramètres
suivants :
• Dans la page MIDI Routing, le menu local MIDI Input
Port vous permet de paramétrer l’entrée MIDI.
• Dans la page Audio Routing, les menus locaux Audio
Output Port vous permettent d’assigner les différentes
sorties audio.
The Grand possède quatre canaux : deux canaux avant (gauche et droit)
et deux canaux arrière (gauche et droit). Il est possible d’assigner des
sorties différentes à chacun de ces canaux. Il suffit de sélectionner une
sortie audio dans le menu local pour mapper cette sortie sur le canal correspondant.
Si vous appuyez sur [Maj] et sélectionnez une sortie audio, les canaux
avant et arrière seront assignés aux ports de sortie audio qui suivent la
sortie sélectionnée, par exemple 1, 2, 3, 4 ou 5, 6, 7, 8.
Si vous appuyez sur [Alt]/[Option]-[Maj] et sélectionnez une sortie audio,
les sorties audio sont assignées par paires aux canaux avant et arrière
(par exemple 1, 2, 1, 2 ou 5, 6, 5, 6).
• La page Metronome vous permet de paramétrer les diverses options du métronome :
Option Description
Mode Permet d’activer et de désactiver le métronome ou de le
Accent Quand cette option est activée, le premier temps de cha-
Level Ce fader permet de régler le niveau de volume du métro-
Connections Permet de sélectionner une sortie audio séparée pour le
paramétrer en mode Décompte.
que mesure est accentué.
nome.
métronome.
66
The Grand 3
Page 67

• Dans la page General, activez l’option “Don’t prompt for
!
!
confirmation when quitting The Grand 3” si vous souhaitez
que The Grand se ferme sans afficher de message quand
vous quittez le programme.
• Le menu ASIO Driver de la page ASIO Driver vous permet de sélectionner le pilote de votre interface audio.
Si vous avez l’intention d’utiliser plusieurs applications audio à la fois, il
peut s’avérer utile d’activer l’option “Release Driver when Application is
in Background” (Libérer le pilote ASIO est en tâche de fond). Ceci autorisera une autre application à utiliser votre carte audio en lecture, même
quand The Grand est en cours d’exécution.
Vous pouvez également voir sur cette page les valeurs de latence de votre carte son en entrée et en sortie. La “latence” est la durée qu’il faut à
votre système pour répondre aux messages qui lui sont transmis. Quand
la latence est élevée, on remarque un décalage entre le moment où l’on
appuie sur une touche et le moment où le son est émis. Sous les valeurs
de latence, vous pouvez voir la fréquence d’échantillonnage définie pour
l’interface audio connectée.
Quand vous utilisez The Grand, plusieurs processus sont en compétition
pour l’accès aux cycles du processeur de votre ordinateur. Le paramètre
“Audio Priority” vous permet de choisir quels processus auront la priorité :
Option Description
Normal Dans ce mode, les processus sans rapport avec l’audio
Boost Dans ce mode, l’audio a priorité sur le MIDI. Essayez ce
bénéficient à peu près du même niveau de priorité que
les processus de lecture audio (paramètre par défaut).
mode si vous rencontrez des problèmes de lecture audio
quand vous lisez des données MIDI et audio.
Sous Windows, nous vous recommandons fortement d’utiliser le pilote ASIO spécialement conçu
pour votre carte son. Si aucun pilote ASIO spécifique n’a été installé, vérifiez auprès du fabricant de
votre carte audio si un pilote ASIO est disponible,
par exemple en téléchargement sur Internet.
Sous Windows Vista, vous pouvez également utiliser
le pilote ASIO générique à faible latence s’il n’existe
pas de pilote ASIO spécifique.
• Une fois le pilote sélectionné, ouvrez la page Advanced
afin de définir les entrées et sorties devant être utilisées,
ainsi que leurs noms. Cliquez sur le bouton Control Panel
afin d’ouvrir l’interface de la carte audio, puis configurez
les paramètres conformément aux instructions fournies
par le fabricant de votre carte son.
Contenus manquants
Il peut arriver qu’un modèle ou un fichier de contenu soit
indisponible. Ceci peut être dû à une partition cryptée
ayant été fermée ou un disque dur externe ayant été déconnecté, par exemple. Le cas échéant, vous êtes informé
qu’une certaine bibliothèque de sons (VST Sound Library)
est introuvable. Pour accéder à nouveau aux contenus recherchés, procédez ainsi :
1. Cliquez sur Ignore.
The Grand se chargera avec les contenus qui ont pu être trouvés.
2. Quittez The Grand.
3. Reconnectez le disque dur externe ou rouvrez la parti-
tion cryptée.
4. Lancez The Grand.
Si les fichiers ou modèles sont introuvables pour une
autre raison (ex : si vous les avez déplacés sur un autre
disque dur après l’installation ou si l’ajout d’un autre disque dur a provoqué un “échange” des partitions), procédez comme indiqué :
1. Dans la fenêtre du message vous informant qu’il manque une VST Sound Library, cliquez sur Locate si vous
souhaitez choisir un autre emplacement pour les fichiers.
Un sélecteur de fichier apparaît.
2. Accédez au répertoire où se trouvent les contenus.
3. Sélectionnez le fichier et cliquez sur Open.
Tous les fichiers de contenus situés à cet emplacement seront à nouveau disponibles.
Ö Si vous avez installé les fichiers de contenus sur plusieurs lecteurs, il est possible que la boîte de dialogue apparaisse à nouveau et que d’autres fichiers de contenus
vous soient demandés.
• Cliquez sur Remove si vous souhaitez que The Grand
cesse de rechercher chaque fois un fichier particulier.
De cette manière, The Grand ne recherchera plus systématiquement les
contenus manquants si vous avez désinstallé un modèle.
Ö Vous pouvez activer l’option “Do not ask again” si vous
souhaitez ignorer ou supprimer d’un seul coup tous les fichiers manquants.
67
The Grand 3
Page 68

Les contenus
L’enregistrement de The Grand
Les quatre modèles de pianos acoustiques ont été enregistrés en Suède par des spécialistes, dans un studio
spacieux, au plafond élevé, tout spécialement adapté à
l’enregistrement des instruments acoustiques. Ces modèles de pianos ont été enregistrés avec du matériel d’enregistrement de pointe et ni filtres, ni effets n’ont été utilisé
lors de la phase de mixage, ceci afin de préserver le son
naturel du piano. Pour chacune des touches des 4 pianos
acoustiques, ce sont jusqu’à 20 vélocités qui ont été enregistrées.
Les modèles
The Grand 3 intègre cinq modèles de pianos différents,
dont chacun possède des caractéristiques qui lui sont
propres. Vous avez le choix entre 3 pianos à queue, un
piano droit et un piano à queue électrique. Les pianos
acoustiques virtuels ont été enregistrés selon deux perspectives différentes : “Close” et “Player”.
Option Description
Close Dans cette perspective l’enregistrement a été effectué à
Player Dans cette perspective, l’enregistrement a été effectué à
La section suivante décrit les caractéristiques des différents modèles de pianos.
proximité du clavier. Le son obtenu est donc très clair et
brillant, avec un minimum d’ambiance. Ce mode est donc
idéal si l’on souhaite ajouter un effet de reverb par la suite
(voir “La page Ambience” à la page 74).
proximité des cordes et des marteaux. Par conséquent, le
son est plus doux et l’ambiance naturelle est plus présente.
Yamaha C7
Le timbre sans égal du piano à queue Yamaha C7 a été
recueilli dans toute sa beauté et son ampleur. Son incroyable sonorité, issue d’une projection tonale et d’un
long sustain, alliée à une réponse de jeu ultra réaliste font
de cet instrument virtuel la réplique quasiment parfaite de
son homologue physique. Ce piano vraiment à part restituera toute l’expressivité du musicien qui l’utilise. Si vous
recherchez un son de piano à la fois brillant et clair, le
Yamaha C7 est l’instrument qu’il vous faut.
Model D
Les échantillons du Model D ont été enregistrés à partir
d’un piano à queue Steinway D. La profondeur envoûtante
et le touché hyper sensible de ce mythique piano sont fidèlement reproduit dans le Model D. De par sa sonorité riche et chaleureuse, vous ne pourrez qu’être séduit par ce
piano virtuel des plus agréables.
Bösendorfer 290
Le registre étendu du piano à queue Bösendorfer 290 Imperial enrichit le timbre du piano échantillonné afin de
vous offrir toute l’amplitude nécessaire pour jouer le pianissimo le plus doux et évoluer en crescendo jusqu’au fortissimo le plus tonitruant. D’un point de vue musical, ce
modèle de piano virtuel excelle en tout point et restitue
toute l’exubérance et la superbe de son homologue original. L’enregistrement réalisé pour The Grand englobe
toute la tessiture des huit octaves (97 touches) du piano à
queue 290 Imperial.
Upright Piano
Le piano droit “Upright” de Nordiska Pianofabriken possède vraiment une personnalité bien distincte ! Son timbre
caractéristique a été recueilli dans ce modèle de piano
droit virtuel, spécialement conçu pour ceux qui cherchent
à conférer un peu de mordant à leurs morceaux. Que vous
jouiez du rock, du blues, du jazz, du gospel ou un autre
style nécessitant un son un peu différent et moins imposant, ce modèle est pour vous.
Yamaha CP80
Intégrant plusieurs effets (trémolo, phaser, flanger et chorus), le piano à queue électrique Yamaha CP80 figure
parmi les meilleurs modèles électriques de ce style. Ici, les
échantillons viennent directement de la source, c’est-àdire des experts en contenus de Yamaha.
68
The Grand 3
Page 69

Paramètres
Vu-mètres de performances (voir
“Vu-mètres de
performances” à
la page 84)
Vue Editor (voir
“Changement de
vue” à la page 70)
Clavier et pédales
de pré-écoute
(voir “Pré-écoute à
l’aide du clavier et
des pédales” à la
page 71)
Commandes générales du plug-in
Commandes du mode
autonome (voir “Com-
mandes supplémentaires de la version
autonome de The
Grand” à la page 79).
Commandes générales du plug-in
Dans la partie supérieure de l’interface du plug-in, vous
trouverez plusieurs commandes globales. Ces commandes
vous permettent de charger et d’enregistrer des préréglages, ou encore, de régler le volume général de l’instrument.
Vous remarquerez également la présence de boutons
d’activation pour les fonctions ECO Mode (voir “ECO
Mode (commandes générales)” à la page 83) et RAM Save
(voir “RAM Save (commandes générales)” à la page 83).
La fonction Reset MIDI (icône en forme d’éclair) permet de
réinitialiser le plug-in. Elle vous sera d’une grande aide si
vous perdez la connexion MIDI, notamment quand vous
jouez sur scène. En haut à gauche, vous trouverez un bouton servant à alterner entre les vues Editor et Player. Enfin,
les logos du plug-in et de Steinberg vous permettent d’accéder à la boîte de dialogue “About” ou de contacter Steinberg. Les commandes générales du plug-in sont décrites
en détail dans les pages qui suivent.
Ö Il est possible de réinitialiser chacune des commandes
de The Grand à sa valeur par défaut en maintenant la touche [Ctrl]/[Commande] enfoncée et en cliquant sur la
commande voulue.
Gestion des préréglages
À droite du logo du plug-in, vous trouverez le menu local
dédié aux préréglages de The Grand. Les préréglages
que vous chargez et enregistrez ici englobent tous les paramètres sonores de The Grand, c’est-à-dire les paramètres des pages Model, Equalizer, Ambience, etc. Les
préréglages d’usine de chaque modèle de piano sont répartis dans des sous-menus distincts. Une ligne sépare
les préréglages d’usine des préréglages utilisateur.
Ö Les préréglages ne prennent pas en compte les paramètres d’utilisation des ressources du disque par rapport
à la mémoire RAM de la page Options.
69
The Grand 3
Page 70

Pour charger un préréglage, procédez comme suit :
1. Cliquez sur le bouton en forme de flèche situé à droite
du champ des préréglages afin d’accéder au menu local
des préréglages.
2. Ouvrez le sous-menu du modèle de piano de votre
choix.
3. Sélectionnez le préréglage que vous souhaitez charger.
Ö Quand vous sélectionnez un préréglage d’un modèle
autre que celui qui a été chargé, les échantillons doivent
être remplacés. Par conséquent, le processus de chargement prend plus longtemps.
Pour enregistrer un préréglage, procédez comme suit :
1. Cliquez sur l’icône de disque située à gauche du menu
local des préréglages.
2. Définissez un emplacement et un nom de fichier dans
le sélecteur de fichier.
3. Cliquez sur Save afin d’enregistrer le préréglage et de
fermer la boîte de dialogue. Cliquez sur Cancel si vous
souhaitez fermer la boîte de dialogue sans enregistrer le
préréglage.
Pour supprimer un préréglage, procédez comme suit :
1. Sélectionnez le préréglage que vous souhaitez supprimer dans le menu local des préréglages.
Si nécessaire, attendez la fin du chargement.
2. Cliquez sur l’icône de corbeille située à gauche du
menu des préréglages.
Un sélecteur de fichier apparaît.
3. Cliquez sur Yes afin de supprimer le préréglage et de
fermer la boîte de dialogue. Cliquez sur No si vous souhaitez fermer la boîte de dialogue sans supprimer le préréglage.
• Pour diminuer le volume, tournez le potentiomètre dans
le sens anti-horaire en cliquant dessus et en faisant glisser
vers le bas.
Changement de vue
The Grand offre deux vues : la vue Editor et la vue Player.
La vue Editor
La vue Editor montre le piano vu de dessus. À la place du
couvercle, vous trouverez des commandes contrôlant les
paramètres du son et du plug-in. Sous cet affichage, des
boutons vous permettent d’accéder aux pages Model,
Equalizer, Ambience, Control et Options. Le clavier et les
trois pédales qui figurent dans la section inférieure servent
à la pré-écoute des pianos.
Ö Les préréglages d’usine ne peuvent pas être supprimés.
Réglage du volume général
Le potentiomètre Main Volume vous permet de régler le
volume général dans The Grand. Sa valeur maximale est
de +12 dB (par défaut, il est réglé sur ±0 dB).
• Pour augmenter le volume, tournez le potentiomètre
dans le sens horaire en cliquant dessus et en faisant glisser vers le haut.
The Grand 3
La vue Player
La vue Player montre le piano dans son entier. Elle offre
une fidèle représentation en 3D du modèle de piano sélectionné. Au dessus de l’image de piano, les commandes
générales du plug-in vous permettent de choisir des pré-
70
Page 71

réglages et de régler le volume principal. En dehors de
cela, la vue Player ne comporte aucune autre commande.
Vous n’avez qu’à charger un préréglage dans le menu local pour commencer à jouer.
Steinberg via votre navigateur Internet par défaut. Pour accéder aux mises à jour du logiciel et obtenir des informations sur la résolution des problèmes rencontrés, il vous
suffit de sélectionner le lien correspondant dans le menu.
Ö Quand vous chargez le plug-in, il s’ouvre toujours en
vue Editor.
Pour pouvoir accéder à la vue Player, il vous faut au préalable charger un piano dans la vue Editor.
Pour passer à la vue Player, procédez comme suit :
1. Dans la vue Editor, chargez un modèle de piano ou un
préréglage.
2. Dans la section en haut à gauche de l’interface, cliquez
sur le bouton “p” qui se trouve à gauche du logo du plug-in.
La vue Player est affichée, montrant le modèle de piano sélectionné.
Pour revenir à la vue Editor, il vous suffit de cliquer à nouveau sur le bouton (qui affiche à présent “e”) situé en haut
à gauche de la vue Player.
Réinitialisation MIDI
Il peut arriver que des notes restent bloquées, par exemple si le plug-in perd la connexion MIDI ou s’il reçoit des
données provenant du mauvais contrôleur MIDI. Le cas
échéant, vous pourrez procéder à une “réinitialisation d’urgence” du plug-in :
• Cliquez sur le bouton Reset MIDI (l’icône en forme
d’éclair) situé à droite du potentiomètre Main Volume. Un
message “All Sound Off” (désactivation de tous les sons)
et “Reset All Controllers” (réinitialisation de tous les contrôleurs) sera envoyé au plug-in.
Cette opération revient à transmettre les données des contrôleurs MIDI
120 (All Sound Off) et 121 (Reset All).
Le plug-in stoppe immédiatement la lecture et réinitialise
tous les contrôleurs à leurs valeurs par défaut.
Logo Steinberg et boîte de dialogue About
Quand vous cliquez sur le logo Steinberg situé dans le
coin supérieur droit du plug-in, un menu local apparaît.
Pour accéder à un manuel au format pdf, vous pouvez sélectionner l’option Help. Si vous sélectionnez les autres
options de ce menu, vous serez dirigé vers le site web de
Ö Pour pouvoir ouvrir le manuel au format pdf, une application permettant la lecture de ce type de fichiers doit être
installée sur votre ordinateur.
Ö D’autre part, votre ordinateur doit disposer d’une connexion Internet active et en état de fonctionnement pour
accéder à la page d’accueil du site Steinberg.
Si vous cliquez sur le logo du plug-in en haut à gauche de
l’interface du logiciel, vous accéderez à la boîte de dialogue About. Celle-ci contient des informations sur la version
et le numéro du plug-in. Ces informations vous seront utiles pour vérifier si le logiciel est à jour. Nous vous invitons à
vous rendre régulièrement sur le site www.steinberg.net
afin de bénéficier des dernières mises à jour. Pour fermer la
boîte de dialogue About, il vous suffit de cliquer dessus ou
d’appuyer sur la touche [Esc] de votre clavier d’ordinateur.
Pré-écoute à l’aide du clavier et des pédales
Généralement, vous jouerez probablement via votre clavier maître MIDI et à l’aide de pédales MIDI. Il est toutefois
possible de pré-écouter le son des pianos en cliquant sur
les touches du clavier et les trois pédales de la vue Editor.
• Pour jouer du piano à l’aide de votre souris, il vous suffit
de cliquer sur les notes souhaitées sur le clavier.
Dans la vue Editor, plus vous cliquez vers l’extrémité d’une touche, plus
la vélocité est importante, et vice versa.
Dans la vue Player, les notes sont toujours jouées à la vélocité maximale.
• Pour jouer des pédales à l’aide de votre souris, il vous
suffit de cliquer sur la pédale de votre choix pour qu’elle
s’enfonce. Si vous cliquez à nouveau sur cette pédale, elle
se relèvera.
L’ordre des pédales est le suivant (de gauche à droite) :
pédale douce, sostenuto et sustain. Chacun des quatre
modèles de pianos acoustiques est doté de ces trois types de pédales. Le CP80 ne possède que la pédale de
sustain.
71
The Grand 3
Page 72

Les fonctions des pédales sont les suivantes :
Pédale Numéro de
Pédale
douce
Sostenuto 66 Pendant que vous appuyez sur cette pé-
Sustain 64 Cette pédale lève tous les étouffoirs des
contrôleur MIDI
67 Cette pédale adoucit le son.
Fonction
dale, les notes des touches jouées avant
sont prolongées. En revanche, les notes
qui sont jouées après l’enfoncement de
la pédale ne sont pas prolongées.
Pour obtenir l’effet sostenuto, les touches ou la pédale doivent être actionnées à l’aide d’un contrôleur externe.
cordes, engendrant ainsi une résonance
soutenue. Toutes les notes jouées bénéficient de cet effet sustain.
La page Model
Cette page vous permet de sélectionner un modèle de
piano et de régler sa sonorité. Tous les aspects importants des pianos acoustiques ont été individuellement
échantillonnés. L’enregistrement prend en compte les résonances de sustain, mais également les sons de relâchement et les bruits mécaniques des touches et des
pédales. Il est possible de régler individuellement le volume de chacun de ces aspects. Vous pouvez ainsi adapter le caractère et le réalisme de votre jeu de piano à votre
convenance. Si par exemple vous recherchez un jeu et un
caractère intimes, comme si vous étiez réellement assis
devant un vrai piano, vous pouvez augmenter le volume
des bruits mécaniques des touches et des pédales.
À noter que cette page est différente pour le modèle
CP80. Comme il s’agit là d’un instrument électro-acoustique, il ne produit pas de bruits mécaniques réellement intéressants. Pour créer des variations sonores, la page
Model du CP80 vous propose en revanche des effets de
trémolo et de modulation (Chorus, Flanger et Phaser).
Les modèles de pianos acoustiques virtuels
En sélectionnant un modèle de piano, vous faites le choix
d’un caractère et d’un son spécifiques. Les pianos acoustiques virtuels ont été enregistrés par rapport à deux perspectives différentes : Close et Player, voir “Les modèles” à
la page 68.
Ö Quand vous changez de modèle de piano, seuls les
échantillons sont remplacés. Tous les autres paramètres,
comme par exemple ceux des pages Equalizer et Ambience, restent les mêmes.
Pour sélectionner un modèle de piano, procédez tel
qu’indiqué :
1. Dans la vue Editor, cliquez sur le bouton Model afin
d’accéder à la page Model.
Si la vue Player est affichée, cliquez sur le bouton “e” situé en haut à
gauche afin d’ouvrir la vue Editor.
2. Cliquez sur l’image correspondant au modèle de
piano de votre choix.
Les cinq modèles de pianos disponibles sont représentés au dessus de
l’image.
3. Sélectionnez le modèle de piano de votre choix et la
perspective d’enregistrement souhaitée.
L’enregistrement des pianos acoustiques ne se limite pas
aux seules notes. Tous les sons émis par les pianos ont
été pris en compte, notamment l’étouffement des cordes
qui vibrent, le relâchement du marteau, le son des pieds
sur les pédales, etc. Dans la page Model, vous avez la
possibilité d’activer ou de désactiver ces sons “accessoires” en cliquant sur les boutons correspondants et en réglant leur volume à l’aide de potentiomètres. Voici les
paramètres qui vous sont proposés :
Option Description
Sustain
Resonance
Quand vous appuyez sur la touche d’un piano acoustique, seul l’étouffoir de cette touche se soulève. Toutes
les autres touches restent étouffées et vous entendez
uniquement la note de la corde frappée au moyen de
cette touche.
Si vous appuyez sur la pédale de sustain, les étouffoirs
de toutes les touches se soulèvent. Par conséquent,
quand vous appuyez sur une touche, la vibration de la
corde correspondante entraîne la résonance des autres
cordes et de tout le cadre. Le son ainsi produit pourrait
être comparé à une reverb. Cet effet n’apparaît que
quand on utilise la pédale de sustain.
72
The Grand 3
Page 73
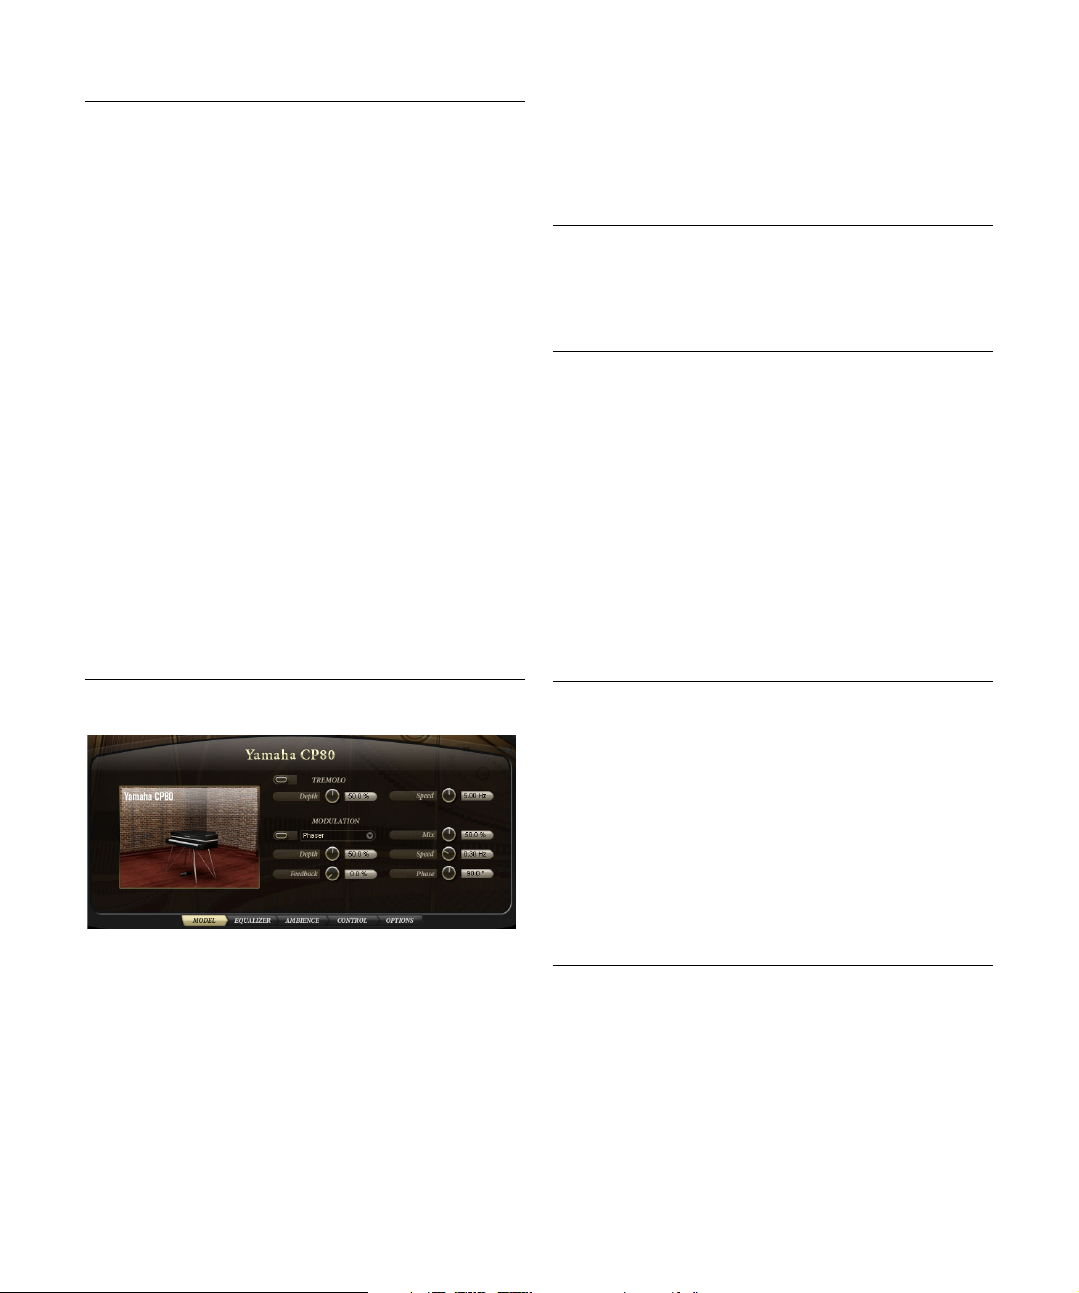
Option Description
String Release Quand on relâche une touche sur un piano, l’étouffoir en
Hammer
Release
(uniquement
sur Yamaha
C7, Model D et
Bösendorfer)
Key Sound
(uniquement
sur Yamaha
C7, Model D et
Bösendorfer)
Damper Pedal
Sound (uniquement sur
Yamaha C7,
Model D et
Bösendorfer)
feutre retombe sur les cordes qui vibrent. Pour autant, la
vibration ne s’arrête pas brusquement, mais se prolonge
jusqu’à la dernière oscillation, produisant un son qu’on
appelle le relâchement de la corde ou “String Release”.
Vous remarquerez qu’en désactivant cette option, la réponse de l’instrument perd un peu de son naturel.
Quand une touche est relâchée, le marteau revient à sa
position d’origine et génère un son qu’on pourrait qualifier de grave et boisé. C’est ce qu’on appelle l’effet de relâchement de marteau ou “Hammer Release”. Un pianiste
assis devant un piano à queue perçoit très nettement ce
son, même si, selon l’emplacement des micros, il n’apparaît pas toujours sur les enregistrements.
Quand cette option est activée, vous bénéficiez de la
perspective sonore du pianiste : The Grand sonne
comme si vous étiez assis devant un véritable piano à
queue de concert. Quand elle est désactivée, The Grand
offre un son plus proche de ce qu’entend le public.
Quand vous appuyez sur la touche d’un vrai piano, le son
obtenu comprend un bruit à peine perceptible produit par
le déplacement de la touche et de ses pièces mécaniques. On pourrait qualifier ce son de boisé, doux et discret. La fonction Key Sound vous permet de restituer la
sonorité du piano comme si vous vous trouviez très près
de l’instrument.
Il s’agit du son qui est produit par les pieds du pianiste
quand il appuie sur les pédales.
Modèle CP80
Les effets de modulation jouent un rôle essentiel dans le
son du CP80. Ce modèle est doté d’un effet de trémolo et
de modulation. Vous pouvez exploiter ces effets pour apporter des variations à votre son.
Le trémolo engendre une modulation de l’amplitude (c’està-dire du volume). Les signaux de modulation des canaux
gauche et droit sont soumis à un décalage fixe de 180°.
L’image sonore évolue donc entre la gauche et la droite.
1. Pour activer l’effet trémolo, cliquez sur le bouton situé
en haut à gauche de la section Tremolo.
Ce bouton devient rouge.
2. Réglez les commandes Speed (vitesse) et Depth (ampleur) à votre convenance :
Option Description
Depth Ce potentiomètre détermine l’intensité de l’effet. Les va-
Speed Cette commande vous permet de définir la fréquence de
leurs de ce paramètre sont comprises entre 0 et 100 %.
modulation en Hertz (Hz). Les valeurs sont comprises entre 0.01 et 10.0 Hz.
Les effets de modulation vous permettent de conférer de
la rondeur et de l’ampleur au son en modulant sa hauteur
ou sa phase. Le modèle CP80 est doté d’effets de Chorus, de Flanger et de Phaser.
1. Dans la section Modulation, cliquez sur le bouton à
gauche du menu local afin d’activer l’effet de modulation.
Ce bouton devient rouge.
2. Dans le menu local, sélectionnez un effet de modulation : Phaser, Chorus ou Flanger.
3. Réglez les commandes à votre convenance.
Pour ajuster les effets de modulation, vous disposez des
paramètres suivants :
Option Description
Depth Ce potentiomètre détermine l’intensité de l’effet. Les va-
Feedback Ce paramètre vous permet d’amplifier la résonance de l’ef-
Mix Cette commande détermine le rapport entre le signal avec
Speed Cette commande vous permet de définir la fréquence de
Phase Ce paramètre permet d’élargir l’image sonore de l’effet de
leurs de ce paramètre sont comprises entre 0 et 100 %.
fet. Les valeurs sont comprises entre -100 et +100 %.
et sans effet. Les valeurs de ce paramètre sont comprises
entre 0 et 100 %. À 100 %, vous entendrez uniquement le
signal traité.
modulation en Hertz (Hz). Les valeurs sont comprises entre
0.01 et 10.0 Hz.
mono à stéréo. Les valeurs sont comprises entre 0 et 180°.
73
The Grand 3
Page 74

La page Equalizer
Cliquez ici pour activer le
panoramique surround.
Cliquez ici pour activer le
panoramique stéréo.
La page Ambience
La page Equalizer vous permet d’utiliser un égaliseur stéréo paramétrique à 4 bandes de qualité supérieure. À
l’aide des quatre bandes de fréquences, 1 Low (basse), 2
Mid (médium), 3 Mid (médium) et 4 High (haute), vous
pouvez peaufiner la couleur de votre son de piano et obtenir un son plus ou moins clair. Les deux bandes médium
jouent le rôle de filtres de crêtes, tandis que les bandes
basse et haute servent de filtres en dégradé. Toutes les
bandes sont entièrement paramétriques et possèdent chacune des commandes Gain, Frequency et Q réglables.
Réglage des paramètres d’égalisation
1. Cliquez sur le bouton EQ situé à gauche des commandes d’égalisation afin d’activer l’égaliseur.
Les 4 bandes d’égalisation seront toutes activées.
2. Réglez les paramètres Gain, Freq et Q à votre convenance. Pour régler simultanément le gain et la fréquence,
vous pouvez faire glisser les points qui figurent sur le graphique de l’égaliseur, à gauche.
Chaque bande de fréquence est dotée des commandes
suivantes :
Option Description
Gain Ce paramètre vous permet de définir le niveau de cou-
Freq Cette commande détermine la fréquence qui sera con-
Q Ce paramètre correspond au facteur de qualité. Il vous
pure ou d’accentuation de la bande d’égalisation. Les valeurs sont comprises entre -24 et +24 dB.
cernée par la coupure ou l’accentuation du paramètre
Gain. Les valeurs sont comprises entre 20 et 20000 Hz.
permet de définir la largeur de bande des filtres de crête
médiums. En augmentant la valeur Q des filtres en dégradé bas et haut, vous pourrez accentuer leur inclinaison. Les valeurs de ce paramètre sont comprises entre
0.5 et 10.0.
Les paramètres de la page Ambience vous permettent de
positionner l’instrument dans la pièce et d’apporter un effet de reverb au son brut du piano.
Positionnement du piano
Grâce à ses deux sorties stéréo, The Grand prend en
charge le mode quad surround (canaux 4.0). Pour activer
ce mode, servez-vous des commandes situées à droite de
l’affichage graphique.
Quand le panoramique surround est activé, vous pouvez
déplacer le piano vers l’avant ou l’arrière de la pièce.
Ö Pour pouvoir entendre les canaux arrière, il vous faut
assigner la seconde sortie stéréo du plug-in à des sorties
physiques sur votre interface audio.
Pour positionner le piano dans le champ stéréo ou surround, vous pouvez utiliser les paramètres Left/Right et
Rear/Front, ou tout simplement faire glisser le piano à
l’emplacement voulu sur l’affichage graphique de gauche.
• Left/Right
Ce paramètre vous permet de définir la position du piano par rapport aux
bords droit et gauche de la pièce. Les valeurs sont comprises entre -100
et +100 %. Si la valeur est positive, le piano sera situé vers la droite, si
elle est négative, il sera situé plutôt vers la gauche.
74
The Grand 3
Page 75

• Rear/Front
Ce paramètre vous permet de définir la position du piano par rapport aux
bordures avant et arrière de la pièce. Les valeurs sont comprises entre 100 et +100 %. Si la valeur est positive, le piano sera situé vers l’avant,
si elle est négative, il sera plutôt vers l’arrière.
Ö Le paramètre Rear/Front n’est perceptible que quand
les canaux arrière ont été assignés à une sortie et quand
l’option surround est activée.
L’affichage graphique à gauche vous montre l’emplacement du piano vu de dessus dans la pièce. En déplaçant
le piano sur cet affichage graphique, vous pouvez contrôler simultanément les paramètres Left/Right et Rear/Front.
Utilisation de la reverb
Il est possible de traiter le son brut du piano en utilisant un
effet de reverb intégré de qualité supérieure. Les paramètres de cette reverb vous permettent de définir différentes
ambiances spatiales, comme celles d’une salle de concert, d’une église ou d’un studio. Qui plus est, vous pouvez régler les caractéristiques de cette reverb.
Ö Pour entendre la reverb en surround, il vous faut activer l’option surround.
Pour utiliser de la reverb sur le son de piano, procédez
ainsi :
1. Dans le menu local Reverb, sélectionnez un préréglage
d’ambiance.
Le bouton On/Off situé à gauche du menu local devient rouge.
2. Si nécessaire, réglez les paramètres Room Size, Time,
Pre-Delay et Mix (voir ci-après).
Option Description
Room Size Ce paramètre vous permet de définir les dimensions de
Time Ce paramètre détermine la durée de la réverbération. Les
Pre-Delay Le Pre-Delay vous permet d’ajouter un court retard au si-
Mix Ce potentiomètre vous permet de paramétrer l’équilibre
la pièce. Les valeurs de ce paramètre sont comprises entre 0 et 100 %. En diminuant la taille de la pièce, vous
pourrez par exemple transformer une salle de concert en
une petite pièce.
valeurs de ce paramètre sont comprises entre 0 et 100 %.
Si la valeur est basse, la reverb s’estompera rapidement,
et vice versa.
gnal de reverb. Plus ce retard sera important, plus la reverb commencera tard et plus le signal avec reverb se
distinguera du son brut du piano. Les valeurs sont comprises entre 0 et 500 ms.
entre le son brut du piano et la reverb. Les valeurs de ce
paramètre sont comprises entre 0 et 100 %. À une valeur
de 0 %, vous entendrez uniquement le son brut du piano,
tout comme si vous vous trouviez à la place du pianiste. À
une valeur de 100 %, vous entendrez uniquement la reverb, comme si vous vous trouviez dans le public. Pour
résumer, plus vous augmentez ce paramètre, plus vous
étendez la distance entre l’auditeur et le pianiste.
La page Control
Ö Pour désactiver le préréglage sélectionné, il suffit de cliquer sur le bouton On/Off situé à gauche du menu local.
Voici les paramètres de reverb qui vous sont proposés :
Option Description
Menu local
Reverb
L’effet de reverb intégré vous permet d’utiliser deux moteurs de reverb différents : une reverb à convolution et une
reverb algorithmique. Pour l’une comme pour l’autre, le
menu Reverb offre diverses ambiances spatiales organisées dans des sous-menus. Quand vous changez de préréglage de reverb, les paramètres Room Size, Time et PreDelay sont modifiés en fonction des caractéristiques de la
pièce sélectionnée. Seul le paramètre Mix reste inchangé.
The Grand 3
Contrairement à un piano à queue acoustique, The Grand
se joue via un clavier maître MIDI ou un piano numérique.
Nous vous recommandons d’utiliser un instrument dont
les touches sont lestées afin de bénéficier de toute la sensibilité et la finesse de réponse dynamique du logiciel.
Néanmoins, tout le monde ne dispose pas d’un instrument
de ce type. La réponse et le jeu peuvent varier d’un clavier
à un autre.
C’est la raison pour laquelle vous avez la possibilité
d’adapter The Grand à votre clavier MIDI et à votre style
de jeu en utilisant de nombreux préréglages de courbe de
vélocité prêts à l’emploi. Vous pouvez également créer
vos propres courbes de vélocité, puis les enregistrer et les
charger sous forme de préréglages.
75
Page 76

À gauche de la page Control, vous trouverez un éditeur de
Faites glisser la courbure vers le haut pour
obtenir un son de
piano incisif.
Faites-la glisser vers le
bas pour un son de
piano plus doux.
courbe de vélocité. Cet éditeur représente la vélocité sous
la forme d’un graphique dont l’axe horizontal correspond à
la vélocité d’entrée et l’axe vertical à la vélocité de sortie.
Par défaut, la courbe représentée est une ligne droite rejoignant le coin inférieur gauche et le coin supérieur droit
du graphique. La vélocité d’entrée est donc mappée terme
à terme sur la vélocité de sortie. Le piano utilise ainsi sa
plage dynamique d’origine. En modifiant cette courbe,
vous pouvez changer la réponse dynamique du piano. Par
exemple, si vous souhaitez que le piano bénéficie d’un son
plus incisif, sélectionnez une courbe orientée vers l’intérieur. Si vous recherchez au contraire un son plus doux,
sélectionnez une courbe orientée vers l’extérieur. Il est
également possible de créer une courbe en modifiant la
courbe définissable par l’utilisateur à l’aide de la souris.
À droite de l’éditeur de courbe de vélocité, vous trouverez
des boutons de sélection des courbes de vélocité. Le
bouton du haut vous permet de sélectionner la courbe définissable par l’utilisateur. Les autres boutons correspondent aux neuf préréglages d’usine des courbes.
Sélection des courbes de vélocité
• Pour sélectionner une courbe de vélocité, il suffit de
cliquer sur le bouton qui correspond à la courbe de votre
choix parmi les boutons situés à droite de l’éditeur de
courbe de vélocité.
La forme de la courbe figure sur le bouton lui-même.
Édition de la courbe définissable par l’utilisateur
Vous pouvez créer vos propres courbes de vélocité en
modifiant la courbe définissable par l’utilisateur. Procédez
comme ceci :
1. Activez le bouton le plus haut parmi ceux qui figurent à
droite de l’éditeur de courbe de vélocité.
2. Dans l’éditeur de courbe de vélocité, double-cliquez
afin de créer des points de courbe.
• Faites glisser les points de la courbe aux emplacements
souhaités.
• Pour supprimer un point de la courbe, il suffit de doublecliquer dessus.
• Faites glisser la courbure dans le sens vertical de manière à tracer une courbe orientée vers l’intérieur ou vers
l’extérieur.
Ö Les nœuds situés dans les coins inférieur gauche et
supérieur droit ne peuvent être déplacés que dans le sens
vertical.
Enregistrement d’une courbe définissable par
l’utilisateur
Pour enregistrer une courbe définissable par l’utilisateur,
procédez tel qu’indiqué ci-dessous :
1. Cliquez sur l’icône de disque située à gauche du menu
local des préréglages de vélocité.
2. Dans le sélecteur de fichier qui apparaît, définissez un
emplacement et un nom de fichier.
3. Cliquez sur Save afin d’enregistrer votre préréglage.
Chargement d’une courbe définissable par l’utilisateur
• Pour charger une courbe définissable par l’utilisateur
enregistrée au préalable, sélectionnez celle de votre choix
dans le menu local des préréglages de vélocité.
Ö Si vous modifiez un préréglage de vélocité, un astérisque apparaîtra à droite de son nom afin d’indiquer que les
paramètres de ce préréglage ont été modifiés. Cet astérisque disparaîtra si vous enregistrez ou réinitialisez le préréglage.
76
The Grand 3
Page 77

Suppression d’une courbe définissable par l’utilisateur
Pour supprimer une courbe définissable par l’utilisateur
ayant été enregistrée au préalable, procédez ainsi :
1. Sélectionnez le préréglage que vous souhaitez supprimer dans le menu local des préréglages de vélocité.
2. Cliquez sur l’icône de corbeille.
Un sélecteur de fichier apparaît.
3. Cliquez sur Yes afin de supprimer le préréglage et de
fermer la boîte de dialogue.
Paramètres Polyphony
Avec les paramètres Polyphony en-dessous du menu local des préréglages de vélocité, vous pouvez spécifier
combien de voix, ou échantillons, The Grand pourra jouer
simultanément.
Voici les paramètres qui vous sont proposés :
Option Description
Max Voices Ce potentiomètre vous permet de définir le nombre maxi-
Low Notes
Reserved
Repedaling Sur un vrai piano acoustique, après avoir relâché la pé-
mum de voix pouvant être jouées simultanément par The
Grand. Chaque échantillon compte pour une voix. Quand
le nombre de voix jouées simultanément dépasse cette limite, The Grand commence à ignorer certaines des notes
jouées. Le nombre de voix est compris entre 1 et 256. Ce
paramètre peut s’avérer très utile pour limiter la charge imposée au système par The Grand.
Vous pouvez utiliser ce réglage pour donner la priorité au
notes basses par rapport aux notes hautes lorsque The
Grand doit exclure des notes. Si par exemple vous devez
jouer un long accord avec la main gauche et un solo avec
la main droite, il peut s’avérer utile de réserver un certain
nombre de notes à l’accord de la main gauche afin d’éviter que celui-ci s’interrompe brusquement. Cette commande vous permet donc de régler le nombre de notes
réservées aux basses notes.
dale de sustain, vous pouvez rappuyer sur cette pédale et
relancer le sustain tant que les cordes n’ont pas été entièrement étouffées et continuent de vibrer. Les cordes
continueront donc de vibrer avec ce qui leur reste d’énergie. L’option Repedaling offre le même résultat. Attention,
cette fonction sollicitant davantage de performances, il
sera préférable de la désactiver si votre système manque
de puissance.
Ö Pour éviter tout décrochage en cours de lecture, The
Grand exclut automatiquement certaines voix quand la
charge CPU dépasse 95 %.
La page Options
Tuning
Pour accorder The Grand avec les instruments ou enregistrements d’accompagnement, vous pouvez vous servir
de la commande Master Tune. La plage de cette commande est comprise entre 415.3 Hz et 466.2 Hz, c’est à
dire entre -100 et +100 centièmes. La valeur par défaut
de cette commande est de 440 Hz, ce qui dans The
Grand correspond à la note A3, celle qui sert généralement de référence pour l’accordage.
L’accordage par défaut de The Grand est celui dans lequel les pianos ont été enregistrés à l’origine. Il s’agit d’un
accordage “étiré”, c’est-à-dire que pour compenser la
dysharmonie des cordes de piano, les notes les plus hautes sont accordées de plus en plus haut et les notes les
plus basses de plus en plus bas. Pour que le son du piano
reste aussi authentique que possible, il est recommandé
de ne pas modifier l’accord du piano. En désactivant le
bouton “Stretched Tuning”, vous appliquez un tempérament égal. Ceci peut être nécessaire lorsque vous voulez
combiner le son du piano avec autres instruments de tempérament égal.
D’autre part, The Grand intègre de nombreux préréglages
de tempéraments prêts à l’emploi, notamment des tempéraments historiques dans différentes tonalités : Werckmeister, Kirnberger, etc.
Chargement des préréglages de gammes
• Pour charger un préréglage de gamme, il suffit de le sélectionner dans le menu local situé à droite du bouton
Scale.
Ce menu local regroupe des préréglages de gammes d’usine et des préréglages de gammes utilisateurs. Une ligne sépare les préréglages de
gammes d’usine et des préréglages de gammes utilisateurs.
77
The Grand 3
Page 78

Ö Pour désactiver le préréglage sélectionné, il suffit de
cliquer sur le bouton On/Off situé à gauche du menu local. Quand le préréglage est désactivé, aucun tempérament n’est appliqué et le piano utilise l’accordage étiré
dans lequel il a été enregistré.
Enregistrement de préréglages de gammes définis par
l’utilisateur
Pour enregistrer un préréglage de gamme défini par l’utilisateur, procédez comme suit :
1. Cliquez sur l’icône de disque située à gauche du menu
des préréglages de gammes.
2. Dans le sélecteur de fichier qui apparaît, définissez un
emplacement et un nom de fichier.
3. Cliquez sur Save afin d’enregistrer le préréglage et de
fermer le sélecteur de fichier.
Suppression des préréglages de gammes
Pour supprimer un préréglage de gamme, procédez
comme suit :
1. Sélectionnez le préréglage que vous souhaitez supprimer dans le menu des préréglages de gammes.
2. Cliquez sur l’icône de corbeille située à gauche du
menu des préréglages de gammes.
Une boîte de dialogue apparaît.
3. Cliquez sur Yes afin de supprimer le préréglage et de
fermer la boîte de dialogue.
Ö Les préréglages d’usine ne peuvent pas être supprimés.
Ö Quand vous modifiez un préréglage de gamme, un as-
térisque apparaîtra à droite de son nom afin d’indiquer
que les paramètres de ce préréglage ont été modifiés. Cet
astérisque disparaîtra si vous enregistrez le préréglage.
Les préréglages de tempéraments d’usine
Le tempérament le plus commun dans la musique occidentale, et celui qui sert de référence pour tous les autres tempéraments, est le tempérament “égal” : les notes adjacentes de la gamme sont séparées d’une distance égale de
100 centièmes. Cette gamme vous sera particulièrement
utile si vous souhaitez jouer de The Grand avec d’autres
instruments accordés selon le même tempérament comme
des cordes, des nappes de synthétiseurs, etc.
En supplément, The Grand intègre les gammes
suivantes :
• Arabic 1 (pour toutes les tonalités de base)
• Arabic 2 (pour toutes les tonalités de base)
• Arabic 3 (pour toutes les tonalités de base)
• Indian 1
• Kirnberger (pour toutes les tonalités de base)
• Pure Major (pour toutes les tonalités de base)
• Pure Minor (pour toutes les tonalités de base)
• Vallotti and Young (pour toutes les tonalités de base)
• Werckmeister (pour toutes les tonalités de base)
Édition des tempéraments
Vous pouvez créer vos propres tempéraments en éditant
les notes par octave (les décalages d’accord s’appliquent
de façon homogène à toutes les octaves du clavier) ou en
éditant les notes MIDI individuellement (les décalages
d’accord s’appliquent uniquement aux notes individuelles). Il est plus pratique d’éditer la gamme par octave pour
créer différents tempéraments. L’édition de la gamme par
notes sert principalement pour l’accordage étiré.
Pour éditer la gamme par octave, procédez tel qu’indiqué
ci-dessous :
1. Cliquez sur le bouton Oct situé à droite de l’éditeur de
gamme.
2. Dans l’éditeur de gamme, cliquez sur le champ Offset
de la note que vous souhaitez modifier dans l’éditeur de
gamme.
3. Définissez un décalage d’accord compris entre -
100.00 et +100.00 centièmes.
Les décalages des 12 notes s’appliqueront de manière
égale à toutes les octaves.
Pour éditer la gamme par note, procédez tel qu’indiqué ci-
dessous :
1. Cliquez sur le bouton de note situé à droite de l’éditeur
de gamme.
2. Dans l’éditeur de gamme, cliquez sur le champ de valeur Offset de la note que vous souhaitez modifier.
3. Définissez un décalage d’accord compris entre -
100.00 et +100.00 centièmes.
Les décalages s’appliqueront de façon individuelle aux
128 notes MIDI.
78
The Grand 3
Page 79

Modes Absolute et Relative
Les notes MIDI contiennent parfois des informations de
micro-accordage, c’est-à-dire des décalages d’accord
par note. Les modes Absolute et Relative déterminent la
manière selon laquelle sont traitées les informations de
micro-accordage entrantes :
Option Description
Absolute Les informations de micro-accordage entrantes sont lais-
Relative Les informations de micro-accordage entrantes sont
sés de côté et The Grand applique uniquement ses propres paramètres de gamme.
conservées et décalées conformément aux paramètres
de gamme de The Grand.
Paramètres de performances
La page Options comporte également un curseur permettant d’équilibrer l’utilisation du disque par rapport à l’utilisation de la RAM. Cette fonction est décrite de façon
détaillée dans la section “Équilibrage entre les performan-
ces disque et RAM (page Options)” à la page 83.
Info-bulles
Quand vous survolez une commande avec votre curseur,
une petite bulle vous fournit des informations sur cette
commande. Désactivez l’option Tooltips si vous souhaitez
que les info-bulles cessent de s’afficher.
Importation de fichiers scala
The Grand vous permet d’importer des tempéraments
sous forme de fichiers au format scala (extension .scl).
Vous pouvez ainsi accéder à des milliers de préréglages
de tempéraments.
Pour importer un fichier scala, procédez ainsi :
1. Sélectionnez “Import Scale…” dans le menu des préréglages de gammes.
2. Dans le sélecteur de fichier qui apparaît, sélectionnez
le fichier scala que vous souhaitez importer.
3. Cliquez sur Open afin d’importer le fichier scala et de
fermer la boîte de dialogue.
Les gammes importées sont stockées dans le dossier des préréglages
utilisateurs et peuvent désormais être chargées depuis cet emplacement, tout comme n’importe quelle autre gamme utilisateur.
Ö Il est également possible d’importer plusieurs fichiers
scala à la fois en procédant de la même manière.
Réglage du niveau
Le paramètre Amount détermine dans quelle mesure le
tempérament doit s’appliquer. Les valeurs de ce paramètre sont comprises entre 0 et 100 %. À une valeur de
100 %, les décalages d’accord s’appliquent conformément à ce qui est défini dans le tempérament. À des valeurs moins élevées, les décalages d’accord sont réduits
de façon relative. À 0 %, le tempérament ne s’applique
pas du tout.
Commandes supplémentaires de la version autonome de The Grand
En haut de l’interface du programme, vous trouverez certaines commandes supplémentaires qui vous serviront si
vous utilisez The Grand en tant qu’instrument autonome.
Pour en savoir plus sur la configuration de The Grand en
tant qu’instrument autonome, voir “The Grand en mode
autonome et ReWire” à la page 65.
La boîte de dialogue Key Commands
Il est possible d’assigner des raccourcis clavier à la plupart des opérations pouvant être effectuées via l’interface
autonome de The Grand. La boîte de dialogue Key Commands regroupe toutes les commandes disponibles et
vous indique pour chacune le raccourci clavier paramétré.
Les commandes sont classées dans une arborescence de
dossiers hiérachique comparable à celle de Windows Explorer ou de Mac OS Finder. Lorsque vous ouvrez le dossier d’une catégorie en cliquant sur le signe plus situé à sa
gauche, les éléments et fonctions s’affichent avec les raccourcis claviers qui leur sont assignés.
79
The Grand 3
Page 80

Pour configurer un raccourci clavier, procédez ainsi :
Cliquez ici…
...pour ouvrir la boîte de dialogue Key Commands.
1. Dans le coin supérieur gauche de l’interface autonome, cliquez sur le bouton situé à droite du menu local de
l’entrée MIDI.
La boîte de dialogue Key Commands apparaît.
2. Dans la liste Commands qui se trouve à gauche, sélectionnez une catégorie.
3. Cliquez sur le signe plus pour ouvrir le dossier de
cette catégorie et afficher les éléments qu’il contient.
À noter qu’il est également possible de cliquer sur les signes plus et
moins “globaux” (“+ All”, “- All”) situés dans le coin supérieur gauche
pour ouvrir et fermer tous les dossiers de catégories à la fois.
4. Dans la liste, sélectionnez l’élément auquel vous souhaitez assigner un raccourci clavier.
Les raccourcis déjà assignés figurent dans la colonne Keys et dans la
section Keys située dans le coin supérieur droit.
Vous pouvez également rechercher une fonction spécifique en saisissant
son nom dans le champ de recherche qui se trouve en haut de la boîte
de dialogue, puis en cliquant sur le bouton de recherche (le bouton en
forme de loupe).
5. Une fois que vous avez trouvé et sélectionné l’élément
souhaité, cliquez sur le champ “Type in Key” et saisissez
un nouveau raccourci clavier.
Il est possible d’utiliser une seule touche ou de choisir une touche combinée à une ou plusieurs touches mortes ([Alt]/[Option], [Ctrl]/[Commande], [Maj]).
6. Cliquez sur le bouton Assign situé au dessus du champ
pour assigner votre raccourci clavier à la fonction choisie.
Votre nouveau raccourci clavier apparaît dans la liste Keys.
7. Cliquez sur OK pour fermer la boîte de dialogue.
• Si le raccourci clavier est déjà attribué à une autre fonc-
tion, un message vous invite à réassigner ce raccourci ou
à annuler l’opération.
• Il est possible d’assigner plusieurs raccourcis clavier à
une même fonction.
• Pour supprimer un raccourci clavier, sélectionnez la
commande correspondante, puis son raccourci clavier
dans la liste Keys. Cliquez ensuite sur l’icône de corbeille.
Sélection de l’entrée MIDI et des sorties audio
Dans le coin supérieur gauche de l’interface du plug-in en
mode autonome, vous trouverez deux menus locaux permettant de sélectionner l’entrée MIDI et la sortie audio
principale du plug-in.
Le menu local de l’entrée MIDI regroupe tous les périphériques MIDI installés sur votre système.
• Ouvrez le menu local de l’entrée MIDI pour sélectionner
le périphérique MIDI que vous souhaitez employer.
La diode orange d’activité MIDI située dans le coin supérieur gauche du plug-in indique l’arrivée de messages
MIDI via l’entrée MIDI sélectionnée. Cette diode s’allume
en cas de transmission de messages Note-On et de messages de contrôleur. Vous pouvez ainsi déterminer si le
plug-in et votre clavier MIDI sont bien connectés à la
même entrée de périphérique MIDI.
Le menu local de sortie audio regroupe toutes les sorties
du périphérique ASIO sélectionné.
• Ouvrez le menu local de sortie audio de manière à sélectionner une sortie audio pour le canal stéréo principal
du plug-in.
Quand vous sélectionnez une sortie audio, les canaux avant et arrière
sont assignés aux ports de sortie audio qui suivent la sortie sélectionnée,
par exemple 1, 2, 3, 4 ou 5, 6, 7, 8.
Quand vous appuyez sur [Alt]/[Option]-[Maj] et sélectionnez une sortie
audio, les sorties audio sont assignées par paires aux canaux avant et arrière (par exemple 1, 2, 1, 2 ou 5, 6, 5, 6).
80
The Grand 3
Page 81

Ö Le périphérique ASIO et les autres sorties devant être
Lecture
Stop Enregistrement Boucler
Chargement des
fichiers MIDI
Enregistrement
des fichiers MIDI
Sélection du mode
d’enregistrement
Réglage du
métronome
Fader de
position dans
le morceau
Piste tempo Valeur de
Tempo
Moduler
Tempo
Signature
rythmique
Icône Info
Indicateur de position
dans le morceau
Format
temporel
Filtre de canaux MIDI
utilisées peuvent être configurés dans la boîte de dialogue
Preferences. Pour en savoir plus, consultez la section “La
boîte de dialogue Preferences” à la page 66.
Scratch pad (Aide-mémoire)
L’aide-mémoire vous permet d’enregistrer et de lire des
fichiers MIDI au format MIDI standard (extension .mid).
Vous pouvez charger des fichiers MIDI, mais également
enregistrer vos propres fichiers et les conserver. La section
de transport est dotée des boutons Lecture, Stop, Enregistrement et Boucler. Sont également affichés la position
dans le morceau, le tempo et la signature rythmique du fichier MIDI. Vous trouverez aussi un métronome qui vous
servira pour l’enregistrement et vous aidera à vous exercer.
Utilisation des commandes de transport
• Le bouton de Lecture vous permet de lancer la lecture
du fichier MIDI.
La lecture débute toujours à l’emplacement de la position dans le morceau.
• Le bouton Stop vous permet de mettre la lecture du fichier MIDI en pause à la position actuelle.
Si vous cliquez deux fois sur ce bouton, la position dans le morceau reviendra au début du fichier.
• Le bouton d’Enregistrement vous permet de lancer l’enregistrement.
• Le bouton Boucler vous permet de lire tout le fichier MIDI
en boucle.
Chargement d’un fichier MIDI
Pour charger un fichier MIDI standard (.mid), procédez tel
qu’indiqué :
1. Cliquez sur le bouton Load File situé sous les boutons
de transport.
2. Dans le sélecteur de fichier qui apparaît, sélectionnez
le fichier de votre choix.
3. Cliquez sur Open pour charger ce fichier MIDI.
Enregistrement d’un fichier MIDI
Pour enregistrer ce que vous avez joué dans un fichier
MIDI, procédez tel qu’indiqué :
1. Cliquez sur le bouton Save File (l’icône de disque) situé sous les boutons de transport.
2. Dans le sélecteur de fichier qui apparaît, définissez un
emplacement et un nom de fichier.
3. Cliquez sur Save pour enregistrer le fichier MIDI.
L’icône Info
Pour savoir quel fichier MIDI est actuellement chargé, il
vous suffit de survoler l’icône Info située dans le coin supérieur gauche de l’indicateur de position dans le morceau. Une info-bulle vous indique le nom du fichier MIDI.
Utilisation du filtre de canaux MIDI
Quand un fichier MIDI comportant plusieurs pistes a été
chargé, vous pouvez choisir de lire tous les canaux (“All”)
ou uniquement les événements d’un seul canal MIDI.
Cette commande se trouve à droite de l’icône Info dans
l’indicateur de position dans le morceau.
Position dans le morceau
Le fader de position dans le morceau vous indique à quel
stade le transport en est rendu dans votre morceau. Cet
emplacement est affiché au format numérique au dessus
du fader de position dans le morceau.
Ö Quand vous chargez un fichier MIDI, l’indicateur vous
montre le fichier dans toute sa longueur et le fader de position est placé en fin de morceau. Toutefois, la lecture
commencera au début quand vous cliquerez sur le bouton
de Lecture.
81
The Grand 3
Page 82

• Pour déplacer le transport à un autre emplacement du
morceau, il vous suffit de faire glisser le fader de position à
l’emplacement souhaité dans le morceau.
• Pour passer d’un format temporel à l’autre, cliquez sur le
symbole de format temporel qui se trouve dans le coin
supérieur droit de l’affichage numérique. Quand le format
paramétré est le temps, vous pouvez voir une horloge à
cet endroit. Quand c’est le format “mesure”, une note s’affiche à la place.
Tempo et signature rythmique
Sous l’indicateur de position dans le morceau, vous trouverez les champs Tempo et Time Signature. Ceux-ci vous
fournissent des informations sur le tempo et la signature
rythmique du plug-in. En mode autonome, ces informations ne vous sont pas indiquées par l’application hôte.
C’est pourquoi ces paramètres figurent dans l’aide-mémoire et le métronome du plug-in.
Option Description
Tempo
Track/Fixed
Valeur de
Tempo
Moduler
Tempo
Sign.
(signature
rythmique)
Si vous souhaitez que le plug-in utilise le tempo du fichier
MIDI, configurez ce paramètre sur “Track”. Pour définir
manuellement le tempo, configurez-le sur “Fixed”.
Détermine le tempo du fichier MIDI. Les valeurs sont
comprises entre 1.000 BPM et 300.000 BPM.
Quand vous sélectionnez l’option Tempo Track, une
commande apparaît. Elle vous permet de moduler la lecture par rapport au tempo d’origine du fichier MIDI. Les
valeurs de cette commande sont comprises entre 0.5x (50%) et 2x (+100%) le tempo du fichier d’origine.
Détermine la signature rythmique utilisée par le plug-in. Il
est possible de saisir la signature souhaitée sous forme
de fraction. Ex : 3/4, 6/8, 4/4, etc.
Enregistrement de ce que vous jouez
1. Cliquez sur le symbole d’enregistrement situé sous le
bouton d’Enregistrement afin de sélectionner le mode
d’enregistrement souhaité dans le menu local :
Option Description
Direct L’enregistrement démarre dès que vous cliquez sur le
MIDI L’enregistrement démarre dès la première note MIDI.
Count In 1 L’enregistrement démarre au bout d’un décompte d’une
Count In 2 L’enregistrement démarre au bout d’un décompte de
bouton d’Enregistrement.
mesure.
deux mesures.
2. Cliquez sur le bouton d’Enregistrement afin de lancer
l’enregistrement.
3. Quand vous avez terminé, appuyez sur le bouton Stop.
• Maintenant vous pouvez enregistrer ce que vous venez
de jouer dans un fichier MIDI, voir “Enregistrement d’un fi-
chier MIDI” à la page 81.
Ö Le fader de position dans le morceau évolue vers la
droite afin de vous indiquer que l’enregistrement est en
cours.
Activation du métronome
Pour sélectionner le mode de lecture du métronome, cliquez sur le bouton Metronome. Le menu local qui apparaît
vous propose les modes suivants :
Option Description
Off Le métronome est désactivé.
Count In Le métronome est uniquement joué pendant le décompte
On Le métronome reste toujours actif.
avant enregistrement.
La commande de volume située à côté de l’icône du métronome vous permet de régler son niveau. Vous pouvez
également accéder aux paramètres du métronome via la
boîte de dialogue Preferences. Consultez “La boîte de
dialogue Preferences” à la page 66.
Volume
Cette commande vous permet de régler le niveau général
des sorties du plug-in en mode autonome. Sont pris en
compte les volumes des sorties principales, des sorties
arrière et de la sortie du métronome.
82
The Grand 3
Page 83

À propos des performances
Chaque modèle de piano utilise plusieurs Go d’échantillons. Cela représente un grand volume de données à gérer pour votre ordinateur. The Grand vous offre plusieurs
possibilités pour optimiser les performances de votre ordinateur. Celles-ci sont décrites dans les sections suivantes.
ECO Mode (commandes générales)
Avec la fonction ECO Mode, le plug-in n’utilise que 7 des
20 couches de vélocité dans lesquelles les pianos à
queue ont été échantillonnés. Comme il utilise moins de
couches de vélocité, votre ordinateur est moins lourdement sollicité. Il est conseillé de recourir à cette fonction
quand vous devez utiliser de nombreuses pistes audio ou
un grand nombre de plug-ins en parallèle de The Grand.
• Pour passer en mode ECO, cliquez sur le bouton ECO
Mode dans la barre des commandes générales.
Quand ce mode est activé, son bouton s’allume.
Ö Le chargement des pianos en mode ECO peut prendre un certain temps.
Quand vous désactivez la fonction ECO Mode, les pianos
sont à nouveau chargés avec l’ensemble de leurs échantillons. Pour les pianos à queue, il peut y avoir jusqu’à 20
couches de vélocité réparties sur 97 touches.
RAM Save (commandes générales)
La fonction RAM Save joue un rôle essentiel dans l’optimisation des performances de votre système. Elle procède à
l’analyse du projet chargé pendant sa lecture et évacue
tous les échantillons inutilisés.
Pour utiliser la fonction RAM Save, procédez comme suit :
1. Dans la barre des commandes générales, cliquez sur
le bouton RAM Save.
Lorsque cette option est activée, une boîte de dialogue vous invitant à
détecter les échantillons nécessaires apparaît.
2. Cliquez sur Yes pour activer la fonction RAM Save.
Le bouton RAM Save commence alors à clignoter.
3. Lisez votre projet dans votre application hôte du début
à la fin (ou jusqu’au stade où aucune note n’est plus
jouée).
4. Cliquez à nouveau sur le bouton RAM Save.
Une boîte de dialogue vous demandant si vous souhaitez évacuer tous
les échantillons inutilisés apparaît.
5. Cliquez sur Yes pour évacuer les échantillons inutilisés.
Le bouton ne clignote plus, mais restera allumé par la suite afin de vous
indiquer que la fonction RAM Save est activée.
6. Pour recharger les échantillons inutilisés, cliquez à
nouveau sur le bouton RAM Save afin de désactiver cette
fonction.
Une boîte de dialogue vous demandant si vous souhaitez désactiver le
mode RAM Save apparaîtra alors. Cliquez sur Yes. Le bouton s’éteindra
et les échantillons seront chargés à nouveau.
Ö Le rechargement des échantillons peut prendre un
certain temps. La durée du processus dépend du nombre
d’échantillons qui ont été déchargés.
Paramètres Sound (page Model)
En désactivant certains des paramètres de cette page,
vous pouvez alléger la charge imposée à votre mémoire
vive et à votre disque dur. Sur les systèmes peu rapides,
ceci vous permettra d’utiliser davantage de voix à la fois.
Équilibrage entre les performances disque et RAM (page
Options)
Il est généralement impossible pour un ordinateur de
charger tous les échantillons en mémoire RAM. Par conséquent, The Grand charge uniquement les premières millisecondes de chaque échantillon dans la RAM, puis il
charge constamment d’autres parties gérables depuis le
disque dur pendant que vous jouez. Comme le disque dur
doit travailler davantage pour chaque note que vous jouez
en plus, il est préférable de charger à l’avance un maximum de sons en mémoire RAM. En contrepartie, les
autres applications bénéficient d’une RAM amoindrie.
Pour exploiter au mieux les performances de votre système, vous pouvez équilibrer l’utilisation du disque dur par
rapport à l’utilisation de la RAM dans The Grand.
Pour ce faire, servez-vous du curseur Disk vs. RAM de la
page Options :
• Si votre disque dur ne parvient pas à transmettre les
données suffisamment rapidement, faites glisser le curseur vers la droite afin d’augmenter l’utilisation de la RAM.
• Si vos autres applications ont besoin de plus de RAM,
faites glisser le curseur vers la gauche afin d’utiliser moins
de mémoire et de solliciter davantage le disque dur.
L’indicateur de mémoire situé en haut à droite de l’interface
du plug-in sera mis à jour en conséquence (voir plus bas).
83
The Grand 3
Page 84

Ö Si vous ne rencontrez aucun problème de performances, ne modifiez pas ce paramètre.
Ö Si vous êtes sans cesse confronté à des problèmes de
performances, quelle que soit la façon dont vous configurez les paramètres, activez la fonction ECO Mode. Vous diminuerez ainsi le nombre de couches de vélocité chargées.
Voir “ECO Mode (commandes générales)” à la page 83.
Vu-mètres de performances
En haut à droite de l’interface du plug-in, vous trouverez
des vu-mètres et des données textuelles vous informant
sur la charge imposée au système par le plug-in.
Option Description
CPU Le vu-mètre du haut vous informe sur la charge imposée
Disk Ce vu-mètre indique la charge de transfert direct
Voices Ce champ vous montre le nombre d’échantillons actuel-
MEM MEM est l’abréviation de mémoire. Cet indicateur vous
au processeur lors de la lecture des voix. Plus le nombre
de voix jouées est élevé, plus la charge processeur est
importante. Si l’indicateur de surcharge devient rouge,
diminuez le paramètre Max Voices sur la page Control.
Vous pouvez également désactiver les options de la page
Model afin de réduire la charge processeur.
d’échantillons et de chargement des modèles depuis le
disque. Si l’indicateur de surcharge devient rouge, c’est
que le disque dur ne parvient pas à transmettre les données suffisamment rapidement à l’ordinateur. Le cas
échéant, faites glisser le curseur Disk vs. RAM vers la
droite dans la page Options. Vous pouvez également diminuer le paramètre Max Voices de la page Control. Pour
réduire encore la charge imposée au disque, il est par
ailleurs recommandé de désactiver les paramètres Sound
de la page Model.
lement joués, ce afin de vous aider à déterminer l’origine
des problèmes de performances. Par exemple, s’il vous
faut réduire le paramètre Max Voices de la page Control,
vous pourrez vérifier le résultat obtenu grâce aux indications de ce champ.
montre la quantité de mémoire RAM actuellement employée par le plug-in et le modèle chargé. Ce niveau correspond au rapport entre la mémoire tampon directe et
les échantillons préchargés. L’indicateur MEM vous
aidera à déterminer l’origine des problèmes de performances. Par exemple, s’il vous faut libérer de la mémoire
pour les autres applications, vous pourrez déplacer le
curseur Disk vs. RAM de la page Options vers la gauche.
Pour vérifier le résultat obtenu, il vous suffira d’observer
l’indicateur MEM.
Ö Si vous rencontrez sans cesse des problèmes de performances, vous pouvez activer la fonction ECO Mode.
Vous diminuerez ainsi le nombre de couches de vélocité
chargées. Voir “ECO Mode (commandes générales)” à la
page 83.
Manque de mémoire
Dans certaines situations, et particulièrement si vous travaillez avec plusieurs plug-ins utilisant des échantillons, il
se peut que vous ne disposiez pas de suffisamment de
RAM pour ouvrir une instance de The Grand. Le cas
échéant, une boîte de dialogue vous avertit de ce manque
de mémoire.
Cette boîte de dialogue vous propose les options suivantes pour vous permettre de charger The Grand malgré
tout :
Option Description
Switch to
ECO Mode
Disable
Sustain Resonance Layer
Reduce RAM
usage
(Disk<>RAM)
The Grand sera chargé en mode ECO, voir “ECO Mode
(commandes générales)” à la page 83.
The Grand se chargera sans les échantillons de résonance de sustain.
Si vous sélectionnez cette option, le paramètre Disk vs.
RAM de la page Options progressera d’un cran vers Disk.
• Sélectionnez tout d’abord l’une des options proposées
et cliquez sur OK.
Si la diminution d’utilisation de la RAM suffit, vous pourrez commencer à
utiliser The Grand. Si vous manquez toujours de mémoire vive, la boîte
de dialogue s’ouvrira à nouveau afin que vous puissiez sélectionner
d’autres options.
Utilisation des contrôleurs MIDI
Par défaut, la plupart des paramètres du plug-in sont déjà
mappés sur un contrôleur MIDI. Vous pouvez personnaliser le mappage par défaut en assignant vos propres contrôleurs MIDI grâce à la fonction d’acquisition (Learn). De
cette manière, vous pourrez adapter à votre convenance
le mappage de votre clavier ou contrôleur MIDI. Pour un
contrôle encore plus approfondi, il est possible de définir
des valeurs maximales et minimales pour chacun des paramètres assignés.
Assignation de contrôleurs MIDI
1. Faites un clic droit sur la commande que vous souhaitez contrôler à distance.
2. Dans le menu contextuel qui apparaît, sélectionnez
Learn CC.
3. Sur le clavier ou contrôleur MIDI, actionnez le potentiomètre, fader ou bouton voulu.
84
The Grand 3
Page 85

Ö La prochaine fois que vous ferez un clic droit sur cette
commande, le menu vous indiquera quel contrôleur MIDI a
été assigné.
Ö Il est possible d’assigner un même contrôleur MIDI à
plusieurs paramètres. En revanche, vous ne pouvez pas assigner de contrôleurs MIDI différents à un seul paramètre.
Suppression des assignations de contrôleurs MIDI
Pour supprimer une assignation de contrôleur MIDI, faites
un clic droit sur la commande et sélectionnez Unassign
dans le menu contextuel.
Définition d’un intervalle de paramètre
Il est possible de définir des valeurs minimale et maximale
pour chacun des paramètres assignés. Ceci vous permet
de mieux contrôler un paramètre, notamment quand vous
devez vous produire sur scène.
• Pour définir la valeur minimale d’un paramètre, réglez-le
sur la valeur minimale souhaitée, faites un clic droit sur la
commande et sélectionnez Set Minimum dans le menu
contextuel.
• Pour définir la valeur maximale d’un paramètre, réglez-le
sur la valeur maximale souhaitée, faites un clic droit sur la
commande et sélectionnez Set Maximum dans le menu
contextuel.
Contrôleurs MIDI
Il est possible de contrôler les paramètres suivants via un
contrôleur MIDI externe (les numéros et les noms des
contrôleurs font référence aux assignations d’usine par
défaut de ces paramètres) :
Page Paramètre N° de
Toutes les
pages
Model Sustain Resonance 75 Sound Controller #6
Main Volume 07 Main Volume
String Release 76 Sound Controller #7
Key Sound 77 Sound Controller #8
Hammer Release 78 Sound Controller #9
Damper Pedal 79 Sound Controller #10
Modulation On/Off
(uniquement pour le
CP80)
contrôleur
93 Effect 3 Depth
Nom
Page Paramètre N° de
Modulation Depth
(uniquement pour le
CP80)
Modulation Speed
(uniquement pour le
CP80)
Modulation Feedback (uniquement
pour le CP80)
Modulation Phase
(uniquement pour le
CP80)
Modulation Mix
(uniquement pour le
CP80)
Tremolo On/Off
(uniquement pour le
CP80)
Tremolo Depth (uniquement pour le
CP80)
Tremolo Speed
(uniquement pour le
CP80)
Equalizer EQ On/Off - -
Low Gain - Low Frequency - Low Q - Mid 1 Gain - Mid 1 Frequency - Mid 1 Q - Mid 2 Gain - Mid 2 Frequency - Mid 2 Q - High Gain - High Frequency - High Q - -
Ambience Left/Right 10 Pan
Rear/Front - Reverb On/Off - Room Size - Reverb Time - Pre-Delay - Reverb Mix 91 Effect 1 Depth
contrôleur
75 Sound Controller #6
76 Sound Controller #7
77 Sound Controller #8
78 Sound Controller #9
79 Sound Controller #10
14 -
12 Effect Control 1
13 Effect Control 2
Nom
85
The Grand 3
Page 86

Paramètres d’automatisation
Les paramètres suivants peuvent être automatisés à partir
de votre logiciel hôte :
Page Paramètre
Toutes les
pages
Model Sustain Resonance
Equalizer EQ On/Off
Main Volume
String Release
Key Sound
Hammer Release
Damper Pedal
Modulation On/Off (uniquement pour le CP80)
Chorus Depth (uniquement pour le CP80)
Chorus Speed (uniquement pour le CP80)
Chorus Feedback (uniquement pour le CP80)
Chorus Phase (uniquement pour le CP80)
Flanger Depth (uniquement pour le CP80)
Flanger Speed (uniquement pour le CP80)
Flanger Feedback (uniquement pour le CP80)
Flanger Phase (uniquement pour le CP80)
Phaser Depth (uniquement pour le CP80)
Phaser Speed (uniquement pour le CP80)
Phaser Feedback (uniquement pour le CP80)
Phaser Phase (uniquement pour le CP80)
Modulation Mix (uniquement pour le CP80)
Tremolo On/Off (uniquement pour le CP80)
Tremolo Depth (uniquement pour le CP80)
Tremolo Speed (uniquement pour le CP80)
1 Low Gain
1 Low Frequency
1 Low Q
2 Mid Gain
2 Mid Frequency
2 Mid Q
3 Mid Gain
3 Mid Frequency
3 Mid Q
4 High Gain
4 High Frequency
Page Paramètre
4 High Q
Ambience Left/Right
Rear/Front
Reverb On/Off
Room Size
Reverb Time
Pre-Delay
Reverb Mix
86
The Grand 3
Page 87

Index
A
Aide-mémoire 81
Application hôte
Applications compatibles AU 65
Cubase 65
Automatisation
Paramètres 86
Autonome
Commandes 79
Préférences 66
The Grand en mode autonome et ReWire 65
C
Clavier de pré-écoute 71
Commandes de transport 81
Configuration système
À propos 64
Contenus
À propos 68
VST Sound Library manquante 67
Contenus manquants 67
Contrôleurs MIDI 84
Courbe de vélocité 76
E
ECO Mode 83
L
Localiser 67
Préréglages
À propos 69
Gamme 77
Préréglages de gammes 77
Protection anti-copie 63
R
Raccourcis Clavier
Assignation 79
Conventions 62
RAM Save 83
Réinitialisation MIDI 71
ReWire
The Grand en mode autonome et ReWire 65
T
Tuning 77
U
USB-eLicenser
À propos 63
V
Volume général
Réglage 70
VST Sound Library
Manquante 67
Vues
Changement 70
M
Modèles 68
Modèles de pianos 68
P
Page Ambience 74
Page Control 75
Page Equalizer 74
Page Model 72
Page Options 77
Performances 83
Polyphony 77
Préréglage
Courbe de vélocité 76
87
The Grand 3
 Loading...