

Page 1

Operation Manual
Page 2

Cristina Bachmann, Heiko Bischoff, Marion Bröer, Sabine Pfeifer, Heike Schilling, Benjamin Schütte
This PDF provides improved access for vision-impaired users. Please note that due to the complexity
and number of images in this document, it is not possible to include text descriptions of images.
The information in this document is subject to change without notice and does not represent a
commitment on the part of Steinberg Media Technologies GmbH. The software described by this
document is subject to a License Agreement and may not be copied to other media except as
specifically allowed in the License Agreement. No part of this publication may be copied, reproduced,
or otherwise transmitted or recorded, for any purpose, without prior written permission by Steinberg
Media Technologies GmbH. Registered licensees of the product described herein may print one
copy of this document for their personal use.
All product and company names are ™ or ® trademarks of their respective owners. Windows 7 is a
registered trademark or trademark of Microsoft Corporation in the United States and/or other countries.
The Mac logo is a trademark used under license. Macintosh and Power Macintosh are registered
trademarks. MP3SURROUND and the MP3SURROUND logo are registered trademarks of Thomson
SA, registered in the US and other countries, and are used under license from Thomson Licensing SAS.
Release Date: August 03, 2011
© Steinberg Media Technologies GmbH, 2011.
All rights reserved.
Page 3

Table of Contents
5 Introduction
5 Welcome
6 Key Command Conventions
7 System Requirements and
Installation
7 About this Chapter
7 Minimum Requirements
8 Installing Sequel
9 Setting Up Your System
9 About this Chapter
9 General Notes on How to Set Up Your
System
9 MIDI Requirements
9 Audio Hardware
11 Setting Up Audio
15 Setting Up MIDI
16 Optimizing Audio Performance
17 The Sequel Window
17 Overview
19 Recording
19 Recording Audio
26 Recording Instrument Parts
28 Editing
28 Introduction
28 Importing
28 Common Editing Functions
32 The Draw Tool
33 The Sample Editor
33 The Key Editor
37 The Beat Page
37 Adding Tempo Changes
39 Mixing
39 Introduction
39 Setting Levels
40 Setting Pan
40 Mute and Solo
40 Adding EQ
42 Audio Effects
44 Adding Automation
47 Exporting
49 Live Pads and Chain Play Mode
49 Introduction
49 Performance Parts
50 Live Record Mode
50 Playback Mode
51 Step Input Mode
53 The Beat Page
53 Introduction
53 Adding Pattern Banks
54 Editing Patterns on the Beat Page
55 Editing Pattern Parts
56 Assigning Audio Samples to Pads
57 Saving your Pattern Bank
58 The Pilot Zone
58 Introduction
58 The Sequel Menu
59 The Project Menu
60 The Edit Menu
62 The Edit Remote Control Assignment
Button
62 The Tuner
62 Sound Input Activity
63 Musical Keyboard Input Activity
63 The Transport Controls
64 The Metronome
64 The Performance Mode Button
64 The Pilot Zone Display
66 The Virtual Keyboard
68 The Arrange Zone
68 Overview
74 Working with Tracks
75 Working with Parts and Events
75 Working with the MediaBay
80 Output Effects
81 The Multi Zone
81 Introduction
82 The Track Inspector Page
85 The Editor Page
94 The Track Picture Page
95 The Mixer Page
96 The Performance Page
99 The Settings Page
100 Computer Usage
3
Page 4

101 Advanced Features
101 Introduction
101 Adding Silence
102 About Time Stretch and Pitch Shift
Algorithms
103 Audio Quantization and Free Warp
105 Step Envelope Editing
107 Detecting the Tempo of an Audio File
108 Smart Transpose
110 Remote-controlling Sequel
114 Quick Controls
116 Key Commands
116 Introduction
116 The Available Key Commands
119 Effects and Instruments Reference
119 Introduction
119 Effects Parameters
122 Instrument Parameters
123 Index
4
Table of Contents
Page 5

Welcome
Introduction
Welcome and congratulations on purchasing Sequel 3. With Steinberg’s latest version
of Sequel you are now able to create, record, mix, and perform your own musical ideas
within one powerful music production center – in the most intuitive way.
It’s your idea. Let’s hear it! Sequel 3 is designed to support you in turning your ideas
into reality. Whether it’s a melody stuck in your head, a rhythm that will not let you go
or a synth sound that keeps you up at night, Sequel is the perfect tool to capture your
ideas and make them last. And you don’t necessarily need to have musical skills or
play an instrument. You are now equipped with thousands of pre-recorded loops,
hundreds of instruments sounds, and a massive load of effects and tools to make your
creative ideas come true and add your own sound to your mix.
You’ll be surprised how easily you’ll earn your first achievements and create tracks that
feel and sound just like you want them to – there are no boundaries to your creativity.
Combine different styles from rock to R’n’B, techno and hip hop or electro and jazz, and
develop your own sound by experimenting with the included sound library.
Sequel 3 is the perfect tool to record your instrument or vocals. Plug in your guitar or
microphone and start your recording session instantly. With the technology of a
professional recording system built on the same engine as the award-winning Cubase
audio production system, Sequel meets the highest requirements for modern music
production.
And Sequel takes it a step further by breaking the barrier between creation and
performance and building the bridge from music production to live experience. Let
your ideas be heard and perform your tracks live with the included performance mode.
After you have registered Sequel 3 online, take some time to explore the community
section at www.steinberg.net/forum. You will find lots of useful information and get to
know other users in our discussion forums. Registering at
www.steinberg.net/mysteinberg also gives you access to special offers from
Steinberg in the future.
Have fun making your ideas come true.
The Steinberg Sequel Team
5
Page 6

Key Command Conventions
Many of the default key commands in Sequel use modifier keys, some of which are
different depending on the operating system. For example, the default key command
for Undo is [Ctrl]-[Z] under Windows and [Command]-[Z] under Mac OS X.
When key commands with modifier keys are described in this manual, they are shown
with the Windows modifier key first:
[Win modifier key]/[Mac modifier key]-[key]
For example, [Ctrl]/[Command]-[Z] means “press [Ctrl] under Windows or [Command]
under Mac OS X, then press [Z]”. Similarly, [Alt]/[Option]-[X] means “press [Alt] under
Windows or [Option] under Mac OS X, then press [X]”.
Key Command Conventions
6
Introduction
Page 7

System Requirements and Installation
About this Chapter
This chapter describes the requirements and installation procedures for Sequel.
Minimum Requirements
To use Sequel, your computer must meet the following minimum requirements:
Windows
-Windows 7
- Intel or AMD Dual Core CPU
-2 GB RAM
- 9 GB of free hard disk space
- Windows compatible audio hardware; ASIO compatible audio hardware
recommended for low latency performance.
- Display resolution of 1280x800 pixels
- DVD ROM drive required for installation
- Internet connection required for license activation
Macintosh
- Mac OS X 10.6 or 10.7
- Intel Dual Core CPU
-2 GB RAM
- 9 GB of free hard disk space
- Display resolution of 1280x800 pixels
- CoreAudio compatible audio hardware
- DVD ROM drive required for installation
- Internet connection required for license activation
7
Page 8

Installing Sequel
Depending on your system, the Start Center program on the DVD may start
automatically. If no interactive start center appears, open the DVD and double-click
the file “Start_Center.exe” (Win) or “Start_Center.app” (Mac). From the Start Center
you can initiate the installation of Sequel and browse through the additional options
and information presented there.
In case you do not want to install Sequel via the interactive Start Center, follow the
procedure below.
Windows
1. Insert the Sequel DVD into the DVD drive of your computer.
2. Locate and double-click the file called “Setup.exe” on the Sequel installation DVD.
3. Follow the instructions on screen.
Macintosh
1. Insert the Sequel DVD into the DVD drive of your computer.
2. Double-click the file called “Sequel.mpkg”.
3. Follow the instructions on screen.
Installing Sequel
Activating Sequel
The process for license activation is described in detail on the Steinberg web site. To
open the corresponding page, follow the “Activation & Registration” link in the Start
Center.
8
System Requirements and Installation
Page 9
Setting Up Your System
!
About this Chapter
In this chapter, you will find information on the basic computer setup and on more
advanced audio and MIDI system setups.
General Notes on How to Set Up Your System
On the Steinberg web site, under “Support–DAW Components”, you find detailed
information on what to consider when setting up a computer system dedicated to
audio work.
• RAM – There is a direct relation between the amount of available RAM and the
number of audio channels that you can have running.
The amount of RAM specified in the minimum requirements is a must, but as a
general rule, the more the better applies.
• Hard-disk size – The size of the hard disk determines how many minutes of audio
you can record.
Recording one minute of stereo CD quality audio requires 10 MB of hard disk
space. That is, eight stereo tracks in Sequel use up at least 80
per recording minute.
MB of disk space
• Hard-disk speed – The speed of the hard drive also determines the number of
audio tracks you can run.
That is the quantity of information that the disk can read, usually expressed as
sustained transfer rate. Again, the more the better applies.
MIDI Requirements
If you intend to use the MIDI features of Sequel, you need the following:
• A USB MIDI keyboard or a MIDI instrument and a MIDI interface to connect
external MIDI equipment to your computer.
• Any audio equipment required to listen to the sound from your MIDI devices.
Audio Hardware
Sequel runs with audio hardware that meets the following specifications:
-Stereo
- 16 bit
- Sampling rate: 44.1kHz
9
Page 10

Using the Built-In Audio Hardware of Macintosh Computers
!
Ö
All current Macintosh models provide at least built-in 16 bit stereo audio hardware.
For detailed information, refer to the documentation describing your computer.
Depending on your preferences and requirements, using the built-in audio hardware
may be sufficient for use with Sequel. It is always available for selection in Sequel –
you do not need to install any additional drivers.
About Drivers
A driver is a piece of software that allows a program to communicate with a certain
piece of hardware. In this case, the driver allows Sequel to use the audio hardware.
For audio hardware, there are different cases, requiring different driver configurations.
Specific ASIO Drivers
Professional audio cards often come with an ASIO driver written especially for the
card. This allows for communication directly between Sequel and the audio card. As a
result, audio cards with specific ASIO drivers can provide lower latency (input-output
delay). The ASIO driver may also provide special support for multiple inputs and
outputs, routing, synchronization, etc.
Audio card-specific ASIO drivers are provided by the card manufacturers. Be sure to
check the manufacturer’s web site for the latest driver versions.
Audio Hardware
If your audio hardware comes with a specific ASIO driver we strongly recommend that
you use this.
DirectX Drivers (Windows only)
DirectX is a Microsoft package for handling various types of multimedia data under
Windows. Sequel supports DirectX, or to be more precise, DirectSound, which is a part
of DirectX used for playing back and recording audio. This requires two types of drivers:
- A DirectX driver for the audio card, allowing it to communicate with DirectX. If the
audio card supports DirectX, this driver should be supplied by the audio card
manufacturer. If it is not installed with the audio card, please check the
manufacturer’s web site for more information.
- The ASIO DirectX Full Duplex driver, allowing Sequel to communicate with
DirectX. This driver is included with Sequel, and does not require any special
installation.
Generic Low Latency ASIO Driver (Windows 7 only)
On Windows systems you can use the Generic Low Latency ASIO driver. This is a
generic ASIO driver that provides ASIO support for all audio cards supported by
Windows 7, thus allowing for low latency. The Generic Low Latency ASIO driver
provides the Windows Core Audio technology in Sequel.
This driver should be used if no specific ASIO driver is available. Although the Generic
Low Latency ASIO driver supports all audio devices, you might get better results with
on-board audio cards than with external USB audio interfaces.
Mac OS X Drivers (Mac only)
If you are using a Macintosh computer, make sure that you are using the latest Mac
OS X drivers for your audio hardware. Follow the manufacturer’s instructions to install
the driver.
10
Setting Up Your System
Page 11
Testing the Audio Hardware
!
To make sure that the audio card works as expected, perform the following two tests:
• Use any software included with the audio card to make sure you can record and
play back audio without problems.
• If the card is accessed via a standard operating system driver, try playing back
audio using the computer’s standard audio application.
Setting Up Audio
Make sure that all equipment is turned off before making any connections!
Connecting Audio
Exactly how to set up your system depends on many different factors, such as the kind
of project you want to create, the external equipment you want to use, or the computer
hardware available to you. Therefore, the following sections can only serve as examples.
How you connect your equipment, that is, whether you use digital or analog
connections, also depends on your individual setup.
Setting Up Audio
A simple
stereo audio
setup
Stereo Input and Output – the Simplest Connection
If you only use a stereo input and output from Sequel, you can connect your audio
hardware directly to the input source, and the outputs to a power amplifier and speaker.
This is probably the simplest of all setups – once you have set up the internal input
and output busses, you can connect your audio source, for example, a microphone, to
your audio interface and start recording.
Multi-Channel Input and Output
You may have other audio equipment that you want to integrate with Sequel, using
several input and output channels. Depending on the equipment available to you,
there are two ways to go: either mixing using an external mixing desk, or mixing using
the mixer inside Sequel.
External mixing means having a hardware mixing device with a group or bus system
that can be used for feeding inputs on your audio hardware.
11
Setting Up Your System
Page 12

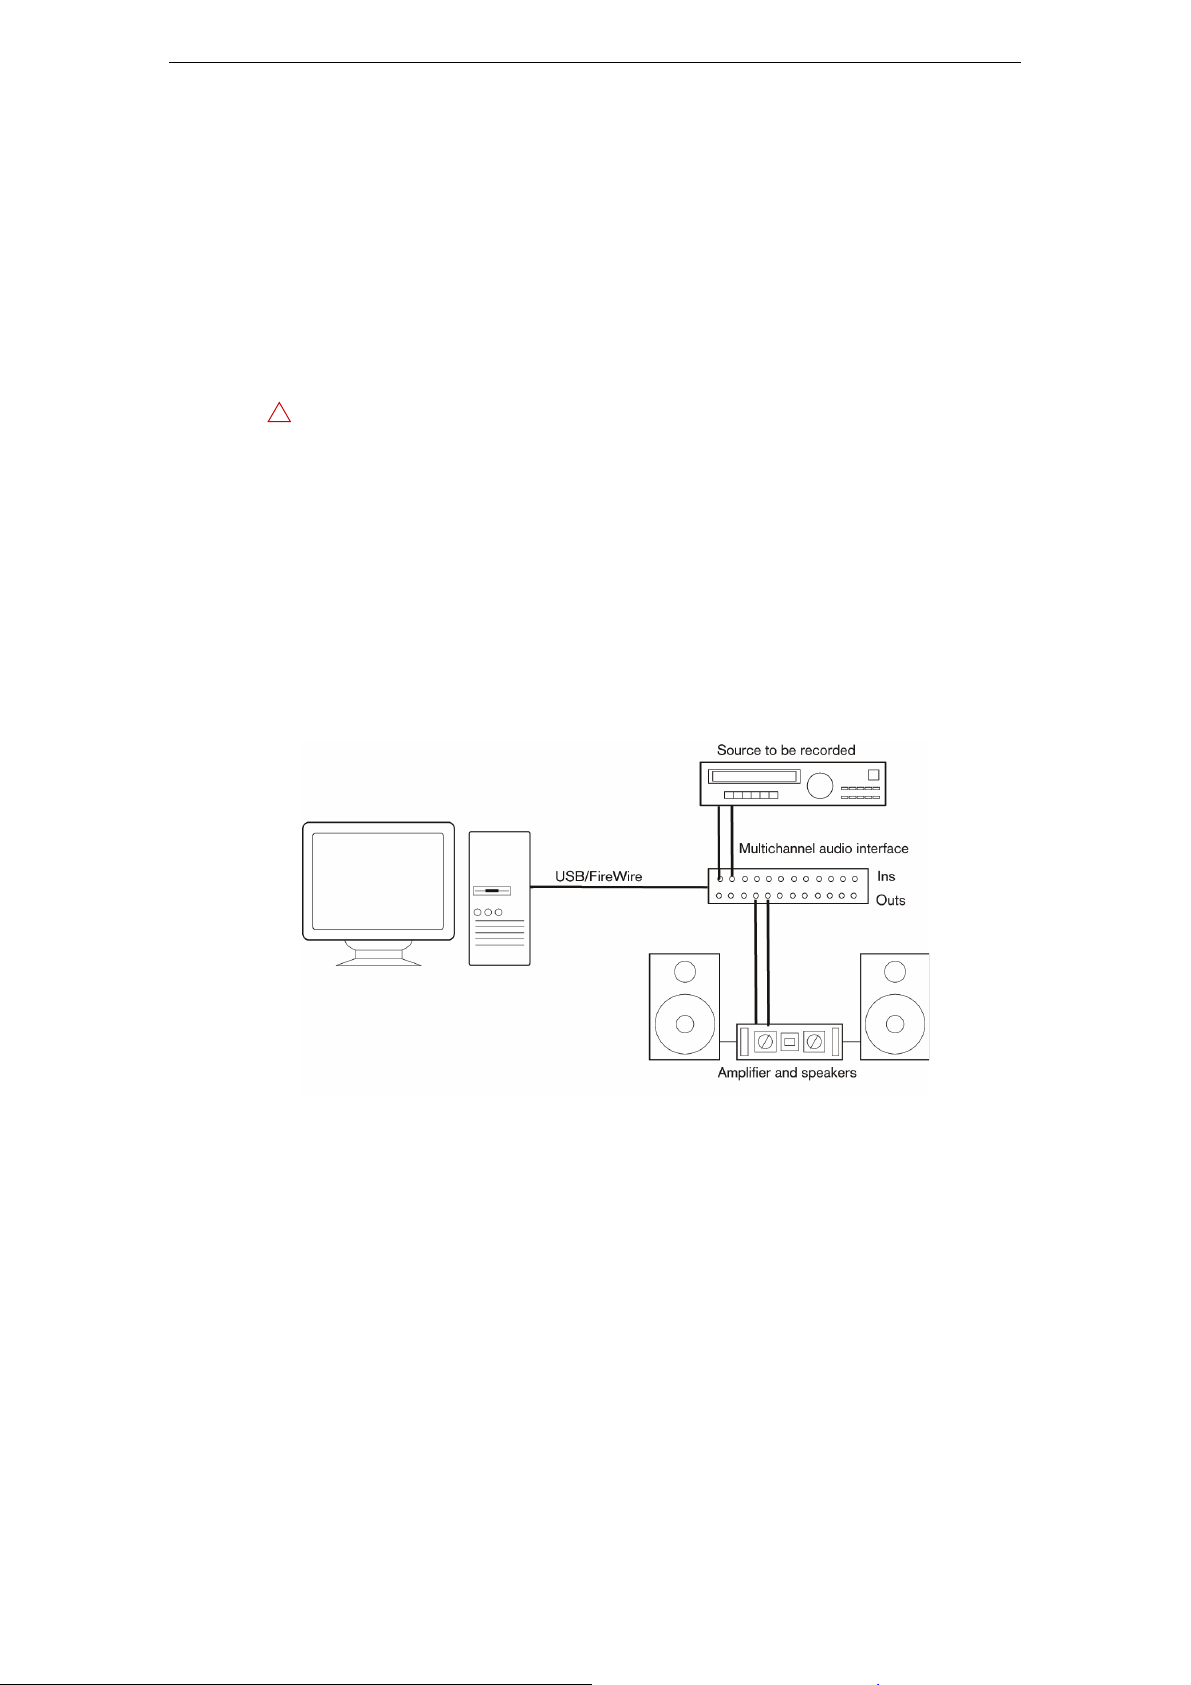
A multi-
Ö
channel audio
setup using an
external mixer
Setting Up Audio
In the example below, four busses are used for feeding signals to the audio hardware
inputs. The four outputs are connected back to the mixer for monitoring and playback.
Remaining mixer inputs can be used for connecting audio sources like microphones,
instruments, etc.
Mixing inside
Sequel
When connecting an input source (like a mixer) to the audio hardware, you should use
output busses, sends, or similar that are separate from the mixer’s master output to
avoid recording what you are playing back. You may also have mixing hardware that
can be connected via FireWire.
When using the Mixer inside Sequel, you can use the inputs on your audio hardware
to connect microphones and/or external devices. Use the outputs to connect your
monitoring equipment.
Recording from a CD Player
Most computers come with a disc drive that can also be used as a regular CD player.
In some cases the CD player is internally connected to the audio hardware so that you
can record the output of the CD player directly into Sequel. Refer to the audio
hardware documentation if you are uncertain.
All routing and level adjustments for recording from a CD are done in the audio
hardware setup application.
12
Setting Up Your System
Page 13

About Recording Levels and Inputs
!
Ö
When you connect your equipment, you should make sure that the impedance and
levels of the audio sources and inputs match. Typically, different inputs may be
designed for use with microphones, consumer line level (-10 dBV), or professional
line level (+4 dBV), or you may be able to adjust input characteristics on the audio
interface or in its control panel. Refer to the audio hardware documentation for details.
Using the correct types of input is important to avoid distortion or noisy recordings.
Sequel does not provide any input level adjustments for the signals coming in to your
audio hardware, since these are handled differently for each card. Adjusting input
levels is either done in a special application included with the hardware or from its
control panel.
Making Settings for the Audio Hardware
Most audio cards come with one or more small applications that allow you to
configure the inputs of the hardware to your liking. This includes:
- Selecting which inputs/outputs are active.
- Setting up word clock synchronization (if available).
- Setting levels for each input. This is very important!
- Setting levels for the outputs, so that they match the equipment you use for
monitoring.
- Selecting digital input and output formats.
- Making settings for the audio buffers.
In many cases all available settings for the audio hardware are gathered in a control
panel, that can be opened from within Sequel as described below. If Sequel is not
running, the control panel can also be opened separately. In some cases, there may be
several different applications and panels. Refer to the audio hardware documentation
for details.
Setting Up Audio
Selecting a Driver and Making Audio Settings in Sequel
The first thing you need to do is select the correct driver in Sequel to make sure that
the program can communicate with the audio hardware:
1. Launch Sequel.
2. Open the Settings Page in the Multi Zone.
3. In the Audio Settings section, click on the “Audio Connection” field, and select
your audio hardware driver.
4. Bring up the control panel for the audio hardware and adjust the settings as
recommended by the audio hardware manufacturer.
• Under Windows, you open the control panel by clicking the “Setup…” button.
The control panel that opens is provided by the audio hardware manufacturer and
not Sequel. Hence it is different for each audio card brand and model.
The control panel for the ASIO DirectX driver is an exception, as it is provided by
Steinberg. It is described in the dialog help, opened by clicking the Help button.
13
Setting Up Your System
Page 14

• Under Mac OS X, you can open the control panel for your audio hardware from the
!
Ö
Ö
System Preferences, opened from the Apple menu or from the Dock.
If you are using the built-in audio hardware of the Macintosh, you use the Sound
control panel in the System Preferences to set levels, balance, etc. If you are using
ASIO audio hardware, you can click the “Control Panel” button to bring up its panel.
If you are Using Audio Hardware with a DirectX Driver (Windows only)
If your Windows audio hardware does not have a specific ASIO driver, a DirectX
driver is the next best option.
Sequel comes with a driver called ASIO DirectX Full Duplex Driver available for
selection on the Audio Connection pop-up menu on the Settings Page.
To take full advantage of DirectX Full Duplex, the audio hardware must support WDM
(Windows Driver Model) in combination with DirectX version 8.1 or higher.
In all other cases, the audio inputs are emulated by DirectX. See the dialog help for
the ASIO DirectX Full Duplex Setup dialog for details about how this is reported.
Setting Up the Input and Output Ports
Setting Up Audio
Setting up the inputs and outputs primarily depends on the configuration settings of
your audio card. You can check the configuration by clicking “Setup…” on the
Settings Page.
If you have a stereo in/out audio card, this is most likely set up automatically.
Inputs
Setting up the recording input for Sequel is described in “Adding an Audio Track” on
page 20.
Outputs
Audio outputs can be selected on the Settings Page from the “Output Selector” popup menu.
Retrieving Channel Names (Mac only)
For some audio cards, it is possible to automatically retrieve the ASIO channel names
for the ports of your audio hardware:
1. Open the Settings Page in the Multi Zone.
2. In the Audio Settings section, select your audio card from the “Audio Connection”
pop up menu.
3. Open the control panel for your audio hardware.
4. Activate the “Use CoreAudio Channel Names” option.
When you now open the “Output Selector” pop-up menu in the Audio Settings
section or the Input pop-up menu in the track list for audio tracks, you will find that
the port names correspond to the names that are used by the CoreAudio driver.
Port Selection and Activation (Mac only)
On the settings page for your audio card, you can specify which input and which output
port are active. For example, this allows you to use the microphone input instead of the
line input or even to deactivate the audio card input or output completely, if required.
This function is only available for built-in audio, standard USB audio devices, and a
certain number of other audio cards.
14
Setting Up Your System
Page 15
About Monitoring
!
In Sequel, monitoring means listening to the input signal while preparing to record or
while recording. Sequel always monitors the signal in realtime.
The audio passes from the input into Sequel, possibly through Sequel effects and EQ
and then back to the output. You control monitoring via settings in Sequel. This allows
you to control the monitoring level from Sequel and add effects to the monitored
signal only.
Setting Up MIDI
Make sure that all equipment is turned off before making any connections!
This section describes how to connect and set up MIDI equipment. Note that this is
only an example – you might need or want to set up your equipment differently!
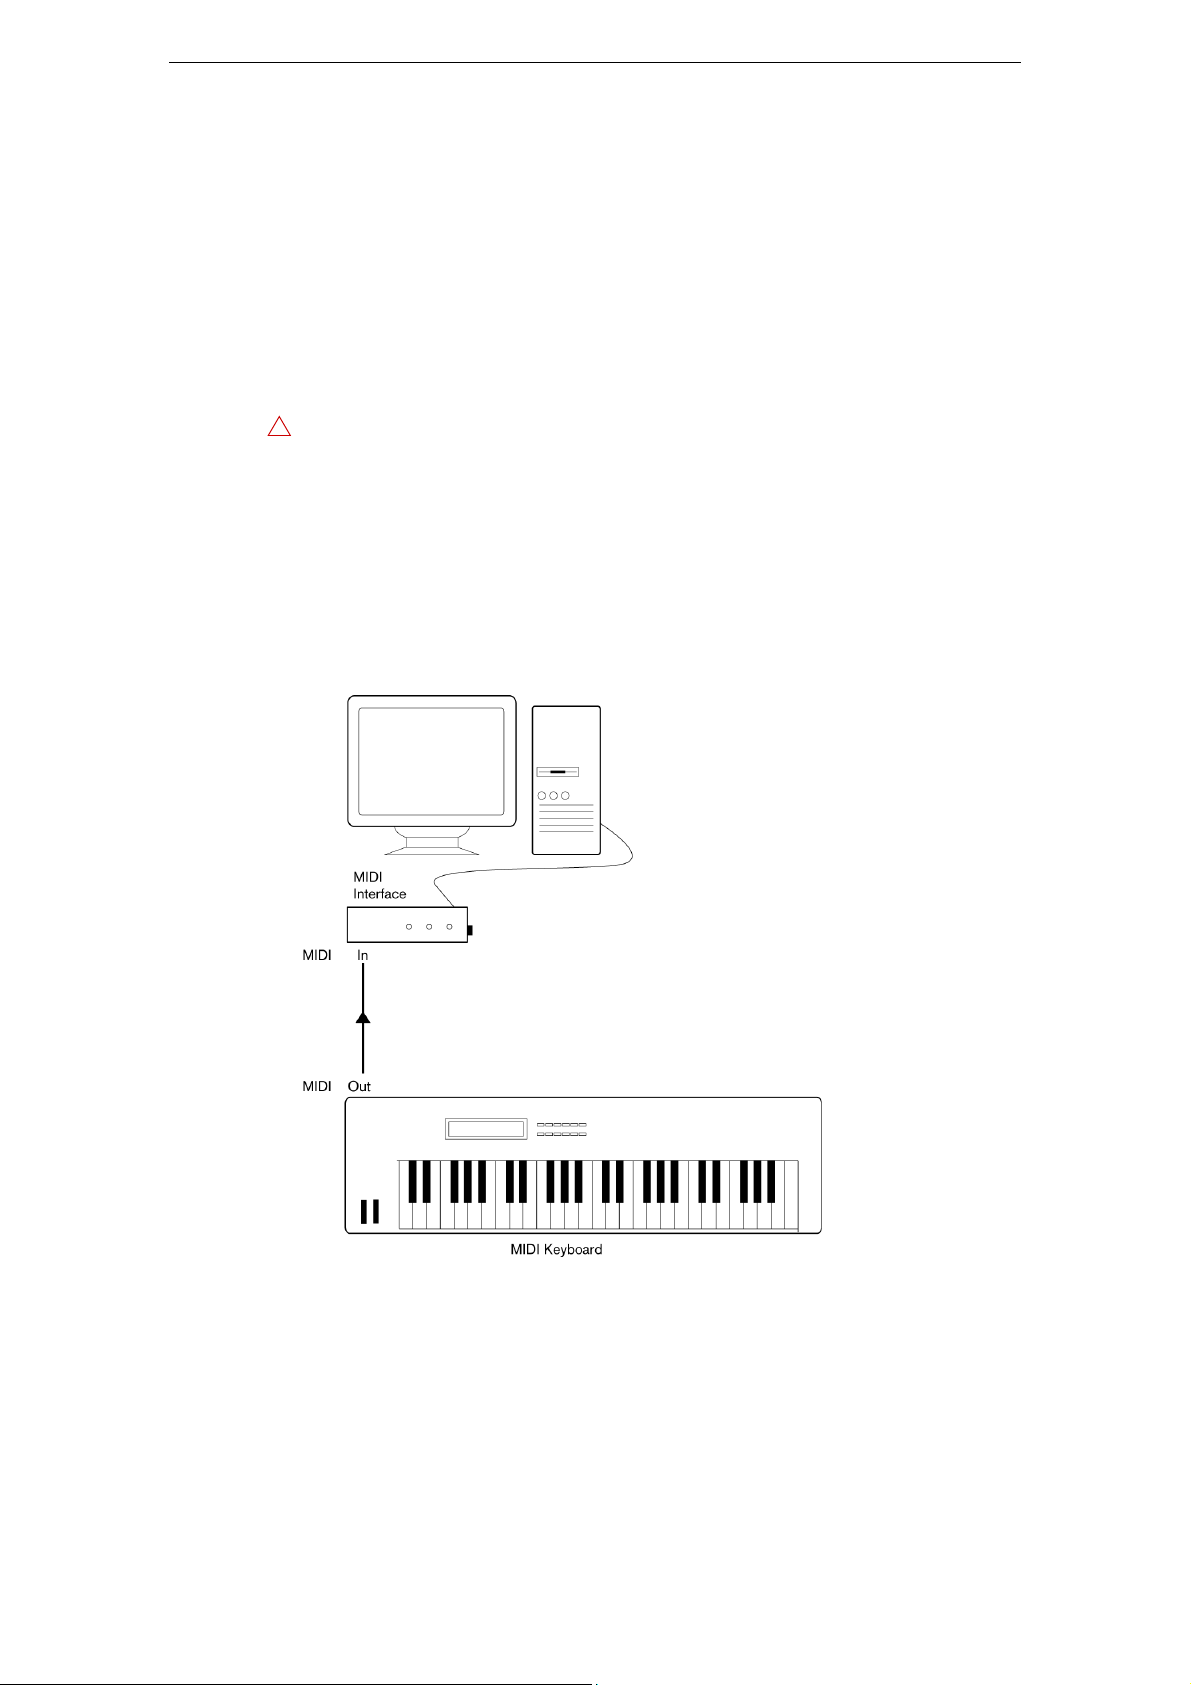
Connecting the MIDI Equipment
In this example we assume that you have a MIDI keyboard. The keyboard is used for
feeding the computer with MIDI messages for recording. Using Sequel’s automatic
MIDI Thru feature you can hear the correct sound from the instrument track while
playing the keyboard or recording.
Setting Up MIDI
A typical
MIDI Setup
Setting Up MIDI Ports in Sequel
Sequel automatically finds any MIDI devices connected to your computer and allows
them to be used as MIDI inputs for recording.
15
Setting Up Your System
Page 16

Optimizing Audio Performance
This section gives you some hints and tips on how to get the most out of your Sequel
system in terms of audio performance.
Two Aspects of Performance
There are two distinct aspects of performance in respect to Sequel:
Tracks and Effects
Simply put: the faster your computer, the more tracks, effects, and EQ you can play.
Short Response Times (Latency)
Another aspect of performance is response time. The term latency refers to the
buffering, or temporary storing, of small chunks of audio data during various steps of
the recording and playback process on a computer. The more and larger those
chunks, the higher the latency.
High latency is most irritating when using software instruments and when monitoring
through the computer, that is, when listening to a live audio source via the Sequel
mixer and effects. However, very long latency times (several hundred milliseconds)
can also affect other processes like mixing, for example, when the effect of a fader
movement is heard only after a noticeable delay.
A system that responds fast is always more convenient to work with.
Optimizing Audio Performance
Depending on your audio hardware, it may be possible to trim your latency times,
usually by lowering the size and the number of buffers.
16
Setting Up Your System
Page 17

Overview
Pilot
Zone
Arrange
Zone
Multi
Zone
MediaBay
Click here to open
the MediaBay
Click here to open the
Output Effects section
The Sequel Window
The Sequel window is divided into three main sections: the Pilot Zone, the Arrange
Zone, and the Multi Zone.
The Pilot Zone
The Pilot Zone gives you access to the Sequel menu functions. Here, you can also
find the functions for remote-controlling the program, the virtual keyboard and the
tuner, the Pilot Zone display, the transport controls, and the metronome.
For further information on the Pilot Zone, see the chapter “The Pilot Zone” on page 58.
The Arrange Zone
The Arrange Zone displays the instrument parts and audio events of the project along
the timeline. Here, you can record, edit, and arrange your project. On the left, the track
list is shown.
For further information on the Arrange Zone, see the chapter “The Arrange Zone” on
page 68.
17
Page 18

The MediaBay
The MediaBay is a browser for media files that allows you to search for media files on
your computer. It can be displayed in the Arrange Zone by clicking the corresponding
button in the lower right corner of the program window.
For further information on the MediaBay, see “Working with the MediaBay” on page 75.
The Output Effects
The output effects are effects that are applied to the overall output in Sequel. They
can be displayed in the Arrange Zone by clicking the Output Effects button in the
lower right corner of the program window.
For further information on output effects, see “Output Effects” on page 80.
The Multi Zone
In the Multi Zone, you have access to various pages where all of your project’s mixing,
effects processing, and advanced editing takes place.
For further information on the Multi Zone, see the chapter “The Multi Zone” on page 81.
Overview
18
The Sequel Window
Page 19
Recording Audio
In this section, you will learn how to record a guitar line, how to add a drum loop, and
play it back. Make sure that you have your audio card set up correctly, see the chapter
“Setting Up Your System” on page 9.
Creating a New Project
By default, Sequel creates a new project on startup. You can change this in the Settings
Page. For more information, see
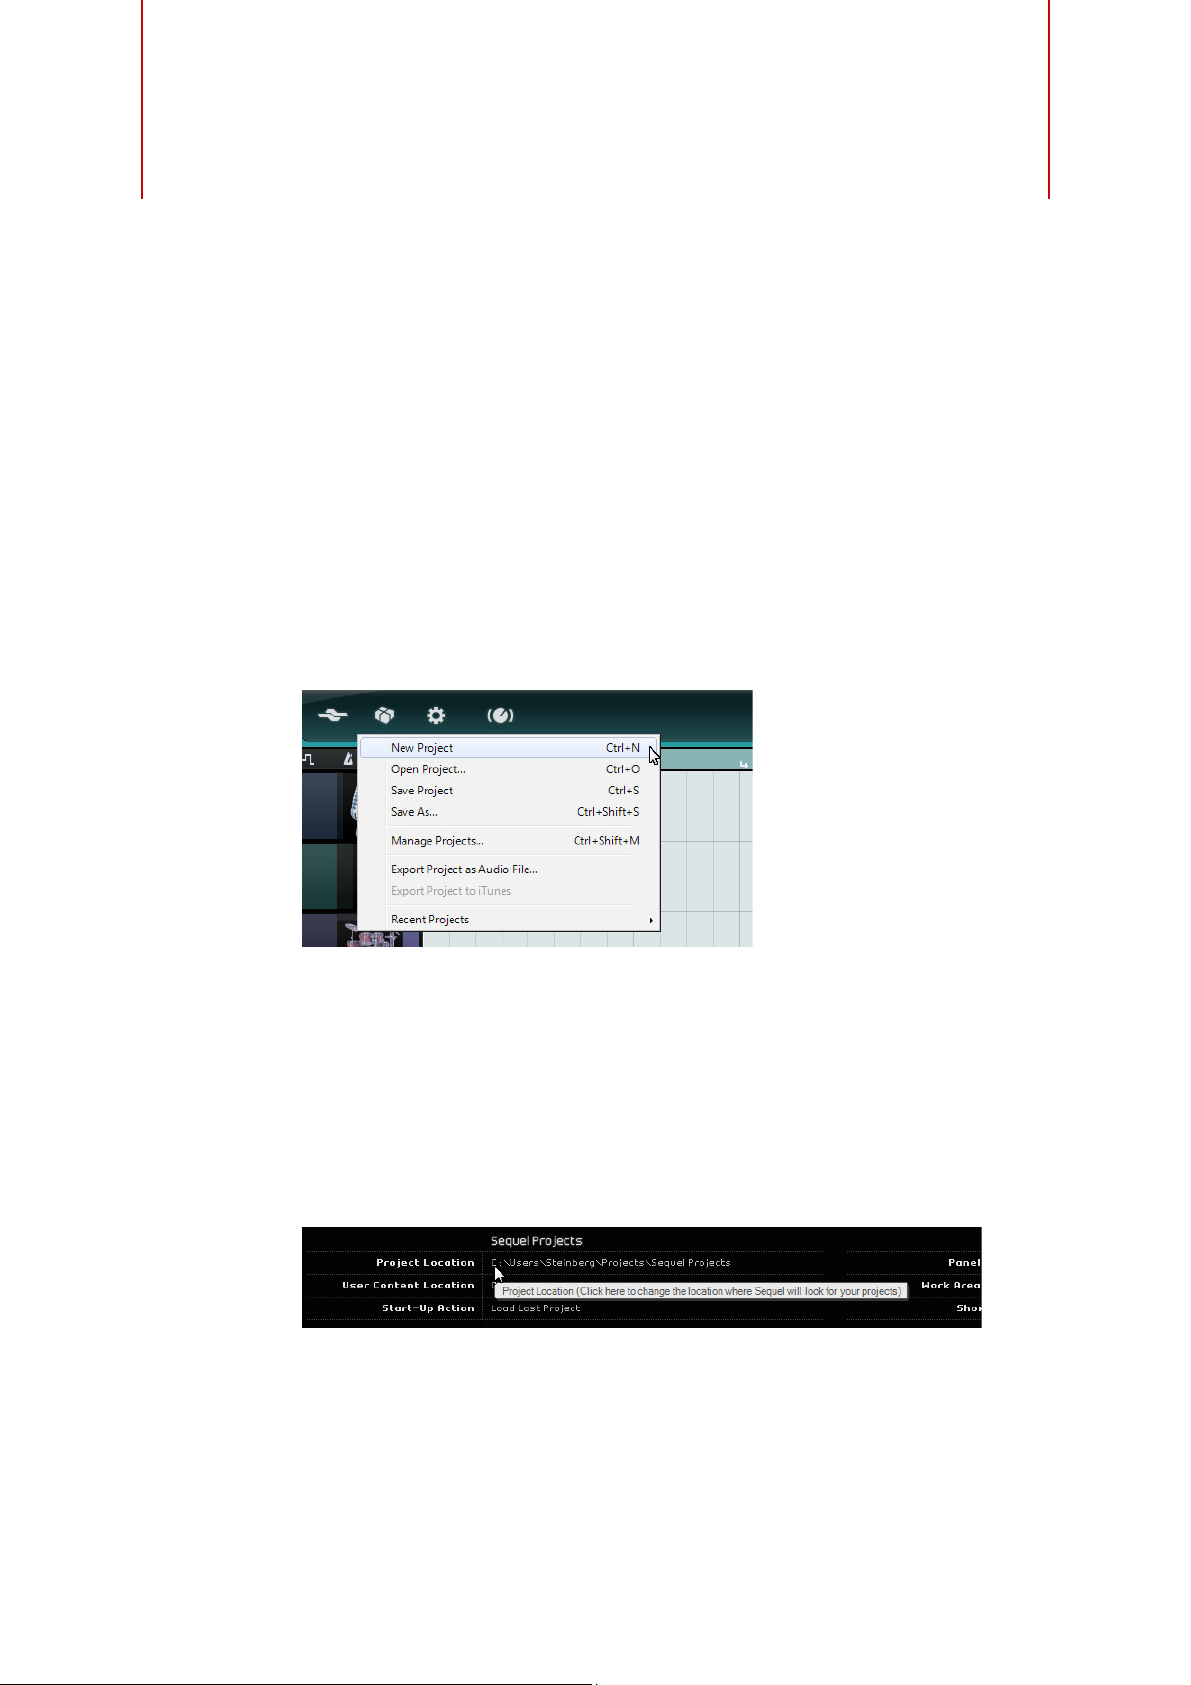
Creating a New Project if a Project is Already Open
• Open the Project menu and select “New Project”.
Recording
“The Settings Page” on page 99.
This creates a new empty project and closes the project that was open.
Setting the Save Folder
To specify where the projects are saved, proceed as follows:
1. Open the Settings Page in the Multi Zone.
2. Click in the “Project Location” field.
A dialog opens allowing you to browse your computer and find a suitable location.
During the installation process, Sequel automatically creates a location for saving
projects.
3. Select a location and click OK.
19
Page 20

Saving a Project
Ö
1. Open the Project menu and select “Save Project”.
2. Type in a name for your project, for example “First Sequel Project”.
3. Click OK.
The project is saved in the folder you specified on the Settings Page.
Adding an Audio Track
Recording Audio
The following sections make reference to tutorial projects, located in the default
Sequel project folder.
• Load the project called “Recording” found in the “Sequel Tutorial 1” folder.
You will now add an audio track to record onto. For this example, you will record a
guitar. The method is the same for all instruments.
1. Click the “Add Track” button below the track list.
The Add Track dialog opens.
2. Select the Audio option.
3. Select “empty” and click OK.
This adds an audio track to the project.
4. Double-click the track name and change it to “Guitar”.
By default, the audio input for the track is set to the first input available on the “Input
Selection” pop-up menu. To see the pop-up menu, you may have to increase the track
height.
20
Recording
Page 21
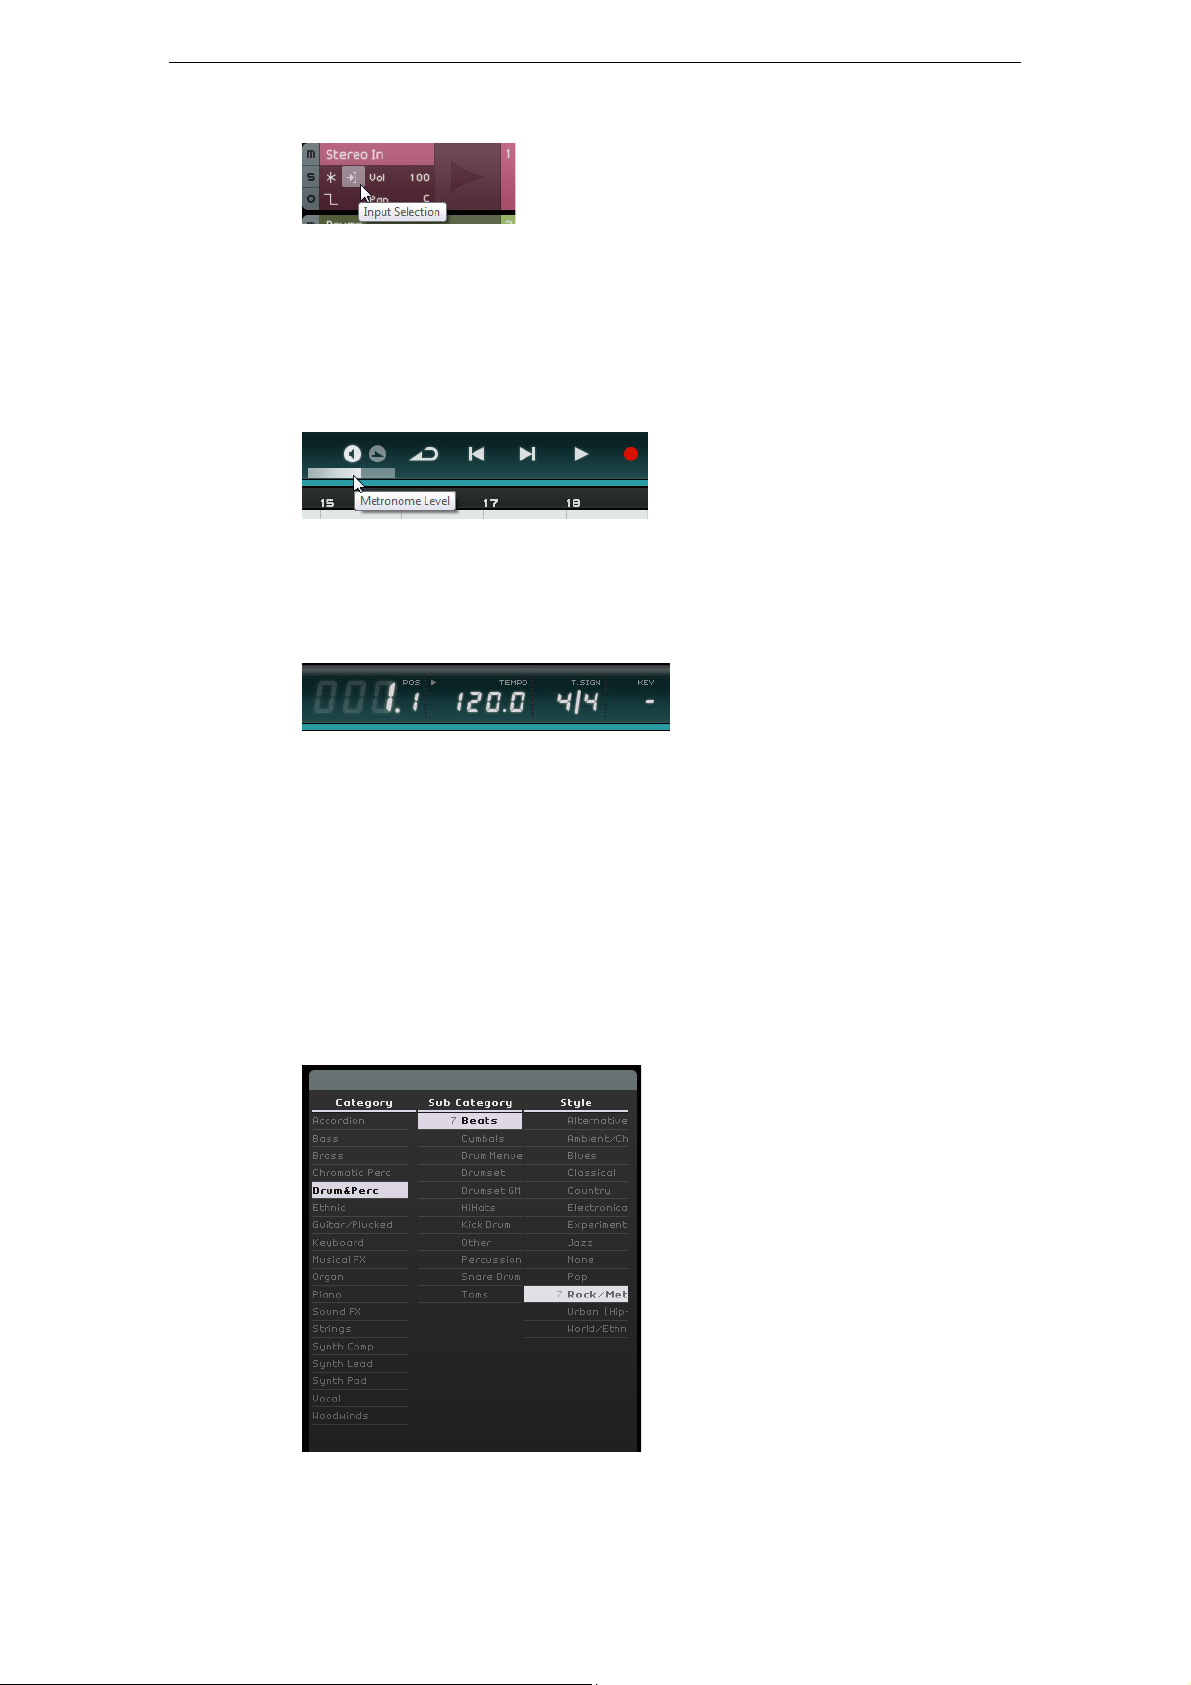
Activating the Metronome Click
Click here to select a
different input.
To align your recording with the bars and beats displayed in the ruler, you can activate
a click or metronome.
• Activate the Metronome button in the Pilot Zone.
• Adjust the metronome volume using the slider.
The metronome is automatically set to add a two-bar precount before recording starts.
You can now specify the project tempo in the Tempo field, see “The Tempo (TEMPO)”
on page 64 for more information. This affects the speed of the metronome click. The
default setting is 120 which means 120 BPM or beats per minute.
Recording Audio
Adding a Drum Loop
Now, add some drums to the project.
Adding a drum loop to your project is also useful for supporting the metronome when
you are recording bass or guitar.
1. Click the MediaBay button in the lower right corner of the Multi Zone.
2. In the MediaBay, click the “Show Filter” button to open the filter section.
3. Set the Category column to “Drum&Perc” and the Sub Category column to
“Beats”.
4. In the Style column, select a style that suits the guitar line you want to record.
21
Recording
Page 22
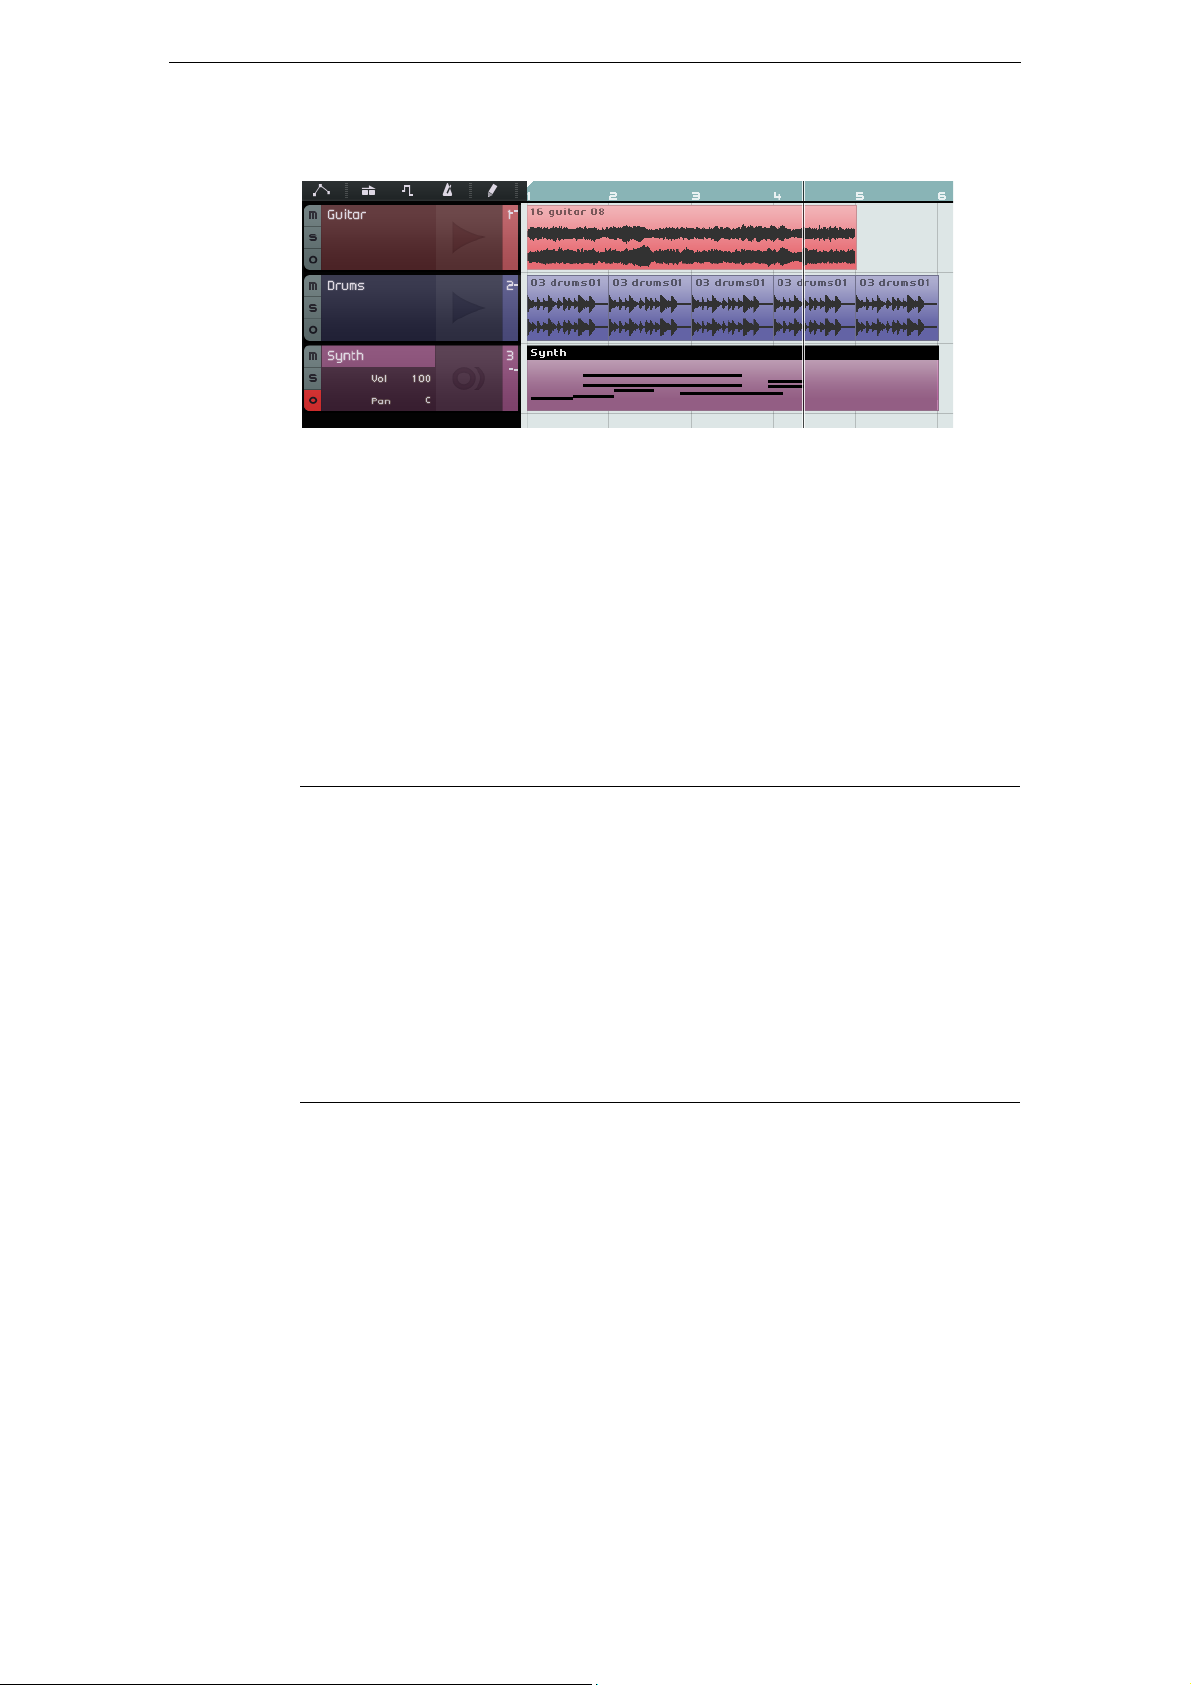
Recording Audio
Ö
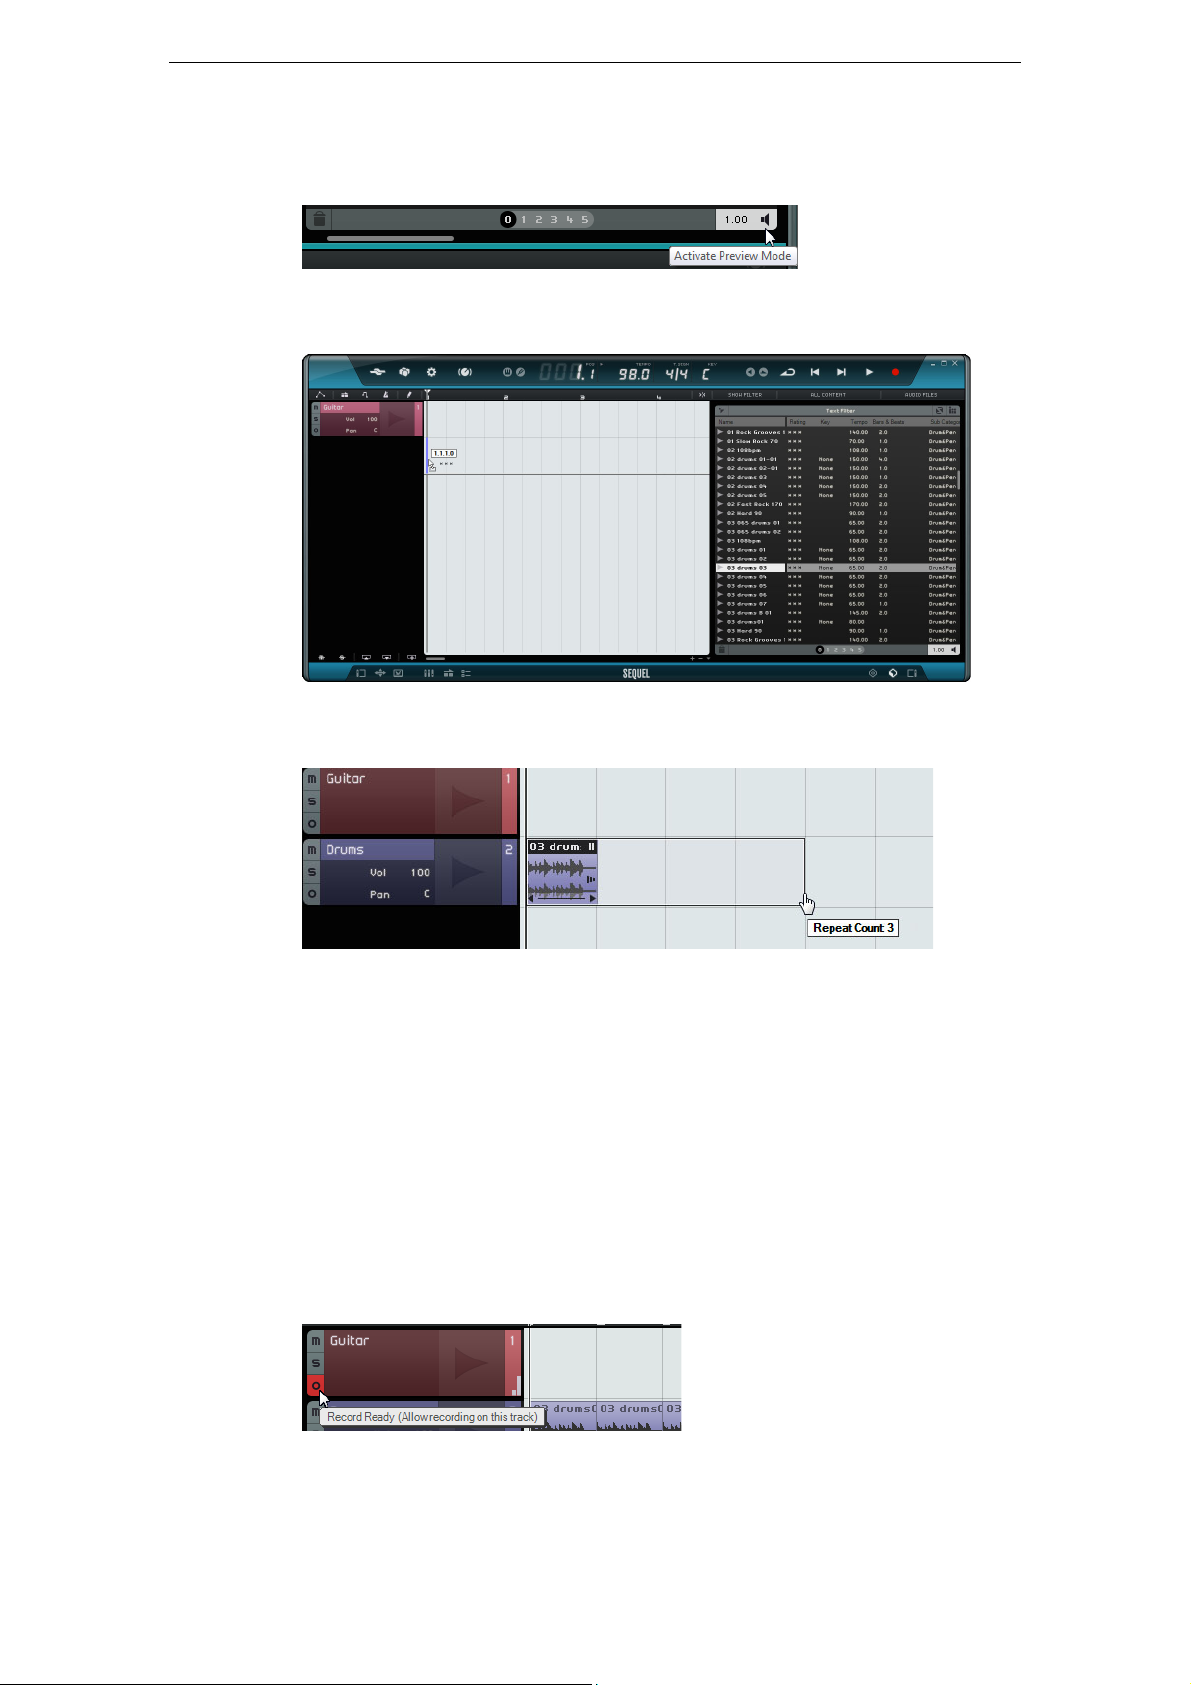
5. Make sure the Preview button is activated and step through the list on the right
until you find a suitable loop.
6. Drag the selected drum loop into the Arrange Zone and line it up with bar 1, just
below the guitar track.
7. Click in the middle of the right edge of the event and drag to the right up to the
8. Rename the track “Drums”.
The tempo of the project has changed to match the drum loop. When you drag a file
into an empty project, its tempo defines the project tempo. Read more about defining
or changing the project tempo in the section
Setting Levels
In this example, a guitar plays through an amplifier with a microphone in front of the
amplifier’s speaker. This microphone is plugged directly into the Steinberg CI1
microphone input. You have set the level so that you have enough volume without
clipping.
1. Activate the Record Ready button to hear the guitar.
beginning of bar 5 to make the loop 4 bars long.
“The Tempo (TEMPO)” on page 64.
You should see the audio coming in to the right of the track.
2. Do the best you can to send the maximum amount of volume to the audio inputs of
your audio card before you hear any distortion.
Most audio cards show some kind of level or volume indication.
22
Recording
Page 23

Tuning your Instrument
Tuning indicator Note and octave
Ö
Sequel features a built-in tuner for tuning guitar or bass, for example.
1. Make sure the guitar track is selected and the Record Ready button is activated so
that you hear the input.
2. Activate the Tuner in the Pilot Zone.
3. Pluck a string on your guitar or bass.
The Tuner automatically detects which string you are hitting as long as it is in fairly
close proximity to the right tuning. The tuning indicator moves left or right. If it moves
to the left, the string is flat. If it moves to the right, the string is sharp.
The Tuner also displays the current note and octave that your string is tuned to.
4. Tune each of your instrument’s strings.
Recording Audio
5. Deactivate the Tuner.
You are now ready to record!
Recording the Guitar
1. Click on the ruler at the position where you want the recording to start or click the
“Jump to Previous Marker” and “Jump to Next Marker” buttons in the Pilot Zone.
This moves the project cursor to this position.
2. Make sure the Cycle button is deactivated.
3. Activate the “Record Ready” button for the track you want to record on.
4. Click the Record button to record the guitar.
Two bars of precount are automatically added. This is indicated by a red cursor at
the position where you start recording and a black cursor that jumps two bars back
and advances towards the record position. This allows you to see the remaining
count in time and the record start position at the same time.
The red cursor is not shown if the record start position is set to the first bar.
5. Press [Space] to stop recording.
23
Recording
Page 24

Playback
Recording Audio
To listen to what you have just recorded, you have to play it back.
• Load the project “Playback” found in the “Sequel Tutorial 1” folder.
Starting Playback
To start playback, you have the following possibilities:
• Click the Play button.
• Press [Space] on your computer keyboard.
This toggles between start and stop.
• Press [Enter] on the numeric keypad.
• Double-click in the lower half of the ruler.
Stopping Playback
To stop playback, you have the following possibilities:
• Click the Play button during playback.
• Press [Space] on your computer keyboard.
This toggles between start and stop.
• Press [0] on the numeric keypad.
Cycle Playback
In Sequel, you can also cycle (or loop) a section of your project.
To draw in a cycle region, proceed as follows:
1. Click the button on the right of the ruler to activate “Snap to Grid”.
This makes it easier to create a precise region.
2. Position the mouse pointer over the top of the ruler, so that it turns into a Draw
tool.
3. Click and drag from bar 3 to bar 4.
4. Activate the Cycle button.
5. Click the “Jump to Previous Marker” or “Jump to Next Marker” buttons until the
project cursor is positioned at the beginning of the cycle (in this example, bar 3).
6. Start playback.
Sequel plays the cycle section over and over again until you stop playback.
24
Recording
Page 25
Recording Multiple Takes of your Audio
Sequel offers the possibility to record multiple takes of your performance. This allows
for recording a section multiple times and then selecting the best take, or assembling
a perfect take from the different takes. Proceed as follows:
1. Draw in a cycle region from bar 3 to 4, and set the project cursor to the beginning
of the cycle.
2. Activate the Cycle button.
3. Make sure that the “Record Ready” button for the track is activated, and click the
Record button to start recording.
The project cursor jumps to a position 2 bars before the recording starts and
Sequel repeats the cycle region over and over again.
4. Record as many takes as you like.
All takes are stacked in the cycle region.
5. Press [Space] to stop recording.
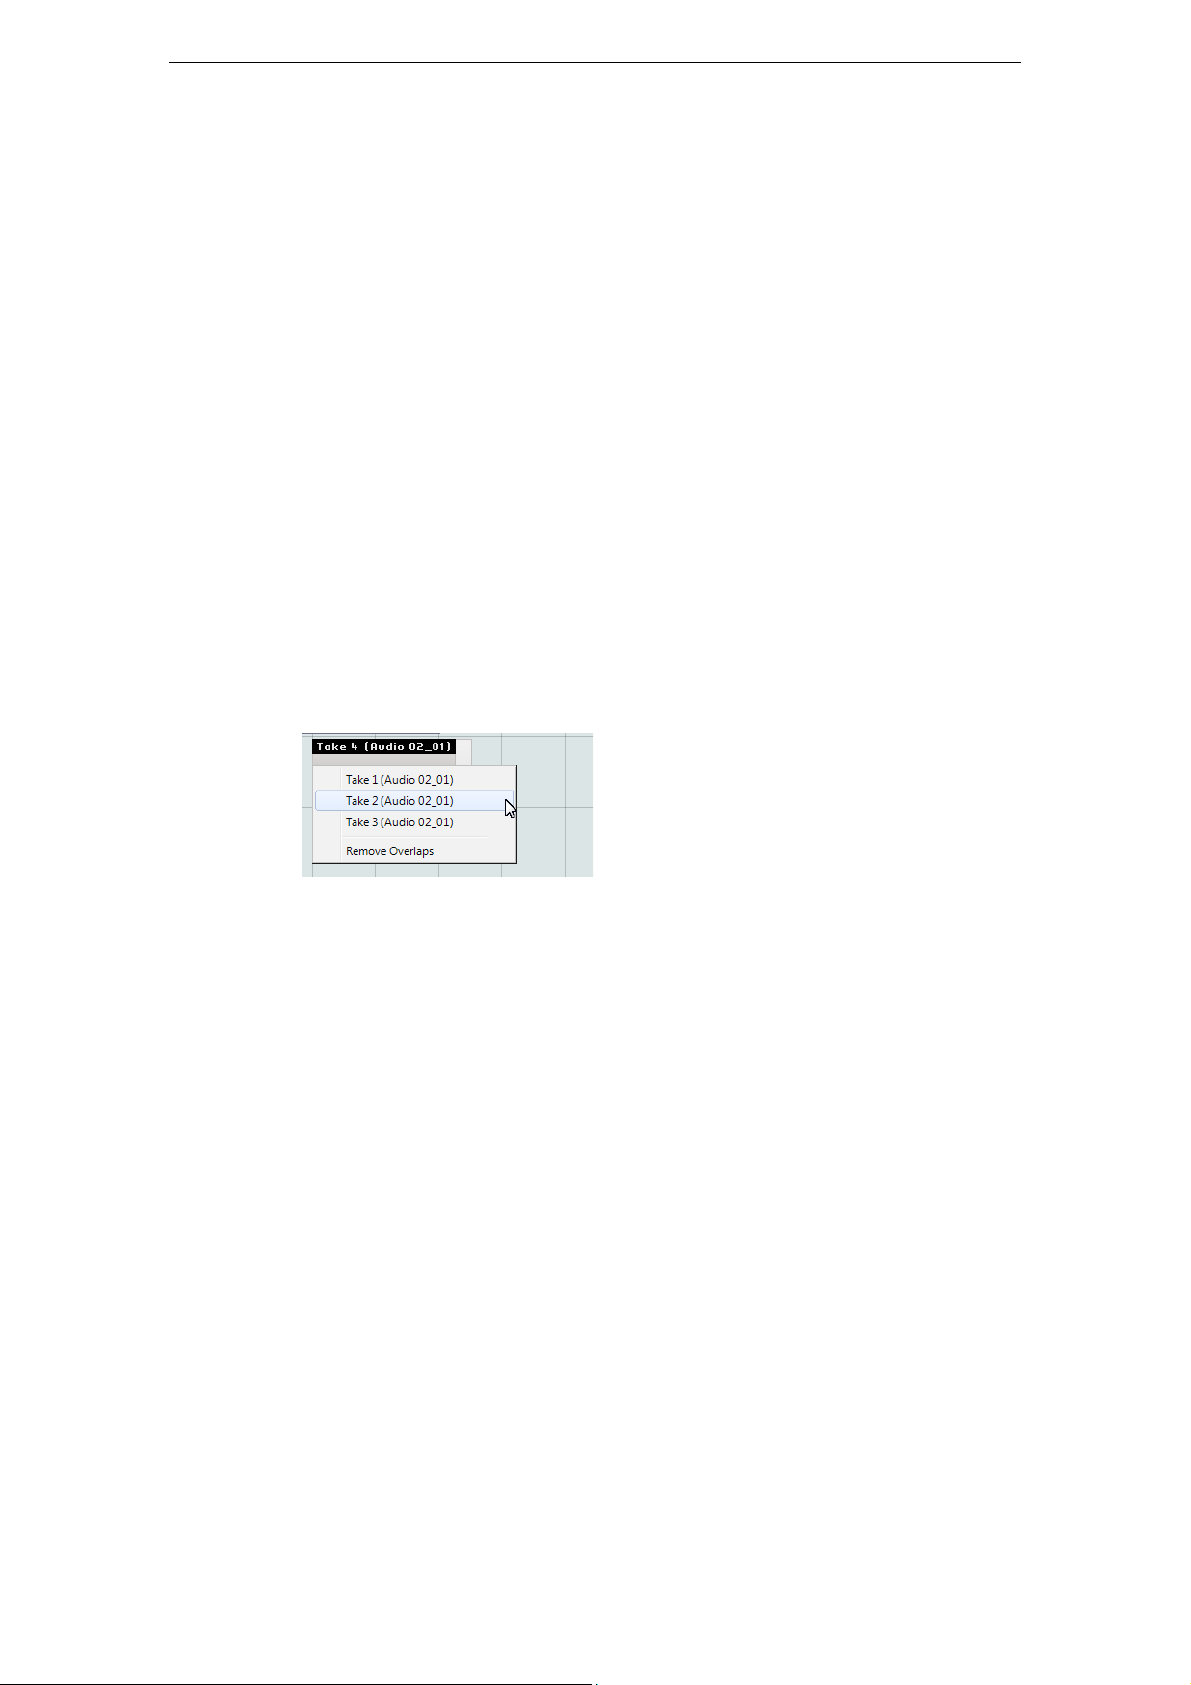
Selecting a Take
When you play back what you have just recorded, you can only hear the take that is
shown in the Arrange Zone. To select a different take for playback, proceed as follows:
Recording Audio
1. Position the mouse pointer over the take and click the small triangle on the top left.
2. On the pop-up menu, select the take that you want to hear.
3. Listen to all your takes and select the one you like most.
4. To delete the other takes, select “Remove Overlaps” from the pop-up menu.
Assembling the Perfect Take
You can also combine segments of the recorded takes to assemble one perfect take.
Proceed as follows:
1. Move the mouse pointer over the bottom of the take so that it turns into a Split tool.
2. Click at the positions where you want to split the takes.
All stacked takes are cut at the same positions.
3. Select the segments that you want to include in the perfect take from the pop-up
menu.
4. On the Edit menu, select the “Bounce Selection” command.
A new audio event that includes all segments is created and all the unused
segments are removed.
25
Recording
Page 26
Recording Instrument Parts
Ö
Ö
In this section, you will learn how to record instrument parts on instrument tracks.
• Load the project called “Recording MIDI” found in the “Sequel Tutorial 1” folder.
Creating an Instrument Track
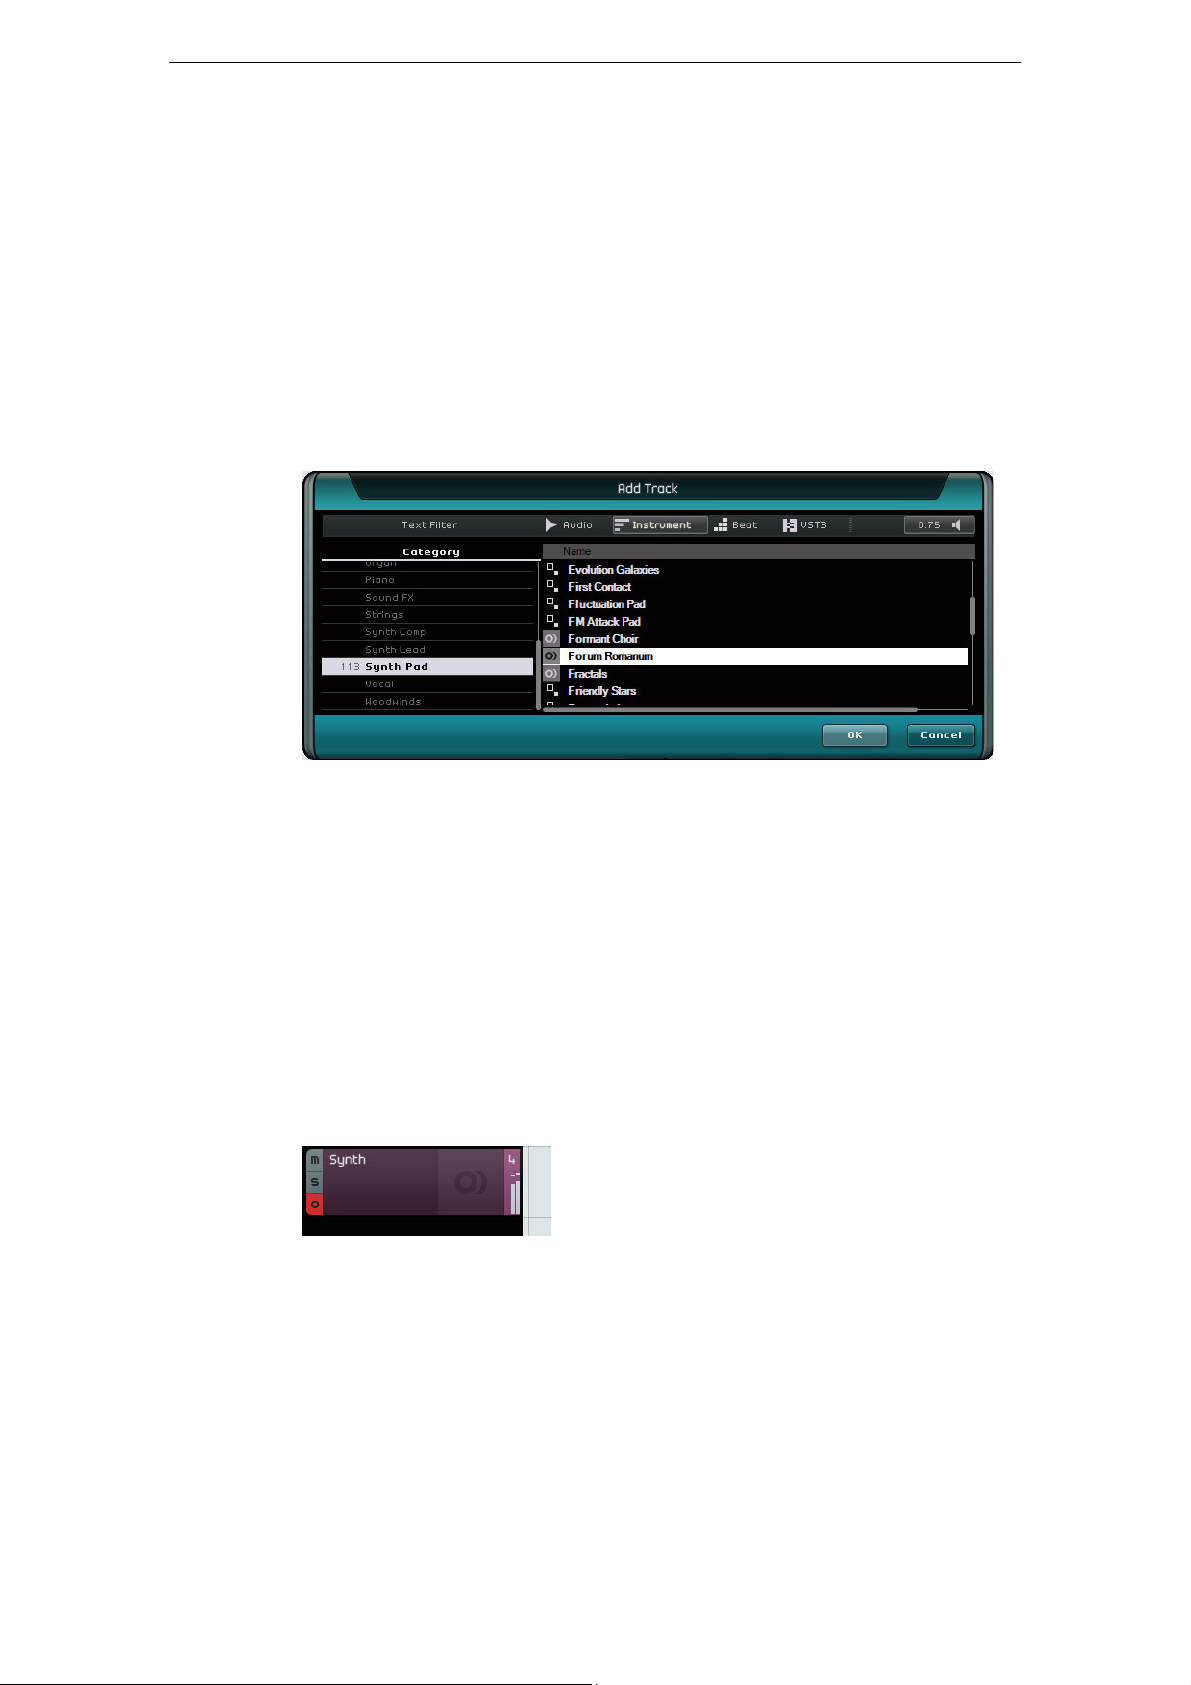
1. Click the “Add Track” button below the track list.
The Add Track dialog opens.
2. Select the Instrument option.
3. Use the Category filter and select a sound for your project, for example a Synth
Pad sound.
Recording Instrument Parts
4. Rename the track according to the type of sound.
Recording an Instrument Part
Now that you have a track and a sound, you can start recording. Recording instrument
parts is very similar to recording audio events.
Sequel automatically finds and uses any MIDI devices that you have on your computer.
The MIDI input of an instrument track is always set to “All Inputs”.
1. Activate the “Record Ready” button for the track and press a few keys on your
MIDI keyboard.
You should hear the MIDI signals and see data coming in to the right of the track.
2. Make sure the Cycle button is deactivated.
3. Click on the ruler at the position where you want the recording to start.
This moves the project cursor to this position.
26
Recording
Page 27
Recording Instrument Parts
4. Click the Record button to start recording.
5. Record 4 bars.
6. Press [Space].
7. Deactivate “Record Ready” so that you do not hear the input any more.
Congratulations! You have just recorded your first instrument part in Sequel.
8. Load the project “MIDI Playback” found in the “Sequel Tutorial 1” folder.
9. Set the project cursor to bar 1 and press [Space] to listen back.
Recording Multiple Takes of an Instrument Part
Basically, recording multiple takes of an instrument part is the same as multi-take
audio recording, but there is one important difference. When it comes to MIDI multitake recording, you can choose between two recording methods:
Recording
method
Take This is the default mode where all recorded MIDI takes are stacked
Mixed In this mode, all notes that you record during the cycles are recorded
You can select the recording method from the MIDI Recording pop-up menu on the
Settings Page in the Multi Zone.
Description
in the cycle region. As with audio takes, you can select the take that
you like most or assemble a perfect take, see
Takes of your Audio” on page 25. This is useful if you want to record
different versions of an instrument part, for example a piano
performance.
into the same instrument part. This is useful for drum recordings, for
example. You can record the kick drum in the first cycle, the snare in
the second cycle, and so on.
“Recording Multiple
27
Recording
Page 28
Introduction
In this chapter, the basic editing methods are described.
• The following sections make reference to tutorial projects, located in the default
Sequel project folder.
Importing
You can import audio files, instrument sounds, pattern banks, or MIDI loops by simply
dragging them from the MediaBay or your desktop and dropping them in the Arrange
Zone.
Common Editing Functions
Editing
Renaming
In this section, you will learn how to edit audio events. This includes renaming, resizing,
splitting, moving, muting, copying, repeating, deleting, and creating a new file from
selected audio events. You can also apply all these functions to instrument and beat
pattern parts.
• Load the project “Event Operations” found in the “Sequel Tutorial 2” folder.
Consistency in the naming of your audio files helps to keep your project clean and
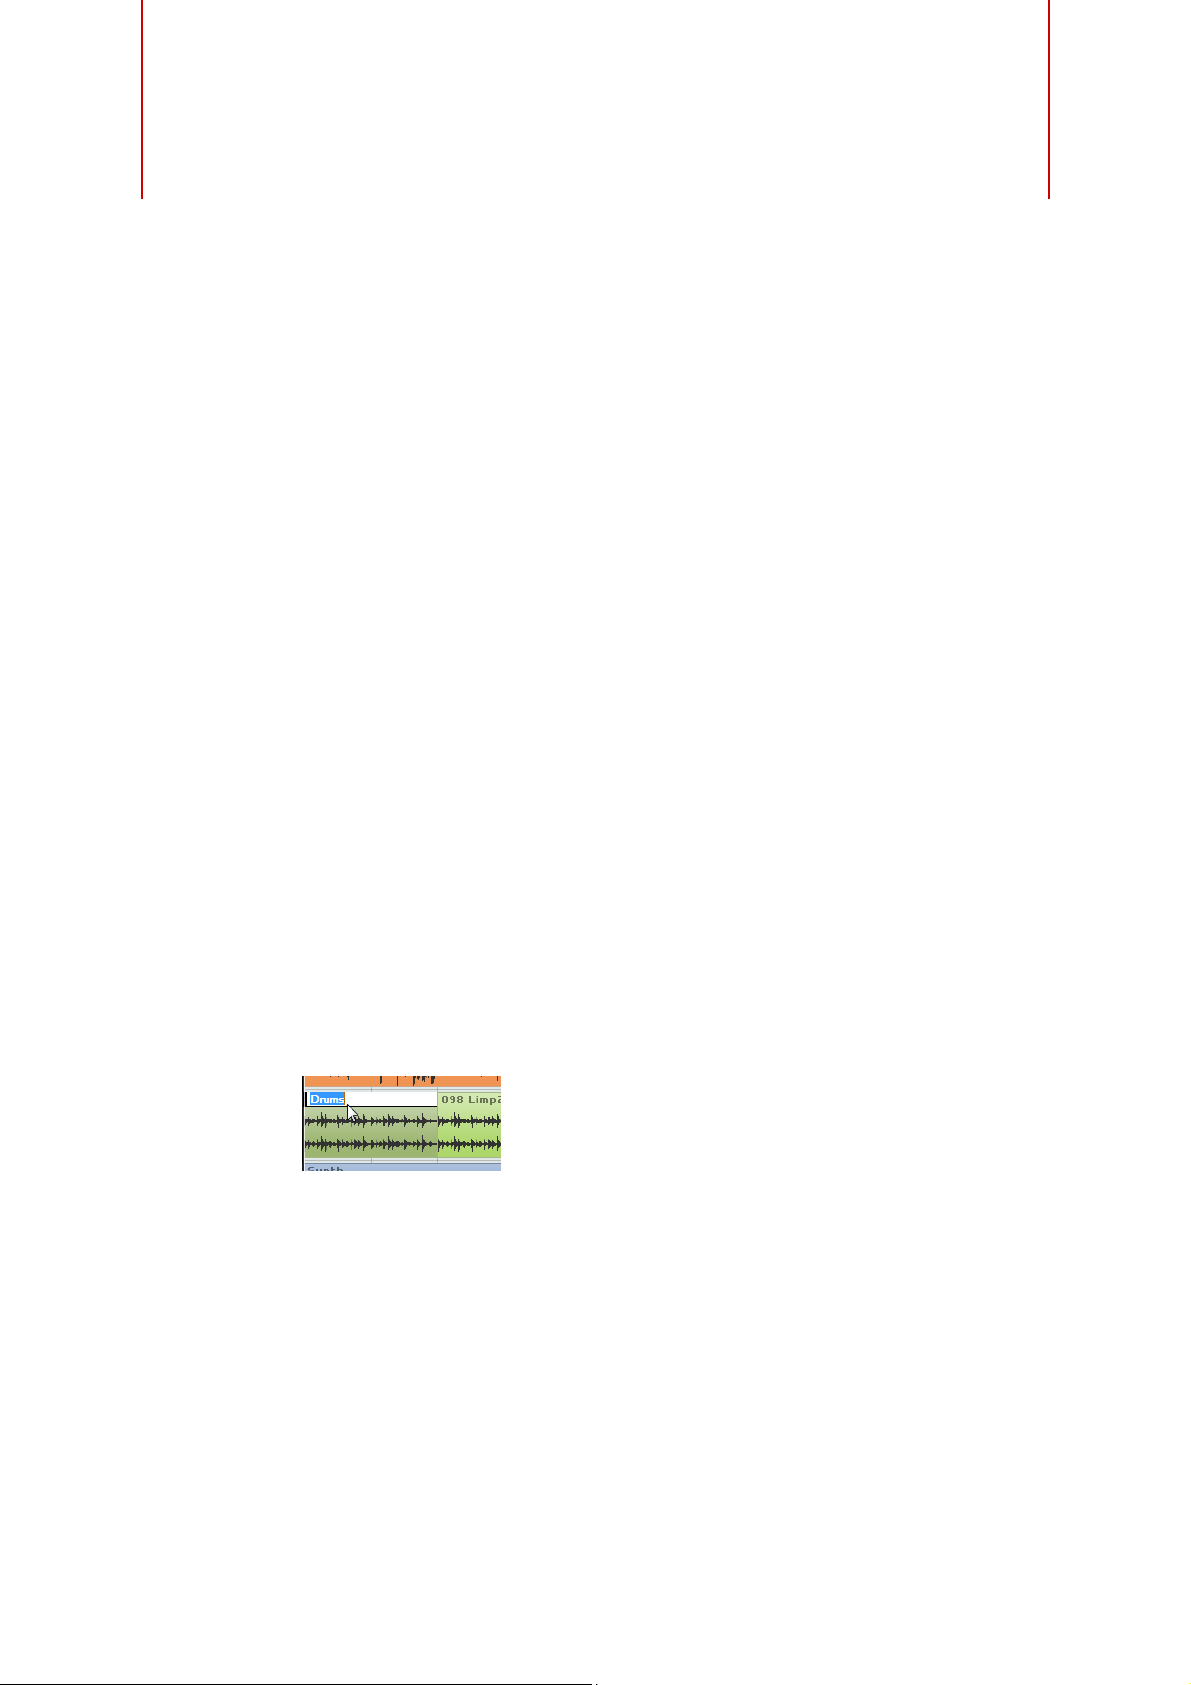
organized. Therefore, rename the audio event on the drum track “Drums”:
1. Double-click the name field on the event.
2. Type in “Drums” and press [Return].
The name changes to “Drums”.
28
Page 29

Resizing
Resize handles
Ö
Common Editing Functions
In the bottom left and right corners of an event, the resize handles are shown. Click
and hold either one of them and drag left or right to lengthen or shorten the event.
For this example, resize the Guitar and Synth events.
• Position the mouse pointer over one of the triangles at the lower left or right of the
event. Click and adjust the Guitar and Synth events.
When you resize an event, the tooltip beside the mouse pointer displays the bar
position and length of the event.
Splitting
Audio events cannot be made any longer than they were when they were created.
You can split an event at any given position or you can split them evenly at positions
defined by the bars and beats position grid displayed in the Arrange Zone.
Splitting without Snap to Grid
Splitting without “Snap to Grid” allows you to cut the event anywhere you like.
1. Make sure that “Snap to Grid” is deactivated.
You can now split the event anywhere you like.
2. Select the Synth event.
3. Point the mouse at the bottom of the event so that it turns into the Split tool.
4. Click anywhere along the bottom of the event to split it. Create as many splits as
you like.
29
Editing
Page 30
Common Editing Functions
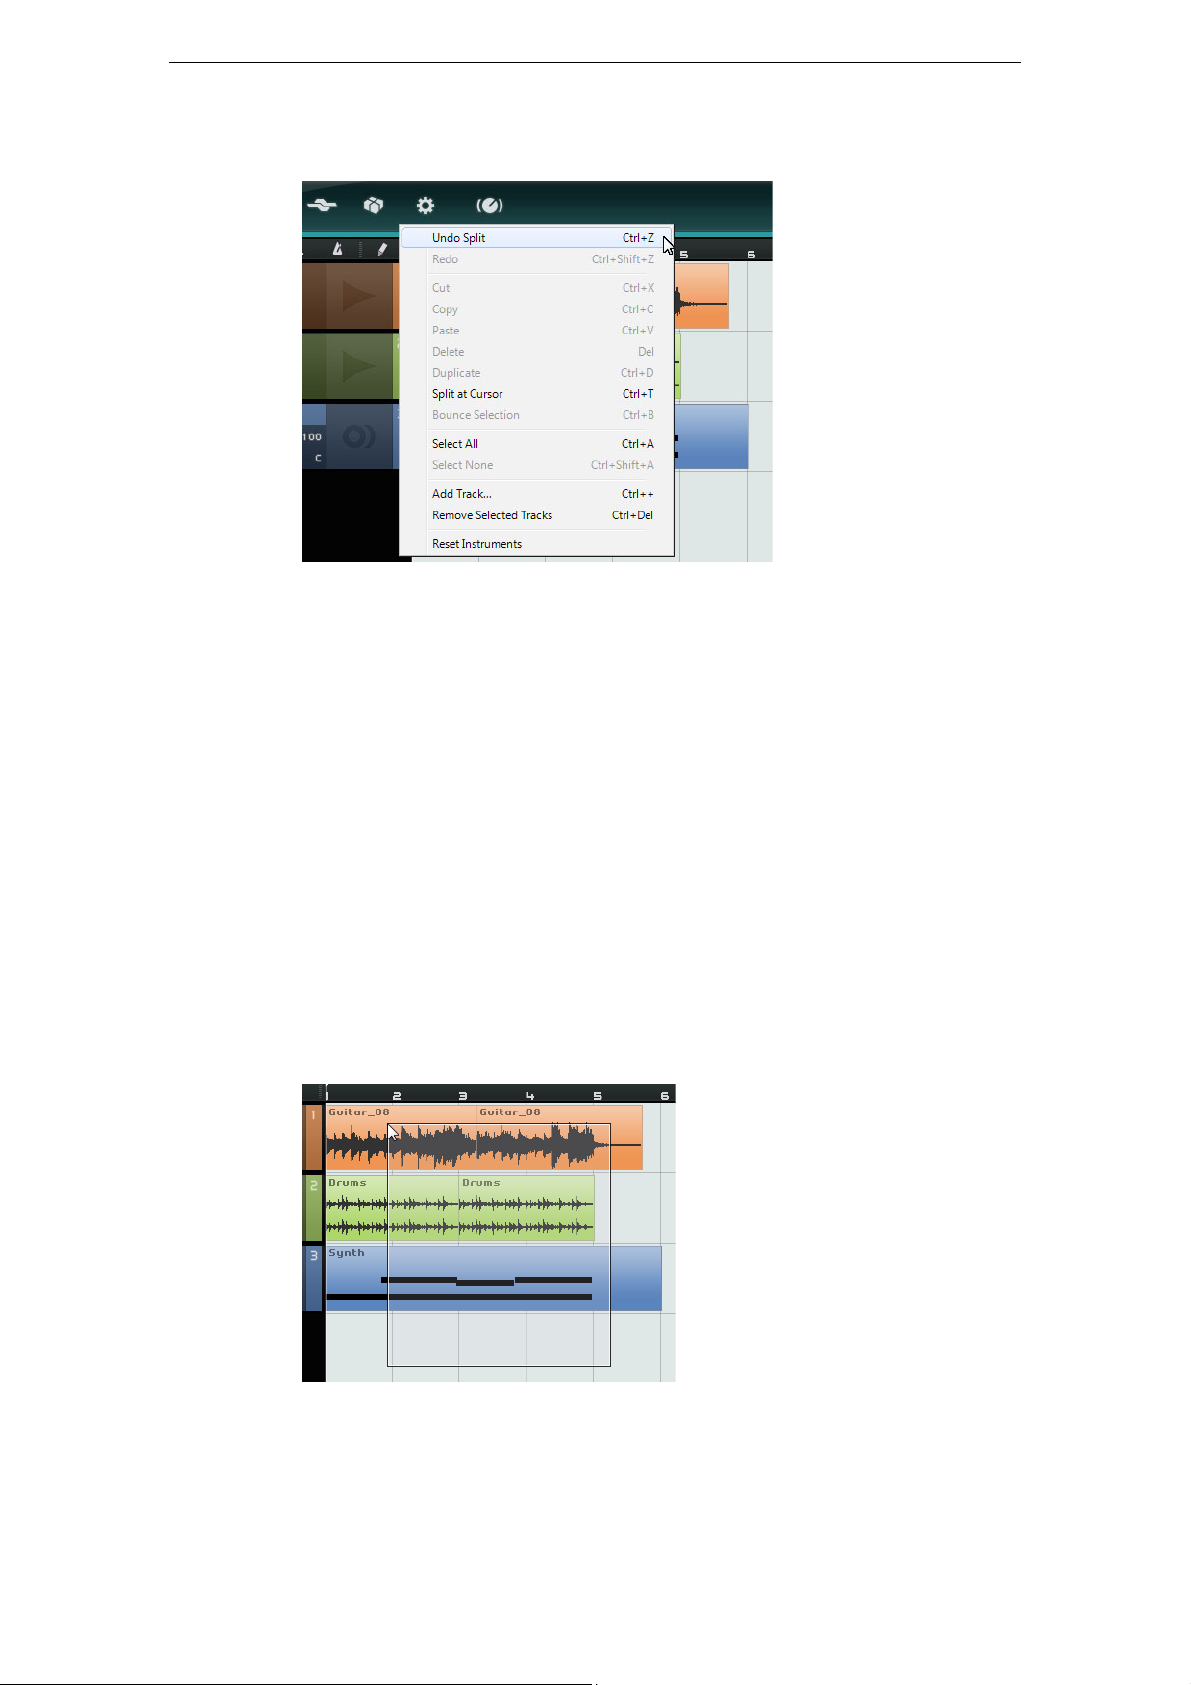
5. Undo your actions by selecting “Undo Split” from the Edit menu.
Splitting with Snap to Grid
Having “Snap to Grid” activated allows you to split with precision, directly on bars or
beats.
Moving
1. Make sure that “Snap to Grid” is activated.
2. Split the Drums event on the third beat of every bar.
If you cannot see beats in the grid, zoom in using the [H] key on your keyboard until
you can see them.
3. Cut on bar 1 beat 3, bar 2 beat 3, bar 3 beat 3, and bar 4 beat 3.
4. Undo your actions by selecting “Undo Split” from the Edit menu.
Now, move the events in the project so that all the events on all tracks line up with bar 2.
1. Make sure that “Snap to Grid” is activated.
2. Click and hold the mouse in an empty area of the Arrange Zone. Drag to create a
selection of all the events.
When you release the mouse button, all events are selected.
30
Editing
Page 31

Muting
Ö
Click here to
mute the event.
Repeat handle
Common Editing Functions
3. With all of the events selected, click and drag them so that the events line up with
bar 2.
All of the events move together, maintaining their relative positions.
Muting an event stops you from hearing just that event. You can mute events on a
track so that the track continues to play back except for the muted events.
This is different from muting a track.
Repeating
Copying
• To mute an event, click the Pause button in the top right corner of the event. The
event turns gray. Click again to unmute it.
The Repeat function is great for repeating events over and over. This function is built
right into events in Sequel.
• To repeat the Drums event, click the repeat handle below the Mute button and
drag until the Repeat Count is three.
You now have five Drums events. Two original ones and three repeats.
You can copy an event to another area in the Arrange Zone.
Using Copy and Paste
1. Click the event, and select Copy from the Edit menu. For this example, copy the
Guitar event.
2. Position the cursor at the position in the project where you want the copy to be
made, for example at beat 2 of bar 5.
3. Select the track that you want the event to be copied to by clicking on it in the
track list.
4. Select Paste from the Edit menu.
You now have two Guitar events.
31
Editing
Page 32

Copying using the [Ctrl]/[Command] Key
1. Place the cursor in the center of the Synth event and hold down [Ctrl]/[Command].
2. Click and hold the selected event and drag to the position where you want the
copy to be made. In this case, drag until the copy is lined up with bar 5.
3. Release the mouse button.
You now have two Synth events.
Deleting
1. Select an event to delete.
2. Press [Delete] or [Backspace] or select the Delete option on the Edit menu.
Creating a New File from Selected Events
When you have edited events, it is often useful to create a new file from the events.
For example, you may have split an event into several events, reordered them, and
want to further edit the entire audio in the Sample Editor. Proceed as follows:
1. Hold down [Ctrl]/[Command] and select the audio events that you want to
combine in a new file.
2. Open the Edit menu and select “Bounce Selection”.
All selected events are combined in a new event.
The Draw Tool
The Draw Tool
At the top of the track list, you have access to the Draw tool.
• You can use the Draw tool to draw in elements in the Arrange Zone.
• You can also press [Alt]/[Option] to toggle the Draw tool in Select mode.
You can draw in the following elements in the Arrange Zone:
- Instrument parts on instrument tracks
- Pattern parts on beat tracks, see “The Beat Page” on page 53
- Performance parts on the performance track, see “Performance Parts” on page 96
- Tempo changes on the tempo track, see “Adding Tempo Changes” on page 37
- Automation events on the automation track, see “Adding Automation” on page 44
- Transpose changes on the transpose track, see “Show Transpose Track” on page
69
32
Editing
Page 33

The Sample Editor
The Sample Editor is used for detailed audio editing.
These features are described in the chapter “Advanced Features” on page 101.
• To open the Sample Editor, select an audio event and then open the Editor Page in
the Multi Zone.
• You can also double-click the event in the Arrange Zone to open it in the Sample
Editor.
The selected audio event is displayed in the center of the Editor Page. Here you
can see a detailed waveform rendering of the audio file.
The Sample Editor
The Key Editor
The Key Editor is where you can make changes to the instrument data on instrument
tracks.
• Load the project “Key Editor” found in the “Sequel Tutorial 2” folder.
Select the Synth part and open the Editor Page in the Multi Zone to view the Key
Editor. Here, you can see the synth notes lined up with a keyboard display on the left.
At the bottom, the velocity of each of the notes is shown and at the top, you can see
the time ruler.
Deleting Notes
To delete all the notes in bar 1, proceed as follows:
1. Drag a selection rectangle over the first bar.
2. Press [Delete] or [Backspace].
Editing
33
Page 34

The Key Editor
Copying Notes
Now, copy all notes from the second bar into the first bar.
1. Select the notes in bar 2.
2. Hold down [Ctrl]/[Command] and drag the notes from bar 2 to bar 1.
Resizing Notes
You can shorten or lengthen notes in the Key Editor. For example, to change all the
eighth notes in the first two bars into quarter notes, proceed as follows:
1. Select all the notes in the first two bars.
2. Position the mouse pointer at the end of any of the selected notes.
It changes into a double arrow.
3. Click and drag right to resize all the notes.
Creating or Drawing in Notes
You can use the Key Editor to draw in notes. This is great for creating instrument
arrangements that you are having trouble playing in yourself.
To add some notes to the first two bars of the project, proceed as follows:
1. Make the Key Editor larger by clicking on the bar along the top of the Multi Zone
and dragging upwards.
2. Zoom in on the notes in the Key Editor by clicking the “+” symbol at the bottom
right of the Key Editor.
3. Draw in a G above the first C in bar 1 so that two notes are played instead of one.
Hold down [Alt]/[Option] to toggle the Draw tool.
34
Editing
Page 35

The Key Editor
Controller lane
Controller pop-up menu
4. Click and drag to draw in an eighth note G.
5. Draw in notes above the rest of the notes in bar 1 and 2.
The Controller Lane
The controller lane allows you to add or modify instrument data such as velocity and
controller information. The most common use for this is to edit velocity or pitch bend.
If you find that the velocity is too strong or too weak on certain notes, you can view
and edit them at the bottom of the Key Editor.
1. On the controller pop-up menu, select the information that you want to view or
change; in this example, select Velocity.
In the controller lane, you can now see the velocity for each note contained in the
instrument part. When you move the mouse pointer to the controller lane, it turns
into a Draw tool.
2. Click and drag to change the velocity information for a note.
Working with Selection Ranges on the Controller Lane
The controller lane editor allows you to perform additional scaling operations for
selection ranges on existing controller curves.
• To open the controller lane editor, create a selection rectangle on the controller
lane, encompassing the controller events that you want to edit.
For Velocity lanes, you have to press
[Alt]/[Option]
to enter Select mode.
35
Editing
Page 36

The Key Editor
In the controller lane editor, so called smart spots appear on the borders of the editor.
These smart spots allow you to activate a specific editing mode:
Editing mode To activate this mode… Description
Move Vertically Click in an empty area on
the upper border of the
editor.
Scale Vertically Click the smart spot in the
middle of the upper border
of the editor.
Tilt the left/right part of
the curve
Compress the left/right
part of the curve
Click the smart spot in the
upper left/right corner of
the editor.
[Alt]/[Option]-click the smart
spot in the upper left/right
corner of the editor.
This mode allows you to move the
entire curve up or down, which is
useful to boost or attenuate an
otherwise perfect curve.
Use this mode to relatively scale
the curve, i.
values in percent (not by absolute
amounts).
These modes allow you to tilt the
left or the right part of the curve,
respectively. This is useful if the
curve form is exactly the way you
want it, but the start or end needs
to be boosted or attenuated a bit.
These modes allow you to
compress the left or the right part
of the curve.
e. to raise or lower the
Scale Around Absolute
Center
Scale Around Relative
Center
Stretch Click and drag in the lower
• To move the whole selection up/down or left/right, click on a controller event
inside the editor and drag the curve.
• By pressing [Ctrl]/[Command] when clicking and dragging, you can restrict the
direction to horizontal or vertical movement, depending on the direction in which
you start dragging.
Click the smart spot in the
middle of the right border of
the editor.
[Alt]/[Option]-click the smart
spot in the middle of the
right border of the editor.
part of the editor (not
available for Velocity lanes).
This mode allows you to scale the
curve around the absolute center,
i.
e. horizontally around the center
of the editor.
This mode allows you to scale the
curve relative to its center.
This allows you to stretch the
selected controller events.
36
Editing
Page 37

The Beat Page
Change Tempo
Curve Mode
Edit Selected
Tempo Events
Maximum Visible Tempo Value
Minimum Visible Tempo Value
The Beat Page is where you can make changes to the data on beat tracks. You can
draw in steps, set velocity values, and specify the sounds, for example.
The steps are shown in the step display, each step representing a beat position in the
pattern. By default, 16 steps are shown per lane.
The Beat Page is described in detail in the section “The Beat Page” on page 53.
Adding Tempo Changes
In this section, you will learn how to add tempo changes to your project.
• In the Arrange Zone, click the “Show Tempo Track” button.
The Beat Page
The tempo track is displayed at the top of the project. In the event display, a horizontal
line shows the current tempo. By adding curve points to this line, you can vary the
tempo within the project. The curve points represent the tempo changes. In the track
list, there are two controls for the tempo track.
Add some tempo changes:
1. Select the Draw tool and click at the positions in your project where you want the
tempo to change.
The tempo display in the track list displays the tempo according to the position of
the mouse pointer.
2. Listen to your project to hear how it sounds with tempo changes.
If necessary, you can edit the tempo curve as follows:
• To modify the inserted tempo changes, click and drag the tempo curve points.
• To enter a specific tempo for the tempo curve point, select the curve point and
double-click the tempo display in the track list.
• To change the tempo gradually from one curve point to the next one, open the
“Change Tempo Curve Mode” pop-up menu in the track list and select Ramp.
The default setting is Jump, where the tempo changes instantly to the new value.
37
Editing
Page 38

Adding Tempo Changes
Ö
• To delete a tempo change, select the corresponding tempo curve point and press
[Delete] or [Backspace].
• To change the maximum and minimum tempo values that are shown in the curve
display, click the values and drag up or down or double-click the values and enter
a specific value.
If you use the Tap Tempo function in the Pilot Zone tempo display, the current tempo
curve is removed and the tapped tempo is used as a single constant tempo, see
“Us ing Tap Te mpo ” on page 65.
38
Editing
Page 39

Introduction
Ö
!
In this chapter, you will learn how to create a mix ready with proper levels, EQs, and
effects. You will also add automation and export the audio.
The following sections make reference to tutorial projects, located in the default
Sequel project folder.
Setting Levels
The first thing that you need to do is to set the levels for the project so that you can
add EQ and effects later.
• Load the project “Mixing 1” found in the “Sequel Tutorial 3” folder.
1. Open the Mixer Page in the Multi Zone.
Mixing
2. Press [Space] to start playing back the project and listen to your mix.
3. Move the faders on each track so that you hear everything the way you like it.
Be careful how high you raise the faders. Make sure that everything is at a good
volume without clipping, distortion, or any other unpleasant sounds. If the Master
fader area turns red, your tracks are too loud. If this happens, lower the levels.
39
Page 40

Setting Pan
• Load the project “Mixing 2” found in the “Sequel Tutorial 3” folder.
• Setting the pan for each track moves its position in the stereo mix. You can either
keep the signal balanced in the middle of the left and right speaker, slightly to the
left or right, or be completely in the left or right speaker.
• Keep the Drums track in the middle. Move the bass track slightly to the left and
move the guitar track almost all the way left and the synth track almost all the way
to the right. This gives the mix a little bit more of a feeling of space.
• To get the panner back to the center, [Ctrl]/[Command]-click directly in the panner
area.
Mute and Solo
Setting Pan
Adding EQ
• Load the project “Mixing 3” found in the “Sequel Tutorial 3” folder.
For each track, there are buttons for mute and solo. Mute prevents you from hearing
the track, and solo only plays that track or tracks that have solo enabled.
• You can mute or solo several tracks simultaneously.
• When you solo a track, the other tracks are muted.
• To disable a solo or mute state, click the button again.
• To simultaneously mute a track that is soloed and solo another track,
[Ctrl]/[Command]-click the Solo button of the track that you want to solo.
That’s it for solo and mute. Let’s move on to adding EQ.
• Load the project “Mixing 4” found in the “Sequel Tutorial 3” folder.
EQ, or equalization, adds or subtracts frequencies, so that you can place each
instrument correctly in the mix. EQ is subjective and can be influenced by the kind of
music you are mixing or the kind of music that you like to listen to.
We are going to run through the EQ features that Sequel has to offer, but feel free to
experiment and try the different presets on your mix.
1. Select the Drums track in the Arrange Zone.
2. Solo the Drums track, and open the Track Inspector Page in the Multi Zone.
40
Mixing
Page 41

Adding EQ
3. Open the Equalizer panel.
4. Play back a part on the Drums track so that you can hear your EQ changes.
The low band allows you to modify the low-frequency portion of the signal (bass), the
middle band the mid frequencies, and the high band the high frequencies (treble).
• To adjust the frequency of a band, drag the corresponding frequency slider to the
left or right.
The exact frequency range is displayed in the EQ settings display.
The middle EQ is a parametric EQ. You can adjust its frequency range by dragging
the Resonance slider. Drag the slider to the right to widen the range and to the left to
shorten it.
5. Adjust the EQ level by dragging the Gain sliders in the Low, Mid, or High section
to the left or right.
• To bypass the EQ, click the Bypass button.
• You can reset any slider by [Ctrl]/[Command]-clicking it. You can also reset the
EQ from the EQ Presets pop-up menu by clicking in the EQ Presets field and
selecting “RESET”.
41
Mixing
Page 42
6. Experiment with the EQs on all your tracks.
• Listen to, and see the EQ changes by loading the project “Mixing 5” found in the
Audio Effects
• Load the project “Mixing 6” found in the “Sequel Tutorial 3” folder.
You will now add some effects to the project. In Sequel, there are three types of
effects:
- Insert effects
- Send effects
- Output effects
For details on each effect and its parameters, see the chapter “Effects and
Instruments Reference” on page 119.
You can also add effects to instrument parts. This is described in the section “Panels
for Instrument Tracks” on page 83.
Insert Effects
Audio Effects
“Sequel Tutorial 3” folder.
Insert effects are inserted into the signal flow. To set up an inset effect, proceed as
follows:
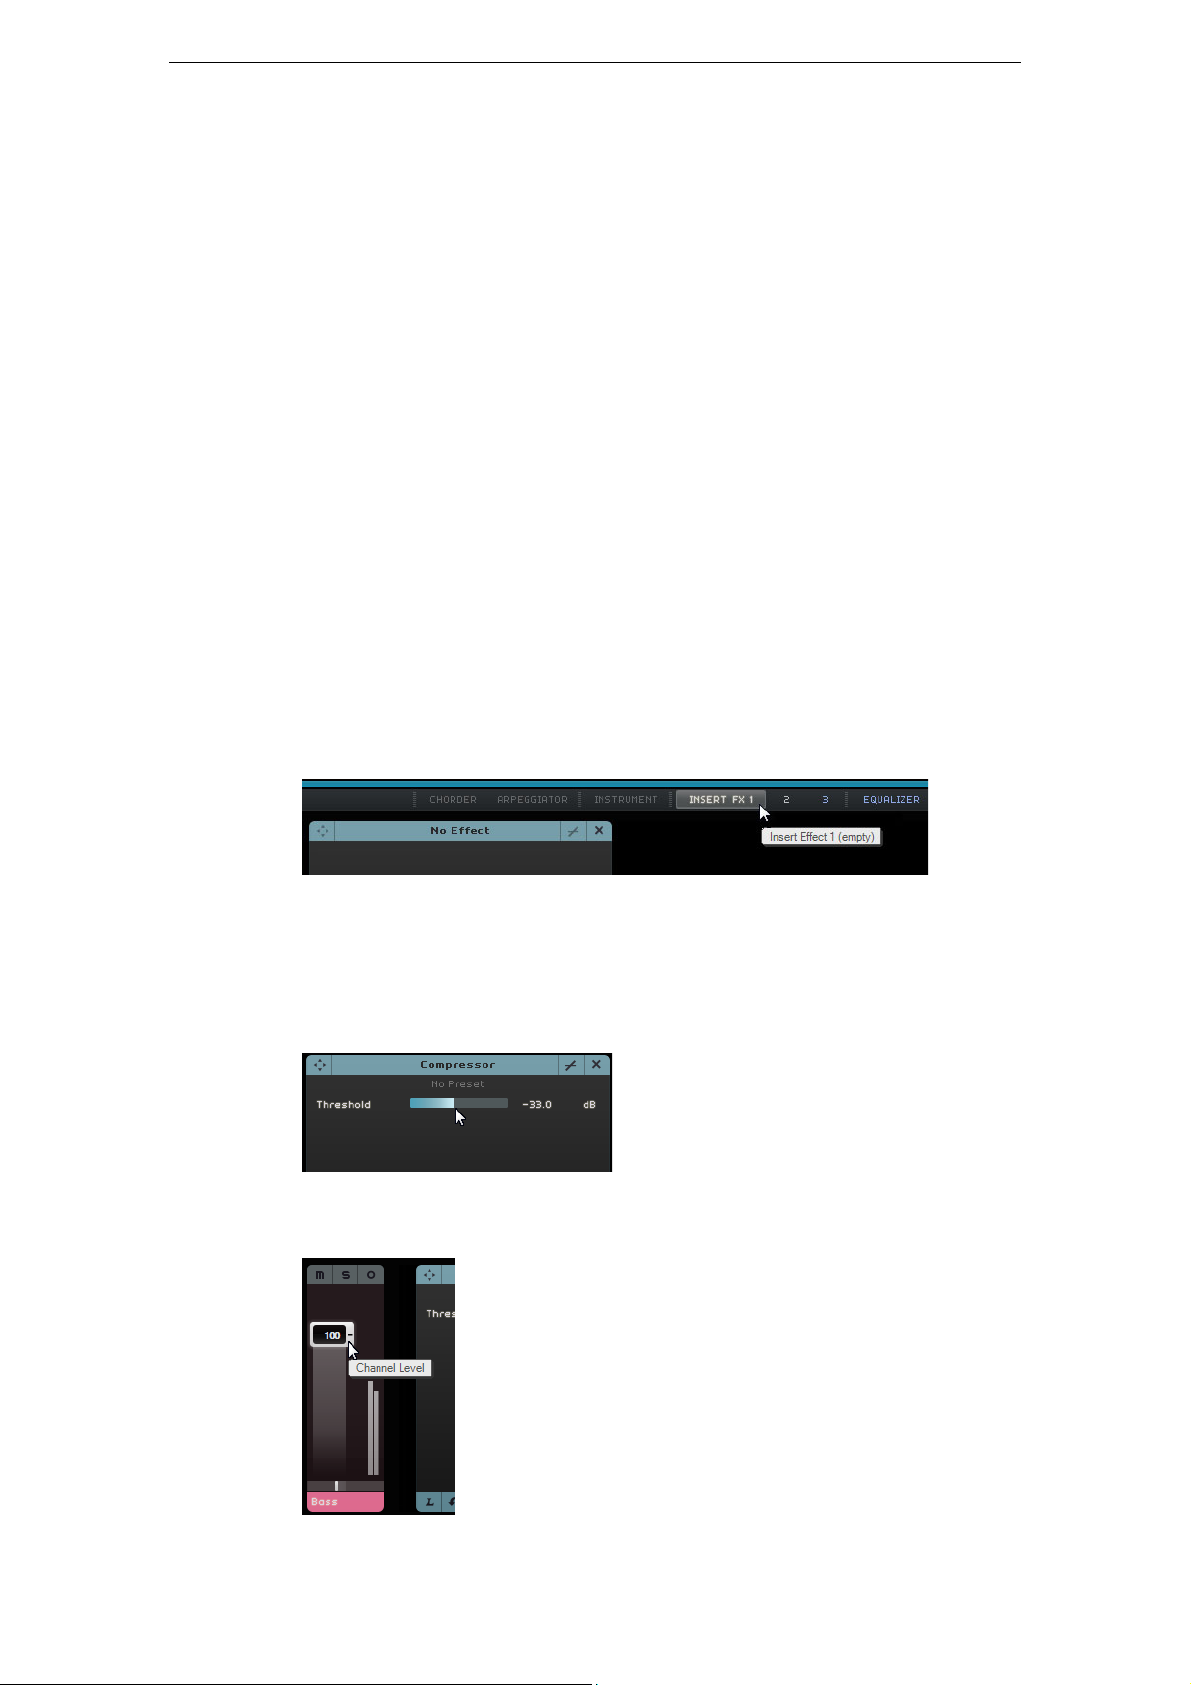
1. Select the Bass track.
2. Open the Track Inspector Page, and make sure that the Insert FX 1 panel is visible.
3. Begin playback and cycle (or loop) a section of music.
• Use the Compressor effect to smooth out the Bass track.
4. Adjust the Threshold slider until the bass sounds smoother and the difference
between the notes that were played quieter versus the notes that were played a
little louder gets smaller.
5. Raise the Channel Level setting to compensate for the reduction in gain that the
compression has caused on the Bass track.
42
Mixing
Page 43

Audio Effects
Effect Preset
menu
Send effect 1
Send effect 2
Amount 1
enabled
6. Add a flanger to the Synth track to make it stand out a little bit more. Select the
Synth track in the Arrange Zone.
7. Open the first insert slot, and choose Flanger from the Modulation submenu.
8. Make changes to the effect manually, or select a preset from the Preset pop-up
menu.
Send Effects
For details on each effect and its parameters, see the chapter “Effects and
Instruments Reference” on page 119.
At the end of this section, you can load the next tutorial that contains all changes you
have made.
• Load the project “Mixing 7” found in the “Sequel Tutorial 3” folder.
Each project can have two send effects.
1. Make sure you have the Track Inspector Page selected and open the Send Effects
panels.
Reverb and StereoDelay are set as the default send effects. You can change them if
you like, but remember you only have two slots that are used for all tracks.
Add some reverb to the drums:
2. Select the Drums track and make sure “Amount 1” is enabled. This sends the
drums to the Reverb effect.
3. Move the “Amount 1” slider until you are satisfied with the sound.
For details on each effect and its parameters, see the chapter “Effects and
Instruments Reference” on page 119.
43
Mixing
Page 44

Output Effects
!
Output effects are like insert effects, but are applied to the Master channel. Open the
“Output Effects” section by clicking the button in the lower right of the Multi Zone.
Adding Automation
The Output Effects section features three assignable effects and a fixed Maximizer
effect. The effects are controlled via sliders and a Bypass button.
• Use the Maximizer to raise the overall volume of the project.
1. Move the Optimize slider until the effect is at a suitable level.
2. You can bypass the effect by clicking the Bypass button.
For details on each effect and its parameters, see the chapter “Effects and
Instruments Reference” on page 119.
Adding Automation
Any automation you have created is always reproduced during playback, even if the
automation data is not shown. If you do not want the automation to be reproduced,
delete all automation data you recorded on your tracks.
You can use an automation to adjust faders, pan, knobs, and effects automatically.
This is very handy, especially when you have a lot of tracks in your project. Any
changes you make are remembered and occur again automatically.
• Load the project “Mixing 8” found in the “Sequel Tutorial 3” folder.
44
Mixing
Page 45
Adding Automation
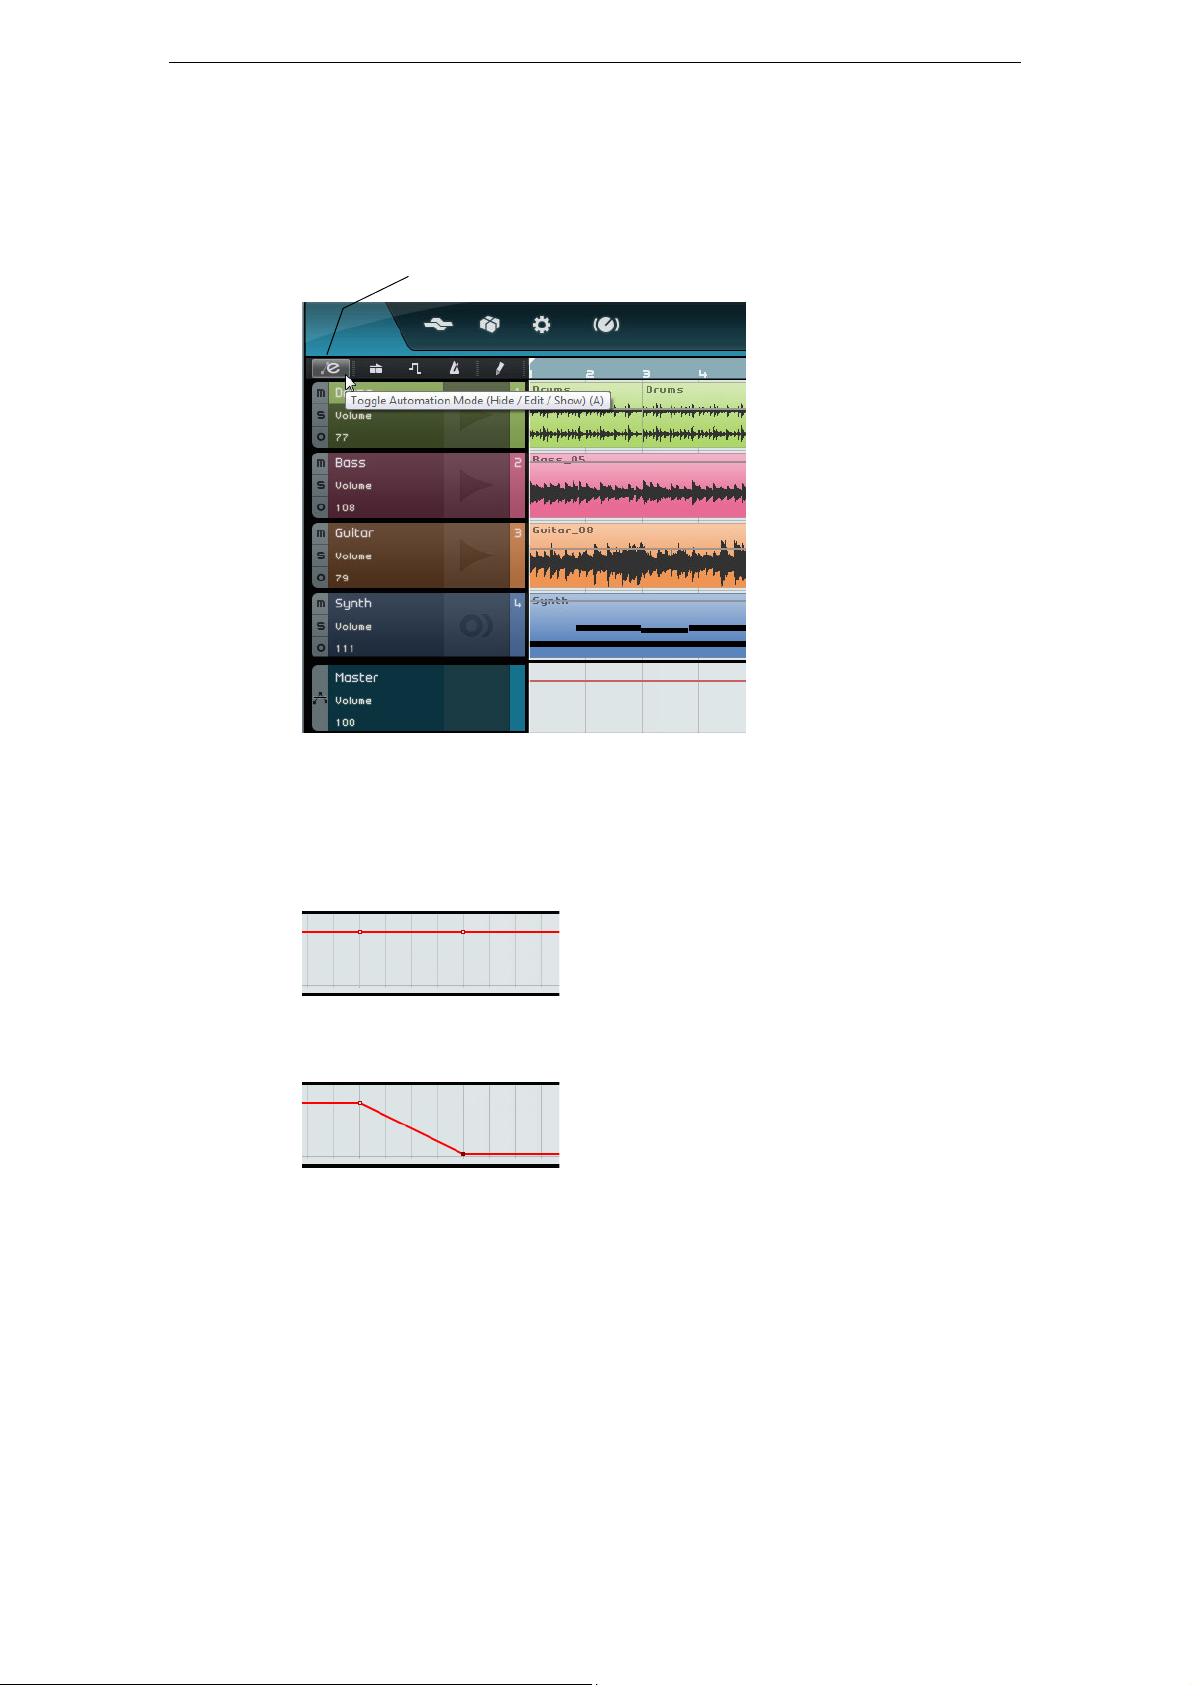
Toggle Automation Mode
Ö
Now, make the whole project fade out by changing the volume automation on the
Master track.
1. Click the “Toggle Automation Mode” button in the Pilot Zone.
Edit mode is activated and the Master track is shown in the Arrange Zone.
2. Make sure that Volume is selected on the automation pop-up menu of the Master
track.
3. Create two anchor points by clicking on the volume automation line – one at the
beginning of the last bar and one at the end of the last bar.
• To delete an anchor point, select it and press [Delete] or [Backspace].
4. Drag the anchor point at the end of the project down until you cannot drag it any
further.
5. Listen to the fade out automation you have created.
You can also create automation during playback or recording, simply by moving a
fader or knob.
45
Mixing
Page 46

Adding Automation
Ö
Now, select a different parameter to automate. In this case, use the Panner on the
Synth track.
1. Make sure that the “Toggle Automation Mode” button is set to Edit mode.
2. From the automation pop-up menu on the Synth track, select “Panner - Left-Right”
so that you can see how the automation is written to the track.
3. Press [Space] to start playback, click in the panner value field, and drag up and
down to pan the signal left or right.
4. Stop playback when you are done.
Sequel automatically smoothes out the automation.
Editing Automation Data
By creating a selection range on an automation track, the automation editor becomes
available. This editor offers additional controls for editing selection ranges. These
controls are identical with the so-called smart spots in the controller lane editor. For a
detailed description, see
page 35.
“Working with Selection Ranges on the Controller Lane” on
Removing and Disabling Automation
To remove and disable automation, you have the following possibilities:
• To remove the track automation for the current parameter, select the first option
from the lower part of the automation pop-up menu (for example, “Remove Volume
Automation”).
Note that this also deletes any automation events for this parameter.
• To remove all automation data from the selected track, select “Remove all
Automation of Track” from the automation pop-up menu.
• To remove all effect automation data from the selected track, select “Remove
Effect Automation” from the automation pop-up menu.
• To remove all EQ automation data from the selected track, select “Remove EQ
Automation” from the automation pop-up menu.
• To enable/disable the master automation, click the “Disable Automation” button on
the master track or in the Master channel of the mixer.
The Read and Write functions as well as all automation on the Master track are
disabled. The initial automation value is used as a fixed value for the whole project.
You can still modify this value using the master automation controls in the track list.
If you deactivate the button, the master automation is enabled again.
46
Mixing
Page 47

Exporting
Ö
Now that you have your project mixed, you can export it so that you can send it to
others, burn it to a CD, or listen to it on your iPod.
• Load the project “Mixing 9” found in the “Sequel Tutorial 3” folder.
Exporting Audio Files
1. To export your project in a different format, open the Project menu and select
“Export Project as Audio File”.
2. A dialog opens, where you can choose an export location and a file name. Click in
the field to the right, select a destination, and name the file “First Mixdown”.
Choosing the project folder is recommended so that your file is not erased or lost
accidentally.
Normally you will save your exported file as a Wave file. This is the most universally
compatible file type for audio. If the application you need the file for demands a
different format, you can choose one from the pop-up menu.
3. Use a bit depth of 16 bit, common for CD burning.
24 bit give a higher audio quality, but the file also uses up more hard-disk space.
Exporting
4. When you are finished selecting all of your settings, click Export to begin exporting
the file.
The progress bar along the bottom shows the progress.
• Load the project “Mixing 10” found in the “Sequel Tutorial 3” folder.
Exporting MP3 Files
Using advanced audio compression algorithms, MP3 files can be made very small, yet
maintaining good audio quality.
Sequel provides a function for exporting your projects as MP3 files. This function is
limited to 20 trial encodings or a period of 30 trial days from the installation date,
whichever comes first. After this period, the function is disabled until you purchase the
MP3 encoder for Sequel.
When the MP3 format is selected, and you click the Export button, a window opens
showing you how many trial encodings you have left. You can upgrade to an unlimited
MP3 export function by clicking the “Go to Online Shop” button in the dialog. This
takes you to Steinberg’s online shop where you can purchase the upgrade. Note that
a working internet connection is required.
47
Mixing
Page 48

Exporting
Ö
• In the Export Project as Audio File dialog, specify the export location and the file
name in the corresponding fields, and activate/deactivate the following options for
MP3 files:
Option Description
Bit Rate In this field, you can select a bit rate for the MP3 file. As a rule, the
higher the bit rate, the better the audio quality and the larger the file.
For stereo audio, 128kBit/s is often considered to result in good
audio quality.
Sample Rate Determines the frequency range of the audio – the lower the sample
rate, the lower the highest audible frequency in the audio.
High Quality Mode When activated, the encoder uses a different resampling mode,
which can give better results depending on your settings. In this
mode, you cannot specify the sample rate, but only the bit rate for
the MP3 file.
Insert ID3 Tag When you activate this option, the ID3 tags that you specified in the
ID3 Tag dialog are included in the file.
Edit ID3 Tag
button
When you click this button, the ID3 Tag dialog opens, where you
can enter information about the file. These text strings (tags) can be
displayed in most MP3 playback applications.
Exporting to iTunes
This function is only available if iTunes is installed on your computer.
• To export your project directly to iTunes, open the Project menu and select “Export
Project to iTunes”.
Your project is exported from start to finish in the default file format of iTunes. iTunes
is launched and your exported project is already part of your library for easy transfer to
your iPod. In iTunes, the project name is shown as the title and your computer user
name as artist name.
Audio Mixdown of Selected Tracks (Bouncing)
Sometimes it can become necessary to combine multiple tracks of a project into one
or to convert CPU-hungry instrument tracks to audio. This is called bouncing tracks.
Proceed as follows:
1. Activate solo on the tracks you want to bounce. Bypass any send or output effects.
You can add them again later.
2. On the Project menu, select “Export Project as Audio File…” and specify a name
and format.
3. Locate the created audio file and drag it into the open project onto the empty
space below the last track.
A new track is created containing the bounced file. You can now mute or delete
the original tracks and adjust your mix.
48
Mixing
Page 49
Introduction
In this chapter, you will learn how to use Sequel to make live performances fun and
easy.
The following sections make reference to tutorial projects, located in the default
Sequel project folder.
Performance Parts
• Load the project “Live Mode 1” found in the “Sequel Tutorial 4” folder.
In the following example you will use performance parts to separate intro, verse,
chorus, and extro into different sections.
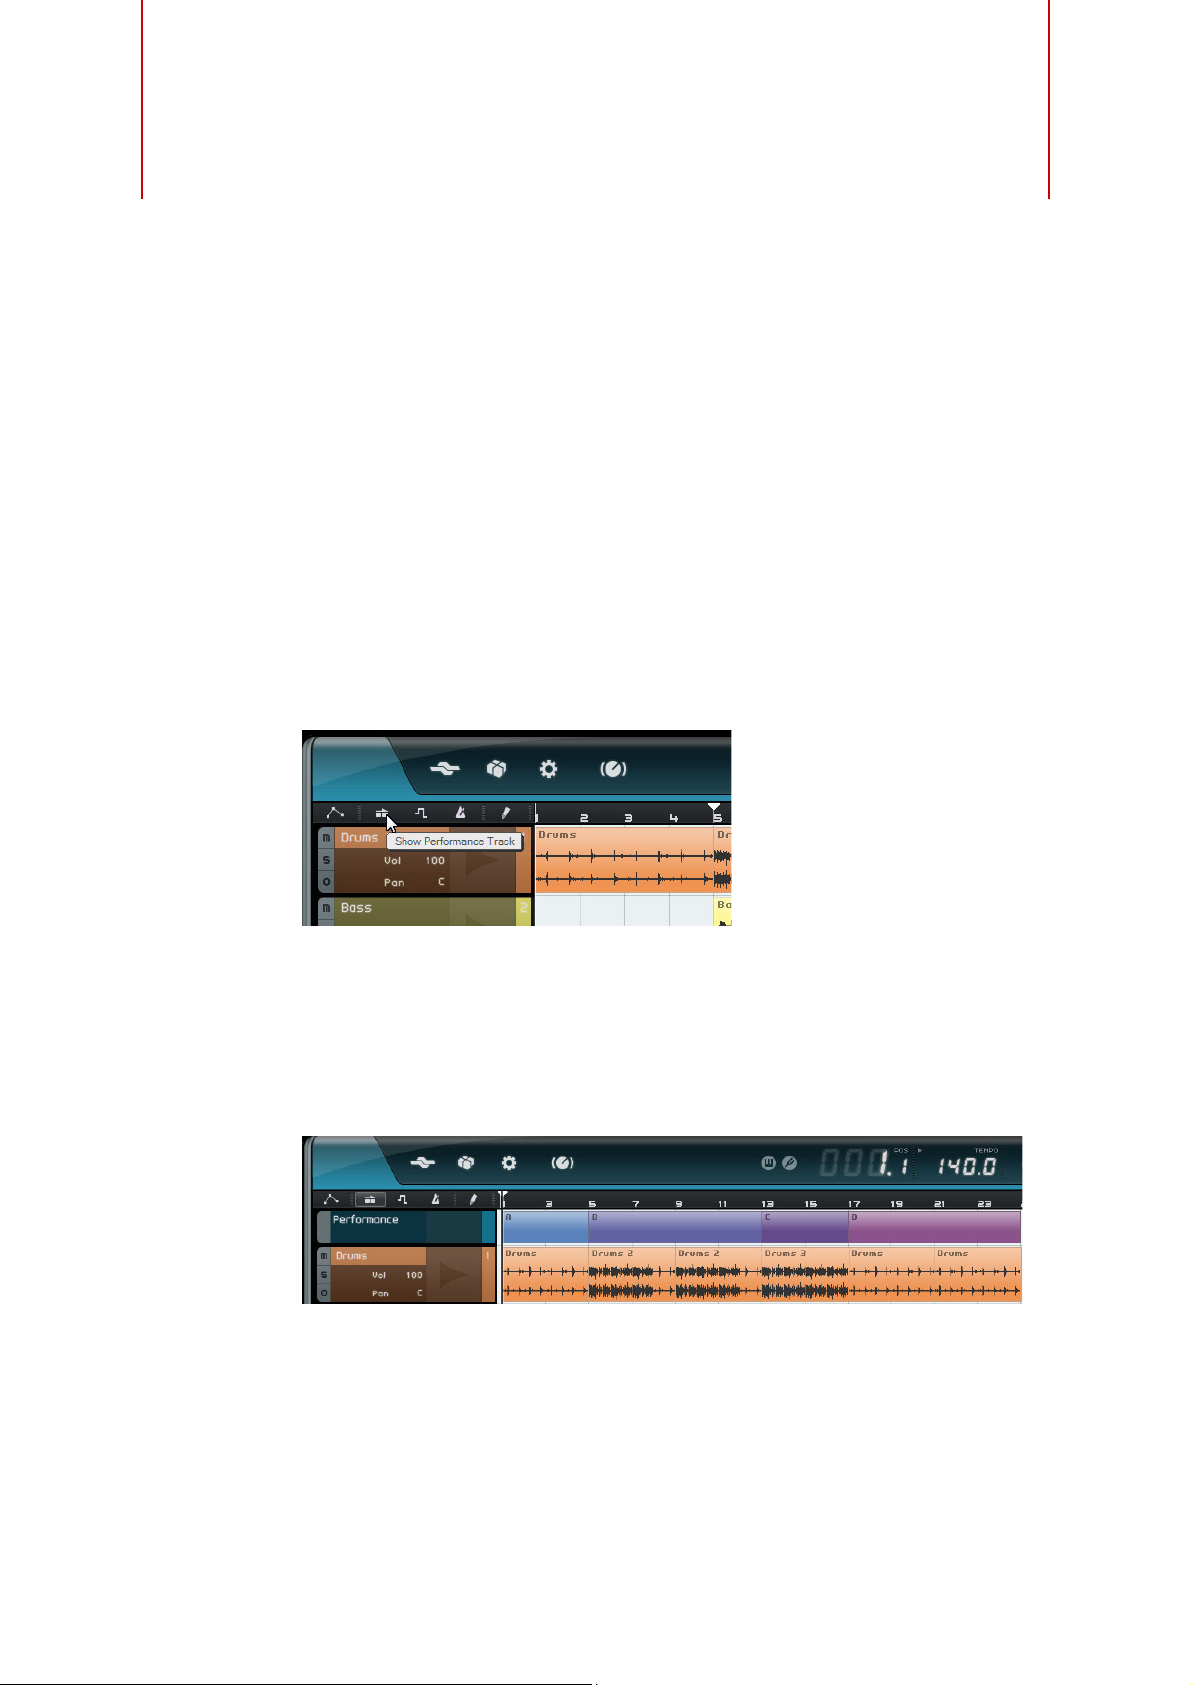
1. Activate the “Show Performance Track” button above the track list.
Live Pads and Chain Play Mode
2. Activate the Draw tool above the track list and move the mouse over the Arrange
Zone for the performance track.
The mouse pointer turns into a pencil.
3. Click and drag to create a performance part from bar 1 to bar 5.
4. Create three more parts from bar 5 to 13, 13 to 17, and 17 to 25.
The parts are labeled alphabetically.
49
Page 50

Live Record Mode
• Load the project “Live Mode 2” found in the “Sequel Tutorial 4” folder.
If you want to create spontaneous performances, the live record mode allows you to
create and record your performances on-the-fly.
To record your performance, proceed as follows:
1. In the Multi Zone, open the Performance page and click the “Record Performance”
button.
The record button starts blinking.
2. Open the “Define Jump Grid” pop-up menu, and select a grid resolution.
The grid resolution determines for how long the selected pad is played and when
Sequel switches to the next pad. You can always change this during your
performance.
Live Record Mode
3. Click a pad to start playback of the corresponding performance part.
The performance part in the Arrange Zone is played back and a new part is created
on the performance timeline. The part is named after the performance part in the
Arrange Zone, and its length is determined by the Jump Grid setting. If the recorded
part on the timeline is longer than the original performance part in the Arrange Zone,
the performance part is retriggered.
4. Click as many pads as you want.
5. Click the Stop pad.
6. Start playback to listen to the new performance.
Playback Mode
• Load the project “Live Mode 2” found in the “Sequel Tutorial 4” folder.
Playback mode allows you to click a pad at any time to play back the assigned
performance part in a loop. The part is played back until you click another pad or hit
stop.
Proceed as follows:
1. In the Multi Zone, open the Performance Page.
2. Open the “Define Jump Grid” pop-up menu, and select the End option.
The grid resolution determines for how long the selected pad is played and when
Sequel switches to the next pad.
3. Click pad A to play back the intro in a loop.
Pad A is highlighted, indicating that this pad is currently playing back or active.
4. Click pad B to play back the verse in a loop.
Pad B starts flashing, indicating that this pad is next in line to be played back.
50
Live Pads and Chain Play Mode
Page 51

Step Input Mode
Ö
Performance
timeline
5. [Alt]/[Option]-click in the lower section of pad A and name it “Intro”.
Do the same for pad B (Verse), pad C (Chorus), and pad D (Extro).
6. Click the Stop pad.
This way you can queue up the pads in the order you want for live playback.
Experiment with the Jump modes and have fun creating different arrangements with
your project.
Using remote controllers together with this mode gives you even more flexibility, see
“Remote-controlling Sequel” on page 110.
Step Input Mode
• Load the project “Live Mode 3” found in the “Sequel Tutorial 4” folder.
In Step Input mode, you can click the pads in the order you want to play them. This
adds the parts to the performance timeline displayed above the pads.
1. At the top of the Performance Page, activate the “Step Input” button.
2. Click pad A.
A part labeled A appears on the performance timeline.
3. Click pads B, C, and D to create the corresponding parts on the performance
timeline.
4. Press [Space] to start playback.
Your new performance is played back.
51
Live Pads and Chain Play Mode
Page 52

Step Input Mode
Right now, the performance timeline plays back the project in its original arrangement,
so let’s change things a bit.
5. Stop playback.
6. Delete all performance parts on the performance timeline by selecting them and
pressing [Delete] or [Backspace].
7. Create a new performance as described above, but use a new sequence, for
example, A, B, C, C, B, C, C, D.
8. Start playback to listen to the new performance.
52
Live Pads and Chain Play Mode
Page 53

Introduction
In this chapter, you will learn how to create rhythm patterns and pattern parts and how
to make editings on the Beat Page.
Adding Pattern Banks
Sequel comes with a large number of pre-configured pattern banks. You can drag a
pattern bank from the MediaBay into the Arrange Zone to add the pattern to your
project. Proceed as follows:
1. Click the MediaBay button in the bottom right corner of the Multi Zone to open the
MediaBay.
2. Set the Browse Location to “Factory Content”.
3. Open the “Select Media Type” pop-up menu and select “Pattern Banks”.
This shows the available pattern banks in the results list.
The Beat Page
4. Select the different entries and preview them.
5. When you found a pattern bank that suits you, drag it from the MediaBay, and drop
it on the track list.
As you drag, an indicator lights up in the track list to show you where you can drop
your pattern bank.
A beat track is created in the Arrange Zone and the Beat Page is shown in the Multi
Zone.
See “The Beat Page” on page 89 for further details.
53
Page 54

Editing Patterns on the Beat Page
Pattern Functions
menu
Steps in the
step display
Lane
selectors
Pattern
Selector Pad
Creating a Pattern
You can now preview the beat patterns and edit them on the Beat Page.
1. Start playback.
The beat pattern shown in the Beat Page step display is played back.
Editing Patterns on the Beat Page
2. Click the lane selector for a drum sound.
The corresponding lane is highlighted in the step display.
3. Click the highlighted lane to enter a step.
The drum sound is triggered.
• To delete a step, click on it again.
4. Enter more steps or remove them until you are satisfied with your pattern.
Your beat pattern is automatically stored on the selected pattern selector pad, by
default the first one.
Editing Steps and Lanes
You can edit steps and lanes on the Beat Page in the following ways:
• You can draw in a step by clicking in the step display.
• You can add a flam, that is, two beats played almost simultaneously, by activating
the Flam tool and clicking.
See “Flam” on page 91 for details.
• You can move all steps on a lane by holding down [Shift], clicking on the lane and
dragging to the left or right.
• You can invert a lane, that is to say reverse the order of the steps, by holding down
[Alt]/[Option] and dragging the mouse over the lane.
This lets you create unusual rhythmic patterns.
• You can copy the content of a lane onto another lane by clicking in the section to
the left of the lane you want to copy and dragging to the new position.
• You can add a swing rhythm to all lanes using the Swing slider.
See “Swing” on page 90 for details.
• You can offset a whole lane using the Offset slider.
See “Lane Offset” on page 91 for details.
54
The Beat Page
Page 55

Editing the Velocity
Drop a pattern selector
pad on a beat track…
…to create a pattern part.
You can edit the velocity in the following ways:
• Fine-tune the velocity for a step by clicking it and dragging up or down.
The current velocity value is shown while you drag, allowing you to find the
corresponding setting easily.
• Fine-tune the velocity for a range of steps by clicking the first step, dragging up or
down while holding the mouse button pressed to enter into velocity edit mode, and
then dragging sideways and up or down to modify the velocity for all the steps.
• Change the velocity for all steps on a lane by holding down [Shift] while dragging
up or down.
The velocity for the steps is increased or decreased by the same amount. The
relative velocity differences of the steps are kept for as long as possible, that is,
until the minimum or maximum setting is reached.
• Create a crescendo or decrescendo for a range of steps by holding down
[Alt]/[Option], clicking the first step, dragging up or down and then dragging to the
left or right while keeping the mouse button pressed.
Editing Pattern Parts
Editing Pattern Parts
Creating Pattern Parts
To create a pattern part, proceed as follows:
1. Drag a pattern selector pad and drop it on a beat track.
2. On the Beat Page, click the second pattern selector pad and set up a new pattern
in the step display.
3. Create more patterns and drag them onto your beat track.
You can create up to 12 beat patterns. These are automatically stored on the
selected selector pad.
55
The Beat Page
Page 56

Selecting Pattern Parts
Dropping an audio sample on
the pad display
Ö
If you create a pattern part on the beat track, pattern 1 is used by default. To change
this, click the little arrow in the upper left corner of the pattern part to open a pop-up
menu and select another pattern.
An asterisk behind the pattern name indicates that this pattern has steps assigned.
• If you select several pattern parts in the Arrange Zone, only the first one is
displayed on the Beat Page.
See “The Beat Page” on page 89 for details.
• If no pattern part is selected in the Arrange Zone, the currently played pattern part
of the selected beat track is shown.
Assigning Audio Samples to Pads
Assigning Audio Samples to Pads
You can assemble your own drum kits by assigning audio samples to the pads in the
pad display.
Proceed as follows:
1. Double-click in the track list.
The Add Track dialog opens.
2. Select the Beat option.
3. Select “empty” and click OK.
This adds an empty beat track to the project.
4. In the MediaBay open the “Select Browse Location” pop-up menu, open the
“Content Libraries” submenu, and select “Groove Agent ONE Content”.
5. Open the “Select Media Type” pop-up menu to the right and select “Audio Files”.
You can also set up an attribute filter to search for certain sounds (kick, hi-hat, etc.).
This makes your search much more comfortable. For more information, see
Media Files” on page 76.
6. Select the different entries and preview them.
7. Select an audio sample that suits you, drag it from the MediaBay, and drop it on a
pad in the pad display.
As you drag, an indicator shows you where you can drop the audio file.
56
The Beat Page
“Filtering
Page 57

Saving your Pattern Bank
Selecting a pad in the pad display highlights the corresponding lane.
Ö
The audio file is now assigned to the pad. The corresponding step display lane is
highlighted and indicates where you can enter the steps that trigger the sample sound.
8. Enter some steps on the highlighted lane.
9. Assign further audio files to the empty pads as described above until you have set
up all drum sounds you want to assign to your drum kit.
You can assign up to 16 drum sounds per group.
If you are not satisfied with a determined pad sound, you can replace it by dropping a
new audio file.
You can also edit the audio files on the pads. See “Sample Display” on page 92 for
further details.
Saving your Pattern Bank
If you want to use your patterns and drum kits in other projects, you can save them as
a pattern bank.
Proceed as follows:
1. Set up all patterns and kits to your liking, drag the corresponding beat track and
drop it on the MediaBay.
A dialog opens.
2. In the Save Pattern Bank dialog, click in the value column and select a value from
the pop-up menu.
This sets the selected attribute to the file. Attributes make it easier for you to
organize your content.
3. Enter a name in the text field at the bottom of the window and click OK to close the
dialog.
Your pattern bank is added to your user content.
You can also drag a pattern selector pad to the MediaBay. This saves all pads.
57
The Beat Page
Page 58

Introduction
Sequel, Project,
and Edit menu
Pilot Zone display
Virtual Keyboard
Edit Remote Control
Assignment
Tuner Transport
controls
Metronome On/Off and
Metronome Level
Enable/Disable Performance Mode
In this chapter, you will learn more about the layout and functions of the Pilot Zone.
The Sequel Menu
The Pilot Zone
Help
Selecting this option opens the manual.
About Sequel
This option allows you to view the exact version of Sequel that you have installed and
also take a look at some of the people involved in putting it together.
Credits and Copyrights
Lists credits and copyright information. This menu also contains links to the Steinberg
web site.
User Registration…
Selecting this option opens your standard web browser and takes you to Steinberg’s
online registration service. We encourage you to register your software! By doing so,
you are entitled to technical support and being kept aware of updates and other news
regarding Sequel.
Quit
Selecting this option exits the program.
58
Page 59

The Project Menu
The Project menu contains the following options:
New Project
Selecting this option creates a new empty project.
Open Project…
Selecting this option allows you to open an existing project.
Save Project
Selecting this option allows you to save your project.
Save As…
Selecting this option allows you to save your project under a different name.
Manage Projects…
The Project Menu
Selecting this option opens a dialog that allows you to manage all your Sequel projects.
The pop-up menu at the bottom of the dialog allows you to select the location of your
projects. Any projects located within that location appear in the list on the left side of
the dialog. You can click on a project to select it and perform the following functions:
Option Description
Rename… Allows you to change the name of a project.
Delete… Allows you to permanently remove a project from the specified
location.
Pack… Allows you to compress all components of your project into one file
for transfer or backup.
Unpack… Opens packed files and restores file and directory structure for
editing.
Open Opens the selected project.
59
The Pilot Zone
Page 60

Export Project as Audio File…
Ö
Selecting this option opens a dialog that allows you to export your project, for
example, to burn a CD. You can specify file name, path, file format, and bit depth. See
also
“Exporting Audio Files” on page 47.
To burn a CD, you need the appropriate software on your computer.
The Edit Menu
Export Project to iTunes
Selecting this option allows you to export your project to an iTunes compatible format
for easy uploading to your iPod, see
Recent Projects
This allows you to quickly access the projects you recently worked on.
The Edit Menu
The Edit menu contains the following editing functions:
Undo
This option allows you to undo your actions.
Redo
This option allows you to redo any undone action. When there is nothing left to redo,
the option is grayed out.
Cut
This option allows you to cut an event or a group of events from the Arrange Zone so
that you can paste it to another area in the Arrange Zone.
“Exporting to iTunes” on page 48.
Copy
This option allows you to copy an event or a group of events.
Paste
This option allows you to paste cut or copied material at the new location.
Delete
This option allows you to remove an event or a group of events from your project.
60
The Pilot Zone
Page 61

Duplicate
This option allows you to create copies of an event that are aligned directly behind the
selected event in the Arrange Zone.
Split at Cursor
This option allows you to split the selected event at the cursor. If no event is selected,
all events that are intersected by the project cursor are split.
Bounce Selection
This option allows you to combine various selected audio events or instrument parts
into one audio event or instrument part. For example, this is useful if you have
recorded several takes in a cycle recording and want to combine the best pieces of
your recording in one take, see
and “Recording Multiple Takes of an Instrument Part” on page 27.
Select All
This option selects all events and parts in the Arrange Zone. This is useful for
performing large scale editing.
The Edit Menu
“Recording Multiple Takes of your Audio” on page 25
Select None
This option clears any selection you have made in the Arrange Zone.
Add Track…
This option opens a dialog that allows you to add tracks to your project.
Remove Selected Tracks
This option removes any tracks that are selected in the Arrange Zone. To select
multiple tracks, hold down [Ctrl]/[Command] and click on them.
Reset Instruments
This option allows you to send out note-off messages and reset controllers on all
instrument channels. Use this if hanging notes or a constant vibrato occur after
loading an instrument preset and hitting a key on your keyboard, for example.
61
The Pilot Zone
Page 62

The Edit Remote Control Assignment Button
Ö
Sound Input Activity indicator
The Edit Remote Control Assignment Button
You can remote-control certain Sequel functions using external controllers. For this,
you need a mixer or keyboard controller with USB or MIDI connection and the ability
to send MIDI messages.
If you activate the “Edit Remote Control Assignment” button, the main user interface is
dimmed. The elements that can be assigned to remote controls are indicated by green
frames. Click the button again to switch back to normal mode.
For further information, see “Remote-controlling Sequel” on page 110.
The Tuner
Sequel features a built-in tuner that can be used for tuning a guitar or a bass before
recording, for example.
When the Tuner is activated for a track, this track is soloed. All insert effects are
bypassed, and sends are disabled.
See “Tuning your Instrument” on page 23 to find out how the Tuner works.
Sound Input Activity
This indicator becomes visible when any input activity of connected audio sources is
detected.
62
The Pilot Zone
Page 63

Musical Keyboard Input Activity
The Musical Keyboard Input Activity indicator
in the Pilot Zone
The Musical Keyboard Input Activity indicator in the track list (for instrument tracks).
Play
Record
Jumps to previous/next marker
Cycle
This indicator becomes visible when any input activity of connected USB/MIDI
keyboards, including controller activity, is detected.
Musical Keyboard Input Activity
The Transport Controls
The transport controls are similar to those you would find on a VCR or DVD player.
The Play Button
The Play button allows you to listen to your project.
• To start playback, click the Play button.
• To stop playback, click the Play button again.
The Record Button
The Record button allows you to record audio events or instrument parts.
• To start recording, click the Record button at any time during playback.
• To stop recording, click the Record button again.
The Locate Buttons
The Locate buttons allow you to locate marker positions or to go to the beginning or
end of your project.
• To locate the previous marker or go to the beginning of the project, click the “Jump
to Previous Marker” button.
• To locate the next marker or go to the end of the project, click the “Jump to Next
Marker” button.
The Cycle Button
Cycle mode allows you to repeat a section of your project so that you can hear it again
and again. To create a cycle region, click and drag in the upper half of the ruler.
• Click the Cycle button to activate/deactivate Cycle mode.
63
The Pilot Zone
Page 64

The Metronome
Ö
Activate the Metronome On/Off button to add a click sound to playback and/or
recording. The metronome follows the project tempo and time signature. For more
information on the metronome and its settings, see
on page 21.
On the Settings Page, you can specify if you want to hear the click during playback or
recording, see “The Settings Page” on page 99.
The Performance Mode Button
By clicking the Performance Mode button, you enter a mode that allows you to create
performances. For more information on the Performance mode, see
on page 97.
The Metronome
“Activating the Metronome Click”
“Performances”
The Pilot Zone Display
The Pilot Zone display shows the project position, the tempo, the time signature, and
the project root key.
The Project Position (POS)
The project position displays the current position of the cursor in bars and beats or in
seconds. To set the time format, click in the top right corner of the project position
field.
To change the project position, you have the following possibilities:
• Double-click the project position field and type in a position.
• Click in the project position field, keep the mouse button pressed, and drag up or
down.
• Click in the lower half of the ruler at the new position.
The Tempo (TEMPO)
The tempo display shows the current project tempo at the cursor position.
To change the tempo, you have the following possibilities:
• Double-click the tempo field and type in a tempo.
• Click in the tempo field, keep the mouse button pressed, and drag up or down.
• Select a loop within your project and drag it onto the Tempo field.
This changes the project tempo to the tempo set in the loop file.
64
The Pilot Zone
Page 65

The Pilot Zone Display
Ö
Using Tap Tempo
The Tap Tempo function allows you to specify a tempo by tapping.
1. Click the Learn button in the upper left corner of the tempo display to activate the
Learn mode.
The button turns red to indicate that you can tap the tempo.
2. If you want to tap the tempo of some recorded material with unknown tempo,
activate playback.
3. Tap the tempo on the space bar of the computer keyboard or on a connected MIDI
keyboard.
4. When you stop tapping, the program calculates the average tempo of the taps and
displays it in the Tempo field.
If the tempo track is activated, clicking the Learn button and tapping the tempo
removes the existing tempo curve and sets a single constant tempo according to your
tapping, see
Using the Rehearsal Tempo
If you are recording an instrument with Sequel and you cannot keep up with the
project tempo, try activating Rehearsal mode. This reduces the project tempo, making
it easier for you to record even tricky parts with Sequel.
• To activate Rehearsal tempo, click in the top right corner of the tempo field.
Rehearsal tempo is activated.
• To deactivate Rehearsal tempo and use the project tempo again, click the button
again.
“Adding Tempo Changes” on page 37.
The Time Signature (T.SIGN)
This shows the current time signature of the project.
To change the time signature, you have the following possibilities:
• Double-click the Time Signature field and type in a time signature.
• Click in the time signature field, keep the mouse button pressed, and drag up or
down.
65
The Pilot Zone
Page 66

The Project Root Key (KEY)
Ö
Ö
This shows the project root key.
To change the root key, you have the following possibilities:
• Click on the value and select a key from the pop-up menu.
• Select a loop in your project that has the key that you want to use and drag it onto
the key field.
This works only if the key information was saved with the original file.
When you create a new project, the first audio event that you drag into your project
defines the key, provided that the audio event data contains key information.
The Virtual Keyboard
The virtual keyboard allows you to play and record MIDI notes using your computer
keyboard or mouse. This is useful if you have no external MIDI instrument at hand and
you do not want to draw in notes with the Draw tool.
1. Create or select an instrument track and activate its “Record Ready” button.
Which type of sound is played depends on the selected preset.
The Virtual Keyboard
2. Activate the virtual keyboard by clicking the “Activate Virtual Keyboard” button.
You can choose between two keyboard display modes: computer keyboard and piano
keyboard.
• To switch between these two modes, click the “Change Virtual Keyboard Display
Type” button.
The virtual keyboard in computer keyboard display mode
The virtual keyboard in piano keyboard display mode
3. Play one key at a time to enter single notes or several keys simultaneously to enter
polyphonic parts.
The maximum number of notes that can be played at one time varies between the
different operating systems and hardware configurations.
• In piano keyboard mode, you have a wider range of keys at your disposal, allowing
you to enter two voices simultaneously, for example bass and lead voice or bass
drums and HiHats.
In computer keyboard mode, you can use the two rows of keys that are displayed
on the virtual keyboard to enter notes. In piano keyboard mode, you can also use
the two rows of keys below these.
When the virtual keyboard is active, the usual key commands are blocked. The only
exceptions are: [*] (“multiply” on the numeric keypad) for recording, [Space] for
start/stop, and [Home]/[Command]-[Home] to jump to the project start.
66
The Pilot Zone
Page 67

The Virtual Keyboard
Ö
4. Use the “Note Velocity Level” fader to the right of the virtual keyboard to adjust the
volume.
5. Use the “Octave Offset” icons to the left and the right of the virtual keyboard to
offset the octave range of the keyboard.
You can also use the virtual keyboard to preview instrument presets in the MediaBay.
67
The Pilot Zone
Page 68

Overview
The Arrange Zone
The Arrange Zone displays the parts and events of the project along the timeline. In
the Arrange Zone you can record, edit, and arrange your project. On the left, the track
list is shown, and on the right you can display the MediaBay or the Output Effects
section.
• To resize the Arrange Zone, move the mouse pointer over the bar at the bottom of
the Arrange Zone until it turns to a double arrow, click and drag up or down. To
reset the Arrange Zone to its default size, double-click the divider.
68
Page 69

The Track List Buttons
Show Transpose
Track
Show
Performance Track
Draw Tool
Show Tempo
Track
Toggle Automation
Mode
Unmute All Tracks
Add Track
Reset All Solo States
Reduce/Increase Track Size
Ö
Ö
Ö
Overview
Toggle Automation Mode
Clicking this button toggles between the automation modes. You can show, edit, and
hide the automation for your project. For more information about automation, see
“Adding Automation” on page 44.
Show Performance Track
Clicking this button shows/hides the performance track. For more information, see the
chapter
“Live Pads and Chain Play Mode” on page 49.
Even when hidden, the performance track affects playback.
Show Transpose Track
Clicking this button shows/hides the transpose track. The transpose track allows you
to set global key changes.
• To add a global transpose change, select the Draw tool, and click on the
transpose track.
• To change a transpose value, click the transpose value on the transpose part and
drag up or down.
• To restore the original tuning, delete all transpose parts on the transpose track.
Even when hidden, the transpose track affects playback.
Show Tempo Track
Clicking this button shows/hides the tempo track. For more information, see “Adding
Tempo Changes” on page 37.
Even when hidden, the tempo track affects playback.
69
The Arrange Zone
Page 70

Overview
Ö
Grid
Ruler
Draw Tool
Clicking this button activates the Draw tool that allows you to draw elements in the
Arrange Zone. For further information, see
Unmute All Tracks
Clicking this button unmutes all tracks in your project.
Reset All Solo States
Clicking this button deactivates all Solo buttons in your project.
Reduce/Increase Track Size
The buttons for resizing tracks allow you to reduce or increase the track height. The
greater the size, the more controls are visible.
You can also resize an individual track by dragging its border in the track list up or
down.
Add Track
Clicking this button opens the Add Track dialog, see “Add Track…” on page 61.
“The Draw Tool” on page 32.
The Ruler
The ruler is located above the Arrange Zone. It displays the project timeline as
numbers corresponding to the bars and beats of your project. Together with the grid,
the timeline allows you to edit with precision and to lock events to time. The resolution
of the grid depends on the zoom factor.
You can also use the ruler for editing:
• Start or stop playback by double-clicking in the lower half of the ruler.
• Move the cursor by clicking in the lower half of the ruler.
• Zoom in and out by clicking in the lower half of the ruler and dragging down or up.
• Create a cycle region by clicking and dragging the mouse in the upper half of the
ruler.
The pointer turns into a Draw tool if you position the mouse in this ruler area.
70
The Arrange Zone
Page 71

The Snap to Grid Function
Horizontal scrollbar
Vertical
scrollbar
Ö
The “Snap to Grid” function can be activated by clicking the button at the far right of
the ruler.
When “Snap to Grid” is activated, all editing you do snaps to the grid. The grid
resolution is determined by the zoom factor.
When “Snap to Grid” is deactivated, events can be moved and performed freely
without snapping to the grid.
The Zoom Commands
Clicking the “+” button zooms in, clicking the “-” button zooms out. At the bottom
right you can find the “Zoom Commands” pop-up menu with three quick zoom
settings:
Option Description
Zoom Full Zooms out so that all events in the Arrange Zone are visible.
Zoom Part Zooms in and centers the event that you have selected in the Arrange Zone.
Zoom Last Returns to the last zoom setting you used.
Overview
The Scrollbars
The scrollbars allow you to get to a specific position in your project.
• The vertical scrollbar on the right side of the Arrange Zone allows you to scroll your
• The horizontal scrollbar at the bottom of the Arrange Zone allows you to scroll your
You can also use your mouse wheel to scroll up and down or use [Shift]-Mouse wheel
to scroll left and right.
project up and down.
project left and right.
71
The Arrange Zone
Page 72

The Track Controls
Each track includes a set of track controls. These are described in the following
sections.
• To display all the available track controls, you may have to adjust the track height.
Mute
Clicking this button for a track stops the output from the corresponding track.
Solo
Clicking this button for a track stops the output from any other track.
Record Ready
Clicking this button enables recording on a track. You can record on up to 8 tracks at
once.
Convert to Instrument Track (Beat Tracks Only)
Clicking this button converts the beat track into an instrument track and replaces all
pattern parts with instrument parts.
Overview
This is useful if you want make finer adjustments, for example, enter 32th notes or edit
the note lengths. Instrument tracks also allow you to use MIDI controllers.
Automatic Fades (Audio Tracks Only)
Clicking this button applies a short fade to the edges of all the events on the track.
This is useful to eliminate pops or clicks that can occur when playing over event
boundaries.
Open/Close Instrument Window (Instrument Tracks Only)
Clicking this button opens the control panel for the instrument that is assigned to the
instrument track. Here, you can make settings for the instrument. For a description of
the available VST instruments and their parameters, see the chapter
Instruments Reference” on page 119.
Freeze
“Effects and
Effect plug-ins and instrument track presets sometimes require a lot of processor
power. If you are using a large number of these tracks, you may reach a point where
the computer cannot play back the track properly (the Computer Usage indicator
lights up, you get crackling sounds, etc.). To remedy this, you can freeze the track by
clicking the Freeze button. After freezing, you hear the track play back as before, but
the insert effects or instrument track presets do not have to be calculated in realtime,
easing the load on the computer processor.
Typically, you freeze a track when it is finished and you do not need to edit it anymore.
72
The Arrange Zone
Page 73

Overview
When you freeze a track, the following happens:
• The program renders the output of the track, including all insert effects or
instrument track presets, to an audio file.
• On playback, the rendered audio file is played back. You can still adjust level and
panning, make EQ settings, and adjust the send and output effects.
• Frozen tracks cannot be edited or removed.
• To edit the events on a frozen track or make settings for the insert effects or
instrument track presets, unfreeze the track by clicking the corresponding Freeze
button again.
This reactivates the frozen track and the freeze files are deleted.
Track Volume and Pan
The track output volume and pan can be controlled by dragging the corresponding
sliders in the track list. You can also double-click the values and enter new values
manually. To reset a fader to its default position, [Ctrl]/[Command]-click in the fader
area.
Input Selection (Audio Tracks Only)
Clicking the “Input Selection” button opens a pop-up menu, where you can select an
input on your audio interface. For more information on setting up your interface, see
the chapter
Track Pictures
For each track, you can set up a track picture. This is described in detail in the section
“The Track Picture Page” on page 94.
Track Meter
The track meter is a visual representation of the output level of audio and instrument
tracks.
Color Selector
Clicking the Color Selector shows the color palette that allows you to select a track
color. All events or parts on that track change their color accordingly. A Color Selector
is also available on the Mixer Page, see
“Setting Up Your System” on page 9.
“Setting the Track Color” on page 95.
73
The Arrange Zone
Page 74

Working with Tracks
Selecting Tracks
To select a track, click the track name. To select multiple tracks, hold down
[Ctrl]/[Command] and click them.
Renaming Tracks
To rename a track, double-click the Track Name field and type in the new name.
Numbering Tracks
Tracks are automatically numbered according to the order in which they are arranged.
You can rearrange tracks by clicking and dragging it up or down. When you move a
track, the track number changes according to its new position in the track list.
Automating Tracks
Track automation allows you to automatically adjust volume, panning, and various
other settings while the project is playing. For example, if you want the drums to be
quieter at the start of the project and then get louder at the end you can make Sequel
do this automatically.
Working with Tracks
Track automation controls
Master
automation
The Automation button switches between three different states:
Option Description
Hide The Master automation track and the automation controls are hidden.
Edit The Master automation track and the automation controls for the tracks are
shown, allowing you to view and edit the automation data. Click the upper field
to select which parameter you want to automate.
You can automate multiple track settings simultaneously, but you can only
view one automation parameter at a time. For more information on creating
and editing automation, see
Show The Master automation track and the other tracks show the automation data
for the selected parameters, but you cannot change the automation settings.
“Adding Automation” on page 44.
74
The Arrange Zone
Page 75

Working with Parts and Events
Filter
section
Results list
For a description on the editing functions in the Arrange Zone, see “Common Editing
Functions” on page 28.
Working with the MediaBay
The MediaBay allows you to search for media files on your computer. Here, you can
also define so-called tags or attributes for media files that allow you to filter the search
results.
The MediaBay is divided into two sections: the filter section and the results list.
Working with Parts and Events
Selecting the Browse Location
At the top of the MediaBay, you find the Select Browse Location pop-up menu. Here,
you can specify which content is shown in the MediaBay. You can also add your own
content files, see
“Adding User Content” on page 78.
Selecting the Media Type
The “Select Media Type” pop-up menu lets you select which media type is shown in
the results list.
75
The Arrange Zone
Page 76
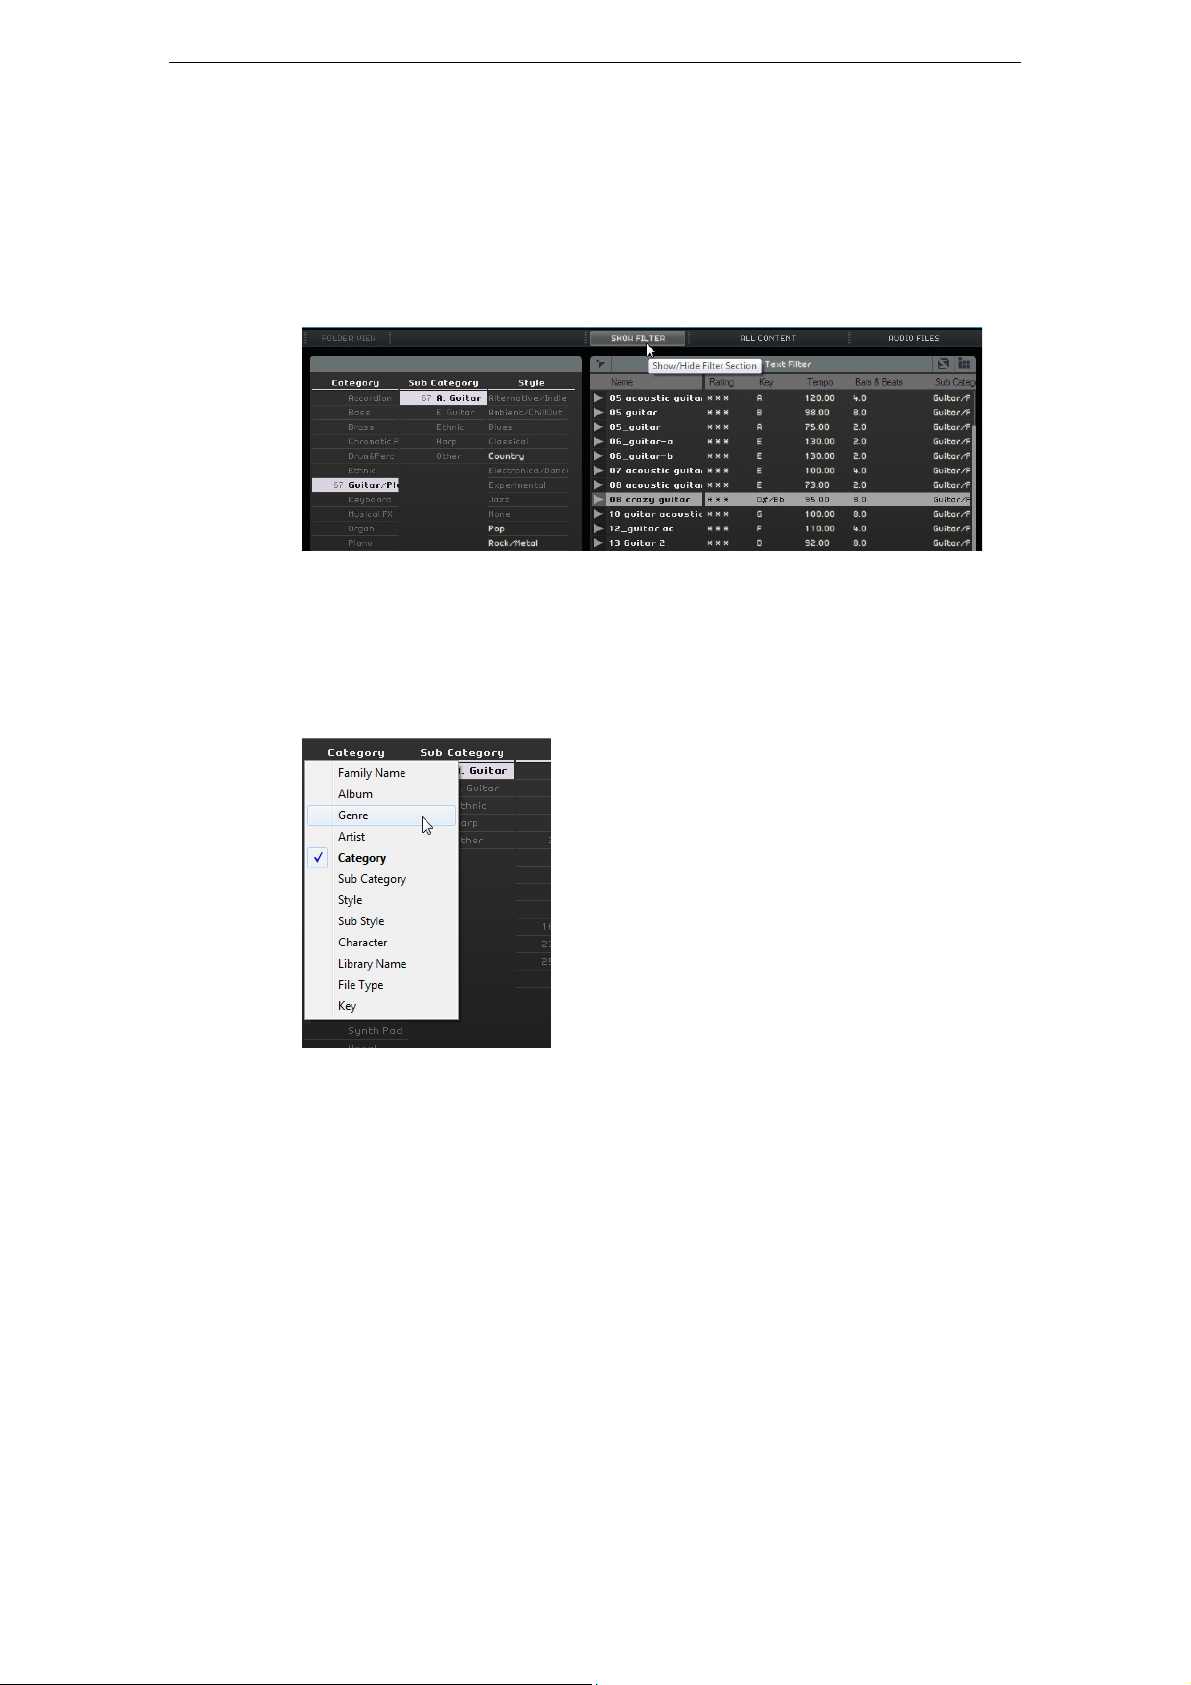
Filtering Media Files
Ö
Filtering by Attributes
If you click the “Show Filter” button, the filter section is displayed. Here, you can filter
the list according to the attributes that are defined for the content, like Category/Sub
Category, Style/Sub Style, and Character. This makes it easy to find files of a certain
sound or style.
If you click one of the items in the attribute columns, the files containing this attribute
are shown in the results list to the right. All other files are grayed out. The number
displayed before an attribute indicates how many files match this criteria.
Working with the MediaBay
If the filter section has the focus, you can use the arrow keys to step through the
columns and press [Ctrl]/[Command]-[Space] to select or deselect the current item.
• To change the attributes that are displayed in a column, click the column header
and select another attribute from the pop-up menu.
76
The Arrange Zone
Page 77

Working with the MediaBay
Show Family ItemsFamily Name
Filtering by Family
When you select a factory content file that is tagged with the Family attribute, the
“Show Family Items” button becomes available. Activate this button to display only
files that are part of the same family. The Family Name column in the filter section
allows you to browse all families. Click the “Show Family Items” button again to return
to the previous unfiltered view.
Filtering by Text
At the top of the results list, the “Text Filter” field is displayed. Type in a name to
search for, and press [Return] to show the results.
Filtering by Rating
You can use the rating filter to filter out any files with a lower rating.
Shuffle Results
If you click the “Shuffle Results” button, the results list entries are listed in a random
order.
Reset Filters
To reset all filters, click the “Reset Filters” button in the top left corner of the results
list.
Previewing Media Files
You can preview files by activating the “Activate Preview Mode” button and selecting
a file. You adjust the volume using the value field to the left. If you preview a file during
playback, the project tempo and key are used. If you preview in stop mode, the media
file is played back with its original tempo and key.
77
The Arrange Zone
Page 78

Adding User Content
!
Sequel comes with thousands of great loops, but you can also add loops from other
libraries or content that you created yourself.
If you add new content to Sequel, the MediaBay has to learn about it and scan the
added files. Under Windows, this happens automatically when the transport is
stopped, so make sure Sequel is not playing when you add loops. Under Mac OS X,
you have to restart Sequel after adding new content.
Add User Content Location
To add a new library from hard disk, CD, or DVD, proceed as follows:
1. On the “Select Browse Location” pop-up menu, select “Add User Content
Location”.
2. In the dialog that opens, navigate to the folder that you want to use, and click OK.
The Set Location Name dialog opens.
3. Enter a name for the new content location, and click OK.
The specified folder is now added to the “User Content Locations” submenu of the
“Select Browse Location” pop-up menu.
Working with the MediaBay
Adding Content Via Drag and Drop
To add content via drag and drop, proceed as follows:
1. Drag and drop your events, parts, or entire folders onto the MediaBay.
A dialog opens.
2. Click in the Value column and select an attribute from the pop-up menu.
This saves the selected attribute in the file. Attributes make it easier for you to
organize and browse files.
3. If you import a single file, enter a name in the text field at the bottom of the window.
4. Click OK.
The file or files are added to your user content.
The User Content Folder
If you select “User Content” from the “Select Browse Location” pop-up menu, only
files of your User Content are shown.
The Folder View
When you select a User Content Location in the results list, the “Folder View” button
becomes available in the filter section. If you activate the button, the user content is
displayed in a hierarchical folder structure.
Delete Selected Media
To delete a media file, select it and click the “Delete Selected Media” button. Note,
however, that factory content cannot be deleted.
78
The Arrange Zone
Page 79

Setting Attributes
Ö
To set or change the attributes that are associated with the selected media file in the
results list, you have the following options:
- To change the rating, click in the Rating field and drag with the mouse.
- To change the Tempo or Bars & Beats attributes, click in the corresponding field
to highlight it, then click again, and type in the new value.
- To change the Key, Sub Style, and Sub Category attributes, click in the
corresponding field to highlight it and click again to open a pop-up menu where
you can choose a new value.
- To change the Character attribute, click in the corresponding field to highlight it,
then click again to open a dialog where you can change the settings.
You can select several files simultaneously and change their attributes all in one go
holding down [Shift] or [Ctrl]/[Command].
Using Drag & Drop
You can drag files and presets from the MediaBay to various zones in the program. If
you drag a loop or preset into an empty section of the Arrange Zone, a new track of
the corresponding type is created.
Working with the MediaBay
Audio Files
Audio files can be dropped in the Arrange Zone or the pad section on the Beat Page.
MIDI Loops
MIDI loops can be dropped in the Arrange Zone. This creates a new instrument track.
Instrument Sounds
Instrument sounds can be dropped on an empty section of the track list. This creates
a new instrument track that contains the instrument sound. If you drag an instrument
sound onto an existing instrument track, the current instrument track preset is
replaced.
Audio Track Presets
Audio track presets can be dropped in an empty section of the Arrange Zone. This
creates a new audio track that uses this preset. If you drag an audio track preset onto
an existing audio track, the current audio track preset is replaced.
Pattern Banks
Pattern banks, that is, track presets with a beat pattern, a drum kit, and track settings,
can be dropped on an empty section of the Arrange Zone. This creates a new beat
track that uses this preset. If you drag a pattern bank onto a beat track, the current
beat track preset is replaced.
You can also drop pattern banks on the different zones of the Beat Page. Depending
on where you drop it, only the patterns, only the sound (drum kit), or both are replaced.
79
The Arrange Zone
Page 80

Output Effects
You can apply three custom output effects to the Master channel. These effects are
pre-fader. Additionally, you can activate the post-fader Maximizer effect. For details on
the effects and their parameters, see the chapter
on page 119.
To open the Output Effects panel, click the corresponding button in the bottom right
of the program window.
Output Effects
“Effects and Instruments Reference”
80
The Arrange Zone
Page 81

Introduction
The Multi Zone is where all of your project’s mixing, effects processing, and advanced
editing takes place. Furthermore, the Multi Zone includes a Performance Page for
taking your project out to the world to play live. The Settings Page contains global
options for configuring Sequel according to your needs.
There are six buttons at the bottom left of the Multi Zone that open the corresponding
pages:
- Track Inspector Page
- Editor Page
- Track Picture Page
-Mixer Page
- Performance Page
- Settings Page
The Multi Zone
At the bottom center of the Multi Zone, the program name is shown. When you point
the mouse at it, the project name and an indicator of the processing load become
visible to the left and right, respectively.
The buttons at the bottom right of the Multi Zone open the MediaBay and the Output
Effects section. These are displayed to the right of the Arrange Zone.
81
Page 82

The Track Inspector Page
Preset
section
Effect parameters
Select Effect
Type
Bypass
Open/Close Plug-in
Window
Quick Control
Learn Mode
Get Default Quick
Controls from Plug-in
The Track Inspector Page allows you to add effects and instruments to your project. It
features several buttons for showing and hiding different panels with settings for the
selected track. The selected track’s channel strip is shown on the left.
• To show or hide a panel, click the corresponding button at the top of the Track
Inspector page.
Global Panel Controls
The Track Inspector Page
The panels for effects, instruments, and the equalizer share most of the following
controls.
• To select an insert or a send effect, click in the “Select Effect Type” field and
select an option from the pop-up menu.
• To select a preset, click in the preset field, and select an option from the pop-up
menu.
• To bypass an effect or the equalizer, click the Bypass button.
• To assign Quick Controls, use the “Quick Control Learn Mode” and “Get Default
Quick Controls from Plug-in” buttons, see
• To open or close the plug-in’s native panel, click the “Open/Close Plug-in Window”
button.
“Quick Controls” on page 114.
82
The Multi Zone
Page 83

Handling Presets
• To select a preset, open the preset browser by clicking in the Effect or Instrument
Preset field.
In the preset browser, you have the following options:
• To find a suitable preset, use the Category and Sub Category filters.
• To apply a preset, double-click it.
• To go back to the last selected preset, click the Restore Preset button at the
bottom left of the preset browser.
Panels for Instrument Tracks
For instrument tracks, three additional panels are available: Chorder, Arpeggiator, and
Instrument.
Chorder
The Chorder automatically plays chords when you press a single note on your MIDI
keyboard.
The Track Inspector Page
Arpeggiator
The Arpeggiator automatically creates patterns based on the notes you play, creating
great rhythm and a really cool effect. The pattern is played as long as a note is held.
The following parameters are available:
Parameter Description
Quantize Sets the resolution of the Arpeggiator patterns.
Octave Range Determines how many octaves the pattern goes above or below the
note you play.
Transpose Step
Determines how many steps the pattern changes each time it
starts again.
83
The Multi Zone
Page 84

Parameter Description
Transpose Play
Direction
Arpeggiator Play
Mode
Instrument
The Instrument panel contains eight controls that are provided by the selected preset.
Insert Effects Panel
The Track Inspector Page
Determines whether the pattern’s key goes up, down, or both.
Determines what type of pattern is played back. If you select
Phrase, you can play a single note to trigger a scale.
Each track can have three pre-fader insert effects. Pre-fader means that raising or
lowering the track fader does not affect how much of the audio signal is sent to the
effect.
Insert Effect 3 is positioned in the signal chain after the equalizer. That means that any
changes to the equalizer settings affect the signal that is sent to the effect.
For details about the different effects, see “Effects Parameters” on page 119.
Equalizer Panel
The Equalizer panel features a three-band EQ. The low band sets the frequency at
which the bass tones are affected. The middle band sets the frequency at which the
middle tones are affected. The high band sets the frequency at which the high tones
are affected.
• The Gain slider determines the gain or volume of the EQ band.
• The Frequency slider determines the frequency of the EQ band.
84
The Multi Zone
Page 85

• The Resonance slider determines the frequency range of the middle EQ band.
Amount fader
Ö
Drag the slider to the left or right to widen or shorten the range.
• To reset the EQ settings, open the presets pop-up menu and select RESET.
The EQ Curve Display
You can also activate EQ modules and make settings using the EQ curve display.
• To adjust the gain, drag a curve point up or down.
• To adjust the frequency, drag a curve point to the left or right.
• To adjust the resonance, click the band 2 curve point, press [Shift], and drag up or
down.
• To deactivate an EQ module, double-click the corresponding curve point or drag it
outside the display.
Send Effects Panel
Each project can have two send effects. They are useful if you want to apply the same
effect to every track. This helps to reduce the CPU load on your computer. You can
use any available effect as send effect.
The Editor Page
The Amount fader determines the signal portion that is sent to the send, see “Send
Effects” on page 43.
Send effects are global for all tracks. If you want to deactivate a send for a particular
track, click the corresponding Disable Amount button.
The Editor Page
The Editor Page allows you to perform advanced editing of your audio events,
instrument parts, and beat patterns. If you select an audio event in the Arrange Zone,
the Editor Page shows the Sample Editor; if you select an instrument part, the Key
Editor is shown; and if you select a beat pattern, the Beat Page is shown.
85
The Multi Zone
Page 86

The Sample Editor
Ö
The Sample Editor allows you to edit the selected audio file. The main area of the
Sample Editor shows a detailed waveform rendering of your audio file.
• Zoom in and out using the “+” and “-” buttons in the bottom right corner or by
clicking in the ruler at the top of the Sample Editor and dragging up or down.
• Use the scrollbar at the bottom to scroll left or right.
The Sample Editor contains two additional sections for editing step envelopes and
detecting the tempo of an audio file, see
“Detecting the Tempo of an Audio File” on page 107.
At the top and on the left of the Sample Editor, you find global audio setting
parameters:
The Editor Page
“Step Envelope Editing” on page 105 and
Event Name/Rename Event
You can rename the event by clicking in the field and entering a new name.
Volume
You can adjust the event volume by clicking the Volume field and dragging up or
down. Alternatively, you can double-click in the Volume field and enter a value.
Original Tempo vs. Project Tempo
You can switch between Original Tempo and Project Tempo mode by clicking the
corresponding buttons:
• In Project Tempo mode, the event’s tempo is locked to the project tempo. The
tempo of the audio is compressed or stretched and the size of the event is
adjusted accordingly.
• In Original Tempo mode, the event keeps the tempo of the corresponding audio
file.
The Free Warp Tool
The Free Warp tool allows you to manually adjust how the audio lines up to bars and
beats. If the Free Warp tool is activated, you can click in the waveform to add warp
tabs and move them to the left or right to change the timing and to time stretch the
audio. See
The warp settings are saved with the project.
“Audio Quantization and Free Warp” on page 103 for more information.
Time Stretch Mode
On the “Set Time Stretch Mode” pop-up menu you can select an algorithm preset that
affects the stretch result of your audio. For details, see
Shift Algorithms” on page 102.
Reset Warping
The “Reset Warping” button resets any changes that you made with the Free Warp
tool. This deletes all warp tabs and restores the bars and beats to their original
settings.
86
The Multi Zone
“About Time Stretch and Pitch
Page 87

The Editor Page
Ö
Reverse selected Audio
You can reverse the event or a selected region by clicking the Reverse button. All
warp tabs are deleted when reversing the audio.
Edit Audio – Transpose
You can change the key of the event by clicking in the Transpose field and dragging
up or down. Alternatively, you can double-click in the Transpose field and enter a
value.
To the left of the Transpose field, the root key (A, Bb, C#, etc.) of the event is shown.
If this information is not available because there is no key attribute, this indicator is
empty. Recorded parts show the key that is defined for the project.
Edit Audio – Ignore Transpose Track
You can make sure that an event does not follow any global transpose changes on the
transpose track by activating “Ignore Transpose Track”.
Edit Audio – Quantize (Project Tempo Mode Only)
On the “Set Grid Resolution” pop-up menu, you can select a quantize value for
quantizing and swing. The “Enable/Disable Quantize” option allows you to quantize
the audio event to the project tempo. See
information.
“Audio Quantization” on page 103 for more
Edit Audio – Swing (Project Tempo Mode Only)
Swing allows you to add a more human feel to an audio event. You can adjust the
swing effect with the set grid resolution: for example, if the grid resolution value is set
to eighth notes, only eighth notes are affected.
Edit Audio – Audio Length (Project Tempo Mode Only)
The “Audio Length” option allows you to manually enter the length of the audio in bars.
This is helpful if the length of the audio file has not been detected, but you know its
length in bars.
Changing the audio length value time stretches the audio.
The Key Editor
The Key Editor allows you to edit your instrument parts. The instrument part selected
in the Arrange Zone is displayed in the main area of the Key Editor.
The most important editing functions in the Key Editor are described in the section
“The Key Editor” on page 33.
• Zoom in and out using the “+” and “-” buttons in the bottom right corner or by
clicking in the ruler at the top of the Key Editor and dragging up or down.
• To zoom in vertically, move the mouse pointer over the left side of the piano
keyboard so that it turns into a hand symbol, click and drag left or right.
• Use the scrollbar along the bottom to scroll left or right and the scrollbar on the
right to scroll up and down. You can also use the mouse wheel to scroll up and
down, or press [Shift] and use the mouse wheel to scroll left and right.
• Click the piano keyboard to hear a specific pitch.
87
The Multi Zone
Page 88

The Editor Page
At the top and on the left of the Key Editor, the following parameters are available:
Rename Part
You can rename the part by clicking in this field and entering a new name.
Draw Tool
Clicking this button activates the Draw tool that allows you to draw in notes in the Key
Editor.
Step Input
This function allows you to enter instrument data note by note and beat by beat, using
a MIDI keyboard or controller. It is useful for quick entry of instrument parts.
When you activate the step input mode, a blue vertical position line appears. Each
time you press a key, a note is entered at this line. The length of the note is determined
by the grid resolution.
You can use the left and right arrow keys on your keyboard to move the position of the
vertical position line.
Snap
When Snap is activated, all editing operations in the Key Editor snap to the grid. The
grid resolution is determined by the zoom factor. When Snap is deactivated, notes
can be moved and performed freely without snapping to the grid.
Edit MIDI – Transpose
You can change the key of the part by adjusting the transpose value.
• To change the key, click the Transpose value and drag up or down. You can also
double-click and enter a value between -24 and 24.
To the left of the Transpose value, the root key (A, Bb, C#, etc.) of the part is shown.
If this information is not available because there is no key attribute, this field is empty.
Recorded parts show the key that is defined for the project.
Edit MIDI – Ignore Transpose Track
You can make sure that a part does not follow any global transpose changes on the
transpose track by activating “Ignore Transpose Track”.
Edit MIDI – Quantize
You select a quantize value from the “Set Grid Resolution” pop-up menu. This value is
used for all quantize-related functions such as swing and triplets. It also determines
the grid resolution for the Key Editor.
When you activate the “Triplets On” button next to the quantize value, you can enter
triplets in an instrument part. The resolution of the triplets is determined by the
quantize value.
Edit MIDI – Reset Quantize
The “Reset Quantize” button lets you restore the previous grid resolution.
Edit MIDI – Perform Quantize
Click “Perform Quantize” to move all the notes to the nearest bar or beat, depending
on the quantize value. If this is set to quarter notes, all notes are moved to the nearest
quarter note position.
88
The Multi Zone
Page 89

The Editor Page
Edit MIDI – Swing
Swing allows you to add a more human feel to an instrument part. You can apply swing
by clicking in the value field and dragging up or down. Alternatively, you can doubleclick in the field and enter a value. Which notes are affected depends on the grid
resolution. If the quantize value is set to eighth notes, only eighth notes are affected.
Edit MIDI – Legato
This option increases or decreases the amount of legato in the selected instrument
part. Legato is defined as a smooth, even style without any noticeable break between
notes. Therefore, when increasing Legato, you are stretching out the notes so that
there is no noticeable attack between two notes. Decreasing this value creates
shorter notes, sounding more staccato.
Nudge Selected Notes Left/Right
These buttons move the selected note left or right in steps based on the grid resolution.
Controller Lane
The controller lane at the bottom of the Key Editor allows you to add or modify
instrument data, such as velocity and controller information. The most common use for
this is to edit velocity, pitch bend, and controller numbers for sustain, etc.
• Open the controller pop-up menu to select which controller data you want to view
For more information about editing controller data, see “The Controller Lane” on page
35.
The Beat Page
The Beat Page allows you to create your own drum parts, or patterns, for a project.
The step display in the main area of the Beat Page shows the pattern part that is
selected in the Arrange Zone.
or modify.
89
The Multi Zone
Page 90

The Editor Page
Ö
Pattern Functions
Click the Pattern button to open the “Pattern Functions” pop-up menu. The following
functions are available:
Option Description
Copy Pattern Copies the active pattern into the clipboard.
Paste Pattern
Clear Pattern
Insert Pattern at
Cursor
Insert all Patterns at
Cursor
Pastes the pattern from the clipboard into the active pattern pad.
Clears the active pattern.
Inserts one occurrence of the pattern on the beat track at the cursor
position.
Inserts one occurrence of all patterns that contain steps on the beat
track at the cursor position.
The Pattern Selector Buttons
• Click a pattern selector button to select a pattern.
If you select a pattern while another pattern is playing back, playback switches to
the new pattern at the next bar position.
- A play icon on the pattern selector button indicates that the pattern is playing.
- A blinking pattern selector button indicates that this pattern will be played when
the cursor reaches the next bar.
You can also use the pattern selector buttons to copy patterns using drag & drop.
If the “Loop Pattern forever” button is activated, the pattern displayed on the Beat
Page is played until a new beat part is reached in the Arrange Zone.
1 Bar
Click this button to set the pattern length to one bar (4/4).
2 Bars
Click this button to set the pattern length to two bars.
Triplet
Click the Triplet button to switch the default step resolution from 1/16 to 1/16 triplets.
Swing
Swing adds a more human feel to drum patterns that might otherwise be too static.
• Click in the Swing field and drag up or down to change the swing value.
Positive values delay every second drum step in the pattern (or third for triplets).
Negative values cause the drum steps to play a little earlier.
90
The Multi Zone
Page 91

The Editor Page
Ö
Flam
A flam is a short secondary drum hit that is played just before or after the actual main
drum beat. If you want to add a flam to a step, proceed as follows:
1. Activate the “Flam Edit Mode” button to the right of the flam function.
2. In the step display, click a step.
A small dot representing a flam appears.
3. Click the Flam value field and drag up or down to adjust the flam value.
This way you can specify whether if the flam is positioned before the beat or after it.
The velocity of a flam is slightly lower than the velocity of the corresponding step.
Lane Selectors
The 16 lane selectors on the left of the Beat Page match the 16 pads shown in the
pad section on the right.
• If you select another pad group in the pad section, the corresponding lanes are
displayed on the left.
• If you click a lane, the assigned instrument is triggered.
The same happens if you select a pad or edit a step in the step display.
Lane Offset
When you move the mouse pointer over a lane, the Lane Offset slider is displayed. It
allows you to offset all drum steps of a lane.
• Drag the slider to the left to let the drum steps start a little earlier or to the right to
start them later.
Step Display
The step display contains 16 steps for each lane.
• To enter a drum step, click in the step field.
When you click in an empty field, it is filled, indicating that you will hear a drum beat
on this step.
• To enter a continuous range of drum steps, click and drag.
• To remove a drum step, click the corresponding field again.
• To remove a range of drum steps, click and drag over them.
• To set a high velocity value, click in the upper part of the field when entering a step,
to set a low velocity value, click in the lower part.
The different velocity settings are indicated by different colors.
91
The Multi Zone
Page 92

The Editor Page
Pad Section
To the right of the step display, you find the pad section that allows you to associate
audio samples with pads. The pad section provides up to 128 pads, organized in
eight groups of 16 pads.
Each pad is mapped to a particular MIDI note (C-2 to G8). If you convert your beat
track into an instrument track, you can trigger the pads via these MIDI notes.
• To assign a sample to a pad, drag it from the MediaBay onto a pad.
• To select a group, click the corresponding group button (labeled 1 to 8) above the
pads.
• To select a pad, click on it.
The waveform of the assigned sample is shown in the sample display to the right
and the pad sound is played.
• To replace the sample mapped to a pad, drag a new sample onto the pad.
Preset Browser
Above the sample display, the loaded VST preset is shown.
• Click in the preset field to open the preset browser where you can choose a
different drum kit.
Sample Display
The sample display shows the waveform of the sample assigned to the pad that is
selected in the pad section.
• Click in the sample display and drag upwards or downwards to zoom the waveform.
• Drag the Start and End flags in the waveform display to define the start and end
points of the sample.
This is useful if you assign a longer (maybe even musical) sample to a pad and you
want to play back only a defined portion of it.
Volume for Selected Pad
Use the Volume slider below the waveform display to change the volume of the pad
that is selected for editing.
Pad Name
The name of the sample is shown in the pad name field below the waveform display.
• To rename a sample, click in the name field, enter a new name, and press [Return].
MG – Assign Selected Pad to Mute Group
With this control, you can assign a pad to one of eight mute groups. Pads within a mute
group never play back simultaneously. With each new note a new pad is triggered.
Panorama for Selected Pad
Use the pan control to change the panorama setting of the selected pad.
92
The Multi Zone
Page 93

The Editor Page
SOLO
If you activate this button, the selected pad is soloed during playback.
VMax
If you activate this button, all pads are played back with the maximum velocity value of
127.
Reset
If you click this button, all pad assignments on the Beat Page are cleared.
Sound Editing Parameters
The section below the waveform display contains sound editing parameters, distributed
to three tabs: Amp, Filter, and Voice.
On the Amp tab, the following parameters are available:
Parameter Description
Attack Controls the amplifier envelope’s attack time.
Release Controls the amplifier envelope’s release time. Reduce the release
time to shorten the decay of sounds played in one-shot mode.
AmpMod Determines the influence that the velocity has on the pad volume
setting. When set to 100
velocity. When set to 0
AttMod Determines the influence that the velocity has on the Attack setting.
The higher the AttMod setting, the longer the additional attack time for
a pad. When this parameter is set to 100
with high velocity, the attack time is increased by 50
0
%, velocity has no effect on the attack.
%, the pad sounds louder, the higher the
%, velocity has no effect on the pad volume.
% and you are playing a pad
%. When set to
On the Filter tab, the following parameters are available:
Parameter Description
Off, LP, HP, BP Sets the filter type: low-pass (LP), high-pass (HP), or band-pass (BP).
When you set this control to Off, the settings on this tab have no effect.
CutOff Sets the filter’s cutoff frequency.
Q Sets the filter’s resonance.
Mod Determines the influence that the velocity has on the cutoff frequency.
When set to 0
the cutoff frequency changes depending on the velocity.
On the Voice tab, the following parameters are displayed:
Parameter Description
Coarse Tunes the pad by up to ±12 semitones.
Fine Fine-tunes the pad by up to ±100 cents.
Reverse Reverses the selected sample so that you hear it backwards.
Trigger Mode Set this to “One Shot” to play the sample of the selected pad from
start to finish, or to “Key Hold” to play the sample for as long as you
hold the mouse button.
%, the setting has no effect. When set to any other value,
93
The Multi Zone
Page 94

The Track Picture Page
Zoom slider
Rotate Picture
button
Clear Picture
button
Reset Zoom
You can add a track picture to the selected track. Pictures are useful in live
performances as they allow you to recognize your tracks at a quick glance. You can
choose pictures of the factory content or add new ones to the user library.
Adding and Deleting Pictures
To add factory pictures, proceed as follows:
1. In the track list, select the track on which you want to insert a track picture.
2. In the Multi Zone, open the Track Picture Page and select the Factory panel.
The pictures from the factory content are displayed.
The Track Picture Page
3. Select one of the pictures.
The picture is displayed for the selected track in the track list and in the
corresponding channel strip on the Mixer Page.
To add your own pictures in *.BMP, *.JPEG, or *.PNG. format, proceed as follows:
1. On the Track Picture Page, select the “User Content” panel.
2. Click the Import button, browse to the location where the picture is stored, select
it, and click Open.
The picture is shown in the preview panel on the Track Picture Page and it is
assigned to the selected track. A copy of the picture is stored in the User Content
Location specified on the Settings Page, see
• To delete a picture from your library, select it, and click the Delete button. You can
select several pictures by [Ctrl]/[Command]-clicking them and delete them
together.
This only works for your own pictures, factory content cannot be deleted.
Previewing and Editing Pictures
In the area on the left, you can view and edit the track pictures.
“User Content Location” on page 99.
The following editing can be performed:
• You can set the track color by clicking the “Track Color” button above the preview
panel, and clicking on a color.
The track picture is automatically tinted in the track color.
94
The Multi Zone
Page 95

• You can increase or decrease the track color tinting by clicking in the Intensity
field, and dragging up or down.
• You can change the size of the track picture using the Zoom slider at the bottom of
the preview panel.
• You can change the visible part of the picture by dragging the picture in the
preview panel.
• You can unassign the picture by clicking the “Clear Picture” button.
• You can change the orientation of the picture by clicking the “Rotate Picture”
button.
The Mixer Page
The Mixer Page features a track mixer that shows any track that you created in the
project.
The Mixer Page
Channel Settings
Each track has its own channel fader that includes a Mute button, a Solo button, and a
Record Ready button. These buttons have the same functionality as the corresponding
buttons in the Arrange Zone, see
Channel Level (Volume) and Pan
Each channel has a fader for controlling the track volume, and a panner. The controls
have the same functionality as the corresponding controls in the Arrange Zone.
Setting the Track Color
When you set up a track by dragging a loop or instrument sound into the Arrange
Zone, Sequel automatically assigns a track color.
On the Mixer Page, you can also set a track color individually for each track. Proceed
as follows:
1. Select the channel that you want to set a color for.
2. Click the channel name of the selected channel.
A color selector is displayed.
“The Track Controls” on page 72.
95
The Multi Zone
Page 96

3. Select a color.
The channel on the Mixer Page and the corresponding track in the Arrange Zone are
displayed in the selected color.
The Master Channel
The Master channel is the output of all tracks combined. This channel features a volume
fader, a panner, and a button to disable the master automation (see
Disabling Automation” on page 46).
The Performance Page
“Removing and
Clipping
If clipping occurs, the channel meter becomes red. In this case, lower the Master
channel fader, or alternatively lower all track faders by the same amount to reduce the
level going into the Master channel. To reset the clipping indicator, click the channel
fader.
The Performance Page
The Performance Page allows you to create different arrangements of a project and to
play back a project in a non-linear way. This is useful for live performances.
Performance Parts
To set up your project for non-linear playback, you need to create some performance
parts on the performance track that mark different sections of your project (for example,
intro, verse, chorus). Performance parts are shown on the performance track. You can
open this track by clicking the “Show Performance Track” button above the track list.
Creating Performance Parts
Activate the Draw tool above the track list, click and drag to create performance parts.
96
The Multi Zone
Page 97
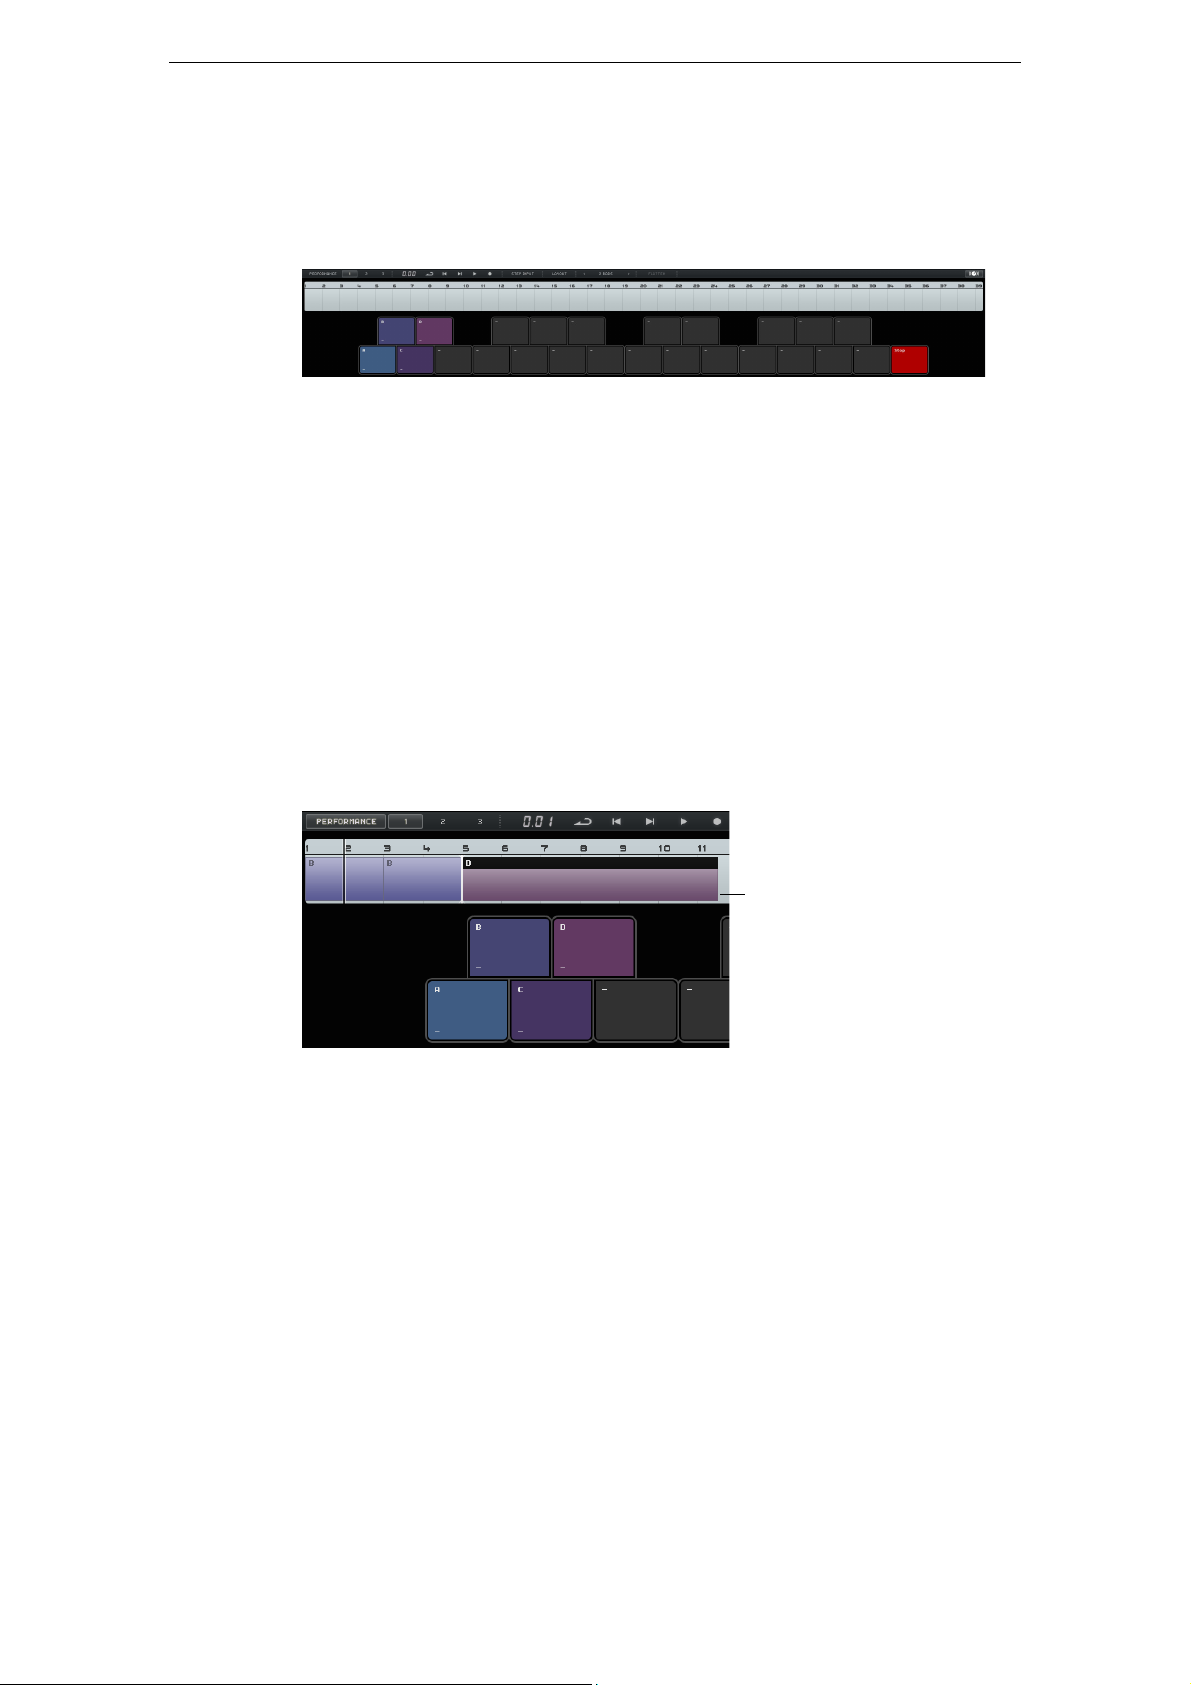
Pads
Performance
timeline
Ö
The Performance Page
The rounded squares in the bottom half of the Performance Page are called pads.
Every performance part you create on the performance track can be assigned to a
pad. If you click a pad, the corresponding part is played back.
Assigning Pads
Press [Alt]/[Option] and click at the top of a pad to open a pop-up menu where you
can choose which performance part is assigned to the pad.
Naming Pads
Press [Alt]/[Option] and click at the bottom of a pad to name it.
Pad Layout Modes
Click the Layout button at the top of the Performance Page to switch the pad display
from keyboard layout to MPC style layout.
Performances
Pads can be used to create performances, that is, sequences of parts that are related
to performance parts on the performance track. Perfomances are displayed on the
performance timeline.
Enabling Performance Mode
Performance mode is automatically enabled when you click a pad, press “Play
Performance” or “Record Performance”, or enable Step Input mode.
In Performance mode, all transport controls affect the performance timeline.
Creating Performances
To create a performance, proceed as follows:
1. Activate the “Record Performance” button and trigger a pad.
2. Press [Space] to stop recording.
3. Click the “Play Performance” button.
A part is created on the performance timeline. You can create as many parts as
you need.
Your performance is played back.
97
The Multi Zone
Page 98

The Performance Page
Ö
!
To create a performance with the Step Input function, proceed as follows:
• Activate the “Step Input” button and trigger a pad.
A part is created on the performance timeline. To the right of the part an insert
cursor is displayed.
To insert a part at an earlier position on the performance timeline, click a part border to
move the insert cursor to this position.
Saving Performances
You can save up to three performances by clicking on the corresponding buttons (1, 2,
3).
Editing on the Performance Timeline
You can edit your parts on the performance timeline. This may have an influence on
the adjacent parts: these can be shortened, lengthened, or moved correspondingly. If
you move or resize your part so that it gets longer than the corresponding
performance part on the performance track, the part is triggered again.
Use the common editing functions to resize, split, move, or delete a part, see
“Common Editing Functions” on page 28.
• To replace a part in the performance timeline, point the mouse at the part label,
and click to open a pop-up menu where you can select another part.
Defining the Jump Grid
The “Define Jump Grid” pop-up menu lets you set a grid resolution for the active part.
Whenever the corresponding grid line is reached, playback jumps to the next part.
This works even if your part is longer than the set grid. If your part is shorter, playback
jumps to the next part as soon as the end of the part is reached. If you activate the End
option, the current part is played back completely before jumping to the next one.
Flatten
The Flatten function is useful, if you want to edit your arranged project by adding
instruments and effects, for example.
If you click the Flatten button, the active performance is converted into a linear project.
All events in your project are reordered, repeated, resized, moved, and/or deleted to
correspond exactly to your performance.
Flattening may remove events and parts from the project. Only use the Flatten function
when you know you do not want to rearrange your performance any more. If in doubt,
save a copy of the project.
98
The Multi Zone
Page 99

The Settings Page
On the Settings Page, you can define main settings in Sequel. These settings are
divided into four categories: Sequel Projects, Audio Settings, User Interface, and
Options.
Sequel Projects
Project Location
Click in this field to select the directory where your projects are stored on the hard
drive. A dialog opens, allowing you to browse the hard drives and find a suitable
location or create a new folder.
The Settings Page
User Content Location
Click in this field to specify where your content is stored. A dialog opens, allowing you
to browse the hard drives and find a suitable location or create a new folder. See
“Adding User Content” on page 78 to find out how to add user content.
Start-up Action
This pop-up menu allows you to decide whether Sequel creates a new project or
loads your last project on start-up.
Audio Settings
Audio Connection
Click in this field to open a pop-up menu where you can select a driver for audio
playback.
• Click the “Setup…” button to open the control panel for your audio interface.
• Click Reset to reset the driver settings.
Output Selector
Click in this field to open a pop-up menu where you can select the output on the audio
interface that you want to use as the output for the project.
Record Format
Click in this field to select the bit rate for your recordings. There are two options:
• 16 Bit is the format used for CDs.
• 24 Bit provides better quality than 16 Bit, but also requires more storage space on
your hard disk.
99
The Multi Zone
Page 100

User Interface
Panel Color and Work Area Color
Use these sliders to apply different colors and shadings to the frames of the main
Sequel program window and the work area.
Show Tips
Activate this option to show tooltips when you move the mouse pointer over a button
or object.
Options
MIDI Recording – Record Mode
Use this pop-up menu to define a record mode for cycle recordings on instrument
tracks.
MIDI Recording – Auto Quantize
If this option is activated, anything recorded on an instrument track is automatically
quantized to 1/16 positions.
Computer Usage
MIDI Recording – Record Placement Method (Windows only)
When a MIDI interface sends notes to the application, this data includes timing
information (so-called timestamps) to correctly position the MIDI events on the Sequel
timeline. There may be situations in which these timestamps are not in sync with the
internal timing information of Sequel, so recorded MIDI events are not positioned
correctly (usually, they occur too late).
If timing problems with the recorded MIDI events occur with your operating system, try
changing the Record Placement Method from A (uses timing information of Sequel) to
B (uses MIDI timestamp).
Metronome – Record/Playback
You can activate or deactivate the Record and/or Playback options to determine when
the metronome click is played.
Remote Controller Source
If you have connected more than one external controller, use this pop-up menu to
select the corresponding input.
Computer Usage
If you point with the mouse on the upper or lower border of the program window, a
Computer Usage indicator is shown on the lower border of the Multi Zone, to the right
of the program name.
If your computer is trying to do too many things at once, it may overload. The indicator
shows the current processor load of your computer. When four or more bars light up,
the workload is quite high. In case of an overload, the whole indicator lights up in
orange. If this happens, try to reduce the processor load, for example, by freezing
tracks, see
“Freeze” on page 72.
100
The Multi Zone
 Loading...