

Page 1
Page 2

English
Page 3

Cristina Bachmann, Heiko Bischoff, Christina Kaboth, Insa Mingers,
Sabine
Pfeifer, Kevin Quarshie, Benjamin Schütte
This PDF provides improved access for vision-impaired users. Please
note that due to the complexity and number of images in this
document, it is not possible to include text descriptions of images.
The information in this document is subject to change without notice
and does not represent a commitment on the part of Steinberg Media
Technologies GmbH. The software described by this document is
subject to a License Agreement and may not be copied to other media
except as specifically allowed in the License Agreement. No part of this
publication may be copied, reproduced, or otherwise transmitted or
recorded, for any purpose, without prior written permission by
Steinberg Media Technologies GmbH. Registered licensees of the
product described herein may print one copy of this document for their
personal use.
All product and company names are ™ or ® trademarks of their
respective owners. For more information, please visit
www.steinberg.net/trademarks.
© Steinberg Media Technologies GmbH, 2014.
All rights reserved.
Page 4

Table of Contents
6 Introduction
6 Welcome!
7 About the Documentation and the Help
9 Typographical Conventions
10 How You Can Reach Us
12 System Requirements and Installation
12 System Requirements
13 Installing the Program
15 Activating Your License
16 Registering Your Software
16 Hardware Installation
19 Setting up Your System
ENGLISH
4
Page 5

5
Page 6

Introduction
Welcome!
Congratulations and thank you very much for purchasing Steinberg's
Cubase Pro 8 or Cubase Artist 8.
The product you have purchased has – by the standards of the software
industry – a very, very long and successful lineage, going all the way
back to 1989. Since the first version was released for the legendary
Atari computer Cubase has changed so much – for the better. It's why
over the last quarter century, millions of musicians, producers, DJs,
composers and audio engineers have chosen Cubase to be the home
of their musical creativity. And these include Grammy winners adored
by millions as well as people who make music at home purely for their
own pleasure; big name producers and small town hopefuls; rock stars
and high school music teachers. And all of these groups are equally
important to us in making this software.
The design goal for this version was to combine the technology with
creativity. To mix innovation with inspiration, and professionalism with
passion. And we believe that we've managed to deliver just that.
The list of new features in Cubase Pro 8 and Cubase Artist 8 is far too
long to repeat here. Some of them will be immediately visible to you on
opening the appropriate part of the program; some of the most
important are hidden from view deep within the program code itself. A
huge amount of engineering work has gone into making projects faster
to open and save, the software itself faster, more fluid and responsive.
All with the goal of making Cubase sleeker, more efficient and at the
same time even more creative than ever before.
If you are an upgrading customer, we thank you deeply for your
continued faith in our product. And if you are entirely new to Cubase,
we hope that the experience of opening up Cubase for the first time and
ENGLISH
6
Page 7

Introduction
NOTE
About the Documentation and the Help
exploring the incredible new possibilities open to you is as thrilling as
we hope to make it. It's why we work at this company and do the job we
do.
Either way, please keep in touch with us about your experience with
Cubase through our internet forums at www.steinberg.net/forum or
through the contact channels for your region, more information on
which you can find at our website.
Most sincerely yours,
Your Steinberg Cubase Team
About the Documentation and the Help
The documentation are available in the PDF format and divided into the
following sections:
• To open the help in the program, select Help > Documentation.
• On Windows systems, you open the PDF documents via the Start
menu, from the Steinberg Cubase folder.
• On Mac OS X systems, the PDF documents are located in the
/Library/Documentation/Steinberg/Cubase
8 folder.
To read the PDF documents, a suitable PDF reader application must be
installed on your computer.
7
Page 8

Introduction
About the Documentation and the Help
Quick Start Guide
This is the document you are reading. It covers the following areas
without going into details:
• System requirements, installation procedure, and license
activation.
• Setting up your system for audio and MIDI work.
Operation Manual
The Operation Manual is the main Cubase reference documentation,
with detailed descriptions of operations, parameters, functions, and
techniques.
MIDI Devices
This document contains descriptions of how to manage MIDI Devices
and device panels.
Plug-in Reference
This document describes the features and parameters of the included
VST plug-ins, VST instruments, and MIDI effects.
ENGLISH
HALion Sonic SE
This document describes the features and parameters of the included
VST instrument HALion Sonic SE.
Groove Agent SE
This document describes the features and parameters of the included
VST instrument Groove Agent SE.
8
Page 9

Introduction
NOTE
Typographical Conventions
Remote Control Devices
This document lists the supported MIDI remote control devices.
Dialog Help
To get information about the active dialog, click its Help button.
Typographical Conventions
Many of the default key commands in Cubase use modifier keys, some
of which are different depending on the operating system. For example,
the default key command for Undo is [Ctrl]-[Z] on Windows and
[Command]-[Z] on Mac OS X.
When key commands with modifier keys are described in this manual,
they are shown with the Windows modifier key first, in the following way:
• [Win modifier key]/[Mac modifier key]-[key]
For example, [Ctrl]/[Command]-[Z] means “press [Ctrl] on Windows or
[Command] on Mac OS X, then press [Z]”.
Similarly, [Alt]/[Option]-[X] means “press [Alt] on Windows or [Option]
on Mac OS X, then press [X]”.
This manual often refers to right-clicking, for example, to open context
menus. If you are using a Mac with a single-button mouse, hold down
[Ctrl] and click.
9
Page 10

Introduction
How You Can Reach Us
How You Can Reach Us
On the Steinberg Hub menu in Cubase you find items linking to
additional information.
The menu contains links to various Steinberg web pages. Selecting a
menu item automatically launches your browser and opens the page.
On these pages you can find support and compatibility information,
answers to frequently asked questions, information about updates and
other Steinberg products, etc. This requires that you have a web
browser installed on your computer, and a working internet connection.
ENGLISH
10
Page 11

Introduction
How You Can Reach Us
11
Page 12
System Requirements and
NOTE
Installation
System Requirements
Your computer must meet the following minimum requirements for the
PC and Mac versions of Cubase:
PC Mac
Windows 7/8.x OS X versions 10.9/10.10
Intel or AMD dual-core CPU
8 GB RAM (minimum: 4 GB)
15 GB free HD space
1920 x 1080 display resolution (minimum: 1366 x 768)
Graphics card with DirectX 10 and WDDM 1.1 support (Windows
only)
USB port for USB-eLicenser (license management)
OS compatible audio hardware
DVD ROM dual-layer drive
Internet connection required for activation, account setup, and
personal/product registration. Additional downloads may be
required for the installation.
ENGLISH
For recommended systems and support of future operating systems,
please refer to the Support section on our website www.steinberg.net.
United States only: This software can be activated and is officially
supported only within the US.
12
Page 13

System Requirements and Installation
PROCEDURE
Installing the Program
Installing the Program
You have two possibilities to install your program, via the Start Center
application or manually.
Launching Installation via the Start Center
From the Start Center application you can easily install your program
and inform yourself about the package contents.
• For Steinberg software delivered with an installation medium, the
Start Center launches automatically as soon as you insert the disc
in your computer’s CD/DVD drive, provided that autorun is
activated.
• For Steinberg software downloaded from the internet, the Start
Center launches when you double-click the downloaded file.
1. In the Start Center, choose your preferred language.
2. Click Install.
3. Follow the instructions on screen.
Launching Installation Manually
If you do not want to install the program via the Start Center, you can
install it manually.
• On Windows systems, double-click the file Setup.exe and
• On Mac OS X systems, double-click the file Cubase 8.pkg and
follow the instructions on screen.
follow the instructions on screen.
13
Page 14
System Requirements and Installation
Installing the Program
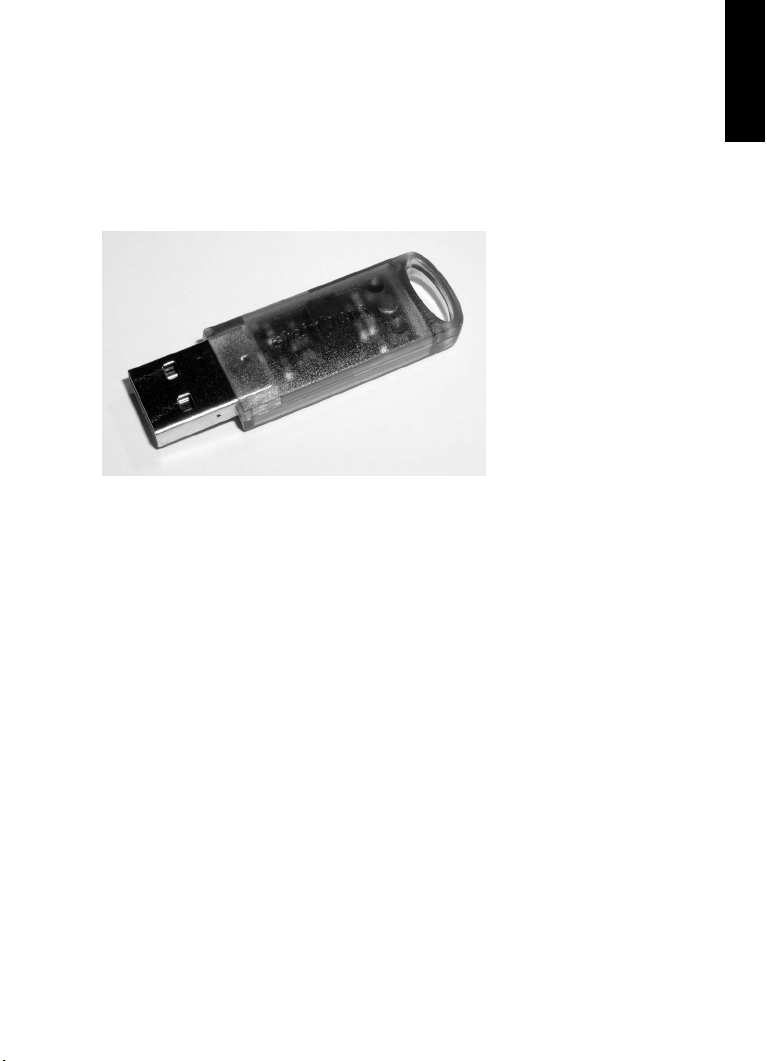
USB-eLicenser
Operation of Steinberg software often requires a USB-eLicenser, a
hardware copy protection device (or “dongle”).
The USB-eLicenser is a USB device on which your Steinberg software
licenses are stored. All hardware-protected Steinberg products use the
same type of device, and you can store several licenses on one device.
Also, licenses can – within certain limits – be transferred between
USB-eLicensers.
If your Steinberg software product does not include a USB-eLicenser,
you can purchase one through the Steinberg online shop.
In the eLicenser Control Center, you can activate new licenses and
check which licenses are installed on your USB-eLicenser. After
installation of your Steinberg application, the eLicenser Control Center
can be opened via the Start menu on Windows systems or the
Applications folder on Mac OS X systems.
If you are using other copy-protected Steinberg products, you may
want to transfer all licenses for your applications to one USB-eLicenser,
thus using up only one USB port of your computer. Refer to the
eLicenser Control Center Help for information on how to transfer
licenses between USB-eLicensers.
ENGLISH
14
Page 15

System Requirements and Installation
PROCEDURE
Activating Your License
Activating Your License
You must activate your license. If your USB-eLicenser already contains
an activated license, you can skip this section.
PREREQUISITE
Make sure that you have a working internet connection.
If you purchased your product via the Steinberg online shop, you also
received an e-mail with a license activation code. Use this code to
download your license to your USB-eLicenser.
If your product was delivered on an installation medium, the product
package may contain an empty USB-eLicenser and the Essential
Product License Information sheet with an activation code.
1. Plug your USB-eLicenser into a USB port of your computer.
2. Start the eLicenser Control Center software.
3. Click the Enter Activation Code button.
4. Enter your activation code, and click Next.
RESULT
The license is downloaded to your USB-eLicenser and activated.
15
Page 16

System Requirements and Installation
PROCEDURE
PROCEDURE
Registering Your Software
Registering Your Software
Register your product at the MySteinberg online customer portal. As a
registered user, you are entitled to technical support, you gain access
to exclusive offers such as software updates and upgrades, and more.
PREREQUISITE
Make sure that you have a working internet connection.
1. Start your software.
2. Select Steinberg Hub > Register now.
An online registration form opens in your web browser.
3. Follow the instructions on screen to register at MySteinberg.
Hardware Installation
ENGLISH
Installing the Audio Hardware and its Driver
1. Install the audio hardware and related equipment on the computer,
as described in the hardware documentation.
2. Install the driver for the audio hardware.
A driver is a piece of software that allows a program to communicate with
a certain piece of hardware. In this case, the driver allows Cubase to use
the audio hardware. Depending on the operating system of your computer,
there are different types of drivers that can be used.
16
Page 17

System Requirements and Installation
IMPORTANT
NOTE
Hardware Installation
Dedicated ASIO Drivers
Professional audio hardware often comes with an ASIO driver written
especially for the device. This allows for direct communication between
Cubase and the audio hardware. As a result, the devices with specific
ASIO drivers can provide lower latency (input-output delay), which is
crucial when monitoring audio via Cubase or using VST instruments.
The ASIO driver may also provide special support for multiple inputs
and outputs, routing, synchronization, etc.
ASIO drivers are provided by the audio hardware manufacturers. Make
sure to check the manufacturer’s web site for the latest driver versions.
If your audio hardware comes with a specific ASIO driver, we strongly
recommend that you use this.
Generic Low Latency ASIO Driver (Windows Only)
On Windows systems, you can use the Generic Low Latency ASIO
driver. This driver provides ASIO support for any audio hardware
supported by Windows, thus allowing for low latency. The Generic Low
Latency ASIO driver provides the Windows Core Audio technology in
Cubase. No additional driver is needed. This driver is included with
Cubase and does not require any special installation.
This driver should be used if no specific ASIO driver is available.
Although the Generic Low Latency ASIO driver supports all audio
devices, you might get better results with on-board audio cards than
with external USB audio interfaces.
17
Page 18

System Requirements and Installation
NOTE
Hardware Installation
Mac OS X Drivers (Mac only)
If you are using a Macintosh computer, make sure that you are using the
latest Mac OS X drivers for your audio hardware. Follow the
manufacturer’s instructions to install the driver.
Testing the Audio Hardware
To make sure that the audio device works as expected, perform the
following tests:
• Use any software included with the hardware to make sure that you
can record and play back audio without problems.
• If the hardware is accessed via a standard operating system driver,
try playing back audio using the standard audio application of the
computer, for example, Windows Media Player or Apple iTunes.
Installing a MIDI Interface or USB MIDI Keyboard
Although many USB MIDI keyboards and MIDI interfaces are plug&play
devices, you may have to install a dedicated device driver. Follow the
installation procedure described in the documentation that came with
the device.
ENGLISH
You should also check the manufacturer’s web site for the latest driver
updates.
18
Page 19

System Requirements and Installation
PROCEDURE
Setting up Your System
Setting up Your System
Selecting the Driver for Your Audio Device
Before you can set up the routing for your audio signals and start
recording, you need to make sure that the correct ASIO driver is
selected.
1. Select Devices > Device Setup.
2. In the Device Setup dialog, click the VST Audio System entry on
the left.
The VST Audio System page is shown on the right.
3. On the ASIO Driver pop-up menu, select the driver that you want
to use.
4. Click OK.
Setting Up the VST Connections
The VST Connections dialog allows you to set up the routing of input
and output signals between Cubase and your audio hardware. These
connections are called busses. In this section you learn how to set up
the busses for playback and recording.
19
Page 20
System Requirements and Installation
PROCEDURE
Setting up Your System
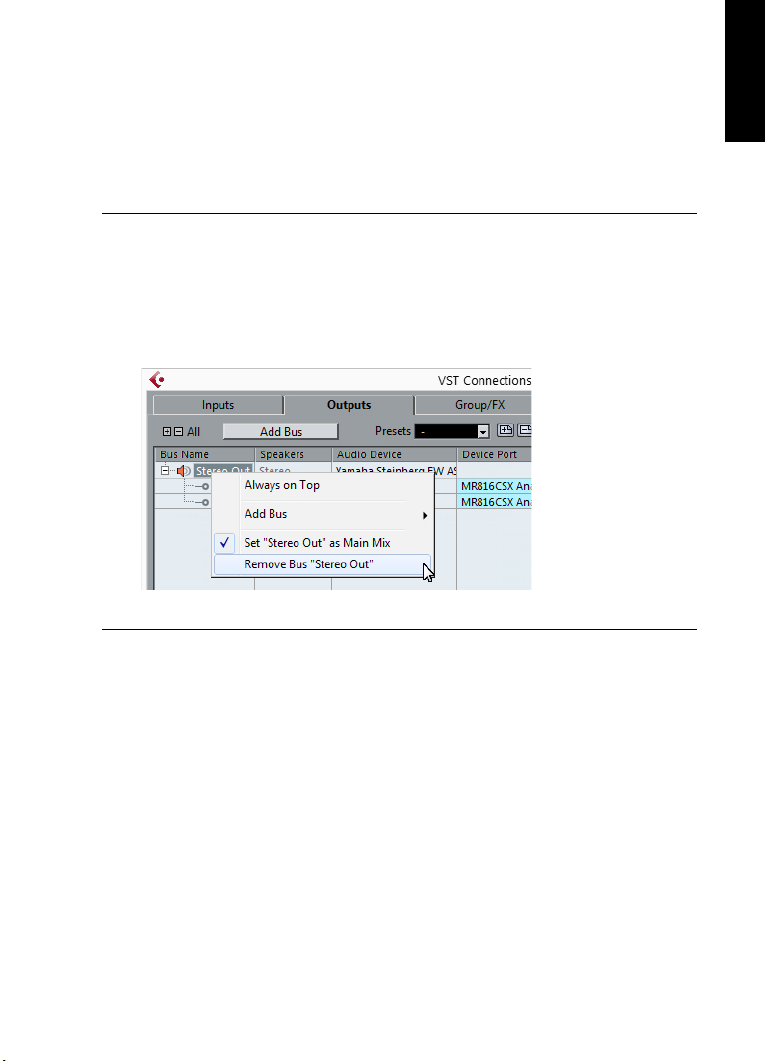
Removing Busses
Before you add busses, it is recommended to remove any outputs that
were automatically added by Cubase.
1. Select Devices > VST Connections.
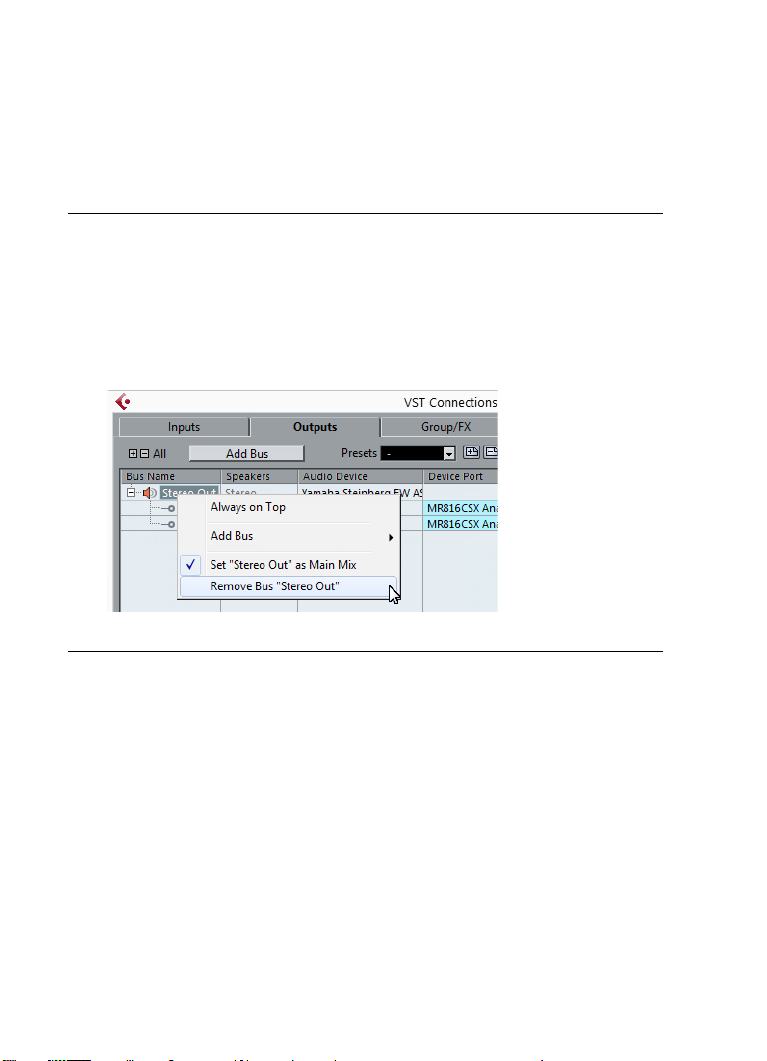
2. In the VST Connections dialog, select the Outputs tab.
3. In the Bus Name column, right-click the top entry and select
Remove Bus from the context menu.
If necessary, repeat this step for any further busses.
ENGLISH
20
Page 21
System Requirements and Installation
PROCEDURE
Setting up Your System
Adding Outputs
You must set up the outputs for playing back audio in Cubase.
PREREQUISITE
Remove the busses that were automatically added by Cubase.
1. Select Devices > VST Connections.
2. In the VST Connections dialog, select the Outputs tab.
3. Click Add Bus.
4. In the Add Output Bus dialog, make your settings.
5. Click Add Bus.
The new bus is added, allowing you to have audio in Cubase routed to
your audio hardware.
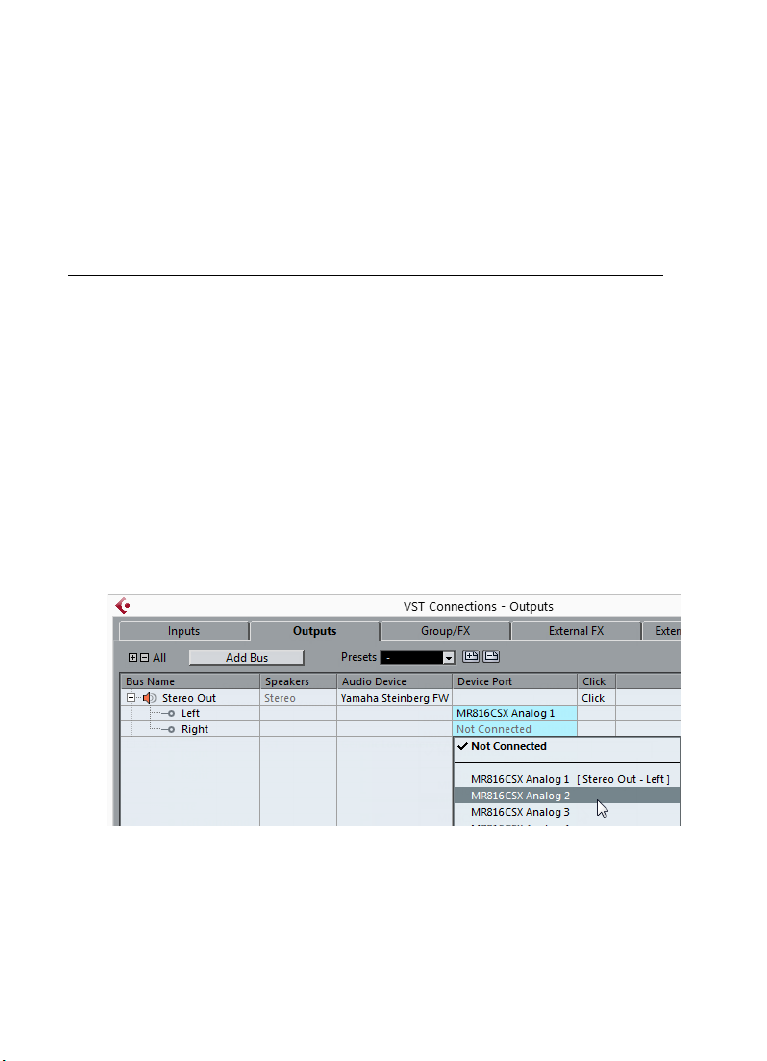
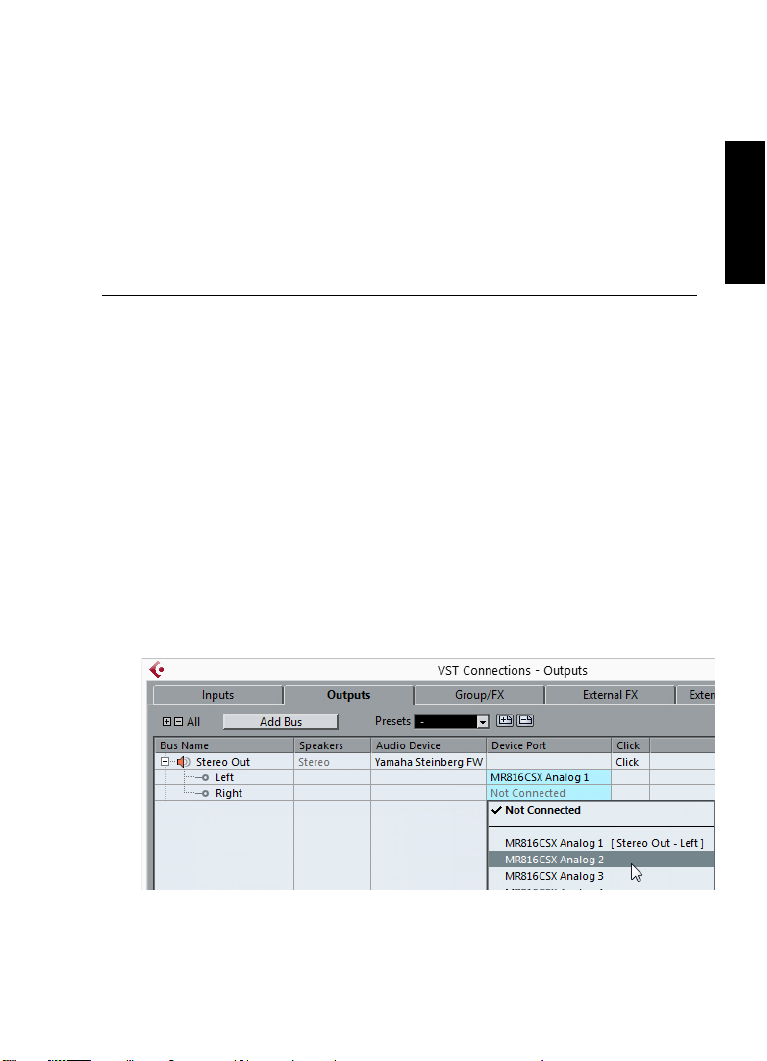
6. Optional: If you want to change the output ports that were selected
automatically, open the Device Port pop-up menu and select
different ports.
21
Page 22

System Requirements and Installation
PROCEDURE
Setting up Your System
Depending on your audio hardware, more than two output ports might be
available. For most cases we recommend to use the main stereo outputs.
RELATED LINKS
“Removing Busses” on page 20
Adding Inputs
You must set up the inputs for recording into Cubase.
1. Select Devices > VST Connections.
2. In the VST Connections dialog, select the Inputs tab.
3. In the Bus Name column, right-click the top entry and select
Remove Bus from the context menu.
If necessary, repeat this step for any further busses.
4. Click Add Bus.
5. In the Add Input Bus dialog, make your settings.
6. Click Add Bus.
The new bus is added, allowing you to have audio from the input of your
audio device routed to Cubase for recording.
7. Optional: If you want to change the input ports that were selected
automatically, open the Device Port pop-up menu and select
different ports.
ENGLISH
RESULT
You are now ready to record audio in Cubase and play it back.
22
Page 23

System Requirements and Installation
IMPORTANT
NOTE
Setting up Your System
The Cubase Start Center provides a link to a demo project that can be
downloaded from the Steinberg web site. If you can play back this
project, you have set up your program properly.
To get started with Cubase, we recommend watching the video
tutorials on the Steinberg YouTube Channel including a demonstration
of the new features of Cubase.
23
Page 24

Deutsch
Page 25

Cristina Bachmann, Heiko Bischoff, Christina Kaboth, Insa Mingers,
Sabine
Pfeifer, Kevin Quarshie, Benjamin Schütte
Übersetzung: Ronald Bias
Diese PDF wurde für die Verwendung von Screenreader-Software
optimiert. Beachten Sie, dass es aufgrund der Komplexität und großen
Anzahl von Bildern in diesem Dokument nicht möglich ist, alternative
Bildbeschreibungen einzufügen.
Die in diesem Dokument enthaltenen Informationen können ohne
Vorankündigung geändert werden und stellen keine Verpflichtung
seitens der Steinberg Media Technologies GmbH dar. Die hier
beschriebene Software wird unter einer Lizenzvereinbarung zur
Verfügung gestellt und darf ausschließlich nach Maßgabe der
Bedingungen der Vereinbarung (Sicherheitskopie) kopiert werden.
Ohne ausdrückliche schriftliche Erlaubnis durch die Steinberg Media
Technologies GmbH darf kein Teil dieses Handbuchs für irgendwelche
Zwecke oder in irgendeiner Form mit irgendwelchen Mitteln
reproduziert oder übertragen werden. Registrierte Lizenznehmer des
Produkts dürfen eine Kopie dieses Dokuments zur persönlichen
Nutzung ausdrucken.
Alle Produkt- und Firmennamen sind ™ oder ® Marken der
entsprechenden Firmen. Weitere Informationen hierzu finden Sie auf
der Steinberg-Website unter www.steinberg.net/trademarks.
© Steinberg Media Technologies GmbH, 2014.
Alle Rechte vorbehalten.
Page 26

Inhaltsverzeichnis
28 Einleitung
28 Willkommen!
29 Die Dokumentation und die Hilfe
31 Typographische Konventionen
32 So können Sie uns erreichen
34 Systemanforderungen und Installation
34 Systemanforderungen
35 Programm installieren
37 Lizenzaktivierung
38 Software-Registrierung
39 Hardware-Installation
42 System einrichten
DEUTSCH
26
Page 27

27
Page 28

Einleitung
Willkommen!
Herzlichen Glückwunsch und danke, dass Sie sich für Cubase Pro 8
oder Cubase Artist 8 von Steinberg entschieden haben.
Das von Ihnen gekaufte Produkt blickt – gemessen an den Maßstäben
der Software-Industrie – auf eine sehr, sehr lange und erfolgreiche
Geschichte zurück, die bis ins Jahr 1989 reicht. Seit der ersten Version,
damals noch auf dem legendären Atari, ist Cubase stetig besser
geworden. Und darum haben sich im Laufe der vergangenen 25 Jahre
Millionen von Musikern, Produzenten, DJs, Komponisten und
Tontechnikern für Cubase entschieden. Dazu gehören
Grammy-Gewinner mit Millionen von Fans genauso wie Menschen, die
nur zu Hause und für sich Musik machen; bekannte Produzenten
ebenso wie junge Talente, Rockstars sowie Musiklehrer. Bei der
Entwicklung dieser Software sind alle diese Menschen für uns gleich
wichtig.
Das Entwicklungsziel für diese Version lautete, Technologie und
Kreativität zu verbinden. Wir wollten Innovation mit Inspiration und
Professionalität mit Leidenschaft zusammenbringen. Und wir glauben,
dass uns genau das gelungen ist.
Die Liste der neuen Funktionen in Cubase Pro 8 und Cubase Artist 8
ist zu lang, um sie hier aufzuführen. Einige neue Funktionen werden
Ihnen sofort auffallen, wenn Sie die entsprechende Stelle im Programm
aufrufen; andere verbergen sich tief in der Programmierung. Sehr viel
Entwicklungsarbeit wurde investiert, damit Projekte schneller geöffnet
und gespeichert werden können, und um die Software insgesamt
reaktiver zu machen. Unser Anspruch war immer, Cubase schneller,
effektiver und gleichzeitig kreativer zu machen als je zuvor.
DEUTSCH
28
Page 29

Einleitung
HINWEIS
Die Dokumentation und die Hilfe
Wenn Sie ein erfahrener Cubase-Benutzer sind, danken wir Ihnen sehr
für Ihr fortgesetztes Vertrauen in unser Produkt. Und wenn Sie Cubase
vorher noch nie benutzt haben, hoffen wir, dass das Öffnen und
Erforschen des Programms für Sie ein spannendes Erlebnis ist. Dafür
arbeiten wir jeden Tag.
Bitte teilen Sie Ihre Erfahrungen mit Cubase mit uns. Nutzen Sie unsere
Internet-Foren unter www.steinberg.net/forum oder eine der anderen
Kontaktmöglichkeiten, die Sie auf unserer Website finden können.
Viele Grüße,
Das Steinberg Cubase-Team
Die Dokumentation und die Hilfe
Die Dokumente sind im Format Adobe Acrobat
(Dateinamenerweiterung .pdf) verfügbar und können wie folgt
aufgerufen werden:
• Um die Hilfe im Programm zu öffnen, klicken Sie auf Hilfe >
Dokumentation.
• Unter Windows öffnen Sie die PDF-Dokumente über das
Start-Menü im Ordner Steinberg Cubase.
• Unter Mac OS X liegen die PDF-Dokumente im Ordner
/Library/Documentation/Steinberg/Cubase
8.
Damit Sie die PDF-Dokumente lesen können, muss ein PDF-Reader auf
Ihrem Computer installiert sein.
29
Page 30

Einleitung
Die Dokumentation und die Hilfe
Schnelleinstieg
Das ist das Dokument, das Sie vor sich haben. Es deckt die folgenden
Bereiche ab, ohne jedoch zu sehr ins Detail zu gehen:
• Systemvoraussetzungen, Installationsprozess und
Lizenzaktivierung.
• Einrichten des Systems für die Audio- und MIDI-Bearbeitung.
Benutzerhandbuch
Das Benutzerhandbuch ist die wichtigste Informationsquelle mit
ausführlichen Beschreibungen aller Parameter, Funktionen und
Arbeitsweisen in Cubase.
MIDI-Geräte
Dieses Dokument enthält Informationen zur Arbeit mit MIDI-Geräten
und Bedienfeldern.
PlugIn-Referenz
Dieses Dokument beschreibt die Funktionen und Parameter der
mitgelieferten VST-PlugIns, VST-Instrumente und MIDI-Effekte.
DEUTSCH
HALion Sonic SE
Dieses Dokument beschreibt die Funktionen und Parameter des
mitgelieferten VST-Instruments HALion Sonic SE.
Groove Agent SE
Dieses Dokument beschreibt die Funktionen und Parameter des
mitgelieferten VST-Instruments Groove Agent SE.
30
Page 31

Einleitung
HINWEIS
Typographische Konventionen
Remote Control Devices
Dieses Dokument listet die unterstützten MIDI-Fernbedienungsgeräte auf.
Dialog-Hilfe
Wenn Sie Informationen über den aktiven Dialog erhalten möchten,
klicken Sie auf den Hilfe-Schalter.
Typographische Konventionen
Für viele Standardtastaturbefehle in Cubase werden Sondertasten
verwendet, die sich je nach Betriebssystem unterscheiden. Der
Standardtastaturbefehl für »Rückgängig« ist z.
[Strg]-[Z] und unter Mac OS X [Befehlstaste]-[Z].
Wenn in diesem Handbuch Tastaturbefehle mit Sondertasten
beschrieben werden, stehen die Windows-Sondertasten an erster
Stelle:
• [Windows-Sondertaste]/[Mac-Sondertaste]-[Taste]
So bedeutet z. B. [Strg]-Taste/[Befehlstaste]-[Z]: »Drücken Sie die
[Strg]-Taste unter Windows bzw. die [Befehlstaste] unter Mac OS X
und dann die Taste [Z]«.
Entsprechend bedeutet [Alt]-Taste/[Wahltaste]-[X]: »Drücken Sie die
[Alt]-Taste unter Windows bzw. die [Wahltaste] unter Mac OS X und
dann die Taste [X]«.
B. unter Windows
Sie werden in diesem Handbuch oft dazu aufgefordert, mit der rechten
Maustaste zu klicken, z.
B. um ein Kontextmenü zu öffnen. Wenn Sie auf
einem Mac mit einer Eintastenmaus arbeiten, müssen Sie dafür beim
Klicken die [Ctrl]-Taste gedrückt halten.
31
Page 32

Einleitung
So können Sie uns erreichen
So können Sie uns erreichen
Im Menü »Steinberg Hub« von Cubase finden Sie Optionen, über die
Sie auf weitere Informationen zugreifen können.
Das Menü enthält Links zu diversen Steinberg-Seiten im Internet. Beim
Auswählen einer Menüoption wird automatisch Ihr Browser gestartet
und die entsprechende Seite geöffnet. Hier erhalten Sie technische
Unterstützung und Informationen zur Kompatibilität, Antworten auf
häufig gestellte Fragen, Informationen über Updates und andere
Steinberg-Produkte usw. Dazu muss auf Ihrem Computer ein
Web-Browser installiert sein und Sie benötigen eine aktive
Internetverbindung.
DEUTSCH
32
Page 33

Einleitung
So können Sie uns erreichen
33
Page 34

Systemanforderungen und
Installation
Systemanforderungen
Ihr Computer muss die folgenden Mindestanforderungen für die
Windows- bzw. Mac-Version von Cubase erfüllen:
PC Mac
Windows 7/8.x OS X 10.9/10.10
Dual-Core-Prozessor von Intel oder AMD
8 GB RAM (mindestens 4 GB)
15 GB freier Speicherplatz
Bildschirmauflösung 1920 x 1080 Pixel (mindestens 1366 x 768
Pixel)
Grafikkarte mit DirectX 10- und WDDM 1.1-Unterstützung (nur
Windows)
USB-Anschluss für USB-eLicenser (Lizenz-Verwaltung)
Mit dem Betriebssystem kompatible Audio-Hardware
DVD-Laufwerk (Double-Layer)
Internetverbindung für Aktivierung und Einrichtung eines
Benutzerkontos sowie die persönliche und die Produktregistrierung.
Die Installation kann zusätzliche Downloads erfordern.
DEUTSCH
Informationen zu empfohlenen Systemen und zur Unterstützung
zukünftiger Betriebssystemgenerationen finden Sie im
Support-Bereich unserer Website www.steinberg.net.
34
Page 35

Systemanforderungen und Installation
VORGEHENSWEISE
Programm installieren
Programm installieren
Sie können das Programm über das Start Center oder manuell
installieren.
Installation über das Start Center starten
Über das Start Center können Sie auf sehr einfache Weise das
Programm installieren und sich über den Packungsinhalt informieren.
• Bei Steinberg-Software, die mit einem Installationsmedium
ausgeliefert wurde, wird das Start Center beim Einlegen des
Mediums automatisch gestartet, vorausgesetzt, dass Autorun
aktiviert ist.
• Bei Steinberg-Software, die aus dem Internet heruntergeladen
wurde, wird das Start Center gestartet, wenn Sie auf die
heruntergeladene Datei doppelklicken.
1. Wählen Sie im Start Center Ihre bevorzugte Sprache aus.
2. Klicken Sie auf Installation.
3. Befolgen Sie die Anweisungen auf dem Bildschirm.
Installation manuell starten
Wenn Sie das Programm nicht über das Start Center installieren
möchten, können Sie es auch manuell installieren.
• Wenn Sie auf einem Windows-System arbeiten, doppelklicken Sie
auf die Datei Setup.exe und befolgen Sie die Anweisungen auf
dem Bildschirm.
35
Page 36

Systemanforderungen und Installation
Programm installieren
• Wenn Sie auf einem Mac OS X-System arbeiten, doppelklicken
Sie auf die Datei Cubase
8.pkg und befolgen Sie die
Anweisungen auf dem Bildschirm.
USB-eLicenser
Für viele Steinberg-Produkte wird ein Hardware-gestützter
Kopierschutz in Form des USB-eLicensers (auch als »Dongle«
bezeichnet) verwendet.
DEUTSCH
Der USB-eLicenser ist ein USB-Gerät, auf dem Ihre
Steinberg-Software-Lizenzen gespeichert werden. Alle
Steinberg-Produkte mit Hardware-gestütztem Kopierschutz
verwenden den gleichen USB-eLicenser und es ist möglich, mehrere
Lizenzen auf einem eLicenser zu speichern. Außerdem können Lizenzen
– innerhalb bestimmter Grenzen – von einem USB-eLicenser auf einen
anderen übertragen werden.
Wenn Ihre Steinberg-Software nicht mit einem USB-eLicenser
ausgeliefert wurde, können Sie diesen über den Online-Shop von
Steinberg erstehen.
Im eLicenser Control Center können Sie überprüfen, welche Lizenzen
sich auf Ihrem USB-eLicenser befinden. Nach der Installation Ihrer
Steinberg-Software können Sie das eLicenser Control Center unter
36
Page 37

Systemanforderungen und Installation
VORGEHENSWEISE
Lizenzaktivierung
Windows über das Start-Menü und auf dem Mac über den
Applications-Ordner öffnen.
Wenn Sie andere kopiergeschützte Steinberg-Produkte besitzen,
können Sie die Lizenzen für Ihre Anwendungen auf einen einzigen
USB-eLicenser übertragen und so nur einen USB-Anschluss des
Computers verwenden. Informationen zum Übertragen von Lizenzen
zwischen zwei USB-eLicensern finden Sie in der Hilfe des eLicenser
Control Centers.
Lizenzaktivierung
Sie müssen die Lizenz für Ihr Steinberg-Produkt aktivieren. Wenn Ihr
USB-eLicenser bereits mit einer aktivierten Lizenz ausgeliefert wurde,
können Sie den folgenden Abschnitt überspringen.
VORAUSSETZUNGEN
Beachten Sie, dass Sie hierzu eine aktive Internetverbindung
benötigen.
Wenn Sie Ihr Steinberg-Produkt über den Online-Shop gekauft haben,
erhalten Sie eine E-Mail mit einem Aktivierungscode. Verwenden Sie
diesen Code, um die Lizenz auf den USB-eLicenser herunterzuladen.
Wenn Sie Ihr Produkt auf einem Installationsmedium und mit einem
leeren USB-eLicenser erhalten haben, enthält der Lieferumfang das
Beiblatt »Essential Product License Information« mit einem
Aktivierungscode.
1. Schließen Sie den USB-eLicenser an Ihren Computer an.
2. Starten Sie das eLicenser Control Center.
37
Page 38

Systemanforderungen und Installation
VORGEHENSWEISE
Software-Registrierung
3. Klicken Sie auf den Schalter Aktivierungscode eingeben.
4. Geben Sie den Aktivierungscode ein und klicken Sie auf Weiter.
ERGEBNIS
Die Lizenz wird auf Ihren USB-eLicenser heruntergeladen und aktiviert.
Software-Registrierung
Registrieren Sie Ihre Software beim Online-Kundenportal MySteinberg.
Als registrierter Benutzer haben Sie Anspruch auf technischen
Support, erhalten exklusive Angebote wie Updates und Upgrades und
vieles mehr.
VORAUSSETZUNGEN
Beachten Sie, dass Sie hierzu eine aktive Internetverbindung
benötigen.
DEUTSCH
1. Starten Sie Ihre Software.
2. Wählen Sie Steinberg Hub > Jetzt registrieren.
3. Befolgen Sie die Anweisungen auf dem Bildschirm, um sich bei
Ein Online-Registrierungsformular wird in Ihrem Web-Browser geöffnet.
MySteinberg zu registrieren.
38
Page 39

Systemanforderungen und Installation
VORGEHENSWEISE
WICHTIG
Hardware-Installation
Hardware-Installation
Audio-Hardware und Treiber installieren
1. Installieren Sie die Audiokarte und die dazugehörige Software wie
in der Bedienungsanleitung für die Karte beschrieben.
2. Installieren Sie den Treiber für die Audio-Hardware.
Mit Hilfe von Treiber-Software kann das Programm mit einer bestimmten
Hardware kommunizieren. In diesem Fall ermöglicht der Treiber Cubase
den Zugriff auf die Audio-Hardware. Je nach Betriebssystem Ihres
Computers können Sie unterschiedliche Treiberarten verwenden.
Spezielle ASIO-Treiber
Professionelle Audio-Hardware wird oft mit einem ASIO-Treiber geliefert,
der speziell für diese Hardware ausgelegt ist. So kann Cubase direkt mit der
Audio-Hardware kommunizieren. Daher kann Audio-Hardware mit speziellen
ASIO-Treibern die Latenzzeiten (Eingangs-/Ausgangsverzögerung)
verkürzen, was beim Mithören von Audiomaterial über Cubase oder beim
Verwenden von VST-Instrumenten entscheidend ist. Der ASIO-Treiber
bietet eventuell auch spezielle Unterstützung für Karten mit mehreren Einund Ausgängen, Routing, Synchronisation usw.
ASIO-Treiber werden vom Hersteller der Audio-Hardware geliefert.
Informieren Sie sich auf der Website des Herstellers über die neuesten
Treiberversionen.
Wenn es für Ihre Audiokarte einen eigenen ASIO-Treiber gibt, sollten
Sie diesen verwenden.
39
Page 40

Systemanforderungen und Installation
HINWEIS
Hardware-Installation
Generischer ASIO Treiber für geringe Latenz
(nur Windows)
Auf Windows-Systemen können Sie den generischen ASIO-Treiber für
geringe Latenz verwenden. Dabei handelt es sich um einen
generischen ASIO-Treiber, der ASIO-Unterstützung für jegliche von
Windows unterstützte Audio-Hardware bereitstellt und für kurze
Latenzzeiten sorgt. Über diesen Treiber kann in Cubase die
Core-Audio-Technologie von Windows genutzt werden. Sie benötigen
keinen zusätzlichen Treiber. Dieser Treiber wird mit Cubase mitgeliefert
und muss nicht extra installiert werden.
Verwenden Sie diesen Treiber, wenn kein spezieller ASIO-Treiber zur
Verfügung steht. Obwohl der generische ASIO-Treiber für geringe
Latenz jegliche Audio-Hardware unterstützt, erzielen Sie mit
Onboard-Audiokarten möglicherweise bessere Ergebnisse als mit
externen USB-Audioschnittstellen.
Mac OS X Treiber (nur Mac)
Wenn Sie einen Macintosh-Computer verwenden, stellen Sie sicher,
dass Sie den aktuellen Mac OS X-Treiber für Ihre Audio-Hardware
verwenden. Beachten Sie die Anleitungen des Herstellers zur
Treiber-Installation.
DEUTSCH
40
Page 41

Systemanforderungen und Installation
HINWEIS
Hardware-Installation
Audio-Hardware überprüfen
Führen Sie folgende Tests durch, um sicherzustellen, dass Ihre
Audio-Hardware wie gewünscht funktioniert:
• Verwenden Sie die mit der Audio-Hardware gelieferte Software,
um zu überprüfen, ob Sie problemlos Audiomaterial aufnehmen
und wiedergeben können.
• Wenn Sie mit einem Betriebssystem-Treiber auf die Karte
zugreifen, geben Sie Audiomaterial mit der
Standard-Audioanwendung wieder (z.
B. Windows Media Player
oder Apple iTunes).
MIDI-Schnittstelle oder USB-MIDI-Keyboard
installieren
Auch wenn es sich bei vielen USB-MIDI-Keyboards und
MIDI-Schnittstellen um Plug&Play-Geräte handelt, müssen Sie
eventuell einen speziellen Gerätetreiber installieren. Befolgen Sie die
Installationsanweisung in der Dokumentation zu Ihrem Gerät.
Informieren Sie sich auf der Website des Herstellers über die neuesten
Treiberversionen.
41
Page 42

Systemanforderungen und Installation
VORGEHENSWEISE
System einrichten
System einrichten
Treiber für Ihr Audiogerät auswählen
Bevor Sie das Routing für Ihre Audiosignale festlegen und mit der
Aufnahme beginnen, sollten Sie sicherstellen, dass der richtige
ASIO-Treiber ausgewählt ist.
1. Wählen Sie Geräte > Geräte konfigurieren.
2. Klicken Sie im Dialog Geräte konfigurieren in der Liste links auf
die Option VST-Audiosystem.
Die Seite VST-Audiosystem wird rechts angezeigt.
3. Wählen Sie im Einblendmenü ASIO-Treiber den Treiber, den Sie
verwenden möchten.
4. Klicken Sie auf OK.
VST-Verbindungen einrichten
Im Dialog VST-Verbindungen können Sie Einstellungen zum
Weiterleiten von Eingangs- und Ausgangssignalen zwischen Cubase
und Ihrer Audio-Hardware vornehmen. Diese Verbindungen werden
Busse genannt. Im folgenden Abschnitt lernen Sie, wie Sie die
Eingangs- und Ausgangsbusse zum Aufnehmen bzw. zur Wiedergabe
einrichten.
DEUTSCH
42
Page 43

Systemanforderungen und Installation
VORGEHENSWEISE
System einrichten
Busse entfernen
Bevor Sie Busse hinzufügen, sollten Sie zunächst alle automatisch von
Cubase erzeugten Busse löschen.
1. Wählen Sie Geräte > VST-Verbindungen.
2. Wählen Sie im Dialog VST-Verbindungen die
Ausgänge-Registerkarte.
3. Klicken Sie in der Spalte Bus-Name mit der rechten Maustaste auf
den obersten Eintrag und wählen Sie im Kontextmenü den Befehl
Bus entfernen.
Wiederholen Sie den Schritt ggf. für alle weiteren angezeigten Busse.
43
Page 44
Systemanforderungen und Installation
VORGEHENSWEISE
System einrichten
Ausgänge hinzufügen
Im folgenden Abschnitt sollen Sie die Ausgänge für die Wiedergabe
von Audiomaterial in Cubase einrichten.
VORAUSSETZUNGEN
Löschen Sie die automatisch von Cubase hinzugefügten Busse.
1. Wählen Sie Geräte > VST-Verbindungen.
2. Wählen Sie im Dialog VST-Verbindungen die
Ausgänge-Registerkarte.
3. Klicken Sie auf Bus hinzufügen.
4. Nehmen Sie im Dialog Ausgangsbus hinzufügen ihre Einstellungen
vor.
5. Klicken Sie auf Bus hinzufügen.
Der neue Bus wird hinzugefügt, so dass Sie Audiomaterial von Cubase an
ihre Audio-Hardware weiterleiten können.
6. Optional: Wenn Sie die automatisch ausgewählten
Ausgangs-Ports ändern möchten, öffnen Sie das Einblendmenü
Geräte-Port und wählen Sie andere Ports aus.
DEUTSCH
44
Page 45

Systemanforderungen und Installation
VORGEHENSWEISE
System einrichten
Je nachdem, welche Audio-Hardware Sie verwenden, können mehr als
zwei Anschlüsse verfügbar sein. In den meisten Fällen werden die
Haupt-Stereo-Ausgänge benötigt.
WEITERFÜHRENDE LINKS
“Busse entfernen” auf Seite 43
Eingänge hinzufügen
Im folgenden Abschnitt lernen Sie, wie Sie die Eingänge zum
Aufnehmen in Cubase einrichten.
1. Wählen Sie Geräte > VST-Verbindungen.
2. Wählen Sie im Dialog VST-Verbindungen die
Eingänge-Registerkarte.
3. Klicken Sie in der Spalte Bus-Name mit der rechten Maustaste auf
den obersten Eintrag und wählen Sie im Kontextmenü den Befehl
Bus entfernen.
Wiederholen Sie den Schritt ggf. für alle weiteren angezeigten Busse.
4. Klicken Sie auf Bus hinzufügen.
5. Nehmen Sie im Dialog Eingangsbus hinzufügen ihre Einstellungen
vor.
6. Klicken Sie auf Bus hinzufügen.
Der neue Bus wird hinzugefügt, so dass Sie über den Eingang Ihres
Audiogeräts empfangene Audiosignale in Cubase aufnehmen können.
7. Optional: Wenn Sie die automatisch ausgewählten
Eingangs-Ports ändern möchten, öffnen Sie das Einblendmenü
Geräte-Port und wählen Sie andere Ports aus.
45
Page 46

Systemanforderungen und Installation
WICHTIG
HINWEIS
System einrichten
ERGEBNIS
Sie können jetzt in Cubase Audiomaterial aufnehmen und wiedergeben.
Im Start Center von Cubase finden Sie einen Link zu einem
Demoprojekt, das Sie von der Steinberg-Website herunterladen
können. Wenn Sie dieses Projekt abspielen können, haben Sie das
Programm erfolgreich eingerichtet.
Für einen schnellen Einstieg in die Arbeit mit Cubase empfehlen wir
Ihnen, sich im Steinberg-Kanal auf YouTube die Video-Lehrgänge und
die Demos der neuen Funktionen in Cubase anzuschauen.
DEUTSCH
46
Page 47

Systemanforderungen und Installation
System einrichten
47
Page 48

Français
Page 49

Cristina Bachmann, Heiko Bischoff, Christina Kaboth, Insa Mingers,
Sabine
Pfeifer, Kevin Quarshie, Benjamin Schütte
Traduction : Gaël Vigouroux
Le document PDF a été amélioré pour être plus facile d’accès aux
personnes malvoyantes. En raison du grand nombre d’images qu’il
contient et de leur complexité, veuillez noter qu’il n’a pas été possible
d’intégrer de descriptions textuelles des images.
Les informations contenues dans ce document sont sujettes à
modification sans préavis et n’engagent aucunement la responsabilité
de Steinberg Media Technologies GmbH. Le logiciel décrit dans ce
document fait l’objet d’un Accord de Licence et ne peut être copié sur
un autre support, sauf si cela est autorisé spécifiquement par l’Accord
de Licence. Aucune partie de cette publication ne peut être copiée,
reproduite ni même transmise ou enregistrée, sans la permission écrite
préalable de Steinberg Media Technologies GmbH. Les détenteurs
enregistrés de la licence du produit décrit ci-après sont autorisés à
imprimer une copie du présent document pour leur usage personnel.
Tous les noms de produits et de sociétés sont des marques déposées
™ ou ® de leurs propriétaires respectifs. Pour de plus amples
informations, rendez-vous sur le site www.steinberg.net/trademarks.
© Steinberg Media Technologies GmbH, 2014.
Tous droits réservés.
Page 50

Table des Matières
52 Introduction
52 Bienvenue !
53 À propos de la documentation et de l’aide
55 Conventions typographiques
56 Comment nous contacter
58 Système requis et installation
58 Système requis
59 Installation du programme
61 Activation de votre licence
62 Enregistrement de votre logiciel
63 Installation du matériel
66 Configuration de votre système
FRANÇAIS
50
Page 51

51
Page 52

Introduction
Bienvenue !
Félicitations et tous nos remerciements pour avoir acheté Cubase Pro
8 ou Cubase Artist 8 de Steinberg.
Le produit que vous venez d’acquérir est le dernier d’une longue et
illustre lignée qui remonte à 1989, c’est-à-dire aux origines des
logiciels. Depuis la sortie de la première version sur Atari, Cubase a
beaucoup évolué, et pour le mieux. Cette amélioration constante est la
raison pour laquelle, depuis un quart de siècle, des millions de
musiciens, producteurs, DJ, compositeurs et ingénieurs du son font le
choix de Cubase pour exprimer leur créativité. Ces utilisateurs sont
aussi bien des lauréats des Grammy Awards, adulés par les foules, que
des amateurs qui font simplement de la musique chez eux, pour leur
propre plaisir. Cubase est utilisé par des producteurs de renom comme
par des musiciens en herbe, par des rock stars comme par des
professeurs de musique. En concevant ce logiciel nous avons accordé
autant d’importance à chacune de ces catégories d’utilisateurs.
L’objectif, avec cette version, était de concilier technologie et créativité,
de faire rimer innovation et inspiration, professionnalisme et passion.
Nous pensons avoir atteint cet objectif.
La liste des nouveautés intégrées à Cubase Pro 8 et Cubase Artist 8
est bien trop longue pour figurer ici. Plusieurs d’entre elles vous
sauteront aux yeux dès que vous ouvrirez certaines parties du
programme, tandis que d’autres, parmi les plus importantes,
interviennent au cœur du logiciel, au niveau du code informatique. Des
efforts considérables ont été déployés pour accélérer l’ouverture et
l’enregistrement des projets, ainsi que pour améliorer la vitesse, la
fluidité et la réactivité du logiciel lui-même. Tout ce travail a été entrepris
dans le but de faire de Cubase un outil plus épuré et plus efficace, qui
stimulera votre créativité comme jamais auparavant.
FRANÇAIS
52
Page 53

Introduction
À NOTER
À propos de la documentation et de l’aide
Si vous possédiez déjà une version antérieure du logiciel, nous vous
remercions de renouveler votre confiance dans notre produit. Si
Cubase est nouveau pour vous, nous espérons que vous serez séduit
par les incroyables possibilités dont recèle Cubase quand vous
l’ouvrirez et le découvrirez pour la première fois. Votre satisfaction est
notre ambition et notre raison de travailler chez Steinberg.
Quoi qu’il en soit, n’hésitez pas à nous faire part de votre avis sur
Cubase via nos forums (www.steinberg.net/forum) et nos points de
contact dans votre zone géographique (pour plus d’informations à ce
sujet, veuillez consulter notre site Web).
Cordialement,
Votre équipe Steinberg Cubase
À propos de la documentation et de l’aide
La documentation est disponible au format PDF et elle est divisée en
plusieurs sections :
• Pour accéder à l’aide à partir du programme, sélectionnez Aide >
Documentation.
• Sous Windows, vous pouvez aussi ouvrir ces documents à partir
du dossier Steinberg Cubase dans le menu Démarrer.
• Sous Mac OS X, les documents PDF se trouvent dans le dossier
/Bibliothèque/Documentation/Steinberg/Cubase 8.
Pour lire les documents PDF il faut qu’une application de lecture de
documents PDF soit installée sur votre ordinateur.
53
Page 54

Introduction
À propos de la documentation et de l’aide
Guide Rapide
Il s’agit du document que vous lisez en ce moment même. Sans trop
entrer dans les détails, il couvre les domaines suivants :
• Configuration minimale, procédure d’installation et activation de la
licence.
• Configuration de votre système pour le traitement audio et MIDI.
Mode d’Emploi
Ce document est le principal manuel de référence de Cubase. Il décrit
en détail les opérations, paramètres, fonctions et techniques du
programme.
Périphériques MIDI
Ce document contient des descriptions relatives à l’usage des
périphériques MIDI et des pupitres de contrôle.
Référence des Plug-ins
Ce document décrit les fonctions et paramètres des plug-ins VST,
instruments VST et effets MIDI inclus.
HALion Sonic SE
Ce document décrit les fonctions et paramètres de l’instrument VST
intégré HALion Sonic SE.
Groove Agent SE
Ce document décrit les fonctions et paramètres de l’instrument VST
intégré Groove Agent SE.
FRANÇAIS
54
Page 55

Introduction
À NOTER
Conventions typographiques
Remote Control Devices
Ce document offre une liste des pupitres de télécommande MIDI pris
en charge.
Aide des boîtes de dialogue
Pour obtenir des informations sur la boîte de dialogue affichée, cliquez
sur son bouton Aide.
Conventions typographiques
Beaucoup de commandes clés par défaut dans Cubase utilisent des
touches de modification, qui peuvent dépendre du système
d’exploitation. Par exemple, le raccourci clavier par défaut pour Annuler
est [Ctrl]-[Z] sous Windows et [Commande]-[Z] sous Mac OS X.
Lorsque des raccourcis clavier employant des touches mortes sont
mentionnés dans ce manuel, ils indiquent d’abord la touche morte
Windows, selon la formule suivante :
• [Touche morte Win]/[Touche morte Mac]-[Touche]
Par exemple, [Ctrl]/[Commande]-[Z] signifie « appuyez sur la touche
[Ctrl] sous Windows ou [Commande] sous Mac OS X, puis appuyez
sur [Z] ».
De même, [Alt]/[Option]-[X] signifie « appuyez sur la touche [Alt] sous
Windows ou [Option] sous Mac OS X, puis appuyez sur [X] ».
Ce manuel fait souvent référence au « clic droit », par exemple pour
ouvrir des menus contextuels. Si vous utilisez un ordinateur Macintosh
avec une souris à un seul bouton, maintenez [Ctrl] et cliquez.
55
Page 56

Introduction
Comment nous contacter
Comment nous contacter
Dans le menu Steinberg Hub de Cubase, plusieurs options vous
permettent d’accéder à des informations supplémentaires.
Ce menu contient des liens vers diverses pages Web Steinberg.
Quand vous sélectionnez un élément du menu, votre navigateur s’ouvre
automatiquement à la page correspondante. Vous y trouverez une
assistance technique et des informations sur la compatibilité, des
réponses aux questions les plus fréquentes, des informations sur les
mises à jour et les autres produits Steinberg, etc. Pour accéder à ces
pages, il faut que votre ordinateur soit doté d’un navigateur et relié à
une connexion Internet.
FRANÇAIS
56
Page 57

Introduction
Comment nous contacter
57
Page 58

Système requis et installation
Système requis
Les caractéristiques de votre ordinateur doivent être supérieures ou au
moins égales aux suivantes pour que les versions PC et Mac de
Cubase soient prises en charge
PC Mac
Windows 7/8.x OS X versions 10.9/10.10
Processeur double-cœur Intel ou AMD
8 Go de RAM (minimum : 4 Go)
15 Go d’espace disponible sur le disque dur
Résolution d’affichage de 1920 x 1080 (minimum : 1366 x 768)
Carte graphique compatible DirectX 10 et WDDM 1.1 (Windows
Port USB pour la clé USB-eLicenser (gestion des licences)
Interface audio compatible OS
Lecteur DVD ROM double-couche
Connexion Internet pour l’activation, la configuration du compte et
l’enregistrement personnel/du produit. L’installation peut nécessiter
des téléchargements supplémentaires.
:
uniquement)
FRANÇAIS
Pour connaître les systèmes recommandés et en savoir plus sur la prise
en charge des prochains systèmes d’exploitation, veuillez vous reporter
à la section Support de notre site Web www.steinberg.net.
58
Page 59

Système requis et installation
PROCÉDER AINSI
Installation du programme
Installation du programme
Vous avez deux possibilités pour l’installation du programme : via
l’application Start Center ou manuellement.
Lancement de l’installation via Start Center
À partir de l’application Start Center, vous pouvez facilement installer
votre programme et découvrir le contenu de la boîte du produit.
• Si votre logiciel Steinberg vous a été fourni avec un support
d’installation, Start Center se lance automatiquement quand vous
insérez ce disque dans le lecteur CD/DVD de votre ordinateur, à
condition que la fonction autorun ait été activée.
• Si vous avez téléchargé votre logiciel Steinberg depuis Internet, Start
Center se lance quand vous double-cliquez sur le fichier téléchargé.
1. Dans Start Center, sélectionnez la langue de votre choix.
2. Cliquez sur Installer.
3. Suivez les instructions à l’écran.
Lancement de l’installation manuellement
Si vous ne souhaitez pas installer le programme via Start Center, vous
pouvez l’installer manuellement.
• Sur les systèmes Windows, double-cliquez sur le fichier
Setup.exe et suivez les instructions à l’écran.
• Sur les systèmes Mac OS X, double-cliquez sur le fichier
Cubase
8.pkg et suivez les instructions à l’écran.
59
Page 60

Système requis et installation
Installation du programme
Clé USB-eLicenser
Pour utiliser les logiciels de Steinberg, il est souvent nécessaire de
recourir à une clé USB-eLicenser. Il s’agit d’un périphérique matériel
(ou «
dongle ») de protection contre la copie.
La clé USB-eLicenser est un périphérique USB sur lequel sont
stockées vos licences logicielles Steinberg. Tous les produits
Steinberg protégés de cette manière utilisent le même type de
périphérique et il est possible de stocker plusieurs licences sur une
seule clé. Les licences peuvent – dans certaines limites – être
transférées d’une clé USB-eLicenser à une autre.
Si votre logiciel Steinberg n’est pas fourni avec une clé USB-eLicenser,
vous pouvez en acheter une sur la boutique en ligne Steinberg.
Le eLicenser Control Center vous permet d’activer les nouvelles
licences et de voir quelles licences sont installées sur votre clé
USB-eLicenser. Une fois votre application Steinberg installée, le
eLicenser Control Center s’ouvre via le menu Démarrer sous Windows
et à partir du dossier Applications sous Mac OS X.
Si vous utilisez d’autres produits Steinberg protégés contre la copie,
vous souhaiterez probablement transférer toutes les licences de vos
applications sur une même clé USB-eLicenser, afin de n’utiliser qu’un
FRANÇAIS
60
Page 61

Système requis et installation
PROCÉDER AINSI
Activation de votre licence
seul port USB de votre ordinateur. Reportez-vous à l’Aide du eLicenser
Control Center pour obtenir de plus amples informations sur le transfert
des licences d’une clé USB-eLicenser à une autre.
Activation de votre licence
Il est obligatoire d’activer la licence. Si votre clé USB-eLicenser
contient déjà une licence activée, vous pouvez ignorer cette section.
CONDITION PRÉALABLE
Assurez-vous de bien être connecté à Internet.
Si vous avez acheté votre produit via la boutique en ligne Steinberg,
vous avez reçu un courrier électronique vous fournissant un code
d’activation de licence. Ce code vous permet de télécharger votre
licence sur votre clé USB-eLicenser.
Si votre produit vous a été fourni sur un support d’installation, il se peut
que la boîte du produit contienne une clé USB-eLicenser vide et la
feuille Essential Product License Information (informations essentielles
sur la licence du produit), laquelle contient un code d’activation.
1. Branchez votre clé USB-eLicenser sur un port USB de votre ordinateur.
2. Lancez le logiciel eLicenser Control Center.
3. Cliquez sur le bouton Entrer Code d’Activation.
4. Saisissez votre code d’activation et cliquez sur Next.
RÉSULTAT
La licence est alors téléchargée sur votre clé USB-eLicenser et activée.
61
Page 62

Système requis et installation
PROCÉDER AINSI
Enregistrement de votre logiciel
Enregistrement de votre logiciel
Enregistrez votre produit sur le portail client en ligne MySteinberg. En
tant qu’utilisateur enregistré, vous avez accès à un service d’assistance
technique, à des offres exclusives telles que des mises à niveau ou des
mises à jour logicielles, et à bien plus encore.
CONDITION PRÉALABLE
Assurez-vous de bien être connecté à Internet.
1. Démarrez votre logiciel.
2. Sélectionnez Steinberg Hub > S’inscrire maintenant.
Un formulaire d’enregistrement en ligne s’ouvre dans votre navigateur
Web.
3. Suivez les instructions à l’écran pour enregistrer votre produit sur
MySteinberg.
FRANÇAIS
62
Page 63

Système requis et installation
PROCÉDER AINSI
IMPORTANT
Installation du matériel
Installation du matériel
Installation de l’interface audio et de son pilote
1. Installez l’interface audio et ses accessoires sur l’ordinateur en
procédant comme indiqué dans la documentation du matériel.
2. Installez le pilote de l’interface audio.
Un pilote est un élément logiciel permettant au programme de
communiquer avec certains matériels. Ici, le pilote permet à Cubase
d’utiliser la carte son. Selon le système d’exploitation de votre ordinateur,
il est possible que vous ayez le choix entre plusieurs types de pilotes.
Pilotes ASIO dédiés
Les interfaces audio professionnelles sont souvent livrées avec un pilote
ASIO spécialement conçu pour ce matériel. Ce pilote assure la
communication directe entre Cubase et l’interface audio. Par
conséquent, les équipements dotés de pilotes ASIO spécifiques
bénéficient d’une latence (retard entre entrée et sortie) moins élevée, ce
qui est essentiel pour pouvoir écouter des signaux audio via Cubase ou
utiliser des instruments VST. D’autre part, le pilote ASIO prend parfois en
charge les entrées et sorties multiples, le routage, la synchronisation, etc.
Les pilotes ASIO sont fournis par le fabricant de l’interface audio.
Vérifiez sur le site Web du fabricant que vous possédez bien la dernière
version du pilote.
Si votre interface audio est livrée avec un pilote ASIO spécifique, nous
vous recommandons fortement d’utiliser celui-ci.
63
Page 64

Système requis et installation
À NOTER
Installation du matériel
Pilote ASIO générique à faible latence
(Windows uniquement)
Sur les systèmes Windows, vous pouvez utiliser le pilote ASIO
générique à faible latence. Ce pilote ASIO assure la compatibilité ASIO
avec toutes les interfaces audio prises en charge par Windows, ce qui
permet de bénéficier d’une latence plus faible. Le pilote ASIO
générique à faible latence intègre la technologie Core Audio de
Windows à Cubase. Aucun autre pilote n’est nécessaire. Ce pilote est
fourni avec Cubase et ne nécessite aucune installation particulière.
En l’absence de pilote ASIO spécifique, il est recommandé d’utiliser ce
pilote. Bien que le pilote ASIO générique à faible latence prenne en
charge toutes les interfaces audio, il se peut que vous obteniez de
meilleurs résultats avec une carte audio intégrée qu’avec une interface
audio USB externe.
Pilotes Mac OS X (Mac uniquement)
Si vous utilisez un ordinateur Macintosh, veillez à installer les tout
derniers pilotes Mac OS X pour votre interface audio. Suivez les
instructions d’installation du fabricant pour installer le pilote.
FRANÇAIS
Test de l’interface audio
Pour vous assurer que votre interface audio fonctionne correctement,
procédez aux tests suivants
• Utilisez l’un des logiciels fournis avec votre matériel pour vous
assurer que la lecture et l’enregistrement audio fonctionnent sans
problèmes.
:
64
Page 65

Système requis et installation
À NOTER
Installation du matériel
• Si l’accès à l’interface se fait via un pilote standard du système
d’exploitation, essayez de lire les données audio en utilisant
l’application audio standard du système (par ex. Windows Media
Player ou Apple iTunes).
Installation d’une interface MIDI ou d’un clavier
MIDI USB
Bien que la plupart des claviers MIDI USB et des interfaces MIDI
fonctionnent en plug&play, vous devrez peut-être installer un pilote
dédié à votre périphérique. Veillez alors à bien suivre la procédure
d’installation décrite dans la documentation fournie avec le
périphérique.
Veuillez aussi vérifier sur le site Web du fabricant que vous disposez
bien de la dernière version du pilote.
65
Page 66

Système requis et installation
PROCÉDER AINSI
Configuration de votre système
Configuration de votre système
Sélection du pilote de votre interface audio
Avant de configurer le routage de vos signaux audio et de commencer
à enregistrer, il vous faut vérifier si le pilote ASIO approprié est bien
sélectionné.
1. Sélectionnez Périphériques > Configuration des
périphériques.
2. Dans la boîte de dialogue Configuration des périphériques,
cliquez sur l’entrée
La page Système audio VST se trouve à droite.
3. Dans le menu local Pilote ASIO, sélectionnez le pilote que vous
souhaitez utiliser.
4. Cliquez sur OK.
Système audio VST à gauche.
FRANÇAIS
Configuration des connexions VST
La boîte de dialogue VST Connexions vous permet de configurer le
routage des signaux d’entrée et de sortie entre Cubase et votre
interface audio. Ces connexions sont appelées bus. Dans cette section,
vous allez découvrir comment configurer les bus pour la lecture et
l’enregistrement.
66
Page 67
Système requis et installation
PROCÉDER AINSI
Configuration de votre système
Supprimer des bus
Avant de créer des bus, il est recommandé de supprimer les sorties
automatiquement créées par Cubase.
1. Sélectionnez Périphériques > VST Connexions.
2. Dans la boîte de dialogue VST Connexions, sélectionnez l’onglet
Sorties.
3. Dans la colonne Nom de bus, faites un clic droit sur la première
entrée et sélectionnez Supprimer bus dans le menu contextuel.
Si nécessaire répétez ce pas pour tous les autres bus.
67
Page 68

Système requis et installation
PROCÉDER AINSI
Configuration de votre système
Ajouter des sorties
Il vous faut configurer les sorties qui seront utilisées pour la lecture
audio dans Cubase.
CONDITION PRÉALABLE
Supprimez les bus qui ont été ajoutés automatiquement par Cubase.
1. Sélectionnez Périphériques > VST Connexions.
2. Dans la boîte de dialogue VST Connexions, sélectionnez l’onglet
Sorties.
3. Cliquez sur Ajouter bus.
4. Dans la boîte de dialogue Ajouter bus de sortie, configurez les
paramètres à votre convenance.
5. Cliquez sur Ajouter bus.
Le bus qui est créé vous permet de router le signal audio de Cubase vers
votre interface audio.
6. Facultatif : Si vous désirez changer les ports de sortie qui ont été
sélectionnés automatiquement, ouvrez le menu local Port
périphérique et sélectionnez d’autres ports.
FRANÇAIS
68
Page 69

Système requis et installation
PROCÉDER AINSI
Configuration de votre système
Selon votre interface audio, plus de deux ports de sortie peuvent être
disponibles. Dans la plupart des cas nous vous recommandons d’utiliser
les sorties stéréo générales.
LIENS ASSOCIÉS
“Supprimer des bus” à la page 67
Ajouter des entrées
Vous devez configurer les entrées pour l’enregistrement dans Cubase.
1. Sélectionnez Périphériques > VST Connexions.
2. Dans la boîte de dialogue VST Connexions, sélectionnez l’onglet
Entrées.
3. Dans la colonne Nom de bus, faites un clic droit sur la première
entrée et sélectionnez Supprimer bus dans le menu contextuel.
Si nécessaire répétez ce pas pour tous les autres bus.
4. Cliquez sur Ajouter bus.
5. Dans la boîte de dialogue Ajouter bus d’entrée, configurez les
paramètres à votre convenance.
6. Cliquez sur Ajouter bus.
Le nouveau bus qui est ajouté vous permet de router le signal audio de
l’entrée de votre périphérique audio vers Cubase pour l’enregistrement.
7. Facultatif : Si vous désirez changer les ports d’entrée qui ont été
sélectionnés automatiquement, ouvrez le menu local Port
périphérique et sélectionnez d’autres ports.
RÉSULTAT
Vous êtes maintenant prêt à enregistrer et lire des données audio dans
Cubase.
69
Page 70

Système requis et installation
IMPORTANT
À NOTER
Configuration de votre système
Dans l’application Start Center de Cubase, vous trouverez un lien vous
permettant de télécharger un projet de démonstration à partir du site
Web de Steinberg. Si vous réussissez à relire ce projet, le programme
est configuré correctement.
Pour vous familiariser avec Cubase, nous vous recommandons de
visionner les didacticiels vidéo sur la chaîne Youtube de Steinberg. Ces
didacticiels vous permettront de découvrir les nouvelles fonctions de
Cubase.
FRANÇAIS
70
Page 71

Système requis et installation
Configuration de votre système
71
Page 72

Italiano
Page 73

Cristina Bachmann, Heiko Bischoff, Christina Kaboth, Insa Mingers,
Sabine Pfeifer, Kevin Quarshie, Benjamin Schütte
Traduzione: Filippo Manfredi
Il presente PDF offre un accesso facilitato per utenti portatori di
handicap visivi. Si noti che a causa della complessità del documento e
dell’elevato numero di immagini in esso presenti non è stato possibile
includere delle descrizioni testuali delle stesse.
Le informazioni contenute in questo manuale sono soggette a variazioni
senza preavviso e non rappresentano un obbligo da parte di Steinberg
Media Technologies GmbH. Il software descritto in questo manuale è
soggetto ad un Contratto di Licenza e non può essere copiato su altri
supporti multimediali, tranne quelli specificamente consentiti dal
Contratto di Licenza. Nessuna parte di questa pubblicazione può
essere copiata, riprodotta o in altro modo trasmessa o registrata, per
qualsiasi motivo, senza un consenso scritto da parte di Steinberg Media
Technologies GmbH. I licenziatari registrati del prodotto descritto di
seguito, hanno diritto a stampare una copia del presente documento
per uso personale.
Tutti i nomi dei prodotti e delle case costruttrici sono marchi registrati
(™ o ®) dei rispettivi proprietari. Per maggiori informazioni, visitare il sito
web www.steinberg.net/trademarks.
© Steinberg Media Technologies GmbH, 2014.
Tutti i diritti riservati.
Page 74

Indice
76 Introduzione
76 Benvenuti!
77 Informazioni sulla documentazione e sulla sezione di aiuto
79 Convenzioni tipografiche
80 Come contattare Steinberg
82 Requisiti di sistema e installazione
82 Requisiti di sistema
83 Installare il programma
85 Attivazione delle licenze
86 Registrazione del software
87 Installazione dell’hardware
89 Configurare il proprio sistema
ITALIANO
74
Page 75

75
Page 76

Introduzione
Benvenuti!
Congratulazioni e grazie per aver scelto Cubase Pro 8 o Cubase Artist
8 di Steinberg!
Il prodotto che avete acquistato è l’ultimo discendente di un lignaggio
di grande successo, che ha visto le sue origini nel lontano 1989. Dalla
sua prima versione – uscita per il leggendario computer Atari – ad oggi,
Cubase ha subìto un’incredibile evoluzione, fino a diventare un vero e
proprio caposaldo a livello mondiale. Ed è per questi motivi che
nell’ultimo quarto di secolo milioni di musicisti, produttori, DJ,
compositori ed ingegneri audio hanno scelto Cubase come cuore
pulsante della propria creatività musicale. Tra questi si annoverano
artisti pluripremiati e venerati da milioni di fan, così come semplici
appassionati che producono musica a casa per il solo piacere di farlo;
la tipologia dei nostri utilizzatori spazia infatti da produttori di fama
mondiale a giovani promesse alle prime armi, da rock star affermate a
docenti delle scuole di musica. Tutti questi gruppi eterogenei di
persone sono allo stesso modo importanti e di grande stimolo per noi
nella realizzazione di questo software.
L’obiettivo di progettazione per questa versione è stato riuscire a
combinare la tecnologia con la creatività. Unire l’innovazione con
l’ispirazione, il professionismo con la passione. E siamo certi di essere
riusciti appieno a raggiungere il nostro intento.
L’elenco delle nuove funzionalità offerte da Cubase Pro 8 e Cubase
Artist 8 è troppo lungo per essere ripetuto qui. Alcune di queste
saranno immediatamente visibili all’apertura della parte appropriata del
programma, mentre molte delle più importanti sono nascoste e
integrate in profondità direttamente nel codice di programmazione. Un
enorme lavoro ingegneristico è stato messo in campo al fine di rendere
i progetti più rapidi da aprire e salvare e per rendere il programma
ITALIANO
76
Page 77

Introduzione
Informazioni sulla documentazione e sulla sezione di aiuto
stesso più fluido, responsivo e più veloce in ogni sua parte. Tutto
questo con l’obiettivo di rendere Cubase più agile, più efficiente e allo
stesso tempo ancora più creativo di sempre.
Se avete acquistato il prodotto come upgrade da una versione
precedente, vi siamo molto grati per la vostra continua e rinnovata
fiducia nel nostro prodotto. Se questa invece è la vostra prima
esperienza con Cubase, ci auguriamo che l’emozione di aprire il
programma per la prima volta ed esplorare le nuove incredibili
possibilità creative che è in grado di offrirvi sia davvero eccitante e
appagante. È questo semplicemente il motivo per cui lavoriamo in
questa compagnia e svolgiamo con grande passione il nostro lavoro.
Vi invitiamo a farci sapere le vostre impressioni e a raccontarci la vostra
esperienza con Cubase attraverso i nostri forum internet disponibili sul
sito web www.steinberg.net/forum o tramite i canali di contatto relativi
al vostro Paese; maggiori informazioni in merito sono disponibili sul
nostro sito.
I nostri più sinceri ringraziamenti,
il vostro Team Cubase di Steinberg
Informazioni sulla documentazione e sulla
sezione di aiuto
La documentazione è disponibile in formato PDF ed è suddivisa nelle
sezioni che seguono:
• Per aprire la sezione di aiuto nel programma, selezionare Aiuto >
Documentazione.
• Su sistemi Windows, i documenti in PDF vengono aperti tramite il
menu Start, dalla cartella Steinberg Cubase.
77
Page 78

Introduzione
NOTA
Informazioni sulla documentazione e sulla sezione di aiuto
• Su sistemi Mac OS X, i documenti in PDF si trovano nella cartella
/Library/Documentation/Steinberg/Cubase
8.
Per leggere i documenti in PDF è necessario che sul computer sia
installata un’applicazione di lettura di questo tipo di file.
Guida Rapida
È il documento che state leggendo in questo momento. Sono trattati i
seguenti argomenti, senza scendere nei dettagli:
• Requisiti di sistema, procedure di installazione e attivazione della
licenza.
• Configurazione del sistema per lavorare con materiale audio e
MIDI.
Manuale Operativo
Il Manuale Operativo rappresenta il documento principale di riferimento
per Cubase e contiene le descrizioni dettagliate delle operazioni, dei
parametri, delle funzioni e delle diverse tecniche di lavoro relative al
programma.
ITALIANO
Periferiche MIDI
Questo documento illustra come gestire le periferiche MIDI e i relativi
pannelli di controllo.
Riferimento dei plug-in
Questo documento descrive le funzioni e i parametri relativi ai plug-in
VST, ai VST Instrument e agli effetti MIDI inclusi.
78
Page 79

Introduzione
Convenzioni tipografiche
HALion Sonic SE
Questo documento descrive le funzioni e i parametri relativi al VST
Instrument HALion Sonic SE incluso col programma.
Groove Agent SE
Questo documento descrive le funzioni e i parametri relativi al VST
Instrument Groove Agent SE incluso col programma.
Remote Control Devices
Questo documento elenca le periferiche MIDI di controllo remoto
supportate.
Finestra di dialogo Aiuto
Per informazioni sulla finestra di dialogo attiva, fare clic sul rispettivo
pulsante Aiuto.
Convenzioni tipografiche
Molti dei comandi da tastiera di default in Cubase utilizzano tasti di
modifica, alcuni dei quali variano a seconda del sistema operativo. Ad
esempio, il comando rapido di default per la funzione Annulla è [Ctrl]-[Z]
su Windows e [Comando]-[Z] su Mac OS X.
Quando nel presente manuale vengono descritti dei comandi da
tastiera con i tasti modificatori, questi vengono visualizzati con prima i
tasti modificatori per Windows, nella maniera seguente:
• [Tasto modificatore per Windows]/[Tasto modificatore per
Mac]-[tasto]
Ad esempio, [Ctrl]/[Comando]-[Z] significa «premere [Ctrl] in Windows
o [Comando] in Mac OS X, quindi premere [Z]».
79
Page 80

Introduzione
NOTA
Come contattare Steinberg
Analogamente, [Alt]/[Opzione]-[X] significa «premere [Alt] in Windows
o [Opzione] in Mac OS X, quindi premere [X]».
In questo manuale si fa spesso riferimento al doppio-clic, ad esempio
per aprire i menu contestuali. Se si sta usando un Mac con un mouse a
pulsante singolo, tenere premuto [Ctrl] e fare clic.
Come contattare Steinberg
Nel menu Steinberg Hub in Cubase sono disponibili delle voci di
collegamento a una serie di informazioni aggiuntive.
Questo menu contiene dei link a diverse pagine del sito web di
Steinberg. La selezione di una voce del menu lancia automaticamente
il browser web e apre la rispettiva pagina. In queste pagine sono
disponibili informazioni relative al supporto tecnico, informazioni di
compatibilità, risposte alla domande più frequenti (FAQ), informazioni
sugli aggiornamenti e sugli altri prodotti Steinberg, ecc. Per avere
accesso a queste pagine, è necessario che sul proprio computer sia
installato un browser web e che sia disponibile una connessione
internet attiva e funzionante.
ITALIANO
80
Page 81

Introduzione
Come contattare Steinberg
81
Page 82

Requisiti di sistema e installazione
Requisiti di sistema
Il computer utilizzato deve soddisfare i seguenti requisiti minimi per le
versioni PC e Mac di Cubase:
PC Mac
Windows 7/8.x OS X versioni 10.9/10.10
CPU Intel o AMD dual-core
8 GB di RAM (minimo: 4 GB)
15 GB di spazio libero su HD
Risoluzione dello schermo 1920 x 1080 (minima: 1366 x 768)
Scheda grafica con supporto per DirectX 10 e WDDM 1.1 (solo
Windows)
Porta USB per collegare gli USB-eLicenser (per la gestione delle
licenze)
Hardware audio compatibile con OS
Lettore DVD dual-layer
Connessione internet necessaria per le operazioni di attivazione,
configurazione dell’account e per la registrazione personale/del
prodotto. Per l’installazione potrebbero essere necessari dei
download aggiuntivi.
ITALIANO
Per approfondimenti sui sistemi raccomandati e sul supporto per i futuri
sistemi operativi, fare riferimento alla sezione Support del nostro sito
web all’indirizzo www.steinberg.net.
82
Page 83

Requisiti di sistema e installazione
PROCEDIMENTO
Installare il programma
Installare il programma
Il programma può essere installato in due modi: tramite lo Start Center
o manualmente.
Lanciare l’installazione dallo Start Center
Dallo Start Center è possibile installare in maniera rapida e semplice il
proprio programma e ottenere informazioni sui pacchetti di contenuti.
• Per il software Steinberg fornito con un disco di installazione, lo
Start Center si avvia automaticamente non appena si inserisce il
disco nel lettore CD/DVD del computer, a condizione che la
funzione di autorun sia attivata.
• Per il software Steinberg acquistato tramite download da internet,
lo Start Center si avvia quando si fa doppio-clic sul file scaricato.
1. Nello Start Center, scegliere la lingua preferita.
2. Fare clic su Installa.
3. Seguire le istruzioni a schermo.
Lanciare l’installazione manualmente
Se non si desidera installare il programma tramite lo Start Center, è
possibile farlo manualmente.
• Su sistemi Windows, fare doppio-clic sul file Setup.exe e
• Su sistemi Mac OS X, fare doppio-clic sul file Cubase 8.pkg e
seguire le istruzioni a schermo.
seguire le istruzioni a schermo.
83
Page 84
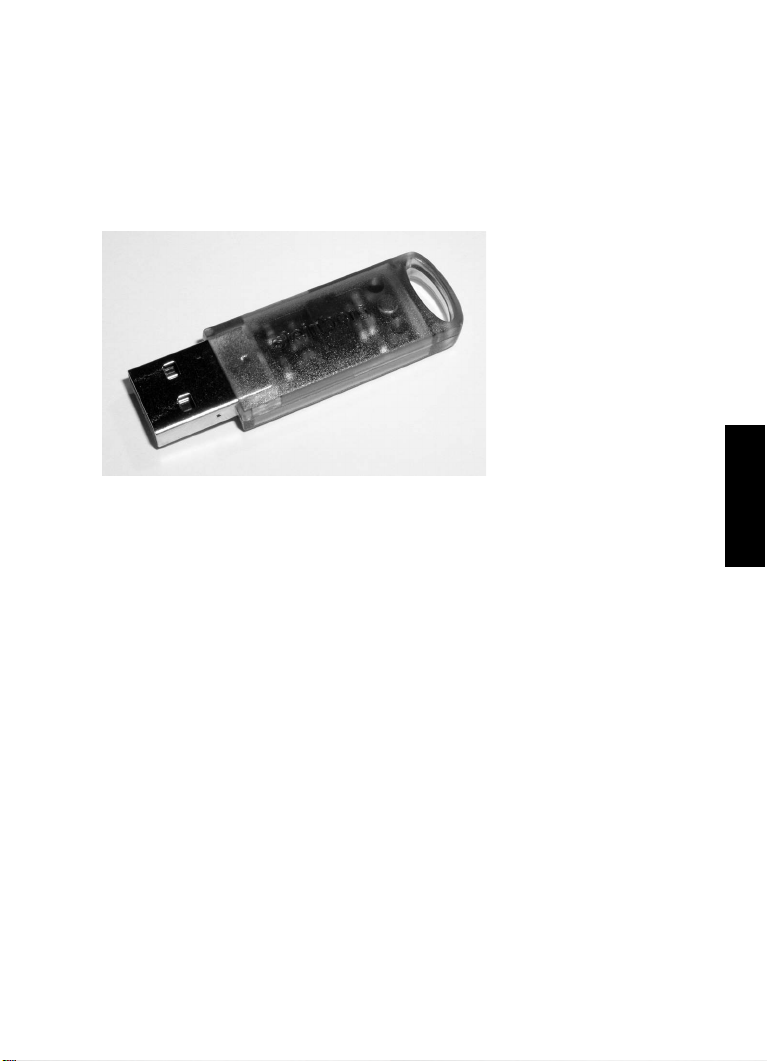
Requisiti di sistema e installazione
Installare il programma
USB-eLicenser
Per l’utilizzo dei software Steinberg è spesso necessario un USB-eLicenser,
un dispositivo hardware di protezione dalla copia (detto anche «dongle»).
L’USB-eLicenser è un dispositivo USB sul quale sono archiviate le proprie
licenze relative ai software Steinberg. Tutti i prodotti Steinberg protetti via
hardware utilizzano lo stesso tipo di dispositivo ed è possibile memorizzare
più licenze sulla stessa chiave. Inoltre, le licenze – entro determinati limiti –
possono essere trasferite da un USB-eLicenser all’altro.
Se il proprio prodotto Steinberg non include un USB-eLicenser, è
possibile acquistarne uno dallo shop online di Steinberg.
Nell’eLicenser Control Center si possono attivare delle nuove licenze e
verificare le licenze che sono installate sull’USB-eLicenser. Dopo avere
eseguito l’installazione della propria applicazione Steinberg, l’eLicenser
Control Center può essere aperto tramite il menu Start sui sistemi
Windows, oppure tramite la cartella Applicazioni su Mac OS X.
Se si stanno utilizzando altri prodotti Steinberg protetti dalla copia, si
potrebbe considerare l’opzione di trasferire tutte le licenze su un unico
USB-eLicenser, andando così ad occupare solamente una porta USB
del computer. Consultare la sezione di Aiuto dell’eLicenser Control
Center per maggiori informazioni sulle modalità di trasferimento delle
licenze da un USB-eLicenser a un altro.
ITALIANO
84
Page 85

Requisiti di sistema e installazione
PROCEDIMENTO
Attivazione delle licenze
Attivazione delle licenze
È necessario attivare le licenze. Se il proprio USB-eLicenser contiene
già una licenza attivata, si può saltare questa sezione.
PREREQUISITI
È ovviamente necessaria una connessione internet funzionante.
Se il prodotto è stato acquistato dallo shop online di Steinberg, un
codice di attivazione viene inviato anche via e-mail. Utilizzare questo
codice per eseguire il download della propria licenza
sull’USB-eLicenser.
Se il prodotto è stato fornito su un disco di installazione, la confezione
potrebbe contenere un USB-eLicenser vuoto e un foglio illustrativo
chiamato Essential Product License Information sul quale è presente un
codice di attivazione.
1. Collegare l’USB-eLicenser a una porta USB del computer.
2. Avviare il software eLicenser Control Center.
3. Fare clic sul pulsante Inserisci Codice di Attivazione.
4. Inserire il codice di attivazione e fare clic su Continua.
RISULTATO
Viene eseguito il download della licenza sull’USB-eLicenser e questa
viene attivata.
85
Page 86

Requisiti di sistema e installazione
PROCEDIMENTO
Registrazione del software
Registrazione del software
Registrate il vostro prodotto sul portale online MySteinberg riservato ai
nostri clienti. Come utenti registrati, avrete diritto al supporto tecnico e
potrete beneficiare di esclusive offerte come aggiornamenti, upgrade
software e molto altro.
PREREQUISITI
È ovviamente necessaria una connessione internet funzionante.
1. Avviare il proprio software.
2. Selezionare Steinberg Hub > Registra ora.
Nel proprio browser internet si apre un form di registrazione online.
3. Seguire le istruzioni a schermo per registrarsi a MySteinberg.
ITALIANO
86
Page 87

Requisiti di sistema e installazione
PROCEDIMENTO
IMPORTANTE
Installazione dell’hardware
Installazione dell’hardware
Installazione dell’hardware audio e dei rispettivi driver
1. Installare la periferica audio e le relative apparecchiature hardware
nel computer, come indicato nella relativa documentazione.
2. Installare il driver dell’hardware audio.
Il driver è quel software che consente ad un programma di comunicare
con i dispositivi hardware. In questo caso, il driver permette a Cubase di
utilizzare l’hardware audio. A seconda del sistema operativo installato sul
proprio computer, possono essere utilizzati diversi tipi di driver.
Driver ASIO dedicati
Spesso le apparecchiature audio professionali dispongono di un driver
ASIO dedicato, che rende possibile una comunicazione diretta tra Cubase
e l’hardware audio. Di conseguenza, le schede audio con driver ASIO
specifici sono in grado di offrire un livello molto ridotto di latenza (ritardo
ingresso-uscita), caratteristica di fondamentale importanza quando si
esegue il monitoraggio dell’audio in Cubase o quando si utilizzano i VST
Instrument. Il driver ASIO è inoltre in grado di offrire un supporto speciale per
ingressi e uscite multipli, per le assegnazioni, per la sincronizzazione, ecc.
I driver ASIO vengono forniti direttamente da parte dei produttori delle
periferiche audio. Si consiglia di visitare periodicamente il sito web dei
relativi produttori per scaricare le ultime versioni dei driver.
Se l’hardware audio viene fornito con un driver ASIO specifico si
raccomanda di usarlo.
87
Page 88

Requisiti di sistema e installazione
NOTA
Installazione dell’hardware
Driver ASIO generico a bassa latenza (solo Windows)
Su sistemi Windows, è anche possibile utilizzare il Driver ASIO
generico a bassa latenza. Questo driver offre il supporto ASIO per tutte
le periferiche hardware audio supportate da Windows, garantendo una
bassa latenza. Il driver ASIO generico a bassa latenza mette a
disposizione la tecnologia Core Audio di Windows in Cubase. Non
sono necessari ulteriori driver. Questo driver è incluso in Cubase e non
richiede alcuna installazione particolare.
Questo driver andrebbe utilizzato nel caso in cui non fosse disponibile
un driver ASIO. Sebbene il Driver ASIO Generico a Bassa Latenza
supporti tutte le periferiche audio, si potrebbero ottenere dei risultati
migliori se usato con schede audio integrate piuttosto che con
dispositivi audio USB esterni.
Driver Mac OS X (solo Mac)
Se si usa un computer Macintosh, assicurarsi di utilizzare per
l’hardware audio i driver Mac OS X più recenti. Per installare i driver
seguire le istruzioni del costruttore.
ITALIANO
Testare l’hardware audio
Per assicurarsi che la periferica audio funzioni correttamente occorre
eseguire i seguenti test:
• Utilizzare il software fornito con la periferica audio per assicurarsi
di riuscire a registrare e riprodurre l’audio senza problemi.
• Se si accede all’hardware audio tramite un driver standard del sistema
operativo, provare a riprodurre l’audio con l’applicazione audio standard
del computer (ad esempio, Windows Media Player o Apple iTunes).
88
Page 89

Requisiti di sistema e installazione
NOTA
PROCEDIMENTO
Configurare il proprio sistema
Installare un’interfaccia MIDI o una tastiera MIDI
USB
Sebbene molte tastiere MIDI USB e interfacce MIDI siano plug&play,
potrebbe essere necessario installare un driver dedicato. Si prega di
seguire le procedure di installazione descritte nella documentazione
fornita con la periferica.
Si raccomanda di consultare il sito web del produttore per verificare se
sono disponibili driver più aggiornati.
Configurare il proprio sistema
Selezionare il driver per la propria periferica audio
Prima di poter configurare le assegnazioni dei segnali audio e iniziare la
registrazione, è necessario assicurarsi che sia selezionato il driver ASIO
corretto.
1. Selezionare Periferiche > Impostazioni periferiche.
2. Nella finestra di dialogo Impostazioni periferiche, fare clic sulla
3. Dal menu a tendina Driver ASIO, selezionare il driver che si
4. Fare clic su OK.
voce VST Audio System sulla sinistra.
A destra viene visualizzata la pagina VST Audio System.
desidera utilizzare.
89
Page 90

Requisiti di sistema e installazione
PROCEDIMENTO
Configurare il proprio sistema
Configurare le connessioni VST
La finestra di dialogo Connessioni VST consente di configurare
l’assegnazione dei segnali di ingresso e uscita tra Cubase e il proprio
hardware audio. Queste connessioni sono chiamate bus. In questa
sezione vengono descritte le modalità di configurazione dei bus per la
registrazione e per la riproduzione.
Rimuovere i bus
Prima di aggiungere dei bus, si raccomanda di rimuovere qualsiasi
uscita che era stata aggiunta automaticamente da parte di Cubase.
1. Selezionare Periferiche > Connessioni VST.
2. Nella finestra di dialogo Connessioni VST, selezionare la linguetta
3. Nella colonna Nome bus, fare clic destro sulla prima voce in alto
ITALIANO
Uscite.
e selezionare Elimina bus dal menu contestuale.
Se necessario, ripetere questo passaggio per qualsiasi altro ulteriore bus.
90
Page 91
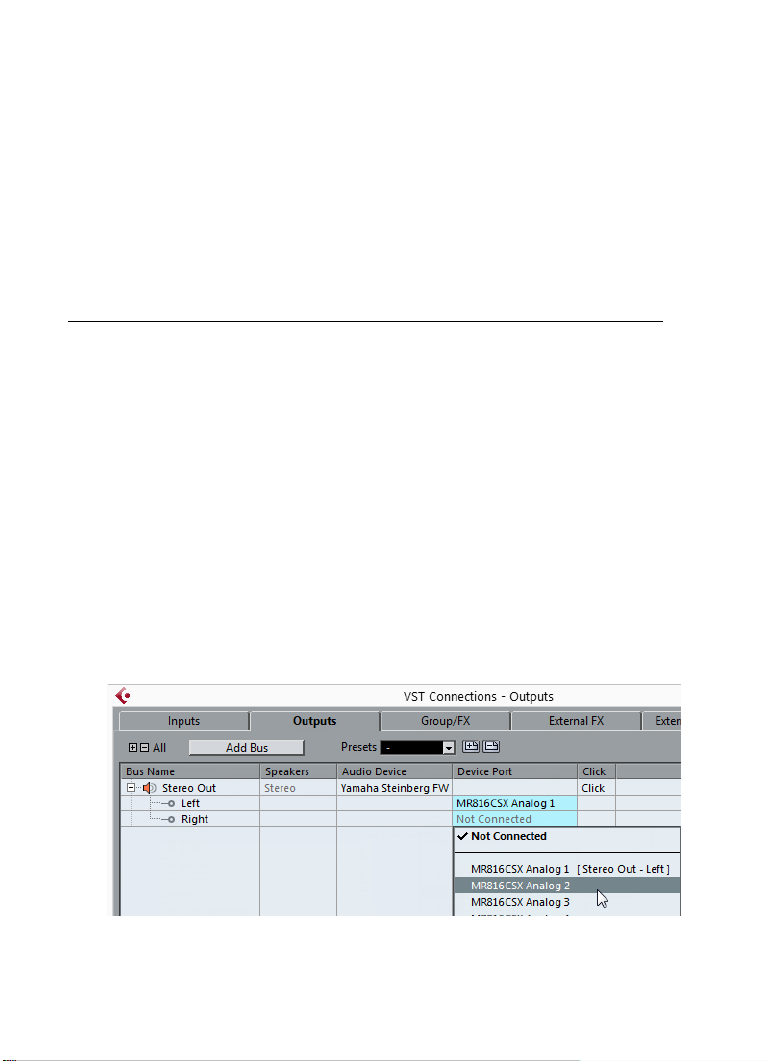
Requisiti di sistema e installazione
PROCEDIMENTO
Configurare il proprio sistema
Aggiunta delle uscite
È necessario configurare le uscite per poter riprodurre l’audio in
Cubase.
PREREQUISITI
Rimuovere i bus che erano stati automaticamente aggiunti da parte di
Cubase.
1. Selezionare Periferiche > Connessioni VST.
2. Nella finestra di dialogo Connessioni VST, selezionare la linguetta
Uscite.
3. Fare clic su Aggiungi bus.
4. Nella finestra di dialogo Aggiungi bus di uscita definire le
impostazioni desiderate.
5. Fare clic su Aggiungi bus.
Viene aggiunto il nuovo bus, grazie al quale è possibile fare in modo che
l’audio in Cubase venga inviato alla propria periferica hardware.
6. Opzionale: Se si desidera modificare le porte di uscita che sono
state selezionate automaticamente, aprire il menu a tendina Porta
periferica e selezionare delle porte differenti.
91
Page 92

Requisiti di sistema e installazione
PROCEDIMENTO
Configurare il proprio sistema
In base alle periferiche audio utilizzate, potrebbero essere disponibili più
di due porte di uscita. Nella maggior parte dei casi, si raccomanda di
utilizzare le uscite stereo principali.
LINK CORRELATI
“Rimuovere i bus” a pag. 90
Aggiunta degli ingressi
È necessario configurare gli ingressi per poter eseguire la registrazione
in Cubase.
1. Selezionare Periferiche > Connessioni VST.
2. Nella finestra di dialogo Connessioni VST, selezionare la linguetta
Ingressi.
3. Nella colonna Nome bus, fare clic destro sulla prima voce in alto
e selezionare Elimina bus dal menu contestuale.
Se necessario, ripetere questo passaggio per qualsiasi altro ulteriore bus.
4. Fare clic su Aggiungi bus.
5. Nella finestra di dialogo Aggiungi bus di ingresso definire le
impostazioni desiderate.
6. Fare clic su Aggiungi bus.
Viene aggiunto il nuovo bus, grazie al quale è possibile inviare a Cubase l’audio
proveniente dall’ingresso della propria periferica audio per la registrazione.
7. Opzionale: Se si desidera modificare le porte di ingresso che sono
state selezionate automaticamente, aprire il menu a tendina Porta
periferica e selezionare delle porte differenti.
ITALIANO
RISULTATO
Siete ora pronti per registrare e riprodurre l’audio in Cubase.
92
Page 93

Requisiti di sistema e installazione
IMPORTANTE
NOTA
Configurare il proprio sistema
Lo Start Center di Cubase contiene un link a un progetto demo
scaricabile dal sito web di Steinberg. Se si riesce a riprodurlo con
successo sulla propria postazione audio, significa che il programma è
stato configurato correttamente.
Per muovere i vostri primi passi con Cubase, vi raccomandiamo di
prendere visione dei video tutorial introduttivi alle nuove funzioni di
Cubase, disponibili sul canale Steinberg di YouTube.
93
Page 94

Español
Page 95

Cristina Bachmann, Heiko Bischoff, Christina Kaboth, Insa Mingers,
Sabine
Pfeifer, Kevin Quarshie, Benjamin Schütte
Traducción por Josep Llodrá
El documento PDF ofrece un acceso mejorado para usuarios con
problemas de visión. Por favor, tenga en cuenta que debido a la
complejidad y al número de imágenes en este documento, no es
posible incluir textos descriptivos a las imágenes.
La información en este documento está sujeta a cambios sin
notificación previa y no representa un compromiso por parte de
Steinberg Media Technologies GmbH. El software descrito en este
documento está sujeto al Acuerdo de Licencia y no se puede copiar a
otros medios excepto que esté permitido específicamente en el
Acuerdo de Licencia. Ninguna parte de esta publicación se puede
copiar, reproducir, retransmitir o grabar, bajo ningún propósito, sin
previo permiso escrito de Steinberg Media Technologies GmbH. Los
titulares de una licencia registrada del producto descrito aquí pueden
imprimir una copia de este documento para su uso personal.
Todos los nombres de productos y compañías son marcas registradas
™ o ® por sus respectivos propietarios. Para más información, visite
por favor www.steinberg.net/trademarks.
© Steinberg Media Technologies GmbH, 2014.
Todos los derechos reservados.
Page 96

Tabla de Contenidos
98 Introducción
98 ¡Bienvenido!
99 Acerca de la Documentación y la Ayuda
101 Convenciones tipográficas
102 Cómo puede contactar con nosotros
104 Requisitos del sistema e instalación
104 Requisitos de sistema
105 Instalar el programa
107 Activar su licencia
108 Registrar su programa
109 Instalación del hardware
112 Configurar el sistema
ESPAÑOL
96
Page 97

97
Page 98

Introducción
¡Bienvenido!
Felicidades y muchas gracias por comprar Cubase Pro 8 o Cubase
Artist 8 de Steinberg.
El producto que ha comprado tiene – según los estándares de la
industria del software – una muy, muy larga y exitosa ascendencia,
remontándose sus raíces hasta 1989. Desde la primera versión para el
legendario ordenador Atari, Cubase ha cambiado mucho – para mejor.
Es por eso que en el último cuarto de siglo, millones de músicos,
productores, DJs, compositores e ingenieros de audio han elegido
Cubase para que sea el hogar de su creatividad musical. Y entre ellos
se incluyen ganadores de premios Grammy adorados por millones de
personas, así como personas que hacen música en casa solo por su
propio placer; productores de renombre y jóvenes promesas; estrellas
del rock y profesores de música de instituto. Y todos estos grupos son
igualmente importantes para nosotros a la hora de hacer este software.
La meta en el diseño de esta versión fue combinar la tecnología con la
creatividad. Mezclar innovación con inspiración, y profesionalismo con
pasión. Y nosotros consideramos que hemos conseguido
precisamente esto.
La lista de nuevas funciones de Cubase Pro 8 y Cubase Artist 8 es
demasiada grande como para repetirla aquí. Algunas de ellas las verá
inmediatamente al abrir partes del programa, algunas de las más
importantes están ocultas a la vista y forman parte del código del
programa en sí. Se ha invertido una gran cantidad de trabajo de
ingeniería para hacer que los proyectos se abran y se guarden más
rápidamente, para hacer que el programa en sí sea más rápido, y más
fluido y con una mejor respuesta. Todo con la meta de hacer que
Cubase sea más brillante, más eficiente y a la vez incluso más creativo
que jamás antes.
ESPAÑOL
98
Page 99

Introducción
NOTA
Acerca de la Documentación y la Ayuda
Si es un cliente que está actualizando, le agradecemos profundamente
su fe continua en nuestro producto. Y si es un usuario de Cubase
totalmente nuevo, esperamos que la experiencia de abrir Cubase por
primera vez y explorar las increíbles nuevas posibilidades que se le
abren sea tan apasionante como nosotros deseamos que sea. Esta es
la razón por la que nosotros trabajamos en esta empresa y hacemos el
trabajo que hacemos.
En cualquier caso, por favor manténgase en contacto con nosotros
acerca de su experiencia con Cubase a través de nuestros foros en
internet en www.steinberg.net/forum o a través de los canales de
contacto de su región, en nuestra página web puede encontrar más
información acerca de ello.
Le saluda atentamente,
Su Equipo Steinberg Cubase
Acerca de la Documentación y la Ayuda
La documentación está disponible en formato PDF y se divide en las
siguientes secciones:
• Para abrir la ayuda en el programa, seleccione Ayuda >
Documentación.
• En sistemas Windows, puede abrir los documentos PDF a través
del menú Inicio, desde la carpeta Steinberg Cubase.
• En sistemas Mac OS X, los documentos PDF se encuentran en la
carpeta /Library/Documentation/Steinberg/Cubase
8.
Para leer los documentos pdf, una aplicación de lectura pdf adecuada
debe estar instalada en su ordenador.
99
Page 100

Introducción
Acerca de la Documentación y la Ayuda
Guía de Inicio Rápido
Es el documento que usted está leyendo. Cubre las siguientes áreas
sin entrar en detalles:
• Requisitos del sistema, procedimiento de instalación, y activación
de licencia.
• Configurar su sistema para que funcione audio y MIDI.
Manual de Operaciones
El Manual de Operaciones es la documentación de referencia principal
de Cubase, con descripciones detalladas de operaciones, parámetros,
funciones, y técnicas.
Dispositivos MIDI
Este documento contiene descripciones de cómo manejar los
dispositivos MIDI y los paneles de dispositivos.
Referencia de Plug-ins
Este documento describe las funcionalidades y parámetros de los
plug-ins VST, instrumentos VST, y efectos MIDI incluidos.
HALion Sonic SE
Este documento describe las funciones y parámetros del instrumento
VST incluido HALion Sonic SE.
Groove Agent SE
Este documento describe las funciones y parámetros del instrumento
VST incluido Groove Agent SE.
100
ESPAÑOL
 Loading...